Sea Urchin Development 4-Conway
37
Chapter 4 Sea Urchin Development Carolyn M. Conway Don Igelsrud Department of Biology Virginia Commonwealth University Richmond, Virginia 23284 USA Department of Biology The University of Calgary Calgary, Alberta T2N 1 N4 Canada Arthur F. Conway Department of Biology Randolph-Macon College Ashland, Virginia 23005 USA Carolyn M. Conway is currently an Assistant Professor of Biology at Virginia Com- monwealth University where she teaches Animal Embryology, Devetopmental Biology, and Teratology. She received her BS and MA degrees at Longwood College and the College of William and Mary respectively. She received her PhD from the University of Miami where her research involved an ultrastructural study of sea urchin eggs. While completing her doctorate she spent several Summers at the Marine Biological Labo- ratory as a participant in the Fertilization and Gamete Physiology Training Program. Prior to joining the VCU faculty she taught at Iowa State University and Hobart and William Smith Colleges. Her current research involves the relationship between ma- ternal autoimmune disease and birth defects. Don Igelsrud is currently an Instructor of Biology at The University of Calgary where he is in charge of the introductory zoology laboratories. He received his BS degree from the University of Kansas and his MA degree from Washington University. Prior to joining the faculty at The University of Calgary he taught at Delaware Valley College where he developed a sfrong interest in laboratory teaching, and at Northwestern Uni- versity where he was Biology Laboratory Director. His main interests are in increasing awareness and understanding of living phenomena and in finding living organisms that survive well in the laboratory with a minimum of maintenance. Arthur F. Conway is currently an Assistant Professor of Biology at Randolph-Macon College where he teaches General Biology, General Physiology, Genetics and Devel- opment, and Histology. He received his BS degree from the College of William and Mary and his PhD from the University of Miami. His doctoral research involved an investigation of sea urchin acrosomal enzymes. While completing his doctorate he spent several summers at the Marine Biological Laboratory as a participant in the Embryol- ogy course and in the Fertilization and Gamete Physiology Training Program. Prior to joining the Randolph-Macon faculty he taught at Iowa State University, Hobart and William Smith Colleges, and Virginia Commonwealth University. His current research involves immunocytochemical localization of antigens in nervous tissue, and antibodies and immune complexes in reproductive system tissues from animals with induced au- toimmune disease. 53 53 53
-
Upload
christerop -
Category
Documents
-
view
224 -
download
1
Transcript of Sea Urchin Development 4-Conway
Chapter 4 Sea Urchin Development
Carolyn M. Conway Don Igelsrud Department of Biology
Virginia Commonwealth University Richmond, Virginia 23284 USA
Department of Biology The University of Calgary
Calgary, Alberta T2N 1 N4 Canada
Arthur F. Conway Department of Biology
Randolph-Macon College Ashland, Virginia 23005 USA
Carolyn M. Conway is currently an Assistant Professor of Biology at Virginia Com- monwealth University where she teaches Animal Embryology, Devetopmental Biology, and Teratology. She received her BS and MA degrees a t Longwood College and the College of William and Mary respectively. She received her PhD from the University of Miami where her research involved an ultrastructural study of sea urchin eggs. While completing her doctorate she spent several Summers at the Marine Biological Labo- ratory as a participant in the Fertilization and Gamete Physiology Training Program. Prior to joining the VCU faculty she taught at Iowa State University and Hobart and William Smith Colleges. Her current research involves the relationship between ma- ternal autoimmune disease and birth defects.
Don Igelsrud is currently an Instructor of Biology at The University of Calgary where he is in charge of the introductory zoology laboratories. He received his BS degree from the University of Kansas and his MA degree from Washington University. Prior to joining the faculty at The University of Calgary he taught at Delaware Valley College where he developed a sfrong interest in laboratory teaching, and at Northwestern Uni- versity where he was Biology Laboratory Director. His main interests are in increasing awareness and understanding of living phenomena and in finding living organisms that survive well in the laboratory with a minimum of maintenance.
Arthur F. Conway is currently an Assistant Professor of Biology at Randolph-Macon College where he teaches General Biology, General Physiology, Genetics and Devel- opment, and Histology. He received his BS degree from the College of William and Mary and his PhD from the University of Miami. His doctoral research involved an investigation of sea urchin acrosomal enzymes. While completing his doctorate he spent several summers a t the Marine Biological Laboratory as a participant in the Embryol- ogy course and in the Fertilization and Gamete Physiology Training Program. Prior to joining the Randolph-Macon faculty he taught at Iowa State University, Hobart and William Smith Colleges, and Virginia Commonwealth University. His current research involves immunocytochemical localization of antigens in nervous tissue, and antibodies and immune complexes in reproductive system tissues from animals with induced au- toimmune disease.
53
53
53
54 Sea Urchin Development
Introduction Sea urchins (Phylum Echinodermata, Class Echinoidea) are excellent or-
ganisms for demonstrating fertilization and early development. They have classically been used in embryology and developmental biology courses. Sea urchins are also an excellent choice of living material for use in general biology or general zoology labs on development. With advanced planning and prep- aration by the instructor, students should be able to observe all major stages of development in a single three-hour laboratory period. If more time is avail- able it may be advantageous to have the students set up their own embryo cultures for intermittent observations over a two to three day time span. The latter option gives the students a better feeling for the temporal aspects of developmental changes. The study of living embryos may be supplemented with models, prepared slides, and films or film loops.
The purpose of this chapter will be to present information on animal avail- ability and maintenance in the laboratory, procedures required of instructors and students for the microscopic study of development, and a description of sea urchin development from fertilization to pluteus larva. Emphasis will be placed on the study of Lytechinus variegatus which may be maintained at room temperature and has exceptionally clear eggs and embryos.
The description of gametes and embryonic development included in the Student Materials is a summary of the important events typically studied in embryology and developmental biology courses. This information is more ex- tensive than necessary for a general biology or general zoology laboratory on development. We suggest that the description be condensed to be compatible with the level of understanding desired for beginning students. For a complete, thorough description of sea urchin development you are referred to the many excellent references available (e.g., Harvey 1956; Tyler and Tyler 1966a, 1966b; Costello and Henley 1971; Guidice 1973; Horstadius 1973; Stearns 1974; Ishikawa 1975; Okazaki 1975; Piatigorsky 1975; Ruggieri 1975; Brook- bank 1978; Davenport 1979).
Student Materials The developmental strategy of sea urchins is typical of many marine in-
vertebrates. The adults are relatively immobile. Upon appropriate stimulation eggs and sperm are released into the sea water. The sperm are small and ex- tremely motile. The larger non-motile eggs contain very little yolk, and the only protective covering around the eggs is a transparent jelly coat. Fertiliz- ation and development occur in the external marine environment. The em- bryos develop into motile, feeding larvae within two to three days depending on the species. The food requirement for the larvae is different from that of the adult. The four to six week larval period serves as a time for dispersal of
Sea Urchin Development 55
the species. Metamorphosis occurs at the end of the larval period. During metamorphosis dramatic developmental changes occur, transforming the lar- val form into a miniature adult sea urchin.
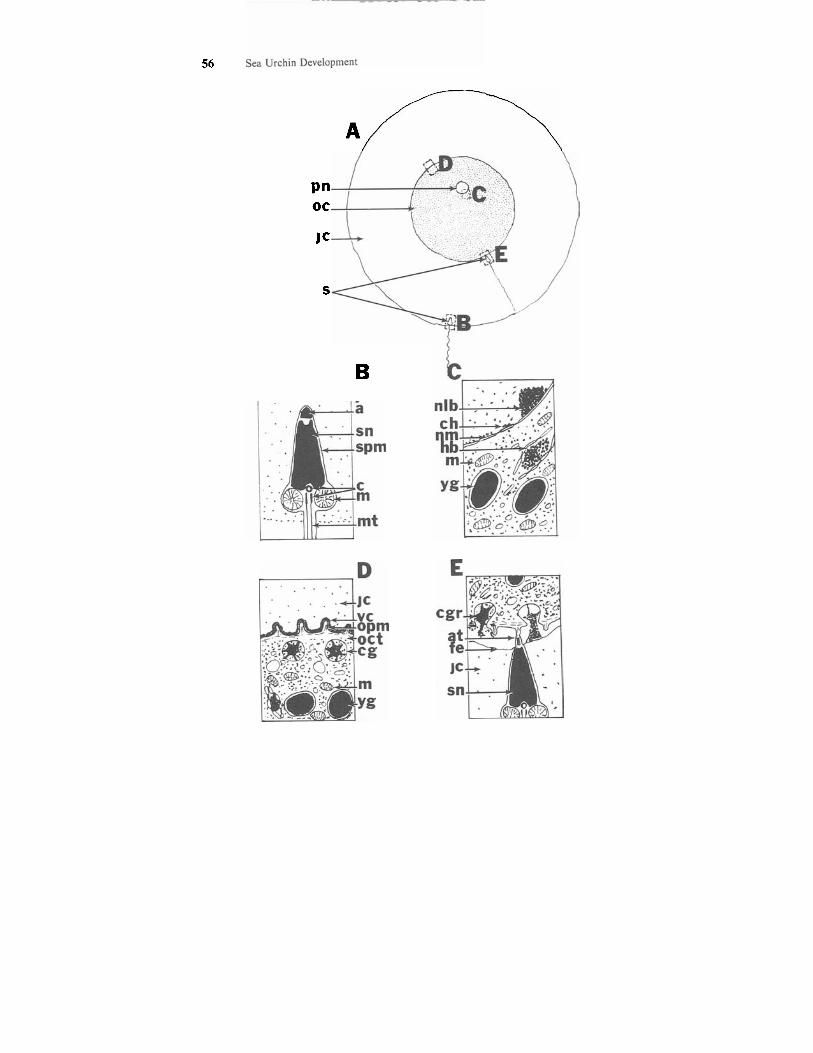
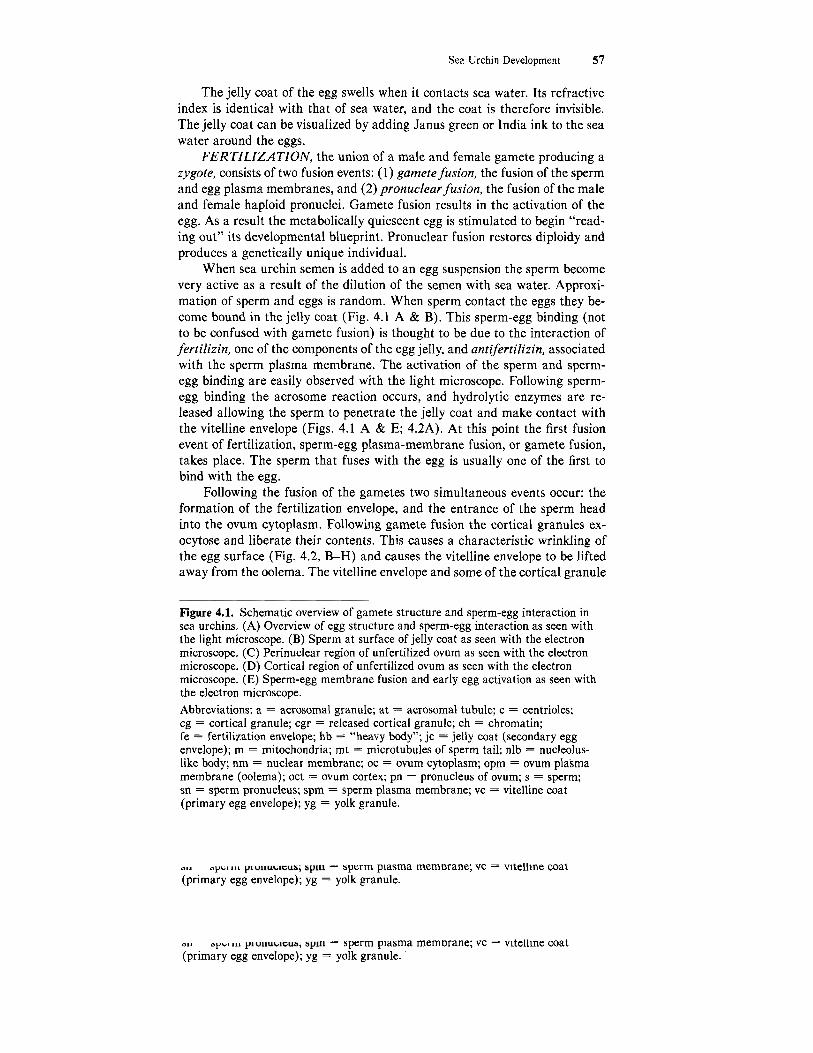
Sea urchin SPERM are very small, consisting of a head and a tail (Fig. 4.1, A & B). The head which appears ovoid contains the acrosome, nucleus, and a pair of centrioles. These cannot be distinguished with the light micro- scope. The acrosome plays several important roles in fertilization (i.e., pro- viding hydrolytic enzymes for penetration of the egg coats and for gamete fusion). The nucleus contains highly condensed chromosomes. The hairlike tail, which may be difficult to see with the light microscope, contains mito- chondria and microtubules. The tightly packed mitochondria are located below the attachment of the tail to the head. The microtubules of the tail are ar- ranged as nine pairs of peripheral microtubules and two central microtubules, like those found in cilia and flagella.
Under concentrated conditions sea urchin sperm are immobile, probably because of the high carbon dioxide concentration. When dispersed in sea water the sperm become extremely motile (referred to as sperm activation). Once the sperm are activated their ability to participate in fertilization is rapidly lost.
Sea urchin EGGS, depending on the species, range in size from 70 to 180 micrometers in diameter. Lytechinus variegatus eggs are approximately 100 micrometers in diameter. The meiotic divisions associated with oogenesis are completed while the eggs are in the ovary. Therefore sea urchin eggs when shed are haploid ova. The polar bodies are usually dislodged during gamete shedding and therefore are usually not seen. The egg has a small, clear, ec- centrically located pronucleus (Figs. 4.1 A & C; 4.2A). This is seen with the light microscope as a small light spot in the egg cytoplasm. The egg is rela- tively homogeneous, containing uniformly distributed yolk granules and other organelles. This egg type in which a small amount of yolk is evenly distributed within the cytoplasm is isolecithal or homolecithal. While L. variegatus eggs contain few pigment granules, the eggs of some other species contain larger numbers of pigment granules. The outer region of the ovum cytoplasm, re- ferred to as the cortex, includes numerous cortical granules underlying the egg plasma membrane, or oolema (Fig. 4.1 A & D). The sea urchin egg in- cludes two egg envelopes. The primary egg envelope, the vitelline envelope, is really an extended glycocalyx and is located just outside the oolema (Fig. 4.1 D). The cytoplasmic organelles and the vitelline envelope can be visualized only with the electron microscope. The secondary egg envelope, the jelly coat, is a thicker coat around the ovum (Fig. 4.1 A & D). It consists of a number of different glycoprotein components, some of which have important roles in the pre-fusion fertilization events.
56
A
pn oc
JC
S
B
Sea Urchin Development 57
The jelly coat of the egg swells when it contacts sea water. Its refractive index is identical with that of sea water, and the coat is therefore invisible. The jelly coat can be visualized by adding Janus green or India ink to the sea water around the eggs.
FERTILIZATION, the union of a male and female gamete producing a zygote, consists of two fusion events: (1) gamete fusion, the fusion of the sperm and egg plasma membranes, and (2) pronuclear fusion, the fusion of the male and female haploid pronuclei. Gamete fusion results in the activation of the egg. As a result the metabolically quiescent egg is stimulated to begin “read- ing out” its developmental blueprint. Pronuclear fusion restores diploidy and produces a genetically unique individual.
When sea urchin semen is added to an egg suspension the sperm become very active as a result of the dilution of the semen with sea water. Approxi- mation of sperm and eggs is random. When sperm contact the eggs they be- come bound in the jelly coat (Fig. 4.1 A & B). This sperm-egg binding (not to be confused with gamete fusion) is thought to be due to the interaction of fertilizin, one of the components of the egg jelly, and antifertilizin, associated with the sperm plasma membrane. The activation of the sperm and sperm- egg binding are easily observed with the light microscope. Following sperm- egg binding the acrosome reaction occurs, and hydrolytic enzymes are re- leased allowing the sperm to penetrate the jelly coat and make contact with the vitelline envelope (Figs. 4.1 A & E; 4.2A). At this point the first fusion event of fertilization, sperm-egg plasma-membrane fusion, or gamete fusion, takes place. The sperm that fuses with the egg is usually one of the first to bind with the egg.
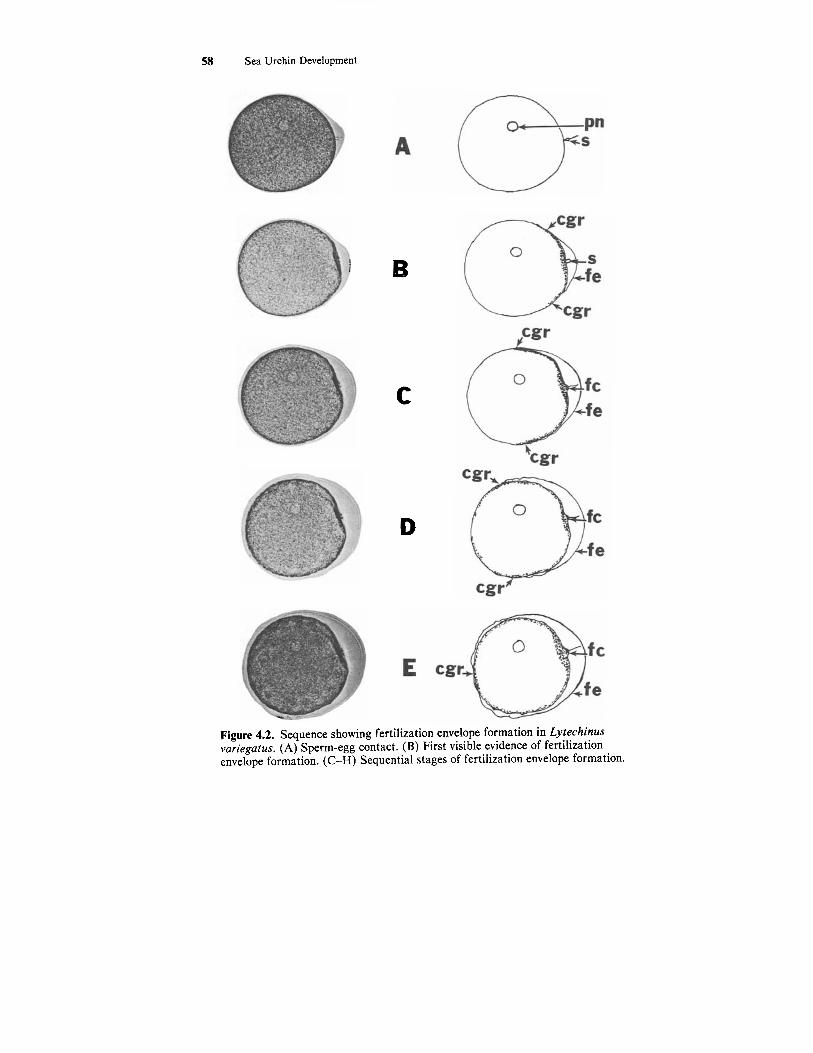
Following the fusion of the gametes two simultaneous events occur: the formation of the fertilization envelope, and the entrance of the sperm head into the ovum cytoplasm. Following gamete fusion the cortical granules ex- ocytose and liberate their contents. This causes a characteristic wrinkling of the egg surface (Fig. 4.2, B-H) and causes the vitelline envelope to be lifted away from the oolema. The vitelline envelope and some of the cortical granule
Figure 4.1. Schematic overview of gamete structure and sperm-egg interaction in sea urchins. (A) Overview of egg structure and sperm-egg interaction as seen with the light microscope. (B) Sperm a t surface of jelly coat as seen with the electron microscope. (C) Perinuclear region of unfertilized ovum as seen with the electron microscope. (D) Cortical region of unfertilized ovum as seen with the electron microscope. (E) Sperm-egg membrane fusion and early egg activation as seen with the electron microscope. Abbreviations: a = acrosomal granule; at = acrosomal tubule; c = centrioles; cg = cortical granule; cgr = released cortical granule; ch = chromatin; fe = fertilization envelope; hb = “heavy body”; jc = jelly coat (secondary egg envelope); m = mitochondria; mt = microtubules of sperm tail; nlb = nucleolus- like body; nm = nuclear membrane; oc = ovum cytoplasm; opm = ovum plasma membrane (oolema); oct = ovum cortex; pn = pronucleus of ovum; s = sperm; sn = sperm pronucleus; spm = sperm plasma membrane; vc = vitelline coat (primary egg envelope); yg = yolk granule.
- sperm plasma memorane; vc = vitelline coat (primary egg envelope); yg = yolk granule.
- sperm plasma memorane; vc = vitelline coat (primary egg envelope); yg = yolk granule.
58 Sea Urchin Development
f B
C
D
Figure 4.2. Sequence showing fertilization envelope formation in Lytechinus vuriegatus. (A) Sperm-egg contact. (B) First visible evidence of fertilization envelope formation. (C-H) Sequential stages of fertilization envelope formation.
Sea Urchin Development 59
F
G fc
H
st
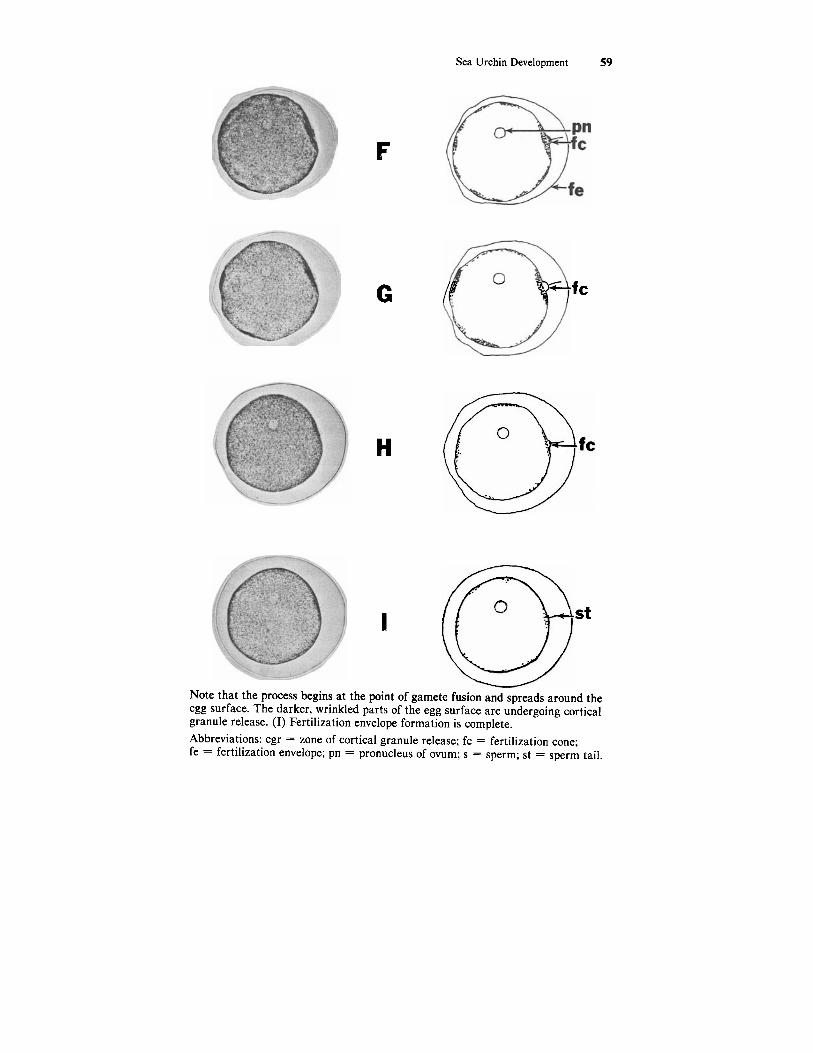
I Note that the process begins at the point of gamete fusion and spreads around the egg surface. The darker, wrinkled parts of the egg surface are undergoing cortical granule release. (I) Fertilization envelope formation is complete. Abbreviations: cgr = zone of cortical granule release; fc = fertilization cone; fe = fertilization envelope; pn = pronucleus of ovum; s = sperm; st = sperm tail.
60 Sea Urchin Development
contents join and form the fertilization envelope which serves as a block to polyspermy. The elevation of the fertilization envelope begins at the point of gamete fusion (Figs. 4.1E; 4.2B) and continues in a wave-like fashion around the entire egg (Fig. 4.2 C-I). The space between the fertilization envelope and the zygote surface is theperivitelline space. The remainder of the cortical granule contents form the hyaline layer outside the oolema. The sperm head (nucleus and proximal centriole) is pulled into the ovum cytoplasm via a fer- tilization cone. It is safe to assume that the sperm head has been taken into the egg cytoplasm by the time the fertilization envelope has been completely elevated.
The formation of the fertilization envelope is easy to observe in Lyte- chinus and Stronglyocentrotus species since the fertilization envelope is ele- vated a considerable distance from the egg surface. In Arbacia the fertilization envelope forms very close to the egg surface and is therefore usually difficult to observe.
The formation of the fertilization envelope occurs quite rapidly (i.e., within a minute after insemination). It may be necessary to fertilize several batches of eggs in order to observe the actual formation of the fertilization envelope. It is best to observe an entire field of eggs with the 10X objective than to concentrate on a single egg observed at a higher magnification.
The second fusion event of fertilization, pronuclear fusion, usually occurs within 30 to 45 minutes after gamete fusion. The approach and fusion of the pronuclei can be followed microscopically with some difficulty. These events are seen best in eggs such as A. punctulata, which are heavily pigmented, since the regions in which the pronuclei are located are less pigmented. For additional information on fertilization in sea urchins you are referred to Metz (1967), Ishikawa (1975), and Epel (1977).
During CLEAVAGE the single-celled zygote is converted into a multi- cellular embryo through rapid and repeated mitotic cell divisions. During the cleavage period there is no growth of the embryo. As the single cell is divided into many cells, the nuclear-to-cytoplasmic ratio of the blastomeres is in- creased, allowing for more effective nuclear-cytoplasmic interactions. In ad- dition the cytoplasmic areas containing specific developmental information are segregated into different cells of the embryo. This segregation of develop- mental potential sets the stage for later cell differentiation.
Cleavage of sea urchin embryos is holoblastic (i.e., the cleavage furrow cuts through the entire dividing cell), radial (i.e., the cleaving embryo is ra- dially symmetrical), and with one exception equal (i.e., the cells produced at
Sea Urchin Development 61
each cytokinesis are equal in size). During cleavage the blastomeres of the sea urchin embryo are held together by the hyaline layer formed after gamete fusion ( i .e . , simultaneously with the formation of the fertilization envelope).
The first cleavage producing the two-cell stage (Fig. 4.3A) occurs 60 to 90 minutes after gamete fusion, depending on the species. The plane of the cleavage furrow is meridional or longitudinal, passing along the animal-ve- getal pole axis. (The animal pole is where the polar bodies were located). The second cleavage producing the four-cell stage (Fig. 4.3B) is also meridional but occurs at a right angle to the first cleavage. The third cleavage is equa- torial or horizontal, cutting perpendicularly across the polar axis and result- ing in the eight-cell stage (Fig. 4.3C). Because all the cells of the embryo in each of the first three cleavages are equal in size, cleavage up to this point is said to be equal. At the eight-cell stage a small cavity appears between the blastomeres. As cleavage continues this space will enlarge to form the blas- tocoel. The fluid inside this space is largely sea water.
Thefourth cleavage produces the 16-cell stage embryo (Figs. 4.3D; 4.4B). The four cells in the animal hemisphere divide equally and meridionally to produce eight mesomeres. The four cells of the vegetal hemisphere divide un- equally and horizontally to produce four larger macromeres and four smaller micromeres located at the vegetal pole of the embryo. Cleavage through the 16-cell stage is relatively easy to follow with the light microscope. From this point on the individual cells become increasingly difficult to distinguish.
The 32-cell stage embryo results from thejifth cleavage. The mesomeres divide horizontally and equally, producing two tiers (or layers) of cells. These layers are named as follows: an, at the animal pole and an, underneath. The macromeres and micromeres divide equally and meridionally.
The sixth cleavage produces the 64-cell stage embryo (Fig. 4.4C) con- taining eight tiers or layers of cells. The an, and an, divide horizontally. The macromeres divide horizontally, producing two tiers of cells referred to as veg, and veg,. The micromeres also divide horizontally. Therefore the makeup of the 64-cell stage embryo from animal to vegetal pole is as follows: 16 an, (two layers of 8 cells each), 16 an2 (two layers of 8 cells each), 8 veg,, 8 veg,, and 16 micromeres (two layers of 8 cells each). These layers are very difficult to distinguish.
On the basis of staining with vital dyes (e.g., Nile blue sulfate) Horstadius (1939) has shown for Paracentrotus (a European sea urchin) that an,, an2, and veg, form the ectoderm of the pluteus larva; veg, cells form the gut en- doderm and part of the mesoderm (coelomic mesoderm and secondary mes- enchyme), and the micromeres form the remainder of the mesoderm (primary mesenchyme).

62 Sea Urchin Development
C
D
Figure 4.3. Early cleavage in Lytechinus variegatus. (A) Two-cell stage. (B1) Polar view of early four-cell stage. (B2) Lateral view of late four-cell stage. (C) Lateral view of early eight-cell stage. (D) Lateral view of late 16-cell stage. Abbreviations: as = aster; bpm = plasma membrane of blastomere; fe = fertilization envelope; mac = macromeres; mes = mesomeres; mic = micromeres; n = nucleus; sp = spindle.
Sea Urchin Development 63
Figure 4.4. Schematic overview of sea urchin development showing the origin and fate of selected cell populations. (A) Fertilized egg or zygote, hemisection. (B) 16- cell stage, surface view. (C) 64-cell stage, surface view. (D) Mesenchyme blastula or early gastrula, hemisection. (E) Late Gastrula, hemisection. (F) Prism, hemisection. (G) Early pluteus larva, hemisection. Light dots = ectoderm. Heavy dots = endoderm, coelomic mesoderm, and secondary mesenchyme. Stippling = primary mesenchyme. Abbreviations: a = animal pole; an = anus; an1 = first tier of animalized blastomeres; an2 = second tier of animalized blastomeres; ar = archenteron; at = apical tuft of cilia; bc = blastocoel; bp = blastopore; br = body rod; ci= cilia; es = esophagus; in = intestine; m1 = primary mesenchyme; m2 = secondary mesenchyme; mac = macromeres; mes = mesomeres; mic = micromeres; mo = mouth; poa = postoral arm; por = postoral rod; pra = preoral aram; prr = preoral rod; sp = spicule; sr = skeletal rod; st = stomodaeum; sh = stomach; tr = transverse rod; v = vegetal pole; vegl = first tier of vegetalized blastomeres; veg2 = second tier of vegetalized blastomeres.
prr = preoral rod; sp = spicule; sr = skeletal rod; st = stomodaeum; sh = stomach; tr = transverse rod; v = vegetal pole; vegl = first tier of vegetalized blastomeres; veg2 = second tier of vegetalized blastomeres.
prr = preoral rod; sp = spicule; sr = skeletal rod; st = stomodaeum; sh = stomach; tr = transverse rod; v = vegetal pole; vegl = first tier of vegetalized blastomeres; veg2 = second tier of vegetalized blastomeres.
64 Sea Urchin Development
Cleavage continues, producing smaller and smaller cells. Layers of cells become indistinguishable, and no special designation of cells is used for post- 64-cell stage embryos.
The BLASTULA stage is characterized by the presence of a large, fluid- filled blastocoel, a declining rate of cell division, and a nuclear-to-cytoplasmic ratio of the blastomeres approaching that of differentiated cells. It is some- times difficult to know exactly when to start referring to a developing embryo and the space inside the embryo as the blastula and blastocoel respectively. These terms may be employed once the space inside the embryo is larger than the largest cell of the embryo. Approximately six hours after fertilization the sea urchin embryo enters the early blastula stage. The cells of the blastula are arranged in a single layer around the blastocoel (Fig. 4.5A). The blasto- meres develop cilia on their outer surface. As a result of the beating of these cilia the embryo will rotate within the fertilization envelope.
Ten to twelve hours after fertilization the mid-blastula, composed of about 600 cells, hatches out of the fertilization envelope. It has been shown by Ishida (1936), Kopac (1941), and many others that the blastula releases a “hatching enzyme” at this time that weakens and dissolves the membrane sufficiently for the blastula to break through. A small tuft of long cilia, the apical tuft, develops at the animal pole of the blastula. In most instances embryos move with the apical tuft region forward. The cilia and apical tuft can be seen if the embryos are viewed with dark field illumination. In the late blastula stage the embryo becomes thickened at the vegetal pole, forming the vegetal plate.
During GASTRULATION extensive cellular rearrangements, usually re- ferred to as morphogenetic movements, occur which convert the hollow, spher- ical blastula into a multi-layered gastrula. These cellular rearrangements occur because of changes in cell shape and in some cases changes in cell affinity. As a result of these morphogenetic movements the embryo’s cells are rearranged into the three germ layers-ectoderm, mesoderm, and endoderm.
The events of gastrulation in the sea urchin embryo have been extensively studied using time-lapse photomicrography (Gustafson and Wolpert 1967; Gustafson and Toneby 197 1). Gastrulation begins when the primary mesen- chyme cells, which are derived from the micromeres and located in the ap- proximate center of the vegetal plate region, migrate as individual cells into the blastocoel (Figs. 4.4D; 4.5C). This cell movement is termed ingression. The embryo at this early stage of gastrulation is referred to as a mesenchyme blastula.
Sea Urchin Development 65
A
C
Figure 4.5. Blastulation through early gastrulation in Lytechinus variegatus. (A) Early to mid-blastula. (B) Late blastula. (C) Mesenchyme blastula or early gastrula. Note the loss of distinct cell outlines during this period (A-C) followed by hatching from the fertilization envelope and the ingression of the primary mesenchyme (C). Abbrevations: at = apical tuft; bc = blastocoel; bpm = plasma membrane of blastomere; ci = cilia; fe = fertilization envelope; m l = primary mesenchyme.
66 Sea Urchin Development
Following the ingression of the primary mesenchyme cells the vegetal plate region, now consisting of secondary mesenchyme and coelomic mesoderm, invaginates forming a depression called the blastopore (Fig. 4.6A). As inva- gination of the vegetal plate region continues a blind-ended tube, the arch- enteron, is formed (Fig. 4.6B). The archenteron continues to elongate as a result of continued cell movement from the surface of the embryo through the blastopore. The tip of the archenteron, consisting of the secondary mesen- chyme and coelomic mesoderm cells eventually makes contact with the ec- toderm opposite the blastopore (Figs. 4.4E; 4.6C). At the end of gastrulation the secondary mesenchyme and coelomic mesoderm cells detach from the archenteron tip.
The invagination of the vegetal plate region occurs 20 to 24 hours after fertilization. Approximately six hours are required for the archenteron to move across the blastocoel and make contact with the ectoderm at the animal pole of the embryo. The gastrula contains approximately 1000 cells.
The PRISM stage is characterized by a change in the overall shape of the embryo and the beginning of differentiation of larval structures (Figs. 4.4F; 4.7). At the end of gastrulation after the tip of the archenteron has made contact with the ectoderm, the archenteron tip bends and begins to shift po- sition toward one side of the embryo (Fig. 4.7A2). At the point of contact between the archenteron tip and the overlying ectoderm the ectoderm inva- ginates slightly to form the future stomodaeum. At the stomodaeum the larval mouth and the anterior opening of the digestive tract will develop. The blas- topore will develop into the anal opening of the digestive tract. Two constric- tions appear in the archenteron subdividing it into three regions-esophagus, stomach, and intestine.
During the prism stage the embryo takes on the shape of a rounded, trun- cated pyramid. The side of the embryo containing the stomodaeum becomes flattened forming the oral surface (classically referred to as the ventral side) of the developing larva. The blastoporal side of the embryo also becomes flat- tened and forms the anal surface (classically referred to as the posterior side) of the developing larva. A band of cilia develops around the stomodaeum. As this occurs the apical tuft disappears and the embryo elongates slightly along what classically has been called the dorso-ventral axis. As a result of these changes in shape the direction of movement changes so that the prism and later the pluteus usually moves with the oral surface forward. Recall that ear- lier the animal pole region containing the apical tuft was usually forward dur- ing movement.
The primary mesenchyme cells begin to aggregate and differentiate into the triradiate spicules, the rudiments of the larval skeleton (Fig. 4.7A2). The secondary mesenchyme cells begin to differentiate into pigment cells.

Sea Urchin Development 67
A
B
C
Figure 4.6. Gastrulation in Lytechinus variegatus. (A) Early gastrula. (B) Mid- gastrula. (C) Late gastrula. Abbreviations: ar = archenteron; bc = blastocoel; bp = blastopore; m l = primary mesenchyme; m2 = secondary mesenchyme.

68 Sea Urchin Development
A 1
A 2
B
Figure 4.7. Prism stages in Lytechinus variegatus. (Al) Oral (ventral) view of early prism. (A2) Lateral view of early prism. (B) Oral (ventral) view of late prism. Abbreviations: ar = archenteron; bp = blastopore; cp = coelomic pouch; fst = future stomodaeum; m l = primary mesenchyme; m2 = secondary mesenchyme; sp = spicule; sr = skeletal rod.
Sea Urchin Development 69
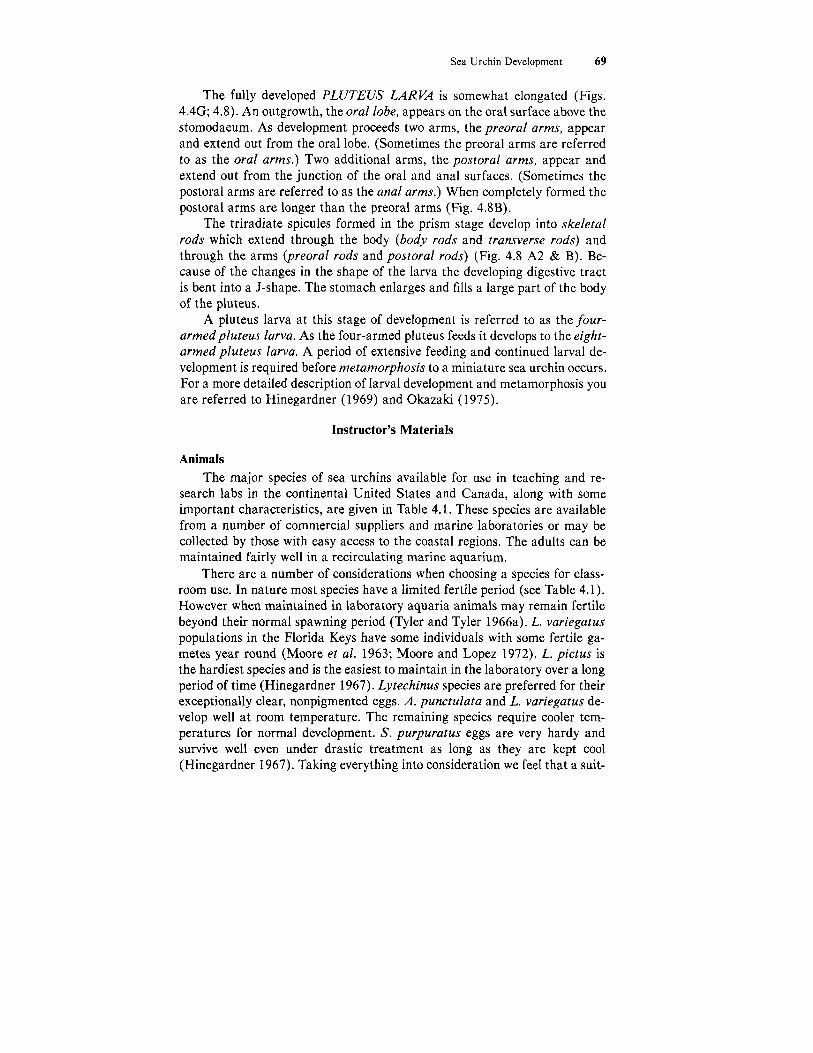
The fully developed PLUTEUS LARVA is somewhat elongated (Figs. 4.4G; 4.8). An outgrowth, the oral lobe, appears on the oral surface above the stomodaeum. As development proceeds two arms, the preoral arms, appear and extend out from the oral lobe. (Sometimes the preoral arms are referred to as the oral arms.) Two additional arms, the postoral arms, appear and extend out from the junction of the oral and anal surfaces. (Sometimes the postoral arms are referred to as the anal arms.) When completely formed the postoral arms are longer than the preoral arms (Fig. 4.8B).
The triradiate spicules formed in the prism stage develop into skeletal rods which extend through the body (body rods and transverse rods) and through the arms (preoral rods and postoral rods) (Fig. 4.8 A2 & B). Be- cause of the changes in the shape of the larva the developing digestive tract is bent into a J-shape. The stomach enlarges and fills a large part of the body of the pluteus.
A pluteus larva at this stage of development is referred to as the four- armedpluteus larva. As the four-armed pluteus feeds it develops to the eight- armed pluteus larva. A period of extensive feeding and continued larval de- velopment is required before metamorphosis to a miniature sea urchin occurs. For a more detailed description of larval development and metamorphosis you are referred to Hinegardner (1969) and Okazaki (1975).
Instructor’s Materials
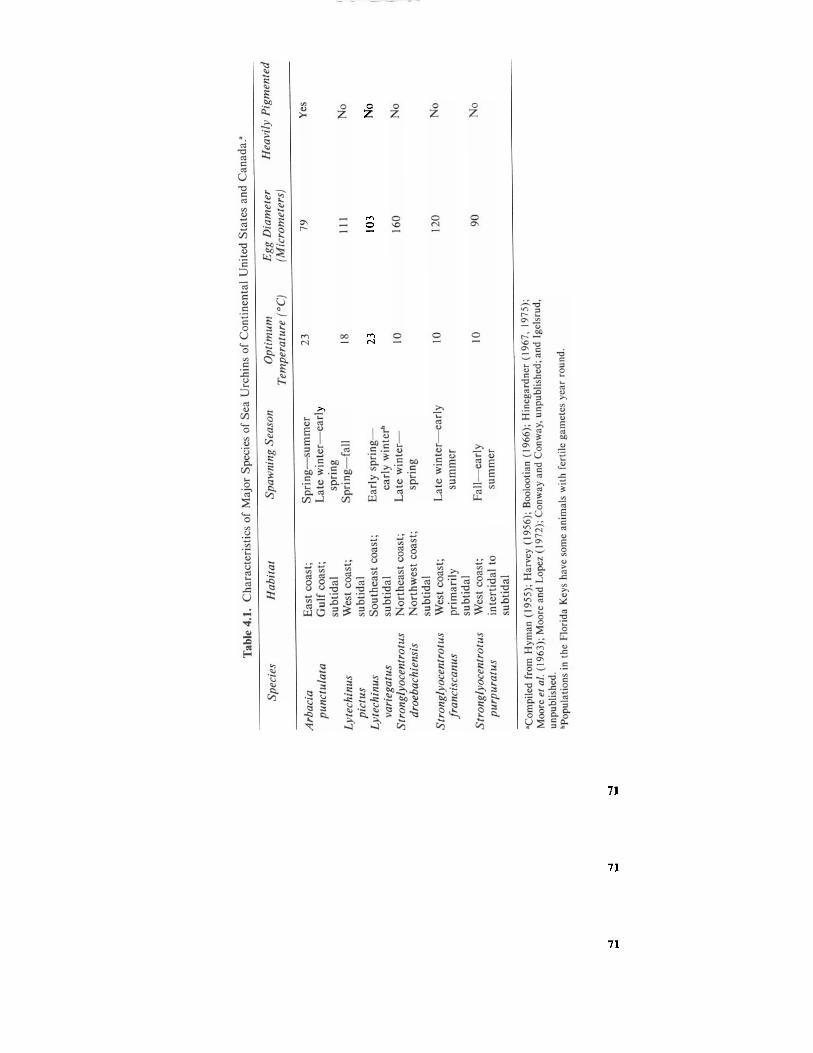
Animals The major species of sea urchins available for use in teaching and re-
search labs in the continental United States and Canada, along with some important characteristics, are given in Table 4.1. These species are available from a number of commercial suppliers and marine laboratories or may be collected by those with easy access to the coastal regions. The adults can be maintained fairly well in a recirculating marine aquarium.
There are a number of considerations when choosing a species for class- room use. In nature most species have a limited fertile period (see Table 4.1). However when maintained in laboratory aquaria animals may remain fertile beyond their normal spawning period (Tyler and Tyler 1966a). L. variegatus populations in the Florida Keys have some individuals with some fertile ga- metes year round (Moore et al. 1963; Moore and Lopez 1972). L. pictus is the hardiest species and is the easiest to maintain in the laboratory over a long period of time (Hinegardner 1967). Lytechinus species are preferred for their exceptionally clear, nonpigmented eggs. A . punctulata and L. variegatus de- velop well at room temperature. The remaining species require cooler tem- peratures for normal development. S. purpuratus eggs are very hardy and survive well even under drastic treatment as long as they are kept cool (Hinegardner 1967). Taking everything into consideration we feel that a suit-
70 Sea Urchin Development
A 1
a
B
poa Figure 4.8. Pluteus larva stages in Lytechinus variegatus. (Al) Anal view of early four-armed pluteus larva. (A2) Lateral view of early four-armed pluteus larva. (B) Antero-dorsal view of late four-armed pluteus larva. Abbreviations: an = anus; cp = coelomic pouch; es = esophagus; mo = mouth; poa = postoral arm; pra = preoral arm; sh = stomach; sr = skeletal rod.
m
m
71
71
71
72 Sea Urchin Development
able choice for use in teaching laboratories is L. variegatus, especially those collected in the Florida Keys. Eggs and embryos are very clear, making ob- servation of developmental phenomena easy. Adults and developing embryos can be maintained at room temperature, eliminating the need for low-tem- perature incubators and rigorous temperature control.
Suggested sources of L. variegatus and other sea urchins are given in Ap- pendix A. Please note that this list is not all-inclusive, but includes those sources that we presently deal with or have dealt with in the past. Customers should make every effort to develop good relationships with these, as well as other suppliers, who are often under considerable stress trying to collect, package, and ship animals. It is advisable to order sea urchins several weeks to a month in advance of the intended shipping date since adverse weather conditions may delay collection and shipment of animals. Since suppliers are not interested in dealing with institutional accounting departments, especially those that do not pay their bills on time, it is best to arrange for advance payment to be sent with your purchase order.
Most, but not all of the suppliers listed in Appendix A, ship their animals via air freight. The recommended procedure is for animals to be held for pickup at the nearest airport. Depending on the airline and airport, your shipment will usually be available within 30 to 60 minutes after flight arrival. Several of the listed suppliers will notify you by phone or mail of the expected arrival time and the air bill number. The other suppliers prefer that you call them for this information. It is best to work with the suppliers to plan a flight route which avoids shipping delays. Shipments routed through certain large cities are often delayed, depending on the airline involved.
To ensure optimum gamete procurement and development, animals should be used soon after they have arrived, or they should be fed. The latter is highly recommended. Several biologists who have used sea urchins in research for many years report that if fed, sea urchins can be maintained in fertile con- ditions over a period of many years (Hinegardner 1975; Inoue, personal com- munication). Several formulae for adult sea urchin food are given in Appendix B. Other food sources for adult sea urchins include frozen shrimp, kelp (fresh or dried), Laminaria, lettuce, Tetramin, and Ulva.
The number of animals ordered will ultimately depend on your course’s size and budget. It is suggested that you order at least 50 animals to ensure adequate numbers of usable gametes. For larger classes 100 or more animals would be advisable.
Marine Aquaria Information on setting up and maintaining marine aquaria suitable for
holding adult sea urchins can be found in Tyler and Tyler (1966a), Hine- gardner (1967, 1975), Spotte (1979), and Igelsrud (1980). A very simple sys-

Sea Urchin Development 73
tem consisting of an under-gravel filter covered with a dolomite or oystershell substrate works very well. The basic requirements for a successful marine aquarium are to convert ammonia to nontoxic nitrogen compounds and to maintain pH. Nitrate buildup is prevented by occasionally removing some of the sea water from the aquarium and then adding fresh sea water. Outside filters with diatomaceous earth or activated charcoal can be used occasionally to clean sea water of particulate matter and/or organic material. For safety it is suggested that the electrical supply to the marine aquarium be equipped with a ground-fault interrupter to reduce the danger of electrical shock.
When a marine aquarium is first set up it must be conditioned before sea urchins and other marine animals are placed in the aquarium. During the conditioning period a bacterial population will develop in the undergravel fil- ter. Once adequately developed, this bacterial population will be responsible for the removal of ammonia from the sea water. Following initial conditioning animals should be added a few at a time to ensure their survival.
Sea Water Natural sea water, artificial sea water, or a mixture of the two is used for
maintaining adults in aquaria and for culturing embryos and larvae. Some suppliers will ship sea water along with the urchins. Instant Ocean (see Ap- pendix C for source) is an excellent choice for marine aquaria. MBL-formula artificial sea water (see Appendix D for formula) or Improved Jamarin Sea Water (see Appendix C for source) is a good choice for manipulation and maintenance of gametes and embryos. Depending on the source of the urchins it may be necessary to adjust the salinity of the sea water to match the en- vironment from which the urchins were collected.
Natural sea water can be sterilized with chlorine, and the chlorine neu- tralized with sodium thiosulfate if initial sterilization is necessary. If sea water is made from salts it should be relatively sterile. Antibiotics (penicillin, 60 mg/l, and streptomycin, 50 mg/l; see Appendix C for source) may be added to the sea water to prevent excessive bacterial growth in dishes of developing embryos. Another method for reducing bacterial contamination and removing particulate matter is to filter the sea water using 0.2 or 0.45 micrometer Gel- man or Millipore filters (see Appendix C for sources).
Procedures If the study of sea urchin development must be confined to a single lab-
oratory period, most of the procedures that follow would be conducted mainly by the instructor. If however the study of sea urchin development can be ex- tended over several days, the students can take a more active part in the lab- oratory. In the latter case some of the procedures that follow must be provided to the students.
74
1
2.
3.
4.
5 .
6.
7.
Sea Urchin Development
General instructions Glassware and plasticware should be as clean as possible and should never have been exposed to toxic substances. Containers previously exposed to formalin should be avoided. Formic acid will leach out of formalin-con- taminated containers each time they are used and will kill any eggs/em- bryos/larvae placed in those containers. Do not crowd eggs/embryos/larvae in culture dishes. Embryos that are crowded will not develop well. For optimum development a good rule of thumb is no more than 100 eggs/embryos in a 60 mm dish. Use a wide mouth pipette (e.g., Nalge dropping pipette with tip cut off see Appendix C for source) rather than a Pasteur pipette to transfer eggs/ embryos. This eliminates possible damage to the eggs/embryos. Avoid overheating embryos during microscopic observation. This is es- pecially a problem since most microscopes used today are equipped with a light source mounted below the stage. Enough heat is generated by the light while it is on to kill or at least substantially affect development. Mi- croscopes with cold illumination (ie., those equipped with substage mir- rors and an external light source) are best for observing embryo development. When not being observed embryo dishes should be removed from the microscope stage. Several embryo dishes, observed in a stag- gered fashion, will also help prevent overheating. Avoid evaporation. Embryo dishes should be at least one-half full and should be kept covered except during observation. This will prevent evap- orative loss of water and an increase in salinity which can substantially affect development. Sea water is very corrosive; therefore do not get sea water on the micro- scope (especially the objectives). When observing embryos in dishes you should use only the 10X objective. If a higher magnification is needed a wet mount on a slide should be made. If you accidently get sea water on the microscope it should be adequately rinsed with distilled water and dried. Do not attempt to anchor embryo dishes in the slide holder of the me- chanical stage of the microscope. While the dish will appear to be initially anchored it will eventually pop out of the slide holder and spill the con- tents. Instead put a clean slide in the slide holder and set the embryo dish on top of the slide. You will be able to move the dish around without spill- ing the contents.
Sea Urchin Development 75
Procurement of gametes There is no external morphological difference between male and female
sea urchins. The sex can be determined only after gamete shedding has begun or following biopsy of the gonads (Hinegardner 1967, 1975). Several methods have been successfully used to induce shedding of gametes:
1. Potassium chloride injection (Tyler 1949; Hinegardner 1967; Fuseler 1973): A volume (0.1 to 1 .0 ml) of 0.5 M potassium chloride (isotonic to sea water) is injected intracoelomically using a one ml tuberculin syringe equipped with a 26 or 30 gauge needle. Gentle shaking of the animal after injection will distribute the potassium chloride to all gonads. This injec- tion should be given through the soft tissue on the oral surface of the animal. Gamete shedding will begin several minutes after the injection is given.
2. Acetylcholine injection (Hinegardner 1961, 1967): Approximately 0.1 ml of 0.01 M acetylcholine (see Appendix C for source) in sea water is in- jected intracoelomically using a one ml tuberculin syringe equipped with a 26 or 30 gauge needle. This injection should also be given through the soft tissue on the oral surface of the animal. Gentle shaking of the animal after injection will distribute the acetylcholine to all gonads. The acetyl- choline should be freshly prepared; the actual concentration of acetyl- choline is not as critical as the freshness of the solution. Hinegardner (1967) recommends that once you have an idea of how much dry acetyl- choline is needed to make up several milliliters of solution you need not bother weighing out the solid but obtain a suitable amount with a spatula and dissolve in sea water.
3. Electrical stimulation (Harvey 1953; Osanai 1975): This involves placing a pair of electrodes on the test (body) of the animal and passing an electric current through the electrodes. An adjustable physiological stimulator (e.g., Grass square-wave stimulator) can be employed at a frequency of 60 hertz. For those urchins which have small tests (e.g.. A . punctulata, L. pictus) the electrodes should be placed near the gonopore region and 6-10 volts AC (biphasic) used for stimulation. For animals with larger tests (e.g., L. variegatus) 30 volts AC must be employed (Osanai 1975). One electrode should be placed near the gonopores and the second elec- trode placed on a wet cotton ball or Kimwipe placed on the oral surface of the urchin. Gamete shedding will begin fairly quickly and will continue as long as the animal is stimulated. Sea urchin semen will adhere to the electrodes. Therefore after a male has been stimulated the electrodes should be rinsed well with distilled water before they are used again. If this precaution is not taken, sperm may be transferred into a dish of eggs.
76 Sea Urchin Development
Some urchins do not respond to potassium chloride injections but do re- spond to acetylcholine injections or electrical stimulation (Hinegardner 1967). Induction of gamete shedding by electrical stimulation is preferred for several reasons. Survival of the animals after shedding of gametes is good and only the amount of gametes needed will be obtained. Electrical stimulation is es- pecially useful for sexing animals.
Once gamete shedding is induced the sex of the animal can be determined from the color of the gametes extruded. Semen is gray-white or cream colored. The eggs, depending on the species, are either pale yellow, yellow-orange, or reddish purple. L. variegutus eggs are pale yellow.
Sea urchins are very susceptible to dessication. Therefore to promote ex- tended survival the adults should not be allowed to remain out of water for any length of time. Dessication of the animals during gamete shedding can be prevented by keeping the animals partially or completely covered with sea water during the shedding procedure (Hinegardner 1975).
Eggs are collected by placing a female in a large container (beaker or finger bowl) containing sea water. If gamete shedding has been induced by potassium chloride or acetylcholine injection the female should be inverted in the container. If the electrical stimulation method is employed the female may be placed in the container with the gonopores up. The female should be com- pletely covered with sea water. The eggs will stream out of the gonopores and settle by gravity to the bottom of the container. Eggs should be “washed” to remove coelomic fluid (known to interfere with the fertilization process), bro- ken spines, and body surface debris. This is done by collecting the eggs with a wide-mouth pipette and placing them in fresh sea water in a beaker. After the eggs have settled to the bottom by gravity the supernatant sea water should be decanted off and fresh sea water added. The eggs should be allowed to settle to the bottom again, the supernatant sea water should be decanted off and fresh sea water added. The eggs are ready for use at this point. The eggs of some sea urchins (e.g., A . punctulata, L. pictus, S . purpuratus) can be main- tained for several hours to an entire day if the container of eggs is placed in a refrigerator or ice bath. L. vuriegatus eggs appear to keep well for several hours at room temperature.
Sea urchin sperm are viable for only a short time after being dispersed in sea water. Therefore it is best to collect semen in a concentrated condition (referred to classically as “dry” sperm). The male is placed in a container (beaker or finger bowl) containing sea water. The level of the sea water should be just below the gonopores. As the semen is extruded from the gonopores it is collected in capillary tubes or with a Pasteur pipette. It may be occasionally necessary to wet the gonopores with a small amount of sea water to allow gamete shedding to continue. Once collected, semen may be placed in a test tube or other suitable container. Semen may be maintained for several hours
Sea Urchin Development 77
to an entire day if it is placed in the refrigerator or in an ice bath. Osanai (1975) reports that diluted sperm will remain viable for an extended period if the pH is lowered to 6 .
Since collection and preparation of gametes require time they are best done by the lab instructor. Gametes can be collected and prepared ahead of time, allowing more time for student observation of developmental processes. If desired, a demonstration of the gamete procurement procedure(s) can be given at some point during the laboratory period. Collection of gametes by the instructor has several other advantages: it prevents excessive handling and damage to the urchins by inexperienced students; it allows the instructor to check the fertilizability of the gametes prior to the lab; and in the event that fertilization does not occur, even after several attempts, there will be time to collect new gametes.
Once the urchins have stopped shedding their gametes they should be re- turned to an aquarium. If an animal that is still shedding its gametes is re- turned to the aquarium it may trigger the other animals in the aquarium to begin shedding their gametes. It is a good idea to keep the “spent” animals separate from the unused animals to prevent their being used again imme- diately.
Fertilization Two methods are available for fertilizing eggs and setting up dishes for
embryo development (referred to as embryo dishes). Since each method is designed for a different purpose you should choose the method best suited for you and/or your students.
Method I . This procedure involves adding an appropriate volume of freshly prepared sperm suspension to an egg suspension in a large container (e.g., beaker or finger bowl). This procedure is recommended when large numbers of eggs are to be fertilized for observational or experimental purposes.
a. Prepare an egg suspension by placing several drops of washed eggs in a container containing approximately 200 ml of sea water.
b. Prepare a dilute sperm suspension by placing one drop of concen- trated semen in a test tube containing approximately 10 ml of sea water. Mix with a clean pipette to obtain a uniformly milky suspen- sion.
c. Add two drops of the dilute sperm suspension to the egg suspension. Gently mix the sperm and eggs with a clean large-bore pipette, wooden stick, or stirring rod.
d. The eggs should be checked for fertilization approximately five min- utes after insemination. This can be done by placing a sample in a small dish or by making a wet mount on a slide. Successful fertiliz- ation is indicated by the presence of a fertilization envelope around each egg (see Fig. 4.2 B-I).
78 Sea Urchin Development
Ideally all the eggs should be fertilized. If necessary repeat steps a through d, using several more drops of sperm suspension when conducting step c. The visible events of development can be followed by observing samples taken at appropriate times. The samples can be placed in a small dish or a wet mount can be made on a slide.
Method 2. This procedure involves adding a tiny drop of concentrated semen to an egg suspension in a small dish (e.g., 60 mm petri dish or Syracuse watch glass). This method is recommended when smaller numbers of eggs are to be fertilized for observational purposes and for observation of fertilization events.
a. Place a drop of washed eggs in a small dish approximately one-third full of sea water.
b. Dip the end of a toothpick into concentrated semen. Adequate num- bers of sperm will adhere to the surface of the toothpick.
c. Swish the end of the toothpick around in the dish of eggs. Adequate mixing of the semen in the sea water is necessary to activate the sperm.
d. To observe the events of fertilization the dish of eggs should be placed under the microscope and the objective focused before the sperm is added. Successful fertilization is indicated by the formation of the fertilization envelope around each egg.
e. The eggs/embryos in the dish can be observed directly with the 10X objective of the compound microscope. If you desire to use higher magnifications, you should prepare a wet mount on a slide.
It is suggested that the instructor fertilize several batches of eggs prior to each laboratory period. If this is done on several occasions prior to each lab- oratory, embryos of many different stages will be available for observation by students. Students should also fertilize at least one batch of eggs themselves for observation of fertilization and early cleavage during and possibly after the laboratory period.
Preparation of wet mounts on slides If gametes, developing embryos or larvae are to be observed with the 40X
or 100X objectives of the microscope, it will be necessary for small samples of semen, eggs, embryos or larvae to be taken and for wet mounts on slides to be prepared. This can be done by either the students or the instructor. For large, multi-section courses or if time is limited, wet mounts of various stages of development should be prepared prior to the laboratory and the slides set up on demonstration microscopes. To facilitate observation adequate numbers of embryos/larvae should be placed on the slide. Several embryos or larvae should always be in the field of view. If necessary embryos/larvae can be con- centrated by pouring a large sample through a 500 mesh Cistron sieve (see Appendix C for source).
Sea Urchin Development 79
The standard type of wet mount on a slide is prepared using the general procedure that follows (Fig. 4.9A). Preparing wet mounts of gametes, non- motile embryos, and motile embryos and larvae present different problems. Therefore some suggestions for dealing with different stages of development are given.
1. Obtain a slide and a suitable coverslip (e.g., 22 X 22 mm or 22 X 50 mm. Preparations using the latter size coverslip often last several days).
2. Using Vaseline or silicone lubricant make a ring (or square or rectangle) on the slide. The area of this ring should be slightly smaller than the size of the coverslip to be employed. A three or five ml syringe equipped with a blunt-end 18 gauge needle can be filled with Vaseline or silicone and then used to apply this material to the slide.
A
B
Figure 4.9. Preparation of wet mount slides of living gametes, embryos, or larvae. (A) Simple wet mount. (B) Wet mount for long term observation of several embryos. Abbreviations: a = microscope slide; b = coverslip; c = grease seal (Vaseline in A; paraffin-lanolin-vaseline, 1:1:1 in B); d = most filter paper; e = drop of sea water containing organisms to be studied.
80 Sea Urchin Development
3 . Place a sample of the material to be observed within the ring. 4. Apply the coverslip over the sample. The Vaseline ring will seal the cov-
erslip to the slide (Fig. 4.9A). This will prevent evaporation of sea water, will confine the sample under the coverslip, and will prevent the coverslip from crushing the eggs, embryos, or larvae.
a. Follow steps 1 and 2 as previously described. b. Place a sample of sea water within the Vaseline ring on the slide. c. Dip the end of a toothpick into a drop of concentrated semen. Ade-
quate numbers of sperm will adhere to the toothpick. d. Swish the end of the toothpick around in the sea water on the slide to
disperse the sperm. This is necessary to dilute the concentrated semen and activate the sperm.
5. For observation of sperm the following suggestions are made.
e. Apply the coverslip over the sperm sample. f. Observe with the microscope. The condenser or iris diaphragm of the
microscope may need to be closed as much as possible to enhance the contrast of the sperm.
6 . For observation of unfertilized eggs the following suggestions are made. a. Follow steps 1 and 2 as previously described. A depression slide (see
Appendix C for source) may also be used. If a depression slide is used the Vaseline should be applied just outside the depression.
b. Place a sample of egg suspension within the Vaseline ring on the slide. c. If you wish to observe the jelly coats around the eggs, place a drop of
0.1 Janus green (see Appendix C for source) in sea water on the slide with the egg suspension and mix with a toothpick. The Janus green will stain the jelly coats and allow their visualization.
d. Apply the coverslip over the egg suspension. e. Observe with the microscope.
7. For direct observation of fertilization the following suggestions are made. This procedure is somewhat tricky but it can be used with practice for direct observation of fertilization events at higher magnifications. a. Follow steps 1 and 2 as previously described. A depression slide may
also be used. If a depression slide is used the Vaseline should be ap- plied just outside the depression.
b. Place a sample of egg suspension within the Vaseline ring on the slide. c. Apply the coverslip over the egg suspension so that the sample area
is not completely covered. One edge of the coverslip should be several mm away from the Vaseline ring.
d. Place the slide under the compound microscope and using the desired magnification focus on some eggs near the middle of the sample.
e. On another slide or in a small dish place one drop of concentrated semen and several drops of sea water. Mix thoroughly to activate the sperm.
Sea Urchin Development 81
f. Use the broad end of a toothpick to transfer some diluted semen to
g. Observe for signs of sperm-egg interaction. 8. For observation of non-motile embryos the following suggestions are made.
a. Follow steps 1 and 2 as previously described. A depression slide may also be used. If a depression slide is used the Vaseline should be ap- plied just outside the depression.
b. Place a sample of embryo suspension within the Vaseline ring on the slide. Since the embryos are not motile you should take your sample from the bottom of the embryo dish.
the exposed portion of the egg suspension.
c. Apply the coverslip over the egg suspension. d. Observe with the microscope.
9. For observation of motile embryos or larvae the following suggestions are made. a. Follow steps 1 and 2 as previously described. A depression slide may
also be used. If a depression slide is used the Vaseline should be ap- plied just outside the depression.
b. Place a sample of embryo/larva suspension within the Vaseline ring on the slide. Since the embryos/larvae are motile you should take your sample from the top of the water.
c. Add a drop of Protoslo (see Appendix C for source) and mix carefully with a toothpick. The Protoslo will slow down the movement of the embryos/larvae.
d. Apply the coverslip over the sample. e. Observe with the microscope.
10. A special type of wet mount on a slide may be prepared using the pro- cedure that follows (Fig. 4.9B). This type of wet mount has been used very successfully for long-term observations of several sea urchin embryos ( S . Inoue, personal communication). a. Obtain a slide, a suitable coverslip, and a piece of filter paper. b. Using a mixture of paraffin-lanolin-Vaseline (1:1: 1) make a square or
rectangle on the slide that is the same size as the coverslip to be em- ployed.
c. Cut a square or rectangle from the filter paper. The size should be just smaller than the coverslip so it will fit inside the square/rectangle of paraffin-lanolin-Vaseline. Cut a circle or oval from the inside of the filter paper square/rectangle. The hole in the filter paper should be approximately 8 mm in diameter. Wet the filter paper and place on the slide.
d. Place a small sample of eggs/embryos in the center of the hole in the filter paper. The drop should be approximately 4 mm in diameter and should not touch the filter paper. This will leave an air space between the edge of the drop and the filter paper (Fig. 4.9B).
82 Sea Urchin Development
e. Apply the coverslip over the sample. f. Observe with the microscope.
Wet mounts prepared by this method may be usable for several days.
Maintenance of developing embryos 1. If a constant-temperature incubator is available use it, set at 20-25°C,
to maintain embryo dishes. 2. If a constant temperature incubator is not available then embryo dishes
should be placed in a location where temperature will be in the range of 20-25 "C and where temperature fluctuations will be minimal.
3. It is a good idea to change the sea water 10 to 15 minutes after insemi- nation to remove excess sperm. Approximately three-fourths of the sea water is decanted or pipetted off and fresh sea water added. To facilitate the removal of sea water from smaller embryo dishes (i.e., 60 mm petri dishes, Syracuse watch glasses) set them at an angle by propping the edge of the dish bottom against the edge of the top or another dish. Within several minutes all the eggs will have settled by gravity to the lowest point in the dish. A pipette can be used to remove approximately three-fourths of the sea water. Fresh sea water can then be added and the dish returned to a flat surface.
4. It is also a good idea to separate the living embryos/larvae from the dead embryos. This is best done after the hatching blastula stage or later when living embryos/larvae are motile and moving throughout the water in the dish. Any embryos remaining at the bottom of the dish are either dead or arrested. Living embryos/larvae can be separated from the dead ones by decanting or pipetting off the sea water containing the living embryos/ larvae and placing it in a clean dish. Care should be taken not to stir up the material at the bottom of the dish.
Maintenance of larvae The maintenance of plutei in the laboratory is somewhat more involved
than maintaining embryos since plutei must be fed regularly. For detailed in- formation on the feeding and development of plutei you are referred to Hinegardner (1969), Cameron and Hinegardner (1974), and Okazaki (1975). Lytechinus plutei will feed on an unidentified species of Rhodamonas desig- nated 3C (see Appendix C for source). In addition to this species Dunaliella (see Appendix C for source) can be used as food for A. punctulata and S. purpuratus (Hinegardner 1969, 1975).
Sea Urchin Development 83
Miscellaneous Information Models, audio-visual materials, and prepared slides may be used to sup-
plement the study of living sea urchin embryos. Models (see Appendix C for source) provide a good three-dimensional perspective that some students can- not discern when studying organisms with the microscope. A number of films and film loops on echinoderm development are commercially available (see list in Appendix E). Prepared slides showing the development of various sea urchins and other echinoderms are commercially available (see Appendix C for source). The embryos on these slides have been stained; therefore individ- ual cells and structures are sometimes difficult to distinguish. Also slides of only a limited number of embryonic stages are available. Instructors who are interested and have the time should consider preparing their own slides (see Appendix F for instructions). This allows an instructor to have slides of many different stages of the same species of sea urchin used in the laboratory.
Sea urchins, like other living organisms, will eventually die. The soft tis- sues will decay leaving the test (endoskeleton) behind. Sea urchin tests are interesting artistically as well as biologically. A quick way to obtain sea urchin tests is to soak dead, decaying sea urchins in sodium hypochlorite (e.g.. Chlo- rox or other commercially available bleach) for one to two days. The tests are then rinsed well with tap water and dried.
References Boolootian, R. A. Reproductive physiology. Boolootian, R. A., ed. Physiology of Echi-
Brookbank, J. W. Developmental Biology. Embryos, Plants, and Regeneration. New
Cameron, R. A.; Hinegardner, R. T. Initiation of metamorphosis in laboratory cul-
Cavanaugh, G. M. Formulae and Methods V. of the Marine Biological Laboratory
Costello, D. P.; Henley, C. Methods for Obtaining and Handling Marine Eggs and
Davenport, R. An Outline of Animal Development. Ch. 15. The sea urchin embryo.
Epel, D. The program of fertilization. Sci. Amer. 237(5):128-138; 1977. Fuseler, J. W. Repetitive procurement of mature gametes from individual sea stars and
Guidice, G. Developmental Biology of the Sea Urchin Embryo. New York: Academic
Gustafson, T.; Toneby, M. I. How genes control morphogenesis. Amer. Sci. 59:452-462;
Gustafson, T.; Wolpert, L. Cellular movement and contact in sea urchin morphogen-
Harvey, E. B. A simplified electrical method of determining the sex of sea urchins and
nodermata. New York: Interscience Publishers; 1966: 561-61 3.
York: Harper & Row: 1978.
tured sea urchins. Biol. Bull. 146:335-342; 1974.
Chemical Room. Woods Hole, MA: Marine Biological Laboratory; 1956.
Embryos. Woods Hole, MA: Marine Biological Laboratory; 197 1.
Reading, MA: Addison-Wesley Publishing Company, 1979: 259-293.
sea urchins. J. Cell Biol. 57:879-881; 1973.
Press; 1973.
1971.
esis. Exp. Cell Res. 62:102-117; 1967.
other marine animals. Biol. Bull. 105:365; 1953.
84 Sea Urchin Development
Harvey, E. B. The American Arbacia and other sea urchins. Princeton, NJ: Princeton
Hinegardner, R. T. The DNA content of isolated sea urchin egg nuclei. Exp. Cell Res.
Hinegardner, R. T. Echinoderms. Wilt, F. H.; Wessels, N. K. eds. Methods in Devel- opmental Biology. New York Thomas Y. Crowell; 1967: 139-155.
Hinegardner, R. T. Growth and development of the laboratory cultured sea urchin. Biol. Bull. 137:465-475; 1969.
Hinegardner, R. Care and handling of sea urchin eggs, embryos, and adults (princi- pally North American species). Czihak, G. ed. The Sea Urchin Embryo. Bio- chemistry and Morphogenesis. New York: Springer-Verlag; 1975: 10-25.
Horstadius, S. The mechanics of sea urchin development, studied by operative meth- ods. Biol. Rev. 14:132-179; 1939.
Horstadius, S. Experimental Embryology of Echinoderms. Oxford: Clarendon Press; 1973.
Hyman, L. H. The Invertebrates: Echinodermata. The Coelomate Bilateria (Vol. IV). New York: McGraw-Hill; 1955.
Igelsrud, D. Ch. 1. A review of sources of living and supplementary materials for lab- oratory instruction with a note about vivisection. Glase, J. C. ed. Tested Studies for Laboratory Teaching. Proceedings of the First Workshop/Conference of the Association for Biology Laboratory Education (ABLE). Dubuque, IA: Kendall/ Hunt Publishing Company; 1980: 1-21.
Ishida, J. An enzyme dissolving the fertilization membrane of sea urchin eggs. Annot. Zool. Jap. 15:453; 1936.
Ishikawa, M. Fertilization. Czihak, G. ed. The Sea Urchin Embryo. Biochemistry and Morphogenesis. New York Springer-Verlag; 1975: 99-147.
Kopac, M. J. Disintegration of the fertilization membrane of the sea urchin Arbacia by the action of an “enzyme”. J. Cell. Comp. Physiol. 18:215-220; 1941.
Metz, C. B. Gamete surface components and their role in fertilization. Metz, C. B.; Monroy, A. eds. Fertilization. Volume I. Comparative Morphology, Biochemistry, and Immunology. New York Academic Press; 1967: 163-236.
Moore, H. B.; Lopez, N. N. Factors controlling variation in the seasonal spawning pat- tern of Lytechinus variegatus. Marine Biol., 14:275-280; 1972.
Moore, H. B.; Jutare, T.; Bauer, J. C.; Jones, J. A. The biology of Lytechinus varie- gatus. Bull. Mar. Sci. Gulf Caribb. 13:23-53; 1963.
Okazaki, K. Normal development to metamorphosis. Czihak, G. ed. The Sea Urchin Embryo. Biochemistry and Morphogenesis. New York Springer-Verlag; 1975:
Osanai, K. Handling Japanese sea urchins and their embryos. Czihak, G. ed. The Sea Urchin Embryo. Biochemistry and Morphogenesis. New York: Springer-Verlag;
Piatigorsky, J. Gametogenesis. Czihak, G. ed. The Sea Urchin Embryo. Biochemistry
Ruggieri, G. D. Echinodermata. Smith, W. L.; Chanley, M. H. eds. Culture of Marine
Spotte, S. Fish and Invertebrate Culture. Water Management in Closed System. 2nd
Stearns, L. W. Sea Urchin Development: Cellular and Molecular Aspects, Strouds-
Tyler, A. A simple, non-injurious method for inducing repeated spawning of sea ur-
University Press, 1956.
25:341-347; 1961.
177-232.
1975: 26-40.
and Morphogenesis. New York Springer-Verlag; 1975: 42-98.
Invertebrate Animals. New York: Plenum Press; 1975: 229-243.
ed. New York John Wiley & Sons; 1979.
burg, PA: Dowden, Hutchinson, & Ross, Inc.; 1974.
chins and sand dollars. Coll. Net 19:19-20; 1949.
Sea Urchin Development 85
Tyler, A.; Tyler, B. The gametes; some procedures and properties. Boolootian, R. A. ed. Physiology of Echinodermata. New York: Interscience Publishers; 1966a:
Tyler, A.; Tyler, B. Physiology of fertilization and early development. Boolootian, R. A. ed. Physiology of Echinodermata. New York: Interscience Publishers; 1966b:
639-682.
683-741.
APPENDIX A Suggested Suppliers of Fertile Sea Urchins
Suppliers for Lytechinus variegatus:
Collegiate Marine Biological Supply Co. Laura G. Causey Rt. 1, Box 429E Big Pine Key, Florida 33043
Animals are shipped via air freight. When communicating with this supplier you should mention that you learned about them through the 3rd ABLE Work- shop/Conference. Otherwise your correspondence may go unanswered.
(305) 872-9508
Suppliers for other sea urchins:
Collegiate Marine Biological Supply Co. See address above. Can occasionally supply Arbacia punctulata.
Florida Marine Specimen Company Glendon C. Noble 3601 Biltmore Drive Panama City, Florida 32401 Supplier for A . punctulata. Animals are shipped via air freight.
Gulf Specimen Company Inc. Jack Rudloe P. 0. Box 237 Panacea, Florida 32346 Supplier for A . punctulata.
Marine Biological Laboratory Department of Marine Resources Woods Hole, Massachusetts 02543 Supplier for A . punctulata and Stronglyocentrotus droebachiensis.
Pacific Bio-Marine Laboratories Inc. Box 536 Venice, California 9029 1 Supplier for Lytechinus pictus and Stronglyocentrotus purpuratus. Animals are
shipped via air freight.

86 Sea Urchin Development
APPENDIX B Food for Adult Sea Urchins
Formula I-Developed especially for Lytechinus variegatus by S. Inoue (personal communication)
250 ml distilled water 250 ml sea water
15 gm agar 3 3
hard-boiled eggs, mashed or strained very fine well-crushed egg shells (must be dry to pulverize well)
Tetramin or similar fish food flakes
Place distilled water, sea water, and agar in double boiler and heat until agar dis- solves. Continue to boil for approximately 30 minutes. Add mashed hard-boiled eggs and pulverized egg shells. Remove from heat and add as many Tetramin as will be readily absorbed into mixture. Pour into petri dish bottoms and cover with laboratory tissue until thoroughly cooled. When top of food is dry and plates cool remove labo- ratory tissue, cover with petri dish tops, and store in refrigerator. Moisture should not be allowed to accumulate on covers because it will promote bacterial growth.
Feed sea urchins twice a week. This formula should provide enough food for 40 animals for a two-week period.
Formula 11-Developed by B. Brandhorst (personal communication)
2 eggs 1000 ml distilled water
5 0 g agar 50 g Tetramin
Hard boil eggs in water. Pour eggs (with shells) and water into a blender. Run a t high speed until shells are fragmented into tiny pieces. Pour into a flat pan (10" X 18") and add agar and Tetramin. Autoclave for five minutes. Cool and store in refrig- erator. Cut into 1 / 4 inch cubes. Feed one cube per urchin one to two times per week.
APPENDIX C Suggested Sources for Miscellaneous Materials
Acetylcholine chloride-Catalog No. A6625. Sigma Chemical Company, P. 0. BOX 14508, St. Louis, Missouri 63178.
500 mesh Cistron sieve-Catalog No. 676-500. Cistron Corporation, 27th and Cum- berland Streets, Lebanon, Pennsylvania 10742.
Depression slides-Catalog No. M6 190. American Scientific Products. See catalog for nearest distributor.
Dunaliella-Catalog No. 15-2 190. Carolina Biological Supply Company, Burlington, North Carolina 27215 or Gladstone, Oregon 97027.
Gelman Metricel filter membranes-Catalog No. 9-730-24 (0.2 micrometer filters). Catalog No. 9-730-20 (0.45 micrometer filters). Fisher Scientific Company. See catalog for nearest distributor.
Janus green-Catalog No. J 1000. Sigma Chemical Company. See address above. Improved Jamarin Sea Water-Jamarin Laboratory; 1 1-5, Shigino-Nishi-2-chome;
Instant Ocean-Catalog No. SS3-100 (makes 300 gallons). Aquarium Systems, Inc., Joh-to Ku, Osaki 9536, Japan 06-961-6007.
33208 Lakeland Blvd., East Lake, Ohio 44094.
Millipore filters-Catalog No. GSWP-0
Sea Urchin Development 87
-00 (0.22 micrometer filters). Catalog No. HAWP-047-00 (0.45 micrometer filters). Millipore Corporation, Order Service Department, Bedford, Massachusetts 01 730.
Models-Starfish Development Set, Catalog No. 56-29 10. Carolina Biological Supply Company. See address above.
Nalge dropping pipettes-Catalog No. P52 18. American Scientific Products. See cat- alog for nearest distributor.
Penicillin G-NA (sodium salt)-Catalog No. PEN-NA. Sigma Chemical Company. See address above.
Prepared slides of echinoderm development-
Arbacia whole mounts, unfertilized ova through gastrula (Catalog Nos. E405, E407, E410, E415, E420, E425, E430, E435, E444, E445, E450, E453, E455, E460, E465). Carolina Biological Supply Company. See address above.
Sand dollar whole mounts, composite of all stages through gastrula (Catalog No. 92W8340). Ward’s Natural Science Establishment, Inc., P. 0. Box 1712, Rochester, New York 14603.
Sea urchin whole mounts, unfertilized egg through pluteus (Catalog Nos. ZJ3-21, ZJ3-23, 253-24, ZJ3-25, ZJ3-26, ZJ3-28, 253-31). Triarch Incorpo- rated, Box 98, Ripon, Wisconsin 54971.
Sea urchin whole mounts, cleavage through pluteus (Catalog Nos. 92W8325, 92W8326,92W8328,92W8331 1). Ward’s Natural Science Establishment, Inc. See address above.
Starfish whole mounts, germinal vesicle through late gastrula (Catalog Nos. E5 10, E520, E524, E525, E526, E527, E528, E530, E534, E535, E540, E545, E550, E560, E562). Carolina Biological Supply Company. See address above.
Starfish whole mounts, germinal vesicle through late gastrula (Catalog Nos.
ZJ1-26,ZJ1-27,ZJ1-28,ZJ1-29). Triarch Incorporated. See address above. Starfish whole mounts, unfertilized egg through late gastrula (Catalog Nos.
92W8241,92W8242,92W8243,92W8244, 92W8245,92W8246,92W8247, 92W8249,92W8250,92W8255). Ward’s Natural Science Establishment, Inc. See address above.
Protoslo (methycellulose)-Catalog No. 88-5 141. Carolina Biological Supply Company. See above address. Catalog No. 37W7605. Ward’s Natural Sci- ence Establishment, Inc. See address above.
Rhodamonas 3C-Dr. Robert Guillard, Marine Biological Laboratory, Woods Hole, Massachusetts 02543.
Streptomycin sulfate-Catalog No. S6501. Sigma Chemical Company. See ad- dress above.
ZJ1-21, ZJ1-23, ZJ1-241, ZJ1-242, ZJ1-243, ZJ1-244, ZJ1-245,
MBL Formula 24.72 g 18.00 ml 0.5 M 18.54 ml 0.5 M 45.88 ml 0.5 M 25.50 ml 1.0 M 4.30 ml 0.5 M Distilled water
APPENDIX D Artificial Sea Water (Modified from Cavanaugh 1956)
sodium chloride potassium chloride calcium chloride (CaCI2•2H2O) magnesium chloride (MgCl2•6H20) magnesium sulfate (MgSO4•7H20) sodium bicarbonate
88 Sea Urchin Development
Begin with approximately 600 ml of distilled water. Add the sodium chloride and dissolve completely. The use of a combination hot plate and magnetic stirrer is rec- ommended. Heating the distilled water will speed up the process. Then add each ad- ditional component separately and mix thoroughly before making the next addition. Adjust volume to approximately 950 ml with distilled water. Check pH. If necessary adjust to pH 8.0 by adding more 0.5 M sodium bicarbonate. Finally adjust volume to 1000 ml with distilled water. The salinity is 31 0/00 and is osmotically identical to the sea water at Woods Hole. Massachusetts.
APPENDIX E Films and Film Loops on Sea Urchin Development
Early Development of the Sea Urchin-Fertilization (Catalog No. 4021) Early Development of the Sea Urchin-Cleavage (Catalog No. 4022) Induced Twinning in the Sea Urchin (Catalog No. 4023)
All of the titles in this series by Eugene Bell are available as individual Technicolor film loops from Kalmia Company.' The complete set of three film loops is sold as Catalog No. 4020.
Echinoderm Development: Fertilization (Catalog No. 401 1) Echinoderm Development: Cleavage (Catalog No. 40 12) Echinoderm Development: Gastrulation, Part 1 (Catalog No. 401 3) Echinoderm Development: Gastrulation, Part 2 (Catalog No. 4014)
All of the titles in this series by R. A. Cloney are available as individual Tech- nicolor film loops from Kalmia Company." The complete set of four film loops is sold as Catalog No. 4010.
Gastrulation in the Sea Urchin This title by T. Gustafson is available as either a Technicolor film loop (Catalog No. 6012-8) or 16 mm reel (Catalog No. 6012-16) from Kalmia Company."
This title by R. W. Hinegardner is available as either a Technicolor film loop (Cat- alog No. 601 1-8) or 16 mm reel (Catalog No. 601 1-16) from Kalmia Company."
According to the Educational Film Locatorb this black and white, 16 mm film is for rent from Indiana University, University of Kansas, University of Nevada (Reno), and University of Washington.
According to the Educational Film Locatorb this color, 16 mm film is available for rent from University of Minnesota.
Reproduction in the Sea Urchin
Sea Urchin (8 minutes, Universal Educational and Visual Aids)
The Sea Urchin (From Egg to Adult) (16 minutes, AIBS, McGraw-Hill Films)
a Kalmia Company, Department B3, Concord, Massachusetts 01742. Educational Film Locator of the Consortium of University Film Centers and R. R. Bowker
Company. 1st ed. New York R. R. Bowker Co.; 1978. This book should be found in the audio- visuals department of most colleges and universities.
Sea Urchin Development 89
APPENDIX F Preparation of Whole-Mount Slides of Stages of Sea Urchin Development
1. Fix specimens in 4% formaldehyde or 2% glutaraldehyde in sea water for at least one hour to overnight at room temperature. Specimens may be stored in fixative indefinitely.
2. Wash with sea water at least 10 minutes, or until settled, at room temperature. 3. Dehydrate in acetone series at least 10 minutes, or until settled, per change at room
temperature. 50%-one change 10%-one change 90%-one change 100-two changes
4. Infiltrate with a low-viscosity electron microscopy embedding medium. Prepare embedding medium as directed by manufacturer. 100% acetone-embedding me- dium (1:1)-one hour, or until settled, at room temperature. Embedding medium-one hour or longer at room temperature. (NOTE: We have used both Spurr low viscosity-embedding mediums and Quetol 65 1 ,b but any low-viscosity embedding medium should be suitable.)
a. Place several drops of fresh embedding medium on a slide. b. Place one drop of sample in the center of the fresh embedding medium. c. Apply a coverslip over the sample and embedding medium. d. Harden the embedding medium by placing the whole-mount slide on a slide
warming table set at the polymerization temperature recommended by the manufacturer of the embedding medium.
‘Available from E. F. Fullam, Inc., P. 0. Box 444, Schenectady, New York 12301 (Catalog No. 5 1850) or Polysciences, Inc., Paul Valley Industrial Park, Warrington, Pennsylvania 18976 (Cat- alog No. 19 16). bAvailable from Ted Pella, Inc., P. 0. Box 510, Tustin, California 92680 (Catalog No. 18070).
5. Prepare whole-mount slides as follows: