SDAccel Development Environment Release Notes ......Installing the Packages on Ubuntu Updated...
25
SDAccel Development Environment Release Notes, Installaon, and Licensing Guide UG1238 (v2019.1) July 26, 2019
Transcript of SDAccel Development Environment Release Notes ......Installing the Packages on Ubuntu Updated...
SDAccel DevelopmentEnvironment
Release Notes, Installation, and Licensing Guide
UG1238 (v2019.1) July 26, 2019
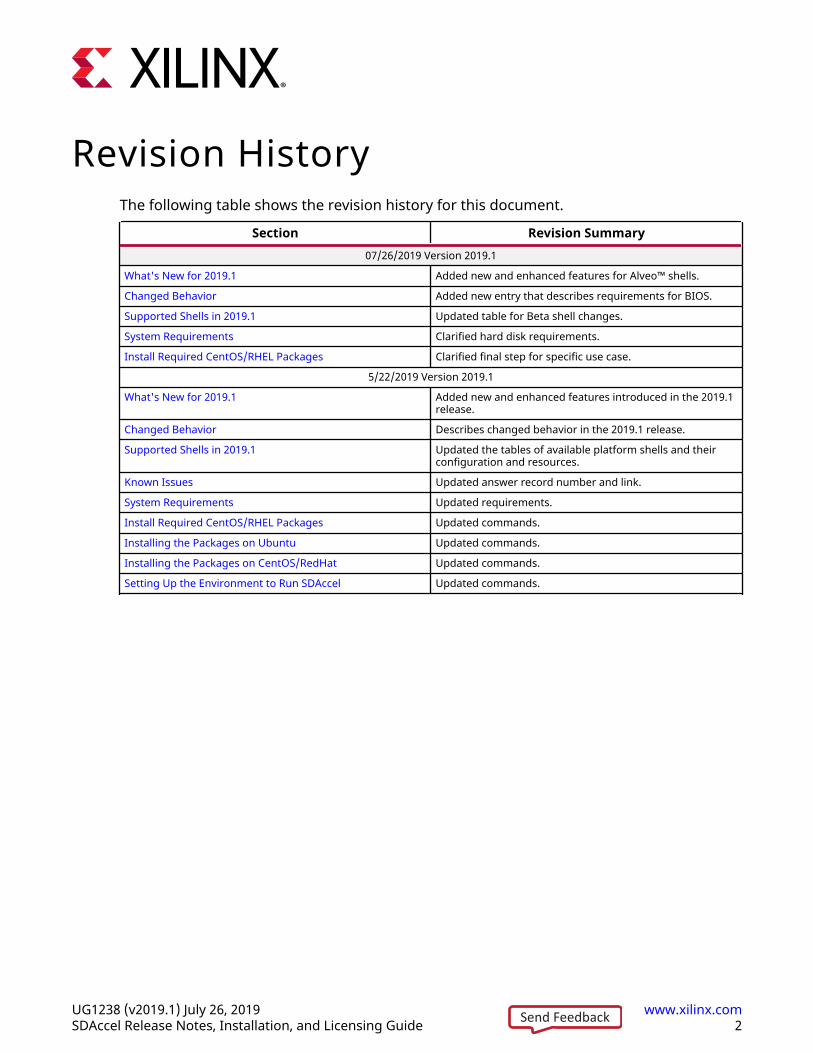
Revision HistoryThe following table shows the revision history for this document.
Section Revision Summary07/26/2019 Version 2019.1
What's New for 2019.1 Added new and enhanced features for Alveo™ shells.
Changed Behavior Added new entry that describes requirements for BIOS.
Supported Shells in 2019.1 Updated table for Beta shell changes.
System Requirements Clarified hard disk requirements.
Install Required CentOS/RHEL Packages Clarified final step for specific use case.
5/22/2019 Version 2019.1
What's New for 2019.1 Added new and enhanced features introduced in the 2019.1release.
Changed Behavior Describes changed behavior in the 2019.1 release.
Supported Shells in 2019.1 Updated the tables of available platform shells and theirconfiguration and resources.
Known Issues Updated answer record number and link.
System Requirements Updated requirements.
Install Required CentOS/RHEL Packages Updated commands.
Installing the Packages on Ubuntu Updated commands.
Installing the Packages on CentOS/RedHat Updated commands.
Setting Up the Environment to Run SDAccel Updated commands.
Revision History
UG1238 (v2019.1) July 26, 2019 www.xilinx.comSDAccel Release Notes, Installation, and Licensing Guide 2Send Feedback
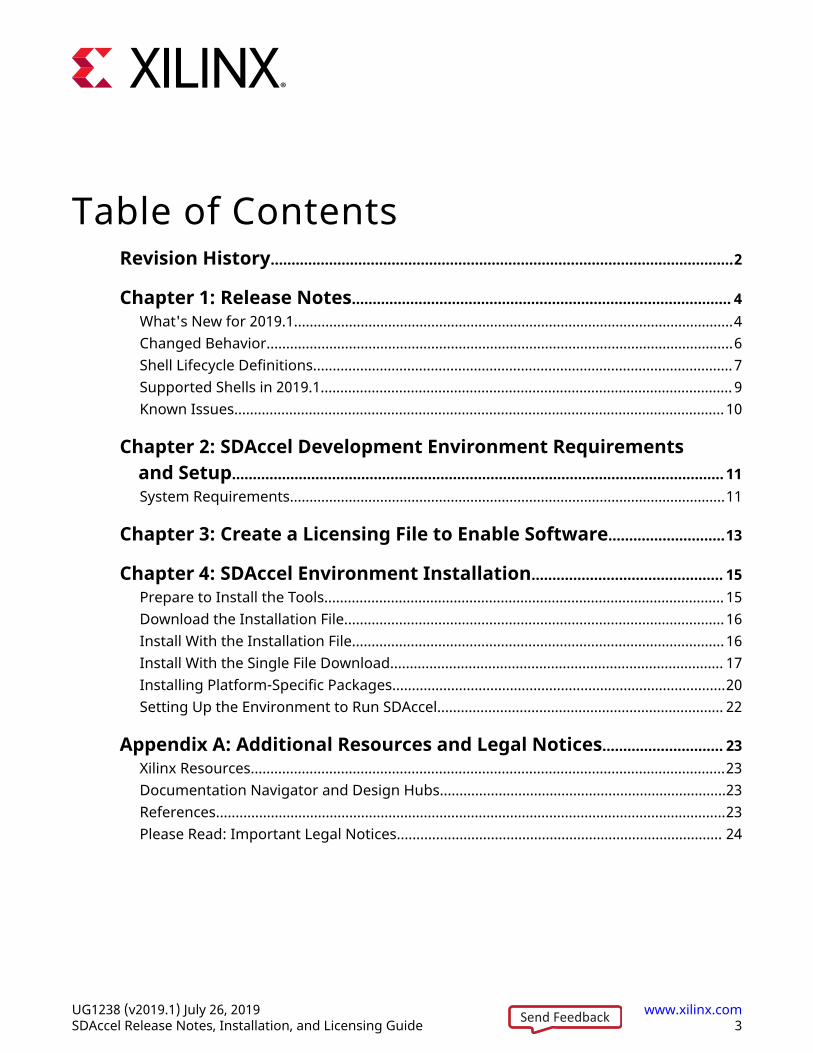
Table of ContentsRevision History...............................................................................................................2
Chapter 1: Release Notes........................................................................................... 4What's New for 2019.1................................................................................................................4Changed Behavior.......................................................................................................................6Shell Lifecycle Definitions...........................................................................................................7Supported Shells in 2019.1......................................................................................................... 9Known Issues............................................................................................................................. 10
Chapter 2: SDAccel Development Environment Requirementsand Setup...................................................................................................................... 11System Requirements...............................................................................................................11
Chapter 3: Create a Licensing File to Enable Software............................13
Chapter 4: SDAccel Environment Installation.............................................. 15Prepare to Install the Tools...................................................................................................... 15Download the Installation File.................................................................................................16Install With the Installation File............................................................................................... 16Install With the Single File Download..................................................................................... 17Installing Platform-Specific Packages.....................................................................................20Setting Up the Environment to Run SDAccel......................................................................... 22
Appendix A: Additional Resources and Legal Notices............................. 23Xilinx Resources.........................................................................................................................23Documentation Navigator and Design Hubs.........................................................................23References..................................................................................................................................23Please Read: Important Legal Notices................................................................................... 24
UG1238 (v2019.1) July 26, 2019 www.xilinx.comSDAccel Release Notes, Installation, and Licensing Guide 3Send Feedback
Chapter 1
Release Notes
What's New for 2019.1The 2019.1 release of the SDAccel™ development environment introduces the followingenhancements and features.
Alveo™ Shell Enhancements
• Support for Alveo U280, built on the Xilinx® 16 nm UltraScale™ architecture with 8 GB ofHBM2 of in-package memory capable of 460 GB/s data transfers
• New Queue DMA (QDMA) platform supports low-latency direct streaming between host andkernels
• DDR memory bandwidth have been optimized for large data transfers
○ DDR memory controller uses bank interleaving and close page policy with auto-precharge
• Addition of DQS BIAS attributes for DDR clocks
○ IOSTANDARD for DDR system clocks is explicit set to LVDS to align with clock distributiondevice.
• Deployment and Development files include build number
○ Filenames include build numbers for file download versioning
• Platforms with M2M IP improve the performance of the clEnqueueCopyBuffer API, allowingmuch faster transfers of buffers from one DDR bank to another (within the same device)
• Improved general interoperability with other acceleration cards that are also present on theserver
• Updated Satellite Controller firmware to 4.2.0
○ Add custom I2C protocol support over OOB (Out-Of-Band)
○ Add support for multiple I2C slave address on OOB
○ Add FRU (Field Replaceable Unit) support on OOB
○ Adds support for v1.6 EEPROM with FRU
○ Decrease I2C timeout from 2 seconds to 1 second
Chapter 1: Release Notes
UG1238 (v2019.1) July 26, 2019 www.xilinx.comSDAccel Release Notes, Installation, and Licensing Guide 4Send Feedback
○ Stability fixes for finishing I2C transactions before going into BSL and reboot on fault ISR(FreeRTOS)
• The U200 XDMA shell now offers kernel FPGA Memory-to-Memory direct access (M2M) tomove data between DDR banks and PCIe® Peer-to-Peer (P2P) to move data between PCIeendpoints without using host memory
• Alveo U250 shell floorplan has been enhanced to support Digital Rights Management (DRM)
○ Provides access from the user's dynamic region to connect DRM function residing in akernel to FPGA Device DNA physical block
• Enabled U250 JTAG access for debugging
Alveo Shell Resolved Issues
• Dynamic Region clocking fix for static DDR
○ Previously, clock domain crossing block was required to the static DDR
Performance degradation was observed when the kernel clock is slower than 250MHz. Withthe 18.3 tool enhancements, the CDC block has been removed.
• Improved robustness on Alveo Card being recognized during warm reboot
○ Card may not be recognized consistently during warm reboot, which required a secondaryreboot. Improvements on reset handling and firmware interaction have been implementedto reduce the frequency of this occurrence.
• PCIe/XDMA parameter addition to pass PCI-SIG testing
○ Added PCIe parameter to improve compliance pass rate CONFIG.enable_multipf_aer{true}
• Newest shells now default to PCIe 64-bit Base Address Registers (BARs)
○ No mixing of 32-bit and 64-bit BARs
○ Extended support of High-end servers with multiple acceleration cards
○ Servers must have BIOS turned on above 4 GB PCIe addressing
○ Support for reconfigurable BAR size (in other words, 4 GB to 64 GB)
Resolves issue of card being recognized by the host during boot-up in a server configurationthat has multiple PCIe cards
• Corrected LED contention issue from FPGA and Satellite Controller
○ The LEDs have limited visibility for lab specific debug conditions and may have contentionissue when driven simultaneously by the FPGA and Satellite Controller.
○ Removed the ability for the Shell to drive LEDs from the FPGA
Chapter 1: Release Notes
UG1238 (v2019.1) July 26, 2019 www.xilinx.comSDAccel Release Notes, Installation, and Licensing Guide 5Send Feedback
SDAccel Tool Enhancements
• Support for QDMA development shells with direct host to kernel streaming
• Improved kernel-to-kernel streaming
○ Supports streaming in C++ kernels
○ New --sc option specifies kernel-to-kernel streaming connections for RTL and C++kernels
○ Supports free-running RTL kernels, which do not require any start/done synchronization
Note: Control-free kernels with an ap_ctrl_none execution model should only be packaged throughscripts generated from the RTL Kernel Wizard. You cannot use package_xo independently.
• Improved SDAccel application timeline trace integrating new streaming features and PCIepeer-to-peer
• The dataflow ping-pong buffers can be sized through the stream pragma
Xilinx Runtime 2.2 (XRT)
• Support for PCIe peer-to-peer, QDMA, M2M
• New xrt.ini configuration file, which replaces SDAccel.ini
• New examples on the Xilinx Media Accelerator (XMA) GitHub repository
• For more information on the XRT 2.2 release, see the changelog on the XRT GitHubrepository
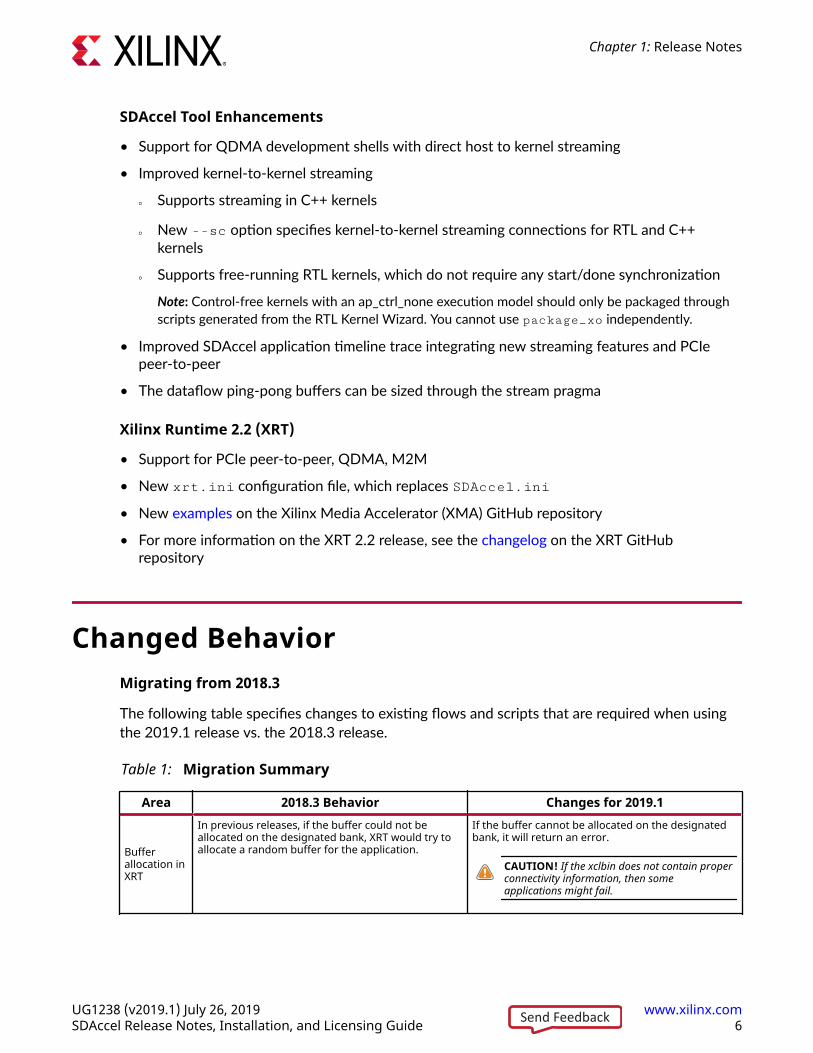
Changed BehaviorMigrating from 2018.3
The following table specifies changes to existing flows and scripts that are required when usingthe 2019.1 release vs. the 2018.3 release.
Table 1: Migration Summary
Area 2018.3 Behavior Changes for 2019.1
Bufferallocation inXRT
In previous releases, if the buffer could not beallocated on the designated bank, XRT would try toallocate a random buffer for the application.
If the buffer cannot be allocated on the designatedbank, it will return an error.
CAUTION! If the xclbin does not contain properconnectivity information, then someapplications might fail.
Chapter 1: Release Notes
UG1238 (v2019.1) July 26, 2019 www.xilinx.comSDAccel Release Notes, Installation, and Licensing Guide 6Send Feedback

Table 1: Migration Summary (cont'd)
Area 2018.3 Behavior Changes for 2019.1
Linking
XRT adds an indirect dependency on a new sharedlibrary, libxrt_coreutil.so. Host applicationslinking with libxilinxopencl.so must be able tolocate this new library during linking. Do this eitherby sourcing the XRT setup.sh/.csh file, as describedin Installing Platform-Specific Packages, or add thefollowing to the xocc linker command line in yourmakefile:
-Wl,-rpath-link,$(XILINX_XRT)/lib
BIOS Servers must have BIOS turned on above 4 GB PCIeaddressing.
Prior Release Notes
For more information on prior changes, refer to the Release Notes for the release:
• What’s New in SDAccel for 2018.3
• What’s New in SDAccel for 2018.2.xdf
• What’s New in SDAccel for 2018.2
Shell Lifecycle DefinitionsNomenclature
Alveo™ Linux package shell names adhere to the nomenclature depicted in the figure shownbelow. The example denotes a Xilinx shell designed for the U200 card with a main customizationlevel xdma. The shell was created with the 2018.3 release of the tools and has a minor shellrevision (release) level of 1
Figure 1: Alveo Shell Nomenclature Example
Chapter 1: Release Notes
UG1238 (v2019.1) July 26, 2019 www.xilinx.comSDAccel Release Notes, Installation, and Licensing Guide 7Send Feedback
The Xilinx runtime (XRT) packages follow a similar nomenclature that also denotes the releasenumber, such as xrt_u200_xdma_201830_1.
Life Cycle for the Alveo XRT and Shells
• Beta: A pre-production version that is typically distributed through Xilinx-hosted secured weblounges. Alveo shells are marked BETA and otherwise ES for cards relying on engineeringsample devices.
• Production: Production shells are available on https://www.xilinx.com/, under their respectivecard product web page. They are supported with the servers and OS combinationsdocumented in Getting Started with Alveo Data Center Accelerator Cards (UG1301).
• Major Release: The major release version of a shell is denoted in the customization substringof its file name. For example, the major release for the xilinx_u200_xdma_201830_1 shellis xdma_201830. A major release can include new features or capabilities.
• Minor Release: Shell updates (bug fixes or enabling specific new features) have anincremented suffix (>1).
The minor release version of a shell is denoted in the customization substring of its file name.For example, the minor release for the xilinx_u200_xdma_201830_1 shell is _1.
Whenever possible, it is recommended to update to the latest minor release of a shell.
• Superseded: Runtime or shells updated and replaced by a newer version, typically a minorrelease with backward compatibility.
• Discontinued: XRT or shells that are no longer supported.
Alveo Shells and Tool Compatibility
• When developing applications, the XRT and the SDAccel development environment musthave the same major release version.
• An Alveo shell for a given major release version can be used with the XRT and SDAcceldevelopment environment for the releases from the next calendar year. For example, 2018.3shells will be supported with the XRT and SDAccel releases from 2019.
• A specific release of the SDAccel development environment and XRT supports the use shellswith a major release version from the prior calendar year, although some additional setup maybe required.
Chapter 1: Release Notes
UG1238 (v2019.1) July 26, 2019 www.xilinx.comSDAccel Release Notes, Installation, and Licensing Guide 8Send Feedback
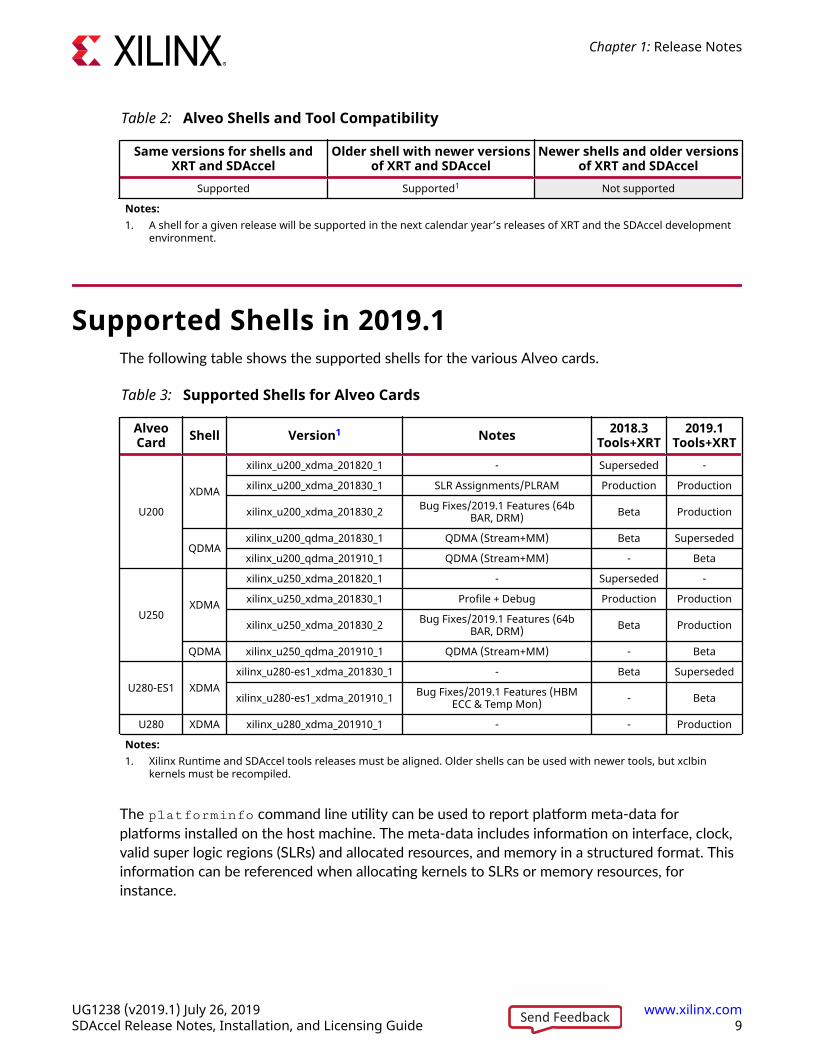
Table 2: Alveo Shells and Tool Compatibility
Same versions for shells andXRT and SDAccel
Older shell with newer versionsof XRT and SDAccel
Newer shells and older versionsof XRT and SDAccel
Supported Supported1 Not supported
Notes:1. A shell for a given release will be supported in the next calendar year’s releases of XRT and the SDAccel development
environment.
Supported Shells in 2019.1The following table shows the supported shells for the various Alveo cards.
Table 3: Supported Shells for Alveo Cards
AlveoCard Shell Version1 Notes 2018.3
Tools+XRT2019.1
Tools+XRT
U200
XDMA
xilinx_u200_xdma_201820_1 - Superseded -
xilinx_u200_xdma_201830_1 SLR Assignments/PLRAM Production Production
xilinx_u200_xdma_201830_2 Bug Fixes/2019.1 Features (64bBAR, DRM) Beta Production
QDMAxilinx_u200_qdma_201830_1 QDMA (Stream+MM) Beta Superseded
xilinx_u200_qdma_201910_1 QDMA (Stream+MM) - Beta
U250XDMA
xilinx_u250_xdma_201820_1 - Superseded -
xilinx_u250_xdma_201830_1 Profile + Debug Production Production
xilinx_u250_xdma_201830_2 Bug Fixes/2019.1 Features (64bBAR, DRM) Beta Production
QDMA xilinx_u250_qdma_201910_1 QDMA (Stream+MM) - Beta
U280-ES1 XDMAxilinx_u280-es1_xdma_201830_1 - Beta Superseded
xilinx_u280-es1_xdma_201910_1 Bug Fixes/2019.1 Features (HBMECC & Temp Mon) - Beta
U280 XDMA xilinx_u280_xdma_201910_1 - - Production
Notes:1. Xilinx Runtime and SDAccel tools releases must be aligned. Older shells can be used with newer tools, but xclbin
kernels must be recompiled.
The platforminfo command line utility can be used to report platform meta-data forplatforms installed on the host machine. The meta-data includes information on interface, clock,valid super logic regions (SLRs) and allocated resources, and memory in a structured format. Thisinformation can be referenced when allocating kernels to SLRs or memory resources, forinstance.
Chapter 1: Release Notes
UG1238 (v2019.1) July 26, 2019 www.xilinx.comSDAccel Release Notes, Installation, and Licensing Guide 9Send Feedback

Known IssuesKnown Issues for the SDAccel development environment are available in AR#72237.
Chapter 1: Release Notes
UG1238 (v2019.1) July 26, 2019 www.xilinx.comSDAccel Release Notes, Installation, and Licensing Guide 10Send Feedback
Chapter 2
SDAccel Development EnvironmentRequirements and Setup
The 2019.1 SDAccel™ development environment consists of the SDx™ developmentenvironment and command-line tools for Data Center and PCIe®-based accelerator systems. Italso includes the Vivado® Design Suite, which is used for programming the target devices.
The Xilinx Runtime (XRT), deployment shell, and development shell are all delivered as separateinstallable Linux packages for each supported platform. Users who simply wish to install anaccelerator card, and deploy applications to run on an accelerator card, should refer to GettingStarted with Alveo Data Center Accelerator Cards (UG1301). However, users who want to use theSDAccel development environment for programming, compiling, and debugging acceleratedapplications, must do a full installation as described in Chapter 4: SDAccel EnvironmentInstallation.
TIP: The version of the Vivado® tools installed by the SDx™ environment installation is the standard version ofthe Vivado Design Suite that can be installed as a separate product. If you are using both the SDAccelenvironment and the Vivado tools, then just install the SDAccel environment.
System RequirementsThe SDAccel development environment runs on the Linux operating systems only, and does notsupport Windows. To install and run on a computer, your system must meet the followingminimum requirements:
Table 4: Minimum System Requirements
Component RequirementOperating System Linux, 64-bit:
• Ubuntu 16.04.5 LTS, 18.04.1 LTS• CentOS 7.4, 7.5, 7.6• RHEL 7.4, 7.5, 7.6
System Memory For deployment installations, a minimum of 16 GB plusapplication memory requirements is required.For development installations, a minimum of 64 GB ofdevice memory is required, but 80 GB is recommended.
UG1238 (v2019.1) July 26, 2019 www.xilinx.comSDAccel Release Notes, Installation, and Licensing Guide 11Send Feedback
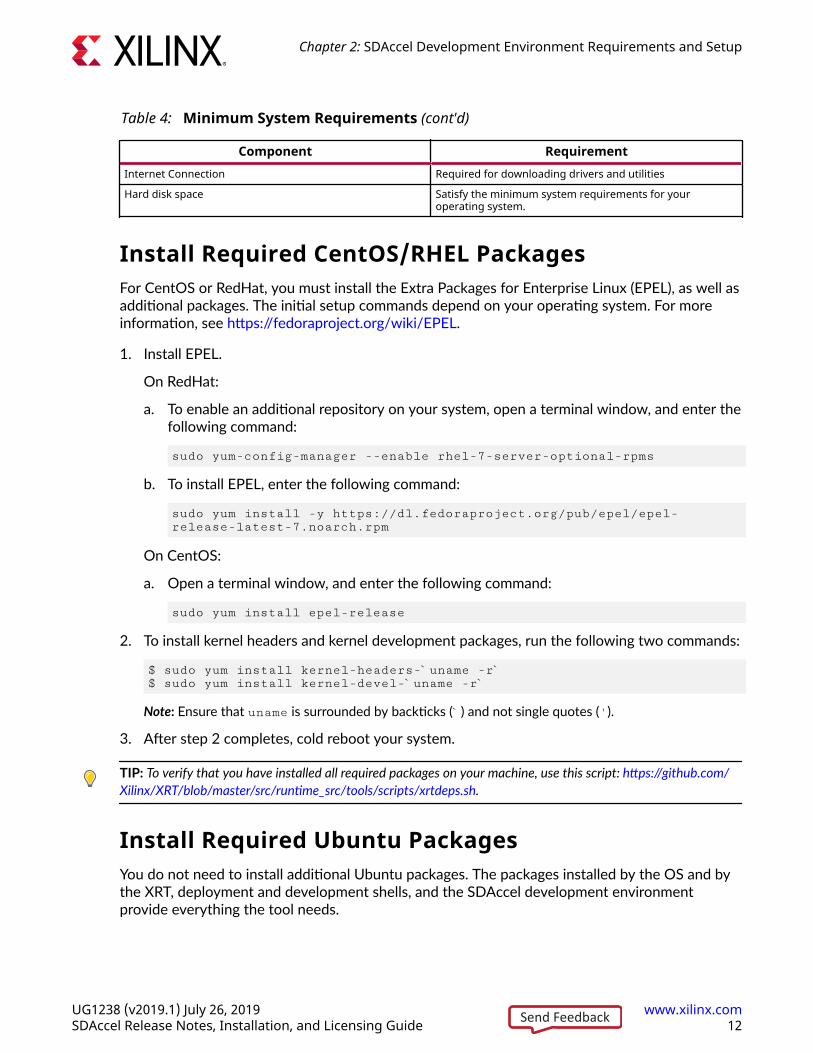
Table 4: Minimum System Requirements (cont'd)
Component RequirementInternet Connection Required for downloading drivers and utilities
Hard disk space Satisfy the minimum system requirements for youroperating system.
Install Required CentOS/RHEL PackagesFor CentOS or RedHat, you must install the Extra Packages for Enterprise Linux (EPEL), as well asadditional packages. The initial setup commands depend on your operating system. For moreinformation, see https://fedoraproject.org/wiki/EPEL.
1. Install EPEL.
On RedHat:
a. To enable an additional repository on your system, open a terminal window, and enter thefollowing command:
sudo yum-config-manager --enable rhel-7-server-optional-rpms
b. To install EPEL, enter the following command:
sudo yum install -y https://dl.fedoraproject.org/pub/epel/epel-release-latest-7.noarch.rpm
On CentOS:
a. Open a terminal window, and enter the following command:
sudo yum install epel-release
2. To install kernel headers and kernel development packages, run the following two commands:
$ sudo yum install kernel-headers-`uname -r` $ sudo yum install kernel-devel-`uname -r`
Note: Ensure that uname is surrounded by backticks (`) and not single quotes (').
3. After step 2 completes, cold reboot your system.
TIP: To verify that you have installed all required packages on your machine, use this script: https://github.com/Xilinx/XRT/blob/master/src/runtime_src/tools/scripts/xrtdeps.sh.
Install Required Ubuntu PackagesYou do not need to install additional Ubuntu packages. The packages installed by the OS and bythe XRT, deployment and development shells, and the SDAccel development environmentprovide everything the tool needs.
Chapter 2: SDAccel Development Environment Requirements and Setup
UG1238 (v2019.1) July 26, 2019 www.xilinx.comSDAccel Release Notes, Installation, and Licensing Guide 12Send Feedback
Chapter 3
Create a Licensing File to EnableSoftware
This section describes the steps to obtain a license for the SDx™ development environment. Thesoftware tools and IP product entitlements you have purchased are presented as selectableoptions in a table to include for licensing.
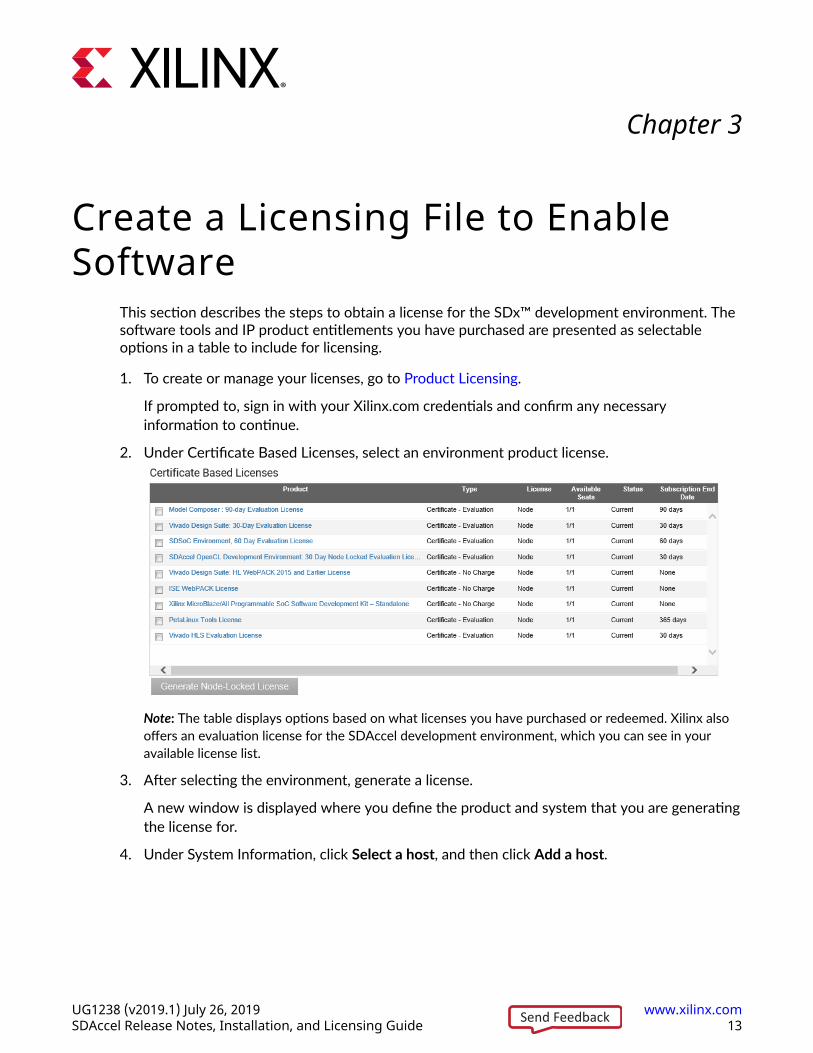
1. To create or manage your licenses, go to Product Licensing.
If prompted to, sign in with your Xilinx.com credentials and confirm any necessaryinformation to continue.
2. Under Certificate Based Licenses, select an environment product license.
Note: The table displays options based on what licenses you have purchased or redeemed. Xilinx alsooffers an evaluation license for the SDAccel development environment, which you can see in youravailable license list.
3. After selecting the environment, generate a license.
A new window is displayed where you define the product and system that you are generatingthe license for.
4. Under System Information, click Select a host, and then click Add a host.
UG1238 (v2019.1) July 26, 2019 www.xilinx.comSDAccel Release Notes, Installation, and Licensing Guide 13Send Feedback

5. Enter information about the host.
a. Enter a host name.
b. For Operating System, select Linux 64-bit.
c. Select the host identification type.
d. Enter the Host ID.
The easiest way to obtain the Host ID of your machine is to run Xilinx® LicenseConfiguration Manager on the machine you want to license.
e. Click Add.
6. Accept the licensing agreement.
You will receive an email from [email protected] with thelicense file, which you must save to your machine.
7. To enable the software, set the XILINXD_LICENSE_FILE environment variable to point tothe location of the license file on your system.
Chapter 3: Create a Licensing File to Enable Software
UG1238 (v2019.1) July 26, 2019 www.xilinx.comSDAccel Release Notes, Installation, and Licensing Guide 14Send Feedback

Chapter 4
SDAccel Environment InstallationWith the delivery of the Xilinx® Alveo™ Data Center accelerator cards, you can configure yoursystem for deploying applications only, or for development. The latter enables you to developand debug applications, in addition to deploying them, but requires additional softwareinstallation.
Deployment Systems
A deployment system allows you to deploy accelerated applications. To deploy acceleratedapplications, install the accelerator card into a system, along with the Xilinx Runtime (XRT) anddeployment shell. For more information on the installation procedures, see Getting Started withAlveo Data Center Accelerator Cards (UG1301).
Development Systems
A development system is necessary to design and develop accelerated applications. It does notrequire an accelerator card (although, you can install one), but it does require XRT and adeployment shell, as well as a development shell. These packages are a required part of theSDAccel™ development environment to support a specific accelerator card in the tool.
To configure your system, use this workflow:
1. Install the SDAccel environment software, as described in Install With the Installation File.
2. For each acceleration platform that you want to develop for, install the platform-specificpackages, as described in Installing Platform-Specific Packages.
Note: For multiple accelerator cards, repeat the installation of platform-specific packages.
Prepare to Install the ToolsYou must perform these actions prior to installation.
TIP: To reduce installation time, disable anti-virus software.
1. Ensure your system meets the system requirements, as described in System Requirements.
2. Close all open programs.
UG1238 (v2019.1) July 26, 2019 www.xilinx.comSDAccel Release Notes, Installation, and Licensing Guide 15Send Feedback
Download the Installation File1. Go to the Xilinx Downloads Website.
2. Click an installation file to download.
• Web Installer: The Web Installer is the recommended installation method, because itreduces download time and saves significant disk space.
When you use the Web Installer, you choose the design tools, device families, and installationoptions at the time of installation. The only files that are downloaded and installed are filesnecessary to support those options.
This method also mitigates issues such as network outages by resuming installation fromwhere it stopped, instead of starting over.
• Single File Download (SFD): The SFD installation download is an image containing alldevices and tool options that can be used for installation at a later time. This option isuseful for installing all files on a network drive, or for providing maximum flexibility tousers when they install the environment.
Install With the Installation FileUse the downloaded installation file to install the SDAccel development environment.
1. Run the installation file, which opens SDx IDE Installer.
2. Click Next.
3. Enter your account credentials.
4. Select Download and Install Now, and then click Next.
5. Read and accept the license agreements.
• To indicate that you accept the Xilinx Inc. End User License Agreement, click I Agree.
• To indicate that you understand and accept the WebTalk Terms and Conditions, click IAgree.
• To indicate that you accept the Third Party Software End User License Agreement, click IAgree.
6. After accepting all license agreements, click Next.
7. Customize the installation by selecting and clearing options in the tree.
To add to this installation later, click Vivado → Help → Add Design Tools or Devices.
8. Click Next.
Chapter 4: SDAccel Environment Installation
UG1238 (v2019.1) July 26, 2019 www.xilinx.comSDAccel Release Notes, Installation, and Licensing Guide 16Send Feedback
9. Select the installation directory.
CAUTION! The installation directory path must not contain any spaces.
10. (Optional) Select shortcut and file association options.
11. Click Next.
An Installation Summary window is displayed, describing the following information:
• Devices• Design tools• Installation options• Installation locations• Download locations• Disk space requirements
12. After reviewing the installation summary, click Install.
Install With the Single File DownloadIf you downloaded the full product installation, decompress the file, and then run xsetup tolaunch the installation.
Configuring Batch Mode Installation FlowThe installer can run in an unattended batch process. To run the installer unattended, you mustdo one of the following.
• Specify a standard edition and installation location
• Include a configuration file that provides the installer with the install location and the tools,devices, and options you want to install
RECOMMENDED: Generate this reference for each new release, so that new devices, tools, options, or otherchanges will be accounted for in your options file.
To begin using batch mode, open a command shell, and change to the directory where you havestored your extracted installer.
Generate a Configuration File1. Run xsetup -b ConfigGen.
Chapter 4: SDAccel Environment Installation
UG1238 (v2019.1) July 26, 2019 www.xilinx.comSDAccel Release Notes, Installation, and Licensing Guide 17Send Feedback
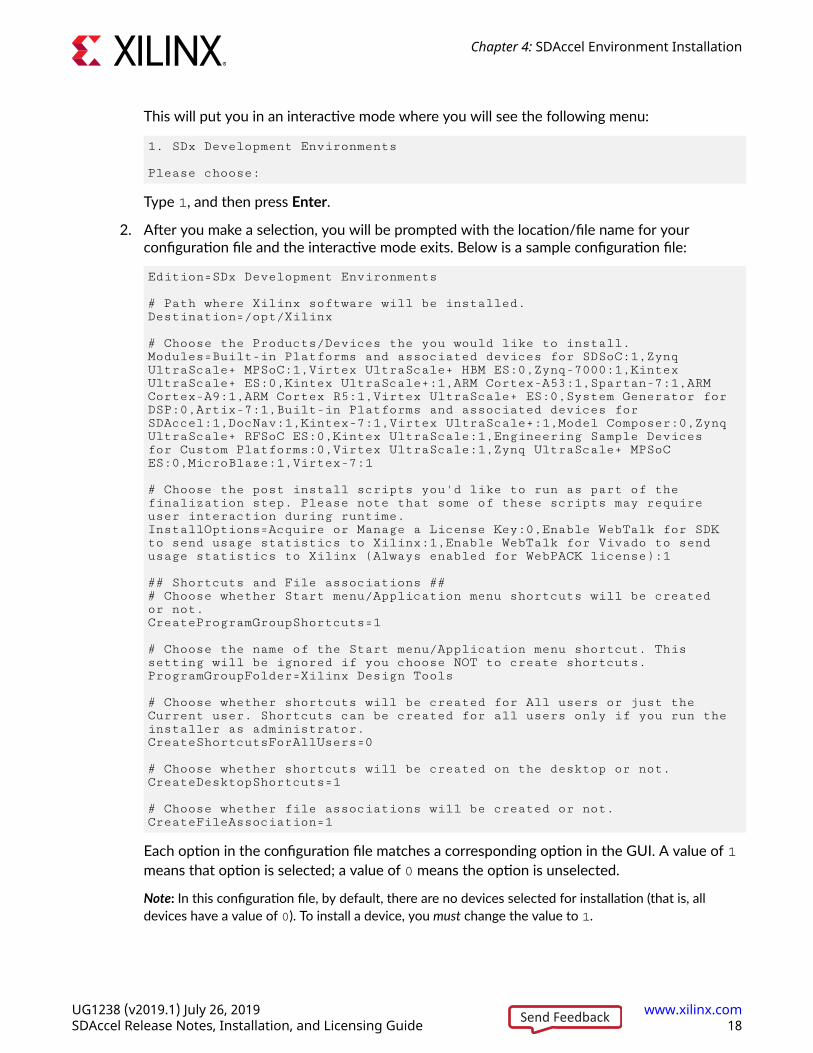
This will put you in an interactive mode where you will see the following menu:
1. SDx Development Environments
Please choose:
Type 1, and then press Enter.
2. After you make a selection, you will be prompted with the location/file name for yourconfiguration file and the interactive mode exits. Below is a sample configuration file:
Edition=SDx Development Environments
# Path where Xilinx software will be installed.Destination=/opt/Xilinx
# Choose the Products/Devices the you would like to install.Modules=Built-in Platforms and associated devices for SDSoC:1,Zynq UltraScale+ MPSoC:1,Virtex UltraScale+ HBM ES:0,Zynq-7000:1,Kintex UltraScale+ ES:0,Kintex UltraScale+:1,ARM Cortex-A53:1,Spartan-7:1,ARM Cortex-A9:1,ARM Cortex R5:1,Virtex UltraScale+ ES:0,System Generator for DSP:0,Artix-7:1,Built-in Platforms and associated devices for SDAccel:1,DocNav:1,Kintex-7:1,Virtex UltraScale+:1,Model Composer:0,Zynq UltraScale+ RFSoC ES:0,Kintex UltraScale:1,Engineering Sample Devices for Custom Platforms:0,Virtex UltraScale:1,Zynq UltraScale+ MPSoC ES:0,MicroBlaze:1,Virtex-7:1
# Choose the post install scripts you'd like to run as part of the finalization step. Please note that some of these scripts may require user interaction during runtime.InstallOptions=Acquire or Manage a License Key:0,Enable WebTalk for SDK to send usage statistics to Xilinx:1,Enable WebTalk for Vivado to send usage statistics to Xilinx (Always enabled for WebPACK license):1
## Shortcuts and File associations ### Choose whether Start menu/Application menu shortcuts will be created or not.CreateProgramGroupShortcuts=1
# Choose the name of the Start menu/Application menu shortcut. This setting will be ignored if you choose NOT to create shortcuts.ProgramGroupFolder=Xilinx Design Tools
# Choose whether shortcuts will be created for All users or just the Current user. Shortcuts can be created for all users only if you run the installer as administrator.CreateShortcutsForAllUsers=0
# Choose whether shortcuts will be created on the desktop or not.CreateDesktopShortcuts=1
# Choose whether file associations will be created or not.CreateFileAssociation=1
Each option in the configuration file matches a corresponding option in the GUI. A value of 1means that option is selected; a value of 0 means the option is unselected.
Note: In this configuration file, by default, there are no devices selected for installation (that is, alldevices have a value of 0). To install a device, you must change the value to 1.
Chapter 4: SDAccel Environment Installation
UG1238 (v2019.1) July 26, 2019 www.xilinx.comSDAccel Release Notes, Installation, and Licensing Guide 18Send Feedback
Running the InstallerAfter editing your configuration file to reflect your installation preferences, you can run theinstaller. During the command line installation, you must indicate your acceptance of the XilinxEnd-User License Agreement and Third Party End-User License Agreement, and confirm youunderstand the WebTalk Terms and Conditions.
WebTalk Terms and Conditions
The WebTalk Terms and Conditions, which you must agree to when running the installer, isbelow:
By indicating I Agree, I also confirm that I have read Section 13 of the terms and conditionsabove concerning WebTalk and have been afforded the opportunity to read the WebTalk FAQposted at https://www.xilinx.com/webtalk. I understand that I am able to disable WebTalk later ifcertain criteria described in Section 13(c) apply. If they don't apply, I can disable WebTalk byuninstalling the Software or using the Software on a machine not connected to the Internet. If Ifail to satisfy the applicable criteria or if I fail to take the applicable steps to prevent suchtransmission of information, I agree to allow Xilinx to collect the information described in Section13(a) for the purposes described in Section 13(b).
When using the command line, use the command-line switch, -a or --agree, to indicate youragreement to each of the above. If one of the above is left out of the list, or the agree switch isnot specified, the installer exits with an error and does not install.
Batch Mode Installation
This is an example of the command line for a typical new installation using a configuration file.
xsetup --agree XilinxEULA,3rdPartyEULA,WebTalkTerms --batch Install --config install_config.txt
If you want to use one of the Xilinx default edition configurations, you do not have to specify the--config option, but since the destination directory is included in the configuration file, youwill be required to specify this on the command line.
xsetup --agree 3rdPartyEULA,WebTalkTerms,XilinxEULA --batch Install --edition "SDx Development Environments" --location "/home/Xilinx"
The above command uses the default configuration options for the edition specified. To see thedefault configuration options, use the –b ConfigGen mode as described above. The batchmode of the installer can also uninstall and upgrade (add additional tools and devices). For the fulllist of the options in the installer batch mode, run xsetup -h or xsetup --help.
Chapter 4: SDAccel Environment Installation
UG1238 (v2019.1) July 26, 2019 www.xilinx.comSDAccel Release Notes, Installation, and Licensing Guide 19Send Feedback
Resolve Internet Connection IssuesThe installer connects to the Internet through the system proxy. The installer uses Firefoxbrowser proxy settings (when explicitly set) to determine connectivity.
If there are connectivity issues, verify the following:
1. If you are using alternate proxy settings to the ones referred to, select the Manual ProxyConfiguration option to specify the settings.
2. Check whether your company firewall requires a proxy authentication with a user name andpassword. If so, select the Manual Proxy Configuration option in the dialog box above.
3. If either the Use System settings or the Auto detect settings option is selected in the Firefoxbrowser, then you must manually set the proxy in the installer.
Installing Platform-Specific PackagesTo develop FPGA-accelerated applications in the SDAccel environment, you must install thefollowing three platform-specific packages for each platform that you want to developapplications for:
• Xilinx Runtime (XRT): The XRT is implemented as a combination of user-space and kerneldriver components. XRT supports PCIe-based boards, and provides a software interface toXilinx FPGAs.
• Deployment Shell: The deployment shell is the communication layer for the accelerator card,and is needed both to build applications with SDAccel and to run them on the correspondingaccelerator card.
• Development Shell: To develop and deliver accelerated applications in the SDAcceldevelopment environment, you must install the development shell. The development shellincludes platform information necessary for compiling and debugging new accelerationapplications.
Before you install platform-specific packages, download the Xilinx Runtime (XRT), theDeployment Shell, and the Development Shell for your specific card from these product pages:
• Alveo U200 Data Center Accelerator Card
• Alveo U250 Data Center Accelerator Card
• Alveo U280 Data Center Accelerator Card
All software installations use standard Linux RPM and Linux DEB distribution files, and rootaccess is required for all software and firmware installations.
Chapter 4: SDAccel Environment Installation
UG1238 (v2019.1) July 26, 2019 www.xilinx.comSDAccel Release Notes, Installation, and Licensing Guide 20Send Feedback
Your operating system might require additional packages to be installed prior to installing theXRT and shells. To verify that you have installed all required packages on your machine, use thisscript: https://github.com/Xilinx/XRT/blob/master/src/runtime_src/tools/scripts/xrtdeps.sh.
IMPORTANT! The installation packages found on the product pages are updated regularly, and the file namesspecified in this document might be different. Make sure to update file names in commands to match thepackages that you actually downloaded.
RECOMMENDED: If you are installing these packages for use with just the SDAccel development environment,you can ignore any message asking you to flash the accelerator card. However, if you are installing thesepackages for use with an installed accelerator card, you must follow the instructions in Getting Started with AlveoData Center Accelerator Cards (UG1301).
Installing the Packages on CentOS/RedHatTo install and use the XRT on CentOS/RedHat, ensure that you have installed all requiredpackages and recommended libraries, as described in Install Required CentOS/RHEL Packages.
To successfully install XRT, you must have kernel-headers and kernel-devel packages installed onyour machine. On CentOS/RedHat, XRT supports Linux kernel up to 4.x.
Use the following commands to install the packages for your specific platform.
Where <rpm-dir> is the directory where the packages were downloaded in the previous step,and <version> is the latter part of the XRT file name.
sudo yum install <rpm-dir>/xrt_<version>.rpmsudo yum install <rpm-dir>/xilinx-<card>-<shell>-<version>.rpmsudo yum install <rpm-dir>/xilinx-<card>-<shell>-dev-<version>.rpm
Installing the Packages on UbuntuUse the following commands to install the packages for your specific platform.
Where <deb-dir> is the directory where the packages were downloaded to, <version> is thelatter part of the XRT file name, and <os> is the operating system.
sudo apt install <deb-dir>/xrt_<version>.debsudo apt install <deb-dir>/xilinx-<card>-<shell>-<version>_<os>.debsudo apt install <deb-dir>/xilinx-<card>-<shell>-<version>-dev_<os>.deb
Chapter 4: SDAccel Environment Installation
UG1238 (v2019.1) July 26, 2019 www.xilinx.comSDAccel Release Notes, Installation, and Licensing Guide 21Send Feedback
Setting Up the Environment to Run SDAccelTo set up the environment to run the SDx tools: source the file below so that the elements of theSDAccel development environment are in the PATH, and other variables that are required are alsoset up.
IMPORTANT! For the SDAccel development environment, you must set up both the SDAccel tool and the XRTthat was installed as part of Installing Platform-Specific Packages.
C Shell:
source <XRT_INSTALL_DIR>/settings64.cshsource <XRT_INSTALL_DIR>/xrt/setup.csh
Bash:
source <XRT_INSTALL_DIR>/settings64.shsource <XRT_INSTALL_DIR>/xrt/setup.sh
Chapter 4: SDAccel Environment Installation
UG1238 (v2019.1) July 26, 2019 www.xilinx.comSDAccel Release Notes, Installation, and Licensing Guide 22Send Feedback
Appendix A
Additional Resources and LegalNotices
Xilinx ResourcesFor support resources such as Answers, Documentation, Downloads, and Forums, see XilinxSupport.
Documentation Navigator and Design HubsXilinx® Documentation Navigator (DocNav) provides access to Xilinx documents, videos, andsupport resources, which you can filter and search to find information. DocNav is installed withthe SDSoC™ and SDAccel™ development environments. To open it:
• On Windows, select Start → All Programs → Xilinx Design Tools → DocNav.
• At the Linux command prompt, enter docnav.
Xilinx Design Hubs provide links to documentation organized by design tasks and other topics,which you can use to learn key concepts and address frequently asked questions. To access theDesign Hubs:
• In DocNav, click the Design Hubs View tab.
• On the Xilinx website, see the Design Hubs page.
Note: For more information on DocNav, see the Documentation Navigator page on the Xilinx website.
References1. SDAccel Environment Release Notes, Installation, and Licensing Guide (UG1238)
UG1238 (v2019.1) July 26, 2019 www.xilinx.comSDAccel Release Notes, Installation, and Licensing Guide 23Send Feedback

2. SDAccel Environment Profiling and Optimization Guide (UG1207)
3. SDAccel Environment Getting Started Tutorial (UG1021)
4. SDAccel™ Development Environment web page
5. Vivado® Design Suite Documentation
6. Vivado Design Suite User Guide: Designing IP Subsystems using IP Integrator (UG994)
7. Vivado Design Suite User Guide: Creating and Packaging Custom IP (UG1118)
8. Vivado Design Suite User Guide: Partial Reconfiguration (UG909)
9. Vivado Design Suite User Guide: High-Level Synthesis (UG902)
10. UltraFast Design Methodology Guide for the Vivado Design Suite (UG949)
11. Vivado Design Suite Properties Reference Guide (UG912)
12. Khronos Group web page: Documentation for the OpenCL standard
13. Xilinx® Alveo™ web page
Please Read: Important Legal NoticesThe information disclosed to you hereunder (the "Materials") is provided solely for the selectionand use of Xilinx products. To the maximum extent permitted by applicable law: (1) Materials aremade available "AS IS" and with all faults, Xilinx hereby DISCLAIMS ALL WARRANTIES ANDCONDITIONS, EXPRESS, IMPLIED, OR STATUTORY, INCLUDING BUT NOT LIMITED TOWARRANTIES OF MERCHANTABILITY, NON-INFRINGEMENT, OR FITNESS FOR ANYPARTICULAR PURPOSE; and (2) Xilinx shall not be liable (whether in contract or tort, includingnegligence, or under any other theory of liability) for any loss or damage of any kind or naturerelated to, arising under, or in connection with, the Materials (including your use of theMaterials), including for any direct, indirect, special, incidental, or consequential loss or damage(including loss of data, profits, goodwill, or any type of loss or damage suffered as a result of anyaction brought by a third party) even if such damage or loss was reasonably foreseeable or Xilinxhad been advised of the possibility of the same. Xilinx assumes no obligation to correct anyerrors contained in the Materials or to notify you of updates to the Materials or to productspecifications. You may not reproduce, modify, distribute, or publicly display the Materialswithout prior written consent. Certain products are subject to the terms and conditions ofXilinx's limited warranty, please refer to Xilinx's Terms of Sale which can be viewed at https://www.xilinx.com/legal.htm#tos; IP cores may be subject to warranty and support terms containedin a license issued to you by Xilinx. Xilinx products are not designed or intended to be fail-safe orfor use in any application requiring fail-safe performance; you assume sole risk and liability foruse of Xilinx products in such critical applications, please refer to Xilinx's Terms of Sale which canbe viewed at https://www.xilinx.com/legal.htm#tos.
Appendix A: Additional Resources and Legal Notices
UG1238 (v2019.1) July 26, 2019 www.xilinx.comSDAccel Release Notes, Installation, and Licensing Guide 24Send Feedback
AUTOMOTIVE APPLICATIONS DISCLAIMER
AUTOMOTIVE PRODUCTS (IDENTIFIED AS "XA" IN THE PART NUMBER) ARE NOTWARRANTED FOR USE IN THE DEPLOYMENT OF AIRBAGS OR FOR USE IN APPLICATIONSTHAT AFFECT CONTROL OF A VEHICLE ("SAFETY APPLICATION") UNLESS THERE IS ASAFETY CONCEPT OR REDUNDANCY FEATURE CONSISTENT WITH THE ISO 26262AUTOMOTIVE SAFETY STANDARD ("SAFETY DESIGN"). CUSTOMER SHALL, PRIOR TO USINGOR DISTRIBUTING ANY SYSTEMS THAT INCORPORATE PRODUCTS, THOROUGHLY TESTSUCH SYSTEMS FOR SAFETY PURPOSES. USE OF PRODUCTS IN A SAFETY APPLICATIONWITHOUT A SAFETY DESIGN IS FULLY AT THE RISK OF CUSTOMER, SUBJECT ONLY TOAPPLICABLE LAWS AND REGULATIONS GOVERNING LIMITATIONS ON PRODUCTLIABILITY.
Copyright
© Copyright 2016–2019 Xilinx, Inc. Xilinx, the Xilinx logo, Alveo, Artix, Kintex, Spartan, Versal,Virtex, Vivado, Zynq, and other designated brands included herein are trademarks of Xilinx in theUnited States and other countries. OpenCL and the OpenCL logo are trademarks of Apple Inc.used by permission by Khronos. HDMI, HDMI logo, and High-Definition Multimedia Interface aretrademarks of HDMI Licensing LLC. AMBA, AMBA Designer, Arm, ARM1176JZ-S, CoreSight,Cortex, PrimeCell, Mali, and MPCore are trademarks of Arm Limited in the EU and othercountries. All other trademarks are the property of their respective owners.
Appendix A: Additional Resources and Legal Notices
UG1238 (v2019.1) July 26, 2019 www.xilinx.comSDAccel Release Notes, Installation, and Licensing Guide 25Send Feedback


![Installing and Basic Usage - EGI (Indico) · Installing and Basic Usage 10 Installation node 1 - Frontend Installing Hands on (node1) ! OpenNebula CLI Commands $ one[TAB] oneuser](https://static.fdocuments.in/doc/165x107/5fa0463219899b5dce783fd1/installing-and-basic-usage-egi-indico-installing-and-basic-usage-10-installation.jpg)