Scratch’Tutorial’ - Calvin Collegevtn2/MACUL Scratch Workshop.pdfSprites’shown’ here’...
61
Transcript of Scratch’Tutorial’ - Calvin Collegevtn2/MACUL Scratch Workshop.pdfSprites’shown’ here’...
Let’s get started!
• Go to h?p://scratch.mit.edu
• If you are new to Scratch, click: • else click: Note: you can use Scratch without logging in, but you can’t see others’ work or save your own work.
2

Try some stuff
• Click on some projects in • Click the green flag to run the project. • Click on to see the code. • Click on various Sprites in lower-‐leN area. – In right-‐side area, you see the Scripts, or Costumes, or Sounds for that sprite.
• Click on the Stage on the leN side. – In right-‐side area, you can see Scripts, Backdrops, or Sounds.
3

Sprites shown here
Scripts/Costumes/Sounds shown here
Canvas
InstrucQons for scripts in different groups
4

Lesson 1: Basic, basic script
Goal: Make Scratch the cat walk back and forth on the screen. 1. File à New 2. Click on 3. Drag over to the script area. 4. Double-‐click on it.
-‐ When you double-‐click on a script, it runs it, once.
5

Basic, basic script (2)
5. Click on , then drag into script area.
6. Put “inside” the loop: 7. Double-‐click on that. When cat gets to the
right edge, drag it back to leN edge with your mouse.
6

Basic, basic script (3)
8. Click on and drag into script area. A?ach to the top of your script. (NoQce that some things can only a?ach at the top, or bo?om.)
9. Click on the above the canvas area. 10. is an “event handler”: the script is
run when the “green flag clicked event” happens.
7

Basic, basic script (4)
11. We want the cat to walk back and forth across the screen, changing direcQon when it hits the edges.
12. Detach all three instrucQons in your script so they are separated. Drag back onto the area that shows the commands – this is how you delete something.
13. Make this instead -‐-‐-‐-‐-‐-‐-‐-‐-‐-‐-‐-‐>
8

Basic, basic script (5)
13. We need to make the cat reverse direcQon when it hits the edge. Click on and find . Add that to your script in the correct place.
14. The cat flips upside down now. To fix this, click on in here:
15. Change the sprite’s rotaQon style to this:
9

Basic, basic script (6)
16. Be?er… but the cat is sliding everywhere. Let’s make it walk. Click on Costumes: NoQce that it already has 2 costumes defined for it -‐-‐-‐-‐-‐>.
17. Click back on Scripts and click on . In there, you’ll find this: . Add that to your script in the correct place. Then, try it!
10
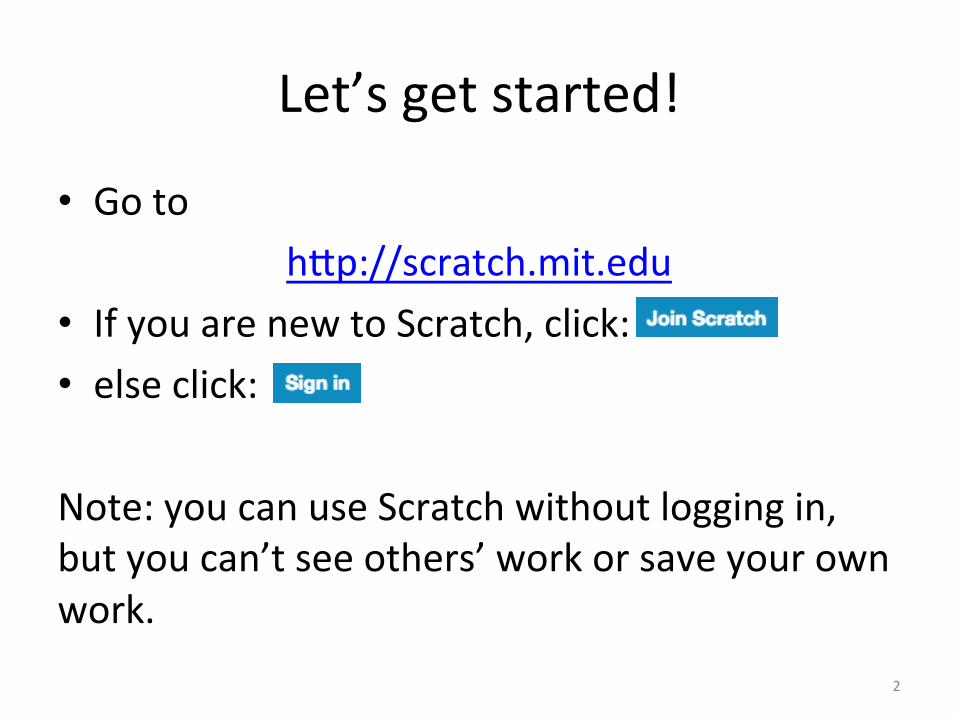
Basic, basic script (7)
18. Your script should look like this:
19. To demonstrate how we can do mulQple scripts simultaneously, *right-‐click* on and choose “duplicate”.
20. Take the block out of one loop and take and out of the other. Now, try it!
11

Play!
Try one or more of these: • Click on the Stage and add mulQple Backdrops, that change every 3 seconds.
• Make the cat change costumes more slowly. • Make the cat’s color change as it moves. • Make music play in the background.
12

Lesson 2: More Control
In this lesson, we’ll learn about • deleQng sprites and adding sprites • if statements • user interacQon • drawing with the pen Goal: make a program that draws lines when you click on the canvas.
13

Lesson 2 (1) • From the main Scratch web page, click or, if you are already in the creaQon page, choose File à New.
• At the top, you’ll see . Hover over these to see what they do. Choose and click on the cat to delete it.
• Now, hover over these and click . You can choose anything you want, but I like the Beetle (under Animals) for this exercise. Click OK.
14
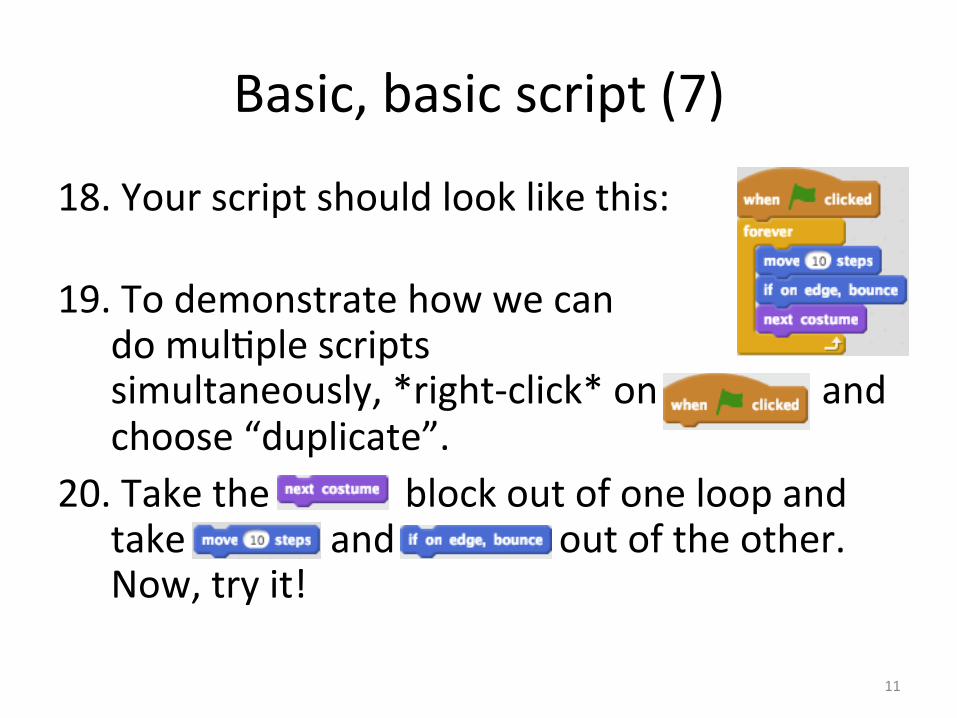
Lesson 2 (2) • Let’s make this Beetle smaller. Choose and click on your sprite unQl it is a good size. Mine looks like this:
• Now, think: we want the sprite to turn to face the mouse pointer at all Qmes. We also want it to move to where the mouse is when we click. Finally, we want it to draw a line each Qme. So, there are 3 steps. Can you figure out how to write this script?
• Breaking a problem up into smaller problems is called Problem Decomposi.on.
15
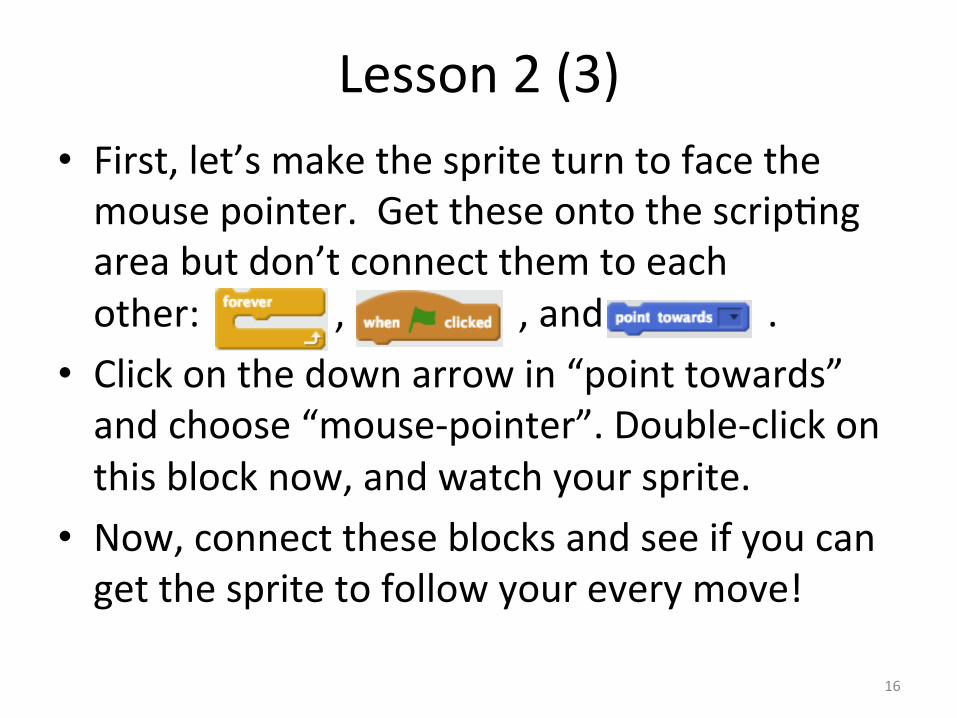
Lesson 2 (3) • First, let’s make the sprite turn to face the mouse pointer. Get these onto the scripQng area but don’t connect them to each other: , , and .
• Click on the down arrow in “point towards” and choose “mouse-‐pointer”. Double-‐click on this block now, and watch your sprite.
• Now, connect these blocks and see if you can get the sprite to follow your every move!
16

Lesson 2 (4) • Your code should look like this: • Click on this, next to your sprite:
• NoQce that each sprite has: an (x, y) locaQon, a direcQon, a rotaQon style, and whether it is visible or not. – Which direcQon in Scratch is northwest? Where is direcQon 0?
17

Lesson 2 (5) • Look above the sprite area and below the canvas and you’ll see something like this:
• What are these numbers? • Watching these numbers, figure out how big the canvas is: – What is the smallest x value? ____ Largest? ____ – What is the smallest y value? ____ Largest? ____
• Stop your script. Now, drag your sprite to (0, 0). What part of the sprite is exactly at (0, 0)?
18

Lesson 2 (6) • Back to the lesson: now we want the sprite to move to wherever we click. For this step, we’ll need:
• (If you have problems finding these, their colors should help you figure out what group they are in.)
• Put them together and then put the whole thing into your forever loop.
19
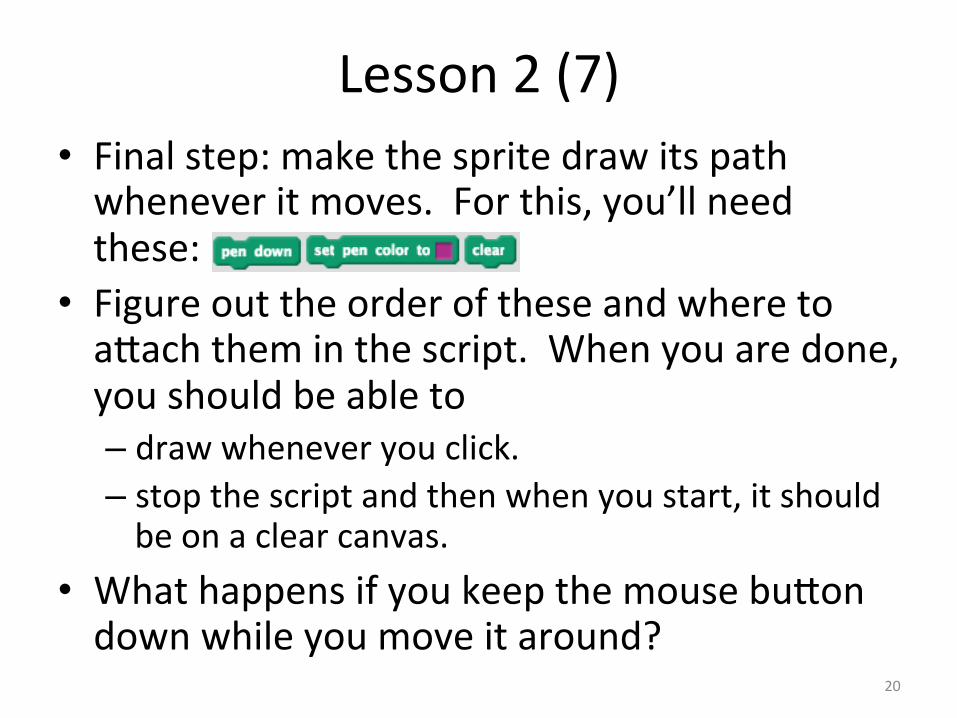
Lesson 2 (7) • Final step: make the sprite draw its path whenever it moves. For this, you’ll need these:
• Figure out the order of these and where to a?ach them in the script. When you are done, you should be able to – draw whenever you click. – stop the script and then when you start, it should be on a clear canvas.
• What happens if you keep the mouse bu?on down while you move it around?
20
Lesson 2 (8)
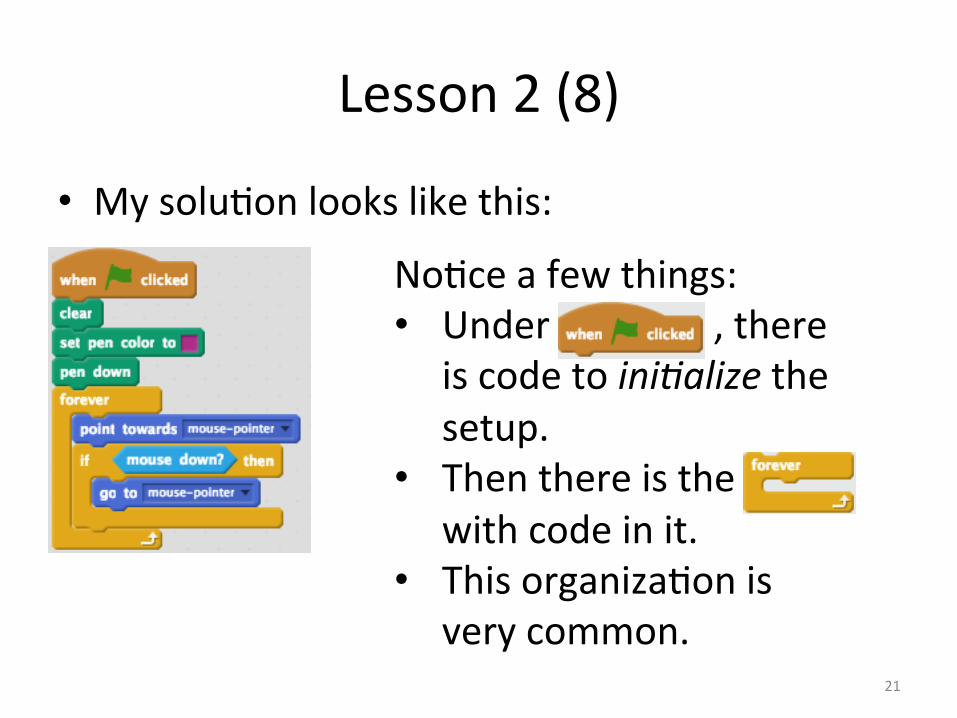
• My soluQon looks like this:
NoQce a few things: • Under , there
is code to ini.alize the setup.
• Then there is the with code in it.
• This organizaQon is very common.
21

Play! Try one or more of these: • Make the color of the pen change (constantly, or whenever you click).
• Set or change the width of the pen. • Make the sprite always start at (0, 0) when you start.
• Make the sprite “glide” to where you have clicked, instead of “zipping” right there. – Note that there is no “glide toward” command…
22

Lesson 3: More interacQon
In this lesson, we’ll learn about • creaQng custom backdrops • if-‐else statements • sensing colors • reacQng to keyboard “events”. Goal: make a program that lets you navigate the cat through a maze.
23

Lesson 3 (1)
• Shrink your cat down to a pre?y small size. I made mine 40% of iniQal size. (You can do this quickly by dragging this to your script area and double-‐clicking on it once.)
• Drag your cat to the lower leN corner of the screen.
• Select the Stage to the leN of your cat Sprite:
24

Lesson 3 (2)
• Now, click on the Backdrops tab: • Click on the Line tool. • Choose a color. I chose red.
• Create a maze for your cat to have to negoQate through. Make sure the hallways are wide enough for your cat to fit through.
25

Lesson 3 (3)
• My maze ended up looking like this:
26
Lesson 3 (4)
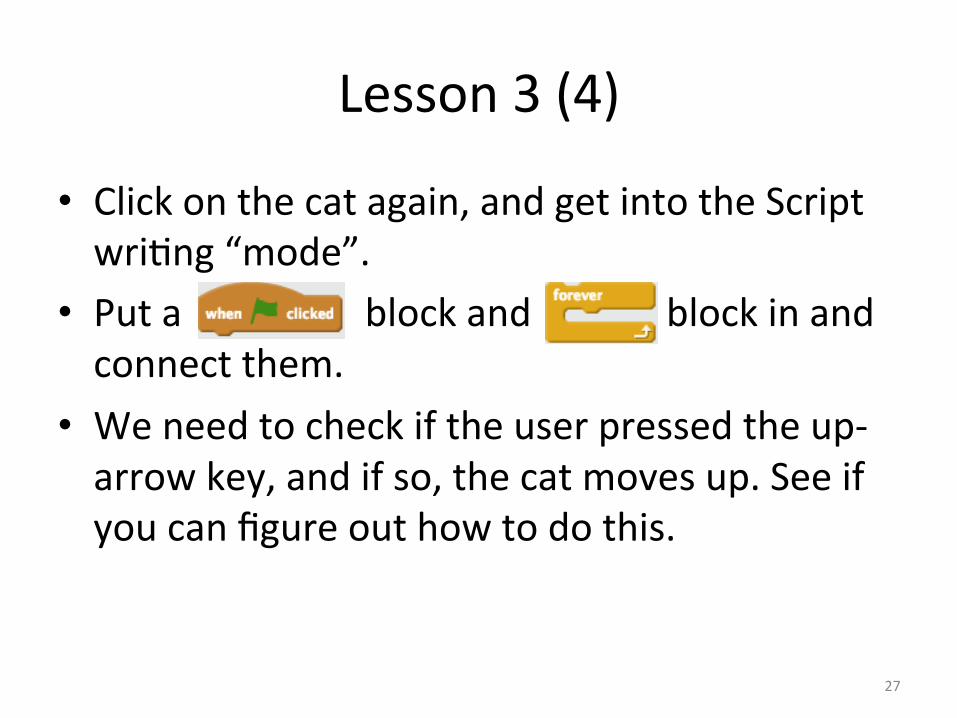
• Click on the cat again, and get into the Script wriQng “mode”.
• Put a block and block in and connect them.
• We need to check if the user pressed the up-‐arrow key, and if so, the cat moves up. See if you can figure out how to do this.
27

Lesson 3 (5)
• You need the . This is a condi.onal block: if the “condiQon” is true, then the code inside it is run. Otherwise, it isn’t.
• The condiQon we need to check is the up-‐arrow key being pressed:
• Now, if that condiQon is true, we want to make the cat face up and then move 10 steps.
• See if you can figure this out.
28
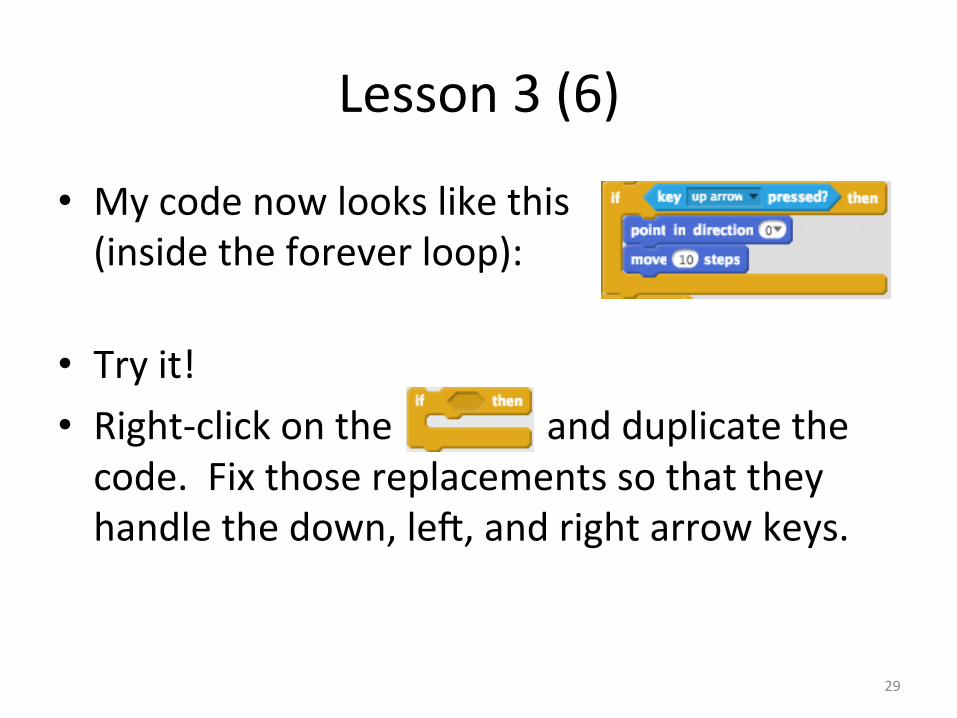
Lesson 3 (6)
• My code now looks like this (inside the forever loop):
• Try it! • Right-‐click on the and duplicate the code. Fix those replacements so that they handle the down, leN, and right arrow keys.
29

Lesson 3 (7)
My code looks like:
AlternaQvely we could use if-‐else blocks:
30

Lesson 3 (8)
• Either the mulQple or mulQple nested blocks work in this case because we only have to handle one keypress at a Qme, and order does not ma?er.
• At this point, you should be able to walk your cat around the screen. But, nothing happens when you hit a wall. How to handle this?
31

Lesson 3 (9)
• Look in the area. How can we tell if the cat is touching a wall?
• What should happen when the cat touches a wall?
• Here is my code: • Where should this code be put? • Perhaps the cat should also say “Ouch!” Try it!
32

Lesson 3 (10) • Each Qme you restart your game, you cat should be moved to the start posiQon.
• Add code to do this. • Next, add a second sprite – a mouse, perhaps – and place it in your maze.
• Add code so that when the cat touches the mouse, something happens, like, perhaps: – the mouse disappears and the cat says “Yum!” – the mouse grows much bigger and eats the cat! – the cat and mouse have a nice conversaQon. – the game ends.
33

Play!
• Try one or more of the following: – at the end, have a Game Over screen. – if the cat touches a wall, have it move back 10 steps (hard, I think).
– have the mouse jump to new set locaQons periodically (and randomly).
34

Lesson 4: Art!
In this lesson, we’ll learn about… • creaQng custom blocks. • how to create art with Scratch. • sending messages. • geung user input and using variables.
Goal of the project: make a program that draws beauQful colorful pictures.
35

Lesson 4 (1)
• Create a new project • In the script area for the cat, combine the following blocks to make the cat draw a square, 100 “units” long on each side:
36

Lesson 4 (2)
• Your code should look like this: • NoQce that the repeat loop draws a square. Let’s make a new block called “drawSquare” that does that code:
• First, click on , and click
37
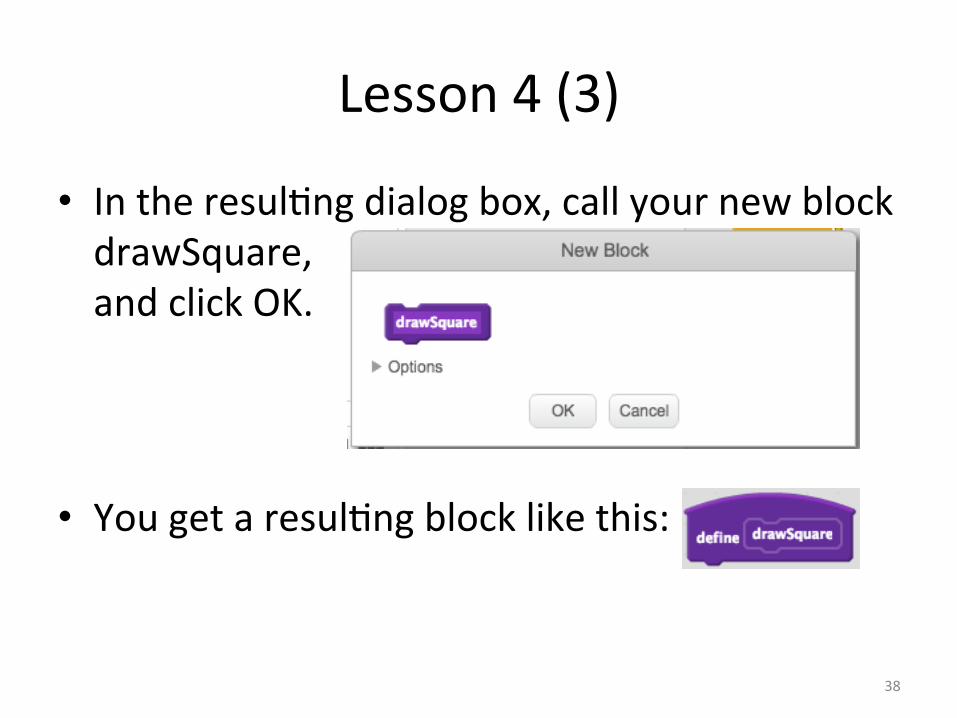
Lesson 4 (3)
• In the resulQng dialog box, call your new block drawSquare, and click OK.
• You get a resulQng block like this:
38

Lesson 4 (4)
• Now, move your into this new block.
• And, call from your “main” code. • In the end, your whole script should look like:
39

Lesson 4 (5)
• Now, let’s make the cat draw mulQple squares, with a li?le turn between each one. To do this, you need another and a .
• If you get these in the correct places in your code, you should get a picture like this:
40

Lesson 4 (6)
• Your “main” code should look like this:
• Things get more interesQng if you make the pen change color for each square. To do this, add this in the correct place.
• You might want to clear the screen before each run: add to the correct place.
41

Lesson 4 (7)
• Now, the best way to organize Scratch code is to put all project setup code in the Stage script area, and then broadcast a message to each object that needs to run code.
• Add this code to your Stage script area: To do this, you have to create the new message “start”.
42

Lesson 4 (8)
• Now, change the code for your cat sprite to run when it receives the “start” message:
• Note that I put the in the code in the Stage because that is set-‐up code for the whole project. The rest of the iniQalizaQon code is sprite-‐specific so I leN it in the cat sprite script area.
43
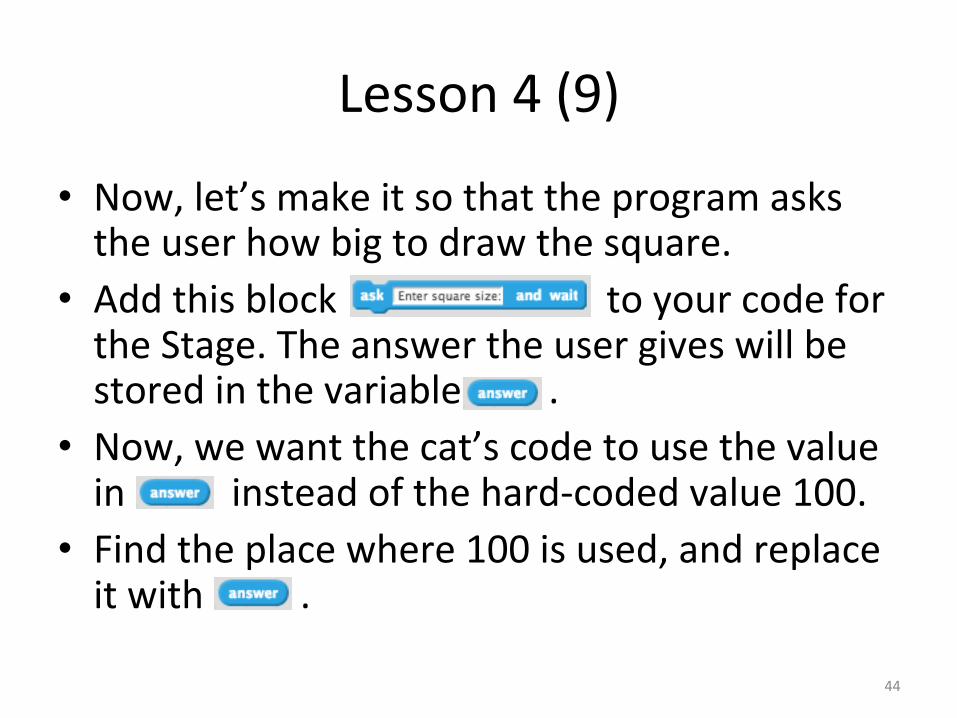
Lesson 4 (9)
• Now, let’s make it so that the program asks the user how big to draw the square.
• Add this block to your code for the Stage. The answer the user gives will be stored in the variable .
• Now, we want the cat’s code to use the value in instead of the hard-‐coded value 100.
• Find the place where 100 is used, and replace it with .
44

Play
• Try one or more of these: – ask the user for the number of sides of the shape, and draw that regular polygon instead of a square.
– make it so that if the user enters 0, a random value between 25 and 150 is chosen.
– make it so that drawSquare is called with a parameter, and this parameter is changed by 1 each Qme drawSquare is called.
45

Lesson 5: Physics
In this project, we’ll see how Scratch can be used to help teach physics concepts. We’ll also learn more about • variables • wait block Goal: create a simulaQon of a ball being tossed, and acceleraQng downward and bouncing.
46

Lesson 5 (1)
• Create a new project. • Move the Scratch cat up to the upper leN corner, at about (-‐210, 100), and shrink it significantly.
• Create a 2nd sprite – a tennis ball – and put to the right of the cat.
47

Lesson 5 (2)
• For the tennis ball, create a script to repeatedly move the tennis ball to the right. Use these blocks:
• Try it. • Now, replace with and but make y change by -‐10.
• Before running the code, predict what the ball will do.
48

Lesson 5 (3)
• Try changing the y value to different values and see what effect it has.
• Add a call in the loop, with value 0.2. • Now, when you throw a ball horizontally, the horizontal velocity (speed) is constant – it does not change. Only the verQcal velocity changes. Gravity changes the verQcal velocity by constantly adding more to it.
• How can we simulate this?
49

Lesson 5 (4)
• Let’s create a variable yvel, iniQalized to 0, and use that to hold the current verQcal velocity:
• Click on , and then . Call the variable yvel, and click OK.
• Add to your code at the top, and change to use the value of yvel:
• Click on the box next to yvel so that you can see its value displayed on the screen:
50

Lesson 5 (5)
• Run your code: it should be the same as before. If it isn’t, compare your code to mine -‐-‐-‐-‐>
• Add , , and to your script. This is a li?le tricky. We want to raise the pen before reseung the ball’s locaQon, then lower it aNerward. Test your code.
51

Lesson 5 (6)
• Now, change to change yvel by -‐5. • When you run the code, you see a staircase look. This demonstrates the xvel and yvel components independently.
• How do we make the ball arc downward, like would happen in real life? Gravity adds velocity to a ball, so we need to do the same.
• Add this code in the loop:
52
Lesson 5 (7)
• Now, we can see how the xvel remains constant but the yvel changes a li?le each Qme. This is accelera.on.
• Note that you can see the acceleraQon both in the drawing and in the yvel shown on the screen.
• Now, let’s make the ball bounce. What happens to the velociQes when a ball bounces?
53
Lesson 5 (8)
• Does the x velocity change? _______ • Does the y velocity change? _______ • If so, by how much? • We need to change the y velocity from, say, -‐10 to 10 when it bounces. I.e., we need to mulQply it by -‐1. But, some energy is lost when a ball bounces, so instead we’ll mulQply by -‐0.8.
• But, first how do we write code to detect when the ball should bounce?
54

Lesson 5 (9)
• Let’s say that the bo?om of the screen is at -‐140 (the bo?om is really -‐180).
• Then, we will bounce the ball when the y posiQon of the ball is < -‐140. Add these blocks to your code, in the correct order and correct place:
• Finaly, change your x velocity from 10 to 5 or 3, so that you can see mulQple bounces.
55

Play!
• The staircase effect is good for learning, but unrealisQc. How would you change the code to remove it?
• Add a comment to to explain how this simulates acceleraQon. Do this by right-‐clicking on the block.
• Add code to ask the user for an x velocity and then move the ball that much each Qme.
• Add a plaworm for the cat to stand on, green grass at the bo?om, and bouncing sounds.
56

SoluQons to some challenges
• Search in Scratch for VictorNorman and look at “Bouncing ball simulaQon v2” (scratch.mit.edu/projects/30438566/) to see how to implement the plaworm, sound effects, etc.
• Search in Scratch for VictorNorman and look at “Bouncing ball simulaQon v3” (scratch.mit.edu/projects/30438566/) to see how to implement asking the user for a value, and using that for x vel and/or clearing the screen.
57
Other Ideas for Scratch
• Create a dynamic greeQng card – an excellent creaQve acQvity for pre-‐Holiday fun.
• Tell a story (exercises creaQve wriQng skills). • Create a music video. You can import music into scratch and play it, and then change scenes, dance moves, etc., for different parts of the song.
• Create a game from the physics demo: aim the ball and try to get it to land in a bucket.
58
Other Ideas for Scratch • Frogger-‐like game h?p://scratch.mit.edu/projects/11424585/
• Repel the invading snowmen h?p://scratch.mit.edu/projects/16199527/
• Raindrops: demonstrates cloning h?p://scratch.mit.edu/projects/18267289/
• Math h?p://scratch.mit.edu/projects/16707152/
• Biology: predator-‐prey simulaQon h?p://scratch.mit.edu/projects/25807305/
59

Scratch Curriculum
• CS First (Google): h?p://www.cs-‐first.com/ • Middle Years CS: h?ps://www.cs.hmc.edu/MyCS/index.html
• EducaQonal material for Scratch: h?p://scratched.gse.harvard.edu/ – e.g., Scratch Curriculum Guide h?p://scratched.gse.harvard.edu/resources/scratch-‐curriculum-‐guide
60

Other tools for teaching programming
• h?p://www.calvin.edu/~vtn2/outreach.html
• Idea: develop Scratch acQviQes to align with Common Core instrucQonal goals. Anyone want to help? J
61