Scratch-building a Baneblade looks harder than it...
9
Scratch-building a Baneblade looks harder than it really is. This was my first scratch-built vehicle. Here’s how I did it. Start by printing off a couple copies of each of these im- ages: Page 1 Page 2 Cut out the templates, making sure you have one of each piece. Use these paper cutouts to cut the shapes from your plastic card. Pieces to not bother cutting out: • BH15 and BH 26 - pieces will likely not fit • BE12 - pieces will definitely not fit • Any “Heavy Bolter Mountings” or cannon barrels • Do not cut holes in BR15 or BH23 What I Used: Plastic card Imperial Guard tank bits Cadian or Catachan Heavy Weapons Squad box set 1/2” aluminum tubing Brass tubing Washers and other hardware 1/32 Abrams Tank kit Hot glue gun X-acto knife scratch it Legal Stuff Selling Warhammer models that you have built yourself is illegal. Because they have a copyright on the image and casts of the models they sell, building a tank in this manner with the intention of selling it is not allowed. Sorry! See the end of this document for the rest of GW’s legalese. OR: HOW I LEARNED TO STOP SPENDING AND BUILD A BANEBLADE
Transcript of Scratch-building a Baneblade looks harder than it...

Scratch-building a Baneblade looks harder than it really is.
This was my first scratch-built vehicle. Here’s how I did it.Start by printing off a couple copies of each of these im-ages:
Page 1Page 2
Cut out the templates, making sure you have one of each piece. Use these paper cutouts to cut the shapes from your plastic card.
Pieces to not bother cutting out:•BH15 and BH 26 - pieces will likely not fit•BE12 - pieces will definitely not fit•Any “Heavy Bolter Mountings” or cannon barrels•Do not cut holes in BR15 or BH23
What I Used:
Plastic cardImperial Guard tank bitsCadian or Catachan Heavy Weapons
! Squad box set1/2” aluminum tubingBrass tubingWashers and other hardware1/32 Abrams Tank kitHot glue gunX-acto knife
scra
tch
it
Legal Stuff Selling Warhammer models that you have built yourself is illegal. Because they have a copyright on the image and casts of the models they sell, building a tank in this manner with the intention of selling it is not allowed. Sorry!See the end of this document for the rest of GW’s legalese.
OR:HOW I LEARNED TO STOP SPENDING AND BUILD A BANEBLADE

The TracksStart by scoring the top of the track casing where it will need to fold down (so that it stays flush with the side piece). To make this bond as solid and as square as possible, I laid the side piece flat and pushed it against the top piece, with a heavy box behind it to hold it up-right.
Then simply glue along the inside seam with hot glue.
Amazingly, the treads from my tank kit fit almost per-fectly onto my Baneblade. I had to cut the vertical piece (with all the pegs for the wheels) once, and custom fit the tracks a little bit, but other than that, it matched up exactly. The scale of the treads was a perfect match as well. I think the detail provided by the wheels and treads are what really ‘sells’ the model. They are a huge improvement over scratch-building your own treads.
Then simply glue the tread onto BT7.
When they are dry, glue the BT1 pieces onto the outer edge of the track units.
The EngineThe engine is pretty straightforward. One method I used when gluing the pieces together is to use tape to hold the pieces together. Put the tape on the outside, then hot-glue on the inside. Once the glue is dry, pull the tape off.
With the engine complete, tape one edge of it to the back edge of BH1. You can now position these two pieces between the tracks. Don’t glue it all together yet.
The exhaust system pieces will have to be custom-fit.

The HullCut out the front pieces of the hull (BH16-24). Getting all these pieces taped together might be a little tricky. Some pieces might need to be re-cut.
I had to create a custom piece (marked with a red dot) to fill a gap on the inside seam.
Turn the model over and cut two small rectangles to fit here (marked in red). This will fill a gap between the engine and the track units.
Then get out the glue gun and have at it.
Cut out all the pieces that say “Side of Upper Hull” and BH2. Lay them out similar to what is shown here. Note that a couple of the pieces shown here need to be flipped before they get taped on.
Tape each piece to BH2, then tape each piece to the ones beside it.
Flip the whole piece over and glue each seam from the inside.
Glue some stacked slotta-bases together with super-glue. They should be the height of the “Upper Hull”. You will glue these pieces down onto BH1 to support the Upper Hull. I used 3 stacks of slotta-bases.
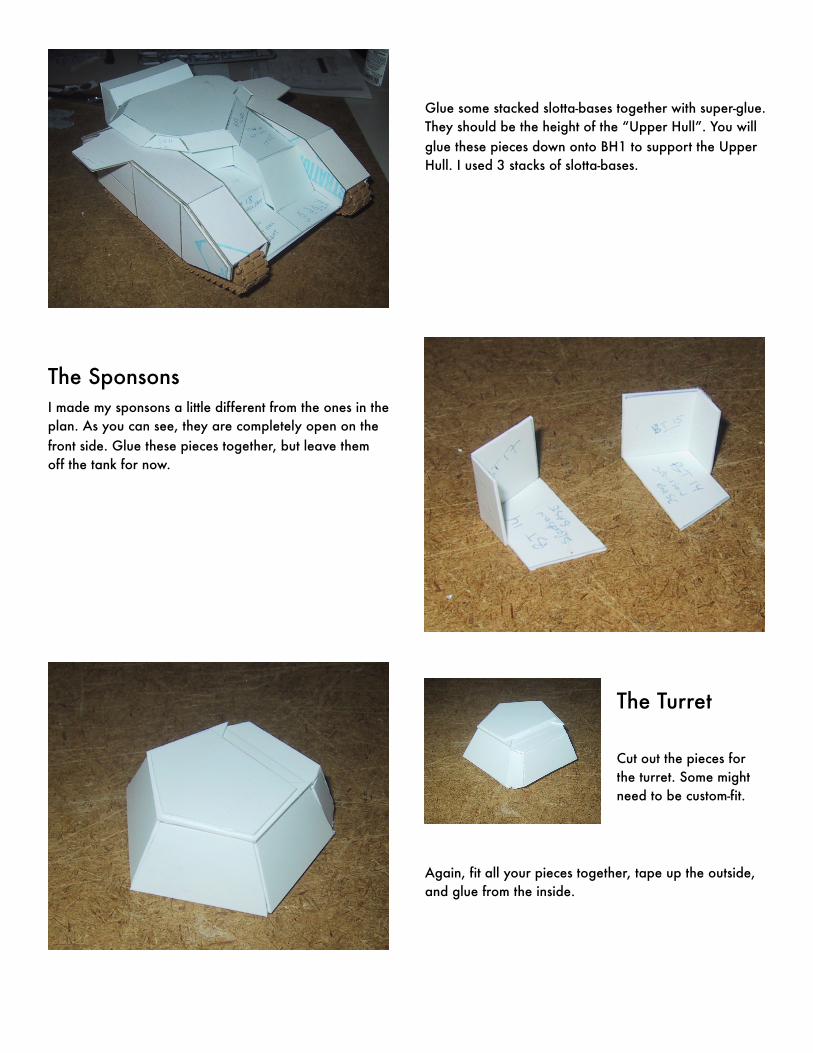
The SponsonsI made my sponsons a little different from the ones in the plan. As you can see, they are completely open on the front side. Glue these pieces together, but leave them off the tank for now.
The Turret
Cut out the pieces for the turret. Some might need to be custom-fit.
Again, fit all your pieces together, tape up the outside, and glue from the inside.

The CannonThe cannon was made out of 1/2” aluminum tubing, with brass tubing slid over top of it. You can get brass tubing in the exact radius and thickness so that it slides into itself perfectly. Check your local hobby shop for these materials.
Glue them together with super-glue.
The front shield for the cannon was made out of PVC piping. Just cut it up with a hacksaw and sand down the edges. Then drill some holes for the barrel and the autocannon. I happened to have a 2nd edition auto-cannon lying around, so I used that.
I used Milliput to fix my barrel to the front shield, as well as to fix the whole thing to the turret. Milliput is great because it dries extremely hard.
I also put a very large, heavy washer on the bottom of my turret, so that the weight of the barrel would not un-balance the turret.
Another view of the turret. Details and bits have already been added.

The DetailsNow for the really fun part: adding all the bits and pieces.
Fortunately, I already own 6 Imperial Guard tanks, which means I have many boxes of leftover tank bits.
My commander here was an extra that happened to be in one of my Leman Russ boxes from 2nd Edition. I cus-tomized a pintle-mounted Heavy Bolter by using the Storm Bolter mount, and slicing up a sponson Heavy Bolter which was left over from my Demolisher.
Glue a small washer to the bottom of this guy. The washer will rest on the top of the turret, and fit over the small plastic cylinder glued there. This allows him to be easily removed, as well as aimed.
Another really important part of this tank for me, was that it have authentic GW weapons. I didn’t want to scratch-build any Heavy Bolters or Lascannons, because I knew that the look would distract from the model. I bought a Catachan Heavy Weapon Squad box set (the Cadian one will work too... the weapons are the same).
I used the mounts from the Hunter-Killer missiles to cre-ate bases for these 3 heavy weapons. Granted, the Heavy Bolter is not “twin-linked” by appearance, but it’s close enough for me.
The weapons shown here are the turret Lascannons (over the sponsons) and the hull Heavy Bolter in the front.
The Sponsons, Part IIThe sponson weapons were made from plastic sponson cylinders from my Demolisher. The bottom piece is a leftover wheel from the tank kit. The top piece is a slotta-base cut like this:
The slotta-base was glued with the top facing down. I didn’t glue the sponson cylinder, so it can swivel to aim.

FinishingThe Demolisher cannon was made from the same tubing as the battle cannon. I know it’s technically supposed to have a bigger radius, but I didn’t feel like buying more tubing. Because it’s so much shorter, it still gives the im-pression of being a beefier cannon, in my opinion.
All the brown plastic pieces shown were taken from the tank kit. There were tons of great details to add, one of my favorites being the gas cap, shown on the engine here.
Grey pieces were taken from Imperial Guard tank kits. Other colors were miscellaneous pieces found in my basement.

Painted pics coming soon

Disclaimer:
This document is completely unofficial and in no way endorsed by Games Workshop Limited.
Adeptus Astartes, Blood Angels, Bloodquest, Cadian, Catachan, the Chaos devices, Cityfight, the Chaos logo, Citadel, Citadel Device, Codex, Daemonhunters, Dark Angels, Dark Eldar, 'Eavy Metal, Eldar, Eldar symbol devices, Eye of Terror, Fire Warrior, Forge World, Games Work-shop, Games Workshop logo, Genestealer, Golden Demon, Gorkamorka, Great Unclean One, Inquisitor, the Inquisitor logo, the Inquisitor de-vice, Inquisitor:Conspiracies, Keeper of Secrets, Khorne, Kroot, Lord of Change, Necron, Nurgle, Ork, Ork skull devices, Sisters of Battle, Slaanesh, Space Hulk, Space Marine, Space Marine chapters, Space Marine chapter logos, Tau, the Tau caste designations, Tyranid, Tyrannid, Tzeentch, Ultramarines, Warhammer, Warhammer 40k Device, White Dwarf, the White Dwarf logo, and all associated marks, names, races, race insignia, characters, vehicles, locations, units, illustrations and images from the Warhammer 40,000 universe are either ®, TM and/or © Copy-right Games Workshop Ltd 2000-2005, variably registered in the UK and other countries around the world. Used without permission. No chal-lenge to their status intended. All Rights Reserved to their respective owners.