Scorpio FFA Full Frame 2x Anamorphics...Apr 2018 • Issue 87 33 Desqueezing with DaVinci Resolve ¤...
8
30 Apr 2018 • Issue 87 Servicevision Scorpio 2x FFA (Full Frame Anamorphic) lenses were introduced in September 2017. ey are unique in having both full-height 24mm coverage and 2x squeeze. (Ultra Panavi- sion 70 lenses have a 1.25x squeeze and the Hawk65 anamorphics are 1.3x.) servicevision.es Scorpio 2x FFA • 2x anamorphic squeeze • Close focus. For example, the 35mm focuses to 1’6”. • Very small and lightweight • Same maximum apertures of T2.2 and T2.8 as the Scorpio 2x Anamorphic S35 set. ey are approximately the same size. • ere will be a whole set, with zooms as well. • ese are not “rear” anamorphics. e cylinders are distributed throughout the lens. • Almost no distortion or breathing • PL mount • Same 95mm front diameter on all lenses • Multiaspheric design 20mm T2.8 25mm T2.2 30mm T2.2 35mm T2.2 40mm T2.2 50mm T2.2 60mm T2.8 75mm T2.2 100mm T2.2 135mm T2.2 150mm T2.8 200mm T2.8 250mm T2.8 300mm T2.8 Scorpio 2x FFA Anamorphic Full Frame VENICE FF (Full Frame) 35.9 x 24 mm 6048 x 4032 (1.50:1) 43.3 mm Ø FF Spherical Widescreen (2.39:1) 35.9 x 15.06 mm 6048 x 2534 39.02 mm Ø Scorpio FFA 2x Anamorphic 28.68 x 24 mm 37.4 mm Ø 4818 x 4032 2x squeeze (1.195:1) Scorpio FFA Full Frame 2x Anamorphics I set these user framelines: • Frame Line A > User Frame Line > On • Frame Line > choose Color, Center Marker (cross hair), etc. • User Frame Line > Height > 269 (this is the maximum picture height, which is 24 mm, 4032 pixels. The 269 number is an engineering figure, which hopefully will be replaced by actual resolution numbers in the future.) • User Frame Line > Width > 384 (this corresponded to 4818 width)
Transcript of Scorpio FFA Full Frame 2x Anamorphics...Apr 2018 • Issue 87 33 Desqueezing with DaVinci Resolve ¤...

30 Apr 2018 • Issue 87
Servicevision Scorpio 2x FFA (Full Frame Anamorphic) lenses were introduced in September 2017. They are unique in having both full-height 24mm coverage and 2x squeeze. (Ultra Panavi-sion 70 lenses have a 1.25x squeeze and the Hawk65 anamorphics are 1.3x.) servicevision.es
Scorpio 2x FFA• 2x anamorphic squeeze• Close focus. For example, the 35mm focuses to 1’6”.• Very small and lightweight• Same maximum apertures of T2.2 and T2.8 as the Scorpio 2x
Anamorphic S35 set. They are approximately the same size.• There will be a whole set, with zooms as well.• These are not “rear” anamorphics. The cylinders are
distributed throughout the lens. • Almost no distortion or breathing• PL mount• Same 95mm front diameter on all lenses• Multiaspheric design
20mm T2.8
25mm T2.2
30mm T2.2
35mm T2.2
40mm T2.2
50mm T2.2
60mm T2.8
75mm T2.2
100mm T2.2
135mm T2.2
150mm T2.8
200mm T2.8
250mm T2.8
300mm T2.8
Scorpio 2x FFA Anamorphic Full Frame
VENICE FF (Full Frame) 35.9 x 24 mm 6048 x 4032(1.50:1)43.3 mm Ø
FF Spherical Widescreen (2.39:1)35.9 x 15.06 mm6048 x 253439.02 mm Ø
Scorpio FFA 2x Anamorphic 28.68 x 24 mm 37.4 mm Ø 4818 x 4032 2x squeeze (1.195:1)
Scorpio FFA Full Frame 2x Anamorphics
I set these user framelines: • Frame Line A > User Frame Line > On• Frame Line > choose Color, Center Marker (cross hair), etc. • User Frame Line > Height > 269 (this is the maximum picture height,
which is 24 mm, 4032 pixels. The 269 number is an engineering figure, which hopefully will be replaced by actual resolution numbers in the future.)
• User Frame Line > Width > 384 (this corresponded to 4818 width)

31Apr 2018 • Issue 87
Anamorphic Desqueeze Math ClassThere are two ways to achieve 2.39:1 widescreen. Shoot spherical or anamorphic.
Spherical appears in the camera’s viewfinder as a wide swath of picture with lots of unused top and bottom area (see diagram on opposite page). Ana-morphic fills the frame and looks squished because anamorphic lenses use cylindrical optical elements to squeeze the image horizontally. The picture is desqueezed in post production or projection.
At the moment, Full Frame anamorphic comes in 2x, 1.3x and 1.25x squeeze ratios. I think we will see many more variations in the future. I also think we will become aspect ratio independent. As surely as Large Format is becoming the industry standard, cinematographers will want to fill those larger frames with squeezed anamorphic images.
An excellent way to rediscover Full Frame widescreen is with a Full Frame mirrorless still camera like a Leica M, Leica SL, Sony a7 series or α9 fitted with a PL mount adapter. The math is fun, so here goes. Let’s begin by abandoning video and still photography aspect ratio numbers (16:9, 17:9, 5x7, 4x6). The math is much easier if we use tradi-tional motion picture numbers, where aspect ratios end in a 1—as in 1.5:1 for Full Frame (not 3:2) and 1.33:1 (not 4:3) and so on.
The image below was photographed with a Scorpio 2x FFA 35mm Full Frame anamorphic lens on a Sony α9. The α9 sensor is 36 x 24 mm, which is an aspect ratio of 3:2...oops...1.5:1.
The image is squished 2x horizontally. Is it a problem that the Scorpio FFA vignettes on the left and right sides? No. That is unused picture area. The maximum area that we need has an aspect ratio of 1.195:1. How do we know it is 1.195:1? Because 1.195:1 is ½ of the final, deliverable aspect ratio of 2.39:1 after it is desqueezed 2x horizontally. (2.39 / 2 = 1.195.)
Since these framelines don’t exist on still cameras, you can mark the live view monitor display with chart tape.
Next, let’s desqueeze. Open the image in Photoshop. In the menu, go to IMAGE > IMAGE SIZE. Simply multiply the WIDTH by 2. (Be sure RESAMPLE is checked. Use “Pixels” as units of measurement.) For ex-ample, if the Sony α9 image was 6,000 x 4,000 pixels, enter the new width of 12,000. Leave the height alone. Eureka. You have desqueezed 2x.
But, the picture is vignetting.
Yikes, and it also has a 3:1 aspect ratio.
How do we know this? Because Full Frame is 1.5:1 and 1.5 x 2 = 3.
Also, the Photoshop image resolution shows 12,000 x 4,000
Time to crop. Select the Photoshop CROP tool. Next to RATIO, enter 2.39 and 1. That’s it. You now have a desqueezed 2.39:1 image. Photoshop does what cylindrical anamorphic projection lenses once did.

32 Apr 2018 • Issue 87
Anamorphic 2x Cinema Math Class
Now that we’ve graduated from Anamorphic Still Photography Math Class 101, let’s enroll in Advanced Anamorphic Cinema Math. But first a field trip back in time for some anamorphic and widescreen history.
Marc Shipman-Mueller, ARRI Product Manager of Camera Systems, is our tour guide. He wrote, “Up until 1952, cinema formats were easy to understand because almost all mainstream movies and television were shot and projected in a 4:3 (1.33:1) aspect ratio of. When anamorphic productions surfaced after 1952, a number of aspect ratios were tried, including 2.66:1 and 2.55:1. (The need for further cost-reduction subsequently spawned the spherical widescreen formats of 1.85:1 and 1.66:1).
“An SMPTE specification for anamorphic projection from 1957 (PH22.106-1957) finally standardized the aperture to 2.35:1. An update in 1970 (PH22.106-1971) changed the aspect ratio to 2.39:1 in order to make splices less noticeable. This aspect ratio of 2.39:1 was confirmed by the most recent revision in August 1993 (SMPTE 195-1993).
“Unfortunately, most people were so used to referring to ana-morphic films as 2.35:1, that many still used that aspect ratio even when talking about films shot after 1970. Similarly, 2.40:1
is incorrect, an unfortunate and unnecessary rounding up; a proper rounding up would be 2.4:1. The correct aspect ratio for anamorphic films shot after 1970 is 2.39:1.”
And then there’s spherical 2.39:1—shot with regular spherical lenses, not anamorphic.
Glenn Kennel, President of ARRI Inc, who worked on many committees in the transition from film to digital, added, “The DCI spec for the DCP (digital cinema package) used for dis-tribution and projection is the aspect ratio (as defined in the original film specs) of 2.39:1.
“‘Scope’ is shorthand for ‘CinemaScope,’ but in DCI documents may be used loosely to refer to the widescreen 2:39:1 format, which is distributed as “flat” or “1:1 pixels”, whether it is captured with an anamorphic lens or just cropped from a spherical lens.”
OK. Enough history. Let the games begin. Shoot. Edit. Des-queeze with DaVinci Resolve.
By the way, the examples that follow were shot with a Sony VENICE camera. The theory should also apply to other Large Format cameras: ARRI ALEXA LF, RED MONSTRO 8K VV, Panavision DXL, Canon C700 FF, with slight differences in the math because of different sensor sizes.
1. Scorpio FFA 2x 35mm Anamorphic lens on Sony VENICE.
VENICE Imager Mode: 6K 3:2 (1.5:1) 6048 x 4032 Full Frame, covering the entire sensor area of 35.9 x 24 mm. 23.98 fps. Recording X-OCN ST to AXSM card in AXS-R7 onboard recorder. VENICE FF 35.9 x 24 mm sensor 43.3 mm Ø
6K 3:2 (1.5:1) 6048 x 4032 Full Frame
Scorpio FFA 2x Anamorphic - 28.68 x 24 mm ( 37.4 mm Ø)2x squeezed (1.195:1) image area 4818 x 4032will be 2.39:1 aspect ratio when desqueezed in DaVinci Resolve
Anamorphic and Spherical Widescreen Field Trip
2. Here’s the sensor. An Anamorphic 2x desqueezed 2.39:1 im-age begins life as a 1.195:1 aspect ratio on the image sensor. So, it is full height, but not as wide as the Full Frame sensor:

33Apr 2018 • Issue 87
Desqueezing with DaVinci Resolve
¤ ¤
¤ ¤
¤¤
¤¤
3. (Above) This is a framegrab of the Sony VENICE Full Frame 6048 x 4032 squeezed image. As with our Sony α9 still photog-raphy test, the sensor size is the same and so is the vignetting on left and right.
4. (Above, right) So, as with the Sony α9 test, we only need the ac-tive 1.195:1 area within the entire 1.5:1 Full Frame for our 2.39:1 final desqueezed picture.
4. (At right) Because 2x Full Frame Anamorphic framelines don’t yet seem exist, be sure to shoot a framing chart for your friendly DaVinci Resolve post production crew. Shoot the chart at right. When desqueezed, the ovals will be circles.
It’s also a good idea to shoot framing charts as often as possible, because as the expression goes, “The projectionist has final cut.”
5. (Above) This is what the 2x desqueezed image will look like in DaVinci Resolve. It’s Full Frame 1.5:1 x 2 = 3:1. But we want 2.39:1 instead.
6. (Right) In the lesson that fol-lows, Blackmagic Design’s Ja-son Druss will take us on a tour with DaVinci Resolve to des-queeze and crop 2x Full Frame anamorphic cinematography. Thanks Jason Druss.

34 Apr 2018 • Issue 87
Desqueezing with DaVinci Resolve, cont’d
A great thing about DaVinci Resolve is that there are often several different ways to accomplish a task. The following steps are the ones we took. Your style of driving and mileage may vary.
8. Sony VENICE X-OCN ST files are visually lossless and RAW. We copy these files from AXSM Memory Card onto hard drive with a Sony AXS-CR1 USB 3.0 Card Reader, and launch DaVinci Resolve.
9. Go to blackmagicdesign.com/products/davinciresolve/ to down-load the free version and the Studio version, or if you are already a customer, go to blackmagicdesign.com/support/family/davinci-resolve-and-fusion for the latest software updates..
10. Go to DaVinci Resolve’s MEDIA page. Drag the X-OCN file folders into the Media Storage Browser. Then drag the desired clips down to the Media Pool.
11. The clips have a 1.5:1 Full Frame aspect ratio. The image still looks squished. There’s still vignetting on the left and right side. As Tom Hanks says in Bridge of Spies, “You don’t seem alarmed.” And Mark Rylance replies, “Would it help?”
12. Here’s help. Go to the EDIT page. Right click on a clip (or all clips by highlighting them all) in the Media Pool on the left side of the screen. Or right click on a clip within your timeline. Right click and select CLIP ATTRIBUTES from the drop down menu.
13. In the Pixel Aspect Ratio dropdown window (below, left) se-lect CinemaScope and OK.
14. Change the timeline resolution to 4096 x 1716 DCI Scope 2.39 by accessing the drop down menu in your timeline resolution set-tings. They’re accessed in project settings in the master settings tab (below, right).
10. Project Settings
Edit Page
Metadata confirms X-OCN ST and our 6048x4032 resolution
Media Pool
12. Clip Attributesof clip in Media Pool
Timeline
13. Pixel Aspect Ratio > Cinemascope 14. Project Settings > Timeline Resolution: 4096 x 1716 DCI Scope 2.39
35Apr 2018 • Issue 87
15. The image delightfully desqueezes (above). But the left and right sides are still vignetting because the aspect ratio is 3:1 and we see a letterbox top and bottom.16. We are on the COLOR Page now. 17. If SIZING is not visible, click on the sizing tab immediately to the left of the 3D icon.
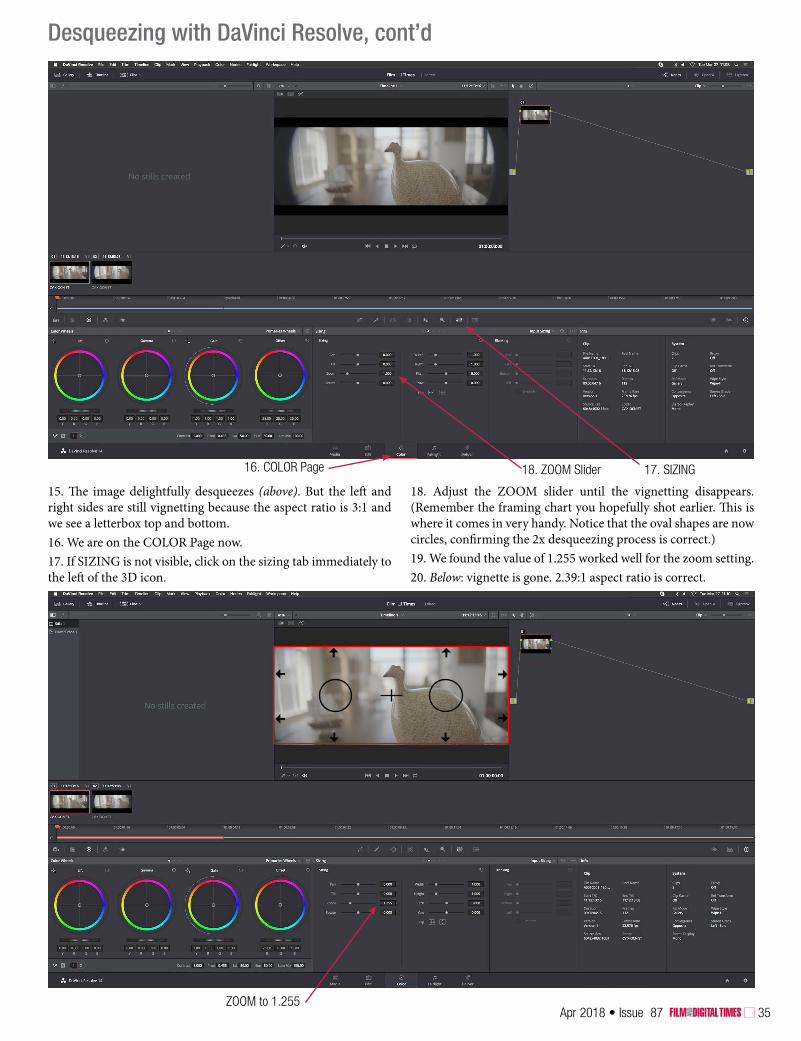
18. Adjust the ZOOM slider until the vignetting disappears. (Remember the framing chart you hopefully shot earlier. This is where it comes in very handy. Notice that the oval shapes are now circles, confirming the 2x desqueezing process is correct.)19. We found the value of 1.255 worked well for the zoom setting.20. Below: vignette is gone. 2.39:1 aspect ratio is correct.
¤ ¤
¤ ¤
¤¤
¤¤
Desqueezing with DaVinci Resolve, cont’d
16. COLOR Page 17. SIZING18. ZOOM Slider
ZOOM to 1.255

36 Apr 2018 • Issue 87
21. To automate the de-vignetting process with a node, right click on the viewer and GRAB STILL (above). 22. Select a clip (or all clips by highlighting them all). Right click on the still you just grabbed and select APPLY GRADE. The grade, in this case, refers to the input sizing adjustment, (right).23. Next, grade the image for look, (below).
Desqueezing with DaVinci Resolve, cont’d
21. Right click on Viewer
21. GRAB STILL
22. Right click on
clipto apply
grade
22. APPLYGRADE
22. Right click on clip

37Apr 2018 • Issue 87
24. Go to the DELIVER page. Enter your render settings, destination and ADD TO RENDER QUEUE (above left).25. START RENDER (above right).
26. Our Apple ProRes 422 Quicktime shows a resolution of 4096 x 1716, which is 2.39:1 (above). 27. Success! (below).
Desqueezing with DaVinci Resolve, cont’d
21. Right click on Viewer
21. GRAB STILL
22. APPLYGRADE