Science Research Project - Young Scientist a bleaching agent – which is required to physically...
28
2015 Science Research Project Dental Whitening and Enamel Loss
Transcript of Science Research Project - Young Scientist a bleaching agent – which is required to physically...
2015
Science Research Project
Dental Whitening and Enamel Loss
Scie
nce
Re
se
arc
h P
roje
ct
7
51
9
Introduction
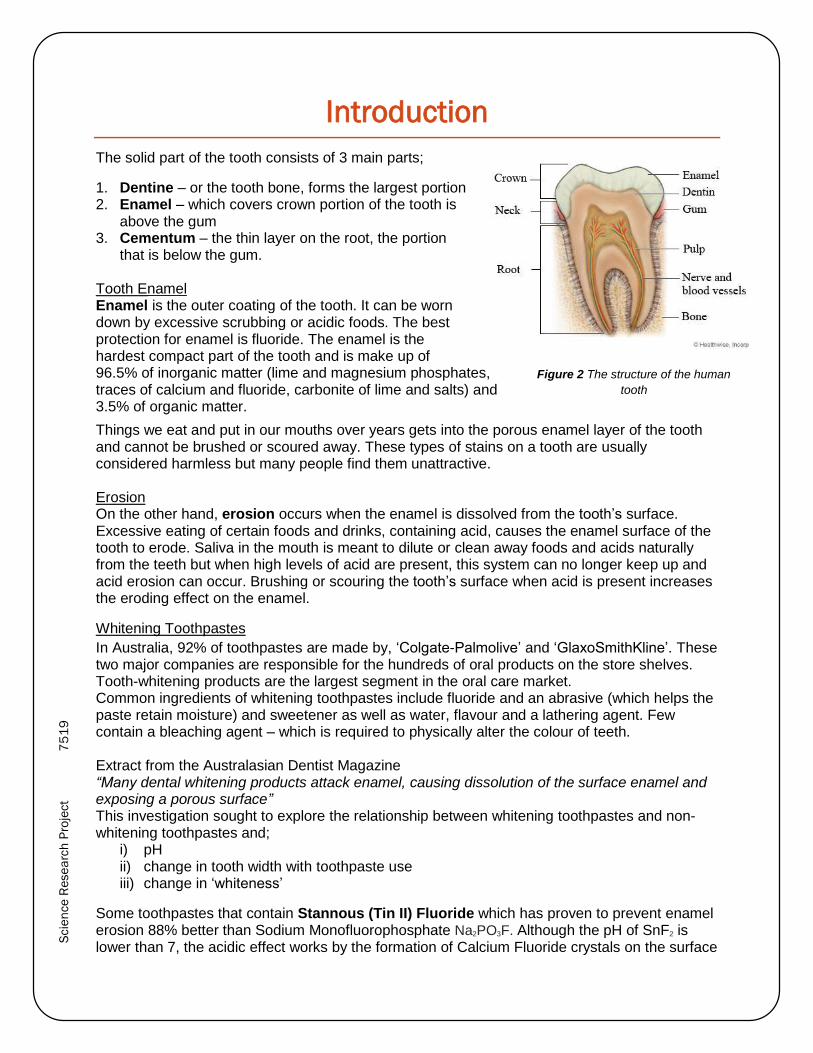
The solid part of the tooth consists of 3 main parts;
1. Dentine – or the tooth bone, forms the largest portion 2. Enamel – which covers crown portion of the tooth is
above the gum 3. Cementum – the thin layer on the root, the portion
that is below the gum. Tooth Enamel Enamel is the outer coating of the tooth. It can be worn down by excessive scrubbing or acidic foods. The best protection for enamel is fluoride. The enamel is the hardest compact part of the tooth and is make up of 96.5% of inorganic matter (lime and magnesium phosphates, traces of calcium and fluoride, carbonite of lime and salts) and 3.5% of organic matter.
Things we eat and put in our mouths over years gets into the porous enamel layer of the tooth and cannot be brushed or scoured away. These types of stains on a tooth are usually considered harmless but many people find them unattractive. Erosion On the other hand, erosion occurs when the enamel is dissolved from the tooth’s surface. Excessive eating of certain foods and drinks, containing acid, causes the enamel surface of the tooth to erode. Saliva in the mouth is meant to dilute or clean away foods and acids naturally from the teeth but when high levels of acid are present, this system can no longer keep up and acid erosion can occur. Brushing or scouring the tooth’s surface when acid is present increases the eroding effect on the enamel.
Whitening Toothpastes
In Australia, 92% of toothpastes are made by, ‘Colgate-Palmolive’ and ‘GlaxoSmithKline’. These two major companies are responsible for the hundreds of oral products on the store shelves. Tooth-whitening products are the largest segment in the oral care market. Common ingredients of whitening toothpastes include fluoride and an abrasive (which helps the paste retain moisture) and sweetener as well as water, flavour and a lathering agent. Few contain a bleaching agent – which is required to physically alter the colour of teeth. Extract from the Australasian Dentist Magazine “Many dental whitening products attack enamel, causing dissolution of the surface enamel and exposing a porous surface” This investigation sought to explore the relationship between whitening toothpastes and non-whitening toothpastes and;
i) pH ii) change in tooth width with toothpaste use iii) change in ‘whiteness’
Some toothpastes that contain Stannous (Tin II) Fluoride which has proven to prevent enamel erosion 88% better than Sodium Monofluorophosphate Na2PO3F. Although the pH of SnF2 is lower than 7, the acidic effect works by the formation of Calcium Fluoride crystals on the surface
Figure 2 The structure of the human
tooth

Scie
nce
Re
se
arc
h P
roje
ct
7
51
9
of the enamel. This then becomes soluble in the next acid attack which forms the ability of remineralisation due to the rich content of fluoride in the surrounding solution.
This study incorporated five toothpastes, three whitening and two non whitening. Ten teeth were used, two with each type of toothpaste. The study was conducted over a period of twenty one days.

Scie
nce
Re
se
arc
h P
roje
ct
7
51
9
Abstract, Aim and Hypothesis
Abstract
The aim of the experiment was to determine whether whitening toothpastes have a lower pH
than non-whitening toothpastes, whether whitening toothpastes whiten teeth more than non-
whitening toothpastes and whether whitening toothpastes cause a greater loss of dental enamel
than non-whitening toothpastes. In total 10 molar teeth, 3 whitening and 2 non-whitening
toothpastes were used. Each of the toothpastes was used to brush two different teeth daily for
21 days. In between brushing, the teeth were soaked in saline solution so as to replicate the
conditions of the oral environment. Each tooth was marked to indicate where the caliper was to
be placed for taking measurements on days 0, 11 and 21. Images of the teeth were taken under
a microscope before and after testing. A tooth colour shade guide was used to determine the
colour of the teeth on days 0, 11 and 21.
The whitening toothpastes produced significant changes in tooth whiteness with the non-
whitening toothpastes bringing about no change. The pH measurement showed no relationship
between toothpaste types. However, the Oral B Original Toothpaste proved acidic due to the
ingredient called Stannous Fluoride.
The results showed that all the whitening toothpastes caused the more loss of dental enamel
than the non-whitening toothpastes. The White Glo whitening toothpaste caused the most
erosion of enamel. Both non-whitening toothpastes caused no erosion.
Aim
To determine if; a) A loss of dental enamel occurs more when using whitening toothpastes than when using
non-whitening toothpastes b) The pH is lower in whitening toothpastes than non-whitening toothpastes c) Whitening toothpastes improve ‘whiteness’ more than non-whitening toothpastes
Hypothesis
Whitening toothpastes cause greater loss of dental enamel, improve whiteness and have a lower pH than non-whitening toothpastes.

Scie
nce
Re
se
arc
h P
roje
ct
7
51
9
Risk Assessment
Step 1
Identify the Hazard
CSIS User code (for chemicals only)
Step 2
Strategies to minimize the hazard
Step 3
Assessment of risk (see table below)
Step 4
What if something goes wrong?
Step 5
Packing up
Unsterilised teeth can be health hazard to those handling
N/A Use gloves and sterilise teeth before handling by soaking in bleach for 24 hours
2+1=3=Moderate Wash hands immediately and consult doctor if irritation occurs
Wipe down bench and or anything that has come into contact with teeth
Electronic caliper is slightly sharp and may cut skin
N/A Keep electronic caliper away from the edges of benches and away from contact of sharp edges with skin
2+1=3=Moderate Seek first aid if required
Pack away carefully
Glass may break and cut skin
N/A Place glassware away from edges of benches and keep outside dry to minimise slipperiness
1+2=3=Moderate In case of breakage consult adult. Empty glassware, brush up and place in ‘broken glass’ bin. Wipe up any spills. SKIN: If cuts occur, seek first aid
Pack away carefully
Pumice may be inhaled when used with the polishing lathe or get into eyes
N/A Wear a facial mask and safety glasses
2+2=4=Moderate Wash eyes with water and/or seek medical attention if coughing pursues
Wipe down any remaining pumice off benches and equipment
Curing Light will cause retinal
N/A Avoid looking directly into light and
4+1=5=Moderate Seek Medical attention as
Ensure the device is turned off
Scie
nce
Re
se
arc
h P
roje
ct
7
51
9
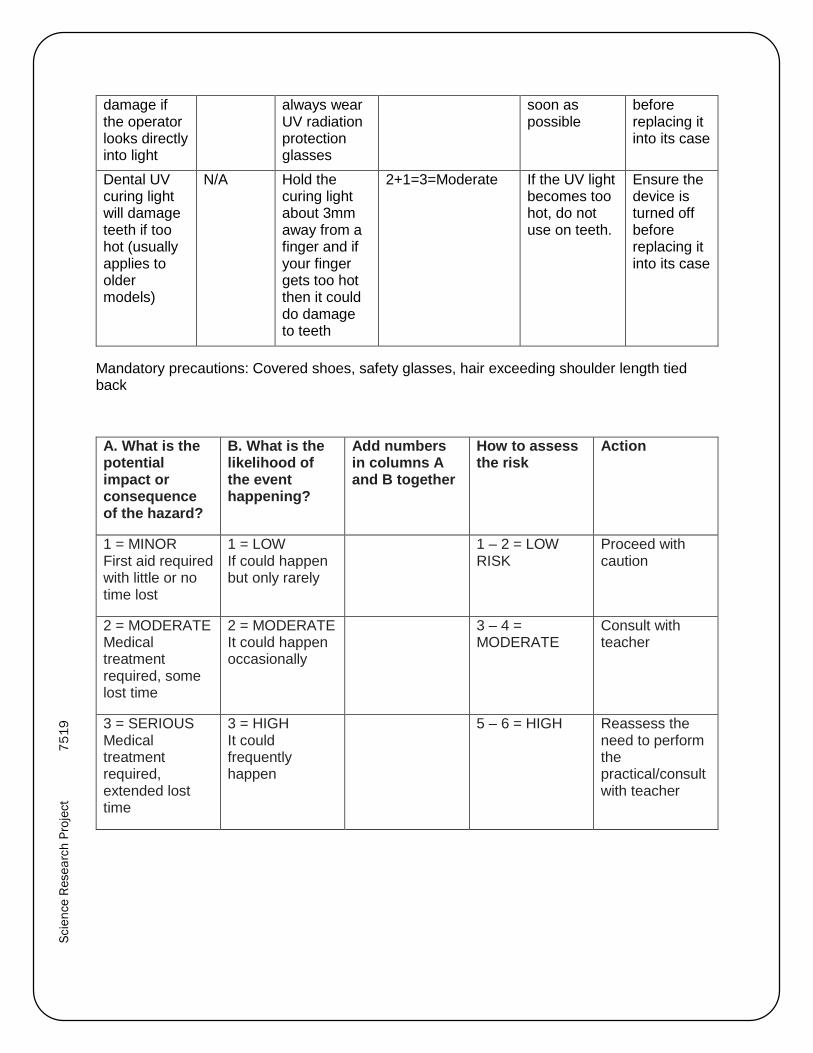
damage if the operator looks directly into light
always wear UV radiation protection glasses
soon as possible
before replacing it into its case
Dental UV curing light will damage teeth if too hot (usually applies to older models)
N/A Hold the curing light about 3mm away from a finger and if your finger gets too hot then it could do damage to teeth
2+1=3=Moderate If the UV light becomes too hot, do not use on teeth.
Ensure the device is turned off before replacing it into its case
Mandatory precautions: Covered shoes, safety glasses, hair exceeding shoulder length tied back
A. What is the potential impact or consequence of the hazard?
B. What is the likelihood of the event happening?
Add numbers in columns A and B together
How to assess the risk
Action
1 = MINOR First aid required with little or no time lost
1 = LOW If could happen but only rarely
1 – 2 = LOW RISK
Proceed with caution
2 = MODERATE Medical treatment required, some lost time
2 = MODERATE It could happen occasionally
3 – 4 = MODERATE
Consult with teacher
3 = SERIOUS Medical treatment required, extended lost time
3 = HIGH It could frequently happen
5 – 6 = HIGH Reassess the need to perform the practical/consult with teacher
Scie
nce
Re
se
arc
h P
roje
ct
7
51
9
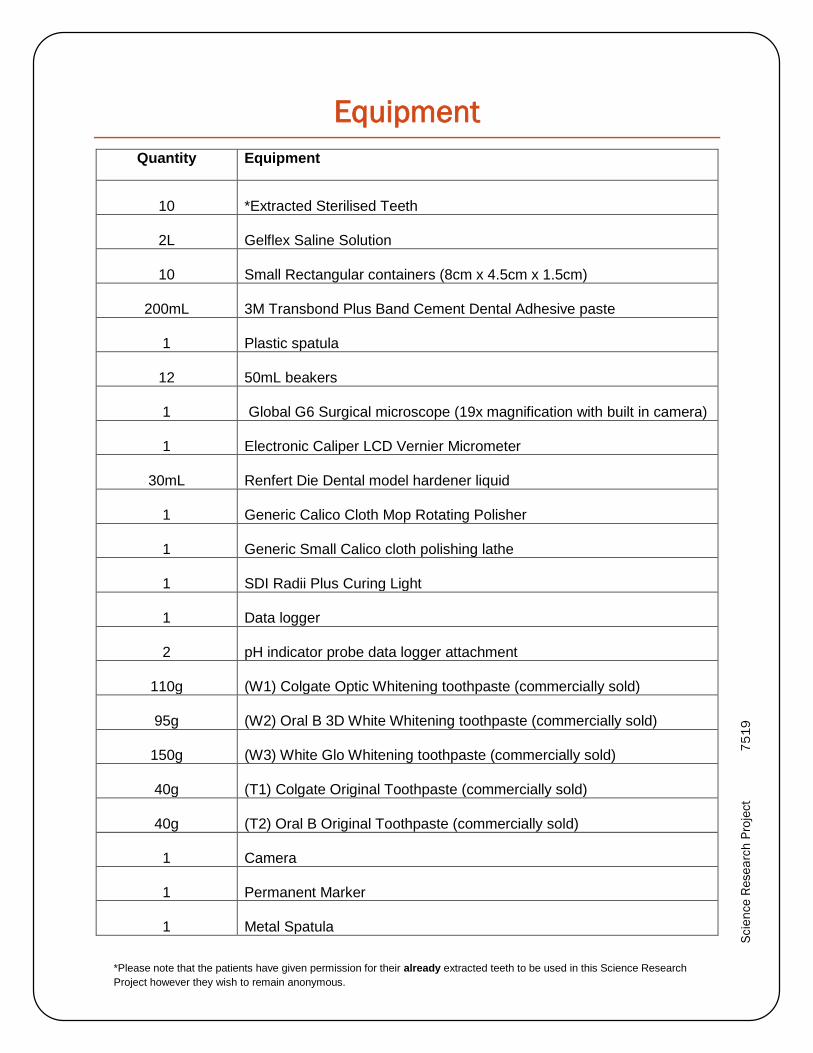
Equipment
Quantity Equipment
10
*Extracted Sterilised Teeth
2L
Gelflex Saline Solution
10
Small Rectangular containers (8cm x 4.5cm x 1.5cm)
200mL
3M Transbond Plus Band Cement Dental Adhesive paste
1
Plastic spatula
12
50mL beakers
1
Global G6 Surgical microscope (19x magnification with built in camera)
1
Electronic Caliper LCD Vernier Micrometer
30mL
Renfert Die Dental model hardener liquid
1
Generic Calico Cloth Mop Rotating Polisher
1
Generic Small Calico cloth polishing lathe
1
SDI Radii Plus Curing Light
1
Data logger
2
pH indicator probe data logger attachment
110g
(W1) Colgate Optic Whitening toothpaste (commercially sold)
95g
(W2) Oral B 3D White Whitening toothpaste (commercially sold)
150g
(W3) White Glo Whitening toothpaste (commercially sold)
40g
(T1) Colgate Original Toothpaste (commercially sold)
40g
(T2) Oral B Original Toothpaste (commercially sold)
1
Camera
1
Permanent Marker
1
Metal Spatula
*Please note that the patients have given permission for their already extracted teeth to be used in this Science Research
Project however they wish to remain anonymous.
Scie
nce
Re
se
arc
h P
roje
ct
7
51
9
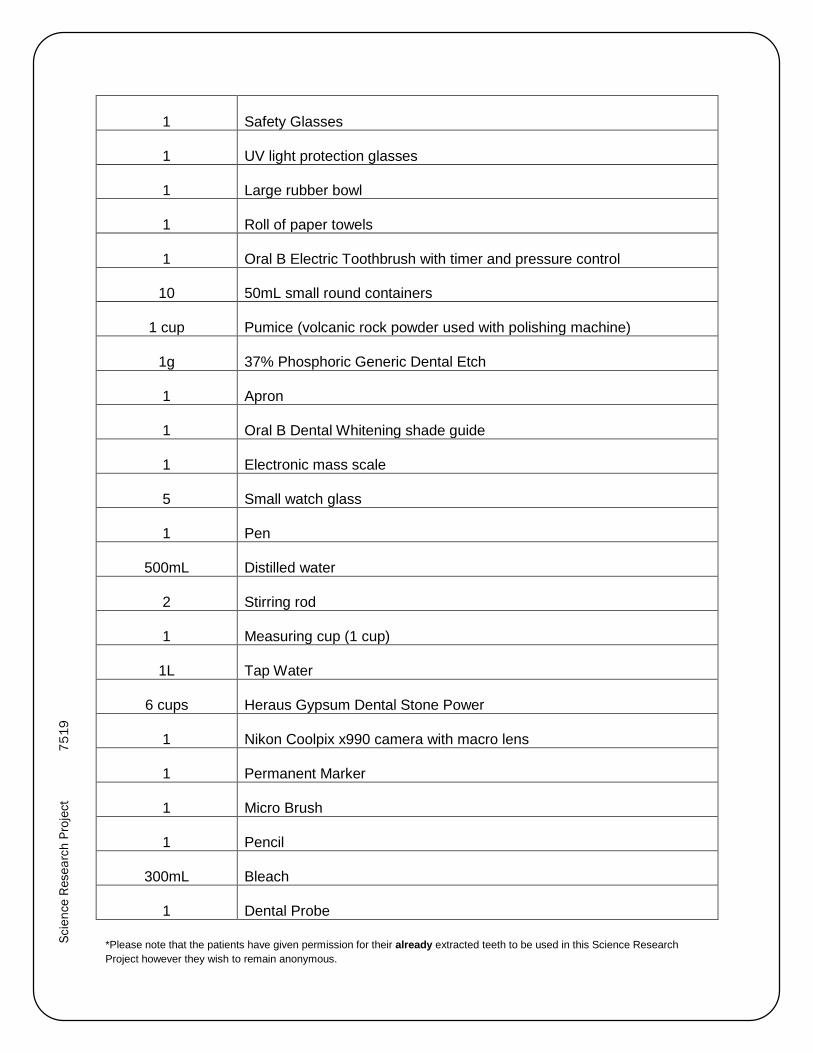
1
Safety Glasses
1
UV light protection glasses
1
Large rubber bowl
1
Roll of paper towels
1
Oral B Electric Toothbrush with timer and pressure control
10
50mL small round containers
1 cup
Pumice (volcanic rock powder used with polishing machine)
1g
37% Phosphoric Generic Dental Etch
1
Apron
1
Oral B Dental Whitening shade guide
1
Electronic mass scale
5
Small watch glass
1
Pen
500mL
Distilled water
2
Stirring rod
1
Measuring cup (1 cup)
1L
Tap Water
6 cups
Heraus Gypsum Dental Stone Power
1
Nikon Coolpix x990 camera with macro lens
1
Permanent Marker
1
Micro Brush
1
Pencil
300mL
Bleach
1
Dental Probe
*Please note that the patients have given permission for their already extracted teeth to be used in this Science Research
Project however they wish to remain anonymous.
Scie
nce
Re
se
arc
h P
roje
ct
7
51
9
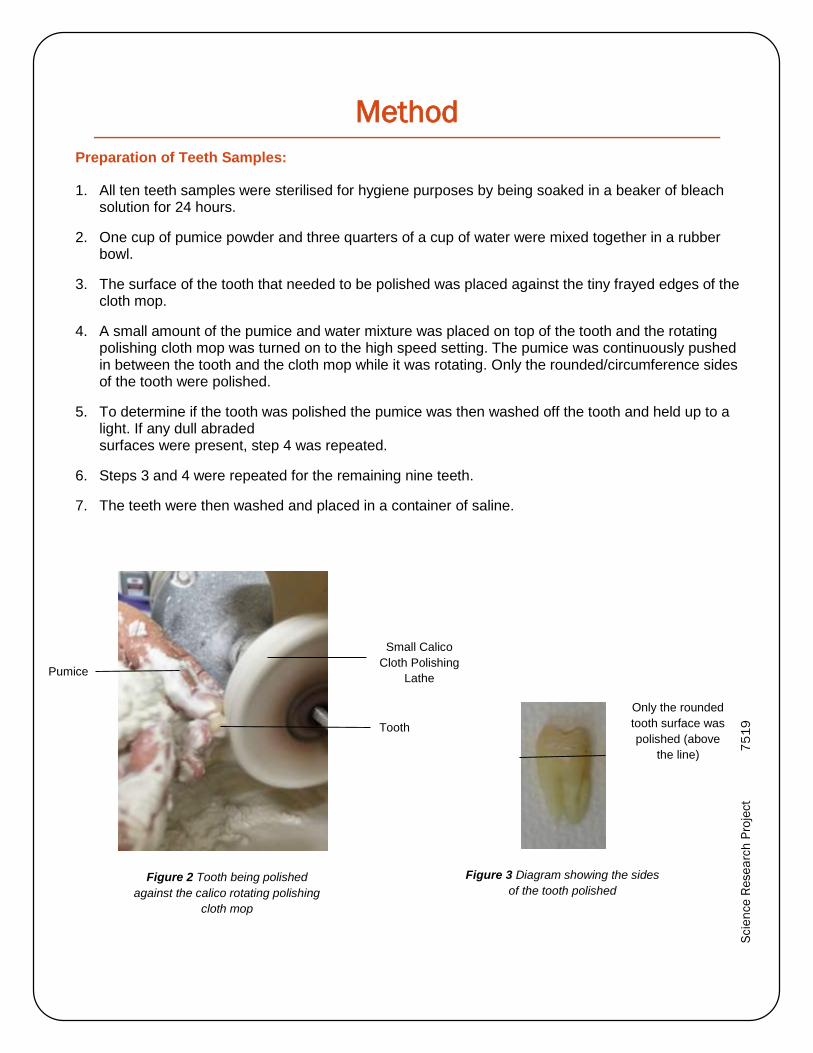
Figure 2 Tooth being polished
against the calico rotating polishing
cloth mop
Figure 3 Diagram showing the sides
of the tooth polished
Only the rounded
tooth surface was
polished (above
the line)
Tooth
Pumice
Small Calico
Cloth Polishing
Lathe
Method
Preparation of Teeth Samples:
1. All ten teeth samples were sterilised for hygiene purposes by being soaked in a beaker of bleach solution for 24 hours.
2. One cup of pumice powder and three quarters of a cup of water were mixed together in a rubber bowl.
3. The surface of the tooth that needed to be polished was placed against the tiny frayed edges of the cloth mop.
4. A small amount of the pumice and water mixture was placed on top of the tooth and the rotating polishing cloth mop was turned on to the high speed setting. The pumice was continuously pushed in between the tooth and the cloth mop while it was rotating. Only the rounded/circumference sides of the tooth were polished.
5. To determine if the tooth was polished the pumice was then washed off the tooth and held up to a light. If any dull abraded surfaces were present, step 4 was repeated.
6. Steps 3 and 4 were repeated for the remaining nine teeth.
7. The teeth were then washed and placed in a container of saline.

Scie
nce
Re
se
arc
h P
roje
ct
7
51
9
Figure 5 Dental Stone painted with
Dental model hardener liquid to
prevent any cracks or breakages in the
stone
Figure 4 Tooth inserted into semi
dried dental stone and left to dry
for around 45 minutes
Figure 6 Stone removed from lid and
randomly selected and labelled
Tooth Semi Dried
Dental Stone
Non-Whitening T1A – Colgate Original Toothpaste Tooth A T1B – Colgate Original Toothpaste Tooth B T2A – Oral B Original Toothpaste Tooth A T2B – Oral B Original Toothpaste Tooth B
Whitening W1A – Colgate Optic White Toothpaste Tooth A W1B – Colgate Optic White Toothpaste Tooth B W2A – Oral B 3D White Toothpaste Tooth A W2B – Oral B 3D White Toothpaste Tooth B W3A – White Glo Whitening Toothpaste Tooth A W3B – White Glo Whitening Toothpaste Tooth B
Method
Identification and handling of teeth:
8. Half a cup of dental stone powder was placed into a large rubber bowl.
9. A small cup filled with tap water was gently trickled into the centre of the bowl while the mixture was stirred using a long plastic spatula.
10. When the mixture became a thick but smooth texture (similar to that of custard) no more water was poured in and the mixture was poured into a small rectangular mold. The mold was then tapped onto a hard flat surface until all the air bubbles had been removed.
11. After 1 to 2 minutes, the tooth was inserted into the centre of the dental stone which had already begun to set. The tooth was inserted root first until only 4-6 millimetres of the tooth’s root (from under the gum line) remained visible.
12. Steps 8 to 11 were repeated for the remaining nine teeth.
13. After about 45 minutes the stones had fully set and was removed from the rectangular lids. (Fig. 5)
14. Dental model hardener liquid was then painted on the entire surface of the stones using a small brush ensuring that the liquid did not come into contact with the tooth. (Fig. 6)
15. After the surfaces of the dental stone had dried, each of the stones were randomly selected and labelled for identification purposes.
Scie
nce
Re
se
arc
h P
roje
ct
7
51
9
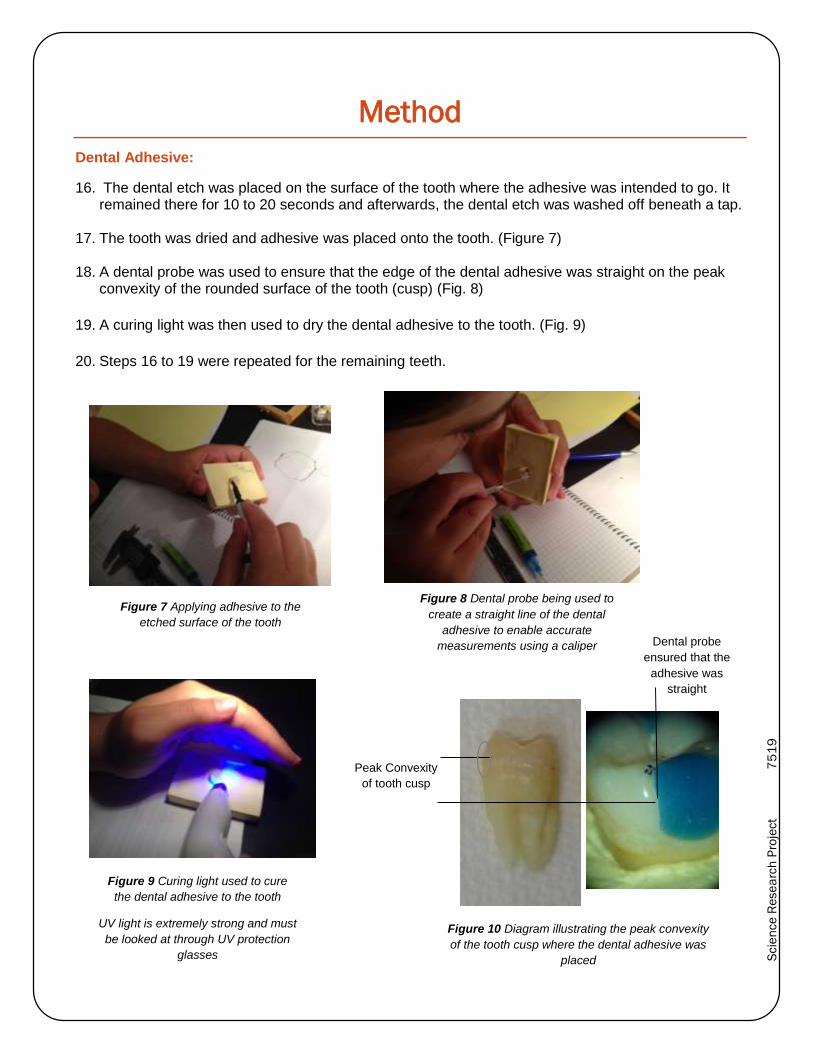
Figure 7 Applying adhesive to the
etched surface of the tooth
Figure 8 Dental probe being used to
create a straight line of the dental
adhesive to enable accurate
measurements using a caliper
Figure 9 Curing light used to cure
the dental adhesive to the tooth
UV light is extremely strong and must
be looked at through UV protection
glasses
Peak Convexity
of tooth cusp
Figure 10 Diagram illustrating the peak convexity
of the tooth cusp where the dental adhesive was
placed
Dental probe
ensured that the
adhesive was
straight
Method
Dental Adhesive:
16. The dental etch was placed on the surface of the tooth where the adhesive was intended to go. It remained there for 10 to 20 seconds and afterwards, the dental etch was washed off beneath a tap.
17. The tooth was dried and adhesive was placed onto the tooth. (Figure 7)
18. A dental probe was used to ensure that the edge of the dental adhesive was straight on the peak convexity of the rounded surface of the tooth (cusp) (Fig. 8)
19. A curing light was then used to dry the dental adhesive to the tooth. (Fig. 9)
20. Steps 16 to 19 were repeated for the remaining teeth.
Scie
nce
Re
se
arc
h P
roje
ct
7
51
9
Figure 11 Photo taken of side view
of tooth showing dental adhesive
Figure 14 Measuring the width of the
tooth using an electronic caliper
Figure 12 Each tooth was photographed using the
Nikon camera. The shade guide was positioned
above the tooth to show the colour
Figure 13 Pencil marking
made on both tooth and stone
for future measurements
Method
Documentation of the enamel surface of the teeth:
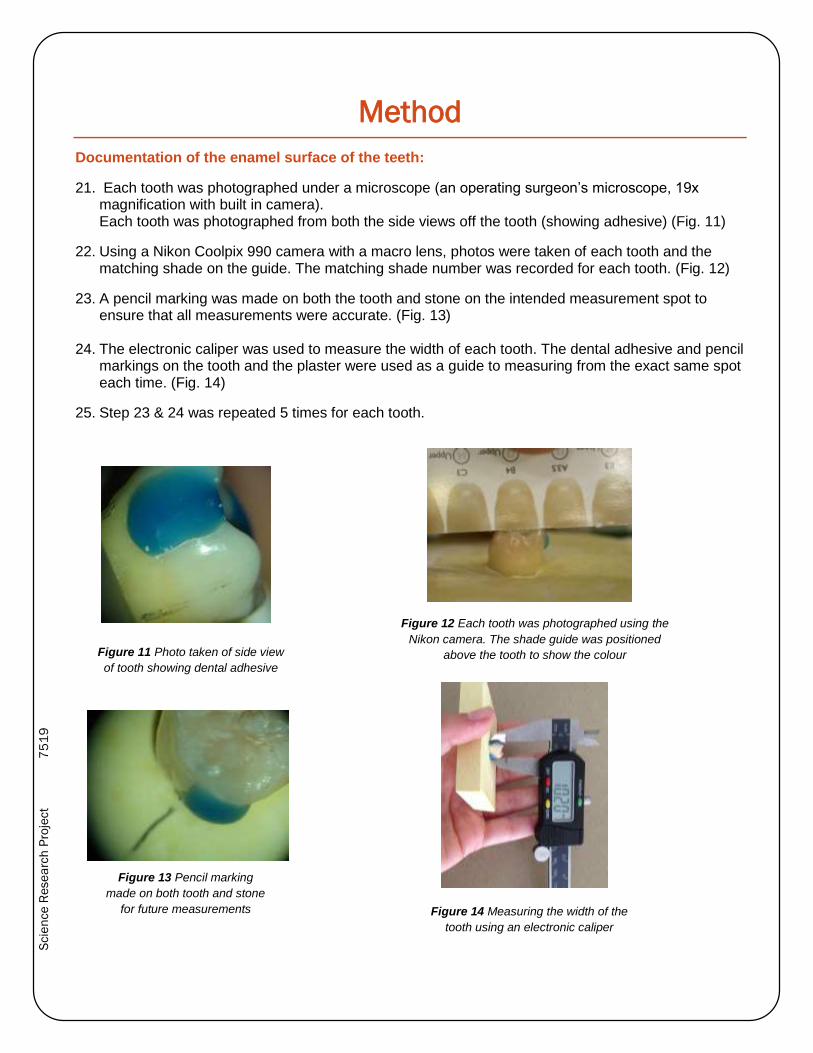
21. Each tooth was photographed under a microscope (an operating surgeon’s microscope, 19x magnification with built in camera). Each tooth was photographed from both the side views off the tooth (showing adhesive) (Fig. 11)
22. Using a Nikon Coolpix 990 camera with a macro lens, photos were taken of each tooth and the matching shade on the guide. The matching shade number was recorded for each tooth. (Fig. 12)
23. A pencil marking was made on both the tooth and stone on the intended measurement spot to ensure that all measurements were accurate. (Fig. 13)
24. The electronic caliper was used to measure the width of each tooth. The dental adhesive and pencil markings on the tooth and the plaster were used as a guide to measuring from the exact same spot each time. (Fig. 14)
25. Step 23 & 24 was repeated 5 times for each tooth.
Scie
nce
Re
se
arc
h P
roje
ct
7
51
9
Figure 15 Toothpastes allocated to a
50mL beaker
Figure 16 pH probe dipped into
the centre of the stirred solution
and the pH was recorded
Probe 2
Probe 1 (in use)
Method
Testing the pH of the Toothpastes:
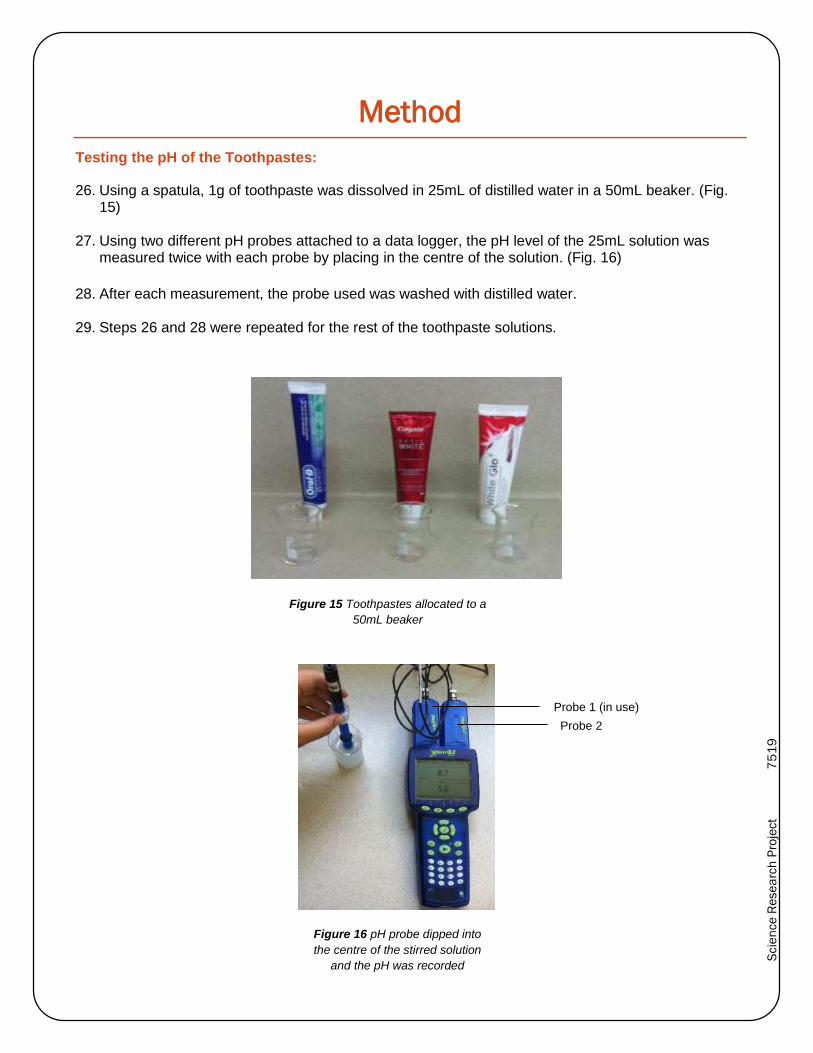
26. Using a spatula, 1g of toothpaste was dissolved in 25mL of distilled water in a 50mL beaker. (Fig. 15)
27. Using two different pH probes attached to a data logger, the pH level of the 25mL solution was measured twice with each probe by placing in the centre of the solution. (Fig. 16)
28. After each measurement, the probe used was washed with distilled water.
29. Steps 26 and 28 were repeated for the rest of the toothpaste solutions.
Scie
nce
Re
se
arc
h P
roje
ct
7
51
9
Figure 18 When too much pressure
is placed on the tooth with the brush,
a warning sign appears on the timer
Figure 17 Saline is squirted
into a small round container
the tooth is then placed
upside down into the saline
Method
Testing:
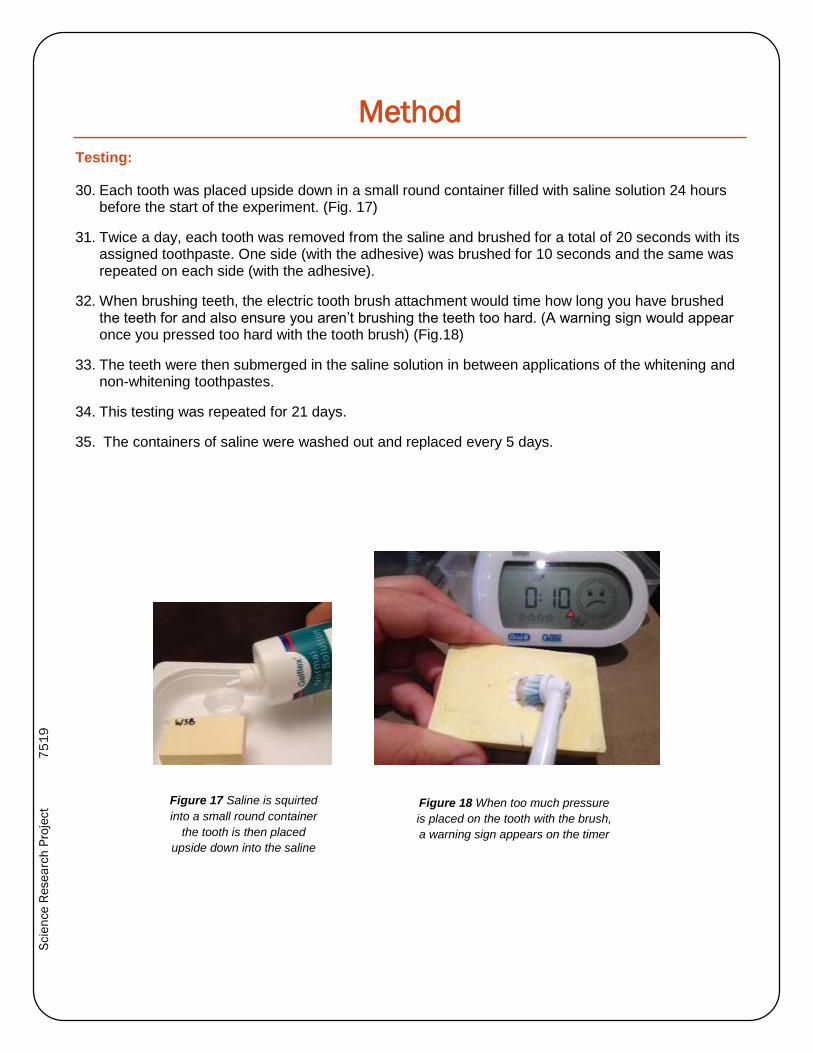
30. Each tooth was placed upside down in a small round container filled with saline solution 24 hours before the start of the experiment. (Fig. 17)
31. Twice a day, each tooth was removed from the saline and brushed for a total of 20 seconds with its assigned toothpaste. One side (with the adhesive) was brushed for 10 seconds and the same was repeated on each side (with the adhesive).
32. When brushing teeth, the electric tooth brush attachment would time how long you have brushed the teeth for and also ensure you aren’t brushing the teeth too hard. (A warning sign would appear once you pressed too hard with the tooth brush) (Fig.18)
33. The teeth were then submerged in the saline solution in between applications of the whitening and non-whitening toothpastes.
34. This testing was repeated for 21 days.
35. The containers of saline were washed out and replaced every 5 days.
Scie
nce
Re
se
arc
h P
roje
ct
7
51
9
Method
Mid-Testing Measurements – Day 11:
36. Steps 22 and 24 were repeated on day 11.
Measuring Findings – Day 21:
37. Using a Nikon Coolpix 990 camera with a macro lens, photos were again taken of each tooth and the matching shade on the guide. The matching shade number was recorded for each tooth.
38. The electronic caliper was used to re-measure the width of each tooth from one exact point to the other, each time.
39. Dental adhesive and pencil markings on the tooth and the plaster were used as a guide to measuring from the exact same spot each.
40. The dental adhesive was then removed from the tooth using a hand scaler
41. After day 21, each tooth was photographed under a microscope (an operating surgeon’s microscope, 19x magnification with built in camera). Each tooth was photographed 4 times.
i) Before the removal of the first adhesive ii) After the removal of the first adhesive iii) Before the removal of the second adhesive iv) After the removal of the second adhesive.
42. The images of the teeth were compared with those taken on day 0 for signs of enamel abrasion.
Scie
nce
Re
se
arc
h P
roje
ct
7
51
9
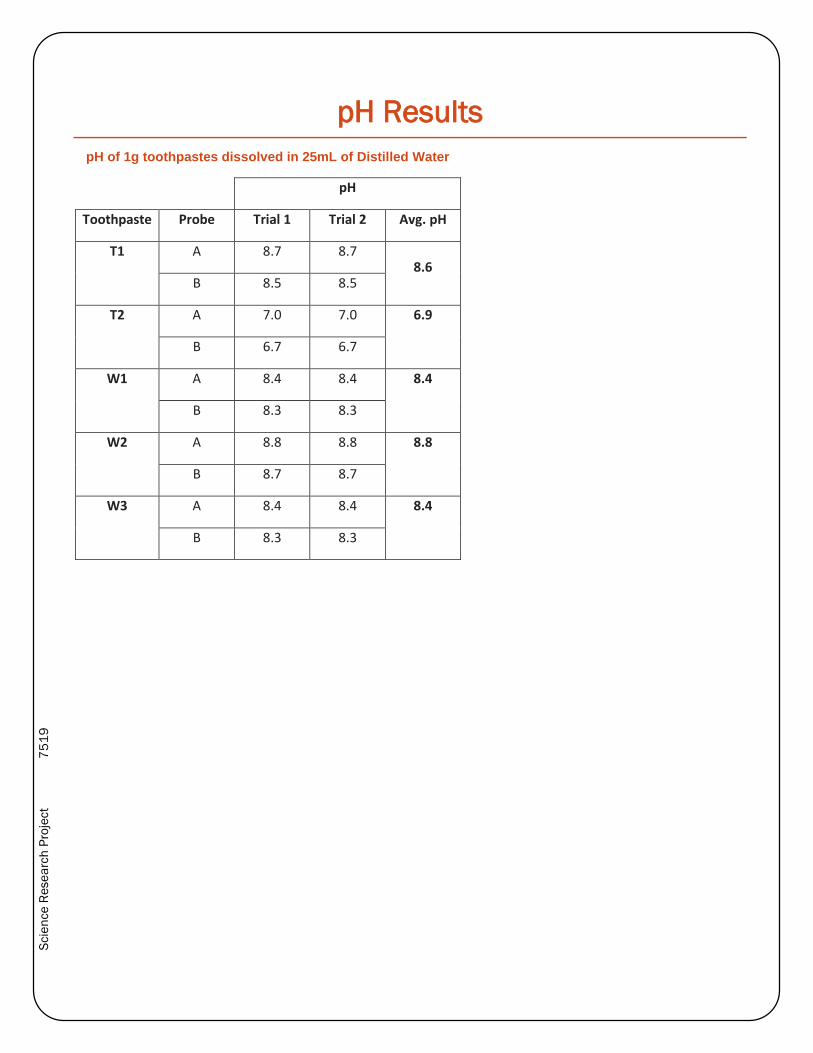
pH Results
pH of 1g toothpastes dissolved in 25mL of Distilled Water
pH
Toothpaste Probe Trial 1 Trial 2 Avg. pH
T1 A 8.7 8.7 8.6
B 8.5 8.5
T2 A 7.0 7.0 6.9
B 6.7 6.7
W1 A 8.4 8.4 8.4
B 8.3 8.3
W2 A 8.8 8.8 8.8
B 8.7 8.7
W3 A 8.4 8.4 8.4
B 8.3 8.3
Scie
nce
Re
se
arc
h P
roje
ct
7
51
9
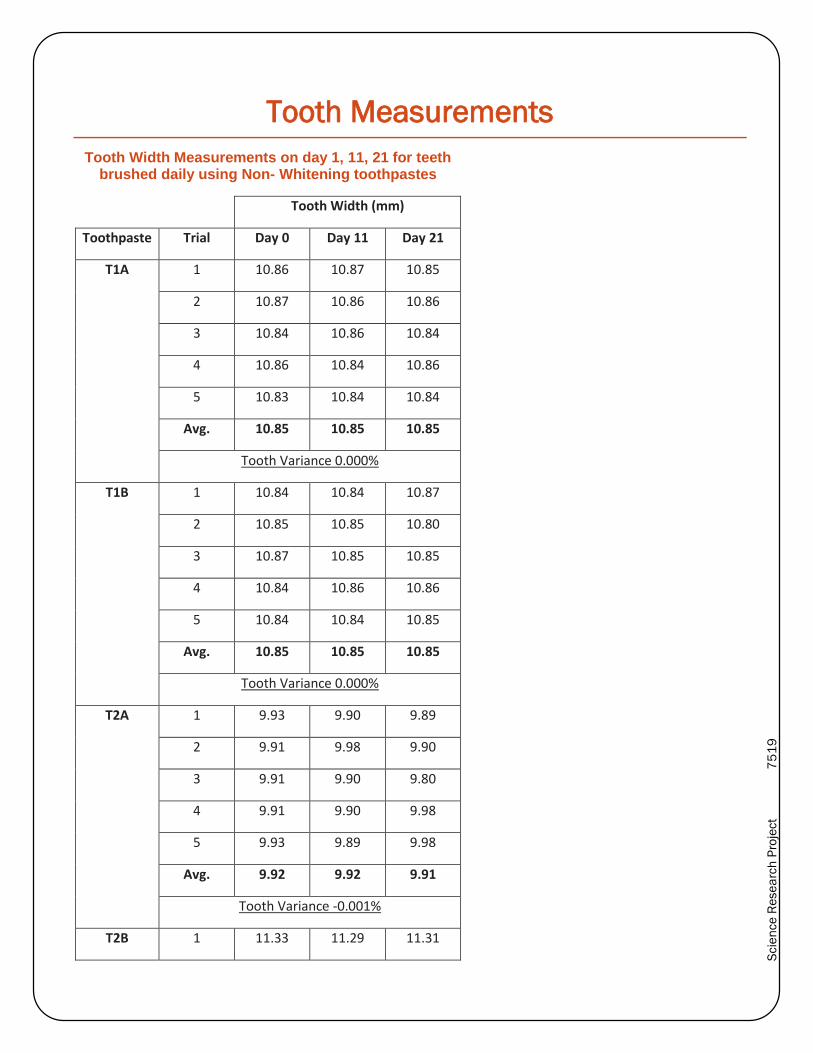
Tooth Measurements
Tooth Width Measurements on day 1, 11, 21 for teeth brushed daily using Non- Whitening toothpastes
Tooth Width (mm)
Toothpaste Trial Day 0 Day 11 Day 21
T1A 1 10.86 10.87 10.85
2 10.87 10.86 10.86
3 10.84 10.86 10.84
4 10.86 10.84 10.86
5 10.83 10.84 10.84
Avg. 10.85 10.85 10.85
Tooth Variance 0.000%
T1B 1 10.84 10.84 10.87
2 10.85 10.85 10.80
3 10.87 10.85 10.85
4 10.84 10.86 10.86
5 10.84 10.84 10.85
Avg. 10.85 10.85 10.85
Tooth Variance 0.000%
T2A 1 9.93 9.90 9.89
2 9.91 9.98 9.90
3 9.91 9.90 9.80
4 9.91 9.90 9.98
5 9.93 9.89 9.98
Avg. 9.92 9.92 9.91
Tooth Variance -0.001%
T2B 1 11.33 11.29 11.31
Scie
nce
Re
se
arc
h P
roje
ct
7
51
9
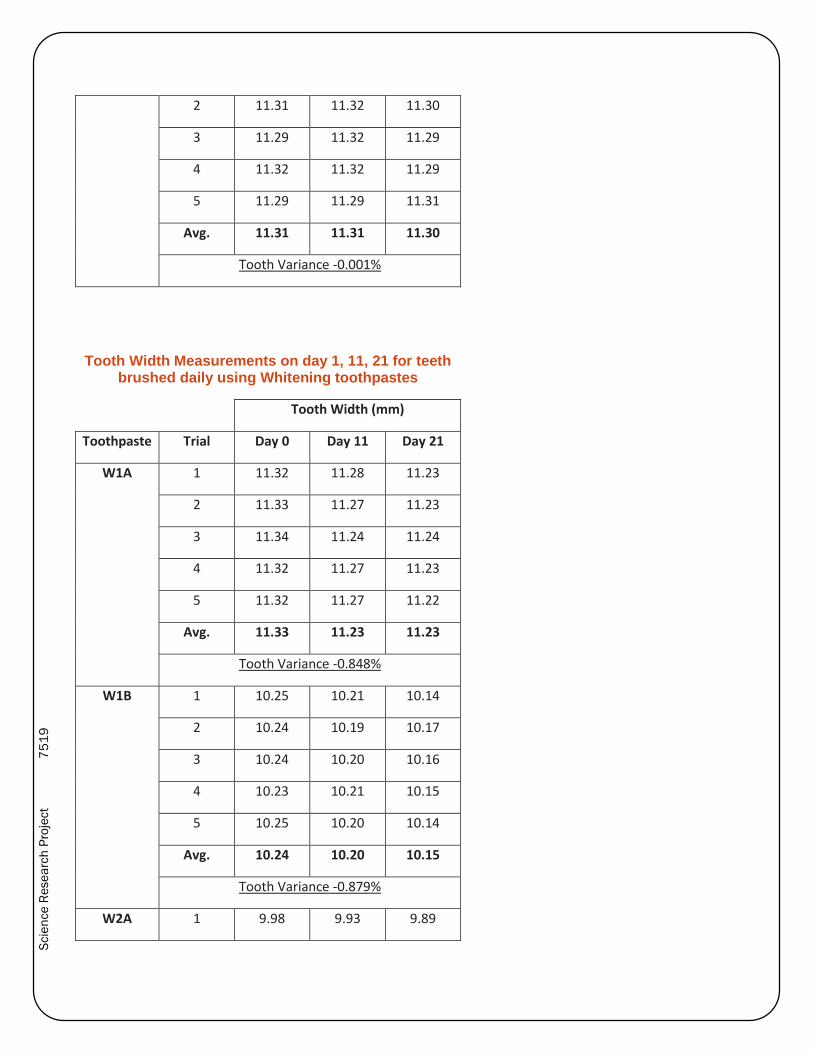
2 11.31 11.32 11.30
3 11.29 11.32 11.29
4 11.32 11.32 11.29
5 11.29 11.29 11.31
Avg. 11.31 11.31 11.30
Tooth Variance -0.001%
Tooth Width Measurements on day 1, 11, 21 for teeth brushed daily using Whitening toothpastes
Tooth Width (mm)
Toothpaste Trial Day 0 Day 11 Day 21
W1A 1 11.32 11.28 11.23
2 11.33 11.27 11.23
3 11.34 11.24 11.24
4 11.32 11.27 11.23
5 11.32 11.27 11.22
Avg. 11.33 11.23 11.23
Tooth Variance -0.848%
W1B 1 10.25 10.21 10.14
2 10.24 10.19 10.17
3 10.24 10.20 10.16
4 10.23 10.21 10.15
5 10.25 10.20 10.14
Avg. 10.24 10.20 10.15
Tooth Variance -0.879%
W2A 1 9.98 9.93 9.89
Scie
nce
Re
se
arc
h P
roje
ct
7
51
9
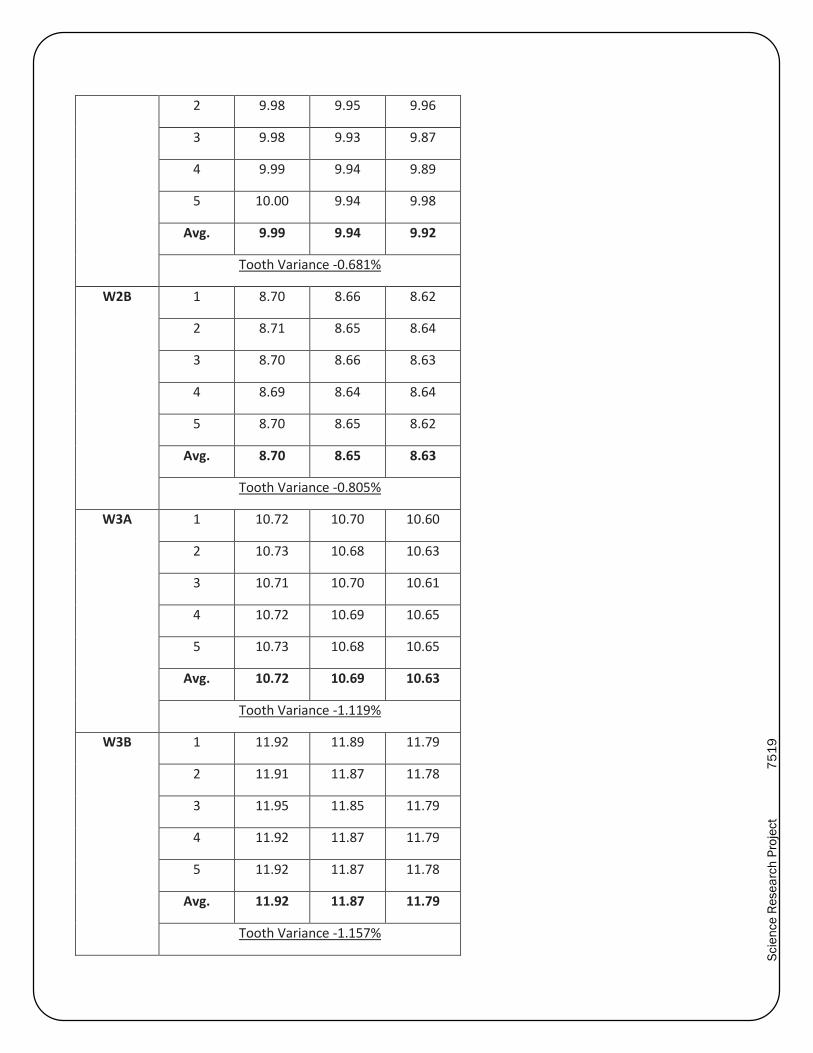
2 9.98 9.95 9.96
3 9.98 9.93 9.87
4 9.99 9.94 9.89
5 10.00 9.94 9.98
Avg. 9.99 9.94 9.92
Tooth Variance -0.681%
W2B 1 8.70 8.66 8.62
2 8.71 8.65 8.64
3 8.70 8.66 8.63
4 8.69 8.64 8.64
5 8.70 8.65 8.62
Avg. 8.70 8.65 8.63
Tooth Variance -0.805%
W3A 1 10.72 10.70 10.60
2 10.73 10.68 10.63
3 10.71 10.70 10.61
4 10.72 10.69 10.65
5 10.73 10.68 10.65
Avg. 10.72 10.69 10.63
Tooth Variance -1.119%
W3B 1 11.92 11.89 11.79
2 11.91 11.87 11.78
3 11.95 11.85 11.79
4 11.92 11.87 11.79
5 11.92 11.87 11.78
Avg. 11.92 11.87 11.79
Tooth Variance -1.157%

Scie
nce
Re
se
arc
h P
roje
ct
7
51
9
Tooth Shade
Tooth shades over duration of testing
Tooth Shade
Tooth Lightest Shade Darkest Shade
Shades Lighter B1 A1 B2 D2 A2 C1 C2 D4 A3 D3 B3 A3.5 B4 C3 A4 C4
T1A EMS No change
T1B EMS No change
T2A EMS No change
T2B EMS No change
W1A E M S 7
W1B E M S 6
W2A E M S 4
W2B E MS 4
W3A EM S 6
W3B E M S 3
E = End M = Mid-way S = Start

Scie
nce
Re
se
arc
h P
roje
ct
7
51
9
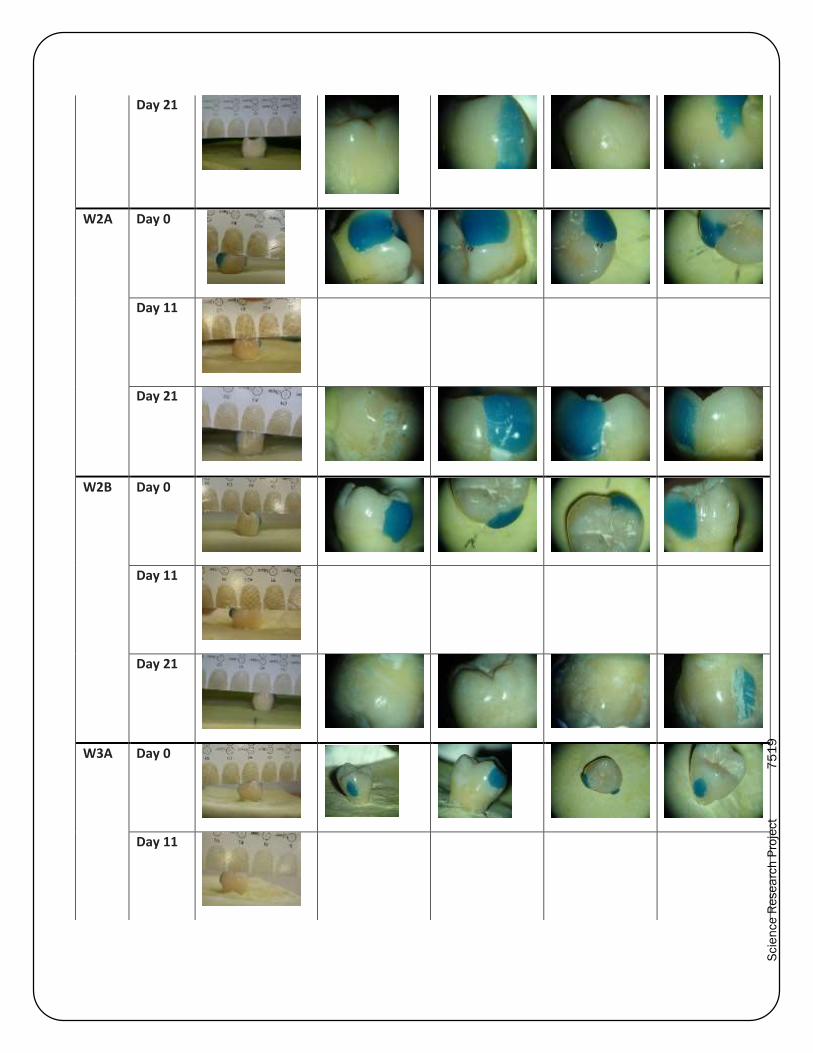
Pictorial Evidence of Abrasion
Tooth Time (Day)
Colour Chart Photo
Microscope Photos
T1A Day 0
Day 11
Day 21
T1B Day 0
Day 11
Day 21
T2A Day 0
Day 11

Scie
nce
Re
se
arc
h P
roje
ct
7
51
9
Day 21
T2B Day 0
Day 11
Day 21
W1A Day 0
Day 11
Day 21
W1B Day 0
Day 11
Scie
nce
Re
se
arc
h P
roje
ct
7
51
9
Day 21
W2A Day 0
Day 11
Day 21
W2B Day 0
Day 11
Day 21
W3A Day 0
Day 11
Scie
nce
Re
se
arc
h P
roje
ct
7
51
9
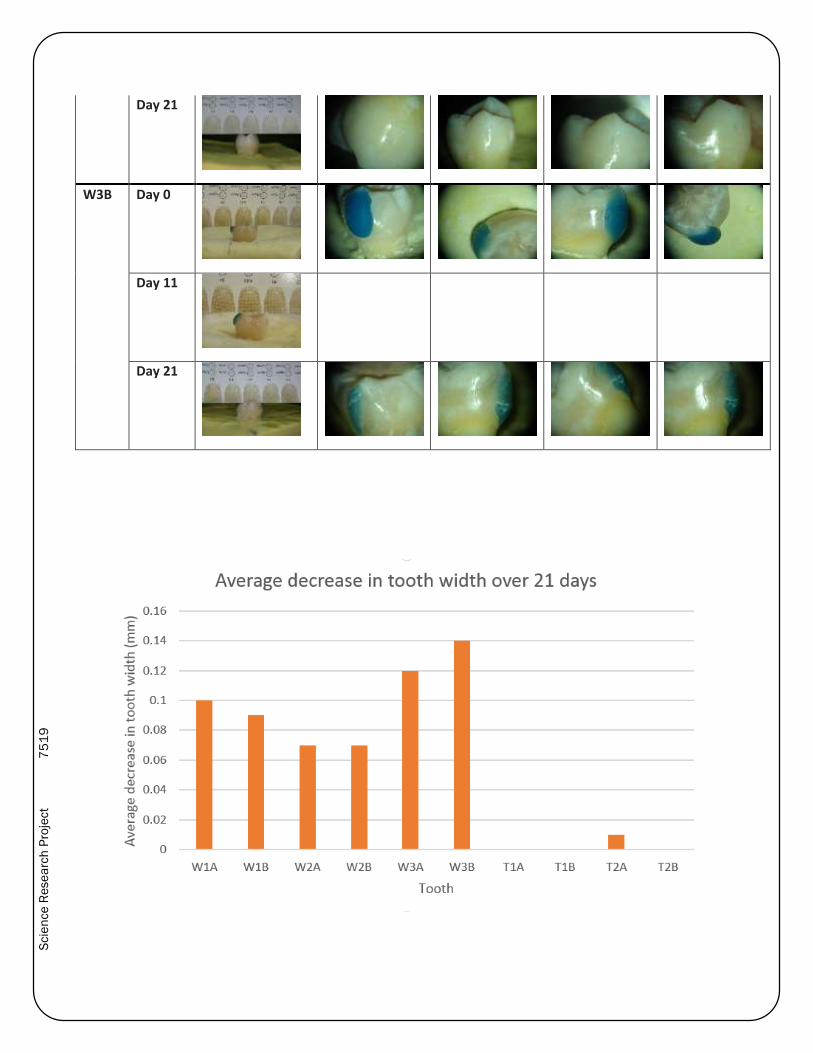
Day 21
W3B Day 0
Day 11
Day 21
Scie
nce
Re
se
arc
h P
roje
ct
7
51
9
Discussion
The majority of the data presented within the results supports the hypothesis that whitening toothpastes
cause greater loss of dental enamel and improve whiteness.
The pH measurements showed no relationship between toothpaste types and there was no distinct
pattern regarding the pH of whitening and the pH of non-whitening toothpastes. The repeat pH tests
were consistent and therefore the measurements are reliable. These results do agree with the
secondary source article from the Indian Society of Periodontology. This article was written about a
clinical study proven that an acidic toothpaste containing Stannous (Tin II) Fluoride prevents enamel
erosion and remineralises the teeth.
The average percentage loss of dental enamel was greater on the teeth that were tested with the
whitening toothpastes. Both non-whitening toothpastes had a 0% loss of tooth enamel compared to the
whitening toothpastes which ranged from 0.7% (Oral B 3D White Test A) to 1.2% (White Glo Test B)
loss of enamel. The results of the White Glo Whitening Toothpaste in both tests indicate that it created
the largest loss of dental enamel compared to the other two whitening products tested, with an overall
percentage loss of 1.1%. The results in both tests for Oral B 3D White whitening toothpaste showed the
lowest average percentage of 0.7% enamel loss in comparison to the other two whitening products.
A visual method of identifying enamel loss was also performed. Under magnification the enamel
surface of the tooth was viewed looking for any evidence of enamel loss (unsmooth surfaces) on the
unprotected surfaces of the tooth. This was identified in one whitening toothpaste mainly Colgate Optic
whitening toothpaste. The comparison of texture was observed between the originally prepared
polished surfaces to the abraded surface. Again the dental adhesive was used as a protective layer on
the enamel. At the end of testing, signs of unsmooth surfaces were found in the teeth tested with the
whitening toothpastes and showed the removal of surface texture demonstrating a loss of dental
enamel had occurred. This agrees with the findings of the caliper measurement results.
In between brushes, the teeth were soaked in saline in to attempt to replicate the oral environment.
Saliva substitutes were difficult to locate and were costly. Keeping the teeth in saline also prevented
them from discoloring due to desiccation therefore allowing valid colour results.
Visual examination of the colour of the teeth using a shade guide was undertaken and when compared
to the colour at the end of the testing both tests showed similar results. The non-whitening toothpastes
had no change in colour and the results show that whitening toothpastes had a colour change, ranging
from 3 to 7 shades lighter across the three products. The results of the Oral B 3D Whitening

Scie
nce
Re
se
arc
h P
roje
ct
7
51
9
Toothpaste in both tests indicate the least effective in whitening the tooth colour compared to the other
whitening products used. This whitening toothpaste while resulting in the least whitening effect it also
caused the least loss of enamel on the tooth. The results indicated that the Colgate Optic White and
White Glo whitening toothpastes had quite similar whitening results. The White Glo whitening
toothpaste was effective in whitening the teeth it was also the most abrasive causing the most enamel
loss on the tooth.
The results from both tests of every toothpaste proved reliable in determining the accuracy of the
results as they both reflected similar results with an acceptable margin of error.
The measurements for the loss of enamel was accurate because the size of the tooth was measured
with the electronic caliper 5 times with producing similar results. Teeth generally possess irregularities
on the enamel surface on the lateral sides and also have a curved surface. This makes it difficult to
determine the exact dimensions of the tooth. To ensure accuracy in the measurements, a sensitive
electronic caliper was used and the tooth’s surface was polished before testing to remove surface
irregularities to a certain extent.
Dental adhesive was used as a location marker on the tooth (as well as for a visual surface comparison
of abrasion) to ensure the caliper was placed into and measured the same point each time. The dental
adhesive also improved the accuracy of the measurements because it created an indication for where
the electronic caliper was placed when taking repeated measurements.
An electronic toothbrush with a pressure control timer on it enabled the experiment to remain
controlled. Although the same pressure was attempted to be maintained, it is almost impossible to
control exactly the same pressure the entire process. Differences in pressure can cause different
abrasive affects and this is indeed a limitation of the experiment.
There are several areas of possible improvement within the experiment and method. One of these
would be, if given more time, to lengthen the experiment by another three weeks as it appears that
whitening toothpastes continue to remove dental enamel. Access to more teeth, would enable the
investigation to be performed using a different range of non-whitening toothpastes. Due to the cost,
other whitening methods such as ‘whitening strips’ and dental whitening kits were not used in this
experiment. Alterations to the method would include measuring each tooth with the caliper from
different angles and sides of the tooth.
Overall, the White Glo Whitening Toothpaste proved to be the most abrasive of tooth enamel when
brushed into teeth twice a day for 21 days.

Scie
nce
Re
se
arc
h P
roje
ct
7
51
9
Conclusion
The three whitening toothpastes, did whiten teeth more than the two non-whitening toothpastes tested.
The three whitening toothpastes caused a significantly greater loss of the dental enamel than the two
non-whitening toothpastes.
Acknowledgements
Jo-anne McGrouther (Teacher)
- Provided guidance regarding the proposed aim and method of the experiment
- Assisted in the editing and made improvements of report
- Gave advice regarding pH testing, i.e. advised the use of distilled water when testing the pH of
the toothpastes
- Provided encouragement over the course of the project
Dr. Clem Maloof (Dental Practitioner)
- Provided access to all dental equipment and products used in experiment
- Advised the proper use of the machinery and tools to ensure safety and correct usage
- Provided the 10 teeth samples
- Provided financial support, i.e. purchased the toothpastes and electronic toothbrush
Scie
nce
Re
se
arc
h P
roje
ct
7
51
9
Bibliography
1. Choice.com.au,. 'Toothpaste Marketing'. N.p., 2012. Web. 10 Feb. 2015.
2. 'Does Dental Whitening Result In Calcium Loss In Enamel?'. Australasian Dentist, Author
Unstated November December 2014.57 (2015): 74, 75. Print.
3. http://img.webmd.com/dtmcms/live/webmd/consumer_assets/site_images/media/medical/hw/h9
991833_001.jpg, Healthwise Incorperated. 2015. Print.
4. Toothpaste. 1st ed. David A. Katz, 2012. Web. 11 Feb. 2015.
5. Brand, Richard W, and Donald E Isselhard. Anatomy Of Orofacial Structures. Print.
6. 'A Randomised Clinical Study To Measure The Anti‐Erosion Benefits Of A Stannous‐Containing
Sodium Fluoride Dentifrice'. Indian Society of Periodontology 19.2 (2015): 185 - 186. Print.