Cash Accounting, Accrual Accounting, and Discounted Cash Flow Analysis Chapter 4.
Table of Contents
1 Issue Checks - Disbursements ......................................................................... 3 1.1 Getting Started: .............................................................................................................. 3 1.2 To Complete the Working Copy of A Check: .................................................................. 5 1.3 To Manage Categories: .................................................................................................. 7 1.4 Memo Field: .................................................................................................................... 9 1.5 Issuing More Than One Check: ...................................................................................... 9
1.6 List Checks: .................................................................................................................. 11 1.7 Voiding Checks That Are Not Posted To the Ledger: ................................................... 12
1.8 Search: ......................................................................................................................... 13 1.9 Print: ............................................................................................................................. 13 1.9.6 Test Print ...................................................................................................................... 17 1.10 Issue Checks Checklist: ................................................................................................ 19 1.11 Adding Checks to the Ledger: ...................................................................................... 19
2 To Exit ............................................................................................................ 20
Appendix: ............................................................................................................. 21
School Cash Account ing ©
User Guide
Issue Checks
1575 Bishop St N, Suite100 Cambridge ON N1R 7J4
6221 Riverside Dr., Suite 102 Irving, TX 75039
www.kevgroup.com
About Us:
KEV Group is an international company that specializes in the management and security of school funds. KEV Group has
continued to grow and address new client needs since our founding almost two decades ago as a pioneer in managing school
funds. Our flagship product, School Cash Accounting, has consistently set the industry standard for school cash management.
Internally, KEV Group has developed several software and web-based solutions to meet the needs of the most demanding school
officials, auditors, and C-level policy makers. Today we work with over 5000 schools on a daily basis with our industry-leading
solutions.
KEV Group specializes in school level accounting, online payment processing, and tracking of student obligations. By showing you
how we enable transparency in school funds, as well as provide secure and detailed audit trails, we can change the way you think
about school fund management. KEV Group makes it easy for districts to evolve to a secure and transparent infrastructure while
being budget conscious.
Our reputation for easy to use software, painless implementation procedure and unique personalized training for district staff and
school bookkeepers makes choosing KEV Group one of the best decisions a district can make.
Minimum Requirements for School Cash Accounting:
Component Description
Browser Windows OS – Internet Explorer 7 or higher / Firefox 3.6 or higher MAC OS – Firefox 3.6 or higher
Report Reader Adobe Reader 7.0 or higher
RAM 256 MB
Bandwidth Required 100kb /Sec per average user session
Network DSL or Cable broadband network connection with 512 kb/sec
Copyright 1996 -2011 KEV Group Inc. (KEV) All Rights Reserved
Edition: This edition applies to Version 4.0.0.0
otherwise indicated in new editions or updates. First Edition: 2004 Revised: February 2011
This document is for information purposes only. KEV Group Inc. (KEV) makes no warranties, expressed or implied. Trademarks:
Adobe ® Acrobat ® Reader® are registered trademarks of Adobe Microsoft®, Silverlight ® and Windows® are registered trademarks of Microsoft Corporation Mozilla Firefox ® is a registered trademark of Mozilla Foundation
Issue Checks 3
SchoolCash.NET V4.0.0 Updated: 01/11 KEV Group Inc. © 1996-2011
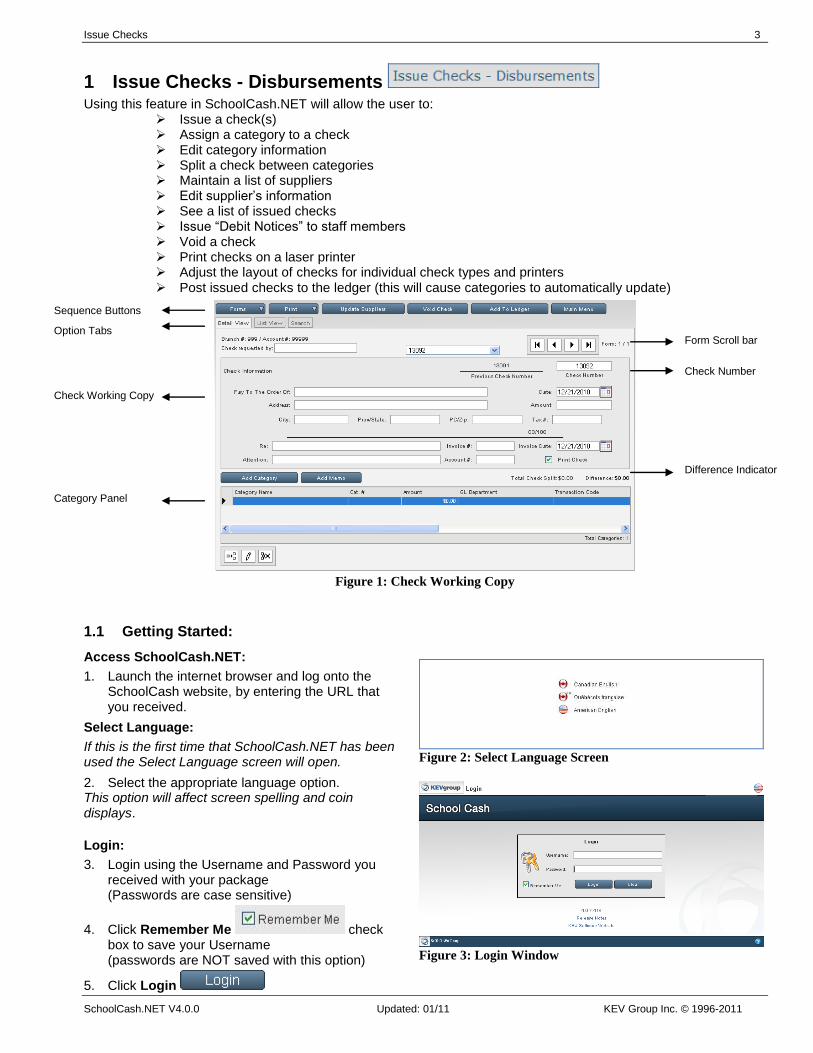
1 Issue Checks - Disbursements Using this feature in SchoolCash.NET will allow the user to:
Issue a check(s) Assign a category to a check Edit category information Split a check between categories Maintain a list of suppliers Edit supplier‟s information See a list of issued checks Issue “Debit Notices” to staff members Void a check Print checks on a laser printer Adjust the layout of checks for individual check types and printers Post issued checks to the ledger (this will cause categories to automatically update)
Figure 1: Check Working Copy
1.1 Getting Started:
Access SchoolCash.NET:
1. Launch the internet browser and log onto the SchoolCash website, by entering the URL that you received.
Select Language:
If this is the first time that SchoolCash.NET has been used the Select Language screen will open.
2. Select the appropriate language option. This option will affect screen spelling and coin displays.
Login:
3. Login using the Username and Password you received with your package (Passwords are case sensitive)
4. Click Remember Me check box to save your Username (passwords are NOT saved with this option)
5. Click Login
Figure 2: Select Language Screen
Figure 3: Login Window
Sequence Buttons
Option Tabs
Check Working Copy
Category Panel
Form Scroll bar
Check Number
Difference Indicator
4 Issue Checks
KEV Group Inc. © 1996-2011 Updated: 01/11 SchoolCash.NET V4.0.0
The Select a Bank Account window will open.
Click here for further information on the Login process.
Tip: Language localization can be changed in the future, by clicking the Language
indicator in the top right corner of any screen. Select the required language option from the Select Language Screen.
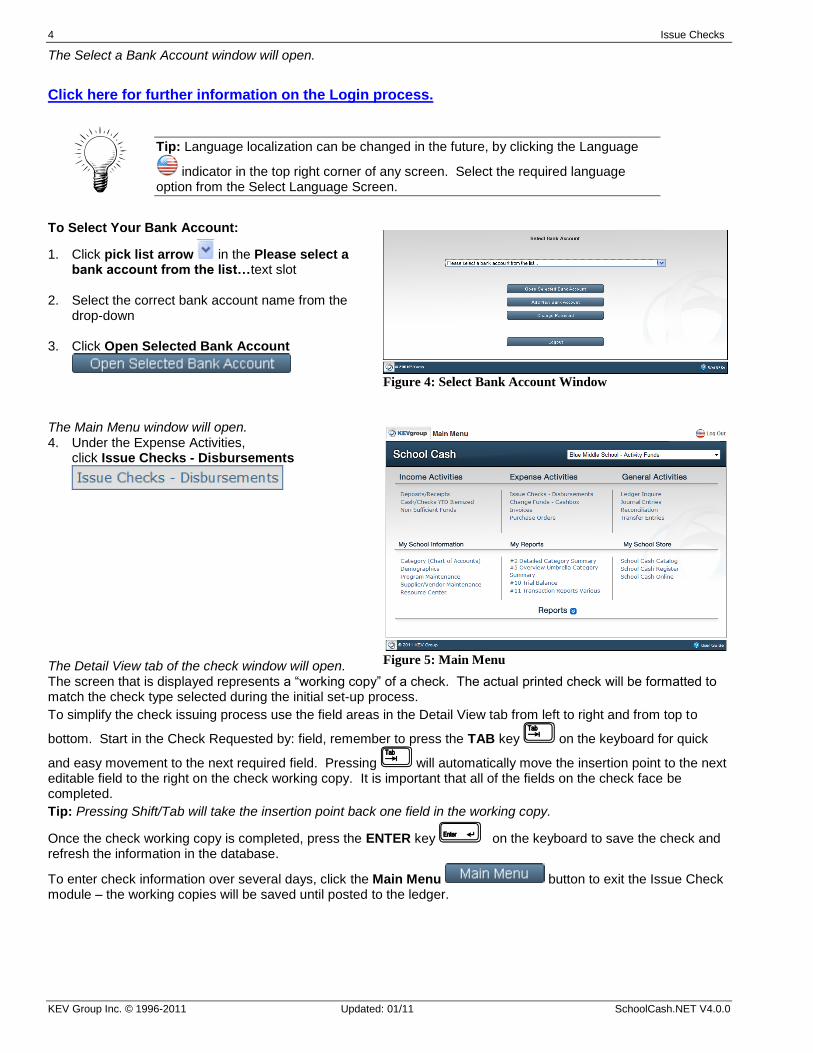
To Select Your Bank Account:
1. Click pick list arrow in the Please select a bank account from the list…text slot
2. Select the correct bank account name from the drop-down
3. Click Open Selected Bank Account
The Main Menu window will open. 4. Under the Expense Activities,
click Issue Checks - Disbursements
The Detail View tab of the check window will open.
Figure 4: Select Bank Account Window
Figure 5: Main Menu
The screen that is displayed represents a “working copy” of a check. The actual printed check will be formatted to match the check type selected during the initial set-up process.
To simplify the check issuing process use the field areas in the Detail View tab from left to right and from top to
bottom. Start in the Check Requested by: field, remember to press the TAB key on the keyboard for quick
and easy movement to the next required field. Pressing will automatically move the insertion point to the next editable field to the right on the check working copy. It is important that all of the fields on the check face be completed.
Tip: Pressing Shift/Tab will take the insertion point back one field in the working copy.
Once the check working copy is completed, press the ENTER key on the keyboard to save the check and refresh the information in the database.
To enter check information over several days, click the Main Menu button to exit the Issue Check module – the working copies will be saved until posted to the ledger.
Issue Checks 5
SchoolCash.NET V4.0.0 Updated: 01/11 KEV Group Inc. © 1996-2011
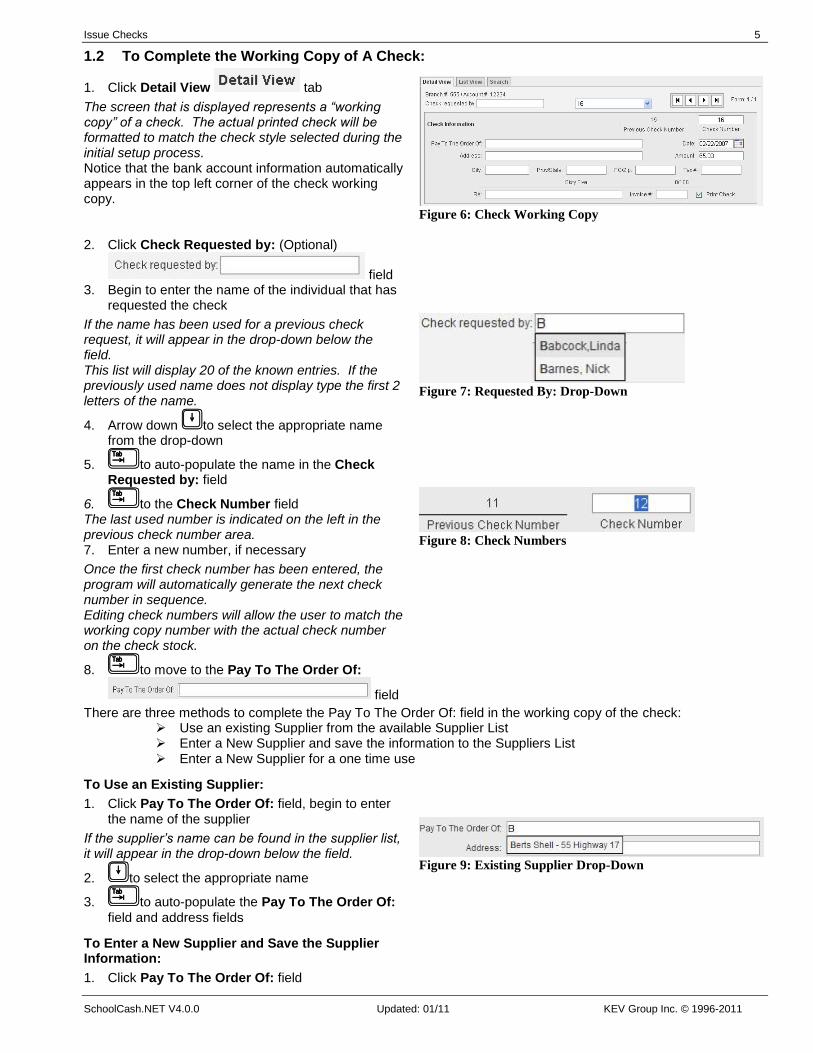
1.2 To Complete the Working Copy of A Check:
1. Click Detail View tab
The screen that is displayed represents a “working copy” of a check. The actual printed check will be formatted to match the check style selected during the initial setup process. Notice that the bank account information automatically appears in the top left corner of the check working copy.
Figure 6: Check Working Copy
2. Click Check Requested by: (Optional)
field 3. Begin to enter the name of the individual that has
requested the check
If the name has been used for a previous check request, it will appear in the drop-down below the field. This list will display 20 of the known entries. If the previously used name does not display type the first 2 letters of the name.
4. Arrow down to select the appropriate name from the drop-down
5. to auto-populate the name in the Check Requested by: field
Figure 7: Requested By: Drop-Down
6. to the Check Number field The last used number is indicated on the left in the previous check number area. 7. Enter a new number, if necessary
Once the first check number has been entered, the program will automatically generate the next check number in sequence. Editing check numbers will allow the user to match the working copy number with the actual check number on the check stock.
Figure 8: Check Numbers
8. to move to the Pay To The Order Of:
field
There are three methods to complete the Pay To The Order Of: field in the working copy of the check: Use an existing Supplier from the available Supplier List Enter a New Supplier and save the information to the Suppliers List Enter a New Supplier for a one time use
To Use an Existing Supplier:
1. Click Pay To The Order Of: field, begin to enter the name of the supplier
If the supplier’s name can be found in the supplier list, it will appear in the drop-down below the field.
2. to select the appropriate name
3. to auto-populate the Pay To The Order Of:
field and address fields
Figure 9: Existing Supplier Drop-Down
To Enter a New Supplier and Save the Supplier Information:
1. Click Pay To The Order Of: field
6 Issue Checks
KEV Group Inc. © 1996-2011 Updated: 01/11 SchoolCash.NET V4.0.0
2. Enter the supplier‟s name
3. Press
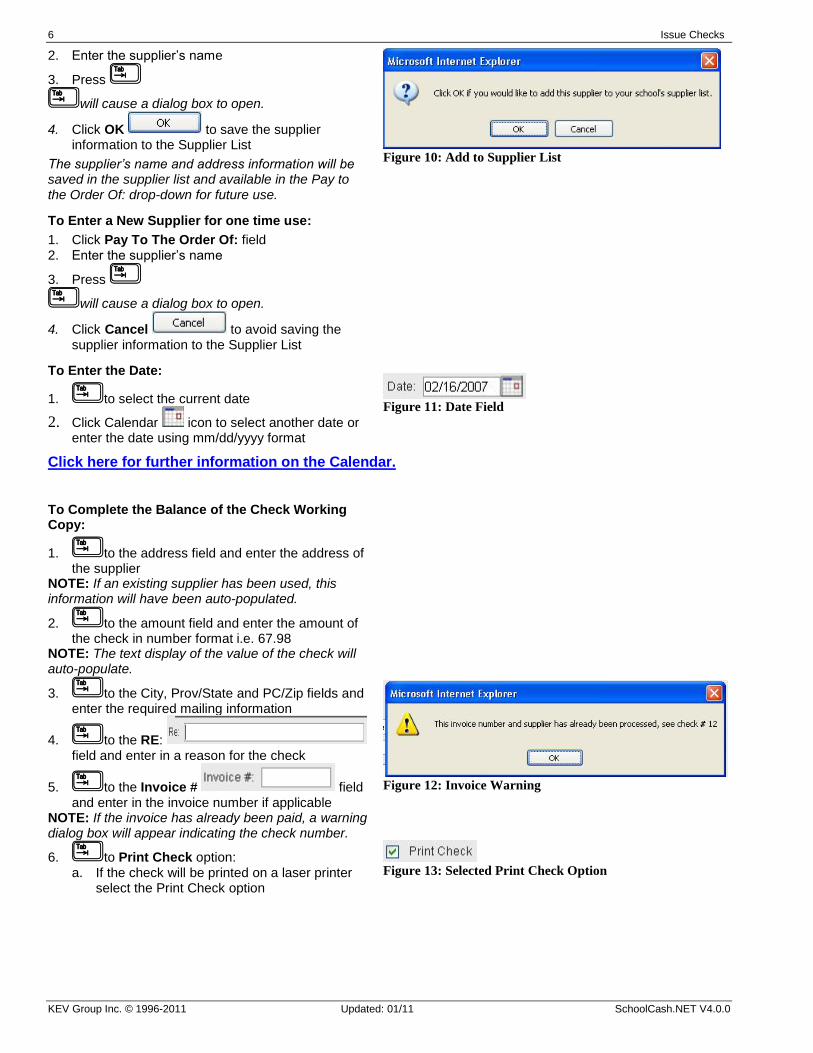
will cause a dialog box to open.
4. Click OK to save the supplier information to the Supplier List
The supplier’s name and address information will be saved in the supplier list and available in the Pay to the Order Of: drop-down for future use.
Figure 10: Add to Supplier List
To Enter a New Supplier for one time use:
1. Click Pay To The Order Of: field 2. Enter the supplier‟s name
3. Press
will cause a dialog box to open.
4. Click Cancel to avoid saving the supplier information to the Supplier List
To Enter the Date:
1. to select the current date
2. Click Calendar icon to select another date or enter the date using mm/dd/yyyy format
Figure 11: Date Field
Click here for further information on the Calendar.
To Complete the Balance of the Check Working Copy:
1. to the address field and enter the address of the supplier
NOTE: If an existing supplier has been used, this information will have been auto-populated.
2. to the amount field and enter the amount of the check in number format i.e. 67.98
NOTE: The text display of the value of the check will auto-populate.
3. to the City, Prov/State and PC/Zip fields and enter the required mailing information
4. to the RE: field and enter in a reason for the check
5. to the Invoice # field and enter in the invoice number if applicable
NOTE: If the invoice has already been paid, a warning dialog box will appear indicating the check number.
Figure 12: Invoice Warning
6. to Print Check option: a. If the check will be printed on a laser printer
select the Print Check option
Figure 13: Selected Print Check Option
Issue Checks 7
SchoolCash.NET V4.0.0 Updated: 01/11 KEV Group Inc. © 1996-2011
1.3 To Manage Categories:
The next step in the Issue Checks process is the assignment of a category to the check. The assignment of a value to a category is an important part of the check writing process. The Issue Checks feature will warn the user if errors have been made in the Category area. The following warnings are in place:
A warning dialog box will appear if a Category Name has not been assigned The Balance indicator will indicate outstanding monies to be assigned to a category (splitting the
category)
The category area will allow the user to : Assign a single category to the amount of the check Split the amount of the check between different categories Create a New Category and assign it to the check Use the New Category in subsequent checks
1.3.1 Category List:
The list of available categories has either been manually entered during the set-up process of the school information or has been imported as a Comma Separated Value (.csv) file. Generally this information comes from the board offices.
Category details assigned at this point will be reflected in the Ledger.
Click here for further information regarding Category Maintenance.
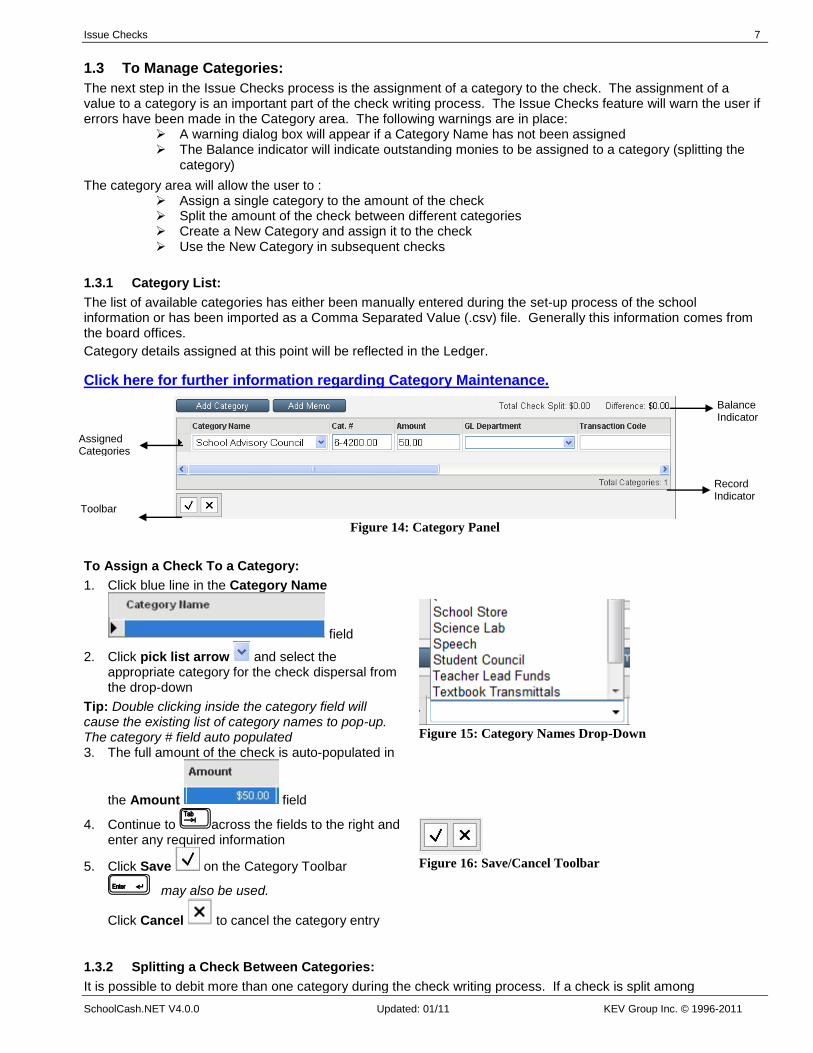
Figure 14: Category Panel
To Assign a Check To a Category:
1. Click blue line in the Category Name
field
2. Click pick list arrow and select the appropriate category for the check dispersal from the drop-down
Tip: Double clicking inside the category field will cause the existing list of category names to pop-up. The category # field auto populated 3. The full amount of the check is auto-populated in
the Amount field
4. Continue to across the fields to the right and enter any required information
5. Click Save on the Category Toolbar
may also be used.
Click Cancel to cancel the category entry
Figure 15: Category Names Drop-Down
Figure 16: Save/Cancel Toolbar
1.3.2 Splitting a Check Between Categories:
It is possible to debit more than one category during the check writing process. If a check is split among
Assigned Categories
Toolbar
Balance Indicator
Record Indicator
8 Issue Checks
KEV Group Inc. © 1996-2011 Updated: 01/11 SchoolCash.NET V4.0.0
categories, the Print Check as List and Print Statement options will print and itemize the category dispersal.
To Assign Another Category To The Check (split the check assignment):
1. Enter the first category and the amount to be debited from that category
2. Click Save
3. Click Insert Row icon on the toolbar in the Category area
A new category row will appear above the selected row in the category assignment area.
4. Click Category Name field and select another category from the list
5. to move to the Amount field 6. Enter the amount to be debited from the category
7. Click Save Continue this process until the required category information has been entered and Total Check Split and the face value of the check are equal and the Difference: is $0.00
Figure 17: Inserted Category Row
Figure 18: Category Split Indicator
At the conclusion of the category assignment and final save, the Total Check Split: amount and the face amount of the check must be equal. The Difference: must be $0.00.
1.3.3 Tax Calculations:
Canadian Users of SchoolCash.NET should click here for instructions regarding Tax Rebates.
1.3.4 Create a New Category While Issuing a Check:
During the check writing process, it may be necessary to add a new category to the current category list.
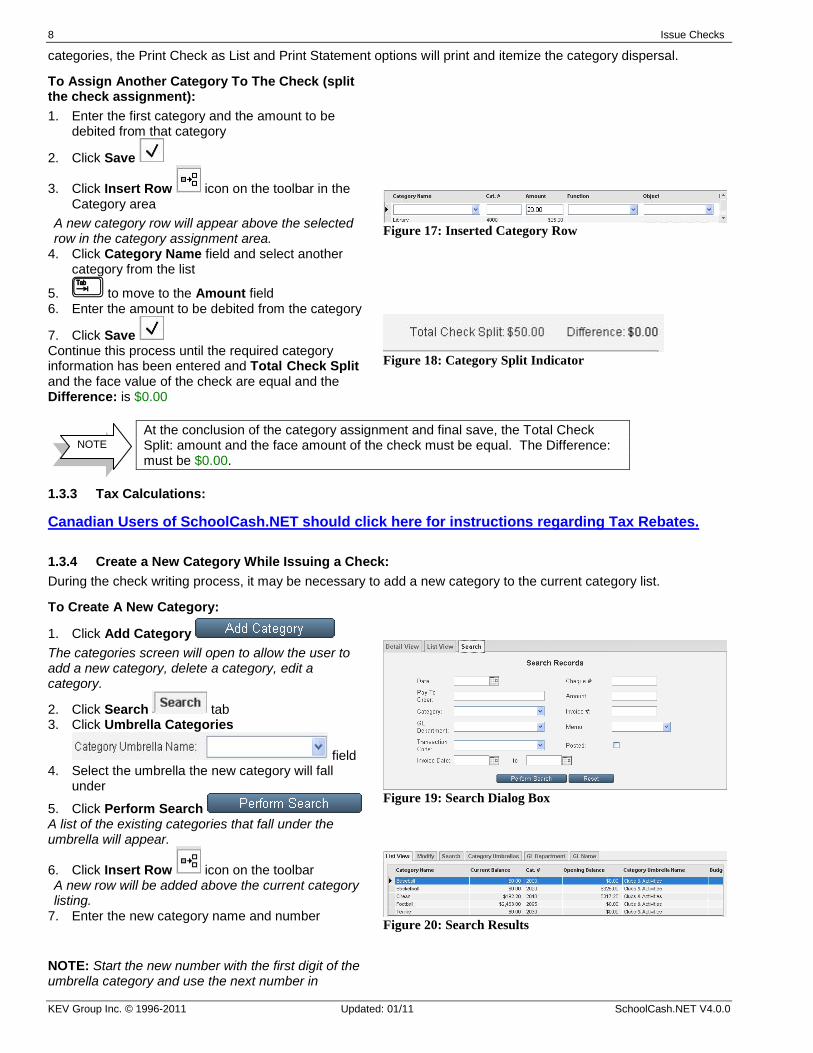
To Create A New Category:
1. Click Add Category
The categories screen will open to allow the user to add a new category, delete a category, edit a category.
2. Click Search tab 3. Click Umbrella Categories
field 4. Select the umbrella the new category will fall
under
5. Click Perform Search A list of the existing categories that fall under the umbrella will appear.
6. Click Insert Row icon on the toolbar A new row will be added above the current category listing.
7. Enter the new category name and number
NOTE: Start the new number with the first digit of the umbrella category and use the next number in
Figure 19: Search Dialog Box
Figure 20: Search Results
NOTE
Issue Checks 9
SchoolCash.NET V4.0.0 Updated: 01/11 KEV Group Inc. © 1996-2011
sequence. 8. Select the Umbrella from the drop-down list
9. Click Save OR
Click Cancel to cancel the entry
The Total Rows indicator will increase by one The New Category will now be available for future
use The Category Name will now appear in the
Category Pick List
10. Click Return to Check to return to the Issue Checks window
11. to the Memo field
1.4 Memo Field:
The Memo field is used to „TRACK‟ specific transactions. For Example: The school has Maintenance Category. This invoice was for repairs to the Playground Equipment. The category would be established as Maintenance, but the Memo field could indicate Playground Equipment. Memo field entries are an option in Report 11
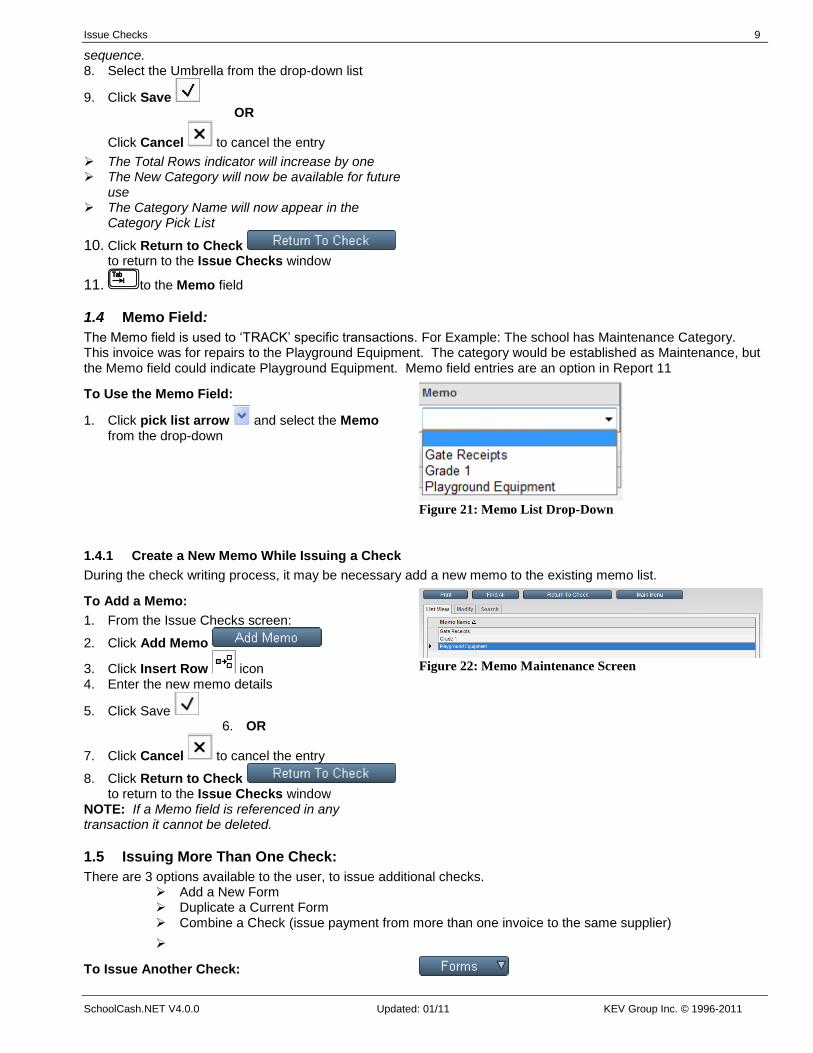
To Use the Memo Field:
1. Click pick list arrow and select the Memo from the drop-down
Figure 21: Memo List Drop-Down
1.4.1 Create a New Memo While Issuing a Check
During the check writing process, it may be necessary add a new memo to the existing memo list.
To Add a Memo:
1. From the Issue Checks screen:
2. Click Add Memo
3. Click Insert Row icon 4. Enter the new memo details
5. Click Save 6. OR
7. Click Cancel to cancel the entry
8. Click Return to Check to return to the Issue Checks window
NOTE: If a Memo field is referenced in any transaction it cannot be deleted.
Figure 22: Memo Maintenance Screen
1.5 Issuing More Than One Check:
There are 3 options available to the user, to issue additional checks. Add a New Form Duplicate a Current Form Combine a Check (issue payment from more than one invoice to the same supplier)
To Issue Another Check:
10 Issue Checks
KEV Group Inc. © 1996-2011 Updated: 01/11 SchoolCash.NET V4.0.0
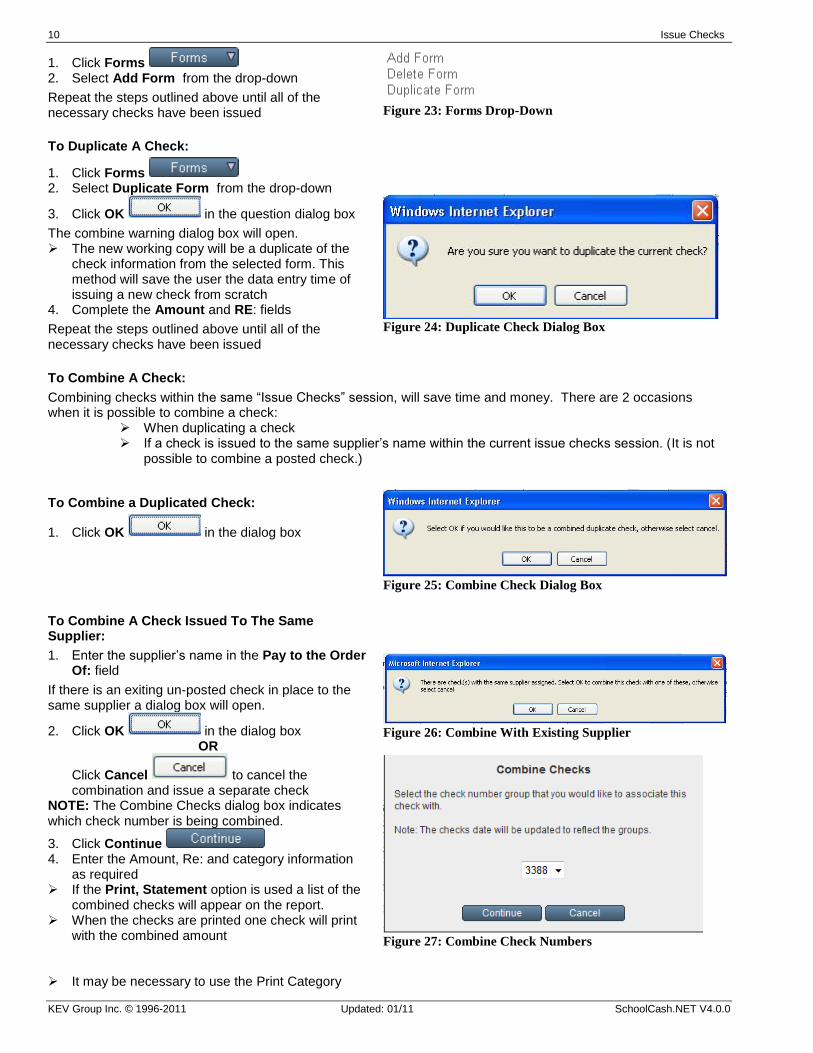
1. Click Forms 2. Select Add Form from the drop-down
Repeat the steps outlined above until all of the necessary checks have been issued
Figure 23: Forms Drop-Down
To Duplicate A Check:
1. Click Forms 2. Select Duplicate Form from the drop-down
3. Click OK in the question dialog box
The combine warning dialog box will open. The new working copy will be a duplicate of the
check information from the selected form. This method will save the user the data entry time of issuing a new check from scratch
4. Complete the Amount and RE: fields
Repeat the steps outlined above until all of the necessary checks have been issued
Figure 24: Duplicate Check Dialog Box
To Combine A Check:
Combining checks within the same “Issue Checks” session, will save time and money. There are 2 occasions when it is possible to combine a check:
When duplicating a check If a check is issued to the same supplier‟s name within the current issue checks session. (It is not
possible to combine a posted check.)
To Combine a Duplicated Check:
1. Click OK in the dialog box
Figure 25: Combine Check Dialog Box
To Combine A Check Issued To The Same Supplier:
1. Enter the supplier‟s name in the Pay to the Order Of: field
If there is an exiting un-posted check in place to the same supplier a dialog box will open.
2. Click OK in the dialog box OR
Click Cancel to cancel the combination and issue a separate check
NOTE: The Combine Checks dialog box indicates which check number is being combined.
3. Click Continue 4. Enter the Amount, Re: and category information
as required If the Print, Statement option is used a list of the
combined checks will appear on the report. When the checks are printed one check will print
with the combined amount
It may be necessary to use the Print Category
Figure 26: Combine With Existing Supplier
Figure 27: Combine Check Numbers
Issue Checks 11
SchoolCash.NET V4.0.0 Updated: 01/11 KEV Group Inc. © 1996-2011
Overflow option if several categories are debited by the combined check.
To interrupt the process, save the current check working copy, click Main Menu
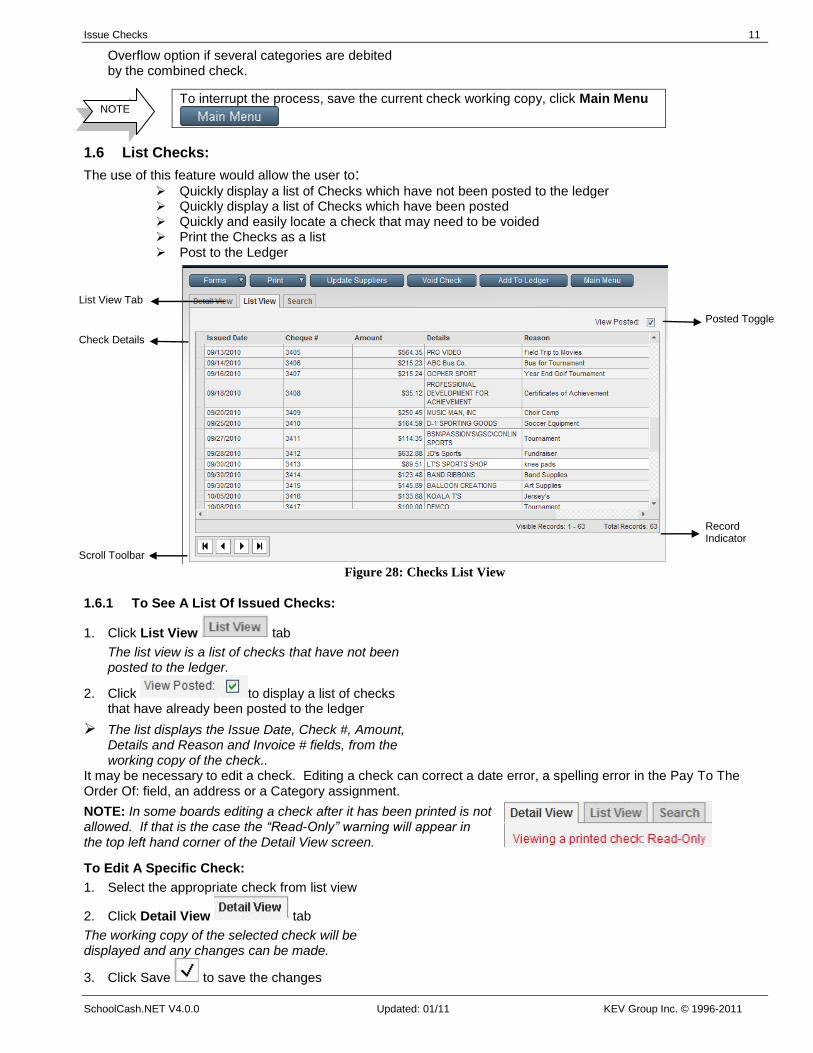
1.6 List Checks:
The use of this feature would allow the user to: Quickly display a list of Checks which have not been posted to the ledger Quickly display a list of Checks which have been posted Quickly and easily locate a check that may need to be voided Print the Checks as a list Post to the Ledger
Figure 28: Checks List View
1.6.1 To See A List Of Issued Checks:
1. Click List View tab
The list view is a list of checks that have not been posted to the ledger.
2. Click to display a list of checks that have already been posted to the ledger
The list displays the Issue Date, Check #, Amount, Details and Reason and Invoice # fields, from the working copy of the check..
It may be necessary to edit a check. Editing a check can correct a date error, a spelling error in the Pay To The Order Of: field, an address or a Category assignment.
NOTE: In some boards editing a check after it has been printed is not allowed. If that is the case the “Read-Only” warning will appear in the top left hand corner of the Detail View screen.
To Edit A Specific Check:
1. Select the appropriate check from list view
2. Click Detail View tab
The working copy of the selected check will be displayed and any changes can be made.
3. Click Save to save the changes
List View Tab
Check Details
Scroll Toolbar
Posted Toggle
Record Indicator
NOTE
12 Issue Checks
KEV Group Inc. © 1996-2011 Updated: 01/11 SchoolCash.NET V4.0.0
OR
Click Cancel to cancel the changes
Any changes to the Amount of the check may make adjustments in the category amounts necessary. Remember that the Total Split Amount and the Amount of the check must equal.
1.6.2 Delete an Un-posted Check:
During the edit process, a check can be deleted. Deleting the check allows the user to re-use the check number. Only checks that have not been added to the ledger can be deleted.
NOTE: In some schools it is not possible to delete a check that has already been printed.
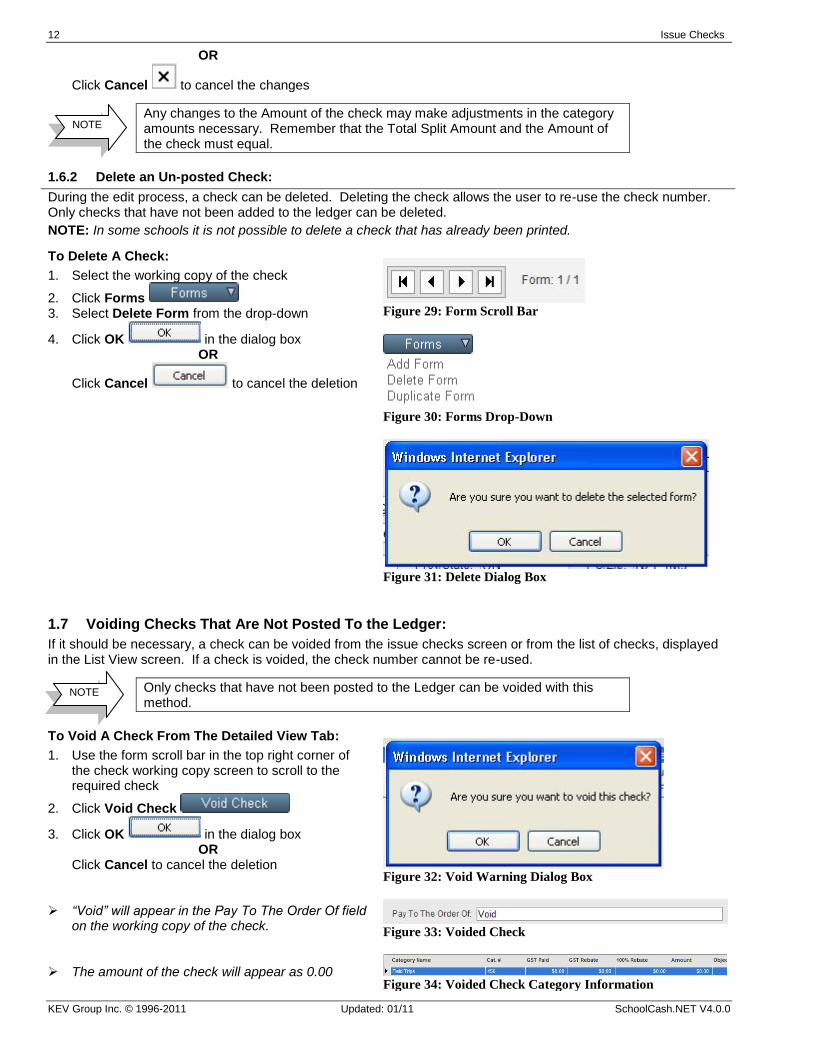
To Delete A Check:
1. Select the working copy of the check
2. Click Forms 3. Select Delete Form from the drop-down
4. Click OK in the dialog box OR
Click Cancel to cancel the deletion
Figure 29: Form Scroll Bar
Figure 30: Forms Drop-Down
Figure 31: Delete Dialog Box
1.7 Voiding Checks That Are Not Posted To the Ledger:
If it should be necessary, a check can be voided from the issue checks screen or from the list of checks, displayed in the List View screen. If a check is voided, the check number cannot be re-used.
Only checks that have not been posted to the Ledger can be voided with this method.
To Void A Check From The Detailed View Tab:
1. Use the form scroll bar in the top right corner of the check working copy screen to scroll to the required check
2. Click Void Check
3. Click OK in the dialog box OR
Click Cancel to cancel the deletion
“Void” will appear in the Pay To The Order Of field on the working copy of the check.
The amount of the check will appear as 0.00
Figure 32: Void Warning Dialog Box
Figure 33: Voided Check
Figure 34: Voided Check Category Information
NOTE
NOTE
Issue Checks 13
SchoolCash.NET V4.0.0 Updated: 01/11 KEV Group Inc. © 1996-2011
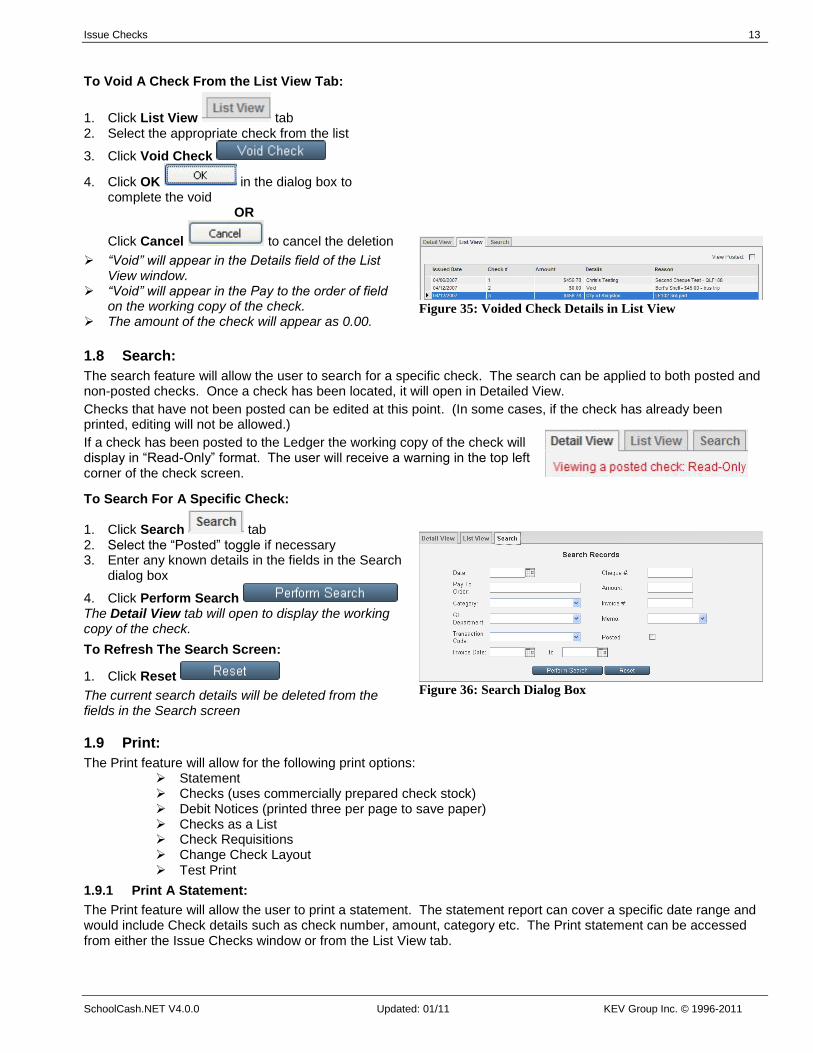
To Void A Check From the List View Tab:
1. Click List View tab 2. Select the appropriate check from the list
3. Click Void Check
4. Click OK in the dialog box to complete the void
OR
Click Cancel to cancel the deletion
“Void” will appear in the Details field of the List View window.
“Void” will appear in the Pay to the order of field on the working copy of the check.
The amount of the check will appear as 0.00.
Figure 35: Voided Check Details in List View
1.8 Search:
The search feature will allow the user to search for a specific check. The search can be applied to both posted and non-posted checks. Once a check has been located, it will open in Detailed View.
Checks that have not been posted can be edited at this point. (In some cases, if the check has already been printed, editing will not be allowed.)
If a check has been posted to the Ledger the working copy of the check will display in “Read-Only” format. The user will receive a warning in the top left corner of the check screen.
To Search For A Specific Check:
1. Click Search tab 2. Select the “Posted” toggle if necessary 3. Enter any known details in the fields in the Search
dialog box
4. Click Perform Search The Detail View tab will open to display the working copy of the check.
To Refresh The Search Screen:
1. Click Reset
The current search details will be deleted from the fields in the Search screen
Figure 36: Search Dialog Box
1.9 Print:
The Print feature will allow for the following print options: Statement Checks (uses commercially prepared check stock) Debit Notices (printed three per page to save paper) Checks as a List Check Requisitions Change Check Layout Test Print
1.9.1 Print A Statement:
The Print feature will allow the user to print a statement. The statement report can cover a specific date range and would include Check details such as check number, amount, category etc. The Print statement can be accessed from either the Issue Checks window or from the List View tab.
14 Issue Checks
KEV Group Inc. © 1996-2011 Updated: 01/11 SchoolCash.NET V4.0.0
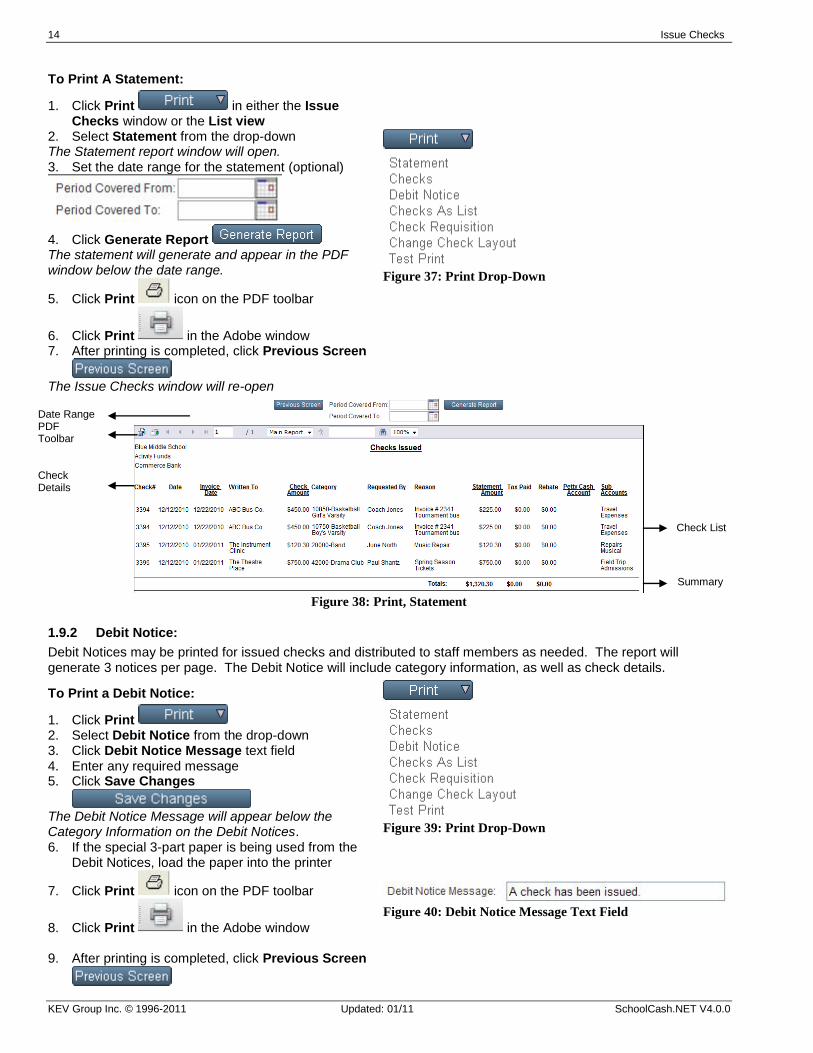
To Print A Statement:
1. Click Print in either the Issue Checks window or the List view
2. Select Statement from the drop-down The Statement report window will open. 3. Set the date range for the statement (optional)
4. Click Generate Report The statement will generate and appear in the PDF window below the date range.
5. Click Print icon on the PDF toolbar
6. Click Print in the Adobe window 7. After printing is completed, click Previous Screen
The Issue Checks window will re-open
Figure 37: Print Drop-Down
Figure 38: Print, Statement
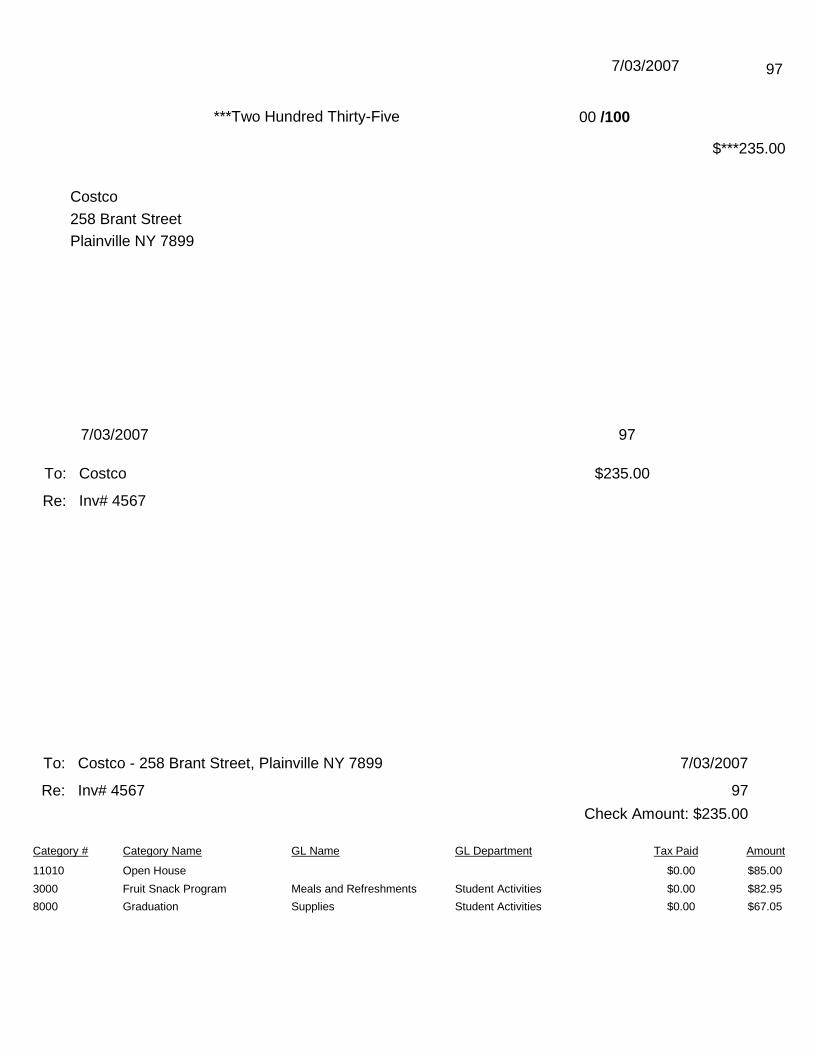
1.9.2 Debit Notice:
Debit Notices may be printed for issued checks and distributed to staff members as needed. The report will generate 3 notices per page. The Debit Notice will include category information, as well as check details.
To Print a Debit Notice:
1. Click Print 2. Select Debit Notice from the drop-down 3. Click Debit Notice Message text field 4. Enter any required message 5. Click Save Changes
The Debit Notice Message will appear below the Category Information on the Debit Notices. 6. If the special 3-part paper is being used from the
Debit Notices, load the paper into the printer
7. Click Print icon on the PDF toolbar
8. Click Print in the Adobe window 9. After printing is completed, click Previous Screen
Figure 39: Print Drop-Down
Figure 40: Debit Notice Message Text Field
Date Range PDF Toolbar Check Details
Check List
Summary

Issue Checks 15
SchoolCash.NET V4.0.0 Updated: 01/11 KEV Group Inc. © 1996-2011
The Issue Checks window will re-open
Click here for further information on special paper products.
Figure 41: Debit Notice
1.9.3 Checks as List:
The Print Checks as List option will allow the user to print a list of checks that has not yet been posted to the Ledger. Printing the list of checks offers a good backup of the checks that have not yet been posted. The printed report includes: Check #, Payee, Category Name and Category # and Amount.
1. Click Print 2. Select Checks As List from the drop-down
3. Click Print icon on the PDF toolbar
4. Click Print in the Adobe window 5. After printing is completed, click Previous Screen
The Issue Checks window will re-open.
Figure 42: Print Drop-Down
Figure 43: Print, Checks as List
Bank Account Information, Date Contact Information
Category Name
Category Balance
Check Details
16 Issue Checks
KEV Group Inc. © 1996-2011 Updated: 01/11 SchoolCash.NET V4.0.0
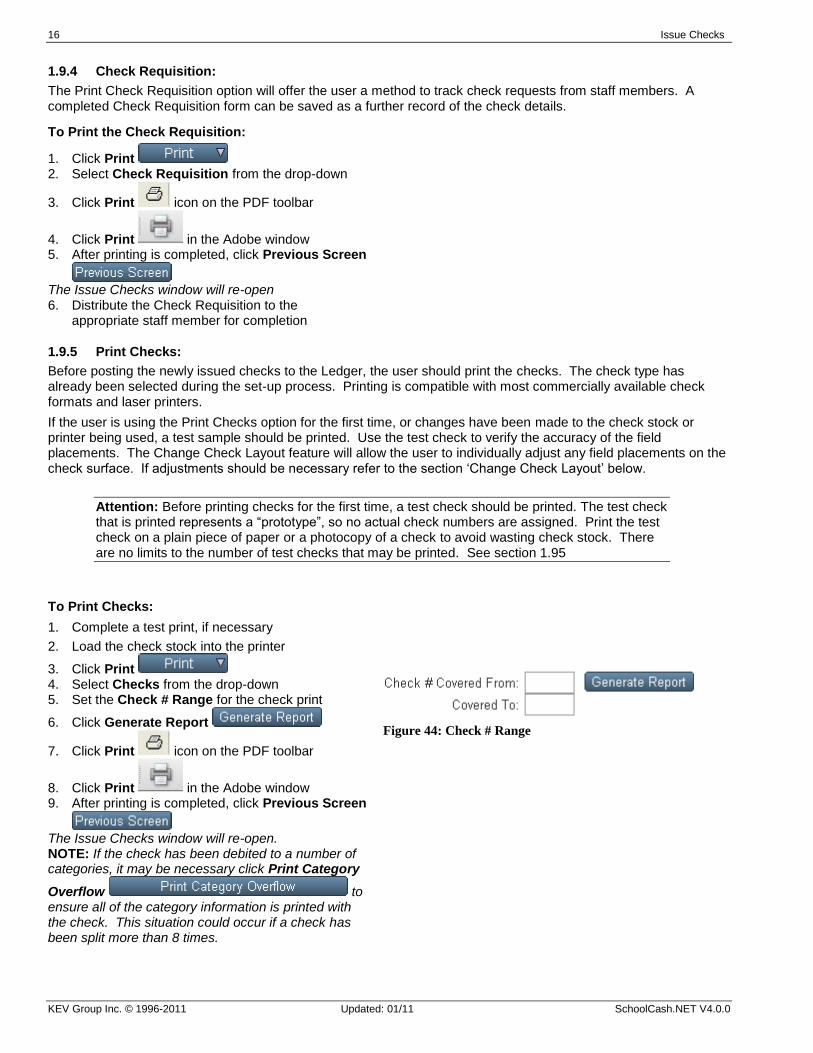
1.9.4 Check Requisition:
The Print Check Requisition option will offer the user a method to track check requests from staff members. A completed Check Requisition form can be saved as a further record of the check details.
To Print the Check Requisition:
1. Click Print 2. Select Check Requisition from the drop-down
3. Click Print icon on the PDF toolbar
4. Click Print in the Adobe window 5. After printing is completed, click Previous Screen
The Issue Checks window will re-open 6. Distribute the Check Requisition to the
appropriate staff member for completion
1.9.5 Print Checks:
Before posting the newly issued checks to the Ledger, the user should print the checks. The check type has already been selected during the set-up process. Printing is compatible with most commercially available check formats and laser printers.
If the user is using the Print Checks option for the first time, or changes have been made to the check stock or printer being used, a test sample should be printed. Use the test check to verify the accuracy of the field placements. The Change Check Layout feature will allow the user to individually adjust any field placements on the check surface. If adjustments should be necessary refer to the section „Change Check Layout‟ below.
Attention: Before printing checks for the first time, a test check should be printed. The test check that is printed represents a “prototype”, so no actual check numbers are assigned. Print the test check on a plain piece of paper or a photocopy of a check to avoid wasting check stock. There are no limits to the number of test checks that may be printed. See section 1.95
To Print Checks:
1. Complete a test print, if necessary
2. Load the check stock into the printer
3. Click Print 4. Select Checks from the drop-down 5. Set the Check # Range for the check print
6. Click Generate Report
7. Click Print icon on the PDF toolbar
8. Click Print in the Adobe window 9. After printing is completed, click Previous Screen
The Issue Checks window will re-open. NOTE: If the check has been debited to a number of categories, it may be necessary click Print Category
Overflow to ensure all of the category information is printed with the check. This situation could occur if a check has been split more than 8 times.
Figure 44: Check # Range
Issue Checks 17
SchoolCash.NET V4.0.0 Updated: 01/11 KEV Group Inc. © 1996-2011
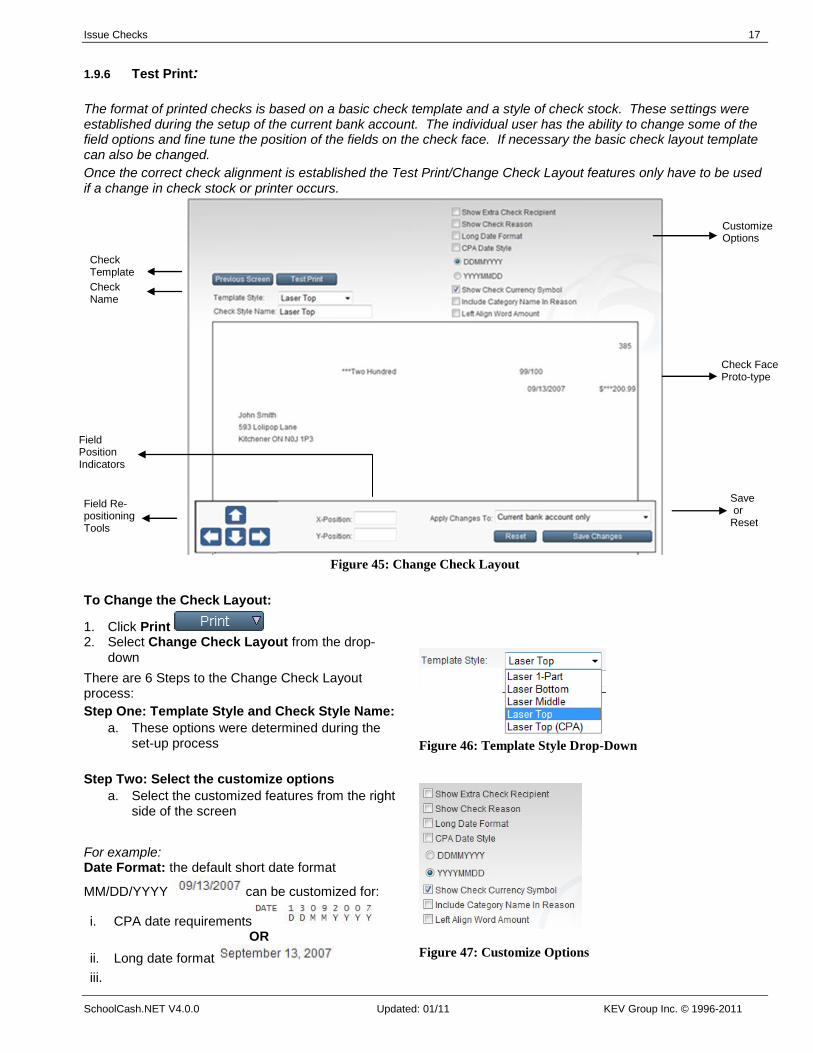
1.9.6 Test Print:
The format of printed checks is based on a basic check template and a style of check stock. These settings were established during the setup of the current bank account. The individual user has the ability to change some of the field options and fine tune the position of the fields on the check face. If necessary the basic check layout template can also be changed.
Once the correct check alignment is established the Test Print/Change Check Layout features only have to be used if a change in check stock or printer occurs.
Figure 45: Change Check Layout
To Change the Check Layout:
1. Click Print 2. Select Change Check Layout from the drop-
down
There are 6 Steps to the Change Check Layout process:
Step One: Template Style and Check Style Name:
a. These options were determined during the set-up process
Step Two: Select the customize options
a. Select the customized features from the right side of the screen
For example: Date Format: the default short date format
MM/DD/YYYY can be customized for:
i. CPA date requirements OR
ii. Long date format
iii.
Figure 46: Template Style Drop-Down
Figure 47: Customize Options
Check Template
Check Name
Field Position Indicators
Field Re-positioning Tools
Customize Options
Check Face Proto-type
Save or Reset
18 Issue Checks
KEV Group Inc. © 1996-2011 Updated: 01/11 SchoolCash.NET V4.0.0
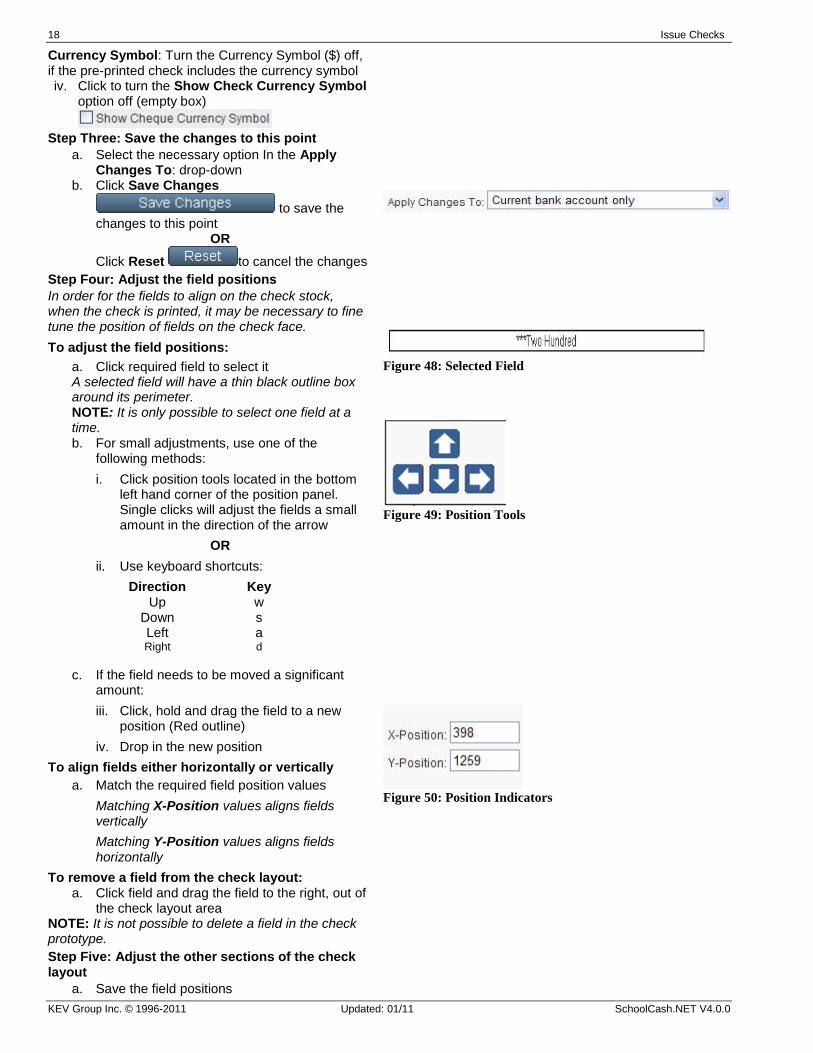
Currency Symbol: Turn the Currency Symbol ($) off, if the pre-printed check includes the currency symbol iv. Click to turn the Show Check Currency Symbol
option off (empty box)
Step Three: Save the changes to this point
a. Select the necessary option In the Apply Changes To: drop-down
b. Click Save Changes
to save the changes to this point
OR
Click Reset to cancel the changes
Step Four: Adjust the field positions
In order for the fields to align on the check stock, when the check is printed, it may be necessary to fine tune the position of fields on the check face.
To adjust the field positions:
a. Click required field to select it A selected field will have a thin black outline box around its perimeter. NOTE: It is only possible to select one field at a time. b. For small adjustments, use one of the
following methods:
i. Click position tools located in the bottom left hand corner of the position panel. Single clicks will adjust the fields a small amount in the direction of the arrow
OR
ii. Use keyboard shortcuts:
Direction Key Up w
Down s Left a Right d
c. If the field needs to be moved a significant amount:
iii. Click, hold and drag the field to a new position (Red outline)
iv. Drop in the new position
To align fields either horizontally or vertically
a. Match the required field position values
Matching X-Position values aligns fields vertically
Matching Y-Position values aligns fields horizontally
To remove a field from the check layout: a. Click field and drag the field to the right, out of
the check layout area NOTE: It is not possible to delete a field in the check prototype.
Step Five: Adjust the other sections of the check layout
a. Save the field positions
Figure 48: Selected Field
Figure 49: Position Tools
Figure 50: Position Indicators
Issue Checks 19
SchoolCash.NET V4.0.0 Updated: 01/11 KEV Group Inc. © 1996-2011
b. Scroll down the window using the blue vertical scroll bar on the far right hand edge of the window
c. Continue adjusting field placement as required
d. Save the changes
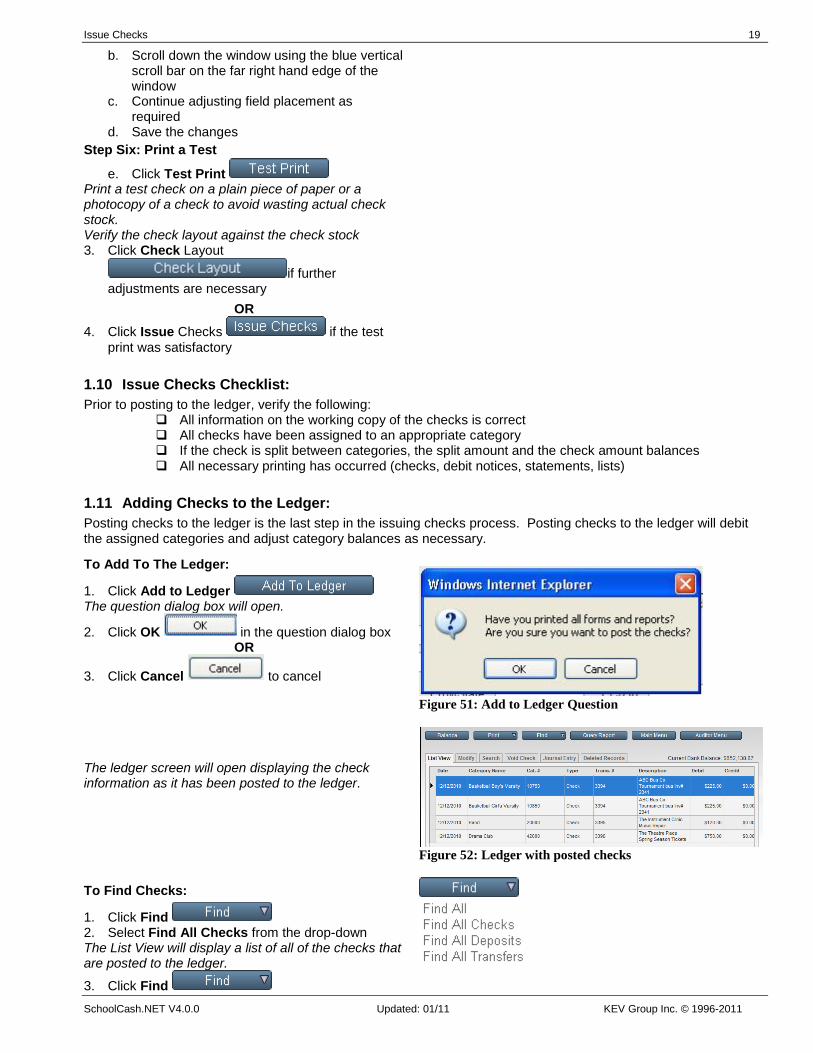
Step Six: Print a Test
e. Click Test Print Print a test check on a plain piece of paper or a photocopy of a check to avoid wasting actual check stock. Verify the check layout against the check stock 3. Click Check Layout
if further adjustments are necessary
OR
4. Click Issue Checks if the test
print was satisfactory
1.10 Issue Checks Checklist:
Prior to posting to the ledger, verify the following: All information on the working copy of the checks is correct All checks have been assigned to an appropriate category If the check is split between categories, the split amount and the check amount balances All necessary printing has occurred (checks, debit notices, statements, lists)
1.11 Adding Checks to the Ledger:
Posting checks to the ledger is the last step in the issuing checks process. Posting checks to the ledger will debit the assigned categories and adjust category balances as necessary.
To Add To The Ledger:
1. Click Add to Ledger The question dialog box will open.
2. Click OK in the question dialog box OR
3. Click Cancel to cancel
The ledger screen will open displaying the check information as it has been posted to the ledger.
Figure 51: Add to Ledger Question
Figure 52: Ledger with posted checks
To Find Checks:
1. Click Find 2. Select Find All Checks from the drop-down The List View will display a list of all of the checks that are posted to the ledger.
3. Click Find
20 Issue Checks
KEV Group Inc. © 1996-2011 Updated: 01/11 SchoolCash.NET V4.0.0
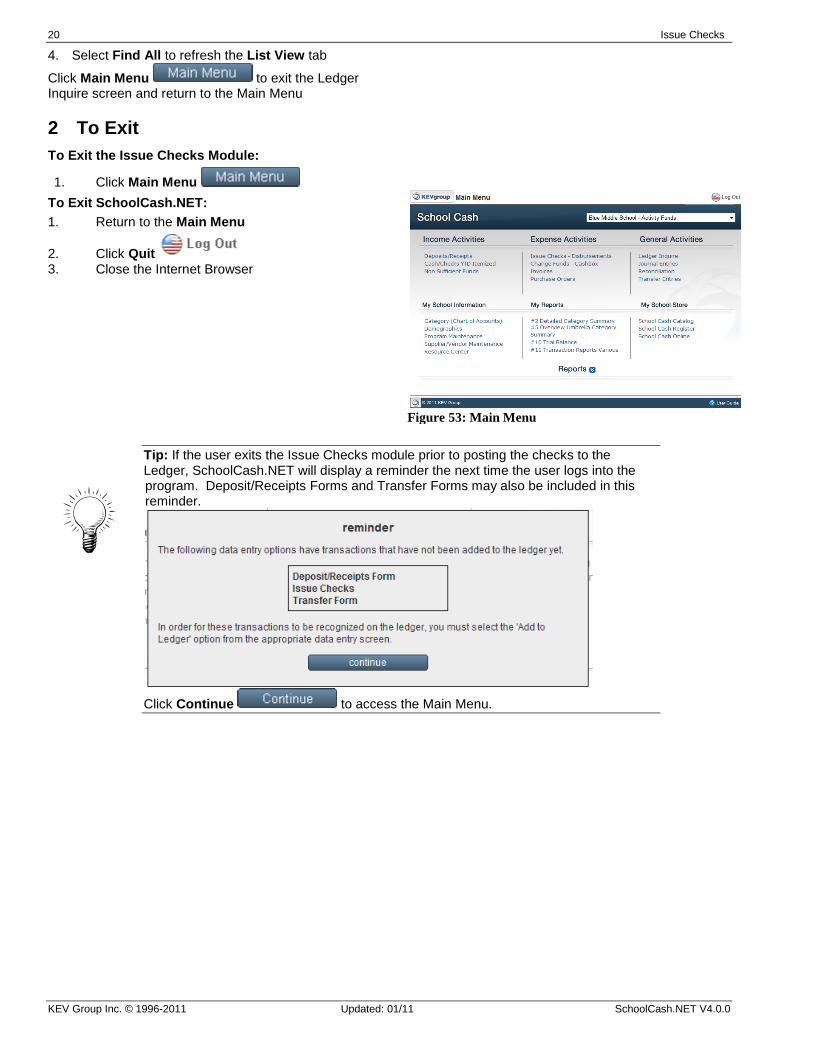
4. Select Find All to refresh the List View tab
Click Main Menu to exit the Ledger Inquire screen and return to the Main Menu
2 To Exit
To Exit the Issue Checks Module:
1. Click Main Menu
To Exit SchoolCash.NET:
1. Return to the Main Menu
2. Click Quit 3. Close the Internet Browser
Figure 53: Main Menu
Tip: If the user exits the Issue Checks module prior to posting the checks to the Ledger, SchoolCash.NET will display a reminder the next time the user logs into the program. Deposit/Receipts Forms and Transfer Forms may also be included in this reminder.
Click Continue to access the Main Menu.
Issue Checks 21
SchoolCash.NET V4.0.0 Updated: 01/11 KEV Group Inc. © 1996-2011
Appendix:
Issue Checks Print Samples Samples Include:
Statement Checks Debit Notice Checks as List Requisition

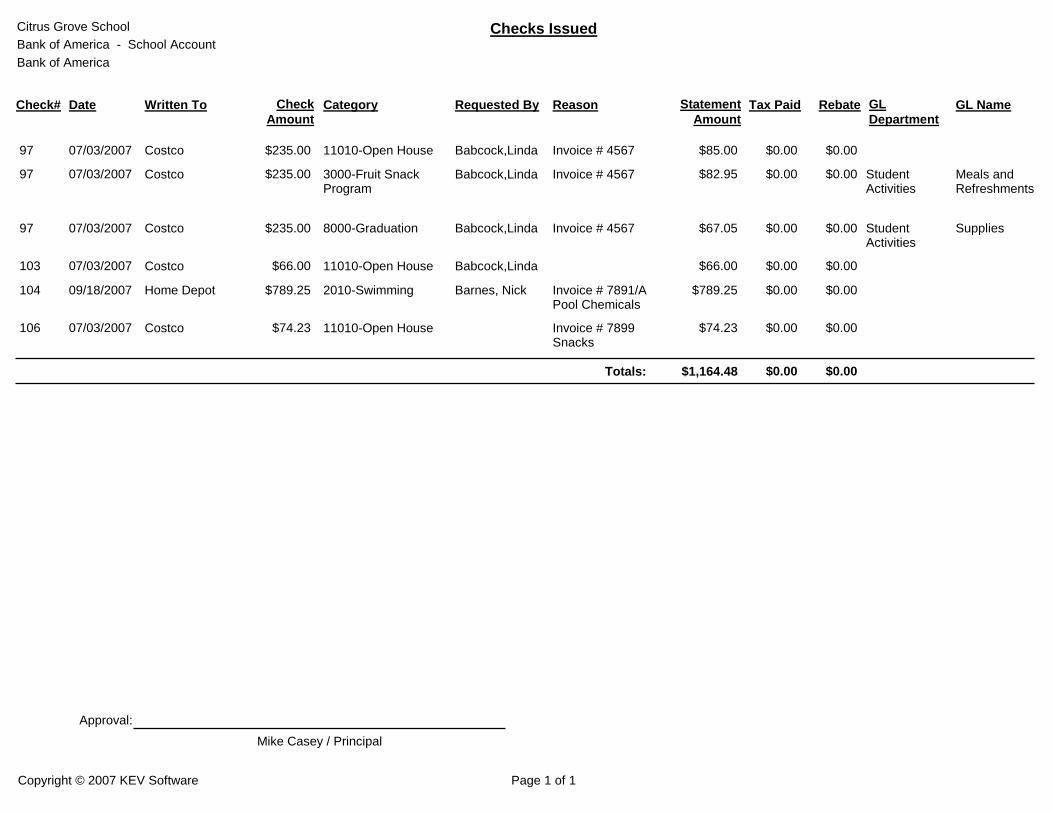
Citrus Grove School
Bank of America - School Account
Bank of America
Checks Issued
Check# Date Written To Check
Amount Category Requested By Reason Statement
Amount Tax Paid Rebate GL
Department GL Name
97 $235.00 07/03/2007 Costco 11010-Open House Babcock,Linda $85.00 $0.00 $0.00 Invoice # 4567
97 $235.00 07/03/2007 Costco 3000-Fruit Snack Program
Babcock,Linda $82.95 $0.00 $0.00 Student Activities
Meals and Refreshments
Invoice # 4567
97 $235.00 07/03/2007 Costco 8000-Graduation Babcock,Linda $67.05 $0.00 $0.00 Student Activities
Supplies Invoice # 4567
103 $66.00 07/03/2007 Costco 11010-Open House Babcock,Linda $66.00 $0.00 $0.00
104 $789.25 09/18/2007 Home Depot 2010-Swimming Barnes, Nick $789.25 $0.00 $0.00 Invoice # 7891/A Pool Chemicals
106 $74.23 07/03/2007 Costco 11010-Open House $74.23 $0.00 $0.00 Invoice # 7899 Snacks
Totals: $1,164.48 $0.00 $0.00
Copyright © 2007 KEV Software Page 1 of 1
Approval:
Mike Casey / Principal
97
Costco
00 /100 ***Two Hundred Thirty-Five
7/03/2007
258 Brant Street
Plainville NY 7899
7/03/2007
To:
Re:
Costco
Inv# 4567
97
$235.00
Inv# 4567 Re:
To: 7/03/2007
97
Check Amount: $235.00
Category # Category Name GL Name GL Department Tax Paid Amount
11010 Open House $0.00 $85.00
3000 Fruit Snack Program Meals and Refreshments Student Activities $0.00 $82.95
8000 Graduation Supplies Student Activities $0.00 $67.05
$***235.00
Costco - 258 Brant Street, Plainville NY 7899
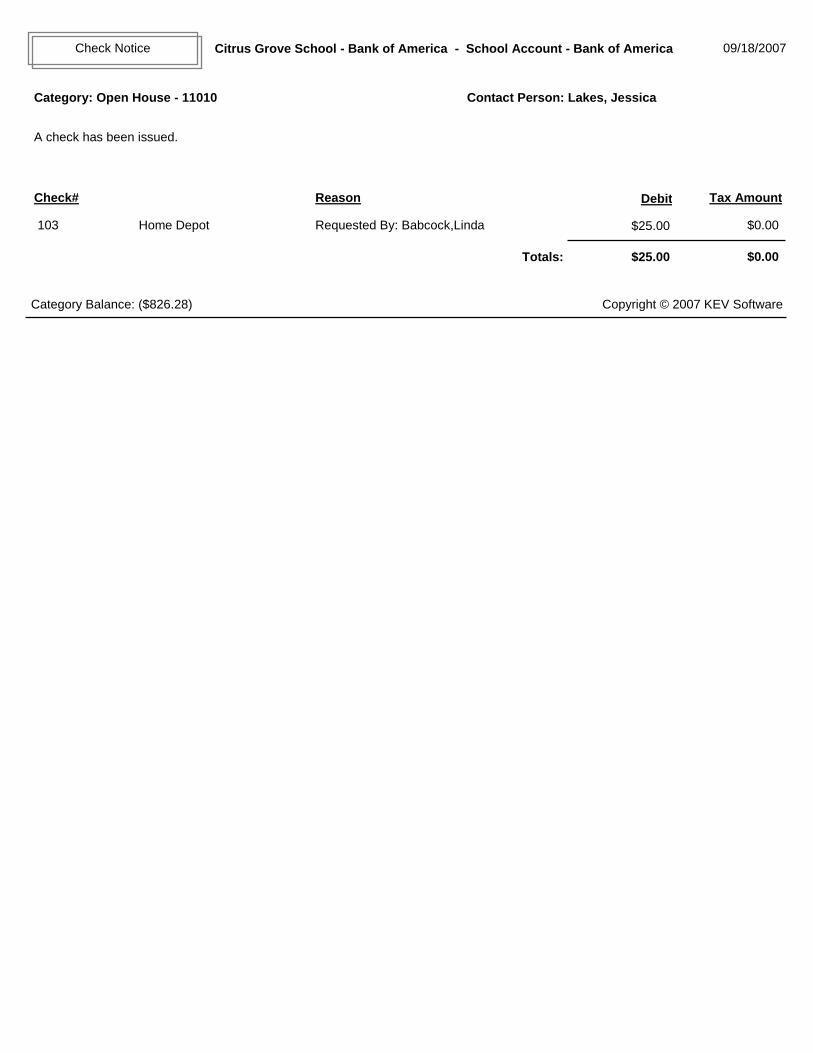
Check Notice Citrus Grove School - Bank of America - School Account - Bank of America 09/18/2007
Category: Open House - 11010 Contact Person: Lakes, Jessica
A check has been issued.
Check# Reason Debit Tax Amount
$25.00 $0.00 Requested By: Babcock,Linda Home Depot 103
Copyright © 2007 KEV Software Category Balance: ($826.28)
Totals: $25.00 $0.00
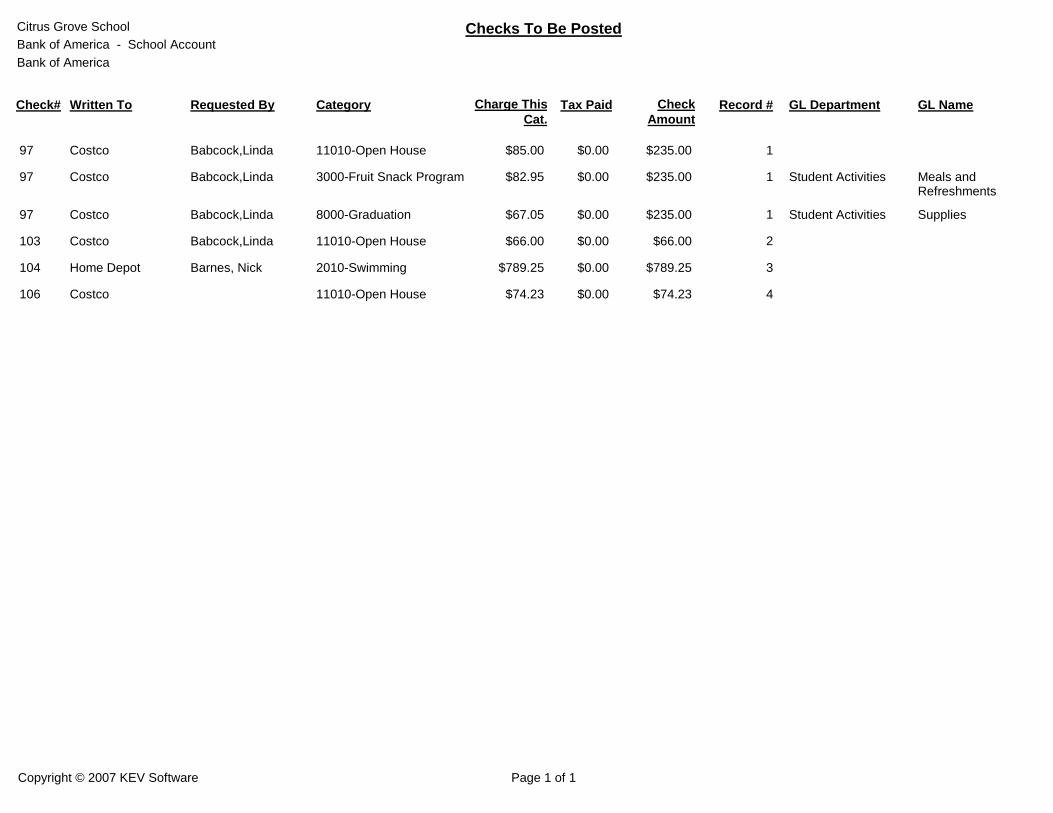
Citrus Grove School
Bank of America - School Account
Bank of America
Checks To Be Posted
Check# Written To Check
Amount Category Requested By Tax Paid GL Department GL Name Charge This
Cat. Record #
97 $235.00 Costco 11010-Open House Babcock,Linda $85.00 $0.00 1
97 $235.00 Costco 3000-Fruit Snack Program Babcock,Linda $82.95 $0.00 Student Activities Meals and Refreshments
1
97 $235.00 Costco 8000-Graduation Babcock,Linda $67.05 $0.00 Student Activities Supplies 1
103 $66.00 Costco 11010-Open House Babcock,Linda $66.00 $0.00 2
104 $789.25 Home Depot 2010-Swimming Barnes, Nick $789.25 $0.00 3
106 $74.23 Costco 11010-Open House $74.23 $0.00 4
Copyright © 2007 KEV Software Page 1 of 1
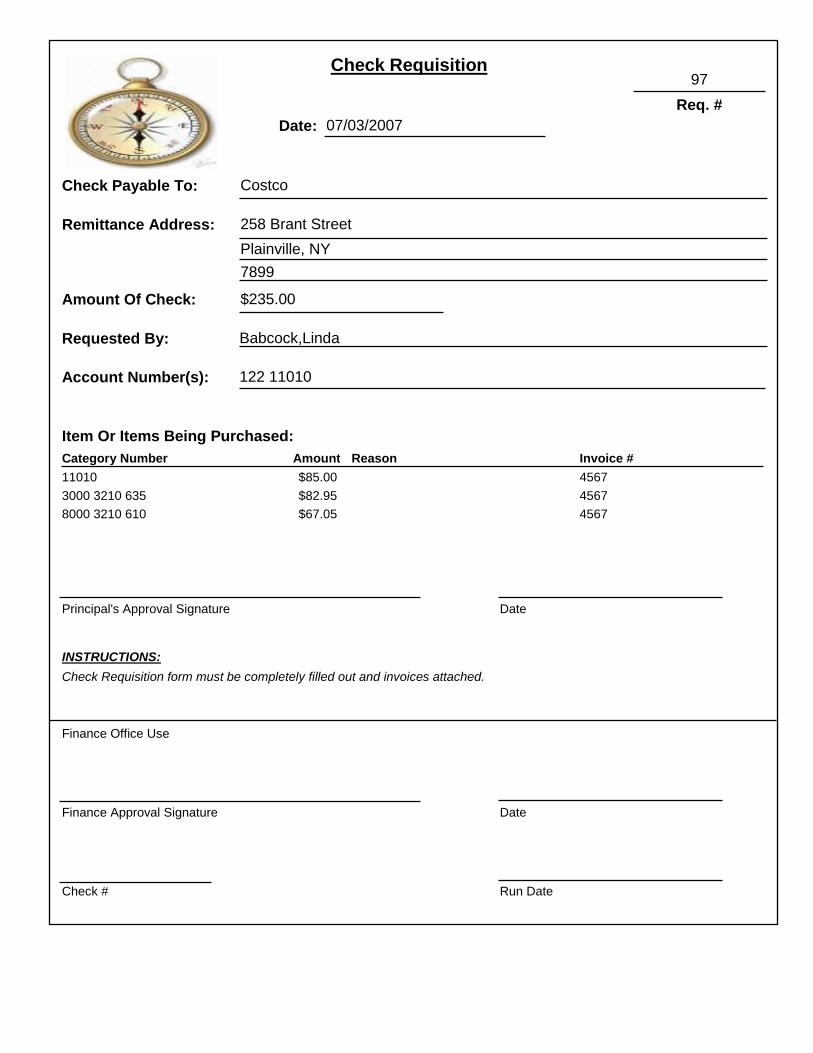
Check Requisition
Req. #
Date:
Check Payable To:
Remittance Address:
Amount Of Check:
Requested By:
Account Number(s):
Item Or Items Being Purchased:
Principal's Approval Signature Date
Finance Office Use
INSTRUCTIONS:
Check Requisition form must be completely filled out and invoices attached.
Finance Approval Signature Date
Check # Run Date
97
07/03/2007
Costco
258 Brant Street
7899
Plainville, NY
$235.00
Babcock,Linda
122 11010
Category Number Amount Reason Invoice #
11010 $85.00 4567
3000 3210 635 $82.95 4567
8000 3210 610 $67.05 4567