Schedules: Beyond the Basics -...
24
Schedules: Beyond the Basics Michael Massey – Applied Software AB1712 - If you can model it, you can schedule it. Using schedules in Autodesk® Revit software is a powerful way of viewing the information in your Building Information Modeling (BIM) projects. Most users create basic schedules and have a good understanding of how to create schedules. What most users do not know is some of the more powerful features of schedules. This class will explore some of the lesser- known aspects of creating schedules, such as creating embedded schedules, using conditional formatting in schedules, and understanding key schedules. We will also dive into shared and project parameters and how to use them in calculated formulas. Learning Objectives At the end of this class, you will be able to: Know when and where to use Key Schedules Create an Embedded Schedule Know how to use Conditional Formatting in Schedules Understand how to work with Parameters in Schedules About the Speaker Mike has more than 15 years of experience as an architect working on various types of projects. He is currently Senior AEC Building Application Specialist at Applied Software, where he helps firms assess, plan, and implement new technology. His knowledge and enthusiasm for AutoCAD® products runs deep; he has been a user of AutoCAD since Release 9 and of AutoCAD Architecture since its debut. He has also developed a deep appreciation for Autodesk® Revit®. Mike is a contributing author of Autodesk Official Training Courseware and a repeated speaker at Autodesk University. [email protected]
Transcript of Schedules: Beyond the Basics -...

Schedules: Beyond the Basics Michael Massey – Applied Software
AB1712 - If you can model it, you can schedule it. Using schedules in Autodesk® Revit software is a
powerful way of viewing the information in your Building Information Modeling (BIM) projects. Most users create basic schedules and have a good understanding of how to create schedules. What most users do not know is some of the more powerful features of schedules. This class will explore some of the lesser-known aspects of creating schedules, such as creating embedded schedules, using conditional formatting in schedules, and understanding key schedules. We will also dive into shared and project parameters and how to use them in calculated formulas.
Learning Objectives At the end of this class, you will be able to:
Know when and where to use Key Schedules
Create an Embedded Schedule
Know how to use Conditional Formatting in Schedules
Understand how to work with Parameters in Schedules
About the Speaker
Mike has more than 15 years of experience as an architect working on various types of
projects. He is currently Senior AEC Building Application Specialist at Applied Software, where
he helps firms assess, plan, and implement new technology. His knowledge and enthusiasm
for AutoCAD® products runs deep; he has been a user of AutoCAD since Release 9 and of
AutoCAD Architecture since its debut. He has also developed a deep appreciation for
Autodesk® Revit®. Mike is a contributing author of Autodesk Official Training Courseware and
a repeated speaker at Autodesk University.
Schedules: Beyond the Basics
2
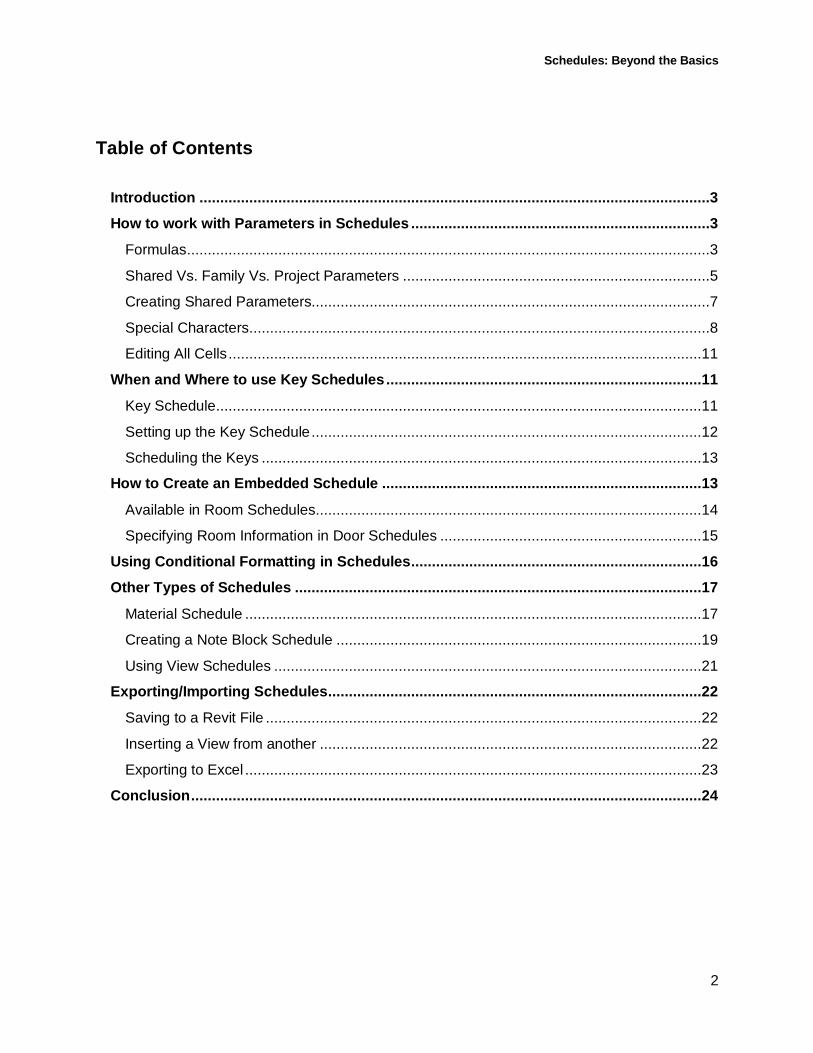
Table of Contents
Introduction ...........................................................................................................................3
How to work with Parameters in Schedules ........................................................................3
Formulas ..............................................................................................................................3
Shared Vs. Family Vs. Project Parameters ..........................................................................5
Creating Shared Parameters................................................................................................7
Special Characters ...............................................................................................................8
Editing All Cells ..................................................................................................................11
When and Where to use Key Schedules ............................................................................11
Key Schedule .....................................................................................................................11
Setting up the Key Schedule ..............................................................................................12
Scheduling the Keys ..........................................................................................................13
How to Create an Embedded Schedule .............................................................................13
Available in Room Schedules.............................................................................................14
Specifying Room Information in Door Schedules ...............................................................15
Using Conditional Formatting in Schedules ......................................................................16
Other Types of Schedules ..................................................................................................17
Material Schedule ..............................................................................................................17
Creating a Note Block Schedule ........................................................................................19
Using View Schedules .......................................................................................................21
Exporting/Importing Schedules ..........................................................................................22
Saving to a Revit File .........................................................................................................22
Inserting a View from another ............................................................................................22
Exporting to Excel ..............................................................................................................23
Conclusion ...........................................................................................................................24
Schedules: Beyond the Basics
3
Introduction Welcome to this session! I hope you will be able to go Beyond the Basics when using
schedules after this session. Schedules are a power part of Revit. The ‘I” in BIM stands for
information. Schedules are the key to getting to the information.
Creating basic schedules in Revit are pretty simple. I want to discuss some of the lesser known
areas of schedules and show some examples that will improve your ability to retrieve the
information you need.
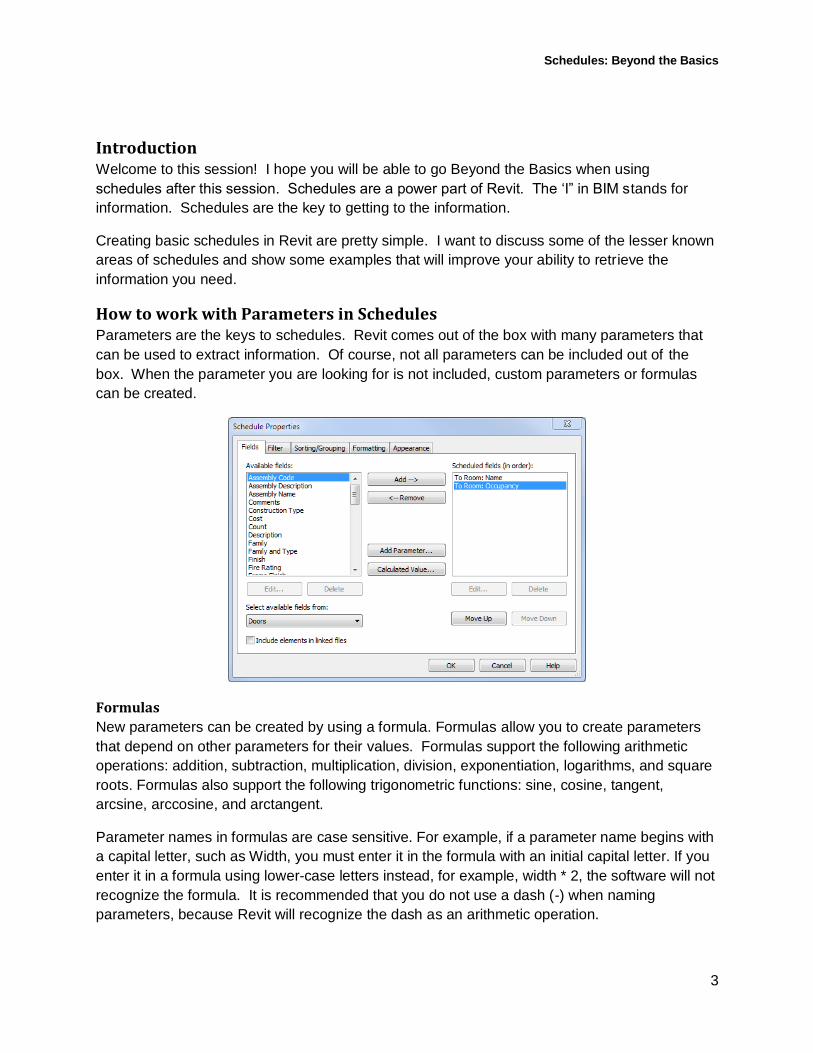
How to work with Parameters in Schedules Parameters are the keys to schedules. Revit comes out of the box with many parameters that
can be used to extract information. Of course, not all parameters can be included out of the
box. When the parameter you are looking for is not included, custom parameters or formulas
can be created.
Formulas
New parameters can be created by using a formula. Formulas allow you to create parameters
that depend on other parameters for their values. Formulas support the following arithmetic
operations: addition, subtraction, multiplication, division, exponentiation, logarithms, and square
roots. Formulas also support the following trigonometric functions: sine, cosine, tangent,
arcsine, arccosine, and arctangent.
Parameter names in formulas are case sensitive. For example, if a parameter name begins with
a capital letter, such as Width, you must enter it in the formula with an initial capital letter. If you
enter it in a formula using lower-case letters instead, for example, width * 2, the software will not
recognize the formula. It is recommended that you do not use a dash (-) when naming
parameters, because Revit will recognize the dash as an arithmetic operation.

Schedules: Beyond the Basics
4
Inconsistent Units
Typically an error in units will come from breaking the rules required by some operation,
meaning an operator or function. For example:
Addition requires both inputs, as well as the result, to have the same numerical unit type.
Multiplication can support any numerical unit type for the inputs, not necessarily the
same, but the result units must be the product of the input units (e.g. length * area =
volume).
sine() requires the input to be an angle and the output to be a unit less number.
if() requires the first argument to be Boolean (Yes/No). The other two arguments and
the result can be numerical or not, but they must all be the same.
By far the most common error when working with formulas is Inconsistent Units. This error is
caused by doing an arithmetic function on two parameters with different units. For example, in
the schedule you already have "Area" and "Cost" but want to add a Calculated Value "Total
Cost". To resolve this error, you will need to get the length value back to a whole number as
opposed to feet. To achieve this, simply divide the length by 1’.
Area * Cost = Inconsistent Units
(Area / 1) * Cost = Total Cost
Another example of an error is trying to multiply two lengths to get a total length. You have to
remember basic algebra. When you multiply a foot value by another foot value you will get a
square foot value, which Revit deciphers as an area. If you want to get a total foot value instead
of an area value, you will need to divide one of the lengths by 1’ to keep the value in feet as
opposed to area. Let’s look at the example below.
100 ft * 100 ft = 10,000 ft²
If you have a Length parameter, and try to use a (Length * Length) formula, you´ll get the “Inconsistent Units" error, because (Length * Length = Length Squared). The only way to resolve this is to neutralize the units on at least one of the parameters in the formula. The easiest way to neutralize a unit is to divide by 1 (one):
100 ft * (100 ft / 1 ft) = 10,000 ft
Therefore 100 ft / 1 ft = 100 (unit less) and 100 ft * 100 = 10,000 ft
Schedules: Beyond the Basics
5
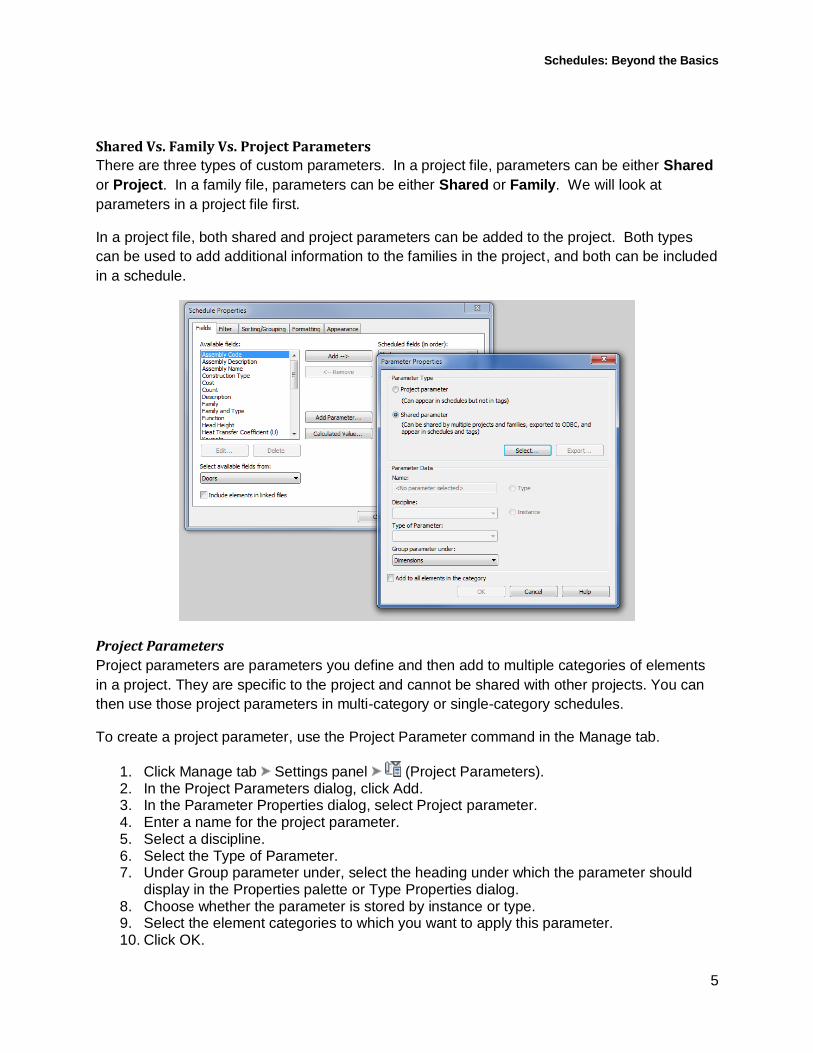
Shared Vs. Family Vs. Project Parameters
There are three types of custom parameters. In a project file, parameters can be either Shared
or Project. In a family file, parameters can be either Shared or Family. We will look at
parameters in a project file first.
In a project file, both shared and project parameters can be added to the project. Both types
can be used to add additional information to the families in the project, and both can be included
in a schedule.
Project Parameters
Project parameters are parameters you define and then add to multiple categories of elements
in a project. They are specific to the project and cannot be shared with other projects. You can
then use those project parameters in multi-category or single-category schedules.
To create a project parameter, use the Project Parameter command in the Manage tab.
1. Click Manage tab Settings panel (Project Parameters). 2. In the Project Parameters dialog, click Add. 3. In the Parameter Properties dialog, select Project parameter. 4. Enter a name for the project parameter. 5. Select a discipline. 6. Select the Type of Parameter. 7. Under Group parameter under, select the heading under which the parameter should
display in the Properties palette or Type Properties dialog. 8. Choose whether the parameter is stored by instance or type. 9. Select the element categories to which you want to apply this parameter. 10. Click OK.

Schedules: Beyond the Basics
6
Shared Parameters
Shared parameters are parameters that you can add to families or projects and then share with
other families and projects. They give you the ability to add specific data that is not already
predefined in the family file or the project template.
Shared parameters are particularly useful when you want to create a schedule that displays
various family categories; without a shared parameter, you cannot do this. If you create a
shared parameter and add it to the desired family categories, you can then create a schedule
with these categories. This is called creating a multi-category schedule in Revit.
Shared parameters are stored in a file independent of any family file or Revit project; this allows
you to access the file from different families or projects.
Family Parameters
In a family file, there are a number of Revit parameter types.
Shared Parameters can be thought of as user-defined variables.
System Parameters are variables that are hard-coded in Revit.
Family parameters are variables that are defined when a family is created or modified.

Schedules: Beyond the Basics
7
Created family parameters cannot appear in tags or schedules. Family parameters are used if
the parameter only needs to be seen in the properties of the family. If you need to use the
parameter in a schedule or tag, you must use a shared parameter.
If a parameter is a family parameter and you wish to change it, you can modify it in the Family
types dialog. If you click the Modify button in the Family Types dialog, the Parameter Properties
dialog opens. You can replace a shared parameter with a family parameter or a family
parameter with a shared parameter. Family parameters are specific to one family. You can also
replace one shared parameter with another.
Creating Shared Parameters
You can create shared parameters in the project environment or in the Family Editor. Shared
parameters are saved in a text file; you can then place this file in a shared area on your network
to allow others to access it.
Shared parameters are organized in groups that you create to assist with categorization. For
example, you might create a group called electrical for specific electrical parameters or a
hardware group for specific hardware parameters. You can create as many groups and
parameters as desired.
Your session of Revit can reference only one shared parameter file at a time. If there are other
shared parameters in a different file that you want in the active shared parameter file, you need
to export the parameters to the active file.
Typically, most offices will have one master shared parameter file. This file will be shared on
the network with all Revit workstations pointing to the same shared parameter file.

Schedules: Beyond the Basics
8
Special Characters
Revit does not allow for graphics to be included in a schedule. However, Revit does allow for
special characters to be used. Special characters can be used as long as the character is of the
same font style as the font defined in the body font style of the schedule. One example of the
use of special characters would be to create a ‘dot matrix’ type of schedule where you want to
show a special character as the dot.
To set up the schedule to show a special character, three (3) custom parameters will need to be
created. The first needs to be a simple Yes/No parameter; the second two will be created by
using a calculated value.
Creating the Yes/No Parameter
In the Schedule Properties, Field tab, click on the Add parameter button to create the
parameter. Give the parameter a Name and define the Type as Yes/No. This parameter will
be used to initially define whether the special character should or should not be shown. This
parameter will also be used in the calculated value parameters that will be created.

Schedules: Beyond the Basics
9
Creating the Graphic Parameter
The next parameter can be created by clicking on the Calculated Value button in the Fields tab
of the Schedule Properties. Prior to creating this parameter, you will need to select your
special character. The easiest way is to open the Windows Character Map. This can be
found by going to the Windows Start button, clicking All Programs, Accessories, and System
Tools. In the Character Map dialog, ensure that the correct font is selected, and browse
through the characters to select the desired character. Once the character is selected; you can
click the Select button and then the Copy button to place the character in the Windows clip
board.
Once the special character has been copied onto the clip board, you can create the Calculated
Value parameter in the Revit schedule. Give the Parameter a Name (like Graphic), and assign
the Type to be Text. The formula is simply an open quotation mark, the symbol, and closed
quotation mark, similar to the image below.

Schedules: Beyond the Basics
10
Creating the If/Then Parameter
The last parameter will be a Calculated Value parameter using an If/Then statement. This will
be the parameter that will display the special character that is defined in the Graphic parameter
if the Yes/No parameter is set to yes.
The If/Then parameter can be created by clicking on the Calculated Value in the Revit
schedule. Give the parameter a Name, assign the Type to Text and type in the following
formula.
if((yes/no parameter name), graphic parameter name, "")
This formula is telling Revit, if the Yes/No parameter is set to yes, then show the Graphic
parameter. If the Yes/No parameter is set to no, then show a blank. The blank is indicated by
the set of quotation marks at the end of the formula with nothing inside of the quotation marks.
Once the schedule information is filled out, hide the Yes/No and the Graphic parameter in the
schedule to show only the special character.

Schedules: Beyond the Basics
11
Editing All Cells
Editing cells in a Revit schedule can be long and monotonous, especially if the majority of the
cells for a parameter are the same though out the schedule. Revit does not allow you to
highlight multiple cells in a schedule to change the value of multiple cells in one step. A tip to
assist in editing multiple cells all at once is to change two properties in the schedule. On the
Sorting /Grouping tab of the Schedule Properties, change the sorting to be sorted by the
parameter that you are trying to change. Then uncheck the Itemize Every Instance check box.
This will collapse all the fields together into one row and you can simply change the value of the
field and it will change it for all items. Then go back and reapply the desired sorting method and
re-check the Itemize Every Instance check box.
When and Where to use Key Schedules
Key Schedule
Schedules can be comprised of multiple items that have the same characteristics. For example,
a room schedule might have 100 rooms with the same floor, ceiling, and base finishes. Rather
than enter all this information manually for all 100 rooms in the schedule, you can define keys
that automatically fill in information. If a room has a defined key, then as that room is added to a
schedule, fields in the schedule automatically update, reducing the time required to produce the
schedule.

Schedules: Beyond the Basics
12
Setting up the Key Schedule
Keys are defined using key schedules. Key schedules look very similar to component
schedules, except that you define them to your specifications. When you create a key, it is listed
as an instance property for the element. When you apply a value for the key, then the key's
attributes are applied to the element.
1. Click View tab Create panel Schedules drop-down Schedule/Quantities. 2. In the New Schedule dialog, select the element category for which you want to schedule
keys. 3. Select Schedule keys. 4. Revit automatically fills in the Key name. This is the name that appears among the
element's instance properties. If desired, enter a new name. 5. Click OK. 6. In the Schedule Properties dialog, add the predefined fields for the style. For example,
add ceiling finish, floor finish, and wall finish. 7. Fields or parameters from the selected category can be scheduled using keys.
Additional project parameters can be added to the category and scheduled. NOTE: Shared parameters cannot be used in a key schedule.
8. Click OK. 9. The key schedule opens.
10. Click Modify Schedule/Quantities tab Rows panel New to add rows to the table. 11. Each row creates a new value for the key. For example, if you are creating a room key
schedule, you can create key values for executive conference room, small conference room, large conference room, executive office, standard office, and so on.
12. Fill in the appropriate information for each of the key values.

Schedules: Beyond the Basics
13
Scheduling the Keys
To apply the schedule key to a component schedule, simply add the key name of the key
schedule and the associated parameters that are associated with the keys.
1. Create a schedule for the appropriate element (such as a room schedule). 2. Include in the scheduled fields the key name you created. For example, if you created a
key name called Room Style, add this key to the schedule. 3. In the schedule, select values for the newly added key. For example, if the key is called
Room Style, you add values for it by selecting them from the menus that appear under the key heading.
Scheduled fields update automatically with the information you define in the key schedule. If you edit and modify any values in the key schedule, they update automatically in the component schedule. When you apply a key value to a schedule row, you cannot modify any fields defined in the key schedule.
How to Create an Embedded Schedule An Embedded schedule is essentially a schedule inside of another schedule. For example if
you wanted to list all the furniture in each room, you could embed a furniture schedule inside of
a room schedule.

Schedules: Beyond the Basics
14
Available in Room Schedules
Embedded schedules have been available to Revit MEP users for the past several releases.
Revit 2013 brought this capability to architects. In previous releases, when creating a schedule
for spaces, duct systems, piping systems, or electrical circuits, you could create an embedded
schedule to show information about components that are members of these systems. In 2013,
an embedded schedule can be added to schedules for Rooms. Room schedules are the only
architecture category that has the embedded schedule feature.
Room schedules have an additional tab called Embedded Schedule in the Schedule
Properties dialog that other types do not have. To create an embedded schedule, click the
Embedded Schedule tab in the Schedule Properties dialog, click Embedded Schedule,
select a Category, and click the Embedded Schedule Properties button. You can then
configure the embedded schedule properties just like other schedules. Once you have finished
setting up the properties, the fields selected for the embedded schedule appear below each line
in the parent schedule.

Schedules: Beyond the Basics
15
Specifying Room Information in Door Schedules
Another method of combining information from room schedules is to specify the room
information inside a door schedule. You can include information in a door schedule about the
room a door leads to and the room a door leads from. Typically, the door swing indicates the
room the door is leading to or from. For example, in the following image door 56 leads from the
hall to the bedroom.
If you change the door swing after you place the door, this will not automatically be reflected in
the schedule. The schedule retains the data of the initial door placement. Therefore the
particular door opening for door 56, always (by default) leads from the hall to the bedroom
regardless of the door swing. If you want door 56 to lead from the bedroom to the hall, you can
change the door swing in plan view, and then edit the appropriate field in the door schedule.
To configure the room information, on the Fields tab, in the Select available fields from drop-
down, select either From Room or To Room. This will give you a different list of fields to add to
the schedule that are room related. You can select Room Name or Room Number for
example.

Schedules: Beyond the Basics
16
Using Conditional Formatting in Schedules You can use conditional formatting in schedules to visually identify parameters that meet or do
not meet design standards. For example, you can set a condition to indicate that an area has a
square footage under a specified minimum.
Conditional formatting can be created by clicking the Conditional Format button on the
Formatting tab of the Schedule Properties. Select the Field, Test and assign the Value to
create condition. Select a Background Color to show up in the schedule view. The color will
only show up in the schedule view and not on sheets.

Schedules: Beyond the Basics
17
Other Types of Schedules
Material Schedule
Material schedules list the sub-components or materials of any Revit family. Material schedules
have all the functionality and characteristics of other schedule views, but they allow you to show
more detail about the assembly of a component. Any material that is placed in a component
within Revit can be scheduled.
To create a Material schedule use the Material Schedule tool on the View tab. Material
schedules are similar to component schedules. You must assign at least one Material
parameter in the schedule (for example, Material: Name).
Assigning Cost to Materials
One of the available fields to add to a material schedule is Material: Cost. This is a field that
you can assign a dollar value for the cost of Material. The Material: Cost parameter is stored
in the Material Library. You can create additional materials with different cost values. Cost
values can be used to create a material cost schedule.

Schedules: Beyond the Basics
18
Calculating Cost Totals
If you desire a material cost schedule, you will need to calculate the cost of the materials by the
area of the material. This can be accomplished by creating a new Calculated Value parameter.
You will need to remember to divide the Material: Area by 1’ to get the units back to whole
numbers.
To get the schedule to properly show the total values, you will need to check the Grand Totals
check box, and uncheck the Itemize Every Instance check box on the Sorting/Group tab. On
the Formatting tab check the Calculate Totals check box for the Material: Area and the Total
Material parameters.

Schedules: Beyond the Basics
19
Creating a Note Block Schedule
A Note Block can be used to create a numbered list of notes in your project.
The Note Block tool creates a unique kind of schedule that reads the parameters for a generic
annotation family. The annotation family is placed into the project and populated with the
information you want to track. The note block will sort and arrange the information that has
been placed in the generic annotation elements.
It is important to understand that the note block element is reading parameters assigned to the
annotation element and not any other elements in the Revit model. In order to make a change,
the annotation element properties must be changed.

Schedules: Beyond the Basics
20
Creating an Annotation Symbol
Revit does not come with an Annotation Symbol that can be used when creating a note block.
A new Annotation Symbol family must be created prior to creating the note block schedule.
The following steps outline how to create the Annotation Symbol family.
1. Click New (Annotation Symbol). 2. In the New Annotation Symbol dialog, select the Annotation Symbol template for the
project, and click Open. 3. The templates are all very similar. Some may already have predefined properties and
values. 4. Revit opens the Family Editor.
5. Click Create tab Properties panel (Family Category and Parameters).
6. Click Create tab Text panel (Label). 7. In the Type Selector, select the label type. 8. Select the vertical and horizontal justification. 9. In the drawing area, click to position the label.
For example, in a generic model tag template, place the cursor at the intersection of the 2 reference planes.
10. Click the New Parameter to create parameter to add to the label. 11. Create a new parameter (named Number). 12. In the Edit Label dialog, under Category Parameters, select the parameter you want in
the label, and click to add the parameter to the label. 13. Click OK. 14. To modify the placement of the label, click Modify, select the label, and then drag it to
the new location.

Schedules: Beyond the Basics
21
Using View Schedules
View schedules are schedules that can be used internally to help manage the views inside the
Revit project. Managing views are critical to ensure that the correct views are being used on the
sheets and that the views are graphically showing what is intended. View schedules will
probably never be placed on a sheet to be plotted, but it is a great tool to use throughout the
duration of the project. It provides a single view listing all the views and items such as level of
detail, scale, and sheet information.

Schedules: Beyond the Basics
22
Exporting/Importing Schedules Typical schedules that are used on every project should be created in the Revit Template file.
This will allow them to be available in all projects started with the template file. Schedules that
are used occasionally should be saved and stored in a ‘Master’ schedule file. This file is an
empty project file on the network that is accessible by all users. Schedules can either be saved
to a new file or inserted from another project to create this ‘Master’ schedule file.
Saving to a Revit File
To save a schedule out to a new Revit file, simply Right Click on the schedule name in the
Project Browser and click Save to a New File. This will export the schedule and all custom
parameters used in the schedule to a new file.
Inserting a View from another
If you need to import a schedule from one file to another, you can use the Insert from File,
Insert Views from File tool on the Insert tab. This will allow you to browse to find the file that
you are inserting the schedule from. Once the file is selected, you will see a list of all the
available views to insert. Select the schedules to insert and click OK. This is a great way to
insert schedules from a ‘Master’ schedule file.

Schedules: Beyond the Basics
23
Exporting to Excel
Revit has the ability to export schedules to a .txt - comma delaminated file that can be opened
in Excel. This is a one-way export, meaning once exported the .txt file will not be updated if the
data changes in the Revit file, and if the .txt file is updated the Revit file will not be updated.
The export tool is found under the Application Menu (the big R). In the Application Menu,
scroll down to Export, Reports, Schedules.

Schedules: Beyond the Basics
24
Conclusion With the technology of Revit we are able to provide more information to the contractors than
ever before. This added information helps provide a better all-around project. Schedules are a
vital part of documentation. Understanding how to retrieve the data in the Revit models will
ensure that projects are coordinated and accurate. The data is stored in parameters.
Parameters are needed both on a project level and an office wide level. Custom parameters are
needed along with calculated value parameters. The topics covered in this session will give you
an infinite supply of knowledge to create the schedules needed for your next project.
In addition to creating schedules for documentation, schedules should be used throughout the
project to assist in meeting design requirements. Take advantage of Conditional Formatting
to see where the design is not meeting the requirements.
I want to thank you for attending my session Schedules: Beyond the Basics. I hope this session
has brought you to a knowledge level that you feel comfortable creating parameters, formulas,
and schedules to meet your project needs.