
Scanner User's Guide
32
Installation Usage & Maintenance
-
Upload
truongkiet -
Category
Documents
-
view
236 -
download
0
Transcript of Scanner User's Guide

Installation Usage & Maintenance

Trademarks
© 2008 Plustek Inc. All rights are reserved. No portion of this document may be reproduced without permission. All trademarks and brand names mentioned in this publication are property of their respective owners.
Liability While all efforts have been made to ensure the accuracy of all contents in this manual, we assume no liability for errors or omissions or by statements of any kind in this manual, whether such errors are omissions or statements resulting from negligence, accidents, or any other cause. The contents of this manual are subject to change without notice.
Copyright The scanning of certain documents, for example checks, bank notes, I.D. cards, government bonds, or public documents, may be prohibited by law and/or subject to criminal prosecution. We recommend you to be responsible and respectful of the copyrights laws when you are scanning books, magazines, journals and other materials.
Environmental Information The product is designed and produced to achieve sustainable environmental improvement. We strive to produce products in compliance with global environmental standards. Please consult your local authorities for proper disposal. The product packaging is recyclable. Attention for recycling (For EU country only) Protect your environment! This product should not be thrown into the household waste container. Please give it to the free collecting center in your community.
Screen Examples in This Manual The screen shots in this guide were made with Windows XP. If you are using Windows 2000 or Vista, your screen will look somewhat different but functions the same.
Table of Contents INTRODUCTION....................................................................................................1
How to Use This Guide............................................................................................... 1 Conventions of This Guide ......................................................................................... 1
A Note about Icons ............................................................................................................... 2 Safety Precautions...................................................................................................... 2 Minimum System Requirements ................................................................................. 3 Box Contents .............................................................................................................. 4 The Scanner Features ................................................................................................ 5
CHAPTER I. INSTALLING THE SCANNER....................................................................7 Software Installation Requirements ............................................................................ 7 Hardware Requirements............................................................................................. 7 Installing and Setting up the Scanner ......................................................................... 8
Step 1. Unlock Your Scanner .............................................................................................. 8 Step 2. Connecting the Scanner to Your Computer ............................................................ 9 Step 3. Installing the Software........................................................................................... 10 Step 4. Testing the Scanner .............................................................................................. 11
Installing Additional Software.................................................................................... 12 CHAPTER II. SCANNING ..................................................................................... 13
Preparing Documents ............................................................................................... 13 Checking Document Conditions ......................................................................................... 14
Placing Documents................................................................................................... 14 Using the Flatbed ............................................................................................................... 14
Scanning Documents................................................................................................ 14 Scanning via TWAIN Interface ........................................................................................... 15 Scanning from Plustek DI Capture Program ...................................................................... 17 Scanning from the Scanner’s Panel or On-screen DocAction's Execute Menu................. 18
CHAPTER III. CARE AND MAINTENANCE ............................................................... 20 Cleaning the Scanner ............................................................................................... 20
Cleaning Materials.............................................................................................................. 20 Cleaning the Flatbed .......................................................................................................... 20
Aligning the Scanner................................................................................................. 21 Power Save .............................................................................................................. 22 Scanner Lock............................................................................................................ 23
CHAPTER IV. TROUBLESHOOTING ........................................................................ 24 Scanner Connection ................................................................................................. 24
APPENDIX A: SPECIFICATIONS............................................................................ 25 APPENDIX B: CUSTOMER SERVICE AND WARRANTY................................................ 26
Statement of Limited Warranty ................................................................................. 26 FCC Radio Frequency Statement............................................................................. 27
CONTACTING PLUSTEK ....................................................................................... 29

INTRODUCTION Thank you for choosing us as your scanner supplier. Your new scanner will
improve the professionalism of your day-to-day computing tasks by allowing you to input images and electronic text into your computer system.
Like all of our products, your new scanner is thoroughly tested and backed by our reputation for unsurpassed dependability and customer satisfaction. We hope you will continue to turn to us for additional quality products as your computing needs and interests grow.
HOW TO USE THIS GUIDE This User’s Guide provides instructions and illustrations on how to install and
operate your scanner. This guide assumes the user is familiar with Microsoft Windows Vista, XP or 2000 Professional. If this is not the case, we suggest you learn more about Microsoft Windows by referring to your Microsoft Windows manual before using your scanner.
The Introduction section of this manual describes the box contents and minimum computer requirements to use this scanner. Before you start installing your scanner, check the box contents to make sure all parts are included. If any items are damaged or missing, please contact the vendor where you purchased your scanner or our customer service directly.
Chapter I describes how to install the scanner’s software and connect the scanner to your computer. Note: The scanner connects to your computer through the Universal Serial Bus (USB). If your computer does not support USB technology, you will need to purchase a USB interface card to add USB capabilities to your computer, or buy and install USB connectors if your motherboard has USB capabilities. This guide assumes that your computer is USB-ready and has a free USB port.
Chapter II describes how to use your scanner.
Chapter III describes how to maintain and clean your scanner.
Chapter IV contains technical support information that can help you solve simple problems.
Appendix A contains the specifications of the scanner you purchased.
Appendix B contains our customer service, the limited warranty agreement and FCC statement concerning the product.
CONVENTIONS OF THIS GUIDE Bold —Represents commands or contents on your computer screen.
1
ALL CAPS —Important note or first use of an important term in a chapter.
Italic —Represents buttons on your scanner OR important notes.
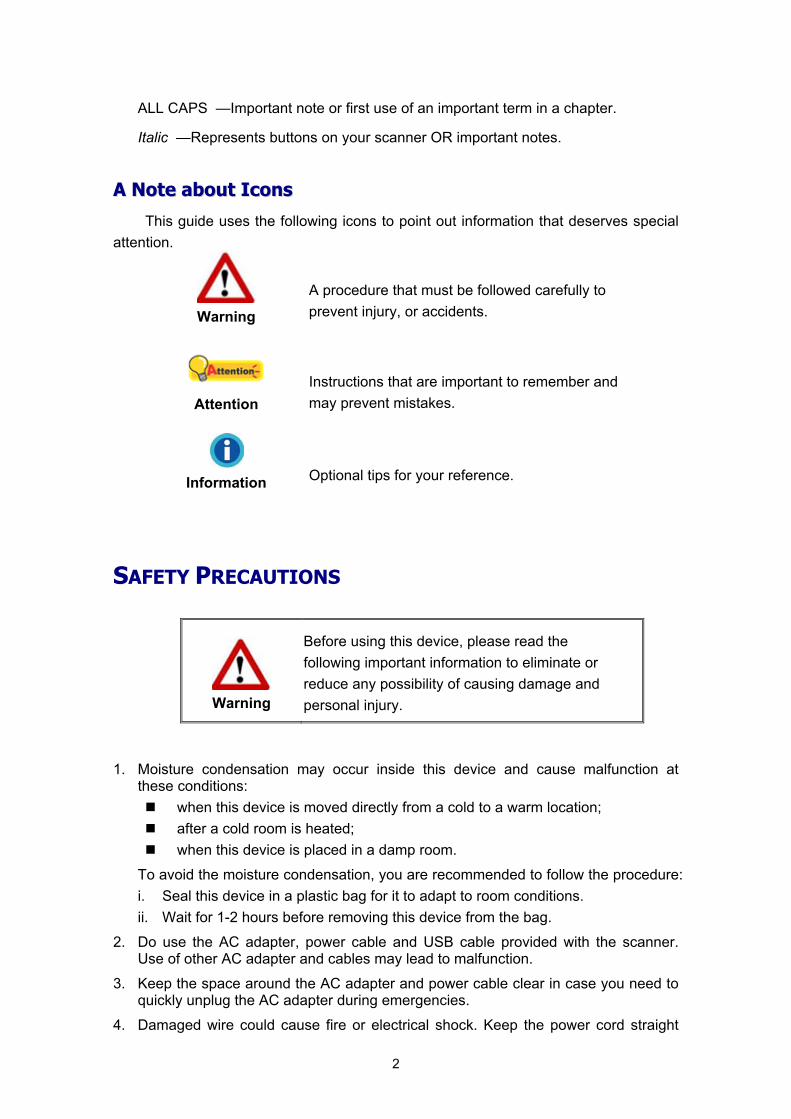
AA NNoottee aabboouutt IIccoonnss
This guide uses the following icons to point out information that deserves special attention.
Warning
A procedure that must be followed carefully to prevent injury, or accidents.
Attention
Instructions that are important to remember and may prevent mistakes.
Information
Optional tips for your reference.
SAFETY PRECAUTIONS
Warning
Before using this device, please read the following important information to eliminate or reduce any possibility of causing damage and personal injury.
1. Moisture condensation may occur inside this device and cause malfunction at these conditions:
when this device is moved directly from a cold to a warm location; after a cold room is heated; when this device is placed in a damp room.
To avoid the moisture condensation, you are recommended to follow the procedure: i. Seal this device in a plastic bag for it to adapt to room conditions. ii. Wait for 1-2 hours before removing this device from the bag.
2. Do use the AC adapter, power cable and USB cable provided with the scanner. Use of other AC adapter and cables may lead to malfunction.
3. Keep the space around the AC adapter and power cable clear in case you need to quickly unplug the AC adapter during emergencies.
4. Damaged wire could cause fire or electrical shock. Keep the power cord straight
2

and without being twisted, bended, or scraped.
5. Unplug this device if you don’t need to use it for a certain period of time, such as, during night or long weekend, to avoid any risks of causing fire.
6. Do not attempt to disassemble the scanner. There is danger of an electrical shock and opening your scanner will void your warranty.
7. Be sure not to bump or knock the scanner glass as it is fragile and could break.
8. Do not subject the scanner to excessive vibration. It may damage the internal components.
MINIMUM SYSTEM REQUIREMENTS1
PC with Intel Pentium® IV 2.0 GHz processor or compatible
512 MB RAM
Available USB 2.0 port
CD-ROM Drive or DVD-ROM Drive
800 MB Free Hard Disk Space
Video card that supports 16-bit color or greater
Operating System: Windows 2000 Professional, Windows XP Home Edition, Windows XP Professional, or Windows Vista (compatible)
Information
Systems with Pentium® IV 3.0 GHz or higher processor (or its compatible), 1GB RAM and 1GB free hard disk space are recommended for optimal performance.
1 Higher requirements might be needed when scanning or editing a large quantity of image data. The system requirements here are only a guideline, as in general the better the computer (motherboard, processor, hard disk, RAM, video graphic card), the better the results.
3
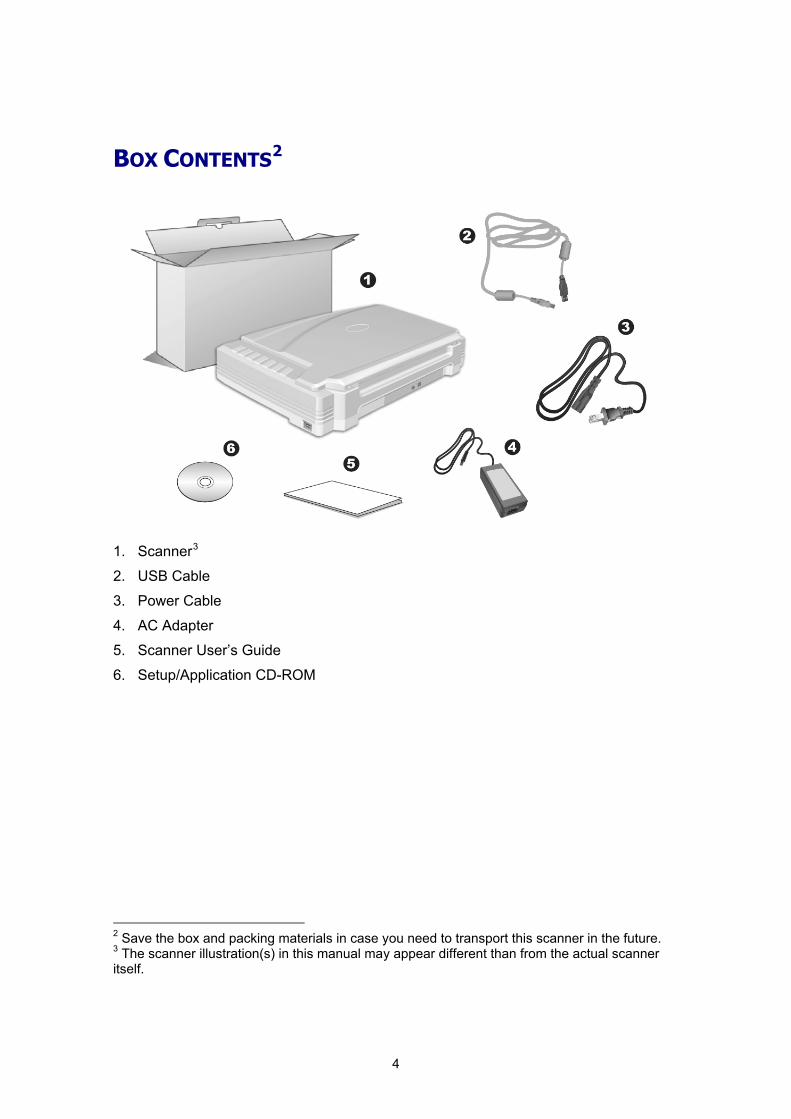
BOX CONTENTS2
1. Scanner3
2. USB Cable
3. Power Cable
4. AC Adapter
5. Scanner User’s Guide
6. Setup/Application CD-ROM
2 Save the box and packing materials in case you need to transport this scanner in the future. 3 The scanner illustration(s) in this manual may appear different than from the actual scanner itself.
4
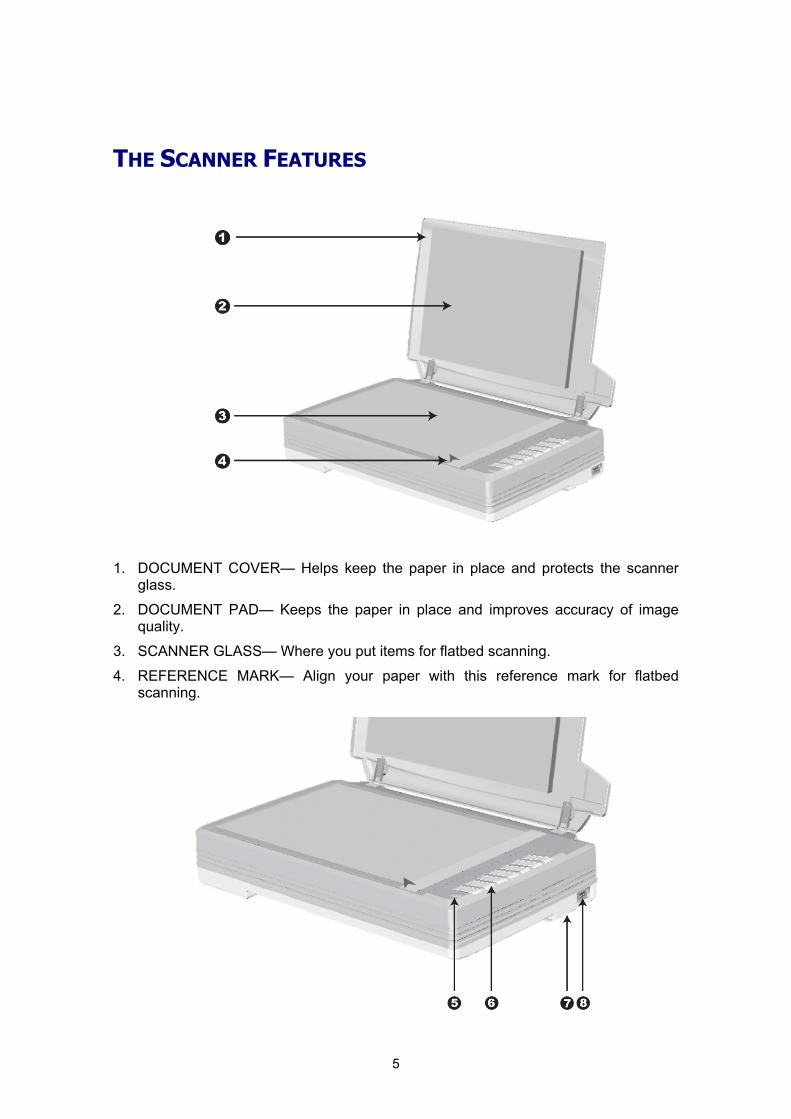
THE SCANNER FEATURES
1. DOCUMENT COVER— Helps keep the paper in place and protects the scanner glass.
2. DOCUMENT PAD— Keeps the paper in place and improves accuracy of image quality.
3. SCANNER GLASS— Where you put items for flatbed scanning.
4. REFERENCE MARK— Align your paper with this reference mark for flatbed scanning.
5
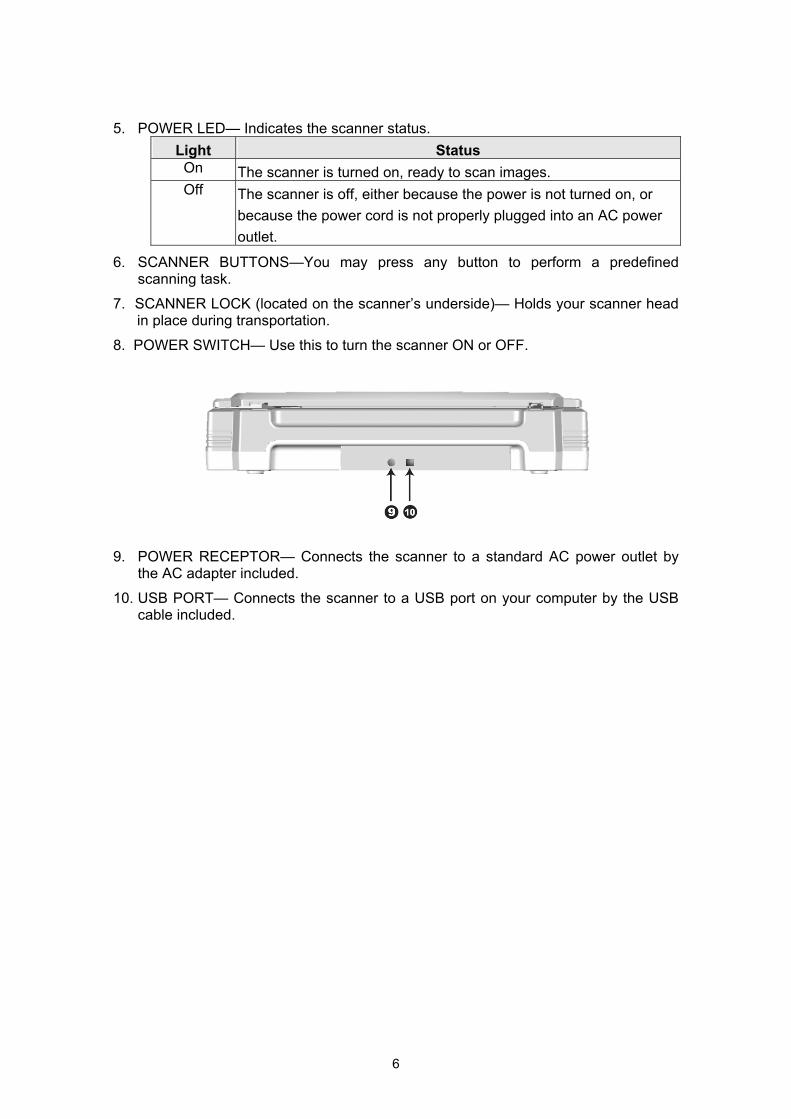
5. POWER LED— Indicates the scanner status. Light Status
On The scanner is turned on, ready to scan images. Off The scanner is off, either because the power is not turned on, or
because the power cord is not properly plugged into an AC power outlet.
6. SCANNER BUTTONS—You may press any button to perform a predefined scanning task.
7. SCANNER LOCK (located on the scanner’s underside)— Holds your scanner head in place during transportation.
8. POWER SWITCH— Use this to turn the scanner ON or OFF.
9. POWER RECEPTOR— Connects the scanner to a standard AC power outlet by
the AC adapter included.
10. USB PORT— Connects the scanner to a USB port on your computer by the USB cable included.
6

CHAPTER I. INSTALLING THE SCANNER Before installing your scanner, please verify that you have all of the proper
components. A list of the package contents is provided in the “Box Contents” section of this guide.
SOFTWARE INSTALLATION REQUIREMENTS Your scanner comes with the image-editing software (NewSoft Presto! ImageFolio),
OCR software (I.R.I.S. Readiris Pro 10 Corporate Edition), the document management software (NewSoft Presto! PageManager), Adobe Reader, the scanner’s driver, the task management software (Plustek DocAction) and the image capture software (Plustek DI Capture). All of these software applications use approximately 400 megabytes of hard disk space after they are installed into your computer. To ensure ample room for the installation, as well as for scanning and saving images, a minimum of 1 GB of hard disk space is recommended.
The USB scanner can only operate under the Microsoft Windows 2000 Professional, XP or Vista operating system.
Attention
Please do not use multiple USB scanners in Windows XP simultaneously! For more information, please refer to the following URL: http://www.microsoft.com
HARDWARE REQUIREMENTS This scanner connects to your computer through the Universal Serial Bus (USB)
which supports HOT PLUG AND PLAY. To determine whether your computer is USB-capable, you must check the rear of your PC to locate a USB jack that looks like the picture below. If you are having trouble in locating the USB port on your computer, please refer to the hardware manual that came with your computer.
Upon examination, you should find one or two rectangular USB ports, which usually appear as shown below.
7

USB Connector(s)
If you don’t find such USB ports on your computer, then you need to purchase a certified USB interface card to add USB capabilities to your computer.
INSTALLING AND SETTING UP THE SCANNER Please follow the step-by-step procedures described below to install the Plustek
scanner.
Attention
Choose a Proper Site First! Always place your scanner on a level,
smooth and strong surface before proceeding the scanner setup or any scanning task. Tilted or uneven surface may cause paper-feeding errors, scanner damage or personal injury.
Avoid using the scanner in a dusty environment. Dust particles and other foreign objects may damage the unit.
SStteepp 11.. UUnnlloocckk YYoouurr SSccaannnneerr
This scanner is designed with a locking mechanism to hold the scanning head in place during transportation. Before you connect your scanner with the computer, ensure to unlock your scanner first.
To unlock the scanner, slide the locking switch on the scanner’s underside toward the back panel of the scanner until it snaps into place. Refer to the “Scanner Lock” section on page 23 of this guide for more details.
8
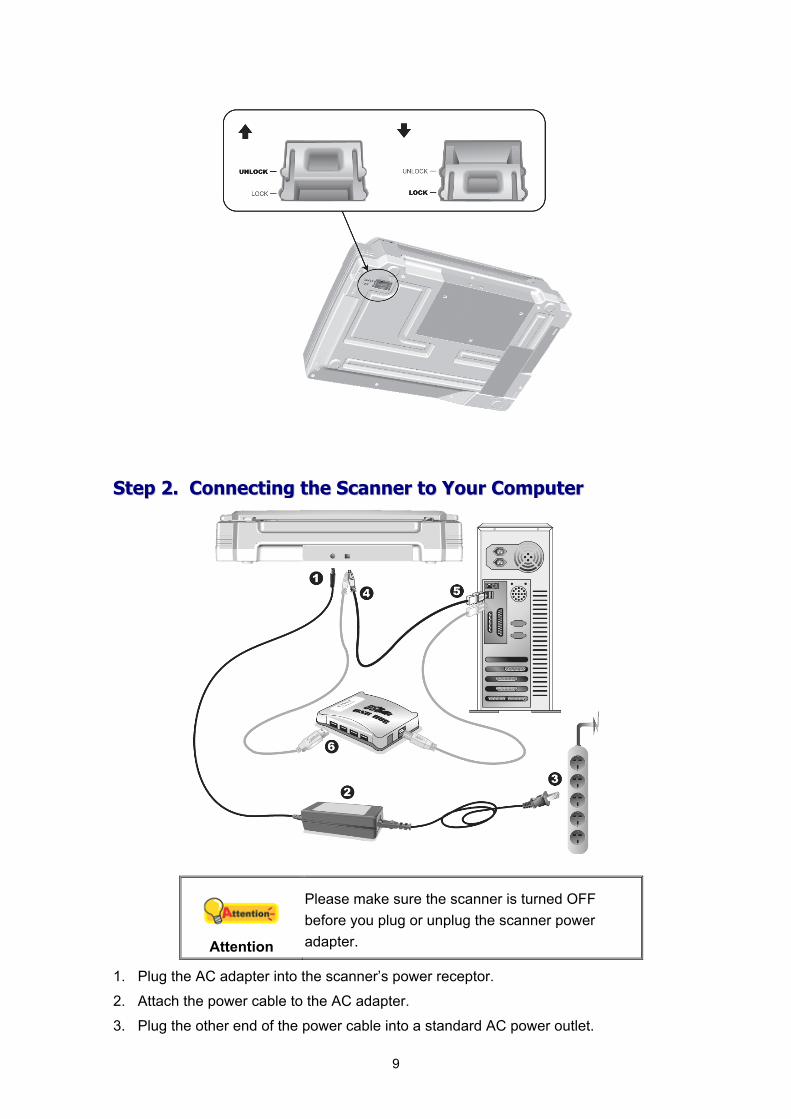
SStteepp 22.. CCoonnnneeccttiinngg tthhee SSccaannnneerr ttoo YYoouurr CCoommppuutteerr
Attention
Please make sure the scanner is turned OFF before you plug or unplug the scanner power adapter.
1. Plug the AC adapter into the scanner’s power receptor.
2. Attach the power cable to the AC adapter.
3. Plug the other end of the power cable into a standard AC power outlet.
9
4. Plug the square end of the included USB cable to the USB port at the rear of the scanner.
5. Plug the rectangular end of the USB cable to an available USB port on your computer.
6. If you plan to connect your scanner to a USB hub4, make sure that the hub is connected to the USB port in your computer. Next, connect the scanner to the USB hub.
SStteepp 33.. IInnssttaalllliinngg tthhee SSooffttwwaarree 1. Switch on the scanner power from the side of the scanner.
2. If the USB components on your computer are functioning correctly, they will automatically detect the scanner causing the Add New Hardware Wizard or Found New Hardware Wizard to be launched.
Information
If your computer is off when the scanner is connected, the “Add New Hardware Wizard” message will not be displayed until the computer is on and Windows starts.
3. For Windows 2000:
a. Click the Next button when the “Add New Hardware Wizard” window is displayed.
b. Select “SEARCH FOR THE BEST DRIVER FOR YOUR DEVICE [RECOMMENDED]” and click the Next button.
c. The next window will ask you where to search to find the drive. Select CD-ROM drive, and deselect Floppy disk drives if it is checked.
d. Insert the Setup/Application CD-ROM, included with your scanner, into your CD-ROM drive and then click the Next button.
e. Click the Next button in the window that appears.
f. During the process of the installation, a message “Digital Signature required” might be prompted. Please ignore it, and click the Yes button to continue the installation without any misgiving for your scanner functioning. Afterwards, please skip to Step 6.
4. For Windows XP:
a. Insert the Setup/Application CD-ROM, included with your scanner, into your CD-ROM drive.
4 The USB hub is not included with the scanner.
10
b. Select Install the software automatically recommended and click the Next button.
c. Click the Next button in the window that appears. Afterwards, please skip to Step 6.
5. For Windows Vista:
a. Select “Locate and install driver software (recommended)” when the “Found New Hardware” window is displayed.
b. Click on the [Continue] button when the “User Account Control” dialog pops up.
c. Insert the Setup/Application CD-ROM, included with your scanner, into your CD-ROM drive when the system prompts you “Insert the disc that came with your USB Scanner", and click on the [Next] button.
d. During the process of the installation, a message “Windows can’t verify the publisher of this driver software” might be prompted. Please ignore it, and click on [Install this driver software anyway] to continue the installation without any misgiving at your scanner functioning.
6. When the system completes the installation, click the Finish button.
7. Follow the on-screen instructions to install all software that your new scanner requires.
8. After the software is installed, close all open applications and click the Finish button to restart your computer.
Information
If the scanner installation is not started and displayed automatically on the screen, click Start, select Run and type in D:\Install (where D: is the drive letter assigned to the CD-ROM drive of your computer.)
SStteepp 44.. TTeessttiinngg tthhee SSccaannnneerr
The following describes how you can check if the scanner is properly functioning with your computer and the scanning software by performing your first scan with our bundled image-editing application NewSoft Presto! ImageFolio. Before testing your scanner, double check to make sure that all connections are securely fastened.
To test the flatbed scanning:
1. Open the scanner's document cover. Place the document onto the scanner glass headfirst and face-down. Align the top left corner of the document with the arrow on the reference mark.
11

2. Gently close the document cover.
3. Click the Windows Start button to launch NewSoft Presto! ImageFolio.
4. (If you have only one scanner connected with your computer, please skip to Step 5.) If you have more than one scanner or other imaging device installed on your computer: Click Select Source from the File menu of Presto! ImageFolio and then choose this scanner as the default scanning source.
5. Within Presto! ImageFolio, click File > Acquire > Acquire.
6. In the TWAIN window that opens, select Flatbed Reflective as the Scan Type.
7. Click the Scan button.
8. If an image appears on your screen, your scanner is working properly.
INSTALLING ADDITIONAL SOFTWARE Your scanner is TWAIN compliant and functions with virtually all available TWAIN
compatible software. If you purchase additional software to be used with your scanner, please make sure that it conforms to the TWAIN standard.
12
CHAPTER II. SCANNING Your scanner needs to be driven by certain type of software program. Since all
documents or images (whether text or pictures) that are acquired from the scanner are treated by your computer as images, most scanning will probably be done from an image-editing program where you can view, edit, save and output the scanned images. An image-editing program has been bundled for your scanner on the included Setup/Application CD-ROM. It will allow you to alter and correct any scanned images by using a variety of filters, tools and effects.
What about scanning text documents and editing them in a word processor? This is the role of Optical Character Recognition (OCR) software. OCR software converts the image files that are created from scanning text documents into text files that can be viewed, edited and saved by word processors. An OCR program has also been bundled on the included Setup/Application CD-ROM, and if you wish to use the scanner in this way you should install the OCR software that is included.
DI Capture, as its name suggests, is a specialized document image capture program that allows you to conveniently digitize your paper documents and automatically save their electronic files in the designated folder. If you are not familiar with scanning, no problem: the Scan Wizard will guide you through to complete each scanning task.
The DocAction program, seamlessly integrating the operation of your scanner with your computer and other peripherals, provides a quick and convenient way to perform various scanning functions. With DocAction, you don't need to adjust settings every time you scan. Simply press any button on the scanner's front panel or click any scanning menu item of DocAction on the screen. The scanner starts to scan your paper documents and transfer them to your assigned destination. The destination can be a printer, your e-mail program, files on your disk drives, an image-editing program, etc.
Please refer to the online help of each program to guide you through any questions you may have while scanning within that program.
This chapter describes three important steps of scanner operations. Read them thoroughly and follow the instructions to ensure correct use and optimal scanner performance.
Step 1. Preparing DocumentsStep 2. Placing DocumentsStep 3. Scanning Documents
PREPARING DOCUMENTS Proper document preparation prior to the scan can prevent paper feed errors and
damages to the scanner.
13
Checking Document Conditions
CChheecckkiinngg DDooccuummeenntt CCoonnddiittiioonnss
Make sure the paper sizes of your documents are acceptable by the scanner. Refer to “Appendix A: Specifications” of this guide for more information.
PLACING DOCUMENTS
UUssiinngg tthhee FFllaattbbeedd
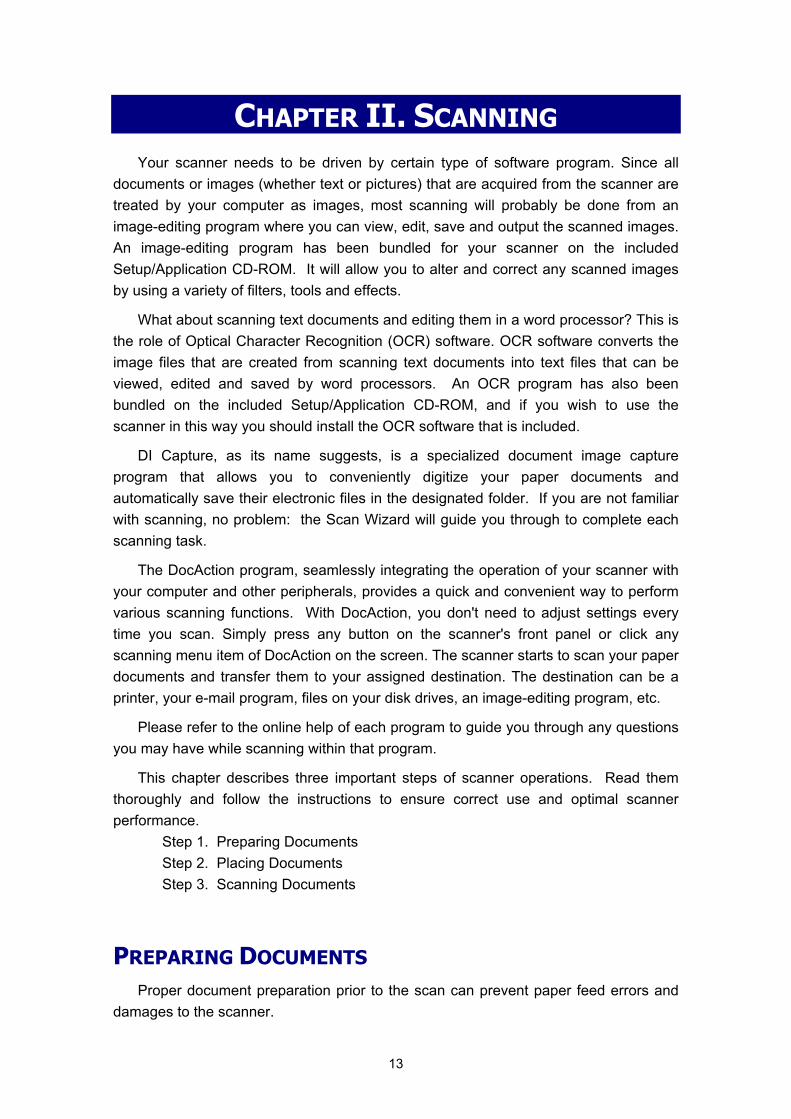
1. Open the scanner's document cover.
2. Place the document onto the scanner glass headfirst and face-down. Align the top left corner of the document with the arrow on the reference mark.
3. Gently close the document cover.
SCANNING DOCUMENTS There are four different ways to operate the scanner:
1. By acquiring images from the scanner through our TWAIN interface within any TWAIN-compliant application programs.
2. By scanning images within our DI Capture software.
3. By scanning from the scan buttons on the scanner.
4. By scanning from DocAction's Execute menu on the screen
14
The TWAIN interface, DI Capture and DocAction software are automatically installed to your system along with the scanner driver.
Attention
Before you start scanning, check the following:
Your scanner has been unlocked and the power of both your computer and scanner is turned on.
The icon appears on the Windows system tray.
Paper is appropriately placed on the scanner flatbed glass.
SSccaannnniinngg vviiaa TTWWAAIINN IInntteerrffaaccee
The TWAIN program is a very important piece of software that comes with your scanner. This program acts as an interface between the scanner hardware and the image-editing software you are using to view and edit images. The TWAIN program allows you to adjust a number of settings to define the quality of the scanned image.
The following describes how you may use our bundled image-editing application (NewSoft Presto! ImageFolio) and OCR software (I.R.I.S. Readiris Pro 10 Corporate Edition) to scan via the TWAIN interface. When you get familiar with the scanning, you may alternatively use other TWAIN compatible scanning programs or image-editing applications to do your scanning projects.
Scan within NewSoft Presto! ImageFolio:
1. Click the Windows Start button to launch Presto! ImageFolio.
Attention
If you have more than one scanner or other imaging devices installed on your computer, you need to set this scanner as the default scanning source before you acquire the TWAIN program.
1. From the File menu of Presto! ImageFolio, click Select Source.
2. In the window that opens, choose this scanner and then click the OK button to set this scanner as the default scanning source.
2. Within Presto! ImageFolio, click File > Acquire > Acquire. 3. In the TWAIN window that opens, select Flatbed Reflective as the Scan Type.
15
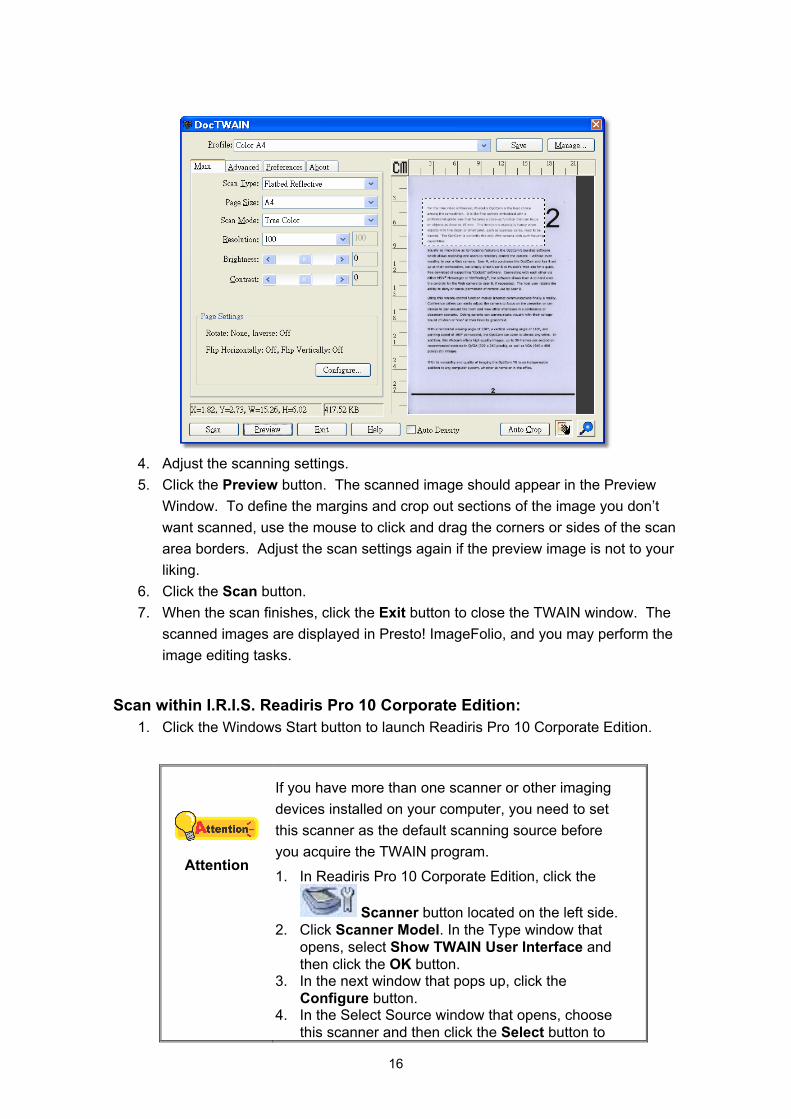
4. Adjust the scanning settings. 5. Click the Preview button. The scanned image should appear in the Preview
Window. To define the margins and crop out sections of the image you don’t want scanned, use the mouse to click and drag the corners or sides of the scan area borders. Adjust the scan settings again if the preview image is not to your liking.
6. Click the Scan button. 7. When the scan finishes, click the Exit button to close the TWAIN window. The
scanned images are displayed in Presto! ImageFolio, and you may perform the image editing tasks.
Scan within I.R.I.S. Readiris Pro 10 Corporate Edition:
1. Click the Windows Start button to launch Readiris Pro 10 Corporate Edition.
Attention
If you have more than one scanner or other imaging devices installed on your computer, you need to set this scanner as the default scanning source before you acquire the TWAIN program.
1. In Readiris Pro 10 Corporate Edition, click the
Scanner button located on the left side. 2. Click Scanner Model. In the Type window that
opens, select Show TWAIN User Interface and then click the OK button.
3. In the next window that pops up, click the Configure button.
4. In the Select Source window that opens, choose this scanner and then click the Select button to
16
set this scanner as the default scanning source. 5. Click the OK button to return to Readiris
workspace.
2. Within Readiris Pro 10 Corporate Edition, click the Scan button located on the left side.
3. In the TWAIN window that opens, select Flatbed Reflective as the Scan Type. 4. Adjust the scanning settings. 5. Click the Preview button. The scanned image should appear in the Preview
Window. To define the margins and crop out sections of the image you don’t want scanned, use the mouse to click and drag the corners or sides of the scan area borders. Adjust the scan settings again if the preview image is not to your liking.
6. Click the Scan button. 7. The scanned images are displayed in Readiris workspace, and you may
proceed OCR to convert images into pdf or editable text formats.
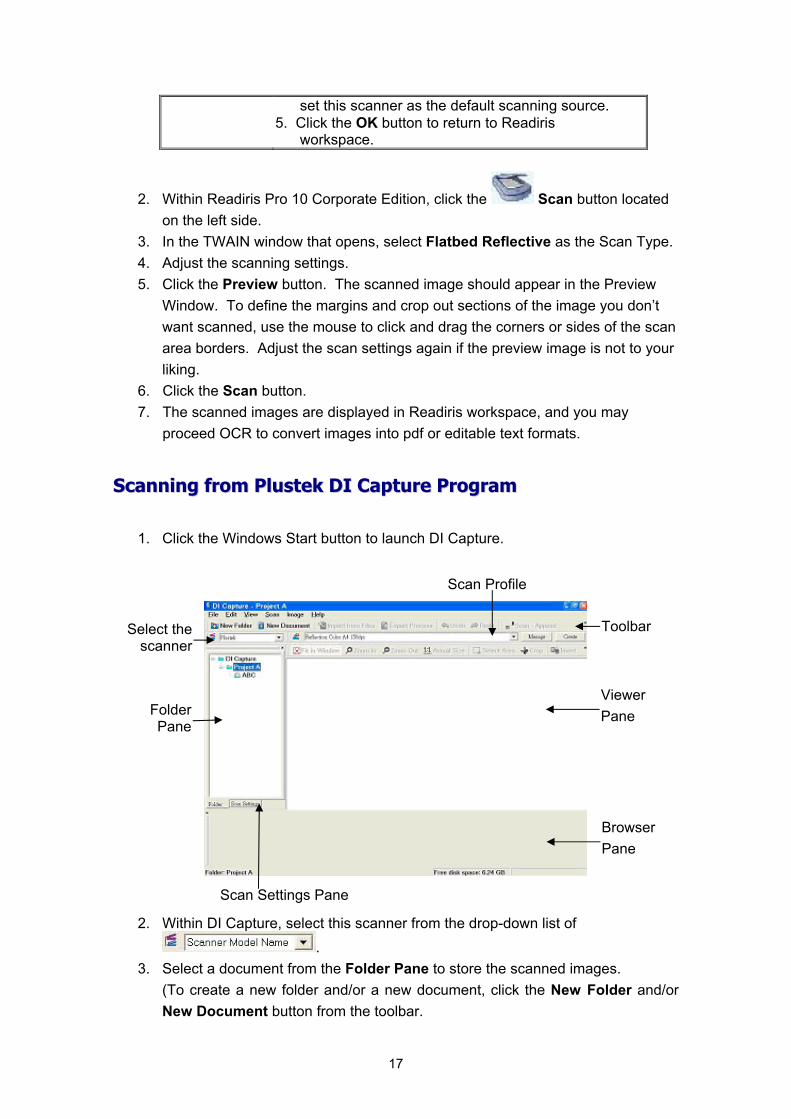
SSccaannnniinngg ffrroomm PPlluusstteekk DDII CCaappttuurree PPrrooggrraamm
1. Click the Windows Start button to launch DI Capture.
Folder Pane
Select the scanner
Scan Profile
Viewer Pane
Browser Pane
Toolbar
Scan Settings Pane
2. Within DI Capture, select this scanner from the drop-down list of .
3. Select a document from the Folder Pane to store the scanned images. (To create a new folder and/or a new document, click the New Folder and/or New Document button from the toolbar.
17

4. Select an appropriate scan profile. (You may click the tab of Scan Settings Pane to check if the current settings of the selected scan profile meet your needs. If not, you may click the Create or Manage button beside the Scan Profile to create a new profile or modify an existing profile.)
5. Click the Scan – Append button from the toolbar. 6. When the scan finishes, all scanned images are displayed on the Browser
Pane. The last scanned image appears on the Viewer Pane.
Alternatively you may click the Scan Wizard button from the toolbar to let the Scan Wizard guide you through the entire scan process.
You may also tailor your own user interface of DI Capture such as the toolbar buttons, Viewer Pane, Browser Pane, etc.
Refer to the online help of DI Capture to explorer more about DI Capture!
SSccaannnniinngg ffrroomm tthhee SSccaannnneerr’’ss PPaanneell oorr OOnn--ssccrreeeenn DDooccAAccttiioonn''ss EExxeeccuuttee MMeennuu
The settings for each button on the scanner's panel are configured through DocAction. DocAction offers you quick access to the most frequently-used scanning functions. They are especially useful when you need to repeatedly scan with the same settings and send images to the same destination.
Buttons on the scanner panel will be used in this guide to demonstrate the scanner operations. You may also use DocAction's on-screen Execute menu to perform the same scanning tasks.
Configure Button Settings
Before performing your first scan via scanner buttons, you are recommended to configure the button settings to your needs and preferences first. There are two ways to configure or view the button settings of DocAction:
Double-click the icon in the Windows system tray.
Right-click the icon in the Windows system tray, and then choose Button Configuration in the pop-up menu that opens.
Within the “Button Configuration” window, you can find a row of icons running through the left side of the window. Each icon corresponds to a button on your scanner's panel (as well as DocAction's on-screen Execute menu). Clicking any icon on the left pane and its current button settings are displayed immediately on the right pane. You may adjust the settings as desired.
Click the Help button within the Button Configuration window for more information about the settings.
18

Scan from the Buttons
Scanning documents or images from this scanner is very easy. Follow the two steps described below:
1. Place the document or images onto the scanner. (Refer to “Chapter II. Scanning” of this guide for more information in placing paper on the flatbed glass properly.)
Attention
Place only text documents for OCR purposes. Do not scan a photo using the OCR button.
2. Do one of the following to start scanning: Press the button from the scanner's panel.
Right-click the icon in the Windows system tray, and then choose Execute in the pop-up menu that opens. Click the desired button function item in the pop-up menu.
The scanner starts to scan immediately and carry out the corresponding action according to the settings you have set up in the Button Configuration window.
19

CHAPTER III. CARE AND MAINTENANCE Your scanner is designed to be maintenance-free. However, constant care and
maintenance can keep your scanner working smoothly.
CLEANING THE SCANNER Paper powder, dust, ink and toner from paper being scanned may make the
scanner glass dirty, which leads to poor image quality or document-feeding errors. How often to clean your scanner depends on the type of paper and number of pages being scanned.
Perform the following procedures to clean the scanner surface and scanner glass. Gently wipe locations described herein. Do not rub too hard.
Warning
Before cleaning the scanner, turn off the scanner and disconnect the scanner’s power cable and USB cable, and then wait a few minutes for the glass to cool to ambient temperature.
Wash your hands with soap and water after cleaning the scanner.
CClleeaanniinngg MMaatteerriiaallss
Have the following cleaning materials ready to clean the scanner: soft, dry, lint-free cloth (or a cotton swab) non-abrasive cleaner—Isopropyl alcohol (95%). DO NOT use water.
Attention
Alternatively you can use glass cleaner or neutral detergent for windows cleaning to clean the scanner glass.
Use of other cleaning materials could damage your scanner.
CClleeaanniinngg tthhee FFllaattbbeedd
1. Open the document cover.
2. Gently wipe the following areas with the cloth dampened with the cleaner.
Clean Document Pad & Scanner Glass:
20
Document Pad
Scanner Glass
3. Wait for cleaned areas to dry completely.
4. Gently close the document cover.
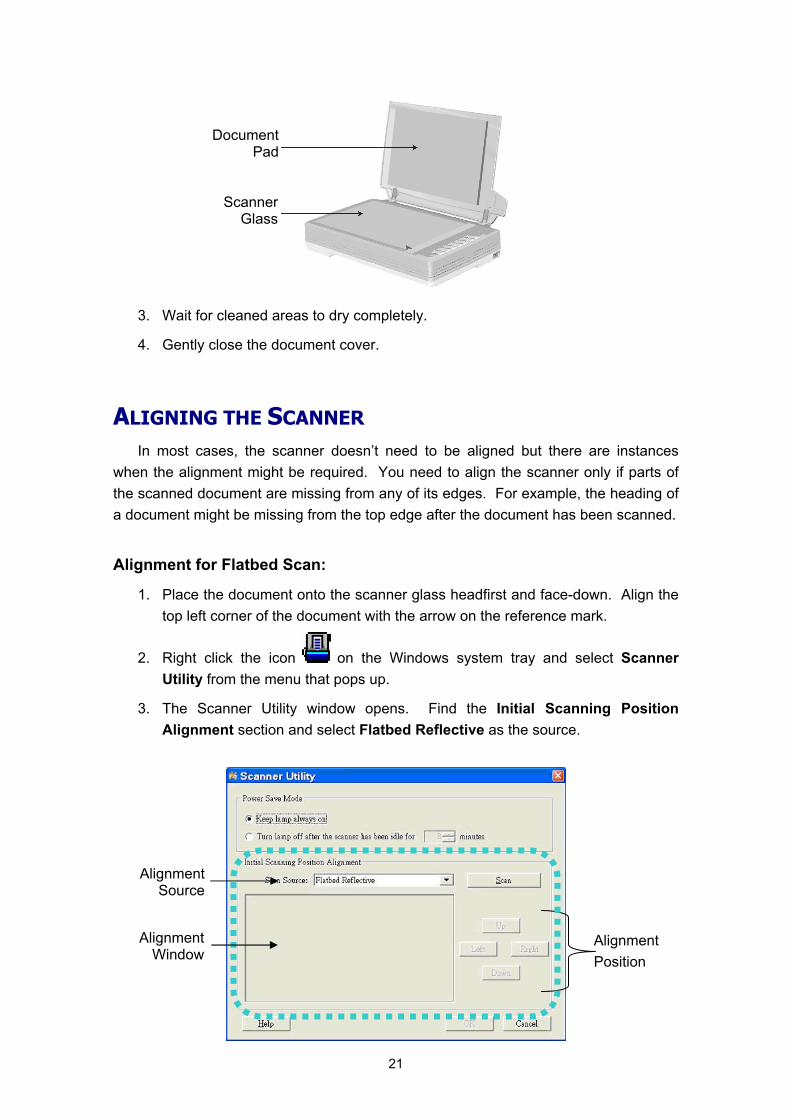
ALIGNING THE SCANNER In most cases, the scanner doesn’t need to be aligned but there are instances
when the alignment might be required. You need to align the scanner only if parts of the scanned document are missing from any of its edges. For example, the heading of a document might be missing from the top edge after the document has been scanned.
Alignment for Flatbed Scan:
1. Place the document onto the scanner glass headfirst and face-down. Align the top left corner of the document with the arrow on the reference mark.
2. Right click the icon on the Windows system tray and select Scanner Utility from the menu that pops up.
3. The Scanner Utility window opens. Find the Initial Scanning Position Alignment section and select Flatbed Reflective as the source.
Alignment Source
Alignment Position
Alignment Window
21
4. Click the Scan button. Part of the document image will be displayed in the Alignment Window.
5. Click the Alignment Position buttons (Up, Down, Left, Right) until the top left corner of the scanned document aligns with the top left corner of the Alignment Window.
6. When the alignment completes, click on OK button to save settings and exit.
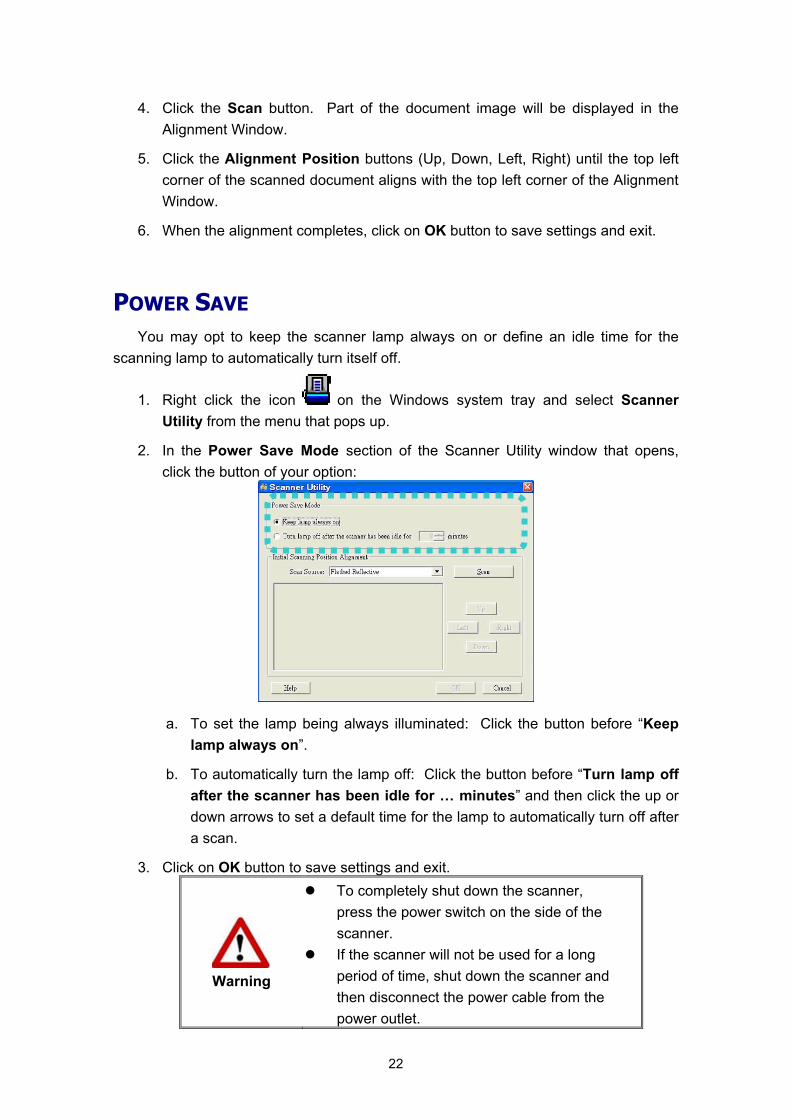
POWER SAVE You may opt to keep the scanner lamp always on or define an idle time for the
scanning lamp to automatically turn itself off.
1. Right click the icon on the Windows system tray and select Scanner Utility from the menu that pops up.
2. In the Power Save Mode section of the Scanner Utility window that opens, click the button of your option:
a. To set the lamp being always illuminated: Click the button before “Keep lamp always on”.
b. To automatically turn the lamp off: Click the button before “Turn lamp off after the scanner has been idle for … minutes” and then click the up or down arrows to set a default time for the lamp to automatically turn off after a scan.
3. Click on OK button to save settings and exit.
Warning
To completely shut down the scanner, press the power switch on the side of the scanner.
If the scanner will not be used for a long period of time, shut down the scanner and then disconnect the power cable from the power outlet.
22
To turn on the lamp again, simply perform any scanning task.
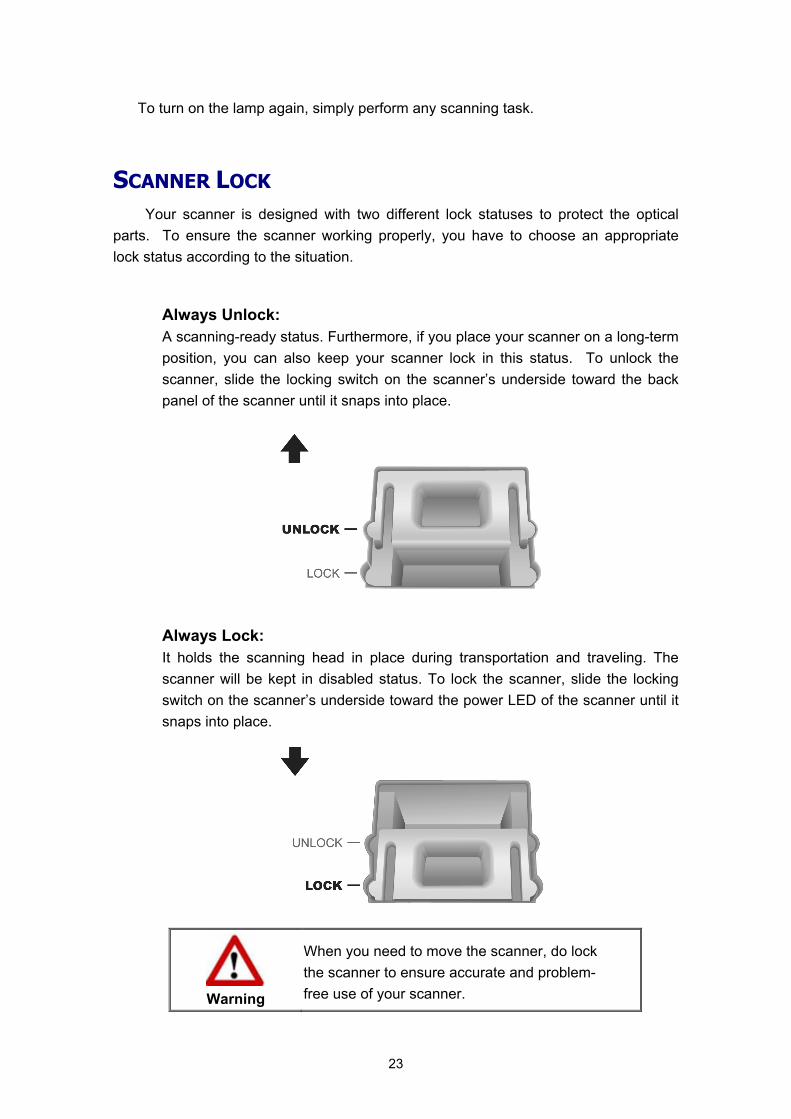
SCANNER LOCK Your scanner is designed with two different lock statuses to protect the optical
parts. To ensure the scanner working properly, you have to choose an appropriate lock status according to the situation.
Always Unlock: A scanning-ready status. Furthermore, if you place your scanner on a long-term position, you can also keep your scanner lock in this status. To unlock the scanner, slide the locking switch on the scanner’s underside toward the back panel of the scanner until it snaps into place.
Always Lock: It holds the scanning head in place during transportation and traveling. The scanner will be kept in disabled status. To lock the scanner, slide the locking switch on the scanner’s underside toward the power LED of the scanner until it snaps into place.
Warning
When you need to move the scanner, do lock the scanner to ensure accurate and problem-free use of your scanner.
23
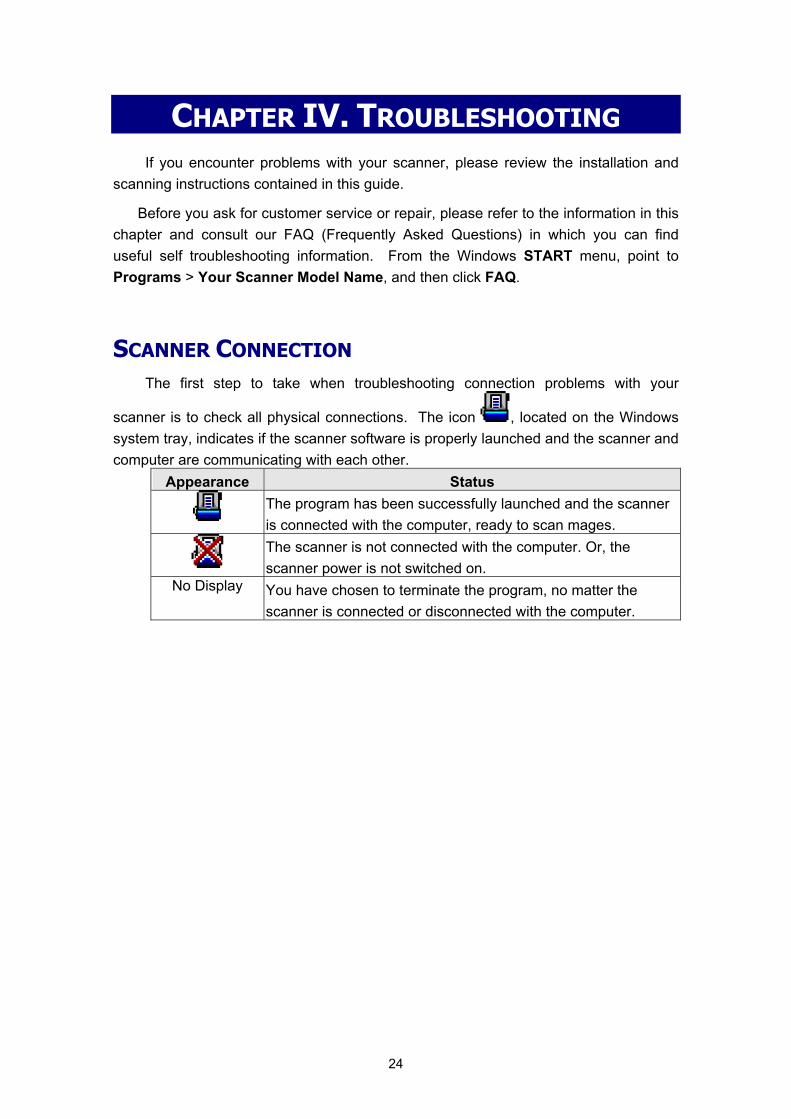
CHAPTER IV. TROUBLESHOOTING If you encounter problems with your scanner, please review the installation and
scanning instructions contained in this guide.
Before you ask for customer service or repair, please refer to the information in this chapter and consult our FAQ (Frequently Asked Questions) in which you can find useful self troubleshooting information. From the Windows START menu, point to Programs > Your Scanner Model Name, and then click FAQ.
SCANNER CONNECTION The first step to take when troubleshooting connection problems with your
scanner is to check all physical connections. The icon , located on the Windows system tray, indicates if the scanner software is properly launched and the scanner and computer are communicating with each other.
Appearance Status
The program has been successfully launched and the scanner is connected with the computer, ready to scan mages.
The scanner is not connected with the computer. Or, the scanner power is not switched on.
No Display You have chosen to terminate the program, no matter the scanner is connected or disconnected with the computer.
24

APPENDIX A: SPECIFICATIONS5
Plustek OpticPro A360
Resolution Optical Resolution: 600 dpi Max. Hardware Resolution: 600 x 1200 dpi
Scan Modes Color: Input 48-it; Output 24-bit Grayscale: Input 16-bit; Output 8-bit Black & White: 1-bit
Lamp Type Cold Cathode Fluorescent Lamp Scan Area (W x L)
Maximum 304.8 x 431.8 mm (12” x 17”) Minimum 12.7 x 12.7 mm (0.5” x 0.5”)
Acceptable Paper Sizes (W x L)
Up to 304.8 x 431.8 mm (12” x 17”)
Power Adapter
Input voltage/frequency: 100Vac – 240Vac (-10 % to +10 %) 47 to 63 Hz
Output voltage/watt: 24Vdc, 1.67A
Power Consumption
Operation: < 36 W Idle: 8 watts
Interface USB 2.0 High Speed Operating Temperature
5°C to 35°C (41°F to 95°F)
Relative Humidity 20% to 80% (non-condensing) Physical Dimensions (WxDxH)
623 x 400 x 133 mm (24.53” x 15.75” x 5.24”)
Weight 7.7 Kgs (16.96 Lbs) Protocols TWAIN Compliant EMC FCC Class A, CE
5 Hardware specifications may change at any time without prior notice.
25

APPENDIX B: CUSTOMER SERVICE AND WARRANTY For further assistance, visit our website or call our customer support phone
number listed on the last page of this guide. One of our representatives will be happy to assist you from Monday through Friday during office working hours.
To avoid delays, please have the following information available before calling: Scanner name and model number Scanner serial number (located at the bottom of the scanner) Scanner CD version and part number A detailed description of the problem Your computer manufacturer and its model number The speed of your CPU Your current operating system and BIOS (optional) Name of software package(s), version or release number and manufacturer
of the software Other USB devices installed
STATEMENT OF LIMITED WARRANTY This Statement of Limited Warranty applies only to the options you originally
purchase for your use, and not for resale, from an authorized reseller.
The manufacturer warranty includes all parts and labor, and is not valid without the receipt of original purchase. To obtain warranty service, you may contact the authorized dealer or distributor, or visit our website to check out the available service information, or send a request via E-mail for further help.
If you transfer this product to another user, warranty service is available to that user for the remainder of the warranty period. You should give your proof of purchase and this statement to that user.
We warrant that this machine will be in good working order and will conform to its functional descriptions in the documentation provided. Upon provision of proof of purchase, replacement parts assume the remaining warranty of the parts they replace.
Before presenting this product for warranty service, you must remove all programs, data and removable storage media. Products returned without guides and software will be replaced without guides and software.
This Limited Warranty service does not provide for carry-in exchange when the problem results from accident, disaster, vandalism, misuse, abuse, unsuitable environment, program modification, another machine or non-vendor modification for this product.
26

If this product is an optional feature, this Limited Warranty applies only when the feature is used in a machine for which it was designed.
If you have any questions about your Limited Warranty, contact the approved retailer from whom you bought the product or the manufacturer.
THIS LIMITED WARRANTY REPLACES ALL OTHER WARRANTIES, EXPRESS OR IMPLIED, INCLUDING, BUT NOT LIMITED TO, THE IMPLIED WARRANTIES OF MERCHANTABLITY AND FITNESS FOR A PARTICULAR PURPOSE. HOWEVER, SOME LAWS DO NOT ALLOW THE EXCLUSION OF IMPLIED WARRANTIES. IF THESE LAWS APPLY, THEN ALL EXPRESS AND IMPLIED WARRANTIES ARE LIMITED IN DURATION TO THE WARRANTY PERIOD. NO OTHER WARRANTIES APPLY AFTER THAT PERIOD.
Some jurisdictions do not allow limitations on how long an implied warranty lasts, so the above limitation may not apply.
Under no circumstances are we liable for any of the following:
1. Third party claims against you for losses or damages.
2. Loss of, or damage to, your records or data; or
3. Economic consequential damages (including lost profits or savings) or incidental damages, even if we are informed of their possibility.
Some jurisdictions do not allow the exclusion or limitations of incidental or consequential damages, so the above limitation or exclusion may not apply to you.
This Limited Warranty gives you specific legal rights, and you may also have other rights that vary from jurisdiction to jurisdiction.
FCC RADIO FREQUENCY STATEMENT This is a Class A product. In a domestic environment this product may cause
radio interference in which case the user may be required to take adequate measures.
This equipment generates, uses and can radiate radio frequency energy and, if not installed and used in accordance with the instructions, may cause harmful interference to radio communications. However, there is no guarantee that interference will not occur in a particular television reception (which can be determined by turning the equipment off and on), the user is encouraged to try to correct the interference by one or more of the following measures:
Reorient or relocate the receiving antenna. Increase the separation between the equipment and receiver. Connect the equipment to an outlet on a circuit different from that which the
receiver is connected.
27

Shielded interconnect cables and shielded power cord which are supplied with this equipment must be employed with this equipment to ensure compliance with the pertinent RF emission limits governing this device.
Consult the dealer or an experienced radio/TV technician for help if the conditions persist.
Changes or modifications not expressly approved by the manufacturer or authorized service center could void the user’s authority to operate this equipment.
This device complies with Part 15 of the FCC Rules. Operation is subject to the following two conditions: (1) this device may not cause harmful interference, and (2) this device must accept any interference received, including interference that may cause undesired operation.
28

CONTACTING PLUSTEK
Europe: Plustek Technology GmbH Gutenbergring 38 22848 Norderstedt Germany Tel.: +49 (0) 40 523 03 130 Fax: +49 (0) 40 523 03 500 E-mail: [email protected]: www.plustek.de
North America: Plustek Technology Inc. 17517 Fabrica Way, Suite B Cerritos, CA 90703 U.S.A. Tel: +1 -714-670-7713 Fax: +1 -714-670-7756 E-mail: [email protected]
Worldwide except Europe & North America:
Plustek Inc. 13F-1, No.3 (Building F), Yuan Qu Street 115 Nankang, Taipei Taiwan Tel: +886-2-2655 7866 Fax: +886-2-2655 7833 Website: www.plustek.com
Visit our website http://www.plustek.com/support/support.htm
for more customer service information.
29