Scanner User’s Guidedownload.brother.com/welcome/doc002910/ds600_use_usr_a.pdf · Scanner you...
57
DSmobile 600 Scanner User’s Guide
Transcript of Scanner User’s Guidedownload.brother.com/welcome/doc002910/ds600_use_usr_a.pdf · Scanner you...

DSmobile 600
Scanner User’s Guide

i
Trademarks
Adobe® and the Adobe logo, Acrobat®, Photoshop® and Reader® are registered trademarks of AdobeSystems Inc.
Brother® is a registered trademark of Brother Industries, Ltd.
Apple®, Macintosh®, Mac®, the Mac logo, Mac OS®, Lion®, Snow Leopard®, Leopard®, Tiger® andPanther® are trademarks of Apple Computer, Inc., registered in the United States and other countries.
PageManager® is a registered trademark of NewSoft America, Inc.
Post-It® is a registered trademark of 3M Company.
Windex® is a registered trademark of S.C. Johnson Company.
Microsoft®, Windows® and the Windows logo are trademarks, or registered trademarks of MicrosoftCorporation in the United States and other countries. Windows Vista® is either a registered trademark ortrademark of Microsoft Corporation in the United States and/or other countries. The official name for Windowsis the Microsoft Windows Operating System.
Wite-Out® is a registered trademark of Wite-Out Products, Inc.
All other trademarks are either registered trademarks or trademarks of their respective owners in the UnitedStates and other countries.

ii
Product Safety Guide
Symbols and conventions used in this documentation
Warning WARNING indicates a potentially hazardous situation which, if not avoided, could result in death or serious injuries.
Caution CAUTION indicates a potentially hazardous situation which, if not avoided, may result in minor or moderate injuries.
Important Important indicates a potentially hazardous situation which, if not avoided, may result in damage to property or loss of product functionality.
Hazard notice: “Be careful.”
Restricted conduct.
Proper conduct: “What you have to do.”
Warning Store the USB cable bundled out of the reach of children. This may result in injury.
Do not disassemble or modify the unit. This may result in a fire, electric shock, or device failure. Contact the store where this unit was purchased to inspect, adjust, and repair the internal components of the unit. (There will be a charge for repairs even when conducted within the warranty period if the unit fails due to the disassembly or modifications by the customer.)
Do not use the device in abnormal conditions, i.e. appearance of smoke, strange smell, odd noise, etc. This may result in a fire, burns, or device failure. Turn the power switch off immediately, remove the USB cable from the outlet. Contact the store where this unit was purchased.
In the event that foreign material enters the unit, turn the power switch off immediately, remove the USB cable. Contact the store where this unit was purchased. This may result in a fire, electric shock, or device failure.
Do not spill drinks, i.e. coffee, juice, etc., or water on the device. Do not use the device in places where water may splash the device. This may result in igniting a fire, electric shock, or device failure. In such a event turn the power switch off immediately, remove the USB cable from the outlet. Contact the store where this unit was purchased.
Keep plastic bags bundled out of the reach of children or throw them away to avoid the danger of suffocation.
In the event that lightening strikes, do not touch the unit for fear of electric shock.
Do not place near open flames or heater. This may result in a fire or device failure.

iii
Caution Strong jolts, i.e. drop, being stepped on, etc., may damage the unit. This may result in injury. In
the event that the unit is damaged, turn the power switch off immediately, remove the USB cable from the outlet. Contact the store where this unit was purchased.
Do not locate the device on rackety or aslope tables. Do not locate the device on unstable surface. The device may fall down and this may result in injury.
Do not place heavy objects on the unit. It may cause unbalance and the device may fall down. This may result in injury.
Do not use an organic solvent, i.e. flammable gas, alcohol, etc., when cleaning the device. Do not use them near the device. This may result in a fire or device failure.
Be cautious when you handle paper. Edges of paper may cut your hands.
Important Do not leave the device at places exposed to direct sunlight and places near open flames or
heater with extremely high or low temperature. Do not use and store the device in locations of much humidity and dust.
Do not conduct any operations not instructed in this guide. This may result in injury or device failure.
Do not use an organic solvents, i.e. paint thinner, benzene, alcohol, etc., when cleaning the unit. This may damage the finish on the surface or may peel the paint resulting in damage. Wipe away any dirt on the unit using a soft, dry cloth.
Do not use any USB cables except the USB cable bundled.
Do not use the device in locations where temperature changes are extreme. The resulting condensation may result in device failure or malfunction. In the event of condensation, use only after drying the device naturally.

iv
Product Warranty Information
Brother™ One-Year Limited Warranty and Replacement Service Scanner (USA Only)
Who is covered:
This limited warranty (“warranty”) is given only to the original end-use/retail purchaser (referred to in this warranty as “Original Purchaser”) of the accompanying Scanner, consumables and accessories (collectively referred to in this warranty as “this Scanner”).
If you purchased a Scanner from someone other than an authorized Brother reseller in the United States or if the Scanner was used (including but not limited to floor models or refurbished Scanners by someone other than Brother), prior to your purchase you are not the Original Purchaser and the Scanner that you purchased is not covered by this warranty.
What is covered:
This Scanner includes a Scanner and may include Consumable and Accessory Items. Consumable and Accessory Items may include but are not limited to USB Cable, photo sleeves, calibration sheets and cleaning sheets.
Except as otherwise provided herein, Brother warrants that the Scanner and the accompanying Consumable and Accessory Items will be free from defects in materials and workmanship, when used under normal conditions.
This warranty applies only to Scanners purchased and used in the United States. For Scanners purchased in, but used outside, the United States, this warranty covers only warranty service within the United States (and does not include shipping outside the United States).
What is the length of the Warranty Periods:
Scanner: one year from the original purchase date.
Accompanying Consumable and Accessory Items: 90 days from the original purchase date or the rated life of consumable, whichever comes first.
What is NOT covered:
This warranty does not cover:
1 Physical damage to this Scanner;
2 Damage caused by improper installation, improper or abnormal use, misuse, neglect or accident (including but not limited to transporting this Scanner without the proper preparation and/or packaging);
3 Damage caused by another device or software used with this Scanner (including but not limited to damage resulting from use of non Brother™-brand parts and Consumable and Accessory Items);
4 Consumable and Accessory Items that expired in accordance with a rated life;
5 Problems arising from other than defects in materials or workmanship.
6 Normal Periodic Maintenance Items beyond the rated life, such as Separation Pad and Pick-up Roller if beyond the rated life.
This limited warranty is VOID if this Scanner has been altered or modified in any way (including but not limited to attempted warranty repair without authorization from Brother and/or alteration/removal of the serial number).

v
What to do if you think your Scanner is eligible for warranty service:
Report your issue to our Customer Service Hotline at 1-877-BROTHER (1-877-276-8437) within the applicable warranty period. Supply Brother with a copy of your dated bill of sale showing that this Scanner was purchased within the U.S.
What Brother will ask you to do:
After contacting Brother you will be required to send the Scanner properly packaged, freight prepaid, to Brother together with a photocopy of your bill of sale. Brother will provide a Return Authorization Number (i.e RA#) that must be written on the outside of the carton that contains your Scanner and instruction to where you should return your Scanner. You are responsible for the cost of shipping, packing the Scanner, and insurance (if you desire). You are also responsible for loss or damage to this Scanner in shipping.
What Brother will do:
If the problem reported concerning your Scanner and/or accompanying Consumable and Accessory Items is covered by this warranty and if you first reported the problem to Brother within the applicable warranty period, Brother will repair or replace the Scanner and/or accompanying Consumable and Accessory Items at no charge to you for parts or labor. The decision as to whether to repair or replace the Machine and/or accompanying Consumable and Accessory Items is made by Brother in its sole discretion. Brother reserves the right to supply a refurbished or remanufactured replacement Scanner and/or accompanying Consumable and Accessory Items and use refurbished parts provided such replacement Scanners conform to the manufacturer’s specifications for new Scanner/parts. The repaired or replacement Scanner and/or accompanying Consumable and Accessory Items will be returned to you freight prepaid.
If the Scanner and/or accompanying Consumable and Accessory Items are not covered by this warranty (either stage), you will be charged for shipping the Scanner and/or accompanying Consumable and Accessory Items back to you and charged for any service and/or replacement parts/Scanners at Brother’s then current rates.
The foregoing are your sole (i.e., only) and exclusive remedies under this warranty. What happens when Brother elects to replace your Scanner:
Brother will send to you a replacement Scanner shipped for receipt within two business days, with the understanding that you will, after receipt of the replacement Scanner, supply the required proof of purchase information, together with the Scanner that Brother agreed to replace. You are then expected to pack the Scanner that Brother agreed to replace in the package from the replacement Scanner and return it to Brother using the pre-paid freight bill supplied by Brother in accordance with the instructions provided by Brother. The replacement Scanner you receive (even if refurbished or remanufactured) will be covered for the balance of the limited warranty period remaining on the original Scanner, plus an additional thirty (30) days. You will keep the replacement Scanner that is sent to you and your original Scanner shall become the property of Brother. Since you will be in possession of two machines, Brother will require that you provide a valid major credit card number. Brother will issue a hold against the credit card account number that you provide until Brother receives your original Scanner and determines that your original Scanner is entitled to warranty coverage. Your credit card will be charged up to the cost of a new Scanner only if: (i) you do not return your original Scanner to Brother within five (5) business days; (ii) the problems with your original Scanner are not covered by the limited warranty; (iii) the proper packaging instructions are not followed and has caused damage to the Scanner; or (iv) the warranty period on your original Scanner has expired or has not been sufficiently validated with a copy of the proof of purchase (bill of sale). Retain your original Accessory Items and a copy of the return freight bill, signed by the courier.
vi
Limitations:
Brother is not responsible for damage to or loss of any equipment, media, programs or data related to the use of this Scanner. Except for the repair or replacement as described above, Brother shall not be liable for any direct, indirect, incidental or consequential damages or specific relief. Because some states do not allow the exclusion or limitation of consequential or incidental damages, the above limitation may not apply to you.
THIS WARRANTY IS GIVEN IN LIEU OF ALL OTHER WARRANTIES, WRITTEN OR ORAL, WHETHER EXPRESSED BY AFFIRMATION, PROMISE, DESCRIPTION, DRAWING, MODEL OR SAMPLE. ANY AND ALL WARRANTIES OTHER THAN THIS ONE, WHETHER EXPRESS OR IMPLIED, INCLUDING IMPLIED WARRANTIES OF MERCHANTABILITY AND FITNESS FOR A PARTICULAR PURPOSE, ARE HEREBY DISCLAIMED.
This Limited Warranty is the only warranty that Brother is giving for this Scanner. It is the final expression and the exclusive and only statement of Brother’s obligations to you. It replaces all other agreements and understandings that you may have with Brother or its representatives.
This warranty gives you certain rights and you may also have other rights that may vary from state to state.
This Limited Warranty (and Brother’s obligation to you) may not be changed in any way unless you and Brother sign the same piece of paper in which we (1) refer to this Scanner and your bill of sale date, (2) describe the change to this warranty and (3) agree to make that change.
Important: We recommend that you keep all original packing materials, in the event that you ship this Scanner.
© 2012 Brother International Corporation

vii

viii

ix

x

xi

xii

xiii
Customer Service (USA only)FREE INFORMATION BY E-MAIL & WEB
Visit our Web site at http://www.brother-usa.com. Search for the “DSmobile 600” scanners where you canaccess:
Features, Specifications, and Compatibility (Windows® & Mac®)
FAQs
Warranty information
Brochures
Manuals
Product Software download information.
CUSTOMER SERVICE (USA only)
Brother recommends that you go to http://www.brother-usa.com, click on “Support-Contact CustomerService”, and use the web contact form to send your question to Customer Service. Either method will sendyour request immediately to customer service personnel.
Telephone Contact: 1-877-BROTHER (1-877-276-8437)
World Wide Web: www.brother-usa.com
Supplies and Accessories: www.brothermall.com or 1-888-879-3232
Product Registration: www.registermybrother.com
View Our Privacy Policy: www.registermybrother.com

xiv
What’s Included with This Package
User Manual (Printable from DVD only)
Installation DVD
Plastic Feeding Sheets (2)
Kit Contents List
USB Cable (6ft.)
Cleaning Sheet
Calibration Sheets (2)
Product Registration Card
Soft Carrying Bag
Regulatory Compliance Statement Sheet
Model DS600 DSmobile® 600 Scanner

xv
Welcome — Introduction to Your DSmobile® ScannerCongratulations on purchasing a DSmobile 600 document scanner!
We have designed this product to provide you with a simple but effective tool to capture, manage, and archivedocuments of many types. We encourage you to read this User’s Guide carefully.
Your DSmobile 600 scanner Installation DVD comes with WHQL certified and/or tested drivers forWindows® 7, Windows Vista® and Windows® XP operating systems. The Windows® 7 and WindowsVista® drivers work with both 32-bit and 64-bit operating systems. This product features TWAIN 1.9 compatibleand Windows® Imaging Acquisition (WIA) drivers that will work with any of your TWAIN/WIA-compliantimaging applications. These TWAIN/WIA drivers are automatically installed for the DSmobile 600 when youload the Windows® drivers. If you experience any difficulty with any of these drivers, please check our websitehttp://www.brother.com to verify that you are using the latest version.
For your convenience, a version of PageManager® is included on the Installation DVD. This software programallows you to scan and organize your digital files with the ability to view, edit, send, and save them. It will alsooutput various selectable file formats. Note that DSmobileSCAN II software outputs Adobe® PDF files as wellas .JPG and .TIF files. Please follow the on-screen instructions. For help with how to use this software, pleaseuse the help facility within PageManager®.
Scanning using Apple® Mac OS® X is supported by a Mac® TWAIN driver using the “Image Capture” softwareprovided on the Macintosh®. This driver is included in the software DVD but must be manually installed. Youcan also download the DSmobile 600 Mac OS® X driver from http://www.brother.com.
In the event that you have previously installed a driver for the DS600 (Windows: Ver B1.2.13 or below,Macintosh: Ver B1.2.4 or below) and DSmobileSCANII (Ver 2.0.12 or below), your new scanner may not becompatible with this driver and software. Brother recommends installing the latest driver and software fromthe DVD that came with your scanner or download it from the web at http://solutions.brother.com.

xvi
Table of Contents1 Windows® Operation 1
INSTALLING SOFTWARE ...................................................................................................................... 1Driver Installation ............................................................................................................................... 1DSmobileSCAN II Installation ............................................................................................................ 4PageManager® 9 Installation (For Windows®) .................................................................................. 5Viewing, Printing, Saving the User’s Guide ....................................................................................... 5Adobe® Reader® Installation ............................................................................................................. 6
UN-INSTALLING SOFTWARE ................................................................................................................ 7INSTALLING HARDWARE ...................................................................................................................... 8CALIBRATION ......................................................................................................................................... 9USING YOUR SCANNER ..................................................................................................................... 11SETTING A DEFAULT PROGRAM ....................................................................................................... 12CHANGING PROGRAMS ..................................................................................................................... 13CLEANING THE SCANNER .................................................................................................................. 14
2 Mac OS® X Operation 17
SETTING ADMINISTRATOR PRIVILEGES .......................................................................................... 17INSTALLING SOFTWARE .................................................................................................................... 18
PageManager® 9 Installation (For Mac OS® X v10.4, v10.5, v10.6 and v10.7) .............................. 19UN-INSTALLING SOFTWARE .............................................................................................................. 20INSTALLING HARDWARE .................................................................................................................... 20CALIBRATION ....................................................................................................................................... 21
Calibrating your DSmobile 600 Scanner using “Image Capture” ..................................................... 21 Lion® (Mac OS® X v10.7) ........................................................................................................... 22 Snow Leopard® (Mac OS® X v10.6) ........................................................................................... 22 Leopard® (Mac OS® X v10.5) ..................................................................................................... 22 Tiger® (Mac OS® X v10.4) .......................................................................................................... 25 Panther® (Mac OS® X v10.3) ..................................................................................................... 27
3 Using Scanning Software 28
DSmobileSCAN II (Windows® Only) ...................................................................................................... 28Using DSmobileSCAN II as Your Default ........................................................................................ 28A Note about Document Names ...................................................................................................... 29Using DSmobileSCAN II Icon on Your Desktop .............................................................................. 29
TWAIN (FOR WINDOWS®) ................................................................................................................... 30PageManager® 9 (For Windows®) ......................................................................................................... 32
Initial Setup with PageManager® 9 .................................................................................................. 32Selecting Scanning Source ............................................................................................................. 32Performing Scanner Calibration ...................................................................................................... 33
PageManager® 9 (For Mac OS® X v10.4, v10.5, v10.6 and v10.7) ....................................................... 34Initial Setup with PageManager® 9 .................................................................................................. 34Selecting Scanning Source ............................................................................................................. 34Performing Scanner Calibration ...................................................................................................... 35
Technical support (For PageManager® and BizCard®) ......................................................................... 37

xvii
4 Specifications 38
5 Tips & Cautions 39

1
1
1
Windows® Operation
FOR BEST RESULTS, PLEASE INSTALL THE SOFTWARE FROM THE INCLUDED INSTALLATION DVDPROVIDED BEFORE PLUGGING IN YOUR SCANNER.
Note
As a precaution, a RED warning label has been placed on the USB cable to remind you to install theInstallation DVD first. Please remove this warning label prior to plugging in the scanner cable after youhave installed the software.
INSTALLING SOFTWARE
Driver Installation
a Insert the Installation DVD that came with your DSmobile 600 scanner into your computer.The Autoplay window will be displayed, select “Run setup.exe”.When the User Account Control window is displayed, choose “Yes”. If the installation does not start automatically, please go to My Computer (Computer), and then double-click the DVD icon.If this installation program does not begin, then double-click the start.exe icon.
b The installation program should begin automatically.Select your language, then click on “Install Scanner Driver.”

Windows® Operation
2
1
The following screen will be displayed. Click “Next”.
c Read the End User License Agreement, click the acceptance box, and click “Next”.
d Select “Complete” (recommended) or “Custom”.

Windows® Operation
3
1
e The following screen will be displayed. Click “Install”.
f When the driver has been installed, the following screen will be displayed. Click “Next”. Follow therecommended choices for the New Hardware Wizard.
g Click “Finish”.
h The installation screen will re-appear and you will now have four choices:
Install DSmobileSCAN II
Install PageManager® 9
View/Print the PDF User Guide
Install the Adobe® Reader®
Note
After you have completed all software installations, we strongly recommend that you remove the DVD andrestart your computer even though you are not requested by Windows® to do so.

Windows® Operation
4
1
DSmobileSCAN II Installation
a Click on Install DSmobileSCAN II.
b Click “Next”.
c Select the box labeled, “I accept . . .”, and then click “Next”.
d Click “Next”.

Windows® Operation
5
1
e Click “Install”.
f Click “Finish”.
g This installation will place a DSmobileSCAN II icon on your Windows® desktop from which you can launchthe application whenever needed.
PageManager® 9 Installation (For Windows®)
At this point you may install the PageManager® 9 software. Follow the on-screen instructions to installPageManager® 9.
Viewing, Printing, Saving the User’s Guide
a Click on Documentation.
b Click on View/Print the PDF User Guide. This will launch Adobe® Reader® and display the first page ofthe User’s Guide. If this does not happen, you must install Adobe® Reader® software as outlined in thenext section.
Windows® Operation
6
1
c From the display of the User’s Guide, you can view the document, or save or print the document byselecting those options under the File menu.
d Close the Adobe® Reader® window when you are finished.
Adobe® Reader® Installation
If you do not have Adobe® Reader® installed yet, you should click the “Get ADOBE READER” button beforeyou click “View/Print the PDF User Guide.” You may then print the User’s Guide after installing the Adobe®
Reader® for your future reference.
If you choose to install the Adobe® Reader®, your Web browser will start and “Adobe Reader download”website will open. Please follow the instructions to install the software.

Windows® Operation
7
1
UN-INSTALLING SOFTWAREIf you should need to un-install the driver software later, you simply insert the original installation DVD andrun the setup again. At this time you will be given three options. Select the REMOVE option, and then clickREMOVE. Scanner driver software will be removed from your computer.
If you should need to un-install Windows® scanning software (DSmobileSCAN II or PageManager®), followthe steps below.
(Windows® 7 and Windows Vista®) Select Start, Control Panel, and then Programs and features to delete the desired software. (Windows® XP) Select Start, Control Panel, and then Add or Remove Programs to delete the desired software.

Windows® Operation
8
1
INSTALLING HARDWAREDo not connect the scanner to your computer until instructed to do so by the driver installation software. Wheninstructed to do so, connect the scanner cable as shown below and follow the instructions.
After you have installed the software, follow the steps below. Then, proceed to Calibration.
a Connect the USB cable to the scanner and to a USB port on your computer as shown below (either to adesktop or laptop computer). If necessary, please check your computer’s user guide to identify the USBports available and their locations.
b The following message will be displayed, and the computer will automatically detect the new hardwaredevice installed and it will be ready for use.

Windows® Operation
9
1
CALIBRATION
Note
• Calibration is critical because it allows the image quality to be “balanced” for your computer and scannercombination. If you switch the computer that you use with your scanner or change scanners, you mustcalibrate again.
• Calibration can be performed on any TWAIN-compliant application. DSmobileSCAN II is such anapplication.
• When you intend to scan by WIA compliant scanner driver, please conduct a calibration process by TWAINcompliant scanner driver beforehand.
a To open DSmobileSCAN II application, you can either double-click DSmobileSCAN II shortcut icon on
your desktop or the “Taskbar tray” icon usually in the lower right-hand corner of the Windows®
Desktop.
b Once you have launched DSmobileSCAN II (or any TWAIN application), select the SCAN button and thestep-by-step calibration instructions will appear in a succession of prompts.
This calibration process uses the special black and white calibration sheet (see picture on page xiv) that wasincluded with your scanner. When calibrating, make sure the side with the black bar is facing down and notethe direction of the arrows for proper insertion.
When the calibration process has been completed successfully, you will see the message above; otherwiseyou will need to clean the scanner and re-calibrate.

Windows® Operation
10
1
If you switch scanners or your image quality has become unsatisfactory, you can re-calibrate your scannerby choosing the CUSTOM button in DSmobileSCAN II window and select the Calibrate button.
If you lose the black and white calibration paper that was included with your scanner, you can use anyplain “White” (the brighter the “White” the better) piece of letter size (or A4) printer paper to perform thecalibration. Simply fold the paper in half and insert the end opposite the fold into the scanner first whencalibrating. The following message will be displayed (see below).
Note
When the image quality has become unsatisfactory, we recommend you clean the scanner with theincluded cleaning sheet (see Tips & Cautions page) and then recalibrate the scanner.

Windows® Operation
11
1
USING YOUR SCANNERPlease insert documents face down. You can either use your preferred scanning application to initiate a scanor use the button on the scanner to start a scan session. See the next section to configure a default scanningaction when the button is pressed.
The following window will appear when you press the button on the top of the scanner. A double click on anyof the programs will initiate that program.

Windows® Operation
12
1
SETTING A DEFAULT PROGRAMYou can select a default scanning program to automatically launch when you press the button on the top ofthe scanner.
a (Windows® 7 and Windows Vista®) Select Start: Control Panel: Devices and Printers.(Windows® XP) Select Start: Control Panel: Scanners and Cameras.
b Right click on the scanner icon, select Scan properties, and then select Events tab.
c Select “Start this program:” in Actions groupbox.
d Select a program in the combobox.
e Click OK, then exit the Control Panel.

Windows® Operation
13
1
CHANGING PROGRAMSYou can set the button operation to force the selection of a scanning application each time the button ispressed.
a (Windows® 7 and Windows Vista®) Select Start: Control Panel: Devices and Printers.(Windows® XP) Select Start: Control Panel: Scanners and Cameras.
b Right click on the scanner icon, select Scan properties, and then select Events tab.
c Select “Prompt for which program to run” in Actions groupbox.
d Click OK, then Exit the Control Panel.
Now the next time you press the button on the top of the scanner, the window for selecting a program willappear.
Windows® Operation
14
1
CLEANING THE SCANNER
Note
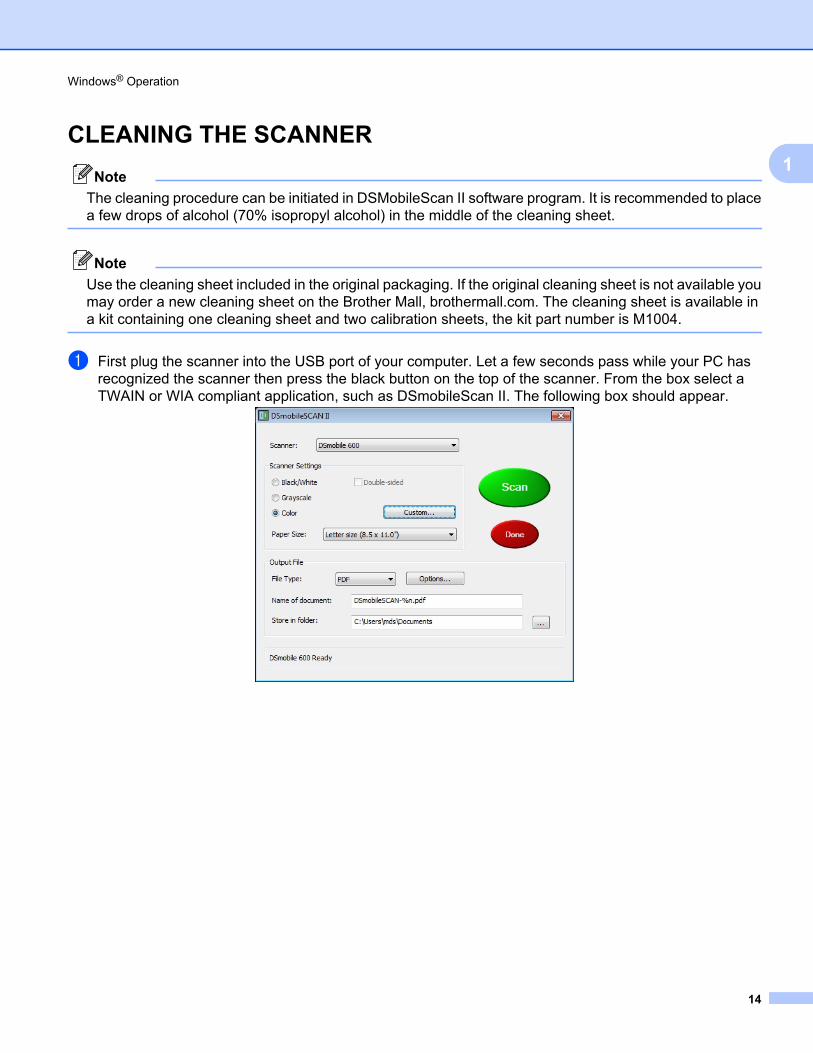
The cleaning procedure can be initiated in DSMobileScan II software program. It is recommended to placea few drops of alcohol (70% isopropyl alcohol) in the middle of the cleaning sheet.
Note
Use the cleaning sheet included in the original packaging. If the original cleaning sheet is not available youmay order a new cleaning sheet on the Brother Mall, brothermall.com. The cleaning sheet is available ina kit containing one cleaning sheet and two calibration sheets, the kit part number is M1004.
a First plug the scanner into the USB port of your computer. Let a few seconds pass while your PC hasrecognized the scanner then press the black button on the top of the scanner. From the box select aTWAIN or WIA compliant application, such as DSmobileScan II. The following box should appear.

Windows® Operation
15
1
b Click the Custom button and the following will appear.
c Click the Calibrate button, and the following will appear.
d Click the Clean button, and the following will appear.
Note
A few drops of alcohol placed on the cleaning paper may help if the paper alone is not effective.
e Insert the cleaning sheet into the machine.

Windows® Operation
16
1
f Click the OK button and this window will reappear.
g Click the Clean button the cleaning paper will move back and forth in the scanner, then be ejected andthe following window will be displayed.
h Click the OK button to finish.

2
17
2
Mac OS® X Operation
FOR BEST RESULTS, PLEASE INSTALL THE SOFTWARE FROM THE INCLUDED INSTALLATION DVDPROVIDED BEFORE PLUGGING IN YOUR SCANNER.
Note
As a precaution, a RED warning label has been placed on the USB cable to remind you to install theInstallation DVD first. Please remove this warning label prior to plugging in the scanner cable after youhave installed the software.
SETTING ADMINISTRATOR PRIVILEGES
If installation or calibration is not working on your Macintosh® system, the solution may be in the privileges.When initially set up, you are given administrator privileges which should allow you to install the DSmobilesoftware and complete the calibration. If, however, your system is set up such that you do not haveadministrator privileges or the privileges have somehow become corrupt, the installation and calibration maynot be possible. To correct this problem, do the following:
a Mouse over the Apple® in the upper left corner of the desktop and select System Preferences.
b Select System and then Users & Groups.
c The left pane of the window will list the current accounts, one of which should be your user name withthe word “Admin” underneath.
d If this is not the case, contact your system administrator to have the privileges changed so you can installsoftware and calibrate the scanner.

Mac OS® X Operation
18
2
INSTALLING SOFTWARE
Insert the Installation DVD that came with your DSmobile 600 scanner into your Mac® computer and followthe steps below.
a Make sure your Macintosh® system software is Mac OS® X v10.3, v10.4, v10.5, v10.6 or v10.7 and thatyour application software works native and not in emulation of lower system software versions.
b Do not connect the DSmobile 600 scanner to your Macintosh® until after the driver installation.
c We recommend that the first installation and calibration should be done using an Administrator account.(See SETTING ADMINISTRATOR PRIVILEGES)
d Click on the DVD icon, and then open “Macintosh” folder.
e Double click on DSmobile 600 Driver.pkg.
f Click on “Continue”.
g Select the disk for the installation or click “Continue”.
h Click “Install”.
i Close other application software and then click “Continue Installation”.
j When the installation is complete, click “Logout”.
k Connect your DSmobile 600 scanner to a Macintosh® USB port.
l Start your TWAIN-compliant application software. The Macintosh® is supplied with “Image Capture”software but you may use other TWAIN-compliant software. Refer to Calibrating your DSmobile 600Scanner using “Image Capture” uu page 21 for instructions on calibrating with “Image Capture”. (For Mac OS® X v10.6 and v10.7, Refer to Performing Scanner Calibration uu page 33 for instructionson calibrating with “PageManager® 9”)
m Select “DSmobile 600” as scanning device.
n Follow the on-screen instructions for calibration and scanning.
o Note that when using the DSmobile 600 on a Macintosh®, the scan button on the top of the scanner doesnot start scanning software automatically (available for Windows® OS only).

Mac OS® X Operation
19
2
PageManager® 9 Installation (For Mac OS® X v10.4, v10.5, v10.6 and v10.7)
At this point you may install the PageManager® 9 software. Insert the Installation DVD that came with your DSmobile 600 scanner into your Mac® computer and followthe steps below.
a Click on the DVD icon.
b Open “Macintosh” folder.
c Open “PageManager 9” folder.
d Double click on PM9Installer.mpkg.
e Follow the on-screen instructions to install PageManager® 9.

Mac OS® X Operation
20
2
UN-INSTALLING SOFTWAREIf you need to remove any of software from your Macintosh system, you may either use the uninstallerapplication in the Installation DVD (PageManager® and BizCard® only) or you can drag the software out ofthe Applications folder to the trash can.
We recommend using the uninstaller application in the Installation DVD.
INSTALLING HARDWARE
Installing hardware is as simple as finding an unused USB port on your Macintosh® and inserting the scannercable’s USB plug into the socket.

Mac OS® X Operation
21
2
CALIBRATIONCalibration is critical because it allows the image quality to be “balanced” for your computer and scannercombination. If you switch the computer that you use with your scanner or change scanners, you mustcalibrate again.
Note that you must be logged in as an Administrator to calibrate the system. See SETTING ADMINISTRATORPRIVILEGES uu page 17 for further information.
This calibration process uses the special black and white calibration sheet (see picture on page xiv) that wasincluded with your scanner. When calibrating, make sure the side with the black bar is facing down and notethe direction of the arrows for proper insertion.
If you lose the black and white calibration paper that was included with your scanner, you can use any plain“White” (the brighter the “White” the better) piece of letter size (or A4) printer paper to perform the calibration.Simply fold the paper in half and insert the end opposite the fold into the scanner first when calibrating. The following message will be displayed (see below).
Note
When the image quality has become unsatisfactory, we recommend you clean the scanner with theincluded cleaning sheet (see Tips & Cautions page) and then recalibrate the scanner.
Calibrating your DSmobile 600 Scanner using “Image Capture”
Calibration is a critical step in setting up your scanner. It allows the scanned color data to be “calibrated” toyour computer and scanner combination for best image quality. If at any time you switch the computer thatyou use with your scanner or change scanners, you will need to calibrate again.
The following steps guide you through calibration of your DSmobile 600 scanner using the built-in “ImageCapture” software on your Mac OS® X along with the Brother driver and GUI. Note that once a calibration isperformed, it does not need to be re-done if you use to another application on the same computer.

Mac OS® X Operation
22
2
Lion® (Mac OS® X v10.7)
For Mac OS® X v10.7, calibrate your scanner with PageMager® 9. See Performing Scanner Calibration uu page 33.
Snow Leopard® (Mac OS® X v10.6)
For Mac OS® X v10.6, calibrate your scanner with PageMager® 9. See Performing Scanner Calibration uu page 33.
Leopard® (Mac OS® X v10.5)
a Install the DSmobile 600 scanner driver using the Installation DVD and restart your computer.
b Connect the scanner to your computer’s USB port.
c Open the Applications folder and run “Image Capture”.
d Close the “DSmobile 600” window.

Mac OS® X Operation
23
2
e From the “Devices” menu, choose “Browse Devices”.
f The “Image Capture Device Browser” window will appear.
g Click the “Use TWAIN UI” button to the right of “DSmobile 600”.
h Click the “Scan” button.

Mac OS® X Operation
24
2
i Click the “Calibrate” button.
j Insert the black and white calibration sheet with the single arrow on top and the black strip down.Alternatively, you can use a blank sheet of white paper.
k Click the “Calibrate” button again.
l When the calibration scan is complete, click “OK” and then proceed to scan your documents.

Mac OS® X Operation
25
2
Tiger® (Mac OS® X v10.4)
a Install the DSmobile 600 scanner driver using the Installation DVD and restart your computer.
b Connect the scanner to your computer’s USB port.
c Open the Applications folder and run “Image Capture”.
d Close the “DSmobile 600” window.
e From the “Devices” window, choose “Browse Devices”.
Mac OS® X Operation
26
2
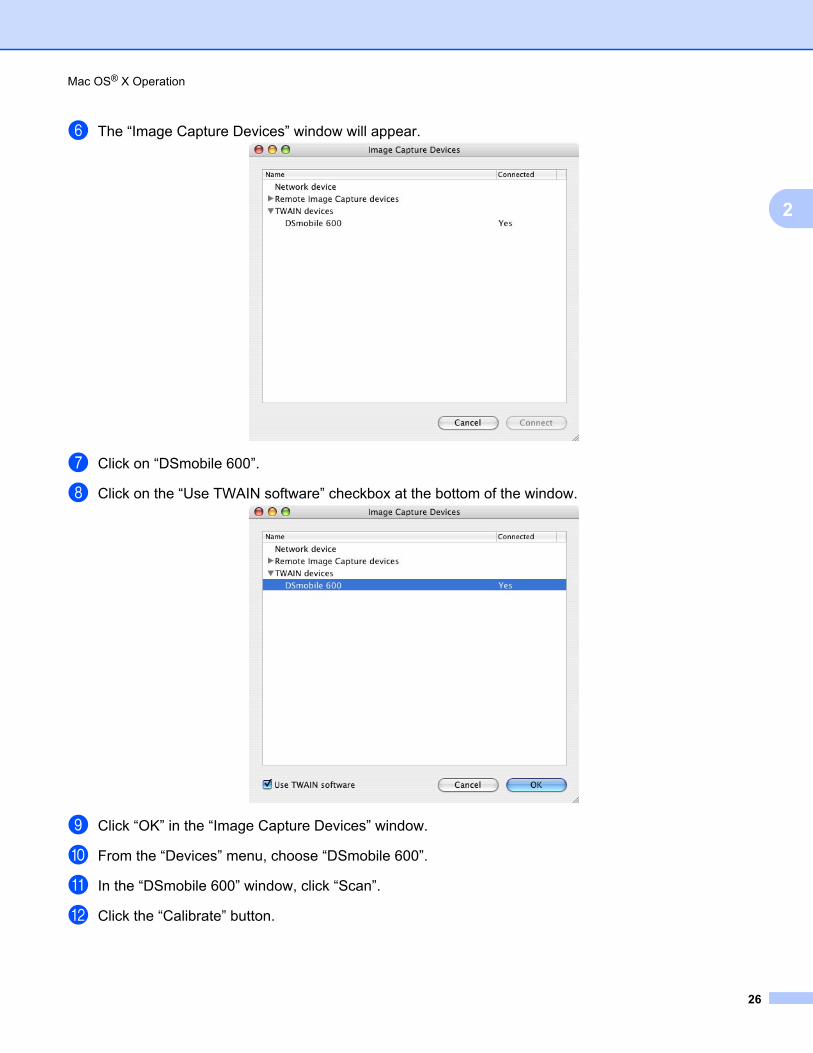
f The “Image Capture Devices” window will appear.
g Click on “DSmobile 600”.
h Click on the “Use TWAIN software” checkbox at the bottom of the window.
i Click “OK” in the “Image Capture Devices” window.
j From the “Devices” menu, choose “DSmobile 600”.
k In the “DSmobile 600” window, click “Scan”.
l Click the “Calibrate” button.

Mac OS® X Operation
27
2
m Insert the black and white calibration sheet with the single arrow on top and the black strip down.Alternatively, you can use a blank sheet of white paper.
n When the calibration scan is complete, click “OK” and then proceed to scan your documents.
Panther® (Mac OS® X v10.3)
a Install the DSmobile 600 scanner driver using the Installation DVD and restart your computer.
b Connect the scanner to your computer’s USB port.
c Open the “Applications” folder and run “Image Capture”.
d Close the “DSmobile 600” window.
e From the “Image Capture”: menu, choose “Preferences”.
f Click the “Scanner” tab at the top of the window.
g Click the “Use TWAIN software whenever possible” checkbox.
h Click “OK” and quit “Image Capture” to save changes.
i Re-launch “Image Capture”.
j In the “DSmobile 600” window, click “Scan”.
k Click the “Calibrate” button.
l Insert the black and white calibration sheet with the single arrow on top and the black strip down.Alternatively, you can use a blank sheet of white paper.
m When the calibration scan is complete, click “OK” and then proceed to scan your documents.

3
28
3
Using Scanning Software
DSmobileSCAN II (Windows® Only)
This software supports Adobe® Acrobat® PDF, JPEG, and TIFF. Note that only PDF format files can be savedas multiple pages. JPEG and TIFF files will be stored as separate files with index numbers added to thefilename (except for the first page).
Using DSmobileSCAN II as Your Default
The advantage of using DSmobileSCAN II as your default is that as a default program it provides the abilityto scan automatically. Pressing the button on top of the scanner once starts DSmobileSCAN II software andpressing it again starts a document scan.
This program gives the user the choice of selecting type of scan and paper size from the main menu (shownabove) or pressing the “Custom” button to utilize the document manager control panel for more precisesettings. Selecting the custom settings will put the program into a TWAIN driver and takes you out of theactual DSmobileSCAN II software application.
If the Custom button is used, it cancels the automatic scan function. The user must choose the setting theywish to make custom, click on “OK” to put the program back to the scanning page, and then click on the green“Scan” button to scan the page.
If DSmobileSCAN II is not set as the default program, when the button on top of the scanner is pressed, awindow will be displayed requiring you to choose a scanning software as shown in USING YOUR SCANNERuu page 11. Follow the scanning instructions for the scanning software you have chosen.

Using Scanning Software
29
3
A Note about Document Names
You can use a suffix with file names to add either an index number or a date. If you append the filename witha “%n”, the file name is appended with a sequential number beginning with 1 (if a previous file exists, thenumber is incremented to the next highest number). If you append the file name with a “%d”, the file name isappended with a date in the form YY-MM-DD.
Using DSmobileSCAN II Icon on Your Desktop
An icon ( ) will appear on your desktop after DSmobileSCAN II software installation. Using this icon will
initiate the DSmobileSCAN software but unless DSmobileSCAN II is set as your default it will put it in a“manual” mode which requires the user to click on the green “SCAN” button to initiate the scan.
If you have chosen DSmobileSCAN II as your default scanning software, pressing the button on the top ofthe scanner after DSmobileSCAN II has been launched from the icon will start the scan process.
If you have not chosen DSmobileSCAN II as your default scanning software, pressing the button on the topof the scanner after DSmobileSCAN II has been launched from the icon will display the “select the programto launch for this action” window. You can now choose another program from the menu. Although theDSmobileSCAN window will show in the background, it will not interfere with the other scanning applicationyou choose. To close DSmobileSCAN II window, you must click on the delete “X” at the top of DSmobileSCANII screen. Closing DSmobileSCAN II window will not interfere with your current software application.

Using Scanning Software
30
3
TWAIN (FOR WINDOWS®)The TWAIN driver for the DSmobile 600 is automatically installed when the Installation DVD installs theWindows® drivers. This TWAIN driver defines communication and data structures between softwareapplications on your PC and the DSmobile 600.
All software that appears in the “select the program to launch for this action” window (shown below) will beTWAIN and WIA-compliant software that is compatible with the DSmobile 600 scanner and allows scanningfrom that software program. Each program will initiate scanning differently. Please follow instruction accordingto the software program you are using.

Using Scanning Software
31
3
If the software you have chosen uses the TWAIN interface instead of the application software interface, theTWAIN control panel (shown below) will appear. The TWAIN interface will allow you to control all the settingsof the scanner. This type of “fine-adjustment” may be required for some of your document scanning needs.
Please notice the Page Tabs at the top of the TWAIN control panel; they are: Pre-defined Setting, CustomSettings, Information. Take a moment to explore these Tabs and their functions.

Using Scanning Software
32
3
PageManager® 9 (For Windows®)This program makes it easy to scan, share, and organize your photos and documents. It helps you not onlyconvert piles of paper into organized digitized files, but also lets you view, edit, send, and back-up files inmany formats.
To install PageManager®, see PageManager® 9 Installation (For Windows®) uu page 5. Refer to the“help” file included with this program for further use instructions.
Initial Setup with PageManager® 9
Note
Calibration is a critical step in setting up your scanner. This process will balance the image quality betweenyour computer and the scanner unit. If at any time you switch the scanner to another computer then youwill need to reinstall the scanner driver and recalibrate the scanner.
Selecting Scanning Source
a When using Presto! PageManager® 9 for the first time you will need to define the Scanning Source thisapplication will be using. This also applies when switching to another scanner.
b Run the PageManager® 9 application and select file in the toolbar menu.
c Under file pull-down menu choose the Select Source option, then your model.
Using Scanning Software
33
3
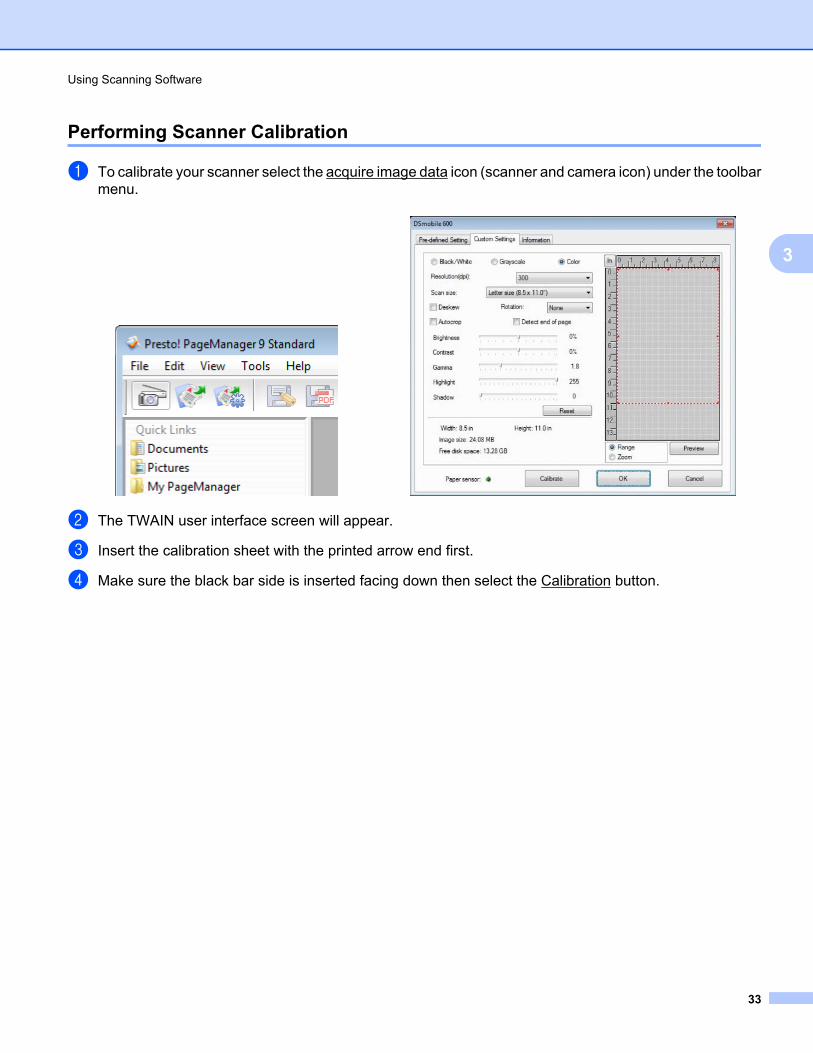
Performing Scanner Calibration
a To calibrate your scanner select the acquire image data icon (scanner and camera icon) under the toolbarmenu.
b The TWAIN user interface screen will appear.
c Insert the calibration sheet with the printed arrow end first.
d Make sure the black bar side is inserted facing down then select the Calibration button.

Using Scanning Software
34
3
PageManager® 9 (For Mac OS® X v10.4, v10.5, v10.6 and v10.7)This program makes it easy to scan, share, and organize your photos and documents.
It helps you not only convert piles of paper into organized digitized files, but also lets you view, edit, send,and back-up files in many formats. To install PageManager®, see PageManager® 9 Installation (For Mac OS® X v10.4, v10.5, v10.6 and v10.7)uu page 19. Refer to the “help” file included with this program for further use instructions.
Initial Setup with PageManager® 9
Note
Calibration is a critical step in setting up your scanner. This process will balance the image quality betweenyour computer and the scanner unit. If at any time you switch the scanner to another computer then youwill need to reinstall the scanner driver and recalibrate the scanner.
Selecting Scanning Source
When using Presto! PageManager® 9 for the first time you will need to define the Scanning Source thisapplication will be using. This also applies when switching to another scanner.
a Run the PageManager® 9 application and select file in the toolbar menu.
b Under file pull-down menu choose the Select Source option, then your model.

Using Scanning Software
35
3
Performing Scanner Calibration
a To calibrate your scanner select the acquire image data icon (scanner and camera icon) under the toolbarmenu.
b The TWAIN user interface screen will appear.
c Insert the calibration sheet with the printed arrow end first.

Using Scanning Software
36
3
d Make sure the black bar side is inserted facing down then select the Calibration button.The following message will appear (see below). Select “OK” and proceed to scanning.

Using Scanning Software
37
3
Technical support (For PageManager® and BizCard®)
For USA
Company name: NewSoft America Inc.
Postal Address: 47102 Mission Falls Court, Suite 202 Fremont CA 94539
Telephone: 510-770-8900
Fax: 510-770-8980
E-mail Address: [email protected]
URL: http://www.newsoftinc.com
For Canada
E-mail Address: [email protected]
Other countries
E-mail Address: [email protected]
Note
For all other issues, please contact your Customer Service (USA only) uu page xiii.

4
38
4
Specifications
Model Name DSmobile 600
Scanning Speed (Mono)(8.5” x 11” letter size @ 200 dpi):
5 pages/minute (B&W)
Scanning Speed (Color)(8.5” x 11” letter size @ 200 dpi):
3 pages/minute (color)
Resolution (Optical) Max 600 × 600 dpi
Gray Scale 256 levels
Color Depth (Int. / Ext.) 24 bit
Media SizesWidth: up to 8.5 in (216 mm)
Length: up to 14.0 in (356 mm)
Document Scanning Width LTR : 216 mm, 8.5 inch
Paper ThicknessMaximum Thickness: 0.8mm
Minimum Thickness: 0.1mm
Temperature (Operation) +5°C to +40°C (+41°F to +104°F) (Operation)
Relative Humidity (Operation) 20 to 85%RH non-condensing
Power SourceUSB bus-power
5V DC
Power Consumption (MAX) 2.3W
Power Consumption (Ready) 0.7W
Power Consumption (Deep Sleep) 0.01W
USB Hi-Speed 2.0
TWAIN Compliant YES
WIA Compliant YES
Scanner Driver (Windows) TWAIN, WIA for XP/Vista/Windows 7
Scanner Driver (Mac) TWAIN for MacOS X v10.3, v10.4, v10.5, v10.6, and v10.7
Processor Minimum Speed Pentium 4 1.3 GHz or later
Minimum RAM 512 MB system memory
Recommended RAM 1GB highly recommended
HDD space to install (For drivers and DSmobileSCAN II)
250 MB disk space

5
39
5
Tips & Cautions
The DSmobile 600 scanner can provide long and productive service. We encourage you to follow thesuggestions below to improve the convenience and quality of your scanning and document managementexperience.
Please do not insert stapled items into the DSmobile 600.
Please do not insert documents that have Wite-Out® that is chipped or wet.
Please do not insert documents with any type of adhesive material, even POST-IT® notes.
Staples Wite out Adhesives
Make sure the leading edge of your document is very straight (not wrinkled or having folded corners) and is inserted level with the intake slot.
Clean the scanner with the included cleaning sheet and 70% isopropyl alcohol (not included). Place a few drops of the alcohol in the middle of the cleaning sheet then go to the Calibrate Menu and select “CLEAN.” Your scanner will automatically pass the cleaning sheet over the internal image sensor to clean it.
Document sleeves can be easily cleaned with a clean cloth and a Windex® type liquid glass cleaner. This will effectively remove finger prints, smudges and roller marks from the sleeve.