Scan to Folder White Paper - Ricoh USA - tsrc.ricoh-usa.com to Folder White Paper.pdf · Scan to...
40
Scan to Folder White Paper Ricoh Americas Corporation June 2007 Copyright 2007 – Ricoh Americas Corporation
Transcript of Scan to Folder White Paper - Ricoh USA - tsrc.ricoh-usa.com to Folder White Paper.pdf · Scan to...
Scan to Folder White Paper
Ricoh Americas Corporation June 2007
Copyright 2007 – Ricoh Americas Corporation
Scan to Folder White Paper
TABLE OF CONTENTS
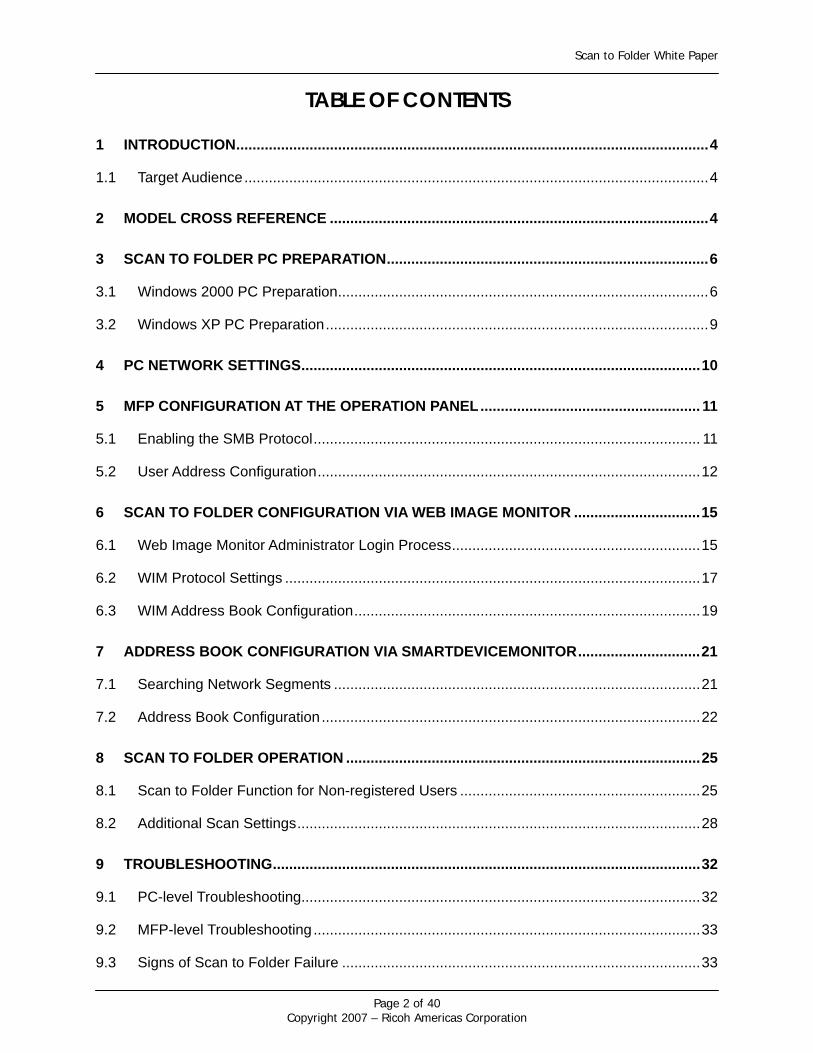
1 INTRODUCTION....................................................................................................................4
1.1 Target Audience..................................................................................................................4
2 MODEL CROSS REFERENCE .............................................................................................4
3 SCAN TO FOLDER PC PREPARATION...............................................................................6
3.1 Windows 2000 PC Preparation...........................................................................................6
3.2 Windows XP PC Preparation..............................................................................................9
4 PC NETWORK SETTINGS..................................................................................................10
5 MFP CONFIGURATION AT THE OPERATION PANEL...................................................... 11
5.1 Enabling the SMB Protocol............................................................................................... 11
5.2 User Address Configuration..............................................................................................12
6 SCAN TO FOLDER CONFIGURATION VIA WEB IMAGE MONITOR ...............................15
6.1 Web Image Monitor Administrator Login Process.............................................................15
6.2 WIM Protocol Settings ......................................................................................................17
6.3 WIM Address Book Configuration.....................................................................................19
7 ADDRESS BOOK CONFIGURATION VIA SMARTDEVICEMONITOR..............................21
7.1 Searching Network Segments ..........................................................................................21
7.2 Address Book Configuration .............................................................................................22
8 SCAN TO FOLDER OPERATION .......................................................................................25
8.1 Scan to Folder Function for Non-registered Users ...........................................................25
8.2 Additional Scan Settings...................................................................................................28
9 TROUBLESHOOTING.........................................................................................................32
9.1 PC-level Troubleshooting..................................................................................................32
9.2 MFP-level Troubleshooting ...............................................................................................33
9.3 Signs of Scan to Folder Failure ........................................................................................33
Page 2 of 40 Copyright 2007 – Ricoh Americas Corporation

Scan to Folder White Paper
9.4 Checking PC Settings.......................................................................................................34
9.5 MFP Network Browsing Capability Test ............................................................................37
9.6 Scan to Folder Problems in a Windows 2003 Server Environment ..................................38
10 SCAN TO FOLDER IN A MAC ENVIRONMENT.................................................................40
11 SUMMARY...........................................................................................................................40
Page 3 of 40 Copyright 2007 – Ricoh Americas Corporation

Scan to Folder White Paper
1 Introduction Ricoh Corporation developed Scan to Folder so customers can scan documents to shared folders, which several other users can access. It creates an efficient means of scanned document storage, access, and distribution without requiring additional hardware or software. 1.1 Target Audience The target audience for this White Paper is:
IT Administrators. All end-users - The information contained in the document can be distributed to end-users
as long as the restrictions outlined on the cover page are followed. The support and marketing staff of Ricoh Sales companies, including Ricoh family group
companies and their subsidiaries. Technical support personnel (CEs) of dealers.
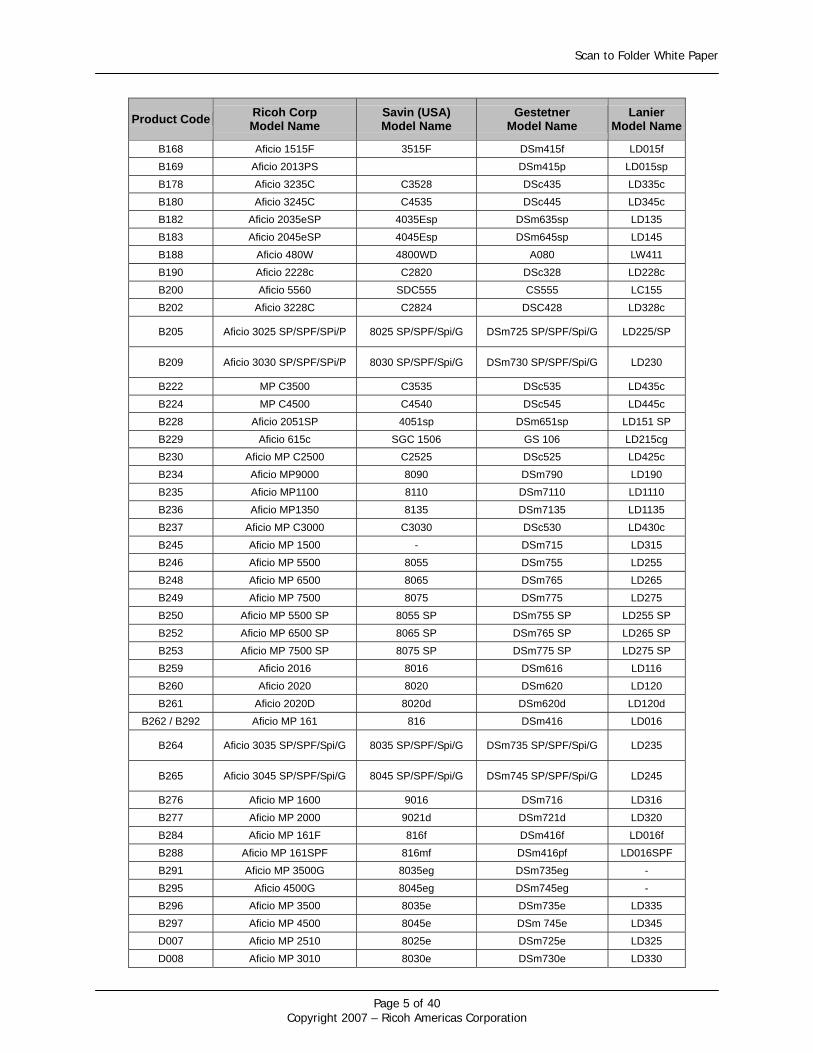
2 Model Cross Reference The tables below covers all models referenced in this document.
Product Code Ricoh Corp Model Name
Savin (USA) Model Name
Gestetner Model Name
Lanier Model Name
B051 Aficio 1224C C2408 DSc224 LD024C B052 Aficio 1232C C3210 DSc232 LD032C B064 Aficio 1060 2560 6002 LD060 B065 Aficio 1075 2575 7502 LD075 B070 Aficio 2090 4090 9002 LD090 B071 Aficio 2105 4105 10512 LD0105 B079 Aficio 2035 4035 3532 LD035 B082 Aficio 2045 4045 4532 LD045 B089 Aficio 2022 4022 DSm622 LD122 B093 Aficio 2027 4027 DSm627 LD127 B121 Aficio 2015 4015 DSM615 LD115 B122 Aficio 2018 4018 DSM618 LD118 B123 Aficio 2018D 4018D DSM618d LD118D B129 Aficio 1515 3515 DSm415 LD015 B130 Aficio 1515MF 3515MF DSm415pf LD015spf B132 Aficio 3260c C6045 DSc460 LD160c B135 Aficio 2035e 4035e DSm635 LD135 B138 Aficio 2045e 4045E DSm645 LD145 B140 Aficio 2060 4060 DSm660 LD160 B141 Aficio 2075 4075 DSm675 LD175 B142 Aficio 2060SP 4060sp DSm660sp LD160 SP B143 Aficio 2075SP 4075sp DSm675sp LD175 SP B147 Aficio 2232c C3224 DSc332 LD232c B149 Aficio 2238c C3828 DSc338 LD238c B156 Aficio 3224c C2410 DSC424 LD124C B163 Aficio 2051 4051 DSm651 LD151
Page 4 of 40 Copyright 2007 – Ricoh Americas Corporation
Scan to Folder White Paper
Product Code Ricoh Corp Model Name
Savin (USA) Model Name
Gestetner Model Name
Lanier Model Name
B168 Aficio 1515F 3515F DSm415f LD015f B169 Aficio 2013PS DSm415p LD015sp B178 Aficio 3235C C3528 DSc435 LD335c B180 Aficio 3245C C4535 DSc445 LD345c B182 Aficio 2035eSP 4035Esp DSm635sp LD135 B183 Aficio 2045eSP 4045Esp DSm645sp LD145 B188 Aficio 480W 4800WD A080 LW411 B190 Aficio 2228c C2820 DSc328 LD228c B200 Aficio 5560 SDC555 CS555 LC155 B202 Aficio 3228C C2824 DSC428 LD328c
B205 Aficio 3025 SP/SPF/SPi/P 8025 SP/SPF/Spi/G DSm725 SP/SPF/Spi/G LD225/SP
B209 Aficio 3030 SP/SPF/SPi/P 8030 SP/SPF/Spi/G DSm730 SP/SPF/Spi/G LD230
B222 MP C3500 C3535 DSc535 LD435c B224 MP C4500 C4540 DSc545 LD445c B228 Aficio 2051SP 4051sp DSm651sp LD151 SP B229 Aficio 615c SGC 1506 GS 106 LD215cg B230 Aficio MP C2500 C2525 DSc525 LD425c B234 Aficio MP9000 8090 DSm790 LD190 B235 Aficio MP1100 8110 DSm7110 LD1110 B236 Aficio MP1350 8135 DSm7135 LD1135 B237 Aficio MP C3000 C3030 DSc530 LD430c B245 Aficio MP 1500 - DSm715 LD315 B246 Aficio MP 5500 8055 DSm755 LD255 B248 Aficio MP 6500 8065 DSm765 LD265 B249 Aficio MP 7500 8075 DSm775 LD275 B250 Aficio MP 5500 SP 8055 SP DSm755 SP LD255 SP B252 Aficio MP 6500 SP 8065 SP DSm765 SP LD265 SP B253 Aficio MP 7500 SP 8075 SP DSm775 SP LD275 SP B259 Aficio 2016 8016 DSm616 LD116 B260 Aficio 2020 8020 DSm620 LD120 B261 Aficio 2020D 8020d DSm620d LD120d
B262 / B292 Aficio MP 161 816 DSm416 LD016
B264 Aficio 3035 SP/SPF/Spi/G 8035 SP/SPF/Spi/G DSm735 SP/SPF/Spi/G LD235
B265 Aficio 3045 SP/SPF/Spi/G 8045 SP/SPF/Spi/G DSm745 SP/SPF/Spi/G LD245
B276 Aficio MP 1600 9016 DSm716 LD316 B277 Aficio MP 2000 9021d DSm721d LD320 B284 Aficio MP 161F 816f DSm416f LD016f B288 Aficio MP 161SPF 816mf DSm416pf LD016SPF B291 Aficio MP 3500G 8035eg DSm735eg - B295 Aficio 4500G 8045eg DSm745eg - B296 Aficio MP 3500 8035e DSm735e LD335 B297 Aficio MP 4500 8045e DSm 745e LD345 D007 Aficio MP 2510 8025e DSm725e LD325 D008 Aficio MP 3010 8030e DSm730e LD330
Page 5 of 40 Copyright 2007 – Ricoh Americas Corporation
Scan to Folder White Paper
3 Scan to Folder PC Preparation Use of the Scan to Folder function requires the creation of a destination folder on a PC. This section covers the creation, sharing, and user access setup of this folder on the Windows 2000 and XP operating systems.
NOTES Do not create the folder on the desktop. In a domain, it may not be possible to
scan to a desktop folder even with proper share settings in place. For Windows 2000 and XP, users will need login name and password
information Multiple folders can be created, if required.
3.1 Windows 2000 PC Preparation This section details the steps used to configure a computer for use with Scan to Folder. A shared folder has to be set up, along with user accounts and access.
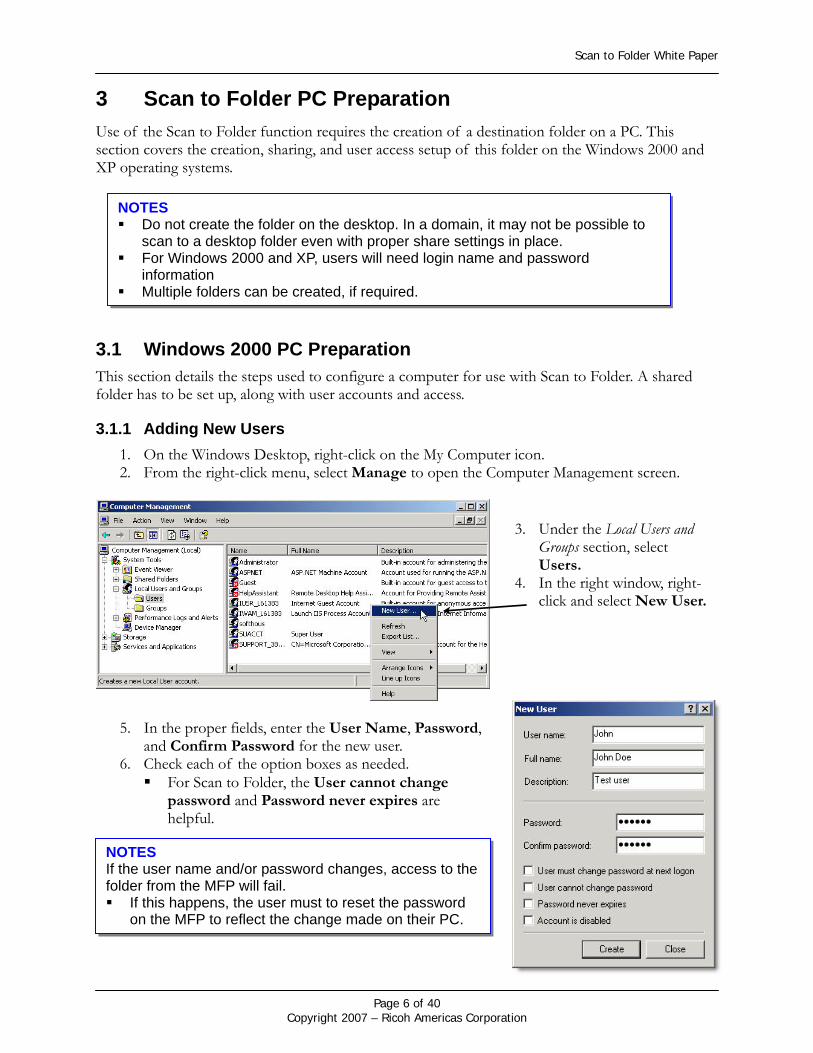
3.1.1 Adding New Users 1. On the Windows Desktop, right-click on the My Computer icon. 2. From the right-click menu, select Manage to open the Computer Management screen.
3. Under the Local Users and Groups section, select Users.
4. In the right window, right-click and select New User.
5. In the proper fields, enter the User Name, Password,
and Confirm Password for the new user. 6. Check each of the option boxes as needed.
For Scan to Folder, the User cannot change password and Password never expires are helpful.
NOTES If the user name and/or password changes, access to the folder from the MFP will fail. If this happens, the user must to reset the password
on the MFP to reflect the change made on their PC.
Page 6 of 40 Copyright 2007 – Ricoh Americas Corporation
Scan to Folder White Paper
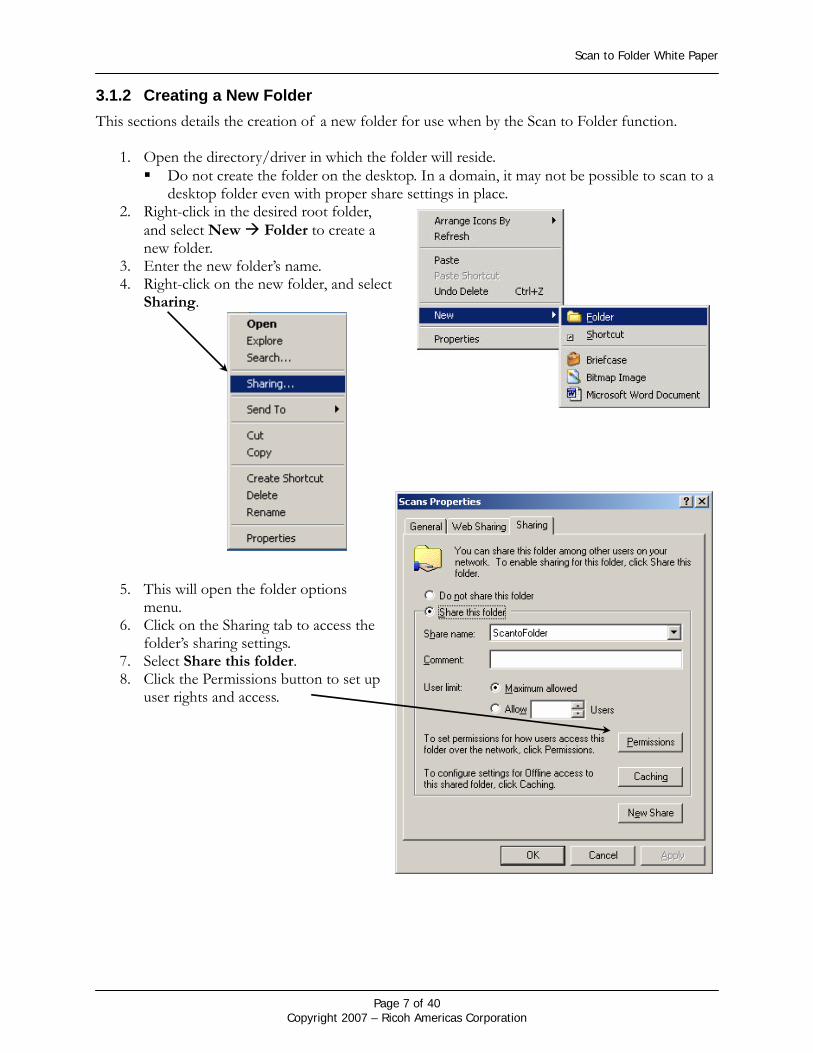
3.1.2 Creating a New Folder This sections details the creation of a new folder for use when by the Scan to Folder function.
1. Open the directory/driver in which the folder will reside. Do not create the folder on the desktop. In a domain, it may not be possible to scan to a
desktop folder even with proper share settings in place. 2. Right-click in the desired root folder,
and select New Folder to create a new folder.
3. Enter the new folder’s name. 4. Right-click on the new folder, and select
Sharing.
5. This will open the folder options menu.
6. Click on the Sharing tab to access the folder’s sharing settings.
7. Select Share this folder. 8. Click the Permissions button to set up
user rights and access.
Page 7 of 40 Copyright 2007 – Ricoh Americas Corporation

Scan to Folder White Paper
9. On the Permissions pop-up, verify that the Group labeled Everyone is present.
10. Check to ensure that the group has both Change and Read permissions enabled.
3.1.3 Private User/Group Folder Creation To specify access to the shared folder, a private user or group can be created allowing only certain users to access the folder.
1. On the permissions pop-up, select Everyone (see screenshot above).
2. Click Remove to delete Everyone from the permissions list.
3. Click the Add button to add a new user/group.
4. From the User/Group selection screen, click on the User/Group to add.
5. Click Add to add the User/Group to the list.
6. In the lower box of the User/Group screen, the added user/group will appear (at left).
7. Once all of the desired users/groups have been added, click OK to save the changes and return to the permissions screen.
Page 8 of 40 Copyright 2007 – Ricoh Americas Corporation
Scan to Folder White Paper
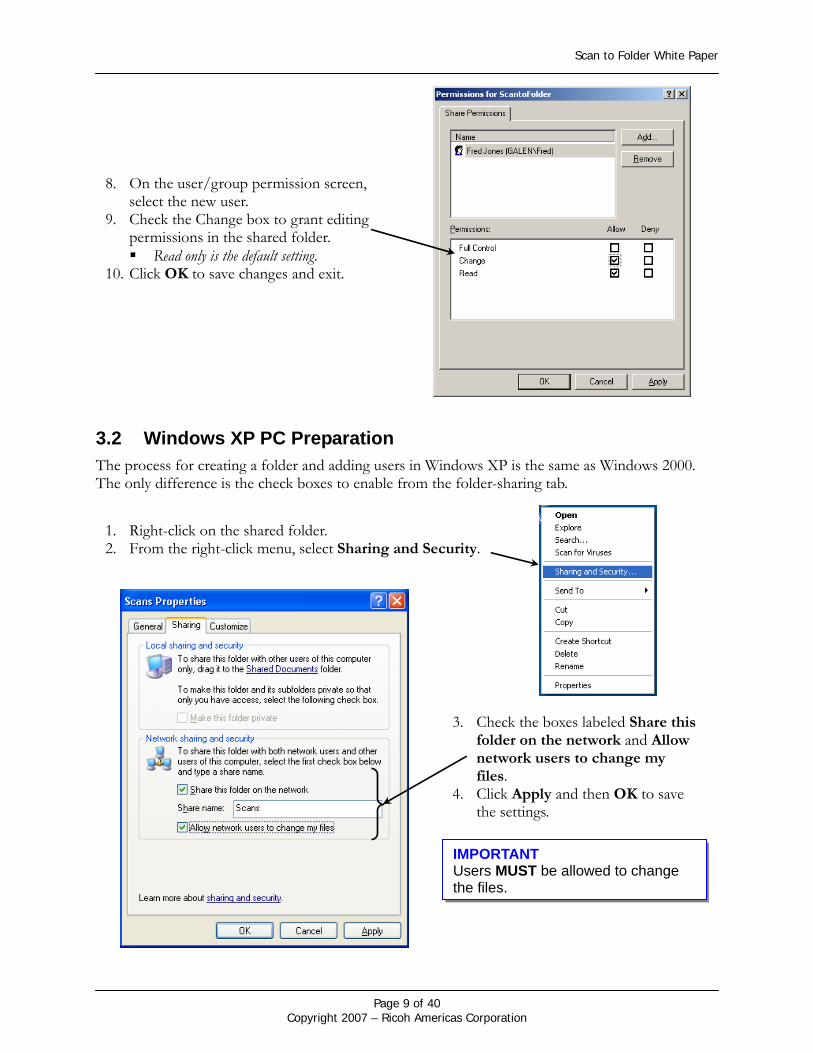
8. On the user/group permission screen, select the new user.
9. Check the Change box to grant editing permissions in the shared folder. Read only is the default setting.
10. Click OK to save changes and exit.
3.2 Windows XP PC Preparation The process for creating a folder and adding users in Windows XP is the same as Windows 2000. The only difference is the check boxes to enable from the folder-sharing tab.
1. Right-click on the shared folder. 2. From the right-click menu, select Sharing and Security.
3. Check the boxes labeled Share this folder on the network and Allow network users to change my files.
4. Click Apply and then OK to save the settings.
IMPORTANT Users MUST be allowed to change the files.
Page 9 of 40 Copyright 2007 – Ricoh Americas Corporation
Scan to Folder White Paper
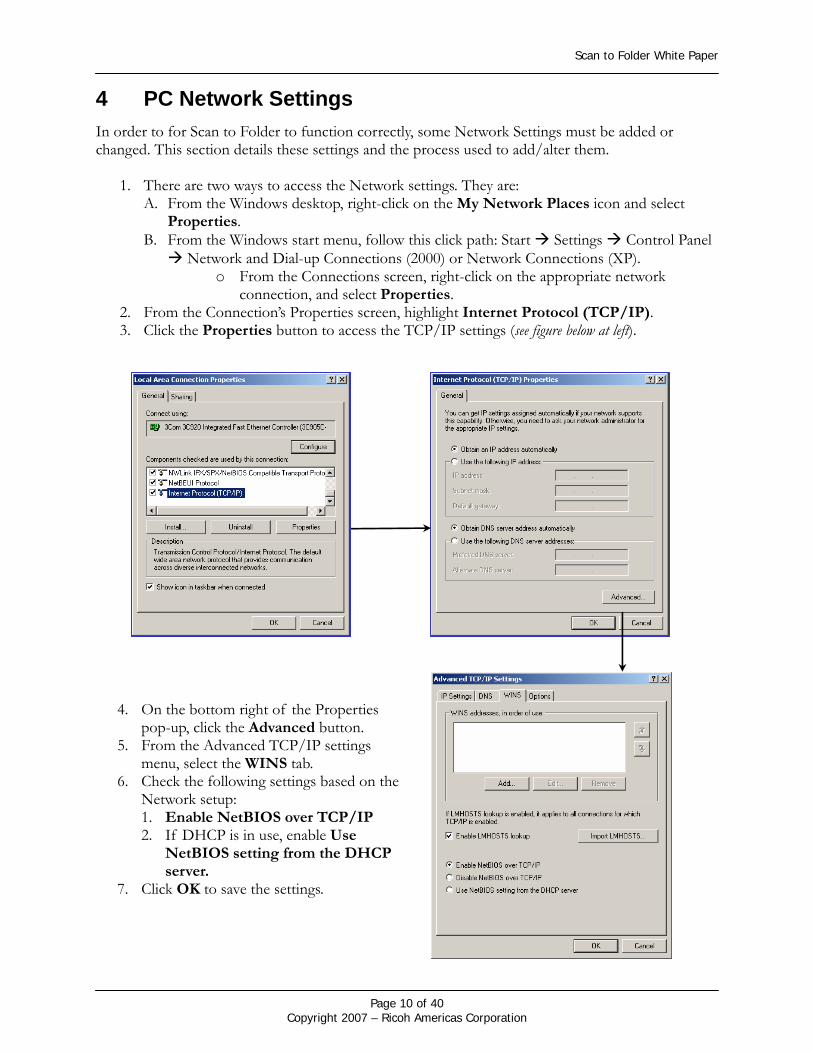
4 PC Network Settings In order to for Scan to Folder to function correctly, some Network Settings must be added or changed. This section details these settings and the process used to add/alter them.
1. There are two ways to access the Network settings. They are: A. From the Windows desktop, right-click on the My Network Places icon and select
Properties. B. From the Windows start menu, follow this click path: Start Settings Control Panel
Network and Dial-up Connections (2000) or Network Connections (XP). o From the Connections screen, right-click on the appropriate network
connection, and select Properties. 2. From the Connection’s Properties screen, highlight Internet Protocol (TCP/IP). 3. Click the Properties button to access the TCP/IP settings (see figure below at left).
4. On the bottom right of the Properties
pop-up, click the Advanced button. 5. From the Advanced TCP/IP settings
menu, select the WINS tab. 6. Check the following settings based on the
Network setup: 1. Enable NetBIOS over TCP/IP 2. If DHCP is in use, enable Use
NetBIOS setting from the DHCP server.
7. Click OK to save the settings.
Page 10 of 40 Copyright 2007 – Ricoh Americas Corporation
Scan to Folder White Paper
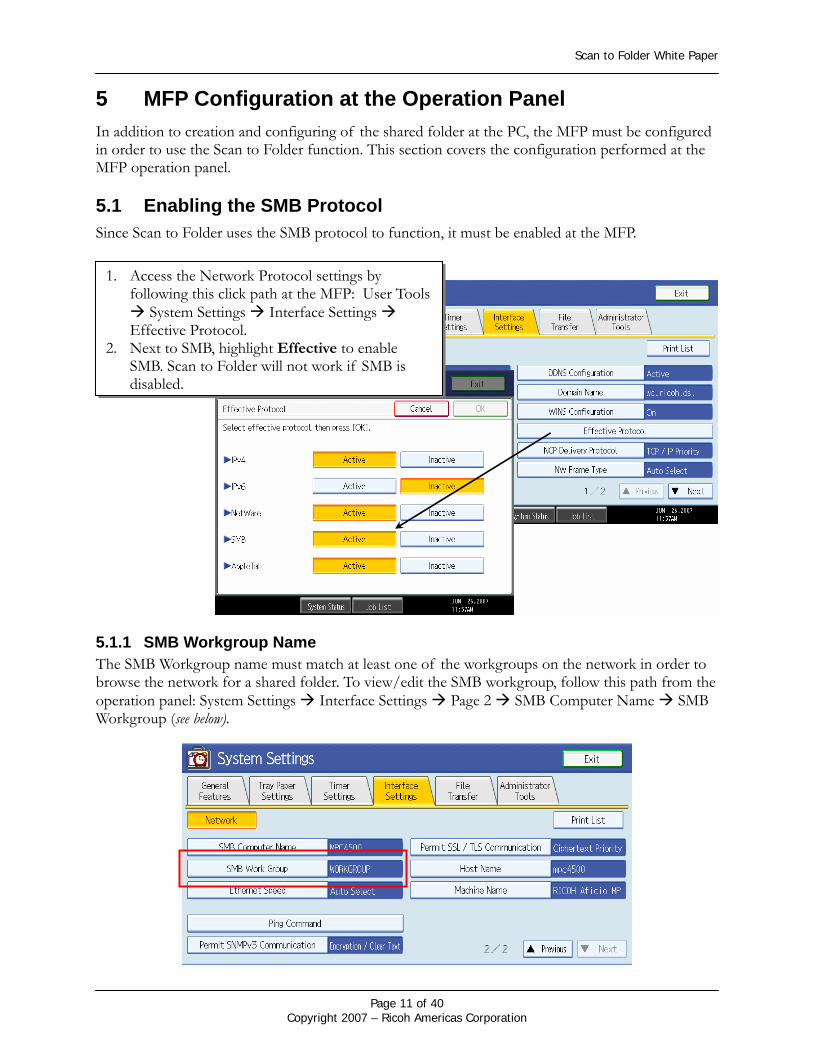
5 MFP Configuration at the Operation Panel In addition to creation and configuring of the shared folder at the PC, the MFP must be configured in order to use the Scan to Folder function. This section covers the configuration performed at the MFP operation panel. 5.1 Enabling the SMB Protocol Since Scan to Folder uses the SMB protocol to function, it must be enabled at the MFP.
1. Access the Network Protocol settings by following this click path at the MFP: User Tools
System Settings Interface Settings Effective Protocol.
2. Next to SMB, highlight Effective to enable SMB. Scan to Folder will not work if SMB is disabled.
5.1.1 SMB Workgroup Name The SMB Workgroup name must match at least one of the workgroups on the network in order to browse the network for a shared folder. To view/edit the SMB workgroup, follow this path from the operation panel: System Settings Interface Settings Page 2 SMB Computer Name SMB Workgroup (see below).
Page 11 of 40 Copyright 2007 – Ricoh Americas Corporation
Scan to Folder White Paper
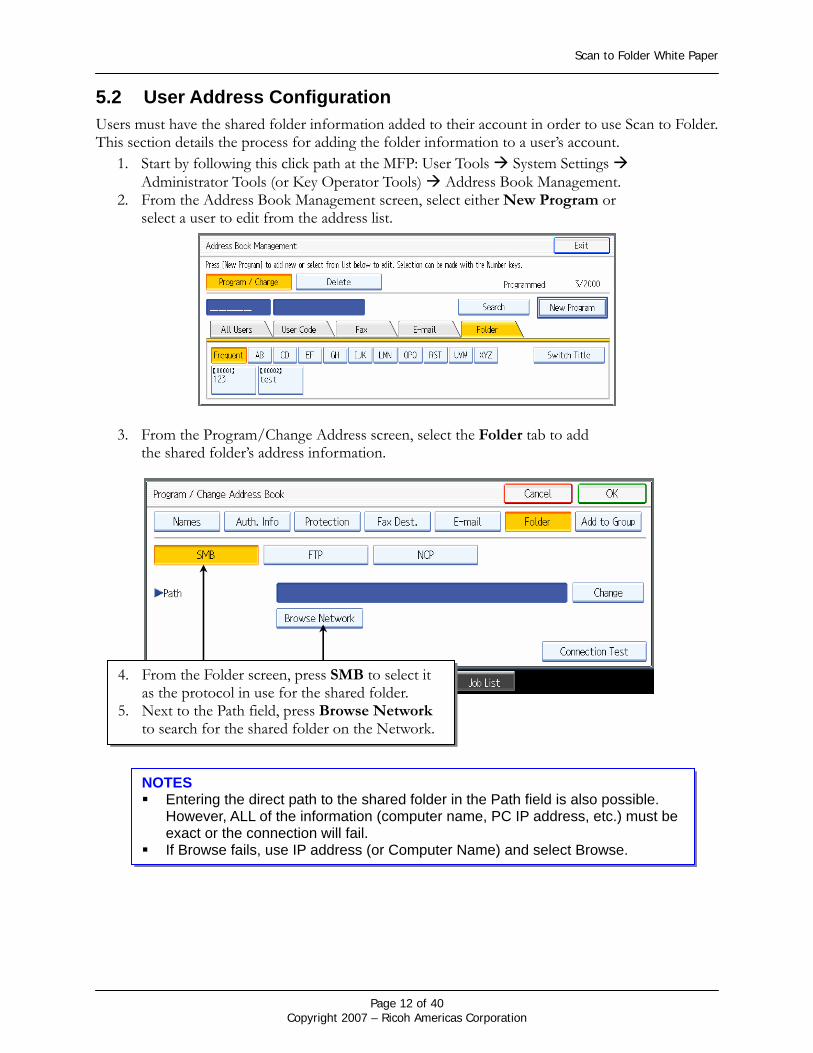
5.2 User Address Configuration Users must have the shared folder information added to their account in order to use Scan to Folder. This section details the process for adding the folder information to a user’s account.
1. Start by following this click path at the MFP: User Tools System Settings Administrator Tools (or Key Operator Tools) Address Book Management.
2. From the Address Book Management screen, select either New Program or select a user to edit from the address list.
3. From the Program/Change Address screen, select the Folder tab to add the shared folder’s address information.
4. From the Folder screen, press SMB to select it as the protocol in use for the shared folder.
5. Next to the Path field, press Browse Network to search for the shared folder on the Network.
NOTES Entering the direct path to the shared folder in the Path field is also possible.
However, ALL of the information (computer name, PC IP address, etc.) must be exact or the connection will fail.
If Browse fails, use IP address (or Computer Name) and select Browse.
Page 12 of 40 Copyright 2007 – Ricoh Americas Corporation
Scan to Folder White Paper
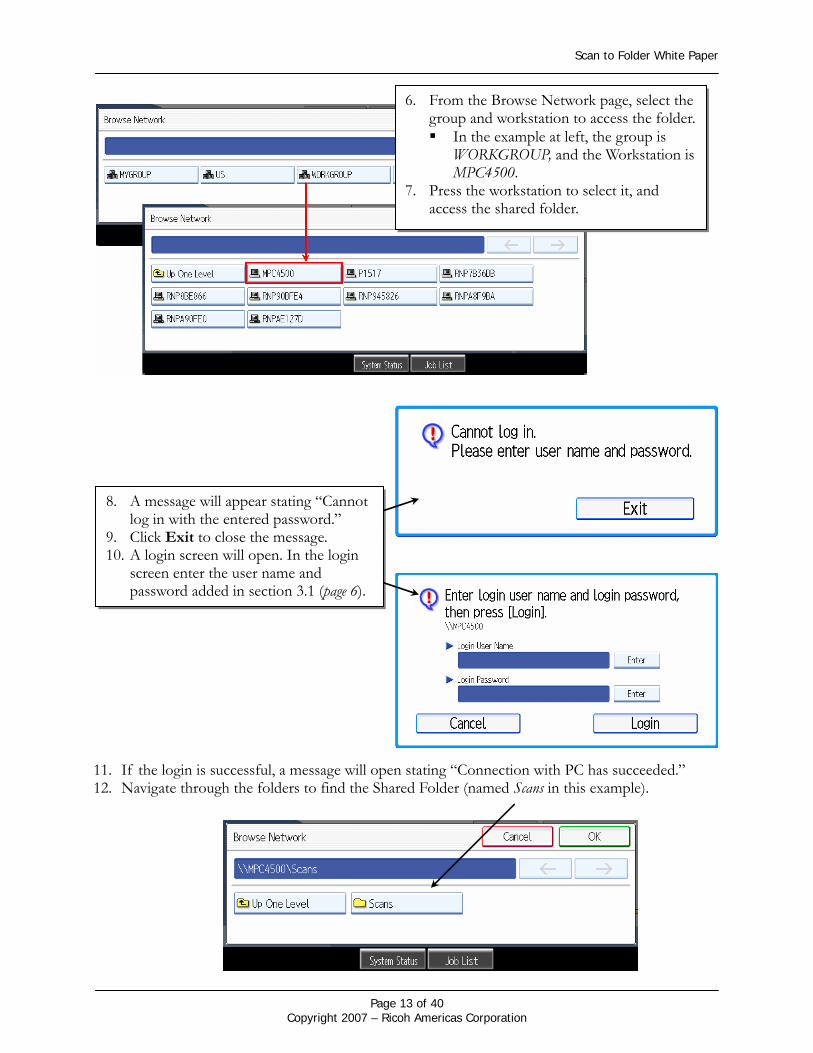
6. From the Browse Network page, select the group and workstation to access the folder. In the example at left, the group is
WORKGROUP, and the Workstation is MPC4500.
7. Press the workstation to select it, and access the shared folder.
8. A message will appear stating “Cannot log in with the entered password.”
9. Click Exit to close the message. 10. A login screen will open. In the login
screen enter the user name and password added in section 3.1 (page 6).
11. If the login is successful, a message will open stating “Connection with PC has succeeded.” 12. Navigate through the folders to find the Shared Folder (named Scans in this example).
Page 13 of 40 Copyright 2007 – Ricoh Americas Corporation

Scan to Folder White Paper
13. Press the folder to select it, and press OK to return to the main folder tab. 14. The address of the shared folder (Scans) now appears in the path field of the User’s folder tab. The shared folder connection is now complete.
NOTE If the shared folder path was input manually, press Connection Test to check that the folder address is valid and accessible by the MFP.
Page 14 of 40 Copyright 2007 – Ricoh Americas Corporation
Scan to Folder White Paper
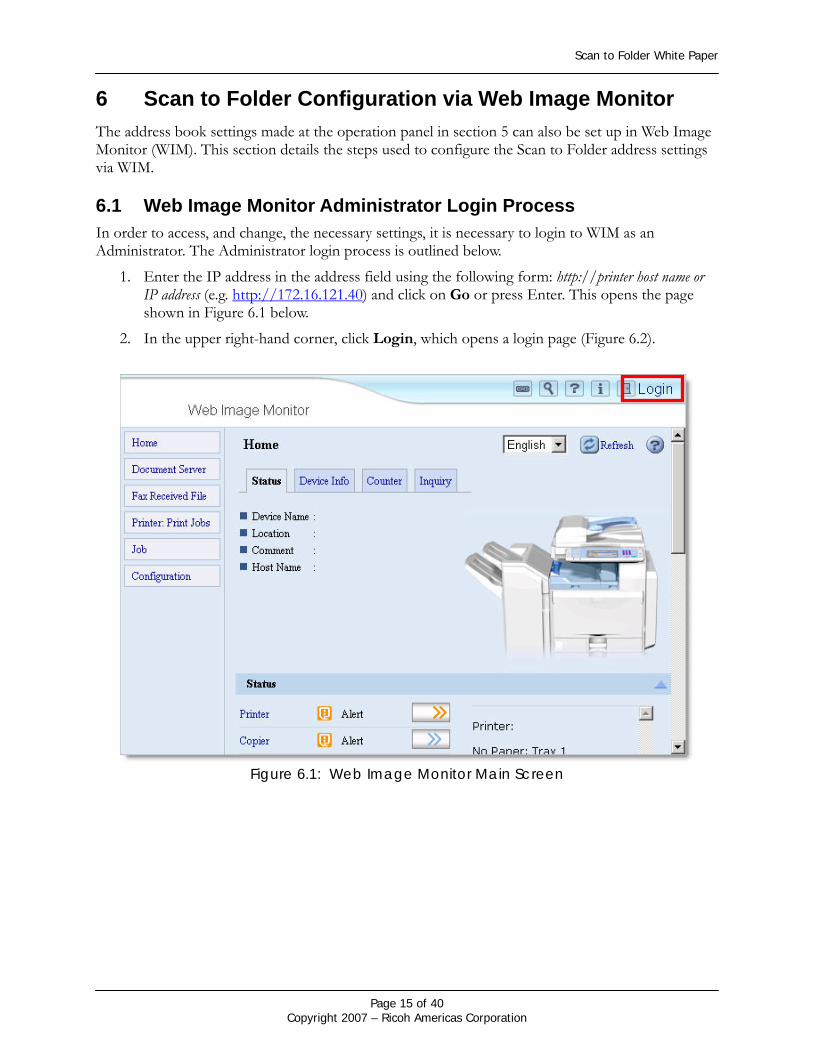
6 Scan to Folder Configuration via Web Image Monitor The address book settings made at the operation panel in section 5 can also be set up in Web Image Monitor (WIM). This section details the steps used to configure the Scan to Folder address settings via WIM. 6.1 Web Image Monitor Administrator Login Process In order to access, and change, the necessary settings, it is necessary to login to WIM as an Administrator. The Administrator login process is outlined below.
1. Enter the IP address in the address field using the following form: http://printer host name or IP address (e.g. http://172.16.121.40) and click on Go or press Enter. This opens the page shown in Figure 6.1 below.
2. In the upper right-hand corner, click Login, which opens a login page (Figure 6.2).
Figure 6.1: Web Image Monitor Main Screen
Page 15 of 40 Copyright 2007 – Ricoh Americas Corporation
Scan to Folder White Paper
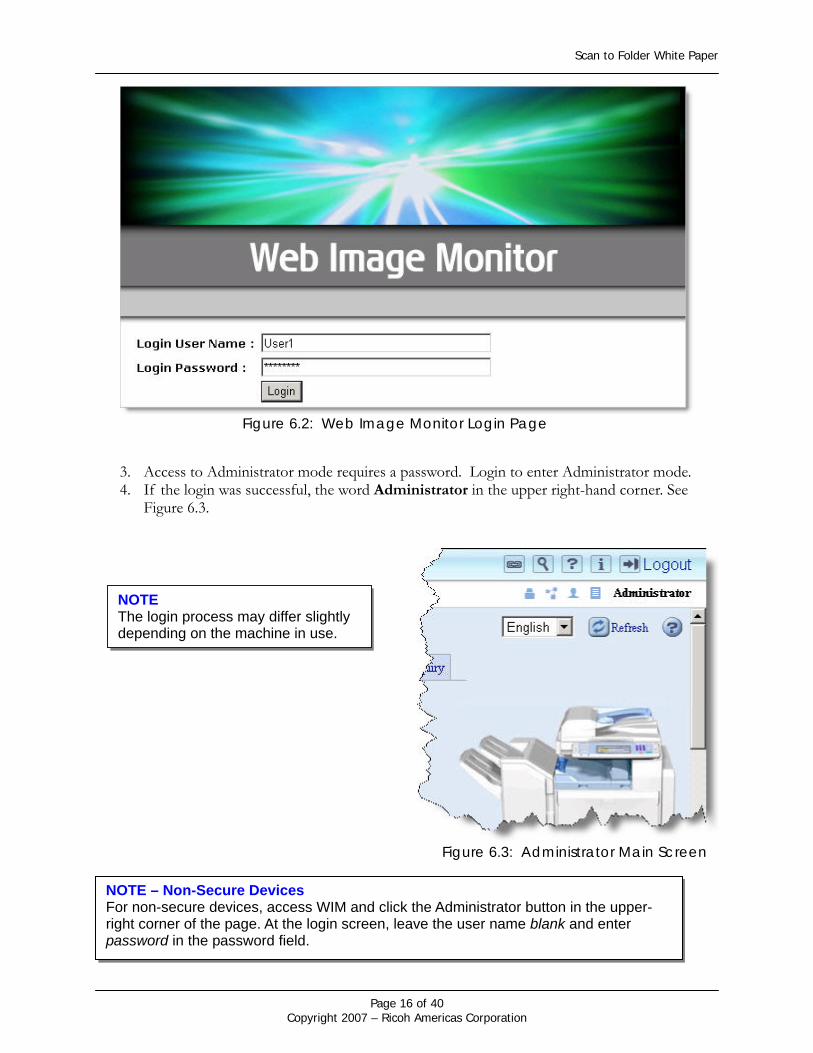
Figure 6.2: Web Image Monitor Login Page
3. Access to Administrator mode requires a password. Login to enter Administrator mode. 4. If the login was successful, the word Administrator in the upper right-hand corner. See
Figure 6.3.
NOTE The login process may differ slightly depending on the machine in use.
Figure 6.3: Administrator Main Screen
NOTE – Non-Secure Devices For non-secure devices, access WIM and click the Administrator button in the upper-right corner of the page. At the login screen, leave the user name blank and enter password in the password field.
Page 16 of 40 Copyright 2007 – Ricoh Americas Corporation
Scan to Folder White Paper
6.2 WIM Protocol Settings After logging in as an Administrator, all of the necessary settings can be changed from WIM. This section details each of the settings needed to use Scan to Folder.
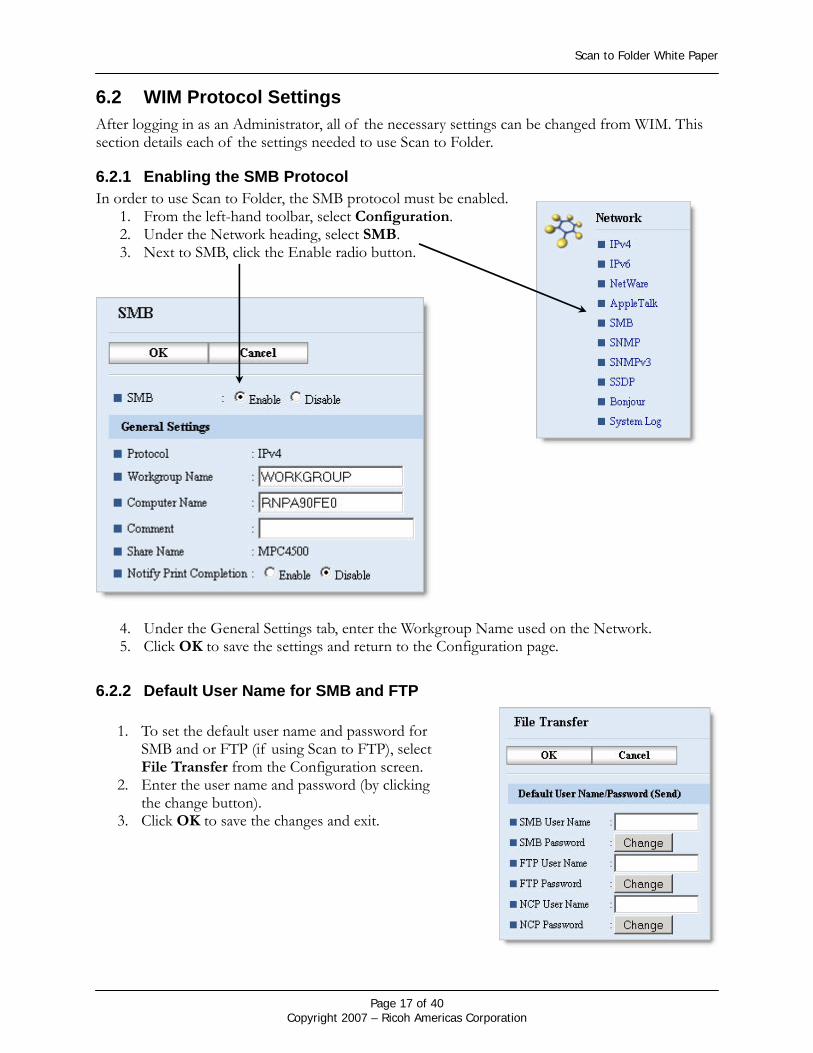
6.2.1 Enabling the SMB Protocol In order to use Scan to Folder, the SMB protocol must be enabled.
1. From the left-hand toolbar, select Configuration. 2. Under the Network heading, select SMB. 3. Next to SMB, click the Enable radio button.
4. Under the General Settings tab, enter the Workgroup Name used on the Network. 5. Click OK to save the settings and return to the Configuration page.
6.2.2 Default User Name for SMB and FTP
1. To set the default user name and password for SMB and or FTP (if using Scan to FTP), select File Transfer from the Configuration screen.
2. Enter the user name and password (by clicking the change button).
3. Click OK to save the changes and exit.
Page 17 of 40 Copyright 2007 – Ricoh Americas Corporation
Scan to Folder White Paper
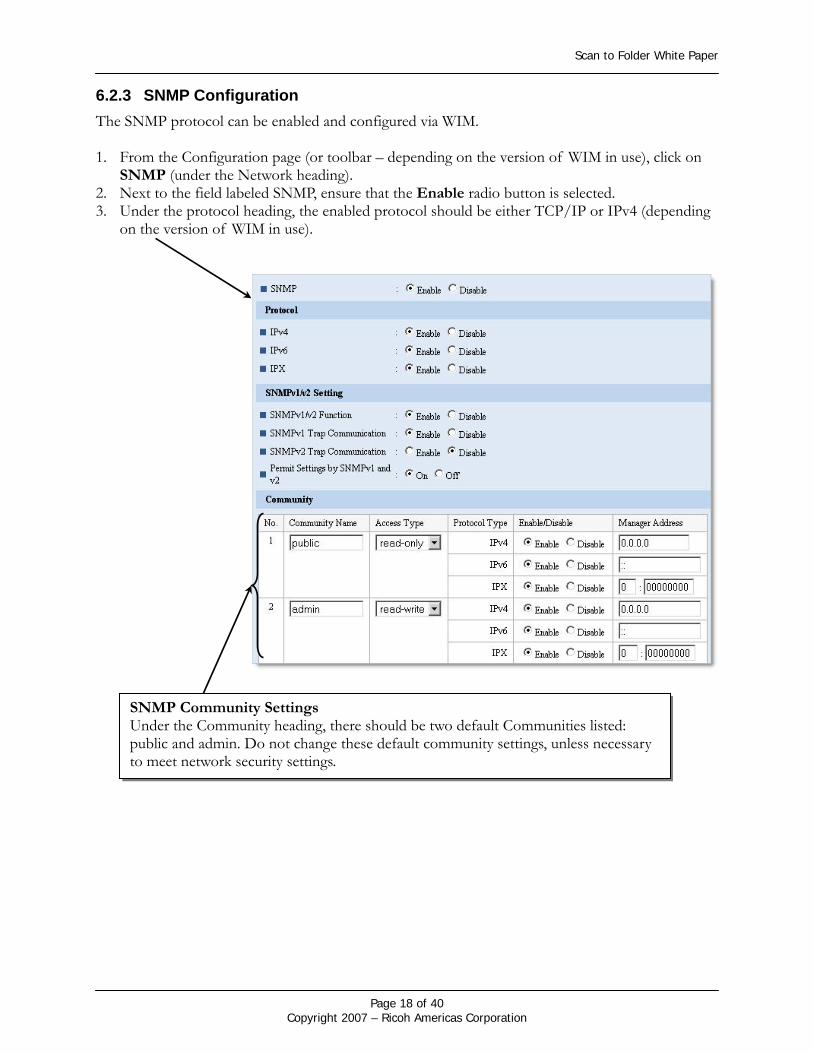
6.2.3 SNMP Configuration The SNMP protocol can be enabled and configured via WIM. 1. From the Configuration page (or toolbar – depending on the version of WIM in use), click on
SNMP (under the Network heading). 2. Next to the field labeled SNMP, ensure that the Enable radio button is selected. 3. Under the protocol heading, the enabled protocol should be either TCP/IP or IPv4 (depending
on the version of WIM in use).
SNMP Community Settings
Under the Community heading, there should be two default Communities listed: public and admin. Do not change these default community settings, unless necessary to meet network security settings.
Page 18 of 40 Copyright 2007 – Ricoh Americas Corporation
Scan to Folder White Paper
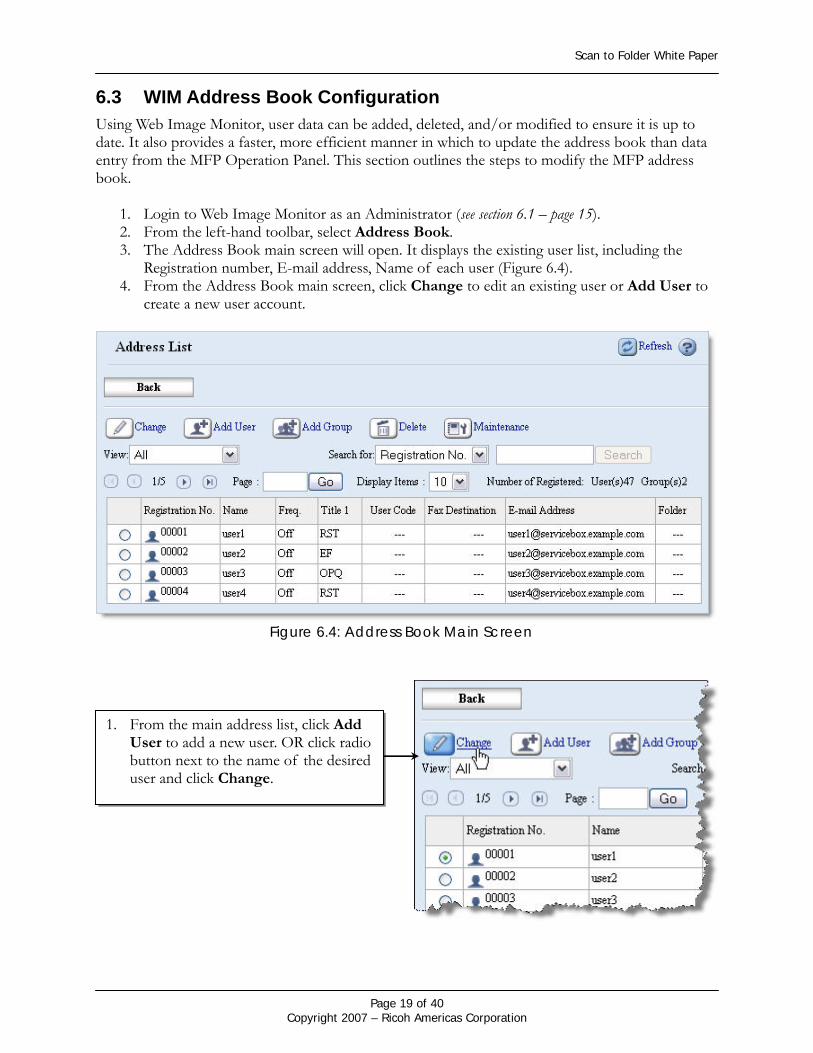
6.3 WIM Address Book Configuration Using Web Image Monitor, user data can be added, deleted, and/or modified to ensure it is up to date. It also provides a faster, more efficient manner in which to update the address book than data entry from the MFP Operation Panel. This section outlines the steps to modify the MFP address book.
1. Login to Web Image Monitor as an Administrator (see section 6.1 – page 15). 2. From the left-hand toolbar, select Address Book. 3. The Address Book main screen will open. It displays the existing user list, including the
Registration number, E-mail address, Name of each user (Figure 6.4). 4. From the Address Book main screen, click Change to edit an existing user or Add User to
create a new user account.
Figure 6.4: Address Book Main Screen
1. From the main address list, click Add User to add a new user. OR click radio button next to the name of the desired user and click Change.
Page 19 of 40 Copyright 2007 – Ricoh Americas Corporation
Scan to Folder White Paper
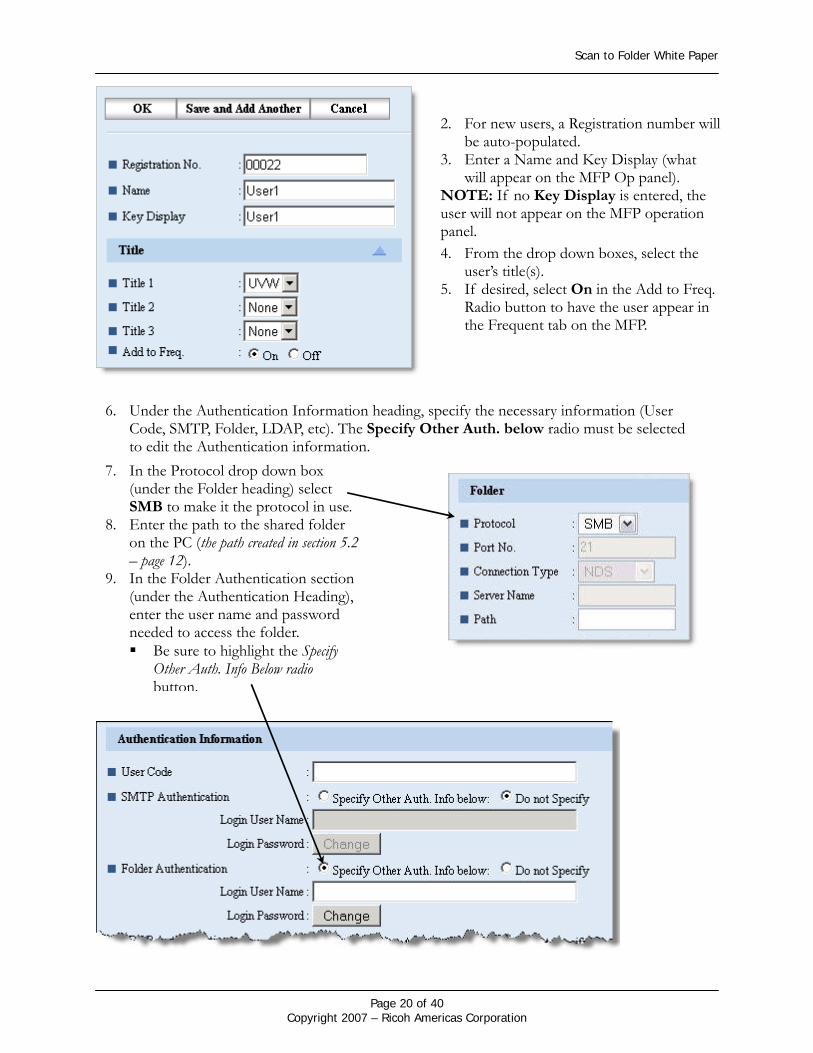
2. For new users, a Registration number will be auto-populated.
3. Enter a Name and Key Display (what will appear on the MFP Op panel).
NOTE: If no Key Display is entered, the user will not appear on the MFP operation panel. 4. From the drop down boxes, select the
user’s title(s). 5. If desired, select On in the Add to Freq.
Radio button to have the user appear in the Frequent tab on the MFP.
7. In the Protocol drop down box (under the Folder heading) select SMB to make it the protocol in use.
8. Enter the path to the shared folder on the PC (the path created in section 5.2 – page 12).
9. In the Folder Authentication section (under the Authentication Heading), enter the user name and password needed to access the folder. Be sure to highlight the Specify
Other Auth. Info Below radio button.
6. Under the Authentication Information heading, specify the necessary information (User Code, SMTP, Folder, LDAP, etc). The Specify Other Auth. below radio must be selected to edit the Authentication information.
Page 20 of 40 Copyright 2007 – Ricoh Americas Corporation
Scan to Folder White Paper
7 Address Book Configuration via SmartDeviceMonitor Using the Address Management tool in SmartDeviceMonitor for Admin (SDMA), user accounts can be added, or modified, to include all of the settings needed to use Scan to Folder. This section details the process used to change the settings via SmartDeviceMonitor.
NOTE It is best to download and install the latest version of SDMA to ensure that it will
work properly with the latest devices. o SDMA is located on the device’s driver download website. o Once SDMA is launched, it will automatically search the local area network for
devices
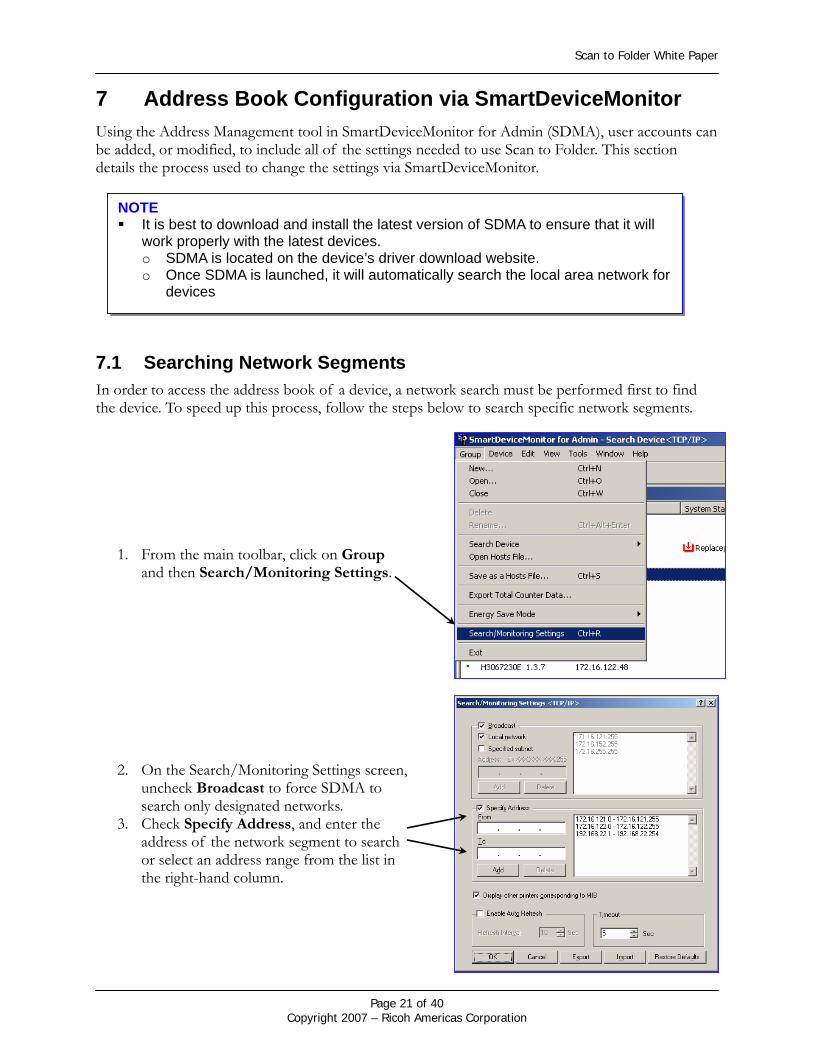
7.1 Searching Network Segments In order to access the address book of a device, a network search must be performed first to find the device. To speed up this process, follow the steps below to search specific network segments.
1. From the main toolbar, click on Group and then Search/Monitoring Settings.
2. On the Search/Monitoring Settings screen, uncheck Broadcast to force SDMA to search only designated networks.
3. Check Specify Address, and enter the address of the network segment to search or select an address range from the list in the right-hand column.
Page 21 of 40 Copyright 2007 – Ricoh Americas Corporation
Scan to Folder White Paper
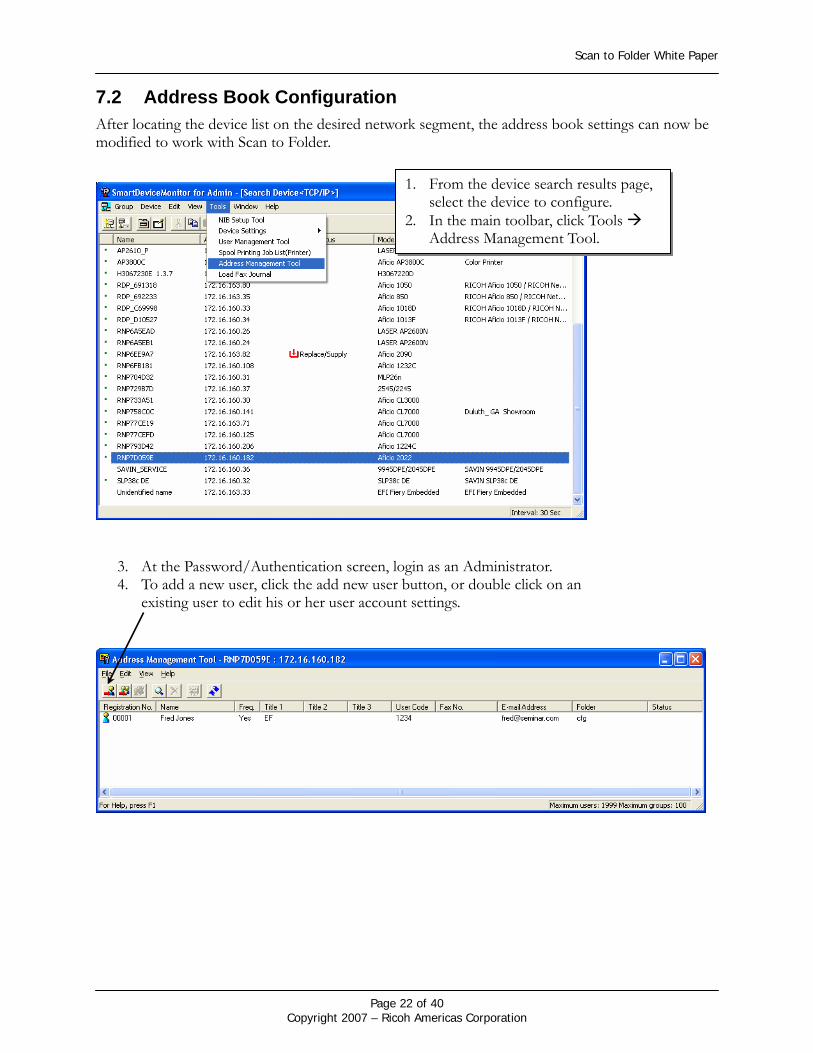
7.2 Address Book Configuration After locating the device list on the desired network segment, the address book settings can now be modified to work with Scan to Folder.
1. From the device search results page, select the device to configure.
2. In the main toolbar, click Tools Address Management Tool.
3. At the Password/Authentication screen, login as an Administrator. 4. To add a new user, click the add new user button, or double click on an
existing user to edit his or her user account settings.
Page 22 of 40 Copyright 2007 – Ricoh Americas Corporation
Scan to Folder White Paper
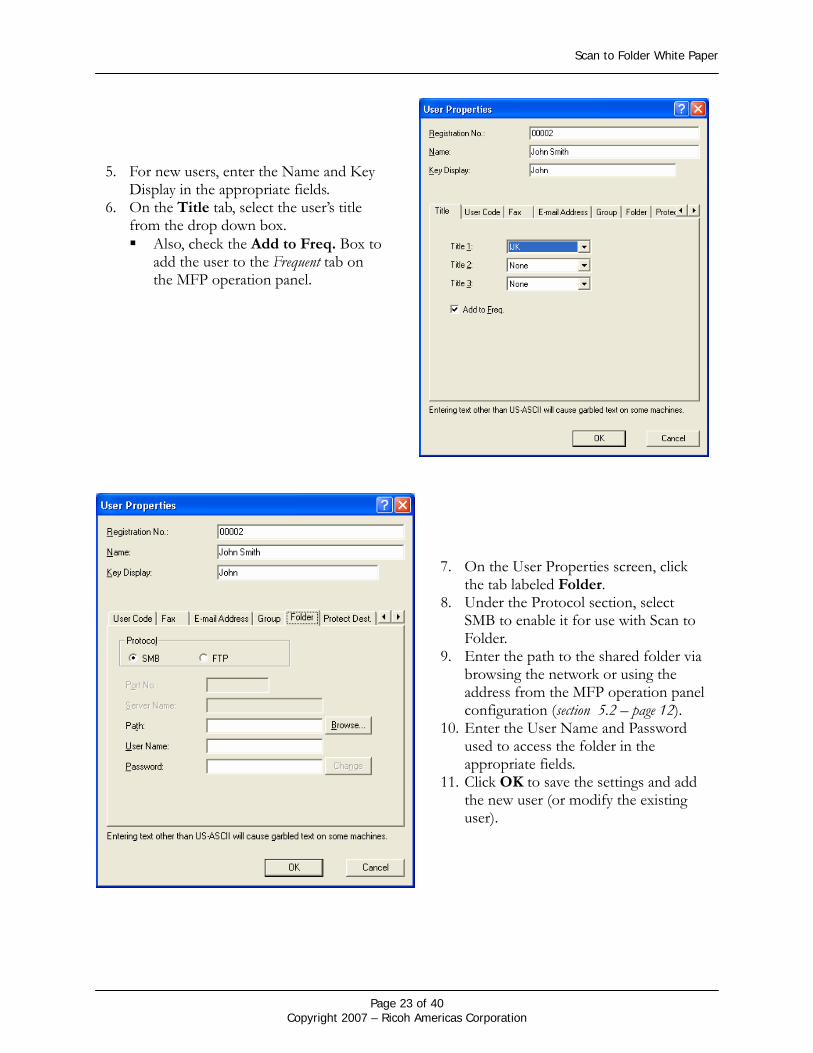
5. For new users, enter the Name and Key Display in the appropriate fields.
6. On the Title tab, select the user’s title from the drop down box. Also, check the Add to Freq. Box to
add the user to the Frequent tab on the MFP operation panel.
7. On the User Properties screen, click the tab labeled Folder.
8. Under the Protocol section, select SMB to enable it for use with Scan to Folder.
9. Enter the path to the shared folder via browsing the network or using the address from the MFP operation panel configuration (section 5.2 – page 12).
10. Enter the User Name and Password used to access the folder in the appropriate fields.
11. Click OK to save the settings and add the new user (or modify the existing user).
Page 23 of 40 Copyright 2007 – Ricoh Americas Corporation
Scan to Folder White Paper
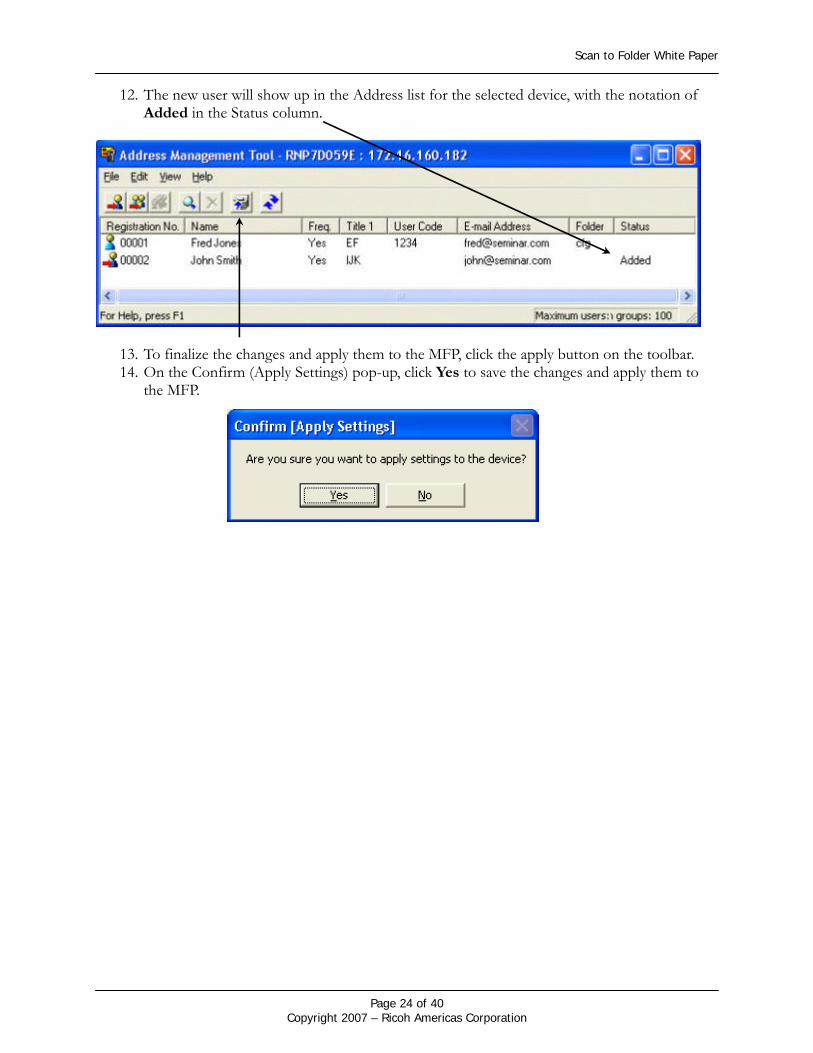
12. The new user will show up in the Address list for the selected device, with the notation of Added in the Status column.
13. To finalize the changes and apply them to the MFP, click the apply button on the toolbar. 14. On the Confirm (Apply Settings) pop-up, click Yes to save the changes and apply them to
the MFP.
Page 24 of 40 Copyright 2007 – Ricoh Americas Corporation

Scan to Folder White Paper
8 Scan to Folder Operation Once all of the necessary settings are in place, the Scan to Folder function can be used from the MFP. This section details the process used when using Scan to Folder.
1. On the MFP operation panel, select Scanner Choose the User Press Attach Sender and choose the Sender.
2. Choose Scanner Settings as required, and press the start key.
8.1 Scan to Folder Function for Non-registered Users In some cases, a non-registered user may want to use the Scan to Folder function. In these situations, the shared folder has to be selected via a manual search.
IMPORTANT Make sure the Folder tab is highlighted as the Scan method (see example at left) If E-mail is highlighted, press the Folder label to select Scan to Folder.
1. For non-registered users, start by pressing the Manual Entry button on the Scanner screen. This opens the Destination entry screen, from which to add the shared folder information.
Page 25 of 40 Copyright 2007 – Ricoh Americas Corporation
Scan to Folder White Paper
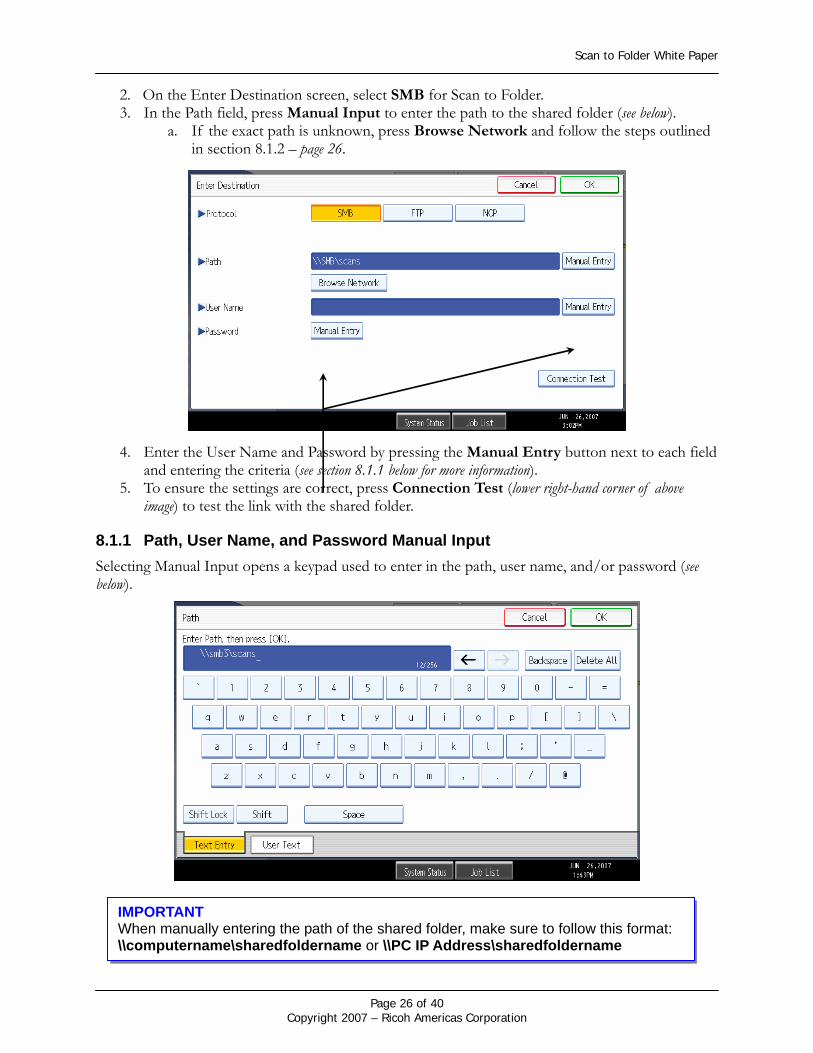
2. On the Enter Destination screen, select SMB for Scan to Folder. 3. In the Path field, press Manual Input to enter the path to the shared folder (see below).
a. If the exact path is unknown, press Browse Network and follow the steps outlined in section 8.1.2 – page 26.
4. Enter the User Name and Password by pressing the Manual Entry button next to each field and entering the criteria (see section 8.1.1 below for more information).
5. To ensure the settings are correct, press Connection Test (lower right-hand corner of above image) to test the link with the shared folder.
8.1.1 Path, User Name, and Password Manual Input Selecting Manual Input opens a keypad used to enter in the path, user name, and/or password (see below).
IMPORTANT When manually entering the path of the shared folder, make sure to follow this format: \\computername\sharedfoldername or \\PC IP Address\sharedfoldername
Page 26 of 40 Copyright 2007 – Ricoh Americas Corporation
Scan to Folder White Paper
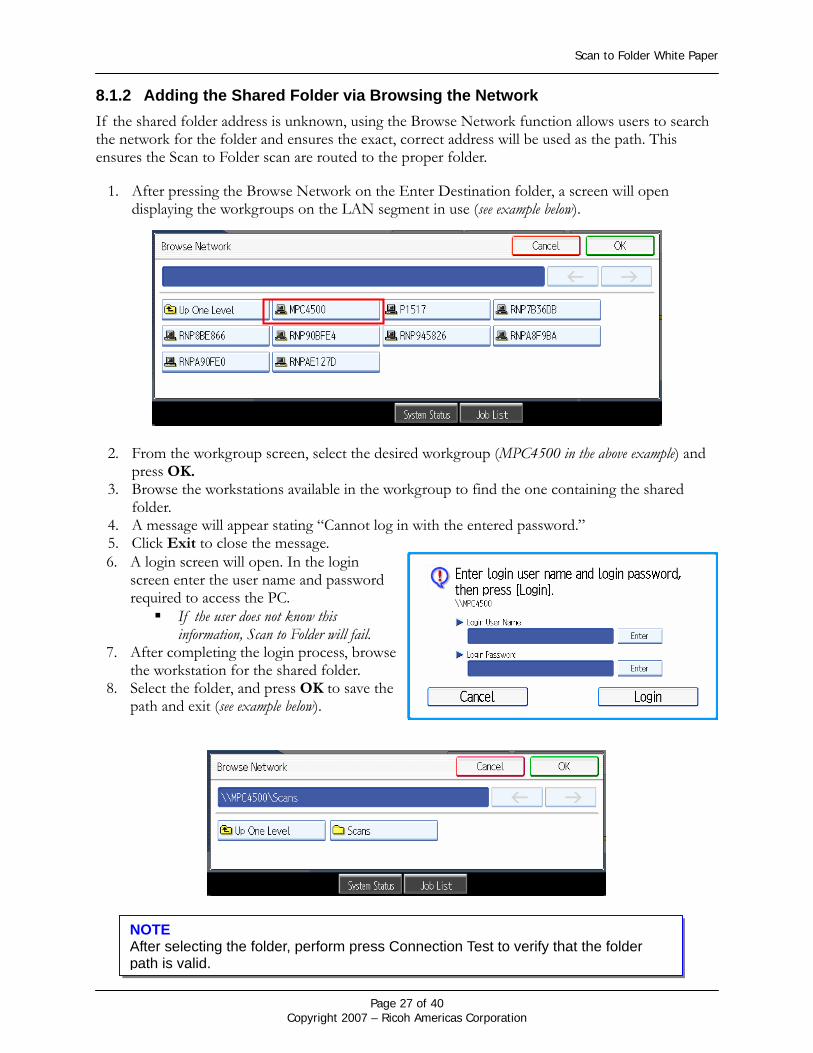
8.1.2 Adding the Shared Folder via Browsing the Network If the shared folder address is unknown, using the Browse Network function allows users to search the network for the folder and ensures the exact, correct address will be used as the path. This ensures the Scan to Folder scan are routed to the proper folder.
1. After pressing the Browse Network on the Enter Destination folder, a screen will open displaying the workgroups on the LAN segment in use (see example below).
2. From the workgroup screen, select the desired workgroup (MPC4500 in the above example) and press OK.
3. Browse the workstations available in the workgroup to find the one containing the shared folder.
4. A message will appear stating “Cannot log in with the entered password.” 5. Click Exit to close the message.
6. A login screen will open. In the login screen enter the user name and password required to access the PC.
If the user does not know this information, Scan to Folder will fail.
7. After completing the login process, browse the workstation for the shared folder.
8. Select the folder, and press OK to save the path and exit (see example below).
NOTE After selecting the folder, perform press Connection Test to verify that the folder path is valid.
Page 27 of 40 Copyright 2007 – Ricoh Americas Corporation
Scan to Folder White Paper
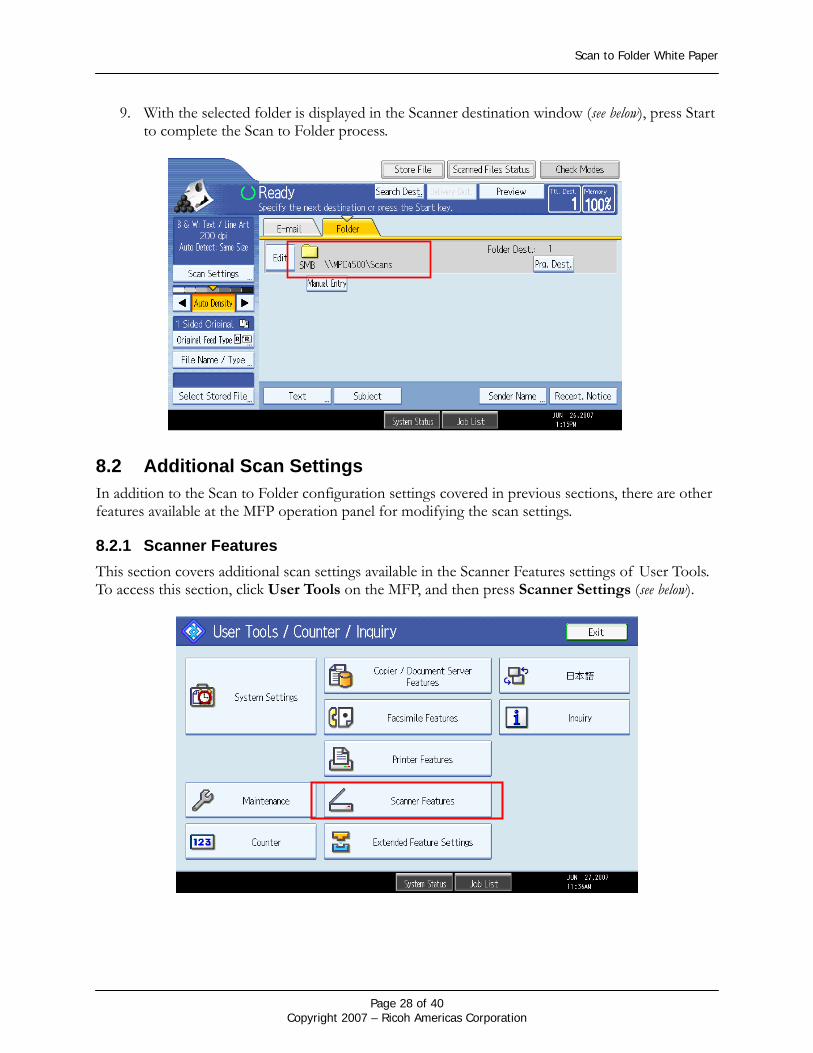
9. With the selected folder is displayed in the Scanner destination window (see below), press Start
to complete the Scan to Folder process.
8.2 Additional Scan Settings In addition to the Scan to Folder configuration settings covered in previous sections, there are other features available at the MFP operation panel for modifying the scan settings.
8.2.1 Scanner Features This section covers additional scan settings available in the Scanner Features settings of User Tools. To access this section, click User Tools on the MFP, and then press Scanner Settings (see below).
Page 28 of 40 Copyright 2007 – Ricoh Americas Corporation
Scan to Folder White Paper
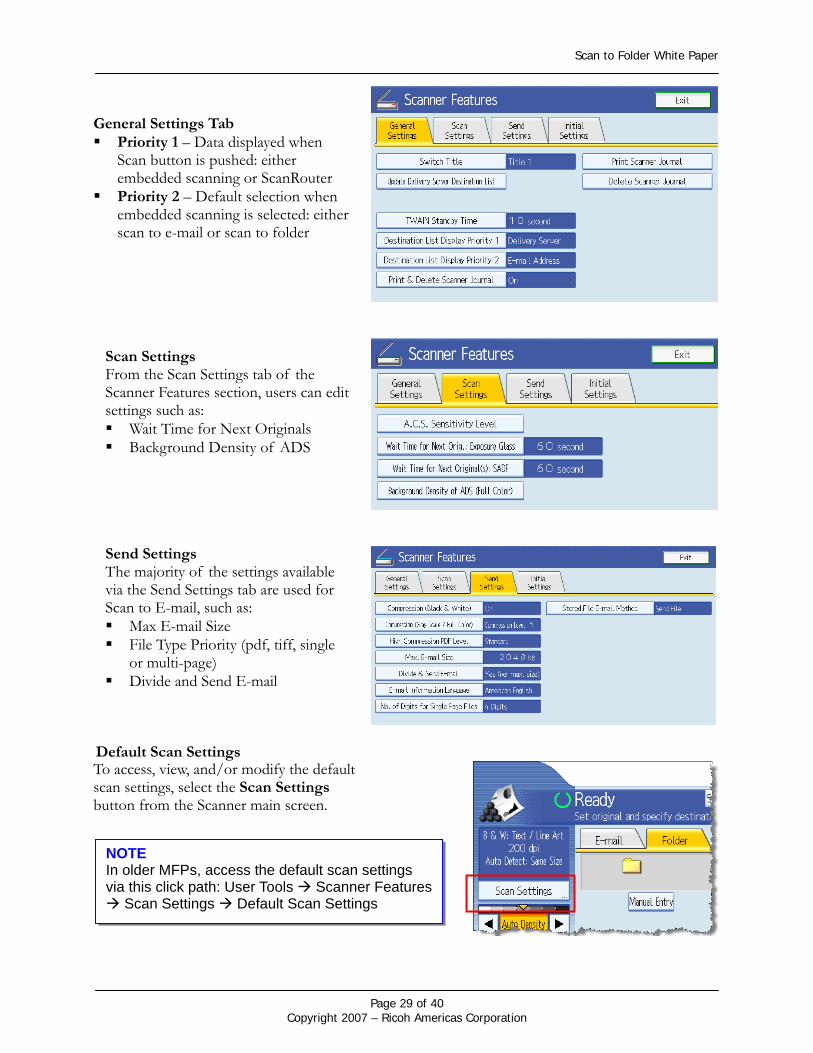
General Settings Tab Priority 1 – Data displayed when
Scan button is pushed: either embedded scanning or ScanRouter
Priority 2 – Default selection when embedded scanning is selected: either scan to e-mail or scan to folder
Scan Settings From the Scan Settings tab of the Scanner Features section, users can edit settings such as: Wait Time for Next Originals Background Density of ADS
Send Settings The majority of the settings available via the Send Settings tab are used for Scan to E-mail, such as: Max E-mail Size File Type Priority (pdf, tiff, single
or multi-page) Divide and Send E-mail
Default Scan Settings To access, view, and/or modify the default scan settings, select the Scan Settings button from the Scanner main screen.
NOTE In older MFPs, access the default scan settings via this click path: User Tools Scanner Features
Scan Settings Default Scan Settings
Page 29 of 40 Copyright 2007 – Ricoh Americas Corporation
Scan to Folder White Paper
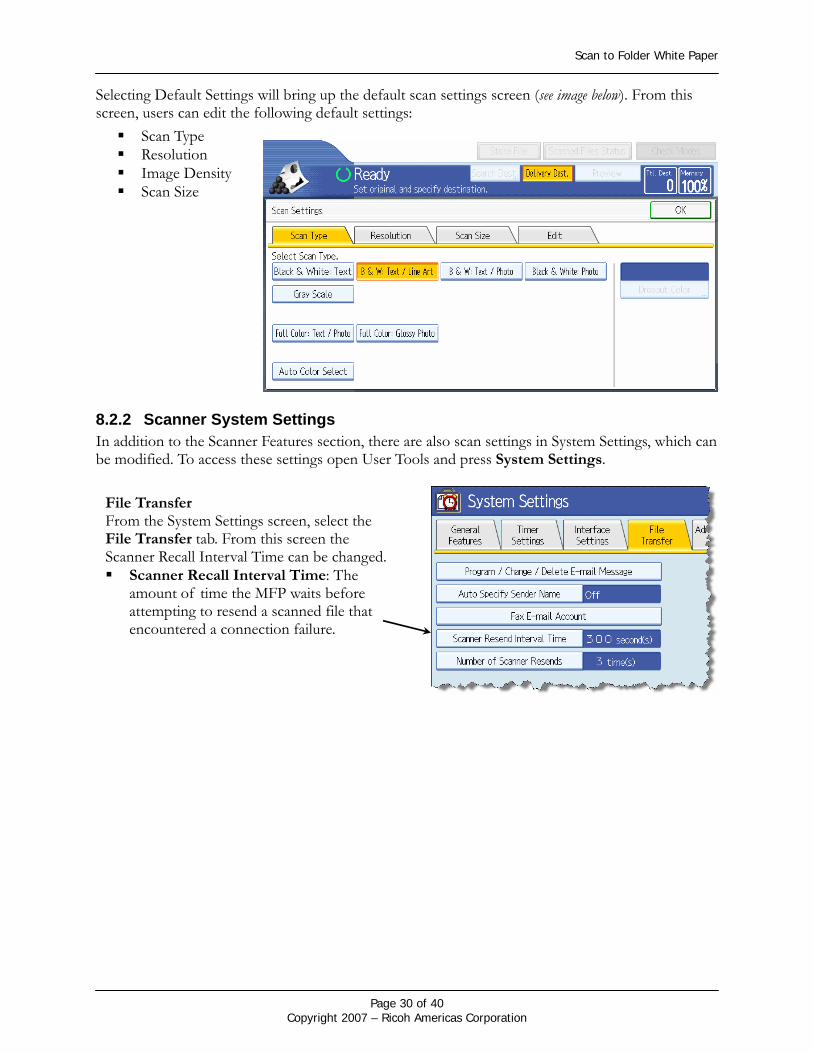
Selecting Default Settings will bring up the default scan settings screen (see image below). From this screen, users can edit the following default settings: Scan Type
Resolution Image Density Scan Size
8.2.2 Scanner System Settings In addition to the Scanner Features section, there are also scan settings in System Settings, which can be modified. To access these settings open User Tools and press System Settings.
File Transfer From the System Settings screen, select the File Transfer tab. From this screen the Scanner Recall Interval Time can be changed. Scanner Recall Interval Time: The
amount of time the MFP waits before attempting to resend a scanned file that encountered a connection failure.
Page 30 of 40 Copyright 2007 – Ricoh Americas Corporation
Scan to Folder White Paper
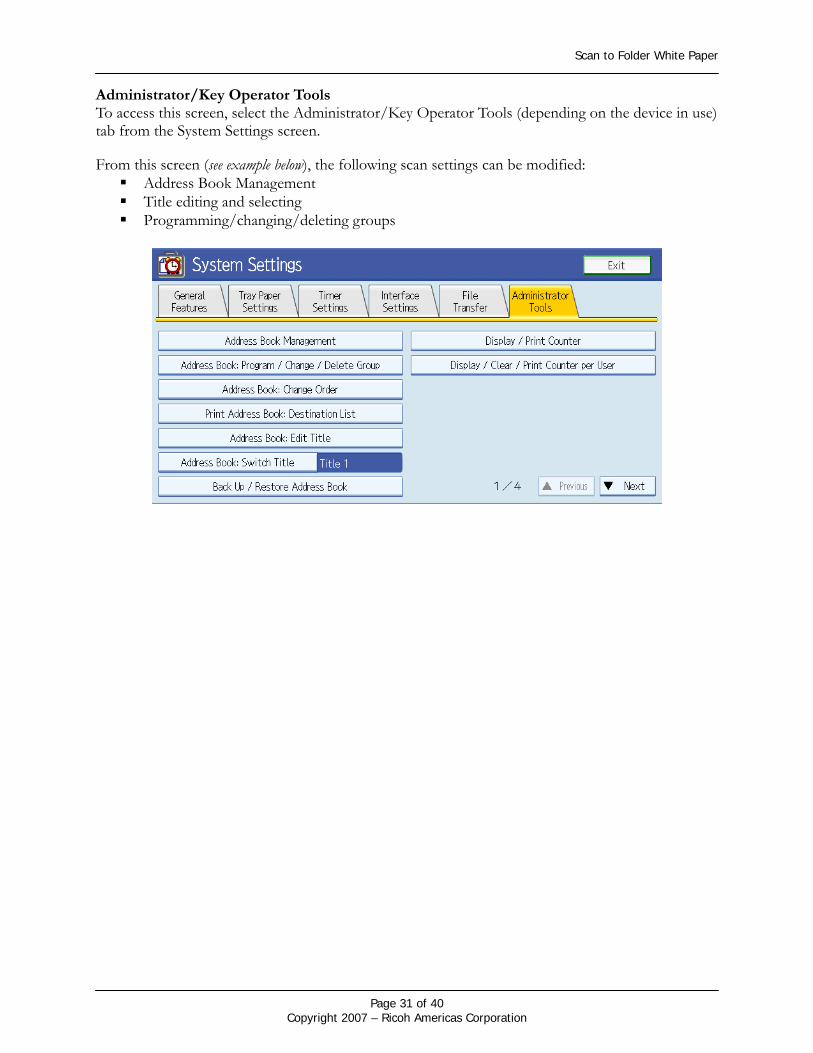
Administrator/Key Operator Tools To access this screen, select the Administrator/Key Operator Tools (depending on the device in use) tab from the System Settings screen.
From this screen (see example below), the following scan settings can be modified: Address Book Management Title editing and selecting Programming/changing/deleting groups
Page 31 of 40 Copyright 2007 – Ricoh Americas Corporation
Scan to Folder White Paper
9 Troubleshooting For various reasons, Scan to Folder will sometimes fail to operate correctly. This section covers the most common issues behind the function’s failure and the solutions to these issues. 9.1 PC-level Troubleshooting This section deals specifically with problems on the PC that holds the shared folder, which are causing Scan to Folder to fail.
9.1.1 Firewalls Firewalls may be blocking the ports used by Scan to Folder. Check any firewalls on the PC to see if the OS or third party software is blocking the following ports:
137 nbname TCP/UDP NetBEUI over TCP/IP name service 138 nbdgram UDP NetBEUI over TCP/IP (NB datagram) 139 nbsess TCP NetBEUI over TCP/IP (NB session)
Also, check with the network administrator. Routers may be setup to block these ports on the customer’s network.
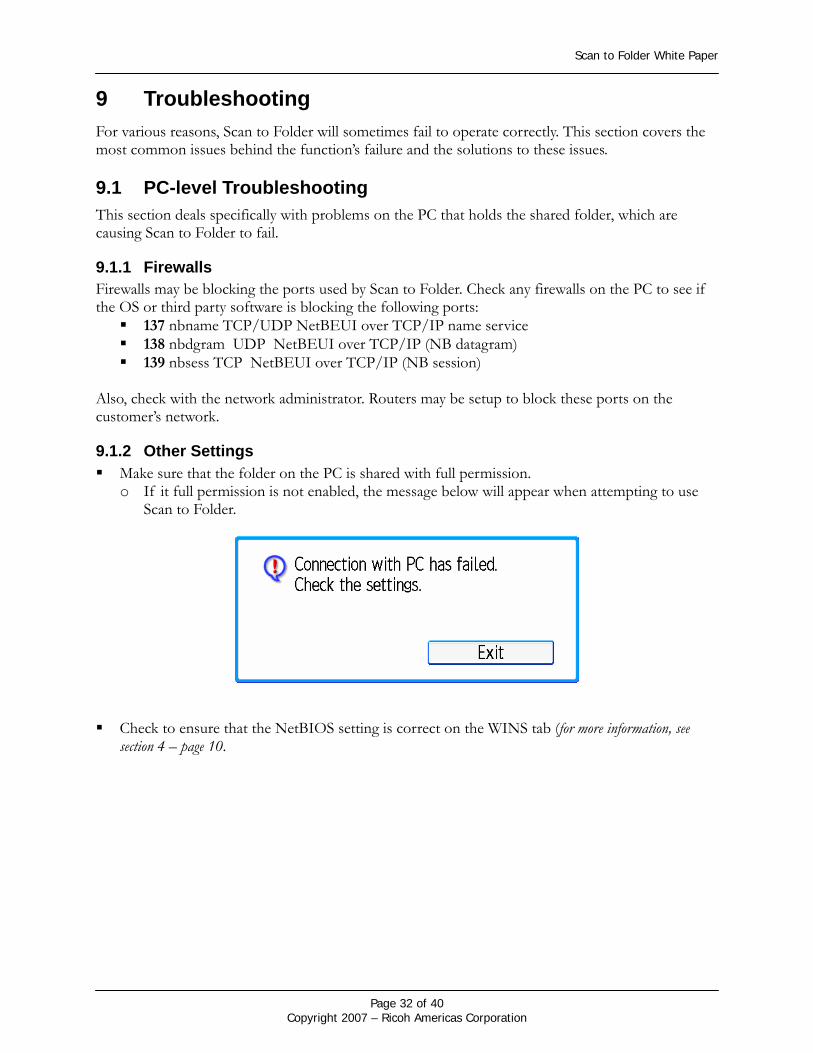
9.1.2 Other Settings Make sure that the folder on the PC is shared with full permission.
o If it full permission is not enabled, the message below will appear when attempting to use Scan to Folder.
Check to ensure that the NetBIOS setting is correct on the WINS tab (for more information, see
section 4 – page 10.
Page 32 of 40 Copyright 2007 – Ricoh Americas Corporation
Scan to Folder White Paper
9.2 MFP-level Troubleshooting This section covers common MFP setup issues that cause Scan to Folder to fail. First, make sure the following settings are enabled via the MFP operation panel: SMB protocol
o Make sure TCP+NetBEUI is selected. SNMP
o Make sure TCP/IP is the selected protocol. SMB Name & Workgroup
o Make sure both are correct.
9.2.1 Checking the Shared Folder Path Test the network connection by using the Browse Network (see section 5.2 – page 12) button to manually search for the folder. This will demonstrate whether or not the MFP is able to access the PC containing the shared folder and the folder itself. If the PC does not appear, manually enter the path using the IP address.
o Example: \\PC IP Address\shared file name 9.3 Signs of Scan to Folder Failure Below are some common signs that the attempt to use Scan to Folder has failed. The sections following this address the possible solutions for these problems.
If an error message appears stating the MFP cannot access the network, remove the MFP from the network and connect to it with a laptop via a cross over cable.
o One of the network PCs may be causing this problem. o If the offending PC is removed from the network, the MFP will be able to browse the
network again. Failed Connection Test after setting up the shared folder path. Even if the path to the shared folder is setup in the browser with the correct PC login
credentials, scan to folder still fails. When using the PC’s IP address instead of its computer name (as the path to the folder)
scanning may work, but the MFP still cannot browse the network.
Page 33 of 40 Copyright 2007 – Ricoh Americas Corporation

Scan to Folder White Paper
9.4 Checking PC Settings If any of the problems mentioned in section 9.3 (page 33) occur, begin troubleshooting by checking the settings on the PC containing the shared folder.
Although the two points below will not prevent the MFP from browsing the network, it is still useful to verify that:
The shared folder on the PC has the proper sharing rights (full read and write privileges enabled).
o For more information, see section 3.1.2 – page 7.
Check the WINS tab (in the Advanced section of TCP/IP properties) to ensure Enable NetBIOS over TCP/IP or are Using NetBIOS from DHCP server (if the customer is using a DNS server).
o For more information, see section 4 – page 10.
9.4.1 Checking NetBIOS over TCP/IP via Device Manager In addition to checking the NetBIOS settings via TCP/IP properties, the setting can also be verified by the Device Manager.
1. To begin, follow one of these two paths: o Right-click on the My Computer icon select Properties Hardware tab Device
Manager o From the Start Menu, select Control Panel System Hardware tab Device
Manager. 2. In Device Manager, click View on the main toolbar. 3. Select Show Hidden Devices to access the NetBIOS over TCP/IP setting. 4. Scroll down to Non-Plug and Play Drivers, and search for NetBIOS over TCP/IP. 5. Right click on NetBIOS over TCP/IP, and select Properties. 6. In the drop down box of the Device usage section (on the General tab), make sure Use this
device (enable) is selected.
Page 34 of 40 Copyright 2007 – Ricoh Americas Corporation
Scan to Folder White Paper
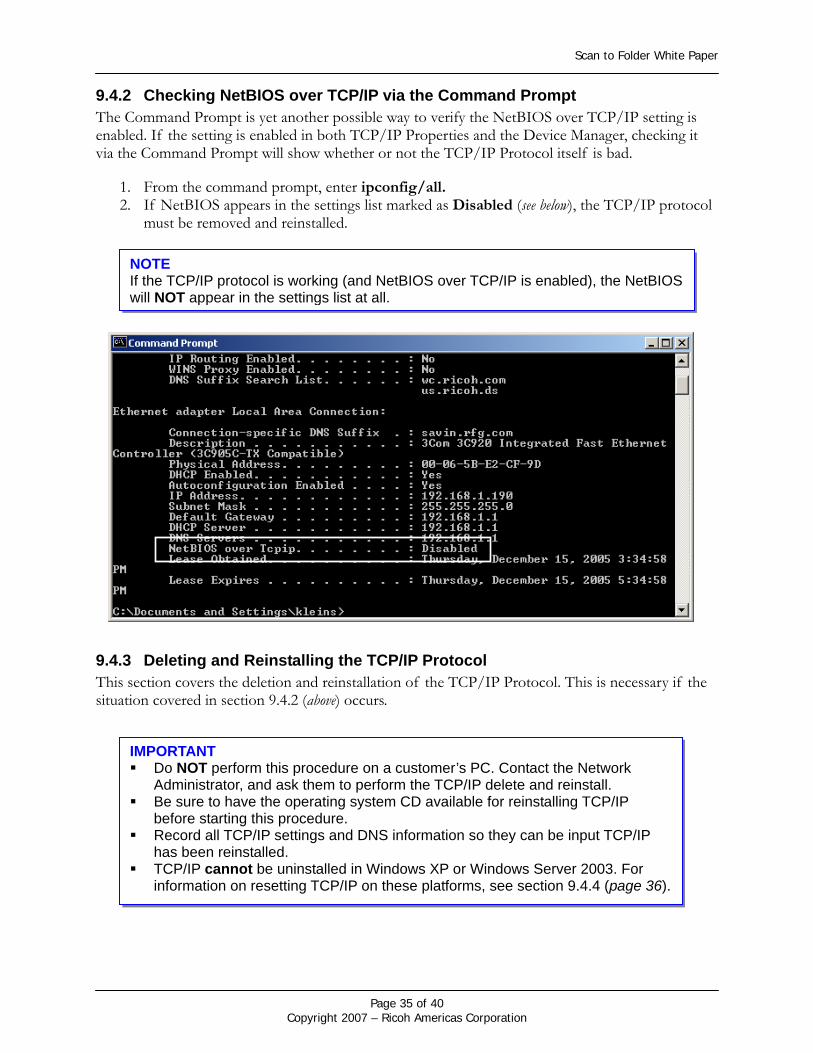
9.4.2 Checking NetBIOS over TCP/IP via the Command Prompt The Command Prompt is yet another possible way to verify the NetBIOS over TCP/IP setting is enabled. If the setting is enabled in both TCP/IP Properties and the Device Manager, checking it via the Command Prompt will show whether or not the TCP/IP Protocol itself is bad.
1. From the command prompt, enter ipconfig/all. 2. If NetBIOS appears in the settings list marked as Disabled (see below), the TCP/IP protocol
must be removed and reinstalled.
NOTE If the TCP/IP protocol is working (and NetBIOS over TCP/IP is enabled), the NetBIOS will NOT appear in the settings list at all.
9.4.3 Deleting and Reinstalling the TCP/IP Protocol This section covers the deletion and reinstallation of the TCP/IP Protocol. This is necessary if the situation covered in section 9.4.2 (above) occurs.
IMPORTANT Do NOT perform this procedure on a customer’s PC. Contact the Network
Administrator, and ask them to perform the TCP/IP delete and reinstall. Be sure to have the operating system CD available for reinstalling TCP/IP
before starting this procedure. Record all TCP/IP settings and DNS information so they can be input TCP/IP
has been reinstalled. TCP/IP cannot be uninstalled in Windows XP or Windows Server 2003. For
information on resetting TCP/IP on these platforms, see section 9.4.4 (page 36).
Page 35 of 40 Copyright 2007 – Ricoh Americas Corporation
Scan to Folder White Paper
1. From the Windows desktop, right-click on the My Network Places icon and select Properties. OR - From the Windows start menu, follow this click path: Start Settings Control Panel
Network and Dial-up Connections (2000) or Network Connections (XP). 2. From the Connections screen, right-click on the appropriate network connection, and select
Properties. 3. From the Connection’s Properties screen, highlight Internet Protocol (TCP/IP). 4. Click Uninstall. 5. A reboot is required before installing TCP/IP. 6. Insert the operating system CD, and select Install Protocol Add TCP/IP 7. Reboot to finalize the installation. 8. To verify TCP/IP is installed and working properly, run the ipconfig/all command again (see
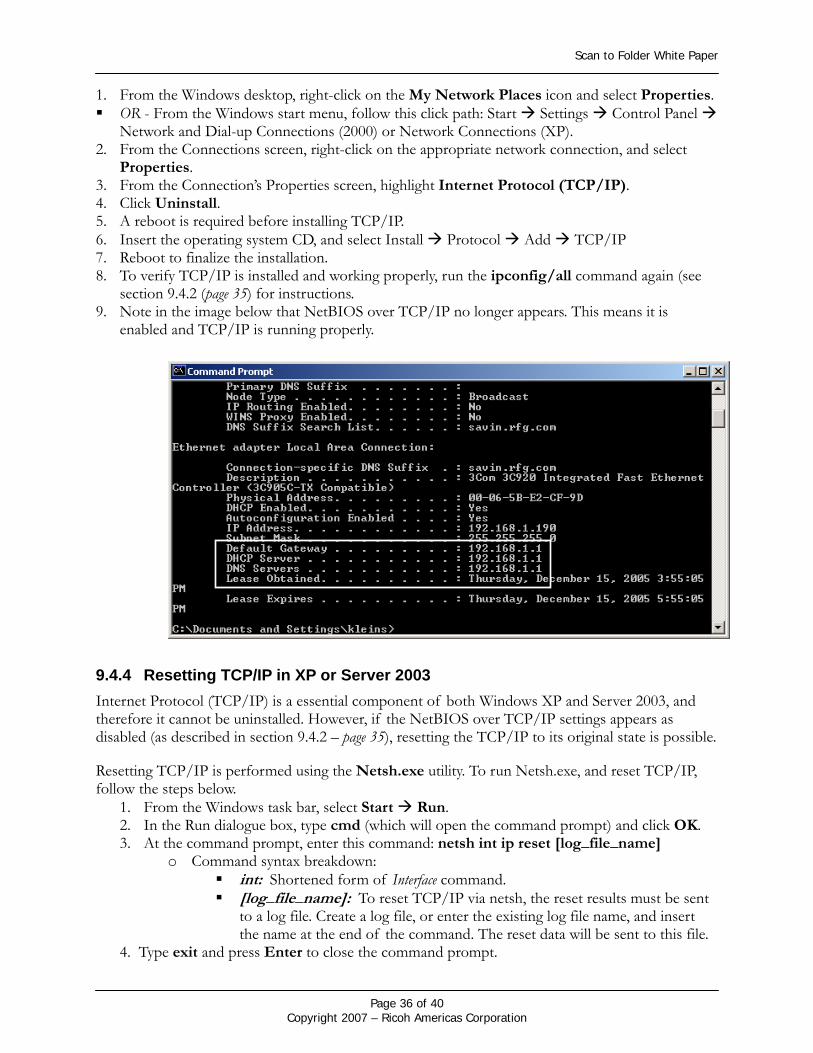
section 9.4.2 (page 35) for instructions. 9. Note in the image below that NetBIOS over TCP/IP no longer appears. This means it is
enabled and TCP/IP is running properly.
9.4.4 Resetting TCP/IP in XP or Server 2003 Internet Protocol (TCP/IP) is a essential component of both Windows XP and Server 2003, and therefore it cannot be uninstalled. However, if the NetBIOS over TCP/IP settings appears as disabled (as described in section 9.4.2 – page 35), resetting the TCP/IP to its original state is possible.
Resetting TCP/IP is performed using the Netsh.exe utility. To run Netsh.exe, and reset TCP/IP, follow the steps below.
1. From the Windows task bar, select Start Run. 2. In the Run dialogue box, type cmd (which will open the command prompt) and click OK. 3. At the command prompt, enter this command: netsh int ip reset [log_file_name]
o Command syntax breakdown: int: Shortened form of Interface command. [log_file_name]: To reset TCP/IP via netsh, the reset results must be sent
to a log file. Create a log file, or enter the existing log file name, and insert the name at the end of the command. The reset data will be sent to this file.
4. Type exit and press Enter to close the command prompt.
Page 36 of 40 Copyright 2007 – Ricoh Americas Corporation
Scan to Folder White Paper
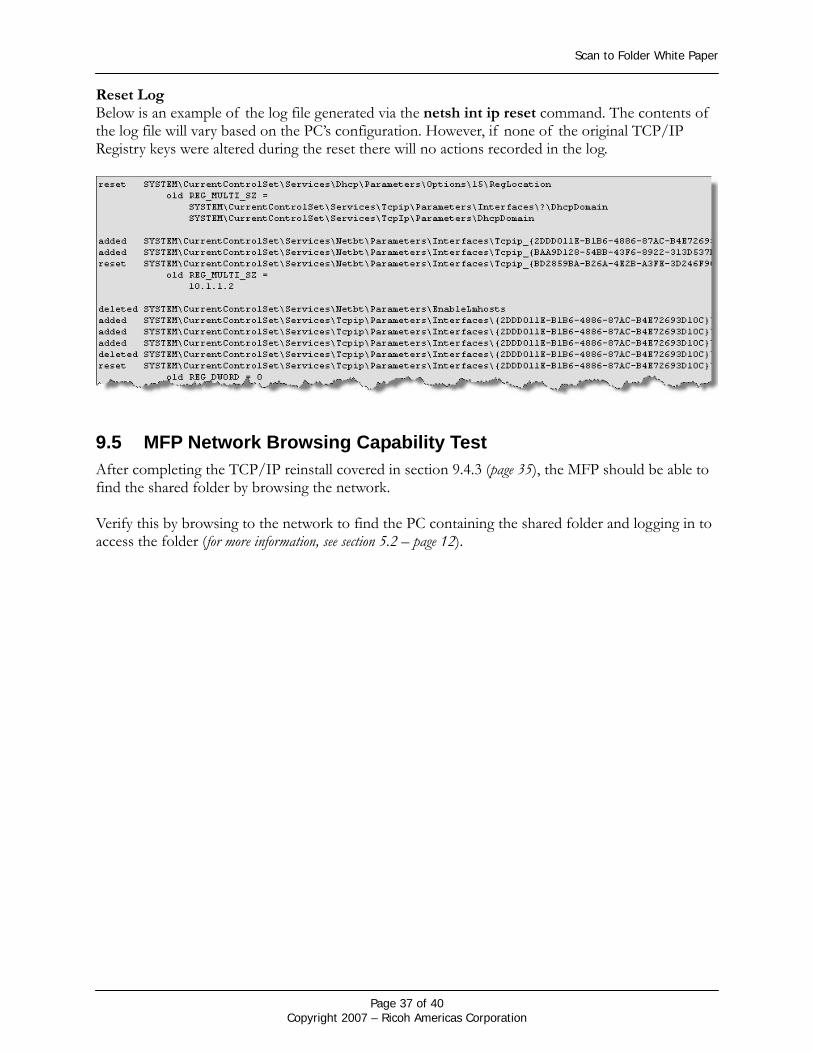
Reset Log Below is an example of the log file generated via the netsh int ip reset command. The contents of the log file will vary based on the PC’s configuration. However, if none of the original TCP/IP Registry keys were altered during the reset there will no actions recorded in the log.
9.5 MFP Network Browsing Capability Test After completing the TCP/IP reinstall covered in section 9.4.3 (page 35), the MFP should be able to find the shared folder by browsing the network. Verify this by browsing to the network to find the PC containing the shared folder and logging in to access the folder (for more information, see section 5.2 – page 12).
Page 37 of 40 Copyright 2007 – Ricoh Americas Corporation
Scan to Folder White Paper
9.6 Scan to Folder Problems in a Windows 2003 Server Environment SMB Signing is enabled by default in Directory Services, but many third party SMB clients do not support it. Fortunately, as of October 2005 firmware is available for all GW MFPs. The firmware is either incorporated into the GW firmware, or available as a separate file download.
If the firmware is a separate file, it is necessary to complete a Custom Firmware Request form (see section 9.6.1)
IMPORTANT If the MFP does not support SMB signing, Scan to Folder is not possible on a 2003
Server. o An error message reading “Can’t Connect” will appear on the operation panel.
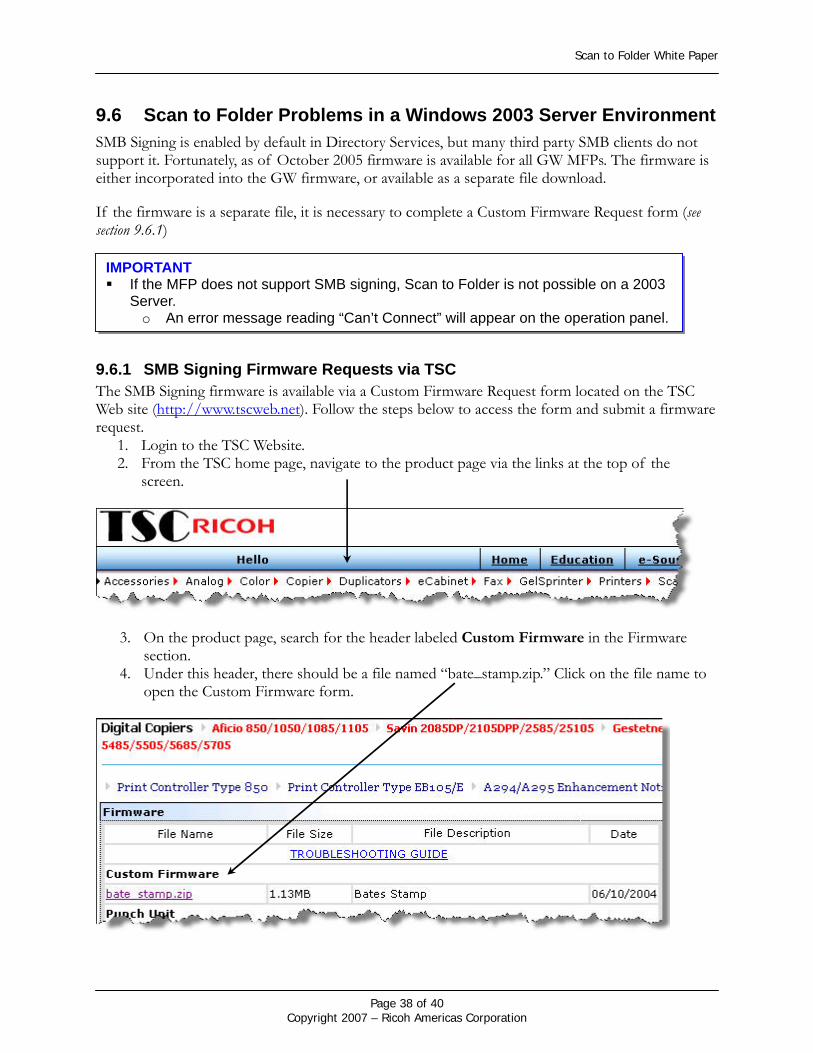
9.6.1 SMB Signing Firmware Requests via TSC The SMB Signing firmware is available via a Custom Firmware Request form located on the TSC Web site (http://www.tscweb.net). Follow the steps below to access the form and submit a firmware request.
1. Login to the TSC Website. 2. From the TSC home page, navigate to the product page via the links at the top of the
screen.
3. On the product page, search for the header labeled Custom Firmware in the Firmware
section. 4. Under this header, there should be a file named “bate_stamp.zip.” Click on the file name to
open the Custom Firmware form.
Page 38 of 40 Copyright 2007 – Ricoh Americas Corporation
Scan to Folder White Paper
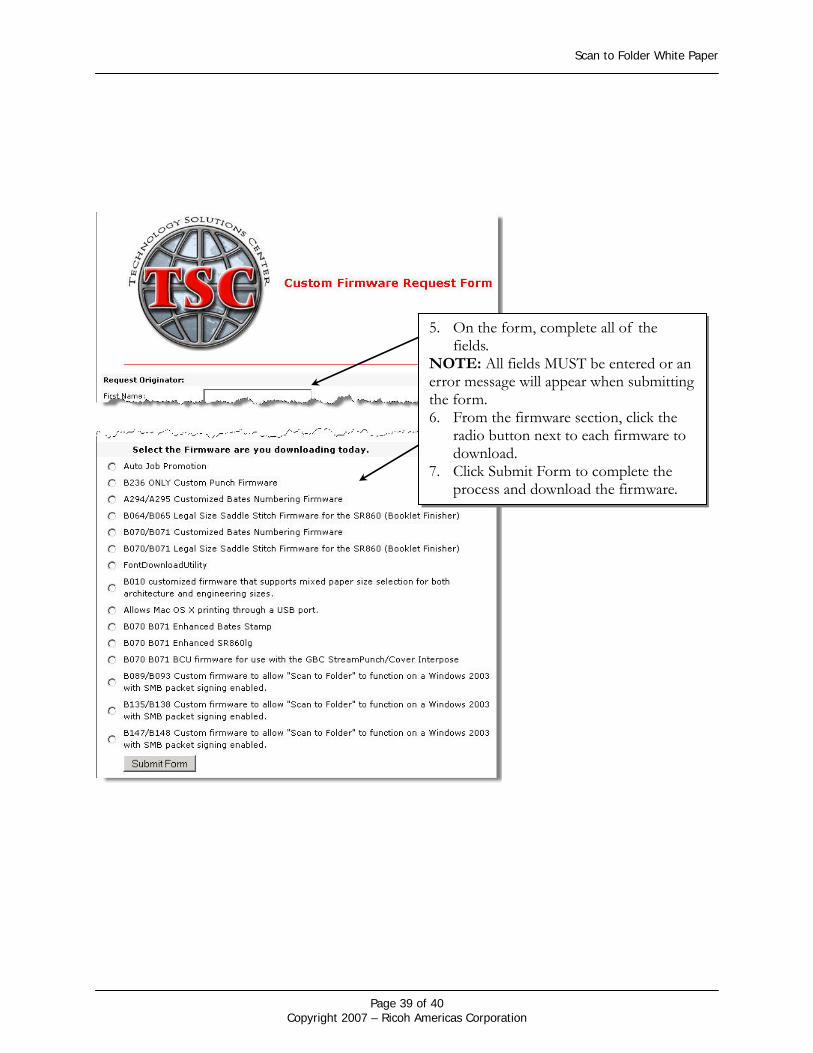
5. On the form, complete all of the fields.
NOTE: All fields MUST be entered or an error message will appear when submitting the form. 6. From the firmware section, click the
radio button next to each firmware to download.
7. Click Submit Form to complete the process and download the firmware.
Page 39 of 40 Copyright 2007 – Ricoh Americas Corporation
Scan to Folder White Paper
10 Scan to Folder in a Mac Environment Depending on the OS version in use, SMB may or may not be supported. Below is a breakdown of which OS versions support Scan to Folder/SMB scanning. OSX 10.2 or later: Support SMB Windows File Sharing. Click the link below for instructions on enabling SMB Windows File Sharing:
o http://docs.info.apple.com/article.html?artnum=107083 OS levels previous to 10.2: Do NOT support SMB In these situations, use Scan to FTP.
11 Summary The material covered in this White Paper should help answer many questions concerning Scan to Folder, such as the shared file setup, MFP configuration, and network settings. This White Paper contains all of the setup information needed to enable, and use, the Scan to Folder function. It applies only to the machines listed in the Model Cross reference (page 4).
Page 40 of 40 Copyright 2007 – Ricoh Americas Corporation