SCADA Genesis64 Iconics
68
Visualize Your Enterprise ™
-
Upload
donficticio -
Category
Documents
-
view
398 -
download
13
description
Manual de Inicio
Transcript of SCADA Genesis64 Iconics

Americas (United States)100 Foxborough BlvdFoxborough, MA 02035Tel: 508 543 8600Fax: 508 543 [email protected]
Asia Pacifi c (Australia)Tel: 61 297 273 411Fax: 61 297 273 422Pacifi [email protected]
Europe (Czech Republic)Tel: 420 37 718 3447Fax: 420 37 718 [email protected]
Visualize Your Enterprise™


GENESIS64 Getting Started
Version 10.6

GENESIS64 Getting Started
ICONICS ii
© 2011 ICONICS, Inc. All rights reserved worldwide. This document may not be reproduced or copied in any manner without written authorization from ICONICS, Inc.
The information contained within this document is subject to change without notice. ICONICS, Inc. does not guarantee the accuracy of the information.
GENESIS64, Hyper Historian, Pocket GENESIS, BizViz and their respective modules, OPC-To-The-Core, and Visualize Your Enterprise are trademarks of ICONICS, Inc.
Windows, Windows XP, Windows 2000, Windows 2003 Server, Windows CE, Windows NT, Windows 2003-64, Windows Vista, Windows Server 2008, Windows 7 and Windows Server 2008 R2 are registered trademarks of Microsoft Corp. in the United States and other countries.
Other product and company names mentioned herein may be trademarks or registered trademarks of their respective owners.
Document No. UG-GEN-1060

GENESIS64 Getting Started License Agreement
ICONICS iii
ICONICS LICENSE AGREEMENT
YOU SHOULD CAREFULLY READ THE FOLLOWING TERMS AND CONDITIONS!
Opening and using the enclosed software for any purpose indicates your acceptance of the terms and conditions of this license agreement. If you do not agree with them you should return all software, documentation and copy protection keys within seven days of shipment unopened and your money will be refunded. ICONICS provides this program and licenses its use in the United States, Puerto Rico, or internationally. You assume the responsibility for the selection of the program to achieve your intended results, and for the installation, use and results obtained from this program.
LICENSE You are granted a personal license to use this program under the terms stated in this Agreement. You may: 1) Install and use the program on a single machine. 2) Make a single archival back-up copy of the program for the sole purpose of supporting your use of the single program on a single machine. 3) You may not use, copy, modify, or transfer the program, or transfer any copy, in whole or in part, except as expressly provided in this license, or with a written contractual agreement with ICONICS, Inc.
TERM The license is effective until terminated. It will terminate if you fail to comply with any term or condition of this Agreement. You agree, upon such termination, to destroy the program and all copies that were made from it and to promptly return any copy protection key(s) to ICONICS.
LIMITED WARRANTY ICONICS WARRANTS THE DVD-ROM OR PHYSICAL DISKETTES, ON WHICH THE PROGRAM IS FURNISHED, AND PHYSICAL DOCUMENTATION TO BE FREE OF DEFECTS IN MATERIALS AND WORKMANSHIP UNDER NORMAL USE FOR A PERIOD OF NINETY (90) DAYS FROM THE DATE OF DELIVERY TO YOU AS EVIDENCED BY YOUR RECEIPT. THIS PROGRAM IS PROVIDED “AS IS” WITHOUT WARRANTY OF ANY KIND, EITHER EXPRESSED OR IMPLIED, INCLUDING BUT NOT LIMITED TO THE IMPLIED WARRANTIES OF TITLE, NON-INFRINGEMENT, MERCHANTABILITY OR FITNESS FOR A PARTICULAR PURPOSE. THE ENTIRE RISK AS TO THE QUALITY AND PERFORMANCE OF THE PROGRAM IS WITH YOU. SHOULD THE PROGRAM PROVE DEFECTIVE, YOU ASSUME THE ENTIRE COST OF ALL NECESSARY SERVICING, REPAIR, OR CORRECTION.

License Agreement GENESIS64 Getting Started
ICONICS iv
ICONICS SPECIFICALLY DISCLAIMS ALL OTHER WARRANTIES, EXPRESSED OR IMPLIED, INCLUDING BUT NOT LIMITED TO, IMPLIED WARRANTIES OF TITLE, NON-INFRINGEMENT, MERCHANTABILITY AND FITNESS FOR A PARTICULAR PURPOSE. IN PARTICULAR, WITH RESPECT TO ANY PARTICULAR APPLICATION, USE OR PURPOSE, IN NO EVENT SHALL ICONICS INC. BE LIABLE FOR ANY OTHER COMMERCIAL DAMAGE, INCLUDING BUT NOT LIMITED TO SPECIAL, INCIDENTAL, CONSEQUENTIAL OR OTHER DAMAGES. ICONICS DOES NOT WARRANT THAT THE FUNCTIONS CONTAINED IN THE PROGRAM WILL MEET YOUR REQUIREMENTS OR THAT THE OPERATION OF THE PROGRAM WILL BE UNINTERRUPTED OR ERROR FREE.
LIMITATION OF REMEDIES ICONICS’ entire liability and your exclusive remedy shall be the replacement of any DVD-ROM or diskette not meeting ICONICS’ “Limited Warranty” which is returned to ICONICS with a copy of your receipt within the warranty period. The remedy for breach of this warranty shall be limited to replacement and shall not encompass any other damages including but not limited to loss of profit, special, incidental, consequential, or other similar claims arising out of the use or inability to use such program even if ICONICS has been advised of the possibility of such damages, or for any claim by any other third party.
GENERAL This Agreement will be governed by the laws of the Commonwealth of Massachusetts. Should you have any questions concerning this Agreement, you may contact ICONICS in writing at:
ICONICS, Inc. 100 Foxborough Boulevard
Foxborough, MA 02035
You acknowledge that you have read this agreement, understand it and agree to be bound by its terms and conditions. You further agree that it is the complete and exclusive statement of the Agreement between you and ICONICS which supersedes any proposal or prior Agreement, oral or written, and any other communications between you and ICONICS relating to the subject matter of the Agreement.
ICONICS RETURN POLICY All sales are final (NO RETURNS) unless one of the following conditions is applicable: Program is returned in its original packaging material within 7 days after shipment. In such a case, a full refund is provided, less all incurred shipping and handling costs. Program is returned within 30 days from the original shipment date. In such a case a 20% restocking fee is applicable. No returns are allowed on OPC ToolWorX or ActiveX ToolWorX.
EXPORT COMPLIANCE You are solely responsible for complying with applicable export and import regulations, securing any necessary export or import license(s), obtaining local customs clearance and paying all duties, taxes and other surcharges.
GENESIS64 Getting Started Table of Contents
ICONICS i. v
TABLE OF CONTENTS
1 GENESIS64 OVERVIEW ..................................................................... 1-1 1.1 INTRODUCTION ................................................................................... 1-1 1.2 WHAT IS GENESIS64? ...................................................................... 1-2 1.3 WHAT IS OPC-UA? ............................................................................ 1-2
2 SYSTEM REQUIREMENTS ............................................................... 2-1
3 INSTALLING GENESIS64 .................................................................. 3-1 3.1 STARTING THE INSTALL ...................................................................... 3-1 3.2 TYPICAL INSTALLATION ..................................................................... 3-2 3.3 CUSTOM INSTALLATION ..................................................................... 3-5 3.4 TRENDWORX64 DATABASE GROUP CONNECTION ........................... 3-6 3.5 UNINSTALLING GENESIS64 .............................................................. 3-6
4 ICONICS SOFTWARE LICENSING ................................................. 4-1 4.1 SOFTWARE AND HARDWARE KEYS .................................................... 4-1
4.1.1 Software Licensing ....................................................................... 4-1 4.1.2 Hardware Key .............................................................................. 4-1
4.2 LICENSING UTILITY ............................................................................ 4-2 4.2.1 Running the Licensing Utility ...................................................... 4-2 4.2.2 License File .................................................................................. 4-3 4.2.3 Activating the 30-day Trial/Emergency License .......................... 4-4 4.2.4 Killing a Software Key License .................................................... 4-6
4.3 LICENSE VIEWER ................................................................................ 4-8 4.4 WEB LICENSING ................................................................................ 4-10
4.4.1 Acquiring a New Software License ............................................ 4-10 4.4.2 Adding to an Existing Software License .................................... 4-16 4.4.3 Upgrading a Software License Key ........................................... 4-18 4.4.4 Upgrading a Hardware License Key ......................................... 4-26 4.4.5 Licensing the New Version ......................................................... 4-26
4.5 DEMO MODE ..................................................................................... 4-27

Table of Contents GENESIS64 Getting Started
ICONICS vi
5 GENDEMO ............................................................................................. 5-1 5.1 INTRODUCTION ................................................................................... 5-1 5.2 GENDEMO TOOLBAR .......................................................................... 5-2 5.3 GRAPHWORX64 INTERACTIVE TUTORIALS IN THE LEARNING CENTER
5-2 5.4 ICONICS PRODUCT PRESENTATIONS ................................................ 5-3 5.5 GETTING HELP FROM GENDEMO ....................................................... 5-4 5.6 INDUSTRY CASE STUDIES AND EXAMPLES ........................................ 5-4
6 GENESIS64 QUICK START................................................................ 6-1 6.1 INTRODUCTION ................................................................................... 6-1 6.2 GRAPHWORX64 ................................................................................. 6-1 6.3 ALARMWORX64 ................................................................................ 6-2 6.4 TRENDWORX64 ................................................................................. 6-2 6.5 EARTHWORX...................................................................................... 6-3 6.6 WORKBENCH ...................................................................................... 6-3 6.7 ADDITIONAL TOOLS AND UTILITIES ................................................... 6-5
7 HELP AND TECHNICAL SUPPORT ................................................ 7-1 7.1 ONLINE HELP ...................................................................................... 7-1 7.2 PRODUCT VIDEOS ............................................................................... 7-1 7.3 TRAINING CLASSES............................................................................. 7-1 7.4 TECHNICAL SUPPORT.......................................................................... 7-2
7.4.1 Global Support and Services ........................................................ 7-2 7.4.2 ICONICS Knowledge Base .......................................................... 7-2 7.4.3 Online Support ............................................................................. 7-3 7.4.4 Telephone Support........................................................................ 7-3 7.4.5 E-mail Support ............................................................................. 7-4

ICONICS 1-1
1 GENESIS64 OVERVIEW 1.1 Introduction
Welcome to ICONICS GENESIS64™, a powerful, 64-bit, Web-enabled, OPC HMI/SCADA suite. GENESIS64 takes full advantage of the convergence of 64-bit-based computing machinery, the release of new Microsoft operating systems (Windows® 7 and Windows Server 2008 R2) and the growing customer demand for engaging three-dimensional graphic visualization of business processes.
GENESIS64, which is compatible with Windows 7, as well as certified for both Windows Vista and Windows Server 2008, includes several solutions that allow for connectivity from the plant floor to corporate business systems to provide a 360-degree view of an entire organization. It was designed from the ground up to utilize new Microsoft technologies including:
• Entirely built using Microsoft .NET 4.0 • Windows Presentation Foundation (WPF) • Microsoft Silverlight • 3D Hardware-accelerated Visualization • Windows Communication Foundation (WCF) • OPC Unified Architecture (OPC-UA) • Windows User Access Control (UAC) Persistence • Windows 7 Search & Organize • Microsoft Windows 7 Multitouch • Microsoft Windows Sidebar Gadgets • Integrated Microsoft Silverlight Technologoy • Microsoft Bing™ Maps
ICONICS GENESIS64 suite is comprised of the following products:
• GraphWorX64™ • AlarmWorX64™ • TrendWorX64™ • EarthWorX™ • Workbench

GENESIS64 Architecture GENESIS64 Getting Started
ICONICS 1-2
This Getting Started manual explains how you can:
• Install the GENESIS64 software.
• Familiarize yourself with and start using the Workbench multi-functional, centralized Web-based environment
• Access online help and technical support.
Note: This manual is an abbreviated version of the full GENESIS64 Help documentation, which is available in the GENESIS64 Product help.
1.2 What Is GENESIS64? GENESIS64 is a suite of tools that you can use to create state display and control software for equipment, machinery, or devices that use the OPC open process control standards of the OPC Foundation. OPC standards exist for both real time data, alarms, and events, as well as for historical data that can be logged and replayed at a later date.
1.3 What Is OPC-UA? OLE™ for Process Control (OPC) is a standards-based approach for connecting data sources (e.g., PLCs, controllers, I/O devices, databases, etc.) with HMI client applications (graphics, trending, alarming, etc.). It enhances the interface between client and server applications by providing a universally supported and well-documented mechanism to communicate data from a data source to any client application. Included are not only a detailed guide on how to pass the data, but also specific information on other attributes to supplement those data, such as range information, data type, quality flags, and date and time information.
OPC-UA or "Unified Architecture" unites legacy OPC standards such as OPC-AE (Alarm & Events), OPC-DA (Data Access), and OPC-HDA (Historical Data Access) into one complete specification. The GENESIS64 automation suite supports these legacy protocols transparently, which incorporates newer communication standards while retaining backwards compatibility.

GENESIS64 Getting Started GENESIS64 Architecture
ICONICS 1-3
Figure 1.1 shows the OPC Architecture, which was introduced by the OPC Foundation. By following the OPC Architecture, a device needs only one standard driver, which is an OPC-compliant server. All OPC-compliant client applications can then be connected to that device, either locally or over a network. Furthermore, connections can be made to more than one OPC server at the same time.
Figure 1.1. OPC-Based Client-Server Architecture
Any OPC client application can connect to any OPC server. In other words, OPC offers true Plug-and-Play capability in the fields of HMI and industrial automation. OPC server types include OPC Data Access (DA), OPC Alarm and Events (AE), and OPC Historical Data Access (HDA).
The AlarmWorX64 application, which has both client and server components, is an example of a real-time data display where the focus is on alarm and event type data that is specified by the OPC-AE standard. You can configure AlarmWorX64 to display real time alarm events inside a viewer application that originates on an alarm server application that is monitoring alarm-based OPC-AE devices.

GENESIS64 Architecture GENESIS64 Getting Started
ICONICS 1-4

ICONICS 2-1
2 SYSTEM REQUIREMENTS GENESIS64 has the following minimum system requirements. Your systems must meet the minimum requirement before you can install GENESIS64.
CPU:
Dual Core 64-bit processors
(AMD Athlon 64 X2, Intel Core 2 Duo, Intel Xeon, and AMD Phenom)
Memory:
Minimum: 2 GB of RAM Recommended: 6 GB of RAM
Hard Disk:
Minimum: 4.0 GB free hard disk space on system drive Recommended: 10 GB free hard disk space
Drive:
8X speed CD-ROM/DVD-ROM
Video Card:
Display Resolution Minimum: 1024x768, 32 bit color Recommended: onboard Video Memory (256Megs), DirectX 9 or 10 Video Card or better
Operating System:
Any Windows 64 operating system, including: Microsoft Windows 7 x64 (Professional or Ultimate Edition) Microsoft Windows Server 2008 R2 x64 Microsoft Windows Vista x64 SP2, Windows Server 2008 x64, Windows Server 2003 x64
.NET Framework:
Microsoft .NET Framework 4.0

System Requirements GENESIS64 Getting Started
ICONICS 2-2
Web Server:
Microsoft Internet Information Services (IIS) 7.0
SQL Server:
Microsoft SQL Server 2008 Express Edition
Microsoft SQL Server 2005 Workgroup/Standard/Enterprise Edition SP2.
Microsoft SQL Server 2005 Express Edition SP2 with Microsoft SQL Server Management Studio Express.
Note. It is recommended that the systems page file size be a minimum of four (4) times the size of installed (physical) RAM.
Note. The connection to a SQL Server data source may be either local or remote.
ICONICS 3-1
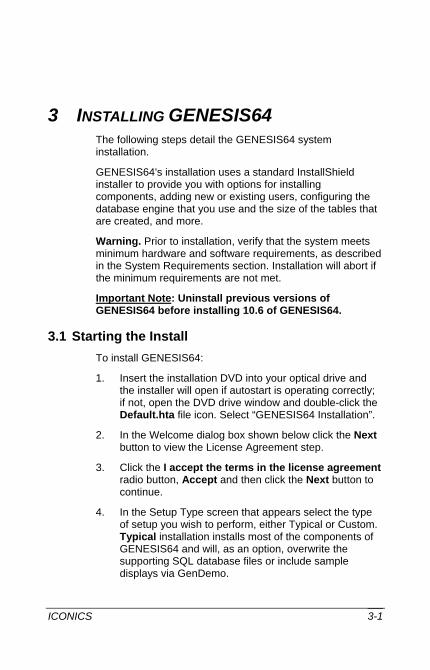
3 INSTALLING GENESIS64 The following steps detail the GENESIS64 system installation.
GENESIS64's installation uses a standard InstallShield installer to provide you with options for installing components, adding new or existing users, configuring the database engine that you use and the size of the tables that are created, and more.
Warning. Prior to installation, verify that the system meets minimum hardware and software requirements, as described in the System Requirements section. Installation will abort if the minimum requirements are not met.
Important Note: Uninstall previous versions of GENESIS64 before installing 10.6 of GENESIS64.
3.1 Starting the Install To install GENESIS64:
1. Insert the installation DVD into your optical drive and the installer will open if autostart is operating correctly; if not, open the DVD drive window and double-click the Default.hta file icon. Select “GENESIS64 Installation”.
2. In the Welcome dialog box shown below click the Next button to view the License Agreement step.
3. Click the I accept the terms in the license agreement radio button, Accept and then click the Next button to continue.
4. In the Setup Type screen that appears select the type of setup you wish to perform, either Typical or Custom. Typical installation installs most of the components of GENESIS64 and will, as an option, overwrite the supporting SQL database files or include sample displays via GenDemo.

Installing GENESIS64 GENESIS64 Getting Started
ICONICS 3-2
Custom installation allows you to pick the options to be installed. Since the Setup procedure varies slightly depending on the installation type you choose, the installation of each is described fully in the two sections that follow. Refer to “Typical Installation” below or “Custom Installation” on page 3-5.
3.2 Typical Installation Typical installation is meant to install all of the GENESIS64 applications and tools and will create, if necessary, all of the supporting databases. You will need to provide the correct database connection and logon information, but once those steps are completed the installation is largely unattended.
If you are installing GENESIS64 on a system that has a previous version of ICONICS products already installed, uninstall the older version before installing GENESIS64. If you have uninstalled a previous version, Setup leaves the database files intact on your system for you to use at a future date. Typical installation will ask you if you want to overwrite or leave the supporting database files.
To perform a typical installation:
1. Click the Typical radio button in the Setup Type dialog box described above. Setup evaluates your system for compliance with the requirements, and then posts a confirmation dialog box.
2. Click the Install button to begin the GENESIS64 User Setup Wizard, then click the Next button to start the wizard.
3. Clicking next will bring up the Database Server Dialog. This will allow you to indicate the database server you wish to install to. The install will search your drives and populate a list of options. If for any reason the desired database server is not listed, use the Browse button to navigate to it. You should use the credentials that the database server is secured under which could involve using Windows authentication or a specific SQL Server authentication. Indicate and type your Login ID and Password if necessary. Click Next to continue.

GENESIS64 Getting Started Installing GENESIS64
ICONICS 3-3
4. The Typical installation will now ask you if you’d like to install
the GenDemo that includes sample displays, examples and tutorials to get you up and running. Select the option, if desired, and click Next. At this time, additional components will be installed automatically.
5. In the User Setup dialog box you can choose to use either a local machine account or a domain security account, as well as create a new user or use an existing user account. Either accept the local machine account or click the Domain radio button and enter the domain machine account, as shown in the following User Setup dialog box.
Either select the New User radio button and enter the User Name and Password for that account; or select the Existing User radio button and select the User Name of the account then provide the password for that account. Then click the Finish button.

Installing GENESIS64 GENESIS64 Getting Started
ICONICS 3-4
6. The GENESIS SQL Databases Installation window will now appear. In the window that appears below, you can either leave the Include Sample Data check box enabled (in order to install sample data that you can experiment with) or disable this check box to install blank tables. Advanced configuration will allow settings for additional sizing options on the database and log files.
7. Click the Install button to continue the installation.
8. If Setup detects previously installed GENESIS64 databases it posts the Overwrite Database dialog box, shown below. Click either Overwrite Existing Database or Don't Overwrite to continue. Before doing so though, you can enable the check box to enforce this choice as your default for the remaining database files.

GENESIS64 Getting Started Installing GENESIS64
ICONICS 3-5
9. After completing the installation, the Wizard Completed dialog box appears. Click the Finish button.
Note: It's generally a good idea to restart your system, although the installation doesn't require that you do so. Should the installation appear to hang, check to see that there aren't any alert boxes posted that require dismissal prior to completing the installation.
3.3 Custom Installation Custom installation varies slightly from the Complete installation in that you select the components you wish to install.
When you click the Custom installation Setup Type that you saw in final step of the first section you will then see the Custom Setup dialog box shown in the following figure. Click the checkboxes to install your selected components.
• Clicking Next will bring up the Database Server Dialog. This will allow you to indicate the database server you wish to install to. The install will search your drives and populate a list of options. If for any reason the desired database server is not listed, use the Browse button to navigate to it. You should use the credentials that the database server is secured under which could involve using Windows authentication or a specific SQL Server authentication. Indicate and type your Login ID and Password if necessary. Click Next to continue.

Installing GENESIS64 GENESIS64 Getting Started
ICONICS 3-6
• Click the Install button to continue the installation.
• If Setup detects previously installed GENESIS64 databases, it posts the Overwrite Database dialog box. Click either Overwrite Existing Database or Don't Overwrite to continue.
Before doing so though, you can enable the checkbox to enforce this choice as your default for the remaining database files.
• After completing the installation, the Wizard Completed dialog box appears. Click the Finish button.
3.4 TrendWorX64 Database Group Connection To enable TrendWorX64 Logger to log into SQL Express 2005:
1. Open Workbench and browse to the database group.
2. Click the Change Connection radio button, enter: .\SQLEXPRESS
3. Click the OK button to close the dialog box.
3.5 Uninstalling GENESIS64 The GENESIS64 software can be uninstalled (removed) from the system. It is recommended that you back up all of your project-related files before uninstalling. If your operating system requires a login, you must log in with administrator capability to uninstall. Uninstalling GENESIS64 Software (or its components) will not uninstall the Licensing software. Your valid license will remain activated on your PC.
To uninstall GENESIS64: From the Windows Start menu, select Settings > Control Panel. Double-click Add/Remove Programs. From the list of programs that you can remove, select ICONICS GENESIS64. Click Change/Remove to remove GENESIS64 and all of its components. Select Remove, and then click the Next button. When the files are removed, the uninstall program will indicate that the process is complete.

ICONICS 4-1
4 ICONICS SOFTWARE LICENSING 4.1 Software and Hardware Keys
GENESIS64 licensing is handled by a software key license registration system that does not require a hardware protection key. However, ICONICS does offer an optional hardware key which you can purchase.
4.1.1 Software Licensing
The software key is a licensing key that resides on the hard drive of a computer. Each software key is used on a single, specific computer and is used only once. It is activated using a site key (license file) that is tied to the computer that is being licensed.
An activated license is required to use the software in full production mode. This license designates which products may be used, as well as the I/O point-count limit that controls the number of active data points (tags) that can be used by a system.
For important details about registering and activating software licenses for your GENESIS64 installations, refer to the ICONICS .NET Licensing Readme.htm file, which is available on your GENESIS64 installation DVD (and as a link from the disc’s Info Center).
4.1.2 Hardware Key
The optional hardware key is a USB thumb drive (or flash drive) that you can move from system to system. GENESIS64 v.10.6 recognizes the hardware key on the system you have the key attached to. A hardware key is easier and is a more reliable way of moving a license from one machine to another than a software key.
Upon insertion of the USB key into an available USB port, the necessary drivers are automatically loaded.

ICONICS Software Licensing GENESIS64 Getting Started
ICONICS 4-2
A green status light will illuminate upon successful connection. Should the USB key be missing or unplugged during operation of GENESIS64 software, plug the USB key back in either within an hour of removal or upon system reboot; otherwise the hardware-based license will not be immediately recognized.
Should you require a replacement key, visit http://www.iconics.com/supportworx. New users must create an account through the ICONICS Web Licensing Utility in order to request replacement keys.
4.2 Licensing Utility The Software Licensing Utility provides full authorization for use to any purchased GENESIS64 product and its available options.
4.2.1 Running the Licensing Utility
To launch the License Utility from the Windows Start menu, select Programs > ICONICS .NET Licensing > Licensing Utility.

GENESIS64 Getting Started ICONICS Software Licensing
ICONICS 4-3
4.2.2 License File
Once you have opened the Software Licensing Utility, you can browse for the site key (License File) itself. Either click on the Browse… button in the License File section of the window OR click on File in the top menu, then Select License File… .
This brings up the Windows Explorer so that you may browse for the License File itself. Once you have located the file, double-click it or click Open to proceed.

ICONICS Software Licensing GENESIS64 Getting Started
ICONICS 4-4
4.2.3 Activating the 30-day Trial/Emergency License Within the Licensing Utility (Software License Activation for .NET) dialog box, you can click on the Activate Trial/Emerg. License box to initiate a 30-day trial/emergency license.
NOTE: This license can be activated only once per machine.
You will then see a warning about proceeding with activating the 30-day trial/emergency license. Click Yes, should you wish to proceed.

GENESIS64 Getting Started ICONICS Software Licensing
ICONICS 4-5
You will then see an additional warning confirming that you understand that enabling the trial license will invalidate any other software license that is currently active on the machine. Click Yes should you wish to proceed.
Once the 30-day trial/emergency license has been enabled, you will see the following messages:
The PC will then be authorized to run for a one-time only, 30-day backup period. The PC can be fully authorized at any time during or at the conclusion of this temporary backup period. Clicking No in the initial windows returns you to the Licensing Utility (Software License Activation for .NET) dialog box and preserves the existing license.

ICONICS Software Licensing GENESIS64 Getting Started
ICONICS 4-6
Note: Temporary backup license authorization is intended for urgent backup situations only. Clicking OK invalidates the existing license and activates a temporary backup authorization, permanently overwriting any existing license. Thus, please use caution when activating a temporary backup license authorization.
4.2.4 Killing a Software Key License
Killing a software key license deletes it and removes the current software license from the machine.
To kill or delete the existing software license:
1. Select Kill Current License within the Licensing Utility (Software License Activation for .NET) dialog box. Using this option, you can remove the current software license from the current machine.

GENESIS64 Getting Started ICONICS Software Licensing
ICONICS 4-7
A warning message appears on the screen as shown in the figure below.
IMPORTANT: If you kill your license, you need to get a new license from ICONICS to restart your GENESIS64 product.
2. Click Yes to continue, or click No to exit. Clicking Yes displays one of the following warning messages.
If you are killing a trial or emergency license, once you click Yes you are done.
Note: A trial or emergency license cannot be credited back to the Web-based License Generator using the Kill Code.
If you are killing a permanent, registered license, after you click Yes, the following warning message appears. Notice that the message lists the old site key, and a kill code. It also lists a .TXT file that has been written to the PC's desktop; the file name begins with "KillCode". This file contains the old site key and kill code that are listed in the message.

ICONICS Software Licensing GENESIS64 Getting Started
ICONICS 4-8
3. Click Yes to copy the kill code to the Windows Clipboard so that you can paste it elsewhere, such as in an e-mail to ICONICS Support or on the ICONICS Web Licensing Utility. If you don't need to copy the kill code at this time, click No.
4. Look on the desktop for the KillCode*.TXT file. Keep this file, and copy it to a safe location! You will have to use the information it contains to confirm that you have killed your license (via either the ICONICS Order Entry Department or the ICONICS Web Licensing Utility).
5. Proceed with the online steps described in 4.4.3.1 “Killing a License via the ICONICS Web Licensing Utility”
Note: To reinstate a permanent license that you killed, you will need to provide the KillCode*.TXT file to ICONICS. Note: If you uninstall the Software License Utility, the KillCode*.TXT file will be deleted. For this reason, make sure you copy the KillCode*.TXT file to a safe location or be sure to note or print its content before uninstalling the Software License Utility on the PC. [* = Site Key that was killed.]
4.3 License Viewer When you purchase licenses, the licenses are measured in a point count that determines the number of OPC tags that you can use in your application. One point count is used for most GENESIS64 applications. There are two different modes for using tags in point counts:
• On-demand mode. A system for dynamically using licensed points, and then reusing the points as needed. The count at any instance includes only active points in use.
• Configure mode. A system in which all points are statically configured in a static central location, inside the Unified Data Manager. All configured points are counted against the point count.

GENESIS64 Getting Started ICONICS Software Licensing
ICONICS 4-9
The two mode types are not interchangeable and require you to buy a new license to upgrade your existing license status.
At any time, you can use the License Viewer to review the license status of ICONICS products installed on that computer. You can access the License Viewer in either of the following ways:
• From the Windows desktop: click Start > All Programs > ICONICS Licensing > ICONICS .NET Licensing > License Viewer.
• From the Workbench: from the Tools ribbon click the Licensing button. Or from the File menu, select Tools, and then Licensing. The License Viewer displays as shown below.
The tab that displays initially is the Overview tab, where you can see general information about the license for the server that the node points to. You can view license information for GENESIS64, AnalytiX, Data Connectors, BizViz, and AlarmWorX Multimedia product features by using the tabs for those products. To locate the nodes where individual product features are consuming the server's license counts, use the Diagnostics tab.

ICONICS Software Licensing GENESIS64 Getting Started
ICONICS 4-10
4.4 Web Licensing You can use the ICONICS Web Licensing Utility to generate a new license, kill a license and transfer a license. A new function to the ICONICS Web Licensing Utility is to use it to upgrade your license. Supported operating systems for using the ICONICS Web Licensing Utility to upgrade your license include Windows Server 2003, Windows Vista, Windows Server 2008, Windows Server 2008 R2 and Windows 7. Using the utility will require Internet access and a Web browser (e.g. Internet Explorer 6.0 and up).
4.4.1 Acquiring a New Software License Users of ICONICS software can use the ICONICS Web Licensing Utility to acquire a new software key license.
4.4.1.1 Issuing a New Software License
1. On the machine where you want the GENESIS64 license to reside, open the License Utility by going to Start -> Programs -> ICONICS Licensing -> ICONICS .NET Licensing -> Licensing Utility. This should open the Software License Activation for .NET window.
2. You will see a dialog come up with a Site Code
and “No Current Site Key” within the Site Key text box. Leave this window open.

GENESIS64 Getting Started ICONICS Software Licensing
ICONICS 4-11
3. Go to http://www.iconics.com/supportworx and launch the Web Licensing Utility Site by clicking on the “License Product” link on the right side of the page.
Or, from ICONICS’ Web site (http://www.iconics.com), select “License Your Product” from the bottom-right Customer Connection area.

ICONICS Software Licensing GENESIS64 Getting Started
ICONICS 4-12
4. The main page of the Web Licensing Utility will load. Click on the “Software” button to access the Software License Options.
5. You will be required to log in to access the Software License Options. Enter your email address and password and click on the “LOGIN” button. If you do not yet have an account, you can create one by clicking on the “Create New Account” link near the bottom of the page.

GENESIS64 Getting Started ICONICS Software Licensing
ICONICS 4-13
6. Once you have logged into the Web site, click on the “New License” link in the top navigation bar.
7. Enter your Product Registration Numbers and
Customer Keys for the products to license, then click “Next”.
NOTE: Your Product Registration Number and Customer Key are usually inside the DVD package that ICONICS sent to you.
8. In the next screen, you will be requested to identify the end user for whom the license is being issued. You can look up a list of users that have been previously entered by clicking on the “Existing End Users” link or can enter a new one by clicking on the “Create New” link.
9. Clicking the Existing End Users link will open a new window with a list of previously entered end users (either entered by you or tied to the product registration numbers entered in the previous screen). Select an end user from the list and click “Select” or double-click the selected end user.

ICONICS Software Licensing GENESIS64 Getting Started
ICONICS 4-14
If you, yourself, are the end user and you are not listed in the grid, you can click on the “I am the End User” link to enter your data as the new end user. After identifying the end user, click on “Next”.
10. In the next screen, you will see a list of the products that are available for you to license. Check all the products that you would like to license. Copy the Site Code from the license utility of the destination machine and paste it into the Site Code box of the current Web page, then click on “Next”.
11. Review the license information before proceeding. Click on “Generate Key” to issue the new site key.
GENESIS64 Getting Started ICONICS Software Licensing
ICONICS 4-15
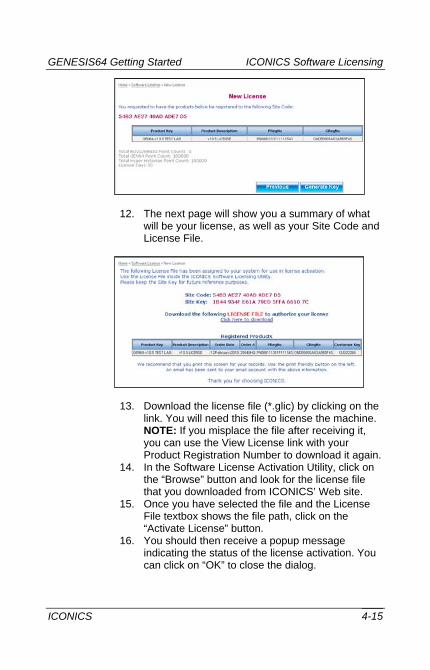
12. The next page will show you a summary of what will be your license, as well as your Site Code and License File.
13. Download the license file (*.glic) by clicking on the link. You will need this file to license the machine. NOTE: If you misplace the file after receiving it, you can use the View License link with your Product Registration Number to download it again.
14. In the Software License Activation Utility, click on the “Browse” button and look for the license file that you downloaded from ICONICS’ Web site.
15. Once you have selected the file and the License File textbox shows the file path, click on the “Activate License” button.
16. You should then receive a popup message indicating the status of the license activation. You can click on “OK” to close the dialog.

ICONICS Software Licensing GENESIS64 Getting Started
ICONICS 4-16
17. The Software License Activation Utility should now show the current license information, similar to the image below.
18. Notice that the Site Code may change, as expected, but the Site Key should be the same one you saw on the Web site.
4.4.2 Adding to an Existing Software License
1. Go to http://www.iconics.com/supportworx and launch the Web Licensing Utility by clicking on “License Your Product”.
2. Once you have logged into the Web site and accessed the Software License main page, click on the “Add to License” link on the top navigation bar.

GENESIS64 Getting Started ICONICS Software Licensing
ICONICS 4-17
3. Enter your Existing Site Key, Product Registration Numbers and Customer Keys, then click “Next”.
4. In the next screen, you will see a summary of the current license and a list of products that are available for you to add to the existing license. Check all the products that you would like to license. Copy the Site Code from the License Utility of the destination machine and paste it into the Site Code text box of the current Web page, then click “Next”.
5. Review the license information before proceeding. Select “Generate Key” as shown in the following image.
ICONICS Software Licensing GENESIS64 Getting Started
ICONICS 4-18
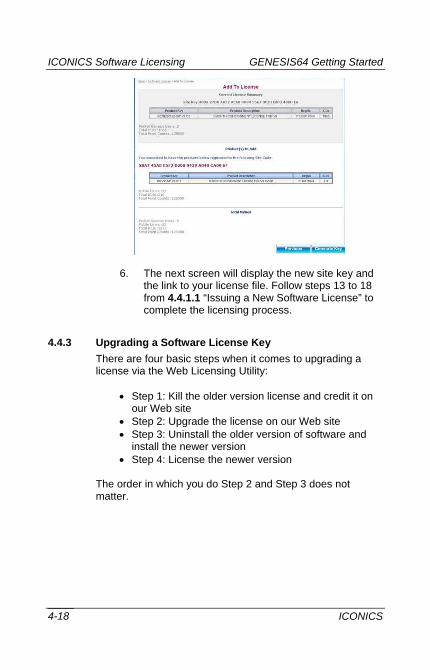
6. The next screen will display the new site key and the link to your license file. Follow steps 13 to 18 from 4.4.1.1 “Issuing a New Software License” to complete the licensing process.
4.4.3 Upgrading a Software License Key There are four basic steps when it comes to upgrading a license via the Web Licensing Utility:
• Step 1: Kill the older version license and credit it on our Web site
• Step 2: Upgrade the license on our Web site • Step 3: Uninstall the older version of software and install the newer version • Step 4: License the newer version
The order in which you do Step 2 and Step 3 does not matter.
GENESIS64 Getting Started ICONICS Software Licensing
ICONICS 4-19
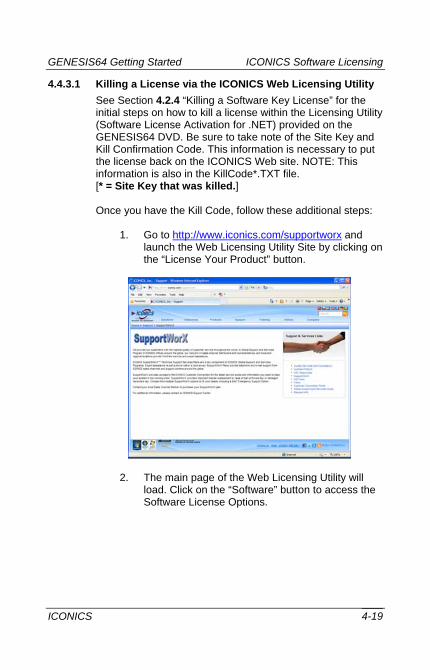
4.4.3.1 Killing a License via the ICONICS Web Licensing Utility See Section 4.2.4 “Killing a Software Key License” for the initial steps on how to kill a license within the Licensing Utility (Software License Activation for .NET) provided on the GENESIS64 DVD. Be sure to take note of the Site Key and Kill Confirmation Code. This information is necessary to put the license back on the ICONICS Web site. NOTE: This information is also in the KillCode*.TXT file. [* = Site Key that was killed.] Once you have the Kill Code, follow these additional steps:
1. Go to http://www.iconics.com/supportworx and launch the Web Licensing Utility Site by clicking on the “License Your Product” button.
2. The main page of the Web Licensing Utility will load. Click on the “Software” button to access the Software License Options.
ICONICS Software Licensing GENESIS64 Getting Started
ICONICS 4-20
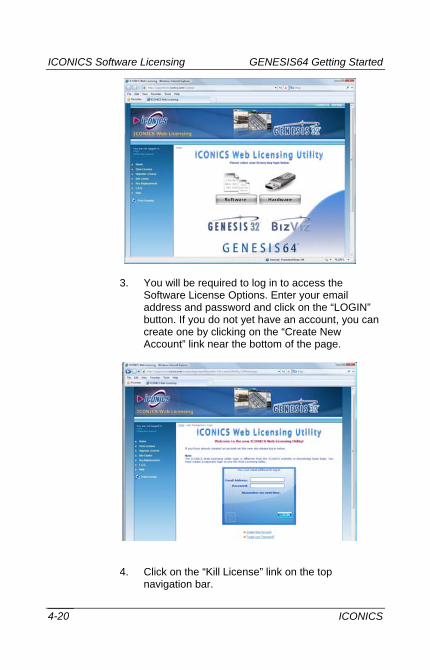
3. You will be required to log in to access the Software License Options. Enter your email address and password and click on the “LOGIN” button. If you do not yet have an account, you can create one by clicking on the “Create New Account” link near the bottom of the page.
4. Click on the “Kill License” link on the top navigation bar.
GENESIS64 Getting Started ICONICS Software Licensing
ICONICS 4-21
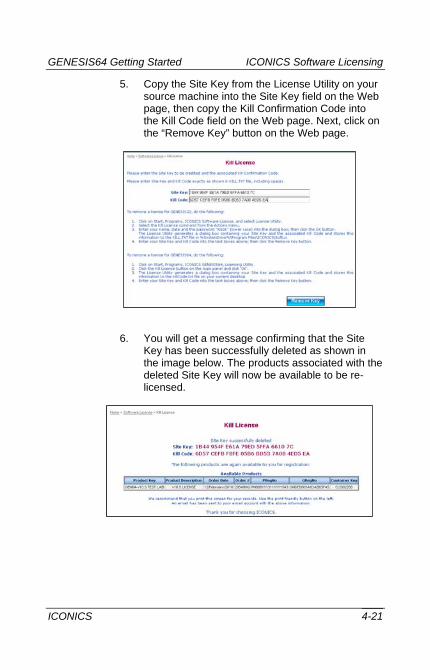
5. Copy the Site Key from the License Utility on your source machine into the Site Key field on the Web page, then copy the Kill Confirmation Code into the Kill Code field on the Web page. Next, click on the “Remove Key” button on the Web page.
6. You will get a message confirming that the Site Key has been successfully deleted as shown in the image below. The products associated with the deleted Site Key will now be available to be re-licensed.

ICONICS Software Licensing GENESIS64 Getting Started
ICONICS 4-22
4.4.3.2 Upgrading the License on ICONICS’ Web Site See Section 4.2.4 “Killing a Software Key License” for the initial steps on how to kill a license within the Licensing Utility (Software License Activation for .NET) provided on the GENESIS64 DVD. Be sure to take note of the Site Key and Kill Confirmation Code. This information is necessary to put the license back on the ICONICS Web site. NOTE: This information is also in the KillCode*.TXT file. [* = Site Key that was killed.]
1. After you have copied your Site Key and Kill
Confirmation Code in the previous step (either physically or electronically), you can now visit http://www.iconics.com/supportworx.asp.
2. Next, click on the “License Your Product” button. This opens a new Web page, as shown below.

GENESIS64 Getting Started ICONICS Software Licensing
ICONICS 4-23
3. Click on the “Software” button to proceed. You will then be required to enter your email address and password for the site, as shown below. If you do not already have a login for this page, click on the “Create New Account” link near the bottom of the page.
4. Once you have logged in, click on the “Kill License” link near the top of the page.
5. Next, fill in your Site Key and Kill Code information that you copied while killing your previous license (see 4.2.4 “Killing a Software Key License”).

ICONICS Software Licensing GENESIS64 Getting Started
ICONICS 4-24
6. Once you kill the license on ICONICS’ Web site, you will receive an email containing the following information: • Site Key • Kill Code • Product for which you have killed the license The Web page itself should now look similar to the figure below.
7. At this point, you have completed killing the license. Notice that in the final “Kill License” page, as shown above, it states that if the license is eligible, it can be upgraded to the latest version and it provides a link for availability.
4.4.3.3 Checking License Upgrade Availability The easiest way to check if your license is available for an upgrade is by clicking the link on the page immediately after you kill the license. Clicking the link brings you to the Upgrade License Page. You can also get to this page by clicking on the “Upgrade License” link in the tree control (third item).

GENESIS64 Getting Started ICONICS Software Licensing
ICONICS 4-25
Follow these steps to upgrade your license.
1. On the Upgrade License page, fill in your Product Registration Number and Customer Key. This is the same information you received in the Web page and in your email after you have killed the license on our Web site.
2. Click on “Next” when you have filled in the necessary information.
3. If the license is available for an upgrade, you will see the available license on the page.
4. Notice that the Product Description here shows a
different product with an earlier version license (Version 8). Yours should reflect the license you have for your product. Check the available product that you would like to upgrade and click on “Next”.
5. The next page is a confirmation page. Check that the information shown is correct and click on the “Upgrade” button to proceed.
6. On the new page that loads next, you can see a list of upgraded products. Notice that the Product Description shows a license for a later version product (Version 9.2) instead of the earlier one (Version 8).

ICONICS Software Licensing GENESIS64 Getting Started
ICONICS 4-26
7. You should also receive an email with the license upgrade information.
4.4.4 Upgrading a Hardware License Key Upgrading a hardware key license is similar to upgrading the software key license. You would follow the exact same procedure as upgrading a software license. In the case of a Hardware key License though, you will need the USB dongle in order to kill the license from it and put the new one onto the key.
4.4.5 Licensing the New Version Now that you have upgraded the license, you can follow the regular procedure to license your machine with the new version. When it asks you for the Product Registration Number and the Customer Key, you can provide the same one. This information was sent to you in the last step of upgrading your license via email. If you need more information on how to license the machine with the upgraded license, please consult our application notes titled Licensing – Using the ICONICS Web License Utility for Software Key Licenses and Licensing – Using the ICONICS Web License Utility for Hardware Key Licenses, as it pertains to your individual situation. These Application Notes and more can be found via the Info Center on the GENESIS64 DVD.

GENESIS64 Getting Started ICONICS Software Licensing
ICONICS 4-27
4.5 Demo Mode Without a valid license installed in your PC, it is still possible to use GENESIS64 in Runtime mode. The software will check for a valid hardware or software license key on initialization. If none is found, GENESIS64 runs in Demo Mode, which limits you to:
• Twelve hours of runtime
• Only 64 OPC tag connections (points) can be updated
Running GENESIS64 longer than the 12-hour limit generates a message stating that the demo time has been exceeded. You must then exit GENESIS64 and reboot the PC. On restarting GENESIS64, you will get another 12-hour block of time in which to run. If there are more than 64tags on a particular screen, gray keys (or whatever is configured as the Point Failure character) will appear in place of the actual I/O data.
If you intend to run in Demo Mode, go to Chapter 5 to read about GenDemo.

ICONICS Software Licensing GENESIS64 Getting Started
ICONICS 4-28

ICONICS 5-1
5 GENDEMO 5.1 Introduction
You can get a sense of the rich applications that can be created by using GenDemo. GenDemo is a set of GraphWorX64 (.gdfx) display files installed with your system to help you explore and learn about GENESIS64 and its products and features.
This chapter provides a brief overview of GenDemo; you are strongly encouraged to explore all files available in GenDemo. To launch the GenDemo, from the Windows Start menu, select Programs > ICONICS > GENESIS64 > GenDemo. This opens the GenDemo home page, shown below.

GenDemo GENESIS64 Getting Started
ICONICS 5-2
5.2 GenDemo Toolbar The main navigation toolbar lines the top right of the GenDemo screen.
The left-most buttons on the toolbar are the play controls. From left to right, they let you skip to the beginning, go back one, choose from a list called the carousel, go ahead one, and skip to the end.
The forward-pointing button, highlighted here on the left, is the Play button. Clicking the Play button advances you to the next tutorial in the Learning Center or the next slide in a presentation.
The other toolbar buttons are explained on the pages that follow.
5.3 GraphWorX64 Interactive Tutorials in the Learning Center
Clicking the Learning Center button, shown here on the left, takes you to a workshop where you can learn more about the graphics tools available in GraphWorX64. The first tutorial in the playlist lets you explore GraphWorX64
shape tools. So if you just click the Play button, an interactive menu (shown below) appears; in the following example, clicking a shape shows you more about the shape.
There are several interactive tutorials available in the Learning Center. Click the Play button to go to the next
GENESIS64 Getting Started GenDemo
ICONICS 5-3
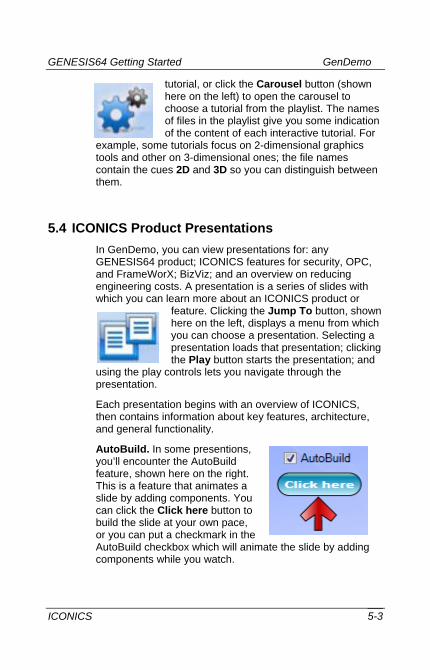
tutorial, or click the Carousel button (shown here on the left) to open the carousel to choose a tutorial from the playlist. The names of files in the playlist give you some indication of the content of each interactive tutorial. For
example, some tutorials focus on 2-dimensional graphics tools and other on 3-dimensional ones; the file names contain the cues 2D and 3D so you can distinguish between them.
5.4 ICONICS Product Presentations In GenDemo, you can view presentations for: any GENESIS64 product; ICONICS features for security, OPC, and FrameWorX; BizViz; and an overview on reducing engineering costs. A presentation is a series of slides with which you can learn more about an ICONICS product or
feature. Clicking the Jump To button, shown here on the left, displays a menu from which you can choose a presentation. Selecting a presentation loads that presentation; clicking the Play button starts the presentation; and
using the play controls lets you navigate through the presentation.
Each presentation begins with an overview of ICONICS, then contains information about key features, architecture, and general functionality.
AutoBuild. In some presentions, you’ll encounter the AutoBuild feature, shown here on the right. This is a feature that animates a slide by adding components. You can click the Click here button to build the slide at your own pace, or you can put a checkmark in the AutoBuild checkbox which will animate the slide by adding components while you watch.

GenDemo GENESIS64 Getting Started
ICONICS 5-4
Merged playlist of all presentations. Note that when you first launch GenDemo, all of the presentations are merged into one playlist, and you can view the merged playlist simply by clicking the Play button. (To view the merged playlist, click the Carousel button.) However, once you select an individual presentation, the playlist is limited to slides for just that one presentation.
To return to the merged playlist of all presentations, click the ICONICS icon in the top left corner of GenDemo (shown here on the right), then select Home from the menu that pops up. (Note that from the ICONICS logo you can also launch the ICONICS web site and a page that tells you more about ICONICS, Inc.)
5.5 Getting Help from GenDemo Clicking the Help button, shown here on the left, opens a pop-up menu with links to the GenDemo Help Screen, as well as the GENESIS64 Getting Started Help
documentation and the GENESIS64 product help files.
5.6 Industry Case Studies and Examples From the Industry Examples button, shown here on the left, you can access a menu that takes you to industry case studies and examples, or a BizViz slideshow.
The Industry Example screen (which looks and works like the Industry Case Studies shown next) provides a starting point for you to view, deconstruct, and learn about how to create world class automation solutions using GENESIS64 products.
Clicking on an example opens it. If you have installed Adobe Reader, you can click the PDF icon (where available) to open a brief that explains the example.

GENESIS64 Getting Started GenDemo
ICONICS 5-5
The Industry Case Studies screen, shown below, is loaded with interactive case studies for the multiple industries that utilize ICONICS products, including utilities, food and drug, oil and gas, transportation, and the public sector.

GenDemo GENESIS64 Getting Started
ICONICS 5-6
Clicking on an individual case study opens the animated model in its own window (see the example below).
Because the case study models are interactive, you can click on them and manipulate them. You can explore them thoroughly to see how they work.
In addition to the models on the Case Studies page, there are icons denoting that PDF files are available with the model. If Adobe Reader is installed, you can click the PDF icon to open a brief that explains the model and helps you understand the case study.
ICONICS 6-1
6 GENESIS64 QUICK START 6.1 Introduction
This chapter provides a brief overview of the following GENESIS64 products and tools:
• GraphWorX64 • AlarmWorX64 • TrendWorX64 • EarthWorX • Workbench • Additional tools and utilities
Note: For complete information about any GENESIS64 product, please refer to the GENESIS64 Help, which you can launch from any GENESIS64 product.
6.2 GraphWorX64 GraphWorX64 is the GENESIS64 product you use to create graphical human-machine interfaces (HMIs). GraphWorX64 has dozens of tools with hundreds of parameters and combinations to create powerful, dynamic, and interactive images in two or three dimensions. Use the interactive tutorials in the GenDemo Learning Center (see the description on page 5-2) to explore the tools that are available to you in GraphWorX64.
To launch GraphWorX64 from the Windows Start menu, select Programs > ICONICS > GENESIS64 > GraphWorX64 > GraphWorX64.
GraphWorX64 has a number of examples available to you. To use them, while in GraphWorX64, select Open from the File menu and browse to the following directory: \Program Files\ICONICS\GENESIS64\GenDemo\. In this folder you will find subfolders with a name prefix of GWX_. Explore the folders and open example files to see what they offer.

GENESIS64 Quick Start GENESIS64 Getting Started
ICONICS 6-2
6.3 AlarmWorX64 AlarmWorX64 is the alarm monitoring, logging, and reporting module in GENESIS64. AlarmWorX64 consists of:
• AlarmWorX64 Viewer – Which you use to configure real-time alarms and attach them to alarm sources; display alarm notifications; make it easier to notice, respond, and acknowledge alarm conditions; and view historical alarms.
• AlarmWorX64 Server – Receives data from OPC-compliant Data Access servers and performs alarm detection and reporting.
• AlarmWorX64 Logger – Stores alarm data to a SQL database, which you can use for later replay.
To launch AlarmWorX64 from the Windows Start menu, select Programs > ICONICS > GENESIS64 > AlarmWorX64 > AlarmWorX64. AlarmWorX64 opens inside the Workbench.
A presentation in GenDemo (see the description on page 5-3) provides an overview of AlarmWorX64. For a complete understanding of AlarmWorX64, access GENESIS64 online Help while in AlarmWorX64.
6.4 TrendWorX64 Use TrendWorX64 to plot real-time and historical OPC data into charts and graphs of all kinds, which you can then use as multifunctional HMI graphic displays. TrendWorX64 has a
number of tools you can use to satisfy a wide range of applications.
To launch TrendWorX64 from the Windows Start menu, select Programs > ICONICS > GENESIS64 >

GENESIS64 Getting Started GENESIS64 Quick Start
ICONICS 6-3
TrendWorX64 > TrendWorX64. TrendWorX64 opens inside the Workbench.
A presentation in GenDemo (see the description on page 5-3) provides an overview of TrendWorX64. For a complete understanding of TrendWorX64, access GENESIS64 online Help while in TrendWorX64.
6.5 EarthWorX Use EarthWorX to incorporate drill-down technology to quickly view alarm conditions for any location around the world, using maps available with Microsoft Bing. EarthWorX helps you to visualize geographically-dispersed assets (such as factories, facilities, or job sites) and track movable objects using GPS coordinates.
A presentation in GenDemo (see the description on page 5-3) provides an overview of EarthWorX. Instructions for using EarthWorX are available in GENESIS64 online Help.
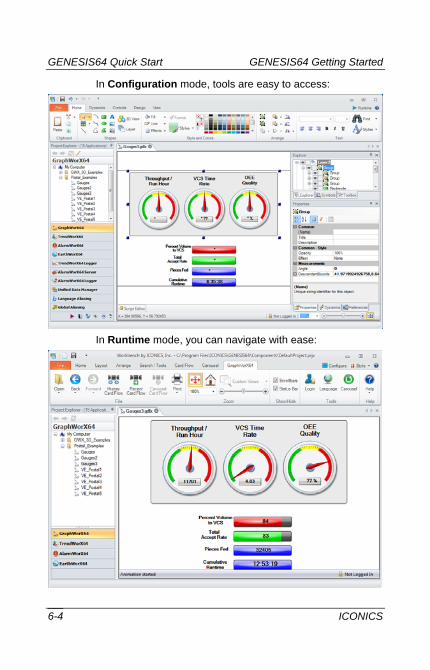
6.6 Workbench The Workbench is the centralized Web-based interface in which you open GENESIS64 products and configure GENESIS64 components, runtime, and security. Every GENESIS64 component can be loaded, worked with, and run inside the Workbench. Projects can be packaged and deployed from inside the Workbench, too.
When you select the Workbench command from the Windows Start menu the Workbench loads with all of the applications showing in the Project Explorer. It swaps in functions with each GENESIS64 product that you load in it.
GENESIS64 Quick Start GENESIS64 Getting Started
ICONICS 6-4
In Configuration mode, tools are easy to access:
In Runtime mode, you can navigate with ease:

GENESIS64 Getting Started GENESIS64 Quick Start
ICONICS 6-5
GENESIS64 providers can be opened from within the Project Explorer in the Workbench.
To launch the Workbench from the Windows Start menu, select Programs > ICONICS > Workbench. A presentation in GenDemo (described on page 5-3) provides an overview of the Workbench. For a complete understanding of the Workbench, access GENESIS64 online Help while in the Workbench.
6.7 Additional Tools and Utilities In addition to the many products and tools already described in this guide, there are additional tools and utilities are installed with GENESIS64. A brief description of each is described below. For more information about a tool or feature, refer to GENESIS64 online Help, which you can access from any GENESIS64 product or tool.
• Use License Viewer (ICONICS Licensing > ICONICS .NET > Licensing > License Viewer) to review the status of your ICONICS licenses. See page 4-1 for additional information.
• Use GenBroker64 to set up network communications to legacy OPC servers residing on other machines in the same network or the internet. (You don’t need GenBroker if you are talking to OPC-UA servers.) You configure GenBroker properties from the FrameWorX Configurator, which you can launch by clicking Start > Programs > ICONICS > Workbench and choose the FrameWorX Server Provider. Once the FrameWorX Configurator is open, expand the tree for the host and, below the “Classic OPC” item, double-click GenBroker.

GENESIS64 Quick Start GENESIS64 Getting Started
ICONICS 6-6
• Use Global Aliasing to set up aliases for use across GENESIS64 products. Click Start > Programs > ICONICS GENESIS64 > Tools > Global Aliasing.
• Use Security to restrict operator and workstation runtime access. Privileges can be granted by a number of means, including application action, points, alarms, files, stations, and custom strings. To work with security, click Start > Programs > ICONICS GENESIS64 > Tools > Security.
• TraceWorX provides online diagnostics and tuning of applications running in GENESIS64. TraceWorX is intended for use by systems integrators, OEMs and customers who want to have tools for doing their own troubleshooting and diagnostics. To work with TraceWorX, click Start > Programs > ICONICS GENESIS64 > Tools > TraceWorX.
• Save implementation and development time by using the Unified Data Manager (UDM) to create libraries of reusable expressions, value sets, tag groups, alarm subscriptions, alarm filters, recipes, and event triggers across ICONICS products. To work with the UDM, click Start > Programs > ICONICS GENESIS64 > Tools > Unified Data Manager.
• Use the SNMP Connector to create, monitor, and manage your own Network Management Systems through GENESIS64, giving Network Managers access to information from nearly every device connected to the network, all from one application. To work with the SNMP Connector, click its button or icon in the Project Explorer in the Workbench.
• Use the ICONICS BACnet Connector to integrate BACnet communications into the GENESIS64 and GENESIS32/Workbench32 product families. To work with the BACnet Connector, click its button or icon in the Project Explorer in the Workbench.

ICONICS 7-1
7 HELP AND TECHNICAL SUPPORT 7.1 Online Help
ICONICS software provides online help with descriptions and explanations of each application. Help is available throughout GENESIS64. You can access help in the following ways:
• Click the Help icon in the Workbench. This opens the help file for that application. To search for a topic in the help file, click the Index tab or the Search tab. Type or select the term you want to find, and then click the topic you want to read.
• Press the F1 key to display context-sensitive help.
• Click the Help button in any dialog box to display context-sensitive help for that dialog box.
• Move the mouse pointer over an icon and pause for a moment to display pop-up ToolTips for quick help.
7.2 Product Videos ICONICS offers videos that showcase and demonstrate solutions using a variety of ICONICS products. To view and download these videos, go to http://www.iconics.com/Video.aspx.
7.3 Training Classes Training classes are held regularly at the ICONICS training facility in Foxborough, Massachusetts. To reserve seats in training courses and to view the current ICONICS training schedule, go to http://www.iconics.com/Training.aspx. If you have any questions about ICONICS training, please contact our training coordinator at 508-543-8600.

GENESIS64 Quick Start GENESIS64 Getting Started
ICONICS 7-2
7.4 Technical Support ICONICS customers may obtain technical support in several different ways. First-Line Support is through your local ICONICS representative or distributor. You may also contact ICONICS’ Support Engineers directly by phone, fax, e-mail or the ICONICS Web site.
For complete information about Global Technical Support, please see the Global Support and Services User Guide at http://www.iconics.com/supportworx.
7.4.1 Global Support and Services
ICONICS is proud to provide our customers with the highest quality customer service. Our Global Support and Services programs are supported by ICONICS offices around the globe and our network of sales channel distributors and representatives, with local and regional locations for front-line service and expert assistance. Programs include the SupportWorX™ Technical Support Services subscription program for continuous technical support; Quality Professional Services for expert system architecture design assistance, training and start-up assistance; a 24 x 7 Emergency Support Option plan; and Training and Certification programs for ICONICS users, systems integrators and sales channels.
For complete information about SupportWorX service plans and technical support, please see the Global Support and Services User Guide at: http://www.iconics.com/supportworx.
7.4.2 ICONICS Knowledge Base
The ICONICS Knowledge Base is a subscription-only service that contains hundreds of known product questions and answers. The Knowledge Base includes solutions, tips and tricks and frequently asked questions (FAQs) on all ICONICS products. Advanced search allows you to tailor queries using a natural language approach. This service is available by subscription only. For more information go to: http://knowledge.iconics.com.

ICONICS 7-3
7.4.3 Online Support
ICONICS maintains a comprehensive Web site at http://www.iconics.com. This is the best place to go for the latest events, support information, product downloads, licensing, documentation, services, and product news.
Note. Software obtained from ICONICS.com is subject to the ICONICS License Agreement.
7.4.4 Telephone Support
ICONICS support centers are open Monday through Friday, year round, except for local holidays and ICONICS holidays. Support handles calls on a first-come, first-served basis. Calls are answered immediately during the business hours below.
Americas (United States): 508-543-8600
8:00 AM – 6:00 PM Eastern Standard Time
Europe (Czech Republic): 420-377-183-447
9:00 AM – 6:00 PM European Central Time
Asia Pacific (Australia): 61-297-273-411
9:00 AM – 6:00 PM Australian Eastern Time
Please have the following available when you call:
• Your SupportWorX Plan Number
• Your GENESIS64 Registration or Serial Number
• A PC available for tests and diagnostics
• A clear understanding about the issue.
• The version of your OS and the ICONICS product(s)
• OPC server or relevant third-party software info
Note: Go to http://www.iconics.com/Support.aspx to contact our Technical Support department.

GENESIS64 Quick Start GENESIS64 Getting Started
ICONICS 7-4
E-mail Support
The ICONICS support center e-mail addresses are:
• North America: [email protected]
• Europe: [email protected]
• Pacific Rim: [email protected]
Please include your SupportWorX Plan Number and Product Registration Number or Serial Number when sending your message. E-mail requests will be answered on a first-come, first-served basis, typically on the same day (up to three

ICONICS 7-5
NOTES

ICONICS
ICONICS, Inc. 100 Foxborough Blvd., Foxborough, MA 02035 508.543.8600 • FAX 508.543.1503 www.iconics.com • E-mail [email protected]
© 2011 ICONICS, Inc. All rights reserved. Specifications subject to change without notice


Americas (United States)100 Foxborough BlvdFoxborough, MA 02035Tel: 508 543 8600Fax: 508 543 [email protected]
Europe (Czech Republic)Tel: 420 37 718 3447Fax: 420 37 718 [email protected]
Asia Pacifi c (Australia)Tel: 61 297 273 411Fax: 61 297 273 422Pacifi [email protected]
Visualize Your Enterprise™