SBSP Tooncast Manual 8-5-11static.highspeedbackbone.net/pdf/Smith Micro Spongebob Squarepant… ·...
23
SpongeBob SquarePants Tooncast Studio Manual Page 1 User Manual Let’s Get Started .............................................................................................. 2 Making your first Tooncast is easy! .................................................................. 3 Understanding Frames and Editing.................................................................. 5 Editing your Tooncast ...................................................................................... 6 Using the Layer Ladder.................................................................................... 7 Experimenting and Sharing.............................................................................. 8 Sizing & Repositioning Assets ......................................................................... 9 Content Navigator .......................................................................................... 11 File Menu ....................................................................................................... 15 Sharing Your Tooncasts ................................................................................ 16 The Layer Ladder........................................................................................... 17 What can and can’t be edited at a particular frame ........................................ 18 The Span Editor ............................................................................................. 19 Transport Controls ......................................................................................... 20 Understand the Span Preview ....................................................................... 21 Glossary......................................................................................................... 22 The most current version of this manual is always available for download from the NetToons Support Center. Visit: http://www.tooncasts.com/support/ SPONGEBOB SQUAREPANTS © 2011 Nickelodeon. All Rights Reserved. Nickelodeon, SpongeBob SquarePants and all related titles, logos and characters are trademarks of Viacom International Inc. Created by Stephen Hillenburg. NetToons, Tooncast and Tooncast Studio are all Registered Trademarks © 2007-2011 NetToons, Inc.
Transcript of SBSP Tooncast Manual 8-5-11static.highspeedbackbone.net/pdf/Smith Micro Spongebob Squarepant… ·...
SpongeBob SquarePants Tooncast Studio Manual Page 1
User Manual
Let’s Get Started .............................................................................................. 2
Making your first Tooncast is easy! .................................................................. 3
Understanding Frames and Editing .................................................................. 5
Editing your Tooncast ...................................................................................... 6
Using the Layer Ladder .................................................................................... 7
Experimenting and Sharing .............................................................................. 8
Sizing & Repositioning Assets ......................................................................... 9
Content Navigator .......................................................................................... 11
File Menu ....................................................................................................... 15
Sharing Your Tooncasts ................................................................................ 16
The Layer Ladder ........................................................................................... 17
What can and can’t be edited at a particular frame ........................................ 18
The Span Editor ............................................................................................. 19
Transport Controls ......................................................................................... 20
Understand the Span Preview ....................................................................... 21
Glossary ......................................................................................................... 22
The most current version of this manual is always available for download from the NetToons Support Center. Visit: http://www.tooncasts.com/support/
SPONGEBOB SQUAREPANTS © 2011 Nickelodeon. All Rights Reserved. Nickelodeon, SpongeBob SquarePants and all related titles, logos and characters are
trademarks of Viacom International Inc. Created by Stephen Hillenburg.
NetToons, Tooncast and Tooncast Studio are all Registered Trademarks
© 2007-2011 NetToons, Inc.
SpongeBob SquarePants Tooncast Studio Manual Page 2
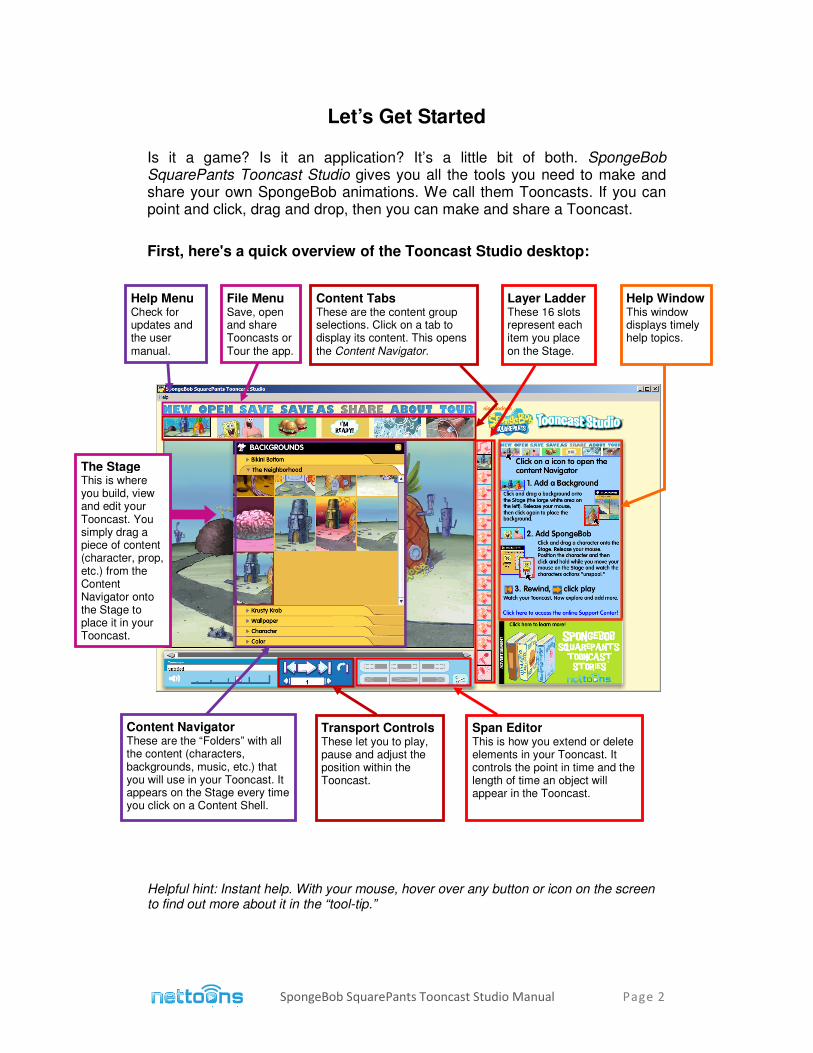
Let’s Get Started
Is it a game? Is it an application? It’s a little bit of both. SpongeBob SquarePants Tooncast Studio gives you all the tools you need to make and share your own SpongeBob animations. We call them Tooncasts. If you can point and click, drag and drop, then you can make and share a Tooncast.
First, here's a quick overview of the Tooncast Studio desktop:
Helpful hint: Instant help. With your mouse, hover over any button or icon on the screen to find out more about it in the “tool-tip.”
Content Navigator These are the “Folders” with all the content (characters, backgrounds, music, etc.) that you will use in your Tooncast. It appears on the Stage every time you click on a Content Shell.
Content Tabs These are the content group selections. Click on a tab to display its content. This opens the Content Navigator.
File Menu Save, open and share Tooncasts or Tour the app.
Layer Ladder These 16 slots represent each item you place on the Stage.
Span Editor This is how you extend or delete elements in your Tooncast. It controls the point in time and the length of time an object will appear in the Tooncast.
Transport Controls These let you to play, pause and adjust the position within the Tooncast.
Help Window This window displays timely help topics.
Help Menu Check for updates and the user manual.
The Stage This is where you build, view and edit your Tooncast. You simply drag a piece of content (character, prop, etc.) from the Content Navigator onto the Stage to place it in your Tooncast.
SpongeBob SquarePants Tooncast Studio Manual Page 3
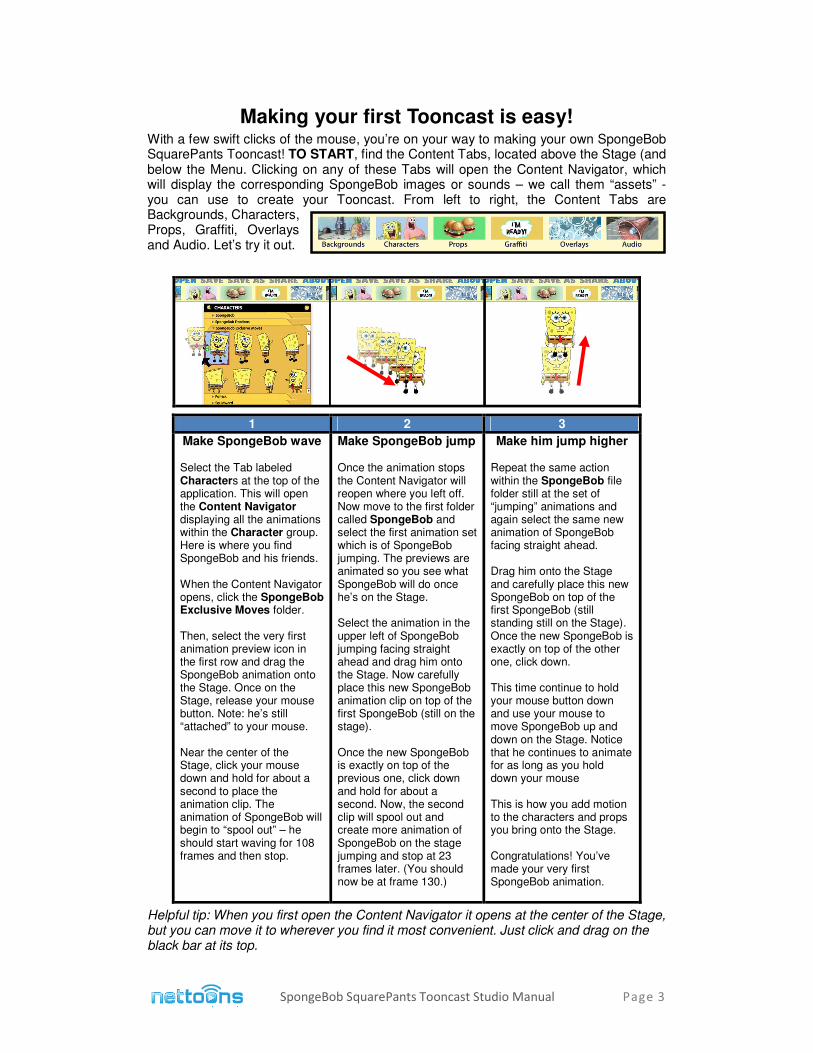
Making your first Tooncast is easy! With a few swift clicks of the mouse, you’re on your way to making your own SpongeBob SquarePants Tooncast! TO START, find the Content Tabs, located above the Stage (and below the Menu. Clicking on any of these Tabs will open the Content Navigator, which will display the corresponding SpongeBob images or sounds – we call them “assets” - you can use to create your Tooncast. From left to right, the Content Tabs are Backgrounds, Characters, Props, Graffiti, Overlays and Audio. Let’s try it out.
Helpful tip: When you first open the Content Navigator it opens at the center of the Stage, but you can move it to wherever you find it most convenient. Just click and drag on the black bar at its top.
1 2 3
Make SpongeBob wave Select the Tab labeled Characters at the top of the application. This will open the Content Navigator displaying all the animations within the Character group. Here is where you find SpongeBob and his friends. When the Content Navigator opens, click the SpongeBob Exclusive Moves folder. Then, select the very first animation preview icon in the first row and drag the SpongeBob animation onto the Stage. Once on the Stage, release your mouse button. Note: he’s still “attached” to your mouse. Near the center of the Stage, click your mouse down and hold for about a second to place the animation clip. The animation of SpongeBob will begin to “spool out” – he should start waving for 108 frames and then stop.
Make SpongeBob jump Once the animation stops the Content Navigator will reopen where you left off. Now move to the first folder called SpongeBob and select the first animation set which is of SpongeBob jumping. The previews are animated so you see what SpongeBob will do once he’s on the Stage. Select the animation in the upper left of SpongeBob jumping facing straight ahead and drag him onto the Stage. Now carefully place this new SpongeBob animation clip on top of the first SpongeBob (still on the stage). Once the new SpongeBob is exactly on top of the previous one, click down and hold for about a second. Now, the second clip will spool out and create more animation of SpongeBob on the stage jumping and stop at 23 frames later. (You should now be at frame 130.)
Make him jump higher Repeat the same action within the SpongeBob file folder still at the set of “jumping” animations and again select the same new animation of SpongeBob facing straight ahead. Drag him onto the Stage and carefully place this new SpongeBob on top of the first SpongeBob (still standing still on the Stage). Once the new SpongeBob is exactly on top of the other one, click down. This time continue to hold your mouse button down and use your mouse to move SpongeBob up and down on the Stage. Notice that he continues to animate for as long as you hold down your mouse This is how you add motion to the characters and props you bring onto the Stage. Congratulations! You’ve made your very first SpongeBob animation.
SpongeBob SquarePants Tooncast Studio Manual Page 4
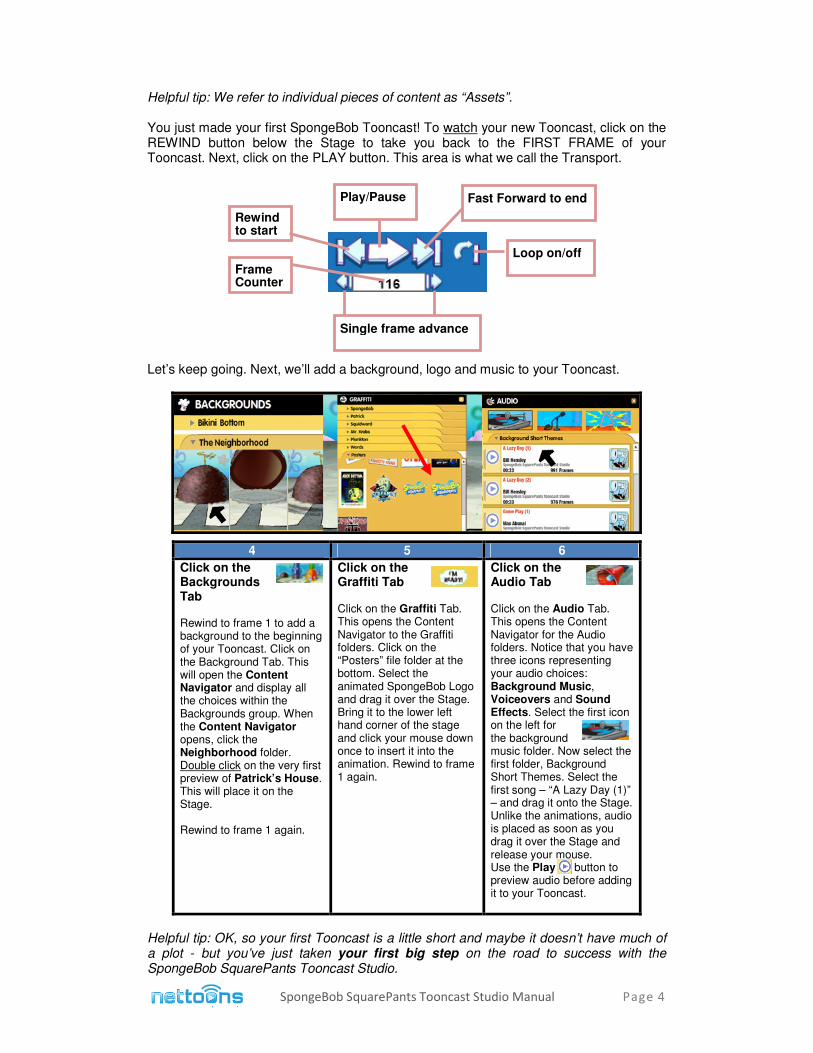
Helpful tip: We refer to individual pieces of content as “Assets”. You just made your first SpongeBob Tooncast! To watch your new Tooncast, click on the REWIND button below the Stage to take you back to the FIRST FRAME of your Tooncast. Next, click on the PLAY button. This area is what we call the Transport.
Let’s keep going. Next, we’ll add a background, logo and music to your Tooncast.
Helpful tip: OK, so your first Tooncast is a little short and maybe it doesn’t have much of a plot - but you’ve just taken your first big step on the road to success with the SpongeBob SquarePants Tooncast Studio.
4 5 6
Click on the Backgrounds Tab Rewind to frame 1 to add a background to the beginning of your Tooncast. Click on the Background Tab. This will open the Content Navigator and display all the choices within the Backgrounds group. When the Content Navigator opens, click the Neighborhood folder. Double click on the very first preview of Patrick’s House. This will place it on the Stage. Rewind to frame 1 again.
Click on the Graffiti Tab Click on the Graffiti Tab. This opens the Content Navigator to the Graffiti folders. Click on the “Posters” file folder at the bottom. Select the animated SpongeBob Logo and drag it over the Stage. Bring it to the lower left hand corner of the stage and click your mouse down once to insert it into the animation. Rewind to frame 1 again.
Click on the Audio Tab Click on the Audio Tab. This opens the Content Navigator for the Audio folders. Notice that you have three icons representing your audio choices: Background Music, Voiceovers and Sound Effects. Select the first icon on the left for the background music folder. Now select the first folder, Background Short Themes. Select the first song – “A Lazy Day (1)” – and drag it onto the Stage. Unlike the animations, audio is placed as soon as you drag it over the Stage and release your mouse. Use the Play button to preview audio before adding it to your Tooncast.
Play/Pause
Rewind to start
Fast Forward to end
Single frame advance
Loop on/off Frame
Counter
SpongeBob SquarePants Tooncast Studio Manual Page 5
Understanding Frames and Editing
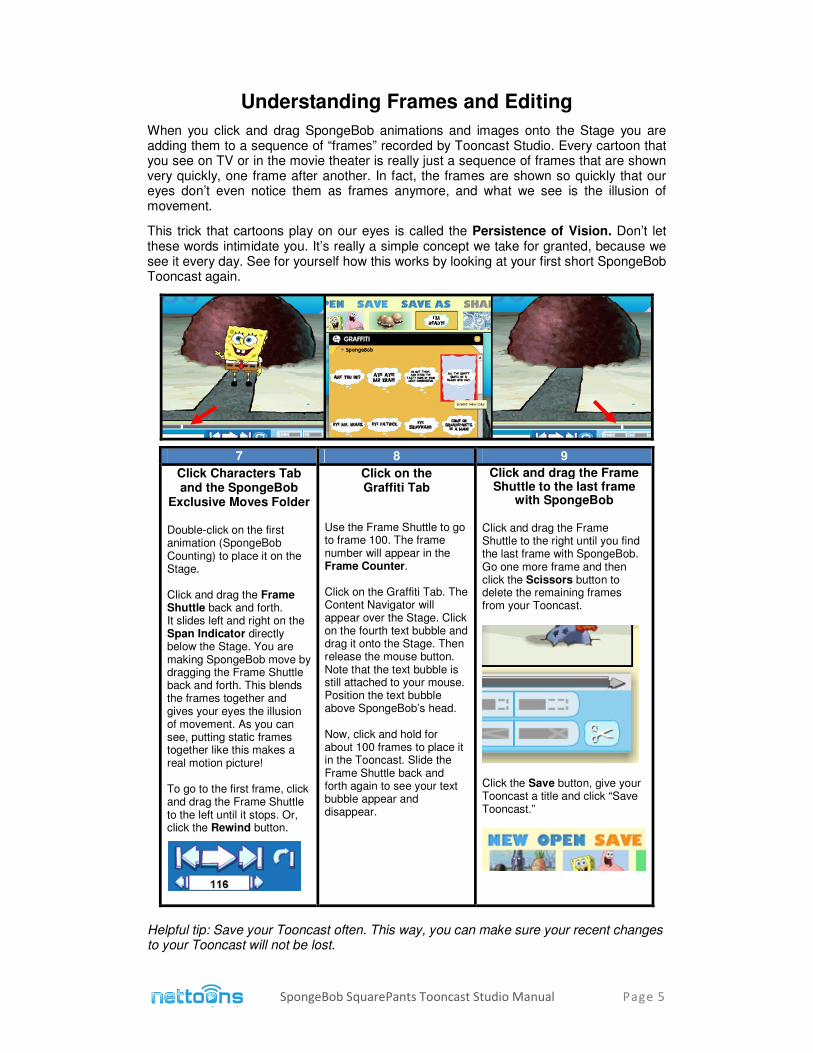
When you click and drag SpongeBob animations and images onto the Stage you are adding them to a sequence of “frames” recorded by Tooncast Studio. Every cartoon that you see on TV or in the movie theater is really just a sequence of frames that are shown very quickly, one frame after another. In fact, the frames are shown so quickly that our eyes don’t even notice them as frames anymore, and what we see is the illusion of movement.
This trick that cartoons play on our eyes is called the Persistence of Vision. Don’t let these words intimidate you. It’s really a simple concept we take for granted, because we see it every day. See for yourself how this works by looking at your first short SpongeBob Tooncast again.
Helpful tip: Save your Tooncast often. This way, you can make sure your recent changes to your Tooncast will not be lost.
7 8 9
Click Characters Tab and the SpongeBob
Exclusive Moves Folder Double-click on the first animation (SpongeBob Counting) to place it on the Stage. Click and drag the Frame Shuttle back and forth. It slides left and right on the Span Indicator directly below the Stage. You are making SpongeBob move by dragging the Frame Shuttle back and forth. This blends the frames together and gives your eyes the illusion of movement. As you can see, putting static frames together like this makes a real motion picture! To go to the first frame, click and drag the Frame Shuttle to the left until it stops. Or, click the Rewind button.
Click on the Graffiti Tab
Use the Frame Shuttle to go to frame 100. The frame number will appear in the Frame Counter. Click on the Graffiti Tab. The Content Navigator will appear over the Stage. Click on the fourth text bubble and drag it onto the Stage. Then release the mouse button. Note that the text bubble is still attached to your mouse. Position the text bubble above SpongeBob’s head. Now, click and hold for about 100 frames to place it in the Tooncast. Slide the Frame Shuttle back and forth again to see your text bubble appear and disappear.
Click and drag the Frame Shuttle to the last frame
with SpongeBob Click and drag the Frame Shuttle to the right until you find the last frame with SpongeBob. Go one more frame and then click the Scissors button to delete the remaining frames from your Tooncast.
Click the Save button, give your Tooncast a title and click “Save Tooncast.”
SpongeBob SquarePants Tooncast Studio Manual Page 6
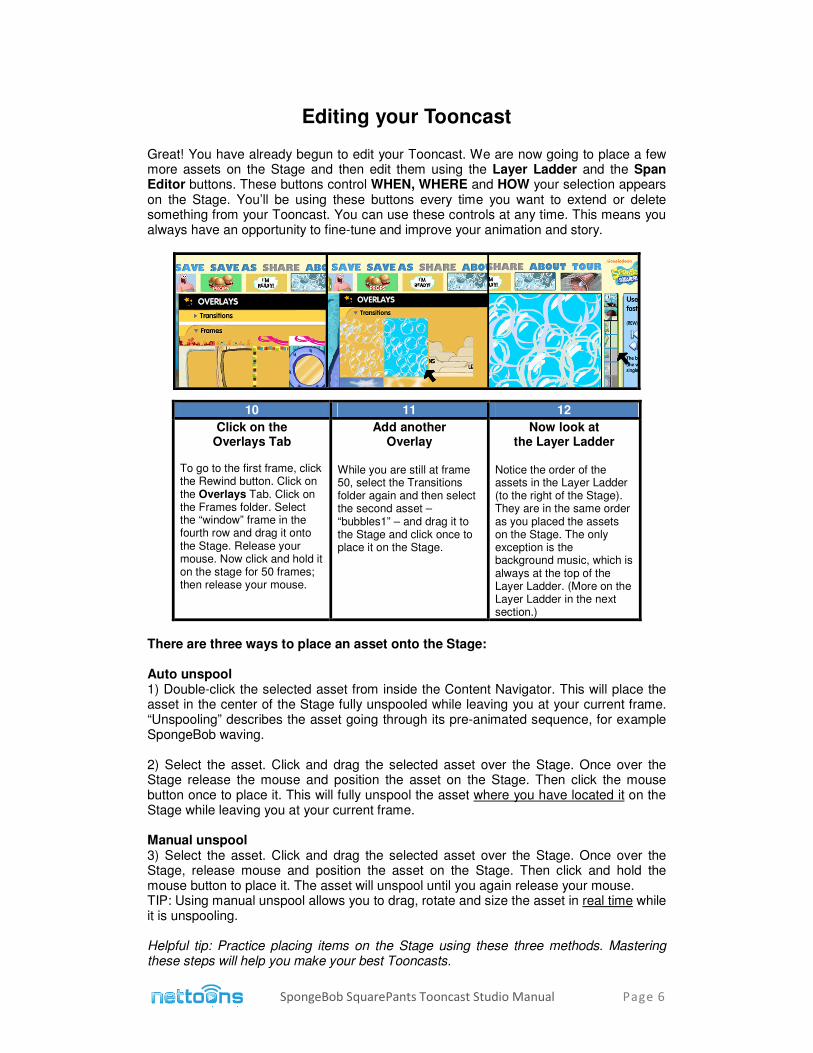
Editing your Tooncast Great! You have already begun to edit your Tooncast. We are now going to place a few more assets on the Stage and then edit them using the Layer Ladder and the Span Editor buttons. These buttons control WHEN, WHERE and HOW your selection appears on the Stage. You’ll be using these buttons every time you want to extend or delete something from your Tooncast. You can use these controls at any time. This means you always have an opportunity to fine-tune and improve your animation and story.
There are three ways to place an asset onto the Stage: Auto unspool 1) Double-click the selected asset from inside the Content Navigator. This will place the asset in the center of the Stage fully unspooled while leaving you at your current frame. “Unspooling” describes the asset going through its pre-animated sequence, for example SpongeBob waving. 2) Select the asset. Click and drag the selected asset over the Stage. Once over the Stage release the mouse and position the asset on the Stage. Then click the mouse button once to place it. This will fully unspool the asset where you have located it on the Stage while leaving you at your current frame. Manual unspool 3) Select the asset. Click and drag the selected asset over the Stage. Once over the Stage, release mouse and position the asset on the Stage. Then click and hold the mouse button to place it. The asset will unspool until you again release your mouse. TIP: Using manual unspool allows you to drag, rotate and size the asset in real time while it is unspooling. Helpful tip: Practice placing items on the Stage using these three methods. Mastering these steps will help you make your best Tooncasts.
10 11 12
Click on the Overlays Tab
To go to the first frame, click the Rewind button. Click on the Overlays Tab. Click on the Frames folder. Select the “window” frame in the fourth row and drag it onto the Stage. Release your mouse. Now click and hold it on the stage for 50 frames; then release your mouse.
Add another Overlay
While you are still at frame 50, select the Transitions folder again and then select the second asset – “bubbles1” – and drag it to the Stage and click once to place it on the Stage.
Now look at the Layer Ladder
Notice the order of the assets in the Layer Ladder (to the right of the Stage). They are in the same order as you placed the assets on the Stage. The only exception is the background music, which is always at the top of the Layer Ladder. (More on the Layer Ladder in the next section.)
SpongeBob SquarePants Tooncast Studio Manual Page 7
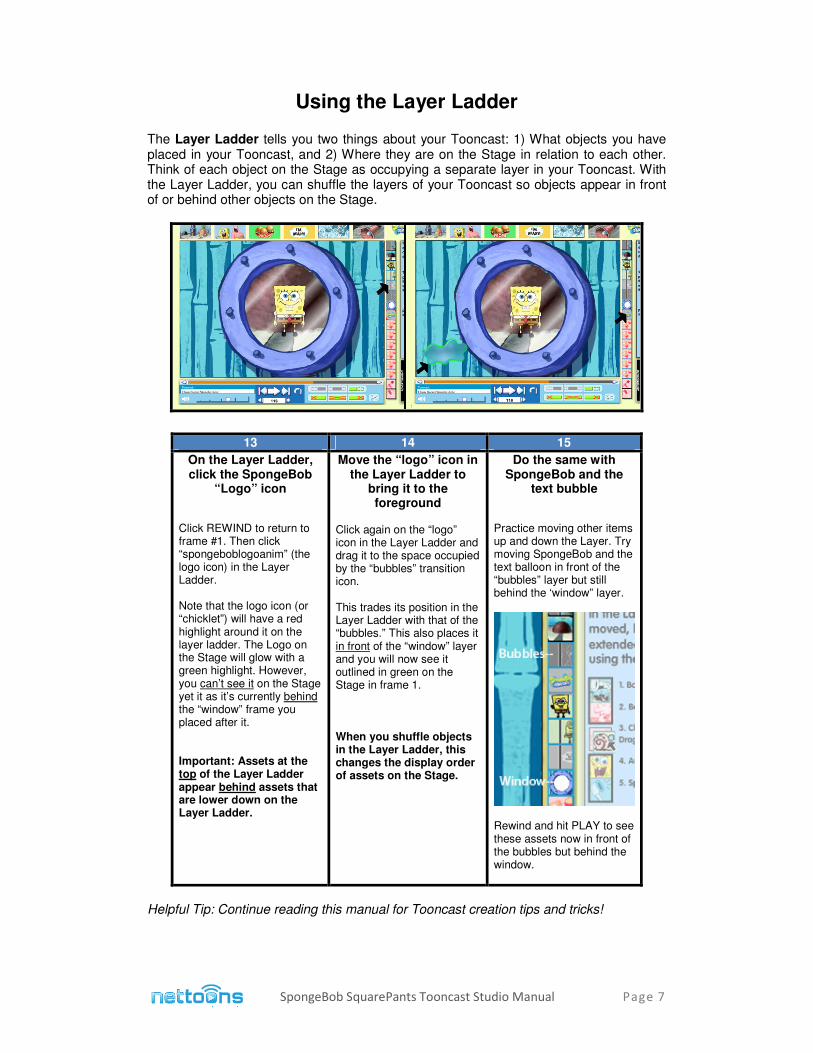
Using the Layer Ladder The Layer Ladder tells you two things about your Tooncast: 1) What objects you have placed in your Tooncast, and 2) Where they are on the Stage in relation to each other. Think of each object on the Stage as occupying a separate layer in your Tooncast. With the Layer Ladder, you can shuffle the layers of your Tooncast so objects appear in front of or behind other objects on the Stage.
Helpful Tip: Continue reading this manual for Tooncast creation tips and tricks!
13 14 15
On the Layer Ladder, click the SpongeBob
“Logo” icon Click REWIND to return to frame #1. Then click “spongeboblogoanim” (the logo icon) in the Layer Ladder. Note that the logo icon (or “chicklet”) will have a red highlight around it on the layer ladder. The Logo on the Stage will glow with a green highlight. However, you can’t see it on the Stage yet it as it’s currently behind the “window” frame you placed after it. Important: Assets at the top of the Layer Ladder appear behind assets that are lower down on the Layer Ladder.
Move the “logo” icon in the Layer Ladder to
bring it to the foreground
Click again on the “logo” icon in the Layer Ladder and drag it to the space occupied by the “bubbles” transition icon. This trades its position in the Layer Ladder with that of the “bubbles.” This also places it in front of the “window” layer and you will now see it outlined in green on the Stage in frame 1. When you shuffle objects in the Layer Ladder, this changes the display order of assets on the Stage.
Do the same with SpongeBob and the
text bubble Practice moving other items up and down the Layer. Try moving SpongeBob and the text balloon in front of the “bubbles” layer but still behind the ‘window” layer.
Rewind and hit PLAY to see these assets now in front of the bubbles but behind the window.
SpongeBob SquarePants Tooncast Studio Manual Page 8
Experimenting and Sharing
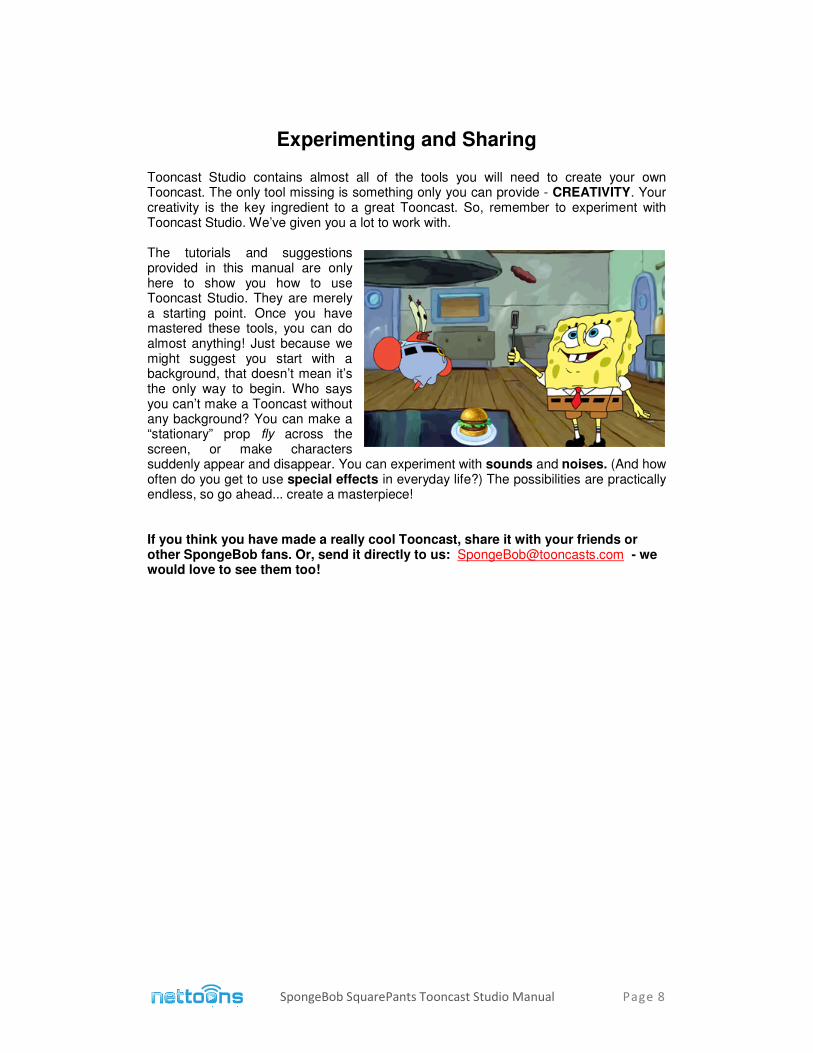
Tooncast Studio contains almost all of the tools you will need to create your own Tooncast. The only tool missing is something only you can provide - CREATIVITY. Your creativity is the key ingredient to a great Tooncast. So, remember to experiment with Tooncast Studio. We’ve given you a lot to work with. The tutorials and suggestions provided in this manual are only here to show you how to use Tooncast Studio. They are merely a starting point. Once you have mastered these tools, you can do almost anything! Just because we might suggest you start with a background, that doesn’t mean it’s the only way to begin. Who says you can’t make a Tooncast without any background? You can make a “stationary” prop fly across the screen, or make characters suddenly appear and disappear. You can experiment with sounds and noises. (And how often do you get to use special effects in everyday life?) The possibilities are practically endless, so go ahead... create a masterpiece! If you think you have made a really cool Tooncast, share it with your friends or other SpongeBob fans. Or, send it directly to us: [email protected] - we would love to see them too!
SpongeBob SquarePants Tooncast Studio Manual Page 9
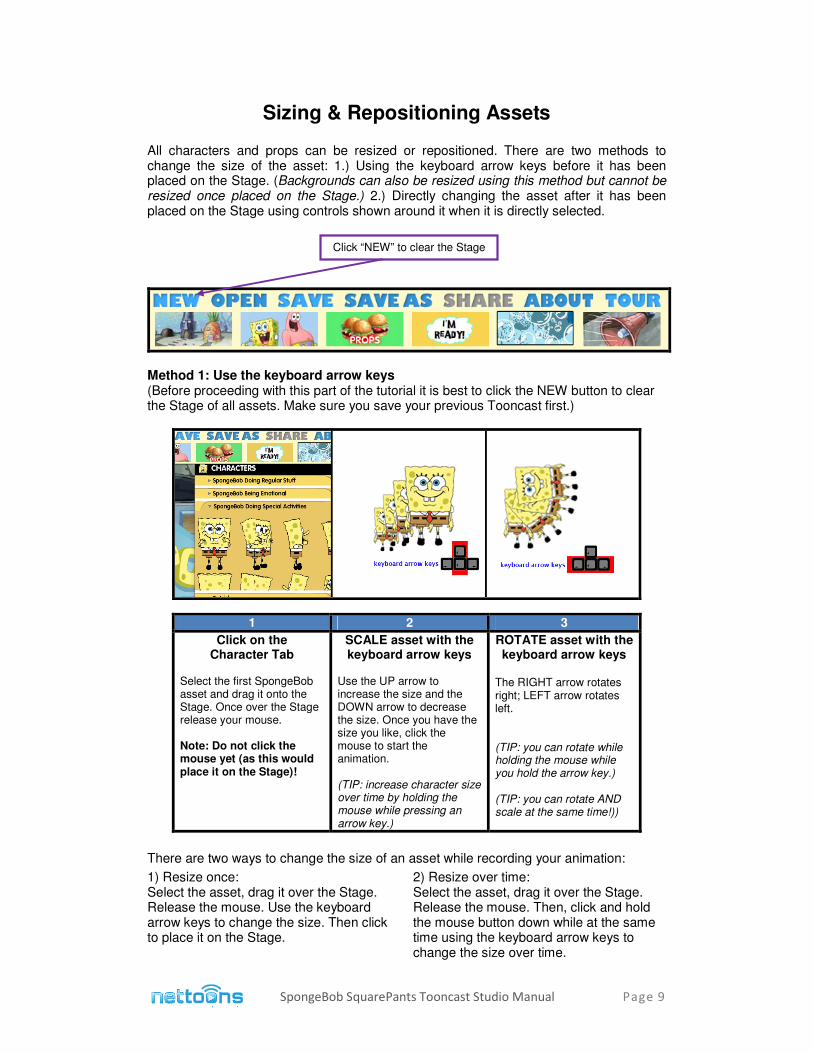
Sizing & Repositioning Assets All characters and props can be resized or repositioned. There are two methods to change the size of the asset: 1.) Using the keyboard arrow keys before it has been placed on the Stage. (Backgrounds can also be resized using this method but cannot be resized once placed on the Stage.) 2.) Directly changing the asset after it has been placed on the Stage using controls shown around it when it is directly selected.
Method 1: Use the keyboard arrow keys (Before proceeding with this part of the tutorial it is best to click the NEW button to clear the Stage of all assets. Make sure you save your previous Tooncast first.)
There are two ways to change the size of an asset while recording your animation:
1) Resize once: Select the asset, drag it over the Stage. Release the mouse. Use the keyboard arrow keys to change the size. Then click to place it on the Stage.
2) Resize over time: Select the asset, drag it over the Stage. Release the mouse. Then, click and hold the mouse button down while at the same time using the keyboard arrow keys to change the size over time.
1 2 3
Click on the Character Tab
Select the first SpongeBob asset and drag it onto the Stage. Once over the Stage release your mouse. Note: Do not click the mouse yet (as this would place it on the Stage)!
SCALE asset with the keyboard arrow keys
Use the UP arrow to increase the size and the DOWN arrow to decrease the size. Once you have the size you like, click the mouse to start the animation. (TIP: increase character size over time by holding the mouse while pressing an arrow key.)
ROTATE asset with the keyboard arrow keys
The RIGHT arrow rotates right; LEFT arrow rotates left. (TIP: you can rotate while holding the mouse while you hold the arrow key.) (TIP: you can rotate AND scale at the same time!))
Click “NEW” to clear the Stage
SpongeBob SquarePants Tooncast Studio Manual Page 10
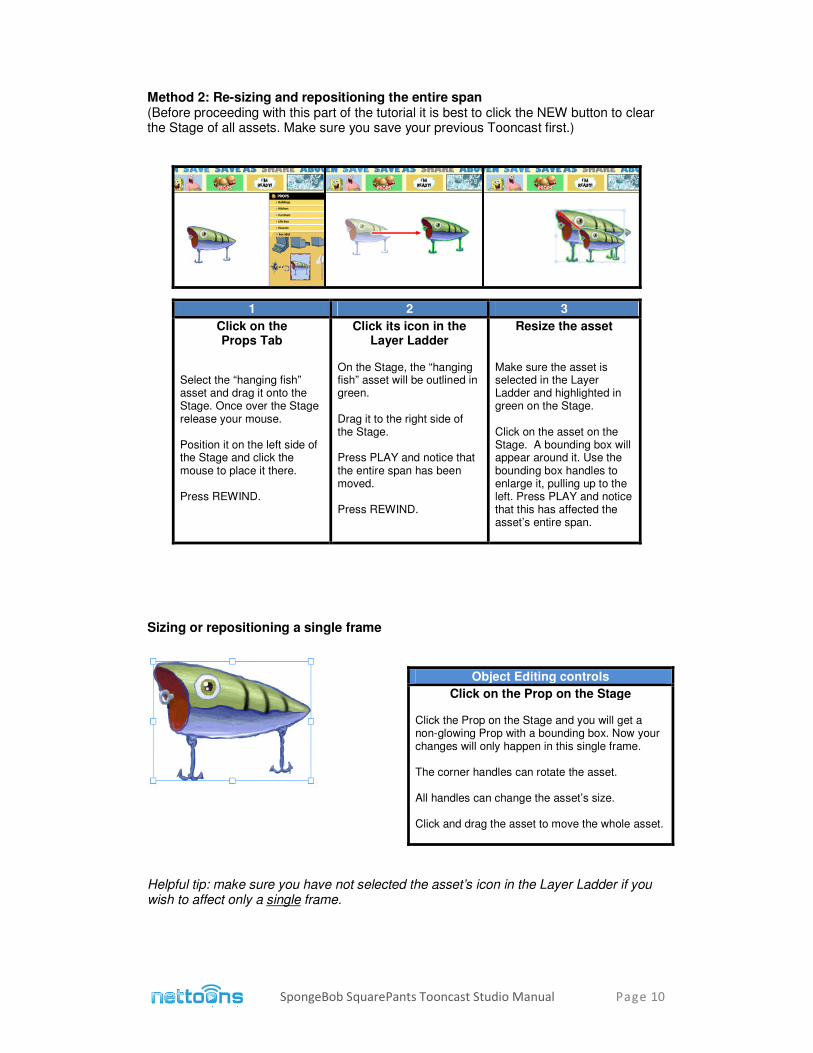
Method 2: Re-sizing and repositioning the entire span (Before proceeding with this part of the tutorial it is best to click the NEW button to clear the Stage of all assets. Make sure you save your previous Tooncast first.)
Sizing or repositioning a single frame
Helpful tip: make sure you have not selected the asset’s icon in the Layer Ladder if you wish to affect only a single frame.
1 2 3
Click on the Props Tab
Select the “hanging fish” asset and drag it onto the Stage. Once over the Stage release your mouse. Position it on the left side of the Stage and click the mouse to place it there. Press REWIND.
Click its icon in the Layer Ladder
On the Stage, the “hanging fish” asset will be outlined in green. Drag it to the right side of the Stage. Press PLAY and notice that the entire span has been moved. Press REWIND.
Resize the asset Make sure the asset is selected in the Layer Ladder and highlighted in green on the Stage. Click on the asset on the Stage. A bounding box will appear around it. Use the bounding box handles to enlarge it, pulling up to the left. Press PLAY and notice that this has affected the asset’s entire span.
Object Editing controls
Click on the Prop on the Stage Click the Prop on the Stage and you will get a non-glowing Prop with a bounding box. Now your changes will only happen in this single frame. The corner handles can rotate the asset. All handles can change the asset’s size. Click and drag the asset to move the whole asset.
SpongeBob SquarePants Tooncast Studio Manual Page 11
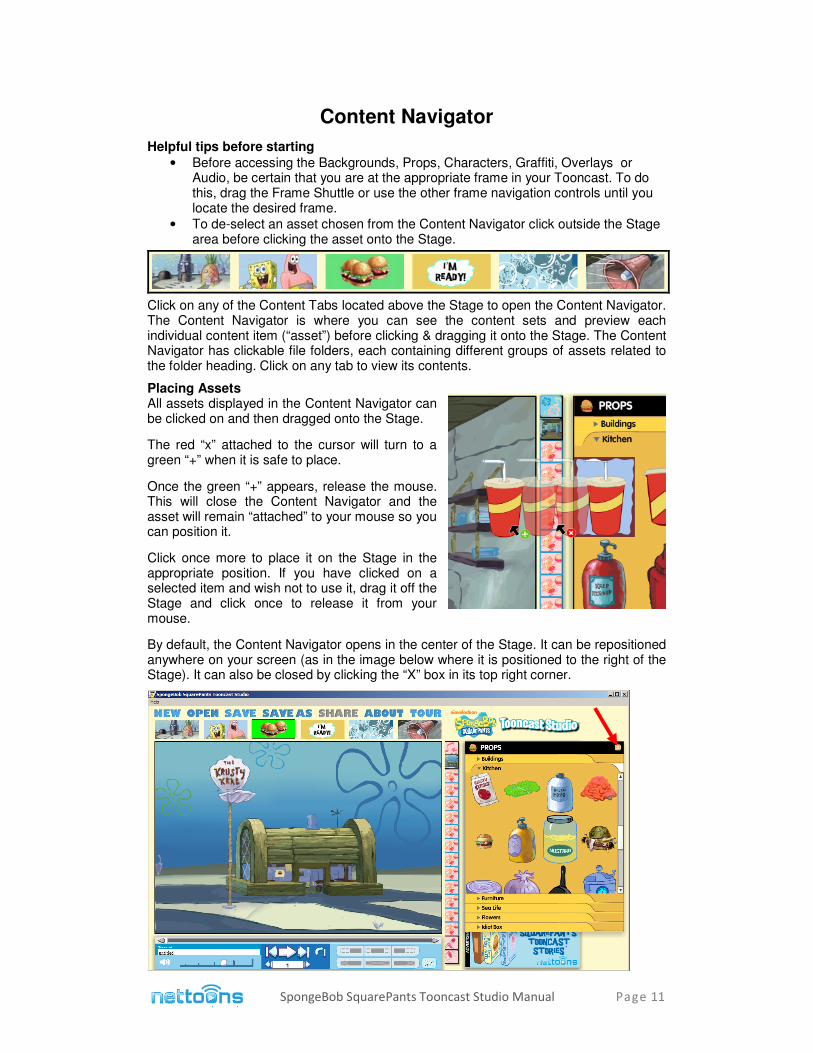
Content Navigator
Helpful tips before starting
• Before accessing the Backgrounds, Props, Characters, Graffiti, Overlays or Audio, be certain that you are at the appropriate frame in your Tooncast. To do this, drag the Frame Shuttle or use the other frame navigation controls until you locate the desired frame.
• To de-select an asset chosen from the Content Navigator click outside the Stage area before clicking the asset onto the Stage.
Click on any of the Content Tabs located above the Stage to open the Content Navigator. The Content Navigator is where you can see the content sets and preview each individual content item (“asset”) before clicking & dragging it onto the Stage. The Content Navigator has clickable file folders, each containing different groups of assets related to the folder heading. Click on any tab to view its contents.
Placing Assets All assets displayed in the Content Navigator can be clicked on and then dragged onto the Stage.
The red “x” attached to the cursor will turn to a green “+” when it is safe to place.
Once the green “+” appears, release the mouse. This will close the Content Navigator and the asset will remain “attached” to your mouse so you can position it.
Click once more to place it on the Stage in the appropriate position. If you have clicked on a selected item and wish not to use it, drag it off the Stage and click once to release it from your mouse.
By default, the Content Navigator opens in the center of the Stage. It can be repositioned anywhere on your screen (as in the image below where it is positioned to the right of the Stage). It can also be closed by clicking the “X” box in its top right corner.
SpongeBob SquarePants Tooncast Studio Manual Page 12
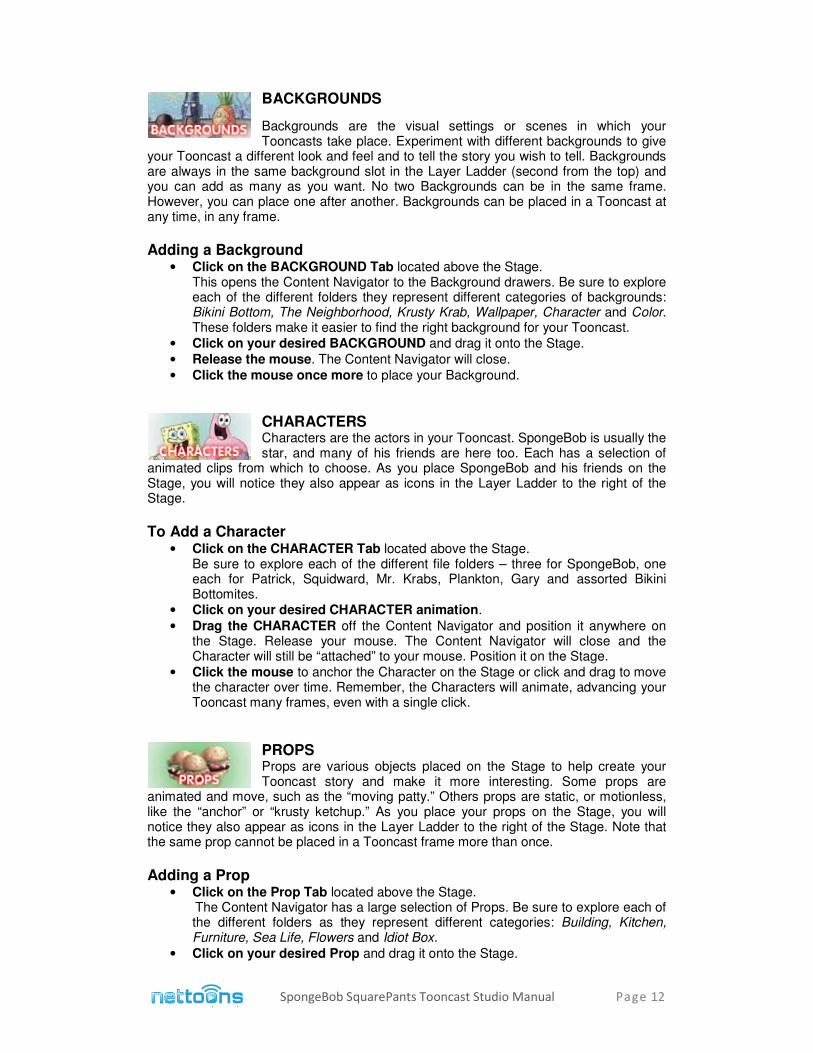
BACKGROUNDS
Backgrounds are the visual settings or scenes in which your Tooncasts take place. Experiment with different backgrounds to give
your Tooncast a different look and feel and to tell the story you wish to tell. Backgrounds are always in the same background slot in the Layer Ladder (second from the top) and you can add as many as you want. No two Backgrounds can be in the same frame. However, you can place one after another. Backgrounds can be placed in a Tooncast at any time, in any frame.
Adding a Background
• Click on the BACKGROUND Tab located above the Stage. This opens the Content Navigator to the Background drawers. Be sure to explore each of the different folders they represent different categories of backgrounds: Bikini Bottom, The Neighborhood, Krusty Krab, Wallpaper, Character and Color. These folders make it easier to find the right background for your Tooncast.
• Click on your desired BACKGROUND and drag it onto the Stage.
• Release the mouse. The Content Navigator will close.
• Click the mouse once more to place your Background.
CHARACTERS Characters are the actors in your Tooncast. SpongeBob is usually the star, and many of his friends are here too. Each has a selection of
animated clips from which to choose. As you place SpongeBob and his friends on the Stage, you will notice they also appear as icons in the Layer Ladder to the right of the Stage.
To Add a Character
• Click on the CHARACTER Tab located above the Stage. Be sure to explore each of the different file folders – three for SpongeBob, one each for Patrick, Squidward, Mr. Krabs, Plankton, Gary and assorted Bikini Bottomites.
• Click on your desired CHARACTER animation.
• Drag the CHARACTER off the Content Navigator and position it anywhere on the Stage. Release your mouse. The Content Navigator will close and the Character will still be “attached” to your mouse. Position it on the Stage.
• Click the mouse to anchor the Character on the Stage or click and drag to move the character over time. Remember, the Characters will animate, advancing your Tooncast many frames, even with a single click.
PROPS Props are various objects placed on the Stage to help create your Tooncast story and make it more interesting. Some props are
animated and move, such as the “moving patty.” Others props are static, or motionless, like the “anchor” or “krusty ketchup.” As you place your props on the Stage, you will notice they also appear as icons in the Layer Ladder to the right of the Stage. Note that the same prop cannot be placed in a Tooncast frame more than once.
Adding a Prop
• Click on the Prop Tab located above the Stage. The Content Navigator has a large selection of Props. Be sure to explore each of the different folders as they represent different categories: Building, Kitchen, Furniture, Sea Life, Flowers and Idiot Box.
• Click on your desired Prop and drag it onto the Stage.
SpongeBob SquarePants Tooncast Studio Manual Page 13
• Release the mouse button. The Content Navigator will close and the Prop will remain “attached” to the mouse.
• Move your mouse to position the Prop anywhere on the Stage.
• Click the mouse once more to anchor the Prop in that frame or click, hold and drag to move the Prop over multiple frames.
Helpful tip: To place a prop through the entire cartoon or just part of it, see page 19 describing the use of the Span Editor.
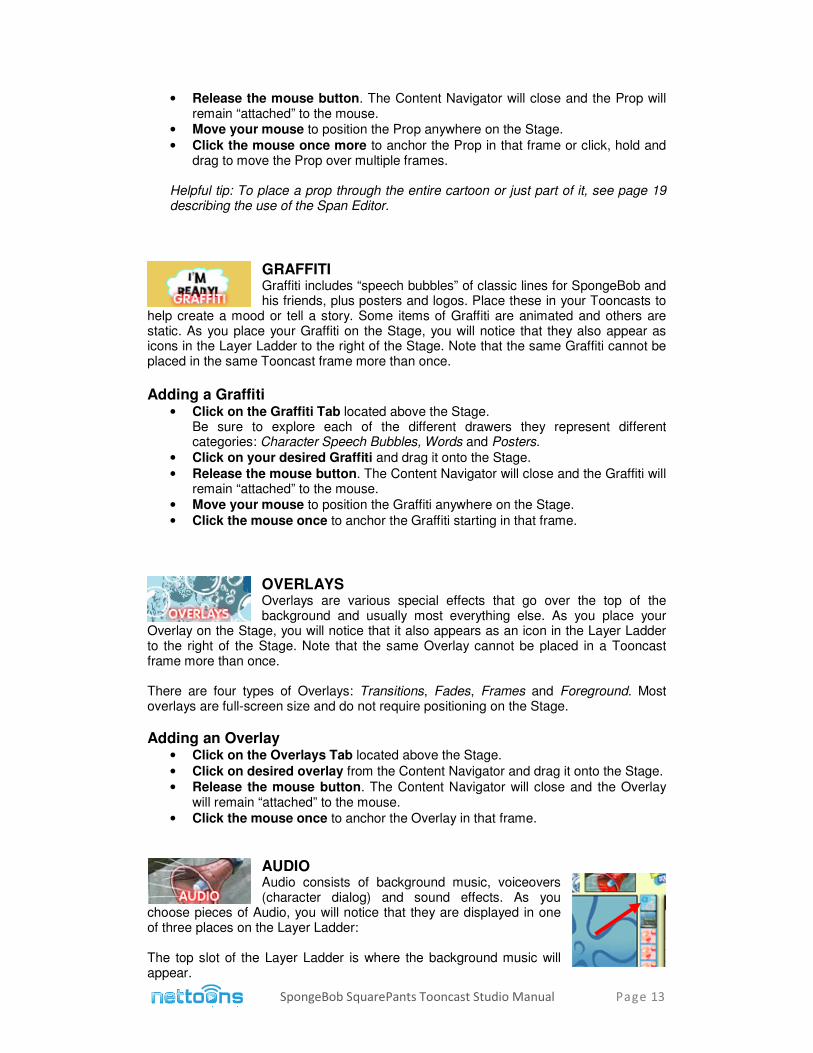
GRAFFITI Graffiti includes “speech bubbles” of classic lines for SpongeBob and his friends, plus posters and logos. Place these in your Tooncasts to
help create a mood or tell a story. Some items of Graffiti are animated and others are static. As you place your Graffiti on the Stage, you will notice that they also appear as icons in the Layer Ladder to the right of the Stage. Note that the same Graffiti cannot be placed in the same Tooncast frame more than once.
Adding a Graffiti
• Click on the Graffiti Tab located above the Stage. Be sure to explore each of the different drawers they represent different categories: Character Speech Bubbles, Words and Posters.
• Click on your desired Graffiti and drag it onto the Stage.
• Release the mouse button. The Content Navigator will close and the Graffiti will remain “attached” to the mouse.
• Move your mouse to position the Graffiti anywhere on the Stage.
• Click the mouse once to anchor the Graffiti starting in that frame.
OVERLAYS Overlays are various special effects that go over the top of the background and usually most everything else. As you place your
Overlay on the Stage, you will notice that it also appears as an icon in the Layer Ladder to the right of the Stage. Note that the same Overlay cannot be placed in a Tooncast frame more than once. There are four types of Overlays: Transitions, Fades, Frames and Foreground. Most overlays are full-screen size and do not require positioning on the Stage.
Adding an Overlay • Click on the Overlays Tab located above the Stage.
• Click on desired overlay from the Content Navigator and drag it onto the Stage. • Release the mouse button. The Content Navigator will close and the Overlay
will remain “attached” to the mouse.
• Click the mouse once to anchor the Overlay in that frame.
AUDIO Audio consists of background music, voiceovers (character dialog) and sound effects. As you
choose pieces of Audio, you will notice that they are displayed in one of three places on the Layer Ladder: The top slot of the Layer Ladder is where the background music will appear.
SpongeBob SquarePants Tooncast Studio Manual Page 14
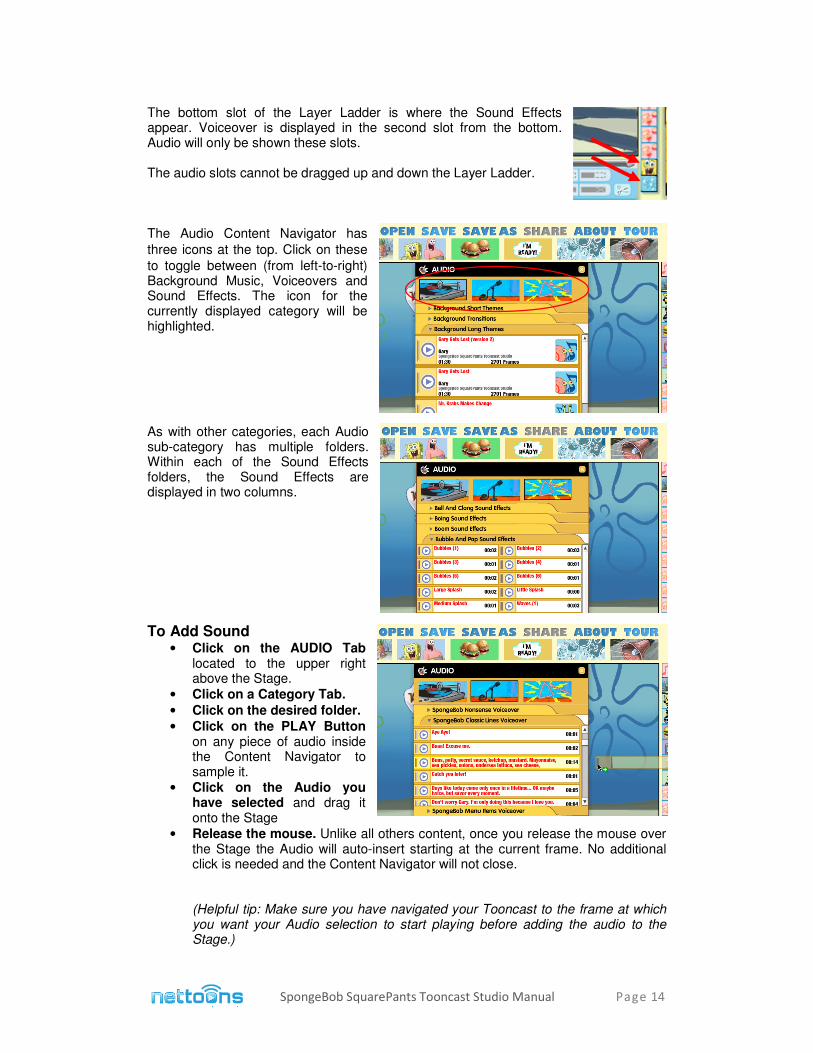
The bottom slot of the Layer Ladder is where the Sound Effects appear. Voiceover is displayed in the second slot from the bottom. Audio will only be shown these slots. The audio slots cannot be dragged up and down the Layer Ladder. The Audio Content Navigator has
three icons at the top. Click on these
to toggle between (from left-to-right) Background Music, Voiceovers and Sound Effects. The icon for the currently displayed category will be highlighted. As with other categories, each Audio sub-category has multiple folders. Within each of the Sound Effects folders, the Sound Effects are displayed in two columns.
To Add Sound
• Click on the AUDIO Tab located to the upper right above the Stage.
• Click on a Category Tab.
• Click on the desired folder.
• Click on the PLAY Button on any piece of audio inside the Content Navigator to sample it.
• Click on the Audio you have selected and drag it onto the Stage
• Release the mouse. Unlike all others content, once you release the mouse over the Stage the Audio will auto-insert starting at the current frame. No additional click is needed and the Content Navigator will not close. (Helpful tip: Make sure you have navigated your Tooncast to the frame at which you want your Audio selection to start playing before adding the audio to the Stage.)
SpongeBob SquarePants Tooncast Studio Manual Page 15
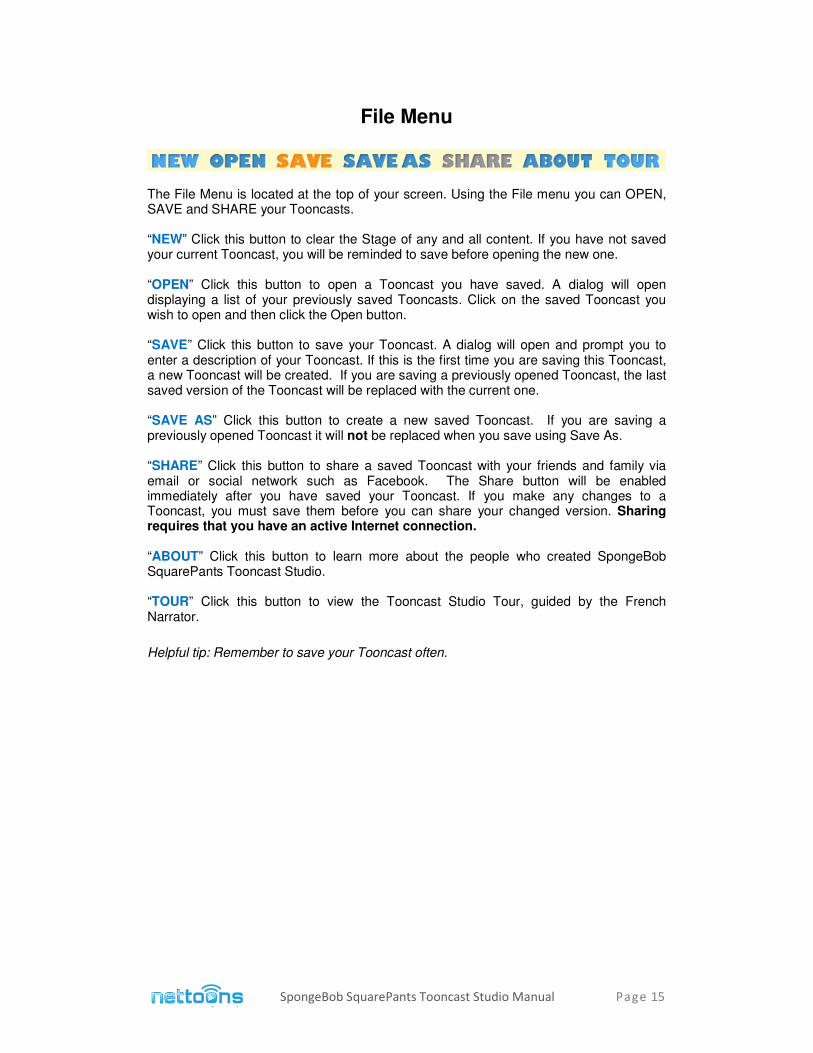
File Menu
The File Menu is located at the top of your screen. Using the File menu you can OPEN, SAVE and SHARE your Tooncasts. “NEW” Click this button to clear the Stage of any and all content. If you have not saved your current Tooncast, you will be reminded to save before opening the new one. “OPEN” Click this button to open a Tooncast you have saved. A dialog will open displaying a list of your previously saved Tooncasts. Click on the saved Tooncast you wish to open and then click the Open button. “SAVE” Click this button to save your Tooncast. A dialog will open and prompt you to enter a description of your Tooncast. If this is the first time you are saving this Tooncast, a new Tooncast will be created. If you are saving a previously opened Tooncast, the last saved version of the Tooncast will be replaced with the current one. “SAVE AS” Click this button to create a new saved Tooncast. If you are saving a previously opened Tooncast it will not be replaced when you save using Save As. “SHARE” Click this button to share a saved Tooncast with your friends and family via email or social network such as Facebook. The Share button will be enabled immediately after you have saved your Tooncast. If you make any changes to a Tooncast, you must save them before you can share your changed version. Sharing requires that you have an active Internet connection. “ABOUT” Click this button to learn more about the people who created SpongeBob SquarePants Tooncast Studio.
“TOUR” Click this button to view the Tooncast Studio Tour, guided by the French Narrator.
Helpful tip: Remember to save your Tooncast often.
SpongeBob SquarePants Tooncast Studio Manual Page 16
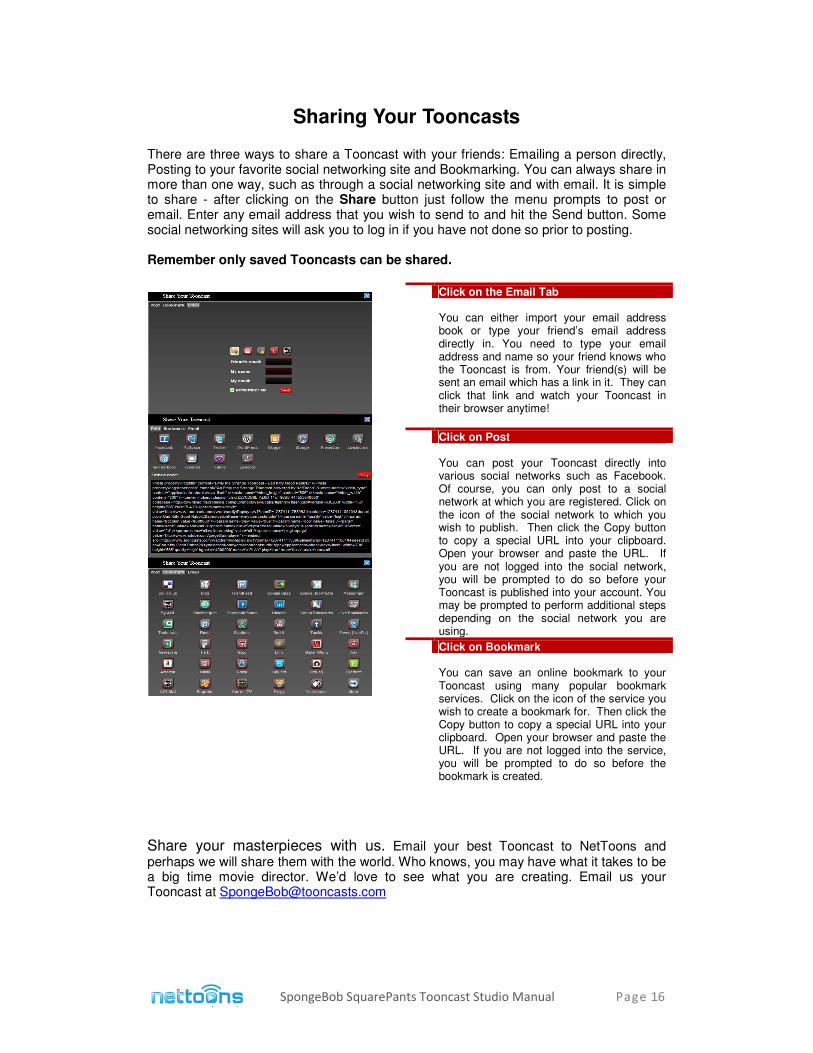
Sharing Your Tooncasts There are three ways to share a Tooncast with your friends: Emailing a person directly, Posting to your favorite social networking site and Bookmarking. You can always share in more than one way, such as through a social networking site and with email. It is simple to share - after clicking on the Share button just follow the menu prompts to post or email. Enter any email address that you wish to send to and hit the Send button. Some social networking sites will ask you to log in if you have not done so prior to posting. Remember only saved Tooncasts can be shared.
Share your masterpieces with us. Email your best Tooncast to NetToons and perhaps we will share them with the world. Who knows, you may have what it takes to be a big time movie director. We’d love to see what you are creating. Email us your Tooncast at [email protected]
Click on the Email Tab
You can either import your email address book or type your friend’s email address directly in. You need to type your email address and name so your friend knows who the Tooncast is from. Your friend(s) will be sent an email which has a link in it. They can click that link and watch your Tooncast in their browser anytime!
Click on Post
You can post your Tooncast directly into various social networks such as Facebook. Of course, you can only post to a social network at which you are registered. Click on the icon of the social network to which you wish to publish. Then click the Copy button to copy a special URL into your clipboard. Open your browser and paste the URL. If you are not logged into the social network, you will be prompted to do so before your Tooncast is published into your account. You may be prompted to perform additional steps depending on the social network you are using.
Click on Bookmark
You can save an online bookmark to your Tooncast using many popular bookmark services. Click on the icon of the service you wish to create a bookmark for. Then click the Copy button to copy a special URL into your clipboard. Open your browser and paste the URL. If you are not logged into the service, you will be prompted to do so before the bookmark is created.
SpongeBob SquarePants Tooncast Studio Manual Page 17
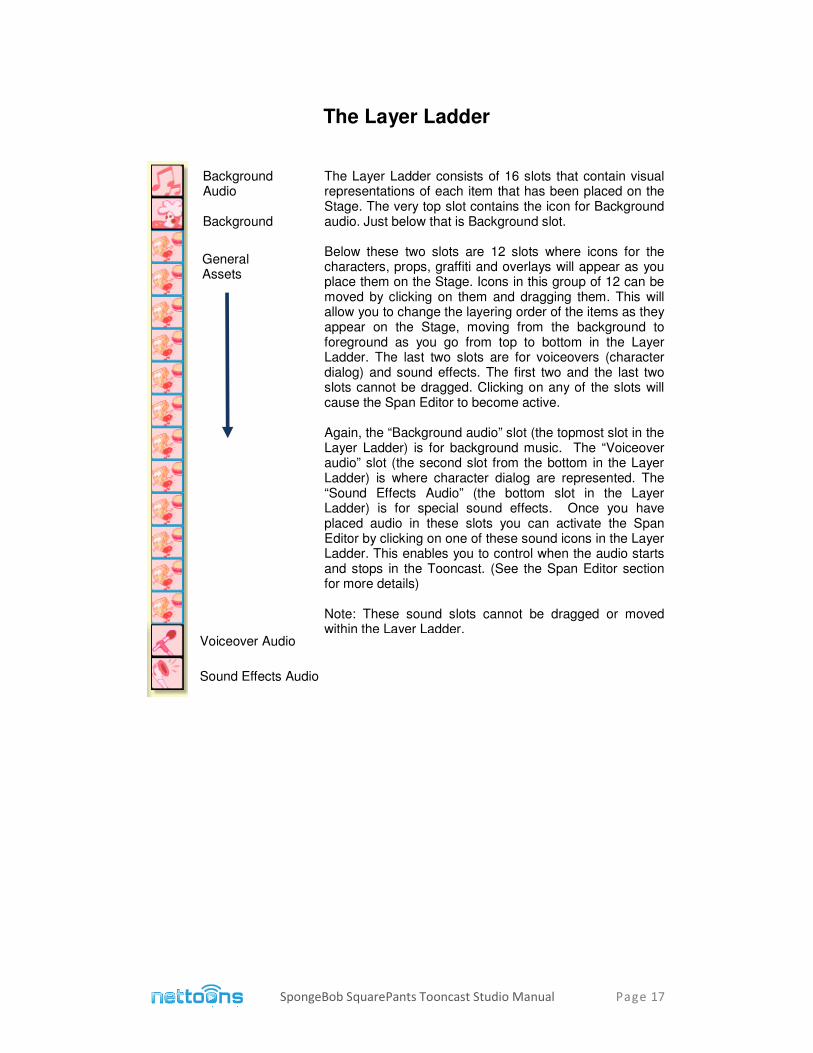
The Layer Ladder
Voiceover Audio
Sound Effects Audio
The Layer Ladder consists of 16 slots that contain visual representations of each item that has been placed on the Stage. The very top slot contains the icon for Background audio. Just below that is Background slot. Below these two slots are 12 slots where icons for the characters, props, graffiti and overlays will appear as you place them on the Stage. Icons in this group of 12 can be moved by clicking on them and dragging them. This will allow you to change the layering order of the items as they appear on the Stage, moving from the background to foreground as you go from top to bottom in the Layer Ladder. The last two slots are for voiceovers (character dialog) and sound effects. The first two and the last two slots cannot be dragged. Clicking on any of the slots will cause the Span Editor to become active. Again, the “Background audio” slot (the topmost slot in the Layer Ladder) is for background music. The “Voiceover audio” slot (the second slot from the bottom in the Layer Ladder) is where character dialog are represented. The “Sound Effects Audio” (the bottom slot in the Layer Ladder) is for special sound effects. Once you have placed audio in these slots you can activate the Span Editor by clicking on one of these sound icons in the Layer Ladder. This enables you to control when the audio starts and stops in the Tooncast. (See the Span Editor section for more details) Note: These sound slots cannot be dragged or moved within the Layer Ladder.
General Assets
Background Audio Background
SpongeBob SquarePants Tooncast Studio Manual Page 18
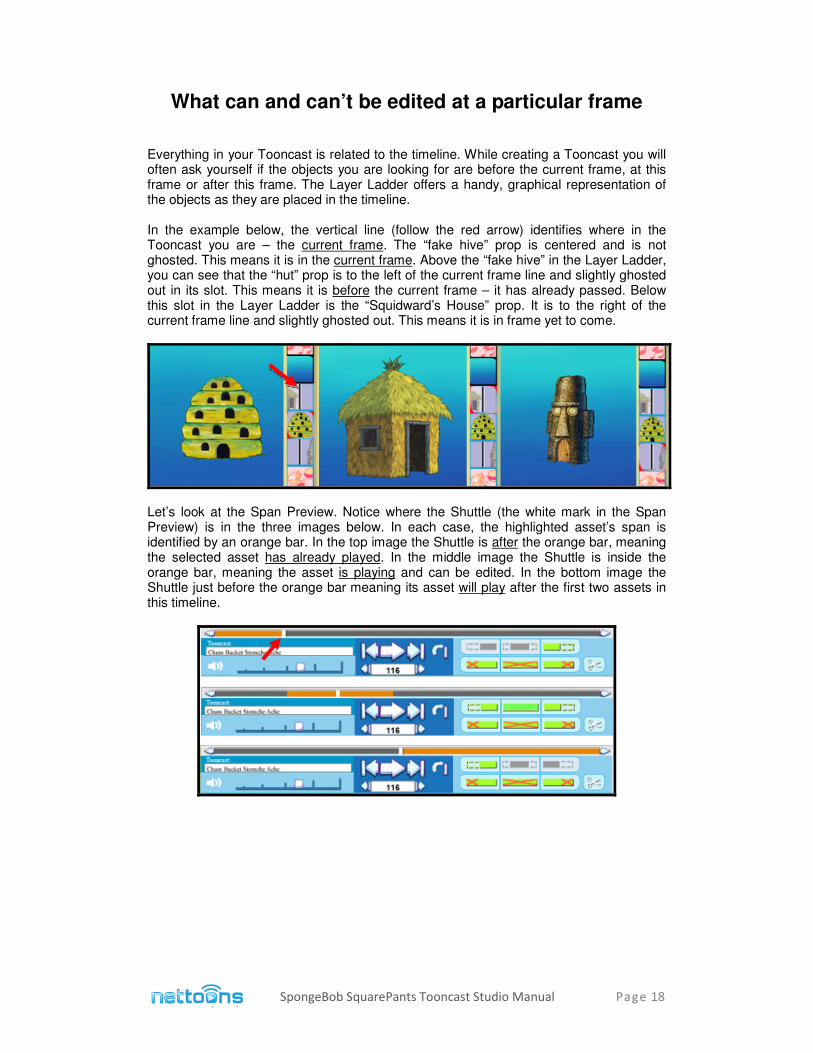
What can and can’t be edited at a particular frame Everything in your Tooncast is related to the timeline. While creating a Tooncast you will often ask yourself if the objects you are looking for are before the current frame, at this frame or after this frame. The Layer Ladder offers a handy, graphical representation of the objects as they are placed in the timeline. In the example below, the vertical line (follow the red arrow) identifies where in the Tooncast you are – the current frame. The “fake hive” prop is centered and is not ghosted. This means it is in the current frame. Above the “fake hive” in the Layer Ladder, you can see that the “hut” prop is to the left of the current frame line and slightly ghosted out in its slot. This means it is before the current frame – it has already passed. Below this slot in the Layer Ladder is the “Squidward’s House” prop. It is to the right of the current frame line and slightly ghosted out. This means it is in frame yet to come.
Let’s look at the Span Preview. Notice where the Shuttle (the white mark in the Span Preview) is in the three images below. In each case, the highlighted asset’s span is identified by an orange bar. In the top image the Shuttle is after the orange bar, meaning the selected asset has already played. In the middle image the Shuttle is inside the orange bar, meaning the asset is playing and can be edited. In the bottom image the Shuttle just before the orange bar meaning its asset will play after the first two assets in this timeline.
SpongeBob SquarePants Tooncast Studio Manual Page 19
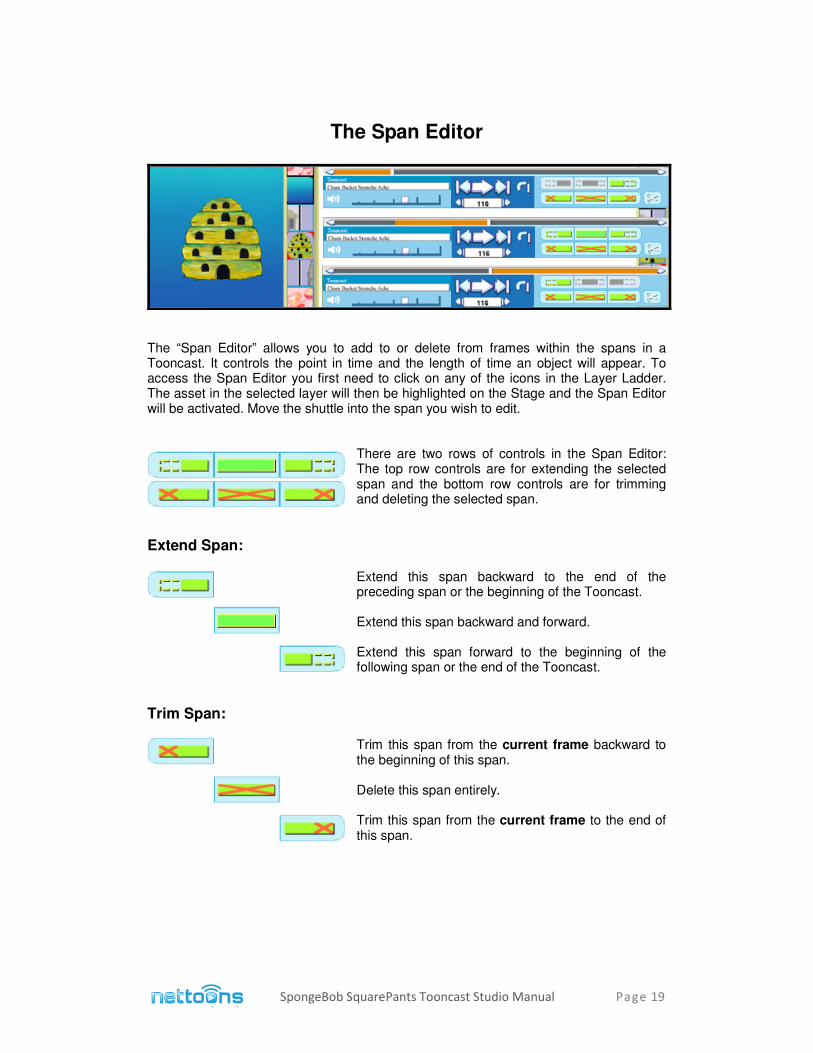
The Span Editor
The “Span Editor” allows you to add to or delete from frames within the spans in a Tooncast. It controls the point in time and the length of time an object will appear. To access the Span Editor you first need to click on any of the icons in the Layer Ladder. The asset in the selected layer will then be highlighted on the Stage and the Span Editor will be activated. Move the shuttle into the span you wish to edit.
There are two rows of controls in the Span Editor: The top row controls are for extending the selected span and the bottom row controls are for trimming and deleting the selected span.
Extend Span: Extend this span backward to the end of the preceding span or the beginning of the Tooncast. Extend this span backward and forward. Extend this span forward to the beginning of the following span or the end of the Tooncast.
Trim Span:
Trim this span from the current frame backward to the beginning of this span. Delete this span entirely. Trim this span from the current frame to the end of this span.
SpongeBob SquarePants Tooncast Studio Manual Page 20
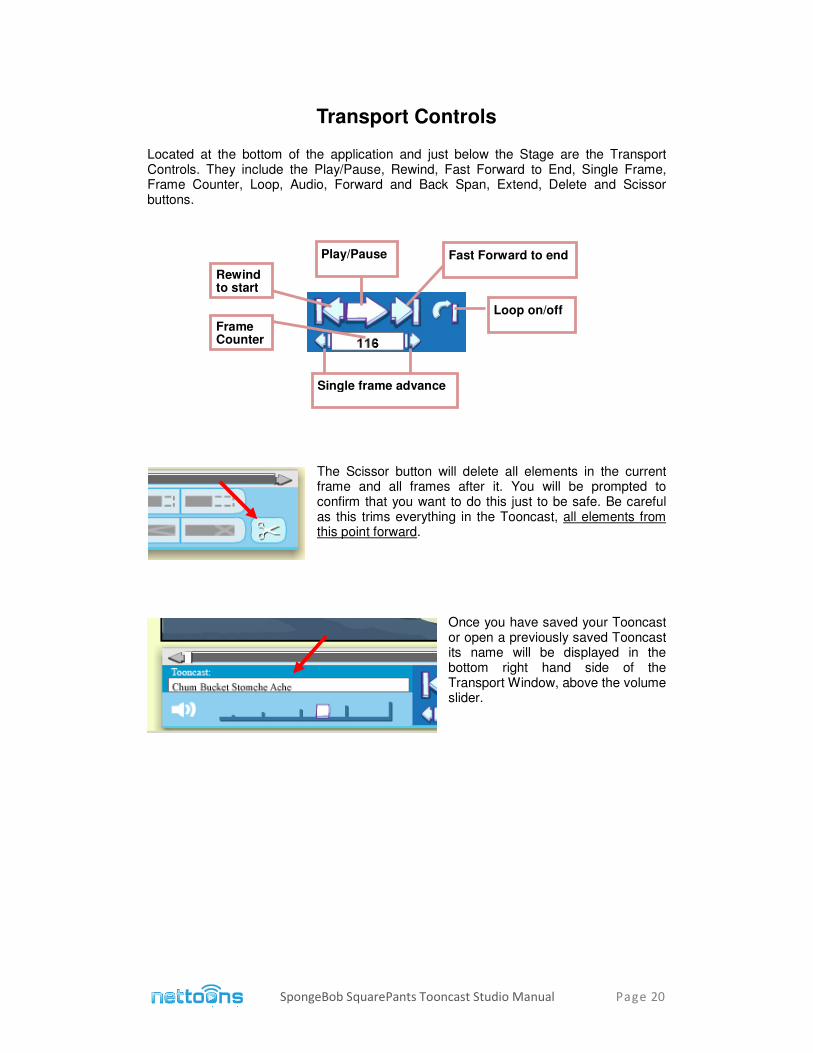
Transport Controls Located at the bottom of the application and just below the Stage are the Transport Controls. They include the Play/Pause, Rewind, Fast Forward to End, Single Frame, Frame Counter, Loop, Audio, Forward and Back Span, Extend, Delete and Scissor buttons.
The Scissor button will delete all elements in the current frame and all frames after it. You will be prompted to confirm that you want to do this just to be safe. Be careful as this trims everything in the Tooncast, all elements from this point forward.
Once you have saved your Tooncast or open a previously saved Tooncast its name will be displayed in the bottom right hand side of the Transport Window, above the volume slider.
Play/Pause
Rewind to start
Fast Forward to end
Single frame advance
Loop on/off Frame
Counter
SpongeBob SquarePants Tooncast Studio Manual Page 21
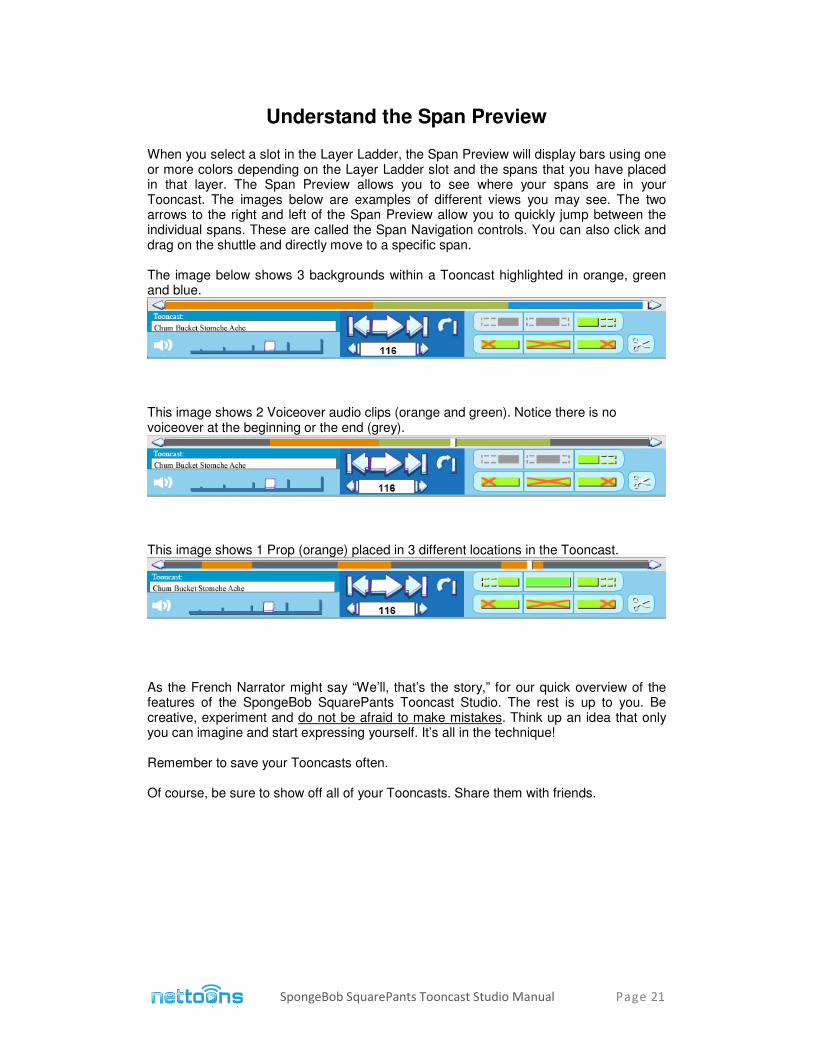
Understand the Span Preview When you select a slot in the Layer Ladder, the Span Preview will display bars using one or more colors depending on the Layer Ladder slot and the spans that you have placed in that layer. The Span Preview allows you to see where your spans are in your Tooncast. The images below are examples of different views you may see. The two arrows to the right and left of the Span Preview allow you to quickly jump between the individual spans. These are called the Span Navigation controls. You can also click and drag on the shuttle and directly move to a specific span. The image below shows 3 backgrounds within a Tooncast highlighted in orange, green and blue.
This image shows 2 Voiceover audio clips (orange and green). Notice there is no voiceover at the beginning or the end (grey).
This image shows 1 Prop (orange) placed in 3 different locations in the Tooncast.
As the French Narrator might say “We’ll, that’s the story,” for our quick overview of the features of the SpongeBob SquarePants Tooncast Studio. The rest is up to you. Be creative, experiment and do not be afraid to make mistakes. Think up an idea that only you can imagine and start expressing yourself. It’s all in the technique! Remember to save your Tooncasts often. Of course, be sure to show off all of your Tooncasts. Share them with friends.
SpongeBob SquarePants Tooncast Studio Manual Page 22
Glossary Content Navigator The Content Navigator contains all the assets (images, animations, and sounds) that you can use to create a Tooncast. Content Tabs Content Tabs are used to open the Content Navigator to display specific groups of assets (backgrounds, characters, props, graffiti, overlays and audio). They are located directly above the Stage. The Content Navigator displays assets based on which Content Tab is selected. The assets are divided into a number of Folders filled with individual assets (pieces of content). Folders Folders are individual groups of assets displayed in the Content Navigator that you can use to craft your Tooncasts. File Menu This is located above the Content Tabs and lets you open, save and share your Tooncasts. Layer Each asset you place in a Tooncast uses one layer. You can place only one asset per each layer. Using the Layer Ladder you can rearrange the layers to bring asset in front of or behind other assets. The exceptions are the audio and background layers; they cannot be rearranged and they can also have more than one asset in the same layer. Layer Ladder The Layer Ladder provides a visual reference to the layering of all the items that you have put into your Tooncast. This helps you organize and edit the objects within your Tooncasts. The Layer Ladder can be used to move items around in space; you can move an item in front of or behind other items by simply moving the order in the Layer Ladder. The Layer Ladder can also be used to access other editing functions such as the Span Editors. Remember, the further down in the Layer Ladder an asset is, the closer to the foreground it will be in your Tooncast. Span A span is a contiguous use of a particular asset in a layer. Spans can be viewed by selecting the asset in the Layer Ladder which will activate the Span Preview in the Transport Bar. A Span can be edited by using the Span Editor controls. Span Editor The Span Editor is where you control the length of time (or “span”) an asset will be placed on the Stage. The Span Editor allows you to fine tune exactly where and in which frames will an asset appear on the Stage. Span Preview The Span Preview provides a visual representation of the spans that are in the currently selected layer. It is activated by selected the desired layer (slot) in the Layer Ladder or double-clicking an object on the Stage.
SpongeBob SquarePants Tooncast Studio Manual Page 23
Stage The Stage is the large open area where you compose your animation, or Tooncast. Transport Control The Transport is a group of controls that let you easily navigate through the timeline of your Tooncast. You can use the Transport controls to quickly move to the beginning or end of your Tooncast or step through frame-by-frame. Tooncast A Tooncast is an animation that you make using SpongeBob SquarePants Tooncast Studio. Tooncasting “Tooncasting” is when you share a Tooncast with friends and others through email or social media. When you share a Tooncast and a friend goes to view it you have “Tooncasted.” A person who watches your Tooncasts may go to a special landing page to see what you are Tooncasting, or they may see it in Facebook or other social site. Tooncaster This is someone, like you, who shares a Tooncast. It’s also the name of a NetToons application on Facebook. SPONGEBOB SQUAREPANTS © 2011 Nickelodeon. All Rights Reserved. Nickelodeon, SpongeBob SquarePants and all related titles, logos and characters are trademarks of Viacom International Inc. Created by Stephen Hillenburg. NetToons, Tooncast and Tooncast Studio are all Registered Trademarks of NetToons, Inc., © 2007-2011 NetToons, Inc. Version 1.6