Savage Exercises - Critical Bench
51
Transcript of Savage Exercises - Critical Bench


Published by www.criticalbench.com
LEGAL STUFF
© 2011 Mike Gillette Published by CriticalBench.com
All Rights Reserved. International Copyright www.CriticalBench.com
This publication is fully copyrighted and does not come with giveaway or resale rights. You may not sell or redistribute this report. It is reserved solely for paying customers of CriticalBench.com. Copyright and illegal distribution violations will be prosecuted. This document has been watermarked with a digital GPS identification tag.
NOTICE The information presented is not intended for the treatment or prevention of disease, nor a substitute for medical treatment, nor as an alternative to medical advice. This publication is presented for information purposes, to increase the public knowledge of developments in the field of strength and conditioning. The program outlined herein should not be adopted without a consultation with your health professional. Use of the information provided is at the sole choice and risk of the reader. You must get your physician’s approval before beginning this or any other exercise program.. Use of the information provided is at the sole choice and risk of the reader. You must get your physician’s approval before beginning this or any other exercise program.

Published by www.criticalbench.com
EXERCISE LIBRARY TABLE OF CONTENTS
Exercise Library Table of Contents
Section 1
• Introduction
Section 2
• Movement Pattern #1 Horizontal Pressing • Movement Pattern #2 Horizontal Pulling • Movement Pattern #3 Vertical Pushing • Movement Pattern #4 Vertical Pulling • Movement Pattern #5 Lower Limb Pushing • Movement Pattern #6 Body Extension • Movement Pattern #7 Body Flexion
Section 3
• Conclusion • Link To Demonstration Videos

Published by www.criticalbench.com
INTRODUCTION This Exercise Library catalogs the various movements that we will draw from to build out your SAVAGE STRENGTH workouts. Each exercise is shown with an illustration of the starting and ending positions and a description of how to perform the exercise. Some exercises will also be accompanied with additional performance or safety tips. Now understand that this is not a list of every exercise that is ‘out there’. Of course we left out all the exercises that we think are waste of time, but we left out some good ones too. Now why would we do this? A couple of reasons... The first reason is that there are some very effective movements which are simply beyond the scope of what we set out to do with the SAVAGE STRENGTH Program. If a movement is overly reliant on a complicated piece of equipment, we left it out of the program. If a movement is so complicated that you need in-person coaching to learn it… well, those got left out too. Remember that this is all about training that you can do without a lot of fuss or fancy gear. But… if you prefer to train at a gym, I will also tell you which exercise variations you can perform that make use of standard gym equipment. The goal is to provide you with plenty of strength-building options. The second reason is that this program is not the “end of the line” for strength trainers. For the dedicated and the fanatical… there are MORE training options ahead. But even for those motivated maniacs, it is essential to master the movements and program variations of the SAVAGE STRENGTH Program first.

Published by www.criticalbench.com
INTRODUCTION One last thing… As you read over some of the exercises you might become a little confused. Some of the exercises are actually ‘bodyweight’ or ‘callisthenic’ movements. You might be checking those out and thinking to yourself, “Didn’t Mike say that heavy resistance was the key to strength gains?” Okay, good. You were paying attention. I did say that. But I also said that “heavy” means heavy for you. So if you are ‘only’ doing a bodyweight exercise but you really have to work hard to perform it correctly, then congratulations…! You have just found a movement that qualifies as ‘heavy’. Some of the bodyweight movements which are shown will be hard for a lot of guys, even some advanced trainees… especially if they are done the right way, with no cheating. But as they become easier, remember about changing angles and increasing the load of your body with things like chains, a backpack or a weight vest. All of these will help you to increase the intensity of a given exercise and allow you to continue your progress towards the attainment of SAVAGE STRENGTH! So if you’re ready, let’s get to the exercises…

Published by www.criticalbench.com
MOVEMENT PATTERN #1 HORIZONTAL PUSHING We will start by examining the push-up. “Seriously, Mike?” “Push-ups?” Yeah, I’m serious. Stay with me… We start with the push-up for two reasons. The first reason we start with the push-up, is that this ‘humble’ exercise, correctly performed, can also humble many guys who think that they are already strong. The key reason for this is that the push-up is a ‘total body’ exercise. And this total body exercise also works very well as a diagnostic tool, one which will expose any weaknesses in your overall structure, from your head to your toes. Here’s what I mean… If you were to take a look at an average group of people doing push-ups, you would see a lot of different body positions. And most of what you’d see would be butts pushed way up in the air or the opposite… sad, sagging backs. You would see some people resting their weight on their knees and possibly even a few resting on the ground from the waist down, merely pushing their torsos up and down. This is because to perform a push-up properly, you need to be strong all the way down from your shoulder girdle, back, core region and posterior chain. Any deficiencies along the way will cause your form to break down and the sad result is a pathetic head-bobbing motion that looks nothing like a real push-up. The second reason that we are starting with the push-up is because the push-up serves as an excellent ‘instructional’ exercise. This means that by conducting a thorough examination of the push-up, you can see the concepts of actual load and perceived load clearly demonstrated. Further, you will see how to use deliberate destabilization to increase perceived load. This is important because we will make similar ‘load’ modifications to many other exercises in this manual, all to allow you to start training these movements regardless of your present strength levels.

Published by www.criticalbench.com
So let’s take a closer look at the Push-up… MOVEMENT PATTERN #1 HORIZONTAL PUSHING
We will use the push-up to illustrate how you can use the change the resistance or ‘perceived load’ of a given exercise through the use of deliberate de-stabilization, adjusting angles and increasing range-of-motion. We’ll begin with an easier variation of the push-up. Easier because the load (bodyweight in this case) is spread across a wider base due to the feet being spread apart. This means that the body doesn’t have to work at as hard to balance the load while performing the exercise motion. To perform this exercise, the back is kept straight, arms are at a 45° (or less) angle to the torso, eyes are up and the body drops down until the upper arms are at least parallel with the floor. To complete the repetition, simply press the entire body back up.
Here is the conventional push-up. Legs and back are straight and in line with each other, eyes are up but the head and neck are not hyper-extended. The feet are together in this example and that requires that the posterior chain is held tight in order to maintain this body alignment throughout the completion of the exercise. You know what to do here… I mean it’s a push up, right? So stay tight, body straight, head up and drop on down. Push yourself back upwards in a smooth, crisp motion.

Published by www.criticalbench.com
MOVEMENT PATTERN #1 HORIZONTAL PUSHING
In this push-up variation, the base has been reduced by placing one foot behind the other. This will require the body to further stabilize the body while the exercise is performed, increasing the perceived load.
In this push-up variation there are several things going on you need to be aware of. First off, you can see that the base is still reduced from the conventional push-up with only one foot being used. But if you look closely, you will see that the one foot is not centered in line with the spine as in the previous example. This creates an off-balanced load and stabilization comes into play. Finally, the right leg is raised which transfers more load (bodyweight) forward onto the muscles which have to perform the exercise. To execute, all previous points-of-performance come into play, especially keeping the body savage tight.

Published by www.criticalbench.com
MOVEMENT PATTERN #1 HORIZONTAL PUSHING
In this push-up variation, the perceived load has been increased by adjusting the angle of resistance (bodyweight) using a 5-gallon plastic bucket, (less than $3.00). Whenever you’re trying to increase load in this manner, make a conscious effort to press your bodyweight against the muscles which are working as much as possible.
In this example, in addition to the adjusted angle provided by the bucket, additional resistance has been added through the use of an Army surplus rucksack. Inside the rucksack? Weight plates wrapped in a towel. (Price of rucksack $15.00). Note: whenever you introduce weighted resistance to ‘bodyweight-style’ exercises there is a tendency for your body to slip outside its normal movement path or ‘groove’. This can lead to injury, so be aware of this.
At the gym: Prop your feet on a flat bench or dead-lift box. For an extra challenge, have someone place a weight plate on your back as an alternative to the rucksack. The weight plate will force you to hold your back flat and tight.

Published by www.criticalbench.com
MOVEMENT PATTERN #1 HORIZONTAL PUSHING
This final push-up example combines all of the previous load enhancers with the addition of two more variables. The first obvious additions are the dumbbells. By gripping the dumbbells as shown, my hands are raised further from the floor. This increases the distance that my chest is able to travel at the ‘bottom’ portion of the movement. This enables the muscles to contract in a stretched position with the objective of forcing additional muscle fibers to activate.
The final variable is also dumbbell-related. These dumbbells are round and are prone to roll in either direction. While performing the push-up motion, I am also forcing the stabilizer muscles of my upper body to ‘lock’ the dumbbells in place while performing the exercise. All of these variables combined together make this push-up variation a ‘total body’ experience.
At the gym: Prop your feet on a flat bench or dead-lift box, grab some dumbbells of the rack and have at it.

Published by www.criticalbench.com
MOVEMENT PATTERN #1 HORIZONTAL PUSHING
This exercise is called the Floor Press. It looks like the familiar bench press, but with one key difference… there is no bench. To perform this motion, grip the bar with your hands approximately shoulder-width, and allow the bar to travel downwards while holding your elbows at a 45° angle (or less). You’ll know you’ve hit bottom when your upper arms are resting on the floor.
To complete the motion, simply press the bar straight up until you have returned to the starting position. Note: To avoid injury, do not allow your elbows to slam into the floor.
At the gym: Because the floor press is a substitute for the bench press, the bench press is a substitute for the floor press. So at the gym, go ahead and bench press.

Published by www.criticalbench.com
MOVEMENT PATTERN #1 HORIZONTAL PUSHING
The Chain Push-up is a great exercise for a few reasons. First, it’s very simple to adjust the amount of resistance by simply raising or lowering the handles. This means that you can start doing them right now even if you’re new to training. The chains also require a lot of work from your stabilizer muscles in order to keep the body tight while performing this motion. And everything you’ve already seen in terms of adjusting angles and adding additional resistance can be applied to this exercise. To perform, proceed just as you would with a conventional push-up. The only difference is that this variation is much harder. So straighten that back, head up, body tight, drop down and push back up. You’ll know that you’ve mastered this one when the chains stop moving all over the place.
At the gym: Don’t plan on bringing your chains to the gym. They’re heavy, noisy and they will scratch up the gym’s equipment. If you want to do ‘chain exercises’ at the gym, then take a look at Special Report #2 which shows exactly how to put together a portable, equipment-friendly rope-based alternative.

Published by www.criticalbench.com
MOVEMENT PATTERN #1 HORIZONTAL PUSHING
This is a bench-press variation performed with dumbbells… the Dumbbell Bench-Press. I like this variation because it is harder to manage two weights than one long barbell. I prefer to perform these with my elbows close to the body. Simply start the motion as shown and allow the weights to descend under control.
This is the ‘down’ position of the exercise. Keep your elbows under your fists for optimal control and imagine that you are pushing up with your elbows. This will assist you in maintaining correct form.
At the gym: Simply find a flat bench and grab some dumbbells off of the rack and you’re in business.

Published by www.criticalbench.com
MOVEMENT PATTERN #1 HORIZONTAL PUSHING
You almost never see anyone perform this exercise and that’s too bad because it is phenomenal. This is the One-Arm Dumbbell Bench Press. It requires tremendous concentration and core strength to perform, but give it a try. As you can see in the photos, I’m keeping my fist over my elbow the entire time and my elbow travels downwards staying close to my body.
This is the ‘down’ position of the exercise. To complete the repetition, keep your body tight and press the dumbbell straight up.
At the gym: Set down one of your dumbbells from the previous exercise and you’re ready to perform the One-Arm Dumbbell Bench Press.

Published by www.criticalbench.com
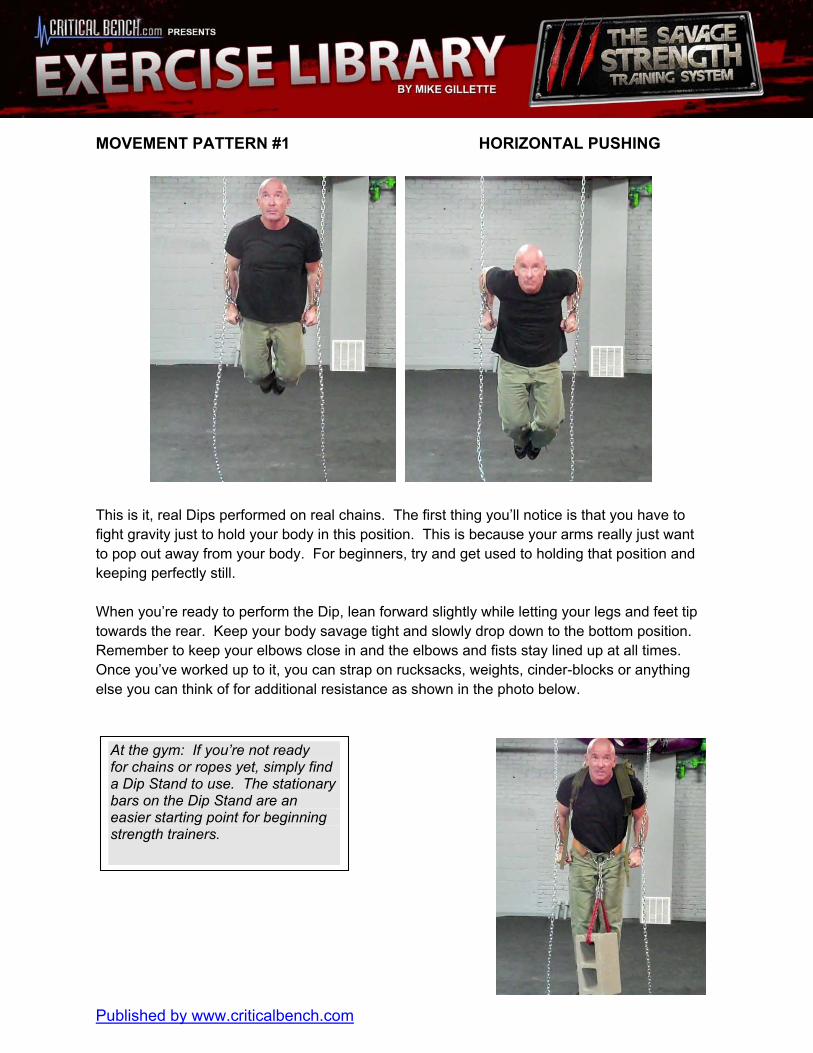
MOVEMENT PATTERN #1 HORIZONTAL PUSHING
Dips can be a bit hard to categorize because of the direction of the ‘push’. It’s really a downwards vertical push and it’s almost the only exercise that moves in that direction. But because dips primarily involve the shoulders, chest and triceps they get put in the HORIZONTAL PUSH category. I use weighted dips as one of my foundation exercises and strongly encourage you to master dips, especially as performed on chains, ropes or straps. The variation shown in these photos is designed for people who may not be strong enough for conventional dips at first. By adjusting the height of the handles and supporting the legs on a bench or some other object, you can fine-tune the resistance to whatever you can handle. As you become stronger, you can start bringing the handles higher and then eventually support all of your weight. To perform, hold yourself as steady as possible and then use gravity to drop down until your upper arms are at least parallel with the floor. You can go farther than that, but be careful. Some people go too crazy with the depth of the motion and end up with nagging shoulder problems as a result.
At the gym: In addition to the ropes set-up, you can position yourself between two flat benches and rest your feet on the floor while you’re getting the feel for dips. Adjust the angles as your strength increases.
Published by www.criticalbench.com
MOVEMENT PATTERN #1 HORIZONTAL PUSHING
This is it, real Dips performed on real chains. The first thing you’ll notice is that you have to fight gravity just to hold your body in this position. This is because your arms really just want to pop out away from your body. For beginners, try and get used to holding that position and keeping perfectly still. When you’re ready to perform the Dip, lean forward slightly while letting your legs and feet tip towards the rear. Keep your body savage tight and slowly drop down to the bottom position. Remember to keep your elbows close in and the elbows and fists stay lined up at all times. Once you’ve worked up to it, you can strap on rucksacks, weights, cinder-blocks or anything else you can think of for additional resistance as shown in the photo below.
At the gym: If you’re not ready for chains or ropes yet, simply find a Dip Stand to use. The stationary bars on the Dip Stand are an easier starting point for beginning strength trainers.

Published by www.criticalbench.com
MOVEMENT PATTERN #2 HORIZONTAL PULLING
This is the Bent-over Row as performed with a barbell. Start from a standing position holding the bar with both hands in an overhand grip as shown, with the hands shoulder-width apart. Bend forward at the waist while keeping the back fairly ‘flat’. A slight bend in the knees will help act as a shock absorber as you execute multiple repetitions. To perform, pull the bar towards your belly. Initiate the pulling motion with the elbows rather than the hands. Imagine that your back muscles are doing all of the pulling and that your arms are just ‘along for the ride’. Don’t forget to experiment with other objects too… Here is an example of Bent-over Rowing performed with a beer keg.
At the gym: Find yourself a suitable barbell and you will be ready to begin.

Published by www.criticalbench.com
MOVEMENT PATTERN #2 HORIZONTAL PULLING
Here is another example of Bent-over Rowing performed with two dumbbells. The body position remains the same and the direction of pull is also the same. The important thing to take away from these examples is that you can accomplish the same goals using a variety of tools, so if you only have a few tools at your disposal don’t let that be an excuse not to train. Additionally, if you have access to a variety of tools… then use ALL of those tools. The variety keeps your training fresh and reduces the chances of overuse-related injuries.
At the gym: You can use dumbbells as shown or you can change from being bent-forwards to a seated position and use a Seated Cable Row Machine as an alternative.

Published by www.criticalbench.com
MOVEMENT PATTERN #2 HORIZONTAL PULLING
This is the Body Row as performed on chains. This exercise can actually be performed on just about any low, horizontal object such as a weight bar in a power rack or even a piece of playground equipment. This is also another exercise where the resistance is extremely adjustable if you are using chains. And while you can add resistance with external loading with things like rucksacks or weight vests, additional load variations can be made by elevating the feet. To perform this exercise, grab a hold of whatever your ‘handle’ happens to be and pull yourself up so that your chest is basically in line with your hands. It is important to hold your upper body and your legs in one long, straight line.
At the gym: If you have access to a power rack, set an Olympic bar at the appropriate height and grab it with an overhand grip to perform. You can do the same thing using the bar on a Smith Machine.

Published by www.criticalbench.com
MOVEMENT PATTERN #2 HORIZONTAL PULLING
The Dumbbell Row is a rowing variation that requires a bench. Position yourself so that your back is flat and that the dumbbell has an unobstructed path to travel upwards. Before you begin, ensure that the weight is motionless. You don’t want to use any swinging or momentum to perform the movement.
To perform, pull the dumbbell straight while keeping your elbow close to your body. Pull until your upper arm is at least parallel with the floor, but most guys like to pull the dumbbell up as high as they can which is just fine. Lower the dumbbell under control while maintaining your body alignment.
At the gym: Find yourself a flat bench and a dumbbell and you’ll be good-to-go.

Published by www.criticalbench.com
MOVEMENT PATTERN #3 VERTICAL PUSHING
This is the Standing Shoulder Press. There is a little bit of body English on this one. In the ‘up’ position, the bar actually travels a little ways to the rear, past the top/center of your head.
In the ‘down’ position the elbows are forward as opposed to either side of the body. This keeps the shoulder joints tight in place so that they are less stressed when the arms are extended overhead. If your weight is lighter, keep your form tight and strict. If your weight is a bit heavy, then there is no problem using a slight bounce from a bend in the knees (not the back!). As long as you can control the weight and keep yourself safe, have at it.
At the gym: In addition to performing these with a barbell as shown, you can also do these on a Smith Machine, or shoulder press machine.

Published by www.criticalbench.com
MOVEMENT PATTERN #3 VERTICAL PUSHING
The Shoulder Press as performed with dumbbells. Keep your elbows forward and control the weight. Here, the ‘up’ position is straight above the shoulders in contrast to the barbell variation. This is due to the differences in balancing two dumbbells versus one barbell.
Here is the Shoulder Press performed with a beer keg. The shape of the keg actually helps keep the hands, arms and shoulders in optimal alignment. This is an excellent training variation as the keg is very awkward to control.
At the gym: A good gym variation of this movement is to use two low pulleys on a cable machine. You will have to fight the constant tension of the cables throughout the motion and that is a good thing.

Published by www.criticalbench.com
MOVEMENT PATTERN #3 VERTICAL PUSHING
This next series of photos depicts a progression of exercises designed to take you to the point where you can eventually perform Full Range-of-Motion (ROM) Handstand Push-ups as pictured above. This is my personal favorite vertical pushing movement, period. No fancy equipment is needed to do this, just Savage Strength! All of the movements in this photo series emphasize the vertical pushing motion, even the first ones which kind of look like lop-sided push-ups. The exercises will become progressively more intense as the angle of the body is adjusted to provide increasing resistance. Don’t be in too much of a hurry with these. Part of what you are learning is how to balance and control your body in unusual positions and this takes time.

Published by www.criticalbench.com
MOVEMENT PATTERN #3 VERTICAL PUSHING
In this first variation, my feet are only about two feet off of the floor. The key to performing it correctly is to get your upper body above your shoulders as much as you can. And just like the Shoulder Press… keep your elbows in and forward, not out to the side. Once you’re in position, drop down. I prefer to touch my head (carefully) to the floor, but this is not a requirement. From the ‘down’ position simply press straight up to complete the repetition.
In this second variation the load has been increased simply by raising my feet to a higher elevation. You will find that it is easier to get the proper upper-body alignment as you increase the height of your foot placement. Other than that, the movement is performed exactly as before in the first example.
At the gym: Prop your feet on a flat bench or you can even have a workout partner hold your feet at whatever height works best for you.

Published by www.criticalbench.com
MOVEMENT PATTERN #3 VERTICAL PUSHING
This is it… ‘legitimate’ Handstand Push-ups. Not too many people get to this point and that’s too bad. Those people are missing out on a serious strength-building movement. This is one of those exercises that is as much about technique as it is about strength. If you will just put the time in and do the progression exercises you can get there. For most people, the hardest part of this exercise is first getting into the ‘up’ position. This will take some trial and error. As you can see in the photos, my hands are set just beyond shoulders-width distance apart. I usually begin by first placing my hands flat on the floor approximately 10” to 12” away from the wall and then just kicking over into a handstand. If you’re not used to hold this handstand position, it’s like a lot of the exercises in this guide… you’ve got to keep your body tight or the whole structure falls apart. So tighten up everything from your core to your toes. To execute drop straight down and then press crisply back up. When just starting out, be extremely careful. As I said before, I prefer to touch my head (lightly) on the floor at the bottom of the repetition. But this is not a requirement. It’s okay to start out performing this exercise with a limited range of motion until you become more confident with it over time. Then you can gradually increase the depth of your repetitions. Note: If at any time you need to bail out on a repetition, just let your feet come off of the wall and tip your whole body forward to take the load off of your arms and shoulders. The most important thing is to get off of your head and neck (by tipping forward) if you should start to ‘fail’ during your repetition.
At the gym: The only tricky part about doing this at the gym is not crashing into anyone while you’re getting into position or finishing up the exercise. Maintain your situational awareness!

Published by www.criticalbench.com
MOVEMENT PATTERN #3 VERTICAL PUSHING
Here they are… Full Range-of-Motion Handstand Push-ups. In this example I’m using cinder blocks to support myself. Whatever supports you use, make sure that they are more than strong enough to support your weight and that they will not slide, tip or roll while you are using them. To perform the movement the most important aspect is to safely get into position. This means that you may need to experiment with where to place your supports. Once you’re in the ‘up’ position, carefully drop into the ‘down’ position. You’ll know you’re there when your upper arms are parallel with the floor. From that position simply press yourself back up.
At the gym: One option is to position yourself between two flat benches. Another is to make two stacks of weight plates to use for your platforms. Just make sure that they are not going to slide apart from each other when you’re performing the exercise.

Published by www.criticalbench.com
MOVEMENT PATTERN #4 VERTICAL PULLING
My goal is to get you doing lots of Pull-ups and Chin-ups. And I really want to get you doing them on chains, ropes or straps. When you are hanging from two suspended handles the targeted muscles have to work much harder to stabilize your body while still performing the exercise. To clarify here, Pull-ups are done when you hands are facing away from you and with Chin-ups, you hands are facing you. There is believed to be more back muscle activation with Pull-ups and more bicep activation with Chin-ups. Since it is good to have a strong back and strong arms you should do both. If you can’t yet do either one without assistance, try this variation. Prop your feet on an object that’s high enough to take off enough load that you can perform your targeted number of repetitions. As you become stronger, your platform simply becomes lower until you reach the point where you can do free-hanging Pull-ups and Chin-ups.
At the gym: Get in a power rack or a Smith Machine and set the bar at a height where you’re pulling as hard as you can to get yourself into the ‘up’ position while resting a portion of your weight on the floor. Continue raising the bar until you’re strong enough to perform a standard Chin-up or Pull-up.

Published by www.criticalbench.com
MOVEMENT PATTERN #4 VERTICAL PULLING
Just about everyone knows how to do Pull-ups and Chin-ups; it’s really just a question if you can do them yet. A key benefit of performing them on chains as shown in the photos is that it will really help take to take stress off of your elbow and wrist joints. Now to perform, go all the way down and come all the way up. You’ll know you’re up all the way when you upper and lower arms are touching and you can’t come up any higher.
Regular Pull-ups and Chin-ups getting too easy? They can be made screamingly difficult simply by adding weight to your body. Chains, weight vests, rucksacks, holding dumbbells between your legs, whatever you have on hand will work just fine.

Published by www.criticalbench.com
MOVEMENT PATTERN #5 LOWER LIMB PUSHING
Here is a simple variation of the Barbell Squat. Feet are flat on the floor and spaced approximately shoulders-width distance apart. They are a couple of inches in front of a bench. The bench can be anything… an upside-down bucket, milk crate, or plyo box at the gym as long it’s the correct height. With the bar positioned behind your head and supported with your arms, you’re ready to begin.
In a controlled manner, squat straight down until you are (lightly) sitting on the bench. Don’t sit down all the way; keep some tension on your legs so that you can crisply return to a standing position. The bench allows you to keep good form, but make sure it’s low enough that your upper legs are parallel with the floor in the ‘down’ position.
At the gym: Get in a power rack, between squat stands or on a Smith Machine to perform.

Published by www.criticalbench.com
MOVEMENT PATTERN #5 LOWER LIMB PUSHING
These are Step-ups performed with a barbell. They are an excellent lower body exercise that helps to develop leg strength ‘unilaterally’ (one leg at a time). Once the barbell is in position you simply step up onto your platform. In the photo I’m just using four cinder blocks stacked two by two.
Look closely and you’ll see that as I step up with my left leg I then step down with my right. On the next repetition I will initiate the step up with my right leg and keep alternating back and forth until the set is finished.
At the gym: A flat bench, squat box or plyometric box will all work as a suitable base for this exercise.

Published by www.criticalbench.com
MOVEMENT PATTERN #5 LOWER LIMB PUSHING
The Step-up is extremely versatile. It can be performed while holding a barbell, dumbbells, a rucksack or even with a training partner on your back. In this example I am performing Step-ups while holding a beer keg. Using unconventional objects like this is very challenging and very productive. Just be careful. For example, holding a keg doesn’t allow me to see where I’m stepping. At the gym: A flat bench, squat box or plyometric box will all work as a suitable base for this exercise.

Published by www.criticalbench.com
MOVEMENT PATTERN #5 LOWER LIMB PUSHING
This is a Lunge as performed while holding a barbell. Lunges are great because like Step-ups they require the legs to work independently. This particular Lunge variation is a ‘Standing Lunge’, so-named because after each leg steps out and down it returns to the same standing position that you started from. To perform, step forward with either leg far enough to allow you to dip your opposite knee towards the floor. Keep your knee in line with your torso while in the ‘down’ position. This is one of those exercise where you have to hit both legs before you can count a single repetition. Now If you’re like me and want to touch the low knee to the floor, that’s fine. But be careful and avoid banging your knees against the floor.
At the gym: Try to find an area where the floor is semi-padded so you don’t abuse your knees. But not too soft a surface or you’ll compromise your footing and stability.

Published by www.criticalbench.com
MOVEMENT PATTERN #5 LOWER LIMB PUSHING
This Lunge variation is performed while carrying dumbbells. This variation is called a Walking Lunge; because you proceed forward until your set is finished, meaning you are actually ‘walking’ across the floor while performing the exercise. Using dumbbells for Walking Lunges is easier for most people because the weight travels closer to the floor and doesn’t require as much balancing as a barbell. Take a look the photo series to see how to perform Walking Lunges.
At the gym: The only challenge in doing this at the gym is having an unobstructed path in which to work. If the gym is crowded, it might be hard to pull this one off.
In this photo the right leg has made the first step or ‘lunge’ forward. Try to keep your weights in line with your spine and keep your head straight above your hips. If you start leaning forward you can easily become off-balanced and fall over.

Published by www.criticalbench.com
MOEMENT PATTERN #5 LOWER LIMB PUSHING
In the standing position, keep an erect posture and control the weights so they don’t swing forward and pull you off-balance.
Stepping/lunging now with the left leg. He head is still over the hips, weights in line with spine.
Returning to the standing position. This is the completion of one full repetition.

Published by www.criticalbench.com
MOEMENT PATTERN #5 LOWER LIMB PUSHING
Here is a squat variation I call Chain Squats, and they are more challenging than they might look at first. Because you are using the chains, you are able to place yourself in the optimal position with your shins straight up and down. This in turn will place all of the load on your upper legs. To perform this exercise, you will descend into the squat position as deeply as possible. With your shins vertical like this, there is very little stress across the knee joint. So go way down and you will experience a very intense muscular contraction. When these become too easy for you, another way to increase the intensity of this movement is to turn them into Jumping Chain Squats. To perform this variation, from a standing position drop into the bottom position and then explosively jump up as hard as you can. Using your legs like shock-absorbers, land back into the bottom ‘squat’ position and continue to perform the rest of your repetitions. Note: Any type of explosive movement can cause injury if you’re not careful. Explosive or ballistic muscle contractions are very intense and can strain or even tear muscle tissue if you are not sufficiently conditioned to perform them. It is also possible to injure joints on the ‘landing phase’ of these explosive exercises. So pay close attention to how you are landing in order to minimize impact and stress on your joints.
At the gym: You can use a single length of rope looped over the top of a power rack or chinning bar and perform the movement while holding both ends.

Published by www.criticalbench.com
MOVEMENT PATTERN #5 LOWER LIMB PUSHING
In this Chain Squat variation, I have added load to the movement by strapping on a rucksack. The exercise is performed in the same way as before with a controlled descent into a deep ‘bottom’ position. Note: If you decide that you have gotten to the point where you might want to try Jumping Chain Squats with the load of a rucksack or weight vest, understand that you’re getting into risky territory. Many people have injured their joints simply by performing explosive ‘bodyweight-only’ movements. Things like clapping push-ups and box jumps have torn up plenty of athletes. The addition of weight creates high levels of joint stress that can take you beyond the point of being productive. This is simply a risk versus benefit issue. The other safety factor is that if you are flying through the air with weights strapped to your body and those weights come loose - all kinds of bad things can happen.

Published by www.criticalbench.com
MOVEMENT PATTERN #6 BODY EXTENSION
This is the Stiff-Leg Dead Lift. Hands are shoulder-widths distance apart and are positioned in what is called a ‘mixed-grip’, with one hand palm-down and the other palm-up. This grip prevents the barbell from pulling your hands open like it would if both hands were in a palms-down or overhand grip. Remember to alternate grips on each set. Keep your arms locked out, they do not perform the pulling motion. Keep your shoulders back, your back flat and tight, and keep your head up throughout the whole repetition. To perform, carefully bend forward at the waist. The bar stays very close to the legs throughout the movement. Descend until your upper body is parallel with the floor to reach the ‘bottom’ position.
From the bottom, with your back flat and tight, pull yourself back to the ‘up’ position by contracting your butt and back muscles. Return to a standing position to complete the repetition.

Published by www.criticalbench.com
MOVEMENT PATTERN #6 BODY EXTENSION
The Stiff-Leg Dead Lift can also be performed with a variety of implements. Dumbbells, sandbags or logs can all be used. In this example I am using a keg to perform the exercise. Any time that you use alternative training tools (often called ‘odd objects’ in the strongman training community) like those listed above, you need to be prepared to modify certain aspects of the exercise based on the item you are using. Unlike the barbell, there is only one way to grip the keg; with the hands grasping the outside edge of the keg. Other than the grip, the rest of the body mechanics remain the same. Head up, shoulders back, back straight and flat (not arched). The body bends forward at the waist until the upper body is parallel with the floor and then back up to a standing position. Things like kegs were not designed for lifting, and as a result they can be awkward to handle. This is great for your training as it forces your body to move in ways it is not accustomed to.
At the gym: You are not likely to find odd-objects at your gym, so plan on using a mix of barbells and dumbbells to perform this very effective exercise.

Published by www.criticalbench.com
MOVEMENT PATTERN #6 BODY EXTENSION
Here is another that almost nobody does but is a tremendous strength builder. It is commonly called the Suitcase Dead Lift, so named because the load is on only one side of the body. This means that you have to deal with the weight in same way that you would carry a single suitcase on one side or the other. It is performed much the same way as the Stiff Leg Dead Lift. The key difference is that you will have to adjust the load way down from what you might normally use with a barbell. This is because the off-balanced load is very challenging to stabilize. And stabilize it you will, because if you allow your body to twist out of position you are asking for some horrible nagging injuries. This is a crazy challenge to your core, so be ready. Start lighter than you think you need to until you can determine an appropriate training poundage. Then, let ‘er rip!

Published by www.criticalbench.com
MOVEMENT PATTERN #6 BODY EXTENSION
Here is a variation of the popular Back Hyperextension exercise which does not require any equipment whatsoever. However, you will need a training partner. These are called Body Drops. To perform the exercise, start by kneeling on the floor. Some people prefer to kneel on a folded towel for a little extra cushion. Your training partner kneels behind you and holds your feet in place. Have them adjust their position so that they can hold your feet with their arms locked out and leaning their chest forward. This in turn makes it easier from them to hold you.
Now simply fall forward towards the floor while resisting the motion as hard as you can all the way down. This means that you are contracting your hamstrings and lower back muscles hard. Perform an explosive push-up to return to the start position and continue the set. Over time you can get strong enough that you can actually go down and back up just by contracting the targeted muscles. If you get to this point, you have built an iron-clad lower back.
At the gym: Many gyms have now Glute-Ham Developers which allow an ‘improved’ version of this movement. If yours doesn’t, grab a buddy and perform the exercise as shown.

Published by www.criticalbench.com
MOVEMENT PATTERN #6 BODY EXTENSION
This is an exercise that was commonly performed 30-plus years ago and more, but you almost never see any more at the gym. But some of the strongest men in the world have never stopped performing them. They are called Good Mornings, as the exercise resembles the bowing motion used to greet someone. Start by placing a barbell behind your head and assume the same position as you would for a barbell squat. Then with your shoulders back and your back flat (is this starting to sound familiar?) carefully bend forward at the waist until your upper body is parallel with the floor. Complete the repetition by returning to a standing position. Note: As great as this exercise is, you must be very careful when performing it. The great Bruce Lee injured his back while performing this movement with too much weight. (He had loaded up the barbell with almost his entire bodyweight!). Any exercise that can hurt Bruce Lee must be respected, so be careful.

Published by www.criticalbench.com
MOVEMENT PATTERN #7 BODY FLEXION
You should work on your Anterior Chain (midsection) just like anything else; using resistance and lower reps. This 500 sit-ups and 1,000 crunches stuff has got to stop. It’s a waste of time and impairs your body’s ability to recover. Stomach muscles are just that; muscles. So train them like you mean business, not like you’re in an aerobics class. Since I know that you already know how to perform sit-ups, take a look at these pictures to get an idea about how you can add resistance to your midsection exercises. You can grab almost anything heavy and get to work. This keg example is a variation of Weighted Sit-ups.
At the gym: Grab as many weight plates as you can handle, lay them on your chest and get to work.

Published by www.criticalbench.com
MOVEMENT PATTERN #7 BODY FLEXION
This variation is called Overhead Weighted Sit-ups. And with the weight held overhead is much more challenging than the first example. I encourage you to try it. While the photos depict a keg being used to provide the resistance, you can use a barbell, a pair of dumbbells or anything else that allows you to extend the load out over your body.
Because the keg is an awkward object to handle, it actually travels slightly forward of the body on its way to the ‘up’ position.
At the gym: Substitute a barbell or dumbbells for the keg. They’ll be easier to handle than a keg, but that doesn’t mean that the exercise itself is easy to do.

Published by www.criticalbench.com
MOVEMENT PATTERN #7 BODY FLEXION
This exercise is the Weighted Leg Raise and it hits the midsection and hip flexors from the other direction. What I’ve done here is secure the rucksack to my feet. I then bring the legs up until they are perpendicular to the floor. That is the ‘up’ position.
Now because of the weight involved, your legs are going to want to crash back to the floor. Try to ‘fight’ the weight all the way down. Will that make the exercise more painful? Yes.
At the gym: Sit down in front of a low-pulley machine and attach the ankle straps. Attach yourself to the straps and pull against a suitable weight on the weight stack. The constant tension from the cable makes this a very demanding movement.

Published by www.criticalbench.com
ARCING MOVEMENTS
You remember those exercise wheels, right? Some people call them ‘Ab Wheels’. They are those things that look like a lawn mower wheel with bicycle handles coming out of either side. Well, if you’ve ever actually tried to use one of those things then you know how beastly hard this movement is. And although people think of those little wheels as an abdominal muscle device, this exercise is a total body scorcher. The exercise shown here is called a Chain Roll-out, and it duplicates the same kind of motion that you would perform with an exercise wheel. What’s great about using the chains instead of the wheel is that the chains offer you a lot more movement variety. And the height of the handles or your feet can be adjusted to vary the resistance. Begin this movement by bending forward at the waist with your weight resting on the chains. From here, just lean forward as though you were ‘sliding’ your hands away from your feet. Hold your body tight and keep leaning out until you are as deep as you are able to go while keeping your body straight. Pause slightly and then tighten up to reverse the motion and pull yourself back to the ‘up’ position.
At the gym: Take an olympic bar and place a 25 lb. plate on either side. Grab the center of the bar with your hands spaced as shown above and assume the same body position. Then just roll the bar forward, allowing the weight plates to function like wheels on the bar. After you’ve hit the ‘out’ position, you can return to a standing position for another rep or try to reverse the motion by contracting your core. Good luck!

Published by www.criticalbench.com
ARCING MOVEMENTS
Here is another ‘blast from the past’ exercise. This is the Straight Arm Pullover. You should start out with a lighter weight than you think you need. This is because very few people have trained this particular movement pattern and you are in a pretty vulnerable position in the ‘down’ position. To perform, grab a weight and lock it out directly overhead. Then while keeping your arms locked out, slowly let the weight descend behind your head. Let the weight continue to go backwards until it reaches the position shown in the photo with the arms overhead. This is the ‘down’ position. To complete the repetition, think of your locked arms as a single unit and imagine pulling with your elbows back to the ‘up’ position. Note: Do not allow the weight to simply ‘fall’ into position. Always keep it under your control. And do not let the weight ‘bounce’ at the bottom of the movement; this is an invitation to injury.

Published by www.criticalbench.com
ARCING MOVEMENTS
This exercise looks like a dumbbell flye, if you can imagine doing one upside down. But the dumbbell version is an isolation movement for the chest area, whereas this exercise will hurt you all over your body. This is called a Chain Flye. You start the same way as performing Chain Push-ups. So your arms are locked and body is held tight in a straight line from head to toe. The only ‘trick’ is that while your arms are ‘locked’ they are not ‘locked out’. You will need a slight bend in the elbows which stays constant throughout the movement. This elbow-bend allows your shoulders to move more comfortably during the exercise. To perform, keep your body straight and allow your arms to ‘fall’ out to the sides. At the same time your body will drop down towards the floor. The ‘down’ position will be limited by your current strength level and shoulder flexibility. It will improve over time, so don’t worry about rushing on this exercise. To return to the ‘up’ position, bring your hands together while maintaining the locked-arms position.
At the gym: If you don’t have a ‘chain-rig’ with you, simply substitute standard Dumbbell Flyes.

Published by www.criticalbench.com
ISOLATION MOVEMENTS
This is our first example of an isolation exercise. This one is called the Tricep Press. To perform, position your weight overhead with your arms extended. Allow the weight to descend downwards until your forearms are at least parallel with the floor. (You can go down farther if you want to). To complete the repetition, press the weight back up and return to the starting position.
Note: That is a metal weight right behind your head. Try to keep those two things from running into each other.

Published by www.criticalbench.com
ISOLATION MOVEMENTS
This isolation movement is the Standing Dumbbell Curl. And this particular variation is often called a Hammer Curl, so named because the palms face the sides of the body throughout the movement as though you are holding a hammer. Begin with the weights hanging at the sides of your body. Then, while keeping your elbows close to your sides. Bring the weights forward and upward until your forearms are perpendicular to the floor. To complete the repetition, lower the weight back down to the starting position. Note: Avoid swinging the weights or leaning your body forward or backward and focus the effort on your arms.
Published by www.criticalbench.com
ISOLATION MOVEMENTS
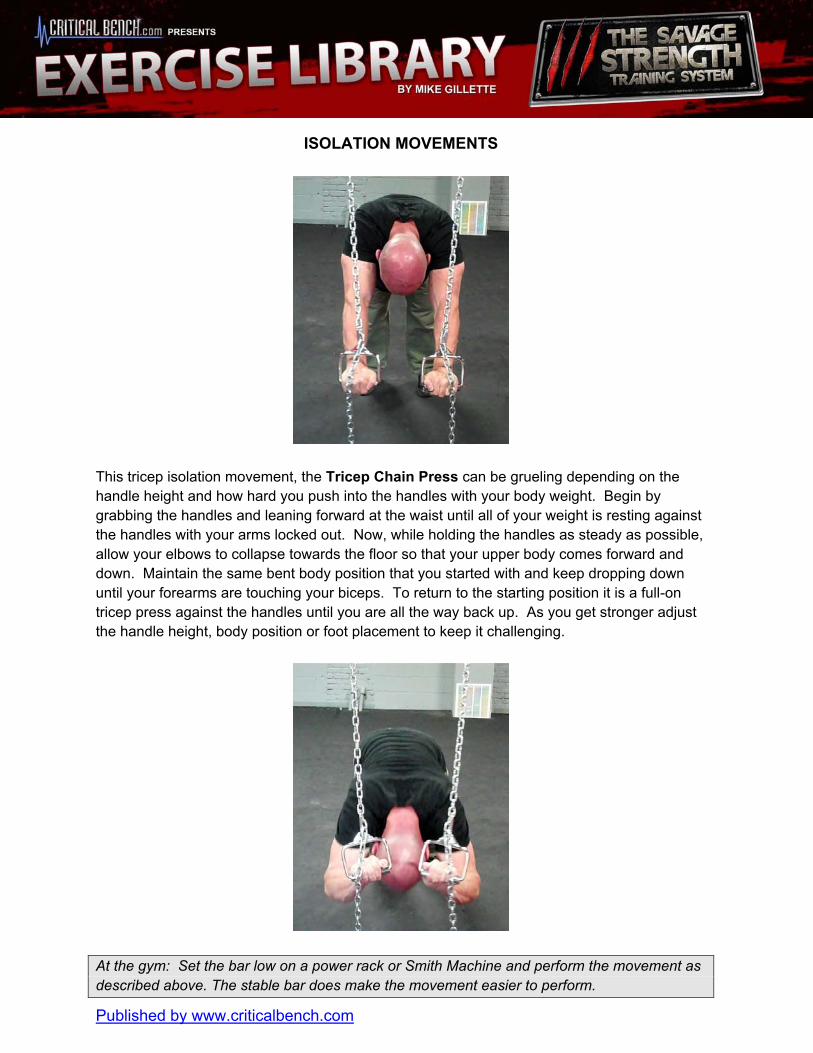
This tricep isolation movement, the Tricep Chain Press can be grueling depending on the handle height and how hard you push into the handles with your body weight. Begin by grabbing the handles and leaning forward at the waist until all of your weight is resting against the handles with your arms locked out. Now, while holding the handles as steady as possible, allow your elbows to collapse towards the floor so that your upper body comes forward and down. Maintain the same bent body position that you started with and keep dropping down until your forearms are touching your biceps. To return to the starting position it is a full-on tricep press against the handles until you are all the way back up. As you get stronger adjust the handle height, body position or foot placement to keep it challenging.
At the gym: Set the bar low on a power rack or Smith Machine and perform the movement as described above. The stable bar does make the movement easier to perform.

Published by www.criticalbench.com
EXERCISE LIBRARY CONCLUSION Okay, get ready for the Savage Strength workouts…. Now you have two choices here, you can use the workout examples as a guideline only and substitute the exercises that you prefer in the same movement patterns. This means that you will be basically be putting together your own workouts from Day 1. Or, if you just want to start training without any further delay and a maximum of simplicity, then pull out your handy training logs that came with your purchase of the Savage Strength Training System. This ‘Quick-Start’ approach will provide you with 4-months worth of workouts complete with pre-selected exercises, sets and repetitions. Then, once you’ve mastered the various program components, you should be comfortable selecting exercise and movement variations to continue your ongoing progress. A Final Word… These movements will give you an introduction to training the Savage Strength way. Remember that doing the exercises correctly is just as critical as how much load you use. It may take a little time, but it will be worth it. Keep in touch by asking questions and be sure to share any Savage Strength discoveries of your own. Now go become STRONG. Your Strength Coach, Mike Gillette
To View Video Demonstrations Of Many Of These Exercises Visit This Link: http://www.criticalbench.com/gains/savage-strength-exercise-demos