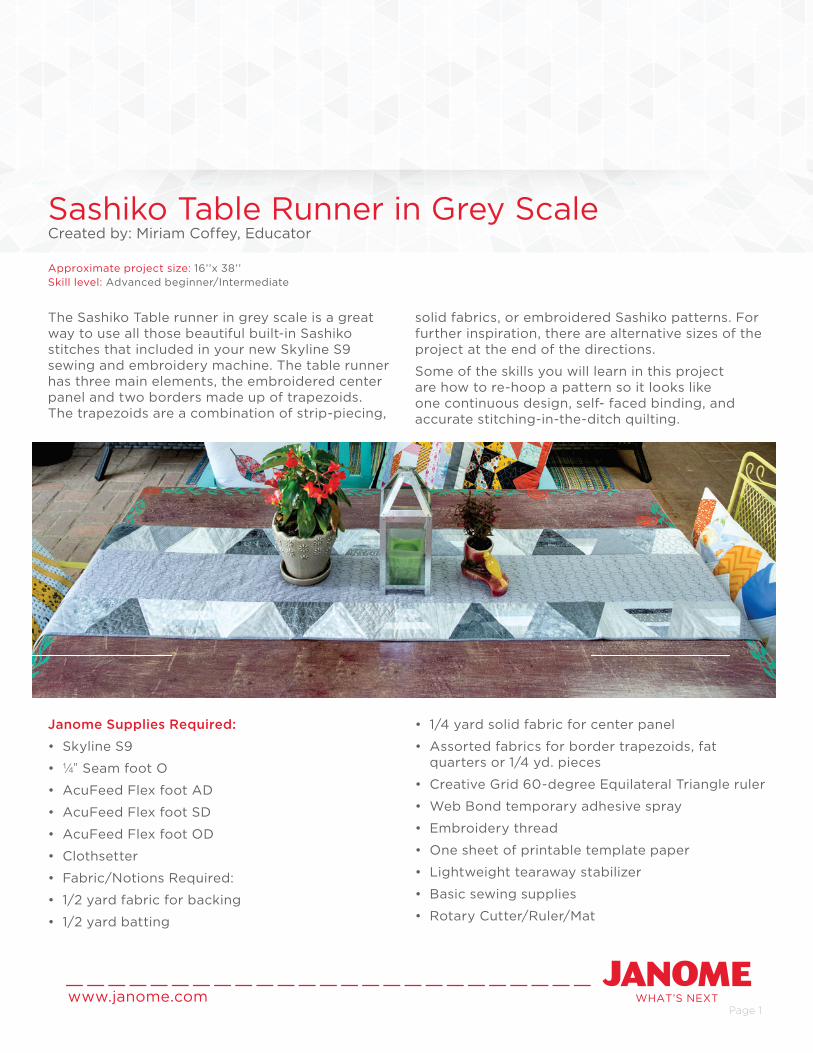
Sashiko Table Runner in Grey Scale - Janome · The Sashiko Table runner in grey scale is a great...
6
Sashiko Table Runner in Grey Scale Created by: Miriam Coffey, Educator WHAT’S NEXT www.janome.com Page 1 Janome Supplies Required: • Skyline S9 • ¼” Seam foot O • AcuFeed Flex foot AD • AcuFeed Flex foot SD • AcuFeed Flex foot OD • Clothsetter • Fabric/Notions Required: • 1/2 yard fabric for backing • 1/2 yard batting • 1/4 yard solid fabric for center panel • Assorted fabrics for border trapezoids, fat quarters or 1/4 yd. pieces • Creative Grid 60-degree Equilateral Triangle ruler • Web Bond temporary adhesive spray • Embroidery thread • One sheet of printable template paper • Lightweight tearaway stabilizer • Basic sewing supplies • Rotary Cutter/Ruler/Mat Approximate project size: 16’’x 38’’ Skill level: Advanced beginner/Intermediate The Sashiko Table runner in grey scale is a great way to use all those beautiful built-in Sashiko stitches that included in your new Skyline S9 sewing and embroidery machine. The table runner has three main elements, the embroidered center panel and two borders made up of trapezoids. The trapezoids are a combination of strip-piecing, solid fabrics, or embroidered Sashiko patterns. For further inspiration, there are alternative sizes of the project at the end of the directions. Some of the skills you will learn in this project are how to re-hoop a pattern so it looks like one continuous design, self- faced binding, and accurate stitching-in-the-ditch quilting.
-
Upload
truongphuc -
Category
Documents
-
view
232 -
download
0
Transcript of Sashiko Table Runner in Grey Scale - Janome · The Sashiko Table runner in grey scale is a great...
Sashiko Table Runner in Grey ScaleCreated by: Miriam Coffey, Educator
WHAT’S NEXTwww.janome.comPage 1
Janome Supplies Required:
• Skyline S9
• ¼” Seam foot O
• AcuFeed Flex foot AD
• AcuFeed Flex foot SD
• AcuFeed Flex foot OD
• Clothsetter
• Fabric/Notions Required:
• 1/2 yard fabric for backing
• 1/2 yard batting
• 1/4 yard solid fabric for center panel
• Assorted fabrics for border trapezoids, fat quarters or 1/4 yd. pieces
• Creative Grid 60-degree Equilateral Triangle ruler
• Web Bond temporary adhesive spray
• Embroidery thread
• One sheet of printable template paper
• Lightweight tearaway stabilizer
• Basic sewing supplies
• Rotary Cutter/Ruler/Mat
Approximate project size: 16’’x 38’’ Skill level: Advanced beginner/Intermediate
The Sashiko Table runner in grey scale is a great way to use all those beautiful built-in Sashiko stitches that included in your new Skyline S9 sewing and embroidery machine. The table runner has three main elements, the embroidered center panel and two borders made up of trapezoids. The trapezoids are a combination of strip-piecing,
solid fabrics, or embroidered Sashiko patterns. For further inspiration, there are alternative sizes of the project at the end of the directions.
Some of the skills you will learn in this project are how to re-hoop a pattern so it looks like one continuous design, self- faced binding, and accurate stitching-in-the-ditch quilting.
Sashiko Table Runner in Grey Scale
WHAT’S NEXTwww.janome.comPage 2
Cutting Instructions:
• Border trapezoid fabric: Cut strips in a variety of sizes ranging from 1’’- 2.5’’ x WOF
• Backing fabric: 17.25’’ x 40’’
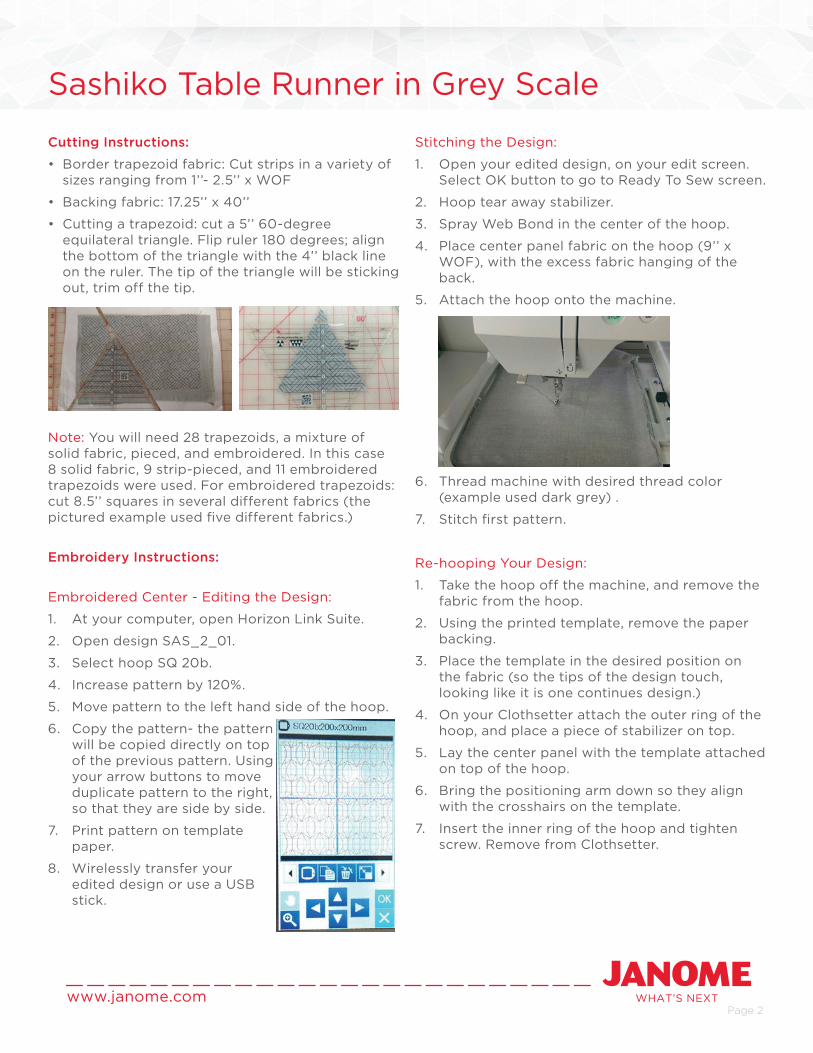
• Cutting a trapezoid: cut a 5’’ 60-degree equilateral triangle. Flip ruler 180 degrees; align the bottom of the triangle with the 4’’ black line on the ruler. The tip of the triangle will be sticking out, trim off the tip.
Note: You will need 28 trapezoids, a mixture of solid fabric, pieced, and embroidered. In this case 8 solid fabric, 9 strip-pieced, and 11 embroidered trapezoids were used. For embroidered trapezoids: cut 8.5’’ squares in several different fabrics (the pictured example used fi ve different fabrics.)
Embroidery Instructions:
Embroidered Center - Editing the Design:
1. At your computer, open Horizon Link Suite.
2. Open design SAS_2_01.
3. Select hoop SQ 20b.
4. Increase pattern by 120%.
5. Move pattern to the left hand side of the hoop.
6. Copy the pattern- the pattern will be copied directly on top of the previous pattern. Using your arrow buttons to move duplicate pattern to the right, so that they are side by side.
7. Print pattern on template paper.
8. Wirelessly transfer your edited design or use a USB stick.
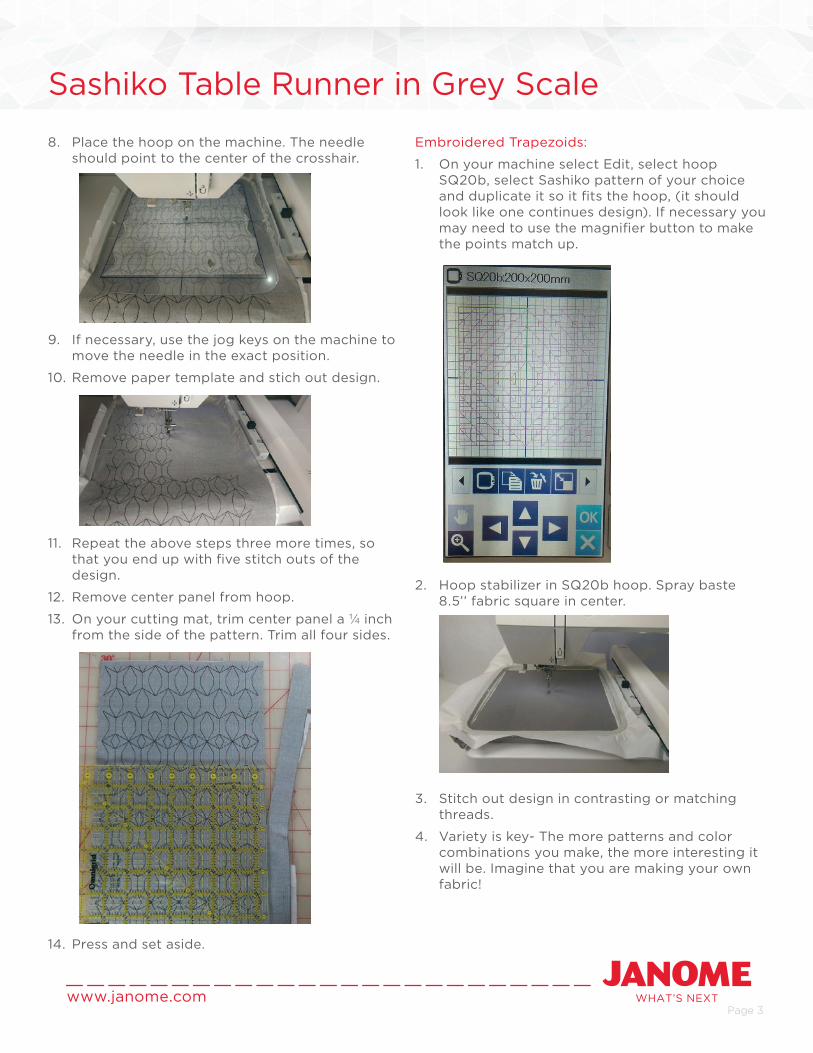
Stitching the Design:
1. Open your edited design, on your edit screen. Select OK button to go to Ready To Sew screen.
2. Hoop tear away stabilizer.
3. Spray Web Bond in the center of the hoop.
4. Place center panel fabric on the hoop (9’’ x WOF), with the excess fabric hanging of the back.
5. Attach the hoop onto the machine.
6. Thread machine with desired thread color (example used dark grey) .
7. Stitch fi rst pattern.
Re-hooping Your Design:
1. Take the hoop off the machine, and remove the fabric from the hoop.
2. Using the printed template, remove the paper backing.
3. Place the template in the desired position on the fabric (so the tips of the design touch, looking like it is one continues design.)
4. On your Clothsetter attach the outer ring of the hoop, and place a piece of stabilizer on top.
5. Lay the center panel with the template attached on top of the hoop.
6. Bring the positioning arm down so they align with the crosshairs on the template.
7. Insert the inner ring of the hoop and tighten screw. Remove from Clothsetter.
Sashiko Table Runner in Grey Scale
WHAT’S NEXTwww.janome.comPage 3
8. Place the hoop on the machine. The needle should point to the center of the crosshair.
9. If necessary, use the jog keys on the machine to move the needle in the exact position.
10. Remove paper template and stich out design.
11. Repeat the above steps three more times, so that you end up with fi ve stitch outs of the design.
12. Remove center panel from hoop.
13. On your cutting mat, trim center panel a ¼ inch from the side of the pattern. Trim all four sides.
14. Press and set aside.
Embroidered Trapezoids:
1. On your machine select Edit, select hoop SQ20b, select Sashiko pattern of your choice and duplicate it so it fi ts the hoop, (it should look like one continues design). If necessary you may need to use the magnifi er button to make the points match up.
2. Hoop stabilizer in SQ20b hoop. Spray baste 8.5’’ fabric square in center.
3. Stitch out design in contrasting or matching threads.
4. Variety is key- The more patterns and color combinations you make, the more interesting it will be. Imagine that you are making your own fabric!
Sashiko Table Runner in Grey Scale
WHAT’S NEXTwww.janome.comPage 4
5. After you have stitched out as many Sashiko patterns and in as many color combinations as you would like, it is time to cut them.
6. Depending on which design you choose and what size you made them will determine how many trapezoids you can get out of one embroidered pattern. On average, two will fi t on each embroidery Sashiko design.
7. Cut trapezoids by following the directions under The Cutting Instructions heading.
8. For the shown example, eleven embroidered trapezoids where made.
9. Set aside.
Sewing Instructions:
Sewing Strips:
1. Switch to Ordinary Sewing Mode.
2. Attach ¼” Seam foot O. Thread machine with piecing thread.
3. Select Sewing Applications, select Quilt, select stitch number two (¼” seam stitch).
4. Gather previously cut strips for pieced trapezoids.
5. Place strips in desired order.
6. Sew seams.
7. Strips do not need to be larger than 5.5’’.
8. Press seams to one side.
9. Cut out trapezoids from strips using the directions found under The Cutting Instructions heading.
10. The sample shows nine pieced trapezoids where made.
Sewing Borders:
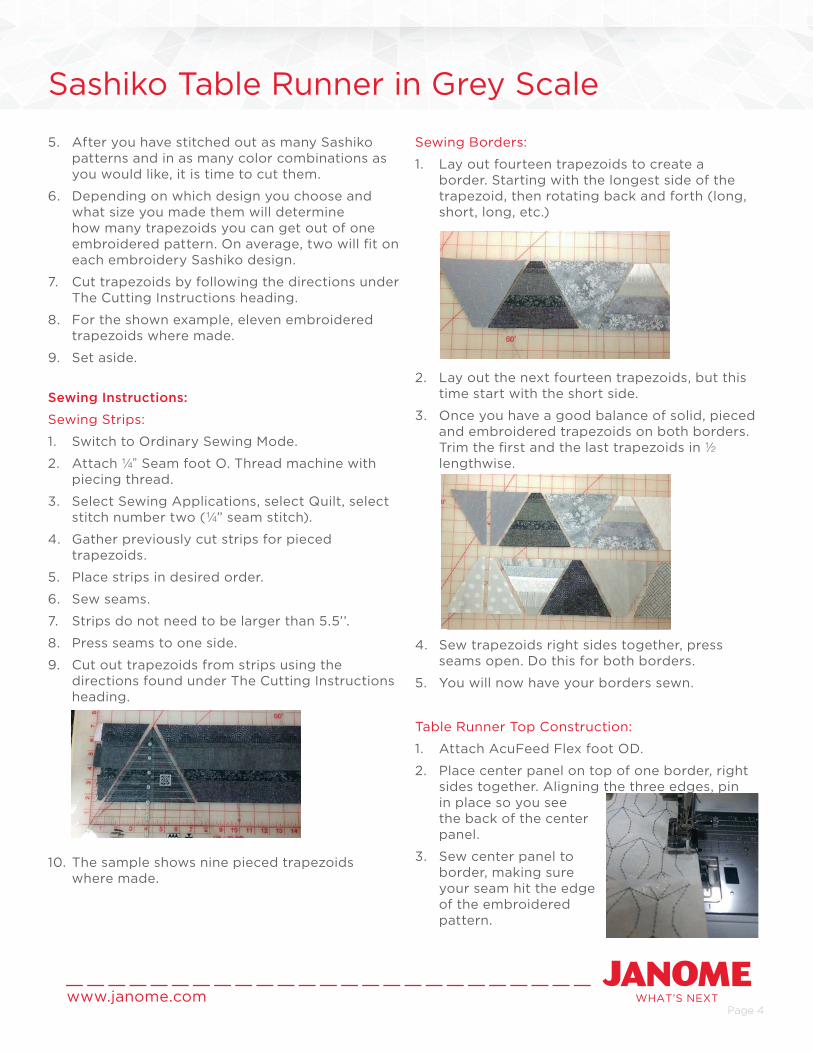
1. Lay out fourteen trapezoids to create a border. Starting with the longest side of the trapezoid, then rotating back and forth (long, short, long, etc.)
2. Lay out the next fourteen trapezoids, but this time start with the short side.
3. Once you have a good balance of solid, pieced and embroidered trapezoids on both borders. Trim the fi rst and the last trapezoids in ½ lengthwise.
4. Sew trapezoids right sides together, press seams open. Do this for both borders.
5. You will now have your borders sewn.
Table Runner Top Construction:
1. Attach AcuFeed Flex foot OD.
2. Place center panel on top of one border, right sides together. Aligning the three edges, pin in place so you see the back of the center panel.
3. Sew center panel to border, making sure your seam hit the edge of the embroidered pattern.
Sashiko Table Runner in Grey Scale
WHAT’S NEXTwww.janome.comPage 5
4. Repeat steps 3 and 4 with the remaining border.
5. Press seams out.
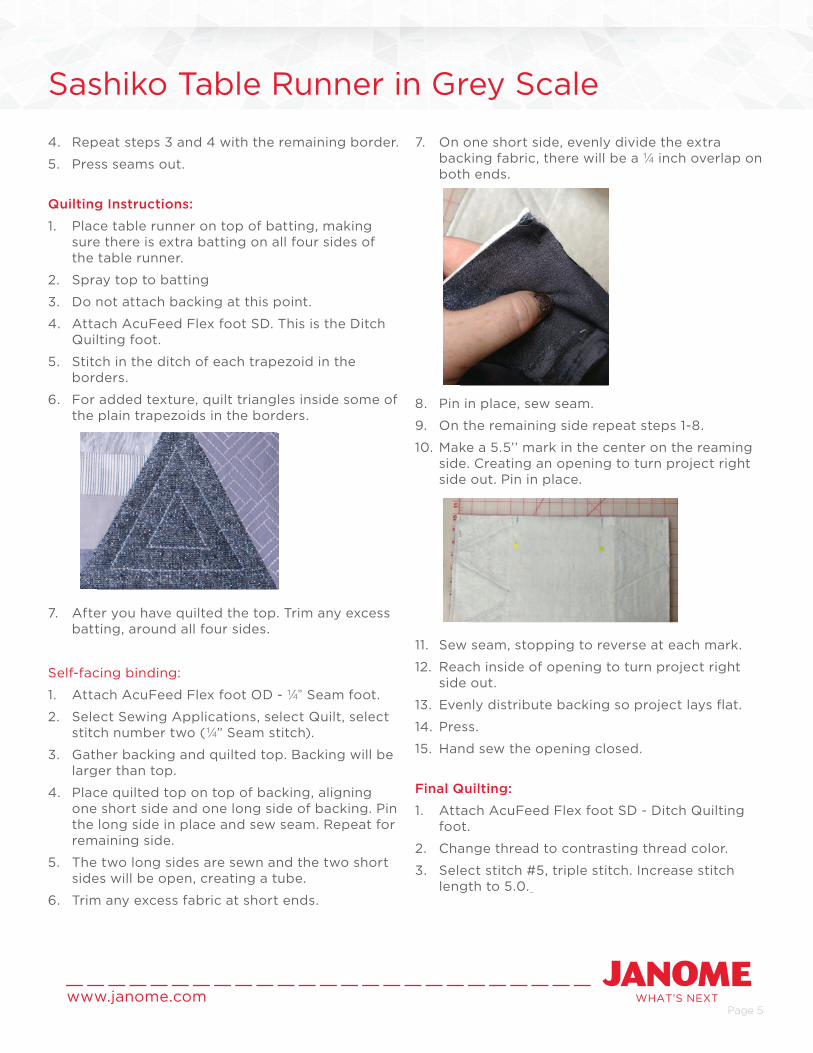
Quilting Instructions:
1. Place table runner on top of batting, making sure there is extra batting on all four sides of the table runner.
2. Spray top to batting
3. Do not attach backing at this point.
4. Attach AcuFeed Flex foot SD. This is the Ditch Quilting foot.
5. Stitch in the ditch of each trapezoid in the borders.
6. For added texture, quilt triangles inside some of the plain trapezoids in the borders.
7. After you have quilted the top. Trim any excess batting, around all four sides.
Self-facing binding:
1. Attach AcuFeed Flex foot OD - ¼” Seam foot.
2. Select Sewing Applications, select Quilt, select stitch number two (¼” Seam stitch).
3. Gather backing and quilted top. Backing will be larger than top.
4. Place quilted top on top of backing, aligning one short side and one long side of backing. Pin the long side in place and sew seam. Repeat for remaining side.
5. The two long sides are sewn and the two short sides will be open, creating a tube.
6. Trim any excess fabric at short ends.
7. On one short side, evenly divide the extra backing fabric, there will be a ¼ inch overlap on both ends.
8. Pin in place, sew seam.
9. On the remaining side repeat steps 1-8.
10. Make a 5.5’’ mark in the center on the reaming side. Creating an opening to turn project right side out. Pin in place.
11. Sew seam, stopping to reverse at each mark.
12. Reach inside of opening to turn project right side out.
13. Evenly distribute backing so project lays fl at.
14. Press.
15. Hand sew the opening closed.
Final Quilting:
1. Attach AcuFeed Flex foot SD - Ditch Quilting foot.
2. Change thread to contrasting thread color.
3. Select stitch #5, triple stitch. Increase stitch length to 5.0.
Sashiko Table Runner in Grey Scale
WHAT’S NEXTwww.janome.comPage 6
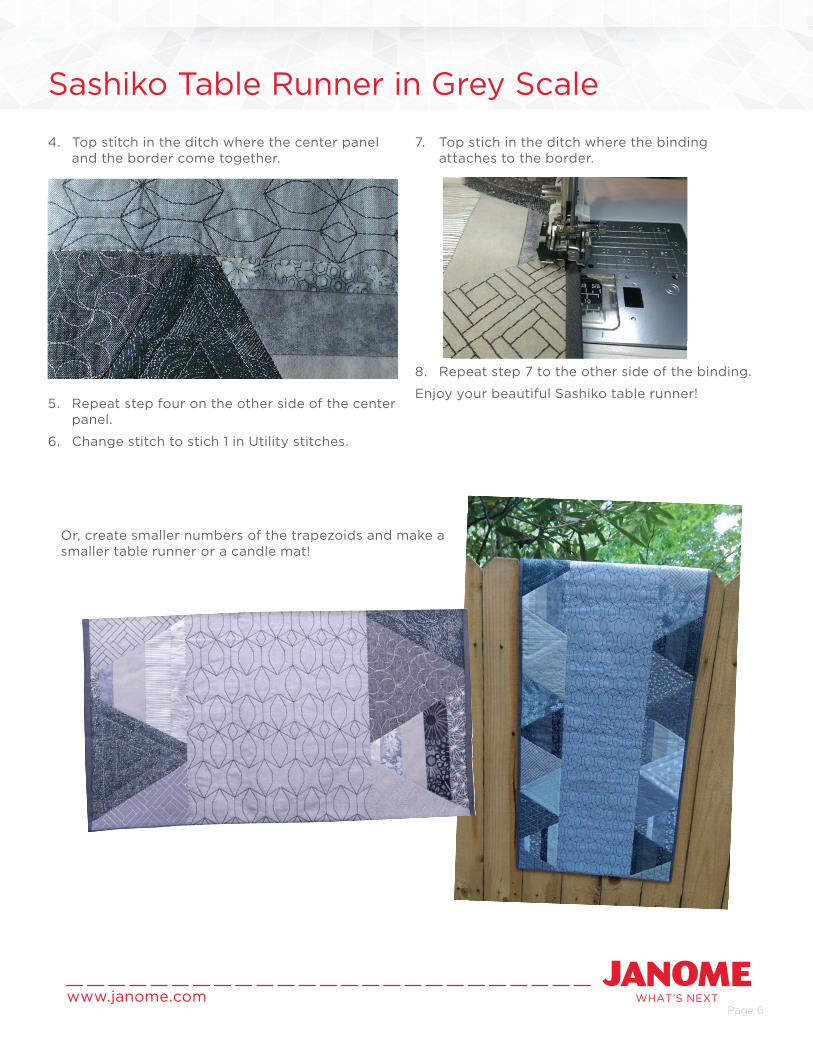
4. Top stitch in the ditch where the center panel and the border come together.
5. Repeat step four on the other side of the center panel.
6. Change stitch to stich 1 in Utility stitches.
7. Top stich in the ditch where the binding attaches to the border.
8. Repeat step 7 to the other side of the binding.
Enjoy your beautiful Sashiko table runner!
Or, create smaller numbers of the trapezoids and make a smaller table runner or a candle mat!