Storage Optimization and Operational Simplicity in SAP Adaptive Server Enterprise
Upload
trinhthienCategory
view
258download
2
SAP Control Center for SAP AdaptiveServer® Enterprise
3.3

DOCUMENT ID: DC01265-01-0330-01LAST REVISED: February 2014Copyright © 2013 by SAP AG or an SAP affiliate company. All rights reserved.No part of this publication may be reproduced or transmitted in any form or for any purpose without the express permission ofSAP AG. The information contained herein may be changed without prior notice.Some software products marketed by SAP AG and its distributors contain proprietary software components of other softwarevendors. National product specifications may vary.These materials are provided by SAP AG and its affiliated companies ("SAP Group") for informational purposes only,without representation or warranty of any kind, and SAP Group shall not be liable for errors or omissions with respect to thematerials. The only warranties for SAP Group products and services are those that are set forth in the express warrantystatements accompanying such products and services, if any. Nothing herein should be construed as constituting an additionalwarranty.SAP and other SAP products and services mentioned herein as well as their respective logos are trademarks or registeredtrademarks of SAP AG in Germany and other countries. Please see http://www.sap.com/corporate-en/legal/copyright/index.epx#trademark for additional trademark information and notices.
Contents
About SAP Control Center for SAP Adaptive ServerEnterprise ..........................................................................1
New Features in SAP Control Center for SAP AdaptiveServer Enterprise .......................................................1
User Interface Overview .................................................2Toolbar Icons ..................................................................3Status Icons ....................................................................4Display and Copy Options in SAP Adaptive Server
Enterprise Monitors ....................................................5Common Display Options ...............................................6Keyboard Shortcuts ........................................................8Displaying the Versions of SCC Components ...............10Style and Syntax Conventions ......................................10SAP Control Center Accessibility Information ...............11
Get Started ...........................................................................13Quick Start for an Evaluation ........................................13Get Started in a Production Environment .....................21Deploying an Instance from a Shared Disk Installation
..................................................................................65Enabling and Disabling Shared-Disk Mode .........66Shared-Disk Mode ...............................................67sccinstance Command ........................................68
Launching SAP Control Center .....................................72Registering the ODBC Driver in Windows ...........73Starting and Stopping SAP Control Center in
Windows ..........................................................73Starting and Stopping SAP Control Center in
UNIX ................................................................76Configuring Memory Usage .................................80scc Command ......................................................84
Logging in to SAP Control Center .................................88
SAP Control Center for SAP Adaptive Server Enterprise iii
Logging out of SAP Control Center ..............................88Setting Up Security .......................................................89
Security ................................................................90Configuring Authentication for Windows ..............91Configuring a Pluggable Authentication Module
(PAM) for UNIX ................................................92Configuring an LDAP Authentication Module .......93Mapping SAP Control Center Roles to LDAP or
OS Groups ....................................................104Encrypting a Password ......................................106Configuring Ports ...............................................107
Configuring the E-mail Server ....................................109Configuring the Automatic Logout Timer ....................110Configuring Retrieval Thresholds for the
Administration Console ..........................................111User Authorization ......................................................112
Assigning a Role to a Login or a Group .............113Removing a Role from a Login or a Group ........113Adding a Group ..................................................114Removing a Group .............................................114Adding a Login Account to a Group ...................115Removing a Login Account from a Group ..........115Adding a Login Account to the System ..............116Removing a Login Account from the System .....117Modifying a User Profile .....................................118Logins, Roles, and Groups ................................118
Configure ............................................................................121Configuring SAP Adaptive Server Enterprise for
Monitoring ...............................................................122Registering an SAP ASE Server ................................123Importing Resources for Batch Registration ...............124Registering the Agent for an SAP ASE Server ...........126Authenticating a Login Account for a Managed
Resource ................................................................127
Contents
iv
Role Assignment in SAP Control Center for SAPASE ...............................................................127
Encrypted Authentication for SAP ASE .............128Setting Up Statistics Collection ...................................128
About Statistics ..................................................130SAP ASE Data Collections ................................130Key Performance Indicators for SAP ASE .........133
Creating an Alert .........................................................138SAP ASE Alerts .................................................141Alert Types, Severities, and States for SAP ASE
.......................................................................147Alert-Triggered Scripts .......................................148Alert-Triggered Script Examples ........................149Substitution Parameters for Scripts ...................151
Setting Display Options for SAP ASE PerformanceData ........................................................................152
Optional Configuration Steps ......................................153Manage and Monitor ..........................................................155
Displaying Resource Availability: the Heat Chart ........155Graphing Performance Counters: the Statistics Chart
................................................................................156Manage SAP Control Center ......................................157
Administration Console ......................................157Job Scheduling ..................................................162Alerts .................................................................167Resources ..........................................................188Perspectives ......................................................191Views .................................................................193Instances ...........................................................195Repository .........................................................204Logging ..............................................................210SAP Control Center Console .............................215Setting SAP ASE Parameters in the
Configuration File ..........................................218Manage and Monitor the SAP ASE Environment .......219
Contents
SAP Control Center for SAP Adaptive Server Enterprise v
Managing an SAP ASE server ...........................220Displaying the Performance Overview ...............238Caches ...............................................................242Clusters ..............................................................254Databases ..........................................................288Defaults ..............................................................354Devices ..............................................................355Engines ..............................................................363Execution Classes .............................................366Extended Stored Procedures .............................367Functions ...........................................................371Networks ............................................................377Precomputed Result Sets ..................................382Procedures ........................................................389Processes ..........................................................396Replication Agents .............................................403Rules ..................................................................404Security ..............................................................406Segments ...........................................................449Statistics ............................................................456SQL Activity .......................................................464Tables ................................................................465Thread Pools ......................................................512Transactions .......................................................515User-Defined Datatypes ....................................516Views .................................................................517
Troubleshoot SAP Control Center for SAP ASE .............521Data Display Problems ...............................................521
Cannot Monitor SAP ASE or Display StatisticsChart .............................................................521
Data on Screens or Charts Is Missing ...............521Database Objects Are Not Updated ..................522Error: No Result Set for this Query ....................523Error: No Data Was Found For Statistic ............523Error: Unable to Format the Date String ............523
Contents
vi
Properties for Engine Groups IncorrectlyDisplayed .......................................................524
Same Name Engine Groups Are Not Selectable.......................................................................524
"Number of Transactions" KPI Is Not Updated . .524Cannot Find Error Information For Monitor View
.......................................................................524Display Large Number of Objects in
Administration Console .................................524Data Collection and Alert Problems ............................525
Collection Job for SAP ASE Fails ......................525Alerts Are Configured But Do Not Fire ..............525Data Collections Fail to Complete ......................525Alerts Are Not Generated ..................................526
Authentication and Access Problems .........................526Cannot Log In ....................................................526SAP Control Center Fails to Start ...................... 526Browser Refresh (F5) Causes Logout ...............527Invalid Connection Profile ..................................527Cannot Authenticate Server Configured with a
Multibyte Character Set .................................527Features Are Not Enabled Although You Have
sa_role ...........................................................528Resetting the Online Help ..................................528
Performance Problems ...............................................529SAP ASE is Responding Slowly ........................529Memory Warnings at Startup .............................529SCC Out of Memory Errors ...............................529Performance Statistics Do Not Cover Enough
Time ..............................................................530Collect Diagnostic Data ..............................................530
Preparing to Collect Diagnostic Data .................531Collecting Field Diagnostic Data ........................531Collecting Optimizer Diagnostic Data ................533Upload Diagnostic Data ..................................... 535
Contents
SAP Control Center for SAP Adaptive Server Enterprise vii
Deleting a Diagnostic Data File .........................538Glossary: SAP Control Center for SAP ASE ...................539Index ................................................................................543
Contents
viii
About SAP Control Center for SAP AdaptiveServer Enterprise
SAP® Control Center for SAP® Adaptive Server® Enterprise is a Web-based tool formonitoring the status and availability of SAP® ASE servers.
SAP Control Center 3.3 supports SAP ASE version 15.0.2 and later. It supports clusteredconfigurations on Cluster Edition, version 15.0.3 through version 16.0.
The SAP Control Center client/server architecture allows multiple clients to monitor andcontrol all SAP ASE servers in an enterprise using one or more SAP Control Centerservers.SAP Control Center provides availability monitoring, historical performancemonitoring, and administration capabilities in a scalable Web application that is integratedwith management modules for other SAP products. It offers shared, consolidatedmanagement of heterogeneous resources from any location, alerts that provide state- andthreshold-based notifications about availability and performance in real time, and intelligenttools for spotting performance and usage trends, all via a thin-client, rich Internet applicationdelivered through your Web browser.
Use SAP Control Center to track a variety of performance metrics, gathering statistics thatover time will give you powerful insight into patterns of use and the behavior of databases,devices, caches, and processes on your servers. You can display collected data as tables orgraphs. By plotting results over any period of time you choose, from a minute to a year, youcan both see the big picture and focus on the particulars. Detailed knowledge of how yourservers have performed in the past helps you ensure that SAP ASE meets your needs in thefuture.
New Features in SAP Control Center for SAP AdaptiveServer Enterprise
Brief descriptions of new and enhanced features with links to complete information.
This guide assumes you are connected to the most recent SAP ASE version. The SAP ControlCenter features that are available depend on the version to which you are connected: Laterversions of SAP Control Center may include features that are not available in earlier versionsof SAP ASE.
The table below list new and enhanced features for the latest SAP Control Center for SAP ASEversion. For features introduced in earlier versions, see the New Features section in the earlierversions of SAP Control Center documentation.
About SAP Control Center for SAP Adaptive Server Enterprise
SAP Control Center for SAP Adaptive Server Enterprise 1
New and Enhanced FeaturesThe following new and enhanced SAP Control Center 3.3 features are available with SAPASE version 16.0.
Feature Topics
Backup scheduling – create new or manage existingbackup job schedules.
Scheduling a Database Backup on page321
Transparent database encryption – encrypt an entiredatabases, providing protection for an entire databasewithout affecting existing applications.
Creating an Encrypted Database on page301
Compression advisor – identify tables that can bebenefited from compression, obtain compression es-timates and recommendations.
Manage Table Compression on page 475
Create or replace support – replace existing compiledobjects with a new definition while preserving theoriginal name, object ID, auditing options, and per-missions.
Replacing Compiled Object Definitions onpage 237
Partition locking support – provides improvement inconcurrency by employing partition level locking. Byenabling partition locking, you are allowing access toother partitions for concurrent DDL and DML access.
Partition Locking on page 489
Index compression – designate tables, indexes, or localindex partitions to be compressed.
Manage Index Compression on page 478
Error log enhancements – improved error log scanningusability and performance.
SAP ASE Error Log on page 225
Server configuration alert – the ASE Configured Re-source Utilization alert displays percentage utilizationof an ASE Configured Resource item.
SAP ASE Alerts on page 141
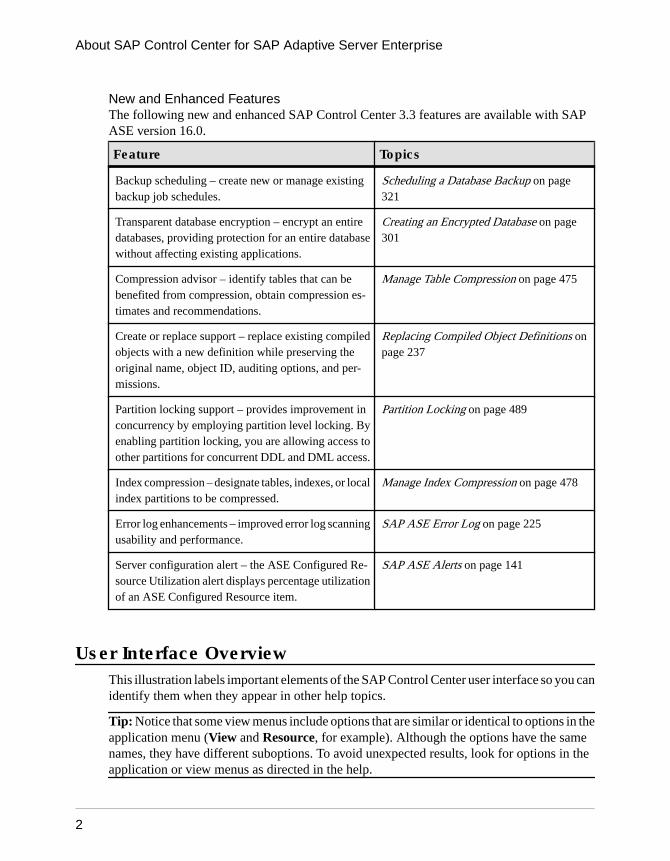
User Interface OverviewThis illustration labels important elements of the SAP Control Center user interface so you canidentify them when they appear in other help topics.
Tip: Notice that some view menus include options that are similar or identical to options in theapplication menu (View and Resource, for example). Although the options have the samenames, they have different suboptions. To avoid unexpected results, look for options in theapplication or view menus as directed in the help.
About SAP Control Center for SAP Adaptive Server Enterprise
2
Figure 1: SAP Control Center User Interface
Toolbar IconsDescribes the icons in the SAP Control Center toolbar for launching and managing views.
Table 1. Toolbar Icons
Icon Name Description
Show/Hide Perspective ResourcesView
Displays or minimizes the Perspective Resour-ces view, which lists registered resources in thisperspective.
Launch Resource Explorer Opens the resource explorer, which lists reach-able resources (both registered and unregis-tered).
Launch Heat Chart Opens the perspective heat chart, which gives astatus overview of the registered resources inthis perspective.
Close All Open Views Closes all open and minimized views.
Minimize All Open Views Minimizes all open views.
About SAP Control Center for SAP Adaptive Server Enterprise
SAP Control Center for SAP Adaptive Server Enterprise 3
Icon Name Description
Restore All Minimized Views Returns all minimized views to their originalsize.
Cascade All Open Views Arranges open views to overlap each other.
Tile All Open Views Vertically Arranges open views in a vertical manner.
Tile All Open Views Horizontally Arranges open views in a horizontal manner.
Status IconsSAP Control Center uses icons to indicate the status of resources and key performanceindicators (KPIs).
Resource Status Icons in the Perspective Resources View and Heat ChartResource status icons indicate the condition of each resource in the heat chart. In addition, theyare used as badges (small overlays) on server icons in both the heat chart and the PerspectiveResources view. The Perspective Resources view also has a Status column that displays thesame status as the badge in English text.
In the heat chart, hover the mouse over an icon in the Status column to display the status inEnglish text.
Table 2. Resource Status Icons
Icon Status Description
Running Resource is up and running
Pending State is changing—check again
Stopped Resource has been shut down
Warning Resource has encountered a potentially harmful situation
Error Resource has encountered a serious problem
About SAP Control Center for SAP Adaptive Server Enterprise
4
Icon Status Description
Unknown Resource is unreachable—state cannot be determined
KPI Status Icons in the Heat ChartThe heat chart uses KPI status icons to indicate the health of the KPIs it displays.
Hover the mouse over a KPI icon in any column to the right of the Status column to display thevalue of that KPI.
Table 3. KPI Status Icons
Icon Status Description
Normal Value of performance indicator is within the normal range
Warning Value of performance indicator is in the warning range
Critical Value of performance indicator is in the critical range
Display and Copy Options in SAP Adaptive ServerEnterprise Monitors
Options for collecting or displaying data on the user interface for SAP Adaptive ServerEnterprise monitoring.
An Options drop-down menu enables you to effectively collect or display only the data thatyou need while monitoring the server. You can:
• Choose columns – choose only the columns that you want to show. By default, all columnsare selected.
• Copy selected row – cut data from a selected row and paste it into another application. Thedata is formatted like a row, and cells are separated by spaces.
• Copy table – cut data from an entire table and paste it into another application. The data isformatted like a table, with rows and columns separated by spaces.
While monitoring SAP ASE cluster configurations, you can also:
• Expand all nodes – display table information for every instance of the cluster. With oneclick, the entire cluster information is displayed.
• Collapse all nodes – hide instance-level information in a table, and display only cluster-level information.
About SAP Control Center for SAP Adaptive Server Enterprise
SAP Control Center for SAP Adaptive Server Enterprise 5
On some windows of the SAP Adaptive Server Enterprise monitor, controls Save All andReset All allow you to save several configured values, or reset all of them, with one click.
Common Display OptionsUse data display features to view resource status and to sort, search by resource name and type,and rearrange status information.
Column OptionsThe Perspective Resources view, Resource Explorer, Administration Console, Alert Monitor,heat chart, and other views in SAP Control Center—including those in product modules—usea tabular grid format to display information about managed resources. You can use optionsprovided by the grid format to sort and organize displayed data.
Table 4. Column Sorting Options
Sorting Option Description
Simple column-based sorting Click a column name to sort the table based on that column inascending or descending order. The arrow in the column’s sortingtab (to the right of the column name) points up when data is sortedin ascending order or down when data is sorted in descendingorder.
Reversing the order of a column-based sort
Click a column’s sorting tab to reverse its sort from ascending todescending order or vice versa.
Nested sorting based on multiplecolumns
Click the column name for the primary sort. For subsidiary sorts,click the column’s sorting tab. Choose the columns for subsidiarysorts in the order you want to apply them. After you click a sortingtab, it displays its sorting level (1 for the primary sort, 2 for thesecondary sort, and so on). Click any column name to clear thenested sort.
Rearranging columns Move columns by dragging and dropping them.
The figure below shows a table of servers sorted first by resource type; within type by softwareversion; and within version by server name. The Type and Name columns sort in ascendingorder and the Version column sorts in descending order.
About SAP Control Center for SAP Adaptive Server Enterprise
6
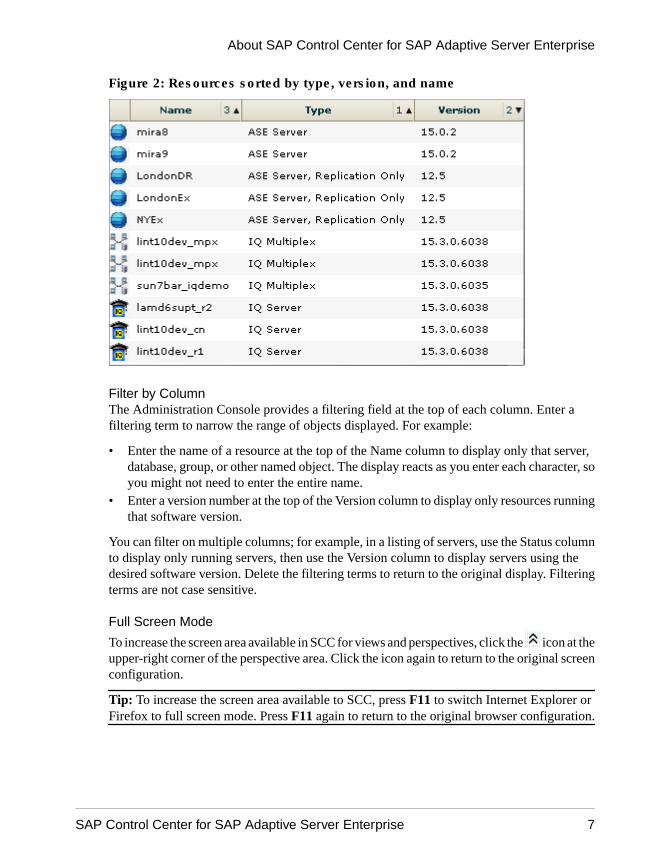
Figure 2: Resources sorted by type, version, and name
Filter by ColumnThe Administration Console provides a filtering field at the top of each column. Enter afiltering term to narrow the range of objects displayed. For example:
• Enter the name of a resource at the top of the Name column to display only that server,database, group, or other named object. The display reacts as you enter each character, soyou might not need to enter the entire name.
• Enter a version number at the top of the Version column to display only resources runningthat software version.
You can filter on multiple columns; for example, in a listing of servers, use the Status columnto display only running servers, then use the Version column to display servers using thedesired software version. Delete the filtering terms to return to the original display. Filteringterms are not case sensitive.
Full Screen Mode
To increase the screen area available in SCC for views and perspectives, click the icon at theupper-right corner of the perspective area. Click the icon again to return to the original screenconfiguration.
Tip: To increase the screen area available to SCC, press F11 to switch Internet Explorer orFirefox to full screen mode. Press F11 again to return to the original browser configuration.
About SAP Control Center for SAP Adaptive Server Enterprise
SAP Control Center for SAP Adaptive Server Enterprise 7
Maximize a Section of a View
Some areas within views have a square minimize/maximize icon ( ) in the upper-rightcorner. Click the icon to expand that area to fill the entire view. Click the icon again to restorethe area to its former size.
View MenuThe Perspective Resources view, the Resource Explorer, the Alert Monitor, and the heat charteach have a View menu. From the View menu, you can:
• Display the filtering tool for searches. (In the heat chart, the Filter option also displays thecolumn selection tool.)
• Toggle between an icon view and a detail view of your resources (Perspective Resourcesview only)
• Refresh the display (Resource Explorer only)
Note: For these tasks, use the View menu in the view window, not the application-level Viewmenu at the top of the SCC window.
Changing the Font SizeTo change the size of fonts in SCC screens:
• Enter Ctrl-Alt + to enlarge display fonts.• Enter Ctrl-Alt - to shrink display fonts.
Keyboard ShortcutsFrequently used key sequences for the SAP Control Center Web interface.
Key Sequence Action
Ctrl-Alt-F12 Pull down the first menu in the topmost view or in the SCC menu bar.Repeat to toggle between the two first menus.
Ctrl-Alt-Shift-F12 Pull down the first menu (Application) in the SCC menu bar.
Space Select the highlighted option—equivalent to clicking the mouse.
Escape • Release a drop-down menu
• Exit an editable cell or field
• Close a window
About SAP Control Center for SAP Adaptive Server Enterprise
8
Key Sequence Action
Arrow keys • Highlight the next list item or menu option in the indicated di-rection. For example, the down arrow highlights the next itemdown in a menu; the right arrow highlights an item in the menu tothe right.
• In a tree hierarchy, the right arrow expands a node; the left arrowcollapses it.
Tab • In a view, highlight the next item in the tab order. (Tab orderprogresses through the accessible fields in a left-to-right, top-to-bottom fashion, starting at the upper left.)
• In a two-pane view, jump from the tree hierarchy in the left paneto the right pane.
• In a view that includes a table or grid display, press Tab twice tohighlight the table, then press the down-arrow to enter it.
Shift-Tab • In a view, highlight the previous item in the tab order.
• In a two-pane view, jump from the right pane back to the treehierarchy in the left pane.
Home Highlight the first item in the active view (or the active section of aview), for example the first row in a table.
End Highlight the last item in the active view (or the active section of aview), for example the last row in a table.
In the SCC menu bar, View >Select > <your view>
Select an open view and bring it to the front.
Ctrl-Alt Arrow key Move the selected view in the indicated direction.
Ctrl-Alt + Increase the size of displayed text.
Ctrl-Alt - Decrease the size of displayed text.
F11 Enable or disable the browser’s full-screen mode.
In the SCC menu bar, Appli-cation > Display > FullScreen
Enable or disable SAP Control Center’s full-screen mode.
SAP Control Center is built on Adobe Flex. For complete information about Adobe Flexkeyboard shortcuts, see http://livedocs.adobe.com/flex/3/html/help.html?content=accessible_5.html.
About SAP Control Center for SAP Adaptive Server Enterprise
SAP Control Center for SAP Adaptive Server Enterprise 9
Displaying the Versions of SCC ComponentsView a list of components installed in SAP Control Center and their versions.
Check the versions of the product modules in your SCC installation to determine whether yourinstallation is up to date. SCC release bulletins list supported product module versions. Youcan find SCC release bulletins on the SAP Help Portal at http://help.sap.com/database. Lookin the documentation set for the product SCC is managing.
1. Log in to SCC and select Help > About SAP Control Center.
2. Compare the versions of product modules (listed as management agent plug-ins) againstthe versions published in the most recent SCC-product-name Release Bulletin.
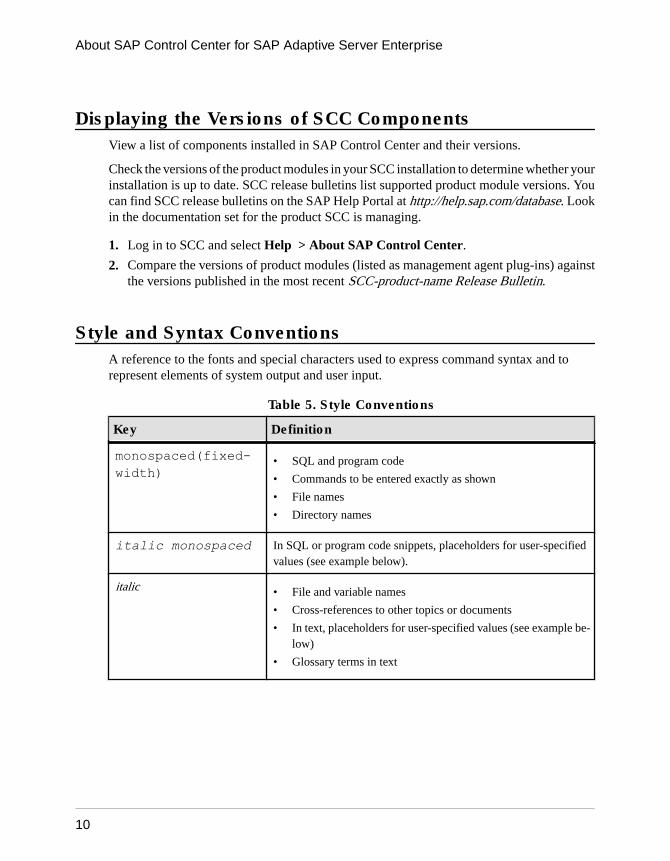
Style and Syntax ConventionsA reference to the fonts and special characters used to express command syntax and torepresent elements of system output and user input.
Table 5. Style Conventions
Key Definition
monospaced(fixed-width)
• SQL and program code
• Commands to be entered exactly as shown
• File names
• Directory names
italic monospaced In SQL or program code snippets, placeholders for user-specifiedvalues (see example below).
italic • File and variable names
• Cross-references to other topics or documents
• In text, placeholders for user-specified values (see example be-low)
• Glossary terms in text
About SAP Control Center for SAP Adaptive Server Enterprise
10
Key Definition
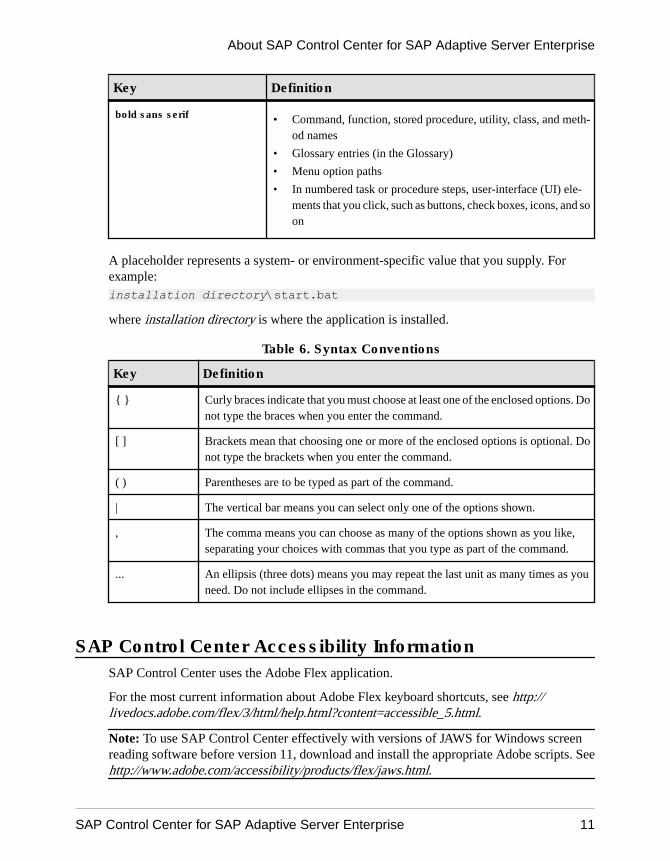
bold sans serif • Command, function, stored procedure, utility, class, and meth-od names
• Glossary entries (in the Glossary)
• Menu option paths
• In numbered task or procedure steps, user-interface (UI) ele-ments that you click, such as buttons, check boxes, icons, and soon
A placeholder represents a system- or environment-specific value that you supply. Forexample:installation directory\start.bat
where installation directory is where the application is installed.
Table 6. Syntax Conventions
Key Definition
{ } Curly braces indicate that you must choose at least one of the enclosed options. Donot type the braces when you enter the command.
[ ] Brackets mean that choosing one or more of the enclosed options is optional. Donot type the brackets when you enter the command.
( ) Parentheses are to be typed as part of the command.
| The vertical bar means you can select only one of the options shown.
, The comma means you can choose as many of the options shown as you like,separating your choices with commas that you type as part of the command.
... An ellipsis (three dots) means you may repeat the last unit as many times as youneed. Do not include ellipses in the command.
SAP Control Center Accessibility InformationSAP Control Center uses the Adobe Flex application.
For the most current information about Adobe Flex keyboard shortcuts, see http://livedocs.adobe.com/flex/3/html/help.html?content=accessible_5.html.
Note: To use SAP Control Center effectively with versions of JAWS for Windows screenreading software before version 11, download and install the appropriate Adobe scripts. Seehttp://www.adobe.com/accessibility/products/flex/jaws.html.
About SAP Control Center for SAP Adaptive Server Enterprise
SAP Control Center for SAP Adaptive Server Enterprise 11
About SAP Control Center for SAP Adaptive Server Enterprise
12
Get Started
Set up SAP® Control Center.
Quick Start for an Evaluation(Optional) Get started using SAP Control Center quickly if you do not need the full set ofsecurity features. This simplified process is suitable for a small-scale, temporary evaluation orproof-of-concept project, or for checking your installation.
PrerequisitesInstall SAP Control Center.
Task
Use these tasks to start SAP Control Center, log in, register and authenticate a server, andmonitor that server.
Note: After completing the tasks below and confirming that SCC is working, set up SCC for aproduction environment if you intend to continue using it.
1. Registering the ODBC Driver in Windows
In Windows, run scc.bat with administrative privileges to register the ODBC driver.
2. Launching SAP Control Center
Use the scc command to start SAP Control Center.
3. Getting Started After Installing
Perform postinstallation testing and configuration.
4. Configuring SAP Adaptive Server Enterprise for Monitoring
On each server you plan to monitor, grant mon_role to the user account used to log in to theSAP ASE server, and set monitoring options in the configuration file.
5. Registering an SAP ASE Server
Register a resource (for example, a server that can be monitored) to make SAP ControlCenter aware of it and its connection information.
6. Authenticating a Login Account for a Managed Resource
Specify the login account and password SAP Control Center will use when it connects toyour server or agent to collect monitoring data or manage the resource.
7. Displaying Resource Availability: the Heat Chart
Use the heat chart to view the status and availability of servers in the current perspective.
Get Started
SAP Control Center for SAP Adaptive Server Enterprise 13
8. Displaying the Performance Overview
The Overview screen shows performance status.
See also• Get Started in a Production Environment on page 21
Registering the ODBC Driver in WindowsIn Windows, run scc.bat with administrative privileges to register the ODBC driver.
When SAP Control Center starts for the first time on a Windows machine, it registers itsODBC driver. Because the automatic registration of the ODBC driver edits the registrysettings, you must execute scc.bat using elevated administrative privileges. If you launch forthe first time without adequate privileges, SCC generates an error and fails to start.
In Windows 2008, Windows 7, and Windows 8, you must use the Run as administratorsetting to launch SCC even if you already have administrative privileges. This process isdescribed below.
In other versions of Windows, you must be logged in as an administrator to start SCC for thefirst time. You need not follow the steps below.
1. In Windows 2008, Windows 7, or Windows 8, open the Command Prompt window withadministrative privileges:
• Select Start > All Programs > Accessories. Right-click Command Prompt andselect Run as administrator.
• Alternatively, enter cmd in the Start Menu search box and press Shift+Ctrl+Enter.
2. Run scc.bat.
Launching SAP Control CenterUse the scc command to start SAP Control Center.
Prerequisites
Install Adobe Flash Player in the browser you will use for SAP Control Center.
Task
1. Start SAP Control Center.
• Windows – navigate to <install_location>\SCC-3_3\bin and double-click scc.bat.
• UNIX – execute scc.sh.
Get Started
14
Messages on the progress of the launch appear in a command window. When SAP ControlCenter is running, the command window becomes the SAP Control Center console; youcan issue commands to get status information on SCC and its ports, plug-ins, and services.
2. Open a Web browser and enter https://<hostname>:8283/scc.
Getting Started After InstallingPerform postinstallation testing and configuration.
PrerequisitesStart SAP Control Center.
Task
1. Install Adobe Flash Player 10.1 or later in the Web browser you will use to connect toSCC.
Flash Player is a free plug-in. You can download the latest version from http://get.adobe.com/flashplayer/.
If Flash Player is already installed but you are not sure which version you have, go to theAdobe test site at http://adobe.com/shockwave/welcome. Click the link that says Testyour Adobe Flash Player installation. The version information box on the next page thatappears displays your Flash Player version.
2. To connect to SCC, direct your browser to:
https://<scc_server_hostname>:8283/sccNote: If you changed the default HTTPS port during installation, use the new port numberinstead of 8283.
3. (Optional) If you see an error about the security certificate, add SCC to your browser’strusted sites zone (Internet Explorer) or add a security exception (Firefox).
4. Log in.
SCC provides a default login account, sccadmin, for initial configuration and setting uppermanent authentication. The password is set during installation.
Note: The sccadmin account and the preconfigured user login module on which it is basedare not intended for use in a production environment. SAP recommends that you passauthentication responsibility to your operating system or to LDAP, as described in the GetStarted > Setting Up Security section of the online help.
SAP further recommends that you disable sccadmin as soon as you have set up and testedauthentication, and that you change the password on the sccadmin account if you do notplan to set up and test authentication right away.
Get Started
SAP Control Center for SAP Adaptive Server Enterprise 15
5. (Optional) Change the password or disable sccadmin—see the SCC-product-nameInstallation Guide for instructions.
Configuring SAP Adaptive Server Enterprise for MonitoringOn each server you plan to monitor, grant mon_role to the user account used to log in to theSAP ASE server, and set monitoring options in the configuration file.
The SAP ASE component of SAP Control Center needs a user account to log in to SAP ASE.To gather monitoring data, that account needs the role mon_role.
1. Create or select a login account for SAP Control Center to use when it connects to SAPASE.
2. Use the sp_role stored procedure to grant mon_role to the login account, which in thisexample is called scc:
sp_role "grant", mon_role, scc
Note: After adding mon_role, if a resource is open for monitoring before you make thesuggested parameter changes, a configuration dialog opens allowing you to modify theparameter values.
3. You see a Configuration Parameters Validation screen that displays the current values andthe recommended values needed to enable monitoring. Change the current values to therecommended values or, for nonbinary values, to values that are consistent with the level ofactivity on the monitored SAP ASE. You must have sa_role to change parametervalues.
NextRegister your SAP ASE server with SAP Control Center and add it to a perspective.
Registering an SAP ASE ServerRegister a resource (for example, a server that can be monitored) to make SAP Control Centeraware of it and its connection information.
1. In the Resource Explorer, select Resources > Register.
2. Specify:
Get Started
16
Table 7. New Resource Type Details
Field Description
Resource Name (Required) Name of the resource to register.Enter the actual name of the managed server,using uppercase and lowercase letters. If thename registered in SAP Control Center doesnot exactly match the server name, some mon-itoring functions, including the topology view,do not work.
Resource Type Select a resource type:• SAP ASE Server (15.0.2.0) – monitor
15.0.2.0 or later. Choose this type for fullserver monitoring capabilities.
• SAP ASE, Replication Only (12.5.0.0) –monitor only the RepAgent threads for anSAP ASE server that is older than version15.0.2.0. Choose this type for a server thatis part of a replication environment.
Description A brief description to help you identify the re-source.
3. Click Next.
4. Specify the connection information for your resource:
Table 8. New Resource Connection Details
Field Description
Server Host Name/Host Name Local host name
Port Number Local host port number
Character Set Character set configured on SAP ASE
Note: If the server is configured to use a language that re-quires a multibyte character set such as Chinese, make sureto specify the correct character set in the connection profile.
Language Language configured on SAP ASE
5. Click Next.
6. (Optional) Enter a user name and password that SCC can use to authenticate with thisresource to retrieve its software version. The credentials are used only for this purpose,then discarded.
If you prefer not to authenticate now, click I do not want to supply authenticationinformation.
Get Started
SAP Control Center for SAP Adaptive Server Enterprise 17
This step enables SCC to display the correct version information for the server before theserver is formally authenticated (later in the configuration process).
7. (Optional) Click Add this resource to the current perspective. You must add a resourceto a perspective (not necessarily the current perspective) before you can manage ormonitor it.
8. (Optional) Click Open the resource explorer to view this new resource. (This option isnot present when the Resource Explorer is open.)
9. Click Finish.
Authenticating a Login Account for a Managed ResourceSpecify the login account and password SAP Control Center will use when it connects to yourserver or agent to collect monitoring data or manage the resource.
Perform this task for each resource registered with SAP Control Center.
Note: You can also authenticate a server during administrative tasks like creating an alert or acollection job.
1. Connect a browser to SAP Control Center and log in.
2. If the Perspective Resources view is not open, click the Show/Hide PerspectiveResources View icon in the toolbar.
3. In the Perspective Resources view, select your resource and select Resource >Authenticate from the view menu.
4. Select Use my current SCC login or Specify different credentials.
Note: The Use my current SCC login option is not available in SCC for Replication.
5. If you chose Specify different credentials, enter the login and password for SAP ControlCenter to use to connect to your resource.
6. If the selected resource is a Replication Server, also enter the RSSD user name andpassword.
7. Click OK to save and exit the dialog.
Displaying Resource Availability: the Heat ChartUse the heat chart to view the status and availability of servers in the current perspective.
The heat chart displays the state of resources in your perspective—whether the resources arerunning, suspended, or down. In addition, the heat chart lists the type of each resource andprovides statistical data, including the start time of the last data collection.
You can filter the resources that you want to see and search and sort the results by column. Youcan also select a resource and pull down its context menu to see monitoring and administrativeoptions that vary based on the resource type.
Heat chart data is collected directly from managed servers, tagged with the date and time whenit was collected, and stored in the SAP Control Center repository.
Get Started
18
1. From the application menu bar, select View > Open > Heat Chart.
2. (Optional) To display information about the status represented by an icon in the chart,hover the mouse over the icon.
• Status column – icon tooltips describe the status of the resource (Running or Stopped,for example).
• All columns to the right of Status – icon tooltips give the value of the KPI listed at thetop of the column.
3. (Optional) To display tools for filtering (narrowing the list of resources in the heat chart) orchanging the columns, select View > Filter from the Perspective Heat Chart menu bar.The Filter and Column tools appear in the left pane.
4. (Optional) To use filtering, select View > Filter from the view’s menu bar and enter asearch term in the Filter string field.
The search term can be any string that appears in the tabular portion of the heat chart, suchas the name, or part of the name, of a server or a resource type (ASE Server, for example).
5. (Optional) Select a filtering setting:
• Match case – search for resources whose displayed data includes the search term,including uppercase and lowercase letters; or
• Exact match – search for resources whose displayed data includes an item identical tothe search term.
6. (Optional) Select a column from the Filter on list to restrict your search to that column.
7. (Optional) Click Columns to customize your heat chart.
8. (Optional) Unselect any column that should not appear in your heat chart.
9. (Optional) Click the sorting arrow in the column headers to sort the column values in eitherascending or descending order.
10. (Optional) Click the resource’s row and pull down the menu to the right of the resourcename to view options for the selected resource.
11. (Optional) To resize the Filter and Columns tools pane, move your mouse over the borderbetween the tools pane and the resource table. When the mouse cursor changes to a resizeicon, click and drag the border to the left or the right.
12. (Optional) To hide the Filter and Columns tools, unselect View > Filter.
Displaying the Performance OverviewThe Overview screen shows performance status.
Check the Overview window to find out whether the server is running, and details aboutmemory usage, CPU utilization, recent alerts, and so on. Other windows in the SAP AdaptiveServer Enterprise monitor display more detailed information about the status of individualserver resources, such as engines, databases, caches, and processes. In cluster configurations,the Clusters Overview window allows you to check whether a particular cluster is running,how many instances of the cluster are down, and so on.
Get Started
SAP Control Center for SAP Adaptive Server Enterprise 19
1. In the Perspective Resources view, select the server, click the drop-down arrow, and selectMonitor. Alternately, in the Administration Console, select the server, click the drop-down arrow, and select Monitor.The SAP Adaptive Server Enterprise monitor opens and displays the Overview screen.Check the server information in the upper-left corner of the screen for the server’s name,software product and version, its hardware platform, and an indication of whether theserver is running. For cluster configurations, you also see the status of instances of eachcluster, and the number of blocked process.
Note: When a server status is Stopped, it means that the server is unreachable over thenetwork.
2. (Optional) If data collections are running, move the mouse over the Engine CPUUtilization graph to display precise figures (values, times, and dates) for points on thecurve.
The graph shows the aggregate CPU utilization for all engines on the server. For clusterconfigurations, the graph shows the aggregate CPU utilization for each instance of thecluster.
3. (Optional; not available in cluster configurations) Move your mouse over the Device IO/Sec graph to display precise figures (values, times, and dates) for points on the curve.
The graph shows device I/O aggregated across all devices on the server.
4. (Optional; not available in cluster configurations) Look at the Processes chart (far right) tosee the number of configured and currently running processes, and the highest number ofconcurrent processes since the server started, as well as the number of blocked processes.
5. (Optional; not available in cluster configurations) Look at the Memory chart to seestatistics for caches and for physical, logical, and unused memory.
6. (Optional) Click a tab to see information about the resource you want to monitor:
• Details – displays the version, edition, platform, number of deadlocks, platform, pagesize, device size, and counters cleared for the server.
• Configured Resources – displays, in tabular form, the configurable resources for eachserver or cluster instance. Each configuration option is shown along with its currentlyconfigured value, the run value that is currently used by the server, the percentage of theresource that is currently in use, and the high-water mark, which is the maximumamount of resources used since the server started. You can sort the table on any column.The configured value for a resource is an editable field, denoted as such by a "pencil"Edit icon. Enter a new numerical value for one or more resources, then choose either:• Save All to update the server with the new values. SCC displays the new values. If
the server encounters an error while applying the new value for a resource, SCCdisplays the error below the table, and also next to the changed field in the row thatcauses the server error.
• Reset All to restore the original value for the resource.
Get Started
20
Note: You can also configure resources for each server or cluster instance in the ServerConfigurations window.
• Wait Events – displays a list of server-wide wait events that can be very useful inperformance tuning. Wait-event information includes the number of waits, wait time,average wait time, and wait description. For clustered servers, this information isshown for each instance.
• Licenses – displays a list of licenses that are currently checked out by the server, or bycluster instances. There is also information about the number, type, status (expirable,permanent and so on), and the expiration date of each license.
• Alerts – displays a list of all fired alerts configured at server, cluster or cluster instancelevels. The information for each alert includes the time at which the alert was fired,severity, current statistic, and threshold.
7. (Optional; for cluster configurations) Move your mouse over the Cluster Instances graphto display precise information for points on the bar graph.
8. (Optional; for cluster configurations) If data collections are running, mouse over theLogical Cluster graph to display precise information for points on the bar graph.
Get Started in a Production EnvironmentPerform a complete setup of SAP Control Center, including configuration of userauthentication and other one-time set-up tasks.
PrerequisitesInstall SAP Control Center and complete the follow-up tasks described in the SCC-product-name Installation Guide.
1. Deploying an Instance from a Shared Disk Installation
(Optional) Create an SAP Control Center server or agent from an installation on a shareddisk.
2. Starting and Stopping SAP Control Center in Windows
There are several ways to start and stop SAP Control Center or the SCC agent. You canstart manually, which is useful for testing and troubleshooting, or set the service to startautomatically and to restart in case of failure.
3. Starting and Stopping SAP Control Center in UNIX
You can start SAP Control Center or the SCC agent manually, which is useful for testingand troubleshooting, or you can set up a service to start automatically and to restart in caseof failure.
4. Configuring Memory Usage
(Optional) Determine whether you need to configure how much memory SAP ControlCenter uses, and if so which configuration method to use.
Get Started
SAP Control Center for SAP Adaptive Server Enterprise 21
5. Logging in to SAP Control CenterEnter the SAP Control Center Web console.
6. Setting Up SecurityConfigure login authentication and map roles.
7. Configuring the E-mail Server(Optional) Specify the e-mail server for SAP Control Center to use to send e-mail alertnotifications.
8. Configuring the Automatic Logout Timer(Optional) Set SAP Control Center to end login sessions when users are inactive for toolong.
9. User AuthorizationThe authorization mechanism in SAP Control Center employs login accounts and task-based roles.
10. ConfigureConfigure login accounts, statistics collection, alerts, and other server monitoring options.
Deploying an Instance from a Shared Disk Installation(Optional) Create an SAP Control Center server or agent from an installation on a shareddisk.
Prerequisites
• Install SAP Control Center on a shared disk.• Enable shared-disk mode.
Task
1. Log in to the host on which you plan to run the SCC server or agent.
Note: You can create an instance on one host and run it on another host, but doing sointerferes with the predeployment checks run by sccinstance. Such a deployment mightgenerate errors (port conflicts, for example). If you are confident that the errors are causedby problems that will not be present on the host where you plan to run the instance, use the-force option to create the instance.
2. Change to SCC-3_3/bin.
3. Create the instance as an SCC agent if you plan to run a managed server on this host. Createthe instance as an SCC server if you plan to manage other SAP servers from this host.
To create an SCC agent called Boston-agent and configure it to run as a Windows service:
sccinstance -create -agent -instance Boston-agent -service
To create an SCC server called Boston and configure it to run as a Windows service:
Get Started
22
sccinstance -create -server -instance Boston -service
On UNIX systems, omit the -service option.
4. If other SCC instances will run on this host, change the port assignments for the newinstance. Change the instance names and port values in the sample commands to suit yourenvironment, but take care to specify ports that are not in use by another SCC instance orany other application or server.
This command changes the port assignments for an SCC agent called myagent:sccinstance -refresh -instance myagent -portconfig rmi=8888,jiniHttp=9093,jiniRmi=9096,tds=9997
This command changes the port assignments for an SCC server called myserver:sccinstance -refresh -server -instance myserver -portconfig rmi=8889,db=3640,http=7072,https=7073,jiniHttp=9094,jiniRmi=9097,msg=2002,tds=9996
5. (Optional) List the instances deployed from this installation:sccinstance -list
6. (Optional) If you are setting up an instance in UNIX, configure it to run as a service. SeeStarting and Stopping SAP Control Center in UNIX.
Next
When you manage and maintain instances, keep in mind that the directory structure forinstances is different from that of singleton installations. In file paths in SCC help, replaceSCC-3_3 or <scc-install-directory> with SCC-3_3/instances/<instance-name>.
For example, the path to the log directory, SCC-3_3/log, becomes this for an instancecalled kalamazoo:
SCC-3_3/instances/kalamazoo/log
See also• Starting and Stopping SAP Control Center in Windows on page 29
• Starting and Stopping SAP Control Center in Windows on page 73
• Starting and Stopping SAP Control Center in UNIX on page 76
Enabling and Disabling Shared-Disk ModeTurn on or turn off shared-disk mode, which allows you to run multiple SAP Control Centeragents and servers from a single installation on a shared disk.
PrerequisitesInstall SAP Control Center on a shared disk. See the SCC-product-name Installation Guide.
Get Started
SAP Control Center for SAP Adaptive Server Enterprise 23
Task
Shared-disk mode affects the entire installation; do not enable or disable individual instances.
Disabling shared-disk mode leaves the instances’ file systems intact under <SCC-install-directory>/instances, but the instances cannot run. If you reenable, theinstances are able to run again.
1. Change to SCC-3_3/bin.
2. Enable or disable shared disk mode.
To enable shared disk mode:sccinstance -enable
To disable shared disk mode:sccinstance -disable
Shared-Disk ModeShared-disk mode lets you run multiple SAP Control Center instances—SCC servers, SCCagents, or a mixture of the two—from a single installation of the product.
The shared-disk capability enables SCC servers or agents on the installation host or on remotehosts to access and execute from the same installation. This feature is especially useful if youplan to use SCC to manage SAP® ASE clusters, SAP® Sybase® Event Stream Processorclusters, or SAP Sybase IQ multiplexes.
After installing SCC on a shared disk, use the sccinstance command to enable shared-diskmode and deploy instances. sccinstance copies the files needed for the instance into a newdirectory structure. The path takes the form <SCC-install-directory>/instances/<instance-name> (for example, SCC-3_3/instances/SCCserver-1).
You can specify a name for each instance. If you do not supply a name, the instance namedefaults to the host name.
An instance runs on the host on which you start it. When shared-disk mode is enabled, SCCservers and agents run out of the SCC-3_3/instances subdirectories, not from the basefile system.
In shared-disk mode, changes made to configuration files in the base file system (everythingunder SCC-3_3 except the SCC-3_3/instances branch) are copied to any instancedeployed thereafter. Previously deployed instances are not affected.
Use sccinstance to deploy, remove, refresh, or convert an instance; to configure an instance’sports; and to configure a Windows instance to run as a service. Perform other tasks, includingconfiguring a UNIX instance to run as a service, and all other configuration, using the toolsand procedures documented for all installations. Use tools provided by the UI whereverpossible. When you must edit a file to change the configuration of an instance (for role
Get Started
24
mapping, for example), edit the copy of the file stored under <SCC-install-directory>/instances/<instance-name>.
sccinstance CommandUse sccinstance.bat (Windows) or sccinstance (UNIX) to deploy an instance of SAPControl Center from a shared-disk installation or to manage existing instances.
You can run multiple instances of SAP Control Center, including SCC servers, SCC agents, ora mixture of the two, from a single installation on a shared disk.
Syntaxsccinstance[.bat] [-agent] [-c | -create] [-d | -debug][-disable] [-enable][-f | -force][-h | -help] [-host host-name][-i | -instance [instance-name]] [-l | -list][-plugins {plugin-ID,plugin-ID,...}] [-portconfig {port-name=port-number,port-name=port-number, ...}][-refresh] [-r | -remove] [-s | -server] [-service][-silent]
Parameters
• -agent – use with -create or -refresh to create or refresh an SCC agent. In a -create or -refresh command, -agent is the default, so you can omit it.
• -create – deploy a new instance. Use alone or with -agent to create an agent instance, orwith -server to create a server instance.
• -d | debug – display debugging messages with the output of this command.• -disable – turn off shared-disk mode for this installation. Generates an error if any instance
is running.• -enable – turn on shared-disk mode for this installation. Shared-disk mode is required if
you intend to run more than one server or agent from a single installation of SCC.• -f | -force – execute sccinstance even if there are potential conflicts, such as port clashes or
a running SCC process. SAP does not recommend using -force to remove or refresh arunning instance in a Windows environment.
• -h | --help – display help and usage information for the sccinstance command.• -host host-name – specify the host for this instance. Use with -create; required only when
the instance name does not match the name of the host on which this instance will run. (The
Get Started
SAP Control Center for SAP Adaptive Server Enterprise 25
instance name defaults to the name of the current host unless you use -instance to specifyanother name.)
• -instance [instance-name] – specify an instance. Use with -create, -remove, or -refresh,or use alone to display the instance’s status. You can omit -instance when you areaddressing the only SCC instance or the only instance of the specified type (server oragent) on the current host.
sccinstance assumes that the host name is the same as the instance name unless you use-host to specify a different host name.
• -l | -list – display a list of all instances deployed from this SCC installation.• -plugins {plugin-ID,plugin-ID,...} – specify one or more product module plug-ins for this
instance. An alternative to -agent and -server, -plugins is primarily for use by the SCCinstallation program. Use with -create or -refresh. Use commas to separate plug-in names.
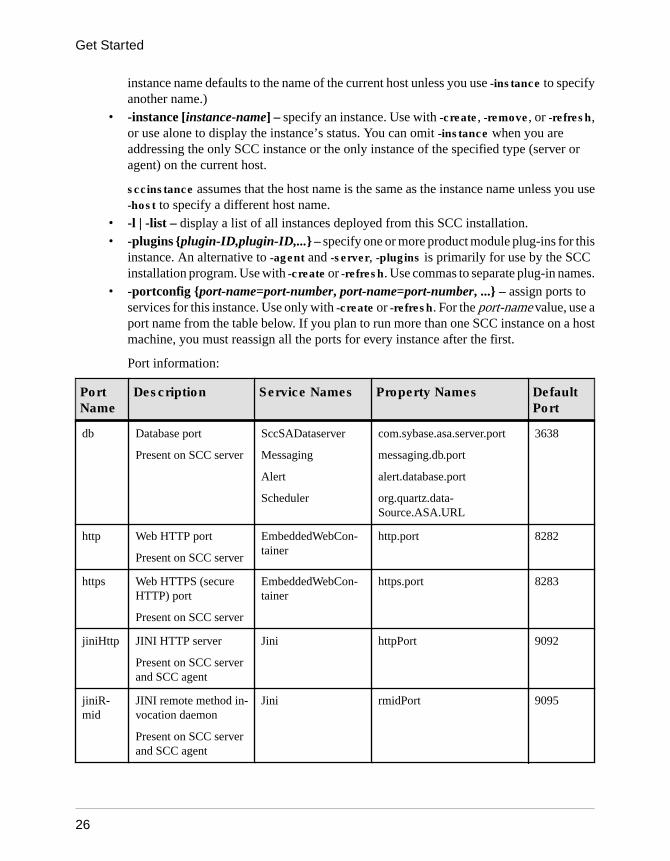
• -portconfig {port-name=port-number, port-name=port-number, ...} – assign ports toservices for this instance. Use only with -create or -refresh. For the port-name value, use aport name from the table below. If you plan to run more than one SCC instance on a hostmachine, you must reassign all the ports for every instance after the first.
Port information:
PortName
Description Service Names Property Names DefaultPort
db Database port
Present on SCC server
SccSADataserver
Messaging
Alert
Scheduler
com.sybase.asa.server.port
messaging.db.port
alert.database.port
org.quartz.data-Source.ASA.URL
3638
http Web HTTP port
Present on SCC server
EmbeddedWebCon-tainer
http.port 8282
https Web HTTPS (secureHTTP) port
Present on SCC server
EmbeddedWebCon-tainer
https.port 8283
jiniHttp JINI HTTP server
Present on SCC serverand SCC agent
Jini httpPort 9092
jiniR-mid
JINI remote method in-vocation daemon
Present on SCC serverand SCC agent
Jini rmidPort 9095
Get Started
26
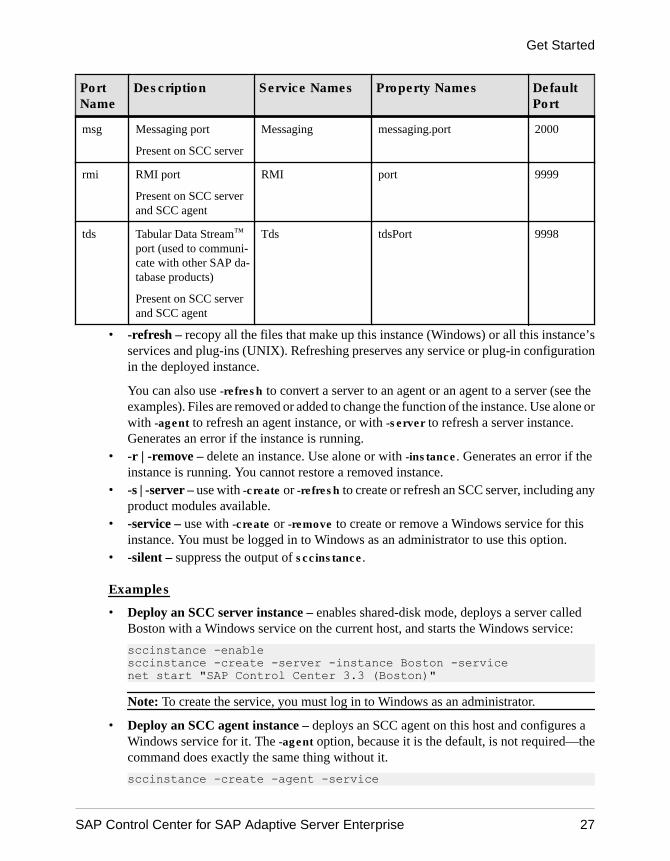
PortName
Description Service Names Property Names DefaultPort
msg Messaging port
Present on SCC server
Messaging messaging.port 2000
rmi RMI port
Present on SCC serverand SCC agent
RMI port 9999
tds Tabular Data Stream™
port (used to communi-cate with other SAP da-tabase products)
Present on SCC serverand SCC agent
Tds tdsPort 9998
• -refresh – recopy all the files that make up this instance (Windows) or all this instance’sservices and plug-ins (UNIX). Refreshing preserves any service or plug-in configurationin the deployed instance.
You can also use -refresh to convert a server to an agent or an agent to a server (see theexamples). Files are removed or added to change the function of the instance. Use alone orwith -agent to refresh an agent instance, or with -server to refresh a server instance.Generates an error if the instance is running.
• -r | -remove – delete an instance. Use alone or with -instance. Generates an error if theinstance is running. You cannot restore a removed instance.
• -s | -server – use with -create or -refresh to create or refresh an SCC server, including anyproduct modules available.
• -service – use with -create or -remove to create or remove a Windows service for thisinstance. You must be logged in to Windows as an administrator to use this option.
• -silent – suppress the output of sccinstance.
Examples
• Deploy an SCC server instance – enables shared-disk mode, deploys a server calledBoston with a Windows service on the current host, and starts the Windows service:
sccinstance -enablesccinstance -create -server -instance Boston -servicenet start "SAP Control Center 3.3 (Boston)"
Note: To create the service, you must log in to Windows as an administrator.
• Deploy an SCC agent instance – deploys an SCC agent on this host and configures aWindows service for it. The -agent option, because it is the default, is not required—thecommand does exactly the same thing without it.
sccinstance -create -agent -service
Get Started
SAP Control Center for SAP Adaptive Server Enterprise 27
or
sccinstance -create -service• Deploy a server instance and reassign ports – deploys the server on this host and
configures nondefault RMI, HTTP, and HTTPS ports.
sccinstance -create -server -portconfig rmi=8888,http=7070,https=7071
• Deploy two instances on the same host – creates two agent instances on the host fireball.The first command does not need the -host option because the instance name is the same asthe host name.
sccinstance -create -agent -instance fireball -portconfig rmi=9991sccinstance -create -agent -instance fireball2 -host fireball -portconfig rmi=9992
Note: In a production environment, SAP recommends that you deploy no more than oneSCC instance of each type (one server and one agent) on the same host.
• Refresh a server instance or convert an agent to a server – refreshes the server on thishost. If the instance on this host is an SCC agent, refreshing it as an SCC server converts itinto a server.
sccinstance -refresh -server• Refresh an agent instance or convert a server to an agent – refreshes the instance
named kalamazoo. If kalamazoo is a server, refreshing it as an SCC agent converts it intoan agent.
sccinstance -refresh -agent -instance kalamazoo• Remove a server instance – removes the instance named porcupine if it is not running:
sccinstance -remove -instance porcupine• Display status – displays the status of the instance on this host:
sccinstance• List all instances – displays a list of all SCC server and agent instances deployed from this
SCC installation:
sccinstance -list• Scenario: Remove an instance by force – suppose you have inadvertently deployed two
SCC agent instances on the same host:
$ sccinstance -list2 SCC instances deployed:SCC instance node1 deployed in agent mode for host node1 RMI port 9999SCC instance node2 deployed in agent mode for host node2 RMI port 9999
Get Started
28
Both instances use the same RMI port. You must either reassign ports for one instance orremove it. But you get an error if you try remove an instance when another instance isrunning on the same host:
$ sccinstance -instance node2 -remove[ERROR] Command execution failed.[ERROR] SCC instance node2 could not be removed because it is running. Shut down the SCC before removing the instance.
Use the -force option to override the error and force the removal of the second agentinstance:
$ sccinstance -instance node2 -remove -forceRemoving SCC instance node2 ...SCC instance node2 was successfully removed.
Permissions
sccinstance permission defaults to all users, except as noted for certain parameters.
Starting and Stopping SAP Control Center in WindowsThere are several ways to start and stop SAP Control Center or the SCC agent. You can startmanually, which is useful for testing and troubleshooting, or set the service to startautomatically and to restart in case of failure.
This topic applies to both SAP Control Center (the server, which includes the management UI)and the SCC agent that runs on each product server managed by SCC. When you install SCCand the SCC agent in the same directory by selecting both options in the installer, you alwaysstart and stop them together—by executing a single command or controlling a single service.This topic applies both to singleton installations (which do not use a shared disk) and toinstances of SCC agents and servers running from a shared disk.
If you run SAP Control Center or the SCC agent manually, you must issue a command everytime you start or shut down. If you run as a service (which is recommended), you can configurethe service to start and restart automatically. These are the options:
• Use the scc.bat command to start SCC or the SCC agent manually. The command givesyou access to the SCC console, which you can use to shut down and to display informationabout services, ports, system properties, and environment variables. You can also usescc.bat to change the logging level for troubleshooting purposes. Using scc.bat preventsyou from taking advantage of the automatic start and restart features available to services.
• Use the Services list under the Windows Control Panel to start, stop, and configure theSAP Control Center service for an SCC server or agent.
• Use the net start and net stop commands. This is another way to run SAP Control Centeror the SCC agent as a service.
Note: To start an SCC agent or server as a service:
Get Started
SAP Control Center for SAP Adaptive Server Enterprise 29

• In a singleton installation, you must have selected Yes in the installer to install the agentor server as a service.
• In a shared disk installation, the agent or server must have been deployed using the -service option of the sccinstance command.
In a singleton installation, the installer lets you start SCC or the SCC agent as a service andconfigures the service to restart automatically. Before starting, check the Windows Serviceslist for an SAP Control Center service.
Here are the steps for each starting and stopping option:
• Start SAP Control Center, the SCC agent, or both when they are installed together:
a) (Skip this step for the SCC agent.) If you are starting SAP Control Center for the firsttime in Windows 2008, Windows 7, or Windows 8, set the Run as Administratoroption on the command prompt so that SAP Control Center can register its ODBCdriver. (This is necessary even if you are logged in as an administrator.)
b) Enter the scc command.
For a singleton installation:
%SYBASE%\SCC-3_3\bin\scc.bat For an instance:
%SYBASE%\SCC-3_3\bin\scc.bat -instance <instance-name> You can omit the -instance option if the instance’s name is the same as its host name(the default).
• Stop SAP Control Center, the SCC agent, or both when they are installed together:
a) Enter the scc --stop command.
For a singleton installation:
%SYBASE%\SCC-3_3\bin\scc.bat --stop
For an instance:
%SYBASE%\SCC-3_3\bin\scc.bat --stop -instance <instance-name>
You can omit the -instance option if the instance’s name is the same as its host name(the default).
Note: You can also enter shutdown at the scc-console> prompt.
• Start or stop from the Windows Control Panel; configure automatic start andrestart:
a) Open the Windows Control Panel.
Get Started
30
b) Select Administrative Tools > Services.c) Locate “SAP Control Center” in the Services list. It may be followed by a release
number; if the service is for an instance, it is also followed by the instance name.Service names do not distinguish between agents and servers. If the service is running,the Status column displays “Started.”
d) To start or stop the service, right-click the SAP Control Center entry in the Serviceslist and choose Start or Stop.
e) To configure automatic starting, double-click the service.f) To set the service to automatically start when the machine starts, change the Startup
type to Automatic.g) To restart the service in case of failure, choose the Recovery tab and change the First,
Second, and Subsequent failures to Restart Service.h) Click Apply to save the modifications and close the dialog.
• Start or stop the SAP Control Center service (controlling SAP Control Center, theSCC agent, or both) from the Windows command line:
a) To start the service, enter the net start command.
For a singleton installation:
net start "SAP control center 3.3"The SAP Control Center 3.3 service is starting......The SAP Control Center 3.3 service was started successfully.
For an instance, include the instance name (Boston-1 in this example) in parentheses:
net start "SAP control center 3.3 (Boston-1)"The SAP Control Center 3.3 (Boston-1) service is starting......The SAP Control Center 3.3 (Boston-1) service was started successfully.
b) To stop the service, enter the net stop command.
For a singleton installation:
net stop "SAP control center 3.3"The SAP Control Center 3.3 service is stopping.....The SAP Control Center 3.3 service was stopped successfully.For an instance, include the instance name (Boston-1 in this example) in parentheses:
net stop "SAP control center 3.3 (Boston-1)"The SAP Control Center 3.3 (Boston-1) service is stopping.....
Get Started
SAP Control Center for SAP Adaptive Server Enterprise 31
The SAP Control Center 3.3 (Boston-1) service was stopped successfully.
See also• Deploying an Instance from a Shared Disk Installation on page 22
Starting and Stopping SAP Control Center in UNIXYou can start SAP Control Center or the SCC agent manually, which is useful for testing andtroubleshooting, or you can set up a service to start automatically and to restart in case offailure.
This topic applies to both SAP Control Center (the server, which includes the management UI)and the SAP Control Center agent that runs on each product server managed by SCC.. Whenyou install SCC and the SCC agent in the same directory by selecting both options in theinstaller, you start and stop them together—by executing a single command or controlling asingle service. This topic applies to both singleton installations (which do not use a shareddisk) and instances of SCC agents and servers running from a shared disk.
If you start SAP Control Center or the SCC agent manually, you must issue a command everytime you start or shut down. If you run as a service (which is recommended), you can configurethe service to start and restart automatically. These are the options:
• Use the scc.sh script to start SAP Control Center or the SCC agent manually. You caneither:• Run scc.sh in the foreground to get access to the SCC console, which you can use to
shut down and to display information about services, ports, system properties, andenvironment variables.
• Run scc.sh in the background to suppress the SCC console.You can use scc.sh to run SAP Control Center at a nondefault logging level fortroubleshooting. When you start manually with scc.sh, you cannot take advantage of theautomatic start and restart features available to services.
• Use the sccd script to configure a service that starts SCC or the SCC agent automatically.
Here are the steps for each starting and stopping option:
• Before you start SAP Control Center or the SCC agent for the first time, setenvironment variables. Do this only once.
a) Change to the parent of the SAP Control Center installation directory. (The parentdirectory is typically /opt/sap or opt/sybase.)
b) Execute one of the following to set environment variables.
Bourne shell:
. SYBASE.shC shell:
Get Started
32
source SYBASE.csh• Run SAP Control Center or the SCC agent (or both, when they are installed together)
in the foreground.
Running in the foreground is a method of manually starting; you must issue commands tostop and restart SCC or the SCC agent.
a) To start SCC or the SCC agent and drop into the console when the start-up sequence isfinished, enter the scc command.
For a singleton installation:
$SYBASE/SCC-3_3/bin/scc.shFor an instance:
$SYBASE/SCC-3_3/bin/scc.sh -instance <instance-name>You can omit the -instance option if the instance’s name is the same as its host name(the default).
• Run SAP Control Center or the SCC agent (or both, when they are installed together)in the background.
You can use nohup, &, and > to run SAP Control Center or the SCC agent in thebackground, redirect output and system error to a file, and suppress the SCC console.Running in the background is a method of manually starting; you must issue commands tostop and restart SCC or the SCC agent.
a) Execute a command similar to the sample below that matches your shell. Both samplecommands direct output to the file scc-console.out. If the output file alreadyexists, you might need to use additional shell operators to append to or truncate thefile.Bourne shell (sh) or Bash
For a singleton installation:nohup ./scc.sh 2>&1 > scc-console.out &
For an instance:nohup ./scc.sh -instance <instance-name> 2>&1 > scc-console-your-instance.out &
You can omit the -instance option if the instance’s name is the same as its host name(the default).
C shell
For a singleton installation:nohup ./scc.sh >& scc-console.out &
For an instance:nohup ./scc.sh -instance <instance-name> >& scc-console.out &
Get Started
SAP Control Center for SAP Adaptive Server Enterprise 33
You can omit the -instance option if the instance’s name is the same as its host name(the default).
• Shut down SAP Control Center or the SCC agent (or both, when they are installedtogether) .
a) To shut down from the scc-console> prompt, enter:
shutdownWarning! Do not enter shutdown at a UNIX prompt; it shuts down the operatingsystem.
To shut down from the UNIX command line, enter the scc --stop command.
For a singleton installation:
$SYBASE/SCC-3_3/bin/scc.sh --stopFor an instance:
$SYBASE/SCC-3_3/bin/scc.sh --stop -instance <instance-name>You can omit the -instance option if the instance’s name is the same as its host name(the default).
• Configure SAP Control Center or the SCC agent to run as a service.
A UNIX service is a daemon process that starts automatically after the machine is startedand runs in the background. UNIX installations of SCC include a shell script, sccd, whichyou can use to configure the SCC service. (Some UNIX platforms supply tools that makeservice configuration easier; Linux chkconfig is an example.)
Note: SAP recommends that if you are not familiar with setting up services in UNIX, youdelegate this task to a system administrator or consult the system administrationdocumentation for your UNIX platform.
a) Copy $SYBASE/SCC-3_3/bin/sccd into this directory:
• AIX (SCC agent only): /etc/rc.d/init.d• HP-UX (SCC agent only): /sbin/init.d• All other platforms: /etc/init.d
b) Open sccd and make these changes:
• Change the line that sets the SYBASE variable to the location of your SAP Sybaseinstallation (that is, the parent of SCC-3_3, the SAP Control Center installationdirectory). By default, this directory is called /opt/sybase if you installed SCCon a machine with an existing Sybase product or environment variable; otherwisethe default parent directory is /opt/sap.
• If you are not using shared-disk mode, or you are using shared-disk mode to run asingle instance whose name is the same as the host name, skip to step 5.c on page35 or step 5.d on page 35.
Get Started
34
• If you are using shared-disk mode to run a single instance whose name is not thehost name, or to run multiple instances on the same host, add the instance name tothe script name. Change:SCRIPT_NAME=scc.sh
to:SCRIPT_NAME="scc.sh -instance <instance-name>"
• If you are using shared-disk mode to run multiple instances on the same host,append the instance name to the name of the ouput log file. Change:./${SCRIPT_NAME} --start 2>&1 >> ${SCC_HOME}/log/scc-service.out &
to:./${SCRIPT_NAME} --start 2>&1 >> ${SCC_HOME}/log/scc-service_<instance-name>.out &
• If you are using shared-disk mode to run multiple instances on the same host, save acopy of the sccd script for each instance, giving each copy a unique name. In eachcopy, add the instance name to the script name and append the instance name to theoutput log file name as described above. Perform the remaining steps in thisprocedure for each copy of sccd.
c) In Linux, configure the service to run in run levels 2, 3, 4, and 5:
/usr/sbin/chkconfig --add sccd/usr/sbin/chkconfig --level 2345 sccdYou can test the sccd script with /usr/sbin/service sccd status. (Theservice command accepts these options: start | stop | status | restart.)
d) On non-Linux platforms, locate this directory:
• AIX (SCC agent only): /etc/rc.d/rc<X>.d• HP-UX (SCC agent only): /sbin/rc<X>.d• Solaris: /etc/rc<X>.dwhere <X> is the run level (for example, 3). Make two soft links in the directory foryour platform and set the links to point to:
• AIX (SCC agent only):/etc/rc.d/init.d/sccd: S90sccd and/etc/rc.d/init.d/sccd: K10sccd
• HP-UX (SCC agent only):/sbin/init.d/sccd: S90sccd and/sbin/init.d/sccd: K10sccd
• Solaris:/etc/init.d/sccd: S90sccd and/etc/init.d/sccd: K10sccd
Get Started
SAP Control Center for SAP Adaptive Server Enterprise 35
The S90sccd link starts the service and the K10sccd link stops the service. Thetwo-digit numbers in the links indicate the start and stop priorities of the service.
e) Use the S90sccd and K10sccd links to test starting and stopping the service. Thelinks are called automatically when the machine is started or shut down.
Configuring Memory Usage(Optional) Determine whether you need to configure how much memory SAP Control Centeruses, and if so which configuration method to use.
It is not usually necessary to configure memory usage for SAP Control Center. This table listsmemory options you can set and circumstances under which you should consider changingthem.
Modify this value When Guidelines
Maximum memory
• jvmopt=-Xmx – if
you are running SAPControl Center as aWindows service
• SCC_MEM_MAX – ifyou are running SCC asa UNIX service
• SCC_MEM_MAX – ifyou are starting SCCfrom the command line
• You need to prevent SAP ControlCenter from using more than agiven amount of memory
• SAP Control Center fails to startand may display an error: Couldnot create the JavaVirtual machine.
• An OutOfMemory error says SAPControl Center is out of heapspace
• A warning message about systemmemory appears during the startprocess
• The machine where SAP ControlCenter is installed has less than4GB of memory. (Starting SAPControl Center on a machine withless than 4GB of memory triggersthe startup warning messageabout system memory.)
On machines with less than 4GB ofmemory, set maximum memory to256MB or more.
Default value: none. (On machineswith 4GB or more of memory, maxi-mum memory is set dynamically andis effectively limited only by theamount of system memory available.)
Get Started
36
Modify this value When Guidelines
Permanent memory
• jvmopt=-XX:MaxPerm-Size – if you are run-
ning SAP Control Cen-ter as a Windows serv-ice
• SCC_MEM_PERM –if you are running SCCas a UNIX service
• SCC_MEM_PERM –if you are starting SCCfrom the command line
An OutOfMemory error says SAPControl Center is out of permanentgeneration space
Increase by 32MB increments. If youreach a value equal to twice the de-fault and still see the OutOfMemoryerror, contact SAP technical support.
Default value: 128MB
You can change memory options in two ways:
• For SAP Control Center started from the command line – execute commands to set one ormore environment variables before executing the scc command to start SAP ControlCenter. When you use this method, your changes to the memory options last only as long asthe current login session. This method is useful for testing new option values.
• For the SAP Control Center service – modify a file used by the SAP Control Centerservice. When you use this method, your changes to the memory options persist—SAPControl Center uses them every time it starts as a service.
See also• Logging in to SAP Control Center on page 39
Changing a Memory Option on the Command LineBefore you start SAP Control Center from the command line, you can issue a command tochange the value of a memory option temporarily.
Changes made using this method last only as long as the current login session. This method isuseful for testing new option values.
1. If SAP Control Center is running, shut it down.
2. Set the environment variable. Specify a size in megabytes but do not indicate the units inthe command.
Windows example:> set SCC_MEM_MAX=512
UNIX example:
Get Started
SAP Control Center for SAP Adaptive Server Enterprise 37
bash$ export SCC_MEM_MAX=5123. Use the scc command to start SAP Control Center.
See also• Changing a Memory Option for an SAP Control Center Windows Service on page 38
• Changing a Memory Option for an SCC UNIX Service on page 38
Changing a Memory Option for an SAP Control Center Windows ServiceAdd a jvmopt command to the scc.properties file to change a memory option (-Xmx or-XX:MaxPermSize) for an SAP Control Center Windows service.
When you use this method to set memory options, your changes are permanent—SAP ControlCenter uses them every time it starts as a service.
1. If SAP Control Center is running, shut it down.
2. Open the SAP Control Center properties file:
<SAP Control Center-install-directory>\SCC-3_3\bin\scc.properties
3. Add (or modify, if it already exists) a jvmopt line specifying the memory size in Javaformat. Use m for megabytes or g for gigabytes.
For example:jvmopt=-Xmx512m
4. Save the file and start the SAP Control Center Windows service.
See also• Changing a Memory Option on the Command Line on page 37
• Changing a Memory Option for an SCC UNIX Service on page 38
Changing a Memory Option for an SCC UNIX ServiceTo change a memory setting for an SAP Control Center UNIX service, add the appropriateenvironment variable (SCC_MEM_MAX or SCC_MEM_PERM) to the sccd script.
When you use this method to set memory options, your changes are permanent—SAP ControlCenter uses them every time it starts as a service.
1. If SAP Control Center is running, shut it down.
2. Open the sccd file: /etc/init.d/sccd3. Add the environment variable at the top of the file (after the comments). Specify a size in
megabytes but do not indicate the units in the command.
For example:SCC_MEM_MAX=512
4. Save the file and start the SAP Control Center UNIX service.
Get Started
38
See also• Changing a Memory Option on the Command Line on page 37
• Changing a Memory Option for an SAP Control Center Windows Service on page 38
Logging in to SAP Control CenterEnter the SAP Control Center Web console.
PrerequisitesInstall Adobe Flash Player in the browser you will use for SCC. See the SCC-product-nameInstallation Guide.
Task
SAP Control Center typically authenticates users through the operating system or an LDAPdirectory service. Consult your SCC administrator if you are not sure which login account touse for SCC.
Only one login session per account is permitted at a time; multiple users cannot be logged in tothe same account simultaneously.
Note: When logging in to a newly installed SAP Control Center for which secureauthentication has not been configured, use the sccadmin account—the password is set duringinstallation. For more information, see the SCC-product-name Installation Guide.
1. Connect to the SAP Control Center server. In your Web browser, enter: https://scc-hostname:8283/scc.
2. Enter your user name and password, and click Login.
Tip: If you use a Windows account to log in to SCC, enter your user name in the formatusername@domain. Omit top-level domain extensions such as .com or .net—for example,enter fred@sap, not [email protected].
See also• Configuring Memory Usage on page 36
Setting Up SecurityConfigure login authentication and map roles.
Read about security and follow these procedures before you configure SAP Control Centerproduct modules.
Note: These security topics are intended for use in a production environment. If you areevaluating or testing SCC, see Quick Start for an Evaluation on page 13.
1. Security
Get Started
SAP Control Center for SAP Adaptive Server Enterprise 39
SAP Control Center can authenticate user logins through an LDAP server, through theoperating system, or both.
2. Configuring Authentication for Windows
Authentication through the Windows operating system is enabled by default.Configuration is required only if you have upgraded from an older version of SAP ControlCenter and no longer want to use the older version’s authentication settings; if you do notwant to use Windows for authentication; or if you want to create login accounts manually.SAP recommends that you allow SCC to create accounts automatically.
3. Configuring a Pluggable Authentication Module (PAM) for UNIX
Set up SAP Control Center to support username and password login using accounts on theUNIX operating system.
4. Configuring an LDAP Authentication Module
Configure an LDAP authentication module for SAP Control Center by editing the securityconfiguration file to point to the correct LDAP server.
5. Mapping SAP Control Center Roles to LDAP or OS Groups
To grant SAP Control Center privileges to users who are authenticated through LDAP orthe operating system, associate roles used in SAP Control Center with groups in LDAP orthe operating system.
6. Encrypting a Password
Use the passencrypt utility to encrypt passwords and other values that must be kept securewhile stored in text files.
7. Configuring Ports
(Optional) Use the scc --port command to assign SAP Control Center services to newports.
See also• Configuring the E-mail Server on page 59
SecuritySAP Control Center can authenticate user logins through an LDAP server, through theoperating system, or both.
• SAP Control Center can be configured to authenticate through any LDAP server thatsupports the inetOrgPerson (RFC 2798) schema.
• When SAP Control Center authenticates through the operating system, it uses theoperating system of the SAP Control Center server machine (not the client).
Although you can create native user accounts in SCC, this approach to authentication is notrecommended. It is simpler and safer to configure SCC to authenticate using existing LDAP,Windows, or UNIX login accounts.
Get Started
40
SAP strongly recommends that you use a common authentication provider for SCC and forSAP database products managed by SCC. A common authentication provider ensures thatsingle sign-on works for users of SAP Control Center and its managed servers.
SCC requires each authenticated login account to have a predefined role. When a login isauthenticated, roles for the login are retrieved by the security module and are mapped to SCCpredefined roles. Authorization is resolved through the mappings between the securitymodule native roles and SCC roles. You can enable mappings by creating a “sybase” group inyour operating system or LDAP server and adding all SCC users, or by modifying the SCCrole-mapping.xml file to configure the mapping of native roles to SCC roles. Thesecurity module authenticates the logins and authorizes access to managed resources.
SAP Control Center provides a set of predefined login modules for authentication. All loginmodules are defined in the <install_location>/SCC-3_3/conf/csi_config.xml file. The syntax is defined by the SAP Common Security Infrastructure(CSI) framework. You can configure the different login modules to customize securitystrength. The login modules are:
• Preconfigured user login – defines a user name, password, and a list of roles. The defaultuser name is sccadmin; its password is configured during installation and its native role isSCC Administrator, which maps to sccAdminRole. You can create additional accounts byadding preconfigured user login modules to csi_config.xml. However, SAP does notrecommend the use of preconfigured user login modules for authentication in productionenvironments.
• NT proxy login – delegates authentication to the underlying Windows operating system.When you log in to SCC through an NT Proxy Login module, enter your user name in theformat username@nt-domain-name. For example, user@sap. Windows authentication isenabled by default, but it requires some configuration after an upgrade from SCC 3.2.5 orearlier.
• UNIX proxy login – delegates authentication to the underlying UNIX or Linux operatingsystem using Pluggable Authentication Modules (PAM). When you log in to SCC througha UNIX PAM, enter your UNIX user name and password. UNIX authentication is enabledby default, but it requires some configuration.
• LDAP login – delegates authentication to an LDAP server you specify. When you log in toSCC through an LDAP server, enter your LDAP user name and password. LDAPauthentication is not enabled by default; you must configure the login module.
Configuring Authentication for WindowsAuthentication through the Windows operating system is enabled by default. Configuration isrequired only if you have upgraded from an older version of SAP Control Center and no longerwant to use the older version’s authentication settings; if you do not want to use Windows forauthentication; or if you want to create login accounts manually. SAP recommends that youallow SCC to create accounts automatically.
This task is optional. However, if you choose not to create SAP Control Center accountsautomatically, you must enter them manually. Even when SCC users authenticate through
Get Started
SAP Control Center for SAP Adaptive Server Enterprise 41
LDAP or the local operating system, SCC needs the accounts for purposes of settingauthorization (user privileges).
1. Log in to SCC using an account with SCC administrative privileges. (The login account orits group must have sccAdminRole.)
2. Select Application > Administration > Security.
3. Click to select or deselect the box labeled Automatically add SCC login records forauthenticated logins.
4. Click to select or deselect the box labeled Automatically grant sccUserRole to newlycreated logins.
5. Click OK to close the Security dialog.
Next
There are two next steps:
• If you opted not to automatically create SCC login accounts, enter each account into SCCmanually.
• Grant privileges to login accounts that require more than basic user access. You can grantprivileges by assigning SCC roles directly to the login accounts, or by assigning the loginaccounts to groups and mapping SCC roles to the groups. The group approach is generallymore efficient.
See also• Configuring a Pluggable Authentication Module (PAM) for UNIX on page 92
Configuring a Pluggable Authentication Module (PAM) for UNIXSet up SAP Control Center to support username and password login using accounts on theUNIX operating system.
1. Using a login account with root privileges, configure the pluggable authentication modulefor your platform:
Platform Action
Solaris Append the contents of the <SCC-install-dir>/utility/<su-nos>/pam.conf file (provided with SAP Control Center) to the /etc/pam.conf file on your Solaris platform.
Get Started
42
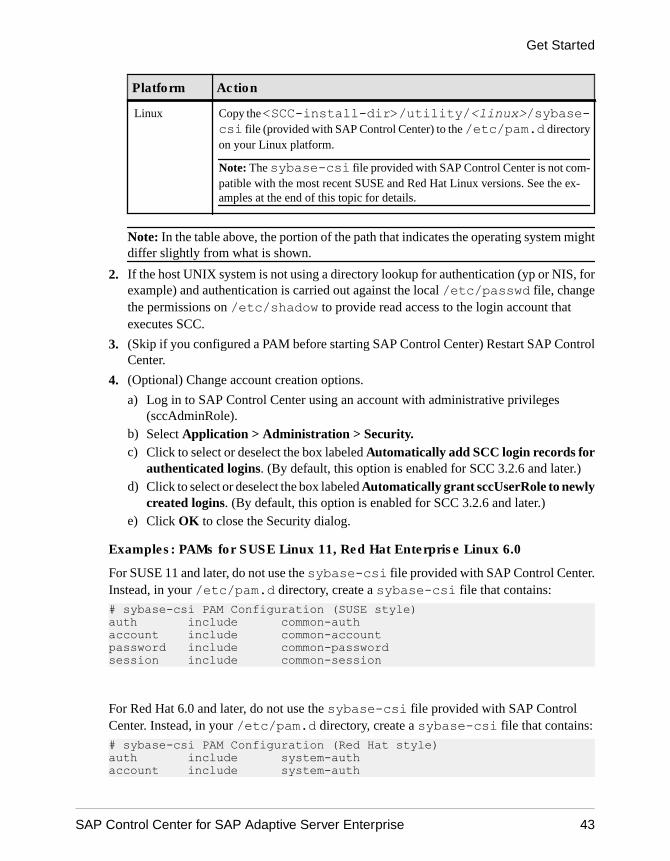
Platform Action
Linux Copy the <SCC-install-dir>/utility/<linux>/sybase-csi file (provided with SAP Control Center) to the /etc/pam.d directoryon your Linux platform.
Note: The sybase-csi file provided with SAP Control Center is not com-patible with the most recent SUSE and Red Hat Linux versions. See the ex-amples at the end of this topic for details.
Note: In the table above, the portion of the path that indicates the operating system mightdiffer slightly from what is shown.
2. If the host UNIX system is not using a directory lookup for authentication (yp or NIS, forexample) and authentication is carried out against the local /etc/passwd file, changethe permissions on /etc/shadow to provide read access to the login account thatexecutes SCC.
3. (Skip if you configured a PAM before starting SAP Control Center) Restart SAP ControlCenter.
4. (Optional) Change account creation options.
a) Log in to SAP Control Center using an account with administrative privileges(sccAdminRole).
b) Select Application > Administration > Security.c) Click to select or deselect the box labeled Automatically add SCC login records for
authenticated logins. (By default, this option is enabled for SCC 3.2.6 and later.)d) Click to select or deselect the box labeled Automatically grant sccUserRole to newly
created logins. (By default, this option is enabled for SCC 3.2.6 and later.)e) Click OK to close the Security dialog.
Examples: PAMs for SUSE Linux 11, Red Hat Enterprise Linux 6.0
For SUSE 11 and later, do not use the sybase-csi file provided with SAP Control Center.Instead, in your /etc/pam.d directory, create a sybase-csi file that contains:
# sybase-csi PAM Configuration (SUSE style)auth include common-authaccount include common-accountpassword include common-passwordsession include common-session
For Red Hat 6.0 and later, do not use the sybase-csi file provided with SAP ControlCenter. Instead, in your /etc/pam.d directory, create a sybase-csi file that contains:
# sybase-csi PAM Configuration (Red Hat style)auth include system-authaccount include system-auth
Get Started
SAP Control Center for SAP Adaptive Server Enterprise 43
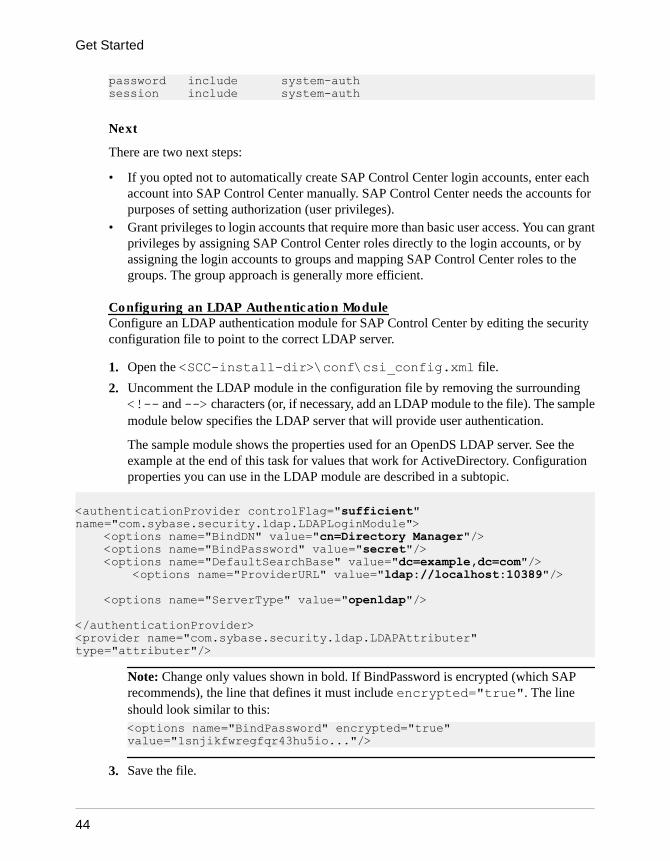
password include system-authsession include system-auth
Next
There are two next steps:
• If you opted not to automatically create SAP Control Center login accounts, enter eachaccount into SAP Control Center manually. SAP Control Center needs the accounts forpurposes of setting authorization (user privileges).
• Grant privileges to login accounts that require more than basic user access. You can grantprivileges by assigning SAP Control Center roles directly to the login accounts, or byassigning the login accounts to groups and mapping SAP Control Center roles to thegroups. The group approach is generally more efficient.
Configuring an LDAP Authentication ModuleConfigure an LDAP authentication module for SAP Control Center by editing the securityconfiguration file to point to the correct LDAP server.
1. Open the <SCC-install-dir>\conf\csi_config.xml file.
2. Uncomment the LDAP module in the configuration file by removing the surrounding<!-- and --> characters (or, if necessary, add an LDAP module to the file). The samplemodule below specifies the LDAP server that will provide user authentication.
The sample module shows the properties used for an OpenDS LDAP server. See theexample at the end of this task for values that work for ActiveDirectory. Configurationproperties you can use in the LDAP module are described in a subtopic.
<authenticationProvider controlFlag="sufficient" name="com.sybase.security.ldap.LDAPLoginModule"> <options name="BindDN" value="cn=Directory Manager"/> <options name="BindPassword" value="secret"/> <options name="DefaultSearchBase" value="dc=example,dc=com"/> <options name="ProviderURL" value="ldap://localhost:10389"/> <options name="ServerType" value="openldap"/>
</authenticationProvider><provider name="com.sybase.security.ldap.LDAPAttributer" type="attributer"/>
Note: Change only values shown in bold. If BindPassword is encrypted (which SAPrecommends), the line that defines it must include encrypted="true". The lineshould look similar to this:<options name="BindPassword" encrypted="true" value="1snjikfwregfqr43hu5io..."/>
3. Save the file.
Get Started
44
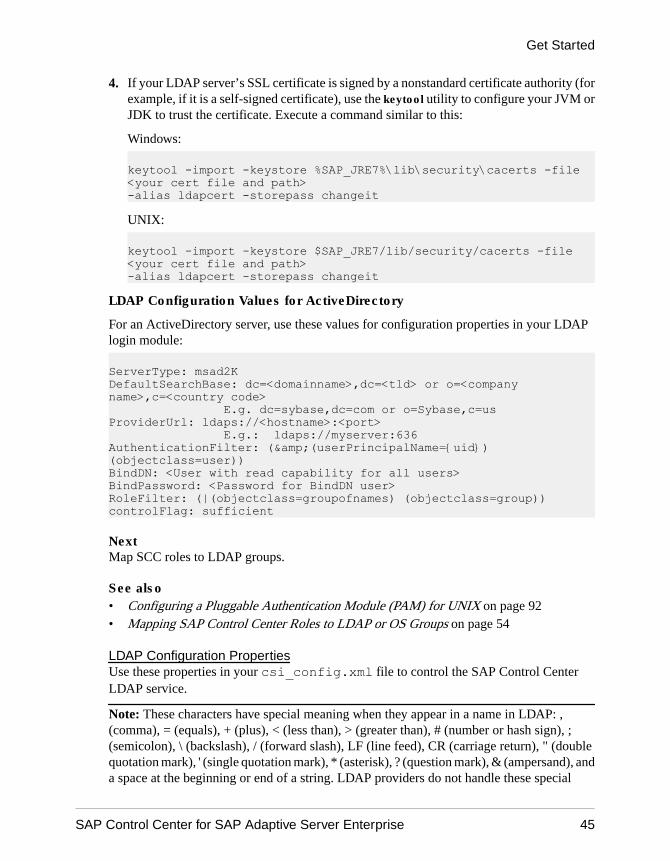
4. If your LDAP server’s SSL certificate is signed by a nonstandard certificate authority (forexample, if it is a self-signed certificate), use the keytool utility to configure your JVM orJDK to trust the certificate. Execute a command similar to this:
Windows:
keytool -import -keystore %SAP_JRE7%\lib\security\cacerts -file <your cert file and path> -alias ldapcert -storepass changeit
UNIX:
keytool -import -keystore $SAP_JRE7/lib/security/cacerts -file <your cert file and path> -alias ldapcert -storepass changeit
LDAP Configuration Values for ActiveDirectory
For an ActiveDirectory server, use these values for configuration properties in your LDAPlogin module: ServerType: msad2KDefaultSearchBase: dc=<domainname>,dc=<tld> or o=<company name>,c=<country code> E.g. dc=sybase,dc=com or o=Sybase,c=usProviderUrl: ldaps://<hostname>:<port> E.g.: ldaps://myserver:636AuthenticationFilter: (&(userPrincipalName={uid}) (objectclass=user))BindDN: <User with read capability for all users>BindPassword: <Password for BindDN user>RoleFilter: (|(objectclass=groupofnames) (objectclass=group))controlFlag: sufficient
NextMap SCC roles to LDAP groups.
See also• Configuring a Pluggable Authentication Module (PAM) for UNIX on page 92• Mapping SAP Control Center Roles to LDAP or OS Groups on page 54
LDAP Configuration PropertiesUse these properties in your csi_config.xml file to control the SAP Control CenterLDAP service.
Note: These characters have special meaning when they appear in a name in LDAP: ,(comma), = (equals), + (plus), < (less than), > (greater than), # (number or hash sign), ;(semicolon), \ (backslash), / (forward slash), LF (line feed), CR (carriage return), " (doublequotation mark), ' (single quotation mark), * (asterisk), ? (question mark), & (ampersand), anda space at the beginning or end of a string. LDAP providers do not handle these special
Get Started
SAP Control Center for SAP Adaptive Server Enterprise 45
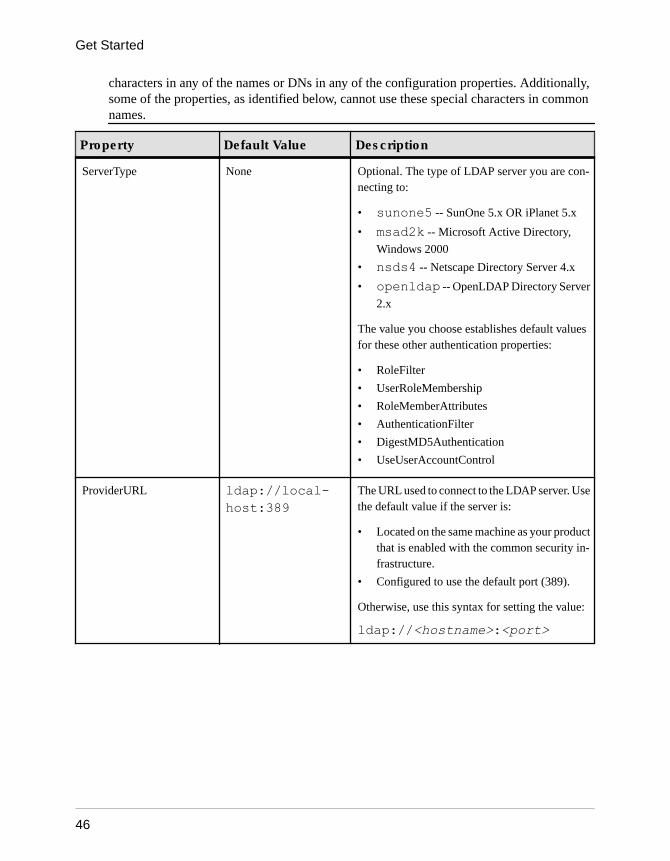
characters in any of the names or DNs in any of the configuration properties. Additionally,some of the properties, as identified below, cannot use these special characters in commonnames.
Property Default Value Description
ServerType None Optional. The type of LDAP server you are con-necting to:
• sunone5 -- SunOne 5.x OR iPlanet 5.x
• msad2k -- Microsoft Active Directory,
Windows 2000
• nsds4 -- Netscape Directory Server 4.x
• openldap -- OpenLDAP Directory Server
2.x
The value you choose establishes default valuesfor these other authentication properties:
• RoleFilter
• UserRoleMembership
• RoleMemberAttributes
• AuthenticationFilter
• DigestMD5Authentication
• UseUserAccountControl
ProviderURL ldap://local-host:389
The URL used to connect to the LDAP server. Usethe default value if the server is:
• Located on the same machine as your productthat is enabled with the common security in-frastructure.
• Configured to use the default port (389).
Otherwise, use this syntax for setting the value:
ldap://<hostname>:<port>
Get Started
46

Property Default Value Description
DefaultSearchBase None The LDAP search base that is used if no othersearch base is specified for authentication, roles,attribution, and self registration:
1. dc=<domainname>,dc=<tld>For example, a machine in the mycomnpa-ny.com domain would have a search base ofdc=mycompany,dc=com.
2. o=<company name>,c=<coun-try code>For example, this might be o=mycomp-nay,c=us for a machine within the Mycom-pany organization.
Note: When you use this property to authenticateSCC:
• Do not use special characters, as listed above,in common names or distinguished names inthe value of this property.
• Do not use Chinese or Japanese characters inuser names or passwords of this property.
SecurityProtocol None The protocol to be used when connecting to theLDAP server.
To use an encrypted protocol, use ssl instead of
ldaps in the URL.
AuthenticationMethod Simple The authentication method to use for all authen-tication requests into LDAP. Legal values aregenerally the same as those of the java.naming.se-curity.authentication JNDI property. Choose oneof:
• simple — For clear-text password authenti-cation.
• DIGEST-MD5 — For more secure hashedpassword authentication. This method re-quires that the server use plain text passwordstorage and only works with JRE 1.4 or later.
Get Started
SAP Control Center for SAP Adaptive Server Enterprise 47

Property Default Value Description
AuthenticationFilter For most LDAP servers:(&(uid={uid})(ob-jectclass=per-son))or
For Active Directory e-mail lookups: (&(userPrincipal-Name={uid})(object-class=user))[ActiveDirecto-ry]For Active DirectoryWindows user namelookups: (&(sAMAccount-Name={uid})(ob-ject-class=user))
The filter to use when looking up the user.
When performing a user name based lookup, thisfilter is used to determine the LDAP entry thatmatches the supplied user name.
The string "{uid}" in the filter is replaced with thesupplied user name.
Note: When you use this property to authenticateSCC:
• Do not use special characters, as listed above,in common names or distinguished names inthe value of this property.
• Do not use Chinese or Japanese characters inuser names or passwords of this property.
AuthenticationScope onelevel The authentication search scope. The supportedvalues for this are:
• onelevel• subtreeIf you do not specify a value or if you specify aninvalid value, the default value is used.
Get Started
48
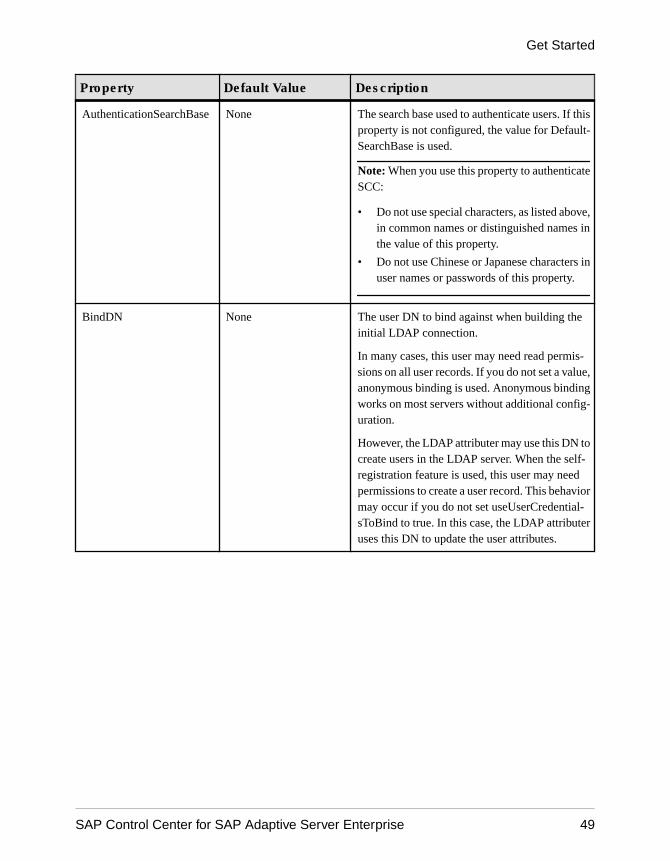
Property Default Value Description
AuthenticationSearchBase None The search base used to authenticate users. If thisproperty is not configured, the value for Default-SearchBase is used.
Note: When you use this property to authenticateSCC:
• Do not use special characters, as listed above,in common names or distinguished names inthe value of this property.
• Do not use Chinese or Japanese characters inuser names or passwords of this property.
BindDN None The user DN to bind against when building theinitial LDAP connection.
In many cases, this user may need read permis-sions on all user records. If you do not set a value,anonymous binding is used. Anonymous bindingworks on most servers without additional config-uration.
However, the LDAP attributer may use this DN tocreate users in the LDAP server. When the self-registration feature is used, this user may needpermissions to create a user record. This behaviormay occur if you do not set useUserCredential-sToBind to true. In this case, the LDAP attributeruses this DN to update the user attributes.
Get Started
SAP Control Center for SAP Adaptive Server Enterprise 49
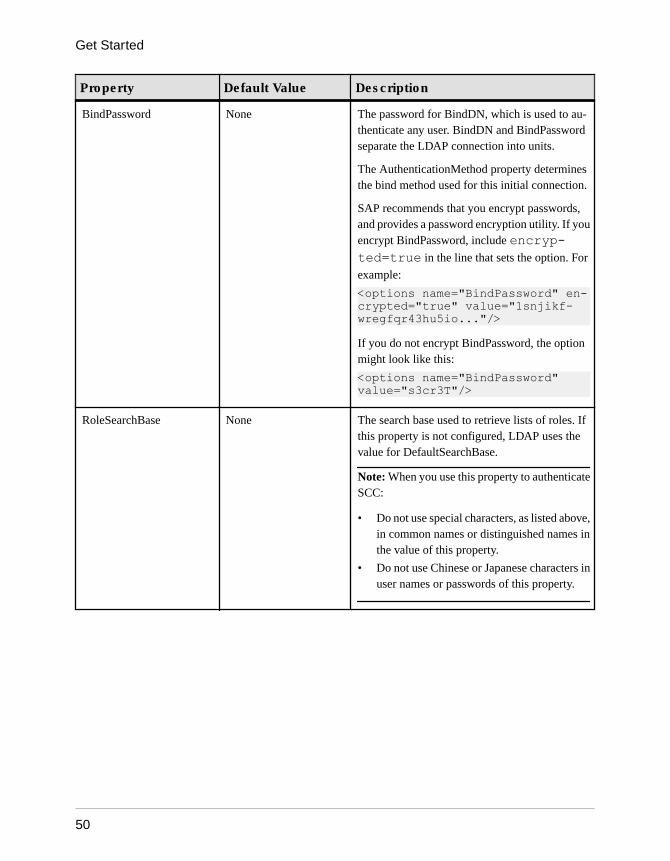
Property Default Value Description
BindPassword None The password for BindDN, which is used to au-thenticate any user. BindDN and BindPasswordseparate the LDAP connection into units.
The AuthenticationMethod property determinesthe bind method used for this initial connection.
SAP recommends that you encrypt passwords,and provides a password encryption utility. If youencrypt BindPassword, include encryp-ted=true in the line that sets the option. For
example:
<options name="BindPassword" en-crypted="true" value="1snjikf-wregfqr43hu5io..."/>If you do not encrypt BindPassword, the optionmight look like this:
<options name="BindPassword" value="s3cr3T"/>
RoleSearchBase None The search base used to retrieve lists of roles. Ifthis property is not configured, LDAP uses thevalue for DefaultSearchBase.
Note: When you use this property to authenticateSCC:
• Do not use special characters, as listed above,in common names or distinguished names inthe value of this property.
• Do not use Chinese or Japanese characters inuser names or passwords of this property.
Get Started
50
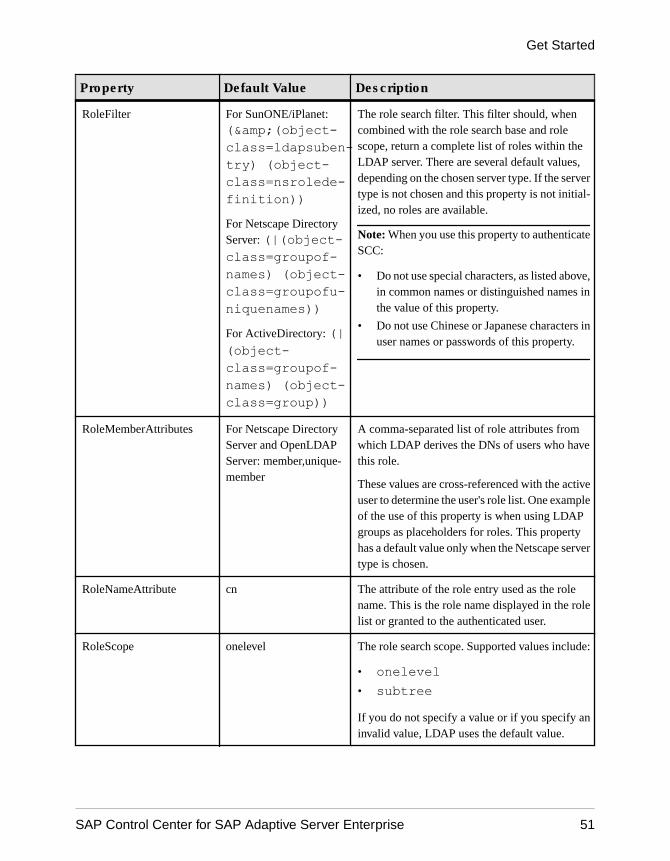
Property Default Value Description
RoleFilter For SunONE/iPlanet:(&(object-class=ldapsuben-try) (object-class=nsrolede-finition))For Netscape DirectoryServer: (|(object-class=groupof-names) (object-class=groupofu-niquenames))For ActiveDirectory: (|(object-class=groupof-names) (object-class=group))
The role search filter. This filter should, whencombined with the role search base and rolescope, return a complete list of roles within theLDAP server. There are several default values,depending on the chosen server type. If the servertype is not chosen and this property is not initial-ized, no roles are available.
Note: When you use this property to authenticateSCC:
• Do not use special characters, as listed above,in common names or distinguished names inthe value of this property.
• Do not use Chinese or Japanese characters inuser names or passwords of this property.
RoleMemberAttributes For Netscape DirectoryServer and OpenLDAPServer: member,unique-member
A comma-separated list of role attributes fromwhich LDAP derives the DNs of users who havethis role.
These values are cross-referenced with the activeuser to determine the user's role list. One exampleof the use of this property is when using LDAPgroups as placeholders for roles. This propertyhas a default value only when the Netscape servertype is chosen.
RoleNameAttribute cn The attribute of the role entry used as the rolename. This is the role name displayed in the rolelist or granted to the authenticated user.
RoleScope onelevel The role search scope. Supported values include:
• onelevel• subtreeIf you do not specify a value or if you specify aninvalid value, LDAP uses the default value.
Get Started
SAP Control Center for SAP Adaptive Server Enterprise 51

Property Default Value Description
SkipRoleLookup false Set this property to true to grant the roles lookedup using the attributes specified by the propertyUserRoleMembershipAttributes without cross-referencing them with the roles looked up usingthe RoleSearchBase and RoleFilter.
LDAP configuration validation succeeds evenwhen an error is encountered when listing all theavailable roles. The error is logged to the serverlog during validation but not reported in SCC,allowing the configuration to be saved. This hasan impact when listing the physical roles for rolemapping as well as in SCC. To successfully au-thenticate the user, set the SkipRoleLookup prop-erty to true.
UserRoleMembershipAttri-butes
For iPlanet/SunONE:nsRoleDN
For Active Directory:memberOf
For all others: none
Defines a user attribute that contains the DNs ofall of the roles a user is a member of.
These comma-delimited values are cross-refer-enced with the roles retrieved in the role searchbase and search filter to generate a list of user'sroles.
If the SkipRoleSearch property is set to true, thesecomma-delimited values are not cross-referencedwith the roles retrieved in the role search base androle search filter. See SkipRoleLookup.
Note: If you use nested groups with Active Di-rectory, you must set this property to to-kenGroups.
UserFreeformRoleMem-bershipAttributes
None The free-form role membership attribute list.Users who have attributes in this comma-delimi-ted list are automatically granted access to roleswhose names are equal to the attribute value. Forexample, if the value of this property is depart-ment and the department attribute in the user'sLDAP record has the values {sales, consulting},the user is granted the roles sales and consulting.
Referral ignore The behavior when a referral is encountered. Val-id values are dictated by LdapContext, but mightinclude follow, ignore, or throw.
Get Started
52
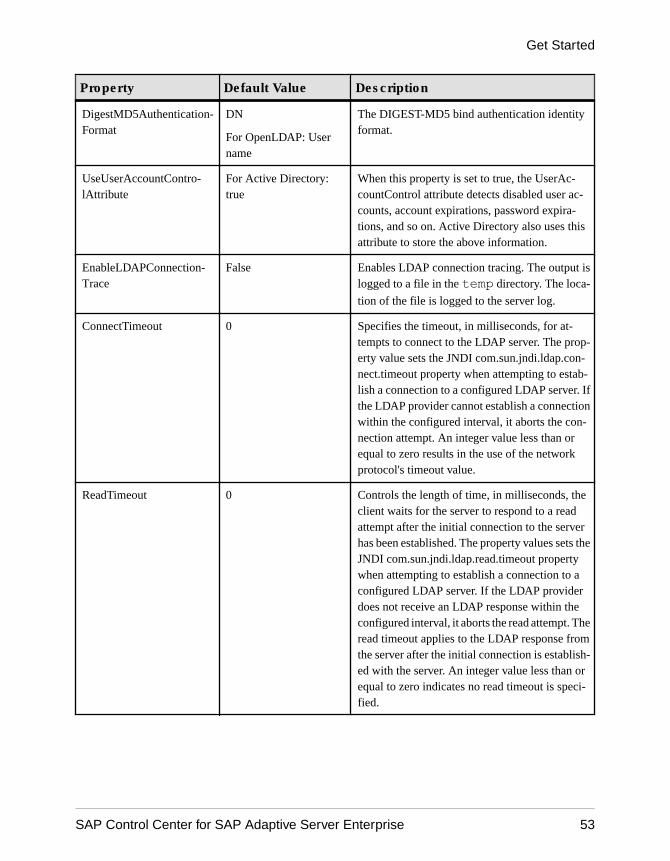
Property Default Value Description
DigestMD5Authentication-Format
DN
For OpenLDAP: Username
The DIGEST-MD5 bind authentication identityformat.
UseUserAccountContro-lAttribute
For Active Directory:true
When this property is set to true, the UserAc-countControl attribute detects disabled user ac-counts, account expirations, password expira-tions, and so on. Active Directory also uses thisattribute to store the above information.
EnableLDAPConnection-Trace
False Enables LDAP connection tracing. The output islogged to a file in the temp directory. The loca-
tion of the file is logged to the server log.
ConnectTimeout 0 Specifies the timeout, in milliseconds, for at-tempts to connect to the LDAP server. The prop-erty value sets the JNDI com.sun.jndi.ldap.con-nect.timeout property when attempting to estab-lish a connection to a configured LDAP server. Ifthe LDAP provider cannot establish a connectionwithin the configured interval, it aborts the con-nection attempt. An integer value less than orequal to zero results in the use of the networkprotocol's timeout value.
ReadTimeout 0 Controls the length of time, in milliseconds, theclient waits for the server to respond to a readattempt after the initial connection to the serverhas been established. The property values sets theJNDI com.sun.jndi.ldap.read.timeout propertywhen attempting to establish a connection to aconfigured LDAP server. If the LDAP providerdoes not receive an LDAP response within theconfigured interval, it aborts the read attempt. Theread timeout applies to the LDAP response fromthe server after the initial connection is establish-ed with the server. An integer value less than orequal to zero indicates no read timeout is speci-fied.
Get Started
SAP Control Center for SAP Adaptive Server Enterprise 53
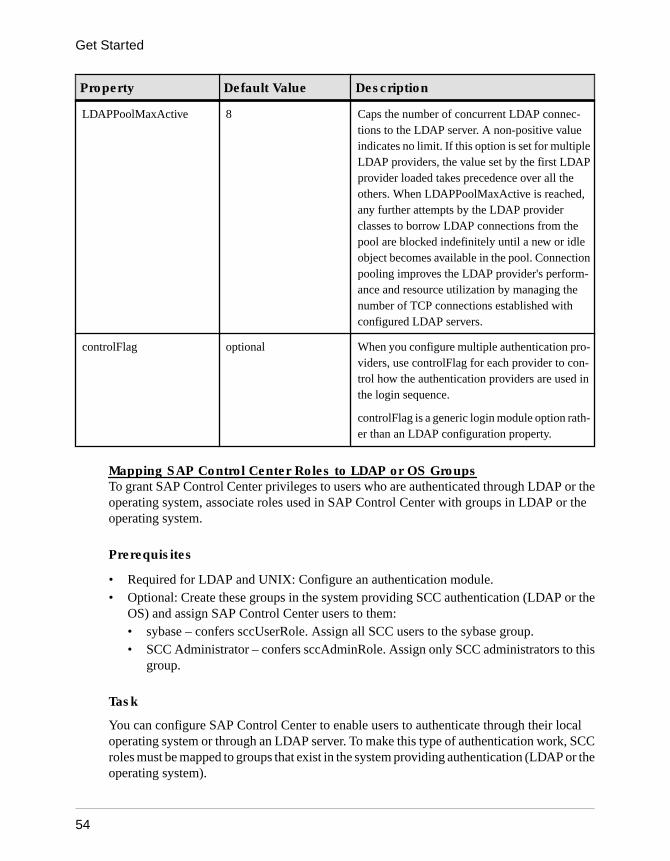
Property Default Value Description
LDAPPoolMaxActive 8 Caps the number of concurrent LDAP connec-tions to the LDAP server. A non-positive valueindicates no limit. If this option is set for multipleLDAP providers, the value set by the first LDAPprovider loaded takes precedence over all theothers. When LDAPPoolMaxActive is reached,any further attempts by the LDAP providerclasses to borrow LDAP connections from thepool are blocked indefinitely until a new or idleobject becomes available in the pool. Connectionpooling improves the LDAP provider's perform-ance and resource utilization by managing thenumber of TCP connections established withconfigured LDAP servers.
controlFlag optional When you configure multiple authentication pro-viders, use controlFlag for each provider to con-trol how the authentication providers are used inthe login sequence.
controlFlag is a generic login module option rath-er than an LDAP configuration property.
Mapping SAP Control Center Roles to LDAP or OS GroupsTo grant SAP Control Center privileges to users who are authenticated through LDAP or theoperating system, associate roles used in SAP Control Center with groups in LDAP or theoperating system.
Prerequisites
• Required for LDAP and UNIX: Configure an authentication module.• Optional: Create these groups in the system providing SCC authentication (LDAP or the
OS) and assign SAP Control Center users to them:• sybase – confers sccUserRole. Assign all SCC users to the sybase group.• SCC Administrator – confers sccAdminRole. Assign only SCC administrators to this
group.
Task
You can configure SAP Control Center to enable users to authenticate through their localoperating system or through an LDAP server. To make this type of authentication work, SCCroles must be mapped to groups that exist in the system providing authentication (LDAP or theoperating system).
Get Started
54
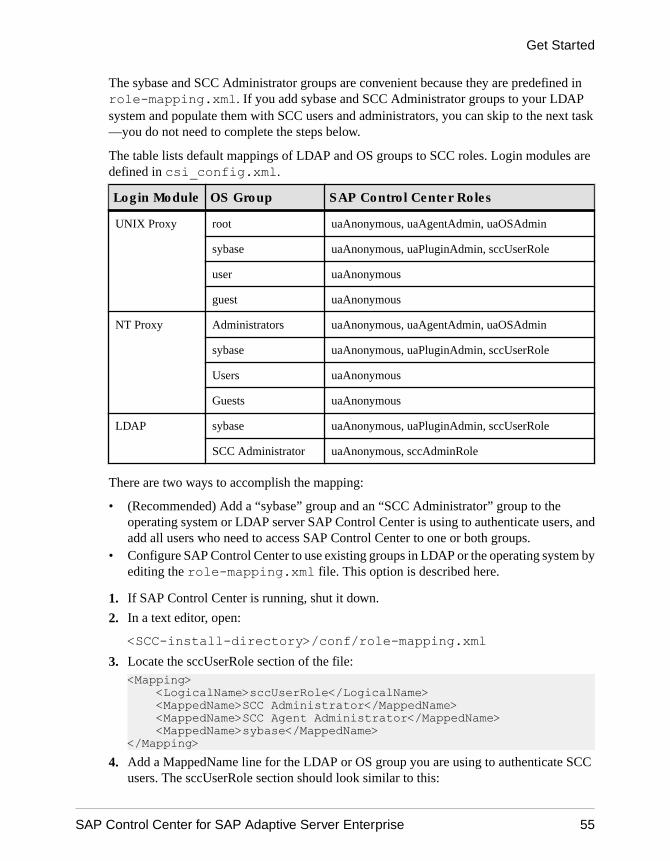
The sybase and SCC Administrator groups are convenient because they are predefined inrole-mapping.xml. If you add sybase and SCC Administrator groups to your LDAPsystem and populate them with SCC users and administrators, you can skip to the next task—you do not need to complete the steps below.
The table lists default mappings of LDAP and OS groups to SCC roles. Login modules aredefined in csi_config.xml.
Login Module OS Group SAP Control Center Roles
UNIX Proxy root uaAnonymous, uaAgentAdmin, uaOSAdmin
sybase uaAnonymous, uaPluginAdmin, sccUserRole
user uaAnonymous
guest uaAnonymous
NT Proxy Administrators uaAnonymous, uaAgentAdmin, uaOSAdmin
sybase uaAnonymous, uaPluginAdmin, sccUserRole
Users uaAnonymous
Guests uaAnonymous
LDAP sybase uaAnonymous, uaPluginAdmin, sccUserRole
SCC Administrator uaAnonymous, sccAdminRole
There are two ways to accomplish the mapping:
• (Recommended) Add a “sybase” group and an “SCC Administrator” group to theoperating system or LDAP server SAP Control Center is using to authenticate users, andadd all users who need to access SAP Control Center to one or both groups.
• Configure SAP Control Center to use existing groups in LDAP or the operating system byediting the role-mapping.xml file. This option is described here.
1. If SAP Control Center is running, shut it down.
2. In a text editor, open:
<SCC-install-directory>/conf/role-mapping.xml3. Locate the sccUserRole section of the file:
<Mapping> <LogicalName>sccUserRole</LogicalName> <MappedName>SCC Administrator</MappedName> <MappedName>SCC Agent Administrator</MappedName> <MappedName>sybase</MappedName></Mapping>
4. Add a MappedName line for the LDAP or OS group you are using to authenticate SCCusers. The sccUserRole section should look similar to this:
Get Started
SAP Control Center for SAP Adaptive Server Enterprise 55
<Mapping> <LogicalName>sccUserRole</LogicalName> <MappedName>SCC Administrator</MappedName> <MappedName>SCC Agent Administrator</MappedName> <MappedName>sybase</MappedName> <MappedName>my_SCC_group</MappedName></Mapping>
5. Locate the sccAdminRole section of the file:<Mapping> <LogicalName>sccAdminRole</LogicalName> <MappedName>SCC Administrator</MappedName></Mapping>
6. Add a MappedName line for the LDAP or OS group you are using to authenticate SCCadministrators. The sccAdminRole section should look similar to this:<Mapping> <LogicalName>sccAdminRole</LogicalName> <MappedName>SCC Administrator</MappedName> <MappedName>my_SCC_admin_group</MappedName></Mapping>
7. Save the file and exit.
8. (LDAP only) Ensure that the roles defined in the LDAP repository match the roles definedin role-mapping.xml.
9. In the <SCC-install-dir>\conf\csi_config.xml file, set the BindPasswordand ProviderURL properties with values used in your deployment.
Sybase recommends that you encrypt sensitive values before saving them incsi_config.xml.
10. Start SAP Control Center.
See also• Configuring an LDAP Authentication Module on page 44
Encrypting a PasswordUse the passencrypt utility to encrypt passwords and other values that must be kept securewhile stored in text files.
You can safely store an encrypted password in a configuration file. Enter the password in cleartext (unencrypted) when you execute passencrypt and when you use the password to log in.
passencrypt, which is located in the SAP Control Center bin directory, uses the SHA-256hash algorithm for passwords used in the PreConfiguredLoginModule incsi_config.xml.
1. Open a command window and change to the bin directory:
Windows: cd <SCC-install-directory>\bin
Get Started
56
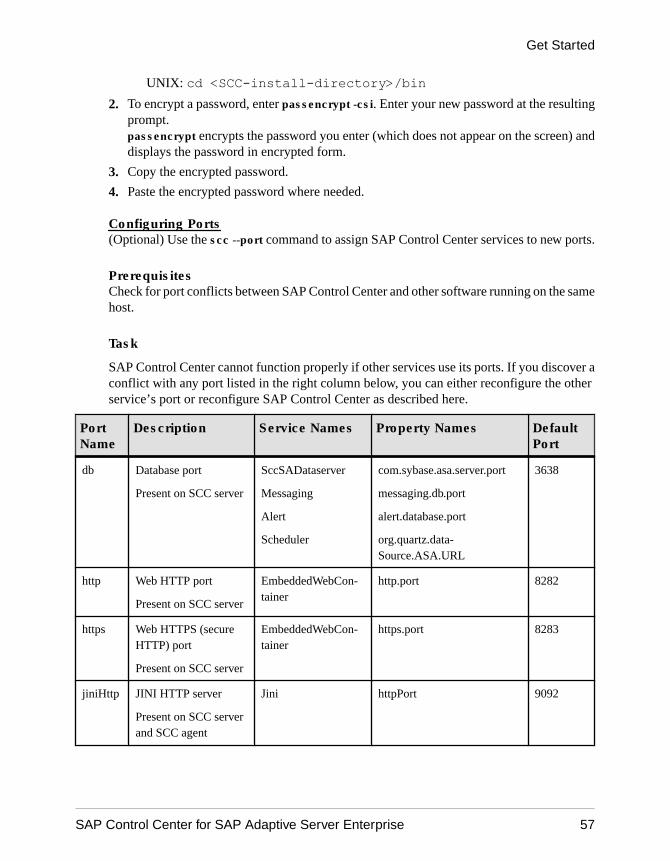
UNIX: cd <SCC-install-directory>/bin2. To encrypt a password, enter passencrypt -csi. Enter your new password at the resulting
prompt.passencrypt encrypts the password you enter (which does not appear on the screen) anddisplays the password in encrypted form.
3. Copy the encrypted password.
4. Paste the encrypted password where needed.
Configuring Ports(Optional) Use the scc --port command to assign SAP Control Center services to new ports.
PrerequisitesCheck for port conflicts between SAP Control Center and other software running on the samehost.
Task
SAP Control Center cannot function properly if other services use its ports. If you discover aconflict with any port listed in the right column below, you can either reconfigure the otherservice’s port or reconfigure SAP Control Center as described here.
PortName
Description Service Names Property Names DefaultPort
db Database port
Present on SCC server
SccSADataserver
Messaging
Alert
Scheduler
com.sybase.asa.server.port
messaging.db.port
alert.database.port
org.quartz.data-Source.ASA.URL
3638
http Web HTTP port
Present on SCC server
EmbeddedWebCon-tainer
http.port 8282
https Web HTTPS (secureHTTP) port
Present on SCC server
EmbeddedWebCon-tainer
https.port 8283
jiniHttp JINI HTTP server
Present on SCC serverand SCC agent
Jini httpPort 9092
Get Started
SAP Control Center for SAP Adaptive Server Enterprise 57
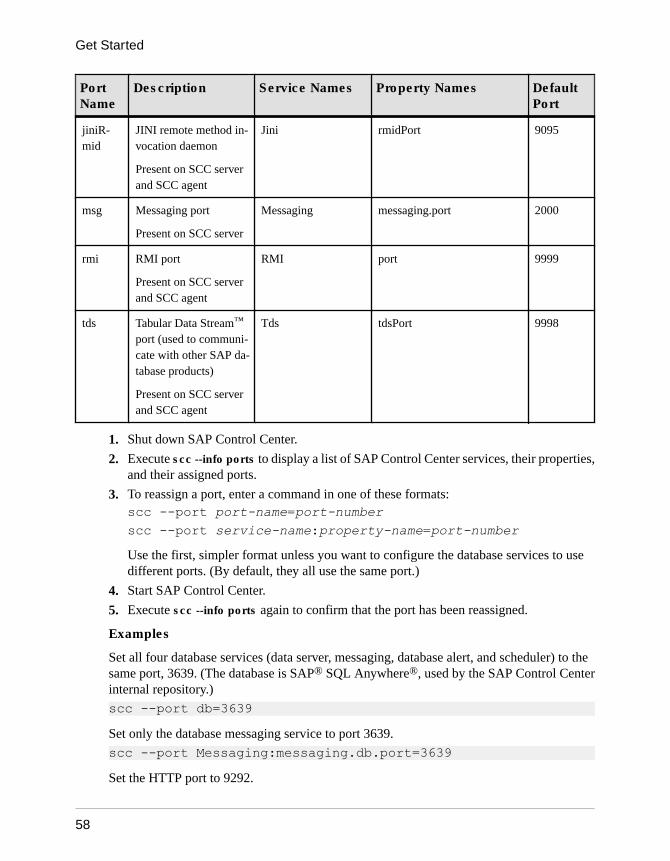
PortName
Description Service Names Property Names DefaultPort
jiniR-mid
JINI remote method in-vocation daemon
Present on SCC serverand SCC agent
Jini rmidPort 9095
msg Messaging port
Present on SCC server
Messaging messaging.port 2000
rmi RMI port
Present on SCC serverand SCC agent
RMI port 9999
tds Tabular Data Stream™
port (used to communi-cate with other SAP da-tabase products)
Present on SCC serverand SCC agent
Tds tdsPort 9998
1. Shut down SAP Control Center.
2. Execute scc --info ports to display a list of SAP Control Center services, their properties,and their assigned ports.
3. To reassign a port, enter a command in one of these formats:scc --port port-name=port-numberscc --port service-name:property-name=port-numberUse the first, simpler format unless you want to configure the database services to usedifferent ports. (By default, they all use the same port.)
4. Start SAP Control Center.
5. Execute scc --info ports again to confirm that the port has been reassigned.
Examples
Set all four database services (data server, messaging, database alert, and scheduler) to thesame port, 3639. (The database is SAP® SQL Anywhere®, used by the SAP Control Centerinternal repository.)
scc --port db=3639Set only the database messaging service to port 3639.
scc --port Messaging:messaging.db.port=3639Set the HTTP port to 9292.
Get Started
58
scc --port http=9292Set the Jini RMI daemon to port 9696.
scc --port jiniRmid=9696Set the main SAP Control Center messaging service to port 2001.
scc --port msg=2001Set the RMI port to 9991.
scc --port rmi=9991Set the Tabular Data Stream port to 9997.
scc --port tds=9997Note: scc commands that include a port-setting option (-p or --port) do not start SAP ControlCenter. To start SCC, execute a separate scc command.
Configuring the E-mail Server(Optional) Specify the e-mail server for SAP Control Center to use to send e-mail alertnotifications.
PrerequisitesLaunch SAP Control Center and log in using an account with administrative privileges. (Thelogin account or its group must have sccAdminRole.)
Task
1. From the application’s menu bar, select Application > Administration.
2. Select General Settings.
3. Click the E-mail tab.
4. Enter the name of the e-mail server through which SAP Control Center will send alertnotifications.
5. Change the default e-mail server port only in consultation with your e-mail administrator.
6. (Optional) Click Customize e-mail settings to display options for setting the domainname and e-mail sender for alert e-mail notifications.
7. (Optional) Enter your domain name (for example, mycompany.com).
Most e-mail servers do not require SCC to provide an explicit domain name. Try providinga domain name here if your first attempt to configure e-mail alerts fails.
8. (Optional) Change the default e-mail sender name.
This name appears in the "From" field of SCC e-mail alert messages. Do not use spaces;use hyphens or underscore characters instead.
Get Started
SAP Control Center for SAP Adaptive Server Enterprise 59
Tip: If you have multiple SCC servers, configure their sender names so you can tell whichSCC an alert is coming from. For example, SybaseControlCenter_Boston or SCC_test11.
9. (Optional) If you entered anything in the E-mail Domain name or E-mail sender namefields, click Apply to make the test e-mail option reappear.
10. (Optional) To dispatch a test message, enter an e-mail address in the Test e-mail addressfield and click Send.If the test e-mail is received, you have properly configured the server for e-mail alertnotifications.
11. Click OK (to apply the change and close the properties dialog) or Apply (to apply thechange and leave the dialog open).
Next(Optional) Configure automatic logout.
See also• Setting Up Security on page 39
Configuring the Automatic Logout Timer(Optional) Set SAP Control Center to end login sessions when users are inactive for too long.
PrerequisitesLaunch SAP Control Center and log in using an account with administrative privileges. (Thelogin account or its group must have sccAdminRole.)
Task
1. From the application’s menu bar, select Application > Administration.
2. Select General Settings.
3. Click the Auto-Logout tab.
4. Enter the number of minutes after which an idle user will be automatically logged out.
Enter 0 or leave the box empty to disable automatic logout.
5. Click OK (to apply the change and close the properties dialog) or Apply (to apply thechange and leave the dialog open).
User AuthorizationThe authorization mechanism in SAP Control Center employs login accounts and task-basedroles.
Access to SAP Control Center is controlled by login accounts. Permissions assign predefinedroles that control tasks the user can perform in SCC, such as administration and monitoring ofparticular types of servers. The roles can be assigned directly to login accounts or to groups; a
Get Started
60
login account inherits the roles of any group to which it belongs. Component product modulesassign some roles automatically.
SAP Control Center classifies roles as follows:
• System roles – define how a user can interact with SCC.• Product roles – define how a user can interact with a particular managed resource in SCC,
for example the Replication Server named RepBoston01.
Note: The tools described here are for managing SCC-enabled login accounts; you cannot usethem to manage accounts and groups that are native to your managed resource.
See also• Configure on page 64
Assigning a Role to a Login or a GroupUse the security configuration options to add one or more roles to an SAP Control Center loginaccount or to a group. Roles enable users to perform tasks such as monitoring servers oradministering SAP Control Center.
PrerequisitesYou must have administrative privileges (sccAdminRole) to perform this task. To assign amonitoring role for a server, first register the server.
TaskAssign the sccAdminRole to any login account that will perform administrative tasks in SAPControl Center.
1. From the application menu bar, select Application > Administration.
2. In the SAP Control Center Properties dialog, expand the Security folder.
3. Click Logins or Groups.
4. In the table, select the login account or group to which you want to assign a role.
5. Click the Roles tab.
6. In the Available roles for resource list, select the role, then click Add. For example, togrant administrative privileges, add the SCC Service:sccAdminRole. To grant monitoringprivileges, add the MonitorRole for the desired server and server type.
Note: SAP Control Center product modules assign certain roles automatically, so youmight not need to add a MonitorRole.
If a role appears in the Has following roles list, this account or group has already beenconfigured with that role.
7. Click OK.
Get Started
SAP Control Center for SAP Adaptive Server Enterprise 61
See also• Adding a Group on page 62
• Adding a Login Account to a Group on page 62
• Logins, Roles, and Groups on page 63
Adding a GroupUse the security configuration options to create a new group.
PrerequisitesYou must have administrative privileges (sccAdminRole) to perform this task.
TaskGroups can make roles easier to manage. Rather than assigning roles to individual users,assign roles to groups and add users to the groups or remove them as needed.
1. From the main menu bar, select Application > Administration.
2. In the SAP Control Center Properties dialog, expand the Security folder.
3. Select Groups.
4. Click Create Group.
5. Enter a group name and a description.
6. Click Finish.
See also• Assigning a Role to a Login or a Group on page 61
• Adding a Login Account to a Group on page 62
• Logins, Roles, and Groups on page 63
Adding a Login Account to a GroupUse the security configuration options to add one or more login accounts to a group.
PrerequisitesYou must have administrative privileges (sccAdminRole) to perform this task.
Task
1. From the main menu bar, select Application > Administration.
2. In the SAP Control Center Properties dialog, expand the Security folder.
3. Click Groups.
4. Select the group to which you want to assign an account.
5. Click the Membership tab.
Get Started
62
6. Select the account, then click Add.
7. Click OK.
See also• Assigning a Role to a Login or a Group on page 61• Adding a Group on page 62• Logins, Roles, and Groups on page 63
Logins, Roles, and GroupsSAP Control Center includes predefined login accounts and roles.
A login account identifies a user who can connect to SAP Control Center. An account has rolesthat control the tasks the user is allowed to perform. Users can be authenticated through nativeSCC accounts, but a safer approach is to delegate authentication to the operating system or toan LDAP directory service.
SCC comes with a predefined login account. SAP recommends using the predefined accountonly for installing, setting up, and testing SAP Control Center. This account is not intended foruse in a production environment.
Table 9. Predefined Login Account
Login Name Description
sccadmin Can use all the administrative features in SAP Control Center. Use forconfiguration and test.
A role is a predefined profile that can be assigned to a login account or a group. Roles controlthe access rights for login accounts. SCC comes with predefined roles that are intended for usein production environments.
Table 10. Predefined Roles
Role Description
sccUserRole Provides nonadministrative access to SAP Control Center. Required forall users and assigned automatically to every authenticated user.
sccAdminRole Provides administrative privileges for managing SAP Control Center.
Monitoring privileges for SCC product modules are assigned automatically.
A group is made up of one or more login accounts; all the accounts in a group have the rolesgranted to the group. SCC lets you create groups to suit your business requirements.
See also• Assigning a Role to a Login or a Group on page 61
Get Started
SAP Control Center for SAP Adaptive Server Enterprise 63
• Adding a Group on page 62
• Adding a Login Account to a Group on page 62
ConfigureConfigure login accounts, statistics collection, alerts, and other server monitoring options.
PrerequisitesBefore configuring SAP Control Center for use in a production environment, complete thetasks in the Get Started section of the help. Setting up security is particularly important.
1. Configuring SAP Adaptive Server Enterprise for Monitoring
On each server you plan to monitor, grant mon_role to the user account used to log in to theSAP ASE server, and set monitoring options in the configuration file.
2. Registering an SAP ASE Server
Register a resource (for example, a server that can be monitored) to make SAP ControlCenter aware of it and its connection information.
3. Importing Resources for Batch Registration
(Optional) Import and register multiple servers from an interfaces or sql.ini file.
4. Registering the Agent for an SAP ASE Server
Register the remote command and control agent.
5. Authenticating a Login Account for a Managed Resource
Specify the login account and password SAP Control Center will use when it connects toyour server or agent to collect monitoring data or manage the resource.
6. Setting Up Statistics Collection
Use the Properties view of your managed resource to create a data collection job and add aschedule to the job.
7. Creating an Alert
Use the Add Alert wizard to create an alert instance for your resource.
8. Setting Display Options for SAP ASE Performance Data
Change the screen refresh interval, chart trend period, alert list size, historical SQLs size,and historical SQLs trend period for an SAP ASE server.
9. Optional Configuration Steps
Perform additional configuration, including user authorization, alerts, data collectionscheduling, backups, and setting purging options for the repository.
See also• User Authorization on page 60
• Logins, Roles, and Groups on page 118
• Setting Up Security on page 89
Get Started
64
• Assigning a Role to a Login or a Group on page 113
Deploying an Instance from a Shared Disk Installation(Optional) Create an SAP Control Center server or agent from an installation on a shareddisk.
Prerequisites
• Install SAP Control Center on a shared disk.• Enable shared-disk mode.
Task
1. Log in to the host on which you plan to run the SCC server or agent.
Note: You can create an instance on one host and run it on another host, but doing sointerferes with the predeployment checks run by sccinstance. Such a deployment mightgenerate errors (port conflicts, for example). If you are confident that the errors are causedby problems that will not be present on the host where you plan to run the instance, use the-force option to create the instance.
2. Change to SCC-3_3/bin.
3. Create the instance as an SCC agent if you plan to run a managed server on this host. Createthe instance as an SCC server if you plan to manage other SAP servers from this host.
To create an SCC agent called Boston-agent and configure it to run as a Windows service:
sccinstance -create -agent -instance Boston-agent -service
To create an SCC server called Boston and configure it to run as a Windows service:
sccinstance -create -server -instance Boston -service
On UNIX systems, omit the -service option.
4. If other SCC instances will run on this host, change the port assignments for the newinstance. Change the instance names and port values in the sample commands to suit yourenvironment, but take care to specify ports that are not in use by another SCC instance orany other application or server.
This command changes the port assignments for an SCC agent called myagent:sccinstance -refresh -instance myagent -portconfig rmi=8888,jiniHttp=9093,jiniRmi=9096,tds=9997
This command changes the port assignments for an SCC server called myserver:
Get Started
SAP Control Center for SAP Adaptive Server Enterprise 65
sccinstance -refresh -server -instance myserver -portconfig rmi=8889,db=3640,http=7072,https=7073,jiniHttp=9094,jiniRmi=9097,msg=2002,tds=9996
5. (Optional) List the instances deployed from this installation:sccinstance -list
6. (Optional) If you are setting up an instance in UNIX, configure it to run as a service. SeeStarting and Stopping SAP Control Center in UNIX.
Next
When you manage and maintain instances, keep in mind that the directory structure forinstances is different from that of singleton installations. In file paths in SCC help, replaceSCC-3_3 or <scc-install-directory> with SCC-3_3/instances/<instance-name>.
For example, the path to the log directory, SCC-3_3/log, becomes this for an instancecalled kalamazoo:
SCC-3_3/instances/kalamazoo/log
See also• Starting and Stopping SAP Control Center in Windows on page 73
• Starting and Stopping SAP Control Center in UNIX on page 76
• Instances on page 195
Enabling and Disabling Shared-Disk ModeTurn on or turn off shared-disk mode, which allows you to run multiple SAP Control Centeragents and servers from a single installation on a shared disk.
PrerequisitesInstall SAP Control Center on a shared disk. See the SCC-product-name Installation Guide.
Task
Shared-disk mode affects the entire installation; do not enable or disable individual instances.
Disabling shared-disk mode leaves the instances’ file systems intact under <SCC-install-directory>/instances, but the instances cannot run. If you reenable, theinstances are able to run again.
1. Change to SCC-3_3/bin.
2. Enable or disable shared disk mode.
To enable shared disk mode:sccinstance -enable
Get Started
66
To disable shared disk mode:sccinstance -disable
See also• Shared-Disk Mode on page 67• sccinstance Command on page 68• Instances on page 195
Shared-Disk ModeShared-disk mode lets you run multiple SAP Control Center instances—SCC servers, SCCagents, or a mixture of the two—from a single installation of the product.
The shared-disk capability enables SCC servers or agents on the installation host or on remotehosts to access and execute from the same installation. This feature is especially useful if youplan to use SCC to manage SAP® ASE clusters, SAP® Sybase® Event Stream Processorclusters, or SAP Sybase IQ multiplexes.
After installing SCC on a shared disk, use the sccinstance command to enable shared-diskmode and deploy instances. sccinstance copies the files needed for the instance into a newdirectory structure. The path takes the form <SCC-install-directory>/instances/<instance-name> (for example, SCC-3_3/instances/SCCserver-1).
You can specify a name for each instance. If you do not supply a name, the instance namedefaults to the host name.
An instance runs on the host on which you start it. When shared-disk mode is enabled, SCCservers and agents run out of the SCC-3_3/instances subdirectories, not from the basefile system.
In shared-disk mode, changes made to configuration files in the base file system (everythingunder SCC-3_3 except the SCC-3_3/instances branch) are copied to any instancedeployed thereafter. Previously deployed instances are not affected.
Use sccinstance to deploy, remove, refresh, or convert an instance; to configure an instance’sports; and to configure a Windows instance to run as a service. Perform other tasks, includingconfiguring a UNIX instance to run as a service, and all other configuration, using the toolsand procedures documented for all installations. Use tools provided by the UI whereverpossible. When you must edit a file to change the configuration of an instance (for rolemapping, for example), edit the copy of the file stored under <SCC-install-directory>/instances/<instance-name>.
See also• Enabling and Disabling Shared-Disk Mode on page 66• sccinstance Command on page 68• Instances on page 195
Get Started
SAP Control Center for SAP Adaptive Server Enterprise 67
sccinstance CommandUse sccinstance.bat (Windows) or sccinstance (UNIX) to deploy an instance of SAPControl Center from a shared-disk installation or to manage existing instances.
You can run multiple instances of SAP Control Center, including SCC servers, SCC agents, ora mixture of the two, from a single installation on a shared disk.
Syntaxsccinstance[.bat] [-agent] [-c | -create] [-d | -debug][-disable] [-enable][-f | -force][-h | -help] [-host host-name][-i | -instance [instance-name]] [-l | -list][-plugins {plugin-ID,plugin-ID,...}] [-portconfig {port-name=port-number,port-name=port-number, ...}][-refresh] [-r | -remove] [-s | -server] [-service][-silent]
Parameters
• -agent – use with -create or -refresh to create or refresh an SCC agent. In a -create or -refresh command, -agent is the default, so you can omit it.
• -create – deploy a new instance. Use alone or with -agent to create an agent instance, orwith -server to create a server instance.
• -d | debug – display debugging messages with the output of this command.• -disable – turn off shared-disk mode for this installation. Generates an error if any instance
is running.• -enable – turn on shared-disk mode for this installation. Shared-disk mode is required if
you intend to run more than one server or agent from a single installation of SCC.• -f | -force – execute sccinstance even if there are potential conflicts, such as port clashes or
a running SCC process. SAP does not recommend using -force to remove or refresh arunning instance in a Windows environment.
• -h | --help – display help and usage information for the sccinstance command.• -host host-name – specify the host for this instance. Use with -create; required only when
the instance name does not match the name of the host on which this instance will run. (The
Get Started
68
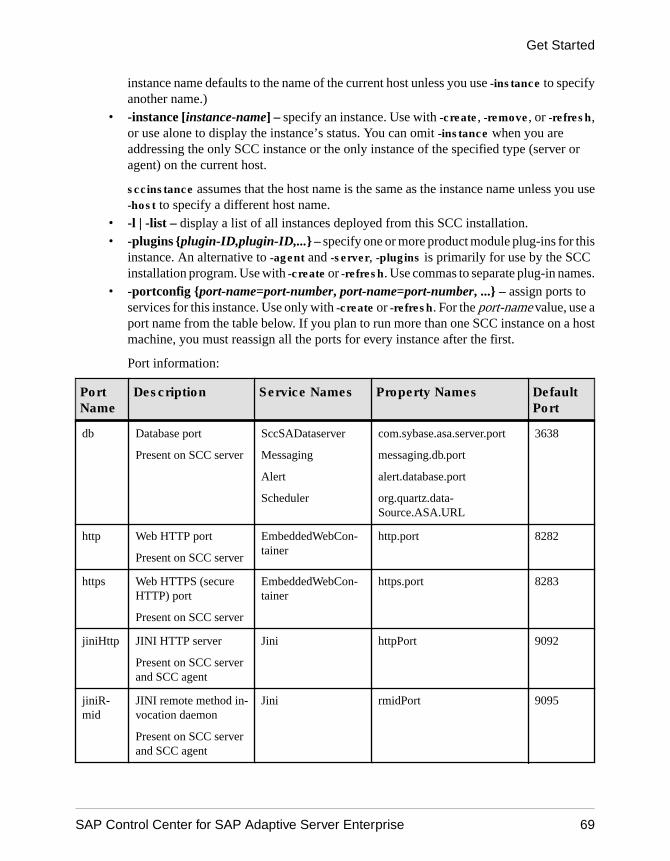
instance name defaults to the name of the current host unless you use -instance to specifyanother name.)
• -instance [instance-name] – specify an instance. Use with -create, -remove, or -refresh,or use alone to display the instance’s status. You can omit -instance when you areaddressing the only SCC instance or the only instance of the specified type (server oragent) on the current host.
sccinstance assumes that the host name is the same as the instance name unless you use-host to specify a different host name.
• -l | -list – display a list of all instances deployed from this SCC installation.• -plugins {plugin-ID,plugin-ID,...} – specify one or more product module plug-ins for this
instance. An alternative to -agent and -server, -plugins is primarily for use by the SCCinstallation program. Use with -create or -refresh. Use commas to separate plug-in names.
• -portconfig {port-name=port-number, port-name=port-number, ...} – assign ports toservices for this instance. Use only with -create or -refresh. For the port-name value, use aport name from the table below. If you plan to run more than one SCC instance on a hostmachine, you must reassign all the ports for every instance after the first.
Port information:
PortName
Description Service Names Property Names DefaultPort
db Database port
Present on SCC server
SccSADataserver
Messaging
Alert
Scheduler
com.sybase.asa.server.port
messaging.db.port
alert.database.port
org.quartz.data-Source.ASA.URL
3638
http Web HTTP port
Present on SCC server
EmbeddedWebCon-tainer
http.port 8282
https Web HTTPS (secureHTTP) port
Present on SCC server
EmbeddedWebCon-tainer
https.port 8283
jiniHttp JINI HTTP server
Present on SCC serverand SCC agent
Jini httpPort 9092
jiniR-mid
JINI remote method in-vocation daemon
Present on SCC serverand SCC agent
Jini rmidPort 9095
Get Started
SAP Control Center for SAP Adaptive Server Enterprise 69
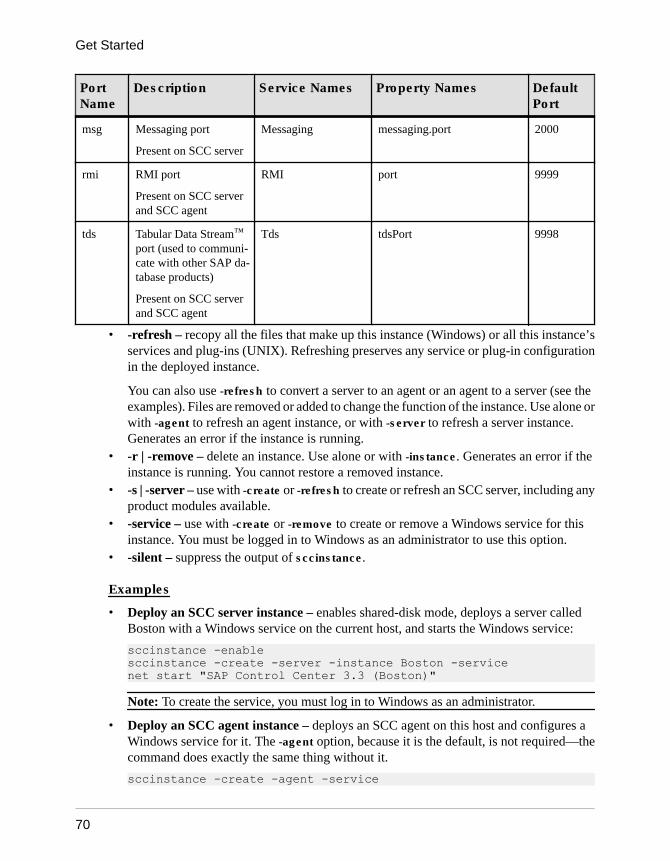
PortName
Description Service Names Property Names DefaultPort
msg Messaging port
Present on SCC server
Messaging messaging.port 2000
rmi RMI port
Present on SCC serverand SCC agent
RMI port 9999
tds Tabular Data Stream™
port (used to communi-cate with other SAP da-tabase products)
Present on SCC serverand SCC agent
Tds tdsPort 9998
• -refresh – recopy all the files that make up this instance (Windows) or all this instance’sservices and plug-ins (UNIX). Refreshing preserves any service or plug-in configurationin the deployed instance.
You can also use -refresh to convert a server to an agent or an agent to a server (see theexamples). Files are removed or added to change the function of the instance. Use alone orwith -agent to refresh an agent instance, or with -server to refresh a server instance.Generates an error if the instance is running.
• -r | -remove – delete an instance. Use alone or with -instance. Generates an error if theinstance is running. You cannot restore a removed instance.
• -s | -server – use with -create or -refresh to create or refresh an SCC server, including anyproduct modules available.
• -service – use with -create or -remove to create or remove a Windows service for thisinstance. You must be logged in to Windows as an administrator to use this option.
• -silent – suppress the output of sccinstance.
Examples
• Deploy an SCC server instance – enables shared-disk mode, deploys a server calledBoston with a Windows service on the current host, and starts the Windows service:
sccinstance -enablesccinstance -create -server -instance Boston -servicenet start "SAP Control Center 3.3 (Boston)"
Note: To create the service, you must log in to Windows as an administrator.
• Deploy an SCC agent instance – deploys an SCC agent on this host and configures aWindows service for it. The -agent option, because it is the default, is not required—thecommand does exactly the same thing without it.
sccinstance -create -agent -service
Get Started
70
or
sccinstance -create -service• Deploy a server instance and reassign ports – deploys the server on this host and
configures nondefault RMI, HTTP, and HTTPS ports.
sccinstance -create -server -portconfig rmi=8888,http=7070,https=7071
• Deploy two instances on the same host – creates two agent instances on the host fireball.The first command does not need the -host option because the instance name is the same asthe host name.
sccinstance -create -agent -instance fireball -portconfig rmi=9991sccinstance -create -agent -instance fireball2 -host fireball -portconfig rmi=9992
Note: In a production environment, SAP recommends that you deploy no more than oneSCC instance of each type (one server and one agent) on the same host.
• Refresh a server instance or convert an agent to a server – refreshes the server on thishost. If the instance on this host is an SCC agent, refreshing it as an SCC server converts itinto a server.
sccinstance -refresh -server• Refresh an agent instance or convert a server to an agent – refreshes the instance
named kalamazoo. If kalamazoo is a server, refreshing it as an SCC agent converts it intoan agent.
sccinstance -refresh -agent -instance kalamazoo• Remove a server instance – removes the instance named porcupine if it is not running:
sccinstance -remove -instance porcupine• Display status – displays the status of the instance on this host:
sccinstance• List all instances – displays a list of all SCC server and agent instances deployed from this
SCC installation:
sccinstance -list• Scenario: Remove an instance by force – suppose you have inadvertently deployed two
SCC agent instances on the same host:
$ sccinstance -list2 SCC instances deployed:SCC instance node1 deployed in agent mode for host node1 RMI port 9999SCC instance node2 deployed in agent mode for host node2 RMI port 9999
Get Started
SAP Control Center for SAP Adaptive Server Enterprise 71
Both instances use the same RMI port. You must either reassign ports for one instance orremove it. But you get an error if you try remove an instance when another instance isrunning on the same host:
$ sccinstance -instance node2 -remove[ERROR] Command execution failed.[ERROR] SCC instance node2 could not be removed because it is running. Shut down the SCC before removing the instance.
Use the -force option to override the error and force the removal of the second agentinstance:
$ sccinstance -instance node2 -remove -forceRemoving SCC instance node2 ...SCC instance node2 was successfully removed.
Permissions
sccinstance permission defaults to all users, except as noted for certain parameters.
See also• Enabling and Disabling Shared-Disk Mode on page 66
• Shared-Disk Mode on page 67
Launching SAP Control CenterUse the scc command to start SAP Control Center.
Prerequisites
Install Adobe Flash Player in the browser you will use for SAP Control Center.
Task
1. Start SAP Control Center.
• Windows – navigate to <install_location>\SCC-3_3\bin and double-click scc.bat.
• UNIX – execute scc.sh.
Messages on the progress of the launch appear in a command window. When SAP ControlCenter is running, the command window becomes the SAP Control Center console; youcan issue commands to get status information on SCC and its ports, plug-ins, and services.
2. Open a Web browser and enter https://<hostname>:8283/scc.
Get Started
72
See also• SAP Control Center Console on page 215
Registering the ODBC Driver in WindowsIn Windows, run scc.bat with administrative privileges to register the ODBC driver.
When SAP Control Center starts for the first time on a Windows machine, it registers itsODBC driver. Because the automatic registration of the ODBC driver edits the registrysettings, you must execute scc.bat using elevated administrative privileges. If you launch forthe first time without adequate privileges, SCC generates an error and fails to start.
In Windows 2008, Windows 7, and Windows 8, you must use the Run as administratorsetting to launch SCC even if you already have administrative privileges. This process isdescribed below.
In other versions of Windows, you must be logged in as an administrator to start SCC for thefirst time. You need not follow the steps below.
1. In Windows 2008, Windows 7, or Windows 8, open the Command Prompt window withadministrative privileges:
• Select Start > All Programs > Accessories. Right-click Command Prompt andselect Run as administrator.
• Alternatively, enter cmd in the Start Menu search box and press Shift+Ctrl+Enter.
2. Run scc.bat.
See also• Starting and Stopping SAP Control Center in Windows on page 73
• Starting and Stopping SAP Control Center in UNIX on page 76
• Configuring Memory Usage on page 80
• scc Command on page 84
Starting and Stopping SAP Control Center in WindowsThere are several ways to start and stop SAP Control Center or the SCC agent. You can startmanually, which is useful for testing and troubleshooting, or set the service to startautomatically and to restart in case of failure.
This topic applies to both SAP Control Center (the server, which includes the management UI)and the SCC agent that runs on each product server managed by SCC. When you install SCCand the SCC agent in the same directory by selecting both options in the installer, you alwaysstart and stop them together—by executing a single command or controlling a single service.This topic applies both to singleton installations (which do not use a shared disk) and toinstances of SCC agents and servers running from a shared disk.
Get Started
SAP Control Center for SAP Adaptive Server Enterprise 73
If you run SAP Control Center or the SCC agent manually, you must issue a command everytime you start or shut down. If you run as a service (which is recommended), you can configurethe service to start and restart automatically. These are the options:
• Use the scc.bat command to start SCC or the SCC agent manually. The command givesyou access to the SCC console, which you can use to shut down and to display informationabout services, ports, system properties, and environment variables. You can also usescc.bat to change the logging level for troubleshooting purposes. Using scc.bat preventsyou from taking advantage of the automatic start and restart features available to services.
• Use the Services list under the Windows Control Panel to start, stop, and configure theSAP Control Center service for an SCC server or agent.
• Use the net start and net stop commands. This is another way to run SAP Control Centeror the SCC agent as a service.
Note: To start an SCC agent or server as a service:• In a singleton installation, you must have selected Yes in the installer to install the agent
or server as a service.• In a shared disk installation, the agent or server must have been deployed using the -
service option of the sccinstance command.
In a singleton installation, the installer lets you start SCC or the SCC agent as a service andconfigures the service to restart automatically. Before starting, check the Windows Serviceslist for an SAP Control Center service.
Here are the steps for each starting and stopping option:
• Start SAP Control Center, the SCC agent, or both when they are installed together:
a) (Skip this step for the SCC agent.) If you are starting SAP Control Center for the firsttime in Windows 2008, Windows 7, or Windows 8, set the Run as Administratoroption on the command prompt so that SAP Control Center can register its ODBCdriver. (This is necessary even if you are logged in as an administrator.)
b) Enter the scc command.
For a singleton installation:
%SYBASE%\SCC-3_3\bin\scc.bat For an instance:
%SYBASE%\SCC-3_3\bin\scc.bat -instance <instance-name> You can omit the -instance option if the instance’s name is the same as its host name(the default).
• Stop SAP Control Center, the SCC agent, or both when they are installed together:
a) Enter the scc --stop command.
For a singleton installation:
Get Started
74
%SYBASE%\SCC-3_3\bin\scc.bat --stop
For an instance:
%SYBASE%\SCC-3_3\bin\scc.bat --stop -instance <instance-name>
You can omit the -instance option if the instance’s name is the same as its host name(the default).
Note: You can also enter shutdown at the scc-console> prompt.
• Start or stop from the Windows Control Panel; configure automatic start andrestart:
a) Open the Windows Control Panel.b) Select Administrative Tools > Services.c) Locate “SAP Control Center” in the Services list. It may be followed by a release
number; if the service is for an instance, it is also followed by the instance name.Service names do not distinguish between agents and servers. If the service is running,the Status column displays “Started.”
d) To start or stop the service, right-click the SAP Control Center entry in the Serviceslist and choose Start or Stop.
e) To configure automatic starting, double-click the service.f) To set the service to automatically start when the machine starts, change the Startup
type to Automatic.g) To restart the service in case of failure, choose the Recovery tab and change the First,
Second, and Subsequent failures to Restart Service.h) Click Apply to save the modifications and close the dialog.
• Start or stop the SAP Control Center service (controlling SAP Control Center, theSCC agent, or both) from the Windows command line:
a) To start the service, enter the net start command.
For a singleton installation:
net start "SAP control center 3.3"The SAP Control Center 3.3 service is starting......The SAP Control Center 3.3 service was started successfully.
For an instance, include the instance name (Boston-1 in this example) in parentheses:
net start "SAP control center 3.3 (Boston-1)"The SAP Control Center 3.3 (Boston-1) service is starting......The SAP Control Center 3.3 (Boston-1) service was started
Get Started
SAP Control Center for SAP Adaptive Server Enterprise 75
successfully.
b) To stop the service, enter the net stop command.
For a singleton installation:
net stop "SAP control center 3.3"The SAP Control Center 3.3 service is stopping.....The SAP Control Center 3.3 service was stopped successfully.For an instance, include the instance name (Boston-1 in this example) in parentheses:
net stop "SAP control center 3.3 (Boston-1)"The SAP Control Center 3.3 (Boston-1) service is stopping.....The SAP Control Center 3.3 (Boston-1) service was stopped successfully.
See also• Registering the ODBC Driver in Windows on page 73
• Starting and Stopping SAP Control Center in UNIX on page 76
• Configuring Memory Usage on page 80
• scc Command on page 84
Starting and Stopping SAP Control Center in UNIXYou can start SAP Control Center or the SCC agent manually, which is useful for testing andtroubleshooting, or you can set up a service to start automatically and to restart in case offailure.
This topic applies to both SAP Control Center (the server, which includes the management UI)and the SAP Control Center agent that runs on each product server managed by SCC.. Whenyou install SCC and the SCC agent in the same directory by selecting both options in theinstaller, you start and stop them together—by executing a single command or controlling asingle service. This topic applies to both singleton installations (which do not use a shareddisk) and instances of SCC agents and servers running from a shared disk.
If you start SAP Control Center or the SCC agent manually, you must issue a command everytime you start or shut down. If you run as a service (which is recommended), you can configurethe service to start and restart automatically. These are the options:
• Use the scc.sh script to start SAP Control Center or the SCC agent manually. You caneither:• Run scc.sh in the foreground to get access to the SCC console, which you can use to
shut down and to display information about services, ports, system properties, andenvironment variables.
Get Started
76
• Run scc.sh in the background to suppress the SCC console.You can use scc.sh to run SAP Control Center at a nondefault logging level fortroubleshooting. When you start manually with scc.sh, you cannot take advantage of theautomatic start and restart features available to services.
• Use the sccd script to configure a service that starts SCC or the SCC agent automatically.
Here are the steps for each starting and stopping option:
• Before you start SAP Control Center or the SCC agent for the first time, setenvironment variables. Do this only once.
a) Change to the parent of the SAP Control Center installation directory. (The parentdirectory is typically /opt/sap or opt/sybase.)
b) Execute one of the following to set environment variables.
Bourne shell:
. SYBASE.shC shell:
source SYBASE.csh• Run SAP Control Center or the SCC agent (or both, when they are installed together)
in the foreground.
Running in the foreground is a method of manually starting; you must issue commands tostop and restart SCC or the SCC agent.
a) To start SCC or the SCC agent and drop into the console when the start-up sequence isfinished, enter the scc command.
For a singleton installation:
$SYBASE/SCC-3_3/bin/scc.shFor an instance:
$SYBASE/SCC-3_3/bin/scc.sh -instance <instance-name>You can omit the -instance option if the instance’s name is the same as its host name(the default).
• Run SAP Control Center or the SCC agent (or both, when they are installed together)in the background.
You can use nohup, &, and > to run SAP Control Center or the SCC agent in thebackground, redirect output and system error to a file, and suppress the SCC console.Running in the background is a method of manually starting; you must issue commands tostop and restart SCC or the SCC agent.
a) Execute a command similar to the sample below that matches your shell. Both samplecommands direct output to the file scc-console.out. If the output file alreadyexists, you might need to use additional shell operators to append to or truncate thefile.Bourne shell (sh) or Bash
Get Started
SAP Control Center for SAP Adaptive Server Enterprise 77
For a singleton installation:nohup ./scc.sh 2>&1 > scc-console.out &
For an instance:nohup ./scc.sh -instance <instance-name> 2>&1 > scc-console-your-instance.out &
You can omit the -instance option if the instance’s name is the same as its host name(the default).
C shell
For a singleton installation:nohup ./scc.sh >& scc-console.out &
For an instance:nohup ./scc.sh -instance <instance-name> >& scc-console.out &
You can omit the -instance option if the instance’s name is the same as its host name(the default).
• Shut down SAP Control Center or the SCC agent (or both, when they are installedtogether) .
a) To shut down from the scc-console> prompt, enter:
shutdownWarning! Do not enter shutdown at a UNIX prompt; it shuts down the operatingsystem.
To shut down from the UNIX command line, enter the scc --stop command.
For a singleton installation:
$SYBASE/SCC-3_3/bin/scc.sh --stopFor an instance:
$SYBASE/SCC-3_3/bin/scc.sh --stop -instance <instance-name>You can omit the -instance option if the instance’s name is the same as its host name(the default).
• Configure SAP Control Center or the SCC agent to run as a service.
A UNIX service is a daemon process that starts automatically after the machine is startedand runs in the background. UNIX installations of SCC include a shell script, sccd, whichyou can use to configure the SCC service. (Some UNIX platforms supply tools that makeservice configuration easier; Linux chkconfig is an example.)
Note: SAP recommends that if you are not familiar with setting up services in UNIX, youdelegate this task to a system administrator or consult the system administrationdocumentation for your UNIX platform.
Get Started
78
a) Copy $SYBASE/SCC-3_3/bin/sccd into this directory:
• AIX (SCC agent only): /etc/rc.d/init.d• HP-UX (SCC agent only): /sbin/init.d• All other platforms: /etc/init.d
b) Open sccd and make these changes:
• Change the line that sets the SYBASE variable to the location of your SAP Sybaseinstallation (that is, the parent of SCC-3_3, the SAP Control Center installationdirectory). By default, this directory is called /opt/sybase if you installed SCCon a machine with an existing Sybase product or environment variable; otherwisethe default parent directory is /opt/sap.
• If you are not using shared-disk mode, or you are using shared-disk mode to run asingle instance whose name is the same as the host name, skip to step 5.c on page79 or step 5.d on page 79.
• If you are using shared-disk mode to run a single instance whose name is not thehost name, or to run multiple instances on the same host, add the instance name tothe script name. Change:SCRIPT_NAME=scc.sh
to:SCRIPT_NAME="scc.sh -instance <instance-name>"
• If you are using shared-disk mode to run multiple instances on the same host,append the instance name to the name of the ouput log file. Change:./${SCRIPT_NAME} --start 2>&1 >> ${SCC_HOME}/log/scc-service.out &
to:./${SCRIPT_NAME} --start 2>&1 >> ${SCC_HOME}/log/scc-service_<instance-name>.out &
• If you are using shared-disk mode to run multiple instances on the same host, save acopy of the sccd script for each instance, giving each copy a unique name. In eachcopy, add the instance name to the script name and append the instance name to theoutput log file name as described above. Perform the remaining steps in thisprocedure for each copy of sccd.
c) In Linux, configure the service to run in run levels 2, 3, 4, and 5:
/usr/sbin/chkconfig --add sccd/usr/sbin/chkconfig --level 2345 sccdYou can test the sccd script with /usr/sbin/service sccd status. (Theservice command accepts these options: start | stop | status | restart.)
d) On non-Linux platforms, locate this directory:
• AIX (SCC agent only): /etc/rc.d/rc<X>.d• HP-UX (SCC agent only): /sbin/rc<X>.d
Get Started
SAP Control Center for SAP Adaptive Server Enterprise 79
• Solaris: /etc/rc<X>.dwhere <X> is the run level (for example, 3). Make two soft links in the directory foryour platform and set the links to point to:
• AIX (SCC agent only):/etc/rc.d/init.d/sccd: S90sccd and/etc/rc.d/init.d/sccd: K10sccd
• HP-UX (SCC agent only):/sbin/init.d/sccd: S90sccd and/sbin/init.d/sccd: K10sccd
• Solaris:/etc/init.d/sccd: S90sccd and/etc/init.d/sccd: K10sccd
The S90sccd link starts the service and the K10sccd link stops the service. Thetwo-digit numbers in the links indicate the start and stop priorities of the service.
e) Use the S90sccd and K10sccd links to test starting and stopping the service. Thelinks are called automatically when the machine is started or shut down.
See also• Registering the ODBC Driver in Windows on page 73
• Starting and Stopping SAP Control Center in Windows on page 73
• Configuring Memory Usage on page 80
• scc Command on page 84
Configuring Memory Usage(Optional) Determine whether you need to configure how much memory SAP Control Centeruses, and if so which configuration method to use.
It is not usually necessary to configure memory usage for SAP Control Center. This table listsmemory options you can set and circumstances under which you should consider changingthem.
Get Started
80
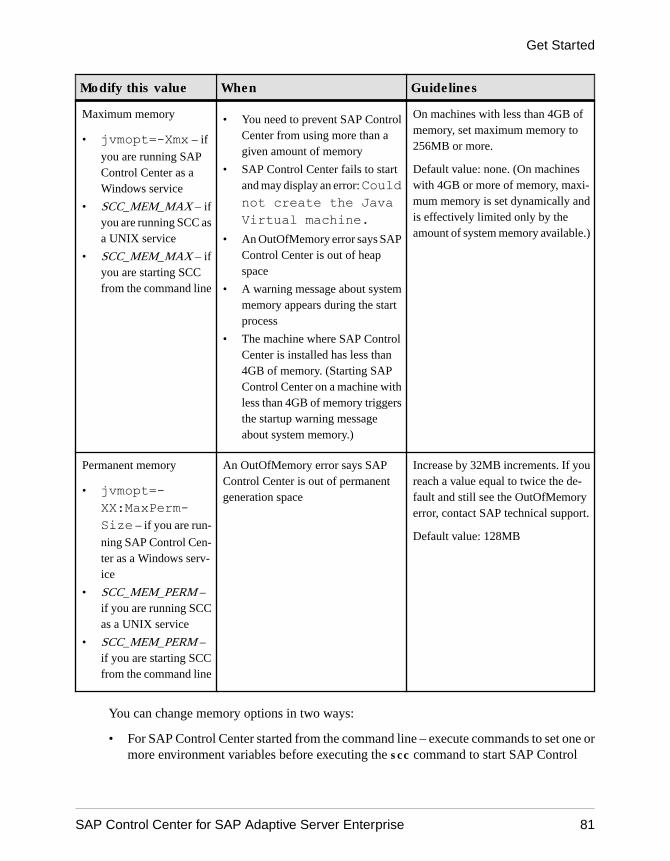
Modify this value When Guidelines
Maximum memory
• jvmopt=-Xmx – if
you are running SAPControl Center as aWindows service
• SCC_MEM_MAX – ifyou are running SCC asa UNIX service
• SCC_MEM_MAX – ifyou are starting SCCfrom the command line
• You need to prevent SAP ControlCenter from using more than agiven amount of memory
• SAP Control Center fails to startand may display an error: Couldnot create the JavaVirtual machine.
• An OutOfMemory error says SAPControl Center is out of heapspace
• A warning message about systemmemory appears during the startprocess
• The machine where SAP ControlCenter is installed has less than4GB of memory. (Starting SAPControl Center on a machine withless than 4GB of memory triggersthe startup warning messageabout system memory.)
On machines with less than 4GB ofmemory, set maximum memory to256MB or more.
Default value: none. (On machineswith 4GB or more of memory, maxi-mum memory is set dynamically andis effectively limited only by theamount of system memory available.)
Permanent memory
• jvmopt=-XX:MaxPerm-Size – if you are run-
ning SAP Control Cen-ter as a Windows serv-ice
• SCC_MEM_PERM –if you are running SCCas a UNIX service
• SCC_MEM_PERM –if you are starting SCCfrom the command line
An OutOfMemory error says SAPControl Center is out of permanentgeneration space
Increase by 32MB increments. If youreach a value equal to twice the de-fault and still see the OutOfMemoryerror, contact SAP technical support.
Default value: 128MB
You can change memory options in two ways:
• For SAP Control Center started from the command line – execute commands to set one ormore environment variables before executing the scc command to start SAP Control
Get Started
SAP Control Center for SAP Adaptive Server Enterprise 81
Center. When you use this method, your changes to the memory options last only as long asthe current login session. This method is useful for testing new option values.
• For the SAP Control Center service – modify a file used by the SAP Control Centerservice. When you use this method, your changes to the memory options persist—SAPControl Center uses them every time it starts as a service.
See also• Registering the ODBC Driver in Windows on page 73
• Starting and Stopping SAP Control Center in Windows on page 73
• Starting and Stopping SAP Control Center in UNIX on page 76
• scc Command on page 84
Changing a Memory Option on the Command LineBefore you start SAP Control Center from the command line, you can issue a command tochange the value of a memory option temporarily.
Changes made using this method last only as long as the current login session. This method isuseful for testing new option values.
1. If SAP Control Center is running, shut it down.
2. Set the environment variable. Specify a size in megabytes but do not indicate the units inthe command.
Windows example:> set SCC_MEM_MAX=512
UNIX example:bash$ export SCC_MEM_MAX=512
3. Use the scc command to start SAP Control Center.
See also• Changing a Memory Option for an SAP Control Center Windows Service on page 82
• Changing a Memory Option for an SCC UNIX Service on page 83
• Starting and Stopping SAP Control Center in Windows on page 73
• Starting and Stopping SAP Control Center in UNIX on page 76
• scc Command on page 84
Changing a Memory Option for an SAP Control Center Windows ServiceAdd a jvmopt command to the scc.properties file to change a memory option (-Xmx or-XX:MaxPermSize) for an SAP Control Center Windows service.
When you use this method to set memory options, your changes are permanent—SAP ControlCenter uses them every time it starts as a service.
Get Started
82
1. If SAP Control Center is running, shut it down.
2. Open the SAP Control Center properties file:
<SAP Control Center-install-directory>\SCC-3_3\bin\scc.properties
3. Add (or modify, if it already exists) a jvmopt line specifying the memory size in Javaformat. Use m for megabytes or g for gigabytes.
For example:jvmopt=-Xmx512m
4. Save the file and start the SAP Control Center Windows service.
See also• Changing a Memory Option on the Command Line on page 82
• Changing a Memory Option for an SCC UNIX Service on page 83
• Starting and Stopping SAP Control Center in Windows on page 73
Changing a Memory Option for an SCC UNIX ServiceTo change a memory setting for an SAP Control Center UNIX service, add the appropriateenvironment variable (SCC_MEM_MAX or SCC_MEM_PERM) to the sccd script.
When you use this method to set memory options, your changes are permanent—SAP ControlCenter uses them every time it starts as a service.
1. If SAP Control Center is running, shut it down.
2. Open the sccd file: /etc/init.d/sccd3. Add the environment variable at the top of the file (after the comments). Specify a size in
megabytes but do not indicate the units in the command.
For example:SCC_MEM_MAX=512
4. Save the file and start the SAP Control Center UNIX service.
See also• Changing a Memory Option on the Command Line on page 82
• Changing a Memory Option for an SAP Control Center Windows Service on page 82
• Starting and Stopping SAP Control Center in UNIX on page 76
Get Started
SAP Control Center for SAP Adaptive Server Enterprise 83
scc CommandUse scc.bat (Windows) or scc.sh (UNIX) to start and stop SAP Control Center agents andservers and to perform administrative tasks like configuring ports and enabling and disablingservices.
Syntaxscc[.bat | .sh] [-a | --address RMI-service-address] [-b | --bitwidth] [--dbpassword][-disable | --disable service-name,service-name...] [-enable | --enable service-name,service-name...][-h | --help] [-I | --info [information-category]][-instance [instance-name]] [-m | --message message-level] [-password | --password password]
[-p | --port {port-name=port-number | service-name:property-name=port-number}][{-start | --start} | {-stop | --stop}] [-status | --status] [-user | --user login-name] [-v | -version | --version]
Parameters
• -a | --address RMI-service-address – the address for the RMI service to use; must be an IPaddress on this machine or the name of this machine (which is the default).
• -b | --bitwidth – returns a string identifying the bit width (32 or 64) of the underlyingplatform; SAP Control Center uses this option to determine which libraries to use for itsinternal database. If you use this option, the scc command does not start SAP ControlCenter.
• --dbpassword – changes the password of the default dba account provided for therepository database. It prompts you for the new password, validates it, and starts the SAPControl Center server. This option does not work if you start SCC in the background—theserver fails to start if there is no console.
• -disable | --disable service-name,service-name... – disable the specified SAP ControlCenter services. This option does not work while SAP Control Center is running or as partof a command that starts SCC. To use it, shut down SCC, execute scc --disable, thenrestart. See under --ports for service names; separate each service from the next with acomma.
• -enable | --enable service-name,service-name... – enable the specified SCC services. Seeunder --ports for service names; separate each service from the next with a comma. Whenyou use this option, scc does not start SAP Control Center—use a separate command tostart SCC.
Get Started
84
• -h | --help – display help and usage information for the scc command. If you use thisoption, scc does not start SAP Control Center.
• -I | --info [information-category] – display the specified categories of information aboutSAP Control Center. Separate each category from the next with a comma. The informationcategories are:
• all – returns all the information provided by the sys, ports, and services categories.Default option.
• sys – returns general information about this instance of SCC, including the version, thehome (installation) directory, the host machine’s name and IP address, the RMI portnumber, the messaging level, and details about the platform and Java installation.
• ports – lists all the ports on which SCC and its services listen, indicates whether eachport is in use, and shows the service running on each port.
• services – lists all the services known to SCC, indicates whether each service isenabled, and lists other services on which each service depends.
• sysprop – lists all the Java system properties known the Java VM and their values.• env – lists the complete Java VM process environment.
• -instance [instance-name] – use with other options (-start and -stop, for example) tospecify an SCC instance in a shared disk deployment. If you do not enter a name for theinstance, it defaults to the host name.
• -m | --message message-level – set the amount of detail recorded in system logs; alsoknown as the logging level. Valid values are OFF, FATAL, ERROR, WARN, INFO,DEBUG, and ALL. WARN is the default.
• -password | --password – specify the password of the user account SCC uses to stopservers or query them for status. Use this option with --user. When you enter a commandwith --user but without --password, the console prompts you to enter a password.
• -p | --port {port-name=port-number | service-name:property-name=port-number} –configure the specified service to run on the specified port. Changing ports is useful if youdiscover a port conflict between SAP Control Center and other software on the samesystem. When you use this option, scc does not start SAP Control Center—use a separatecommand to start SCC.
Valid port names, service names and property names are:
PortName
Description Service Names Property Names DefaultPort
db Database port
Present on SCC server
SccSADataserver
Messaging
Alert
Scheduler
com.sybase.asa.server.port
messaging.db.port
alert.database.port
org.quartz.data-Source.ASA.URL
3638
Get Started
SAP Control Center for SAP Adaptive Server Enterprise 85
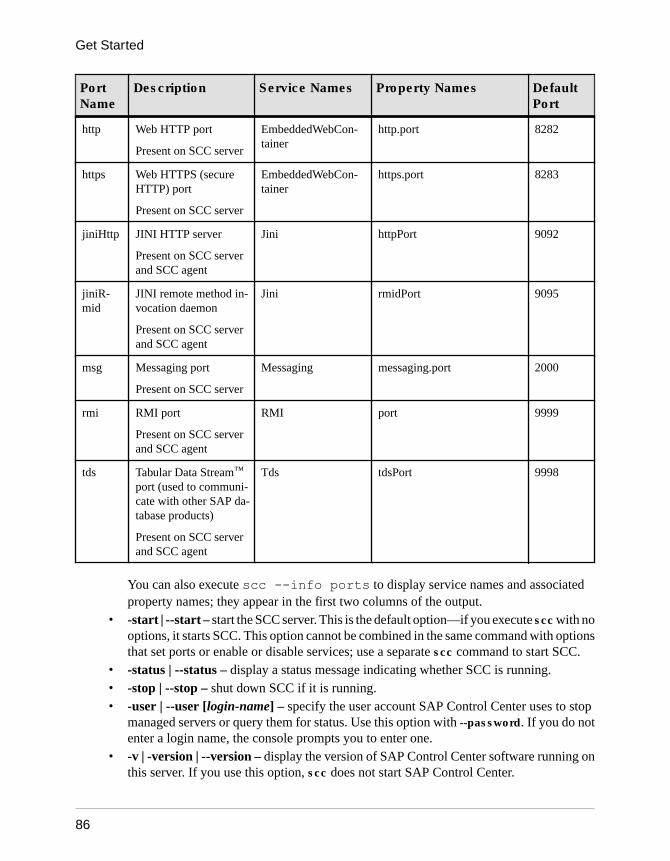
PortName
Description Service Names Property Names DefaultPort
http Web HTTP port
Present on SCC server
EmbeddedWebCon-tainer
http.port 8282
https Web HTTPS (secureHTTP) port
Present on SCC server
EmbeddedWebCon-tainer
https.port 8283
jiniHttp JINI HTTP server
Present on SCC serverand SCC agent
Jini httpPort 9092
jiniR-mid
JINI remote method in-vocation daemon
Present on SCC serverand SCC agent
Jini rmidPort 9095
msg Messaging port
Present on SCC server
Messaging messaging.port 2000
rmi RMI port
Present on SCC serverand SCC agent
RMI port 9999
tds Tabular Data Stream™
port (used to communi-cate with other SAP da-tabase products)
Present on SCC serverand SCC agent
Tds tdsPort 9998
You can also execute scc --info ports to display service names and associatedproperty names; they appear in the first two columns of the output.
• -start | --start – start the SCC server. This is the default option—if you execute scc with nooptions, it starts SCC. This option cannot be combined in the same command with optionsthat set ports or enable or disable services; use a separate scc command to start SCC.
• -status | --status – display a status message indicating whether SCC is running.• -stop | --stop – shut down SCC if it is running.• -user | --user [login-name] – specify the user account SAP Control Center uses to stop
managed servers or query them for status. Use this option with --password. If you do notenter a login name, the console prompts you to enter one.
• -v | -version | --version – display the version of SAP Control Center software running onthis server. If you use this option, scc does not start SAP Control Center.
Get Started
86
Examples
• Set the RMI port – each of these commands sets the RMI port to 9999 (the default). Thefirst command illustrates the port name syntax; the second illustrates the servicename:property name syntax.
scc --port rmi=9999scc --port RMI:port=9999
• Set the RMI port and start SCC – these commands set the RMI port to 9996, then startSCC. Two commands (separated by a semicolon here) are needed because scc does notstart SCC when the command includes any of the port-setting options.
scc -p rmi=9996; scc• Set all database ports – this command sets all four of the SQL Anywhere database ports
(data server, messaging, database alert, and scheduler) to 3638. (The SCC repository is aSQL Anywhere database.)
scc --port db=3638• Set the TDS port – this command sets the TDS port to 9998 (the default):
scc --port Tds:tdsPort=9998• Enable a service and start SCC – the first scc command enables the TDS service; the
second starts SCC. (The two commands are separated by a semicolon.) The secondcommand is needed because scc does not start SAP Control Center when the commandincludes the -enable option.
scc -enable Tds; scc• Start an SCC instance – this command starts the SCC instance called kalamazoo. -start is
optional because it is the default.
scc -start -instance kalamazoo
Permissions
scc permission defaults to all users. No permission is required to use it.
See also• Registering the ODBC Driver in Windows on page 73
• Starting and Stopping SAP Control Center in Windows on page 73
• Starting and Stopping SAP Control Center in UNIX on page 76
• Configuring Memory Usage on page 80
• Configuring Ports on page 107
• Logging or Message Levels on page 213
Get Started
SAP Control Center for SAP Adaptive Server Enterprise 87
Logging in to SAP Control CenterEnter the SAP Control Center Web console.
PrerequisitesInstall Adobe Flash Player in the browser you will use for SCC. See the SCC-product-nameInstallation Guide.
Task
SAP Control Center typically authenticates users through the operating system or an LDAPdirectory service. Consult your SCC administrator if you are not sure which login account touse for SCC.
Only one login session per account is permitted at a time; multiple users cannot be logged in tothe same account simultaneously.
Note: When logging in to a newly installed SAP Control Center for which secureauthentication has not been configured, use the sccadmin account—the password is set duringinstallation. For more information, see the SCC-product-name Installation Guide.
1. Connect to the SAP Control Center server. In your Web browser, enter: https://scc-hostname:8283/scc.
2. Enter your user name and password, and click Login.
Tip: If you use a Windows account to log in to SCC, enter your user name in the formatusername@domain. Omit top-level domain extensions such as .com or .net—for example,enter fred@sap, not [email protected].
Logging out of SAP Control CenterWhen you finish working in SAP Control Center, end your login session.
From the main menu bar, select Application > Log Out.
Alternatively, click Log Out in the upper-right corner of the window.
Note: If an administrator has configured the automatic logout feature, SAP Control Centerlogs you out if your session is idle (no typing or mouse movement) for longer than the timeoutperiod, which is set by the administrator.
If no automatic logout period is configured,
• A login session left open on a screen that refreshes (a monitor screen or a data collectionjob screen, for example) remains open indefinitely.
Get Started
88
• A login session left open on a screen that does not change expires after 30 minutes. Thenext time you make a request of the server, SCC logs you out.
Setting Up SecurityConfigure login authentication and map roles.
Read about security and follow these procedures before you configure SAP Control Centerproduct modules.
Note: These security topics are intended for use in a production environment. If you areevaluating or testing SCC, see Quick Start for an Evaluation on page 13.
1. Security
SAP Control Center can authenticate user logins through an LDAP server, through theoperating system, or both.
2. Configuring Authentication for Windows
Authentication through the Windows operating system is enabled by default.Configuration is required only if you have upgraded from an older version of SAP ControlCenter and no longer want to use the older version’s authentication settings; if you do notwant to use Windows for authentication; or if you want to create login accounts manually.SAP recommends that you allow SCC to create accounts automatically.
3. Configuring a Pluggable Authentication Module (PAM) for UNIX
Set up SAP Control Center to support username and password login using accounts on theUNIX operating system.
4. Configuring an LDAP Authentication Module
Configure an LDAP authentication module for SAP Control Center by editing the securityconfiguration file to point to the correct LDAP server.
5. Mapping SAP Control Center Roles to LDAP or OS Groups
To grant SAP Control Center privileges to users who are authenticated through LDAP orthe operating system, associate roles used in SAP Control Center with groups in LDAP orthe operating system.
6. Encrypting a Password
Use the passencrypt utility to encrypt passwords and other values that must be kept securewhile stored in text files.
7. Configuring Ports
(Optional) Use the scc --port command to assign SAP Control Center services to newports.
Get Started
SAP Control Center for SAP Adaptive Server Enterprise 89
SecuritySAP Control Center can authenticate user logins through an LDAP server, through theoperating system, or both.
• SAP Control Center can be configured to authenticate through any LDAP server thatsupports the inetOrgPerson (RFC 2798) schema.
• When SAP Control Center authenticates through the operating system, it uses theoperating system of the SAP Control Center server machine (not the client).
Although you can create native user accounts in SCC, this approach to authentication is notrecommended. It is simpler and safer to configure SCC to authenticate using existing LDAP,Windows, or UNIX login accounts.
SAP strongly recommends that you use a common authentication provider for SCC and forSAP database products managed by SCC. A common authentication provider ensures thatsingle sign-on works for users of SAP Control Center and its managed servers.
SCC requires each authenticated login account to have a predefined role. When a login isauthenticated, roles for the login are retrieved by the security module and are mapped to SCCpredefined roles. Authorization is resolved through the mappings between the securitymodule native roles and SCC roles. You can enable mappings by creating a “sybase” group inyour operating system or LDAP server and adding all SCC users, or by modifying the SCCrole-mapping.xml file to configure the mapping of native roles to SCC roles. Thesecurity module authenticates the logins and authorizes access to managed resources.
SAP Control Center provides a set of predefined login modules for authentication. All loginmodules are defined in the <install_location>/SCC-3_3/conf/csi_config.xml file. The syntax is defined by the SAP Common Security Infrastructure(CSI) framework. You can configure the different login modules to customize securitystrength. The login modules are:
• Preconfigured user login – defines a user name, password, and a list of roles. The defaultuser name is sccadmin; its password is configured during installation and its native role isSCC Administrator, which maps to sccAdminRole. You can create additional accounts byadding preconfigured user login modules to csi_config.xml. However, SAP does notrecommend the use of preconfigured user login modules for authentication in productionenvironments.
• NT proxy login – delegates authentication to the underlying Windows operating system.When you log in to SCC through an NT Proxy Login module, enter your user name in theformat username@nt-domain-name. For example, user@sap. Windows authentication isenabled by default, but it requires some configuration after an upgrade from SCC 3.2.5 orearlier.
• UNIX proxy login – delegates authentication to the underlying UNIX or Linux operatingsystem using Pluggable Authentication Modules (PAM). When you log in to SCC through
Get Started
90
a UNIX PAM, enter your UNIX user name and password. UNIX authentication is enabledby default, but it requires some configuration.
• LDAP login – delegates authentication to an LDAP server you specify. When you log in toSCC through an LDAP server, enter your LDAP user name and password. LDAPauthentication is not enabled by default; you must configure the login module.
See also• Configuring a Pluggable Authentication Module (PAM) for UNIX on page 92
• Configuring an LDAP Authentication Module on page 93
• Mapping SAP Control Center Roles to LDAP or OS Groups on page 104
Configuring Authentication for WindowsAuthentication through the Windows operating system is enabled by default. Configuration isrequired only if you have upgraded from an older version of SAP Control Center and no longerwant to use the older version’s authentication settings; if you do not want to use Windows forauthentication; or if you want to create login accounts manually. SAP recommends that youallow SCC to create accounts automatically.
This task is optional. However, if you choose not to create SAP Control Center accountsautomatically, you must enter them manually. Even when SCC users authenticate throughLDAP or the local operating system, SCC needs the accounts for purposes of settingauthorization (user privileges).
1. Log in to SCC using an account with SCC administrative privileges. (The login account orits group must have sccAdminRole.)
2. Select Application > Administration > Security.
3. Click to select or deselect the box labeled Automatically add SCC login records forauthenticated logins.
4. Click to select or deselect the box labeled Automatically grant sccUserRole to newlycreated logins.
5. Click OK to close the Security dialog.
Next
There are two next steps:
• If you opted not to automatically create SCC login accounts, enter each account into SCCmanually.
• Grant privileges to login accounts that require more than basic user access. You can grantprivileges by assigning SCC roles directly to the login accounts, or by assigning the loginaccounts to groups and mapping SCC roles to the groups. The group approach is generallymore efficient.
Get Started
SAP Control Center for SAP Adaptive Server Enterprise 91
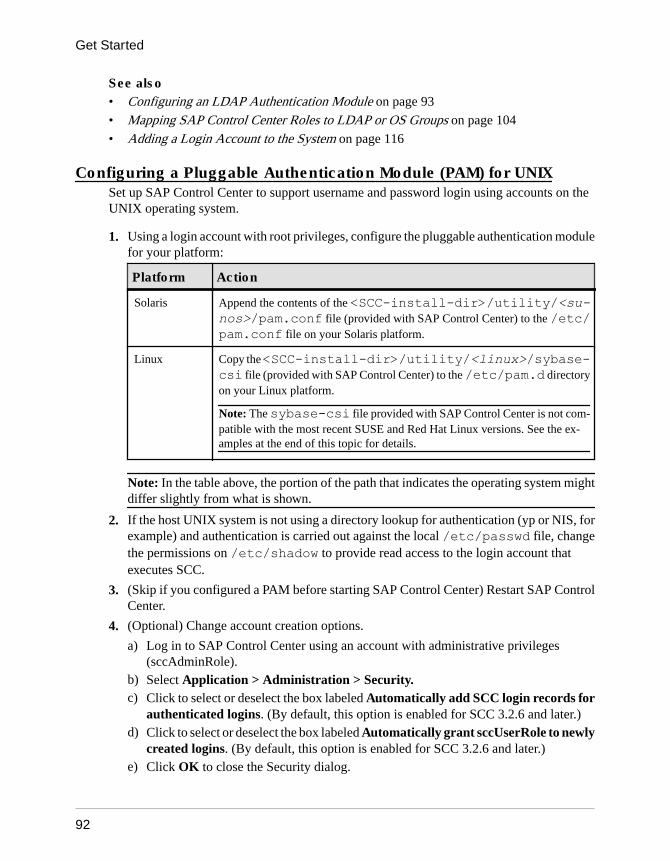
See also• Configuring an LDAP Authentication Module on page 93
• Mapping SAP Control Center Roles to LDAP or OS Groups on page 104
• Adding a Login Account to the System on page 116
Configuring a Pluggable Authentication Module (PAM) for UNIXSet up SAP Control Center to support username and password login using accounts on theUNIX operating system.
1. Using a login account with root privileges, configure the pluggable authentication modulefor your platform:
Platform Action
Solaris Append the contents of the <SCC-install-dir>/utility/<su-nos>/pam.conf file (provided with SAP Control Center) to the /etc/pam.conf file on your Solaris platform.
Linux Copy the <SCC-install-dir>/utility/<linux>/sybase-csi file (provided with SAP Control Center) to the /etc/pam.d directoryon your Linux platform.
Note: The sybase-csi file provided with SAP Control Center is not com-patible with the most recent SUSE and Red Hat Linux versions. See the ex-amples at the end of this topic for details.
Note: In the table above, the portion of the path that indicates the operating system mightdiffer slightly from what is shown.
2. If the host UNIX system is not using a directory lookup for authentication (yp or NIS, forexample) and authentication is carried out against the local /etc/passwd file, changethe permissions on /etc/shadow to provide read access to the login account thatexecutes SCC.
3. (Skip if you configured a PAM before starting SAP Control Center) Restart SAP ControlCenter.
4. (Optional) Change account creation options.
a) Log in to SAP Control Center using an account with administrative privileges(sccAdminRole).
b) Select Application > Administration > Security.c) Click to select or deselect the box labeled Automatically add SCC login records for
authenticated logins. (By default, this option is enabled for SCC 3.2.6 and later.)d) Click to select or deselect the box labeled Automatically grant sccUserRole to newly
created logins. (By default, this option is enabled for SCC 3.2.6 and later.)e) Click OK to close the Security dialog.
Get Started
92
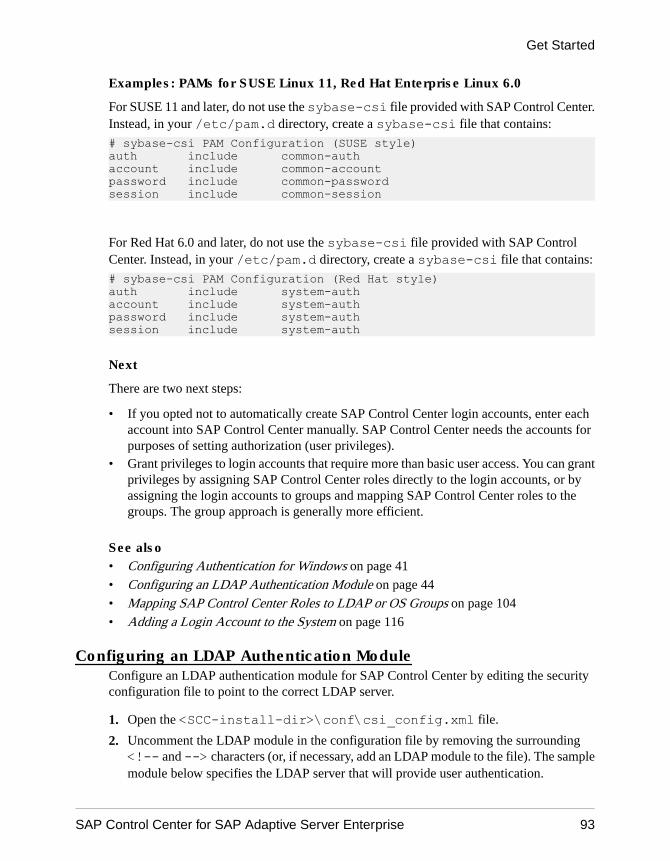
Examples: PAMs for SUSE Linux 11, Red Hat Enterprise Linux 6.0
For SUSE 11 and later, do not use the sybase-csi file provided with SAP Control Center.Instead, in your /etc/pam.d directory, create a sybase-csi file that contains:
# sybase-csi PAM Configuration (SUSE style)auth include common-authaccount include common-accountpassword include common-passwordsession include common-session
For Red Hat 6.0 and later, do not use the sybase-csi file provided with SAP ControlCenter. Instead, in your /etc/pam.d directory, create a sybase-csi file that contains:
# sybase-csi PAM Configuration (Red Hat style)auth include system-authaccount include system-authpassword include system-authsession include system-auth
Next
There are two next steps:
• If you opted not to automatically create SAP Control Center login accounts, enter eachaccount into SAP Control Center manually. SAP Control Center needs the accounts forpurposes of setting authorization (user privileges).
• Grant privileges to login accounts that require more than basic user access. You can grantprivileges by assigning SAP Control Center roles directly to the login accounts, or byassigning the login accounts to groups and mapping SAP Control Center roles to thegroups. The group approach is generally more efficient.
See also• Configuring Authentication for Windows on page 41
• Configuring an LDAP Authentication Module on page 44
• Mapping SAP Control Center Roles to LDAP or OS Groups on page 104
• Adding a Login Account to the System on page 116
Configuring an LDAP Authentication ModuleConfigure an LDAP authentication module for SAP Control Center by editing the securityconfiguration file to point to the correct LDAP server.
1. Open the <SCC-install-dir>\conf\csi_config.xml file.
2. Uncomment the LDAP module in the configuration file by removing the surrounding<!-- and --> characters (or, if necessary, add an LDAP module to the file). The samplemodule below specifies the LDAP server that will provide user authentication.
Get Started
SAP Control Center for SAP Adaptive Server Enterprise 93
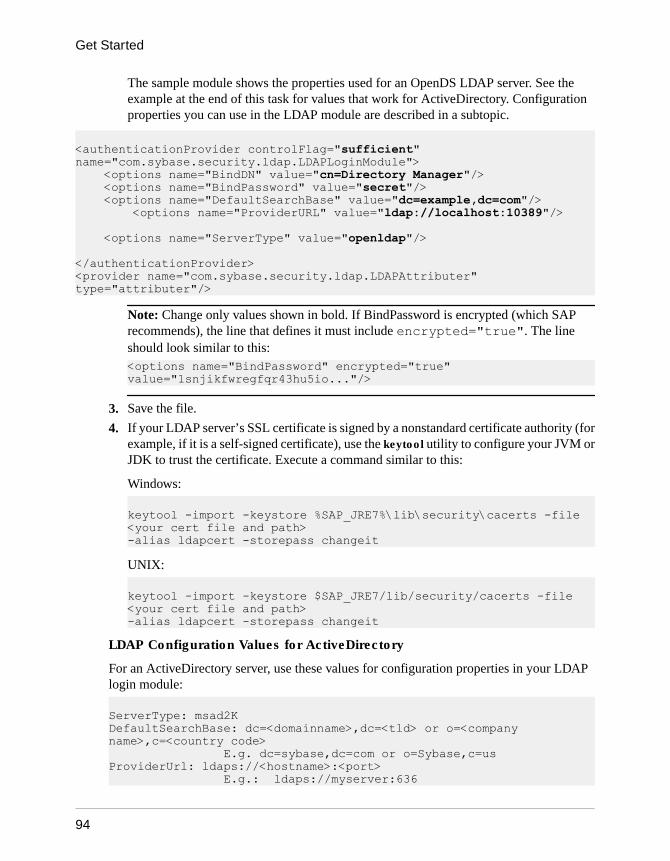
The sample module shows the properties used for an OpenDS LDAP server. See theexample at the end of this task for values that work for ActiveDirectory. Configurationproperties you can use in the LDAP module are described in a subtopic.
<authenticationProvider controlFlag="sufficient" name="com.sybase.security.ldap.LDAPLoginModule"> <options name="BindDN" value="cn=Directory Manager"/> <options name="BindPassword" value="secret"/> <options name="DefaultSearchBase" value="dc=example,dc=com"/> <options name="ProviderURL" value="ldap://localhost:10389"/> <options name="ServerType" value="openldap"/>
</authenticationProvider><provider name="com.sybase.security.ldap.LDAPAttributer" type="attributer"/>
Note: Change only values shown in bold. If BindPassword is encrypted (which SAPrecommends), the line that defines it must include encrypted="true". The lineshould look similar to this:<options name="BindPassword" encrypted="true" value="1snjikfwregfqr43hu5io..."/>
3. Save the file.
4. If your LDAP server’s SSL certificate is signed by a nonstandard certificate authority (forexample, if it is a self-signed certificate), use the keytool utility to configure your JVM orJDK to trust the certificate. Execute a command similar to this:
Windows:
keytool -import -keystore %SAP_JRE7%\lib\security\cacerts -file <your cert file and path> -alias ldapcert -storepass changeit
UNIX:
keytool -import -keystore $SAP_JRE7/lib/security/cacerts -file <your cert file and path> -alias ldapcert -storepass changeit
LDAP Configuration Values for ActiveDirectory
For an ActiveDirectory server, use these values for configuration properties in your LDAPlogin module: ServerType: msad2KDefaultSearchBase: dc=<domainname>,dc=<tld> or o=<company name>,c=<country code> E.g. dc=sybase,dc=com or o=Sybase,c=usProviderUrl: ldaps://<hostname>:<port> E.g.: ldaps://myserver:636
Get Started
94
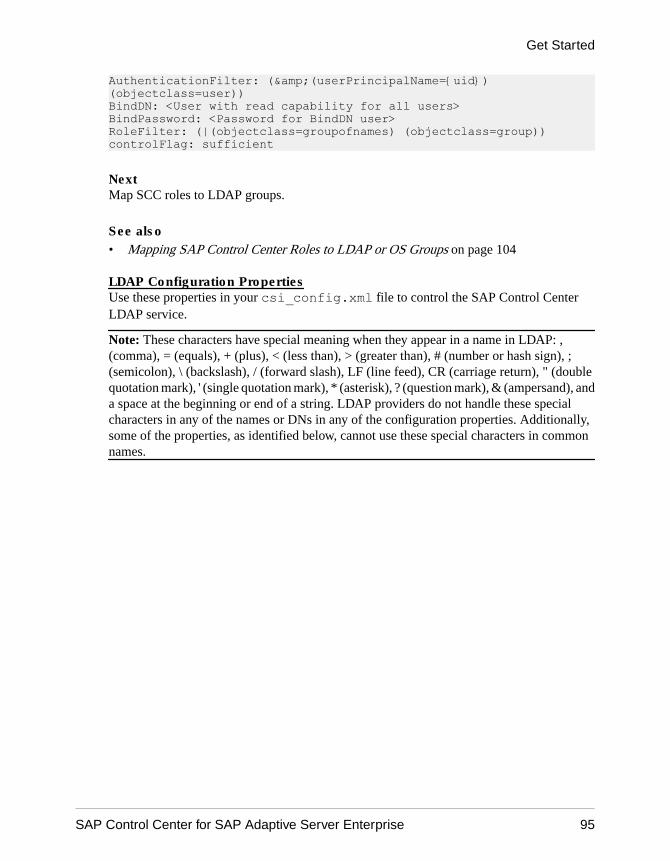
AuthenticationFilter: (&(userPrincipalName={uid}) (objectclass=user))BindDN: <User with read capability for all users>BindPassword: <Password for BindDN user>RoleFilter: (|(objectclass=groupofnames) (objectclass=group))controlFlag: sufficient
NextMap SCC roles to LDAP groups.
See also• Mapping SAP Control Center Roles to LDAP or OS Groups on page 104
LDAP Configuration PropertiesUse these properties in your csi_config.xml file to control the SAP Control CenterLDAP service.
Note: These characters have special meaning when they appear in a name in LDAP: ,(comma), = (equals), + (plus), < (less than), > (greater than), # (number or hash sign), ;(semicolon), \ (backslash), / (forward slash), LF (line feed), CR (carriage return), " (doublequotation mark), ' (single quotation mark), * (asterisk), ? (question mark), & (ampersand), anda space at the beginning or end of a string. LDAP providers do not handle these specialcharacters in any of the names or DNs in any of the configuration properties. Additionally,some of the properties, as identified below, cannot use these special characters in commonnames.
Get Started
SAP Control Center for SAP Adaptive Server Enterprise 95
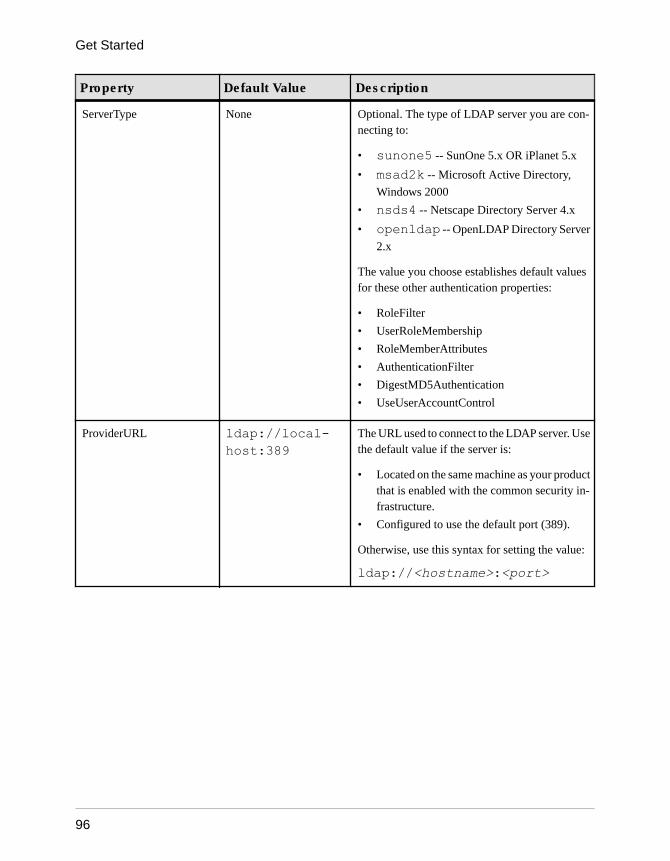
Property Default Value Description
ServerType None Optional. The type of LDAP server you are con-necting to:
• sunone5 -- SunOne 5.x OR iPlanet 5.x
• msad2k -- Microsoft Active Directory,
Windows 2000
• nsds4 -- Netscape Directory Server 4.x
• openldap -- OpenLDAP Directory Server
2.x
The value you choose establishes default valuesfor these other authentication properties:
• RoleFilter
• UserRoleMembership
• RoleMemberAttributes
• AuthenticationFilter
• DigestMD5Authentication
• UseUserAccountControl
ProviderURL ldap://local-host:389
The URL used to connect to the LDAP server. Usethe default value if the server is:
• Located on the same machine as your productthat is enabled with the common security in-frastructure.
• Configured to use the default port (389).
Otherwise, use this syntax for setting the value:
ldap://<hostname>:<port>
Get Started
96
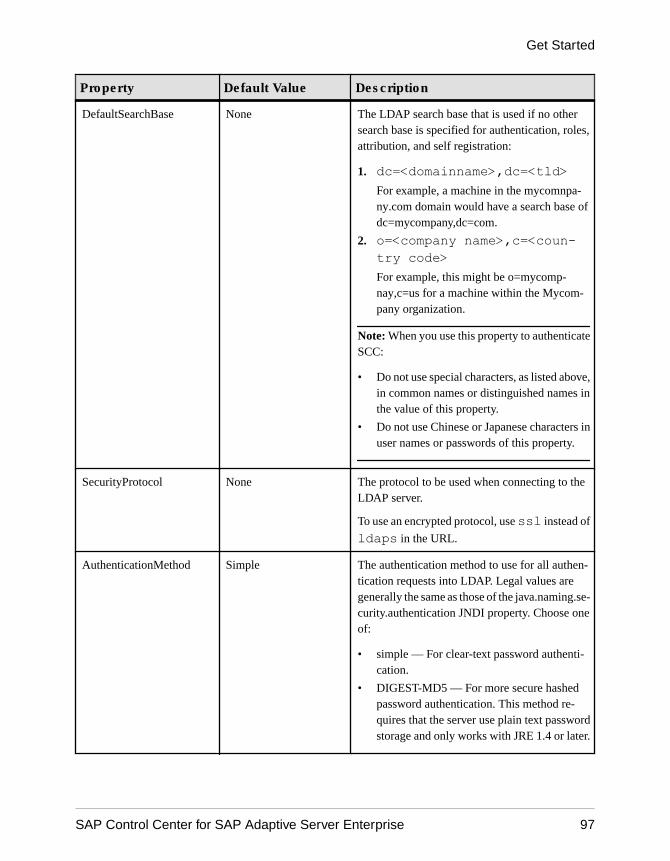
Property Default Value Description
DefaultSearchBase None The LDAP search base that is used if no othersearch base is specified for authentication, roles,attribution, and self registration:
1. dc=<domainname>,dc=<tld>For example, a machine in the mycomnpa-ny.com domain would have a search base ofdc=mycompany,dc=com.
2. o=<company name>,c=<coun-try code>For example, this might be o=mycomp-nay,c=us for a machine within the Mycom-pany organization.
Note: When you use this property to authenticateSCC:
• Do not use special characters, as listed above,in common names or distinguished names inthe value of this property.
• Do not use Chinese or Japanese characters inuser names or passwords of this property.
SecurityProtocol None The protocol to be used when connecting to theLDAP server.
To use an encrypted protocol, use ssl instead of
ldaps in the URL.
AuthenticationMethod Simple The authentication method to use for all authen-tication requests into LDAP. Legal values aregenerally the same as those of the java.naming.se-curity.authentication JNDI property. Choose oneof:
• simple — For clear-text password authenti-cation.
• DIGEST-MD5 — For more secure hashedpassword authentication. This method re-quires that the server use plain text passwordstorage and only works with JRE 1.4 or later.
Get Started
SAP Control Center for SAP Adaptive Server Enterprise 97

Property Default Value Description
AuthenticationFilter For most LDAP servers:(&(uid={uid})(ob-jectclass=per-son))or
For Active Directory e-mail lookups: (&(userPrincipal-Name={uid})(object-class=user))[ActiveDirecto-ry]For Active DirectoryWindows user namelookups: (&(sAMAccount-Name={uid})(ob-ject-class=user))
The filter to use when looking up the user.
When performing a user name based lookup, thisfilter is used to determine the LDAP entry thatmatches the supplied user name.
The string "{uid}" in the filter is replaced with thesupplied user name.
Note: When you use this property to authenticateSCC:
• Do not use special characters, as listed above,in common names or distinguished names inthe value of this property.
• Do not use Chinese or Japanese characters inuser names or passwords of this property.
AuthenticationScope onelevel The authentication search scope. The supportedvalues for this are:
• onelevel• subtreeIf you do not specify a value or if you specify aninvalid value, the default value is used.
Get Started
98

Property Default Value Description
AuthenticationSearchBase None The search base used to authenticate users. If thisproperty is not configured, the value for Default-SearchBase is used.
Note: When you use this property to authenticateSCC:
• Do not use special characters, as listed above,in common names or distinguished names inthe value of this property.
• Do not use Chinese or Japanese characters inuser names or passwords of this property.
BindDN None The user DN to bind against when building theinitial LDAP connection.
In many cases, this user may need read permis-sions on all user records. If you do not set a value,anonymous binding is used. Anonymous bindingworks on most servers without additional config-uration.
However, the LDAP attributer may use this DN tocreate users in the LDAP server. When the self-registration feature is used, this user may needpermissions to create a user record. This behaviormay occur if you do not set useUserCredential-sToBind to true. In this case, the LDAP attributeruses this DN to update the user attributes.
Get Started
SAP Control Center for SAP Adaptive Server Enterprise 99
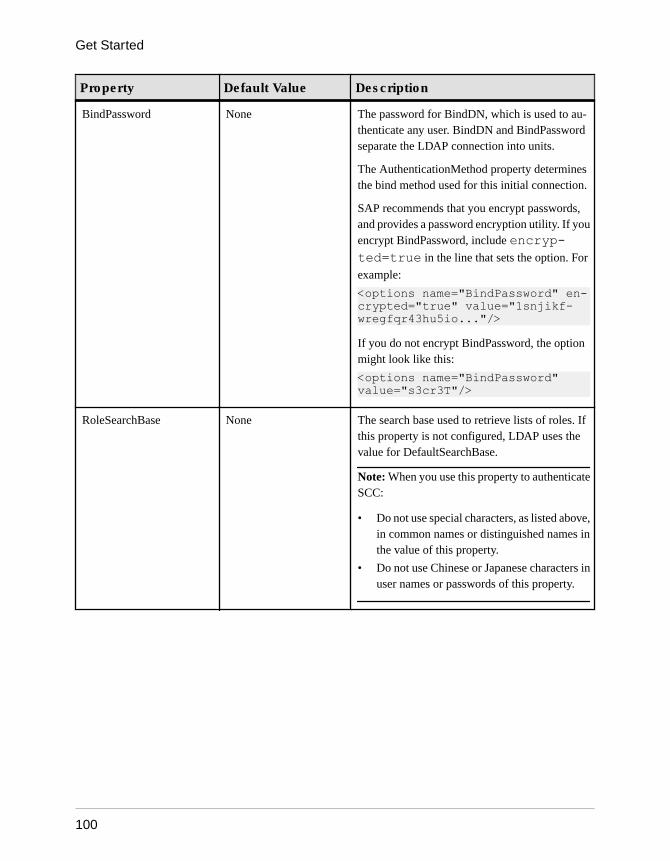
Property Default Value Description
BindPassword None The password for BindDN, which is used to au-thenticate any user. BindDN and BindPasswordseparate the LDAP connection into units.
The AuthenticationMethod property determinesthe bind method used for this initial connection.
SAP recommends that you encrypt passwords,and provides a password encryption utility. If youencrypt BindPassword, include encryp-ted=true in the line that sets the option. For
example:
<options name="BindPassword" en-crypted="true" value="1snjikf-wregfqr43hu5io..."/>If you do not encrypt BindPassword, the optionmight look like this:
<options name="BindPassword" value="s3cr3T"/>
RoleSearchBase None The search base used to retrieve lists of roles. Ifthis property is not configured, LDAP uses thevalue for DefaultSearchBase.
Note: When you use this property to authenticateSCC:
• Do not use special characters, as listed above,in common names or distinguished names inthe value of this property.
• Do not use Chinese or Japanese characters inuser names or passwords of this property.
Get Started
100
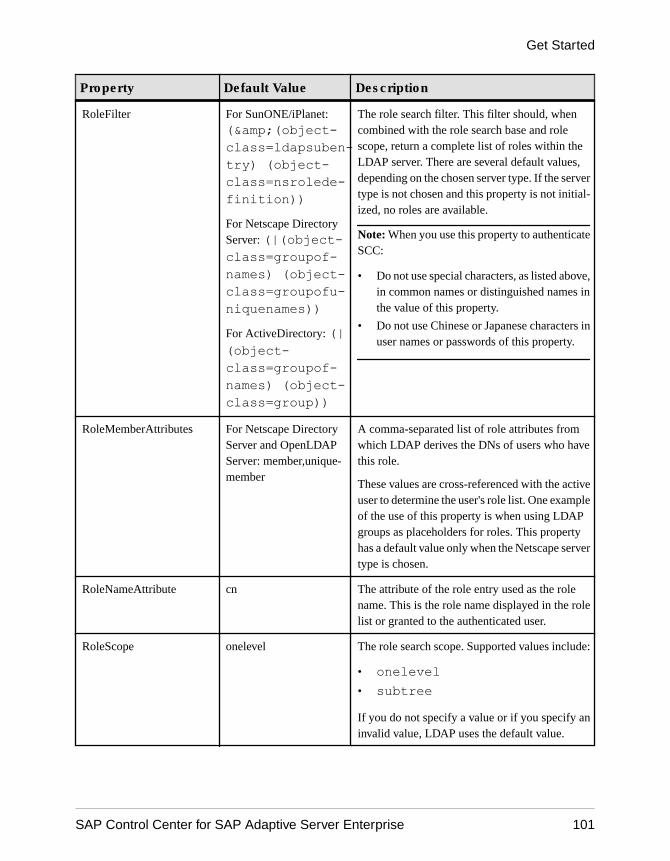
Property Default Value Description
RoleFilter For SunONE/iPlanet:(&(object-class=ldapsuben-try) (object-class=nsrolede-finition))For Netscape DirectoryServer: (|(object-class=groupof-names) (object-class=groupofu-niquenames))For ActiveDirectory: (|(object-class=groupof-names) (object-class=group))
The role search filter. This filter should, whencombined with the role search base and rolescope, return a complete list of roles within theLDAP server. There are several default values,depending on the chosen server type. If the servertype is not chosen and this property is not initial-ized, no roles are available.
Note: When you use this property to authenticateSCC:
• Do not use special characters, as listed above,in common names or distinguished names inthe value of this property.
• Do not use Chinese or Japanese characters inuser names or passwords of this property.
RoleMemberAttributes For Netscape DirectoryServer and OpenLDAPServer: member,unique-member
A comma-separated list of role attributes fromwhich LDAP derives the DNs of users who havethis role.
These values are cross-referenced with the activeuser to determine the user's role list. One exampleof the use of this property is when using LDAPgroups as placeholders for roles. This propertyhas a default value only when the Netscape servertype is chosen.
RoleNameAttribute cn The attribute of the role entry used as the rolename. This is the role name displayed in the rolelist or granted to the authenticated user.
RoleScope onelevel The role search scope. Supported values include:
• onelevel• subtreeIf you do not specify a value or if you specify aninvalid value, LDAP uses the default value.
Get Started
SAP Control Center for SAP Adaptive Server Enterprise 101
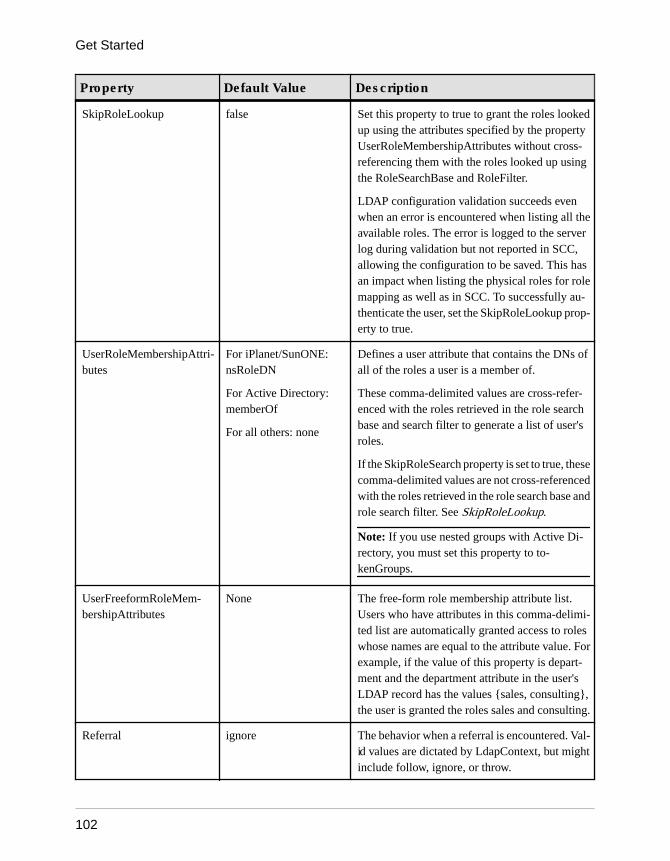
Property Default Value Description
SkipRoleLookup false Set this property to true to grant the roles lookedup using the attributes specified by the propertyUserRoleMembershipAttributes without cross-referencing them with the roles looked up usingthe RoleSearchBase and RoleFilter.
LDAP configuration validation succeeds evenwhen an error is encountered when listing all theavailable roles. The error is logged to the serverlog during validation but not reported in SCC,allowing the configuration to be saved. This hasan impact when listing the physical roles for rolemapping as well as in SCC. To successfully au-thenticate the user, set the SkipRoleLookup prop-erty to true.
UserRoleMembershipAttri-butes
For iPlanet/SunONE:nsRoleDN
For Active Directory:memberOf
For all others: none
Defines a user attribute that contains the DNs ofall of the roles a user is a member of.
These comma-delimited values are cross-refer-enced with the roles retrieved in the role searchbase and search filter to generate a list of user'sroles.
If the SkipRoleSearch property is set to true, thesecomma-delimited values are not cross-referencedwith the roles retrieved in the role search base androle search filter. See SkipRoleLookup.
Note: If you use nested groups with Active Di-rectory, you must set this property to to-kenGroups.
UserFreeformRoleMem-bershipAttributes
None The free-form role membership attribute list.Users who have attributes in this comma-delimi-ted list are automatically granted access to roleswhose names are equal to the attribute value. Forexample, if the value of this property is depart-ment and the department attribute in the user'sLDAP record has the values {sales, consulting},the user is granted the roles sales and consulting.
Referral ignore The behavior when a referral is encountered. Val-id values are dictated by LdapContext, but mightinclude follow, ignore, or throw.
Get Started
102

Property Default Value Description
DigestMD5Authentication-Format
DN
For OpenLDAP: Username
The DIGEST-MD5 bind authentication identityformat.
UseUserAccountContro-lAttribute
For Active Directory:true
When this property is set to true, the UserAc-countControl attribute detects disabled user ac-counts, account expirations, password expira-tions, and so on. Active Directory also uses thisattribute to store the above information.
EnableLDAPConnection-Trace
False Enables LDAP connection tracing. The output islogged to a file in the temp directory. The loca-
tion of the file is logged to the server log.
ConnectTimeout 0 Specifies the timeout, in milliseconds, for at-tempts to connect to the LDAP server. The prop-erty value sets the JNDI com.sun.jndi.ldap.con-nect.timeout property when attempting to estab-lish a connection to a configured LDAP server. Ifthe LDAP provider cannot establish a connectionwithin the configured interval, it aborts the con-nection attempt. An integer value less than orequal to zero results in the use of the networkprotocol's timeout value.
ReadTimeout 0 Controls the length of time, in milliseconds, theclient waits for the server to respond to a readattempt after the initial connection to the serverhas been established. The property values sets theJNDI com.sun.jndi.ldap.read.timeout propertywhen attempting to establish a connection to aconfigured LDAP server. If the LDAP providerdoes not receive an LDAP response within theconfigured interval, it aborts the read attempt. Theread timeout applies to the LDAP response fromthe server after the initial connection is establish-ed with the server. An integer value less than orequal to zero indicates no read timeout is speci-fied.
Get Started
SAP Control Center for SAP Adaptive Server Enterprise 103
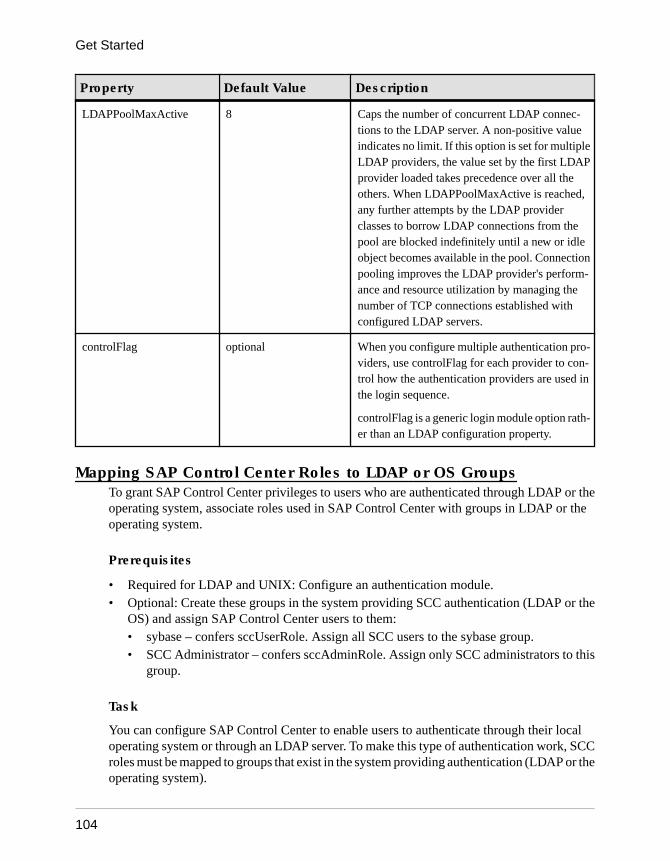
Property Default Value Description
LDAPPoolMaxActive 8 Caps the number of concurrent LDAP connec-tions to the LDAP server. A non-positive valueindicates no limit. If this option is set for multipleLDAP providers, the value set by the first LDAPprovider loaded takes precedence over all theothers. When LDAPPoolMaxActive is reached,any further attempts by the LDAP providerclasses to borrow LDAP connections from thepool are blocked indefinitely until a new or idleobject becomes available in the pool. Connectionpooling improves the LDAP provider's perform-ance and resource utilization by managing thenumber of TCP connections established withconfigured LDAP servers.
controlFlag optional When you configure multiple authentication pro-viders, use controlFlag for each provider to con-trol how the authentication providers are used inthe login sequence.
controlFlag is a generic login module option rath-er than an LDAP configuration property.
Mapping SAP Control Center Roles to LDAP or OS GroupsTo grant SAP Control Center privileges to users who are authenticated through LDAP or theoperating system, associate roles used in SAP Control Center with groups in LDAP or theoperating system.
Prerequisites
• Required for LDAP and UNIX: Configure an authentication module.• Optional: Create these groups in the system providing SCC authentication (LDAP or the
OS) and assign SAP Control Center users to them:• sybase – confers sccUserRole. Assign all SCC users to the sybase group.• SCC Administrator – confers sccAdminRole. Assign only SCC administrators to this
group.
Task
You can configure SAP Control Center to enable users to authenticate through their localoperating system or through an LDAP server. To make this type of authentication work, SCCroles must be mapped to groups that exist in the system providing authentication (LDAP or theoperating system).
Get Started
104

The sybase and SCC Administrator groups are convenient because they are predefined inrole-mapping.xml. If you add sybase and SCC Administrator groups to your LDAPsystem and populate them with SCC users and administrators, you can skip to the next task—you do not need to complete the steps below.
The table lists default mappings of LDAP and OS groups to SCC roles. Login modules aredefined in csi_config.xml.
Login Module OS Group SAP Control Center Roles
UNIX Proxy root uaAnonymous, uaAgentAdmin, uaOSAdmin
sybase uaAnonymous, uaPluginAdmin, sccUserRole
user uaAnonymous
guest uaAnonymous
NT Proxy Administrators uaAnonymous, uaAgentAdmin, uaOSAdmin
sybase uaAnonymous, uaPluginAdmin, sccUserRole
Users uaAnonymous
Guests uaAnonymous
LDAP sybase uaAnonymous, uaPluginAdmin, sccUserRole
SCC Administrator uaAnonymous, sccAdminRole
There are two ways to accomplish the mapping:
• (Recommended) Add a “sybase” group and an “SCC Administrator” group to theoperating system or LDAP server SAP Control Center is using to authenticate users, andadd all users who need to access SAP Control Center to one or both groups.
• Configure SAP Control Center to use existing groups in LDAP or the operating system byediting the role-mapping.xml file. This option is described here.
1. If SAP Control Center is running, shut it down.
2. In a text editor, open:
<SCC-install-directory>/conf/role-mapping.xml3. Locate the sccUserRole section of the file:
<Mapping> <LogicalName>sccUserRole</LogicalName> <MappedName>SCC Administrator</MappedName> <MappedName>SCC Agent Administrator</MappedName> <MappedName>sybase</MappedName></Mapping>
4. Add a MappedName line for the LDAP or OS group you are using to authenticate SCCusers. The sccUserRole section should look similar to this:
Get Started
SAP Control Center for SAP Adaptive Server Enterprise 105
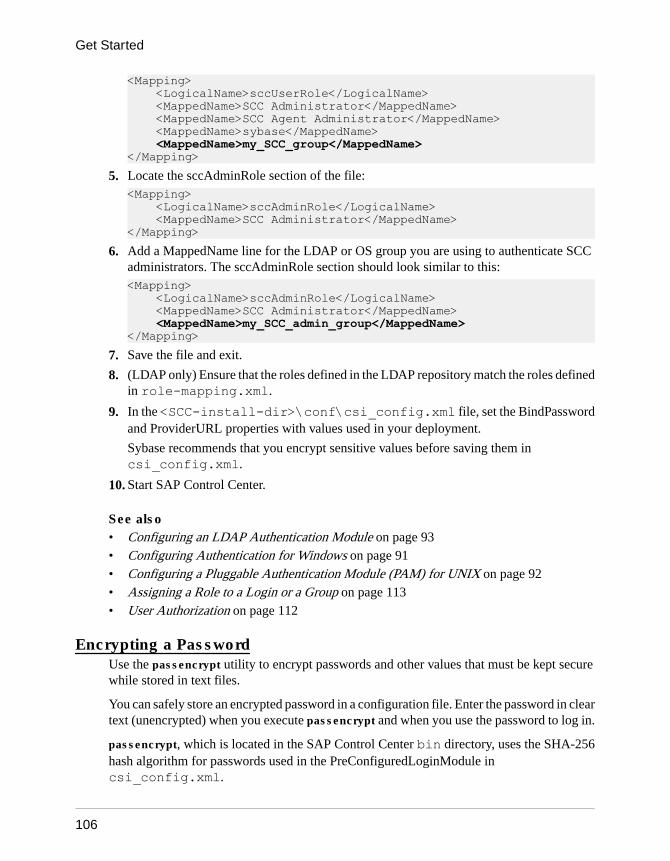
<Mapping> <LogicalName>sccUserRole</LogicalName> <MappedName>SCC Administrator</MappedName> <MappedName>SCC Agent Administrator</MappedName> <MappedName>sybase</MappedName> <MappedName>my_SCC_group</MappedName></Mapping>
5. Locate the sccAdminRole section of the file:<Mapping> <LogicalName>sccAdminRole</LogicalName> <MappedName>SCC Administrator</MappedName></Mapping>
6. Add a MappedName line for the LDAP or OS group you are using to authenticate SCCadministrators. The sccAdminRole section should look similar to this:<Mapping> <LogicalName>sccAdminRole</LogicalName> <MappedName>SCC Administrator</MappedName> <MappedName>my_SCC_admin_group</MappedName></Mapping>
7. Save the file and exit.
8. (LDAP only) Ensure that the roles defined in the LDAP repository match the roles definedin role-mapping.xml.
9. In the <SCC-install-dir>\conf\csi_config.xml file, set the BindPasswordand ProviderURL properties with values used in your deployment.
Sybase recommends that you encrypt sensitive values before saving them incsi_config.xml.
10. Start SAP Control Center.
See also• Configuring an LDAP Authentication Module on page 93• Configuring Authentication for Windows on page 91• Configuring a Pluggable Authentication Module (PAM) for UNIX on page 92• Assigning a Role to a Login or a Group on page 113• User Authorization on page 112
Encrypting a PasswordUse the passencrypt utility to encrypt passwords and other values that must be kept securewhile stored in text files.
You can safely store an encrypted password in a configuration file. Enter the password in cleartext (unencrypted) when you execute passencrypt and when you use the password to log in.
passencrypt, which is located in the SAP Control Center bin directory, uses the SHA-256hash algorithm for passwords used in the PreConfiguredLoginModule incsi_config.xml.
Get Started
106
1. Open a command window and change to the bin directory:
Windows: cd <SCC-install-directory>\binUNIX: cd <SCC-install-directory>/bin
2. To encrypt a password, enter passencrypt -csi. Enter your new password at the resultingprompt.passencrypt encrypts the password you enter (which does not appear on the screen) anddisplays the password in encrypted form.
3. Copy the encrypted password.
4. Paste the encrypted password where needed.
Configuring Ports(Optional) Use the scc --port command to assign SAP Control Center services to new ports.
PrerequisitesCheck for port conflicts between SAP Control Center and other software running on the samehost.
Task
SAP Control Center cannot function properly if other services use its ports. If you discover aconflict with any port listed in the right column below, you can either reconfigure the otherservice’s port or reconfigure SAP Control Center as described here.
PortName
Description Service Names Property Names DefaultPort
db Database port
Present on SCC server
SccSADataserver
Messaging
Alert
Scheduler
com.sybase.asa.server.port
messaging.db.port
alert.database.port
org.quartz.data-Source.ASA.URL
3638
http Web HTTP port
Present on SCC server
EmbeddedWebCon-tainer
http.port 8282
https Web HTTPS (secureHTTP) port
Present on SCC server
EmbeddedWebCon-tainer
https.port 8283
Get Started
SAP Control Center for SAP Adaptive Server Enterprise 107
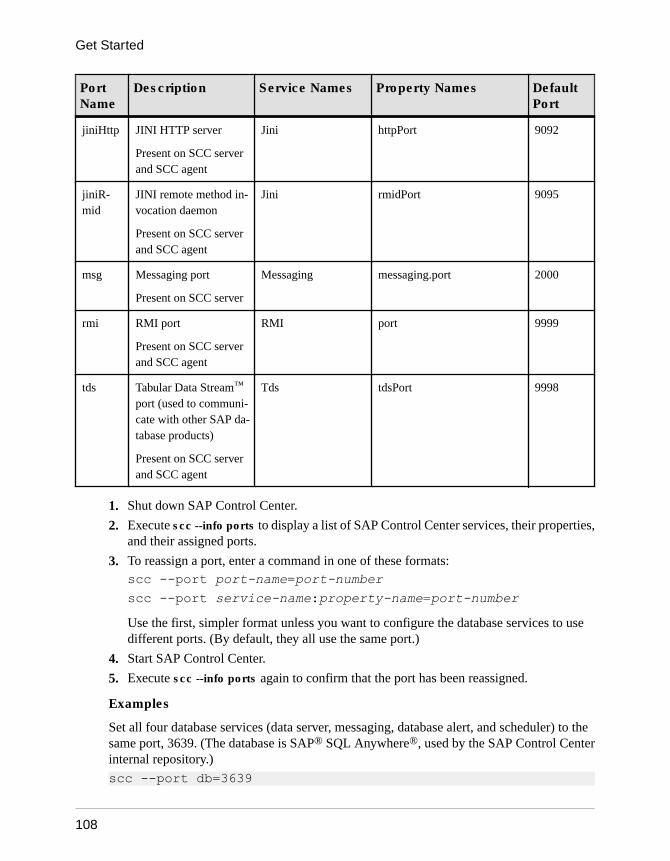
PortName
Description Service Names Property Names DefaultPort
jiniHttp JINI HTTP server
Present on SCC serverand SCC agent
Jini httpPort 9092
jiniR-mid
JINI remote method in-vocation daemon
Present on SCC serverand SCC agent
Jini rmidPort 9095
msg Messaging port
Present on SCC server
Messaging messaging.port 2000
rmi RMI port
Present on SCC serverand SCC agent
RMI port 9999
tds Tabular Data Stream™
port (used to communi-cate with other SAP da-tabase products)
Present on SCC serverand SCC agent
Tds tdsPort 9998
1. Shut down SAP Control Center.
2. Execute scc --info ports to display a list of SAP Control Center services, their properties,and their assigned ports.
3. To reassign a port, enter a command in one of these formats:scc --port port-name=port-numberscc --port service-name:property-name=port-numberUse the first, simpler format unless you want to configure the database services to usedifferent ports. (By default, they all use the same port.)
4. Start SAP Control Center.
5. Execute scc --info ports again to confirm that the port has been reassigned.
Examples
Set all four database services (data server, messaging, database alert, and scheduler) to thesame port, 3639. (The database is SAP® SQL Anywhere®, used by the SAP Control Centerinternal repository.)
scc --port db=3639
Get Started
108
Set only the database messaging service to port 3639.
scc --port Messaging:messaging.db.port=3639Set the HTTP port to 9292.
scc --port http=9292Set the Jini RMI daemon to port 9696.
scc --port jiniRmid=9696Set the main SAP Control Center messaging service to port 2001.
scc --port msg=2001Set the RMI port to 9991.
scc --port rmi=9991Set the Tabular Data Stream port to 9997.
scc --port tds=9997Note: scc commands that include a port-setting option (-p or --port) do not start SAP ControlCenter. To start SCC, execute a separate scc command.
See also• scc Command on page 84
Configuring the E-mail Server(Optional) Specify the e-mail server for SAP Control Center to use to send e-mail alertnotifications.
PrerequisitesLaunch SAP Control Center and log in using an account with administrative privileges. (Thelogin account or its group must have sccAdminRole.)
Task
1. From the application’s menu bar, select Application > Administration.
2. Select General Settings.
3. Click the E-mail tab.
4. Enter the name of the e-mail server through which SAP Control Center will send alertnotifications.
5. Change the default e-mail server port only in consultation with your e-mail administrator.
Get Started
SAP Control Center for SAP Adaptive Server Enterprise 109
6. (Optional) Click Customize e-mail settings to display options for setting the domainname and e-mail sender for alert e-mail notifications.
7. (Optional) Enter your domain name (for example, mycompany.com).
Most e-mail servers do not require SCC to provide an explicit domain name. Try providinga domain name here if your first attempt to configure e-mail alerts fails.
8. (Optional) Change the default e-mail sender name.
This name appears in the "From" field of SCC e-mail alert messages. Do not use spaces;use hyphens or underscore characters instead.
Tip: If you have multiple SCC servers, configure their sender names so you can tell whichSCC an alert is coming from. For example, SybaseControlCenter_Boston or SCC_test11.
9. (Optional) If you entered anything in the E-mail Domain name or E-mail sender namefields, click Apply to make the test e-mail option reappear.
10. (Optional) To dispatch a test message, enter an e-mail address in the Test e-mail addressfield and click Send.If the test e-mail is received, you have properly configured the server for e-mail alertnotifications.
11. Click OK (to apply the change and close the properties dialog) or Apply (to apply thechange and leave the dialog open).
Next(Optional) Configure automatic logout.
See also• Alerts on page 167
• SAP ASE Data Collections on page 130
• Substitution Parameters for Scripts on page 151
• Key Performance Indicators for SAP ASE on page 133
• SAP ASE Alerts on page 141
• Launching SAP Control Center on page 72
• Logging in to SAP Control Center on page 88
Configuring the Automatic Logout Timer(Optional) Set SAP Control Center to end login sessions when users are inactive for too long.
PrerequisitesLaunch SAP Control Center and log in using an account with administrative privileges. (Thelogin account or its group must have sccAdminRole.)
Get Started
110

Task
1. From the application’s menu bar, select Application > Administration.
2. Select General Settings.
3. Click the Auto-Logout tab.
4. Enter the number of minutes after which an idle user will be automatically logged out.
Enter 0 or leave the box empty to disable automatic logout.
5. Click OK (to apply the change and close the properties dialog) or Apply (to apply thechange and leave the dialog open).
See also• Launching SAP Control Center on page 72
• Logging in to SAP Control Center on page 88
Configuring Retrieval Thresholds for the AdministrationConsole
(Optional) Set limits on the time the Administration Console waits for data to load or on thenumber of rows it loads.
PrerequisitesLaunch SAP Control Center and log in using an account with administrative privileges. (Thelogin account or its group must have sccAdminRole.)
Task
Performing some tasks may cause the Administration Console to load a large amount of data,which can be time-consuming and can place a heavy load on your network. This is particularlylikely if your perspective includes many resources. The Administration Console mitigates thisproblem by displaying partial results and by displaying placeholders called message rowswhen data takes longer than a specified number of seconds to retrieve or exceeds a specifiednumber of rows. The data retrieval options let you specify those numbers.
This data retrieval scheme reduces network traffic because result sets that exceed the specifiedrow count are not transmitted unless you ask for them by expanding a message row. Bydisplaying partial results and message rows for data from slow-responding resources, thescheme also minimizes the time you spend waiting.
1. From the application’s menu bar, select Application > Administration.
2. Select General Settings.
3. Click the Administration Console tab.
Get Started
SAP Control Center for SAP Adaptive Server Enterprise 111
4. Set the timeout for data retrieval in seconds.
When SCC is not able to return all requested data within this period of time, it displays anydata it has received and generates message rows in place of the missing results. TheAdministration Console replaces message rows with real data as soon as the data arrives.
5. Set the row count.
When a request returns results that exceed the specified row count, SCC displays amessage row in place of the expected results. You can expand the message row by selectingit, clicking the drop-down arrow, and selecting Expand.
6. Click OK (to apply the change and close the properties dialog) or Apply (to apply thechange and leave the dialog open).
See also• Searching and Filtering Resources on page 158
User AuthorizationThe authorization mechanism in SAP Control Center employs login accounts and task-basedroles.
Access to SAP Control Center is controlled by login accounts. Permissions assign predefinedroles that control tasks the user can perform in SCC, such as administration and monitoring ofparticular types of servers. The roles can be assigned directly to login accounts or to groups; alogin account inherits the roles of any group to which it belongs. Component product modulesassign some roles automatically.
SAP Control Center classifies roles as follows:
• System roles – define how a user can interact with SCC.• Product roles – define how a user can interact with a particular managed resource in SCC,
for example the Replication Server named RepBoston01.
Note: The tools described here are for managing SCC-enabled login accounts; you cannot usethem to manage accounts and groups that are native to your managed resource.
See also• Authenticating a Login Account for a Managed Resource on page 127
Get Started
112
Assigning a Role to a Login or a GroupUse the security configuration options to add one or more roles to an SAP Control Center loginaccount or to a group. Roles enable users to perform tasks such as monitoring servers oradministering SAP Control Center.
PrerequisitesYou must have administrative privileges (sccAdminRole) to perform this task. To assign amonitoring role for a server, first register the server.
TaskAssign the sccAdminRole to any login account that will perform administrative tasks in SAPControl Center.
1. From the application menu bar, select Application > Administration.
2. In the SAP Control Center Properties dialog, expand the Security folder.
3. Click Logins or Groups.
4. In the table, select the login account or group to which you want to assign a role.
5. Click the Roles tab.
6. In the Available roles for resource list, select the role, then click Add. For example, togrant administrative privileges, add the SCC Service:sccAdminRole. To grant monitoringprivileges, add the MonitorRole for the desired server and server type.
Note: SAP Control Center product modules assign certain roles automatically, so youmight not need to add a MonitorRole.
If a role appears in the Has following roles list, this account or group has already beenconfigured with that role.
7. Click OK.
See also• Role Assignment in SAP Control Center for SAP ASE on page 127
• Logins, Roles, and Groups on page 118
• Removing a Role from a Login or a Group on page 113
Removing a Role from a Login or a GroupUse the security configuration options to remove one or more roles from an SAP ControlCenter login account or from a group.
PrerequisitesYou must have administrative privileges to perform this task.
Get Started
SAP Control Center for SAP Adaptive Server Enterprise 113
Task
1. From the menu bar, select Application > Administration.
2. In the SAP Control Center Properties dialog, expand the Security folder.
3. Click Logins or Groups.
4. Select the login account or group from which you want to remove a role.
5. Click the Roles tab.
6. Select the role, then click Remove.
7. Click OK.
See also• Assigning a Role to a Login or a Group on page 113
Adding a GroupUse the security configuration options to create a new group.
PrerequisitesYou must have administrative privileges (sccAdminRole) to perform this task.
TaskGroups can make roles easier to manage. Rather than assigning roles to individual users,assign roles to groups and add users to the groups or remove them as needed.
1. From the main menu bar, select Application > Administration.
2. In the SAP Control Center Properties dialog, expand the Security folder.
3. Select Groups.
4. Click Create Group.
5. Enter a group name and a description.
6. Click Finish.
See also• Removing a Group on page 114• Adding a Login Account to a Group on page 115• Removing a Login Account from a Group on page 115
Removing a GroupUse the security configuration options to remove a group.
PrerequisitesYou must have administrative privileges (sccAdminRole) to perform this task.
Get Started
114
Task
1. From the main menu bar, select Application > Administration.
2. In the SAP Control Center Properties dialog, expand the Security folder.
3. Select Groups.
4. Select the group to remove.
5. Click Delete.
6. Click OK to confirm the deletion.
See also• Adding a Group on page 114• Adding a Login Account to a Group on page 115• Removing a Login Account from a Group on page 115
Adding a Login Account to a GroupUse the security configuration options to add one or more login accounts to a group.
PrerequisitesYou must have administrative privileges (sccAdminRole) to perform this task.
Task
1. From the main menu bar, select Application > Administration.
2. In the SAP Control Center Properties dialog, expand the Security folder.
3. Click Groups.
4. Select the group to which you want to assign an account.
5. Click the Membership tab.
6. Select the account, then click Add.
7. Click OK.
See also• Adding a Group on page 114• Removing a Group on page 114• Removing a Login Account from a Group on page 115
Removing a Login Account from a GroupUse the security configuration options to remove one or more login accounts from a group.
PrerequisitesYou must have administrative privileges (sccAdminRole) to perform this task.
Get Started
SAP Control Center for SAP Adaptive Server Enterprise 115
Task
1. From the main menu bar, select Application > Administration.
2. In the SAP Control Center Properties, expand the Security folder.
3. Select Groups.
4. Select the group from which to remove members.
5. Click the Membership tab.
6. Select the login, then click Remove.
7. Click OK.
See also• Adding a Group on page 114
• Removing a Group on page 114
• Adding a Login Account to a Group on page 115
Adding a Login Account to the SystemUse the security configuration options to create a native login account in SAP Control Center.
Prerequisites
• You must have SCC administrative privileges (sccAdminRole) to perform this task.• If you intend to use LDAP or the operating system to authenticate users, configure the
appropriate authentication module.
Task
Note: SAP does not recommend that you manually create a native login account for every SAPControl Center user. It is more efficient to configure SAP Control Center to authenticate usersthrough their user accounts in LDAP or the operating system. When you do that, SCCautomatically creates a native account for every authenticated user.
1. From the main menu bar, select Application > Administration.
2. In the SAP Control Center Properties dialog, expand the Security folder.
3. Select Logins.
4. Click Create Login.
5. Enter a login name and expiration for the new account. Expiration is optional.
6. Click Next.
7. Select Specify new user information.
8. Enter details about the user:
• Title
Get Started
116

• First name*• M.I. (middle initial)• Last name*• Suffix• E-mail address*• Phone• Ext.• Fax• Mobile• Supports text messaging (checkbox)
*You must fill in the First Name, Last Name, and E-mail Address fields.
9. Click Finish.
NextGrant privileges to the new login account. You can grant privileges by assigning SAP ControlCenter roles directly to the login accounts, or by assigning the login accounts to groups andmapping SAP Control Center roles to the groups. The group approach is generally moreefficient.
See also• Configuring Authentication for Windows on page 91
• Configuring a Pluggable Authentication Module (PAM) for UNIX on page 92
• Configuring an LDAP Authentication Module on page 93
• Removing a Login Account from the System on page 117
• Modifying a User Profile on page 118
Removing a Login Account from the SystemUse the security configuration options to delete an SAP Control Center login account.
PrerequisitesYou must have administrative privileges (sccAdminRole) to perform this task.
Task
1. From the main menu bar, select Application > Administration.
2. In the SAP Control Center Properties dialog, expand the Security folder.
3. Select Logins.
4. Select the login to delete.
5. Click Delete.
Get Started
SAP Control Center for SAP Adaptive Server Enterprise 117
6. Click OK to confirm the deletion.
See also• Adding a Login Account to the System on page 116
• Modifying a User Profile on page 118
Modifying a User ProfileUse the security configuration options to suspend a login account, impose an expiration date,or modify the account’s user information.
PrerequisitesYou must have administrative privileges (sccAdminRole) to perform this task.
Task
1. From the main menu bar, select Application > Administration.
2. In the SAP Control Center Properties dialog, expand the Security folder.
3. Select Logins.
4. Select the login account to modify.
5. Click the General tab.
6. To suspend this account, click Login disabled.
7. To set the date on which this account will stop working, click the calendar icon next to theExpiration field and select a data.
8. Click Apply.
9. Click the User Info tab.
10. Edit the user information.
When this user configures e-mail alert subscriptions, SAP Control Center automaticallypopulates the subscription dialog with the e-mail address you enter here.
11. Click Apply.
See also• Adding a Login Account to the System on page 116
• Removing a Login Account from the System on page 117
Logins, Roles, and GroupsSAP Control Center includes predefined login accounts and roles.
A login account identifies a user who can connect to SAP Control Center. An account has rolesthat control the tasks the user is allowed to perform. Users can be authenticated through native
Get Started
118
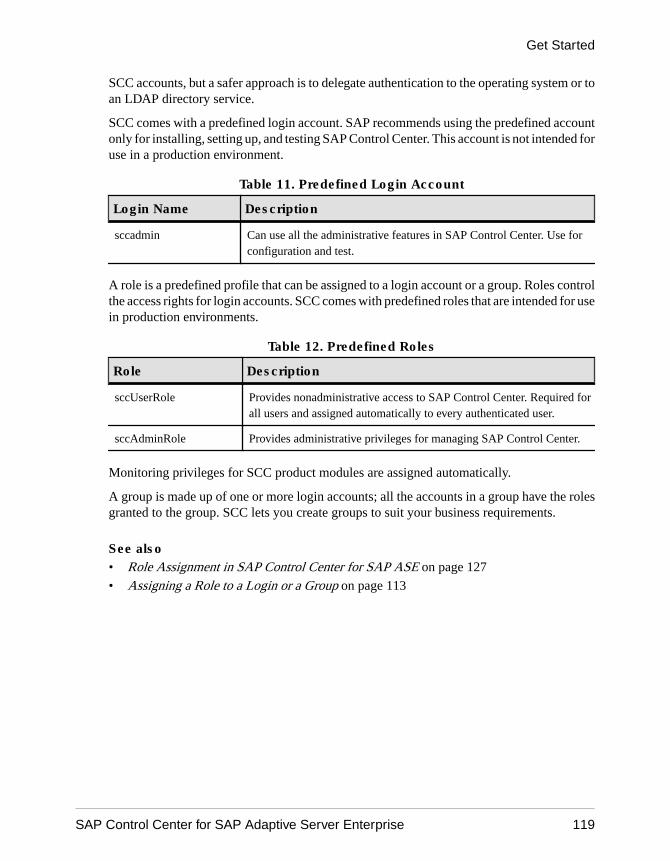
SCC accounts, but a safer approach is to delegate authentication to the operating system or toan LDAP directory service.
SCC comes with a predefined login account. SAP recommends using the predefined accountonly for installing, setting up, and testing SAP Control Center. This account is not intended foruse in a production environment.
Table 11. Predefined Login Account
Login Name Description
sccadmin Can use all the administrative features in SAP Control Center. Use forconfiguration and test.
A role is a predefined profile that can be assigned to a login account or a group. Roles controlthe access rights for login accounts. SCC comes with predefined roles that are intended for usein production environments.
Table 12. Predefined Roles
Role Description
sccUserRole Provides nonadministrative access to SAP Control Center. Required forall users and assigned automatically to every authenticated user.
sccAdminRole Provides administrative privileges for managing SAP Control Center.
Monitoring privileges for SCC product modules are assigned automatically.
A group is made up of one or more login accounts; all the accounts in a group have the rolesgranted to the group. SCC lets you create groups to suit your business requirements.
See also• Role Assignment in SAP Control Center for SAP ASE on page 127
• Assigning a Role to a Login or a Group on page 113
Get Started
SAP Control Center for SAP Adaptive Server Enterprise 119

Get Started
120
Configure
Configure login accounts, statistics collection, alerts, and other server monitoring options.
PrerequisitesBefore configuring SAP Control Center for use in a production environment, complete thetasks in the Get Started section of the help. Setting up security is particularly important.
1. Configuring SAP Adaptive Server Enterprise for MonitoringOn each server you plan to monitor, grant mon_role to the user account used to log in to theSAP ASE server, and set monitoring options in the configuration file.
2. Registering an SAP ASE ServerRegister a resource (for example, a server that can be monitored) to make SAP ControlCenter aware of it and its connection information.
3. Importing Resources for Batch Registration(Optional) Import and register multiple servers from an interfaces or sql.ini file.
4. Registering the Agent for an SAP ASE ServerRegister the remote command and control agent.
5. Authenticating a Login Account for a Managed ResourceSpecify the login account and password SAP Control Center will use when it connects toyour server or agent to collect monitoring data or manage the resource.
6. Setting Up Statistics CollectionUse the Properties view of your managed resource to create a data collection job and add aschedule to the job.
7. Creating an AlertUse the Add Alert wizard to create an alert instance for your resource.
8. Setting Display Options for SAP ASE Performance DataChange the screen refresh interval, chart trend period, alert list size, historical SQLs size,and historical SQLs trend period for an SAP ASE server.
9. Optional Configuration StepsPerform additional configuration, including user authorization, alerts, data collectionscheduling, backups, and setting purging options for the repository.
See also• User Authorization on page 60• Logins, Roles, and Groups on page 118• Setting Up Security on page 89• Assigning a Role to a Login or a Group on page 113
Configure
SAP Control Center for SAP Adaptive Server Enterprise 121
Configuring SAP Adaptive Server Enterprise for MonitoringOn each server you plan to monitor, grant mon_role to the user account used to log in to theSAP ASE server, and set monitoring options in the configuration file.
The SAP ASE component of SAP Control Center needs a user account to log in to SAP ASE.To gather monitoring data, that account needs the role mon_role.
1. Create or select a login account for SAP Control Center to use when it connects to SAPASE.
2. Use the sp_role stored procedure to grant mon_role to the login account, which in thisexample is called scc:
sp_role "grant", mon_role, scc
Note: After adding mon_role, if a resource is open for monitoring before you make thesuggested parameter changes, a configuration dialog opens allowing you to modify theparameter values.
3. You see a Configuration Parameters Validation screen that displays the current values andthe recommended values needed to enable monitoring. Change the current values to therecommended values or, for nonbinary values, to values that are consistent with the level ofactivity on the monitored SAP ASE. You must have sa_role to change parametervalues.
NextRegister your SAP ASE server with SAP Control Center and add it to a perspective.
See also• Authenticating a Login Account for a Managed Resource on page 127
• Setting SAP ASE Parameters in the Configuration File on page 218
• Displaying Configuration Values on page 230
• Setting Up Statistics Collection on page 128
• Role Assignment in SAP Control Center for SAP ASE on page 127
• Adding a Resource to a Perspective on page 189
Configure
122
Registering an SAP ASE ServerRegister a resource (for example, a server that can be monitored) to make SAP Control Centeraware of it and its connection information.
1. In the Resource Explorer, select Resources > Register.
2. Specify:
Table 13. New Resource Type Details
Field Description
Resource Name (Required) Name of the resource to register.Enter the actual name of the managed server,using uppercase and lowercase letters. If thename registered in SAP Control Center doesnot exactly match the server name, some mon-itoring functions, including the topology view,do not work.
Resource Type Select a resource type:• SAP ASE Server (15.0.2.0) – monitor
15.0.2.0 or later. Choose this type for fullserver monitoring capabilities.
• SAP ASE, Replication Only (12.5.0.0) –monitor only the RepAgent threads for anSAP ASE server that is older than version15.0.2.0. Choose this type for a server thatis part of a replication environment.
Description A brief description to help you identify the re-source.
3. Click Next.
4. Specify the connection information for your resource:
Table 14. New Resource Connection Details
Field Description
Server Host Name/Host Name Local host name
Port Number Local host port number
Configure
SAP Control Center for SAP Adaptive Server Enterprise 123
Field Description
Character Set Character set configured on SAP ASE
Note: If the server is configured to use a language that re-quires a multibyte character set such as Chinese, make sureto specify the correct character set in the connection profile.
Language Language configured on SAP ASE
5. Click Next.
6. (Optional) Enter a user name and password that SCC can use to authenticate with thisresource to retrieve its software version. The credentials are used only for this purpose,then discarded.
If you prefer not to authenticate now, click I do not want to supply authenticationinformation.
This step enables SCC to display the correct version information for the server before theserver is formally authenticated (later in the configuration process).
7. (Optional) Click Add this resource to the current perspective. You must add a resourceto a perspective (not necessarily the current perspective) before you can manage ormonitor it.
8. (Optional) Click Open the resource explorer to view this new resource. (This option isnot present when the Resource Explorer is open.)
9. Click Finish.
See also• Common Display Options on page 6• Resources on page 188• Unregistering a Resource on page 189
Importing Resources for Batch Registration(Optional) Import and register multiple servers from an interfaces or sql.ini file.
PrerequisitesCopy the interfaces or sql.ini file to a location on or accessible from the machine thathosts your Web browser.
Task
An interfaces (UNIX) or sql.ini file (Windows) is a list of SAP database servers andtheir ports; it may contain other connection information as well. The file is created during theinstallation of a server:
Configure
124
• Windows: %SYBASE%\ini\sql.ini• Unix: $SYBASE/interfacesFor more information on interfaces files, see the appendix on configuration files inConfiguration Guide Open Client and Open Server 15.0 for UNIX.
For more information on sql.ini files, see the chapter on network communications usingsql.ini in the SAP Sybase ASE 15.0 Configuration Guide for Windows.
Note: The Import Resources wizard imports servers in batches of a single type (SAP ASE,SAP® Sybase® IQ, or Replication Server, for example). If your interfaces or sql.inifile includes resources of more than one type, you must perform this procedure for eachresource type.
1. In the application menu, select View > Open > Resource Explorer.
2. In the Resource Explorer, select Resources > Import.The Import Resources wizard opens; Interfaces file is already selected.
3. Click Next.The Directory Service Connection page appears.
4. Click Browse and navigate to the interfaces file you want to import from.
You cannot type in the File name field.
5. Click Next.
6. On the Import Resource Type page, select the type of server you want to import.
7. On the Resource Selection page, click to select the servers you want to import.
Select only servers of the type you chose on the Import Resource Type page. If you importservers with incorrect types, SAP Control Center will not be able to monitor or managethem properly.
8. Resources of your chosen type may require connection parameters in addition to thosepresent in the file—RSSD host name and port for Replication Server, for example, orcharacter set and language for SAP ASE. Enter any required connection parameters.
9. Click Next.
10. (Optional) Click Add these resources to the current perspective. You must add aresource to a perspective (not necessarily the current perspective) before you can manageor monitor it.
11. Click Next.The Confirmation page displays a list of the resources you have selected.
12. Click Finish if you are ready to import, or click Back to return to the previous screens andchange your selections.When you click Finish, SCC imports and registers the resources and displays a summarypage.
13. Click Close to finish the wizard.
Configure
SAP Control Center for SAP Adaptive Server Enterprise 125
The newly imported resources appear in the Resource Explorer. If you elected to add them tothe current perspective, the resources also appear in the Perspective Resources view.
See also• Resources on page 188
• Unregistering a Resource on page 189
Registering the Agent for an SAP ASE ServerRegister the remote command and control agent.
Note: For SAP ASE versions 15.7 and earlier, the agent is the Unified Agent. For versions 15.7ESD #1 and later, the agent is the SCC agent. Follow the steps provided here to register eithertype of agent.
The agent is installed and set up as a component of the installation. See the SAP ASEinstallation guide for your platform.
To perform certain administrative tasks, such as starting the server or viewing the error log,you must register and authenticate the agent to use SCC.
For full administrative control, register an agent for each server you have configured. Theagent is configured on the same host as the server that it manages. When you register the agent,you are updating SCC with information about the machine and port number on which theagent is configured.
1. In the Perspective Resources view, select a resource, click the drop-down arrow thatappears next to the name, and select Administration Console.
2. Click ASE Servers.You see a list of monitored servers.
3. Select the server you want to manage and click the drop-down arrow that appears next tothe name.
4. Click Register Agent.You see the Server Properties screen.
5. Enter the port number for the agent and click Register.
Note: After the agent is registered, you can authenticate the agent, or clear the registration.
6. (Optional) Enter the login name and password for the agent, and click Authenticate.
The default login name for the agent is uafadmin. The default password depends on theversion of SAP ASE:
15.7 and earlier that use Unified Agent 2.0 – no password
15.7 ESD #1 – Sybase4me
Configure
126
15.7 ESD #2 and later – no default; password is set during installation
Authenticating a Login Account for a Managed ResourceSpecify the login account and password SAP Control Center will use when it connects to yourserver or agent to collect monitoring data or manage the resource.
Perform this task for each resource registered with SAP Control Center.
Note: You can also authenticate a server during administrative tasks like creating an alert or acollection job.
1. Connect a browser to SAP Control Center and log in.
2. If the Perspective Resources view is not open, click the Show/Hide PerspectiveResources View icon in the toolbar.
3. In the Perspective Resources view, select your resource and select Resource >Authenticate from the view menu.
4. Select Use my current SCC login or Specify different credentials.
Note: The Use my current SCC login option is not available in SCC for Replication.
5. If you chose Specify different credentials, enter the login and password for SAP ControlCenter to use to connect to your resource.
6. If the selected resource is a Replication Server, also enter the RSSD user name andpassword.
7. Click OK to save and exit the dialog.
See also• Setting Up Statistics Collection on page 128• Configuring SAP Adaptive Server Enterprise for Monitoring on page 122• Setting SAP ASE Parameters in the Configuration File on page 218• User Authorization on page 112
Role Assignment in SAP Control Center for SAP ASESAP Control Center automatically grants administrative or monitoring privileges for SAPASE.
Monitoring privileges are automatically assigned to users who have mon_role privileges onSAP ASE, which lets them perform monitoring tasks for that server.
Administration privileges are automatically assigned to users who have sa_role privileges onan SAP ASE, which lets them perform certain administrative tasks for that server.
SCC checks for role validation every 30 minutes. The Monitor option in the Resource menu ofthe Perspective Resources view cannot be selected until the resource is authenticated. If you
Configure
SAP Control Center for SAP Adaptive Server Enterprise 127
authenticate a resource without having mon_role privileges, SCC warns you that you cannotperform monitoring tasks or configure alerts on the server.
Note: If a role is revoked from outside of SCC, the change is not registered until the nextrole-check occurs. If a role is revoked from within SCC, the change is registered immediately.
See also• Logins, Roles, and Groups on page 118• Assigning a Role to a Login or a Group on page 113
Encrypted Authentication for SAP ASESCC uses encrypted passwords to connect to SAP ASE that are configured for networkpassword encryption.
If you have configured an SAP ASE server to use network password encryption by setting netpassword encryption reqd, SCC establishes a connection to the server using a password thatis encrypted during network transmission.
See System Administration Guide: Volume 1 > Setting Configuration Parameters.
Setting Up Statistics CollectionUse the Properties view of your managed resource to create a data collection job and add aschedule to the job.
Statistics gathering consumes system resources intensively; the more collection jobs you run,the greater the burden on your server. For best performance, Sybase recommends theseguidelines for scheduling data collection jobs:
• Schedule only one collection job for each collection.• Set the collection interval to 5 minutes or more. (The default is 5 minutes.)
Data collections for a managed resource do not run until the resource is authenticated.
1. In the Perspective Resources view, select a resource, click its drop-down arrow, and selectResource > Properties.
2. Select Collection Jobs.
3. Click Create Job.
4. If this resource has not yet been authenticated, you see the Authentication page. Enter auser name and password that SAP Control Center can use to log in to the resource. ClickAuthenticate to verify your credentials. Data collections can run only on an authenticatedresource.
5. On the Collection Information page, select the data collection that this job will run.
6. (Optional) If you do not want SCC to save data collected for this job in the repository,unselect Save data collected from this job.
Configure
128
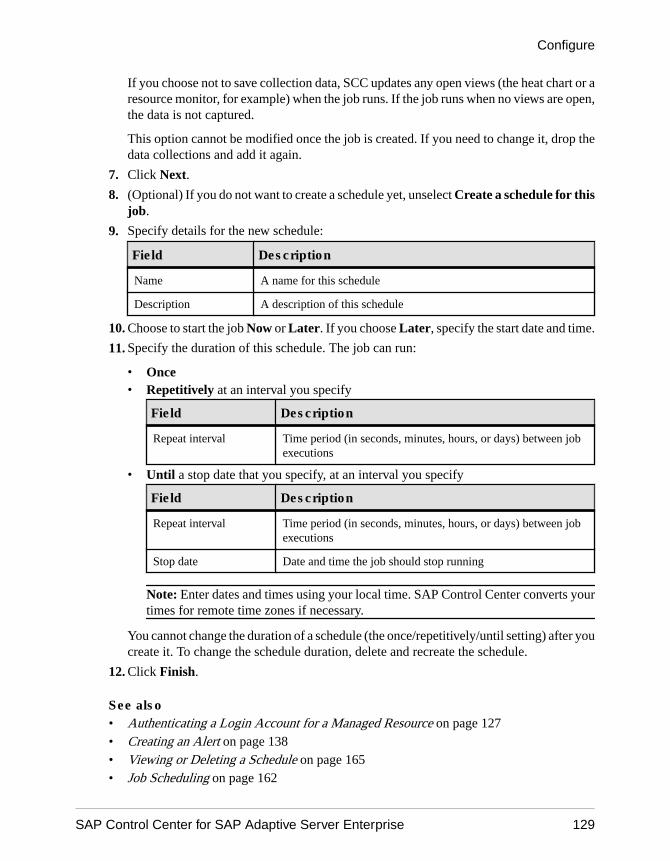
If you choose not to save collection data, SCC updates any open views (the heat chart or aresource monitor, for example) when the job runs. If the job runs when no views are open,the data is not captured.
This option cannot be modified once the job is created. If you need to change it, drop thedata collections and add it again.
7. Click Next.
8. (Optional) If you do not want to create a schedule yet, unselect Create a schedule for thisjob.
9. Specify details for the new schedule:
Field Description
Name A name for this schedule
Description A description of this schedule
10. Choose to start the job Now or Later. If you choose Later, specify the start date and time.
11. Specify the duration of this schedule. The job can run:
• Once• Repetitively at an interval you specify
Field Description
Repeat interval Time period (in seconds, minutes, hours, or days) between jobexecutions
• Until a stop date that you specify, at an interval you specify
Field Description
Repeat interval Time period (in seconds, minutes, hours, or days) between jobexecutions
Stop date Date and time the job should stop running
Note: Enter dates and times using your local time. SAP Control Center converts yourtimes for remote time zones if necessary.
You cannot change the duration of a schedule (the once/repetitively/until setting) after youcreate it. To change the schedule duration, delete and recreate the schedule.
12. Click Finish.
See also• Authenticating a Login Account for a Managed Resource on page 127• Creating an Alert on page 138• Viewing or Deleting a Schedule on page 165• Job Scheduling on page 162
Configure
SAP Control Center for SAP Adaptive Server Enterprise 129
About StatisticsUnderstand availability and performance statistics in SAP Control Center.
The statistics you work with in SAP Control Center can be divided into two types:
• Availability statistics are concerned with present conditions; they help you determinewhether a resource you are monitoring (a server or an agent, for example) is running andfunctioning properly.
• Performance statistics are concerned with behavior of the same resources over time. Theydescribe the flow of data through your environment. You can use performance statistics tospot trends, identify problems like resource bottlenecks, and make plans.
SAP Control Center includes predefined key performance indicators (KPIs) for each productmodule; these KPIs are grouped into collections. KPIs such as server status, which serves as anavailability statistic when it is fresh, have long-term value as historical performance statistics.
Availability statistics appear on the heat chart and on resource monitoring screens in eachproduct module.
Performance statistics appear on the statistics chart and on resource monitoring screens ineach product module.
Some KPIs are included in the default collection for each product module. To make other KPIsavailable to the heat chart, statistics chart, and resource monitoring views, you must set upcollection jobs in the scheduler. See the data collections help topic for information on datacollections and the KPIs contained in them.
Several configuration options affect the collection and display of data in SAP Control Center:
• Collection repeat interval—The frequency of data collection. Set this on the collection jobin the scheduler.
• Screen refresh interval—The period between screen refreshes. Refreshing the screenredraws it with the newest available data. Set the screen refresh interval in the productmodule. (May not be settable in all product modules.)
• Chart trend period—The period over which data is displayed in historical charts. Set thetrend period in the product module. (May not be settable in all product modules.)
SAP ASE Data CollectionsCollection of SAP ASE data may be scheduled through either a default data collection orpreconfigured statistics collections.
When an SAP ASE server is first authenticated, SCC schedules a default data collection calledcollection_ase_availability.
The user who first authenticates and monitors an SAP ASE resource owns its defaultcollection. You can begin to schedule a default collection in one of these ways:
Configure
130
• Authenticate a server after registering it. This is the default method of scheduling a defaultcollection.
• Create a scheduled job that is initiated when the SCC server starts.
You can set up jobs in the scheduler to collect preconfigured statistics collections using thecollections collection_ase_all_client_kpis, collection_ase_histmon,collection_ase_all_config_resources, or collection_ase_rat.
Listed below are the SAP ASE data collections and corresponding key performance indicators(KPIs).
collection_ase_availabilityThe default collection of data that is set up when a server is first authenticated. The data in thedefault collection is gathered in 60 second intervals.
Note: The default collection contains the same key performance indicators (KPIs) as thePerspective Heatchart, and therefore these KPIs need not be scheduled in additionalcollections.
The KPIs used in the default collection include:
Server Percent CPU Utilization Number of Suspended Processes
Number of Blocked Processes Server Availability State
collection_ase_all_client_kpisCollects the data for historical charts in the SAP ASE component, including those on theOverview, Devices, Engines, and Segments screens in the SAP Adaptive Server Enterprisemonitor. Schedule this collection to see real time charting for these resources.
The KPIs used in collection_ase_all_client_kpis include:
Active Connections in Cluster Instance Device IO Response Time
Device IO Rate in Cluster Instance Engine CPU Utilization
Engine CPU Utilization in Cluster Instance Segment Space Usage
CPU Busy Value for Logical Cluster Workload Server CPU Utilization
IO Load Value for Logical Cluster Workload Server Device IO Rate
Load Score for Logical Cluster Workload Cluster Temp DB IO Rate
Run Queue Length for Logical Cluster Workload Thread User CPU Utilization
Device APF Reads Thread System CPU Utilization
Device IO Rate Thread Total CPU Utilization
Configure
SAP Control Center for SAP Adaptive Server Enterprise 131
collection_ase_histmonCollects historical statistics for an SAP ASE server. These statistics are not displayed in theSAP Adaptive Server Enterprise monitor. To view these statistics, launch the 'Statistics Chart'window from the context menu. Schedule this collection to activate alerts and view them in astatistics chart.
The KPIs used in collection_ase_histmon include:
Workload Load Score in Cluster Instance Number of Bytes Received in Network IO
Number of Bytes Received in Cluster Instance Number of Bytes Sent in Network IO
Number of Bytes Sent in Cluster Instance Number of Deadlocks
Number of CIPC Messages Received in ClusterInstance
Number of Locks
Number of CIPC Messages Sent in Cluster In-stance
Number of Packets Received in Network IO
Number of Committed Transactions in ClusterInstance
Number of Packets Sent in Network IO
Number of Packets Received in Cluster Instance Number of Page Locks
Number of Packets Sent in Cluster Instance Number of Row Locks
Cache Hit Ratio Number of Table Locks
Number of Cache Misses Number of Transactions
Number of Cache Searches Number of User Connections
Device Free Space Procedure Cache Hit Ratio
Device Space Usage Server Device IO Rate
Active Connections in Logical Cluster sp_who Response Time
Number of Failover Instances in Logical Cluster Statement Cache Hit Ratio
Segment Free Space Server tempdb Free Space
Average Blocked Process Wait Time Server tempdb Space Used
Number of Address Locks
collection_ase_all_config_resources
Schedule this collection to configure alerts and be automatically notified when the utilizationof any of the resources reaches a level that may require attention.
Configure
132
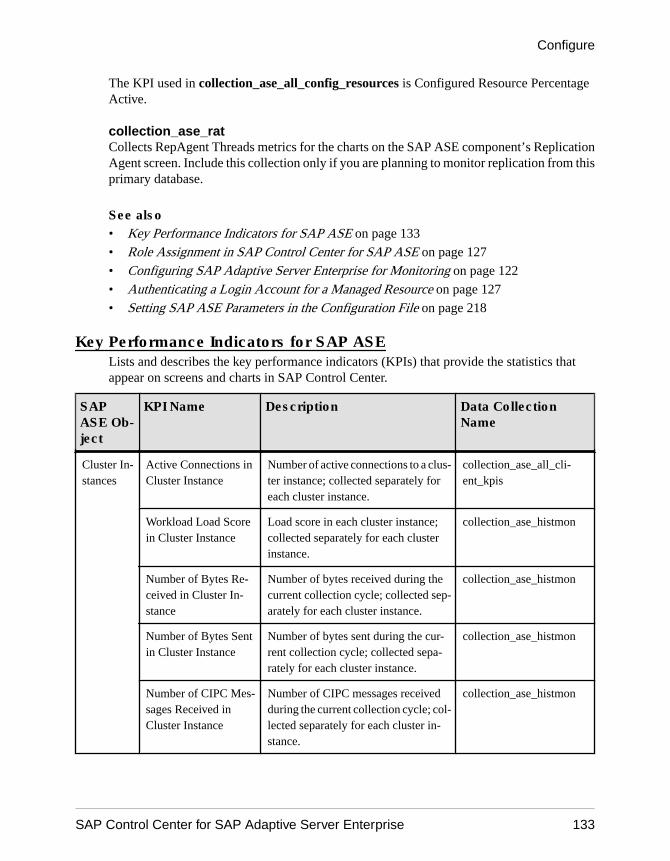
The KPI used in collection_ase_all_config_resources is Configured Resource PercentageActive.
collection_ase_ratCollects RepAgent Threads metrics for the charts on the SAP ASE component’s ReplicationAgent screen. Include this collection only if you are planning to monitor replication from thisprimary database.
See also• Key Performance Indicators for SAP ASE on page 133
• Role Assignment in SAP Control Center for SAP ASE on page 127
• Configuring SAP Adaptive Server Enterprise for Monitoring on page 122
• Authenticating a Login Account for a Managed Resource on page 127
• Setting SAP ASE Parameters in the Configuration File on page 218
Key Performance Indicators for SAP ASELists and describes the key performance indicators (KPIs) that provide the statistics thatappear on screens and charts in SAP Control Center.
SAPASE Ob-ject
KPI Name Description Data CollectionName
Cluster In-stances
Active Connections inCluster Instance
Number of active connections to a clus-ter instance; collected separately foreach cluster instance.
collection_ase_all_cli-ent_kpis
Workload Load Scorein Cluster Instance
Load score in each cluster instance;collected separately for each clusterinstance.
collection_ase_histmon
Number of Bytes Re-ceived in Cluster In-stance
Number of bytes received during thecurrent collection cycle; collected sep-arately for each cluster instance.
collection_ase_histmon
Number of Bytes Sentin Cluster Instance
Number of bytes sent during the cur-rent collection cycle; collected sepa-rately for each cluster instance.
collection_ase_histmon
Number of CIPC Mes-sages Received inCluster Instance
Number of CIPC messages receivedduring the current collection cycle; col-lected separately for each cluster in-stance.
collection_ase_histmon
Configure
SAP Control Center for SAP Adaptive Server Enterprise 133
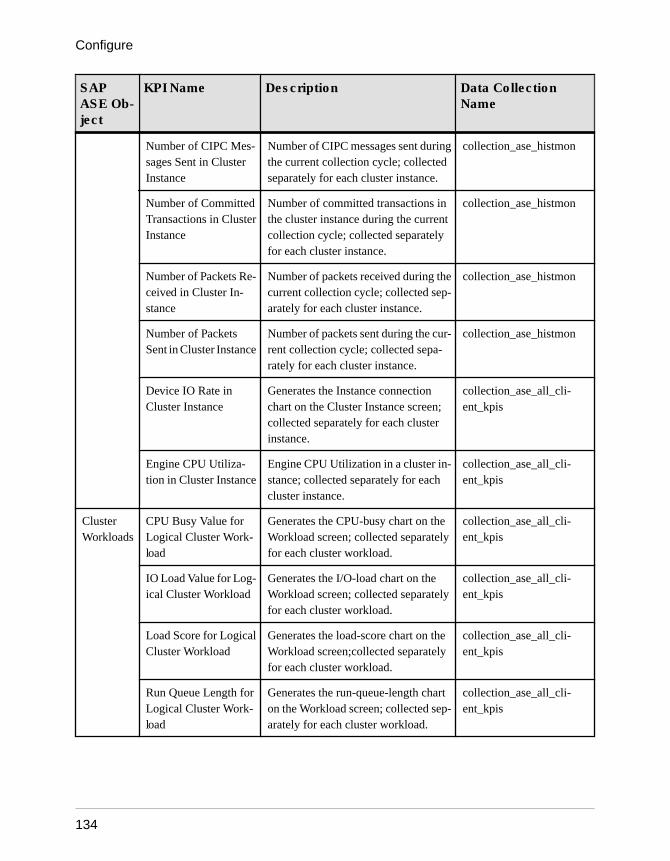
SAPASE Ob-ject
KPI Name Description Data CollectionName
Number of CIPC Mes-sages Sent in ClusterInstance
Number of CIPC messages sent duringthe current collection cycle; collectedseparately for each cluster instance.
collection_ase_histmon
Number of CommittedTransactions in ClusterInstance
Number of committed transactions inthe cluster instance during the currentcollection cycle; collected separatelyfor each cluster instance.
collection_ase_histmon
Number of Packets Re-ceived in Cluster In-stance
Number of packets received during thecurrent collection cycle; collected sep-arately for each cluster instance.
collection_ase_histmon
Number of PacketsSent in Cluster Instance
Number of packets sent during the cur-rent collection cycle; collected sepa-rately for each cluster instance.
collection_ase_histmon
Device IO Rate inCluster Instance
Generates the Instance connectionchart on the Cluster Instance screen;collected separately for each clusterinstance.
collection_ase_all_cli-ent_kpis
Engine CPU Utiliza-tion in Cluster Instance
Engine CPU Utilization in a cluster in-stance; collected separately for eachcluster instance.
collection_ase_all_cli-ent_kpis
ClusterWorkloads
CPU Busy Value forLogical Cluster Work-load
Generates the CPU-busy chart on theWorkload screen; collected separatelyfor each cluster workload.
collection_ase_all_cli-ent_kpis
IO Load Value for Log-ical Cluster Workload
Generates the I/O-load chart on theWorkload screen; collected separatelyfor each cluster workload.
collection_ase_all_cli-ent_kpis
Load Score for LogicalCluster Workload
Generates the load-score chart on theWorkload screen;collected separatelyfor each cluster workload.
collection_ase_all_cli-ent_kpis
Run Queue Length forLogical Cluster Work-load
Generates the run-queue-length charton the Workload screen; collected sep-arately for each cluster workload.
collection_ase_all_cli-ent_kpis
Configure
134
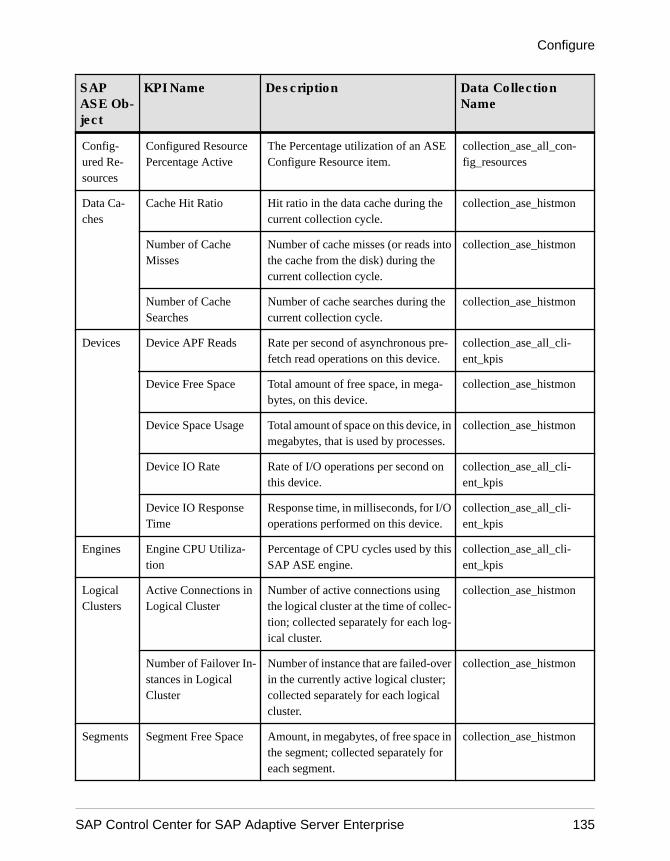
SAPASE Ob-ject
KPI Name Description Data CollectionName
Config-ured Re-sources
Configured ResourcePercentage Active
The Percentage utilization of an ASEConfigure Resource item.
collection_ase_all_con-fig_resources
Data Ca-ches
Cache Hit Ratio Hit ratio in the data cache during thecurrent collection cycle.
collection_ase_histmon
Number of CacheMisses
Number of cache misses (or reads intothe cache from the disk) during thecurrent collection cycle.
collection_ase_histmon
Number of CacheSearches
Number of cache searches during thecurrent collection cycle.
collection_ase_histmon
Devices Device APF Reads Rate per second of asynchronous pre-fetch read operations on this device.
collection_ase_all_cli-ent_kpis
Device Free Space Total amount of free space, in mega-bytes, on this device.
collection_ase_histmon
Device Space Usage Total amount of space on this device, inmegabytes, that is used by processes.
collection_ase_histmon
Device IO Rate Rate of I/O operations per second onthis device.
collection_ase_all_cli-ent_kpis
Device IO ResponseTime
Response time, in milliseconds, for I/Ooperations performed on this device.
collection_ase_all_cli-ent_kpis
Engines Engine CPU Utiliza-tion
Percentage of CPU cycles used by thisSAP ASE engine.
collection_ase_all_cli-ent_kpis
LogicalClusters
Active Connections inLogical Cluster
Number of active connections usingthe logical cluster at the time of collec-tion; collected separately for each log-ical cluster.
collection_ase_histmon
Number of Failover In-stances in LogicalCluster
Number of instance that are failed-overin the currently active logical cluster;collected separately for each logicalcluster.
collection_ase_histmon
Segments Segment Free Space Amount, in megabytes, of free space inthe segment; collected separately foreach segment.
collection_ase_histmon
Configure
SAP Control Center for SAP Adaptive Server Enterprise 135

SAPASE Ob-ject
KPI Name Description Data CollectionName
Segment Space Usage Change, in megabytes, in the amount ofspace used by this segment since thelast refresh.
collection_ase_all_cli-ent_kpis
Server Average Blocked Proc-ess Wait Time
Average time, in milliseconds, that thecurrent blocked processes have waited.
collection_ase_histmon
Long Running Trans-action Execution Time
Generates alerts for longest runningSAP ASE transactions.
collection_ase_histmon
Number of AddressLocks
Number of address-level locks server-wide.
collection_ase_histmon
Number of BlockedProcesses
Number of currently blocked processesthat have been blocked for more than 5seconds. The heat chart uses this metricto display server status.
collection_ase_availabili-ty
Number of Bytes Re-ceived in Network IO
Number of bytes received during thecurrent collection cycle.
collection_ase_histmon
Number of Bytes Sentin Network IO
Number of bytes sent during the cur-rent collection cycle.
collection_ase_histmon
Number of CriticalFlags Last Collection
Number of critical flags received dur-ing the collection cycle.
collection_ase_histmon
Number of Deadlocks Number of deadlocks on the serversince the most recent execution of thecollection.
collection_ase_histmon
Number of Error Flags Number of error flags received duringthe collection cycle.
collection_ase_histmon
Number of InformationFlags
Number of information flags receivedduring the collection cycle.
collection_ase_histmon
Number of Locks Total number of active locks of alltypes on the server.
collection_ase_histmon
Number of Packets Re-ceived in Network IO
Number of packets received during thecurrent collection cycle.
collection_ase_histmon
Number of PacketsSent in Network IO
Number of packets sent during the cur-rent collection cycle.
collection_ase_histmon
Configure
136
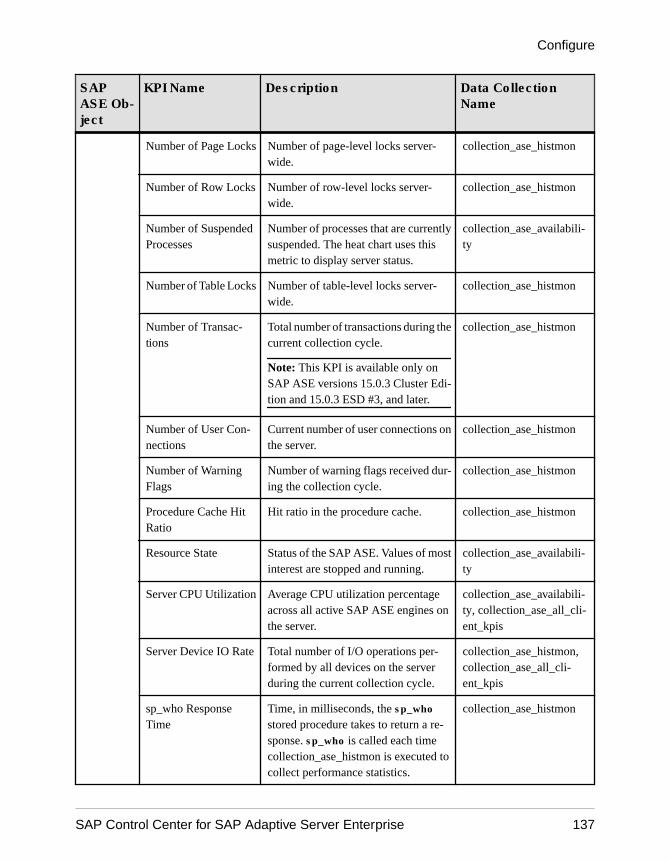
SAPASE Ob-ject
KPI Name Description Data CollectionName
Number of Page Locks Number of page-level locks server-wide.
collection_ase_histmon
Number of Row Locks Number of row-level locks server-wide.
collection_ase_histmon
Number of SuspendedProcesses
Number of processes that are currentlysuspended. The heat chart uses thismetric to display server status.
collection_ase_availabili-ty
Number of Table Locks Number of table-level locks server-wide.
collection_ase_histmon
Number of Transac-tions
Total number of transactions during thecurrent collection cycle.
Note: This KPI is available only onSAP ASE versions 15.0.3 Cluster Edi-tion and 15.0.3 ESD #3, and later.
collection_ase_histmon
Number of User Con-nections
Current number of user connections onthe server.
collection_ase_histmon
Number of WarningFlags
Number of warning flags received dur-ing the collection cycle.
collection_ase_histmon
Procedure Cache HitRatio
Hit ratio in the procedure cache. collection_ase_histmon
Resource State Status of the SAP ASE. Values of mostinterest are stopped and running.
collection_ase_availabili-ty
Server CPU Utilization Average CPU utilization percentageacross all active SAP ASE engines onthe server.
collection_ase_availabili-ty, collection_ase_all_cli-ent_kpis
Server Device IO Rate Total number of I/O operations per-formed by all devices on the serverduring the current collection cycle.
collection_ase_histmon,collection_ase_all_cli-ent_kpis
sp_who ResponseTime
Time, in milliseconds, the sp_who
stored procedure takes to return a re-sponse. sp_who is called each timecollection_ase_histmon is executed tocollect performance statistics.
collection_ase_histmon
Configure
SAP Control Center for SAP Adaptive Server Enterprise 137
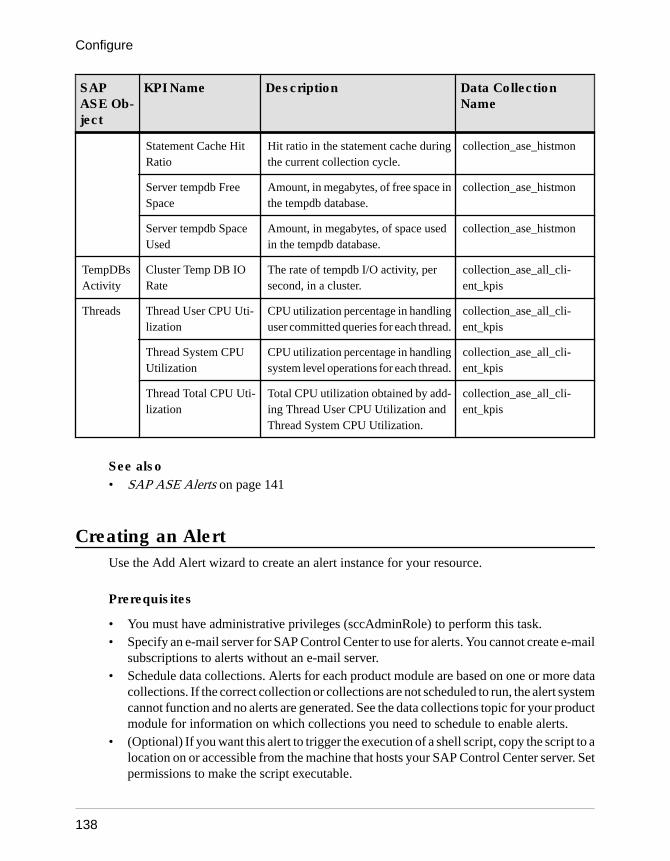
SAPASE Ob-ject
KPI Name Description Data CollectionName
Statement Cache HitRatio
Hit ratio in the statement cache duringthe current collection cycle.
collection_ase_histmon
Server tempdb FreeSpace
Amount, in megabytes, of free space inthe tempdb database.
collection_ase_histmon
Server tempdb SpaceUsed
Amount, in megabytes, of space usedin the tempdb database.
collection_ase_histmon
TempDBsActivity
Cluster Temp DB IORate
The rate of tempdb I/O activity, persecond, in a cluster.
collection_ase_all_cli-ent_kpis
Threads Thread User CPU Uti-lization
CPU utilization percentage in handlinguser committed queries for each thread.
collection_ase_all_cli-ent_kpis
Thread System CPUUtilization
CPU utilization percentage in handlingsystem level operations for each thread.
collection_ase_all_cli-ent_kpis
Thread Total CPU Uti-lization
Total CPU utilization obtained by add-ing Thread User CPU Utilization andThread System CPU Utilization.
collection_ase_all_cli-ent_kpis
See also• SAP ASE Alerts on page 141
Creating an AlertUse the Add Alert wizard to create an alert instance for your resource.
Prerequisites
• You must have administrative privileges (sccAdminRole) to perform this task.• Specify an e-mail server for SAP Control Center to use for alerts. You cannot create e-mail
subscriptions to alerts without an e-mail server.• Schedule data collections. Alerts for each product module are based on one or more data
collections. If the correct collection or collections are not scheduled to run, the alert systemcannot function and no alerts are generated. See the data collections topic for your productmodule for information on which collections you need to schedule to enable alerts.
• (Optional) If you want this alert to trigger the execution of a shell script, copy the script to alocation on or accessible from the machine that hosts your SAP Control Center server. Setpermissions to make the script executable.
Configure
138
Warning! Use caution in writing scripts. A poorly designed script can cause a blockingsituation, creating a deadlock in your SAP Control Center server.
Task
1. In the Perspective Resources view, click the server or other resource and select Resource >Properties in the view’s menu bar.
2. Select Alerts in the left pane and click Add.The Add Alert wizard opens. If the selected resource supports child alerts, the wizardopens to the Resource page. If the resource does not support child alerts, the wizard opensto the Type page—in that case, skip to step 5.
3. On the Resource page of the wizard, select the object on which to set the alert. Expand thefolder representing the server or agent to select lower-level child objects.
4. Click Next.
5. On the Type page, select the alert type and click Next.
For this step and the next one, see the topic on key performance indicators for informationon what this alert monitors and how it is triggered. (Each alert is based on a KPI.)
6. Based on the type of alert you selected, do one of the following:
• For a state-based alert – select a severity level for each alert state.
Note: You can associate only one severity level with each state.
• For a threshold-based alert – review and if necessary adjust the range of values thatdefines each severity.
7. Click Next.
8. (Optional) Enter the storm suppression period. Storm suppression blocks redundant alertnotifications and script executions resulting from the same condition for the specifiedperiod of time. Enter this value in seconds, minutes, or hours and click Next.
9. (Optional) To configure this alert to trigger the execution of a script:
a) Alert Severity specifies the severity level that triggers the script. Select Critical,Warning, or both.
Critical is typically more serious than Warning.b) Browse to the location of the script.
Note: In UNIX, make sure the script is executable. You cannot select a script unless ithas execute permission.
c) If the script requires parameter values, click Select Parameters to enter them in theExecution Parameters box.
You can include a number of predefined substitution parameters, which are replaced byvalues from the alert. The parameter values are passed on the command line to thescript. See the example and the substitution parameters topic (linked below) for moreinformation.
Configure
SAP Control Center for SAP Adaptive Server Enterprise 139
Note: When you test a script, SAP Control Center supplies test values for the%Severity% and %Source_Application% parameters (“Testing” and“TestScriptExecution,” respectively). Any test values you supply for these parametersare discarded. This prevents the test results from being confused with real script resultsafter testing and in the SCC repository.
d) (Optional) Click Test to perform a test execution of your script.If your script takes parameters, the test may fail if parameter values are missing orincorrect.
e) Click Next.If the selected resource has sibling resources (databases or devices of the same type, forexample) that support this alert type, you see the Duplicates page. If the selected resourcehas no identical siblings, you see the Subscription page.
10. (Optional) On the Duplicates page, select any resources that should use this alert definitionas a template for their own alerts. Click the box at the top of the list to select all theresources listed. Then click Next.This step saves time when you need to configure similar alerts for several resources of thesame type.
11. (Optional) On the Subscription page, specify e-mail addresses if you want this alert toissue e-mail notifications when it fires.
The e-mail addresses default to the address in your user profile, but you can override thedefaults.
For both critical and warning alerts:
Table 15. Alert subscription details
Option Description
E-mail To send an e-mail notification when this alert fires, click the E-mailMessage box and enter the e-mail address of one user or list.
Escalation E-mail To escalate this alert (by sending another e-mail notification if this alerthas not been responded to after a specified period of time), click theEscalation E-mail box and enter the e-mail address of one user or list.You cannot enter an escalation address unless you enter an address forprimary notification first.
Time Period Specify how long to wait, following the initial alert notification, beforeSAP Control Center sends an e-mail notification to the escalation ad-dress. (The same notification is sent again to the original notificationaddress.) Select a time unit (hours, minutes, or seconds) and enter anumber.
12. Click Finish.If you are creating duplicate or child alerts, the Cancel button is activated; click it tointerrupt the creation of further alerts. (The primary alert, at a minimum, is always created
Configure
140
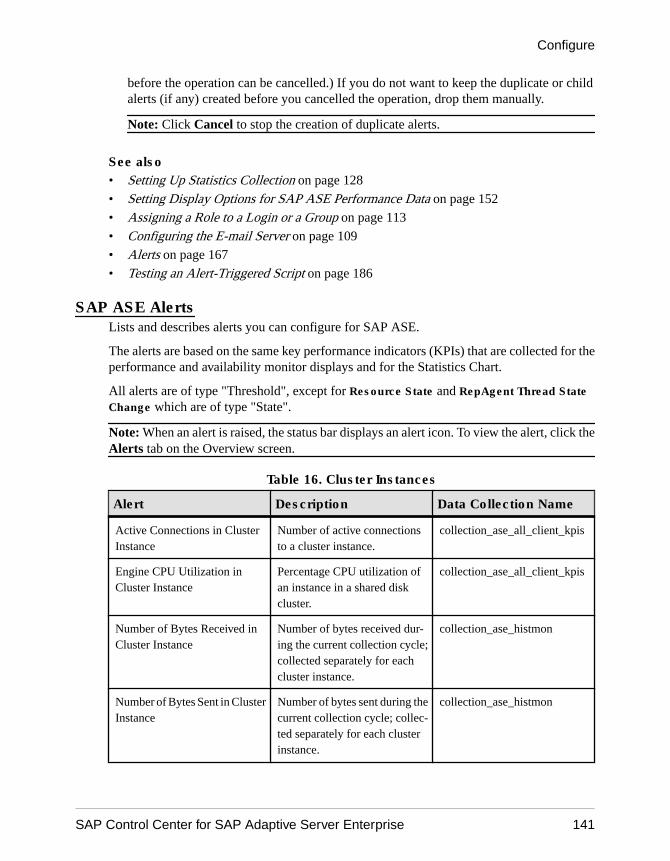
before the operation can be cancelled.) If you do not want to keep the duplicate or childalerts (if any) created before you cancelled the operation, drop them manually.
Note: Click Cancel to stop the creation of duplicate alerts.
See also• Setting Up Statistics Collection on page 128
• Setting Display Options for SAP ASE Performance Data on page 152
• Assigning a Role to a Login or a Group on page 113
• Configuring the E-mail Server on page 109
• Alerts on page 167
• Testing an Alert-Triggered Script on page 186
SAP ASE AlertsLists and describes alerts you can configure for SAP ASE.
The alerts are based on the same key performance indicators (KPIs) that are collected for theperformance and availability monitor displays and for the Statistics Chart.
All alerts are of type "Threshold", except for Resource State and RepAgent Thread StateChange which are of type "State".
Note: When an alert is raised, the status bar displays an alert icon. To view the alert, click theAlerts tab on the Overview screen.
Table 16. Cluster Instances
Alert Description Data Collection Name
Active Connections in ClusterInstance
Number of active connectionsto a cluster instance.
collection_ase_all_client_kpis
Engine CPU Utilization inCluster Instance
Percentage CPU utilization ofan instance in a shared diskcluster.
collection_ase_all_client_kpis
Number of Bytes Received inCluster Instance
Number of bytes received dur-ing the current collection cycle;collected separately for eachcluster instance.
collection_ase_histmon
Number of Bytes Sent in ClusterInstance
Number of bytes sent during thecurrent collection cycle; collec-ted separately for each clusterinstance.
collection_ase_histmon
Configure
SAP Control Center for SAP Adaptive Server Enterprise 141
Alert Description Data Collection Name
Number of CIPC Messages Re-ceived in Cluster Instance
Number of messages receivedduring the current collection cy-cle; collected separately foreach cluster instance.
collection_ase_histmon
Number of CIPC MessagesSent in Cluster Instance
Number of messages sent dur-ing the current collection cycle;collected separately for eachcluster instance.
collection_ase_histmon
Number of Packets Received inCluster Instance
Number of packets receivedduring the current collection cy-cle; collected separately foreach cluster instance.
collection_ase_histmon
Number of Packets Sent inCluster Instance
Number of packets sent duringthe current collection cycle; col-lected separately for each clus-ter instance.
collection_ase_histmon
Number of Committed Transac-tions in Cluster Instance
Number of committed transac-tions in the cluster instance dur-ing the current collection cycle;collected separately for eachcluster instance.
collection_ase_histmon
Workload Load Score in ClusterInstance
Load score in each cluster in-stance; collected separately foreach cluster instance.
collection_ase_histmon
Table 17. Cluster Workload
Alert Description Data Collection Name
CPU Busy Value for LogicalCluster Workload
Generates the CPU-busy charton the Workload screen; collec-ted separately for each clusterworkload.
collection_ase_all_client_kpis
IO Load Value for Logical Clus-ter Workload
Generates the I/O-load chart onthe Workload screen; collectedseparately for each clusterworkload.
collection_ase_all_client_kpis
Configure
142
Alert Description Data Collection Name
Load Score for Logical ClusterWorkload
Generates the load-score charton the Workload screen;collec-ted separately for each clusterworkload.
collection_ase_all_client_kpis
Run Queue Length for LogicalCluster Workload
Generates the run-queue-lengthchart on the Workload screen;collected separately for eachcluster workload.
collection_ase_all_client_kpis
Table 18. Data Caches
Alert Description Data Collection Name
Cache Hit Ratio Hit ratio in the data cache duringthe current collection cycle.
collection_ase_histmon
Table 19. Devices
Alert Description Data Collection Name
Device Free Space Total amount of free space, inmegabytes, on this device.
collection_ase_all_client_kpis
Device IO Rate Rate of I/O operations per sec-ond on this device.
collection_ase_all_client_kpis
Device IO Response Time Response time, in milliseconds,for I/O operations performed onthis device.
collection_ase_all_client_kpis
Table 20. Engines
Alert Description Data Collection Name
Engine CPU Utilization Percentage of CPU cycles usedby this SAP ASE engine.
collection_ase_all_client_kpis
Configure
SAP Control Center for SAP Adaptive Server Enterprise 143
Table 21. Logical Clusters
Alert Description Data Collection Name
Active Connections in LogicalCluster
Number of active connectionsusing the logical cluster at thetime of collection; collectedseparately for each logical clus-ter.
collection_ase_histmon
Number of Failover Instances inLogical Cluster
Number of instance that arefailed-over in the currently ac-tive logical cluster; collectedseparately for each logical clus-ter.
collection_ase_histmon
Table 22. Replication Agent
Alert Description Data Collection Name
RepAgent Thread State Change The alert to send when a Rep-Agent thread changes state.
collection_ase_rat
Transaction Log Size The size of a RepAgent thread'stransaction log.
collection_ase_rat
Number of Log OperationsScanned per Second
The number of operations scan-ned by a RepAgent thread.
collection_ase_rat
Number of Log Operations Pro-cessed per Second
The number of operations pro-cessed by a RepAgent thread.
collection_ase_rat
Table 23. Resources
Alert Description Data Collection Name
ASE Configured Resource Uti-lization
Percentage utilization of anASE Configured Resourceitem.
collection_ase_all_config_re-sources
Table 24. Segments
Alert Description Data Collection Name
Segment Free Space Amount of free space in the seg-ment; collected separately foreach segment.
collection_ase_histmon
Configure
144
Table 25. Server
Alert Description Data Collection Name
Average Blocked Process WaitTime
Average time, in milliseconds,that the current blocked pro-cesses have waited.
collection_ase_histmon
Long Running Transaction Ex-ecution Time
Execution time of longest run-ning transaction
collection_ase_histmon
Number of Address Locks Number of address-level locksserver-wide.
collection_ase_histmon
Number of Blocked Processes Number of currently blockedprocesses that have beenblocked for more than 5 sec-onds. The heat chart uses thismetric to display server status.
collection_ase_availability
Number of Bytes Received inNetwork IO
Number of bytes received dur-ing the current collection cycle.
collection_ase_histmon
Number of Bytes Sent in Net-work IO
Number of bytes sent during thecurrent collection cycle.
collection_ase_histmon
Number of Critical Flags LastCollection
Number of critical flags re-ceived during the collection cy-cle.
collection_ase_histmon
Number of Deadlocks Number of deadlocks on theserver since the most recent ex-ecution of the collection.
collection_ase_histmon
Number of Error Flags Number of error flags receivedduring the collection cycle.
collection_ase_histmon
Number of Information Flags Number of information flags re-ceived during the collection cy-cle.
collection_ase_histmon
Number of Locks Total number of active locks ofall types on the server.
collection_ase_histmon
Number of Packets received inNetwork IO
Number of packets receivedduring the current collection cy-cle.
collection_ase_histmon
Number of Packets sent in Net-work IO
Number of packets sent duringthe current collection cycle.
collection_ase_histmon
Configure
SAP Control Center for SAP Adaptive Server Enterprise 145
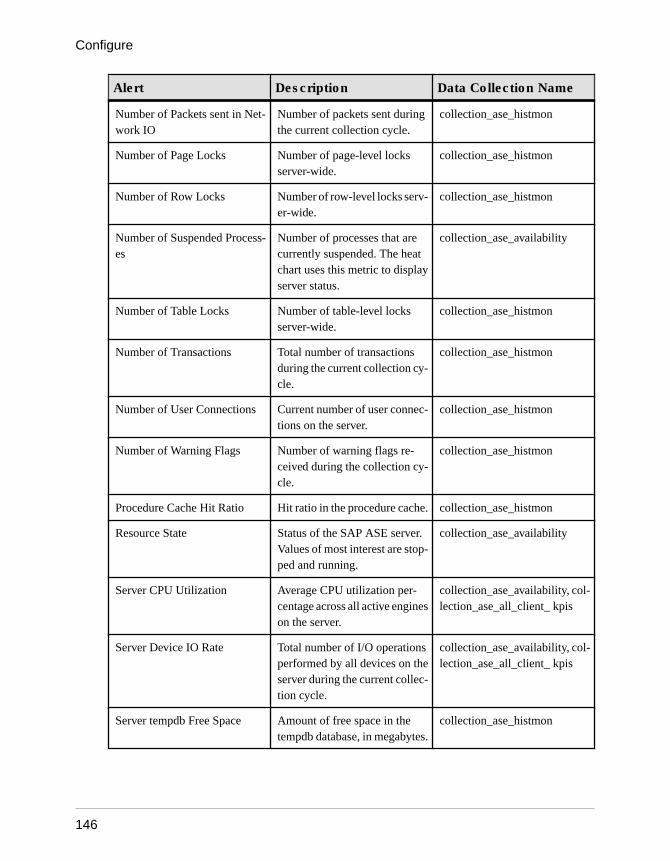
Alert Description Data Collection Name
Number of Packets sent in Net-work IO
Number of packets sent duringthe current collection cycle.
collection_ase_histmon
Number of Page Locks Number of page-level locksserver-wide.
collection_ase_histmon
Number of Row Locks Number of row-level locks serv-er-wide.
collection_ase_histmon
Number of Suspended Process-es
Number of processes that arecurrently suspended. The heatchart uses this metric to displayserver status.
collection_ase_availability
Number of Table Locks Number of table-level locksserver-wide.
collection_ase_histmon
Number of Transactions Total number of transactionsduring the current collection cy-cle.
collection_ase_histmon
Number of User Connections Current number of user connec-tions on the server.
collection_ase_histmon
Number of Warning Flags Number of warning flags re-ceived during the collection cy-cle.
collection_ase_histmon
Procedure Cache Hit Ratio Hit ratio in the procedure cache. collection_ase_histmon
Resource State Status of the SAP ASE server.Values of most interest are stop-ped and running.
collection_ase_availability
Server CPU Utilization Average CPU utilization per-centage across all active engineson the server.
collection_ase_availability, col-lection_ase_all_client_ kpis
Server Device IO Rate Total number of I/O operationsperformed by all devices on theserver during the current collec-tion cycle.
collection_ase_availability, col-lection_ase_all_client_ kpis
Server tempdb Free Space Amount of free space in thetempdb database, in megabytes.
collection_ase_histmon
Configure
146
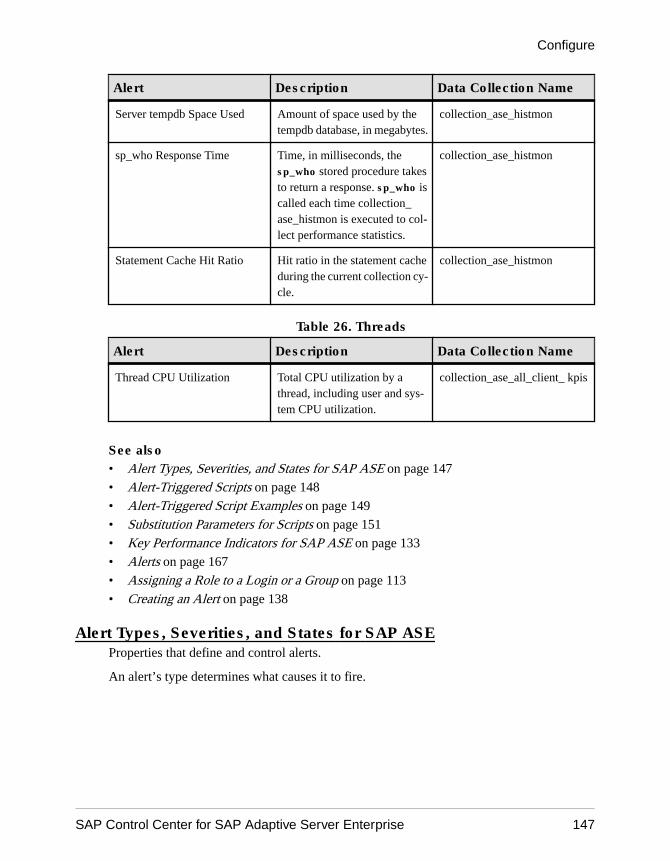
Alert Description Data Collection Name
Server tempdb Space Used Amount of space used by thetempdb database, in megabytes.
collection_ase_histmon
sp_who Response Time Time, in milliseconds, thesp_who stored procedure takesto return a response. sp_who iscalled each time collection_ase_histmon is executed to col-lect performance statistics.
collection_ase_histmon
Statement Cache Hit Ratio Hit ratio in the statement cacheduring the current collection cy-cle.
collection_ase_histmon
Table 26. Threads
Alert Description Data Collection Name
Thread CPU Utilization Total CPU utilization by athread, including user and sys-tem CPU utilization.
collection_ase_all_client_ kpis
See also• Alert Types, Severities, and States for SAP ASE on page 147
• Alert-Triggered Scripts on page 148
• Alert-Triggered Script Examples on page 149
• Substitution Parameters for Scripts on page 151
• Key Performance Indicators for SAP ASE on page 133
• Alerts on page 167
• Assigning a Role to a Login or a Group on page 113
• Creating an Alert on page 138
Alert Types, Severities, and States for SAP ASEProperties that define and control alerts.
An alert’s type determines what causes it to fire.
Configure
SAP Control Center for SAP Adaptive Server Enterprise 147
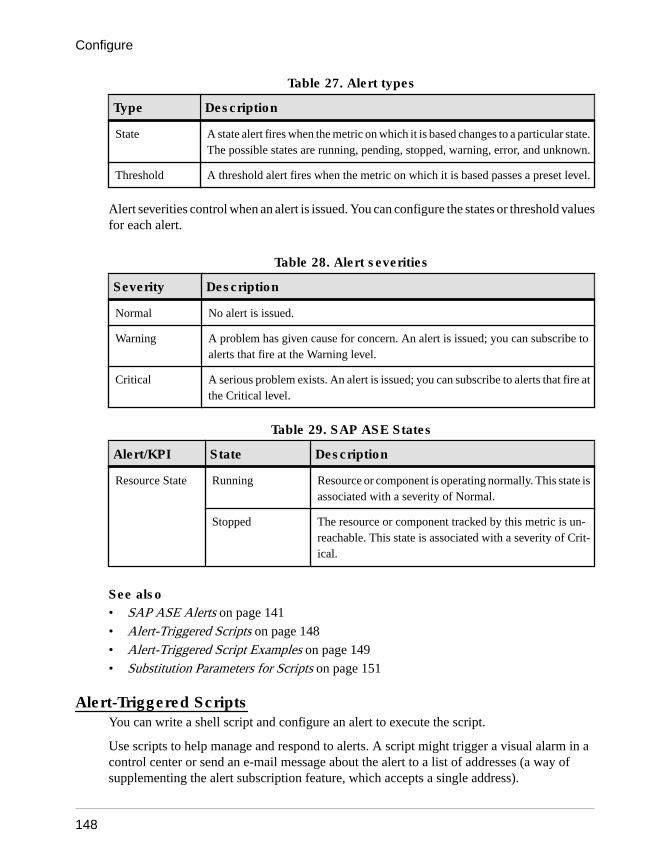
Table 27. Alert types
Type Description
State A state alert fires when the metric on which it is based changes to a particular state.The possible states are running, pending, stopped, warning, error, and unknown.
Threshold A threshold alert fires when the metric on which it is based passes a preset level.
Alert severities control when an alert is issued. You can configure the states or threshold valuesfor each alert.
Table 28. Alert severities
Severity Description
Normal No alert is issued.
Warning A problem has given cause for concern. An alert is issued; you can subscribe toalerts that fire at the Warning level.
Critical A serious problem exists. An alert is issued; you can subscribe to alerts that fire atthe Critical level.
Table 29. SAP ASE States
Alert/KPI State Description
Resource State Running Resource or component is operating normally. This state isassociated with a severity of Normal.
Stopped The resource or component tracked by this metric is un-reachable. This state is associated with a severity of Crit-ical.
See also• SAP ASE Alerts on page 141
• Alert-Triggered Scripts on page 148
• Alert-Triggered Script Examples on page 149
• Substitution Parameters for Scripts on page 151
Alert-Triggered ScriptsYou can write a shell script and configure an alert to execute the script.
Use scripts to help manage and respond to alerts. A script might trigger a visual alarm in acontrol center or send an e-mail message about the alert to a list of addresses (a way ofsupplementing the alert subscription feature, which accepts a single address).
Configure
148
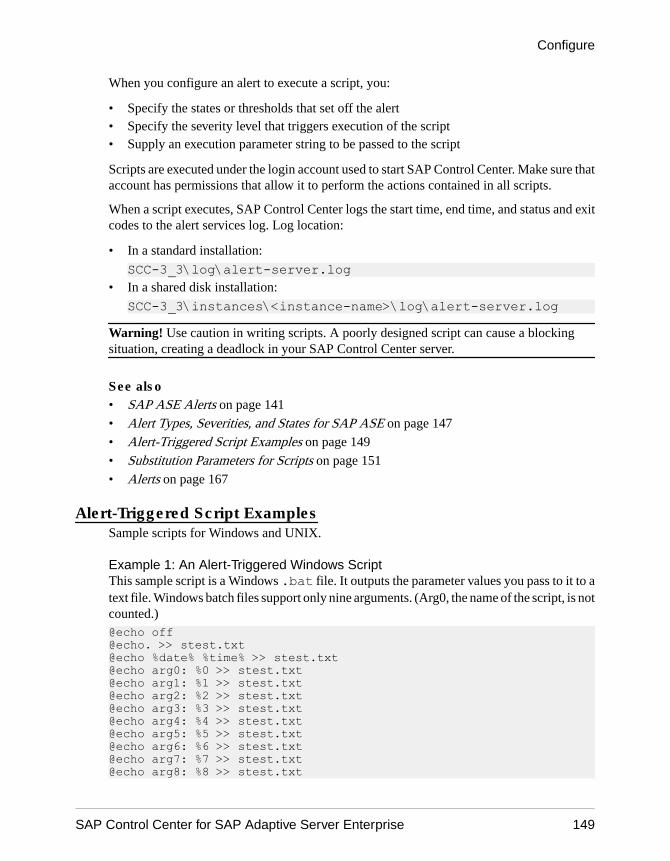
When you configure an alert to execute a script, you:
• Specify the states or thresholds that set off the alert• Specify the severity level that triggers execution of the script• Supply an execution parameter string to be passed to the script
Scripts are executed under the login account used to start SAP Control Center. Make sure thataccount has permissions that allow it to perform the actions contained in all scripts.
When a script executes, SAP Control Center logs the start time, end time, and status and exitcodes to the alert services log. Log location:
• In a standard installation:
SCC-3_3\log\alert-server.log• In a shared disk installation:
SCC-3_3\instances\<instance-name>\log\alert-server.logWarning! Use caution in writing scripts. A poorly designed script can cause a blockingsituation, creating a deadlock in your SAP Control Center server.
See also• SAP ASE Alerts on page 141
• Alert Types, Severities, and States for SAP ASE on page 147
• Alert-Triggered Script Examples on page 149
• Substitution Parameters for Scripts on page 151
• Alerts on page 167
Alert-Triggered Script ExamplesSample scripts for Windows and UNIX.
Example 1: An Alert-Triggered Windows ScriptThis sample script is a Windows .bat file. It outputs the parameter values you pass to it to atext file. Windows batch files support only nine arguments. (Arg0, the name of the script, is notcounted.)@echo off@echo. >> stest.txt@echo %date% %time% >> stest.txt@echo arg0: %0 >> stest.txt@echo arg1: %1 >> stest.txt@echo arg2: %2 >> stest.txt@echo arg3: %3 >> stest.txt@echo arg4: %4 >> stest.txt@echo arg5: %5 >> stest.txt@echo arg6: %6 >> stest.txt@echo arg7: %7 >> stest.txt@echo arg8: %8 >> stest.txt
Configure
SAP Control Center for SAP Adaptive Server Enterprise 149
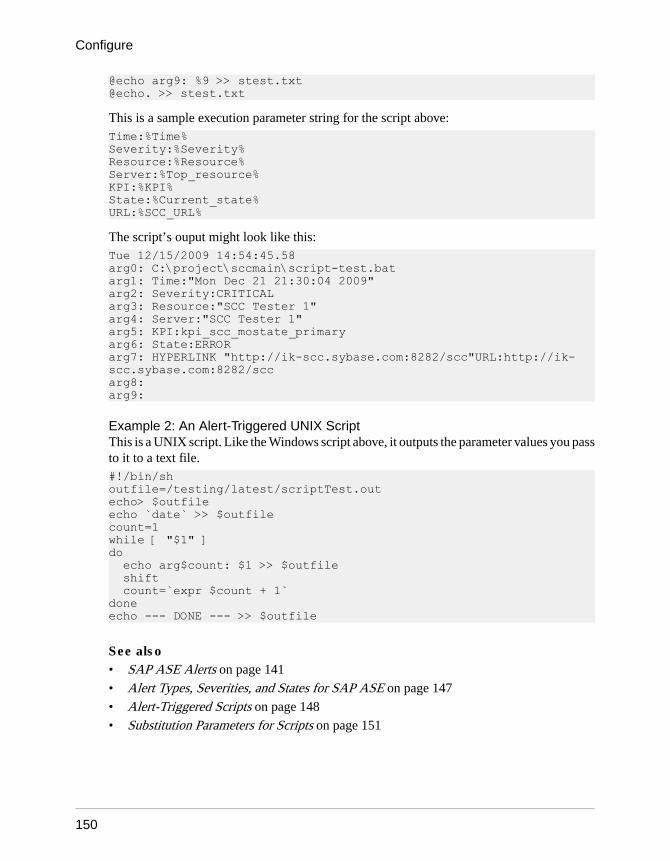
@echo arg9: %9 >> stest.txt@echo. >> stest.txt
This is a sample execution parameter string for the script above:Time:%Time% Severity:%Severity% Resource:%Resource% Server:%Top_resource% KPI:%KPI% State:%Current_state% URL:%SCC_URL%
The script’s ouput might look like this:Tue 12/15/2009 14:54:45.58 arg0: C:\project\sccmain\script-test.bat arg1: Time:"Mon Dec 21 21:30:04 2009" arg2: Severity:CRITICAL arg3: Resource:"SCC Tester 1" arg4: Server:"SCC Tester 1" arg5: KPI:kpi_scc_mostate_primary arg6: State:ERROR arg7: HYPERLINK "http://ik-scc.sybase.com:8282/scc"URL:http://ik-scc.sybase.com:8282/scc arg8: arg9:
Example 2: An Alert-Triggered UNIX ScriptThis is a UNIX script. Like the Windows script above, it outputs the parameter values you passto it to a text file.#!/bin/shoutfile=/testing/latest/scriptTest.outecho> $outfileecho `date` >> $outfilecount=1while [ "$1" ]do echo arg$count: $1 >> $outfile shift count=`expr $count + 1`doneecho --- DONE --- >> $outfile
See also• SAP ASE Alerts on page 141
• Alert Types, Severities, and States for SAP ASE on page 147
• Alert-Triggered Scripts on page 148
• Substitution Parameters for Scripts on page 151
Configure
150
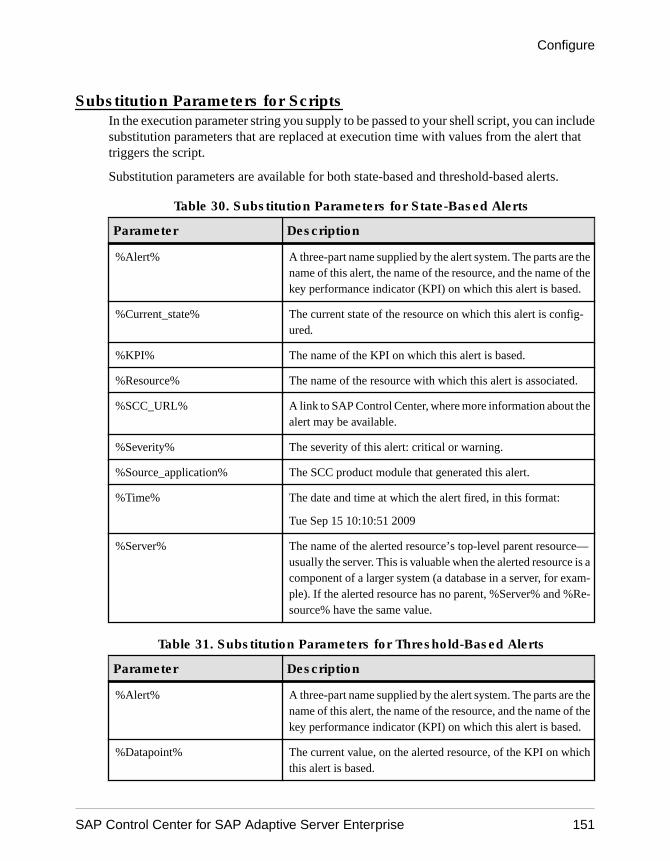
Substitution Parameters for ScriptsIn the execution parameter string you supply to be passed to your shell script, you can includesubstitution parameters that are replaced at execution time with values from the alert thattriggers the script.
Substitution parameters are available for both state-based and threshold-based alerts.
Table 30. Substitution Parameters for State-Based Alerts
Parameter Description
%Alert% A three-part name supplied by the alert system. The parts are thename of this alert, the name of the resource, and the name of thekey performance indicator (KPI) on which this alert is based.
%Current_state% The current state of the resource on which this alert is config-ured.
%KPI% The name of the KPI on which this alert is based.
%Resource% The name of the resource with which this alert is associated.
%SCC_URL% A link to SAP Control Center, where more information about thealert may be available.
%Severity% The severity of this alert: critical or warning.
%Source_application% The SCC product module that generated this alert.
%Time% The date and time at which the alert fired, in this format:
Tue Sep 15 10:10:51 2009
%Server% The name of the alerted resource’s top-level parent resource—usually the server. This is valuable when the alerted resource is acomponent of a larger system (a database in a server, for exam-ple). If the alerted resource has no parent, %Server% and %Re-source% have the same value.
Table 31. Substitution Parameters for Threshold-Based Alerts
Parameter Description
%Alert% A three-part name supplied by the alert system. The parts are thename of this alert, the name of the resource, and the name of thekey performance indicator (KPI) on which this alert is based.
%Datapoint% The current value, on the alerted resource, of the KPI on whichthis alert is based.
Configure
SAP Control Center for SAP Adaptive Server Enterprise 151
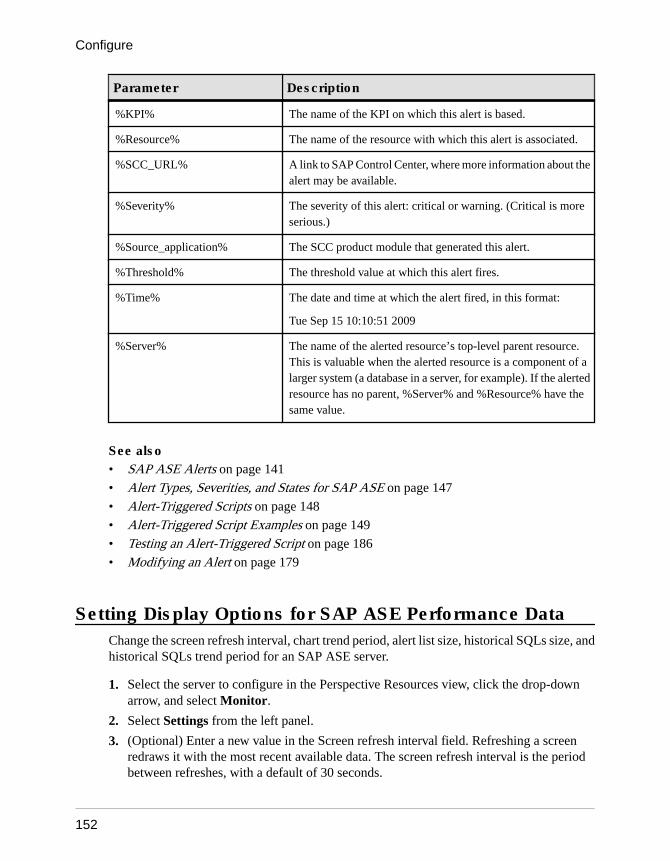
Parameter Description
%KPI% The name of the KPI on which this alert is based.
%Resource% The name of the resource with which this alert is associated.
%SCC_URL% A link to SAP Control Center, where more information about thealert may be available.
%Severity% The severity of this alert: critical or warning. (Critical is moreserious.)
%Source_application% The SCC product module that generated this alert.
%Threshold% The threshold value at which this alert fires.
%Time% The date and time at which the alert fired, in this format:
Tue Sep 15 10:10:51 2009
%Server% The name of the alerted resource’s top-level parent resource.This is valuable when the alerted resource is a component of alarger system (a database in a server, for example). If the alertedresource has no parent, %Server% and %Resource% have thesame value.
See also• SAP ASE Alerts on page 141
• Alert Types, Severities, and States for SAP ASE on page 147
• Alert-Triggered Scripts on page 148
• Alert-Triggered Script Examples on page 149
• Testing an Alert-Triggered Script on page 186
• Modifying an Alert on page 179
Setting Display Options for SAP ASE Performance DataChange the screen refresh interval, chart trend period, alert list size, historical SQLs size, andhistorical SQLs trend period for an SAP ASE server.
1. Select the server to configure in the Perspective Resources view, click the drop-downarrow, and select Monitor.
2. Select Settings from the left panel.
3. (Optional) Enter a new value in the Screen refresh interval field. Refreshing a screenredraws it with the most recent available data. The screen refresh interval is the periodbetween refreshes, with a default of 30 seconds.
Configure
152

4. (Optional) Enter a new value in the Chart trend period field. The chart trend period is theamount of time covered by historical charts in the Adaptive Server component. The defaultis 15 minutes.
5. (Optional) Enter a new value in the Alert list size field. The Alerts table in the Overviewwindow contains a list of all alerts configured for a server. The maximum number of rowsin the Alerts table is controlled by the alert list size, with a default of 100.
6. (Optional) Enter a new value in the Historical SQLs size field. The active SQLs table in theSQL Activity window contains a list of active SQL statements. The maximum number ofstatements in this table is controlled by the historical SQLs size, with a default of 500.
7. (Optional) Enter a new value in the Historical SQLs trend period field. The list of activeSQL statements in the active SQLs table is displayed for a maximum period of timecontrolled by the historical SQLs trend period. The default value for this setting is 5minutes.
8. Click Apply Settings.
See also• Creating an Alert on page 138
Optional Configuration StepsPerform additional configuration, including user authorization, alerts, data collectionscheduling, backups, and setting purging options for the repository.
Table 32. Configuration areas
Configuration area Description Topic
User authorization Set up groups of users or assign roles.Make sure there are users with adminis-trative privileges (sccAdminRole).
User Authorization on page112
Authentication Add authentication modules to allowWindows, UNIX, and LDAP users to login to SAP Control Center.
Setting up Security on page89
Alerts Modify alert thresholds and subscriptionsand delete alerts.
Alerts on page 167
Data collection Modify collection intervals and sched-ules, suspend and resume the schedule,and delete collection jobs.
Job Scheduling on page 162
Resources Unregister resources, add them to per-spectives, or remove them.
Resources on page 188
Configure
SAP Control Center for SAP Adaptive Server Enterprise 153
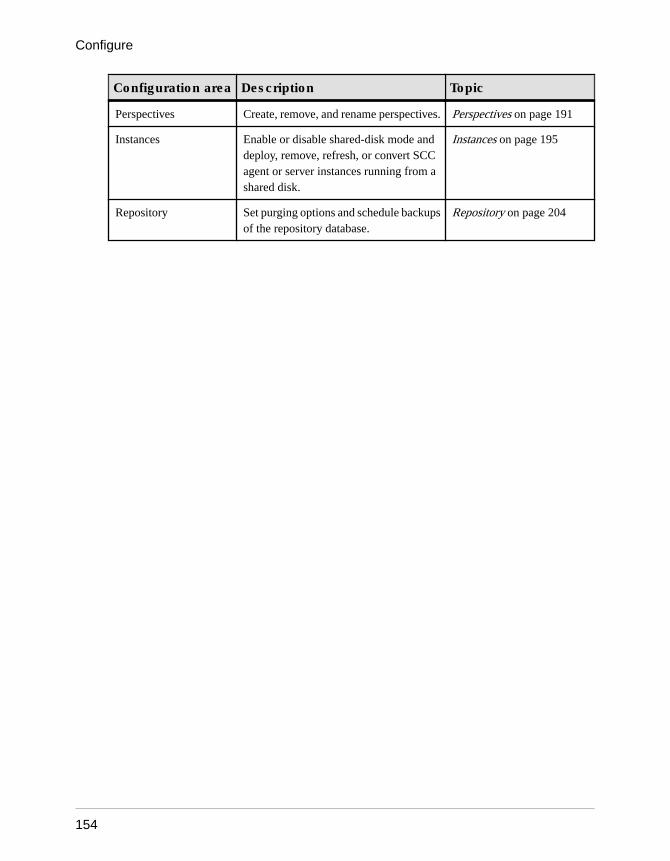
Configuration area Description Topic
Perspectives Create, remove, and rename perspectives. Perspectives on page 191
Instances Enable or disable shared-disk mode anddeploy, remove, refresh, or convert SCCagent or server instances running from ashared disk.
Instances on page 195
Repository Set purging options and schedule backupsof the repository database.
Repository on page 204
Configure
154

Manage and Monitor
Manage and monitor the servers and their components.
Displaying Resource Availability: the Heat ChartUse the heat chart to view the status and availability of servers in the current perspective.
The heat chart displays the state of resources in your perspective—whether the resources arerunning, suspended, or down. In addition, the heat chart lists the type of each resource andprovides statistical data, including the start time of the last data collection.
You can filter the resources that you want to see and search and sort the results by column. Youcan also select a resource and pull down its context menu to see monitoring and administrativeoptions that vary based on the resource type.
Heat chart data is collected directly from managed servers, tagged with the date and time whenit was collected, and stored in the SAP Control Center repository.
1. From the application menu bar, select View > Open > Heat Chart.
2. (Optional) To display information about the status represented by an icon in the chart,hover the mouse over the icon.
• Status column – icon tooltips describe the status of the resource (Running or Stopped,for example).
• All columns to the right of Status – icon tooltips give the value of the KPI listed at thetop of the column.
3. (Optional) To display tools for filtering (narrowing the list of resources in the heat chart) orchanging the columns, select View > Filter from the Perspective Heat Chart menu bar.The Filter and Column tools appear in the left pane.
4. (Optional) To use filtering, select View > Filter from the view’s menu bar and enter asearch term in the Filter string field.
The search term can be any string that appears in the tabular portion of the heat chart, suchas the name, or part of the name, of a server or a resource type (ASE Server, for example).
5. (Optional) Select a filtering setting:
• Match case – search for resources whose displayed data includes the search term,including uppercase and lowercase letters; or
• Exact match – search for resources whose displayed data includes an item identical tothe search term.
6. (Optional) Select a column from the Filter on list to restrict your search to that column.
Manage and Monitor
SAP Control Center for SAP Adaptive Server Enterprise 155
7. (Optional) Click Columns to customize your heat chart.
8. (Optional) Unselect any column that should not appear in your heat chart.
9. (Optional) Click the sorting arrow in the column headers to sort the column values in eitherascending or descending order.
10. (Optional) Click the resource’s row and pull down the menu to the right of the resourcename to view options for the selected resource.
11. (Optional) To resize the Filter and Columns tools pane, move your mouse over the borderbetween the tools pane and the resource table. When the mouse cursor changes to a resizeicon, click and drag the border to the left or the right.
12. (Optional) To hide the Filter and Columns tools, unselect View > Filter.
Graphing Performance Counters: the Statistics ChartTo show performance trends, generate a graph for any set of performance counters over aspecified period of time.
PrerequisitesVerify that statistical data to be graphed has been collected. To verify data collection, go to theCollection Jobs page of the Resource Properties view and check the History tab for acollection job. You can also look at the resource monitor: if data appears there, data is beingcollected.
Task
Tip: Data collections start running when a resource is authenticated. A recently authenticatedresource might not have accumulated enough data to make a useful graph.
1. In the Perspective Resources view, click a resource and select Resource > StatisticsChart in the view menu bar.
2. Expand the folders in the Statistics tab and select the key performance indicator (KPI) youwant to graph.
3. Click Graph Statistic or drag the KPI onto the Chart tab.The Chart tab displays the graphed data, while the KPI with its corresponding value andthe date and time it was collected appear in the Data tab.
4. (Optional) Repeat to add KPIs to the graph.
5. (Optional) Use the slider at the bottom of the Chart tab to control the amount of timecovered by the graph, ranging from a minute to a year.
6. (Optional) Use <<, <, >, and >> to move the displayed graph to an earlier or later time.Increments depend on how the slider is set.
Manage and Monitor
156
Tip: The statistics chart displays data covering a fixed period of time, and that period doesnot change automatically. If you are viewing the most recent statistics and want to keep thegraph current, adjust the displayed time period as new statistics are collected.
7. (Optional) You can click the date/time labels that appear above the slider. Use these tochange the start and end time and the chart time span.
8. (Optional) Click Clear Graph to remove all the graphed statistics and start anew.
Note: You can graph a maximum of five statistics with no more than two distinct units ofmeasure. By default, only 24 hours of statistics are available; change the repository purgeoptions to save statistics for a longer period.
See also• Configuring Repository Purging on page 209
Manage SAP Control CenterManage SCC for SAP ASE using monitoring statistics and the SCC log.
Administration ConsoleUse the Administration Console to browse and manage the selected resources in a perspective.
Browsing and Managing ResourcesCreate new resources or browse and manage existing resources.
PrerequisitesIf you want to view or manage existing resources, register at least one resource and add it to aperspective.
Task
The Administration Console enables you to view and manage both servers and resourcesbelow the server level, such as processes, databases, and devices.
1. Launch the Administration Console.
• To populate the Administration Console with information on one or more resources: inthe Perspective Resources view, select the resources and select Resource >Administration Console. This method is the most efficient because it displays onlyselected resources.
• To populate the Administration Console with information on all the resources in thecurrent perspective: from the main menu bar, select View > Open > Administration
Manage and Monitor
SAP Control Center for SAP Adaptive Server Enterprise 157
Console. If you are monitoring a large number of resources, the AdministrationConsole may take a few minutes to load.
2. To explore the hierarchy of object types, select Navigation > Browse in the left pane.Expand an object type by clicking its arrow icon.
3. Select an object type (any server type, for example) in the hierarchy.
In the right pane, the Administration Console displays a list of resources of that type.
Note: Message rows in the right pane are placeholders for:• Failed requests – to retry, select the message row and click the drop-down arrow that
appears to the right. Select Retry.• Slow-responding requests – SCC replaces these rows with real data as soon as it
arrives.• Large result sets – to display, select the message row and click the drop-down arrow
that appears to the right. Select Expand. The results might take a minute to appear.Hover the mouse over a message row to see a tooltip with more information.
4. (Optional) To create an object of the type now selected, click Folder > Create or Folder >New.
5. (Optional) To refresh the view, select Folder > Refresh.
6. In either the right or the left pane, select an object.A dropdown arrow appears to the right of the name. If the selected object is in the rightpane, the Resource menu becomes active.
7. Click the dropdown arrow to display a menu of actions you can perform on that object. Ifthe selected object is in the right pane, use the Resource menu to display the same actions.
Note: Some managed objects have no actions.
See also• Searching and Filtering Resources on page 158• Searching for Objects in SAP ASE on page 159• Configuring Retrieval Thresholds for the Administration Console on page 161
Searching and Filtering ResourcesUse the Administration Console’s search and filter tools to quickly find the resources orobjects within resources that interest you.
1. Launch the Administration Console.
• To populate the Administration Console with information on one or more resources: inthe Perspective Resources view, select the resources and select Resource >Administration Console. This method is the most efficient because it displays onlyselected resources.
• To populate the Administration Console with information on all the resources in thecurrent perspective: from the main menu bar, select View > Open > Administration
Manage and Monitor
158
Console. If you are monitoring a large number of resources, the AdministrationConsole may take a few minutes to load.
2. (Optional) You can use the Administration Console’s tools to control which resources itdisplays:
a) In the left pane, click Resource Selection.b) SCC refreshes the list of resources in the right pane with each selection you make in
this pane. If you are making multiple selection changes, unselect Automaticallyrefresh details to turn the refresh feature off.
c) Select or unselect resources to include or eliminate them from Administration Consoledisplays.
3. To find a resource without navigating the hierarchy:
a) In the left pane, select Navigation > Search.b) (Required) On the Search tab, select the resource type and object type of the resource
you want to find.c) Enter a search string.
The search string can be the full or partial name of a resource.d) (Optional) Select Exact match to find only the resource whose name is identical to the
search string.e) Click Search.
Results appear in the right pane.
Note: Message rows in the right pane are placeholders for:• Failed requests – to retry, select the message row and click the drop-down arrow
that appears to the right. Select Retry.• Slow-responding requests – SCC replaces these rows with real data as soon as it
arrives.• Large result sets – to display, select the message row and click the drop-down arrow
that appears to the right. Select Expand. The results might take a minute to appear.Hover the mouse over a message row to see a tooltip with more information.
f) To further narrow your search, enter a filter string in the field at the top of any column ofsearch results. For example, in a search for databases, enter wilma above the Devicecolumn to display only results associated with the device wilma.
See also• Browsing and Managing Resources on page 157
• Searching for Objects in SAP ASE on page 159
• Configuring Retrieval Thresholds for the Administration Console on page 161
Searching for Objects in SAP ASESearch for a list of objects based on the resource, resource type, object type, and name.
Manage and Monitor
SAP Control Center for SAP Adaptive Server Enterprise 159

1. In n the Perspective Resources view, select the resources and select Resource >Administration Console.
2. (Optional) Click Resource Selection and select specific resources to include in yoursearch.
3. Click Navigation.
4. (Optional) From the Browser tab, expand ASE Servers, click on the category for theobject type for which you want to search, then select an object type.
5. Click the Search tab.If you selected the resource and object type from the Browser tab, your selection in listed inthe Object type pull-down menu. The resource type is ASE Servers.
6. Enter the full or partial name of the object in the Search string text box.The text search is case insensitive.
7. (Optional) Click Exact Match to display only objects with names matching the exactsearch string.
8. Click Search.
9. (Optional) If the request cannot be displayed within the given threshold limits, a messagerow is displayed; providing status of the retrieval request. Depending on the type ofprocessing issue involved, you can choose to cancel, expand, or retry the retrieval request.Hovering you mouse over the message row provides information specific to the type ofprocessing issue.
See also• Browsing and Managing Resources on page 157• Searching and Filtering Resources on page 158• Configuring Retrieval Thresholds for the Administration Console on page 161
Manage Message Rows for Search RequestsProcessing of data retrieval from a search request can result in a message row being displayed.
Processing of data retrieval may be slow due to various problems such as: a slow networkconnection or a heavy server load, the result set may be larger than the threshold display ortime limit, or an error can occur and the request cannot be displayed.Use the Administration Console to search for objects and display results in the right pane.
• Processing request - (Optional) Click the drop-down arrow on the message row and selectCancel.When the processing of data retrieval is slower than the set display time, a message row isdisplayed. By default, the time period after which a message row is displayed is sevenseconds. Once the requested data is available, the actual result set is displayed, replacingthe message row. Once Cancel is chosen the processing request is stopped and you see anew message row with an option to retry the request.
• Number of Rows - (Optional) Click the drop-down arrow on the message row and selectExpand.
Manage and Monitor
160
When the requested result set size exceeds the threshold display limit, a message row isdisplayed. The default threshold display limit for rows is 500. Hovering your mouse overthe message row provides the number of rows. Selecting Expand allows you to see theentire result set.When you select Expand an expanded message row is displayed below any remainingmessage rows once the processing is complete. If the processing takes a large amount oftime, then you have the option of cancelling the processing by selecting Cancel from thecontext menu of the expanded message row.
Note: If the number of rows are large (in the thousands), SAP recommends that you use theSearch tab to narrow your results.
• Error - (Optional) Click the drop-down arrow on the message row and select Retry.If a result set cannot be returned, a message row is displayed indicating an error hasoccurred. Hovering your mouse over the message row provides the reason for theexception.
Configuring Retrieval Thresholds for the Administration Console(Optional) Set limits on the time the Administration Console waits for data to load or on thenumber of rows it loads.
PrerequisitesLaunch SAP Control Center and log in using an account with administrative privileges. (Thelogin account or its group must have sccAdminRole.)
Task
Performing some tasks may cause the Administration Console to load a large amount of data,which can be time-consuming and can place a heavy load on your network. This is particularlylikely if your perspective includes many resources. The Administration Console mitigates thisproblem by displaying partial results and by displaying placeholders called message rowswhen data takes longer than a specified number of seconds to retrieve or exceeds a specifiednumber of rows. The data retrieval options let you specify those numbers.
This data retrieval scheme reduces network traffic because result sets that exceed the specifiedrow count are not transmitted unless you ask for them by expanding a message row. Bydisplaying partial results and message rows for data from slow-responding resources, thescheme also minimizes the time you spend waiting.
1. From the application’s menu bar, select Application > Administration.
2. Select General Settings.
3. Click the Administration Console tab.
4. Set the timeout for data retrieval in seconds.
Manage and Monitor
SAP Control Center for SAP Adaptive Server Enterprise 161
When SCC is not able to return all requested data within this period of time, it displays anydata it has received and generates message rows in place of the missing results. TheAdministration Console replaces message rows with real data as soon as the data arrives.
5. Set the row count.
When a request returns results that exceed the specified row count, SCC displays amessage row in place of the expected results. You can expand the message row by selectingit, clicking the drop-down arrow, and selecting Expand.
6. Click OK (to apply the change and close the properties dialog) or Apply (to apply thechange and leave the dialog open).
See also• Browsing and Managing Resources on page 157
• Searching and Filtering Resources on page 158
• Searching for Objects in SAP ASE on page 159
Job SchedulingA schedule defines a data collection job and specifies how often the job executes in yoursystem.
In SAP Control Center, collection jobs provide the data that appears on monitoring screensand charts. A collection is a set of key performance indicators (KPIs). When the scheduler runsa collection job, it gathers the value of each KPI in the collection and tags the data with the dateand time it was gathered. The data is stored in the repository and displayed. Each productmodule has predefined collections that you can schedule.
You can define schedules as one-time or repeating. You can modify the schedule for a jobbased on a number of attributes such as:
• Repeat interval• Date• Time
The job history displays the status of jobs executed each day.
See also• Setting Up Statistics Collection on page 128
• SAP ASE Data Collections on page 130
Executing and Stopping a Data Collection JobUse the Properties view to execute or stop a data collection job.
Most of the time, data collection jobs should run on a schedule; you should rarely need to startor stop a job manually.
Manage and Monitor
162
1. In the Perspective Resources view, select the resource associated with the job and selectResource > Properties.
2. Select Collection Jobs.
3. Select the job and:
• To execute a job immediately, click Execute.
• To stop a job, click Stop, then click Yes to confirm.
See also• Deleting a Data Collection Job on page 163
• Resuming and Suspending a Data Collection Job on page 163
• Adding a New Schedule to a Job on page 164
• Viewing or Deleting a Schedule on page 165
• Modifying the Data Collection Interval for a Job on page 166
• Resuming and Suspending the Scheduler on page 166
• Viewing the Job Execution History on page 167
Deleting a Data Collection JobUse the Properties view for a resource to delete one or more data collection jobs.
1. In the Perspective Resources view, select the resource associated with the job and selectResource > Properties.
2. Select Collection Jobs.
3. Select the job and click Delete.
4. Click OK to confirm the deletion.
See also• Executing and Stopping a Data Collection Job on page 162
• Resuming and Suspending a Data Collection Job on page 163
• Adding a New Schedule to a Job on page 164
• Viewing or Deleting a Schedule on page 165
• Modifying the Data Collection Interval for a Job on page 166
• Resuming and Suspending the Scheduler on page 166
• Viewing the Job Execution History on page 167
Resuming and Suspending a Data Collection JobUse the Properties view for a resource to resume or suspend a data collection job.
1. In the Perspective Resources view, select the resource associated with the job and selectResource > Properties.
Manage and Monitor
SAP Control Center for SAP Adaptive Server Enterprise 163
2. Select Collection Jobs.
3. Select the job (a top-level item in the Collection Jobs table). On the General tab:
• To resume a job, click Resume.• To suspend a job, click Suspend, then click Yes to confirm the suspension.
Tip: If the General tab is grayed out, you have selected a schedule (child) rather than a job(parent) in the Collection Jobs table. Select the parent job to display the General tab.
See also• Executing and Stopping a Data Collection Job on page 162
• Deleting a Data Collection Job on page 163
• Adding a New Schedule to a Job on page 164
• Viewing or Deleting a Schedule on page 165
• Modifying the Data Collection Interval for a Job on page 166
• Resuming and Suspending the Scheduler on page 166
• Viewing the Job Execution History on page 167
Adding a New Schedule to a JobUse the Properties view for a resource to add schedules to a data collection job.
1. In the Perspective Resources view, select the resource associated with the job and selectResource > Properties.
2. Select Collection Jobs.
3. Select the job.
4. Click Add Schedule.
5. Specify details for the new schedule:
Field Description
Name A name for this schedule
Description A description of this schedule
6. Choose to start the job Now or Later. If you choose Later, specify the start date and time.
7. Specify the duration of this schedule. The job can run:
• Once• Repetitively at an interval you specify
Field Description
Repeat interval Time period (in seconds, minutes, hours, or days) between jobexecutions
• Until a stop date that you specify, at an interval you specify
Manage and Monitor
164
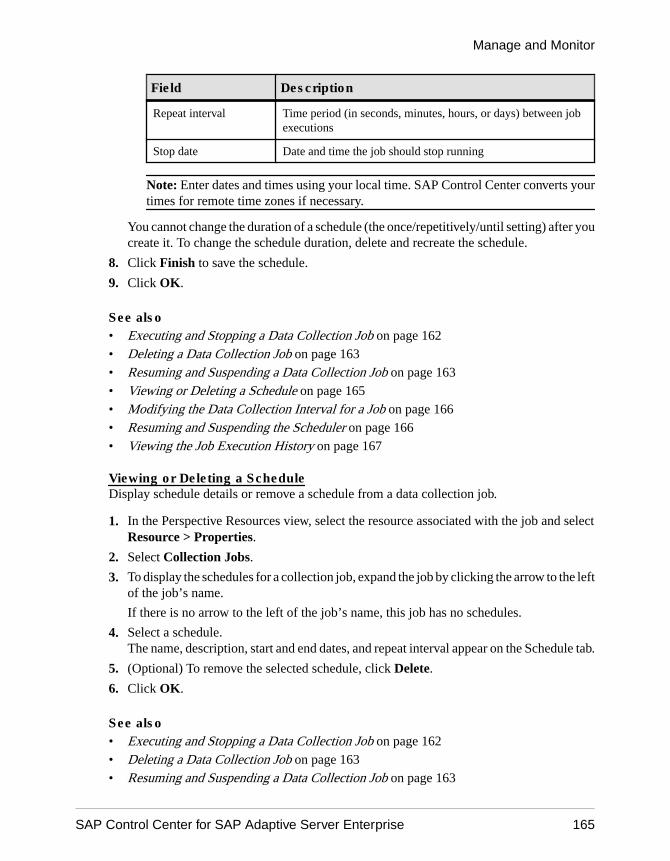
Field Description
Repeat interval Time period (in seconds, minutes, hours, or days) between jobexecutions
Stop date Date and time the job should stop running
Note: Enter dates and times using your local time. SAP Control Center converts yourtimes for remote time zones if necessary.
You cannot change the duration of a schedule (the once/repetitively/until setting) after youcreate it. To change the schedule duration, delete and recreate the schedule.
8. Click Finish to save the schedule.
9. Click OK.
See also• Executing and Stopping a Data Collection Job on page 162• Deleting a Data Collection Job on page 163• Resuming and Suspending a Data Collection Job on page 163• Viewing or Deleting a Schedule on page 165• Modifying the Data Collection Interval for a Job on page 166• Resuming and Suspending the Scheduler on page 166• Viewing the Job Execution History on page 167
Viewing or Deleting a ScheduleDisplay schedule details or remove a schedule from a data collection job.
1. In the Perspective Resources view, select the resource associated with the job and selectResource > Properties.
2. Select Collection Jobs.
3. To display the schedules for a collection job, expand the job by clicking the arrow to the leftof the job’s name.
If there is no arrow to the left of the job’s name, this job has no schedules.
4. Select a schedule.The name, description, start and end dates, and repeat interval appear on the Schedule tab.
5. (Optional) To remove the selected schedule, click Delete.
6. Click OK.
See also• Executing and Stopping a Data Collection Job on page 162• Deleting a Data Collection Job on page 163• Resuming and Suspending a Data Collection Job on page 163
Manage and Monitor
SAP Control Center for SAP Adaptive Server Enterprise 165
• Adding a New Schedule to a Job on page 164
• Modifying the Data Collection Interval for a Job on page 166
• Resuming and Suspending the Scheduler on page 166
• Viewing the Job Execution History on page 167
Modifying the Data Collection Interval for a JobUse the Properties view for a managed resource to modify the data collection schedule.
1. In the Perspective Resources view, select a server (or other resource).
2. In the view’s menu bar, select Resource > Properties.
3. Select Collection Jobs.
4. Expand a job folder and select a schedule.
5. On the Schedule tab, modify the Repeat interval field.
6. Click Apply.
See also• Executing and Stopping a Data Collection Job on page 162
• Deleting a Data Collection Job on page 163
• Resuming and Suspending a Data Collection Job on page 163
• Adding a New Schedule to a Job on page 164
• Viewing or Deleting a Schedule on page 165
• Resuming and Suspending the Scheduler on page 166
• Viewing the Job Execution History on page 167
Resuming and Suspending the SchedulerUse the scheduler settings to resume or suspend all scheduled jobs.
PrerequisitesYou must have administrative privileges (sccAdminRole) to perform this task.
Task
1. From the main menu bar, select Application > Administration.
2. In the SAP Control Center Properties dialog, select Scheduler.
3. Do one of the following:
• To resume the scheduler, click Resume.• To suspend the scheduler, click Suspend.
4. Click OK.
Manage and Monitor
166
See also• Executing and Stopping a Data Collection Job on page 162
• Deleting a Data Collection Job on page 163
• Resuming and Suspending a Data Collection Job on page 163
• Adding a New Schedule to a Job on page 164
• Viewing or Deleting a Schedule on page 165
• Modifying the Data Collection Interval for a Job on page 166
• Viewing the Job Execution History on page 167
Viewing the Job Execution HistoryUse the Properties view to display a data collection job’s execution history.
1. In the Perspective Resources view, select the resource associated with the job and selectResource > Properties.
2. Select Collection Jobs.
3. Select a job.
4. Click the History tab.
See also• Executing and Stopping a Data Collection Job on page 162
• Deleting a Data Collection Job on page 163
• Resuming and Suspending a Data Collection Job on page 163
• Adding a New Schedule to a Job on page 164
• Viewing or Deleting a Schedule on page 165
• Modifying the Data Collection Interval for a Job on page 166
• Resuming and Suspending the Scheduler on page 166
AlertsYou can configure SAP Control Center to notify you when a resource requires attention.
You do this by setting up a predefined alert that is triggered when a performance counter entersa particular state or passes a threshold value that you set. When the alert goes off, it generatesan alert notification.
An alert notification takes the form of a visual indicator in the Alert Monitor and, optionally,an e-mail message. The Alert Monitor displays information about the alert, including theresource name, alert severity, value, and date. You can resolve the alert or allow it to escalate.
Configure, monitor, and control alerts for managed resources by:
• Enabling and disabling alert subscriptions for resources• Configuring shell scripts to run when alerts fire
Manage and Monitor
SAP Control Center for SAP Adaptive Server Enterprise 167
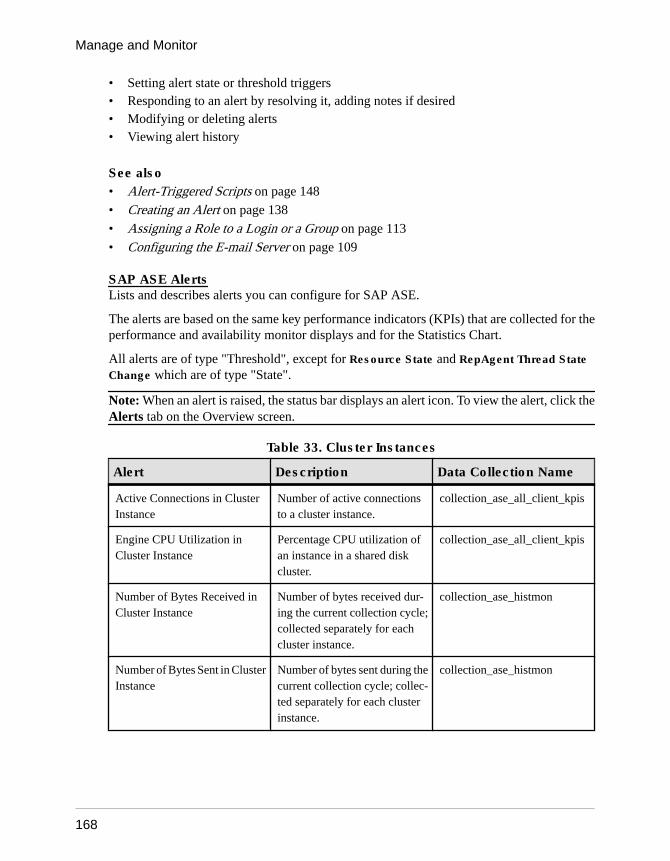
• Setting alert state or threshold triggers• Responding to an alert by resolving it, adding notes if desired• Modifying or deleting alerts• Viewing alert history
See also• Alert-Triggered Scripts on page 148
• Creating an Alert on page 138
• Assigning a Role to a Login or a Group on page 113
• Configuring the E-mail Server on page 109
SAP ASE AlertsLists and describes alerts you can configure for SAP ASE.
The alerts are based on the same key performance indicators (KPIs) that are collected for theperformance and availability monitor displays and for the Statistics Chart.
All alerts are of type "Threshold", except for Resource State and RepAgent Thread StateChange which are of type "State".
Note: When an alert is raised, the status bar displays an alert icon. To view the alert, click theAlerts tab on the Overview screen.
Table 33. Cluster Instances
Alert Description Data Collection Name
Active Connections in ClusterInstance
Number of active connectionsto a cluster instance.
collection_ase_all_client_kpis
Engine CPU Utilization inCluster Instance
Percentage CPU utilization ofan instance in a shared diskcluster.
collection_ase_all_client_kpis
Number of Bytes Received inCluster Instance
Number of bytes received dur-ing the current collection cycle;collected separately for eachcluster instance.
collection_ase_histmon
Number of Bytes Sent in ClusterInstance
Number of bytes sent during thecurrent collection cycle; collec-ted separately for each clusterinstance.
collection_ase_histmon
Manage and Monitor
168
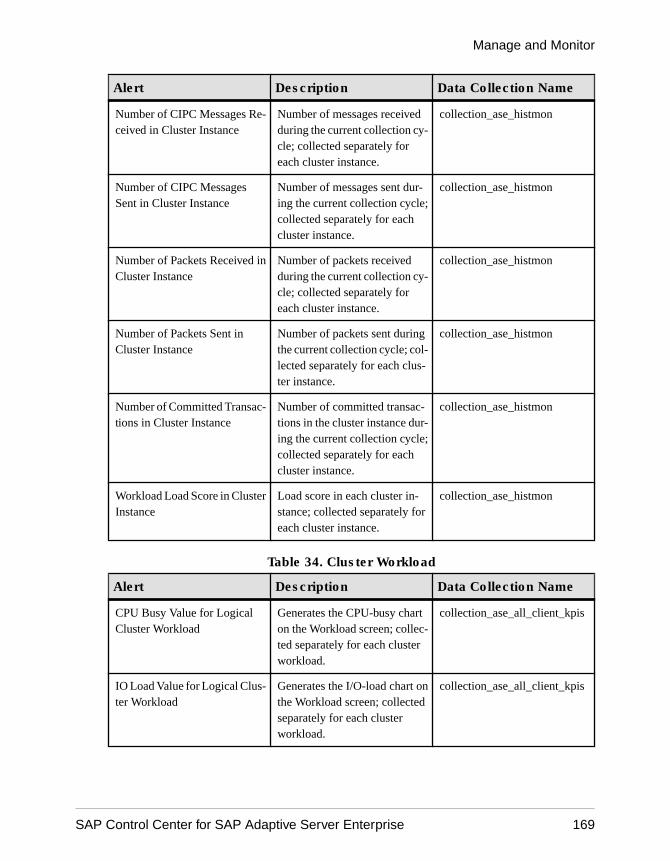
Alert Description Data Collection Name
Number of CIPC Messages Re-ceived in Cluster Instance
Number of messages receivedduring the current collection cy-cle; collected separately foreach cluster instance.
collection_ase_histmon
Number of CIPC MessagesSent in Cluster Instance
Number of messages sent dur-ing the current collection cycle;collected separately for eachcluster instance.
collection_ase_histmon
Number of Packets Received inCluster Instance
Number of packets receivedduring the current collection cy-cle; collected separately foreach cluster instance.
collection_ase_histmon
Number of Packets Sent inCluster Instance
Number of packets sent duringthe current collection cycle; col-lected separately for each clus-ter instance.
collection_ase_histmon
Number of Committed Transac-tions in Cluster Instance
Number of committed transac-tions in the cluster instance dur-ing the current collection cycle;collected separately for eachcluster instance.
collection_ase_histmon
Workload Load Score in ClusterInstance
Load score in each cluster in-stance; collected separately foreach cluster instance.
collection_ase_histmon
Table 34. Cluster Workload
Alert Description Data Collection Name
CPU Busy Value for LogicalCluster Workload
Generates the CPU-busy charton the Workload screen; collec-ted separately for each clusterworkload.
collection_ase_all_client_kpis
IO Load Value for Logical Clus-ter Workload
Generates the I/O-load chart onthe Workload screen; collectedseparately for each clusterworkload.
collection_ase_all_client_kpis
Manage and Monitor
SAP Control Center for SAP Adaptive Server Enterprise 169
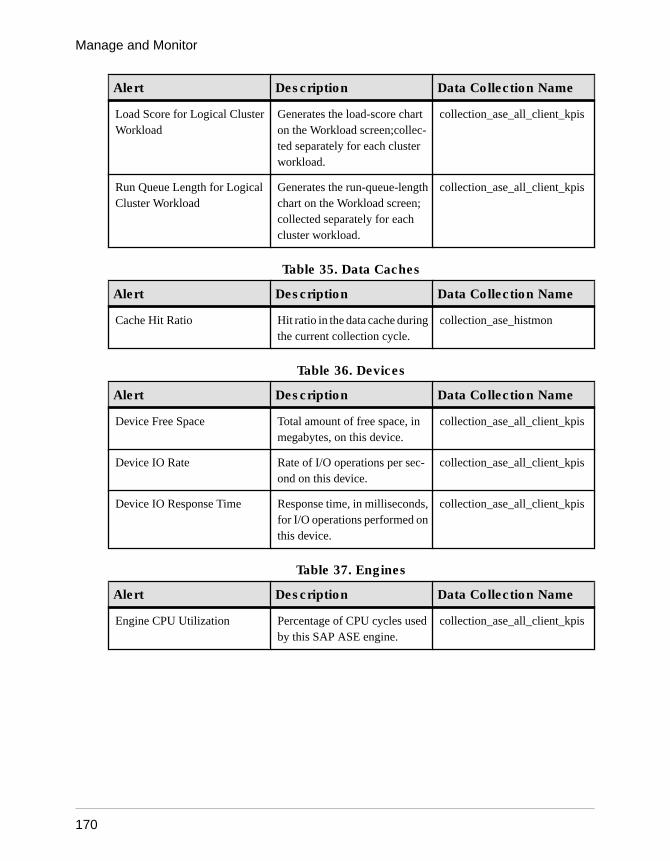
Alert Description Data Collection Name
Load Score for Logical ClusterWorkload
Generates the load-score charton the Workload screen;collec-ted separately for each clusterworkload.
collection_ase_all_client_kpis
Run Queue Length for LogicalCluster Workload
Generates the run-queue-lengthchart on the Workload screen;collected separately for eachcluster workload.
collection_ase_all_client_kpis
Table 35. Data Caches
Alert Description Data Collection Name
Cache Hit Ratio Hit ratio in the data cache duringthe current collection cycle.
collection_ase_histmon
Table 36. Devices
Alert Description Data Collection Name
Device Free Space Total amount of free space, inmegabytes, on this device.
collection_ase_all_client_kpis
Device IO Rate Rate of I/O operations per sec-ond on this device.
collection_ase_all_client_kpis
Device IO Response Time Response time, in milliseconds,for I/O operations performed onthis device.
collection_ase_all_client_kpis
Table 37. Engines
Alert Description Data Collection Name
Engine CPU Utilization Percentage of CPU cycles usedby this SAP ASE engine.
collection_ase_all_client_kpis
Manage and Monitor
170
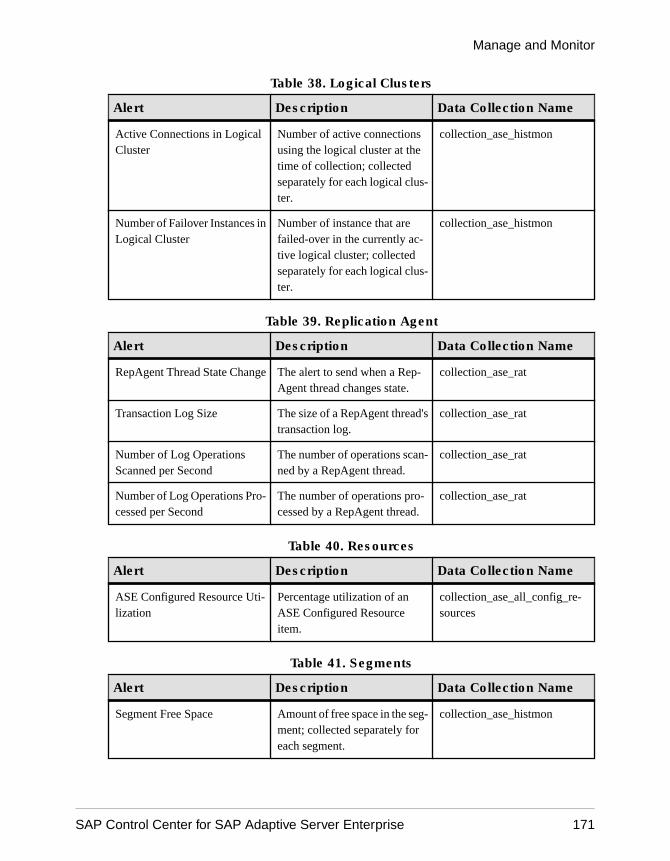
Table 38. Logical Clusters
Alert Description Data Collection Name
Active Connections in LogicalCluster
Number of active connectionsusing the logical cluster at thetime of collection; collectedseparately for each logical clus-ter.
collection_ase_histmon
Number of Failover Instances inLogical Cluster
Number of instance that arefailed-over in the currently ac-tive logical cluster; collectedseparately for each logical clus-ter.
collection_ase_histmon
Table 39. Replication Agent
Alert Description Data Collection Name
RepAgent Thread State Change The alert to send when a Rep-Agent thread changes state.
collection_ase_rat
Transaction Log Size The size of a RepAgent thread'stransaction log.
collection_ase_rat
Number of Log OperationsScanned per Second
The number of operations scan-ned by a RepAgent thread.
collection_ase_rat
Number of Log Operations Pro-cessed per Second
The number of operations pro-cessed by a RepAgent thread.
collection_ase_rat
Table 40. Resources
Alert Description Data Collection Name
ASE Configured Resource Uti-lization
Percentage utilization of anASE Configured Resourceitem.
collection_ase_all_config_re-sources
Table 41. Segments
Alert Description Data Collection Name
Segment Free Space Amount of free space in the seg-ment; collected separately foreach segment.
collection_ase_histmon
Manage and Monitor
SAP Control Center for SAP Adaptive Server Enterprise 171
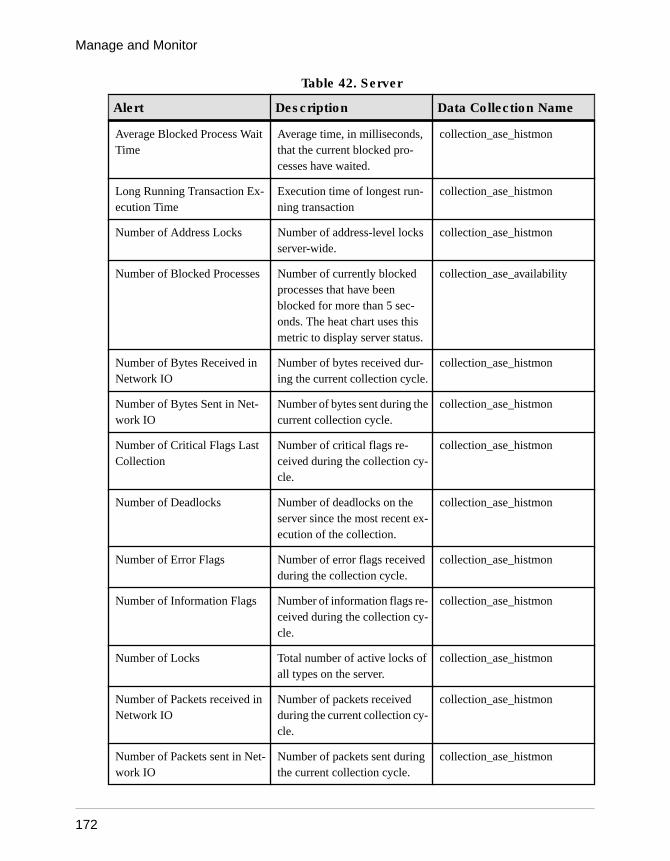
Table 42. Server
Alert Description Data Collection Name
Average Blocked Process WaitTime
Average time, in milliseconds,that the current blocked pro-cesses have waited.
collection_ase_histmon
Long Running Transaction Ex-ecution Time
Execution time of longest run-ning transaction
collection_ase_histmon
Number of Address Locks Number of address-level locksserver-wide.
collection_ase_histmon
Number of Blocked Processes Number of currently blockedprocesses that have beenblocked for more than 5 sec-onds. The heat chart uses thismetric to display server status.
collection_ase_availability
Number of Bytes Received inNetwork IO
Number of bytes received dur-ing the current collection cycle.
collection_ase_histmon
Number of Bytes Sent in Net-work IO
Number of bytes sent during thecurrent collection cycle.
collection_ase_histmon
Number of Critical Flags LastCollection
Number of critical flags re-ceived during the collection cy-cle.
collection_ase_histmon
Number of Deadlocks Number of deadlocks on theserver since the most recent ex-ecution of the collection.
collection_ase_histmon
Number of Error Flags Number of error flags receivedduring the collection cycle.
collection_ase_histmon
Number of Information Flags Number of information flags re-ceived during the collection cy-cle.
collection_ase_histmon
Number of Locks Total number of active locks ofall types on the server.
collection_ase_histmon
Number of Packets received inNetwork IO
Number of packets receivedduring the current collection cy-cle.
collection_ase_histmon
Number of Packets sent in Net-work IO
Number of packets sent duringthe current collection cycle.
collection_ase_histmon
Manage and Monitor
172
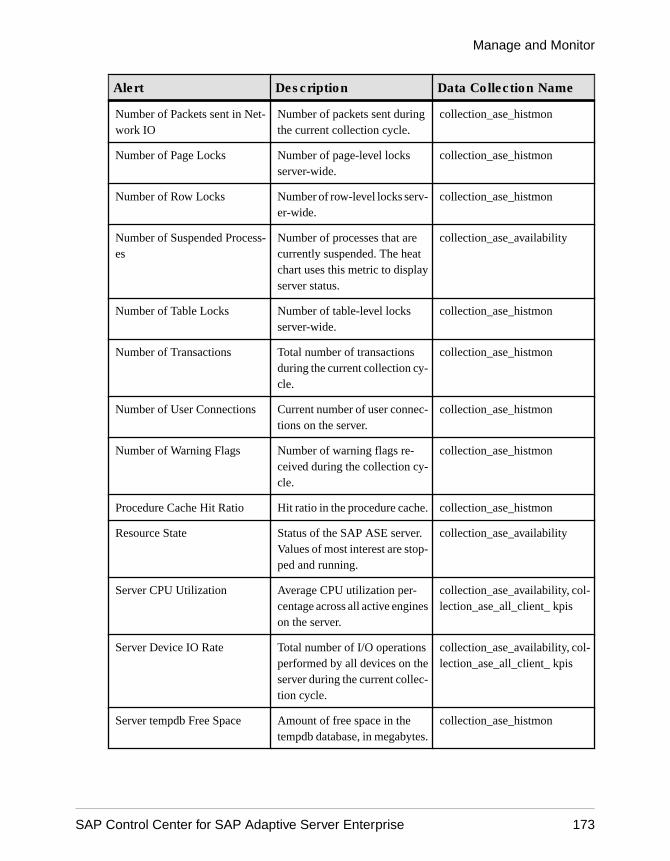
Alert Description Data Collection Name
Number of Packets sent in Net-work IO
Number of packets sent duringthe current collection cycle.
collection_ase_histmon
Number of Page Locks Number of page-level locksserver-wide.
collection_ase_histmon
Number of Row Locks Number of row-level locks serv-er-wide.
collection_ase_histmon
Number of Suspended Process-es
Number of processes that arecurrently suspended. The heatchart uses this metric to displayserver status.
collection_ase_availability
Number of Table Locks Number of table-level locksserver-wide.
collection_ase_histmon
Number of Transactions Total number of transactionsduring the current collection cy-cle.
collection_ase_histmon
Number of User Connections Current number of user connec-tions on the server.
collection_ase_histmon
Number of Warning Flags Number of warning flags re-ceived during the collection cy-cle.
collection_ase_histmon
Procedure Cache Hit Ratio Hit ratio in the procedure cache. collection_ase_histmon
Resource State Status of the SAP ASE server.Values of most interest are stop-ped and running.
collection_ase_availability
Server CPU Utilization Average CPU utilization per-centage across all active engineson the server.
collection_ase_availability, col-lection_ase_all_client_ kpis
Server Device IO Rate Total number of I/O operationsperformed by all devices on theserver during the current collec-tion cycle.
collection_ase_availability, col-lection_ase_all_client_ kpis
Server tempdb Free Space Amount of free space in thetempdb database, in megabytes.
collection_ase_histmon
Manage and Monitor
SAP Control Center for SAP Adaptive Server Enterprise 173
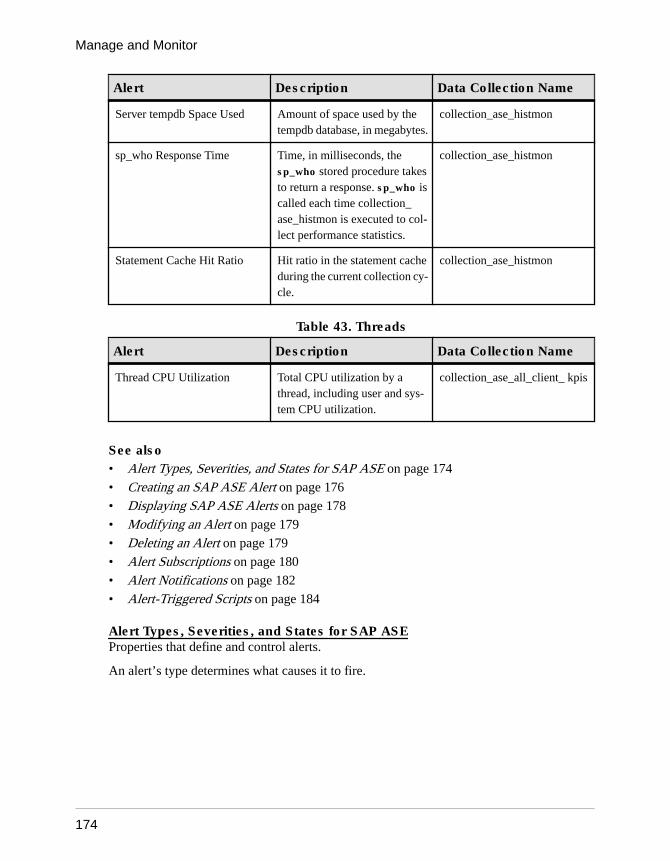
Alert Description Data Collection Name
Server tempdb Space Used Amount of space used by thetempdb database, in megabytes.
collection_ase_histmon
sp_who Response Time Time, in milliseconds, thesp_who stored procedure takesto return a response. sp_who iscalled each time collection_ase_histmon is executed to col-lect performance statistics.
collection_ase_histmon
Statement Cache Hit Ratio Hit ratio in the statement cacheduring the current collection cy-cle.
collection_ase_histmon
Table 43. Threads
Alert Description Data Collection Name
Thread CPU Utilization Total CPU utilization by athread, including user and sys-tem CPU utilization.
collection_ase_all_client_ kpis
See also• Alert Types, Severities, and States for SAP ASE on page 174
• Creating an SAP ASE Alert on page 176
• Displaying SAP ASE Alerts on page 178
• Modifying an Alert on page 179
• Deleting an Alert on page 179
• Alert Subscriptions on page 180
• Alert Notifications on page 182
• Alert-Triggered Scripts on page 184
Alert Types, Severities, and States for SAP ASEProperties that define and control alerts.
An alert’s type determines what causes it to fire.
Manage and Monitor
174
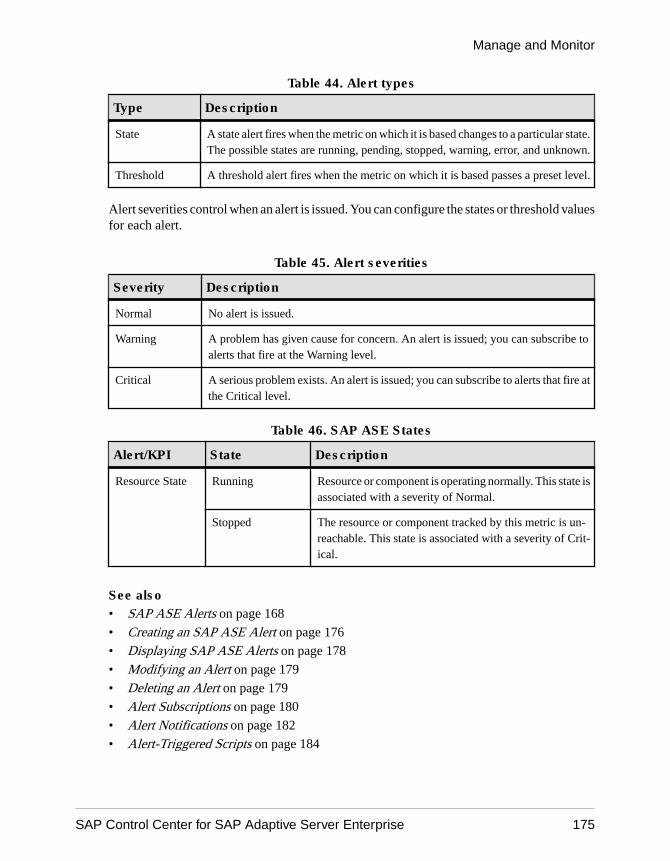
Table 44. Alert types
Type Description
State A state alert fires when the metric on which it is based changes to a particular state.The possible states are running, pending, stopped, warning, error, and unknown.
Threshold A threshold alert fires when the metric on which it is based passes a preset level.
Alert severities control when an alert is issued. You can configure the states or threshold valuesfor each alert.
Table 45. Alert severities
Severity Description
Normal No alert is issued.
Warning A problem has given cause for concern. An alert is issued; you can subscribe toalerts that fire at the Warning level.
Critical A serious problem exists. An alert is issued; you can subscribe to alerts that fire atthe Critical level.
Table 46. SAP ASE States
Alert/KPI State Description
Resource State Running Resource or component is operating normally. This state isassociated with a severity of Normal.
Stopped The resource or component tracked by this metric is un-reachable. This state is associated with a severity of Crit-ical.
See also• SAP ASE Alerts on page 168
• Creating an SAP ASE Alert on page 176
• Displaying SAP ASE Alerts on page 178
• Modifying an Alert on page 179
• Deleting an Alert on page 179
• Alert Subscriptions on page 180
• Alert Notifications on page 182
• Alert-Triggered Scripts on page 184
Manage and Monitor
SAP Control Center for SAP Adaptive Server Enterprise 175
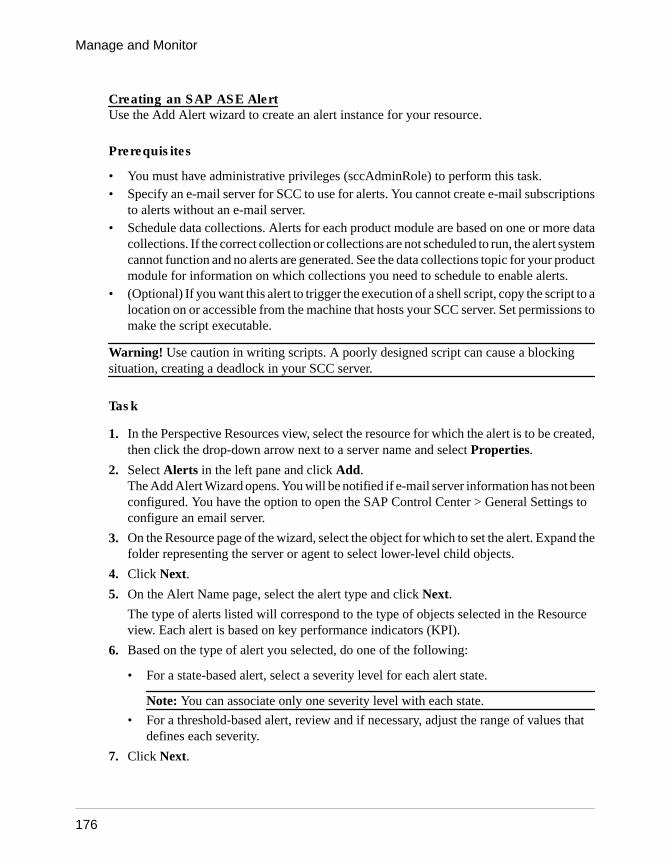
Creating an SAP ASE AlertUse the Add Alert wizard to create an alert instance for your resource.
Prerequisites
• You must have administrative privileges (sccAdminRole) to perform this task.• Specify an e-mail server for SCC to use for alerts. You cannot create e-mail subscriptions
to alerts without an e-mail server.• Schedule data collections. Alerts for each product module are based on one or more data
collections. If the correct collection or collections are not scheduled to run, the alert systemcannot function and no alerts are generated. See the data collections topic for your productmodule for information on which collections you need to schedule to enable alerts.
• (Optional) If you want this alert to trigger the execution of a shell script, copy the script to alocation on or accessible from the machine that hosts your SCC server. Set permissions tomake the script executable.
Warning! Use caution in writing scripts. A poorly designed script can cause a blockingsituation, creating a deadlock in your SCC server.
Task
1. In the Perspective Resources view, select the resource for which the alert is to be created,then click the drop-down arrow next to a server name and select Properties.
2. Select Alerts in the left pane and click Add.The Add Alert Wizard opens. You will be notified if e-mail server information has not beenconfigured. You have the option to open the SAP Control Center > General Settings toconfigure an email server.
3. On the Resource page of the wizard, select the object for which to set the alert. Expand thefolder representing the server or agent to select lower-level child objects.
4. Click Next.
5. On the Alert Name page, select the alert type and click Next.
The type of alerts listed will correspond to the type of objects selected in the Resourceview. Each alert is based on key performance indicators (KPI).
6. Based on the type of alert you selected, do one of the following:
• For a state-based alert, select a severity level for each alert state.
Note: You can associate only one severity level with each state.
• For a threshold-based alert, review and if necessary, adjust the range of values thatdefines each severity.
7. Click Next.
Manage and Monitor
176

8. (Optional) Enter the storm suppression period. Storm suppression blocks redundant alertnotifications and script executions resulting from the same condition for the specifiedperiod of time. Enter this value in seconds, minutes, or hours and click Next.
9. (Optional) To configure this alert to trigger the execution of a script:
a) Alert Severity specifies the severity level that triggers the script. Select Critical,Warning, or both.
Critical is typically more serious than Warning.b) Browse to the location of the script.
Note: In UNIX, make sure the script is executable. You cannot select a script unless ithas execute permission.
c) If the script requires parameter values, click Select Parameters to enter them in theExecution Parameters box.
You can include a number of predefined substitution parameters, which are replaced byvalues from the alert. The parameter values are passed on the command line to thescript. See the substitution parameters topic for more information.
Note: When you test a script, SAP Control Center supplies test values for the%Severity% and %Source_Application% parameters (“Testing” and“TestScriptExecution,” respectively). Any test values you supply for these parametersare discarded. This prevents the test results from being confused with real script resultsafter testing and in the SCC repository.
d) (Optional) Click Test to perform a test execution of your script.
If your script takes parameters, the test may fail if parameter values are missing orincorrect.
e) Click Next.
If the selected resource has sibling resources (databases or devices of the same type, forexample) that support this alert type, you see the Duplicates page. If the selected resourcehas no identical siblings, you see the Subscription page.
10. (Optional) On the Subscription page, specify e-mail addresses if you want this alert toissue e-mail notifications when it fires.
The e-mail addresses default to the address in your user profile, but you can override thedefaults.
For both critical and warning alerts:
Table 47. Alert subscription details
Option Description
E-mail To send an e-mail notification when this alert fires, click the E-mailMessage box and enter the e-mail address of one user or list.
Manage and Monitor
SAP Control Center for SAP Adaptive Server Enterprise 177
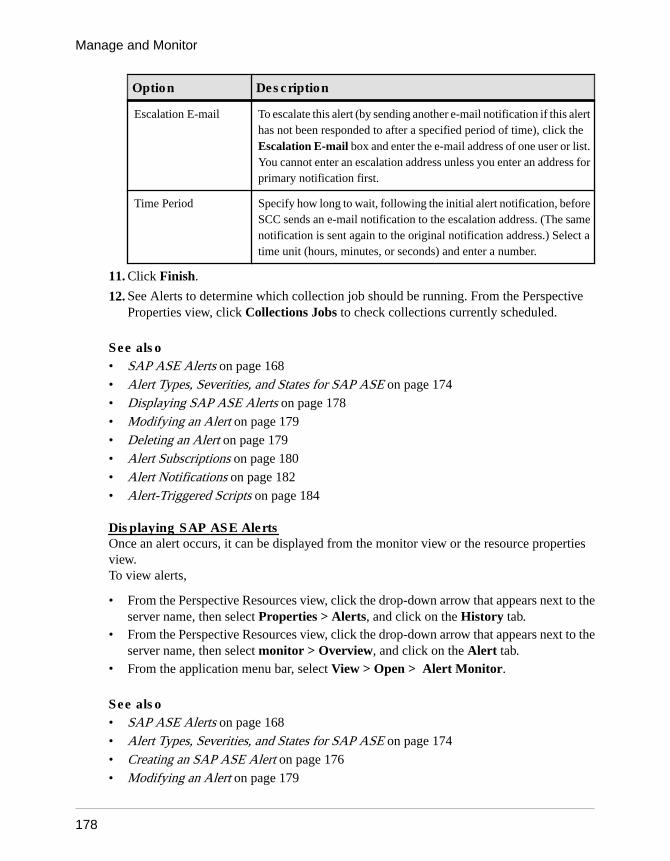
Option Description
Escalation E-mail To escalate this alert (by sending another e-mail notification if this alerthas not been responded to after a specified period of time), click theEscalation E-mail box and enter the e-mail address of one user or list.You cannot enter an escalation address unless you enter an address forprimary notification first.
Time Period Specify how long to wait, following the initial alert notification, beforeSCC sends an e-mail notification to the escalation address. (The samenotification is sent again to the original notification address.) Select atime unit (hours, minutes, or seconds) and enter a number.
11. Click Finish.
12. See Alerts to determine which collection job should be running. From the PerspectiveProperties view, click Collections Jobs to check collections currently scheduled.
See also• SAP ASE Alerts on page 168• Alert Types, Severities, and States for SAP ASE on page 174• Displaying SAP ASE Alerts on page 178• Modifying an Alert on page 179• Deleting an Alert on page 179• Alert Subscriptions on page 180• Alert Notifications on page 182• Alert-Triggered Scripts on page 184
Displaying SAP ASE AlertsOnce an alert occurs, it can be displayed from the monitor view or the resource propertiesview.To view alerts,
• From the Perspective Resources view, click the drop-down arrow that appears next to theserver name, then select Properties > Alerts, and click on the History tab.
• From the Perspective Resources view, click the drop-down arrow that appears next to theserver name, then select monitor > Overview, and click on the Alert tab.
• From the application menu bar, select View > Open > Alert Monitor.
See also• SAP ASE Alerts on page 168• Alert Types, Severities, and States for SAP ASE on page 174• Creating an SAP ASE Alert on page 176• Modifying an Alert on page 179
Manage and Monitor
178
• Deleting an Alert on page 179
• Alert Subscriptions on page 180
• Alert Notifications on page 182
• Alert-Triggered Scripts on page 184
Modifying an AlertUse the Properties view of your managed resource to modify an alert.
1. In the Perspective Resources view, select a resource and select Resource > Properties.
2. Select Alerts.
3. Select the alert to modify.
4. On the Thresholds tab, modify the threshold values. Click OK to save your changes.
5. On the Script tab, click Modify to change the alert severity at which script execution istriggered, the path to the script, the execution parameters, or the test values. Click Finish tosave your changes.
6. On the Subscriptions tab, select a subscription and click Modify to change its e-mailaddress or escalation address. Click Finish to save your changes.
7. On the Storm Suppression tab, pull down the menu to change the units and enter a value forthe storm suppression period.
8. Click OK (to apply the changes and close the properties dialog) or Apply (to apply thechanges and leave the dialog open).
See also• SAP ASE Alerts on page 168
• Alert Types, Severities, and States for SAP ASE on page 174
• Creating an SAP ASE Alert on page 176
• Displaying SAP ASE Alerts on page 178
• Deleting an Alert on page 179
• Alert Subscriptions on page 180
• Alert Notifications on page 182
• Alert-Triggered Scripts on page 184
Deleting an AlertUse the Properties view of your resource to delete an alert.
1. In the Perspective Resources view, select a resource and select Resource > Properties.
2. Select Alerts.
3. Select an alert and click Drop.
4. Click Yes to confirm the deletion.
Manage and Monitor
SAP Control Center for SAP Adaptive Server Enterprise 179
See also• SAP ASE Alerts on page 168
• Alert Types, Severities, and States for SAP ASE on page 174
• Creating an SAP ASE Alert on page 176
• Displaying SAP ASE Alerts on page 178
• Modifying an Alert on page 179
• Alert Subscriptions on page 180
• Alert Notifications on page 182
• Alert-Triggered Scripts on page 184
Alert SubscriptionsWhen an alert subscription is configured, the alert notifies the specified user or group of usersby e-mail message when the alert fires.
You can configure an alert subscription to send e-mail notifications when the alert reaches aseverity of warning, a severity of critical, or both.
You can also configure an alert subscription to escalate after a period of time that you specify.If the alert is not resolved within the escalation period, SAP Control Center e-mails anescalation message to the user or group whose address you provide for escalations, as well asto the primary subscriber. The escalation message is identical to the primary notificationmessage. SAP recommends that if you configure alert subscriptions to escalate, you do so onlyfor the most urgent alerts, those with a severity of critical.
See also• SAP ASE Alerts on page 168
• Alert Types, Severities, and States for SAP ASE on page 174
• Creating an SAP ASE Alert on page 176
• Displaying SAP ASE Alerts on page 178
• Modifying an Alert on page 179
• Deleting an Alert on page 179
• Alert Notifications on page 182
• Alert-Triggered Scripts on page 184
Adding or Modifying an Alert SubscriptionUse the Properties view to subscribe to an alert or edit an alert subscription.
PrerequisitesSpecify the e-mail server to which SAP Control Center will send e-mail alert notifications.
Manage and Monitor
180
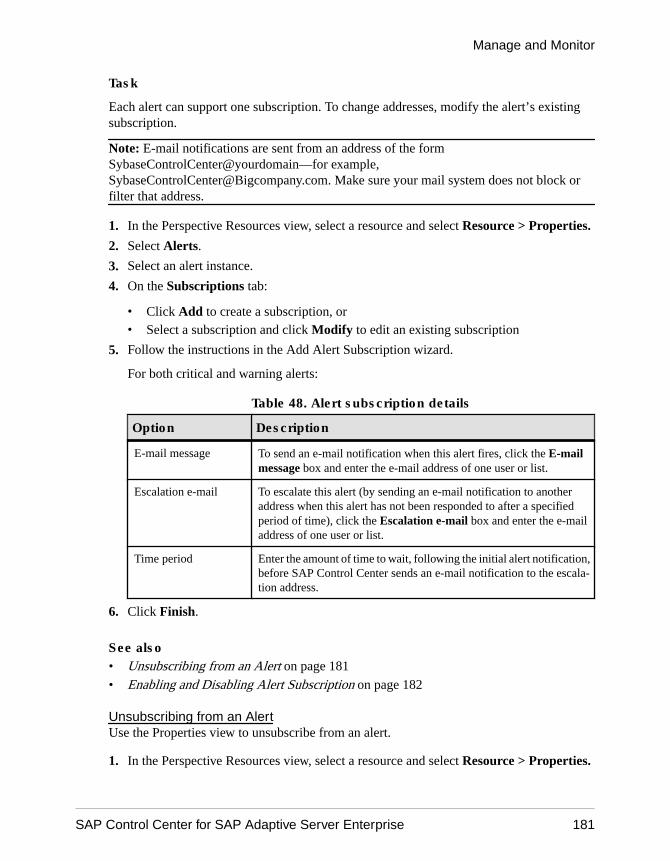
Task
Each alert can support one subscription. To change addresses, modify the alert’s existingsubscription.
Note: E-mail notifications are sent from an address of the formSybaseControlCenter@yourdomain—for example,[email protected]. Make sure your mail system does not block orfilter that address.
1. In the Perspective Resources view, select a resource and select Resource > Properties.
2. Select Alerts.
3. Select an alert instance.
4. On the Subscriptions tab:
• Click Add to create a subscription, or• Select a subscription and click Modify to edit an existing subscription
5. Follow the instructions in the Add Alert Subscription wizard.
For both critical and warning alerts:
Table 48. Alert subscription details
Option Description
E-mail message To send an e-mail notification when this alert fires, click the E-mailmessage box and enter the e-mail address of one user or list.
Escalation e-mail To escalate this alert (by sending an e-mail notification to anotheraddress when this alert has not been responded to after a specifiedperiod of time), click the Escalation e-mail box and enter the e-mailaddress of one user or list.
Time period Enter the amount of time to wait, following the initial alert notification,before SAP Control Center sends an e-mail notification to the escala-tion address.
6. Click Finish.
See also• Unsubscribing from an Alert on page 181
• Enabling and Disabling Alert Subscription on page 182
Unsubscribing from an AlertUse the Properties view to unsubscribe from an alert.
1. In the Perspective Resources view, select a resource and select Resource > Properties.
Manage and Monitor
SAP Control Center for SAP Adaptive Server Enterprise 181
2. Select Alerts.
3. Select an alert instance.
4. In the Subscriptions tab, select the alert subscription and click Drop.When you drop a regular subscription, any escalation subscription is also dropped.However, dropping an escalation does not affect the regular subscription.
5. Click Yes to confirm the deletion.
See also• Adding or Modifying an Alert Subscription on page 180• Enabling and Disabling Alert Subscription on page 182
Enabling and Disabling Alert SubscriptionUse the Properties view to enable and disable alert subscription.
1. In the Perspective Resources view, select a resource and select Resource > Properties.
2. Select Alerts.
3. Select an alert instance.
4. In the Subscriptions tab, select an alert subscription and:
• To enable subscription, click Enable.• To disable subscription, click Disable, then click Yes to confirm.
See also• Adding or Modifying an Alert Subscription on page 180• Unsubscribing from an Alert on page 181
Alert NotificationsAn alert notification indicates that an alert has been generated.
Alert notifications are produced when alerts fire. An alert fires if the performance indicator onwhich it is based passes the threshold or state specified for the severity level of warning. If theperformance indicator passes the threshold or state specified for the severity level of critical,the alert fires again and another notification is generated.
Detailed alert notifications appear in the Alert Monitor view. In addition, alerts appear asyellow ! symbols in the heat chart. You can set an alert to also send an e-mail message when itfires.
See also• SAP ASE Alerts on page 168• Alert Types, Severities, and States for SAP ASE on page 174• Creating an SAP ASE Alert on page 176• Displaying SAP ASE Alerts on page 178
Manage and Monitor
182
• Modifying an Alert on page 179
• Deleting an Alert on page 179
• Alert Subscriptions on page 180
• Alert-Triggered Scripts on page 184
Displaying Alert History and ResolutionsUse the Properties view to see historical information about resolved and unresolved alerts.
The History tab on the Alerts page of the Resource Properties view displays information aboutevery time this alert has fired. Each row of the table represents a single notification generatedby the selected alert.
The Resolutions tab displays information about alerts that have been resolved (closed) by anSAP Control Center administrator.
The History and Resolutions tabs display the 100 most recent alerts or alerts for the last 24hours, whichever is reached first.
1. In the Perspective Resources view, select a resource and select Resource > Properties.
2. Select Alerts.
3. Select the alert instance.
4. Click the History tab.
5. (Optional) Click the Resolutions tab.
See also• Resolving Alerts on page 183
Resolving AlertsAfter you address the cause of an alert, resolve it to remove it from the list of active alerts in theAlert Monitor.
PrerequisitesYou must be logged in as a user with SAP Control Center administrative privileges(sccAdminRole) to resolve alerts.
Task
1. In the Perspective Resources view, select a resource and select Resource > Properties.
2. In the left pane, select Alerts.
3. Select an alert instance in the top table.
4. Click Resolve.
5. Enter an explanation of how you resolved the alert.
Manage and Monitor
SAP Control Center for SAP Adaptive Server Enterprise 183
6. Click Submit.The state of the alert (shown in the State column) changes to Normal. Notifications on thisalert disappear from the Alert Monitor.
Note: See the Resolutions tab for details on resolved alerts.
See also• Displaying Alert History and Resolutions on page 183
Alert-Triggered ScriptsYou can write a shell script and configure an alert to execute the script.
Use scripts to help manage and respond to alerts. A script might trigger a visual alarm in acontrol center or send an e-mail message about the alert to a list of addresses (a way ofsupplementing the alert subscription feature, which accepts a single address).
When you configure an alert to execute a script, you:
• Specify the states or thresholds that set off the alert• Specify the severity level that triggers execution of the script• Supply an execution parameter string to be passed to the script
Scripts are executed under the login account used to start SAP Control Center. Make sure thataccount has permissions that allow it to perform the actions contained in all scripts.
When a script executes, SAP Control Center logs the start time, end time, and status and exitcodes to the alert services log. Log location:
• In a standard installation:
SCC-3_3\log\alert-server.log• In a shared disk installation:
SCC-3_3\instances\<instance-name>\log\alert-server.logWarning! Use caution in writing scripts. A poorly designed script can cause a blockingsituation, creating a deadlock in your SAP Control Center server.
See also• SAP ASE Alerts on page 168
• Alert Types, Severities, and States for SAP ASE on page 174
• Creating an SAP ASE Alert on page 176
• Displaying SAP ASE Alerts on page 178
• Modifying an Alert on page 179
• Deleting an Alert on page 179
• Alert Subscriptions on page 180
• Alert Notifications on page 182
Manage and Monitor
184
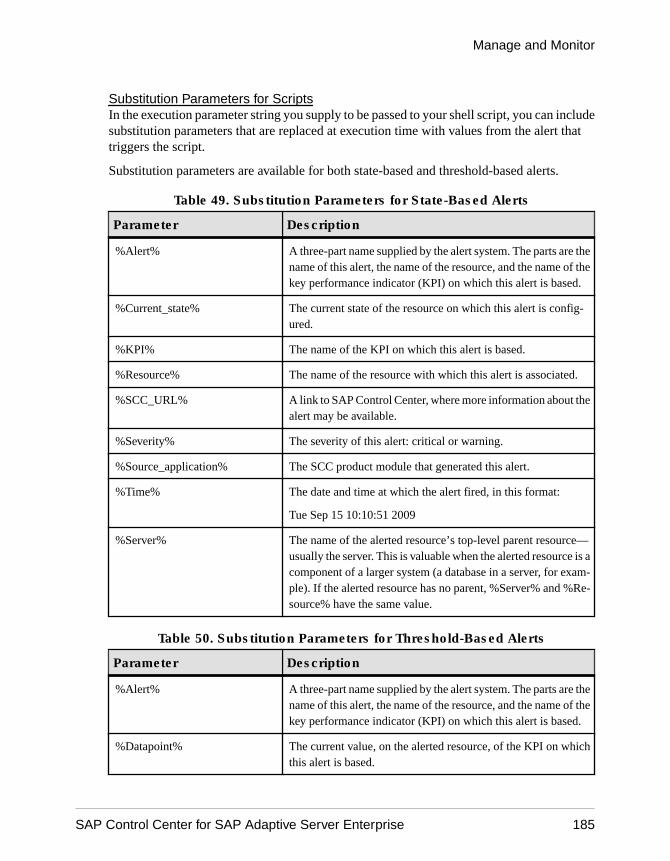
Substitution Parameters for ScriptsIn the execution parameter string you supply to be passed to your shell script, you can includesubstitution parameters that are replaced at execution time with values from the alert thattriggers the script.
Substitution parameters are available for both state-based and threshold-based alerts.
Table 49. Substitution Parameters for State-Based Alerts
Parameter Description
%Alert% A three-part name supplied by the alert system. The parts are thename of this alert, the name of the resource, and the name of thekey performance indicator (KPI) on which this alert is based.
%Current_state% The current state of the resource on which this alert is config-ured.
%KPI% The name of the KPI on which this alert is based.
%Resource% The name of the resource with which this alert is associated.
%SCC_URL% A link to SAP Control Center, where more information about thealert may be available.
%Severity% The severity of this alert: critical or warning.
%Source_application% The SCC product module that generated this alert.
%Time% The date and time at which the alert fired, in this format:
Tue Sep 15 10:10:51 2009
%Server% The name of the alerted resource’s top-level parent resource—usually the server. This is valuable when the alerted resource is acomponent of a larger system (a database in a server, for exam-ple). If the alerted resource has no parent, %Server% and %Re-source% have the same value.
Table 50. Substitution Parameters for Threshold-Based Alerts
Parameter Description
%Alert% A three-part name supplied by the alert system. The parts are thename of this alert, the name of the resource, and the name of thekey performance indicator (KPI) on which this alert is based.
%Datapoint% The current value, on the alerted resource, of the KPI on whichthis alert is based.
Manage and Monitor
SAP Control Center for SAP Adaptive Server Enterprise 185
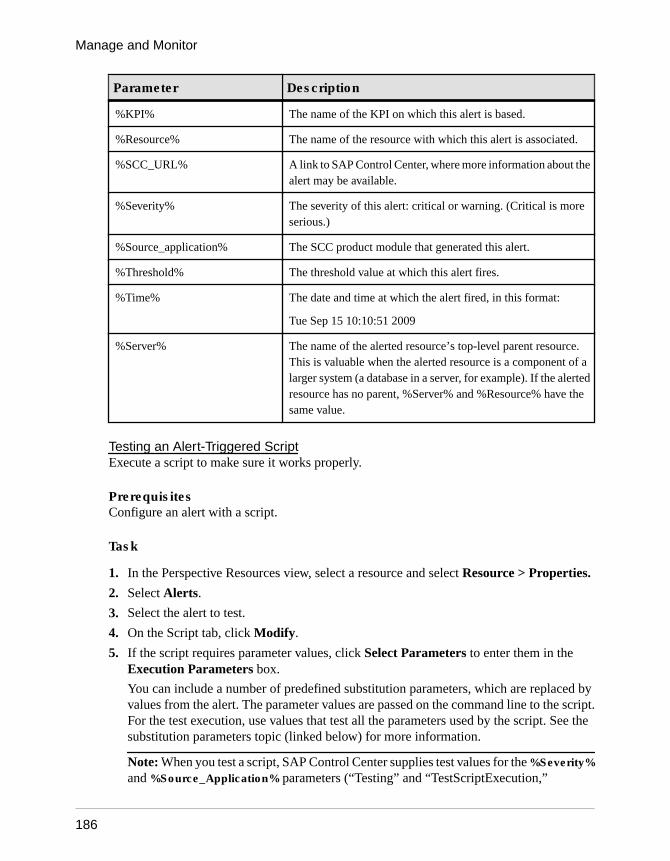
Parameter Description
%KPI% The name of the KPI on which this alert is based.
%Resource% The name of the resource with which this alert is associated.
%SCC_URL% A link to SAP Control Center, where more information about thealert may be available.
%Severity% The severity of this alert: critical or warning. (Critical is moreserious.)
%Source_application% The SCC product module that generated this alert.
%Threshold% The threshold value at which this alert fires.
%Time% The date and time at which the alert fired, in this format:
Tue Sep 15 10:10:51 2009
%Server% The name of the alerted resource’s top-level parent resource.This is valuable when the alerted resource is a component of alarger system (a database in a server, for example). If the alertedresource has no parent, %Server% and %Resource% have thesame value.
Testing an Alert-Triggered ScriptExecute a script to make sure it works properly.
PrerequisitesConfigure an alert with a script.
Task
1. In the Perspective Resources view, select a resource and select Resource > Properties.
2. Select Alerts.
3. Select the alert to test.
4. On the Script tab, click Modify.
5. If the script requires parameter values, click Select Parameters to enter them in theExecution Parameters box.
You can include a number of predefined substitution parameters, which are replaced byvalues from the alert. The parameter values are passed on the command line to the script.For the test execution, use values that test all the parameters used by the script. See thesubstitution parameters topic (linked below) for more information.
Note: When you test a script, SAP Control Center supplies test values for the %Severity%and %Source_Application% parameters (“Testing” and “TestScriptExecution,”
Manage and Monitor
186
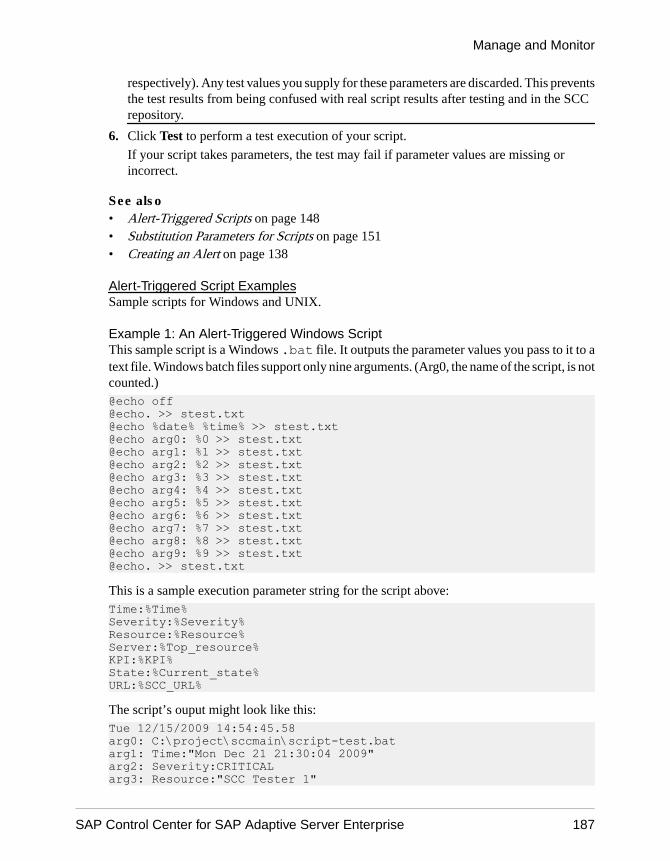
respectively). Any test values you supply for these parameters are discarded. This preventsthe test results from being confused with real script results after testing and in the SCCrepository.
6. Click Test to perform a test execution of your script.
If your script takes parameters, the test may fail if parameter values are missing orincorrect.
See also• Alert-Triggered Scripts on page 148• Substitution Parameters for Scripts on page 151• Creating an Alert on page 138
Alert-Triggered Script ExamplesSample scripts for Windows and UNIX.
Example 1: An Alert-Triggered Windows ScriptThis sample script is a Windows .bat file. It outputs the parameter values you pass to it to atext file. Windows batch files support only nine arguments. (Arg0, the name of the script, is notcounted.)@echo off@echo. >> stest.txt@echo %date% %time% >> stest.txt@echo arg0: %0 >> stest.txt@echo arg1: %1 >> stest.txt@echo arg2: %2 >> stest.txt@echo arg3: %3 >> stest.txt@echo arg4: %4 >> stest.txt@echo arg5: %5 >> stest.txt@echo arg6: %6 >> stest.txt@echo arg7: %7 >> stest.txt@echo arg8: %8 >> stest.txt@echo arg9: %9 >> stest.txt@echo. >> stest.txt
This is a sample execution parameter string for the script above:Time:%Time% Severity:%Severity% Resource:%Resource% Server:%Top_resource% KPI:%KPI% State:%Current_state% URL:%SCC_URL%
The script’s ouput might look like this:Tue 12/15/2009 14:54:45.58 arg0: C:\project\sccmain\script-test.bat arg1: Time:"Mon Dec 21 21:30:04 2009" arg2: Severity:CRITICAL arg3: Resource:"SCC Tester 1"
Manage and Monitor
SAP Control Center for SAP Adaptive Server Enterprise 187
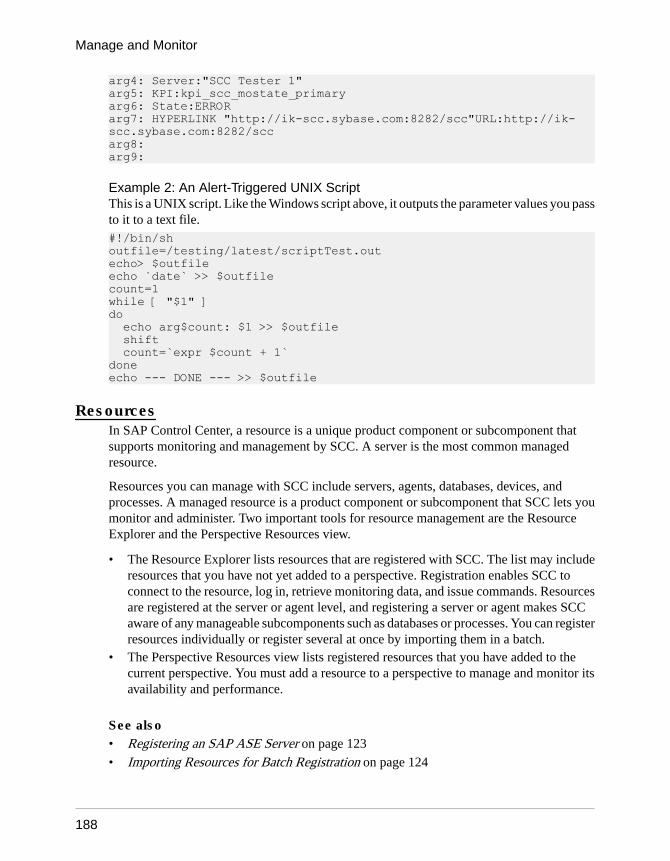
arg4: Server:"SCC Tester 1" arg5: KPI:kpi_scc_mostate_primary arg6: State:ERROR arg7: HYPERLINK "http://ik-scc.sybase.com:8282/scc"URL:http://ik-scc.sybase.com:8282/scc arg8: arg9:
Example 2: An Alert-Triggered UNIX ScriptThis is a UNIX script. Like the Windows script above, it outputs the parameter values you passto it to a text file.#!/bin/shoutfile=/testing/latest/scriptTest.outecho> $outfileecho `date` >> $outfilecount=1while [ "$1" ]do echo arg$count: $1 >> $outfile shift count=`expr $count + 1`doneecho --- DONE --- >> $outfile
ResourcesIn SAP Control Center, a resource is a unique product component or subcomponent thatsupports monitoring and management by SCC. A server is the most common managedresource.
Resources you can manage with SCC include servers, agents, databases, devices, andprocesses. A managed resource is a product component or subcomponent that SCC lets youmonitor and administer. Two important tools for resource management are the ResourceExplorer and the Perspective Resources view.
• The Resource Explorer lists resources that are registered with SCC. The list may includeresources that you have not yet added to a perspective. Registration enables SCC toconnect to the resource, log in, retrieve monitoring data, and issue commands. Resourcesare registered at the server or agent level, and registering a server or agent makes SCCaware of any manageable subcomponents such as databases or processes. You can registerresources individually or register several at once by importing them in a batch.
• The Perspective Resources view lists registered resources that you have added to thecurrent perspective. You must add a resource to a perspective to manage and monitor itsavailability and performance.
See also• Registering an SAP ASE Server on page 123
• Importing Resources for Batch Registration on page 124
Manage and Monitor
188
Unregistering a ResourceRemove one or more servers or other resources from SAP Control Center.
1. From the SAP Control Center toolbar, click the Launch Resource Explorer icon.
2. In the Resource Explorer, select the resources you want to unregister. Use Shift+click orControl+click to select multiple resources.
3. Select Resources > Unregister.
4. Click Yes to confirm the removal.
See also• Adding a Resource to a Perspective on page 189• Removing a Resource from a Perspective on page 190• Modifying a Resource’s Name and Connection Properties on page 190• Searching for Resources in the Resource Explorer on page 191• Registering an SAP ASE Server on page 123• Importing Resources for Batch Registration on page 124
Adding a Resource to a PerspectiveAdd one or more resources to the current perspective.
PrerequisitesRegister the resources.
TaskAdd servers or other resources to a perspective so you can monitor and manage them alongwith other resources in the same perspective.
1. From the SAP Control Center toolbar, click the Launch Resource Explorer icon.
2. Select the resources to add to your perspective. Use Shift-click or Control-click to selectmultiple resources.
3. Perform one of these actions:
• Select Resources > Add Resources to Perspective.• Drag and drop resources from the Resource Explorer onto the Perspective Resources
view. You can select and drag multiple resources.
See also• Unregistering a Resource on page 189• Removing a Resource from a Perspective on page 190• Modifying a Resource’s Name and Connection Properties on page 190• Searching for Resources in the Resource Explorer on page 191
Manage and Monitor
SAP Control Center for SAP Adaptive Server Enterprise 189

• Configuring SAP Adaptive Server Enterprise for Monitoring on page 122
• Registering an SAP ASE Server on page 123
• Importing Resources for Batch Registration on page 124
Removing a Resource from a PerspectiveRemove one or more resources from the current perspective.
Removing a resource from a perspective does not unregister the resource; it remains in anyother perspectives to which it has been added, and remains accessible in the ResourceExplorer.
1. Before removing a resource, make sure it is not in use by an open view.
• Close any views that display the resource.• If you prefer not to close the Administration Console, unselect the resource:
a) In the left pane of the Administration Console, click Resource Selection.b) Locate the resource in the list and click the box to unselect it.
2. If the Perspective Resources view is not open, click the Show/Hide PerspectiveResources View icon in the perspective toolbar.
3. In the Perspective Resources view, select the resources to remove. Use Shift-click orControl-click to select multiple resources.
4. Select Resource > Remove.
5. Click Yes to confirm the removal.
See also• Unregistering a Resource on page 189
• Adding a Resource to a Perspective on page 189
• Modifying a Resource’s Name and Connection Properties on page 190
• Searching for Resources in the Resource Explorer on page 191
Modifying a Resource’s Name and Connection PropertiesChange the properties of a resource registered with SAP Control Center.
1. In the Perspective Resources view, select a resource and select Resource >Properties .
2. (Optional) On the General Properties page, modify the name or description of theresource.
Enter the actual name of the managed server, using uppercase and lowercase letters. If thename registered in SAP Control Center does not exactly match the server name, somemonitoring functions, including the topology view, do not work.
3. (Optional) On the Connection Information page, modify:
• the host name
Manage and Monitor
190
• the port number• other options for the managed resource
4. Click OK (to apply the changes and close the properties dialog) or Apply (to apply thechanges and leave the dialog open).
See also• Unregistering a Resource on page 189• Adding a Resource to a Perspective on page 189• Removing a Resource from a Perspective on page 190• Searching for Resources in the Resource Explorer on page 191
Searching for Resources in the Resource ExplorerSearch for all your managed resources or narrow your search for a particular resource.
1. Click the Launch Resource Explorer icon.
2. If the Filter pane is not visible in the Resource Explorer window, select View > Filter fromthe view’s menu bar.
3. Enter your search term in the Filter string field.
The search term can be any string that appears in the tabular portion of the ResourceExplorer, such as the name, or part of the name, of a server or a resource type (ASE Server,for example).
4. (Optional) Select a filtering setting:
• Match case – search for resources whose displayed data includes the search term,including uppercase and lowercase letters; or
• Exact match – search for resources whose displayed data includes an item identical tothe search term.
5. (Optional) Select a column from the Filter on list to restrict your search to that column.
See also• Unregistering a Resource on page 189• Adding a Resource to a Perspective on page 189• Removing a Resource from a Perspective on page 190• Modifying a Resource’s Name and Connection Properties on page 190
PerspectivesA perspective is a named container for a set of one or more managed resources. You cancustomize perspectives to provide the information you need about your environment.
As the main workspaces in the SAP Control Center window, perspectives let you organizemanaged resources. You might assign resources to perspectives based on where the resourcesare located (continents, states, or time zones, for example), what they are used for, which
Manage and Monitor
SAP Control Center for SAP Adaptive Server Enterprise 191

group owns them, or which administrator manages them. Perspectives appear as tabs in themain window.
Every perspective includes a Perspective Resources view, which lists the resources in thatperspective and provides high-level status and descriptive information. Use the View menu toswitch from detail view to icon view and back.
You can open additional views —the heat chart, statistics chart, or alert monitor, for example— as needed to manage the perspective’s resources. The views in a perspective displayinformation only about resources in that perspective.
One resource can appear in many perspectives.
Creating a PerspectiveCreate a perspective in which you can add and manage resources.
1. From the application menu bar, select Perspective > Create.
2. Enter a name for your perspective. The name can contain up to 255 characters.
3. Click OK.
See also• Removing a Perspective on page 192
• Renaming a Perspective on page 192
Removing a PerspectiveDelete a perspective window.
1. Select the perspective tab you want to delete.
2. In the main menu bar, select Perspective > Delete.The selected perspective disappears. If there are other perspectives, SAP Control Centerdisplays one.
See also• Creating a Perspective on page 192
• Renaming a Perspective on page 192
Renaming a PerspectiveChange the name of your perspective.
1. Select the perspective tab you want to rename.
2. From the main menu bar, select Perspective > Rename..
3. Enter the new name for your perspective.
4. Click OK.
Manage and Monitor
192
See also• Creating a Perspective on page 192
• Removing a Perspective on page 192
ViewsUse views to manage one or more resources within a perspective.
In SAP Control Center, views are the windows you use to monitor and manage a perspective’sresources. You can re-arrange, tile, cascade, minimize, maximize, and generally control thedisplay of the views in your perspective.
Each perspective includes these views:
• Perspective Resources• Administration Console• Heat chart• Alert monitor• Component log viewer• Views that exist for each managed resource. These vary by resource type, but typically
include the statistics chart, the properties view, and a monitoring view.
Note: SAP Control Center views are not related to database views; they serve a completelydifferent purpose.
Managing a ViewOpen, close, minimize, maximize, or restore a view in the current perspective.
You can:
Task Action
Open a view Do one of the following:
• In the Perspective Resources view, select a resource, click the drop-down arrow to the right of the resource name, and select the view toopen.
• In the application menu bar, select View > Open and choose a view.
Close a view Select the view to close. In the application menu bar, select View > Close.You can also click the X in the view’s upper right corner.
Maximize a view Click the box in the view’s upper right corner. The view enlarges to fill theentire perspective window. Click the box again to return the view to itsformer size.
Minimize a view Click the _ in the view’s upper right corner. The view shrinks to a smalltab at the bottom of the perspective window.
Manage and Monitor
SAP Control Center for SAP Adaptive Server Enterprise 193
Task Action
Minimize all views In the application menu bar, select View > Minimize All Views.
Restore a view Click the box on the minimized tab to maximize the view. Click the boxagain to return the view to its former (smaller) size so you can see otherviews at the same time.
Bring a view to the front In the application menu bar, select View > Select and choose the view youwant from the submenu.
See also• Arranging View Layout in a Perspective on page 194
Arranging View Layout in a PerspectiveUse the view layout options to manage your perspective space.
Click one of these icons in the SAP Control Center toolbar:
Icon Action
Close All Open Views
Minimize All Open Views
Restore All Minimized Views
Cascade All Open Views
Tile All Open Views Vertically
Tile All Open Views Horizontally
In a cascade, views overlap; in tiling arrangements, they do not.
Alternatively, you can arrange view layouts from the SAP Control Center menu bar. From themenu bar, select Perspective > Arrange and select your view layout.
See also• Managing a View on page 193
Manage and Monitor
194
InstancesDeploy, remove, refresh, or convert SAP Control Center server or agent instances runningfrom an installation on a shared disk.
Enabling and Disabling Shared-Disk ModeTurn on or turn off shared-disk mode, which allows you to run multiple SAP Control Centeragents and servers from a single installation on a shared disk.
PrerequisitesInstall SAP Control Center on a shared disk. See the SCC-product-name Installation Guide.
Task
Shared-disk mode affects the entire installation; do not enable or disable individual instances.
Disabling shared-disk mode leaves the instances’ file systems intact under <SCC-install-directory>/instances, but the instances cannot run. If you reenable, theinstances are able to run again.
1. Change to SCC-3_3/bin.
2. Enable or disable shared disk mode.
To enable shared disk mode:sccinstance -enable
To disable shared disk mode:sccinstance -disable
See also• Deploying an Instance from a Shared Disk Installation on page 195
• Refreshing or Converting an Instance on page 197
• Removing an Instance on page 198
• Shared-Disk Mode on page 199
• sccinstance Command on page 200
Deploying an Instance from a Shared Disk Installation(Optional) Create an SAP Control Center server or agent from an installation on a shareddisk.
Prerequisites
• Install SAP Control Center on a shared disk.• Enable shared-disk mode.
Manage and Monitor
SAP Control Center for SAP Adaptive Server Enterprise 195
Task
1. Log in to the host on which you plan to run the SCC server or agent.
Note: You can create an instance on one host and run it on another host, but doing sointerferes with the predeployment checks run by sccinstance. Such a deployment mightgenerate errors (port conflicts, for example). If you are confident that the errors are causedby problems that will not be present on the host where you plan to run the instance, use the-force option to create the instance.
2. Change to SCC-3_3/bin.
3. Create the instance as an SCC agent if you plan to run a managed server on this host. Createthe instance as an SCC server if you plan to manage other SAP servers from this host.
To create an SCC agent called Boston-agent and configure it to run as a Windows service:
sccinstance -create -agent -instance Boston-agent -service
To create an SCC server called Boston and configure it to run as a Windows service:
sccinstance -create -server -instance Boston -service
On UNIX systems, omit the -service option.
4. If other SCC instances will run on this host, change the port assignments for the newinstance. Change the instance names and port values in the sample commands to suit yourenvironment, but take care to specify ports that are not in use by another SCC instance orany other application or server.
This command changes the port assignments for an SCC agent called myagent:sccinstance -refresh -instance myagent -portconfig rmi=8888,jiniHttp=9093,jiniRmi=9096,tds=9997
This command changes the port assignments for an SCC server called myserver:sccinstance -refresh -server -instance myserver -portconfig rmi=8889,db=3640,http=7072,https=7073,jiniHttp=9094,jiniRmi=9097,msg=2002,tds=9996
5. (Optional) List the instances deployed from this installation:sccinstance -list
6. (Optional) If you are setting up an instance in UNIX, configure it to run as a service. SeeStarting and Stopping SAP Control Center in UNIX.
Next
When you manage and maintain instances, keep in mind that the directory structure forinstances is different from that of singleton installations. In file paths in SCC help, replaceSCC-3_3 or <scc-install-directory> with SCC-3_3/instances/<instance-name>.
Manage and Monitor
196
For example, the path to the log directory, SCC-3_3/log, becomes this for an instancecalled kalamazoo:
SCC-3_3/instances/kalamazoo/log
See also• Enabling and Disabling Shared-Disk Mode on page 195
• Refreshing or Converting an Instance on page 197
• Removing an Instance on page 198
• Shared-Disk Mode on page 199
• sccinstance Command on page 200
• Starting and Stopping SAP Control Center in Windows on page 73
• Starting and Stopping SAP Control Center in UNIX on page 76
Refreshing or Converting an InstanceRefresh an SAP Control Center server or agent deployed from an installation on a shared disk,or convert between server and agent.
PrerequisitesShut down the instance.
Task
When you refresh an instance of an SCC server or agent, SCC recopies files from the maininstallation on the shared disk (SCC-3_3/) into the instance’s subdirectories (SCC-3_3/instances/<instance-name>). In Windows, SCC recopies all the files that make upthis instance; in UNIX, it recopies all this instance’s services and plug-ins.
Refreshing an instance preserves configuration and logs but overwrites the repository, sohistorical performance data is lost.
As part of a refresh, you can:
• Convert a server to an agent• Convert an agent to a server• Reassign ports on the instance
Converting from an agent to a server adds server-related files to the instance; converting from aserver to an agent removes files.
1. Change to SCC-3_3/bin.
2. Refresh the instance. Change the instance names and port values in the sample commandsto suit your environment, but take care to specify ports that are not in use by another SCCinstance or any other application or server.
Manage and Monitor
SAP Control Center for SAP Adaptive Server Enterprise 197
This command refreshes an SCC server called boston. If boston is an agent, it becomes aserver after the refresh.
sccinstance -refresh -server -instance boston
This command refreshes an SCC agent called kalamazoo. If kalamazoo is a server, itbecomes an agent after the refresh.
sccinstance -refresh -agent -instance kalamazoo
This command refreshes an SCC agent called kalamazoo and reassigns kalamazoo’s RMIand TDS ports. If kalamazoo is a server, it becomes an agent after the refresh.
sccinstance -refresh -agent -instance kalamazoo -portconfig rmi=7070,tds=7071
3. (Optional) Display the status of the refreshed instance. Replace the name in the samplecommand with your instance’s name, or omit the -instance option to display the status ofthe instance on this host.
sccinstance -instance kalamazoo
See also• Enabling and Disabling Shared-Disk Mode on page 195
• Deploying an Instance from a Shared Disk Installation on page 195
• Removing an Instance on page 198
• Shared-Disk Mode on page 199
• sccinstance Command on page 200
Removing an InstanceDelete an SAP Control Center server or agent deployed from an installation on a shared disk.
PrerequisitesShut down the instance.
Task
Removing an SCC instance deletes the instance’s files and directories (SCC-3_3/instances/<instance-name> and its contents) from the installation.
You cannot restore a removed instance.
1. Change to SCC-3_3/bin.
2. Remove the instance. Change the instance names in the sample commands to suit yourenvironment.
Manage and Monitor
198
This command removes an SCC server called porcupine if it is not running; if it is running,you see an error.
sccinstance -remove -instance porcupine
This command removes the SCC agent on the current host if it is not running. If the agent isrunning, the command returns an error.
sccinstance -remove
See also• Enabling and Disabling Shared-Disk Mode on page 195• Deploying an Instance from a Shared Disk Installation on page 195• Refreshing or Converting an Instance on page 197• Shared-Disk Mode on page 199• sccinstance Command on page 200
Shared-Disk ModeShared-disk mode lets you run multiple SAP Control Center instances—SCC servers, SCCagents, or a mixture of the two—from a single installation of the product.
The shared-disk capability enables SCC servers or agents on the installation host or on remotehosts to access and execute from the same installation. This feature is especially useful if youplan to use SCC to manage SAP® ASE clusters, SAP® Sybase® Event Stream Processorclusters, or SAP Sybase IQ multiplexes.
After installing SCC on a shared disk, use the sccinstance command to enable shared-diskmode and deploy instances. sccinstance copies the files needed for the instance into a newdirectory structure. The path takes the form <SCC-install-directory>/instances/<instance-name> (for example, SCC-3_3/instances/SCCserver-1).
You can specify a name for each instance. If you do not supply a name, the instance namedefaults to the host name.
An instance runs on the host on which you start it. When shared-disk mode is enabled, SCCservers and agents run out of the SCC-3_3/instances subdirectories, not from the basefile system.
In shared-disk mode, changes made to configuration files in the base file system (everythingunder SCC-3_3 except the SCC-3_3/instances branch) are copied to any instancedeployed thereafter. Previously deployed instances are not affected.
Use sccinstance to deploy, remove, refresh, or convert an instance; to configure an instance’sports; and to configure a Windows instance to run as a service. Perform other tasks, includingconfiguring a UNIX instance to run as a service, and all other configuration, using the toolsand procedures documented for all installations. Use tools provided by the UI wherever
Manage and Monitor
SAP Control Center for SAP Adaptive Server Enterprise 199
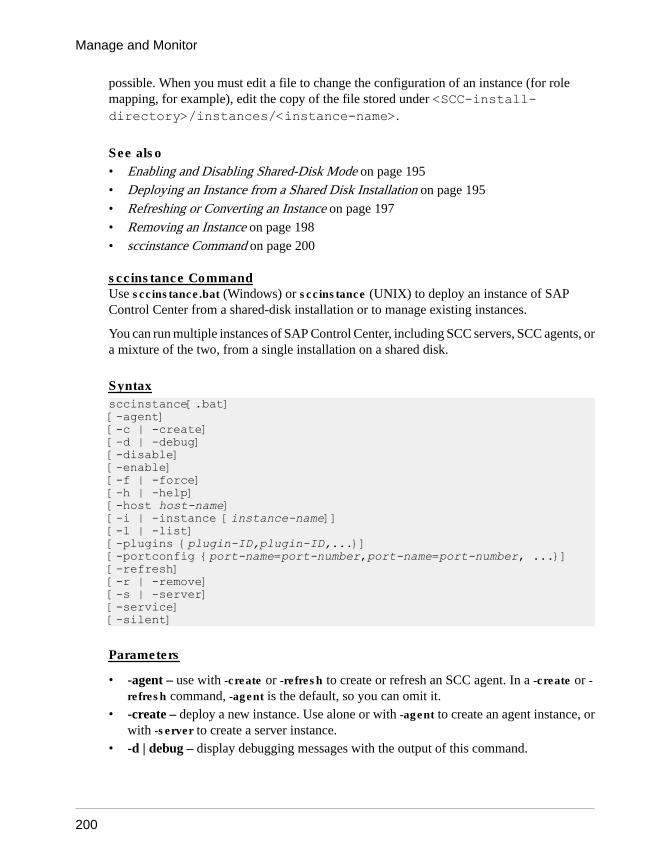
possible. When you must edit a file to change the configuration of an instance (for rolemapping, for example), edit the copy of the file stored under <SCC-install-directory>/instances/<instance-name>.
See also• Enabling and Disabling Shared-Disk Mode on page 195
• Deploying an Instance from a Shared Disk Installation on page 195
• Refreshing or Converting an Instance on page 197
• Removing an Instance on page 198
• sccinstance Command on page 200
sccinstance CommandUse sccinstance.bat (Windows) or sccinstance (UNIX) to deploy an instance of SAPControl Center from a shared-disk installation or to manage existing instances.
You can run multiple instances of SAP Control Center, including SCC servers, SCC agents, ora mixture of the two, from a single installation on a shared disk.
Syntaxsccinstance[.bat] [-agent] [-c | -create] [-d | -debug][-disable] [-enable][-f | -force][-h | -help] [-host host-name][-i | -instance [instance-name]] [-l | -list][-plugins {plugin-ID,plugin-ID,...}] [-portconfig {port-name=port-number,port-name=port-number, ...}][-refresh] [-r | -remove] [-s | -server] [-service][-silent]
Parameters
• -agent – use with -create or -refresh to create or refresh an SCC agent. In a -create or -refresh command, -agent is the default, so you can omit it.
• -create – deploy a new instance. Use alone or with -agent to create an agent instance, orwith -server to create a server instance.
• -d | debug – display debugging messages with the output of this command.
Manage and Monitor
200
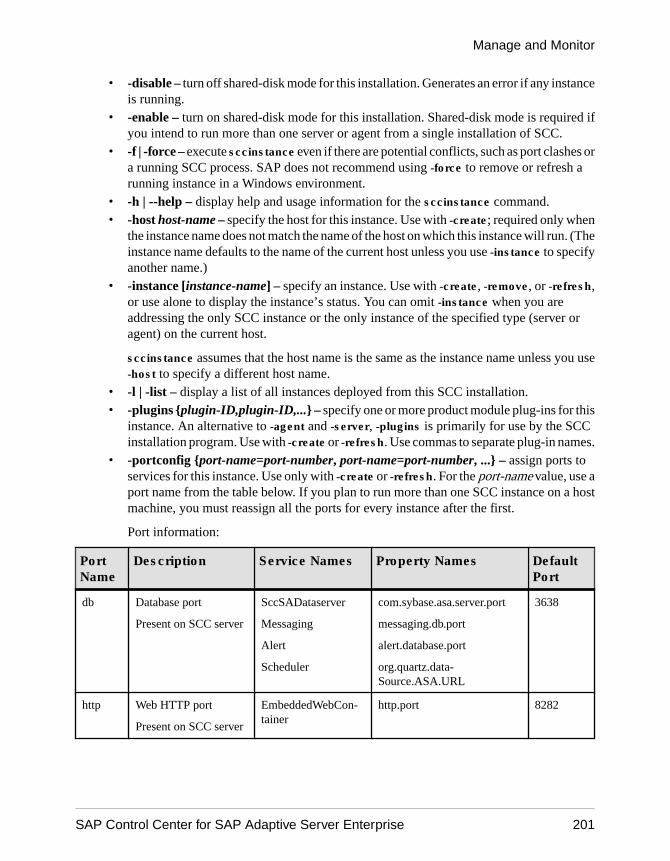
• -disable – turn off shared-disk mode for this installation. Generates an error if any instanceis running.
• -enable – turn on shared-disk mode for this installation. Shared-disk mode is required ifyou intend to run more than one server or agent from a single installation of SCC.
• -f | -force – execute sccinstance even if there are potential conflicts, such as port clashes ora running SCC process. SAP does not recommend using -force to remove or refresh arunning instance in a Windows environment.
• -h | --help – display help and usage information for the sccinstance command.• -host host-name – specify the host for this instance. Use with -create; required only when
the instance name does not match the name of the host on which this instance will run. (Theinstance name defaults to the name of the current host unless you use -instance to specifyanother name.)
• -instance [instance-name] – specify an instance. Use with -create, -remove, or -refresh,or use alone to display the instance’s status. You can omit -instance when you areaddressing the only SCC instance or the only instance of the specified type (server oragent) on the current host.
sccinstance assumes that the host name is the same as the instance name unless you use-host to specify a different host name.
• -l | -list – display a list of all instances deployed from this SCC installation.• -plugins {plugin-ID,plugin-ID,...} – specify one or more product module plug-ins for this
instance. An alternative to -agent and -server, -plugins is primarily for use by the SCCinstallation program. Use with -create or -refresh. Use commas to separate plug-in names.
• -portconfig {port-name=port-number, port-name=port-number, ...} – assign ports toservices for this instance. Use only with -create or -refresh. For the port-name value, use aport name from the table below. If you plan to run more than one SCC instance on a hostmachine, you must reassign all the ports for every instance after the first.
Port information:
PortName
Description Service Names Property Names DefaultPort
db Database port
Present on SCC server
SccSADataserver
Messaging
Alert
Scheduler
com.sybase.asa.server.port
messaging.db.port
alert.database.port
org.quartz.data-Source.ASA.URL
3638
http Web HTTP port
Present on SCC server
EmbeddedWebCon-tainer
http.port 8282
Manage and Monitor
SAP Control Center for SAP Adaptive Server Enterprise 201
PortName
Description Service Names Property Names DefaultPort
https Web HTTPS (secureHTTP) port
Present on SCC server
EmbeddedWebCon-tainer
https.port 8283
jiniHttp JINI HTTP server
Present on SCC serverand SCC agent
Jini httpPort 9092
jiniR-mid
JINI remote method in-vocation daemon
Present on SCC serverand SCC agent
Jini rmidPort 9095
msg Messaging port
Present on SCC server
Messaging messaging.port 2000
rmi RMI port
Present on SCC serverand SCC agent
RMI port 9999
tds Tabular Data Stream™
port (used to communi-cate with other SAP da-tabase products)
Present on SCC serverand SCC agent
Tds tdsPort 9998
• -refresh – recopy all the files that make up this instance (Windows) or all this instance’sservices and plug-ins (UNIX). Refreshing preserves any service or plug-in configurationin the deployed instance.
You can also use -refresh to convert a server to an agent or an agent to a server (see theexamples). Files are removed or added to change the function of the instance. Use alone orwith -agent to refresh an agent instance, or with -server to refresh a server instance.Generates an error if the instance is running.
• -r | -remove – delete an instance. Use alone or with -instance. Generates an error if theinstance is running. You cannot restore a removed instance.
• -s | -server – use with -create or -refresh to create or refresh an SCC server, including anyproduct modules available.
• -service – use with -create or -remove to create or remove a Windows service for thisinstance. You must be logged in to Windows as an administrator to use this option.
• -silent – suppress the output of sccinstance.
Manage and Monitor
202
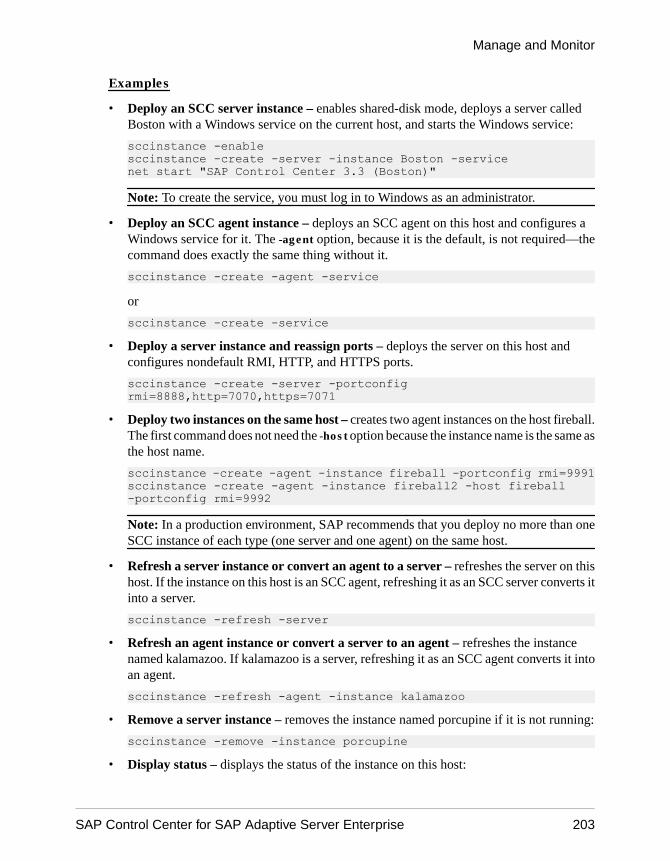
Examples
• Deploy an SCC server instance – enables shared-disk mode, deploys a server calledBoston with a Windows service on the current host, and starts the Windows service:
sccinstance -enablesccinstance -create -server -instance Boston -servicenet start "SAP Control Center 3.3 (Boston)"
Note: To create the service, you must log in to Windows as an administrator.
• Deploy an SCC agent instance – deploys an SCC agent on this host and configures aWindows service for it. The -agent option, because it is the default, is not required—thecommand does exactly the same thing without it.
sccinstance -create -agent -service
or
sccinstance -create -service• Deploy a server instance and reassign ports – deploys the server on this host and
configures nondefault RMI, HTTP, and HTTPS ports.
sccinstance -create -server -portconfig rmi=8888,http=7070,https=7071
• Deploy two instances on the same host – creates two agent instances on the host fireball.The first command does not need the -host option because the instance name is the same asthe host name.
sccinstance -create -agent -instance fireball -portconfig rmi=9991sccinstance -create -agent -instance fireball2 -host fireball -portconfig rmi=9992
Note: In a production environment, SAP recommends that you deploy no more than oneSCC instance of each type (one server and one agent) on the same host.
• Refresh a server instance or convert an agent to a server – refreshes the server on thishost. If the instance on this host is an SCC agent, refreshing it as an SCC server converts itinto a server.
sccinstance -refresh -server• Refresh an agent instance or convert a server to an agent – refreshes the instance
named kalamazoo. If kalamazoo is a server, refreshing it as an SCC agent converts it intoan agent.
sccinstance -refresh -agent -instance kalamazoo• Remove a server instance – removes the instance named porcupine if it is not running:
sccinstance -remove -instance porcupine• Display status – displays the status of the instance on this host:
Manage and Monitor
SAP Control Center for SAP Adaptive Server Enterprise 203
sccinstance• List all instances – displays a list of all SCC server and agent instances deployed from this
SCC installation:
sccinstance -list• Scenario: Remove an instance by force – suppose you have inadvertently deployed two
SCC agent instances on the same host:
$ sccinstance -list2 SCC instances deployed:SCC instance node1 deployed in agent mode for host node1 RMI port 9999SCC instance node2 deployed in agent mode for host node2 RMI port 9999
Both instances use the same RMI port. You must either reassign ports for one instance orremove it. But you get an error if you try remove an instance when another instance isrunning on the same host:
$ sccinstance -instance node2 -remove[ERROR] Command execution failed.[ERROR] SCC instance node2 could not be removed because it is running. Shut down the SCC before removing the instance.
Use the -force option to override the error and force the removal of the second agentinstance:
$ sccinstance -instance node2 -remove -forceRemoving SCC instance node2 ...SCC instance node2 was successfully removed.
Permissions
sccinstance permission defaults to all users, except as noted for certain parameters.
See also• Enabling and Disabling Shared-Disk Mode on page 195• Deploying an Instance from a Shared Disk Installation on page 195• Refreshing or Converting an Instance on page 197• Removing an Instance on page 198• Shared-Disk Mode on page 199• Instances on page 195
RepositoryThe SAP Control Center embedded repository stores information related to managedresources, as well as user preference data, operational data, and statistics.
You can back up the repository database on demand, schedule automatic backups, restore therepository from backups, and configure repository purging options. Full and incremental
Manage and Monitor
204
backups are available. A full backup copies the entire repository. An incremental backupcopies the transaction log, capturing any changes since the last full or incremental backup.
By default, SAP Control Center saves backups as follows:
• Each full backup is stored in its own subdirectory in SCC-3_3/backup.
• Each incremental backup is stored in a file in SCC-3_3/backup/incremental.
SAP recommends that you periodically move backup files to a secondary storage location toprevent the installation directory from becoming too large.
Scheduling Backups of the RepositoryConfigure full and incremental backups of the repository to occur automatically.
PrerequisitesDetermine your backup strategy, including when to perform full backups and incrementalbackups. For example, you might schedule incremental backups every day and a full backupevery Saturday.
You must have administrative privileges (sccAdminRole) to perform this task.
Task
A full backup copies the entire repository. An incremental backup copies the transaction log,capturing any changes since the last full or incremental backup.
1. From the main menu, select Application > Administration.
2. In the left pane, select Repository.
3. Click the Full Backup tab.
4. (Optional) To change the directory in which backups will be stored, click Browse andnavigate to the desired directory.
5. Select Schedule a Regular Backup.
6. Specify the day you want scheduled backups to begin. Enter a Start date or click thecalendar and select a date.
7. (Optional) Use the Time and AM/PM controls to specify the time at which backups occur.
8. Specify how often backups occur by setting the Repeat interval and selecting hours, days,or weeks.
9. (Optional) To purge the repository after each backup, select Run a repository purge afterthe backup completes.
10. If you include purging in the backup schedule, go to the Size Management tab andunselect Automatically purge the repository periodically to disable automatic purging.
11. Click Apply to save the schedule.
Manage and Monitor
SAP Control Center for SAP Adaptive Server Enterprise 205
12. Click the Incremental Backup tab and repeat the steps above to schedule incrementalbackups to occur between full backups.
NextSet purging options on the Size Management tab.
See also• Modifying the Backup Schedule on page 206
• Forcing an Immediate Backup on page 207
• Restoring the Repository from Backups on page 207
• Configuring Repository Purging on page 209
Modifying the Backup ScheduleSuspend or resume repository backups or change the backup schedule.
PrerequisitesYou must have administrative privileges (sccAdminRole) to perform this task.
Task
1. From the main menu, select Application > Administration.
2. In the left pane, select Repository.
3. Choose the type of backup to modify:
• Click the Full Backup tab, or• Click the Incremental Backup tab.
4. (Optional) To suspend or resume the backup schedule, select or unselect Schedule aRegular Backup.When you unselect (uncheck) this option, the scheduling area is grayed out and scheduledbackups no longer occur. However, the schedule is preserved and you can reinstate it at anytime.
5. To change the backup schedule, edit the Start date, Time, Repeat interval, or units. Youcan also select or unselect Run a repository purge after the backup completes.
6. Click Apply to save the schedule.
See also• Scheduling Backups of the Repository on page 205
• Forcing an Immediate Backup on page 207
• Restoring the Repository from Backups on page 207
• Configuring Repository Purging on page 209
Manage and Monitor
206
Forcing an Immediate BackupPerform an unscheduled full or incremental backup of the repository.
PrerequisitesYou must have administrative privileges (sccAdminRole) to perform this task.
Task
1. From the main menu, select Application > Administration.
2. In the left pane, select Repository.
3. Choose the type of backup to run:
• Click the Full Backup tab, or• Click the Incremental Backup tab.
4. Click Back up Now.
SAP Control Center saves the backup to the directory shown in the Location field.
See also• Scheduling Backups of the Repository on page 205
• Modifying the Backup Schedule on page 206
• Restoring the Repository from Backups on page 207
• Configuring Repository Purging on page 209
Restoring the Repository from BackupsLoad backup files into the repository database to revert undesirable changes or to recover froma catastrophic failure.
If you configured SAP Control Center to store backups somewhere other than the defaultlocation, change the source directory in the copy commands in this procedure.
1. Shut down SAP Control Center.
2. Copy the most recent full backup from SCC-3_3/backup/<generated_directory_name> to SCC-3_3/services/Repository. Forexample:
Windows:copy C:\sap\SCC-3_3\backup\repository.270110161105\scc_repository.db C:\sap\SCC-3_3\services\Repository
UNIX:
Manage and Monitor
SAP Control Center for SAP Adaptive Server Enterprise 207
cp /opt/sap/SCC-3_3/backup/repository.270110161105/scc_repository.db /opt/sap/SCC-3_3/services/Repository
3. If you have no incremental backups to load,
a) Also copy the log file from SCC-3_3/backup/<generated_directory_name> to SCC-3_3/services/Repository.For example:
Windows:copy C:\sap\SCC-3_3\backup\repository.270110161105\scc_repository.log C:\sap\SCC-3_3\services\Repository
UNIX:cp /opt/sap/SCC-3_3/backup/repository.270110161105/scc_repository.log /opt/sap/SCC-3_3/services/Repository
b) Skip to step 5 on page 208.
4. (Optional) To load incremental backups, start the repository database using the -ad option,which directs it to load transaction logs (incremental backups) from the incrementaldirectory. (The database loads full backups automatically.) For example:
Windows:cd sap\SCC-3_3\services\Repository
..\..\bin\sa\bin_<platform>\dbsrv11.exe scc_repository -ad sap\SCC-3_3\backup\incremental
UNIX:cd /opt/sap/SCC-3_3/services/Repository
../../bin/sa/bin_<platform>/dbsrv11 scc_repository -ad /opt/sap/SCC-3_3/backup/incremental
The repository database loads the full backup and any subsequent incremental backupspresent in the incremental directory. Incremental backups are loaded in date order.After loading and saving, the database shuts down.
5. Start SAP Control Center.If you loaded incremental backups, SAP Control Center starts normally (that is, no furtherrecovery occurs). If you copied a full backup to the Repository directory, the databaserecovers the repository from the full backup.
Example: Loading incremental backups into the repository database
These commands start SQL Anywhere® on a 32-bit Windows machine:
% cd C:\sap\SCC-3_3\services\Repository% ..\..\bin\sa\bin_windows32\dbsrv11.exe scc_repository -ad C:\sap\SCC-3_3\backup\incremental
Manage and Monitor
208
These commands start SQL Anywhere on a 64-bit machine running Solaris:
$ cd /opt/sap/SCC-3_3/services/Repository$ ../../bin/sa/bin_sunsparc64/dbsrv11 scc_repository -ad /opt/sap/SCC-3_3/backup/incremental
See also• Scheduling Backups of the Repository on page 205
• Modifying the Backup Schedule on page 206
• Forcing an Immediate Backup on page 207
• Configuring Repository Purging on page 209
Configuring Repository PurgingChange repository purging options.
PrerequisitesYou must have administrative privileges (sccAdminRole) to perform this task.
Task
As you decide how to purge your repository, consider that:
• Purging keeps the repository from absorbing too much disk space.• By default, purging is enabled. It occurs once a day and purges data older than one day.• Statistics and alert history can help you detect trends in server performance and user
behavior. The SAP Control Center statistics chart can graph performance data over aperiod of a year or more if the data is available. If you have enough disk space, considersaving data for a longer period of time or disabling the purging of statistics or alert history.
• Changing the purge frequency and other options might affect SAP Control Centerperformance.
Note: If you configure purging as part of a scheduled backup of the repository, disableautomatic purging on the Size Management tab.
1. From the main menu bar, select Application > Administration.
2. Select Repository.
3. Click the Size Management tab.
4. To turn automatic purging on or off, click Automatically purge the repositoryperiodically.
Turn this option off if purging is configured as part of your scheduled full or incrementalbackups.
5. Click purge options to turn them on or off:
• Purge statistics
Manage and Monitor
SAP Control Center for SAP Adaptive Server Enterprise 209
• Purge alert history
6. In Purge data older than, enter the number of days after which to purge repository data.
7. Click Apply, then OK.
See also• Scheduling Backups of the Repository on page 205• Modifying the Backup Schedule on page 206• Forcing an Immediate Backup on page 207• Restoring the Repository from Backups on page 207
LoggingLogging helps SAP Control Center administrators identify and track errors and other systemevents by recording messages about the events in log files.
SAP Control Center maintains these logs:
• The client log – captures messages about activities in the browser-based clientcomponents. These messages are generated by the component product modules to displayinformation that is pertinent to the user but not critical enough to warrant a pop-up. Sybasealso uses the client log to trace client browser operations.
• Server logs – capture messages about activities during the initialization sequence, such asstarting services; auditing messages recording logins and logouts; errors such as missedscheduled events; and other events on the server. Server logs include:• Component logs, which record only events concerning individual product modules• The SCC agent log, which is a composite log. In an SCC server, the agent log records
events in all product modules and in the SAP Control Center framework. In an SCCagent, the agent log records events in the agent.
• The repository log – captures information about inserts and updates that have occurred inthe SAP Control Center repository, a SQL Anywhere database. This log is inSCC-3_3\log\repository.log.
• The alert services log – captures information about alert service status and events,including execution of alert-triggered scripts (start time, end time, and status and exitcodes). This log is in SCC-3_3\log\alert-server.log.
Viewing the SAP ASE Component LogView SAP ASE event logs.
The log files are located at:
• Windows – %SCC_HOME%\SCC-3_3\plugins\ASEMAP\log\ASEMAP.log• UNIX – $SCC_HOME/SCC-3_3/plugins/ASEMAP/log/ASEMAP.log
See also• Viewing SAP Control Center Server Logs on page 211
Manage and Monitor
210
• Viewing the SAP Control Center Client Log on page 211• Changing the Logging Level on page 212• Logging or Message Levels on page 213• Changing Logging Configuration on page 213
Viewing SAP Control Center Server LogsView event logs for the SAP Control Center server.
SAP Control Center logs events to several places:
• The console from which SAP Control Center is launched.• The SAP Control Center agent log: <SCC-install-directory>/log/
agent.log• The repository log: <SCC-install-directory>/log/repository.log• The component log for each installed SAP Control Center product module. The path to the
component log takes this form: <SCC-install-directory>/plugins/<component>/log/<component>.log
1. Display one of the log files using a log viewer or a method of your choice.
2. Look for entries of interest such as login attempts or the failure of a service to start.
On the console and in the SAP Control Center agent log file, some components prepend thecomponent name to log entries.
See also• Viewing the SAP ASE Component Log on page 210• Viewing the SAP Control Center Client Log on page 211• Changing the Logging Level on page 212• Logging or Message Levels on page 213• Changing Logging Configuration on page 213
Viewing the SAP Control Center Client LogDisplay the event log for the current session of your SAP Control Center browser client.
In the perspective tab window (the main window), do either of the following to display theclient log:
• Enter Ctrl+Alt+L.• Select View > Open > Log Window.
Note: The client log reader displays the 100 most recent log messages for the current loginsession.
See also• Viewing the SAP ASE Component Log on page 210
Manage and Monitor
SAP Control Center for SAP Adaptive Server Enterprise 211
• Viewing SAP Control Center Server Logs on page 211
• Changing the Logging Level on page 212
• Logging or Message Levels on page 213
• Changing Logging Configuration on page 213
Changing the Logging LevelAdjust the logging level that determines which events SAP Control Center records in theserver logs. This task requires you to restart SAP Control Center.
If you are having a problem with SAP Control Center, you might be able to discover the causeof the problem by changing the server logging level so that more events are recorded.
1. Shut down SAP Control Center.
2. Restart SAP Control Center using the -m option to change the logging level. In <SCC-installation-dir>/bin, enter:
scc -m <logging-level>
The logging levels are OFF (logs nothing), FATAL (logs only the most severe events),ERROR, WARN, INFO, DEBUG, and ALL (logs everything).
3. Examine the server log for clues about what might be causing the problem.
4. When you have resolved the problem, set the logging level back to WARN, the default.Your log may become unmanageably large if you leave it at the DEBUG or ALL level.
Example
These commands, which must be executed in the installation directory, start SAP ControlCenter with the logging level set to debug:
Windows: bin\scc -m DEBUGUNIX: bin/scc -m DEBUG
See also• Viewing the SAP ASE Component Log on page 210
• Viewing SAP Control Center Server Logs on page 211
• Viewing the SAP Control Center Client Log on page 211
• Logging or Message Levels on page 213
• Changing Logging Configuration on page 213
• Starting and Stopping SAP Control Center in Windows on page 73
• Starting and Stopping SAP Control Center in UNIX on page 76
Manage and Monitor
212
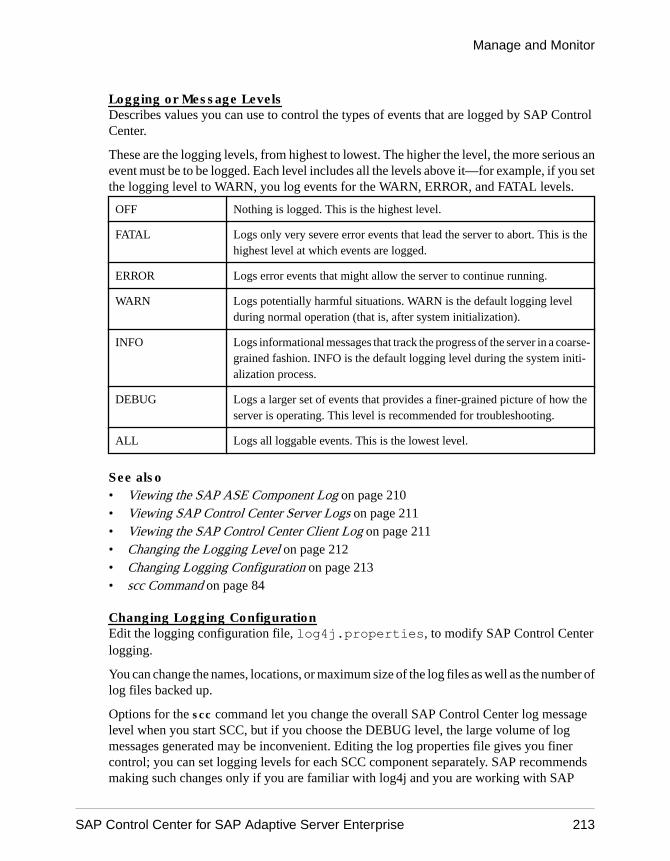
Logging or Message LevelsDescribes values you can use to control the types of events that are logged by SAP ControlCenter.
These are the logging levels, from highest to lowest. The higher the level, the more serious anevent must be to be logged. Each level includes all the levels above it—for example, if you setthe logging level to WARN, you log events for the WARN, ERROR, and FATAL levels.
OFF Nothing is logged. This is the highest level.
FATAL Logs only very severe error events that lead the server to abort. This is thehighest level at which events are logged.
ERROR Logs error events that might allow the server to continue running.
WARN Logs potentially harmful situations. WARN is the default logging levelduring normal operation (that is, after system initialization).
INFO Logs informational messages that track the progress of the server in a coarse-grained fashion. INFO is the default logging level during the system initi-alization process.
DEBUG Logs a larger set of events that provides a finer-grained picture of how theserver is operating. This level is recommended for troubleshooting.
ALL Logs all loggable events. This is the lowest level.
See also• Viewing the SAP ASE Component Log on page 210• Viewing SAP Control Center Server Logs on page 211• Viewing the SAP Control Center Client Log on page 211• Changing the Logging Level on page 212• Changing Logging Configuration on page 213• scc Command on page 84
Changing Logging ConfigurationEdit the logging configuration file, log4j.properties, to modify SAP Control Centerlogging.
You can change the names, locations, or maximum size of the log files as well as the number oflog files backed up.
Options for the scc command let you change the overall SAP Control Center log messagelevel when you start SCC, but if you choose the DEBUG level, the large volume of logmessages generated may be inconvenient. Editing the log properties file gives you finercontrol; you can set logging levels for each SCC component separately. SAP recommendsmaking such changes only if you are familiar with log4j and you are working with SAP
Manage and Monitor
SAP Control Center for SAP Adaptive Server Enterprise 213
technical support; DEBUG-level log messages are not likely to be meaningful to you. (If youhave not used log4j before, a good place to start is http://logging.apache.org/log4j/1.2/manual.html.)
1. Shut down SCC.
2. Make a backup copy of the log4j.properties file located in <SCC-installation-directory>/conf.
3. Open the log4j.properties file for editing.
4. Change values in the file to suit your needs. For example:
To Modify
Change the name or location of alog file
• Agent log – log4j.appender.agent.File• Repository log – log4j.appender.repository.File• Collection statistics log – log4j.appender.collection-
stats.File• Alert server log – log4j.appender.alert.File• Gateway log – log4j.appender.gateway.File
Change the maximum size that alog file can reach before SCCcreates a new file
• Agent log – log4j.appender.agent.MaxFileSize• Repository log – log4j.appender.repository.MaxFileSize• Collection statistics log – log4j.appender.collection-
stats.MaxFileSize• Alert server log – log4j.appender.alert.MaxFileSize• Gateway log – log4j.appender.gateway.MaxFileSize
Change the number of log filesSCC backs up before deletingthe oldest file
• Agent log – log4j.appender.agent.MaxBackupIndex• Repository log – log4j.appender.repository.MaxBacku-
pIndex• Collection statistics log – log4j.appender.collection-
stats.MaxBackupIndex• Alert server log – log4j.appender.alert.MaxBackupIndex• Gateway log – log4j.appender.gateway.MaxBackupIndex
5. Save and exit the file.
6. Start SCC to make the logging changes take effect.
See also• Viewing the SAP ASE Component Log on page 210• Viewing SAP Control Center Server Logs on page 211• Viewing the SAP Control Center Client Log on page 211• Changing the Logging Level on page 212• Logging or Message Levels on page 213• Starting and Stopping SAP Control Center in Windows on page 73• Starting and Stopping SAP Control Center in UNIX on page 76
Manage and Monitor
214
SAP Control Center ConsoleThe console is a command-line interface for displaying details about the status of the SAPControl Center server and its subsystems.
When you use the scc command to start SAP Control Center, it displays start-up messages andthen displays the console prompt.
Note: The console prompt does not appear if you start SAP Control Center as a service, if youdirect the output of scc to a file, or if you start SAP Control Center in the background.
See also• Launching SAP Control Center on page 72
Console CommandsUse the SAP Control Center console to get status information on SAP Control Center and itsports, plug-ins, and services.
help CommandDisplay syntax information for one or more SAP Control Center console commands.
Syntaxhelp [command_name]
Parameters
• command_name – optional. status, info, or shutdown. If you omit command_name, helpreturns information on all the console commands.
Examples
• Example 1 – returns information on the status command:
help status
Permissions
help permission defaults to all users. No permission is required to use it.
See also• info Command on page 216
• shutdown command on page 217
• status Command on page 217
Manage and Monitor
SAP Control Center for SAP Adaptive Server Enterprise 215
info CommandDisplay information about specified parts of the SAP Control Center server.
If you enter info with no parameters, it returns information for every parameter.
Syntaxinfo [-a | --sys] [-D | --sysprop [system-property]] [-e | --env [environment-variable]][-h | --help][-m | --mem][-p | --ports][-s | --services]
Parameters
• -a | --sys – optional. List all the services known to SAP Control Center, indicate whethereach service is enabled, and list other services on which each service depends.
• -D | --sysprop [system-property] – optional. Display information about the specified Javasystem property. Omit the system-property argument to return a list of all Java systemproperties and their values.
• -e | --env [environment-variable] – optional. List all the environment variables in the SAPControl Center Java VM process environment. Omit the environment-variable argumentto return a list of environment variables and their values.
• -h | --help – optional. Display information about the info command.• -m | --mem – optional. Display information about the server’s memory resources.• -p | --ports – optional. List all the ports on which the SAP Control Center agent and its
services listen, indicate whether each port is in use, and show the service running on eachport.
• -s | --services – optional. List all SAP Control Center services, indicate whether eachservice is enabled, and list other services on which each service depends.
Examples
• Example 1 – displays information about ports on this SAP Control Center server:
info -p
Permissions
info permission defaults to all users. No permission is required to use it.
See also• help Command on page 215
Manage and Monitor
216
• shutdown command on page 217
• status Command on page 217
shutdown commandStop the SAP Control Center server if it is running.
Syntaxshutdown
Examples
• Example 1 – shuts down SAP Control Center:
shutdown
Permissions
shutdown permission defaults to all users. No permission is required to use it.
See also• help Command on page 215
• info Command on page 216
• status Command on page 217
status CommandDisplay the status of the SAP Control Center agent, plug-in, or service components of SAPControl Center.
Syntaxstatus [-a | --agent] [-h | --help] [-p | --plugin [plugin-name]] [-s | --service [service-name]]
Parameters
• -a | --agent – display the status of the SAP Control Center agent component.• -h | --help – display information about the info command.• -p | --plugin [plugin-name] – display the status of the specified SAP Control Center plug-
in (for example, ASEMap, the Adaptive Server® management module). Omit the plugin-name argument to return a list of plug-ins.
Manage and Monitor
SAP Control Center for SAP Adaptive Server Enterprise 217
• -s | --service [service-name] – display the status of the specified SAP Control Centerservice (for example, the Alert service or the Messaging service). Omit the service-nameargument to return a list of services.
Examples
• Example 1 – displays status information on the Repository service:
status --service Repository
Permissions
status permission defaults to all users. No permission is required to use it.
See also• help Command on page 215• info Command on page 216• shutdown command on page 217
Setting SAP ASE Parameters in the Configuration FileSet options that control the behavior of SAP Control Center for SAP ASE.
The configuration file for SAP Control Center for SAP ASE contains a set of internalparameters for fine-tuning the behavior of SCC.
Note: SAP recommends that you consult SAP technical support before setting any parametersin the configuration file.
The configuration file resides here:
Windows: %SYBASE%\SCC-3_3\plugins\ASEMAP\config.propertiesUNIX: $SYBASE/SCC-3_3/plugins/ASEMAP/config.properties
1. Open the config.properties file with a text editor.
2. Save a backup copy of the file.
3. Modify configuration parameter values as needed. See the reference topic for parameterdescriptions.
4. Save and exit the file.
5. To make the new settings take effect, restart SAP Control Center.
Configuration Parameters for SAP ASEReference to parameters you can set in the SAP Control Center for the SAP ASE configurationfile.
Note: SAP recommends that you consult SAP technical support before setting any parametersin the configuration file.
Manage and Monitor
218
SAP Control Center for SAP ASE provides these configuration parameters:
• attempts_reopen_con – the number of times SCC tries to reopen a broken JDBCconnection to SAP ASE. This parameter only affects re-establishing broken connections—it does not control retries when a first attempt to connect to the server fails.
Note: SCC does not declare a server stopped (down) until all the retries called for byattempts_reopen_con have failed.
Default: 5• time_between_reattempts – the interval (in seconds) between successive attempts to
reopen a broken JDBC connection. This parameter only tries to re-establish brokenconnections—it does not control retries when a first attempt to connect to the server fails.Default: 6
• revalidation_frequency – the interval (in hours) between refreshes of the list of monitoredobjects in the SAP Control Center repository.The repository stores a list of the caches, devices, engines, and segments for all monitoredserverss. SCC does not collect statistics for objects unless they are listed in the repository.The revalidation_frequency parameter controls how often SCC refreshes (revalidates) thelist of objects associated with each monitored server.Default: 24
• jdbc_internal_query_timeout – the time interval (in seconds) for JDBC internal queries toexecute before they time out. The timeout prevents server connection attempts and otheroperations from hanging when server resources have been exhausted. Consider modifyingthis value if SAP ASE is running, but performance is so slow that the SCC agent fails toestablish a connection to the server. This failure usually indicates a configuration problemon SAP ASE and not in SCC. Contact SAP technical support for help in determining thecause of connection problems before modifying this parameter.Default: 15
• query_timeout – the default query timeout (in seconds) for any statements created on thisconnection.Default: 600
• query_timeout_spaceused – the query timeout (in seconds) for sp_spaceused, whichdetermines the space usage parameters for a database.Default: 180
Note: Changes to parameter values do not take effect until SCC restarts.
Manage and Monitor the SAP ASE EnvironmentMonitor the performance, processes, databases, and other aspects of SAP ASE servers.
Manage and Monitor
SAP Control Center for SAP Adaptive Server Enterprise 219
Managing an SAP ASE serverRegister and authenticate a running an agent, start and stop your server, and view the servererror log.
1. In the Perspective Resources view, select a resource, click the drop-down arrow thatappears next to the name, and select Administration Console.
2. Click ASE Servers.You see a list of monitored servers.
3. Select the server you want to manage and click the drop-down arrow that appears next tothe name.
4. (Optional) To register the agent, click Register Agent. To clear agent registration, clickClear Agent Registration.
5. (Optional) To authenticate the agent, click Authenticate Agent. To clear agentregistration, click Clear Agent Authentication.
6. (Optional) To start the server, click Start Server.
7. (Optional) To stop a running the server, click Stop Server.
8. (Optional) To view the error log of a server, click View Log. You can further choose tofilter the error log.
9. (Optional) To view the properties of the server and agent, click Properties.
Executing SQL StatementsExecute SQL statements on one or more servers.
You can use the Execute SQL view to run any valid SQL statement, including queries andstored procedures. Anyone can launch a query; no permissions are required. However, if youdo not have authority to perform the actions in the query, SCC displays an error.
1. In the Administration Console, select one or more servers, click the drop-down arrow, andselect Execute SQL.
2. Enter the SQL statements.
SQL history is persistently saved on a login basis. You can select previous added SQLstatements or sort through a list of saved SQL statements by using the Previous SQL, SQLHistory, and Next SQL buttons.
SQL history is saved when the history has been changed from previously saved history.You can clear the history by clicking Clear SQL.
3. Click Execute.
The query runs on all the servers you selected, and results appear in the bottom portion ofthe view. The view includes a results tab for each server. On the tabs:• A green check indicates a successful query.
Manage and Monitor
220
• A red X indicates an error. A tab with a red X also displays an error message.
Registering the Agent for an SAP ASE ServerRegister the remote command and control agent.
Note: For SAP ASE versions 15.7 and earlier, the agent is the Unified Agent. For versions 15.7ESD #1 and later, the agent is the SCC agent. Follow the steps provided here to register eithertype of agent.
The agent is installed and set up as a component of the installation. See the SAP ASEinstallation guide for your platform.
To perform certain administrative tasks, such as starting the server or viewing the error log,you must register and authenticate the agent to use SCC.
For full administrative control, register an agent for each server you have configured. Theagent is configured on the same host as the server that it manages. When you register the agent,you are updating SCC with information about the machine and port number on which theagent is configured.
1. In the Perspective Resources view, select a resource, click the drop-down arrow thatappears next to the name, and select Administration Console.
2. Click ASE Servers.You see a list of monitored servers.
3. Select the server you want to manage and click the drop-down arrow that appears next tothe name.
4. Click Register Agent.You see the Server Properties screen.
5. Enter the port number for the agent and click Register.
Note: After the agent is registered, you can authenticate the agent, or clear the registration.
6. (Optional) Enter the login name and password for the agent, and click Authenticate.
The default login name for the agent is uafadmin. The default password depends on theversion of SAP ASE:
15.7 and earlier that use Unified Agent 2.0 – no password
15.7 ESD #1 – Sybase4me
15.7 ESD #2 and later – no default; password is set during installation
See also• Authenticating the Unified Agent on page 222
• Starting an SAP ASE Server on page 223
• Stopping an SAP ASE Server on page 224
Manage and Monitor
SAP Control Center for SAP Adaptive Server Enterprise 221
Authenticating the Unified Agent(SAP ASE versions 15.7 and earlier) Authenticate the Unified Agent using the AuthenticateAgent option in the Administration Console.
Note: While executing this command, you may experience performance degradation if thereis a firewall between the SAP Control Center server and the monitored host machines.Communication with the agent uses the Java RMI network protocol, which requires a networkconnection between the SAP Control Center server and agent. If the firewall prevents theseconnections from being established, then performance may degrade.
1. In the Perspective Resources view, select a resource, click the drop-down arrow thatappears next to the name, and select Administration Console.
2. Click ASE Servers.You see a list of monitored servers.
3. Select the server you want to manage and click the drop-down arrow that appears next tothe name.
4. Click Authenticate Agent.
5. On the server properties screen, enter the agent user name and password (optional) for theUnified Agent.
You must have configured the Unified Agent to allow the SCC user to authenticate. TheSCC user must also have the necessary permissions to manage the SAP ASE server usingthe Unified Agent.
Note: The authentication credentials for the Unified Agent are different from those used toauthenticate the SAP ASE resource.
6. (Optional) Click Clear Authentication.
See also• Registering the Agent for an SAP ASE Server on page 221
• Starting an SAP ASE Server on page 223
• Stopping an SAP ASE Server on page 224
Authenticating the SCC Agent(SAP ASE versions 15.7 ESD #1 and later) Authenticate the SCC Agent using theAuthenticate Agent option in the Administration Console.
Note: You may experience performance degradation if there is a firewall between the SCCserver and the monitored SAP ASE host machines. Communication with the SCC agent usesthe Java RMI network protocol, which requires a network connection between the SCC serverand SCC agent. If the firewall prevents these connections from being established, thenperformance may degrade.
Manage and Monitor
222
1. In the Perspective Resources view, select a resource, click the drop-down arrow thatappears next to the name, and select Administration Console.
2. Click ASE Servers.You see a list of monitored servers.
3. Select the server you want to manage and click the drop-down arrow that appears next tothe name.
4. Click Authenticate Agent.You see the Server Properties screen.
5. Enter the agent user name and password for the SCC Agent.
You must have configured the SCC agent to allow the SCC user to authenticate. The SCCuser must also have the necessary permissions to manage the SAP ASE server using theSCC agent.
Note: The authentication credentials for the SCC agent are different from those used toauthenticate the SAP ASE resource.
6. (Optional) Click Clear Authentication.
Starting an SAP ASE ServerStart an SAP ASE server using the Start Server option in the Administration Console.
Note: You may experience performance degradation if there is a firewall between the SCCserver and the monitored SAP ASE host machines. Communication with the agent uses theJava RMI network protocol, which requires a network connection between the SCC server andagent. If the firewall prevents these connections from being established, then performancemay degrade.
SCC uses the RUN server script to start the SAP ASE server.
1. In the Perspective Resources view, select a resource, click the drop-down arrow thatappears next to the name, and select Administration Console.
2. Click ASE Servers.You see a list of monitored servers.
3. Select the server you want to manage and click the drop-down arrow that appears next tothe name.
4. Click Start Server.
Start-up logs and messages are displayed.
Note: If the associated agent is not running on the host, or the agent is not registered orauthenticated, the Start Server option is disabled.
5. Click Yes.
See also• Registering the Agent for an SAP ASE Server on page 221
Manage and Monitor
SAP Control Center for SAP Adaptive Server Enterprise 223
• Authenticating the Unified Agent on page 222• Stopping an SAP ASE Server on page 224
Stopping an SAP ASE ServerShut down an SAP ASE Server using the Stop Server option in the Administration Console.
Note: While executing this command, you may experience performance degradation if thereis a firewall between the SCC server and the monitored SAP ASE host machines.Communication with the agent uses the Java RMI network protocol, which requires a networkconnection between the SCC server and agent. If the firewall prevents these connections frombeing established, then performance may degrade.
1. In the Perspective Resources view, select a resource, click the drop-down arrow thatappears next to the name, and select Administration Console.
2. Click ASE Servers.You see a list of monitored servers.
3. Select the server you want to manage and click the drop-down arrow that appears next tothe name.
4. Click Stop Server.You see the table of current server processes.
Note: To see the running processes in the table, you must first have the resourceauthenticated.
5. (Optional) Select the option to shut down the server immediately.
See also• Registering the Agent for an SAP ASE Server on page 221• Authenticating the Unified Agent on page 222• Starting an SAP ASE Server on page 223
Configuring Retrieval Thresholds for the Administration ConsoleSet limits on the length of time the Administration Console waits for data to load or on thenumber of rows it loads.
PrerequisitesLaunch SAP Control Center and log in using an account with administrative privileges. (Thelogin account or its group must have sccAdminRole.)
Task
Performing some tasks may cause the Administration Console to load a large amount of data,which can be time-consuming and can place a heavy load on your network. This is particularlylikely if your perspective includes many resources. The Administration Console mitigates thisproblem by displaying partial results and by displaying placeholders called message rows
Manage and Monitor
224
when data takes longer than a specified number of seconds to retrieve or exceeds a specifiednumber of rows. The data retrieval options let you specify those numbers.
This data retrieval scheme reduces network traffic because result sets that exceed the specifiedrow count are not transmitted unless you ask for them by expanding a message row. Bydisplaying partial results and message rows for data from slow-responding resources, thescheme also minimizes the time you spend waiting.
1. From the application’s menu bar, select Application > Administration.
2. Select General Settings.
3. Click the Administration Console tab.
4. Set the timeout, in seconds, for data retrieval.
When the SCC server cannot return all requested data to the Administration Consolewithin this period of time, the server sends any data it has received and generates messagerows in place of the missing results. The Administration Console replaces message rowswith real data as soon as the data arrives.
5. Set the row count.
When a request returns results that exceed the specified row count, the SCC servergenerates a message row in place of the expected results. You can expand the message rowby selecting it, clicking the drop-down arrow, and selecting Expand.
6. Click OK (to apply the change and close the properties dialog) or Apply (to apply thechange and leave the dialog open).
SAP ASE Error LogServer messages are written to an error log that can provide information about various aspectsof the server, such as connections, database objects, syntax, semantics, and permissions.
Each time SAP ASE starts, it writes information to a local error log file:
$SYBASE/$SYBASE_ASE/install/server_name.logThis file:
• Stores information about the success or failure of each start-up attempt• Logs error and informational messages generated by the server during its operations• Remains open until you stop the server process• Contains start-up messages from SAP ASE
Once a server has been started, check the error log for startup behavior and non-standardmessages. Set up error logs to be automatically scanned on running servers, and send (via e-mail) any nonstandard messages to the appropriate DBA. Flag definitions provide additionalsearching capabilities. You can set up flag definitions to search for different types of messagesthat might include keywords such as error, stack, infected, or warning. See Error Messages inthe Troubleshooting and Error Messages Guide for information about different types of errormessages.
Manage and Monitor
SAP Control Center for SAP Adaptive Server Enterprise 225
Viewing the SAP ASE Error LogView SAP ASE error log messages.
PrerequisitesRegister and authenticate the agent to enable error log viewing.
Task
1. Display server error log entries:
• From the monitor view – From the Perspective Resources view, click the drop-downarrow that appears next to the server name, then select Monitor. In the SAP AdaptiveServer Enterprise Monitor window, click Error Log.
• From the Administration Console – In the left pane of the Administration Console,select ASE Servers to populate the right pane with a list of servers. Select a server,click the drop-down arrow that appears next to the name, then select View ErrorLog.
• From an instance in the Cluster Edition – In the left pane of the AdministrationConsole, select Cluster Management > Instances. Select an instance, click the drop-down arrow that appears next to the name, then select View Error Log.
The error log shows, by default, the most recent 1000 log entries.
2. (Optional) In the error log view, you can unselect Auto Refresh.Auto Refresh allows additional log messages to be added to the error log viewer as theyoccur.
3. (Optional) To filter the entries for specific text, click in the Filter messages field and enter aword or phrase to isolate server messages containing the entry. For example, enter"memory" to find all log output pertaining to memory usage. Any text that matches whatyou entered is highlighted. Click the x to clear the Filter messages field.
4. (Optional) Sort the columns in ascending or descending order.
5. (Optional) Click the next or previous flag arrows to navigate to through the messages thatare flagged. To navigate to a specific flag type, click the Flag type arrow before clicking thenext or previous arrows.
Searching the Error Log for MessagesSearch log entries based on words or phases, the date, and the number of recent messages.
PrerequisitesRegister and authenticate the agent to enable error log viewing.
Manage and Monitor
226
Task
1. Display server error log entries:
• From the monitor view – From the Perspective Resources view, click the drop-downarrow that appears next to the server name, then select Monitor. In the SAP AdaptiveServer Enterprise Monitor window, click Error Log.
• From the Administration Console – In the left pane of the Administration Console,select ASE Servers to populate the right pane with a list of servers. Select a server,click the drop-down arrow that appears next to the name, then select View ErrorLog.
• From an instance in the Cluster Edition – In the left pane of the AdministrationConsole, select Cluster Management > Instances. Select an instance, click the drop-down arrow that appears next to the name, then select View Error Log.
The error log shows, by default, the most recent 1000 log entries.
2. (Optional) In the error log view, you can unselect Auto Refresh.Auto Refresh allows additional log messages to be added to the error log viewer as theyoccur.
3. Click Show Search Options.
4. In the Search text field, enter words or phases to isolate server messages containing theentry. Once a search is applied, the words and phases that have been entered are availablefor future searches by selecting down arrow next to the text field.
5. (Optional) To limit the search to the exact text case entered, unselect Ignore Case .
6. Choose the number of entries in which to search or a specific time frame:
• Search all entries.• Specify the number of last log entries in which to search.• Specify the number of days, hours, or minutes in which to search.• Specify a specific from and to date in which to search.
7. (Optional) To limit the search for specific types of log messages, select one or more flagtypes.
8. Click Apply Search Options.
9. (Optional) Sort columns in ascending or descending order.
10. (Optional) To reset the search options to the default values, click Restore Defaults.
11. (Optional) To reset the search options to the default values when collapsing the searchoptions menu, click Also reset search before selecting Hide Search Options.
Managing Flag DefinitionsFlag definitions provide additional searching capabilities for error log entries.
PrerequisitesRegister and authenticate the agent to enable error log viewing.
Manage and Monitor
SAP Control Center for SAP Adaptive Server Enterprise 227
Task
1. Display server error log entries:
• From the monitor view – From the Perspective Resources view, click the drop-downarrow that appears next to the server name, then select Monitor. In the SAP AdaptiveServer Enterprise Monitor window, click Error Log.
• From the Administration Console – In the left pane of the Administration Console,select ASE Servers to populate the right pane with a list of servers. Select a server,click the drop-down arrow that appears next to the name, then select View ErrorLog.
• From an instance in the Cluster Edition – In the left pane of the AdministrationConsole, select Cluster Management > Instances. Select an instance, click the drop-down arrow that appears next to the name, then select View Error Log.
The error log shows, by default, the most recent 1000 log entries.
2. Click Show Search Options.
3. Click Show Flag Definitions.
4. To add a new flag definition, click Add.
a) Specify a descriptive name or phase for the definitions. For example, "Abnormalconnection termination."
b) Enter a search phase for the definition. For example, "Abnormal termination."
User-defined regular expressions are persistently saved.c) Select the flag type to associated with the expression and click OK.
5. You can remove or edit a definition by selecting the expression from the flag definition list,clicking Edit or Remove, making the appropriate changes, and clicking OK.
6. Enable or disable individual flag definitions by clicking the check box in thecorresponding Enable column.
7. Enable or disable all definitions by clicking Enable All or Disable All.
8. Click Apply to save your changes.
Importing Flag DefinitionsYou can add flag definitions to a server by importing a list of definitions from a target server.
PrerequisitesRegister and authenticate the agent to enable error log viewing.
Task
1. Display server error log entries:
Manage and Monitor
228
• From the monitor view – From the Perspective Resources view, click the drop-downarrow that appears next to the server name, then select Monitor. In the SAP AdaptiveServer Enterprise Monitor window, click Error Log.
• From the Administration Console – In the left pane of the Administration Console,select ASE Servers to populate the right pane with a list of servers. Select a server,click the drop-down arrow that appears next to the name, then select View ErrorLog.
• From an instance in the Cluster Edition – In the left pane of the AdministrationConsole, select Cluster Management > Instances. Select an instance, click the drop-down arrow that appears next to the name, then select View Error Log.
The error log shows, by default, the most recent 1000 log entries.
2. Click Show Search Options.
3. Click Show Flag Definitions.
4. Click Add.
5. Click Import from server , then select a server.You see a list of flag definitions from the source server.
By default, the flag definitions on the target servers are replaced by the definition list on thesource server, including each definition's state of enabled or disabled.
6. (Optional) To merge the definition list on the source server with the definition lists on thetarget servers, unselect Overwrite existing flag definitions. The merge is based on thefollowing:
• If the regular expression of the source definition does not exist in the list of the targetdefinitions, the source definition is appended to the target list.
• If the regular expression of the source definition does exist in the list of the targetdefinitions, the source definition is not appended to the list, regardless of the state.
7. Click OK to save your changes.
Exporting Flag DefinitionsTo apply the same rules across multiple servers, export a list of flag definitions.
PrerequisitesRegister and authenticate the agent to enable error log viewing.
Task
1. Display server error log entries:
• From the monitor view – From the Perspective Resources view, click the drop-downarrow that appears next to the server name, then select Monitor. In the SAP AdaptiveServer Enterprise Monitor window, click Error Log.
• From the Administration Console – In the left pane of the Administration Console,select ASE Servers to populate the right pane with a list of servers. Select a server,
Manage and Monitor
SAP Control Center for SAP Adaptive Server Enterprise 229
click the drop-down arrow that appears next to the name, then select View ErrorLog.
• From an instance in the Cluster Edition – In the left pane of the AdministrationConsole, select Cluster Management > Instances. Select an instance, click the drop-down arrow that appears next to the name, then select View Error Log.
The error log shows, by default, the most recent 1000 log entries.
2. Click Show Search Options.
3. Click Show Flag Definitions.
4. Click Export.
You see a list of qualified target servers (those that are agent-authenticated, and listed in theperspective resource view), in the Export Flag Definitions dialog.
5. Select the target servers.
By default, the flag definitions on the target servers are replaced by the definition list on thesource server, including each definition's state of enabled or disabled.
6. (Optional) To merge the definition list on the source server with the definition lists on thetarget servers, unselect Overwrite existing flag definitions. The merge is based on thefollowing:
• If the regular expression of the source definition does not exist in the list of the targetdefinitions, the source definition is appended to the target list.
• If the regular expression of the source definition does exist in the list of the targetdefinitions, the source definition is not appended to the list, regardless of the state.
7. Click OK to save your changes.
Server ConfigurationDisplay and monitor SAP ASE configuration values.
Displaying Configuration ValuesDisplay the values and descriptions of parameters in the SAP ASE configuration file.
1. In the Perspective Resources view, select the server to monitor, click the drop-down arrow,and select Monitor.
2. In the left pane, select Server Configuration.
3. (Optional - for cluster configurations only) Select a cluster instance from ShowConfiguration for Cluster Instance. Select All to see information about all clusterinstances.
4. Select a configuration category from Show Configuration Parameters for. For example,select Cache Manager.
5. (Optional) Enter filter text in Show Configuration Parameter Matching. For example,enter sql.
Manage and Monitor
230
The Server Configuration table displays parameters that have names that match or includeyour filter text. The filter narrows the selection made with Show ConfigurationParameters for, so if you select All and then filter on sql, you find more parameters thanwhen you select Monitoring and then filter on sql.
6. From the Server Configuration table, select a parameter.A description of the parameter appears at the bottom of the screen.
For more information on configuration parameters, see the chapter on setting configurationparameters in theSystem Administration Guide, Volume 1.
See also• Modifying Server Configuration Parameters on page 231
• Server Configuration Statistics and Details on page 232
Modifying Server Configuration ParametersUse SAP Control Center to configure server parameters.
1. In the SAP Adaptive Server Enterprise monitor view, select Server Configuration.Alternately, in the Administration Console, select the server, click the drop-down arrow,and select Configure.
Note: You must have sa_role to select Configure from the Administration Console.
You see a table with parameter names, values, default values, maximum values, minimumvalues, and restart required. Editable columns are indicated by a pencil icon. To reset avalue to the previously configured value, click the Reset icon that appears after you haveedited a field.
2. Select the server configuration parameter to configure. For example, increase or decreasethe size of the procedure cache by selecting the procedure cache size parameter, or of thestatement cache by selecting statement cache size parameter.
a) Click Configure Value for the selected row.b) Enter the new value for the configuration parameter.
If the value is invalid, you see an error message. Some parameters require a restart; thechanged value is in the Pending Value column until you restart the server.
c) Click Save All to update the server with the new values or Reset All to restore theoriginal values for the resource.
See also• Displaying Configuration Values on page 230
• Server Configuration Statistics and Details on page 232
Manage and Monitor
SAP Control Center for SAP Adaptive Server Enterprise 231
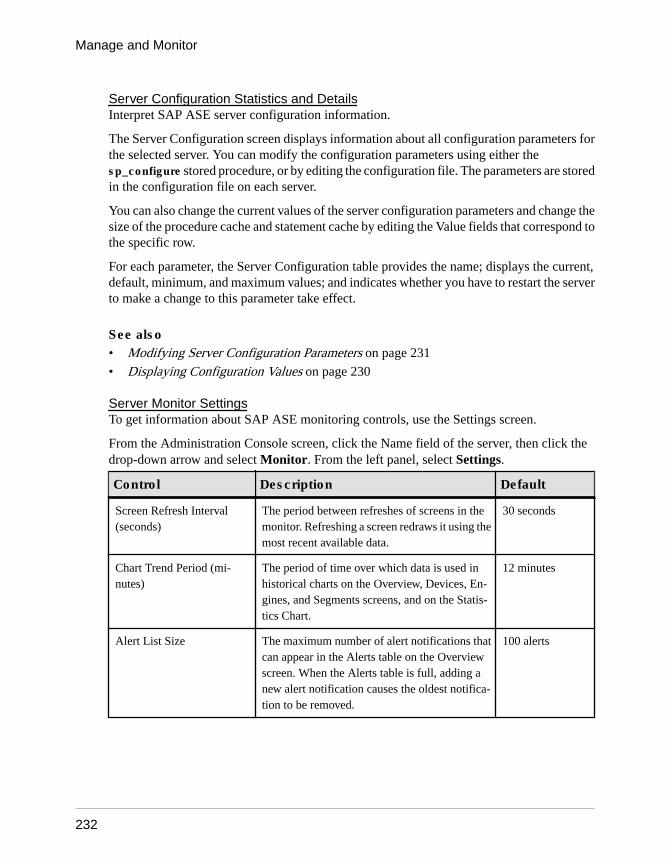
Server Configuration Statistics and DetailsInterpret SAP ASE server configuration information.
The Server Configuration screen displays information about all configuration parameters forthe selected server. You can modify the configuration parameters using either thesp_configure stored procedure, or by editing the configuration file. The parameters are storedin the configuration file on each server.
You can also change the current values of the server configuration parameters and change thesize of the procedure cache and statement cache by editing the Value fields that correspond tothe specific row.
For each parameter, the Server Configuration table provides the name; displays the current,default, minimum, and maximum values; and indicates whether you have to restart the serverto make a change to this parameter take effect.
See also• Modifying Server Configuration Parameters on page 231
• Displaying Configuration Values on page 230
Server Monitor SettingsTo get information about SAP ASE monitoring controls, use the Settings screen.
From the Administration Console screen, click the Name field of the server, then click thedrop-down arrow and select Monitor. From the left panel, select Settings.
Control Description Default
Screen Refresh Interval(seconds)
The period between refreshes of screens in themonitor. Refreshing a screen redraws it using themost recent available data.
30 seconds
Chart Trend Period (mi-nutes)
The period of time over which data is used inhistorical charts on the Overview, Devices, En-gines, and Segments screens, and on the Statis-tics Chart.
12 minutes
Alert List Size The maximum number of alert notifications thatcan appear in the Alerts table on the Overviewscreen. When the Alerts table is full, adding anew alert notification causes the oldest notifica-tion to be removed.
100 alerts
Manage and Monitor
232
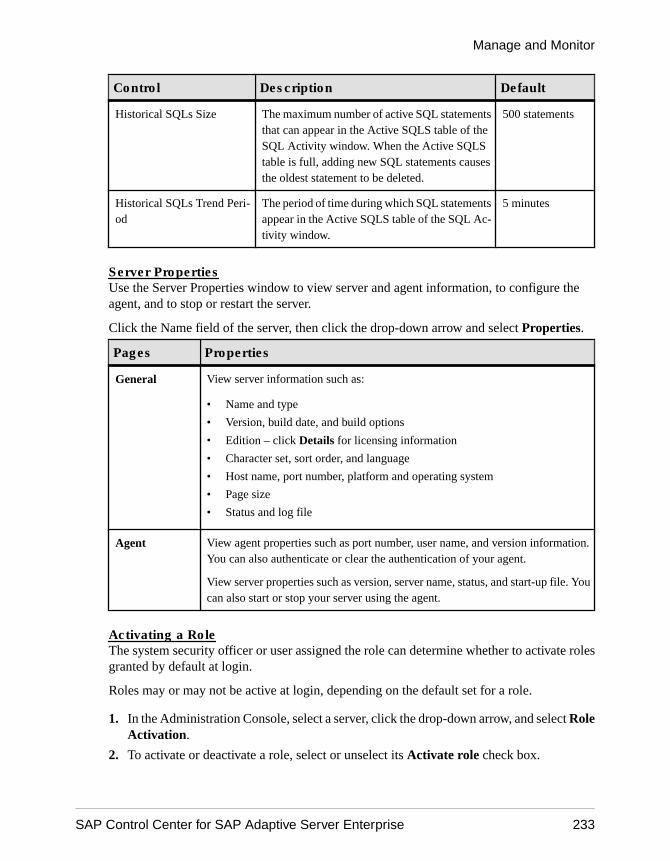
Control Description Default
Historical SQLs Size The maximum number of active SQL statementsthat can appear in the Active SQLS table of theSQL Activity window. When the Active SQLStable is full, adding new SQL statements causesthe oldest statement to be deleted.
500 statements
Historical SQLs Trend Peri-od
The period of time during which SQL statementsappear in the Active SQLS table of the SQL Ac-tivity window.
5 minutes
Server PropertiesUse the Server Properties window to view server and agent information, to configure theagent, and to stop or restart the server.
Click the Name field of the server, then click the drop-down arrow and select Properties.
Pages Properties
General View server information such as:
• Name and type
• Version, build date, and build options
• Edition – click Details for licensing information
• Character set, sort order, and language
• Host name, port number, platform and operating system
• Page size
• Status and log file
Agent View agent properties such as port number, user name, and version information.You can also authenticate or clear the authentication of your agent.
View server properties such as version, server name, status, and start-up file. Youcan also start or stop your server using the agent.
Activating a RoleThe system security officer or user assigned the role can determine whether to activate rolesgranted by default at login.
Roles may or may not be active at login, depending on the default set for a role.
1. In the Administration Console, select a server, click the drop-down arrow, and select RoleActivation.
2. To activate or deactivate a role, select or unselect its Activate role check box.
Manage and Monitor
SAP Control Center for SAP Adaptive Server Enterprise 233
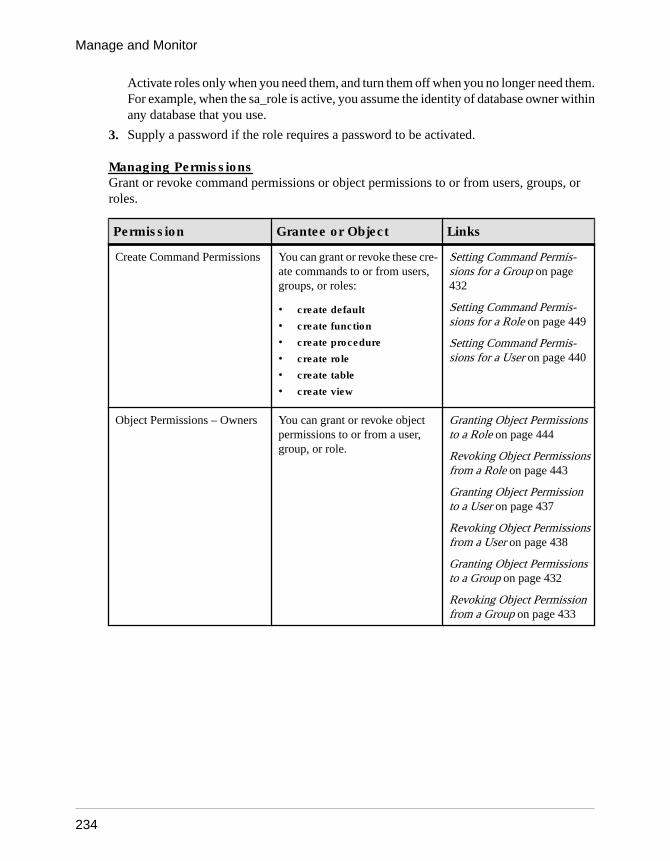
Activate roles only when you need them, and turn them off when you no longer need them.For example, when the sa_role is active, you assume the identity of database owner withinany database that you use.
3. Supply a password if the role requires a password to be activated.
Managing PermissionsGrant or revoke command permissions or object permissions to or from users, groups, orroles.
Permission Grantee or Object Links
Create Command Permissions You can grant or revoke these cre-ate commands to or from users,groups, or roles:
• create default
• create function
• create procedure
• create role
• create table
• create view
Setting Command Permis-sions for a Group on page432
Setting Command Permis-sions for a Role on page 449
Setting Command Permis-sions for a User on page 440
Object Permissions – Owners You can grant or revoke objectpermissions to or from a user,group, or role.
Granting Object Permissionsto a Role on page 444
Revoking Object Permissionsfrom a Role on page 443
Granting Object Permissionto a User on page 437
Revoking Object Permissionsfrom a User on page 438
Granting Object Permissionsto a Group on page 432
Revoking Object Permissionfrom a Group on page 433
Manage and Monitor
234
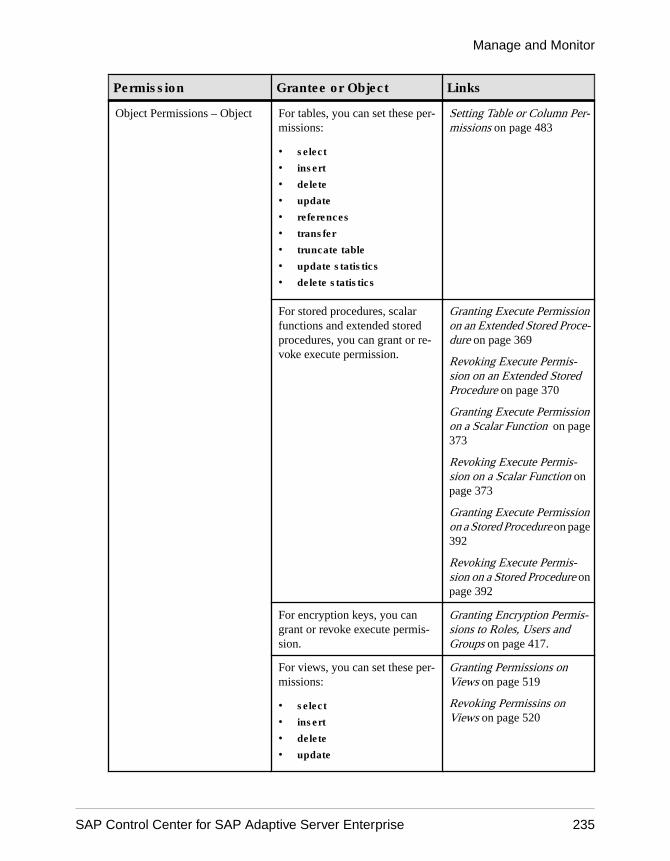
Permission Grantee or Object Links
Object Permissions – Object For tables, you can set these per-missions:
• select
• insert
• delete
• update
• references
• transfer
• truncate table
• update statistics
• delete statistics
Setting Table or Column Per-missions on page 483
For stored procedures, scalarfunctions and extended storedprocedures, you can grant or re-voke execute permission.
Granting Execute Permissionon an Extended Stored Proce-dure on page 369
Revoking Execute Permis-sion on an Extended StoredProcedure on page 370
Granting Execute Permissionon a Scalar Function on page373
Revoking Execute Permis-sion on a Scalar Function onpage 373
Granting Execute Permissionon a Stored Procedure on page392
Revoking Execute Permis-sion on a Stored Procedure onpage 392
For encryption keys, you cangrant or revoke execute permis-sion.
Granting Encryption Permis-sions to Roles, Users andGroups on page 417.
For views, you can set these per-missions:
• select
• insert
• delete
• update
Granting Permissions onViews on page 519
Revoking Permissins onViews on page 520
Manage and Monitor
SAP Control Center for SAP Adaptive Server Enterprise 235
Permission Grantee or Object Links
For precomputed results, you cangrant or revoke execute permis-sion.
Granting Permissions on page386
Revoking Permissions onpage 386
Granting Precomputed ResultSet Permissions to a SpecificUser on page 387
Revoking Precomputed Re-sult Set Permissions to a Spe-cific Use on page 388
Enabling Granular PermissionsGranular permissions enable you to grant system privileges; allowing you to construct site-specific roles with privileges to match your requirements, and restrict system administratorsand database owners from accessing user data.
The granular permissions feature requires the ASE_PRIVACY license.
To enable granular permissions, set the configuration parameter enable granular permissionsto 1.
You must have sso_role privileges to turn on granular permissions, and the manage securityconfiguration system privilege to turn off granular permissions.
To grant the following permissions, the system privilege manage server permissions isrequired, and to access database sybsecurity, the system privilege manage securitypermissions is required:
• checkpoint
• dump database
• load database
• online database
• own database
• use database
When enable granular permissions is set to 1:
• Checks for permissions are conducted and only users with the appropriate permissions seethe menu options available for setting those permissions. For example, the ChangePassword option is available only if you have Manage Any Encryption Key permission, orif you are the key owner for the column encryption key.
• System-defined roles (sa_role, sso_role, oper_role, and replication_role) are explicitlygranted a set of default privileges. You have the option to revoke explicitly granted systemprivileges from system-defined roles.
Manage and Monitor
236
• The system privilege manage security permissions is required to restore dbo userprivileges.
By default, the sa_role is granted the system privilege own any database. This privilegeallows a system administrator to become the database owner of any user database. However,database owners can revoke the own any database privilege from the sa_role.
To generate DDL for encryption keys, logins, and roles:
• You must have the Select Any System Catalog privilege on the master databaseto generate DDL for logins or roles.
• For encryption keys, you must have Select Any System Catalog privilege on thedatabase where the encryption key resides.
Select Any System Catalog is not an automatically granted privilege, even if youcan access system catalogs. If you have sso_role, you are automatically given the ManageSecurity Permissions privilege when granular permission is enabled. Once you havethe Manage Security Permissions permission, you can grant the Select AnySystem Catalog privilege to yourself or other users to allow access to generate DDL.
For complete information about how to manage granular permissions in SAP ASE, see theSecurity Administration Guide.
See also• Creating a Stored Procedure on page 390• Reorganizing Tables at the Database Level on page 495• Reorganizing Tables on page 497• Reorganizing Indexes on page 502• Reorganizing Table Partitions on page 500• Reorganizing Index Partitions on page 503• Restoring System Roles on page 442• Granting Privileges to a Role on page 445• Revoking Privileges from a Role on page 445• Granting Privileges to a User on page 439• Revoking Privileges from a User on page 439• Granting Privileges to a Group on page 434• Revoking Privileges from a Group on page 434
Replacing Compiled Object DefinitionsReplace existing compiled objects with a new definition while preserving the original name,object ID, auditing options, and permissions.
A compiled object is any object that requires entries in the sysprocedures table.
Compiled objects include:
Manage and Monitor
SAP Control Center for SAP Adaptive Server Enterprise 237
• Check constraints• Defaults• Rules• Stored procedures• Extended stored procedures• Triggers• Views• Functions• Computed columns• Partition conditions
When granular permissions is enabled or disabled, you must be the object owner to replace acompiled object. You cannot impersonate a user through an alias or by using setuser.However, if you are the owner through set proxy, you can replace a compiled object.
Replacing compiled objects is achieved by either using the Replace option from an object'scontext menu, or by using the Create wizard for the object and specifying a new definition foran existing object.
When using the Create wizard to replace a complied object definition, you must specify thesame compiled object name, owner, and database location in the Create wizard.
These objects are supported by the Replace option:
• Stored procedures• SQLJ procedures• Extended stored procedures• Views• Triggers• Scalar user-defined functions• SQLJ functions• Rules• Defaults
Displaying the Performance OverviewThe Overview screen shows performance status.
Check the Overview window to find out whether the server is running, and details aboutmemory usage, CPU utilization, recent alerts, and so on. Other windows in the SAP AdaptiveServer Enterprise monitor display more detailed information about the status of individualserver resources, such as engines, databases, caches, and processes. In cluster configurations,the Clusters Overview window allows you to check whether a particular cluster is running,how many instances of the cluster are down, and so on.
Manage and Monitor
238
1. In the Perspective Resources view, select the server, click the drop-down arrow, and selectMonitor. Alternately, in the Administration Console, select the server, click the drop-down arrow, and select Monitor.The SAP Adaptive Server Enterprise monitor opens and displays the Overview screen.Check the server information in the upper-left corner of the screen for the server’s name,software product and version, its hardware platform, and an indication of whether theserver is running. For cluster configurations, you also see the status of instances of eachcluster, and the number of blocked process.
Note: When a server status is Stopped, it means that the server is unreachable over thenetwork.
2. (Optional) If data collections are running, move the mouse over the Engine CPUUtilization graph to display precise figures (values, times, and dates) for points on thecurve.
The graph shows the aggregate CPU utilization for all engines on the server. For clusterconfigurations, the graph shows the aggregate CPU utilization for each instance of thecluster.
3. (Optional; not available in cluster configurations) Move your mouse over the Device IO/Sec graph to display precise figures (values, times, and dates) for points on the curve.
The graph shows device I/O aggregated across all devices on the server.
4. (Optional; not available in cluster configurations) Look at the Processes chart (far right) tosee the number of configured and currently running processes, and the highest number ofconcurrent processes since the server started, as well as the number of blocked processes.
5. (Optional; not available in cluster configurations) Look at the Memory chart to seestatistics for caches and for physical, logical, and unused memory.
6. (Optional) Click a tab to see information about the resource you want to monitor:
• Details – displays the version, edition, platform, number of deadlocks, platform, pagesize, device size, and counters cleared for the server.
• Configured Resources – displays, in tabular form, the configurable resources for eachserver or cluster instance. Each configuration option is shown along with its currentlyconfigured value, the run value that is currently used by the server, the percentage of theresource that is currently in use, and the high-water mark, which is the maximumamount of resources used since the server started. You can sort the table on any column.The configured value for a resource is an editable field, denoted as such by a "pencil"Edit icon. Enter a new numerical value for one or more resources, then choose either:• Save All to update the server with the new values. SCC displays the new values. If
the server encounters an error while applying the new value for a resource, SCCdisplays the error below the table, and also next to the changed field in the row thatcauses the server error.
• Reset All to restore the original value for the resource.
Manage and Monitor
SAP Control Center for SAP Adaptive Server Enterprise 239
Note: You can also configure resources for each server or cluster instance in the ServerConfigurations window.
• Wait Events – displays a list of server-wide wait events that can be very useful inperformance tuning. Wait-event information includes the number of waits, wait time,average wait time, and wait description. For clustered servers, this information isshown for each instance.
• Licenses – displays a list of licenses that are currently checked out by the server, or bycluster instances. There is also information about the number, type, status (expirable,permanent and so on), and the expiration date of each license.
• Alerts – displays a list of all fired alerts configured at server, cluster or cluster instancelevels. The information for each alert includes the time at which the alert was fired,severity, current statistic, and threshold.
7. (Optional; for cluster configurations) Move your mouse over the Cluster Instances graphto display precise information for points on the bar graph.
8. (Optional; for cluster configurations) If data collections are running, mouse over theLogical Cluster graph to display precise information for points on the bar graph.
See also• Displaying the Cluster Overview on page 256
• Interpreting Statistics on page 457
Performance Overview Statistics and DetailsThe Overview screen displays high-level information about the current ASE SAP server. Thetables and charts are populated by data from the collection_ase_all_client_kpis, covering thecurrent chart trend period.
Note: The Overview screen is called Cluster Overview in cluster configurations.
Engine CPU Utilization Displays aggregate CPU utilization for all engines on thisserver. For information about individual server engines, see theEngines screen. Because all I/O for a process goes through oneengine, CPU usage is not always evenly distributed acrossengines. For cluster configurations, the graph shows the ag-gregate CPU utilization for each instance of the cluster.
Device IO/Sec (For cluster configurations, this information is on the ClusterInstances window) Displays device I/O per second, aggregatedacross all devices on this server. For information about indi-vidual devices, see the Devices screen.
Manage and Monitor
240
Memory (For cluster configurations, this information is on the ClusterInstances window) Displays memory usage statistics, includ-ing:
• Amount of physical and logical memory in use
• Amount of unused memory
• Size of the procedure, statement, and data caches
Processes Displays process statistics, including:
• Max User Processes – number of processes for which thisserver is configured.
• High Water Mark – highest number of processes that ranconcurrently since this server started.
• Active – processes currently running.
• (Cluster configurations only) Blocked Processes – pro-cesses that are waiting for a resource, or for another processto finish.
For more on processes, see the Processes screen.
Details tab Displays information about this server, including number ofdays it has been running, number of deadlocks, data cache hitrate, procedure cache stalls, page and device sizes, maximumnumber of online engines, number of open databases, and thedates and times of the server’s most recent restart and of theclearing of these counters. For cluster configurations, the De-tails tab also displays information about software product andversion, hardware platform, server edition, number of deadlocks, page and device sizes, when the server was last re-star-ted, and when the counters were last cleared.
Configured Resources tab Displays usage statistics for many of the configured resourcesfor this server or cluster instance:
• Current – amount of this resource the server is currentlyusing.
• Run value – configured maximum for this resource.
• Percentage – percentage of the configured maximum rep-resented by the current use of this resource.
• High Water Mark – maximum amount of this resource thathas been used since this server started.
Use the Percentage and High Water Mark columns to identifyresources that might be over- or under-configured.
Manage and Monitor
SAP Control Center for SAP Adaptive Server Enterprise 241
Wait Events Displays a list of server-wide wait events, which can be veryuseful in performance tuning. Information about the waitevents includes the number of waits, wait time, average waittime, and wait description. For clustered servers, this sameinformation appears for each instance.
Licenses tab Displays information about software licenses on this server orcluster instance.
Alerts tab Displays, for this server, cluster, or cluster instance, all alertnotifications that have occurred since the monitor view wasopened. If any alerts have occurred since you last looked at theAlerts tab, a yellow warning icon appears on the tab.
You can use the Alert List Size property on the Settings screento control the number of alerts that appears.
See also• Device Statistics and Details on page 357
• Engine Statistics and Details on page 363
• Process Statistics and Details on page 402
CachesMonitor SAP ASE data, procedure, statement caches, and in-memory storage.
Monitor CachesFrom the Perspective Resources view, use the Monitor option on your server to display cachestatistics and to monitor cache activity.
Monitoring SAP ASE Data CachesDisplay information about data caches.
1. In the Perspective Resources view, select the server to monitor, click the drop-down arrow,and select Monitor.
2. In the left pane, select Caches.
3. Click the Data Caches tab.
4. Select a cache.The tabs at the bottom of the screen are populated with information about the selectedcache.
5. (Optional for cluster configurations) Select Global for information about global datacaches. Select Local for information on data caches in each cluster instance.
Manage and Monitor
242
6. (Optional for cluster configurations) Select a cache in the Global Data Caches or LocalData Caches table.The tabs at the bottom of the screen are populated with information about the selectedcache.
7. Click the tabs to show details about Pool Information or Cached Objects.
8. (Optional for cluster configurations) Click the tab to show details about Distribution for aselected global data cache.
For more information on data caches, see System Administration Guide Volume 2.
See also• Monitoring the SAP ASE Procedure Cache on page 245
• Monitoring the SAP ASE Statement Cache on page 246
• Monitoring SAP ASE In-memory Storage on page 248
• Data Cache Statistics and Details on page 244
• Procedure Cache Statistics and Details on page 246
• Statement Cache Statistics and Details on page 247
• In-memory Storage Statistics and Details on page 249
Modifying Data Cache SizesModify the size of the data cache and specify the number of partitions in the data cache.
You need sa_role to modify data caches. For more details on administering data caches, see theSystem Administration Guide.
1. In the Perspective Resources view, select the server to monitor, click the drop-down arrow,and select Monitor.
2. In the left pane, select Caches.
3. Select the cache to configure.
4. Right-click the selected cache to display the Resize option that allows you to modify thesize of the data cache.You see the current size of the data cache, available space, and partition information.
5. Enter the new size of the data cache.
An increase in the data cache size takes immediate effect; a decrease requires a serverrestart.
6. (Optional) Enter a new values for the partitions in the data cache.
7. (Optional) Use Calculate Overhead to calculate the amount of memory required to resizethe data cache with the new input size.
8. Click Save.The dialog box closes if the operation succeeds, otherwise SAP Control Center displays anerror and the dialog box remains open.
Manage and Monitor
SAP Control Center for SAP Adaptive Server Enterprise 243
Adding Data Cache Buffer PoolsChange the configuration of your data cache buffer pools.
1. In the Perspective Resources view, select the server to monitor, click the drop-down arrow,and select Monitor.
2. In the monitor view, select Caches.
3. Select the cache to configure.
4. Right-click the selected cache and select Add Buffer Pool to modify the configuration ofthe data cache. Alternately, click Add Buffer Pool in the Pool Information table.
5. To configure the new buffer pool, enter values for I/O buffer size, amount in pool, washsize, and a prefetch limit. You can also select the pool from which to allocated space for thechanged configuration.
6. Click Save.The dialog box closes if the operation succeeds, otherwise SCC displays an error and thedialog box remains open.
Data Cache Statistics and DetailsThe Data Cache window displays information about SAP ASE data caches.
In cluster configurations, the Global Datacaches window provides information about theglobal data caches and the Local Datacaches screen provides information about local datacaches grouped by cluster instances.
The Data Caches table shows the size and level of activity in each data cache, including hit rate(the percentage of database requests that can be answered from the cache), volatility, numberof partitions in this cache, relaxed replacement, and physical reads and writes. Select a cachein the table to populate the tabs at the bottom of the screen with details about that cache. Toview the Data Caches table, from the Perspective Resources view, select the server to monitor,click the drop-down arrow, and select Monitor.
Right-click a selected cache and select Resize to modify the size of the data cache, or AddBuffer Pool to change the configuration of your data cache buffer pool.
Table 51. Tabs on the Data Cache Window
Pool Information Shows information about the pools of differentsizes that optimize I/O in the selected cache. De-tails include size, usage, reread ratio, physical anddirty reads, pages touched, buffers to MRU (mostrecently used), and buffers to LRU (least recentlyused). The Buffers to MRU and Buffers to LRUcolumns show buffers added to the ends of thebuffer list. The oldest buffers (the least recentlyused) are flushed first.
Manage and Monitor
244
Cached Objects Lists the tables in the selected data cache and theirsize, in kilobytes. Click the Cached Size columnheading to sort the table by size.
Distribution Shows information about the distribution metricsfor each instance of a cluster, including hit rate,volatility, cache partitions, relaxed replacement,and physical reads and writes.
See also• Procedure Cache Statistics and Details on page 246
• Statement Cache Statistics and Details on page 247
• In-memory Storage Statistics and Details on page 249
• Monitoring SAP ASE Data Caches on page 242
• Monitoring the SAP ASE Procedure Cache on page 245
• Monitoring the SAP ASE Statement Cache on page 246
• Monitoring SAP ASE In-memory Storage on page 248
Monitoring the SAP ASE Procedure CacheDisplay information about the procedure cache.
1. In the Perspective Resources view, select the server to monitor, click the drop-down arrow,and select Monitor.
2. In the left pane, select Caches.
3. Click Procedure Cache.
4. (Optional for cluster configurations) Select a specific cluster instance to see all theprocedures for that instance.
For more information on the procedure cache, see Performance and Tuning Series: Basics.
See also• Monitoring SAP ASE Data Caches on page 242
• Monitoring the SAP ASE Statement Cache on page 246
• Monitoring SAP ASE In-memory Storage on page 248
• Data Cache Statistics and Details on page 244
• Procedure Cache Statistics and Details on page 246
• Statement Cache Statistics and Details on page 247
• In-memory Storage Statistics and Details on page 249
Manage and Monitor
SAP Control Center for SAP Adaptive Server Enterprise 245
Procedure Cache Statistics and DetailsThe Procedure Cache screen displays information about the contents of the procedure cache,which is a memory pool used for stored procedures and a variety of other objects.
The functions that use the procedure cache are called modules—there are over 20 modules inthe system. The bar chart on this screen, Top 10 Procedure Cache Module Users, shows themodules that use the cache most heavily. The Procedural Objects module contains storedprocedures; there is also a module for the statement cache. Use the bar chart to see which partsof the system are using the procedure cache.
The Cached Procedures table lists the stored procedures in the cache (in the ProceduralObjects Module). For each stored procedure, it gives the name, database name, cached size,owner’s name, compile date, and plan ID.
For cluster configurations, information for each selected instance of the cluster is depicted inthe Procedure Cache Summary, and includes the hit ratio, number of stalls or dirty reads,amount of procedure cache memory that is currently in use, and the total procedure cachememory allocated.
See also• Data Cache Statistics and Details on page 244
• Statement Cache Statistics and Details on page 247
• In-memory Storage Statistics and Details on page 249
• Monitoring SAP ASE Data Caches on page 242
• Monitoring the SAP ASE Procedure Cache on page 245
• Monitoring the SAP ASE Statement Cache on page 246
• Monitoring SAP ASE In-memory Storage on page 248
Monitoring the SAP ASE Statement CacheDisplay information about the statement cache, including cached SQL queries.
Note: Statement cache monitoring is controlled by the two configuration options enable stmtcache monitoring and statement cache size. For the Statement Cache tab to appear, thestatement cache must be configured in SAP ASE and the enable stmt cache monitoringoption must be turned on in SAP ASE. Turning on the enable stmt cache monitoring option isnot necessary to enable monitoring of a server.
1. In the Perspective Resources view, select the server to monitor, click the drop-down arrow,and select Monitor.
2. In the left pane, select Caches.
3. Click the Statement Cache tab.
4. (Optional for cluster configurations) Select a specific cluster instance to see all thestatements for that instance.
Manage and Monitor
246
5. Select a statement in the Cached Statements table.The SQL query appears at the bottom of the screen.
6. Click the tabs to display pool information or details about cached objects.
For more information on the statement cache, see System Administration Guide, Volume 2.
See also• Monitoring SAP ASE Data Caches on page 242
• Monitoring the SAP ASE Procedure Cache on page 245
• Monitoring SAP ASE In-memory Storage on page 248
• Data Cache Statistics and Details on page 244
• Procedure Cache Statistics and Details on page 246
• Statement Cache Statistics and Details on page 247
• In-memory Storage Statistics and Details on page 249
Setting the Statement Cache SizeTo set the statement cache size, use either SCC, or the sp_configure system procedure.
If you do not configure the statement cache in the monitored server, SCC displays an errorwhen you open the Statement Cache tab on the SAP Adaptive Server Enterprise MonitorView Caches screen:[error#=12052] Collection of monitoring data for table'monCachedStatement' requires that the 'statement cache size'configuration option(s) be enabled. To set the necessaryconfiguration, contact a user who has the System Administrator(SA) role.
To enable the statement cache, use one of these methods:
• In SCC, open the SAP Adaptive Server Enterprise Monitor view, or AdministrationConsole Configuration screen, and change the value of statement cache size to a nonzerovalue.
• Log in to the server and execute the sp_configure system procedure to set the value of thestatement cache size parameter to a nonzero value.
Statement Cache Statistics and DetailsThe Statement Cache window displays information about SQL queries and query plans storedin the statement cache.
The Statement Cache Summary gives details about the size, hit count, and traffic in the cache.The Cached Statements table lists SQL statements by statement ID (SSQLID), and gives theowner name, use count, CPU time, elapsed time to execute, and logical and physical I/Ofigures for each query.
The Cached Statement Text window displays the query selected in the Cached Statementstable.
Manage and Monitor
SAP Control Center for SAP Adaptive Server Enterprise 247
Note: A cached query and query plan can be reused only by the user who first entered thequery. Thus, if two or more users enter the same query, it appears in the cache several times.
See also• Data Cache Statistics and Details on page 244
• Procedure Cache Statistics and Details on page 246
• In-memory Storage Statistics and Details on page 249
• Monitoring SAP ASE Data Caches on page 242
• Monitoring the SAP ASE Procedure Cache on page 245
• Monitoring the SAP ASE Statement Cache on page 246
• Monitoring SAP ASE In-memory Storage on page 248
Monitoring SAP ASE In-memory StorageSCC provides detailed information about in-memory storage.
In-memory databases are not currently supported in Cluster Edition 15.5, or in any releaseearlier than SAP ASE 15.5.
1. In the Perspective Resources view, select the server to monitor, click the drop-down arrow,and select Monitor.
2. In the left pane, select Caches.
3. Click the In-memory Storage tab.
4. Select a cache in the In-memory Storage table.The tabs at the bottom of the screen are populated with information about the selected in-memory storage cache.
5. Click the tabs to display In-memory Devices, In-memory Databases, or CachedObjects details.
For more information on in-memory storage, see In-memory Database Users Guide.
See also• Monitoring SAP ASE Data Caches on page 242
• Monitoring the SAP ASE Procedure Cache on page 245
• Monitoring the SAP ASE Statement Cache on page 246
• Data Cache Statistics and Details on page 244
• Procedure Cache Statistics and Details on page 246
• Statement Cache Statistics and Details on page 247
• In-memory Storage Statistics and Details on page 249
Manage and Monitor
248
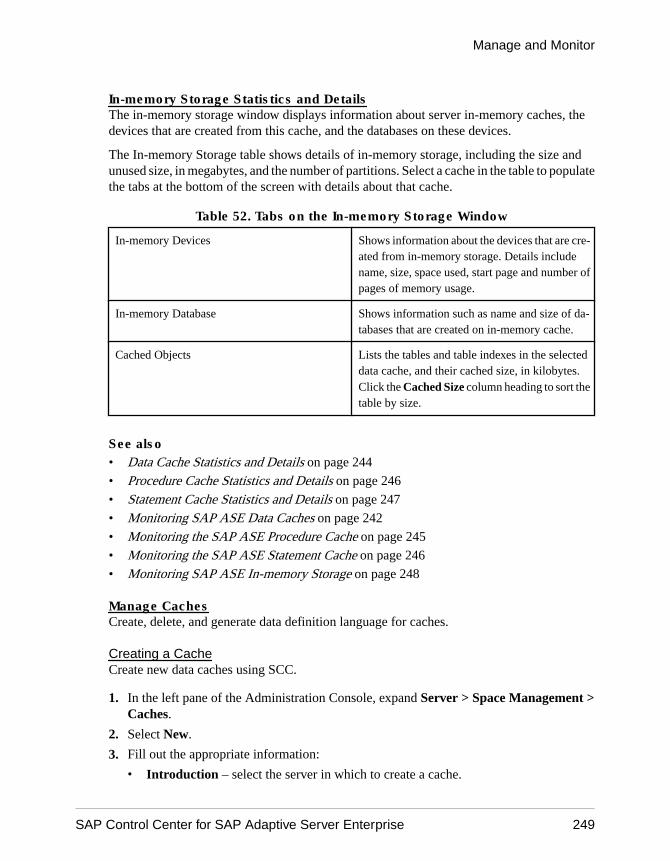
In-memory Storage Statistics and DetailsThe in-memory storage window displays information about server in-memory caches, thedevices that are created from this cache, and the databases on these devices.
The In-memory Storage table shows details of in-memory storage, including the size andunused size, in megabytes, and the number of partitions. Select a cache in the table to populatethe tabs at the bottom of the screen with details about that cache.
Table 52. Tabs on the In-memory Storage Window
In-memory Devices Shows information about the devices that are cre-ated from in-memory storage. Details includename, size, space used, start page and number ofpages of memory usage.
In-memory Database Shows information such as name and size of da-tabases that are created on in-memory cache.
Cached Objects Lists the tables and table indexes in the selecteddata cache, and their cached size, in kilobytes.Click the Cached Size column heading to sort thetable by size.
See also• Data Cache Statistics and Details on page 244
• Procedure Cache Statistics and Details on page 246
• Statement Cache Statistics and Details on page 247
• Monitoring SAP ASE Data Caches on page 242
• Monitoring the SAP ASE Procedure Cache on page 245
• Monitoring the SAP ASE Statement Cache on page 246
• Monitoring SAP ASE In-memory Storage on page 248
Manage CachesCreate, delete, and generate data definition language for caches.
Creating a CacheCreate new data caches using SCC.
1. In the left pane of the Administration Console, expand Server > Space Management >Caches.
2. Select New.
3. Fill out the appropriate information:
• Introduction – select the server in which to create a cache.
Manage and Monitor
SAP Control Center for SAP Adaptive Server Enterprise 249
• (Optional; cluster environment only) Create this as a local cache – create the cache asa local cache, then select the online instance on which to create the cache.
• Cache Name – enter the name of the cache to create.• Cache Size – enter the size of the new cache, which must be at least 512KB, but can be
no larger than the unconfigured amount remaining on the server.(Optional) To determine if the server can manage the cache size, enter the size and clickCalculate overhead. The wizard calculates the overhead necessary for the specifiedcache size.
• Type of Cache – select one of:• Data and log pages• Only log pages• In-memory database – this option is available only on SAP ASE version 15.5 and
later
4. Click Summary to see the cache options you selected.
5. (Optional) Click Preview to view the Transact-SQL syntax used to create the cache.
See also• Generating DDL for a Cache on page 253
• Deleting a Cache on page 253
Cache PropertiesUse the Cache Properties window to modify default data cache sizes, buffer pool values, andcache bindings. If you created the cache in an in-memory database, use the Properties windowto also view in-memory database and in-memory device information.
Click the Name field of the cache, then click the drop-down arrow and select Properties.
Pages Properties
General Current size – select the display format:
• Pages
• KB
• MB
• GB
Configuration • Currently configured – you can change the size of the data cache.
• Show in – allows you to specify the format in which to show cache size, in-cluding pages, kilobytes, megabytes, and gigabytes.
See Managing Cache Configurations on page 253.
Manage and Monitor
250
Pages Properties
Buffer Pool Current buffer pool values for regular caches – you can add, change, or removebuffer pools. See Managing Buffer Pools on page 252.
Cache Bind-ings
Shows object bindings for databases, tables, and indexes for regular caches – youcan add, change, or remove cache bindings. See Managing Binding Options on page251.
In-MemoryDatabase
(Available only for in-memory databases) Displays the in-memory database that iscreated on this cache.
In MemoryDevice
(Available only for in-memory databases) Displays the in-memory device list thatoccupies this cache.
See also• Managing Cache Configurations on page 253
• Managing Binding Options on page 251
• Managing Buffer Pools on page 252
Managing Binding OptionsYou can add and change object bindings for your data cache.
1. In the left pane of the Administration Console, expand Server > Space Management >Caches.
2. Click the Name field of the cache, then click the drop-down arrow and selectProperties.
3. Click Cache Bindings. You see a list of cached bindings for databases, tables, or indexesdepending on what you select from the Show object bindings for.
4. Modify cache bindings for your data cache:
• Add a binding – select the database, table, or index and click Bind to bind a new objectto the cache within your selected scope. If you do not select a scope, the default isdatabase.
• Delete a cache binding – select the bound database, table, or index object and clickUnbind.
(Optional) Click Properties to see the detailed properties of the object you select.
See also• Managing Cache Configurations on page 253
• Managing Buffer Pools on page 252
• Cache Properties on page 250
Manage and Monitor
SAP Control Center for SAP Adaptive Server Enterprise 251
Managing Buffer PoolsYou can add and change buffer pools for your data cache.
1. In the left pane of the Administration Console, expand Server > Space Management >Caches.
2. Click the Name field of the cache, then click the drop-down arrow and selectProperties.
3. Click Buffer Pool to see a list of existing buffer pool values.
4. Modify the buffer pool allocation for your data cache:
• Click Add to add an additional memory pool to the existing data cache, and specify:• I/O buffer size – select the size of your I/O buffer, in kilobytes.• Amount in pool – set the desired size and select the size format. The default size
format is MB.• Wash size – set the desired wash size—the point in the cache at which the server
writes dirty pages to disk for a memory pool—and size format. The default is KB.• Local async prefetch limit – set the percent of buffers in the pool that you can use
to hold buffers that have been read into cache by asynchronous prefetch, but haveyet to be used.
• Affected pool – specify the amount of memory, in kilobytes, the new pool shouldtake from the existing pool. The menu lists the existing buffer pool you added to thecache. Since there is only a 2KB page-sized pool in the cache, you can add a newbuffer pool only by taking part of the size from the 2KB page-sized pool.
• Select a buffer pool and click Change to change the memory pool settings. You see thesame Add/Change Memory Pool dialog, with fewer options to modify:• Wash size• Local async prefetch limit• Affected limit – since you do not affect other pools when you change an existing
pool, set this to null.• Select the buffer pool to delete, and click Remove to remove any additional buffer
pools you created. You cannot remove the default buffer pool.
See also• Managing Cache Configurations on page 253
• Managing Binding Options on page 251
• Cache Properties on page 250
Manage and Monitor
252
Managing Cache ConfigurationsChange the size of your data cache.
1. In the left pane of the Administration Console, expand Server > Space Management >Caches.
2. Click the Name field of the cache, then click the drop-down arrow and selectProperties.
3. Click Configuration to see the information for your data cache.
4. (Not available for in-memory storage caches) Choose whether the cache is stored as dataand log pages, or only as log pages. You cannot change the type for default cache, which isconfigured for data and log pages.
5. (Not available for in-memory storage caches) In the Currently configured field, specify thesize of the data cache.
Note: Current size indicates how much unused space remains in your specified data cache,while Available space shows the amount of additional memory available for all caches.
Calculate Overhead allows you to see how much overhead you need to manage your datacache.
See also• Managing Binding Options on page 251• Managing Buffer Pools on page 252• Cache Properties on page 250
Generating DDL for a CacheUse SAP Control Center to generate a DDL script for caches.
1. In the left pane of the Administration Console, expand Server > Space Management >Caches.
2. Click the Name field of the cache, then click the drop-down arrow and select GenerateDDL.
3. (Optional) Click Save to export and save the DDL statement.
You can save the DDL in an external file on your local file system.
See also• Creating a Cache on page 249• Deleting a Cache on page 253
Deleting a CacheUse SCC to delete a cache in SAP ASE.
You cannot delete the default data cache.
Manage and Monitor
SAP Control Center for SAP Adaptive Server Enterprise 253
1. In the Administration Console view, select ASE Servers.
2. .
3. Navigate to your cache, then click the Name field of the cache you want to delete.
4. Select Delete from the menu.
5. Confirm the deletion.
6. Click Finish.
See also• Creating a Cache on page 249
• Generating DDL for a Cache on page 253
ClustersManage and monitor SAP ASE cluster instances.
Monitor ClustersMonitor SAP ASE cluster configurations. Monitored resources include memory usage, deviceI/O, engine CPU utilization, connection information, interprocess communication, workloadmanagement, load profiles, routes, and so on.
To monitor clusters, you must have connect to permissions granted in the master database.
connect to permissions can be granted to a role, user, or group.
The syntax is:grant connect to someone
where someone is a role, a user, or a group.
Cluster InstancesMonitor instances of an SAP ASE cluster configuration including memory usage, device I/O,engine CPU utilization, and connection information.
See also• Cluster Interconnect on page 256
• Workload Management on page 259
• Displaying the Cluster Overview on page 256
• Cluster Interconnect Statistics and Details on page 257
• Workload Management Statistics and Details on page 261
• Monitoring Interprocess Communication in Cluster Configurations on page 258
• Monitoring Workloads in Cluster Configurations on page 259
Manage and Monitor
254
Monitoring Cluster Instances in Cluster ConfigurationsThe Cluster Instances window displays details about memory and device usage of all clusterinstances in an cluster configuration.
Use the Cluster Instances window to gather information about memory usage, processes, userconnections, and device I/O per instance of the cluster.
1. In the Perspective Resources view, select a shared-disk cluster, click the drop-down arrow,and click Monitor.The Cluster Instances screen displays information pertaining to each cluster instance.
2. Select Cluster Instances from the left pane.
3. (Optional) Click the Details or Advanced tab at the bottom of the screen to display moreinformation about individual instances:
• Details – displays two charts, Memory Usage and Processes. Memory Usagerepresents the memory (physical and logical) and cache usage (procedure, statementand data) of a single cluster instance. Processes gives a summary of running, blocking,and blocked processes on a single cluster instance.
• Advanced – displays graphs Device I/O per Sec, Active Connections, and Engine CPUUtilization. Device I/O per Sec represents the reads and writes of the selected instanceduring a certain time period. Active Connections represents the number of userconnections created on a selected instance during a certain time period. Engine CPUUtilization represents the aggregate CPU utilization by all engines of a selectedinstance.
See also• Monitoring Interprocess Communication in Cluster Configurations on page 258• Monitoring Workloads in Cluster Configurations on page 259• Cluster Instances Statistics and Details on page 255• Cluster Interconnect Statistics and Details on page 257• Workload Management Statistics and Details on page 261• Displaying the Cluster Overview on page 256• Cluster Interconnect on page 256• Workload Management on page 259
Cluster Instances Statistics and DetailsThe Cluster Instances screen displays information pertaining to each cluster instance in graphand chart formats.
The Memory Usage chart represents the memory (physical and logical) and cache usage(procedure, statement and data) of a single cluster instance. The Processes chart gives asummary of running, blocking, and blocked processes on a single cluster instance.
The Device I/O per Sec graph represents the reads and writes of the selected instance during acertain time period. The Active Connections graph represents the number of user connections
Manage and Monitor
SAP Control Center for SAP Adaptive Server Enterprise 255
created on a selected instance during a certain time period. The Engine CPU Utilization graphrepresents the aggregate CPU utilization by all engines of a selected instance.
Right-click a cache and select Resize to modify the size of the data cache, or Add Buffer Poolto change the configuration of your data cache buffer pool.
Table 53. Tabs on the Cluster Instances Window
Details Displays the Memory Usage and Processescharts.
Advanced Displays the Device I/O per Sec, Active Connec-tions, and Engine CPU Utilization graphs.
Workload Status Displays the workload metric and the corre-sponding base metric value.
See also• Cluster Interconnect Statistics and Details on page 257• Workload Management Statistics and Details on page 261• Monitoring Cluster Instances in Cluster Configurations on page 255• Monitoring Interprocess Communication in Cluster Configurations on page 258• Monitoring Workloads in Cluster Configurations on page 259• Displaying the Cluster Overview on page 256• Cluster Interconnect on page 256• Workload Management on page 259
Cluster InterconnectMonitor interprocess communication in an SAP ASE cluster configuration.
See also• Displaying the Cluster Overview on page 256• Cluster Instances on page 254• Workload Management on page 259• Cluster Instances Statistics and Details on page 255• Workload Management Statistics and Details on page 261• Monitoring Cluster Instances in Cluster Configurations on page 255• Monitoring Workloads in Cluster Configurations on page 259
Displaying the Cluster OverviewThe Cluster Overview screen shows performance status for cluster configurations.
Check the Cluster Overview window to find out whether the server is running, and detailsabout memory usage, CPU utilization, recent alerts, and so on. Other windows in the monitor
Manage and Monitor
256
display more detailed information about the status of individual server resources such asengines, databases, caches, and processes.
See also• Cluster Instances on page 254
• Cluster Interconnect on page 256
• Workload Management on page 259
• Performance Overview Statistics and Details on page 240
• Cluster Instances Statistics and Details on page 255
• Cluster Interconnect Statistics and Details on page 257
• Workload Management Statistics and Details on page 261
• Displaying the Performance Overview on page 238
• Monitoring Cluster Instances in Cluster Configurations on page 255
• Monitoring Interprocess Communication in Cluster Configurations on page 258
• Monitoring Workloads in Cluster Configurations on page 259
Cluster Interconnect Statistics and DetailsThe Cluster Interconnect window displays information pertaining to each cluster instance,including instance name, count of received, transmitted, multicast and retransmittedmessages, and count of successful and failed switches.
Table 54. Tabs on the Cluster Interconnect Window
CIPC Displays the current status for each CIPC link.Status information for each instance includes theinstance name, count of received, transmitted,multicast and retransmitted messages, and countof successful and failed switches.
CIPC Links Displays the current status for each CIPC link.Status information for each instance includes theID, local and remote interfaces, passive and activestates, and ages of passive and active states.
CIPC Mesh Displays cluster instance name, channel name,far-end cluster instance, received and transmittedmessage counts, and dropped, re-sent and retriedmessages. There is a Message Send Queue sum-mary with send queue and sent queue informa-tion. The send queue includes current messageswaiting to be sent to the instance, while the sentqueue includes sent messages for which notifica-tion has not been processed.
Manage and Monitor
SAP Control Center for SAP Adaptive Server Enterprise 257
CIPC Endpoints Displays cluster instance name, endpoint name,received and transmitted message counts, and re-ceived and transmitted byte counts. There is also aMessage Received Summary with received queueand done queue information. The received queueincludes messages queued for this logical end-point. The done queue includes messages for thislogical endpoint that have been processed, andawait further action.
See also• Cluster Instances Statistics and Details on page 255
• Workload Management Statistics and Details on page 261
• Monitoring Cluster Instances in Cluster Configurations on page 255
• Monitoring Interprocess Communication in Cluster Configurations on page 258
• Monitoring Workloads in Cluster Configurations on page 259
• Displaying the Cluster Overview on page 256
• Cluster Instances on page 254
• Workload Management on page 259
Monitoring Interprocess Communication in Cluster ConfigurationsThe Cluster Interconnect window provides information about interprocess communication ina cluster configuration.
The Cluster Interconnect window provides detailed interprocess communication informationfor each instance of the cluster.
1. In the Perspective Resources view, select a shared-disk cluster, click the drop-down arrowand click Monitor.
2. To show the Cluster Interconnect screen, select Cluster Interconnect from the left pane.The Cluster Interconnect window displays information pertaining to each cluster instance,including instance name, count of received, transmitted, multicast and retransmittedmessages, and count of successful and failed switches. Additional tabs show moreinformation about CIPC (cluster interprocess communication) links, messages, channels,and endpoints.
3. (Optional) Click a tab at the top of the screen to display more CIPC information onindividual instances. By default, the CIPC tab is selected.
• CIPC – displays the current status for each CIPC link. Status information for eachinstance includes the instance name, count of received, transmitted, multicast andretransmitted messages, and count of successful and failed switches.
Manage and Monitor
258
• CIPC Links – displays the current status for each CIPC link. Status information foreach instance includes the ID, local and remote interfaces, passive and active states,and ages of passive and active states.
• CIPC Mesh – displays cluster instance name, channel name, far-end cluster instance,received and transmitted message counts, and dropped, re-sent and retried messages.There is a Message Send Queue summary with send queue and sent queue information.The send queue includes current messages waiting to be sent to the instance, while thesent queue includes sent messages whose notification has not been processed.
• CIPC EndPoints – displays cluster instance name, endpoint name, received andtransmitted message counts, and received and transmitted byte counts. There is also aMessage Received Summary with received queue and done queue information. Thereceived queue includes messages queued for this logical endpoint. The done queueincludes messages for this logical endpoint that have been processed, and await furtheraction.
See also• Monitoring Cluster Instances in Cluster Configurations on page 255• Monitoring Workloads in Cluster Configurations on page 259• Cluster Instances Statistics and Details on page 255• Cluster Interconnect Statistics and Details on page 257• Workload Management Statistics and Details on page 261• Displaying the Cluster Overview on page 256• Cluster Instances on page 254• Workload Management on page 259
Workload ManagementMonitor the workload for a cluster configuration, including load profiles, load scores, routes,connections, and states.
See also• Displaying the Cluster Overview on page 256• Cluster Instances on page 254• Cluster Interconnect on page 256• Cluster Instances Statistics and Details on page 255• Cluster Interconnect Statistics and Details on page 257• Monitoring Cluster Instances in Cluster Configurations on page 255• Monitoring Interprocess Communication in Cluster Configurations on page 258
Monitoring Workloads in Cluster ConfigurationsThe Workload Management window provides, for each instance of the cluster, detailedinformation on logical clusters, load profiles, routes, and system information.
Manage and Monitor
SAP Control Center for SAP Adaptive Server Enterprise 259
1. In the Perspective Resources view, select a shared-disk cluster, click the drop-down arrowand click Monitor.
2. Select Workload Management from the left pane.
3. (Optional) Click a tab at the top of the screen to display more workload information onindividual instances. By default Logical Clusters is selected.
• Logical Clusters – The values for state are: online, offline, failed, inactive, andtime_wait. The type may be application, login, or alias. The General, Base Instances,Failover Instances, and Routes tabs at the bottom of the screen provide access toadditional information about a selected logical cluster.• (Optional) To see the system view, start-up mode, failover mode, down-routing
mode, login distribution mode, and logical cluster role for the selected logicalcluster, select General.
• (Optional) To see the ID, name, and state of the selected logical cluster select BaseInstances.
• (Optional) To see the ID, name, state, and failover group of the selected logicalcluster, select Failover Instances.
• (Optional) To see the name and type of route associated with the selected logicalcluster, select Routes.
• Workloads – displays a list of workloads with information on instance, load profile,load score, user connections, CPU busy, run queue length, I/O load, engine deficit, anduser score.• (Optional) To see charts depicting load score, and percentage use of the CPU, select
Details for a selected workload.• (Optional) To see charts depicting queue length, and I/O load, select Advanced for
a selected workload.• Load Profiles – displays a list of load profiles with information on name, type,
minimum load score, login redirection, and dynamic migration.(Optional) To see a chart of metrics, select Metric Weight for a selected load profile.The metrics include user connections, CPU busy, run queue length, and so on, and thecorresponding weights associated with the metric.
• Routes – displays a list of routes with the name of the route, the logical cluster it isdefined on, and the type of route such as alias, application, or login.
See also• Monitoring Cluster Instances in Cluster Configurations on page 255• Monitoring Interprocess Communication in Cluster Configurations on page 258• Cluster Instances Statistics and Details on page 255• Cluster Interconnect Statistics and Details on page 257• Workload Management Statistics and Details on page 261• Displaying the Cluster Overview on page 256• Cluster Instances on page 254
Manage and Monitor
260
• Cluster Interconnect on page 256
Workload Management Statistics and DetailsThe Workload Management window displays, for each instance of the cluster, detailedinformation on logical clusters, load profiles, routes, and system information.
Table 55. Tabs on the Workload Management window
Logical Clusters Displays the logical cluster name, state, activeconnections, base instances, active base instan-ces, failover instances, active failover instances,and load profile name. The possible values forstate are: online, offline, failed, inactive, andtime_wait. The type may be application, login, oralias.
Routes depicts the name and type of route asso-ciated with the selected logical cluster.
Failover Instances depicts the ID, name, state,and failover group of the selected logical cluster.
Base Instances depicts the ID, name, and state ofthe selected logical cluster.
General depicts the system view, start-up mode,failover mode, down-routing mode, login distri-bution mode, and logical cluster role for the se-lected logical cluster.
Manage and Monitor
SAP Control Center for SAP Adaptive Server Enterprise 261
Workload Scores Displays a list of workloads with information oninstance, load profile, load score, user connec-tions score, CPU busy score, run queue lengthscore, I/O load score, engine deficit score, anduser score.
Details displays charts depicting load score, andpercentage use of the CPU, for a selected work-load.
Advanced displays charts depicting run queuelength score, and I/O load score, for a selectedworkload.
Note: Elements of the monitor screens may beupdated at different intervals, depending on themechanism that is used to collect the data. Forexample, the historical charts are updated basedon the frequency of the all_client_kpis collectionwhile the data in the tables on the screen are up-dated with the frequency that the user has set forthe screen refresh interval on the Settings win-dow.
Base Metric Values Displays a list of instances and their user con-nections, CPU busy percentage, run queue length,I/O load, engine deficit percentage and user per-centage.
Load Profiles Displays a list of load profiles with informationon name, type, minimum load score, login redi-rection, and dynamic migration.
Metric Weight for a selected load profile displaysuser connections, CPU busy, run queue length,and so on, and the corresponding weights asso-ciated with the metric.
Routes Displays a list of routes with the name of theroute, the logical cluster it is defined on, and thetype of route such as alias, application, or login.
See also• Cluster Instances Statistics and Details on page 255• Cluster Interconnect Statistics and Details on page 257• Monitoring Cluster Instances in Cluster Configurations on page 255• Monitoring Interprocess Communication in Cluster Configurations on page 258
Manage and Monitor
262
• Monitoring Workloads in Cluster Configurations on page 259
• Displaying the Cluster Overview on page 256
• Cluster Instances on page 254
• Cluster Interconnect on page 256
Manage ClustersCreate clusters, manage load profiles, add instances to a cluster, display properties of clusters,and manage routes.
To manage clusters, you must have connect to permissions granted in the master database.connect to permissions can be granted to a role, user, or group.
The syntax is:grant connect to someone
where someone is a role, a user, or a group.
In the cluster environment, each machine is referred to as a node, and each server as aninstance. Connected instances form a cluster, working together to manage a single set ofdatabases on the shared disks. In each case, the instances present as a single system, with alldata accessible from any instance. The Cluster Edition assigns server process IDs (spids) thatare unique to the cluster, so the spid identifies a single process across all instances in thecluster, with all data accessible from any instance.
You can configure a cluster to run multiple servers as a shared-disk or private cluster. You canalso create a shared cluster in Veritas Cluster Server (VCS) mode.
You cannot mix different operating systems or hardware architectures. However, each nodecan contain a different number of processors, cores, and RAM. This difference inconfiguration can be accounted for within the cluster configuration file (and subsequentlywithin the Workload Manager) once the Cluster Edition is installed and your cluster is built.
See the Installation Guide Cluster Edition for your platform for information about installingthe software, platform support, and system requirements.
See the Clusters Users Guide for detailed information about the features available in theCluster Edition.
Starting the SCC agent for a Cluster(SAP ASE versions 15.7 ESD #1 and later) The SCC agent enables the distributedmanagement of the cluster.
Note: Start the SCC agent on each node that will host instances in the cluster.
1. From the $SYBASE directory of each instance, source the SYBASE.sh file.
2. Start the SCC agent:$SYBASE/SCC-3_2/bin/scc.sh --start --port rmi=<port-number>
Manage and Monitor
SAP Control Center for SAP Adaptive Server Enterprise 263
where portNumber is any available port. The default port number is 9999; however, thismay not be the correct port number for your configuration.
Starting the Unified Agent for a Cluster(SAP ASE versions 15.7 and earlier) The Unified Agent enables the distributed managementof the cluster.
1. From the $SYBASE directory of each instance, source the SYBASE.sh file.
2. Start the Unified Agent:$SYBASE/UAF-2_5/bin/uafstart-up.sh -port portNumber &where portNumber is any available port.
The Unified Agent creates $SYBASE/UAF-2_5/nodes/<node_name>/log/agent.log, and sends agent output to the agent.log file. The default port number is9999; however, this may not be the correct port number for your configuration.
Preparing to Create a ClusterPrerequisites for creating a cluster.
1. Install Cluster Edition.
2. Allocate enough storage space for the required database devices. Only raw partitionsrather than file system-based devices are supported. Ensure that the raw partitions areaccessible from each node using the same access path. These database devices are createdif they do not exist:
• master device• sybsystemprocs device• sybsystemdb device• quorum device (no actual database visible from within SAP ASE is created)
3. Allocate one device for the local temporary database on each node. For example, if you arecreating a three-node cluster, then you need three individual raw partitions for temporarydatabases—one for each node.
4. Create the appropriate number of devices, such as data and log, for your user databases.Create the devices only once. For example, if you have a four-node cluster and you areconnected to instance, when you run a disk init command for datadev1 on ASE1, theinstances ASE2, ASE3, and ASE4 recognize, and can write to datadev1 once disk initcompletes.
5. Start the agent from your installation directory.
Creating a ClusterCreate and configure a shared-disk cluster.
Prerequisites
Complete the preparation steps for creating a cluster.
Manage and Monitor
264
Task
1. In the Perspective Resources view, select a server, then select Resource > AdministrationConsole.
2. In the left pane of the Administration Console, select ASE Servers, click the drop-downarrow, then select Create Cluster.
Optionally you can click ASE Servers, then from the menu bar, click Folder > CreateCluster.
3. On the Introduction screen:
• Provide a name for the cluster, or,• Import an existing cluster file.
Note: Once you have entered the information to create a cluster into the wizard, you canexport the information to a file on the final Summary screen.
4. On the Options screen:
a) Select your platform. All nodes must use the same operating system and 64-bithardware architecture.
b) Choose Shared or Private installation.c) Specify the number of instances allowed. The maximum number allowed is 4.
5. On the Nodes screen, click Add to specify the hosts that will participate in the cluster.Provide the host name, the SCC agent port number, and the SCC agent user name andpassword.
6. On the Quorum Device screen, enter the full path to the device. The quorum device is acommunications medium and synchronization point that provides a location to performcluster membership management. It also provides a persistent place to store configurationdata used by instances and the Unified Agent.
If a cluster agent plug-in exists, you can either accept the existing plug-in or create a newone.
7. The Cluster Environment screen is specific to a shared installation. List any start-upparameters and trace flags. For a private installation, this information is specified whenyou define instances for the cluster.
If a Veritas Cluster Server (VCS) base device is detected on the system, you are promptedto integrate the ASE Cluster Edition Dataserver with the Veritas Cluster Server. See Usingthe Cluster Edition with the Veritas Cluster Server in the Clusters Users Guide.
If an LDAP environment is detected, see Using LDAP as a Directory Service in theClusters Users Guide.
If the devices you specify in the following steps do not include SCSI-3 PGR capability orsupport I/O fencing, you can continue, not continue, or ignore further messages regardingSCSI-3 PGR capability or I/O fencing support. This dialog does not appear if a VCS deviceis detected.
Manage and Monitor
SAP Control Center for SAP Adaptive Server Enterprise 265
8. On the Master Device screen, enter the full path to the device, the device size, databasesize, and the page size of the instance.
9. On the System Procedures Device screen, enter the full path to the device, the device size,and the database size.
10. On the System Database Device screen, enter the full path to the device, the device size,and the database size.
11. (Optional) On the PCI Device screen, click to enable the PCI device, then enter the fullpath to the device, the device size, and the database size.
See Java in Adaptive Server Enterprise for more information about PCI devices.
12. On the Network Protocol screen, verify or update the network protocol:
a) The UDP network protocol.b) Choose an unused starting port number for the cluster’s network interconnects.c) (Optional) Click the box if you have a secondary network available.d) (Optional) Click Validate Port to make sure the ports are not currently in use.
13. On the Instance screen, click Add to add instances to the cluster.You see the Define Server Instance screen with the tabs General, Local SystemTemporary Database, and, for a private installation, Private.
14. On the General tab:
a) Select the node where the instance will be located.b) Enter the instance name.c) Select a query port number, then select Validate Port to make sure this port is
available.d) Select a primary and secondary network address. The Secondary option is enabled if
you specified on the Network Protocol screen that a secondary address is available.e) Provide a full path to the error log for this instance.f) List any start-up parameters for the instance.g) List any trace flags to use at start-up.
15. The Local System Temporary Database tab shows default values for local temporarydatabases. A shared-disk installation requires a local system temporary database. Acceptthe defaults or change the database device values.
16. (Optional) Click Summary to review the information you have provided.
17. (Optional) Click Automatically start the cluster after it is successfully created.
18. (Optional) Click Export to save the cluster information to a file.
19. Click Next to create the cluster.
Note: You cannot start this cluster from the command line using a run_server file. Tostart the cluster, the agent must be running on each node and the cluster must be registeredwith SAP Control Center.
Manage and Monitor
266
Registering a ClusterRegistering a cluster allows you to manage the cluster in SAP Control Center as a resource.
Prerequisites
The agent must be running on each node.
The cluster does not need to be running to be registered as a resource.
Task
If your cluster is registered with SAP Control Center, it appears in the Resource Explorer andcan be added to one or more perspectives. If your cluster does not appear in the ResourceExplorer, you must register the cluster.
1. From the SAP Control Center main window, select Resource > Register.
2. On the Resource Type screen, enter the name of the cluster, then select the resource type.
3. (Optional) Provide a description of the cluster.
4. On the Connection Information screen, enter the name of a host that is running one of theinstances of the cluster.
5. On the ASE Port number field, enter the port number of the host from step 4.
6. (Optional) Enter a default character set.
7. (Optional) Enter a default language.
8. (Optional) On the Authentication Information screen, enter the user name and passwordfor the administrator.
9. (Optional) On the Options screen, add the cluster to the list of current perspectiveresources.
10. (Optional) Click to open the Resource Explorer screen. This option is available only if thewindow is not already open.
11. On the Resource Explorer screen, highlight the cluster name, then select Resources > AddResources to Perspective.
12. From the application menu bar, select View > Open > Resource Explorer.From the Perspective Resource view, you can open the Administration Console to registerand authenticate a running agent, then start your cluster.
Manage and Monitor
SAP Control Center for SAP Adaptive Server Enterprise 267
Registering the Agent and Starting a ClusterOnce a cluster is registered, you can authenticate the agent, start the cluster, and authenticatethe cluster.
Prerequisites
To start the cluster, the SCC agent must be running on each node, and the cluster must beregistered and available in the Perspective Resources screen.
Task
After you register and authenticate the agent, you see an option to start the cluster. Optionally,if the cluster is authenticated, you can choose to start the cluster from the AdministrationConsole. Starting the cluster from the Administration Console provides a log trace that showsthe start-up status along with any potential warning or error messages.
1. From the Perspective Resources view, select the cluster, click the drop-down arrow thatappears next to the name, then select Administration Console.
2. In the left pane of the Administration Console, select ASE Servers to populate the rightpane with a list of servers.
3. Select the cluster, click the drop-down arrow that appears next to the cluster name, thenselect Register Agent.
4. In the Agent screen, enter the port number to the agent running the node and clickRegister. The default port number is 9999; however, this may not be the correct portnumber for your configuration.
5. Enter the user name and password for the user authorized as the agent and clickAuthenticate.Once the agent is authenticated, the screen updates with the cluster status and prompts youto start the cluster.
6. Click Start Server.The cluster status changes to Running.
7. From the Perspective Resources view, select the cluster, click the drop-down arrow thatappears next to the name, then select Authenticate.
8. Select the credential type to authenticate the cluster.
9. (Optional) If the credential type is ASE Username, enter the user name and passwordauthorized to authenticate the server and click OK.
Displaying Cluster Configuration ValuesDisplay or modify cluster configuration values.
1. In the Administration Console, select the cluster, click the drop-down arrow, and selectConfigure.
Manage and Monitor
268
Note: You must have sa_role to select Configure from the Administration Console.
You see a table with fields, parameter names, value, default value, maximum value,minimum value, and restart required. Editable columns are indicated by a "pencil" icon. Toreset a value to the previously configured value, click the Reset icon, which appears afteryou have edited a field.
2. Select the cluster configuration parameter to configure.
a) Click Configure Value for the selected row.b) Enter the new value for the configuration parameter.
If the value is invalid, you see an error message. As some parameters require a restart,the changed value is in the Pending Value column until the server is restarted.
c) Click Save All to update the server with the new values or Reset All to restore theoriginal values for the resource.
Starting a ClusterStart a cluster from the Administration Console after the agent is authenticated to see a logtrace with any warning and error messages.
Prerequisites
The agent must be running on each node and the cluster or clusters must be registered andavailable in the Perspective Resources screen.
Task
If the agent is authenticated and you start the cluster from the Administration Console, you seea log trace in the dialog that shows the start-up status along with any potential warning or errormessages. You can optionally start a cluster immediately after you register and authenticatethe agent on the Server Properties screen; however, this option does not provide a log trace.
1. In the Perspective Resources view, select multiple resources then select Resource >Administration Console from the menu bar.
2. In the left pane of the Administration Console, select ASE Servers to populate the rightpane with a list of servers.
3. Select a cluster or multiple clusters, click the drop-down arrow that appears next to thename, then select Start Cluster. All servers you are starting must be the same type. Youcan start multiple symmetric multiprocessors (SMP) or shared disk cluster (SDC) servers.
4. Click Yes.
You seeDone in the Start Cluster window when the start-up request has finished.
Manage and Monitor
SAP Control Center for SAP Adaptive Server Enterprise 269
Stopping a ClusterShut down a cluster immediately, or wait for transactions to complete.
1. In the left pane of the Administration Console, select ASE Servers to populate the rightpane with a list of servers.
Alternatively, click the menu next to the server name, and select Agent > Stop Cluster.This option does not provide a log trace.
2. Select a cluster or multiple clusters, click the drop-down arrow that appears next to thename, then select Stop Cluster. All servers you are stopping must be the same type. Youcan stop multiple symmetric multiprocessors (SMP) or shared disk cluster (SDC) servers.
3. Choose:
• Yes to wait for all statements and transactions to complete before shutting down eachinstance in the order specified in the cluster configuration file.
• Shut down immediately to shut down the cluster immediately, without waiting fortransactions to complete.
You seeDone in the Stop Cluster window when the shut down request has finished.
Dropping a ClusterDropping a cluster removes the cluster and associated devices, logs, and files.
PrerequisitesShut down the cluster. The agent must be authenticated to drop the cluster.
Task
1. In the left pane of the Administration Console, select ASE Servers to populate the rightpane with a list of servers.
2. Select the cluster, click the drop-down arrow that appears next to the name, then selectDrop.You see the Confirm Delete screen.
3. Select the devices, logs, and files associated with the selected cluster that you want toremove and click OK.
Note: Due to certain file-system locking, the UAF plug-in directory may not be deletedafter you drop a cluster. Verify that the $SYBASE/UAF-2_5/nodes/*/plugins/<cluster_name> directory has been deleted. If the directory still exists, shut down theUAF agent, manually delete the directory, then restart the UAF agent.
Manage and Monitor
270
Viewing a Cluster LogView information about the success or failure of each start-up attempt of a cluster and itsoperations.
PrerequisitesThe agent must be authenticated in order to view a cluster log.
Task
1. In the left pane of the Administration Console, select ASE Servers to populate the rightpane with a list of servers.
2. Select the cluster, click the drop-down arrow that appears next to the name, then selectView Log.You see the Server Log screen.
3. (Optional) Enter search criteria in the "Show messages matching" field to search forspecific errors or messages.
4. (Optional) Click Settings to limit the number of messages to retrieve, and select a regularexpression to include in the retrieval process.
5. (Optional) Click Options to add or remove information columns, to copy a specific row, orto copy the entire table.
Cluster PropertiesUse the Cluster Properties window to view cluster and agent information, to configure theagent, and to stop or restart the cluster.
Click the Name field of the cluster, then click the drop-down arrow and select Properties.
Pages Properties
General View cluster information such as:
• Name and type
• Version, build date, and build options
• Edition – click Cluster Edition for licensing information.
• Character set, sort order, and language
• Host name, port number, platform and operating system (if the agent has been au-thenticated)
• Page size
• Status: running or stopped
Manage and Monitor
SAP Control Center for SAP Adaptive Server Enterprise 271
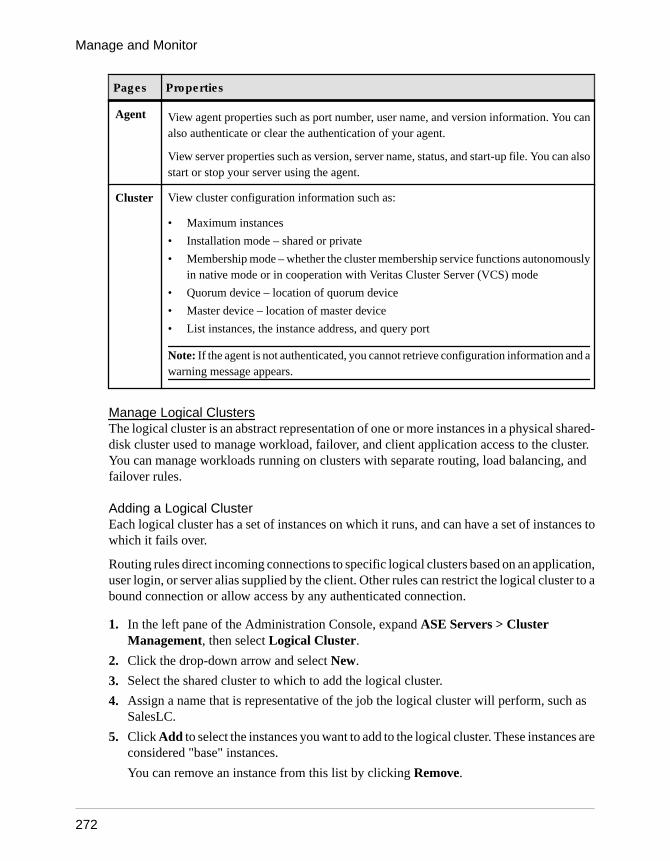
Pages Properties
Agent View agent properties such as port number, user name, and version information. You canalso authenticate or clear the authentication of your agent.
View server properties such as version, server name, status, and start-up file. You can alsostart or stop your server using the agent.
Cluster View cluster configuration information such as:
• Maximum instances
• Installation mode – shared or private
• Membership mode – whether the cluster membership service functions autonomouslyin native mode or in cooperation with Veritas Cluster Server (VCS) mode
• Quorum device – location of quorum device
• Master device – location of master device
• List instances, the instance address, and query port
Note: If the agent is not authenticated, you cannot retrieve configuration information and awarning message appears.
Manage Logical ClustersThe logical cluster is an abstract representation of one or more instances in a physical shared-disk cluster used to manage workload, failover, and client application access to the cluster.You can manage workloads running on clusters with separate routing, load balancing, andfailover rules.
Adding a Logical ClusterEach logical cluster has a set of instances on which it runs, and can have a set of instances towhich it fails over.
Routing rules direct incoming connections to specific logical clusters based on an application,user login, or server alias supplied by the client. Other rules can restrict the logical cluster to abound connection or allow access by any authenticated connection.
1. In the left pane of the Administration Console, expand ASE Servers > ClusterManagement, then select Logical Cluster.
2. Click the drop-down arrow and select New.
3. Select the shared cluster to which to add the logical cluster.
4. Assign a name that is representative of the job the logical cluster will perform, such asSalesLC.
5. Click Add to select the instances you want to add to the logical cluster. These instances areconsidered "base" instances.
You can remove an instance from this list by clicking Remove.
Manage and Monitor
272
6. In the Failovers screen, select Add to choose the failover server instances on which thelogical cluster runs if one or more of the base instances fail. Any instance in the physicalcluster can be a failover resource.
7. Select the group number for the failover instances. The failover group lets you specifypreference and order in which failover instances are used. Lower-numbered groups areused first.
8. Click Add to add routed applications, logins, or aliases.
Routing rules allow you to specify specific applications, logins, and aliases to which thelogical cluster connects. See the Cluster Users Guide for more information about routing.Add additional routes by selecting:• Application Route – specify the name of the application in the Add Application Route
screen.• Alias Route – specify the alias name in the Add Alias Route screen.• Login Route – select the login name from the list in the Add Login Route screen (hold
the Ctrl key to select multiple names).
You can drop a listed route by selecting the route name and clicking Remove.
9. On the Load Profile screen, click Change to select a load profile to assign to the logicalcluster.
The Cluster Edition offers two system load profiles: sybase_profile_oltp forOLTP environments and sybase_profile_dss for DSS environments. You cannotmodify or delete system load profiles.
10. On the Set Options page:
a) Select Cluster or Instance for the system view.
The system view determines whether the logical cluster users view the Cluster Editionas an entire cluster or as individual instances. This affects some queries and storedprocedures.
b) (Optional) Select Automatically start logical cluster to start the logical cluster whenthe shared cluster is started.
c) Choose instance or group to specify whether the instances are brought online as agroup or individually.
d) (Optional) Select Fail to any to specify whether any instance, or a specific instance canbe a failover resource.
e) Choose the down-routing mode to specify how client connections are routed if thelogical cluster designated by the routing rule is not available.
• system – sends unroutable connections to the system logical cluster.• open – sends unroutable connections to the open logical cluster.• disconnect – disconnects unroutable connections.
f) Choose a login distribution mode to specify how connections are distributed in logicalclusters with multiple instances.
Note: The login distribution mode does not affect single-instance logical clusters.
Manage and Monitor
SAP Control Center for SAP Adaptive Server Enterprise 273
• affinity – specifies that a connection accepted by an instance is retained as long asthe target logical cluster is running on that instance. If the load profile specifies aload threshold, and the load on the instance is too high, the workload managerredirects the connection to the least loaded instance in a logical cluster. If the targetlogical cluster is not running on the instance, the workload manager redirects theconnection to the least loaded instance in a logical cluster.
• round-robin – specifies that incoming connections are distributed in a round-robinfashion among the instances hosting a logical cluster. For example, if “SalesLC” isrunning on “ase1” and “ase2”, the workload manager sends the first connection to“ase1,” the next to “ase2”, and so on. Load scores are not included in the algorithm.
g) (Optional) Select Open role to indicate that all connections that are not routed to alogical cluster via an explicit routing rule are routed to the current open logical cluster.When you create a new cluster, the system logical cluster is automatically designatedthe open logical cluster. You can reassign the open role to another logical cluster.However, only one open logical cluster can exist per physical cluster.
11. (Optional) Click Summary to review your information.
12. Select Finish to build the logical cluster.
Designating a Failover Logical ClusterDesignate the logical cluster as the failover.
PrerequisitesThe logical cluster must be online to designate a failover cluster.
Task
1. In the left pane of the Administration Console, expand ASE Servers > ClusterManagement, then select Logical Cluster.
2. Select the logical cluster, click the drop-down arrow that appears next to the name, thenselect Failover.
3. Confirm the failover.
Designating a Failback Logical ClusterReverse a failover of a logical cluster by reinstating the original base resources.
1. In the left pane of the Administration Console, expand ASE Servers > ClusterManagement, then select Logical Cluster.
2. Select the logical cluster, click the drop-down arrow that appears next to the name, thenselect Failback.
3. Confirm the failback.
Manage and Monitor
274
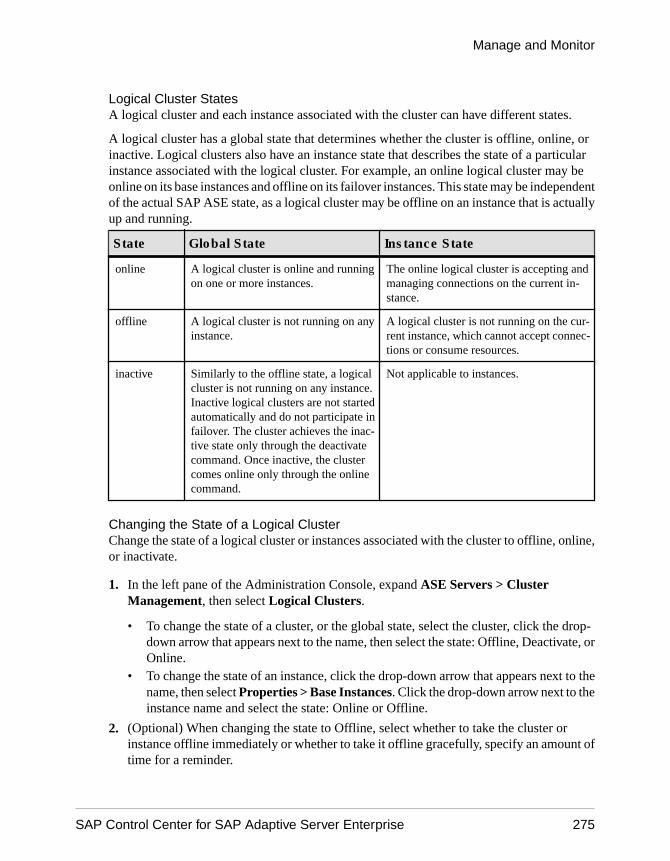
Logical Cluster StatesA logical cluster and each instance associated with the cluster can have different states.
A logical cluster has a global state that determines whether the cluster is offline, online, orinactive. Logical clusters also have an instance state that describes the state of a particularinstance associated with the logical cluster. For example, an online logical cluster may beonline on its base instances and offline on its failover instances. This state may be independentof the actual SAP ASE state, as a logical cluster may be offline on an instance that is actuallyup and running.
State Global State Instance State
online A logical cluster is online and runningon one or more instances.
The online logical cluster is accepting andmanaging connections on the current in-stance.
offline A logical cluster is not running on anyinstance.
A logical cluster is not running on the cur-rent instance, which cannot accept connec-tions or consume resources.
inactive Similarly to the offline state, a logicalcluster is not running on any instance.Inactive logical clusters are not startedautomatically and do not participate infailover. The cluster achieves the inac-tive state only through the deactivatecommand. Once inactive, the clustercomes online only through the onlinecommand.
Not applicable to instances.
Changing the State of a Logical ClusterChange the state of a logical cluster or instances associated with the cluster to offline, online,or inactivate.
1. In the left pane of the Administration Console, expand ASE Servers > ClusterManagement, then select Logical Clusters.
• To change the state of a cluster, or the global state, select the cluster, click the drop-down arrow that appears next to the name, then select the state: Offline, Deactivate, orOnline.
• To change the state of an instance, click the drop-down arrow that appears next to thename, then select Properties > Base Instances. Click the drop-down arrow next to theinstance name and select the state: Online or Offline.
2. (Optional) When changing the state to Offline, select whether to take the cluster orinstance offline immediately or whether to take it offline gracefully, specify an amount oftime for a reminder.
Manage and Monitor
SAP Control Center for SAP Adaptive Server Enterprise 275
Deleting a Logical ClusterRemove an offline logical cluster.
PrerequisitesA logical cluster must be offline before it can be deleted.
Task
1. In the left pane of the Administration Console, expand ASE Servers > ClusterManagement, then select Logical Cluster.
2. Select the cluster, click the drop-down arrow that appears next to the name, then selectDelete.
3. Confirm the deletion.
Generating a DDL Script for a Logical ClusterGenerate DDL to create a logical cluster.
1. In the left pane of the Administration Console, expand ASE Servers > ClusterManagement and select Logical Clusters.
2. Select the cluster, click the drop-down arrow that appears next to the name, then selectGenerate DDL.
You can save the DDL in an external file on your local file system.
Logical Cluster PropertiesUse the Properties window to view logical cluster information.
Click the Name field of the logical cluster, then click the drop-down arrow and selectProperties.
Manage and Monitor
276
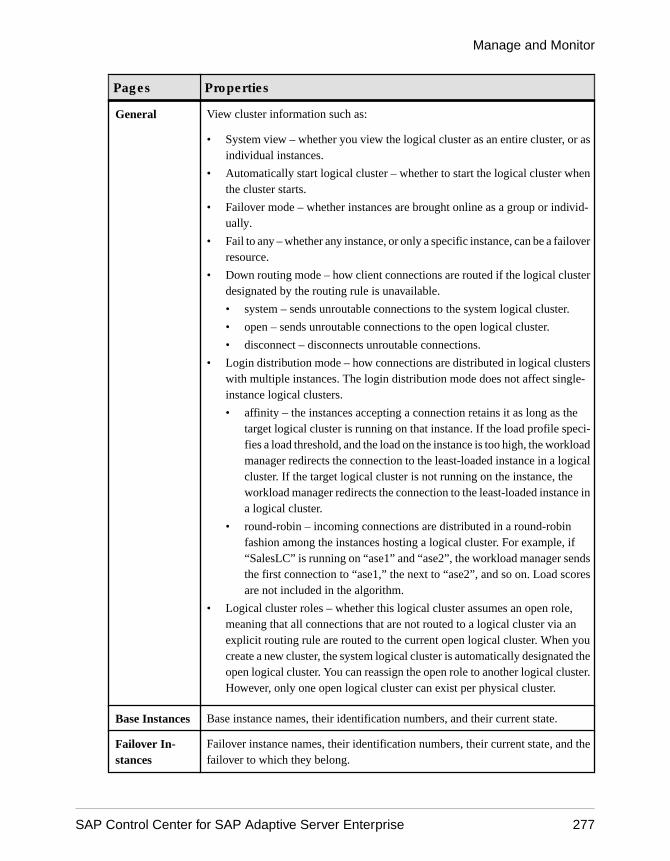
Pages Properties
General View cluster information such as:
• System view – whether you view the logical cluster as an entire cluster, or asindividual instances.
• Automatically start logical cluster – whether to start the logical cluster whenthe cluster starts.
• Failover mode – whether instances are brought online as a group or individ-ually.
• Fail to any – whether any instance, or only a specific instance, can be a failoverresource.
• Down routing mode – how client connections are routed if the logical clusterdesignated by the routing rule is unavailable.
• system – sends unroutable connections to the system logical cluster.
• open – sends unroutable connections to the open logical cluster.
• disconnect – disconnects unroutable connections.
• Login distribution mode – how connections are distributed in logical clusterswith multiple instances. The login distribution mode does not affect single-instance logical clusters.
• affinity – the instances accepting a connection retains it as long as thetarget logical cluster is running on that instance. If the load profile speci-fies a load threshold, and the load on the instance is too high, the workloadmanager redirects the connection to the least-loaded instance in a logicalcluster. If the target logical cluster is not running on the instance, theworkload manager redirects the connection to the least-loaded instance ina logical cluster.
• round-robin – incoming connections are distributed in a round-robinfashion among the instances hosting a logical cluster. For example, if“SalesLC” is running on “ase1” and “ase2”, the workload manager sendsthe first connection to “ase1,” the next to “ase2”, and so on. Load scoresare not included in the algorithm.
• Logical cluster roles – whether this logical cluster assumes an open role,meaning that all connections that are not routed to a logical cluster via anexplicit routing rule are routed to the current open logical cluster. When youcreate a new cluster, the system logical cluster is automatically designated theopen logical cluster. You can reassign the open role to another logical cluster.However, only one open logical cluster can exist per physical cluster.
Base Instances Base instance names, their identification numbers, and their current state.
Failover In-stances
Failover instance names, their identification numbers, their current state, and thefailover to which they belong.
Manage and Monitor
SAP Control Center for SAP Adaptive Server Enterprise 277
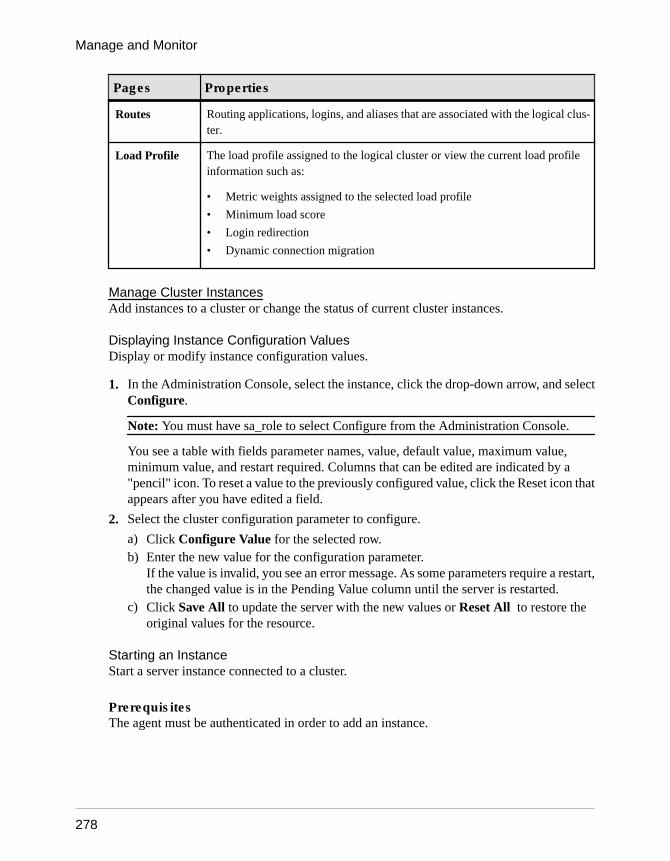
Pages Properties
Routes Routing applications, logins, and aliases that are associated with the logical clus-ter.
Load Profile The load profile assigned to the logical cluster or view the current load profileinformation such as:
• Metric weights assigned to the selected load profile
• Minimum load score
• Login redirection
• Dynamic connection migration
Manage Cluster InstancesAdd instances to a cluster or change the status of current cluster instances.
Displaying Instance Configuration ValuesDisplay or modify instance configuration values.
1. In the Administration Console, select the instance, click the drop-down arrow, and selectConfigure.
Note: You must have sa_role to select Configure from the Administration Console.
You see a table with fields parameter names, value, default value, maximum value,minimum value, and restart required. Columns that can be edited are indicated by a"pencil" icon. To reset a value to the previously configured value, click the Reset icon thatappears after you have edited a field.
2. Select the cluster configuration parameter to configure.
a) Click Configure Value for the selected row.b) Enter the new value for the configuration parameter.
If the value is invalid, you see an error message. As some parameters require a restart,the changed value is in the Pending Value column until the server is restarted.
c) Click Save All to update the server with the new values or Reset All to restore theoriginal values for the resource.
Starting an InstanceStart a server instance connected to a cluster.
PrerequisitesThe agent must be authenticated in order to add an instance.
Manage and Monitor
278
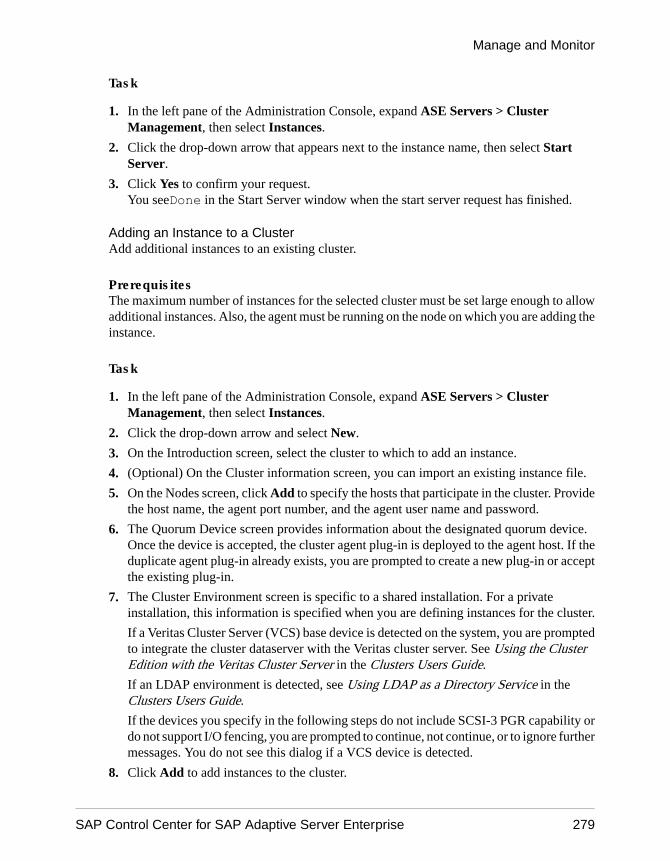
Task
1. In the left pane of the Administration Console, expand ASE Servers > ClusterManagement, then select Instances.
2. Click the drop-down arrow that appears next to the instance name, then select StartServer.
3. Click Yes to confirm your request.You seeDone in the Start Server window when the start server request has finished.
Adding an Instance to a ClusterAdd additional instances to an existing cluster.
PrerequisitesThe maximum number of instances for the selected cluster must be set large enough to allowadditional instances. Also, the agent must be running on the node on which you are adding theinstance.
Task
1. In the left pane of the Administration Console, expand ASE Servers > ClusterManagement, then select Instances.
2. Click the drop-down arrow and select New.
3. On the Introduction screen, select the cluster to which to add an instance.
4. (Optional) On the Cluster information screen, you can import an existing instance file.
5. On the Nodes screen, click Add to specify the hosts that participate in the cluster. Providethe host name, the agent port number, and the agent user name and password.
6. The Quorum Device screen provides information about the designated quorum device.Once the device is accepted, the cluster agent plug-in is deployed to the agent host. If theduplicate agent plug-in already exists, you are prompted to create a new plug-in or acceptthe existing plug-in.
7. The Cluster Environment screen is specific to a shared installation. For a privateinstallation, this information is specified when you are defining instances for the cluster.
If a Veritas Cluster Server (VCS) base device is detected on the system, you are promptedto integrate the cluster dataserver with the Veritas cluster server. See Using the ClusterEdition with the Veritas Cluster Server in the Clusters Users Guide.
If an LDAP environment is detected, see Using LDAP as a Directory Service in theClusters Users Guide.
If the devices you specify in the following steps do not include SCSI-3 PGR capability ordo not support I/O fencing, you are prompted to continue, not continue, or to ignore furthermessages. You do not see this dialog if a VCS device is detected.
8. Click Add to add instances to the cluster.
Manage and Monitor
SAP Control Center for SAP Adaptive Server Enterprise 279
You see the Define Server Instance screen with the tabs General, Local System TemporaryDatabase, and for a private installation, Private.
9. On the General tab:
a) Select the node on which to add the instance.b) Enter the instance name.c) Select a query port number, then select Validate Port to make sure it is available.d) Select a primary and secondary network address. The Secondary option is enabled if
you specified on the Network Protocol screen that a secondary address is available.e) Provide a full path to the error log for this instance.f) List any start-up parameters for the instance.g) List any trace flags to use at start-up.
10. On the Local System Temporary Database tab, default values are provided for the localtemporary databases. You must create a local system temporary database for a shared-diskinstallation. Accept the defaults or change the database device values.
11. (Optional) On the Private tab:
a) Home directory – the SAP ASE release directory (value of $SYBASE).
b) SAP ASE home – the full path to the ASE-16_0 directory (value of $SYBASE/$SYBASE_ASE).
c) Interfaces directory – path to the directory containing the interfaces file.d) Environment script – full path to the script that you use to set the environment
variables.e) Cluster configuration file – full path to the cluster configuration file.
12. (Optional) Click Summary to review the information you have provided.
13. (Optional) Click Export to save the instance information to a file.
14. Click Next to add the instance to the selected cluster.
Note: After adding instances, start each one separately.
Stopping an InstanceShut down an instance immediately or wait for transactions to complete.
1. In the left pane of the Administration Console, expand ASE Servers > ClusterManagement, then select Instances.
2. Click the drop-down arrow that appears next to the instance name, then select StartServer.
3. Choose:
• Yes to wait for all statements and transactions to complete before shutting down.• Shut down immediately to shut down the cluster immediately, without waiting for
transactions to complete.
You see Done in the Stop Server window when the shut-down request has finished.
Manage and Monitor
280
Deleting an InstanceRemove an offline cluster instance.
PrerequisitesThe agent must be authenticated and the cluster instance must be offline.
Task
1. In the left pane of the Administration Console, expand ASE Servers > ClusterManagement, then select Instances.
2. Click the drop-down arrow that appears next to the instance name, then select Delete.
3. Confirm the deletion.
Instance PropertiesUse the Properties window to view instance information.
Click the Name field of the instance, then click the drop-down arrow and select Properties.
Pages Properties
General View instance information such as:
• Name and type
• Version, build date, and build options
• Edition – click Cluster Edition for licensing information.
• Character set, sort order, and language
• Host name, port number, platform and operating system (shown if agent isauthenticated)
• Page size
• Status: running or stopped
• Location of SAP home directory
Viewing an Instance LogView information about the success or failure of each start-up attempt of the cluster instanceand its operations.
PrerequisitesThe agent must be authenticated.
Manage and Monitor
SAP Control Center for SAP Adaptive Server Enterprise 281
Task
1. In the left pane of the Administration Console, select ASE Servers > ClusterManagement > Instances to populate the right pane with a list of instances.
2. Select the instance, click the drop-down arrow that appears next to the name, then selectView Log.
3. (Optional) Enter search criteria in the "Show messages matching" field to search forspecific errors or messages.
4. (Optional) Click Settings to limit the number of messages to retrieve, and to select aregular expression to include in the retrieval process.
5. (Optional) Click Options to add or remove information columns, to copy a specific row, orto copy the entire table.
Manage Load ProfilesLoad profiles let you define the operating criteria for a logical cluster.
Load profile criteria are typically called “load score metrics,” with the value associated foreach criteria rolled into a “score” for each instance in the logical cluster that uses the loadprofile. You can periodically compare load scores for different instances within a logicalcluster to detect when the workload is undesirably skewed to one or more instances, or todetermine if an instance is underutilized.
Instances included in multiple logical clusters can be impacted by multiple load profiles, sotake care when associating instances with multiple logical clusters and when defining andapplying load profiles.
The Cluster Edition includes two system load profiles: sybase_profile_oltp for OLTPenvironments and sybase_profile_dss for DSS environments. You cannot modify ordelete system load profiles. However, you can duplicate them and modify the duplicates tocreate your own load profiles.
The load profile status reports the:
• Name – name of load profile configuration.• Type – system or user.• Metric weights – relative weight assigned to each metric in the load profile, including:
• User connections• CPU busy• Run queue length• IO load• Engine deficit• Users
• Thresholds – configured difference, as a percentage, in the load between two instances in alogical cluster at which point the following can occur:
Manage and Monitor
282

• Login redirection – used for connection-time load balancing, and routing connectionsto a logical cluster. If necessary, an instance directs a client to stop the current loginattempt and try connecting to instances it supplies as a list of available networkaddresses.
• Dynamic migration – (also known as the hysteresis value) the dynamic migrationconfiguration.
• Minimum load score – load score necessary to trigger login redirection and dynamicmigration.
Adding a Load ProfileUse a load profile to consolidate all configurable aspects of the workload scoring system into asingle named entity.
1. In the left pane of the Administration Console, expand ASE Servers > ClusterManagement, then select Load Profile.
2. Click the drop-down arrow and select New.
3. Select a cluster for the load profile.
4. Enter a name for your profile.
5. Specify the metric weights for the load profile.
When a load profile is associated with a logical cluster, the workload manager calculates aload score for each instance in the logical cluster. This is calculated using the weight youentered for each metric, the raw value of each metric for the instance, and the workloadmeasurement algorithm.
The metrics measured by the server are:• User connections – the capacity of an instance to accept a new connection, based on
resource availability.• CPU busy – the capacity of an instance to accept additional work.• Run-queue length – the number of runnable tasks on a system. The run-queue length
measures the processing backlog, and is a good indicator of relative response time.• I/O load – outstanding asynchronous I/Os.• Engine deficit – the difference in the number of online engines among instances in the
cluster. Engine deficit is measurable only when instances in the cluster have unequalnumbers of engines. Engine deficit adds a metric for maximum relative capacity to theload score.
• User-defined – an optional customer-supplied metric specific to the user’senvironment.
6. Enter values for:• Minimum Load Score – the load score is not a percentage, but is the minimum score the
workload manager requires before it redirects work to other instances. The minimumload score is meaningful when compared to the load scores of other instances in thelogical cluster using the load profile.
Manage and Monitor
SAP Control Center for SAP Adaptive Server Enterprise 283
• Login Redirection (%) – the load threshold for determining how best to distributedincoming connections.
• Dynamic Connection Migration (%) – the load threshold that determines whether todistribute existing connections. The load threshold is the percentage differencebetween the load on the current instance and the load on the least-loaded instancecurrently participating in a logical cluster. That value must be met before the ClusterEdition redirects a login or migrates an existing connection.
The percentages for Login Redirection and Dynamic Connection Migration areindependent, and do not need to add up 100.
7. (Optional) Click Summary to verify your selected options.
Deleting a Load ProfileDelete a user-created load profile.
You cannot modify or delete the system load profiles, sybase_profile_oltp andsybase_profile_dss.
1. In the left pane of the Administration Console, expand ASE Servers > ClusterManagement and select Load Profile.
2. Click the drop-down arrow that appears next to the load profile name, then selectDelete.
3. Confirm the deletion.
Generating a DDL Script for a Load ProfileGenerate DDL to create a load profile.
1. In the left pane of the Administration Console, expand ASE Servers > ClusterManagement and select Load Profile.
2. Select the load profile, click the drop-down arrow that appears next to the name, then selectGenerate DDL.
You can save the DDL in an external file on your local file system.
Load Profile PropertiesUse the Properties window to view load profile information.
Click the Name field of the load profile, then click the drop-down arrow and selectProperties.
Pages Properties
General View the name and type of load profile.
Metric Weights Change the metric weights currently assigned to the selected load profile.
Thresholds Change the thresholds currently assigned to the selected load profile.
Manage and Monitor
284
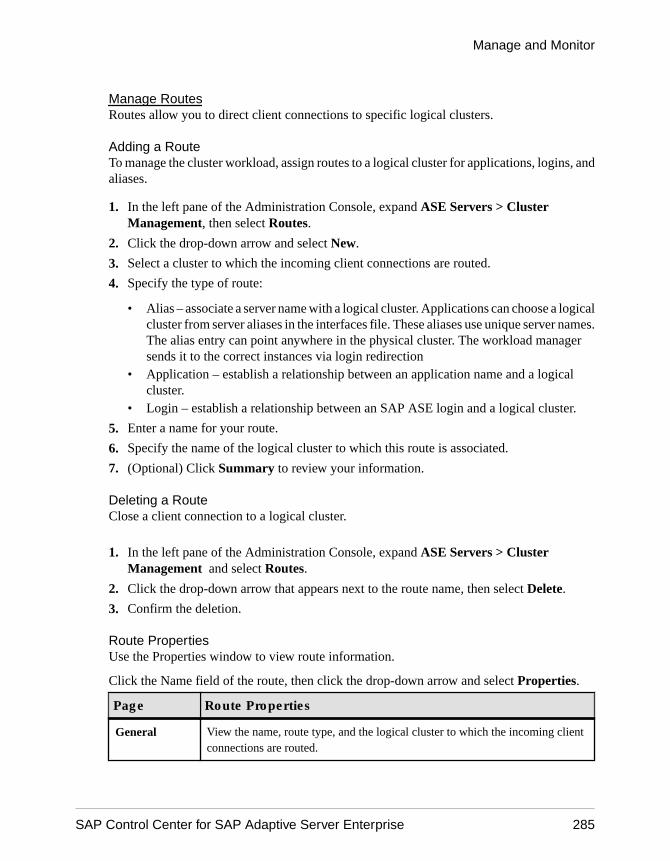
Manage RoutesRoutes allow you to direct client connections to specific logical clusters.
Adding a RouteTo manage the cluster workload, assign routes to a logical cluster for applications, logins, andaliases.
1. In the left pane of the Administration Console, expand ASE Servers > ClusterManagement, then select Routes.
2. Click the drop-down arrow and select New.
3. Select a cluster to which the incoming client connections are routed.
4. Specify the type of route:
• Alias – associate a server name with a logical cluster. Applications can choose a logicalcluster from server aliases in the interfaces file. These aliases use unique server names.The alias entry can point anywhere in the physical cluster. The workload managersends it to the correct instances via login redirection
• Application – establish a relationship between an application name and a logicalcluster.
• Login – establish a relationship between an SAP ASE login and a logical cluster.
5. Enter a name for your route.
6. Specify the name of the logical cluster to which this route is associated.
7. (Optional) Click Summary to review your information.
Deleting a RouteClose a client connection to a logical cluster.
1. In the left pane of the Administration Console, expand ASE Servers > ClusterManagement and select Routes.
2. Click the drop-down arrow that appears next to the route name, then select Delete.
3. Confirm the deletion.
Route PropertiesUse the Properties window to view route information.
Click the Name field of the route, then click the drop-down arrow and select Properties.
Page Route Properties
General View the name, route type, and the logical cluster to which the incoming clientconnections are routed.
Manage and Monitor
SAP Control Center for SAP Adaptive Server Enterprise 285
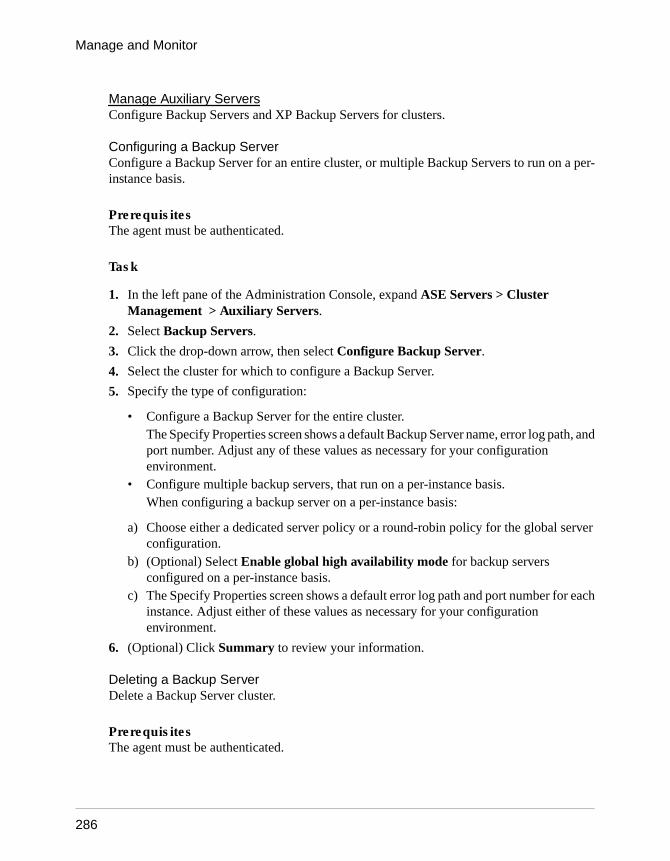
Manage Auxiliary ServersConfigure Backup Servers and XP Backup Servers for clusters.
Configuring a Backup ServerConfigure a Backup Server for an entire cluster, or multiple Backup Servers to run on a per-instance basis.
PrerequisitesThe agent must be authenticated.
Task
1. In the left pane of the Administration Console, expand ASE Servers > ClusterManagement > Auxiliary Servers.
2. Select Backup Servers.
3. Click the drop-down arrow, then select Configure Backup Server.
4. Select the cluster for which to configure a Backup Server.
5. Specify the type of configuration:
• Configure a Backup Server for the entire cluster.The Specify Properties screen shows a default Backup Server name, error log path, andport number. Adjust any of these values as necessary for your configurationenvironment.
• Configure multiple backup servers, that run on a per-instance basis.When configuring a backup server on a per-instance basis:
a) Choose either a dedicated server policy or a round-robin policy for the global serverconfiguration.
b) (Optional) Select Enable global high availability mode for backup serversconfigured on a per-instance basis.
c) The Specify Properties screen shows a default error log path and port number for eachinstance. Adjust either of these values as necessary for your configurationenvironment.
6. (Optional) Click Summary to review your information.
Deleting a Backup ServerDelete a Backup Server cluster.
PrerequisitesThe agent must be authenticated.
Manage and Monitor
286
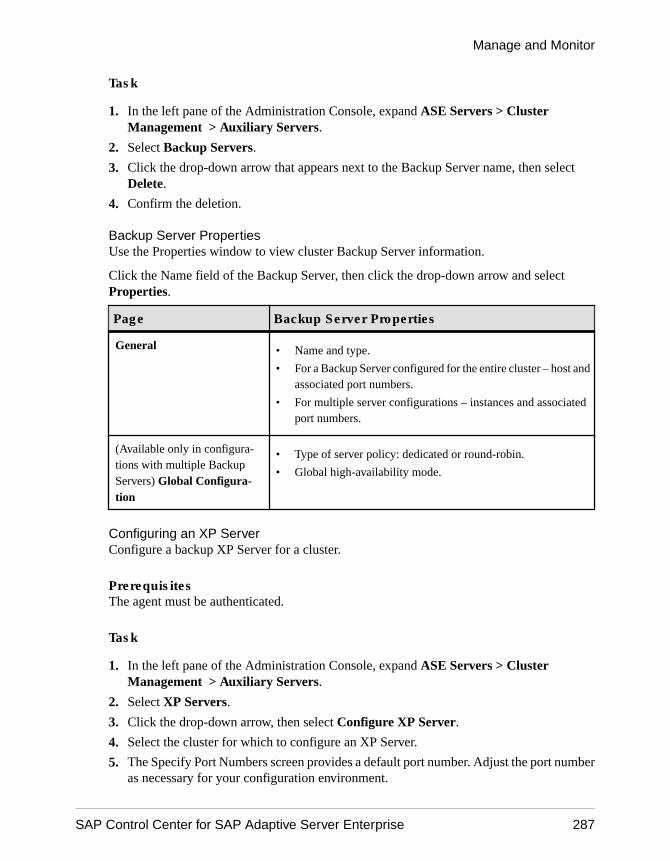
Task
1. In the left pane of the Administration Console, expand ASE Servers > ClusterManagement > Auxiliary Servers.
2. Select Backup Servers.
3. Click the drop-down arrow that appears next to the Backup Server name, then selectDelete.
4. Confirm the deletion.
Backup Server PropertiesUse the Properties window to view cluster Backup Server information.
Click the Name field of the Backup Server, then click the drop-down arrow and selectProperties.
Page Backup Server Properties
General • Name and type.
• For a Backup Server configured for the entire cluster – host andassociated port numbers.
• For multiple server configurations – instances and associatedport numbers.
(Available only in configura-tions with multiple BackupServers) Global Configura-tion
• Type of server policy: dedicated or round-robin.
• Global high-availability mode.
Configuring an XP ServerConfigure a backup XP Server for a cluster.
PrerequisitesThe agent must be authenticated.
Task
1. In the left pane of the Administration Console, expand ASE Servers > ClusterManagement > Auxiliary Servers.
2. Select XP Servers.
3. Click the drop-down arrow, then select Configure XP Server.
4. Select the cluster for which to configure an XP Server.
5. The Specify Port Numbers screen provides a default port number. Adjust the port numberas necessary for your configuration environment.
Manage and Monitor
SAP Control Center for SAP Adaptive Server Enterprise 287
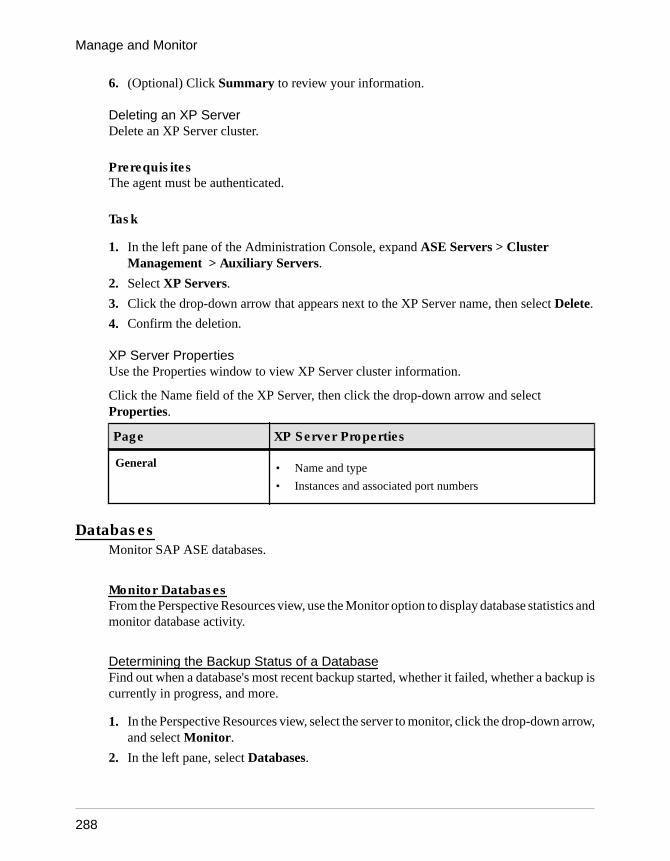
6. (Optional) Click Summary to review your information.
Deleting an XP ServerDelete an XP Server cluster.
PrerequisitesThe agent must be authenticated.
Task
1. In the left pane of the Administration Console, expand ASE Servers > ClusterManagement > Auxiliary Servers.
2. Select XP Servers.
3. Click the drop-down arrow that appears next to the XP Server name, then select Delete.
4. Confirm the deletion.
XP Server PropertiesUse the Properties window to view XP Server cluster information.
Click the Name field of the XP Server, then click the drop-down arrow and selectProperties.
Page XP Server Properties
General • Name and type
• Instances and associated port numbers
DatabasesMonitor SAP ASE databases.
Monitor DatabasesFrom the Perspective Resources view, use the Monitor option to display database statistics andmonitor database activity.
Determining the Backup Status of a DatabaseFind out when a database's most recent backup started, whether it failed, whether a backup iscurrently in progress, and more.
1. In the Perspective Resources view, select the server to monitor, click the drop-down arrow,and select Monitor.
2. In the left pane, select Databases.
Manage and Monitor
288
You can also display the Databases window by clicking a Databases link on anotherwindow in the monitor view.
3. Locate your database in the Databases table.
The table shows:• The date and time at which the most recent backup started• Whether a backup is currently in progress• Whether the most recent backup failed• Whether the transaction log is full• Whether there are suspended processes associated with this database
For more information on backups, see the sections on developing a recovery plan and onbacking up and restoring user databases in the System Administration Guide, Volume 2.
See also• Displaying Resources Used by a Database on page 289
• Displaying Information About Segments Used by a Database on page 292
• Database Statistics and Details on page 290
Displaying Resources Used by a DatabaseView disk usage, running processes, unused indexes, and devices and segments associatedwith a database.
1. In the Perspective Resources view, select the server to monitor, click the drop-down arrow,and select Monitor.
2. In the left pane, select Databases.
You can also display the Databases screen by clicking a Databases link from a differentwindow in the monitor view.
3. Select a database in the Databases table.
The tabs at the bottom of the screen are populated with information on the database youselected.
Note: When you select a database, space usage is calculated before any data is shown; for alarge database, this calculation may take 30 seconds or more.
4. Click a tab to see information about the resource you are interested in:
• Details – shows disk usage, including the size of reserved and unreserved data and logsegments.
• Running Processes – shows the server process ID (spid), login, host, command, andtransaction for each process that is currently using the database. Each spid number is alink; click it to see more information about that process.
Manage and Monitor
SAP Control Center for SAP Adaptive Server Enterprise 289
• Devices Used – shows the size and usage allocation (data or log) for each device thatprovides storage for this database. Each device name is a link; click it to see moreinformation about that device.
• Segments Used – shows the size and unused portion of each segment, in megabytes.Each segment name is a link; click it to see more information about that segment.
• Unused Indexes – shows the name and table of each unused index.• Frequently Used Tables – shows usage statistics for frequently used tables.
See also• Determining the Backup Status of a Database on page 288
• Displaying Information About Segments Used by a Database on page 292
• Database Statistics and Details on page 290
Modifying Database SizesIncrease the size of databases using SAP Control Center.
1. In the SAP Adaptive Server Enterprise monitor, select Databases.
2. From the Databases table, select the database to configure.
3. Right-click the database name and select Extend Database from the context menu.You see the Database Extend wizard .
4. (Optional) Select a Device Name on which to extend the database.
5. (Optional) Specify the amount of space to allocate to the log and data segments.
6. Click OK.The dialog box closes if the operation succeeds, otherwise you see an error and the dialogbox remains open.
Database Statistics and DetailsThe Databases window shows a variety of detailed statistics, including the status of activedatabases.
Note: In cluster configurations, the Global Databases table provides information about globaldatabases, and the Local Databases tables provides information about local, temporarydatabases, grouped by cluster instance.
The Databases table lists the databases in the current server by name. If a database isunavailable, for example, because it is quiesced or is offline, the Name column includes thereason.
The Databases table lists the type, durability, and DML logging status for each database. TheDatabases table also includes for each database, the ID, and current status information, backupstatus, whether the transaction log is full, and whether there are suspended processes.Processes may be suspended when the transaction log fills up.
Manage and Monitor
290
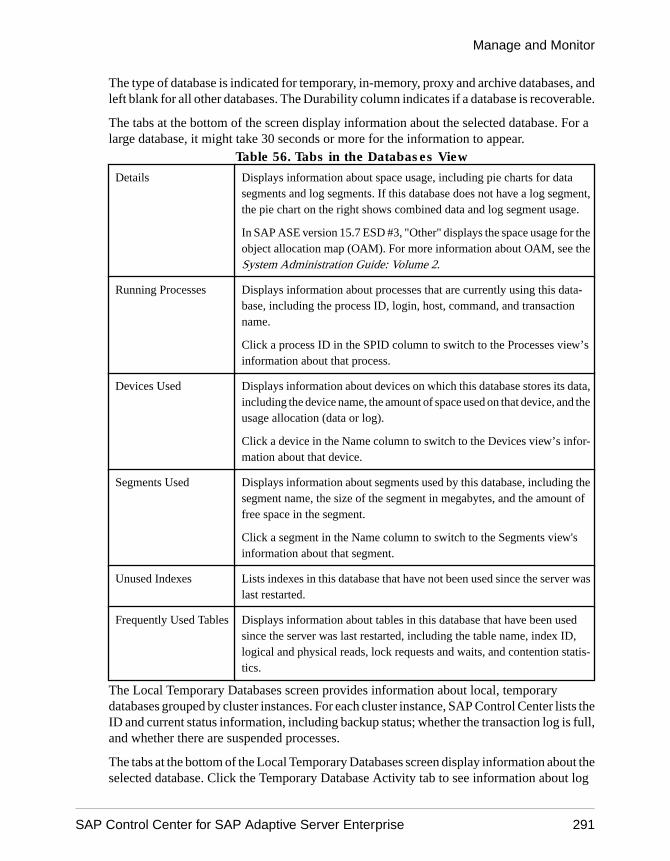
The type of database is indicated for temporary, in-memory, proxy and archive databases, andleft blank for all other databases. The Durability column indicates if a database is recoverable.
The tabs at the bottom of the screen display information about the selected database. For alarge database, it might take 30 seconds or more for the information to appear.
Table 56. Tabs in the Databases View
Details Displays information about space usage, including pie charts for datasegments and log segments. If this database does not have a log segment,the pie chart on the right shows combined data and log segment usage.
In SAP ASE version 15.7 ESD #3, "Other" displays the space usage for theobject allocation map (OAM). For more information about OAM, see theSystem Administration Guide: Volume 2.
Running Processes Displays information about processes that are currently using this data-base, including the process ID, login, host, command, and transactionname.
Click a process ID in the SPID column to switch to the Processes view’sinformation about that process.
Devices Used Displays information about devices on which this database stores its data,including the device name, the amount of space used on that device, and theusage allocation (data or log).
Click a device in the Name column to switch to the Devices view’s infor-mation about that device.
Segments Used Displays information about segments used by this database, including thesegment name, the size of the segment in megabytes, and the amount offree space in the segment.
Click a segment in the Name column to switch to the Segments view'sinformation about that segment.
Unused Indexes Lists indexes in this database that have not been used since the server waslast restarted.
Frequently Used Tables Displays information about tables in this database that have been usedsince the server was last restarted, including the table name, index ID,logical and physical reads, lock requests and waits, and contention statis-tics.
The Local Temporary Databases screen provides information about local, temporarydatabases grouped by cluster instances. For each cluster instance, SAP Control Center lists theID and current status information, including backup status; whether the transaction log is full,and whether there are suspended processes.
The tabs at the bottom of the Local Temporary Databases screen display information about theselected database. Click the Temporary Database Activity tab to see information about log
Manage and Monitor
SAP Control Center for SAP Adaptive Server Enterprise 291
requests and wait status, device read and write values, and charts depicting I/O activity in theselected temporary database.
See also• Determining the Backup Status of a Database on page 288
• Displaying Resources Used by a Database on page 289
• Displaying Information About Segments Used by a Database on page 292
Displaying Information About Segments Used by a DatabaseFor a database, get details about space usage, devices that make up each segment, and tablesand indexes that use it.
1. In the Perspective Resources view, select the server to monitor, click the drop-down arrow,and select Monitor.
2. In the left pane, select Databases.
3. Select a database in the Databases table at the top of the window.
The tabs at the bottom of the window are populated with information on the database youselected.
4. Click the Segments Used tab.
5. Each segment name is a link; click it to see more information about that segment.In the Segments window, the tabs at the bottom of the screen are populated withinformation about the selected segment.
6. Click the tabs to see information about space usage on the segment, devices that make upthe segment, and tables and indexes that are allocated on the segment.
7. If the database uses more than one segment, return to the Databases screen to identify andclick through to the remaining segments.
For more information on segments, see the System Administration Guide, Volume 2.
See also• Determining the Backup Status of a Database on page 288
• Displaying Resources Used by a Database on page 289
• Database Statistics and Details on page 290
• Determining the Space Used by a Table on a Segment on page 450
• Extending a Segment in SAP ASE on page 450
• Segment Statistics and Details on page 451
Manage DatabasesFrom the Perspective Resources view, use the Administration Console option to createdatabases, modify their properties, and perform other administrative tasks.
Manage and Monitor
292
Creating a User DatabaseCreate a user database using the SAP Control Center Administration Console.
Prerequisites
Consider these database attributes:
• Size:• sp_estspace helps you estimate table and index space requirements based on the
definition of a specific table.• Space for planned views, stored procedures, defaults, rules, and triggers.• Size of the transaction log.• Space for anticipated expansion.
• Database device location, and whether there is enough space on that device.• Transaction log location – SAP recommends that you store the transaction log on a
different device than the data.
Task
1. In the left pane of the Administration Console, expand ASE Servers > Schema Objects >Databases.
2. Click User Databases.
3. Click the drop-down arrow and select New.
4. On the Introduction screen, select the server in which to create a database.
5. On the Database screen, enter the name of the database you want to create.
6. (Optional) On the Devices screen, enter the size of the new database. If you do not enter asize, the default size allocated is 3MB. You can specify separately the amount of space toallocate to the log and data segments.
7. (Optional) On the Options screen, select:
• (Not recommended) With override to store the log and data on the same logicaldevice.
• For load to use the database for loading a database dump.
If you created a database encryption key, you can select Encrypt this database, thenspecify the name of the database encryption key.
8. (Optional) On the Durability Level screen, choose one of these levels to improve serverperformance by reducing the recoverability in case of a system failure:
• NO_RECOVERY – there is no guarantee that, at runtime, committed transactions arewritten to the disk.
Manage and Monitor
SAP Control Center for SAP Adaptive Server Enterprise 293
• AT_SHUTDOWN – all committed transactions are written to disk during a normalserver shutdown.
• FULL – a complete recovery of committed transactions is possible after a systemfailure.
Note: These options apply only to nonclustered version 15.5 and later.
9. (Optional) On the Data Compression screen, select:
• Data compression for the entire database – either page-level or row-level compression.If you choose neither option, then data is not compressed.
• LOB compression – from levels 0 – 9, 100, or 101.• In-row LOB length – the length of the LOB column to be saved in-row. To disallow
in-row LOB storage in the database, set the length to 0.
Note: These options apply only to nonclustered version 15.7 and later.
10. (Optional) Use the Guest User screen, to create a guest user who can access the databasewith limited privileges.
11. (Optional) Click Summary to view your selected options.
See also• Creating a Temporary Database on page 295
• Creating a Proxy Database on page 294
• Creating an Archive Database on page 297
• Creating an In-Memory Database on page 298
• Creating an In-Memory Temporary Database on page 299
• Creating a Temporary Database Group on page 304
• Mounting an SAP ASE Database on page 344
• Database Properties on page 345
• Creating a Database Encryption Key on page 415
Creating a Proxy DatabaseCreate a proxy database using the SAP Control Center Administration Console.
Prerequisites
Consider these database attributes:
• Size:• sp_estspace helps you estimate table and index space requirements based on the
definition of a specific table.• Space for planned views, stored procedures, defaults, rules, and triggers.• Size of the transaction log.
Manage and Monitor
294
• Space for anticipated expansion.• Database device location, and whether there is enough space on that device.• Transaction log location – SAP recommends that you store the transaction log on a
different device than the data.
Task
1. In the left pane of the Administration Console, expand ASE Servers > Schema Objects >Databases.
2. Click Proxy Databases.
3. Click the drop-down arrow and select New.
4. On the Introduction screen, select the server in which to create a database.
5. On the Database screen, enter the name of the database you want to create.
6. (Optional) On the Devices screen, enter the size of the new database. If you do not enter asize, the default size allocated is 3MB. You can specify separately the amount of space toallocate to the log and data segments.
7. (Optional) On the Default Location screen, enter the name of the remote location whereyou want to store your proxy database. Select For Proxy Update to automatically getmetadata from the remote location while creating proxy tables.
8. (Optional) Click Summary to view your selected options.
See also• Creating a User Database on page 293
• Creating a Temporary Database on page 295
• Creating an Archive Database on page 297
• Creating an In-Memory Database on page 298
• Creating an In-Memory Temporary Database on page 299
• Creating a Temporary Database Group on page 304
• Mounting an SAP ASE Database on page 344
• Database Properties on page 345
Creating a Temporary DatabaseCreate a temporary database using the SAP Control Center Administration Console.
Prerequisites
Consider these database attributes:
• Size:• sp_estspace helps you estimate table and index space requirements based on the
definition of a specific table.
Manage and Monitor
SAP Control Center for SAP Adaptive Server Enterprise 295
• Space for planned views, stored procedures, defaults, rules, and triggers.• Size of the transaction log• Space for anticipated expansion.
• Database device location, and whether there is enough space on that device.• Transaction log location – SAP recommends that you store the transaction log on a
different device than the data.
Task
1. In the left pane of the Administration Console, expand ASE Servers > Schema Objects >Databases.
2. Click Temporary Databases.
3. Click the drop-down arrow and select New.
4. On the Introduction screen, select the server in which to create a database.
5. (Optional, cluster environment only) Click Create this as a local temporary database,then select the online instance on which to create the database.
You can create local user temporary databases on private devices, but you must create localsystem temporary databases on shared devices. You can use local file system devices(block devices) to manage the storage needs of temporary data in the cluster. These devicesare added as private devices and can only be used by local user temporary databases.
6. On the Database screen, enter the name of the database you want to create.
7. (Optional, cluster environment only) On the Temporary Database Group screen, select thegroup to which to add the local temporary database.
You can add a local temporary database only to a temporary database group. You cannotadd global temporary databases to a temporary database group.
8. (Optional) On the Devices screen, enter the size of the new database. If you do not enter asize, the default size allocated is 3MB. You can specify separately the amount of space toallocate to the log and data segments.
9. (Optional) On the Options screen, select:
• (Not recommended) With override to store the log and data on the same logicaldevice.
• For load to use the database for loading a database dump.• Specify a template database that is copied over to create the in-memory database.
10. (Optional) On the Data Compression screen, select:
• Data compression for the entire database – either page-level or row-level compression.If you choose neither option, then data is not compressed.
• LOB compression – from levels 0 – 9, 100, or 101.• In-row LOB length – the length of the LOB column to be saved in-row. To disallow
in-row LOB storage in the database, set the length to 0.
Manage and Monitor
296
If you created a database encryption key, you can select Encrypt this database, thenspecify the name of the database encryption key.
11. (Optional) On the Temporary Database Group screen, select the database group that thetemporary database belongs to.
12. (Optional) Click Summary to view your selected options.
See also• Creating a User Database on page 293
• Creating a Proxy Database on page 294
• Creating an Archive Database on page 297
• Creating an In-Memory Database on page 298
• Creating an In-Memory Temporary Database on page 299
• Creating a Temporary Database Group on page 304
• Mounting an SAP ASE Database on page 344
• Database Properties on page 345
• Creating a Database Encryption Key on page 415
Creating an Archive DatabaseCreate an archive database using the SAP Control Center Administration Console.
Prerequisites
Consider these database attributes:
• Size:• sp_estspace helps you estimate table and index space requirements based on the
definition of a specific table.• Space for planned views, stored procedures, defaults, rules, and triggers.• Size of the transaction log.• Space for anticipated expansion.
• Database device location, and whether there is enough space on that device.• Transaction log location – SAP recommends that you store the transaction log on a
different device than the data.
Task
1. In the left pane of the Administration Console, expand ASE Servers > Schema Objects >Databases.
2. Click Archive Databases.
3. Click the drop-down arrow and select New.
4. On the Introduction screen, select the server in which to create a database.
Manage and Monitor
SAP Control Center for SAP Adaptive Server Enterprise 297
5. On the Database screen, enter the name of the database you want to create.
To enter the name of an archive database, you must first select a scratch database. You canmark a database as a scratch database by selecting the Scratch Database option from thedatabase property sheet.
For information on scratch databases, see the System Administration Guide: Volume 2.
6. (Optional) On the Devices screen, enter the size of the new database. If you do not enter asize, the default size allocated is 3MB. You can specify separately the amount of space toallocate to the log and data segments.
7. (Optional) On the Options screen, if you created a database encryption key, you can selectEncrypt this database, then specify the name of the database encryption key.
8. (Optional) Click Summary to view your selected options.
See also• Creating a User Database on page 293
• Creating a Temporary Database on page 295
• Creating a Proxy Database on page 294
• Creating an In-Memory Database on page 298
• Creating an In-Memory Temporary Database on page 299
• Creating a Temporary Database Group on page 304
• Mounting an SAP ASE Database on page 344
• Database Properties on page 345
• Creating a Database Encryption Key on page 415
Creating an In-Memory DatabaseCreate an in-memory database using the SAP Control Center Administration Console.
Prerequisites
Consider these database attributes:
• Size:• sp_estspace helps you estimate table and index space requirements based on the
definition of a specific table.• Space for planned views, stored procedures, defaults, rules, and triggers.• Size of the transaction log.• Space for anticipated expansion.
• Database device location, and whether there is enough space on that device.• Transaction log location – SAP recommends that you store the transaction log on a
different device than the data.
Manage and Monitor
298
Task
1. In the left pane of the Administration Console, expand ASE Servers > Schema Objects >Databases.
2. Click In-Memory Databases.
3. Click the drop-down arrow and select New.
4. On the Introduction screen, select the server in which to create a database.
5. On the Database screen, enter the name of the database you want to create.
6. On the Devices screen, enter the size of the new database. If you do not enter a size, thedefault size allocated is 3MB. You can specify separately the amount of space to allocate tothe log and data segments.
7. (Optional) On the Options screen, select:
• (Not recommended) With override to store the log and data on the same logicaldevice.
• For load to use the database for loading a database dump.• Specify a template database that is copied over to create the in-memory database.
8. (Optional) Use the Guest User screen, to create a guest user who can access the databasewith limited privileges.
9. (Optional) Click Summary to view your selected options.
See also• Creating a User Database on page 293
• Creating a Temporary Database on page 295
• Creating a Proxy Database on page 294
• Creating an Archive Database on page 297
• Creating an In-Memory Temporary Database on page 299
• Creating a Temporary Database Group on page 304
• Mounting an SAP ASE Database on page 344
• Database Properties on page 345
Creating an In-Memory Temporary DatabaseCreate an in-memory temporary database using the SAP Control Center AdministrationConsole.
Prerequisites
Consider these database attributes:
• Size:
Manage and Monitor
SAP Control Center for SAP Adaptive Server Enterprise 299
• sp_estspace helps you estimate table and index space requirements based on thedefinition of a specific table.
• Space for planned views, stored procedures, defaults, rules, and triggers.• Size of the transaction log.• Space for anticipated expansion.
• Database device location, and whether there is enough space on that device.• Transaction log location – SAP recommends that you store the transaction log on a
different device than the data.
Task
1. In the left pane of the Administration Console, expand ASE Servers > Schema Objects >Databases.
2. Click In-Memory Temporary Databases.
3. Click the drop-down arrow and select New.You see the Add In-Memory Temporary Database wizard.
4. On the Introduction screen, select the server in which to create a database.
5. On the Database screen, enter the name of the database you want to create.
6. (Optional) On the Devices screen, enter the size of the new database. If you do not enter asize, the default size allocated is 3MB. You can specify separately the amount of space toallocate to the log and data segments.
7. (Optional) On the Options screen, select:
• (Not recommended) With override to store the log and data on the same logicaldevice.
• For load to use the database for loading a database dump.• Specify a template database that is copied over to create the in-memory database.
8. (Optional) On the Temporary Database Group screen, select the database group that thetemporary database belongs to.
9. (Optional) Click Summary to view your selected options.
See also• Creating a User Database on page 293
• Creating a Temporary Database on page 295
• Creating a Proxy Database on page 294
• Creating an Archive Database on page 297
• Creating an In-Memory Database on page 298
• Creating a Temporary Database Group on page 304
• Mounting an SAP ASE Database on page 344
• Database Properties on page 345
Manage and Monitor
300
Creating an Encrypted DatabaseManage the transparent encryption of databases through SAP Control Center.
PrerequisitesBefore you can encrypt a database:
1. Create a master key. See Creating a Master Key on page 408.2. Create a database encryption key. See Creating a Database Encryption Key on page
415.
Task
Full database encryption protects an entire database without affecting existing applications.Once you encrypt a database, all of its data, indexes, and transaction logs become encrypted.This encryption is transparent; so that you can perform operations on tables, indexes, and soon, as usual, without noticing any differences.
Data is encrypted at the page level. Once your database is set up as encrypted, the encryptionand decryption process is automatic. Data becomes encrypted just before the page is writteninto disk, and decrypted as soon as the data page is loaded into memory.
See also• Manage Encryption Keys on page 406
Encrypting an Existing DatabaseUse the Encrypt Database wizard to encrypt an existing unencrypted database.
1. In the left pane of the Administration Console, expand ASE Servers > Schema Objects >Databases.
2. Click User Databases.
3. Click the Name field of the database, then click the drop-down arrow and selectEncrypt.
4. In the Options screen:
• Select Encrypt to encrypt the database.• Specify the database encryption key with which to encrypt the database.• Select Specify the degree of parallelism and enter a numeric value in the field.
5. (Optional) Click Summary to view your selected options.
See also• Manage Encryption Keys on page 406
Manage and Monitor
SAP Control Center for SAP Adaptive Server Enterprise 301
Suspending the Encryption ProcessUse the Encrypt Database wizard to stop the encryption process of a database.
1. In the left pane of the Administration Console, expand ASE Servers > Schema Objects >Databases.
2. Click User Databases.
3. Click the Name field of the database, then click the drop-down arrow and selectEncrypt.
4. In the Options screen, if the database you chose is in the process of being encrypted, theonly option you can choose is Suspend encryption.
5. (Optional) Click Summary to view your selected options.
See also• Manage Encryption Keys on page 406
Resuming the Encryption ProcessManage the transparent encryption of databases through SAP Control Center
1. In the left pane of the Administration Console, expand ASE Servers > Schema Objects >Databases.
2. Click User Databases.
3. Click the Name field of the database, then click the drop-down arrow and selectEncrypt.
4. Select Resume encryption to resume the encryption process.If you have suspended the encryption process of the database, you can choose to eitherResume encryption or Decrypt in the Options srceen.
5. Specify the degree of parallelism for the encryption.
6. (Optional) Click Summary to view your selected options.
See also• Manage Encryption Keys on page 406
Decrypting an Encrypted DatabaseUse the Encrypt Database wizard to decrypt an encrypted database.
You may need to revert an encrypted database back to the plain text state as part ofdowngrading to an earlier version that does not support encrypted databases.
1. In the left pane of the Administration Console, expand ASE Servers > Schema Objects >Databases.
Manage and Monitor
302
2. Click User Databases.
3. Click the Name field of the database to decrypt, then click the drop-down arrow and selectEncrypt.
4. In the Options screen, if the database you chose is encrypted, the only option you canchoose is Decrypt.
5. Specify the degree of parallelism for the decryption.
6. (Optional) Click Summary to view your selected options.
See also• Manage Encryption Keys on page 406
Suspending the Decryption ProcessManage the transparent encryption of databases through SAP Control Center.
1. In the left pane of the Administration Console, expand ASE Servers > Schema Objects >Databases.
2. Click User Databases.
3. Click the Name field of the database, then click the drop-down arrow and selectEncrypt.
4. In the Options screen, if the database you chose is in the process of being decrypted, theonly option you can choose is Suspend decryption.
5. (Optional) Click Summary to view your selected options.
See also• Manage Encryption Keys on page 406
Resuming the Decryption ProcessManage the transparent encryption of databases through SAP Control Center.
1. In the left pane of the Administration Console, expand ASE Servers > Schema Objects >Databases.
2. Click User Databases.
3. Click the Name field of the database, then click the drop-down arrow and selectEncrypt.
4. Select Resume decryption to resume the decryption process.If you have suspended the decryption process of the database, you can choose to eitherResume decryption or Encrypt in the Options screen.
5. Specify the degree of parallelism for the decryption.
6. (Optional) Click Summary to view your selected options.
Manage and Monitor
SAP Control Center for SAP Adaptive Server Enterprise 303
See also• Manage Encryption Keys on page 406
Creating a Temporary Database GroupCreate a temporary database group using the SAP Control Center Administration Console.
1. In the left pane of the Administration Console, expand ASE Servers > Schema Objects >Databases.
2. Click Temporary Database Groups.
3. Click the drop-down arrow and select New.
4. On the Introduction screen, select the server in which to create a database group.
5. On the Group Name screen, enter the name of the temporary database group.
6. On the Databases screen, specify the temporary database to be added to the temporarydatabase group.
7. On the Bindings screen, select:
• Bind Application to specify applications to be bound to the temporary database group.• Bind Login to specify logins to be bound to the temporary database group.
Note: If you change the binding of a login to a different group, the old binding is nolonger valid.
8. (Optional) Click Summary to view your selected options.
See also• Creating a User Database on page 293
• Creating a Temporary Database on page 295
• Creating a Proxy Database on page 294
• Creating an Archive Database on page 297
• Creating an In-Memory Database on page 298
• Creating an In-Memory Temporary Database on page 299
• Mounting an SAP ASE Database on page 344
• Database Properties on page 345
Shrinking a DatabaseShrink databases, freeing unused space for reuse or deletion.
Note: The shrink database functionality is not supported on the Cluster Edition.
1. In the Perspective Resources view, select the server on which the table resides, then clickthe drop-down arrow next to the server name and select Administration Console.
2. Expand ASE Servers > Schema Objects > Databases, then choose one of:
Manage and Monitor
304
• User Databases• System Databases• Temporary Databases
3. Click the Name field of the database, then click the drop-down arrow and select Shrink.
4. Select the device from which to release space, or select Add to add a device to the list.
5. On the Options screen, specify the timeout period for this shrink operation.
6. On the Summary screen, verify your selections.
7. Click Finish to perform the shrink operation.
Backing Up (Dumping) a DatabaseUse SAP Control Center to help you back up a database and its transaction log.
Prerequisites
• Ensure that you can connect to the Backup Server from each server you administer.• Decide on the backup media you will use, and create dump devices that identify the
physical backup media to the server.• Ensure that the login of the person starting the Backup Server has write permissions for the
physical backup dump device, and that the dump device is available.
Task
Although SAP ASE has automatic recovery procedures to protect you during power outagesand computer failures, your best protection against media failure is creating regular andfrequent backups of system and user databases. See the System Administration Guide fordetails on backup and recovery.
Note: SAP Control Center verifies that Backup Server is available. If it is not, the Backup andRestore wizards display a message, similar to Default Backup Server is notrunning, and you cannot proceed.
1. In the left pane of the Administration Console, expand ASE Servers > Schema Objects >Databases.
2. Select one of:
• User Databases• System Databases• Temporary Databases• Proxy Databases• In-Memory Databases• In-Memory Temporary Databases
3. Click the Name field of the database, then click the drop-down arrow and select BackUp.
Manage and Monitor
SAP Control Center for SAP Adaptive Server Enterprise 305
4. In the Introduction screen of the Backup Database wizard, choose whether to back up thedatabase or transaction log using a dump configuration by selecting Backup usingconfiguration.
If you back up only the transaction log, you can:• Create either a new transaction log or a new transaction entry in the log• Delete the inactive part of the logClick Next.
5. In the Dump Devices screen, click Add, or specify the dump device. Click Next.
6. (Optional) In the Options screen, specify:
Input Description
Compres-sion level
Row-level, or page-level.
Block size The block size for the dump operation, which overrides the default block size forthe device. For optimal performance, specify the block size as a power of 2. Defaultvalue is 0.
Retentiontime
The number of days for which the dump is preserved and cannot be overwritten.The default value is 0. Specify retention time to override the default value for alldump devices. The backup server does not automatically overwrite data unless it isolder than the retention time.
Password This password protects the backup from unauthorized access. If you specify apassword here, you must use the same password while restoring the database.
Click Next.
7. (Optional) In the Dump Performance screen, choose a setting to optimize the performanceof the backup (see sp_dumpoptimize in Reference Manual: Procedures for moreinformation about reserved threshold and allocation threshold settings):
Setting Description
Default Dumps the database using default optimize options value. By default, the reservedthreshold is 85 percent and the allocation threshold is set to 40 percent.
Maximum Dumps the entire database without determining which pages are allocated. UsingMaximum sets both reserved threshold and allocation threshold to 0 percent.
Minimum Dumps only the allocated pages, which results in the smallest possible archiveimage. Minimum sets both reserved threshold and allocation threshold to 100percent.
Advanced Dumps the database with user-specified values for both reserved threshold andallocation threshold. You can also specify the threshold values for reserved pagesand allocated pages.
8. (Optional) Click Summary to verify your selected options.
Manage and Monitor
306
9. Click Finish to start the backup. SAP Control Center displays backup messages from theserver.
See also• Restoring (Loading) a Database on page 334
• Creating a Dump Device on page 360
Viewing Available Dump ConfigurationsView available dump configurations using the SAP Control Center Administration Console.
Prerequisites
You must be the system administrator or database owner to display the list of available dumpconfigurations.
Task
1. In the Administration Console view, select ASE Servers > Backup/Recovery > DumpConfigurations.You see the name of the available dump configurations and the Backup Servers they resideon.
2. Click the Name field of the dump configuration, then click the drop-down arrow and selectDelete to delete it, or Properties to view or update it.
The Backup Servers that the dump configurations reside on must be running for theconfigurations to appear on the list.
Creating a Dump ConfigurationSystem administrators can create a dump configuration using SAP Control Center.
PrerequisitesAgent authentication is required when the wizard must validate user input in the archivedirectory; otherwise, you can run this wizard without first authenticating the agent.
Task
1. In the Administration Console view, select ASE Servers > Backup/Recovery > DumpConfigurations.You see the name of the available dump configurations and the Backup Servers they resideon.
2. Select New.
3. On the Introduction screen, select the server in which to create the dump configuration.
Manage and Monitor
SAP Control Center for SAP Adaptive Server Enterprise 307
4. On the Dump Configuration Name screen, enter the unique name of the dumpconfiguration you want to create.
5. On the Options screen, specify:
Input Description
Archive di-rectory
The name of the stripe directory that holds the dump files. By default, the stripedirectory is the directory from which Backup Server is started.
External API The name of the byte stream device to be used for the dump operation.
Number ofstripe devi-ces
The number of stripe devices to be used for the dump operation. The default valueis 1.
Retry times The number of times the server tries to execute the dump operation for nonfatalerrors. The range of values is 0 to 5. The default value is 0.
Block size The block size for the dump operation, which overrides the default block size forthe device. For optimal performance, specify the block size as a power of 2. Thedefault value is 0.
Retain days The number of days for which the dump is preserved and cannot be overwritten.The default value is 0.
Compressionlevel
The level of compression for compressed dumps. By default, this option is dis-abled and set to 0. See Backing Up and Restoring User Databases in SystemAdministration Guide, Volume II for more information on compression levels.
Dump verifi-cation
Specify whether Backup Server must perform a minimal page-header or fullstructural row check on the data pages as they are copied to archives. By default,this option is unselected. When selected, the default option is header.
Message des-tination
Specify whether the Backup Server must route messages to the client terminalthat initiated the dump, or to the operator-console terminal where the BackupServer is running. By default, this option is unselected. When selected, the de-fault option is client.
Use the drop-down menu on the Options screen to specify the backup server.
See dump database in Reference Manual: Commands for more information on theseparameters.
6. (Optional) Click Summary to view your selected options.
7. (Optional) Click Preview to view the SQL syntax the wizard created, then click Save tosave the SQL, or Close to close the preview.
Manage and Monitor
308
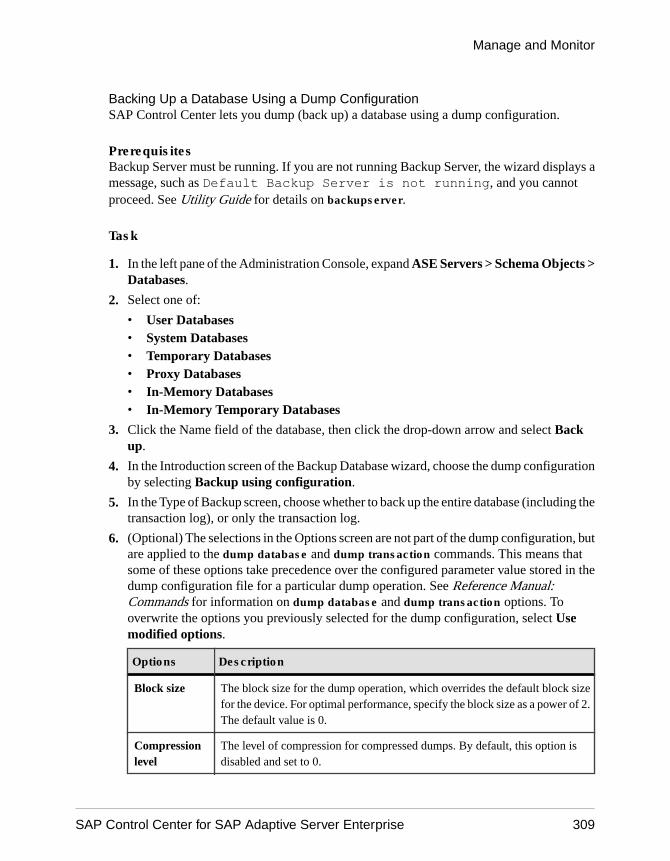
Backing Up a Database Using a Dump ConfigurationSAP Control Center lets you dump (back up) a database using a dump configuration.
PrerequisitesBackup Server must be running. If you are not running Backup Server, the wizard displays amessage, such as Default Backup Server is not running, and you cannotproceed. See Utility Guide for details on backupserver.
Task
1. In the left pane of the Administration Console, expand ASE Servers > Schema Objects >Databases.
2. Select one of:
• User Databases• System Databases• Temporary Databases• Proxy Databases• In-Memory Databases• In-Memory Temporary Databases
3. Click the Name field of the database, then click the drop-down arrow and select Backup.
4. In the Introduction screen of the Backup Database wizard, choose the dump configurationby selecting Backup using configuration.
5. In the Type of Backup screen, choose whether to back up the entire database (including thetransaction log), or only the transaction log.
6. (Optional) The selections in the Options screen are not part of the dump configuration, butare applied to the dump database and dump transaction commands. This means thatsome of these options take precedence over the configured parameter value stored in thedump configuration file for a particular dump operation. See Reference Manual:Commands for information on dump database and dump transaction options. Tooverwrite the options you previously selected for the dump configuration, select Usemodified options.
Options Description
Block size The block size for the dump operation, which overrides the default block sizefor the device. For optimal performance, specify the block size as a power of 2.The default value is 0.
Compressionlevel
The level of compression for compressed dumps. By default, this option isdisabled and set to 0.
Manage and Monitor
SAP Control Center for SAP Adaptive Server Enterprise 309

Options Description
Dump pass-word
A password, between 6 and 30 characters, protect the dump file from unau-thorized users. The default is null.
Retain days The number of days that the dump is preserved and cannot be overwritten. Thedefault value is 0.
Dump verifi-cation
Specify whether Backup Server must perform a minimal page-header or fullstructural row check on the data pages as they are copied to archives. By default,this is unselected. When selected, the default option is header.
Message desti-nation
Specify whether the Backup Server must route messages to the client terminalthat initiated the dump, or to the operator-console terminal where the BackupServer is running. By default, this is unselected. When selected, the defaultoption is client.
7. (Optional) Click Summary to view your selected options.
8. Click Finish to start the backup. SAP Control Center displays backup messages from theserver.
See also• Dump Configuration Properties on page 310
Dump Configuration PropertiesUse the Dump Configuration Properties wizard to modify dump configuration options.
Click the Name field of the dump configuration, then click the drop-down arrow and selectProperties.
Wizard Op-tion
Dump Configuration Properties
General View the name of the dump configuration.
Manage and Monitor
310

Wizard Op-tion
Dump Configuration Properties
Options View and modify these dump configuration options:
• Archive directory – name of the stripe directory that holds the dump files. Bydefault, the stripe directory is the directory from which Backup Server isstarted.
• External API – name of the byte stream device to be used for the dumpoperation.
• Number of stripe devices – number of stripe devices to be used for the dumpoperation. The default is 1.
• Retry times – number of times the server tries to execute the dump operationfor nonfatal errors. The range of values is 0 to 5. The default value is 0.
• Block size – block size for the dump operation, which overrides the defaultblock size for the device. For optimal performance, specify the block size as apower of 2. The default value is 0.
• Compression level – level of compression for compressed dumps. By default,this option is disabled and set to 0.
• Retain days – number of days that the dump is preserved and cannot beoverwritten. The default value is 0.
• Volume reinitialization – whether the volume must be reinitialized. The de-fault value is noinit.
• Dump verification – specify whether Backup Server must perform a minimalpage-header or full structural row check on the data pages as they are copied toarchives. By default, this is unselected. When selected, the default option isheader.
• Message destination – specify whether the Backup Server must route mes-sages to the client terminal that initiated the dump, or to the operator-consoleterminal where the Backup Server is running. By default, this is unselected.When selected, the default option is client.
• Backup Server name – the remote Backup Server used for the dump operation.
(Optional) Click Preview to view the SQL syntax generated by the settings fromyour options, then click Save to save the SQL, or Close to close the preview.
See also• Backing Up a Database or Transaction Log to Multiple Stripes on page 312
• Backing Up a Database Incrementally on page 314
• Backing Up a Database Incrementally Using a Dump Configuration on page 316
• Backing Up a Database Using a Dump Configuration on page 309
• Backing Up Server Configuration Files on page 321
Manage and Monitor
SAP Control Center for SAP Adaptive Server Enterprise 311
Deleting a Dump ConfigurationDelete a dump configuration, database objects, or the database itself.
PrerequisitesYou must have sa_role to delete a dump configuration.
Task
1. In the Administration Console view, select ASE Servers.
2. Navigate to your dump configuration.
3. Click the Name field of the dump configuration, then click the drop-down arrow and selectDelete.
4. Verify that the dialog displays the dump configuration to delete, and click OK..
5. (Optional) Click Preview to view the SQL syntax the wizard created, then click Save tosave the SQL, or Close to close the preview.
6. Confirm the deletion.
7. Click Finish.
Backing Up a Database or Transaction Log to Multiple StripesSAP Control Center lets you dump (back up) a database or transaction log to multiple stripes.
PrerequisitesBackup Server must be running. If you are not running Backup Server, the wizard displays amessage, such as Default Backup Server is not running, and you cannotproceed.
Task
1. In the left pane of the Administration Console, expand ASE Servers > Schema Objects >Databases.
2. Select one of:
• User Databases• System Databases• Temporary Databases• Proxy Databases• In-Memory Databases• In-Memory Temporary Databases
3. Click the Name field of the database, then click the drop-down arrow and select Backup.
Manage and Monitor
312
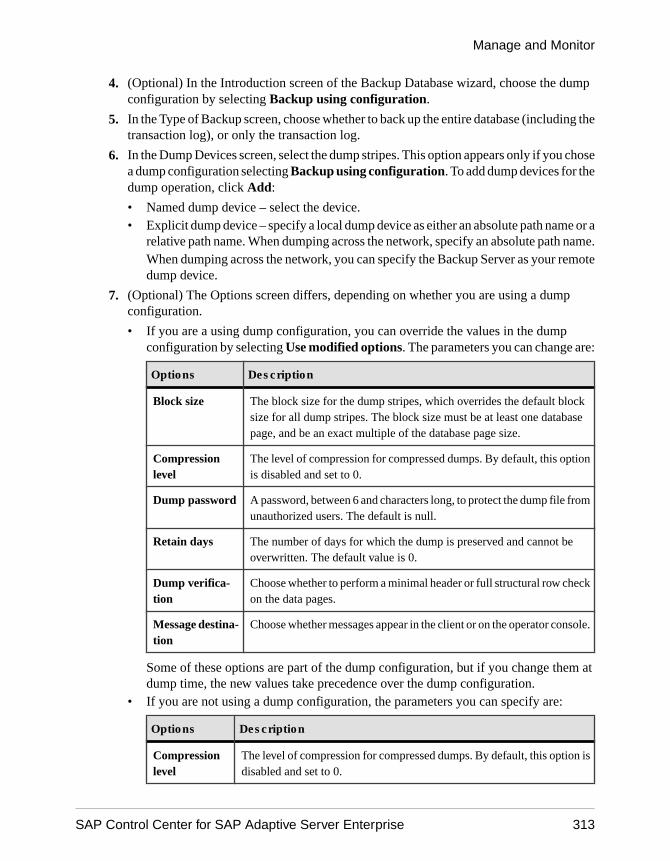
4. (Optional) In the Introduction screen of the Backup Database wizard, choose the dumpconfiguration by selecting Backup using configuration.
5. In the Type of Backup screen, choose whether to back up the entire database (including thetransaction log), or only the transaction log.
6. In the Dump Devices screen, select the dump stripes. This option appears only if you chosea dump configuration selecting Backup using configuration. To add dump devices for thedump operation, click Add:
• Named dump device – select the device.• Explicit dump device – specify a local dump device as either an absolute path name or a
relative path name. When dumping across the network, specify an absolute path name.When dumping across the network, you can specify the Backup Server as your remotedump device.
7. (Optional) The Options screen differs, depending on whether you are using a dumpconfiguration.
• If you are a using dump configuration, you can override the values in the dumpconfiguration by selecting Use modified options. The parameters you can change are:
Options Description
Block size The block size for the dump stripes, which overrides the default blocksize for all dump stripes. The block size must be at least one databasepage, and be an exact multiple of the database page size.
Compressionlevel
The level of compression for compressed dumps. By default, this optionis disabled and set to 0.
Dump password A password, between 6 and characters long, to protect the dump file fromunauthorized users. The default is null.
Retain days The number of days for which the dump is preserved and cannot beoverwritten. The default value is 0.
Dump verifica-tion
Choose whether to perform a minimal header or full structural row checkon the data pages.
Message destina-tion
Choose whether messages appear in the client or on the operator console.
Some of these options are part of the dump configuration, but if you change them atdump time, the new values take precedence over the dump configuration.
• If you are not using a dump configuration, the parameters you can specify are:
Options Description
Compressionlevel
The level of compression for compressed dumps. By default, this option isdisabled and set to 0.
Manage and Monitor
SAP Control Center for SAP Adaptive Server Enterprise 313
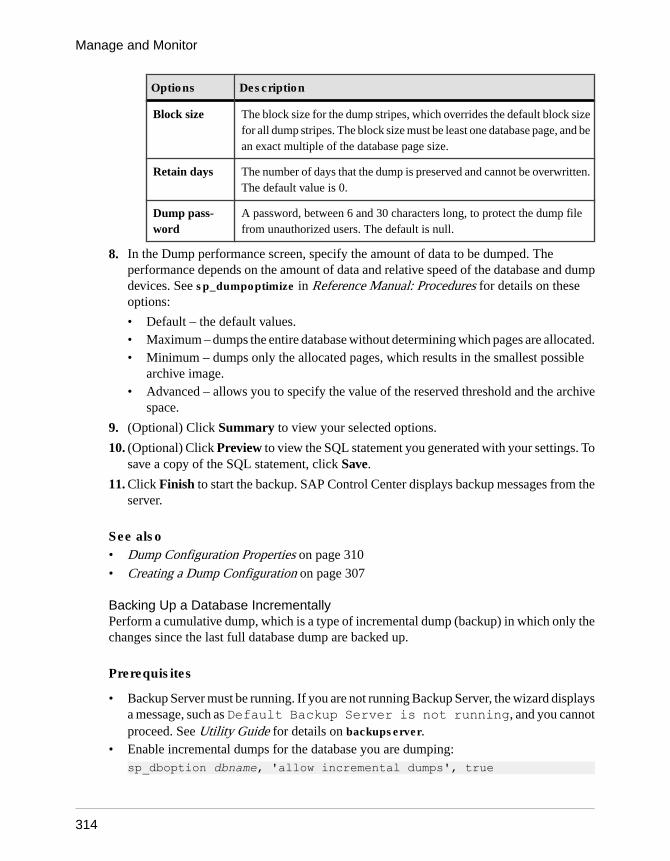
Options Description
Block size The block size for the dump stripes, which overrides the default block sizefor all dump stripes. The block size must be least one database page, and bean exact multiple of the database page size.
Retain days The number of days that the dump is preserved and cannot be overwritten.The default value is 0.
Dump pass-word
A password, between 6 and 30 characters long, to protect the dump filefrom unauthorized users. The default is null.
8. In the Dump performance screen, specify the amount of data to be dumped. Theperformance depends on the amount of data and relative speed of the database and dumpdevices. See sp_dumpoptimize in Reference Manual: Procedures for details on theseoptions:
• Default – the default values.• Maximum – dumps the entire database without determining which pages are allocated.• Minimum – dumps only the allocated pages, which results in the smallest possible
archive image.• Advanced – allows you to specify the value of the reserved threshold and the archive
space.
9. (Optional) Click Summary to view your selected options.
10. (Optional) Click Preview to view the SQL statement you generated with your settings. Tosave a copy of the SQL statement, click Save.
11. Click Finish to start the backup. SAP Control Center displays backup messages from theserver.
See also• Dump Configuration Properties on page 310
• Creating a Dump Configuration on page 307
Backing Up a Database IncrementallyPerform a cumulative dump, which is a type of incremental dump (backup) in which only thechanges since the last full database dump are backed up.
Prerequisites
• Backup Server must be running. If you are not running Backup Server, the wizard displaysa message, such as Default Backup Server is not running, and you cannotproceed. See Utility Guide for details on backupserver.
• Enable incremental dumps for the database you are dumping:sp_dboption dbname, 'allow incremental dumps', true
Manage and Monitor
314

If you do not do this before performing the task, you cannot select the cumulative backupoption.
Task
Note: You cannot perform cumulative dumps on cluster configurations.
1. In the left pane of the Administration Console, expand ASE Servers > Schema Objects >Databases.
2. Select one of:
• User Databases• System Databases• In-Memory Databases
3. Click the Name field of the database, then click the drop-down arrow and select Backup.
4. In the Introduction screen of the Backup Database wizard, choose whether to back up thedatabase using a dump configuration by selecting Backup using configuration.
5. In the Type of Backup screen, choose Cumulative backup. This creates a copy of all thechanges in the database since the last time the entire database was backed up.
To verify that you have enough space, click Estimate Dump Size.
Note: Cumulative backup is unavailable if you have not performed a full backup sinceenabling incremental dumps, and you see a message similar to:No full databasedump is available for cumulative dump.
6. In the Dump Devices screen, specify the dump stripes from the list. To add dump devicesfor the dump operation, click Add:
• Named dump device – select the device.• Explicit dump device – specify a local dump device as either an absolute path name or a
relative path name. When dumping across the network, specify an absolute path name.When dumping across the network, you can specify the backup server as your remotedump device.
7. (Optional) The selections in the Options screen are not part of the dump configuration, butare for the dump database and dump transaction commands. This means that some of theoptions take precedence over the configured parameter value stored in the dumpconfiguration file for a particular dump operation. See dump database and dumptransaction in Reference Manual: Commands for more information on these options:
Options Description
Compressionlevel
The level of compression for all dump stripes. By default, this option is dis-abled.
Manage and Monitor
SAP Control Center for SAP Adaptive Server Enterprise 315
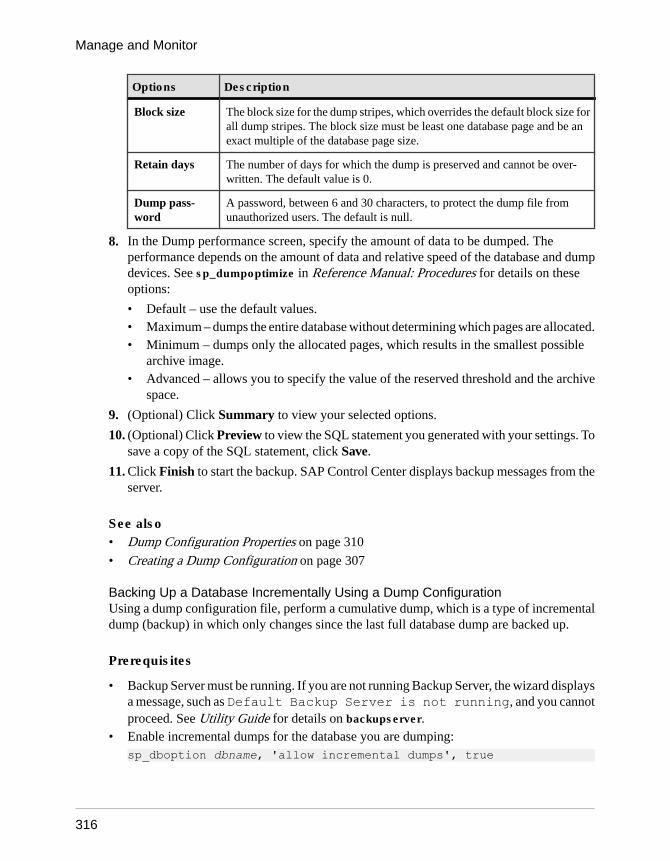
Options Description
Block size The block size for the dump stripes, which overrides the default block size forall dump stripes. The block size must be least one database page and be anexact multiple of the database page size.
Retain days The number of days for which the dump is preserved and cannot be over-written. The default value is 0.
Dump pass-word
A password, between 6 and 30 characters, to protect the dump file fromunauthorized users. The default is null.
8. In the Dump performance screen, specify the amount of data to be dumped. Theperformance depends on the amount of data and relative speed of the database and dumpdevices. See sp_dumpoptimize in Reference Manual: Procedures for details on theseoptions:
• Default – use the default values.• Maximum – dumps the entire database without determining which pages are allocated.• Minimum – dumps only the allocated pages, which results in the smallest possible
archive image.• Advanced – allows you to specify the value of the reserved threshold and the archive
space.
9. (Optional) Click Summary to view your selected options.
10. (Optional) Click Preview to view the SQL statement you generated with your settings. Tosave a copy of the SQL statement, click Save.
11. Click Finish to start the backup. SAP Control Center displays backup messages from theserver.
See also• Dump Configuration Properties on page 310
• Creating a Dump Configuration on page 307
Backing Up a Database Incrementally Using a Dump ConfigurationUsing a dump configuration file, perform a cumulative dump, which is a type of incrementaldump (backup) in which only changes since the last full database dump are backed up.
Prerequisites
• Backup Server must be running. If you are not running Backup Server, the wizard displaysa message, such as Default Backup Server is not running, and you cannotproceed. See Utility Guide for details on backupserver.
• Enable incremental dumps for the database you are dumping:sp_dboption dbname, 'allow incremental dumps', true
Manage and Monitor
316
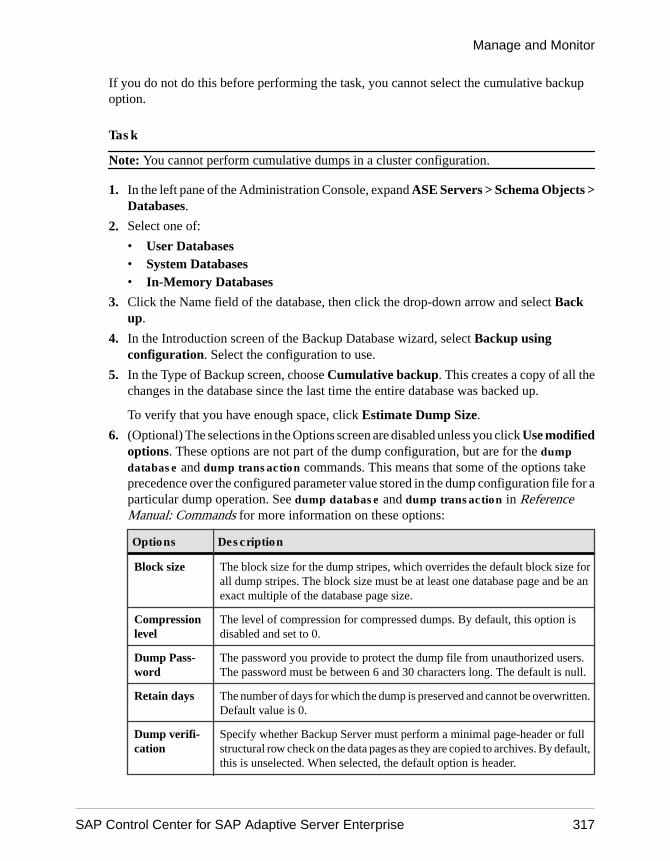
If you do not do this before performing the task, you cannot select the cumulative backupoption.
Task
Note: You cannot perform cumulative dumps in a cluster configuration.
1. In the left pane of the Administration Console, expand ASE Servers > Schema Objects >Databases.
2. Select one of:
• User Databases• System Databases• In-Memory Databases
3. Click the Name field of the database, then click the drop-down arrow and select Backup.
4. In the Introduction screen of the Backup Database wizard, select Backup usingconfiguration. Select the configuration to use.
5. In the Type of Backup screen, choose Cumulative backup. This creates a copy of all thechanges in the database since the last time the entire database was backed up.
To verify that you have enough space, click Estimate Dump Size.
6. (Optional) The selections in the Options screen are disabled unless you click Use modifiedoptions. These options are not part of the dump configuration, but are for the dumpdatabase and dump transaction commands. This means that some of the options takeprecedence over the configured parameter value stored in the dump configuration file for aparticular dump operation. See dump database and dump transaction in ReferenceManual: Commands for more information on these options:
Options Description
Block size The block size for the dump stripes, which overrides the default block size forall dump stripes. The block size must be at least one database page and be anexact multiple of the database page size.
Compressionlevel
The level of compression for compressed dumps. By default, this option isdisabled and set to 0.
Dump Pass-word
The password you provide to protect the dump file from unauthorized users.The password must be between 6 and 30 characters long. The default is null.
Retain days The number of days for which the dump is preserved and cannot be overwritten.Default value is 0.
Dump verifi-cation
Specify whether Backup Server must perform a minimal page-header or fullstructural row check on the data pages as they are copied to archives. By default,this is unselected. When selected, the default option is header.
Manage and Monitor
SAP Control Center for SAP Adaptive Server Enterprise 317
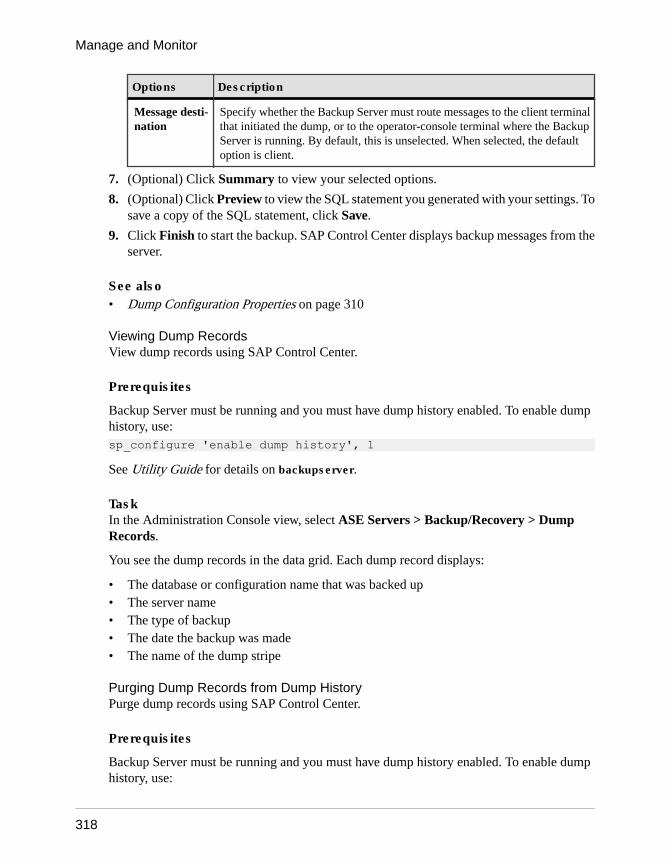
Options Description
Message desti-nation
Specify whether the Backup Server must route messages to the client terminalthat initiated the dump, or to the operator-console terminal where the BackupServer is running. By default, this is unselected. When selected, the defaultoption is client.
7. (Optional) Click Summary to view your selected options.
8. (Optional) Click Preview to view the SQL statement you generated with your settings. Tosave a copy of the SQL statement, click Save.
9. Click Finish to start the backup. SAP Control Center displays backup messages from theserver.
See also• Dump Configuration Properties on page 310
Viewing Dump RecordsView dump records using SAP Control Center.
Prerequisites
Backup Server must be running and you must have dump history enabled. To enable dumphistory, use:sp_configure 'enable dump history', 1
See Utility Guide for details on backupserver.
TaskIn the Administration Console view, select ASE Servers > Backup/Recovery > DumpRecords.
You see the dump records in the data grid. Each dump record displays:
• The database or configuration name that was backed up• The server name• The type of backup• The date the backup was made• The name of the dump stripe
Purging Dump Records from Dump HistoryPurge dump records using SAP Control Center.
Prerequisites
Backup Server must be running and you must have dump history enabled. To enable dumphistory, use:
Manage and Monitor
318
sp_configure 'enable dump history', 1
See Utility Guide for details on backupserver.
Task
1. In the Administration Console view, select ASE Servers > Backup/Recovery > DumpRecords.
2. Select Purge.
3. On the Introduction screen, select the server in which to dump records. You need notauthenticate the agent to see the records.
4. On the Type screen, select the type of dump record to be purged:
• ALL – purges database objects, transaction dump objects, and server configurationobjects.
• DB – database objects created by dump database.• XACT – transaction dump objects created by dump transaction.• CONFIG – server configuration objects created by dump configuration
5. On the Time screen, select a date and time; dump records before and including the selectedtime will be purged.
6. On the Status screen, select whether successful or failed records are to be purged. Thevalues allowed are Successful, Failed, and All.
7. (Optional) Click Summary to view your selected options.
Generating Database-Creation SQL for a Target DatabaseGenerate SQL and load sequences to create target databases that differ from the sourcedatabases you back up, into which you can load database dumps.
Prerequisites
Backup Server must be running and you must have dump history enabled. To enable dumphistory, use:sp_configure 'enable dump history', 1
See Utility Guide for details on backupserver.
Task
The Target Database DDL Generation wizard generates database-creation SQL usinginformation from the dump history file. It extracts device and segment mapping informationfrom dump images, then generates a sequence of create database and alter databasecommands. Use this wizard to generate a target database into which you can restore (load) adatabase you backed up
The wizard performs the load database command using the listonly=create_sql option.
Manage and Monitor
SAP Control Center for SAP Adaptive Server Enterprise 319
1. In the left pane of the Administration Console, expand ASE Servers > Schema Objects >Databases.
2. Click the Name field of the database, then click the drop-down arrow and select GenerateTarget Database DDL.
3. On the Introduction screen, specify the name of your target database.
4. In the Options screen, generate the load sequence. By default, this option is unselected. Togenerate:
• Database-reation SQL only, do not select Generate load sequence. Select Next to goto the Summary screen.
• Both database-creation SQL and load sequence, select Generate load sequence. Ifyou used a password to back up your database, enter it in the password field.
5. If you selected Generate load sequence, you see the Point in Time screen. Select a dumptime. By default, the point in time is set to the most recent database dump.
6. (Optional) Click Summary to view your selected options.
7. (Optional) Click Preview to view the SQL statement you generated with your settings. Tosave a copy of the SQL statement, click Save.
Generating Database-Creation SQL from a Dump ImageGenerate database-creation SQL for a target database from a dump image.
Prerequisites
Backup Server must be running and you must have dump history enabled. To enable dumphistory, use:sp_configure 'enable dump history', 1
See Utility Guide for details on backupserver.
Task
The Generate DDL from Dump Image wizard generates database-creation SQL usinginformation from the dump image. It extracts device and segment mapping information fromdump images, then generates a sequence of create database and alter database commands,ensuring that you can create an exact copy of the same data and log segment layout for yourtarget database.
.
1. In the left pane of the Administration Console, expand ASE Servers > Schema Objects >Databases.
2. Click the Name field of the database, then click the drop-down arrow and select GenerateDDL from Dump Image.
3. On the Introduction screen, choose whether to:
Manage and Monitor
320
• Generate database DDL SQL.• Display dump header contents.
4. In the Image screen, select a dump image from the list of available images from which togenerate your database-creation SQL. By default, the wizard selects the most recentimage.
5. In the Target Database screen, specify the name of the target database for which to generatethe database DDL. If you leave this blank, the wizard creates DDL for the database that thedump image came from.
6. (Optional) Click Summary to view your selected options.
7. (Optional) Click Preview to view the SQL statement you generated with your settings. Tosave a copy of the SQL statement, click Save.
Backing Up Server Configuration FilesBack up server configuration files using SAP Control Center.
1. In the Administration Console, select a server, click the arrow, and select Back UpConfiguration Files.
2. On the Introduction screen, select the type of files to back up: server configuration, dumphistory, or cluster configuration files.
3. Enter the path of the directory to which to copy the files.
4. (Optional) Click Summary to view your selected options.
See also• Dump Configuration Properties on page 310
Scheduling a Database BackupUse SAP Control Center to schedule backups of databases.
Prerequisites
Task
Database backups are an important part of system management and disaster recovery, and aretypically performed by the database administrator or database owner. By using the features ofJob Scheduler, a database administrator or owner can schedule predefined database backupjobs into a prearranged sequence that includes database backups, transaction backups, andcumulative backups, which can then be automatically executed at planned times.
1. Create a schedule into which to add backup jobs.
2. To start the Add Scheduled Jobs wizard, choose one of:
Backup wizard Click Schedule in the Backup wizard.
Manage and Monitor
SAP Control Center for SAP Adaptive Server Enterprise 321
AdministrationConsole
1. In the Administration Console view, expand ASEServers > Task Management.
2. Select Scheduled Jobs.3. Select New.
See also• Creating a Schedule for Backups on page 322• Scheduling a Backup Job in the Backup Wizard on page 324• Creating a New Scheduled Backup Job on page 325
Requirements and Permissions for Scheduling BackupsSet up your system before you schedule backups in SAP Control Center.
Make sure:
• You install sybmgmtdb, the Job Scheduler database.
• Run the installjsdb Job Scheduler installation script.
• You install the JSTemplate procedures and XML files.• The user has either js_user_role or js_admin_role permissions.• Ensure that you can connect to the Backup Server from each SAP ASE server you
administer.• Ensure that the login of the person starting the Backup Server has write permissions for the
physical backup dump device, and that the dump device is available.
Creating a Schedule for BackupsUse the Add Schedule wizard to create a new schedule into which you can add a backup job.
1. In the Administration Console view, expand ASE Servers > Task Management.
2. Click Schedules.
3. Select New.You see the Add Schedule wizard.
4. In the Introduction screen, select the server for which to create the schedule.
5. In the Schedule Name screen, enter:
• A name for the schedule• (Optional) A description of the schedule
6. (Optional) Select Allow others to use this schedule.
7. In the Time Range screen, select the start time for the schedule you are creating:
• At – to schedule a specific time.• Between – to schedule a time range.
When you click Between, the Recurrence page appears, where you can specify therepeat interval for the new schedule.
Manage and Monitor
322
Optionally, if you select Restrict the schedule to certain in the Recurrence page, theRecurrence Days page appears. Specify the days on which to activate the the newschedule.
8. In the Date Range screen, specify the start and end date for the schedule.For time-ranged schedules, you can specify a start and end date. For point-in-timeschedules, an end date is not applicable.
9. (Optional) Click Summary to verify your settings:
• Name• Description• Timeout• Allow multiple concurrent executions• Allow others to use this job• Always execute as the job owner
Click Preview to view the SQL syntax for the options you selected for the schedule.
Schedule PropertiesTo modify default schedule settings, use the Schedule Properties window.
Click the Name field of the scheduled job, then click the drop-down arrow and selectProperties.
Pages Properties
General • Name – change the name of the schedule.
• ID – displays the ID of the schedule.
• Owner – change the owner of the schedule.
• Creation date – displays the date and time the schedule was created.
• Allow others to use this schedule – to give permission to others to use the schedule.
• Description – add a description about the schedule.
Time • Current time on server
• Current local time
• Start time – choose either:
• At – enter a time to start the schedule at a specific time.
• Between – enter a range within which the schedule can start.
Dates • Start date
• End date
Manage and Monitor
SAP Control Center for SAP Adaptive Server Enterprise 323
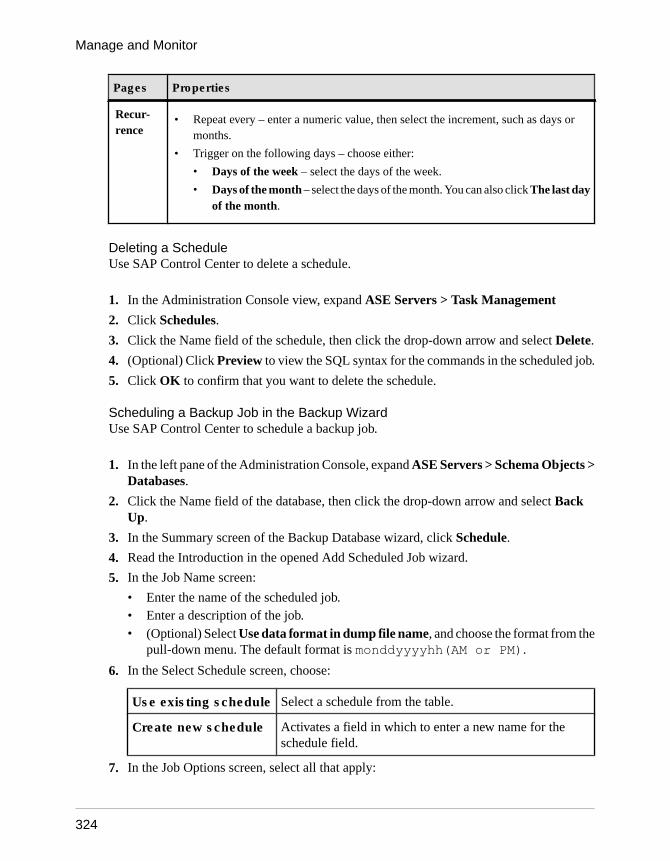
Pages Properties
Recur-rence
• Repeat every – enter a numeric value, then select the increment, such as days ormonths.
• Trigger on the following days – choose either:
• Days of the week – select the days of the week.
• Days of the month – select the days of the month. You can also click The last dayof the month.
Deleting a ScheduleUse SAP Control Center to delete a schedule.
1. In the Administration Console view, expand ASE Servers > Task Management
2. Click Schedules.
3. Click the Name field of the schedule, then click the drop-down arrow and select Delete.
4. (Optional) Click Preview to view the SQL syntax for the commands in the scheduled job.
5. Click OK to confirm that you want to delete the schedule.
Scheduling a Backup Job in the Backup WizardUse SAP Control Center to schedule a backup job.
1. In the left pane of the Administration Console, expand ASE Servers > Schema Objects >Databases.
2. Click the Name field of the database, then click the drop-down arrow and select BackUp.
3. In the Summary screen of the Backup Database wizard, click Schedule.
4. Read the Introduction in the opened Add Scheduled Job wizard.
5. In the Job Name screen:
• Enter the name of the scheduled job.• Enter a description of the job.• (Optional) Select Use data format in dump file name, and choose the format from the
pull-down menu. The default format is monddyyyyhh(AM or PM).
6. In the Select Schedule screen, choose:
Use existing schedule Select a schedule from the table.
Create new schedule Activates a field in which to enter a new name for theschedule field.
7. In the Job Options screen, select all that apply:
Manage and Monitor
324
Allow multipleconcurrent executions
Allows you to run your job concurrently, except for jobsthat may interfere with another instance of itself, such asdbcc reorg.
Allow others to use thisjob
Gives permission to others to use the schedule and executeyour job.
Always execute as thejob owner
Specify this if you want all executions of this job to occurunder your login.
8. In the Job Execute screen, select all that apply:
Timeout Specify a numeric value, in minutes. If the job does not completein the amount specified, the job is terminated.
Note: You can override this value for individual scheduled jobs.
Do not log outputfrom job
By default, any output generated by a job is saved and can beviewed in the Job Histories folder. Select this option tosuppress output from the job you are scheduling. By default, it isunselected.
Allow others toexecute thisscheduled job
Allow others to be able to execute this job. By default, this isunselected.
Disable on failure Disable the job if its previous execution failed, and suspend allscheduled executions of the job until you manually re-enable it.
Delete oncompletion
Delete the scheduled job when it finishes executing. This isuseful for jobs that do not recur.
Note: Choosing this option does not delete the underlying job orschedule.
9. (Optional) Click Preview from within any screen in the Add Scheduled Job wizard to viewthe SQL syntax for your selected options.
10. (Optional) Click Summary to verify your selected options.
11. Click Finish to schedule the job.
See also• Backing Up (Dumping) a Database on page 305
Creating a New Scheduled Backup JobUse the Add Scheduled Job wizard in SAP Control Center to schedule a backup job.
Manage and Monitor
SAP Control Center for SAP Adaptive Server Enterprise 325
1. In the Administration Console view, expand ASE Servers > Task Management
2. Click Scheduled Jobs
3. Select New.
4. In the Introduction screen, select the server for which to schedule the backup job.
5. In the Job Name screen:
• Enter a name for the scheduled job• (Optional) Enter a description for the job.• If you installed the Job Scheduler template in the server you selected, you see Use a JS
template to create this job. Select this to use the template.
6. If you selected Use a JS template to create this job:
a) Choose a backup template from the Backup Template screen.b) In the Target Server screen, select:
• The local Job Scheduler target server, which is the same as the server you selected.You can then select a database from the local Job Schedule target server.
• A remote Job Scheduler target server listed in the sysservers system table,after which, you specify a database on that remote target server.
7. If you left Use a JS template to create this job blank, you see the Job Command screen.Enter the SQL syntax for your backup job. In the target server page, select either the localtarget server or the remote target server on which the backup schedule job is to be executed.
8. In the Select Schedule screen, choose one of:
Use existing schedule Select a schedule from the table
Create new schedule A field in which to enter a new name for the schedule field.
Note: From this point in the wizard, click Preview at any point to view the SQL syntax foryour selected options.
9. If you are using a backup template, you see the Backup Template Options screen:
Dump location (Optional) Specify the location to which to dump thedatabase. Job Scheduler uses the default location if youleave this field blank.
Server name Use server name in dump filename.
Date format Use date format in dump filename.
Number of stripe files Specify how many dump stripe file will be generated.
Compression level Data compression mode in dump operation.
10. In the Job Options screen, select all that apply:
Manage and Monitor
326
Allow multipleconcurrentexecutions
Allows you to run your job concurrently, except for jobs thatmay interfere with another instance of itself, such as dbccreorg.
Allow others to usethis job
Gives permission to others to use the schedule and executeyour job.
Always execute asthe job owner
Specify this if you want all executions of this job to occurunder your login.
Timeout Specify a numeric value, in minutes. If the job does notcomplete in the amount specified, the job is terminated.
Note: You can override this value for individual scheduledjobs.
11. In the Job Execution Option screen, select all that apply:
Do not log outputfrom job
By default, any output generated by a job is saved and can beviewed in the Job Histories folder. Select this option tosuppress output from the job you are scheduling. By default, itis unselected.
Allow others toexecute thisscheduled job
Allow others to be able to execute this job. By default, this isunselected.
Disable on failure Disable the job if its previous execution failed, and suspend allscheduled executions of the job until you manually re-enableit.
Delete oncompletion
Delete the scheduled job when it finishes executing. This isuseful for jobs that do not recur.
Note: Choosing this option does not delete the underlying jobor schedule.
12. (Optional) Click Summary to verify your selected options.
13. Click Finish to schedule the job.
Properties of a Scheduled Backup JobView and modify the properties of scheduled backup jobs.
1. In the Administration Console view, expand ASE Servers > Task Management.2. Click Scheduled Jobs. The Scheduled Jobs pane appears, and you see the following for
each scheduled backup job:• Job Name
Manage and Monitor
SAP Control Center for SAP Adaptive Server Enterprise 327
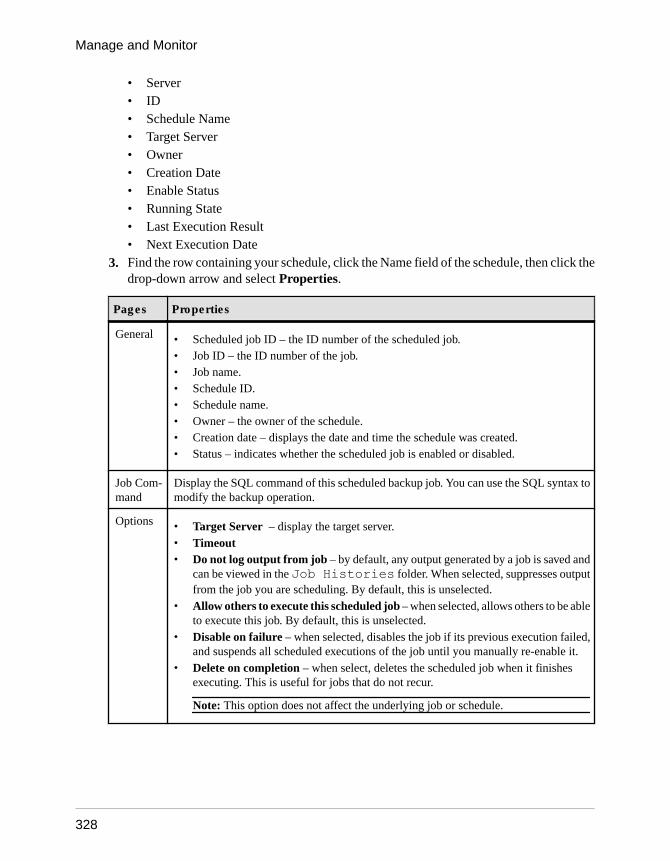
• Server• ID• Schedule Name• Target Server• Owner• Creation Date• Enable Status• Running State• Last Execution Result• Next Execution Date
3. Find the row containing your schedule, click the Name field of the schedule, then click thedrop-down arrow and select Properties.
Pages Properties
General • Scheduled job ID – the ID number of the scheduled job.• Job ID – the ID number of the job.• Job name.• Schedule ID.• Schedule name.• Owner – the owner of the schedule.• Creation date – displays the date and time the schedule was created.• Status – indicates whether the scheduled job is enabled or disabled.
Job Com-mand
Display the SQL command of this scheduled backup job. You can use the SQL syntax tomodify the backup operation.
Options • Target Server – display the target server.• Timeout• Do not log output from job – by default, any output generated by a job is saved and
can be viewed in the Job Histories folder. When selected, suppresses outputfrom the job you are scheduling. By default, this is unselected.
• Allow others to execute this scheduled job – when selected, allows others to be ableto execute this job. By default, this is unselected.
• Disable on failure – when selected, disables the job if its previous execution failed,and suspends all scheduled executions of the job until you manually re-enable it.
• Delete on completion – when select, deletes the scheduled job when it finishesexecuting. This is useful for jobs that do not recur.
Note: This option does not affect the underlying job or schedule.
Manage and Monitor
328
Manage a Scheduled Backup JobManually run an idle scheduled job from the job's context menu, or terminate, disable, orenable a running scheduled job.
When you install Job Scheduler, the JS Agent creates its own log file in the same directory asthe SAP ASE log file. If you encounter connection issues or failures, check the log file to viewJS activity such as connection issues and task request.
1. In the Administration Console view, expand ASE Servers > Task Management
2. Click Schedule Jobs
3. Right-click the scheduled job you want to manage, and select:
Enable See Enabling Scheduled Jobs on page 329.
Delete See Deleting a Backup Job from the Schedule on page 329.
Disable See Disabling Scheduled Jobs on page 330.
Run now See Running a Scheduled Job Now on page 330.
Terminate Stops a scheduled backup job that is in progress. See Terminating aScheduled Job in Progress on page 331.
4. (Optional) Click Preview to view the SQL syntax for the commands to run the schedulejob.
5. Click OK to confirm your option.
Enabling Scheduled JobsManually enable a scheduled job.
1. In the Administration Console view, expand ASE Servers > Task Management
2. Click Schedule Jobs
3. Click the Name field of the scheduled job, then click the drop-down arrow and selectEnable.
This option is available if the scheduled job you selected is disabled.
4. (Optional) In the Enable Scheduled Jobs window, click Preview to view the SQL syntaxfor the job, and save the text as a file.
5. Click OK to enable the job.
Deleting a Backup Job from the ScheduleManually delete a backup job from the schedule
1. In the Administration Console view, expand ASE Servers > Task Management
Manage and Monitor
SAP Control Center for SAP Adaptive Server Enterprise 329
2. Click Schedule Jobs
3. Click the Name field of the scheduled job, then click the drop-down arrow and selectDelete.
4. (Optional) In the Confirms Delete window, click Preview to view the SQL syntax for thejob, and save the text as a file.
5. Click OK to delete the scheduled job.
Disabling Scheduled JobsManually enable a scheduled job.
1. In the Administration Console view, expand ASE Servers > Task Management
2. Click Schedule Jobs
3. Click the Name field of the scheduled job, then click the drop-down arrow and selectDisable.
This option is available if the scheduled job you selected is already enabled.
4. (Optional) In the Disable Scheduled Jobs window, click Preview to view the SQL syntaxfor the job, and save the text as a file.
5. Click OK to disable the job.
Running a Scheduled Job NowManually run an idle scheduled job from the job's context menu.
1. In the Administration Console view, expand ASE Servers > Task Management
2. Click Schedule Jobs
The status displayed on this screen is not updated automatically. Refresh the folder in orderto see the current status of the jobs listed.
3. Click the Name field of the dump scheduled jobs, then click the drop-down arrow andselect Run now. You can select more than one job.
4. (Optional) In the Run Scheduled Jobs window, click Preview to view the SQL syntax forthe job, and save the text as a file.
5. Click OK to run the job.
Rescheduling a Backup JobYou can reschedule an existing backup job by resetting the schedule, target server, andexecution options for the backup job.
1. In the Administration Console view, expand ASE Servers > Task Management
2. Click Reschedule Jobs
Manage and Monitor
330
3. Click the Name field of the scheduled job, then click the drop-down arrow and selectReschedule.
4. In the Introduction screen, enter the name of the job you want to reschedule.
5. In the Select Schedule screen, choose the schedule you want to apply to your job.
6. In the Target Server screen:
a) Choose a server from the pull-down list as your target server on which your jobexecutes. The server can be a local host or a remote server.
b) Select Reset target server to set the target server on which the scheduled job will beexecuted. By default, this option is unselected and the original target server is used.
7. In the Job Execution Options screen, update these schedule settings:
• Time out for the schedule• Log output for the job• Allow others to use• Disable the scheduled job when the job fails• Delete the scheduled job when the job completes
8. (Optional) Click Summary to verify your settings:
9. (Optional) Click Preview to view the SQL syntax for the options you selected for theschedule.
Terminating a Scheduled Job in ProgressManually terminate a scheduled job that is running, from the job's context menu.
1. In the Administration Console view, expand ASE Servers > Task Management
2. Click Schedule Jobs
3. Click the Name field of the scheduled job, then click the drop-down arrow and selectTerminate.
This option is available only when there is a backup job in progress.
4. (Optional) In the Terminate Scheduled Jobs window, click Preview to view the SQLsyntax for the job, and save the text as a file.
5. Click OK to terminate the job.
Viewing the Execution History of a Scheduled Backup JobCheck the execution history for all scheduled backup jobs, including execution ID, job name,schedule name, start and end times, as well as target server.
1. In the Administration Console view, expand ASE Servers > Task Management
2. Click Job History.The Job History pane appears, and displays the execution history of all scheduled backupjobs.
Manage and Monitor
SAP Control Center for SAP Adaptive Server Enterprise 331
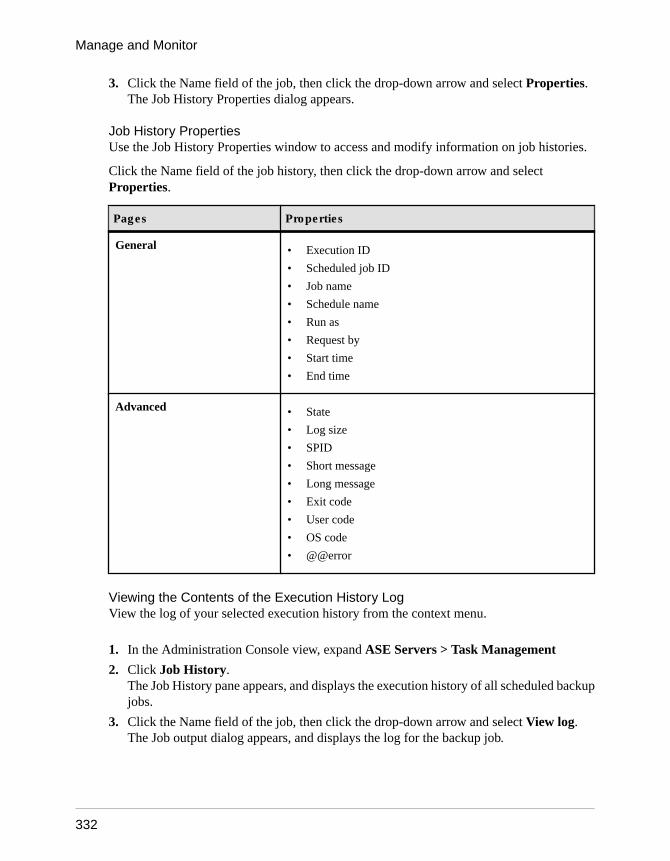
3. Click the Name field of the job, then click the drop-down arrow and select Properties.The Job History Properties dialog appears.
Job History PropertiesUse the Job History Properties window to access and modify information on job histories.
Click the Name field of the job history, then click the drop-down arrow and selectProperties.
Pages Properties
General • Execution ID
• Scheduled job ID
• Job name
• Schedule name
• Run as
• Request by
• Start time
• End time
Advanced • State
• Log size
• SPID
• Short message
• Long message
• Exit code
• User code
• OS code
• @@error
Viewing the Contents of the Execution History LogView the log of your selected execution history from the context menu.
1. In the Administration Console view, expand ASE Servers > Task Management
2. Click Job History.The Job History pane appears, and displays the execution history of all scheduled backupjobs.
3. Click the Name field of the job, then click the drop-down arrow and select View log.The Job output dialog appears, and displays the log for the backup job.
Manage and Monitor
332
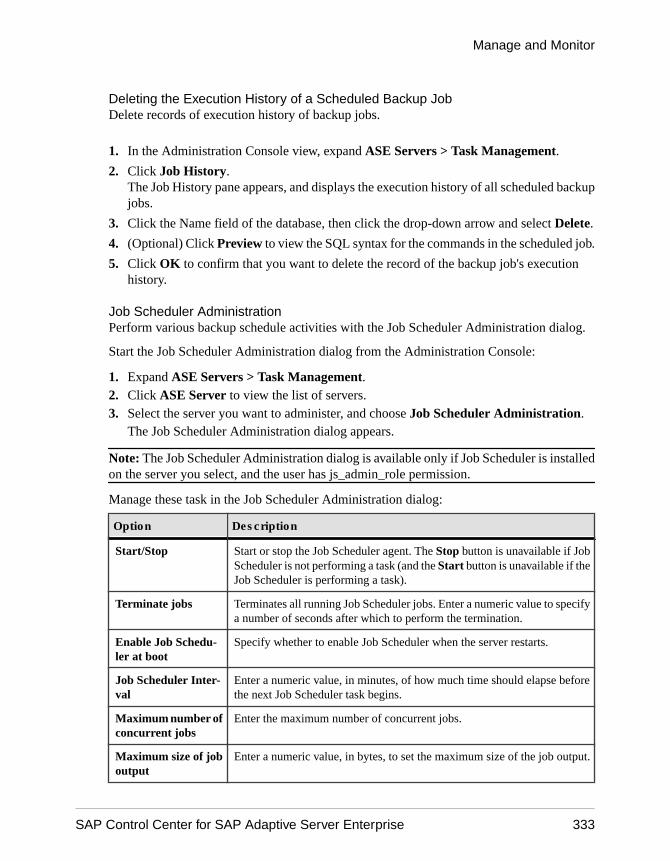
Deleting the Execution History of a Scheduled Backup JobDelete records of execution history of backup jobs.
1. In the Administration Console view, expand ASE Servers > Task Management.
2. Click Job History.The Job History pane appears, and displays the execution history of all scheduled backupjobs.
3. Click the Name field of the database, then click the drop-down arrow and select Delete.
4. (Optional) Click Preview to view the SQL syntax for the commands in the scheduled job.
5. Click OK to confirm that you want to delete the record of the backup job's executionhistory.
Job Scheduler AdministrationPerform various backup schedule activities with the Job Scheduler Administration dialog.
Start the Job Scheduler Administration dialog from the Administration Console:
1. Expand ASE Servers > Task Management.2. Click ASE Server to view the list of servers.3. Select the server you want to administer, and choose Job Scheduler Administration.
The Job Scheduler Administration dialog appears.
Note: The Job Scheduler Administration dialog is available only if Job Scheduler is installedon the server you select, and the user has js_admin_role permission.
Manage these task in the Job Scheduler Administration dialog:
Option Description
Start/Stop Start or stop the Job Scheduler agent. The Stop button is unavailable if JobScheduler is not performing a task (and the Start button is unavailable if theJob Scheduler is performing a task).
Terminate jobs Terminates all running Job Scheduler jobs. Enter a numeric value to specifya number of seconds after which to perform the termination.
Enable Job Schedu-ler at boot
Specify whether to enable Job Scheduler when the server restarts.
Job Scheduler Inter-val
Enter a numeric value, in minutes, of how much time should elapse beforethe next Job Scheduler task begins.
Maximum number ofconcurrent jobs
Enter the maximum number of concurrent jobs.
Maximum size of joboutput
Enter a numeric value, in bytes, to set the maximum size of the job output.
Manage and Monitor
SAP Control Center for SAP Adaptive Server Enterprise 333
Set Up an Alert for When a Backup Job FailsYou can set up an alert to notify you when a scheduled job to back up an SAP ASE databasefails.
The steps for setting up an alert to monitor the status of database backups is the same as forcreating other alerts in SAP Control Center.
See also• Alerts on page 167
Restoring (Loading) a DatabaseRestore a database backup and its transaction log.
PrerequisitesDecide to load the backup into a new database with the for load option, or into a preexistingdatabase.
Task
You cannot load a database backup that was created on a different operating system, or with anearlier version of SAP ASE.
Note: When loading an archive database, the block size and compression level are set to thesystem default value for each stripe.
1. In the left pane of the Administration Console, expand ASE Servers > Schema Objects >Databases.
2. Select one of:
• User Databases• System Databases• Archive Databases• In-Memory Databases
3. Click the Name field of the database, then click the drop-down arrow and selectRestore.
4. In the wizard's Introduction screen, choose:
• Default – loads a database or its transaction log from a single or multiple dumpdevices.
• Restore using script – loads a database from an existing SQL script.• Restore point-in-time – loads a database from a specified time in the database dump
sequence.• Generate load sequence only – generates database load sequence SQL from a
specified time. You can save the load SQL for future use. The load sequence consists ofa batch of load SQL, such as:
Manage and Monitor
334
load database testdb from...load transaction testdb from...
You may restore the database directly from the saved SQL script, either using ExecuteSQL or script functionality in ASEMAP or by using ISQL.
5. In the Type of Restore screen, choose to restore the entire database or only the transactionlog. This option is available only when you select the Default restore option.
6. By default, the Dump Device screen is initially empty. Click Add to identify the dumpdevices or dump stripes you want to load back into the database:
• Named dump device – select the device from the menu.• Explicit dump device – specify a local dump device as either an absolute path name or
relative path name. When dumping across the network, specify an absolute path name.You can specify the backup server as your remote dump device when using a defaultserver. This option is not available when loading an archive database; use Nameddump device instead.If you select a remote backup server, select its server name from the drop-down list.
7. (Optional) In the Options screen, if you specified a password for backup, you must use thesame password while restoring the database.
Select Bring the database online to bring the database online after the restoration iscomplete. By default, this option is not selected.
8. (Optional) Click Summary to view your selected options.
9. (Optional) Click Preview to view the SQL statement you generated with your settings. Tosave a copy of the SQL statement, click Save.
10. Click Finish to start the restore process. SAP Control Center displays restore messagesfrom the server.
See also• Backing Up (Dumping) a Database on page 305
Generating a Database Load SequenceSAP Control Center lets you generate a load sequence.
1. In the left pane of the Administration Console, expand ASE Servers > Schema Objects >Databases.
2. Select one of:
• User Databases• System Databases• Archive Databases• In-Memory Databases
The Restore wizard is unavailable if you choose:
Manage and Monitor
SAP Control Center for SAP Adaptive Server Enterprise 335
• Temporary Databases• Proxy Databases• In-Memory Temporary Databases
3. Click the Name field of the database, then click the drop-down arrow and selectRestore.
4. On the Introduction screen, select Generate load sequence only to generate database loadsequence SQL from a specified time. You can save the load sequence SQL for future use.The load sequence consists of a batch of SQL load commands, such as:load database testdb from...load transaction testdb from...
You may restore the database directly from the saved SQL script, either using isql or byusing script functionality in ASEMAP.
5. On the Point in Time screen, select a dump time from the list of points in time in which thedatabase was backed up. By default, the point in time is set to the most recent databasedump time.
6. (Optional) In the Options screen, if you specified a password for backup, you must use thesame password while restoring the database.
7. (Optional) Click Summary to view your selected options.
8. (Optional) Click Preview to view the SQL statement you generated with your settings. Tosave a copy of the SQL statement, click Save.
9. (Optional) Click Save in the SQL Preview window to save the script to your local machine.
Generating a Database Load Sequence for a Target Database from Dump HistorySAP Control Center lets you generate a load sequence from the dump history file.
1. In the left pane of the Administration Console, expand ASE Servers > Schema Objects >Databases.
2. Select one of:
• User Databases• System Databases• Archive Databases• In-Memory Databases
The Restore wizard is unavailable if you choose:• Temporary Databases• Proxy Databases• In-Memory Temporary Databases
3. Click the Name field of the database, then click the drop-down arrow and selectRestore.
Manage and Monitor
336
4. On the Introduction screen, select Generate load sequence only to generate database loadsequence SQL from a specified time. You can save the load SQL for future use. The loadsequence consists of a batch of load SQL, such as:load database testdb from...load transaction testdb from...
You may restore the database directly from the saved SQL script, either using isql or byusing script functionality in ASEMAP.
5. On the Point in Time screen, select a dump time from the list of points in time in which thedatabase was backed up. By default, the point in time is set to the last database dump time.
6. On the Options screen:
• If you used a password during the backup process, you must enter the same password torestore the database.
• (Optional) Select Restore to target database to generate database creation SQL for atarget database that is different from the database you backed up. This target databasecan reside on a different server.If you choose this option, enter the name of the target database.
7. (Optional) Click Summary to view your selected options.
8. (Optional) Click Preview to view the SQL statement you generated with your settings. Tosave a copy of the SQL statement, click Save.
9. (Optional) Click Save in the SQL Preview window to save the script to your local machine.
Restoring a Database from a Cumulative DumpRestore a database backup and its transaction log from a cumulative backup, in which only thechanges since the last full database dump are backed up.
PrerequisitesDecide whether to load the backup into a new database with the for load option, or into apreexisting database.
Task
You cannot load a database backup that was created on a different operating system, or with anearlier version of SAP ASE.
1. In the left pane of the Administration Console, expand ASE Servers > Schema Objects >Databases.
2. Select one of:
• User Databases• System Databases• Archive Databases• In-Memory Databases
The Restore wizard is unavailable if you choose:
Manage and Monitor
SAP Control Center for SAP Adaptive Server Enterprise 337
• Temporary Databases• Proxy Databases• In-Memory Temporary Databases
3. Click the Name field of the database, then click the drop-down arrow and selectRestore.
4. In the wizard's Introduction screen, choose Default.
5. In the Type of Restore screen, choose Cumulative restore.
6. In the Dump Devices screen, specify the dump stripes from the list. To add dump devicesfor the dump operation, click Add:
• Named dump device – select the device from the menu.• Explicit dump device – specify a local dump device as either an absolute path name or
relative path name. When dumping across the network, specify an absolute path name.You can specify the backup server as your remote dump device when using a defaultserver. This option is unavailable when you are loading an archive database.
7. (Optional) In the Options screen, if you used a password during the backup process, enterthis password.
Click Bring the database online to bring the database online after the restoration iscomplete. By default, this option is not selected.
8. (Optional) Click Summary to verify your selected options.
9. (Optional) Click Preview to view the SQL statement you generated with your settings. Tosave a copy of the SQL statement, click Save.
10. Click Finish to start the restore process. SAP Control Center displays restore messagesfrom the server.
Restoring a Database from a SQL ScriptRestore a database backup from an existing SQL script.
You cannot load a database backup that was created on a different operating system, or with anearlier version of SAP ASE.
1. In the left pane of the Administration Console, expand ASE Servers > Schema Objects >Databases.
2. Select one of:
• User Databases• System Databases• Archive Databases• In-Memory Databases
The Restore wizard is unavailable if you choose:• Temporary Databases• Proxy Databases
Manage and Monitor
338
• In-Memory Temporary Databases
3. Click the Name field of the database, then click the drop-down arrow and selectRestore.
4. In the wizard's Introduction screen, choose Restore using script.
5. On the Script page, you can:
• Enter the syntax for your restore command in the text field.• Click Select script file to import an existing SQL file from a local machine that
includes the restore command. The command from your SQL file then populates thetext field.
6. (Optional) Choose Summary from the left pane to see the summary of your restorecommand, including:
• Database name• Type of restoration• Script name
7. Click Finish to begin restoring the database.
Restoring a Database from a Point in TimeRestore a database backup from a specific point in time.
You cannot load a database backup that was created on a different operating system, or with anearlier version of SAP ASE.
1. In the left pane of the Administration Console, expand ASE Servers > Schema Objects >Databases.
2. Select one of:
• User Databases• System Databases• Archive Databases• In-Memory Databases
The Restore wizard is unavailable if you choose:• Temporary Databases• Proxy Databases• In-Memory Temporary Databases
3. Click the Name field of the database, then click the drop-down arrow and selectRestore.
4. In the wizard's Introduction screen, choose Restore point-in-time.
5. Click Point In Time, and:
• Select a time range from the list. A time range represents a valid dump sequence thatcontains a database dump and a set of transaction dumps.
Manage and Monitor
SAP Control Center for SAP Adaptive Server Enterprise 339
• Select a range of time in the database dump sequence that spans from the time of thefirst dump to the time of the most recent dump.
6. (Optional) In the Options screen, if you specified a password for backup, you must use thesame password while restoring the database:
Select On-line database to bring the database online after the restoration is complete. Bydefault, this option is not selected.
7. (Optional) Click Summary to verify your selected options.
8. (Optional) Click Preview to view the SQL statement you generated with your settings. Tosave a copy of the SQL statement, click Save.
9. Click Finish to start the restore process. SAP Control Center displays restore messagesfrom the server.
Viewing Database StatisticsView database statistic using SAP Control Center.
Note: To execute this command, you must have an agent configured for your SAP ASE server.
1. In the left pane of the Administration Console, expand ASE Servers > Schema Objects >Databases.
2. Select one of:
• User Databases• System Databases• Temporary Databases• Proxy Databases• Archive Databases• In-Memory Databases• In-Memory Temporary Databases
3. Click the Name field of the database, then click the drop-down arrow and select DatabaseStatistics.You see table, page details such as data and empty page counts, space utilization, and otherstatistics for the selected database.
See also• Changing Database Ownership on page 347
• Modifying Database Storage Allocations on page 348
• Modifying the Transaction Log Cache and the Log I/O Buffer Size on page 349
• Changing Database Options on page 350
• Database Properties on page 345
Manage and Monitor
340
Checkpointing DatabasesUse the checkpoint command to force SAP ASE to write modified data pages from memory todisk.
When you issue a checkpoint, SAP ASE freezes all current data-modifying transactions whilewriting to the disk. See the Reference Manual: Commands.
1. In the left pane of the Administration Console, expand ASE Servers > Schema Objects >Databases.
2. Select one of:
• User Databases• System Databases• Temporary Databases• Proxy Databases• Archive Databases• In-Memory Databases• In-Memory Temporary Databases
3. Click the Name field of the database, then click the drop-down arrow and selectCheckpoint.
4. Confirm that you want to run checkpoint on the current database.
See also• Checking Database Consistency on page 341
Checking Database ConsistencyUse the database consistency check to check the logical and physical consistency of adatabase.
Regular database consistency checks detect, and often correct, index and page allocationerrors resulting in corrupted tables.
1. In the left pane of the Administration Console, expand ASE Servers > Schema Objects >Databases.
2. Select one of:
• User Databases• System Databases• Temporary Databases• Proxy Databases• Archive Databases• In-Memory Databases• In-Memory Temporary Databases
Manage and Monitor
SAP Control Center for SAP Adaptive Server Enterprise 341
3. Click the Name field of the database, then click the drop-down arrow and select CheckConsistency.
4. In the Database Consistency Checker wizard, choose from these options:
Table 57. Inputs for the Database Consistency Checker Wizard
Input Description
Check overall con-sistency
Run dbcc checkdb, which checks each table and index in the selecteddatabase.
To skip checking nonclustered indexes on users tables, select Ignorenon-clustered indexes; leave it unselected to check all indexes on alltables in the database.
The generated report for each undamaged table shows the number of datapages and data rows.
Check allocation Run dbcc checkalloc, which checks page allocation.
To fix allocation errors, select Fix allocation errors. The database isautomatically placed in single-user mode while executing dbcc check-alloc, then returned to multiuser mode when processing is complete.
The generated report shows the amount of space allocated and used byeach database table, including the system tables. For each table or index,the report shows the number of pages and extents (8-page blocks ofallocated space) used.
Check system cata-logs
Execute dbcc checkcatalog and check for consistency within and be-tween the system tables found in a database. The generated report liststhe segments used by the database.
5. Click Finish to start the consistency check.
See also• Checkpointing Databases on page 341
Placing a Database in Quiesce-HoldUse Quiesce Hold to block updates to a database during a copy operation.
Quiesce hold allows you to block updates to one or more databases while you perform a diskunmirroring or external copy of each database device. Because no writes are performed duringthis time, the external, secondary copy of the database is identical to the primary image. Whilethe database is in the quiescent state, read-only queries to operations on the database areallowed. You can load the external copy of the database onto a secondary server, ensuring thatyou have a transactionally consistent copy of your primary image.
Only database owners or system administrators can quiesce a database.
Manage and Monitor
342
Note: If there are distributed or multidatabase transactions in the database in prepared state,SAP Control Center waits for 5 seconds for those transactions to complete. If they do notcomplete in 5 seconds, the quiesce database hold operation fails.
1. In the left pane of the Administration Console, expand ASE Servers > Schema Objects >Databases.
2. Select one of:
• User Databases• System Databases• Temporary Databases• Proxy Databases
3. Click the Name field of the database, then click the drop-down arrow and select QuiesceHold.
4. In the Quiesce Database Hold wizard, choose from these options:
Input Description
Tag Name A tag name for the quiesce hold operation.
External Dump Op-tion
Copy the database while updates to specified databases are suspendedwith the Quiesce Hold command. You must also specify:• Manifest File – specify the path for the manifest file.• Evaluate Dependencies – if you have not selected all the databases to
be quiesced, allow the wizard to generate a list of databases that mustbe quiesced, along with your selected database, to ensure that thequiesce hold succeeds.The list of unselected databases that must be quiesced are indicatedin the dependency matrix.
5. (Optional) Click Summary to verify your selected options.
6. Click Finish to start the quiesce-hold process.
See also• Placing a Database in Quiesce-Release on page 343
Placing a Database in Quiesce-ReleaseUse quiesce release to resume database updates that were suspended by a quiesce holdcommand.
Issue quiesce release only when the external copy operation has completed.
1. In the left pane of the Administration Console, expand ASE Servers > Schema Objects >Databases.
2. Select one of:
Manage and Monitor
SAP Control Center for SAP Adaptive Server Enterprise 343
• User Databases• System Databases• Temporary Databases• Proxy Databases
3. Click the Name field of the database, then click the drop-down arrow and select QuiesceRelease.
4. Enter the tag information to release the database hold.
Note: If you have mon_role permissions, you can select a tag from the list. Otherwise,enter the tag name in the text input box.
5. Click Finish to start the quiesce-release process.
See also• Placing a Database in Quiesce-Hold on page 342
Mounting an SAP ASE DatabaseMount a user database on a server.
The mount command attaches the database to the destination or secondary server. mount alsodecodes the information in the manifest file and makes a set of databases available online. Theserver also adds database devices, if necessary, and activates them, creates the catalog entriesfor the new databases, recovers them, and puts them online.
1. In the left pane of the Administration Console, expand ASE Servers > Schema Objects >Databases.
2. Click User Databases.
3. Click the drop-down arrow and select Mount.
4. Select the server to which to attach the database.
5. Specify the path of the manifest file, and select With Verify to verify the devices specifiedon the manifest.
6. Verify that the device paths listed in the Device Specification screen are correct. Click anyrow to change the device path of the corresponding device.
7. (Optional) Click Summary to view your selected options.
See also• Unmounting an SAP ASE Database on page 344
Unmounting an SAP ASE DatabaseUnmount a database from a server.
When you unmount a database, you remove the database and its devices from an server. Theunmount command shuts down the database. All tasks using the database are terminated. Thedatabase and its pages are not altered and remain on the operating system devices.
Manage and Monitor
344
1. In the left pane of the Administration Console, expand ASE Servers > Schema Objects >Databases.
2. Click User Databases.
3. Click the Name field of the database to unmount, and select Unmount.You see the Unmount Database Wizard.
4. Specify a location for the manifest file.
5. Select Yes on the Evaluate Dependencies screen to view any unselected databases thatmust be selected for the unmount command to succeed.
Note: The unmount command fails unless you select all the databases on a device.
6. Select the databases listed in the Dependency Matrix screen for unmount to succeed. If nodatabases are listed in the Unselected Databases column, there are no dependencies.
7. Override referential integrity checks by selecting With override.
Note: When the referencing database is dropped by the unmount command with anoverride, you cannot drop the referential constraints.
8. Enter a delay for distributed or multidatabase transactions in prepared state to completebefore the unmount command is activated. If the transactions do not complete during thespecified time period, the unmount command is not executed.
9. (Optional) Click Summary to view your selected options.
See also• Mounting an SAP ASE Database on page 344
Database PropertiesUse the Database Properties window to modify database options, cache options and storageallocation, extend log buffers, and change the owner.
Click the Name field of the database, then click the drop-down arrow and select Properties.
Manage and Monitor
SAP Control Center for SAP Adaptive Server Enterprise 345

Pages Properties
General • Change Owner – see Changing Ownership of a Database on page 347.
• Instance name (cluster environment only)
• Data cache – from the drop-down menu, select the cache to which you want tobind the database.
• Durability level – select one of:
• NO_RECOVERY – there is no guarantee that, at runtime, committedtransactions are written to the disk.
• AT_SHUTDOWN – all committed transactions are written to disk duringa normal server shutdown.
• FULL – a complete recovery of committed transactions is possible after asystem failure.
• Note: These options apply only to nonclustered version 15.5 and later.
Default location – specify the default storage location for remote tables if nostorage location is provided via sp_addobjectdef. See the section on sys-databases in the Reference Manual: Tables.
• DML logging – enable DML logging.
• Database guest user – guest users are configured on the database.
• Resynchronize proxy tables – force resynchronization of proxy tables in theproxy databases. See the alter database command in the Reference Manual:Commands .
Devices • Database devices – you can add or remove devices associated with a selecteddatabase. See Modifying Database Storage Allocations on page 348.
• Transaction log – you can move the transaction log to a different location. SeeModifying Database Storage Allocations on page 348.
TransactionLog
• Transaction log buffer size – you can modify the I/O buffer size of the trans-action log. See Modifying Transaction Log Buffer Size on page 349.
Options • Server configuration options – see Changing Database Options on page350.
Manage and Monitor
346
Pages Properties
Usage • Details – SAP Control Center displays a graph of the space used by the tablesand indexes of your database. Use these values to determine if you haveenough unreserved space to accommodate new database objects.
In SAP ASE version 15.7 ESD #3, "Other" displays the space usage for theobject allocation map (OAM). For more information about OAM, see theSystem Administration Guide: Volume 2.
• Largest user tables – shows the largest user tables based on space reserved,used space, and row count.
See also• Creating a User Database on page 293
• Creating a Temporary Database on page 295
• Creating a Proxy Database on page 294
• Creating an Archive Database on page 297
• Creating an In-Memory Database on page 298
• Creating an In-Memory Temporary Database on page 299
• Creating a Temporary Database Group on page 304
• Mounting an SAP ASE Database on page 344
• Changing Database Ownership on page 347
• Modifying Database Storage Allocations on page 348
• Modifying the Transaction Log Cache and the Log I/O Buffer Size on page 349
• Changing Database Options on page 350
• Viewing Database Statistics on page 340
Changing Database OwnershipUse the Database Properties wizard to change the owner of a database.
System administrators can change the ownership of a database to a user who is not a currentuser of the database and who does not have a current alias in the database.
1. In the left pane of the Administration Console, expand ASE Servers > Schema Objects >Databases.
2. Select one of:
• User Databases• System Databases• Temporary Databases• Proxy Databases• Archive Databases
Manage and Monitor
SAP Control Center for SAP Adaptive Server Enterprise 347
• In-Memory Databases• In-Memory Temporary Databases
3. Click the Name field of the database, then click the drop-down arrow and selectProperties.
4. On the default General screen, click Change Owner.
5. From the list, choose the login name for the new owner of the database. Additionally, youcan choose to transfer all aliases and their permissions to the new owner.
6. Click OK.
See also• Modifying Database Storage Allocations on page 348
• Modifying the Transaction Log Cache and the Log I/O Buffer Size on page 349
• Changing Database Options on page 350
• Viewing Database Statistics on page 340
• Database Properties on page 345
Modifying Database Storage AllocationsSystem administrators can use the Database Properties wizard to add or modify spaceallocations for the database.
1. In the left pane of the Administration Console, expand ASE Servers > Schema Objects >Databases.
2. Select one of:
• User Databases• System Databases• Temporary Databases• Proxy Databases• Archive Databases• In-Memory Databases• In-Memory Temporary Databases
3. Click the Name field of the database, then click the drop-down arrow and selectProperties.
4. Click Devices.You see the list of devices to which the database is allocated.
5. (Optional) Modify storage allocation for your database:
• Click Add to add space from a different device for your database. Specify whether thespace is to be allocated for data or for the transaction log.
• Click Remove to remove the space allocated to your database from a device. You canonly remove devices that are added using the Add option.
Manage and Monitor
348
• Click Move log to move the transaction log of a database, with log and data on the samedevice, to a separate device. See sp_logdevice in the Reference Manual.
6. (Optional) Click Create log or data fragment with override to force SAP ASE toallocate the data and log devices as specified, even if data and log are specified on the samedevice.
7. (Optional) Click Preview to see the SQL statements for your command.
8. Click Apply.
See also• Changing Database Ownership on page 347
• Modifying the Transaction Log Cache and the Log I/O Buffer Size on page 349
• Changing Database Options on page 350
• Viewing Database Statistics on page 340
• Database Properties on page 345
Modifying the Transaction Log Cache and the Log I/O Buffer SizeUse the Database Properties wizard to modify the transaction log cache and the log I/O buffersize.
Change the size of the transaction log cache and log I/O buffer by binding the log to a cache ofdifferent size. The log buffer size determines the number of I/O transactions that can be storedin the transaction log I/O cache.
1. In the left pane of the Administration Console, expand ASE Servers > Schema Objects >Databases.
2. Select one of:
• User Databases• System Databases• Temporary Databases• Proxy Databases
3. Click the Name field of the database, then click the drop-down arrow and selectProperties.
4. Click Transaction Log.You see the list of caches; the highlighted cache is the one currently configured for yourdatabase I/O buffer.
5. Select a different cache and click Apply.
See also• Changing Database Ownership on page 347
• Modifying Database Storage Allocations on page 348
• Changing Database Options on page 350
Manage and Monitor
SAP Control Center for SAP Adaptive Server Enterprise 349
• Viewing Database Statistics on page 340
• Database Properties on page 345
Changing Database OptionsDatabase owners and system administrators can use the Database Properties wizard to changedatabase options.
1. In the left pane of the Administration Console, expand ASE Servers > Schema Objects >Databases.
2. Select one of:
• User Databases• System Databases• Temporary Databases• Proxy Databases
Note: You cannot update any database options for the master database, or for archivedatabases.
3. Click the Name field of the database, then click the drop-down arrow and selectProperties.
4. Click Options to see the list of options that you can set for this database.
Database options that you can set include:
Option Description
abort tranon full log
Determines how active transactions are treated when the database’s logbecomes critically low on space:• To cancel all user queries that need to write to the transaction log until
space in the log has been freed, select this option.• To suspend transactions and awaken them when space has been freed,
unset this option.
allow nullsby default
Affects the ability of columns in newly created database tables to acceptNULL values:• If you select this option, columns in newly created tables allow null
values unless the column definitions explicitly state “not null.”• If you do not select this option, nulls are not allowed unless the column
definitions explicitly permit them.
allow widedol row
Allows wide, variable-length data-only-locked (DOL) rows in user databa-ses.
allow wide dol row is supported by SAP ASE version 15.7 andlater.
Manage and Monitor
350
Option Description
async logservice
Provides greater scalability and higher throughput in logging subsystemsfor high-end symmetric multiprocessor systems.
async log service is supported by SAP ASE version 15.5 andlater.
auto iden-tity
Automatically adds a 10-digit IDENTITY column in a new table when auser creates the table without specifying a primary key, a unique index, or anIDENTITY column.
dbo use on-ly
Restricts database access to the database owner.
ddl in tran Allows users to include data definition language syntax within their trans-actions.
Generally, avoid using DDL commands inside transactions. For more in-formation about this option, see the Reference Manual.
delayedcommit
When enabled, all local transactions use delayed commits so that controlreturns to the client without waiting for the I/O on log pages to complete, andI/O is not issued on the last log buffer for delayed commit transactions.delayed commit is supported by SAP ASE version 15.5 and later.
Note: Delayed commit is not used if you enable both delayed com-mit and async log service for a database.
enforcedump transequence
When set to true, prevents operations that disallow a subsequent dumptransaction.
enforce dump tran sequence is supported by SAP ASE ver-sion 15.7 and later.
erase re-sidual data
Allows you to enable or disable the removal of residual data based on yourneeds.
When you enable the option at a session level, all the page deallocationsduring that session have their residual data removed. This includes pagedeallocations of tables that have the erase residual data ex-plicitly turned off.
identity innonuniqueindexes
Automatically includes an IDENTITY column in a table’s index keys, sothat all indexes created on the table are unique.
Manage and Monitor
SAP Control Center for SAP Adaptive Server Enterprise 351
Option Description
no chkpt onrecovery
Sets the database so that a checkpoint record is added to the database after itis recovered due to restarting the server.
This checkpoint, which ensures that the recovery mechanism does not re-run unnecessarily, changes the sequence number on the database. If thesequence number on the secondary database has been changed, a subsequentdump of the transaction log from the primary database cannot be loaded intoit.
Select this option if you keep an up-to-date copy of a database. This preventsthe secondary database from getting a checkpoint from the recovery processso that subsequent transaction log dumps from the primary database can beloaded into it.
no freespace acctg
Determines whether the database enables free-space accounting and exe-cution of threshold actions for non log segments.
Suppressing free-space accounting speeds recovery time because the free-space counts are not recomputed for those segments. However, it disablesupdating the rows-per-page value stored for each table, so system proce-dures that estimate space usage may report inaccurate values.
Note: Only system security officers can change the no free spaceacctg option.
read only Prevents modification of any data in the database.
scratch da-tabase
The database that stores the sysaltusages table. See the System Ad-ministration Guide: Volume 2.
select in-to/bulkcopy/pllsort
Allows users to perform nonlogged operations. Nonlogged operations in-clude select into for permanent tables, the bulk-copy utility bcp, and thewritetext utility.
You need not select this option to allow select into for temporary tables or torun bcp on a table with indexes, because inserts are logged.
Attempting to dump the transaction log in a database after unlogged changeshave been made to the database with select only or bulk-copy produces anerror message instructing you to use dump database instead.
single user Allows only one user at a time to use the database.
Manage and Monitor
352
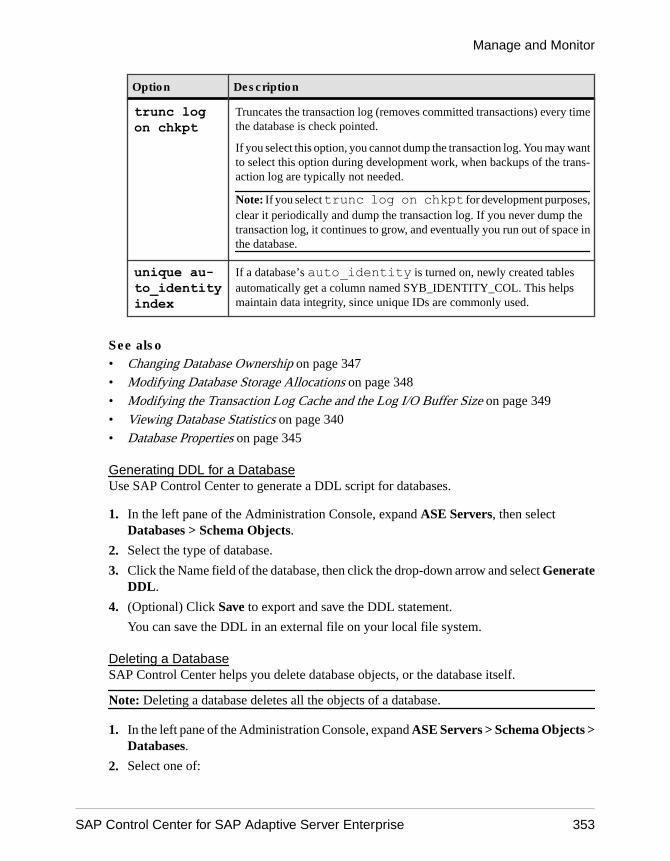
Option Description
trunc logon chkpt
Truncates the transaction log (removes committed transactions) every timethe database is check pointed.
If you select this option, you cannot dump the transaction log. You may wantto select this option during development work, when backups of the trans-action log are typically not needed.
Note: If you select trunc log on chkpt for development purposes,clear it periodically and dump the transaction log. If you never dump thetransaction log, it continues to grow, and eventually you run out of space inthe database.
unique au-to_identityindex
If a database’s auto_identity is turned on, newly created tablesautomatically get a column named SYB_IDENTITY_COL. This helpsmaintain data integrity, since unique IDs are commonly used.
See also• Changing Database Ownership on page 347
• Modifying Database Storage Allocations on page 348
• Modifying the Transaction Log Cache and the Log I/O Buffer Size on page 349
• Viewing Database Statistics on page 340
• Database Properties on page 345
Generating DDL for a DatabaseUse SAP Control Center to generate a DDL script for databases.
1. In the left pane of the Administration Console, expand ASE Servers, then selectDatabases > Schema Objects.
2. Select the type of database.
3. Click the Name field of the database, then click the drop-down arrow and select GenerateDDL.
4. (Optional) Click Save to export and save the DDL statement.
You can save the DDL in an external file on your local file system.
Deleting a DatabaseSAP Control Center helps you delete database objects, or the database itself.
Note: Deleting a database deletes all the objects of a database.
1. In the left pane of the Administration Console, expand ASE Servers > Schema Objects >Databases.
2. Select one of:
Manage and Monitor
SAP Control Center for SAP Adaptive Server Enterprise 353
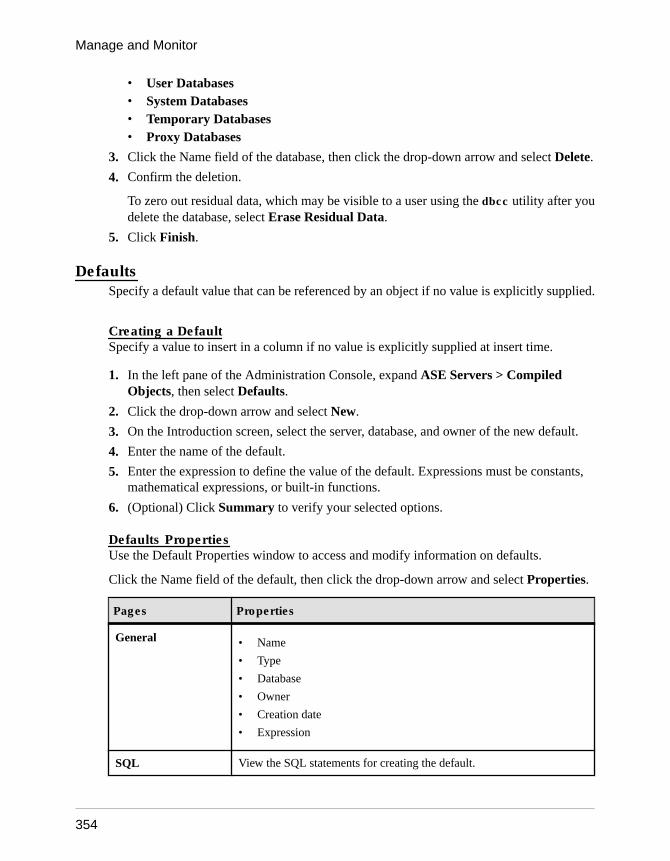
• User Databases• System Databases• Temporary Databases• Proxy Databases
3. Click the Name field of the database, then click the drop-down arrow and select Delete.
4. Confirm the deletion.
To zero out residual data, which may be visible to a user using the dbcc utility after youdelete the database, select Erase Residual Data.
5. Click Finish.
DefaultsSpecify a default value that can be referenced by an object if no value is explicitly supplied.
Creating a DefaultSpecify a value to insert in a column if no value is explicitly supplied at insert time.
1. In the left pane of the Administration Console, expand ASE Servers > CompiledObjects, then select Defaults.
2. Click the drop-down arrow and select New.
3. On the Introduction screen, select the server, database, and owner of the new default.
4. Enter the name of the default.
5. Enter the expression to define the value of the default. Expressions must be constants,mathematical expressions, or built-in functions.
6. (Optional) Click Summary to verify your selected options.
Defaults PropertiesUse the Default Properties window to access and modify information on defaults.
Click the Name field of the default, then click the drop-down arrow and select Properties.
Pages Properties
General • Name
• Type
• Database
• Owner
• Creation date
• Expression
SQL View the SQL statements for creating the default.
Manage and Monitor
354

Pages Properties
Referenced By • Name
• Type
• Owner
• Properties of objects referenced by this default
Replacing a Default DefinitionYou can replace an existing default expression with a new definition.
1. In the left pane of the Administration Console, expand ASE Servers > Compiled Objects> Defaults.
2. Choose one of the following:
• Click the drop-down arrow on the default for which you want to replace the definitionand select Replace.
• From Defaults in the left pane, click the drop-down arrow and select New. Enter thename of the existing default for which you want to replace the definition.When selecting an existing default, the Confirm Replace dialog appears with anoption to replace the object definition or cancel the replacement.
The Replace Default wizard appears.
3. (Optional) On the Default Expression screen, enter the new default value.
4. (Optional) On the Summary screen, verify the default name, database name, and the newexpression for the default.
Deleting a DefaultUse SAP Control Center to delete a default.
1. In the left pane of the Administration Console, expand ASE Servers > CompiledObjects, then select Defaults.
2. Click the Name field of the default, then click the drop-down arrow and select Delete.
3. Confirm the deletion.
4. Click Finish.
DevicesManage and monitor the devices used by SAP ASE.
Monitor DevicesMonitor the devices used by SAP ASE.
Manage and Monitor
SAP Control Center for SAP Adaptive Server Enterprise 355
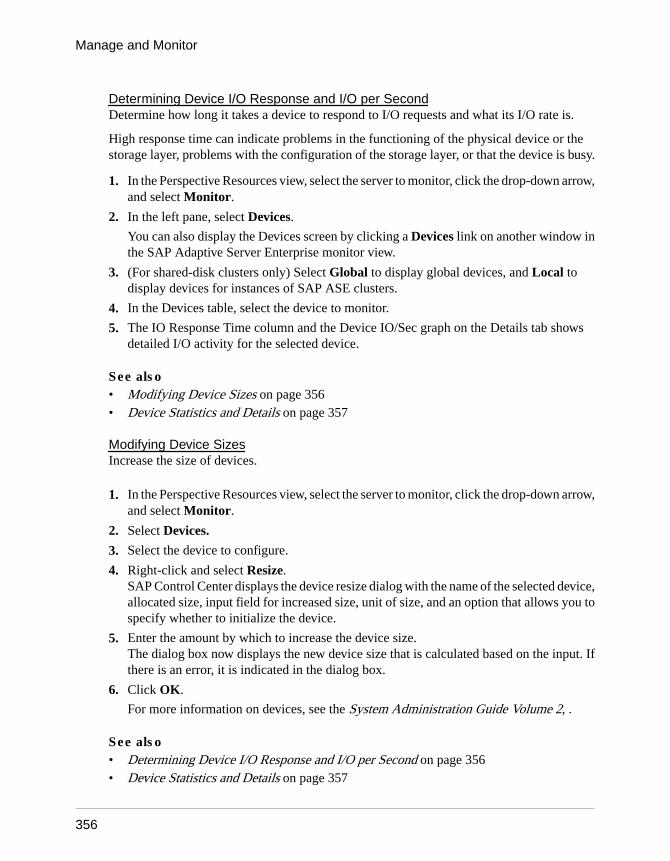
Determining Device I/O Response and I/O per SecondDetermine how long it takes a device to respond to I/O requests and what its I/O rate is.
High response time can indicate problems in the functioning of the physical device or thestorage layer, problems with the configuration of the storage layer, or that the device is busy.
1. In the Perspective Resources view, select the server to monitor, click the drop-down arrow,and select Monitor.
2. In the left pane, select Devices.
You can also display the Devices screen by clicking a Devices link on another window inthe SAP Adaptive Server Enterprise monitor view.
3. (For shared-disk clusters only) Select Global to display global devices, and Local todisplay devices for instances of SAP ASE clusters.
4. In the Devices table, select the device to monitor.
5. The IO Response Time column and the Device IO/Sec graph on the Details tab showsdetailed I/O activity for the selected device.
See also• Modifying Device Sizes on page 356• Device Statistics and Details on page 357
Modifying Device SizesIncrease the size of devices.
1. In the Perspective Resources view, select the server to monitor, click the drop-down arrow,and select Monitor.
2. Select Devices.
3. Select the device to configure.
4. Right-click and select Resize.SAP Control Center displays the device resize dialog with the name of the selected device,allocated size, input field for increased size, unit of size, and an option that allows you tospecify whether to initialize the device.
5. Enter the amount by which to increase the device size.The dialog box now displays the new device size that is calculated based on the input. Ifthere is an error, it is indicated in the dialog box.
6. Click OK.
For more information on devices, see the System Administration Guide Volume 2, .
See also• Determining Device I/O Response and I/O per Second on page 356• Device Statistics and Details on page 357
Manage and Monitor
356
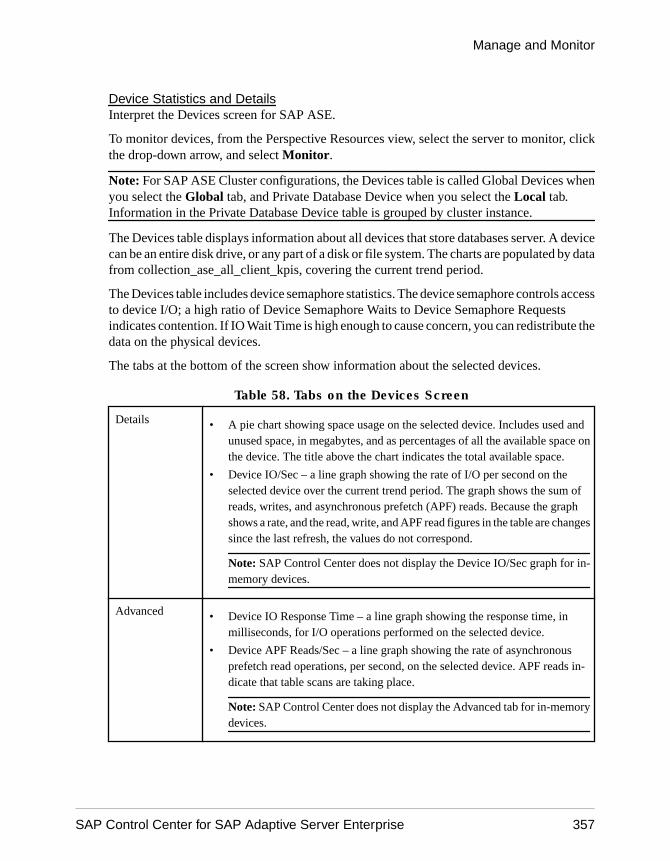
Device Statistics and DetailsInterpret the Devices screen for SAP ASE.
To monitor devices, from the Perspective Resources view, select the server to monitor, clickthe drop-down arrow, and select Monitor.
Note: For SAP ASE Cluster configurations, the Devices table is called Global Devices whenyou select the Global tab, and Private Database Device when you select the Local tab.Information in the Private Database Device table is grouped by cluster instance.
The Devices table displays information about all devices that store databases server. A devicecan be an entire disk drive, or any part of a disk or file system. The charts are populated by datafrom collection_ase_all_client_kpis, covering the current trend period.
The Devices table includes device semaphore statistics. The device semaphore controls accessto device I/O; a high ratio of Device Semaphore Waits to Device Semaphore Requestsindicates contention. If IO Wait Time is high enough to cause concern, you can redistribute thedata on the physical devices.
The tabs at the bottom of the screen show information about the selected devices.
Table 58. Tabs on the Devices Screen
Details • A pie chart showing space usage on the selected device. Includes used andunused space, in megabytes, and as percentages of all the available space onthe device. The title above the chart indicates the total available space.
• Device IO/Sec – a line graph showing the rate of I/O per second on theselected device over the current trend period. The graph shows the sum ofreads, writes, and asynchronous prefetch (APF) reads. Because the graphshows a rate, and the read, write, and APF read figures in the table are changessince the last refresh, the values do not correspond.
Note: SAP Control Center does not display the Device IO/Sec graph for in-memory devices.
Advanced • Device IO Response Time – a line graph showing the response time, inmilliseconds, for I/O operations performed on the selected device.
• Device APF Reads/Sec – a line graph showing the rate of asynchronousprefetch read operations, per second, on the selected device. APF reads in-dicate that table scans are taking place.
Note: SAP Control Center does not display the Advanced tab for in-memorydevices.
Manage and Monitor
SAP Control Center for SAP Adaptive Server Enterprise 357
IO Distribution (Global Devices on shared-disk clusters only) – Details for master device I/Oactivities for each instance include I/O wait time, response time, APF reads andrequest and wait times for device semaphores.
See also• Engine Statistics and Details on page 363• Process Statistics and Details on page 402• Determining Device I/O Response and I/O per Second on page 356• Modifying Device Sizes on page 356• Setting Up Statistics Collection on page 128
Manage DevicesCreate, delete, and generate data definition language for database, device, and dump devices.
Displaying a Device ObjectView database and in-memory device objects.
1. In the left pane of the Administration Console, expand ASE Servers > SpaceManagement > Devices.
2. Click:
• Database Devices to view a list of database devices• In-Memory Devices to view a list of in-memory devices
Both lists display:• Name – name of the database device.• Server – name of the server in which the database resides.• Size – amount of space, in megabytes, used by the device.• Unused size – the amount of unallocated space, in megabytes, for the device.• Physical name – name of the physical device.
Creating a Database DeviceCreate new database devices.
1. In the left pane of the Administration Console, expand ASE Servers > SpaceManagement > Devices.
2. Click Database Devices.
3. Click the drop-down arrow and select New.
4. Select the server in which to create the database device.
5. (Optional) For a cluster environment, click Create this as a private database device, thenselect the instance on which to create the private device.
Private devices are used only by local user temporary databases. For the Cluster Edition,you can use block devices to manage the storage needs of temporary data in the cluster.
Manage and Monitor
358
These devices are added as private devices and can be used only by local user temporarydatabases. See Using Temporary Databases in the Clusters User Guide for moreinformation.
6. On the Device Name and Path screen, enter:
• Device name – the logical device name used in the create database and alter databasecommands.
• Device path – the physical device name, usually in the form of a full path for the newfile, or in UNIX, a raw device partition. If you do not specify a device path, this field isfilled with the device name along with a .dat file extension.
7. On the Advanced Options screen, specify:
• The device size, in megabytes• The device number – a unique number that identifies this device on the server. A
default device number is provided.• Starting address – the virtual starting address, or the offset, for the server to begin using
the database device. Defines the starting address for this device, and is a virtual offset in2KB blocks. The default is 0. See Other optional parameters for disk init in the SystemAdministration Guide for information about vstart.
• Skip initialization of device – select to speed up the resizing of the device.
8. Select a write option:
• Data sync – ensures that writes to the database device occur on the physical storagemedium. This allows the server to recover data from the device when a system failureoccurs.
• Direct IO – transfers the data directly to disk, bypassing the operating system's buffercache.
• Cached IO – turns off the data sync option, and any writes to the database device arebuffered into the file system. During system failures, the server does not recover anydata that has not been updated to the physical medium.
9. (Optional) On the Mirroring screen, you can click Mirror the database device andspecify the path for the duplicate device.
Note: If the server is not configured to enable disk mirroring, the options for the Mirroringpage are unavailable.
Creating an In-Memory DeviceCreate an in-memory device—or a cache device—in a cache created for an in-memorydatabase. This device resides on an in-memory storage cache, and allows you to create in-memory databases.
1. In the left pane of the Administration Console, expand ASE Servers > SpaceManagement > Devices.
2. Click In-Memory Devices.
Manage and Monitor
SAP Control Center for SAP Adaptive Server Enterprise 359
3. Click the drop-down arrow and select New.
4. Select the server on which to create the in-memory device.
Note: The In-Memory Device wizard is available only in SAP ASE 15.5 and later. If youdo not select a valid server, the wizard is disabled and you see error messages at the bottomof the server selection page.
5. On the Device Name screen, enter the logical device name, which the server uses in itscreate database and alter database commands.
6. The In-Memory Storage screen displays a list of caches on which to create your in-memory device. On this screen, you can:
• Add – displays the Specify Cache Device and Size wizard page, and lets you choose acache to create the device in. The default size of an in-memory device is 6MB. If thein-memory storage is smaller than 6MB, the device size automatically matches the in-memory storage size.
• Edit – allows the in-memory device to require more space from the in-memory storage.You cannot, however, increase the size of the storage itself.
• Remove – removes the selected cache.
Creating a Dump DeviceCreate a dump device on a server. A dump device is a tape, partition, or file used for database ortransaction dumps.
1. In the left pane of the Administration Console, expand ASE Servers > SpaceManagement > Devices.
2. Click Dump Devices.
3. Click the drop-down arrow and select New.
4. On the Introduction screen, select the server on which to create the dump device.
5. On the Device Name and Path screen, enter:
Dump device path – the physical device path.
Dump device name – the name of the dump device.
6. On the Advanced Options screen, specify the type of device to create the disk or tape dumpdevice. If you select a tape device, enter its size, in megabytes.
Database Device PropertiesUse the database device properties window to view the device's general information, as well asanalyze its mirror status, databases that occupy the space on the device, and segmentscontained in the device.
Click the Name field of the database device, then click the drop-down arrow and selectProperties.
Manage and Monitor
360
Pages Properties
General • Name and type of device
• I/O fencing support (cluster environment only)
• Instance name (cluster environment only)
• Physical name and path
• Space allocated – you can change the value, which is in megabytes.
• Default device – specify whether to set this device as the default device.
• Write option – choose data sync, direct I/O, or cached I/O (data sync off) for thisdevice.
Mirror Displays whether disk mirroring is enabled. If it is, you can select:
• Mirror device – turn on mirror device, choose whether the mirror is written after theprimary is written or in parallel with parallel writes, and specify the mirror path in afile name relative to the server.
• Disable mirror – select either the primary or secondary device to disable, and whetherthis disabling is temporary or permanent.
Databa-ses
Displays a list of databases that occupy space on the device. Click Properties to see thedatabase properties without going to the Database view.
Seg-ments
Displays a list of segments contained in the device. Click Properties to view segmentproperties without going into the segment view.
In-Memory Device PropertiesUse the In-Memory Device Properties window to view general information, and analyze thelist of databases and segments contained in the in-memory device.
Click the Name field of the in-memory device, then click the drop-down arrow and selectProperties.
Pages Properties
General • In-memory storage object name
• Type information
• Status
• Current size – check the size of the in-memory device's storage by pages, kilo-bytes, megabytes, or gigabytes.
In-MemoryDatabase
The in-memory database created on the in-memory device. Click Properties to seethe database properties.
Manage and Monitor
SAP Control Center for SAP Adaptive Server Enterprise 361
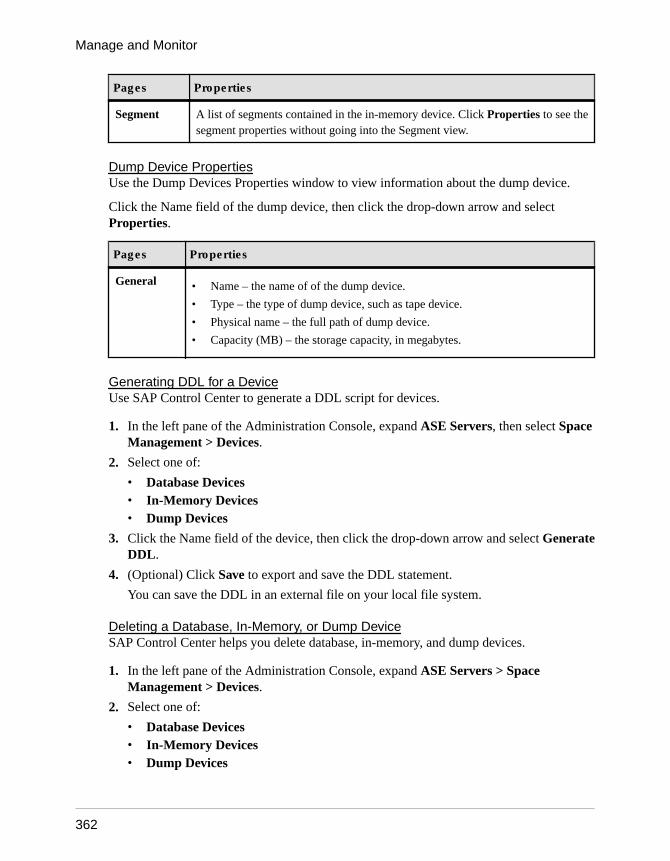
Pages Properties
Segment A list of segments contained in the in-memory device. Click Properties to see thesegment properties without going into the Segment view.
Dump Device PropertiesUse the Dump Devices Properties window to view information about the dump device.
Click the Name field of the dump device, then click the drop-down arrow and selectProperties.
Pages Properties
General • Name – the name of of the dump device.
• Type – the type of dump device, such as tape device.
• Physical name – the full path of dump device.
• Capacity (MB) – the storage capacity, in megabytes.
Generating DDL for a DeviceUse SAP Control Center to generate a DDL script for devices.
1. In the left pane of the Administration Console, expand ASE Servers, then select SpaceManagement > Devices.
2. Select one of:
• Database Devices• In-Memory Devices• Dump Devices
3. Click the Name field of the device, then click the drop-down arrow and select GenerateDDL.
4. (Optional) Click Save to export and save the DDL statement.
You can save the DDL in an external file on your local file system.
Deleting a Database, In-Memory, or Dump DeviceSAP Control Center helps you delete database, in-memory, and dump devices.
1. In the left pane of the Administration Console, expand ASE Servers > SpaceManagement > Devices.
2. Select one of:
• Database Devices• In-Memory Devices• Dump Devices
Manage and Monitor
362
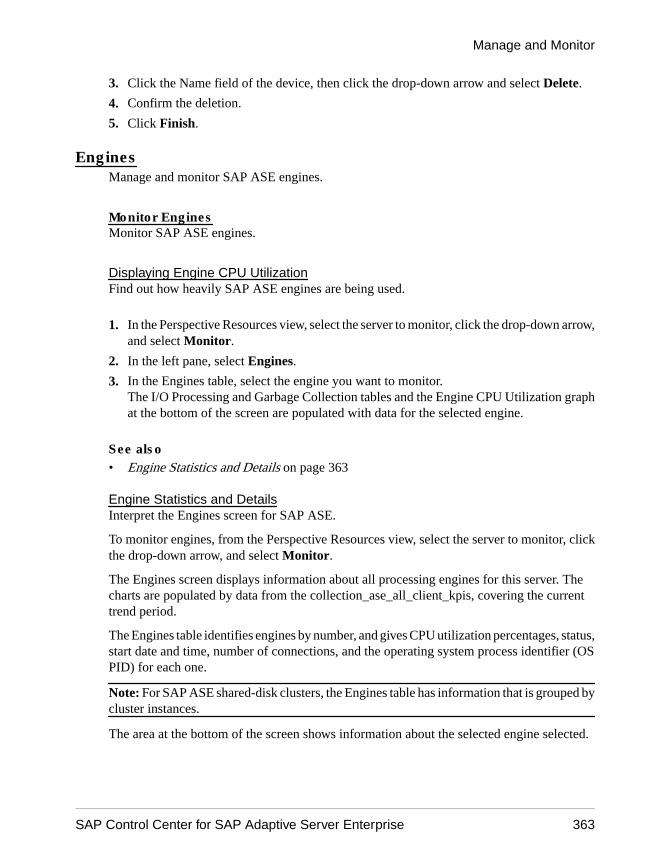
3. Click the Name field of the device, then click the drop-down arrow and select Delete.
4. Confirm the deletion.
5. Click Finish.
EnginesManage and monitor SAP ASE engines.
Monitor EnginesMonitor SAP ASE engines.
Displaying Engine CPU UtilizationFind out how heavily SAP ASE engines are being used.
1. In the Perspective Resources view, select the server to monitor, click the drop-down arrow,and select Monitor.
2. In the left pane, select Engines.
3. In the Engines table, select the engine you want to monitor.The I/O Processing and Garbage Collection tables and the Engine CPU Utilization graphat the bottom of the screen are populated with data for the selected engine.
See also• Engine Statistics and Details on page 363
Engine Statistics and DetailsInterpret the Engines screen for SAP ASE.
To monitor engines, from the Perspective Resources view, select the server to monitor, clickthe drop-down arrow, and select Monitor.
The Engines screen displays information about all processing engines for this server. Thecharts are populated by data from the collection_ase_all_client_kpis, covering the currenttrend period.
The Engines table identifies engines by number, and gives CPU utilization percentages, status,start date and time, number of connections, and the operating system process identifier (OSPID) for each one.
Note: For SAP ASE shared-disk clusters, the Engines table has information that is grouped bycluster instances.
The area at the bottom of the screen shows information about the selected engine selected.
Manage and Monitor
SAP Control Center for SAP Adaptive Server Enterprise 363
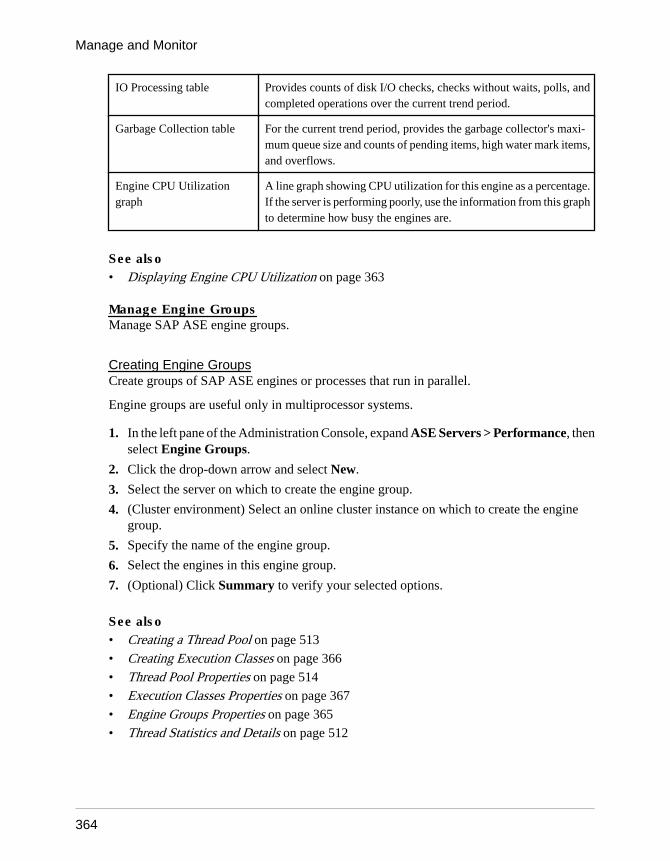
IO Processing table Provides counts of disk I/O checks, checks without waits, polls, andcompleted operations over the current trend period.
Garbage Collection table For the current trend period, provides the garbage collector's maxi-mum queue size and counts of pending items, high water mark items,and overflows.
Engine CPU Utilizationgraph
A line graph showing CPU utilization for this engine as a percentage.If the server is performing poorly, use the information from this graphto determine how busy the engines are.
See also• Displaying Engine CPU Utilization on page 363
Manage Engine GroupsManage SAP ASE engine groups.
Creating Engine GroupsCreate groups of SAP ASE engines or processes that run in parallel.
Engine groups are useful only in multiprocessor systems.
1. In the left pane of the Administration Console, expand ASE Servers > Performance, thenselect Engine Groups.
2. Click the drop-down arrow and select New.
3. Select the server on which to create the engine group.
4. (Cluster environment) Select an online cluster instance on which to create the enginegroup.
5. Specify the name of the engine group.
6. Select the engines in this engine group.
7. (Optional) Click Summary to verify your selected options.
See also• Creating a Thread Pool on page 513
• Creating Execution Classes on page 366
• Thread Pool Properties on page 514
• Execution Classes Properties on page 367
• Engine Groups Properties on page 365
• Thread Statistics and Details on page 512
Manage and Monitor
364
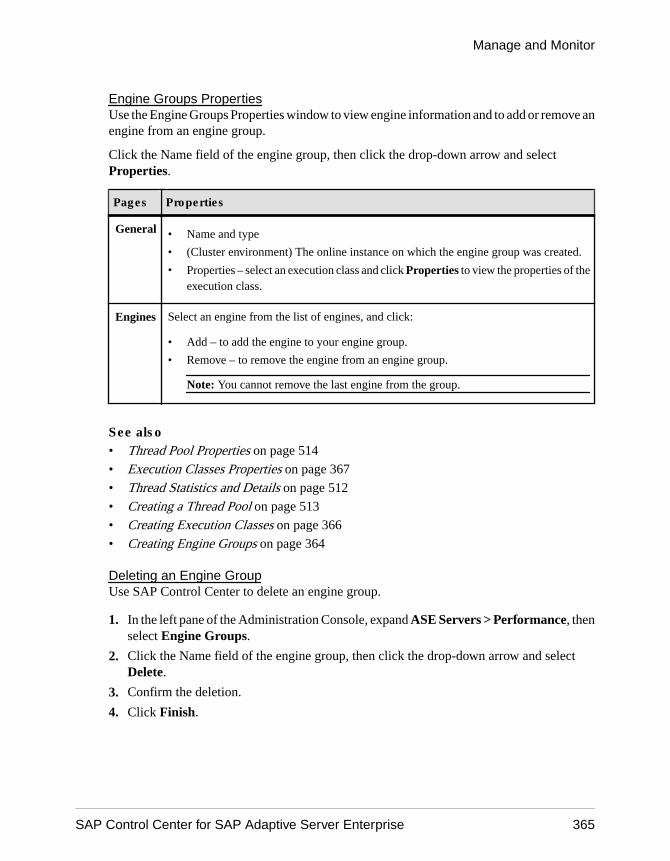
Engine Groups PropertiesUse the Engine Groups Properties window to view engine information and to add or remove anengine from an engine group.
Click the Name field of the engine group, then click the drop-down arrow and selectProperties.
Pages Properties
General • Name and type
• (Cluster environment) The online instance on which the engine group was created.
• Properties – select an execution class and click Properties to view the properties of theexecution class.
Engines Select an engine from the list of engines, and click:
• Add – to add the engine to your engine group.
• Remove – to remove the engine from an engine group.
Note: You cannot remove the last engine from the group.
See also• Thread Pool Properties on page 514
• Execution Classes Properties on page 367
• Thread Statistics and Details on page 512
• Creating a Thread Pool on page 513
• Creating Execution Classes on page 366
• Creating Engine Groups on page 364
Deleting an Engine GroupUse SAP Control Center to delete an engine group.
1. In the left pane of the Administration Console, expand ASE Servers > Performance, thenselect Engine Groups.
2. Click the Name field of the engine group, then click the drop-down arrow and selectDelete.
3. Confirm the deletion.
4. Click Finish.
Manage and Monitor
SAP Control Center for SAP Adaptive Server Enterprise 365
Generating DDL for an Engine GroupUse SAP Control Center to generate a DDL script for engine groups.
1. In the left pane of the Administration Console, expand ASE Servers > Performance, thenselect Engine Groups.
2. Click the Name field of the engine group, then click the drop-down arrow and selectGenerate DDL.
3. (Optional) Click Save to export and save the DDL statement.
You can save the DDL in an external file on your local file system.
Execution ClassesCreate, delete, and modify execution classes.
Creating Execution ClassesCreate execution classes that can be bound to logins or tasks.
1. In the left pane of the Administration Console, expand ASE Servers > Performance, thenselect Execution Classes.
2. Click the drop-down arrow and select New.
3. Select a server that is configured to run in threaded mode.
4. Specify the name of the execution class you want to create.
5. Select the priority of the execution class to High, Medium, or Low. This prioritydetermines the priority of the tasks that are bound to the execution class. It also determinesthe priority of the tasks run by the logins associated with the execution class.
6. Specify the affinity of the execution class. This is the thread pool or engine groupassociated with the execution class. If the server is running in threaded mode, the tasksbound to the execution class can run only on the thread from the chosen thread pool.
7. (Optional) Click Summary to verify your selected options.
See also• Creating a Thread Pool on page 513
• Creating Engine Groups on page 364
• Thread Pool Properties on page 514
• Execution Classes Properties on page 367
• Engine Groups Properties on page 365
• Thread Statistics and Details on page 512
Manage and Monitor
366
Execution Classes PropertiesUse the Execution Classes Properties window to view an execution class or change bindings.
Click the Name field of the execution class, then click the drop-down arrow and selectProperties.
Pages Properties
General • Priority – modify the priority of your execution class.• Properties – modify the thread pool properties.
Bindings Change the process, login, or stored procedure that is bound to this execution class.
See also• Thread Pool Properties on page 514
• Engine Groups Properties on page 365
• Thread Statistics and Details on page 512
• Creating a Thread Pool on page 513
• Creating Execution Classes on page 366
• Creating Engine Groups on page 364
Modifying Bindings to Execution ClassesChange the scope and bindings of execution classes.
1. In the left pane of the Administration Console, expand ASE Servers > Performance, thenselect Execution Classes.
2. Click the Name field of the execution class to modify.
3. Click the drop-down arrow and select Properties.
4. Click Bindings.
5. Click Bind to bind objects to an execution class.
a) Select the scope of the execution class.b) Select the login to bind to the execution class.
6. (Optional) Select a login bound to the execution class and click Unbind to release thebinding.
7. (Optional) Select a login bound to the execution class and click Properties.
Extended Stored ProceduresCreate, delete, modify, and administer extended stored procedures.
Manage and Monitor
SAP Control Center for SAP Adaptive Server Enterprise 367
Creating an Extended Stored ProcedureCreate an extended stored procedure.
1. In the Administration Console view, select ASE Servers > Compiled Objects >Extended Stored Procedures.
2. Click the drop-down arrow and select New.
3. On the Introduction screen, select the server, database and owner of the new extendedstored procedure.
4. Enter the name of the extended stored procedure.
5. Enter the name of the dynamic link library or shared library that is executed when anapplication invokes the extended stored procedure.
6. (Optional) Click Preview to see the SQL statements for your command.
7. (Optional) Click Summary to verify your selected options.
See also• Manage Stored Procedures on page 389
• Extended Stored Procedures Properties on page 369
Replacing an Extended Stored Procedure DefinitionYou can replace the SQL definition of a extended procedure or change whether the procedureis recompiled each time it is executed.
1. In the left pane of the Administration Console, expand ASE Servers > Compiled Objects> Extended Stored Procedures.
2. Choose one of the following:
• Click the drop-down arrow on the extended stored procedure for which you want toreplace the definition and select Replace.
• From Extended Stored Procedures in the left pane, click the drop-down arrow andselect New. Enter the name of the existing extended stored procedure for which youwant to replace the definition.When selecting an existing extended stored procedure, the Confirm Replace dialogappears with an option to replace the object definition or cancel the replacement.
The Replace Extended Stored Procedure wizard appears.
3. (Optional) On the Library Name screen, enter a new library name.
4. (Optional) On the Summary screen, verify the procedure name, database, and owner.
Manage and Monitor
368
Extended Stored Procedures PropertiesUse the Extended Stored Procedure Properties window to access and modify information onextended stored procedures.
Click the Name field of the extended stored procedure, then click the drop-down arrow andselect Properties.
Pages Properties
General View the name, type, database, owner, creation date, and dynamic link library (DLL)path of the stored procedure. The DLL need not exist when you create the extendedstored procedure, but it must exist when you execute the extended stored procedure.
Permissions Grant and revoke permissions on an extended stored procedure to users, groups, orroles. Choose the Grant option to allow the grantee to further grant permissions toother users. Select an object in the table of permissions, and click Properties to viewthe object properties.
ReferencedBy
View the name, type, owner, and properties of objects that are referenced by thisextended stored procedure.
See also• Manage Stored Procedures on page 389
• Creating an Extended Stored Procedure on page 368
Granting Execute Permission on an Extended Stored ProcedureGrant execute permission on extended stored procedures.
1. In the left pane of the Administration Console, expand ASE Servers > CompiledObjects, then select Extended Stored Procedures.
2. Click the Name field of the extended stored procedure, then click the drop-down arrow andselect Properties.
3. In the left pane, click Permissions.
4. Click Grant to grant access permissions for the selected object.
5. On the Welcome screen, select the type of grantee:
• Users• Groups• Roles
6. On the Grantee screen, select one or more grantees.
7. Select Execute.
Manage and Monitor
SAP Control Center for SAP Adaptive Server Enterprise 369
8. Choose With grant option to allow the grantee to further grant permissions to otherusers.
9. (Optional) Click Summary to verify your selected options.
Revoking Execute Permission on an Extended Stored ProcedureRevoke execute permission on extended stored procedures.
1. In the left pane of the Administration Console, expand ASE Servers > CompiledObjects, then select Extended Stored Procedures.
2. Click the Name field of the extended stored procedure, then click the drop-down arrow andselect Properties.
3. In the left pane, click Permissions.
4. Select the grantee, then click Revoke to revoke access permissions to the object.In the Revoke Permissions wizard, each type of permission and the current grantedpermissions are shown in cells.
5. Choose one of:
• Revoke all permission.
• Individual cells to revoke the currently granted permissions. The cell changes to showan "x", indicating that the permission type is no longer granted.
6. Click OK.
Deleting an Extended Stored ProcedureUse SAP Control Center to delete extended stored procedures.
1. In the Administration Console view, select ASE Servers > Compiled Objects >Extended Stored Procedures.
2. Click the Name field of the extended stored procedure, then click the drop-down arrow andselect Delete.
3. Confirm the deletion.
4. Click Finish.
Generating DDL for an Extended Stored ProcedureUse SAP Control Center to generate a DDL script for extended stored procedures.
1. In the Administration Console view, select ASE Servers > Compiled Objects >Extended Stored Procedures.
2. Click the Name field of the extended stored procedure, then click the drop-down arrow andselect Generate DDL.
3. (Optional) Click Save to export and save the DDL statement.
You can save the DDL in an external file on your local file system.
Manage and Monitor
370
FunctionsManage scalar and SQLJ functions using SAP Control Center.
Manage Scalar FunctionsCreate, delete, modify, and administer scalar functions.
Creating a Scalar FunctionA scalar function takes a list of scalar arguments and return a single scalar value.
1. In the left pane of the Administration Console, expand ASE Servers > Compiled Objects> Functions, then select Scalar Functions.
2. Click the drop-down arrow and select New.
3. On the Introduction screen, select the server, database, and owner of the new function.
4. Enter the name of the function.
5. Select the datatype of the value returned by the function.
6. On the Compilation Option screen, you can elect to have your function recompiled everytime it is executed. This is useful if you expect parameter values to change frequently. Ifyou do not select this option, the function is compiled only the first time it is executed.
7. On the SQL Editor screen, provide the SQL statements for the scalar function. Ensure thatall objects referenced by the function exist in the database.
8. (Optional) Click Preview to see the SQL statements for your command.
9. (Optional) Click Summary to verify your selected options.
See also• Creating a SQLJ Function on page 374• Scalar Function Properties on page 372
Replacing a Scalar User Defined Function DefinitionYou can replace the SQL definition, the return type, and change whether the function isrecompiled each time it is executed.
1. In the left pane of the Administration Console, expand ASE Servers > Compiled Objects> Functions > Scalar Functions.
2. Choose one of the following:
• Click the drop-down arrow on the scalar function for which you want to replace thedefinition and select Replace.
• From Scalar Functions in the left pane, click the drop-down arrow and select New.Enter the name of the existing scalar function for which you want to replace thedefinition.
Manage and Monitor
SAP Control Center for SAP Adaptive Server Enterprise 371

When selecting an existing scalar function, the Confirm Replace dialog appears withan option to replace the object definition or cancel the replacement.
The Replace Scalar Function wizard appears.
3. (Optional) On the Return Type screen, enter any changes to the return type.
4. (Optional) On the Compilation Option screen, change the recompile behavior forcompiling the function.
5. (Optional) On the SQL Editor screen, enter any changes to the SQL description.
6. (Optional) On the Summary screen, verify the function name, database, the return type,and recompile option.
Scalar Function PropertiesUse the Scalar Function Properties window to access and modify information.
Click the Name field of the scalar function, then click the drop-down arrow and selectProperties.
Pages Properties
General • Name
• Type
• Database
• Owner
• Creation date
• Group number
SQL The SQL statements for creating the function.
Parameters • Name
• Type
• Mode – indicates whether it is an input or an output parameter
• Order – a numeric value that indicates the place of the parameter in the list ofparameters
To change the parameters, change the definition of the function by dropping and re-creating the function.
Permissions Grant and revoke execute permission on a scalar function to users, groups, or roles.
See also• Creating a Scalar Function on page 371
• Creating a SQLJ Function on page 374
Manage and Monitor
372
Granting Execute Permission on a Scalar FunctionGrant execute permission on scalar functions.
1. In the left pane of the Administration Console, expand ASE Servers > CompiledObjects, then select Scalar Function.
2. Click the Name field of the scalar function, then click the drop-down arrow and selectProperties.
3. In the left pane, click Permissions.
4. Click Grant to grant access permissions for the selected object.
5. On the Welcome screen, select the type of grantee:
• Users• Groups• Roles
6. On the Grantee screen, select one or more grantees.
7. Select Execute.
8. Choose With grant option to allow the grantee to further grant permissions to otherusers.
9. (Optional) Click Summary to verify your selected options.
Revoking Execute Permission on a Scalar FunctionRevoke execute permission on scalar functions.
1. In the left pane of the Administration Console, expand ASE Servers > CompiledObjects, then select Scalar Function.
2. Click the Name field of the scalar function, then click the drop-down arrow and selectProperties.
3. In the left pane, click Permissions.
4. Select the grantee, then click Revoke to revoke access permissions to the object.In the Revoke Permissions wizard, each type of permission and the current grantedpermissions are shown in cells.
5. Choose one of:
• Revoke all permission.
• Individual cells to revoke the currently granted permissions. The cell changes to showan "x", indicating that the permission type is no longer granted.
6. Click OK.
Manage and Monitor
SAP Control Center for SAP Adaptive Server Enterprise 373
Deleting a Scalar FunctionUse SAP Control Center to delete scalar functions.
1. In the left pane of the Administration Console, expand ASE Servers > Compiled Objects> Functions, then select Scalar Functions.
2. Click the Name field of the scalar function, then click the drop-down arrow and selectDelete.
3. Confirm the deletion.
4. Click Finish.
Generating DDL for a Scalar FunctionUse SAP Control Center to generate a DDL script for scalar functions.
1. In the left pane of the Administration Console, expand ASE Servers > Compiled Objects> Functions, then select Scalar Functions.
2. Click the Name field of the scalar function, then click the drop-down arrow and selectGenerate DDL.
3. (Optional) Click Save to export and save the DDL statement.
You can save the DDL in an external file on your local file system.
Manage SQLJ FunctionsCreate, delete, modify , and administer SQLJ functions.
See also• Manage SQLJ Procedures on page 393
Creating a SQLJ FunctionCreate a user-defined function by adding a SQL wrapper to a Java static method.
1. In the left pane of the Administration Console, expand ASE Servers > Compiled Objects> Functions, then select SQLJ Functions.
2. Click the drop-down arrow and select New.
3. On the Introduction screen, select the server, database, and owner of the new function.
4. Enter the name of the function.
5. Specify the external name, which identifies the Java method, class, and an optionalpackage name.
6. Select the datatype of the value returned by the function.
7. On the SQL Properties screen, select:
Manage and Monitor
374
• Null input – select to either return null if input is null, or to execute the function withnull input.
• Modifies SQL data – indicate that the Java method invokes SQL operations andmodifies SQL data in the database.
• Exportable – specify if this function may be run on a remote server using the SAP ASEOmniConnect™ feature. Both the procedure and the method it is built on must exist onthe remote server.
• Deterministic option – include the keywords deterministic or not deterministic forcompatibility with the SQLJ standard. However, SAP ASE does not make use of thisoption.
8. On the SQL Editor screen, provide the SQLJ statements for the function. Ensure that allobjects referenced by the function exist in the database.
9. (Optional) Click Preview to see the SQL statements for your command.
10. (Optional) Click Summary to verify your selected options.
See also• Creating a Scalar Function on page 371
• Scalar Function Properties on page 372
• Creating a SQLJ Procedure on page 394
• SQLJ Function Properties on page 376
• SQLJ Procedure Properties on page 395
Replacing a SQLJ Function DefinitionYou can replace the SQL definition, the return type, and change whether the function isrecompiled each time it is executed.
1. In the left pane of the Administration Console, expand ASE Servers > Compiled Objects> Functions > SQLJ Functions.
2. Choose one of the following:
• Click the drop-down arrow on the SQLJ function for which you want to replace thedefinition and select Replace.
• From SQLJ Functions in the left pane, click the drop-down arrow and select New.Enter the name of the existing SQLJ function for which you want to replace thedefinition.When selecting an existing SQLJ function, the Confirm Replace dialog appears withan option to replace the object definition or cancel the replacement.
The Replace SQLJ Function wizard appears.
3. (Optional) On the External Name screen, enter a new Java class name.
Manage and Monitor
SAP Control Center for SAP Adaptive Server Enterprise 375
4. (Optional) On the Return Type screen, specify the datatype of the value returned by thefunction.
5. (Optional) On the SQL Properties screen, modify the SQL data such as setting the dynamicresult sets option, and the deterministic option.
6. (Optional) On the SQL Editor screen, enter any changes to the SQL description.
7. (Optional) On the Summary screen, verify the function name, database, and owner.
SQLJ Function PropertiesUse the SQLJ Function Properties window to access and modify SQLJ functions.
Click the Name field of the SQLJ function, then click the drop-down arrow and selectProperties.
Pages Properties
General • Name
• Type
• Database
• Owner
• Creation date
• Group number
SQL The SQL statements for creating the function.
Parameters • Name
• Type
• Mode – indicates whether it is an input or an output parameter
• Order – numeric value that indicates the place of the parameter in the list of pa-rameters
To change the parameters, change the definition of the function by dropping and re-creating the function.
See also• SQLJ Procedure Properties on page 395
• Creating a SQLJ Function on page 374
• Creating a SQLJ Procedure on page 394
Deleting a SQLJ FunctionUse SAP Control Center helps to delete SQLJ functions.
1. In the left pane of the Administration Console, expand ASE Servers > Compiled Objects> Functions, then select SQLJ Functions.
Manage and Monitor
376

2. Click the Name field of the SQLJ function, then click the drop-down arrow and selectDelete.
3. Confirm the deletion.
4. Click Finish.
Generating DDL for a SQLJ FunctionUse SAP Control Center to generate a DDL script for SQLJ functions.
1. In the left pane of the Administration Console, expand ASE Servers > Compiled Objects> Functions, then select SQLJ Functions.
2. Click the Name field of the SQLJ function, then click the drop-down arrow and selectGenerate DDL.
3. (Optional) Click Save to export and save the DDL statement.
You can save the DDL in an external file on your local file system.
NetworksManage remote servers.
Managing Remote ServersAdd, delete, or configure remote servers using SAP Control Center.
Configuring a Server for Remote Procedure CallsConfigure server installations to allow request for execution of stored procedures on a remoteserver from a local server. The result of this request is called a remote procedure call (RPC).
Your choice of RPC handling method affects SAP ASE configuration and login mapping forremote servers. To handle RPCs, you can use either a site handler, or Component IntegrationServices (CIS).
The default method for handling interaction between local and remote servers is through a sitehandler, which creates a physical connection between the local server and the remote server. Itthen creates a logical connection for each RPC to the remote server. SAP ASE creates a sitehandler for each remote server it connects to. A site handler is used only for connectionsbetween two server installations.
You can enable CIS for a server to request execution of stored procedures and access data on aremote server as if it were on the local server. CIS RPC handling is always used forconnections involving proxy tables.
The principal difference between the two methods of handling RPCs is how the remote serverviews the RPC:
• If you use site handler, the remote server detects that the logical connection is made byanother remote server and performs remote server verification through sysremotelogins.
Manage and Monitor
SAP Control Center for SAP Adaptive Server Enterprise 377
• If you use CIS RPC handling, the remote server sees the RPC as an ordinary clientconnection. There is no verification using sysremotelogins. Therefore, connections musthave a valid server login account established prior to the connection request. You cannotuse trusted mode. Use of CIS RPC handling allows you to include RPCs in a transaction.Work done by an RPC can be committed or rolled back along with the other workperformed in the transaction.
See also• Testing a Remote Server Connection on page 379
• Adding a Remote Server on page 378
Adding a Remote ServerTo gain access to a remote server, it must be defined on the local server.
To add a remote server you must register and authenticate the agent for SAP ASE.
1. In the left pane of the Administration Console, expand Networks, then select RemoteServers.
2. Click the drop-down arrow and select New.
3. On the Introduction screen, select the local server.
4. On the Remote Server Name screen, specify the local name for the remote server.
5. Enter a network name for the remote server.
6. Specify the server class of the remote server.If Component Integration Services (CIS) is enabled, specify the server class of the remoteserver. If CIS is not enabled, accept the default server class: ASEnterprise.
7. (Optional) Click Summary to see the SQL statement and verify your selected options.
See also• Configuring a Server for Remote Procedure Calls on page 377
Deleting a Remote ServerDelete a remote server from the SAP ASE system tables.
1. In the left pane of the Administration Console, expand Networks, then select RemoteServers.
2. Click the Name field of the server, then click the drop-down arrow and select Delete.
3. Click OK to confirm.
Manage and Monitor
378
Remote Server PropertiesUse the Remote Server Properties window to test a connection, change the server class, maplocal and remote logins, and change configuration options.
Click the Name field of the remote server, then click the drop-down arrow and selectProperties.
Pages Properties
General • Remote server name
• Type
• Network name
• Server class
Options Provides options for configuring a remote server. Setting options is only available for auser-created remote server.
Login Map-ping
Manage:
• Default mapping for remote logins when called from a remote server.
• Remote logins specifically mapped to local logins when called from a remoteserver.
CIS Manage the mapping of local logins or roles to remote logins when access to theremote server is through Component Integration Services.
Testing a Remote Server ConnectionVerify that a connection can be established between the local server and the remote server.
1. In the Administration Console, select Networks > Remote Servers.
2. Click the Name field of the remote server, then click the drop-down arrow and selectProperties > General.
3. In the General window, select the server class for the remote server and click TestConnection.
See also• Configuring a Server for Remote Procedure Calls on page 377
Setting Options for a Remote ServerView or change or remote server options.
To set options for a remote server, click the Name field of the remote server, then click thedrop-down arrow and select Properties > Options.
Manage and Monitor
SAP Control Center for SAP Adaptive Server Enterprise 379
Option Description
Server cost (Component Integration Services only) Specifies the cost of a singleexchange under the user’s control, on a per-server basis.
CIS hafailover (Component Integration Services only) When enabled, instructsOpen Client to use automatic fail over when connections fail. In thiscase, CIS connection failures automatically failover to the serverspecified in directory services (such as the interface file and LDAPserver) as the failover server.
Enable login redirection Used by the server workload manager to send incoming connec-tions to specific instances based on the logical cluster configurationand the cluster’s current workload.
External engine auto start Specifies that EJB Server starts each time the server starts. Thedefault is true; starting the server also starts the EJB Server.
Mutual authentication Verifies the identity of the client and the server. The local serverinitiating the remote connection can request mutual authenticationfor all remote connection requests to target a server. This allows theclient to verify the identity of the remote server.
Negotiated logins (Component Integration Services only) This option is necessary ifCIS connections to XP Server or Backup Server are required. Whenenabled, Omni connects to the specified server and establishes acallback handler that can respond appropriately to login challengesfrom XP Server and Backup Server.
Net password encryption Specifies whether to initiate connections with a remote server withthe client-side password encryption handshake or with the normal(unencrypted password) handshake sequence. The default is false,which means that no network encryption takes place.
Readonly (Component Integration Services only) Specifies that access to theserver named is read-only.
Relocated joins Permits joins between local and remote tables to be on the remoteserver.
Security mechanism External software that provides security services for a connection.
Server logins (Component Integration Services only) To fully support remotelogins, Client-Library provides connection properties that enableCIS to request a server connection. This connection is recognized atthe receiving server as a server connection (as opposed to an ordi-nary client connection), allowing the remote server to validate theconnection as if the connection were made by a site handler.
Manage and Monitor
380
Option Description
Timeouts When unset (false), disables the normal timeout code used by thelocal server, so the site connection handler does not automaticallydrop the physical connection after one minute with no logical con-nection.
Use message confidentiality Data is encrypted over the network to protect against unauthorizeddisclosure.
Use message integrity Verifies that communications have not been modified during trans-port.
Managing Remote Server Login MappingsAdd, remove, and configure remote server login mappings.
1. In the Administration Console, select Networks > Remote Servers.
2. Click the Name field of the remote server, then click the drop-down arrow and selectProperties > Login Mapping.
3. In the Login Mapping window, choose how logins from a remote server are mapped to alocal server.
• None – a particular remote login is mapped to a particular local login name. Forexample, user joe on the remote server might be mapped to joesmith.
• Map to local logins with the same names – all logins from one remote server can usetheir remote names.
• Map all to a single local login – all logins from one remote server can be mapped to onelocal name. For example, all users sending remote procedure calls from the MAINserver are be mapped to remusers.
Note: Mapping more than one remote login to a single local login reduces individualaccountability on the server. Audited actions can be traced only to the local serverlogin, not to the individual logins on the remote server.
4. (Optional) To map a particular remote login to a specific local login name, click Add.
a) In the Add Specific Mapping window, specify the remote login name, then select thelocal login name.
b) (Optional) Click Trusted Password to indicate that the remote logins are trusted.Using the Trusted Password option reduces the security of your server, as thepasswords are not verified.
5. (Optional) To remove a mapping of particular remote login from a specific local loginname, select the login, then click Remove.
See also• Managing CIS Roles and Logins Mappings on page 382
Manage and Monitor
SAP Control Center for SAP Adaptive Server Enterprise 381

Managing CIS Roles and Logins MappingsAdd, remove, and configure remote server CIS roles and logins mappings.
Logins and roles for CIS RPC handling are mapped on the local server level. By default, yourlocal login is used as the remote login.
1. In the Administration Console, select Networks > Remote Servers.
2. Click the Name field of the remote server, then click the drop-down arrow and selectProperties > CIS.
3. To add a mapping for CIS, click Add in the CIS Mapping window
a) In the Add Login Mapping window, select the local login or role, then specify theremote login name.
b) Type in the remote password and confirm the password.
4. (Optional) To remove a CIS mapping, select the remote login name, then click Remove.
See also• Managing Remote Server Login Mappings on page 381
Precomputed Result SetsUse SAP Control Center to manage precomputed result sets (PRS).
Precomputed result sets are views for which the result is computed, stored, and available forfuture use. SAP ASE precomputes queries and attempts to use the precomputed result duringsubsequent iterations.
Configuring SAP ASE to Use Precomputed Result SetsYou must configure SAP ASE to use precomputed result sets.Set these database set parameters:• set ansinull on
• set arithabort on
• set arithignore off
• set string_rtruncation on
See also• Refreshing Precomputed Result Sets on page 385
• Creating a Precomputed Result Set on page 383
• Deleting a Precomputed Result Set on page 384
• Altering a Precomputed Result Set on page 384
Manage and Monitor
382
Viewing Precomputed Result SetsSee a list of all currently configured precomputed result sets.In the Administration Console view, select ASE Servers > Compiled Objects >Precomputed Result Sets.The precomputed results set information includes:• Name• Server• Database• Owner• Creation Date
Creating a Precomputed Result SetCreate precomputed result sets.
1. In the Administration Console view, select ASE Servers > Compiled Objects >Precomputed Result Sets.
2. Click the drop-down arrow and select New.
3. On the Introduction page, indicate the:• Server on which you are creating the precomputed result set• Database in which the precomputed result set resides• Owner of the precomputed result set
4. Click Next.
5. Enter the name of the precomputed result set.
6. Click Next.
7. On the Options page, specify:• The refresh policy for the precomputed result set:
• Immediate – the precomputed result set is updated with the same transaction thatupdates the base tables (requires a unique key).
• Manual – the precomputed result set is updated with an explicit refresh command.• Whether the precomputed result set is populated with data when it is created.• The locking scheme.• Whether the precomputed result set is enabled when it is created.• Whether to include the precomputed result set for query rewrite during optimization,
or whether to allow queries to use the precomputed result set with stale data.
8. Click Next.
9. On the top panel of the Query Expression page, view your selections for creating theprecomputed result set . In the bottom panel, add the query to create the precomputed resultset.
Manage and Monitor
SAP Control Center for SAP Adaptive Server Enterprise 383
10. On the Summary page, view your choices. Select Finish to create the precomputed resultset. Select Back to change a selection.
See also• Refreshing Precomputed Result Sets on page 385
• Configuring SAP ASE to Use Precomputed Result Sets on page 382
• Deleting a Precomputed Result Set on page 384
• Altering a Precomputed Result Set on page 384
Deleting a Precomputed Result SetDeleting a precomputed result set deletes its data, removes any system table entries, anddeletes the precomputed result set.
1. In the Administration Console view, select ASE Servers > Compiled Objects >Precomputed Result Sets.
2. Click the Name field of the precomputed result set, then click the drop-down arrow andselect Delete.
3. From the Confirm Delete window, select:• Preview – to view the SQL text of the precomputed result set you are dropping• Yes – to refresh the data in the precomputed result set.• No – to cancel the delete
See also• Refreshing Precomputed Result Sets on page 385
• Configuring SAP ASE to Use Precomputed Result Sets on page 382
• Creating a Precomputed Result Set on page 383
• Altering a Precomputed Result Set on page 384
Altering a Precomputed Result SetAltering a precomputed result set changes its policies or properties.
1. In the Administration Console view, select ASE Servers > Compiled Objects >Precomputed Result Sets.
2. Click the Name field of the precomputed result set, then click the drop-down arrow andselect Properties > General.
3. Select new options for these precomputed result set policies:• Refresh policy• Locking scheme• Enable the precomputed result set• Enable query rewriting
Manage and Monitor
384
4. Select Preview to verify your changes.
5. Click Save to confirm the changes.
See also• Refreshing Precomputed Result Sets on page 385
• Configuring SAP ASE to Use Precomputed Result Sets on page 382
• Creating a Precomputed Result Set on page 383
• Deleting a Precomputed Result Set on page 384
Refreshing Precomputed Result SetsRefresh precomputed result sets to prevent their data from getting stale.
1. In the Administration Console view, select ASE Servers > Compiled Objects >Precomputed Result Sets.
2. Click the Name field of the precomputed result set, then click the drop-down arrow andselect Refresh.
3. From the Confirm Refresh window, select:• Preview – to view the SQL text of the precomputed result set you are refreshing.• Yes – to refresh the data in the precomputed result set.• No – to cancel the refresh.
See also• Configuring SAP ASE to Use Precomputed Result Sets on page 382
• Creating a Precomputed Result Set on page 383
• Deleting a Precomputed Result Set on page 384
• Altering a Precomputed Result Set on page 384
Truncating a Precomputed Result SetTruncating a precomputed result set removes the data but retains the definition of theprecomputed result set in the system table.
1. In the Administration Console view, select ASE Servers > Compiled Objects >Precomputed Result Sets.
2. Click the Name field of the precomputed result set, then click the drop-down arrow andselect Truncate.
3. From the Confirm Truncate window, select:• Preview – to view the SQL text of the precomputed result set you are truncating.• Yes – to truncate the data in the precomputed result set.• No – to cancel the truncate.
Manage and Monitor
SAP Control Center for SAP Adaptive Server Enterprise 385

Granting Permissions on Precomputed Result SetsGrant permission on precomputed result sets for users, groups, and roles.
1. In the Administration Console view, select ASE Servers > Compiled Objects >Precomputed Result Sets
2. Click the Name field of the precomputed result set, then click the drop-down arrow andselect Properties > Permissions.
3. Click Grant
4. On the Welcome tab, select whether you are granting permissions for a user, group, orrole.
5. Click Next.
6. On the Grantee page, indicate the user to whom you are granting permissions.
7. Click Next.
8. On the Columns and Options page, select the columns for which to grant permissions.
9. Click Next.
10. The Permissions tab shows which actions you can perform. Select the actions for which togrant permissions:• If you select all the columns, the Permissions page shows all actions.• If you select a subset of columns, the Permissions page shows only the actions
permissible for these columns.
11. Click Next.
12. On the Summary page, review your choices.
13. Select Finish to grant these permissions.
See also• Granting Precomputed Result Set Permissions to a Specific User on page 387
• Revoking Precomputed Result Set Permissions from a Specific User on page 388
• Revoking Permissions on Precomputed Result Sets on page 386
Revoking Permissions on Precomputed Result SetsRevoke permissions on precomputed result sets for users, groups, and roles.
1. In the Administration Console view, select ASE Servers > Compiled Objects >Precomputed Result Sets
2. Click the Name field of the precomputed result set, then click the drop-down arrow andselect Properties > Permissions.
3. Select the object from which to revoke permissions.
4. Click Revoke.
Manage and Monitor
386
5. Select Revoke all permissions.
6. From the Confirm Refresh window, select:• Preview – to view the SQL text.• OK – to revoke the permissions.• Cancel – to cancel your permissions changes.
See also• Granting Precomputed Result Set Permissions to a Specific User on page 387
• Revoking Precomputed Result Set Permissions from a Specific User on page 388
• Granting Permissions on Precomputed Result Sets on page 386
Granting Precomputed Result Set Permissions to a Specific UserGrant permission for precomputed result sets to specific users.
1. In the Administration Console view, select ASE Servers > Security > Users.
2. Click the user for whom to change permissions. Select Properties.
3. Select the Object Permissions tab.
4. Select Views.
5. Click Grant.
6. In the Welcome page, click Precomputed Result Set.
7. Click Next.
8. On the Objects and Options page, select the objects for which to grant permissions.
9. Click Next.
10. On the Permissions page, select the permissions to grant.
11. Click Next.
12. On the Summary page, view your choices. Select:• Preview – to view the SQL text.• Back – to change a selection.• Finish – to change the change the permissions to the choices you have selected.• Cancel – to cancel the truncate.
See also• Revoking Precomputed Result Set Permissions from a Specific User on page 388
• Granting Permissions on Precomputed Result Sets on page 386
• Revoking Permissions on Precomputed Result Sets on page 386
Manage and Monitor
SAP Control Center for SAP Adaptive Server Enterprise 387
Revoking Precomputed Result Set Permissions from a Specific UserRevoke precomputed result set permission from a specific user.
1. In the Administration Console view, select ASE Servers > Security > Users.
2. Click the Name field of user for whom to change permissions, then click the drop-downarrow and select Properties.
3. Select the Object Permissions tab.
4. Select Views from the drop-down list.
5. Select the object from which you want to revoke permissions.
6. Click Revoke to start the Revoke Permissions wizard.
7. Click the object's row in the Select column to revoke individual permissions. An "X"indicates the object's permissions are being revoked.
8. Select Preview to view the SQL text.
9. Click OK.
See also• Granting Precomputed Result Set Permissions to a Specific User on page 387
• Granting Permissions on Precomputed Result Sets on page 386
• Revoking Permissions on Precomputed Result Sets on page 386
Displaying Information About Precomputed Result SetsDisplay information (such as column IDs, user names, partition names, and so on) associatedwith precomputed result sets.
1. In the Administration Console view, select ASE Servers > Compiled Objects >Precomputed Result Sets.
2. Click the Name field of the precomputed result set, then click the drop-down arrow andselect Properties.From the View Properties dialog, you can display:• SQL – the SQL used to create the precomputed result set.• Columns – the column names and character sets• Data – the data the precomputed result set contains.• Permissions – permissions granted on the precomputed result sets.• References – the name, object type, and owner of all objects the precomputed result set
references.• Partitions – the name of the partitions, the segment on which they reside, and the date
they were created.• Indexes – select the Index page. SCC displays the:
• Name of the index
Manage and Monitor
388
• Any constraints• Whether the index is clustered• Whether the index is unique• Which columns include indexesClick the index name to:• Generate DDL• Check consistency• Update statistics• View the index properties
Generating DDL for a Precomputed Result SetGenerate object definitions for existing precomputed result sets.
1. In the Administration Console view, select ASE Servers > Compiled Objects >Precomputed Result Sets.
2. Click the Name field of the device, then click the drop-down arrow and select GenerateDDL.
3. (Optional) Click Save to export and save the DDL statement.
You can save the DDL in an external file on your local file system.
ProceduresManage stored and SQLJ procedures using SAP Control Center.
Manage Stored ProceduresCreate, delete, or modify stored procedures.
Stored procedures are named collections of SQL statements and flow control statements. Astored procedure that performs a select, execute, or data modification command must havethe same owner as the object acted upon.
A system administrator, a database owner, or a user or group with create procedurepermission can create a stored procedure.
See also• Extended Stored Procedures Properties on page 369
• Creating an Extended Stored Procedure on page 368
Manage and Monitor
SAP Control Center for SAP Adaptive Server Enterprise 389
Creating a Stored ProcedureA stored procedure is a collection of SQL statements and optional control-of-flow statementsstored under a name.
1. In the left pane of the Administration Console, expand ASE Servers > Compiled Objects> Procedures, then select Stored Procedures.
2. Click the drop-down arrow and select New.
3. On the Introduction screen, select the server, database, and owner of the new procedure.
4. Enter the name of the procedure.
5. (Optional) On the Compile Option screen, you have the option to recompiled yourprocedure every time it is executed. This is useful if you expect parameter values to changefrequently. If you do not select this option, the procedure is compiled only the first time it isexecuted.
6. (Optional) On the Stored Procedure Group screen, you can specify a group number towhich to add the stored procedure. Grouping together all stored procedures that belong to acertain application lets you drop all procedures with a single command.
7. (Optional) (Available on 15.7 ESD#2 and higher) On the Execution Behavior screen,select how the procedure will be executed. This feature is not controlled by the enablegranular permissions configuration option.
8. On the SQL Editor screen, provide the SQL statements for the procedure. Ensure that allobjects referenced by the procedure exist in the database.
9. (Optional) Click Preview to see the SQL statements for your command.
10. (Optional) Click Summary to verify your selected options.
See also• Creating a SQLJ Procedure on page 394
• Extended Stored Procedures on page 367
• Stored Procedure Properties on page 391
• Enabling Granular Permissions on page 236
Replacing a Stored Procedure DefinitionYou can replace the SQL definition of a stored procedure and change whether the procedure isrecompiled each time it is executed.
1. In the left pane of the Administration Console, expand ASE Servers > Compiled Objects> Procedures > Stored Procedures.
2. Choose one of the following:
• Click the drop-down arrow on the stored procedure for which you want to replace thedefinition and select Replace.
Manage and Monitor
390
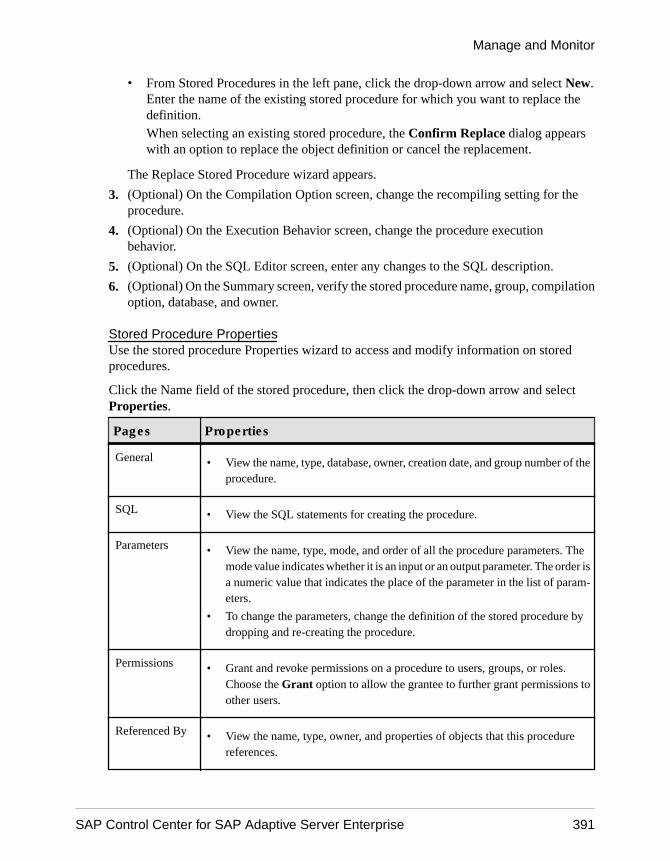
• From Stored Procedures in the left pane, click the drop-down arrow and select New.Enter the name of the existing stored procedure for which you want to replace thedefinition.When selecting an existing stored procedure, the Confirm Replace dialog appearswith an option to replace the object definition or cancel the replacement.
The Replace Stored Procedure wizard appears.
3. (Optional) On the Compilation Option screen, change the recompiling setting for theprocedure.
4. (Optional) On the Execution Behavior screen, change the procedure executionbehavior.
5. (Optional) On the SQL Editor screen, enter any changes to the SQL description.
6. (Optional) On the Summary screen, verify the stored procedure name, group, compilationoption, database, and owner.
Stored Procedure PropertiesUse the stored procedure Properties wizard to access and modify information on storedprocedures.
Click the Name field of the stored procedure, then click the drop-down arrow and selectProperties.
Pages Properties
General • View the name, type, database, owner, creation date, and group number of theprocedure.
SQL • View the SQL statements for creating the procedure.
Parameters • View the name, type, mode, and order of all the procedure parameters. Themode value indicates whether it is an input or an output parameter. The order isa numeric value that indicates the place of the parameter in the list of param-eters.
• To change the parameters, change the definition of the stored procedure bydropping and re-creating the procedure.
Permissions • Grant and revoke permissions on a procedure to users, groups, or roles.Choose the Grant option to allow the grantee to further grant permissions toother users.
Referenced By • View the name, type, owner, and properties of objects that this procedurereferences.
Manage and Monitor
SAP Control Center for SAP Adaptive Server Enterprise 391
Pages Properties
References • View the name, type, owner, and properties of objects that this procedurereferences.
See also• Extended Stored Procedures on page 367
• Creating a SQLJ Procedure on page 394
• Creating a Stored Procedure on page 390
Granting Execute Permission on a Stored ProcedureGrant execute permission on stored procedures.
1. In the left pane of the Administration Console, expand ASE Servers > CompiledObjects, then select Stored Procedures.
2. Click the Name field of the stored procedure, then click the drop-down arrow and selectProperties.
3. In the left pane, click Permissions.
4. Click Grant to grant access permissions for the selected object.
5. On the Welcome screen, select the type of grantee:
• Users• Groups• Roles
6. On the Grantee screen, select one or more grantees.
7. Select Execute.
8. Choose With grant option to allow the grantee to further grant permissions to otherusers.
9. (Optional) Click Summary to verify your selected options.
Revoking Execute Permission on a Stored ProcedureRevoke execute permission on stored procedures.
1. In the left pane of the Administration Console, expand ASE Servers > CompiledObjects, then select Stored Procedures.
2. Click the Name field of the stored procedure, then click the drop-down arrow and selectProperties.
3. In the left pane, click Permissions.
4. Select the grantee, then click Revoke to revoke access permissions to the object.
Manage and Monitor
392
In the Revoke Permissions wizard, each type of permission and the current grantedpermissions are shown in cells.
5. Choose one of:
• Revoke all permission.
• Individual cells to revoke the currently granted permissions. The cell changes to showan "x", indicating that the permission type is no longer granted.
6. Click OK.
Deleting a Stored ProcedureUse SAP Control Center to delete stored procedures.
1. In the left pane of the Administration Console, expand ASE Servers > Compiled Objects> Procedures, then select Stored Procedures.
2. Click the Name field of the stored procedure, then click the drop-down arrow and selectDelete.
3. Confirm the deletion.
4. Click Finish.
Generating DDL for a Stored ProcedureUse SAP Control Center to generate a DDL script for stored procedures.
1. In the left pane of the Administration Console, expand ASE Servers > Compiled Objects> Procedures, then select Stored Procedures.
2. Click the Name field of the stored procedure, then click the drop-down arrow and selectGenerate DDL.
3. (Optional) Click Save to export and save the DDL statement.
You can save the DDL in an external file on your local file system.
Manage SQLJ ProceduresCreate, delete, modify , and administer SQLJ procedures.
SQLJ procedures are named collections of SQLJ statements and flow control statements. Astored procedure that performs a select, execute, or data modification command must havethe same owner as the object acted upon.
A system administrator, a database owner, or a user or group with create procedurepermission can create a stored procedure.
See also• Manage SQLJ Functions on page 374
Manage and Monitor
SAP Control Center for SAP Adaptive Server Enterprise 393
Creating a SQLJ ProcedureCreate a SQLJ procedure by adding a SQL wrapper to a Java static method..
1. In the left pane of the Administration Console, expand ASE Servers > Compiled Objects> Procedures > SQLJ Procedures.
2. Click the drop-down arrow and select New.
3. On the Introduction screen, select the server, database, and owner of the new procedure.
4. Enter the name of the procedure.
5. Specify the external name, which identifies the Java method, class, and an optionalpackage name.
6. On the SQL Properties screen, select:
• Modifies SQL data – indicate that the Java method invokes SQL operations andmodifies SQL data in the database.
• Dynamic result set – set the number of rows returned. The default number of returnedrows is 1.
• Deterministic option – include the keywords deterministic or not deterministic forcompatibility with the SQLJ standard. However, SAP ASE does not make use of thisoption.
7. On the SQL Editor screen, provide the SQL statements for the procedure. Ensure that allobjects referenced by the procedure exist in the database.
8. (Optional) Click Preview to see the SQL statements for your command.
9. (Optional) Click Summary to verify your selected options.
See also• Creating a Stored Procedure on page 390
• Extended Stored Procedures on page 367
• Stored Procedure Properties on page 391
• Creating a SQLJ Function on page 374
• SQLJ Function Properties on page 376
• SQLJ Procedure Properties on page 395
Replacing a SQLJ Procedure DefinitionYou can replace the SQL definition of a SQLJ procedure.
1. In the left pane of the Administration Console, expand ASE Servers > Compiled Objects> Procedures > SQLJ Procedures.
2. Choose one of the following:
Manage and Monitor
394
• Click the drop-down arrow on the SQLJ procedure for which you want to replace thedefinition and select Replace.
• From SQLJ Procedures in the left pane, click the drop-down arrow and select New.Enter the name of the existing SQLJ procedure for which you want to replace thedefinition.When selecting an existing SQLJ procedure, the Confirm Replace dialog appearswith an option to replace the object definition or cancel the replacement.
The Replace SQLJ Procedure wizard appears.
3. (Optional) On the External Name screen, enter a new Java class name.
4. (Optional) On the SQL Properties screen, modify the SQL data such as setting the dynamicresult sets option, and the deterministic option.
5. (Optional) On the SQL Editor screen, enter any changes to the SQL description.
6. (Optional) On the Summary screen, verify the procedure name, database, and owner.
SQLJ Procedure PropertiesUse the SQLJ procedure Properties window to access and modify SQLJ procedures.
Click the Name field of the SQLJ procedure, then click the drop-down arrow and selectProperties.
Pages Properties
General • Name
• Type
• Database
• Owner
• Creation date
• Group number
SQL SQL statements for creating the procedure
Parameters • Name
• Type
• Mode – indicates whether it is an input or an output parameter
• Order of all the procedure parameters – a numeric value that indicates the placeof the parameter in the list of parameters
To change the parameters, change the definition of the stored procedure by droppingand re-creating the procedure.
Permissions Grant and revoke permissions on a procedure to users, groups, or roles. Choose theGrant option to allow the grantee to further grant permissions to other users.
Manage and Monitor
SAP Control Center for SAP Adaptive Server Enterprise 395
Pages Properties
Referenced By • Name
• Type
• Owner
• Properties of objects
References • Name
• Type
• Owner
• Properties of objects that the procedure references
See also• SQLJ Function Properties on page 376
• Creating a SQLJ Function on page 374
• Creating a SQLJ Procedure on page 394
Deleting a SQLJ ProcedureUse SAP Control Center to delete SQLJ procedures.
1. In the left pane of the Administration Console, expand ASE Servers > Compiled Objects> Procedures > SQLJ Procedures.
2. Click the Name field of the SQLJ procedure, then click the drop-down arrow and selectDelete.
3. Confirm the deletion.
4. Click Finish.
Generating DDL for a SQLJ ProcedureUse SAP Control Center to generate a DDL script for SQLJ procedures.
1. In the left pane of the Administration Console, expand ASE Servers > Compiled Objects> Procedures > SQLJ Procedures.
2. Click the Name field of the SQLJ procedure, then click the drop-down arrow and selectGenerate DDL.
3. (Optional) Click Save to export and save the DDL statement.
You can save the DDL in an external file on your local file system.
ProcessesMonitor SAP ASE processes.
Manage and Monitor
396
Identifying Resource-Intensive ProcessesFind the user processes that are consuming the most system resources on the selected SAPASE.
You can choose a system resource (CPU, disk I/O, incoming network traffic, or outgoingnetwork traffic) and display information about the user processes that are using the chosenresource most intensively. For each system resource, you can rank the processes by cumulativeor most recent activity values. Each bar in the graph represents the value of the selected metricfor a process.
1. In the Perspective Resources view, select the server to monitor, click the drop-down arrow,and select Monitor.
2. In the left pane, select Processes.By default, the All Processes tab is selected. A bar graph shows the five user processes thatare using the most cumulative CPU cycles.
3. (Optional for cluster configurations) Click Select User Processes by. Choose AllInstances to depict information for the entire cluster, or select a specific instance to seeinformation for only the selected instance of the cluster.
4. Use the menu to the right of the bar graph to change the system resource. You canchoose:
• CPU Cumulative – cumulative CPU activity since the server started or the counterwrapped.
• CPU Activity – CPU activity, per second, since the last screen refresh.• Disk I/O Cumulative – cumulative disk I/O since the server started or the counter
wrapped.• Disk I/O Activity – I/O activity per second since the last screen refresh.• Incoming Network Traffic Cumulative – cumulative incoming network traffic since
the server started or the counter wrapped.• Incoming Network Traffic Activity – incoming network traffic per second since the
last screen refresh.• Outgoing Network Traffic Cumulative – cumulative outgoing network traffic since
the server started or the counter wrapped.• Outgoing Network Traffic Activity – outgoing network traffic per second since the
last screen refresh.
5. (Optional) Move your mouse over a bar in the graph to display the server process ID(SPID) and the value of the selected system resource metric for the process.
6. (Optional) Select Only display user processes below to filter out system processes, anddisplay only user process information.
7. (Optional) Click a bar in the graph to highlight information about that process in the tablebelow.
Manage and Monitor
SAP Control Center for SAP Adaptive Server Enterprise 397
8. (Optional) Click a bar in the graph or a row in the table to display information about thatprocess in the Details, SQL, and Wait Events tabs at the bottom of the screen.
See also• Displaying Wait Events for a Process on page 401
• Displaying the SQL Query Associated with a Process on page 401
• Identifying the Lead Blocker in a Chain on page 399
• Identifying Blocked Processes and Blocking Processes on page 398
• Terminating Blocking Processes on page 399
• Process Statistics and Details on page 402
Identifying Blocked Processes and Blocking ProcessesFind user processes that are blocked and the processes that are blocking them.
1. In the Perspective Resources view, select the server to monitor, click the drop-down arrow,and select Monitor.
2. In the left pane, select Processes.
3. Click the All Processes tab.
4. (Optional for cluster configurations) Click Select User Processes by. Choose AllInstances to depict information for the entire cluster, or select a specific instance to seeinformation for only the selected instance of the cluster.
5. Check the table below the bar graph for rows highlighted in red, and with a lock icon,which indicate blocked processes.
The Blocked by SPID column identifies the blocking process. Blocking processes are alsoshown in the table, highlighted in yellow.
6. Click a red table row to display information about the blocked process in the Details, SQL,and Wait Events tabs at the bottom of the screen.
7. Click the row for the blocking process (yellow) to display its information in the tabs.
Note: Identifying the lock held by a blocking process is not always straightforward. Forexample, the blocking process does not necessarily hold a page lock; it might hold a tablelock. For this reason, the lock request process that is blocking another process is shown,not the blocking lock.
8. Click the Blocked Processes tab to display additional information about blockedprocesses, including details about the lock, the row number, the page number, and the lockconfiguration options.
For nonclustered servers, the numbers of free locks, active locks, and maximum used locksare shown. For clustered servers, these values are shown on a per instance basis, and youmust select Display Lock Configuration to display these values.
Manage and Monitor
398
NextFor information on handling blocked processes, see the locking reports chapter of thePerformance and Tuning Series: Locking and Concurrency Control.
See also• Displaying Wait Events for a Process on page 401
• Displaying the SQL Query Associated with a Process on page 401
• Identifying the Lead Blocker in a Chain on page 399
• Identifying Resource-Intensive Processes on page 397
• Terminating Blocking Processes on page 399
• Process Statistics and Details on page 402
Terminating Blocking ProcessesTerminate a blocking process from the Processes window.
1. In the Perspective Resources view, select the server to monitor, click the drop-down arrow,and select Monitor.
2. Select Processes.
3. Select the blocking process, or a set of blocking processed, to terminate.
4. Right-click the selected row and select Terminate.
5. Select Yes to relay the terminate request to the server, or No to close the dialog box withoutperforming the terminate operation.
See also• Displaying Wait Events for a Process on page 401
• Displaying the SQL Query Associated with a Process on page 401
• Identifying the Lead Blocker in a Chain on page 399
• Identifying Resource-Intensive Processes on page 397
• Identifying Blocked Processes and Blocking Processes on page 398
• Process Statistics and Details on page 402
Identifying the Lead Blocker in a ChainFind a process that is blocking several other processes.
When Process A blocks Process B, which blocks Process C—and so on—the blockingprocesses form a chain.
1. In the Perspective Resources view, select the server to monitor, click the drop-down arrow,and select Monitor.
2. In the left pane, select Processes.
3. Click Blocked Processes.
Manage and Monitor
SAP Control Center for SAP Adaptive Server Enterprise 399

You see a table with information about blocked and blocking processes, including the lockrequests on the basis of which processes are blocked.
4. (Optional for cluster configurations) Click Select User Processes by. Choose AllInstances to depict information for the entire cluster, or select a specific instance to seeinformation for only the selected instance of the cluster.
5. The table on the Blocked Processes tab has an entry for each lead blocker; click the arrowto expand the entry and show all the blocked processes in the chain.
Note: Identifying the lock held by a blocking process is not always straightforward. Forexample, the blocking process does not necessarily hold a page lock; it might hold a tablelock. For this reason, the lock request process that is blocking another process is shown,not the blocking lock.
6. Select a process to populate the tabs at the bottom of the screen with information about thatprocess.
7. Click the tabs to see:
Details Details about the selected process, including the initiating program,transaction information, and network statistics
SQL The SQL statement and query plan for the selected process
Wait Events Information about wait events for the selected process, includingnumber of waits, wait times, and wait descriptions
8. (Optional) Click the All Processes tab at the top of the window.In the table below the bar graph, rows that are highlighted in yellow indicate blockingprocesses. Rows that are highlighted in red indicate blocked processes.
NextFor information on handling blocked processes, see the Performance and Tuning Series:Locking and Concurrency Control. You can find SAP Adaptive Server Enterprisedocumentation on the SAP Product Documents Web site at http://sybooks.sybase.com.
See also• Displaying Wait Events for a Process on page 401
• Displaying the SQL Query Associated with a Process on page 401
• Identifying Resource-Intensive Processes on page 397
• Identifying Blocked Processes and Blocking Processes on page 398
• Terminating Blocking Processes on page 399
• Process Statistics and Details on page 402
Manage and Monitor
400
Displaying the SQL Query Associated with a ProcessSee the SQL statement and query plan for an SAP ASE user process.
1. In the Perspective Resources view, select the server to monitor, click the drop-down arrow,and select Monitor.
2. In the left pane, select Processes.
3. Click either the All Processes tab or the Blocked Processes tab.
4. (Optional for cluster configurations) Click Select User Processes by. Choose AllInstances to depict information for the entire cluster, or select a specific instance to seeinformation for only the selected instance of the cluster.
5. To select a process, click a row in the table.
6. At the bottom of the window, click the SQL tab.
The tab shows the SQL query and query plan for this process.
See also• Displaying Wait Events for a Process on page 401
• Identifying the Lead Blocker in a Chain on page 399
• Identifying Resource-Intensive Processes on page 397
• Identifying Blocked Processes and Blocking Processes on page 398
• Terminating Blocking Processes on page 399
• Process Statistics and Details on page 402
Displaying Wait Events for a ProcessGet information about wait events that are affecting an SAP ASE process.
1. In the Perspective Resources view, select the server to monitor, click the drop-down arrow,and select Monitor.
2. In the left pane, select Processes.
3. Click All Processes.
Each row of the table below the bar graph displays information about a process.
4. (Optional for cluster configurations) Click Select User Processes by. Choose AllInstances to depict information for the entire cluster, or select a specific instance to seeinformation for only the selected instance of the cluster.
5. To select a process, click a row in the table.
6. Click Wait Events.
For more information on wait events, see the wait events chapter in the Performance andTuning Series: Monitoring Tables guide.
Manage and Monitor
SAP Control Center for SAP Adaptive Server Enterprise 401
See also• Displaying the SQL Query Associated with a Process on page 401
• Identifying the Lead Blocker in a Chain on page 399
• Identifying Resource-Intensive Processes on page 397
• Identifying Blocked Processes and Blocking Processes on page 398
• Terminating Blocking Processes on page 399
• Process Statistics and Details on page 402
Process Statistics and DetailsInterpret SAP ASE process information.
Lock icons in the SPID column of the Processes table identify processes that are blocked (adimmed lock) or blocking (a gold lock) other processes. Other columns of the Processes tableinclude the family ID (which is the parent SPID value), processes blocked by an SPID, CPUactivity, CPU cumulative activity, disk I/O activity, and disk I/O cumulative activity.
On the Blocked Processes tab, SAP Control Center shows the lock request process that isblocking another process, not the blocking lock itself. A yellow warning icon appears on theBlocked Processes tab label when there are any blocked processes.
Table 59. Color indicators in the Processes
Color Process State
Blue Selected
Green Executing a query
Yellow Blocking another process
Red Blocked by a lock held by another process
Table 60. Tabs
Details Displays information about the selected process, including program name,current SQL command, client machine IP address and name, transactionname and start time, physical and logical reads, and CPU utilization.
SQL If the selected process is active, displays the SQL statement and query planfor the query that the process is executing.
Manage and Monitor
402
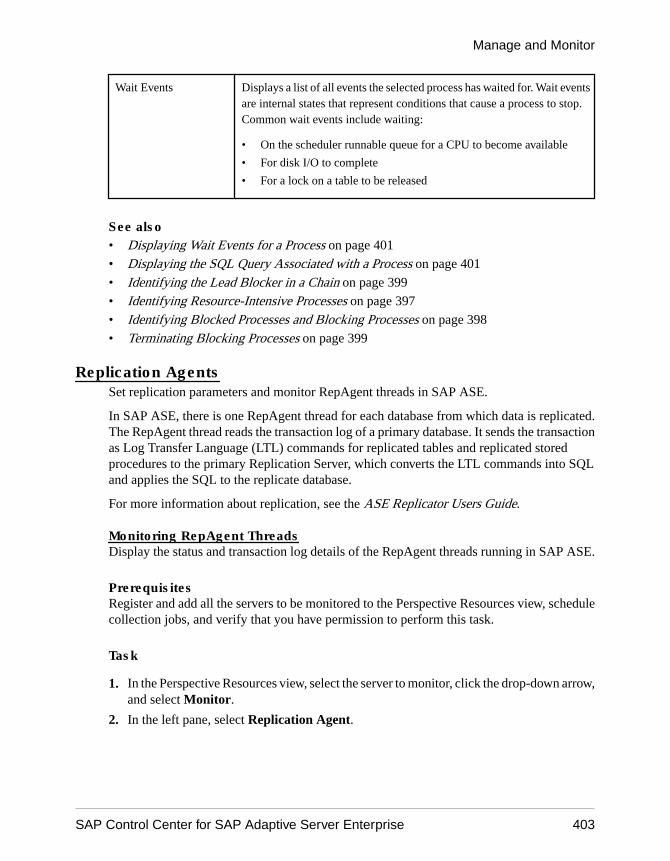
Wait Events Displays a list of all events the selected process has waited for. Wait eventsare internal states that represent conditions that cause a process to stop.Common wait events include waiting:
• On the scheduler runnable queue for a CPU to become available
• For disk I/O to complete
• For a lock on a table to be released
See also• Displaying Wait Events for a Process on page 401
• Displaying the SQL Query Associated with a Process on page 401
• Identifying the Lead Blocker in a Chain on page 399
• Identifying Resource-Intensive Processes on page 397
• Identifying Blocked Processes and Blocking Processes on page 398
• Terminating Blocking Processes on page 399
Replication AgentsSet replication parameters and monitor RepAgent threads in SAP ASE.
In SAP ASE, there is one RepAgent thread for each database from which data is replicated.The RepAgent thread reads the transaction log of a primary database. It sends the transactionas Log Transfer Language (LTL) commands for replicated tables and replicated storedprocedures to the primary Replication Server, which converts the LTL commands into SQLand applies the SQL to the replicate database.
For more information about replication, see the ASE Replicator Users Guide.
Monitoring RepAgent ThreadsDisplay the status and transaction log details of the RepAgent threads running in SAP ASE.
PrerequisitesRegister and add all the servers to be monitored to the Perspective Resources view, schedulecollection jobs, and verify that you have permission to perform this task.
Task
1. In the Perspective Resources view, select the server to monitor, click the drop-down arrow,and select Monitor.
2. In the left pane, select Replication Agent.
Manage and Monitor
SAP Control Center for SAP Adaptive Server Enterprise 403
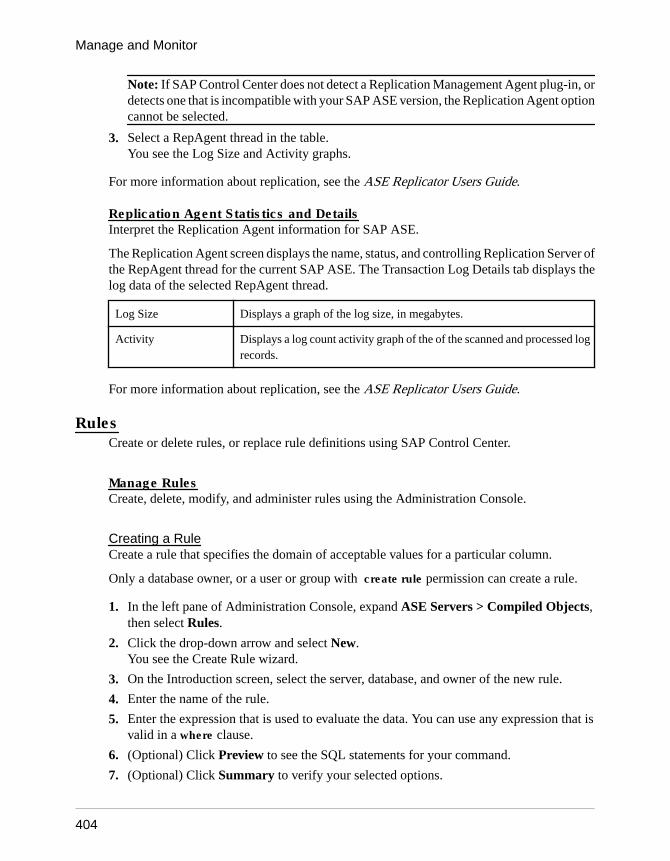
Note: If SAP Control Center does not detect a Replication Management Agent plug-in, ordetects one that is incompatible with your SAP ASE version, the Replication Agent optioncannot be selected.
3. Select a RepAgent thread in the table.You see the Log Size and Activity graphs.
For more information about replication, see the ASE Replicator Users Guide.
Replication Agent Statistics and DetailsInterpret the Replication Agent information for SAP ASE.
The Replication Agent screen displays the name, status, and controlling Replication Server ofthe RepAgent thread for the current SAP ASE. The Transaction Log Details tab displays thelog data of the selected RepAgent thread.
Log Size Displays a graph of the log size, in megabytes.
Activity Displays a log count activity graph of the of the scanned and processed logrecords.
For more information about replication, see the ASE Replicator Users Guide.
RulesCreate or delete rules, or replace rule definitions using SAP Control Center.
Manage RulesCreate, delete, modify, and administer rules using the Administration Console.
Creating a RuleCreate a rule that specifies the domain of acceptable values for a particular column.
Only a database owner, or a user or group with create rule permission can create a rule.
1. In the left pane of Administration Console, expand ASE Servers > Compiled Objects,then select Rules.
2. Click the drop-down arrow and select New.You see the Create Rule wizard.
3. On the Introduction screen, select the server, database, and owner of the new rule.
4. Enter the name of the rule.
5. Enter the expression that is used to evaluate the data. You can use any expression that isvalid in a where clause.
6. (Optional) Click Preview to see the SQL statements for your command.
7. (Optional) Click Summary to verify your selected options.
Manage and Monitor
404
See also• Rule Properties on page 405
Replacing a Rule DefinitionYou can replace the rule expression of an existing rule.
1. In the left pane of the Administration Console, expand ASE Servers > Compiled Objects> Rules.
2. Choose one of the following:
• Click the drop-down arrow on the rule for which you want to replace the definition andselect Replace.
• From Rules in the left pane, click the drop-down arrow and select New. Enter the nameof the existing rule for which you want to replace the definition.When selecting an existing rule, the Confirm Replace dialog appears with an option toreplace the object definition or cancel the replacement.
The Replace Rule wizard appears.
3. (Optional) On the Rule Expression screen, enter the new rule value.
4. (Optional) On the Summary screen, verify the rule name, database, owner, and the newexpression.
Rule PropertiesUse the Rules Properties window to access information on rules and objects that theyreference.
Click the Name field of the rule, then click the drop-down arrow and select Properties.
Pages Properties
General View the name, type, database, owner, creation date, and rule expression.
SQL View the SQL statements for creating the rule.
Referenced By View the name, type, owner, and properties of objects that referenced by this rule.
See also• Creating a Rule on page 404
Deleting a RuleUse SAP Control Center to delete rules.
1. In the left pane of Administration Console, expand ASE Servers > Compiled Objects,then select Rules.
Manage and Monitor
SAP Control Center for SAP Adaptive Server Enterprise 405
2. Click the Name field of the rule, then click the drop-down arrow and select Delete.
3. Confirm the deletion.
4. Click Finish.
Generating DDL for a RuleUse SAP Control Center to generate a DDL script for rules.
1. In the left pane of the Administration Console, expand ASE Servers, then selectCompiled Objects > Rules.
2. Click the Name field of the rule, then click the drop-down arrow and select GenerateDDL.
3. (Optional) Click Save to export and save the DDL statement.
You can save the DDL in an external file on your local file system.
SecurityUse server-level security features such as logins, login profiles, and roles, and database-levelsecurity features such as encrypted columns, users, and groups.
Manage Encryption KeysYou can encrypt database columns using keys that are created with user-defined or loginpasswords.
Encryption KeysIn each database, you can create a key that encrypts columns. Creating a key on each databaseminimizes cross-database key integrity problems. Such key problems can happen indistributed systems, particularly when you are dumping and loading, or mounting andunmounting databases.
Note: You can create encryption keys only you have:
• System security officer or key custodian role• Permissions to execute create encryption key
If you are a key owner, allow other users to access encryption keys by either:
• Creating an encryption key with a user-defined password and sharing it with each user whoaccesses key-encrypted data, or
• Giving each user a copy of the base encryption key, and allowing him or her to change thekey-copy password.
Encryption Keys with User-Defined PasswordsUsing encryption keys with user-defined passwords creates a highly secure system in whicheven database owners and system administrators cannot access encrypted data. You can alsorequire that the key encryption method itself use a user-defined password.
Manage and Monitor
406
SAP ASE provides recovery for lost base-key passwords.
When data is encrypted, system security officers, key-custodians, and users with permissionto create encryption keys can also create base keys. System security officers can also grantbase key creation permission to users who have no other permissions.
The creator of the base key is the "key owner." To control access to encrypted data, only keyowners and system security officers can change the base-key password.
Encryption Keys with Login PasswordsTo prevent users from having to keep multiple passwords, you can authorize users to accessencrypted data using their login password. Using login passwords to access key-encrypteddata:
• Gives users access to encrypted data without requiring them to explicitly supplypasswords.
• Involves fewer passwords for users to track.• Reduces the need for the key custodian to replace lost passwords.
Key CopiesKey owners can allow data access to other users by making copies of the base key—called keycopies. A key copy is an additional password for the base key that can be changed as soon as itis assigned to a user, or key-copy owner. Only the key-copy owner can change the key-copypassword.
You can make key copies for designated users if you are the base-key owner or a systemsecurity officer. Key copies of the base key are not new keys themselves; they are additionalpasswords for the base key. Key-copy assignees should change their user-defined passwordfor as soon as the key copy is assigned to them.
The key copy is encrypted with the login password as soon as the assignee logs in and accessesthe key copy.
Note: The base key can be encrypted by the system encryption password or a user-definedpassword. Key copies can be encrypted by a login password or by a user-defined password.The recovery key copy can be encrypted only by a user-defined password. Keys that areencrypted with the system encryption password cannot have key copies.
Key recovery requires you to create a special key copy, called the recovery key, that isdesignated for the recovery of the base key. If you lose your password, use the recovery key toaccess the base key.
See also• Creating an Encrypted Database on page 301• Encrypting an Existing Database on page 301• Suspending the Encryption Process on page 302• Resuming the Encryption Process on page 302
Manage and Monitor
SAP Control Center for SAP Adaptive Server Enterprise 407
• Decrypting an Encrypted Database on page 302
• Suspending the Decryption Process on page 303
• Resuming the Decryption Process on page 303
• Creating a Master Key on page 408
• Creating a Database Encryption Key on page 415
Modifying and Deleting a System Encryption PasswordChange or delete the system encryption password using SAP Control Center.
Only the system security officer (SSO) can change the system encryption password.
1. In the left pane of the Administration Console, expand ASE Servers > Security >Encryption Keys.
2. Click System Encryption Passwords.
3. Click the Name field of the database for which you want to change the encryptionpassword, then click the drop-down arrow and select Change Password.
4. Enter the old and new passwords, and confirm the new password.
5. (Optional) To delete the system encryption password, select Delete, then confirm thedeletion.
Creating a System Encryption PasswordThe system security officer (SSO) creates the default system encryption password. SAP ASEencrypts keys using the Advanced Encryption Standard (AES) algorithm. The systemencryption password is encrypted and stored in the database.
The security of encryption keys might be compromised if system encryption passwords aretoo short or easy to guess.
Note: Keys that are encrypted using the system encryption password cannot have key copies.
1. In the left pane of the Administration Console, expand ASE Servers > Security >Encryption Keys.
2. Click System Encryption Passwords.
3. Click the drop-down arrow and select New.
4. Select the server and database containing the keys that the system encryption passwordencrypts.
5. Enter the new password, and confirm it.
6. (Optional) Click Summary to verify your selected options.
Creating a Master KeyCreate the master key for the database.
The master key:
Manage and Monitor
408
• Is a database-level key, created by a user with sso_role or keycustodian_role.• Is used as a key encryption for user-defined encryption keys.• Replaces the system-encryption password as the default key encryption key (KEK) for
user-defined keys.
Note: SAP recommends that you do not create system encryption passwords after youhave created master keys.
• Can be used with the dual master key as a composite key to provide dual control and splitknowledge for all user-created keys. Alternatively, the master key can be used as acomposite key with a column encryption key’s explicit password.
• Can be altered to add key copies. Master key copies provide access to the dual-master keyfor unattended start-up, to support recovery of the master key, and to allow users other thanthe base-key owner to set the encryption password.
1. In the left pane of the Administration Console, expand ASE Servers > Security >Encryption Keys.
2. Click Master Keys.
3. Select New.You see the Add Master Key wizard.
4. Select the server and database where the encryption key is being defined.
5. Enter a password for the master key and confirm it.
6. (Optional) Click Summary to verify your selected options.
See also• Modifying, Regenerating, and Deleting a Master Key on page 410
• Dual Control and Split Knowledge on page 411
• Master Key Properties on page 409
• Manage Encryption Keys on page 406
Master Key PropertiesProperties of master keys and key copies.
Click the Name field of the master key, then click the drop-down arrow and selectProperties.
Manage and Monitor
SAP Control Center for SAP Adaptive Server Enterprise 409
Pages Properties
General • Name – change the name of the master key.
• Change Owner – change the owner of the master key.• Key recovery – indicates if this key has a recovery copy.• Master key startup file – specify if the master key has an automatic start-up copy. The
automatic startup copy is used to access the master or dual-master keys when aserver, configured for automatic master key access, is started.
Key Cop-ies
Assignees and other information about keys – lists the types of passwords and assigneesfor the key, and information about whether the key is recoverable.
See also• Dual Control and Split Knowledge on page 411
• Creating a Master Key on page 408
• Modifying, Regenerating, and Deleting a Master Key on page 410
Modifying, Regenerating, and Deleting a Master KeyModify existing passwords or regenerate the master key.
Use Change Password when a password is compromised.
Use Regenerate to periodically change key encryption keys (KEKs), which is recommendedas good key management. The master or dual-master key is replaced with a new value and allcolumn encryption keys that are encrypted by the master or dual-master keys are reencrypted.
1. In the left pane of the Administration Console, expand ASE Servers > Security >Encryption Keys.
2. Click Master Keys.
3. Click the Name field of the master key, then click the drop-down arrow.
4. (Optional) To change the master key:
a) Select Change Password.b) Enter the old and new passwords, and confirm the new password.
Note: If a key has key copies, you cannot modify the key to encrypt it with the systemencryption password.
5. (Optional) To set the master key, select Supply Password, and confirm it on the nextscreen.
6. (Optional) To delete the master key, select Delete, and confirm it on the next screen.
7. (Optional) To regenerate the master key:
a) Select Regenerate.b) Enter the old and new passwords, and confirm the new password.
Manage and Monitor
410
See also• Creating a Master Key on page 408
• Dual Control and Split Knowledge on page 411
• Master Key Properties on page 409
Dual Control and Split KnowledgeUse SAP Control Center to manage dual-control and split-knowledge encryption.
You can use a combination of system keys at the database level, called the master key and thedual-master key. You must have sso_role or keycustodian_role to create the master key anddual master key. The master key and the dual master key must have different owners.
With SAP Control Center, you can provide passwords for the master keys using the SupplyPassword option for encryption keys. You can also use the Execute SQL option to provide thepassword using SQL. The passwords to both these keys are not stored in the database.
Master and dual-master keys act as key encryption keys (KEKs), and protect other keys, suchas column encryption keys and service keys. Once created, master and dual-master keysbecome the default protection method for column encryption keys. There can only be onemaster and one dual-master key for a database.
The dual-master key is needed only for dual control of column encryption keys. Once themaster key is created, it replaces the system encryption password as the default key encryptionkey for user-created keys.
A composite key, comprising the master key and dual-master key, provides dual control andsplit-knowledge security for all user-created keys. Alternately, you can create a composite keyusing the master key and the column encryption key’s password. When master and dual-master keys are configured in a database, the combination is used to encrypt passwords whenyou issue create table, alter table or select into commands specifying dual control.
See also• Master Key Properties on page 409
• Creating a Master Key on page 408
• Modifying, Regenerating, and Deleting a Master Key on page 410
• Executing SQL Statements on page 220
Creating a Column Encryption KeyCreate a column encryption key using a specified encryption method.
1. In the left pane of the Administration Console, expand ASE Servers > Security >Encryption Keys.
2. Click Column Encryption Keys.
3. Select New.
Manage and Monitor
SAP Control Center for SAP Adaptive Server Enterprise 411
You see the Add Column Encryption Key wizard.
4. Select the server and database where the encryption key is being defined.
5. Select the key owner.
6. Enter an encryption key name.
7. Select these parameters for the Advanced Encryption Standard (AES) encryptionalgorithm:
• Key length – choose 128, 192, or 256, depending on the level of security you need.• Default key – select this key as the default key to allow users to create encrypted
columns without specifying the key.• Encryption method – select one of:
• User-defined password – provide a password and confirm it. Select With dualcontrol to encrypt with the master key and a user-defined password.
• Master key – enable encryption using the master key. Select With dual control toencrypt with the master key and a user-defined password.
Note: If you select dual control, the master key must already exist in the database,and you must supply the master key password.
• System encryption password – enable encryption using the system encryptionpassword.
8. Select the initialization vector to be either random (the default) or null. Use initializationvector padding to increase the security of encrypted data by increasing the cryptographicvariance of the cipher text.
9. Select the pad value to be either random or null (the default). If pad is set to random, thedatatype padding is used when the length is smaller than one block.
10. (Optional) Click Summary to verify your selected options.
See also• Modifying and Deleting a Column Encryption Key on page 414
• Executing SQL Statements on page 220
• Modifying, Regenerating, and Deleting a Master Key on page 410
• Column Encryption Keys Properties on page 412
Column Encryption Keys PropertiesProperties of column encryption keys and key copies.
Click the Name field of the column encryption key, then click the drop-down arrow and selectProperties.
Manage and Monitor
412
Pages Properties
General • Name – change the name of the encryption key.
• Change Owner – change the owner of the encryption key.
• Default – select this key as the default key to allow users to create encrypted columnswithout specifying the key.
• Key recovery – indicates if this key has a recovery copy.
• Init vector – use the initialization vector padding to increase the security of encryp-ted data by increasing the cryptographic variance of the cipher text.
• Pad – if pad is set to random, the datatype padding is used when the length is less thanone block.
Key Cop-ies
• Assignees and other information about keys – list the types of passwords and as-signees for the key, and information about whether the key is recoverable.
• Assignees and other information about key copies – the general properties of keycopies, including database, owner, assignee, and type of password.
• Key-copy management:
• Create a new key copy.
• Delete a key copy.
ObjectPermis-sions
• Grantees and other object information – list the grantees and grantee types for thekey, and information whether select is granted.
• Permissions – modify permissions to users, groups, or roles.
Depend-encies
Encrypted columns – list the columns encrypted by this key, and their databases andtables.
See also• Creating a Column Encryption Key on page 411
• Modifying and Deleting a Column Encryption Key on page 414
• Executing SQL Statements on page 220
• Modifying, Regenerating, and Deleting a Master Key on page 410
Creating a Key CopyCreate key copies specifying an encryption method.
1. In the left pane of the Administration Console, expand ASE Servers > Security >Encryption Keys.
2. Click Column Encryption Keys.
3. Click the Name field of the column encryption key, then click the drop-down arrow andselect Properties.
Manage and Monitor
SAP Control Center for SAP Adaptive Server Enterprise 413
4. Click Key Copies.
5. Select New.You see the Add Key Copy wizard.
6. Enter the password for the base key.
7. Enter the assignee for the key copy. The assignee cannot be the key owner.
8. (Optional) Designate this key copy as the recovery-key copy.
9. Select one of these encryption methods for the key copy:
• User-defined password – provide a password and confirm it.• Login password – enable encryption using the login password.• System encryption password – enable encryption using the system encryption
password.
10. (Optional) Click Summary to verify your selected options.
Modifying and Deleting a Column Encryption KeyChange the encryption key, with the option of adding dual control.
1. In the left pane of the Administration Console, expand ASE Servers > Security >Encryption Keys.
2. Click Column Encryption Keys.
3. Click the Name field of the column encryption key, then click the drop-down arrow.
4. (Optional) To change the encryption key:
a) Select Change Password.b) Select one of these methods to encrypt the key:
• Using a user-defined password – enter the old and new passwords, and confirm thenew password. If With dual control is selected, both the master key and user-defined password are used to encrypt the column encryption key. Both master anddual-master keys are used for encryption if both exist in the database.
• Using the master key – the server encrypts your key using the master key.• Using the system encryption password – the server encrypts your key using the
system encryption password. Before choosing this option, ensure that a systemencryption password exists in your database.
(Optional) Select With dual control to use master and dual-master keys to control thesecurity of your column encryption keys.
5. (Optional) To set the column encryption key, select Supply Password, and confirm it onthe next screen.
6. (Optional) To delete the column encryption key, select Delete, and confirm it on the nextscreen.
See also• Creating a Column Encryption Key on page 411
Manage and Monitor
414
• Executing SQL Statements on page 220
• Modifying, Regenerating, and Deleting a Master Key on page 410
• Column Encryption Keys Properties on page 412
Creating a Database Encryption KeyCreate a database encryption key using a specified encryption method.
Prerequisites
Before you can create a database encryption key (DEK):
• Verify that you have a valid SAP ASE encryption feature license (ASE_ENCRYPTION)• Create a key encryption key (KEK). This can be a master key or dual master key; these both
protect the database encryption key (DEK). See Using Database-Level Master and DualMaster Keys in the Encrypted Columns Users Guide.
• Set the sp_configure enable encrypted columns configuration parameter.• Ensure that you have the appropriate privileges. With:
• Granular permissions enabled – you must have permission to execute managedatabase encryption key to create a database encryption key.
• Granular permissions disabled – you must have sso_role, keycustodian_role, orexecute permission on the create encryption key command.
Task
1. In the left pane of the Administration Console, expand ASE Servers > Security >Encryption Keys
2. Click Database Encryption Keys
3. Select New
4. In the Introduction screen, select:
• The server where the encryption key is being defined• The key ownerThese fields are cannot be modified if you do not have:• Any servers enabled for database encryption• A master key for the master database in your selected server
5. On the Encryption Key Name screen, enter a database encryption key name.
6. On the Algorithm screen, select with dual master key if there is a dual master key in themaster database.
7. (Optional) Click Summary to verify your settings:
• Key name• Key length – 256.• Encrypted by – master key.
Manage and Monitor
SAP Control Center for SAP Adaptive Server Enterprise 415
• Initialization vector – random.• Encrypted by dual_control(master key + dual master key) – if you
selected with dual master key on the Algorithm screen.
See also• Manage Encryption Keys on page 406
• Dual Control and Split Knowledge on page 411
Database Encryption Keys PropertiesProperties of database encryption keys.
Click the Name field of the database encryption key, then click the drop-down arrow and selectProperties.
Pages Properties
General • Name – change the name of the encryption key.
• Type – indicates that this is a database encryption key.
• Database – indicates what database the encryption key is for. The default ismaster, since the database encryption key is created only in the masterdatabase.
• Owner – you can change the owner of the encryption key if you have changepermission.
• Creation date – shows when the encryption key was created.
• ID – shows the ID number of the encryption key.
• Key length (bits) – shows the key length, in bits. The only valid value is 256.
• Key algorithm – shows the algorithm. For database encryption keys, the only validvalue is AES.
• Initialization vector – shows the initialization vector for the database encryptionkey. The only valid value is "random."
• Encrypted by – indicates that the database encryption key was created by themaster key. If you used a dual-master key, to create the database encryption keywith dual control selected, you can change the setting if you have change permis-sion.
Object Per-missions
• Grantees and other object information – list the grantees and grantee types for thekey, and information whether select is granted.
• Permissions – modify permissions to users, groups, or roles.
Dependen-cies
Encrypted databases – list the databases encrypted by this key.
Manage and Monitor
416
Granting Encryption Permissions to a Role, User, or GroupGrant permission to access the encryption key.
1. In the left pane of the Administration Console, expand ASE Servers > Security >Encryption Keys.
2. Click either:
• Column Encryption Keys – to grant permissions for the column encryption key.• Database Encryption Keys – to grant permissions for the database encryption key.
3. Click the Name field of the column encryption key, then click the drop-down arrow andselect Object Permissions.
4. Click Grant to allow other users, groups, or roles to access the encryption key.You see the Grant Permission wizard.
5. Select one of users, groups, or roles for access to the encryption key.
6. Select the grantee from the list of possible users, groups, or roles.
7. Select the key permissions to be granted.
8. (Optional) Click Summary to verify your selected options.
Modifying a Database Encryption KeyChange or delete the database encryption key using SAP Control Center.
1. In the left pane of the Administration Console, expand ASE Servers > Security >Encryption Keys.
2. Click Database Encryption Keys.
3. Click the Name field of the database encryption key, then click the drop-down arrow andselect Properties.
4. (Optional) Change these database encryption key properties:
• Name – the name of the database encryption key.• Owner – users who can own the database encryption key.• (Optional) With dual master key – select this option to use dual control.
Deleting an Encryption KeyUse SAP Control Center to delete encryption keys.
1. In the left pane of the Administration Console, expand ASE Servers, then select Security> Encryption Keys.
2. Click the Name field of the encryption key, then click the drop-down arrow and selectDelete.
3. Confirm the deletion.
4. Click Finish.
Manage and Monitor
SAP Control Center for SAP Adaptive Server Enterprise 417
Generate DDL for an Encryption KeyUse SAP Control Center to generate a DDL script for encryption keys.
PrerequisitesYou must have Select Any System Catalog privilege on the database where theencryption key resides to generate DDL scripts for encryption keys.
Task
1. In the left pane of the Administration Console, expand ASE Servers, then select Security> Encryption Keys.
2. Click the Name field of the encryption key, then click the drop-down arrow and selectGenerate DDL.
3. (Optional) Click Save to export and save the DDL statement.
You can save the DDL in an external file on your local file system.
Manage Login ProfilesYou can manage login accounts with login profiles that define attributes for individual logins,a subset of logins, or all logins.
A login profile is a collection of attributes that are specific to login accounts. You can managelogin accounts attributes by creating login profiles and associating the profile with a loginaccount. You can manage attributes for many login accounts by defining a login profile as: thedefault for all login accounts, a subset of login accounts, or individual login accounts.
Note: Login profiles are supported in multiple-server or a single-server environments.
When you create or modify a login profile, you can:
• Assign a default database and default language• Assign an authentication mechanism• Track the last login• Define a stale login inactivity period• Execute a login script
Login profiles attributes are associated with login accounts using this precedence:
1. Attribute values from a login profile that is bound to the login2. Attribute values from a default login profile3. Values that have been specified using sp_passwordpolicy under these circumstances:
• A default login profile does not exist• A login profile has not been defined and bound to the account• The login profile is set to be ignored
Manage and Monitor
418
4. The default value for the attribute
Creating a Login ProfileCreate a login profile to manage attributes of login accounts.
Note: Only a system security officer can create, modify, or delete login profiles.
1. In the left pane of the Administration Console, expand ASE Servers > Security > LoginProfiles.
2. Select New.The Add Login Profile wizard appears.
3. On the Introduction window, select one or more servers on which to create the loginprofile.
If you create multiple login profiles on different servers, the names of the login profiles arethe same on all servers. However, the login profiles on each server can have differentdefault databases, default languages, or authentication mechanisms.
4. On the Login Profile Name window, enter the name of the login profile to create.
5. (Optional) Select:
a) With attributes derived from an existing login account – to transfer existing loginaccount values to a new login profile.
b) As default for all login accounts – for the new login profile to be the default for alllogin accounts on the selected servers.
6. (Optional) On the Default Database window, click Specify default database to choose adatabase to be used as the default for the login profile. Select one of:
• Use common default database for the login profile on all servers, then select thedefault database.The list of available of databases depends on the databases that are common on allservers that have been selected. If there are no servers on this list, there are no commondatabases available.
• Use default database for the login profile on individual server, then select thedefault database.
7. (Optional) On the Default Language window, select Specify default language to choose alanguage to be used as the default for the login profile. Select one of:
• Use common default language for the login profile on all servers, then select thedefault language.us_english is the default language, but you can install locale character sets. Theadditional installed languages and the default language constitute the list of availablelanguages.
• Use default language for the login profile on individual server, then select thedefault language.
Manage and Monitor
SAP Control Center for SAP Adaptive Server Enterprise 419
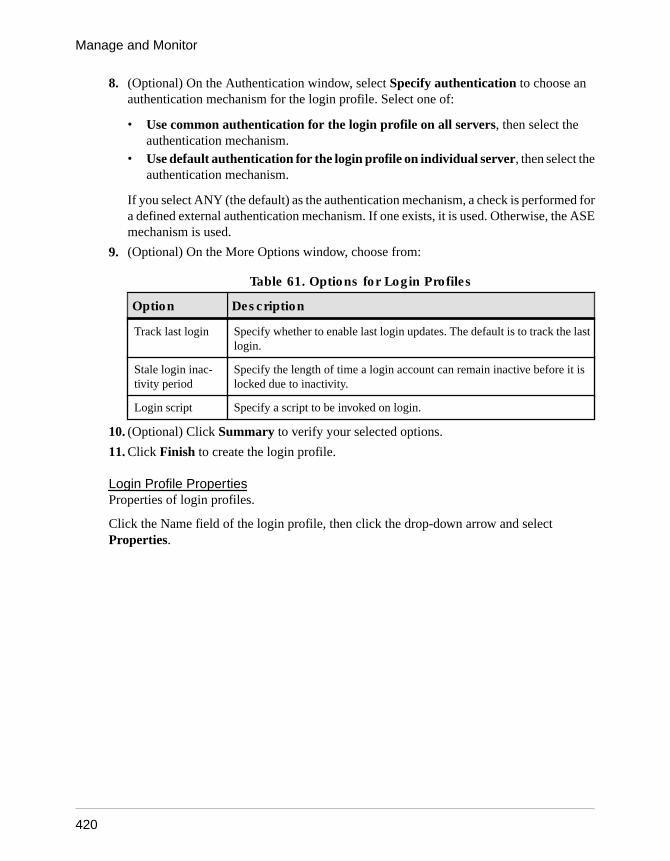
8. (Optional) On the Authentication window, select Specify authentication to choose anauthentication mechanism for the login profile. Select one of:
• Use common authentication for the login profile on all servers, then select theauthentication mechanism.
• Use default authentication for the login profile on individual server, then select theauthentication mechanism.
If you select ANY (the default) as the authentication mechanism, a check is performed fora defined external authentication mechanism. If one exists, it is used. Otherwise, the ASEmechanism is used.
9. (Optional) On the More Options window, choose from:
Table 61. Options for Login Profiles
Option Description
Track last login Specify whether to enable last login updates. The default is to track the lastlogin.
Stale login inac-tivity period
Specify the length of time a login account can remain inactive before it islocked due to inactivity.
Login script Specify a script to be invoked on login.
10. (Optional) Click Summary to verify your selected options.
11. Click Finish to create the login profile.
Login Profile PropertiesProperties of login profiles.
Click the Name field of the login profile, then click the drop-down arrow and selectProperties.
Manage and Monitor
420

Pages Properties
General • Default database – if not specified, the master database.
• Default language – if not specified, us_english is the default.
• Authentication – specify the external authentication mechanism:
• ANY
• ASE
• KERBEROS
• LDAP
• PAM
If you select ANY (the default) as the authentication mechanism, a check is performedfor a defined external authentication mechanism. If one exists, it is used. Otherwise, theASE mechanism is used.
• Track last login – specify whether to enable last login updates. The default is to track thelast login.
• Stale login inactivity period – specify the length of time a login account can remaininactive before it is locked due to inactivity.
• Login script – specify a script to be invoked on login.
Logins Displays the login accounts that are bound to the selected login profile.
Roles You can add or remove roles that have been granted to the selected login profile.
Removing Roles Granted to a Login ProfileRemove roles from login profiles.
Prerequisites
To grant or revoke predicated privileges, set the configuration parameter enable predicateprivileges to 1.
Task
1. In the left pane of the Administration Console, expand ASE Servers > Security > LoginProfiles.
2. Click the Name field of the login profile, then click the drop-down arrow and selectProperties.
3. In the left pane, click Roles.
4. Select a role and click Remove.
Manage and Monitor
SAP Control Center for SAP Adaptive Server Enterprise 421
Granting Roles to a Login ProfileAdd roles to a login profile.
Prerequisites
To grant or revoke predicated privileges, set the configuration parameter enable predicateprivileges to 1.
Task
1. In the left pane of the Administration Console, expand ASE Servers > Security > LoginProfiles.
2. Click the Name field of the login profile, then click the drop-down arrow and selectProperties.
3. In the left pane, click Roles.
4. In the right pane, click Add.You see the Add Roles to Login Profile window.
5. (Optional) Click With activation predicate and enter an expression for the activationpredicate.
6. (Optional) Select Active By Default to indicate the role must be automatically activatedon login.
Deleting a Login ProfileUse SAP Control Center to drop a login profile.
1. In the left pane of the Administration Console, expand ASE Servers > Security > LoginProfiles.
2. Click the Name field of the login profile, then click the drop-down arrow and selectDelete.
3. (Optional) From the Confirm Delete Login Profile window, select Drop with override toforcefully drop login profiles that are bound to login accounts. Login accounts that arebound to the deleted login profile are reassigned to the default login profile.
4. (Optional) Select Preview to view the properties of the login profile.
Displaying Logins Assigned to a Login ProfileDisplay login profiles and the bindings of login accounts to login profiles.
1. In the left pane of the Administration Console, expand ASE Servers > Security > LoginProfiles.
2. Click the Name field of the login profile, then click the drop-down arrow and selectProperties.
Manage and Monitor
422
3. Select Login.
You can find additional details about the login profile in the General and Roles propertiesoptions.
Transferring Login Attributes to a Login ProfileUse attributes of an existing login account to create a login profile.
1. In the left pane of the Administration Console, expand ASE Servers > Security > LoginProfiles.
2. Click the Name field of the login profile, then click the drop-down arrow and selectProperties.
3. Select New.You see the Create Login Profile wizard.
4. On the Introduction window, select one or more servers on which to create the loginprofile.
5. Enter the name of the new login profile.
If you are creating login profiles on different servers, a login profile is created on eachserver. All the login profiles have the same name, but can have different attributes.
6. Select With attributes derived from an existing login account.
7. (Optional) Click As default for all login accounts to set the new login profile or profiles asthe default for all login accounts on the selected servers.
8. (Optional) On the Select Login Name window, select the login account from which toderive attributes. Select one of:
• Use common login on all servers, then select the login account.The list of available of login accounts is based on login accounts that are common on allof the servers that have been selected. An empty list indicates that there are no commonlogin accounts.A login profile is created on each server, based on the attributes of the common loginaccount. The name of the login profile is the same on each server.
• Use login account on individual server, then select the login accounts.A login profile is created on each server, based on the attributes from different loginaccounts. The name of the login profile is the same on each server.
Manage LoginsEach SAP ASE user must have a login account that is identified by a unique login name and apassword.
Note: Only a system security officer can create, modify, or delete login accounts.
To access a server, users must have a login account with a unique name and password. When alogin account is added to one or more servers, the account is given a unique system user ID,which identifies the users regardless of the server being used. Once a login account is created,
Manage and Monitor
SAP Control Center for SAP Adaptive Server Enterprise 423
a user account is created for users to access individual database. Login profiles can beassociated with a login account to manage attributes such as the default database, defaultlanguage, authentication mechanism, tracking the login, setting inactivity periods, andinvoking login scripts.
The options for managing login accounts are:
• Grant roles to logins• Map users to logins• Map client users to logins• Assign login profiles to login accounts• Lock login accounts• Expire login accounts• Set the number of failed logins• Configure passwords parameters at the server level• Change the password for a specific login
Creating a LoginThe system security officer (SSO) creates a login account for each user.
Note: Only a system security officer can create, modify, or delete login accounts.
1. In the left pane of the Administration Console, expand ASE Servers > Security >Logins.
2. Select New.You see the Add Login wizard.
3. On the Introduction window, select one or more servers on which to create a loginaccount.
4. On the Login Name window, enter a name for the login account you want to create, thenenter a password.
5. (Optional) Enter a full name for the account.Specifying a full name for the account allows easier identification of the account owner.
6. On the Login Profile window, choose whether to use a login profile and designate theservers on which the login profile will be used. Choose one of:
• Ignore login profile in creating login.• Use common login profile for the login on the servers with version 15.7 and above.
This option is available only when an existing login profile is available.• Use different login profile for the login on individual server. This option is available
only when an existing login profile is available.
7. (Optional) On the Default Database window, select a default database for the loginaccount. Choose one of:
• Use common default database for the login on all servers
Manage and Monitor
424
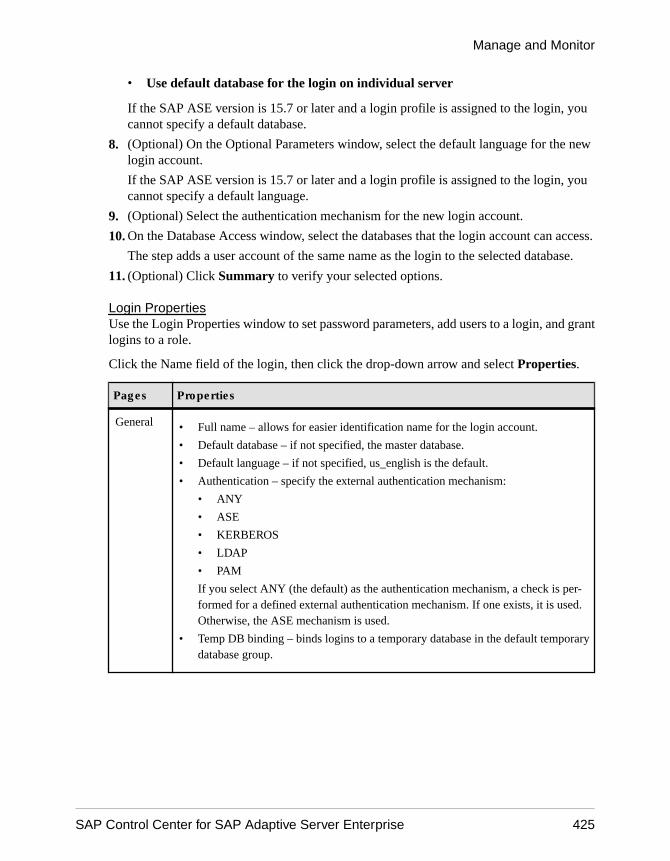
• Use default database for the login on individual server
If the SAP ASE version is 15.7 or later and a login profile is assigned to the login, youcannot specify a default database.
8. (Optional) On the Optional Parameters window, select the default language for the newlogin account.
If the SAP ASE version is 15.7 or later and a login profile is assigned to the login, youcannot specify a default language.
9. (Optional) Select the authentication mechanism for the new login account.
10. On the Database Access window, select the databases that the login account can access.
The step adds a user account of the same name as the login to the selected database.
11. (Optional) Click Summary to verify your selected options.
Login PropertiesUse the Login Properties window to set password parameters, add users to a login, and grantlogins to a role.
Click the Name field of the login, then click the drop-down arrow and select Properties.
Pages Properties
General • Full name – allows for easier identification name for the login account.
• Default database – if not specified, the master database.
• Default language – if not specified, us_english is the default.
• Authentication – specify the external authentication mechanism:
• ANY
• ASE
• KERBEROS
• LDAP
• PAM
If you select ANY (the default) as the authentication mechanism, a check is per-formed for a defined external authentication mechanism. If one exists, it is used.Otherwise, the ASE mechanism is used.
• Temp DB binding – binds logins to a temporary database in the default temporarydatabase group.
Manage and Monitor
SAP Control Center for SAP Adaptive Server Enterprise 425
Pages Properties
Parame-ters
• Invalid password or NULL – specify a new password for the login account.
• Password has expired – the account owner must change the login password.
• Account is locked – lock the login account.
• Password last set – indicates when the password was changed.
• Max failed logins – the number of login attempts allowed, after which the account islocked.
• Min password length – minimum password length required for the login account.
• Password expiration intervals (days) – the number of days until the password ex-pires.
• CPU time accumulated – the amount of CPU time used by the login.
• I/O time accumulated – the amount of time spent processing input and outputoperations used by the login.
DatabasesOwned
Displays a list of databases that are owned by the specified login account.
Roles Displays a list of roles granted to the account. You can add or remove roles that have beengranted to the selected login. Click Predicates to view the role activation SQL text forpredicates.
Users Displays a list of users or aliases that are bound to the account. You can add or removeusers to or from the account.
ClientMapping
Displays a list of client users mapped to the account. You can add or remove client usersto or from the account.
Managing Users Mapped to LoginsUse SAP Control Center to map users to logins.
1. From the Administration Console, select ASE Servers > Security > Logins.
2. Click the Name field of the login profile, then click the drop-down arrow and selectProperties.
3. Select Users.
Users currently mapped to the selected login account are listed in the Name field.
• To add a user to the login account, click Add, then select one or more users.• To remove users from a login account, select a user and select Remove.• To see the attributes and properties assigned to a user, select Properties.
See also• Assigning Login Profiles to a Login on page 429• Granting Roles to a Login on page 427
Manage and Monitor
426
• Removing Roles from a Login on page 427
Removing Roles from a LoginRemove roles granted to login accounts.
Prerequisites
To grant or revoke predicated privileges, set the configuration parameter enable predicateprivileges to 1.
Task
1. In the left pane of the Administration Console, expand ASE Servers > Security >Logins.
2. Click the Name field of the login, then click the drop-down arrow and selectProperties.
3. In the left pane, click Roles.
4. Select a role and click Remove.
See also• Managing Users Mapped to Logins on page 426
• Assigning Login Profiles to a Login on page 429
• Granting Roles to a Login on page 427
Granting Roles to a LoginAdd roles to login accounts.
Prerequisites
To grant or revoke predicated privileges, set the configuration parameter enable predicateprivileges to 1.
Task
1. In the left pane of the Administration Console, expand ASE Servers > Security >Logins.
2. Click the Name field of the login, then click the drop-down arrow and selectProperties.
3. In the left pane, click Roles.
4. In the right pane, click Add.You see the Add Roles to Login window.
5. Select one or more roles.
Manage and Monitor
SAP Control Center for SAP Adaptive Server Enterprise 427
6. (Optional) Click With activation predicate and enter an expression for the activationpredicate.
7. (Optional) Select Active By Default to indicate the role must be automatically activatedon login.
See also• Managing Users Mapped to Logins on page 426
• Assigning Login Profiles to a Login on page 429
• Removing Roles from a Login on page 427
Configuring Login Password PropertiesUse SAP Control Center to manage password properties for login accounts.
1. Select ASE Servers > Security > Logins > Configure Login Passwords.
2. In the Servers Selection window, select one or more servers on which to configurepasswords.
3. Click Configuration.
4. Select options from the table to configure password complexity options.
5. (Optional) In the Expiration window, select Expire login accounts to specify that theowners of the login accounts must change the login password.
• (Optional) To expire passwords for specific login accounts or login accounts matchingspecified characters, select Expire passwords.
• (Optional) To expire passwords that have not been changed by a specified date, selectExpire stale passwords and specify a cut-off date.
6. In the Lock Inactive Accounts window, check Lock inactive login accounts to lockedaccounts due to inactivity.To lock inactive accounts, enable last login updates on the Configuration screen must bechecked.
7. Specify the number of days the account can remain inactive before the account is locked.
See also• Changing a Login Password on page 428
• Displaying Login Account Properties on page 429
Changing a Login PasswordChange passwords and parameters for login accounts using the Administration Console.
1. In the left pane of the Administration Console, expand ASE Servers > Security >Logins.
Manage and Monitor
428
2. Click the Name field of the login, then click the drop-down arrow and selectProperties.
3. (Optional) Set the Min password length, Max failed logins, and Password expirationinterval.
4. Click Change Password.
5. Enter the current password for the login and the new password.
See also• Configuring Login Password Properties on page 428
Displaying Login Account PropertiesUse SAP Control Center to view or modify properties of login accounts.
1. In the left pane of the Administration Console, expand ASE Servers > Security >Logins.
2. Click the Name field of the login, then click the drop-down arrow and selectProperties.
3. Select:
• General – to view or change settings for defaults.• Parameters – to view or change password and login settings.• Databases Owned – to view databases owned by the selected login.• Roles – to view roles granted to the login.• Users – to view users mapped to the login.• Clients – to view clients mapped to the login.
See also• Configuring Login Password Properties on page 428
Assigning Login Profiles to a LoginManage attributes of login accounts by assigning a login profile to an individual login, a subsetof logins, or all logins.
Note: Login Profiles are supported in SAP ASE 15.7 and higher
1. In the left pane of the Administration Console, expand ASE Servers > Security >Logins.
2. Click the Name field of the login, then click the drop-down arrow and selectProperties.
3. Select General.
4. Unselect Ignore login profile.
Manage and Monitor
SAP Control Center for SAP Adaptive Server Enterprise 429
5. Select the name of the login profile.The available login profiles are those that have been defined on the same server as theselected login account.
See also• Managing Users Mapped to Logins on page 426
• Granting Roles to a Login on page 427
• Removing Roles from a Login on page 427
Deleting a LoginUse SAP Control Center to delete logins.
1. In the left pane of the Administration Console, expand ASE Servers > Security >Logins.
2. Click the Name field of the login, then click the drop-down arrow and select Delete.
3. Confirm the deletion.
4. Click Finish.
Manage GroupsYou can grant permissions to groups to access database objects.
The database owner grants and revokes group encryption permissions.
When SAP ASE is configured to restrict decrypt permission, only the system security officercan grant decrypt permission on tables, columns, and views. When restricted decryptpermission is turned off, the system security officer or the database owner can grant decryptpermission.
Command permissions allow the group to execute create commands. Database owners canassign command permissions to groups in the databases they own.
Note: SAP Control Center reports only explicitly granted and revoked permissions as well asthose that users obtain by belonging to a group. For example, SAP Control Center does notreport on permissions associated with a login role.
Creating a GroupCreate a group in a database.
1. In the Administration Console view, select ASE Servers > Security > Groups.
2. Select New.You see the Add Group wizard.
3. Select the server and database in which to create a group.
4. Enter the name of the group to create.
5. (Optional) Click Summary to verify your selected options.
Manage and Monitor
430
See also• Creating a User on page 435
• Transferring Ownership of a Database Object on page 436
Adding or Removing Users to or from a GroupAdd users to a group, look at the users who belong to a group, or remove users from a group.
1. In the left pane of the Administration Console, expand ASE Servers > Security >Groups.
2. Click the Name field of the group, then click the drop-down arrow and selectProperties.Users who are currently granted to the selected group are listed in the right pane.
3. (Optional) To add users to a group, click Add and select the users from the Add User toGroup view.
4. (Optional) To remove users from a group, select the users from the General view and clickRemove.
Group PropertiesUse the Group Properties window to assign users to a group and change command or objectpermissions.
Click the Name field of the group, then click the drop-down arrow and select Properties.
Pages Properties
General • Users – to change the users in your group, use:
• Add – select a user and click Apply to add the user to your group.
• Remove – select a user and click Apply.
CommandPermission
Permissions to create database objects – select the permissions to grant the group:
• Create default
• Create procedure
• Create rule
• Create table
• Create view
• Create encryption key
Object Per-mission
Permissions to access database objects – use the Grant Permission and Revoke Per-mission wizards to grant or revoke permissions and predicated privileges for specificdatabase operations such as insert, delete, update, reference, and decrypt for specificdatabase objects. Decrypt permission is visible if encrypted columns is enabled in theserver. Transfer permission is visible if incremental transfer is enabled on the table.
Manage and Monitor
SAP Control Center for SAP Adaptive Server Enterprise 431
Setting Command Permissions for a GroupGrant or revoke command permissions to or from a group.
1. In the left pane of the Administration Console, expand ASE Servers > Security >Groups.
2. Click the Name field of the group, then click the drop-down arrow and selectProperties.
3. Select a group for which to grant or revoke command permissions.
4. From the left pane, click Command Permissions.Commands that are currently granted to the selected group are listed in the right pane.
5. (Optional) To grant commands, click Grant and select the commands from the GrantCommand Permission view.
6. (Optional) To revoke commands, select the commands from the Command Permissionview and click Revoke.
Granting Object Permissions to a GroupGrant database object permissions to a group.
Prerequisites
To grant or revoke predicated privileges, set the configuration parameter enable predicateprivileges to 1.
Task
1. In the left pane of the Administration Console, expand ASE Servers > Security >Groups.
2. Click the Name field of the group, then click the drop-down arrow and selectProperties.
3. In the left pane, click Object Permissions.
4. In the right pane, click Grant to grant access permissions to the listed group.You see the Grant Permission wizard.
5. In the Welcome window, select an object type on which to grant permissions, then clickNext or Objects and Options.
6. Select the object and options on which to grant permissions, then click Next orPermission.
7. Select the type of permissions to grant.
8. (Optional) Click With predicated privileges.
a) Enter the where search conditions.
Manage and Monitor
432
The search conditions act as a row filter, with the where clause specified on select,update, or delete. Search conditions can use all syntax allowed in a generic whereclause.
b) (Optional) Enter a correlation name.The correlation name is an alias for referencing columns in the selected table within thewhere clause.
c) (Optional) Enter a name for the predicate.
9. (Optional) Click Preview to see the SQL statements for your command.
Revoking Object Permissions from a GroupRevoke database object permissions from a group.
Prerequisites
To grant or revoke predicated privileges, set the configuration parameter enable predicateprivileges to 1.
Task
1. In the left pane of the Administration Console, expand ASE Servers > Security >Groups.
2. Click the Name field of the group, then click the drop-down arrow and selectProperties.
3. In the left pane, click Object Permissions.
4. In the right pane, click the drop-down list and select an object type to filter the objects.
5. Select the object from which to revoke permission, then click Revoke.In the Revoke Permissions window, each type of permission is listed. Currently grantedpermissions are indicated by a check mark. Permissions with predicated privileges areindicated by the letter "p" under a check mark.
6. Choose one of:
• Click Revoke all permission to revoke all permissions shown in the RevokePermissions window.
• Click individual cells to revoke the currently granted permissions. The cell changes toshow an "x," indicating that the permission type is no longer granted.
• Click Revoke all permission with predicate to revoke all permissions with apredicate shown in the Revoke Permissions window.
Click Predicate to see details of the predicate search condition.
7. (Optional) Click Preview to see the SQL statements for your command.
Manage and Monitor
SAP Control Center for SAP Adaptive Server Enterprise 433
Granting Privileges to a GroupGrant system privileges to groups at the server or database level.
Prerequisites
See Enabling Granular Permissions.
Task
1. In the left pane of the Administration Console, expand ASE Servers > Security >Groups.
2. Click the Name field of the group, then click the drop-down arrow and selectProperties.
3. In the left pane, click Privileges.
4. In the right pane, click Grant.
5. Select the privilege from the Grant Privileges menu that you want to grant to the group andclick OK.
Only those privileges that are specific to groups and privileges that you are allowed to grantappear in the Grant Privileges menu.
See also• Revoking Privileges from a Group on page 434
• Enabling Granular Permissions on page 236
Revoking Privileges from a GroupRevoke system privileges from groups.
1. In the left pane of the Administration Console, expand ASE Servers > Security >Groups.
2. Click the Name field of the group, then click the drop-down arrow and selectProperties.
3. In the left pane, click Privileges.
4. Select one or more privileges and click Revoke.
See also• Granting Privileges to a Group on page 434
• Enabling Granular Permissions on page 236
Manage and Monitor
434
Deleting a GroupUse SAP Control Center to delete groups.
1. In the Administration Console view, select ASE Servers > Security > Groups.
2. Click the Name field of the login, then click the drop-down arrow and select Delete.
3. Confirm the deletion.
4. Click Finish.
Generate DDL for a GroupUse SAP Control Center to generate a DDL script for groups.
1. In the Administration Console view, select ASE Servers > Security > Groups.
2. Click the Name field of the group, then click the drop-down arrow and select GenerateDDL.
3. (Optional) Click Save to export and save the DDL statement.
You can save the DDL in an external file on your local file system.
Manage UsersYou can grant database object access to users, and change ownership of database objects usingthe Users Properties wizard.
Creating a UserCreate a new user in a database.
1. In the Administration Console view, select ASE Servers > Security > Users.
2. Select New.You see the Add User wizard.
3. Select the server and database in which to create a user.
4. Select the login to which the user will be assigned.
5. Enter the name of the user to create.
6. (Optional) Select Create guest user to create a guest user with limited privileges.
7. (Optional) Select a group to which the user will be assigned.
8. (Optional) Click Summary to verify your choices for creating the user.
See also• Creating a Group on page 430
• Transferring Ownership of a Database Object on page 436
Manage and Monitor
SAP Control Center for SAP Adaptive Server Enterprise 435
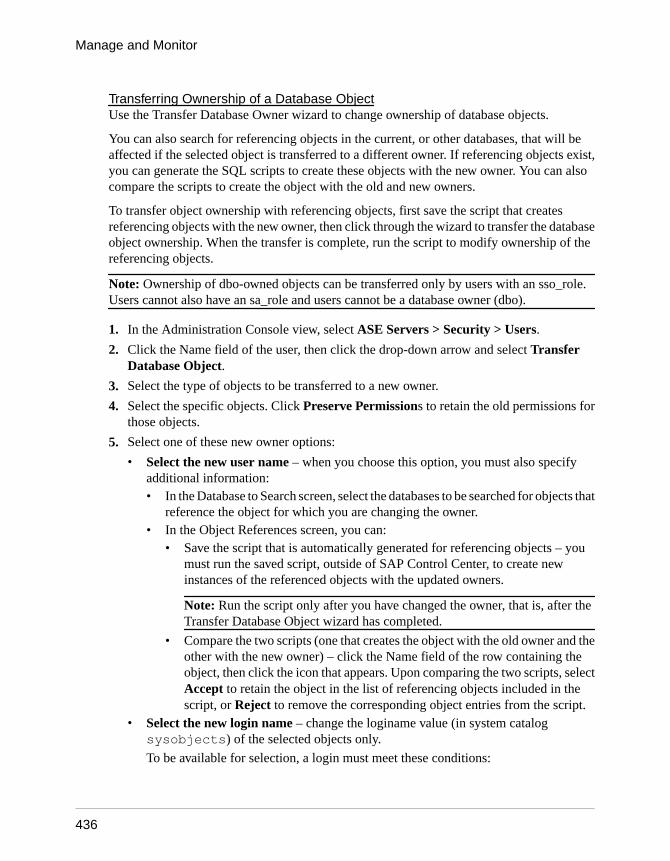
Transferring Ownership of a Database ObjectUse the Transfer Database Owner wizard to change ownership of database objects.
You can also search for referencing objects in the current, or other databases, that will beaffected if the selected object is transferred to a different owner. If referencing objects exist,you can generate the SQL scripts to create these objects with the new owner. You can alsocompare the scripts to create the object with the old and new owners.
To transfer object ownership with referencing objects, first save the script that createsreferencing objects with the new owner, then click through the wizard to transfer the databaseobject ownership. When the transfer is complete, run the script to modify ownership of thereferencing objects.
Note: Ownership of dbo-owned objects can be transferred only by users with an sso_role.Users cannot also have an sa_role and users cannot be a database owner (dbo).
1. In the Administration Console view, select ASE Servers > Security > Users.
2. Click the Name field of the user, then click the drop-down arrow and select TransferDatabase Object.
3. Select the type of objects to be transferred to a new owner.
4. Select the specific objects. Click Preserve Permissions to retain the old permissions forthose objects.
5. Select one of these new owner options:
• Select the new user name – when you choose this option, you must also specifyadditional information:• In the Database to Search screen, select the databases to be searched for objects that
reference the object for which you are changing the owner.• In the Object References screen, you can:
• Save the script that is automatically generated for referencing objects – youmust run the saved script, outside of SAP Control Center, to create newinstances of the referenced objects with the updated owners.
Note: Run the script only after you have changed the owner, that is, after theTransfer Database Object wizard has completed.
• Compare the two scripts (one that creates the object with the old owner and theother with the new owner) – click the Name field of the row containing theobject, then click the icon that appears. Upon comparing the two scripts, selectAccept to retain the object in the list of referencing objects included in thescript, or Reject to remove the corresponding object entries from the script.
• Select the new login name – change the loginame value (in system catalogsysobjects) of the selected objects only.
To be available for selection, a login must meet these conditions:
Manage and Monitor
436
• If the current owner is guest, the login name must be valid, cannot have sa_role, andthe login suid cannot be in the sysusers or sysaliases tables.
• If the current owner is dbo, the login name must be valid, the login suid must beeither in the sysaliases table that is aliased to the dbo, or have sa_role.
• If the current owner is anyone else other than guest or dbo, the login name must bevalid and the login suid must be in the sysaliases table that is aliased to thecurrent owner.
6. (Optional) Click Summary to verify your selected options.
See also• Creating a Group on page 430
• Creating a User on page 435
Users PropertiesUse the Users Properties window to modify permissions to access database objects andcommands and modify login aliases.
Click the Name field of the user, then click the drop-down arrow and select Properties.
Pages Properties
General Select from the list of groups to change the group for the user.
Objects Owned Select the database objects that your user owns in this database.
Command Permis-sions
Permissions to create database objects.
Object Permis-sions
Permissions to access database objects – use the Grant Permission and RevokePermission wizards to grant or revoke permissions and predicated privileges forspecific database operations such as insert, delete, update, reference, anddecrypt for specific database objects such as tables, procedures, and so on.
Login Aliases Logins – to change login aliases:
• Add – select a login and click Apply to add the login to your user alias.
• Remove – select the login from the list, and click Remove, then Apply.
Granting Object Permissions to a UserGrant database object permissions to a user.
Prerequisites
To grant or revoke predicated privileges, set the configuration parameter enable predicateprivileges to 1.
Manage and Monitor
SAP Control Center for SAP Adaptive Server Enterprise 437
Task
1. In the left pane of the Administration Console, expand ASE Servers > Security >Users.
2. Click the Name field of the user, then click the drop-down arrow and select Properties.
3. In the left pane, click Object Permissions.
4. In the right hand pane, click Grant to grant permissions to the listed user.
5. In the Welcome window, select an object type on which to grant permissions, then clickNext or Objects and Options.
6. Select the object and options on which to grant permissions, then click Next orPermission.
7. Select the type of permissions to grant.
8. (Optional) Click With predicated privileges.
a) Enter the where search conditions.The search conditions act as a row filter, with the where clause specified on select,update, or delete. Search conditions can use all syntax allowed in a generic whereclause.
b) (Optional) Enter a correlation name.The correlation name is an alias for referencing columns in the selected table within thewhere clause.
c) (Optional) Enter a name for the predicate.
9. (Optional) Click Preview to see the SQL statements for your command.
Revoking Object Permissions from a UserRevoke database object permissions from a user.
Prerequisites
To grant or revoke predicated privileges, set the configuration parameter enable predicateprivileges to 1.
Task
1. In the left pane of the Administration Console, expand ASE Servers > Security >Users.
2. Click the Name field of the user, then click the drop-down arrow and select Properties.
3. In the left pane, click Object Permissions.
4. In the right pane, click the drop-down list and select an object type to filter the objects.
5. Select the object from which to revoke permission, then click Revoke.
Manage and Monitor
438
In the Revoke Permissions window, each type of permission is listed. Currently grantedpermissions are indicated by a check mark. Permissions with predicated privileges areindicated by the letter "p" under a check mark.
6. Choose one of:
• Click Revoke all permission to revoke all permissions shown in the RevokePermissions window.
• Click individual cells to revoke the currently granted permissions. The cell changes toshow an "x," indicating that the permission type is no longer granted.
• Click Revoke all permission with predicate to revoke all permissions with apredicate shown in the Revoke Permissions window.
Click Predicate to see details of the predicate search condition.
7. (Optional) Click Preview to see the SQL statements for your command.
Granting Privileges to a UserGrant system privileges to users at the server or database level.
Prerequisites
To grant or revoke privileges, set the configuration parameter enable granular permissions to1.
Task
1. In the left pane of the Administration Console, expand ASE Servers > Security >Users.
2. Click the Name field of the user, then click the drop-down arrow and select Properties.
3. In the left pane, click Privileges.
4. In the right pane, click Grant.Only those privileges that are specific to the selected users and privileges that you areallowed to grant appear in the Grant Privileges menu.
5. Select one or more privileges from the Grant Privileges menu and click OK.
See also• Revoking Privileges from a User on page 439• Enabling Granular Permissions on page 236
Revoking Privileges from a UserRevoke system privileges from users.
Prerequisites
See Enabling Granular Permissions.
Manage and Monitor
SAP Control Center for SAP Adaptive Server Enterprise 439
Task
1. In the left pane of the Administration Console, expand ASE Servers > Security >Users.
2. Click the Name field of the user, then click the drop-down arrow and select Properties.
3. In the left pane, click Privileges.
4. Select one or more privileges and click Revoke.
See also• Granting Privileges to a User on page 439
• Enabling Granular Permissions on page 236
Setting Command Permissions for a UserGrant or revoke command permissions to or from a user.
1. In the left pane of the Administration Console, expand ASE Servers > Security >Users.
2. Click the Name field of the user, then click the drop-down arrow and select Properties.
3. From the left pane, click Command Permissions.Commands that are currently granted to the selected user are listed in the right pane.
4. (Optional) To grant commands, click Grant and select the commands from the GrantCommand Permission view.
5. (Optional) To revoke commands, select the commands from the Command Permissionview and click Revoke.
Deleting a UserUse SAP Control Center to delete users.
1. In the Administration Console view, select ASE Servers > Security > Users.
2. Click the Name field of the group, then click the drop-down arrow and select Delete.
3. Confirm the deletion.
4. Click Finish.
Manage RolesManage permissions to multiple login accounts by creating roles and granting roles to logins.
Note: Only a system security officer can create, modify, or delete roles.
A system security officer can define and create roles as a convenient way to grant and revokepermissions to several logins. A role can be granted only to a login account or another role.
When creating or modifying roles, these options are available:
Manage and Monitor
440
• Choose permission access for object types or command type• Expire passwords• Set mutually exclusive roles• Set role hierarchy• Assign logins to roles• Set passwords
PermissionsPermissions granted to roles override permissions granted to users or groups. For example, ifJohn is granted the role of system security officer and individual permissions of salesaccounts, he can still access the sales accounts if his individual permissions are revokedbecause his role permissions override his user permissions.
Hierarchical RolesA system security officer can define role hierarchies such that a role can be assigned to anotherrole. For example, the chief financial officer role might contain both the financial analyst andthe salary administrator roles.
Mutually Exclusive RolesRoles can be defined to be mutually exclusive. The supported exclusive types are:
• Membership – one user cannot be granted two different roles. For example, the systemadministrator and system security officer roles can be defined as mutually exclusive formembership; that is, one user cannot be granted both roles.
• Activation – one user cannot activate, or enable, two different roles. For example, a usermight be granted both the senior auditor and the equipment buyer roles, but is notpermitted to have both roles enabled simultaneously.
Expiring a Role PasswordUse SAP Control Center to change a password for a role.
1. Select ASE Servers > Security > Roles > Configure Role Passwords.
2. On the Servers Selection window, select one or more servers on which to expire rolepasswords.
3. Select Expiration.
4. Select Expire role passwords to specify that the password must be changed for the role.Choose one of:
• Expire passwords – to expire passwords for specific roles or roles matching specifiedcharacters.
• Expire stale passwords – to expire passwords that have not been changed by aspecified date.
Manage and Monitor
SAP Control Center for SAP Adaptive Server Enterprise 441
Creating a RoleYou can grant login to one or more roles. You can also grant roles to other roles.
1. In the left pane of the Administration Console, expand ASE Servers > Security >Roles.
2. Select New.
3. In the Introduction window, select one or more servers on which to create a role.
4. Click Role Name.
5. Specify the name of the role to create.
6. (Optional) Click Set password and enter a password for the role.
7. (Optional) Click Summary to verify your selected options.
Restoring System RolesReturn system role privilege to the default system-defined values.
Prerequisites
See Enabling Granular Permissions.
You must have the manage security permissions system privilege to restore system roles andmanage server permissions to restore sa_role privileges.
Task
1. In the left pane of the Administration Console, expand ASE Servers > Security >Roles.
2. Click the Name field of the role, then click the drop-down arrow and select RestoreSystem Role.
These system roles can be restored: sa_role, sso_role, oper_role, replication_role,keycustodian_role.
3. Choose to restore the privileges for the selected role on the current database or for allonline databases and click OK.
See also• Enabling Granular Permissions on page 236
Role PropertiesUse the Role Properties window to set passwords, assign logins to roles, set permissions,hierarchically map roles, and set roles as mutually exclusive.
Click the Name field of the role, then click the drop-down arrow and select Properties.
Manage and Monitor
442
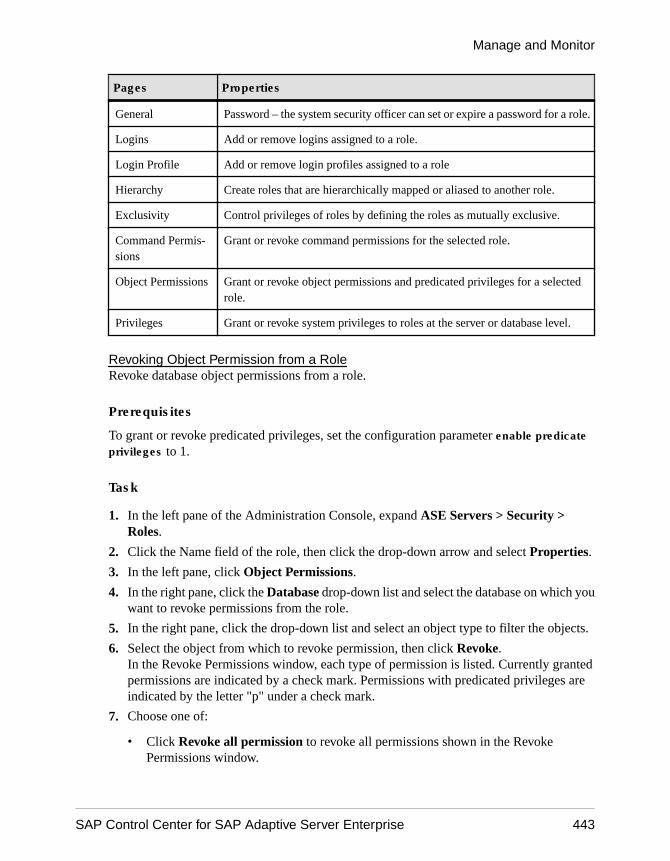
Pages Properties
General Password – the system security officer can set or expire a password for a role.
Logins Add or remove logins assigned to a role.
Login Profile Add or remove login profiles assigned to a role
Hierarchy Create roles that are hierarchically mapped or aliased to another role.
Exclusivity Control privileges of roles by defining the roles as mutually exclusive.
Command Permis-sions
Grant or revoke command permissions for the selected role.
Object Permissions Grant or revoke object permissions and predicated privileges for a selectedrole.
Privileges Grant or revoke system privileges to roles at the server or database level.
Revoking Object Permission from a RoleRevoke database object permissions from a role.
Prerequisites
To grant or revoke predicated privileges, set the configuration parameter enable predicateprivileges to 1.
Task
1. In the left pane of the Administration Console, expand ASE Servers > Security >Roles.
2. Click the Name field of the role, then click the drop-down arrow and select Properties.
3. In the left pane, click Object Permissions.
4. In the right pane, click the Database drop-down list and select the database on which youwant to revoke permissions from the role.
5. In the right pane, click the drop-down list and select an object type to filter the objects.
6. Select the object from which to revoke permission, then click Revoke.In the Revoke Permissions window, each type of permission is listed. Currently grantedpermissions are indicated by a check mark. Permissions with predicated privileges areindicated by the letter "p" under a check mark.
7. Choose one of:
• Click Revoke all permission to revoke all permissions shown in the RevokePermissions window.
Manage and Monitor
SAP Control Center for SAP Adaptive Server Enterprise 443

• Click individual cells to revoke the currently granted permissions. The cell changes toshow an "x," indicating that the permission type is no longer granted.
• Click Revoke all permission with predicate to revoke all permissions with apredicate shown in the Revoke Permissions window.
Click Predicate to see details of the predicate search condition.
8. (Optional) Click Preview to see the SQL statements for your command.
See also• Setting Command Permissions for a Role on page 449
• Managing Mutually Exclusive Roles on page 447
• Granting Object Permissions to a Role on page 444
Granting Object Permissions to a RoleUse object access permissions to regulate the use of specific commands that access specificdatabase objects.
Prerequisites
To grant or revoke predicated privileges, set the configuration parameter enable predicateprivileges to 1.
Task
1. In the left pane of the Administration Console, expand ASE Servers > Security >Roles.
2. Click the Name field of the role, then click the drop-down arrow and select Properties.
3. In the left pane, click Object Permissions.
4. In the right pane, click Grant to grant permissions to the listed role.
5. In the Welcome window, select an object type on which to grant permissions, then clickNext or Objects and Options.
6. Select the object and options on which to grant permissions, then click Next orPermission.
7. Select the type of permissions to grant.
8. (Optional) Click With predicated privileges.
a) Enter the where search conditions.The search conditions act as a row filter, with the where clause specified on select,update, or delete. Search conditions can use all syntax allowed in a generic whereclause.
b) (Optional) Enter a correlation name.
Manage and Monitor
444
The correlation name is an alias for referencing columns in the selected table within thewhere clause.
c) (Optional) Enter a name for the predicate.
9. (Optional) Click Preview to see the SQL statements for your command.
See also• Setting Command Permissions for a Role on page 449
• Managing Mutually Exclusive Roles on page 447
• Revoking Object Permission from a Role on page 443
Revoking Privileges from a RoleRevoke system privileges from roles.
Prerequisites
See Enabling Granular Permissions.
Task
1. In the left pane of the Administration Console, expand ASE Servers > Security >Roles.
2. Click the Name field of the role, then click the drop-down arrow and select Properties.
3. In the right pane, click the Database drop-down list and select the database from whichyou want to revoke privileges.
4. Select one or more privileges and click Revoke.
See also• Granting Privileges to a Role on page 445
• Enabling Granular Permissions on page 236
Granting Privileges to a RoleGrant system privileges to roles at the server or database level.
Prerequisites
See Enabling Granular Permissions.
Task
1. In the left pane of the Administration Console, expand ASE Servers > Security >Roles.
2. Click the Name field of the role, then click the drop-down arrow and select Properties.
Manage and Monitor
SAP Control Center for SAP Adaptive Server Enterprise 445
3. In the left pane of the Properties view, click Privileges.
4. In the right pane, click the Database drop-down list and select the database on which youwant to grant privileges to the role.
You can grant server-wide privileges or database privileges in the master database. Server-wide privileges must be granted in the master database.
5. In the right pane, click Grant.Only those privileges that are specific to the selected role and privileges that you areallowed to grant will appear in the Grant Privileges menu.
6. Select the privilege from the Grant Privileges menu and click OK.
7. Click Preview to see the SQL statements.
The following is an example of the SQL preview for granting server-wide privileges. Auser with permission to the master database grants the server-wide privilege "OnlineDatabase" to a database called "myDatabase."
set quoted_identifier ongoUSE mastergogrant Online Database on myDatabase to mon_rolegoUSE mastergoset quoted_identifier offgo
See also• Revoking Privileges from a Role on page 445
• Enabling Granular Permissions on page 236
Creating Role HierarchyTo manage permissions or privileges for one or more logins, you can grant roles hierarchically.
1. In the left pane of the Administration Console, expand ASE Servers > Security >Roles.
2. Click the Name field of the role, then click the drop-down arrow and select Properties.The selected role is the top-level role. Additional roles can be assigned to the top-levelrole.
Manage and Monitor
446
3. Click Hierarchy.
4. From the Role Properties window, click Assign.
5. From the Add a Role Assignment window, select one or more roles.You see a folder, which you can expand to see the roles assigned to the top-level role. Thetop-level role is automatically granted all permission and privileges of the lower-levelroles.
Managing Mutually Exclusive RolesTo prevent users from being granted different roles, or activating two different roles, usemutually exclusive roles.
Use mutually exclusive roles to control or restrict permissions or privileges.
1. In the left pane of the Administration Console, expand ASE Servers > Security >Roles.
2. Click the Name field of the role, then click the drop-down arrow and select Properties.
3. From the Roles Properties window, select Exclusivity.
You see a list of roles that are mutually exclusive to the selected role.
• To add mutually exclusive roles, click Add , then select one or more roles.• (Optional) Select Membership to indicate that one user cannot be granted two
different roles.• (Optional) Select Activation to indicate that one user cannot activate, or enable, two
different roles.• To remove mutually exclusive roles, select a role and click Remove.
See also• Setting Command Permissions for a Role on page 449
• Granting Object Permissions to a Role on page 444
• Revoking Object Permission from a Role on page 443
Removing Login Profiles Assigned to a RoleRemove login profiles currently assigned to a role.
1. In the left pane of the Administration Console, expand ASE Servers > Security >Roles.
2. Click the Name field of the role, then click the drop-down arrow and select Properties.
3. In the left pane, click Login Profiles.
4. Select one or more login profiles.
5. Click Remove.
Manage and Monitor
SAP Control Center for SAP Adaptive Server Enterprise 447
Assigning Login Profiles to a RoleAssign a login profile to a role.
Prerequisites
To grant or revoke predicated privileges, set the configuration parameter enable predicateprivileges to 1.
Task
1. In the left pane of the Administration Console, expand ASE Servers > Security >Roles.
2. Click the Name field of the role, then click the drop-down arrow and select Properties.
3. In the left pane, click Login Profile.You see the Add Roles to Login Profile window.
4. In the right pane, click Add.
5. Select one or more login profiles.
6. (Optional) Click With activation predicate and enter an expression for the activationpredicate.
7. (Optional) Select Active By Default to activate the login profile automatically on login.
Removing Logins Assigned to a RoleRemove login accounts assigned to roles.
1. In the left pane of the Administration Console, expand ASE Servers > Security >Roles.
2. Click the Name field of the role, then click the drop-down arrow and select Properties.
3. In the left pane, click Logins.
4. Select one or more logins.
5. Click Remove.
Assigning Logins to a RoleAssign one or more logins to a role.
Prerequisites
To grant or revoke predicated privileges, set the configuration parameter enable predicateprivileges to 1.
Manage and Monitor
448
Task
1. In the left pane of the Administration Console, expand ASE Servers > Security >Roles.
2. Click the Name field of the role, then click the drop-down arrow and select Properties.
3. In the left pane, click Logins.
4. In the right pane, click Add.You see the Add Login to Role window.
5. Select one or more logins.
6. (Optional) Click With activation predicate and enter an expression for the activationpredicate.
7. (Optional) Select Active By Default to activate the login account automatically on login.
Setting Command Permissions for a RoleManage login account privileges by granting command permissions to a selected role.
1. In the left pane of the Administration Console, expand ASE Servers > Security >Roles.
2. Select one or more roles on which to set command permissions, then click the drop-downarrow and select Properties.
3. From the Roles Properties window, select Command Permissions.
4. Select a database on which the selected roles will have permission to execute commands.
• To grant command permissions for the selected roles, click Grant and select one ormore commands.
• To revoke command permissions for the selected roles, select a command and clickRevoke.
See also• Managing Mutually Exclusive Roles on page 447
• Granting Object Permissions to a Role on page 444
• Revoking Object Permission from a Role on page 443
SegmentsUse segments to improve performance and provide the System Administrator or DatabaseOwner increased control over the placement, size, and space usage of database objects.
Monitor SegmentsMonitor the segments used by SAP ASE databases.
Manage and Monitor
SAP Control Center for SAP Adaptive Server Enterprise 449
Determining the Space Used by a Table on a SegmentFind reserved space figures for tables on a segment.
You can sort tables by reserved size, which simplifies planning for a reorganization or rebuild.
1. In the Perspective Resources view, select the server to monitor, click the drop-down arrow,and select Monitor.
2. In the left pane, select Segments.
You can also display the Segments window by clicking a Segments link on anotherwindow in the Adaptive Server Enterprise monitor.
3. (Optional for cluster configurations) Select Global for information about segments on theglobal database. Select Local for information about segments on local, temporarydatabases.
4. In the Segments table, select the segment to monitor.
5. Click the Used Tables tab.The tab displays the name and amount of space reserved, in kilobytes, for each table.
6. To sort a table by reserved size, select the table and click Space Reserved.
For more information on segments, see the chapter on creating and using segments in theSystem Administration Guide, Volume 2.
See also• Extending a Segment in SAP ASE on page 450
• Displaying Information About Segments Used by a Database on page 292
• Segment Statistics and Details on page 451
Extending a Segment in SAP ASEExtend a segment on a specific device.
1. In the Perspective Resources view, select the server to monitor, click the drop-down arrow,and select Monitor.
2. Select Segments.You see the Segments table.
3. Select the segment to configure.
4. Select the Extend menu item from the context menu.You see the Extend dialog, which includes the name, size, and unused size of the device.
5. Click the device name onto which to extend the segment.
Note: The device list is empty if the selected segment is using all the devices configured onthe server. In this case, add a new device to the server to extend the segment.
6. Click OK.
Manage and Monitor
450
See also• Determining the Space Used by a Table on a Segment on page 450• Displaying Information About Segments Used by a Database on page 292• Segment Statistics and Details on page 451
Segment Statistics and DetailsInterpret segment information for SAP ASE.
The Segment Statistics and Details screen displays information about segments. In clusterconfigurations, select the Global tab to see information about segments on global databases.Select the Local tab to see information about segments on local, temporary databases,grouped by cluster instances.
The Segments screen displays information about all segments for this server. The charts onthis screen are populated by data from the collection_ase_all_client_kpis, covering the currenttrend period.
The Segments table lists each segment used by this server and provides the name of thedatabase that uses the segment, the database’s size and unused space on the segment, and thenumber of thresholds.
The tabs at the bottom of the screen show information about the selected segment.
Table 62. Tabs on the Segments Screen
Details Displays two charts:
• A pie chart shows current space usage on the selected segment. Includes usedand unused space, in megabytes, and as percentages of the available space onthe segment. The title above the chart indicates the total available space.
• Space Usage – a line graph shows changes in space usage on the selectedsegment over the current trend period.
Devices Used Displays devices included in the selected segment and the size of each device, inmegabytes. Click a name in the Device column to switch to the Devices moni-toring view’s information for that device.
Used Tables Displays tables allocated on the selected segment and the reserved size of eachtable, in kilobytes.
Used Indexes Displays indexes allocated on the selected segment and the table associated witheach index.
For more information on segments, see the chapter on creating and using segments in theSystem Administration Guide, Volume 2.
See also• Determining the Space Used by a Table on a Segment on page 450
Manage and Monitor
SAP Control Center for SAP Adaptive Server Enterprise 451
• Extending a Segment in SAP ASE on page 450• Displaying Information About Segments Used by a Database on page 292• Setting Up Statistics Collection on page 128
Manage SegmentsCreate, delete, and generate data definition language for segments.
Displaying SegmentsDisplay a summary of available segments—labels that point to one or more database devices—in your databases.In the Administration Console, select and expand ASE Servers > Space Management >Segments.You see a list of existing segments and their properties:• Name – the name of the database device.• Server – the name of the server in which the database device resides.• Database – the database in which the segment resides. This column includes both system-
provided databases (such as model) and user-created databases.
• Last Chance – whether a last-chance stored procedure such as sp_thresholdaction isadded to the segment. See Managing Free Space with Thresholds in the SystemAdministration Guide.
• Size – displays the size of the database, in megabytes.• Used – displays the amount of memory used by the database, in megabytes.• Free – displays the amount of unused memory in the database.
Creating a SegmentUse SAP Control Center to create a new segment—a label that points to one or more databasedevices—in a database.
1. In the left pane of the Administration Console, expand ASE Servers > SpaceManagement > Segments.
2. Click the arrow and select New.
3. Complete these wizard pages:
• Introduction – select the server and database in which to create the segment.• Segment Name – enter the name of the segment to create.• Device Selection – select the database device to use for the segment.
4. (Optional) Click Preview to view the SQL statement that is created by this wizard.
5. Click Finish.
Segment PropertiesUse the Segment Properties window to modify database devices, tables, and thresholds.
Click the Name field of the segment, then click the drop-down arrow and select Properties.
Manage and Monitor
452
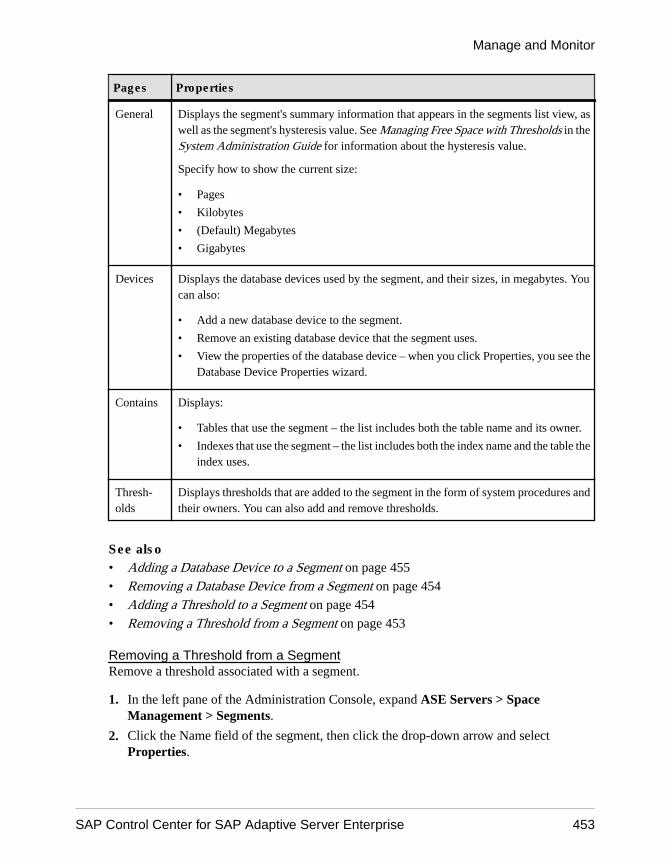
Pages Properties
General Displays the segment's summary information that appears in the segments list view, aswell as the segment's hysteresis value. See Managing Free Space with Thresholds in theSystem Administration Guide for information about the hysteresis value.
Specify how to show the current size:
• Pages
• Kilobytes
• (Default) Megabytes
• Gigabytes
Devices Displays the database devices used by the segment, and their sizes, in megabytes. Youcan also:
• Add a new database device to the segment.
• Remove an existing database device that the segment uses.
• View the properties of the database device – when you click Properties, you see theDatabase Device Properties wizard.
Contains Displays:
• Tables that use the segment – the list includes both the table name and its owner.
• Indexes that use the segment – the list includes both the index name and the table theindex uses.
Thresh-olds
Displays thresholds that are added to the segment in the form of system procedures andtheir owners. You can also add and remove thresholds.
See also• Adding a Database Device to a Segment on page 455
• Removing a Database Device from a Segment on page 454
• Adding a Threshold to a Segment on page 454
• Removing a Threshold from a Segment on page 453
Removing a Threshold from a SegmentRemove a threshold associated with a segment.
1. In the left pane of the Administration Console, expand ASE Servers > SpaceManagement > Segments.
2. Click the Name field of the segment, then click the drop-down arrow and selectProperties.
Manage and Monitor
SAP Control Center for SAP Adaptive Server Enterprise 453

3. Click Thresholds. Any existing threshold-related stored procedures for this segmentappear in the table, listed by procedure name, owner, and the amount of free space, inmegabytes.
4. Select the stored procedure to delete, and click Remove.
5. Click Apply after each stored procedure you delete, and OK when you are finished.
See also• Adding a Database Device to a Segment on page 455
• Removing a Database Device from a Segment on page 454
• Adding a Threshold to a Segment on page 454
• Segment Properties on page 452
Adding a Threshold to a SegmentCreate a threshold to monitor space on a database segment.
1. In the left pane of the Administration Console, expand ASE Servers > SpaceManagement > Segments.
2. Click the Name field of the segment, then click the drop-down arrow and selectProperties.
3. Click Thresholds. Any existing threshold-related stored procedures for this segmentappear in the table, listed by procedure name, owner, and the amount of free space, inmegabytes.
4. Click Add to view the Add New Threshold wizard page.
5. Choose a stored procedure, and specify its free-space threshold in pages, kilobytes,megabytes (the default), or gigabytes.
6. Click Apply after each new stored procedure you add, and OK when you are finished.
See also• Adding a Database Device to a Segment on page 455
• Removing a Database Device from a Segment on page 454
• Removing a Threshold from a Segment on page 453
• Segment Properties on page 452
Removing a Database Device from a SegmentRemove a database device that is associated with a segment.
1. In the left pane of the Administration Console, expand ASE Servers > SpaceManagement > Segments.
2. Click the Name field of the segment, then click the drop-down arrow and selectProperties.
Manage and Monitor
454
3. In the Devices wizard page, click Remove.
4. Select the database device to remove.
See also• Adding a Database Device to a Segment on page 455
• Adding a Threshold to a Segment on page 454
• Removing a Threshold from a Segment on page 453
• Segment Properties on page 452
Adding a Database Device to a SegmentUse the Segment Properties wizard to add an existing database device to a segment.
1. In the left pane of the Administration Console, expand ASE Servers > SpaceManagement > Segments.
2. Click the Name field of the segment, then click the drop-down arrow and selectProperties.
3. In the Devices dialog, click Add.
4. Choose an existing database device from the list to the add to the segment.
See also• Removing a Database Device from a Segment on page 454
• Adding a Threshold to a Segment on page 454
• Removing a Threshold from a Segment on page 453
• Segment Properties on page 452
Deleting a SegmentUse SAP Control Center to delete segments.
Note: You can delete only the segments you created; the Delete option is not available forsegments created by other users.
1. In the left pane of the Administration Console, expand ASE Servers > SpaceManagement > Segments.
2. Click the Name field of the segment, then click the drop-down arrow and select Delete.
3. Confirm the deletion.
4. Click Finish.
Manage and Monitor
SAP Control Center for SAP Adaptive Server Enterprise 455
Generating DDL for a SegmentUse SAP Control Center to generate a DDL script for segments.
1. In the left pane of the Administration Console, expand ASE Servers > SpaceManagement > Segments.
2. Click the Name field of the segment, then click the drop-down arrow and select GenerateDDL.
3. (Optional) Click Save to export and save the DDL statement.
You can save the DDL in an external file on your local file system.
StatisticsAvailability and performance statistics can help you determine whether your systems arerunning as efficiently as possible.
Availability statistics are concerned with present conditions; they help you determine whethera system component you are monitoring (a server or a storage device, for example) is runningand functioning properly. Performance statistics are concerned with behavior of the samecomponents over time. You can use them to spot trends, identify problems or potentialproblems, and make plans.
SAP Control Center includes predefined key performance indicators (KPIs) for server that aregrouped into collections. KPIs such as Server Status, which serves as an availability statisticwhen it is fresh, also have long-term value as historical performance statistics.
Availability statistics appear on the heat chart and on the screens of the SAP Adaptive ServerEnterprise monitor for each server. The heat chart includes these KPIs:
• Server Status (up or down)• Server CPU Utilization• Number of Blocked Processes• Number of Suspended Processes
These KPIs are part of the default collection: collection_ase_availability.
Performance statistics appear on the statistics chart and on the screens of the SAP AdaptiveServer Enterprise monitor for each server. In the statistics chart, you expand folders in theStatistics tab to drill down to specific KPIs. See the KPI values as tables or graphs, andcompare them by displaying several KPIs together. These are the folders that contain KPIs youcan use to display data:
• Server Overview• Devices• Engines• Segments
Manage and Monitor
456
• Data Caches
Cluster configurations have these additional folders on the statistics chart:
• Cluster Instances• Cluster Workload• Logical Clusters• tempDBs Activity
To make specific KPIs available to the statistics chart and to the SAP Adaptive ServerEnterprise monitor screens that use them, in addition to the availability statistics scheduled bydefault, set up collection jobs in the scheduler for:
• collection_ase_histmon – the KPIs in this collection are available only in the statisticschart and for setting alerts.
• collection_ase_all_client_kpis – this collection is necessary to gather statistics forhistorical charts in the SAP Adaptive Server Enterprise monitor. The statistics are alsoavailable in the statistic chart and for setting alerts.
Several configuration options affect the collection and appearance of server data in SAPControl Center:
• Collection repeat interval – the frequency of data collection. Set the repeat interval on thecollection job in the scheduler. This option is set when the collection is scheduled, but maybe modified later.
• Screen refresh interval – the period between screen refreshes. Refreshing the screenredraws it with the latest available data. This option can be configured from the Settingswindow.
• Chart trend period – the period over which data appears in historical charts. You canconfigure this option in the Settings window.
See also• Executing SQL Statements on page 220
Interpreting StatisticsUnderstand the scope and freshness of server data in SAP Control Center.
Each server statistic presented in SAP Control Center has a scope:
• Delta – the number of occurrences since the last screen refresh. For example, the user logcache statistics on the Transactions screen are delta values.
• Rate – the number of occurrences over the given period of time. Device I/O is given as arate.
• Percentage or ratio – an amount, number, or rate stated as a proportion to a whole.Percentage statistics include CPU utilization, space usage on devices and segments, andcache hit rates. Ratios include cache volatility.
Manage and Monitor
SAP Control Center for SAP Adaptive Server Enterprise 457
• Count – a simple value; for example, the size of a database or cache in megabytes, or thenumber of partitions in a cache.
• Cumulative – the number of occurrences since the server started, or since the counterwrapped. On the Processes screen, you can set the Top 5 User Processes chart to displaythe five processes that use the most CPU, disk I/O, or network resources as rates or ascumulative values.
Note: When a server has been running for a long time, its statistical counters might wrap,which means they restart from zero. This most often affects cumulative statistics. Informationabout when or how many times a counter has wrapped is not available.
Most server statistics not otherwise labeled are presented as deltas since the last screenrefresh; rates, percentages, and cumulative numbers are labeled as such.
SAP Control Center displays statistics promptly. However, there are several factors that affectthe freshness of the data on the screens:
• The screen refresh interval, which you can set on the Settings screen.• The collection repeat interval, which you can set in the scheduler for each server collection• Network latency.
For more information about interpreting server statistics, see:
• Performance and Tuning Series: Improving Performance with Statistical Analysis• Performance and Tuning Series: Monitoring Adaptive Server with sp_sysmon• Performance and Tuning Series: Basics
Updating Statistics on a TableUse SAP Control Center to update column-related statistics, such as histograms and densities.
1. In the Administration Console view, select ASE Servers > Schema Objects > Tables >User Tables.
2. Click the Name field of the table, then click the drop-down arrow and select UpdateStatistics.
3. On the Command Type screen, select the update statistics command to run.
4. (Optional) On the Data Partitions screen, select Specify a data partition, if applicable,and indicate any data partitions. update statistics runs on all partitions if you do notspecify one. Click Next.
5. On the Columns screen, indicate whether:• To run update statistics on specific columns.• Histograms on all columns (the default).• To updates statistics in ordered column grouping. SAP ASE versions earlier than 15.7
ESD #2 support only ordered grouping statistics; the histograms option is unavailable.
6. On the Indexes screen (not available if you selected update all statistics on the CommandType tab, or specified any columns on the Columns tab), indicate any indexes on which to
Manage and Monitor
458
run update statistics. If you do not select any indexes, update statistics updates allindexes.
7. On the Index Partitions screen (visible when you select an index on the Indexes screen),indicate the index partition to update.
8. On the Hashing screen, select:• The type of hashing:
• Partial hashing – for columns that have 65536 or fewer unique values.• With hashing – for columns that have greater than 65536 unique values.• No hashing.
• A value for max resource granularity (which indicates the maximum percentage of thesystem’s resources a query can use), if applicable.
9. On the Histogram Tuning screen, set the histogram tuning factor. The size of thehistogram is established by multiplying the number of steps with the value for histogramtuning factor.
10. On the Sampling screen, specify whether to set sampling, and to what percentage.
11. On the Step Number screen, indicate whether to set the number of histogram steps, and ifso, how many.
12. On the Consumers screen, set the number of consumer processes to be used in parallelprocessing. The controls are enabled if the value for max parallel degree is 3 or greater.
13. On the DataChange Threshold screen, indicate whether to run update statistics when itreaches a data change threshold, and if so, the value of the threshold.
14. On the Summary screen, verify your selections.
15. Click Finish.
See also• Updating Statistics on an Index on page 460
• Updating Statistics for a Data Partition on page 461
Updating Statistics on Specific ColumnsCreating statistics on unindexed columns can improve the performance of many queries.Adding statistics for the minor columns of indexes and for unindexed columns that arefrequently used in search arguments can greatly improve the optimizer’s estimates.
1. In the Administration Console view, select ASE Servers > Schema Objects > Tables >User Tables.
2. Click the Name field of the table, then click the drop-down arrow and selectProperties.
3. In the left pane, click Columns.
4. Click the Name field of the column, then click the drop-down arrow and select UpdateStatistics.
Manage and Monitor
SAP Control Center for SAP Adaptive Server Enterprise 459
5. (Optional) On the Data Partitions screen of the Update Statistics wizard, select Specify adata partition, if applicable, and indicate any data partitions. update statistics runs on allpartitions if you do not specify one.
6. On the Hashing screen, select:• The type of hashing:
• Partial hashing – for columns that have 65536 or fewer unique values.• With hashing – for columns that have more than 65536 unique values.• No hashing.
• A value for max resource granularity (which indicates the maximum percentage of thesystem’s resources a query can use), if applicable.
7. On the Histogram Tuning screen, set the histogram tuning factor. The size of thehistogram is established by multiplying the number of steps with the value for histogramtuning factor.
8. On the Sampling screen, specify whether to set sampling, and to what percentage.
9. On the Step Number screen, indicate whether to set the number of histogram steps. Ifapplicable, enter the number.
10. On the Consumers screen, set the number of consumer processes to be used in parallelprocessing. The controls are enabled if the value for max parallel degree is 3 or greater.
11. On the Datachange Threshold screen, indicate whether to run update statistics when itreaches a data change threshold, and if so, the value of the threshold.
12. On the Summary screen, verify your selections.
13. Click Finish.
Updating Statistics on an IndexMaintaining indexes statistics can improve the performance of many queries.
1. In the Administration Console view, select ASE Servers > Schema Objects > Tables >User Tables.
2. Click the Name field of the table, then click the drop-down arrow and selectProperties.
3. In the left pane, click Indexes.
4. Click the Name field of the index, then click the drop-down arrow and select UpdateStatistics.
5. On the Command Type screen, select the update statistics command to run.
6. (Optional) On the Index Partitions screen, select the index partition to update.
7. (Optional) On the Hashing screen, select:• The type of hashing:
• Partial hashing – for columns that have 65536 or fewer unique values.• With hashing – for columns that have more than 65536 unique values.• No hashing.
Manage and Monitor
460
• A value for max resource granularity (which indicates the maximum percentage of thesystem’s resources a query can use), if applicable.
8. On the Histogram Tuning screen, set the histogram tuning factor. The size of thehistogram is established by multiplying the number of steps with the value for histogramtuning factor.
9. On the Sampling screen, specify whether to set sampling, and to what percentage.
10. On the Step Number screen, indicate whether to set the number of histogram steps, andhow many.
11. On the Consumers screen, set the number of consumer processes to be used in parallelprocessing. The controls are enabled if the value for max parallel degree is 3 or greater.
12. On the DataChange Threshold screen, indicate whether to run update statistics when itreaches a data change threshold, and if so, the value of the threshold.
13. On the Summary screen, verify your selections.
14. Click Finish.
See also• Updating Statistics on a Table on page 458
• Updating Statistics for a Data Partition on page 461
Updating Statistics for a Data PartitionMaintaining data partition statistics can improve the performance of many queries.
1. In the Administration Console view, select ASE Servers > Schema Objects > Tables >User Tables.
2. Click the Name field of the table, then click the drop-down arrow and selectProperties.
3. In the left pane, click Partitions.
4. Click the Name field of the partition, then click the drop-down arrow and select UpdateStatistics.
5. On the Command Type screen, select the update statistics command to run.
6. On the Hashing screen, select:• The type of hashing:
• Partial hashing – for columns that have 65536 or fewer unique values.• With hashing – for columns that have more than 65536 unique values.• No hashing.
• A value for max resource granularity (which indicates the maximumpercentage of the systems resources a query can use), if applicable.
7. On the Histogram Tuning screen, set the histogram tuning factor. The size of thehistogram is established by multiplying the number of steps with the value for histogramtuning factor.
Manage and Monitor
SAP Control Center for SAP Adaptive Server Enterprise 461
8. On the Sampling screen, specify whether to set sampling, and to what percentage.
9. On the Step Number screen, indicate whether to set the number of histogram steps, andhow many.
10. On the Summary screen, verify your selections.
11. Click Finish.
See also• Updating Statistics on a Table on page 458
• Updating Statistics on an Index on page 460
Updating Statistics on an Index PartitionMaintaining index partition statistics can improve the performance of many queries.
1. In the Administration Console view, select ASE Servers > Schema Objects > Tables >User Tables.
2. Click the Name field of the table, then click the drop-down arrow and selectProperties.
3. In the left pane, click Indexes.
4. Click the Name field of the table, then click the drop-down arrow and selectProperties.
5. In the left pane, click Index Partition.
6. Click the Name field of the index partition, then click the drop-down arrow and selectUpdate Statistics.
7. On the Command Type screen, select the update statistics command to run.
8. On the Hashing screen, select:• The type of hashing:
• Partial hashing – for columns that have 65536 or fewer unique values.• With hashing – for columns that have more than 65536 unique values.• No hashing.
• A value for max resource granularity (which indicates the maximum percentage of thesystem’s resources a query can use), if applicable.
9. On the Histogram Tuning screen, set the histogram tuning factor. The size of thehistogram is established by multiplying the number of steps with the value for histogramtuning factor.
10. On the Sampling screen, specify whether to set sampling, and to what percentage.
11. On the Step Number screen, indicate whether to set the number of histogram steps, andhow many.
12. On the Summary screen, verify your selections.
13. Click Finish.
Manage and Monitor
462

Deleting Statistics from a TableUse SAP Control Center to drop statistics for tables.
1. In the Administration Console view, select ASE Servers > Schema Objects > Tables >User Tables.
2. Click the Name field of the table, then click the drop-down arrow and select DeleteStatistics.
3. (Optional) On the Data Partitions screen, select Specify a data partition, if applicable,and indicate any data partitions. update statistics runs on all partitions if you do notspecify one. Click Next.
4. On the columns screen, click the columns from which to delete statistics.
5. Verify your selections on the Summary screen.
6. Click Finish.
Deleting Statistics from a ColumnUse SAP Control Center to drop statistics for specific columns.
1. In the Administration Console view, select ASE Servers > Schema Objects > Tables >User Tables.
2. Click the Name field of the table, then click the drop-down arrow and selectProperties.
3. In the left pane, click Columns.
4. Click the Name field of the column, then click the drop-down arrow and select DeleteStatistics.
5. On the Data Partitions screen, select Specify a data partition, if applicable, and indicateany data partitions. update statistics runs on all partitions if you do not specify one. ClickNext.
6. Verify your selections on the Summary screen.
7. Click Finish.
Deleting Statistics from a Data PartitionUse SAP Control Center to drop statistics for data partitions..
1. In the Administration Console view, select ASE Servers > Schema Objects > Tables >User Tables.
2. Click the Name field of the table, then click the drop-down arrow and selectProperties.
3. In the left pane, click Partitions.
4. Click the Name field of the partition, then click the drop-down arrow and select DeleteStatistics.
Manage and Monitor
SAP Control Center for SAP Adaptive Server Enterprise 463
5. On the Summary screen, verify your selections.
6. Click Finish.
SQL ActivityMonitor SQL queries on SAP ASE.
Monitoring SQL QueriesDisplay details about recently executed SQL queries.
1. In the Perspective Resources view, select the server to monitor, click the drop-down arrow,and select Monitor.
2. In the left pane, select SQL Activity.The SQL Activity screen lists queries executed during the current trend period, along withdetails, including each query’s server process identifier (spid), the login account thatexecuted the query, the kernel process identifier (KPID), batch identifier, and executionstatistics.
In cluster configurations, information in the Active SQLs table is grouped by clusterinstances.
3. Select a SQL query from the Active SQLs in Batch table.The SQL statement appears at the bottom of the screen.
Note: The SQL Activity screen displays SQL text for only the most recent collectioninterval.
See also• Executing SQL Statements on page 464
Executing SQL StatementsExecute SQL statements on one or more servers.
You can use the Execute SQL view to run any valid SQL statement, including queries andstored procedures. Anyone can launch a query; no permissions are required. However, if youdo not have authority to perform the actions in the query, SCC displays an error.
1. In the Administration Console, select one or more servers, click the drop-down arrow, andselect Execute SQL.
2. Enter the SQL statements.
SQL history is persistently saved on a login basis. You can select previous added SQLstatements or sort through a list of saved SQL statements by using the Previous SQL, SQLHistory, and Next SQL buttons.
SQL history is saved when the history has been changed from previously saved history.You can clear the history by clicking Clear SQL.
Manage and Monitor
464

3. Click Execute.
The query runs on all the servers you selected, and results appear in the bottom portion ofthe view. The view includes a results tab for each server. On the tabs:• A green check indicates a successful query.• A red X indicates an error. A tab with a red X also displays an error message.
See also• Monitoring SQL Queries on page 464
TablesUse SAP Control Center to create or modify tables and table objects.
Tables consist of columns and rows that contain data on a database. SAP ASE uses thefollowing types of tables:
• A system table stores information that allows the database to perform its services.• A user table stores and provides access to user data.• A proxy table accesses data on remote servers.
Note: System table definitions are not usually updated.
To plan a table’s design:
• Decide what columns you need in the table, and the datatype, length, precision, and scale,for each.
• Create any new user-defined datatypes before you define the table where they are to beused.
• Decide which column, if any, should be the IDENTITY column.• Decide which columns should and which should not accept null values.• Decide what integrity constraints or column defaults, if any, you need to add to the
columns in the table.• Decide whether you need defaults and rules, and if so, where and what kind.• Consider the relationship between the NULL and NOT NULL status of a column and
defaults and rules.• Decide what kind of indexes you need and where.
Creating a User or Proxy TableCreate a user or proxy table to store and provide access to user data.
A proxy table is a user table that allows you to access data in a remote table, view, remoteprocedure call, directory, or file. A proxy table has all the attributes of a user table, such ascolumns, indexes, and triggers, but it does not contain any data locally.
Note: Only a database owner or a user with create table permission can create a table.
Manage and Monitor
SAP Control Center for SAP Adaptive Server Enterprise 465
1. In the left pane of the Administration Console, expand ASE Servers > Schema Objects >Tables, then choose one of the following:
• User Tables• Proxy Tables
2. Select New.
3. On the Introduction window, select the server, database, and owner for the new table.
4. Enter a name for the table.
5. Enter the SQL statements for the new table and related table objects.
For example, this SQL statement creates a table called titles in the pubs2 database:
create table titles (title_id tid, title varchar(80) not null, type char(12), pub_id char(4) null, price money null, advance money null, royalty int null, total_sales int null, notes varchar(200) null, pubdate datetime, contract bit not null)
6. (Optional) Click Summary to review your selected options.
7. Click Finish to create the table.
Creating a ColumnAdd a column to an existing table.
1. In the left pane of the Administration Console, expand ASE Servers > Schema Objects >Tables, then choose one of the following:
• User Tables• Proxy Tables
2. Click the Name field of the table, then click the drop-down arrow and selectProperties.
3. In te left pane, click Columns.
4. Select New.
5. On the Column Name screen, enter the name of the column.
6. On the SQL Editor screen, modify the SQL statement for the selected table to include thenew column and related objects syntax.
7. (Optional) Click Summary to review your selected options.
Manage and Monitor
466
Creating an IndexAn index provides quick access to data in a table, based on the values in specified columns.
An index is created on one or more table columns and points to the place where the columndata is stored on disk. Indexes speed data retrieval and are useful for enforcing referentialintegrity. A table can have more than one index.
1. In the left pane of the Administration Console, expand ASE Servers > Schema Objects >Tables, then choose one of the following:
• User Tables• Proxy Tables
2. Click the Name field of the table, then click the drop-down arrow and selectProperties.
3. In the left pane, click Indexes.
4. Select New > Index.
5. On the Name screen, enter a name for the index.
6. On the Columns screen, select the columns to include in the index.
7. (Optional) Click Add index column expression.
a) Select Asc. or Desc. as the order of the index expression.b) (Optional) Enter a name for the expression.
8. On the Database Segment screen, select the database segment on which to place the index.
9. On the Database Cache screen, select a data cache for the index.
10. (Optional) On the Key Type screen, select either or both of:
• Make this index unique – If the index is unique, you can ignore duplicate keys in theDuplicate Keys/Row window.
• Make this index clustered – If the index is clustered, specify how you want the serverto handle requests to insert duplicate rows in a table in the Duplicate Keys/Rowwindow.
11. (Optional) On the Duplicate Key screen:
• Click Ignore duplicate keys to ignore duplicate keys rather than abort the transaction.
• Choose whether to allow or ignore duplicate rows in a table.
12. (Optional) On the Space Management screen:
a) Specify the percentage amount to fill a page when the index is created.b) Specify the number of rows allowed on pages.c) Specifying a ratio of empty pages to filled pages.
13. (Optional) On the Index Compression screen, specify whether or not to apply indexcompression.
Manage and Monitor
SAP Control Center for SAP Adaptive Server Enterprise 467
14. (Optional) On the Cache Strategy screen, specify the cache strategy when creating theindex:
• Most recently used replacement – reads new pages into the LRU end of the chain ofbuffers in cache. The pages are used and immediately flushed when a new page entersthe MRU end. This strategy is advantageous when a page is needed only once for aquery. It tends to keep such pages from flushing out other pages that can potentially bereused while still in cache.
• Large buffer prefetch – if memory pools for large I/O are configured for the cacheused by a table or an index, the optimizer can prefetch data or index pages byperforming large I/Os of up to eight data pages at a time. This prefetch strategy can beused on the data pages of a table or on the leaf-level pages of a nonclustered index. Bydefault, prefetching is enabled for all tables, indexes, and text or image objects. Settingthe prefetch option to off disables prefetch for the specified object.
• Data already sorted – if data is already sorted, this option saves index creation time.• Online– create indexes without blocking access to the data you are indexing.
Restrictions:• User tables must include a unique index to use the create clustered index ... online
command (creating nonclustered indexes does not have this restriction).• You can run create index ... online with a pll sort only on round robin partitioned
tables• If you issue an insert, delete, update, or select command while create index …
online or reorg … online are in the logical synchronization blocking phase:• The insert, delete, update, or select commands may wait and execute after
create index … online or reorg … online are finished• SAP ASE may issue error message 8233.
• You cannot:• Run dbcc commands and utility commands, such as reog rebuild, on the same
table while you are simultaneously running create index ... online.• Run more than one iteration of create index ... online simultaneously.• Perform a dump transaction after running create index ... online. Instead, you
can:• Run create index ... online, then dump the database, or• Run a blocking create index, then issue dump transaction.
• Run create index ... online within a multistatement transaction.• Create a functional index using the online parameter
15. (Optional) On the Local Partition screen, specify whether to create a local partitionedindex.
16. (Optional) Click Summary to review your selected options.
17. Click Finish to create the index.
Manage and Monitor
468
Restoring Table DataRestore table data from an archive or stand-by database.
1. In the left pane of the Administration Console, expand ASE Servers > Schema Objects >Tables and select User Tables.
2. Click the Name field of the table, then click the drop-down arrow and select RestoreData.
3. In the Specify Database screen, select the database where the source table data is located.
4. On the Specify Table screen, select the table to be used as a source for restoring data.
5. (Optional) In the left pane, Preview to verify your selection options.
6. In the left pane, Copy Data to start the restore process.
Creating a Foreign KeyCreate a foreign key to constrain a column based on values in a reference table.
A foreign key:
• is a column or combination of columns that have values that match the primary key,• does not need to be unique.• is often in a many to-one relationship to a primary key• may be null; if any part of a composite foreign key is null, the entire foreign key must be
null.
1. In the left pane of the Administration Console, expand ASE Servers > Schema Objects >Tables, then choose one of the following:
• User Tables• Proxy Tables
2. Click the Name field of the table, then click the drop-down arrow and selectProperties.
3. In the left pane, click Foreign Keys.
4. Select New.
5. On the Referenced Table screen:
a) Select the database that contains the table that the foreign key references.b) Select the referenced table of the foreign key,c) Provide a name for the foreign key.
6. On the Referenced Column screen:
a) Select the key to which the foreign key references.b) Select columns from the Foreign Key Column to match to columns in Primary Key
Column.
Manage and Monitor
SAP Control Center for SAP Adaptive Server Enterprise 469
Foreign key values should be copies of the primary key values. No value in the foreignkey should exist unless the same value exists in the primary key.
7. (Optional) Click Summary to review your selected options.
8. Click Finish .
See also• Creating a Check Constraint on page 470
• Creating a Unique Constraint or Primary Key on page 474
• Binding Defaults and Rules to a Column on page 472
Creating a Check ConstraintCreating a check constraint specifies a condition that any value must pass before it is insertedinto the table.
A check constraint specifies a condition that any value must pass before it is inserted into thetable. You can create a check constraint at the table or column level. Column-level checkconstraints reference a single column. Table-level check constraints apply to the entire table.
1. In the left pane of the Administration Console, expand ASE Servers > Schema Objects >Tables, then choose one of the following:
• User Tables• Proxy Tables
2. Click the Name field of the table, then click the drop-down arrow and selectProperties.
3. In the left pane, click Check Constraint.
4. Select New.
5. On the Name screen, enter a name for the check constraint.
6. On the Expression screen, enter an expression that defines the constraint.For example, salary > 0. The comparable command line syntax using alter table is:
alter table sample.dbo.employeeadd constraint test_constCHECK (salary > 0)
7. (Optional) Click Summary to review the check constraint expression.
8. Click Finish .
See also• Creating a Unique Constraint or Primary Key on page 474
• Creating a Foreign Key on page 469
• Binding Defaults and Rules to a Column on page 472
Manage and Monitor
470
Checking Table ConsistencyCheck and repair the logical and physical consistency of a table.
1. In the left pane of the Administration Console, expand ASE Servers > Schema Objects >Tables, then choose one of the following:
• User Tables• Proxy Tables• System Tables
2. Click the Name field of the table, then click the drop-down arrow and select CheckConsistency.
3. On the Choose DBCC options screen:
a) Select Check overall consistency, then optionally click Ignore non-clusteredindexes.Check overall consistency checks that:• Index and data pages are linked correctly.• Indexes are sorted properly.• Pointers are consistent.• All indexes and data partitions are correctly linked.• Data rows on each page have entries in the row-offset table.• Partition statistics for partitioned tables are correct.
b) (Optional) Select Check allocation, then optionally click Fix allocation errors.Check allocation checks the table to ensure that:• All pages are correctly allocated.• Partition statistics on the allocation pages are correct.• No page is allocated that is not used.• All pages are correctly allocated to the partitions in the specified table and that
allocated pages are used.• No unallocated page is used.
c) (Optional) Select Reindex.This option allows the system administrator or table owner to check the integrity ofindexes attached to a user table and to rebuild suspect indexes.
a) (Optional; only for tables that contain text data) Select Fix text.Select this options if you are changing to a new multibyte character set from either asingle-byte or a multibyte character set.
b) Select the type of allocation report.
4. Click Finish.
Manage and Monitor
SAP Control Center for SAP Adaptive Server Enterprise 471
Binding Defaults and Rules to a ColumnSpecify constraints on column data by binding defaults or rules to a column.
Make sure that any default value bound to a column or user-defined datatype is compatiblewith the rule. A default that conflicts with the rule is not inserted.
You cannot bind a rule to a text, image, or timestamp column.
Rules bound to columns take precedence over rules bound to user-defined datatypes.
1. In the left pane of the Administration Console, expand ASE Servers > Schema Objects >Tables, then choose one of the following:
• User Tables• Proxy Tables
2. Click the Name field of the table, then click the drop-down arrow and selectProperties.
3. In the left pane, click Columns.
4. Click the Name field of the column, then click the drop-down arrow and selectProperties.
5. In the left pane, Rules and Defaults.
6. Choose one of:
• Default – None.• Default – Binding to bind an existing default to the column.• Default – Value to bind a default user, defined value to the column.• Rule Binding to bind an existing rule to a column.
7. Click Apply to apply your rules or defaults.
See also• Creating a Check Constraint on page 470
• Creating a Unique Constraint or Primary Key on page 474
• Creating a Foreign Key on page 469
Placing a Table on a SegmentUsing a segment to put a table on a specific database device can improve performance and giveincreased control over placement, size, and space usage of database objects.
1. In the left pane of the Administration Console, expand ASE Servers > Schema Objects >Tables, then choose one of the following:
• User Tables• Proxy Tables
Manage and Monitor
472
2. Click the Name field of the table, then click the drop-down arrow and selectProperties.
3. In the left pane, click Usage.
4. Select the segment to on which to place the table.
5. Click Apply.
Setting the Table Locking SchemeChoose or alter a locking scheme based on required performance.
Conversions between allpages locking and data-only locking schemes can be expensive intime and I/O and require sufficient free space. Convert the locking scheme by creating copiesof the tables and re-creating indexes. You must also dump the affected databases, and updatestatistics before changing between allpages locking and data-only locking schemes.
Conversions between data page and data row locking are quick and inexpensive, andimplemented by updates to system tables. The data page and data row schemes are collectivelycalled data-only locking.
1. In the left pane of the Administration Console, expand ASE Servers > Schema Objects >Tables, then choose one of the following:
• User Tables• Proxy Tables
2. Click the Name field of the table, then click the drop-down arrow and selectProperties.
3. In the left pane, click Lock Scheme.
4. On the Lock Scheme screen:
a) Select the lock scheme.b) Set the maximum rows per page, to limit the number of rows on a data page.c) Set the rows size. This can increase the amount of storage required. If your tables have
many rows that are shorter than the expected row size, setting this value andreorganizing the use of table space or changing the locking scheme increases thestorage space required for the table.
d) Set the reserve page gap to leaves empty pages on extents that are allocated to the objectwhen commands that perform extent allocation are executed. Setting the reserve pagegap to a low value increases the number of empty pages and spreads the data acrossmore extents, so the additional space required is greatest immediately after creating anindex or reorganizing the use of table space.
e) Set the fill factor to allow space on the index pages to reduce page splits. Very smallfillfactor values can cause the storage space required for a table or an index to besignificantly greater.
Manage and Monitor
SAP Control Center for SAP Adaptive Server Enterprise 473
5. (Optional) After converting from all pages locking and either of the data-only lockingschemes, check table and database consistency. You must also perform a full databasedump before you can back up the transaction log with a dump transaction.
Creating a Unique Constraint or Primary KeyCreating a unique constraint or primary key constraint to ensure that no two rows in a tablehave the same values in the specified columns.
A primary key is a column or combination of columns that uniquely identifies a row. It cannotbe NULL and it must have a unique index. A table with a primary key is eligible for joins withforeign keys in other tables. Think of the primary key table as the master table in a master-detail relationship. There can be many such master-detail groups in a database.
1. In the left pane of the Administration Console, expand ASE Servers > Schema Objects >Tables, then choose one of the following:
• User Tables• Proxy Tables
2. Click the Name field of the table, then click the drop-down arrow and selectProperties.
3. In the left pane, click Index, then click the drop-down arrow and select UniqueConstraint.
4. On the Name screen:
a) Specify a name for the unique constraint or primary key.b) Click Unique Constraint or Primary key.c) (Optionally) Click Make supporting index clustered.
5. On the Columns screen, select the columns to include in the unique constraint or primarykey.
6. On the Database Segment screen, select a segment on which to place the unique constraintor primary key.
7. On the Space Management screen:
a) (Optional) Specify a fill factor percentage.b) (Optional) Specify the maximum number of rows per page for the index.c) (Optional) Specify the ratio of empty pages to filled pages to provide for expansion.
8. (Optional) Click Summary to review your selected options.
9. Click Finish.
See also• Creating a Check Constraint on page 470
• Creating a Foreign Key on page 469
• Binding Defaults and Rules to a Column on page 472
Manage and Monitor
474
Manage Table CompressionThe compression advisor provides an estimate of the percentage of space you can save bycompressing a user table.
Compression reduces database storage space and improves system performance, especially inI/O-bound systems. Queries against compressed data can be performed with fewer I/Ooperations, because each read from the disk retrieves more data.
Use the database usage properties to identify tables that might benefit from compression. Thecompression advisor then provides recommendations for which compression attributes toapply, and a compression estimation that is based on an analysis of sampled data. The estimateis then compared to the selected table in an uncompressed state and the table in its currentstate, which may or may not be compressed.
Compression advisor requires an ASE_COMPRESSION license and the system-wideconfiguration parameter enable compression to be set to 1.
Identifying Table Compression CandidatesIdentify the largest user tables based on space reserved, used space, or row count.
Before compressing a user table, identify the largest tables then generate a compressionestimate to determine if the table will benefit from compression.
1. In the left pane of the Administration Console, expand ASE Servers > Schema Objects >Databases > User Databases.
2. Click the Name field of the database, then click the drop-down arrow and selectProperties.
3. In the left pane, click Usage.
4. Click the Largest user tables tab.
5. (Optional) In the View field, click the arrow or enter a number to choose the number oftables to include and click View to update the display.You see a list of the largest tables based on the selected criteria.
6. Select the conditions by which the size of the tables is determined:
• Rowcount• Space reserved• Used space
7. (Optional) Click Compression Advisor to invoke the Compression Advisor wizard.
Manage and Monitor
SAP Control Center for SAP Adaptive Server Enterprise 475
Initiating a Compression EstimateApply compression attributes to a selected tables to reduce the size and improve performancefor a database.
Prerequisites
• You must have an ASE_COMPRESSION license.• Set the system-wide configuration parameter enable compression to 1.
• Use the database properties to identify the largest user tables, which are the most likely tobenefit from compression.
Task
1. In the left pane of the Administration Console, expand ASE Servers > Schema Objects >Tables > User Tables.
2. Click the Name field of the table, then click the drop-down arrow and select CompressionAdvisor.
3. On the Storage screen:
a) Select a sampling size for the selected table and click Apply.The sampling information reflects a sampling size for the selected table. To estimatethe compressed size of the selected table, the compression advisor creates a temporarytable and loads into it sample data from the table to be compressed.
For large tables, a sample size of 10% may provide good results. However, for smallertables, a larger sample size may provide better results.
b) Select a database to use for the sampling process.
The temporary table is created once you click Estimate. It is deleted when you close theCompression Advisor Results dialog.
4. On the Table Attributes screen:
a) Choose the level of data compression.• Row-level compression compresses individual rows in a table.• Page compression performs row-level compression first, then page-level
compression.For uncompressed tables, data compression is, by default, set to page-levelcompression.
a) If the table has one or more indexes, and the version is 16.0 or later, select the type ofindex compression.
To compress large object (LOB) data, choose the compression level for FastLZ (100 –101)or ZLib (1–9).
Manage and Monitor
476
The LOB compression option is available for tables that use text, image, Unitext, or JavaLOB datatypes.
5. (Optional) On the Columns Attributes screen, for LOB columns, click Calculate tocalculate the best LOB length for each LOB column based on the sampling size.
a) Click Cancel to cancel the calculation and restore the original values.b) Once the calculation is complete, click Restore to restore the original values.
6. (Optional) On the Columns Attributes screen, select individual column attributes tooverride the inherited table-level attributes. You can also choose to not compressindividual columns.
• You cannot change an in-row column to an off-row column.• You cannot reduce the in-row length.• You must set at least one column to be compressed.
7. (Optional; only available for tables with indexes) In the Indexes Attributes window, selecteither page compression or no compression for individual indexes. Selected compressionvalues override the inherited index-level compression attributes.
8. Click Summary to see a comparison of the selected compression options for the table.
9. Click Estimate to start the compression estimate calculation.The Results window automatically appears.
10. Click Preview to show the compression attributes changes in SQL statements.Preview is available once the compression estimate has been initiated.
Applying Compression SettingsThe compression advisor provides compression estimates and recommendations. Based onthe results of these estimates, you can apply the attributes and compress the selected table.
PrerequisitesIf granular permissions is enabled, you must have reorg any table privilege or be thetable owner. If granular permissions is not enabled, you must be the table owner or havesa_role.
Apply compression attributes to the selected tables and apply changes to its existing data.
Task
Once the compression estimate is initiated, you see the Compression Advisor Results window.The Results tab shows the compression ratio for the sample table, compared to the selectedtable in an uncompressed state.
1. (Optional) On the Result screen:
a) Click Space usage of sampling table to view the sampling table's space usage.b) (Optional) Click Space usage of the real table to view the current table's space
usage.
Manage and Monitor
SAP Control Center for SAP Adaptive Server Enterprise 477
2. (Optional) On the Compression Attributes screen:
a) (Optional) Click on Current compression attributes to see a summary of the currenttable's compression attributes.
b) (Optional) You can change attribute values and click Apply to apply the new values.Any value changes are applied to new data in the specified table.
c) (Optional) To apply changes to existing data or on the entire table, clickReorganize.
3. (Optional) In the left pane, click Messages to show any server messages related to thecompression estimate.
4. Click Compress to initiate compression of the selected table.You see the Compression Results window, including all messages regarding the executionof compression.
Manage Index CompressionUse the Create Table and Create Index wizards to set index compression. You cansubsequently turn it on or off on the table, index, or local index property screens.
Set index compression on:
• Tables• Indexes• Local index partitions
Any table, index, or local index partition can be designated for index compression, exceptsystem catalogs and work tables.
The value of compression is page-level compression, which compresses redundantinformation on a page by storing repeated values in a single place and uses a symbol on thedata page to refer to them.
Setting Index Compression on an IndexUse the Create Index wizard to specify index compression on an index.
1. In the left pane of the Administration Console, expand ASE Servers > Schema Objects >Tables and select the table type.
2. Click the Name field of the table, then click the drop-down arrow and selectProperties.
3. In the left pane, select Indexes.
4. Click the Name field of the index, then click the drop-down arrow and selectProperties.
5. In the left pane, select General.
6. From the Index Compression drop-down field, select Page or None.
Manage and Monitor
478
Setting Index Compression on a Local Index PartitionUse the Create Index wizard to specify index compression on a local index partition.
1. In the left pane of the Administration Console, expand ASE Servers > Schema Objects >Tables and select the table type.
2. Click the Name field of the table, then click the drop-down arrow and selectProperties.
3. In the left panel, select Indexes.
4. Click the Name field of the index, then click the drop-down arrow and selectProperties.
5. In the left pane, select Index Partitions.
6. Click the Name field of the index partition, then click the drop-down arrow and selectProperties.
7. In the left pane, select General.
8. From the Index compression drop-down field, select Page or None.The Index compression field is available when the index has been created with the localindex parameter.
Setting Index Compression on a TableUse the Create Index wizard to specify index compression on a table.
1. In the left pane of the Administration Console, expand ASE Servers > Schema Objects >Tables and select the table type.
2. Click the Name field of the table, then click the drop-down arrow and selectProperties.
3. In the left pane, select General.
4. From the Index Compression drop-down field, select Page or None.
Manage TriggersA trigger is a special type of procedure attached to a table column that goes into effect when auser changes the table. Triggers execute immediately after data modification statements arecompleted.
Creating a TriggerCreate a trigger on a table to enable checks whenever data is inserted, updated, or deleted.
1. In the left pane of the Administration Console, expand ASE Servers > Schema Objects >Tables, then choose one of the following:
• User Tables• Proxy Tables
Manage and Monitor
SAP Control Center for SAP Adaptive Server Enterprise 479
2. Click the Name field of the table, then click the drop-down arrow and selectProperties.
3. In the left pane, click Triggers, then click the drop-down arrow and select New.
4. On the Name and Owner screen:
a) Enter the name of the trigger.b) Select the owner of the trigger.
5. On the Trigger Type screen:
a) Select the events, that when executed, will call the trigger.b) Select Update of columns, then select the columns to be updated. If changes are made
to any of the selected columns, the trigger executes.
6. On the SQL Editor screen, enter the SQL statements for the new trigger and related tableobjects.
7. (Optional) Click Summary to review your selected options.
Trigger PropertiesThe Trigger Properties window shows the selected trigger options and objects referenced bythe trigger.
Click the Name field of the trigger, then click the drop-down arrow and select Properties.
Pages Properties
General Shows the select trigger options.
Referenced by Displays the name, type, and owner of the objects that are referenced by the specifiedtrigger.
See also• Index Properties on page 508
• Foreign Key Properties on page 510
• Check Constraint Properties on page 510
• Partition Properties on page 511
• Table Properties on page 506
• Column Properties on page 507
Replacing a Trigger DefinitionYou can replace the SQL definition of a trigger.
1. In the left pane of the Administration Console, expand ASE Servers > Schema Objects >Tables, then choose one of the following:
• User Tables
Manage and Monitor
480
• Proxy Tables
2. Click the Name field of the table, then click the drop-down arrow and selectProperties.
3. In the left pane, select Triggers.
4. Choose one of the following:
• Click the drop-down arrow on the trigger for which you want to replace the definitionand select Replace.
• From Triggers in the left pane, click the drop-down arrow and select New. Enter thename of the existing trigger for which you want to replace the definition.When selecting an existing trigger, the Confirm Replace dialog appears with anoption to replace the object definition or cancel the replacement.
The Replace Trigger wizard appears.
5. (Optional) On the SQL Editor screen, enter the new trigger value.
6. (Optional) On the Summary screen, verify the trigger name, and type.
Incrementally Transferring DataIncremental data transfer lets you transfer data to SAP ASE or other products.
Incremental Transfer is available only on SAP ASE 15.5 or higher. In versions earlier than15.5, you can transfer only entire tables. You must mark tables as eligible to participate inincremental transfer.
Enabling Incremental TransferYou can designate incremental transfer eligibility on an existing table, or when you create atable.
Enable incremental transfer on an existing table.
1. In the left pane of the Administration Console, expand ASE Servers > Schema Objects >Tables, then choose one of the following:
• User Tables• Proxy Tables
2. Click the Name field of the table, then click the drop-down arrow and selectProperties.
3. On the General screen, click Enable incremental transfer, then click OK.
Incrementally Transferring Data InUse incremental transfer to read data files into SAP ASE.
1. In the left pane of the Administration Console, expand ASE Servers > Schema Objects >Tables, then choose one of the following:
Manage and Monitor
SAP Control Center for SAP Adaptive Server Enterprise 481
• User Tables• Proxy Tables
2. Click the Name field of the table, then click the drop-down arrow and select IncrementalTransfer In.
3. On the Introduction screen, specify the file name of data to be read into SAP ASE. You canoptionally specify an absolute path.Only SAP ASE data file format is supported.
4. (Optional) Click Summary to review the file name and path.
5. Click Finish.
Incrementally Transferring Data OutTransfer table data that has changed since a prior transmission from tables that are marked forincremental transfer.
Enable incremental transfer in the properties window of the selected table.
1. In the left pane of the Administration Console, expand ASE Servers > Schema Objects >Tables, then choose one of the following:
• User Tables• Proxy Tables
2. Click the Name field of the table, then click the drop-down arrow and select IncrementalTransfer Out.
3. On the Introduction window, specify a destination file name. Optionally include anabsolute path.
4. On the Data Formats screen, specify the data format for the destination file.
5. On the Command Options screen, specify the order in which the column data is to written.
6. On the Tracking and Sequence ID screen:
a) (Optional) Specify the tracking ID.b) (Optional) Specify whether to resend previously transferred data, then choose either to
resend data using a sequence ID to determine the starting time stamp or resend theentire table.
7. (Optional) Click Summary to review your selected options.
8. Click Finish.
Bulk Copying DataYou can use bulk copy to copy data into or out of a table.
Bulk copying data in or out of a table provides a convenient, high-speed method fortransferring data between a database table or view and an operating system file. When copyingin from a file, bulk copy inserts data into an existing database table; when copying out to a file,bulk copy overwrites any previous contents of the file.
Manage and Monitor
482
Bulk Copying Data Into or Out of TablesUse bulk copy to insert data into an existing database table or to copy table data to an externalfile.
1. In the left pane of the Administration Console, expand ASE Servers > Schema Objects >Tables, then choose one of the following:
• User Tables• Proxy Tables
2. Click the Name field of one or more tables, then click the drop-down arrow and selecteither Bulk Copy In or Bulk Copy Out.If you select one table, you can select a different data file for each partition. If you selectmultiple tables, you can only provide one data file for all partitions for the table.
3. On the Specify Data File screen, enter the location for partitions.
4. On the Specify File Format, select the format for copying data.
5. On the Specify Copy Format screen, choose the field and row parameters for the file to becopied into the table.
6. Click Finish.
Setting Table or Column PermissionsGrant or revoke permissions on tables or columns for users, groups, and roles.
You can grant and revoke permissions on a table based on the grantee type; users, groups, orroles, then select a specific grantee. You can grant or revoke permission for specific columnsbelonging to a table.
You can also grant permission with predicated privileges, which are privileges subject toconditions that are evaluated when data is accessed. Row-level access control can be grantedon a given object based on conditions expressed through a general SQL where clause.
As an example of the where clause in a SQL statement, the following describes how to grantaccess to a group of engineers, allowing each member to see only his or her own salary and thesalary of any direct reports.grant select on emp (eng_salary) where eng_name = USER or engr = USER to eng_role
Note: To grant or revoke predicated privileges, set the configuration parameter enablepredicate privileges to 1.
Granting Table PermissionsGrant table access permission to users, groups, or roles.
Table owners and database owners can grant database object permissions on a table.
Manage and Monitor
SAP Control Center for SAP Adaptive Server Enterprise 483
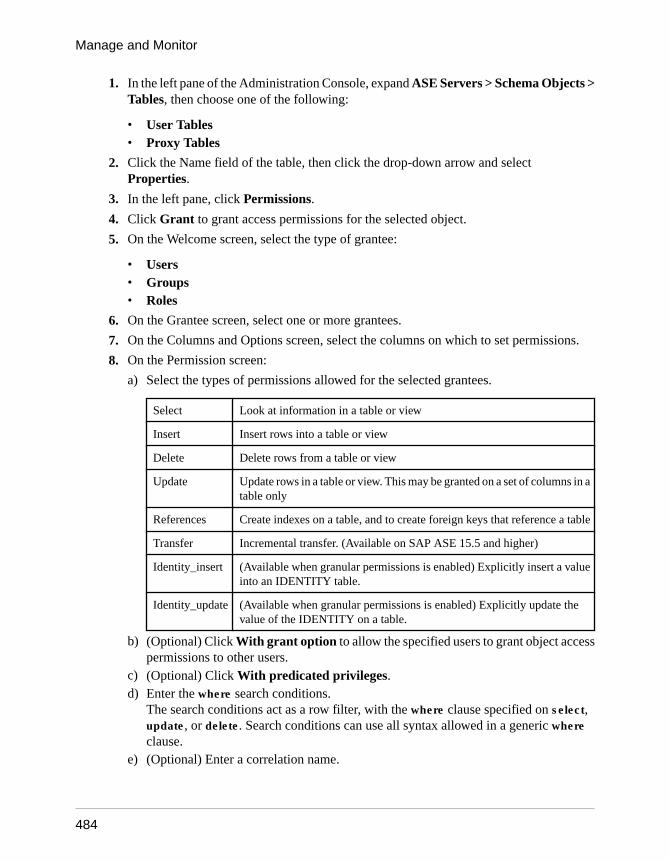
1. In the left pane of the Administration Console, expand ASE Servers > Schema Objects >Tables, then choose one of the following:
• User Tables• Proxy Tables
2. Click the Name field of the table, then click the drop-down arrow and selectProperties.
3. In the left pane, click Permissions.
4. Click Grant to grant access permissions for the selected object.
5. On the Welcome screen, select the type of grantee:
• Users• Groups• Roles
6. On the Grantee screen, select one or more grantees.
7. On the Columns and Options screen, select the columns on which to set permissions.
8. On the Permission screen:
a) Select the types of permissions allowed for the selected grantees.
Select Look at information in a table or view
Insert Insert rows into a table or view
Delete Delete rows from a table or view
Update Update rows in a table or view. This may be granted on a set of columns in atable only
References Create indexes on a table, and to create foreign keys that reference a table
Transfer Incremental transfer. (Available on SAP ASE 15.5 and higher)
Identity_insert (Available when granular permissions is enabled) Explicitly insert a valueinto an IDENTITY table.
Identity_update (Available when granular permissions is enabled) Explicitly update thevalue of the IDENTITY on a table.
b) (Optional) Click With grant option to allow the specified users to grant object accesspermissions to other users.
c) (Optional) Click With predicated privileges.d) Enter the where search conditions.
The search conditions act as a row filter, with the where clause specified on select,update, or delete. Search conditions can use all syntax allowed in a generic whereclause.
e) (Optional) Enter a correlation name.
Manage and Monitor
484
The correlation name is an alias for referencing columns in the selected table within thewhere clause.
f) (Optional) Enter a name for the predicate.
9. (Optional) Click Summary to review your selected options.
See also• Revoking Table Permissions on page 485
• Granting Column Permissions on page 486
• Revoking Column Permissions on page 487
Revoking Table PermissionsRevoke table access permissions from users, groups, or roles.
Prerequisites
To grant or revoke predicated privileges, set the configuration parameter enable predicateprivileges to 1.
Task
Table owners and database owners can revoke database object permissions from a table.
1. In the left pane of the Administration Console, expand ASE Servers > Schema Objects >Tables, then choose one of the following:
• User Tables• Proxy Tables
2. Click the Name field of the table, then click the drop-down arrow and selectProperties.
3. In the left pane, click Permissions.
4. In the right pane, select the grantee and click Revoke.In the Revoke Permissions window, each type of permission is listed. Currently grantedpermissions are indicated by a check mark. Permissions with predicated privilege areindicated by the letter "p" under a check mark.
5. Choose one of:
• Click Revoke all permission to revoke all permissions shown in the RevokePermissions window.
• Click individual cells to revoke the currently granted permissions. The cell changes toshow an "x," indicating that the permission type is no longer granted.
• Click Revoke all permission with predicate to revoke all permissions with apredicate shown in the Revoke Permissions window.
Manage and Monitor
SAP Control Center for SAP Adaptive Server Enterprise 485
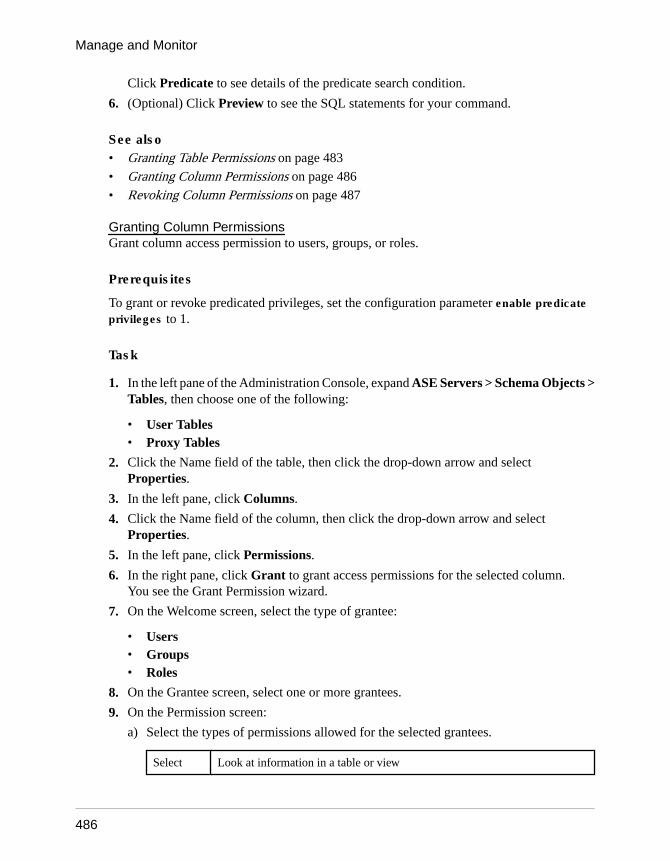
Click Predicate to see details of the predicate search condition.
6. (Optional) Click Preview to see the SQL statements for your command.
See also• Granting Table Permissions on page 483
• Granting Column Permissions on page 486
• Revoking Column Permissions on page 487
Granting Column PermissionsGrant column access permission to users, groups, or roles.
Prerequisites
To grant or revoke predicated privileges, set the configuration parameter enable predicateprivileges to 1.
Task
1. In the left pane of the Administration Console, expand ASE Servers > Schema Objects >Tables, then choose one of the following:
• User Tables• Proxy Tables
2. Click the Name field of the table, then click the drop-down arrow and selectProperties.
3. In the left pane, click Columns.
4. Click the Name field of the column, then click the drop-down arrow and selectProperties.
5. In the left pane, click Permissions.
6. In the right pane, click Grant to grant access permissions for the selected column.You see the Grant Permission wizard.
7. On the Welcome screen, select the type of grantee:
• Users• Groups• Roles
8. On the Grantee screen, select one or more grantees.
9. On the Permission screen:
a) Select the types of permissions allowed for the selected grantees.
Select Look at information in a table or view
Manage and Monitor
486
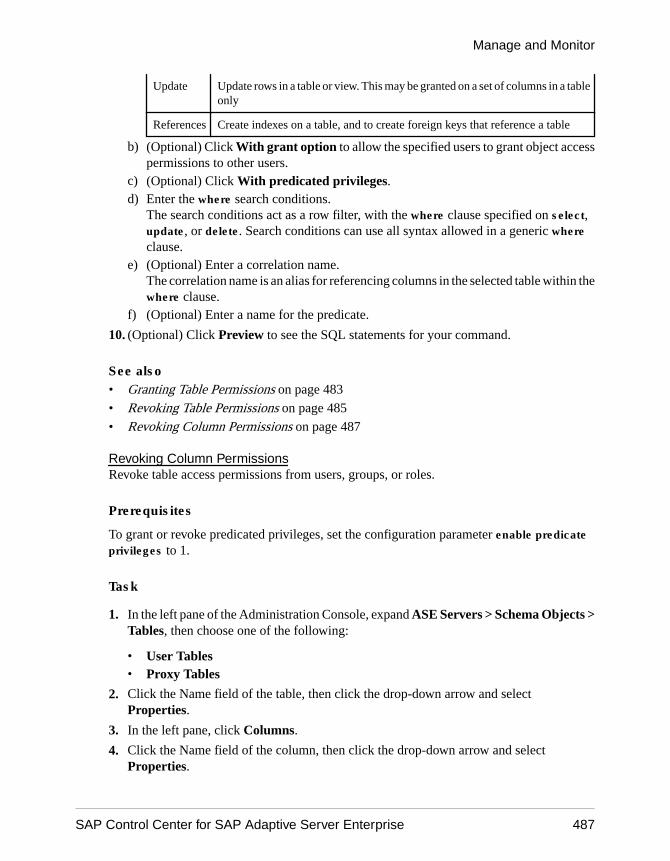
Update Update rows in a table or view. This may be granted on a set of columns in a tableonly
References Create indexes on a table, and to create foreign keys that reference a table
b) (Optional) Click With grant option to allow the specified users to grant object accesspermissions to other users.
c) (Optional) Click With predicated privileges.d) Enter the where search conditions.
The search conditions act as a row filter, with the where clause specified on select,update, or delete. Search conditions can use all syntax allowed in a generic whereclause.
e) (Optional) Enter a correlation name.The correlation name is an alias for referencing columns in the selected table within thewhere clause.
f) (Optional) Enter a name for the predicate.
10. (Optional) Click Preview to see the SQL statements for your command.
See also• Granting Table Permissions on page 483
• Revoking Table Permissions on page 485
• Revoking Column Permissions on page 487
Revoking Column PermissionsRevoke table access permissions from users, groups, or roles.
Prerequisites
To grant or revoke predicated privileges, set the configuration parameter enable predicateprivileges to 1.
Task
1. In the left pane of the Administration Console, expand ASE Servers > Schema Objects >Tables, then choose one of the following:
• User Tables• Proxy Tables
2. Click the Name field of the table, then click the drop-down arrow and selectProperties.
3. In the left pane, click Columns.
4. Click the Name field of the column, then click the drop-down arrow and selectProperties.
Manage and Monitor
SAP Control Center for SAP Adaptive Server Enterprise 487
5. In the left pane, click Permissions.
6. In the right pane, select the grantee and click Revoke.In the Revoke Permissions window, each type of permission is listed. Currently grantedpermissions are indicated by a check mark. Permissions with predicated privilege areindicated by the letter "p" under a check mark.
7. Choose one of:
• Click Revoke all permission to revoke all permissions shown in the RevokePermissions window.
• Click individual cells to revoke the currently granted permissions. The cell changes toshow an "x," indicating that the permission type is no longer granted.
• Click Revoke all permission with predicate to revoke all permissions with apredicate shown in the Revoke Permissions window.
Click Predicate to see details of the predicate search condition.
8. (Optional) Click Preview to see the SQL statements for your command.
See also• Granting Table Permissions on page 483• Revoking Table Permissions on page 485• Granting Column Permissions on page 486
Manage PartitionsUse partitioning to divide large tables and indexes into smaller, more manageable pieces.
PartitionsPartitions are database objects that have unique IDs and can be managed independently. Eachpartition can reside on a separate segment.
Horizontal partitioning is supported, which means you can distribute a selection of table rowsamong storage devices. Assign individual table or index rows to a partition according to apartitioning strategy. By default, every table and index is created on a single, round-robinpartition. You can also choose a semantics-based strategy that assigns rows to partitions.
Semantics-based partitioning is a separately licensed feature.
Hash PartitioningWith hash partitioning, a hash function is used to specify the partition assignment for each row.You select the partitioning key columns, but SAP ASE chooses the hash function that controlsthe partition assignment. Hash partitioning is a good choice for:
• Large tables with many partitions, particularly in decision-support environments• Efficient equality searches on hash key columns• Data that has no particular order, for example, alphanumeric product code keys
If you choose an appropriate partition key, hash partitioning distributes data evenly across allpartitions. However, if you choose an inappropriate key, for example, a key that has the same
Manage and Monitor
488
value for many rows—the result may be skewed data, with an unbalanced distribution of rowsamong the partitions.
Range PartitioningRows in a range-partitioned table or index are distributed among partitions according to valuesin the partitioning key columns. The partitioning column values of each row are comparedwith a set of upper and lower bounds that determine the partition to which the row belongs.
Every partition has an inclusive upper bound and every partition except the first has anoninclusive lower bound.
Range partitioning is particularly useful for high-performance applications in both OLTP anddecision-support environments. Select ranges carefully so that rows are assigned equally to allpartitions—knowledge of the data distribution of the partition key columns is crucial tobalancing the load evenly among the partitions. Range partitions are ordered; that is, eachsucceeding partition must have a higher bound than the previous partition.
List PartitioningAs with range partitioning, list partitioning distributes rows semantically; that is, according tothe actual value in the partitioning key column. A list partition has only one key column. Thevalue in the partitioning key column is compared with sets of user-supplied values todetermine the partition to which each row belongs. The partition key must match exactly oneof the values specified for a partition.
The value list for each partition must contain at least one value, and value lists must be uniqueacross all partitions. You can specify as many as 250 values in each list partition. List partitionsare not ordered.
Round-Robin PartitioningIn round-robin partitioning, partitioning criteria is not used. Round-robin-partitioned tableshave no partition key. Rows are assigned in a round-robin manner to each partition so that eachpartition contains a more or less equal number of rows and load balancing is achieved.Because there is no partition key, rows are distributed randomly across all partitions.
Partition LockingPartition locking improves concurrency and data availability.
Partition locking can be enabled or disabled for user tables. By enabling partition locking, youare locking a partition of interest and therefore allowing access to other partitions forconcurrent DDL and DML access options. Concurrent access is allowed for tables during themerge, move, split, and drop partition operations.
Partition locking requires system administrator or database owner permission.
Enabling Partition LockingEnable or disable partition locking for user tables. By default, partition locking is disabled.
Manage and Monitor
SAP Control Center for SAP Adaptive Server Enterprise 489
1. Expand ASE Servers > Schema Objects > Tables > User Tables.
2. Click the Name field of the table, then click the drop-down arrow and selectProperties.
3. In the left pane, click Partitions.
4. Click Enable partition locking, then click Apply.
Enabling Semantic-based PartitioningEnable semantic-based partitions to use hash, list, or range partition strategies.
1. In the left pane of the Administration Console, click ASE Servers.
2. Click the Name field of the server, then click the drop-down arrow and selectConfigure.
3. On the Server Configuration window, turn on enable semantic partitioning, then clickSave All.
Using a Hash PartitionCreate a new partition or change an existing partition using a strategy of a system-generatedhashing function.
Note: To create hash, list, or range partitions, you must first enable semantic partitioning.
1. In the left pane of the Administration Console, expand ASE Servers > Schema Objects >Tables, then choose one of the following:
• User Tables• Proxy Tables
2. Click the Name field of the table, then click the drop-down arrow and selectProperties.
3. In the left pane, click Partitions.
4. Click the drop-down arrow and select New, or choose to an existing partition from the rightpane.
5. In the Select Partition Strategy screen:
a) Choose the partitioning strategy Hash.b) (Optionally) Specify the number of partitions.
6. In the Select Partition Key Columns screen, use the arrow buttons to select partition keycolumns.Partition key columns are table columns that determine how the table is to be partitioned.
7. In the Partition Specification screen, specify the name of the partition and where thepartition will reside.
8. (Optional) Click Summary to review your selected options.
Manage and Monitor
490
Using a Range PartitionCreate a new partition or change an existing partition according to whether one or more valuesin a row fall within a range of predefined values for the partition.
Note: To create hash, list, or range partitions, you must first enable semantic partitioning.
1. In the left pane of the Administration Console, expand ASE Servers > Schema Objects >Tables, then choose one of the following:
• User Tables• Proxy Tables
2. Click the Name field of the table, then click the drop-down arrow and selectProperties.
3. In the left pane, click Partitions.
4. Click the drop-down arrow and select New, or choose to an existing partition from the rightpane.
5. In the Select Partition Strategy screen, choose Range.
6. In the Select Partition Key Columns screen, use the arrow buttons to select partition keycolumns.Partition key columns are table columns that determine how the table is to be partitioned.
7. In the Partition Specification screen, specify the name of the partition, the range of values,and where the partition will reside.
8. (Optional) Click Summary to review your selected options.
Using a List PartitionCreate a new partition or change an existing partition according to whether one value in therow matches one of a set of predefined values unique for each partition.
Note: To create hash, list, or range partitions, you must first enable semantic partitioning.
1. In the left pane of the Administration Console, expand ASE Servers > Schema Objects >Tables and select User Tables.
2. Click the Name field of the table, then click the drop-down arrow and selectProperties.
3. In the left pane, click Partitions.
4. Click the drop-down arrow and select New, or choose to an existing partition from the rightpane.
5. In the Select Partition Strategy screen, choose List.
6. In the Select Partition Key Columns screen, use the arrow buttons to select one partitionkey column.
Manage and Monitor
SAP Control Center for SAP Adaptive Server Enterprise 491
List partitions use only one key column. The value in the partitioning key column iscompared with values supplied in the partition specification window to determine thepartition to which each row belongs.
7. In the Partition Specification screen, specify the name of the partition, specify a list ofdiscrete values, and where the partition will reside.
8. (Optional) Click Summary to review your selected options.
Using a Round-Robin PartitionCreate a new partition or change an existing partition using the round-robin strategy so thateach partition contains an approximately equal number of rows.
1. In the left pane of the Administration Console, expand ASE Servers > Schema Objects >Tables, then choose one of the following:
• User Tables• Proxy Tables
2. Click the Name field of the table, then click the drop-down arrow and selectProperties.
3. In the left pane, click Partitions.
4. Click the drop-down arrow and select New, or choose to an existing partition from the rightpane.
5. In the Select Partition Strategy screen:
a) Choose the partitioning strategy Round Robin.b) (Optionally) Specify the number of partitions.
6. In the Partition Specification screen, specify the name of the partition and where thepartition will reside.This partitioning strategy is random as no partitioning criteria are used. Round-robin-partitioned tables have no partition keys.
7. (Optional) Click Summary to review your selected options.
Splitting a PartitionSplitting partitions can improve performance on partitions that include frequent queries andupdates.
• You must set the select into/bulkcopy/pllsort database option to true before you split apartition.
• You may split only list and range partitions.
See the Transact-SQL Users Guide for information about partitions.
1. Expand ASE Servers > Schema Objects > Tables, then choose one of:
• User Tables
Manage and Monitor
492
• Proxy Tables
2. Click the Name field of the table, then click the drop-down arrow and selectProperties.
3. In the left pane, click Partitions.
4. Click the drop-down arrow and select New, or choose to an existing partition from the rightpane.
5. Click the Name field of the partition, then click the drop-down arrow and select Split.
6. (Optional; only for user tables) Select Enable 'online' mode, which improvesconcurrency and data availability during the split partition operationEnable partition locking must also be enabled.
7. Click Next.
8. On the Partition Specification screen, click Add and enter the.
• Partition name.• (Optional) Segment name.• (Optional) Column name. SCC displays the partition key, which is based on the table
that has been partitioned. Enter a new value (or partition condition) for the splitoperation.
• Value.
9. Click OK.
Merging PartitionsMerging partitions consolidates data from partitions that are accessed infrequently into asingle partition. You can merge only list and range partitions.
You can merge any two list partitions, but only adjacent range partitions. The partitionsselected to be merged must be on same segment.
Note: You must set the select into/bulkcopy/pllsort database option to true before you mergepartitions.
See the Transact-SQL Users Guide for information about partitions.
1. Expand ASE Servers > Schema Objects > Tables, then choose one of:
• User Tables• Proxy Tables
2. Click the Name field of the table, then click the drop-down arrow and selectProperties.
3. In the left pane, click Partitions.
4. Click the drop-down arrow and select New, or choose to an existing partition from the rightpane.
5. Click the Name field of the partition, then click the drop-down arrow and select Merge.
Manage and Monitor
SAP Control Center for SAP Adaptive Server Enterprise 493
6. In the Marge Partition dialog, enter the name of the destination partition.
7. (Optional; only for user tables) Select Enable 'online' mode, which improvesconcurrency and data availability during the merge partition operationEnable partition locking must also be enabled.
8. (Optional) Select Preview to view the new partition information.
9. Click OK.
Moving a PartitionTable owners, database owners, or system administrators can move partitions to anothersegment.
Note: You must set the select into/bulkcopy/pllsort database option to true before you split apartition.
See the Transact-SQL Users Guide for information about partitions.
1. Expand ASE Servers > Schema Objects > Tables, then choose one of:
• User Tables• Proxy Tables
2. Click the Name field of the table, then click the drop-down arrow and selectProperties.
3. In the left pane, click Partitions.
4. Click the drop-down arrow and select New, or choose to an existing partition from the rightpane.
5. Click the Name field of the partition, then click the drop-down arrow and select Move.
6. In the Move Partition dialog, select the destination segment to which to move the partition.
7. (Optional; only for user tables) Select Enable 'online' mode, which improvesconcurrency and data availability during the move partition operationEnable partition locking must also be enabled.
8. (Optional) Select Preview to view the new partition information.
9. Click OK.
Deleting a PartitionDrop a user or proxy table partition.
• You must set the select into/bulkcopy/pllsort database option to true before you can deletea partition.
See the Transact-SQL Users Guide for information about partitions.
1. Expand ASE Servers > Schema Objects > Tables, then choose one of:
• User Tables
Manage and Monitor
494
• Proxy Tables
2. Click the Name field of the table, then click the drop-down arrow and selectProperties.
3. In the left pane, click Partitions.
4. Click the drop-down arrow and select New, or choose to an existing partition from the rightpane.
5. Click the Name field of the partition, then click the drop-down arrow and selectDelete.
You see the Confirm Delete dialog.
6. Click OK.
Reorganize Tables and Table ObjectsReorganize tables, table partitions, indexes, and index partitions to improve performance byreclaiming unused page space, removing row forwarding, or rewriting all table rows to newpages, depending on the option used.
For additional information about reorganization, see Using the reorg Command in the SystemAdministration Guide: Volume 2.
Reorganizing Tables at the Database LevelReorganize a table at the database level to improve performance.
Prerequisites
You must be a system administrator, or have reorg any table permissions whengranular permissions is enabled.
TaskYou can reorganize only one database at a time.
1. In the left pane of the Administration Console, expand ASE Servers > Schema Objects >Database , then choose one of the following:
• User Databases• System Databases• Temporary Databases• Proxy Databases
2. Click the Name field of the database, then click the drop-down arrow and selectReorganize Tables.
3. On the Select tables screen, choose all tables, exclude system tables, or search for a table.
• To reorganize all tables in the database, click Select all tables.
Manage and Monitor
SAP Control Center for SAP Adaptive Server Enterprise 495

• To search for a table by name, click Use search criteria, select Name contains, enterthe table name, and click Search. Select one or more tables from the list.
• To search for a table by space utilization, click Use search criteria, select Spaceutilization <=, enter the value, and click Search. Select one or more tables from thelist.
• Choose whether to select Exclude system tables.
4. On the Commands screen, select the type and level of reorganization.
Option Description Restrictions
Compact Reclaim space and remove row forwarding. Not supported with all-pages-locked tables.
Defragmentation Reorganize data and allow concurrent readsor writes.
Not supported with:• Tables without an index
(tables must have at leastone index)
• System tables• All-pages-locked tables
Forwarded rows Remove row forwarding. Not supported with all-pages-locked tables.
Rebuild • Remove row forwarding and reclaimunused page space.
• Rewrite all rows to accord with aclustered index for a table, if it has one.
• Write rows to data pages to accord withany changes made in spacemanagement settings throughsp_chgattribute.
• Drop and re-create all indexesbelonging to the table.
Requires that the select intodatabase option to be true.
Not supported with systemtables.
Reclaim space Reclaim unused page space resulting fromdeletions and row-shortening updates.
Not supported with all-pages-locked tables.
5. On the Options screen, select your reorganization options.
Option Description Restrictions
Compress Compress the rows affected by thereorganization.
Available only when one of thesereorganization types is selected:• Compact• Forwarded rows• Reclaim space
Not available on SAP ASE versionsearlier than 15.7.
Manage and Monitor
496
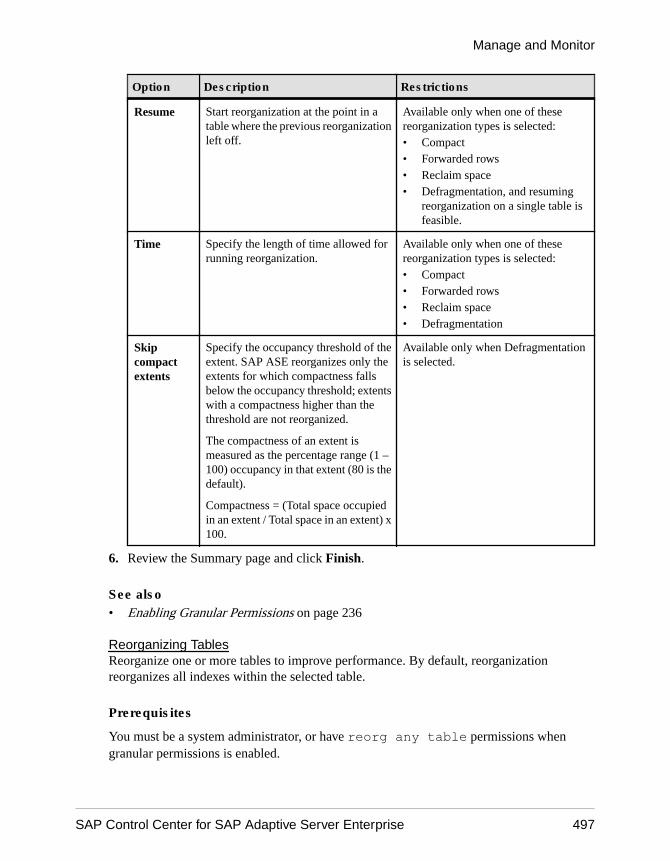
Option Description Restrictions
Resume Start reorganization at the point in atable where the previous reorganizationleft off.
Available only when one of thesereorganization types is selected:• Compact• Forwarded rows• Reclaim space• Defragmentation, and resuming
reorganization on a single table isfeasible.
Time Specify the length of time allowed forrunning reorganization.
Available only when one of thesereorganization types is selected:• Compact• Forwarded rows• Reclaim space• Defragmentation
Skipcompactextents
Specify the occupancy threshold of theextent. SAP ASE reorganizes only theextents for which compactness fallsbelow the occupancy threshold; extentswith a compactness higher than thethreshold are not reorganized.
The compactness of an extent ismeasured as the percentage range (1 –100) occupancy in that extent (80 is thedefault).
Compactness = (Total space occupiedin an extent / Total space in an extent) x100.
Available only when Defragmentationis selected.
6. Review the Summary page and click Finish.
See also• Enabling Granular Permissions on page 236
Reorganizing TablesReorganize one or more tables to improve performance. By default, reorganizationreorganizes all indexes within the selected table.
Prerequisites
You must be a system administrator, or have reorg any table permissions whengranular permissions is enabled.
Manage and Monitor
SAP Control Center for SAP Adaptive Server Enterprise 497
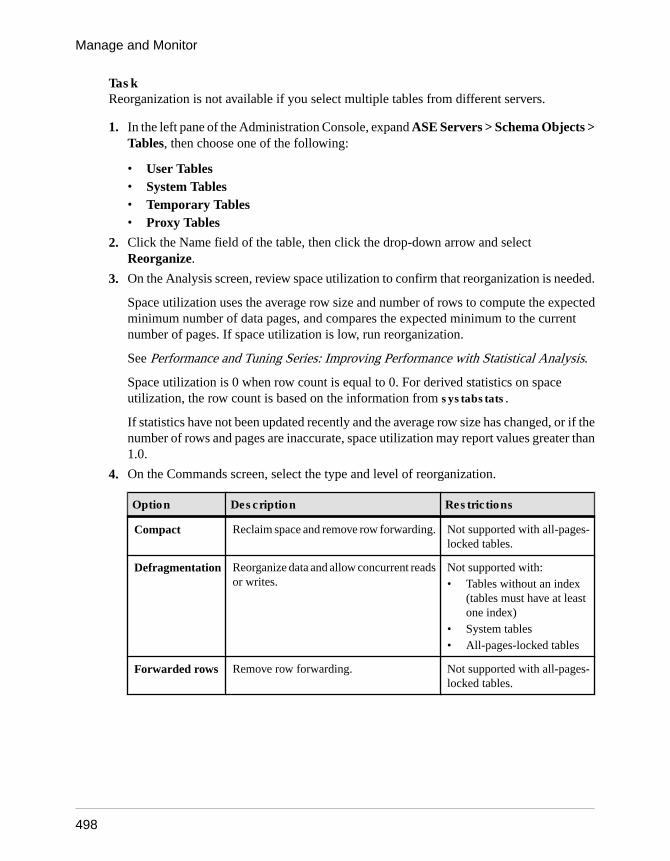
TaskReorganization is not available if you select multiple tables from different servers.
1. In the left pane of the Administration Console, expand ASE Servers > Schema Objects >Tables, then choose one of the following:
• User Tables• System Tables• Temporary Tables• Proxy Tables
2. Click the Name field of the table, then click the drop-down arrow and selectReorganize.
3. On the Analysis screen, review space utilization to confirm that reorganization is needed.
Space utilization uses the average row size and number of rows to compute the expectedminimum number of data pages, and compares the expected minimum to the currentnumber of pages. If space utilization is low, run reorganization.
See Performance and Tuning Series: Improving Performance with Statistical Analysis.
Space utilization is 0 when row count is equal to 0. For derived statistics on spaceutilization, the row count is based on the information from systabstats.
If statistics have not been updated recently and the average row size has changed, or if thenumber of rows and pages are inaccurate, space utilization may report values greater than1.0.
4. On the Commands screen, select the type and level of reorganization.
Option Description Restrictions
Compact Reclaim space and remove row forwarding. Not supported with all-pages-locked tables.
Defragmentation Reorganize data and allow concurrent readsor writes.
Not supported with:• Tables without an index
(tables must have at leastone index)
• System tables• All-pages-locked tables
Forwarded rows Remove row forwarding. Not supported with all-pages-locked tables.
Manage and Monitor
498
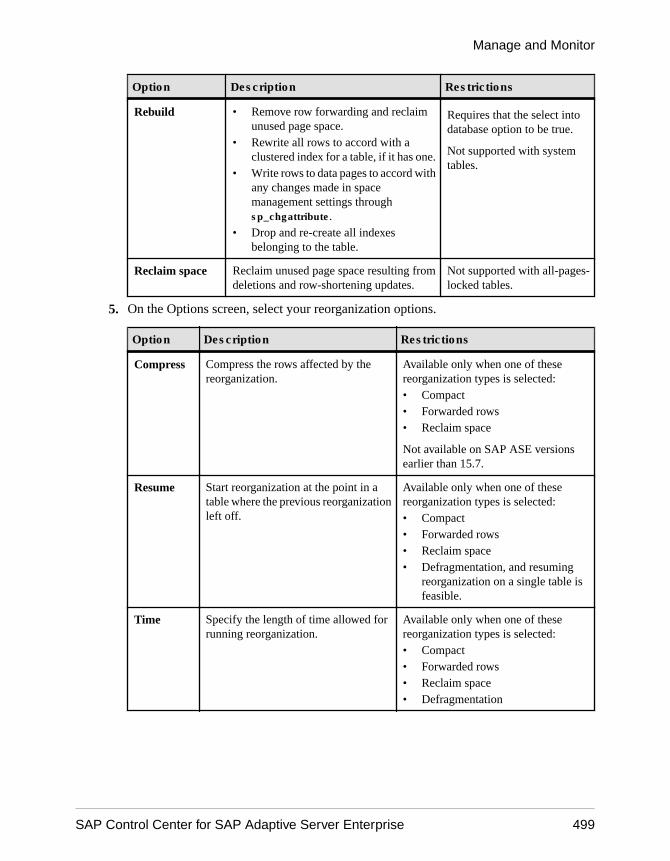
Option Description Restrictions
Rebuild • Remove row forwarding and reclaimunused page space.
• Rewrite all rows to accord with aclustered index for a table, if it has one.
• Write rows to data pages to accord withany changes made in spacemanagement settings throughsp_chgattribute.
• Drop and re-create all indexesbelonging to the table.
Requires that the select intodatabase option to be true.
Not supported with systemtables.
Reclaim space Reclaim unused page space resulting fromdeletions and row-shortening updates.
Not supported with all-pages-locked tables.
5. On the Options screen, select your reorganization options.
Option Description Restrictions
Compress Compress the rows affected by thereorganization.
Available only when one of thesereorganization types is selected:• Compact• Forwarded rows• Reclaim space
Not available on SAP ASE versionsearlier than 15.7.
Resume Start reorganization at the point in atable where the previous reorganizationleft off.
Available only when one of thesereorganization types is selected:• Compact• Forwarded rows• Reclaim space• Defragmentation, and resuming
reorganization on a single table isfeasible.
Time Specify the length of time allowed forrunning reorganization.
Available only when one of thesereorganization types is selected:• Compact• Forwarded rows• Reclaim space• Defragmentation
Manage and Monitor
SAP Control Center for SAP Adaptive Server Enterprise 499
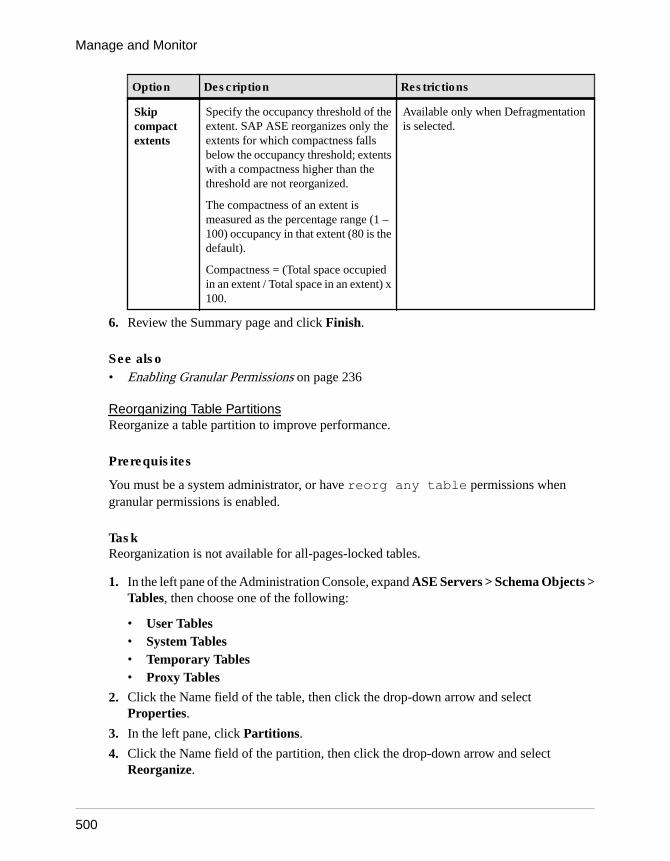
Option Description Restrictions
Skipcompactextents
Specify the occupancy threshold of theextent. SAP ASE reorganizes only theextents for which compactness fallsbelow the occupancy threshold; extentswith a compactness higher than thethreshold are not reorganized.
The compactness of an extent ismeasured as the percentage range (1 –100) occupancy in that extent (80 is thedefault).
Compactness = (Total space occupiedin an extent / Total space in an extent) x100.
Available only when Defragmentationis selected.
6. Review the Summary page and click Finish.
See also• Enabling Granular Permissions on page 236
Reorganizing Table PartitionsReorganize a table partition to improve performance.
Prerequisites
You must be a system administrator, or have reorg any table permissions whengranular permissions is enabled.
TaskReorganization is not available for all-pages-locked tables.
1. In the left pane of the Administration Console, expand ASE Servers > Schema Objects >Tables, then choose one of the following:
• User Tables• System Tables• Temporary Tables• Proxy Tables
2. Click the Name field of the table, then click the drop-down arrow and selectProperties.
3. In the left pane, click Partitions.
4. Click the Name field of the partition, then click the drop-down arrow and selectReorganize.
Manage and Monitor
500
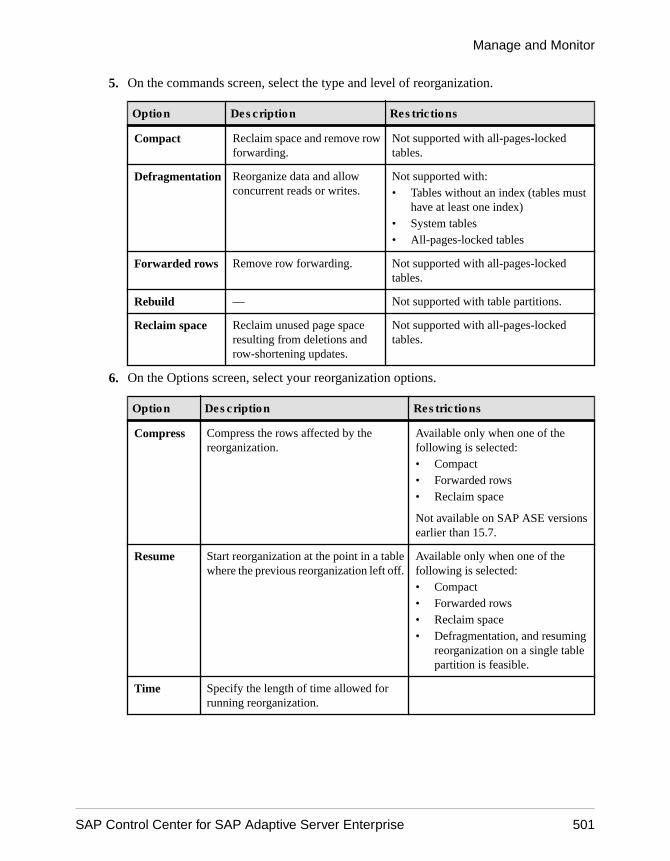
5. On the commands screen, select the type and level of reorganization.
Option Description Restrictions
Compact Reclaim space and remove rowforwarding.
Not supported with all-pages-lockedtables.
Defragmentation Reorganize data and allowconcurrent reads or writes.
Not supported with:• Tables without an index (tables must
have at least one index)• System tables• All-pages-locked tables
Forwarded rows Remove row forwarding. Not supported with all-pages-lockedtables.
Rebuild — Not supported with table partitions.
Reclaim space Reclaim unused page spaceresulting from deletions androw-shortening updates.
Not supported with all-pages-lockedtables.
6. On the Options screen, select your reorganization options.
Option Description Restrictions
Compress Compress the rows affected by thereorganization.
Available only when one of thefollowing is selected:• Compact• Forwarded rows• Reclaim space
Not available on SAP ASE versionsearlier than 15.7.
Resume Start reorganization at the point in a tablewhere the previous reorganization left off.
Available only when one of thefollowing is selected:• Compact• Forwarded rows• Reclaim space• Defragmentation, and resuming
reorganization on a single tablepartition is feasible.
Time Specify the length of time allowed forrunning reorganization.
Manage and Monitor
SAP Control Center for SAP Adaptive Server Enterprise 501
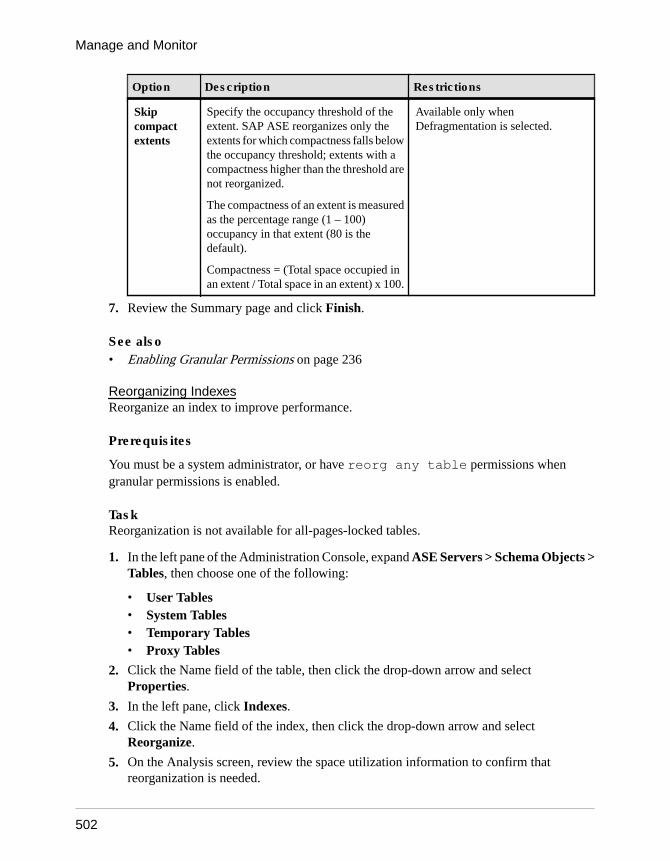
Option Description Restrictions
Skipcompactextents
Specify the occupancy threshold of theextent. SAP ASE reorganizes only theextents for which compactness falls belowthe occupancy threshold; extents with acompactness higher than the threshold arenot reorganized.
The compactness of an extent is measuredas the percentage range (1 – 100)occupancy in that extent (80 is thedefault).
Compactness = (Total space occupied inan extent / Total space in an extent) x 100.
Available only whenDefragmentation is selected.
7. Review the Summary page and click Finish.
See also• Enabling Granular Permissions on page 236
Reorganizing IndexesReorganize an index to improve performance.
Prerequisites
You must be a system administrator, or have reorg any table permissions whengranular permissions is enabled.
TaskReorganization is not available for all-pages-locked tables.
1. In the left pane of the Administration Console, expand ASE Servers > Schema Objects >Tables, then choose one of the following:
• User Tables• System Tables• Temporary Tables• Proxy Tables
2. Click the Name field of the table, then click the drop-down arrow and selectProperties.
3. In the left pane, click Indexes.
4. Click the Name field of the index, then click the drop-down arrow and selectReorganize.
5. On the Analysis screen, review the space utilization information to confirm thatreorganization is needed.
Manage and Monitor
502
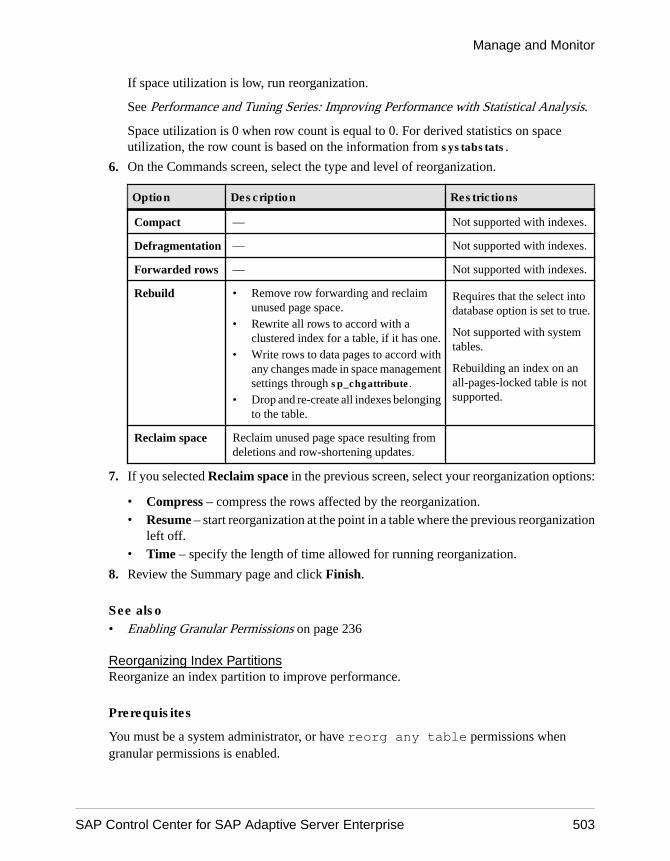
If space utilization is low, run reorganization.
See Performance and Tuning Series: Improving Performance with Statistical Analysis.
Space utilization is 0 when row count is equal to 0. For derived statistics on spaceutilization, the row count is based on the information from systabstats.
6. On the Commands screen, select the type and level of reorganization.
Option Description Restrictions
Compact — Not supported with indexes.
Defragmentation — Not supported with indexes.
Forwarded rows — Not supported with indexes.
Rebuild • Remove row forwarding and reclaimunused page space.
• Rewrite all rows to accord with aclustered index for a table, if it has one.
• Write rows to data pages to accord withany changes made in space managementsettings through sp_chgattribute.
• Drop and re-create all indexes belongingto the table.
Requires that the select intodatabase option is set to true.
Not supported with systemtables.
Rebuilding an index on anall-pages-locked table is notsupported.
Reclaim space Reclaim unused page space resulting fromdeletions and row-shortening updates.
7. If you selected Reclaim space in the previous screen, select your reorganization options:
• Compress – compress the rows affected by the reorganization.• Resume – start reorganization at the point in a table where the previous reorganization
left off.• Time – specify the length of time allowed for running reorganization.
8. Review the Summary page and click Finish.
See also• Enabling Granular Permissions on page 236
Reorganizing Index PartitionsReorganize an index partition to improve performance.
Prerequisites
You must be a system administrator, or have reorg any table permissions whengranular permissions is enabled.
Manage and Monitor
SAP Control Center for SAP Adaptive Server Enterprise 503
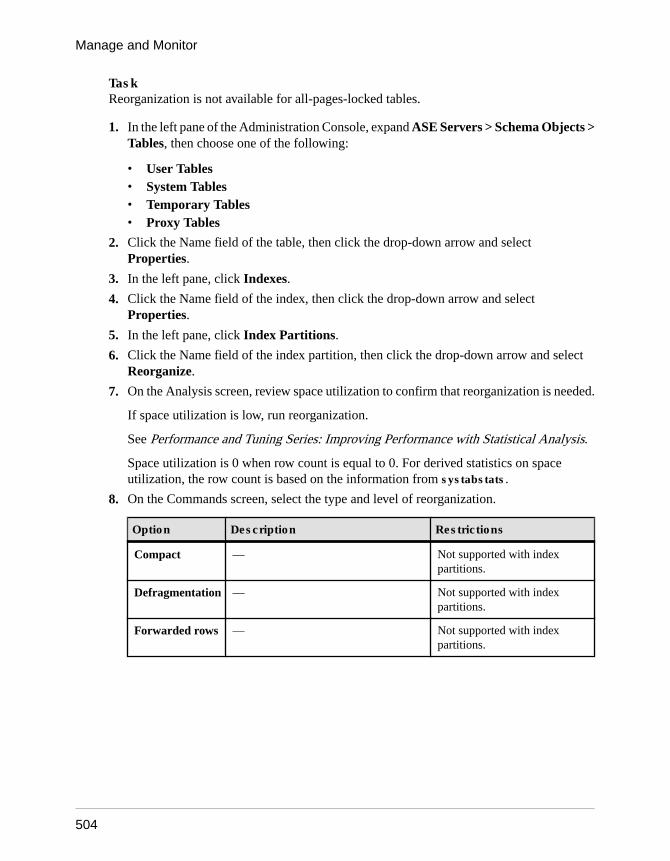
TaskReorganization is not available for all-pages-locked tables.
1. In the left pane of the Administration Console, expand ASE Servers > Schema Objects >Tables, then choose one of the following:
• User Tables• System Tables• Temporary Tables• Proxy Tables
2. Click the Name field of the table, then click the drop-down arrow and selectProperties.
3. In the left pane, click Indexes.
4. Click the Name field of the index, then click the drop-down arrow and selectProperties.
5. In the left pane, click Index Partitions.
6. Click the Name field of the index partition, then click the drop-down arrow and selectReorganize.
7. On the Analysis screen, review space utilization to confirm that reorganization is needed.
If space utilization is low, run reorganization.
See Performance and Tuning Series: Improving Performance with Statistical Analysis.
Space utilization is 0 when row count is equal to 0. For derived statistics on spaceutilization, the row count is based on the information from systabstats.
8. On the Commands screen, select the type and level of reorganization.
Option Description Restrictions
Compact — Not supported with indexpartitions.
Defragmentation — Not supported with indexpartitions.
Forwarded rows — Not supported with indexpartitions.
Manage and Monitor
504
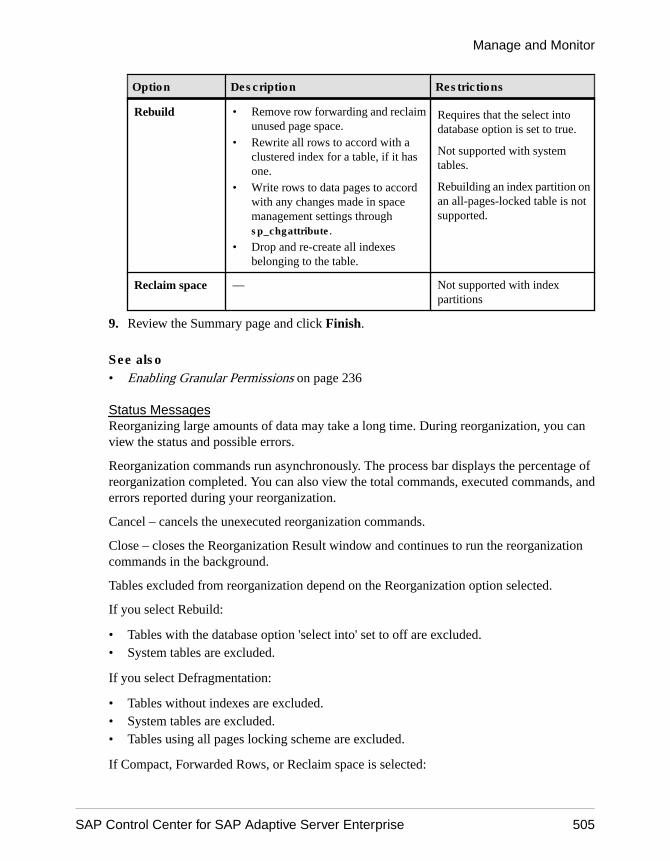
Option Description Restrictions
Rebuild • Remove row forwarding and reclaimunused page space.
• Rewrite all rows to accord with aclustered index for a table, if it hasone.
• Write rows to data pages to accordwith any changes made in spacemanagement settings throughsp_chgattribute.
• Drop and re-create all indexesbelonging to the table.
Requires that the select intodatabase option is set to true.
Not supported with systemtables.
Rebuilding an index partition onan all-pages-locked table is notsupported.
Reclaim space — Not supported with indexpartitions
9. Review the Summary page and click Finish.
See also• Enabling Granular Permissions on page 236
Status MessagesReorganizing large amounts of data may take a long time. During reorganization, you canview the status and possible errors.
Reorganization commands run asynchronously. The process bar displays the percentage ofreorganization completed. You can also view the total commands, executed commands, anderrors reported during your reorganization.
Cancel – cancels the unexecuted reorganization commands.
Close – closes the Reorganization Result window and continues to run the reorganizationcommands in the background.
Tables excluded from reorganization depend on the Reorganization option selected.
If you select Rebuild:
• Tables with the database option 'select into' set to off are excluded.• System tables are excluded.
If you select Defragmentation:
• Tables without indexes are excluded.• System tables are excluded.• Tables using all pages locking scheme are excluded.
If Compact, Forwarded Rows, or Reclaim space is selected:
Manage and Monitor
SAP Control Center for SAP Adaptive Server Enterprise 505
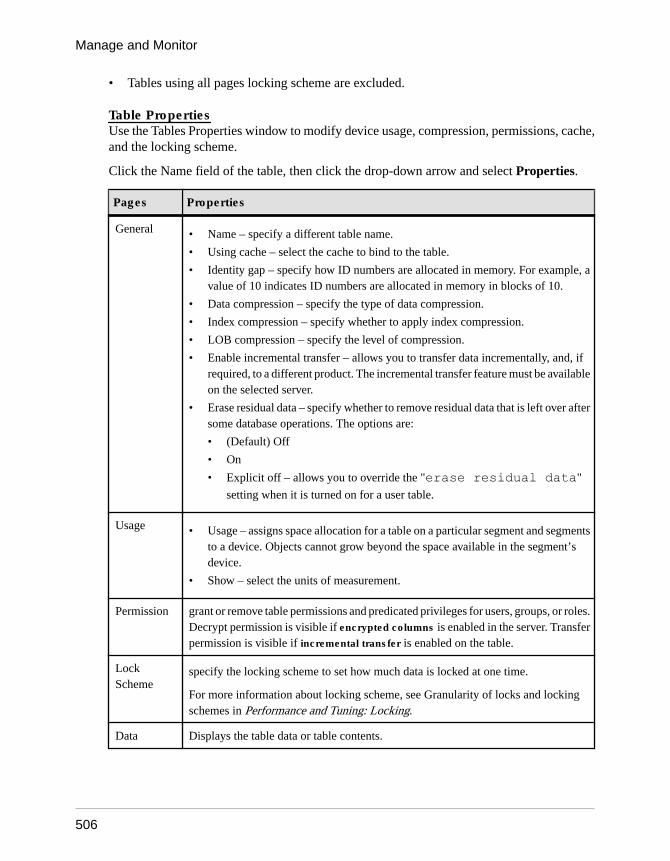
• Tables using all pages locking scheme are excluded.
Table PropertiesUse the Tables Properties window to modify device usage, compression, permissions, cache,and the locking scheme.
Click the Name field of the table, then click the drop-down arrow and select Properties.
Pages Properties
General • Name – specify a different table name.
• Using cache – select the cache to bind to the table.
• Identity gap – specify how ID numbers are allocated in memory. For example, avalue of 10 indicates ID numbers are allocated in memory in blocks of 10.
• Data compression – specify the type of data compression.
• Index compression – specify whether to apply index compression.
• LOB compression – specify the level of compression.
• Enable incremental transfer – allows you to transfer data incrementally, and, ifrequired, to a different product. The incremental transfer feature must be availableon the selected server.
• Erase residual data – specify whether to remove residual data that is left over aftersome database operations. The options are:
• (Default) Off
• On
• Explicit off – allows you to override the "erase residual data"
setting when it is turned on for a user table.
Usage • Usage – assigns space allocation for a table on a particular segment and segmentsto a device. Objects cannot grow beyond the space available in the segment’sdevice.
• Show – select the units of measurement.
Permission grant or remove table permissions and predicated privileges for users, groups, or roles.Decrypt permission is visible if encrypted columns is enabled in the server. Transferpermission is visible if incremental transfer is enabled on the table.
LockScheme
specify the locking scheme to set how much data is locked at one time.
For more information about locking scheme, see Granularity of locks and lockingschemes in Performance and Tuning: Locking.
Data Displays the table data or table contents.
Manage and Monitor
506
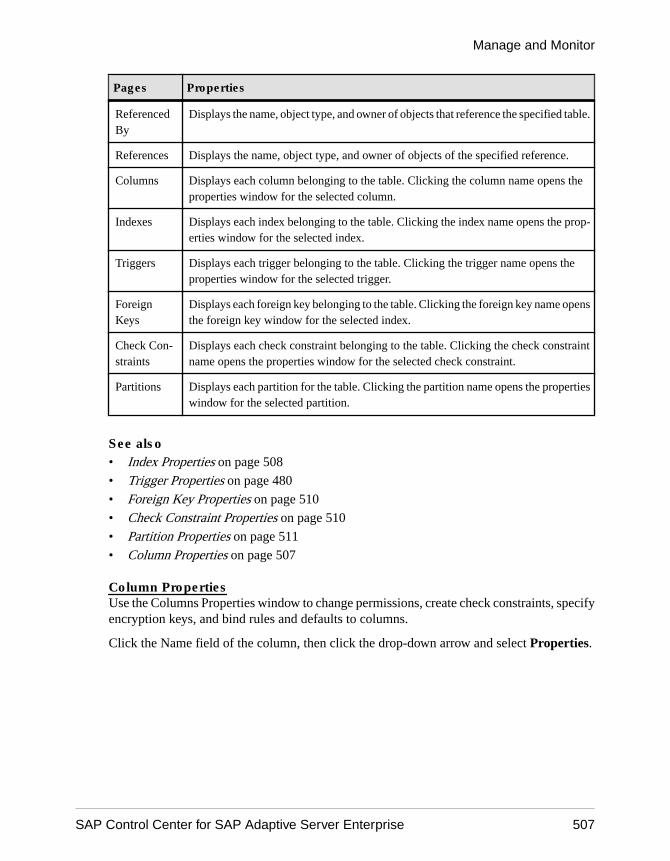
Pages Properties
ReferencedBy
Displays the name, object type, and owner of objects that reference the specified table.
References Displays the name, object type, and owner of objects of the specified reference.
Columns Displays each column belonging to the table. Clicking the column name opens theproperties window for the selected column.
Indexes Displays each index belonging to the table. Clicking the index name opens the prop-erties window for the selected index.
Triggers Displays each trigger belonging to the table. Clicking the trigger name opens theproperties window for the selected trigger.
ForeignKeys
Displays each foreign key belonging to the table. Clicking the foreign key name opensthe foreign key window for the selected index.
Check Con-straints
Displays each check constraint belonging to the table. Clicking the check constraintname opens the properties window for the selected check constraint.
Partitions Displays each partition for the table. Clicking the partition name opens the propertieswindow for the selected partition.
See also• Index Properties on page 508
• Trigger Properties on page 480
• Foreign Key Properties on page 510
• Check Constraint Properties on page 510
• Partition Properties on page 511
• Column Properties on page 507
Column PropertiesUse the Columns Properties window to change permissions, create check constraints, specifyencryption keys, and bind rules and defaults to columns.
Click the Name field of the column, then click the drop-down arrow and select Properties.
Manage and Monitor
SAP Control Center for SAP Adaptive Server Enterprise 507
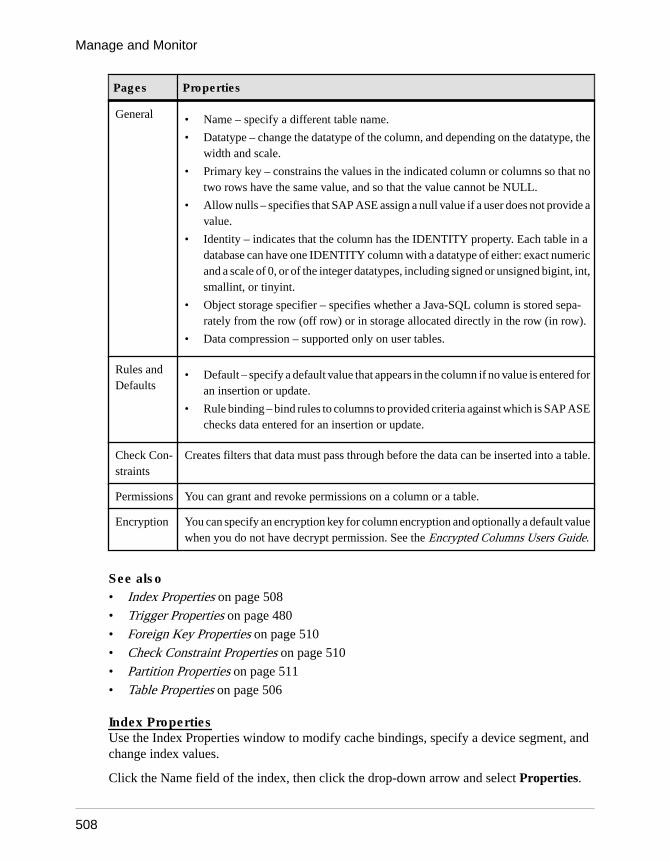
Pages Properties
General • Name – specify a different table name.
• Datatype – change the datatype of the column, and depending on the datatype, thewidth and scale.
• Primary key – constrains the values in the indicated column or columns so that notwo rows have the same value, and so that the value cannot be NULL.
• Allow nulls – specifies that SAP ASE assign a null value if a user does not provide avalue.
• Identity – indicates that the column has the IDENTITY property. Each table in adatabase can have one IDENTITY column with a datatype of either: exact numericand a scale of 0, or of the integer datatypes, including signed or unsigned bigint, int,smallint, or tinyint.
• Object storage specifier – specifies whether a Java-SQL column is stored sepa-rately from the row (off row) or in storage allocated directly in the row (in row).
• Data compression – supported only on user tables.
Rules andDefaults
• Default – specify a default value that appears in the column if no value is entered foran insertion or update.
• Rule binding – bind rules to columns to provided criteria against which is SAP ASEchecks data entered for an insertion or update.
Check Con-straints
Creates filters that data must pass through before the data can be inserted into a table.
Permissions You can grant and revoke permissions on a column or a table.
Encryption You can specify an encryption key for column encryption and optionally a default valuewhen you do not have decrypt permission. See the Encrypted Columns Users Guide.
See also• Index Properties on page 508
• Trigger Properties on page 480
• Foreign Key Properties on page 510
• Check Constraint Properties on page 510
• Partition Properties on page 511
• Table Properties on page 506
Index PropertiesUse the Index Properties window to modify cache bindings, specify a device segment, andchange index values.
Click the Name field of the index, then click the drop-down arrow and select Properties.
Manage and Monitor
508
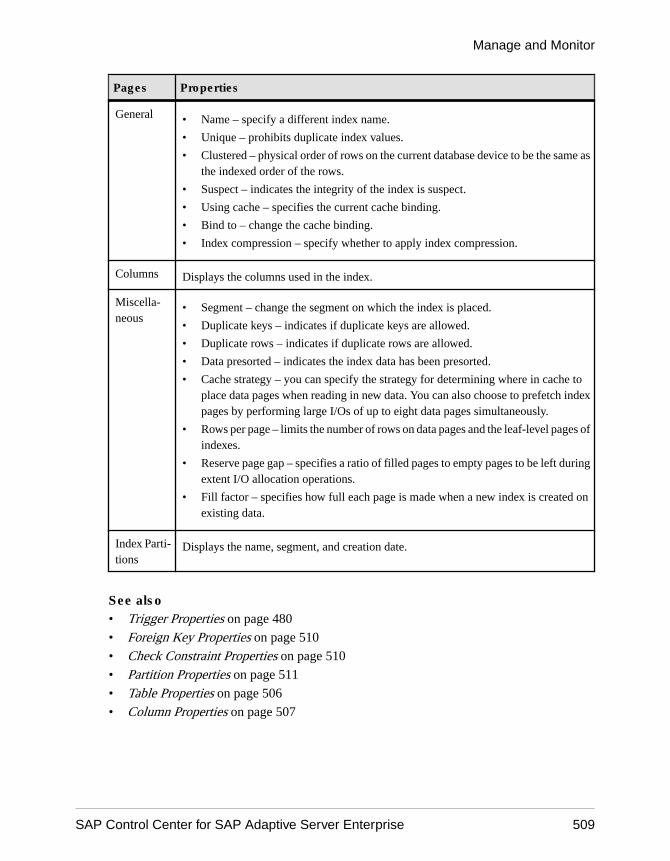
Pages Properties
General • Name – specify a different index name.
• Unique – prohibits duplicate index values.
• Clustered – physical order of rows on the current database device to be the same asthe indexed order of the rows.
• Suspect – indicates the integrity of the index is suspect.
• Using cache – specifies the current cache binding.
• Bind to – change the cache binding.
• Index compression – specify whether to apply index compression.
Columns Displays the columns used in the index.
Miscella-neous
• Segment – change the segment on which the index is placed.
• Duplicate keys – indicates if duplicate keys are allowed.
• Duplicate rows – indicates if duplicate rows are allowed.
• Data presorted – indicates the index data has been presorted.
• Cache strategy – you can specify the strategy for determining where in cache toplace data pages when reading in new data. You can also choose to prefetch indexpages by performing large I/Os of up to eight data pages simultaneously.
• Rows per page – limits the number of rows on data pages and the leaf-level pages ofindexes.
• Reserve page gap – specifies a ratio of filled pages to empty pages to be left duringextent I/O allocation operations.
• Fill factor – specifies how full each page is made when a new index is created onexisting data.
Index Parti-tions
Displays the name, segment, and creation date.
See also• Trigger Properties on page 480
• Foreign Key Properties on page 510
• Check Constraint Properties on page 510
• Partition Properties on page 511
• Table Properties on page 506
• Column Properties on page 507
Manage and Monitor
SAP Control Center for SAP Adaptive Server Enterprise 509
Foreign Key PropertiesThe Foreign Key Properties window shows current foreign key options and the matchingprimary keys.
Click the Name field of the foreign key, then click the drop-down arrow and selectProperties.
Pages Properties
General Shows the selected foreign key options.
Columns Shows the defined foreign keys and the primary keys to which the foreign keys applies.
See also• Index Properties on page 508
• Trigger Properties on page 480
• Check Constraint Properties on page 510
• Partition Properties on page 511
• Table Properties on page 506
• Column Properties on page 507
Check Constraint PropertiesThe Check Constraint Properties window shows the check constraint definitions.
Click the Name field of the constraint, then click the drop-down arrow and selectProperties.
Page Properties
General • Name, Owner, Creation date – shows the check constraint properties.
• Check Constraint – shows the check constraint expression or condition that values mustpass before being inserted into the table.
See also• Index Properties on page 508
• Trigger Properties on page 480
• Foreign Key Properties on page 510
• Partition Properties on page 511
• Table Properties on page 506
• Column Properties on page 507
Manage and Monitor
510
Partition PropertiesThe Partition Properties window shows the partition name, strategy, and type.
Click the Name field of the partition, then click the drop-down arrow and select Properties.
Page Properties
General Shows the partition properties including the name, strategy, and type of partition. You canchange the segment on which the index is placed and the type of data compression.
See also• Index Properties on page 508
• Trigger Properties on page 480
• Foreign Key Properties on page 510
• Check Constraint Properties on page 510
• Table Properties on page 506
• Column Properties on page 507
Deleting a TableUse SAP Control Center to delete tables.
1. In the left pane of the Administration Console, expand ASE Servers > Schema Objects >Tables and select the table type.
2. Click the Name field of the table, then click the drop-down arrow and select Delete.
3. Confirm the deletion.
To zero out residual data, which may be visible to a user using the dbcc utility after youdelete the table, select Erase Residual Data. You cannot use Erase Residual Data ontables that were created on a user database earlier than SAP ASE version 16.0.
4. Click Finish.
Deleting an IndexUse SAP Control Center to delete indexes created on user tables.
1. In the left pane of the Administration Console, expand ASE Servers > Schema Objects >Tables > User Tables.
2. Click the Name field of the table, then click the drop-down arrow and selectProperties.
3. In the left pane, click Indexes.
4. Click the Name field of the index, then click the drop-down arrow and select Delete.
5. Confirm the deletion.
Manage and Monitor
SAP Control Center for SAP Adaptive Server Enterprise 511
To zero out residual data, which may be visible to a user using the dbcc utility after youdelete the index, select Erase Residual Data. You cannot use Erase Residual Data onindexes for tables that were created on a user database earlier than SAP ASE version 16.0.
6. Click Finish.
Thread PoolsMonitor threads or manage thread pools into groups of CPU resources.
Monitor ThreadsMonitor SAP ASE threads.
To monitor threads, you must start SAP Adaptive Server Enterprise in threaded mode.
Identifying the Threads in a Thread PoolFind the threads belonging to a certain thread pool, and the associated kernel task name.
You can configure thread pools in SAP ASE 15.7 and later.
1. In the Perspective Resources view, select the server to monitor, click the drop-down arrow,and select Monitor.
2. In the left pane, select Threads.
3. In the right pane, select a thread from the list of threads.The lower portion of the right pane is updated with the details of the selected thread.
4. Click the Tasks tab to see the kernel task name associated with the thread pool.
See also• Creating a Thread Pool on page 513
• Thread Pool Properties on page 514
Thread Statistics and DetailsInterpret SAP ASE thread information.
In a cluster environment, threads created on instances of a cluster appear as an InstanceThreads in the right pane of the Threads screen.
Manage and Monitor
512
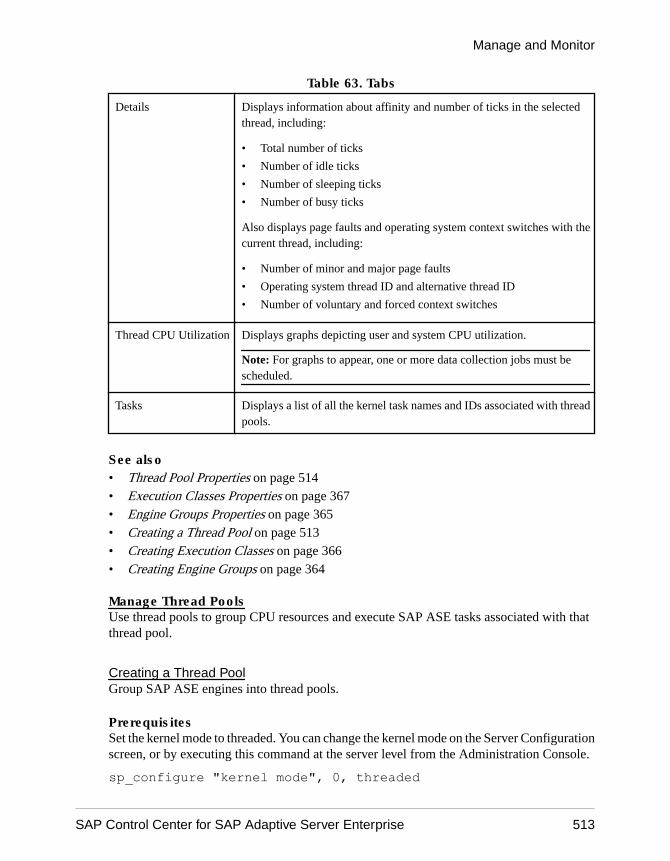
Table 63. Tabs
Details Displays information about affinity and number of ticks in the selectedthread, including:
• Total number of ticks
• Number of idle ticks
• Number of sleeping ticks
• Number of busy ticks
Also displays page faults and operating system context switches with thecurrent thread, including:
• Number of minor and major page faults
• Operating system thread ID and alternative thread ID
• Number of voluntary and forced context switches
Thread CPU Utilization Displays graphs depicting user and system CPU utilization.
Note: For graphs to appear, one or more data collection jobs must bescheduled.
Tasks Displays a list of all the kernel task names and IDs associated with threadpools.
See also• Thread Pool Properties on page 514• Execution Classes Properties on page 367• Engine Groups Properties on page 365• Creating a Thread Pool on page 513• Creating Execution Classes on page 366• Creating Engine Groups on page 364
Manage Thread PoolsUse thread pools to group CPU resources and execute SAP ASE tasks associated with thatthread pool.
Creating a Thread PoolGroup SAP ASE engines into thread pools.
PrerequisitesSet the kernel mode to threaded. You can change the kernel mode on the Server Configurationscreen, or by executing this command at the server level from the Administration Console.
sp_configure "kernel mode", 0, threaded
Manage and Monitor
SAP Control Center for SAP Adaptive Server Enterprise 513
You must restart SAP ASE for the change to take effect.
Task
Thread pools are groups of resources, such as engines, that execute user tasks, run specific jobssuch as signal handling, and process requests from a work queue. Both system-defined anduser-defined thread pools are supported.
1. In the left pane of the Administration Console, expand ASE Servers > Performance, thenselect Thread Pools.
2. Select New.
3. On the Introduction screen, select a server that is configured to run in threaded mode.
4. (Optional) For a cluster environment, click Create this as local thread pool, then selectthe cluster instance on which the thread pool will be created.
5. On the Thread Pool Name screen, specify the name of the thread pool you want to create.
Note: You cannot name thread pools starting with a syb_ prefix since that is reserved forsystem thread pools.
6. On the Thread count screen, specify the number of threads. The maximum number ofthreads you can configure cannot exceed the value of max online engines.
7. Specify the thread pool idle time out in microseconds.
8. (Optional) Provide a description for the thread pool.
9. (Optional) Click Preview to see the SQL statements for your command.
10. (Optional) Click Summary to verify your selected options.
See also• Creating Execution Classes on page 366
• Creating Engine Groups on page 364
• Thread Pool Properties on page 514
• Execution Classes Properties on page 367
• Engine Groups Properties on page 365
• Thread Statistics and Details on page 512
Thread Pool PropertiesView properties of thread pools in an SAP ASE.
Click the Name field of the thread pool, then click the drop-down arrow and selectProperties.
Manage and Monitor
514
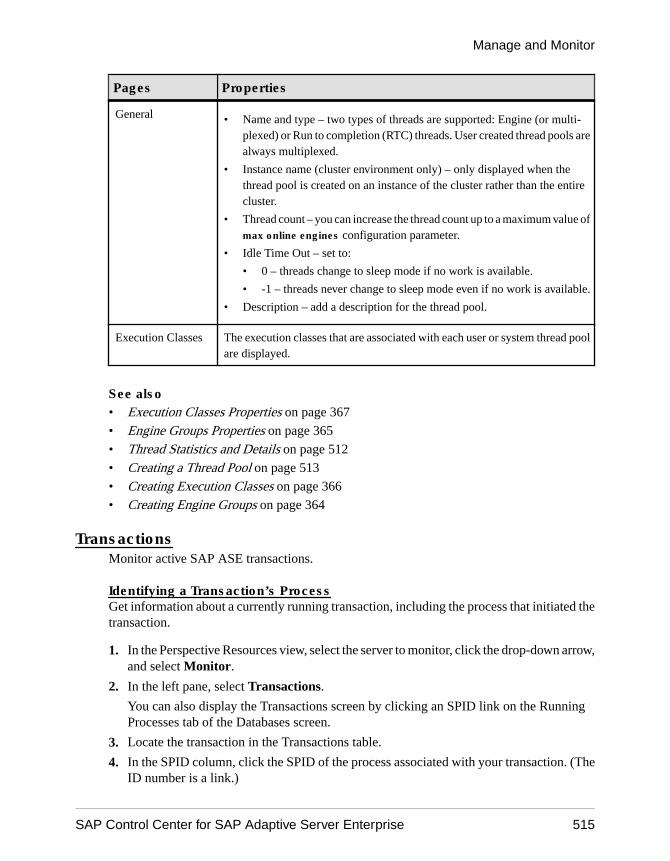
Pages Properties
General • Name and type – two types of threads are supported: Engine (or multi-plexed) or Run to completion (RTC) threads. User created thread pools arealways multiplexed.
• Instance name (cluster environment only) – only displayed when thethread pool is created on an instance of the cluster rather than the entirecluster.
• Thread count – you can increase the thread count up to a maximum value ofmax online engines configuration parameter.
• Idle Time Out – set to:
• 0 – threads change to sleep mode if no work is available.
• -1 – threads never change to sleep mode even if no work is available.
• Description – add a description for the thread pool.
Execution Classes The execution classes that are associated with each user or system thread poolare displayed.
See also• Execution Classes Properties on page 367• Engine Groups Properties on page 365• Thread Statistics and Details on page 512• Creating a Thread Pool on page 513• Creating Execution Classes on page 366• Creating Engine Groups on page 364
TransactionsMonitor active SAP ASE transactions.
Identifying a Transaction’s ProcessGet information about a currently running transaction, including the process that initiated thetransaction.
1. In the Perspective Resources view, select the server to monitor, click the drop-down arrow,and select Monitor.
2. In the left pane, select Transactions.
You can also display the Transactions screen by clicking an SPID link on the RunningProcesses tab of the Databases screen.
3. Locate the transaction in the Transactions table.
4. In the SPID column, click the SPID of the process associated with your transaction. (TheID number is a link.)
Manage and Monitor
SAP Control Center for SAP Adaptive Server Enterprise 515
You see the Processes screen, which shows information about your transaction’s parentprocess.
See also• Process Statistics and Details on page 402• Transaction Statistics and Details on page 516
Transaction Statistics and DetailsInterpret information about SAP ASE transactions.
The Transactions table displays information about all active transactions on the selectedserver. Details include the name of the transaction, the login of the user who owns it, theapplication that launched the transaction, the process that initiated the transaction (SPIDcolumn), the transaction’s start time, the name of the host where the transaction is running, andthe database it is running against. (If a transaction affects more than one database, the tabledoes not display them all—it shows the transaction’s current database and the process thatstarted the transaction.)
Note: In cluster configurations, information in the Transactions table is grouped by clusterinstances.
When you select a transaction in the table, the User Log Cache Usage tab at the bottom of thescreen displays statistics about the user log cache for the selected transaction. Details includebytes written, number of flushes and full flushes, maximum cache usage (in bytes), andcurrent usage (in bytes).
See also• Process Statistics and Details on page 402• Identifying a Transaction’s Process on page 515
User-Defined DatatypesAdd, delete, or modify user-defined datatypes.
Adding a User-Defined DatatypeName and design your own datatypes to supplement system datatypes.
1. In the Administration Console, select Server > Schema Objects > User DefinedDatatypes.
2. Select New.
3. On the Introduction screen, select the server and database in which to create the datatype,and the datatype owner.
4. On the User-Defined Datatype Name screen, enter the name of the datatype.
5. On the System Datatype screen, select the system datatype that the user-defined datatypeis based on, and whether the datatype allows null or identity values.
Manage and Monitor
516
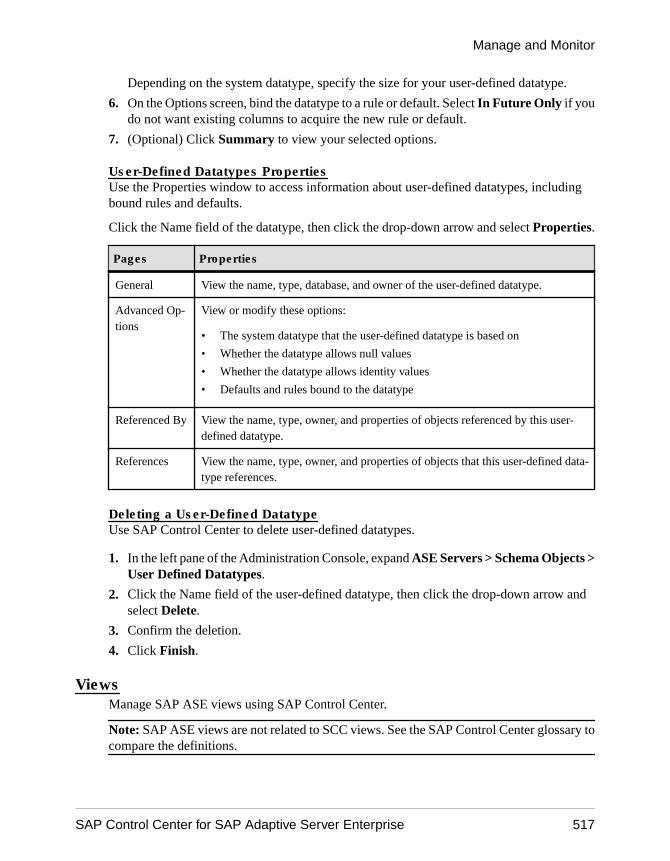
Depending on the system datatype, specify the size for your user-defined datatype.
6. On the Options screen, bind the datatype to a rule or default. Select In Future Only if youdo not want existing columns to acquire the new rule or default.
7. (Optional) Click Summary to view your selected options.
User-Defined Datatypes PropertiesUse the Properties window to access information about user-defined datatypes, includingbound rules and defaults.
Click the Name field of the datatype, then click the drop-down arrow and select Properties.
Pages Properties
General View the name, type, database, and owner of the user-defined datatype.
Advanced Op-tions
View or modify these options:
• The system datatype that the user-defined datatype is based on
• Whether the datatype allows null values
• Whether the datatype allows identity values
• Defaults and rules bound to the datatype
Referenced By View the name, type, owner, and properties of objects referenced by this user-defined datatype.
References View the name, type, owner, and properties of objects that this user-defined data-type references.
Deleting a User-Defined DatatypeUse SAP Control Center to delete user-defined datatypes.
1. In the left pane of the Administration Console, expand ASE Servers > Schema Objects >User Defined Datatypes.
2. Click the Name field of the user-defined datatype, then click the drop-down arrow andselect Delete.
3. Confirm the deletion.
4. Click Finish.
ViewsManage SAP ASE views using SAP Control Center.
Note: SAP ASE views are not related to SCC views. See the SAP Control Center glossary tocompare the definitions.
Manage and Monitor
SAP Control Center for SAP Adaptive Server Enterprise 517
Creating a ViewCreate an SAP ASE view, which is an alternative way of looking at the data in one or moretables.
Note: SAP ASE views are not related to SCC views. See the SAP Control Center glossary tocompare the definitions.
1. In the left pane of the Administration Console, expand ASE Servers > CompiledObjects, then select Views.
2. Select New.
3. On the Introduction screen, select the server, database, and owner of the new view.
4. Enter the name of the view.
5. On the SQL Editor screen, provide the SQL statements for the view.
6. (Optional) Click Preview to see the SQL statements for your command.
7. (Optional) Click Summary to verify your selected options.
See also• View Properties on page 518
Replacing a View DefinitionYou can replace the SQL definition of an existing view.
1. In the left pane of the Administration Console, expand ASE Servers > Compiled Objects> Views.
2. Choose one of the following:
• Click the drop-down arrow on the view for which you want to replace the definition andselect Replace.
• From Views in the left pane, click the drop-down arrow and select New. Enter the nameof the existing view for which you want to replace the definition.When selecting an existing view, the Confirm Replace dialog appears with an optionto replace the object definition or cancel the replacement.
3. (Optional) On the SQL Editor screen, enter the new view value.
4. (Optional) On the Summary screen, verify the view name, database, owner, and the newexpression.
View PropertiesUse the View Properties window to access information on column datatype and permissions,and on database objects that reference, and are referenced by, the view.
Click the Name field of the view, then click the drop-down arrow and select Properties.
Manage and Monitor
518
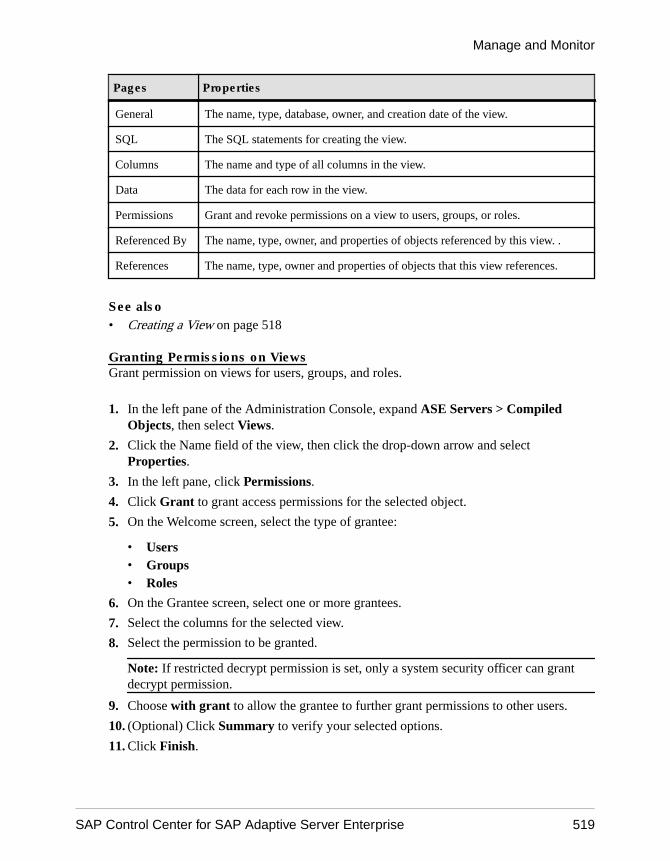
Pages Properties
General The name, type, database, owner, and creation date of the view.
SQL The SQL statements for creating the view.
Columns The name and type of all columns in the view.
Data The data for each row in the view.
Permissions Grant and revoke permissions on a view to users, groups, or roles.
Referenced By The name, type, owner, and properties of objects referenced by this view. .
References The name, type, owner and properties of objects that this view references.
See also• Creating a View on page 518
Granting Permissions on ViewsGrant permission on views for users, groups, and roles.
1. In the left pane of the Administration Console, expand ASE Servers > CompiledObjects, then select Views.
2. Click the Name field of the view, then click the drop-down arrow and selectProperties.
3. In the left pane, click Permissions.
4. Click Grant to grant access permissions for the selected object.
5. On the Welcome screen, select the type of grantee:
• Users• Groups• Roles
6. On the Grantee screen, select one or more grantees.
7. Select the columns for the selected view.
8. Select the permission to be granted.
Note: If restricted decrypt permission is set, only a system security officer can grantdecrypt permission.
9. Choose with grant to allow the grantee to further grant permissions to other users.
10. (Optional) Click Summary to verify your selected options.
11. Click Finish.
Manage and Monitor
SAP Control Center for SAP Adaptive Server Enterprise 519
Revoking Permissions on ViewsRevoke permission on views for users, groups, and roles.
1. In the left pane of the Administration Console, expand ASE Servers > CompiledObjects, then select Views.
2. Click the Name field of the view, then click the drop-down arrow and selectProperties.
3. In the left pane, click Permissions.
4. Select the grantee, then click Revoke to revoke access permissions to the object.In the Revoke Permissions wizard, each type of permission and the current grantedpermissions are shown in cells.
5. Choose one of:
• Revoke all permission.
• Individual cells to revoke the currently granted permissions. The cell changes to showan "x", indicating that the permission type is no longer granted.
6. Click OK.
Deleting a ViewUse SAP Control Center to delete views.
1. In the left pane of the Administration Console, expand ASE Servers > Compiled Objects> Views.
2. Click the Name field of the view, then click the drop-down arrow and select Delete.
3. Confirm the deletion.
4. Click Finish.
Manage and Monitor
520
Troubleshoot SAP Control Center for SAP ASE
Solve problems that occur in SAP Control Center for SAP ASE.
Data Display ProblemsTroubleshoot problems that involve object or monitor display issues.
Cannot Monitor SAP ASE or Display Statistics ChartProblem: In the Perspective Resources view, the Monitor and Statistics Chart context menuitems for a monitored SAP ASE are grayed out.
Solution: Make sure your user account is authenticated on the SAP ASE. To monitor the SAPASE, you must also make sure that your account has been granted mon_role.
See also• Role Assignment in SAP Control Center for SAP ASE on page 127
Data on Screens or Charts Is MissingProblem: Data on screens or charts is missing.
Solution 1: Schedule collectionsSchedule collection jobs for statistics collections. If collections are scheduled, make sure thestart and stop times are set correctly.
• In the SAP Adaptive Server Enterprise monitor, the Overview, Devices, Engines, andSegments screens use data from collection_ase_all_client_kpis.
• Also in the SAP Adaptive Server Enterprise monitor, the Replication Agent screen usesdata from collection_ase_rat.
• The statistics chart uses data from collection_ase_histmon andcollection_ase_all_client_kpis.
• The heat chart uses data from collection_ase_availability, which is the default collection.
Solution 2: Check revalidation frequencyIf appropriate collections are scheduled but data is missing on caches, devices, engines, orsegments that were recently added to a registered SAP ASE server, check the value of therevalidation_frequency parameter. If the repository has not refreshed (revalidated) its list ofmonitored resources since the new resources were added, data on the new resources is notcollected or displayed. Wait for the next revalidation to see the data.
Troubleshoot SAP Control Center for SAP ASE
SAP Control Center for SAP Adaptive Server Enterprise 521
Solution 3: Reset system clocksIf appropriate collections are scheduled but data is missing, truncated, or incomplete, comparethe clock settings on the machines where SAP Control Center and the client browser arerunning. Clocks that are out of sync by a few minutes cause screens and charts to displayincomplete data. If the clocks’ time difference exceeds the value of the chart trend period,displays that use the chart trend period contain no data. (This problem occurs when the time onone or both system clocks is incorrect. It is not caused by time zone differences—servers andclients can operate successfully in different time zones.)
Solution 4: Reset collection interval or trend periodIf appropriate collections are scheduled but lines on graphs are missing, truncated, orincomplete, the values of the collection repeat interval and the chart trend period might be tooclose together. When these options are set to similar values, graphs sometimes contain only asingle data point. Because SAP Control Center needs at least two data points to draw a curveon a graph and a single data point is not displayed, graphs are empty. For example, if thecollection interval is 12 minutes and the trend period is 15 minutes, graphs will display twodata points for only a few minutes at a time, so they will appear to be blank more often thannot.
To resolve the problem, decrease the collection repeat interval (set on the collection job in thescheduler) or increase the chart trend period (set on the Settings screen in the SAP AdaptiveServer Enterprise monitor) so that multiple collection intervals occur within the trend period.
See also• Setting SAP ASE Parameters in the Configuration File on page 218
• Setting Up Statistics Collection on page 128
• Setting Display Options for SAP ASE Performance Data on page 152
Database Objects Are Not UpdatedProblem: Changes made to database objects are sometimes not visible in SAP Control Centerdialogs or screens.
Solution: Click Refresh on the SAP Control Center screens to see the updated values for thedatabase objects.
You may see this problem when you:
• Click Finish on a wizard, and do not see the updates (that should be generated by thewizard action) on your current screens.
• Create or update database objects outside of SAP Control Center.
Troubleshoot SAP Control Center for SAP ASE
522
Error: No Result Set for this QueryProblem: The agent log contains one or more instances of the error “No result set for thisquery.”
Solution: This error occurs when queries executed by SAP Control Center for SAP ASEcannot be completed. To solve the problem, try increasing the space available to the tempdb onSAP ASE. This example uses the alter database command to increase the size of tempdb by20MB:
alter database tempdb on tempdb_dev=20For more information on increasing the size of the tempdb, see:
• The alter database command in the Adaptive Server Reference Manual: Commands• The chapter on temporary databases in the Performance and Tuning Series: Physical
Database Tuning
If the problems persists, contact SAP technical support.
Error: No Data Was Found For StatisticProblem: I selected a KPI in the Statistic Chart and clicked Graph Statistic but I get the error“No data was found for statistic myserver: .”
Solution: The error is because the KPI belongs to a collection that is not scheduled for thisserver. Schedule the collection.
See also• Key Performance Indicators for SAP ASE on page 133
Error: Unable to Format the Date StringProblem: While using SAP ASE 15.5, the error log contains error messages about date stringformat.
If you use SAP ASE 15.5, you see error messages in the SAP Control Center server log such asthis:
2009-11-17 09:13:14,493 ERROR [RMI TCPConnection(12)-10.33.55.77] Unable to format the date string00000 08:39:50.23 using the format yyyy/MM/dd HH:mm:ss.SSSSolution:
1. Shut down the Unified Agent managing the server.2. Rename the agent’s UAF-2_5/plugins/com.sybase.ase/lib/
ASEAgentPlugin.jar.
Troubleshoot SAP Control Center for SAP ASE
SAP Control Center for SAP Adaptive Server Enterprise 523
3. Copy ASEAgentPlugin.jar from <scc-installation-directory>/SCC-3_3/plugins/ASEMAP to UAF-2_5/plugins/com.sybase.ase/lib.
4. Start the Unified Agent that is managing the server.
Properties for Engine Groups Incorrectly DisplayedProblem: When you view the properties for an instance level engine group from the executionclass General properties screen, the instance level engine group does not correctly identify theengine.
Solution: Open the instance level engine group properties screen directly from theAdministration Console > Performance > Engine Groups screen.
Same Name Engine Groups Are Not SelectableProblem: If you create engine group with the same name on multiple instances and then createan execution class or edits the properties page of an execution class to include a same namedengine group, the engine groups with the same name will be displayed, but only one will beselectable.
Solution: Do not create create engine group with the same name on multiple instances.
"Number of Transactions" KPI Is Not UpdatedProblem: Cannot update the KPI Number of Transactions
Solution: The Number of Transactions KPI is populated only if the monitored version is 15.0.3or later.
If your server version is 15.0.3 or later and the Number of Transactions KPI is not beingupdated, verify that you have installed the latest version of the installmaster script onyour server.
Cannot Find Error Information For Monitor ViewProblem: The SAP Adaptive Server Enterprise Monitor view is not responding and errorinformation is needed.
Solution: Errors are reported in both the SAP Control Center server log file in $SCC_HOME/SCC-3_2/log/agent.log, and the log file for the SAP ASE component of SAP Control Centerin $SCC_HOME/SCC-3_2/plugins/ASEMAP/log/ASEMAP.log
Display Large Number of Objects in Administration ConsoleProblem: Large number of objects (tens of thousands) are not completely displayed in theAdministration Console.
Solution: Use the Search tab to narrow the object results displayed.
Troubleshoot SAP Control Center for SAP ASE
524
Data Collection and Alert ProblemsTroubleshoot problems that involve data collection and generation of alerts.
Collection Job for SAP ASE FailsProblem: A collection job for SAP ASE may fail when the number of open databases is toolow.
Solution: Modify the value of number of open databases by using either the ServerConfiguration screen of the SAP Adaptive Server Enterprise monitor, or these steps:
1. Log in to the SAP ASE:isql -S<server_name> -U<sa user name> -P<sa password>
2. Run this command to display the current configuration value:sp_configure 'number of open databases'
3. Run this command to change the current configuration value:sp_configure 'number of open databases', <number>Add 10 to the current configuration value and substitute this number for <number>.
See also• Modifying Server Configuration Parameters on page 231
Alerts Are Configured But Do Not FireProblem: An alert is configured and the condition for the alert occurs, but the alert does notfire.
Solution: The collection for the KPI that the alert requires is not scheduled. If the alert isdefined on one of the KPIs displayed in the historical charts in the ASE Monitor then theall_client_kpis collection must be scheduled. If the KPI is not one of the KPIs used by the ASEMonitor charts then the ase_histmon collection must be scheduled.
Data Collections Fail to CompleteProblem: A collection frequently times out or generates errors citing theREJECT_DUPLICATE_RESOURCE_AND_COLLECTION policy, but no problems withthe monitored resources are evident.
The errors appear in the log and on the collection history screen.
Solution: Try to determine why the collection is taking so long. For example, are networkdelays slowing down traffic between SAP Control Center and the monitored server?
Troubleshoot SAP Control Center for SAP ASE
SAP Control Center for SAP Adaptive Server Enterprise 525
In the case of network delays and other resource-related problems, the interval betweencollections might be shorter than the time needed to finish the collection. To fix this problem,increase the time between collections.
See also• Modifying the Data Collection Interval for a Job on page 166
Alerts Are Not GeneratedProblem: Alerts are not being generated in SAP Control Center.
Solution: Schedule a job to run the data collection that supports your alerts. See the datacollections topic for your SAP Control Center product module for information on whichcollections must be scheduled.
See also• Setting Up Statistics Collection on page 128
Authentication and Access ProblemsTroubleshoot problems that involve log in, starting, stopping, and authentication.
Cannot Log InProblem: Cannot log in to SAP Control Center Web console.
Solution: Make sure that SAP Control Center has been configured:
• To allow logins through the operating system• To grant appropriate roles to your login account
Ask the SAP Control Center administrator to help you check.
See also• User Authorization on page 112
• Setting Up Security on page 89
SAP Control Center Fails to StartProblem: The SAP Control Center server does not start.
Solution 1: Port conflictSolution: SCC might be using one or more ports that are also being used by another server orapplication on this machine. To check for port conflicts:
Troubleshoot SAP Control Center for SAP ASE
526
1. Execute this command:scc --info ports
The command lists all the ports on which SAP Control Center and its services listen,indicates whether each port is in use, and shows the service running on each port. If SCC isnot running, any port shown to be in use represents a conflict.
2. If you discover a conflict, use scc --port to change the port used by the SAP Control Centerservice.
Solution 2: Insufficient memoryYou might see this error why you try to start: Could not create the Java Virtualmachine. Increase the maximum memory setting.
See also• Configuring Ports on page 107
• Configuring Memory Usage on page 80
Browser Refresh (F5) Causes LogoutProblem: Pressing the F5 key to refresh your browser logs you out of SAP Control Center.
Solution: Do not use F5 when you are logged in to SAP Control Center. Browser refresh doesnot refresh data inside SAP Control Center, but refreshes the loaded application or pages in thebrowser—in this case, the Adobe Flash on which SAP Control Center is built. Consequently,pressing F5 logs you out of any servers you are currently logged in to, including SAP ControlCenter.
Invalid Connection ProfileProblem: During the login authentication step, a security error warns that the connectionprofile is invalid.
Solution: Check the connection information stored by SAP Control Center. You can make surethe information is valid by using it with iSQL or SAP Central to connect to the server.
See also• Registering an SAP ASE Server on page 123
Cannot Authenticate Server Configured with a Multibyte Character SetProblem: If the SAP ASE is configured to use a language that requires a multibyte characterset such as Chinese, an attempt to authenticate the server fails if the correct character set is notspecified in the connection profile for the server.
Solution: The character set for the connection profile can be specified in either of these ways:
• On the Resource Registration screen while registering the resource.
Troubleshoot SAP Control Center for SAP ASE
SAP Control Center for SAP Adaptive Server Enterprise 527
• On the Connection page of the Properties dialog for the SAP ASE resource.
For example, if your server is using the Chinese language, it may be using character setgb18030. In this case, specify gb18030 as the character set.
See also• Registering an SAP ASE Server on page 123
Features Are Not Enabled Although You Have sa_roleProblem: Some features are not enabled even though you are using a login account that hassa_role on the managed server.
Solution: If your login account was granted sa_role after you opened the SAP Adaptive ServerEnterprise Monitor view, exit from the monitor view and reauthenticate. This causes SAPControl Center to reconnect to the server and the new connection acquires the updated loginprivileges.
Resetting the Online HelpProblem: SAP Control Center online help is corrupted or cannot be found (404 error).
Solution: Clear online help files to force SCC to build new ones.
1. Shut down SAP Control Center.2. Remove this directory:
<SCC-installation-directory>\SCC-3_3\services\EmbeddedWebContainer\container\Jetty-6.1.22\work\Jetty_0_0_0_0_8282_help.war__help__.smpe97Tip: In Windows, you might see a deletion error. Regardless of what the errors says, itmight be caused by the length of the path. If deletion fails, rename theJetty_0_0_0_0_8282_help.war__help__.smpe97 folder to something veryshort, such as J. Then delete the renamed folder.
3. Remove these files:<SCC-installation-directory>\SCC-3_3\services\EmbeddedWebContainer\container\Jetty-6.1.22\contexts\_help.xml<SCC-installation-directory>\SCC-3_3\services\SybaseControlCenter\help\com.sybase.infocenter.scc.zip<SCC-installation-directory>\SCC-3_3\services\SybaseControlCenter\help\help.war<SCC-installation-directory>\SCC-3_3\services\SybaseControlCenter\help\help_info.xml
4. Start SCC. After the server comes up it rebuilds the help, which takes a few minutes.5. To display the help, go to https://<your-SCC-host>:8283/help/
index.jsp.
Troubleshoot SAP Control Center for SAP ASE
528
Note: If you try to display the help too soon after restarting, you get a file not found error.Wait a minute or two and try again.
Performance ProblemsTroubleshoot problems that involve performance and memory errors.
SAP ASE is Responding SlowlyProblem: A monitored SAP ASE server is responding slowly. How do you tell whether theproblem lies in the network or the server?
Solution: On the SAP Adaptive Server Enterprise monitor for the server in question, selectEngines. On the Engines screen, select an engine from the Engines table and check theEngine CPU Utilization graph. If the graph shows high activity for the period of slowresponse, the engine might be overloaded. If the graphs for all engines on this server show lowactivity, a network problem is more likely.
See also• Displaying Engine CPU Utilization on page 363
Memory Warnings at StartupProblem: When SAP Control Center starts, you see warnings about system memory or heapmemory allocation.
Solution: Increase the maximum memory setting (SCC_MEM_MAX or jvmopt=-Xmx).
See also• Configuring Memory Usage on page 80
SCC Out of Memory ErrorsProblem: SAP Control Center generates OutOfMemory errors.
Solution:
• If the OutOfMemory error says that SAP Control Center is out of heap space, increase themaximum memory setting (SCC_MEM_MAX or jvmopt=-Xmx).
• If the OutOfMemory error says that SAP Control Center is out of permanent generationspace, increase the permanent memory setting (SCC_MEM_PERM or jvmopt=-XX:MaxPermSize).
• Repeated OutOfMemory errors may indicate a memory leak. OutOfMemory errorsgenerate heap dumps:
Troubleshoot SAP Control Center for SAP ASE
SAP Control Center for SAP Adaptive Server Enterprise 529
• When SAP Control Center runs as a service in Windows:C:/windows/system32
• When SAP Control Center runs as a service in UNIX:<SCC-install-directory>/SCC-3_3/bin
Send the heap dump files to Technical Support for analysis.
See also• Configuring Memory Usage on page 80
Performance Statistics Do Not Cover Enough TimeProblem: I want to graph performance counters over a long period of time but the statisticschart displays only very recent data.
Solution: Ask your SAP Control Center administrator to change the repository purgingoptions to keep statistical data available for as long as you need it. By default, statistics arepurged frequently to conserve disk space.
See also• Configuring Repository Purging on page 209
• Graphing Performance Counters: the Statistics Chart on page 156
Collect Diagnostic DataSAP Control Center supports the collection of comprehensive SAP ASE configuration andenvironment data for diagnostic analysis. SAP Technical Support uses this information todiagnose server issues, thus expediting customer cases.
The two types of diagnostic data you can collect are:
• Field diagnostic data – includes configuration and environment information about SAPASE at the time it is run. SAP Control Center invokes the sybdiag utility command tocollect the information.
• Optimizer diagnostic data – provides a way to analyze SQL queries to optimize theirperformance. SAP Control Center invokes the sp_opt_querystats system procedure tocollect this information.
You can collect diagnostic data for the Cluster Edition of SAP ASE at both the cluster andinstance levels. For:
• Cluster resource – the local agent that is registered and authenticated in the agent page isused by to gather diagnostic data.
• Instance resource – the embedded local agent is used to collect diagnostic data.
Troubleshoot SAP Control Center for SAP ASE
530
Preparing to Collect Diagnostic DataPrerequisites for collecting diagnostic data.
Note: You can only use the diagnostic data wizard with SAP ASE version 15.7 ESD #2 andlater.
To gather diagnostic data in the Cluster Edition of SAP ASE:
• For cluster resource – navigate to Administration Console > ASE Servers.• For instance resource – navigate to Administration Console > ASE Servers > Cluster
Management > Instances.
Perform the following to use all the functionality of the diagnostic data wizard:
• SAP Control Center requires a local agent running on a remote server.• The SCC administrator must grant the "aseDiagnosticRole" role to all SCC users who are
sending diagnostic data through the diagnostic wizard to SAP Technical Support via FTPupload or e-mail message.
• The SCC administrator must configure the e-mail server in SCC for any SCC user to sendthe diagnostic data as an e-mail attachment using the diagnostic wizard.
• SCC users who plan to upload their diagnostic data to SAP via FTP must contact SAPTechnical Support to obtain a case ID number and upload password.
See also• Uploading Diagnostic Data Via FTP on page 535
• Submitting Diagnostic Data via E-mail Message on page 537
Collecting Field Diagnostic DataUse SAP Control Center to collect comprehensive diagnostic data, to send to SAP CustomerSupport, about the configuration and environment of SAP ASE at the time it is run.
PrerequisitesRegister and authenticate the agent to enable the collection of diagnostic data.
Task
SAP Control Center obtains field diagnostic data by executing the sybdiag utility. Seesybdiag in the Utility Guide.
1. From the Administration Console, select ASE Servers.
2. From the servers on the summary list, click the server to collect diagnostic data for, andselect Properties.
3. In the Server Properties window, select Diagnostic Data.
Troubleshoot SAP Control Center for SAP ASE
SAP Control Center for SAP Adaptive Server Enterprise 531
4. From the Diagnostic Data window, click Collect Field Diagnostic Data.
5. In the Diagnostic Data page, specify:
• Record name – is the name associated with the diagnostic data package in the SCCrepository. This record name is not the name of the diagnostic file, which is long andcomplex, but uses a short default format that is easy to associate with your server. Thedefault format is servername_number, where servername is the name of your server,and number is the lowest unused number. You can change the record name.
• Output directory – is the path in which to store the diagnostic data file. The path can beeither absolute or relative to the release directory, but must point to the location of theremote server node. The default value is the release directory.
6. On the Feature Types page, select the type of diagnostic data to collect:
• Operating system information• Configuration data• Monitoring data• External files – consists of the configuration file, error log, interfaces file, and so onBy default, all of these options are selected.
7. On the Upload Options page, specify whether to upload the diagnostic data to SybaseTechnical Support immediately after SCC collects the data. You can perform an upload asa separate step later.
If you select Upload the package to SAP Customer Support, the Upload Options pagedisplays these options:• (Default) Upload diagnostic data package via FTP site – if you select this option and
click Next, the FTP Server page appears, and you see FTP Server on the left pane.• Upload diagnostic data package via e-mail notification – if you select this option and
click Next, the E-mail Notification page appears, and you see E-mail Notification onthe left pane.
By default, the Upload Options page lets you delete the diagnostic data package after asuccessful upload. SAP Control Center skips this operation if the upload task fails.
8. Click Next to start the collection process on the Summary page.
See also• Collecting Optimizer Diagnostic Data on page 533
• Uploading Diagnostic Data Via FTP on page 535
• Submitting Diagnostic Data via E-mail Message on page 537
• Deleting a Diagnostic Data File on page 538
Troubleshoot SAP Control Center for SAP ASE
532
Collecting Optimizer Diagnostic DataUse SAP Control Center to collect diagnostic data to send to SAP Technical Support toperform detailed analyses in optimizing SQL queries and improving performance.
Prerequisites
Register and authenticate the agent to enable the collection of diagnostic data.
Make sure Job Scheduler is installed, enabled, and running. You must also be logged in to JobScheduler with a login that has sa_role permissions and either js_user_role or js_admin_rolebefore you collect optimizer diagnostic data; otherwise, you see an error message on theIntroduction page, and the Next button becomes disabled.
Task
SAP Control Center obtains diagnostic data to optimize complex SQL queries by executingthe sp_opt_querystats system procedure. See sp_opt_querystats in Reference Manual:Procedures.
1. From the Administration Console, select ASE Servers.
2. From the servers on the summary list, click the server to collect diagnostic data for, andselect Properties.
3. In the Server Properties window, select Diagnostic Data.
4. From the Diagnostic Data window, click Collect Optimizer Diagnostic Data.
5. In the Diagnostic Data page, specify:
• Record name – is the name associated with the diagnostic data package in the SCCrepository. This record name is not the name of the diagnostic file, which is long andcomplex, but uses a short default format that is easy to associate with your server. Thedefault format is servername_number, where servername is the name of your server,and number is the lowest unused number. You can change the record name.
• Output directory – is the path in which to store the diagnostic data file. The path can beeither absolute or relative to the release directory, but must point to the location of theremote server node. The default value is the release directory.
6. In the text field of the Query SQL page, specify the SQL statement to collect diagnosticinformation for. You can either:
• Type a SQL query directly into the text field, or,• Click Import to display a window, from which you can navigate to, and select your
saved file.
Click Clear to remove text you added in the field.
7. On the Diagnostic Options page, if you select Customize diagnostic options, you see anumber of options. Equivalent to the diagnostic_option parameter of sp_opt_querystats,
Troubleshoot SAP Control Center for SAP ASE
SAP Control Center for SAP Adaptive Server Enterprise 533
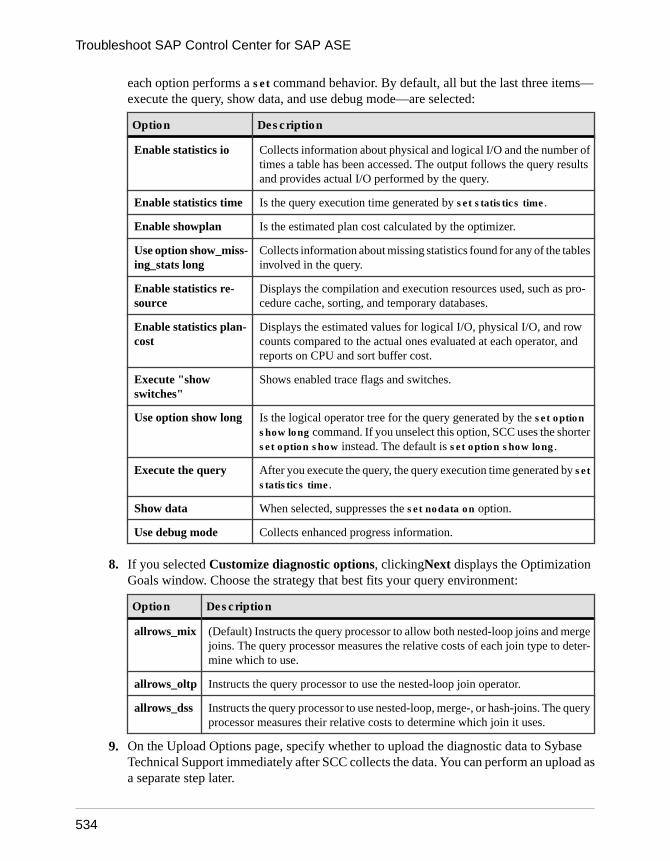
each option performs a set command behavior. By default, all but the last three items—execute the query, show data, and use debug mode—are selected:
Option Description
Enable statistics io Collects information about physical and logical I/O and the number oftimes a table has been accessed. The output follows the query resultsand provides actual I/O performed by the query.
Enable statistics time Is the query execution time generated by set statistics time.
Enable showplan Is the estimated plan cost calculated by the optimizer.
Use option show_miss-ing_stats long
Collects information about missing statistics found for any of the tablesinvolved in the query.
Enable statistics re-source
Displays the compilation and execution resources used, such as pro-cedure cache, sorting, and temporary databases.
Enable statistics plan-cost
Displays the estimated values for logical I/O, physical I/O, and rowcounts compared to the actual ones evaluated at each operator, andreports on CPU and sort buffer cost.
Execute "showswitches"
Shows enabled trace flags and switches.
Use option show long Is the logical operator tree for the query generated by the set optionshow long command. If you unselect this option, SCC uses the shorterset option show instead. The default is set option show long.
Execute the query After you execute the query, the query execution time generated by setstatistics time.
Show data When selected, suppresses the set nodata on option.
Use debug mode Collects enhanced progress information.
8. If you selected Customize diagnostic options, clickingNext displays the OptimizationGoals window. Choose the strategy that best fits your query environment:
Option Description
allrows_mix (Default) Instructs the query processor to allow both nested-loop joins and mergejoins. The query processor measures the relative costs of each join type to deter-mine which to use.
allrows_oltp Instructs the query processor to use the nested-loop join operator.
allrows_dss Instructs the query processor to use nested-loop, merge-, or hash-joins. The queryprocessor measures their relative costs to determine which join it uses.
9. On the Upload Options page, specify whether to upload the diagnostic data to SybaseTechnical Support immediately after SCC collects the data. You can perform an upload asa separate step later.
Troubleshoot SAP Control Center for SAP ASE
534
If you select Upload the package to SAP Customer Support, the Upload Options pagedisplays these options:• (Default) Upload diagnostic data package via FTP site – if you select this option and
click Next, the FTP Server page appears, and you see FTP Server on the left pane.• Upload diagnostic data package via e-mail notification – if you select this option and
click Next, the E-mail Notification page appears, and you see E-mail Notification onthe left pane.
By default, the Upload Options page lets you delete the diagnostic data package after asuccessful upload. SAP Control Center skips this operation if the upload task fails.
10. Click Next to start the collection process on the Summary page.
See also• Collecting Field Diagnostic Data on page 531
• Uploading Diagnostic Data Via FTP on page 535
• Submitting Diagnostic Data via E-mail Message on page 537
• Deleting a Diagnostic Data File on page 538
Upload Diagnostic DataSAP Control Center allows you to upload collections of diagnostic data for review by SAPTechnical Support.
You can upload diagnostic data packages:
• During data collection – select the upload option in the Diagnostic Data wizard as the laststep during data collection.
• After data collection – manually select to upload data packages that are created by theDiagnostic Data wizard.
You can further specify how the files are uploaded:
• File transfer protocol – use SAP Control Center to upload the package of diagnostic files tothe SAP Technical Support FTP server.
• E-mail – send an e-mail message to SAP Technical Support that includes the package ofdiagnostic files as an attachment.
Uploading Diagnostic Data Via FTPUpload field and optimizer diagnostic data in the SAP Control Center Administration Consoleto SAP Technical Support via FTP.
PrerequisitesUse this process only if you are using the Diagnostic Data wizard to specify FTP uploadinformation, or have already created a diagnostic data package on your server and have createda record name for it in the SCC repository.
Troubleshoot SAP Control Center for SAP ASE
SAP Control Center for SAP Adaptive Server Enterprise 535
• The SCC administrator must grant all SCC users who are uploading diagnostic data viaFTP the "aseDiagnosticRole" role:1. Go to Application > Administration > Security > Logins dialog2. Select the Roles tab and assign the appropriate role to the user on a per-SAP ASE
basis.There is a separate aseDiagnosticRole listed for each registered SAP ASE server. Thename of each entry begins with the server name. For example, a the role name for aserver named my_server is "my_server:aseDiagnosticRole".
• The SAP FTP server process requires a case ID and upload password. Contact SAPTechnical Support to obtain your case ID number and upload password before you beginthe FTP upload process.
TaskTo display the FTP Server window:
• While you are creating a diagnostic data package – select Upload diagnostic datapackage to FTP site in the Upload Options page in the Diagnostic Data wizard.
• After you create a diagnostic data package record and save it to the SCC repository –right-click the package in the Diagnostic Data summary window, select UploadPackages, then select Upload diagnostic data package to FTP site.
In the FTP Server page, complete these fields:
Field Description
FTP Server Host The FTP server to which you want to upload the diagnostic data package.Select the site closest to your region:• Dublin, CA: ftps. sybase.com• Hong Kong: ftps-apo.sybase.com• Maidenhead, England: ftps-emea.sybase.com
Password for login"public"
The password you obtained from SAP Technical Support to upload this pack-age.
Case DirectoryName
The case ID number SAP Technical Support has assigned to this case.
See also• Collecting Field Diagnostic Data on page 531
• Collecting Optimizer Diagnostic Data on page 533
• Submitting Diagnostic Data via E-mail Message on page 537
• Deleting a Diagnostic Data File on page 538
• Granting Roles to a Login on page 427
Troubleshoot SAP Control Center for SAP ASE
536
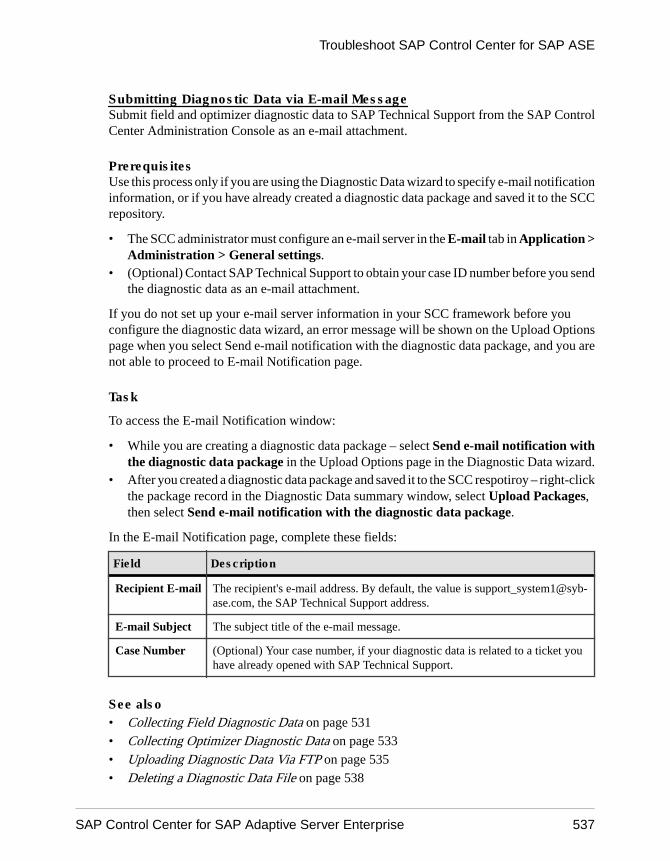
Submitting Diagnostic Data via E-mail MessageSubmit field and optimizer diagnostic data to SAP Technical Support from the SAP ControlCenter Administration Console as an e-mail attachment.
PrerequisitesUse this process only if you are using the Diagnostic Data wizard to specify e-mail notificationinformation, or if you have already created a diagnostic data package and saved it to the SCCrepository.
• The SCC administrator must configure an e-mail server in the E-mail tab in Application >Administration > General settings.
• (Optional) Contact SAP Technical Support to obtain your case ID number before you sendthe diagnostic data as an e-mail attachment.
If you do not set up your e-mail server information in your SCC framework before youconfigure the diagnostic data wizard, an error message will be shown on the Upload Optionspage when you select Send e-mail notification with the diagnostic data package, and you arenot able to proceed to E-mail Notification page.
Task
To access the E-mail Notification window:
• While you are creating a diagnostic data package – select Send e-mail notification withthe diagnostic data package in the Upload Options page in the Diagnostic Data wizard.
• After you created a diagnostic data package and saved it to the SCC respotiroy – right-clickthe package record in the Diagnostic Data summary window, select Upload Packages,then select Send e-mail notification with the diagnostic data package.
In the E-mail Notification page, complete these fields:
Field Description
Recipient E-mail The recipient's e-mail address. By default, the value is [email protected], the SAP Technical Support address.
E-mail Subject The subject title of the e-mail message.
Case Number (Optional) Your case number, if your diagnostic data is related to a ticket youhave already opened with SAP Technical Support.
See also• Collecting Field Diagnostic Data on page 531• Collecting Optimizer Diagnostic Data on page 533• Uploading Diagnostic Data Via FTP on page 535• Deleting a Diagnostic Data File on page 538
Troubleshoot SAP Control Center for SAP ASE
SAP Control Center for SAP Adaptive Server Enterprise 537
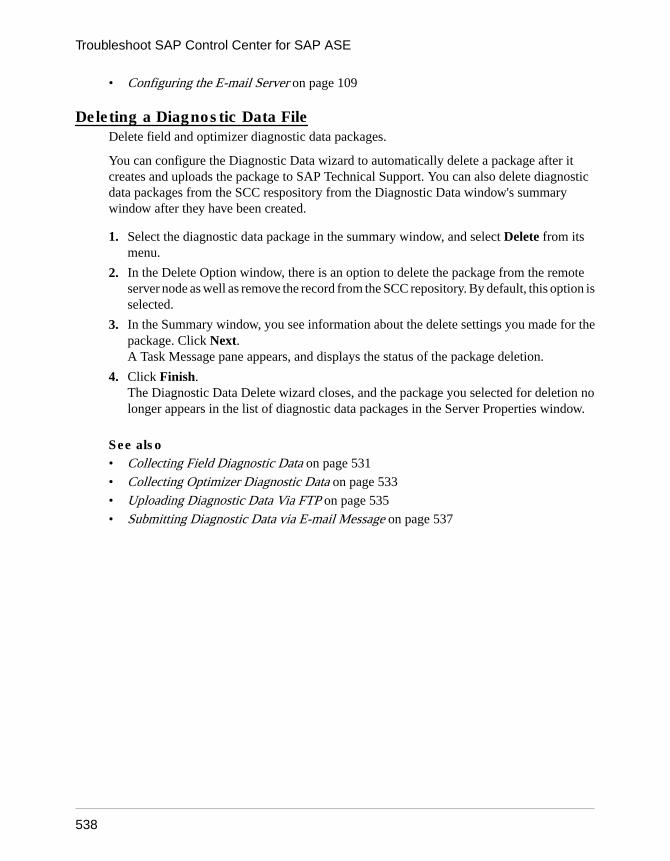
• Configuring the E-mail Server on page 109
Deleting a Diagnostic Data FileDelete field and optimizer diagnostic data packages.
You can configure the Diagnostic Data wizard to automatically delete a package after itcreates and uploads the package to SAP Technical Support. You can also delete diagnosticdata packages from the SCC respository from the Diagnostic Data window's summarywindow after they have been created.
1. Select the diagnostic data package in the summary window, and select Delete from itsmenu.
2. In the Delete Option window, there is an option to delete the package from the remoteserver node as well as remove the record from the SCC repository. By default, this option isselected.
3. In the Summary window, you see information about the delete settings you made for thepackage. Click Next.A Task Message pane appears, and displays the status of the package deletion.
4. Click Finish.The Diagnostic Data Delete wizard closes, and the package you selected for deletion nolonger appears in the list of diagnostic data packages in the Server Properties window.
See also• Collecting Field Diagnostic Data on page 531
• Collecting Optimizer Diagnostic Data on page 533
• Uploading Diagnostic Data Via FTP on page 535
• Submitting Diagnostic Data via E-mail Message on page 537
Troubleshoot SAP Control Center for SAP ASE
538
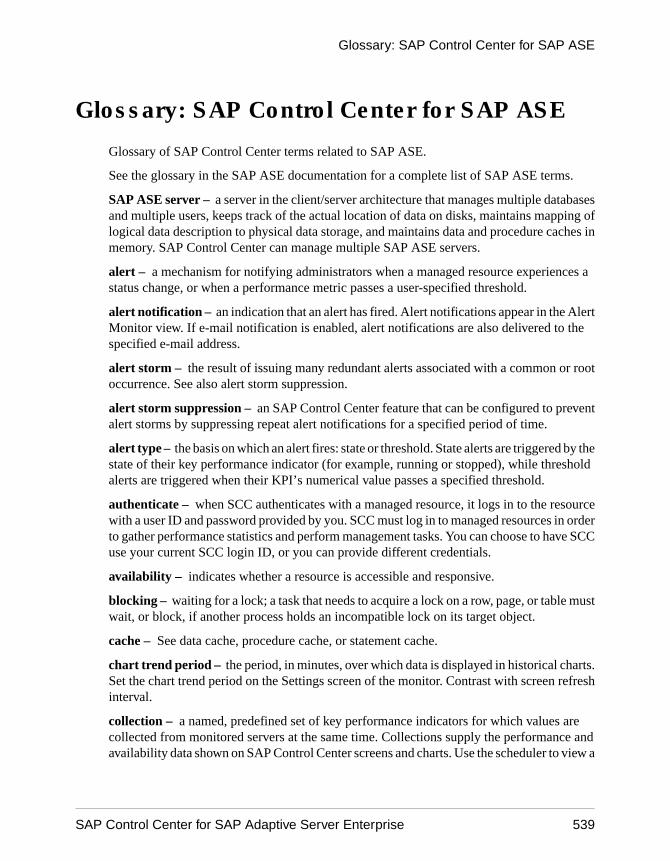
Glossary: SAP Control Center for SAP ASE
Glossary of SAP Control Center terms related to SAP ASE.
See the glossary in the SAP ASE documentation for a complete list of SAP ASE terms.
SAP ASE server – a server in the client/server architecture that manages multiple databasesand multiple users, keeps track of the actual location of data on disks, maintains mapping oflogical data description to physical data storage, and maintains data and procedure caches inmemory. SAP Control Center can manage multiple SAP ASE servers.
alert – a mechanism for notifying administrators when a managed resource experiences astatus change, or when a performance metric passes a user-specified threshold.
alert notification – an indication that an alert has fired. Alert notifications appear in the AlertMonitor view. If e-mail notification is enabled, alert notifications are also delivered to thespecified e-mail address.
alert storm – the result of issuing many redundant alerts associated with a common or rootoccurrence. See also alert storm suppression.
alert storm suppression – an SAP Control Center feature that can be configured to preventalert storms by suppressing repeat alert notifications for a specified period of time.
alert type – the basis on which an alert fires: state or threshold. State alerts are triggered by thestate of their key performance indicator (for example, running or stopped), while thresholdalerts are triggered when their KPI’s numerical value passes a specified threshold.
authenticate – when SCC authenticates with a managed resource, it logs in to the resourcewith a user ID and password provided by you. SCC must log in to managed resources in orderto gather performance statistics and perform management tasks. You can choose to have SCCuse your current SCC login ID, or you can provide different credentials.
availability – indicates whether a resource is accessible and responsive.
blocking – waiting for a lock; a task that needs to acquire a lock on a row, page, or table mustwait, or block, if another process holds an incompatible lock on its target object.
cache – See data cache, procedure cache, or statement cache.
chart trend period – the period, in minutes, over which data is displayed in historical charts.Set the chart trend period on the Settings screen of the monitor. Contrast with screen refreshinterval.
collection – a named, predefined set of key performance indicators for which values arecollected from monitored servers at the same time. Collections supply the performance andavailability data shown on SAP Control Center screens and charts. Use the scheduler to view a
Glossary: SAP Control Center for SAP ASE
SAP Control Center for SAP Adaptive Server Enterprise 539
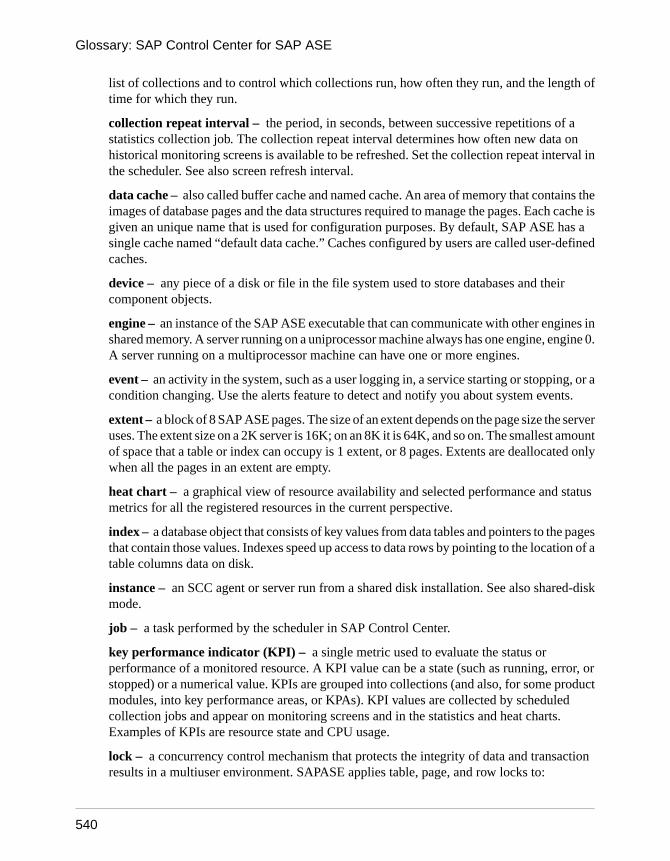
list of collections and to control which collections run, how often they run, and the length oftime for which they run.
collection repeat interval – the period, in seconds, between successive repetitions of astatistics collection job. The collection repeat interval determines how often new data onhistorical monitoring screens is available to be refreshed. Set the collection repeat interval inthe scheduler. See also screen refresh interval.
data cache – also called buffer cache and named cache. An area of memory that contains theimages of database pages and the data structures required to manage the pages. Each cache isgiven an unique name that is used for configuration purposes. By default, SAP ASE has asingle cache named “default data cache.” Caches configured by users are called user-definedcaches.
device – any piece of a disk or file in the file system used to store databases and theircomponent objects.
engine – an instance of the SAP ASE executable that can communicate with other engines inshared memory. A server running on a uniprocessor machine always has one engine, engine 0.A server running on a multiprocessor machine can have one or more engines.
event – an activity in the system, such as a user logging in, a service starting or stopping, or acondition changing. Use the alerts feature to detect and notify you about system events.
extent – a block of 8 SAP ASE pages. The size of an extent depends on the page size the serveruses. The extent size on a 2K server is 16K; on an 8K it is 64K, and so on. The smallest amountof space that a table or index can occupy is 1 extent, or 8 pages. Extents are deallocated onlywhen all the pages in an extent are empty.
heat chart – a graphical view of resource availability and selected performance and statusmetrics for all the registered resources in the current perspective.
index – a database object that consists of key values from data tables and pointers to the pagesthat contain those values. Indexes speed up access to data rows by pointing to the location of atable columns data on disk.
instance – an SCC agent or server run from a shared disk installation. See also shared-diskmode.
job – a task performed by the scheduler in SAP Control Center.
key performance indicator (KPI) – a single metric used to evaluate the status orperformance of a monitored resource. A KPI value can be a state (such as running, error, orstopped) or a numerical value. KPIs are grouped into collections (and also, for some productmodules, into key performance areas, or KPAs). KPI values are collected by scheduledcollection jobs and appear on monitoring screens and in the statistics and heat charts.Examples of KPIs are resource state and CPU usage.
lock – a concurrency control mechanism that protects the integrity of data and transactionresults in a multiuser environment. SAPASE applies table, page, and row locks to:
Glossary: SAP Control Center for SAP ASE
540
• Prevent two or more users from changing the same data at the same time• Prevent processes from reading data that is in the process of being changed
managed resource – see resource.
message row – a row that appears in the right pane of the Administration Console in place of aslow-responding request, a failed request, or a large result set. Rows with slow-respondingrequests are populated as soon as the data arrives. You can retry failed requests or expand largeresult sets—select the row and click the drop-down arrow to see options.
perspective – a named tab in SAP Control Center that displays information related to acollection of managed resources (such as servers) and a set of views associated with thoseresources. The views in a perspective are chosen by users of the perspective. You can create asmany perspectives as you need, and customize them to monitor and manage your resources.Perspectives allow you to group resources in ways that make sense in your environment—forexample by location, department, or project.
procedure cache – memory used for stored procedures, batch query plans, triggers, thestatement cache, datachange tracking, query compilation, and other objects used during queryexecution.
product module – a plug-in component of SAP Control Center that manages and monitors aparticular Sybase product. SCC product modules are available for SAP ASE, Data Assurance(a Replication Server option), replication (Replication Server, Replication Agent, and MirrorReplication Agent), SAP Sybase Event Stream Processor, and SAP Sybase IQ.
query plan – the ordered set of steps required to carry out a SQL query, complete with theaccess methods chosen for each table. Query plans are chosen by the optimizer.
repository – a database in SAP Control Center that stores information related to managedresources, along with user preference data, operational data, and performance statistics.
resource – a server, agent, or other entity that can be monitored or administered by SAPControl Center. Resources SCC can manage include SAP ASE, Data Assurance Server,Replication Server, Replication Agent, Mirror Replication Agent, SAP Sybase Event StreamProcessor, SAP Sybase IQ, and certain subcomponents.
SCC-enabled login account – a user account that has been granted privileges in SAP ControlCenter by mapping appropriate SAP Control Center roles. (Roles are typically mapped to agroup to which the account belongs rather than to the account itself.) The user account andgroup can be native to SAP Control Center or created in the operating system or the LDAPdirectory service to which SAP Control Center authentication is delegated. You must use anSCC-enabled account to log in to SAP Control Center.
SCC agent – a remote command and control agent for SAP Control Center that runs on amanaged server. The SCC agent is installed automatically as part of the Sybase server.
schedule – the definition of a task (such as the collection of a set of statistics) and the timeinterval at which SAP Control Center executes the task.
Glossary: SAP Control Center for SAP ASE
SAP Control Center for SAP Adaptive Server Enterprise 541
screen refresh interval – the period in seconds between refreshes of screens in the servercomponent of SAP Control Center. Refreshing a screen redraws it with the most recentavailable data. Set the screen refresh interval on the Settings screen of the monitor. See alsocollection repeat interval.
segment – space allocated on one or more database devices. Segments can be used to controlthe placement of tables and indexes on specific database devices.
semaphore – a simple internal locking mechanism that prevents a second task from accessingthe data structure currently in use. SAP ASE uses semaphores to protect transaction logs, userlog caches, and I/O devices. A semaphore is relevant only in symmetric multiprocessing(SMP) environments.
shared-disk mode – a feature that enables multiple instances of SAP Control Center toexecute from a single installation on a shared disk. Instances can be SCC servers, agents, or amixture of the two.
singleton installation – an SAP Control Center installation that runs a single SCC agent orserver. Contrast with instance; see also shared-disk mode.
statement cache – memory used to store computed query plans. The statement cache is partof the procedure cache.
transaction – a set of related SQL statements that are treated as a single unit of work. Toensure consistency, if all the statements in the set cannot be executed, the changes made by thequery are rolled back. The tables queried during the transaction are locked until a transaction iscompleted.
Transact-SQL – the SQL dialect used in SAP ASE.
trend period – See chart trend period.
view (SAP ASE) – a named select statement that is stored in the database as an object. A viewlets you see a subset of rows or columns from one or more tables. Contrast with view (SCC).
view (SCC) – a window in an SAP Control Center perspective that displays information aboutone or more managed resources. Some views also let you interact with managed resources orwith SCC itself. For example, the Perspective Resources view lists all the resources managedby the current perspective. Other views allow you to configure alerts, view the topology of areplication environment, and graph performance statistics.
wait event – a condition that causes a SAP ASE process to pause and wait for another event.Common wait events are waiting for disk I/O to complete, waiting on the scheduler runnablequeue for a CPU to become available, and waiting for another processes lock on a table to bereleased.
Glossary: SAP Control Center for SAP ASE
542
Index-Xmx maximum memory option 38, 82-XX:MaxPermSize permanent memory option 38,
82
Aaccessibility 11administer
authenticating SCC agent 222authenticating Unified Agent 222caches 249manage segments 452
administer, SAP ASEerror log 220executing SQL 220, 464manage devices 358manage stored procedures 389registering SCC Agent 126, 221registering Unified Agent 126, 221server shutdown 220server start 220start SAP ASE servers 223stop SAP ASE servers 224view log 226
Administration Consolecannot display objects, troubleshooting 524column filtering 7display tools and options 6displaying only selected resources 157, 158message rows in result sets 158proxy rows 158searching for objects 159setting data retrieval thresholds 111, 161, 224using 157, 159
Adobe Flex 11alert list size, setting in SAP ASE 232alert notifications 539alert storm 539alert storm suppression 539alert subscriptions
disabling 182enabling 182
alert type 539alert-triggered scripts 148, 184, 186
examples 149, 187
substitution parameters 151, 185alerts 539
about 167configured but do not fire 525configured, deleting 179configured, modifying 179configuring duplicate alerts 140configuring e-mail server 59, 109configuring escalations 140configuring storm suppression 139configuring subscriptions 140configuring to execute scripts 139creating 138, 176displaying history 183displaying resolutions 183effects of repository purging on history 209escalations 180log 148, 184modifying subscriptions 180not being generated 526notifications, about 182resolving 183SAP ASE 141, 168script examples 149, 187scripts executed by 148, 184setting triggering states and thresholds 139state values in SAP ASE 147, 174subscribing to 180subscriptions 180substitution parameters for scripts 151, 185testing 186triggering scripts, about 148, 184unsubscribing from 181
alerts, setting upJob Scheduler for SAP ASE 334
ALL logging level 213altering precomputed result sets 384application menu 2archive databases, SAP ASE
creating 297assign login profiles to
logins 429attempts_reopen_con parameter
setting 218authenticate 539
Index
SAP Control Center for SAP Adaptive Server Enterprise 543
authenticate SAP ASE, troubleshooting 527authenticating
SAP ASE 128SCC with a managed resource 18, 127
authenticationabout 40, 90configuring for LDAP 44, 93configuring for UNIX 42, 92configuring for Windows 41, 91
authorization 60, 112availability 539availability statistics 456
Bbackground, running SCC or SCC agent in 32, 76backing up
databases 305, 309, 314databases incrementally using dump
configuration 316SAP ASE configuration files 321
backing up, schedulingSAP ASE databases 321–325, 327, 329–334
backup serverdatabases, backing up incrementally 314
Backup Servercluster Backup Server, configuring 286cluster Backup Server, deleting 286
backup server, SAP ASE 316databases, backing up 305databases, backing up using a dump
configuration 309dump history, enabling 319
backupsabout 204changing the schedule 206configuration files for incremental dump 316databases 305databases or logs to multiple stripes 312databases using a dump configuration 309databases, restoring 334, 339databases, restoring from a SQL script 338databases, restoring from cumulative backups
337dump configuration properties 310dump configurations, creating 307dump configurations, deleting 312dump configurations, viewing 307dump records, purging 318forcing 207
generating load sequences from dump history336
incremental dumps 314load sequences, generating 335restoring from 207scheduling 205server configurations 321suspending and resuming 206target database DDL, generating 319, 320
backups, schedulingSAP ASE databases 321–325, 327, 329–334
badges, status 4bindings, adding in SAP ASE 251blocked processes, SAP ASE
identifying 398blocking 539blocking processes, identifying in SAP ASE 398blocking processes, SAP ASE
displaying SQL for 399displaying wait events for 399identifying the lead blocker in a chain 399
buffer cache 540buffer pools in data caches
adding 252changing 252
bulk copydata in 483
Ccache 540
user log 516cache bindings, deleting in SAP ASE 253cache configurations, managing 253cache devices
See in-memory devices, SAP ASEcaches, managing configurations in 253caches, SAP ASE
creating 249DDL, generating 253properties of 250
changing, SAP ASEpasswords 428
chart trend periodinteraction with collection repeat interval in
displaying graphs 521chart trend period, SAP ASE
setting 232check constraints
creating 470
Index
544
properties of 510CIS roles, managing 382client log, viewing 211clocks, synchronizing to correct missing data
problems 521cluster configuration values, displaying 268cluster SCC agent, SAP ASE, starting 263cluster states, changing in SAP ASE 275cluster Unified Agent, SAP ASE
starting 264clusters
instances, starting 278clusters, SAP ASE
Backup Server, configuring 286Backup Server, deleting 286cluster Backup Server, properties 287configuration values, displaying 268creating 264DDL scripts, generating for logical clusters
276dropping 270failback logical clusters 274failover 274instances, adding 279instances, deleting 281instances, properties 281instances, stopping 280logical cluster states 275logical clusters, adding 272logical clusters, adding routes 285logical clusters, changing 275logical clusters, deleting 276logical clusters, deleting routes 285logical clusters, properties 276logs 271, 281managing 263prerequisites 264properties 271registering 267routes 285SCC agent 263starting 268, 269stopping 270Unified Agent 264XP Server properties 288XP Server, configuring 287XP Server, deleting 288
collecting diagnostic data 531sp_opt_querystat 533
collection job 525collection repeat interval 540
interaction with chart trend period indisplaying graphs 521
collection_ase_all_client_kpisSAP ASE statistics collection 130
collection_ase_availabilitySAP ASE statistics collection 130
collection_ase_histmonSAP ASE statistics collection 130
collection_ase_ratSAP ASE statistics collection 130
collections 539no data was found for statistic 523
column encryption keys, SAP ASEcreating 411deleting 414modifying 414properties of 412
column filtering in SCC 7column permissions 486column statistics, updating 458columns
creating 466deleting statistics 463properties of 507sorting by 6updating statistics 459
config.properties filefor SCC for SAP ASE 218
configurationoptional 153
configuration fileSAP ASE 16, 122
configuration files, SAP ASEbacking up 321
configuration parameterssetting in SCC for SAP ASE 218
configuration valuesdisplaying 230
connection profiletroubleshooting 527
consoleabout 215commands 215
conventions, style and syntax 10counts 457CPU utilization, SAP ASE
displaying for an engine 363
Index
SAP Control Center for SAP Adaptive Server Enterprise 545
creatingcaches in SAP ASE 249database devices in SAP ASE 358hash partitions 490in-memory devices in SAP ASE 359list partitions 491range partitions 491role hierarchy 446roles 442round robin partitions 492segments 452
creating a database, SAP ASEencryption, using 301
creating a schedule for database backups 322creating a scheduled backup job, SAP ASE 325creating precomputed result sets 383creating, SAP ASE
login profiles 419logins 424
csi_config.xml file 44, 93cumulative backups, SAP ASE
databases, dumping 314cumulative values 457
Ddata caches
binding 251binding options, managing 251buffer pools, adding 252buffer pools, changing existing 252configuring 253
data caches, changing bindings in 251data caches, SAP ASE 540
buffer pools 244creating new 249DDL, generating 253interpreting display 244modifying size of 243monitoring 242
data collection jobsadding 128adding schedules 164creating 128deleting 163displaying history 167executing 162not saving data 128removing schedules 165resuming 163
stopping 162suspending 163viewing schedules 165
data collection schedulesadding 128modifying 166
data collectionstroubleshooting timeouts 525
data inbulk copy 483
data missing on monitoring screens 521data partitions
deleting statistics 463updating statistics 461
data retrieval thresholdssetting for Administration Console 111, 161,
224database data, SAP ASE
in cache 244database devices, SAP ASE
creating new 358properties of 360
database encryption keycreating 415
database encryption keysdeleting 417modifying 417
database encryption keys, SAP ASEcreating 415properties of 416
databasescreating new segments 452encryption 415, 417
databases, deleting in SAP ASE 353databases, SAP ASE
archive databases 297backing up 305backing up incrementally using dump
configurations 316backing up server configuration files 321backing up to multiple stripes 312backup status of 288changing options of 350changing ownership of 347checking consistency 341checkpointing 341cumulative backups 314DDL for a target database, generating 319DDL, generating from a dump image 320
Index
546
decrypting 302decryption 303decryption, resuming 303displaying devices used 289displaying disk usage 289displaying processes for 289displaying resources used 289displaying segments used 289displaying segments used by 292displaying unused indexes 289dump configuration properties 310dump configurations, backing up with 309dump configurations, creating 307dump configurations, deleting 312dump configurations, viewing 307dump records, purging 318encrypting 301encryption 301encryption, resuming process 302generating load sequences from dump history
336in-memory 249in-memory databases 298in-memory temporary databases 299incremental backups, restoring 337interpreting display 290load sequences, generating 335managing 292managing size 290modifying log I/O buffer size of 349modifying storage allocations of 348modifying transaction log cache of 349monitoring 288mounting 344placing in quiesce-hold 342placing in quiesce-release 343properties of 345proxy databases 294restoring 334restoring from a point in time 339restoring from a SQL script 338scheduling backups of 321–325, 327,
329–334shrinking 304suspending the encryption process of 302temporary database groups 304temporary databases 295unmounting 344user databases 293
using the manifest file 344viewing statistics of 340
datatypesuser-defined 516
DDL, generatingcaches in SAP ASE 253precomputed result sets 389script for load profiles 284scripts for logical clusters 276target databases from dump image 320target databases, creating for 319
DEBUG logging level 213decrypting an encrypted database, SAP ASE 302decryption, SAP ASE
suspending 303defaults, deleting in SAP ASE 355defaults, SAP ASE
creating 354properties of 354
defined 539–542DEK
See database encryption keydeleting
dump devices in SAP ASE 358scheduled backup job, SAP ASE 329
deleting caches in SAP ASE 253deleting cluster instances in SAP ASE 281deleting databases in SAP ASE 353deleting defaults in SAP ASE 355deleting dump configurations 312deleting engine groups in SAP ASE 365deleting extended stored procedures in SAP ASE
370deleting indexes 511deleting logins 430deleting precomputed result sets 384deleting SAP ASE database devices 362deleting SAP ASE dump devices 362deleting SAP ASE in-memory devices 362deleting scalar functions in SAP ASE 374deleting scheduled backup job, SAP ASE 329deleting segments 455deleting SQLJ functions in SAP ASE 376deleting statistics
from a table 463from columns 463from data partitions 463
deleting tables 511deleting user-defined datatypes 517
Index
SAP Control Center for SAP Adaptive Server Enterprise 547
deleting views 520deleting, SAP ASE
login profiles 422delta values 457device objects, SAP ASE
displaying 358device semaphore 357devices, SAP ASE 356, 540
creating in-memory devices 359creating new database devices 358creating new dump devices 360database properties of 360determining I/O response time and I/O per
second 356displaying device objects 358displaying for a database 289in-memory, properties of 361interpreting display 357
diagnostic datacollecting field information 531collecting optimizer data 533deleting data packages 538described 530prerequisites 531sending as an e-mail attachment 537upload support 535uploading via FTP 535
disabling a scheduled backup job, SAP ASE 329disabling an enabled scheduled backup job, SAP
ASE 330disk usage
displaying for an SAP ASE database 289display and copy options 5display options in SCC 6display, SAP ASE
login profiles 422displaying
SAP ASE log 210displaying, SAP ASE
login properties 429drivers
ODBC, registering 14, 73dump configuration
deleting 312dump configurations, SAP ASE 309
creating 307incremental backups and 316properties of 310viewing 307
dump devicesproperties of 362
dump devices, SAP ASEcreating new 360
dump recordsviewing 318
dump records, SAP ASEpurging 318
dumping databases, SAP ASEcumulatively 314cumulatively, using dump configurations 316dump configurations, using 309multiple stripes 312
Ee-mail server, configuring for alerts 59, 109enabling a disabled scheduled backup job, SAP ASE
329encrypted databases 415encrypted databases,
deleting database encryption keys 417modifying database encryption keys 417
encrypted databases, SAP ASE 301creating 301decrypting 302resuming decryption 303resuming encryption process 302suspending encryption 302suspending the decryption process 303
encryptiondatabases 415deleting database encryption keys 417modifying database encryption keys 417
encryption, SAP ASEcreating column encryption keys 411creating database encryption keys 415creating key copies 413creating master keys 408creating system encryption passwords 408databases, creating 301databases, decrypting 302databases, encrypting 301databases, resuming decryption of 303databases, resuming encryption process 302databases, suspending encryption process of
302databases, suspending the decryption process
303deleting column encryption keys 414
Index
548
deleting master keys 410deleting system encryption passwords 408dual control 411granting permissions to roles, users, and groups
417managing column encryption keys 412managing database encryption keys 416managing keys 406managing master keys 409modifying column encryption keys 414modifying master keys 410modifying system encryption passwords 408regenerating master keys 410split knowledge 411
engine CPU utilization, SAP ASEdisplaying 363
engine groupstroubleshooting 524
engine groups, deleting in SAP ASE 365engine groups, SAP ASE
properties of 365engines, SAP ASE 540
interpreting display 363environment variables
SCC_MEM_MAX 36–38, 80, 82, 83SCC_MEM_PERM 36–38, 80, 82, 83
ERROR logging level 213error messages
troubleshooting 523errors
OutOfMemory 529REJECT_DUPLICATE_RESOURCE_AND
_COLLECTION policy 525timeouts for data collections 525
evaluationquick start instructions 13
events 540execution classes
troubleshooting 524execution classes, SAP ASE
properties of 367execution history log, scheduled jobs in SAP ASE
332execution history of scheduled SAP ASE backup
jobs, viewing 331execution history, deleting
scheduled backup jobs, SAP ASE 324, 333expiration dates for login accounts 118
expiring rolepasswords 441
extended stored procedures, deleting in SAP ASE370
extended stored procedures, SAP ASEcreating 368properties of 369
extents 540
F
F11 (browser full screen mode toggle) 7F5 (browser refresh)
logging out of SAP Control Center 527FATAL logging level 213features not enabled, troubleshooting 528features, new
SAP Control Center for SAP ASE 1Flash Player 15font size, changing 8foreground, running SCC or SCC agent in 32, 76foreign key
properties of 510foreign keys
creating 469frequency of revalidation
setting 218FTP
uploading diagnostic data 535full backups 205full screen mode 7functions, SAP ASE
creating scalar 371creating SQLJ 374scalar functions 372SQLJ functions 376
G
getting started after installing 15glossaries
SCC SAP ASE terms 539grant role, SAP ASE
logins 427grant roles, SAP ASE
login profiles 422granting
table permissions 483
Index
SAP Control Center for SAP Adaptive Server Enterprise 549
granting permissionson precomputed result sets 386to specific users 387
graphing statistics 156graphing statistics, troubleshooting 521grid format, using 6groups 63, 118
adding login accounts 62, 115assigning monitoring and administration roles
61, 113creating 62, 114, 430granting permissions to 432in LDAP, mapping to SCC roles 54, 104in OS, mapping to SCC roles 54, 104managing 430properties of 431remove login 115removing 114removing roles 113SCC Administrator 54, 104sybase 54, 104
groups, SAP ASEassigning monitoring and administration roles
127
H
hash partitionscreating 490
heat chart 540customizing columns 18, 155display tools and options 6displaying 18, 155filtering resources displayed 18, 155icons 4launch icon 3
help command (console) 215historical performance monitoring 156history displays for alerts 183
I
I/O rate for SAP ASE 356I/O response time for SAP ASE 356icons
for server status 4in SCC toolbar 3minimize/maximize sections of a view 8on SAP ASE Processes screen 402
in-memory database caches, SAP ASEcreating 249properties of 250
in-memory databases, SAP ASEcreating 298
in-memory devices, SAP ASEcreating new 359properties of 361
in-memory storage, SAP ASEinterpreting display 249monitoring 248
in-memory temporary databases, SAP ASEcreating 299
incremental backups 205incremental backups, SAP ASE
databases, dumping 314databases, restoring from cumulative dumps
337incremental transfer in 481incremental transfer out 482index partition
reorganizing 495, 503updating statistics 462
indexes 540properties of 508reorganizing 495, 502unused, displaying for an SAP ASE database
289updating statistics 460
indexes, SAP ASEcreating 467
info command (console) 216INFO logging level 213instance configuration values
displaying 278instances 540
about 24, 67, 199converting 197deploying 22, 65, 195deploying and managing 25, 68, 200displaying values 278file locations 23, 66, 196refreshing 197removing 198
interfaces files, importing resources from 124
JJava system properties
displaying information about 216
Index
550
JDBCcontrolling internal query timeouts 218controlling reconnection attempts 218
Job SchedulerSAP ASE and 321–325, 327, 329–334
jobs 540modifying collection intervals 166resuming 166suspending 166
jvmopt memory options for Windows services 36,38, 80, 82
K
key copies, SAP ASEcreating 413
key performance indicators 540getting values from heat chart icons 18, 155SAP ASE 133state values in SAP ASE 147, 174
keyboard shortcuts 8keyboard shortcuts for Adobe Flex 11KPIs 540
SAP ASE, listed and described 133
L
layout for SCC views 194LDAP
configuration properties 45, 95configuring authentication 44, 93configuring to authenticate SCC logins 40, 90
list partitionscreating 491
load profiles, SAP ASEadding 283DDL script 284deleting 284managing 282
load sequences, SAP ASEgenerating 335generating from dump history 336
locking schemessetting 473
locks, SAP ASE 540log4j.properties file 213logging in to SAP Control Center 39, 88
troubleshooting 526logging in to SAP Control Center - first user 15
logging levels 213logging out of SAP Control Center 88
unintentionally, using F5 browser refresh 527logical clusters, SAP ASE
adding 272changing 275DDL scripts 276deleting 276failback 274failover 274properties 276states 275
login accountsassigning monitoring and administration roles
61, 113authenticating 18, 127, 128creating automatically (UNIX) 42, 92creating automatically (Windows) 41, 91default 116expiration date, imposing 118granting privileges with roles and groups 54,
104modifying 118native SCC, adding 116predefined 63, 118removing 117removing roles 113SAP ASE, configuring monitoring role 16,
122suspending 118
login accounts, defaultabout 15
login accounts, SAP ASEassigning monitoring and administration roles
127creating 424
login assigned toroles 448
login attributes, SAP ASEtransfer 423
login mappings, managing 382login modules 40, 90login passwords, SAP ASE
properties of 428login profiles
properties of 420login profiles, SAP ASE
creating 419deleting 422
Index
SAP Control Center for SAP Adaptive Server Enterprise 551
display assigned logins 422grant of roles 422manage 418
login session timeout 88setting 60, 110
loginsassign login profiles 429
logins, SAP ASEcreating 424displaying 429grant roles 427properties of 425users mapped to 426
logsagent log, no result set for this query error
523agent log, viewing 211alert services 148, 184alert services log, about 210changing the logging level 212client log, about 210client log, viewing 211cluster logs 281clusters, viewing 271component logs, about 210configuring 213repository log, about 210repository log, viewing 211SCC agent log, about 210script execution log, about 210server logs, about 210server logs, viewing 211
LRU buffers, SAP ASE 244
Mmanage, SAP ASE
login profiles 418logins 423
managed resources 188, 541managed servers
See managed resourcesmanaging
adding datatypes 516bulk copy data in 483check constraints, properties 510check table consistency 471CIS roles 382cluster instances, starting 278columns, properties 507
creating check constraint 470creating columns 466creating foreign keys 469creating primary keys 474creating rules 404creating triggers 479creating user tables 465database encryption keys 417datatypes 516foreign keys, properties 510groups 430, 432groups, properties 431indexes, properties 508login mapping 382partitions 488partitions, properties 511restoring table data 469roles 440segments, properties 452setting locking schemes 473tables 465tables, properties 506thread pools, creating 513thread pools, properties 514transfer in 481transfer out 482triggers, properties 480user-defined datatypes, properties 517users 435–437users, properties 437using segments 472views, properties 518
managing, SAP ASEadd, remote server 378adding caches 249backing up server configurations 321bindings, adding 251buffer pools, adding 252cache configurations 253caches, deleting 253caches, properties 250changing database options 350changing database ownership 347checking database consistency 341checkpointing databases 341cluster Backup Server, configuring 286cluster Backup Server, deleting 286cluster Backup Server, properties 287cluster instances, deleting 281
Index
552
cluster instances, properties 281cluster instances, stopping 280cluster logs 271, 281cluster prerequisites 264cluster SCC agent 263cluster Unified Agent 264cluster, starting 268clusters 263clusters, creating 264clusters, dropping 270clusters, properties 271clusters, registering 267clusters, starting 269clusters, stopping 270column encryption keys 411, 414column encryption keys, properties 412creating archive databases 297creating defaults 354creating extended stored procedures 368creating in-memory databases 298creating in-memory temporary databases 299creating indexes 467creating proxy databases 294creating scalar functions 371creating SQLJ functions 374creating SQLJ procedures 394creating stored procedures 390creating temporary database groups 304creating temporary databases 295creating user databases 293database devices, deleting 362database devices, properties 360database encryption keys 415database encryption keys, properties 416database objects, deleting 353databases 292databases, backing up 305databases, dumping cumulatively 314databases, dumping cumulatively using dump
configurations 316databases, dumping to multiple stripes 312databases, dumping using dump configurations
309databases, ownership 347databases, properties 345, 350databases, restoring 334databases, restoring from a cumulative dump
337databases, restoring from a point in time 339
databases, restoring from a SQL script 338databases, scheduling backups of 321–325,
327, 329–334databases, shrinking 304databases, storage allocations 348DDL script for load profiles 284DDL scripts for logical clusters 276defaults, deleting 355defaults, properties 354delete, remote server 378dump configurations, creating 307dump configurations, properties 310dump configurations, viewing 307dump devices, deleting 362dump records, purging 318encryption keys 406, 411encryption, properties 413engine groups, creating 364engine groups, deleting 365engine groups, properties 365execution classes 366execution classes, creating 366execution classes, modifying bindings 367execution classes, properties 367extended stored procedures, deleting 370extended stored procedures, properties 369failback, clusters 274failover, clusters 274generating load sequences from dump history
336granting permissions 373groups, granting encryption permissions 417in-memory devices, deleting 362in-memory devices, properties 361instances 279key copies 413load profile, adding 283load profile, properties 284load profiles 282load profiles, deleting 284load sequences, generating 335log I/O buffer size 349logical cluster routes, deleting 285logical clusters, adding 272logical clusters, adding routes 285logical clusters, deleting 276logical clusters, properties 276master keys 408, 410master keys, properties 409
Index
SAP Control Center for SAP Adaptive Server Enterprise 553
modifying database storage allocations 348modifying transaction log cache 349mounting databases 344placing databases in quiesce-hold 342placing databases in quiesce-release 343registering 16, 123remote server login mappings 381revoking permissions 373roles, granting encryption permissions 417route properties for clusters 285rules, properties 405scalar functions, deleting 374scalar functions, properties 372server, properties 233SQLJ functions, deleting 376SQLJ functions, properties 376SQLJ procedures 393states of logical clusters, changing 275states, logical clusters 275stored procedures, properties 391system encryption passwords 408target database DDL, generating 319, 320unmounting databases 344users, granting encryption permissions 417viewing database statistics 340XP Server and clusters 287XP Server, deleting 288XP Server, properties 288
master keys, SAP ASEcreating 408deleting 410modifying 410properties of 409regenerating 410
memoryconfiguring 36, 80displaying information about 216warnings at startup 529
memory leak 529memory, insufficient 526menus, application and view 2merging partitions 493message levels 213message rows 541
about 111, 161, 224using 158
minimize/maximize icon 8mon_role, granting 16, 122
monitored objectsrefreshing SCC's list of 218
monitoringerror information 524performance 156tasks 512tasks in a thread pool, determining 512threads 512unavailable for SAP ASE, troubleshooting
521monitoring, SAP ASE 5
cluster instances 255cluster interconnect, cluster interprocess
communication, CIPC Links, CIPCMesh, CIPC EndPoints 257, 258
cluster overview, displaying 256cluster workload management 259, 261cluster workload management, load profile
259, 261cluster workload management, logical clusters
259, 261cluster workload management, routes 259,
261cluster workload management, workloads 259,
261configuring for 16, 122databases 288overview, displaying 19, 238overview, interpreting display 240
moving partitions 494MRU buffers, SAP ASE 244multibyte character sets, troubleshooting 527mutually exclusive
roles 447
N
named cache 540new features
SAP Control Center for SAP ASE 1no data was found for statistic 523no result set for this query error 523
O
object bindings in data caches, adding 251object permissions
roles 444
Index
554
object privilegesgroup 434roles 445users 439
objectsnot displayed in Administration Console,
troubleshooting 524ODBC drivers
registering 14, 73online help
resetting 528operating system
configuring to authenticate SCC logins 40, 90optimizing SQL queries 533options, remote server
remote server options 379OutOfMemory errors, SCC 529
Pparameters
displaying 230parameters for scripts 151, 185parameters, SCC for SAP ASE
setting 218partitions
managing 488merging 493moving 494properties of 511reorganizing 495, 500, 503semantic-based 490splitting 492
passencrypt utility 56, 106passwords
encrypting 56, 106expiring role 441for repository database dba account, changing
84for SCC default login account 15
passwords, SAP ASEchanging 428
percentage or ratio values 457performance monitoring 156performance statistics 456permissions
granting on precomputed result sets 386granting to specific users 387revoking from specific users 388revoking on precomputed result sets 386
permissions forroles 449
permissions, SAP ASEgranting encryption permissions 417
Perspective Heat Chart view 18, 155Perspective Resources view
about 188, 191display tools and options 6icons 4show/hide icon 3
perspectives 541about 191adding resources 189creating 192removing 192removing a resource 190renaming 192
pluggable authentication modules for UNIXauthentication 42, 92
pools in caches, SAP ASE 244port conflicts 526ports
changing 84configuring 57, 107default 84displaying information about 216
postinstallation tasks 15precomputed result sets
altering 384configuring SAP ASE for 382creating 383deleting 384displaying information about 388generating DDL 389granting permissions on 386granting permissions to specific users 387refreshing data 385revoking permissions from specific users 388revoking permissions on 386set parameters for 382truncating 385viewing current 383
primary keyscreating 474
procedure cache, SAP ASE 541interpreting display 246monitoring 245
procedure callsremote server 377
Index
SAP Control Center for SAP Adaptive Server Enterprise 555
processes, SAP ASEblocked, identifying 398blocking, identifying 398, 399blocking, terminating 399displaying for a database 289displaying SQL and query plans for 401displaying wait events for 401finding 397interpreting display 402monitoring 396
product modules 541displaying versions 10
production environment, setting up SCC in 21propertie
partitions 511properties
check constraints 510columns 507dump devices 362for resources, changing 190foreign keys 510groups 431indexes 508Job Scheduler job histories 332Job Scheduler schedule 323login profiles 420scheduled backup jobs, SAP ASE 327segments 452tables 506thread pools 514triggers 480user-defined datatypes 517users 437views 518
properties ofroles 442
properties of, SAP ASElogin passwords 428
properties, SAP ASEcaches 250cluster Backup Server 287cluster instances 281clusters 271column encryption keys 412database devices 360database encryption keys 416databases 345defaults 354dump configurations 310
engine groups 365execution classes 367extended stored procedures 369in-memory devices 361load profiles 284logical clusters 276logins 425master keys 409permissions 373remote server 379routes for clusters 285rules 405server 233stored procedures 391XP Server 288
proxy databases, SAP ASEcreating 294
Q
queries, SQLin SAP ASE statement cache 246
query plan for an SAP ASE process, displaying401
query timeoutssetting 218
quick start instructions 13
R
range partitionscreating 491
rate values 457Red Hat Linux authentication 43, 93refresh policy, setting for precomputed result sets
383, 384refreshing precomputed result sets 385registering, SAP ASE 16, 123registration
about 188REJECT_DUPLICATE_RESOURCE_AND
_COLLECTION policy errors 525remote server
procedure calls 377remote server connection
testing 379remote server, SAP ASE
add 378delete 378
Index
556
properties of 379removing logins from roles 448removing roles 421reorganize
index partitions 495, 503indexes 495, 502table partitions 495, 500tables 495, 497tables at the database level 495
reorganize status messages 505RepAgent threads
monitoring in SAP ASE 403Replication Agent screen, SAP ASE
interpreting display 404Replication Agent threads
monitoring in SAP ASE 403Replication Agents
running in SAP ASE 403repository 204, 541
backing up 207changing backup schedule 206changing database dba password 84configuring purging 209restoring from backup 207scheduling backups 205
resource explorerlaunch icon 3
Resource Explorerabout 188display tools and options 6searching in 191
resources 541about 188adding to a perspective 189authenticating 18, 127, 128browsing and managing 157changing connection properties 190changing name 190displaying availability 18, 155filtering by column in Admin Console 6importing in batch 124modifying data collection schedules 166removing from a perspective 190searching 159searching and filtering in Admin Console 158searching for 191selecting for display in Admin Console 158unregistering 189
response time, troubleshooting 529
restartsconfiguring in UNIX 32, 76configuring in Windows 29, 73
restoring databases 338restoring databases, SAP ASE
cumulative dump, from 337revalidation_frequency parameter
missing data, and 521setting 218
revokingtable permissions 485
revoking object permissions 438revoking permissions
from specific users 388on precomputed result sets 386
role hierarchycreating 446
role-mapping.xml file 54, 104roles
assigning to users and groups 61, 113creating 442login assigned to 448managing 440mapping SCC roles to LDAP or OS groups 54,
104mutually exclusive 447object permissions 444object privileges 434, 439, 445permissions 449predefined 63, 118product level 60, 112properties of 442removing 113system level 60, 112
roles, SAP ASEassigning to users and groups 127
round robin partitionscreating 492
routes, SAP ASEdeleting connection to a logical cluster 285logical clusters, adding 285
row retrieval thresholdsetting for Administration Console 111, 161,
224RSSD user name, using to authenticate 18, 127rules
creating 404rules, SAP ASE
properties of 405
Index
SAP Control Center for SAP Adaptive Server Enterprise 557
running a scheduled backup job now, SAP ASE330
Ssa_role
troubleshooting 528same name engine groups
troubleshooting 524SAP ASE 539
configuring to be monitored 16, 122enabling performance statistics collection 130encryption keys 411performance overview screen 240
SAP ASE data cachesbuffer pool, adding 252buffer pools, changing 252cache bindings, changing 251caches, unbinding 251creating new 249DDL, generating 253
SAP ASE databasesscheduling backups of 321–325, 327,
329–334SAP Control Center
accessibility 11connecting a browser to 15console commands 215deploying and managing instances 25, 68,
200deploying instances from a shared disk 22, 65,
195display tools and options 6displaying component versions 10failure to start 526keyboard shortcuts 8log files 211logging in 39, 88logging out 88logging out unintentionally with F5 527shared-disk mode 23, 66, 195starting 14, 72starting in UNIX 32, 76starting in UNIX as a service 32, 76starting in Windows 29, 73starting in Windows as a service 29, 73stopping in UNIX 32, 76stopping in Windows 29, 73
SAP Control Center, SAP ASEmanaging 157
monitoring 157Save data collected from this job checkbox 128scalar functions, deleting in SAP ASE 374scalar functions, SAP ASE
properties of 372SCC Administrator group 54, 104SCC agent 541
deploying and managing instances 25, 68,200
deploying instances from a shared disk 22, 65,195
shared-disk mode 23, 66, 195starting in UNIX 32, 76starting in UNIX as a service 32, 76starting in Windows 29, 73starting in Windows as a service 29, 73stopping in UNIX 32, 76stopping in Windows 29, 73
scc command 84using to launch SAP Control Center 14, 72
SCC_MEM_MAX 36–38, 80, 82, 83, 529SCC_MEM_PERM 36–38, 80, 82, 83SCC-enabled login account 541scc.bat 14, 29, 73scc.sh 32, 76sccadmin account
about 15sccAdminRole 63, 118sccd shell script 32, 76sccinstance command 25, 68, 200sccUserRole 63, 118scheduled backup jobs, SAP ASE
deleting 329deleting execution history 324, 333disabling 329, 330enabling 329properties 327rescheduling 330running 329running now 330setting up alerts 334terminating 331viewing execution history log 332viewing execution history of 331
schedulerresuming 166suspending 166
schedules 162, 541adding to a job 164
Index
558
creating for a data collection job 128removing from a job 165viewing 165
scheduling a backup job, SAP ASE 324scheduling database backups, SAP ASE 321–325,
327, 329–334creating a schedule 322
screen refresh interval, SAP ASE 542screen refresh interval, setting in SAP ASE 232screens
maximizing 7maximizing and minimizing sections of a view
8scripts
alert-triggered 186alert-triggered, examples 149, 187substitution parameters 151, 185triggered by alerts 148, 184
security 40, 90configuring 39, 89encrypted databases 415, 417
security providersconfiguring 40, 90
security, SAP ASEencrypted databases 301–303encrypted databases, decrypting 302encrypted databases, suspending decryption
303segments
adding threshold to a segment 454creating new 452deleting 455displaying 452extending 450finding reserved table space for 450interpreting display 451properties of 452removing threshold 453
segments, SAP ASE 542displaying for a database 289, 292
semantic-based partitionsenabling 490
semaphore, SAP ASE 542server configuration, SAP ASE 231
interpreting display 232server logs, viewing 211servers
authenticating 18, 127, 128displaying availability 18, 155
importing in batch 124modifying data collection schedules 166searching for 191unregistering 189
servicesenabling and disabling 84listing 216
services, UNIXconfiguring SCC memory options for 38, 83running SCC or SCC agent as 32, 76
services, Windowsconfiguring SAP Control Center memory
options for 38, 82running SCC or SCC agent as 29, 73
set parameters for precomputed result sets 382Settings screen
SAP ASE monitoring 232shared-disk mode 542
about 24, 67, 199enabling and disabling 23, 66, 195
shutdown command (console) 217singleton installation 542sorting by column 6sp_configure stored procedure 16, 122, 232sp_opt_querystas
SCC Admin Console 533sp_opt_querystats
SAP Control Center, using 530sp_role stored procedure 16, 122splitting partitions 492SQL
displaying cached queries in SAP ASE 246displaying for SAP ASE processes 401monitoring queries 464
SQL scripts, restoring a database from 338sql.ini files, importing resources from 124SQLJ functions, deleting in SAP ASE 376SQLJ functions, SAP ASE
properties of 376SQLJ procedures, SAP ASE
creating 394start up
automatic, configuring in UNIX 32, 76automatic, configuring in Windows 29, 73
starting cluster instances 278starting SAP Control Center 14, 72statement cache, SAP ASE 542
interpreting display 247monitoring 246
Index
SAP Control Center for SAP Adaptive Server Enterprise 559
setting size 247states
values for alerts in SAP ASE 147, 174values for KPIs in SAP ASE 147, 174
statisticsabout 130, 456availability 130deleting from a table 463deleting from data partitions 463deleting on specific columns 463interpreting 457performance 130scope of 457updating 458updating for a data partition 461updating for an index 460updating for an index partition 462updating on specific columns 459
statistics chartdisplaying data for a longer period 530effects of repository purging on 209graphing performance counters 156troubleshooting 530unavailable for SAP ASE, troubleshooting
521statistics, SAP ASE
enabling collection 130status command (console) 217status icons and badges for resources 4status messages
reorganization 505stopping cluster instances, SAP ASE 280stored procedures, SAP ASE
creating 390in cache 246properties of 391
storm suppression for alerts 139stripes, SAP ASE
databases, dumping to 312substitution parameters for scripts 151, 185SUSE Linux authentication 43, 93suspending encryption of database, SAP ASE 302sybase group 54, 104sybdiag
SCC Admin Console 531Sybase Control Center, using 530
system encryption passwords, SAP ASEcreating 408deleting 408
modifying 408system properties
displaying information about 216system resources, SAP ASE
identifying processes that use 397system-wide features
configuring 39, 89
Ttable consistency
check 471repair 471
table datarestoring 469
table permissionsgranting 483revoking 485
table placementsegments 472
tablesabout 465creating columns 466creating user tables 465deleting statistics 463properties of 506reorganizing 495, 497
tables, deleting 511tables, in SAP ASE
choosing display columns, in SAP ASE 5collapsing cluster nodes, in SAP ASE 5copying 5copying rows, in SAP ASE 5expanding cluster nodes, in SAP ASE 5
target databases, SAP ASEDDL, generating 320generating DDL 319
taskscreating thread pools 513managing datatypes 516managing groups 430managing users 435merging partitions 493monitoring 512moving partitions 494splitting partitions 492
tasks, SAP ASEcreating engine groups 364creating execution classes 366deleting caches 253
Index
560
deleting database devices 362deleting database objects 353, 370deleting defaults 355deleting dump devices 362deleting engine groups 365deleting in-memory devices 362deleting scalar functions 374deleting SQLJ functions 376managing column encryption keys 411managing database encryption keys 415managing databases 292managing encryption key copies 413managing encryption keys 406managing master keys 408managing system encryption passwords 408monitoring databases 288shrinking databases 304
tempdbno result set for this query error 523
temporary database groups, SAP ASEcreating 304
temporary databases, SAP ASEcreating 295
terminating a scheduled backup job that is running,SAP ASE 331
terminating a scheduled backup job, SAP ASE 329terms
SCC SAP ASE 539testing
remote server connection 379text conventions 10thread pools
properties of 514threads
interpreting display 512monitoring 512
thresholdadding for use by segments 454removing from segments 453
thresholds for data retrievalsetting for Administration Console 111, 161,
224time_between_reattempts parameter
setting 218timeout
errors on data collections 525setting for login sessions 60, 110
toolbar icons 3Transact-SQL 542
transactionsidentifying associated processes 515interpreting display 516monitoring 515user log cache usage 516
transactions, SAP ASE 542transfer data
incremental 481transfer, SAP ASE
login attributes 423triggers
creating 479properties of 480
troubleshooting 521truncating precomputed result sets 385
UUnified Agent
managing a cluster 264UNIX
configuring authentication 42, 92running SCC or SCC agent in the background
32, 76running SCC or SCC agent in the foreground
32, 76starting, stopping SCC or SCC agent 32, 76
update database objectstroubleshooting 522
update KPIfailure to update 524Number of Transactions KPI 524troubleshooting 524
update statistics 458on data partitions 461on indexes 460on specific columns 459
uploading diagnostic datavia FTP 535
user accountsdefault 116native SCC, adding 116native SCC, not using 40, 90
user databases, SAP ASEcreating 293
user informationmodifying 118
user interface, about 2user interface, SAP ASE
choose columns 5
Index
SAP Control Center for SAP Adaptive Server Enterprise 561
collapse all nodes 5copy selected row 5copy table 5expand all nodes 5options 5
user tablescreating 465
user-defined datatypes 517about 516adding 516properties of 517
userscreating 435granting permissions to 387, 437managing 435properties of 437revoking permissions from 388transferring database object ownership to 436
users mapped to, SAP ASElogins 426
Vversions of SCC components
displaying 10View menu 8views
maximizing and minimizing sections 8properties of 518
views, deleting 520
views, SAP ASE 542views, SCC 542
about 193arranging in perspective 194bringing to front of perspective 193closing 193icons for managing 3maximizing 193menus 2minimizing 193opening 193restoring 193
W
wait event, SAP ASE 542wait events
displaying for SAP ASE processes 401wait events, SAP ASE 402WARN logging level 213Windows
configuring authentication 41, 91starting, stopping SCC or SCC agent 29, 73
X
XP Server, SAP ASEconfiguring 287deleting 288
Index
562