SAP Applications Built on NetApp FlexPodDesign Guide
132
FlexPod for SAP Applications Last Updated: May 11, 2011 Building Architectures to Solve Business Problems
-
Upload
cisco-data-center-sdn -
Category
Technology
-
view
607 -
download
0
Transcript of SAP Applications Built on NetApp FlexPodDesign Guide
FlexPod for SAP ApplicationsLast Updated: May 11, 2011
Building Architectures to Solve Business Problems

Cisco Validated Design2

3
About the Authors
Ulrich Kleidon, Technical Marketing Engineer, Cisco Unified Computing System Solutions and Performance Team, Cisco SystemsUlrich is a Technical Marketing Engineer for Cisco's Unified Computing System (UCS) and Performance team. He
is currently focused on validation of SAP application ready infrastructure solutions for the SAP Business Suite and
Business Intelligent applications. . Over the past three years at Cisco, Ulrich has been in charge of the SAP certifi-
cation and defining reference architectures, sizing rules and best practices for SAP on the Cisco Unified Comput-
ing System. Ulrich is a certified SAP NetWeaver Consultant and has more than 15 years experience in Datacenter
and Enterprise Application solutions.
Nils Bauer, SAP Competence Center Manager, NetAppNils Bauer has a technical marketing role in NetApp's SAP Global Alliance team. Over the last 10 years at NetApp,
the areas of responsibility have been the integration of NetApp storage solutions into SAP environments as well as
defining reference architectures, sizing rules and best practices for SAP on NetApp. Other areas Nils has been a
part of are SAP technical pre-sales support and development of joint solutions with SAP and partners. Before join-
ing NetApp, Nils worked at a consulting company where he focused on system and network management solutions
and SAP Basis consulting
Marco Schoen, Senior Technical Marketing Engineer, NetApp.Marco Schoen is a Technical Marketing Engineer at NetApp's SAP Competence Center. Main focus is developing
NetApp storage based solutions for SAP applications, also jointly with SAP and SAP partners. In addition, Marco
defines SAP reference architectures, best practices guides, and SAP technical presales. Prior to the 9 years at
NetApp, Marco worked at a consulting company as a SAP Basis consultant

4
About the Authors (continued)
Bernd Herth, CTO, GOPA IT Consultants With more than 20 years of SAP background in all areas of SAP Technology, Bernd is a leading capacity on the
SAP platform and infrastructure. Bernd focuses on ongoing R&D activities in partnership with leading technology
partners and SAP, along with how to optimize IT infrastructure and creating the SAP Data Center of the future.
Tobias Brandl, SAP consultant and SAP infrastructure architect, GOPA IT ConsultantsTobias is a lead technical consultant in the area of SAP virtualization & infrastructure. He supports customers in
optimizing their SAP architecture and operations using new technology concepts & virtualization. Before joining
GOPA ITC, he was a developer at SAP in the areas of SAP ACC, SAP Business ByDesign and he was part of the
virtual appliance factory development team.
FlexPod for SAP Applications
IntroductionThis Cisco® Validated Design reports the results of a study evaluating the usability of an shared infrastructure for SAP applications and SAP landscapes on Cisco® UCS B-Series Blade Servers running VMware vSphere connected to the NetApp Storage array.
Audience
This document is intended to assist solution architects, sales engineers, field engineers and consultants in planning, design, and deployment of SAP application landscapes on the Cisco Unified Computing System. This document assumes that the reader has an architectural understanding of the Cisco Unified Computing System, VMware vSphere, NetApp storage system, and SAP software.
The Challenge
Today's IT departments are increasingly challenged by the complexity and management of disparate components within their data centers. Rapidly proliferating silos of server, storage, and networking resources combined with numerous management tools and operational processes have led to crippling inefficiencies and costs.
Savvy organizations understand the financial and operational benefits of moving from infrastructure silos to a virtualized, shared environment. However, many of them are hesitant to make the transition due to potential short-term business disruptions and long-term architectural inflexibility, which can impede scalability and responsiveness to future business changes. Enterprises and service providers need a tested, cost-effective virtualization solution that can be easily implemented and managed within their existing infrastructures and that scales to meet their future cloud computing objectives.
Business Challenges Facing the SAP Customer
Corporations deploying SAP software today are under pressure to reduce cost, minimize risk, and control change by accelerating deployments and increasing the availability of their SAP landscapes. Changing market conditions, restructuring activities, and mergers and acquisitions often result in the
Corporate Headquarters:
Copyright © 2011 Cisco Systems, Inc. All rights reserv
Cisco Systems, Inc., 170 West Tasman Drive, San Jose, CA 95134-1706 USA
Introduction
creation of new SAP landscapes based on the SAP NetWeaver® platform. Deployment of these business solutions usually exceeds a single production instance of SAP. Business process owners and project managers must coordinate with IT management to optimize the scheduling and availability of systems to support rapid prototyping and development, frequent parallel testing or troubleshooting, and appropriate levels of end user training. The ability to access these systems as project schedules dictate with current data sets and without affecting production operations often determines whether SAP projects are delivered on time and within budget.
The Solution-FlexPod for SAP Applications
To meet this challenge NetApp and Cisco have collaborated to create FlexPod for SAP Applications™. FlexPod is a proven, long term data center solution built on a flexible, shared infrastructure that can scale easily or be configured for secure multi-tenancy and Cloud environments. FlexPod is a prevalidated configuration that delivers a virtualized data center in a rack composed of leading computing, networking, storage, and infrastructure software components.
FlexPod for SAP Applications differs from other virtualized infrastructure offerings by providing:
• Validated technologies from industry leaders in computing, storage, networking and server virtualization
• A single platform, built from unified computing, fabric, and storage technologies, that lets you scale to meet the largest data center requirements without disruption or architectural changes in the future
• Integrated components that enable you to centrally manage all your infrastructure pools
• An open design management framework that integrates with your existing third-party infrastructure management solutions
• Support of bare metal server and VMware based virtual machines
• Virtualization on all layers of the solution stack
• Secure Multi-Tenancy for operating fenced SAP systems or landscapes
• Application and data mobility
• Integrated storage-based backup
• Provisioning of infrastructure components, like tenants and operating systems
• Automated SAP system copies
• Provisioning of fenced SAP systems based on clones of production systems
The key benefits of the FlexPod for SAP Applications infrastructure solution are:
Cloud-Ready Architecture Together, NetApp, Cisco, and VMware provide a unified flexible architecture that is ready for virtualized environments today, yet is flexible enough to grow at your own pace to a fully private cloud.
IT Investment Protection The Ethernet-based FlexPod framework fits right into your current infrastructure, eliminating the cost of replacing your existing technology.
Improved Predictability FlexPod components are integrated and standardized to help you achieve timely, repeatable, consistent deployments and eliminate guesswork from the following areas:
• Resource procurement and planning
• Capacity and data center sizing
6
Solution Overview and Component Description
• Identification of operations and provisioning requirements
As a result, you can understand and better predict the exact power, floor space, usable capacity, performance, and cost for each FlexPod deployment.
Scalable Architecture FlexPod configurations can be right-sized up or out, and then duplicated in modular fashion to fit your specific organizational needs. For example, large enterprises or service providers with mature IT processes and rapid growth expectations can deploy and scale out one or more FlexPod configurations to meet the following requirements:
• Migration to a shared infrastructure with many SAP applications
• Improved agility to meet growth and key critical business initiatives
• Lower cost per user without sacrificing scalability
• Simplified operating skills and processes and reduced costs
• Evolution to operations that align with ITIL-based standards
Medium-sized enterprises and customers with more moderate growth requirements can use FlexPod as a starting point for virtualization solutions. They can then scale up storage and compute pool capacity or performance within a FlexPod configuration while maintaining centralized management of the infrastructure solution.
Scope of This Document
In this document, we will show the required components and the related installation and configuration steps to build a SAP Applications Ready infrastructure with the FlexPod Infrastructure Solution. We show how to setup the components on the server, network and storage layer as well as the operating system, tools and application layer. At the end of this document we also show one of many use cases and how this solution can simplify operational tasks for SAP applications
Solution Overview and Component Description
FlexPod for SAP Applications Architecture
FlexPod for SAP Applications introduces an infrastructure that is based on virtualization technologies on all layers of the solution stack within a pool of shared resources. SAP applications can be run on Vmware virtual machines as well as on bare metal servers.
As the name details, the FlexPod architecture is highly modular or “pod” like. While each customer's FlexPod may vary in its exact configuration, once a FlexPod is built it can easily be scaled as requirements and demand change. This includes scaling both up (adding additional resources within a FlexPod) and out (adding additional FlexPod units).
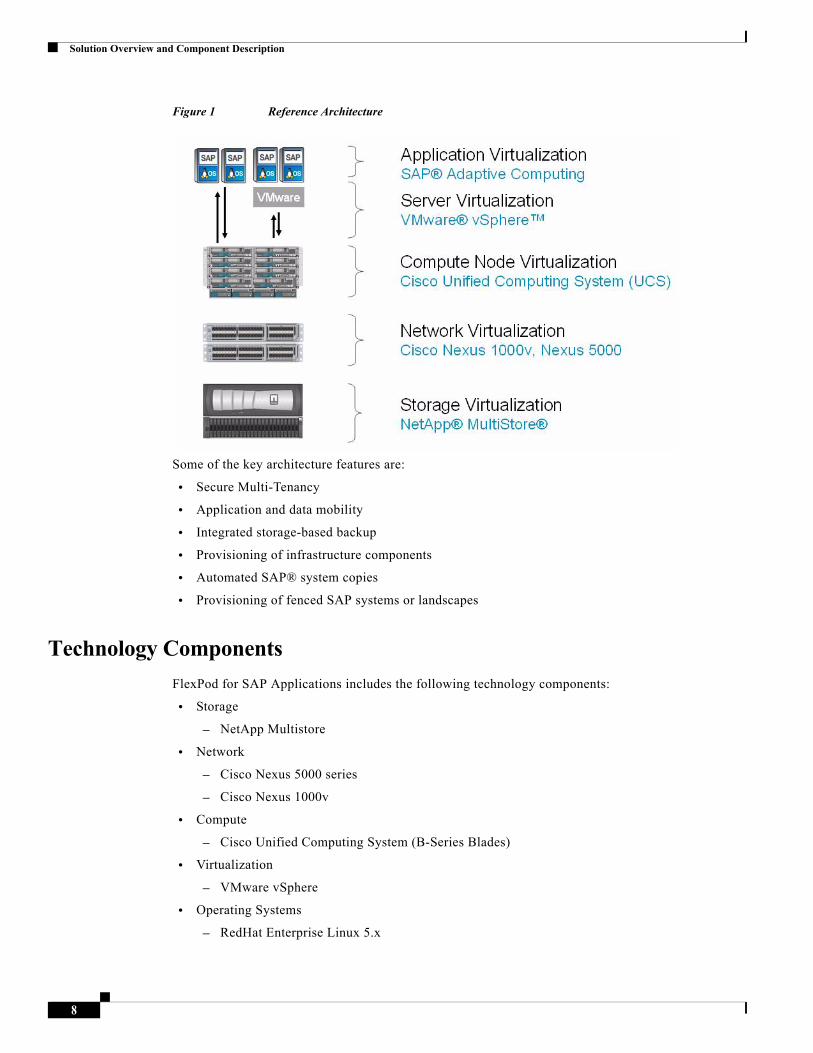
Specifically, FlexPod is a defined set of hardware and software that serves as an integrated building block for all virtualization solutions. FlexPod for SAP Applications includes NetApp® storage, Cisco® networking, the Cisco Unified Computing System™ (Cisco UCS), and VMware® virtualization software in a single package in which the computing and storage fit in one data center rack with the networking residing in a separate rack. Due to port density the networking components can accommodate multiple FlexPod configurations. Figure 1 shows the FlexPod for VMware components.
7
Solution Overview and Component Description
Figure 1 Reference Architecture
Some of the key architecture features are:
• Secure Multi-Tenancy
• Application and data mobility
• Integrated storage-based backup
• Provisioning of infrastructure components
• Automated SAP® system copies
• Provisioning of fenced SAP systems or landscapes
Technology Components
FlexPod for SAP Applications includes the following technology components:
• Storage
– NetApp Multistore
• Network
– Cisco Nexus 5000 series
– Cisco Nexus 1000v
• Compute
– Cisco Unified Computing System (B-Series Blades)
• Virtualization
– VMware vSphere
• Operating Systems
– RedHat Enterprise Linux 5.x
8
Solution Overview and Component Description
– Suse Linux Enterprise Server 11 SP1
• Applications
– SAP Business Suite with Oracle RDBMS
Management Components
FlexPod for SAP Applications includes the following management software components from the different partners.
• SAP application management
– SAP Adaptive Computing Controller
• Vmware management:
– VMware vCenter Server
• Server management:
– Cisco Unified Computing System Manager
• Storage management:
– Operations Manager
– Provisioning Manager
– Protection Manager
– SnapManager for SAP
– Virtual Storage Console (VSC) including SnapManager for VI (SMVI) and Rapid Cloning Utility (RCU)
The following sections detail the various components used in the reference architecture configuration.
Server Overview-Cisco Unified Computing System
The Cisco Unified Computing System (UCS) is a next-generation data center platform that unites compute, network, and storage access. The platform, optimized for virtual environments, is designed within open industry standard technologies and aims to reduce TCO and increase business agility. The system integrates a low-latency, lossless 10 Gigabit Ethernet unified network fabric with enterprise-class, x86-architecture servers. The system is an integrated, scalable, multi-chassis platform in which all resources participate in a unified management domain.
The Cisco Unified Computing System represents a radical simplification of the traditional blade server deployment model by providing simplified, stateless blades and a blade server chassis that is centrally provisioned, configured, and managed by Cisco UCS Manager. The result is a unified system that significantly reduces the number of components while offering a just-in-time provisioning model that allows systems to be deployed or redeployed in minutes rather than hours or days.
The Cisco Unified Computing System is designed to deliver:
• Reduced TCO at the platform, site, and organizational levels
• Increased IT staff productivity and business agility through just-in-time provisioning and mobility support for both virtualized and non-virtualized environments
• A cohesive, integrated system that is managed, serviced, and tested as a whole
9

Solution Overview and Component Description
• Scalability through a design for up to 320 discrete servers and thousands of virtual machines, and the capability to scale I/O bandwidth to match demand
• Industry standards supported by a partner ecosystem of industry leaders
• Innovations Supporting Business Benefits
Each of the system's business benefits is supported by a rich set of technical innovations that contribute to this first implementation of the Cisco® unified computing vision:
• Embedded system management through Cisco UCS Manager
• Just-in-time provisioning with service profiles
• Unified fabric using 10-Gbps Ethernet
• VN-Link virtualization support
• Cisco Extended Memory technology
• State of the art performance using Intel Xeon Processors
• Energy efficient platform design
The following section details the Cisco UCS components.
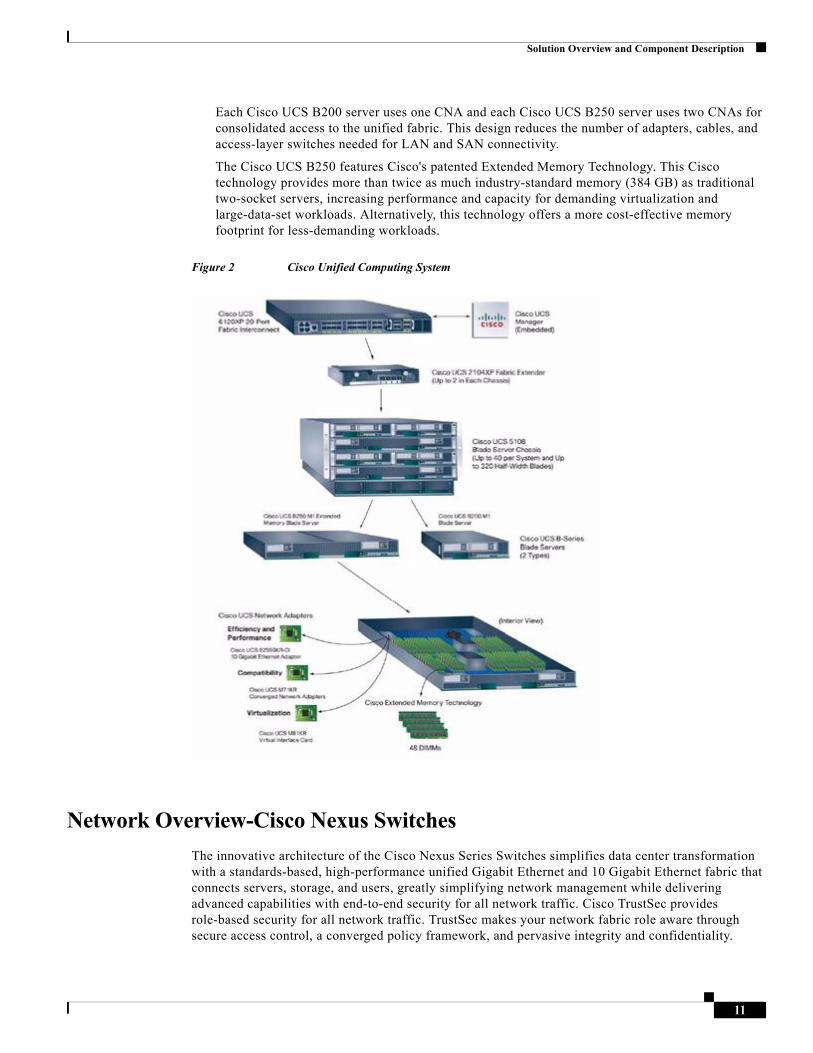
Cisco UCS Components
Cisco UCS 6100 Series Fabric Interconnects-Comprising a family of line-rate, low-latency, lossless, 10-Gbps Ethernet interconnect switches that consolidate I/O within the system. Both 20-port one-rack-unit (1RU) and 40-port 2RU versions accommodate expansion modules that provide Fibre Channel and 10Gigabit Ethernet connectivity.
Cisco UCS Manager-Provides centralized management capabilities, creates a unified management domain, and serves as the central nervous system of the Cisco Unified Computing System.
Cisco UCS 2100 Series Fabric Extenders-Bring unified fabric into the blade-server chassis, providing up to four 10-Gbps connections each between blade servers and the fabric interconnect, simplifying diagnostics, cabling, and management.
Cisco UCS 5100 Series Blade Server Chassis-The Cisco UCS 5100 Series Blade Server Chassis (model 5108) is a logical part of the Cisco Unified Computing System's fabric interconnects, adding no management complexity to the system.
Cisco UCS 5108-Fits on a standard rack, is 6RU high and physically houses blade servers and up to two Cisco UCS 2100 Series Fabric Extenders. It also houses eight cooling fans and four power supply units. The cooling fans and power supply are hot swappable and redundant. The chassis requires only two power supplies for normal operation; the additional power supplies are for redundancy. The highly-efficient (in excess of 90%) power supplies, in conjunction with the simple chassis design that incorporates front to back cooling, makes the Cisco UCS system very reliable and energy efficient.
Cisco UCS network adapters-Offers a range of options to meet application requirements, including adapters optimized for virtualization, converged network adapters (CNAs) for access to unified fabric and compatibility with existing driver stacks, Fibre Channel host bus adapters (HBAs), and efficient, high-performance Ethernet adapters.
Cisco UCS B-Series Blade Servers-Based on Intel Xeon 5500 and 5600 series processors, adapt to application demands, intelligently scale energy use, and offer best-in-class virtualization. These socket blade servers come in two forms: the Cisco UCS B200 half-slot, and the Cisco UCS B250 full-slot extended memory server. Cisco UCS first generation, M1 series, features the Intel Xeon processor 5500 series while the next generation, M2 series, features the Intel Xeon 5600 processor.
10
Solution Overview and Component Description
Each Cisco UCS B200 server uses one CNA and each Cisco UCS B250 server uses two CNAs for consolidated access to the unified fabric. This design reduces the number of adapters, cables, and access-layer switches needed for LAN and SAN connectivity.
The Cisco UCS B250 features Cisco's patented Extended Memory Technology. This Cisco technology provides more than twice as much industry-standard memory (384 GB) as traditional two-socket servers, increasing performance and capacity for demanding virtualization and large-data-set workloads. Alternatively, this technology offers a more cost-effective memory footprint for less-demanding workloads.
Figure 2 Cisco Unified Computing System
Network Overview-Cisco Nexus Switches
The innovative architecture of the Cisco Nexus Series Switches simplifies data center transformation with a standards-based, high-performance unified Gigabit Ethernet and 10 Gigabit Ethernet fabric that connects servers, storage, and users, greatly simplifying network management while delivering advanced capabilities with end-to-end security for all network traffic. Cisco TrustSec provides role-based security for all network traffic. TrustSec makes your network fabric role aware through secure access control, a converged policy framework, and pervasive integrity and confidentiality.
11
Solution Overview and Component Description
Cisco Nexus 5000 Series Switches
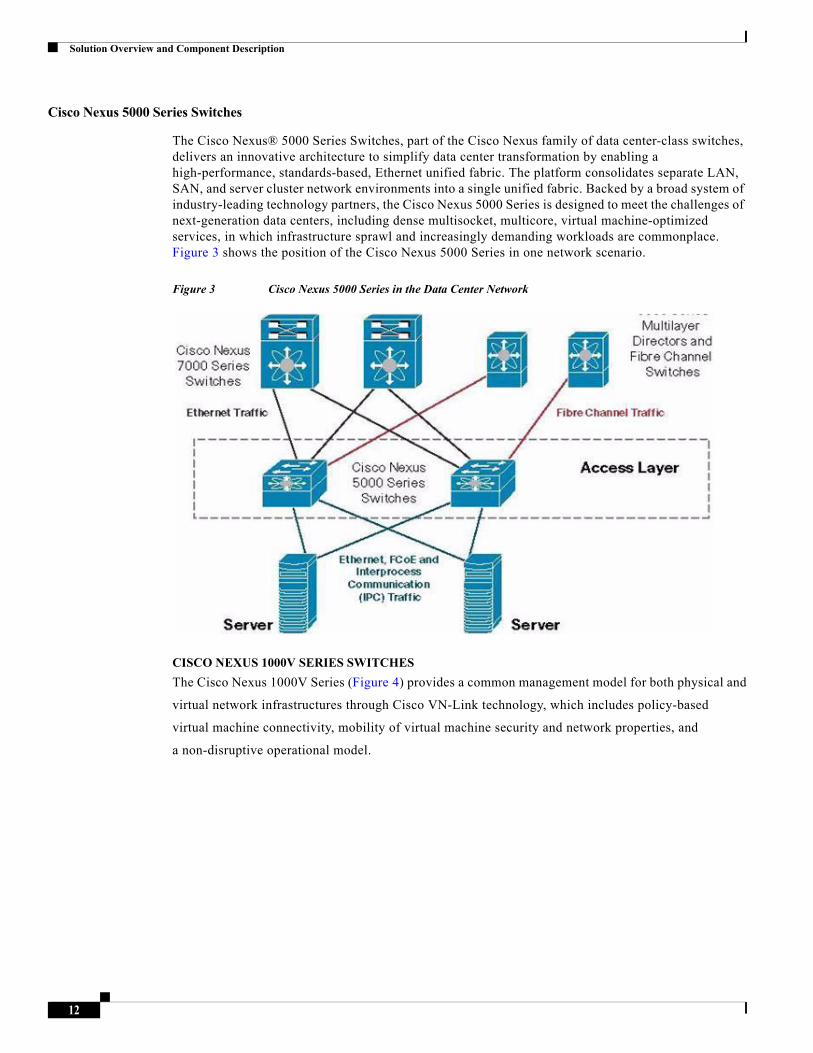
The Cisco Nexus® 5000 Series Switches, part of the Cisco Nexus family of data center-class switches, delivers an innovative architecture to simplify data center transformation by enabling a high-performance, standards-based, Ethernet unified fabric. The platform consolidates separate LAN, SAN, and server cluster network environments into a single unified fabric. Backed by a broad system of industry-leading technology partners, the Cisco Nexus 5000 Series is designed to meet the challenges of next-generation data centers, including dense multisocket, multicore, virtual machine-optimized services, in which infrastructure sprawl and increasingly demanding workloads are commonplace. Figure 3 shows the position of the Cisco Nexus 5000 Series in one network scenario.
Figure 3 Cisco Nexus 5000 Series in the Data Center Network
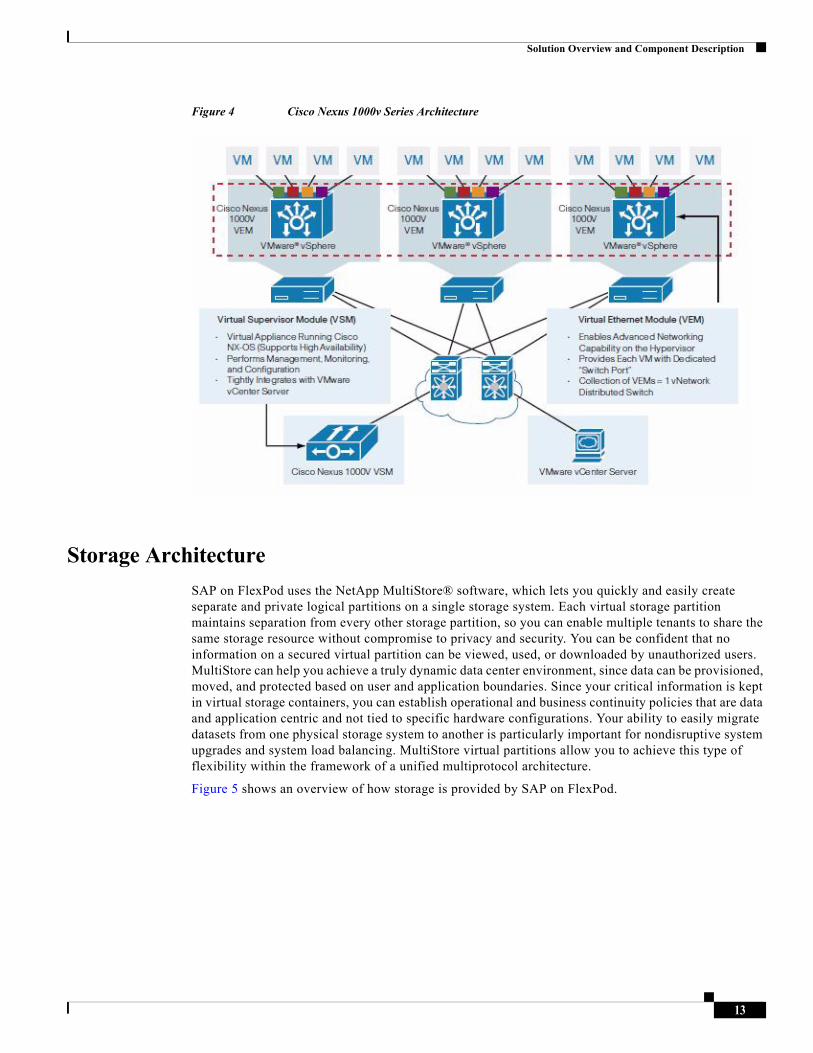
CISCO NEXUS 1000V SERIES SWITCHES
The Cisco Nexus 1000V Series (Figure 4) provides a common management model for both physical and
virtual network infrastructures through Cisco VN-Link technology, which includes policy-based
virtual machine connectivity, mobility of virtual machine security and network properties, and
a non-disruptive operational model.
12
Solution Overview and Component Description
Figure 4 Cisco Nexus 1000v Series Architecture
Storage Architecture
SAP on FlexPod uses the NetApp MultiStore® software, which lets you quickly and easily create separate and private logical partitions on a single storage system. Each virtual storage partition maintains separation from every other storage partition, so you can enable multiple tenants to share the same storage resource without compromise to privacy and security. You can be confident that no information on a secured virtual partition can be viewed, used, or downloaded by unauthorized users. MultiStore can help you achieve a truly dynamic data center environment, since data can be provisioned, moved, and protected based on user and application boundaries. Since your critical information is kept in virtual storage containers, you can establish operational and business continuity policies that are data and application centric and not tied to specific hardware configurations. Your ability to easily migrate datasets from one physical storage system to another is particularly important for nondisruptive system upgrades and system load balancing. MultiStore virtual partitions allow you to achieve this type of flexibility within the framework of a unified multiprotocol architecture.
Figure 5 shows an overview of how storage is provided by SAP on FlexPod.
13

Solution Overview and Component Description
Figure 5 SAP on FlexPod Storage Overview
With SAP on FlexPod, each tenant is assigned a vFiler unit that is hosted on a primary physical storage system and a vFiler unit that is assigned to a secondary physical storage system. Therefore, each tenant can access fast primary storage for production SAP systems as well as secondary storage for backup purposes or for SAP systems with low I/O requirements like development or training systems.
Integrated Storage-Based Backup
FlexPod for SAP Applications has an integrated backup solution for all infrastructure and application data.
Non-application data are backed-up using Protection Manager. All storage volumes are provisioned with Provisioning Manager and are automatically assigned to a protection policy.
• Automated backup processes
• Fast and space-efficient Snapshot based backups
• Fast and space-efficient replication with SnapVault based on block level changes
Virtual machines and templates will be backed up with SMVI, part of VSC. SMVI integrates into VMware vSphere and provides consistent storage Snapshots of individual VMs or complete datastores. These consistent Snapshots will be replicated to a secondary storage system through Protection Manager.
SAP application data is backed with SnapManager for SAP and Protection Manager. SnapManager for SAP offers a backint integration into the SAP Br*tools. Therefore backup and restore processes can be controlled with SAP Brbackup and Brrestore. Backups executed by Brbackup will create Snapshot backups on the storage level. Snapshot backups on the primary storage will be replicated to the secondary storage using the SnapVault functionality controlled by SMSAP and Protection Manager.
• Backups of SAP systems are done using an SAP certified interface with SnapManager for SAP
• Backups are done in a few minutes independent from the database size
14

Solution Overview and Component Description
• Restoring a database is done in a few minutes independent from the database size
• Fast and space-efficient replication with SnapVault based on block level changes
• Backup load fully decoupled from server layer
Figure 6 Integrated Storage Backup
NetApp Snapshot technology can create an online or offline database backup in minutes. The time needed to create a Snapshot copy is independent of the size of the database, because a Snapshot copy does not move any data blocks. The use of Snapshot technology has no performance effect on the production SAP system because the NetApp Snapshot implementation does not copy data blocks when the Snapshot copy is created or when data in the active file system is changed. Therefore, the creation of Snapshot copies can be scheduled without having to consider peak dialog or batch activity periods. SAP and NetApp customers typically schedule several online Snapshot backups during the day, for instance, every four hours. These Snapshot backups are typically kept for three to five days on the primary storage system.
Snapshot copies also provide key advantages for the restore and recovery operation. The NetApp SnapRestore functionality allows restore of the entire database or parts of the database to the point in time when any available Snapshot copy was created. This restore process is done in a few minutes, independent of the size of the database. Because several online Snapshot backups were created during the day, the time needed for the recovery process is also dramatically reduced. Because a restore can be done using a Snapshot copy that is at most four hours old, fewer transaction logs need to be applied. The mean time to recover, which is the time needed for restore and recovery, is therefore reduced to several minutes compared to several hours with conventional tape backups.
Snapshot backups are stored on the same disk system as the active online data. Therefore, NetApp recommends using Snapshot backups as a supplement, not a replacement for backups to a secondary location such as disk or tape. Although backups to a secondary location are still necessary, there is only
15
Solution Overview and Component Description
a slight probability that these backups will be needed for restore and recovery. Most restore and recovery actions are handled by using SnapRestore on the primary storage system. Restores from a secondary location are only necessary if the primary storage system holding the Snapshot copies is damaged or if it is necessary to restore a backup that is no longer available from a Snapshot copy, for instance, a two-week-old backup.
A backup to a secondary location is always based on Snapshot copies created on the primary storage. Therefore, the data is read directly from the primary storage system without generating load on the SAP database server. The primary storage communicates directly with the secondary storage and sends the backup data to the destination. The NetApp SnapVault functionality offers significant advantages compared to tape backups. After an initial data transfer, in which all the data has to be transferred from the source to the destination, all following backups copy only the changed blocks to the secondary storage. The typical block change rate for a SAP system is around 2% per day. Therefore the load on the primary storage system and the time needed for a full backup are significantly reduced. Because SnapVault stores only the changed blocks at the destination, a full database backup requires significantly less disk space.
VMware Overview
VMware vSphere
VMware® vSphere provides a foundation for virtual environments, including clouds. Besides the hypervisor itself, it provides tools to manage the virtual landscape such as VMotion® and allows creating secure private landscapes. VMotion allows you to move a virtual machine from one physical compute node to another without service interruption.
The powerful VMware virtualization solution enables you to pool server and desktop resources and dynamically allocate them with service-level automation so you can deploy a private cloud and deliver IT as a service (ITaaS). VMware components provide a scalable approach to virtualization that delivers high availability and agility to meet your changing business requirements. VMware vSphere, the industry's most complete and robust virtualization platform, increases IT efficiency through consolidation and automation, dramatically reducing your capital and operating costs while giving you the freedom to choose your applications, OS, and hardware. VMware vCenter Standard offers proactive end-to-end centralized management of virtual environments, delivering the visibility and responsiveness you need for cloud-ready applications.
VMware Network Distributed Switch
VMware vNetwork Distributed Switch maintains network runtime state for VMs as they move across multiple hosts, enabling inline monitoring and centralized firewall services. It provides a framework for monitoring and maintaining the security of virtual machines as they move from physical server to physical server and enables the use of third-party virtual switches such as the Cisco Nexus 1000V to extend familiar physical network features and controls to virtual networks.
16
Solution Overview and Component Description
Secure Multi-Tenancy and Operational Modes
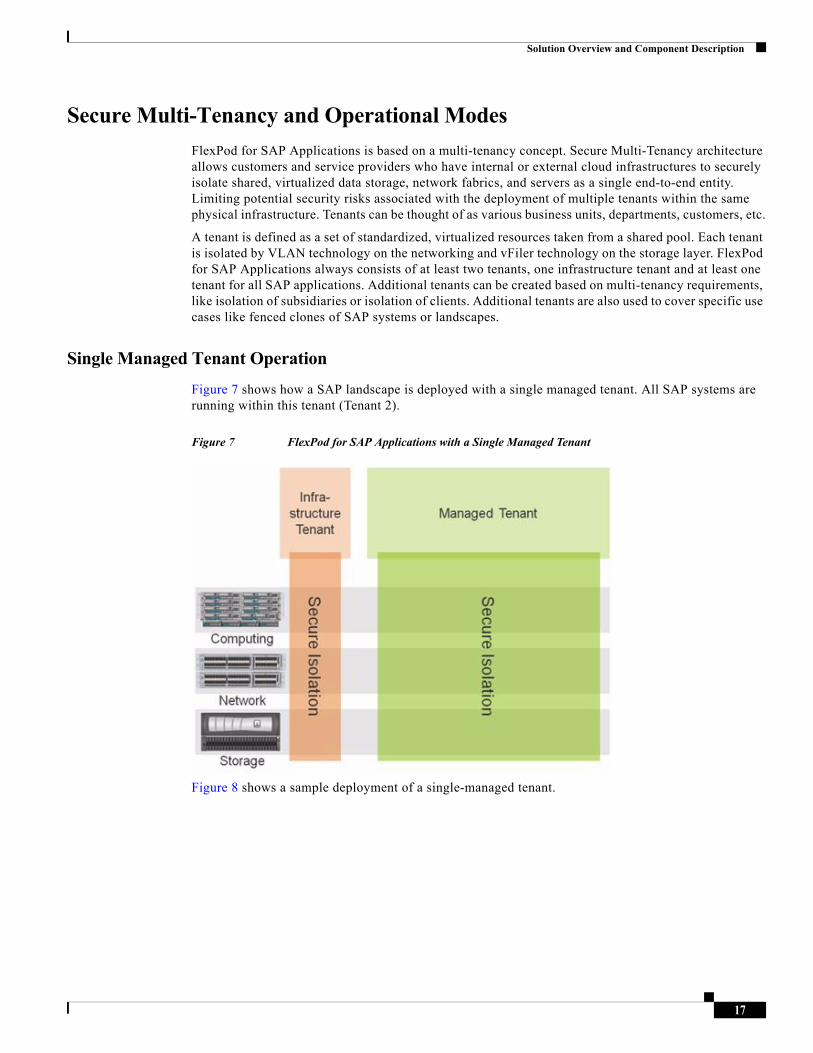
FlexPod for SAP Applications is based on a multi-tenancy concept. Secure Multi-Tenancy architecture allows customers and service providers who have internal or external cloud infrastructures to securely isolate shared, virtualized data storage, network fabrics, and servers as a single end-to-end entity. Limiting potential security risks associated with the deployment of multiple tenants within the same physical infrastructure. Tenants can be thought of as various business units, departments, customers, etc.
A tenant is defined as a set of standardized, virtualized resources taken from a shared pool. Each tenant is isolated by VLAN technology on the networking and vFiler technology on the storage layer. FlexPod for SAP Applications always consists of at least two tenants, one infrastructure tenant and at least one tenant for all SAP applications. Additional tenants can be created based on multi-tenancy requirements, like isolation of subsidiaries or isolation of clients. Additional tenants are also used to cover specific use cases like fenced clones of SAP systems or landscapes.
Single Managed Tenant Operation
Figure 7 shows how a SAP landscape is deployed with a single managed tenant. All SAP systems are running within this tenant (Tenant 2).
Figure 7 FlexPod for SAP Applications with a Single Managed Tenant
Figure 8 shows a sample deployment of a single-managed tenant.
17
Solution Overview and Component Description
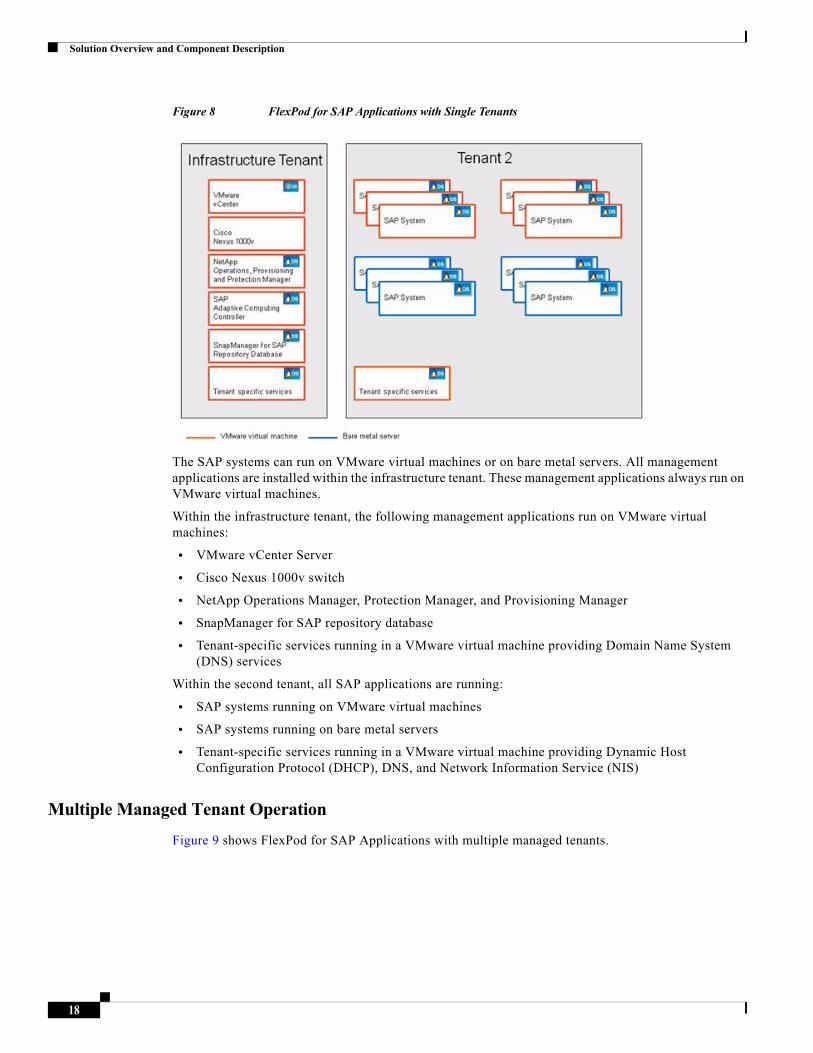
Figure 8 FlexPod for SAP Applications with Single Tenants
The SAP systems can run on VMware virtual machines or on bare metal servers. All management applications are installed within the infrastructure tenant. These management applications always run on VMware virtual machines.
Within the infrastructure tenant, the following management applications run on VMware virtual machines:
• VMware vCenter Server
• Cisco Nexus 1000v switch
• NetApp Operations Manager, Protection Manager, and Provisioning Manager
• SnapManager for SAP repository database
• Tenant-specific services running in a VMware virtual machine providing Domain Name System (DNS) services
Within the second tenant, all SAP applications are running:
• SAP systems running on VMware virtual machines
• SAP systems running on bare metal servers
• Tenant-specific services running in a VMware virtual machine providing Dynamic Host Configuration Protocol (DHCP), DNS, and Network Information Service (NIS)
Multiple Managed Tenant Operation
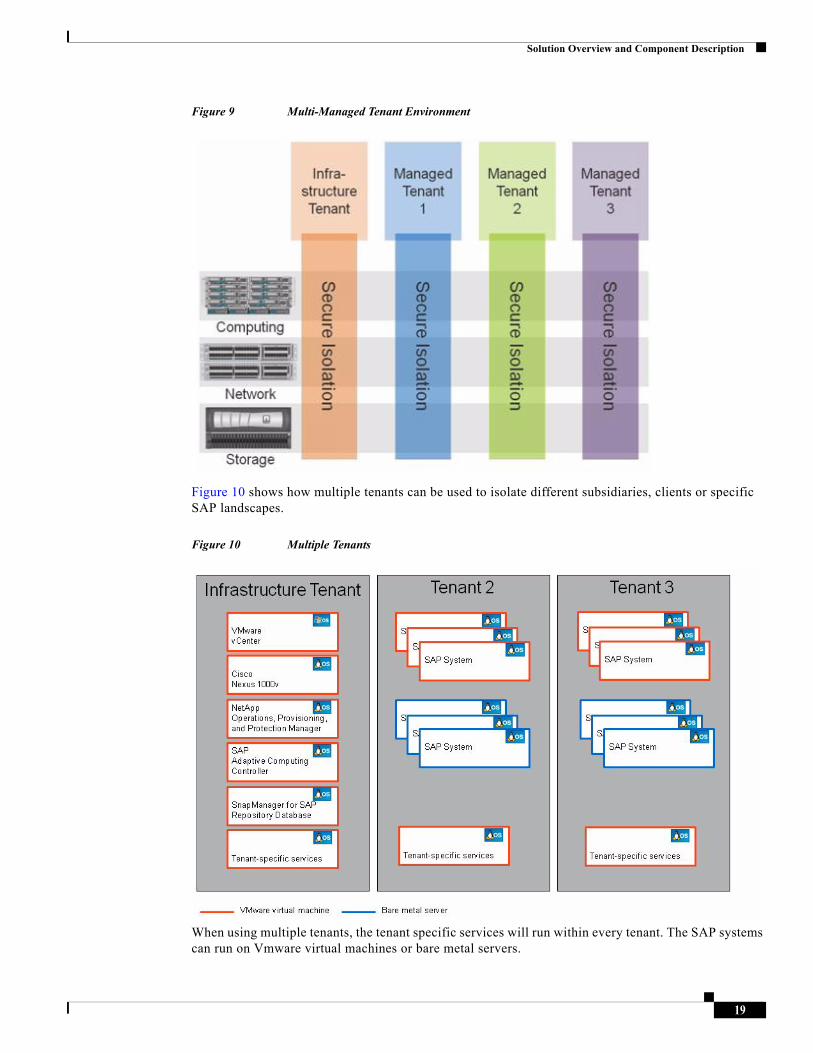
Figure 9 shows FlexPod for SAP Applications with multiple managed tenants.
18
Solution Overview and Component Description
Figure 9 Multi-Managed Tenant Environment
Figure 10 shows how multiple tenants can be used to isolate different subsidiaries, clients or specific SAP landscapes.
Figure 10 Multiple Tenants
When using multiple tenants, the tenant specific services will run within every tenant. The SAP systems can run on Vmware virtual machines or bare metal servers.
19
Solution Overview and Component Description
Application and Data Mobility
SAP on FlexPod provides mobility on all layers of the solution stack:
Application Mobility With SAP Adaptive Computing
The SAP Adaptive Computing Application virtualization functionality allows to start, stop and relocate an SAP application instance from one running operating system to another running operating system. Hereby it is possible to relocate an SAP application instance from an bare metal operating system to an bare metal OS or to an virtual machine based OS or vise versa.
Server Mobility With Cisco UCS Service Profile Technology
The Cisco UCS Service profile technology allows the migration of an full installed stack of OS and application from one physical server to another physical server. UCS takes care that all important characteristics of an server like the WWN, MAC addresses and UUID will be applied before the OS and application starts. With this type of migration it is possible to do a server migration for a planned hardware maintenance or to cover a hardware failure or to scale-up or scale-down the server to cover performance requirement of the Application. The SAP Hardware key is always the same and therefore also the SAP licence is always valid as long a valid licence key is applied to the SAP system.
Server Mobility With VMware
Live migration of VMs with VMware vMotion. VMotion allows you to move a virtual machine from one physical compute node to another without service interruption
Data Mobility With NetApp Datamotion
MultiStore can help you achieve a truly dynamic data center environment, since data can be provisioned, moved, and protected based on user and application boundaries. Since your critical information is kept in virtual storage containers, you can establish operational and business continuity policies that are data and application centric and not tied to specific hardware configurations. Your ability to easily migrate datasets from one physical storage system to another is particularly important for nondisruptive system upgrades and system load balancing. MultiStore virtual partitions allow you to achieve this type of flexibility within the framework of a unified multiprotocol architecture.
These technologies are used for migrating applications and data without or with minimal downtime and support the following use cases:
– Changing performance requirements
– Migration of vFiler units and data to different physical storage system
– Migration of VMs to a different ESX server
– Migration of SAP systems or databases from VM to bare metal server or vice versa
• Minimize planned downtime (hardware exchange)
– Migration of vFiler units and data, VMs, or SAP applications to new hardware
• Support requirements
– Migration of database from VM to bare metal server
20
FlexPod Provisioning Overview
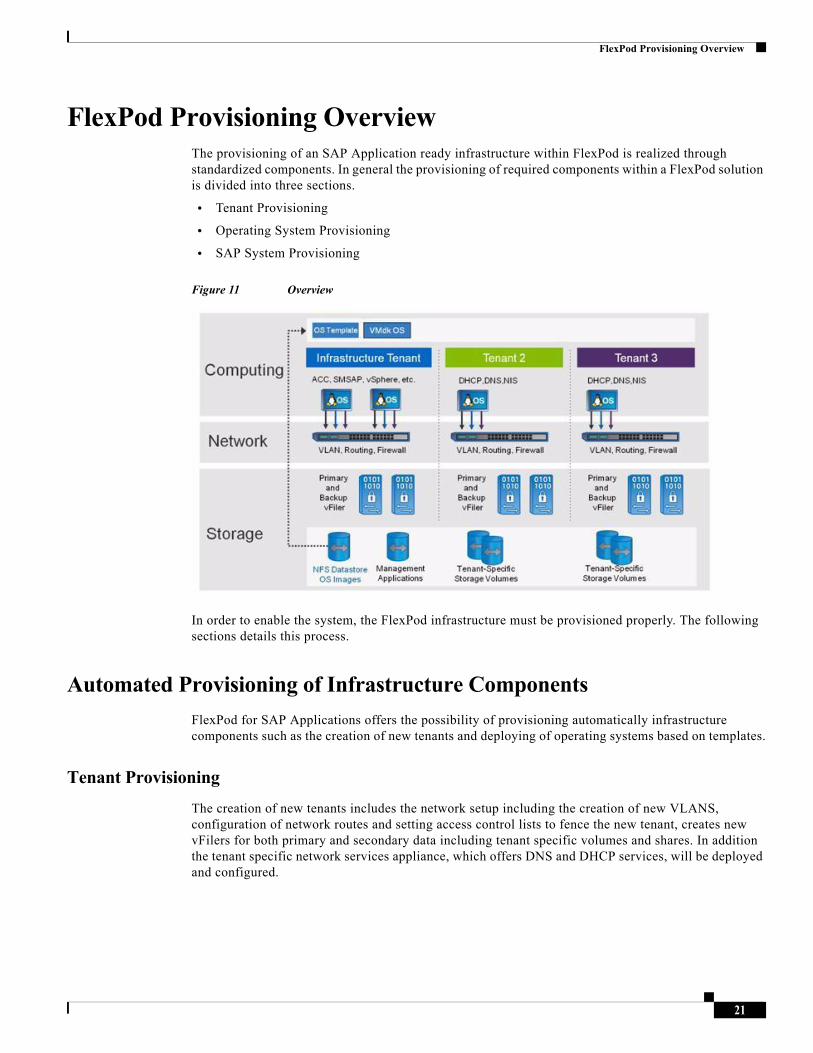
FlexPod Provisioning OverviewThe provisioning of an SAP Application ready infrastructure within FlexPod is realized through standardized components. In general the provisioning of required components within a FlexPod solution is divided into three sections.
• Tenant Provisioning
• Operating System Provisioning
• SAP System Provisioning
Figure 11 Overview
In order to enable the system, the FlexPod infrastructure must be provisioned properly. The following sections details this process.
Automated Provisioning of Infrastructure Components
FlexPod for SAP Applications offers the possibility of provisioning automatically infrastructure components such as the creation of new tenants and deploying of operating systems based on templates.
Tenant Provisioning
The creation of new tenants includes the network setup including the creation of new VLANS, configuration of network routes and setting access control lists to fence the new tenant, creates new vFilers for both primary and secondary data including tenant specific volumes and shares. In addition the tenant specific network services appliance, which offers DNS and DHCP services, will be deployed and configured.
21

Solution Setup and Operation Overview
Operating System Deployment
The combination of NetApp cloning technology, templates of operating systems, and virtualized applications with SAP Adaptive Computing allows fast provisioning of operating systems (OSs) for new servers or virtual machines and simplified patching of operating systems.
New patches will be applied and tested at a new golden image and afterward, cloned and in combination with VMware vSphere and the Cisco Unified Computing System, provisioned to new servers (physical or virtual), and the SAP application will be moved to the new hosts.
All required services for operating an SAP systems are pre installed, for example backup services and will be automatically configured during deployment of an operating system.
This reduces the amount of time and resources required to apply patches to operating systems as only one operating system must be patched and tested and not the operating systems of all involved hosts and to configure an operating system with the required services.
Storage Provisioning
At the storage level new space can be provisioned using MultiStore and FlexVol® technology, and new SAP systems can be provisioned with FlexClone technology. In addition, NetApp MultiStore, together with NetApp Data Motion, provides data mobility at the storage level. This makes it easy to move SAP systems, for example, to higher performance storage and servers when operations require greater throughput. All of the functionality mentioned above is integrated into NetApp OperationsManager, Protection Manager, and Provisioning Manager allowing central management and monitoring of storage related activities.
With FlexPod for SAP Applications each tenant has assigned a vFiler that is hosted on primary physical storage system and a vFiler that is assigned to secondary physical storage system. Therefore each tenant can access fast primary storage for production SAP systems as well as secondary storage for backup purposes or for SAP systems with low IO requirements like development or training systems.
Solution Setup and Operation Overview
Infrastructure Setup Tasks
The following lists the steps involved to setup your infrastructure:
1. FlexPod for VMware setup
2. Additional FlexPod for SAP Applications configuration steps
3. Infrastructure tenant setup
a. NetApp Operations, Provisioning and Protection Manager configuration
b. Setting up infrastructure volumes
c. Backup configuration of infrastructure volumes
d. SAP Adaptive Computing Controller installation
e. SnapManager for SAP repository database installation
f. SnapManager for SAP installation on the DFM host
g. Tenant-specific services configuration (DHCP, DNS, NIS)
22
Setup FlexPod for VMware
4. Installation and configuration of OS
a. OS template for VMware
b. OS auto install framework for bare metal
5. Provisioning of one or more tenants
a. Network configuration
b. Storage configuration
c. Tenant specific services configuration (DHCP, DNS, NIS)
Initial Operation Tasks
The following lists the tasks involved in the initial setup:
1. OS provisioning into target tenants
2. SAP system provisioning
a. Preparation
b. System installation
3. Configuring backup services for SAP systems
a. Protection Manager Protection Policy
b. Creating SnapManager for SAP profile
c. Configuring data protection
d. Configuring Br*tools and backint
4. Configuring SAP ACC for SAP systems
Setup FlexPod for VMwareThe first step in setting up SAP on FlexPod is setting up FlexPod for VMware according to the FlexPod for VMware Cisco Validated Design Guide. The following sections describe only the differences and additional tasks.
Differences of NetApp Components to FlexPod for VMware
NetApp Operations Manager is installed on a Linux VM Instead of a Windows VM. The configuration steps are the same in the FlexPod for VMware Cisco Validated Design Guide.
The NetApp Virtual Storage Console is installed on the Windows vCenter VM instead of a new Windows VM (Chapter 3.11 of FlexPod for VMware Implementation guide) . It is required to add a second network card to the vCenter VM connected to the NFS network.
Every application other than the management components runs in an additional tenant or additional tenants and not within the infrastructure tenant.
23

Setup FlexPod for VMware
Additional Storage Configuration
To configure additional storage, log on to controller A and set the following option:
options vfiler.vol_clone_zapi_allow on
Set this option also at controller B.
Create a new VLAN for NDMP traffic and configure SnapVault and SnapMirror® access on each controller.
Log on to controller A and execute the following commands:
vlan add vif0 <<var_ndmp_vlan_id>>
wrfile -a /etc/rc <<vlan add vif0 <<var_ndmp_vlan_id>>
ifconfig vif0-<<var_ndmp_vlan_id>> mtusize 9000
wrfile -a /etc/ "ifconfig vif0-<<var_ndmp_vlan_id>> mtusize 9000"
ifconfig vif0-<<var_ndmp_vlan_id>> partner vif0-<<var_ndmp_vlan_id>>
wrfile -a /etc/ "ifconfig vif0-<<var_ndmp_vlan_id>> partner vif0-<<var_ndmp_vlan_id>>
ifconfig vif0-<<var_ndmp_vlan_id>> <<var_ndmp_ip_contr_a>> netmask <<var_ndmp_netmask>>
wrfile -a /etc/ "ifconfig vif0-<<var_ndmp_vlan_id>> <<var_ndmp_ip_contr_a>> netmask <<var_ndmp_netmask>>
options ndmpd.preferred_interface vif0-<<var_ndmp_vlan_id>>
wrfile -a /etc/snapmirror.allow <<var_ntap_B_hostname>>
wrfile -a /etc/snapmirror.allow <<var_ndmp_ip_contr_b>>
Options snapvault.access host=<<var_ntap_B_hostname>>,<<var_ndmp_ip_contr_b>>
Log on to controller B and execute the following commands:
vlan add vif0 <<var_ndmp_vlan_id>>
wrfile -a /etc/rc <<vlan add vif0 <<var_ndmp_vlan_id>>
ifconfig vif0-<<var_ndmp_vlan_id>> mtusize 9000
wrfile -a /etc/ "ifconfig vif0-<<var_ndmp_vlan_id>> mtusize 9000"
ifconfig vif0-<<var_ndmp_vlan_id>> partner vif0-<<var_ndmp_vlan_id>>
wrfile -a /etc/ "ifconfig vif0-<<var_ndmp_vlan_id>> partner vif0-<<var_ndmp_vlan_id>>
ifconfig vif0-<<var_ndmp_vlan_id>> <<var_ndmp_ip_contr_b>> netmask <<var_ndmp_netmask>>
wrfile -a /etc/ "ifconfig vif0-<<var_ndmp_vlan_id>> <<var_ndmp_ip_contr_b>> netmask <<var_ndmp_netmask>>
options ndmpd.preferred_interface vif0-<<var_ndmp_vlan_id>>
wrfile -a /etc/snapmirror.allow <<var_ntap_A_hostname>>
wrfile -a /etc/snapmirror.allow <<var_ndmp_ip_contr_a>>
24
Setup FlexPod for VMware
Options snapvault.access host=<<var_ntap_A_hostname>>,<<var_ndmp_ip_contr_a>>
Additional Network Configuration
Management Network for Physical Components
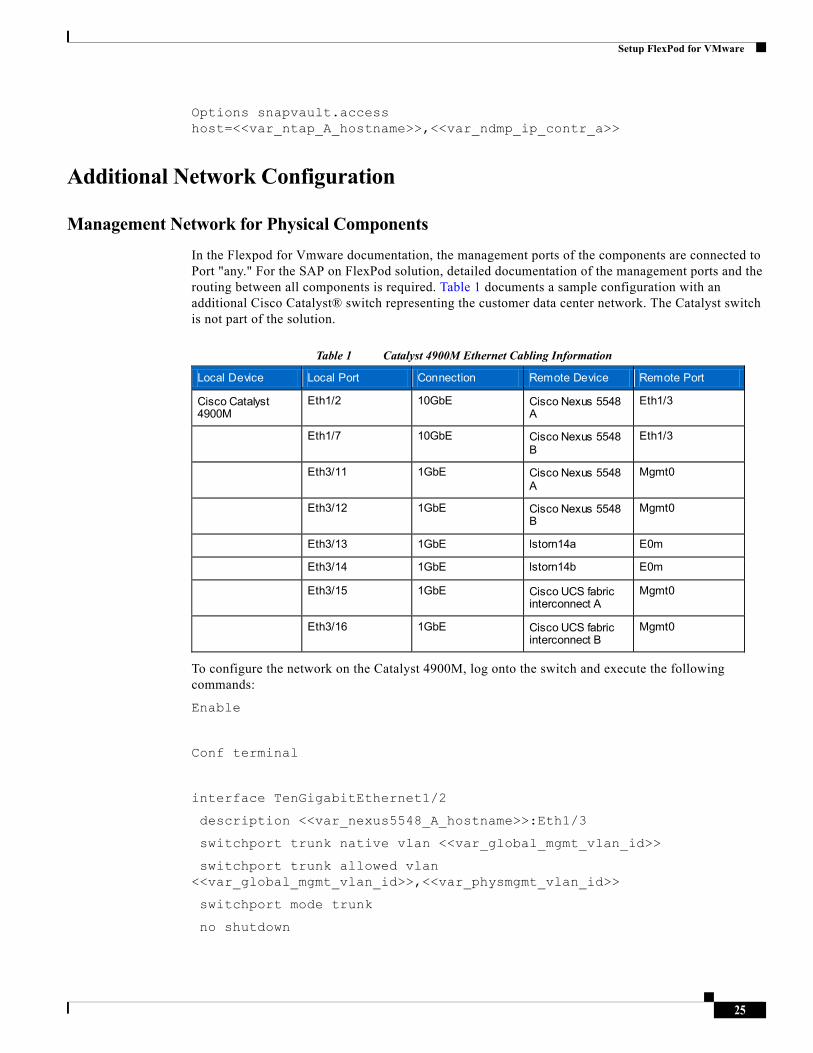
In the Flexpod for Vmware documentation, the management ports of the components are connected to Port "any." For the SAP on FlexPod solution, detailed documentation of the management ports and the routing between all components is required. Table 1 documents a sample configuration with an additional Cisco Catalyst® switch representing the customer data center network. The Catalyst switch is not part of the solution.
Table 1 Catalyst 4900M Ethernet Cabling Information
Local Device Local Port Connection Remote Device Remote Port
Cisco Catalyst 4900M
Eth1/2 10GbE Cisco Nexus 5548 A
Eth1/3
Eth1/7 10GbE Cisco Nexus 5548 B
Eth1/3
Eth3/11 1GbE Cisco Nexus 5548 A
Mgmt0
Eth3/12 1GbE Cisco Nexus 5548 B
Mgmt0
Eth3/13 1GbE lstorn14a E0m
Eth3/14 1GbE lstorn14b E0m
Eth3/15 1GbE Cisco UCS fabric interconnect A
Mgmt0
Eth3/16 1GbE Cisco UCS fabric interconnect B
Mgmt0
To configure the network on the Catalyst 4900M, log onto the switch and execute the following commands:
Enable
Conf terminal
interface TenGigabitEthernet1/2
description <<var_nexus5548_A_hostname>>:Eth1/3
switchport trunk native vlan <<var_global_mgmt_vlan_id>>
switchport trunk allowed vlan <<var_global_mgmt_vlan_id>>,<<var_physmgmt_vlan_id>>
switchport mode trunk
no shutdown
25
Setup FlexPod for VMware
interface TenGigabitEthernet1/7
description <<var_nexus5548_B_hostname>>:Eth1/3
switchport trunk native vlan <<var_global_mgmt_vlan_id>>
switchport trunk allowed vlan <<var_global_mgmt_vlan_id>>,<<var_physmgmt_vlan_id>>
switchport mode trunk
no shutdown
interface GigabitEthernet3/11
description <<var_nexus5548_A_hostname>>:mgmt
switchport access vlan <<var_global_mgmt_vlan_id>>
switchport mode access
no shutdown
interface GigabitEthernet3/12
description <<var_nexus5548_B_hostname>>:mgmt
switchport access vlan <<var_global_mgmt_vlan_id>>
switchport mode access
no shutdown
interface GigabitEthernet3/13
description <<var_ntap_A_hostname>>:e0m
switchport access vlan <<var_global_mgmt_vlan_id>>
switchport mode access
no shutdown
interface GigabitEthernet3/14
description <<var_ntap_B_hostname>>:e0m
switchport access vlan <<var_global_mgmt_vlan_id>>
switchport mode access
no shutdown
interface GigabitEthernet3/15
description <<var_ucsm_A_hostname>>:mgmt
switchport access vlan <<var_global_mgmt_vlan_id>>
switchport mode access
no shutdown
26
Setup FlexPod for VMware
interface GigabitEthernet3/16
description <<var_ucsm_B_hostname>>:mgmt
switchport access vlan <<var_global_mgmt_vlan_id>>
switchport mode access
no shutdown
exit
exit
copy run start
exit
Configure the network on the Nexus 5548 switches to enable the communicating to the Catalyst 4900M,. Log onto <<var_nexus_A_hostname>> and execute the following commands:
Conf terminal
interface port-channel100
description cat4900
switchport mode trunk
switchport trunk native vlan <<var_global_mgmt_vlan_id>>
switchport trunk allowed vlan <<var_global_mgmt_vlan_id>>,<<var_physmgmt_vlan_id>>,<<var_software_vlan_id>>
spanning-tree port type network
vpc 100
exit
interface Ethernet1/3
description cat4900:Eth1/2
channel-group 100 mode active
no shutdown
exit
copy run start
exit
Log onto <<var_nexus_B_hostname>> and execute the following commands:
Conf terminal
interface port-channel100
description cat4900
27
Setup FlexPod for VMware
switchport mode trunk
switchport trunk native vlan <<var_global_mgmt_vlan_id>>
switchport trunk allowed vlan <<var_global_mgmt_vlan_id>>,<<var_physmgmt_vlan_id>>
spanning-tree port type network
vpc 100
exit
interface Ethernet1/3
description cat4900:Eth1/7
channel-group 100 mode active
no shutdown
exit
copy run start
exit
Inter-VLAN Routing
The Flexpod environment forces an introduction of predefined access rules in order to implement a strict separation of the different tenants combined with specific access rights to the general available services.
In the first step, standard access lists are implemented that match only on IP network prefixes to separate the networks and define on a low granular layer the basic access rights. In the next step, access lists are defined with focus on the application layer, and therefore extended access lists must be used.
For each tenant IP network, its own VLAN is defined and separates the different networks on Layer2. Each VLAN is configured on the central switch with a Switch Virtual Interface (SVI). That interface represents a logical Layer3 interface on a switch and id bound to a specific VLAN. The SVI offers the capability of basic Layer3 routing functionality on a Layer2 switch without the requirement of specific routing protocols in order to implement inter-VLAN routing.
The following items define the access rights:
• No global inter VLAN routing is allowed.
• Each tenant is allowed to ping its own SVI, the Layer3 interface dedicated to a specific VLAN and defined as Default Gateway in each VLAN.
• The Central Software Tenant Network (<<var_software_network>>) must have access to each tenant and vice versa.
• The Global Management tenant (<<var_inftastructure_network>>) must have access to each tenant and vice versa.
To establish the inter-VLAN routing functionality, we used the Catalyst 4900M switch.
Log on to the Catalyst 4900M and execute the following commands:
Enable
Conf terminal
28
Setup FlexPod for VMware
ip access-list standard Vlan <<var_physmgmt_vlan_id>>
permit <<var_infratructure_network>> 0 0.0.0.255
permit <<var_physmgmt_net_addr>> 0.0.0.255
deny any
interface Vlan <<var_physmgmt_vlan_id>>
ip address <<var_physmgmt_gw_addr>> <<var_physmgmt_netmask>>
ip access-group Vlan<<var_physmgmt_vlan_id>> in
ip access-group Vlan<<var_physmgmt_vlan_id>> out
Exit
Copy run start
Exit
NDMP-Traffic Network
NDMP-traffic network is used for data transfer from Netapp storage to Netapp storage.
The NDMP-Traffic VLAN is required only between the storage controllers within a FlexPod solution; therefore the VLAN ID is configured only on the Cisco Nexus® 5548 and storage devices.
Log on to <<var_nexus_A_hostname>> and <<var_nexus_B_hostname>> and execute the following commands:
Conf terminal
vlan <<var_ndmp_vlan_id>>
name NDMP-VLAN
exit
interface Vlan <<var_ndmp_vlan_id>>
no shutdown
ip address <<var_ndmp_network>> <<var_ndmp_netmask>>
exit
interface port-channel11
switchport trunk allowed vlan <<var_ndmp_vlan_id>> <<var_global_nfs_vlan_id>>
exit
interface port-channel12
switchport trunk allowed vlan <<var_ndmp_vlan_id>> <<var_global_nfs_vlan_id>>
exit
29
Setup FlexPod for VMware
exit
copy run start
exit
The NDMP-Traffic network is not routed in our configuration; therefore, we do not configure inter-VLAN routing on the Catalyst 4900 and do not allow the VLAN ID on the port-channel 100.
Central Software Share Network
The Central software repository is used to store configuration files, installation images, and additional software components. In fact that all servers need access to this share a dedicated network segment is defined.
Log on to <<var_nexus_A_hostname>> and <<var_nexus_B_hostname>> and execute the following commands:
Conf terminal
vlan <<var_software_vlan_id>>
name CentralSW
exit
interface Vlan<<var_software_vlan_id>>
no shutdown
exit
interface port-channel11
switchport trunk allowed vlan <<var_software_vlan_id>> <<var_ndmp_vlan_id>>, <<var_global_nfs_vlan_id>>
exit
interface port-channel12
switchport trunk allowed vlan <<var_software_vlan_id>>, ,<<var_ndmp_vlan_id>>, <<var_global_nfs_vlan_id>>
exit
exit
copy run start
exit
Configure the inter VLAN routing function on the Catalyst 4900 switch. Log onto the catalyst 4900 and execute the following commands:
Enable
Conf terminal
vlan <<var_software_vlan_id>>
30
Setup FlexPod for VMware
name CentralSW
exit
interface Vlan<<var_software_vlan_id>>
ip address <<var_software_gw_addr>> <<var_software_netmask>>
no shutdown
exit
interface TenGigabitEthernet1/2
switchport trunk allowed vlan , <<var_global_mgmt_vlan_id>>, <<var_physmgmt_vlan_id>>,<<var_software_vlan_id>>
exit
interface TenGigabitEthernet1/7
switchport trunk allowed vlan , <<var_global_mgmt_vlan_id>>, <<var_physmgmt_vlan_id>>,<<var_software_vlan_id>>
exit
copy run start
exit
Cisco UCS Configuration for Bare Metal Operating Systems
In addition to the FlexPod for VMware solution, this FlexPod for SAP Applications solution includes bare metal operating systems. To provision a physical server with Cisco UCS a service profile is required. The creation of a Cisco UCS Service Profile can be simplified by using Service Profile templates.
Create Service Profile Template for Bare Metal Linux Installations
Create the virtual host bus adapter (vHBA) templates.
Log on to <<var_ucsm_A_hostname>> or <<var_ucsm_B_hostname>>.
scope org FlexPod
create vhba-template vHBA_Linux_A
set descr "vHBA Fabric A"
set fabric a
set fc-if name VSAN_A
set wwpn-pool WWPN_Pool_A
commit-buffer
31
Setup FlexPod for VMware
exit
create vhba-template vHBA_Linux_B
set descr "vHBA Fabric B"
set fabric b
set fc-if name VSAN_B
set wwpn-pool WWPN_Pool_B
commit-buffer
exit
Create the service profile template:
scope org FlexPod
create service-profile linux_a initial-template
set descr "Template for BM Linux Server"
set identity uuid-suffix-pool UUID_Pool
set identity wwnn-pool WWNN_Pool
power down
commit-buffer
create vhba vHBA_A
set template-name vHBA_Linux_A
commit-buffer
exit
create vhba vHBA_B
set template-name vHBA_Linux_B
commit-buffer
exit
create vnic vNIC_A
set fabric a-b
set mtu 9000
set identity mac-pool MAC_Pool_A
set adapter-policy Linux
set nw-control-policy Net_Ctrl_Policy
create eth-if default
commit-buffer
exit
exit
create vnic vNIC_B
set fabric b-a
set mtu 9000
32
Setup FlexPod for VMware
set identity mac-pool MAC_Pool_B
set adapter-policy Linux
set nw-control-policy Net_Ctrl_Policy
create eth-if default
commit-buffer
exit
exit
set boot-policy lstorn14a
commit-buffer
exit
commit-buffer
create service-profile linux_b initial-template
set descr "Template for BM Linux Server"
set identity uuid-suffix-pool UUID_Pool
set identity wwnn-pool WWNN_Pool
power down
commit-buffer
create vhba vHBA_A
set template-name vHBA_Linux_A
commit-buffer
exit
create vhba vHBA_B
set template-name vHBA_Linux_B
commit-buffer
exit
create vnic vNIC_A
set fabric a-b
set mtu 9000
set identity mac-pool MAC_Pool_A
set adapter-policy Linux
set nw-control-policy Net_Ctrl_Policy
create eth-if default
commit-buffer
exit
exit
create vnic vNIC_B
set fabric b-a
33
Infrastructure Tenant Setup
set mtu 9000
set identity mac-pool MAC_Pool_B
set adapter-policy Linux
set nw-control-policy Net_Ctrl_Policy
create eth-if default
commit-buffer
exit
exit
set boot-policy lstorn14b
commit-buffer
exit
commit-buffer
Infrastructure Tenant Setup
Additional Software Components
Besides the components described in the FlexPod for VMware Implementation Guide , the following additional components are needed. For each component, an additional VM with Linux operating system must be used. All of these components are part of tenant infrastructure, and the management and NFS network must be assigned to each VM.
• SAP Adaptive Computing Controller 7.30
• SnapManager for SAP repository database
In addition, VMware vSphere PowerCLI is used to manage some of the workflow. Therefore, install VMware vSphere PowerCLI and the required Microsoft PowerShell V 2.0 at a Windows system within the Infrastructure tenant; for example, at the vCenter VM. It is necessary to use the 32-bit version of PowerShell because some commands used within some workflow scripts do not run with the 64-bit version.
In addition, perform the following preparation steps for using the PowerShell scripts:
• Open a PowerShell command line and execute the following commands.
– set-executionpolicy remotesigned
– connect-VIServer <name of virtual center server>
• Accept the default values
• If operating system authentication cannot be used to connect to the vSphere server, save the credentials with the first connect.
connect-VIServer -server "Name or IP of the Virtual Center server" -user <name of vCenter administrator> -password <password of vCenter administrator> -savecredentials
34
Infrastructure Tenant Setup
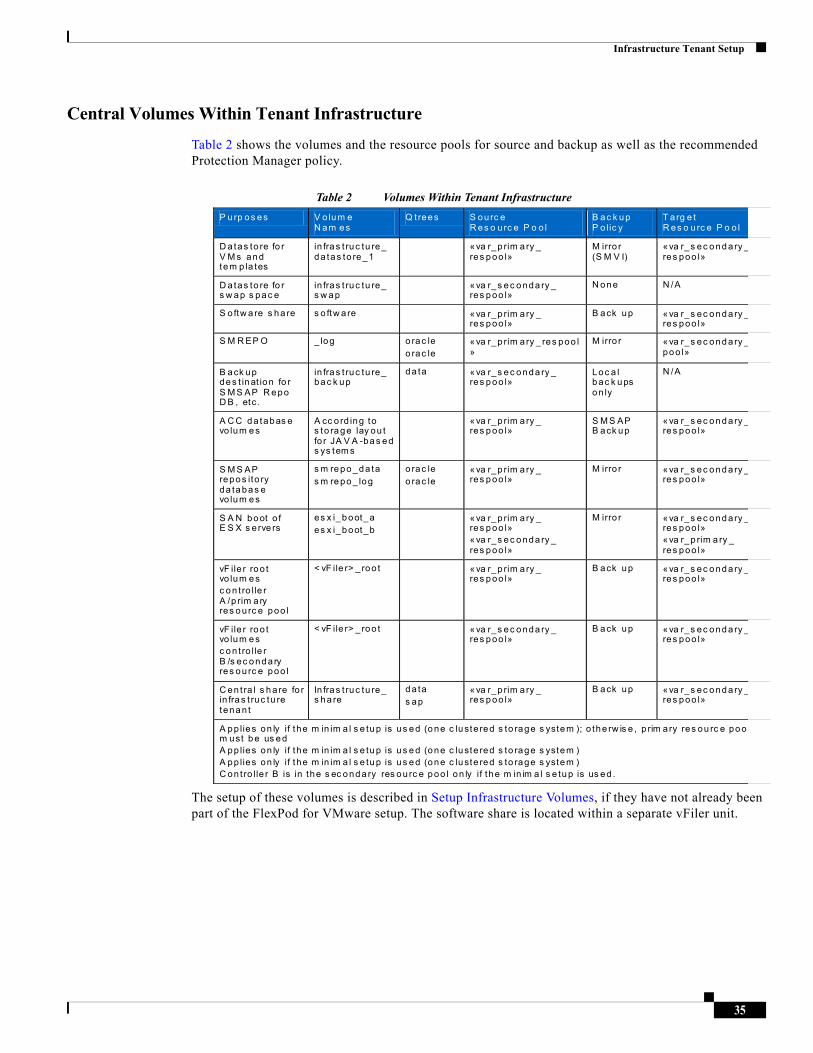
Central Volumes Within Tenant Infrastructure
Table 2 shows the volumes and the resource pools for source and backup as well as the recommended Protection Manager policy.
Table 2 Volumes Within Tenant Infrastructure
P urp o s e s V o lum e N am es
Q t ree s S ou rc e R es o u rc e P o o l
B ac k u p P o lic y
T a rg e t R es o u rc e P o o l
D a tas to re fo r V M s an d tem p la tes
in fra s t ruc tu re_ da tas to re _1
«va r_p rim ary _ res p oo l»
M irro r (S M V I)
«va r_s ec o nd ary _res poo l»
D a tas to re fo r s w ap s pa c e
in fra s t ruc tu re_ s w a p
«va r_s e c o nda ry _ res p oo l»
N on e N /A
S o ftw a re s ha re s o ftw a re «va r_p rim ary _ res p oo l»
B ack up «va r_s ec o nd ary _res poo l»
S M R EP O _ log o rac le o rac le
«va r_p rim ary _ res poo l»
M irro r «va r_s ec o nd ary _po o l»
B ack up de s t in at io n fo r S M S AP R e po D B , etc.
in fra s t ruc tu re_ ba c k up
d a ta «va r_s e c o nda ry _ res p oo l»
L oc a l b ac k ups o n ly
N /A
A C C da tabas e vo lum e s
A cc o rd ing to s to ra ge lay ou t fo r JA V A -ba s e d s ys tem s
«va r_p rim ary _ res p oo l»
S M S AP B ack up
«va r_s ec o nd ary _res poo l»
S M S AP repo s ito ry da ta ba s e vo lum e s
s m re po _da ta s m re po _ log
o rac le o rac le
«va r_p rim ary _ res p oo l»
M irro r «va r_s ec o nd ary _res poo l»
S A N bo ot o f E S X s e rve rs
es x i_b oot_a es x i_b oot_b
«va r_p rim ary _ res p oo l» «va r_s e c o nda ry _ res p oo l»
M irro r «va r_s ec o nd ary _res poo l» «va r_p rim a ry _ res poo l»
vF ile r ro o t vo lum e s c o n t ro lle r A /p rim a ry res o u rc e poo l
< vF ile r> _ ro o t «va r_p rim ary _ res p oo l»
B ack up «va r_s ec o nd ary _res poo l»
vF ile r ro o t vo lum e s c o n t ro lle r B /s ec o nd ary res o u rc e poo l
< vF ile r> _ ro o t «va r_s e c o nda ry _ res p oo l»
B ack up «va r_s ec o nd ary _res poo l»
C en t ra l s h a re fo r in fra s t ruc tu re tena n t
In fra s t ruc tu re_ s h a re
d a ta s ap
«va r_p rim ary _ res p oo l»
B ack up «va r_s ec o nd ary _res poo l»
A pp lies on ly if the m in im a l s e tu p is u s e d (o ne c lu ste red s to rage s ystem ); o the rw is e , p rim ary res ou rc e po o lm ust b e us e d A pp lies on ly if the m in im a l s e tu p is u s e d (o ne c lu ste red s to rage s ystem ) A pp lies on ly if the m in im a l s e tu p is u s e d (o ne c lu ste red s to rage s ystem ) C on t ro lle r B is in the s ec o nd ary res o u rc e p oo l on ly if the m in im a l s e tu p is us ed .
The setup of these volumes is described in Setup Infrastructure Volumes, if they have not already been part of the FlexPod for VMware setup. The software share is located within a separate vFiler unit.
35
Infrastructure Tenant Setup
Configuring the Operation, Protection, and Provisioning Manager
This section describes the configuration and creation of the policies needed for provision of new tenants, including vFiler units and volumes. This section assumes that the Operations Manager (OM) has been set up and configured according to the technical report NetApp FlexPod for VMware Deployment Guide (TR- 3892). The configuration is done through the NetApp Management Console connected to the Provisioning/Protection Manager (PM).
Defining Resource Pools
Provisioning Manager offers the ability to easily provision new tenants and volumes using resource pools. A resource pool can consist of several physical controllers and aggregates. Each pool should contain similar resources such as controllers and aggregates for primary storage, or controllers and aggregates for backup purposes.
The following are the steps to define a resource pool, in this case for the primary storage:
1. Click the Add button within the DATA - Resource Pools window.
2. Click Next in the wizard windows.
3. Provide a name for the resource pool: <<var_primary_respool>>
4. Add the desired physical controllers and aggregates as resources to this resource pool. Physical controllers are required to be able to provision new vFiler units.
5. Assign labels to the resource; for example, controller for the physical controller and aggr for the aggregate.
6. Set the desired thresholds.
7. Click Finish to create the resource pool.
8. Repeat the steps above to create a new resource pool for secondary storage; for example, <<var_secondary_respool>>.
Defining Provisioning Policies
A provision policy defines which physical storage is to be used based on several criteria. In combination with an assigned resource pools to a dataset, the desired aggregate will be used. It also allows restricting the possible storage by labels as defined in the previous section. These labels make sure the right choice of the storage in resource pools with different kind of controllers and disks (SATA vs SAS vs FCP).
The following are the steps to define a provisioning policy for NAS storage:
1. Click the Add button within the Policies - Provisioning window.
2. Click Next in the wizard window that appears.
3. Assign a name <<var_backup_prov_profile>> and provide a description, and select NAS as Storage Type.
4. It is recommended to choose Disk failure protection (RAID-DP) and Storage controller failure.
5. Select the desired resource label; for example, aggr.
6. It is not recommended to enable deduplication for SAP systems.
7. Accept the default by clicking Next.
8. Set the desired space utilization thresholds.
9. Select a provision script (Optional).
36
Infrastructure Tenant Setup
10. Create the provisioning profile by pressing the Finish button.
To create a new provisioning profile <<var_backup_prov_profile>> for secondary storage, repeat the above steps, but choose Secondary as Storage type in step 3.
Defining a vFiler Template
A vFiler template is used to provide general information for every vFiler to be created by the Provisioning Manager.
The following are the steps to create a Default profile:
1. Click the Add button within the Policies - vFiler Templates window.
2. Click Next in the wizard window that appears.
3. Assign a name <<var_vfiler_template>> and provide a description.
4. Do not provide DNS or NIS information now because this information is tenant specific.
5. If you want to access the vFiler unit from Windows also, provide the necessary information, but always choose Multiprotocol as Security protocol.
6. Click Finish to create the vFiler template.
Setup Infrastructure Volumes
This section describes the creation of the additional volumes, including export and backup configuration. This section describes the minimal setup (one clustered storage system). If a dedicated storage system is used as secondary storage, the backup vFiler unit must run at this system. That means that either infrastructure_vfiler_2 must run on the dedicated storage system or an additional vFiler running on this dedicated storage system must be used as Backup or Mirror node.
Software Share
This share contains the scripts and software that are needed for operating workflows within the different tenants later on. Because the content of this volume is replicated into every tenant, do not store any sensitive data within this volume.
The following are the steps to create the software share:
1. Log on to the dfm hosts and create the software vFiler unit with the following DFM command:
dfpm vfiler create -d <<var_software_ip>> -s software -a nfs,cifs,iscsi -f <<var_primary_respool>> software
2. Set up the software vFiler unit with the following DFM command:
dfpm vfiler setup -t <<var_vfiler_template>> -r <<var_vfiler_pw>> -c -w workgroup -i <<var _software_ip":vif0:<<var_software_netmask>>:<<var_software_vlan_id>>:9000:vif0 software
3. Log onto the storage controller A.
4. Create the volume software:
vol create software -s none aggr1 <<var_software_size>>
5. Add the software volume to vFiler software:
37
Infrastructure Tenant Setup
vfiler add software /vol/software
6. Change the context to vFiler software:
vfiler context software
7. Add the default network route:
route add default <<var_software_gate_ip>> 1
8. Export the volume to all hosts:
exportfs -p sec=sys,ro,rw=<<var_infratructure_network>>,anon=0 /vol/software
9. Log on to the dfm host.
10. Create a new dataset:
dfpm dataset create -v <<var_prim_prov_profile>> -r software software
11. Add the software volume to the dataset:
dfpm dataset add software software:/software
12. Add the backup policy to the dataset:
dfpm dataset modify -p "Back up" -v <<var_backup_prov_profile>> software Backup
13. Assign the secondary resource pool to the mirror node:
dfpm dataset respool add -N "Backup" software <<var_secondary_respool>>
Volume Infrastructure Share
This volume is needed to store the /usr/sap/mnt/directory of the ACC, the log files of the infrastructure components.
The following are the steps to create the infrastructure share:
1. Log onto the dfm host.
2. Create a dataset for the infrastructure_share volume:
dataset create -v <<var_prim_prov_profile>> -r infrastructure_vfiler_1 infrastructure_share
3. Add the primary resource pool to the infrastructure_share:
dfpm dataset respool add infrastructure_share <<var_primary_respool>>
4. Assign the backup policy to the infrastructure_share volume, and set the destination to the secondary vFiler unit:
dfpm dataset modify -p "Back up" -r infrastructure_vfiler_2 infrastructure_share Backup
5. Add the secondary resource pool to the backup destination of the infrastructure_share volume/dataset:
dfpm dataset respool add -N "Backup" infrastructure_share <<var_secondary_respool>>
6. Provision the SAP qtree of the infrastructure_share dataset:
38
Infrastructure Tenant Setup
dfpm dataset provision -n data -s <<var_infra_share_data_size>> -e nfs -w all -N no -a 0 -S sys infrastructure_share
7. Provision the data qtree of the infrastructure_share dataset:
dfpm dataset provision -n sap -s <<var_tenant_share_sap_size>> -e nfs -w all -N no -a 0 -S sys infrastructure_share
Volume Infrastructure Backup
This volume is used for backup purposes; for example, archive log backup of the ACC and backup of the DFM database.
The following steps create the infrastructure backup volume:
1. Log onto the DFM host.
2. Create a dataset for the backup volume:
dfpm dataset create -v <<var_backup_prov_profile>> -r infrastructure_vfiler_2 infrastructure_backup
3. Add the secondary resource pool to the backup dataset:
dfpm dataset respool add infrastructure_backup <<var_secondary_respool>>
4. Assign the Local backups only policy to the central share volume, and set the destination to the secondary vFiler unit:
dfpm dataset modify -p "Local backups only" -r infrastructure_vfiler_2 infrastructure_backup
5. Provision the backup dataset:
dfpm dataset provision -n data -s <<var_infra_backup_size>> -e nfs -w all -N no -a 0 -S sys infrastructure_backup
SMSAP Repository Volumes
These volumes are needed to store the repository database of SMSAP.
The following steps create the SMSAP repository volumes:
1. Log onto the DFM host.
2. Create a dataset for the SMSAP repository data volume:
dfpm dataset create -v <<var_prim_prov_profile>> -r infrastructure_vfiler_1 smrepo_data
3. Create a dataset for the SMSAP repository data volume:
dfpm dataset create -v <<var_prim_prov_profile>> -r infrastructure_vfiler_1 smrepo_log
4. Add the primary resource pool to the data dataset:
dfpm dataset respool add smrepo_data <<var_primary_respool>>
5. Add the primary resource pool to the log dataset:
dfpm dataset respool add smrepo_log <<var_primary_respool>>
6. Assign the Mirror policy to the data dataset and set the destination to the secondary vFiler:
39
Infrastructure Tenant Setup
dfpm dataset modify -p "Mirror" -r infrastructure_vfiler_2 smrepo_data Mirror
7. Assign the Mirror policy to the log dataset and set the destination to the secondary vFiler:
dfpm dataset modify -p "Mirror" -r infrastructure_vfiler_2 smrepo_log Mirror
8. Add the secondary resource pool to the backup destination of the data dataset:
dfpm dataset respool add -N "Mirror" smrepo_data <<var_secondary_respool>>
9. Add the secondary resource pool to the backup destination of the data dataset:
dfpm dataset respool add -N "Mirror" smrepo_log <<var_secondary_respool>>
10. Provision the data dataset:
dfpm dataset provision -n oracle -s 30G -e nfs -w all -N no -a 0 -S sys smrepo_data
11. Provision the log dataset:
dfpm dataset provision -n oracle -s 10G -e nfs -w all -N no -a 0 -S sys smrepo_log
SMSAP Repository Database Backup
The backup of the Repository is done with the export functionality from Oracle. A script is provided, which can be scheduled by cron.
The following are the steps to schedule SMSAP repository backups:
1. Create folder /mnt/backup/backup_repo.
2. chown 777 /mnt/backup/backup_repo.
3. oracle@t001-smrepo:~> /mnt/software/scripts/backup_repo.sh.
4. oracle@t001-smrepo:~> crontab -e.
5. Insert the following:
30 20 * * * /mnt/software/scripts/backup_repo.sh
SMSAP Repository Database Restore
The restore of a dedicated Repository schema can be done with imp. It is recommended that you delete and recreate the Repository user prior to the restore.
The following example is for the Repository of tenant t009:
Import of only one Schema for a dedicated user:
oracle@t001-smrepo:~> sqlplus / as sysdba
SQL*Plus: Release 10.2.0.1.0 - Production on Tue Apr 12 16:26:26 2011
Copyright (c) 1982, 2005, Oracle. All rights reserved.
40

Infrastructure Tenant Setup
Connected to:
Oracle Database 10g Enterprise Edition Release 10.2.0.1.0 - 64bit Production
With the Partitioning, OLAP and Data Mining options
SQL> drop user smrepo_t009 cascade;
User dropped.
SQL>
SQL> create user smrepo_t009 identified by "ucs4sap!" default tablespace repdata_t009;
User created.
SQL> grant resource, connect to smrepo_t009;
Grant succeeded.
SQL>exit
oracle@t001-smrepo:~> NLS_LANG=AMERICAN_AMERICA.WE8ISO8859P1 ;export NLS_LANG
oracle@t001-smrepo:~>imp system/ucs4sap! fromuser=smrepo_t009 file=/mnt/backup/backup_repo/backup_"time stamp"_REP.expdat log=/mnt/backup/ imp.log
Import: Release 10.2.0.1.0 - Production on Tue Apr 12 16:34:01 2011
Copyright (c) 1982, 2005, Oracle. All rights reserved.
Connected to: Oracle Database 10g Enterprise Edition Release 10.2.0.1.0 - 64bit Production
With the Partitioning, OLAP and Data Mining options
Export file created by EXPORT:V10.02.01 via conventional path
import done in WE8ISO8859P1 character set and AL16UTF16 NCHAR character set
import server uses WE8ISO8859P1 character set (possible charset conversion)
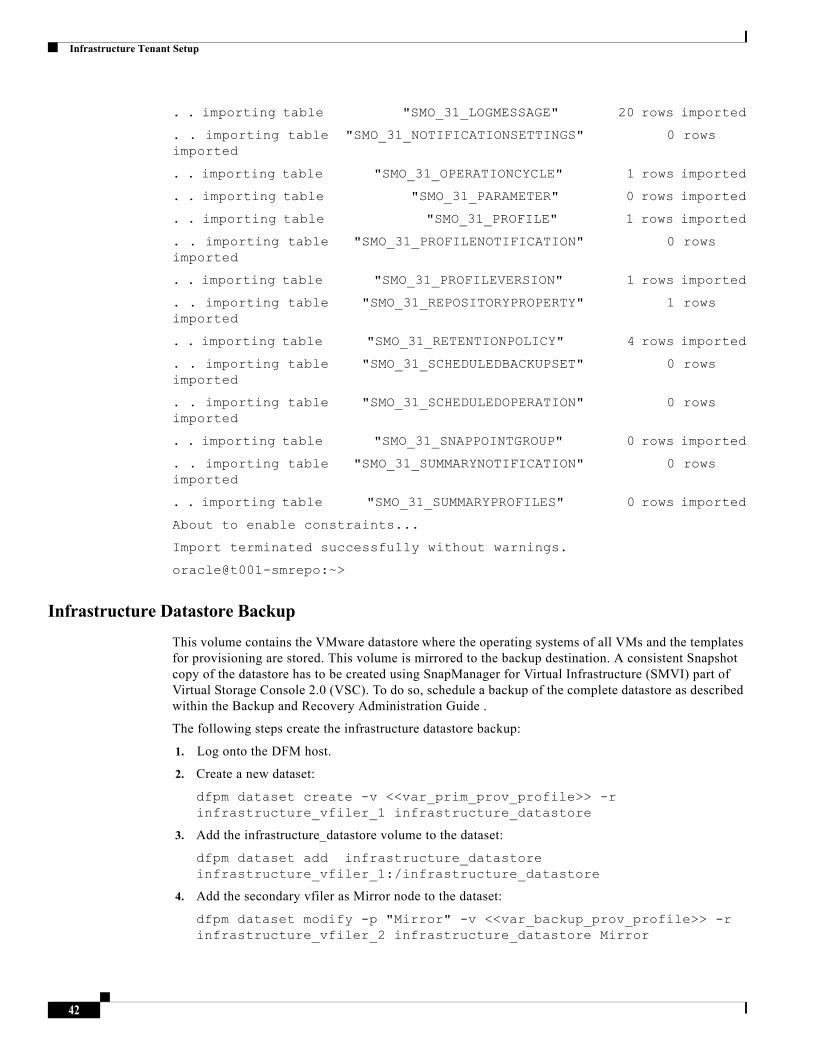
. importing SMREPO_T009's objects into SMREPO_T009
. . importing table "SMO_31_AUTOGENPROFILE" 0 rows imported
. . importing table "SMO_31_CONNECTION" 0 rows imported
. . importing table "SMO_31_CONNECTMAPPINGS" 0 rows imported
. . importing table "SMO_31_CONTAINER" 0 rows imported
. . importing table "SMO_31_CREDENTIAL" 2 rows imported
. . importing table "SMO_31_DATASET" 0 rows imported
. . importing table "SMO_31_EXTERNALTABLE" 0 rows imported
41
Infrastructure Tenant Setup
. . importing table "SMO_31_LOGMESSAGE" 20 rows imported
. . importing table "SMO_31_NOTIFICATIONSETTINGS" 0 rows imported
. . importing table "SMO_31_OPERATIONCYCLE" 1 rows imported
. . importing table "SMO_31_PARAMETER" 0 rows imported
. . importing table "SMO_31_PROFILE" 1 rows imported
. . importing table "SMO_31_PROFILENOTIFICATION" 0 rows imported
. . importing table "SMO_31_PROFILEVERSION" 1 rows imported
. . importing table "SMO_31_REPOSITORYPROPERTY" 1 rows imported
. . importing table "SMO_31_RETENTIONPOLICY" 4 rows imported
. . importing table "SMO_31_SCHEDULEDBACKUPSET" 0 rows imported
. . importing table "SMO_31_SCHEDULEDOPERATION" 0 rows imported
. . importing table "SMO_31_SNAPPOINTGROUP" 0 rows imported
. . importing table "SMO_31_SUMMARYNOTIFICATION" 0 rows imported
. . importing table "SMO_31_SUMMARYPROFILES" 0 rows imported
About to enable constraints...
Import terminated successfully without warnings.
oracle@t001-smrepo:~>
Infrastructure Datastore Backup
This volume contains the VMware datastore where the operating systems of all VMs and the templates for provisioning are stored. This volume is mirrored to the backup destination. A consistent Snapshot copy of the datastore has to be created using SnapManager for Virtual Infrastructure (SMVI) part of Virtual Storage Console 2.0 (VSC). To do so, schedule a backup of the complete datastore as described within the Backup and Recovery Administration Guide .
The following steps create the infrastructure datastore backup:
1. Log onto the DFM host.
2. Create a new dataset:
dfpm dataset create -v <<var_prim_prov_profile>> -r infrastructure_vfiler_1 infrastructure_datastore
3. Add the infrastructure_datastore volume to the dataset:
dfpm dataset add infrastructure_datastore infrastructure_vfiler_1:/infrastructure_datastore
4. Add the secondary vfiler as Mirror node to the dataset:
dfpm dataset modify -p "Mirror" -v <<var_backup_prov_profile>> -r infrastructure_vfiler_2 infrastructure_datastore Mirror
42
Infrastructure Tenant Setup
5. Assign the secondary resource pool to the mirror node:
dfpm dataset respool add -N "Mirror" infrastructure_datastore <<var_secondary_respool>>
Infrastructure Swap Backup
This volume contains the VMware swap space for all VMs. Because this volume contains only temporary data, a backup is not necessary. For management and monitoring reasons, this volume should be added to a DFM dataset.
The following steps create the dataset for volume infrastructure swap:
1. Log onto the DFM host.
2. Create a new dataset:
dfpm dataset create -v <<var_prim_prov_profile>> -r infrastructure_vfiler_2 infrastructure_swap
3. Add the infrastructure_swap volume to the dataset:
dfpm dataset add infrastructure_swap infrastructure_vfiler_2:/ infrastructure_swap
vFiler Root Volumes Backup
It is recommended to backup the configuration of the vFiler units and the physical controllers (vfiler0).
The following steps backup the configuration of vFiler units and physical controllers:
1. Log on to the DFM host.
2. Create a new dataset for the primary vFiler units:
dfpm dataset create backup_prim_vfilers
3. Create a new dataset for the secondary vFiler units:
dfpm dataset create backup_bck_vfilers
4. Add the root volume of controller A to the backup_prim_vfilers dataset:
dfpm dataset add backup_prim_vfilers <<var_ntap_A_hostname>>:/vol0
5. Add the root volume of infrastructure_vfiler_1 to the backup_prim_vfilers dataset:
dfpm dataset add backup_prim_vfilers infrastructure_vfiler_1:/infrastructure_root
6. Add the root volume of infrastructure_vfiler_1 to the backup_prim_vfilers dataset:
dfpm dataset add backup_prim_vfilers software:/software_root
7. Assign the backup policy to the dataset:
dfpm dataset modify -p "Back up" -v <<var_backup_prov_profile" backup_prim_vfilers Backup
8. Assign the secondary resource pool to the Backup node:
dfpm dataset respool add -N "Backup" backup_prim_vfilers <<var_secondary_respool>>
9. Add the root volume of controller B to the backup_bck_vfilers dataset:
43
Infrastructure Tenant Setup
dfpm dataset add backup_bck_vfilers <<var_ntap_B_hostname>>:/vol0
10. Add the root volume of infrastructure_vfiler_2 to the backup_bck_vfilers dataset:
dfpm dataset add backup_bck_vfilers infrastructure_vfiler_2:/infrastructure_root
11. Assign the backup policy to the dataset:
dfpm dataset modify -p "Back up" -v <<var_prim_prov_profile>> backup_bck_vfilers Backup
12. Assign the primary resource pool to the Backup node:
dfpm dataset respool add -N "Backup" backup_bck_vfilers <<var_primary_respool>>
SAN Boot Volumes of ESXI Servers Backup
It is recommended to mirror the boot disks of the ESXi servers.
The following steps backup SAN boot volumes of ESXI servers:
1. Log onto the DFM host.
2. Create a new dataset for the volume esxi_boot_a:
dfpm dataset create esxi_boot_a
3. Create a new dataset for the volume esxi_boot_b:
dfpm dataset create esxi_boot_b
4. Add the esxi_boot_a volume to the dataset:
dfpm dataset add esxi_boot_a <<var_ntap_A_hostname>>:/esxi_boot_a
5. Add the esxi_boot_b volume to the dataset:
dfpm dataset add esxi_boot_b <<var_ntap_B_hostname>>:/esxi_boot_b
6. Add the protection policy Mirror to the dataset:
dfpm dataset modify -p "Mirror" -v <<var_backup_prov_profile>> - esxi_boot_a Mirror
7. Add the protection policy Mirror to the dataset:
dfpm dataset modify -p "Mirror" -v <<var_backup_prov_profile>> - esxi_boot_b Mirror
8. Assign the secondary resource pool to the mirror node:
dfpm dataset respool add -N "Mirror" esxi_boot_a <<var_secondary_respool>>
9. Assign the secondary resource pool to the mirror node:
dfpm dataset respool add -N "Mirror" esxi_boot_b <<var_primary_respool>>
44
Infrastructure Tenant Setup
Adaptive Computing Controller Setup
The SAP Adaptive Computing Controller (ACC) provides the possibility to monitor and operate SAP system landscapes. An adaptive computing-enabled SAP landscape contains the parts, the controller itself (ACC), and host agents that monitor and interact with hardware resources and SAP systems. This section describes the installation of the ACC. The installation of the host agents is described as part of the OS template installation.
The installation of ACC 7.30 is done on a dedicated host within the infrastructure tenant and consists of three steps:
1. Installation of SAP Netweaver CE 7.2
2. Deployment of ACC package.
3. Execution of ACC CTCs.
The installation of SAP NW CE 7.2 is done through SAPINST following the standard procedure of an SAP installation. Use the usage type "basic" to install the NW system.
The installation of the ACC package is a deployment of the LMACC.sda software archive. This can be done through telnet or through the SAP NW developer studio. This section describes the installation through telnet.
The following steps install the ACC package through telnet:
1. Copy the sda file to a folder on the ACC host; for example, /tmp.
2. Open a telnet session to the ACC system; for example, telnet t001-acc 50008.
3. Log in with the Administrator account.
4. Deploy the archive using the DEPLOY command; for example, DEPLOY /tmp/LMACC.sda.
5. A success message is displayed when the archive has been deployed.
The ACC basic configuration must be done by running the ACC CTC scripts within SAP Netweaver Administrator.
The following steps configure the ACC:
1. Open a browser window to the SAP NWA; for example, through http://t001-acc:50000/nwa.
2. Log in with the Administrator account.
3. Navigate to Configuration Management>Scenarios>Configuration Wizard.
4. Select and Start the Initial Setup for Adaptive Computing Controller script.
Note Keep the default values that were provided during the script execution.
SMSAP Repository Database
The SMSAP Repository is installed on Linux VM within the infrastructure tenant. This VM must be created with 4GB RAM, 20GB disk space, and two network interfaces; one interface connected to the management VLAN and one interface connected to the NFS VLAN.
Mount the volumes created for the repository database and install the SMSAP repository database with the following parameters:
Hostname: t001-smrepo.t001.company.corp
45
Infrastructure Tenant Setup
SID: REP
Listener Port: 1521
The configuration of the tenant-specific repositories is part of the tenant provisioning scenario and is described in this section.
SMSAP Installation on the DFM Server
The DFM host is used to run the script fp_clone4repair.sh within the workflow for the Clone of SAP production system.
The DFM host where the script is executed needs to run SMSAP commands. Therefore SMSAP needs to be installed on the host. There is no need to install SDU, and the SMSAP server does not need to be started at the host.
After SMSAP is installed, the following configuration must be done in the SMSAP configuration file:
t001-dfm:/mnt/software/scripts # vi /opt/NetApp/smsap/properties/smsap.config
******
# If set to true the users OS password will be cached in the credential file in an encrypted form.
host.credentials.persist=true
*******
Credentials for repository, hosts, and profiles are set during the workflow “Clone of SAP production system.”
Infrastructure Tenant-Specific Services
Tenant-specific services are currently provided by a Linux VM within each tenant.
Within the infrastructure tenant, the only service that is provided is DNS. The configuration is described in this section.
DNS
Figure 12 shows the DNS structure of the infrastructure tenant and the other tenants.
46
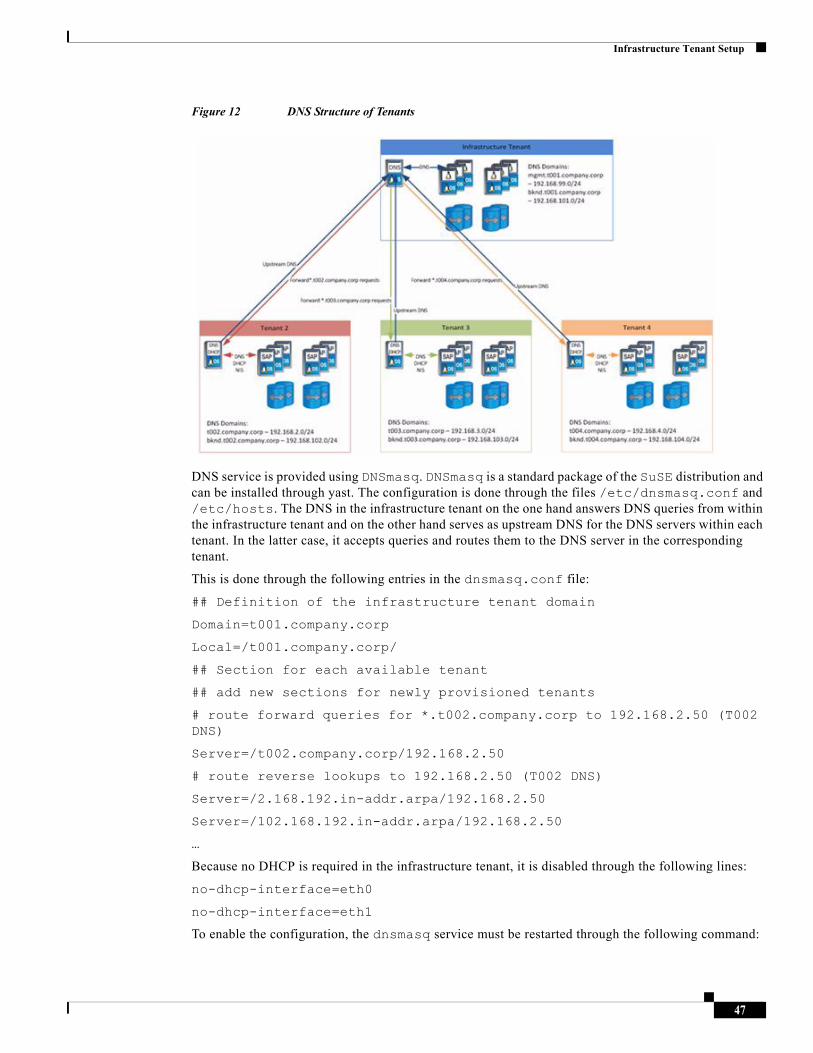
Infrastructure Tenant Setup
Figure 12 DNS Structure of Tenants
DNS service is provided using DNSmasq. DNSmasq is a standard package of the SuSE distribution and can be installed through yast. The configuration is done through the files /etc/dnsmasq.conf and /etc/hosts. The DNS in the infrastructure tenant on the one hand answers DNS queries from within the infrastructure tenant and on the other hand serves as upstream DNS for the DNS servers within each tenant. In the latter case, it accepts queries and routes them to the DNS server in the corresponding tenant.
This is done through the following entries in the dnsmasq.conf file:
## Definition of the infrastructure tenant domain
Domain=t001.company.corp
Local=/t001.company.corp/
## Section for each available tenant
## add new sections for newly provisioned tenants
# route forward queries for *.t002.company.corp to 192.168.2.50 (T002 DNS)
Server=/t002.company.corp/192.168.2.50
# route reverse lookups to 192.168.2.50 (T002 DNS)
Server=/2.168.192.in-addr.arpa/192.168.2.50
Server=/102.168.192.in-addr.arpa/192.168.2.50
…
Because no DHCP is required in the infrastructure tenant, it is disabled through the following lines:
no-dhcp-interface=eth0
no-dhcp-interface=eth1
To enable the configuration, the dnsmasq service must be restarted through the following command:
47
Installing and Configuring the Operating System Images
service dnsmasq restart
Logging information for DNSmasq can be found in /var/log/dnsmasq.log, and the configuration can be adapted by editing the active config files /etc/dnsmasq.conf and /etc/hosts or the according template files.
Table 3, Table 4, and Table 5 give an overview of fixed hostnames and IP addresses in the infrastructure tenant.
Table 3 Management LAN
Table 4 Back-End LAN
Table 5 Other Networks
Installing and Configuring the Operating System Images
SLES VMware
Operating System Template Installation
This section describes the creation of a VMware template, which is used for OS/VM provisioning.
Hostname IP Address Description
t001-smrepo.mgmt.t001.company.corp 192.168.99.30 NetApp SnapManager Repository
t001-0-lnx.mgmt.t001.company.corp 192.168.99.50 Tenant Specific Services VM
smt-dfm.mgmt.t001.company.corp 192.168.99.68 NetApp DataFabric Manager
ucsvmwvc.mgmt.t001.company.corp 192.168.99.78 VMware vSphere Center
t001-acc.mgmt.t001.company.corp 192.168.99.101 Adaptive Computing Controller
vsappesx001.mgmt.t001.company.corp 192.168.99.241 VMware vShield App ESX 001
vsappesx002.mgmt.t001.company.corp 192.168.99.242 VMware vShield App ESX 002
Hostname IP Address Description
t001-1-prim.bknd.t001.company.corp 192.168.101.10 Infrastructure Tenant vFiler
smt-dfm.bknd.t001.company.corp 192.168.101.20 NetApp DataFabric Manager
t001-smrepo.bknd.t001.company.corp 192.168.101.30 NetApp SnapManager Repository
t001-acc.bknd.t001.company.corp 192.168.101.101 Adaptive Computing Controller
Hostname IP Address Description
software.company.corp 192.168.96.10 Software share available to all tenants
lstorn14a.t001.company.corp 192.168.98.10 Infrastructure Filer 14a
lstorn14b.t001.company.corp 192.168.98.11 Infrastructure Filer 14b
48
Installing and Configuring the Operating System Images
• Log onto the VMware vCenter server and create a new virtual machine with the following criteria
Name: <<var_template_name_suse>>
Datastore: Infrastructure
Virtual Machine Version: 7
Guest Operating System: Linux -> Suse Linux Enterprise 11 (64bit)
Number of virtual Processors: 4
Memory Configuration: 8 GB
Network connections: Define two network connections, one connected to the Global-MGMT network and one connected to the NFS-Network.
Virtual Disk capacity: 60 GB
ISO image mapping: Define the location of the Suse SLES 11 SP1 installation ISO image.
• Boot the virtual machine and start the operating system installation process.
Please follow the installation steps on the screen and accept the defaults excepting the following requirements for FlexPod for SAP Application requirements.
Disk Layout: Add two primary partitions, the first one with size of 20GB Linux Native with Ext3 FS Type mounted at / and the second one with size of 40GB as Linux swap.
Software Selection: Add the following software components in addition to the standard: SAP Application Server Base, C/C++ Development tools, and your desired desktop. Also required packages are unixODBC, unixODBC-32bit, unixODBC-devel, and unixODBC-devel-32bit, java-1_4_2-ibm. Check whether Perl 5 is chosen for installation. If not, choose Perl 5, too.
• Check the box Change Hostname through DHCP.
Open the SSH ports in the firewall and set the Network interfaces (eth0-ethX) to internal networks
The network test can be skipped.
Change the User Authentication Method to NIS. Configure the NIS and Check the boxes Use NIS and Open Ports in Firewall.
DHCP Client Configuration
This section describes the necessary DHCP Client configuration and other network-related configurations.
Adjust the DHCP Client timeout by setting it to 99 seconds. This makes surethat make sure the DHCP client does not go into background to get the DHCP lease. This is necessary because otherwise other scripts or services that require network access may fail to start at boot time. Edit /etc/sysconfig/network/dhcp and change the timeout value to 99:
DHClient_TIMEOUT='99'
As all interfaces should get the same hostname. Insert the line hostname > /etc/HOSTNAME into the section case$state in up into /etc/sysconfig/network/scripts/dhcpd-hook as shown below:
…
case $state in
up)
write_cached_config_data dhcp4_state up $INTERFACE
49
Installing and Configuring the Operating System Images
commit_cached_config_data $INTERFACE
$debug && NC_OPTIONS="-v"
/sbin/netconfig modify -s "dhcpcd" \
-i $INTERFACE $NC_OPTIONS \
-l $leaseinfo 2>&1 | $log_dbg
hostname > /etc/HOSTNAME
In addition, it is necessary that all other interfaces wait until the first interface (eth0) is up and gotst the new hostname assigned. Therefore, add the following line into the configuration files (for example, /etc/sysconfig/network/ifcfg-eth1 for eth1 of all interfaces except for eth0.
PRE_UP_SCRIPT="wait4eth0"
Afterward, create the script "wait4eth0" in directory /etc/sysconfig/network/script with the following content:
#!/bin/bash
ifstatus eth0
eth0up=$?
while [ $eth0up -gt 0 ]; do
echo "waiting for eth0...";
sleep 5;
ifstatus eth0;
eth0up=$?;
done
Disable the use of persistent network device names by clearing the UDEV configuration for network interfaces according to the Novell/SUSE TID 3048119:
cat< /dev/null > /etc/udev/rules.d/70-persistent-net.rules
This step must be repeated if the template is started or rebooted for other changes.
Check whether the network interfaces are set to internal networks at the firewall.
Open /etc/sysconfig/SuSEfirewall2 and check whether the network interfaces are included in FW_DEV_INT as shown below:
FW_DEV_INT="eth0 eth1 eth2"
NIS Configuration
The OS template is configured to run a NIS client communicating with a NIS server to provide central user management capabilities. The following maps are provided by the NIS server: passwd, group, services. This section describes the necessary configurations.
NSSWITCH
The file /etc/nsswitch.conf configures where to get data from for the different user configuration files. The OS template should contain the following nsswitch.conf entries:
50
Installing and Configuring the Operating System Images
passwd: compat
shadow: files
group: compat
hosts: dns files
networks: files dns
services: nis
PASSWD
The following line must be appended to the file /etc/passwd to merge NIS users with local users:
+::::::
Groups
The following line must be appended to the file /etc/group to merge NIS groups with local groups:
+:::
Services
The services definition is completely retrieved from the NIS server. No local services are possible.
Linux Kernel Configuration
No special kernal settings are required for the FlexPod for SAP Applications landscape other than the ones mentioned in SAP Note 1310037 for SLES 11 installations. The most important thing is to install the sapconf (fka sapinit) package. This is done automatically when you select the pattern “SAP Application Server Base” during the SLES installation process.
SAP Host Agents Installation
The SAPHOSTAGENT package contains all of the required elements for centrally monitoring any host. You can either install the host agent using SAPInst (only the kernel DVD is required) or install the package directly (download SAPHOSTAGENT.SAR from SAP Service Marketplace).
The following steps install the SAP host agents:
1. Login as user root.
2. Make sure the group sapsys exists on the host.
3. Make sure the user sapadm exists and is a member of the sapsys group.
4. Decompress the SAPHOSTAGENT.SAR archive with the SAPCAR tool (for example, into /tmp): sapcar -xvf SAPHOSTAGENT.SAR.
5. Go to the extracted path /tmp/hostctrl/exe.
6. Execute the installation procedure: ./saphostexec -install.
51
Installing and Configuring the Operating System Images
7. Verify that the centrally mounted SAPOSCOL working directory /usr/sap/tmp exists (if not, mount it accordingly) or change the working directory by adding the following line to the file /usr/sap/hostctrl/exe/host_profile:
DIR_PERF = /usr/sap/hostctrl/work
SnapDrive Installation and Configuration
After the SnapDrive is installed, the following configuration file changes must be made:
• vFiler units do not support HTTPS. HTTP must be configured in the snapdrive config file.
• The SAP systems are installed as adaptive computing aware. There are no service-specific entries in /etc/fstab.
• Turn off the autosupport option:
t002-1-lnx:/opt/NetApp/snapdrive # vi snapdrive.conf
use-https-to-filer=off # Communication with filer done via HTTPS instead of HTTP
snapcreate-check-nonpersistent-nfs=off # Check that entries exist in /etc/fstab for specified nfs fs.
autosupport-enabled=off
Access configuration to Data Fabric Manager:
snapdrive config set -dfm <user_name> <<var_ntap_dfm_ip>>
SMAP Installation and Configuration
During the installation, user and group must be configured to root/root.
Please enter the operating system user name and group name that should be used to run SnapManager for SAP commands. Press <ENTER> to accept the default
values.
User Name (DEFAULT: oracle): root
User Group (DEFAULT: dba): root
Insert the following option into /opt/NetApp/smsap/properties/smsap.config:
auto_support.on=off
JAVA.SECURITY File
Within the java.security file /dev/urandom must be changed to /dev/./urandom.
cat /opt/NetApp/smsap/jre/lib/security/java.security | grep securerandom
# the securerandom.source property. If an exception occurs when
securerandom.source=file:/dev/./urandom
# Specifying this system property will override the securerandom.source
52
Installing and Configuring the Operating System Images
Authorization Configuration
Create /etc/pam.d/snapmanger for SMSAP:
t002-1-lnx:/etc/pam.d # vi snapmanager
Insert : auth required pam_unix.so
account required pam_unix.so
t002-1-lnx:/etc/pam.d # cat snapmanager
auth required pam_unix.so
account required pam_unix.so
t002-1-lnx:/etc/pam.d #
SMSAP Post Cloning Plugin Configuration
The scripts os_db_authentication.sh and sap_follow_up_activities.sh must be copied from /opt/NetApp/smsap/plugins/examples/clone/create/post to /opt/NetApp/smsap/plugins/clone/create/post/.
The function execute in the script os_db_authentication.sh must be adapted.
Original version:
function execute {
EXIT=0
[ -z "$SCHEMAOWNER" ] && EXIT=4 && echo "parameter [SCHEMAOWNER] not set"
[ -z "$ORADBUSR_FILE" ] && EXIT=4 && echo "parameter [ORADBUSR_FILE] not set"
[ -z "$SM_TARGET_SID" ] && EXIT=4 && echo "parameter [SM_TARGET_SID] not set"
[ -z "$SM_ORIGINAL_SID" ] && EXIT=4 && echo "parameter [SM_ORIGINAL_SID] not set"
[ $EXIT -ne 0 ] && echo "processing stopped due to missing parameters" && _exit $EXIT
[ ! -f "$ORADBUSR_FILE" ] && echo "file [$ORADBUSR_FILE] is not a regular file" && _exit 4
sqlplus /nolog @${ORADBUSR_FILE} $SCHEMAOWNER UNIX $SM_TARGET_SID x
sqlplus /nolog <<EOF
set echo on
set termout on
connect / as sysdba
insert into OPS\$${SM_TARGET_SID}ADM.SAPUSER select * from OPS\$${SM_ORIGINAL_SID}ADM.SAPUSER;
commit;
53
Installing and Configuring the Operating System Images
exit
The following is the correct version:
function execute {
EXIT=0
[ -z "$SCHEMAOWNER" ] && EXIT=4 && echo "parameter [SCHEMAOWNER] not set"
[ -z "$ORADBUSR_FILE" ] && EXIT=4 && echo "parameter [ORADBUSR_FILE] not set"
[ -z "$SM_TARGET_SID" ] && EXIT=4 && echo "parameter [SM_TARGET_SID] not set"
[ -z "$SM_ORIGINAL_SID" ] && EXIT=4 && echo "parameter [SM_ORIGINAL_SID] not set"
[ $EXIT -ne 0 ] && echo "processing stopped due to missing parameters" && _exit $EXIT
[ ! -f "$ORADBUSR_FILE" ] && echo "file [$ORADBUSR_FILE] is not a regular file" && _exit 4
sqlplus /nolog @${ORADBUSR_FILE} $SCHEMAOWNER UNIX $SM_TARGET_SID x
. ${ORACLE_HOME}/../.profile && . ${ORACLE_HOME}/../.dbenv.sh
${DIR_LIBRARY}/brconnect -u / -c force -f chpass -o SAPSR3 -p sap
_exit $?
}
Download oradbusr10.zip as described in SAP Note 50088. Extract the zip file and copy ORADBUSR.SQL to /opt/NetApp/smsap/plugins/clone/create/post/.
System Boot Configuration
The script flexpod_config is used to execute the following tasks during system boot:
• Mounting the read-only software share
• Mounting tenant-specific data share
• Configuring the SDU password for the primary vFiler
• Configuring the SDU password for the backup vFiler
The mount points /mnt/software, /mnt/data, and /mnt/backup must be created. The permissions of these mount points must be changed to 777.
The script flexpod_config must be copied to /etc/rc.d/for SuSe, for RedHat it is /etc/rc.d/init.d
A new directory, /opt/NetApp/FlexPod, must be created. The script set_sdu_password.sh must be copied to /opt/NetApp/FlexPod.
The system boot configuration is done with the chkconfig command.
t003-20-lnx:/etc/rc.d # chkconfig --add flexpod_config
flexpod_config 0:off 1:off 2:off 3:on 4:off 5:on 6:off
54
Installing and Configuring the Operating System Images
Prerequisites
The vFiler password is hardcoded in the script and must be the same for all tenants.
Converting the Virtual Machine to a Template
After any changes to the template the following checks have to be done before converting the virtual machine to the template.
SnapDrive
When the template is booted, SnapDrive gets started with a cron job that waits for 300 seconds. Before converting the virtual machine to the template, SnapDrive must have finished the starting process.
Cron job is still running. SnapDrive is not running yet:
t003-17-lnx:~ # ps -ef | grep snap
root 6609 6608 0 10:01 ? 00:00:00 /bin/sh /opt/NetApp/snapdrive/snapdrived_cron
t003-17-lnx:~ # snapdrived status
9001-016 SOAP ERROR : 24 : A connection error occured. Please check if snapdrived is running
Cron job finished. SnapDrive is running:
t003-17-lnx:~ # ps -ef | grep snap
root 6690 1 0 10:06 ? 00:00:00 /opt/NetApp/snapdrive/bin/snapdrived start
t003-17-lnx:~ # snapdrived status
Snapdrive Daemon Version : 4.2 (Change 1189505 Built Sat Oct 2 10:27:12 PDT 2010)
Snapdrive Daemon start time : Mon Feb 21 10:06:01 2011
Total Commands Executed : 1
Job Status:
No command in execution
After SnapDrive is started, any appliance configuration must be deleted (this configuration has been configured during boot of the OS template). In the following example, the entries t003-1-prim and t003-1-bck need to be deleted.
t003-17-lnx:/opt/NetApp # snapdrive config list
username appliance name appliance type
-----------------------------------------------------------
root t003-1-prim StorageSystem
root t003-1-bck StorageSystem
root smt-dfm.mgmt.t001.company.corp DFM
t003-17-lnx:/opt/NetApp # snapdrive config delete t003-1-prim
Deleted configuration for appliance: t003-1-prim
55
Installing and Configuring the Operating System Images
t003-17-lnx:/opt/NetApp # snapdrive config delete t003-1-bck
Deleted configuration for appliance: t003-1-bck
The snapdrive config list command should have only one entry for the DFM server.
t003-17-lnx:/opt/NetApp # snapdrive config list
username appliance name appliance type
-----------------------------------------------------------
root smt-dfm.mgmt.t001.company.corp DFM
UDEV Configuration
Disable the use of persistent network device names by clearing the UDEV configuration for network interfaces according to the Novell/SUSE TID 3048119:
cat< /dev/null > /etc/udev/rules.d/70-persistent-net.rules
This step must be repeated if the template is started or rebooted for other changes. After all steps described in the previous sections have been completed, shut down the virtual machine by executing halt within a terminal window. When the virtual machine is turned off, right-click the virtual machine within the vSphere client and choose Template>Convert to template.
The template is now usable for deploying new virtual machines.
Redhat Enterprise Linux 5.X VMware
This section describes the creation of a VMware template for RedHat Enterprise Linux (RHEL) 5.5 virtual machines.
Operating System Template Installation
This section describes the creation of a VMware template, which is used for OS/VM provisioning.
Log onto the VMware vCenter Server and create a virtual machine as described in Installing and Configuring the Operating System Images.
Select RedHat Linux 5 (64 Bit) in the Operating System section and add the RedHat Enterprise Linux 5.x installation ISO to the virtual CD-ROM for installation.
1. Start the virtual machine.
2. Connect to the virtual console.
3. Boot from virtual CD-Rom to start the installation process.
4. Create a partitioning layout with a 40 GB swap and 20 GB root file system.
5. Activate on Boot for all Ethernet interfaces.
6. Select or deselect the Gnome and KDE desktop. And add Development Libraries and Development Tools.
7. After the operating system is installed log into the server as root for the next steps.
8. Click System >Authentication. In the newly opened window Authentication Configuration, select Enable NIS Support and click Configure NIS.
9. Enter t002.company.corp.nis as the NIS Domain and leave the NIS Server field empty. Click OK to close the NIS Settings window.
56
Installing and Configuring the Operating System Images
10. Click OK on the Authentication Configuration window to accept the NIS configuration and close the window.
11. Open a Terminal window.
12. Open file /etc/nsswitch.conf with an editor like vi and change the listed lines as follows:
Passwd: filesnis
Shadow:filesnis
Group:filesnis
Hosts:files dns
Services:filesnis
DHCP Client Hook
To retain all necessary search domains in the /etc/resolv.conf file, a custom DHCP client hook is necessary. Therefore, the file /etc/dhclient-enter-hooks must be created with the following content.
Copy the function make_resolv_conf() from the original /sbin/dhclient-script to the file. Locate the if [ -n "$SEARCH" ]; … fi clause, and exchange it by with the following:
if [ -z "$SEARCH" ]; then
make_search $new_domain_name
fi
echo search $SEARCH >> $rscf
Add the following function to the file.
make_search() {
domain_name=`dnsdomainname`
if [ -z "$domain_name" ] ||
[ "$domain_name" == "localdomain" ]; then
domain_name=$1
fi
echo "using domain $domain_name..."
old_search=`grep search /etc/resolv.conf`
old_search="$old_search $1"
new_search=
for item in $old_search; do
match=`echo $item | grep -o $domain_name`
if [ -n "$match" ]; then
already_added=
for added_item in $new_search; do
if [ "$item" == "$added_item" ]; then
57
Installing and Configuring the Operating System Images
already_added=1
fi
done
if [ -z "$already_added" ]; then
new_search="$new_search $item"
fi
fi
done
SEARCH=$new_search
}
Network Card Configuration
Add the following line to /etc/sysconfig/network-scripts/ifcfg-eth1:
DHCP_HOSTNAME=`hostname`
Delete the following line from /etc/sysconfig/network-scripts/ifcfg-eth0 and /etc/sysconfig/network-scripts/ifcfg-eth1:
HWADDR=….
SAP Host Agents Installation
Follow the instructions in section SAP Host Agents Installation.
SnapDrive Installation and Configuration
Follow the instructions in section SnapDrive Installation and Configuration.
SMSAP Installation and Configuration
Follow the instructions in section SMAP Installation and Configuration.
System Boot Configuration
Follow the instructions in section System Boot Configuration.
Converting the Virtual Machine to a Template
Follow the instructions in section Converting the Virtual Machine to a Template.
58
Installing and Configuring the Operating System Images
Bare Metal
ISO Images
Copy ISO images from SLES 11 SP1 and RHEL 5.5 to the central software share on the central software vfiler.
Log onto a server in the Infrastructure tenant with read/write permissions on the central software share. The default mount point on linux operating systems is /mnt/software.
Create a new directory for the ISO images.
Mkdir /mnt/software/ISO
Copy the required ISO images to the new directory
Cp /tmp/rhel-server-5.5-x86_64-dvd.iso /mnt/software/ISO/rhel-server-5.5-x86_64-dvd.iso
Kickstart File For Rhel 5.5
Create a new directory on the central software share:
Mkdir /mnt/software/RHEL
Create a new Kickstart file in the new directory
vi /mnt/software/RHEL/rhel55.ks
Add the following lines to the new Kickstart file:
START OF SAMPLE KICKSTART
# Kickstart file automatically generated by anaconda.
install
nfs --server=192.168.96.10 --dir=/vol/software/ISO
key --skip
lang en_US.UTF-8
keyboard us
network --device eth0 --bootproto dhcp
network --device eth1 --bootproto dhcp --hostname=`hostname`
rootpw --iscrypted $1$BCDPox75$CyI4U56yKfDkd5E/lCQrh.
firewall --enabled --trust eth0 --trust eth1
authconfig --enableshadow --enablemd5 --enablenis --nisdomain=company.corp.nis
selinux --permissive
reboot
timezone --utc Europe/Berlin
bootloader --location=mbr --driveorder=sda --append="rhgb quiet"
59
Installing and Configuring the Operating System Images
# The following is the partition information you requested
# Note that any partitions you deleted are not expressed
# here so unless you clear all partitions first, this is
# not guaranteed to work
%include /tmp/part-include
%packages
@base
@core
@development-libs
@development-tools
@editors
@legacy-software-development
@legacy-software-support
@printing
@base-x
@gnome-desktop
iscsi-initiator-utils
fipscheck
device-mapper-multipath
sgpio
python-dmidecode
imake
openssl097a
compat-openldap
xorg-x11-utils
xorg-x11-server-Xvfb
-emacs-leim
-psgml
-emacspeak
%post
#!/bin/bash
. /etc/bashrc
( # for logging purpose
echo "BEGIN: KICKSTART POST PROCEDURE"
echo "BEGIN: Prepare eth1 setup"
cat > /etc/sysconfig/network-scripts/ifcfg-eth1 <<EOF
DEVICE=eth1
60
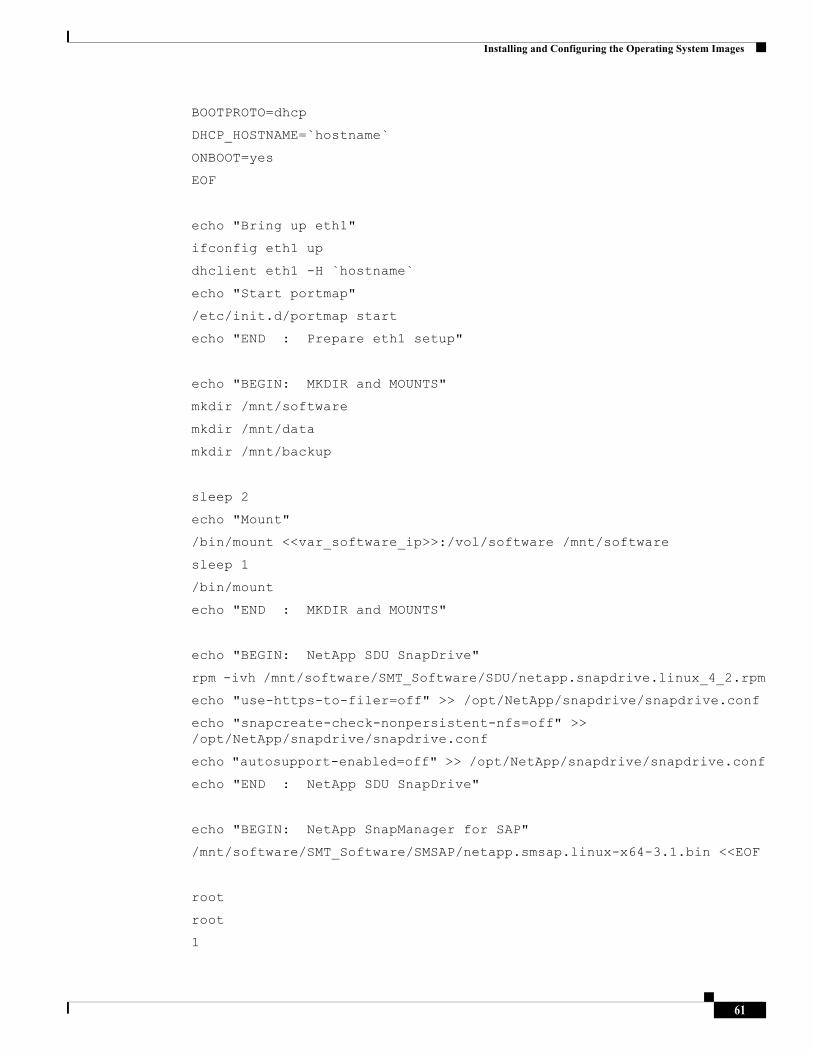
Installing and Configuring the Operating System Images
BOOTPROTO=dhcp
DHCP_HOSTNAME=`hostname`
ONBOOT=yes
EOF
echo "Bring up eth1"
ifconfig eth1 up
dhclient eth1 -H `hostname`
echo "Start portmap"
/etc/init.d/portmap start
echo "END : Prepare eth1 setup"
echo "BEGIN: MKDIR and MOUNTS"
mkdir /mnt/software
mkdir /mnt/data
mkdir /mnt/backup
sleep 2
echo "Mount"
/bin/mount <<var_software_ip>>:/vol/software /mnt/software
sleep 1
/bin/mount
echo "END : MKDIR and MOUNTS"
echo "BEGIN: NetApp SDU SnapDrive"
rpm -ivh /mnt/software/SMT_Software/SDU/netapp.snapdrive.linux_4_2.rpm
echo "use-https-to-filer=off" >> /opt/NetApp/snapdrive/snapdrive.conf
echo "snapcreate-check-nonpersistent-nfs=off" >> /opt/NetApp/snapdrive/snapdrive.conf
echo "autosupport-enabled=off" >> /opt/NetApp/snapdrive/snapdrive.conf
echo "END : NetApp SDU SnapDrive"
echo "BEGIN: NetApp SnapManager for SAP"
/mnt/software/SMT_Software/SMSAP/netapp.smsap.linux-x64-3.1.bin <<EOF
root
root
1
61

Installing and Configuring the Operating System Images
EOF
echo "auto_support.on=off" >> /opt/NetApp/smsap/properties/smsap.config
cp /mnt/software/SMT_Software/SMSAP/snapmanager /etc/pam.d/snapmanager
cp /opt/NetApp/smsap/plugins/examples/clone/create/post/*activities.sh /opt/NetApp/smsap/plugins/clone/create/post/
cp /opt/NetApp/smsap/plugins/examples/clone/create/post/os_db_auth*.sh /opt/NetApp/smsap/plugins/clone/create/post/
cp /mnt/software/SMT_Software/SMSAP/ORADBUSR.SQL /opt/NetApp/smsap/plugins/clone/create/post/
cp /mnt/software/SMT_Software/SMSAP/os_db_authentication.sh /opt/NetApp/smsap/plugins/clone/create/post/
echo "END : NetApp SnapManager for SAP"
echo "BEGIN: SAP Hostagent "
cd /tmp
tar -xf /mnt/software/ACC/hostagent7.2L.tgz
groupadd sapsys
useradd -g sapsys sapadm
cd /tmp/hostctrl
cp -fp /mnt/software/ACC/installsapinit.sh .
./saphostexec -install
echo "END : SAP Hostagent "
echo "BEGIN: FlexPod bootscript config "
mkdir /opt/NetApp/FlexPod
sleep 1
cp /mnt/software/scripts/flexpod_config /etc/init.d
/sbin/chkconfig --add flexpod_config
cp /mnt/software/scripts/set_sdu_password.sh /opt/NetApp/FlexPod/
echo "END : FlexPod bootscript config "
echo "END : KICKSTART POST PROCEDURE"
%pre
#!/bin/bash
# VMs may have different device name for 1st hdd
62
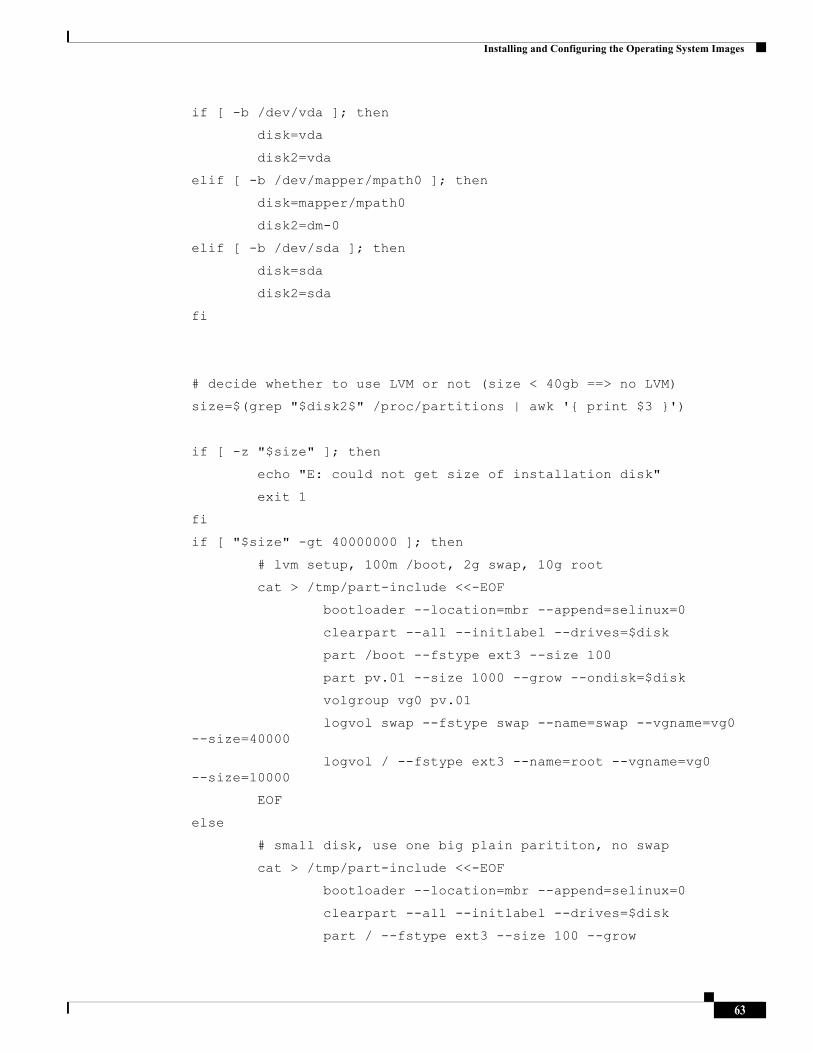
Installing and Configuring the Operating System Images
if [ -b /dev/vda ]; then
disk=vda
disk2=vda
elif [ -b /dev/mapper/mpath0 ]; then
disk=mapper/mpath0
disk2=dm-0
elif [ -b /dev/sda ]; then
disk=sda
disk2=sda
fi
# decide whether to use LVM or not (size < 40gb ==> no LVM)
size=$(grep "$disk2$" /proc/partitions | awk '{ print $3 }')
if [ -z "$size" ]; then
echo "E: could not get size of installation disk"
exit 1
fi
if [ "$size" -gt 40000000 ]; then
# lvm setup, 100m /boot, 2g swap, 10g root
cat > /tmp/part-include <<-EOF
bootloader --location=mbr --append=selinux=0
clearpart --all --initlabel --drives=$disk
part /boot --fstype ext3 --size 100
part pv.01 --size 1000 --grow --ondisk=$disk
volgroup vg0 pv.01
logvol swap --fstype swap --name=swap --vgname=vg0 --size=40000
logvol / --fstype ext3 --name=root --vgname=vg0 --size=10000
EOF
else
# small disk, use one big plain parititon, no swap
cat > /tmp/part-include <<-EOF
bootloader --location=mbr --append=selinux=0
clearpart --all --initlabel --drives=$disk
part / --fstype ext3 --size 100 --grow
63
Installing and Configuring the Operating System Images
EOF
fi
%end
%end
Tenant-Specific Services Virtual Machine Template
Tenant-specific services are currently provided by a lightweight Linux virtual machine within each tenant. The tenant-specific services virtual machine template is build based on the SLES VMware image described in section SLES VMware. Some additional packages are installed and configured to form the tenant-specific services virtual machine template. The following packages must be installed on the virtual machine. All of them can be installed through the SLES installer yast.
• dnsmasq—a lightweight DNS and DHCP server
• ypserv—the NIS server package
• yppasswdd—the NIS password change deamon
DNSMASQ
The following are the steps to install dnsmasq:
1. Install the dnsmasq package through yast and make sure the service is configured in the correct runlevel.
2. Manually mount the central software share (no DNS resolution of software.company.corp possible at this point) to /mnt/software.
3. Copy the dnsmasq configuration template from /mnt/software/scripts/dnsmasq.conf.template to /etc.
4. Copy the hosts configuration template from /mnt/software/scripts/hosts.template to /etc.
5. Copy the services configuration template from /mnt/software/scripts/services.template to /etc/services
6. Add the following groups:
a. groupadd -g 1000 sapinst
b. groupadd -g 1001 sapsys
c. groupadd -g 1002 dba
d. groupadd -g 1003 oper
7. Copy the dnsmasq configuration script from /mnt/software/scripts/configure_dnsmasq.sh to /flexpod (create if necessary).
YPSERV
The following are the steps to install ypserv:
1. Install the ypserv package through yast, and make sure the service is configured in the correct runlevel (chkconfig ypserv).
64
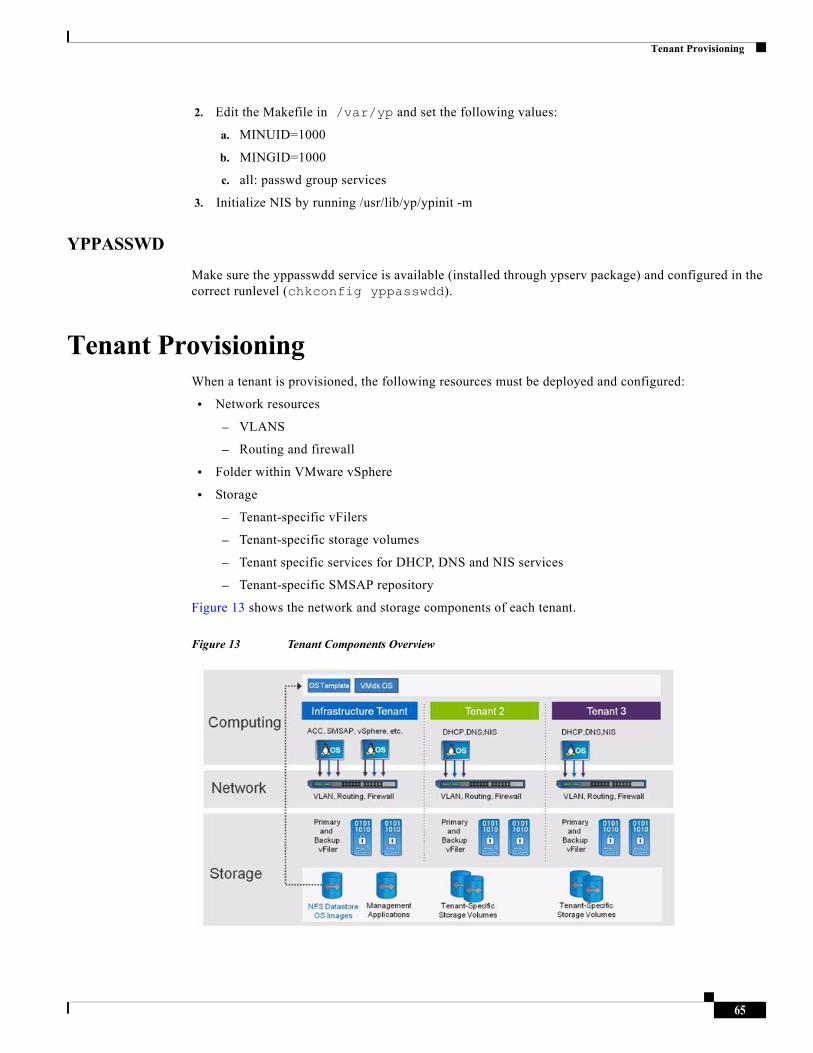
Tenant Provisioning
2. Edit the Makefile in /var/yp and set the following values:
a. MINUID=1000
b. MINGID=1000
c. all: passwd group services
3. Initialize NIS by running /usr/lib/yp/ypinit -m
YPPASSWD
Make sure the yppasswdd service is available (installed through ypserv package) and configured in the correct runlevel (chkconfig yppasswdd).
Tenant ProvisioningWhen a tenant is provisioned, the following resources must be deployed and configured:
• Network resources
– VLANS
– Routing and firewall
• Folder within VMware vSphere
• Storage
– Tenant-specific vFilers
– Tenant-specific storage volumes
– Tenant specific services for DHCP, DNS and NIS services
– Tenant-specific SMSAP repository
Figure 13 shows the network and storage components of each tenant.
Figure 13 Tenant Components Overview
65
Tenant Provisioning
Network
A Managed Tenant is a separate unit with its own vFiler systems, a dedicated Tenant Access VLAN, and a dedicated Tenant Back-end VLAN.
Tenant Access LAN: Dedicated VLAN ID and IP Address range that is accessible for administrators and users through a network router or firewall.
Tenant Back-end LAN: Dedicated VLAN ID and IP Address range for all traffic between the tenant specific vFiler unit and the servers.
Table 6 lists all of the required commands required to configure the access and back-end network for a new tenant.
66
Tenant Provisioning
Table 6 Configuration Steps For Tenant VLANS
Checklist Activity Process Verification
Define tenant-specific VLANs on the Cisco Nexus 5548 switches.
Duration: 10 minutes
Log on to «var_nexus_A_hostname»
and «var_nexus_B_hostname».Conf t
vlan <<var_new_tenant_vlan_id_access>>
name «var_new_tenant_name»-accessexit
interface Vlan
<<var_new_tenant_vlan_id_access>>
no shtdown
exit
interface port-channel13
switchport trunk allowed vlan <<Existing VLAN IDs>>, ,<<var_new_tenant_vlan_id_access>>exit
vlan «var_new_tenant_vlan_id_backend»
name «var_new_tenant_name»-backendexit
interface port-channel11
switchport trunk allowed vlan <<Existing VLAN IDs>>, «var_new_tenant_vlan_id_backend»
exit
interface port-channel12
switchport trunk allowed vlan <<Existing VLAN IDs>>
, «var_new_tenant_vlan_id_backend»
exit
exitcopy run startexit
To verify, run the show run
command and see whether the VLAN configuration exists.
67
Tenant Provisioning
Configure the tenant VLANs on the Cisco UCS.
Log on to one of the Fabric Interconnects of the UCS through ssh.
scope eth-uplink
create vlan «var_new_tenant_name»
-access <<var_new_tenant_vlan_id_access>> exit
create vlan «var_new_tenant_name»
-backend «var_new_tenant_vlan_id_backend»
exit exit commit-buffer
scope org FlexPod scope vnic-templ vNIC_Template_A
enter eth-if «var_new_tenant_name»-access set default-net no exit
enter eth-if «var_new_tenant_name»-backend set default-net no exit commit-buffer scope vnic-templ vNIC_Template_B
enter eth-if «var_new_tenant_name»-access set default-net no exit
enter eth-if «var_new_tenant_name»-backend set default-net no exit commit-bufferexitexit
68
Tenant Provisioning
Configure the inter-VLAN routing function on the Catalyst 4900 switch. Log onto the Catalyst 4900 and execute the following commands:
Enable
Conf terminal
vlan <<var_new_tenant_vlan_id_access>>
name "var_new_tenant_name"-access
exit
ip access-list standard Vlan<<var_new_tenant_vlan_id_access>>
permit <<var_new_tenant_network>> 0.0.0.255
Define tenant-specific VLANs on the Cisco Nexus 1000v vSwitch
Log on to the Cisco Nexus 1000v VSM.Conf t
vlan <<var_new_tenant_vlan_id_access>>
name «var_new_tenant_name»-access
vlan <<var_new_tenant_vlan_id_backend>> name «var_new_tenant_name»-backendexit
port-profile type vethernet «var_new_tenant_name»-access vmware port-group switchport mode access switchport access vlan
<<var_new_tenant_vlan_id_access>> no shutdown
system vlan <<var_new_tenant_vlan_id_access>> state enabled
port-profile type vethernet «var_new_tenant_name»-backend vmware port-group switchport mode access switchport access vlan
«var_new_tenant_vlan_id_backend»
no shutdown
system vlan «var_new_tenant_vlan_id_backend»
state enabledexit
exitcopy run start
69
Tenant Provisioning
permit <<var_software_network>> 0.0.0.255
permit <<var_global_mgmt_network>> 0.0.0.255
deny any
exit
interface Vlan<<var_new_tenant_vlan_id_access>>
ip address <<var_new_tenant_gw_addr>> <<var_new_tenant_netmask>>
ip access-group Vlan<<var_new_tenant_vlan_id_access>> in
ip access-group Vlan<<var_new_tenant_vlan_id_access>> out
no shutdown
exit
interface TenGigabitEthernet1/2
switchport trunk allowed vlan , <<EXISTING VLAN IDs>>,<<var_new_tenant_vlan_id_access>>
exit
interface TenGigabitEthernet1/7
switchport trunk allowed vlan , <<EXISTING VLAN IDs>>,<<var_new_tenant_vlan_id_access>>
exit
copy run start
exit
VMware
Within the VMware vSphere a folder with the tenant name has to be created Execute the following command PowerCLI command after connect to the vCenter server:
new-folder -name <<var_new_tenant_name>> -location vm
Storage
This section describes the steps necessary to create new vFiler units and new volumes for a new tenant. It also provides information on how to automatically assign protection polices and relationships for the tenant-specific volumes.
The network configuration for the tenant has to done before the storage configuration.
70
Tenant Provisioning
The following information must be provided:
• The name of the primary resource pool for active data defined within PM: <<var_primary_respool"
• The name of the resource pool for archive data has been defined within PM: <<var_secondary_respool>>
• The name of the provisioning profile defined within PM: <<var_prim_prov_profile>> for NAS storage and <<var_backup_prov_profile>> for secondary storage
• The name of the vFiler template defined within PM: <<var_vfiler_template>>
• Name of the tenant: <<var_new_tenant_name>>
• The name of the physical interface or VIF: vif0
• The vlan id: <<var_new_tenant_vlan_id_backend>>
• The IP address of the primary and secondary vFiler units:<<var_new_tenant_prim_vfiler_ip>> and <<var_new_tenant_sec_vfiler_ip>>
• The network mask for the vFiler units: <<var_new_tenant_netmask_vfiler>>
• The name of the ipspace of the vFiler units is defined as "ipspace-<<var_new_tenant_name>>
• Name of the primary vFiler is <<var_new_tenant_name>>-1-prim"
• Name of the secondary vFiler is <<"var_new_tenant_name>>1-bck",
• Dataset name of the central volume is <<var_new_tenant_name>>_share"
• Names of the qtrees are sap and data
• Dataset name of the backup volume is <<var_new_tenant_name>>_backup"
• Qtree name is data
vFiler Creation and Configuration
The following are the commands that are executed at the DFM server host:
1. Create the primary vFiler unit with the following DFM command:
dfpm vfiler create -d <<var_new_tenant_prim_vfiler_ip>> -s ipspace-<<var_new_tenant_name>> -a nfs,cifs,iscsi -f <<var_primary_respool>> <<var_new_tenant_name>>-1-prim
2. Create the secondary vFiler unit with the following DFM command:
dfpm vfiler create -d <<var_new_tenant_sec_vfiler_ip>> -s ipspace-<<var_new_tenant_name>> -a nfs,cifs,iscsi -f <<var_secondary_respool>> <<var_new_tenant_name>>-1-bck
3. Set up the primary vFiler unit with the following DFM command:
dfpm vfiler setup -t <<var_vfiler_template>> -r <<var_vfiler_pw>> -c -w workgroup -i <<var_new_tenant_prim_vfiler_ip>>:vif0:<<var_new_tenant_netmask_vfiler>>:<<var_new_tenant_vlan_id_backend>>:9000:vif0 <<var_new_tenant_name>>-1-prim
4. Set up the secondary vFiler unit with the following DFM command:
71
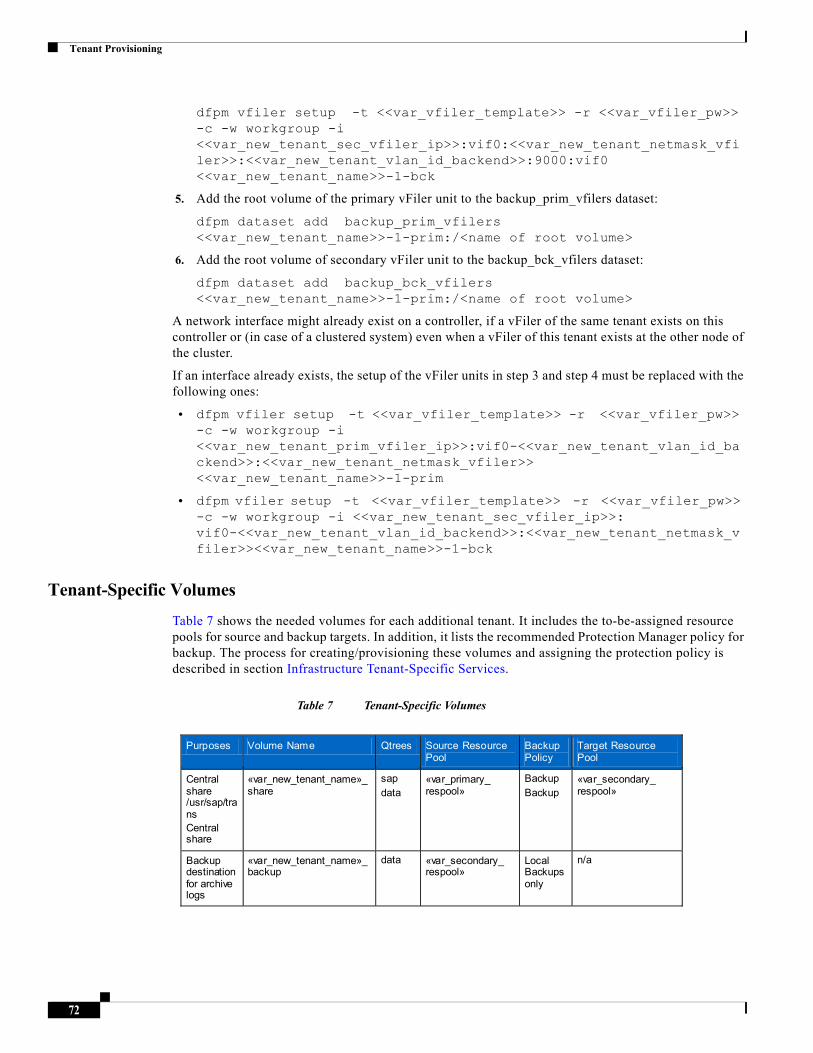
Tenant Provisioning
dfpm vfiler setup -t <<var_vfiler_template>> -r <<var_vfiler_pw>> -c -w workgroup -i <<var_new_tenant_sec_vfiler_ip>>:vif0:<<var_new_tenant_netmask_vfiler>>:<<var_new_tenant_vlan_id_backend>>:9000:vif0 <<var_new_tenant_name>>-1-bck
5. Add the root volume of the primary vFiler unit to the backup_prim_vfilers dataset:
dfpm dataset add backup_prim_vfilers <<var_new_tenant_name>>-1-prim:/<name of root volume>
6. Add the root volume of secondary vFiler unit to the backup_bck_vfilers dataset:
dfpm dataset add backup_bck_vfilers <<var_new_tenant_name>>-1-prim:/<name of root volume>
A network interface might already exist on a controller, if a vFiler of the same tenant exists on this controller or (in case of a clustered system) even when a vFiler of this tenant exists at the other node of the cluster.
If an interface already exists, the setup of the vFiler units in step 3 and step 4 must be replaced with the following ones:
• dfpm vfiler setup -t <<var_vfiler_template>> -r <<var_vfiler_pw>> -c -w workgroup -i <<var_new_tenant_prim_vfiler_ip>>:vif0-<<var_new_tenant_vlan_id_backend>>:<<var_new_tenant_netmask_vfiler>> <<var_new_tenant_name>>-1-prim
• dfpm vfiler setup -t <<var_vfiler_template>> -r <<var_vfiler_pw>> -c -w workgroup -i <<var_new_tenant_sec_vfiler_ip>>: vif0-<<var_new_tenant_vlan_id_backend>>:<<var_new_tenant_netmask_vfiler>><<var_new_tenant_name>>-1-bck
Tenant-Specific Volumes
Table 7 shows the needed volumes for each additional tenant. It includes the to-be-assigned resource pools for source and backup targets. In addition, it lists the recommended Protection Manager policy for backup. The process for creating/provisioning these volumes and assigning the protection policy is described in section Infrastructure Tenant-Specific Services.
Table 7 Tenant-Specific Volumes
Purposes Volume Name Qtrees Source Resource Pool
Backup Policy
Target Resource Pool
Central share /usr/sap/trans Central share
«var_new_tenant_name»_share
sap data
«var_primary_ respool»
Backup Backup
«var_secondary_ respool»
Backup destination for archive logs
«var_new_tenant_name»_backup
data «var_secondary_ respool»
Local Backups only
n/a
72
Tenant Provisioning
The following are the steps required to provision a volume for central data (for example, /usr/sap/trans at the primary vFiler) and other data, and a volume for backup (for example, archive logs) at the secondary vFiler using the DFM command line.
1. Create a dataset for the central share volume:
dfpm dataset create -v <<var_prim_prov_profile>> -r <<var_new_tenant_name>>-1-prim <<var_new_tenant_name>>_share
2. Add the primary resource pool to the central dataset:
dfpm dataset respool add <<var_new_tenant_name>>_share <<var_primary_respool>>
Note If desired, protect the central volume by assigning provisioning policies (in this example Back up) and assign the required resource pool.
3. Assign the Back up policy to the central dataset/volume and set the destination to the secondary vFiler:
dfpm dataset modify -p "Back up" -r <<var_new_tenant_name>>-1-bck <<var_new_tenant_name>>_share Backup
4. Add the secondary resource pool to the backup destination of the central volume/dataset:
dfpm dataset respool add -N "Backup" <<var_new_tenant_name>>_share <<var_secondary_respool>>
5. Provision the central dataset (part1):
dfpm dataset provision -n data -s <<var_tenant_share_data_size>> -e nfs -w all -N no -a 0 -S sys <<var_new_tenant_name>>_share
6. Provision the central dataset (part2):
dfpm dataset provision -n sap -s <<var_tenant_share_sap_size>>-e nfs -w all -N no -a 0 -S sys " <<var_new_tenant_name>>_share
7. Create a dataset for the backup volume:
dfpm dataset create -v <<var_backup_prov_profile>> -r <<var_new_tenant_name>>-1-bck <<var_new_tenant_name>>_backup
8. Add the secondary resource pool to the backup dataset:
dfpm dataset respool add <<var_new_tenant_name>>_backup <<var_secondary_respool>>
Note If desired, protect the backup volume by assigning provisioning policies, in this example Local backups only.
9. Assign the "Local backups only" policy to the central dataset/volume and set the destination to the secondary vFiler:
dfpm dataset modify -p "Local backups only" -r <<var_new_tenant_name>>-1-bck <<var_new_tenant_name>>_backup
10. Provision the backup dataset:
dfpm dataset provision -n data -s <size, e.g. 100g> -e nfs -w all -N no -a 0 -S " <<var_new_tenant_name>>_backup
73
Tenant Provisioning
Script CREATE_NEW_vFILERS.SH
The shell script create_new_vfiler.sh creates the required vFiler unit and provisions the required volumes, including data protection for a new tenant. It must be run at the DFM host with a parameter file as command line argument: create_vfiler.sh <parameter_file>. More details about this script are provided in the section Appendix D—Description of Scripts and Configuration Files.
Tenant-Specific Volume Central (TXXX_SHARE)
After the central volume txxx_share is provisioned, several directories have to created and the permission for these directories have to be set:
Mount the txxx_share to a server within the tenant; for example, use the tenant specific DNS/DHCP appliance to execute the following commands:
t005-lnx-0:/mnt/software/scripts # mkdir /mnt/tmp
t005-lnx-0:/mnt/software/scripts # mount t005-prim:/vol/t005_share/sap /mnt/tmp
t005-lnx-0:/mnt/software/scripts # mkdir /mnt/tmp/sap/trans
t005-lnx-0:/mnt/software/scripts # mkdir /mnt/tmp/sap/tmp
t005-lnx-0:/mnt/software/scripts # mkdir /mnt/tmp/sap/ccms
t005-lnx-0:/mnt/software/scripts # chmod 777 /mnt/tmp/sap/trans
t005-lnx-0:/mnt/software/scripts # chmod 777 /mnt/tmp/sap/tmp
t005-lnx-0:/mnt/software/scripts # chmod 777 /mnt/tmp/sap/ccms
t005-lnx-0:/mnt/software/scripts # mkdir /mnt/tmp/data/log
t005-lnx-0:/mnt/software/scripts # chmod 777 /mnt/tmp/data/log
t005-lnx-0:/mnt/software/scripts # umount /mnt/tmp
Tenant-Specific Services
Tenant specific services are currently provided by a lightweight Linux virtual machine called Tenant-specific services within each tenant.
The tenant-specific services virtual machine is available as a virtual machine template in the environment and can be provisioned to a new tenant. After the provisioning, a couple of configuration steps must be performed. First, the virtual machine must have static IP address assigned through the config files in /etc/sysconfig/network. Edit ifcfg-eth0 and ifcfg-eth1 and assign IP addresses according the rules provided in Table 8.
Table 8 IP Address Rules for Tenant-Specific Services
Config file IP Address Description
ifcfg-eth0 192.168.<tenant_id>.50, e.g. 192.168.4.50 User Access LAN
ifcfg-eth1 192.168.<tenant_id>+100.50, e.g. 192.168.104.50 Backend LAN
74
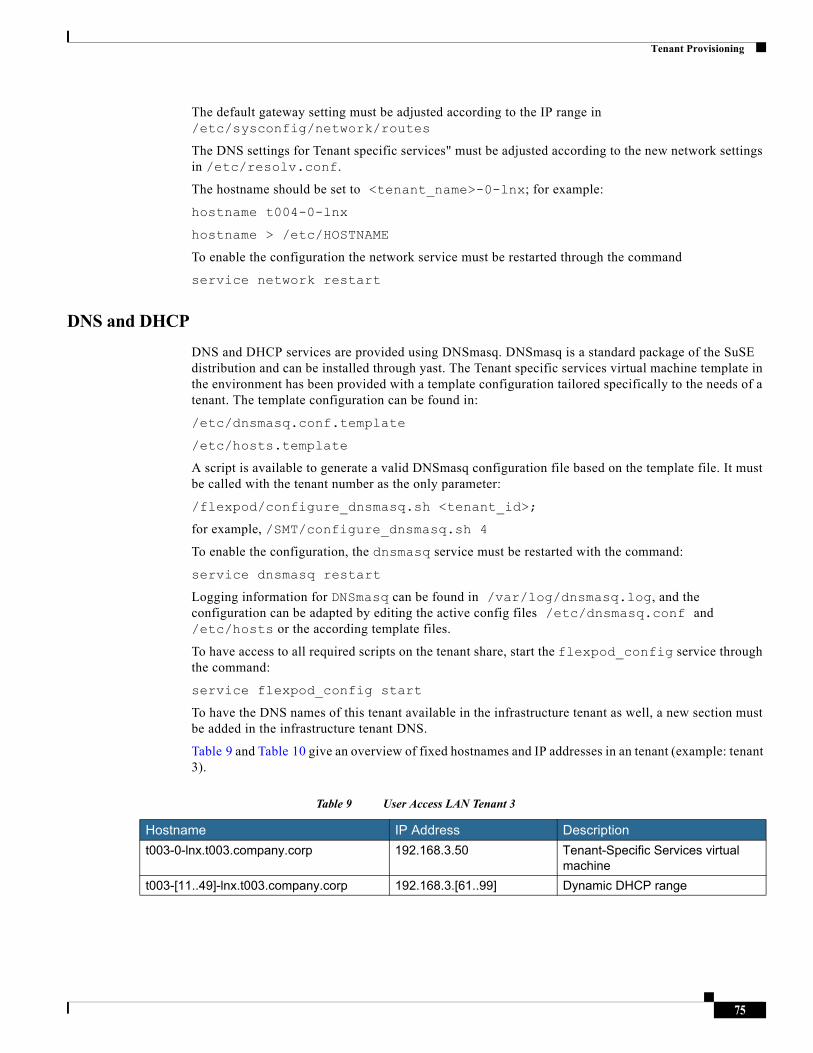
Tenant Provisioning
The default gateway setting must be adjusted according to the IP range in /etc/sysconfig/network/routes
The DNS settings for Tenant specific services" must be adjusted according to the new network settings in /etc/resolv.conf.
The hostname should be set to <tenant_name>-0-lnx; for example:
hostname t004-0-lnx
hostname > /etc/HOSTNAME
To enable the configuration the network service must be restarted through the command
service network restart
DNS and DHCP
DNS and DHCP services are provided using DNSmasq. DNSmasq is a standard package of the SuSE distribution and can be installed through yast. The Tenant specific services virtual machine template in the environment has been provided with a template configuration tailored specifically to the needs of a tenant. The template configuration can be found in:
/etc/dnsmasq.conf.template
/etc/hosts.template
A script is available to generate a valid DNSmasq configuration file based on the template file. It must be called with the tenant number as the only parameter:
/flexpod/configure_dnsmasq.sh <tenant_id>;
for example, /SMT/configure_dnsmasq.sh 4
To enable the configuration, the dnsmasq service must be restarted with the command:
service dnsmasq restart
Logging information for DNSmasq can be found in /var/log/dnsmasq.log, and the configuration can be adapted by editing the active config files /etc/dnsmasq.conf and /etc/hosts or the according template files.
To have access to all required scripts on the tenant share, start the flexpod_config service through the command:
service flexpod_config start
To have the DNS names of this tenant available in the infrastructure tenant as well, a new section must be added in the infrastructure tenant DNS.
Table 9 and Table 10 give an overview of fixed hostnames and IP addresses in an tenant (example: tenant 3).
Table 9 User Access LAN Tenant 3
Hostname IP Address Description
t003-0-lnx.t003.company.corp 192.168.3.50 Tenant-Specific Services virtual machine
t003-[11..49]-lnx.t003.company.corp 192.168.3.[61..99] Dynamic DHCP range
75
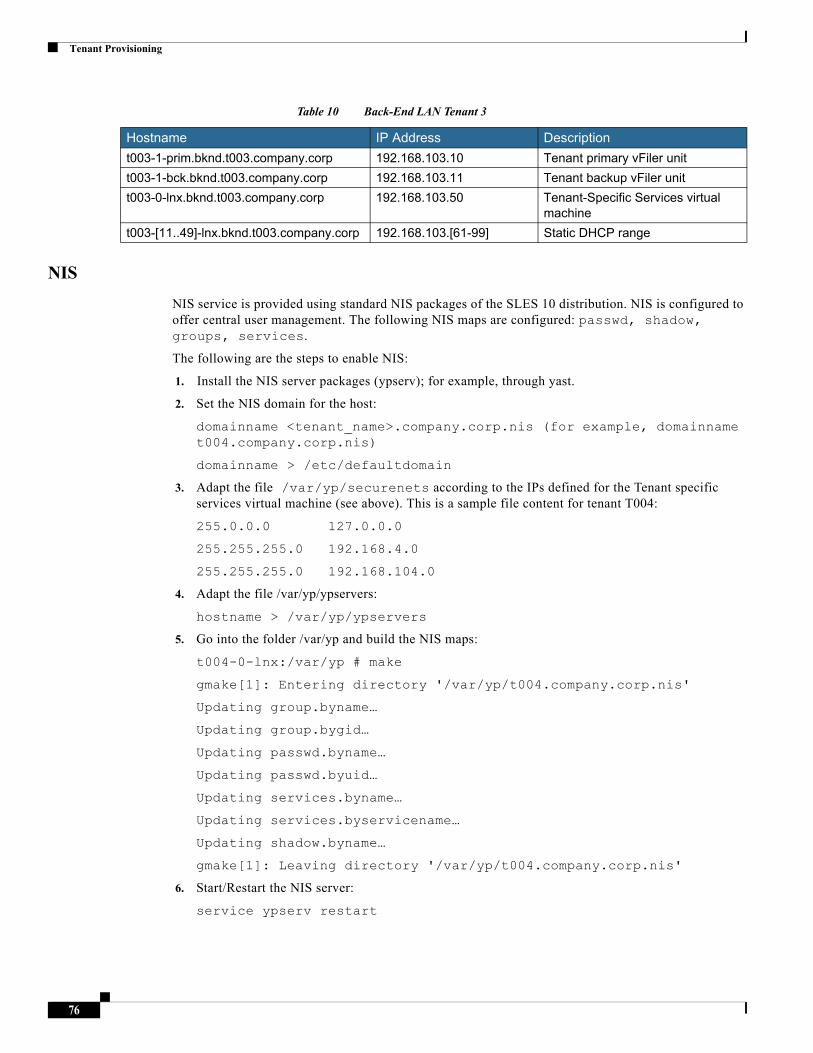
Tenant Provisioning
Table 10 Back-End LAN Tenant 3
NIS
NIS service is provided using standard NIS packages of the SLES 10 distribution. NIS is configured to offer central user management. The following NIS maps are configured: passwd, shadow, groups, services.
The following are the steps to enable NIS:
1. Install the NIS server packages (ypserv); for example, through yast.
2. Set the NIS domain for the host:
domainname <tenant_name>.company.corp.nis (for example, domainname t004.company.corp.nis)
domainname > /etc/defaultdomain
3. Adapt the file /var/yp/securenets according to the IPs defined for the Tenant specific services virtual machine (see above). This is a sample file content for tenant T004:
255.0.0.0 127.0.0.0
255.255.255.0 192.168.4.0
255.255.255.0 192.168.104.0
4. Adapt the file /var/yp/ypservers:
hostname > /var/yp/ypservers
5. Go into the folder /var/yp and build the NIS maps:
t004-0-lnx:/var/yp # make
gmake[1]: Entering directory '/var/yp/t004.company.corp.nis'
Updating group.byname…
Updating group.bygid…
Updating passwd.byname…
Updating passwd.byuid…
Updating services.byname…
Updating services.byservicename…
Updating shadow.byname…
gmake[1]: Leaving directory '/var/yp/t004.company.corp.nis'
6. Start/Restart the NIS server:
service ypserv restart
Hostname IP Address Description
t003-1-prim.bknd.t003.company.corp 192.168.103.10 Tenant primary vFiler unit
t003-1-bck.bknd.t003.company.corp 192.168.103.11 Tenant backup vFiler unit
t003-0-lnx.bknd.t003.company.corp 192.168.103.50 Tenant-Specific Services virtual machine
t003-[11..49]-lnx.bknd.t003.company.corp 192.168.103.[61-99] Static DHCP range
76
Tenant Provisioning
PXE Boot Service
In addition to the DHCP services provided by DNSmasq, a TFTP service must be configured to boot a server through PXE over the network. DNSmasq comes with an integrated TFTP service.
The following are the steps enable the integrated TFTP service:
1. Open /etc/dnsmasq.conf and add the following lines:
# Enable dnsmasq built-in tftp server
enable-tftp
tftp-no-blocksize
# Set the root directory of the TFTP service
tftp-root=/var/tftpboot
# An example of dhcp-boot with built-in dhcp server
dhcp-boot=pxelinux.0
2. Prepare the required directory structure for the boot environment:
mkdir /tftpboot
mkdir /tftpboot/pxelinux.cfg
mkdir /tftpboot/images/rhel55
3. Prepare the PXE boot loader:
cp /usr/lib/syslinux/pxelinux.0 /tftpboot
Create the file /tftpboot/pxelinux.cfg/default with the following content:
DEFAULT RHEL55
prompt 0
timeout 300
LABEL RHEL56
kernel images/rhel56/vmlinuz
append initrd=images/rhel56/initrd.img mpath ramdisk_size=5939 ks=nfs:<<var_software_ip>>:/vol/software/RHEL/ rhel55_<<var_new_tenant_name>>.ks ksdevice=eth0
LABEL RHEL55
kernel images/rhel55/vmlinuz
append initrd=images/rhel55/initrd.img mpath ramdisk_size=5939 ks=nfs:<<var_software_ip>>:/vol/software/RHEL/ rhel55_<<var_new_tenant_name>>.ks ksdevice=eth0
4. Prepare the Linux boot image:
mkdir /mnt/rhel55
77
Tenant Provisioning
mount -o loop,ro <<var_software_ip>>:/vol/software/ISO/rhel-server-5.5-x86_64-dvd.iso /mnt/rhel55
cp /mnt/rhel55/images/pxeboot/* /tftpboot/images/rhel55
umount /mnt/rhel55
rmdir /mnt/rhel55
mkdir /mnt/rhel56
mount -o loop,ro <<var_software_ip>>:/vol/software/ISO/rhel-server-5.6-x86_64-dvd.iso /mnt/rhel56
cp /mnt/rhel56/images/pxeboot/* /tftpboot/images/rhel56
umount /mnt/rhel56
rmdir /mnt/rhel56
5. Restart the DNSmasq service:
/etc/init.d/dnsmasq restart
6. Create a tenant-specific Kickstart file for RHEL installation.
Log on to a server with write access on the software share:
cp /mnt/software/RHEL/rhel55.ks /mnt/software/RHEL/rhel55_<<var_new_tenant_name>>.ks
Open the new file and change the following line:
nisdomain=company.corp.nis
to
nisdomain=<<var_new_tenant_name>>.company.corp.nis
Tenant-Specific SMSAP Repository
Within the SMSAP repository database, each tenant has its own repository. At the repository database server, execute the commands as shown in the following example of repository preparation for tenant 2.
t001-smrepo:/mnt/software/scripts # su - oracle
oracle@t001-smrepo:~> sqlplus /nolog
SQL*Plus: Release 10.2.0.1.0 - Production on Mon Feb 7 12:24:40 2011
Copyright (c) 1982, 2005, Oracle. All rights reserved.
SQL> connect / as sysdba
Connected.
78
Tenant Provisioning
SQL> create tablespace repdata_t002 datafile '/oracle/REP/oradata/repdata_t002.dbf' size 100m;
Tablespace created.
SQL> create user smrepo_t002 identified by "ucs4sap!" default tablespace repdata_t002;
User created.
SQL> grant connect, resource to smrepo_t002;
Grant succeeded.
The repository can be created using either the CLI or the SMSAP GUI. The following example shows the creation of a repository for tenant 3 using the CLI.
t001-smrepo:/mnt/software/scripts # smsap repository create -repository -port 1521 -dbname REP -host t001-smrepo.mgmt.t001.company.corp -login -username smrepo_t003
Enter password for database connection [email protected]:1521/REP: ********
[ INFO] SMSAP-20019: Set password for repository "smrepo_t003@REP/t001-smrepo.mgmt.t001.company.corp:1521" in user credentials for "root".
[ INFO] SMSAP-09202: Creating new schema as smrepo_t003 on jdbc:oracle:thin:@//t001-smrepo.mgmt.t001.company.corp:1521/REP.
[ INFO] SMSAP-09205: Schema generation complete.
[ INFO] SMSAP-09209: Performing repository version INSERT.
[ INFO] SMSAP-09210: Repository created with version: 102
[ INFO] SMSAP-13048: Repository Create Operation Status: SUCCESS
[ INFO] SMSAP-13049: Elapsed Time: 0:00:04.054
t001-smrepo:/mnt/software/scripts #
Figure 14 and Figure 15 show the creation of a repository using the GUI. Using tenant 2 as an example, Figure 14 shows the configuration information to enter.
79
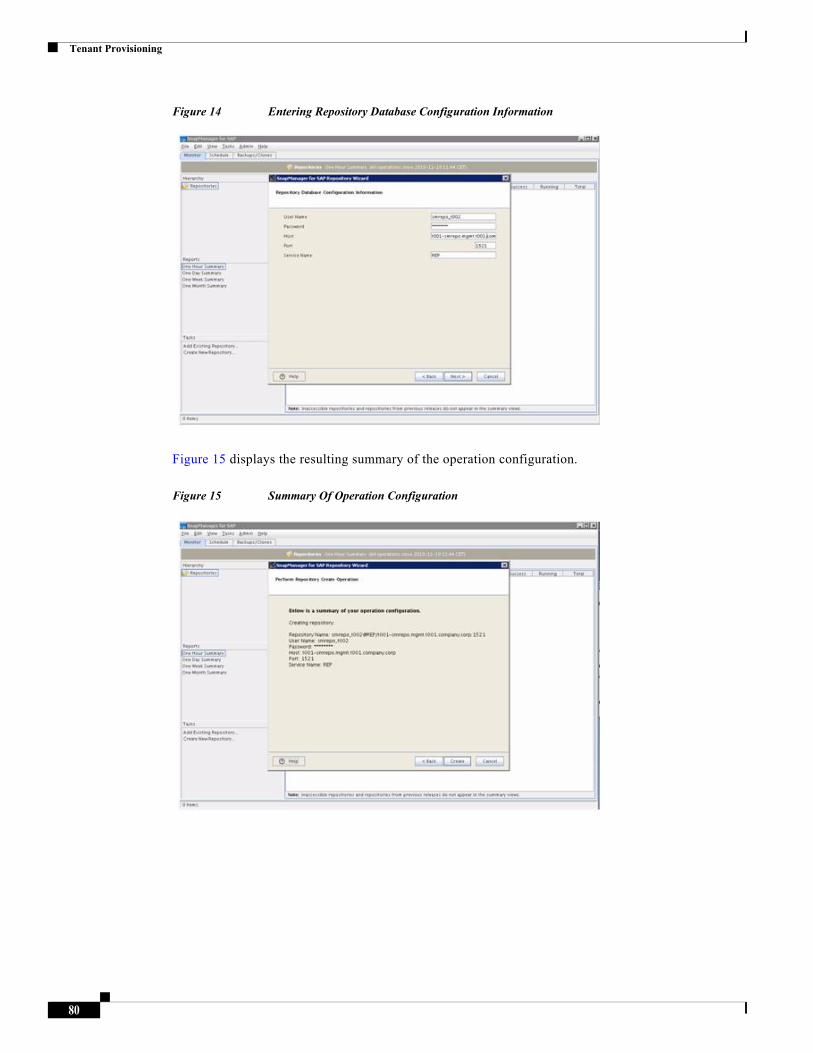
Tenant Provisioning
Figure 14 Entering Repository Database Configuration Information
Figure 15 displays the resulting summary of the operation configuration.
Figure 15 Summary Of Operation Configuration
80
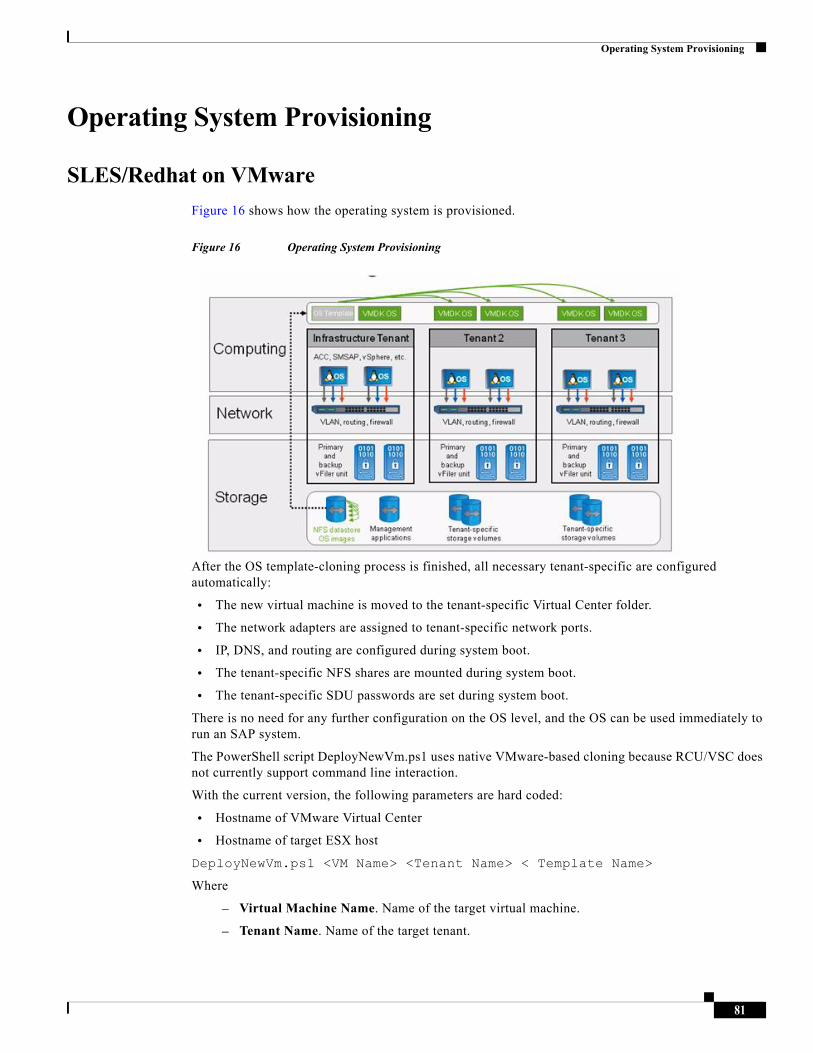
Operating System Provisioning
Operating System Provisioning
SLES/Redhat on VMware
Figure 16 shows how the operating system is provisioned.
Figure 16 Operating System Provisioning
After the OS template-cloning process is finished, all necessary tenant-specific are configured automatically:
• The new virtual machine is moved to the tenant-specific Virtual Center folder.
• The network adapters are assigned to tenant-specific network ports.
• IP, DNS, and routing are configured during system boot.
• The tenant-specific NFS shares are mounted during system boot.
• The tenant-specific SDU passwords are set during system boot.
There is no need for any further configuration on the OS level, and the OS can be used immediately to run an SAP system.
The PowerShell script DeployNewVm.ps1 uses native VMware-based cloning because RCU/VSC does not currently support command line interaction.
With the current version, the following parameters are hard coded:
• Hostname of VMware Virtual Center
• Hostname of target ESX host
DeployNewVm.ps1 <VM Name> <Tenant Name> < Template Name>
Where
– Virtual Machine Name. Name of the target virtual machine.
– Tenant Name. Name of the target tenant.
81
Operating System Provisioning
– Template Name. Name of the source template to be cloned.
The script executes the following steps:
1. Adds vSphere PowerShell sSnapin to the PowerShell session
2. Connects to VMware Virtual Center
3. Creates a VMware clone of the source template
(RCU is not used with the scripted version.)
4. Moves the new virtual machine to the tenant-specific Virtual Center folder
5. Assigns network adapters to tenant-specific network ports:
– <tenant-name>-access
– <tenant-name>-backend
6. Starts the new virtual machine
During the boot process, the DHCP server configures the hostname and the interfaces for the user and backend LANs, as well as the default route.
The following example (for a host within tenant 3) shows the configuration that should be available:
t003-40-lnx:~ # ifconfig
eth0 Link encap:Ethernet HWaddr 00:50:56:A6:00:46
inet addr:192.168.3.90 Bcast:192.168.3.255 Mask:255.255.255.0
inet6 addr: fe80::250:56ff:fea6:46/64 Scope:Link
UP BROADCAST RUNNING MULTICAST MTU:1500 Metric:1
RX packets:5265 errors:0 dropped:0 overruns:0 frame:0
TX packets:6328 errors:0 dropped:0 overruns:0 carrier:0
collisions:0 txqueuelen:1000
RX bytes:1202537 (1.1 Mb) TX bytes:1416674 (1.3 Mb)
eth1 Link encap:Ethernet HWaddr 00:50:56:A6:00:47
inet addr:192.168.103.90 Bcast:192.168.103.255 Mask:255.255.255.0
inet6 addr: fe80::250:56ff:fea6:47/64 Scope:Link
UP BROADCAST RUNNING MULTICAST MTU:1500 Metric:1
RX packets:6235877 errors:0 dropped:0 overruns:0 frame:0
TX packets:4234493 errors:0 dropped:0 overruns:0 carrier:0
collisions:0 txqueuelen:1000
RX bytes:8355884612 (7968.7 Mb) TX bytes:1661872038 (1584.8 Mb)
t003-40-lnx:~ # hostname
t003-40-lnx
t003-40-lnx:~ # netstat -nr
82
Operating System Provisioning
Kernel IP routing table
Destination Gateway Genmask Flags MSS Window irtt Iface
192.168.103.0 0.0.0.0 255.255.255.0 U 0 0 0 eth1
192.168.3.0 0.0.0.0 255.255.255.0 U 0 0 0 eth0
169.254.0.0 0.0.0.0 255.255.0.0 U 0 0 0 eth0
127.0.0.0 0.0.0.0 255.0.0.0 U 0 0 0 lo
0.0.0.0 192.168.3.1 0.0.0.0 UG 0 0 0 eth0
In addition, the rc script flexpod config is executed during the boot process. It is part of the Linux OS and performs the following tasks:
• Mounts the software share from
software.company.corp:/vol/software to /mnt/software
• Mounts the backup volume for archive log backups from
"$TENANT"-1-bck:/vol/"$TENANT"_backup/data to /mnt/backup
• Mounts the shared data volume from
"$TENANT"-1-prim:/vol/"$TENANT"_share/data to /mnt/data
After the OS is booted, the following NFS mounts should be available, as this example for a host within tenant 3 shows:
software.company.corp:/vol/software
167772160 57500096 110272064 35% /mnt/software
t003-1-bck:/vol/t003_backup/data
31456896 4224 31452672 1% /mnt/backup
t003-1-prim:/vol/t003_share/data
31457280 320 31456960 1% /mnt/data
In addition, the script starts the script /opt/NetApp/FlexPod/set_sdu_password.sh in the background to set the SDU passwords. The script set_sdu_password.sh waits until the SDU daemon is started and executes the following commands:
• Setting SDU password for user root at primary vFiler unit "$TENANT"-1-prim
• Setting SDU password for user root at backup vFiler unit "$TENANT"-1-bck
After the SDU daemon has been started (5 minutes), the SDU configuration should be available, as shown in the following example for a host within tenant 3:
t003-40-lnx:~ # snapdrive config list
username appliance name appliance type
-----------------------------------------------------------
root t003-1-prim StorageSystem
root t003-1-bck StorageSystem
root smt-dfm.mgmt.t001.company.corp DFM
83
Operating System Provisioning
Operating System Provisioning SLES on Bare Metal
Create a Service Profile From a Service Profile Template
Log onto <<var_ucsm_A_hostname>> or <<var_ucsm_B_hostname>>.
create service-profile t005-lnx-01
set src-templ-name linux_a
scope vnic vNIC_A
create eth-if t005-access
set default-net yes
commit-buffer
exit
delete eth-if default
commit-buffer
exit
exit
scope vnic vNIC_B
create eth-if t005-backend
set default-net yes
commit-buffer
exit
delete eth-if default
commit-buffer
exit
associate server-pool Infa_Pool
commit-buffer
exit
commit-buffer
Configure SAN Zoning
The following are the steps to configure SAN zoning:
1. Log onto the Cisco Nexus 5548 A - <<var_nexus_A_hostname>>
2. From the global configuration mode, type "device-alias database".
3. Type "device-alias name <<var_new_hostname>>_<<var_ntap_A_hostname>>_A pwwn <vHBA_A WWPN>".
4. Type "device-alias name <<var_new_hostname>>_<<var_ntap_B_hostname>>_A pwwn <vHBA_A WWPN>".
5. After all of the necessary device-alias are created, type "exit".
84
Operating System Provisioning
6. Type "device-alias commit".
7. Create the zones for each service profile.
a. Type "zone name <<var_new_hostname>>_<<var_ntap_A_hostname>>_A vsan <<var_global_vsan_A_id>>.
b. Type "member device-alias <<var_new_hostname>>_<<var_ntap_A_hostname>>_A>>.
c. Type "member device-alias <<var_ntap_A_hostname>>_0c>>.
d. Type "exit".
e. Type "zone name <<var_new_hostname>>_<<var_ntap_B_hostname>>_A vsan <<var_global_vsan_A_id>>.
f. Type "member device-alias <<var_new_hostname>>_<<var_ntap_B_hostname>>_A>>.
g. Type "member device-alias <<var_ntap_B_hostname>>_0c".
h. Type "exit".
8. After all of the zones for the Cisco UCS service profiles have been created, create a zoneset to organize and manage them.
9. Create the zoneset and add the necessary members.
a. Type "zoneset name flexpod vsan <<var_global_vsan_A_id>>.
b. Type "member <<var_new_hostname>>_<<var_ntap_A_hostname>>_A".
c. Type "member <<var_new_hostname>>_<<var_ntap_B_hostname>>_A".
d. Type "exit".
10. Activate the zoneset.
a. Type "zoneset activate name flexpod vsan <<var_global_vsan_A_id>>.
b. Type "exit".
c. Type "copy run start".
Cisco Nexus 5548 B - <<var_nexus_B_hostname>>
1. From the global configuration mode, type "device-alias database".
2. Type "device-alias name <<var_new_hostname>>_<<var_ntap_A_hostname>>_B pwwn <vHBA_B WWPN>".
3. Type "device-alias name <<var_new_hostname>>_<<var_ntap_B_hostname>>_B pwwn <vHBA_B WWPN>".
4. After all of the necessary device-alias are created, type "exit".
5. Type "device-alias commit".
6. Create the zones for each service profile.
a. Type "zone name <<var_new_hostname>>_<<var_ntap_B_hostname>>_B vsan <<var_global_vsan_B_id>>.
b. Type "member device-alias <<var_new_hostname>>_<<var_ntap_B_hostname>>_B".
c. Type "member device-alias <<var_ntap_A_hostname>>_0d".
85
Operating System Provisioning
d. Type "exit".
e. Type "zone name <<var_new_hostname>>_<<var_ntap_B_hostname>>_B vsan <<var_global_vsan_B_id>>.
f. Type "member device-alias <<var_new_hostname>>_<<var_ntap_B_hostname>>_B".
g. Type "member device-alias <<var_ntap_B_hostname>>_0d".
h. Type "exit".
7. After all of the zones for the Cisco UCS service profiles have been created, create a zoneset to organize and manage them.
8. Create the zoneset and add the necessary members.
a. Type "zoneset name flexpod vsan <<var_global_vsan_B_id>>.
b. Type "member <<var_new_hostname>>_<<var_ntap_A_hostname>>_B".
c. Type "member <<var_new_hostname>>_<<var_ntap_B_hostname>>_B".
d. Type "exit".
9. Activate the zoneset.
a. Type "zoneset activate name flexpod vsan <<var_global_vsan_B_id>>.
b. Type "exit".
c. Type "copy run start".
Configure the Storage
The following are the steps to configure the storage:
Controller A - <<var_ntap_A_hostname>>
For the service profile containing <<var_ntap_A_hostname>> do the following to create igroups for each vHBA:
"igroup create -f -t linux <<var_new_hostname>>_<<var_ntap_A_hostname>>_A<vHBA_A WWPN>".
"igroup create -f -t linux <<var_new_hostname>>_<<var_ntap_A_hostname>>._B<vHBA_B WWPN>".
Controller B - <<var_ntap_B_hostname>>
For the service profile containing <<var_ntap_B_hostname>> do the following to create igroups for each vHBA:
"igroup create -f -t linux <<var_new_hostname>>t_<<var_ntap_B_hostname>>._A<vHBA_A WWPN>".
"igroup create -f -t linux <<var_new_hostname>>_<<var_ntap_B_hostname>>_B<vHBA_B WWPN>".
Controller A - <<var_ntap_A_hostname>>
Create a LUN for the service profile booting from <<var_ntap_A_hostname>>:
86
Operating System Provisioning
"lun create -s 60g -t linux -o no reserve /vol/boot_A/<<var_new_hostname>>_<<var_ntap_A_hostname>>
Controller B - <<var_ntap_B_hostname>>
Create a LUN for the service profile booting from <<var_ntap_B_hostname>>:
"lun create -s 60g -t vmware -o no reserve /vol/boot_B/ <<var_new_hostname>>_<<var_ntap_B_hostname>>
Controller A - <<ar_ntap_A_hostname>>
For each LUN created, enter the following command to map the created LUNs to the two initiator groups per service profile:
"lun map /vol/boot_A/<<var_new_hostname>>_<<var_ntap_A_hostname>> <<var_new_hostname>>_<<var_ntap_A_hostname>>_A0"
"lun map /vol/boot_A/<<var_new_hostname>>_<<var_ntap_A_hostname>> <<var_new_hostname>>_<<var_ntap_A_hostname>>_B 0"
Controller B - <<var_ntap_B_hostname>>
For each LUN created, enter the following command to map the created LUNs to the two initiator groups per service profile:
"lun map /vol/boot_B/<<var_new_hostname>>_<<var_ntap_B_hostname>> <<var_new_hostname>>_<<var_ntap_B_hostname>>_A 0"
"lun map /vol/boot_B/<<var_new_hostname>>_<<var_ntap_B_hostname>> <<var_new_hostname>>_<<var_ntap_B_hostname>._B 0"
Choose a desired name for the igroups and LUNs and use the WWPNs of the vHBAs of the new server to be assigned to the igroups. Create the LUNs with a size of 60GB instead of 10GB.
Install SLES 11 Sp1
Before the server installation can be started, the NetApp controllers and SAN zoning must be configured completely as a prerequisite.
boot iso image is SLES-11-SP1-DVD-x86_64-GM-DVD1.iso.
The following are the steps for the initial OS installation:
1. Open the KVM Console of the created Service Profile by clicking on the Service Profile entry. Click KVM Console. A new window appears.
2. Choose English (US) as the language, select your correct keyboard layout, and accept the license terms after reading and agreeing to it.
3. If desired,check the installation medium.
4. Choose New Installation.
5. Define your Time Zone settings.
6. Choose Physical Machine as Server Base Scenario.
87
Operating System Provisioning
7. In the Installations Settings overview, the Partitioning must be adapted and the Multipathing option enabled.
8. Select Hard Disks and then click Configure… and Configure Multipath.
9. Click Yes.
10. Two primary partitions must be created:
– SWAP:Partition with disk space 40GB
– /:Root Partion based on ext3 filesystem with disk space 20GB
11. Click Booting..
12. Modify the Boot Loader options or select Write generic Boot Code to MBR and click OK
13. Delete all devices excepting the first multipath device and Click OK.
14. Add the following Software components in addition to the standard: SAP Application Server Base, C/C++ Development tools, and your desired desktop. Afterward, click Details.
15. Search for odbc.
16. Choose unixODBC, unixODBC-32bit, unixODBC-devel, and unixODBC-devel-32bit and accept. In addition, search for java and install java-1_4_2-ibm. Check whether Perl 5 is chosen for installation. If not, choose Perl 5, too.
17. Set the Default Runlevel to 3. Full multiuser with network.
18. Click Install.
19. Click Install to start the installation process.
20. After the correct OS installation, the System boots the first time and starts with the specific server host configurations.
21. Set the root password and click Next.
22. Leave the Hostname and Domain Name on the default and select Change Hostname through DHCP and click Next.
23. Open the SSH ports in the firewall and set the Network interfaces (eth0-ethX) to internal networks.
24. The network test is optional.
25. Change the User Authentication Method to NIS.
26. Configure the NIS: Check the boxes Use NIS and Open Ports in Firewall.
27. Read the Release Notes and go to the next step.
28. Use the default hardware configuration.
29. Click Next.
30. Summary and all config information is stored in /root/autoinst.xml.
31. Reboot the system.
DHCP Client Configuration
This section describes the necessary DHCP Client configuration and other network-related configurations.
88
Operating System Provisioning
Adjust the DHCP Client timeout by setting it to 99 seconds. This makes sure that the DHCP client does go in background to get the DHCP lease. This is necessary because otherwise other scripts or services that require network access may fail to start at boot time. Edit /etc/sysconfig/network/dhcp and change the timeout value to 99:
DHClient_TIMEOUT='99'
Because all interfaces should get the same hostname, insert the line hostname > /etc/HOSTNAME into the section case$state in up into /etc/sysconfig/network/scripts/dhcpd-hook as shown:
case $state in
up)
write_cached_config_data dhcp4_state up $INTERFACE
commit_cached_config_data $INTERFACE
$debug && NC_OPTIONS="-v"
/sbin/netconfig modify -s "dhcpcd" \
-i $INTERFACE $NC_OPTIONS \
-l $leaseinfo 2>&1 | $log_dbg
hostname > /etc/HOSTNAME
In addition, it is necessary that all other interfaces wait until the first interface (eth0) is up and got the new hostname assigned. Therefore, add the following line into the configuration files (for example, /etc/sysconfig/network/ifcfg-eth1 for eth1) of all interfaces except for eth0.
PRE_UP_SCRIPT="wait4eth0"
Afterwards create the script "wait4eth0" in directory /etc/sysconfig/network/script was the following content:
#!/bin/bash
ifstatus eth0
eth0up=$?
while [ $eth0up -gt 0 ]; do
echo "waiting for eth0...";
sleep 5;
ifstatus eth0;
eth0up=$?;
done
Disable the use of persistent network device names by clearing the UDEV configuration for network interfaces according to the Novell/SUSE TID 3048119:
cat< /dev/null > /etc/udev/rules.d/70-persistent-net.rules
This step must be repeated if the template is started or rebooted for other changes.
Check whether the network interfaces are set to internal networks at the firewall.
Open /etc/sysconfig/SuSEfirewall2 and check whether the network interfaces are included into FW_DEV_INT as shown in the following line:
89
Operating System Provisioning
FW_DEV_INT="eth0 eth1 eth2"
NIS Configuration
The OS template is configured to run an NIS client communicating with a NIS server to provide central user management capabilities. The following maps are provided by the NIS server: passwd, group, services. This section describes the necessary configurations.
NSSWITCH
The file /etc/nsswitch.conf configures where to get data from for the different user configuration files. The OS template should contain the following nsswitch.conf entries:
passwd: compat
shadow: files
group: compat
hosts: dns files
networks: files dns
services: nis
PASSWD
The following line must be appended to the file /etc/passwd to merge NIS users with local users:
+::::::
Groups
The following line must be appended to the file /etc/group to merge NIS groups with local groups:
+:::
Services
The services definition is completely retrieved from the NIS server. No local services are possible.
Linux Kernel Configuration
No special kernel settings are required for the SAP on FlexPod landscape other than the ones mentioned in SAP Note 1310037 for SLES 11 installations. The most important thing is to install the sapconf (fka sapinit) package. This is done automatically when you select the pattern “SAP Application Server Base” during the SLES installation procedure.
SAP Host Agents Installation
The SAPHOSTAGENT package contains all of the required elements for centrally monitoring any host. You can either install the host agent using SAPInst (only the kernel DVD is required) or install the package directly (download SAPHOSTAGENT.SAR from SAP Service Marketplace).
The following are the steps to directly install SAP Host Agents:
1. Login as user root.
90
Operating System Provisioning
2. Make sure the group sapsys exists on the host.
3. Make sure the user sapadm exists and that it is a member of the sapsys group.
4. Decompress the SAPHOSTAGENT.SAR archive with the SAPCAR tool (for example, into /tmp): sapcar -xvf SAPHOSTAGENT.SAR
5. Go to the extracted path /tmp/hostctrl/exe.
6. Execute the installation procedure: ./saphostexec -install.
7. Verify that the centrally mounted SAPOSCOL working directory /usr/sap/tmp exists (if not, mount it accordingly) or change the working directory by adding the following line to the file /usr/sap/hostctrl/exe/host_profile:
DIR_PERF = /usr/sap/hostctrl/work
SnapDrive Installation and Configuration
After SnapDrive is installed, the following changes must be made in the configuration file:
• vFiler units don't support HTTPS, HTTP needs to be configured in the snapdrive config file.
• The SAP systems are installed adaptive computing aware; there won't be any service-specific entries in /etc/fstab.
• Turn off the autosupport option.
t002-1-lnx:/opt/NetApp/snapdrive # vi snapdrive.conf
use-https-to-filer=off # Communication with filer done via HTTPS instead of HTTP
snapcreate-check-nonpersistent-nfs=off # Check that entries exist in /etc/fstab for specified nfs fs.
autosupport-enabled=off
Access Configuration to Data Fabric Manager:
snapdrive config set -dfm <user_name> <<var_ntap_dfm_ip>>
SMSAP Installation and Configuration
During the installation, user and group must be configured to root/root.
Please enter the operating system user name and group name that should be used
to run SnapManager for SAP commands. Press <ENTER> to accept the default
values.
User Name (DEFAULT: oracle): root
User Group (DEFAULT: dba): root
Insert the following option into /opt/NetApp/smsap/properties/smsap.config:
auto_support.on=off
JAVA.SECURITY File
Within the java.security file, /dev/urandom must be changed to /dev/./urandom.
91
Operating System Provisioning
cat /opt/NetApp/smsap/jre/lib/security/java.security | grep securerandom
# the securerandom.source property. If an exception occurs when
securerandom.source=file:/dev/./urandom
# Specifying this system property will override the securerandom.source
Authorization Configuration
Create /etc/pam.d/snapmanager for SMSAP:
t002-1-lnx:/etc/pam.d # vi snapmanager
Insert : auth required pam_unix.so
account required pam_unix.so
t002-1-lnx:/etc/pam.d # cat snapmanager
auth required pam_unix.so
account required pam_unix.so
t002-1-lnx:/etc/pam.d #
SMSAP Post Cloning Plugin Configuration
The scripts os_db_authentication.sh and sap_follow_up_activities.sh must be copied from /opt/NetApp/smsap/plugins/examples/clone/create/post to /opt/NetApp/smsap/plugins/clone/create/post/.
The function execute in the script os_db_authentication.sh must be adapted.
Original version:
function execute {
EXIT=0
[ -z "$SCHEMAOWNER" ] && EXIT=4 && echo "parameter [SCHEMAOWNER] not set"
[ -z "$ORADBUSR_FILE" ] && EXIT=4 && echo "parameter [ORADBUSR_FILE] not set"
[ -z "$SM_TARGET_SID" ] && EXIT=4 && echo "parameter [SM_TARGET_SID] not set"
[ -z "$SM_ORIGINAL_SID" ] && EXIT=4 && echo "parameter [SM_ORIGINAL_SID] not set"
[ $EXIT -ne 0 ] && echo "processing stopped due to missing parameters" && _exit $EXIT
[ ! -f "$ORADBUSR_FILE" ] && echo "file [$ORADBUSR_FILE] is not a regular file" && _exit 4
sqlplus /nolog @${ORADBUSR_FILE} $SCHEMAOWNER UNIX $SM_TARGET_SID x
sqlplus /nolog <<EOF
92
Operating System Provisioning
set echo on
set termout on
connect / as sysdba
insert into OPS\$${SM_TARGET_SID}ADM.SAPUSER select * from OPS\$${SM_ORIGINAL_SID}ADM.SAPUSER;
commit;
exit
EOF
Correct version:
function execute {
EXIT=0
[ -z "$SCHEMAOWNER" ] && EXIT=4 && echo "parameter [SCHEMAOWNER] not set"
[ -z "$ORADBUSR_FILE" ] && EXIT=4 && echo "parameter [ORADBUSR_FILE] not set"
[ -z "$SM_TARGET_SID" ] && EXIT=4 && echo "parameter [SM_TARGET_SID] not set"
[ -z "$SM_ORIGINAL_SID" ] && EXIT=4 && echo "parameter [SM_ORIGINAL_SID] not set"
[ $EXIT -ne 0 ] && echo "processing stopped due to missing parameters" && _exit $EXIT
[ ! -f "$ORADBUSR_FILE" ] && echo "file [$ORADBUSR_FILE] is not a regular file" && _exit 4
sqlplus /nolog @${ORADBUSR_FILE} $SCHEMAOWNER UNIX $SM_TARGET_SID x
. ${ORACLE_HOME}/../.profile && . ${ORACLE_HOME}/../.dbenv.sh
${DIR_LIBRARY}/brconnect -u / -c force -f chpass -o SAPSR3 -p sap
_exit $?
}
Download oradbusr10.zip as described in SAP Note 50088. Extract the zip file and copy ORADBUSR.SQL to /opt/NetApp/smsap/plugins/clone/create/post/.
System Boot Configuration
The script flexpod_config is used to execute the following tasks during system boot:
• Mounting the read-only software share
• Mounting tenant-specific data share
• Configuring the SDU password for the primary vFiler unit
• Configuring the SDU password for the backup vFiler unit
The mount points /mnt/software, /mnt/data, and /mnt/backup must be created. The permissions of these mount points must be changed to 777.
93
Operating System Provisioning
The script flexpod_config must be copied to /etc/rc.d
A new directory /opt/NetApp/FlexPod must be created. The script set_sdu_password.sh must be copied to /opt/NetApp/FlexPod.
The system boot configuration is done with the chkconfig command.
t003-20-lnx:/etc/rc.d # chkconfig --add flexpod_config
flexpod_config 0:off 1:off 2:off 3:on 4:off 5:on 6:off
Prerequisites: The vFiler password is hard coded in the script and must be the same for all tenants.
Operating System Provisioning RHEL on Bare Metal
Create A Service Profile From A Service Profile Template
Log onto <<var_ucsm_A_hostname>> or <<var_ucsm_B_hostname>>.
create service-profile t005-lnx-02
set src-templ-name linux_a
scope vnic vNIC_A
create eth-if t005-access
set default-net yes
commit-buffer
exit
delete eth-if default
commit-buffer
exit
exit
scope vnic vNIC_B
create eth-if t005-backend
set default-net yes
commit-buffer
exit
delete eth-if default
commit-buffer
exit
associate server-pool Infa_Pool
commit-buffer
exit
commit-buffer
94
SAP System Provisioning
Configure the SAN Zoning
Configure the Cisco Nexus 5548 switches for the new servers similarly as described in section 3.6 Cisco Nexus 5548 Deployment Procedure: Part II of the FlexPod for VMware Deployment Guide.
Choose a desired name for the zone name and use the WWPNs of the vHBAs of the new server for the configuration (instead of ESXi hosts).
Install RHEL 5 With Kickstart Option
Before the server installation can be started, the NetApp controllers and SAN zoning must be configured completely as shown in the following steps.
The following are the steps to install the initial RHEL:
1. Open the KVM Console of the created Service Profile by clicking on the Service Profile entry. Click KVM Console. A new window appears.
2. Click Tools and then Launch Virtual Media.
3. In the new window add the ISO image rhel-server-5.5-x86_64-dvd.iso
4. From the KVM window click Boot.
5. The server will start booting from the selected RHEL 5.5 DVD.
6. Start the installation process by entering:
linux mpath ks=nfs:<location of the kickstart file> ksdevice=eth0
7. Click Return.
8. The server will be installed as defined in the Kickstart file including all required components and parameters for SAP.
9. The server is ready to use after a reboot.
SAP System Provisioning
Preparation
The following are the steps to install or migrate an SAP system:
1. Provision the new OS image for the new host (bare metal or virtual machine).
2. Configure DNS and NIS for the new SAP system.
3. Provision the storage for the new SAP system.
4. Create necessary subdirectories within the new storage volumes.
5. Mount the file system and configure the IP alias with script fp_sap_system.sh.
6. Start SAPINST to install the new SAP system or migrate the existing one into the FlexPod landscape.
95
SAP System Provisioning
Provisioning of New Operating System
The new OS image is deployed as described in the section Operating System Provisioning SLES on Bare Metal.
DNS and NIS Configuration
Some information must be added to the DNS and NIS configuration for the new SAP system.
The following are the steps to add information to the DNS and NIS configuration:
1. Create the required SAP OS users on the tenant-specific services virtual machine. The following users must be created:
"ora<sid> (group: dba) - Oracle Database Administrator for <SID>
"<sid>adm (group: sapsys) - SAP System Administrator for <SID>
This can be done using the script /mnt/software/scripts/createSAPuser.sh
Usage: createSAPuser.sh <user_type> <SID> <user_id> <group> [<additional_groups> [<password>]]
<user_type> : {adm|ora}, adm = <sid>adm user, ora = ora<sid> user
<SID> : SAP System ID
<user_id> : user ID of the new user
<group> : group ID or name of the primary group of the new user
<additional_groups> : (opt.) list of additional groups (comma separated list of names)
<password> : (opt.) password for the new user
2. Choose available user IDs (user ID >= 1000) for the new users; for example:
/mnt/software/scripts/createSAPuser.sh adm QE6 1001 sapsys 'sapinst,dba,oper' 'myPassword!'
/mnt/software/scripts/createSAPuser.sh ora QE6 1002 dba 'sapinst,oper' 'myPassword!'
3. Add missing service entries on the tenant-specific services virtual machine. Usually the SAP message server entry is missing. This can be done using the script /mnt/software/scripts/addSAPservice.sh:
Usage: addSAPservice.sh <SID> <SN>
<SID> : SAP System ID
<SN> : SAP System number of the CI/SCS
4. Enter the SID and system number of the new system; for example:
/mnt/software/scripts/addSAPservice.sh QE6 00
5. Add DNS entries for the virtual hostnames of the target SAP system to the DNS configuration on the tenant-specific services virtual machine. This can be done using the script /mnt/software/scripts/addDNSHostname.sh:
96
SAP System Provisioning
Usage: addDNSHostname.sh <virtual_hostname>
<virtual_hostname> : the virtual hostname to add (simple or full name)
The following lines show an example for the ABAP central system QE6:
/mnt/software/scripts/addDNSHostname.sh dbqe6
/mnt/software/scripts/addDNSHostname.sh ciqe6
6. To activate the changes:
– Restart the DNS services: service dnsmasq restart.
– Update the NIS maps: /mnt/software/scripts/update_nis.sh.
Storage Provisioning
To provision storage, run the following commands on the NetApp DFM host in the management tenant:
1. Create a dataset for the data volume:
dfpm dataset create -v <provisioning policy> -r < primary vFiler name> <<tenant>_sapdata_<SID> >
For example: dfpm dataset create -v Default -r t002-1-prim t002_sapdata_PA1
2. Add the primary resource pool to the data dataset:
dfpm dataset respool add <<tenant>_sapdata_<SID> > <primary resource pool>
For example: dfpm dataset respool add t002_sapdata_PA1 filer14a
3. Provision the data dataset:
dfpm dataset provision -n sapdata_<SID> -s <size, e.g., 150g> -e nfs -w all -N no -a 0 -S sys <<tenant>_sapdata_<SID> >
For example: dfpm dataset provision -n sapdata_PA1 -s 150g -e nfs -w all -N no -a 0 -S sys t002_sapdata_PA1
4. Create a dataset for the log volume:
dfpm dataset create -v <provisioning policy> -r <primary vFiler name> <<tenant>_saplog_<SID> >
For example: dfpm dataset create -v Default -r t002-1-prim t002_saplog_PA1
5. Add the primary resource pool to the log dataset:
dfpm dataset respool add <<tenant>_saplog_<SID> > <primary resource pool>
For example: dfpm dataset respool add t002_saplog_PA1 filer14a
6. Provision the saplog SID qtree:
dfpm dataset provision -n saplog_<SID> -s <size, e.g. 10g> -e nfs -w all -N no -a 0 -S sys <<tenant>_saplog_<SID> >
For example: dfpm dataset provision -n saplog_PA1 -s 10g -e nfs -w all -N no -a 0 -S sys t002_saplog_PA1
7. Provision the sapusr _SID qtree:
97
SAP System Provisioning
dfpm dataset provision -n sapusr_<SID> -s <size, e.g. 10g> -e nfs -w all -N no -a 0 -S sys <<tenant>_saplog_<SID> >
For example: dfpm dataset provision -n sapusr_PA1 -s 10g -e nfs -w all -N no -a 0 -S sys t001_saplog_PA1
8. Provision the sapusr SMD qtree:
dfpm dataset provision -n sapusr_SMD -s <size, e.g., 10g> -e nfs -w all -N no -a 0 -S sys <<tenant>_saplog_<SID> >
For example: dfpm dataset provision -n sapusr_SMD -s 10g -e nfs -w all -N no -a 0 -S sys t002_saplog_PA1
9. Provision the sapmnt SID qtree:
dfpm dataset provision -n sapmnt_<SID> -s <size, e.g., 10g> -e nfs -w all -N no -a 0 -S sys <<tenant>_saplog_<SID> >
For example: dfpm dataset provision -n sapmnt_PA1 -s 10g -e nfs -w all -N no -a 0 -S sys t002_saplog_PA1
10. Provision the saphome qtree:
dfpm dataset provision -n saphome_<SID> -s <size, e.g., 10g> -e nfs -w all -N no -a 0 -S sys <<tenant>_saplog_<SID> >
For example: dfpm dataset provision -n saphome_PA1 -s 10g -e nfs -w all -N no -a 0 -S sys t002_saplog_PA1
11. Delete the log dataset:
dfpm dataset destroy -f <<tenant>_saplog_<SID> >
For example: dfpm dataset destroy -f t002_saplog_PA1
12. Delete the dataset itself:
dfpm dataset destroy -f <<tenant>_sapdata_<SID> >
For example: dfpm dataset destroy -f t002_saplog_PA1
After the datasets, the volumes, and the qtrees are provisioned, the dataset itself is deleted in the last step because SDU creates the necessary datasets when data protection is configured within SMSAP.
Creating Subdirectories
To create the remaining subdirectories within the qtrees, call the following script on the tenant-specific services virtual machine:
Usage: provision_SAP_storage.sh <tenant number> <SID> <vFiler> [<task>]
<tenant number> : the number of the tenant, e.g. 4 for T004
<SID> : the SAP system ID
<vFiler> : the vFiler name, e.g. t004-1-prim
<task> : {log|data|all}, provision log volume, data volume or both; default: log
For example: t002-0-lnx:/mnt/software/scripts # ./provision_SAP_storage.sh 2 PA1 t002-1-prim all
98
Configuring Backup Services for SAP Systems
Mounting File Systems and Configuring IP Alias
The script fp_sap_system.sh is used to mount the necessary file systems and configure the IP alias. This script is executed at the host where the SAP system will be installed or migrated with the following command:
/mnt/software/scripts/fp_sap_system.sh startmountonly <SID> <abap | java>
The script executes the following tasks:
1. Creates a directory for archive log backups (if none exists)
2. Configures virtual interfaces for the SAP and database services
3. Creates mount points (if none exists)
4. Mounts file systems
SAP System Installation With SAPINST
The SAP system is installed using SAPINST. To get an installation that uses virtual hostnames (necessary to move systems between hosts and for the SAP ACC integration), the xxxxx must be installed in the following order (choosing the distributed system option):
1. Global Host Preparation using SAPINST parameter SAPINST_USE_HOSTNAME=<CI_or_SCS_virtual_hostname>
2. Database Instance using SAPINST parameter SAPINST_USE_HOSTNAME=<DB_virtual_hostname>
3. Central Instance using SAPINST parameter SAPINST_USE_HOSTNAME=<CI_or_JC_virtual_hostname>
Configuring Backup Services for SAP SystemsBackup services can be configured for newly installed or migrated SAP systems as well as for SAP systems created using a system copy with SMSAP.
If backup services have been configured for SAP systems based on a SMSAP system copy, several additional steps must be taken before refreshing this SAP system again. More details can be found in section "Cloning based system copy - system refresh."
The SAP Br*tools, in combination with SMSAP and Protection Manager, are used to back up the SAP systems.
• Brbackup, with the retention class set to the hourly option, is used to create local backups based on Snapshot images at the primary storage. With the retention class set to the daily option, Brbackup is used to create local backups, including data protection with Protection Manager.
• Brarchive is used to back up the archive logs directly to a mount point from the secondary storage and to delete the archive logs at the primary storage.
• Brconnect is used to delete the archive logs at the secondary storage based on a configurable retention policy.
Figure 17 shows how SMSAP and Protection Manager work together with the SAP Br*tools.
99
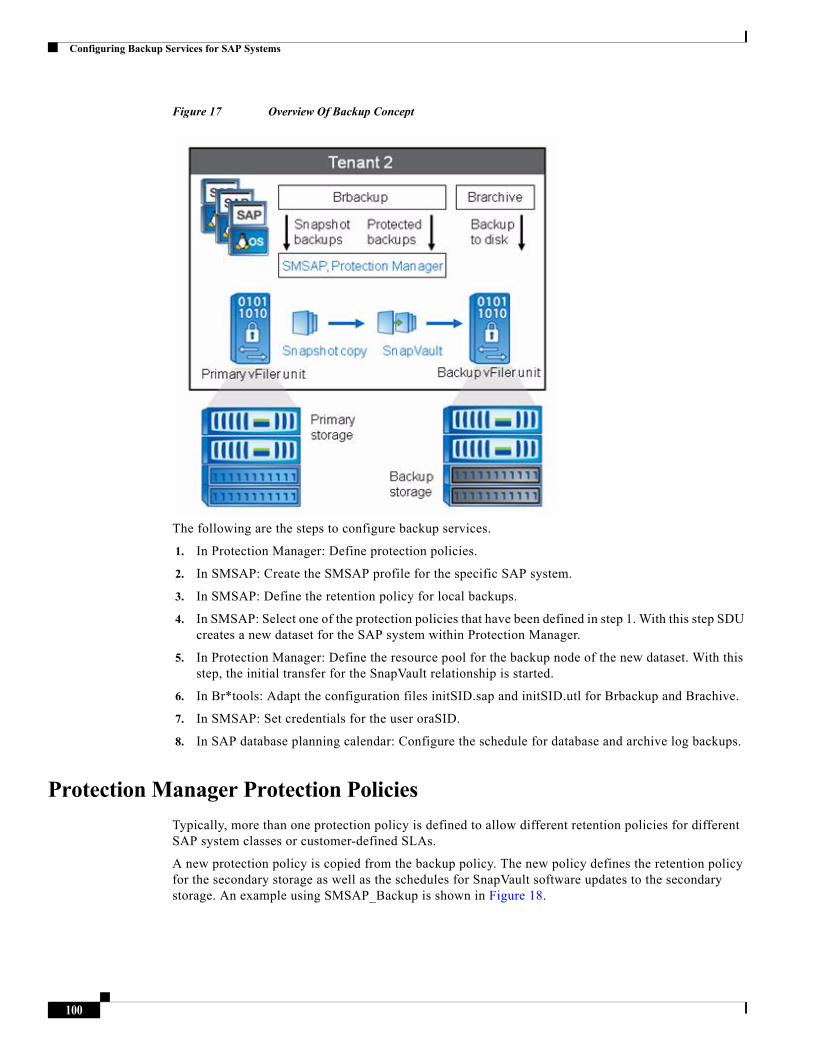
Configuring Backup Services for SAP Systems
Figure 17 Overview Of Backup Concept
The following are the steps to configure backup services.
1. In Protection Manager: Define protection policies.
2. In SMSAP: Create the SMSAP profile for the specific SAP system.
3. In SMSAP: Define the retention policy for local backups.
4. In SMSAP: Select one of the protection policies that have been defined in step 1. With this step SDU creates a new dataset for the SAP system within Protection Manager.
5. In Protection Manager: Define the resource pool for the backup node of the new dataset. With this step, the initial transfer for the SnapVault relationship is started.
6. In Br*tools: Adapt the configuration files initSID.sap and initSID.utl for Brbackup and Brachive.
7. In SMSAP: Set credentials for the user oraSID.
8. In SAP database planning calendar: Configure the schedule for database and archive log backups.
Protection Manager Protection Policies
Typically, more than one protection policy is defined to allow different retention policies for different SAP system classes or customer-defined SLAs.
A new protection policy is copied from the backup policy. The new policy defines the retention policy for the secondary storage as well as the schedules for SnapVault software updates to the secondary storage. An example using SMSAP_Backup is shown in Figure 18.
100
Configuring Backup Services for SAP Systems
Figure 18 Defining the New Protection Policy
Because local Snapshot images are created by SMSAP, the local backup schedule is set to None.
The schedule for SnapVault software updates is configured in Primary data to Backup.
The retention policy at the secondary storage is defined in Backup.
SMSAP Profile Creation
The profile for each SAP system within a tenant can be created using either the SMSAP GUI or the CLI.
Profile Creation Using the Command Line
The following example shows the profile creation for the SAP system PP7 in tenant 2:
t002-24-lnx:~ # smsap profile create -profile PP7 -profile-password ucs4sap! -repository -dbname REP -host t001-smrepo.mgmt.t001.company.corp -port 1521 -login -username smrepo_t002 -database -dbname PP7 -host dbpp7.t002.company.corp -osaccount orapp7 -osgroup dba -comment "Portal PP7"
Enter password for database connection [email protected]:1521/REP: ********
[ INFO] SMSAP-20019: Set password for repository "smrepo_t002@REP/t001-smrepo.mgmt.t001.company.corp:1521" in user credentials for "root".
[ INFO] SMSAP-20020: Set password for profile "PP7" in user credentials for "root".
Operation Id [402882ca2e94f8d3012e94f8d6770009] succeeded.
The SMSAP CLI must be executed at the host where the database PP7 is running.
101
Configuring Backup Services for SAP Systems
Profile Creation Using the SMSAP GUI
The following are the steps to create a profile using the SMSAP GUI:
1. Enter the profile configuration information.
2. Configure the virtual hostname for the database hostname.
3. Enter the host account and host group.
4. Specify the database connection.
5. The response indicates that the profile configuration is complete.
Data Protection Configuration
The following are the steps to configure data protection:
1. Within the profile properties of SMSAP, select the protection policy.
2. SDU automatically creates a dataset within Protection Manager that is linked to the selected protection policy. The new dataset is now visible within Protection Manager.
3. Add a resource pool to the Backup node.
4. Select the resource pool of the secondary storage system.
5. Select the secondary vFiler unit for the specific tenant. For example, the SAP system PE6 is running in tenant 2.
6. The message appears that configuration has successfully been completed.
7. The SnapVault software initial transfer is now started.
8. Protected backups can be scheduled after the initial transfer is finished.
BRBACKUP and BRARCHIVE Configuration
Brbackup is used to create local Snapshot-based backups at the primary storage using the configuration file initSID_hourly.sap. These backups are not replicated to the secondary storage as configured in the initSID_hourly.utl file. A second configuration file is used to configure daily backups, which are replicated to the secondary storage.
Archive log backups are backed up using brrachive with the backup_device_type disk instead of using SMSAP. The destination for the archive log backups is a mount point at the secondary storage. Brconnect is used to delete the archive logs at the secondary storage based on a configurable retention policy in initSID.sap.
Table 11 shows a configuration example for a system with SID=PE6.
102
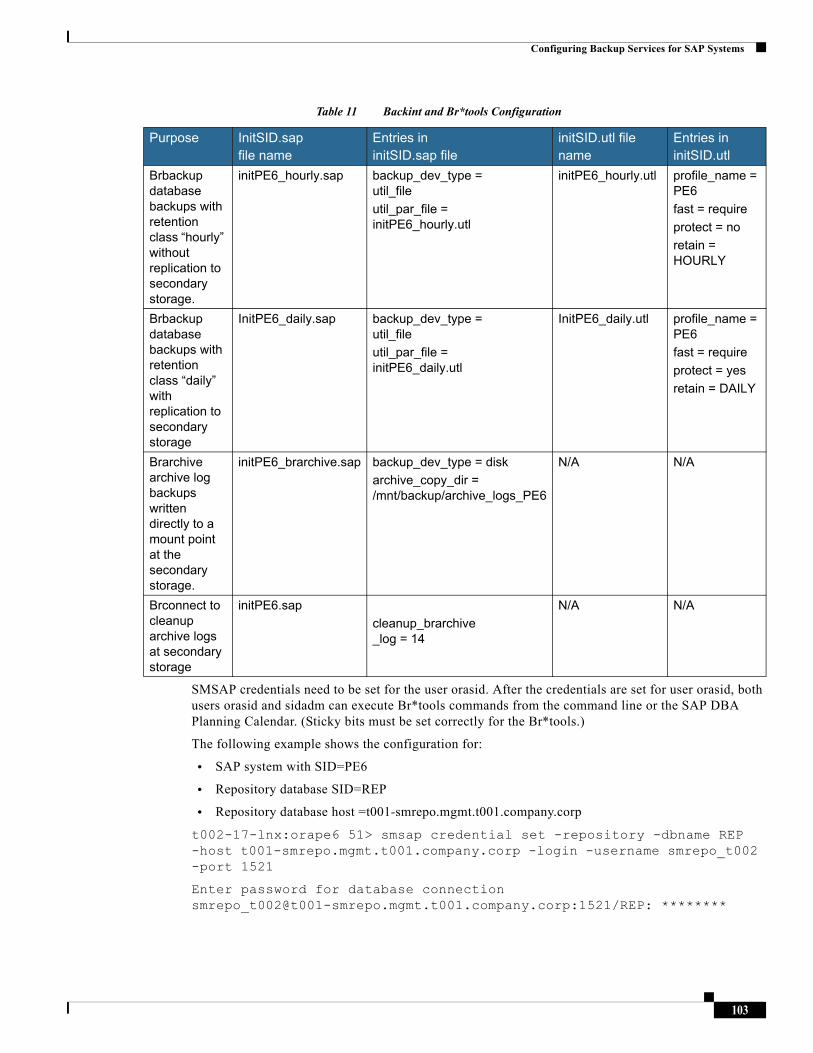
Configuring Backup Services for SAP Systems
Table 11 Backint and Br*tools Configuration
SMSAP credentials need to be set for the user orasid. After the credentials are set for user orasid, both users orasid and sidadm can execute Br*tools commands from the command line or the SAP DBA Planning Calendar. (Sticky bits must be set correctly for the Br*tools.)
The following example shows the configuration for:
• SAP system with SID=PE6
• Repository database SID=REP
• Repository database host =t001-smrepo.mgmt.t001.company.corp
t002-17-lnx:orape6 51> smsap credential set -repository -dbname REP -host t001-smrepo.mgmt.t001.company.corp -login -username smrepo_t002 -port 1521
Enter password for database connection [email protected]:1521/REP: ********
Purpose InitSID.sapfile name
Entries in initSID.sap file
initSID.utl file name
Entries in initSID.utl
Brbackup database backups with retention class “hourly” without replication to secondary storage.
initPE6_hourly.sap backup_dev_type = util_file
util_par_file = initPE6_hourly.utl
initPE6_hourly.utl profile_name = PE6
fast = require
protect = no
retain = HOURLY
Brbackup database backups with retention class “daily” with replication to secondary storage
InitPE6_daily.sap backup_dev_type = util_file
util_par_file = initPE6_daily.utl
InitPE6_daily.utl profile_name = PE6
fast = require
protect = yes
retain = DAILY
Brarchive archive log backups written directly to a mount point at the secondary storage.
initPE6_brarchive.sap backup_dev_type = disk
archive_copy_dir = /mnt/backup/archive_logs_PE6
N/A N/A
Brconnect to cleanup archive logs at secondary storage
initPE6.sap
cleanup_brarchive_log = 14
N/A N/A
103
Configuring ACC For SAP Systems
[ INFO] SMSAP-20019: Set password for repository "smrepo_t002@REP/t001-smrepo.mgmt.t001.company.corp:1521" in user credentials for "orape6".
t002-17-lnx:orape6 52> smsap profile sync -repository -dbname REP -host t001-smrepo.mgmt.t001.company.corp -port 1521 -login -username smrepo_t002
[ INFO] SMSAP-20010: Synchronizing mapping for profiles in repository "smrepo_t002@REP/t001-smrepo.mgmt.t001.company.corp:1521".
[ INFO] SMSAP-20011: Loaded mapping for profile "PE6".
t002-17-lnx:orape6 53> smsap credential set -profile -name PE6
Enter password for profile PE6: ********
[ INFO] SMSAP-20020: Set password for profile "PE6" in user credentials for "orape6".
t002-17-lnx:orape6 54>
After the configuration files have been adapted, database and archive log backups can be scheduled using the SAP DBA Planning Calendar (DB13).
Configuring ACC For SAP SystemsTo be able to monitor and manage SAP systems with the Adaptive Computing Controller (ACC) the infrastructure components and the SAP systems must be configured in ACC
The following are the steps to start any configuration:
1. Open a browser window and go to the ACC start page; for example, http://t001-acc:50000/acc.
2. Log on as Administrator or as any other user with ACC administrative rights.
3. Go to the Configuration tab.
Configuring Virtualization Managers
Before you can integrate information from the VMware virtualization landscape, you must follow the steps below to configure the VMware Virtualization Manager in ACC.
The following are the steps to configure the VMware Virtualization Manager in ACC:
1. Select Virtualization Managers and click on Add. Select the VMware platform.
2. Enter the required information to connect to the VMware Virtual Center.
3. Save the connection information. At this point, ACC can interact with the Virtual Center.
Configuring Pools, Networks, and Characteristics
The different tenants (called "pools" in ACC), their networks, and their characteristics must be identified in ACC. To configure tenant information in ACC, follow the steps below.
Note These steps must be repeated every time a new tenant is provisioned.
104
Configuring ACC For SAP Systems
The following are the steps to configure tenance information in ACC:
1. Select Pools, Networks, and Characteristics and click on Edit and then on Add.
2. Enter the information to create a new pool (or tenant).
3. Select the Networks tab and click Add.
4. Enter the required information for the access LAN.
5. Click Add again to enter the required information for the back-end LAN.
6. Click Save to save the pool and network information just entered.
Configuring Resources
All hosts, virtual machines as well as physical servers, that are to be managed by ACC must be configured first. Follow the steps below to register such resources in ACC.
The following are the teps to register resources in ACC:
1. Select Resources and click Add Resources.
2. Click Expert Mode and select Detect Using Host and Instance Agent as source.
3. Enter the hostnames and the network domain of the hosts to be configured, and set the required credentials for the host agents running on these hosts:
4. Click Detect. The new resource should now be discovered by ACC.
5. Assign the corresponding pool (tenant) to the new resources and click Save.
6. Select one of the newly discovered resources from the list and click on Edit to assign networks to the resources.
7. Check all information on the next screen and test the host agent connection. Verify that the connection works and the AC-Managed flag is set. Then click Next.
8. Check the flags AC-Enabled and AC-Operational.
9. Click Retrieve & Add Interfaces from Host Agent.
10. If more than one host has been discovered in step 0, click Next to start the Mass Configuration. Otherwise click Save to end the configuration.
11. Optionally, for mass configuration only, there is another step: Select all remaining hosts from the list of hosts that have been discovered in step 0 and click Save & Apply Mass Configuration.
12. Click Apply.
Configuring Services
All SAP systems that are to be managed by ACC must be configured first. The steps below describe how to register SAP systems in ACC.
The following are the teps to register SAP systems in ACC:
1. Select Services and click Add Services.
2. Click Expert Mode and select Detect Using Host and Instance Agent as source.
3. Enter the virtual hostnames and the network domain of the SAP systems, and set the required credentials for the host agents running on these hosts.
105
Configuring ACC For SAP Systems
4. Click Detect. The new SAP services should now be discovered by ACC.
5. Select the action Assign to New System and select the correct pool (tenant) for the SAP systems.
6. Click Assign New to create a new representation in ACC for the SAP system. Change the default entries as needed. Then click Assign.
7. Open the new system in the list and select the database instance. Then click Edit.
8. Check all default values and enter the database operator credentials. Then click Next.
9. Set the AC-Enabled flag and select the correct network for the virtual hostname. Then select the OS from the list of Required Resource Type. Click Next.
10. Deselect the flag OS Managed Mounts (Automounter) and click Retrieve Mount List.
11. Click Sort and remove all mount entries that do not belong to the instance. Then click Save to store the information of the database instance.
12. Now select the remaining Central Instance and repeat steps 0 through 0 accordingly. Fill in the information as required.
106
Appendix A—Sample Use Case
Appendix A—Sample Use Case
Provisioning Fenced SAP Systems
The built-in secure multi-tenancy functionality of FlexPod for SAP Applications is also used to cover specific use cases, which require isolation of an SAP system.
One use case is the creation of a Repair System which can be used to address logical errors.
Figure 19 Example of a Repair System Use Case
FlexPod for SAP Applications includes a fully automated workflow for creating a Repair Systems.
• The time stamp of the Repair System can be chosen very flexible, since any SMSAP backup can be chosen as the source.
• A new OS image will be provisioned into the repair tenant
• The required users and services will be configured within the “tenant specific services” in the repair tenant.
• The source system will be cloned using the chosen SMSAP backup.
• The clone will be moved to the repair tenant.
• The database and SAP system will be started in the repair tenant.
The creation of the Repair System is done in a few minutes and the problem analysis can be started.
107

Appendix B—Naming Conventions and Prerequisites
Appendix B—Naming Conventions and Prerequisites
SAP Service Names
Naming convention for the SAP services names (virtual hostnames):
• ci<sid>: Central instance service
• db<sid>: Database service
• jc>sid>: Java component
• scs<sid>: SAP central services
• ascs<sid>: ABAP central services (used for HA installations)
• lc<sid>: Live Cache
• trx<sid>: TREX instance
• ers<sid>: Enqueue Replication Server
• app<sn><sid>: ABAP dialog instance
• j<sn><sid>: Java dialog instance
• <sid> = lowercase
• <sn> = two-digit system number
These host names and IP addresses must be available within the DNS service in the tenant.
Table 12 shows the storage layout for ABAP and the JAVA Central system.
Table 12 Storage Layout for ABAP and JAVA Central System
<SID>= uppercase, <sid>=lowercase, <tenant>=tenant name
FlexVol® Volume Qtree Subdirectory To Be Mounted
Mountpoint at SAP Server
<tenant>_sapdata_<SID> sapdata_<SID> sapdata1 /oracle/<SID>/sapdata1
sapdata2 /oracle/<SID>/sapdata2
sapdata3 /oracle/<SID>/sapdata3
sapdata4 /oracle/<SID>/sapdata4
<tenant>_saplog_<SID> saplog_<SID> /oracle
sapusr_<SID> /usr/sap/<SID>
sapusr_SMD /usr/sap/SMD
sapmnt_<SID> /sapmnt/<SID>
saphome_<SID> <sid>adm /home/<sid>adm
smdadm /home/smdadm
<tenant>_share sap trans /usr/sap/trans
tmp /usr/sap/tmp
ccms /usr/sap/ccms
108
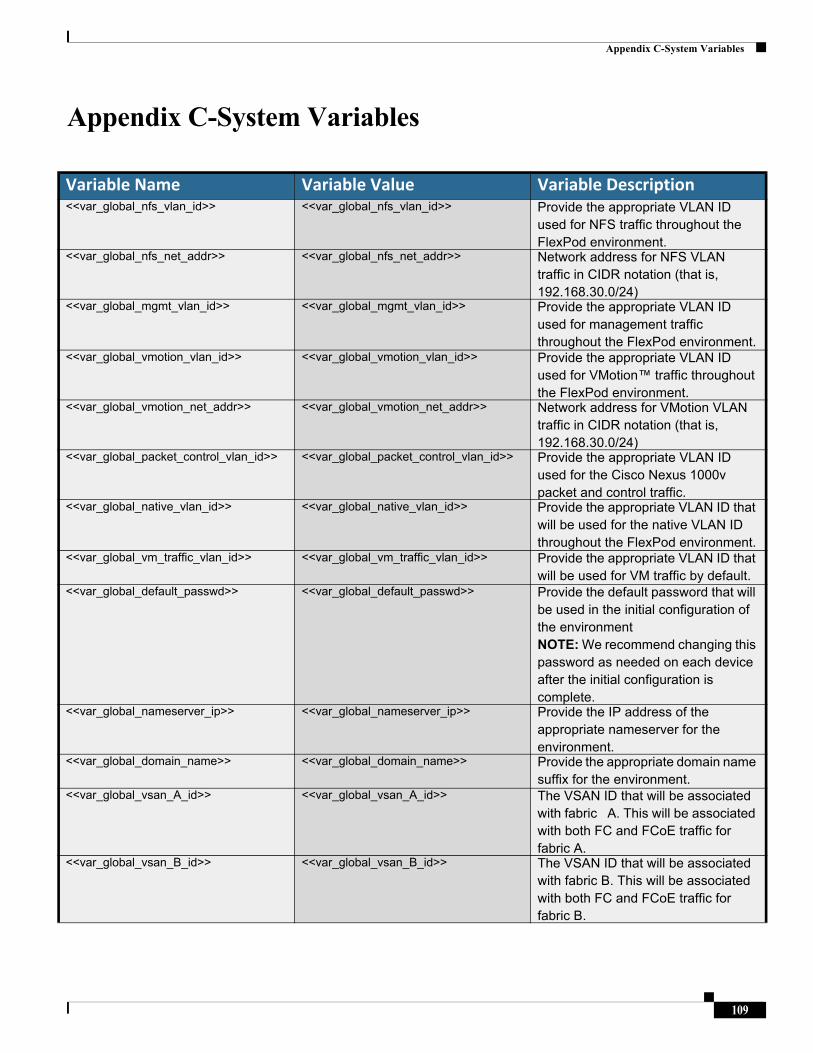
Appendix C-System Variables
Appendix C-System Variables
Variable Name Variable Value Variable Description<<var_global_nfs_vlan_id>> <<var_global_nfs_vlan_id>> Provide the appropriate VLAN ID
used for NFS traffic throughout the FlexPod environment.
<<var_global_nfs_net_addr>> <<var_global_nfs_net_addr>> Network address for NFS VLAN traffic in CIDR notation (that is, 192.168.30.0/24)
<<var_global_mgmt_vlan_id>> <<var_global_mgmt_vlan_id>> Provide the appropriate VLAN ID used for management traffic throughout the FlexPod environment.
<<var_global_vmotion_vlan_id>> <<var_global_vmotion_vlan_id>> Provide the appropriate VLAN ID used for VMotion™ traffic throughout the FlexPod environment.
<<var_global_vmotion_net_addr>> <<var_global_vmotion_net_addr>> Network address for VMotion VLAN traffic in CIDR notation (that is, 192.168.30.0/24)
<<var_global_packet_control_vlan_id>> <<var_global_packet_control_vlan_id>> Provide the appropriate VLAN ID used for the Cisco Nexus 1000v packet and control traffic.
<<var_global_native_vlan_id>> <<var_global_native_vlan_id>> Provide the appropriate VLAN ID that will be used for the native VLAN ID throughout the FlexPod environment.
<<var_global_vm_traffic_vlan_id>> <<var_global_vm_traffic_vlan_id>> Provide the appropriate VLAN ID that will be used for VM traffic by default.
<<var_global_default_passwd>> <<var_global_default_passwd>> Provide the default password that will be used in the initial configuration of the environmentNOTE: We recommend changing this password as needed on each device after the initial configuration is complete.
<<var_global_nameserver_ip>> <<var_global_nameserver_ip>> Provide the IP address of the appropriate nameserver for the environment.
<<var_global_domain_name>> <<var_global_domain_name>> Provide the appropriate domain name suffix for the environment.
<<var_global_vsan_A_id>> <<var_global_vsan_A_id>> The VSAN ID that will be associated with fabric A. This will be associated with both FC and FCoE traffic for fabric A.
<<var_global_vsan_B_id>> <<var_global_vsan_B_id>> The VSAN ID that will be associated with fabric B. This will be associated with both FC and FCoE traffic for fabric B.
109
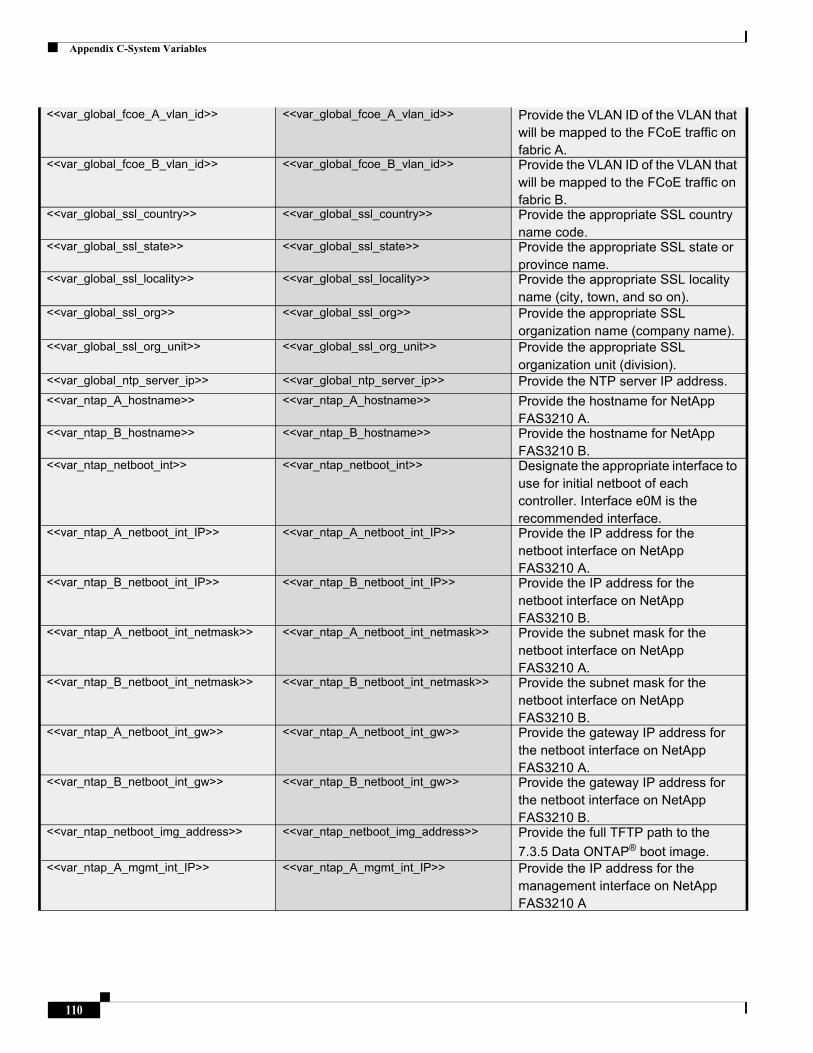
Appendix C-System Variables
<<var_global_fcoe_A_vlan_id>> <<var_global_fcoe_A_vlan_id>> Provide the VLAN ID of the VLAN that will be mapped to the FCoE traffic on fabric A.
<<var_global_fcoe_B_vlan_id>> <<var_global_fcoe_B_vlan_id>> Provide the VLAN ID of the VLAN that will be mapped to the FCoE traffic on fabric B.
<<var_global_ssl_country>> <<var_global_ssl_country>> Provide the appropriate SSL country name code.
<<var_global_ssl_state>> <<var_global_ssl_state>> Provide the appropriate SSL state or province name.
<<var_global_ssl_locality>> <<var_global_ssl_locality>> Provide the appropriate SSL locality name (city, town, and so on).
<<var_global_ssl_org>> <<var_global_ssl_org>> Provide the appropriate SSL organization name (company name).
<<var_global_ssl_org_unit>> <<var_global_ssl_org_unit>> Provide the appropriate SSL organization unit (division).
<<var_global_ntp_server_ip>> <<var_global_ntp_server_ip>> Provide the NTP server IP address.
<<var_ntap_A_hostname>> <<var_ntap_A_hostname>> Provide the hostname for NetApp FAS3210 A.
<<var_ntap_B_hostname>> <<var_ntap_B_hostname>> Provide the hostname for NetApp FAS3210 B.
<<var_ntap_netboot_int>> <<var_ntap_netboot_int>> Designate the appropriate interface to use for initial netboot of each controller. Interface e0M is the recommended interface.
<<var_ntap_A_netboot_int_IP>> <<var_ntap_A_netboot_int_IP>> Provide the IP address for the netboot interface on NetApp FAS3210 A.
<<var_ntap_B_netboot_int_IP>> <<var_ntap_B_netboot_int_IP>> Provide the IP address for the netboot interface on NetApp FAS3210 B.
<<var_ntap_A_netboot_int_netmask>> <<var_ntap_A_netboot_int_netmask>> Provide the subnet mask for the netboot interface on NetApp FAS3210 A.
<<var_ntap_B_netboot_int_netmask>> <<var_ntap_B_netboot_int_netmask>> Provide the subnet mask for the netboot interface on NetApp FAS3210 B.
<<var_ntap_A_netboot_int_gw>> <<var_ntap_A_netboot_int_gw>> Provide the gateway IP address for the netboot interface on NetApp FAS3210 A.
<<var_ntap_B_netboot_int_gw>> <<var_ntap_B_netboot_int_gw>> Provide the gateway IP address for the netboot interface on NetApp FAS3210 B.
<<var_ntap_netboot_img_address>> <<var_ntap_netboot_img_address>> Provide the full TFTP path to the
7.3.5 Data ONTAP® boot image.<<var_ntap_A_mgmt_int_IP>> <<var_ntap_A_mgmt_int_IP>> Provide the IP address for the
management interface on NetApp FAS3210 A
110
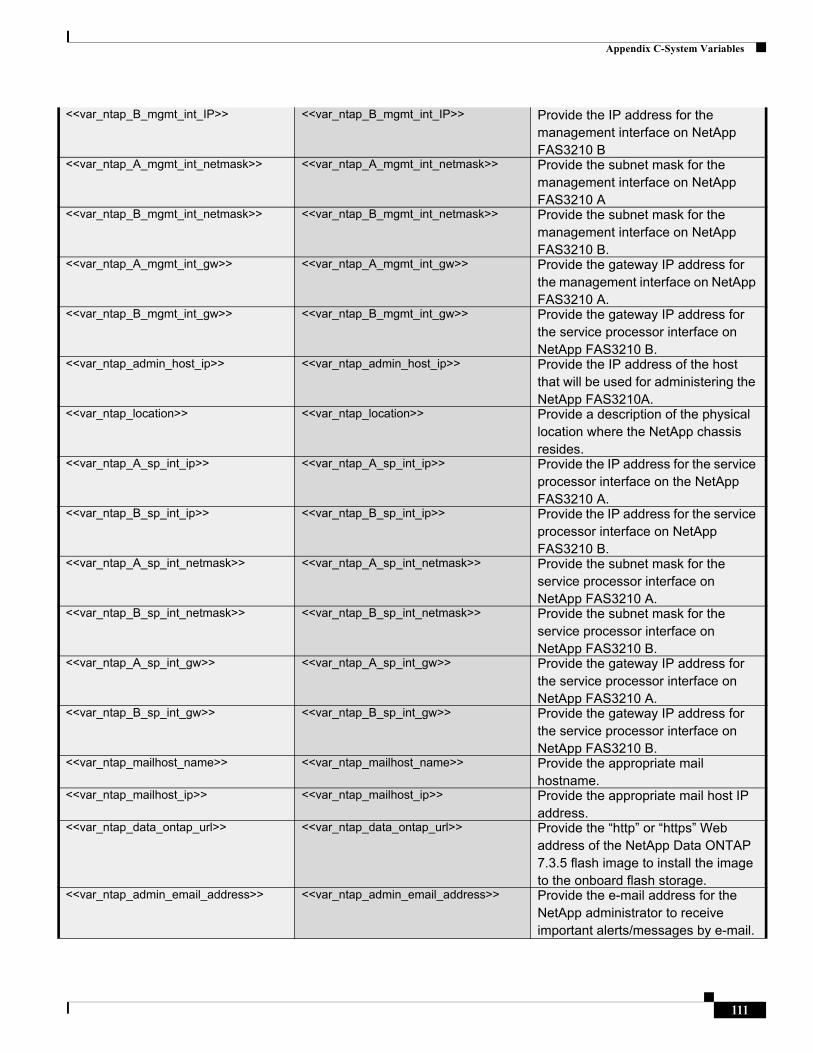
Appendix C-System Variables
<<var_ntap_B_mgmt_int_IP>> <<var_ntap_B_mgmt_int_IP>> Provide the IP address for the management interface on NetApp FAS3210 B
<<var_ntap_A_mgmt_int_netmask>> <<var_ntap_A_mgmt_int_netmask>> Provide the subnet mask for the management interface on NetApp FAS3210 A
<<var_ntap_B_mgmt_int_netmask>> <<var_ntap_B_mgmt_int_netmask>> Provide the subnet mask for the management interface on NetApp FAS3210 B.
<<var_ntap_A_mgmt_int_gw>> <<var_ntap_A_mgmt_int_gw>> Provide the gateway IP address for the management interface on NetApp FAS3210 A.
<<var_ntap_B_mgmt_int_gw>> <<var_ntap_B_mgmt_int_gw>> Provide the gateway IP address for the service processor interface on NetApp FAS3210 B.
<<var_ntap_admin_host_ip>> <<var_ntap_admin_host_ip>> Provide the IP address of the host that will be used for administering the NetApp FAS3210A.
<<var_ntap_location>> <<var_ntap_location>> Provide a description of the physical location where the NetApp chassis resides.
<<var_ntap_A_sp_int_ip>> <<var_ntap_A_sp_int_ip>> Provide the IP address for the service processor interface on the NetApp FAS3210 A.
<<var_ntap_B_sp_int_ip>> <<var_ntap_B_sp_int_ip>> Provide the IP address for the service processor interface on NetApp FAS3210 B.
<<var_ntap_A_sp_int_netmask>> <<var_ntap_A_sp_int_netmask>> Provide the subnet mask for the service processor interface on NetApp FAS3210 A.
<<var_ntap_B_sp_int_netmask>> <<var_ntap_B_sp_int_netmask>> Provide the subnet mask for the service processor interface on NetApp FAS3210 B.
<<var_ntap_A_sp_int_gw>> <<var_ntap_A_sp_int_gw>> Provide the gateway IP address for the service processor interface on NetApp FAS3210 A.
<<var_ntap_B_sp_int_gw>> <<var_ntap_B_sp_int_gw>> Provide the gateway IP address for the service processor interface on NetApp FAS3210 B.
<<var_ntap_mailhost_name>> <<var_ntap_mailhost_name>> Provide the appropriate mail hostname.
<<var_ntap_mailhost_ip>> <<var_ntap_mailhost_ip>> Provide the appropriate mail host IP address.
<<var_ntap_data_ontap_url>> <<var_ntap_data_ontap_url>> Provide the “http” or “https” Web address of the NetApp Data ONTAP 7.3.5 flash image to install the image to the onboard flash storage.
<<var_ntap_admin_email_address>> <<var_ntap_admin_email_address>> Provide the e-mail address for the NetApp administrator to receive important alerts/messages by e-mail.
111
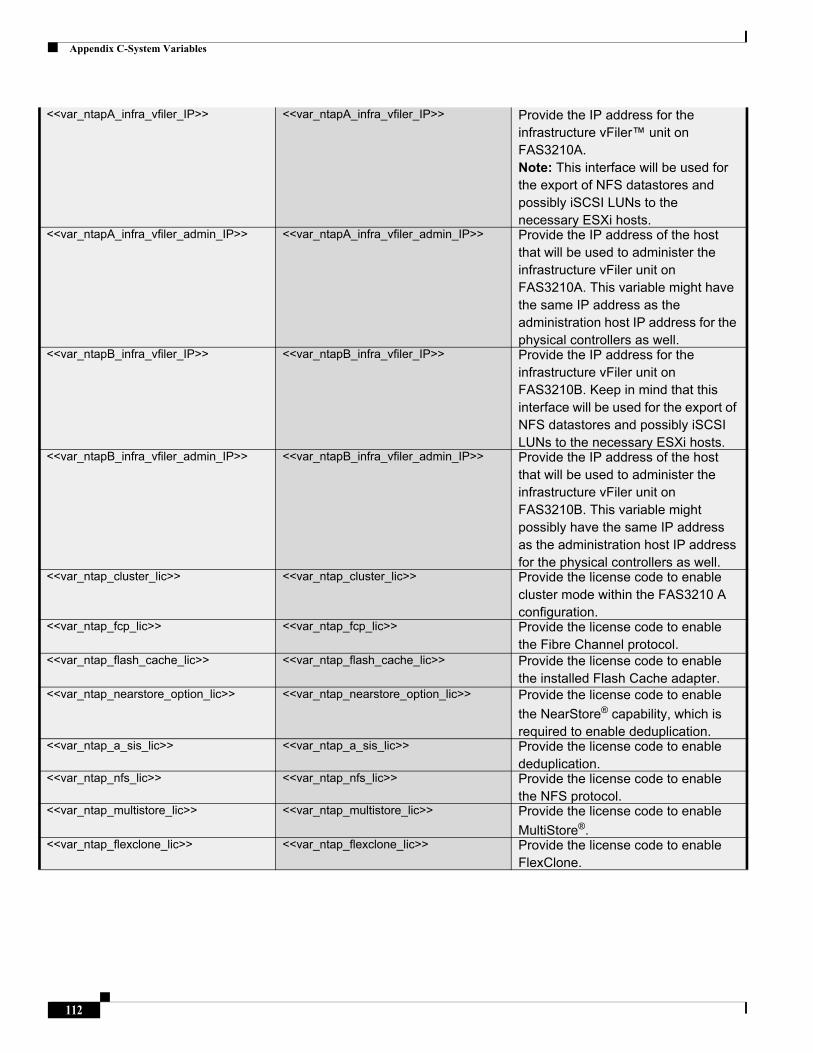
Appendix C-System Variables
<<var_ntapA_infra_vfiler_IP>> <<var_ntapA_infra_vfiler_IP>> Provide the IP address for the infrastructure vFiler™ unit on FAS3210A. Note: This interface will be used for the export of NFS datastores and possibly iSCSI LUNs to the necessary ESXi hosts.
<<var_ntapA_infra_vfiler_admin_IP>> <<var_ntapA_infra_vfiler_admin_IP>> Provide the IP address of the host that will be used to administer the infrastructure vFiler unit on FAS3210A. This variable might have the same IP address as the administration host IP address for the physical controllers as well.
<<var_ntapB_infra_vfiler_IP>> <<var_ntapB_infra_vfiler_IP>> Provide the IP address for the infrastructure vFiler unit on FAS3210B. Keep in mind that this interface will be used for the export of NFS datastores and possibly iSCSI LUNs to the necessary ESXi hosts.
<<var_ntapB_infra_vfiler_admin_IP>> <<var_ntapB_infra_vfiler_admin_IP>> Provide the IP address of the host that will be used to administer the infrastructure vFiler unit on FAS3210B. This variable might possibly have the same IP address as the administration host IP address for the physical controllers as well.
<<var_ntap_cluster_lic>> <<var_ntap_cluster_lic>> Provide the license code to enable cluster mode within the FAS3210 A configuration.
<<var_ntap_fcp_lic>> <<var_ntap_fcp_lic>> Provide the license code to enable the Fibre Channel protocol.
<<var_ntap_flash_cache_lic>> <<var_ntap_flash_cache_lic>> Provide the license code to enable the installed Flash Cache adapter.
<<var_ntap_nearstore_option_lic>> <<var_ntap_nearstore_option_lic>> Provide the license code to enable
the NearStore® capability, which is required to enable deduplication.
<<var_ntap_a_sis_lic>> <<var_ntap_a_sis_lic>> Provide the license code to enable deduplication.
<<var_ntap_nfs_lic>> <<var_ntap_nfs_lic>> Provide the license code to enable the NFS protocol.
<<var_ntap_multistore_lic>> <<var_ntap_multistore_lic>> Provide the license code to enable
MultiStore®.<<var_ntap_flexclone_lic>> <<var_ntap_flexclone_lic>> Provide the license code to enable
FlexClone.
112
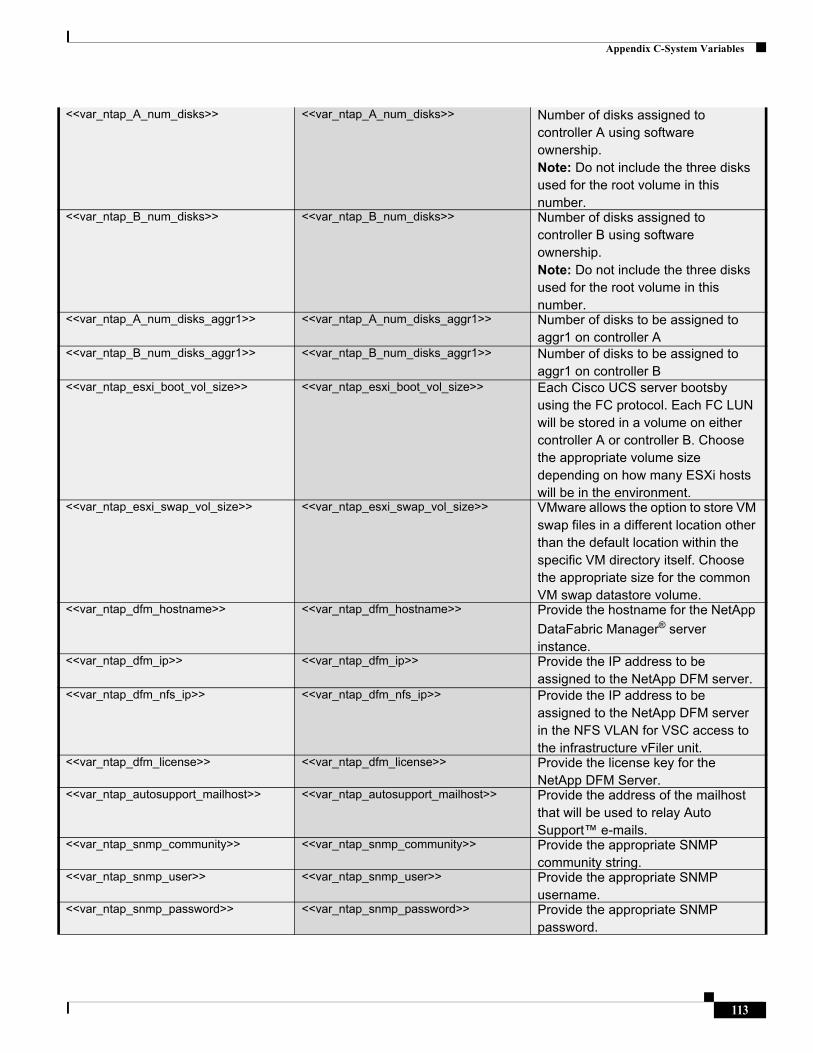
Appendix C-System Variables
<<var_ntap_A_num_disks>> <<var_ntap_A_num_disks>> Number of disks assigned to controller A using software ownership. Note: Do not include the three disks used for the root volume in this number.
<<var_ntap_B_num_disks>> <<var_ntap_B_num_disks>> Number of disks assigned to controller B using software ownership. Note: Do not include the three disks used for the root volume in this number.
<<var_ntap_A_num_disks_aggr1>> <<var_ntap_A_num_disks_aggr1>> Number of disks to be assigned to aggr1 on controller A
<<var_ntap_B_num_disks_aggr1>> <<var_ntap_B_num_disks_aggr1>> Number of disks to be assigned to aggr1 on controller B
<<var_ntap_esxi_boot_vol_size>> <<var_ntap_esxi_boot_vol_size>> Each Cisco UCS server bootsby using the FC protocol. Each FC LUN will be stored in a volume on either controller A or controller B. Choose the appropriate volume size depending on how many ESXi hosts will be in the environment.
<<var_ntap_esxi_swap_vol_size>> <<var_ntap_esxi_swap_vol_size>> VMware allows the option to store VM swap files in a different location other than the default location within the specific VM directory itself. Choose the appropriate size for the common VM swap datastore volume.
<<var_ntap_dfm_hostname>> <<var_ntap_dfm_hostname>> Provide the hostname for the NetApp
DataFabric Manager® server instance.
<<var_ntap_dfm_ip>> <<var_ntap_dfm_ip>> Provide the IP address to be assigned to the NetApp DFM server.
<<var_ntap_dfm_nfs_ip>> <<var_ntap_dfm_nfs_ip>> Provide the IP address to be assigned to the NetApp DFM server in the NFS VLAN for VSC access to the infrastructure vFiler unit.
<<var_ntap_dfm_license>> <<var_ntap_dfm_license>> Provide the license key for the NetApp DFM Server.
<<var_ntap_autosupport_mailhost>> <<var_ntap_autosupport_mailhost>> Provide the address of the mailhost that will be used to relay Auto Support™ e-mails.
<<var_ntap_snmp_community>> <<var_ntap_snmp_community>> Provide the appropriate SNMP community string.
<<var_ntap_snmp_user>> <<var_ntap_snmp_user>> Provide the appropriate SNMP username.
<<var_ntap_snmp_password>> <<var_ntap_snmp_password>> Provide the appropriate SNMP password.
113

Appendix C-System Variables
<<var_ntap_snmp_traphost>> <<var_ntap_snmp_traphost>> Provide the IP address or hostname for the SNMP traphost.
<<var_ntap_snmp_request_role>> <<var_ntap_snmp_request_role>> Provides the request role for SNMP.
<<var_ntap_snmp_managers>> <<var_ntap_snmp_managers>> Users who have the ability to manage SNMP.
<<var_ntap_snmp_site_name>> <<var_ntap_snmp_site_name>> Provides the site name as required by SNMP.
<<var_ntap_ent_snmp_trap_dest>> <<var_ntap_ent_snmp_trap_dest>> Provides the appropriate enterprise SNMP trap destination.
<<var_nexus_A_hostname>> <<var_nexus_A_hostname>> Provide the hostname for the Cisco Nexus 5548 A.
<<var_nexus_B_hostname>> <<var_nexus_B_hostname>> Provide the hostname for the Cisco Nexus 5548 B.
<<var_nexus_A_mgmt0_IP>> <<var_nexus_A_mgmt0_IP>> Provide the IP address for the mgmt0 interface on the Cisco Nexus 5548 A.
<<var_nexus_B_mgmt0_IP>> <<var_nexus_B_mgmt0_IP>> Provide the IP address for the mgmt0 interface on the Cisco Nexus 5548 B.
<<var_nexus_A_mgmt0_netmask>> <<var_nexus_A_mgmt0_netmask>> Provide the subnet mask for the mgmt0 interface on the Cisco Nexus 5548 A.
<<var_nexus_B_mgmt0_netmask>> <<var_nexus_B_mgmt0_netmask>> Provide the subnet mask for the mgmt0 interface on the Cisco Nexus 5548 B.
<<var_nexus_A_mgmt0_gw>> <<var_nexus_A_mgmt0_gw>> Provide the gateway IP address for the mgmt0 interface on the Cisco Nexus 5548 A.
<<var_nexus_B_mgmt0_gw>> <<var_nexus_B_mgmt0_gw>> Provide the gateway IP address for the mgmt0 interface on the Cisco Nexus 5548 B.
<<var_nexus_vpc_domain_id>> <<var_nexus_vpc_domain_id>> Provide a unique vPC domain ID for the environment.
<<var_n1010_A_hostname <<var_n1010_A_hostname Provide a host name for the Cisco Nexus 1010 A virtual appliance.
<<var_n1010_B_hostname <<var_n1010_B_hostname Provide a host name for the Cisco Nexus 1010 B virtual appliance.
<<var_n1010_A_cimc_ip>> <<var_n1010_A_cimc_ip>> Provide the IP address for the out-of-band management interface or CIMC on the Cisco Nexus 1010 A appliance.
<<var_n1010_A_cimc_netmask>> <<var_n1010_A_cimc_netmask>> Provide the netmask for the out-of-band management interface or CIMC on the Cisco Nexus 1010 A appliance.
<<var_n1010_A_cimc_gw>> <<var_n1010_A_cimc_gw>> Provide the gateway for the out-of-band management interface or CIMC on the Cisco Nexus 1010 A appliance.
<<var_n1010_hostname>> <<var_n1010_hostname>> Provide the host name for the Cisco Nexus 1010 A virtual appliance.
114
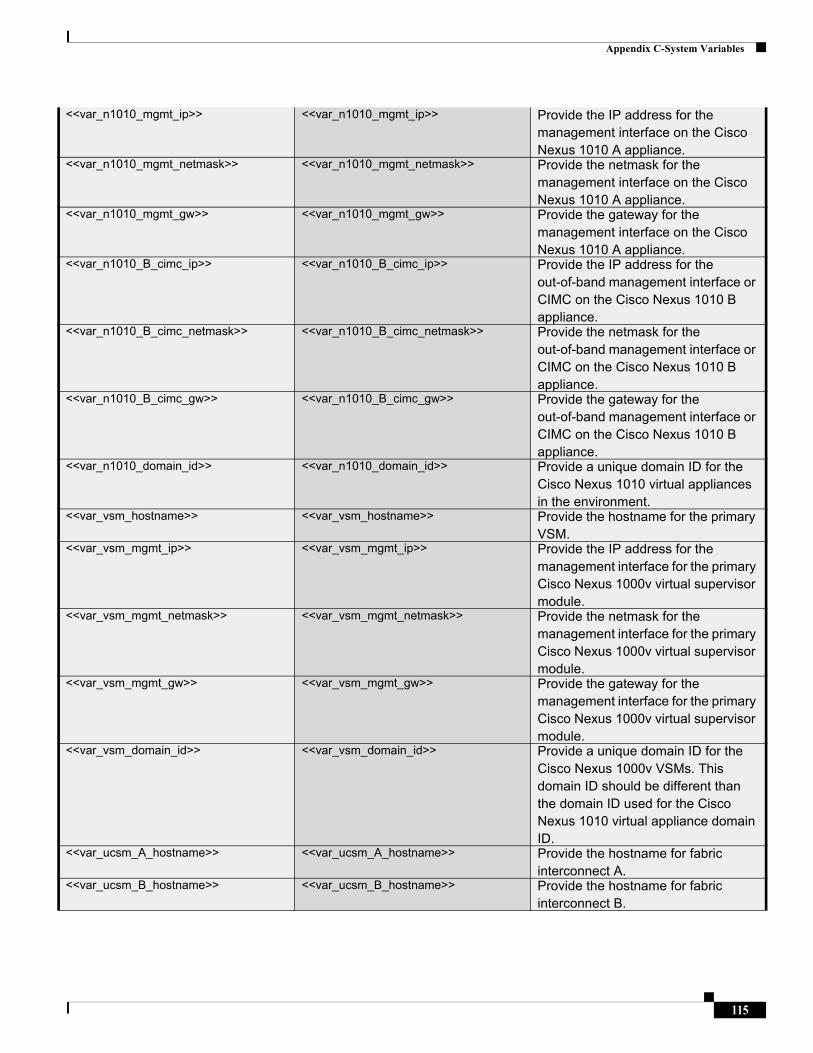
Appendix C-System Variables
<<var_n1010_mgmt_ip>> <<var_n1010_mgmt_ip>> Provide the IP address for the management interface on the Cisco Nexus 1010 A appliance.
<<var_n1010_mgmt_netmask>> <<var_n1010_mgmt_netmask>> Provide the netmask for the management interface on the Cisco Nexus 1010 A appliance.
<<var_n1010_mgmt_gw>> <<var_n1010_mgmt_gw>> Provide the gateway for the management interface on the Cisco Nexus 1010 A appliance.
<<var_n1010_B_cimc_ip>> <<var_n1010_B_cimc_ip>> Provide the IP address for the out-of-band management interface or CIMC on the Cisco Nexus 1010 B appliance.
<<var_n1010_B_cimc_netmask>> <<var_n1010_B_cimc_netmask>> Provide the netmask for the out-of-band management interface or CIMC on the Cisco Nexus 1010 B appliance.
<<var_n1010_B_cimc_gw>> <<var_n1010_B_cimc_gw>> Provide the gateway for the out-of-band management interface or CIMC on the Cisco Nexus 1010 B appliance.
<<var_n1010_domain_id>> <<var_n1010_domain_id>> Provide a unique domain ID for the Cisco Nexus 1010 virtual appliances in the environment.
<<var_vsm_hostname>> <<var_vsm_hostname>> Provide the hostname for the primary VSM.
<<var_vsm_mgmt_ip>> <<var_vsm_mgmt_ip>> Provide the IP address for the management interface for the primary Cisco Nexus 1000v virtual supervisor module.
<<var_vsm_mgmt_netmask>> <<var_vsm_mgmt_netmask>> Provide the netmask for the management interface for the primary Cisco Nexus 1000v virtual supervisor module.
<<var_vsm_mgmt_gw>> <<var_vsm_mgmt_gw>> Provide the gateway for the management interface for the primary Cisco Nexus 1000v virtual supervisor module.
<<var_vsm_domain_id>> <<var_vsm_domain_id>> Provide a unique domain ID for the Cisco Nexus 1000v VSMs. This domain ID should be different than the domain ID used for the Cisco Nexus 1010 virtual appliance domain ID.
<<var_ucsm_A_hostname>> <<var_ucsm_A_hostname>> Provide the hostname for fabric interconnect A.
<<var_ucsm_B_hostname>> <<var_ucsm_B_hostname>> Provide the hostname for fabric interconnect B.
115
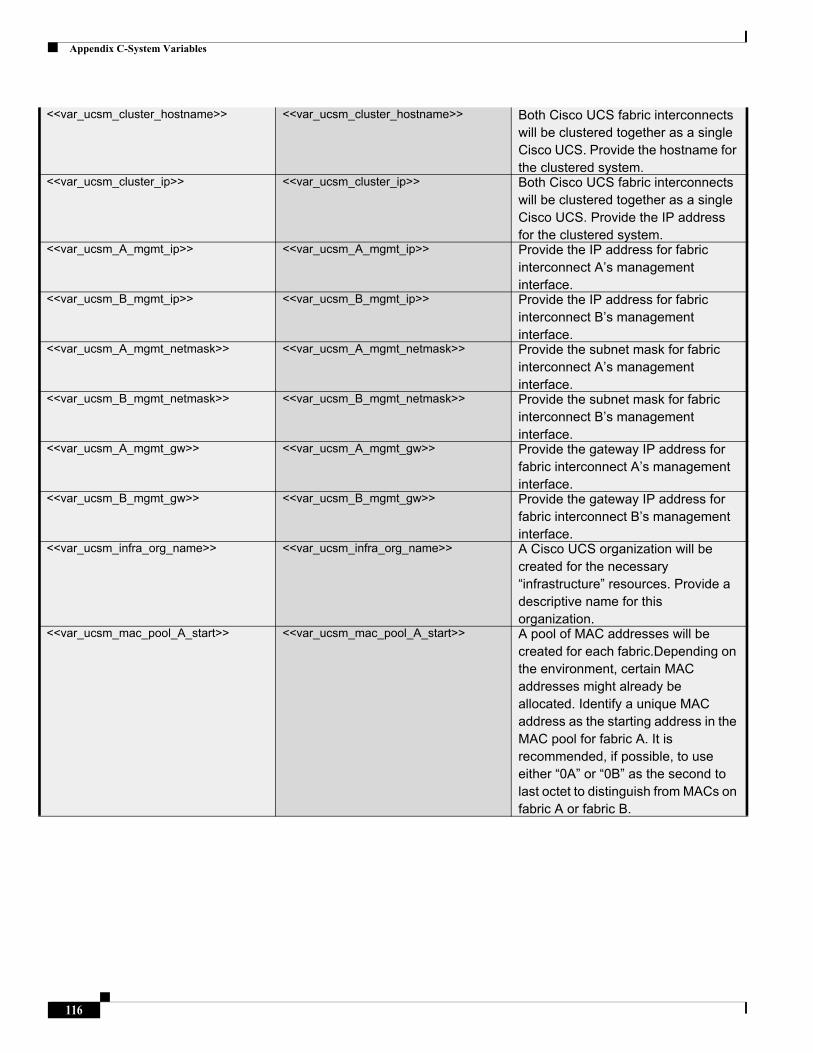
Appendix C-System Variables
<<var_ucsm_cluster_hostname>> <<var_ucsm_cluster_hostname>> Both Cisco UCS fabric interconnects will be clustered together as a single Cisco UCS. Provide the hostname for the clustered system.
<<var_ucsm_cluster_ip>> <<var_ucsm_cluster_ip>> Both Cisco UCS fabric interconnects will be clustered together as a single Cisco UCS. Provide the IP address for the clustered system.
<<var_ucsm_A_mgmt_ip>> <<var_ucsm_A_mgmt_ip>> Provide the IP address for fabric interconnect A’s management interface.
<<var_ucsm_B_mgmt_ip>> <<var_ucsm_B_mgmt_ip>> Provide the IP address for fabric interconnect B’s management interface.
<<var_ucsm_A_mgmt_netmask>> <<var_ucsm_A_mgmt_netmask>> Provide the subnet mask for fabric interconnect A’s management interface.
<<var_ucsm_B_mgmt_netmask>> <<var_ucsm_B_mgmt_netmask>> Provide the subnet mask for fabric interconnect B’s management interface.
<<var_ucsm_A_mgmt_gw>> <<var_ucsm_A_mgmt_gw>> Provide the gateway IP address for fabric interconnect A’s management interface.
<<var_ucsm_B_mgmt_gw>> <<var_ucsm_B_mgmt_gw>> Provide the gateway IP address for fabric interconnect B’s management interface.
<<var_ucsm_infra_org_name>> <<var_ucsm_infra_org_name>> A Cisco UCS organization will be created for the necessary “infrastructure” resources. Provide a descriptive name for this organization.
<<var_ucsm_mac_pool_A_start>> <<var_ucsm_mac_pool_A_start>> A pool of MAC addresses will be created for each fabric.Depending on the environment, certain MAC addresses might already be allocated. Identify a unique MAC address as the starting address in the MAC pool for fabric A. It is recommended, if possible, to use either “0A” or “0B” as the second to last octet to distinguish from MACs on fabric A or fabric B.
116
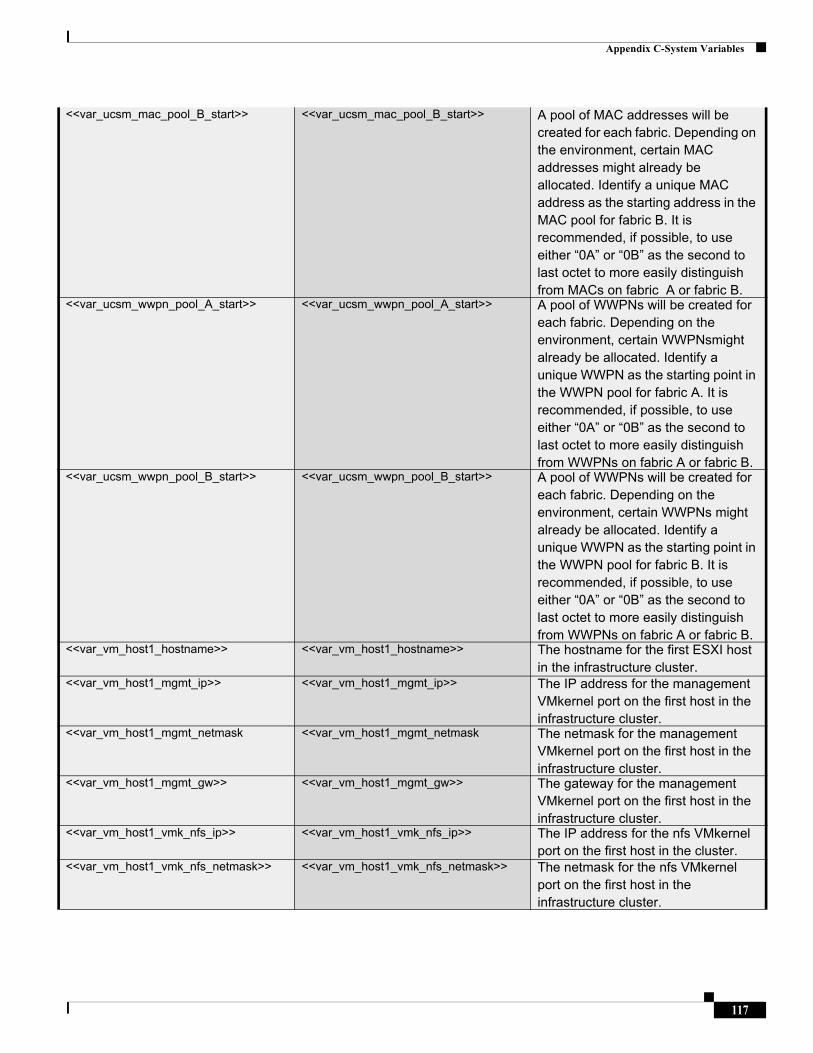
Appendix C-System Variables
<<var_ucsm_mac_pool_B_start>> <<var_ucsm_mac_pool_B_start>> A pool of MAC addresses will be created for each fabric. Depending on the environment, certain MAC addresses might already be allocated. Identify a unique MAC address as the starting address in the MAC pool for fabric B. It is recommended, if possible, to use either “0A” or “0B” as the second to last octet to more easily distinguish from MACs on fabric A or fabric B.
<<var_ucsm_wwpn_pool_A_start>> <<var_ucsm_wwpn_pool_A_start>> A pool of WWPNs will be created for each fabric. Depending on the environment, certain WWPNsmight already be allocated. Identify a unique WWPN as the starting point in the WWPN pool for fabric A. It is recommended, if possible, to use either “0A” or “0B” as the second to last octet to more easily distinguish from WWPNs on fabric A or fabric B.
<<var_ucsm_wwpn_pool_B_start>> <<var_ucsm_wwpn_pool_B_start>> A pool of WWPNs will be created for each fabric. Depending on the environment, certain WWPNs might already be allocated. Identify a unique WWPN as the starting point in the WWPN pool for fabric B. It is recommended, if possible, to use either “0A” or “0B” as the second to last octet to more easily distinguish from WWPNs on fabric A or fabric B.
<<var_vm_host1_hostname>> <<var_vm_host1_hostname>> The hostname for the first ESXI host in the infrastructure cluster.
<<var_vm_host1_mgmt_ip>> <<var_vm_host1_mgmt_ip>> The IP address for the management VMkernel port on the first host in the infrastructure cluster.
<<var_vm_host1_mgmt_netmask <<var_vm_host1_mgmt_netmask The netmask for the management VMkernel port on the first host in the infrastructure cluster.
<<var_vm_host1_mgmt_gw>> <<var_vm_host1_mgmt_gw>> The gateway for the management VMkernel port on the first host in the infrastructure cluster.
<<var_vm_host1_vmk_nfs_ip>> <<var_vm_host1_vmk_nfs_ip>> The IP address for the nfs VMkernel port on the first host in the cluster.
<<var_vm_host1_vmk_nfs_netmask>> <<var_vm_host1_vmk_nfs_netmask>> The netmask for the nfs VMkernel port on the first host in the infrastructure cluster.
117
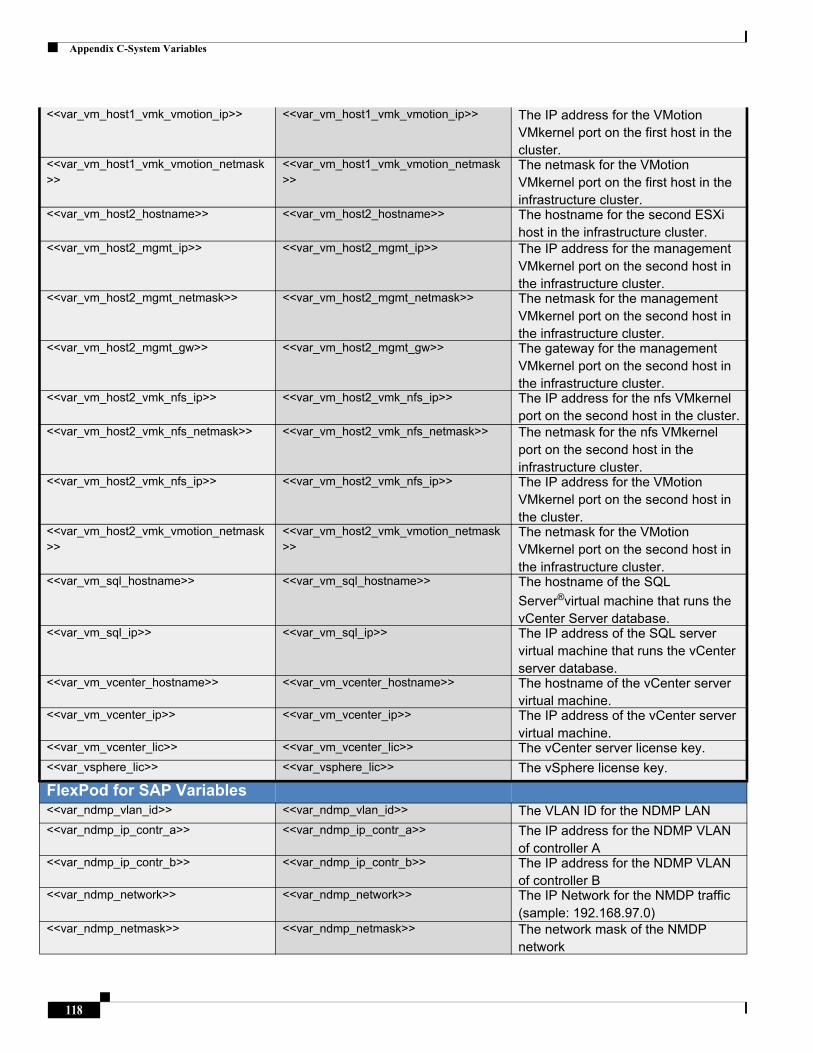
Appendix C-System Variables
<<var_vm_host1_vmk_vmotion_ip>> <<var_vm_host1_vmk_vmotion_ip>> The IP address for the VMotion VMkernel port on the first host in the cluster.
<<var_vm_host1_vmk_vmotion_netmask>>
<<var_vm_host1_vmk_vmotion_netmask>>
The netmask for the VMotion VMkernel port on the first host in the infrastructure cluster.
<<var_vm_host2_hostname>> <<var_vm_host2_hostname>> The hostname for the second ESXi host in the infrastructure cluster.
<<var_vm_host2_mgmt_ip>> <<var_vm_host2_mgmt_ip>> The IP address for the management VMkernel port on the second host in the infrastructure cluster.
<<var_vm_host2_mgmt_netmask>> <<var_vm_host2_mgmt_netmask>> The netmask for the management VMkernel port on the second host in the infrastructure cluster.
<<var_vm_host2_mgmt_gw>> <<var_vm_host2_mgmt_gw>> The gateway for the management VMkernel port on the second host in the infrastructure cluster.
<<var_vm_host2_vmk_nfs_ip>> <<var_vm_host2_vmk_nfs_ip>> The IP address for the nfs VMkernel port on the second host in the cluster.
<<var_vm_host2_vmk_nfs_netmask>> <<var_vm_host2_vmk_nfs_netmask>> The netmask for the nfs VMkernel port on the second host in the infrastructure cluster.
<<var_vm_host2_vmk_nfs_ip>> <<var_vm_host2_vmk_nfs_ip>> The IP address for the VMotion VMkernel port on the second host in the cluster.
<<var_vm_host2_vmk_vmotion_netmask>>
<<var_vm_host2_vmk_vmotion_netmask>>
The netmask for the VMotion VMkernel port on the second host in the infrastructure cluster.
<<var_vm_sql_hostname>> <<var_vm_sql_hostname>> The hostname of the SQL
Server®virtual machine that runs the vCenter Server database.
<<var_vm_sql_ip>> <<var_vm_sql_ip>> The IP address of the SQL server virtual machine that runs the vCenter server database.
<<var_vm_vcenter_hostname>> <<var_vm_vcenter_hostname>> The hostname of the vCenter server virtual machine.
<<var_vm_vcenter_ip>> <<var_vm_vcenter_ip>> The IP address of the vCenter server virtual machine.
<<var_vm_vcenter_lic>> <<var_vm_vcenter_lic>> The vCenter server license key.
<<var_vsphere_lic>> <<var_vsphere_lic>> The vSphere license key.
FlexPod for SAP Variables <<var_ndmp_vlan_id>> <<var_ndmp_vlan_id>> The VLAN ID for the NDMP LAN
<<var_ndmp_ip_contr_a>> <<var_ndmp_ip_contr_a>> The IP address for the NDMP VLAN of controller A
<<var_ndmp_ip_contr_b>> <<var_ndmp_ip_contr_b>> The IP address for the NDMP VLAN of controller B
<<var_ndmp_network>> <<var_ndmp_network>> The IP Network for the NMDP traffic (sample: 192.168.97.0)
<<var_ndmp_netmask>> <<var_ndmp_netmask>> The network mask of the NMDP network
118
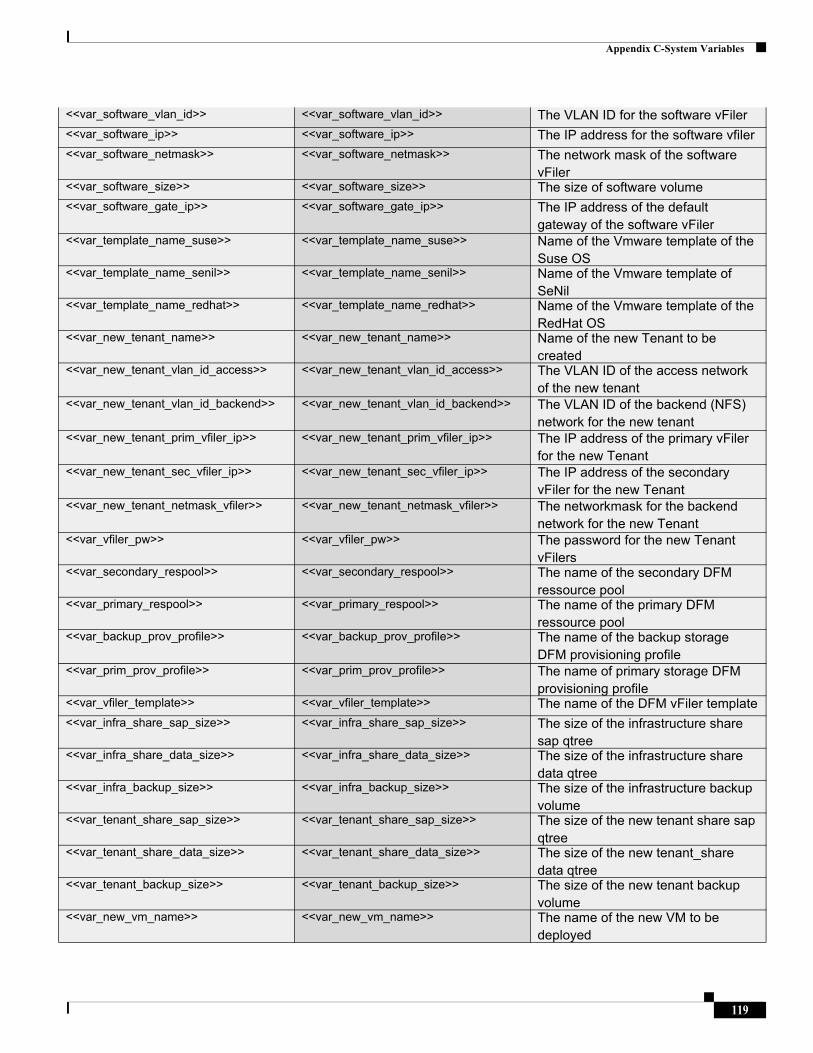
Appendix C-System Variables
<<var_software_vlan_id>> <<var_software_vlan_id>> The VLAN ID for the software vFiler
<<var_software_ip>> <<var_software_ip>> The IP address for the software vfiler
<<var_software_netmask>> <<var_software_netmask>> The network mask of the software vFiler
<<var_software_size>> <<var_software_size>> The size of software volume
<<var_software_gate_ip>> <<var_software_gate_ip>> The IP address of the default gateway of the software vFiler
<<var_template_name_suse>> <<var_template_name_suse>> Name of the Vmware template of the Suse OS
<<var_template_name_senil>> <<var_template_name_senil>> Name of the Vmware template of SeNil
<<var_template_name_redhat>> <<var_template_name_redhat>> Name of the Vmware template of the RedHat OS
<<var_new_tenant_name>> <<var_new_tenant_name>> Name of the new Tenant to be created
<<var_new_tenant_vlan_id_access>> <<var_new_tenant_vlan_id_access>> The VLAN ID of the access network of the new tenant
<<var_new_tenant_vlan_id_backend>> <<var_new_tenant_vlan_id_backend>> The VLAN ID of the backend (NFS) network for the new tenant
<<var_new_tenant_prim_vfiler_ip>> <<var_new_tenant_prim_vfiler_ip>> The IP address of the primary vFiler for the new Tenant
<<var_new_tenant_sec_vfiler_ip>> <<var_new_tenant_sec_vfiler_ip>> The IP address of the secondary vFiler for the new Tenant
<<var_new_tenant_netmask_vfiler>> <<var_new_tenant_netmask_vfiler>> The networkmask for the backend network for the new Tenant
<<var_vfiler_pw>> <<var_vfiler_pw>> The password for the new Tenant vFilers
<<var_secondary_respool>> <<var_secondary_respool>> The name of the secondary DFM ressource pool
<<var_primary_respool>> <<var_primary_respool>> The name of the primary DFM ressource pool
<<var_backup_prov_profile>> <<var_backup_prov_profile>> The name of the backup storage DFM provisioning profile
<<var_prim_prov_profile>> <<var_prim_prov_profile>> The name of primary storage DFM provisioning profile
<<var_vfiler_template>> <<var_vfiler_template>> The name of the DFM vFiler template
<<var_infra_share_sap_size>> <<var_infra_share_sap_size>> The size of the infrastructure share sap qtree
<<var_infra_share_data_size>> <<var_infra_share_data_size>> The size of the infrastructure share data qtree
<<var_infra_backup_size>> <<var_infra_backup_size>> The size of the infrastructure backup volume
<<var_tenant_share_sap_size>> <<var_tenant_share_sap_size>> The size of the new tenant share sap qtree
<<var_tenant_share_data_size>> <<var_tenant_share_data_size>> The size of the new tenant_share data qtree
<<var_tenant_backup_size>> <<var_tenant_backup_size>> The size of the new tenant backup volume
<<var_new_vm_name>> <<var_new_vm_name>> The name of the new VM to be deployed
119
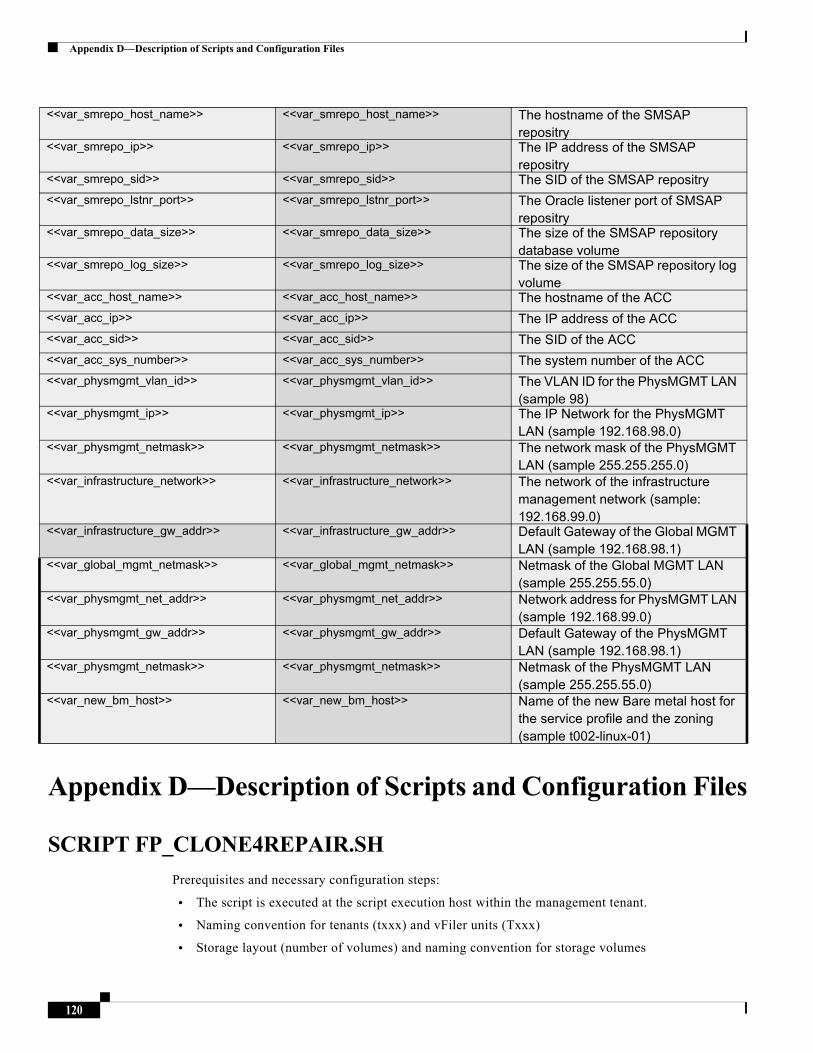
Appendix D—Description of Scripts and Configuration Files
Appendix D—Description of Scripts and Configuration Files
SCRIPT FP_CLONE4REPAIR.SH
Prerequisites and necessary configuration steps:
• The script is executed at the script execution host within the management tenant.
• Naming convention for tenants (txxx) and vFiler units (Txxx)
• Storage layout (number of volumes) and naming convention for storage volumes
<<var_smrepo_host_name>> <<var_smrepo_host_name>> The hostname of the SMSAP repositry
<<var_smrepo_ip>> <<var_smrepo_ip>> The IP address of the SMSAP repositry
<<var_smrepo_sid>> <<var_smrepo_sid>> The SID of the SMSAP repositry
<<var_smrepo_lstnr_port>> <<var_smrepo_lstnr_port>> The Oracle listener port of SMSAP repositry
<<var_smrepo_data_size>> <<var_smrepo_data_size>> The size of the SMSAP repository database volume
<<var_smrepo_log_size>> <<var_smrepo_log_size>> The size of the SMSAP repository log volume
<<var_acc_host_name>> <<var_acc_host_name>> The hostname of the ACC
<<var_acc_ip>> <<var_acc_ip>> The IP address of the ACC
<<var_acc_sid>> <<var_acc_sid>> The SID of the ACC
<<var_acc_sys_number>> <<var_acc_sys_number>> The system number of the ACC
<<var_physmgmt_vlan_id>> <<var_physmgmt_vlan_id>> The VLAN ID for the PhysMGMT LAN (sample 98)
<<var_physmgmt_ip>> <<var_physmgmt_ip>> The IP Network for the PhysMGMT LAN (sample 192.168.98.0)
<<var_physmgmt_netmask>> <<var_physmgmt_netmask>> The network mask of the PhysMGMT LAN (sample 255.255.255.0)
<<var_infrastructure_network>> <<var_infrastructure_network>> The network of the infrastructure management network (sample: 192.168.99.0)
<<var_infrastructure_gw_addr>> <<var_infrastructure_gw_addr>> Default Gateway of the Global MGMT LAN (sample 192.168.98.1)
<<var_global_mgmt_netmask>> <<var_global_mgmt_netmask>> Netmask of the Global MGMT LAN (sample 255.255.55.0)
<<var_physmgmt_net_addr>> <<var_physmgmt_net_addr>> Network address for PhysMGMT LAN (sample 192.168.99.0)
<<var_physmgmt_gw_addr>> <<var_physmgmt_gw_addr>> Default Gateway of the PhysMGMT LAN (sample 192.168.98.1)
<<var_physmgmt_netmask>> <<var_physmgmt_netmask>> Netmask of the PhysMGMT LAN (sample 255.255.55.0)
<<var_new_bm_host>> <<var_new_bm_host>> Name of the new Bare metal host for the service profile and the zoning (sample t002-linux-01)
120
Appendix D—Description of Scripts and Configuration Files
Usage: fp_clone4repair.sh <create|delete>
<hostname physical storage controller>
<target tenant>
<smsap_backup_label>
<smsap_backup_profile>
Where:
Create. Create the clone volumes and attach them to the target vFiler unit
Delete. Delete the clone volumes and detach them from the target vFiler unit
Hostname physical storage controller. Physical storage controller, where the tenants are hosted
Tenant. Tenant name where the repair or test system should run
smsap_backup_label. Label of the backup of the source system as shown with the SMSAP GUI
smsap_backup_profile. Profile name of the source SAP system as configured within SMSAP
With the create parameter, the script executes the following tasks:
1. Identifies parent volume and snapshot names using an SMSAP call with <smsap_backup_label> and <smsap_profile_name>.
2. Creates and executes FlexClone volumes using dfm run cmd at the physical storage controller . with these parent volume and Snapshot copy names.
3. Attaches the FlexClone volumes to the target vFiler unit using dfm run cmd executed at the physical storage controller.
4. Configures the FlexClone volumes for export using dfm run cmd executed at the physical storage controller.
5. With the delete parameter, the script executes the following tasks:
6. Identifies parent volume and snapshot names using an SMSAP call with <smsap_backup_label> and <smsap_profile_name>.
7. Removes the FlexClone volumes from the target vFiler unit using dfm run cmd executed at the physical storage controller.
8. Destroys FlexClone volumes using dfm run cmd executed at the physical storage controller
SCRIPT FP_SAP_SYSTEM.SH
The script is executed on a host within tenant, where the SAP system is running.
These are the prerequisites and limitations:
• The tenant name is extracted from the host name.
• The standardized volume, qtree, and directory structure, including naming convention, is used.
• The naming convention for SAP service names (virtual hostnames) has been followed.
• The SAP system is installed "adaptive enabled"
• The OS image must not contain entries for the SAP system in the /etc/fstab file.
• The script does not support SAP Systems that are based on SMSAP clones.
• The script uses hard coded mount options
121
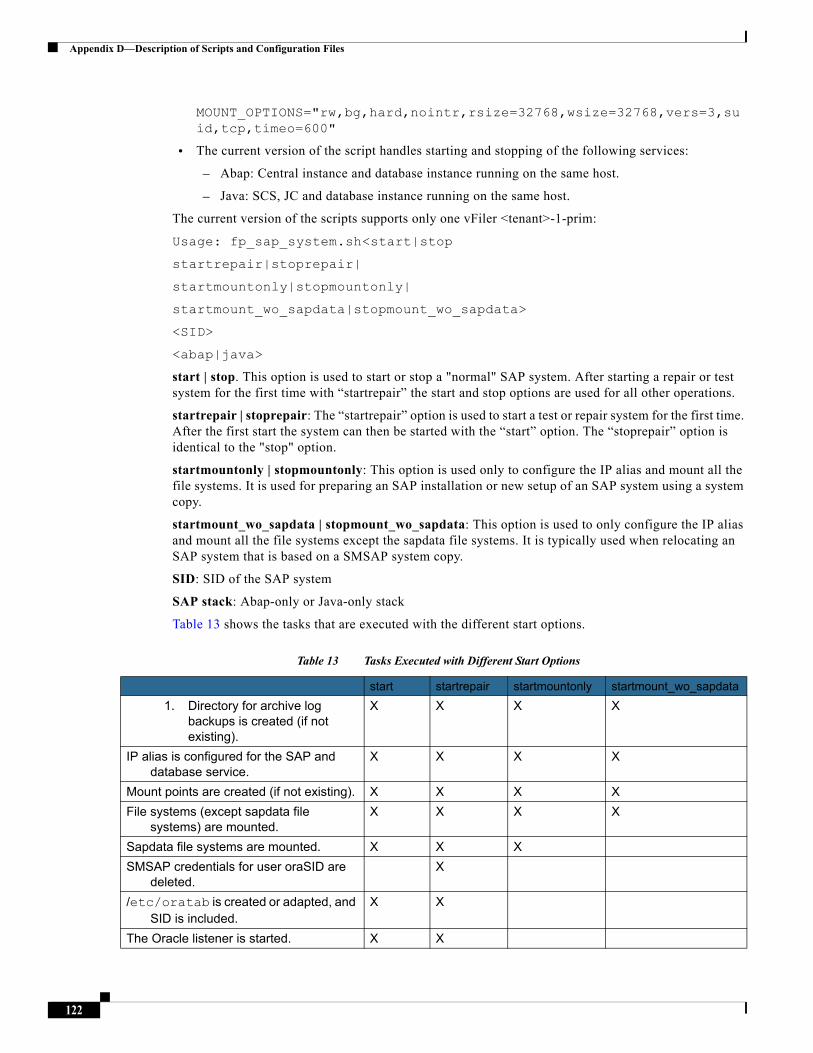
Appendix D—Description of Scripts and Configuration Files
MOUNT_OPTIONS="rw,bg,hard,nointr,rsize=32768,wsize=32768,vers=3,suid,tcp,timeo=600"
• The current version of the script handles starting and stopping of the following services:
– Abap: Central instance and database instance running on the same host.
– Java: SCS, JC and database instance running on the same host.
The current version of the scripts supports only one vFiler <tenant>-1-prim:
Usage: fp_sap_system.sh<start|stop
startrepair|stoprepair|
startmountonly|stopmountonly|
startmount_wo_sapdata|stopmount_wo_sapdata>
<SID>
<abap|java>
start | stop. This option is used to start or stop a "normal" SAP system. After starting a repair or test system for the first time with “startrepair” the start and stop options are used for all other operations.
startrepair | stoprepair: The “startrepair” option is used to start a test or repair system for the first time. After the first start the system can then be started with the “start” option. The “stoprepair” option is identical to the "stop" option.
startmountonly | stopmountonly: This option is used only to configure the IP alias and mount all the file systems. It is used for preparing an SAP installation or new setup of an SAP system using a system copy.
startmount_wo_sapdata | stopmount_wo_sapdata: This option is used to only configure the IP alias and mount all the file systems except the sapdata file systems. It is typically used when relocating an SAP system that is based on a SMSAP system copy.
SID: SID of the SAP system
SAP stack: Abap-only or Java-only stack
Table 13 shows the tasks that are executed with the different start options.
Table 13 Tasks Executed with Different Start Options
start startrepair startmountonly startmount_wo_sapdata
1. Directory for archive log backups is created (if not existing).
X X X X
IP alias is configured for the SAP and database service.
X X X X
Mount points are created (if not existing). X X X X
File systems (except sapdata file systems) are mounted.
X X X X
Sapdata file systems are mounted. X X X
SMSAP credentials for user oraSID are deleted.
X
/etc/oratab is created or adapted, and SID is included.
X X
The Oracle listener is started. X X
122
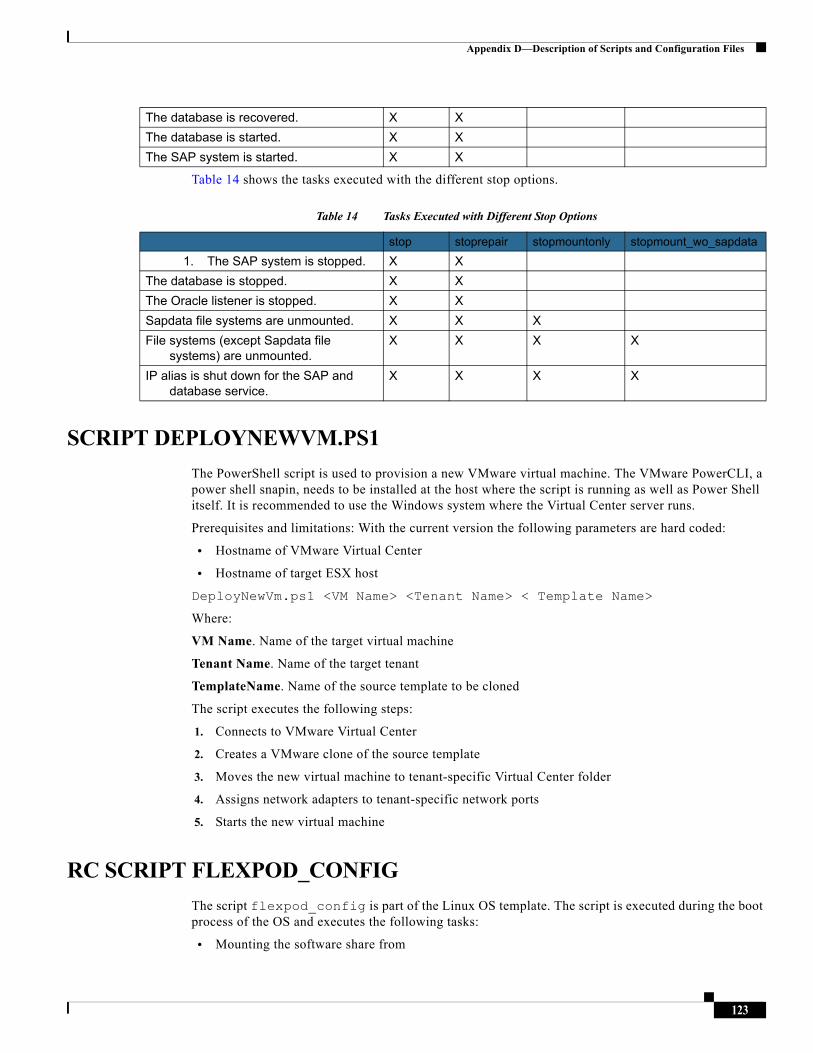
Appendix D—Description of Scripts and Configuration Files
Table 14 shows the tasks executed with the different stop options.
Table 14 Tasks Executed with Different Stop Options
SCRIPT DEPLOYNEWVM.PS1
The PowerShell script is used to provision a new VMware virtual machine. The VMware PowerCLI, a power shell snapin, needs to be installed at the host where the script is running as well as Power Shell itself. It is recommended to use the Windows system where the Virtual Center server runs.
Prerequisites and limitations: With the current version the following parameters are hard coded:
• Hostname of VMware Virtual Center
• Hostname of target ESX host
DeployNewVm.ps1 <VM Name> <Tenant Name> < Template Name>
Where:
VM Name. Name of the target virtual machine
Tenant Name. Name of the target tenant
TemplateName. Name of the source template to be cloned
The script executes the following steps:
1. Connects to VMware Virtual Center
2. Creates a VMware clone of the source template
3. Moves the new virtual machine to tenant-specific Virtual Center folder
4. Assigns network adapters to tenant-specific network ports
5. Starts the new virtual machine
RC SCRIPT FLEXPOD_CONFIG
The script flexpod_config is part of the Linux OS template. The script is executed during the boot process of the OS and executes the following tasks:
• Mounting the software share from
The database is recovered. X X
The database is started. X X
The SAP system is started. X X
stop stoprepair stopmountonly stopmount_wo_sapdata
1. The SAP system is stopped. X X
The database is stopped. X X
The Oracle listener is stopped. X X
Sapdata file systems are unmounted. X X X
File systems (except Sapdata file systems) are unmounted.
X X X X
IP alias is shut down for the SAP and database service.
X X X X
123

Appendix D—Description of Scripts and Configuration Files
software.company.corp:/vol/software to /mnt/software
• Mounting the backup volume for archive log backups from
"$TENANT"-1-bck:/vol/"$TENANT"_backup/data to /mnt/backup
• Mounting the shared data volume from
"$TENANT"-1-prim:/vol/"$TENANT"_share/data to /mnt/data
In addition, the script starts the script /opt/NetApp/FlexPod/set_sdu_password.sh in the background to set the SDU passwords. The script set_sdu_password.sh waits until the SDU deamon is started and executes the following commands:
• Setting SDU password for user root at primary vFiler unit "$TENANT"-1-prim
• Setting SDU password for user root at backup vFiler unit "$TENANT"-1-bck
SMSAP CLONING SPECIFICATION FILE
Sample cloning specifiaction files are available for SAP system copies.
• New system setup based on SMSAP cloning
File:Clone_PE6_DE6_new_setup.xml
• Refresh of an SAP system based on SMSAP cloning
File: Clone_PE6_DE6_refresh.xml
These files can easily be adapted by replacing the source and target SID values.
The sample file for system refresh also includes the necessary configuration for the post-cloning plugins that are used to configure the ops$ authentication as well as to delete batch jobs in the target system.
SCRIPT SET_SMSAP_CREDENTIALS.SH
The script is used to set the necessary SMSAP credentials so that the script fp_clone4repair.sh can execute SMSAP commands.
With the current version, the following parameters are hard coded:
• Same password for repository, root user at target host and SMSAP profile
• Hostname of repository database: t001-smrepo.mgmt.t001.company.corp
• Listener port of repository database
Usage: set_smsap_credentials.sh <SID> <TENANT NAME>
<SID> : the SAP system ID
<TENANT NAME> : tenant name where the SAP system runs
The script executes the following tasks:
• Sets credentials for the tenant-specific repository
• Syncs the profiles of the repository
• Sets credentials for the profile
• Sets credentials for the host
124
Appendix D—Description of Scripts and Configuration Files
SCRIPT CREATE_VFILER.SH
This script simplifies the provisioning of a new Tenant into the existing FlexPod Solution. Typically when provisioning a new Tenant, the storage administrator would have to manually perform a set of tasks: from creating vFiler units for that Tenant, to provisioning FlexVol volumes and shares and protecting those using SnapVault and Protection Manager.
This script can replace those manual steps and automate those tasks by delivering the following results:
Creates two initial vFiler units for a new tenant:
• tenant-1-prim
• tenant-1-bck
Creates additional vFiler unitss for an existing tenant:
• tenant-2-prim tenant-3-prim, tenant-4-prim
Provision Operations Manager datasets:
• tenant_share (qtree(s) data, sap)
• tenant_backup (qtree data)
Configures Protection Manager to protect the datasets:
• Tenant_share (Backup)
• Tenant_backup (Local backups only)
The script should be executed with root privileges from the DFM server using the following syntax:
# create_vfiler.sh <tenant_parameter_file>
Where <tenant_parameter_file> is a file containing variables to be parsed by the script, these variables define tenant specific parameters such as tenant name, resource pools to use, network configuration.
For each tenant, a new parameter file should be created and edited accordingly.
Parameter TENANTNAME should contain the tenant name for the new tenant; this must be a unique name, as it is used in several objects within the flexpod solution, such as vFiler units and datasets.
As an example, the following could be used as tenant names: t002, t003, t004, t005. The recommendation is to keep t001 for the infrastructure tenant.
Parameter VFILERTEMPLATE contains the Provisioning Manager vFiler template to use during the setup of the vFiler unit for the new tenant.
Parameter PROVPFLNAS and PROVPFLSEC contain the protection policies to use with the datasets on primary(PROVPFLNAS) and secondary(PROVPFLSEC)
Parameter PRIMRESPOOL and SECRESPOOL contain the name of the resource pools to use for primary(PRIMRESPOOL) and secondary(SECRESPOOLS) vFiler units.
Parameter SHAREDATASIZE contains the size of the primary dataset tenantname_share/data.
Parameter SHARESAPSIZE contains the size of the primary dataset tenantname_share/sap.
Parameter BACKUPDATASIZE contains the size of the secondary dataset tenantname_backup/data.
125
Appendix D—Description of Scripts and Configuration Files
Parameter SUFFIXNUMBER allows for scaling of an existing tenant by adding additional primary vFiler units, the create_vfiler.sh script creates tenant vFiler units using the following convention: 'tenantname-suffixnumber-prim' or 'tenantname-1-bck'. If a tenant requires an additional vFiler unit, then the parameter SUFFIXNUMBER can be modified from '1' to '2', and executing this script would create a new vFiler unit 'tenant-2-prim'.
This script won't create any additional secondary vFiler units (tenantname-2-bck). Also, no additional datasets are created on the new vFiler unit. By default, this parameter should be set to 1.
Parameter VFPRIMIP and VFSECIP are the IP addresses for both primary (VFPRIMIP) and secondary (VFSECIP) vFiler units.
Parameter VLANID contains the STORAGE VLAN number to use. This VLAN is the VLAN where the hosts access the NFS exports.
Parameter PW contains the root password for both the primary and the secondary vFiler units.
Parameter NIC contains the vfiler0 VIF interface where the IP aliases for the different VLANs are to be configured.
Parameters MTUSIZE and NETWORKMASK contain the MTU size in bytes and the network mask (for example, 255.255.255.0).
#!/bin/sh
#PARAMETER file for tenant t009
#TENANTNAME contains the tenant name
tenantname=t009
#VFILERTEMPLATE contains the vfiler template to use during the initial
#setup of the vfiler
vfilertemplate=Default
#PROVPFLNAS contains the Provisioning Policy to use
#during setup of the datasets in the primary vfiler
provpflnas=Default
#PROVPFLSEC contains the Provisioning Policy to use
#during setup of the datasets in the secondary vfiler
provpflsec=Backup
#SHAREDATASIZE contains the size of the primary dataset tenantname_share/data
sharedatasize=10g
#SHARESAPSIZE contains the size of the primary dataset tenantname_share/sap
126
Appendix D—Description of Scripts and Configuration Files
sharesapsize=30g
#BACKUPDATASIZE contains the size of the secondary dataset tenantname_backup/data
Backupdatasize=40g
#PRIMRESPOOL contains the name of the primary resource pool
primrespool=filer14a
#SECRESPOOL contains the name of the secondary resource pool
secrespool=filer14b
#SUFFIXNUMBER is an unique sequential number to use when
#creating additional vfilers for an existing tenant
#the initial vfiler(s) should always use suffixnumber=1
#Additional primary vfilers would use suffixnumber=2,suffixnumber=3,...
suffixnumber=1
#VLANID contains the storage vlan id to use
vlanid=3009
#VFPRIMIP contains the IP address of the primary vfiler
vfprimip=192.168.109.10
#VFSECIP contains the IP address of the secondary vfiler
vfsecip=192.168.109.11
#PW contains the vfiler(s) root password
pw=ucs4sap!
#NIC contains the name of the vif on the storage controllers
nic=vif0
#MTUSIZE contains the mtu size to use
mtusize=1500
#NETWORKMASK contains the network mask to use
127
Appendix D—Description of Scripts and Configuration Files
networkmask=255.255.255.0
The script starts by parsing the <parameter-tenant> file to initialize all the variables.
It then executes function create_vfiler, which creates two vFiler units (tenantname-1-prim and tenant-1-sec) when the parameter suffixnumber is set to 1.
The function create_dataset creates the DATASETs 'tenant_share' and 'tenant_backup', the provisioning of the qtrees 'sap' and 'data' is done by the function provision_dataset.
The script then applies the specific Protection Manager Policies Back up and Local Backups Only through function protect_dataset.
Finally, the datasets are exported through function export_flexvol.
In case the parameter suffixnumber is set to any number higher than 1, then only an additional primary vFiler unit is created (for example: tenantname-2-prim), and no additional datasets are created within this vFiler unit.
SCRIPT ADDDNSHOSTNAME.SH
The script is used to add host entries to the DNS configuration of the tenant-specific services.
The script must be executed on the tenant-specific services virtual machine.
Usage: addDNSHostname.sh <virtual_hostname>
<virtual_hostname> : the virtual hostname to add (simple or full name)
The script executes the following tasks:
• Find valid IP address
• Add entry to local hosts
To activate the changes, the following tasks have to be completed:
• Restart the DNS services: service dnsmasq restart.
• Update the NIS maps: /mnt/software/scripts/update_nis.sh.
SCRIPT ADDSAPSERVICE.SH
The script is used to add required services entries into the tenant-specific services.
The script must be executed on the tenant-specific services virtual machine.
Usage: addSAPservice.sh {<SID> <SN>|-line <service_entry>}
<SID> : SAP System ID
<SN> : SAP System number of the CI/SCS
<service_entry> : the complete service entry as it appears in /etc/services
The script executes the following task:
• Add entry to /etc/services
128
Appendix D—Description of Scripts and Configuration Files
SCRIPT CONFIGUREDNSMASQ.SH
The script generates a valid DNSmasq configuration file based on the template file. It must be called with the tenant number as the only parameter:
Usage: configure_dnsmasq.sh <tenant_id>
<tenant_id> : number of the tenant
To enable the configuration, the DNSmasq service must be restarted with this command:
service dnsmasq restart
SCRIPT CREATESAPUSER.SH
This Script create the required SAP OS users on the tenant-specific services virtual machine:
• ora<sid> (group: dba,oper)—Oracle Database Administrator for <SID>
• <sid>adm (group: sapsys,dba,oper)—SAP System Administrator for <SID>
Usage: createSAPuser.sh <user_type> <SID> <user_id> <group> [<additional_groups> [<password>]]
<user_type> : {adm|ora}, adm = <sid>adm user, ora = ora<sid> user
<SID> : SAP System ID
<user_id> : user ID of the new user
<group> : group ID or name of the primary group of the new user
<additional_groups> : (opt.) list of additional groups (comma separated list of names)
<password> : (opt.) password for the new user
SCRIPT DELETE_VFILER.SH
This script simplifies the decommissioning of a Tenant from the existing FlexPod Solution. It is the counter part of the crate_vfielr.sh and uses the same parameter file.
The script should be executed with root privileges from the DFM server using the following syntax:
Usage: create_vfiler.sh <tenant_parameter_file>
Where: <tenant_parameter_file> is a file containing variables to be parsed by the script. These variables define tenant-specific parameters such as tenant name, resource pools to use, and network configuration.
SCRIPT PROVISION_SAP_STORAGE.SH
This script creates the required subdirectories for an SAP system, within volumes on the storage system. The script must run on the tenant-specific services virtual machine:
Usage: provision_SAP_storage.sh <tenant number> <SID> <vFiler> [<task>]
129
Appendix D—Description of Scripts and Configuration Files
<tenant number> : the number of the tenant, e.g. 4 for T004
<SID> : the SAP system ID
<vFiler> : the vFiler name, e.g. t004-1-prim
<task> : {log|data|all}, provision log volume, data volume or both; default: log
SCRIPT SET_SDU_PASSWORD.SH
The script is used to set up the communication between SnapDrive for Unix and the virtual storage controller.
With the current version, the following parameters are hard coded:
• User for snapdrive communication
• Password for snapdrive users
Usage: set_sdu_credentials.sh
The script executes the following tasks:
• Sets SDU password for communication with primary vFiler unit
• Sets SDU password for communication with backup vFiler unit
SCRIPT UPDATE_NIS.SH
The script is used to activate NIS Service configurations. It must run on the tenant specific services virtual machine.
Usage: update_nis.sh
The script executes the following tasks:
• Update passwd.byname
• Update passwd.byuid
SCRIPT BACKUP_REPO.SH
The script is used to create an export from the Repository Database for backup purposes.
It is designated to run on the SMSAP Repository Database Host. It can be run either from cli or scheduled by cron as user oracle.
With the current version the following parameters are hard coded and might be adjusted prior to first use:
• Username and Password of DB User
• Backup and Logfile location
• Specific Oracle DB Environment Values
• Retention for the Backup
Usage: backup_repo.sh
The script executes the following tasks:
• Exports whole database
130
References
• Queries some information about the Repository Database
• Organizes Backup and Logfile Retention
References • Backup and Recovery Administration Guide
• NetApp FlexPod for VMware Implementation Guide (TR-3892)
• SAP Note 50088
• Novell/SUSE TID 3048119
131
About Cisco Validated Design (CVD) Program
About Cisco Validated Design (CVD) ProgramThe CVD program consists of systems and solutions designed, tested, and documented to facilitate faster, more reliable, and more predictable customer deployments. For more information visit www.cisco.com/go/designzone.
ALL DESIGNS, SPECIFICATIONS, STATEMENTS, INFORMATION, AND RECOMMENDATIONS (COLLECTIVELY, "DESIGNS") IN THIS MANUAL ARE PRESENTED "AS IS," WITH ALL FAULTS. CISCO AND ITS SUPPLIERS DISCLAIM ALL WARRANTIES, INCLUDING, WITHOUT LIMITATION, THE WARRANTY OF MERCHANTABILITY, FITNESS FOR A PARTICULAR PURPOSE AND NONINFRINGEMENT OR ARISING FROM A COURSE OF DEALING, USAGE, OR TRADE PRACTICE. IN NO EVENT SHALL CISCO OR ITS SUPPLIERS BE LIABLE FOR ANY INDIRECT, SPECIAL, CONSEQUENTIAL, OR INCIDENTAL DAMAGES, INCLUDING, WITHOUT LIMITATION, LOST PROFITS OR LOSS OR DAMAGE TO DATA ARISING OUT OF THE USE OR INABILITY TO USE THE DESIGNS, EVEN IF CISCO OR ITS SUPPLIERS HAVE BEEN ADVISED OF THE POSSIBILITY OF SUCH DAMAGES.
THE DESIGNS ARE SUBJECT TO CHANGE WITHOUT NOTICE. USERS ARE SOLELY RESPONSIBLE FOR THEIR APPLICATION OF THE DESIGNS. THE DESIGNS DO NOT CONSTITUTE THE TECHNICAL OR OTHER PROFESSIONAL ADVICE OF CISCO, ITS SUPPLIERS OR PARTNERS. USERS SHOULD CONSULT THEIR OWN TECHNICAL ADVISORS BEFORE IMPLEMENTING THE DESIGNS. RESULTS MAY VARY DEPENDING ON FACTORS NOT TESTED BY CISCO.
CCDE, CCENT, Cisco Eos, Cisco Lumin, Cisco Nexus, Cisco StadiumVision, Cisco TelePresence, Cisco WebEx, the Cisco logo, DCE, and Welcome to the Human Network are trademarks; Changing the Way We Work, Live, Play, and Learn and Cisco Store are service marks; and Access Registrar, Aironet, AsyncOS, Bringing the Meeting To You, Catalyst, CCDA, CCDP, CCIE, CCIP, CCNA, CCNP, CCSP, CCVP, Cisco, the Cisco Certified Internetwork Expert logo, Cisco IOS, Cisco Press, Cisco Systems, Cisco Systems Capital, the Cisco Systems logo, Cisco Unity, Collaboration Without Limitation, EtherFast, EtherSwitch, Event Center, Fast Step, Follow Me Browsing, FormShare, GigaDrive, HomeLink, Internet Quotient, IOS, iPhone, iQuick Study, IronPort, the IronPort logo, LightStream, Linksys, MediaTone, MeetingPlace, MeetingPlace Chime Sound, MGX, Networkers, Networking Academy, Network Registrar, PCNow, PIX, PowerPanels, ProConnect, ScriptShare, SenderBase, SMARTnet, Spectrum Expert, StackWise, The Fastest Way to Increase Your Internet Quotient, TransPath, WebEx, and the WebEx logo are registered trademarks of Cisco Systems, Inc. and/or its affiliates in the United States and certain other countries.
All other trademarks mentioned in this document or website are the property of their respective owners. The use of the word partner does not imply a partnership relationship between Cisco and any other company. (0809R)
© 2011 Cisco Systems, Inc. All rights reserved
132