Samsung Galaxy S4 Display Assembly Replacement · Samsung Galaxy S4 Display Assembly Replacement...
18
Samsung Galaxy S4 Display Assembly Replacement Replace the front panel display assembly on a Samsung Galaxy S4. Written By: Sam Goldheart Samsung Galaxy S4 Display Assembly Replacement Draft: 2018-11-29 Guide ID: 16540 - This document was generated on 2019-09-19 08:11:39 AM (MST). © iFixit — CC BY-NC-SA www.iFixit.com Page 1 of 18
Transcript of Samsung Galaxy S4 Display Assembly Replacement · Samsung Galaxy S4 Display Assembly Replacement...
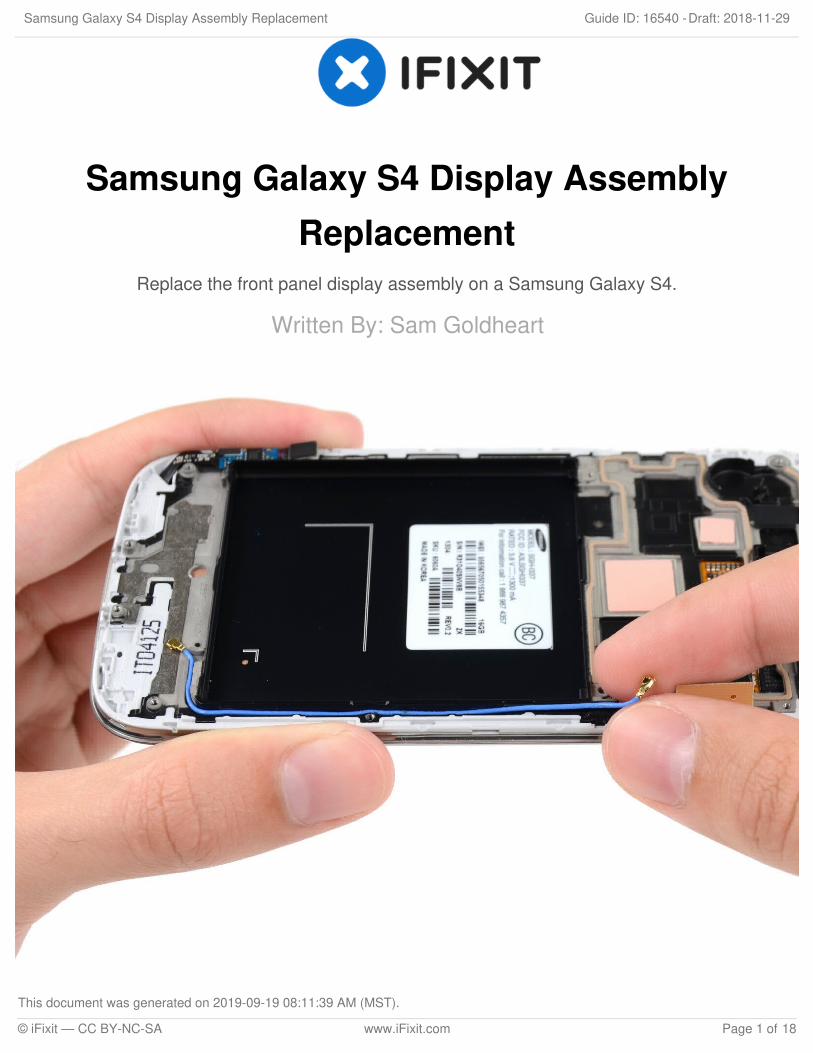
Samsung Galaxy S4 Display AssemblyReplacement
Replace the front panel display assembly on a Samsung Galaxy S4.
Written By: Sam Goldheart
Samsung Galaxy S4 Display Assembly Replacement Draft: 2018-11-29Guide ID: 16540 -
This document was generated on 2019-09-19 08:11:39 AM (MST).
© iFixit — CC BY-NC-SA www.iFixit.com Page 1 of 18
INTRODUCTION
Use this guide to replace your Samsung Galaxy S4 display assembly.
TOOLS:iFixit Opening Tools (1)Phillips #00 Screwdriver (1)Spudger (1)
PARTS:Galaxy S4 (I9500) Screen Assembly (1)Galaxy S4 (AT&T/T-Mobile) Screen
Assembly (1)Galaxy S4 (Sprint/Verizon) Screen
Assembly (1)Samsung Galaxy S IV 4 Display
Assembly (Digitizer/Front Panel) (1)Samsung Galaxy S IV S4 LTE Display
Assembly I9505 (Digitizer/Front Panel) (1)Samsung Galaxy S IV S4 LTE2 Display
Assembly I9506 (Digitizer/Front Panel) (1)Samsung Galaxy S IV S4 Vibrator
(Sprint) (1)
Samsung Galaxy S4 Display Assembly Replacement Draft: 2018-11-29Guide ID: 16540 -
This document was generated on 2019-09-19 08:11:39 AM (MST).
© iFixit — CC BY-NC-SA www.iFixit.com Page 2 of 18
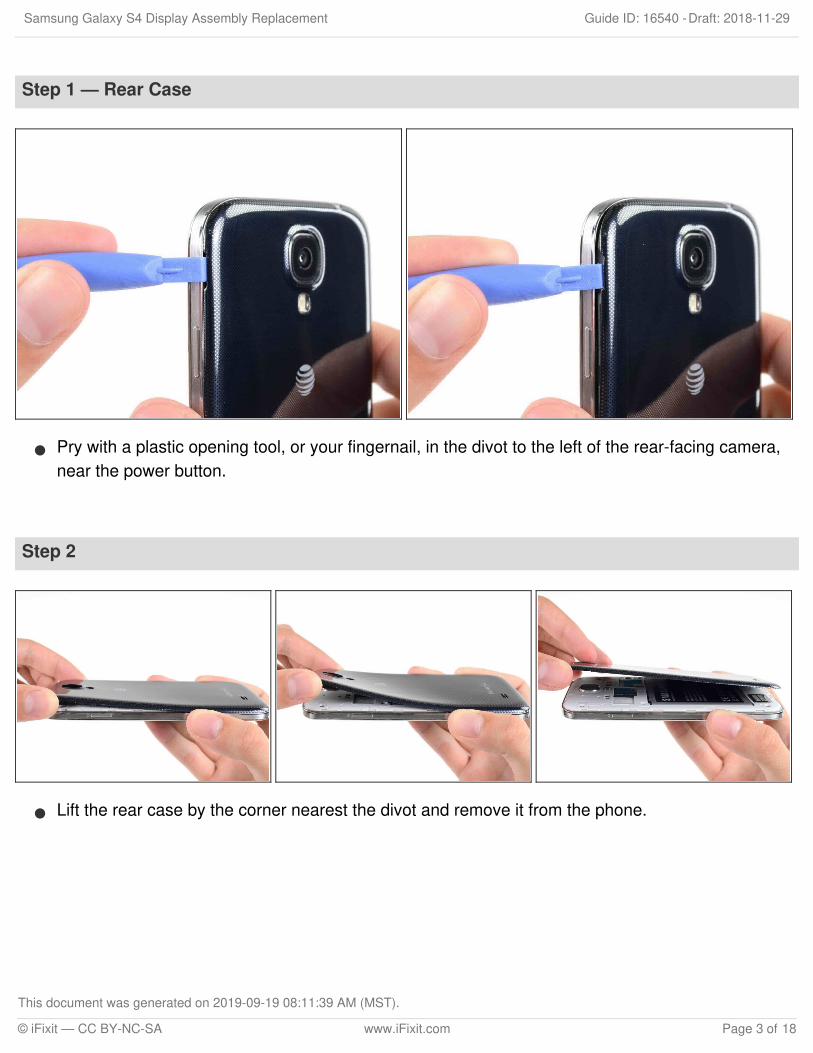
Step 1 — Rear Case
Pry with a plastic opening tool, or your fingernail, in the divot to the left of the rear-facing camera,near the power button.
Step 2
Lift the rear case by the corner nearest the divot and remove it from the phone.
Samsung Galaxy S4 Display Assembly Replacement Draft: 2018-11-29Guide ID: 16540 -
This document was generated on 2019-09-19 08:11:39 AM (MST).
© iFixit — CC BY-NC-SA www.iFixit.com Page 3 of 18
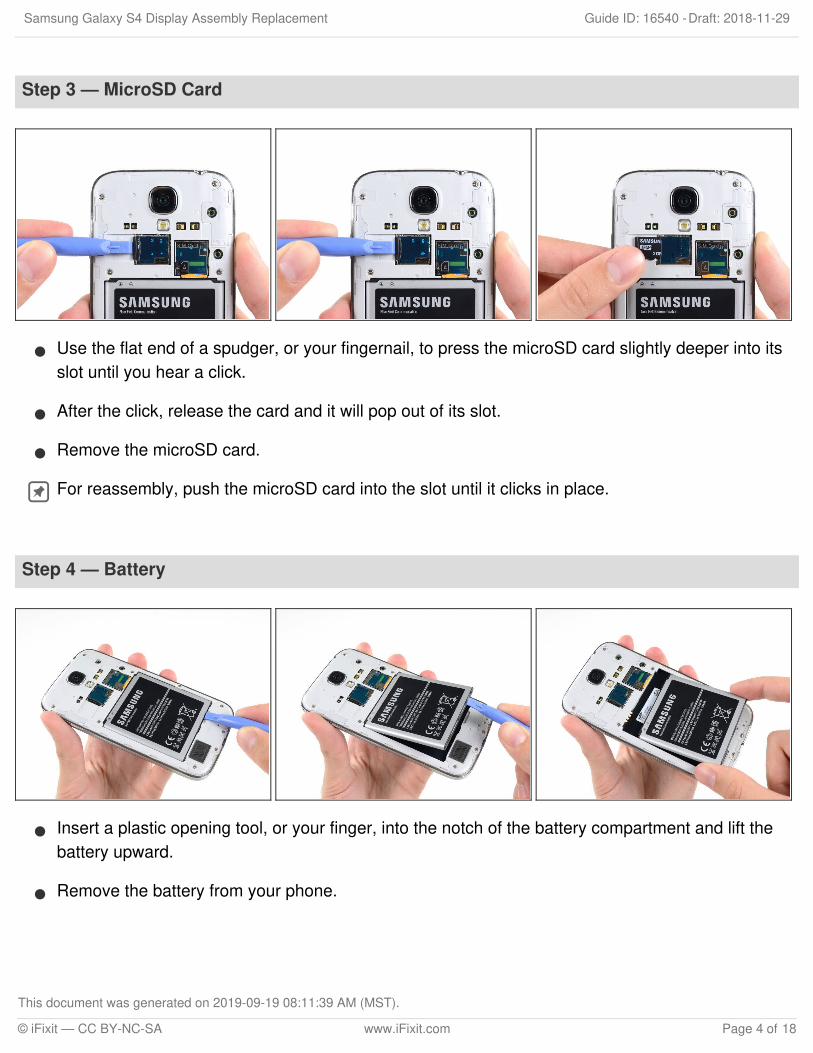
Step 3 — MicroSD Card
Use the flat end of a spudger, or your fingernail, to press the microSD card slightly deeper into itsslot until you hear a click.
After the click, release the card and it will pop out of its slot.
Remove the microSD card.
For reassembly, push the microSD card into the slot until it clicks in place.
Step 4 — Battery
Insert a plastic opening tool, or your finger, into the notch of the battery compartment and lift thebattery upward.
Remove the battery from your phone.
Samsung Galaxy S4 Display Assembly Replacement Draft: 2018-11-29Guide ID: 16540 -
This document was generated on 2019-09-19 08:11:39 AM (MST).
© iFixit — CC BY-NC-SA www.iFixit.com Page 4 of 18
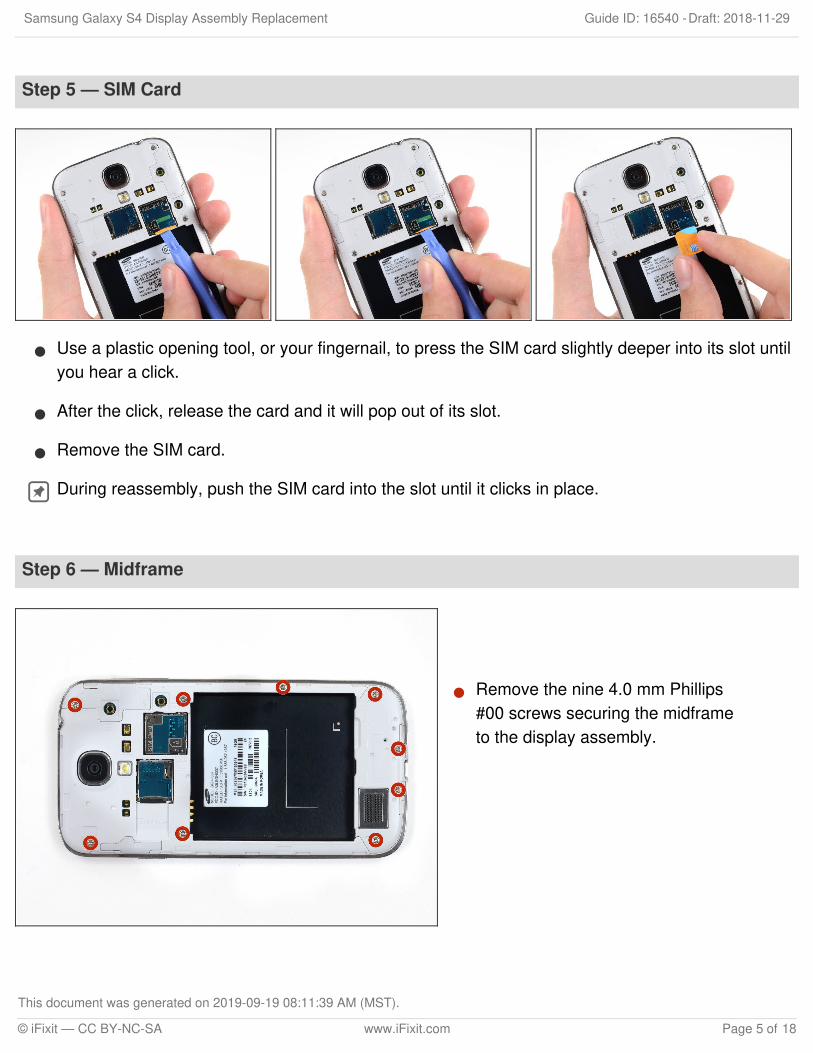
Step 5 — SIM Card
Use a plastic opening tool, or your fingernail, to press the SIM card slightly deeper into its slot untilyou hear a click.
After the click, release the card and it will pop out of its slot.
Remove the SIM card.
During reassembly, push the SIM card into the slot until it clicks in place.
Step 6 — Midframe
Remove the nine 4.0 mm Phillips#00 screws securing the midframeto the display assembly.
Samsung Galaxy S4 Display Assembly Replacement Draft: 2018-11-29Guide ID: 16540 -
This document was generated on 2019-09-19 08:11:39 AM (MST).
© iFixit — CC BY-NC-SA www.iFixit.com Page 5 of 18
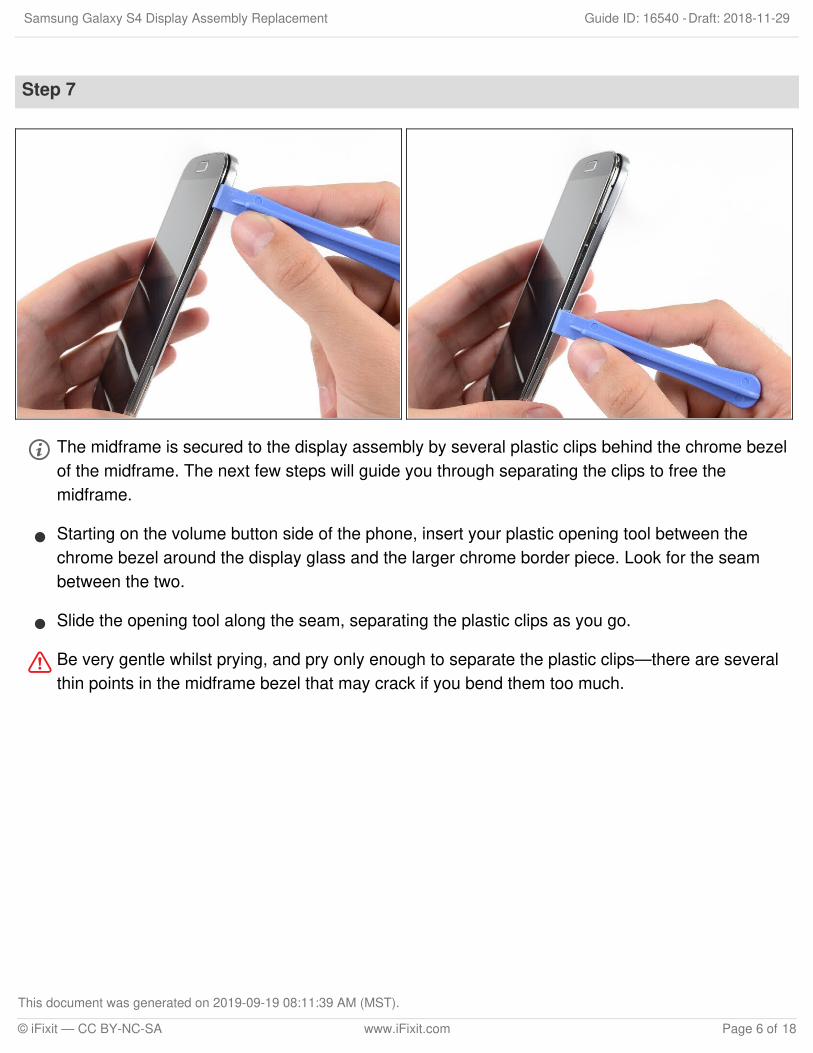
Step 7
The midframe is secured to the display assembly by several plastic clips behind the chrome bezelof the midframe. The next few steps will guide you through separating the clips to free themidframe.
Starting on the volume button side of the phone, insert your plastic opening tool between thechrome bezel around the display glass and the larger chrome border piece. Look for the seambetween the two.
Slide the opening tool along the seam, separating the plastic clips as you go.
Be very gentle whilst prying, and pry only enough to separate the plastic clips—there are severalthin points in the midframe bezel that may crack if you bend them too much.
Samsung Galaxy S4 Display Assembly Replacement Draft: 2018-11-29Guide ID: 16540 -
This document was generated on 2019-09-19 08:11:39 AM (MST).
© iFixit — CC BY-NC-SA www.iFixit.com Page 6 of 18
Step 8
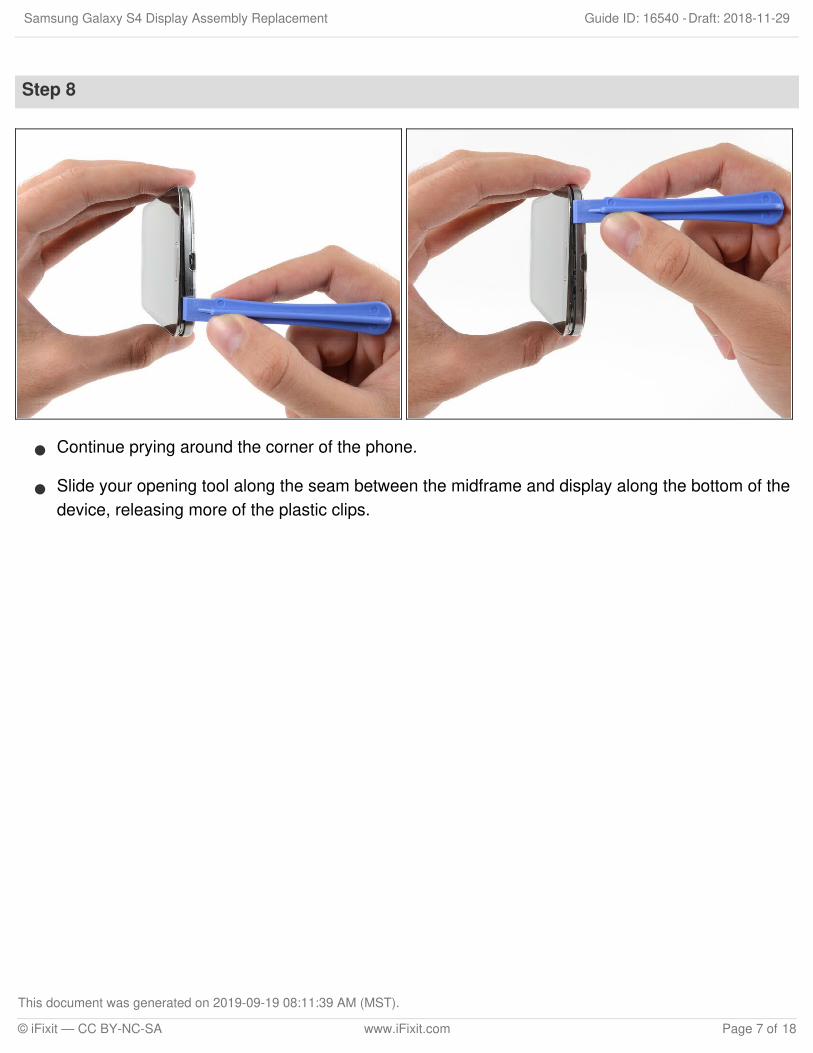
Continue prying around the corner of the phone.
Slide your opening tool along the seam between the midframe and display along the bottom of thedevice, releasing more of the plastic clips.
Samsung Galaxy S4 Display Assembly Replacement Draft: 2018-11-29Guide ID: 16540 -
This document was generated on 2019-09-19 08:11:39 AM (MST).
© iFixit — CC BY-NC-SA www.iFixit.com Page 7 of 18
Step 9
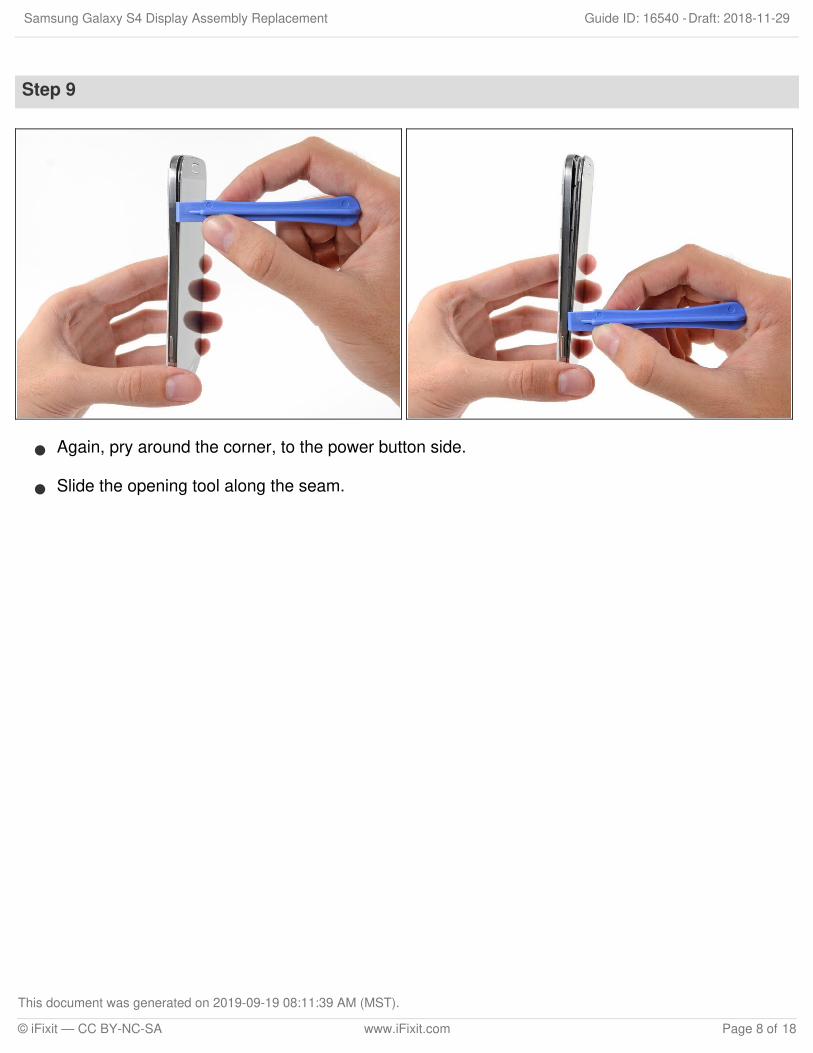
Again, pry around the corner, to the power button side.
Slide the opening tool along the seam.
Samsung Galaxy S4 Display Assembly Replacement Draft: 2018-11-29Guide ID: 16540 -
This document was generated on 2019-09-19 08:11:39 AM (MST).
© iFixit — CC BY-NC-SA www.iFixit.com Page 8 of 18
Step 10
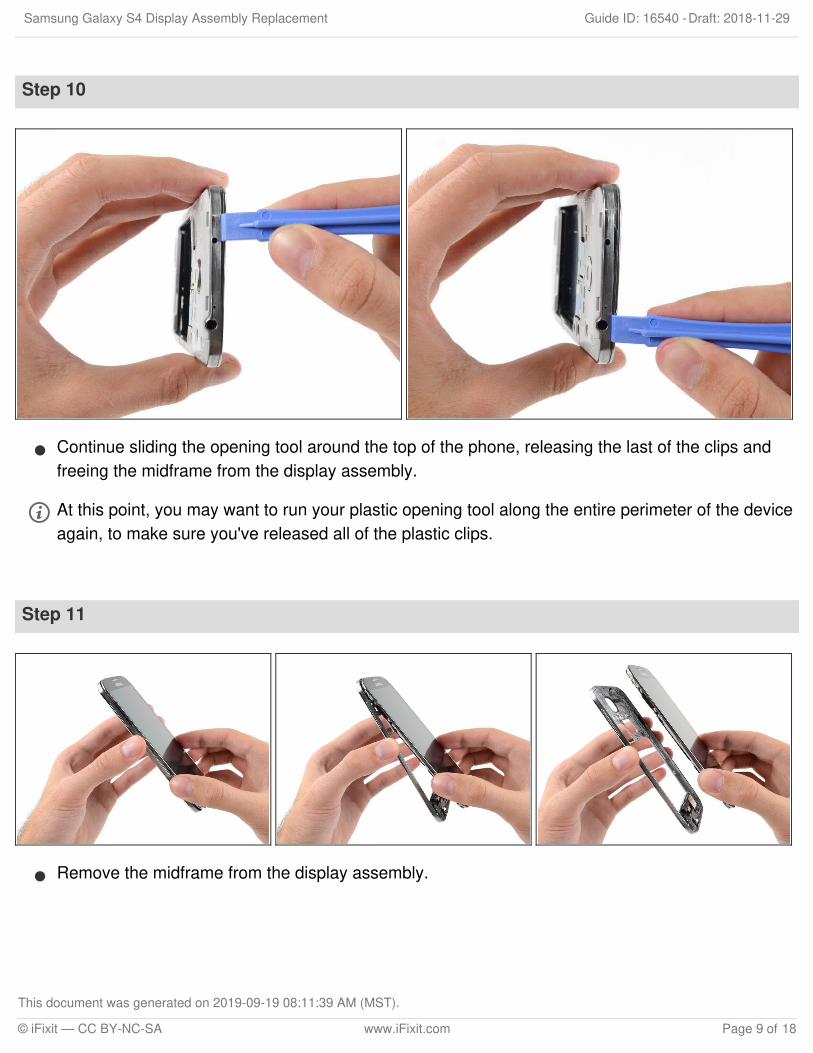
Continue sliding the opening tool around the top of the phone, releasing the last of the clips andfreeing the midframe from the display assembly.
At this point, you may want to run your plastic opening tool along the entire perimeter of the deviceagain, to make sure you've released all of the plastic clips.
Step 11
Remove the midframe from the display assembly.
Samsung Galaxy S4 Display Assembly Replacement Draft: 2018-11-29Guide ID: 16540 -
This document was generated on 2019-09-19 08:11:39 AM (MST).
© iFixit — CC BY-NC-SA www.iFixit.com Page 9 of 18
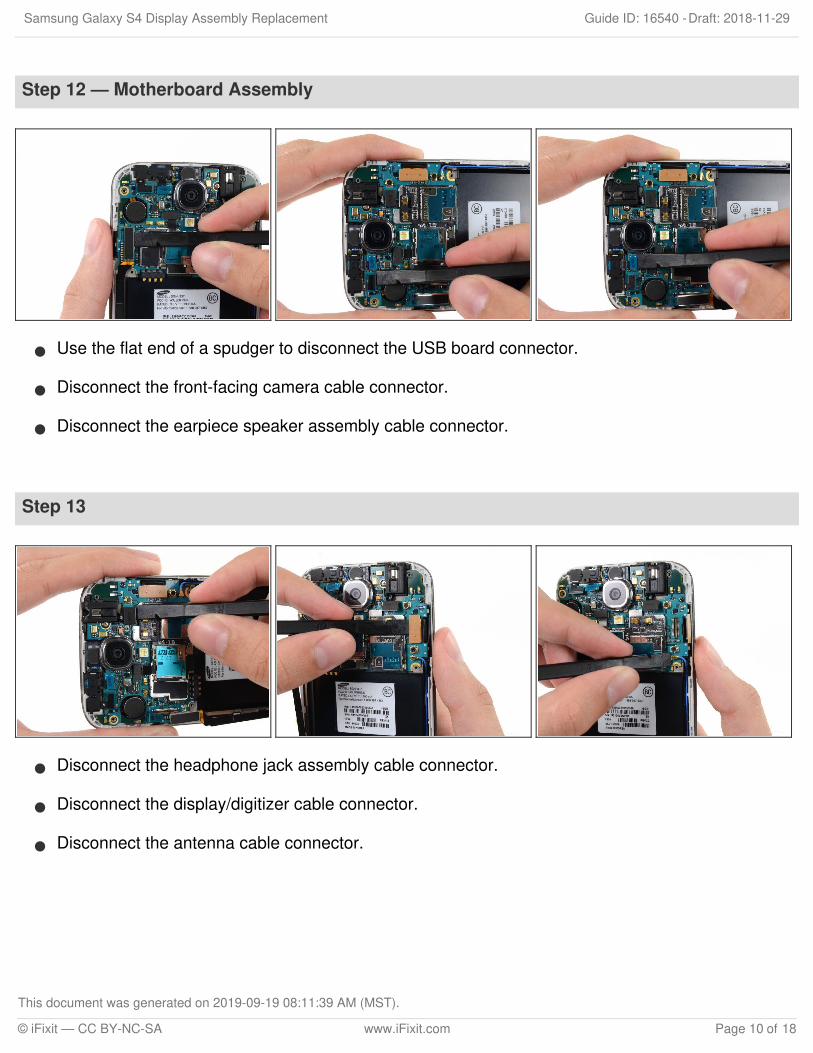
Step 12 — Motherboard Assembly
Use the flat end of a spudger to disconnect the USB board connector.
Disconnect the front-facing camera cable connector.
Disconnect the earpiece speaker assembly cable connector.
Step 13
Disconnect the headphone jack assembly cable connector.
Disconnect the display/digitizer cable connector.
Disconnect the antenna cable connector.
Samsung Galaxy S4 Display Assembly Replacement Draft: 2018-11-29Guide ID: 16540 -
This document was generated on 2019-09-19 08:11:39 AM (MST).
© iFixit — CC BY-NC-SA www.iFixit.com Page 10 of 18
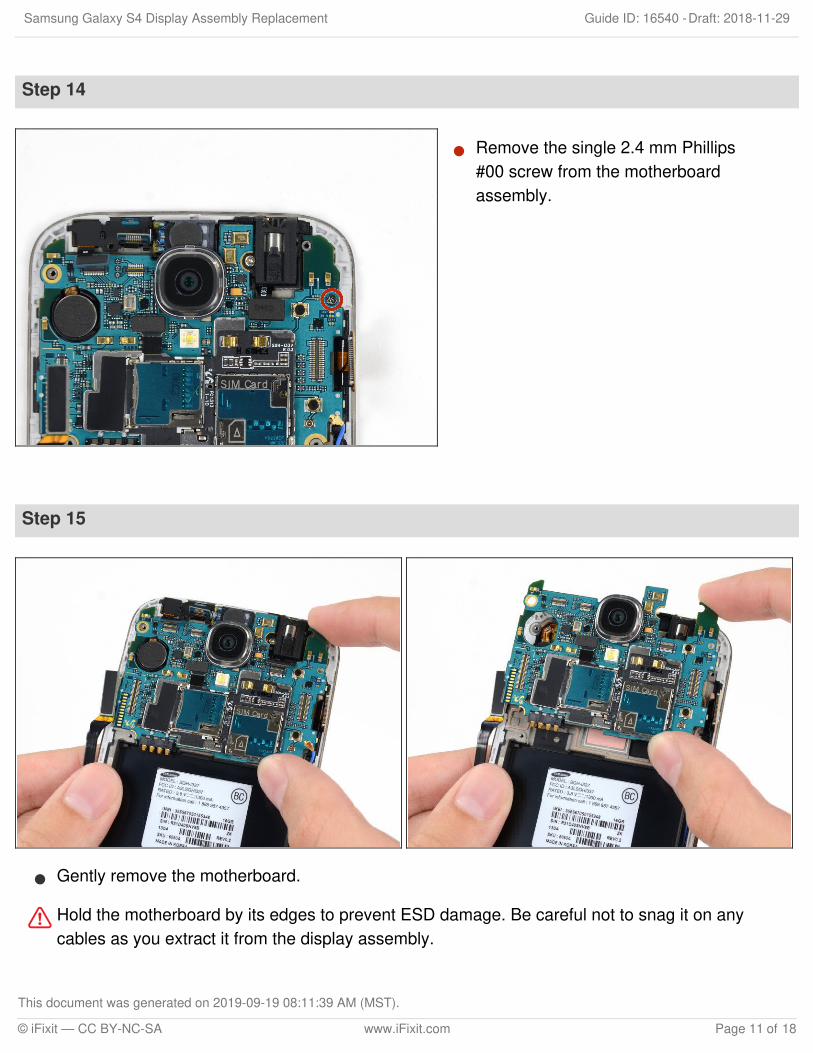
Step 14
Remove the single 2.4 mm Phillips#00 screw from the motherboardassembly.
Step 15
Gently remove the motherboard.
Hold the motherboard by its edges to prevent ESD damage. Be careful not to snag it on anycables as you extract it from the display assembly.
Samsung Galaxy S4 Display Assembly Replacement Draft: 2018-11-29Guide ID: 16540 -
This document was generated on 2019-09-19 08:11:39 AM (MST).
© iFixit — CC BY-NC-SA www.iFixit.com Page 11 of 18
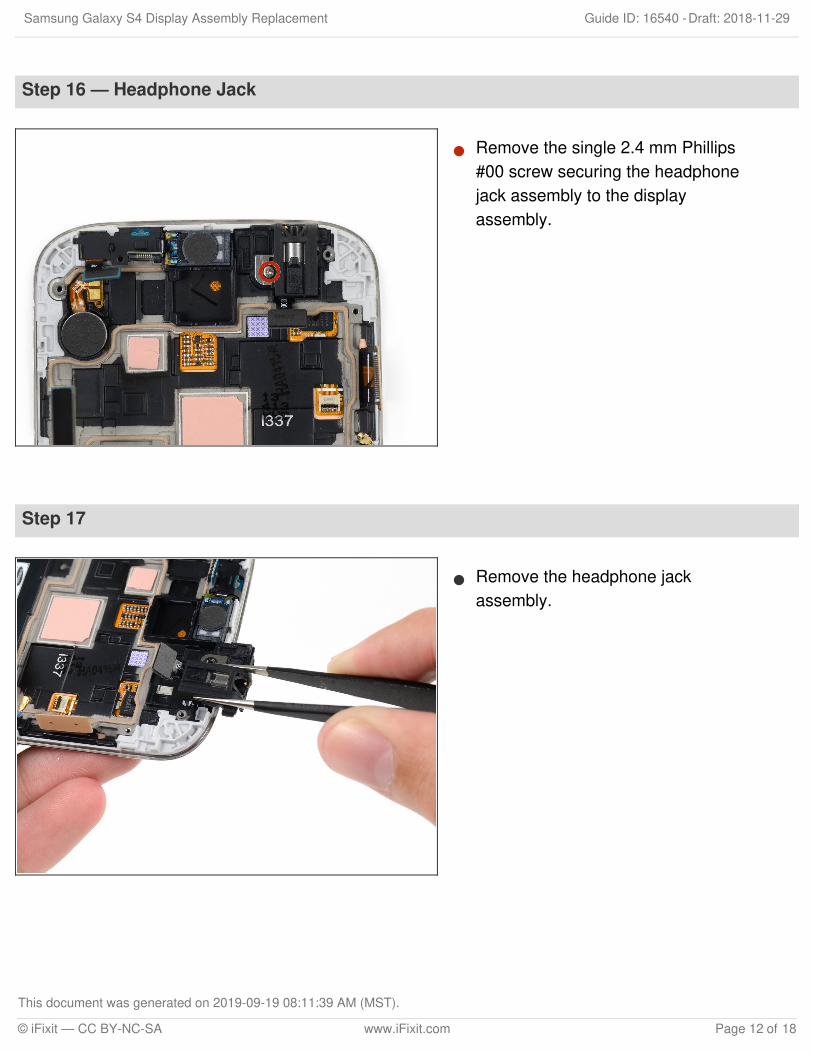
Step 16 — Headphone Jack
Remove the single 2.4 mm Phillips#00 screw securing the headphonejack assembly to the displayassembly.
Step 17
Remove the headphone jackassembly.
Samsung Galaxy S4 Display Assembly Replacement Draft: 2018-11-29Guide ID: 16540 -
This document was generated on 2019-09-19 08:11:39 AM (MST).
© iFixit — CC BY-NC-SA www.iFixit.com Page 12 of 18
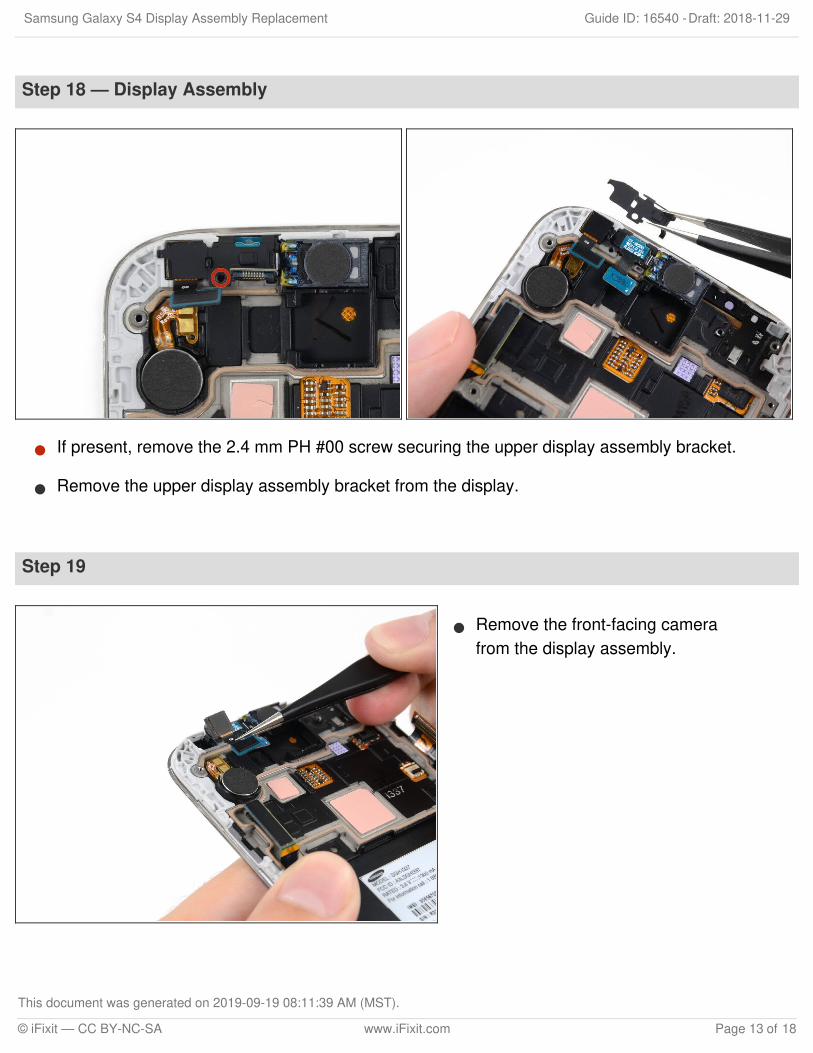
Step 18 — Display Assembly
If present, remove the 2.4 mm PH #00 screw securing the upper display assembly bracket.
Remove the upper display assembly bracket from the display.
Step 19
Remove the front-facing camerafrom the display assembly.
Samsung Galaxy S4 Display Assembly Replacement Draft: 2018-11-29Guide ID: 16540 -
This document was generated on 2019-09-19 08:11:39 AM (MST).
© iFixit — CC BY-NC-SA www.iFixit.com Page 13 of 18
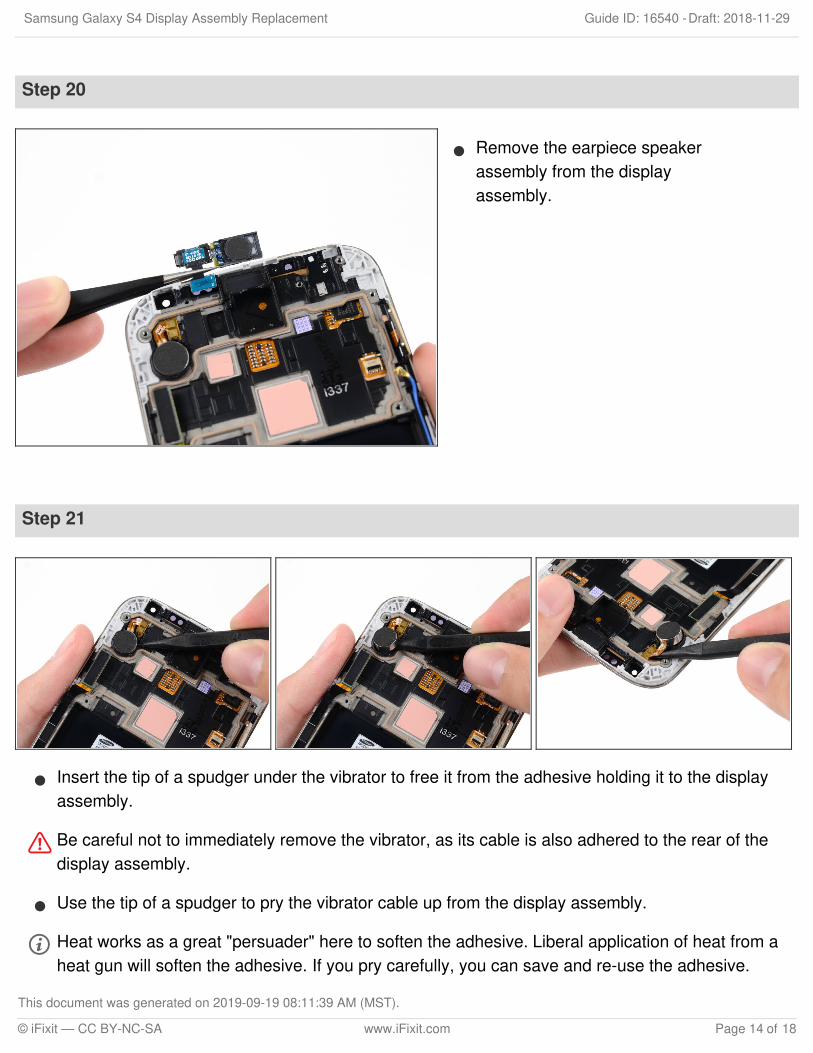
Step 20
Remove the earpiece speakerassembly from the displayassembly.
Step 21
Insert the tip of a spudger under the vibrator to free it from the adhesive holding it to the displayassembly.
Be careful not to immediately remove the vibrator, as its cable is also adhered to the rear of thedisplay assembly.
Use the tip of a spudger to pry the vibrator cable up from the display assembly.
Heat works as a great "persuader" here to soften the adhesive. Liberal application of heat from aheat gun will soften the adhesive. If you pry carefully, you can save and re-use the adhesive.
Samsung Galaxy S4 Display Assembly Replacement Draft: 2018-11-29Guide ID: 16540 -
This document was generated on 2019-09-19 08:11:39 AM (MST).
© iFixit — CC BY-NC-SA www.iFixit.com Page 14 of 18
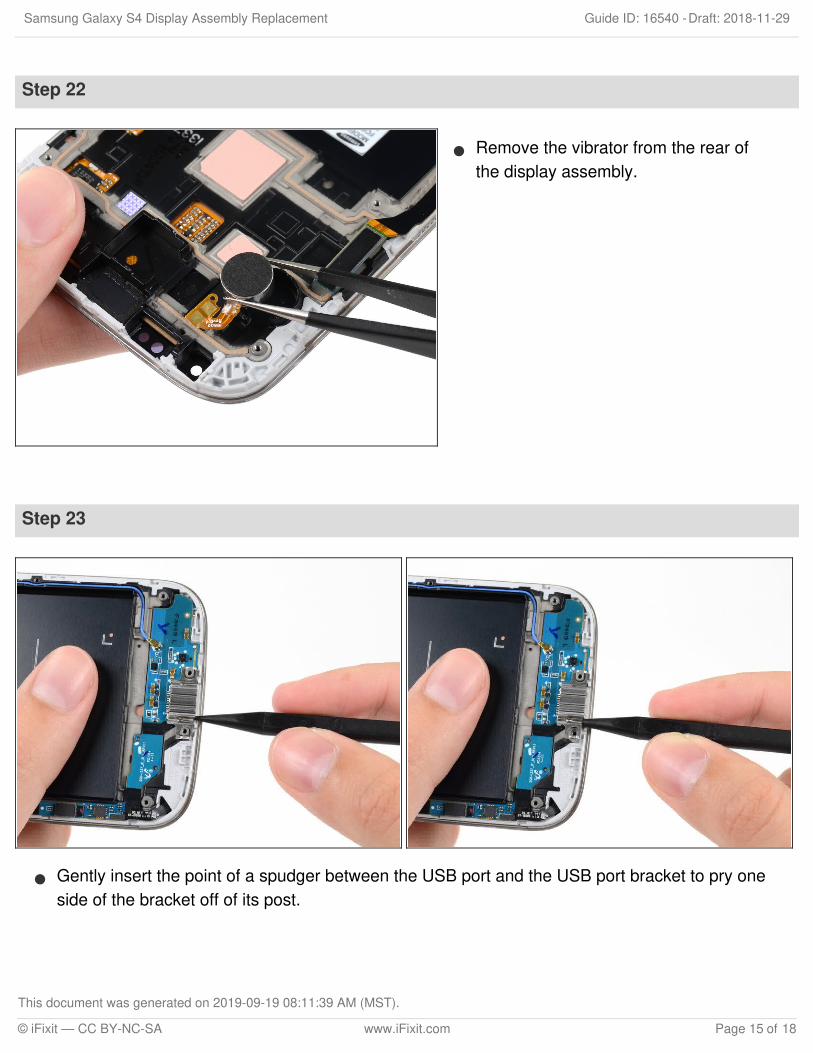
Step 22
Remove the vibrator from the rear ofthe display assembly.
Step 23
Gently insert the point of a spudger between the USB port and the USB port bracket to pry oneside of the bracket off of its post.
Samsung Galaxy S4 Display Assembly Replacement Draft: 2018-11-29Guide ID: 16540 -
This document was generated on 2019-09-19 08:11:39 AM (MST).
© iFixit — CC BY-NC-SA www.iFixit.com Page 15 of 18
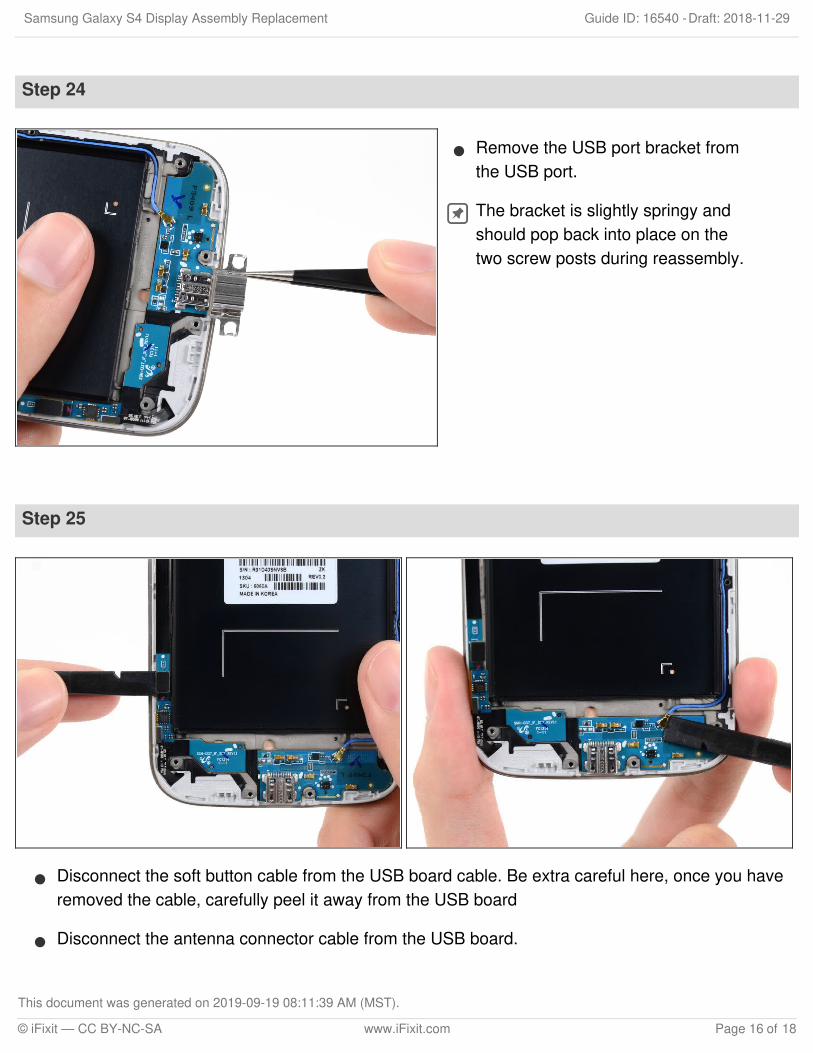
Step 24
Remove the USB port bracket fromthe USB port.
The bracket is slightly springy andshould pop back into place on thetwo screw posts during reassembly.
Step 25
Disconnect the soft button cable from the USB board cable. Be extra careful here, once you haveremoved the cable, carefully peel it away from the USB board
Disconnect the antenna connector cable from the USB board.
Samsung Galaxy S4 Display Assembly Replacement Draft: 2018-11-29Guide ID: 16540 -
This document was generated on 2019-09-19 08:11:39 AM (MST).
© iFixit — CC BY-NC-SA www.iFixit.com Page 16 of 18
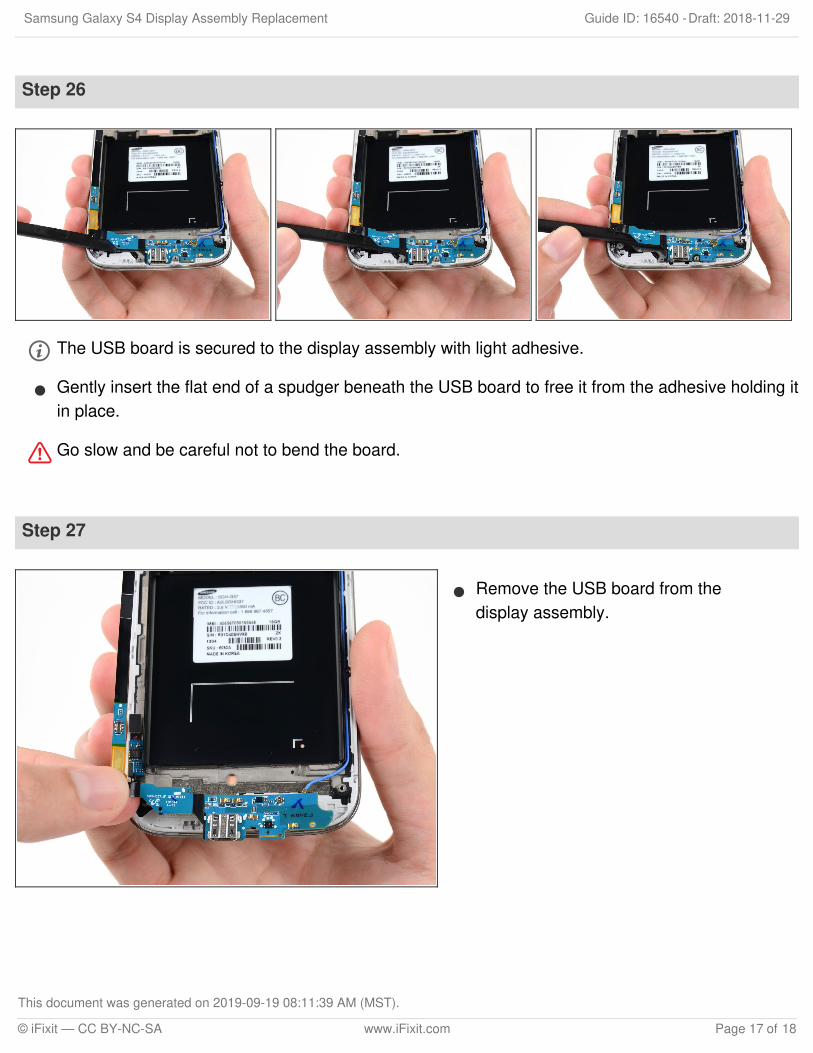
Step 26
The USB board is secured to the display assembly with light adhesive.
Gently insert the flat end of a spudger beneath the USB board to free it from the adhesive holding itin place.
Go slow and be careful not to bend the board.
Step 27
Remove the USB board from thedisplay assembly.
Samsung Galaxy S4 Display Assembly Replacement Draft: 2018-11-29Guide ID: 16540 -
This document was generated on 2019-09-19 08:11:39 AM (MST).
© iFixit — CC BY-NC-SA www.iFixit.com Page 17 of 18
To reassemble your device, follow these instructions in reverse order.
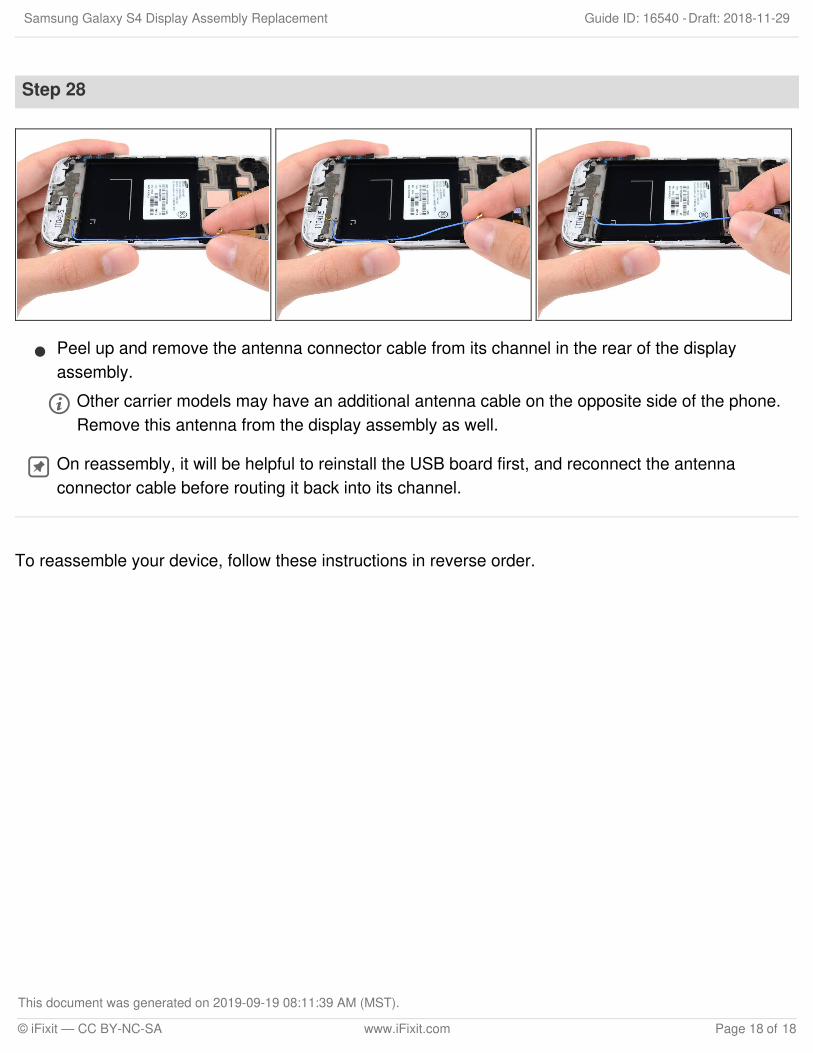
Step 28
Peel up and remove the antenna connector cable from its channel in the rear of the displayassembly.
Other carrier models may have an additional antenna cable on the opposite side of the phone.Remove this antenna from the display assembly as well.
On reassembly, it will be helpful to reinstall the USB board first, and reconnect the antennaconnector cable before routing it back into its channel.
Samsung Galaxy S4 Display Assembly Replacement Draft: 2018-11-29Guide ID: 16540 -
This document was generated on 2019-09-19 08:11:39 AM (MST).
© iFixit — CC BY-NC-SA www.iFixit.com Page 18 of 18