Sample win95NT 1997
103
Introduction to Windows NT 4.0
-
Upload
ray-dulski -
Category
Documents
-
view
121 -
download
0
Transcript of Sample win95NT 1997

Introduction to
Windows NT 4.0

ICOM Solutions MS Windows NT 4.0 - Introduction/Intermediate
Page No 2 ICOM Solutions © 9261 2499
CONTENTS
Chapter 1 Understanding Windows NT 4
COURSE OBJECTIVES ....................................................................................................................... 3
WHAT IS WINDOWS NT 4? ............................................................................................................... 4
WHAT’S TO KNOW IN WINDOWS NT 4 ........................................................................................ 5
CONVENTIONS USED IN THIS TUTORIAL .................................................................................. 7
A BRIEF INTRODUCTION TO PERSONAL COMPUTERS ......................................................... 8
The Personal Computer .................................................................................................................. 8 OVERVIEW AND HISTORY ..................................................................................................................... 8
The Personal Computer .................................................................................................................. 8 Why a Personal Computer .............................................................................................................. 8
HARDWARE COMPONENTS ................................................................................................................... 9 Output Devices ................................................................................................................................ 9 Input Devices .................................................................................................................................. 9 The Computer ................................................................................................................................. 9
SOFTWARE .......................................................................................................................................... 10 DRIVES ............................................................................................................................................... 10 BOOTING ............................................................................................................................................ 10 ICONS ................................................................................................................................................. 10 FLOPPY DISK ...................................................................................................................................... 10
UNDERSTANDING FILES AND FOLDERS ................................................................................... 11
INTRODUCTION TO THE ANALOGY ...................................................................................................... 11 Files .............................................................................................................................................. 11 Folders .......................................................................................................................................... 11
UNDERSTANDING PATHS .............................................................................................................. 12
MOUSE USAGE .................................................................................................................................. 13
Pointing ......................................................................................................................................... 13 Left-Click ...................................................................................................................................... 13 Double-Click ................................................................................................................................. 13 Right-Click .................................................................................................................................... 13 Dragging ....................................................................................................................................... 13 Right Dragging ............................................................................................................................. 13 Manually Resizing ......................................................................................................................... 13
SCROLL BARS .................................................................................................................................... 14
DIALOG BOXES ................................................................................................................................. 15
SECURITY ........................................................................................................................................... 16

MS Windows NT 4.0 - Introduction/Intermediate ICOM Solutions
ICOM Solutions © 1997 Page 3
Course Objectives The main objective of this course is to introduce you to the workings of MS Windows NT4. You will master the Desktop, use Explorer (previously known as File Manger under Windows 3.1X) and learn the basic concepts of using Windows NT and all its resources. These resources include: The Desktop
The Start button
Explorer
Dialog Boxes
Commands
Using Help
Shutting down the computer
Icons
Printing
File Sharing
Tips
Shortcuts
and many more features that are included in Windows NT 4.0

ICOM Solutions MS Windows NT 4.0 - Introduction/Intermediate
Page No 4 ICOM Solutions © 9261 2499
What is Windows NT 4? MS Windows NT 4.0 is the latest version of the Windows operating system from Microsoft. It contains many of the features of previous Windows versions but Windows NT has both enhanced existing features and has added many new Workgroup and Communication facilities. One main feature is the support for the Internet. Windows NT 4.0 Workstation is designed for power users and can be run on a ‘Stand-Alone’ PC or on a networked PC. In Stand-Alone mode the workgroup facilities are unavailable.

MS Windows NT 4.0 - Introduction/Intermediate ICOM Solutions
ICOM Solutions © 1997 Page 5
What’s to know in Windows NT 4
Filenames - You can now type in a filename up to 255 characters including spaces.
The following characters are not to be used in filenames / \ ? * : “ < > Directories are now known as Folders
Minimise, Maximise & Close buttons
Windows is known as a GUI (Graphical User Interface) Ctrl + Alt + Del will now give you an option:
To end a task (close an application that has crashed) - there is no need to shutdown Windows.
Shut-down the system (Use only if your whole system has crashed )
Shortcut menus - (also known as context-sensitive menu or pop-up menu) can be activated by selecting an object (File, folder, Icon) and then right-click
It is recommended that when saving a file that is to be transferred to another PC (Non-Win95/NT), ensure the filenames do not exceed eight (8) characters.

ICOM Solutions MS Windows NT 4.0 - Introduction/Intermediate
Page No 6 ICOM Solutions © 9261 2499
If you attached two files E. g. My notes on Timeline1 and My notes
on Timeline2 the files will appear as:
mynote~1.doc mynote~2.doc
File Extensions - all files have a three-character extension. These extensions are used to relate to the application that they belong to;
E.g. WORD documents have the extension .DOC Bitmap files (Picture graphic files) have the extension .BMP

MS Windows NT 4.0 - Introduction/Intermediate ICOM Solutions
ICOM Solutions © 1997 Page 7
Conventions Used in this Tutorial Depending on the exercise layout there are two types of commands that are used throughout this tutorial. Sample 1
Start | Settings | Control Panel
The above command specifies select Start, then select Settings, and then select Control Panel Sample 2 (Basic commands)
Click the menu File…
And Task #
Step 1
Step 2
You will be requested to complete tasks concerning topics in this Tutorial.

ICOM Solutions MS Windows NT 4.0 - Introduction/Intermediate
Page No 8 ICOM Solutions © 9261 2499
A Brief Introduction to Personal Computers The Personal Computer
Overview and History
The Personal Computer Personal Computers, also known as PCs, have been in existence for over 20 years in various forms. They have changed business styles and the way people work, giving people access to information and storage of data that was basically unheard 20 years ago.
Why a Personal Computer The concept of a PC is simply that it is a computer for business or for your own personal use. Depending on the programs that are installed on your computer, you can specify what it will be used for.
Monitor
Screen
Computer Box
Mouse Keyboard
Floppy Drive (A Drive)
Desktop Computer

MS Windows NT 4.0 - Introduction/Intermediate ICOM Solutions
ICOM Solutions © 1997 Page 9
Hardware Components Hardware is the physical equipment which you use. It is generally all the things which you see when you look at a PC. There are three main Hardware Components to a PC
Output Devices The basics are: Monitor Printer
These allow you to view the results of your work , either on screen or on paper
Input Devices The basics are: Keyboard Mouse Scanner These allow you to insert your work into the computer, so that it can be processed, manipulated and then saved, and then if you wish, displayed as output
The Computer Also known as the Box - either Desktop or Tower.
This is the heart and mind of the computer. Everything must first go through this before it passes out into the real world.
Tower Box Desktop Box

ICOM Solutions MS Windows NT 4.0 - Introduction/Intermediate
Page No 10 ICOM Solutions © 9261 2499
Software There are two types of software; Operating Systems and Applications. Operating Systems are what your computer needs to run and it coincides with the Hardware of your system. Think of it as the conductor in a large orchestra, telling the players (Software Applications) when they can play or when they must stop. E.g.: Windows NT is an operating system and MS Office applications (WORD, EXCEL, POWERPOINT and ACCESS) are software applications.
Drives Drives include Floppy drives, Hard drives, Tape Backup and CD ROMS drives. Floppy drives are used for floppy disks, which are disks that you can insert and remove from your computer. Hard Drives contain the Hard Disk, which in most situations is the C drive. This is where your operating system and application software is installed and located.
Booting Booting means turning the computer on. When the computer Boots up it automatically runs your Operating System, and when this is completed you can then run your Software Application.
Icons An Icon on a computer screen is a picture that represents a folder, file or command. To select an Icon click the icon with the left-mouse button. To activate the Icon double-click with the left-mouse button. You can also right-click an icon to view other commands/properties.
Floppy Disk
Ensure that a floppy disk is not inserted in your computer (In most situations the ‘A’ drive) when turning on the computer.

MS Windows NT 4.0 - Introduction/Intermediate ICOM Solutions
ICOM Solutions © 1997 Page 11
Understanding Files and Folders
Introduction to the Analogy Windows NT refers to Files and Folders in organising its information storage. An analogy is being made to Files (pieces of paper) and Folders (Manila folders). Each Folder can contain Files, more Folders or both. To continue this analogy, a Filing Cabinet could be likened to your Computer, with each Drawer of the Cabinet representing a Drive (of any kind).
Files A File is a collection of information bound together by a common Filename. This information can be Document information created in an Application, or even an Application itself. All information stored in the Computer’s Drives is in the Files.
Folders The Files may be sorted into Folders, just as you may expect Files in a Filing Cabinet to be sorted into Folders. Each Drive, although being a Drawer in our analogy contains one Large Folder in which all of its contents are stored. This Large Folder is known as the Root Folder and It contains Files and other Folders/sub-folders, which can, in turn, contain further Files and Sub-Folders, and so on.
Data
C:
My File.doc
Word

ICOM Solutions MS Windows NT 4.0 - Introduction/Intermediate
Page No 12 ICOM Solutions © 9261 2499
Understanding Paths The Path specifies how to find a folder or file on your disk that contains more than one folder. C:\Word\Letters\Business\Timeline.doc As for the above sample, here we have several folders under the main folder titled Word. Depending on how we set up our path some folders may contain files and folders, or just folders, or files. What the diagram above means: On the current drive there is a folder called Word. In Word there is a folder called Letters. In the Letters folder there are two folders, one called Personal’, the other Business. In the Business folder there is a file called Timeline.doc To view if files exist in a folder you must open that folder.
Word
Letters
memos
reports
Business
Personal
C Drive

MS Windows NT 4.0 - Introduction/Intermediate ICOM Solutions
ICOM Solutions © 1997 Page 13
Mouse Usage The mouse is the primary input device for Windows NT and Windows applications. Noted below are several mouse functions that should be understood.
Pointing Move the mouse so that the pointer ( ) has its tip resting on an object.
Left-Click You depress and then release the LEFT mouse button while pointing to an object
Double-Click Make two clicks in quick succession with the Left-Mouse button while pointing to an object
Right-Click You depress and then release the RIGHT mouse button while pointing to an object
Dragging Point to an object, depress the LEFT button, move the mouse (the object will move also) and then release the LEFT button
Right Dragging Point to an object, depress the RIGHT button, move the mouse (the object will move also) and then release the RIGHT button
Manually Resizing It is possible to manually size a Window screen. This can be done by the resizing Pointers ( , , , and ). These are obtained by pointing to the borders or sizing corner of a Window. From there you can resize the Window to your preference.

ICOM Solutions MS Windows NT 4.0 - Introduction/Intermediate
Page No 14 ICOM Solutions © 9261 2499
Scroll Bars When you have resized a window, you may find that there are hidden contents in that window. When this is the case, scroll bars will appear either vertically, horizontally or both.
Windows (as above) can also be moved. This can be accomplished by first placing the pointer on the Title Bar, hold down the Left-Mouse button then dragging the object to a new destination.
Scroll Buttons
Scroll Bars
Scroll Box
No. of objects in screen - only nine are displayed
Title Bar

MS Windows NT 4.0 - Introduction/Intermediate ICOM Solutions
ICOM Solutions © 1997 Page 15
Dialog Boxes Windows NT uses dialog (or dialogue) boxes for displaying current settings or to request information. E. g. The Properties dialog box. Accessed from the My Computer Icon.
Depending on which dialog box was selected, the information within each dialogue box can be entered in a variety of ways. Typing text and selecting are some of the available options.

ICOM Solutions MS Windows NT 4.0 - Introduction/Intermediate
Page No 16 ICOM Solutions © 9261 2499
Security A very important factor concerning a Networking system is Security. Security involves ensuring that everyone has access to data that they need, and do not have access to data that they do not require. For this to operate every user has a User Identification (User ID) and a password. Once logged in, the Network system can determine who you are and what access you are entitled to.

MS Windows NT 4.0 - Introduction/Intermediate ICOM Solutions
ICOM Solutions © 1997 Page 17
Notes:

CONTENTS
Chapter 2 The DeskTop
THE DESKTOP ................................................................................................................................... 19
Windows Essentials ....................................................................................................................... 20 Cascading and Tiling Windows ............................................................................................................... 22 Menus, Commands and Dialog Boxes ..................................................................................................... 22
THE START BUTTON, START MENU AND TASKBAR ............................................................................. 27 Start Button Contents ............................................................................................................................... 27 Launching Programs ................................................................................................................................ 29
Taskbar Properties ....................................................................................................................... 31 Hiding the Taskbar ................................................................................................................................... 31 Changing the Position and Size of the Taskbar ........................................................................................ 32
THE MY COMPUTER AND RECYCLE BIN ICONS ................................................................................... 34 My Computer ................................................................................................................................ 34
Control Panel ........................................................................................................................................... 34 Format Floppy Disk ................................................................................................................................. 35 Copying a Floppy disk ............................................................................................................................. 35
Recycle Bin ................................................................................................................................... 36 What you can do with the Right-Mouse button ............................................................................. 38
CREATING SHORTCUTS ....................................................................................................................... 40 Creating Shortcut Sample 1 ..................................................................................................................... 41 Creating Shortcut Sample 2 ..................................................................................................................... 42 Creating a Folder on the Desktop ............................................................................................................. 45
USING THE DESKTOP TO MANAGE FOLDERS AND FILES ..................................................................... 45 CONFIGURING YOUR DESKTOP ........................................................................................................... 47
Background .............................................................................................................................................. 48 Screensaver .............................................................................................................................................. 49 Appearance .............................................................................................................................................. 49 Plus .......................................................................................................................................................... 49 Settings..................................................................................................................................................... 49

ICOM Solutions MS Windows NT 4.0 - Introduction/Intermediate
ICOM Solutions © 1997 Page 19
The Desktop In most situations you will be required to enter a password when Windows NT is booting up. After you have entered your password the Windows NT Desktop screen will be displayed.
This is where you control the operations of your computer. The main components are:
Icons
The Task Bar - which includes the Start button and the System
Tray
MS Office 97 Toolbar (If MSOffice is installed)
Start Button Task Bar
Icons
System Tray
MS Office Shortcuts

MS Windows NT 4.0 - Introduction/Intermediate ICOM Solutions
Page No 20 ICOM Solutions © 9261 2499
Windows Essentials When you click on an Icon to open it the contents will appear in a Window. To become proficient in Windows NT to need to know how to manipulate windows because all windows basically behave the same way. Task one - Opening an Icon
Double-click the My Computer Icon
The following Window will be displayed. This is a typical Window layout:
The Title bar contains the Program Icon and the Application name. It also contains the Minimise, Maximise and Close buttons. When the title Bar is coloured blue, it means it is active. If you open another application or a folder within the Title Bar colour becomes gray, this means that the Window is now inactive. Task 2 - Maximising, Minimising, Restoring a Window
Click the Maximise button and view
Click the Restore button
Click the Minimise button
Title Bar Application
Status
Program Icon
Menu Bar
Drive(s) Folder(s)
Minimise, Maximise, Close buttons
Resizing Handle

ICOM Solutions MS Windows NT 4.0 - Introduction/Intermediate
ICOM Solutions © 1997 Page 21
You will notice that the My Computer application is now displayed as a button on the Taskbar. You have not closed the application but have only stored it. It is similar to the way you might place a folder on your table in the corner instead of filing it away, which would take longer to retrieve. To open the My Computer Icon, click the button on the Taskbar, or you can right-click the button and view several options that are available: Restore, Maximise and Close. Tip If you have several windows opened at the one time and you wish to minimise all of them, right-click on an empty area of the Taskbar and select Minimise All Windows. To restore all your windows again right-click on an empty area of the Taskbar and select Undo Minimise All. Tip The Program Icon, positioned on the far left of the Title Bar will display a shortcut menu of similar operations by clicking on it. The same menu will appear if you right-click on the Title Bar.
Tip You can also close a Window by double-clicking its Program Icon - located far-left corner of the Title Bar. You can close all open Windows within a program by holding down the shift key whilst clicking the Close icon on the active Window.
Use one of the methods of closing the My Computer icon

MS Windows NT 4.0 - Introduction/Intermediate ICOM Solutions
Page No 22 ICOM Solutions © 9261 2499
Cascading and Tiling Windows If you have several Windows open at once you can view them all (or part of them) at the same time. Task 3 - Cascading and Tiling Windows
Double-click My Computer icon to open it Or select the icon
(ensure it is highlighted) and right-click. Then click Open
Open the Control Panel folder
Click on an blank area of the Taskbar
Click Cascade, Tile Horizontally, or Tile Vertically
When completed close all windows
Tip To restore your Windows to their original state, click on a blank area of the Taskbar and click Undo Cascade or Undo Tile Menus, Commands and Dialog Boxes

ICOM Solutions MS Windows NT 4.0 - Introduction/Intermediate
ICOM Solutions © 1997 Page 23
When you are using Windows NT you will work extensively with Menus and dialog boxes. All Windows have a Menu Bar with a list of available menus which contain a list of commands. When a menu command requires more information before it can be executed, a dialog box is displayed. To access commands select and click a menu title or use hold the Alt key and press the underlined letter of the required menu title.
Open the My Computer Icon
Select View menu and click it once Or use Alt + V
In most instances menus will display symbols next to a command. These symbols are:
A tick indicates that the item can be toggled on or off
A dot indicates a chosen selection
Indicates a further selection or sub-menu(s)
… Further information is required E.g. A dialog box will be displayed for further input from the user

MS Windows NT 4.0 - Introduction/Intermediate ICOM Solutions
Page No 24 ICOM Solutions © 9261 2499
Task 4 - Different settings
From the View menu, select the commands Small Icons, List
and Details and view each display
If not activated select Toolbar from the View menu
Place the pointer over each of the Toolbar buttons (wait one
second) and view the pop-up information concerning that
button
Select the C drive by clicking it once
Click the Properties button
Click the Tools tab
The C drive properties dialog box will be displayed.
Tip To switch back to a previous folder,
click the on the toolbar Or press the Backspace key. If the Toolbar is not visible, click the View menu and then click toolbar

ICOM Solutions MS Windows NT 4.0 - Introduction/Intermediate
ICOM Solutions © 1997 Page 25
From here you are able to backup files, check your Hard / Floppy disks for errors and defragment your hard disk. Tip You can access the Properties and other commands by right-clicking on an icon.
Close the Properties window
Where available the Speedkey alternatives are shown immediately to the right of the command name. Once you have memorised them, these key combinations are used without displaying the menu to quickly execute the command. E.g. The Open command can be executed by pressing the Ctrl + O keys. Tip Speedkeys generally do not work if the drop-down menu is displayed. If a drop-down menu displays commands in gray type it means that the commands at present are not available.
Commands are made unavailable by the application because the conditions are not appropriate for the command to function. An object must first be selected before it can be deleted or renamed (see above sample menu).

MS Windows NT 4.0 - Introduction/Intermediate ICOM Solutions
Page No 26 ICOM Solutions © 9261 2499
Notes:

ICOM Solutions MS Windows NT 4.0 - Introduction/Intermediate
ICOM Solutions © 1997 Page 27
The Start button, Start Menu and Taskbar
Windows NT features many resources for the user. To access these resources you click the Start button and the Start menu will be displayed. This basically is your Launching Pad, which provides a wide range of menu items.
Click the Start button
The Start Menu Start Button Contents Listed below is an explanation of the commands in the Start Menu: Programs This will list the available applications on your system
Documents Displays the last 15 of the most recently used files
Settings Access to Control Panel, Printers and Taskbar settings
Find Find a File, folder or another computer on the Network
Help Use this to find any topic that you may need help on. There
are three basic options
Contents
Index
Find
Run Use this to find an application that is not listed in the programs Start menu and/or to install an application
Shut Down Use this to turn of your computer. Other options are available from this command

MS Windows NT 4.0 - Introduction/Intermediate ICOM Solutions
Page No 28 ICOM Solutions © 9261 2499
You will notice on the Start Menu that you can also access MS Office applications (If installed). Task 5 - Viewing the Start Menus
Select each menu item and view only

ICOM Solutions MS Windows NT 4.0 - Introduction/Intermediate
ICOM Solutions © 1997 Page 29
Launching Programs In the Start menu, many items contain sub-menus, which themselves may contain further sub-menus. The cascading approach to menus is common in Windows NT
To access a program click the Start button, then guide the pointer to the program that you want to launch. In the sample above we are going to access the Volume Control. There is no need to click until you have reached the program Task 6 - Launching Programs
From the Start button, launch the program WordPad
From the Start button, launch the program Paint

MS Windows NT 4.0 - Introduction/Intermediate ICOM Solutions
Page No 30 ICOM Solutions © 9261 2499
Your screen will display the two open applications:
Notice the Taskbar, it contains the two application buttons. The WordPad button is raised, which means that the application in inactive (gray title bar). The Paint button is depressed which means that this application is active (blue title bar). You can toggle between the applications by either clicking on the application or clicking their respective buttons.
Tip You can also switch between applications by holding down the Alt key, and pressing the Tab key until the required program is selected Task 7 - Open Applications
Switch between applications by selecting the application and
using the buttons on the Taskbar
When completed close both programs
If you are requested to save click No

ICOM Solutions MS Windows NT 4.0 - Introduction/Intermediate
ICOM Solutions © 1997 Page 31
Taskbar Properties As previously mentioned the Taskbar is used to re-activate programs and switch between tasks. It also contains a System Tray, which displays the time, printing progress, volume control (If Sound orientated) and other utility devises that may be attached to your system.
At times it would be beneficial to hide the Taskbar when you want to increase the screen area occupied by an application. The Taskbar, when hidden, can be displayed by moving the pointer to the bottom of the screen. Hiding the Taskbar
Start | Settings | Taskbar Or Place the pointer on an empty
area of the Taskbar and select Properties
From here we can set the settings for the Taskbar Task 8 - Configuring the Taskbar
System Tray Open Applications

MS Windows NT 4.0 - Introduction/Intermediate ICOM Solutions
Page No 32 ICOM Solutions © 9261 2499
Activate or de-activate the check boxes
To view changes click the Apply button - The Apply lets you
view changes that can be made. By clicking the OK button
those changes will take effect
When completed return to default by selecting Always on top
and Show Clock
Click the Start Menu Programs tab
From here we can add, remove titles from our Start menu and remove recently used documents. Note that the application is not deleted from your hard disk if you remove a Start menu item.
To add to the program list
Remove an application from the program list
Displays the Explorer screen in a format in which you can customise your program settings Changing the Position and Size of the Taskbar
ICOM Solutions MS Windows NT 4.0 - Introduction/Intermediate
ICOM Solutions © 1997 Page 33
There is another method of hiding the Taskbar.
Point to the top of the Taskbar until you see a double-headed
arrow
Click and drag until the Taskbar becomes a thin line at the
bottom of the screen
Release the mouse button
If you have more applications running than the Taskbar will display, its size can be increased.
Point to the top of the Taskbar
Click and drag until the Taskbar is the size you require
Release the mouse button
The Taskbar can be positioned at the bottom, top, left or right of the screen
Point to a blank area of the Taskbar
Click and drag the Taskbar to the top, left or right of the screen
Release the mouse button
Task 9 - Changing the Position and Size of the Taskbar
Experiment with the above Taskbar settings

MS Windows NT 4.0 - Introduction/Intermediate ICOM Solutions
Page No 34 ICOM Solutions © 9261 2499
The My Computer and Recycle Bin Icons My Computer
You can view your folders and files by using the My Computer icon. When opened, you can see a list of all disk drives attached to your computer. Just double-click on any icon to see what is
inside. The folder icon represents folders and when opened the folder is displayed as open. Some folders have a graphical representation of their contents on the outside such as the Printers and Control Panel folders.
Folder Control Panel Printer Folder Hard Drive
Double-click My Computer icon
Double-click on a drive E. g. C drive and view
Open the Control Panel view
Control Panel

ICOM Solutions MS Windows NT 4.0 - Introduction/Intermediate
ICOM Solutions © 1997 Page 35
From here you can configure the basics of your system. E. g. Screen display, sounds, Time, colours and more. Tip You can access the Control Panel from the Start button, then Settings, then click Control Panel
Open several of the icons and view only
Format Floppy Disk You can format floppy disks from the My Computer icon. Select the A drive (click once - ensure it is highlighted) and click menu File then click Format.
Copying a Floppy disk To copy a floppy disk from the My Computer icon again select the A drive (ensure it is highlighted), click menu File, then click Copy Disk…

MS Windows NT 4.0 - Introduction/Intermediate ICOM Solutions
Page No 36 ICOM Solutions © 9261 2499
Empty bin
Recycle Bin One of the major new features of Windows NT is the Recycle Bin. You can use the Recycle bin to remove, view or retrieve any deleted files by double clicking on it. You then have the option of removing the file/s permanently or restoring the files to their original position by using the Restore command from the File Menu.
Tip Should you wish to delete the f i les or fo lders permant ley wi thout p lacing them in the recycle bin, hold the Shift key and then select Delete
Double-click the Recycle Bin icon
If there are files stored remove them by selecting menu File,
then Empty Recycle Bin
Close the Recycle Bin screen
Select the Recycle Bin (Ensure it is highlighted) and right-
click, then select Properties
Deleted files in bin

ICOM Solutions MS Windows NT 4.0 - Introduction/Intermediate
ICOM Solutions © 1997 Page 37
Click the Cancel button
From the Recycle Bin Properties Dialog box you can configure the Recycle Bin options that are available.
MS Windows NT 4.0 - Introduction/Intermediate ICOM Solutions
Page No 38 ICOM Solutions © 9261 2499
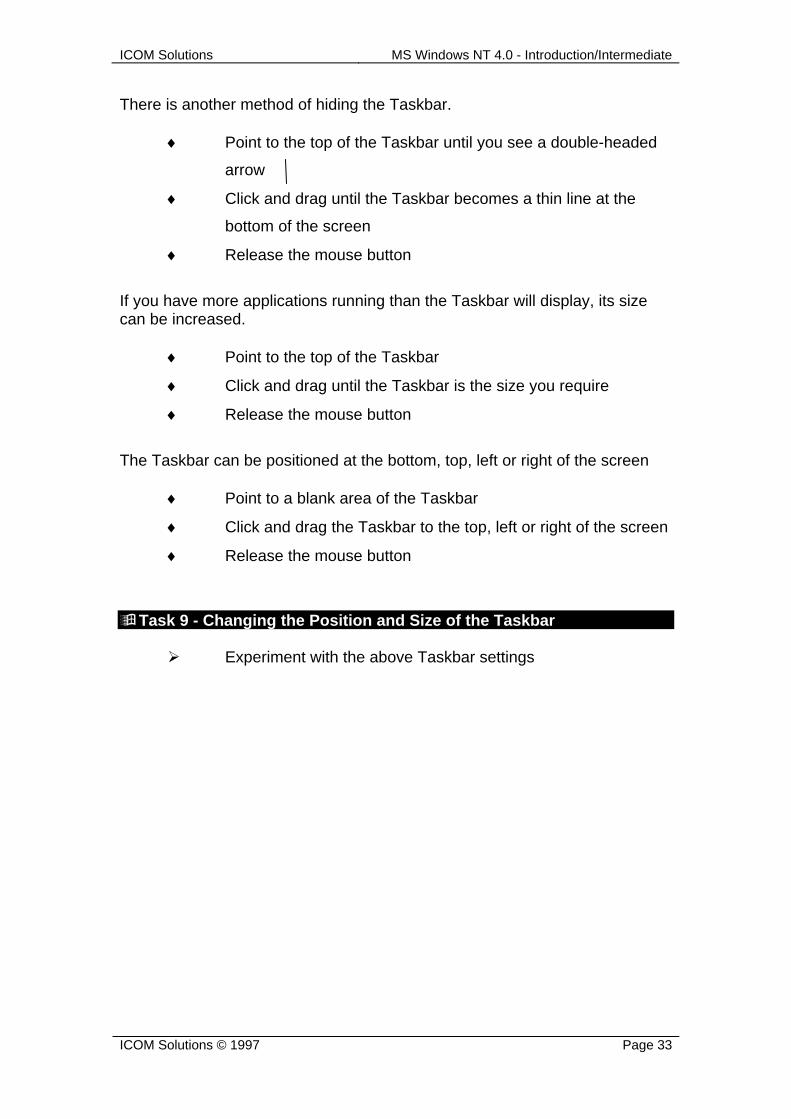
What you can do with the Right-Mouse button The right-mouse button now gives you access to facilities in Windows NT itself and in the applications. A different list appears depending on the item you click on. Samples Icons Start Button
Desktop Recycle Bin
Folder, document or Program Icon
Notes:

ICOM Solutions MS Windows NT 4.0 - Introduction/Intermediate
ICOM Solutions © 1997 Page 39

MS Windows NT 4.0 - Introduction/Intermediate ICOM Solutions
Page No 40 ICOM Solutions © 9261 2499
Creating Shortcuts A powerful feature in Windows NT is the Shortcut facility. If you use an application every day it would be useful to create a shortcut icon for that application. You can place a shortcut (also known as a link), on the Desktop and/or folder.
A Shortcut features an arrow on the icon . Basically, a Shortcut is a pointer to an object and not the object itself. Therefore if you delete the Shortcut it will not effect the object (application) in any way. There are several ways that Shortcuts can be created.
Sample 1
Locate and select the program, folder, printer, or computer you
want to create a Shortcut to
From the File menu, select Create Shortcut
Drag the Shortcut icon onto the Desktop
Sample 2
Place the pointer on an empty area of the Desktop
Right-click mouse button
Click New
Click Shortcut
Then follow the procedures as displayed
If you want to change any settings for a Shortcut, E. g. what kind of Window it starts in or what key combination is used to access it, right-click the Shortcut icon, and then click Properties. Should you wish to delete a Shortcut icon you can either right-click it and select Delete or simply drag it top the Recycle Bin.

ICOM Solutions MS Windows NT 4.0 - Introduction/Intermediate
ICOM Solutions © 1997 Page 41
Creating Shortcut Sample 1 In the following exercise you will create a shortcut for the application WordPad
Open the My Computer icon
Double-click the C Drive
Double-click the Windows folder
Click once the Write file (ensure it is highlighted) - You may
need to use the scroll bars to locate it
From the File menu select Create Shortcut Or Place the
pointer on the file and right-click. Then select Create Shortcut
You will notice the new shortcut as displayed:
Select the Shortcut to Write and drag it to the Desktop and
release the mouse button
The Write shortcut is now displayed on the Desktop
Ensure that the Write shortcut is highlighted
Press the F2 key - This is used to rename a folder, file, or
shortcut
Type in WordPad
Press the Enter key
Open the WordPad program by double-clicking the shortcut
icon
View then Close
If prompted to Save click No

MS Windows NT 4.0 - Introduction/Intermediate ICOM Solutions
Page No 42 ICOM Solutions © 9261 2499
Creating Shortcut Sample 2 In the following exercise you will create a shortcut for the application game Solitaire
Place the pointer on an empty area of your Desktop
Right-click mouse button
Click New
Click Shortcut
The Create Shortcut dialog box will be displayed:
Click the Browse button - If you know the name of the path
you can type it in now

ICOM Solutions MS Windows NT 4.0 - Introduction/Intermediate
ICOM Solutions © 1997 Page 43
Double-click the Windows folder
Double-click the Sol file - You may need to use the scroll bars
to locate this file

MS Windows NT 4.0 - Introduction/Intermediate ICOM Solutions
Page No 44 ICOM Solutions © 9261 2499
Click the Next button
In the text field area type Solitaire
Click the Finish button
Your Solitaire shortcut will now be displayed on the Desktop

ICOM Solutions MS Windows NT 4.0 - Introduction/Intermediate
ICOM Solutions © 1997 Page 45
Task 10 - Creating Shortcuts
Create two new shortcuts using the two sample methods.
Create a shortcut for the application Explorer
Create a shortcut for the application Paint (Pbrush)
Both these files are located in the Windows folder Creating a Folder on the Desktop The next exercise is to create a folder for our Desktop and move the four new shortcuts into this folder.
Place the pointer on an empty area of the Desktop and right-
click the mouse button
Select New
Select Folder
Name the folder as your given name
Open the new folder
Drag the shortcuts to the new folder - By holding the Ctrl key
you can select the four icons then drag to the new folder
Using the Desktop to Manage Folders and Files

MS Windows NT 4.0 - Introduction/Intermediate ICOM Solutions
Page No 46 ICOM Solutions © 9261 2499
You can create Folders (Directories) and manage your files now from the Desktop. If you ever used a Macintosh then basically the same principle now applies to Windows NT Desktop.
Open the My Computer icon
Double-click the C Drive
Click menu File | New | Folder
Name the folder My Data
Press the Enter key
Double-click the My Data folder to open it
Double-click the Windows folder
Your screen will look similar as displayed:
Your next task is to copy several bitmap image files from the Windows folder to the My Data folder.
Select a bitmap image
Hold down the Ctrl key

ICOM Solutions MS Windows NT 4.0 - Introduction/Intermediate
ICOM Solutions © 1997 Page 47
While holding the left-mouse button down, drag the file to the
My Data folder - copy three (3) bitmap image files
Tip If you do not hold the Ctrl key you will be moving the file, not copying it. Your next task is to create a sub-folder under the My Data folder.
Select menu File | New | Folder from the My Data window on
your Desktop
Name this folder Graphics
Select the three bitmap files (use the Ctrl key) then drag them
to the Graphics folder
When the Graphics folder is highlighted release the left mouse
button
Configuring Your Desktop To change your Screensaver, Wallpaper, Colours, Screen settings you must view the Display Properties dialog box.
Your bitmap files are now located in the Graphics folder. To view them double-click this folder.

MS Windows NT 4.0 - Introduction/Intermediate ICOM Solutions
Page No 48 ICOM Solutions © 9261 2499
Click Start | Settings | Control Panel | Display
Or
Right-click on an empty area of the desktop and click
Properties
Background The first screen of the dialog box lets you change the background screen. You may also use the Browse button to select any other bitmap (Filename.BMP) file on your system.
Art1

ICOM Solutions MS Windows NT 4.0 - Introduction/Intermediate
ICOM Solutions © 1997 Page 49
Screensaver Screensavers save wear and tear on your screen. You have the option of selecting any screensaver that was installed with Windows NT. Most screensavers can be modified for your taste and passwords can be implemented for security. Appearance This lets you modify your colour settings. You can select your own colours, or select one of many of Windows NT scheme settings. Fonts may also be changed to suit your style. Plus Contains several functions to enhance the Desktop Settings This is where you change the colour and screen size of your monitor. The two popular screen sizes are 640 X 480 or 800 X 600. 256 Colours is the standard colour format for most business applications. Should you be involved in producing high quality pictures then it would be advisable to increase your colour settings. Task 11
Change your background screen
Click the Apply button
View then click Cancel
Close the Display Properties window
Notes:

MS Windows NT 4.0 - Introduction/Intermediate ICOM Solutions
Page No 50 ICOM Solutions © 9261 2499

CONTENTS
Chapter 3 Windows NT Applications
WINDOWS NT APPLICATIONS ...................................................................................................... 52
WordPad ....................................................................................................................................... 52 Selecting Text .......................................................................................................................................... 52
Paint .............................................................................................................................................. 53 Calculator ..................................................................................................................................... 54
To work with Numbers stored in Memory ............................................................................................... 55 To recall a Stored Number ....................................................................................................................... 55 To Clear the Memory ............................................................................................................................... 55 To Add the Displayed Number to the Number already in Memory ......................................................... 55
Notepad ......................................................................................................................................... 55 USING WINZIP .................................................................................................................................... 57
Compressing Files .................................................................................................................................... 57 Extracting Files ........................................................................................................................................ 62

MS Windows NT 4.0 - Introduction/Intermediate ICOM Solutions
Page No 52 ICOM Solutions © 9261 2499
Windows NT Applications Windows NT includes a number of applications. These include WordPad, a word Processor; Paint, a graphics drawing tool; Imagining, an image manipulation tool; Calculator and Notepad. These are all designed to take advantage of the new operating system and the working together approach to computing. All these applications can be located by using the Start | Programs | Accessories
WordPad This is a basic word processing program which takes advantage of the Windows NT graphics screen capabilities to show different typeface attributes on the screen as well as different typefaces. It contains the usual word processing features such as cut, copy and paste, paragraph alignment, character attribute control, headers and footers. You can also save WordPad in several formats including Word 6.0 As in any word processing package it is important that when you wish to format any text in any way it must first be selected. This can be done in several ways and selected text appears in Inverse Video. Selecting Text To change the format of your text, place the pointer close to the left edge of the screen. The mouse pointer will change to point to the right when it is in the selection area. To Select
Do This
Single Word Double-click onto the word
Single Line Point to a line from the selection area (blank white area in the left margin) and click the mouse button
Paragraph
Point to a paragraph from the selection area and double-click the mouse button
The Whole Document
Point into the selection area on the left and click whilst holding down the Ctrl key

ICOM Solutions MS Windows NT 4.0 - Introduction/Intermediate
ICOM Solutions © 1997 Page 53
Paint This is a graphics package that allows you to draw pictures, add text and if you wish, you can use it as a background picture. You can also use Paint to edit any bitmap files, and copy them into any other Windows programs E. g. documents. You can also use Paint to view and edit scanned photos if saved in a BMP (bitmap) format.
The Tool palette can be repositioned to provide you with a larger working area. This is useful for cutting or copying large areas of a picture
MS Windows NT 4.0 - Introduction/Intermediate ICOM Solutions
Page No 54 ICOM Solutions © 9261 2499
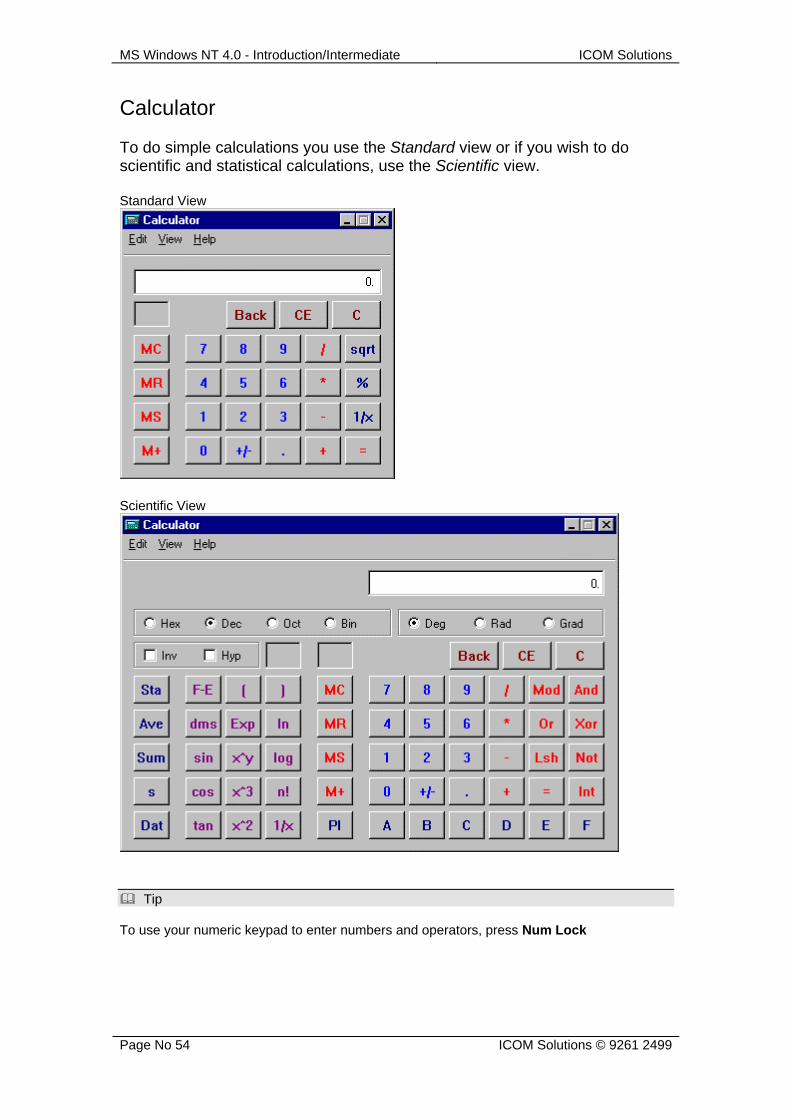
Calculator To do simple calculations you use the Standard view or if you wish to do scientific and statistical calculations, use the Scientific view. Standard View
Scientific View
Tip To use your numeric keypad to enter numbers and operators, press Num Lock

ICOM Solutions MS Windows NT 4.0 - Introduction/Intermediate
ICOM Solutions © 1997 Page 55
To work with Numbers stored in Memory
Click the MS button to store a number
When you store a number memory, an M appears in the box above the memory options. To recall a Stored Number
Click the MR button
Tip If you store another number in memory, it replaces the number currently in memory
To Clear the Memory
Click the MC button
To Add the Displayed Number to the Number already in Memory
Click the M+ button
Notepad You can use Notepad to create or edit text files that do not require formatting and are smaller than 64K. Notepad opens and saves text in ASCII format only. To create or edit files that require formatting or are larger than 64K use the application WordPad.

MS Windows NT 4.0 - Introduction/Intermediate ICOM Solutions
Page No 56 ICOM Solutions © 9261 2499
Task 12
Open the WordPad, Paint programs
Type in a paragraph of your own text
Create some drawings (be artistic) in Paint using different tools
Copy from Paint to WordPad
Save the WordPad file to your Documents folder as text1, the
Paint file to your Graphics folder as Art1
When completed close both programs
From the Desktop copy the Art1 file to the Windows folder

ICOM Solutions MS Windows NT 4.0 - Introduction/Intermediate
ICOM Solutions © 1997 Page 57
Using Winzip Winzip is a utility program that is used to compress your files. It does not come with Windows NT but it is a useful application to have on your system. If files that you had created are not used or you wish to take them home with you it is advisable to compress (AKA compact or archive) them, especially if the file exceeds 1.4Mb (the storage limit of a high density disk). By compressing files you free more space on your hard disk, and if you require the file it is a simple case of extracting them. Compressing Files
Task 13 - Using Winzip From Explorer:
Create a folder on the C drive (unless otherwise advised) and name
it Storage
Select a number of files (minimum six - large files) and copy them to
the Storage folder (If need be your trainer will advise what files to
copy)
In the sample below the files that are to be compressed use over 15Mb of disk space
When completed close the Explorer screen
Open the Winzip program from your Start menu
The Winzip utility program will be launched:

MS Windows NT 4.0 - Introduction/Intermediate ICOM Solutions
Page No 58 ICOM Solutions © 9261 2499
Or depending on what version you have the screen may look similar to this:
Click the New button

ICOM Solutions MS Windows NT 4.0 - Introduction/Intermediate
ICOM Solutions © 1997 Page 59
Select the Storage folder by double-clicking on it
In the File Name area type in WorkFile
Click OK

MS Windows NT 4.0 - Introduction/Intermediate ICOM Solutions
Page No 60 ICOM Solutions © 9261 2499
The Winzip Add dialog box will appear.
In the Add From box area, use the down-arrow button and select
the folder Storage
Select all the files (use the Shift method to select all) and click the
Add button.
After a few seconds the following screen will be displayed:

ICOM Solutions MS Windows NT 4.0 - Introduction/Intermediate
ICOM Solutions © 1997 Page 61
Notice the titlebar, it displays the name of the Winzip file
Close Winzip and open the Explorer Screen
Open the Storage folder
Notice in our sample the Workfile.zip file is only 717KB.
Delete all files in the Storage folder except Workfile.zip - by doing
this you are freeing up (in our sample) over 14Mb of hard disk
space

MS Windows NT 4.0 - Introduction/Intermediate ICOM Solutions
Page No 62 ICOM Solutions © 9261 2499
Extracting Files In this task you will now extract the files that you compressed. Task 14 - Extracting Files
Open the Winzip utility program
When opened click the Open button
Select the Storage folder in the Look In box area
Double-click the workfile.zip file Or click it once to select it, then
click the Open button

ICOM Solutions MS Windows NT 4.0 - Introduction/Intermediate
ICOM Solutions © 1997 Page 63
Click the Extract button
Select the Storage folder
Click the Extract button
Once completed click the Close button
Open Explorer and view the Storage folder
You will notice that are files have been extracted. The Workfile.zip file is still located in the Storage folder. Tip If you extracted a number of files and only modified one file, there is no need to compress all the files again into a new Winzip file. All you do is add the modified file to your existing winzip file. Notes:

MS Windows NT 4.0 - Introduction/Intermediate ICOM Solutions
Page No 64 ICOM Solutions © 9261 2499

CONTENTS
Chapter 4 The Explorer
THE EXPLORER ................................................................................................................................ 66
FOLDERS............................................................................................................................................. 67 Creating Folders ........................................................................................................................... 67
Using the Pull down menu ....................................................................................................................... 67 Creating a folder with the right-mouse button ......................................................................................... 68
COPYING, MOVING AND DELETING FILES IN EXPLORER ..................................................................... 69 1 The Dragging Method ........................................................................................................................... 70 2 Using the Edit Menu ............................................................................................................................. 71 3 Using the right mouse button ................................................................................................................ 73 4 Using the ‘Send To’ command .............................................................................................................. 74
THE FIND COMMAND .......................................................................................................................... 75

MS Windows NT 4.0 - Introduction/Intermediate ICOM Solutions
Page No 66 ICOM Solutions © 9261 2499
The Explorer If you used File Manager under your previous version of windows then the new Windows Explorer (do not get confused with MS Internet Explorer) is basically the same ease of use. It is a powerful way to browse and manage your files, drives and network connections. The basic Window commands such as Copy, Paste, Cut and Undo can now be used in Explorer. To open Explorer:
Start | Programs | Windows NT Explorer
Or
Right-click Start button, then click Explore
Up one level in Directory Structure Cut Copy Paste Properties
Large Icons
List Details
No. of objects Space available on hard disk
Maximise
Close
Map Network drive
Disconnect Net Drive
Undo
Delete
Small Icons
Minimise

ICOM Solutions MS Windows NT 4.0 - Introduction/Intermediate
ICOM Solutions © 1997 Page 67
Folders Directories are now known as Folders and there are two basic ways to create folders. The first step is to select where you want to create your folder; should it be on the C root path or under another folder. We will create two folders using two different methods.
Using the pull down menu
Using the right mouse button
Creating Folders Using the Pull down menu The first step in both instances is to select where we will create the new folder. In the first sample we will create a folder called My paintings on the C root path.
Click the C drive
Click menu File | New | Folder
Step 1
Step 2

MS Windows NT 4.0 - Introduction/Intermediate ICOM Solutions
Page No 68 ICOM Solutions © 9261 2499
You will notice on the right pane of your Explorer window a new highlighted folder titled New Folder.
Name the folder My Paintings
Press the Enter key
Creating a folder with the right-mouse button
Select C drive and place the mouse on the right pane of your
Explorer screen and right-click mouse button
Once the following pop-up menu has appeared select New,
then Folder
Name this folder My Work
Tip If you cannot see the new folder select View, then Refresh

ICOM Solutions MS Windows NT 4.0 - Introduction/Intermediate
ICOM Solutions © 1997 Page 69
Copying, Moving and Deleting Files in Explorer Let’s try a couple of methods of copying several bitmap files from the Windows folder to our new created folder My Paintings. There are several methods that can we can use:
by dragging
using the edit menu
using the right mouse button
using the send to command
In the following tasks you again will use bitmap files. These files end with the extension .BMP E.g. BUBBLES.BMP and in most instances can be found under the Windows folder.

MS Windows NT 4.0 - Introduction/Intermediate ICOM Solutions
Page No 70 ICOM Solutions © 9261 2499
1 The Dragging Method
Select four bitmap files by holding down the Ctrl key
You will copy the files to My Paintings folder
Select one of the files with the pointer, press and hold the right
mouse button and drag to our destination folder.
When you notice that the folder is highlighted release the right-
mouse button and the following menu commands will be
displayed.
When completed double click the My paintings folder.
You should have four BMP files displayed on the right pane of your screen.

ICOM Solutions MS Windows NT 4.0 - Introduction/Intermediate
ICOM Solutions © 1997 Page 71
Delete these files by selecting the first file, hold shift key, and
select the last file - release the shift key.
Press the Delete key. When prompted to confirm the deletion
of these files select Yes
2 Using the Edit Menu
Use the same four bitmap files and this time select the menu
Edit, then Copy
Again select the My paintings folder. When highlighted select
Edit then Paste.

MS Windows NT 4.0 - Introduction/Intermediate ICOM Solutions
Page No 72 ICOM Solutions © 9261 2499
Once completed the files will be displayed on the right pane of explorer.
Select and delete two of these files. This time do not put the
files in the Recycle Bin.
How did you carry out this command? ______________________________

ICOM Solutions MS Windows NT 4.0 - Introduction/Intermediate
ICOM Solutions © 1997 Page 73
3 Using the right mouse button
Select four different types of files from
another folder E. g. document files
Once the files are highlighted click the right
mouse button on any file. When the
following menu is displayed select Copy.
Select the folder My Work and again press
the right-mouse button. Select Paste.

MS Windows NT 4.0 - Introduction/Intermediate ICOM Solutions
Page No 74 ICOM Solutions © 9261 2499
4 Using the ‘Send To’ command In this sample you will copy four bitmap files to the A drive.
Select the four files and press the right mouse button. Select
Send to and the following menu will be displayed.
If you have a floppy disk insert it in the A drive
Select 3.5 floppy. The files will be copied to the A drive.
Task 15 - Creating a sub-folder/Moving files
In the Explorer screen, create a sub-folder under My Work
titled Today. Move the remaining bitmap files from My
Paintings to Today.
What method did you use to accomplish these two tasks?_______________ _____________________________________________________________ _____________________________________________________________ _____________________________________________________________
Delete the Folders My Work and My Paintings - They are to
be stored in the Recycle Bin
Open the Recycle Bin screen
Restore the My Work folder
View the Explorer screen then close

ICOM Solutions MS Windows NT 4.0 - Introduction/Intermediate
ICOM Solutions © 1997 Page 75
The Find Command If you had accidentally saved a file in a wrong folder, you may use the Find’ command to locate and open it.
From the Start button click Find
You have an option to search for files and folders or a computer located on your network. In this sample we will select Files or Folders to search for a specific file.
Start | Find | Files or Folder
Once selected the following screen will be displayed.
Type in the name of the file in the Named box and then specify which drive you wish to search. To start the search, click the Find button

MS Windows NT 4.0 - Introduction/Intermediate ICOM Solutions
Page No 76 ICOM Solutions © 9261 2499
Tip I f you are in the Explorer screen mode and you wish to f ind a f i le or fo lder, f i rs t select ‘Tools ’ then ‘Find’ . Tip You may use the * or ? in f i lenames to search for specif ic f i les, where the * means any character or characters or ? which means only one character . For an example, i f we were looking for f i les that ended wi th the extension .BMP we would type * .bmp in the ‘Named’ box and then speci fy a locat ion for i t to search. Task 16 - Finding files
Use the two methods of finding files, one from the Start button
and one from the Explorer screen. From the Explorer click
menu Tools, then Find
Notes:

ICOM Solutions MS Windows NT 4.0 - Introduction/Intermediate
ICOM Solutions © 1997 Page 77

CONTENTS
Chapter 5 Printing
PRINTING IN WINDOWS NT .......................................................................................................... 79
The Printers Folder ...................................................................................................................... 79 Printing Documents ...................................................................................................................... 79
To View documents Waiting to be printed .............................................................................................. 80 To Change Printer Settings ........................................................................................................... 81 Pausing and Resuming a Printer .................................................................................................. 82 Printing Over a Network / Adding a Printer................................................................................. 82 To Share your Printer with other Users ....................................................................................... 86 Drag and Drop Printing ............................................................................................................... 86

ICOM Solutions MS Windows NT 4.0 - Introduction/Intermediate
ICOM Solutions © 1997 Page 79
Printing in Windows NT Windows NT provides many printing facilities. In the next following pages you will explore the Printers folder via which many printing actions can be carried out, shows you different ways to print and how to share a printer across a network.
The Printers Folder
To open the Printers folder:
Double-click the My Computer icon from the Desktop then
double-click the Printers folder
Or
Click Start | Settings | Printers
Sample of items in a Printers folder
Printing Documents
If a document is open E. g. Word Processor, then click the File
menu, then click Print
Or
If the document is not open, you can drag the document from
My Computer or Explorer to your printer in the Printers Folder

MS Windows NT 4.0 - Introduction/Intermediate ICOM Solutions
Page No 80 ICOM Solutions © 9261 2499
When a document is printing, a printer icon appears next to the clock on the Taskbar. When the printing has finished, the printer icon disappears from the Taskbar. Tip For easy access to your printer, you can create a shortcut to it on the Desktop To View documents Waiting to be printed
Click the Start button
Select Settings
Click Printers
Double-click the icon for the printer you want to look at
The print queue with all of the print jobs listed appears.
In the Printer window, you can find information such as the status of print jobs and the owner of the document. Should you wish to cancel or pause the printing of any of the documents that you had sent, click the document, and then use the commands on the document menu. You can also right-click the document to access these commands. Tip If you had sent a document to the printer, double-click the Printers icon (or right-click) from the Taskbar. This will display the Printers window. From here you can re-order the documents that you had sent to the printer

ICOM Solutions MS Windows NT 4.0 - Introduction/Intermediate
ICOM Solutions © 1997 Page 81
To Change Printer Settings
From the Start menu, select Settings
Select Printers
Click the icon for the printer you are using
From the File menu, select Properties Or Right-click on the
printer and select Properties
The Printers Dialog box
Task 17 - Viewing the Printers Properties
Open the Printers folder
Select Properties
Click the different tabs to see all the options you have
Tip Changing the Printer properties will change them for all documents you print on the printer. To change these settings for one document, use the Page Setup or Print Setup command in the application you are using

MS Windows NT 4.0 - Introduction/Intermediate ICOM Solutions
Page No 82 ICOM Solutions © 9261 2499
Pausing and Resuming a Printer
Open the Printers folder
Double-click the icon for the printer you want to pause or
restart
From the Printer menu, select Pause Printing - a check mark is
placed next to the command
To restart the printer click the Pause command again
You can pause a printer only if it is attached to the computer you are using. You cannot pause a network printer from your own computer. If you had turned off spooling in your Printer Properties, the Pause Printing command is unavailable.
Printing Over a Network / Adding a Printer
If you need to use a Shared Network Printer, double-click the Network Neighborhood icon, then double-click the computer where the printer you want to use is located.

ICOM Solutions MS Windows NT 4.0 - Introduction/Intermediate
ICOM Solutions © 1997 Page 83
Depending on what access you have, you can browse the computers in your workgroup and /or the computers that are on your network (in most situations it will display only the servers that you have logged onto). Tip To view which computers have shared printers attached click the View menu, then click Details. Look for printer names or description in the Comment column of the Network Neighborhood window
Double-click the main file-server - depending on your location
your trainer will advise which icon to select - In this sample we
had selected TOWFS1
The following screen will be displayed:
Here you will notice the printers that are available on your system. In this sample we want to add the printer IS_COLOUR_2.
Double-click the printer icon IS_COLOUR_2 - Depending on your
location your trainer will advise which printer to select

MS Windows NT 4.0 - Introduction/Intermediate ICOM Solutions
Page No 84 ICOM Solutions © 9261 2499
You will be requested to confirm the setup of the printer
Click Yes
The following dialog box will be displayed:
Select the option that you require then click Next

ICOM Solutions MS Windows NT 4.0 - Introduction/Intermediate
ICOM Solutions © 1997 Page 85
In most instances the printer driver’s name will appear in the Printer Name text area. To familiarise what printer you had selected it is recommended that you use the same name as the printer that you had selected.
When completed click the Next screen
From here you can test print a page
When completed click the Finish button
Your new printer is now ready to use.

MS Windows NT 4.0 - Introduction/Intermediate ICOM Solutions
Page No 86 ICOM Solutions © 9261 2499
To Share your Printer with other Users
From the Start menu, select Settings
Select Printers
Click the icon for the printer you want to share
From the File menu, select Properties
Click the Sharing tab, and then click Shared As
Tip You can only share a printer that is connected to your computer
Drag and Drop Printing If you created a shortcut to your printer(s) on your Desktop, you can then just drag the file to this icon. Your document will then print. Task 18 - Printing Documents

ICOM Solutions MS Windows NT 4.0 - Introduction/Intermediate
ICOM Solutions © 1997 Page 87
Step 1
Open the Explorer screen (or My Computer icon). Find the
four files named PT1.doc to PT4.doc files - Your trainer will
advise you where the files are located
Rename the files as your initials E. g. If your name is Joe
Bloggs, rename the files JB1.doc to JB4.doc
Close the Explorer screen Or My Computer screen
Open your Printers Folder
Double-click your printer
From the Printer menu, select Pause Printing
Start WordPad
Open and send to print each of the four files (XX1, XX2 etc -
where XX stands for your initials)
With the four files in the print queue move XX4.doc up the
queue
Move XX2.doc to the end of the queue
Delete XX3 from the queue
Resume printing
Step 2
Create a shortcut to your printer on the Desktop
Open Explorer Or My Computer
Find the file XX1.doc and drag it to the Printer shortcut. The file
should print
Notes:

MS Windows NT 4.0 - Introduction/Intermediate ICOM Solutions
Page No 88 ICOM Solutions © 9261 2499

CONTENTS
Chapter 6 Help / Shutdown
WINDOWS NT HELP ......................................................................................................................... 90
Context Sensitive Help ............................................................................................................................. 90 Menu Command Help .............................................................................................................................. 91
SHUTTING DOWN THE COMPUTER ........................................................................................... 92

MS Windows NT 4.0 - Introduction/Intermediate ICOM Solutions
Page No 90 ICOM Solutions © 9261 2499
Windows NT Help Windows NT provides an extensive on-line Help facility. The Help Topic is readily accessible from the Windows Desktop and all applications. If you are ever in doubt and require Help in haste, press the F1 key from any open Window, and you will be presented with the following screen.
To access Help, click the Help menu then select Help Topics. Three options are available to you: Contents; Index and Find. Context Sensitive Help Dialog boxes have a question mark icon in the upper-right hand corner of the title bar. To activate the Context Sensitive Help, click on the Question mark. A Question mark will appear next to your cursor. You then click on the item you require help with. Windows will then display a message box with the relevant help.

ICOM Solutions MS Windows NT 4.0 - Introduction/Intermediate
ICOM Solutions © 1997 Page 91
Menu Command Help In any window, to see a description of what each menu command does, click the View menu, and make sure that the Status Bar command is ticked. Then when you rest your mouse over a menu command, information about that command appears in the Status Bar at the bottom of the window. Task 19 - Using Help
Open Help from the Start button
Click the available Help tabs and view
Find Troubleshooting
Write down the three (3) of the tasks mentioned under
Troubleshooting
1 _______________________________________________________ 2 _______________________________________________________ 3 _______________________________________________________

MS Windows NT 4.0 - Introduction/Intermediate ICOM Solutions
Page No 92 ICOM Solutions © 9261 2499
Shutting Down the Computer Before turning of the computer you will need to shutdown Windows NT. Never turn the computer off when Windows NT or other applications are running. The Shutdown menu option provides you with a safe and orderly way to turn off your computer knowing that all your applications and data files have been closed and saved.
To Shutdown you computer click the Start button
From the Start button, select Shut Down
Click the Shut down the computer option
Click the Yes button
Wait for You can now safely turn off your computer message to
appear
Turn off your computer
Two other options are available: Restart The Computer Use this if your computer is acting sluggish
and needs a reboot
Close all programs and log on as a different user ?
This option provides you with a way of logging off and logging on as another user
Notes:

ICOM Solutions MS Windows NT 4.0 - Introduction/Intermediate
ICOM Solutions © 1997 Page 93

CONTENTS
Chapter 7 Windows NT Tips
MODIFYING THE START MENU ................................................................................................... 95
WINDOWS NT TIPS ......................................................................................................................... 100
SHORTCUT KEYS ............................................................................................................................ 102

ICOM Solutions MS Windows NT 4.0 - Introduction/Intermediate
ICOM Solutions © 1997 Page 95
Modifying the Start Menu Depending on what you have on your system, the Start Menu Programs contain all applications that exist on your hard drive or Network system. It is beneficial to ‘tidy-up’ the programs menu so that the application you are looking for is easy to find (If no shortcut is available on the Desktop). For instance the programs menu may contain several graphic; utility or other programs that need to be categorised. In the following sample we will group our Graphic and Utilities applications. At present our Programs Menu will look as displayed:
The four applications that we wish to group are PSP, MTB40 (Graphics) and Quick View Plus, Winzip 95 (Utilities).
Place the pointer on an empty area of the Taskbar and right-
click
Click Properties

MS Windows NT 4.0 - Introduction/Intermediate ICOM Solutions
Page No 96 ICOM Solutions © 9261 2499
Click Start Menu Programs tab
Click Advanced button

ICOM Solutions MS Windows NT 4.0 - Introduction/Intermediate
ICOM Solutions © 1997 Page 97
Basically you are in the Explorer screen mode. You use the same method that you use in Explorer to create folders, move or copy folders, files etc.
Double-click the Programs folder
All the items that appear in our Start | Programs menu are displayed in the right-pane of the screen.
Start Menu
Start Programs menu

MS Windows NT 4.0 - Introduction/Intermediate ICOM Solutions
Page No 98 ICOM Solutions © 9261 2499
In the right-pane, place the pointer and right-click
Select New, then Folder
In this sample the new folder is named Utilities
The second new folder is named Graphics
From the right-pane simply select the item and drag it to the
destination folder E. g. Select Winzip95 and drag it to the
Utilities folder, then release the mouse button
Move the other shortcuts to their destination folder
When completed click the Close button
Click OK on the Taskbar Properties
The Start | Programs menu will look as displayed:

ICOM Solutions MS Windows NT 4.0 - Introduction/Intermediate
ICOM Solutions © 1997 Page 99
Task 20 - Modifying the Start Programs
View the Start Menu Programs
Assort them in Categories of your choice - If not sure ask your
trainer

MS Windows NT 4.0 - Introduction/Intermediate ICOM Solutions
Page No 100 ICOM Solutions © 9261 2499
Windows NT Tips 1. Tired of seeing separate windows appearing on your screen (e.g. in
Desktop) each time you open a folder from a Window screen ? One way to overcome this is to open an icon (for a sample use the ‘My Computer’ icon), select ‘View’ then ‘Options’. Select the second option “Browse folders using a single window…”
2. If you do not have the ‘Explorer’ icon on your desktop, you can easily launch the ‘Explorer’ by holding the ‘Shift’ key and double-clicking the ‘My Computer’ icon.
3. To view two ‘Explorer’ screens at the one time open ‘Explorer’ twice, (use the minimise button on the first ‘Explorer’ screen is screen is full size, and then open the second ‘Explorer’) and then place the mouse on empty space of the Taskbar. Click the right-mouse button and a pop-up menu will appear. This will give you several options e.g. ‘Cascade’, ‘Tile Horizontally’, “Tile Vertically’, ‘Minimise Windows’, ‘Undo Tile’ and ‘Properties’. You can also use this method to arrange all your open windows.
4. Remember DOS, it’s still on our system and its called DOS version 7. If you ever mastered the basic DOS commands you’ll remember that to move up (or return) one-step the command is cd.. . In Windows NT DOS you can move up two levels by using cd… - move up three levels cd…. - and so on.
5. In DOS mode you can type in commands that use more than eight characters and spaces. For this to operate you must use the Start command e.g. C:\>start “C:\windows\start menu”. This will return you to Windows displaying the ‘Start Menu’ screen.
6. You can view most files without opening its respective application. Windows NT comes with a program called ‘Quick View’. You can select a file from ‘Explorer’ and then click the right-mouse button. The ‘Quick View’ option will be displayed in the pop-up menu. This program is not installed by default so if ‘Quick View’ is not active the program can be installed at a later date.
7. You may wish to change the size of your icons and their labels. To accomplish this place the mouse on an empty space on the Desktop and click the right-mouse button. Select ‘Properties’ then click ‘Appearance’ tab. Choose ‘icon’ from the ‘Item List’ to change the look of the icon. The default size is 32.
8. If you need to launch an application from the Desktop but you have several applications running: Place the mouse on an empty part of the Taskbar, right-click the mouse button and select “Minimise All Windows’

ICOM Solutions MS Windows NT 4.0 - Introduction/Intermediate
ICOM Solutions © 1997 Page 101
9. If you wish to keep one application open (refer to previous tip) and minimise the others, select ‘File’, ‘Open’ from that application (For Folders, select ‘View’ then ‘Options’). Right-click a blank area of the Taskbar and select ‘Minimise All’.
10. It is useful to have a folder of your often most used applications or favorite programs. To accomplish this right-click a empty area of your desktop and select ‘New’ then ‘Folder’. Give it a name and press the ‘Enter’ key. Open the folder and the select the icons from the Desktop by dragging them with the right-mouse button to the new folder. When mouse-button is released you have the option of copying or moving the icon/s to the new folder. Should you just wish to move the icons to a folder just select it and drag with left-mouse button.
Task 21 - Experiment using Win NT tips Experiment with the Windows NT tips. See if you can discover any other tips e.g.: Arranging your Icons in Desktop… _____________________________________________________________ _____________________________________________________________ _____________________________________________________________ _____________________________________________________________ _____________________________________________________________ _____________________________________________________________ _____________________________________________________________ _____________________________________________________________ _____________________________________________________________ _____________________________________________________________

MS Windows NT 4.0 - Introduction/Intermediate ICOM Solutions
Page No 102 ICOM Solutions © 9261 2499
Shortcut keys To save you time when working in Windows NT, you may find the following shortcut keys of use. They are another alternative to using the mouse & various menu commands that we have worked with so far. Shortcut Key/s Activates Alt + Letter (A-Z) Application menu that corresponds to
the letter you pressed Alt or F10 Applications menu bar Enter or Return Highlighted button or menu Esc Closes a dialog box or menu Alt + Tab Switch between open applications Alt + Esc Switch between open applications in
Taskbar Ctrl + Escape Start button menu & Taskbar Alt + F4 Closes the current application. If no
applications are open closes down Windows after confirmation
Printscreen (Prt Sc) Copies the entire Windows screen to the clipboard
Alt + Prt Sc Copies only the currently active window to the clipboard
Tab Moves the selection cursor to the next selection of a dialog box
Shift + Tab As above in reverse Ctrl + C Copy an object - File, text, folder Ctrl + V Paste Ctrl + A Selects All Ctrl + X Cut Delete Clears a selected object
Notes:

ICOM Solutions MS Windows NT 4.0 - Introduction/Intermediate
ICOM Solutions © 1997 Page 103