Sage Accpac U.S. Payroll 5
58
SAGE ACCPA C Sage Accpac ERP ™ U.S. Payroll 5.5A Update Notice
Transcript of Sage Accpac U.S. Payroll 5
SAGE ACCPAC
Sage Accpac ERP™
U.S. Payroll 5.5A Update Notice
©2008 Sage Software, Inc. All rights reserved. Sage Software, Sage Software logos, and all Sage Accpac product and service names are registered trademarks or trademarks of Sage Software, Inc., or its affiliated entities. All other trademarks are the property of their respective owners. Sage Software, Inc. Publisher No part of this documentation may be copied, photocopied, reproduced, translated, microfilmed, or otherwise duplicated on any medium without written consent of Sage Software, Inc. Use of the software programs described herein and this documentation is subject to the Sage Software License Agreement enclosed in the software package.
Version 5.5 Update Notice i
Contents
Payroll Documentation........................................................................ 1 Installing Payroll 5.5.......................................................................... 1 Changes in U.S. Payroll 5.5................................................................... 2
New Option for Accrual Carry-over ....................................................... 2 New “Accruals Carry-over Log” ........................................................... 3 Employee Activity Form — More Accrual Information..................................... 4 New Payroll Features for Sage Accpac 100 ERP and Sage Accpac 200 ERP............... 4 Employee Timecard — Ability to Enter Accrual Payments ................................ 6 New Option to Print or Hide the SSN on Paychecks....................................... 6 Enhancements to Overtime Calculation................................................... 7 Record the Employee’s E-Mail Address ................................................... 7 Improvements in Speed and Efficiency ................................................... 7 Removal of ACCPAC Plus Payroll Conversion Icon ........................................ 7 Dates on Reversed Payroll Checks ........................................................ 7 Employee Supplemental Information and Quarterly Wage on
Disk(ette) Reporting for Vermont ..................................................... 8 Changes to Online Help ................................................................... 8 Enhancements in Payroll Integrated with Project Job Costing ............................ 9
Categories in Standard Projects (for Expense Reimbursements) ..................... 9 Other Changes on the Project And Job Costing Details Form ........................10 Progressive or Non-Progressive Calculation for Billing Amounts .....................11 Change to the Certified Payroll Report ...............................................11
Changes in U.S. Payroll 5.4..................................................................11 Payroll Desktop Changes.................................................................11 Enhanced General Ledger Integration ...................................................13
Changes to Reports ..................................................................14 Drilldown from Sage Accpac General Ledger and Bank Services ........................14 Check List and Check Inquiry: New Ways to Look Up Paychecks ........................14 Overtime Processing Enhancements .....................................................15
Earnings and Deductions Form — Overtime Setup...................................15 Employees Form — Overtime Setup .................................................16 Timecard — Overtime Entry..........................................................17 Workers’ Compensation Codes Assessment Report
and Adjusted Overtime...........................................................19 Cost Center Override ....................................................................19
Multiple Levels of Cost Center Overrides.............................................19 Employer’s Cost Center Overrides ...................................................20
Earnings/Deductions Form Enhancements...............................................20
ii Sage Accpac U.S. Payroll
Progressive or Non-progressive Calculation ......................................... 21 Annualized Wage Brackets........................................................... 22 Years of Service ..................................................................... 23 Maximum Accrual and Maximum Carryover ......................................... 23 Lifetime Maximum ................................................................... 23 Secondary Rate...................................................................... 23 Override the Annual Maximum and Minimum/Maximum Values..................... 24
Employees Form Enhancements......................................................... 24 Employees Form (G/L Distribution Code)............................................ 26
Detailed Timecard Enhancements ....................................................... 26 New Timecard List Feature .......................................................... 26 New Copy Timecard Feature......................................................... 27 New Fields and Button on the Detailed Timecard.................................... 27 Procedure Change in the Detailed Timecard......................................... 29 Timecards Detail Report ............................................................. 29 Importing Timecards ................................................................ 29
Employee Timecard Enhancements ..................................................... 30 Manual Checks Form Enhancements .................................................... 30
New Fields on the Manual Checks form.............................................. 30 Procedure Changes in the Manual Check ............................................ 31 Manual Checks Report ............................................................... 32 Importing Manual Checks............................................................ 32
New Printed Check Forms ............................................................... 32 Enhancements to Update Employee Functions .......................................... 33
Assign Earnings/Deductions to Employees .......................................... 33 Update Earnings/Deductions for All Employees...................................... 34 Update Tax for All Employees ....................................................... 34 Payroll Employee Reports............................................................ 34
Employee Selection List Enhancements ................................................. 34 Creating Selection Lists.............................................................. 35 Assign Selection Lists to Employees ................................................. 35
New Work Classification Codes Form in Payroll Setup................................... 36 New Selection Criteria when Deleting Inactive Records ................................. 36 Payroll Transaction History Changes .................................................... 36 Employee Supplemental Information (for Magnetic Media Reporting) .................. 36 Enhanced Data Integrity Checking ...................................................... 37 Combine EFT Files (Direct Deposit) ..................................................... 37 Optional Fields........................................................................... 38
Optional Fields in Finders ............................................................ 38 Required Optional Fields without Default Values .................................... 38
Integration with Sage Accpac Project And Job Costing.................................. 38 Set up Security for Integration with Project and Job Costing........................ 38

Version 5.5 Update Notice iii
Set up Payroll for Integration with Project and Job Costing..........................39 Set Up Employees for Integration with Project and Job Costing .....................40 Processing for Project and Job Costing...............................................42 Other Forms and Reports Modified for Project and Job Costing......................43
Enhanced Reporting .....................................................................44 New Reports .............................................................................45 Direct Deposit of Paychecks (EFT) .......................................................46 If you use ACCPAC EFT Direct Payroll 4.1A ..............................................48
Deactivate the PRDIR Deduction .....................................................48 Transfer Data from ACCPAC EFT Direct Payroll 4.1A.................................49
If you use EFT Direct Payroll 6.5A for ACCPAC Plus Payroll..............................51 Export the Data from ACCPAC EFT Direct Payroll 6.5A...............................51


Version 5.5 Update Notice 1
Sage Accpac U.S. Payroll Version 5.5 Update Notice
This Update Notice outlines the enhancements and new features in Sage Accpac U.S. Payroll 5.5.
Payroll Documentation The Sage Accpac ERP 5.5 DVD includes the following U.S. Payroll 5.5 documentation in the \DOCS folder:
• U.S. Payroll Update Notice
• U.S. Payroll Getting Started
• U.S. Payroll User Guide
When you install Payroll, you also install the following Payroll documents in the \DOCS folder where Sage Accpac ERP programs are installed (for example, Sage Software\Sage Accpac\DOCS \UP55AENG):
• README.wri — contains specialized information about the program.
• UPTECHINFO.wri — describes database tables, and changes to the Payroll database or reports.
• UP-SETUP.pdf — is a two-page checklist that lists the steps for setting up the Payroll program.
• UP IMPORT_EXPORT.pdf — describes importing and exporting specific Payroll data.
For a description of all the documentation included with Payroll, refer to Chapter 1 of the Getting Started manual.
New program features
For information about the new features and other changes in U.S. Payroll 5.5, see “Changes in U.S. Payroll,” later in this notice.
Installing Payroll 5.5 Refer to the System Manager 5.5 Update Notice for information about:
• System requirements
Changes in U.S. Payroll 5.5
2 Sage Accpac U.S. Payroll
• Compatibility with prior versions
• Installation and activation instructions, including what you need to do before and after installation.
Note that when you activate Payroll:
Multicurrency • If you are activating Payroll 5.5 for a multicurrency company, a dialog box will ask you to specify the type of currency you will be using for that company’s payroll.
EFT Direct Payroll • Activating Payroll also activates EFT Direct Payroll, if you have installed EFT Direct Payroll from this DVD and have installed the license and activation code for EFT Direct Payroll.
Changes in U.S. Payroll 5.5 The rest of this notice summarizes the major changes and new features in Sage Accpac Payroll version 5.5.
For complete details on how to use the new features for Payroll 5.5, refer to the Payroll Getting Started manual and the User Guide, or to the online Help.
New Option for Accrual Carry-over
You can now choose between two methods of carrying over employees’ unused accrued vacation, sick and compensatory time to the start of a new accrual period.
The new “Calc Max. Carry-over Based on Remaining Balance” check box on the Employee tab of Earnings And Deductions setup form provides this choice.
For the accrual, this check box tells Payroll which component to compare with the Maximum Carry-Over field. The carry-over amount will vary, depending on the method chosen:
• Select this check box, if you do not want the employee’s carry-over amount to exceed the value specified in the Maximum Carry-Over field of the Earnings And Deductions form. (This is the new method introduced in Payroll 5.5.)
In this method, Payroll compares the employee’s remaining balance at accrual year-end (that is, the entire unused amount) with the Maximum Carry-Over field. The employee’s starting balance for a new accrual year cannot exceed the Maximum Carry-Over field (unless a

Changes in U.S. Payroll 5.5
Version 5.5 Update Notice 3
number is specified in the “Beginning” column of the Earnings And Deductions setup form).
• Do not select this check box, if you allow employees to carry over the unused portion of the amount (or hours) accrued during the year, up to the specified maximum carry-over, PLUS any unused amounts carried over from the previous year. (This is the method used in Payroll 5.4.)
In this method, Payroll compares only the employee’s unused portion of the amount accrued during the year with the Maximum Carry-Over field. The employee’s starting balance for a new year can exceed the amount specified in the Maximum Carry-Over field.
In both cases:
• After carry-over is calculated, any value you entered in the “Beginning” column of the accrual’s setup record, will be added to the carry-over amount to arrive at the employee’s starting balance for the accrual.
• Accrual amounts are subject to the amount specified in the accrual’s Maximum Accrual field. Once the employee’s accrual amount reaches the maximum accrual, the employee stops accruing.
Note: When you upgrade to Payroll 5.5, the new check box will not be selected, so you will retain the method used in Payroll 5.4 or earlier. You can select the check box if you wish.
New “Accruals Carry-over Log”
For employees you select, the new Accruals Carry-over Log shows the date of each accrual carry-over, and the amounts or hours carried over to a new accrual period. Carry-overs are initiated by posting of system and manual checks, and by transaction history entries.
To produce the report, select the Payroll Transaction Reports folder, then Accruals. In the Report Format field, choose Accruals Carry-over Log.
Some of the fields shown on the report include:
• Carried-over Amt/Hrs. This field shows the amount or hours carried over, after the specified maximum carry-over and maximum accrual have been considered.
• Actual Beg. Increment. This field shows any flat “beginning” amount that is added to the carry-over amount or hours, subject to the maximum accrual. (You specify the flat amount in the “Beginning” field of the Employee tab of the Earnings And Deductions setup form.)

Changes in U.S. Payroll 5.5
4 Sage Accpac U.S. Payroll
For example, suppose the maximum accrual was 10 hours. Suppose the carry-over was calculated to be 8 hours, and the “Beginning” field contained 5. Only 2 (of the 5 hours) can be added to 8, since the maximum accrual is 10. The Actual Beg. Increment field on the Accruals Carry-over log would show 2.
• New Beg. Balance. This field is the sum of the two fields mentioned previously, up to the maximum accrual. It is the starting balance for the new period.
Payroll starts to collect carry-over information for the log after Payroll 5.5 is installed, so the log shows only the carry-over information from that time onwards.
Information on the log is cleared when you use the Delete Inactive Records function to delete employee history.
Employee Activity Form — More Accrual Information
In Payroll 5.4, the Activity tab of the Employee Activity form (in the Payroll Employees folder) displayed only general information about accruals. Accrued amounts and accruals paid were shown in the Earning/Deductions section. Accrued hours and accrued hours paid were shown in the Hours section.
In Payroll 5.5, the Employee Activity form displays more detailed information about accruals:
• On the Activity tab, the accrued amounts are separated into accrued vacation and sick amounts (note that compensatory time is accrued in hours, not amounts). The accruals paid are separated into accrued vacation, sick, and compensatory time paid.
Similarly, the accrued hours and accrued hours paid will be separated into vacation, sick, and compensatory time hours, accrued and paid.
• A new Accruals tab displays three sections: vacation, sick and compensatory time. Each section shows detailed information such as the carry-over start and end dates, beginning balances as of the carry-over start date, and the amount (or hours) accrued, paid, and remaining.
New Payroll Features for Sage Accpac 100 ERP and Sage Accpac 200 ERP
The following payroll features are now available in Sage Accpac 100 ERP.
• On the Earnings And Deductions setup form:
Changes in U.S. Payroll 5.5
Version 5.5 Update Notice 5
− On the Sales tab, Piece tab, and Brackets tab, you now have the option to use progressive or non-progressive calculation.
− On the Brackets tab, for benefits or deductions, you now have the Annualized Wage Brackets option, to enable you to enter ranges (in the From/To fields) as annualized amounts or pay period detail amounts.
− On the Employee tab, for accruals, you can now specify up to 10 categories when defining years of service.
− For any earning or deduction (except accruals) that allows you to enter an Annual Maximum amount, you can now also enter a Lifetime Maximum amount, on the Employee (or Employer) tab.
• In the Payroll Employees folder:
− An “Assign Selection Lists To Employees” form enables you to quickly assign or remove employees to/from selection lists.
− On the Employee Selection form, when creating employee selection lists, you can copy or combine selection lists, or specify more criteria when selecting employees.
• In the Payroll Transactions folder:
− The Check List form enables you to enter selection criteria to find paychecks and list them on the screen.
• In the Payroll Timecards folder:
− The Timecard List form enables you to find timecards and list them on the screen.
− The Copy Timecard form enables you to select an existing timecard, and create copies of that timecard across a range of employees.
The following payroll features are now available in Sage Accpac 200 ERP.
• On the Earnings And Deductions setup form:
− For any earning or deduction (except accruals) that allows you to enter an Annual Maximum amount, you can now also enter a Lifetime Maximum amount, on the Employee (or Employer) tab.
• In the Payroll Employees folder:
− An “Assign Selection Lists To Employees” form enables you to quickly assign or remove employees to/from selection lists.

Changes in U.S. Payroll 5.5
6 Sage Accpac U.S. Payroll
Employee Timecard — Ability to Enter Accrual Payments
On the Employee Timecards form, employees can now enter sick or vacation time taken (that is, accrual payments). The bottom of the form automatically displays the employee’s total sick and vacation hours taken, for that timecard.
To enable the employee to enter accrual payments on the Employee Timecard, open the Employees form, select the employee, select the Pay tab, select the sick (or vacation) earning/deduction code, and select the Available In Employee Timecards option.
Other related changes:
• For sick and vacation accrual codes, the Available In Employee Timecards option is now available on these forms and report:
− Assign Earn/Ded to Employees form
− Update Earn/Ded for all Employees form
− Employee Information report
• The Employee Timecards report now shows accrual payments for sick and vacation time.
New Option to Print or Hide the SSN on Paychecks
Service Pack 2 for Payroll 5.4 enabled you to choose whether to print the social security number (SSN) on paycheck stubs, by editing a setting in the UP.INI file.
When you upgrade to Payroll 5.5, the UP.INI file will no longer have this setting. You now make the choice on these Payroll forms:
• On the Payroll Options form (Processing tab) of the Payroll Setup folder — You can choose to print the SSN on paychecks, as a default setting for the company, by selecting the new Print SSN On Checks option. To hide the SSN, clear the option.
• On the Payroll Checks form of the Payroll Transactions folder — You can choose whether or not to print the SSN just before you print the paychecks. On the Payroll Checks form, the new Print SSN option defaults to the setting from the Payroll Options form, but you can change it on the Payroll Checks form.
Note: If you have already specified a choice in a previous UP.INI file, be sure to set the choice on the Payroll Options form.
Changes in U.S. Payroll 5.5
Version 5.5 Update Notice 7
Enhancements to Overtime Calculation
Several enhancements have been made to overtime calculation in Payroll, such as:
• Entry in the Days Worked field on the detailed timecard has been simplified. For example, you no longer have to enter a value in the Days Worked field on the timecard to match the days implied by the employee’s pay frequency. If you enter zeroes in the Days Worked field, Payroll will automatically use the days implied by the pay frequency.
• Enhancements have been made to the way Payroll calculates overtime when lump sum amounts are entered on the timecard (for example, one entry that specifies 40 hours, instead of 5 individual entries at 8 hours each).
Note that entering individual detail lines for each day worked (each line with specified dates) on the timecard provides the most accurate method of calculating the overtime that you expect, since this relays the proper information to Payroll.
Note also that on the timecard, you can override the automatically-calculated overtime amounts, to specify your intended overtime amount.
Record the Employee’s E-Mail Address
On the Employees form, the new E-mail field (at the bottom of the General tab) enables you to enter and store the employee’s e-mail address, up to 50 characters.
Improvements in Speed and Efficiency
Payroll 5.5 has been enhanced for faster and more efficient performance.
Removal of ACCPAC Plus Payroll Conversion Icon
The ACCPAC Plus Payroll Conversion icon is no longer available in the Payroll Setup folder.
Dates on Reversed Payroll Checks
If your company does not use the option “Use Original Dates when Reversing Checks” on the Payroll Options setup form, the dates shown for a reversed check in Payroll will now be the Reconciliation Date that was
Changes in U.S. Payroll 5.5
8 Sage Accpac U.S. Payroll
entered on the form used to reverse the check (that is, the Reverse Payments form or the Reconcile Statements form, both in Bank Services).
(If your company did not use the option in Payroll 5.4, the dates used for reversed checks were the Reversal Date field from the Reverse Payments form, and the session date from the Reconcile Statements form.)
The Reconciliation Date is a new field on the Reverse Payments form in Bank Services 5.5, but is not a new field on the Reconcile Statements form.
Note that if your company does use the option “Use Original Dates when Reversing Checks,” the original check’s date will be used, as was the case in Payroll 5.4.
Employee Supplemental Information and Quarterly Wage on Disk(ette) Reporting for Vermont
For the state of Vermont, the following changes reflect the latest Quarterly Wage magnetic media reporting requirements:
• You must report Vermont employees’ pay type (hourly or salaried). If you have any employees who are paid on an hourly basis, complete the Employee Supplemental Information form (in the Employees folder) before creating your quarterly wage magnetic media file. On the Defaults tab of the form, select the new Hourly Employee check box. In the new Hourly Wages field, you can enter an hourly wage that applies to all employees. To specify differing hourly wages among employees, use the Employee tab.
• On the Quarterly Wage on Disk(ette) form in the Government Reports folder, fields that are no longer required have been removed, as follows:
− On the Employer Info II tab, all fields except the SUTA Employer Percentage field have been removed.
− On the Transmitter Info I tab, the Suffix Code and Magnetic Authorization Number fields have been removed.
Note: Sage Accpac Payroll produces a quarterly wage magnetic media file in Format 1 (that is, 3.5 Floppy Diskette or Compact Disc).
Changes to Online Help
We have changed the look of the online help by adding the following:
Changes in U.S. Payroll 5.5
Version 5.5 Update Notice 9
Feedback • A feedback link is now included at the bottom of Help pages so you can send feedback directly to the writers for the help topic you were viewing. When clicked, it opens a new e-mail in your e-mail program, addressed to our documentation team. You write your comments in the body of the message.
Tasks-oriented links
• Click the Help Contents item labeled “What do you want to do?” to view instructions for Payroll tasks. If appropriate, a task will offer “Before” and “After” suggestions, and links to related topics, as well as additional information pertinent to that particular task.
Enhancements in Payroll Integrated with Project Job Costing
This section describes enhancements that are available if you use the Sage Accpac Project and Job Costing application with Sage Accpac Payroll.
Categories in Standard Projects (for Expense Reimbursements)
In the initial Payroll 5.4 version, you could specify only categories whose cost classification is “labor” when assigning job-related information to qualified earnings/deductions. Service Pack 2 for Payroll 5.4 subsequently allowed you to specify categories of all cost classifications in basic projects, for expense reimbursements.
Now, in Payroll 5.5, you can specify categories of all cost classifications in standard projects as well, for expense reimbursements.
As in Payroll 5.4, you use the Project And Job Costing Details form to enter job-related information. (To open the form, you select an earning/deduction line and the job-related option on forms such as Timecards, Employee Timecards, Manual Checks, or Check Inquiry.)
On the Project And Job Costing Details form, for an expense reimbursement:
• The Category field now lets you enter all category types. It is no longer restricted to labor.
• The following new fields enable you to enter details related to this enhancement:
Cost Class. In the Service Pack 2 for Payroll 5.4, this field was added for expense reimbursements in basic projects. The field is now added for expense reimbursements in standard projects.
This field corresponds to the Cost Class field in the Sage Accpac Project and Job Costing application. The value in the Cost Class field on the Project And Job Costing Detail form depends on the Category field entered, and is automatically displayed. You will not be able to edit it.

Changes in U.S. Payroll 5.5
10 Sage Accpac U.S. Payroll
Resource. This field corresponds to the Resource field in the Sage Accpac Project and Job Costing application. The Resource field depends on the Cost Class field:
• If the Cost Class field is labor, then the Resource field automatically displays the employee number, and you cannot edit it.
• If the Cost Class field is not labor, then:
− For a basic project, you can enter a resource or leave the Resource field blank.
− For a standard project, you must enter the Resource field. Type the resource, or click the finder in this field to open a list of choices and select a resource.
Payroll validates the contents of the Resource field in the same manner as Project and Job Costing.
Resource Description. This field describes the resource, and depends on the Cost Class field:
• If the Cost Class field is labor, then this field automatically displays the employee’s name, and you cannot edit it.
• If the Cost Class field is not labor, Payroll automatically displays the resource description as specified in the Resource Description field in Sage Accpac Project and Job Costing, and you can edit the description.
The three new fields are also reflected in Payroll reports, such as Employee Timecards, Detailed Timecards, Jobs, Manual Checks, Pre-check Payroll Register, Payroll Register, Pre-check Payroll Job Register, and Payroll Job Register.
Other Changes on the Project And Job Costing Details Form
On the Project And Job Costing Details form (that opens from Employee Timecards, Timecards, and Manual Checks), the following changes are available in Payroll 5.5:
• Ability to Edit WIP Accounts. You can now edit WIP accounts (Regular, Overtime or Shift WIP accounts) for a project that has the following setup:
Project Type: Fixed Price Accounting Method: Billings and Costs A/R Invoice Type: Item

Changes in U.S. Payroll 5.4
Version 5.5 Update Notice 11
• Amount in the Jobs for Benefits and Deductions. You can now specify an amount in Pieces/Sales/Amt field of the Project And Job Costing Details form, for a benefit or deduction.
• Multiple Customers. A new feature in Sage Accpac Project and Job Costing 5.5 allows you to specify a different customer for each project within a contract. Accordingly, Payroll 5.5 will display the customer for each project, as it was set up in Sage Accpac Project and Job Costing.
Progressive or Non-Progressive Calculation for Billing Amounts
For sales commission and piece rate earnings, Payroll now calculates billing amounts using the progressive or non-progressive calculation method, depending on your setting choice on the Sales tab (or Piece Rate tab) of the Earnings And Deductions setup form.
(Payroll 5.4 always used non-progressive calculation for billing amounts for sales commission and piece rate earnings.)
Change to the Certified Payroll Report
If you choose to print the employer-side accruals, benefits, and deductions, the report will display the Hours and Amounts fields from the job details instead of from the paycheck. This means that some employer-side accruals, benefits, and deductions that might have been displayed in Payroll 5.4, will no longer be displayed (because only employer-side accruals, benefits, and deductions that have jobs assigned to them will be displayed on the report).
Changes in U.S. Payroll 5.4 This section describes the changes that were implemented during the first release of Sage Accpac U.S. Payroll 5.4. It does not describe changes provided in subsequent service packs or tax updates.
Note: Some of the new features described in this document are available only in certain editions of Sage Accpac ERP.
For complete details on how to use the new features for Payroll 5.4, refer to the Payroll 5.4 Getting Started manual and the User Guide, or the online Help.
Payroll Desktop Changes
The Sage Accpac Payroll desktop has several new icons and folders that reflect the new and enhanced features in Payroll 5.4. This includes:
Changes in U.S. Payroll 5.4
12 Sage Accpac U.S. Payroll
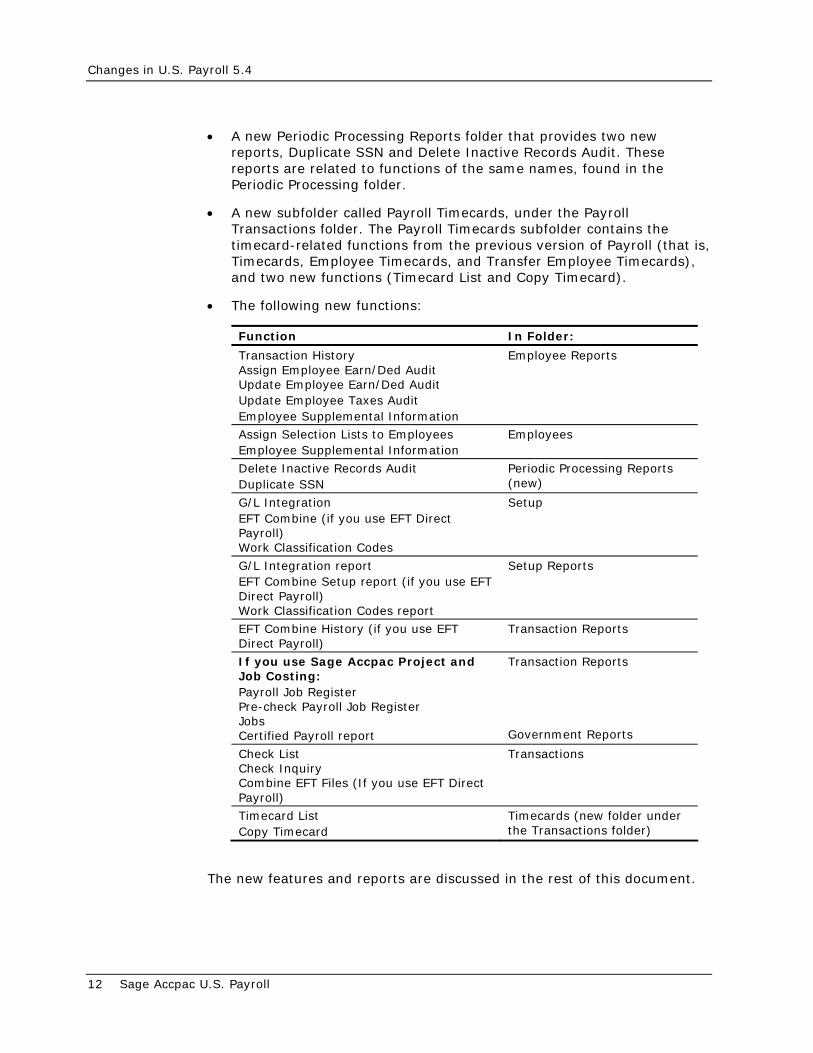
• A new Periodic Processing Reports folder that provides two new reports, Duplicate SSN and Delete Inactive Records Audit. These reports are related to functions of the same names, found in the Periodic Processing folder.
• A new subfolder called Payroll Timecards, under the Payroll Transactions folder. The Payroll Timecards subfolder contains the timecard-related functions from the previous version of Payroll (that is, Timecards, Employee Timecards, and Transfer Employee Timecards), and two new functions (Timecard List and Copy Timecard).
• The following new functions:
Function In Folder:
Transaction History Assign Employee Earn/Ded Audit Update Employee Earn/Ded Audit Update Employee Taxes Audit Employee Supplemental Information
Employee Reports
Assign Selection Lists to Employees Employee Supplemental Information
Employees
Delete Inactive Records Audit Duplicate SSN
Periodic Processing Reports (new)
G/L Integration EFT Combine (if you use EFT Direct Payroll) Work Classification Codes
Setup
G/L Integration report EFT Combine Setup report (if you use EFT Direct Payroll) Work Classification Codes report
Setup Reports
EFT Combine History (if you use EFT Direct Payroll)
Transaction Reports
If you use Sage Accpac Project and Job Costing: Payroll Job Register Pre-check Payroll Job Register Jobs Certified Payroll report
Transaction Reports Government Reports
Check List Check Inquiry Combine EFT Files (If you use EFT Direct Payroll)
Transactions
Timecard List Copy Timecard
Timecards (new folder under the Transactions folder)
The new features and reports are discussed in the rest of this document.
Changes in U.S. Payroll 5.4
Version 5.5 Update Notice 13
Enhanced General Ledger Integration
In the Payroll Setup folder, a new G/L Integration form replaces the former Integration tab and Segments tab of the Payroll Options form.
Post G/L batches automatically when you create them
On the new form, the option Append G/L Transactions To Existing Batch has been renamed Create G/L Transactions By. Previously, the option let you choose whether to add transactions to an existing batch or create a new batch. If you use Sage Accpac General Ledger, it now provides a third choice, Creating And Posting A New Batch, to create and automatically post a new batch in General Ledger.
Assign data to four General Ledger fields
The new form also lets you assign a wide range of Payroll information to the following general ledger fields:
• G/L Entry Description
• G/L Detail Reference
• G/L Detail Description
• G/L Detail Comment
Because you assign Payroll data separately for headers and details for each transaction type, you can now include information that is relevant for each particular type of transaction.
When you create general ledger transactions, if assigned information was missing from the original transaction, the field will be blank in the G/L transaction.
Unconsolidated transactions
If you do not consolidate general ledger transactions, information for all the G/L fields is passed to General Ledger, as specified on the G/L Integration setup form.
Consolidated transactions
If you consolidate general ledger transactions, only the information for the G/L Entry Description field is passed to General Ledger. The detail reference, description, and comment are lost in consolidation.
If you use Sage Accpac Project and Job Costing, the Segments tab shows a new option, Apply cost center overrides to Project and Job Costing accounts, which enables you to override the G/L accounts normally applied to job-related accounts. See the later section, “Set up Payroll for Integration with Project and Job Costing.”
When you activate Payroll 5.4, activation:
Default Detail Description and Reference
• Retains settings for the G/L Detail Description and G/L Detail Reference settings that are comparable to the ones you used previously for the G/L Description and G/L Reference fields.
In most cases, activation assigns identical information. However, for some transaction types, where the settings from the earlier version
Changes in U.S. Payroll 5.4
14 Sage Accpac U.S. Payroll
were not especially meaningful, a more useful piece of information is substituted as the default setting.
Default Detail Comment
• Sets a blank as the default for the G/L Detail Comment. (There was no comparable G/L Detail field in earlier versions.)
Default Entry Description
• Sets the transaction description as the default for the G/L Entry Description.
Note: After activation, you should review the default settings, and make any changes you require.
Changes to Reports
The Payroll Options report no longer includes G/L Integration options. A new report called G/L Integration, lists your G/L Integration selections. Print this report from the Payroll Setup Reports folder, or from the G/L Integration form, by choosing the File menu, then Print.
Drilldown from Sage Accpac General Ledger and Bank Services
You can now display (drill down) posted paycheck details from these areas:
• The General Ledger Journal Entry form, if you post paychecks to Sage Accpac General Ledger.
Drilldown icon
On the General Ledger Journal Entry form, select a Payroll journal entry (check), and click the Drilldown icon.
• The Reverse Payments form and Reconcile Statements form in Sage Accpac Bank Services. Select a paycheck, and click the Document button.
This opens the new Payroll Check Inquiry form, showing the paycheck details. The section “Check List and Check Inquiry: New Ways to Look Up Paychecks” describes the Check Inquiry form.
Note: You can drill down only paychecks that have been posted by Payroll 5.4 (not by previous versions of Payroll).
Check List and Check Inquiry: New Ways to Look Up Paychecks
In the Payroll Transactions folder, two new on-screen forms provide information about employee paychecks:
Changes in U.S. Payroll 5.4
Version 5.5 Update Notice 15
Check List. (Not available in Sage Accpac 100 ERP.) This form enables you to enter selection criteria to find paychecks and list them on the screen.
Check Inquiry. This form shows the details of a check. You can also access the Check Inquiry form by:
• The Check List form
• The Employee Activity form
• The G/L Journal Entry form (in Sage Accpac General Ledger)
• The Reconcile Statements form and Reverse Payments form in Bank Services (in Common Services of System Manager)
• If you use Sage Accpac Project and Job Costing, you can open it from these forms in Project and Job Costing:
− The Transaction History form (in the PJC Transactions folder) — Select a detail line where the Application column contains CP, and click the Details button.
− The Billing Worksheet (in the PJC Periodic Processing folder, then A/R Billing) — Select an unposted detail line where the Module column contains CP, and click the Drill Down button.
Overtime Processing Enhancements
Payroll 5.4 now enables you to calculate overtime pay in several new ways.
For example, Payroll 5.4 enables you to calculate overtime pay that reflect the Fair Labor Standards Act (FLSA) requirements, which includes bonuses and shift differentials in the computation of the overtime rate.
The next subsections describe how to set up and take advantage of the new methods of overtime calculation.
Earnings and Deductions Form — Overtime Setup
You can set up certain earnings so that they are included in FLSA overtime calculations. On the Basic Info tab, set this field:
• Include in FLSA Overtime Calculation. This field appears only for the following types of earnings:
− Salary & Wages that uses an employee calculation method of Flat, Fixed, or Hourly Rate.
− Reported Tips.
Changes in U.S. Payroll 5.4
16 Sage Accpac U.S. Payroll
− Allocated Tips.
After you activate Payroll 5.4, the Include In FLSA Overtime Calculation field will not be selected on any earning. If you select this option, the earning will be included when calculating overtime, if the employee is set up for an FLSA overtime calculation method (see the next section for a description of overtime calculation methods on the Employee form).
Employees Form — Overtime Setup
On the Pay tab, enter these new fields that Payroll uses in calculating overtime.
On the header portion:
• Regular Hours per Day. Enter the number of regular (not overtime) hours the employee normally works in a day. The default is 8.
• Regular Hours per Week. This field is available only if you choose FLSA – Salary Fixed Hours in the Overtime Calculation field. Type the number of regular (not overtime) hours the employee normally works in a week.
The default for this field is calculated to be the weekly equivalent of the value in the Regular Hours Per Period field (based on the periods per year options on the Payroll Options form). For example, if an employee is paid monthly, and the Regular Hours Per Period field contains 160 hours , then Payroll calculates the Regular Hours Per Week field as 37; that is, (160 * 12) / 52 .
• Overtime Calculation. Select the method you want to use for calculating overtime for the employee. Options are:
− Hourly Rate. Use this option for overtime calculations based on an hourly rate. This option does not support FLSA overtime calculations.
− Minimum Wage. Use this option for overtime calculations based on the minimum wage that is stored in an employee’s record. This option does not support FLSA overtime calculations.
− Shift Rate. Use this option for overtime calculations based on the shift rate. This option does not support FLSA overtime calculations.
− FLSA-Hourly. Use this option for overtime calculations based on the hourly rate that may include other types of earnings, as required by FLSA regulations.
− FLSA-Salary Fixed Hours. Use this option to calculate FLSA overtime for salaried employees who work a fixed number of hours per week. Payroll will calculate the weekly equivalent salary that
Changes in U.S. Payroll 5.4
Version 5.5 Update Notice 17
includes any earnings you have set to be included in FLSA overtime calculations. Payroll divides the weekly equivalent salary by the regular hours to establish the regular rate used to calculate overtime.
− FLSA-Salary Fluctuating Hours. Use this option for overtime calculations for a salaried employee whose hours change (or may change) from week to week. If you select this option, payroll will divide the straight time compensation by the total hours actually worked to calculate the regular rate. Payroll will then override the rate multiplier in the overtime schedule and the overtime rate will automatically be half the regular rate. With this option, you can include other types of earnings in the overtime calculations, as required by FLSA regulations.
Note: After you activate Payroll 5.4, the Hourly Rate method is automatically assigned to all employees. Change the method, if you wish.
In the Earnings/Deductions grid:
• Include in FLSA Calculation. The setting of this option is defined in the Earnings And Deductions setup form, but you can change it here for the employee, if the employee’s overtime calculation method is one of the FLSA options, and if the earning is one of these types:
− Salary & Wages that uses an employee calculation method of Flat, Fixed, or Hourly Rate.
− Reported Tips.
− Allocated Tips.
Hint: To update this option for several employees, you can use the Update Earnings/Deductions For All Employees function in the Payroll Employees folder.
Timecard — Overtime Entry
You can enter these new fields that Payroll uses in calculating overtime.
On the header portion:
• Overtime Override. To override the overtime calculations that Payroll would automatically perform according to your setup options, select the Overtime Override option. This enables you to override the overtime hours and rate for specific types of earnings in the grid of the Earnings/Deductions tab (see the next subsection).
Changes in U.S. Payroll 5.4
18 Sage Accpac U.S. Payroll
Note: The Overtime Override field applies only to the timecard for which it has been selected. If you have multiple timecards, you must select this field for each timecard where you want to override the overtime calculation.
On the Earnings/Deductions tab:
• OT Hours Override and OT Rate Override. These two fields appear only if you selected the Overtime Override option.
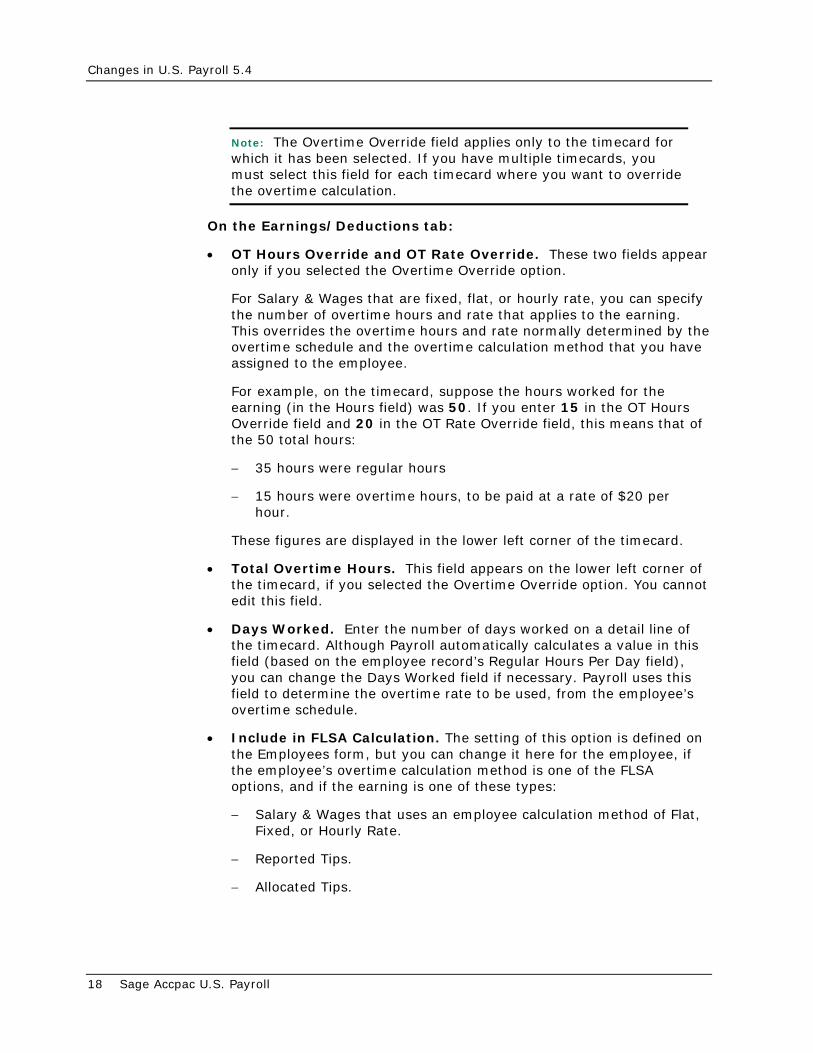
For Salary & Wages that are fixed, flat, or hourly rate, you can specify the number of overtime hours and rate that applies to the earning. This overrides the overtime hours and rate normally determined by the overtime schedule and the overtime calculation method that you have assigned to the employee.
For example, on the timecard, suppose the hours worked for the earning (in the Hours field) was 50. If you enter 15 in the OT Hours Override field and 20 in the OT Rate Override field, this means that of the 50 total hours:
− 35 hours were regular hours
− 15 hours were overtime hours, to be paid at a rate of $20 per hour.
These figures are displayed in the lower left corner of the timecard.
• Total Overtime Hours. This field appears on the lower left corner of the timecard, if you selected the Overtime Override option. You cannot edit this field.
• Days Worked. Enter the number of days worked on a detail line of the timecard. Although Payroll automatically calculates a value in this field (based on the employee record’s Regular Hours Per Day field), you can change the Days Worked field if necessary. Payroll uses this field to determine the overtime rate to be used, from the employee’s overtime schedule.
• Include in FLSA Calculation. The setting of this option is defined on the Employees form, but you can change it here for the employee, if the employee’s overtime calculation method is one of the FLSA options, and if the earning is one of these types:
− Salary & Wages that uses an employee calculation method of Flat, Fixed, or Hourly Rate.
− Reported Tips.
− Allocated Tips.
Changes in U.S. Payroll 5.4
Version 5.5 Update Notice 19
Workers’ Compensation Codes Assessment Report and Adjusted Overtime
Due to the new overtime calculations that you can now select in Payroll, the figures for the regular rate on the Workers’ Compensation Codes (assessment) report may appear differently from Payroll 5.3, if the option “Adjust OT Pay to Regular Rate” was chosen during Workers’ Compensation Codes setup, and if you chose an overtime calculation method that was not hourly rate.
Cost Center Override
Two new features in cost center overriding are now available: multiple levels of cost center overrides, and employer’s cost center overrides.
Multiple Levels of Cost Center Overrides
You can now distribute the wage expenses of earnings, benefits or deductions that use the calculation method of Percentage Of Base or Amount Per Hour, to the cost centers (G/L accounts) of the earnings/deductions on which those expenses were based.
These types of wage expenses will be prorated according to the earnings/deductions on which they are based.
Payroll uses the items in the “Base Earnings Include” box of the Calc Base tab (of the Earnings And Deductions setup form) when determining the proration of an earnings/deductions code. The deductions in the “Base Deductions Include” box, and the taxes in the "Base Taxes Include” box (both on the Calc Base tab), will be deducted from an earning base to determine the base.
Two-sided deductions (that is, those in which both the employee and employer participate) can be overridden, and will be done separately if their bases are different or if one side is not subject to the override.
To use this new feature, select the new option called “Cost Center Override Allocated Based on Calc Base” on the Earnings And Deductions form (Basic Info tab).
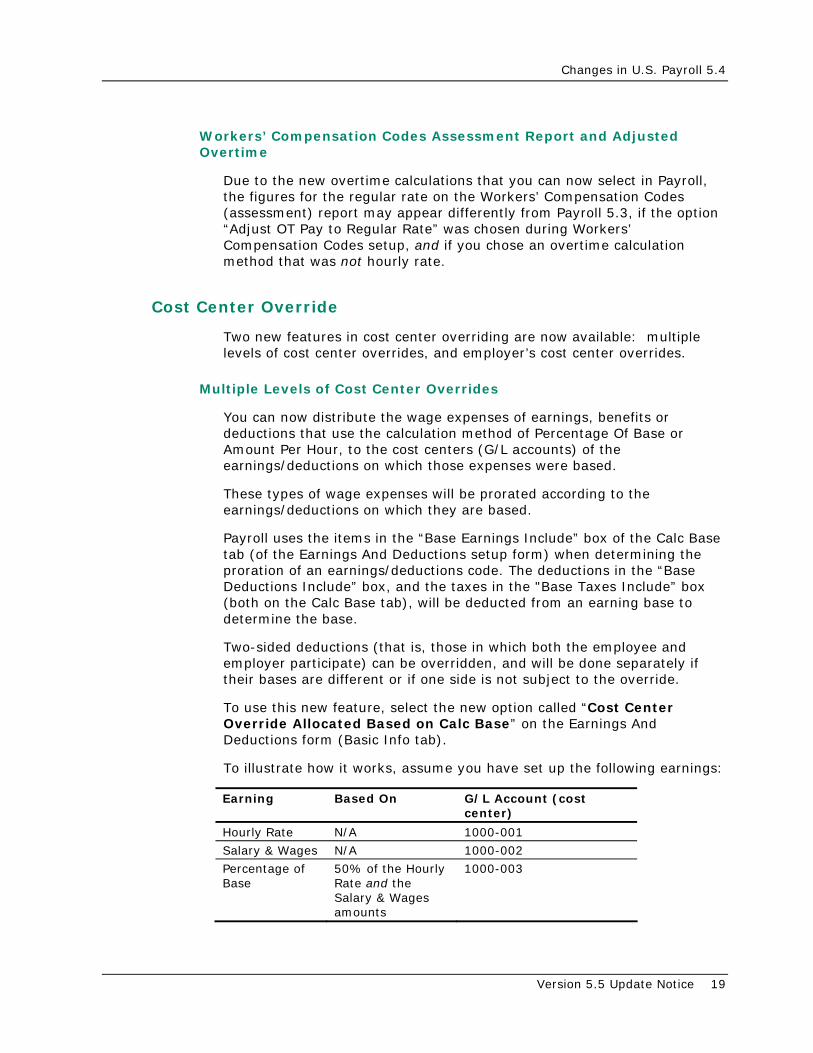
To illustrate how it works, assume you have set up the following earnings:
Earning Based On G/L Account (cost center)
Hourly Rate N/A 1000-001
Salary & Wages N/A 1000-002
Percentage of Base
50% of the Hourly Rate and the Salary & Wages amounts
1000-003
Changes in U.S. Payroll 5.4
20 Sage Accpac U.S. Payroll
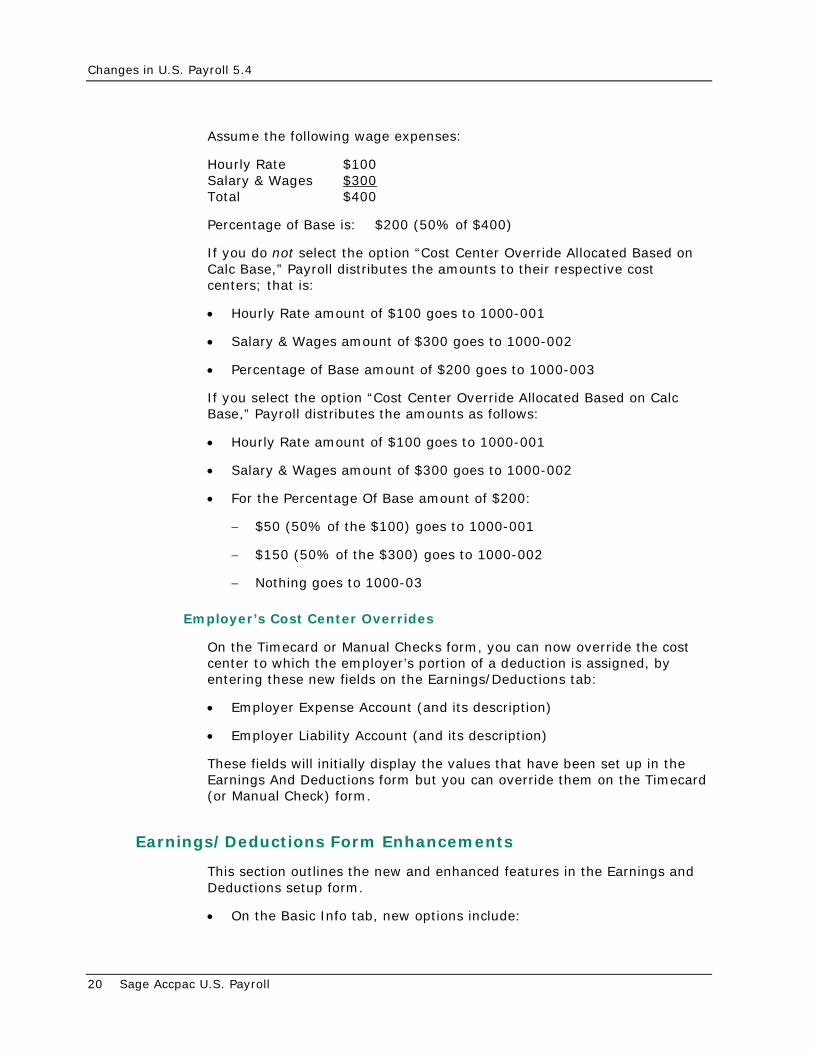
Assume the following wage expenses:
Hourly Rate $100 Salary & Wages $300 Total $400
Percentage of Base is: $200 (50% of $400)
If you do not select the option “Cost Center Override Allocated Based on Calc Base,” Payroll distributes the amounts to their respective cost centers; that is:
• Hourly Rate amount of $100 goes to 1000-001
• Salary & Wages amount of $300 goes to 1000-002
• Percentage of Base amount of $200 goes to 1000-003
If you select the option “Cost Center Override Allocated Based on Calc Base,” Payroll distributes the amounts as follows:
• Hourly Rate amount of $100 goes to 1000-001
• Salary & Wages amount of $300 goes to 1000-002
• For the Percentage Of Base amount of $200:
− $50 (50% of the $100) goes to 1000-001
− $150 (50% of the $300) goes to 1000-002
− Nothing goes to 1000-03
Employer’s Cost Center Overrides
On the Timecard or Manual Checks form, you can now override the cost center to which the employer’s portion of a deduction is assigned, by entering these new fields on the Earnings/Deductions tab:
• Employer Expense Account (and its description)
• Employer Liability Account (and its description)
These fields will initially display the values that have been set up in the Earnings And Deductions form but you can override them on the Timecard (or Manual Check) form.
Earnings/Deductions Form Enhancements
This section outlines the new and enhanced features in the Earnings and Deductions setup form.
• On the Basic Info tab, new options include:

Changes in U.S. Payroll 5.4
Version 5.5 Update Notice 21
Cost Center Override Allocated Based on Calc Base. Appears only for an earning with employee calculation method of Amount Per Hour or Percentage Of Base. Lets you override cost center accounts. See the section “Cost Center Override.”
Include in FLSA Calculation. This field appears only for the certain types of earnings. If you select this option, the earning will be included when calculating overtime, if the employee is set up for an FLSA overtime calculation method. For more details, see the section, “Overtime Processing Enhancements.”
• If you use Sage Accpac Project and Job Costing, you also see the following field on the Employee tab, Sales tab, or Piece Rate tab, for an accrual, expense reimbursement and earning (except tips):
Billing Percentage or Billing Rate. For the earning, enter the percentage or rate to be billed to the project. For more details on setup and processing for Project and Job Costing, see the section “Integration with Sage Accpac Project And Job Costing,” on page 38.
Progressive or Non-progressive Calculation
In previous versions of Payroll, the following earnings/deductions that used tables were calculated only in a progressive manner:
• Earnings that used the employee calculation method of Sales Commission Table.
• Earnings that used the employee calculation method of Piece Rate Table.
• Benefits or deductions that used the employee calculation method of Wage Bracket Table.
If you use Sage Accpac 200 or 500 ERP, you can now choose to calculate the above in a progressive or non-progressive manner, using the new Progressive Calculation check box on the Sales tab, Piece tab or Brackets tab. Sage Accpac 100 ERP continues to calculate only in the progressive manner.
Note: After you activate Payroll 5.4, the new Progressive Calculation option is set so that the program will calculate in the same manner as in versions prior to Payroll 5.4. This means that:
• For earnings using Sales Commission and Piece Rate Table, the option is selected.
• For benefits/deductions using Wage Bracket Table, the option is not selected.
Change the option if you wish.
Changes in U.S. Payroll 5.4
22 Sage Accpac U.S. Payroll
Does not apply to billing amounts
If you use Project and Job Costing, note that Payroll always uses non-progressive calculation for billing amounts. (This changes in Payroll 5.5.)
The following explains these two options, using sales commission earnings (the Sales tab) as an example. Earnings, deductions or benefits based on piece rates or wage brackets work similarly.
In progressive calculation, one commission rate is paid for sales up to a set threshold. A second rate is paid on any sales above the threshold during the same pay period. For example, suppose you set up a sales commission table with a commission percentage of 10% for sales between $1.00 and $5,000.00 and a commission percentage of 15% for sales between $5,000.01 and $7,500.00. If an employee’s sales were $6,800.00 during a pay period, the system would calculate $500.00 of commission for the first $5,000.00 worth of sales (10% x $5,000.00) and $270.00 of commission for the next $1,800.00 worth of sales (15% x $1,800.00), for a total commission of $770.00.
In non-progressive calculation, the same commission rate is paid for all the sales, but that rate is determined by the total amount of sales during a pay period. For example, suppose you set up a sales commission table with a commission percentage of 10% for sales between $1.00 and $5,000.00 and a commission percentage of 15% for sales between $5,000.01 and $7,500.00. If an employee’s sales were $6,800.00 during a pay period, the system would calculate a total of $1,020.00 commission (15% x $6,800.00).
Annualized Wage Brackets
For benefits or deductions that use the employee calculation method of Wage Bracket Table:
• On the Brackets tab, the new Annualized Wage check box enables you to enter ranges (in the From/To fields) as annualized amounts or pay period detail amounts. In the previous version of Payroll, you entered the ranges as annualized amounts only.
This new option is available only in Sage Accpac 200 ERP and Sage Accpac 500 ERP. In Sage Accpac 100 ERP, you continue to enter the ranges as annualized amounts.
Note: After you activate Payroll 5.4, the new Annualized Wage option is selected, so that the program will calculate the table as annualized amounts, as in versions prior to Payroll 5.4. Deselect the option if you wish.
Changes in U.S. Payroll 5.4
Version 5.5 Update Notice 23
Years of Service
On the Employee tab, for accruals, you can now specify up to 10 categories when defining years of service, if you use Sage Accpac 200 ERP or Sage Accpac 500 ERP.
Sage Accpac 100 ERP offers up to 4 categories.
Maximum Accrual and Maximum Carryover
On the Employee tab, for an accrual that uses an employee calculation method of Hours Per Hour Worked or Hours Per Frequency, you can now enter up to 999,999.99 hours in the Maximum Accrual and Maximum Carryover columns, instead of up to 9,999.99 as previously. (The maximum values you can enter for an accrual that uses the Percentage Of Base method, has not changed.)
Lifetime Maximum
This new feature is available only in Sage Accpac 500 ERP.
For any earning or deduction (except accruals) that allows you to enter an Annual Maximum amount, you can now also enter a Lifetime Maximum amount, on the Employee (or Employer) tab.
The new Lifetime Maximum field enables you to specify when the Payroll program should stop calculating the earning or deduction, without specifying a time limit.
For example, if you create a car payment deduction with a lifetime maximum of $100,000, then during every Calculate Payroll run, the program will deduct a car payment amount for employees who have been assigned that deduction, until $100,000 has been deducted.
The value you enter on the Earnings And Deductions form becomes the default for new employee records created. However, you can change the value on individual employee records.
Secondary Rate
For any deduction that allows you to enter an Annual Maximum amount (that is, if you have set the Minimum And Maximum Based On field to an option other than “No Limit”), and that uses an employee (or employer) calculation method of Flat, Amount per Hour, Percentage of Base, or Percentage of Employee Contributions (the latter being an employer calculation method only):
• On the Employee tab (or Employer tab), the new Secondary Rate (Percent/Amount/Amount Per Hour) field enables you to specify a second rate (expressed as a percentage, amount, or amount per hour, in accordance to the calculation method chosen) to be used for a
Changes in U.S. Payroll 5.4
24 Sage Accpac U.S. Payroll
deduction, once the maximum (Annual or Lifetime Maximum fields) for the first rate has been reached.
• The associated field, Secondary Rate (Percent/Amount/Amount Per Hour) Effective, enables you to specify when the Secondary Rate should be effective.
The value you enter on the Earnings And Deductions form becomes the default for new employee records created. However, you can change the value on individual employee records.
Note: There is no maximum after the secondary rate commences, so Payroll will continue to deduct the secondary rate, until you de-activate the rate.
To stop deducting the secondary rate for all employees, set the Secondary Rate Effective field to Never.
To stop deducting the secondary rate for individual employees, open the Employees form, select the deduction on the Pay tab, and clear the “Calculate Earning/Deduction” option.
For example, assume you created a flat $1,000 Car Payment deduction with a lifetime maximum of $100,000. You also specified a secondary rate amount of $500, to be effective “After Lifetime Maximum Reached.”
Then during every Calculate Payroll run, the program will deduct a $1,000 car payment for each employee who has been assigned that deduction, until $100,000 has been deducted for the employee. The program will then deduct $500 during every Calculate Payroll run, until you stop the deduction, using one of the methods described earlier.
Note: Other Payroll update functions, such as the Assign Earnings/Deductions to Employees and Update Earnings/Deductions for all Employees, have been modified to reflect the changes.
Override the Annual Maximum and Minimum/Maximum Values
If, for an earning or deduction (except accruals), you have specified an Annual Maximum value or Minimum/Maximum values, you can now override that value on individual employee records (Pay tab). For more details, see “Employees Form Enhancements,” in this document.
Employees Form Enhancements
The Employees form in the Payroll Employees folder contains several new fields, some of which enable you to override the default value specified in
Changes in U.S. Payroll 5.4
Version 5.5 Update Notice 25
the Earnings And Deductions form in the Payroll Setup folder. The new employee fields include:
• On the General tab, there is a new field called Country Code. After activating Payroll version 5.4, employee records will contain the default value in this field. Review your employee records, and change the value as necessary. The country code will appear on the Employee Information report.
• On the Class/Schedule tab, there is a new field called Work Classification. See the section “New Work Classification Codes Form in Payroll Setup,” in this document.
• On the main part of the Pay tab, the following new fields are used by Payroll in calculating overtime:
− Regular Hours per Day
− Regular Hours per Week
− Overtime Calculation
For more details on these fields, see the section “Overtime Processing Enhancements” on page 15.
• On the Pay tab, the following new fields are in the Earnings/Deductions For Employee grid. When creating a new employee record, these fields default to the values you set up on the Earnings/Deductions setup form.
− Period Minimum (for employee or employer)
− Period Maximum (for employee or employer)
− Annual Maximum (for employee or employer)
− Lifetime Maximum (for employee or employer). See page 23.
− Lifetime Accumulation (for employee or employer)
This field maintains a lifetime sum of the employee’s (or employer’s) portion of the earning/deduction.
Note: After you activate Payroll 5.4, check the value in the Employee/Employer Lifetime Accumulation field in your employee records, and edit the value if necessary.
− Secondary Rate/Amt/Pct (for employee or employer. See page 23.
− Include in FLSA Calculation. See the section “Overtime Processing Enhancements.”
• If you use Sage Accpac Project and Job Costing, these fields also appear on the Pay tab:
Changes in U.S. Payroll 5.4
26 Sage Accpac U.S. Payroll
− Override Billing Rates or Billing Percentage fields
− Jobs Allocated Based on Calc Base
For details about these fields, see the section, “Set Up Employees for Integration with Project and Job Costing.”
Hint: To display all fields for an earning/deduction using a detailed form (instead of on a single line on the Pay tab grid), select the line and press F9. This opens the detailed entry form, which now contains two tabs:
− The General tab contains the information that was available in the previous version of Payroll, and the new Include in FLSA Calculation check box.
− The Min/Max. tab contains fields that require minimum or maximum values, or a secondary rate. The fields that you can edit depend on the type of earning selected.
Employees Form (G/L Distribution Code)
On the Pay tab (or Taxes tab), when you add a new earning/deduction (or tax) that has been defined with only one G/L distribution code during setup, the G/L Dist. Code field now automatically defaults to that setup code, instead of requiring you to enter the code in the G/L Dist. Code field, as in the previous version of Payroll.
However, if the earning/deduction or tax has more than one G/L distribution code, you must select a code in the G/L Dist. Code field.
Detailed Timecard Enhancements
Payroll 5.4 provides several new features that facilitate creating, entering, processing, and tracking detailed timecards.
Timecard-related functions are now grouped in the new Payroll Timecards subfolder, under the Payroll Transactions folder.
The next subsections summarize the new timecard features.
New Timecard List Feature
The new Timecard List form is not available in Sage Accpac 100 ERP.
The Timecard List form enables you to find timecards and list them on the screen. You can then select a timecard from the list, and copy, delete, or print it, or display it in detail. From this form, you can also open the Timecards form to create a new timecard.

Changes in U.S. Payroll 5.4
Version 5.5 Update Notice 27
New Copy Timecard Feature
The new Copy Timecard form is not available in Sage Accpac 100 ERP.
The Copy Timecard form enables you to select an existing timecard, and create copies of that timecard across a range of employees. The copy timecard feature is available from the following Payroll forms:
• Copy Timecards. This is a new form in the Timecards subfolder on the desktop.
• Timecard List. (Not available in Sage Accpac 100 ERP.) You can highlight a timecard in the list and press the Copy button. This opens the Copy Timecards form.
• Timecards. You can select a timecard and press the Copy button. This opens the Copy Timecards form.
To use the Copy Timecard form:
1. Select the employee whose timecard is to be copied (not required if the Copy Timecard form was opened from the Timecard List or Timecard).
2. Enter the new (unique) timecard number to assign to the new timecards, and select options for the new timecards.
3. Select the range of employees to assign to the new timecard. You can choose employees by employee number, class code, or selection list.
4. Choose whether to:
• Skip invalid details, such as earnings, deductions, taxes for the employee. If you choose to skip, Payroll will not insert the invalid information in the new timecards, without warning, when you verify or create the timecard.
Or
• Skip employees with invalid details. If you choose to skip, Payroll will not create timecards for employees for whom the selected timecard details are invalid.
5. Click Verify (optional).
6. Click Create.
New Fields and Button on the Detailed Timecard
The following fields and button have been added.
Changes in U.S. Payroll 5.4
28 Sage Accpac U.S. Payroll
On the header or bottom portion of the form
• Overtime Override check box. Selecting this check box enables you to enter overtime hours and rates for individual earnings in the grid. For more details, see the section, “Overtime Processing Enhancements.”
• Job Related check box. This appears only if you use Sage Accpac Project and Job Costing. Select this box if you want to enter job-related information for the earnings/deductions, and transfer this information to Project and Job Costing. For more details, see the section, “Integration with Sage Accpac Project And Job Costing.”
• Copy button. This button copies the timecard for a range of employees.
On the Earnings/Deductions tab
To display all fields for a earning/deduction line, select the line and press F9. This opens the detailed entry form, which now contains two tabs: the Group/Sched tab and the G/L Dist tab.
For each earning/deduction line, new fields include:
• Line #. Payroll now automatically assigns a line number to each detail line you enter on the grid, to enable easier identification, and sorting in reports.
• Work Classification. Optionally enter a code that you have set up. See the section “New Work Classification Codes Form in Payroll Setup.”
• Days Worked. You can specify the number of days worked for the detail line. See the section “Overtime Processing Enhancements.”
• Include in FLSA Calculation. See the section “Overtime Processing Enhancements.”
• Overtime Hours and Rate. These appear only if you had selected the Overtime Override option on the timecard.
• G/L Distribution Code. This field will default to the G/L distribution code specified for the earning/deduction (or tax) in the employee’s record.
• Employer Expense Account. You can specify the account for employer expense, if applicable.
• Employer Liability Account. You can specify the account for employer liability, if applicable.
• If you use Sage Accpac Project and Job Costing, and have selected the new Job Related check box on the Timecards, the following new fields
Changes in U.S. Payroll 5.4
Version 5.5 Update Notice 29
are displayed. For details about these fields, see the section, “Integration with Sage Accpac Project And Job Costing.”
− Jobs Allocated Based on Calc Base
− Jobs
− Total Job Hours
− Total Job Pieces/Sales/Amt
Procedure Change in the Detailed Timecard
If you change the Timecard or Period End Date field on an existing timecard, Payroll will now display a message that asks you to choose one of these options:
• Start a new timecard.
• Start a new timecard, but copy the details from this timecard.
• Change the current timecard.
Timecards Detail Report
If you choose to print the Timecards report in detailed format:
• You can now sort the Timecard Detail report by Line Number or by Earning/Deduction/Tax code. If you choose the Line Number option, the details on the report is sorted in the same order as they were entered on the Timecards form.
• If you use Sage Accpac Project and Job Costing, you can choose to include the following information:
− Job Details
− Billing
Importing Timecards
To enable the new features in Payroll 5.4, several changes have been made to the timecard data file. For example, Payroll now automatically assigns a line number to each detail line on the timecard, to enable easier identification, and sorting in reports.
Consequently:
• When you import information into the Timecards form, you now have only the option to “insert” the information. To avoid duplication of imported data that use line numbers, the option to “update” and “insert and update” are no longer available.
Changes in U.S. Payroll 5.4
30 Sage Accpac U.S. Payroll
If you export the Timecards information, with the intention of changing data and then importing back to the Timecards form, you must change the keys in the timecard header key in the export file before you import it. Then, when you import, the information is imported as a new timecard.
• If you encounter problems when importing timecard data from a previous version of Payroll, change the format of the data file that you are importing, to match the format required by Payroll 5.4.
• You may also have to change the macros that you use, so that they reflect the Payroll 5.4 file format.
Employee Timecard Enhancements
The Employee Timecard, in the Timecards folder, has these new capabilities:
1. On the Employee Timecard, you can now include an earning that uses a sales commission table or a piece rate table, for specific employees. To set this up:
a. Open the Employees form and select the employee.
b. On the Pay tab, select the earning, and turn on the option, Available in Employee Timecards.
For that employee, earnings with this setting will appear as one of the options in the Earnings/Expense Code column on the Employee Timecard.
Manual Checks Form Enhancements
This section describes the new features and modifications related to the manual check entry in Payroll.
New Fields on the Manual Checks form
The following fields have been added.
On the header portion of the form
• Job Related check box. This appears only if you use Sage Accpac Project and Job Costing. Select this box if you want to enter job-related information for the earnings/deductions, and transfer this information to Project and Job Costing. For more details, see the section, “Integration with Sage Accpac Project And Job Costing.”
Changes in U.S. Payroll 5.4
Version 5.5 Update Notice 31
On the Earnings/Deductions tab
To display all fields for a earning/deduction line, select the line and press F9. This opens the detailed entry form.
For each earning/deduction line, new fields include:
• Line #. Payroll now automatically assigns a line number to each detail line you enter on the grid, to enable easier identification, and sorting in reports.
• Work Classification. Optionally enter a code that you have set up. See the section “New Work Classification Codes Form in Payroll Setup.”
• G/L Distribution Code. This new field will default to the G/L distribution code specified for the earning/deduction (or tax) in the employee’s record.
• Employer Expense Account. You can specify the account for employer expense, if applicable.
• Employer Liability Account. You can specify the account for employer liability, if applicable.
• If you use Sage Accpac Project and Job Costing, and have selected the new Job Related check box on the Manual Checks form, the following new fields are displayed. For details about these fields, see the section, “Integration with Sage Accpac Project And Job Costing.”
− Jobs
− Total Job Hours
− Total Job Pieces/Sales/Amt
Procedure Changes in the Manual Check
• If you de-select the Print Check option on a manual check that previously had that option selected, a dialog box now asks you to enter the check number, bank, and check stock.
• If you change the key fields other than the Employee number (such as the check date, check number, check stock, or period end date) on an existing manual check, Payroll will now display a message that asks you to choose one of these options:
− Start a new manual check.
− Start a new manual check, but copy the details from this manual check.
− Change the current manual check.
Changes in U.S. Payroll 5.4
32 Sage Accpac U.S. Payroll
Manual Checks Report
You can now sort the Manual Checks report by Line Number or by Earning/Deduction/Tax code. If you choose the Line Number option, the details on the report is sorted in the same order as they were entered on the Manual Checks form.
If you use Sage Accpac Project and Job Costing, you can choose to include the following information:
• Job Details
• Billing
Importing Manual Checks
To enable the new features in Payroll 5.4, several changes have been made to the manual check data file. For example, Payroll now automatically assigns a line number to each detail line on the manual check, to enable easier identification, and sorting in reports.
Consequently:
• When you import information into the Manual Checks form, you now have only the option to “insert” the information. To avoid duplication of imported data that use line numbers, the option to “update” and “insert and update” are no longer available.
If you export the Manual Checks information, with the intention of changing data and then importing back to the Manual Checks form, you must change the keys in the manual check header key in the export file before you import it. Then, when you import, the information is imported as a new manual check.
• If you encounter problems when importing manual check data from a previous version of Payroll, change the format of the data file that you are importing, to match the format required by Payroll 5.4.
• You may also have to change the macros that you use, so that they reflect the Payroll 5.4 file format.
New Printed Check Forms
Payroll 5.4 enables you to print the new ANSI-compliant checks for the US and Canada. (The American National Standards Institute standard facilitates the conversion of checks to electronic images so that they can be cleared electronically.)
Payroll 5.4 still provides the Payroll 5.3 check report definition files (UPCHECK1.RPT, UPCHECK2.RPT, UPCHECK4.RPT). Payroll 5.4 also provides the following new files to print the new ANSI-compliant checks:
Changes in U.S. Payroll 5.4
Version 5.5 Update Notice 33
• UPCHCK1A.RPT is the new version of UPCHECK1.RPT, which produces an 8 ½-by-11-inch laser printer form. The advice is on the bottom two-thirds of the form including the column labels.
• UPCHCK2A.RPT is the new version of UPCHECK2.RPT, which is designed to print on preprinted 8 ½-by-11-inch dot-matrix printer forms. The advice is on the bottom two-thirds of the form. Note that UPCHECK2.RPT is for continuous form but UPCHCK2A.RPT is not.
• UPCHCK4A.RPT is the new version of UPCHECK4.RPT, which produces an 8 ½-by-11-inch laser printer form. The advice is repeated twice on the bottom two-thirds of the form including the column labels.
For more details about the check report definition files, refer to the document “Customizing Forms” (from the Start menu in Windows, select All Programs, Sage Accpac, Online Documentation, US Payroll 5.4).
Enhancements to Update Employee Functions
Payroll 5.4 provides several enhancements to the following functions (in the Payroll Employees folder) that enable you to quickly assign or update earnings, deductions, and tax information on employee records:
• Assign Earnings/Deductions to Employees
• Update Earnings/Deductions for All Employees
• Update Tax for all Employees
Assign Earnings/Deductions to Employees
On this form, two tabs are now provided:
• General tab — contains the same information that was available in Payroll version 5.3.
• Min/Max tab — a new tab that enables you to specify the minimum and maximum amounts for earnings/deductions that use them.
In addition, a new check box called Use Employee Defaults For Blank Or Zero Values is available:
• If you select this option, Payroll will fill in the fields that are blank or zero on the Assign Earn/Ded to Employees form, using the default value (if any) of the earning or deduction, when it assigns the earning/deduction. (The default value may come from the earning/deduction record, or the employee record, depending on the field and the type of earning/deduction you are assigning.)
Changes in U.S. Payroll 5.4
34 Sage Accpac U.S. Payroll
• If you do not select this option, Payroll will leave the fields that are blank or zero on the Assign Earn/Ded to Employees form, as they are, when it assigns the earning/deduction.
Update Earnings/Deductions for All Employees
You can now specify more criteria for selecting the records you want to update. In the new Update By field, you can select records based on:
• Employee Number
• Class
• Selection List
• Set Criteria
When you select one of these options, other fields become available for you to enter. For example, if you chose Set Criteria, the Set Criteria button (adjacent to the Employee Criteria field) is enabled for you to click and enter criteria.
Update Tax for All Employees
You can now specify more criteria for selecting the records you want to update, in the same manner as described in the previous section, “Update Earnings/Deductions for All Employees.”
Payroll Employee Reports
In the Payroll Employee Reports folder, there are three new audit reports, Assign Employee Earn/Ded Audit, Update Employee Earn/Ded Audit, and Update Tax For All Employees Audit. You can also print these reports from the File menu of each of their related functions (forms). For a brief description of each report, see the section, “New Reports” later in this document.
Employee Selection List Enhancements
Payroll 5.4 provides several enhancements to the employee selection list feature:
• When creating employee selection lists, you can copy or combine selection lists, or specify more criteria when selecting employees. (Not available in Sage Accpac 100 ERP.)
• A new “Assign Selection Lists To Employees” form that enables you to quickly assign or remove employees to/from selection lists. (Available only in Sage Accpac 500 ERP.)

Changes in U.S. Payroll 5.4
Version 5.5 Update Notice 35
• When you specify criteria to print certain reports (such as the Payroll Register, the Pre-check Payroll Register, Earnings and Hours, Earnings/Deductions Summary, and so on), you now have the option of using selection lists.
Creating Selection Lists
You create selection lists by using the Employee Selection form in the Payroll Employees folder. When you create a new selection list, the following new buttons are now available in Sage Accpac 200 ERP and Sage Accpac 500 ERP:
• Copy. You can copy all the employees of an existing selection list to the new list.
• Criteria. You can now specify a broader range of criteria by which to select employees for your new list.
• Combine. You can choose employees from two existing selection lists to the new list. You can combine all the employees from the two lists, combine only employees whose names appear on both lists, or combine only employees whose names appear on only one of the existing lists.
Assign Selection Lists to Employees
This new feature is available only in Sage Accpac 500 ERP.
To help you add (or remove) an employee quickly to one or several selection lists, use the new Assign Selection Lists to Employees form in the Payroll Employees folder.
1. On the Assign Selection Lists To Employees form, select an employee.
− The Non-Member section displays all the selection lists where the employee is not included.
− The Member section displays all the selection lists where the employee is included.
2. You can do the following:
− To add the employee to a selection list, choose a selection list from the Non-Member section, and click Include.
− To add the employee to all selection lists in the Non-Member section, click All.
− To remove the employee from a selection list, choose a selection list from the Member section, and click Exclude.
Changes in U.S. Payroll 5.4
36 Sage Accpac U.S. Payroll
− To remove the employee from all selection lists in the Member section, click None.
New Work Classification Codes Form in Payroll Setup
In the Setup folder, you can use the new Work Classification Codes form to enter the occupational classifications for employees.
You may need to record this information for government contracts and where legislation dictates a fair wage for certain types of employment, such as in the construction industry. Work classification is required for the Certified Payroll report, which is new in Payroll 5.4 (see the later section “New Reports”).
New Selection Criteria when Deleting Inactive Records
In the Periodic Processing folder, the Delete Inactive Records form now enables you to specify the range of records to delete, for each of the four categories (employee history, terminated employees, inactive earnings/deductions, or inactive taxes).
At the end of the Delete Inactive Records process, if any records were deleted, you can choose to print an audit report that shows the records deleted. Alternatively, you could print it later by selecting the new Delete Inactive Records Audit Report icon in the Periodic Processing folder.
Payroll Transaction History Changes
On the Payroll Transaction History form (in the Employees folder):
• On the Earnings/Deductions tab, the Date, Start Time, and Stop Time fields have been added.
• You can now print a Transaction History report. From the File menu, choose Print. (You can also print the report from the Employee Reports folder.) For details, refer to the section, “New Reports,” on page 45.
• You now have an option of entering an earning/deduction on a form by pressing F9 on the keyboard to open the form.
• You can now enter optional fields.
Employee Supplemental Information (for Magnetic Media Reporting)
For Quarterly Wage on Diskette reporting and W-2s on Diskette reporting, you can now use the new Employee Supplemental Information form (in the Payroll Employees folder) to enter the special employee information

Changes in U.S. Payroll 5.4
Version 5.5 Update Notice 37
required by certain states. You no longer enter this information in a .CSV file, as required in the previous version of U.S. Payroll.
If you need to use the Employee Supplemental Information form, it must be completed before you use the Quarterly Wage On Diskette form. On the Defaults tab, enter the default values that will be used for all employees. To override the default values for some employees, use the Employees tab to specify which employees, and the values to be used instead of the default ones.
Note that two fields for Indiana (County Code and County Tax ID) have been moved from the W-2s On Diskette form to the new Employee Supplemental Information form.
You can print a report of the information that you entered on the Employee Supplemental Information form, by selecting the File menu, then Print. Alternatively, you can select the Employee Supplemental Information icon from the Payroll Employee Reports folder.
Enhanced Data Integrity Checking
The data integrity checking process (available from System Manager’s Administrative Services) has been enhanced for payroll, such as:
• On the Data Integrity form, when you choose the Payroll application and click Application Options, a new Payroll dialog box lets you choose these options:
− To instruct the program to check that each detail record has a matching header record, select the “Check for Orphans” option.
− To instruct the program to total the values stored in detail records and compare those totals with the totals stored on their corresponding header record, select the “Check the Employee YTD Summary” option.
Keep in mind that selecting either option increases the data checking time.
• The error log has been streamlined. For example, blank lines and lines informing of “0 error(s)” will no longer appear.
Combine EFT Files (Direct Deposit)
If you use the EFT (direct deposit) feature in Payroll 5.4, you can now combine several bank files into one file that you can then submit to the bank.
First, you must set up your system for this feature by clicking EFT Combine in the Payroll Setup folder, and completing the form that opens.

Changes in U.S. Payroll 5.4
38 Sage Accpac U.S. Payroll
Then, to combine EFT files that were generated from the Calculate Payroll function, click Combine EFT Files from the Payroll Transactions folder, and complete the form that opens.
Reports related to the new features are also available:
• EFT Combine Setup Report (under the Payroll Setup Reports folder)
• EFT Combine History Report (under the Payroll Transactions folder)
For a brief description of each report, see the section, “New Reports” later in this document.
Optional Fields
If you use Sage Accpac Transaction Analysis and Optional Field Creator, note the following changes related to optional fields for Payroll.
Optional Fields in Finders
Optional fields now appear in Finders for Payroll records, so you can search for and select records using the entries in optional fields.
When you click the Finder icon (for example, on the Employees form) to open the Finders dialog box, click on the Settings menu, select Columns, choose the optional field from the list on the left to include in the Selected list, then click OK.
Required Optional Fields without Default Values
In version 5.3 of Sage Accpac ERP, you had to specify a default value for any optional fields that were required in transaction forms or records. This is no longer the case. Note, however, that you must make an entry for all required fields before you can save records or post transactions.
Integration with Sage Accpac Project And Job Costing
If you use the Sage Accpac Project and Job Costing 5.4 program, you can integrate it with Payroll. The next subsections describe how to set up for integration, the procedures, and the reports involved.
Set up Security for Integration with Project and Job Costing
If you use security, assign the new security access “PJC Billing Information” to the appropriate employees. This security access allows an employee to view billing information about jobs, in reports and on Payroll forms on-screen. Note that an employee still needs the security access to the function that contains billing information; for example, an employee
Changes in U.S. Payroll 5.4
Version 5.5 Update Notice 39
needs the security access “Timecard Entry” to gain access to the Timecards form.
An employee who is not given the “PJC Billing Information” rights will only be able to view and/or edit jobs. Billing information will not be displayed.
Set up Payroll for Integration with Project and Job Costing
You can use these setup forms in the Payroll Setup folder to specify information related to Project and Job Costing.
• On the new G/L Integration setup form, on the Segments tab: If you want to be able to override the G/L accounts normally applied, select the option “Apply Cost Center Overrides to Project and Job Costing Accounts.” Payroll then uses the cost center segment codes specified on employee records, for G/L job-related accounts (such as the Work in Progress account) from Project and Job Costing.
• If you use overtime schedules, open the Overtime Schedule setup form. You can enter the Billing Rate Multiplier for each “Hours Over” category.
• If you use shift differentials, open the Shift Differential setup form. You can enter the Billing Rate for each shift, in each currency used.
• On the Earnings And Deductions setup form, you can specify default billing information for expense reimbursements, accruals, and earnings, as follows.
− For an expense reimbursement, accrual, or earning with an employee calculation method of flat, fixed, hourly rate, amount per hour: On the Employee tab, click the arrow next to the Billing Rates field to open the Billing Rates form. You can enter billing rates in different currencies. Select the currency, enter the billing rate, and click Close. The program automatically puts a checkmark in the Billing Rate check box on the Employee tab (or leaves the check box empty if you have not defined any billing rates). Note that billing occurs only when the accrual is paid out, not at the time it is accrued.
− For an earning with an employee calculation method of Percentage of Base, enter the Billing Percentage field on the Employee tab.
− For an earning with an employee calculation method of Sales Commission Table, enter the range of billing percentages on the Sales tab.
− For an earning with an employee calculation method of Piece Rate Table: On the Piece Rate tab, click the arrow next to the Billing Rates field to open the Billing Rates form. You can enter billing rates in different currencies. Select the currency, enter the billing
Changes in U.S. Payroll 5.4
40 Sage Accpac U.S. Payroll
rate for each piece rate range (scrolling to the right if necessary), and click Close. The program automatically puts a checkmark in the Billing Rate check box on the Piece Rate tab (or leaves the check box empty if you have not defined any billing rates).
Set Up Employees for Integration with Project and Job Costing
For earnings using the calculation method “Percentage Of Base” or “Sales Commission Table,” the billing information you set up on the Earnings And Deductions form will be the default on the Employees form, if you add those earnings when creating an employee record. You can specify a different value for an employee when you choose an earning, expense reimbursement, or accrual from the grid on the Pay tab of the Employees form, as follows.
• For an earning that uses an employee calculation method of Percentage Of Base, enter the Billing PCT (Pct of Base) field, or if you are using the F9 detailed entry form, enter the Billing Percentage field.
• For an earning that uses an employee calculation method of Sales Commission Table, enter the Billing PCT (Sales Commission) fields, or if you are using the F9 detailed entry form, enter the Billing Percentages tab.
• Otherwise, click the arrow next to the Override Billing Rates field, and enter the information on the Billing Rates form.
Then, to enter job-related information or to specify the jobs to which to allocate the costs of the employee’s accruals, expense reimbursements, or earnings, use the detailed timecard, employee timecard or manual check form as described later in the section, “Processing for Project and Job Costing.”
Jobs Allocated Based on Calc Base
For an earning whose employee calculation method is Amount Per Hour or Percentage Of Base, you can also set the new Jobs Allocated Based on Calc Base option. This option is also available on the detailed timecard.
Payroll calculates the cost of these types of earnings, based on other earnings that you defined as their calculation base earnings during earning/deduction setup.
If you want to allocate the cost of a Percentage Of Base (or Amount Per Hour) earning to jobs, this option determines whether you manually enter the earning on the timecard:
• If you select this option, you do not enter this type of earning on the timecard, but you do enter job information for its calculation base earnings (that is, specify the jobs to which the base earnings belong).
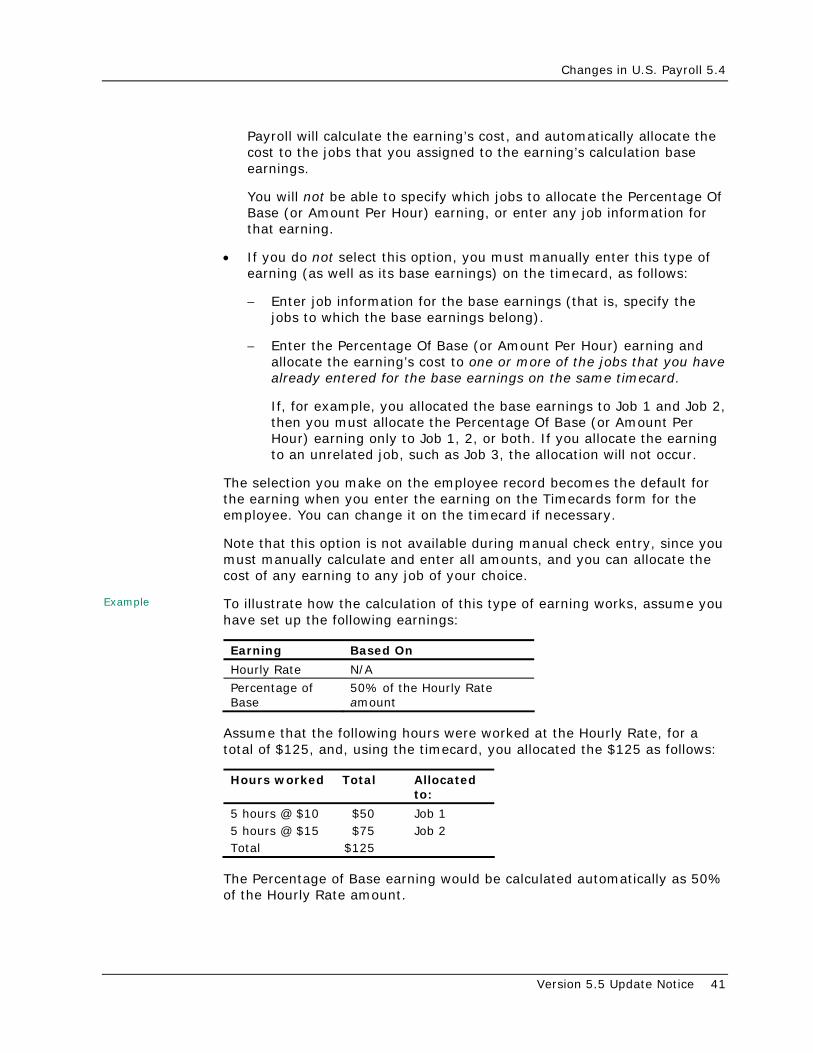
Changes in U.S. Payroll 5.4
Version 5.5 Update Notice 41
Payroll will calculate the earning’s cost, and automatically allocate the cost to the jobs that you assigned to the earning’s calculation base earnings.
You will not be able to specify which jobs to allocate the Percentage Of Base (or Amount Per Hour) earning, or enter any job information for that earning.
• If you do not select this option, you must manually enter this type of earning (as well as its base earnings) on the timecard, as follows:
− Enter job information for the base earnings (that is, specify the jobs to which the base earnings belong).
− Enter the Percentage Of Base (or Amount Per Hour) earning and allocate the earning’s cost to one or more of the jobs that you have already entered for the base earnings on the same timecard.
If, for example, you allocated the base earnings to Job 1 and Job 2, then you must allocate the Percentage Of Base (or Amount Per Hour) earning only to Job 1, 2, or both. If you allocate the earning to an unrelated job, such as Job 3, the allocation will not occur.
The selection you make on the employee record becomes the default for the earning when you enter the earning on the Timecards form for the employee. You can change it on the timecard if necessary.
Note that this option is not available during manual check entry, since you must manually calculate and enter all amounts, and you can allocate the cost of any earning to any job of your choice.
Example To illustrate how the calculation of this type of earning works, assume you have set up the following earnings:
Earning Based On
Hourly Rate N/A
Percentage of Base
50% of the Hourly Rate amount
Assume that the following hours were worked at the Hourly Rate, for a total of $125, and, using the timecard, you allocated the $125 as follows:
Hours worked Total Allocated to:
5 hours @ $10 $50 Job 1 5 hours @ $15 $75 Job 2 Total $125
The Percentage of Base earning would be calculated automatically as 50% of the Hourly Rate amount.
Changes in U.S. Payroll 5.4
42 Sage Accpac U.S. Payroll
• If you selected Jobs Allocated Based On Calc Base, then the Percentage of Base earning would be applied as follows:
− $25.00 (50% of $50.00) is automatically applied to Job 1
− $37.50 (50% of $75.00) is automatically applied to Job 2
You will not be able to specify which jobs to allocate the Percentage of Base earning, or enter any job information for the Percentage of Base earning.
• If you did not select Jobs Allocated Based On Calc Base:
On the timecard, you would allocate the Percentage Of Base earning to Job 1 or Job 2, or both. If you allocated the Percentage of Base earning to an unrelated job, such as Job 3, the allocation would not occur.
If you allocated the Percentage of Base earning to Job 1, then $25.00 is applied to Job 1.
If you allocated the Percentage of Base earning to Job 2, then $37.50 is applied to Job 2.
Processing for Project and Job Costing
If you want to enter job-related information for earnings/deductions, you must select the check box called Job Related when entering a detailed timecard, employee timecard, or manual check. This enables the following fields on the timecard or manual check:
• Jobs. This field allows you to specify the job information for a timecard or manual check detail line, and is available for all earnings/deductions, except:
− An hourly rate, fixed or flat earning that is using an overtime schedule that is setup to pay overtime as compensatory time hours.
− An earning that uses Percentage Of Base or Amount Per Hour, if you have selected the Jobs Allocated Based On Calc Base option for that earning. Note that although selecting this option will not let you enter the Jobs field, Payroll will still automatically calculate the cost and billing amount and transfer the information to Project and Job Costing.
To use the Jobs field:
a. Select a line on the grid of the Earnings/Deductions tab.
b. Click the up-arrow next to the Jobs field to open the Projects And Job Costing Details form.
Changes in U.S. Payroll 5.4
Version 5.5 Update Notice 43
c. Enter the information (such as the contract, project or category that this earning is to billed, the billing type and rate, accounts, and so on) that is applicable to the selected earning/deduction.
• Total Job Hours. This is a display field only.
• Total Job Pieces/Sales/Amt. This is a display field only.
On the detailed timecard only, the following field also appears:
• Jobs Allocated Based on Calc Base. This appears only for an earning whose employee calculation method is Amount Per Hour or Percentage Of Base. The value for this option defaults from the employee’s record, but you can change it on the timecard. See the explanation in the previous section, “Set Up Employees for Integration with Project and Job Costing.”
When you print and approve (post) payroll checks, Payroll transfers the job-related information you enter for accrual payments, expense reimbursements, and most earnings to Project and Job Costing, except for:
• Hourly earnings that use an overtime schedule that is setup to pay overtime as compensatory time hours.
• Reported tips or allocated tips
Job-related information for all other earnings/deductions (advances, deductions, benefits) are not transferred, but stored in Payroll for reporting purposes.
Other Forms and Reports Modified for Project and Job Costing
Update Earnings/Deductions for All Employees form
You can use this form to update:
• Billing percentages for earnings that use an employee calculation method of Sales Commissions or Percentage of Base.
• Billing amounts for accruals, expense reimbursements, and earnings that qualify for Project and Job Costing.
For accruals and earnings codes using employee calculation methods other than Percentage of Base and Commissions, enter the new Billing Currency field, to specify the currency of the billing amounts that will be modified.
Assign Earnings/Deductions to All Employees form
When using this form, you can enter billing information for accruals, expense reimbursements, and earnings that you want to assign to employees.
Changes in U.S. Payroll 5.4
44 Sage Accpac U.S. Payroll
Payroll Reports for Project and Job Costing
You can produce the following new reports in Transaction Reports folder that display job-related information:
• Pre-check Payroll Job Register
• Payroll Job Register
• Jobs
• Certified Payroll Report
See the later section “New Reports” for brief descriptions of these reports.
In addition, you will have the option of including job and billing information in reports such as Employee Timecards, Timecards, Manual Checks, Earnings and Deductions, Overtime Schedule, Shift Differential, Employee Information, and so on.
Enhanced Reporting
Several enhancements to Payroll reporting are available in Payroll 5.4, including:
• When you specify criteria to print certain reports (such as the Payroll Register, the Pre-check Payroll Register, Earnings and Hours, Earnings/Deductions Summary, and so on), you now have the option of using employee selection lists (see also the topic “Employee Selection List Enhancements”).
• In the Payroll Employee Reports folder, the Employee Selection form now provides you the choice of printing the Employee Selection report in these formats:
− Selection List — prints selection lists and the employees who belong to each list.
− Employee List — prints the employees and the selection lists in which they belong.
• For the Timecards and Manual Checks report, you can choose to sort the detail lines by their line numbers or their earning/deduction/tax codes.
• If you use Sage Accpac Project and Job Costing, you will have options to include job costing information on certain reports (for example, the Timecard Detail report and Manual Checks report).
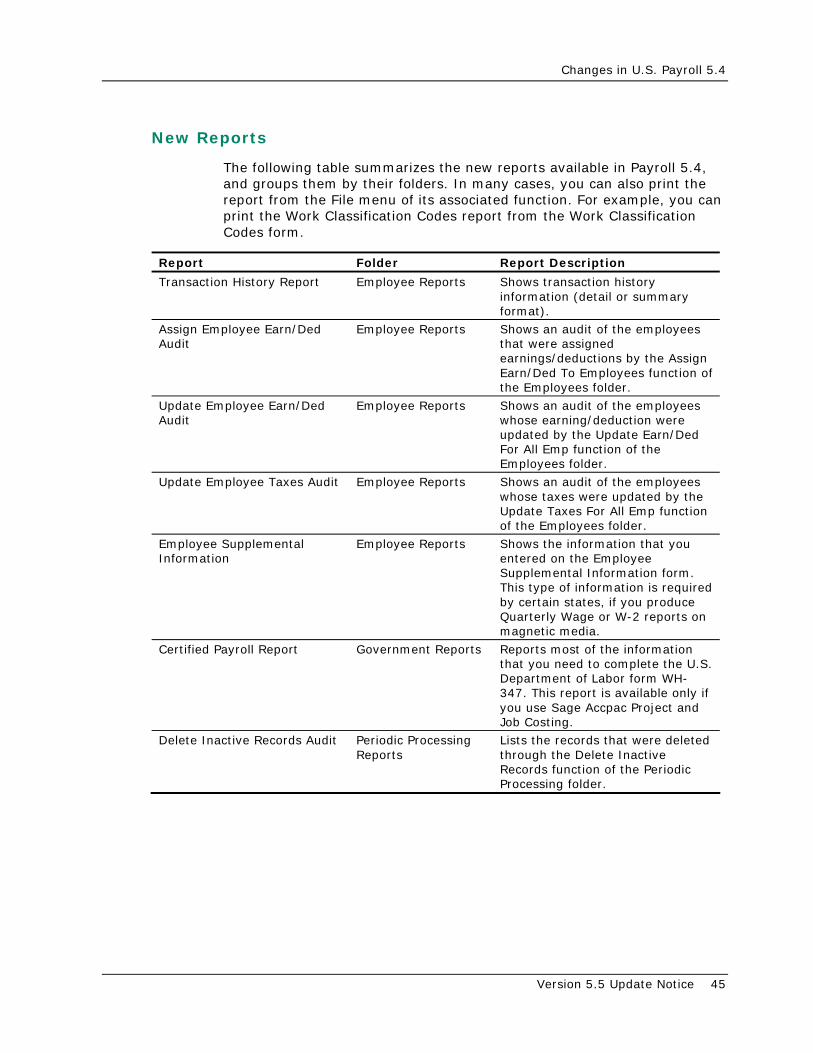
Changes in U.S. Payroll 5.4
Version 5.5 Update Notice 45
New Reports
The following table summarizes the new reports available in Payroll 5.4, and groups them by their folders. In many cases, you can also print the report from the File menu of its associated function. For example, you can print the Work Classification Codes report from the Work Classification Codes form.
Report Folder Report Description
Transaction History Report Employee Reports Shows transaction history information (detail or summary format).
Assign Employee Earn/Ded Audit
Employee Reports Shows an audit of the employees that were assigned earnings/deductions by the Assign Earn/Ded To Employees function of the Employees folder.
Update Employee Earn/Ded Audit
Employee Reports Shows an audit of the employees whose earning/deduction were updated by the Update Earn/Ded For All Emp function of the Employees folder.
Update Employee Taxes Audit Employee Reports Shows an audit of the employees whose taxes were updated by the Update Taxes For All Emp function of the Employees folder.
Employee Supplemental Information
Employee Reports Shows the information that you entered on the Employee Supplemental Information form. This type of information is required by certain states, if you produce Quarterly Wage or W-2 reports on magnetic media.
Certified Payroll Report Government Reports Reports most of the information that you need to complete the U.S. Department of Labor form WH-347. This report is available only if you use Sage Accpac Project and Job Costing.
Delete Inactive Records Audit Periodic Processing Reports
Lists the records that were deleted through the Delete Inactive Records function of the Periodic Processing folder.
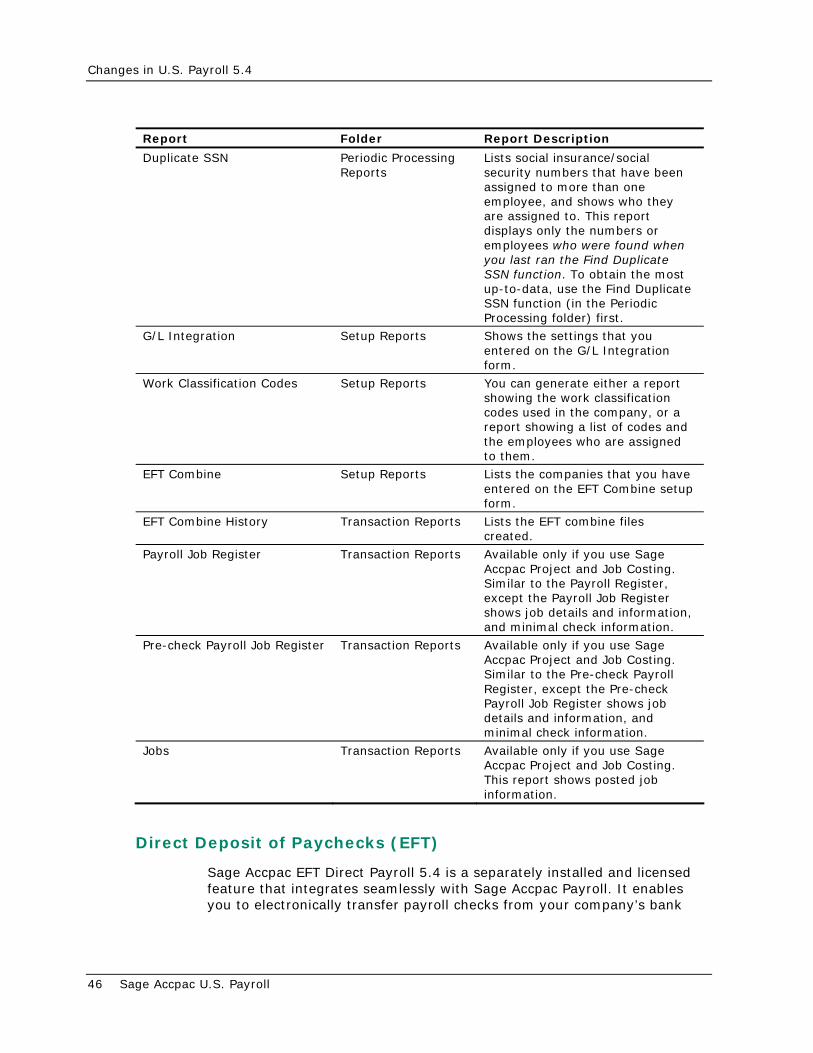
Changes in U.S. Payroll 5.4
46 Sage Accpac U.S. Payroll
Report Folder Report Description
Duplicate SSN Periodic Processing Reports
Lists social insurance/social security numbers that have been assigned to more than one employee, and shows who they are assigned to. This report displays only the numbers or employees who were found when you last ran the Find Duplicate SSN function. To obtain the most up-to-data, use the Find Duplicate SSN function (in the Periodic Processing folder) first.
G/L Integration Setup Reports Shows the settings that you entered on the G/L Integration form.
Work Classification Codes Setup Reports You can generate either a report showing the work classification codes used in the company, or a report showing a list of codes and the employees who are assigned to them.
EFT Combine Setup Reports Lists the companies that you have entered on the EFT Combine setup form.
EFT Combine History Transaction Reports Lists the EFT combine files created.
Payroll Job Register Transaction Reports Available only if you use Sage Accpac Project and Job Costing. Similar to the Payroll Register, except the Payroll Job Register shows job details and information, and minimal check information.
Pre-check Payroll Job Register Transaction Reports Available only if you use Sage Accpac Project and Job Costing. Similar to the Pre-check Payroll Register, except the Pre-check Payroll Job Register shows job details and information, and minimal check information.
Jobs Transaction Reports Available only if you use Sage Accpac Project and Job Costing. This report shows posted job information.
Direct Deposit of Paychecks (EFT)
Sage Accpac EFT Direct Payroll 5.4 is a separately installed and licensed feature that integrates seamlessly with Sage Accpac Payroll. It enables you to electronically transfer payroll checks from your company’s bank
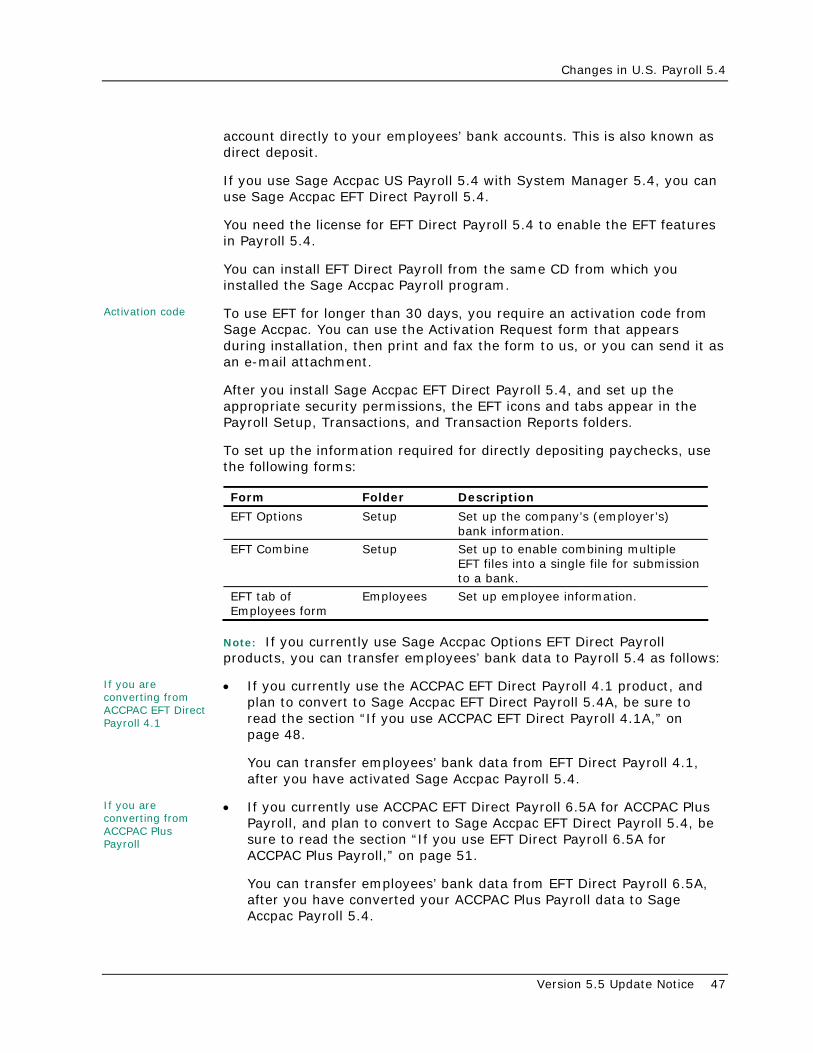
Changes in U.S. Payroll 5.4
Version 5.5 Update Notice 47
account directly to your employees’ bank accounts. This is also known as direct deposit.
If you use Sage Accpac US Payroll 5.4 with System Manager 5.4, you can use Sage Accpac EFT Direct Payroll 5.4.
You need the license for EFT Direct Payroll 5.4 to enable the EFT features in Payroll 5.4.
You can install EFT Direct Payroll from the same CD from which you installed the Sage Accpac Payroll program.
Activation code To use EFT for longer than 30 days, you require an activation code from Sage Accpac. You can use the Activation Request form that appears during installation, then print and fax the form to us, or you can send it as an e-mail attachment.
After you install Sage Accpac EFT Direct Payroll 5.4, and set up the appropriate security permissions, the EFT icons and tabs appear in the Payroll Setup, Transactions, and Transaction Reports folders.
To set up the information required for directly depositing paychecks, use the following forms:
Form Folder Description
EFT Options Setup Set up the company’s (employer’s) bank information.
EFT Combine Setup Set up to enable combining multiple EFT files into a single file for submission to a bank.
EFT tab of Employees form
Employees Set up employee information.
Note: If you currently use Sage Accpac Options EFT Direct Payroll products, you can transfer employees’ bank data to Payroll 5.4 as follows:
If you are converting from ACCPAC EFT Direct Payroll 4.1
• If you currently use the ACCPAC EFT Direct Payroll 4.1 product, and plan to convert to Sage Accpac EFT Direct Payroll 5.4A, be sure to read the section “If you use ACCPAC EFT Direct Payroll 4.1A,” on page 48.
You can transfer employees’ bank data from EFT Direct Payroll 4.1, after you have activated Sage Accpac Payroll 5.4.
If you are converting from ACCPAC Plus Payroll
• If you currently use ACCPAC EFT Direct Payroll 6.5A for ACCPAC Plus Payroll, and plan to convert to Sage Accpac EFT Direct Payroll 5.4, be sure to read the section “If you use EFT Direct Payroll 6.5A for ACCPAC Plus Payroll,” on page 51.
You can transfer employees’ bank data from EFT Direct Payroll 6.5A, after you have converted your ACCPAC Plus Payroll data to Sage Accpac Payroll 5.4.
Changes in U.S. Payroll 5.4
48 Sage Accpac U.S. Payroll
Once you set up the required information, use the following forms to process paychecks for direct deposit:
• On the Calculate Payroll form, select the new Generate EFT Checks option to produce paychecks data for direct deposit.
• On the Payroll Checks form, select whether to print and post all paychecks, EFT checks only, or non-EFT checks.
• On the Generate EFT File form, complete the data to produce the direct deposit paychecks data to a file that you submit to the company’s bank.
• If you have set up for EFT Combine, you can use the Combine EFT Files form to combine several EFT files into a single file for submission to a bank.
If you use ACCPAC EFT Direct Payroll 4.1A
This section describes what you need to do if you are currently using the ACCPAC EFT Direct Payroll 4.1A product, and are converting to Sage Accpac EFT Direct Payroll 5.4A:
• Deactivate the PRDIR deduction, if used
• Transfer data from EFT Direct Payroll 4.1A (optional)
Deactivate the PRDIR Deduction
If, in EFT Direct Payroll 4.1A, you used the subledger type P and have added the PRDIR deduction code to Sage Accpac Payroll, you must deactivate the PRDIR deduction and ensure that it is not actively assigned to your employees. To do so, follow all these steps:
1. From the Setup folder, open the Earnings And Deductions form. Then:
a. Select the PRDIR deduction.
b. Select the Inactive As Of box. The current date automatically appears in the next field.
c. Click Save.
This step deactivates the PRDIR deduction as of the specified date, and therefore prevents you from assigning the PRDIR deduction to new employees.
2. Change the Calculate field of any PRDIR deduction assigned to employees to No, so that PRDIR will not be used in payroll calculation. You can do this manually by changing the PRDIR deduction on the Pay
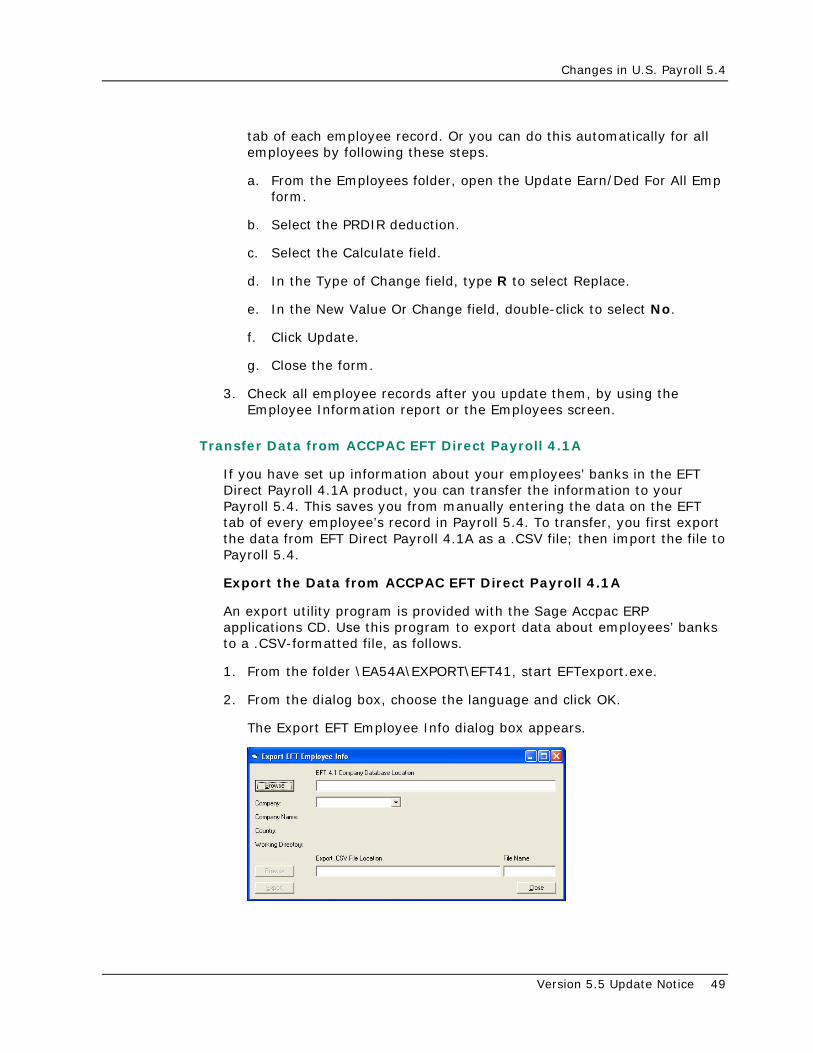
Changes in U.S. Payroll 5.4
Version 5.5 Update Notice 49
tab of each employee record. Or you can do this automatically for all employees by following these steps.
a. From the Employees folder, open the Update Earn/Ded For All Emp form.
b. Select the PRDIR deduction.
c. Select the Calculate field.
d. In the Type of Change field, type R to select Replace.
e. In the New Value Or Change field, double-click to select No.
f. Click Update.
g. Close the form.
3. Check all employee records after you update them, by using the Employee Information report or the Employees screen.
Transfer Data from ACCPAC EFT Direct Payroll 4.1A
If you have set up information about your employees’ banks in the EFT Direct Payroll 4.1A product, you can transfer the information to your Payroll 5.4. This saves you from manually entering the data on the EFT tab of every employee’s record in Payroll 5.4. To transfer, you first export the data from EFT Direct Payroll 4.1A as a .CSV file; then import the file to Payroll 5.4.
Export the Data from ACCPAC EFT Direct Payroll 4.1A
An export utility program is provided with the Sage Accpac ERP applications CD. Use this program to export data about employees’ banks to a .CSV-formatted file, as follows.
1. From the folder \EA54A\EXPORT\EFT41, start EFTexport.exe.
2. From the dialog box, choose the language and click OK.
The Export EFT Employee Info dialog box appears.
Changes in U.S. Payroll 5.4
50 Sage Accpac U.S. Payroll
3. In the EFT 4.1 Company Database Location field, enter the path and file name of your EFT Direct Payroll 4.1A database (click Browse to locate it, if necessary). The file name should be COMPANY.MDB.
4. The Company field then lists all the databases created for the company you entered in the EFT 4.1 Company Database Location field. Select the database from the list. The program then displays the company name, country, and working directory of the database selected.
5. In the Export .CSV File Location field, enter the path only (not the file name) to where your file will be exported. The program automatically provides the file name CAN_EFTx.CSV, where x is the next consecutive file number assigned by the program. Note that previously generated export files are not overwritten or deleted. They remain until you remove them.
6. Click Export.
7. In the location specified in step 5, the program then creates:
a. The CAN_EFTx.CSV file. In Payroll 5.4, import this file, as described in the topic “Import the Data to Payroll 5.4.”
b. A log file called CAN_EFT.LOG, overwriting any previously generated log files. This log informs you of any errors during the export process.
Import the Data to Payroll 5.4
To import the employee’s bank information file to Sage Accpac Payroll, follow these steps. If you need more instructions on importing data, refer to the ACCPAC System Manager User Guide.
1. Open the Employees form.
2. From the File menu, choose Import.
3. Import as a file type “Single CSV File” and choose Insert and Update (to import new records and update existing records).
4. In the File field, enter the file to be imported. You can click the Browse button to find the file.
5. Press the Tab key on the keyboard to set the status field of records to Import Ready (you can accept all records and fields shown).
6. Click OK.
7. After the import, you should review the imported information on each employee’s EFT tab of the Employees form or print the Employee Information report, choosing the EFT check box to include EFT information. You may want to adjust employees’ EFT information to fit requirements.

Changes in U.S. Payroll 5.4
Version 5.5 Update Notice 51
Note some of the fields that are converted during the export/import:
Bank Code. This is a field that did not exist in EFT Direct Payroll 4.1A, but exists in Payroll 5.4. The bank code assigned to institutions you import will appear in Payroll 5.4 as BANK01, BANK02, and so on.
If you wish to change the bank code (by deleting and adding it), do so before processing your first payroll. You will be unable to delete the bank code if there is history of paychecks processed by that bank code.
Percentage. The percentages set up in your EFT Direct Payroll 4.1A will be imported to Payroll 5.4 as a percentage with five decimal places, and as the calculation type Percentage (%) of Net Pay.
Start Date. The start date assigned to each bank account imported will be the session date that you entered when you opened the company.
If you use EFT Direct Payroll 6.5A for ACCPAC Plus Payroll
If you have set up information about your employees’ banks in the EFT Direct Payroll 6.5A for ACCPAC Plus product, you can install an export utility program that enables you to transfer the information from ACCPAC Plus to Sage Accpac Payroll 5.4. This saves you from manually entering the data on the EFT tab of every employee’s record in Payroll 5.4.
The export utility program is found on the Sage Accpac applications CD, under the folder \EA54A\EXPORT\PLUS_US. To install the program, follow the instructions in the README.TXT file, located in the same folder.
After you install it, you first export the data from EFT Direct Payroll 6.5A as a .CSV file; then import the .CSV file to Payroll 5.4, as described in the next topic.
Export the Data from ACCPAC EFT Direct Payroll 6.5A
To export data about employees’ banks to a .CSV-formatted file, follow these steps.
1. From the Payroll Master Menu, select Direct Deposit.
2. Select Employee Maintenance.
3. Verify that the Institution field contains numbers only (spaces are not permitted).
4. Save any changes you make, and close the window.
5. Select Employee Export for AAS Payroll.
Changes in U.S. Payroll 5.4
52 Sage Accpac U.S. Payroll
6. Highlight Export and press Enter. (You need not complete any of the fields on screen.)
The program will export the data to a CSV-formatted file called CAN_EFTX.CSV in the data directory. Note that the program will overwrite any previous contents in the file.
In Payroll 5.4, import this file, as described in the topic “Import the Data to Payroll 5.4” on page 50.