Safety Workshop for Lighting Techs Grips - Spring 2015
61
For Grips and Lighting For Grips and Lighting Personnel Personnel
-
Upload
cheryl-lustenberger -
Category
Education
-
view
36 -
download
1
Transcript of Safety Workshop for Lighting Techs Grips - Spring 2015

For Grips and Lighting For Grips and Lighting PersonnelPersonnel


Note all exits and keep free of obstructions.
Good housekeeping should be maintained at all times. Walkways and work areas are to be kept clear of materials, equipment, and trash.
Do not lift anything that is too heavy. Ask for help if
you need it.
Always be aware of people working above and below you.
Everyone on set should know what to do in case of an emergency.

No smoke/fog/dry ice, haze, open flames, weapons, or animals are allowed.
Toxic substances or dangerous materials are not permitted.
A basic understanding of electrical power and the dangers of equipment misuse is required.

NO sandals, flip flops, or open toe or high heeled shoes are allowed. Rubber soled shoes, like sneakers and boots are recommended.
NEVER wear conductive shoes or clothing.
DO NOT wear items with fringe or loose material that might get caught on equipment.
DO wear leather gloves. They protect your hands from heat, abrasion, and grime.


Do not drag heavy items over the floors.
Use extreme caution when moving any flat. Flats are top heavy and very prone to tipping over if pushed from the back.
Spraying of any kind is not allowed in the studios, i.e.: hair spray, dulling spray, painting etc.
All decorative set materials must be flame retardant or made of non-combustible materials.
Flats and set pieces must be securely attached and braced with jacks, C-clamps, and sandbags.

Lifting loads improperly can cause back injuries.
Make sure you get the appropriate assistance when lifting or moving heavy or awkward objects.
Before lifting any load, check for slivers, jagged edges, burrs, rough or slippery surfaces and protruding nails or staples.
Keep fingers away from pinch points, especially when setting materials down on the floor or against walls, posts, or other materials.
Check your intended path for obstructions.


Care should be taken not to walk on, or drive over camera or electrical cables.
In the Studios, stingers come in lengths of 5, 10, 20 and 50 ft. Use the appropriate length to properly reach a light.
When connecting two cables, use a stress knot or the cables' tie-rope to hold the connection together. This helps prevent a "kick- out,” or accidental unplugging.

All cables should be neatly routed. Cables in walkways and traffic areas should be covered with mats and/or cable crossovers.

When a light is on a stand, the power cord should fall straight to the ground at the base and have some slack coiled or in a figure eight at the base.
It is a good practice to run the cable under the sandbag so that if someone trips on the stinger, the strain will be absorbed at the bottom of the stand and will not pull the whole light over.
Report immediately any irregularities, defective equipment, or incidents of electrical shock - no matter how slight!

Exceeding the amperage capacity of a wire or plug causes it to heat up and eventually melt the insulation. A bad connection in a socket or plug also overheats the insulation.
When lights are left on for more than 20 minutes, it is a good practice to touch the cables and plugs from time to time to check for overheating.
It is normal for cables to run warm, but if they become hot to the touch, replace the lighting instrument or stingers, as necessary, and notify the TV Office
Staff.


The TV Studios have two aerial lifts.
They allow you to go to height on an enclosed platform with multiple lights and accessories.
They are usually a safer and quicker alterative to using the ladders.

Only trained users will be able to use the lift. Training will be provided by the Studio Staff.
Be sure the lift is unplugged when you go to use it.
Wear a hardhat when using the lift.
Those working underneath the lift must also wear a hardhat.
There should be no more then 2 people on the lift.
Feet must remain on the main platform. Do not climb on the railings. Do not take any risk by leaning way out to reach an instrument. Move the lift if necessary.
The lift should be left clean at the end of your session – no lights, empty lamp boxes, gels, frames, clothes pins, etc.

Make sure the platform is fully lowered.
Maintain three point hand/foot contact with the lift. Three-point contact is defined as using one hand and two feet or two hands and one foot at any single time.
Face the lift when either mounting or dismounting.
Use handrails and steps when mounting the platform.
Make certain that all handrails, toe boards, and gates are in place and secured before raising the platform.

Check all instruments, gauges and indicator lights. Make sure everything is functioning properly.
Check all control functions, including the Emergency Stop Switch, at the upper control station. If the lift does not respond correctly when each control is operated, DO NOT use the lift and report the problem to the TV Office Staff.
Before raising the platform, disperse any load evenly, making sure that nothing is interfering with any of the controls.
The platform shall not be loaded beyond its rated capacity. (JLG 880 lbs. / TM-12 590 lbs.)


If there is more than one person on the platform, only the designated operator should operate the controls.
The worker going to height should always control the elevated work platform. No ground-operated controls shall be engaged without the permission of the worker at height, except in an emergency.
Wear gloves, proper clothing and footwear. It will help ground you & protect you from hot lights.

Never leave the work platform without first lowering it to the ground and placing the controls in neutral.
If the machine is to be unattended, lower the platform, and press the Stop Switch.
When driving the lift, or positioning the platform, keep all parts of your body inside the platform railings.
Stay Alert. Should something break, loosen, or malfunction on the lift, stop work, shut it off and seek assistance to correct the condition. Do not operate the machine until the condition has been corrected. If it is not possible to lower the platform in a normal manner, request rescue.

Never drive the lift up to someone standing in front of a fixed object.
Whenever possible, travel only in the full-down, stowed position for maximum stability.
Always keep your attention in the direction of travel and be sure to check clearance above, below and on all sides. Use a lookout when your view is obstructed.
Never drive the base of the platform into a stationary object.
Never use the machine to push or pull another object.

Make sure the lift is on firm, level ground before raising the platform.
If the platform or any other part of the lift becomes entangled with an adjacent object, DO NOT attempt to free the lift by operating the platform controls. Call for assistance from the TV Office Staff to free the lift.
Do not lean over or sit or climb on the platform railings. Always keep both feet on the platform floor at all times.

Never use ladders, planks, chairs or other devices to provide additional reach or gain greater height.
Keep non-operating personnel at least 6ft away from the lift during all driving operations.
Avoid operating a raised platform over ground personnel. Warn crewmembers and talent not to work, stand, or walk under a raised platform.

There are 2 Emergency Stop Switches: one on the Platform Controller Panel and the second on the Chassis Side Panel. Push one of these red buttons if you need to immediately stop the lift from operating.

Platform Controller PaneL Chassis Side Panel
Each Panel has an emergency stop switch (#3)

1 System Distress Indicator – Indicates an abnormal operating condition, which if not corrected, may cause the lift to stop working or possible damage. Will light up yellow with a flash fault code. If you see this warning light come on, stop using the lift and report the problem to the TV Office Staff.

3 Tilt Indicator Warning Light & Alarm – A red warning light on the control panel illuminates and an audible alarm sounds when the lift is at or beyond the permitted amount of slope.
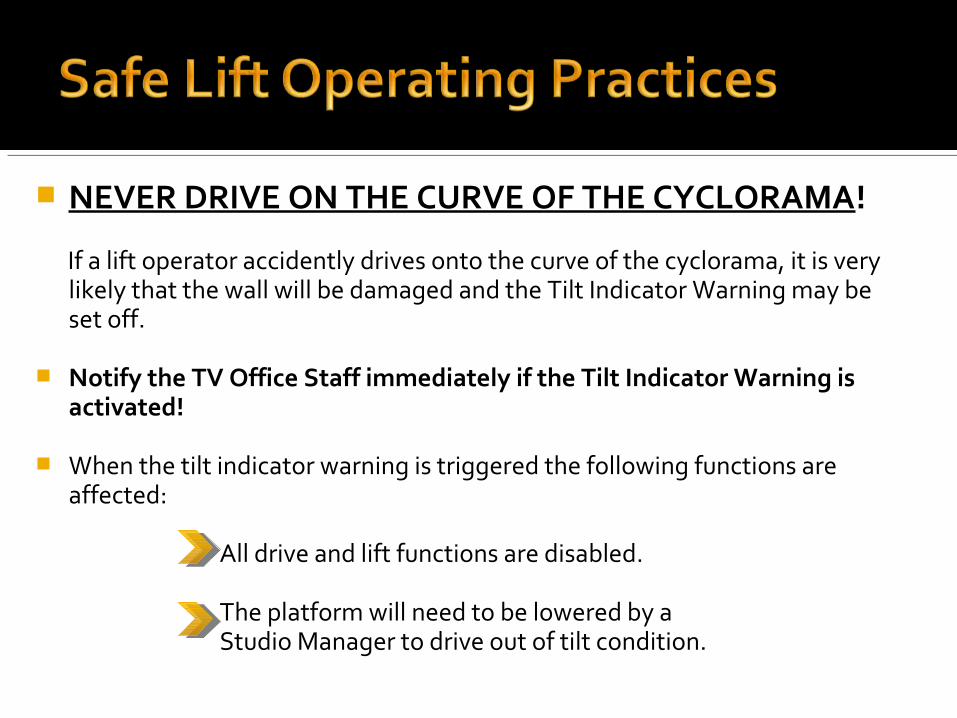
NEVER DRIVE ON THE CURVE OF THE CYCLORAMA! If a lift operator accidently drives onto the curve of the cyclorama, it is very
likely that the wall will be damaged and the Tilt Indicator Warning may be set off.
Notify the TV Office Staff immediately if the Tilt Indicator Warning is
activated! When the tilt indicator warning is triggered the following functions are
affected:
All drive and lift functions are disabled.
The platform will need to be lowered by a Studio Manager to drive out of tilt condition.

Always move the lift directly under the light that needs to be worked on. Do not move the lift so far away that the person must lean over the railing. This is dangerous and could result in a serious fall.
Objects or production equipment with
the potential of falling from an aerial platform should be secured with an adequate safety cable or similar device.
NEVER throw or drop anything from a raised platform!

There are three ladders available a 10 ft., 8 ft., and 6 ft.
Two people should be present when working on the ladder.
Inspect all ladders prior to use to ensure structural integrity. (Report issues to the TV Office Staff.)
If you need help moving the ladder please ask for assistance.
Always open the ladder fully, so that the spreaders lock in the open position.

Position the ladder so that you can work comfortably with the light. Don't reach too far to the sides or behind you.
Always face the ladder when climbing up or down.
Always maintain Three-Point Contact.
Once the ladder is placed and secure, one person should provide weight at the bottom as the other climbs.
Pay attention to obstacles (lights, arms, cables etc.) above
and below when moving the ladder.

Make sure your ladder is tall enough. For stepladders, obey the "not a step" markings on the top steps and the shelf.

Do not move the ladder if there is a person on it. This is clearly dangerous.
KEEP ALL OTHERS CLEAR OF THE LIFT and LADDER when in use. When working with either the ladder or the lift, all other people in the studio should maintain a safe distance away.
A safe distance is defined as at least 5 to 10 feet from the main work area.

Just because you can stand on it, doesn’t mean it is a ladder!
Never substitute an object, like a chair or stool, for a ladder!!!


NEVER hang an instrument without securing it to the grid with a safety cable!
Safety cables can hold a substantial amount of weight and can prevent harm to people if a C-clamp or other lighting hardware fails.
NEVER leave an instrument up in the grid without a cable. If you see a light without a safety, please install one.
ALWAYS hold the light with at least one hand until it is secured to the grid.

Each dimmer can control up to 2000 watts (2kw). Ideally, we prefer one instrument per dimmer.
Lights used on the studio floor on stands should only be plugged into the long, gray power strips found on the walls throughout the studios or the numbered, wall dimmer controlled plugs.
NEVER plug the Kino Flo lights into a dimmable outlet. Use only the outlets on the gray power strips.

Before a light fixture is re-lamped, repaired or otherwise worked on, the fixture shall be switched off and disconnected from the power source.
When re-lamping a light fixture, NEVER touch the glass part of the bulb with your fingers. Fingers leave residue that can cause a bulb to shatter or to explode when it heats up.
Handle the bulb with a clean, lint free cloth, lens tissue, or the foam material in which the new bulb is packed. Clean the glass with an alcohol wipe if you do touch the lamp.

Anytime you work at height, on a ladder or on the lift, secure all items so that they cannot fall. If you are using a wrench, attach it to your belt with a length of tie-rope, a safety cable, or tool leash.
If you drop something, yell a warning such as "Heads," "Heads up," or just "Look out below!"

Remember that lights placed too closely to props, sets and other materials may pose a fire risk and, therefore, make sure that lights are placed far enough away to alleviate risk.
No lights may be placed beyond the yellow safety tape found on the grid.
If you smell smoke or something burning, don't cause a panic. Cut power to the instrument or stinger you suspect is the source of the odor and notify the TV Office Staff immediately of the problem.

Always use a safety on gel frames or barn doors.
Lights get very hot and can easily start a fire. Common sense and proper care are essential to the prevention of accidents.
Lighting instruments are not to be left on the studio floor! Put lights back where they came from - either on the grid or on the grip cart.


Do not hang or move an instrument while it is plugged in or turned on. TURN OFF THE DIMMER for the light at the lighting board.
Every light secured to the grid should have a safety cable.
Never descend the ladder with a light in your hand. Have an assistant ready to take the light from you midway down.

All lighting instruments are to be tightened securely!
Tightening means tighten the pipe bolt, pan/set screw, the C-clamp to yoke bolt and the yoke locking knob.

Align the lift or ladder so that it is directly below the area you need to work.
Loosen the main C-clamp holding the light to the grid.
Take a firm grip on the light handle and unhook the safety cable. Keep the cable attached to the light.
With both hands, take the light off the grid, rotate your body, and carefully hand the light down to your assistant waiting midway on the ladder.
(If you’re using the lift, place it on the platform.)

Position the lift or ladder directly under the area you need to work.
Climb the ladder, when midway up, the assistant should pass the light up. (Skip this step if you’re on the lift.)
With both hands, place the light on the grid. Hold the light with one hand and tighten the screw of the C-clamp
with the other hand. Attach the safety cable. Make sure you loop the chain through the
light and around the grid pipe
Use the wrench to make sure the light is tightly fastened to the grid.
Plug the light into the designated plug.

Slightly loosen the handle or the screw.
Swivel the light accordingly.
Tighten the handle or screw to fix the light in the new position.
Remember to use gloves to adjust, focus or move hot instruments.
When adjusting a light, do not look directly into it, instead look at the object to be lit and how the beam strikes it.

Dress lighting cables NEATLY. Do not coil over the grid.
If a light’s barn doors are closed, the unit should NOT
be plugged in.
Do not use tape of any kind on lights or gel frames.
Use only wooden clothespins to secure gels or diffusion to lights. Make sure gels and diffusion DO NOT touch hot light lenses!


Place the longest/highest leg of a C-Stand so that it is directly under the extended arm.
When you are standing behind the stand with the arm pointing away from you, the knuckles should be on your RIGHT.
This way, when weight is put on the arm, gravity pulls the grip head clockwise, which tightens it.
If the knuckle is on the left, the weight will eventually loosen the knuckle, and the whole rig will collapse.
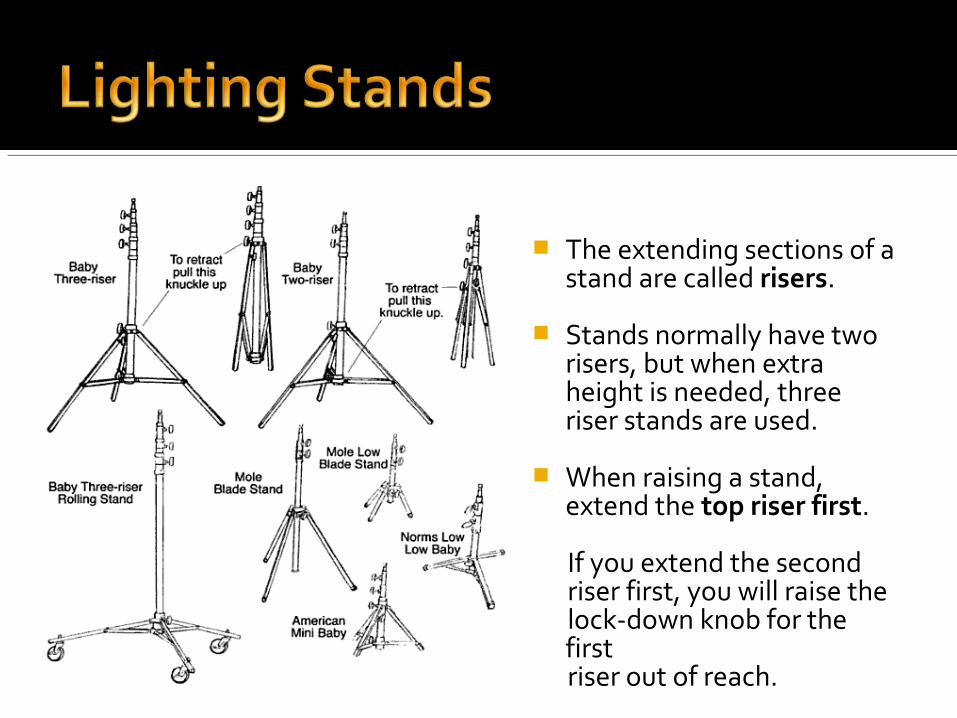
The extending sections of a stand are called risers.
Stands normally have two risers, but when extra height is needed, three riser stands are used.
When raising a stand, extend the top riser first.
If you extend the second riser first, you will raise the lock-down knob for the
first riser out of reach.

Lock-down knobs on light stands, such as C-stands and combo-stands, tighten when turned to the RIGHT (clockwise) and loosen when turned to the left. Remember: righty tighty, lefty loosey.
Tighten the head making sure that the arm is slightly higher – usually 10 – 15 degrees higher than parallel – this will cause the weight of the light or other accessory to add even more pressure and more tightening power to the head.
Use a sandbag! Make sure that you place the large leg toward the direction of the arm of the stand (large leg directly below the arm) and place the sand bag on it. Place the bag on the leg so that the weight rests on the stand, not on the floor.

When raising or lowering a heavy light, wear gloves, do not put your fingers where they will get pinched should a riser come down faster than expected. Don't hesitate to get help from other crewmembers if you need it.
To focus a fixture once it is raised out of reach, use a ladder. It may be enough to move an apple box next to the stand.

Everything about thisC-stand setup is wrong!
The right-hand rule is not observed, the arm is set at eye level in a way someone could poke his/her eye out, the weight is not over the high leg, there is no sandbag, and they have begun raising it not on the top riser.

A properly done C-stand.
The right-hand rule is observed, the arm is set safely out of the way, the weight is over the high leg, and a sandbag is set also on the high leg.

Make certain that all light stands are put away on the grip cart with their risers lowered and all lock-downs tightened.
Stands should be placed on the grip cart so that they are secure and will not fall and injure someone.
Lights should be put on the grip cart neatly & safely.

Safety must not be an afterthought in the Studio!
Lighting instruments are heavy items; barn doors have sharp edges. In the rush to get a shot lit under time pressure, too often safety is forgotten or compromised. An instrument that has been sloppily hung can suddenly become an instrument of destruction.
A falling light can injure, maim, or even kill!
Lights must be hung securely, with a safety cable hooked to the grid.
Make sure that fabrics are not too close to instruments; it doesn’t take long for drapes to catch fire when touching the front of a 2-K fresnel!
The most common safety hazard is not lights on grids, but lights on stands. These are often extended to their extreme length and are set up quickly, thereby representing a top-heavy accident waiting to happen.

Remember that the TV Studio Managers and Staff are always available to answer your questions and to provide you with assistance.
Have a plan before you go into the studio and be ready to adjust if there are changes.
MAKE SAFETY YOUR No. 1 PRIORITY!MAKE SAFETY YOUR No. 1 PRIORITY!