SAFETY INSTRUCTIONS - Canadian Tire€¦ · Refer to assembly instructions and ensure the bike...
16
-
Upload
vuongtuyen -
Category
Documents
-
view
224 -
download
4
Transcript of SAFETY INSTRUCTIONS - Canadian Tire€¦ · Refer to assembly instructions and ensure the bike...


model no. 040-1196-2
INSTRUCTION MANUAL
NOTE: Read instructions carefully before installation.Refer to assembly instructions and ensure the bike carrier is installed correctly. Keep this instruction manual in your vehicle for future reference. For assistance, please contact customer service at
1-888-670-6686 (toll-free).
PREMIUM HITCH MOUNT PLATFORM BIKE CARRIER
model no. 040-1196-2
SAFE
TY IN
STRU
CTIO
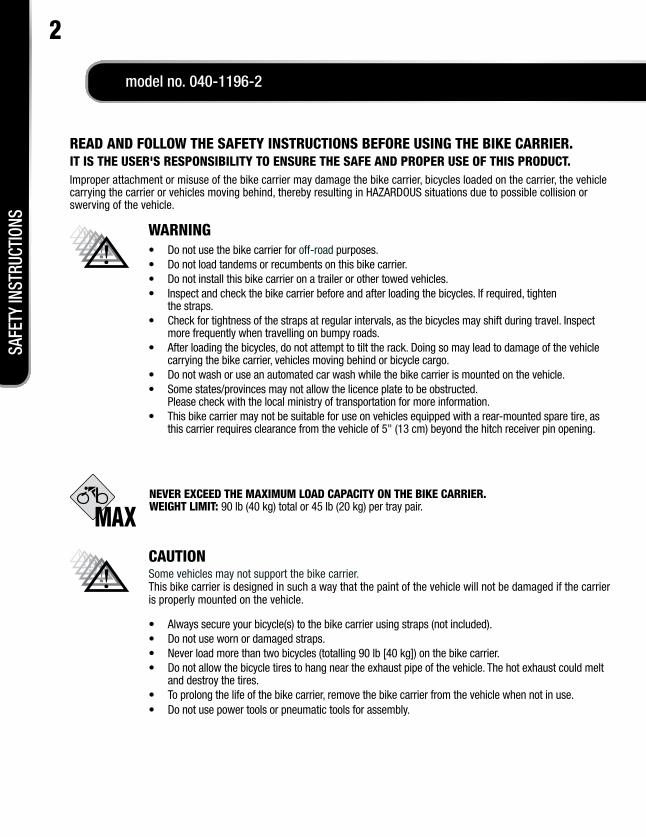
NS WARNING• Do not use the bike carrier for off-road purposes.• Do not load tandems or recumbents on this bike carrier.• Do not install this bike carrier on a trailer or other towed vehicles.• Inspect and check the bike carrier before and after loading the bicycles. If required, tighten
the straps.• Check for tightness of the straps at regular intervals, as the bicycles may shift during travel. Inspect
more frequently when travelling on bumpy roads.• After loading the bicycles, do not attempt to tilt the rack. Doing so may lead to damage of the vehicle
carrying the bike carrier, vehicles moving behind or bicycle cargo. • Do not wash or use an automated car wash while the bike carrier is mounted on the vehicle.• Some states/provinces may not allow the licence plate to be obstructed.
Please check with the local ministry of transportation for more information.• This bike carrier may not be suitable for use on vehicles equipped with a rear-mounted spare tire, as
this carrier requires clearance from the vehicle of 5" (13 cm) beyond the hitch receiver pin opening.
IT IS THE USER'S RESPONSIBILITY TO ENSURE THE SAFE AND PROPER USE OF THIS PRODUCT.Improper attachment or misuse of the bike carrier may damage the bike carrier, bicycles loaded on the carrier, the vehicle carrying the carrier or vehicles moving behind, thereby resulting in HAZARDOUS situations due to possible collision or swerving of the vehicle.
READ AND FOLLOW THE SAFETY INSTRUCTIONS BEFORE USING THE BIKE CARRIER.
NEVER EXCEED THE MAXIMUM LOAD CAPACITY ON THE BIKE CARRIER. WEIGHT LIMIT: 90 lb (40 kg) total or 45 lb (20 kg) per tray pair.
2
CAUTIONSome vehicles may not support the bike carrier. This bike carrier is designed in such a way that the paint of the vehicle will not be damaged if the carrier is properly mounted on the vehicle.
• Always secure your bicycle(s) to the bike carrier using straps (not included).• Do not use worn or damaged straps. • Never load more than two bicycles (totalling 90 lb [40 kg]) on the bike carrier.• Do not allow the bicycle tires to hang near the exhaust pipe of the vehicle. The hot exhaust could melt
and destroy the tires.• To prolong the life of the bike carrier, remove the bike carrier from the vehicle when not in use.• Do not use power tools or pneumatic tools for assembly.
LIMITED WARRANTY This CCM product is guaranteed for 1 year from the date of original retail purchase against defects in materials and workmanship. Subject to the conditions and limitations described below, this product, if returned to us with proof of purchase within the stated warranty period and if covered under this warranty, will be repaired or replaced (with the same model, or one of equal value or specification), at our option. We will bear the cost of any repair or replacement and any costs of labour relating thereto.
THESE WARRANTIES ARE SUBJECT TO THE FOLLOWING CONDITIONS AND LIMITATIONS:
• a bill of sale verifying the purchase and purchase date must be provided;• this warranty will not apply to any product or part thereof which is worn or broken or which has become
inoperative due to abuse, misuse, accidental damage, neglect or lack of proper installation, operation or maintenance (as outlined in the applicable owner’s manual or operating instructions) or which is being used for industrial, professional, commercial or rental purposes;
• this warranty will not apply to normal wear and tear or to expendable parts or accessories that may be supplied with the product that are expected to become inoperative or unusable after a reasonable period of use;
• this warranty will not apply to routine maintenance and consumable items such as, but not limited to, fuel, lubricants, vacuum bags, blades, belts, sandpaper, bits, fluids, tune-ups or adjustments;
• this warranty will not apply where damage is caused by repairs made or attempted by others (i.e. persons not authorized by the manufacturer);
• this warranty will not apply to any product that was sold to the original purchaser as a reconditioned or refurbished product (unless otherwise specified in writing);
• this warranty will not apply to any product or part thereof if any part from another manufacturer is installed therein or any repairs or alterations have been made or attempted by unauthorized persons;
• this warranty will not apply to normal deterioration of the exterior finish, such as, but not limited to, scratches, dents, paint chips, or to any corrosion or discoloring by heat, abrasive and chemical cleaners; and
• this warranty will not apply to component parts sold by and identified as the product of another company, which shall be covered under the product manufacturer’s warranty, if any.
ADDITIONAL LIMITATIONS
This warranty applies only to the original purchaser and may not be transferred. Neither the retailer nor the manufacturer shall be liable for any other expense, loss or damage, including, without limitation, any indirect, incidental, consequential or exemplary damages arising in connection with the sale, use or inability to use this product.
NOTICE TO CONSUMER
This warranty gives you specific legal rights, and you may have other rights, which may vary from province to province. The provisions contained in this warranty are not intended to limit, modify, take away from, disclaim or exclude any statutory warranties set forth in any applicable provincial or federal legislation.
WAR
RANT
Y
3
Made in China Imported by Trileaf Distribution Trifeuil Toronto, Canada M4S 2B8
model no. 040-1196-2
PACK
AGIN
G CO
NTEN
TS
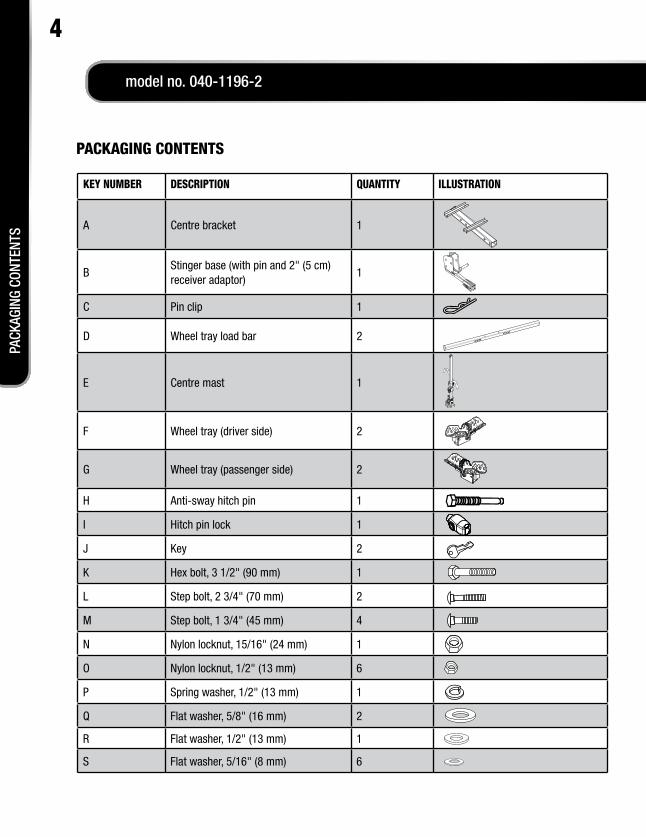
PACKAGING CONTENTS
KEY NUMBER DESCRIPTION QUANTITY ILLUSTRATION
A Centre bracket 1
BStinger base (with pin and 2" (5 cm) receiver adaptor)
1
C Pin clip 1
D Wheel tray load bar 2
E Centre mast 1
F Wheel tray (driver side) 2
G Wheel tray (passenger side) 2
H Anti-sway hitch pin 1
I Hitch pin lock 1
J Key 2
K Hex bolt, 3 1/2" (90 mm) 1
L Step bolt, 2 3/4" (70 mm) 2
M Step bolt, 1 3/4" (45 mm) 4
N Nylon locknut, 15/16" (24 mm) 1
O Nylon locknut, 1/2" (13 mm) 6
P Spring washer, 1/2" (13 mm) 1
Q Flat washer, 5/8" (16 mm) 2
R Flat washer, 1/2" (13 mm) 1
S Flat washer, 5/16" (8 mm) 6
4
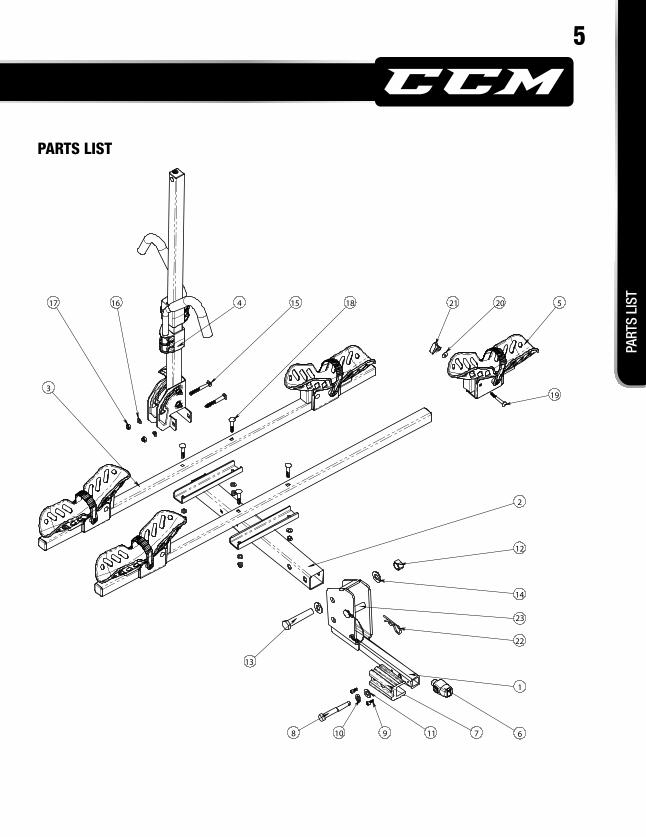
PARTS LIST
1
2
3
4 5
678 910 11
12
13
14
151617 18
19
2021
22
23
5
PART
S LI
ST

model no. 040-1196-2
ASSE
MBL
Y
6
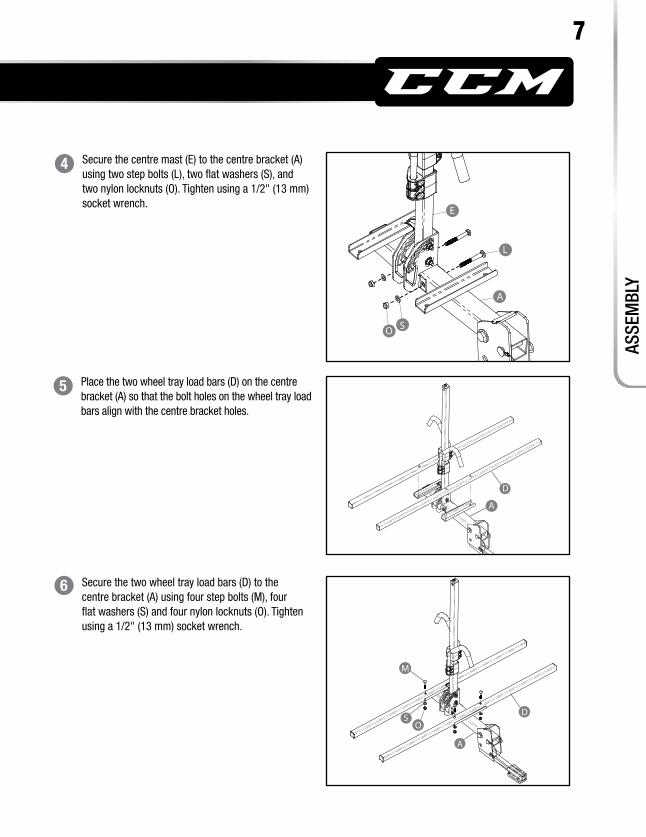
Align the holes on the centre bracket (A) with corresponding upper holes on the stinger base (B). Secure using hex bolt (K), two flat washers (Q) and a nylon lock nut (N) in the indicated hole. Tighten using 15/16" (24 mm) socket wrench and adjustable wrench.
QN
QK
A
B
B
C
A
23
Insert the tethered pin (23) into the aligned holes on the centre bracket (A) and stinger base (B). Secure using the pin clip (C).
1
2
3
ASSEMBLING THE BIKE CARRIER
TOOLS REQUIRED (NOT INCLUDED)• 1" (25 mm) adjustable wrench• 1/2" (13 mm) socket wrench• 15/16" (24 mm) socket wrench• 3/4" (19 mm) socket wrench• 3/16" (4.76 mm) hex drive screwdriver
E
A
Place the centre mast (E) on the centre bracket (A) so that the holes on the base of the centre mast align with the bracket.
ASSE
MBL
Y
ASSE
MBL
Y
A
DO
S
M
Secure the two wheel tray load bars (D) to the centre bracket (A) using four step bolts (M), four flat washers (S) and four nylon locknuts (O). Tighten using a 1/2" (13 mm) socket wrench.
6
Place the two wheel tray load bars (D) on the centre bracket (A) so that the bolt holes on the wheel tray load bars align with the centre bracket holes.
A
D
5
O S
E
A
L
Secure the centre mast (E) to the centre bracket (A) using two step bolts (L), two flat washers (S), and two nylon locknuts (O). Tighten using a 1/2" (13 mm) socket wrench.
4
7
ASSE
MBL
Y
model no. 040-1196-2
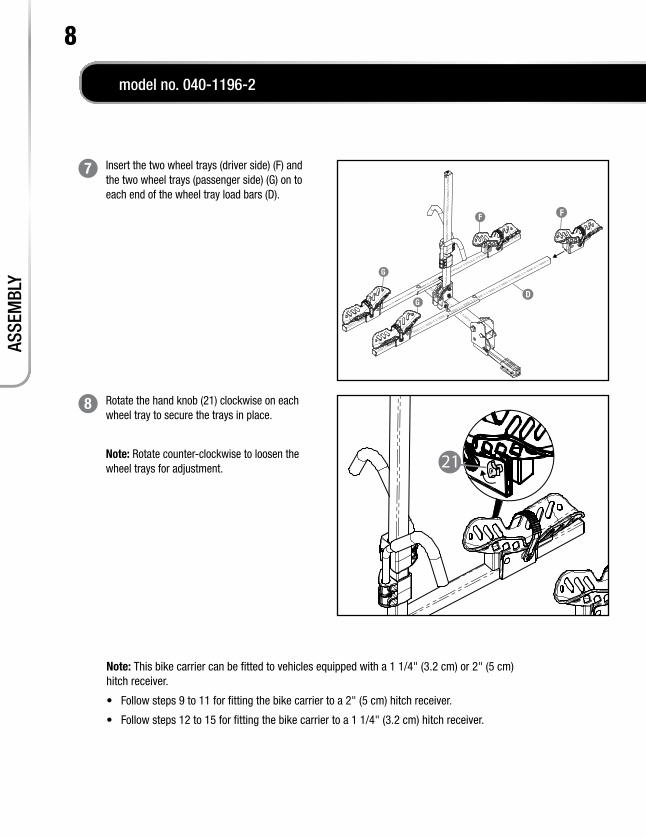
F
DG
G
F
Insert the two wheel trays (driver side) (F) and the two wheel trays (passenger side) (G) on to each end of the wheel tray load bars (D).
7
Note: This bike carrier can be fitted to vehicles equipped with a 1 1/4" (3.2 cm) or 2" (5 cm) hitch receiver.
• Follow steps 9 to 11 for fitting the bike carrier to a 2" (5 cm) hitch receiver.
• Follow steps 12 to 15 for fitting the bike carrier to a 1 1/4" (3.2 cm) hitch receiver.
21
Rotate the hand knob (21) clockwise on each wheel tray to secure the trays in place.
Note: Rotate counter-clockwise to loosen the wheel trays for adjustment.
8
8AS
SEM
BLY
ASSE
MBL
Y
9
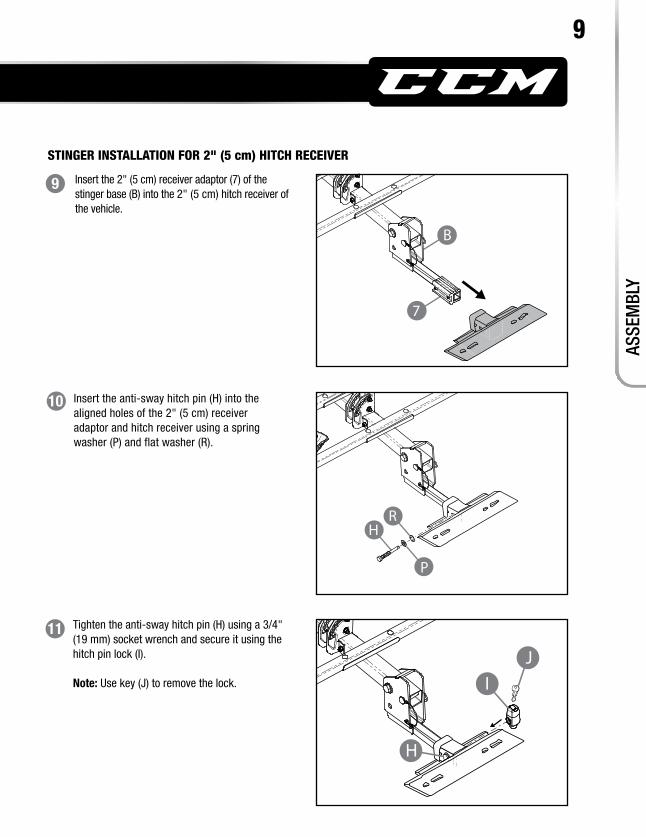
IJ
H
Tighten the anti-sway hitch pin (H) using a 3/4" (19 mm) socket wrench and secure it using the hitch pin lock (I).
Note: Use key (J) to remove the lock.
11
Insert the anti-sway hitch pin (H) into the aligned holes of the 2" (5 cm) receiver adaptor and hitch receiver using a spring washer (P) and flat washer (R).
10
H
P
R
STINGER INSTALLATION FOR 2" (5 cm) HITCH RECEIVER
B
799
Insert the 2" (5 cm) receiver adaptor (7) of the stinger base (B) into the 2" (5 cm) hitch receiver of the vehicle.
9

model no. 040-1196-2
ASSE
MBL
Y10
H
P
R
Insert the anti-sway hitch pin (H) into the aligned holes of the stinger and hitch receiver using a spring washer (P) and flat washer (R).
14
B
Insert the stinger base (B) into the 1 1/4" (3.2 cm) hitch receiver of the vehicle.
13
79
Disassemble the 2" (5 cm) receiver adaptor (7) of the stinger base (B) by removing the two 3/16" hex drive screws (9) using a screwdriver.
12
STINGER INSTALLATION FOR 1 1/4" (3.2 CM) HITCH RECEIVER
IJ
H
Tighten the anti-sway hitch pin (H) using a 3/4" (19 mm) socket wrench and secure it using the hitch pin lock (I).
Note: Use key (J) to remove the lock.
15
F
11
CAUTION: • Position the bicycle pedal in such a way to prevent the vehicle from being
scratched.
• Do not allow the bicycle tires to hang near the exhaust pipe of vehicle. The hot exhaust could melt and destroy the tires.
• Check for tightness of the straps at regular intervals, as the straps may loosen and bicycles may shift during travel. Inspect more frequently when travelling on bumpy roads.
• Remove the bike carrier from the vehicle when not in use to avoid additional wear on both the vehicle and the carrier.
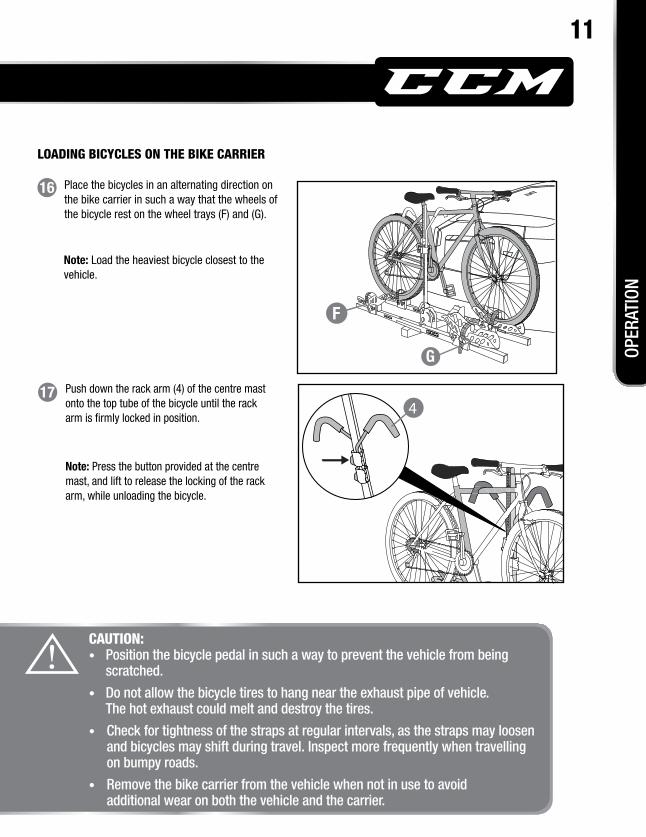
Place the bicycles in an alternating direction on the bike carrier in such a way that the wheels of the bicycle rest on the wheel trays (F) and (G).
16
Note: Load the heaviest bicycle closest to the vehicle.
LOADING BICYCLES ON THE BIKE CARRIER
4Push down the rack arm (4) of the centre mast onto the top tube of the bicycle until the rack arm is firmly locked in position.
Note: Press the button provided at the centre mast, and lift to release the locking of the rack arm, while unloading the bicycle.
17
OPER
ATIO
N
G
F
model no. 040-1196-2
12
WARNING: Hold the centre mast firmly while pulling the quick-release handle so as to prevent the user from being hit by the rack arm.
Ensure that the bike carrier is not loaded with bicycles.
19
TILTING THE BIKE CARRIER
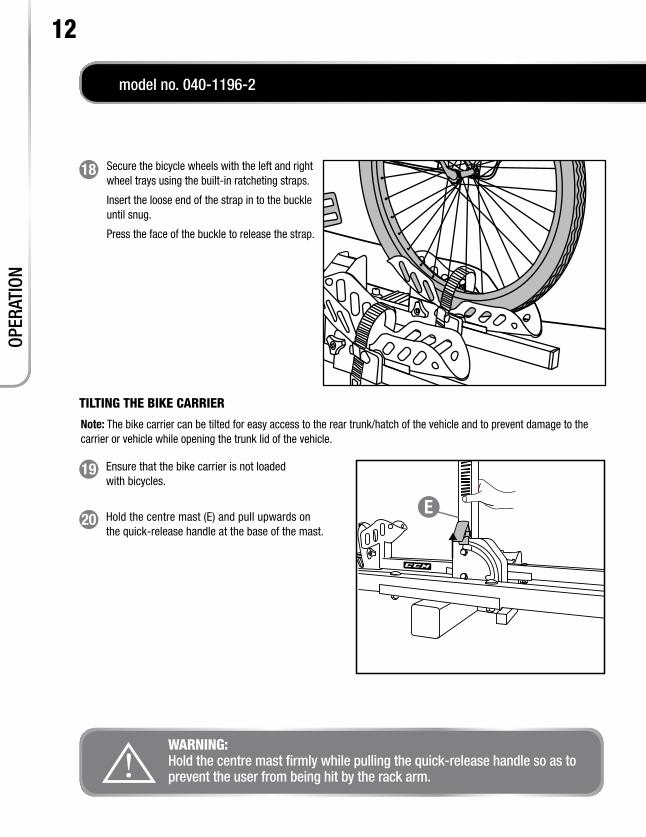
Secure the bicycle wheels with the left and right wheel trays using the built-in ratcheting straps.
Insert the loose end of the strap in to the buckle until snug.
Press the face of the buckle to release the strap.
18
Note: The bike carrier can be tilted for easy access to the rear trunk/hatch of the vehicle and to prevent damage to the carrier or vehicle while opening the trunk lid of the vehicle.
Hold the centre mast (E) and pull upwards on the quick-release handle at the base of the mast.
20
OPER
ATIO
N
E
E
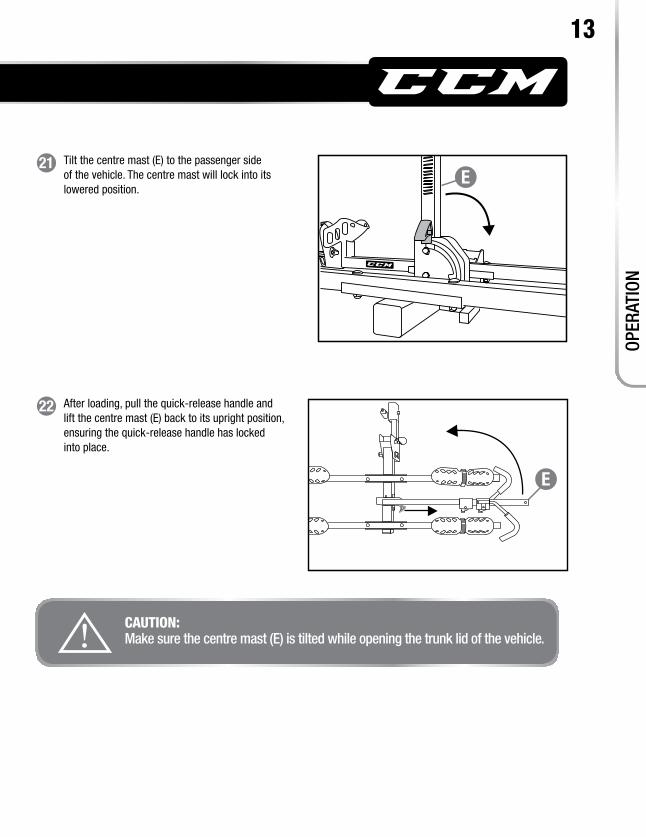
Tilt the centre mast (E) to the passenger side of the vehicle. The centre mast will lock into its lowered position.
After loading, pull the quick-release handle and lift the centre mast (E) back to its upright position, ensuring the quick-release handle has locked into place.
21
22
OPER
ATIO
NCAUTION: Make sure the centre mast (E) is tilted while opening the trunk lid of the vehicle.
13
E
model no. 040-1196-2
FOLDING THE BIKE CARRIER
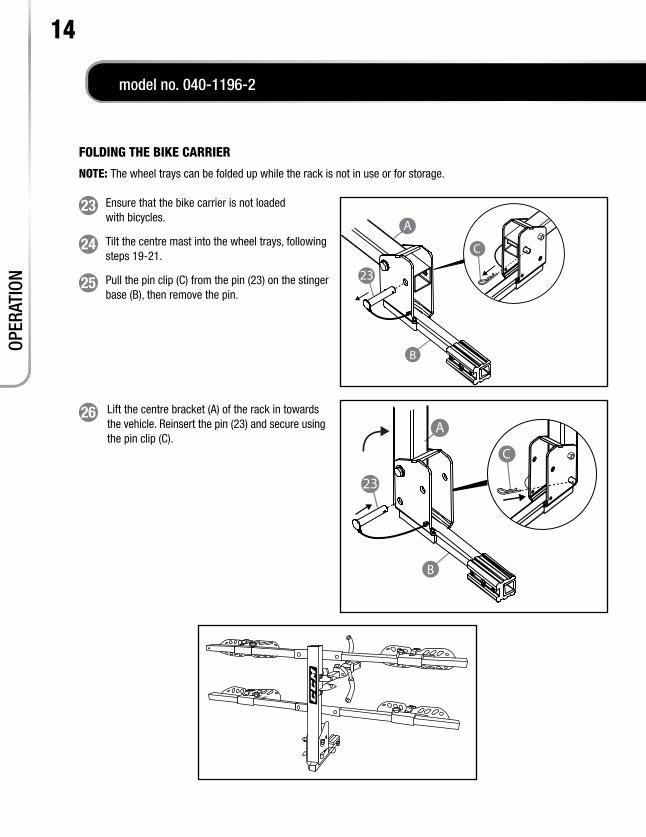
Lift the centre bracket (A) of the rack in towards the vehicle. Reinsert the pin (23) and secure using the pin clip (C).
Ensure that the bike carrier is not loaded with bicycles.
Pull the pin clip (C) from the pin (23) on the stinger base (B), then remove the pin.
23
25
26
B
C
A
23
C
B
A
23
OPER
ATIO
N
NOTE: The wheel trays can be folded up while the rack is not in use or for storage.
14
Tilt the centre mast into the wheel trays, following steps 19-21.
24
• Wipe the bike carrier with a damp cloth and mild detergent after every use and before storage.
• Fold the wheel trays for compact storage of the bike carrier.
• Store the bike carrier indoors and in a cool, dry place.
CLEANING
STORAGE
CLEA
NING
AND
STO
RAGE
15