Safety in the Glass Lab - Arizona State Universityaomdw/GLASS/book.pdf · Safety in the Glass Lab...
47
1 The objective of this course is to acquaint the student with basic glassblowing hand operations and techniques. Each class period will begin with a brief demonstration of the particular glass seal to be accomplished, followed by “hands-on” practice of each seal by the student. Successful completion of the course will enable most students to accomplish routine glassblowing tasks encountered in the lab. It will also give you a solid background for preparing sketches and plans that are submitted to the Glass Shop for construction. The following items will be discussed before we begin the glassblowing lessons: Safety in the Glass Lab Most of the safety procedures we will follow are similar to those of any chemistry lab. We will be working around open flames, hot glassware, and sharp edges on the glassware. The following is a list of important rules for the glass lab: 1. Safety glasses are required at all times. * Each student will be provided with a pair of Didymium glassblowing glasses. These glasses filter the bright sodium glare produced when the glass is heated. * Welder’s goggles are required when working quartz or Vycor glass. These goggles filter harmful ultraviolet light produced as the quartz is heated. 2. Heat only clean, solvent free glassware. * Never heat glass with volatile or toxic materials inside. If you must heat glassware under these conditions, do so in a hood with a safety shield. Also, attach a trapped blow hose to the glass so that you do not inhale vapors from inside the apparatus. * After rinsing glassware with solvents, air dry the apparatus to make certain that no solvent remains. (Explosion could result.) * Metal vapors must never be present in glass to be heated. The most common metal encountered in glassware is mercury. Remove all traces of mercury before heating and blowing on this glassware. * Silicone stopcock grease is another source of contamination in heated glassware. A fine white powder (silica) is produced when heated to high temperatures. This silica will fire into the glass and, in turn, weaken it. 3. Protective clothing * Sandals are not recommended footwear. * Long hair should be tied back when working around open flames. * Avoid wearing synthetic clothing that will burn and melt when exposed to flames or hot glass. * Roll up long sleeves so they won’t catch on fire. * Heat insulated gloves are available to handle hot glassware.
Transcript of Safety in the Glass Lab - Arizona State Universityaomdw/GLASS/book.pdf · Safety in the Glass Lab...
1
The objective of this course is to acquaint the student with basic glassblowing hand operationsand techniques. Each class period will begin with a brief demonstration of the particular glassseal to be accomplished, followed by “hands-on” practice of each seal by the student.Successful completion of the course will enable most students to accomplish routineglassblowing tasks encountered in the lab. It will also give you a solid background forpreparing sketches and plans that are submitted to the Glass Shop for construction.
The following items will be discussed before we begin the glassblowing lessons:
Safety in the Glass Lab
Most of the safety procedures we will follow are similar to those of any chemistry lab. Wewill be working around open flames, hot glassware, and sharp edges on the glassware.
The following is a list of important rules for the glass lab:
1. Safety glasses are required at all times.∗ Each student will be provided with a pair of Didymium glassblowing glasses.
These glasses filter the bright sodium glare produced when the glass is heated.∗ Welder’s goggles are required when working quartz or Vycor glass. These
goggles filter harmful ultraviolet light produced as the quartz is heated.
2. Heat only clean, solvent free glassware.∗ Never heat glass with volatile or toxic materials inside. If you must heat
glassware under these conditions, do so in a hood with a safety shield. Also,attach a trapped blow hose to the glass so that you do not inhale vapors frominside the apparatus.
∗ After rinsing glassware with solvents, air dry the apparatus to make certainthat no solvent remains. (Explosion could result.)
∗ Metal vapors must never be present in glass to be heated. The most commonmetal encountered in glassware is mercury. Remove all traces of mercurybefore heating and blowing on this glassware.
∗ Silicone stopcock grease is another source of contamination in heatedglassware. A fine white powder (silica) is produced when heated to hightemperatures. This silica will fire into the glass and, in turn, weaken it.
3. Protective clothing∗ Sandals are not recommended footwear.∗ Long hair should be tied back when working around open flames.∗ Avoid wearing synthetic clothing that will burn and melt when exposed to
flames or hot glass.∗ Roll up long sleeves so they won’t catch on fire.∗ Heat insulated gloves are available to handle hot glassware.

2
4. First Aid∗ IMMEDIATELY tell instructor you are injured.∗ For minor cuts, Band-Aids will be available.∗ Severe cuts may require treatment at the Student Health Center.∗ For burns, immediate immersion in ice water is the best treatment for minor
burns to the hands. An ice bath will be available during all class periods.
5. Know location of each of the following:∗ Fire blanket∗ Fire extinguisher∗ Fire alarm∗ Safety shower∗ Eye wash
6. General safety rules:∗ Never hand the instructor a piece of hot glassware.∗ No eating or drinking in the glass lab.∗ Use common sense.∗ Report all accidents to the instructor immediately.
Equipment
This section describes the tools and burners that we will be using during the class. Eachstudent will be issued the following equipment:
1. Bench mounted torch2. File or glass knife3. Flat graphite4. Graphite rod5. Tweezers6. Corrugated cardboard7. Cork stopper assortment8. Cork stopper with tube assortment9. Ruler10. Blow hose11. Didymium glassblowing glasses
Glassblowing Torch
The torch we will use is a National hand torch which operates with a fuel gas (natural gas,propane, or hydrogen) and compressed air or oxygen. To properly heat the Pyrex glass usedin the class, we will use natural gas (at line pressure, about 4 PSI) and oxygen (at about 7
3
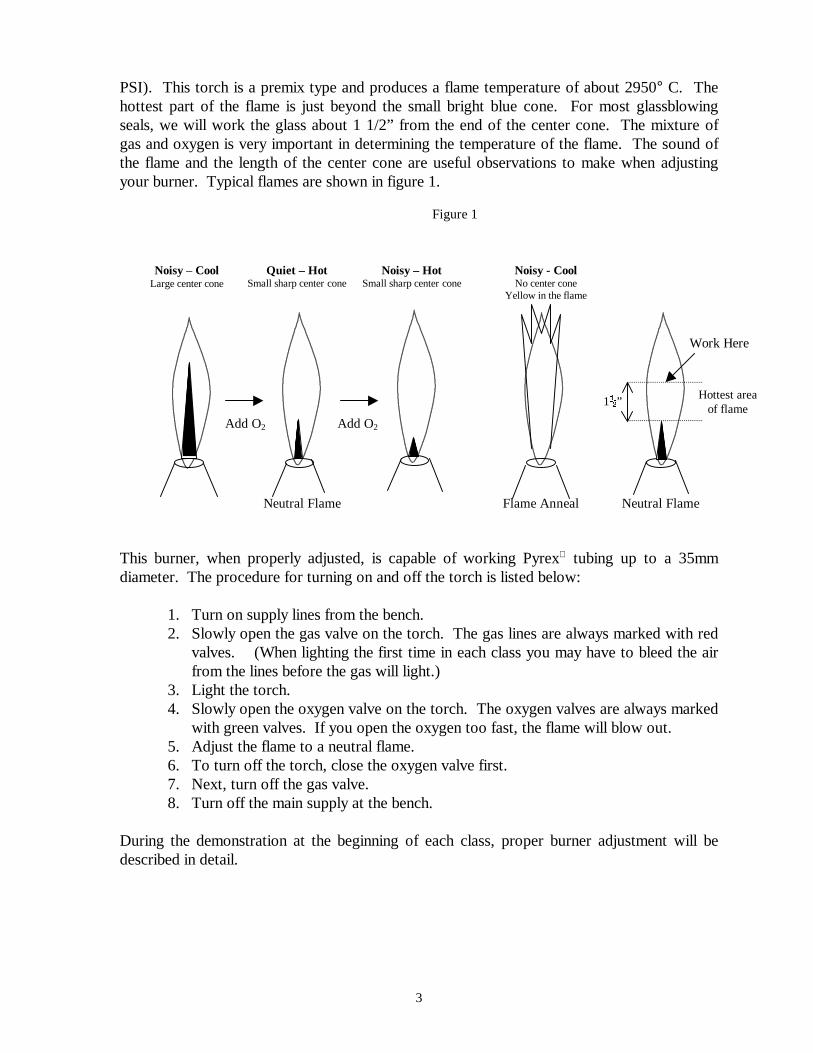
PSI). This torch is a premix type and produces a flame temperature of about 2950° C. Thehottest part of the flame is just beyond the small bright blue cone. For most glassblowingseals, we will work the glass about 1 1/2” from the end of the center cone. The mixture ofgas and oxygen is very important in determining the temperature of the flame. The sound ofthe flame and the length of the center cone are useful observations to make when adjustingyour burner. Typical flames are shown in figure 1.
This burner, when properly adjusted, is capable of working Pyrex tubing up to a 35mmdiameter. The procedure for turning on and off the torch is listed below:
1. Turn on supply lines from the bench.2. Slowly open the gas valve on the torch. The gas lines are always marked with red
valves. (When lighting the first time in each class you may have to bleed the airfrom the lines before the gas will light.)
3. Light the torch.4. Slowly open the oxygen valve on the torch. The oxygen valves are always marked
with green valves. If you open the oxygen too fast, the flame will blow out.5. Adjust the flame to a neutral flame.6. To turn off the torch, close the oxygen valve first.7. Next, turn off the gas valve.8. Turn off the main supply at the bench.
During the demonstration at the beginning of each class, proper burner adjustment will bedescribed in detail.
Noisy – CoolLarge center cone
Add O2
Quiet – HotSmall sharp center cone
Add O2
Neutral Flame
Noisy – HotSmall sharp center cone
Noisy - CoolNo center cone
Yellow in the flame
Flame Anneal Neutral Flame
Work Here
Hottest areaof flame
1ë”
Figure 1

4
Hand Tools
The tools used for forming the glass are made of graphite. The hot glass will stick to almostany other material. Each work area will have graphite rods and flat plates to be used forflaring and flattening the heated glass. These procedures will be demonstrated at thebeginning of each class period.
Properties of Common Glasses
There are thousands of different glass types available on the market today. The most commonglasses found in the laboratory are, borosilicates (trade names, Pyrex and Kimble KG33),soft glass (trade names: Exax, Kimax, Corex, etc.) and Quartz. Before 1920, the mostcommon laboratory glass available was soft glass (commonly called soda glass, or soda limeglass). The following are the chemical and physical properties of the types of glasses.
Soda Glass
Chemical Properties of Soda Glass:Soda Glass:SilicaAluminaCalcium oxideMagnesium oxideSodium oxidePotassium oxideBoric oxideSulfur trioxide
Typical Composition (%):70.52.65.72.916.31.20.50.2
Physical Properties of Soda Glass:
Linear Strain Annealing SofteningExpansion Point Point PointCoefficient (°C) (°C) (°C)(X 10-7)
92 475 510 696
Volumetric ware, television picture tubes, neon signs, household glassware and windowglasses continue to be made from soda glass.

5
Pyrex
Soft glass played an important role in early chemical development, but because it lacks goodchemical and thermal shock resistance, other glasses were developed. In the 1920’s achemical and shock resistant glass was developed by Corning Glass Works called Pyrex. Thisglass has made many additional chemical applications possible in today’s laboratory.
Chemical Properties of Pyrex:
Pyrex:SilicaAluminaCalcium oxideSodium oxidePotassium oxideBoric oxide
Typical Composition (%):74.32.00.24.52.0
17.0
Physical Properties of Pyrex:
Linear Strain Annealing SofteningExpansion Point Point PointCoefficient (°C) (°C) (°C)(X 10-7)
32 510 553 819
Pyrex has many advantages over soft glass. With a much lower coefficient of expansion, itcan be constructed with a much greater wall thickness, and consequently greater mechanicalstrength, without affecting the thermal shock resistance. Pyrex has a greater resistance tochemical attack, is harder and more resistant to surface abrasion, and complex glassware isfabricated and repaired much easier than with soft glasses.
Quartz
Chemical Properties of Quartz:
Quartz:SilicaMisc.
Typical Composition (%):99.80.2
6
Physical Properties of Quartz:
Linear Strain Annealing SofteningExpansion Point Point PointCoefficient (°C) (°C) (°C)(X 10-7)
5 1070 1140 1650
Quartz glass is used when high temperature or high purity conditions exist for the particularchemical reaction. Making glassware from Quartz glass is very difficult, because of theextreme working temperatures needed (2400°C).
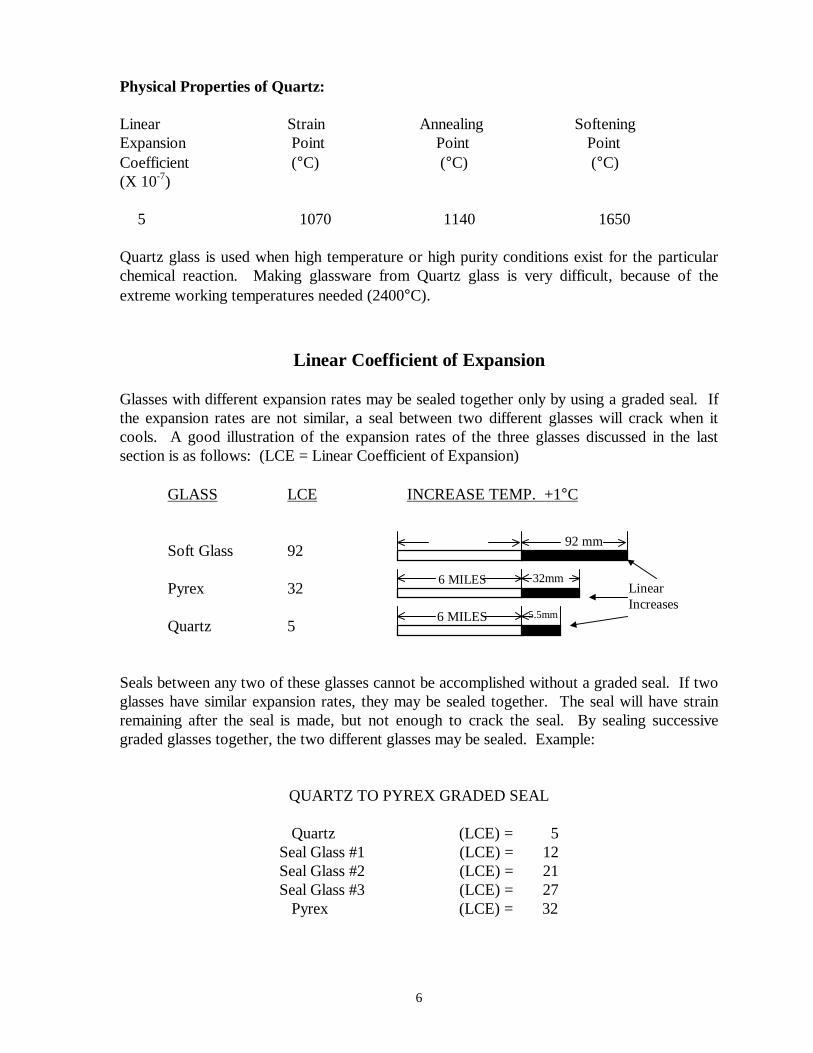
Linear Coefficient of Expansion
Glasses with different expansion rates may be sealed together only by using a graded seal. Ifthe expansion rates are not similar, a seal between two different glasses will crack when itcools. A good illustration of the expansion rates of the three glasses discussed in the lastsection is as follows: (LCE = Linear Coefficient of Expansion)
GLASS LCE INCREASE TEMP. +1°C
Soft Glass 92
Pyrex 32
Quartz 5
Seals between any two of these glasses cannot be accomplished without a graded seal. If twoglasses have similar expansion rates, they may be sealed together. The seal will have strainremaining after the seal is made, but not enough to crack the seal. By sealing successivegraded glasses together, the two different glasses may be sealed. Example:
QUARTZ TO PYREX GRADED SEAL
Quartz (LCE) = 5Seal Glass #1 (LCE) = 12Seal Glass #2 (LCE) = 21Seal Glass #3 (LCE) = 27 Pyrex (LCE) = 32
6 MILES
6 MILES
92 mm
32mm
5.5mm
LinearIncreases

7
Identifying Unknown Glasses
Several methods will be discussed to identify an unknown type of glass. This will be helpfulwhen trying to repair an existing apparatus of which the composition is unknown.
Glass Fiber Test
Take a sampling of the glass to be tested and form it into a 3-4mm rod. Take a known type ofglass and do the same to it. Seal the two rods together and draw into a 12” fiber keepingtension on the fiber as it cools. Burn the fiber through in the flame 3/4 of the way up the fiber.If the fiber curves, the glasses are not similar. A straight fiber means similar glasses.
Index of Refraction Test
Preparing liquids with a similar refraction index to the glass to be tested can identify glasses.For soft glass, the liquid is chlorobenzene. The solution for Pyrex is 16 parts methyl alcoholand 84 parts benzene. Label each container with the contents and the glass that matches therefractive index. Keep containers tightly closed.
When an unknown glass is immersed in the solution and “disappears”, you have identified theglass by matching the refractive index. Dissimilar glasses and solutions will leave the glassvisible in the container. A faint varicolored outline may be visible if the glass is viewed againsta light background.
Physical Test
Glasses may be identified by visual observations of the glass. The following are char-acteristics of each glass:
SOFT GLASS -1. When looking at the end of the tube, you will see a yellow/green color.2. When heated, glass will give a strong sodium glare.3. Fire polishes very rapidly when heated in a neutral flame.4. Without preheating, the glass may crack easily when heated quickly.5. The surface finish is smooth and free of bubbles and imperfections.
PYREX -1. When looking at the end of the tube, you will see a green color.2. When heated, glass will give a strong sodium glare.3. When fire polished, it takes a moderate time to flow.4. The surface finish is smooth and free of bubbles and imperfections.

8
QUARTZ & VYCOR –1. When looking at the end of the tube, a white to light blue color will be seen.2. When heated, no sodium glare will be present.3. When heated, a bright white light will be given off.4. The surface finish may be rough or show tool marks. Vycor may look cloudy and
have a rough texture.5. Used or heated quartz may have sublimed silica (a white powder deposit) on part
of the tubing.
Annealing Glassware
The annealing of glass seals is important if durable equipment is desired. Internal thermalstress is introduced when the glass is heated above the strain point. (The strain point ofPyrex is 510°C). Annealing is the process of heating the glassware to a temperature justbelow the softening point and then allowing it to cool slowly. This process may beaccomplished by heating the glass in electric ovens or with annealing flames.
Locating Thermal Stress with Polarized Light
The presence of residual thermal strain in glass cannot be detected with the unaided eye. Byviewing the glassware through a polarized light source, the strain can be easily located. It isknown that light transmitted by strain free glass obeys the laws of refraction; and that a ray oflight transmitted by strained glass is split into two rays. These rays follow slightly differentpaths through the glass, they’re planes are polarized and their vibrations are at right angles toone another. If a beam of polarized light is passed through a piece of glassware, and theemergent light is viewed through the analyzer; the regions of glass that are strained will showa brighter light intensity. Areas of bright narrow light bands will cause cracking, and shouldbe reannealed.
Figure 2
Polarized Plates
Strain-freeSeal
Strain lines show aslight band in polarizedlight
9
Oven Annealing
A large or complicated piece of apparatus may be assumed to be strained after it is blown.Each piece of glassware produced should be oven annealed to insure that it will not crackwhen it cools. The glass is annealed in a thermostatically controlled electric oven. The still-hot glass is placed in the oven and heated to a temperature at which the glass is rigid enoughto keep its overall shape, but plastic enough to flow so as to relieve internal strain. It is thencooled slowly to room temperature. Even though strains develop after the glass cools, or“sets”, these strains are never severe enough to crack the glass.
Flame Annealing
Most laboratories do not have an annealing oven, and hot glass must be annealed by judicioususe of flames. After a piece of work has been blown, it is heated uniformly over a wide areasurrounding the seal area, to a temperature just below the softening point, but above the strainpoint. For Pyrex, this corresponds to incipient red heat. Next, the work is rotated uniformlyin a large, slightly yellow brushy flame. This flame will begin to deposit a layer of blackcarbon on the surface of the glassware. When a thin layer of carbon covers the annealed area,you have completed the flame annealing process.
Glassblowing Operations
Cutting Tubing and Rod
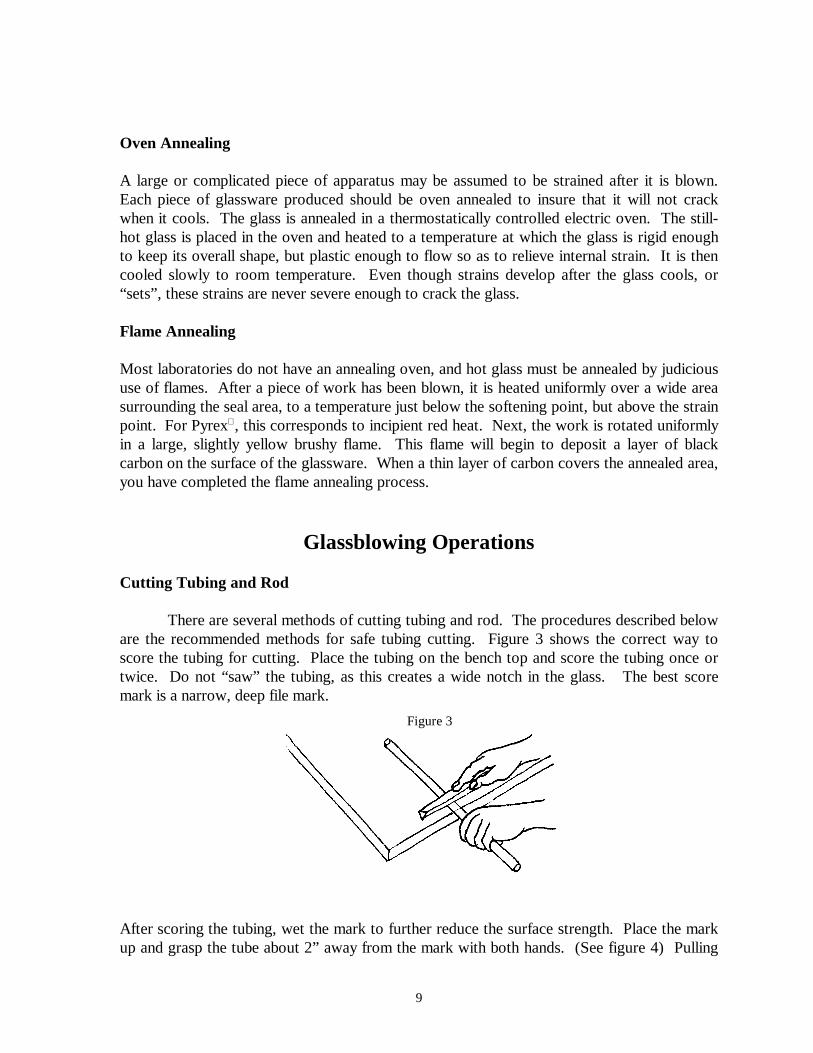
There are several methods of cutting tubing and rod. The procedures described beloware the recommended methods for safe tubing cutting. Figure 3 shows the correct way toscore the tubing for cutting. Place the tubing on the bench top and score the tubing once ortwice. Do not “saw” the tubing, as this creates a wide notch in the glass. The best scoremark is a narrow, deep file mark.
After scoring the tubing, wet the mark to further reduce the surface strength. Place the markup and grasp the tube about 2” away from the mark with both hands. (See figure 4) Pulling
Figure 3

10
back and away with the arms, exerting a perpendicular force to the tubing then breaks theglass.
Another method of cutting glass is by applying a hot rod to the scored tube. This isdone in the following manner:
Make a deep scratch on the tube as described above. Hold the tube in one hand andwith the other hand, take a piece of 3mm rod and soften the end in the torch. Whenthe end of the rod is molten, touch it to the scratch. If the scratch is straight, the tubewill break cleanly. (See Figure 5) This method is convenient to use when theapparatus prevents you from grasping the tube in both hands.
Figure 4
Wet FileMark
Figure 5
Pressure
PullPull
Pressure
Wet FileMark

11
Procedure for Rotating Tubing
Uniform rotation of glass during heating and blowing is essential for obtaining an evenlydistributed wall thickness. The process of rotating cannot be overemphasized! If you stoprotating while your work is in the flame, it will sag or thicken on one side. Only bycontinuous, even rotation can you get smooth, even seals. You may rotate in any direction,but it is most common to have the top of the glass move away from the glassblower.
The tubing in the left hand should be supported by the last three fingers, which act as abearing. The thumb and forefinger are then used to rotate the tubing.
The tubing in the right hand is held differently. The right palm faces up and the tube is heldbetween the forefinger and the thumb. The other fingers are arranged so that at least one isunder the tube and is ready to support it when the finger and thumb release their hold and takea new hold on the tube. This is the hand that will give the beginning student the most trouble.Practice the right hand rotation as much as possible.
Left Hand
Figure 6
RightHand
Figure 7

12
You must synchronize the right and left-hand movements to prevent twisting of the tubing inthe heated zone. This may be practiced by joining a pair of tubes with a piece of cloth, andthen rotating the tubes without twisting the cloth.
The following diagram shows the proper rotation method for both hands.
Figure 8
Rotate
Figure 9

13
Basic Glassblowing Seals
The following seals will be discussed and practiced by each student:
1. Fire polish tube ends2. Pull points3. Round bottoms4. Flat bottoms5. Butt seals6. Flare tubing7. “T” seals8. Tubing bends9. Rod seals10. Blind seals11. Capillary seals12. Blowing Bulbs
Included in the basic seals portion will be construction of the following:
1. Eye droppers2. Volumetric pipettes3. Glass flower4. Graduated cylinder5. Bulb to bulb distillation apparatus6. Migratory fowl barometer
Lesson 1: Fire polish tube ends
Fire polishing the sharp ends of the glassware is a very important procedure. Theglassblower is constantly blowing into the open ends of the apparatus and a sharp edge cancut the lips very severely. For your own safety, fire polish all sharp edges before beginning toheat the apparatus.
Fire polishing is accomplished by rotating the glass in the flame near the outer edge. Heat theglass until the edges flow into the hemisphere shape on the end. Do not heat to the point ofconstricting the diameter of the tube. Flame anneal each seal.
Fire Polish

14
Lesson 2: Pulling points
“Points”, as designated by glassblowers, are elongation’s on the ends of tubing, formed bypulling the tube to a small diameter. They form convenient handles for holding short pieces oftubing, as well as providing a means for closing the tube.
The correct procedure in pulling a “point” consists of rotating the tube in the flame so as toheat a length of about 2 times the diameter. When the glass has become pliable, remove itfrom the flame, and while still rotating, pull slowly to a length of about 4-5”. It is importantthat the resulting “points” have the same axis as the original tube. If the “points” are not inline, it will be necessary to heat at the junction with the tube to straighten them. Flame annealeach seal.
Lesson 3: Round Bottoms
The round bottom is made using one of the “points” that you have just made. Place the largediameter in your left hand and the “point” in your right hand. (Refer to tubing rotationsection.) Next, heat the junction of the “point” in the flame and slowly draw it away. Burnthe “point” through in the flame and remove it. Now, with the tube end sealed, rotate downand into the flame to gather the glass. The glass will thicken as you are heating. Aftersufficient heating, and while still rotating, remove it from the flame. Turn the end of the tubeup and blow lightly into the open end of the tube. Blow just hard enough to shape the moltenglass into a hemisphere on the end of the tube. Repeat this procedure until the round bottomis formed. The glass in the bottom of the seal should have the same wall thickness as thestarting tube. If your round bottom is not uniform, your rotation in the flame was not evenand smooth. Flame anneal each seal.
Heat 2 times the diameter
Draw
BurnThrough
Rotate!

15
Lesson 4: Flat Bottoms
Flat bottoms are very similar to round bottoms in construction. Start with a “point” and whilerotating in the flame, pull away and burn through the “point”. It is important to remove moreglass from the bottom of the tube when making a flat bottom seal. You may want to use asmall rod to “pick” away more glass from the end of the seal. When the seal is about half asthick as the wall thickness of the starting tube, rotate the tube in the edge of the flame. Makesure that the flame does not fire onto the shoulder too far. Keep the flame directed at thebottom of the seal only. As you fire the bottom, some glass will flow from the shoulder intothe bottom. When you see that the bottom thickness equals the wall thickness, remove fromthe flame and rotate against a graphite paddle. Make sure you continue rotating as you touchthe hot glass to the graphite. Flame anneal each seal.
Burn through and remove point
Heat bottom by holding tube down andinto the flame
Completed round bottom
Burn through and remove point
Remove glass by “picking” excess awaywith rod
Heat at edge of flame on bottom only!
Rotate against graphite paddle
Rotate!
Rotate!

16
Lesson 5a: Butt Seals
Uniform butt seals require even rotation of the glass with both hands. (Refer to TubingRotation Section.) Cut two tubes of the same diameter to a 6” length and put a cork stopperin the end of one tube. Place the stoppered tube in the left hand and the open tube into theright hand. In a narrow flame, begin heating both edges until they begin to flow. Whilecontinuously rotating, remove the tubes from the flame and touch the back edges together androll the tubes together. While the seal is still molten, blow lightly into the open end. Moveback into the flame and reheat the seal until the edges begin to flow and gather thickness.Again, remove the glass from the flame while rotating, and blow into the open end. Blow theseal up slightly larger than the diameter of the starting tubes. Repeat the heating process, butthis time blow the seal up to the same diameter as the starting tube. Rotate the seal tostraighten. Flame anneal each seal.
Pre-heat edges
Touch edges androll together
Blow
Heat to fuseseal
Blow
Complete
Rotate!
17
Lesson 5b: Butt Seals with Different Sized Tubes
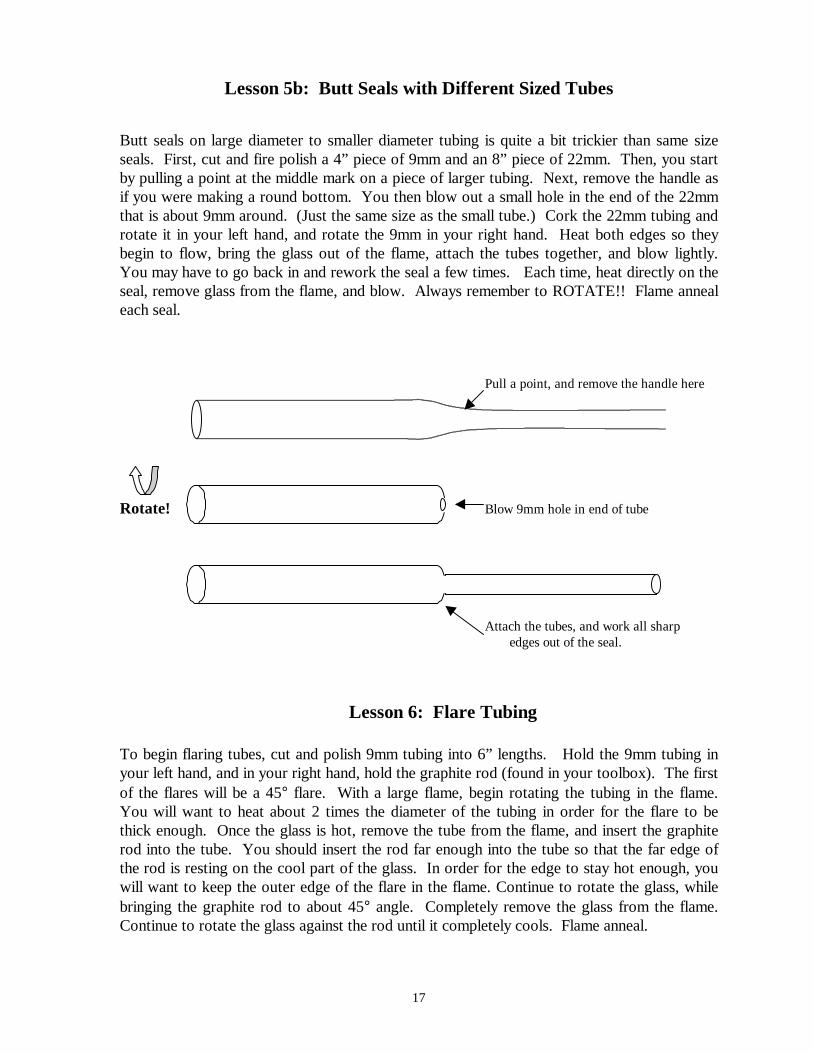
Butt seals on large diameter to smaller diameter tubing is quite a bit trickier than same sizeseals. First, cut and fire polish a 4” piece of 9mm and an 8” piece of 22mm. Then, you startby pulling a point at the middle mark on a piece of larger tubing. Next, remove the handle asif you were making a round bottom. You then blow out a small hole in the end of the 22mmthat is about 9mm around. (Just the same size as the small tube.) Cork the 22mm tubing androtate it in your left hand, and rotate the 9mm in your right hand. Heat both edges so theybegin to flow, bring the glass out of the flame, attach the tubes together, and blow lightly.You may have to go back in and rework the seal a few times. Each time, heat directly on theseal, remove glass from the flame, and blow. Always remember to ROTATE!! Flame annealeach seal.
Pull a point, and remove the handle here
Rotate! Blow 9mm hole in end of tube
Attach the tubes, and work all sharp edges out of the seal.
Lesson 6: Flare Tubing
To begin flaring tubes, cut and polish 9mm tubing into 6” lengths. Hold the 9mm tubing inyour left hand, and in your right hand, hold the graphite rod (found in your toolbox). The firstof the flares will be a 45° flare. With a large flame, begin rotating the tubing in the flame.You will want to heat about 2 times the diameter of the tubing in order for the flare to bethick enough. Once the glass is hot, remove the tube from the flame, and insert the graphiterod into the tube. You should insert the rod far enough into the tube so that the far edge ofthe rod is resting on the cool part of the glass. In order for the edge to stay hot enough, youwill want to keep the outer edge of the flare in the flame. Continue to rotate the glass, whilebringing the graphite rod to about 45° angle. Completely remove the glass from the flame.Continue to rotate the glass against the rod until it completely cools. Flame anneal.

18
Heat about 2 times the diameter, and insert rod.Remember to keep the rod on the cool areaof the tube.
45°
2x the diameter
Flare the tube up to a 45° angle, keeping theouter edge in the flame. Rotate until cool.
The next flare is similar to the 45° flare, except it is a 90° flare. The steps are thesame, except when you hold the graphite rod, you will need to bring it perpendicular to thetube.
Heat 2 times the diameter of the tubing and insert graphite rod.
90°
Continue to hold graphite againstglass until it completely cools.

19
Lesson 7: “T” Seals
To begin the same size “T” Seals, cut and polish 9mm tubing into 8” (cut at 8”, and mark at4”) and 4” lengths. With the corked 8” piece in your left hand, come up from underneath thesmall flame at the 4” mark. Heat a small area on the side of the tube until molten, and thenblow lightly to form a small bump. This bump should be about 9mm. Heat the top of thebump in the flame until it becomes molten, and then blow out the glass. There now should bea hole about the size of the tube to attach to it (9mm). (If your hole is too small, you can usethe graphite rod to push out a bigger hole.) Next, cork the other end of the 8” piece oftubing. Hold this in your left hand. You should come up from underneath of the flame withthis tube, and hold the other tube in your right hand. Then, get all edges molten, come out ofthe flame, and stick them together. To get a good seal, you may want to stick the back edgetogether first and roll them together. Then, in order to get a nice, strong seal, the cold edgesmust be worked. At this point, you will want to get the smallest flame you can. You then canbegin by picking one spot of the seal, and begin “spot heating” around until all of the sharpedges are gone. You can do the large to small “T” seals following all of the steps mentionedabove, using an 8” piece of 22mm. Flame anneal each seal.
Blow out 8mm hole in middle of tube
Come from underneath the flame
Spot heat at the seal to workout all rough edges
Complete

20
Lesson 8: Tubing Bends
To begin, cut and polish 9mm tubing into 8” (4x) and 12” (4x) pieces. When bending tubing,it is important that you get enough of the tubing hot enough, so you don’t have to reworkyour bends. A good rule of thumb is to heat 3 times the diameter of the tubing for the 90°bends, and to heat about 4 times the diameter of the tubing for 180° bends. Begin byadjusting your flame to be the biggest, hottest flame you can get. Then, with the corked endof tubing in your left hand, begin rotating the tube in the flame, heating back and forth.Remember to heat about 3 times the diameter. So, for 9mm tubing, try to heat about 27mm(or just over 1”). Once you have the glass just to the softening point, you then want to sweepthe backside of the tubing into the flame. (This will allow the outer side of the bend to be hotenough to blow out round.) In order to do this sweeping motion, you will need to move yourleft hand to hold the tube from the underneath (like the right hand holds the tube). This willalso allow you to smoothly bring the tube up to your mouth to blow. After you sweep thebackside, bring your right hand up to your mouth, bend the tube up 90°with your left hand,and blow. If the tube is heated correctly, you will not have to rework the bend. Sometimes, itmay be necessary to use a small flame on the inside of the bend to work out any kinks. Flameanneal.
Heat 3 times the diameter of the tubeSwipe backside of tube into flame.
Bend at 90° angle, while blowing into the right side.Work out any folds on inside of bend with small flame.
Flame anneal.

21
In order to bend the tubing 180°, you must heat about 4 times the diameter of the tube (about36mm). The same techniques as the 90° bend are used, with one exception. After you sweepthe backside of the tube in the flame, you will bring your right hand up to blow into it. Whileyou are bringing your left hand up to the 180° point, you will then use a “scrubbing” motion.Your right and left hands will act as though you are actually scrubbing something betweenthem. This allows any kinks to work out of the bend. It may be necessary to use a smallflame to work out any kinks that might be on the inside of the bend. Flame anneal.
Heat 4 times the diameter of the tube.Swipe backside of tube in the flame.
Use “scrubbing” action to completethe 180° bend. Use a small flame
toWork out any kinks on inside of
bend.
Flame anneal.

22
Lesson 9: Rod Seals
To begin your rod work, you will start by making a Teflon blade stir rod. This is quitesimple to make. First, cut a piece of rod about 10”. Hold the rod in your left hand, and rotatethe right edge of it in the flame. You want to gather a section of glass (about ¾”) that youcan push flat. Next, come out of the flame, continue to rotate, and with your graphite paddlein your right hand, push the glass against the paddle to form a lip. Then, heat about ¼” backfrom this lip with a fairly wide flame. Once the glass is just to the molten stage, you then wantto use your paddle as a “finger”, and push the tip down at a 90° angle. The last step tomaking this stir rod, is to add a small piece of glass to the end. This will keep the Teflon bladein place when on the rod. Flame anneal.
Heat the end of the rod, and pressit against the graphite paddle to createlip on end of rod.
Heat about ¼” away fromlip, and bend down 90°
Complete Stir Rod
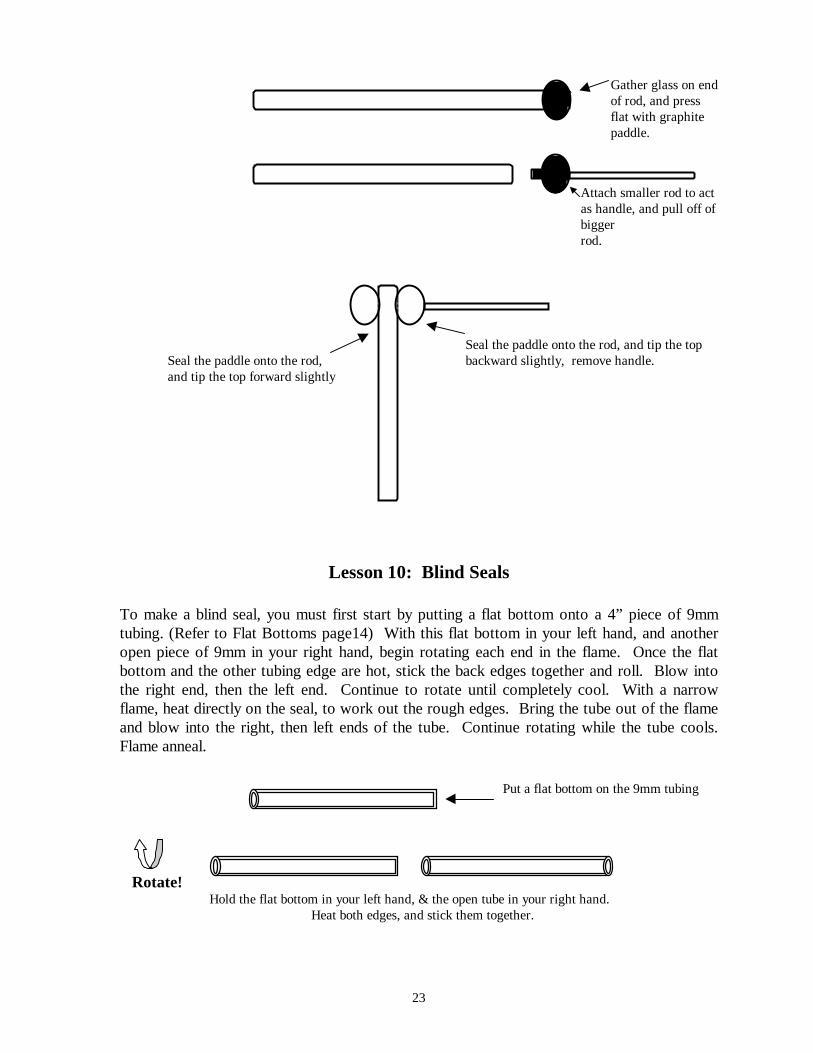
The next rod seal is a glass stir rod. To start the stir rod, first cut and polish a piece of rodabout 10”. To make the round stirring paddles, you need to gather a large amount of glass onthe end of a rod, then press it flat with the graphite paddle. You will want to press the glassagainst another graphite piece. Attach the paddle to a smaller rod, which will act as thehandle when attaching it to the rod shaft. Remove the paddle from the larger rod, leaving asmall section of glass to attach to the rod shaft. You will need to make two of these paddles.Once these are made, you will then attach them to the rod. To do this, make sure you heat onboth the rod and the paddle. Once both sides are glowing red, stick the paddle onto the rod atabout a 30° angle from the rod. Repeat this process with the other paddle, attaching it 180°from the first. Flame anneal.
23
Gather glass on endof rod, and pressflat with graphitepaddle.
Attach smaller rod to actas handle, and pull off ofbiggerrod.
Seal the paddle onto the rod, and tip the topSeal the paddle onto the rod, backward slightly, remove handle.and tip the top forward slightly
Lesson 10: Blind Seals
To make a blind seal, you must first start by putting a flat bottom onto a 4” piece of 9mmtubing. (Refer to Flat Bottoms page14) With this flat bottom in your left hand, and anotheropen piece of 9mm in your right hand, begin rotating each end in the flame. Once the flatbottom and the other tubing edge are hot, stick the back edges together and roll. Blow intothe right end, then the left end. Continue to rotate until completely cool. With a narrowflame, heat directly on the seal, to work out the rough edges. Bring the tube out of the flameand blow into the right, then left ends of the tube. Continue rotating while the tube cools.Flame anneal.
Put a flat bottom on the 9mm tubing
Rotate!Hold the flat bottom in your left hand, & the open tube in your right hand.
Heat both edges, and stick them together.

24
With a small flame, heat on the seal, come out of the flame and blow into both ends.
Lesson 11: Capillary Seals
To begin with capillary butt seals, cut and polish an 8” piece of capillary tubing. At the centermark (4”), you are going to blow a small bulb. With the closed end of tubing in your left hand,rotate the tube in the flame at the center point, until it becomes molten. Once it becomesmolten, bring your right hand up to your mouth, and blow gently into the tube. This nowcreated an enlarged part of the capillary, which will allow you to more easily seal the tubestogether. Next, rotate the tube in the flame, and pull the tube apart in the center of the bulbyou just blew. You will then heat the end of the bulb in the flame to blow out the end of thetube. With your graphite rod, tool the edge of the tube into a nice, smooth surface. Repeatthis step with the other tube. Then, you are going to close up the end of tube in your lefthand, and do a butt seal (refer to Page 15). You must use a very small flame, in order for thecapillary not to collapse. Flame anneal each seal.
Heat at the 4” point to blow a small bulb in the capillary tubing.
Blow the center of the bulb out to create smooth ends for your seal.Heat both edges until hot, and touch the back edges together, roll towards you and blow.
Continue to heat and blow to work out the seal.
Next, you will make capillary butt seals with two different size tubes. You will begin byblowing a small bulb in the center of the capillary tubing, as you did for the above example.
25
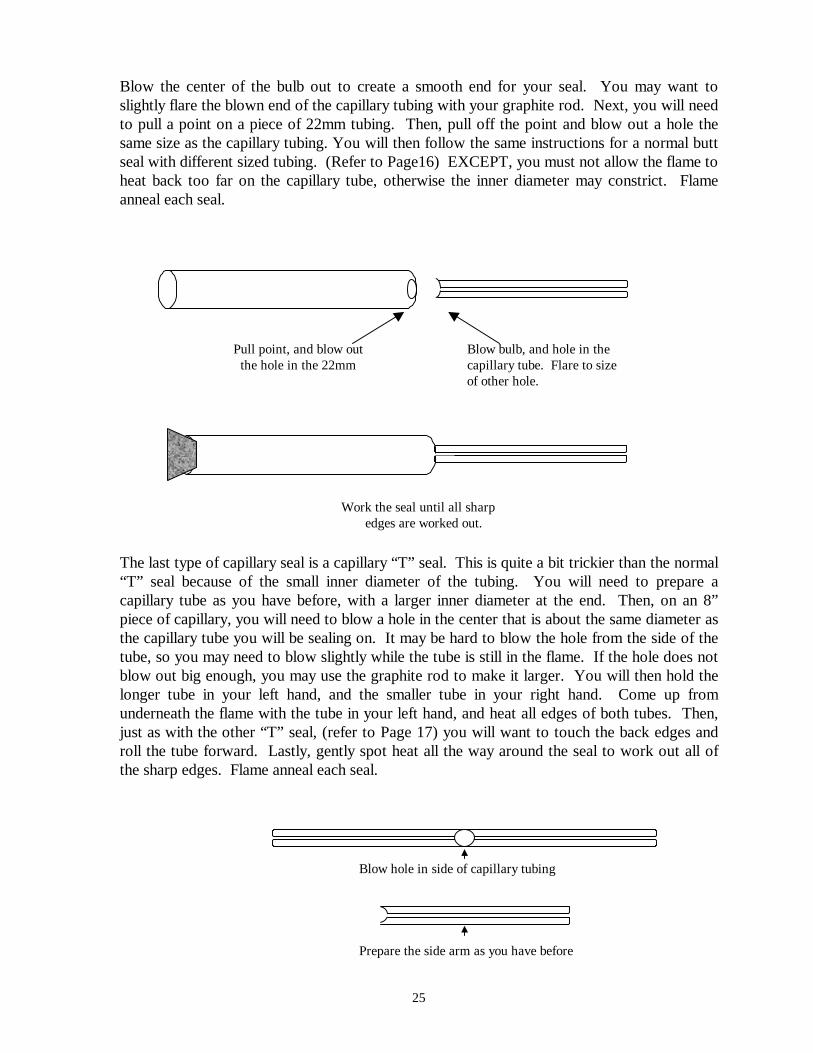
Blow the center of the bulb out to create a smooth end for your seal. You may want toslightly flare the blown end of the capillary tubing with your graphite rod. Next, you will needto pull a point on a piece of 22mm tubing. Then, pull off the point and blow out a hole thesame size as the capillary tubing. You will then follow the same instructions for a normal buttseal with different sized tubing. (Refer to Page16) EXCEPT, you must not allow the flame toheat back too far on the capillary tube, otherwise the inner diameter may constrict. Flameanneal each seal.
Pull point, and blow out Blow bulb, and hole in the the hole in the 22mm capillary tube. Flare to size
of other hole.
Work the seal until all sharpedges are worked out.
The last type of capillary seal is a capillary “T” seal. This is quite a bit trickier than the normal“T” seal because of the small inner diameter of the tubing. You will need to prepare acapillary tube as you have before, with a larger inner diameter at the end. Then, on an 8”piece of capillary, you will need to blow a hole in the center that is about the same diameter asthe capillary tube you will be sealing on. It may be hard to blow the hole from the side of thetube, so you may need to blow slightly while the tube is still in the flame. If the hole does notblow out big enough, you may use the graphite rod to make it larger. You will then hold thelonger tube in your left hand, and the smaller tube in your right hand. Come up fromunderneath the flame with the tube in your left hand, and heat all edges of both tubes. Then,just as with the other “T” seal, (refer to Page 17) you will want to touch the back edges androll the tube forward. Lastly, gently spot heat all the way around the seal to work out all ofthe sharp edges. Flame anneal each seal.
Blow hole in side of capillary tubing
Prepare the side arm as you have before
26
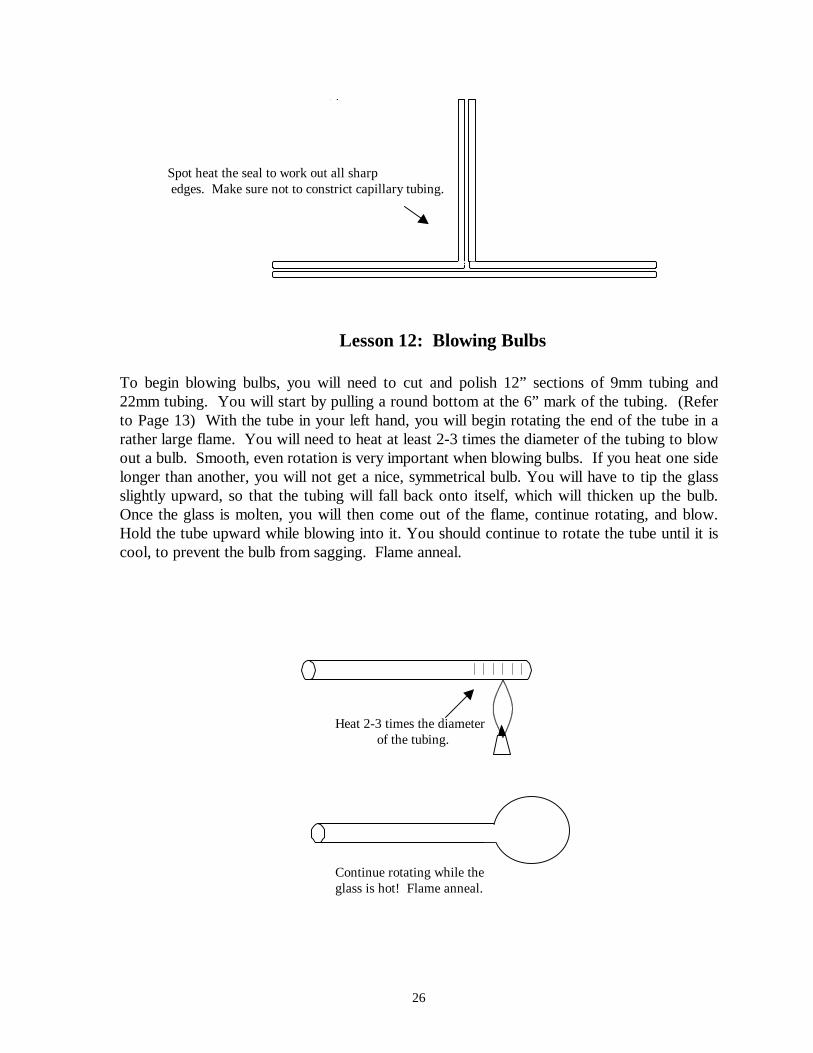
Spot heat the seal to work out all sharp edges. Make sure not to constrict capillary tubing.
Lesson 12: Blowing Bulbs
To begin blowing bulbs, you will need to cut and polish 12” sections of 9mm tubing and22mm tubing. You will start by pulling a round bottom at the 6” mark of the tubing. (Referto Page 13) With the tube in your left hand, you will begin rotating the end of the tube in arather large flame. You will need to heat at least 2-3 times the diameter of the tubing to blowout a bulb. Smooth, even rotation is very important when blowing bulbs. If you heat one sidelonger than another, you will not get a nice, symmetrical bulb. You will have to tip the glassslightly upward, so that the tubing will fall back onto itself, which will thicken up the bulb.Once the glass is molten, you will then come out of the flame, continue rotating, and blow.Hold the tube upward while blowing into it. You should continue to rotate the tube until it iscool, to prevent the bulb from sagging. Flame anneal.
Heat 2-3 times the diameterof the tubing.
Continue rotating while theglass is hot! Flame anneal.

27
The next type of bulb is one that is in the middle of the tube. To begin, cut and polish thetubing into 12” sections. You are going to want a large flame in order to heat enough tubing.Begin rotating the tubing in the flame, with the tubing in the left hand corked. Heat a sectionof glass that is about 2-3 times the diameter of the tubing. You will need to move the glassback and forth in the flame to get it all hot. Then, once the tubing is molten, bring the tubingin your right hand up to your mouth and blow. You will need to rotate the tubing while youare blowing into it, to keep from sagging. Once the tubing is cool, flame anneal.
Heat 2-3 times the diameter of thetubing, using a sweeping motion.
Continue rotating while blowingthe bulb. Flame anneal
The last project for the bulb section is to make an actual round bottom flask. To do this, blowa bulb on the end of the tube, as described above. Once that bulb is cool, cut the neck of theflask off short, and bead the top. In order to bead the top, you will need to rotate the outeredge of the neck in the flame, insert your graphite rod, and slightly flare the tubing. This willcreate a tooled top for your flask. Flame anneal.
Cut the neck off here, and tool.
Complete flask
28
Advanced Seals
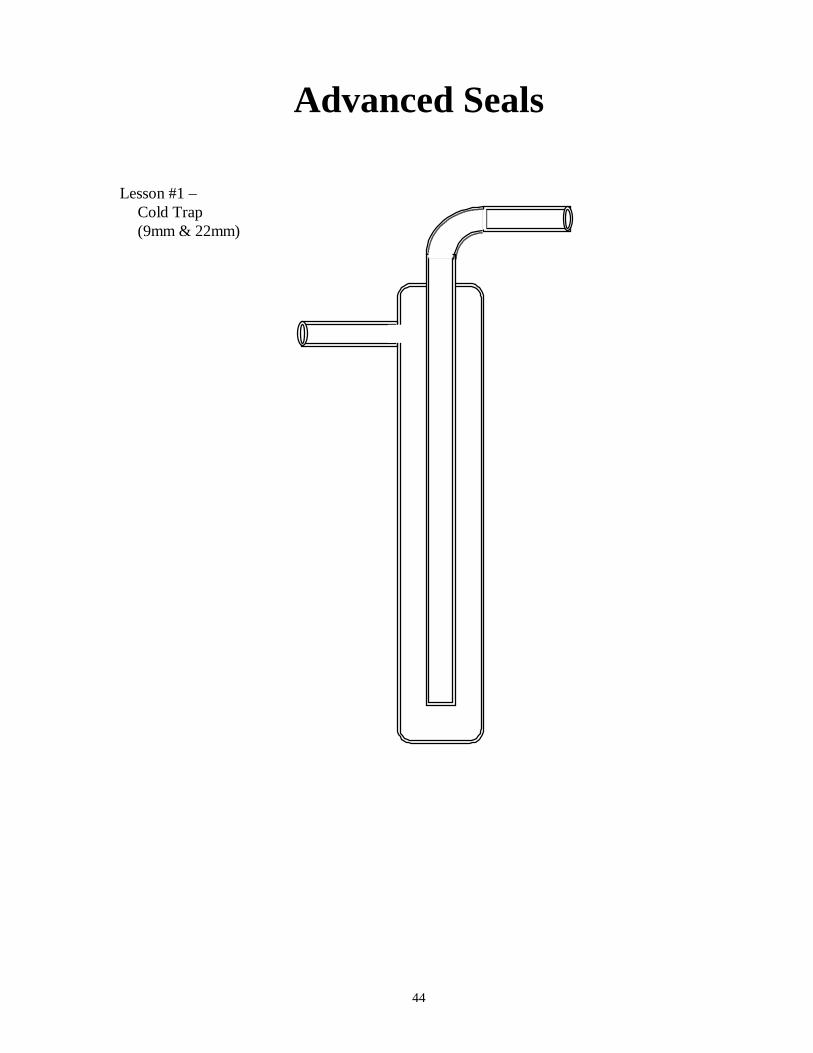
Lesson 1: Cold Trap – Ring Seals
Materials List:3 each 6” long 9mm tube (inner tube and side arms)1 each 10” long 22mm tube (trap body)Firepolish all tubes.
Construction Details:
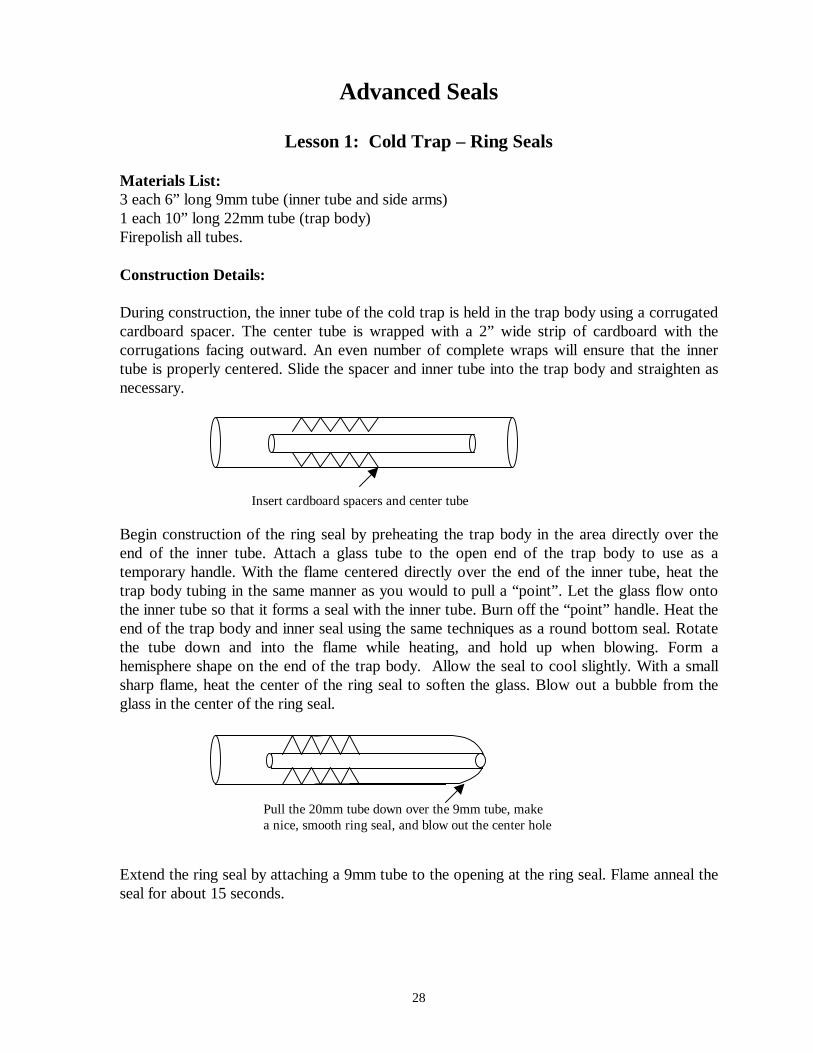
During construction, the inner tube of the cold trap is held in the trap body using a corrugatedcardboard spacer. The center tube is wrapped with a 2” wide strip of cardboard with thecorrugations facing outward. An even number of complete wraps will ensure that the innertube is properly centered. Slide the spacer and inner tube into the trap body and straighten asnecessary.
Insert cardboard spacers and center tube
Begin construction of the ring seal by preheating the trap body in the area directly over theend of the inner tube. Attach a glass tube to the open end of the trap body to use as atemporary handle. With the flame centered directly over the end of the inner tube, heat thetrap body tubing in the same manner as you would to pull a “point”. Let the glass flow ontothe inner tube so that it forms a seal with the inner tube. Burn off the “point” handle. Heat theend of the trap body and inner seal using the same techniques as a round bottom seal. Rotatethe tube down and into the flame while heating, and hold up when blowing. Form ahemisphere shape on the end of the trap body. Allow the seal to cool slightly. With a smallsharp flame, heat the center of the ring seal to soften the glass. Blow out a bubble from theglass in the center of the ring seal.
Pull the 20mm tube down over the 9mm tube, makea nice, smooth ring seal, and blow out the center hole
Extend the ring seal by attaching a 9mm tube to the opening at the ring seal. Flame anneal theseal for about 15 seconds.

29
Extend the ring seal with another piece of 9mm
Attach a side tube to the trap body near the ring seal. Cut the side tube so that it is about 2”long. Fire polish the cut end. Completely flame anneal this end of the cold trap. Using a wirehook, remove the cardboard spacer.
Add side armRemove cardboard
Preheat the open end of the trap body and attach a glass handle to the open end of the trapbody. Pull a “point” and continue making a round bottom seal. Flame anneal the roundbottom. Allow to cool.
Add side armMake round bottom
Complete the cold trap by making a 90° bend on the ring seal extension tube. Cut to about 2”length, fire polish and flame anneal.
Bend tubingFlame anneal
30
Lesson 2: Condenser
Material List:5 each 6” long 9mm tube (inner tube, side arms, and ring seal extensions)1 each 10” long 22mm tube (condenser body)Fire polish all ends.
Construction Details:
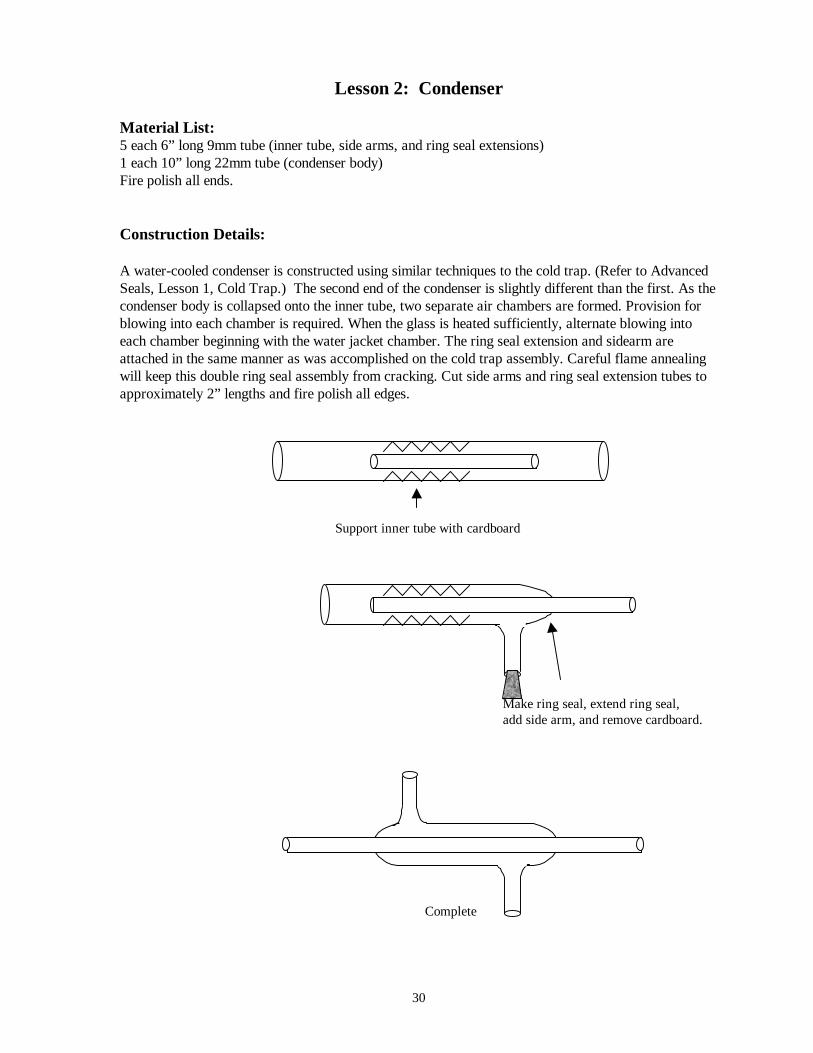
A water-cooled condenser is constructed using similar techniques to the cold trap. (Refer to AdvancedSeals, Lesson 1, Cold Trap.) The second end of the condenser is slightly different than the first. As thecondenser body is collapsed onto the inner tube, two separate air chambers are formed. Provision forblowing into each chamber is required. When the glass is heated sufficiently, alternate blowing intoeach chamber beginning with the water jacket chamber. The ring seal extension and sidearm areattached in the same manner as was accomplished on the cold trap assembly. Careful flame annealingwill keep this double ring seal assembly from cracking. Cut side arms and ring seal extension tubes toapproximately 2” lengths and fire polish all edges.
Support inner tube with cardboard
Make ring seal, extend ring seal,add side arm, and remove cardboard.
Complete

31
Lesson 3: Cold Trap – Side Ring Seal
Material List:1 each 12” long 9mm tube (inner tube)2 each 6” long 9mm tube (side arm and ring seal extension)1 each 10” long 22mm tube (cold trap body)
Construction Details:
Begin construction of the cold trap by making a sharp radius 90° bend in the 12” long 9mmtube. Cut off one side of the bend such that the distance from the center of the tube is 2mmlonger than the radius of the inside diameter of the cold trap body. (In this case, the radius is9.5mm. Cut the tube at 11.5mm).
Bend tubing at 90° angle, then cut at 11.511.5mm
To facilitate construction of the side ring seal, a blister must be blown up on the side of thetrap body where the ring seal will be located. This blister allows the inner tube to extend pastthe side wall. Support the inner tube with corrugated cardboard so that the inner tube iscentered and extends into the blister on the trap body. Heat the glass blister so that it collapsesonto the end of the inner tube. Make certain that the seal is well heated so that the seal issmooth and there are no sharp angles remaining. Blow out the center of the ring seal andextend the ring seal with a 6” long 9mm tube. While the ring seal is still hot, attach theopposing side arm. Attach a glass handle to the open end of the trap body and pull a “point”about 1” from the ring seal. Remove the “point” and complete the round bottom. Flameanneal completely.
Blow a blister on sidewall, insert bent tube,and make ring seal
Extend ring seal, attachother side arm, and sealoff the top end of the trap

32
Attach a temporary extension to one of the side tubes and form a “handle” as shown below.Center the “handle” to the axis of the trap body. Preheat the open end of the trap body andpull a “point” about 1” from the end of the inner tube. Complete a round bottom seal. Flameanneal completely. Cut and fire polish each side arm to about 2” long. Fire polish and anneal.
Blow a blister on sidewall, Insert bent tube,and make ring seal
Extend ring seal, attachother side arm, and sealoff the top end of the trap

33
Lesson 4: Dewar SealMaterial List:1 each 6” long 9mm tube (side arm)1 each 8” long 15mm tube (Dewar inner tube)1 each 8” long 22mm tube (Dewar outer tube)
Construction Details:
Place a 20mm diameter 90° flare on one end of the 15mm tube. Allow to cool. On theopposite end, form a round bottom so that the tube is 6” long. Allow to cool. Wrap this innertube with corrugated cardboard and insert into the Dewar outer body. Center the tube.
Heat the edge of the flare and with the graphite paddle, push the glass together such that theseal is airtight. Continue heating the seal until it is smooth. Flame anneal briefly. While theDewar seal is still hot, add the side arm. Anneal completely. Allow to cool and removecardboard spacer.
Heat 2-3 times the diameter of thetubing, using a sweeping motion.
The final step is to add a round bottom to the 22mm tubing. You will need to blow into theside arm to complete this round bottom. Flame anneal.
Heat 2-3 times the diameter of the

34
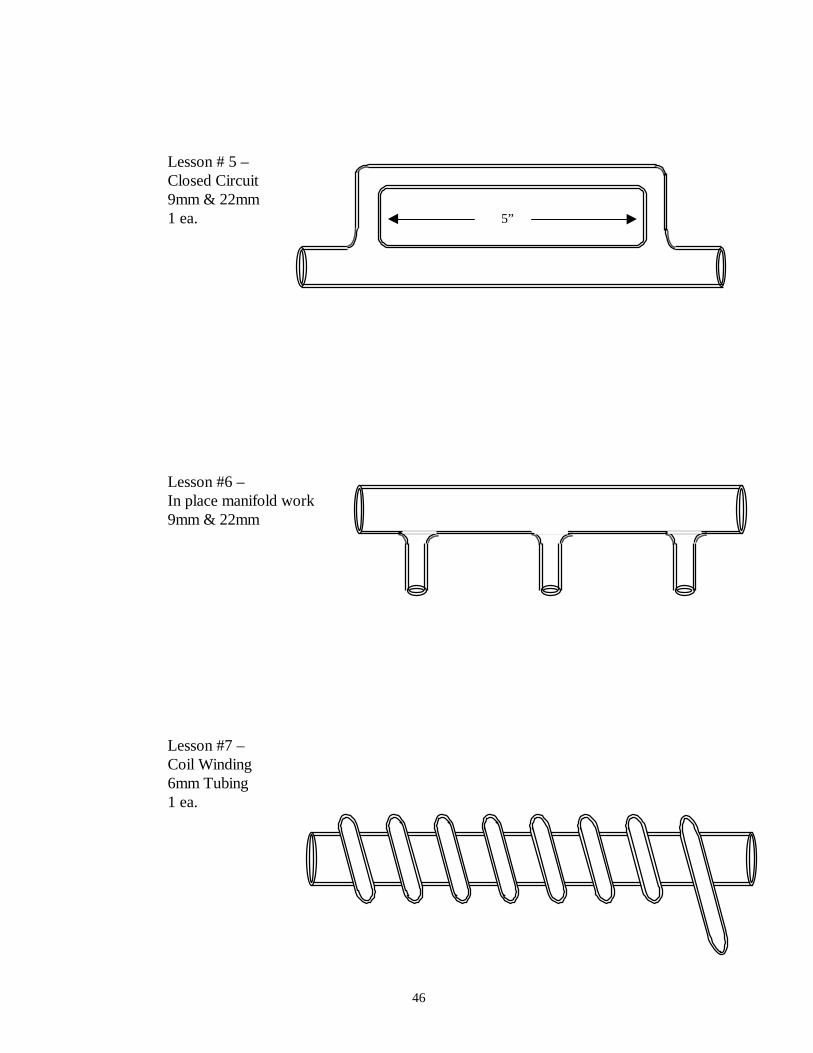
Lesson 5: Closed Circuit Seals
Materials List:
1 each 14” long 9mm tube (side tube)1 each 12” long 22mm tube
Construction Details:
Closed circuit seals involve heating and sealing tubes at two locations simultaneously. Beginby bending the 9mm tube at 90° angles in two locations about 5” apart. Allow to cool. Cuteach leg of the tube 2” long. Flame anneal and allow to cool. Measure the exact distancebetween the centerline of the two arms of the tube.
Based on the previous measurement, blow 2 holes in the 22mm tube so that the 9mm tube willalign properly. Preheat each seal location and begin heating one seal location. When the glassis molten, join the tubes together. While the first seal is still hot, quickly heat the second seal.Join the second seal together. Additional heating may be required to get both seals hot at onetime. Alternate heating seals until both are airtight. A 3mm patch rod will help fill holes thatmight be present. Quickly smooth one seal while keeping the other seal hot. Flame annealingboth seal areas is very important throughout the entire sealing procedure.
5”
35
Lesson 6: In-place Manifold Work
Materials List:
1 each 16” long 22mm tube (manifold tube)6 each 6” long 9mm tube with slight flare (side tubes)
Construction Details
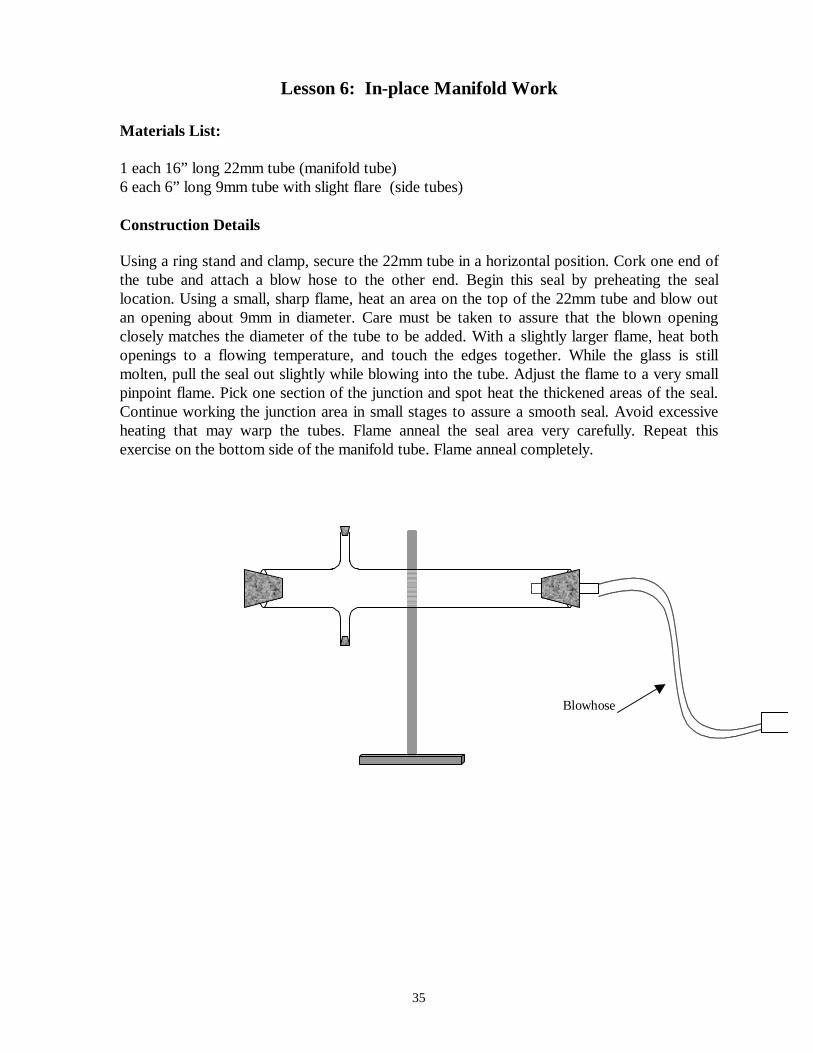
Using a ring stand and clamp, secure the 22mm tube in a horizontal position. Cork one end ofthe tube and attach a blow hose to the other end. Begin this seal by preheating the seallocation. Using a small, sharp flame, heat an area on the top of the 22mm tube and blow outan opening about 9mm in diameter. Care must be taken to assure that the blown openingclosely matches the diameter of the tube to be added. With a slightly larger flame, heat bothopenings to a flowing temperature, and touch the edges together. While the glass is stillmolten, pull the seal out slightly while blowing into the tube. Adjust the flame to a very smallpinpoint flame. Pick one section of the junction and spot heat the thickened areas of the seal.Continue working the junction area in small stages to assure a smooth seal. Avoid excessiveheating that may warp the tubes. Flame anneal the seal area very carefully. Repeat thisexercise on the bottom side of the manifold tube. Flame anneal completely.
Blowhose

36
Lesson 7: Coil Winding
Materials List:
1 each 48” long 6mm tube1 each coil mandrel covered with ceramic paper
Construction Details:
Preheat the coil mandrel slightly. Bend a hook on the end of the 6mm tube. Attach the hookto the rod attachment on the coil mandrel. In a large bushy flame, heat the 6mm tube such thatit is soft enough to bend but not deform excessively. Keep tension on the tube as you rotatethe mandrel and rotate the top of the mandrel towards you. The tubing will begin to coil ontothe mandrel. Coordinate the flame temperature with the speed of rotation to accomplishsmooth coils. On the bottom side of the mandrel, observe the spacing between the previouscoil and the tubing to set the spacing of the coils. Raising your right hand during rotation willplace the coils closer together. Lowering your right hand will increase the coil spacing.Constant adjustment may be required to accomplish uniform coil spacing. When the coil andmandrel have cooled, break the hook end of the coil away from the mandrel. While runningunder cool water rotate the coil and remove from the mandrel. Cut and fire polish the ends ofthe coil. Flame anneal.
1 ea.

37
ProjectSketches
CHM 593
38
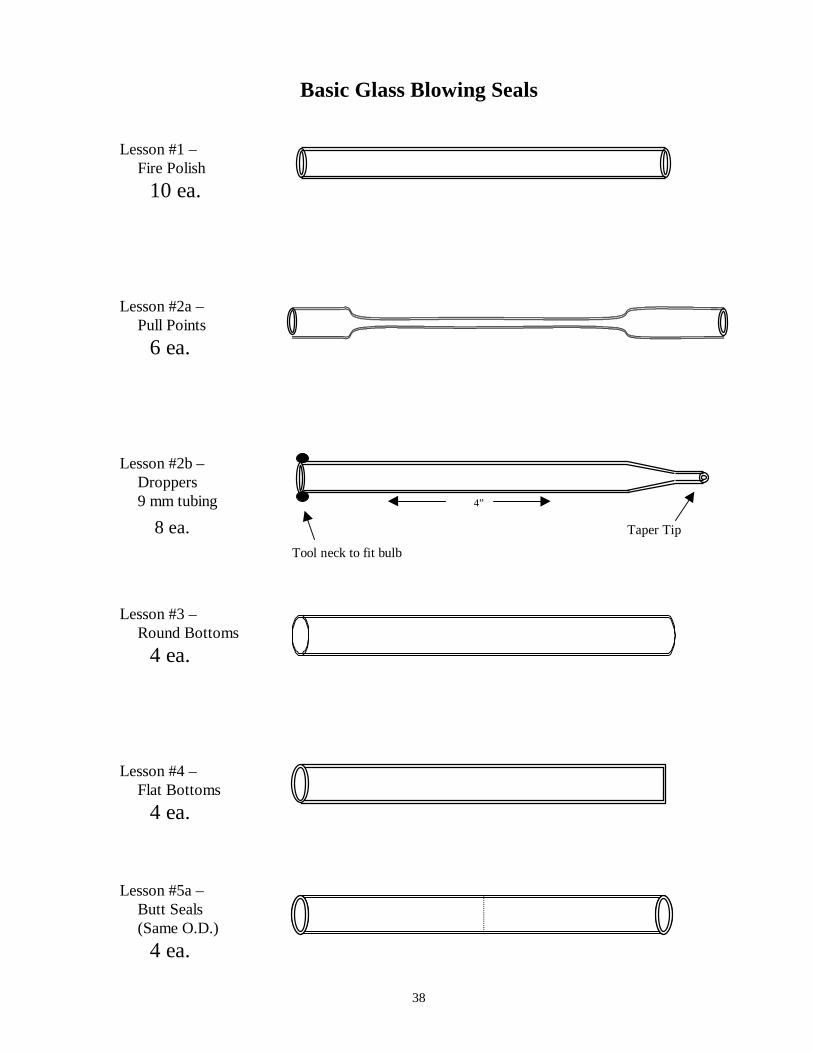
Basic Glass Blowing Seals
Lesson #1 –Fire Polish
10 ea.
Lesson #2a –Pull Points
6 ea.
Lesson #2b –Droppers9 mm tubing
Lesson #3 –Round Bottoms
4 ea.
Lesson #4 –Flat Bottoms
4 ea.
Lesson #5a –Butt Seals(Same O.D.)
4 ea.
8 ea.
4”
Taper Tip
Tool neck to fit bulb

39
Lesson #5b –Butt Seals(Different O.D.)
4 ea.
Lesson #5c –Volumetric Pipettes
3 ea.
Lesson #6a –Tubing Flare (45°)9mm Tubing
2 ea.
Lesson #6b –Tubing Flare
(90°)9mm Tubing
Lesson #6c –Hose Connector9mm Tubing
Lesson #7a –“T” Seals(Small Diameter)
4 ea.
2x diameter
45°
90°
2x diameter
2 ea.
6 ea.
3 ea.
22mm9mm 9mm
40
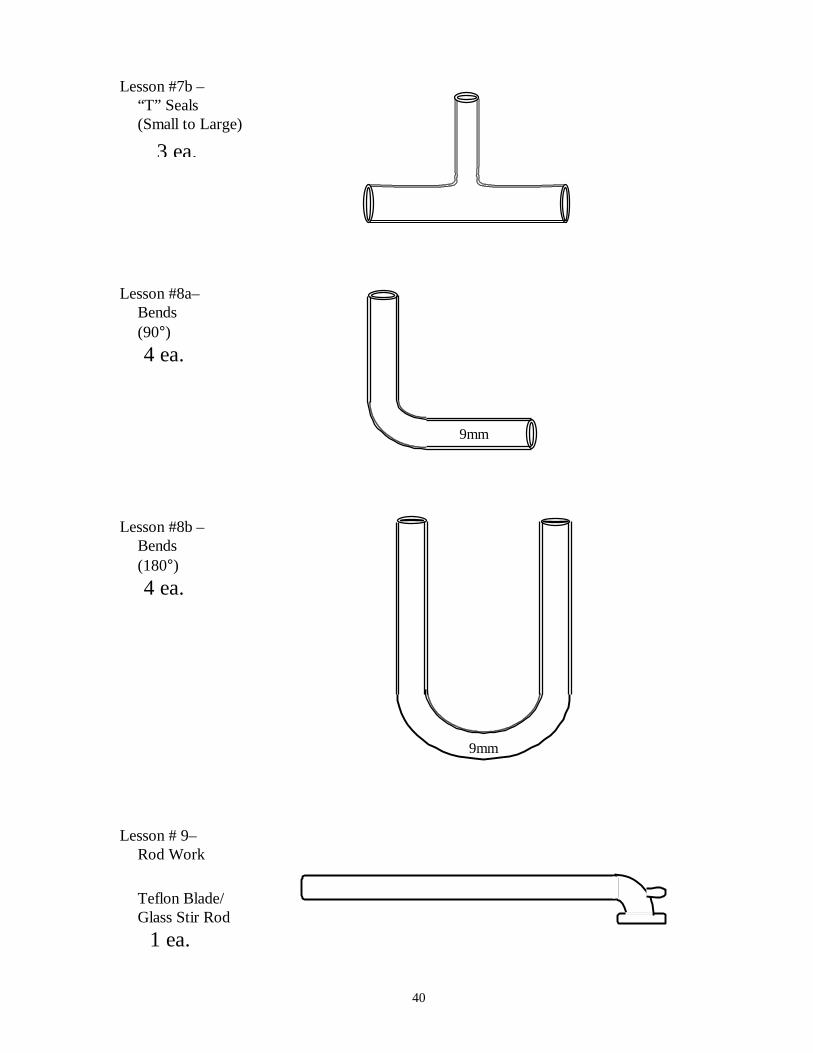
Lesson #7b –“T” Seals(Small to Large)
Lesson #8a–Bends(90°)4 ea.
Lesson #8b –Bends(180°)4 ea.
Lesson # 9–Rod Work
Teflon Blade/Glass Stir Rod
1 ea.
9mm
9mm
3 ea.

41
Glass Stir Rod
1 ea.
Glass Hooks
3 ea.
Lesson #10a –Blind Seals
3 ea.
Lesson #10b –Cylinder construction
2 ea.
Lesson #11a –Capillary Butt Seals(Same O.D.)
1 ea.
Lesson #11b –Capillary Butt Seals(Different O.D.)
1 ea.
9mm
9mm
6”
Tool the top and addpour spout
Flare next toblind seal
22mm
42
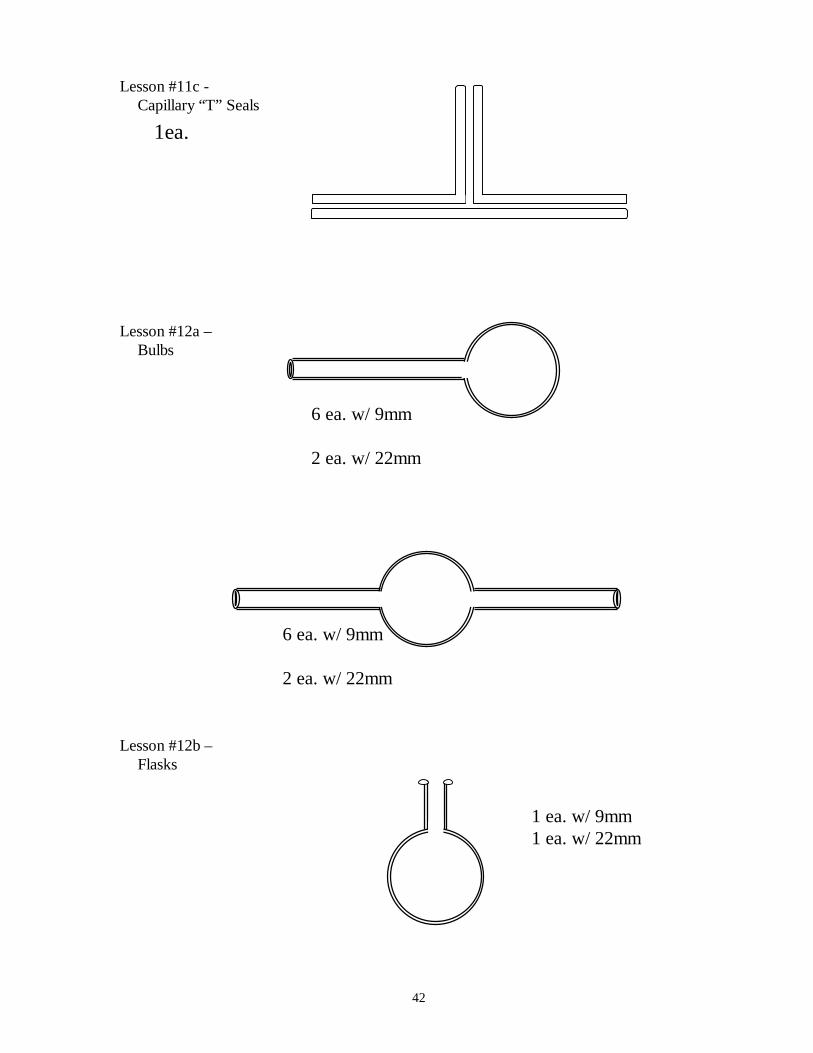
Lesson #11c -Capillary “T” Seals
Lesson #12a –Bulbs
Lesson #12b –Flasks
6 ea. w/ 9mm
2 ea. w/ 22mm
6 ea. w/ 9mm
2 ea. w/ 22mm
1 ea. w/ 9mm1 ea. w/ 22mm
1ea.

43
Lesson #12c –Bulb to Bulb Distillation
1 ea.
44
Advanced Seals
Lesson #1 –Cold Trap(9mm & 22mm)
45
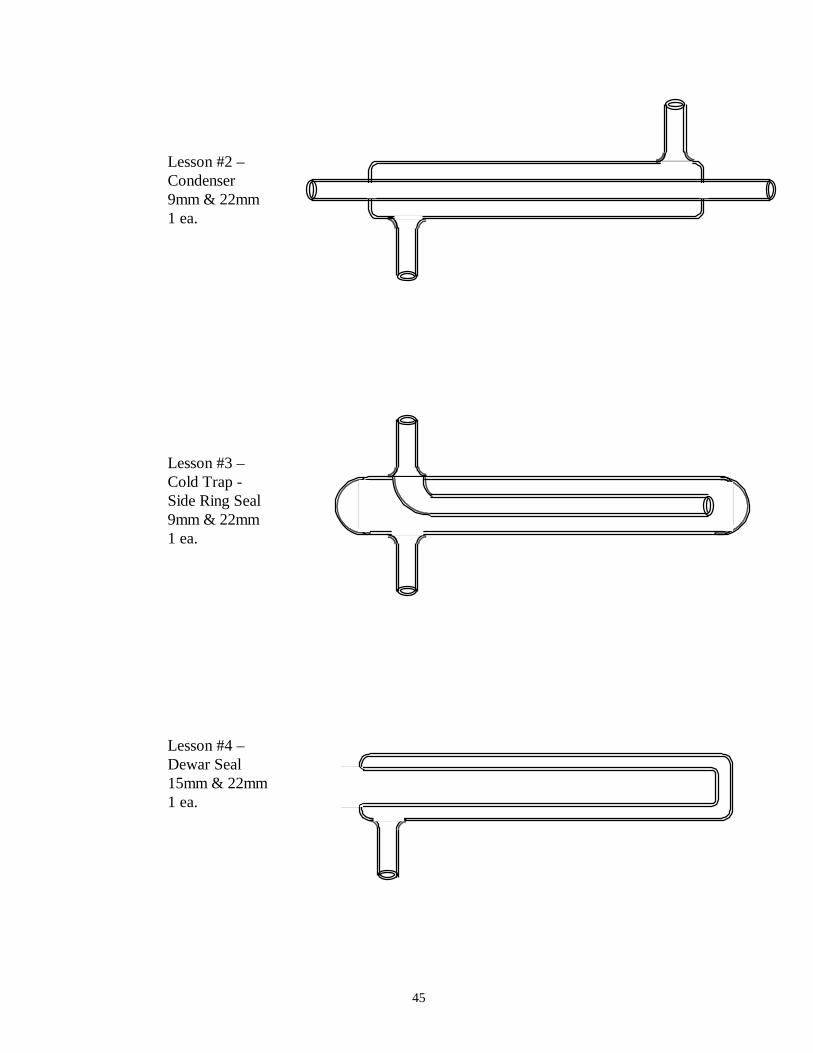
Lesson #2 –Condenser9mm & 22mm1 ea.
Lesson #3 –Cold Trap -Side Ring Seal9mm & 22mm1 ea.
Lesson #4 –Dewar Seal15mm & 22mm1 ea.
46
Lesson # 5 –Closed Circuit9mm & 22mm1 ea.
Lesson #6 –In place manifold work9mm & 22mm
Lesson #7 –Coil Winding6mm Tubing1 ea.
5”

47
Final Project
ConstructionDetails
CHM 593