SAFARI Montage Endpoint · The SAFARI Montage Endpoint is the perfect complement to every display...
20
SAFARI Montage ® Endpoint
-
Upload
vuonghuong -
Category
Documents
-
view
219 -
download
0
Transcript of SAFARI Montage Endpoint · The SAFARI Montage Endpoint is the perfect complement to every display...

SAFARI Montage® Endpoint

Dear Customer,
Thank you for the purchase of your new SAFARI Montage Endpoint!
The SAFARI Montage Endpoint is the perfect complement to every display and projector, and it
integrates seamlessly with your SAFARI Montage environment to provide a fully managed platform
for the delivery of district-wide digital signage, broadcasts, and classroom-based digital media and
live streams.
This manual will guide you through the initial installation of your endpoint and registration within
your SAFARI Montage environment.
Before you the begin installation, please read all instructions, heed all safety information in this
guide and make certain that all components of your endpoint are present.
In the unlikely event that any components are missing or defective, please have the serial number
of your endpoint handy, and contact the SAFARI Montage support team at 1–800–782–7230.
Please keep this user manual and a permanent record of the serial number of your endpoint in a
safe place for future reference.

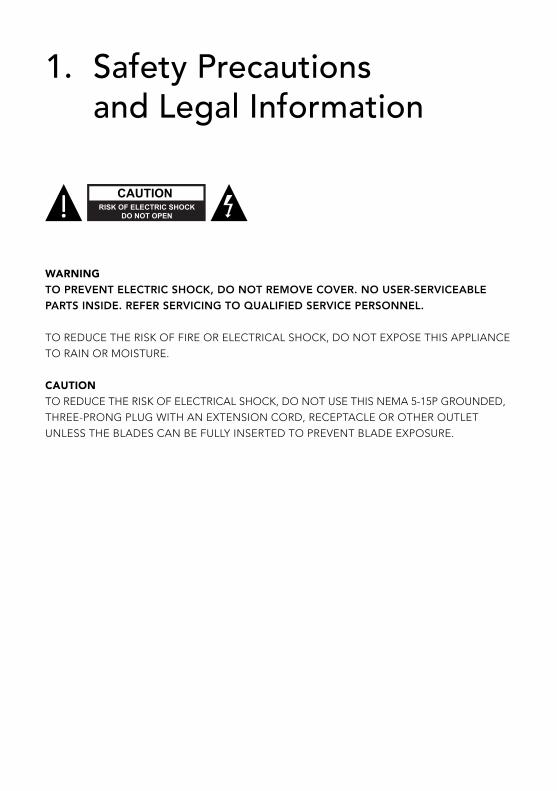
1. Safety Precautions and Legal Information
WARNINGTO PREVENT ELECTRIC SHOCK, DO NOT REMOVE COVER. NO USER-SERVICEABLE PARTS INSIDE. REFER SERVICING TO QUALIFIED SERVICE PERSONNEL.
TO REDUCE THE RISK OF FIRE OR ELECTRICAL SHOCK, DO NOT EXPOSE THIS APPLIANCE
TO RAIN OR MOISTURE.
CAUTIONTO REDUCE THE RISK OF ELECTRICAL SHOCK, DO NOT USE THIS NEMA 5-15P GROUNDED,
THREE-PRONG PLUG WITH AN EXTENSION CORD, RECEPTACLE OR OTHER OUTLET
UNLESS THE BLADES CAN BE FULLY INSERTED TO PREVENT BLADE EXPOSURE.

1.1 Important Safety and Operating Environment Considerations
Follow these important safety guidelines when installing and using your SAFARI
Montage Endpoint:
1. Read all instructions, heed all warnings herein and install according to all
manufacturer’s instructions.
2. Do not use this product near water.
3. Allow for adequate ventilation to maintain normal operating temperature. Do not block
ventilation openings, position the product in an enclosed space that would restrict airflow
around the unit, place anything on top of the product or place the product on top of another
heat-producing device.
4. Do not install near any heat sources, such as radiators, heat registers or any other apparatus
(including amplifiers) that produces heat. If the device has been in a cold environment, allow it
to warm to room temperature for at least two hours before connecting it to a power source.
5. Install the product securely to prevent damage.
6. Use only the power supply provided with the product. The use of any other power supply
may cause damage and void the warranty. Do not defeat the safety purpose of the polarized
or grounding-type plug provided with the product. A polarized plug has two blades and a
third grounding prong. The wide-blade and the third prong is provided for your safety. If
the provided plug does not fit your outlet, consult an electrician for replacement of the
obsolete outlet.
7. Protect the power cord from being walked on or pinched, particularly at plugs, convenience
receptacles and the point where they exit from the product.
8. Read and follow all safety instructions in this user manual related to the included remote
control, including but not limited to the use of batteries within the remote control.
9. Disconnect this product from the power supply before cleaning, clean with a dry cloth only and
do not use any cleaning agents or solvents.
10. Only use the attachments and accessories specified by the manufacturer.
11. Unplug this product during lightning storms or when unused for long periods of time.
12. The endpoint must be placed at a distance of at least 10 cm from other equipment that may
cause electromagnetic interference, such as TV sets or video recorders.
13. The endpoint can be operated at an ambient temperature of 0°C to +35°C and at a relative
humidity of 10% to 70% (non-condensing).
14. The SAFARI Montage endpoint must be installed in accordance with SAFARI Montage’s
warranty terms with properly conditioned power and surge protection.
15. All servicing of the endpoint must be referred to SAFARI Montage in accordance with any
applicable warranty.

The following safety guidelines apply to your use of the included SAFARI Montage
Endpoint Remote Control:
1. Use only two (2) AAA 1.5 volt batteries for the remote control.
2. Follow the polarity diagram (+ /-) in the battery compartment to avoid the risk of explosion.
3. Do not store or use the remote control near heat sources, at high temperatures or in
direct sunlight.
4. Do not use the remote control in a moist, wet or corrosive environment.
5. Remove batteries before storing the remote control for extended periods.
6. Do not mix old and new or different battery types.
7. Dispose of used batteries responsibly and according to applicable regulations.
8. Do not expose the batteries to excessive heat, as batteries exposed to heat may
explode or leak.
9. Do not attempt to recharge non-rechargeable batteries.
10. Keep the remote control and batteries out of the reach of children.
11. Ensure that the endpoint is oriented to allow reception of remote control signals and avoid
orienting the product such that the IR receiver is directly aligned with fluorescent lighting,
which may cause interference with IR remote signals.
TO AVOID ELECTRIC SHOCK, ONLY OPEN THE REMOTE CONTROL TO REPLACE THE BATTERIES. THERE ARE NO USER-SERVICEABLE PARTS INSIDE THE REMOTE CONTROL.
1.2 Regulatory Information
NOTE:This equipment has been tested and found to comply with the limits for a Class B digital device,
pursuant to part 15 of the FCC Rules. These limits are designed to provide reasonable protection
against harmful interference in a residential installation. This equipment generates, uses and can
radiate radio frequency energy and, if not installed and used in accordance with the instructions,
may cause harmful interference to radio communications. However, there is no guarantee that
interference will not occur in a particular installation. If this equipment does cause harmful
interference to radio or television reception, which can be determined by turning the equipment
off and on, the user is encouraged to try to correct the interference by one or more of the
following measures:
• Reorient or relocate the receiving antenna.
• Increase the separation between the equipment and receiver.
• Connect the equipment into an outlet on a circuit different from that to which the receiver
is connected.
• Consult SAFARI Montage or your SAFARI Montage authorized dealer for assistance.
Please note that changes or modifications not expressly approved by the party responsible for
compliance could void the user’s authority to operate the equipment.

1.3 Legal Notices
Copyright © 2015–2017 Library Video Company. All rights reserved.
Library Video Company d/b/a SAFARI Montage reserves the right to revise this user manual and
to make changes to it from time to time without obligation on the part of SAFARI Montage to
provide notification of any such change. SAFARI Montage provides this user manual without
warranty of any kind, either implied or express, including but not limited to the implied warranties
of merchantability or fitness for a particular purpose. SAFARI Montage may make improvements
in the product(s) described in this manual at any time without notice.
The “SAFARI Montage” word and picture logos are trademarks of Library Video Company and
may not be used without written permission from SAFARI Montage. HDMI, the HDMI logo and
High-Definition Multimedia Interface are trademarks or registered trademarks of HDMI Licensing
LLC. Intel is a trademark of Intel Corporation or its subsidiaries in the U.S. and/or other countries.
Microsoft and Windows are trademarks or registered trademarks of Microsoft Corporation in the
United States and/or other countries. All other product or service names are the property of their
respective owners.

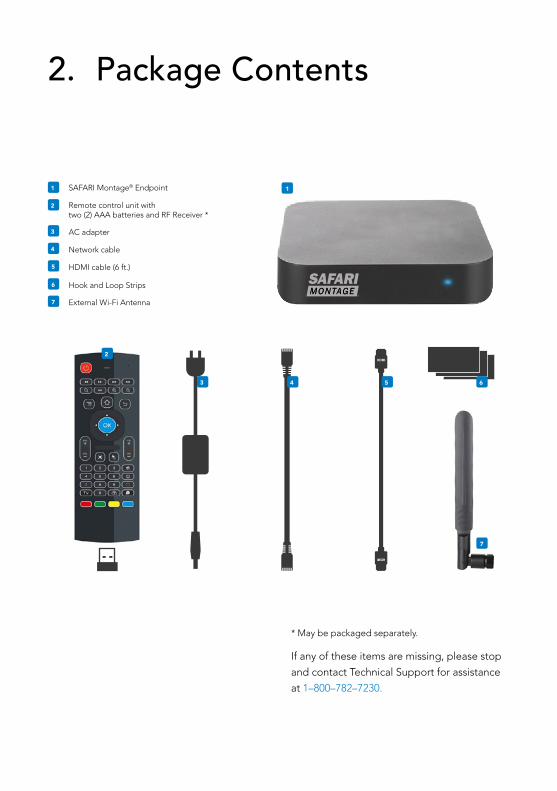
2. Package Contents
SAFARI Montage® Endpoint
Remote control unit with two (2) AAA batteries and RF Receiver *
AC adapter
Network cable
HDMI cable (6 ft.)
1
2
3
4
5
1
2
54
* May be packaged separately.
If any of these items are missing, please stop
and contact Technical Support for assistance
at 1–800–782–7230.
Hook and Loop Strips6
6
7
7
External Wi-Fi Antenna
3
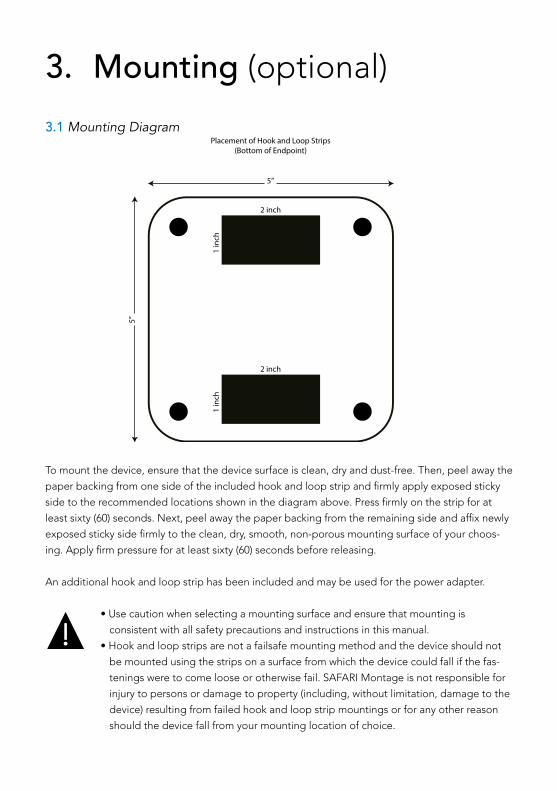
3. Mounting (optional)
5”
5”Placement of Hook and Loop Strips
(Bottom of Endpoint)
1 in
ch
2 inch
1 in
ch2 inch
3.1 Mounting Diagram
To mount the device, ensure that the device surface is clean, dry and dust-free. Then, peel away the
paper backing from one side of the included hook and loop strip and firmly apply exposed sticky
side to the recommended locations shown in the diagram above. Press firmly on the strip for at
least sixty (60) seconds. Next, peel away the paper backing from the remaining side and affix newly
exposed sticky side firmly to the clean, dry, smooth, non-porous mounting surface of your choos-
ing. Apply firm pressure for at least sixty (60) seconds before releasing.
An additional hook and loop strip has been included and may be used for the power adapter.
• Use caution when selecting a mounting surface and ensure that mounting is
consistent with all safety precautions and instructions in this manual.
• Hook and loop strips are not a failsafe mounting method and the device should not
be mounted using the strips on a surface from which the device could fall if the fas-
tenings were to come loose or otherwise fail. SAFARI Montage is not responsible for
injury to persons or damage to property (including, without limitation, damage to the
device) resulting from failed hook and loop strip mountings or for any other reason
should the device fall from your mounting location of choice.
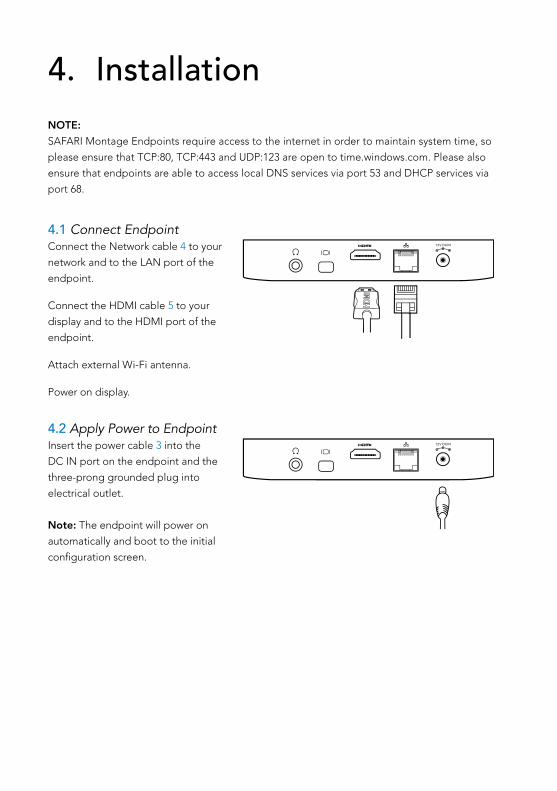
4. Installation
4.2 Apply Power to Endpoint Insert the power cable 3 into the
DC IN port on the endpoint and the
three-prong grounded plug into
electrical outlet.
Note: The endpoint will power on
automatically and boot to the initial
configuration screen.
4.1 Connect EndpointConnect the Network cable 4 to your
network and to the LAN port of the
endpoint.
Connect the HDMI cable 5 to your
display and to the HDMI port of the
endpoint.
Attach external Wi-Fi antenna.
Power on display.
NOTE:SAFARI Montage Endpoints require access to the internet in order to maintain system time, so
please ensure that TCP:80, TCP:443 and UDP:123 are open to time.windows.com. Please also
ensure that endpoints are able to access local DNS services via port 53 and DHCP services via
port 68.
TF
P o we r LED
12V DCIN
TF
P o we r LED
12V DCIN
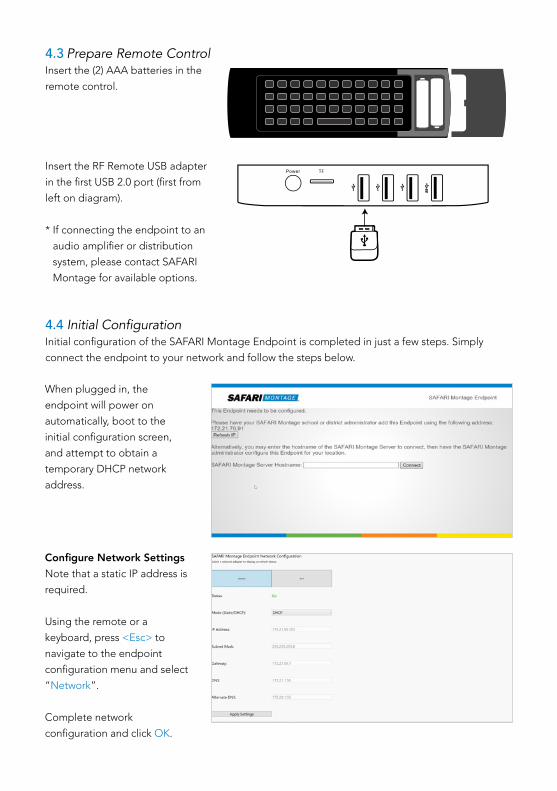
When plugged in, the
endpoint will power on
automatically, boot to the
initial configuration screen,
and attempt to obtain a
temporary DHCP network
address.
4.3 Prepare Remote Control Insert the (2) AAA batteries in the
remote control.
Insert the RF Remote USB adapter
in the first USB 2.0 port (first from
left on diagram).
* If connecting the endpoint to an
audio amplifier or distribution
system, please contact SAFARI
Montage for available options.
4.4 Initial Configuration Initial configuration of the SAFARI Montage Endpoint is completed in just a few steps. Simply
connect the endpoint to your network and follow the steps below.
Configure Network SettingsNote that a static IP address is
required.
Using the remote or a
keyboard, press <Esc> to
navigate to the endpoint
configuration menu and select
“Network”.
Complete network
configuration and click OK.
TF
P o we r LED
12V DCIN
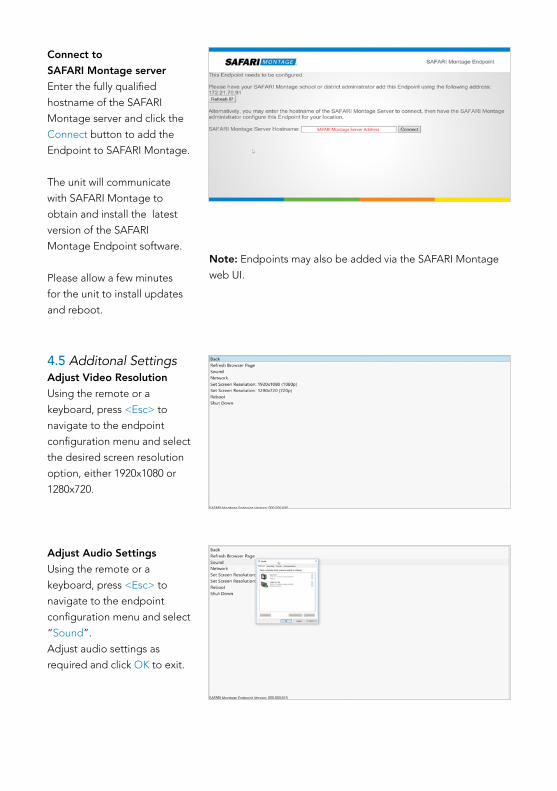
Connect to SAFARI Montage serverEnter the fully qualified
hostname of the SAFARI
Montage server and click the
Connect button to add the
Endpoint to SAFARI Montage.
The unit will communicate
with SAFARI Montage to
obtain and install the latest
version of the SAFARI
Montage Endpoint software.
Please allow a few minutes
for the unit to install updates
and reboot.
4.5 Additonal Settings Adjust Video ResolutionUsing the remote or a
keyboard, press <Esc> to
navigate to the endpoint
configuration menu and select
the desired screen resolution
option, either 1920x1080 or
1280x720.
Adjust Audio SettingsUsing the remote or a
keyboard, press <Esc> to
navigate to the endpoint
configuration menu and select
“Sound”.
Adjust audio settings as
required and click OK to exit.
Note: Endpoints may also be added via the SAFARI Montage
web UI.
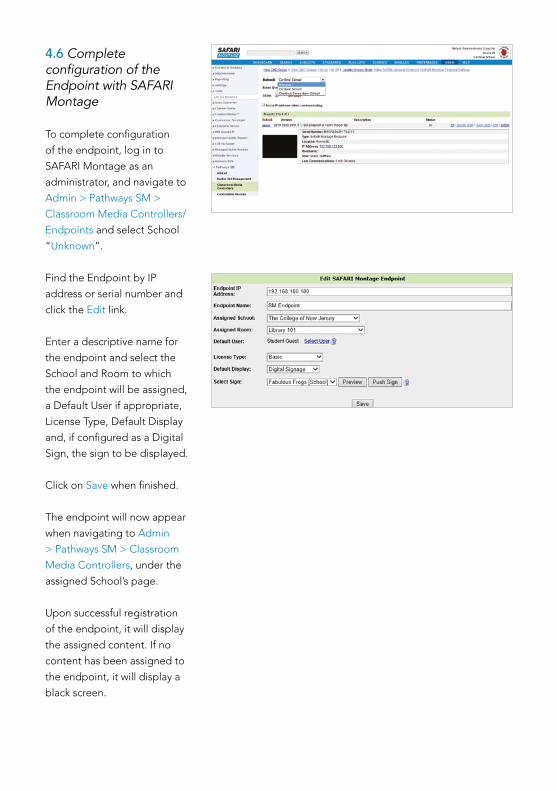
4.6 Complete configuration of the Endpoint with SAFARI Montage
To complete configuration
of the endpoint, log in to
SAFARI Montage as an
administrator, and navigate to
Admin > Pathways SM >
Classroom Media Controllers/
Endpoints and select School
“Unknown”.
Find the Endpoint by IP
address or serial number and
click the Edit link.
Enter a descriptive name for
the endpoint and select the
School and Room to which
the endpoint will be assigned,
a Default User if appropriate,
License Type, Default Display
and, if configured as a Digital
Sign, the sign to be displayed.
Click on Save when finished.
The endpoint will now appear
when navigating to Admin
> Pathways SM > Classroom
Media Controllers, under the
assigned School’s page.
Upon successful registration
of the endpoint, it will display
the assigned content. If no
content has been assigned to
the endpoint, it will display a
black screen.
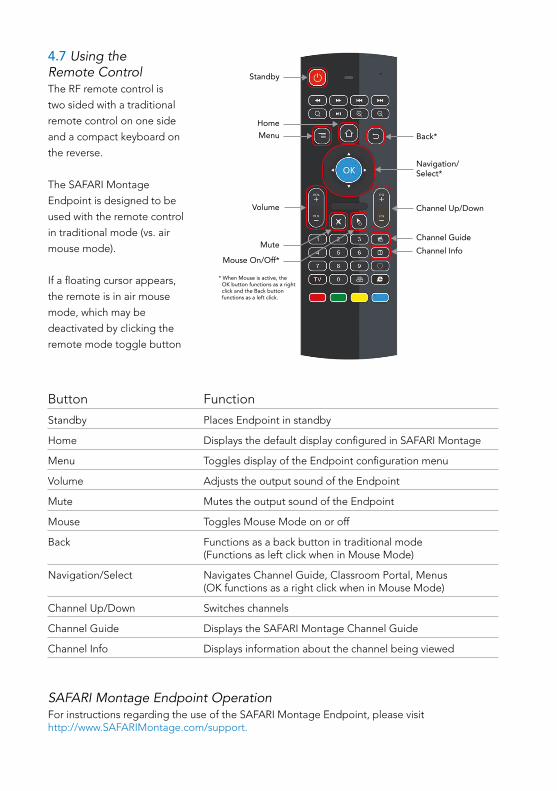
4.7 Using the Remote ControlThe RF remote control is
two sided with a traditional
remote control on one side
and a compact keyboard on
the reverse.
The SAFARI Montage
Endpoint is designed to be
used with the remote control
in traditional mode (vs. air
mouse mode).
If a floating cursor appears,
the remote is in air mouse
mode, which may be
deactivated by clicking the
remote mode toggle button
Menu Back*
Channel Up/Down
Channel GuideChannel Info
Navigation/Select*
Home
Standby
Volume
Mute
Mouse On/Off*
* When Mouse is active, the OK button functions as a right click and the Back button functions as a left click.
Button Function
Standby Places Endpoint in standby
Home Displays the default display configured in SAFARI Montage
Menu Toggles display of the Endpoint configuration menu
Volume Adjusts the output sound of the Endpoint
Mute Mutes the output sound of the Endpoint
Mouse Toggles Mouse Mode on or off
Back Functions as a back button in traditional mode (Functions as left click when in Mouse Mode)
Navigation/Select Navigates Channel Guide, Classroom Portal, Menus (OK functions as a right click when in Mouse Mode)
Channel Up/Down Switches channels
Channel Guide Displays the SAFARI Montage Channel Guide
Channel Info Displays information about the channel being viewed
SAFARI Montage Endpoint OperationFor instructions regarding the use of the SAFARI Montage Endpoint, please visit http://www.SAFARIMontage.com/support.

100317
5. Troubleshooting
SAFARI Montage Five Tower Bridge 300 Barr Harbor Drive, Suite 700West Conshohocken, PA 19428 www.SAFARIMontage.com
If you have any difficulties with installation or need further information, please visit
http://www.SAFARIMontage.com/support or call a support representative at 1–800–782–7230,
8 AM – 6 PM ET Monday – Friday.
When calling Technical Support, please have the server and endpoint serial numbers available.
The server serial number can be found by navigating to Help > About and the endpoint serial
number can be found on the packaging label or the bottom of the endpoint.
Serial Number:
Date of Purchase:
NOTICE:The information in this installation guide is subject to change without notice. Library Video
Company reserves the right to modify the design of its products and change the information in
this installation guide.