
Sacroiliac Support - DoYoga · 2012-08-21 · pelvis-the sacrum, the two hip bones, and the...
7
Sacroiliac Support Gentle adjustmelllS and a targeted yoga routine can relieve pain in YOl'" SI j"ints and low back By Doug Keller o you experience stinging pain at the back of your pelvis on one side when you bend, twist, or stand up after a long period of sitting? This is a likely indicator of sacroiliac instability. As human beings, our uni«.ue upright posture places a great deal of stress on the sacroiliac region, or pelvis-the sacrum, the two hip bones, and the sacroiliac joints in between-making it vulnerable to misalignments. This can lead to further postural imbalances, causing pain or discomfort in the back or shoulders. But relief is within reach. By identifYing sacroil, iac imbalances, and then working mindfully to stabilize and restore healthy movement in this area, you can bring ease to your low back and a happy swing to your step. Structural Fac 0 'S The sacrum derives its name from the Latin word racer, meaning "sacred"-it is literally the "sacred bone." Consisting of five fused ver- tebrae at the base ofthe spine, this large triangular bone provides the gravitational center of your body around which you twist and turn. The tVIO sacroiliac joints form the meeting points between the sacrum and the hip bones. Each hip bone is comprised of three parts: the winglike ilium, or hip, at the top; the ischium at the bottom; and the pubic bone at the front of the pelvis. The inner edge of each ilium
Transcript of Sacroiliac Support - DoYoga · 2012-08-21 · pelvis-the sacrum, the two hip bones, and the...

Sacroiliac Support Gentle adjustmelllS and a targeted yoga routine can relieve pain in YOl'" SI j"ints and low back By Doug Keller
o you experience stinging pain at the back of your pelvis on one side when you bend, twist, or stand up after a long period of sitting? This is a likely indicator of sacroiliac instability.
As human beings, our uni«.ue upright posture places a great deal of stress on the sacroiliac region, or
pelvis-the sacrum, the two hip bones, and the sacroiliac joints in between-making it vulnerable to misalignments. This can lead to further postural imbalances, causing pain or discomfort in the back or shoulders. But relief is within reach. By identifYing sacroil, iac imbalances, and then working mindfully to stabilize and restore healthy movement in this area, you can bring ease to your low back and a happy swing to your step.
Structural Fac 0 'S
The sacrum derives its name from the Latin word racer, meaning "sacred"-it is literally the "sacred bone." Consisting of five fused vertebrae at the base ofthe spine, this large triangular bone provides the gravitational center of your body around which you twist and turn.
The tVIO sacroiliac joints form the meeting points between the sacrum and the hip bones. Each hip bone is comprised of three parts: the winglike ilium, or hip, at the top; the ischium at the bottom; and the pubic bone at the front of the pelvis. The inner edge of each ilium

Sacroiliac Joints
THE PELVIS contains two hip bones and the sacrum. The winglike portion of each hip, the ilium, connects to the sacrum at the sacroiliac joints.
has a grooved surface into which the sacrum fits, forming the sacroiliac ( or SI) joints on either side. The uni«..ue structure of the SI joints allows the pel' vis to support the weight of the torso while making the dynamic movement between the spine and the lower Iimbs possible.
To better understand the relation' ship between the sacrum and the hips, think of the pelvis (Fig. 1) as a chariot
the sacrum is the cart and the two hip bones serve as the wheels . Similar to the mechanics of movement in a chariot, the hip bones can rotate back and forth with the movement of the legs, while the sacrum itself remains reiatively stable.
Sacroiliac pain arises from postural stress on the joint or from pelvic torsion (twisting) caused by hypermobility, where loose ligaments allow too much movement in the joint and the potential for the sacrum to slip out ofits groove.
Some cases of postural imbalancesuch as a weaker arch in one foot, which causes that hip to drop- can also result in pelvic torsion. In these cases , targeted action at the root of the problem can cop reet the misalignment; for example, you can strengthen the weaker arch (see yogaplus .orgjarches) to balance your weight on both legs. But often the pos'
tural tendency is a manifestation of a sacroiliac problem, and the solution be' gins with balancing and stabilizing the hips and SI joints themselves .
Checking Pelvic Alignment Anterior Evaluation
The first step to determining any pelvic misalignments is simple visual obsen'a' tion. Locate the hip points-the promi' nent bony protrusions on each side of the front of your pelvis (called the anterior superior iliac spine, or ASIS)then check yourselfin a mirror (Fig. 2) .
Is one hip point higher than the other? Judging from the waistline, is the entire pelvis rota ted or shifted to one side? One ASIS may be higher because the "wheel" of that hip bone, to use the chariot analogy, is rota ted backward and up, andjor because the other hip is rotated forward and down. The differ' ence in height between the two bony projections teIls you whether there 1S
torsion in the pelvis, which in turn is causing strain on the SI joint.
2 ASIS EVALUATION Find the two bony projections at the front of the hip bones (the ASIS)
and check in a mirror to see if they are level.
YO G_-\PLC$.ORG FALL l "' .... Ij Y ,-

3
-.. - - :-" sL:Dde resr allmvs you to - - --e - croiliac joints by check,
- ; :..:." :- ""() ~ny projections in the back : --" ?<=' T knmm as the posterior .:?Cnor iliac spine, or PSIS. To find
G:-se pomts, place your hands on your
PSIS EVALUATION To feel sacroiliac imbalances in the back body, slowly sway the knees from side to side, and sense whether one PSIS presses into the floor more than the other.
waist while standing, hook your thumbs around the back of your hips, and feel for the slight knobs ofbone on either side of your sacrum. When there is strain on the SI joint, you may feel sore' ness or tenderness at the PSIS .
To sense this for yourself, lie on your back on a hard floor with your knees bent and your feet placed parallel under your knees . If you are on a soft carpet, place something hard like a thin book under your sacrum. Support your head and neck if necessary.
Gently press your low back into the floor, tilting your pelvis back by slightly scooping your tailbone up to' ward the ceiling. Keep your knees to' gether and your feet on the floor, and move your knees slowly to the right 6 to 8 inches , and then back to center, and then to the left in the same way (Fig. 3) .
Repeat this back and forth a fell' rimes. If you're keeping your back flat on
the floor and not swinging your knees
58 YOGA+JOYFU L LI VI NG F A LL 2009 YO GA PLUS .OR G
too far to either side, you should be able to feel the knobs ofthe PSIS on the hard surface. Notice any asymmetry: Is the PSIS more prominent or does it press more firmly into the floor on one side than the other? Is the area more tender or irritated on one side than the other? If one knob seems to protrude more, that hip bone is most likely rotated back. This usually correlates with the ASIS being higher on that side in the front body, which you may have noticed in your initial evaluation.
The PSIS inQ..uiry is both a simple selfdiagnostic techni~e and a gentle massage for your SI joints against the floor, stimulating a number of acupres' sure points and encouraging the para' spinal muscles- the muscles on either side of the spine that exert a pull on the hip bones and sacrum- to release ifthey are in spasm. While you might feel a Jit,
tle tenderness, this massage by itself can bring some relief for SI discomfort.

THE SACROIlIAC JOINTS ARE TWO OF THE MOST IMPORTANT JOINTS IN THE BODY. THEY ARE AT THE CENTER OF BOTH REST AND MOTION.
Gentle Re lignmen Based on the imbalances you detected in the previous evaluations, the following exercises will help you safely and gently correct pelvic torsion. (If you didn't sense any misalignments, you can prac' tice these exercises on both sides, instead of one, to promote sacroiliac stability.)
FistE 'CIS
Straighten the leg on the side where the PSIS was more prominent on the floor, and bend the opposite knee. The hip bone on this side is the "wheel" that is rota ted backward; we want to rotate it forward by extending that leg while rotating the opposite hip back by bend, ing the knee. Bring the bent knee toward your chest with the thigh angled at about 45 degrees to the floor. Hold the back of your thigh (not your knee), and allow a relaxed, natural curve in your lower back.
Lift your straight leg about three inches from the floor, keeping it ex' tended and firm (Fig. 4) . The weight of the leg will bring the ilium forward through the pull of the «-uadriceps; you can gently bounce the leg up and down a couple of inches to amplifY this ac' tion. Then lower your leg back to the floor.
Seco d E 'e eise
Now you can work to open this same hip, allowing the sacrum to slide into place. Draw the bent leg doser to the chest. Lift the straight leg three inches from the floor, and then swing it out to the side-one to two feet- allowing it to
rotate with the leg and foot pointing out (Fig. 5) . Slowly lower the leg toward the floor from the swung out position, letting your pelvis tip to that side. The leg does' n't have to touch the floor-it 's just exerting weight on the outwardly rotated hip, creating so me space for the sacrum
to slip back into its proper place. Repeat this exercise once more on the same side.
hec '0 Ir P'ogres
N ow place both feet on the floor with the knees bent and repeat the original se!f,diagnostic techni«-ue for the PSIS by rocking your knees side to side and tun' ing in to any changes in the back of the pelvis (Fig. 3) . Ifthe PSIS feels softer, less tender, or less prominent, it's a sign of progress. If you fee! that progress was minimal, you can repeat the exercise with a small weight on your ankle or thigh (no more than I to 2 pounds) to provide more leverage. Since you are
promoting balance by correcting an asymmetry, these exercises are not repeated on both sides, but only on the side where the PSIS is more prominent. (If you have no significant imbalances in your hips, try practicing the routine on both sides as a pleasant preparation for relaxation in shavasana.)
Check your sacroiliac symmetry in the morning and evening and correct it as necessary with these exercises. Since the very shape and structure of the bones of the hips and sacrum can make us susceptible to misalignments, it's a good idea to make this apart of your general wellness routine.
4 LEG EXTENSION To realign the hip whose PSIS was more prominent (or whose ASIS appeared higher), straighten and lift that leg three inches off the floor while bending the opposite knee toward the chest.
5 HIP OPENING Lift the extended leg off the floor again and swing it to the side with the toes rotated out.
YOG A PLUS.ORG FALL 2 009 YOG A+JOYFUL LI VI NG I 59
sana tor SI Heal h For overall sacroiliac health, these gende adjustments should be supported-with some direction from a teacher-with a more active yoga routine that includes stretching the hamstrings, gluteals, and low back muscles; toning the abdominal muscles that support the front of the spine; and strengthening all the muscles that support the pelvis. Here are some key pos es to target these actions within the larger framework of your general practice.
Stretching the Surroundmg Muscles:
Supta Padangusthasana
The reclining leg stretch (supta padaw gusthasana) , with a small support at the low back, is one ofthe best pos es for stretching the hamstrings, the gluteals, and the muscles of the low back.
Lie on your back with one leg ex' tended and the opposite knee bent and drawn in toward your ehest. You can support your head with ablanket or a cushion to maintain a natural relaxed curve in the neck (a tight, hyperextended neck will tighten your hip flexors, exert' ing a pull on your hip bones and sa' crum). Loop astrap around the arch of your foot just beneath the mound of the big toe and straighten your leg, extend, ing through the heel and the mound of the big toe, to feel a stretch in the harn' strings at the back of your thigh. Grad, ually bend your elbows out to the sides to pull on the strap, bringing the leg
60 YOGA + JOYFUL LIVING FALL 2009 YOGAPLUS.ORG
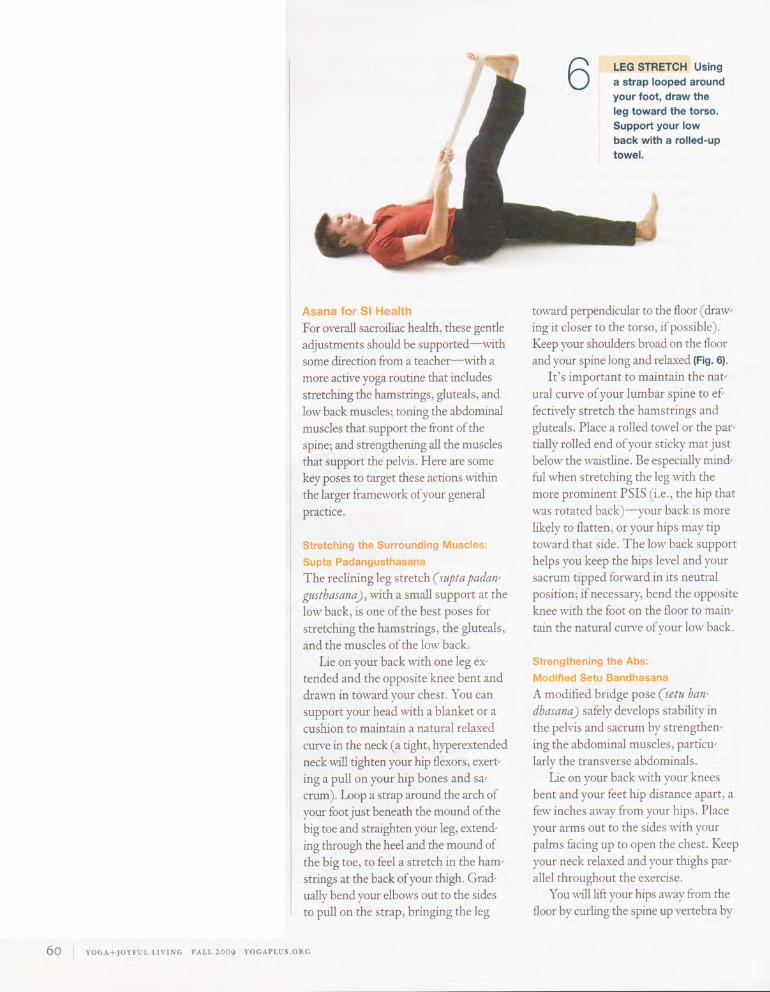
6 LEG STRETCH Using astrap looped around your foot, draw the leg toward the torso. Support your low back with a rolled-up towel.
toward perpendicular to the floor ( draw' ing it closer to the torso, if possible). Keep your shoulders broad on the floor and your spine long and relaxed (Fig. 6).
It's important to maintain the nat' ural curve of your lumbar spine to ef fectively stretch the hamstrings and gluteals. Place a rolled towel or the par' tially rolled end of your sticky mat just below the waistline. Be especially mind, ful when stretching the leg with the more prominent PSIS (i.e., the hip that was rotated back)-your back is more
likely to flatten, or your hips may tip toward that side. The low back support helps you keep the hips level and your sacrum tipped forward in its neutral position; if necessary, bend the opposite knee with the foot on the floor to main' tain the natural curve of your low back.
Strengthening the Abs:
10 i ed Se u Bi ndhasana
A modified bridge pose (setu ban' dhasana) safely develops stability in the pelvis and sacrum by strengthew ing the abdominal muscles, particu' larly the transverse abdominals.
Lie on your back with your knees bent and your feet hip distance apart, a few inches away from your hips. Place your arms out to the sides with your palms facing up to open the ehest. Keep your neck relaxed and your thighs par' allel throughout the exercise.
You will lift your hips away from the floor by curling the spine up vertebra by

vertebra, starting with the tailbone. The curling action tones the rectus abdomi,
nis muscles that run from your pubic
bone to your navel, as weil as the lower
transverse abdominals. (You can sense whether the transverse abdominals are engaged by placing your fingertips on your hip points as you curl up-your hip points should draw toward each other.)
To deepen the abdominal engage'
ment, co ordinate the curling action with your breath. Exhale by pursing your lips and blowing through them as if cooling a bowl ofhot soup. As you firm the lower abdominal muscles ,vith your exhala' tion, lengthen your tailbone away from
your head, curl it slightly up toward the
ceiling, and lift the hips until you've reached a straight line from your shoul,
der blades to your knees (Fig. 7) . Do not lift your hips higher than a straight line or arch your back-you're not going for the backbend version of the pose,
just abdominal engagement. Press into
the floor through your heels and the backs of your shoulders.
As you inhale, lower your hips back down to the floor with a neutral curve in your spine and return to the starting posi'
tion. Repeat 3 to 5 times. This exercise helps you cultivate fluiclity in the spine
and strength in the lower abdominals.
Doug Keller's yoga journey includes 14 years of practicing in Siddha roga ashrams, intemive tralll' ing in the Iyengar al/d Anllsara methods, and near/y a decade ofteaching in the U.S. and abroad.
7 MODIFIED BRIDGE On an exhale, lengthen the tailbone away trom your head and curl the
spine toward the ceiling until the hips are in li ne with both your knees and shoulders.
Stronger W· onasana
Nowyou can integrate tone in the ab,
dominals and length in the spine with
stability in the pehis by practicing side
angle pose (parshvakonasana). This pose allows you to specifically target any asymmetry benl"een the two hips as you work with each side inclividually.
Let's say your left hip point appeared lower in the ASIS evaluation. We'll start
with the left leg as the straight (back)
leg. Step your feet wide apart. Turn your left foot in about 30 degrees and your right foot and leg out 90 degrees. Exhale and bend the right knee over the right
ankle, bringing the thigh as close to par' allel to the floor as you can. With the
torso facing fon,"ard, bend to the right at
the hip crease. Support your upper body by placing your right forearm on the thigh just abOl"e the knee, or your hand
on a block. "-\djust your feet as needed: you want your right shin to be perpendi'
cular to the floor, your right sit bone in line with the nght knee and heel, and
your left leg fully straightened. Since the left hip point was rotated
fonvard and down, we want to lift and
lengthen through the left hip. Wrap the fingers ofyour left hand around the left
hip bone, placing your thumb at the top
of the buttock muscle. Take a deep breath in, and as you exhale, extend through the left leg, rooting through the heel as you firm the lower abdominals, lengthen through the tailbone, and firm
and lengthen the buttock muscles to'
YOGAPLUS.ORG FALL 2009 YOGA-JOYfl"L L :\ " I

ward the heel (Fig. 8) . You can feel this action with your thumb- the buttock muscles are working to turn the "wheel" of the left hip back and up.
Rather than extending the arm over' head to assurne the full pose, keep your left hand on your hip and practice the lengthening action from your tailbone to your heel through the back body, while toning and lifting from the lower abdomen to gently lift the hip point and rotate it back. Notice that as you firm the lower abdomen, it also draws the hip point toward the midline of your body (through the toning of the trans' verse abdominals). This action pre' vents you from overdoing the lift in the hip point. Repeat these actions coordi, nated with the breath 3 to 5 times.
The actions will be slightly different when practicing the pose on the other side. Since this hip bone (we'll assurne it's the right) is already rotated back, we don't need to rotate it back further. Instead, when you practice with your left leg bent and your right leg straight, wrap your fingers around your right hip bone and rotate it a bit more toward the floor (Fig. 9) . You may need to turn your right toes in to help the thigh spi, ral slightly inward; keep your right leg firm and the arch of your foot lifted.
SIOE ANGLE A Send the knee on the side where the front hip point appeared higher. To rotate the opposite hip up and back, firm the lower abs and lengthen the tailbone.
This adjustment rotates the hip point forward and should bring a release to the sacroiliac joints, along with a broad, ening feeling across the back of your pelvis . Repeat the toning and lengthew ing action through the lower abdomen and tailbone for 3 to 5 breaths.
As you practice the pose on this side, explore the feeling of greater length and ease in your spine and back body, rather than seeking a big opening in your front body. Firm the right but, tock and lengthen from hip to heel.
Press your outer left heel into the floor to firm the left but, tock as weIl. This action scoops the left sit bone in line with your left knee, effectively rotating your left hip bone up and back. Now you're mov' ing toward greater balance between the two sides.
SI OE ANGLE S To realign the opposite side, spin the thigh of the straight leg toward the floor as you firm the lower abdomen.
In summary, the sacroiliac joints are two of the most important joints in the body, at the center ofboth rest and motion. By striking balance between the two sides and working to keep your "wheels" in alignment, you'll find relief from pain while gaining both stability and freedom in your hips and low back.
62 I YOGA + JOYFUL LI VI NG FA LL 2009 YO G A PLUS .OR G


