s4h25 openSAP: Unit 8: Setting up SAP Fiori and activating ...
112
s4h25 – Unit 8 Exercises s4h25 openSAP: Unit 8: Setting up SAP Fiori and activating initial business roles Exercise 1: Verify Unit 7 Exercises are complete Exercise 2: Set up the Embedded Gateway Exercise 3: Activate your SAP Fiori Foundation and launchpad features Exercise 4: Activate initial SAP Business Roles Exercise 5: OPTIONAL, RECOMMENDED Testing SAP Fiori PUBLIC
Transcript of s4h25 openSAP: Unit 8: Setting up SAP Fiori and activating ...

s4h25 – Unit 8 Exercises
s4h25 openSAP: Unit 8: Setting up SAP Fiori and activating initial business roles
Exercise 1: Verify Unit 7 Exercises are complete
Exercise 2: Set up the Embedded Gateway
Exercise 3: Activate your SAP Fiori Foundation and launchpad features
Exercise 4: Activate initial SAP Business Roles
Exercise 5: OPTIONAL, RECOMMENDED Testing SAP Fiori
PUBLIC

s4h25 – Unit 8 Exercises
2
TABLE OF CONTENTS
Contents
BEFORE YOU START......................................................................................................................................................................................................... 4
PREREQUISITES FOR THIS EXERCISE .................................................................................................................................................................................................. 4 LOGON DATA ............................................................................................................................................................................................................................. 4 LOGON TO SYSTEM (SAP S/4HANA) ............................................................................................................................................................................................. 4 ADDITIONAL INFORMATION:.......................................................................................................................................................................................................... 4
EXERCISE 1: VERIFY UNIT 7 EXERCISES ARE COMPLETE ..................................................................................................................................... 5
OVERVIEW ................................................................................................................................................................................................................................. 5 OBJECTIVE.................................................................................................................................................................................................................................. 5 EXERCISE DESCRIPTION ................................................................................................................................................................................................................. 5
EXERCISE 2: SET UP THE EMBEDDED GATEWAY ..................................................................................................................................................... 9
OVERVIEW ................................................................................................................................................................................................................................. 9 OBJECTIVE.................................................................................................................................................................................................................................. 9 EXERCISE DESCRIPTION ............................................................................................................................................................................................................... 10
EXERCISE 3: ACTIVATE YOUR SAP FIORI FOUNDATION AND LAUNCHPAD FEATURES............................................................................... 21
s4h25 – Unit 8 Exercises
3
OVERVIEW ............................................................................................................................................................................................................................... 21 OBJECTIVE................................................................................................................................................................................................................................ 21 EXERCISE DESCRIPTION ............................................................................................................................................................................................................... 21 ADDITIONAL INFORMATION ......................................................................................................................................................................................................... 57
EXERCISE 4: ACTIVATE INITIAL SAP BUSINESS ROLES ....................................................................................................................................... 58
OVERVIEW ............................................................................................................................................................................................................................... 58 OBJECTIVE................................................................................................................................................................................................................................ 58 EXERCISE DESCRIPTION ............................................................................................................................................................................................................... 59 ADDITIONAL INFORMATION ......................................................................................................................................................................................................... 77
EXERCISE 5: OPTIONAL, RECOMMENDED TESTING SAP FIORI .......................................................................................................................... 78
OVERVIEW ............................................................................................................................................................................................................................... 78 OBJECTIVE................................................................................................................................................................................................................................ 78 EXERCISE DESCRIPTION ............................................................................................................................................................................................................... 78
s4h25 – Unit 8 Exercises
4
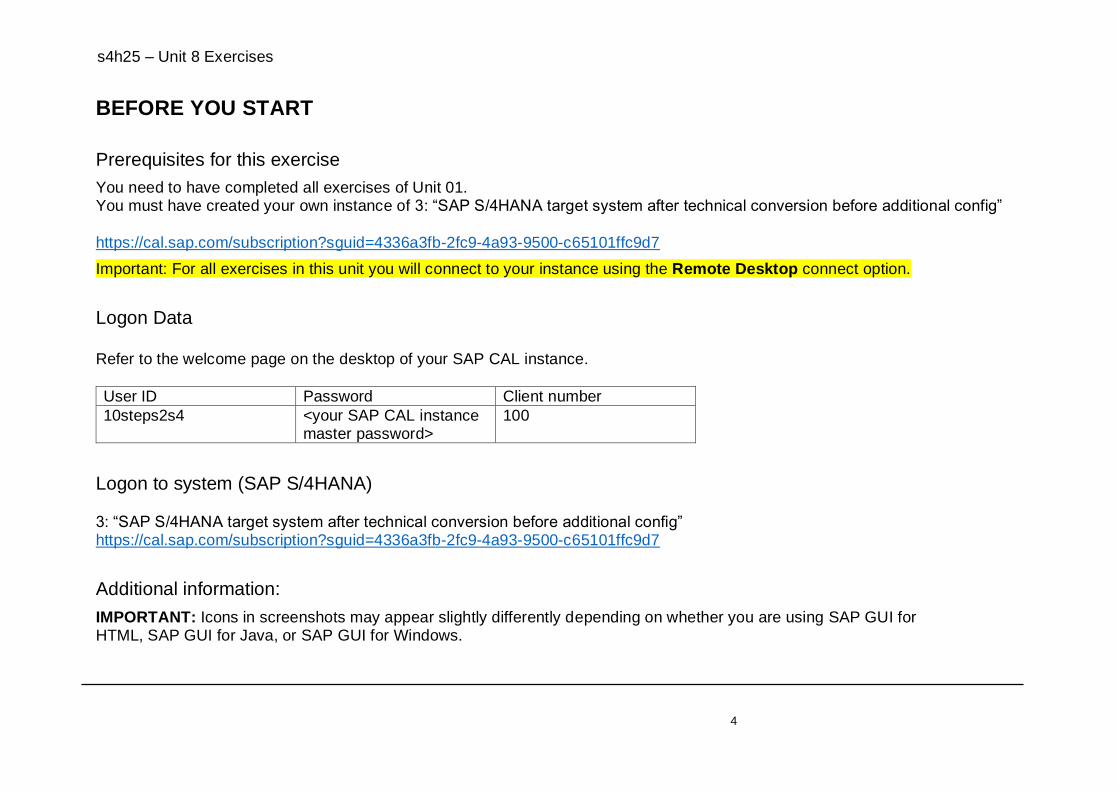
BEFORE YOU START
Prerequisites for this exercise
You need to have completed all exercises of Unit 01. You must have created your own instance of 3: “SAP S/4HANA target system after technical conversion before additional config”
https://cal.sap.com/subscription?sguid=4336a3fb-2fc9-4a93-9500-c65101ffc9d7
Important: For all exercises in this unit you will connect to your instance using the Remote Desktop connect option.
Logon Data Refer to the welcome page on the desktop of your SAP CAL instance.
User ID Password Client number
10steps2s4 <your SAP CAL instance master password>
100
Logon to system (SAP S/4HANA)
3: “SAP S/4HANA target system after technical conversion before additional config” https://cal.sap.com/subscription?sguid=4336a3fb-2fc9-4a93-9500-c65101ffc9d7
Additional information:
IMPORTANT: Icons in screenshots may appear slightly differently depending on whether you are using SAP GUI for HTML, SAP GUI for Java, or SAP GUI for Windows.

s4h25 – Unit 8 Exercises
5
Exercise 1: Verify Unit 7 Exercises are complete Overview
Estimated time: 2 minutes
Objective Check prerequisites are in place
Exercise Description You will check the Unit 7 task lists have been completed. You will check the status of the SAP Fiori launchpad for your instance.
For all exercises in this unit you will connect to your instance using the Remote Desktop connect option.

s4h25 – Unit 8 Exercises
6
What to do What you will see
1. Launch SAP Logon and log into your SAP S/4HANA instance.

s4h25 – Unit 8 Exercises
7
2. Verify that Unit 7 has been completed.
Go to transaction STC02. Clear the Created By field and press
the execute (Start Search) button.
3. Check the following tasks lists have been completed successfully (green square “Success” icon)
SAP_BW_SETUP_INITIAL_S4HANA SAP_ESH_RESET SAP_ESH_INITIAL_SETUP_WRK_CLIENT Hint: If there is more than one run of the task list, check that the most recent run of the task list was successful.
s4h25 – Unit 8 Exercises
8
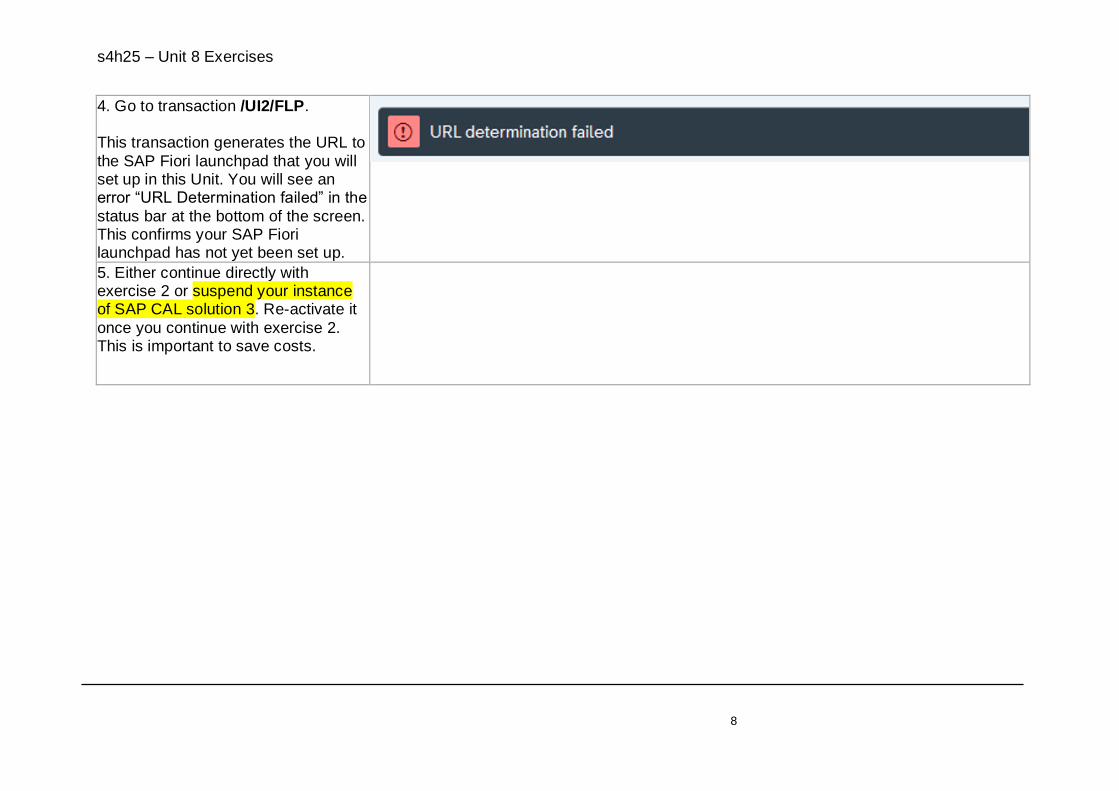
4. Go to transaction /UI2/FLP. This transaction generates the URL to
the SAP Fiori launchpad that you will set up in this Unit. You will see an error “URL Determination failed” in the
status bar at the bottom of the screen. This confirms your SAP Fiori launchpad has not yet been set up.
5. Either continue directly with exercise 2 or suspend your instance of SAP CAL solution 3. Re-activate it
once you continue with exercise 2. This is important to save costs.

s4h25 – Unit 8 Exercises
9
Exercise 2: Set up the Embedded Gateway Overview
Estimated time: 20 minutes
Objective You will run the task list SAP_GW_FIORI_ERP_ONE_CLNT_SETUP to technically set up your embedded Gateway
component to be your embedded SAP Fiori Front-end server. Once executed you will have an empty launchpad ready for SAP Fiori configuration.
You use this task list in your sandbox and development environments. You can find more information on this task list in the SAP Fiori Overview guide in the SAP Help Portal – refer to section Automatic Activation of Embedded-Deployed SAP Fiori
For all exercises in this unit you will connect to your instance using the Remote Desktop connect option.
Prerequisites
As a prerequisite in your own system, make sure you are using the latest version of the task list.
You should apply the latest version SAP Note 2510134 - Fiori Setup: Updates for task lists for Gateway/Fiori configuration.
In your CAL Solution 3 this has already been done for you.
The following system parameters must be set. In CAL solution 3 these parameters have already been set for you.
System Parameter Description Value in CAL solution 3 SAPLOCALHOST Host name of the server vhcalabaci SAPFQDN Fully qualified domain name dummy.nodomain
SAPLOCALHOSTFULL Fully qualified host name of the server vhcalabaci.dummy.nodomain
icm/host_name_full Fully qualified host name of ICM

s4h25 – Unit 8 Exercises
10
icm/server_port_0 The icm server ports must include the HTTP port
8000
icm/server_port_1 The icm server ports must include the HTTPS port
9443
abap/shared_objects_size_MB This must be large enough to support activation of roles. Making this setting too small will result in “out of memory” short dump errors. As a guideline, this is usually set to 4000 MB in a cloud appliance SAP S/4HANA Fully Activated trial solution.
4000 MB
If you are interested, you can review these values by using transaction RZ10 to import the active profile, and then use transaction RZ11 to check the parameter values that have been set.
Exercise Description Perform the following tasks:
• Execute the task list SAP_GW_FIORI_ERP_ONE_CLNT_SETUP
• Complete the setup as per SAP Note 2889595 - Fiori Logon Page does not prompt for credentials

s4h25 – Unit 8 Exercises
11
What to Do What You Will See
1. Go to transaction STC01 and
execute task list SAP_GW_FIORI_ERP_ONE_CLNT_SETUP via the “Generate Task List
Run” button.
2. Select the Fill Parameters icon
for the row “Report /IWFND/R_COF_VIRUS_PROFILE – SAP Gateway Virus Scan Profile
Configuration”.

s4h25 – Unit 8 Exercises
12
3. Check “Virus Scan Switched Off”. Save the parameter and then use the < Back icon to go back to the task list.
Important: Usually, when using a Virus Scanner, you would set the
Virus Scan Profile to /UI5/UI5_INFRA_APP/REP_DT_PUT.
Be aware that if you are NOT using a Virus Scanner, additional authorizations may be required to
access some apps and features, for example as explained in: SAP Note 2568947 - SmartVariantManagement
- Setup and Authorizations
s4h25 – Unit 8 Exercises
13
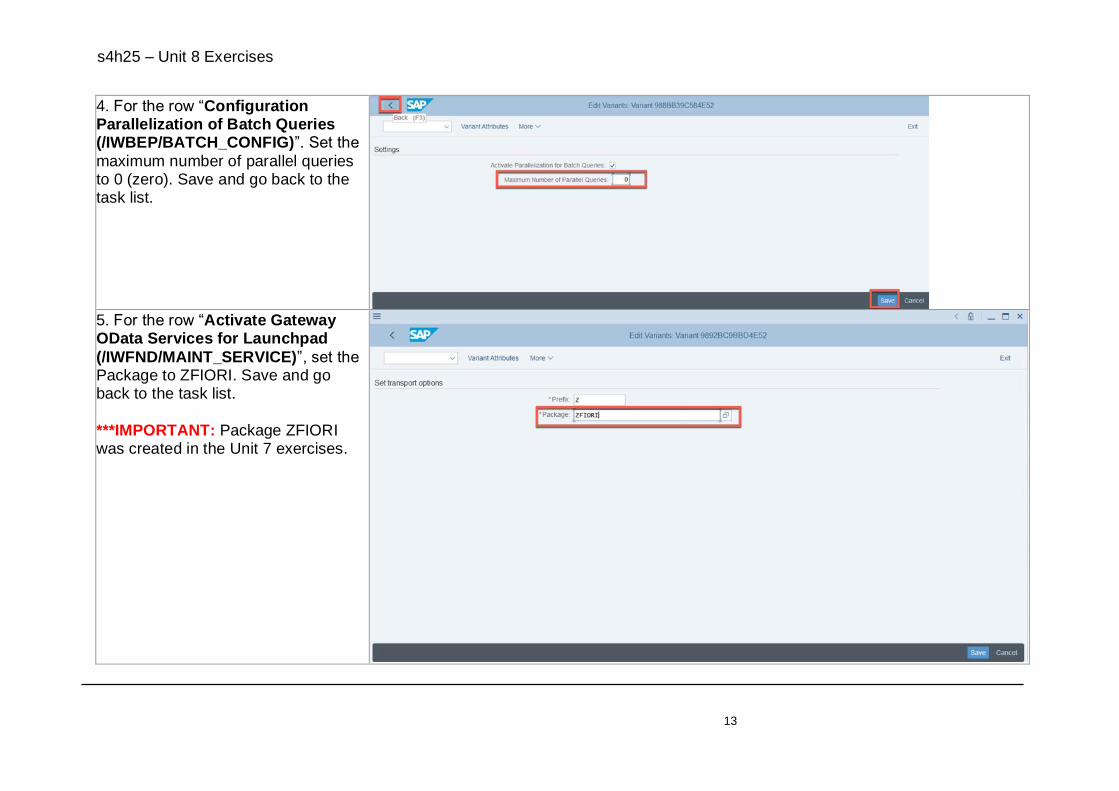
4. For the row “Configuration Parallelization of Batch Queries (/IWBEP/BATCH_CONFIG)”. Set the
maximum number of parallel queries to 0 (zero). Save and go back to the task list.
5. For the row “Activate Gateway OData Services for Launchpad
(/IWFND/MAINT_SERVICE)”, set the Package to ZFIORI. Save and go back to the task list.
***IMPORTANT: Package ZFIORI was created in the Unit 7 exercises.
s4h25 – Unit 8 Exercises
14
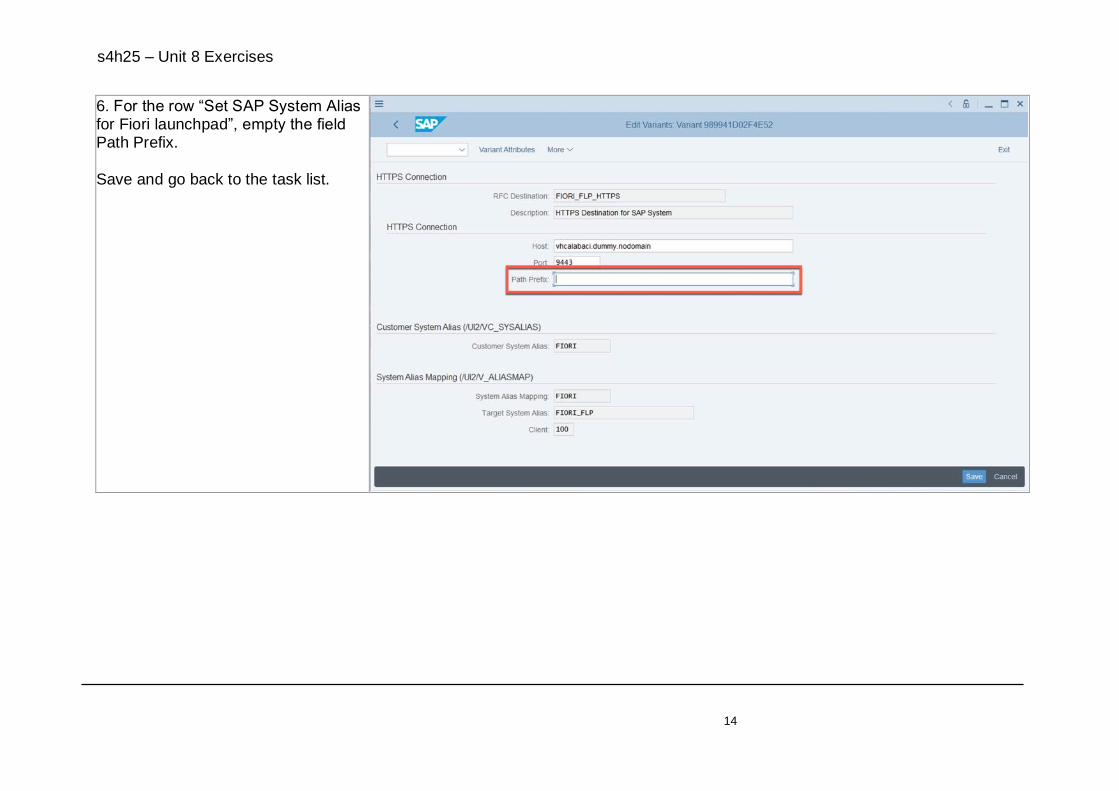
6. For the row “Set SAP System Alias for Fiori launchpad”, empty the field Path Prefix.
Save and go back to the task list.
s4h25 – Unit 8 Exercises
15
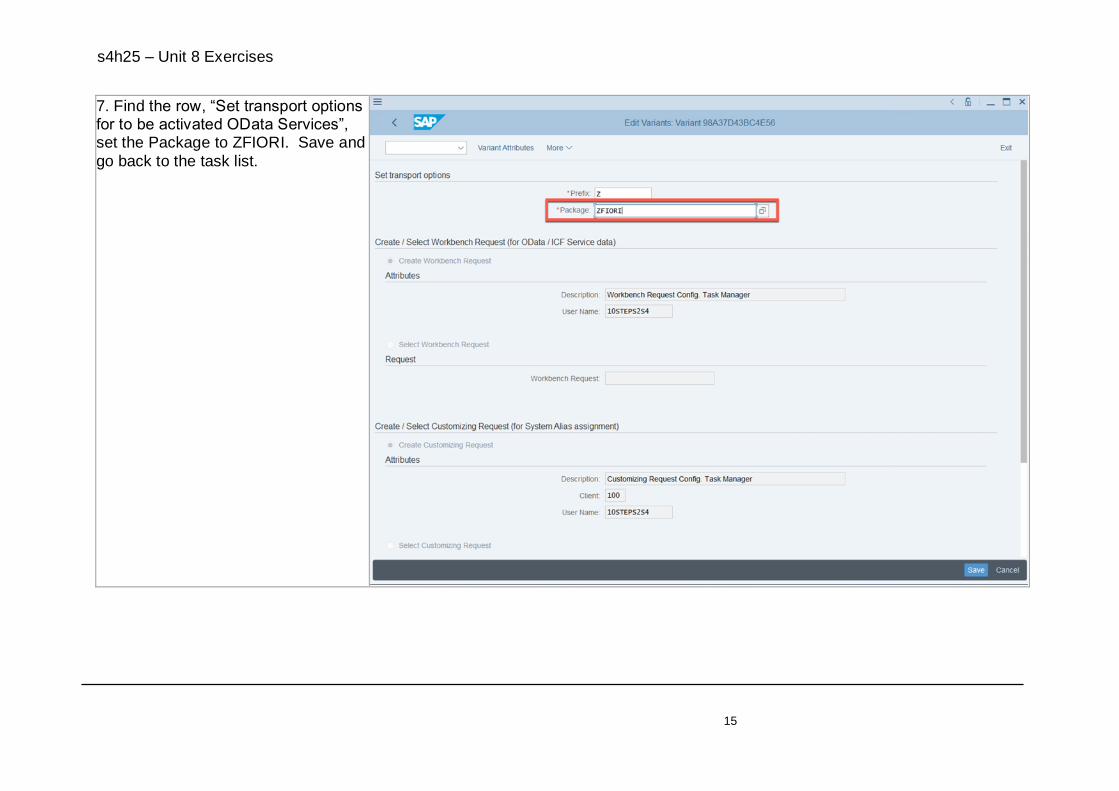
7. Find the row, “Set transport options for to be activated OData Services”, set the Package to ZFIORI. Save and
go back to the task list.
s4h25 – Unit 8 Exercises
16
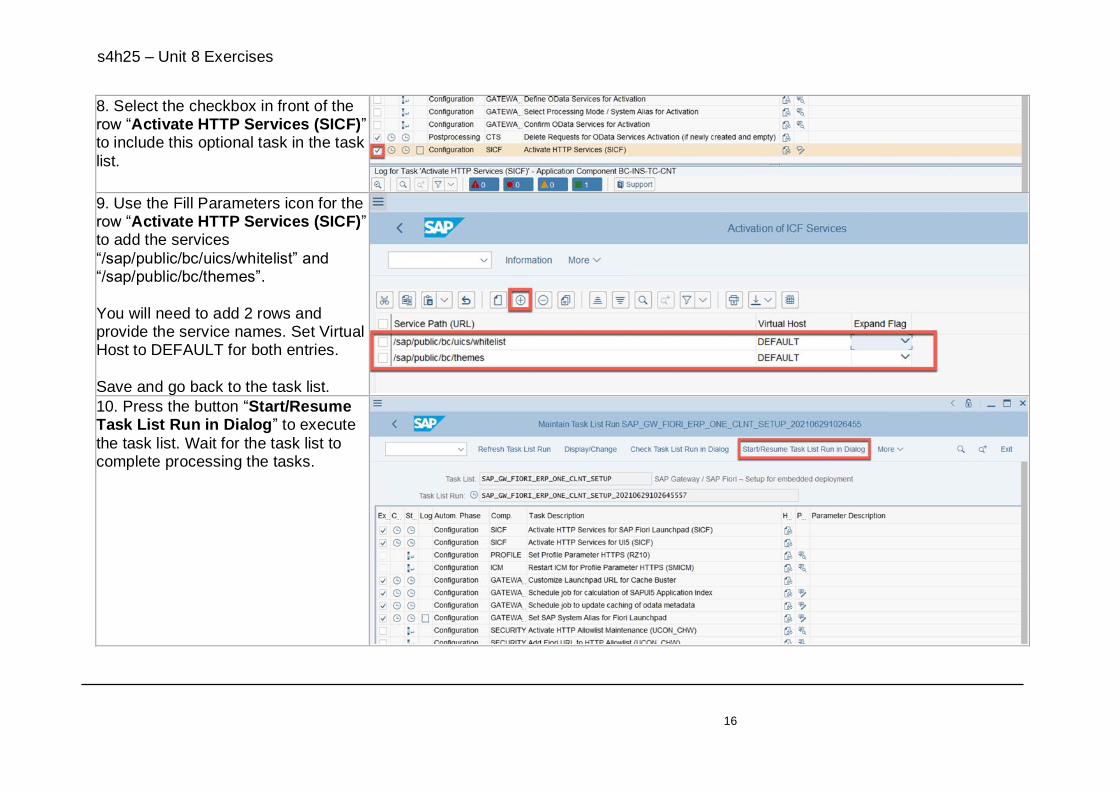
8. Select the checkbox in front of the row “Activate HTTP Services (SICF)” to include this optional task in the task
list.
9. Use the Fill Parameters icon for the row “Activate HTTP Services (SICF)” to add the services
“/sap/public/bc/uics/whitelist” and “/sap/public/bc/themes”.
You will need to add 2 rows and provide the service names. Set Virtual Host to DEFAULT for both entries.
Save and go back to the task list. 10. Press the button “Start/Resume Task List Run in Dialog” to execute
the task list. Wait for the task list to complete processing the tasks.

s4h25 – Unit 8 Exercises
17
11. Check the task list completes successfully. Check the messages in the log – they should all be successful
(green square icon). There should not be any errors (red circle icon)
You can ignore any warnings (yellow triangle icon).
IMPORTANT: If you encounter any errors and the task list stops, correct the problem, then resume the task list
from wherever it stopped.
s4h25 – Unit 8 Exercises
18
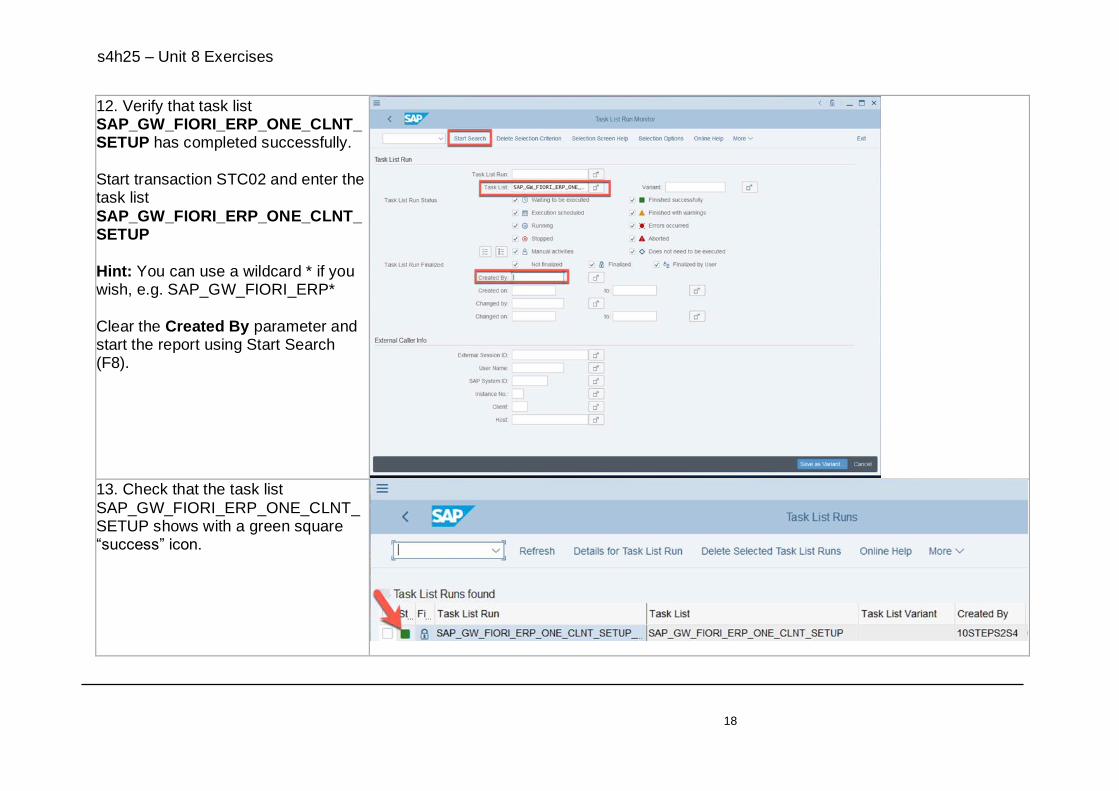
12. Verify that task list SAP_GW_FIORI_ERP_ONE_CLNT_SETUP has completed successfully.
Start transaction STC02 and enter the task list
SAP_GW_FIORI_ERP_ONE_CLNT_SETUP
Hint: You can use a wildcard * if you wish, e.g. SAP_GW_FIORI_ERP*
Clear the Created By parameter and start the report using Start Search (F8).
13. Check that the task list
SAP_GW_FIORI_ERP_ONE_CLNT_SETUP shows with a green square “success” icon.

s4h25 – Unit 8 Exercises
19
Verifying what you have done: 14. Start transaction /UI2/FLP, e.g.
by putting /n/UI2/FLP in the OkCode field. This will launch the URL https://vhcalabaci.dummy.nodomain:9
443/sap/bc/ui2/flp Hint: You use transaction /UI2/FLP to
generate the URL to the launchpad. You can bookmark the URL, so you can use it directly from your web
browser. IMPORTANT: You do NOT need to
continue using transaction /UI2/FLP once you have the URL.
IMPORTANT: If you get a security error, check if the correct HTTPS port number was assigned in the
icm/server_port parameters. If you are blocked by an invalid
certificate error, you may need to try a different web browser.

s4h25 – Unit 8 Exercises
20
15. You will see an empty launchpad page.
You can access: • Home navigation button
• Search – but only “search in apps”
• User actions menu including Settings and App Finder
You do not have any SAP Fiori apps or classic UIs assigned.
Standard launchpad features such as Enterprise Search, Notifications, and
User Assistant are not yet available.
16. Either continue directly with exercise 3 or suspend your instance
of SAP CAL solution 3. Re-activate your instance just before you continue with exercise 3. This is important to
save cost.
Results:
• Your SAP Gateway is setup as an embedded SAP Fiori Front-end server.
• You can access the basic launchpad entry page with minimal features.
In the next exercise you will turn on the SAP Fiori foundation including the main launchpad features, such as Enterprise Search,
Notifications, and User Assistant.
s4h25 – Unit 8 Exercises
21
Exercise 3: Activate your SAP Fiori Foundation and launchpad features Overview
Estimated time: 20 minutes
Objective You execute the SAP Fiori Foundation task list to activate the SAP Fiori launchpad, configure launchpad features, and to create
security authorization roles for administrators and business users.
You typically run this task list in your sandbox and your development environment on first installation and on upgrade. On first installation you will usually run all steps. On upgrade you can use the task list to run selected steps, such as activate new
launchpad features, adjust configuration to the recommended best practices, and activate new capabilities.
This task list is used in your sandbox and development environments to activate the SAP Fiori launchpad and main launchpad features.
You can find more information on this task list in the SAP Fiori Overview guide in the SAP Help Portal – refer to section Activating SAP Fiori Foundation Via Task List SAP_FIORI_FOUNDATION_S4
For all exercises in this unit you will connect to your instance using the Remote Desktop connect option.
Prerequisites You must have completed Exercises 1 and 2.
As a prerequisite in your own system, make sure you are using the latest version of the task list. You should apply the latest version SAP Note 2712785 - Fiori Setup: Initial Setup for Fiori Applications S/4
In CAL solution 3 this has already been done for you.
Exercise Description
s4h25 – Unit 8 Exercises
22
Perform the following tasks:
• Copy 10Steps2S4 to create a Fiori administrator user id FIORIADM that you will use towards the end of the exercise to verify that your launchpad features are working
• Execute the SAP Fiori Foundation task list SAP_FIORI_FOUNDATION_S4
• Perform post-task list activities to adjust the authorizations so your FIORIADM user is ready to verify the launchpad: o Adjust authorizations for Analysis Path Framework apps as per SAP Note 2712785 - Fiori Setup: Initial Setup for Fiori
Applications S/4 o Adjust authorizations for accessing notifications as per SAP Note 2954378 - The Gateway Error Log shows: No
authorization to access service group '/IWNGW/NOTIFICATION' o Activate the SAP Fiori notifications service by publishing the ODataV4 service group /IWNGW/NOTIFICATION o Adjust the authorizations as per SAP Note 2431835 - No tiles/groups displayed in FLP / Missing module URL -
sap.ui2.srvc.Chip
• Log in to the SAP Fiori launchpad as your administrator user FIORIADM to verify that launchpad features are working
Hint: You can also review the openSAP microlearning Activating SAP Fiori launchpad using Fiori Foundation task list to see an example of how to run the task list.

s4h25 – Unit 8 Exercises
23
What to Do What You Will See
1. You will need a user id for the Fiori administrator. Go to
transaction SU01. Enter the user id
10STEPS2S4 and press Copy.

s4h25 – Unit 8 Exercises
24
2. Copy the user id 10STEPS2S4 to user id FIORIADM. Ignore any
warnings or errors. After you have copied to the
new user id, adjust the first name, last name, defaults and initial password to your
preferred values. Save the user id FIORIADM.
IMPORTANT: Take a note of the initial password.
3. Launch the launchpad to verify you can login as user FIORIADM.
For example, in your Remote Desktop, you can launch this
directly in the browser using the URL https://vhcalabaci.dummy.nodomain:9443/sap/bc/ui2/flp
Change your initial password if asked.

s4h25 – Unit 8 Exercises
25
4. Return to your GUI session. You can use your 10STEPS2S4 user or your
FIORIADM user. Go to transaction STC01 and execute the task list
SAP_FIORI_FOUNDATION_S4 via the “Generate Task List Run” button.
5. Select the Fill Parameters
icon for the row, “Set transport options for to be
activated OData Services”.

s4h25 – Unit 8 Exercises
26
6. Set the Package to ZFIORI. Save and go back to the task list.

s4h25 – Unit 8 Exercises
27
7. Select the Fill Parameters icon for row “Generate Fiori Foundation Roles”.
8. Note the names of the
security roles that will be generated by the task list.
You do not need to change anything. Go back to the task list.
9. Select the checkbox at the start of row “Activate and
Configure FLP for Spaces and Pages” to include it in the task list.

s4h25 – Unit 8 Exercises
28
Then select the Fill Parameters icon for row “Activate and Configure FLP
for Spaces and Pages”.
10. Set the package to ZFIORI. Save and go back to the task list.

s4h25 – Unit 8 Exercises
29
11. Execute the task list using the Start/Resume Task List Run in Dialog
button. Wait for all the tasks to be processed. This will take around 8-10 minutes.
Hint: If you wish, you could instead start the task in the
background and check it later in transaction STC02.

s4h25 – Unit 8 Exercises
30
12. Check that the task list completed successfully, i.e. all show green square
“success” (or yellow triangle “warning”) icons.
You can review the details of what was activated and any messages via the Display
Log icon. In the log you will see
success messages confirming that the tasks have completed successfully.
s4h25 – Unit 8 Exercises
31
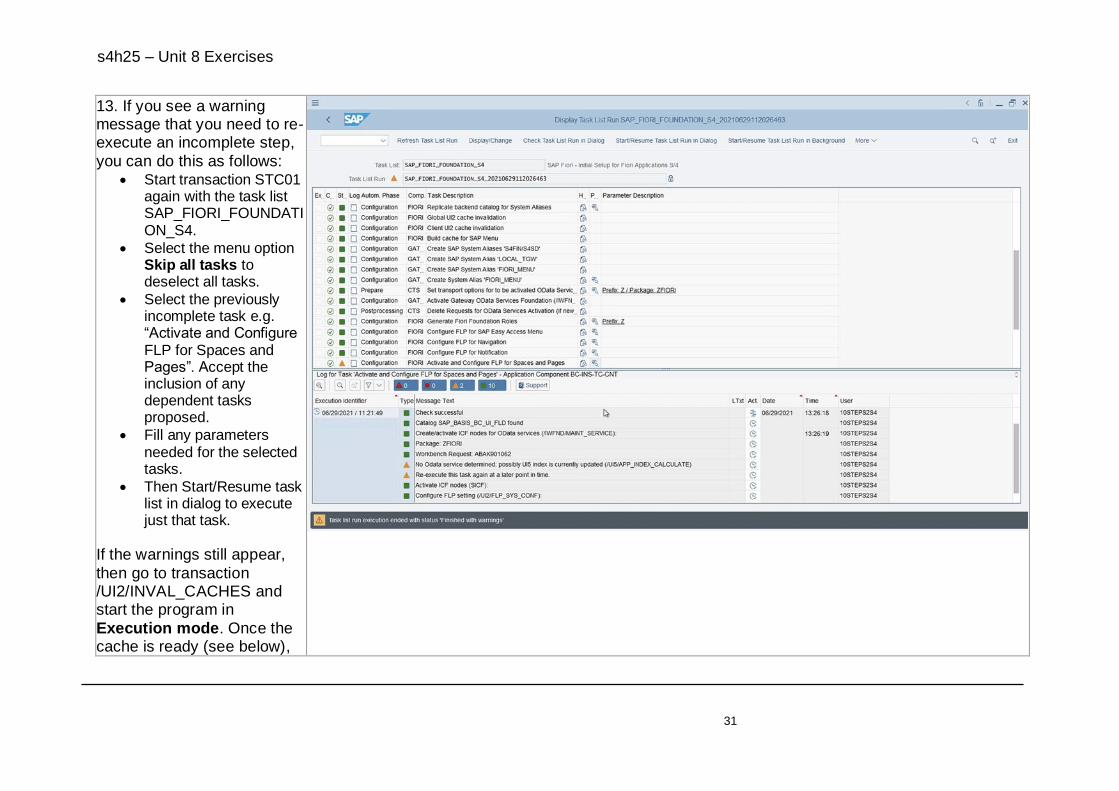
13. If you see a warning message that you need to re-execute an incomplete step,
you can do this as follows: • Start transaction STC01
again with the task list SAP_FIORI_FOUNDATION_S4.
• Select the menu option Skip all tasks to deselect all tasks.
• Select the previously incomplete task e.g. “Activate and Configure FLP for Spaces and Pages”. Accept the inclusion of any dependent tasks proposed.
• Fill any parameters needed for the selected tasks.
• Then Start/Resume task list in dialog to execute just that task.
If the warnings still appear,
then go to transaction /UI2/INVAL_CACHES and start the program in
Execution mode. Once the cache is ready (see below),

s4h25 – Unit 8 Exercises
32
execute the task list with just the remaining task selected again.
HOW TO CHECK THE CACHE IS READY: After the cache is invalidated,
it can take 5-10 minutes for the cache to be refilled.
Here is a quick way to check if the cache is ready. Go to transaction
/UI2/FLPCM_CUST. If you see an error message “Content is being updated.
Please restart the transaction in a few minutes” then the cache is still refilling.
Wait a couple of minutes and try navigating to the
transaction /UI2/FLPCM_CUST again. Once you can enter the
transaction and see the title Launchpad Content Manager and tabs Catalogs,
Tiles/Target Mappings, and Roles, the cache is rady.

s4h25 – Unit 8 Exercises
33
14. Post activation you may need to perform some additional steps.
Additional steps are listed in the composite SAP Note:
Rapid Activation for SAP Fiori in SAP S/4HANA <release and FPS>
For example: In SAP S/4HANA 2020 Initial
Shipment Stack, you follow SAP Note 2947824 – Composite SAP note Rapid
Activation for SAP Fiori in SAP S/4HANA 2020. You will notice that you need to adjust
authorizations on the generated roles.
s4h25 – Unit 8 Exercises
34
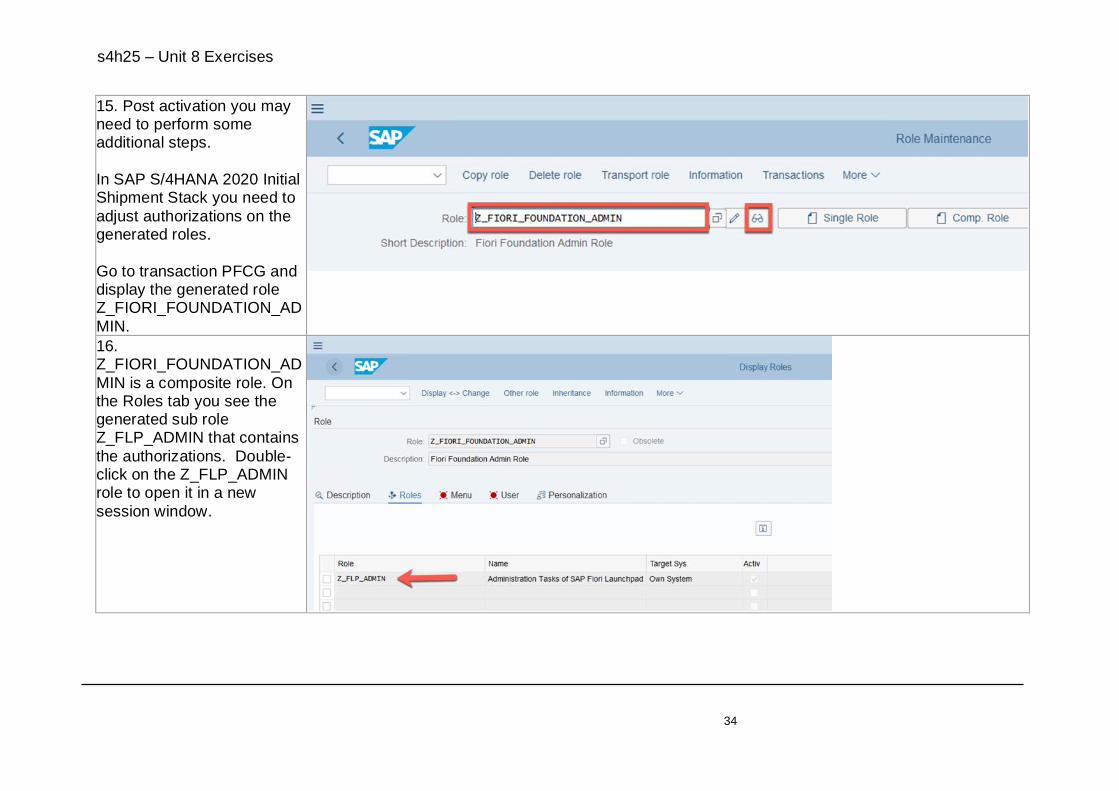
15. Post activation you may need to perform some additional steps.
In SAP S/4HANA 2020 Initial Shipment Stack you need to
adjust authorizations on the generated roles.
Go to transaction PFCG and display the generated role Z_FIORI_FOUNDATION_AD
MIN.
16. Z_FIORI_FOUNDATION_AD
MIN is a composite role. On the Roles tab you see the generated sub role Z_FLP_ADMIN that contains
the authorizations. Double-click on the Z_FLP_ADMIN role to open it in a new
session window.

s4h25 – Unit 8 Exercises
35
17. You need to adjust some authorizations.
Press the Display/Change icon to go into Change mode. Press the Change
Authorization Data button.

s4h25 – Unit 8 Exercises
36
18. Press the Add Manually button to add the authorization /UIF/LREP.
19. Enter the Authorization object /UIF/LREP and press Continue to add the
authorization object to the profile.
s4h25 – Unit 8 Exercises
37
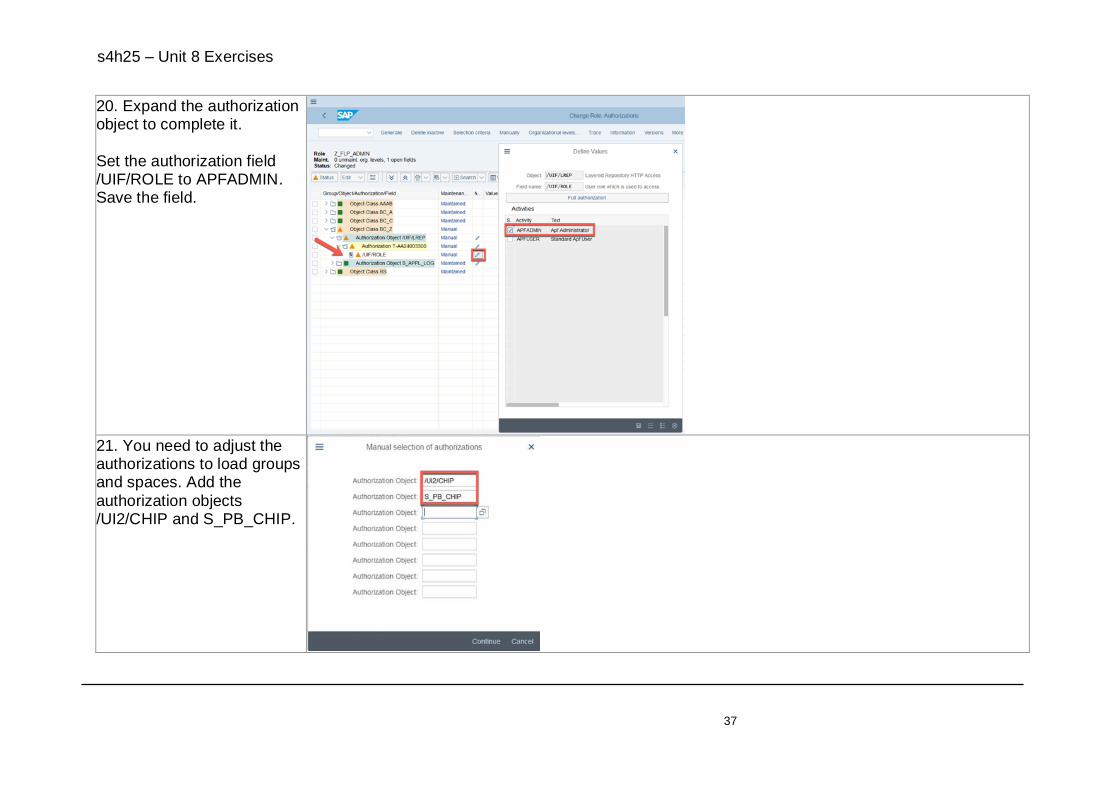
20. Expand the authorization object to complete it.
Set the authorization field /UIF/ROLE to APFADMIN. Save the field.
21. You need to adjust the authorizations to load groups and spaces. Add the
authorization objects /UI2/CHIP and S_PB_CHIP.

s4h25 – Unit 8 Exercises
38
22. Select the edit icons to complete the authorizations for /UI2/CHIP and
S_PB_CHIP. You can put: • Chip = *
• Activities = all activities
23. You need to add the authorizations for
notifications. These authorizations are added using a template. Select the
menu option More > Edit > Insert authorizations > From template...

s4h25 – Unit 8 Exercises
39
24. Find and select the template /IWNGW/RT_USER_CONSU
to allow the user to receive notifications. This will insert 3 authorizations:
25. It will add an S_RFC and
an S_RFCACL authorization. For the purposes of this exercise, deactivate the
authorization S_RFCACL using the deactivate icon.
IMPORTANT: In a productive system you would set this authorization explicitly.

s4h25 – Unit 8 Exercises
40
26. Similarly, find and select the template /IWNGW/RT_USER_PRODU
to allow the user to trigger notifications. This will add 2 additional authorizations.
For the purposes of the exercise, deactivate the
additional S_RFCACL authorization.
s4h25 – Unit 8 Exercises
41
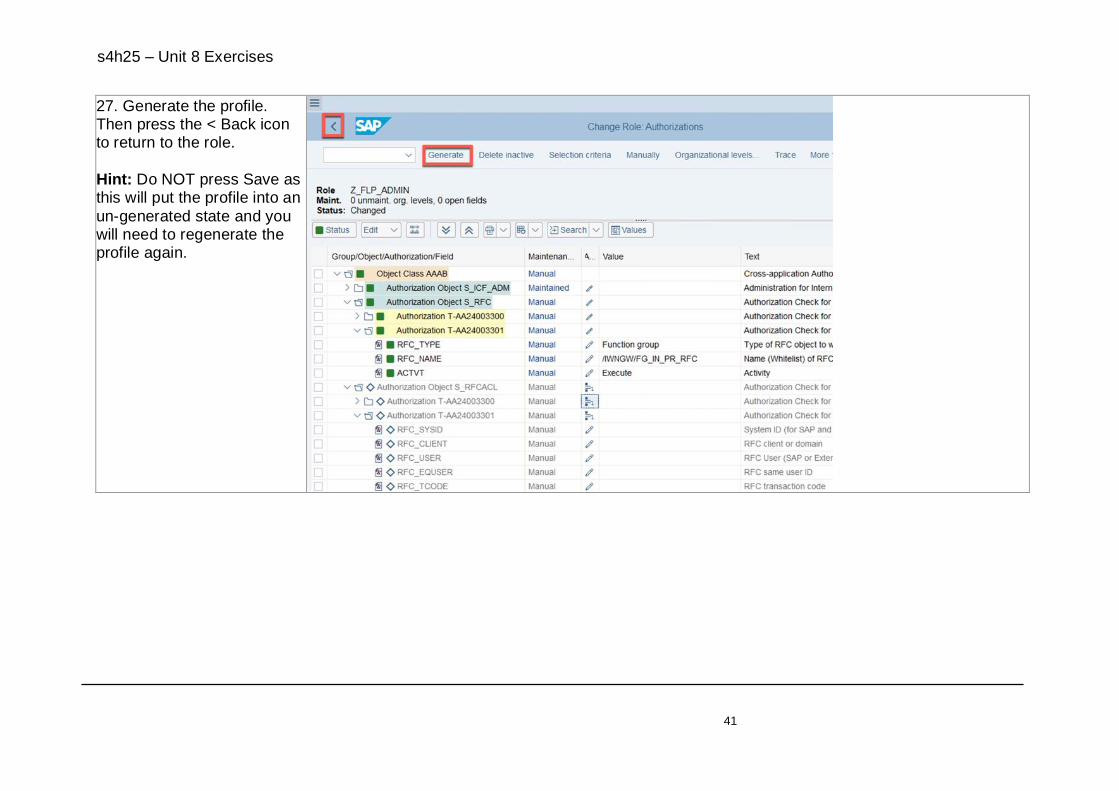
27. Generate the profile. Then press the < Back icon to return to the role.
Hint: Do NOT press Save as this will put the profile into an
un-generated state and you will need to regenerate the profile again.

s4h25 – Unit 8 Exercises
42
28. Check that the status of the authorization profile is “Authorization profile is
current”.

s4h25 – Unit 8 Exercises
43
29. Repeat the changes you made for Z_FLP_ADMIN, for the role Z_FLP_USER.
Go to transaction PFCG and display the role
Z_FLP_USER. Press the Display/Change
icon to go into Change mode. Press the Change Authorization Data button to
change the authorizations. IMPORTANT: Z_FLP_USER
is a sub-role of Z_FIORI_FOUNDATION_USER.

s4h25 – Unit 8 Exercises
44
30. Press the Add Manually button to add the authorization /UIF/LREP.
Add the authorization object /UIF/LREP.
Set the authorization field /UIF/ROLE to APFUSER.
Your role should then show the Object class BC_Z
contains Authorization Object /UIF/LREP, which has the authorization field /UIF/ROL
set to “Standard Apf User”.
s4h25 – Unit 8 Exercises
45
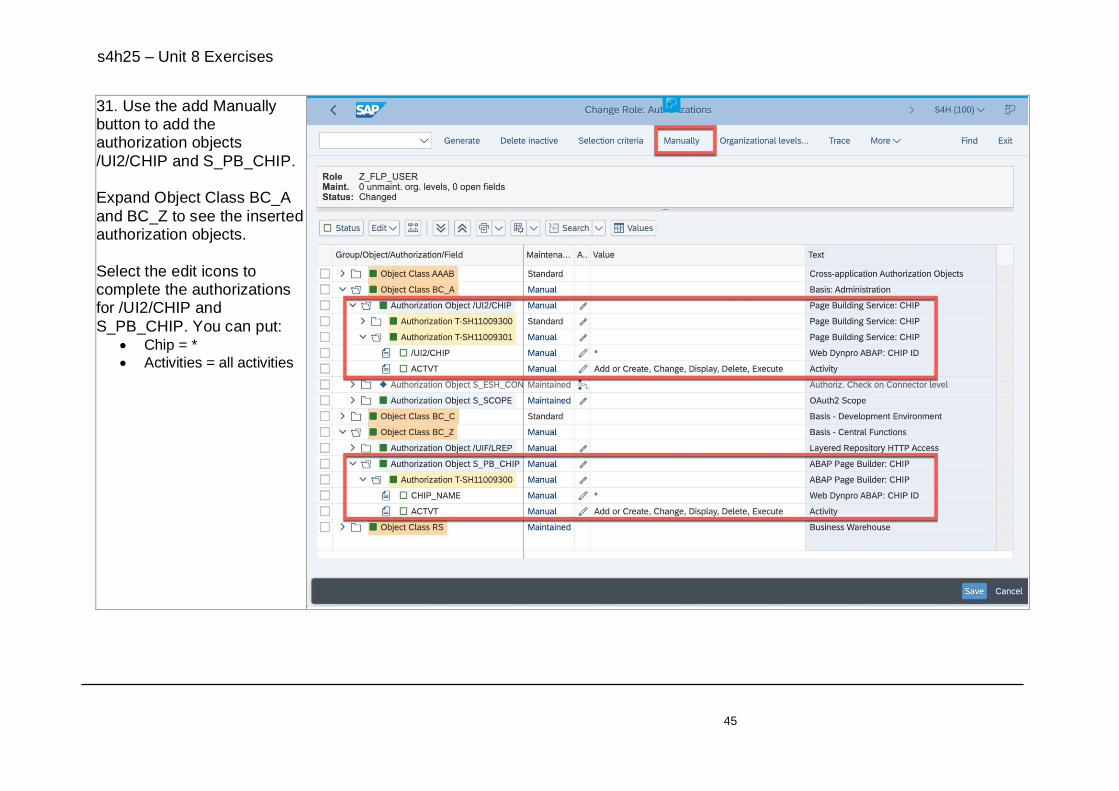
31. Use the add Manually button to add the authorization objects
/UI2/CHIP and S_PB_CHIP. Expand Object Class BC_A
and BC_Z to see the inserted authorization objects.
Select the edit icons to complete the authorizations for /UI2/CHIP and
S_PB_CHIP. You can put: • Chip = *
• Activities = all activities

s4h25 – Unit 8 Exercises
46
31. Select the menu option More > Edit > Insert authorizations > From
template... to add the template /IWNGW/RT_USER_CONSU
and then template /IWNGW/RT_USER_PRODU so users can receive and
trigger notifications. Expand Object Class AAAB
to see the added entries. For the purposes of this
exercise, deactivate the authorization S_RFCACL.
Save your changes using the Save button.

s4h25 – Unit 8 Exercises
47
32. Generate the profile and check the status says the profile is generated. Then
press the < Back icon to return to the role.
Check that the status of the authorization profile is “Authorization profile is
current”. You have completed the
changes to the role Z_FLP_USER.

s4h25 – Unit 8 Exercises
48
33. Go to transaction PFCG. Open the role Z_FIORI_FOUNDATION_AD
MIN in Change mode. On the User tab, assign the
user id FIORIADM to the role Z_FIORI_FOUNDATION_ADMIN.
Press Save and check that the User tab shows a green
square success icon. Hint: If the User tab does not
show the success icon, there is an inconsistency. You can use the User Comparison
button to update the assigned users to remove the inconsistency.

s4h25 – Unit 8 Exercises
49
34. You want to activate Fiori notifications.
Go to transaction /IWFND/V4_ADMIN.
Press the button Publish Service Groups.
35. Enter system alias
LOCAL and search for service group id with wildcard *NGW*. You can press Get
Service Groups or just press ENTER to start the search.
Select the service group /IWNGW/NOTIFICATION and press Publish Service
Groups. Confirm any pop-up dialogs.

s4h25 – Unit 8 Exercises
50
36. Check if the notification service group is now available.

s4h25 – Unit 8 Exercises
51
37. Log in to the SAP Fiori launchpad using your user FIORIADM and password.
For example, in your Remote Desktop, you can launch this
directly in the browser using the URL https://vhcalabaci.dummy.no
domain:9443/sap/bc/ui2/flp Once you are logged in, you
will see that some apps are already assigned. These are apps you can use to adjust
the launchpad content and layout for all users.
Check if you can see the following launchpad icons in the top “shell” bar:
• Search (magnifying glass)
• Notifications (alarm bell)
• User Actions (person)

s4h25 – Unit 8 Exercises
52
38. You can check the options in the User Actions menu.
39. Check if the Search is working.
Press the search icon. You should see the Search
for apps. If you have activated
Enterprise Search, you can use the dropdown “All” to see all the different types of
business objects that can be searched for.

s4h25 – Unit 8 Exercises
53
40. Check if the Notifications are working.
It should show “You have no notifications” by default.
You should not see any error dialog (if you check your authorizations).
41. Try the Home navigation button. This is another way to reach your apps from
wherever you are.
s4h25 – Unit 8 Exercises
54
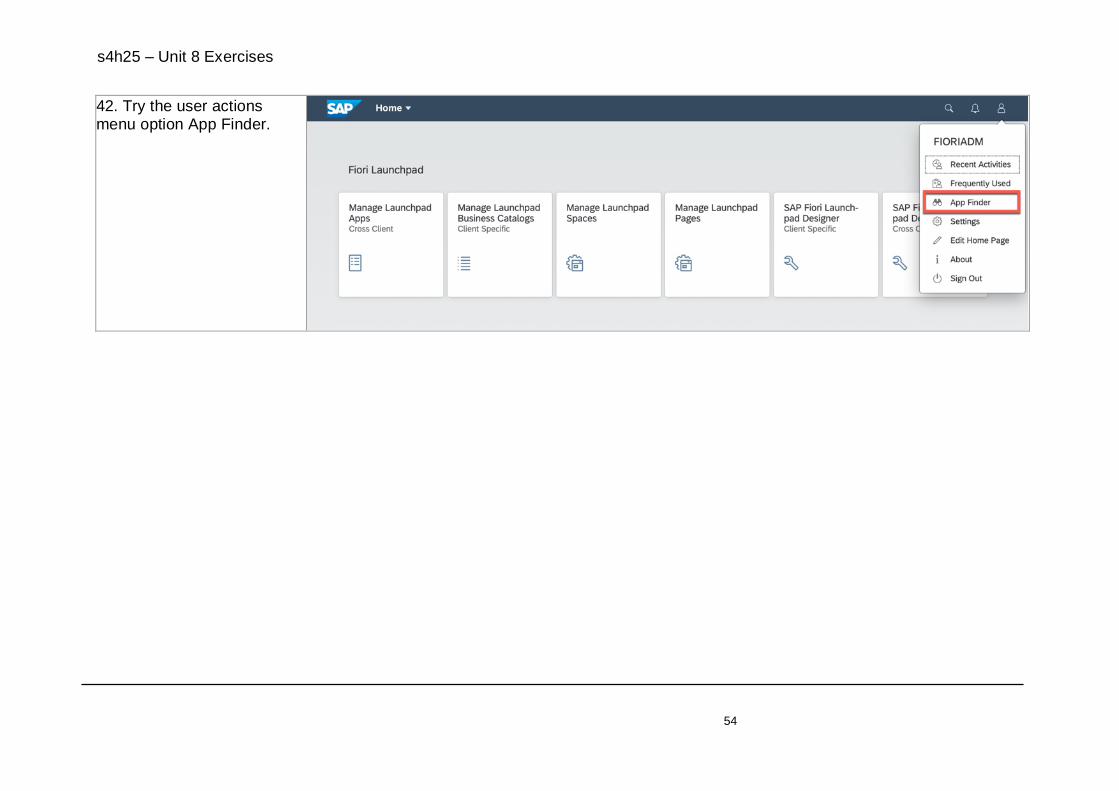
42. Try the user actions menu option App Finder.

s4h25 – Unit 8 Exercises
55
43. In the App Finder you can get to all your SAP Fiori apps and classic UIs, even the
occasional apps/UIs that are not on your entry page.
Go to the SAP Menu tab.
s4h25 – Unit 8 Exercises
56
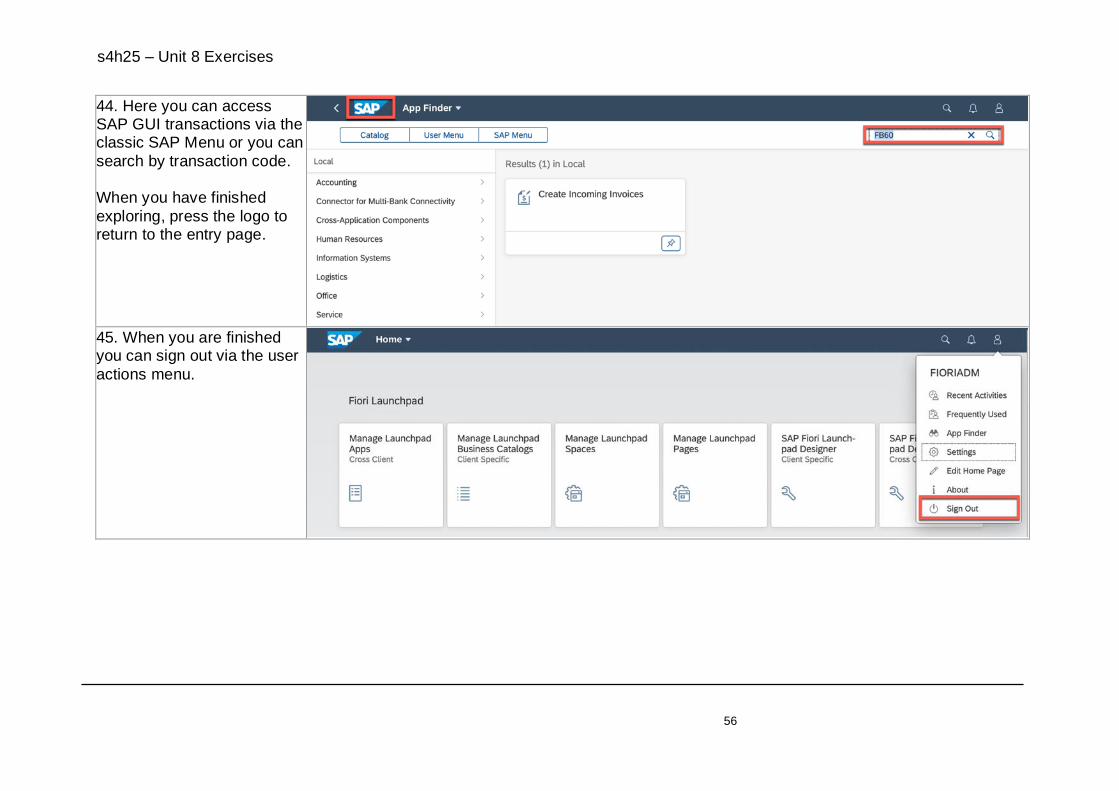
44. Here you can access SAP GUI transactions via the classic SAP Menu or you can
search by transaction code. When you have finished
exploring, press the logo to return to the entry page.
45. When you are finished you can sign out via the user
actions menu.

s4h25 – Unit 8 Exercises
57
46. Either continue directly with exercise 4 or suspend your instance of SAP CAL
solution 3. Re-activate it once you continue with exercise 4. This is important to save
cost.
Results:
• You can login to your SAP Fiori launchpad
• You have been assigned the apps that manage launchpad content and layouts
• You can use the main launchpad features
Additional information The User Assistant Help “?” icon requires setup of the SAP Web Dispatcher or a reverse proxy. Refer to SAP Fiori for SAP S/4HANA – How to setup the User Assistant in your S/4HANA Fiori launchpad
To receive notifications, notification providers need to be configured. Refer to: • SAP Fiori for SAP S/4HANA – Notification Center – Part 1 – Activation
• SAP Fiori for SAP S/4HANA – Notification Center – Part 2 – Providing Notifications
Find out more about refining launchpad content and layout in the openSAP microlearning playlist for SAP S/4HANA User
Experience.

s4h25 – Unit 8 Exercises
58
Exercise 4: Activate initial SAP Business Roles Overview
Estimated time: 1.5 hours
This consists of 30 minutes to complete on-system activities + approx. 1 hour for background generation of roles in step 15.
You do need to be logged in while the background generation step completes. See the commentss in step 15.
Objective Activate your selected SAP Business Roles and create test users ready to explore the content you have activated.
This task list is typically used in your sandbox environment, so you can explore the delivered SAP Business Roles.
To understand the process used in the development environment, review the Further Learning resources in the Downloads section of the course.
For all exercises in this unit you will connect to your instance using the Remote Desktop connect option.
Prerequisites
As a prerequisite in your own system, make sure you are using the latest version of the task list.
• You should apply the latest version of SAP Note 2686456 - Fiori Setup: Content Activation for SAP Business Roles
In CAL solution3 the latest version has already been applied for you.
Review the SAP Note for Rapid content activation for your release for any pre/post steps per role for the SAP Business Roles you are activating:
• You can find the overview of all notes for each release in SAP Notes 2902673 - Rapid Activation for SAP Fiori in SAP S/4HANA - Overview
• For example, for SAP S/4HANA 2020 Initial Shipment Stack, review SAP Note 2947824 - Composite SAP note: Rapid Activation for SAP Fiori in SAP S/4HANA 2020 for any pre- or post-activation steps for your selected SAP Business Roles.

s4h25 – Unit 8 Exercises
59
o For example, in SAP S/4HANA 2020 Initial Shipment Stack, you need to implement these notes for the Purchaser (SAP_BR_PURCHASER) role:
▪ SAP Note 2985260 - Manage Source Lists application not loading ▪ SAP Note 2971682 - Material Price Variance - error while adding service MM_PUR_MATL_PRC_VARIANCE ▪ In your CAL solution 3 these SAP Notes have already been applied for you.
Exercise Description Perform the following tasks:
• Execute the task list SAP_FIORI_CONTENT_ACTIVATION to activate selected SAP Business Roles
• You will also activate the SAP Recommended Roles needed to configure, adapt, and extend SAP S/4HANA. o For more information refer to SAP Fiori for SAP S/4HANA – Yes you need SAP Fiori to Configure, Adapt and Extend SAP
S/4HANA
• You will use the task list to generate test users to verify and explore the activated SAP Business Roles

s4h25 – Unit 8 Exercises
60
What to Do What You Will See
1. Start the task list for rapid activation of SAP Fiori content.
Go to transaction STC01 and execute task list
SAP_FIORI_CONTENT_ACTIVATION via the “Generate Task List Run” button.
2. The task list is displayed with the default tasks selected.
s4h25 – Unit 8 Exercises
61
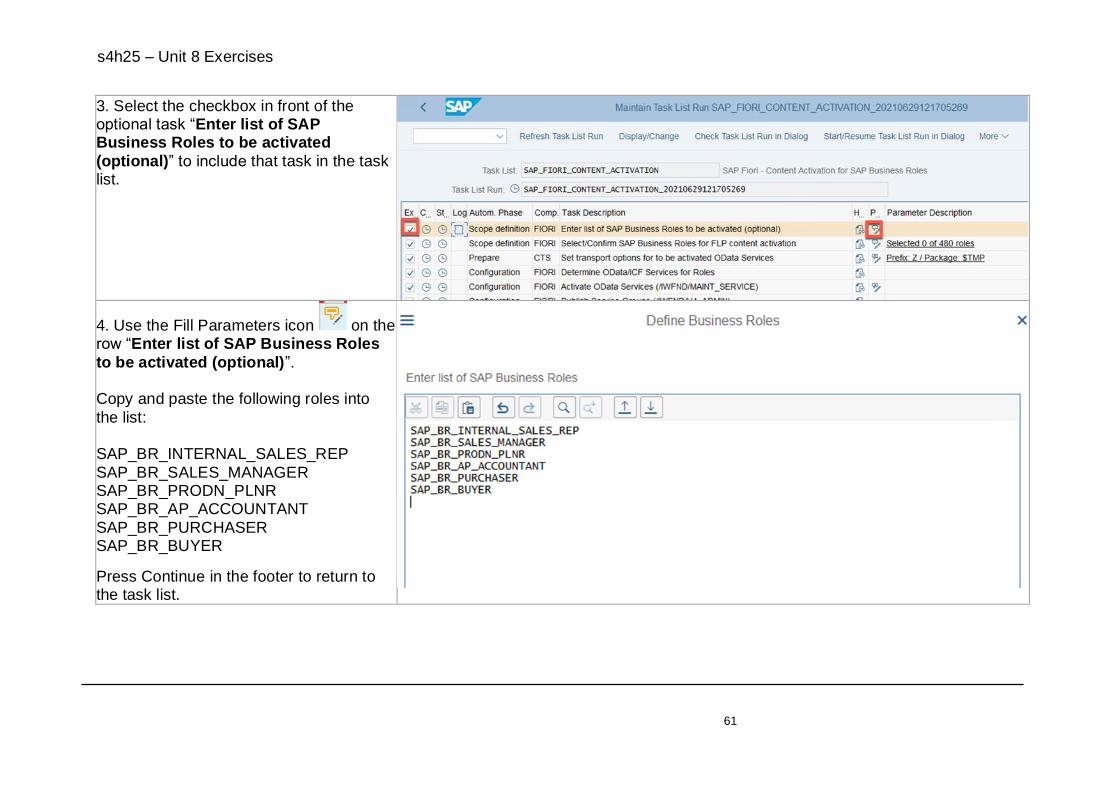
3. Select the checkbox in front of the optional task “Enter list of SAP Business Roles to be activated
(optional)” to include that task in the task list.
4. Use the Fill Parameters icon on the row “Enter list of SAP Business Roles
to be activated (optional)”. Copy and paste the following roles into
the list: SAP_BR_INTERNAL_SALES_REP
SAP_BR_SALES_MANAGER SAP_BR_PRODN_PLNR SAP_BR_AP_ACCOUNTANT
SAP_BR_PURCHASER SAP_BR_BUYER
Press Continue in the footer to return to the task list.

s4h25 – Unit 8 Exercises
62
5. You will see that 6 roles have been selected. You now need to add the recommended roles to
configure/adapt/extend SAP S/4HANA. Select the Fill Parameters icon on the row
“Select/Confirm SAP Business Roles for FLP content activation”.
6. Press the button “Select
Recommended SAP Business Roles”. Notice that 4 roles have been added:
SAP_BR_ADMINISTRATOR SAP_BR_ANALYTICS_SPECIALIST SAP_BR_BR_BPC_EXPERT
SAP_BR_BUSINESS_PROCESS_SPEC Press Save and then the back arrow to
return to the task list.
s4h25 – Unit 8 Exercises
63
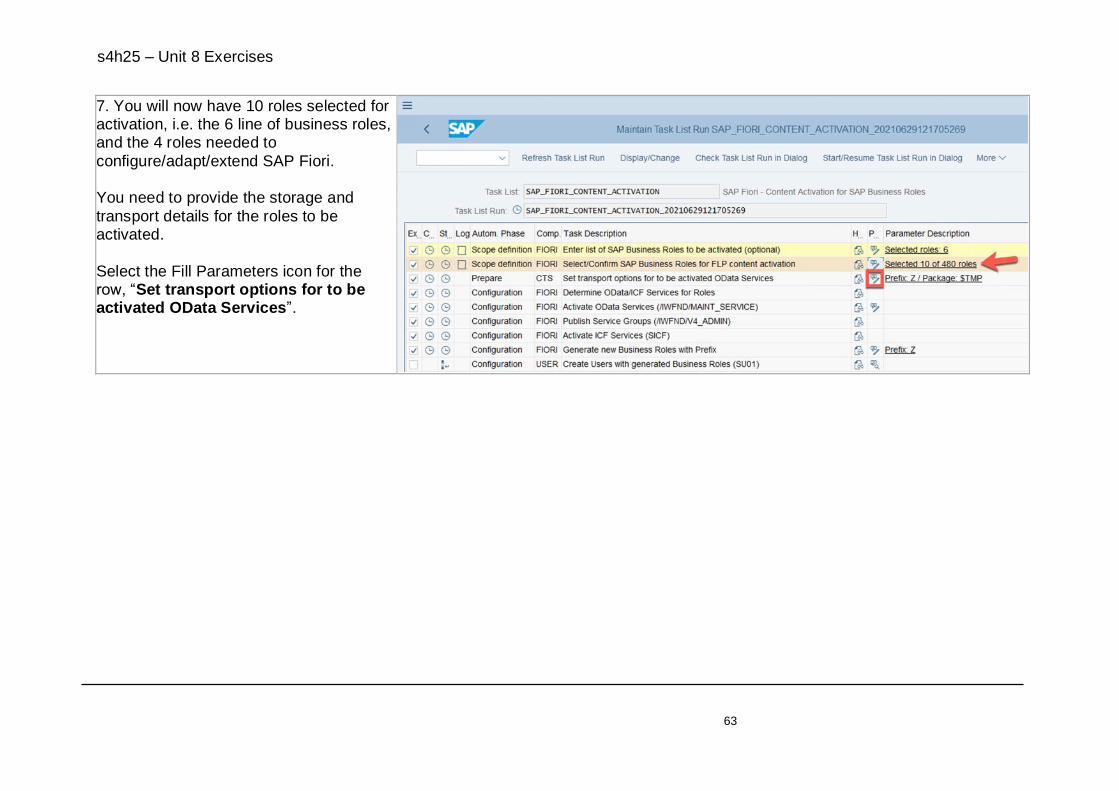
7. You will now have 10 roles selected for activation, i.e. the 6 line of business roles, and the 4 roles needed to
configure/adapt/extend SAP Fiori. You need to provide the storage and
transport details for the roles to be activated.
Select the Fill Parameters icon for the row, “Set transport options for to be activated OData Services”.

s4h25 – Unit 8 Exercises
64
8. Set the Package to ZFIORI. You can leave the other defaults as-is.
Save and go back to the task list.

s4h25 – Unit 8 Exercises
65
9. You can use the standard defaults for the task “Activate OData Services (/IWFND/MAINT_SERVICE)” to activate
these services in co-deployed mode on your embedded server. Press the Fill Parameters icon to view the defaults.
10. You can see that while most OData Services will be co-deployed, an
exception is made for the special TASKPROCESSING service.
The TASKPROCESSING service is used for the SAP Fiori My Inbox, which needs a special system alias to gather work items
from multiple providers. There is nothing you need to change.
Return to the task list.

s4h25 – Unit 8 Exercises
66
11. You can use the standard defaults for the task “Generate new Business Roles with Prefix”.
This will generate Z prefixed versions of the standard SAP Business Roles, so you
can refine them as you explore the business roles in your sandbox environment.
There is nothing you need to change. Return to the task list.
12. Since you are activating delivered SAP Business Roles to explore them, it’s
helpful to create test users ready to explore each role.
This will help you understand which apps and UIs and features are relevant for that role, and how someone in that role will
navigate between them. Select the checkbox in front of the
optional task “Create users with generated Business Roles (SU01)” to include it in the task list.
Then Select the Fill Parameters icon for the row, “Create users with generated Business Roles (SU01)”.

s4h25 – Unit 8 Exercises
67
13. Test users are usually shared by the project team.
Enter an easy to remember password, e.g. Welcome@123 in the Password and Repeat Password fields.
Add the role assignment Z_FIORI_FOUNDATION_USER that
gives them access to the SAP Fiori launchpad and launchpad features. Hint: This is the role you generated in
Exercise 2 via the Fiori foundation task list.
Save and go back to the task list.

s4h25 – Unit 8 Exercises
68
14. Depending on the number and size of the roles you have selected activation may take from minutes to hours. The 10
roles you have selected should take about 1 hour to fully activate. Execute the task list in the background using the button
“Start/Resume Task list in Background”.
s4h25 – Unit 8 Exercises
69
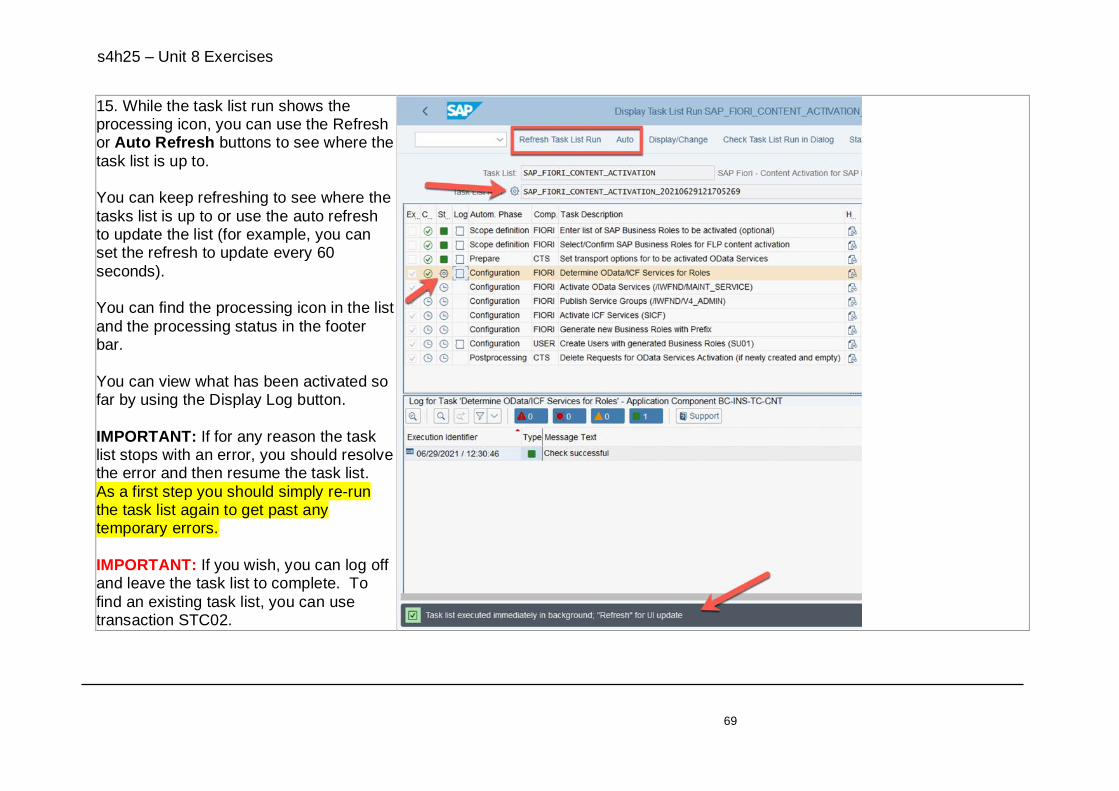
15. While the task list run shows the processing icon, you can use the Refresh or Auto Refresh buttons to see where the
task list is up to. You can keep refreshing to see where the
tasks list is up to or use the auto refresh to update the list (for example, you can set the refresh to update every 60
seconds). You can find the processing icon in the list
and the processing status in the footer bar.
You can view what has been activated so far by using the Display Log button.
IMPORTANT: If for any reason the task list stops with an error, you should resolve the error and then resume the task list.
As a first step you should simply re-run the task list again to get past any temporary errors.
IMPORTANT: If you wish, you can log off and leave the task list to complete. To
find an existing task list, you can use transaction STC02.

s4h25 – Unit 8 Exercises
70
16. Once the task list is finished, check the log and the status of the task list run.
All roles have been activated successfully. The task list run shows status “warning”.
In the Log pane you can see that there is 1 warning.
To see the warning, toggle off the “Display Information Messages” button in the Log pane to just see the warning
message. Note: If your task list run stops with the
following error, simply re-run the task list and the error should be resolved: “Service: PP_MNTR_WRKCTR_SRV 1
failed / ICF Node: not available”

s4h25 – Unit 8 Exercises
71
17. The warning is that the CATALOGSERVICE has been activated in 2 different processing modes.
You can ignore the warning message.
Press the Display log button to see the log.

s4h25 – Unit 8 Exercises
72
18. Scroll down through the log to find the task “Create Users with generated Business Roles (SU01)”. You can see
the parameters used and the resulting list of users generated. There is one user generated for each role:
T20_AD Administrator T31_ANSP Analytics Specialist T34_APAC AP Accountant T145_BPEX Configuration Expert
T153_BUPRSP Business Process Specialist T155_BU Buyer T304_INSARE Internal Sales Representative T380_PRPL Production Planner T407_PU Purchaser T434_SAMA Sales Manager

s4h25 – Unit 8 Exercises
73
19. You want to check which roles have been activated. Go to transaction /UI2/FLPCM_CUST.
Hint: If you see the message “Content is being updated. Please restart the
transaction in a few minutes”. Wait for a few minutes and then start the transaction again.
Go to the Roles tab. Search for roles using the wildcard Z_BR*.
s4h25 – Unit 8 Exercises
74
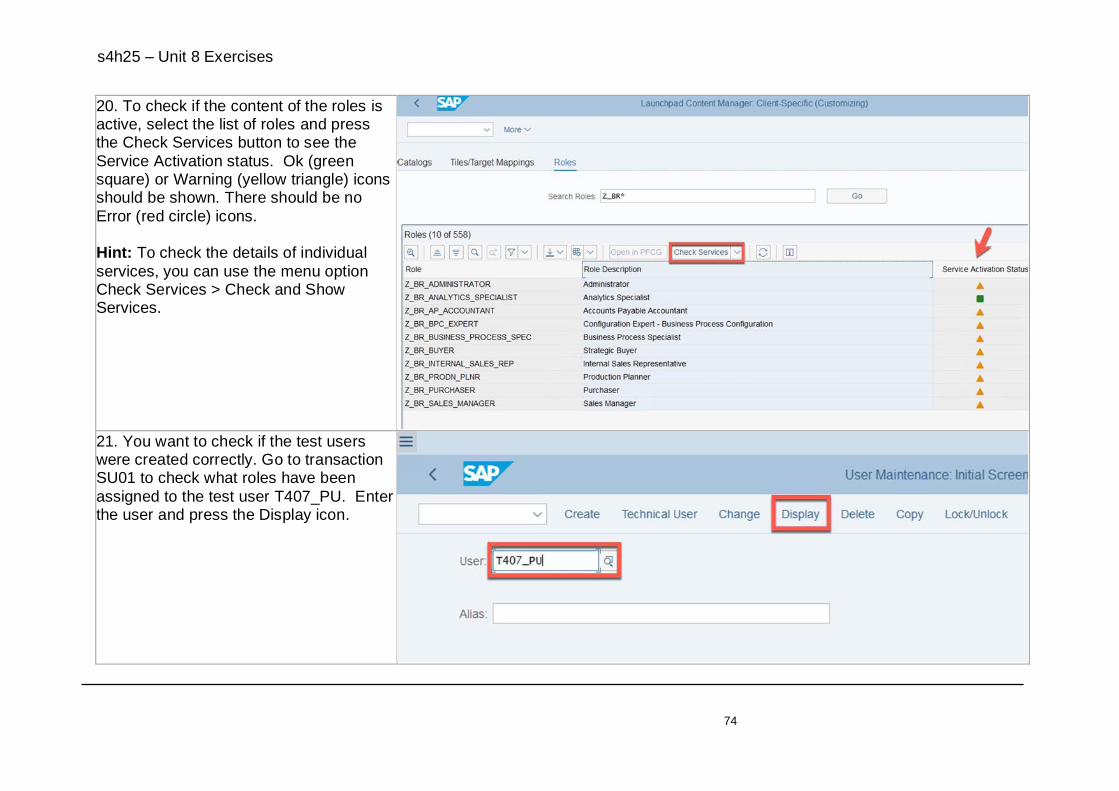
20. To check if the content of the roles is active, select the list of roles and press the Check Services button to see the
Service Activation status. Ok (green square) or Warning (yellow triangle) icons should be shown. There should be no
Error (red circle) icons. Hint: To check the details of individual
services, you can use the menu option Check Services > Check and Show Services.
21. You want to check if the test users were created correctly. Go to transaction SU01 to check what roles have been
assigned to the test user T407_PU. Enter the user and press the Display icon.

s4h25 – Unit 8 Exercises
75
22. Test users are assigned to the generated Z copy of the SAP Business Role and the
Z_FIORI_FOUNDATION_USER role, which gives them access to the SAP Fiori launchpad.
23. Because you have changed the configuration and the OData activation, you will need to clear the caches. Go to
transaction /UI2/INVAL_CACHES. Select execution mode and press Execute (e.g. in the footer bar).
s4h25 – Unit 8 Exercises
76
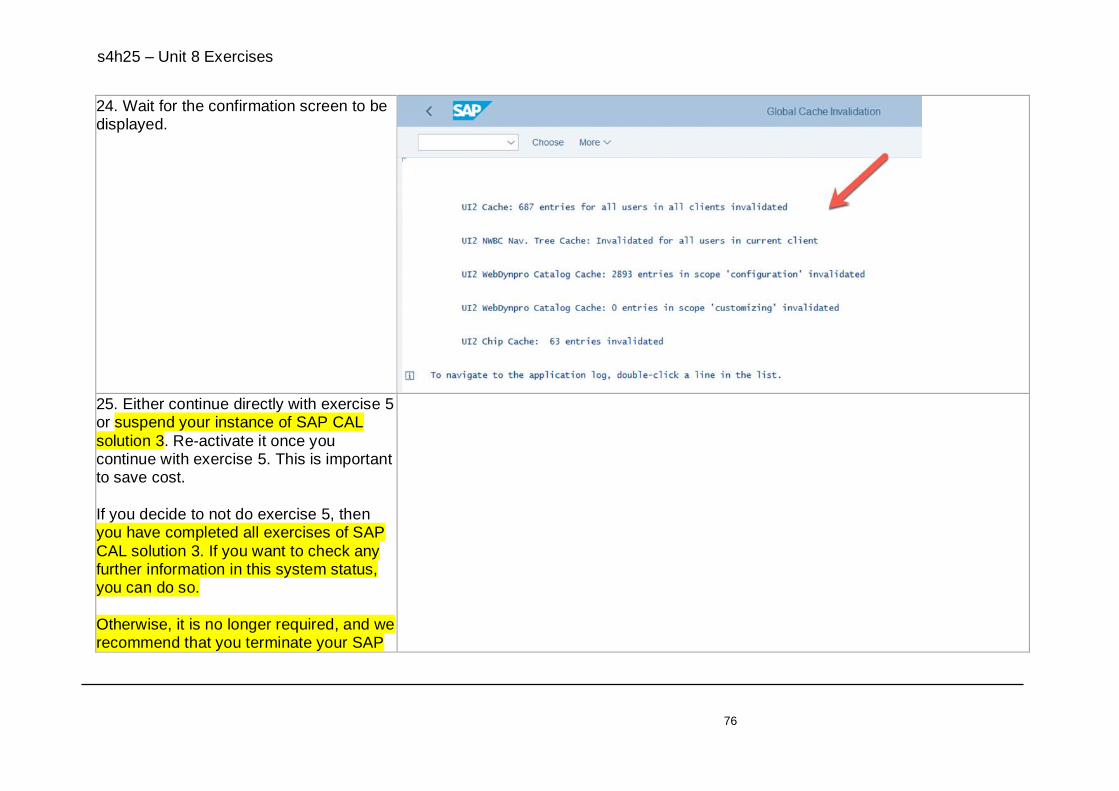
24. Wait for the confirmation screen to be displayed.
25. Either continue directly with exercise 5 or suspend your instance of SAP CAL
solution 3. Re-activate it once you continue with exercise 5. This is important to save cost.
If you decide to not do exercise 5, then you have completed all exercises of SAP
CAL solution 3. If you want to check any further information in this system status, you can do so.
Otherwise, it is no longer required, and we recommend that you terminate your SAP
s4h25 – Unit 8 Exercises
77
CAL solution 3 instance in order to save cost.
Please note that an instance termination cannot be revoked, and you would be losing any configuration that you have
done in that instance.
Results:
• You have activated the SAP Fiori apps and classic UIs in SAP Business Roles
• You have created a test user for each SAP Business Role
• You have cleared the cache to apply the changes in activation and configuration ready for testing.
Additional information
Do NOT activate all SAP Business Roles.
• Some business roles are dependent on the business functions you have activated for your functional scope and industry.
• Activating all roles leads to unnecessary troubleshooting, e.g. where the related business function is not active.
Do NOT activate a large number of roles in a single run of the task list. • Running the task list uses ABAP shared memory and activating a very large number of roles runs the risk of exhausting your ABAP
shared memory.
For test users, you assign Z_FIORI_FOUNDATION_USER and the Z_BR_xxxxxxxxxx generated version of the SAP Business Role. Do NOT assign the SAP_BR_xxxxxxx role directly.
• The generated Z_BR_ version of the role has all the derived authorizations generated and ready to use.
Avoid assigning multiple business roles to a single user id during exploration.

s4h25 – Unit 8 Exercises
78
Exercise 5: OPTIONAL, RECOMMENDED Testing SAP Fiori Overview
Estimated time: 20 mins This exercise is OPTIONAL. However, it is strongly RECOMMENDED as you will gain some hands-on experience in working with
the most common SAP Fiori floorplans used by many apps.
Be aware that many apps are more interesting when you have more data to view. As you will only have minimal data in your CAL solution 3, the screens you see will be simple.
Objective Test your activated SAP Business Roles using the test users you generated.
Try out a few SAP Fiori apps to explore 4 of the major SAP Fiori floorplans: Overview Page, Analytical List Page, Object Page, and List Report. These floorplans are used by most of the SAP delivered apps.
Briefly try out the search.
For all exercises in this unit you will connect to your instance using the Remote Desktop connect option.
Exercise Description Perform the following tasks:
• Review the main launchpad features
• Launch an app
• Explore the app
s4h25 – Unit 8 Exercises
79
What to Do What You Will See
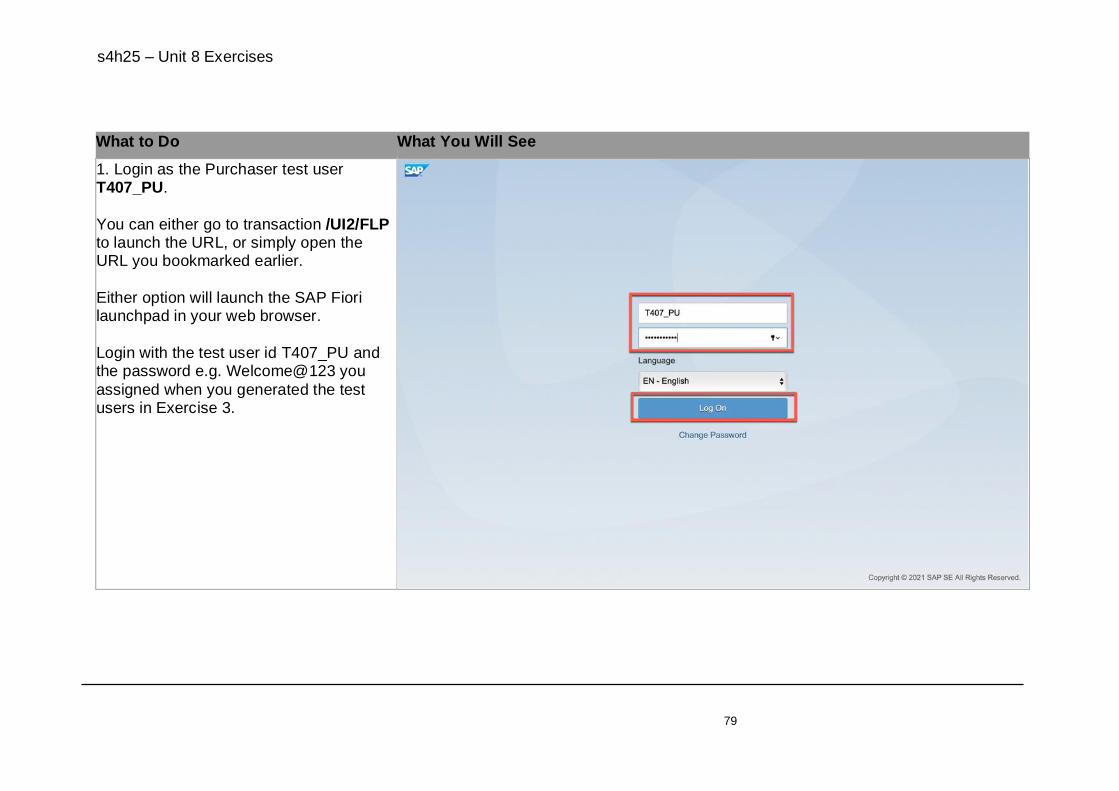
1. Login as the Purchaser test user T407_PU.
You can either go to transaction /UI2/FLP to launch the URL, or simply open the URL you bookmarked earlier.
Either option will launch the SAP Fiori launchpad in your web browser.
Login with the test user id T407_PU and the password e.g. Welcome@123 you
assigned when you generated the test users in Exercise 3.

s4h25 – Unit 8 Exercises
80
2. You can use the menu button for the Operational Purchasing space to view different pages within the space.
IMPORTANT: When you first login, it may take a few seconds for the
launchpad to show all features. This is normal. For optimal performance, the launchpad prioritizes certain features,
such as the tiles on your initial page, so you can start working while other features are still being rendered. If you
don’t immediately see the Operational Purchasing space, just wait a few seconds until it appears.

s4h25 – Unit 8 Exercises
81
3. In the Operational Purchasing tab on the Overview page, select the tile Procurement Overview to launch the
SAP Fiori app F1990 Procurement Overview.
Hint: The Operational Purchasing tab is technically known as a “space”. Each space can have one or more “pages”.
4. Enter USD as the Display Currency and press Go.

s4h25 – Unit 8 Exercises
82
5. You can see some cards giving you an overview of the procurement business domain within your system. You can drag
and drop cards around to suit your preferences.
Drag one of the cards to change its position.
s4h25 – Unit 8 Exercises
83
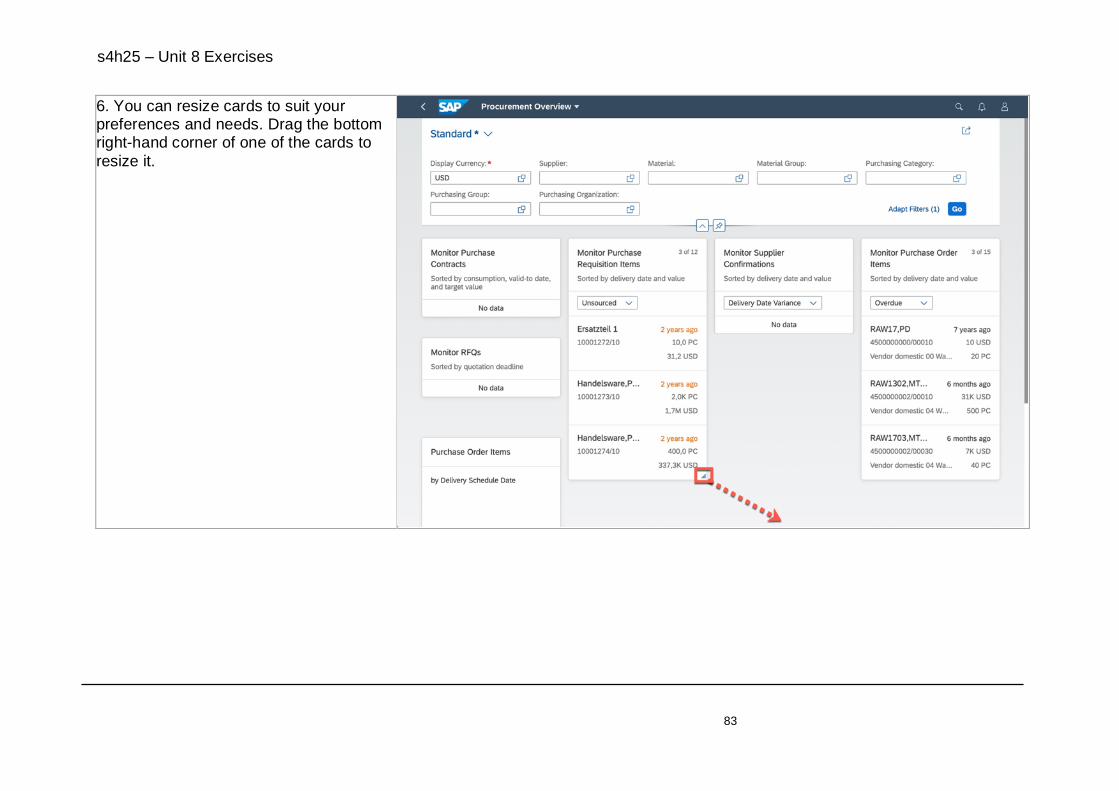
6. You can resize cards to suit your preferences and needs. Drag the bottom right-hand corner of one of the cards to
resize it.

s4h25 – Unit 8 Exercises
84
7. Open the User Actions (person icon) menu and find the option Manage Cards. You can use the option Manage Cards to
hide cards you are not interested in.

s4h25 – Unit 8 Exercises
85
8. You don’t have any purchase contracts, so you would like to hide this card for now. Switch the toggle on card Monitor
Purchase Contracts and press Ok to hide the card.
s4h25 – Unit 8 Exercises
86
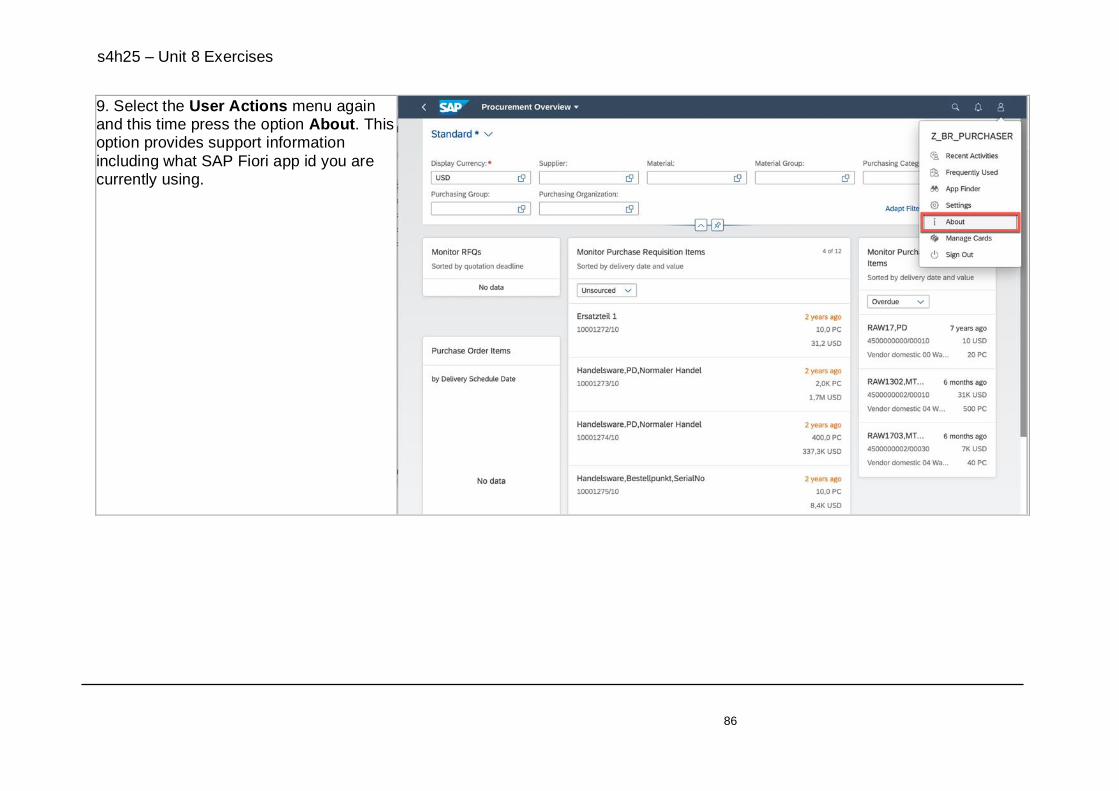
9. Select the User Actions menu again and this time press the option About. This option provides support information
including what SAP Fiori app id you are currently using.

s4h25 – Unit 8 Exercises
87
10. In the About dialog window, you can see the App ID is F1990. You can find information about the app by searching on
this code in the SAP Fiori apps reference library or in the SAP ONE Support Launchpad.
If you ever need to search for SAP Notes or raise an SAP Incident for this app, you
can see the assigned Application Component Hierarchy you need to use. For this app it is MM-PUR-HBA.
Press Ok to close the dialog window.

s4h25 – Unit 8 Exercises
88
11. Someone asks you a question about a specific supplier. You can use the Supplier filter criteria to focus cards on a
specific supplier. Start typing in the name of the supplier
vendor domes and the matching suppliers are proposed.
Select the supplier Vendor domestic 04 Warehouse.
s4h25 – Unit 8 Exercises
89
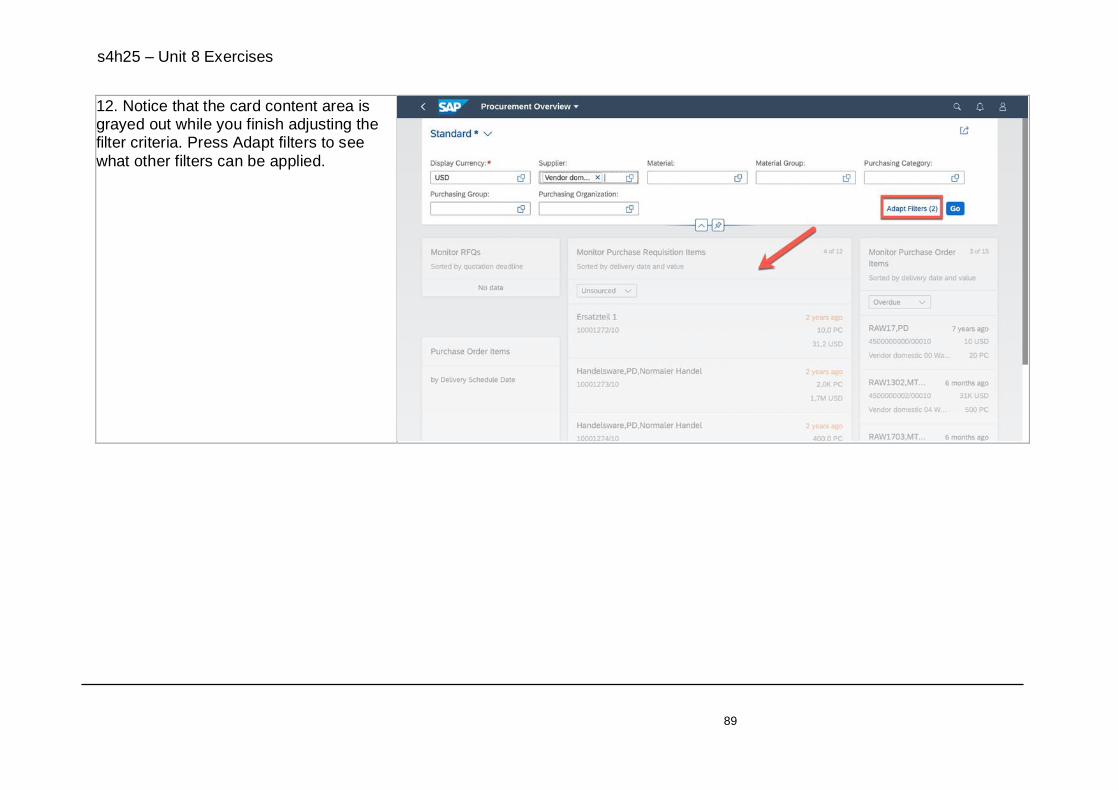
12. Notice that the card content area is grayed out while you finish adjusting the filter criteria. Press Adapt filters to see
what other filters can be applied.

s4h25 – Unit 8 Exercises
90
13. Scroll down to see the available filters. Notice that filters are grouped into related sections You can click on any of the More
Filters links to see what filters are available in the section. Use the checkbox next to each filter criteria to opt
to include or exclude the filter. Press Ok when you are done to close the
Adapt Filters dialog.
s4h25 – Unit 8 Exercises
91
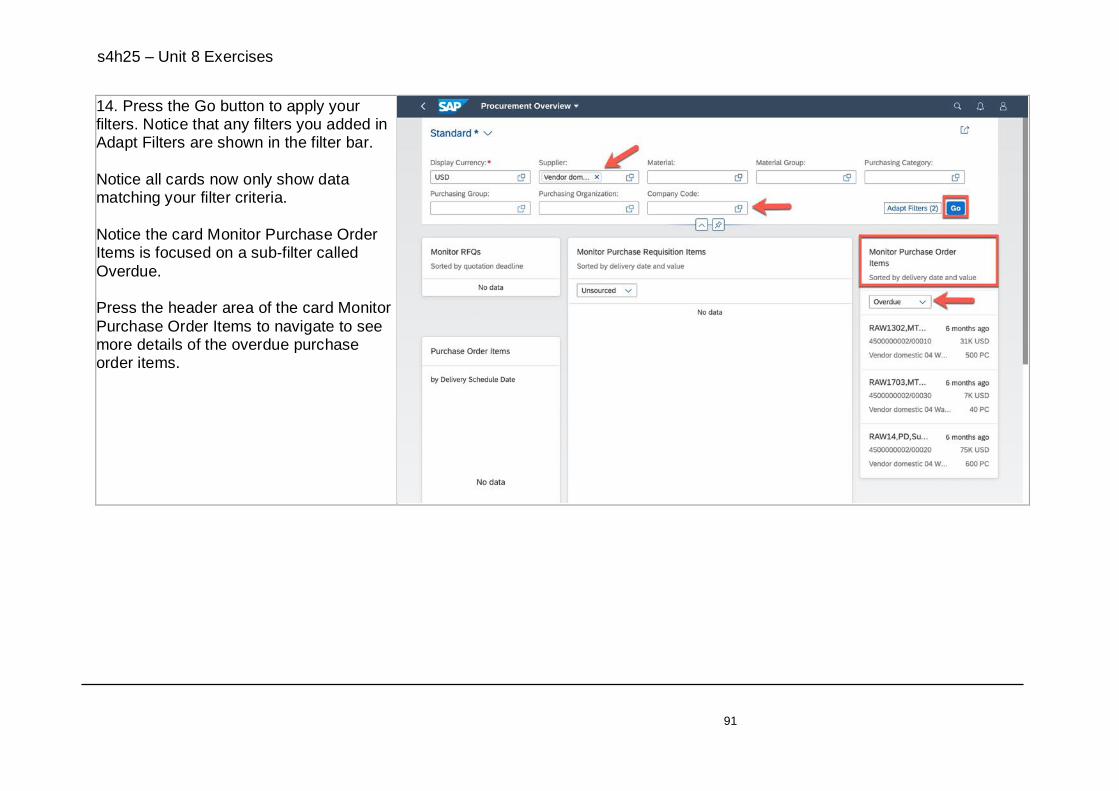
14. Press the Go button to apply your filters. Notice that any filters you added in Adapt Filters are shown in the filter bar.
Notice all cards now only show data matching your filter criteria.
Notice the card Monitor Purchase Order Items is focused on a sub-filter called
Overdue. Press the header area of the card Monitor
Purchase Order Items to navigate to see more details of the overdue purchase order items.
s4h25 – Unit 8 Exercises
92
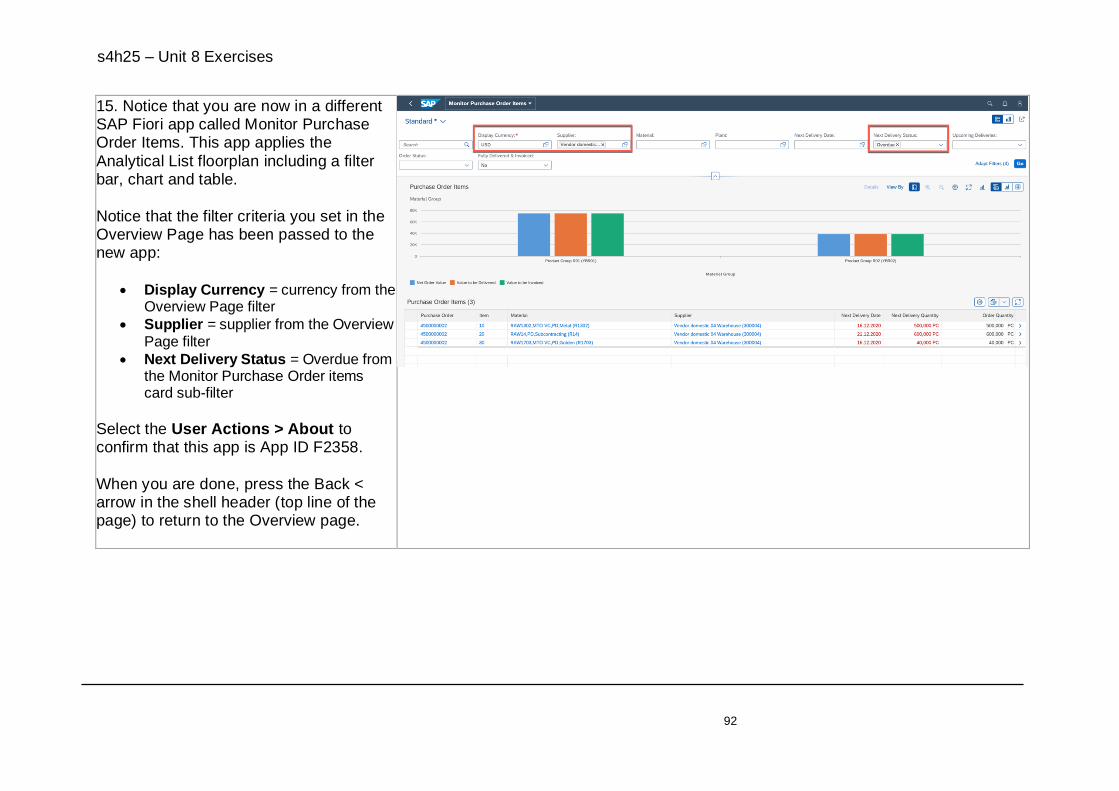
15. Notice that you are now in a different SAP Fiori app called Monitor Purchase Order Items. This app applies the
Analytical List floorplan including a filter bar, chart and table.
Notice that the filter criteria you set in the Overview Page has been passed to the new app:
• Display Currency = currency from the
Overview Page filter
• Supplier = supplier from the Overview Page filter
• Next Delivery Status = Overdue from the Monitor Purchase Order items card sub-filter
Select the User Actions > About to confirm that this app is App ID F2358.
When you are done, press the Back < arrow in the shell header (top line of the page) to return to the Overview page.

s4h25 – Unit 8 Exercises
93
16. You are returned to the Procurement Overview with all your filters intact.
Select one of the rows in the Monitor Purchase Order Items card.

s4h25 – Unit 8 Exercises
94
17. You are taken to an overview of that Purchase Order Item.
Have a look at the information shown. Select User Actions > About to find out
that this app is called App ID F0842A. When you are finished, press the SAP
logo to return to the entry page.

s4h25 – Unit 8 Exercises
95
18. On the Operational Purchasing Overview page, select the tile Monitor Purchase Order Items to launch the SAP
Fiori app Monitor Purchase Order Items.
s4h25 – Unit 8 Exercises
96
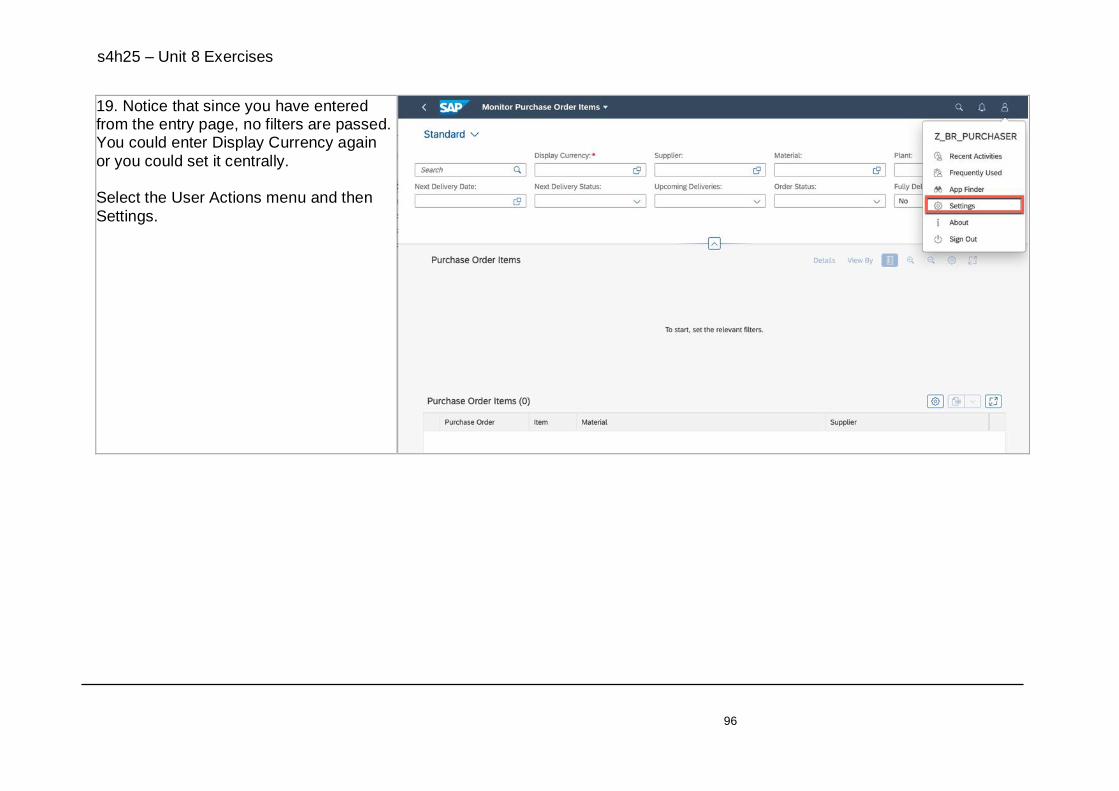
19. Notice that since you have entered from the entry page, no filters are passed. You could enter Display Currency again
or you could set it centrally. Select the User Actions menu and then
Settings.

s4h25 – Unit 8 Exercises
97
20. Go to Default Values and enter USD as your default value for the field Display Currency then press Save.
You need to restart the app to apply the new defaults. Press the SAP logo to
return to the entry page and then use the tile to launch the Monitor Purchase Order Items app again.
s4h25 – Unit 8 Exercises
98
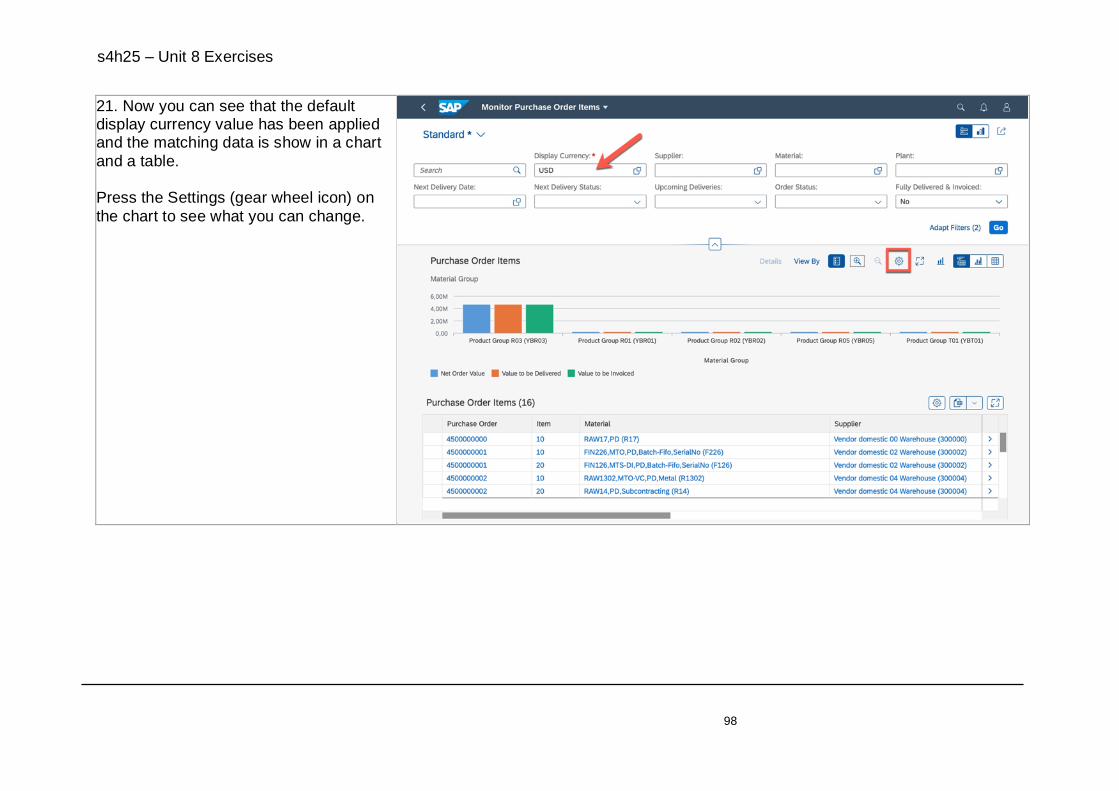
21. Now you can see that the default display currency value has been applied and the matching data is show in a chart
and a table. Press the Settings (gear wheel icon) on
the chart to see what you can change.
s4h25 – Unit 8 Exercises
99
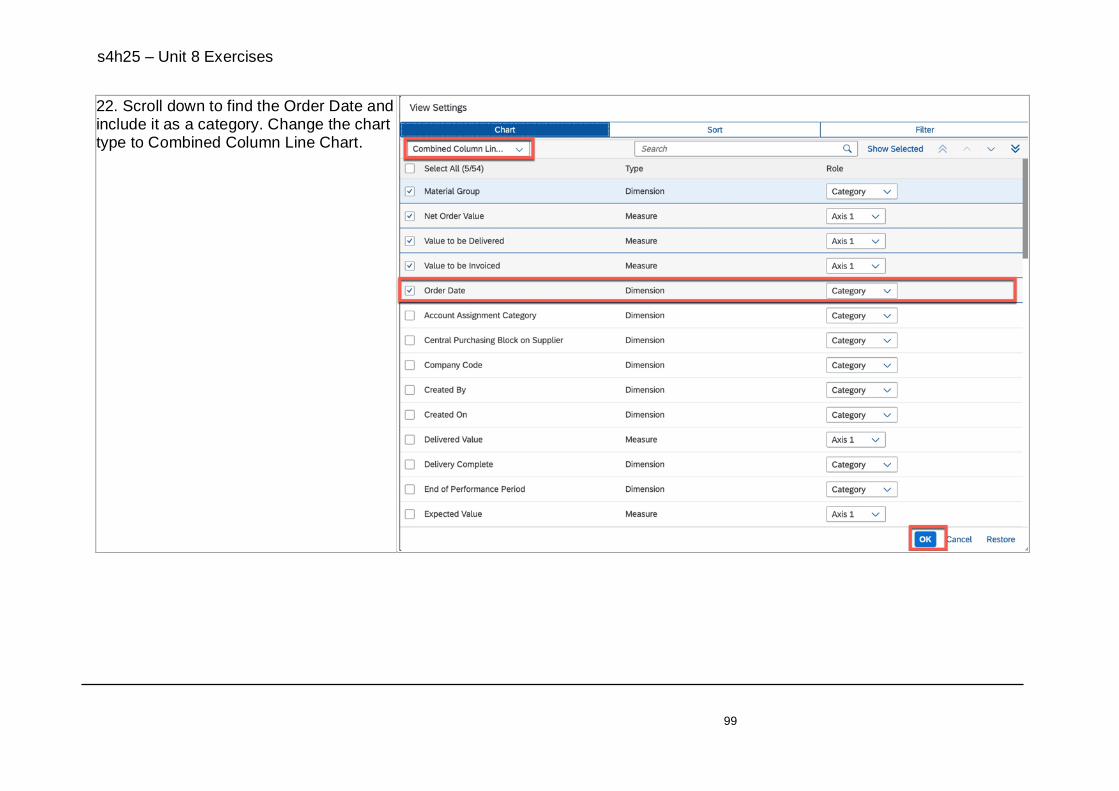
22. Scroll down to find the Order Date and include it as a category. Change the chart type to Combined Column Line Chart.

s4h25 – Unit 8 Exercises
100
23. Notice that if you hover on chart elements, it gives you more details – you can also select chart columns to find the
related items in the table below. Select the Settings (gear wheel icon) on
the table to see what you can change in the table.

s4h25 – Unit 8 Exercises
101
24. Review the list of columns available. Select a column such as Order Date to add it to the table. Use the arrowhead
icons to change the order of columns. Hint: If you wish, you can also adjust the
sorting, filtering or grouping.

s4h25 – Unit 8 Exercises
102
25. Notice the option to export to spreadsheet.

s4h25 – Unit 8 Exercises
103
26. Scroll to the right of the table to find some totals for amount columns.
Save your changes as a new view. Press the dropdown next to Standard*
and press Save As.
27. Give your view a name. You can make it your default view for this app if
you wish. You can also set Apply Automatically if
you wish. This is the equivalent of pressing the Go button as soon as you enter the view.
Alternatively, you can leave this option empty, so that you can control when you
press the Go button, e.g. so you can adjust other filters before pressing Go.

s4h25 – Unit 8 Exercises
104
28. Select a purchase order to see other apps that you can use to find out more. Your favourite links are displayed first, this
has been preset to Manage Purchase Orders.
You can also use the More Links button to find more apps you can use.
Select Manage Purchase Orders.

s4h25 – Unit 8 Exercises
105
29. Check the User Actions > About to confirm that this is the F0842A app that you used earlier to display the details of a
Purchase Order Item. When you are finished, press the SAP
logo button to return to the entry page.

s4h25 – Unit 8 Exercises
106
30. Press the Manage Purchase Order Items tile to launch that app.
31. Manage Purchase Orders is an app that uses the List Report floorplan. It has
a filter area and a list. Press User Actions > About to check that
this is the same app F0842A that you used earlier.
Close the About dialog.

s4h25 – Unit 8 Exercises
107
32. Press Go to see some data. If you wish, you can use the Settings icon to confirm that you can adjust the list/table in
much the same way as you could do for the Analytical List Page app.
Manage Purchase Orders supports single item selection. Select a row to see more details.

s4h25 – Unit 8 Exercises
108
33. You can see an Object Page for the whole purchase order. Check User Actions > About to see that this is still part
of app F0842A. Select a row in the table Purchase Order
Items.

s4h25 – Unit 8 Exercises
109
34. Now you see the Purchase Order Item details.
You can use User Actions > About to confirm that this is also part of app F0842A.
35. You want to find other apps that are
related to purchase orders. Select the search icon and type in
purchase order. Your most used matching apps will be
proposed. Select “Apps” to see all available apps.
s4h25 – Unit 8 Exercises
110
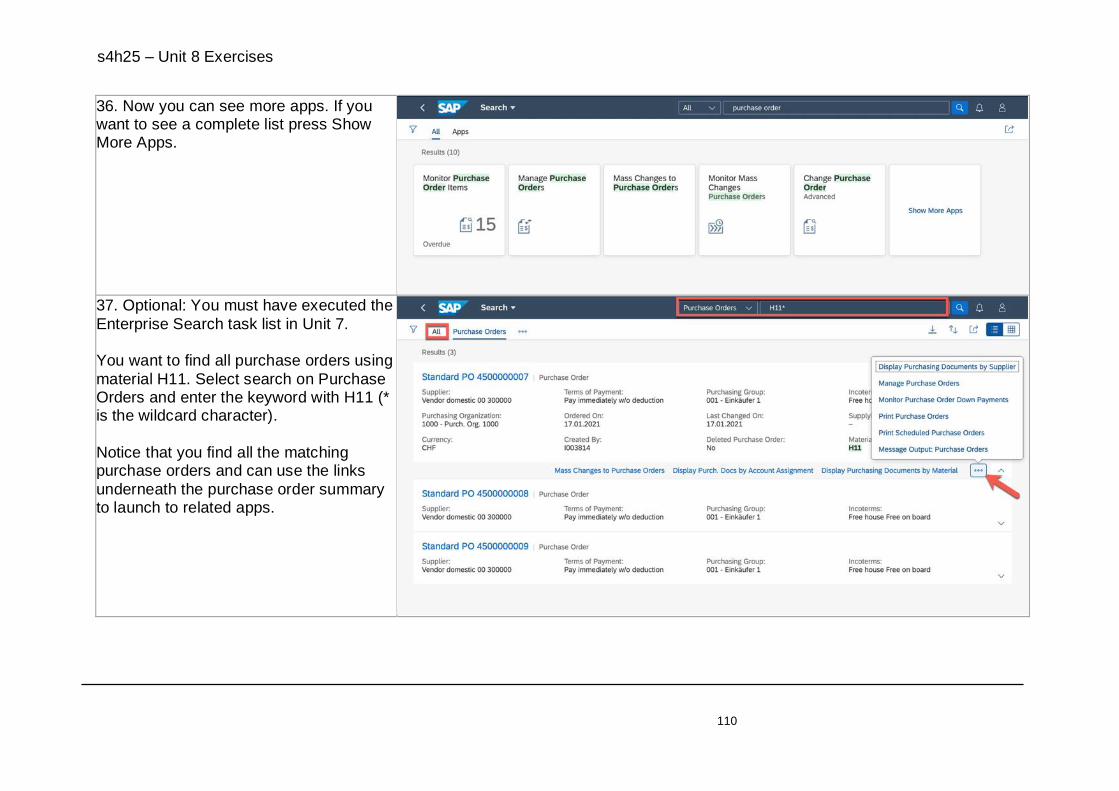
36. Now you can see more apps. If you want to see a complete list press Show More Apps.
37. Optional: You must have executed the
Enterprise Search task list in Unit 7. You want to find all purchase orders using
material H11. Select search on Purchase Orders and enter the keyword with H11 (* is the wildcard character).
Notice that you find all the matching purchase orders and can use the links
underneath the purchase order summary to launch to related apps.

s4h25 – Unit 8 Exercises
111
38. You have completed all exercises of SAP CAL solution 3. If you want to check any further information in this system
status, you can do so. Otherwise, it is no longer required, and we
recommend that you terminate your SAP CAL solution 3 instance to save cost.
Please note that an instance termination cannot be revoked, and you would be losing any configuration that you have
done in that instance.
Results:
• You can log in as a test user to the SAP Fiori launchpad
• You can view and launch apps from the SAP Fiori launchpad
• You have learnt some of the features of the major SAP Fiori floorplans: Overview Page, Analytical List Page, Object Page, and List Report
• You can use Enterprise Search to find apps and business objects using keywords, including partial keywords and wildcards

s4h25 – Unit 8 Exercises
112
© 2021 SAP SE or an SAP affiliate company. All rights reserved.
No part of this publication may be reproduced or transmitted in any form or for any purpose without the express permission of SAP SE or an SAP affiliate company.
The information contained herein may be changed without prior notice. Some software products marketed by SAP SE and its distributors contain proprietary software components of other software vendors. National product
specifications may vary.
These materials are provided by SAP SE or an SAP affiliate company for informational purposes only, without representation or warranty of any kind, and SAP or its affiliated companies shall not be liable for errors or
omissions with respect to the materials. The only warranties for SAP or SAP affiliate company products and services are those that are set forth in the express warranty statements accompanying such products and services, if
any. Nothing herein should be construed as constituting an additional warranty.
In particular, SAP SE or its affiliated companies have no obligation to pursue any course of business outlined in this document or any related presentation, or to develop or release any functionality mentioned therein. This
document, or any related presentation, and SAP SE’s or its affiliated companies’ strategy and possible future developments, products, and/or platform directions and functionality are all subject to change and may be changed by
SAP SE or its affiliated companies at any time for any reason without notice. The information in this document is not a commitment, promise, or legal obligation to deliver any material, code, or functionality. All forward-
looking statements are subject to various risks and uncertainties that could cause actual results to differ materially from expectations. Readers are cautioned not to place undue reliance on these forward-looking statements, and
they should not be relied upon in making purchasing decisions.
SAP and other SAP products and services mentioned herein as well as their respective logos are trademarks or registered trademarks of SAP SE (or an SAP affiliate company) in Germany and other countries. All other product
and service names mentioned are the trademarks of their respective companies. See www.sap.com/copyright for additional trademark information and notices.
www.sap.com/contactsap
Coding Samples Any software coding or code lines/strings (“Code”) provided in this documentation are only examples and are not intended for use in a production system environment. The Code is only intended to better explain and visualize
the syntax and phrasing rules for certain SAP coding. SAP does not warrant the correctness or completeness of the Code provided herein and SAP shall not be liable for errors or damages cause by use of the Code, except where
such damages were caused by SAP with intent or with gross negligence.