
S314413_hadoop
51
Extracting Real Value from Your Data With Apache Hadoop Sarah Sproehnle Hadoop Instructor, Cloudera Glynn Durham Hadoop Instructor, Cloudera Daniel Templeton Product Manager, Oracle Grid Engine Michal Bachorik Member Technical Staff, Oracle Grid Engine
-
Upload
prabhakarn1 -
Category
Documents
-
view
103 -
download
2
Transcript of S314413_hadoop

Extracting Real Value from Your Data With Apache Hadoop
Sarah SproehnleHadoop Instructor, Cloudera
Glynn DurhamHadoop Instructor, Cloudera
Daniel TempletonProduct Manager, Oracle Grid Engine
Michal BachorikMember Technical Staff, Oracle Grid Engine
JavaOne|Oracle DevelopExtracting Real Value from Your Data With Apache Hadoop Hands-on Lab: S314413
IntroductionHadoop is an open-source project administered by the Apache Software Foundation. Hadoop’s contributors work for some of the world’s biggest technology companies. That diverse, motivated community has produced a genuinely innovative platform for consolidating, combining and understanding data.
Enterprises today collect and generate more data than ever before. Relational and data warehouse products excel at OLAP and OLTP workloads over structured data. Hadoop, however, was designed to solve a different problem: the fast, reliable analysis of both structured and complex data. As a result, many enterprises deploy Hadoop alongside their legacy IT systems, which allows them to combine old and new data sets in powerful new ways.
Technically, Hadoop consists of two key services: reliable data storage using the Hadoop Distributed File System (HDFS) and high-performance parallel data processing using a technique called MapReduce.
Hadoop runs on a collection of commodity, shared-nothing servers. You can add or remove servers in a Hadoop cluster at will; the system detects and compensates for hardware or system problems on any server. Hadoop, in other words, is self-healing. It can deliver data — and can run large-scale, high-performance processing jobs — in spite of system changes or failures.
Originally developed and employed by dominant Web companies like Yahoo and Facebook, Hadoop is now widely used in finance, technology, telecom, media and entertainment, government, research institutions and other markets. With Hadoop, enterprises can easily explore complex data using custom analyses tailored to their information and questions.
PrerequisitesThis hands-on lab assumes you have basic experience with the following technologies:
• Java SE Platform
Notations Use In This Documentation<lab_root> The directory into which the lab contents were placed, i.e. where this document lives
<hadoop_home> The directory where the Hadoop distribution lives
<hive_home> The directory where the Hive distribution lives
Lab Exercises1. Getting Familiar With Hadoop
2. Developing Map/Reduce Applications
3. Using a Custom File Format
4. Getting Familiar with Hive – BONUS
Page 2 of 51

Solutions to the lab exercises can be found in the /home/lab314413/solutions directory.
Please feel free to seek assistance from the instructor or Oracle Demo staff at any point during the lab.
Page 3 of 51
Exercise 1: Getting Familiar With Hadoop (20 minutes)
This lab exercise is designed to give you hands-on experience getting acquainted with the Hadoop tools.
Background InformationIn addition to being an API against which Map/Reduce applications are written, Hadoop is also a complex execution framework and distributed file system. The primary interface to both is the <hadoop_home>/bin/hadoop command. Using the hadoop command, it's possible to transfer data in and out of HDFS and launch and monitor Map/Reduce jobs. (A job is a running instance of a Map/Reduce application.)
The hadoop command is subdivided into several subsystems. For example, there's a subsystem for working with HDFS and another for launching and managing jobs. To find out more about the subsystems available, run hadoop. To find out more about a specific subsystem, run hadoop <subsystem>, e.g. hadoop fs.
Steps To Follow
Step 1: Exploring HDFS
The first thing to do is to use the Hadoop Distributed File System, HDFS. This is where data is stored in a way that makes it accessible to Hadoop MapReduce programs. The subsystem associated with the wrapper program is fs.
1. Open up a terminal window by selecting Applications → Accessories → Terminal from the desktop menu or by right-clicking on the desktop background and selecting Open Terminal.
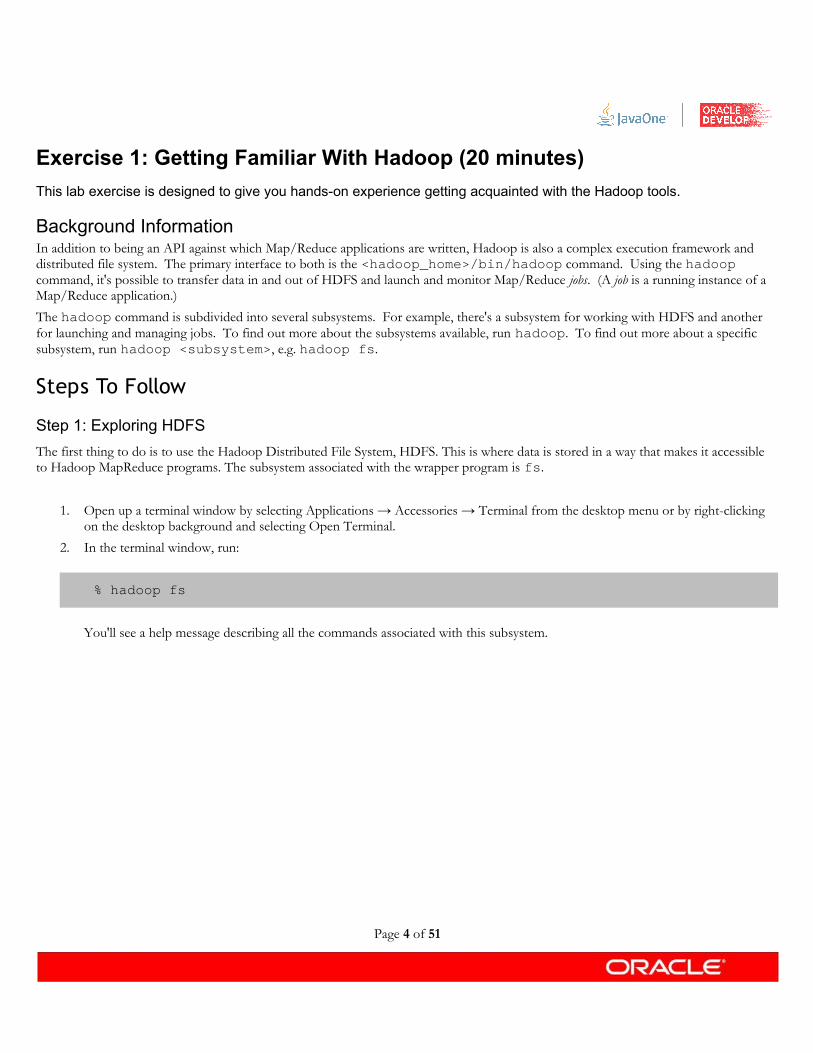
2. In the terminal window, run:
% hadoop fs
You'll see a help message describing all the commands associated with this subsystem.
Page 4 of 51
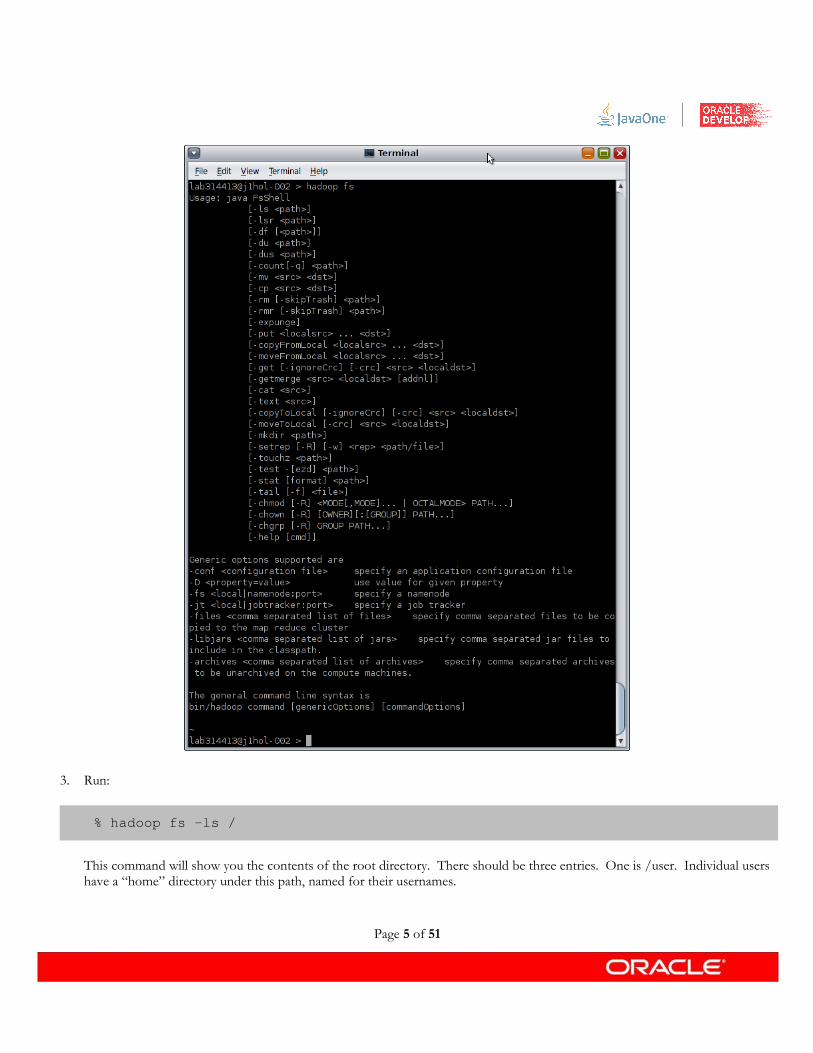
3. Run:
% hadoop fs -ls /
This command will show you the contents of the root directory. There should be three entries. One is /user. Individual users have a “home” directory under this path, named for their usernames.
Page 5 of 51
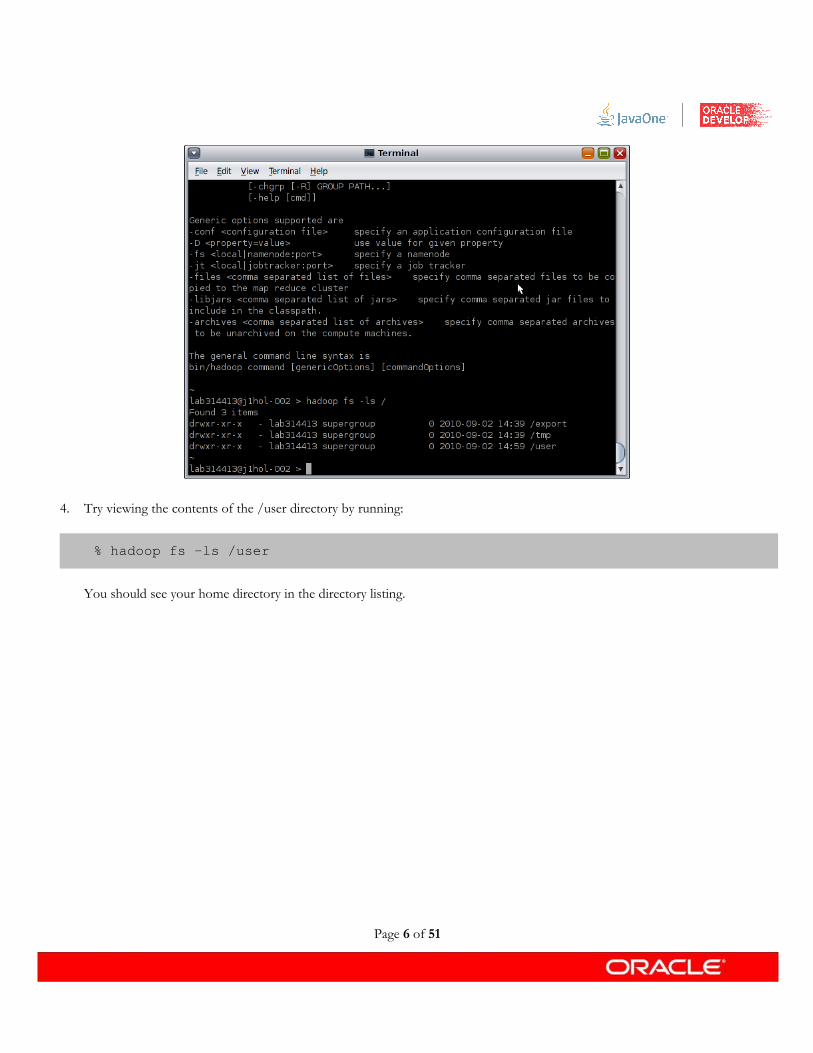
4. Try viewing the contents of the /user directory by running:
% hadoop fs -ls /user
You should see your home directory in the directory listing.
Page 6 of 51
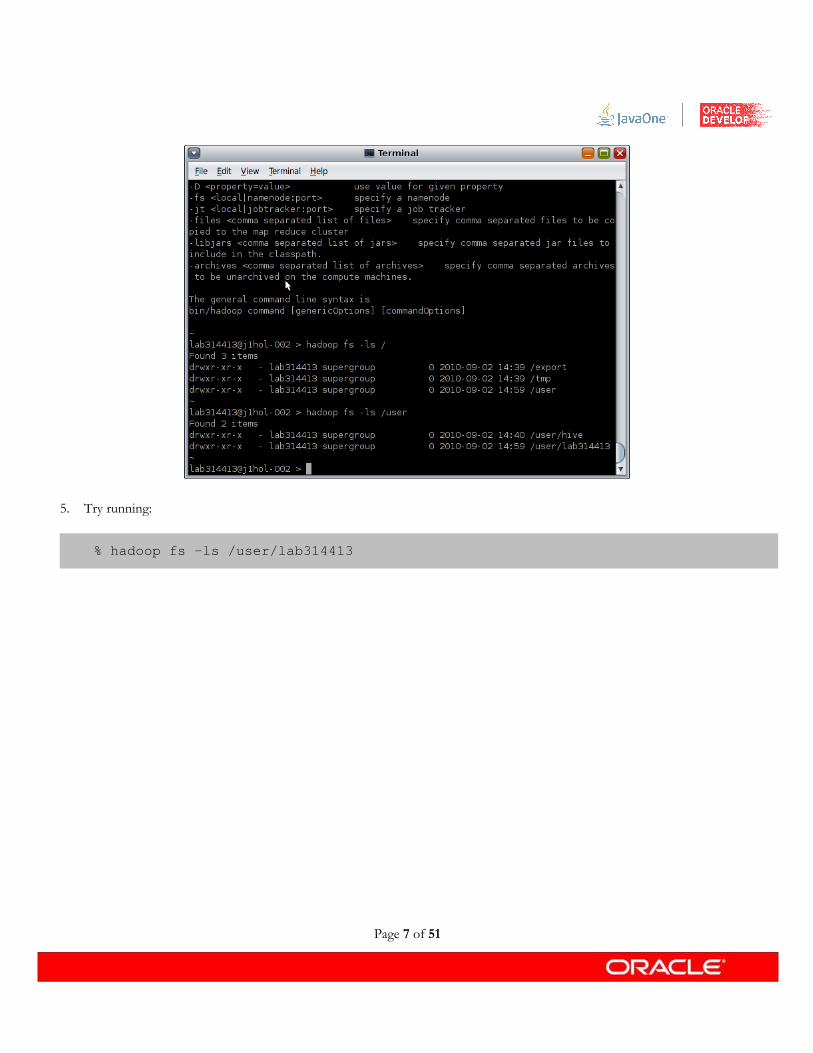
5. Try running:
% hadoop fs -ls /user/lab314413
Page 7 of 51

Because there are currently no files in your home directory, the command silently exits. Note that behavior is different from what would happen if you tried to refer to a directory that doesn't exist, such as “ hadoop fs -ls /foo”
Note that the directory structure within HDFS has nothing to do with the directory structure of the local file system; they're completely separate name spaces.
Step 2: Uploading Files
Besides browsing the existing file system, another important thing can do with the FsShell (as this subsystem is properly called), is to upload new data into it.
If you browse the input directory in your home directory, you'll see a large file called all-shakespeare (as well as some others). This file contains the complete works of William Shakespeare (175,376 lines of text).
1. Insert the complete input directory into HDFS:
% hadoop fs -put input /user/lab314413/input
This command will copy the local input directory into a remote directory named /user/lab314413/input.
2. Try to view the contents of your HDFS home directory now:
% hadoop fs -ls /user/lab314413
You should see an entry for the input directory.
Page 8 of 51

3. Now try the same fs -ls command without a path argument:
% hadoop fs -ls
Page 9 of 51

You should see the same results. If you don't include a path argument to the fs -ls command, it assumes you mean your home directory, e.g. /user/lab314413.
Step 3: Viewing Files
1. Let's look at some of the data in the /user/lab314413/input directory:
% hadoop fs -cat input/all-shakespeare | head -20
Page 10 of 51
Relative paths
If you pass any relative (non-absolute) paths to FsShell commands (or use relative paths in MapReduce programs), they will implicitly be relative to the user's directory. For example, you can see the contents of the uploaded input directory by running:
hadoop fs -ls input
You also could have uploaded the Shakespeare files into HDFS by running:
hadoop fs -put input input
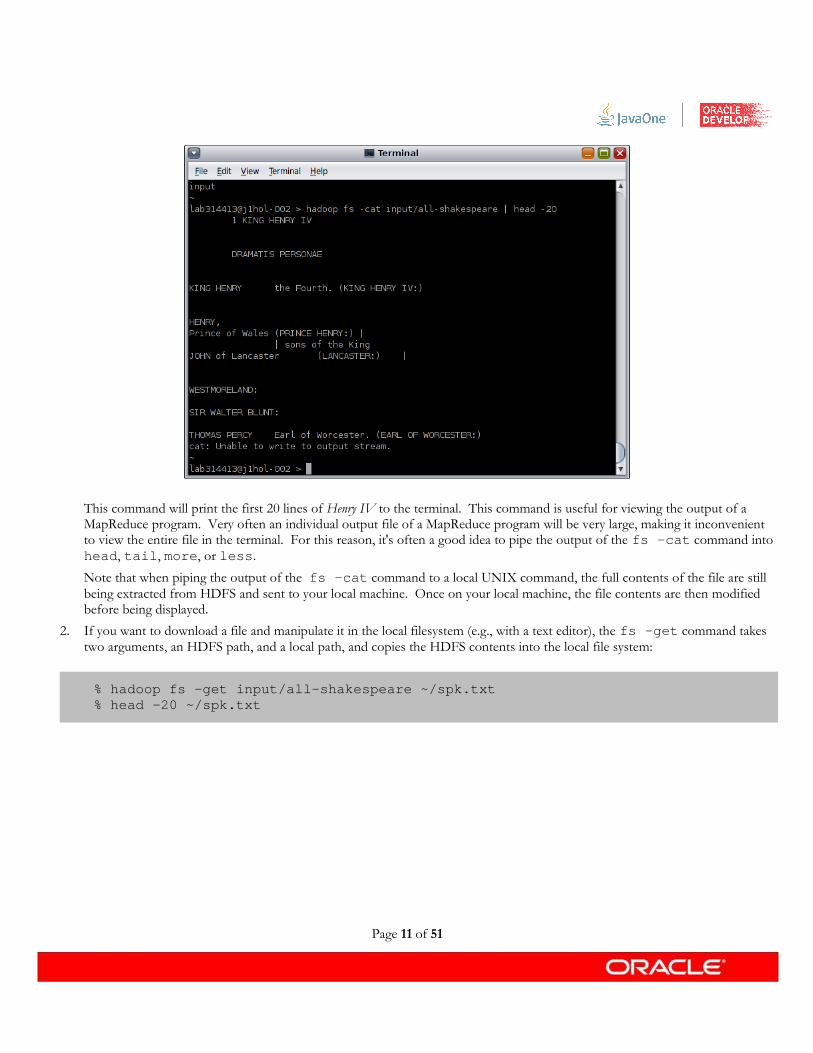
This command will print the first 20 lines of Henry IV to the terminal. This command is useful for viewing the output of a MapReduce program. Very often an individual output file of a MapReduce program will be very large, making it inconvenient to view the entire file in the terminal. For this reason, it's often a good idea to pipe the output of the fs -cat command into head, tail, more, or less.
Note that when piping the output of the fs -cat command to a local UNIX command, the full contents of the file are still being extracted from HDFS and sent to your local machine. Once on your local machine, the file contents are then modified before being displayed.
2. If you want to download a file and manipulate it in the local filesystem (e.g., with a text editor), the fs -get command takes two arguments, an HDFS path, and a local path, and copies the HDFS contents into the local file system:
% hadoop fs -get input/all-shakespeare ~/spk.txt% head -20 ~/spk.txt
Page 11 of 51

Other Commands
There are several other commands associated with the FsShell subsystem; these can perform most common filesystem manipulations (rm, mv, cp, mkdir, etc.). Try playing around with a few of these if you'd like.
Step 4: Running a MapReduce Program
The same wrapper program is used to launch MapReduce jobs. The source code for a job is contained in a compiled .jar file. Hadoop will load the JAR into HDFS and distribute it to the worker nodes, where the individual tasks of the MapReduce job will be executed.
Hadoop ships with some example MapReduce programs to run. One of these is a distributed grep application which reads through a set of source documents for strings which match a user-provided regular expression. Let's run the grep program on the input documents you loaded in the previous steps.
1. Run the following command:
% hadoop jar $HADOOP_HOME/*examples*.jar grep input grep_output "[Ww]herefore"
The format of this command is hadoop jar jarfilename [arguments to pass to program here]
Page 12 of 51

This program will search for all instances of the word "wherefore" in the Shakespeare corpus, regardless of initial capitalization, and report back the number of occurrences of each matching string. The strings which matched the regular expression argument, as well as their frequency of occurrence, will be written to files in the output directory, called grep_output. Note that this behavior is different than what the UNIX grep tool typically does.
2. Now, use fs -ls on the output directory to see the list of output files:
% hadoop fs -ls grep_output
Page 13 of 51

3. Use fs -cat to view individual output files. (There should be one, named part-00000.)
% hadoop fs -cat grep_output/part-00000
Page 14 of 51
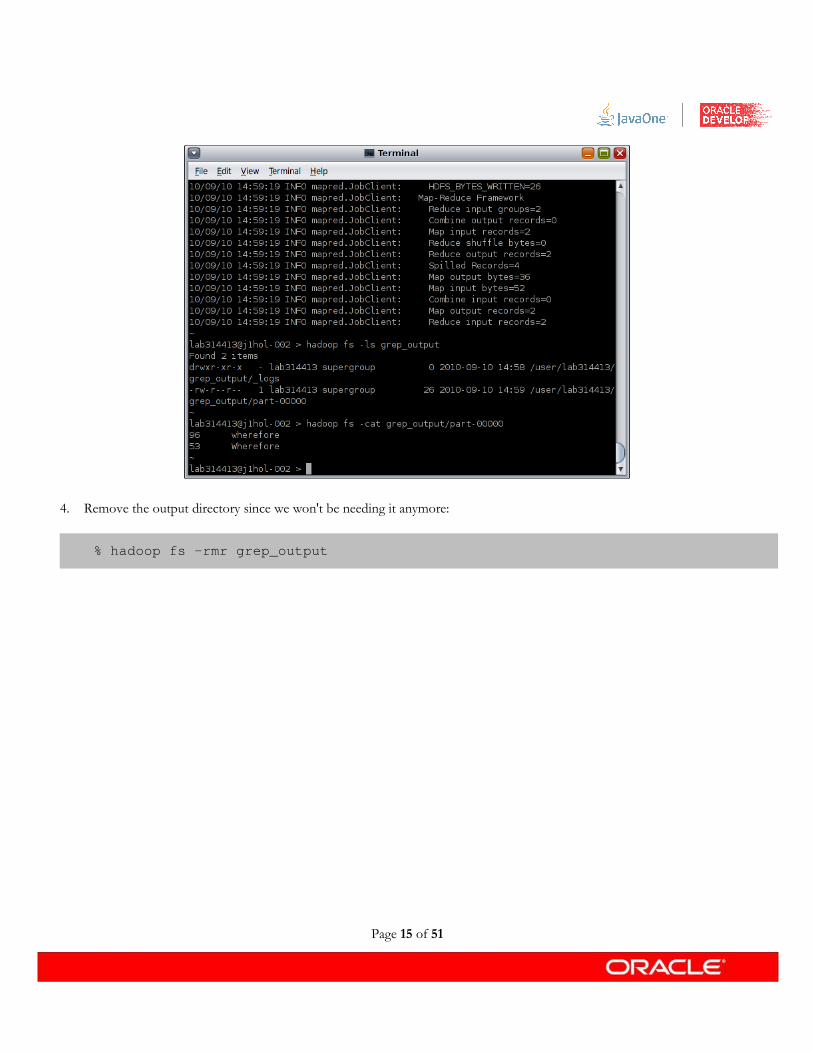
4. Remove the output directory since we won't be needing it anymore:
% hadoop fs -rmr grep_output
Page 15 of 51
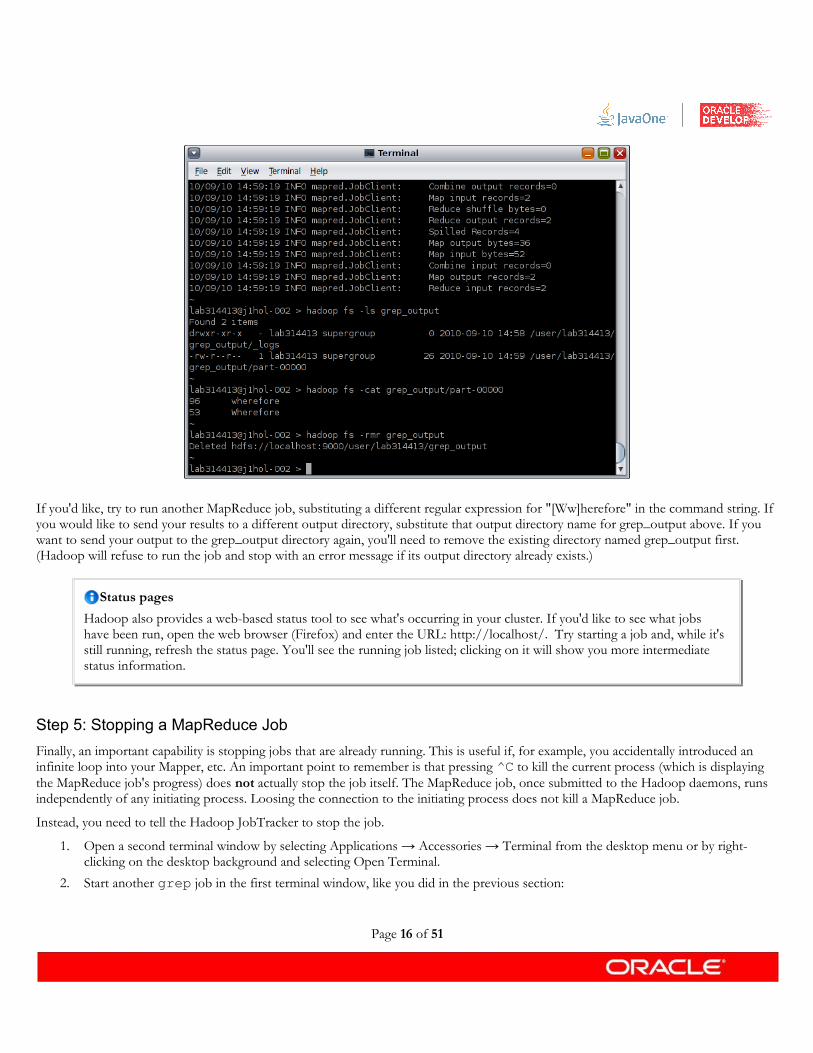
If you'd like, try to run another MapReduce job, substituting a different regular expression for "[Ww]herefore" in the command string. If you would like to send your results to a different output directory, substitute that output directory name for grep_output above. If you want to send your output to the grep_output directory again, you'll need to remove the existing directory named grep_output first. (Hadoop will refuse to run the job and stop with an error message if its output directory already exists.)
Step 5: Stopping a MapReduce Job
Finally, an important capability is stopping jobs that are already running. This is useful if, for example, you accidentally introduced an infinite loop into your Mapper, etc. An important point to remember is that pressing ^C to kill the current process (which is displaying the MapReduce job's progress) does not actually stop the job itself. The MapReduce job, once submitted to the Hadoop daemons, runs independently of any initiating process. Loosing the connection to the initiating process does not kill a MapReduce job.
Instead, you need to tell the Hadoop JobTracker to stop the job.
1. Open a second terminal window by selecting Applications → Accessories → Terminal from the desktop menu or by right-clicking on the desktop background and selecting Open Terminal.
2. Start another grep job in the first terminal window, like you did in the previous section:
Page 16 of 51
Status pages
Hadoop also provides a web-based status tool to see what's occurring in your cluster. If you'd like to see what jobs have been run, open the web browser (Firefox) and enter the URL: http://localhost/. Try starting a job and, while it's still running, refresh the status page. You'll see the running job listed; clicking on it will show you more intermediate status information.

% hadoop jar $HADOOP_HOME/*examples*.jar grep input grep_output "[Ww]herefore"
3. In the second terminal run:
% hadoop job -list
This will list the job id's of all running jobs. A job id looks something like job_200902131742_0002.
4. Copy the job id, and then kill the job by running:
% hadoop job -kill <jobid>
Page 17 of 51
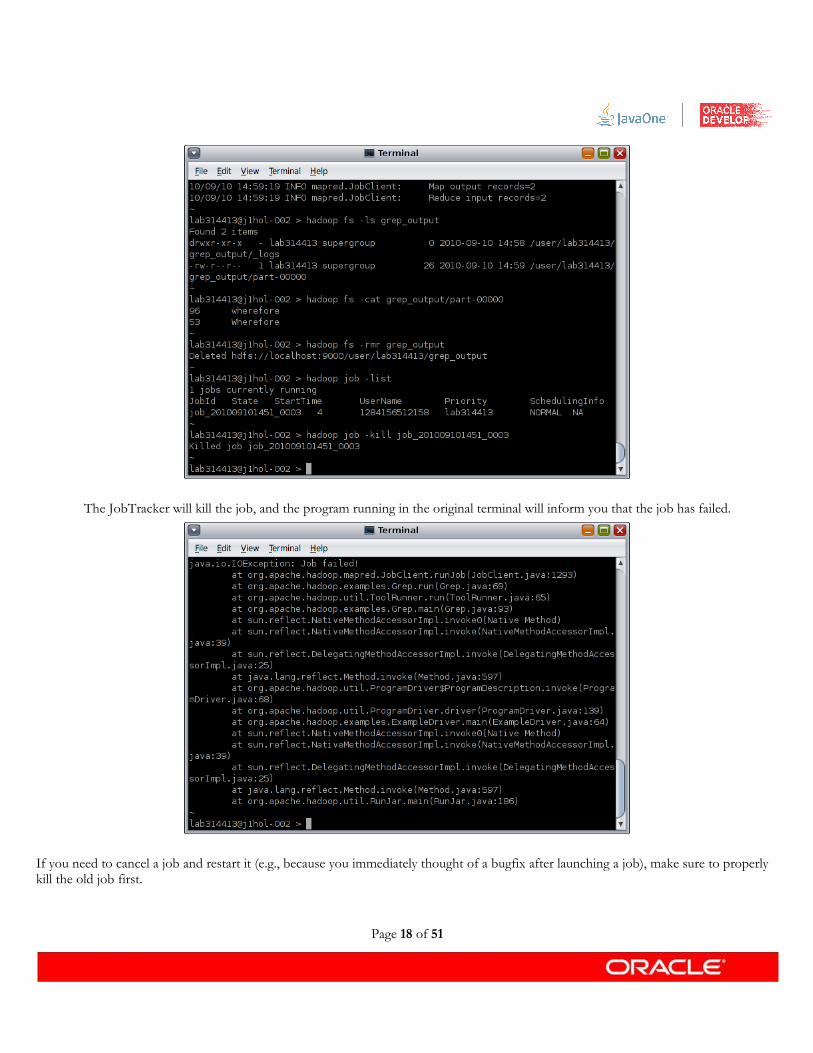
The JobTracker will kill the job, and the program running in the original terminal will inform you that the job has failed.
If you need to cancel a job and restart it (e.g., because you immediately thought of a bugfix after launching a job), make sure to properly kill the old job first.
Page 18 of 51

SummaryIn this exercise you learned about how to use the hadoop command and two of the command subsystems. You should now be able to move data into and out of HDFS as well as start and stop MapReduce programs. In the next exercise we'll look at how to write your own MapReduce program.
Page 19 of 51

Exercise 2: Developing Map/Reduce Applications (40 minutes)
MapReduce is a programming model designed for processing large volumes of data in parallel by dividing the work into a set of independent tasks. MapReduce programs are written in a particular style influenced by functional programming constructs, specifically idioms for processing lists of data. This module explains the nature of this programming model and how it can be used to write programs which run in the Hadoop environment.
Background Information
Functional Programming Concepts
MapReduce programs are designed to compute large volumes of data in a parallel fashion. This requires dividing the workload across a large number of machines. This model would not scale to large clusters (hundreds or thousands of nodes) if the components were allowed to share data arbitrarily. The communication overhead required to keep the data on the nodes synchronized at all times would prevent the system from performing reliably or efficiently at large scale.
Instead, all data elements in MapReduce are immutable, meaning that they cannot be updated. If in a mapping task you change an input (key, value) pair, it does not get reflected back in the input files; communication occurs only by generating new output (key, value) pairs which are then forwarded by the Hadoop system into the next phase of execution.
List Processing
Conceptually, MapReduce programs transform lists of input data elements into lists of output data elements. A MapReduce program will do this twice, using two different list processing idioms: map, and reduce. These terms are taken from several list processing languages such as LISP, Scheme, or ML.
Mapping Lists
The first phase of a MapReduce program is called mapping. A list of data elements are provided, one at a time, to a function called the Mapper, which transforms each element individually to an output data element.
As an example of the utility of map, suppose you had a function toUpper(str) which returns an uppercase version of its input string. You could use this function with map to turn a list of strings into a list of uppercase strings. Note that we are not modifying the input string here: we are returning a new string that will form part of a new output list.
Page 20 of 51
Figure 1: Mapping creates a new output list by applying a function to individual elements of an input list.

Reducing Lists
Reducing lets you aggregate values together. A reducer function receives an iterator of input values from an input list. It then combines these values together, returning a single output value.
Reducing is often used to produce "summary" data, turning a large volume of data into a smaller summary of itself. For example, "+" can be used as a reducing function, to return the sum of a list of input values.
Putting Them Together in MapReduce
The Hadoop MapReduce framework takes these concepts and uses them to process large volumes of information. A MapReduce program has two components: one that implements the mapper, and another that implements the reducer. The Mapper and Reducer idioms described above are extended slightly to work in this environment, but the basic principles are the same.
Keys and values: In MapReduce, no value stands on its own. Every value has a key associated with it. Keys identify related values. For example, a log of time-coded speedometer readings from multiple cars could be keyed by license-plate number; it would look like:
AAA-123 65mph, 12:00pmZZZ-789 50mph, 12:02pmAAA-123 40mph, 12:05pmCCC-456 25mph, 12:15pm...
The mapping and reducing functions receive not just values, but (key, value) pairs. The output of each of these functions is the same: both a key and a value must be emitted to the next list in the data flow.
MapReduce is also less strict than other languages about how the Mapper and Reducer work. In more formal functional mapping and reducing settings, a mapper must produce exactly one output element for each input element, and a reducer must produce exactly one output element for each input list. In MapReduce, an arbitrary number of values can be output from each phase; a mapper may map one input into zero, one, or one hundred outputs. A reducer may compute over an input list and emit one or a dozen different outputs.
Keys divide the reduce space: A reducing function turns a large list of values into one (or a few) output values. In MapReduce, all of the output values are not usually reduced together. All of the values with the same key are presented to a single reducer together. This is
Page 21 of 51
Figure 2: Reducing a list iterates over the input values to produce an aggregate value as output.

performed independently of any reduce operations occurring on other lists of values, with different keys attached.
Steps To FollowThis project is designed to get you familiar with the MapReduce environment by having you write a one-pass MapReduce program to calculate an inverted index over a set of documents.
Given a body of input text, an offset indexer uses Hadoop to produce an index of all the words in the text. For each word, the index has a list of all the locations where the word appears, and optionally a text excerpt of each line where the word appears. Running the line indexer on the complete works of Shakespeare, the following input lines:
lucrece.txt, offset 38624: To cipher what is writ in learned books,orlando.txt, offset 66001: ORLANDO Which I take to be either a fool or a cipher.
would produce the following output for the word "cipher:"
cipher lucrece.txt@38624,orlando.txt@66001,...
The goal of this exercise is to develop an inverted index program and run it in Hadoop on a set of documents. The idea will be to create a mapper class that outputs every word in its document as a key with the file and location as the value, and then to create a reducer class that aggregates the values of like keys.
Step 1: Open the Project
1. Open the NetBeans IDE by double-clicking the NetBeans icon on the desktop or by selecting Applications → Developer Tools → NetBeans IDE 6.9 from the desktop menu.
2. Open a project by selecting File → Open Project... from the NetBeans menu.
Page 22 of 51
Figure 3: Different colors represent different keys. All values with the same key are presented to a single reduce task.

3. Select InvertedIndex.
4. Click Open Project.
Step 2: Create the Mapper Class
1. From the Projects tab, expand the InvertedIndex → Source Packages → index branch of the tree.
Page 23 of 51

2. Double-click on the LineIndexMapper.java node. The Java source file will open in the editor window.
3. Look at the class definition on lines 22 and 23. Notice that the mapper class extends the MapReduceBase class, which is a helper class for developing MapReduce applications. Notice also that it implements the Mapper interface and uses Generics to specify four class types. The first class is the type of the input key. In most cases, the key for the mapper is the byte offset into the file as a long. The second class is the type of the input values. In most cases the values are lines of text as strings. The third and fourth classes are the types of the keys and values emitted by this mapper class. Our inverted index mapper will be outputting text keys and text values. Notice that Hadoop uss its own set of classes for dealing with primitives (including strings) for performance reasons. Instead of a Long, the input key is a org.apache.hadoop.io.LongWritable. Instead of String, the other three types are org.apache.hadoop.io.Text.
4. Go to line 30 where you will find the INSERT CODE HERE comment. This comment is in the map() method and marks the place where the mapping should be done. Remember that the input key is the byte offset into the file of the first character of the line, and the input value is the line of text found at that byte offset, minus any trailing new lines and carriage returns.
5. The first thing to do is to find the file name for the input split. First, get the FileSplit object for the current input split with the Reporter.getInputSplit() method. You'll have to cast it to a FileSplit object explicitly. Next get the file name from the FileSplit object with the FileSplit.getPath() method. This method returns a Path object, so you'll need to convert it to a String using the Path.getName() method:
String fileName = ((FileSplit)reporter.getInputSplit()).getPath().getName();
6. Next, build the output value by concatinating the file name and the given key with an '@':
Text outputValue = new Text(fileName + "@" + key);
Notice that you should use the org.apache.hadoop.io.Text class instead of java.lang.String.
7. Next, tokenize the input value so you can find all the words in it:
StringTokenizer tokenizer = new StringTokenizer(value.toString());
Page 24 of 51

8. Next, loop over the tokenizer to process each word:
while (tokenizer.hasMoreTokens()) { String word = tokenizer.nextToken(); ...}
9. Finally, for each word that you find, use the OutputCollector instance to output the word as a key with the value from above:
output.collect(new Text(word), outputValue);
Notice that you have to convert the String word into a Text instance.
Your mapper class should now look something like:
Step 3: Create the Reducer Class
1. From the Projects tab, double-click on the LineIndexReducer.java node. The Java source file will open in the editor window.
2. Look at the class definition on lines 22 and 23. Notice that the reducer class also extends the MapReduceBase class. Notice also that it implements the Reducer interface and again uses Generics to specify four class types: input key, input value, output key, output value. For the reducer, they're all strings since the mapper is emitting strings and our destination is a text file.
3. Go to line 31 where you will find the INSERT CODE HERE comment. This comment is in the reduce() method and marks the place where the reduce should be done. The input to be reduced is a set of word = file@offset pairs.
4. The objective of this reduce() method is to build one comma-separated value string out of the set of name-value pairs. First
Page 25 of 51
public class LineIndexMapper extends MapReduceBase implements Mapper<LongWritable, Text, Text, Text> {
public LineIndexMapper() { }
public void map(LongWritable key, Text value, OutputCollector<Text, Text> output, Reporter reporter) throws IOException { String fileName = (FileSplit)reporter.getInputSplit()).getPath().getName(); Text outputValue = new Text(fileName + "@" + key);
StringTokenizer tokenizer = new StringTokenizer(value.toString()); while (tokenizer.hasMoreTokens()) { String word = tokenizer.nextToken(); output.collect(new Text(word), outputValue); } }}
Listing 1: LineIndexMapper.java

thing you'll need is a StringBuilder instance for building the value string:
StringBuilder combinedValue = new StringBuilder();
5. Next, loop over the set of name-values pairs in the values parameter and concatenate then into a comma-separated string:
boolean first = true;
while (values.hasNext()) { if (!first) { combinedValue.append(SEP); }
combinedValue.append(values.next().toString()); first = false;}
6. Finally, emit the combined value using the same key as in the input:
output.collect(key, new Text(combinedValue.toString()));
Notice that you have to convert the StringBuilder into a String and then into a Text instance.
Your reducer class should now look something like:
Page 26 of 51
Step 4: Create the Driver Class
Now that you have the mapper and reducer classes written, you'll need a small application to actually run the job. A driver class also gives you an opportunity to configure the parameters that control how the job will be executed.
1. From the Projects tab, double-click on the InvertedIndex.java node. The Java source file will open in the editor window.
2. Look at the class definition on line 24. Notice that the driver class extends the Configured class and implements the Tool interface. Extending the Configured class gives the driver class access to the configuration information that comes from the XML config files. Implementing the Tool interface allows the driver class to be launched by the hadoop command.
3. Go to line 33 where you will find the INSERT CODE HERE comment. This comment is in the run() method and marks the place where the job should be configured and launched.
4. First, you'll need a JobConf instance for configuring the job. Create a new JobConf instance using the Configuration instance retrievable through the getConf() method:
JobConf conf = new JobConf(getConf(), InvertedIndex.class);
Page 27 of 51
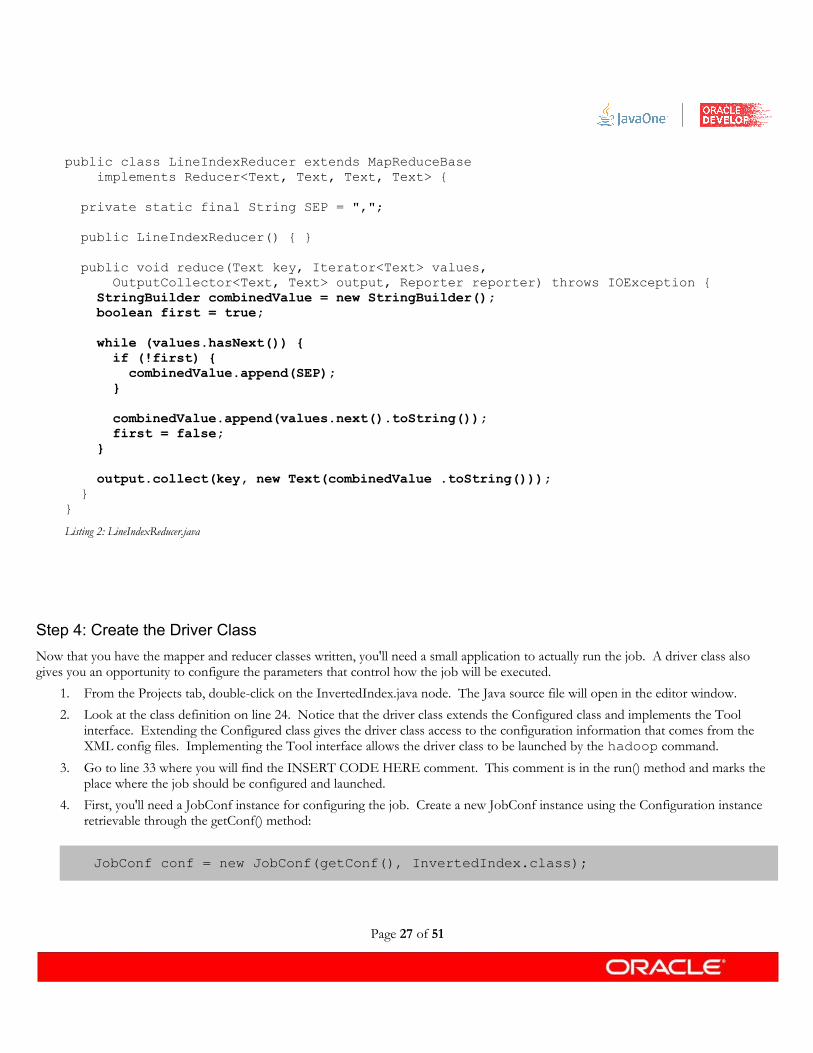
public class LineIndexReducer extends MapReduceBase implements Reducer<Text, Text, Text, Text> {
private static final String SEP = ",";
public LineIndexReducer() { }
public void reduce(Text key, Iterator<Text> values, OutputCollector<Text, Text> output, Reporter reporter) throws IOException { StringBuilder combinedValue = new StringBuilder(); boolean first = true;
while (values.hasNext()) { if (!first) { combinedValue.append(SEP); }
combinedValue.append(values.next().toString()); first = false; }
output.collect(key, new Text(combinedValue .toString())); }}
Listing 2: LineIndexReducer.java

The InvertedIndex.class argument is given as the second parameter to help the JobConf instance to locate the JAR file associated with the job. It will use the facilities provided by the Java platform to trace back from the class file to the JAR file. You could have specified any class in the project, e.g. the mapper or reducer class.
5. Next, set the input and output paths to the constant values defined above:
FileInputFormat.addInputPath(conf, new Path(INPUT_PATH));FileOutputFormat.setOutputPath(conf, new Path(OUTPUT_PATH));
The FileInputFormat and FileOutputFormat classes serve dual roles. They serve both as base classes for the classes that manage the ingestion of input files and the creation of output files and as configuration points. They offer several static methods for configuring how input and output are managed. In this case, we use the static methods to add an input path and set the output path.
6. Next, set the mapper and reducer classes to run:
conf.setMapperClass(LineIndexMapper.class);conf.setReducerClass(LineIndexReducer.class);
7. Next, the MapReduce framework needs to know the types of the keys and values emitted by the mapper and reducer. In this exercise, the mapper and reducer emit keys and values of the same types, so both can be set together with the JobConf.setOutputKeyClass() and JobConf.setOutputValueClass() methods. (If the mapper and reducer emitted different key and value types, you could override the key and value types for the mapper with the JobConf.setMapOutputKeyClass() and JobConf.setMapOutputValueClass().) Set the types of the key and values emitted from the reducer to Text:
conf.setOutputKeyClass(Text.class);conf.setOutputValueClass(Text.class);
8. Finally, run the job:
JobClient.runJob(conf);
Your driver class should now look something like:
Page 28 of 51

Step 5: Run the Program
In order to run this job, you'll need data. In the previous exercise you loaded an interesting data set into HDFS. Let's use that. (Actually, you hard-coded the path to that data into your driver class, so this isn't really an open question at this point.)
1. Select Run → Clean and Build Project (InvertedIndex) from the NetBeans menu.
Page 29 of 51
public class InvertedIndex extends Configured implements Tool { // where to put the data in hdfs when we're done private static final String OUTPUT_PATH = "output";
// where to read the data from. private static final String INPUT_PATH = "input/all-shakespeare";
/** Driver for the actual MapReduce process */ public int run(String[] args) throws IOException { JobConf conf = new JobConf(getConf(), InvertedIndex.class);
FileInputFormat.addInputPath(conf, new Path(INPUT_PATH)); FileOutputFormat.setOutputPath(conf, new Path(OUTPUT_PATH));
conf.setMapperClass(LineIndexMapper.class); conf.setReducerClass(LineIndexReducer.class);
conf.setOutputKeyClass(Text.class); conf.setOutputValueClass(Text.class);
JobClient.runJob(conf);
return 0; }
public static void main(String[] args) throws Exception { int ret = ToolRunner.run(new LineIndexer(), args); System.exit(ret); }}
Listing 3: InvertedIndex.java

2. From a terminal window (You should have two open; pick one.) run:
% cd <lab_root>/exercises/InvertedIndex% hadoop jar dist/InvertedIndex.jar
This command will read the Shakespeare compendium in the input directory in HDFS and compute an inverted index. It will be written to a directory named output. (You hard-coded that path into the driver class in the previous step.)
3. View your results by running:
% hadoop fs -cat output/part-00000 | more
To stop viewing the file contents, press 'q' or 'CTRL-c'.
Page 30 of 51

SummaryIn this exercise you wrote your first complete MapReduce program. You learned the basic structure of the mapper class, the reducer class, and the driver class. You also were introduced to the Hadoop classes for managing primitives and strings. In the next exercise, you'll learn more about writing MapReduce programs.
Page 31 of 51
Before You Rerun
If you need to rerun your program for any reason, you'll first need to remove the output directory that was created in the previous run:
% hadoop fs -rmr output
If you don't, Hadoop will refuse to run the job and print an error message: “Directory already exists”.
Exercise 3: Using a Custom File Format (30 minutes)
In this exercise, we'll first look in a little more depth at what actually happens behind the scenes in a MapReduce application. We'll then set about writing a custom input format to read multi-line data records for use in a MapReduce program.
Background Information
MapReduce Data Flow
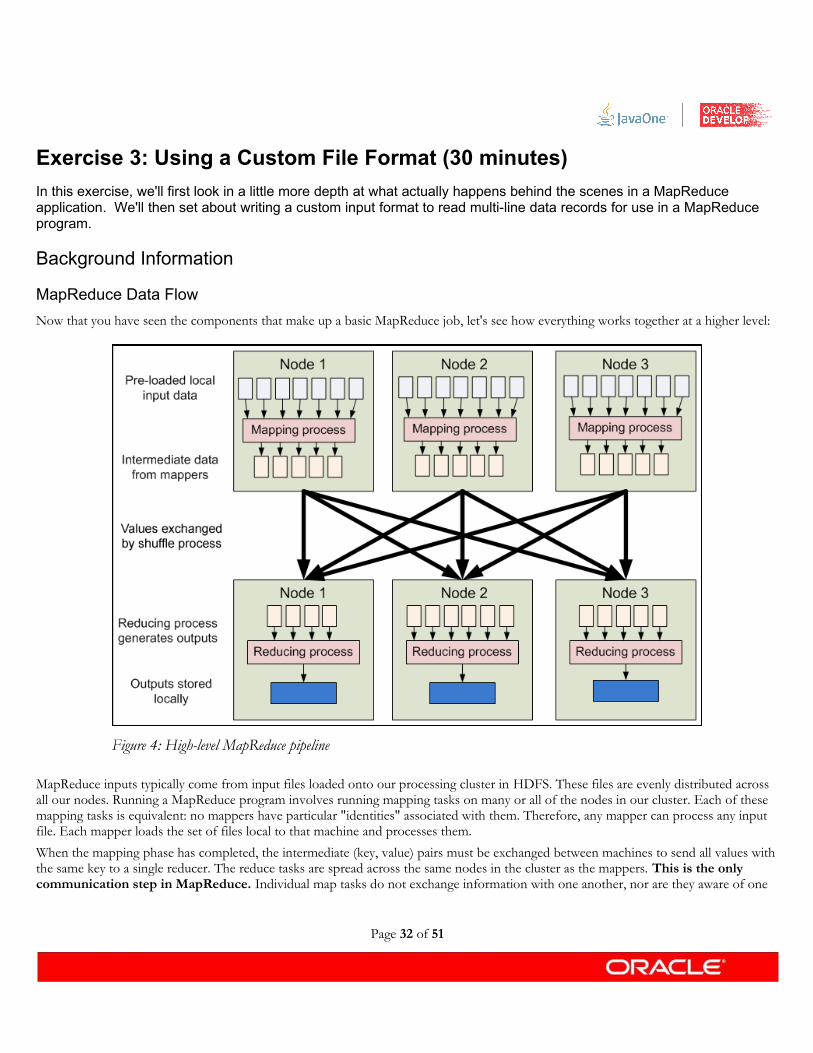
Now that you have seen the components that make up a basic MapReduce job, let's see how everything works together at a higher level:
MapReduce inputs typically come from input files loaded onto our processing cluster in HDFS. These files are evenly distributed across all our nodes. Running a MapReduce program involves running mapping tasks on many or all of the nodes in our cluster. Each of these mapping tasks is equivalent: no mappers have particular "identities" associated with them. Therefore, any mapper can process any input file. Each mapper loads the set of files local to that machine and processes them.
When the mapping phase has completed, the intermediate (key, value) pairs must be exchanged between machines to send all values with the same key to a single reducer. The reduce tasks are spread across the same nodes in the cluster as the mappers. This is the only communication step in MapReduce. Individual map tasks do not exchange information with one another, nor are they aware of one
Page 32 of 51
Figure 4: High-level MapReduce pipeline

another's existence. Similarly, different reduce tasks do not communicate with one another. The user never explicitly marshals information from one machine to another; all data transfer is handled by the Hadoop MapReduce platform itself, guided implicitly by the different keys associated with values. This is a fundamental element of Hadoop MapReduce's reliability. If nodes in the cluster fail, tasks must be able to be restarted. If they have been performing side-effects, e.g., communicating with the outside world, then the shared state must be restored in a restarted task. By eliminating communication and side-effects, restarts can be handled more gracefully.
A Closer Look
The previous figure described the high-level view of Hadoop MapReduce. From this diagram, you can see where the mapper and reducer components of the Word Count application fit in, and how it achieves its objective. We will now examine this system in a bit closer detail.
Figure 5 shows the pipeline with more of its mechanics exposed. While only two nodes are depicted, the same pipeline can be replicated
Page 33 of 51
Figure 5: Detailed Hadoop MapReduce data flow
Input files: This is where the data for a MapReduce task is initially stored. While this does not need to be the case, the input files typically reside in HDFS. The format of these files is arbitrary; while line-based log files can be used, we could also use a binary format, multi-line input records, or something else entirely. It is typical for these input files to be very large -- tens of gigabytes or more.
InputFormat: How these input files are split up and read is defined by the InputFormat. An InputFormat is a class that provides the following functionality:
• Selects the files or other objects that should be used for input • Defines the InputSplits that break a file into tasks • Provides a factory for RecordReader objects that read the file
Several InputFormats are provided with Hadoop. An abstract type is called FileInputFormat; all InputFormats that operate on files inherit functionality and properties from this class. When starting a Hadoop job, FileInputFormat is provided with a path containing files to read. The FileInputFormat will read all files in this directory. It then divides these files into one or more InputSplits each. You can choose which InputFormat to apply to your input files for a job by calling the setInputFormat() method of the JobConf object that defines the job.
InputSplits: An InputSplit describes a unit of work that comprises a single map task in a MapReduce program. A MapReduce program applied to a data set, collectively referred to as a Job, is made up of several (possibly several hundred) tasks. Map tasks may involve reading a whole file; they often involve reading only part of a file. By default, the FileInputFormat and its descendants break a file up into 64 MB chunks (the same size as blocks in HDFS). By processing a file in chunks, we allow several map tasks to operate on a single file in parallel. If the file is very large, this can improve performance significantly through parallelism. Even more importantly, since the various blocks that make up the file may be spread across several different nodes in the cluster, it allows tasks to be scheduled on each of these different nodes; the individual blocks are thus all processed locally, instead of needing to be transferred from one node to another. Of course, while log files can be processed in this piece-wise fashion, some file formats are not amenable to chunked processing. By writing a custom InputFormat, you can control how the file is broken up (or is not broken up) into splits.
RecordReader: The InputSplit has defined a slice of work, but does not describe how to access it. The RecordReader class actually loads the data from its source and converts it into (key, value) pairs suitable for reading by the Mapper. The RecordReader instance is defined by the InputFormat. The default InputFormat, TextInputFormat, provides a LineRecordReader, which treats each line of the input file as a new value. The key associated with each line is its byte offset in the file. The RecordReader is invoke repeatedly on the input until the entire InputSplit has been consumed. Each invocation of the RecordReader leads to another call to the map() method of the Mapper.
Partition & Shuffle: After the first map tasks have completed, the nodes may still be performing several more map tasks each. But they also begin exchanging the intermediate outputs from the map tasks to where they are required by the reducers. This process of moving map outputs to the reducers is known as shuffling. A different subset of the intermediate key space is assigned to each reduce node; these subsets (known as "partitions") are the inputs to the reduce tasks. Each map task may emit (key, value) pairs to any partition; all values for the same key are always reduced together regardless of which mapper is its origin. Therefore, the map nodes must all agree on where to send the different pieces of the intermediate data. The Partitioner class determines which partition a given (key, value) pair will go to. The default partitioner computes a hash value for the key and assigns the partition based on this result.
Sort: Each reduce task is responsible for reducing the values associated with several intermediate keys. The set of intermediate keys on a single node is automatically sorted by Hadoop before they are presented to the Reducer.
OutputFormat: The (key, value) pairs provided to this OutputCollector are then written to output files. The way they are written is governed by the OutputFormat. The OutputFormat functions much like the InputFormat class described earlier. The instances of OutputFormat provided by Hadoop write to files on the local disk or in HDFS; they all inherit from a common FileOutputFormat. Each Reducer writes a separate file in a common output directory. These files will typically be named part-nnnnn, where nnnnn is the partition id associated with the reduce task. The output directory is set by the FileOutputFormat.setOutputPath() method. You can control which particular OutputFormat is used by calling the setOutputFormat() method of the JobConf object that defines your MapReduce job. A table of provided OutputFormats is given below.
Page 34 of 51

RecordWriter: Much like how the InputFormat actually reads individual records through the RecordReader implementation, the OutputFormat class is a factory for RecordWriter objects; these are used to write the individual records to the files as directed by the OutputFormat.
The output files written by the Reducers are then left in HDFS for your use, either by another MapReduce job, a separate program, for for human inspection.
More On Input Formats
The InputFormat defines how to read data from a file into the Mapper instances. Hadoop comes with several implementations of InputFormat; some work with text files and describe different ways in which the text files can be interpreted. Others, like SequenceFileInputFormat, are purpose-built for reading particular binary file formats.
More powerfully, you can define your own InputFormat implementations to format the input to your programs however you want. For example, the default TextInputFormat reads lines of text files. The key it emits for each record is the byte offset of the line read (as a LongWritable), and the value is the contents of the line up to the terminating '\n' character (as a Text object). If you have multi-line records each separated by a $ character, you could write your own InputFormat that parses files into records split on this character instead.
Another important job of the InputFormat is to divide the input data sources (e.g., input files) into fragments that make up the inputs to individual map tasks. These fragments are called "splits" and are encapsulated in instances of the InputSplit interface. Most files, for example, are split up on the boundaries of the underlying blocks in HDFS, and are represented by instances of the FileInputSplit class. Other files may be unsplittable, depending on application-specific data. Dividing up other data sources (e.g., tables from a database) into splits would be performed in a different, application-specific fashion. When dividing the data into input splits, it is important that this process be quick and cheap. The data itself should not need to be accessed to perform this process (as it is all done by a single machine at the start of the MapReduce job).
The TextInputFormat divides files into splits strictly by byte offsets. It then reads individual lines of the files from the split in as record inputs to the Mapper. The RecordReader associated with TextInputFormat must be robust enough to handle the fact that the splits do not necessarily correspond neatly to line-ending boundaries. In fact, the RecordReader will read past the theoretical end of a split to the end of a line in one record. The reader associated with the next split in the file will scan for the first full line in the split to begin processing that fragment. All RecordReader implementations must use some similar logic to ensure that they do not miss records that span InputSplit boundaries.
Steps To FollowIn this exercise you'll developing a custom InputFormat implementation as well as an associated reader to read email messages for processing by a provided MapReduce application. To avoid privacy issues, rather than using real email messages, you'll be working with messages from a Twitter ATOM feed on Justin Bieber tweets. The message format is the same and has all the same properties.
Step 1: Open the Project
1. Open a project by selecting File → Open Project... from the NetBeans menu.
Page 35 of 51
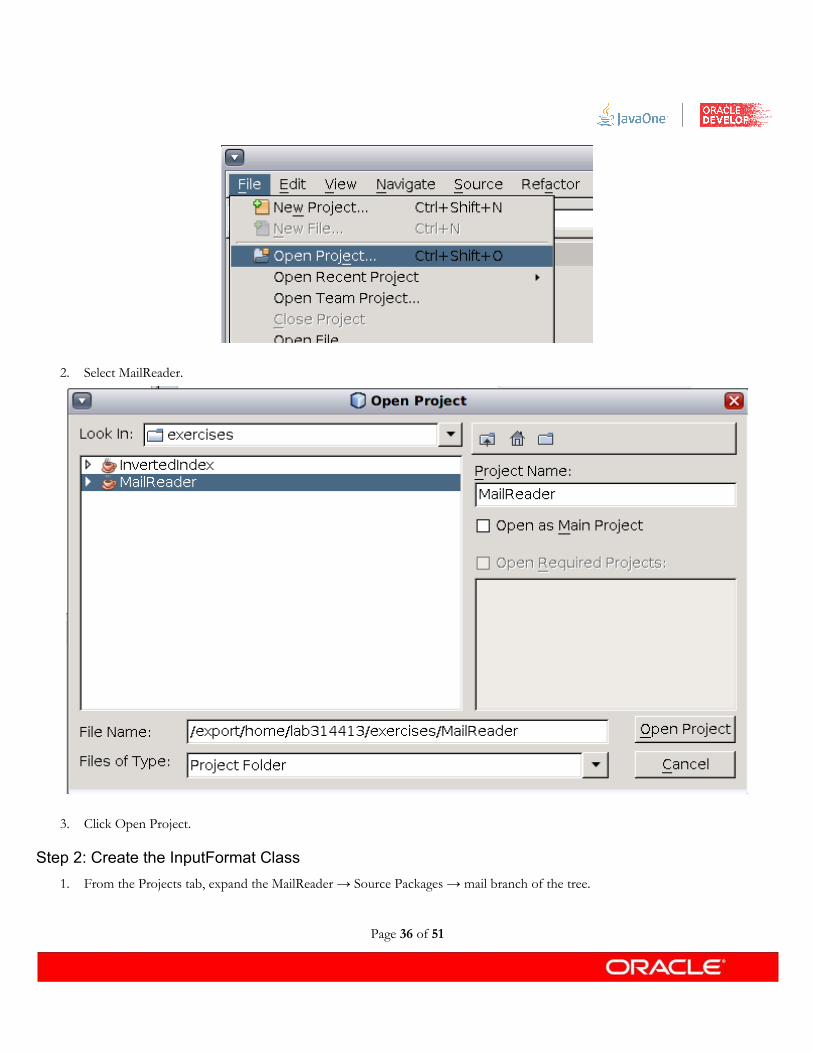
2. Select MailReader.
3. Click Open Project.
Step 2: Create the InputFormat Class
1. From the Projects tab, expand the MailReader → Source Packages → mail branch of the tree.
Page 36 of 51
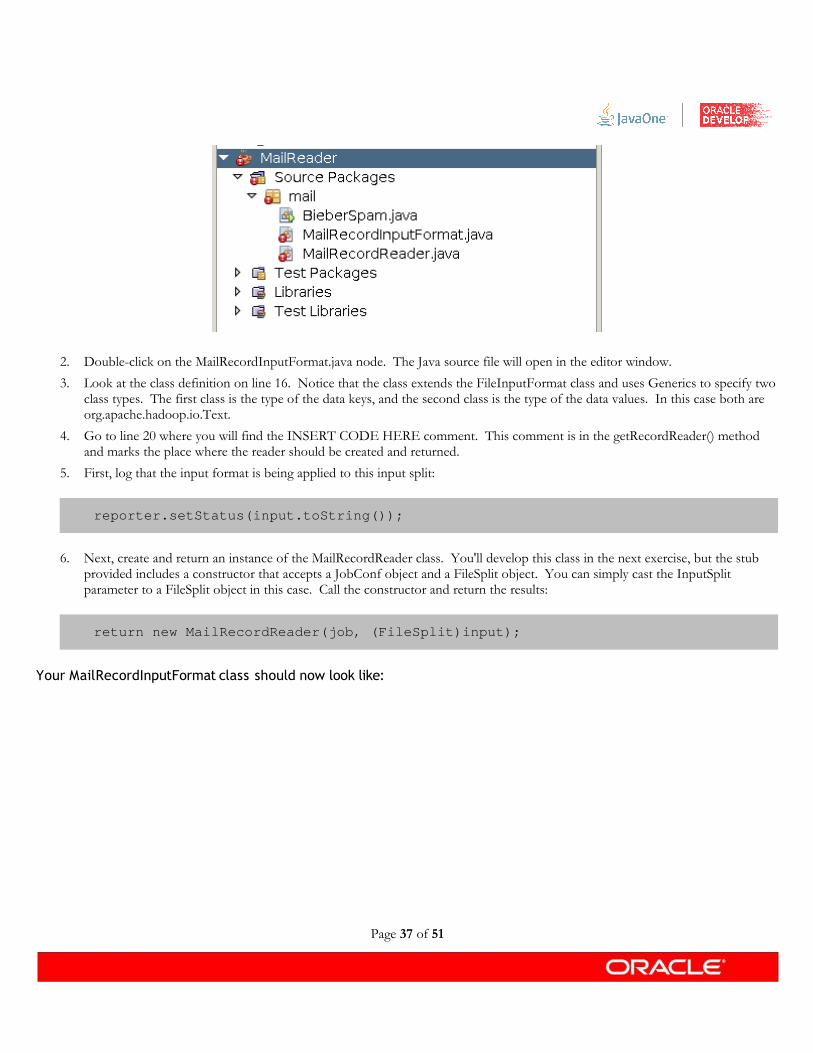
2. Double-click on the MailRecordInputFormat.java node. The Java source file will open in the editor window.
3. Look at the class definition on line 16. Notice that the class extends the FileInputFormat class and uses Generics to specify two class types. The first class is the type of the data keys, and the second class is the type of the data values. In this case both are org.apache.hadoop.io.Text.
4. Go to line 20 where you will find the INSERT CODE HERE comment. This comment is in the getRecordReader() method and marks the place where the reader should be created and returned.
5. First, log that the input format is being applied to this input split:
reporter.setStatus(input.toString());
6. Next, create and return an instance of the MailRecordReader class. You'll develop this class in the next exercise, but the stub provided includes a constructor that accepts a JobConf object and a FileSplit object. You can simply cast the InputSplit parameter to a FileSplit object in this case. Call the constructor and return the results:
return new MailRecordReader(job, (FileSplit)input);
Your MailRecordInputFormat class should now look like:
Page 37 of 51
Step 3: Create the Reader Class
1. Double-click on the MailRecordReader.java node in the porjects tab. The Java source file will open in the editor window.
2. Look at the class definition on line 18. Notice that the class extends the RecordReader class and uses Generics to specify two class types. The first class is the type of the data keys, and the second class is the type of the data values. In this case both are org.apache.hadoop.io.Text.
3. Go to line 33 where you will find the INSERT CODE HERE comment. This comment is in the MailRecordReader() constructor and marks the place where the reader should be initialized.
4. First, you'll need a reference to the file that contains the given input split. You can get the path from the FileSplit.getPath() method, get the file system from the Path.getFileSystem() method, and open the file with the FileSystem.open() method:
Path file = split.getPath();FileSystem fs = file.getFileSystem(job);FSDataInputStream fileIn = fs.open(split.getPath());
5. Next, you'll need to initialize the start, end, and pos counters. Set start to the byte offset of the beginning of the input split (InputSplit.getStart()). Set end to start plus the length of the input split (InputSplit.getLength()). Set pos to start.
start = split.getStart();end = start + split.getLength();
6. Next, use the open file to create a org.apache.hadoop.util.LineReader object. The LineReader class is a utility class for reading input files one line at a time. It's similar in function to the java.io.BufferedReader class, except that it's a little friendlier to input splits. The MailRecordReader stub includes an convenience method, initializeLineReader() that takes a Configuration object and a FSDataInputStream object and prepares the LineReader object, including adjusting the start counter..
The majority of the inializeLineReader() method is concerned with finding the beginning of the first complete record in the given split. Remember that an input split does not necessarily have to fall along record or even line boundaries. The approach used in this method is to back up a little bit into the previous input split and then read and discard a complete record. That approach guarantees that the reader will then be positioned at the beginning of the first complete record in the input split.Call the convenience method:
Page 38 of 51
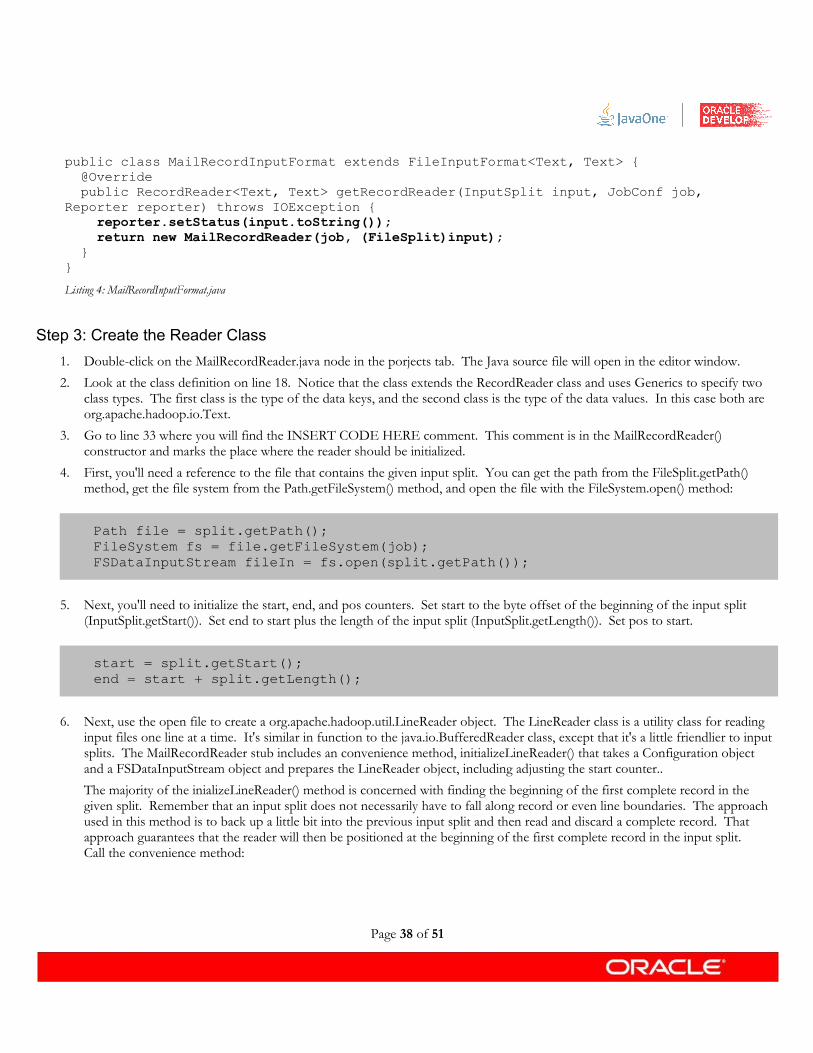
public class MailRecordInputFormat extends FileInputFormat<Text, Text> { @Override public RecordReader<Text, Text> getRecordReader(InputSplit input, JobConf job, Reporter reporter) throws IOException { reporter.setStatus(input.toString()); return new MailRecordReader(job, (FileSplit)input); }}
Listing 4: MailRecordInputFormat.java
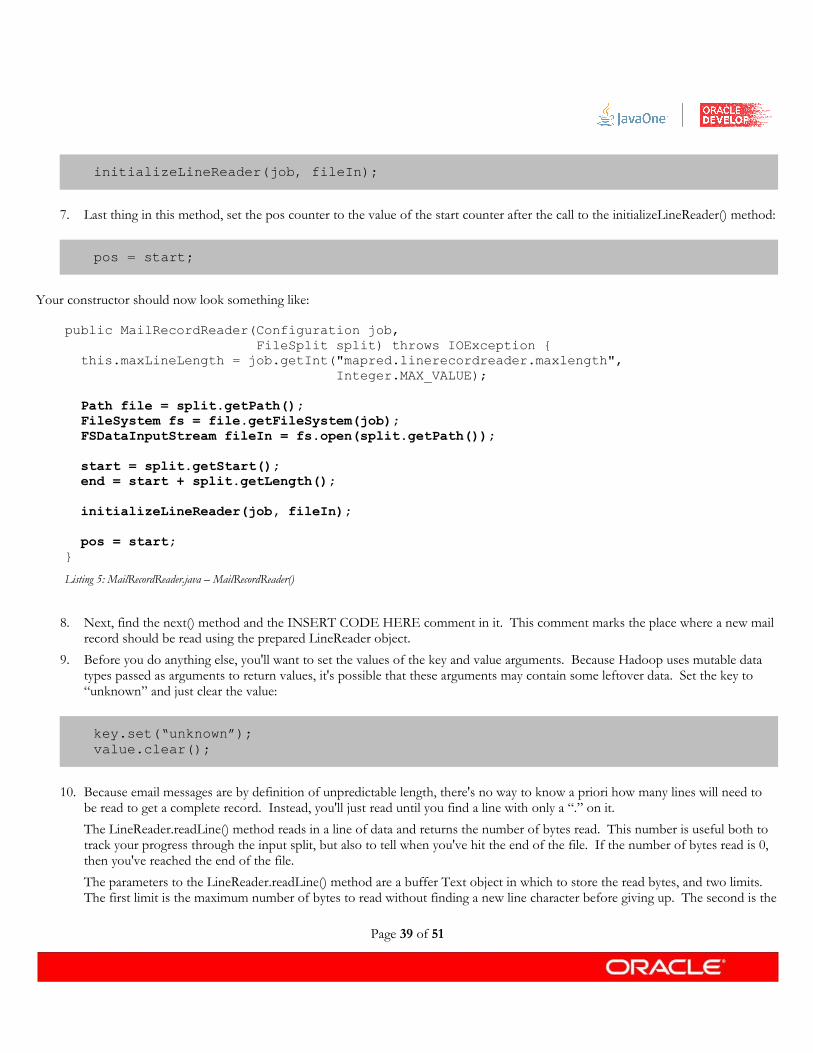
initializeLineReader(job, fileIn);
7. Last thing in this method, set the pos counter to the value of the start counter after the call to the initializeLineReader() method:
pos = start;
Your constructor should now look something like:
8. Next, find the next() method and the INSERT CODE HERE comment in it. This comment marks the place where a new mail record should be read using the prepared LineReader object.
9. Before you do anything else, you'll want to set the values of the key and value arguments. Because Hadoop uses mutable data types passed as arguments to return values, it's possible that these arguments may contain some leftover data. Set the key to “unknown” and just clear the value:
key.set(“unknown”);value.clear();
10. Because email messages are by definition of unpredictable length, there's no way to know a priori how many lines will need to be read to get a complete record. Instead, you'll just read until you find a line with only a “.” on it.
The LineReader.readLine() method reads in a line of data and returns the number of bytes read. This number is useful both to track your progress through the input split, but also to tell when you've hit the end of the file. If the number of bytes read is 0, then you've reached the end of the file.
The parameters to the LineReader.readLine() method are a buffer Text object in which to store the read bytes, and two limits. The first limit is the maximum number of bytes to read without finding a new line character before giving up. The second is the
Page 39 of 51
public MailRecordReader(Configuration job, FileSplit split) throws IOException { this.maxLineLength = job.getInt("mapred.linerecordreader.maxlength", Integer.MAX_VALUE);
Path file = split.getPath(); FileSystem fs = file.getFileSystem(job); FSDataInputStream fileIn = fs.open(split.getPath());
start = split.getStart(); end = start + split.getLength();
initializeLineReader(job, fileIn);
pos = start;}
Listing 5: MailRecordReader.java – MailRecordReader()

maximum number of bytes to read in total. The reason for having two limits has to do with input splits and how they're handled. Remember that a MapReduce task will be assigned an input split that is local to it (or as close as possible), but that the HDFS interface works at the file level. If you read past the end of your input split, HDFS will just go transfer whatever data you need from the remote node hosting it. While that works, it's something you want to avoid for performance reasons. The reason for a line length limit is to keep a bad data file from causing a large file from accidentally being read completely as one line, initiating large data transfers in the process. The reason for the overall read limit is to be able to limit the read to the boundaries of the input split. There's a catch, however. While you want to limit the read to the boundaries of the input split, you also want to read in complete records. To get a complete record, it's OK to read past the end of the input split. So, instead of setting the overall read limit to the number of bytes remaining in the input split, a convenience method, maxToConsume(), is provided that returns a limit based on the number of bytes remaining in the input split and the maximum expected line length.
Let's start with a loop to read a line per interation until the current position (pos) is greater than the end of the split (end). If the number of bytes read was 0, break out of the loop:
while (pos < end) { int newSize = in.readLine(buffer, maxLineLength, maxToConsume());
if (newSize == 0) { break; //EOF }}
11. Next, in the loop, increment the current position in the input split by the number of bytes read:
pos += newSize;
12. Next, let's look at the data. If the contents of the buffer are “.” then we read a complete record. The EOM constant is provided to make the buffer comparison easier. In the loop, compare the buffer to EOM, and if they match, then set recordRead to true and break out of the loop:
if (buffer.compareTo(EOM) == 0) { recordRead = true; break; // EOM}
13. Assuming the buffer isn't the EOM marker, then next in the loop you should append its contents to the value object. Because the LineReader.readLine() method strips off any trailing new line characters, you'll also want to add a new line character to the end. The NEWLINE constant is provided to make that append easier. Use the Text.append() method to do the append:
value.append(buffer.getBytes(), 0, buffer.getLength());value.append(NEWLINE, 0, NEWLINE.length);
14. The data key for each mail record will come from a message-id header in the message. The last thing to do is test whether the
Page 40 of 51

buffer starts with “message-id: “, and if so, use the remainder of the line as the value of the key. Because the name of the header might be “Message-ID” or “MESSAGE-ID” or “message-id” or any other combination of cases, you'll first want to convert the buffer into a string and the string into lower (or upper) case before making the comparison. Use the Text.set() method to set the value of the key to the substring of the buffer after the header::
if (buffer.toString().toLowerCase().startsWith("message-id: ")) { key.set(buffer.getBytes(), 12, buffer.getLength() - 12);}
Your next() method should now look something like:
Page 41 of 51

Step 4: Run the Program
In order to run this job, you'll need data. In exercise1 you loaded the entire input directory into HDFS. One of the files in that directory is mail.txt, a file containing roughly 15,000 tweets about Justin Bieber, stored as mail messages.
1. Select Run → Clean and Build Main Project from the NetBeans menu.
Page 42 of 51
public boolean next(Text key, Text value) throws IOException { boolean recordRead = false; Text buffer = new Text();
key.set("unknown"); value.clear();
while (pos < end) { int newSize = in.readLine(buffer, maxLineLength, maxToConsume());
if (newSize == 0) { break; // EOF }
pos += newSize;
if (buffer.compareTo(EOM) == 0) { recordRead = true; break; }
value.append(buffer.getBytes(), 0, buffer.getLength()); value.append(NEWLINE, 0, NEWLINE.length);
if (buffer.toString().toLowerCase().startsWith("message-id: ")) { key.set(buffer.getBytes(), 12, buffer.getLength() - 12); } }
return recordRead;}
Listing 6: MailRecordReader.java – next()

2. From a terminal window (You should have two open; pick one.) run:
% hadoop fs -rmr output% cd <lab_root>/exercises/MailReader% hadoop jar dist/MailReader.jar input/mail.txt output
This command will read through the mail.txt file and calculate which users are spamming Twitter with the most Justin Bieber content. It will output the worst offender and the number of messages that person sent.
4. View your results by running:
% hadoop fs -cat output/part-00000
To stop viewing the output file, press 'q' or 'CTRL-c'.
Page 43 of 51
SummaryIn this exercise you learned about how to control the way that MapReduce reads in data files and how data in managed in a Hadoop cluster. You should now be ready to begin writing your own Hadoop applications. In the last exercise, we'll look at a higher-level abstraction on top of MapReduce called Hive.
Page 44 of 51
Before You Rerun
If you need to rerun your program for any reason, you'll first need to remove both output directories that were created in the previous run:
% hadoop fs -rmr output_0% hadoop fs -rmr output
If you don't, Hadoop will refuse to run the job and print an error message: “Directory already exists”.
Bonus Exercise 4: Getting Familiar With Hive (20 minutes)
MapReduce is a powerful tool for data analysis, but in some cases can be cumbersome. Often times, a MapReduce program doesn't do anything particularly complicated. In those cases where the data set is tabular or even semi-tabular, a higher level abstraction is useful. In this exercise you will learn how to use Hive to do data analysis for the cases where MapReduce would be overkill.
Background InformationHive is a data warehouse infrastructure built on top of Hadoop that provides tools to enable easy data summarization, ad hoc querying and analysis of large datasets data stored in HDFS files. It provides a mechanism to apply structure to this data along with a simple query language called Hive QL, that is based on SQL and that enables users familiar with SQL to query this data. At the same time, this language also allows traditional map/reduce programmers to be able to plug in their custom mappers and reducers to do more sophisticated analysis that may not be supported by the built-in capabilities of the language.
What Hive is Not
Hadoop is a batch processing system and Hadoop jobs tend to have high latency and incur substantial overheads in job submission and scheduling. As a result, latency for Hive queries is generally very high (minutes) even when data sets involved are very small (even a few hundred megabytes). As a result Hive cannot be compared with systems such as the Oracle Database where analyses are conducted on a significantly smaller amount of data but the analyses proceed much more iteratively with the response times between iterations being less than a few minutes. Hive aims to provide acceptable (but not optimal) latency for interactive data browsing, queries over small data sets, and test queries. Hive also does not provide any sort of data or query cache to make repeated queries over the same data set faster.
Hive is not designed for online transaction processing and does not offer real-time queries and row level updates. It is best used for batch jobs over large sets of immutable data (like web logs). The attributes Hive values most are scalability (scale out with more machines added dynamically to the Hadoop cluster), extensibility (with MapReduce framework and UDF/UDAF/UDTF), fault-tolerance, and loose-coupling with its input formats.
Hive Structure
Hive structures data into the well-understood database concepts like tables, columns, rows, and partitions. It supports all the major primitive types – integers, floats, doubles and strings – as well as complex types such as maps, lists and structs. The latter can be nested arbitrarily to construct more complex types. In addition, Hive allows users to extend thesystem with their own types and functions. The query language is very similar to SQL and therefore can be easily understood by anyone familiar with SQL. There are some nuances in the data model, type system and HiveQL that are different from traditional databases and that have been motivated by the experiences gained at Facebook. We will highlight these and other details in this section.
Steps To Follow
Step 1: Starting Hive
The first thing to do is to start the Hive shell:
1. If you don't already have a terminal window open, open up a terminal window by selecting Applications → Accessories → Terminal from the desktop menu or by right-clicking on the desktop background and selecting Open Terminal.
2. In the terminal window, run:
Page 45 of 51

% hive
You should see something like:
Hive history file=/tmp/s314413/hive_job_log_s314413_201009231410_542324277.txthive>
Step 2: Loading the Data
In order to work with Hive, you'll need some data. In the input directory that you uploaded in the first exercise, there are two files containing the frequency of works in the Shakespeare corpus and the frequency of words in the Bible. The files were generated by running a simple MapReduce program against the full text of both works.
1. Create a table to hold the frequency of words in the body of Shakespeare's works:
hive> create table shake_freq (freq int, word string);
2. Next, import the shake_freq.txt file into the table:
hive> load data inpath 'input/shake_freq.txt' overwrite into table shake_freq;
3. Now, do the same for the Bible:
hive> create table bible_freq like shake_freq;hive> load data inpath 'input/bible_freq.txt' overwrite into table bible_freq;
Notice that this time we used the LIKE operator for CREATE to copy the structure of the shake_freq table.
4. If you don't have a second terminal window open, open up a new terminal window by selecting Applications → Accessories → Terminal from the desktop menu or by right-clicking on the desktop background and selecting Open Terminal.
5. In the new terminal window run:
% hadoop fs -lsr /user/hive
Hive stores its table data in the /user/hive/warehouse directory in HDFS unless otherwise specified. Notice that there is a subdirectory for each Hive table you just created, and that each contains one or more data files for that table.
6. Look at the contents of a file by running:
Page 46 of 51
% hadoop fs -cat /user/hive/warehouse/bible_freq/bible_freq.txt | head
Notice that the Hive data file has the same contents as the file you uploaded to the input directory. (Actually, it is the file you uploaded to the input directory. The LOAD command caused the file in HDFS to be moved into the /user/hive/warehouse directory.)
Step 3: Examining the Data
3. To view the available tables in the Hive data warehouse, go back to the first terminal window and run:
hive> show tables;
You should see the two tables you created: bible_freq and shake_freq.
4. Next, examine the structure of the shake_freq table:
hive> describe shake_freq;
5. Next, look at the contents of the shake_freq table. Because the shake_freq table is very large, you should limit the number of rows returned to a smallish number. To select 20 rows from the shake_freq table, run:
hive> select * from shake_freq limit 20;
Notice that the Hive Query Language is very similar to SQL, specifically to the MySQL implementation. This query should run very quickly because it doesn't involve any WHERE or SORT BY clause, which means that Hive can simply read directly from the file in HDFS.
6. Try a slightly more complex query:
hive> select * from shake_freq where freq > 100 order by freq desc limit 20;
Notice that this time running the query involved creating and executing a MapReduce job and hence took considerably longer.
Step 4: Aggregating the Data
Hive QL offers a GROUP BY clause and aggregation functions similar to those provided by SQL.
1. First, use the AVG() function to calculate the mean frequency of words in the Shakespeare corpus:
hive> select avg(freq) from shake_freq;
Page 47 of 51

Notice that this query resulted in a two-stage MapReduce job, making it a very slow query.
2. Next, try finding the most commonly occurring frequency among words in the Shakespeare corpus (i.e. the mode of the frequencies) using the COUNT() function and the GROUP BY clause:
hive> select freq, count('*') as f2 from shake_freqgroup by freq order by f2 desc limit 1;
(Not surprisingly, 1 is the most commonly occurring frequency.)
Step 5: Subqueries
To finish out calculating the average frequencies, you're now going to calculate the medium frequency, which is to say that if there are n rows in the table in sorted order, you're looking for the frequency in row n/2.
1. First, you'll have to calculate the median row number using the COUNT() function:
hive> select (count('*') / 2) from shake_freq;
Remember this value.
2. Next, to get the median frequency, you'll want to select the top n/2 rows and then select the bottom 1 row from that. You can do that using a query embedded in a query:
hive> select freq from (select freq from shake_freq order by freq asc limit 15904) f1 order by freq desc limit 1;
Note that subqueries can only be used for the FROM clause, which is why you had to calculate the median row to use as a limit in a separate query. Also note that the results of the subquery must be assigned a name. We used f1 in this case.
Step 6: Joining Tables
Just like SQL, Hive QL offers the capability to do left, right, full, and outer joins.
1. Create a new table to hold the joined contents of the shake_freq and bible_freq tables. The table should have columns for the word, the Shakespearean frequency, and the biblical frequency. Execute:
hive> create table merged (word string, sfreq int, bfreq int);
2. Now, do a joined select from the shake_freq and bible_freq tables to populate the merged table. Hive QL lets you insert the results of a select directly into a table:
hive> insert overwrite table merged select s.word, s.freq, b.freqfrom shake_freq s join bible_freq b on (s.word = b.word)
Page 48 of 51

where s.freq >= 1 and b.freq >=1;
This join excludes words that don't appear in both texts.
3. Now you can run queries against the merged table. First, check that the merged data looks reasonable by selecting the first 20 rows:
hive> select * from merged limit 20;
4. Next, find the word that appears most frequently in the combined texts:
hive> select word, sfreq, bfreq, (sfreq + bfreq) as tfreqfrom merged order by tfreq desc limit 1;
(Not surprisingly, the most common word is 'the'.) You could have combined steps 2 and 4 into a single statement (select s.word, s.freq, b.freq, (s.freq + b.freq) as tfreq from shake_freq s join bible_freq b on (s.word = b.word) where s.freq >= 1 and b.freq >=1 order by tfreq desc limit 1;) if there were no need to run any additional queries on the combined tables.
5. Quit Hive:
hive> quit;
SummaryIn this exercise, you've been introduced to Hive and how it can be used to perform ad hoc queries much more simply than by writing MapReduce programs directly. For straightforward data mining tasks, Hive is often the best tool for the job. For complex tasks, however, it is often necessary to fall back to a power and flexibility offered by a MapReduce program.
Page 49 of 51
Summary
Congratulations! You have successfully completed LAB S314413: Extracting Real Value from Your Data With Apache Hadoop. In this lab you learned about writing MapReduce programs, how to customize the MapReduce process, and how to use the Hive data warehousing tool.
For additional information about the technologies used in this lab, please see the following links:
http://hadoop.apache.org/
http://www.cloudera.com/hadoop-tutorial/
You can also contact the lab authors directly at:
Thank you for participating!
Page 50 of 51
Performing This Lab Outside of the JavaOne Environment
System Requirements• Suggested operating environments: Solaris, MacOS X, Linux
• Memory requirements: 2GB
• Disk spare requirements: 100GB
Software Needed For This LabPlease install the following set of software:
• Java SE 6
◦ http://www.oracle.com/technetwork/java/javase/downloads/index.html
• NetBeans IDE 6.9.1 (for Java, Java SE, or All)
◦ http://netbeans.org/downloads/index.html
• Apache Hadoop 0.20.2
◦ http://archive.cloudera.com/cdh/3/hadoop-0.20.2+320.tar.gz
• Apache Hive 0.5.0
◦ http://archive.cloudera.com/cdh/3/hive-0.5.0+20.tar.gz
Install and Configure Lab Environment1. Download and unpack the Hadoop and Hive tar balls.
2. In your .profile or .cshrc file, set the HADOOP_HOME variable to the location where you unpacked the Hadoop tar ball and add $HADOOP_HOME/bin to your path. Also set HIVE_HOME to the location where you unpacked the Hive tar ball and add $HIVE_HOME/bin to your path.
3. Follow the instructions at http://hadoop.apache.org/common/docs/current/single_node_setup.html#PseudoDistributed to configure Hadoop for single-node Pseudo-distributed operation.
4. Download NetBeans and follow the installation instructions: http://netbeans.org/community/releases/69/install.html
5. Unpack the lab module on your local machine.
6. You're ready to start with Exercise 1!
Page 51 of 51


