Guidance for Industry - S2(R1) Genotoxicity Testing and Data ...
Upload
hannah-doyleCategory
view
213download
0
S1/S2DATA BOOK
Design and Technology

ContentsThe symbols opposite will help you to identify the topics
• Health and Safety Rules
• Designing
• Data on Timber• Man-made Boards• Methods of Joining Timber• Woodworking Hand Tools• Machine Tools• Methods Of Fixing Timber• Wood Finishes

Contents
• Metals and their Properties
• Metalworking Hand Tools
• Permanent Methods of Joining Metal
• Metal Finishes
• Data on Plastics
• Plastics and their Properties
• Shaping and Forming Plastics
• Systems
• Sub-Systems
Input Output Process

• Graphic Symbols and Signs• Charts and Graphs• Free Hand Sketching• Measurement• Orthographic Drawing - 3 rd Angle Projection• Lines and Symbols• Perspective Drawing• Isometric Projection• Oblique Projection• Colour Theory• The Colour Wheel• Shading and Rendering
Contents

Health and Safety Rules
Attention to safety is the most important thing in any workshop and everyone, teachers and pupils alike, must learn the following simple safety rules before beginning any practical work.
1. Always dress safely:• The best way to prepare for a practical lesson is to take
off your jacket and put on an apron.• Long sleeves are dangerous so they should be rolled up.• Long hair is also dangerous and should be tied back so
that it cannot fall forward.• Jewellery should be removed and ties safely tucked in.
Contents

Health and Safety Rules2. Always wear the correct safety equipment:• Take special care to protect hands, eyes and feet. If there is
the slightest risk of eye injury safety goggles should be worn.• When handling hot materials gauntlet style protective gloves
should be worn.• In order to avoid any foot injuries, strong shoes should be
worn in the workshop. 3. Never run or play in the workshop and do not play tricks
on people:• Accidents in the craft rooms usually result from silly
behaviour.• Never act in a foolish manner in the craft room or encourage
anyone else to act in a foolish manner. Remember someone else's foolish behaviour could result in your injury.
• Always carry tools and materials safely. • Sharp tools must be held so that they cannot cut anybody.
Contents

Health and Safety Rules4. Never use a machine without permission and correct training:• Only ONE person at a time can use a machine.• Do not distract or stand talking to anyone who is operating a
machine.• You must wear safety goggles when operating machinery.• Make sure all machine safety guards are in place and that the
work to be machined is held securely.5. Keep yourself and the workshop clean and tidy:• To avoid the danger of skin disease, always wash your hands
thoroughly at the end of each lesson.• Care should be taken to avoid spilling paint, varnish etc. onto your
clothes.• Do not allow tools, materials or waste to litter the benches,
machines or floor.Never break a safety rule.
If in doubt ask.
Contents

DesigningTHE DESIGN PROCESS – is the steps that you go through to get from a problem to the solution.
Required Specification
Investigation
Solution
Manufacture
Evaluation
Analysis
Contents
Problem

DesigningPROBLEM – States what your problem is but not how it
should be solved.e.g. I keep mixing my keys up with my brother, and need to be able to identify my own keys.
REQUIRED SPECIFICATION – This is a list that describes what the solution has to be able to do, and be like. It will describe such features as size, shape, safety, function etc.e.g. The pencil has to:
1. Be a suitable size to fit into your pocket2. Be easy to hold3. Cost 15p or less4. Be brightly coloured to appeal to children.
Contents

DesigningINVESTIGATION – This is where you investigate
1. the types of material that are available for you to use
2. designs that you want to try
3. colour that you would like to use
4. Finish that you could use
5. environment that it will be used in
6. maximum cost
Contents

DesigningSOLUTION – This should contain a sketch of what you intent to make.
The solution usually contains a set of Working Drawings. These drawing show all the parts, their shapes, and their sizes, and how they fit together. this allows you to plan for your manufacture
5
40
PLAN
ELEVATIONEND
ELEVATIONEND
ELEVATION
5
6 0
4
4
Contents

DesigningMANUFACTURE – This will contain a cutting list that will help you to collect the correct material.
The manufacture contains a Sequence of Operations; this is a set of instructions that describes how to make the product. All steps must be in the correct order and the tools that will be used named. Sketches should be used to help make the sequence clearer.
PART No. REQUIRED
LENGTH
BREADTH THICKNESS MATERIAL
Contents

DesigningEVALUATION – Testing a finished product. • ‘How well does it do the job?’• ‘Does it look good?’• The best way to evaluate something is to test it
against the Required Specifications. The evaluation also includes
• ‘Problems met during manufacture’• ‘Things I’d do better next time’• ‘Good and bad points.’.
Contents

Data on TimberThere are 2 types of timber: SOFTWOOD and HARDWOODS. It has nothing to do with how hard the wood is.
SOFTWOODS come from trees that have needles and cones (coniferous trees). The needles remain all year round, except for one or two species. The grain is usually very noticeable.Examples: Pine, Larch, and Spruce. They grow in cool countries like the UK, Scandinavia, Canada, and Russia.HARDWOODS come from trees that have broad leaves. (Broadleaf trees). They are common in cool countries also, and the leaves fall off in winter. Examples: Oak, Ash, and Elm.
Contents

Data on TimberThere are 2 types of timber: SOFTWOOD and HARDWOODS. It has nothing to do with how hard the wood is.
SOFTWOODS come from trees that have needles and cones (coniferous trees). The needles remain all year round, except for one or two species. The grain is usually very noticeable.Examples: Pine, Larch, and Spruce. They grow in cool countries like the UK, Scandinavia, Canada, and Russia.
HARDWOODS come from trees that have broad leaves. (Broadleaf trees). They are common in cool countries also, and the leaves fall off in winter. Examples: Oak, Ash, and Elm. HARDWOODS also grow in tropical countries where it is hot and wet. There is no winter so the leaves are there all year round. Examples of Tropical Hardwoods: Mahogany. Jelutong, Balsa.
Contents

Data on TimberThe Importance Of Timber
Timber has been an important material all over the world for thousands of years.Britain’s natural forests have almost completely disappeared, due to the increase in need for land for development and for home building.The remaining world forests are ecologically important as they change carbon dioxide into oxygen and this helps prevent global warming.Timber can be a renewable resource if it is harvested and planted properly.
How We Get Our Wood
Growing Tree
Felled Log
Sawn Log
Plank Contents

Softwoods and Their Properties
(Coniferous trees)Name Advantages Disadvantages Uses
Red Pine Cheap, Straight grain. Fairly strong. Easy to work. Finishes well. Fairly durable.
Knotty. Sometimes stains from fungus.
Most used softwood in the UK. Suitable for interior work and exterior work with a preservative.
Spruce Fairly strong, easy to work, very resistant to splitting
Not durable, has small hard knots and lots of resin.
General inside work.
Cedar Very durable, easy to work, knot free and attractive.
Most expensive than the two above. Not very strong.
Exterior joinery, cladding for buildings and sheds etc.
Douglas Fir Knot free, straight grain, slightly resinous, fairly strong and durable.
Splits easily. General outside work, ladders and plywood.
Contents

Hardwoods and Their Properties
(Broadleaf trees)Name Advantages Disadvantages Uses
Oak Very strong, very durable, works well with sharp tools, finishes well and attractive.
Heavy, expensive, contains acid which corrodes steel screws, use brass.
Boat building, high-class furniture and floors.
Beech Hard, tough, very strong and straight. Close grain, polishes well and is hard wearing.
Not suitable for outdoors, heavy and difficult to work.
Most used hardwood in the UK. Furniture, floors, wooden tools and toys.
Walnut Works fairly well and is attractive.
Cross grain can make planing difficult.
High-class interior and exterior joinery and furniture.
Teak Hard, strong, very durable, attractive straight grain and works fairly easily.
Difficult to glue because of oil in wood. Very expensive.
High-class furniture, laboratory benches and ships decking.
Contents

Man-made BoardsWide boards of hardwood or softwood are expensive and can warp. Man-made boards are available in large boards which do not warp (twist).
ROTARY CUT VENEERS – the log is fitted to a lathe and is then slowly rotated against a knife that cuts a continuous sheet of wood.
PLYWOOD – is made from layers or piles of wood glued together. The grain of each ply is laid at right angles to the next. This makes the ply strong in both directions.Plywood is ideal for lightweight box construction, cabinet backs and drawer bottoms.
Contents

Man-made BoardsBLOCKBOARD and LAMINBOARD – these boards are made by sandwiching strips of softwood between two piles. The strips are narrower for laminboard. The outer faces of veneer have the grain running at right angles to the strips. It is usually less expensive to make laminboard rather than plywood that is over 12mm thick.
CHIPBOARD – is made by gluing chips of wood together under heat and pressure. Veneer and plastic laminate-faced chipboard is widely used for worktops, shelves and furniture making.
Contents

Man-made BoardsMEDIUM DENSITY FIBREBOARD (MDF) – is usually manufactured in a similar way to hardboard but is compressed under greater pressure and is therefore much stronger. MDF is cheap, strong and is easily shaped and finished. It is ideal for all types of furniture making.
Contents

Methods of Joining Timber
THE HOUSING JOINT – is used in the carcass construction of cabinets to support shelves and in box construction for partitions.
THE REBATE – is used in carcass construction to join sides to the top and likewise in box construction.
THE DOWELLED JOINT – is used in similar situations as the rebate. A jig is very useful to help make sure that the dowel holes line up.
There are many different methods used to join timber together. Here we will look at some of the most common used.
Contents

Methods of Joining Timber
THE DOVETAIL JOINT – is very strong because of the way the ‘tails’ and ‘pins’ are shaped. This makes it difficult to pull the joint apart and virtually impossible when glue is added. This type of joint is used in box constructions such as drawers, jewellery boxes, cabinets and other pieces of furniture where strength is required.
KNOCKDOWN FITTINGS – There is a wide range of knockdown fittings available. These devices are commonly used to fit flat packed furniture together, particularly chip board flat packed kitchens
Contents

Tool Name Uses
Saw Board Or
Bench Hook
The sawing board is used to aid cutting of timber battens. The board is gripped in the vice and the timber held against the bench hook while being cut.
Try-square This tool has two uses.1.To test the squareness of the material.2.To mark out lines at right angles to a given surface.
Marking Gauge This tool is used to mark lines parallel to an edge or side.
Woodworking Hand ToolsThere are a vast range of hand tools available to the wood worker but here we will only look at the tools that you will be using in first and second year.
Contents

Tool Name Uses
Coping Saw The coping saw has a very fine blade which can be used to cut thin wood or plastic. This saw is suited to cutting curves and intricate shapes.
Firmer Chisel The firmer chisel is a general-purpose chisel used for cutting and parting wood. E.g. For cutting waste wood in a housing joint.
Bradawl This tool is used to mark centres and prepare pilot holes for screws.
Tenon Saw The Tenon Saw has a rigid back and is designed to be used for straight cutting of small timber sections.
Woodworking Hand Tools
Contents

Tool Name Uses
Nail Punch The nail punch is used to drive nail heads below the surface of the wood. Nail punches are made from high carbon steel, hardened and tempered.
Jack-plane This plane is used for a wide variety of work. It is used to remove marks left on the timber by the saw, to bring the down to size, to make the timber flat and square, etc.
Smoothing-plane
The smoothing plane is used to remove slight irregularities by taking thin shavings from the surface. It is used to prepare surfaces for finishing.
Bevel-edge Chisel
The bevel-edge chisel is a more specialised chisel for lighter work. The bevel edge allows the chisel to be used in tight corners. E.g. when trimming corners.
Woodworking Hand Tools
Contents

Woodworking Hand Tools
Contents
Tool Name Uses
Wood Mallet The wood mallet is designed for striking chisel handles when heavy cutting is required. The head and the shaft are made from beech. The handle is a wedge to fit into the head.
Cross Pein Hammer
Or Warrington Hammer
This hammer is a lightweight general-purpose hammer. The cross pein is used to start driving in short nails. The handle is made from ash or hickory.
Claw Hammer The claw hammer is the joiner’s choice of hammers. The claw of the hammer is used to withdraw nails.

Machine ToolsWhile there is a large range of machine tools available to the wood worker and the metalworker it will only be necessary to look at one of these machines for now.The Pedestal or Pillar DrillThis machine is designed to drill holes. The pedestal drill will hold both parallel and tapered shank twist drills. Unlike the drills you may have seen at home or in Do it Yourself shops the drill is mounted on a stand which supports it weight and makes it easy to use. Although the drill is fixed the drill table is adjustable both for height and from side to side (some tables can also be tilted so that angled drilling can be done). This is to allow different shapes and sizes of objects to be drilled.To allow the user to drill accurately there is a depth stop on the side of the drill. The depth stop is very useful if the user wishes to drill a series of holes al the same depth.The pedestal drill is not a dangerous machine to use provided all the health and safety rules are strictly followed.
Contents

Methods Of Fixing Timber As well as fixing timber with glue it is often necessary to use mechanical
methods as well. Normally this is done either to hold the joint together while the glue dries or to allow the joint to be taken apart later.
NAILS AND NAILING – there is a vast range of nails available. Each nail type is designed to be used for a special purpose. As well as having different types of nails they are also available in different lengths. The types of nails that you will generally use in first and second year are panel pins. Panel Pins are very thin nails with small heads and are used to hold panels in place while the glue dries. So that the head of the nail is not visible it can be driven below the surface of the wood with a nail punch.
WOOD SCREWS – are a much more secure method of mechanically joining timber together. It is also possible to undo a screwed joint to dismantle the construction. Screws are also available in different types, sizes and lengths.
Contents

Wood FinishesThere are two main reasons for giving wood a finish.1. To protect it from dirt and the wet.2. To make it look good.
Examples of wood finishes: Gloss paint. Varnish. Sanding Sealer. Stain. Vegetable Oil.
How to get a good finish.1. Plane it smooth2. Sand it along the grain with abrasive paper. (e.g. Glass paper,
garnet paper)3. Remove the dust4. Apply the 1st coat of varnish. Do not overload the brush.5. When dry, rub down with glass paper.6. Apply the 2nd coat of varnish. Do not overload the brush.7. Repeat this 3 or 4 times.
Contents

Wood FinishesVARNISH – is probably the most frequently used finish applied to timber. This is because it brings out the natural colour and grain of the timber. Generally varnishes are clear (uncoloured) and are available in gloss, silk and matt finish.
SILK FINISH gives a more natural sheen to the wood and does not show up the imperfections like gloss varnish. The two most common types of varnish available today are polyurethane and acrylic.
POLYURETHANE varnish gives a very hard wearing waterproof, smooth finish after only one or two coats but the brush has to be very carefully cleaned in white spirit afterwards. Polyurethane varnish is the best finish for exterior work.
ACRYLIC varnish requires more coats, is perhaps not a durable, but he brush can easily be cleaned under the tap.
Contents

Wood FinishesPAINT FINISHES – there are a number of types of paint suitable for application on wood.There are: Emulsion
Oil based paintsPolyurethane
Emulsion paint is water based and is not very durable. A wide range of colours is available. Being water based the brush is easily cleaned under the tap. Emulsion paints are available in matt or silk finish.
Oil based paints are much more durable than emulsion and are suitable for both interior and exterior use. These paints come in a wide range of colours which are usually a gloss finish. The brush must be cleaned in white spirit.
Polyurethane paints are very durable and hardwearing. They are ideal for exterior use and are available in a wide range of colours. The brush must be cleaned in white spirit.
Contents

Metals and their Properties Metal Composition Properties Forms Uses
Copper Pure Metal Conducts heat and electricity.Can be bent easily.
SheetBar
Tube
PlumbingWire Core
Brass Alloy of Copper and Zinc
Stronger than copper.Casts well.
SheetBar
Woodscrews,castings, valves and propellers.
Tool Steel Iron and Carbon Very hard and brittle but can be hardened and
tempered.
Bar Screwdrivers, scribers, centre punches, saw
blades.
Tin Plate Sheet Steel with a coating of tin on
both sides
Easily bent. Will rust if the tin surface is broken.
Sheet Tin cans and light sheet
metalwork.
Cast Iron Iron with 3.5% carbon. Hard wearing and brittle. Castings Engine blocks, vice bodies,
blacksmith’s anvil.
Black Bar Almost pure iron Can be forged easily. Can be easily bent without
fracture.
Bar Gates, stands and other decorative
work.
Aluminium Pure Metal Light and strong and can be easily bent.
Does not corrode after initial corrosion has made a
protective coating.
BarTubeSheet
Window frame and greenhouse
frames.
Contents

Metals and their Properties
Aluminium is a very important metal. It comes from the ore called Bauxite. The Bauxite is heated in an electric furnace. The metal produced is very purePure aluminium is soft and easy to work. It can be made stronger and harder by mixing other metals with it. (This is called and alloy).Aluminium is lightweight, easy to recycle and it is a good conductor of heat and electricity.It is a non-ferrous metal. (It contains no iron). It does not rust as iron does. Instead a skin of oxide forms on the surface so it looks dull. The skin prevents further oxidation.
Contents

Metalworking Hand Tools
Contents
Tool Name Uses
Scriber For marking out lines on metal.
Engineers Square
For testing internal and external right angles.For marking out lines at right angles to an edge.
Centre Punch For punching a small indent to locate twist drills and spring divider points.
Straight Edge For marking straight lines or checking straightness.
Spring Dividers Marking out tool used to scribe circles and arcs on metal and wood.
Ball-pein hammer
OrEngineers hammer
Metalwork hammer. Small sizes are used for centre punching, riveting, bending and large sizes are used for forging.

Metalworking Hand Tools
Contents
Tool Name Uses
Rawhide mallet A soft mallet used to shape sheet metal without damaging the surface.
Hacksaw
Junior hacksaw
The hacksaw is used to cut metal bars, plates and tubes. There are a variety of blades available for different types of work.The junior hacksaw is smaller and designed to cut thin material and for lighter work.
Odd leg callipers
OrJenny callipers
This marking out tool is used to scribe lines parallel to an edge.
InsideAnd
Outside callipers
These are used to measure the inside and outside diameters of objects. The size is then read from the edge of a steel rule.

Metalworking Hand Tools
Contents
Tool Name Uses
Flat File General filing of straight edges on plastic and metal.
Half round file General filing of straight edges and curves on plastic and metal.
Tin snips – straight and
curved
For cutting thin sheet metal. The curved cutters are for cutting radius cuts.
Vice – engineer and
hand
Engineers vice used to grip large sections of bar and tube when drilling.The hand vice should be used to grip thin sheet metal when drilling.

Permanent Methods of Joining Metals
WELDING – Steel parts can be joined together by using an electric current to melt a steel rod onto the joint. There is a danger of flashes to the eyes. A weld is very strong but not very neat.
Example: Metal chairs and benches.
BRAZING – This is very similar to welding, except that a brass rod is used and a hot flame is used to heat up the metal. A brazed joint is not as strong as a weld, but it is neater.Example: Bicycle frames.
Contents

Permanent Methods of Joining Metals
RIVETING – A rivet is a sort of metal rod with a head. It can be hammered into shape.Example: Pot lids and handles.
Flat head rivetfor thin metal.
Snap head rivetfor strength.
Countersunk head Rivet for a flat joint
POP RIVETING – hollow rivets are put in with a ‘gun’. Used for joining thin metal. The work can be done from one side.Example: Ventilation Ducts.
Contents

Permanent Methods of Joining Metals
SPOT WELDING – For joining thin sheets. The spot welder melts the metal at a single ‘spot’. It works by passing an electric current through the metal at the spot. The spot gets so hot that it melts the plates together.Example: Car bodies
Contents

Metal FinishesAs with timber, the finish of metal is very important. Before applying any finish to metal the surface must be carefully prepared. If the article is to be painted the surface of the metal should be prepared in the following way.
1. Prepare the metal by making sure that all major blemishes are removed. This should be first with a file and then with emery cloth.
2. Any major imperfections can be repaired with plastic car body filler.
3. Once the surface has been thoroughly prepared and sanded down it should be wiped clean with a cloth dipped in white spirit to remove all traces of oil and grease.
Contents

Metal Finishes4. The metal should now be painted with a
suitable primer – in the care of ferrous metals a rust preventative primer.
5. When the primer is dry it should be lightly rubbed down with fine grade wet or dry paper and then cleaned with a cloth in preparation for the topcoat.
6. If the finish achieved in 5 is acceptable then the topcoat should be applied. If not, the stages 4 and 5 should be repeated.
Contents

Metal FinishesThe above procedures apples to a variety of different paint materials.
1. Oil based paints – cover well and are ideal for both indoor and outdoor use.
2. Emulsion paints – are available in a wide variety of colours. They are not very durable and are best suited to indoor use.
3. Cellulose paints - are available in a wide variety of colours. These paints, available in spray cans, are used to paint car bodies.
Contents

Metal FinishesDIP COATING – gives protection to metals by coating with a coloured plastic. The work should first be cleaned and then heated. When hot, the metal is then dipped into the nylon or acrylic powder, which is contained in a fluidiser. A fluidiser tank contains the plastic powder which has compressed air blown in at the base. This renders the powder ‘fluid’ and ensures even coating of the hot metal.
The coated article is then removed from the tank and allowed to cool. The hot metal first melts the plastic powder attached to its surface and as it cools the plastic hardens leaving a thin coating of plastic on the metal surface. The metal can be heated using an oven at approximately 150oC
Fluidiser
Contents

Data on Plastics
Compared with wood and metal, plastics are very new materials. They have only been manufactured during the last 40 years or so.There are many kinds of plastic and we use them for many different jobs. This is because they can be made to behave in almost any way that is needed.You have probably come across plastics that are hard, soft, brittle, flexible, transparent, coloured and so on. The list is almost endless.
Contents

Data on PlasticsMost plastics are made from oil; a natural material which will run out quite soon if we do not use it sensibly. Disposing of waste plastic without causing pollution can also be a problem, so perhaps we should now stop thinking of plastic as such a disposable material.There are two main types of plastic:
THERMOSETTING PLASTICS – are generally strong and resistant to heat. Once formed into a shape they cannot be re-shaped. These plastics are used in situations where resistance to heat is important. Although they are quite hard, they can be chipped or cracked if they are dropped or banged.
THERMOPLASTICS – when thermoplastics are heated, they become soft and can be moulded into shapes. When cooled, they keep their shape. If these plastics are heated again they become soft and can be re-moulded into other shapes. This process can be repeated over and over again as long as the plastic has not been stretched too far.
Contents

Plastics and their Properties
ThermosettingProperties Hard, heat
resistantHard, heat resistant
Hard, heat resistant &
brittle
Forms Powder, granules
Liquid, paste Liquid, paste
Uses Electrical appliances, saucepan handles
Bonding, gluing GRP boats, car bodies,
embedding.
Phenolic Resin Epoxy Resin Polyester Resin
Contents

Plastics and their Properties
ThermoplasticsProperties Stiff, hard,
clear. Easily cut, glued &
polished. Scratches
easily
Stiff, hard, wide range of
colours. OR Very light &
buoyant.
Hard, tough. Good bearing
surface. Wear & friction resistant.
Good colour range. Stiff, hard. OR Soft &
flexible.
Forms Rod, tube & sheet in a wide range of colours
Powders, granules &
sheet. OR Slabs & beads.
White powder, granules &
chips. Rod, tube & sheet.
Powders, pastes & sheets.
Uses Car light units, shop signs,
watch lenses
Model kits, disposable
cups. OR Insulation &
floats.
Gear wheels, bearings, clothing &
combs.
Pipes & guttering. OR Dip
coating, floor tiles.
Acrylic Polystyrene Nylon PVC
Contents

Shaping and Forming Plastics
Plastics such as acrylic can be easily cut, shaped, drilled and formed. These processes in general will use equipment that is also used for metal and/or wood. The main difference with plastic is that it need to be treated very carefully as it can be scratched, chipped or broken easily. Materials such as acrylic come with a protective coating of paper or film, this should be left on to protect the material while it is being worked.
CUTTING AND SHAPING ACRYLIC – before cutting the material should be carefully marked out with a felt tipped pen. Once marked out the acrylic should be cut with either a junior hacksaw or a coping saw. The material should be cut near to the line but not on it and then the plastic can be filed up to the line.
DRILLING ACRYLIC – acrylic and be drilled with ordinary twist drills, hole saws and flat bits. However, as the acrylic is quite brittle it should be drilled with great care. The cutter should be brought down on the plastic very slowly.
Contents

Shaping and Forming Plastics
FORMING ACRYLIC – there are two main methods of forming acrylic used in schools. These are:
1. Strip heater – bending
2. Press forming
THE STRIP HEATER – is designed to heat a narrow strip across a sheet of plastic so that it can be bent. The heater has a single element enclosed in a box which has a slot above the element. The plastic sheet should be heated on both sides to ensure even heating. To make bends at particular angles the sheet can be bent against a protractor and the correct angle maintained while the plastic cools.
Contents

Shaping and Forming Plastics
HEATING PLASTIC IN AN OVEN – when a large radius curve or double bend is required it is best to heat the whole sheet in an oven and then form the sheet around a suitable former. Even heating of the sheet is important. Bending should not be attempted until the whole sheet is heated right through and is completely flexible.Heating times are: -3mm acrylic heated to 160oC for 20 minutes.6mm acrylic heated to 160oC for 30 minutes.
Contents

Shaping and Forming Plastics
PRESS FORMER – If you require to make a simple shaped object then the best process to use is press forming. Press forming uses a two-part mould, the female former and the male former. The male former will consist of a ‘replica’ of the shape to be formed – the surface finish of this former must be good if a good quality shape is required. The female former consists of a ring, which fits around the perimeter of the male former (allowing for a gap equal to the thickness of the plastic all around).
Contents

Technological Studies – Systems
In order to use the system we do not need to know how it works, but simply what it does. The Scot-rail Transport System is a complicated railway system consisting of many railway stations connected together by railway track.
The human body is made up of systems, the circulation system, the nervous system and the respiratory system.
Input Output Process
Contents

Technological Studies – Systems
A System, then, is something complicated, made up from lots of parts, but which we think of as a single thing. We may not know how it works but we know how to use it.Lets look at another system, the ‘Coca-Cola’ drinks machine in the school canteen. This is a system for converting money into drinks. We do not know how it works, but we all know what it does and how to use it. We put money IN and the machine gives OUT a drink
An electric kettle may also be described as a system. We put IN cold water, switch IN electricity and later pour OUT hot water.
Coke Machin
e
Money Can of Coke
Cold Water Hot Water
Electricity
Kettle
Input Output Process
Contents
Technological Studies – Systems
A washing machine is another system.We put IN dirty clothes, soap powder, water and electricity, and we get OUT clean clothes and dirty water.
Clean ClothesWashing Machine
Dirty Clothes
Soap Powder
Clean Water Dirty Water
Electricity
Input Output Process
Contents

Technological Studies – Systems
On the diagrams we have shown a box with arrows attached at the sides. Some of the arrows are entering the box and some are leaving the box.The arrows entering the box represent INPUTS to the system.The arrows leaving the box represent OUTPUTS from the system.The box represents the PROCESS (or change) that takes place in the system.Thus a system is made up of INPUTS, PROCESS and OUTPUTS.
Input OutputProces
s
Input Output Process
Contents
Sub-SystemsSome systems are made up from other smaller systems called SUB-SYSTEMS.
Lets take another look at the ‘Coca-Cola’ machine. This machine (or system) is made up of the following sub-systems: -the money counting sub-systemthe can selecting sub-systemthe can dispensing sub-system
MoneyCorrect Amount
Money Counte
r
CanSelecte
d
Can Select
or
CanCan Dispens
er
System Boundary
Input Output Process
Contents
Sub-SystemsThe money counting sub-system counts the value of the coins as they are put into the machine. When the correct amount has been entered, a signal is sent to activate the can selection sub-system. Once a button is pressed to select the required drink, a signal is sent to the can dispensing sub-system and a can drops down. The machine is then reset to await more money.
No matter how complicated the system might be, block diagrams can represent it.
Input Output Process
Contents

Graphic Communication A busy street is full of signs and signals, which give information to passers by. For example, a shop sign tells shoppers what goods are for sale inside a building; road signs tell drivers what lies ahead as they drive; traffic lights give instructions to pedestrians and drivers to prevent accidents and create an even traffic flow.
This giving of information is called communication.
A collection of objects or connected parts can be grouped together to form a system. There are many different kinds of systems. The solar system consists of the Sun and the planets, which revolve around it. The railway system in Scotland includes all the track, stations, engines, and carriages, which are run by Rail Track. The telephone system conveys sound between connected houses by electrical pulses. The transmission system of a car passes power from the engine to the axle, which turns the wheels.
Contents

Graphic Communication All types of communication use a code or language to represent information in a convenient form.
This may be made up of shapes, sounds, hand-signals, lights, and other signs. Together, these symbols or tokens can form a code.
For example, C-A-T are letter symbols strung together in a particular order to convey the idea of an animal. Would this drawing not do as well?
To communicate effectively, only information which is necessary should be included: the message may be lost if too much information is given.
Contents

Graphic Symbols and Signs
Graphic Symbols and Signs are used to form visual languages for all to understand. Wherever groups of people with different speaking and written languages meet communication can be assisted with symbols.
It is important that the message is clear and is easily interpreted. Many of the symbol signs that you will see are without text. There are some that are text only and these are generally used in conjunction with the symbol signs.
Chemist Musician Tourist
Contents

SymbolsYellow triangleYellow triangle /Black BorderYellow most easily seen even in poor light. Black provides a striking contrast.
Warning Signs (Caution)Risk of danger
Prohibition Signs (Prohibit)Do Not Do
White CircleWhite Circle/ Red Border/ Red Cross BarRed is associated with danger.
Blue CircleEasily seenGood contrast with white.
Mandatory Signs (Protection)Must Do
Fire Fighting Signs
Safe Condition SignsThe Safe Way
Green Square/ RectangleGreen is associated with safety
Red Square/ RectangleRed is associated with fire.
Contents

Charts and GraphsThere are many different types of graphs that are used. Each type of graph is used to show different information.
Line Graphs - are used to show the variations between two quantities, such as time/distance, current/voltage
Bar Charts - are a simple way of comparing information.
Pie Charts - are a useful way of showing numerical information in the form of a picture.
Contents

Free Hand SketchingThere are an number of way that an object can be drawn in order to allow the shape and form of the object to be understood by someone who is looking at the drawing.
You may know of some already. The methods that we are going to look at are ISOMETRIC and OBLIQUE.
For this you will need:
1. A pencil
2. A blank piece of paper
3. An eraser
When you are free hand sketching you NEVER use a rule to draw your lines. Each line that you draw should be as light a possible at first and then they can be darkened in if there are no mistakes.
Contents

PracticePractice by first of all sketching some lines. Begin sketching some horizontal lines and then some vertical lines or if you prefer diagonal lines.
If you find that horizontal lines are easier then turn your paper until you are comfortable.
If you find that vertical lines are easier then turn your paper until you are comfortable.
If you find that diagonal lines are easier then turn your paper until you are comfortable.
You should continue to practice these lines at home.
Contents

Sketching Oblique Cubes
1. Start off with a square made up of 4 straight lines.
2. Sketch three parallel lines from the corners at approximately a 45° angle.
3. Now join up the lines as shown.
4. Darken in the outside lines only, as shown.
Contents

Sketching Isometric Cubes
1. Start of with a vertical line. Then draw 2 pairs of parallel line that are at approximately a 30° angle, as shown.
2. Now join up the lines as shown above.
3. Darken in the outside lines only, as shown below.
Contents

Sketching Circles
1. Sketch a square.
2. Sketch in a vertical line, a horizontal line and two diagonal lines from corner to corner as shown.
3. Select the points as shown by splitting the diagonals into three equal parts.
4. Sketch the circle as shown.
Contents

Sketching an Ellipse
Sketching an ellipse is very similar to sketching a circle.
Instead of sketching a square you should sketch a rectangle and then select the points in the exact same way as for a circle.
Contents

Measurement
In both Graphic Communication and in Craft and Design it is very important to be able to measure and mark out accurately.
In both these subjects all your measuring and marking out will always be in millimetres (mm). e.g. 1 cm = 10 mm, 50 cm = 500 mm etc.
In Graphic Communication you will use a variety of measuring instruments that have to be handled carefully, rule with chips out of them do not measure accurately, compasses with damaged points cannot draw accurate circles.
Contents

Scale Drawing
Scale drawing is used when something large, e.g. a building or some thing small, e.g. a microchip, has to be drawn on to a sheet of paper.Some people who use scales are:Architects designing buildingsGeographers drawing mapsElectronic engineers designing printed circuit boards
Reading scale drawings and making scale drawings is usually done in one of three ways or as a combination of these three ways.1.Using the written scale as a multiplier for each scale size.e.g. Measured or scale length = 32 mm
Scale is 1:10Actual or real length = 32 x 10 = 320 mm
2.By measuring a distance on a drawing using a pair of compasses and comparing the distance lifted to a scale printed for that purpose. 3.By using or making a scale rule to suit the drawing
Note It is not difficult to decide which method to use, in fact the decision is likely to be made for you by the problem involved.
Contents

Orthographic Drawing 3 rd Angle Projection
Ortho comes from a Greek word meaning ‘straight’, ‘right’, or ‘square’.
Graphic comes from a Greek word meaning ‘to draw’.
So orthographic means ‘to draw by projecting straight and parallel lines’.
Orthographic drawing is a drawing technique commonly used in industrial areas as a method of communicating detailed information. The type of orthographic drawing that you will be using is called 3 rd angle projection and the views observed from the positions shown above would be presented in the way shown below.
ELEVATION END ELEVATION
PLAN
Contents
ELEVATIONEND ELEVATION
PLAN

Lines and symbols
Full Line
Faint Line
Broken Line
Chain Line
used to indicate the OUTLINE of objects
used in the CONSTRUCTION of objects
used to indicate HIDDEN edges
used to indicate lines of SYMMETRY in objects
Continuous thick line
Short dashes, thin line
Continuous thin line
Chain, thin line
Contents

Perspective DrawingPerspective drawing allows us to draw 3D shapes quickly. A perspective
drawing shows an object in way that resembles the actual appearance of an object.
When we look at objects we see that:1. Parallel lines appear to converge. i.e. come closer together until they
disappear to a vanishing point.2. Equal sizes appear smaller the further they are away. This is known as
foreshortening.3. Objects of similar size appear to get smaller as they recede from us.
If you look at the drawing of the railway trackyou will be able to see this. The parallel lines converge to a vanishing point. The equal length sleepers foreshorten as they recede. (Go into the distance)
Contents
HORIZON LINE

One-point PerspectiveTo draw a simple box shape in one point perspective:1. Draw a flat view of one side of the object in light construction lines.
2. Draw the horizon line, which represents your eye level as you look at the object. If you want to see the top of the object then the horizon line is drawn above the flat view. If you want to see the bottom of the object then the horizon line should be below the flat view. If you want to show the object viewed straight on then the horizon line should run through the flat view.
Mark the vanishing point on the horizon line. The position of this point will determine the side of the view that you will see.
Step 1 – Flat view
Step 2 – Insert horizon line and vanishing point
Contents

One-point Perspective3. Draw feint lines from each corner of the flat view to the vanishing point.
4. Complete the shape by drawing the back of the shape.
Step 3 – Lines to the vanishing point
Step 4 – Draw in the back.
Contents

Two-point PerspectiveThis method is a little more complicated than one point perspective but will give you a much more realistic view of an object. The horizontal lines of the object will recede in two directions and converge on two different vanishing points. The diagrams below show the six simple stages of making a two-point perspective drawing.
Step 1. Draw the horizontal line.
Step 2. Mark on the vanishing points.
Step 3. Draw the corner of the box that will be closest to you. Contents

Two-point Perspective
Step 4. Draw in the lines to both of the vanishing points.
Step 5. Estimate the length of the side and the end of the box and draw them in.
Step 6. Connect the corners of the box to the vanishing point and draw in the outline.
Contents

Isometric ProjectionFor this example you will be shown how to construct an isometric crate ready to hold a more complex form. Always draw the basic crate lightly first as this will save you time later.
Step 1. front and base edges
Step 1 - front and base edgesa) Make sure you have only the 30°/60° set-square available.b) Mark the bottom position of the drawing.c) Project a vertical line and mark the height of the crate onto it. d) Project a line, at an angle of 30°
to the left, and measure the depth of the crate.
e) Project a line, at an angle of 30° to the right, and measure the
length of the crate.
Length
Heig
ht
Depth
Contents

Isometric Projection
Step 2 - front and side surfaces
Step 2 - front and side surfacesa) Project a vertical line from the length
marker and a line at 30°, parallel to the base, from the height marker.This provides you the front surface.
b) Project a vertical line from the depth marker and a 30° line, parallel to the base, from the height marker.This provides you the side surface.
Step 3 - top surfacea) From the top left hand comer project a 30°
line up to right.b) From the top right hand comer project a
30° line up to left until it crosses the one above completing the isometric crate.
Step 3 - top surface
Contents

Oblique ProjectionFor this example you will be shown how to construct an oblique crate ready to hold a more complex form. Always draw the basic crate lightly first as this will save you time later.
Step 1 - front surface
Step 1 - front surfacea) Draw a construction rectangle with the same
length and height to the crate required.This will be the front surface of your crate.
Heig
ht
Length
½ D
epth
Step 2 - side and top surfacesa) From the bottom right and both the top corners of the rectangle project lines at an angle of 45° to the right.b) Find the depth of the required crate and half this size. You should always halve sizes being projected along the 45° lines.c) Mark this size along one of the 45° lines.d) Construct the rest of the crate using lines parallel to those already on the page.
Step 2 - side and top surfaces
Contents
The Colour Wheel
YELLO W
BLU E R ED
VIO LET
GR
EE
N
OR
AN
GE
V IO LET
YELLO W
GR
EE
N
OR
AN
GE
RE
D
BLU
E
BLU
EG
RE
EN
GREEN
YELLOWYELLOW
ORANGE
RE
DO
RA
NG
E
RED
VIOLETVIOLETBLUE
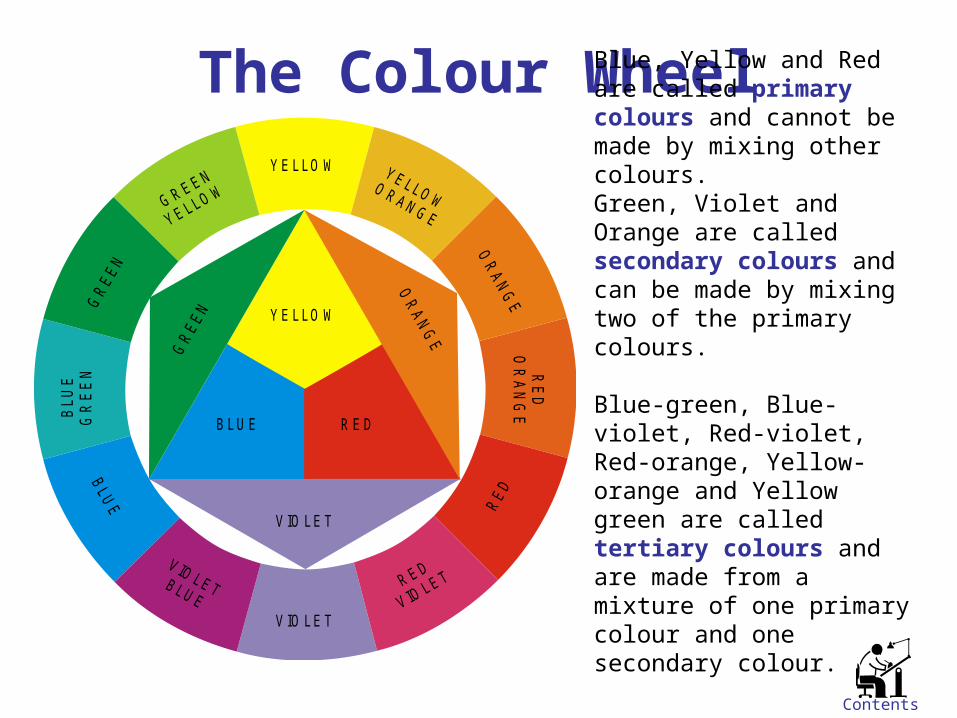
Blue, Yellow and Red are called primary colours and cannot be made by mixing other colours.Green, Violet and Orange are called secondary colours and can be made by mixing two of the primary colours.
Blue-green, Blue-violet, Red-violet, Red-orange, Yellow-orange and Yellow green are called tertiary colours and are made from a mixture of one primary colour and one secondary colour.
Contents

Colour Theory There is no right or wrong in selecting a colour. Colour is only unsuitable if used inappropriately or in inharmonious combinations.
The choice of colour combinations is highly personal but you should be able to give a reason for your choice of colour selection using the guidelines below.
Red Great power of attraction but too much can be tiring.Hot, bold, exciting, festive, positive.Can be associated with rage, aggression, danger, courage, speed.
Yellow Most easily seen, luminous.Bright, pleasant, happy, sunny, lively, cheerful.Associated with sunshine and holidays.
Blue More formal than red or yellow.Cool, sophisticate, aristocratic, serene, passive, elegant, reliable.Not used in food, as it is associated with mould.
Orange Sunny, cheerful, warm, happy.Associate with flavour and energy.
Green Most restful of the colours.Fresh, youthful, soothing, natural, informal.Associated with safety, health and the environment.
Contents

Colour Theory Purple Combines the courage of red and the nobility of blue.
Rich, pompous, impressive, regal.
Violet Cool, negative, retiring, subdued, solemn.Associated with peacefulness and solitude.
Grey Neutral, sedate, dignified, inconspicuous.Associated with old age.
White Luminous, positive, light, delicate, clean.Associated with innocence and purity.
Black Subdued, solemn, profound.Associated with sorrow, and evil.
Brown Safe, reliable, natural.Associated with earth, therefore good.
Yellow/Green Unpleasant. Associated with sickness.
Contents

Shading and RenderingPencil shading can be used to improve the impact of a drawing. If this shading is to look realistic, the effect of light must be taken into account.When the light falls on an object, surfaces reflect different amounts of light depending on their position in relation to the light source. Look at the picture shown below. It shows that when solid forms are illuminated the side that faces towards the light looks lighter than the face that faces away from the light. With the cylinder, the part directly facing the light source is the lightest.
When shading, use a soft lead pencil to give a wide range of tones from light grey to dense black. It will be difficult to obtain dark enough shading with any grade of pencil harder than HB. The most suitable grades are 2B, B and HB.The areas to be shaded can be covered quickly and evenly if the pencil is held, as shown in the picture below, so that it is nearly horizontal. In this position more lead is in contact with the paper.
Contents