s T Reverse Alchemy - Daycreek Home...
2
24 www.BACKHOMEMAGAZINE.COM a foot or more thick and insulated in the center to bolster the wood’s R-value. We had done a similar type of project when adding our passive solar greenhouse to our cordwood home in the mid-1980s. Rather than go the whole thick-wall cordwood route, we put a cordwood skin of log slices over the exterior wall of the addition and then mortared between the gaps. This time, we skipped the mortar and sim- ply fastened the slices onto a painted wooden panel. We could then lift the whole piece into place and attach it to the framing of the metal shed. Go Ye and Do Likewise The process is really straightforward and can be accomplished in no time D rive along any country road and it’s pretty apparent there are lots of dreary, dilapidated metal sheds dotting the landscape of rural America. Since we were the not-so- proud owners of one, we have taken active—maybe even artistic—steps to remedy this sad state of affairs. We jokingly call it “reverse alche- my” . . . turning metal into wood. And in the spirit of Lady Bird Johnson’s American Beautification Campaign of the 1960s, we did our part to conceal the eyesore in our own backyard. The technique is an effort to make something attractive out of something mundane. It’s a project just about anybody can do, and you don’t have to be a cordwood builder to do it. Our method is really just a facade that goes in place easily and has the look of rustic masonry once it’s done. It’s also very cost-effective—about $1.00 per square foot for the completed panels. A Cordwood Siding Face-Lift A few months ago, we came to the conclusion that our dismal-looking 26' X 36' metal pole shed needed a face-lift. Sure we could paint it, or cover it with lumber or metal, but to what effect? Since we already were the proud own- ers of a beautiful 32-year-old cordwood masonry home, we thought it would be nice to continue with that cordwood motif. Cordwood, for those not familiar with it, is a masonry technique that uses split-end round wood, like firewood, in- stead of stone or brick. The walls can be Reverse Alchemy Turning metal into wood with cordwood siding. By Richard and Becky Flatau PHOTOS SUPPLIED BY AUTHORS
Transcript of s T Reverse Alchemy - Daycreek Home...

24 www.BackHomemagazine.com
a foot or more thick and insulated in the center to bolster the wood’s R-value.
We had done a similar type of project when adding our passive solar greenhouse to our cordwood home in the mid-1980s. Rather than go the whole thick-wall cordwood route, we put a cordwood skin of log slices over the exterior wall of the addition and then mortared between the gaps. This time, we skipped the mortar and sim-ply fastened the slices onto a painted wooden panel. We could then lift the whole piece into place and attach it to the framing of the metal shed.
Go Ye and Do Likewise
The process is really straightforward and can be accomplished in no time
D rive along any country road and it’s pretty apparent there are lots of dreary, dilapidated metal sheds dotting the landscape of rural America. Since we were the not-so-proud owners of one, we have taken active—maybe even artistic—steps to remedy this sad state of affairs.
We jokingly call it “reverse alche-my” . . . turning metal into wood. And in the spirit of Lady Bird Johnson’s American Beautification Campaign of the 1960s, we did our part to conceal the eyesore in our own backyard.
The technique is an effort to make something attractive out of something mundane. It’s a project just about anybody can do, and you don’t have to be a cordwood builder to do it. Our method is really just a facade that goes
in place easily and has the look of rustic masonry once it’s done. It’s also very cost-effective—about $1.00 per square foot for the completed panels.
A Cordwood Siding Face-Lift
A few months ago, we came to the conclusion that our dismal-looking 26' x 36' metal pole shed needed a face-lift. Sure we could paint it, or cover it with lumber or metal, but to what effect? Since we already were the proud own-ers of a beautiful 32-year-old cordwood masonry home, we thought it would be nice to continue with that cordwood motif. Cordwood, for those not familiar with it, is a masonry technique that uses split-end round wood, like firewood, in-stead of stone or brick. The walls can be
Reverse AlchemyTurning metal into wood with cordwood siding.
By Richard and Becky FlataupH
oTos
sup
plie
d By
auT
HoRs
25BackHome magazine July/aug 2012
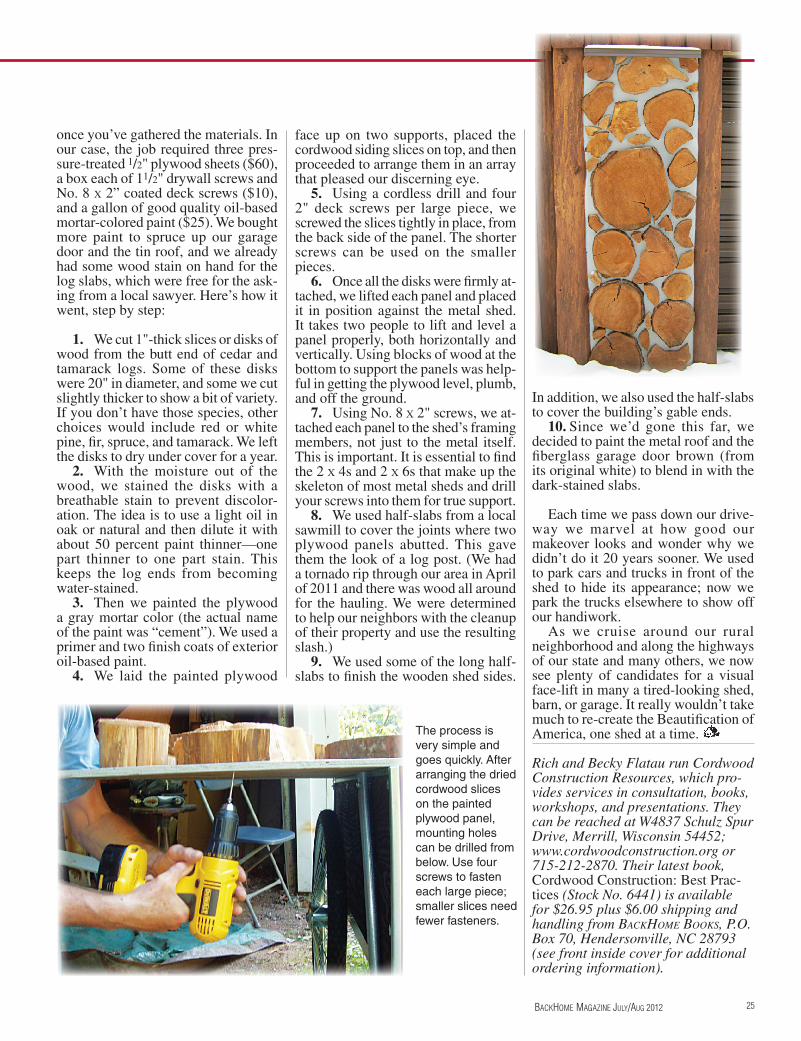
once you’ve gathered the materials. In our case, the job required three pres-sure-treated 1/2" plywood sheets ($60), a box each of 11/2" drywall screws and No. 8 x 2” coated deck screws ($10), and a gallon of good quality oil-based mortar-colored paint ($25). We bought more paint to spruce up our garage door and the tin roof, and we already had some wood stain on hand for the log slabs, which were free for the ask-ing from a local sawyer. Here’s how it went, step by step:
1. We cut 1"-thick slices or disks of wood from the butt end of cedar and tamarack logs. Some of these disks were 20" in diameter, and some we cut slightly thicker to show a bit of variety. If you don’t have those species, other choices would include red or white pine, fir, spruce, and tamarack. We left the disks to dry under cover for a year.
2. With the moisture out of the wood, we stained the disks with a breathable stain to prevent discolor-ation. The idea is to use a light oil in oak or natural and then dilute it with about 50 percent paint thinner—one part thinner to one part stain. This keeps the log ends from becoming water-stained.
3. Then we painted the plywood a gray mortar color (the actual name of the paint was “cement”). We used a primer and two finish coats of exterior oil-based paint.
4. We laid the painted plywood
face up on two supports, placed the cordwood siding slices on top, and then proceeded to arrange them in an array that pleased our discerning eye.
5. Using a cordless drill and four 2" deck screws per large piece, we screwed the slices tightly in place, from the back side of the panel. The shorter screws can be used on the smaller pieces.
6. Once all the disks were firmly at-tached, we lifted each panel and placed it in position against the metal shed. It takes two people to lift and level a panel properly, both horizontally and vertically. Using blocks of wood at the bottom to support the panels was help-ful in getting the plywood level, plumb, and off the ground.
7. Using No. 8 x 2" screws, we at-tached each panel to the shed’s framing members, not just to the metal itself. This is important. It is essential to find the 2 x 4s and 2 x 6s that make up the skeleton of most metal sheds and drill your screws into them for true support.
8. We used half-slabs from a local sawmill to cover the joints where two plywood panels abutted. This gave them the look of a log post. (We had a tornado rip through our area in April of 2011 and there was wood all around for the hauling. We were determined to help our neighbors with the cleanup of their property and use the resulting slash.)
9. We used some of the long half-slabs to finish the wooden shed sides.
In addition, we also used the half-slabs to cover the building’s gable ends.
10. Since we’d gone this far, we decided to paint the metal roof and the fiberglass garage door brown (from its original white) to blend in with the dark-stained slabs.
Each time we pass down our drive-way we marvel at how good our makeover looks and wonder why we didn’t do it 20 years sooner. We used to park cars and trucks in front of the shed to hide its appearance; now we park the trucks elsewhere to show off our handiwork.
As we cruise around our rural neighborhood and along the highways of our state and many others, we now see plenty of candidates for a visual face-lift in many a tired-looking shed, barn, or garage. It really wouldn’t take much to re-create the Beautification of America, one shed at a time.
Rich and Becky Flatau run Cordwood Construction Resources, which pro-vides services in consultation, books, workshops, and presentations. They can be reached at W4837 Schulz Spur Drive, Merrill, Wisconsin 54452; www.cordwoodconstruction.org or 715-212-2870. Their latest book, Cordwood Construction: Best Prac-tices (Stock No. 6441) is available for $26.95 plus $6.00 shipping and handling from BackHome Books, P.O. Box 70, Hendersonville, NC 28793 (see front inside cover for additional ordering information).
The process is very simple and goes quickly. After arranging the dried cordwood slices on the painted plywood panel, mounting holes can be drilled from below. Use four screws to fasten each large piece; smaller slices need fewer fasteners.