RxWorks V4 · RxWorks 4.3 Release Notes _____ Page | 5 AUTOMATED MESSAGE MANAGER (AMM) SMS DETAILS...
49
RxWorks V4.3 Release Notes ©RxWorks Inc 7/28/2010 V2 The most ‘Multi-Branch’ friendly release to date
-
Upload
hoangquynh -
Category
Documents
-
view
228 -
download
0
Transcript of RxWorks V4 · RxWorks 4.3 Release Notes _____ Page | 5 AUTOMATED MESSAGE MANAGER (AMM) SMS DETAILS...

RxWorks V4.3 Release Notes
©RxWorks Inc
7/28/2010
V2
The most ‘Multi-Branch’ friendly release to date

RxWorks 4.3 Release Notes ___________________________
Page | 2
TABLE OF CONTENTS
AUTOMATED MESSAGE MANAGER (AMM) .................................................................. 5
SMS DETAILS FOR MULTI-BRANCH PRACTICES ............................................................. 5
AUTOMATED SOFTWARE UPDATES .............................................................................. 6
CHOOSE WHEN TO RUN YOUR SOFTWARE UPDATES ................................................... 6
CONFIGURATION .............................................................................................. 6
DOCUMENT EDITS AND MANAGEMENT ....................................................................... 7
.DOCX SUPPORT ............................................................................................................. 7
CLINIC ADDRESS MERGE FIELDS .................................................................................... 7
VITAL SIGN MERGE FIELDS............................................................................................. 7
VIEWING ATTACHMENTS AND DOCUMENTS ................................................................ 8
CLIENT COMMUNICATIONS ........................................................................................ 10
UPDATES TO THE CLIENT COMMUNICATIONS LOG .................................................... 10
EASIER EMAIL COMMUNICATIONS .............................................................................. 10
SHOWING NEXT APPOINTMENT DETAILS .................................................................... 14
CHOOSE TO PRINT NEXT APPOINTMENT DETAILS ...................................................... 14
ACCESSING THE ‘PRINT NEXT APPOINTMENT’ OPTION ................................. 14
TAX ............................................................................................................................ 15
TRANSACTION TYPE TAX RATE .................................................................................... 15
DEFAULT SERVICE HEADING TAX RATE ....................................................................... 15
STOCK ORDERS ........................................................................................................... 16
LEGEND FOR SYMBOLS ON STOCK ORDERS ................................................................ 16
IDEAL LEVEL .................................................................................................... 16
CRITICAL LEVEL ............................................................................................... 16
REMINDERS................................................................................................................ 17
CHANGES TO THE REMINDER WINDOW ..................................................................... 17
REMINDER ITEM DETAILS ............................................................................................ 17
IMPROVEMENTS TO REMINDER EMAILS AND SMTP SETTINGS .................................. 18
SETTING SMTP DETAILS WHEN GENERATING REMINDERS ............................ 18
ACTIONING FAILED EMAILS ............................................................................ 20
WORKING AROUND THE ‘ALL REMINDERS’ DOCUMENT ............................................ 21
VIEW PATIENT REMINDER HISTORY ............................................................................ 23
REPORTS .................................................................................................................... 24

RxWorks 4.3 Release Notes ___________________________
Page | 3
PATIENT DRUG CLASSIFICATION REPORT .................................................................... 24
ANALYSE ALL FEES (BY CROSS TAB) – PERFORMANE PACK ONLY ............................... 25
RESTRICTING C4 REPORTS TO CLIENT RECORDS ......................................................... 27
PRICE LIST REPORTS ..................................................................................................... 28
PRINTING PROCEDURE LABELS .................................................................................... 29
OPTION TO DISABLE PROCEDURE LABELS ................................................................... 29
ACCESSING THE PRINT LABELS OPTION .......................................................... 29
LISTING CLIENTS ......................................................................................................... 30
LIST CLIENTS FOR ALL CLINICS ..................................................................................... 30
TOOLBAR RIBBON ...................................................................................................... 31
FUTURE APPOINTMENTS (BUTTON) ............................................................................ 31
OPEN CLIENT WORK AREA (BUTTON) .......................................................................... 31
EMAIL (BUTTON) .......................................................................................................... 31
ADD PROCEDURE FOR CURRENT CONSULT (BUTTON) ................................................ 31
HEALTHCARE MANAGER ............................................................................................. 32
‘DEFER ALL’ REMOVED (BUTTON) ............................................................................... 32
BASED ON FEEDBACK ...................................................................................... 32
HOW TO QUICKLY SKIP INDICATORS .............................................................. 32
PROCEDURE MANAGEMENT ....................................................................................... 32
SEPARATE WORKSPACE FOR PROCEDURE MANAGEMENT ......................................... 32
BACKUP MANAGEMENT ............................................................................................. 33
ENHANCEMENTS TO THE BACKUP MANAGER WINDOW ............................................ 33
Accessing the backup manager window ......................................................... 33
The ‘Last Successful Backup Dates’ Area ........................................................ 33
The ‘Logs and Folders’ Area ............................................................................ 34
The ‘Tasks’ Area .............................................................................................. 34
The ‘Configuration’ Area ................................................................................. 35
COLORED SUMMARY BAR UPDATES............................................................................ 37
VISIT LIST, RECALL LIST AND HEALTHCARE SUMMARY BARS ...................................... 37
INCOMPLETE VISITS & DEACTIVATED / DECEASED PATIENTS ..................................... 37
THE VISIT WORK AREA ................................................................................................ 38
PROMPT WHEN CHANGING THE VET ASSOCIATED WITH A VISIT ............................... 38
VITAL SIGN AND THE PATIENT VISIT LIST..................................................................... 38

RxWorks 4.3 Release Notes ___________________________
Page | 4
COUNTER SALES ......................................................................................................... 39
CLINIC SPECIFIC COUNTER SALES ................................................................................ 39
CONFIGURATION ............................................................................................ 39
PAYMENTS ................................................................................................................. 40
WARNINGS FOR VISIT DETAILS STILL BEING EDITED ................................................... 40
OPEN INVOICING (RECEIPT TO ACCOUNT) SYSTEMS - PAYMENT WORKFLOW
CHANGES ..................................................................................................................... 41
PRESCRIPTIONS (SCRIPTS) ........................................................................................... 42
CANCELLING PRESCRIPTIONS ...................................................................................... 42
TO CANCEL A PATIENTS PRESCRIPTION .......................................................... 42
PATIENT BREEDS ........................................................................................................ 44
INVALID PATIENT BREEDS CLEANUP UTILITY ............................................................... 44
ACCESSING THE BREEDS CLEANUP UTILITY .................................................... 44
USING THE BREEDS CLEANUP UTILITY ............................................................ 44
REQUESTING NEW BREEDS IN CENTRALLY ALIGNED SYSTEMS ...................... 45
ADVANCED BREED PROMPTING .................................................................................. 46
GROUP POLICIES ........................................................................................................ 47
INTRODUCING THE GROUP POLICY MANAGER ........................................................... 47
Accessing the Policies Options: ...................................................................... 47
An example RxWorks Policy: .......................................................................... 47
Configuring Policies: ....................................................................................... 47
Editing Policy Rules: ........................................................................................ 49

RxWorks 4.3 Release Notes ___________________________
Page | 5
AUTOMATED MESSAGE MANAGER (AMM)
SMS DETAILS FOR MULTI-BRANCH PRACTICES
Automated Message Manager (AMM) now automatically merges clinic details into an SMS
(Text Message) template based on the clinic for which an appointment or reminder was
created. Merge details can also be based on the patient’s preferred clinic for a prescription.
Previously, Automated Messages only used the details of the main practice.
RxWorks 4.3 Release Notes ___________________________
Page | 6
AUTOMATED SOFTWARE UPDATES
CHOOSE WHEN TO RUN YOUR SOFTWARE UPDATES
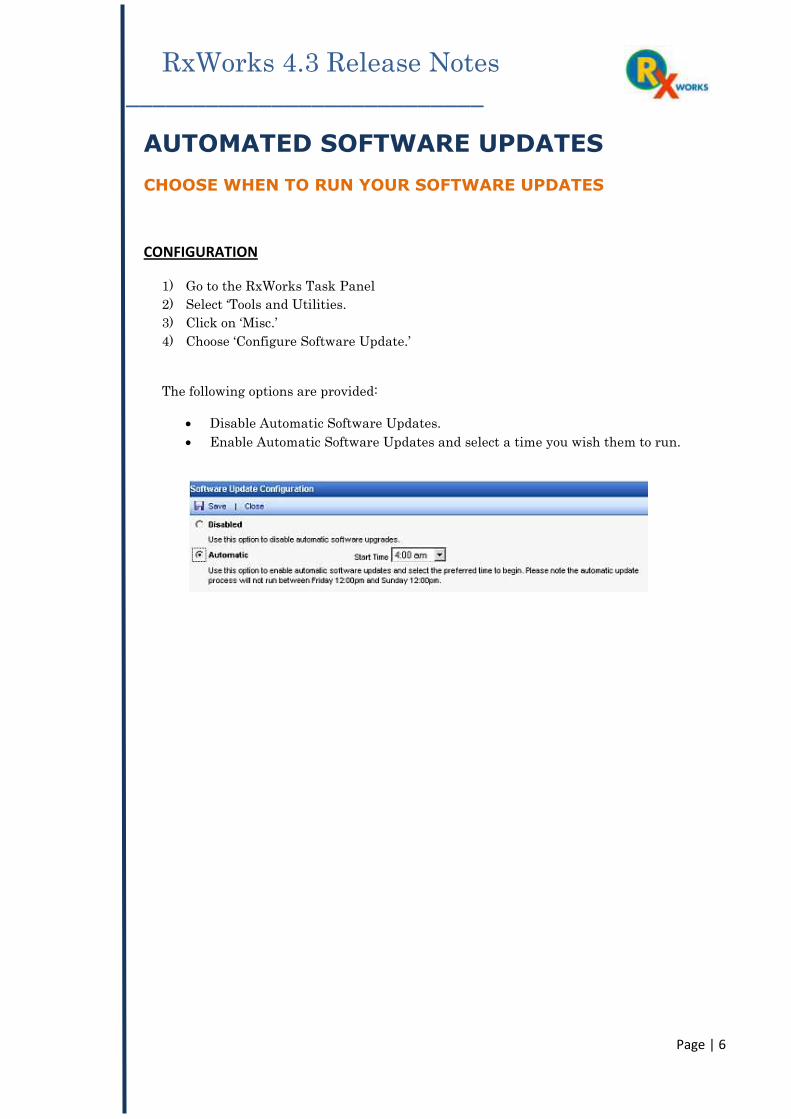
CONFIGURATION
1) Go to the RxWorks Task Panel
2) Select ‘Tools and Utilities.
3) Click on ‘Misc.’
4) Choose ‘Configure Software Update.’
The following options are provided:
Disable Automatic Software Updates.
Enable Automatic Software Updates and select a time you wish them to run.

RxWorks 4.3 Release Notes ___________________________
Page | 7
DOCUMENT EDITS AND MANAGEMENT
.DOCX SUPPORT
RxWorks now supports importing the Microsoft Word formats .docx and .docm, which are
used in Office 2007.
CLINIC ADDRESS MERGE FIELDS
The merge fields ‘LoggedInClinicAddress’ and
‘PreferredClinicAddress’ have been added as merge fields
available to Word Documents.
Using these, a practice can now personalize their
documents using address details either from the clinic
used in creating the documents, or based on a client’s
preferred clinic.
VITAL SIGN MERGE FIELDS
Each patient vital sign has been added as merge field that is available in Word. You can
now merge vital signs from a patient’s currently active visit into a document. If a Visit
Work Area for a patient is not open, the merge fields will be
empty.
Vital sign merge fields are:
Weight,
Temperature,
Heart Rate,
Dental Grade,
Blood Pressure,
Body Score,
Resp. Rate,
Pain Score,
CRT,
MM Colour.
These fields will also work from the Patient Work Area by using the last known value for
each vital sign.
RxWorks 4.3 Release Notes ___________________________
Page | 8
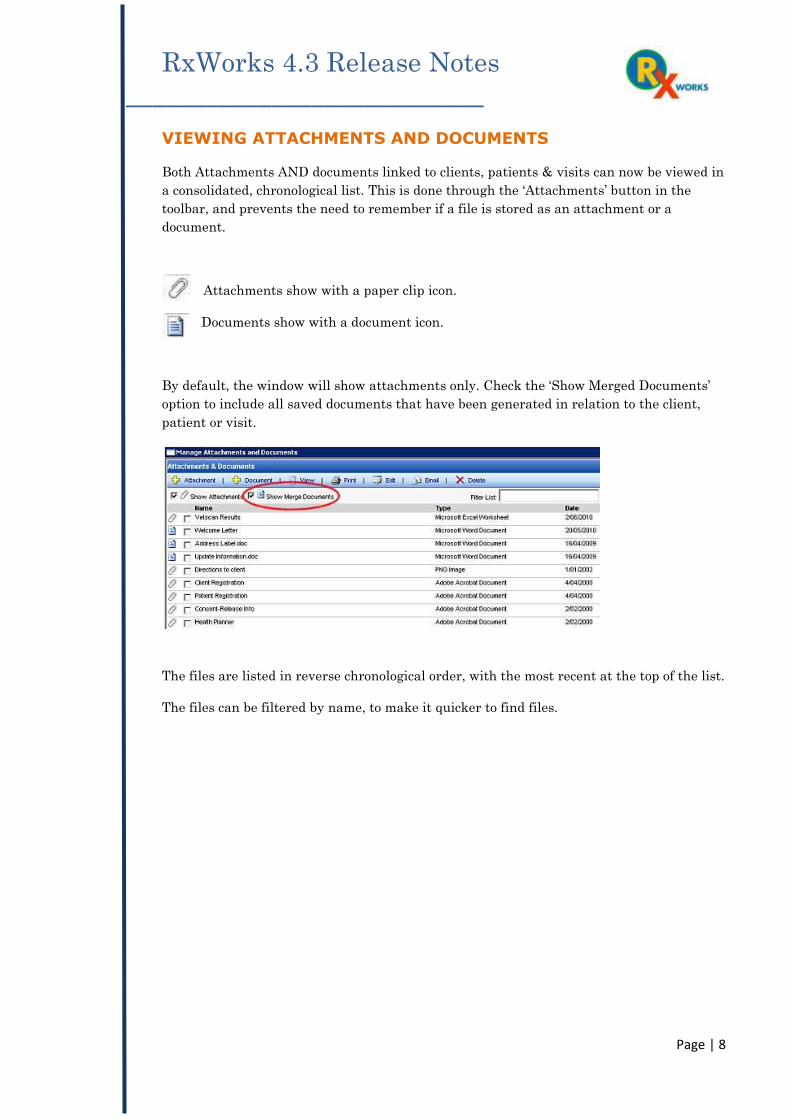
VIEWING ATTACHMENTS AND DOCUMENTS
Both Attachments AND documents linked to clients, patients & visits can now be viewed in
a consolidated, chronological list. This is done through the ‘Attachments’ button in the
toolbar, and prevents the need to remember if a file is stored as an attachment or a
document.
Attachments show with a paper clip icon.
Documents show with a document icon.
By default, the window will show attachments only. Check the ‘Show Merged Documents’
option to include all saved documents that have been generated in relation to the client,
patient or visit.
The files are listed in reverse chronological order, with the most recent at the top of the list.
The files can be filtered by name, to make it quicker to find files.

RxWorks 4.3 Release Notes ___________________________
Page | 9
Adding Attachments
To add an attachment, click the ‘Add Attachment’ button.
There is now the ability to create new attachments by copying an existing one already
linked to a patient. This is useful for pregnancy test excel spreadsheets, where a new file is
required each year.
Multiple files can be printed or emailed at once by selecting them and clicking the preferred
option in the toolbar.

RxWorks 4.3 Release Notes ___________________________
Page | 10
CLIENT COMMUNICATIONS
UPDATES TO THE CLIENT COMMUNICATIONS LOG
The Client Communications Log – found in the Client Work Area, now shows:
The user associated with the client communication in the top right corner, and
If the communication record in an SMS or email that failed to send, it will show a
caution icon indicating it failure to send.
EASIER EMAIL COMMUNICATIONS
Client communication through email has just been made easier. Any emails sent through
the Client, Patient and Visit Work Areas will be saved to the Client Communications log.
The Email button
If a client has one or more email
addresses configured, the EMAIL
button in the toolbar will be
highlighted.
Click on the email button to view
the ‘Send Email’ Window. Easily
send emails to the selected email
addresses.

RxWorks 4.3 Release Notes ___________________________
Page | 11
Selecting a FROM email address from the ‘Send Email’ Window
Choose to send emails from the clinic’s general email address or from the email address of
the currently logged in user.
Selecting a TO email address from the ‘Send Email’ Window
Any email address configured for a client will be displayed with check-boxes. This will
allow you to select one or more email addresses to send your communications to.
You can select ALL email address by clicking on ‘Select All’ under ‘To:’
Click on the check box for ‘Manual Entry’ to type in an alternate email address.
Send attachments and documents saved to a file
If there are attachments and/or documents linked to a client, patient or visit file, they will
be displayed in the ‘Send Email’ window. Select one or many files to send in an email by
checking the boxes next to them.
Alternately, click on ‘Select All’ under ‘Attachments.’
If there are lab results in a patient or visit work area, they can also be sent.

RxWorks 4.3 Release Notes ___________________________
Page | 12
Entering the email subject and body
Enter the email subject & body text.
You can fill out the email body text by selecting a
pre-defined template that uses merges fields.
Templates can be configured by selecting Configure >
Message Templates from the toolbar. (see heading
below)
Pre-defined email templates
A pre-defined email template can be added or edited through the ‘Send Email’ Window.
1. Click on ‘Configure’ from the ‘Send Email’
menu.
2. Select ‘Templates.’
To edit an existing template
1. Click on ‘Configure’ from the ‘Send Email’ menu.
2. Select ‘Templates.’
3. Select the template you with to edit.
RxWorks 4.3 Release Notes ___________________________
Page | 13
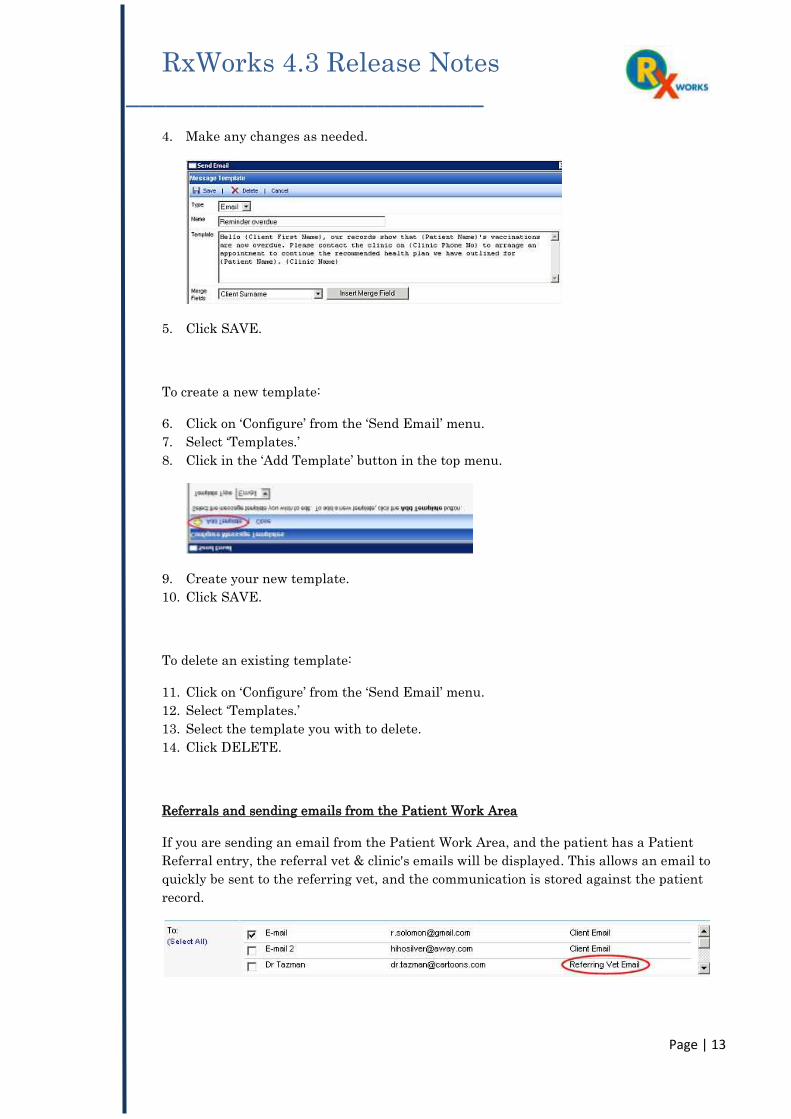
4. Make any changes as needed.
5. Click SAVE.
To create a new template:
6. Click on ‘Configure’ from the ‘Send Email’ menu.
7. Select ‘Templates.’
8. Click in the ‘Add Template’ button in the top menu.
9. Create your new template.
10. Click SAVE.
To delete an existing template:
11. Click on ‘Configure’ from the ‘Send Email’ menu.
12. Select ‘Templates.’
13. Select the template you with to delete.
14. Click DELETE.
Referrals and sending emails from the Patient Work Area
If you are sending an email from the Patient Work Area, and the patient has a Patient
Referral entry, the referral vet & clinic's emails will be displayed. This allows an email to
quickly be sent to the referring vet, and the communication is stored against the patient
record.

RxWorks 4.3 Release Notes ___________________________
Page | 14
SHOWING NEXT APPOINTMENT DETAILS
CHOOSE TO PRINT NEXT APPOINTMENT DETAILS
The option to print ‘Next Appointment Details’ on invoices is now available. This is offered
as a ‘per clinic’ setting, rather than a global one. The feature gives more flexibility in multi-
clinic setups.
ACCESSING THE ‘PRINT NEXT APPOINTMENT’ OPTION
You can access the ‘print next appointment’ option through:
Task Panel > Options and Setup > Finance > Invoice Receipt & Account Styles

RxWorks 4.3 Release Notes ___________________________
Page | 15
TAX
TRANSACTION TYPE TAX RATE
In the USA, cities and counties have their own sales tax rates as well as the state’s sales
tax rate. This varies from city to city and state to state and was difficult to deal with in
prior versions of RxWorks for some multi-site clinics.
In response to this, the Transaction Type tax rate in RxWorks is now set at a pricing clinic
level, rather than globally for all branch clinics.
To set up Transaction Types,
1. Go to TASK PANEL
2. Select ‘Options and Setup.’
3. Choose ‘Finance’ from the Options and Setup Window.
4. Click on ‘Transaction Type.’
Changes made to the Tax Rate field will apply to the clinic into which you are currently
logged.
DEFAULT SERVICE HEADING TAX RATE
The default tax rate for service headings can now be configured at an individual clinic level.
This provides more flexibility than having the tax rate set globally for all branch clinics.
To set this up,
1. Go to TASK PANEL
2. Select ‘Options and Setup.’
3. Choose ‘Item’ from the Options and Setup Window.
4. Click on ‘Service Headings.’
Changes made to the Tax Rate field will apply to the clinic into which you are currently
logged.

RxWorks 4.3 Release Notes ___________________________
Page | 16
STOCK ORDERS
LEGEND FOR SYMBOLS ON STOCK ORDERS
A legend is now found at the bottom of each Stock Order Page.
Reports > Orders > Create new Orders > Automatically Generate Orders.
Reports > Orders > Create new Orders > Create New Blank Order.
Reports > Orders > Create new Orders > Import Orders.
The legend explains the meaning of the colour for each exclamation mark used in stock
orders.
A Blue exclamation mark indicates a stock item is below ideal level.
A Red exclamation mark indicates a stock item is below critical level.
IDEAL LEVEL
The Ideal Level is the maximum quantity of an item that the practice wants to keep in
stock at any one time.
CRITICAL LEVEL
The Critical Level is the on-hand quantity in stock that will trigger a re-order.
Automated Stock Control will order items with an on-hand stock level equal to or
below the Critical Level. It orders sufficient packs to bring the item on-hand quantity
up to at least the Ideal Level.

RxWorks 4.3 Release Notes ___________________________
Page | 17
REMINDERS
CHANGES TO THE REMINDER WINDOW
The window that controls how reminder documents are generated for a reminder run has
been updated. This is to allow more flexibility, especially for emailing reminders. When
merging or reprinting reminders, you will now see the following screen.
All options & filters that were in prior versions are still available,
including filtering for a selected clinic.
REMINDER ITEM DETAILS
Reminders and recalls on the patient
screen will now list the name of the
product that generated the reminder.
This will only work if the reminder was generated as part of a visit or counter sale.

RxWorks 4.3 Release Notes ___________________________
Page | 18
IMPROVEMENTS TO REMINDER EMAILS AND SMTP SETTINGS
In prior versions of RxWorks, sending an email reminder required an email client (such as
Microsoft Outlook) to be installed, as well as the ‘Click Yes’ software.
This is no longer the case in RxWorks 4.3. All that is required is to define the outgoing mail
settings for the clinic’s internet connection.
To send reminders by Email, you will need to make sure your SMTP (Outgoing Mail
settings) is configured in RxWorks.
If you are running the Automated Message Manager module, you will have already have
SMTP configured. If not, you will be prompted when printing your reminders to configure
the Outgoing Mail settings, as shown below.
You only need to complete these settings once and they will be saved for future reminder
runs.
SETTING SMTP DETAILS WHEN GENERATING REMINDERS
When generating reminders, RxWorks will check for email reminders as the documents are
being created. If there are no outgoing mail server details configured, users will be notified.
1) Select the ‘Click Here’ link next to the email settings notice.
When a reminder email is sent, RxWorks will then add an entry of the reminder into
the Client Communication Log.

RxWorks 4.3 Release Notes ___________________________
Page | 19
2) In the window that opens, enter the SMTP settings for the clinic.
3) Test the settings by clicking on ‘Test Settings’ and enter your email address to
send a test email. If you receive the email, your settings are correct.
If you do not receive it, check the settings with your Internet Service Provider
and/or your current Email configuration.
4) Click ‘Save’ to save the SMTP settings and continue to generate your
reminders.
Once SMTP settings are configured, the Generate Reminder Documents screen will
display without the Email Settings warning.

RxWorks 4.3 Release Notes ___________________________
Page | 20
ACTIONING FAILED EMAILS
If you come across a problem when sending email reminders to clients, RxWorks will
preview the letter on the screen so alternatively, you can print them out and send them.
A new option in RxWorks 4.3 allows you to preview or print reminders that are normally
sent as emails. This is done from the Reminders Window, and is particularly useful if you
know that there is an issue with your email system.

RxWorks 4.3 Release Notes ___________________________
Page | 21
WORKING AROUND THE ‘ALL REMINDERS’ DOCUMENT
You can now set up individual reminders to be excluded from the ‘All Reminders’ letter.
Setting up individual reminders in this way will generate a letter that is separate from the
generic letter that groups all reminders for a patient.
This is useful for important reminders such as Rabies that need to be emphasized or
explained in greater detail.
EXAMPLE CASE
The Problem
Deputy the dog has four current reminders. They are:
Kennel Cough
Rabies
Dental / Oral
Flea Prevention
Because RxWorks is configured to group all reminders by patient, these reminders are all
grouped and listed together into the one 'All Reminders' document when creating a
reminder run.
The 'All Reminders' document is generic and does not elaborate the reminder for Rabies as
you hope it could.
The only way to elaborate the Rabies reminder would be to print it out separately. But this
takes time as you then need to find the patient file and print the document from there.
The Resolution
Set RxWorks up to recognize Rabies as an important reminder. As it is an important
reminder, it must always be printed separate to the 'All Reminders' document when
patients have more than one reminder.
Deputy will still receive his four reminders, but only the Kennel Cough, Dental / Oral and
Flea Prevention reminders are listed in the 'All Reminders' document. The Rabies reminder
is printed separately to emphasize it's importance.
RxWorks 4.3 Release Notes ___________________________
Page | 22
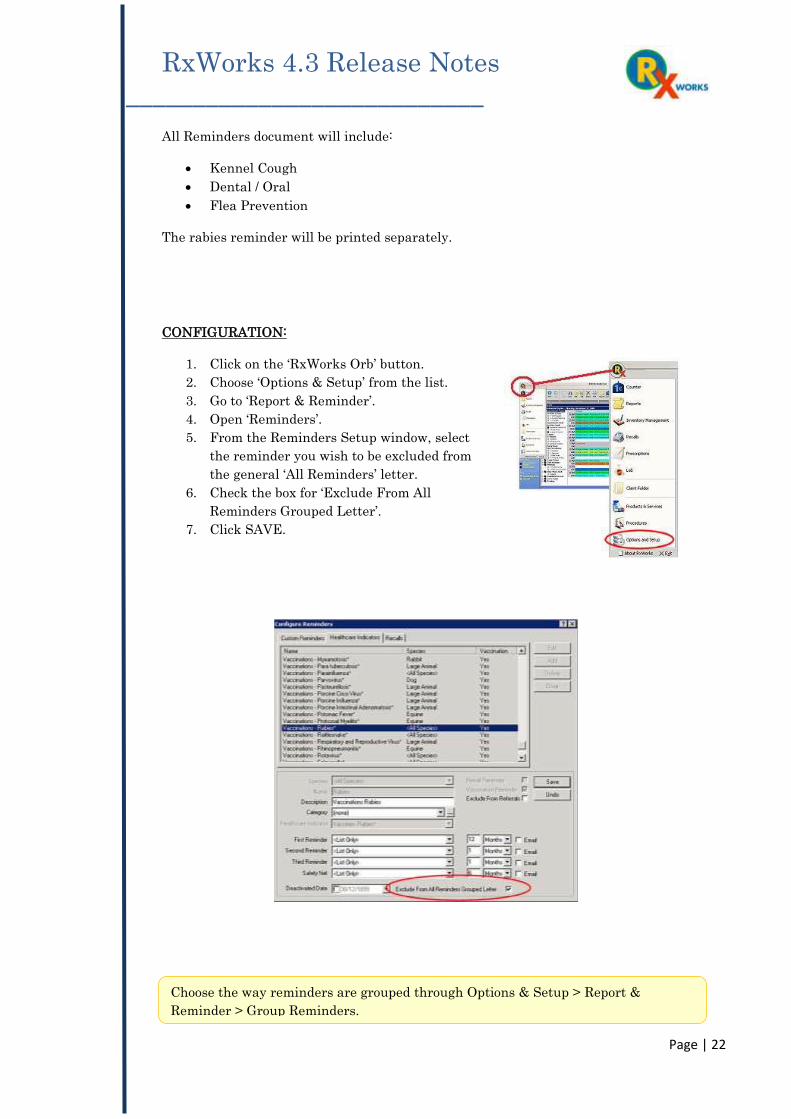
All Reminders document will include:
Kennel Cough
Dental / Oral
Flea Prevention
The rabies reminder will be printed separately.
CONFIGURATION:
1. Click on the ‘RxWorks Orb’ button.
2. Choose ‘Options & Setup’ from the list.
3. Go to ‘Report & Reminder’.
4. Open ‘Reminders’.
5. From the Reminders Setup window, select
the reminder you wish to be excluded from
the general ‘All Reminders’ letter.
6. Check the box for ‘Exclude From All
Reminders Grouped Letter’.
7. Click SAVE.
Choose the way reminders are grouped through Options & Setup > Report &
Reminder > Group Reminders.

RxWorks 4.3 Release Notes ___________________________
Page | 23
VIEW PATIENT REMINDER HISTORY
Since RxWorks Version 4.1, audits have been kept for
patient reminders, even if they had been deleted by a
user or overwritten by a newer reminder.
To see a history of any deleted reminders for a patient:
1. Go to the patient you wish to view deleted
reminders for.
2. Right click on any listed HealthCare Indicator,
Reminder, Custom Reminder or Recall.
3. Select 'View History' from the menu that appears.
Each audited entry will show:
The date the reminder was due.
Why the reminder was deleted or overwritten (Action).
If the reminder was sent as a 1st, 2nd, 3rd or 4th reminder before it was actioned.
The date created and if the reminder was created as part of a consult.
The consult number that generated the reminder (with a hyperlink to navigate to
it).
The item the reminder was generated by.
If the reminder is a historical reminder, it will also show the date it was deleted.
Select the history for a reminder type by using the drop down list next to ‘Reminder.’
This feature will only work for reminder history deleted since RxWorks V4.1.

RxWorks 4.3 Release Notes ___________________________
Page | 24
REPORTS
PATIENT DRUG CLASSIFICATION REPORT
The Patient Drug Classification report can now be reprinted for any of a
patient’s visits or for a specified date range.
To print a Patient Drug Classification report, click on the Print button
from the patient’s visit screen and choose ‘Patient Drug Classification’
from the drop-down list.
Selecting the ‘Current Visit’ option will print a report for the visit you
are currently viewing. The option to print a Drug Classification report
when finalizing a visit is still available.
To print the report for a specified date range, choose the start and end date from the
appropriate date fields.

RxWorks 4.3 Release Notes ___________________________
Page | 25
ANALYSE ALL FEES (BY CROSS TAB) – PERFORMANE PACK ONLY
A new option called ‘Procedure Service’ has been added to the crosstab restrictions for the
‘E3 - Analyse All Fees (by cross tab)’ report. This addition is available for Performance Pack
users only, to help when reporting income sales at a Service Heading level.
The option will group at the Procedure’s service heading for Performance Pack fees, and the
Item’s service heading for any Inventory items that are embedded inside the procedure - for
example medications and consumables.
This will also help where a procedure had a fixed price with a negative variance but the
variance component fee was in a different service heading to the Procedure that it was
embedded in. This will be particularly noticeable for your Vaccinations & Desexing
procedures.
EXAMPLE
The Vaccination Procedure ‘Vaccs C3 (1yr) + Exam’, under the ‘Vaccinations & Health
Check’ service heading, with fixed price has the components as shown in the image to the
right.
The Variance fee that adjusts the procedure to its fixed price is in the Vaccinations service
heading. The inventory item is in the Vaccines service heading.

RxWorks 4.3 Release Notes ___________________________
Page | 26
Using the traditional ‘Service Heading’ option on the
cross tab report would show as per the image to the
left.
Using the new ‘Procedure Service’ option, the report
shows:
The inventory item (Vaccines) is separated into its
own Service Heading, but the remaining
components are grouped into the Procedure’s
Service Heading (Vaccination & Health Check.
As you can see the VAR-Vaccinations
shows up as a negative value in the
Vaccinations service heading.

RxWorks 4.3 Release Notes ___________________________
Page | 27
RESTRICTING C4 REPORTS TO CLIENT RECORDS
In prior versions of RxWorks, to restricting a ‘Product & Services Sales Analysis by Client’
report to a single client record would first involve navigating to the report (Reports > C4).
Users would then need to enter the appropriate client number as a restriction.
Report Now Runs from the Client Work Area
To make this process easier, users can now run the report
from the toolbar of any Client Work Area.
By selecting the report option from the Print Menu it will
automatically fill out the currently active client number as
the restriction.
Restricting to Client records from the Reports Work Area
The ‘Product & Services Sales Analysis by
Client’ report now includes a button next to
the ‘Restrict to Client’ option. This allows
users to select the currently active client
record as a restriction.
1. Go to the RxWorks Task Panel.
2. Select REPORTS.
3. Choose ‘C: Price Lists & Inventory Control.’
4. Select ‘’Products & Services Sales Analysis by Client.’
5. Click the ‘Currently Active Client’ icon to choose the currently active record as the
restriction for the report.
Restricting the Report to an Item
We’ve improved the ‘Restrict to Item’
option by replacing the old drop-down
list with a button to select an item
using the Advanced Search feature.
Previously, the drop-down list contained all the items in the system.

RxWorks 4.3 Release Notes ___________________________
Page | 28
PRICE LIST REPORTS
Reports > C: Price Lists & Inventory > 1. Price Lists’ (C1 Report).
These reports in now have the option to restrict to ‘Items Only’, ‘Procedures Only’ or both
‘Items & Procedures’.

RxWorks 4.3 Release Notes ___________________________
Page | 29
PRINTING PROCEDURE LABELS
OPTION TO DISABLE PROCEDURE LABELS
Choose to print labels when charging procedures from the visit screen or not to.
This option can be toggled on and off from the Tools and Utilities section of RxWorks.
RxWorks will print labels for any fee grouped into a procedure that is configured to print a
label.
ACCESSING THE PRINT LABELS OPTION
You can access the print labels utility through:
Task Panel > Tools and Utilities > Miscellaneous> ‘System – Disable printing labels
when charging procedures.’

RxWorks 4.3 Release Notes ___________________________
Page | 30
LISTING CLIENTS
LIST CLIENTS FOR ALL CLINICS
The client list has been updated to improve performance and help users find the clients
more easily.
When selecting the ‘List’ button from the toolbar when the client Work Area is active, users
are prompted to enter the first few letters of the surname. The list will then populate with
the matching results.
Feedback from our users running RxWorks V4.2, and who are in a multi-branch setup
suggested they would prefer the ‘Client List’ to include clients from all branches, not just
from the clinic in which they are logged into RxWorks.
We have taken this suggestion onboard and the ‘Client List’ now automatically includes
clients for all branch clinics, but indicates the clients’ Preferred Clinic in a new column to
help quickly find the correct client.
Clicking on the column heading will re-sort the list by that column.

RxWorks 4.3 Release Notes ___________________________
Page | 31
TOOLBAR RIBBON
FUTURE APPOINTMENTS (BUTTON)
The ‘Future Appointments’ button is highlighted orange when there
is an appointment scheduled for the current patient or client record.
This button icon is displayed on both the Client and Patient Toolbar
Ribbons.
OPEN CLIENT WORK AREA (BUTTON)
Each of the Client, Patient, Visit and Financial Work Areas now
shows an ‘Open New Workspace’ button. RxWorks allows 8
workspaces to be open at any one time, allowing a user to be
working with multiple records at the same time. This button
icon is displayed on the Client, Patient, Visit and Financial
Toolbar Ribbons.
EMAIL (BUTTON)
The client ‘Email’ button shows orange if the currently active client record has an
email address listed under their contact details.
ADD PROCEDURE FOR CURRENT CONSULT (BUTTON)
RxWorks allows you to add a new procedure template
based on the currently active visit details. Add the
new procedure by selecting the ‘Add Procedure from
Visit’ under TOOLS. This option has been moved from
the Procedures configuration menu to remove the
extra step needed in prior versions of RxWorks.

RxWorks 4.3 Release Notes ___________________________
Page | 32
HEALTHCARE MANAGER
‘DEFER ALL’ REMOVED (BUTTON)
The ‘Defer All’ option has been removed from the HealthCare Manager page.
BASED ON FEEDBACK
Feedback from our users has identified that it was too easy for inexperienced medical staff
to 'defer all' of a patient’s indicators, without reviewing them individually with the client.
It also meant that all the overdue indicators for a patient would be set to the same due
date, regardless of whether they were for a vaccination, parasiticide prevention or
healthcheck etc.
Since HealthCare Indicators now directly drive your reminder system, clients could have
received an unintended reminder letter using the deferred date.
HOW TO QUICKLY SKIP INDICATORS
If you need to quickly skip indicators without review, use the 'Skip All' option.
This will then be clearly reflected in the patient’s history. The due dates for the indicators
will remain unchanged and preserve the integrity of your Standards of Care.
PROCEDURE MANAGEMENT
SEPARATE WORKSPACE FOR PROCEDURE MANAGEMENT
Procedures can still be accessed through the ‘RxWorks Orb’ button
and the ‘Home’ section of the toolbar. However, Procedure
Management itself now lives in a separate workspace (as shown).
This removes the need to re-enter search criteria after navigating to
a procedure.

RxWorks 4.3 Release Notes ___________________________
Page | 33
BACKUP MANAGEMENT
ENHANCEMENTS TO THE BACKUP MANAGER WINDOW
The release of RxWorks V4.3 has seen an enhancement to the Backup Manager window.
This allows for a quick review on the status of your backups.
Accessing the backup manager window
You can access the backup manager window through:
Task Panel > Tools and Utilities > Backups.
The ‘Last Successful Backup Dates’ Area
Full backups should run once every day.
Log backups should run once every hour.
Maintenance should be run once every week.
RxWorks recommends you check your backup status daily so issues can be quickly
resolved.

RxWorks 4.3 Release Notes ___________________________
Page | 34
If you have an RxWorks server,
it will also show the date of the
last server backup. This should
run once every night.
When the backups are up to
date and have completed
without error, a green icon will
be displayed.
If a backup is overdue or
there was an error, a cross
icon will be displayed next
to the backup type, and the
last successful date will
appear in red.
The last known error will show underneath the backup type that failed.
The ‘Logs and Folders’ Area
The ‘Logs and Folders’ area provides shortcuts
that open:
The RxWorks backup log text file.
The Full backup folder.
The Log backup folder.
If running an RxWorks server, you will also see a link to the Server Backup log (text file).
The ‘Tasks’ Area
The ‘Tasks’ area gives you the ability to further
manage your backups.
You can:
Manually run a full backup.
Manually run a log backup.
Run Database Maintenance.
RxWorks 4.3 Release Notes ___________________________
Page | 35
The first two options are convenient if you want to ensure you have a current backup before
running a mass update of prices, or if a backup has failed and you wish to run a Manual
Full Backup (or Manual Log Backup).
The SQL Server Maintenance will run a log backup and attempt to shrink your database
size by clearing unused space.
These features will use the paths configured for your backup files.
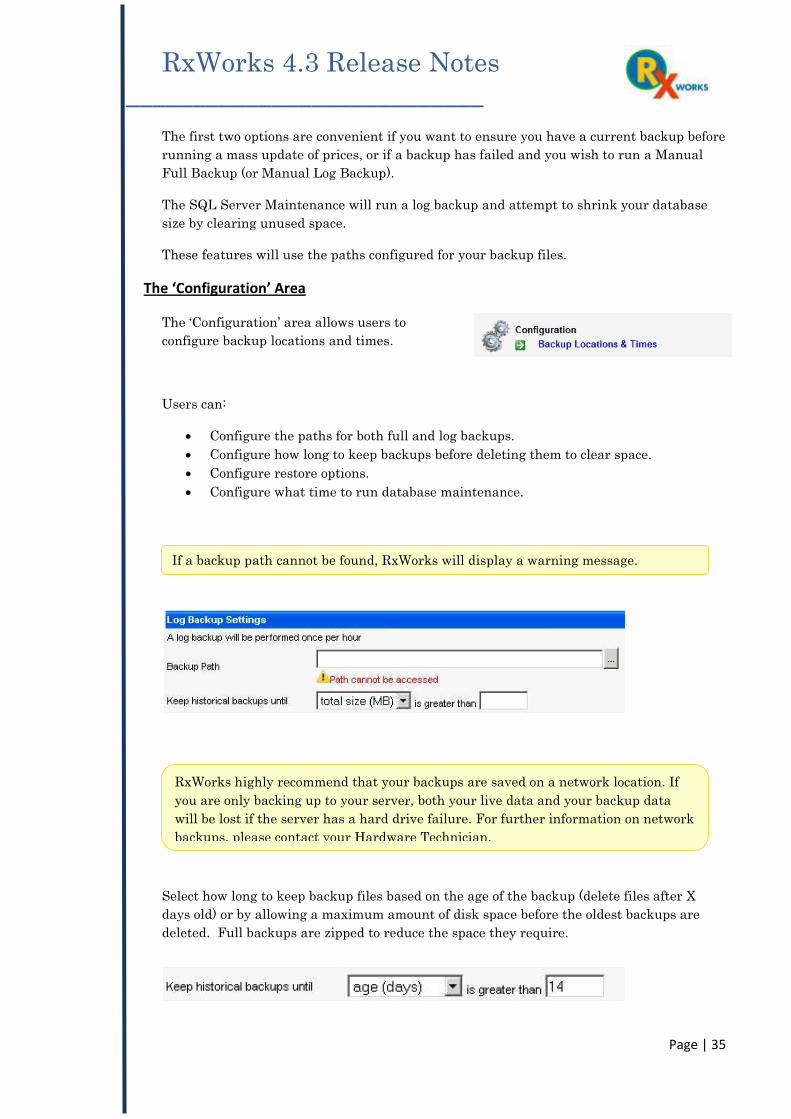
The ‘Configuration’ Area
The ‘Configuration’ area allows users to
configure backup locations and times.
Users can:
Configure the paths for both full and log backups.
Configure how long to keep backups before deleting them to clear space.
Configure restore options.
Configure what time to run database maintenance.
Select how long to keep backup files based on the age of the backup (delete files after X
days old) or by allowing a maximum amount of disk space before the oldest backups are
deleted. Full backups are zipped to reduce the space they require.
If a backup path cannot be found, RxWorks will display a warning message.
RxWorks highly recommend that your backups are saved on a network location. If
you are only backing up to your server, both your live data and your backup data
will be lost if the server has a hard drive failure. For further information on network
backups, please contact your Hardware Technician.

RxWorks 4.3 Release Notes ___________________________
Page | 36
Setting a time for the database maintenance will stop the full backup & maintenance tasks
from trying to run automatically during the day. This causes the performance of RxWorks
to become very slow.
Restoring a database as part of the backup process will check the integrity of the backup
file.
To enable this option:
1. Open the Backup Locations & Times window.
2. Tick the box for 'RxWorks Server?' under ‘Restore Full Backup Settings.’
The backup will be restored with the database name of ‘RxRestore’.
If you have an RxWorks 2003 Server with a Backup Workstation, you can select to restore
to that location by selecting the option for ‘Backup Workstation Emergency Copy?’
After running a full backup, RxWorks has the ability to restore the backup to a 2nd
database on your server. This is one of the best ways to test the integrity & validity
of the backup that has just been created.
You will need to type in the Backup Workstation SQL Instance. If you do not know
this, please contact the RxWorks Support Team for assistance.

RxWorks 4.3 Release Notes ___________________________
Page | 37
COLORED SUMMARY BAR UPDATES
VISIT LIST, RECALL LIST AND HEALTHCARE SUMMARY BARS
The Visit List, Recall List and HealthCare Prompt windows now include new Summary
Bars that are more consistent with the client & patient work areas.
As with other areas of RxWorks, the summary bars will show:
Blue for male animals
Pink for female
Grey for deactivated/deceased animals.
INCOMPLETE VISITS & DEACTIVATED / DECEASED PATIENTS
The summary bar will show any incomplete visits for deactivated or deceased patients.
RxWorks 4.3 Release Notes ___________________________
Page | 38
THE VISIT WORK AREA
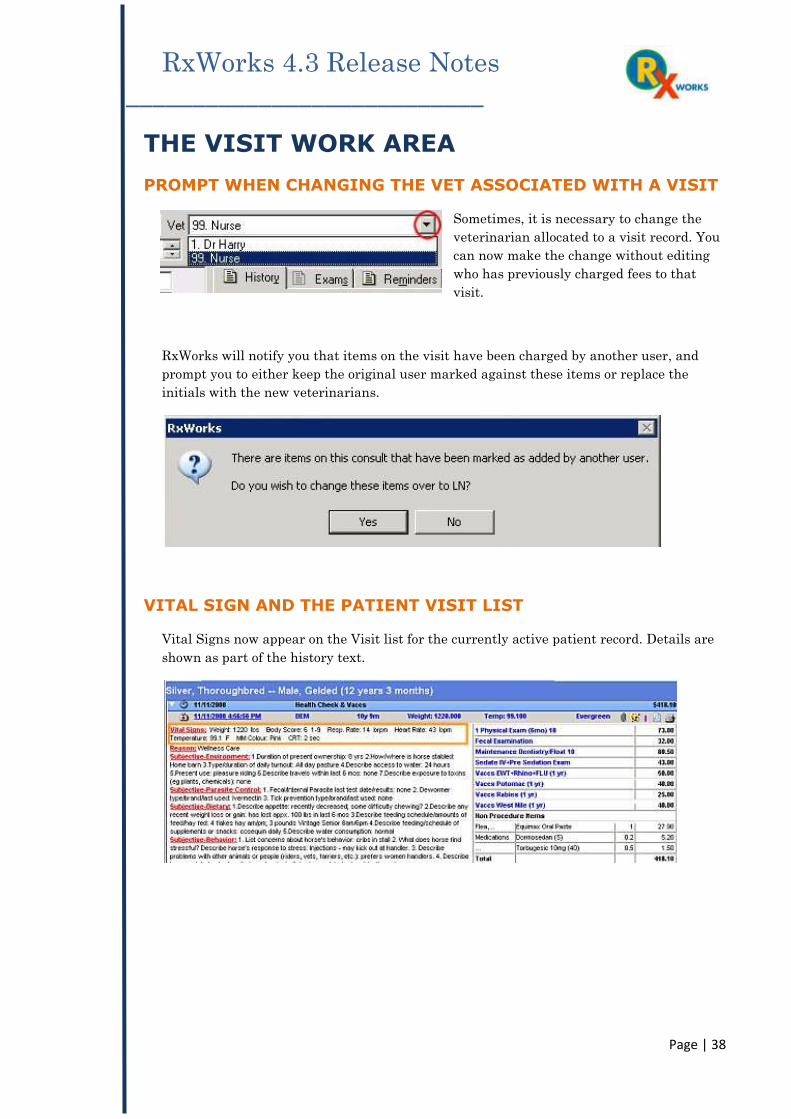
PROMPT WHEN CHANGING THE VET ASSOCIATED WITH A VISIT
Sometimes, it is necessary to change the
veterinarian allocated to a visit record. You
can now make the change without editing
who has previously charged fees to that
visit.
RxWorks will notify you that items on the visit have been charged by another user, and
prompt you to either keep the original user marked against these items or replace the
initials with the new veterinarians.
VITAL SIGN AND THE PATIENT VISIT LIST
Vital Signs now appear on the Visit list for the currently active patient record. Details are
shown as part of the history text.

RxWorks 4.3 Release Notes ___________________________
Page | 39
COUNTER SALES
CLINIC SPECIFIC COUNTER SALES
In prior versions of RxWorks, Cash Counter Sales were recorded against one global ‘Cash
Counter Sale Client’. For multi-branch practices, this did not allow for cash receipts to be
effectively monitored for each branch. To resolve this, RxWorks now allows for different
‘Cash Counter Sale Clients’ to be specified for individual clinics.
CONFIGURATION
To configure separate Cash Counter Sale clients:
1. Open the 'RxWorks Orb' button.
2. Select 'Options & Setup'.
3. Choose 'Counter Sale' from the options and setup window.
4. Click on 'Client Number for Counter Sales'.
5. Set the Cash Counter Sale Client number you wish to apply for the clinic you are
currently logged in to.
6. Click SAVE.
RxWorks strongly recommend attaching sales to patients instead of using the Cash
Counter Sales function. Because some item sales generate action on reminders and
HealthCare Indicators, if a staff member sells and item through Cash Counter Sales
they are increasing the chance of a patient's Reminders and HealthCare Indicators
being inacurate.

RxWorks 4.3 Release Notes ___________________________
Page | 40
PAYMENTS
WARNINGS FOR VISIT DETAILS STILL BEING EDITED
When taking a payment, users are already warned about any incomplete visits that may
exist for the client.
In RxWorks Version 4.3, users
will now also be warned about
any visits that are still being
edited for the client.
A vet may have finalized a visit
and sent it to the 'Waiting to
Pay' clipboard ready for the
client to pay at the counter. If
the vet then remembers an
extra charge and begins to re-
edit the invoice in the consulting
room, RxWorks will notify the
receptionist when they click
‘Add Payment’ that the invoice total may not yet be confirmed.
In previous versions of RxWorks, a vet would need to go out to reception and advise of the
invoice edits needed. If this was not done, the clinic risked the extra charges being missed
when taking the payment from the client.
To proceed with a payment, click 'Continue'.
The notification screen does not 'block' a payment from continuing, but it does allow
receptionists to make a decision on why they may need to wait.
RxWorks will only show this message if the charges in a visit are being edited. The
message will not display if any other area of the visit record, such as the history
notes, are being worked on.

RxWorks 4.3 Release Notes ___________________________
Page | 41
OPEN INVOICING (RECEIPT TO ACCOUNT) SYSTEMS - PAYMENT
WORKFLOW CHANGES
Payments can now be taken when no invoices exist. This will allow for a client to be put
into credit. This functionality is not available in Netherlands.
In the payment allocation screen, $0 invoices are now not automatically selected to be
included as part of an account.
An invoice can now be allocated to without first having to allocate any outstanding
accounts.

RxWorks 4.3 Release Notes ___________________________
Page | 42
PRESCRIPTIONS (SCRIPTS)
CANCELLING PRESCRIPTIONS
You may have a prescription for a patient, however for many reasons it may need to be
cancelled. It is good medical record practice (and a legal requirement in some countries) to
keep the prescription record instead of deleting it from the patients’ record.
For this reason RxWorks has introduced the ‘Cancel Prescription’ function which sets the
prescription expiry date to the current day and keeps the prescription entry in the patient
medical files.
TO CANCEL A PATIENTS PRESCRIPTION
1) Click the ‘Scripts’ button from the Patient Work Area. This will open the
‘Prescriptions’ Work Area.
2) Select the script you wish to cancel for the patient.
3) Click ‘Cancel Prescription’.
4) RxWorks will prompt you to add a reason for the prescription cancellation.
This detail will be marked against the prescription record.
RxWorks 4.3 Release Notes ___________________________
Page | 43
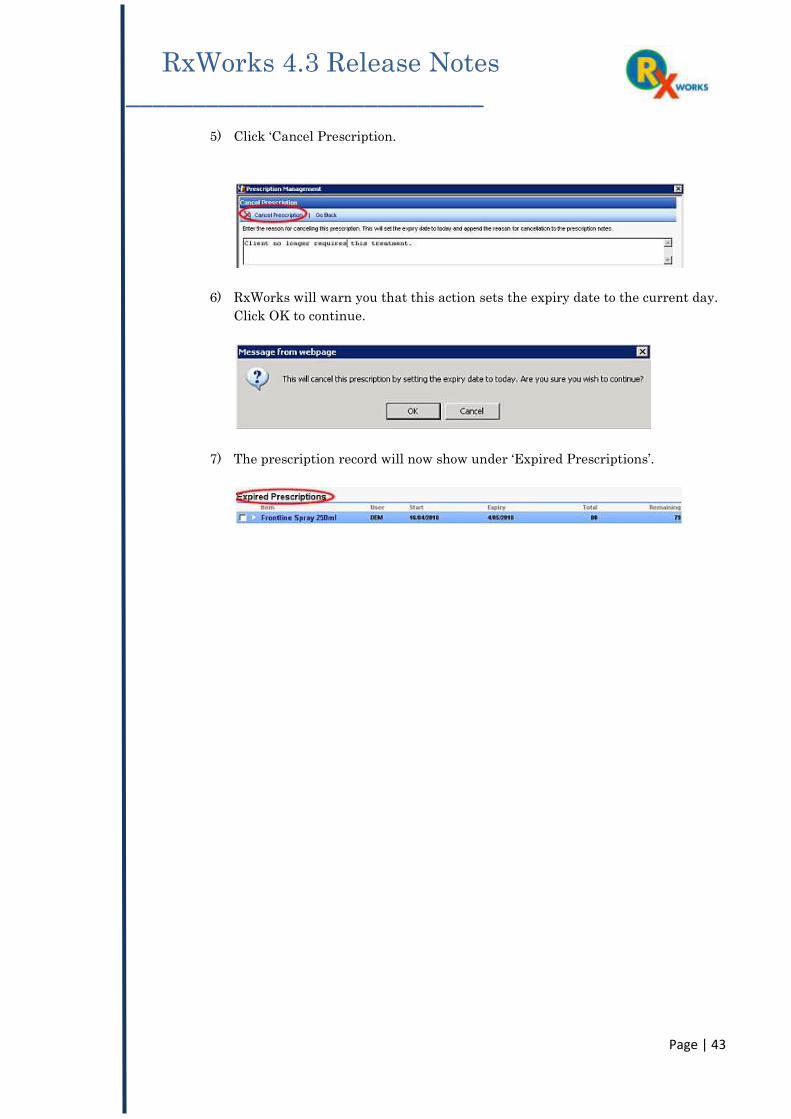
5) Click ‘Cancel Prescription.
6) RxWorks will warn you that this action sets the expiry date to the current day.
Click OK to continue.
7) The prescription record will now show under ‘Expired Prescriptions’.

RxWorks 4.3 Release Notes ___________________________
Page | 44
PATIENT BREEDS
INVALID PATIENT BREEDS CLEANUP UTILITY
There is now a utility in RxWorks that allows users to systematically work through their
invalid patient breed names. This means that breed names in data converted from legacy
systems can be mapped to a central list containing thousands of standardized and
validated breed names.
ACCESSING THE BREEDS CLEANUP UTILITY
You can access the ‘Invalid Patient Breed Cleanup’ utility through:
Task Panel > Tools and Utilities > Patient > Update Invalid Breed Data.
USING THE BREEDS CLEANUP UTILITY
1) Select the clinic for which you wish to filter invalid breeds.
2) Select the Species for which you wish to filter invalid breeds.
3) Select the invalid breed you wish to map.

RxWorks 4.3 Release Notes ___________________________
Page | 45
4) Select the species for which you wish to map the invalid breed.
5) Search for an existing (valid) breed name to which the invalid breed name
should be mapped. You can enter full breed names or part names. The search
results will show below the search box as you type.
6) Select a valid breed name to map to. .
REQUESTING NEW BREEDS IN CENTRALLY ALIGNED SYSTEMS
If you cannot find a breed to map to, you can request that the name to be added to the
RxWorks Central Database by clicking on ‘Request New Breed’.

RxWorks 4.3 Release Notes ___________________________
Page | 46
ADVANCED BREED PROMPTING
In addition to the patient breed cleanup utility, there is also the Advanced Breed Searching
feature.
After a conversion to Central Data Alignment there may be a patient who is not marked as
a breed that matches the predefined list supplied under Options and Setup. For example, a
patient’s breed may say ‘Lab’, when the correct name would be ‘Labrador.’ When you
navigate to the patient you will be prompted to search for the correct breed and update the
patient record.
RxWorks 4.3 Release Notes ___________________________
Page | 47
GROUP POLICIES
INTRODUCING THE GROUP POLICY MANAGER
Policies are similar to Windows policies and either deny or allow a particular action or
workflow in RxWorks based on a set of criteria. They are more flexible than the traditional
workflow settings in RxWorks, such as the checkboxes against a User to control a
particular action under options and setup.
RxWorks expect to have many useful policies added in future releases of our program.
Accessing the Policies Options:
You can access the ‘policies’ option through:
Task Panel > Tools and Utilities > Policies.
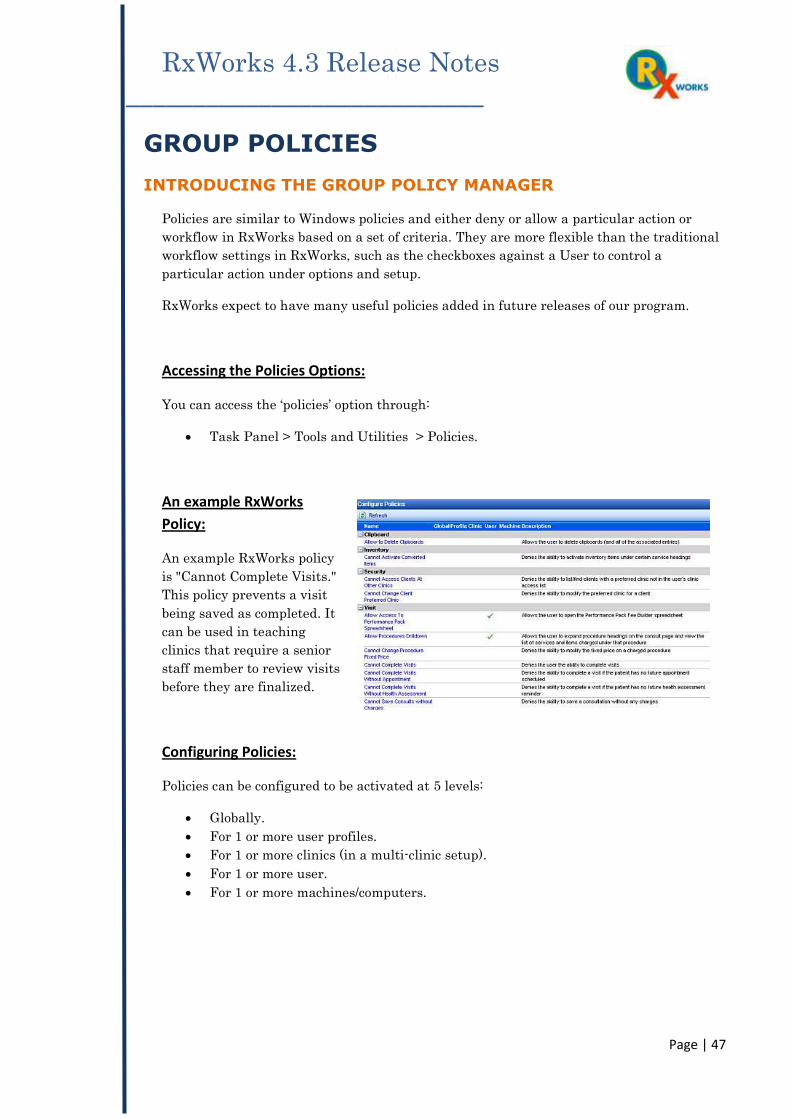
An example RxWorks
Policy:
An example RxWorks policy
is "Cannot Complete Visits."
This policy prevents a visit
being saved as completed. It
can be used in teaching
clinics that require a senior
staff member to review visits
before they are finalized.
Configuring Policies:
Policies can be configured to be activated at 5 levels:
Globally.
For 1 or more user profiles.
For 1 or more clinics (in a multi-clinic setup).
For 1 or more user.
For 1 or more machines/computers.

RxWorks 4.3 Release Notes ___________________________
Page | 48
Policies can also be set up using a combination of the above. For example, you can set up a
policy for several users, or any user that is logged onto a particular machine/computer.
To configure a policy:
1. Select the policy you wish to implement. For example, ‘Allow to Delete Clipboards.’
2. If the policy is to be global, check the box for this option. Otherwise leave it blank.
3. Alternatively, apply the policy to a profile, clinic, user and/or machine by selecting your
choice from the drop down menu associated with that option and clicking on ‘Add
Profile,’ ‘Add Clinic,’ ‘Add User’ or ‘Add Machine.’
The option you have chosen to add will be shown under the related policy level.
Continue in this way until all the options you wish to apply have been configured.

RxWorks 4.3 Release Notes ___________________________
Page | 49
4. Click SAVE.
In the main RxWorks Policies Window, the levels in which this policy has been applied
will be reflected under the associated headings by a green tick.
Editing Policy Rules:
To edit the rules for a policy:
1. Click on the policy name from the main policy window.
2. Add the required options, or delete them by clicking on the red cross.
Policies can only be configured when logged in as a system administrator.
Policies do not apply to system administrators. System Administrators are ALWAYS
‘allowed’ and NEVER ‘denied’ based on the policy settings.