Running gear - VolksPage · Running gear The following features will be explained to you ... The...
25
40 SSP 200/047 Running gear The following features will be explained to you on the next pages: The running gear, which comprises a suspen- sion strut axle, double wishbones and a tor- sion beam rear axle, is based on the same principle as the predecessor model. - The steering - The front axle - The torsion beam rear axle - The braking system - The front and rear brakes - The ULW tyres - The light-alloy wheel. The interaction of the running gear components, for example, the newly designed front and rear axles with large wheels and power steering, results in a comfortable ride. All the wheel hubs have a five-hole pattern for securing the wheels.
-
Upload
trinhthuan -
Category
Documents
-
view
214 -
download
0
Transcript of Running gear - VolksPage · Running gear The following features will be explained to you ... The...

40
SSP 200/047
Running gear
The following features will be explained to you on the next pages:
The running gear, which comprises a suspen-sion strut axle, double wishbones and a tor-sion beam rear axle, is based on the same principle as the predecessor model.
- The steering- The front axle- The torsion beam rear axle- The braking system- The front and rear brakes- The ULW tyres - The light-alloy wheel.
The interaction of the running gear components, for example, the newly designed front and rear axles with large wheels and power steering, results in a comfortable ride.All the wheel hubs have a five-hole pattern for securing the wheels.

41
SSP 200/044
SSP 200/33 a,c-e
The steering column can be adjusted manually by 50 mm fore and aft.
The upper end of the steering column is attached to the central tube by two 8 mm hexagon bolts. Shear pins are no longer needed. The lower end is attached to the steering gear by a universal joint.
The deformation distance of the steering system during a crash is 250 mm. The steering column angle is 24°. The direction in which the airbag inflates is therefore better matched to the driver’s position.
The mechanical anti-theft device on the steering assemblyprevents the striker pin from shearing off at the steering wheel lock.
The steering Power steering is fitted as standard. The steeringassembly is rigidly attached to the subframe and locked in place to prevent the steering gear from slipping on the subframe. Both track rods are adjustable.
Reach adjustment
The steering column can be adjusted by 44mm in height.
Rake adjustment
The steering column attachments
The crash concept
Steering system anti-theft device
50 mm
44 m
m

42
SSP 200/042
SSP 200/036 a-c
Running gear
The standard power steering permits a larger caster.This improves directional stability.
The self-locking effect is eliminated by modifying the conical shape of the track rod end. To slacken the nut, use a hexagon socket wrench to counter-hold the track rod end.
The suspension strut is mounted in the wheel bearing housing and clamped with a bolt. A special tool is required to remove the suspension strut (Spreader 3424)
The front axle This is based on the proven principle of the sus-pension strut axle with double wishbones. It has been optimised and adapted to the new Golf.
The single bolt clamp
The caster
The track rod end

43
SSP 200/037 a-c
SSP 200/043
25°The large-size rear axle mountings are positioned at an angle of 25° to the transverse axis of the vehicle. This reduces the self-steering effect of the rear axle.
The double ball bearings of the rear axle require no adjustment. The axial play is determined by the tightening torque of the axle nut.
The shock absorbers and springs are located separately, giving a through-loading width of over one metre. There is less tyre noise in the interior because the dampers are secured by bolts in the wheel housing.
It is a torsion beam axle with anti-roll bar.The rear axle
Separate spring and shock absorber mountings
Rear axle mountings
Wheel bearings

44
SSP 200/029
prevents the wheels from locking when braking. This means that the driver can retain vehicle maneouvrability even in extreme situations.
Running gear
The braking system
The new Golf has disc brakes at the front and rear; the front disc brakes are ventilated.
allocates brake pressure to the front and rear wheels by means of solenoid valves in the ABS unit. The operating range of the EBPD ends at the ABS cut-in point.
is an automatic starting control system. The EDL automatically brakes wheels which spin when setting off on slippery surfaces. The dif-ferential transfers the input torque to the wheel which is gripping the road. The EDL is effective up to 80kph.
prevents the driven wheels from lock up on slip-pery surfaces when the driver lifts his foot off the accelerator pedal quickly. The ABS sensor recognises when the driven wheels are on the verge of locking up. The ABS control unit then sends a command to the engine control unit over the CAN databus. The engine control unit increases engine speed momentarily to enable the wheels to rotate freely again. This retains vehicle maneouvrability.The EBC operates across the entire engine speed range. EBC is only available on the 66kW TDI and the 81kW TDI models.
Electrical wires
Hydraulic pipes
The new Golf is equipped with the Mark 20 IE anti-lock braking system and electronic brake pressure distribution (EBPD) as standard. It has a diagonally-split dual-circuit design.
The anti-lock braking system
Electronic brake pressure distribution
TTTThhhheeee eeeelllleeeeccccttttrrrroooonnnniiiicccc ddddiiiiffffffffeeeerrrreeeennnnttttiiiiaaaallll lllloooocccckkkk
The engine braking control

45
WOB VK-12
55 KW
50 KW-SDI
74 KW
110 KW
66 KW-TDI
81 KW- TDI
92 KW
SSP 200/025
ø 256 x 22 mm
SSP 200/026
ø 280 x 22 mm
SSP 200/027
ø 288 x 25 mm
SSP 200/028
WOB VK-12
ø 232 x 9 mm
Front brake Rear brake
Brake servo: left-hand drive vehicles (ø 10“ )
Since there is less space in right-hand drive vehi-cles, a tandem brake servo (ø 7“/ 8“) is used.

46
SSP 200/030
SSP 200/032
SSP 200/031
Running gear
Brake hoses and brake pipes
are made of precision-bent steel pipes. They are protected against corrosion by several coatings.
link up the moving parts of the braking system. The brake fluid absorbs the bulk of the water through these hoses. Brake hoses are made of four layers. The innermost layer is now made of a special synthetic material which reduces water absorption.
Special synthetic material
Oil and petroleum resistant plastic
Viscose fibres
Polyamide
Chromate
Aluminium
Nickel
Cu-plated steel
All exterior bolts in the braking system are dac-rometised. This coating, which contains zinc-aluminium powder, protects the bolts against corrosion.
The brake hoses
The brake pipes
Dacrometised bolts
You can find further information in Self-Study Programme No. 160.
47
SSP 200/080
SSP 200/105
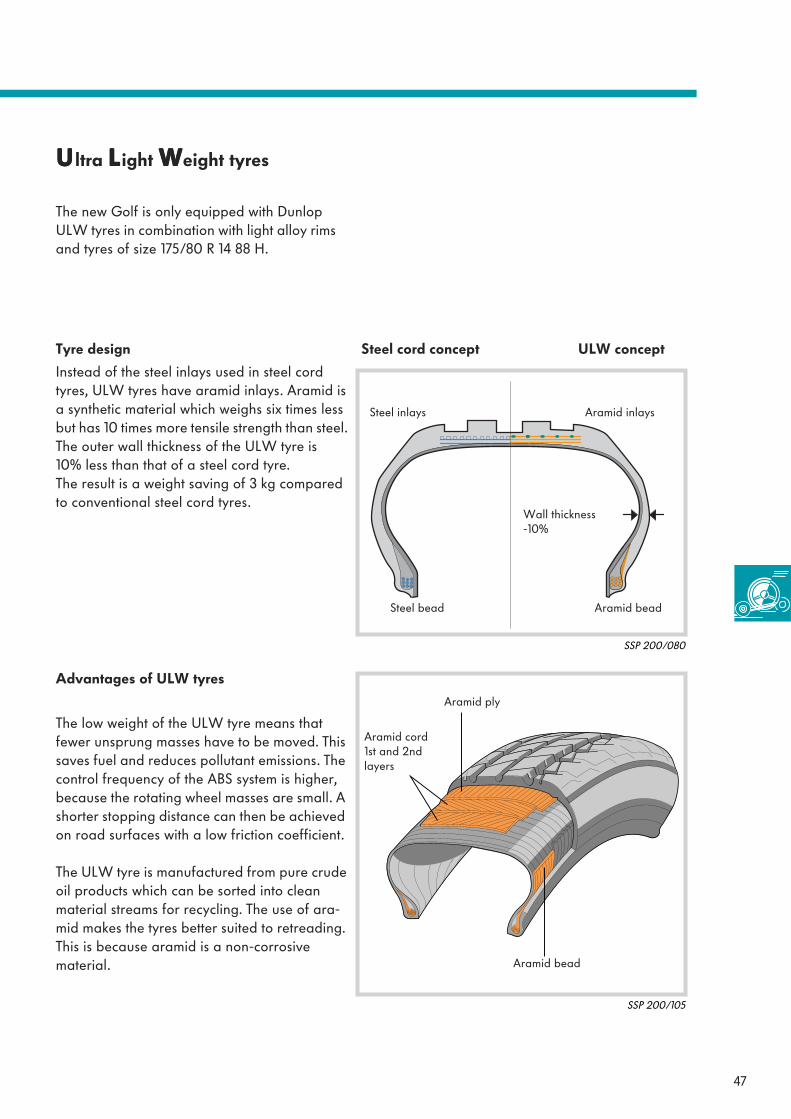
The low weight of the ULW tyre means that fewer unsprung masses have to be moved. This saves fuel and reduces pollutant emissions. The control frequency of the ABS system is higher, because the rotating wheel masses are small. A shorter stopping distance can then be achieved on road surfaces with a low friction coefficient.
The ULW tyre is manufactured from pure crude oil products which can be sorted into clean material streams for recycling. The use of ara-mid makes the tyres better suited to retreading. This is because aramid is a non-corrosive material.
Instead of the steel inlays used in steel cord tyres, ULW tyres have aramid inlays. Aramid is a synthetic material which weighs six times less but has 10 times more tensile strength than steel. The outer wall thickness of the ULW tyre is 10% less than that of a steel cord tyre.The result is a weight saving of 3 kg compared to conventional steel cord tyres.
Steel cord concept
Aramid inlaysSteel inlays
Wall thickness -10%
Aramid beadSteel bead
ULW concept
Advantages of ULW tyres
Tyre design
Aramid ply
Aramid cord1st and 2nd layers
UUUUltra LLLLight WWWWeight tyres
The new Golf is only equipped with Dunlop ULW tyres in combination with light alloy rims and tyres of size 175/80 R 14 88 H.
Aramid bead

48
-3 kg
SSP 200/090
In the development departments of the automo-bile industry, the top priority is to reduce the weight of conventional components. The tradi-tional material of steel is gradually being replaced by alternative materials such as alu-minium, magnesium and synthetic materials.
Running gear
The light alloy rim
The new Golf has light alloy rims in combina-tion with size 175/80 R14 ULW tyres.These rims consist of an aluminium-magne-sium-manganese alloy. The alloy can be cold-formed, is corrosion resistant and lightweight.
The alloy rim is approx. 3 kg lighter thanthe steel rim through the use of this material.
Steel rim Light alloy rim

49
WOB - VK 12
SSP 200/086
CCCController AAAArea NNNNetwork databus
If it wasn’t for the CAN databus, a separate wire would be required to convey every item of infor-mation between each of the control units. To keep the electrics/electronics as simple and compact as possible, Volkswagen uses the Bosch CAN databus.
The demands on vehicle safety, ride comfort, exhaust emissions and fuel economy are con-stantly rising. To meet these demands, a large volume of data has to be exchanged between the control units. The CAN databus can transmit large data streams within the shortest possible space of time.
You can find detailed informationin Self-Study Programme No. 186.
CAN in the convenience system between the central control unit and the door con-trol units
CAN in the drive train area between the control units for the engine, ABS/EDL and automatic gearbox on the 1.6-ltr. ver-sion and upwards.
Electrical system

50
SSP 200/085
WOB - VK 12
Electrical system
The vehicle electrical system
Use Wiring Harness Repair System VAS 1978 to carry out repair work on the wiring harness.
The wiring harness is dependent on the vehicle specifications. It is custom-made according to the vehicle identification number (VIN).
Coupling station, A-pillar
Coupling station, B-pillar
Main fuse box
Coupling station, A-pillar
Coupling station, B-pillar
Fuse carrier
Coupling station, plenumchamber
Relay board with auxiliaryrelay carrier
Relay carrier, enginecompartment
has a decentralised layout, i.e. the component parts of the system are situated at different fit-ting locations within the vehicle. This is
The fitting locations for the component parts are shown in the drawing below.
necessary due to the increase in the amount of electrics/electronics used in the new Golf.

51
SSP 200/119 a-f
The components of thedecentralised vehicle electrical sys-tem
Coupling station in plenum chamber
Main fuse box
Relay board with auxiliary relay carrier
Fuse box
Relay carrier in engine compartment
Coupling stations, A and B pillars
These fuses prevent overloading of the main consumers connected directly behind the battery, e.g. alternator, engine control unit, passenger compartment and cooling fan 2nd stage.
Integrated in the coupling station in the plenum chamber are the plug connectors between the passenger compart-ment and the engine compartment.
Located on the relay board are the relays for the basic equipment and three fuses for optional extras. For instal-ling optional extras, there are additional relays and fuses on the auxiliary relay carrier.
These fuses protect the individual electric circuits against overload.
The relays for low and high heating output for TDI diesel engines are arranged on this relay carrier.
Integrated in these coupling stations are the plug and socket combinations for the electrical components in the doors.

52
1
4
7
C
2
5
8
0
3
6
9
Q
V.A.G - EIGENDIAGNOSE HELP01 - Motorelektronik
HELP
1
4
7
C
2
5
8
0
3
6
9
Q
V.A.G - EIGENDIAGNOSE HELP01 - Motorelektronik
HELP
Safe
SSP 200/088
Electrical system
The convenience system
Central lockingTailgate lock
assumes the functions shown in the diagram below. It has a decentralised layout, which means that the individual functions are shared among several control units.
Interior lighting control
Radio wave remote control
Tilting/sliding roof• Convenience locking• Enable
Anti-theft alarm system
Self-diagnosisAddress word 46
Interface to vehicle electrical system
Functions of the central control unit
Functions of the door control units
Central locking the doors with SAFE feature
Electric windows with excess power limitation
Electrically adjustable and heated exterior rear view mirrors
Self-diagnosisAddress word 46
53
WOB - VK 12
SSP 200/079
The convenience system
Self-diagnosis can be performed by using address word 46.
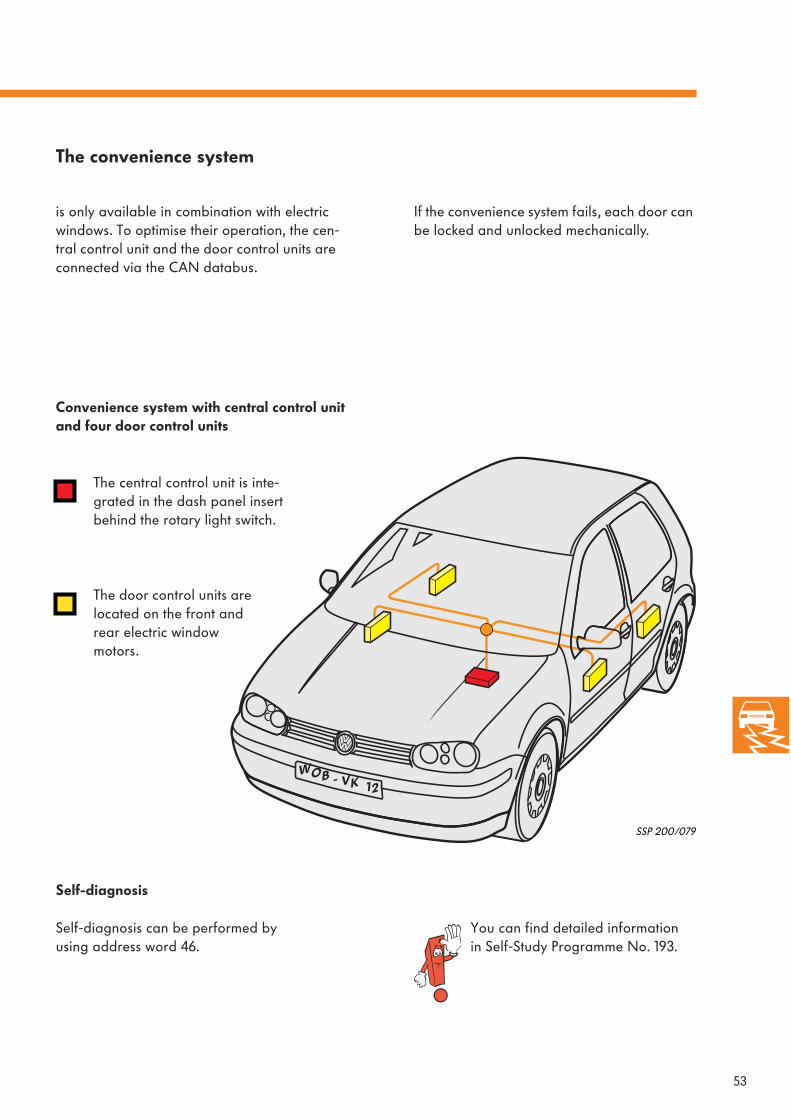
The central control unit is inte-grated in the dash panel insert behind the rotary light switch.
is only available in combination with electric windows. To optimise their operation, the cen-tral control unit and the door control units are connected via the CAN databus.
Self-diagnosis
Convenience system with central control unit and four door control units
The door control units are located on the front and rear electric window motors.
If the convenience system fails, each door can be locked and unlocked mechanically.
You can find detailed informationin Self-Study Programme No. 193.
54
SSP 200/087
Electrical system
The new headlights
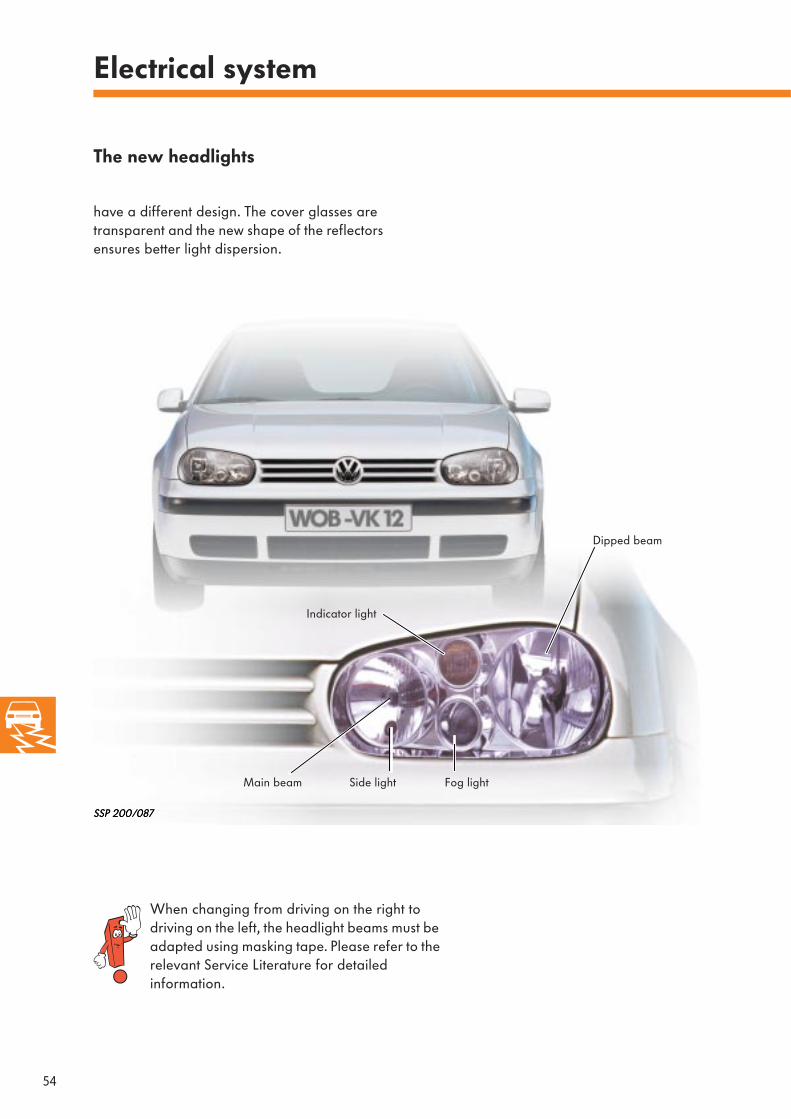
have a different design. The cover glasses are transparent and the new shape of the reflectors ensures better light dispersion.
SSP 200/087
When changing from driving on the right to driving on the left, the headlight beams must be adapted using masking tape. Please refer to the relevant Service Literature for detailed information.
Dipped beam
Fog lightMain beam
Indicator light
Side light

55
SSP 200/093
SSP200/082
The adjustable wiper interval
Four wiper intervals can be preset using a prese-lector switch.Each setting is automatically adapted to the road speed. The higher the road speed, the shorter the wiper interval.
Wiper interval = Time to wipe window + pause
The rain sensor
As a result, less light is reflected by the wind-screen surface. Light refraction is dependent on rainfall intensity. The rain sensor sends a signal to the relay for the automatic intermittent wash/wipe system and the windscreen washers are switched on.
The rain sensor emits a light beam through LEDs. When the windscreen is dry, the entire light beam is reflected by the windscreen sur-face. If the windscreen is wet, the light beam emitted by the rain sensor is refracted differently.
is located at the base of the interior rear-view mirror. It detects rainfall and automatically switches the wiper on in the intermittent setting.
LED
Windscreen surface
Photodiode
LED
Windscreen dry = strong light reflection Windscreen wet = minimal light reflection

56
SSP 200/081
Electrical system
The automatic anti-dazzleinterior mirror
This is how it works
The anti-dazzle interior mirror consists of a mir-ror element and an electronic control unit with two photosensors.
The applied voltage changes the colour of the electrolyte. The higher the voltage, the darker the electrolyte. Incident light is no longer reflected so strongly.
When reverse gear is engaged, the mirror dim-ming function is deactivated. The mirror can now be used to, say, reverse out of a dark garage into the light.
Silver reflective coating
Glass pane
Electrolytic coating
Glass pane
PhotosensorPhotosensor
The electronic control unit detects incident light from the front and rear by means of the photo-sensors. If the light incidence on the side of the mirror facing the rear is greater than from the front, the electronic control unit applies a volt-age to the conductive coating.
has a continuous dimming function which pre-vents the driver from being dazzled by vehicles behind.
Electronic control unit
Conductive coatings

57
SSP 200/038
SSP 200/039
Heating, air-conditioning system
Three alternative heating and air-conditioning packages are available for the Golf: Heater only
Manually-operated heater and air conditionerElectronically-operated heater and air condi-tioner (CLIMAtronic)
•••
Heating
In contrast to the predecessor model, a fresh air/air recirculation mode is possible in the new Golf. The main shut-off flap is therefore no longer required.
ActuatorFresh air/air recir-culation flap
Air recirculation mode
The fresh air / air recirculation flap is operated by an actuator. All other flaps are adjusted by Bowden cables.In defrost mode, the air recirculation mode is deactivated mechanically. This also prevents moist air inside the vehicle from condensing on the windscreen.

58
SSP 200/040
SSP 200/041
Fresh air /air recirculation flap
Fresh air/air recirculation flap
Backpressure flap
The manual air-conditioning system
If a manual air-conditioning system is fitted, the climate inside the vehicle is controlled by the driver.
The fresh air / air recirculation flap is now oper-ated by an electric motor. All other flaps are adjusted by Bowden cables.
CLIMAtronic
When CLIMAtronic is fitted, the climate inside the vehicle is controlled automatically.CLIMAtronic is controlled in the same way as the system fitted in the Passat 97.Temperature and air flow rate control have been adapted to the interior dimensions of the Golf.
The fresh air / air recirculation flap together with the backpressure flap are driven by a com-mon electric motor.
Heating, air-conditioning system
59
SSP 200/034
SSP 200/035
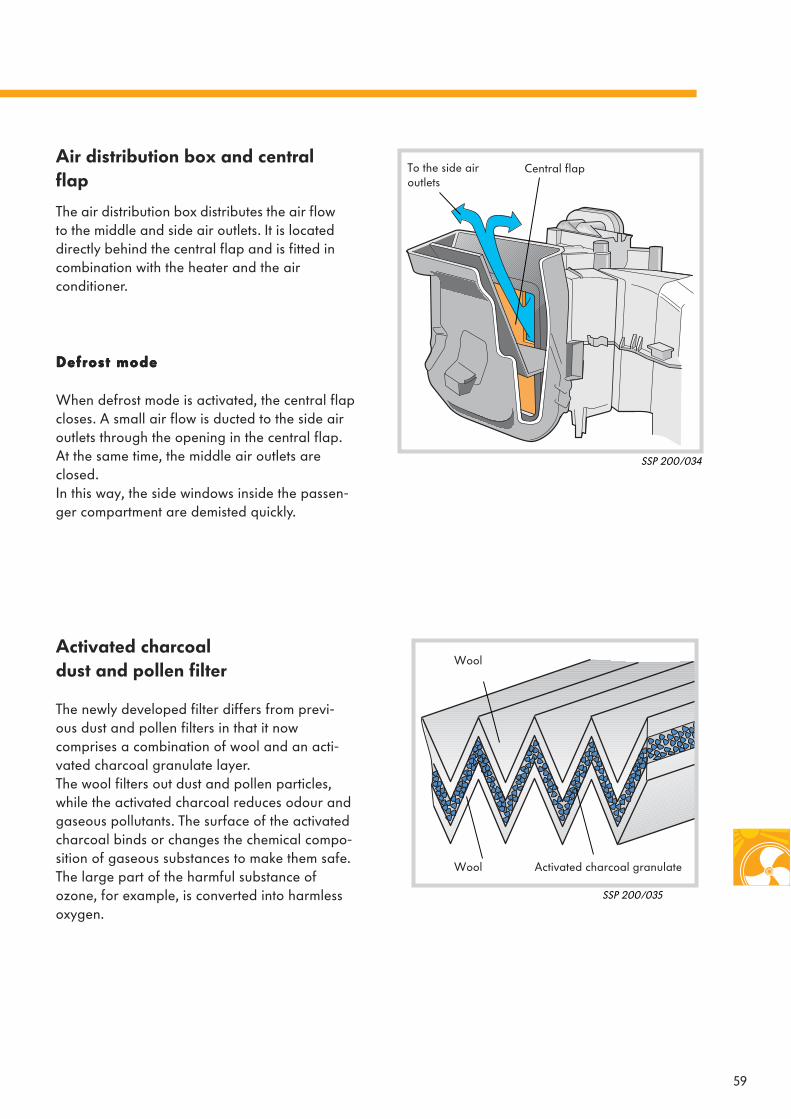
Wool Activated charcoal granulate
Wool
When defrost mode is activated, the central flap closes. A small air flow is ducted to the side air outlets through the opening in the central flap. At the same time, the middle air outlets are closed.In this way, the side windows inside the passen-ger compartment are demisted quickly.
Activated charcoal dust and pollen filter
Air distribution box and central flap
The air distribution box distributes the air flow to the middle and side air outlets. It is located directly behind the central flap and is fitted in combination with the heater and the air conditioner.
The newly developed filter differs from previ-ous dust and pollen filters in that it nowcomprises a combination of wool and an acti-vated charcoal granulate layer.The wool filters out dust and pollen particles, while the activated charcoal reduces odour and gaseous pollutants. The surface of the activated charcoal binds or changes the chemical compo-sition of gaseous substances to make them safe.The large part of the harmful substance of ozone, for example, is converted into harmless oxygen.
DDDDeeeeffffrrrroooosssstttt mmmmooooddddeeee
To the side air outlets
Central flap

60
SSP 200/109
SSP 200/111
SSP 200/110
ca. 200°C
Service
When removing one of the front seats, the side airbag can be triggered by anybody who is elec-trostatically charged. Therefore, before unplugging the connectors briefly touch the door striker pin or the vehicle body panel to get rid of any electrostatic charge.
Body
After a panel has been beaten to remove a dent, it has a greater rigidity against dents. The panelis more resilient and greater force is required. The material may fracture if subjected to exces-sive stress.
Removing seats
Repairing high-strength panels
After unplugging the connectors below the seat, plug in the adapter to re-close the earth circuit of the airbag system.
Adapter for side airbag VAS 5061
If the material is heated too rapidly and to an excessively high temperature (approx. 200°C) with a drying radiator during a partial respray, the panel will deform.

61
SSP 200/134a-e
3320/2
3320
The new special tools andworkshop equipment are shown below.
3320/2 Socket insert
T 10006Disengaging tool
Tool number and designation
Use
For adjusting the door
For disengaging the brake servo linkage from the brake pedal
T 10010Socket wrench
For fitting the positioning element of the central lok-king system in the tailgate
T 10011Socket wrench
For fitting the door lock
VAS 5056/2Adapter cable set
For airbag auxiliary tester VAS 5056

62
Notes

63
16
120
2
77
7
1211
11
17
18
18
8
10
16
15
9
4
3
19
19
6
514
13
14
are to be shaped. To do this, pull the tread down-wards over an edge (e.g. table edge) before joining the wheel halves is order to soften the cardboard so it is easier to shape. Now coat the inner surfaces of the wheel halves with glue, allow the glue to set slightly and glue on the tread around the outer circumference of the wheel. Use the serrations on each side of the tread to affix the tread. Now glue the wheels on the axle, making sure that the centre of the wheel coin-cides with the axle marking.
The tyres (parts 17, 18)
To assemble the body, cut out small triangles between roof and body side section on each side at the front and rear. Then fold these triangles inwards and use them as tabs for gluing the roof and body side section.
The body (part 1)
Once the rear end has been glued together for a few minutes, coat the outer ends of the indicator lights, fold them and press them into the desired position. You can shape adjustments in this way.
The rear end parts 5,6)
Glue the windscreen. Glue the bonnet fromthe inside to the lower side section of the winds-creen. Then glue the bonnet to the side sections of the body.
The front section (parts 3, 4)
Glue the anti-roll bar level with the central roof pil-lar. Press the outer sides firmly against the anti-roll bar to help maintain the basic shape of the model. Now place the model on a level surface to see if all parts have been inserted straight. Any unevenness can now be corrected by pulling parts apart at the adhesive bond or by applying light pressure.
The anti-roll bar (part 2)
Glue the floorpan sections to the underside of the body to stabilise the model.
The floorpan sections (part 7)
Bend slightly and glue in place as shown in the drawing.
The front section reinforcements (parts 8,9)
Glue the axles on the
The axles (parts 11)
Now you can glue the entire floorpan assembly into the model from below.
Floorpan (part 12).
should also be folded beforehand and glued on the
Now assemble the bumpers.
must be folded beforehand and glued on theThe rear bumper (part 13)
After allowing the glue to evaporate, glue the bumper together with the side sections on the body. Using a cutter; now carefully press the upper edge of the bumper upwards so that it finally takes shape.
Side sections (parts 14)
The front bumper (part 15)
Then glue the bumper on the body.
side sections (parts 16).
Precut the mirrors to roughly the correct shape beforehand, then fold them along the marking and glue as shown in the drawing. Now cut out the mir-ror contour. Using a sharp cutter, carefully cut a slot at the marking in the black triangle on the side win-dow. Now glue the mirror in this slot.
The mirrors (parts 19)
Also attach the roof aerial to the model.
The roof aerial (part 20)
fold
slit slightly
cut out
cut
in direction of arrow
bend cardboard
cut off projections after gluing together
Assembly instructions for VW GOLF 98
General notes:
Slightly slit all fold lines on the flat section using a blunt cutter,fold them up and then coat with adhesive.
It is better to cut out all parts in the order in which they are fitted.
Carefully coat all folds with adhesive and allow them to set slightly. Then press the parts together firmly between thumb and index finger.

64
Service. 200
For internal use only © VOLKSWAGEN AG, WolfsburgAll rights reserved. Technical specifications subject to change without notice.
740.2810.15.20 Technical status: 08/97
❀ Printed on chlorine-freebleached cellulose paper