RuggedReader - enviroequipment.com · Step Three: Calibrate the Touchscreen Apply a screen...
2
Rugged Reader ® QUICK START GUIDE ➔ ➔ 1c 1b 1a Press on the battery door about ¼” below the door latch and slide the latch to the right. Slowly unhook and lift up the bottom latch of the hand strap. CAUTION: Do not let the hand strap hook hit the display. Step One: Install the Battery Pack 1d 1f 1e Insert the tabs on the battery door into the slots. Make sure the door latch is all the way to the right and properly aligned. Then close the battery door. ➔ Insert the battery pack so that the battery contacts mate with the RuggedReader contacts. Remove the battery door. Press very firmly on the battery door and slide the latch to the left to lock it. Reattach the hand strap. (turn over for next steps) ➔ Press here ➔ Press here ➔ ➔ 1 Charge LED (red) 2 Power button 3 Battery door latch 4 Battery door 5 Hand strap 6 Stylus 7 Main screws (DO NOT REMOVE) 8 Top cap screws (captive) 9 Slot for future accessory 10 Compact Flash (CF) card slot 11 Secure Digital (SD) I/O card slot 12 USB Host (mini A) 13 9-pin serial port 14 12V DC jack 15 USB Client (mini B) Anatomy of the RuggedReader 1 2 In-Situ Inc. RuggedReader 3 4 5 6 7 TIP: For a complete description of the device and its functions, please refer to the RuggedReader operator’s manual on the In-Situ software/resource CD. Top view with top cap 6 8 9 10 11 Top view without top cap Communications module 12 13 14 15
Transcript of RuggedReader - enviroequipment.com · Step Three: Calibrate the Touchscreen Apply a screen...

RuggedReader ®
QUICK START GUIDE
➔
➔
1c1b1a Press on the battery door about ¼” below the door latch and slide the latch to the right.
Slowly unhook and lift up the bottom latch of the hand strap. CAUTION: Do not let the hand strap hook hit the display.
Step One: Install the Battery Pack
1d 1f1e Insert the tabs on the battery door into the slots. Make sure the door latch is all the way to the right and properly aligned. Then close the battery door.
➔
Insert the battery pack so that the battery contacts mate with the RuggedReader contacts.
Remove the battery door.
Press very firmly on the battery door and slide the latch to the left to lock it.Reattach the hand strap.
(turn over for next steps)
➔
Press here
➔Press here
➔
➔
1 Charge LED (red) 2 Power button 3 Battery door latch 4 Battery door 5 Hand strap 6 Stylus 7 Main screws (DO NOT REMOVE) 8 Top cap screws (captive) 9 Slot for future accessory10 Compact Flash (CF) card slot 11 Secure Digital (SD) I/O card slot
12 USB Host (mini A) 13 9-pin serial port 14 12V DC jack15 USB Client (mini B)
Anatomy of the RuggedReader
1
2
In-Situ Inc.
RuggedReader
3
4
5
6
7
TIP: For a complete description of the device and its functions, please refer to the RuggedReader operator’s manual on the In-Situ software/resource CD.
Top view with top cap
6
8
9 10 11Top view without top cap
Communications module
12 13 14 15
Due to continuing product development this information is subject to change without notice. In-Situ and the In-Situ logo, Win-Situ, TROLL, BaroTROLL, miniTROLL, RuggedReader, and RuggedCable are trademarks or registered trademarks of In-Situ Inc. Microsoft, Windows, Excel, Internet Explorer, and ActiveSync are trademarks or registered trademarks of Microsoft Corporation. Copyright © 2006, 2007 by In-Situ Inc. All rights reserved.
1 800 446 7488(toll-free, US and Canada) or 970 498 1500 www.in-situ.com
RuggedReader®
0057520 rev. 001 08/07
2a 2b 2c
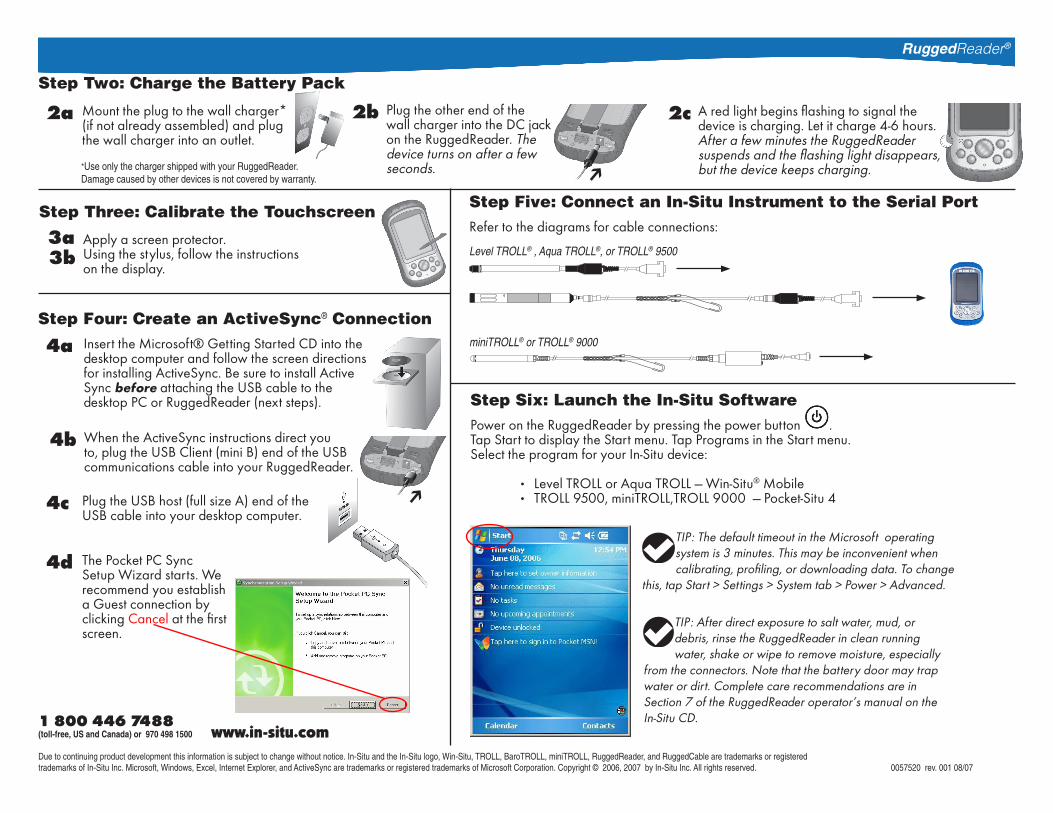
Step Two: Charge the Battery Pack
Mount the plug to the wall charger* (if not already assembled) and plug the wall charger into an outlet.
Plug the other end of the wall charger into the DC jack on the RuggedReader. The device turns on after a few seconds.
A red light begins flashing to signal the device is charging. Let it charge 4-6 hours. After a few minutes the RuggedReader suspends and the flashing light disappears, but the device keeps charging.
3aStep Three: Calibrate the Touchscreen
Apply a screen protector.Using the stylus, follow the instructions on the display.
4a
4b
4c
4d
Insert the Microsoft® Getting Started CD into the desktop computer and follow the screen directions for installing ActiveSync. Be sure to install Active Sync before attaching the USB cable to the desktop PC or RuggedReader (next steps).
Plug the USB host (full size A) end of the USB cable into your desktop computer.
The Pocket PC Sync Setup Wizard starts. We recommend you establish a Guest connection by clicking Cancel at the first screen.
➔
Step Four: Create an ActiveSync® Connection
Step Six: Launch the In-Situ SoftwarePower on the RuggedReader by pressing the power button . Tap Start to display the Start menu. Tap Programs in the Start menu. Select the program for your In-Situ device: • Level TROLL or Aqua TROLL — Win-Situ® Mobile • TROLL 9500, miniTROLL,TROLL 9000 — Pocket-Situ 4 ➔
When the ActiveSync instructions direct you to, plug the USB Client (mini B) end of the USB communications cable into your RuggedReader.
3b
*Use only the charger shipped with your RuggedReader. Damage caused by other devices is not covered by warranty.
TIP: The default timeout in the Microsoft operating system is 3 minutes. This may be inconvenient when calibrating, profiling, or downloading data. To change
this, tap Start > Settings > System tab > Power > Advanced.
TIP: After direct exposure to salt water, mud, or debris, rinse the RuggedReader in clean running water, shake or wipe to remove moisture, especially
from the connectors. Note that the battery door may trap water or dirt. Complete care recommendations are in Section 7 of the RuggedReader operator’s manual on the In-Situ CD.
Step Five: Connect an In-Situ Instrument to the Serial PortRefer to the diagrams for cable connections:
Level TROLL® , Aqua TROLL®, or TROLL® 9500
miniTROLL® or TROLL® 9000