Rubbermaid Big Max Jr Assembly Instructions -...
8
BIG MAX 7' x 3'6" RESIN STORAGE BUILDING ASSEMBLY Pre-Assembly: • Review the parts list and make sure that no parts are missing. • Level the area where the shed will be located. • Areas of “fill dirt” should be tamped/compacted to prevent settling/sinking. • If a foundation is desired, it should be constructed before assembly. NOTE: To simplify assembly and to ensure proper engagement of all components, apply a mild detergent to dovetail and snap fits before assembling. Two Person Assembly 3713 Description Assembly Letter Quantity Left Floor A 1 Left Side Panel C 1 Right Side Panel D 1 Left Back Panel E 1 Right Door Panel F 1 Right Back Panel G 1 Left Front Panel H 1 Right Front Panel J 1 Left Door Panel K 1 Gable M 2 Left Roof Panel N 1 Right Roof Panel P 1 Wall Connector Q 4 Ridge Beam R 1 Right Floor U 1 Lock Hasp X 1 #14 x 1.0" Combo Pan Head Screw AA 24 1/4-20 x 0.5" Combo Round Head Bolt BB 2 1/4-20 Flat Washer CC 2 1/4-Hex Nut DD 2 Roof Pin EE 4 A E G H J F U X K M M P C R D Q Required Tools Safety Glasses Phillips Screw Driver Rubber Mallet Liquid Soap (2) Step Stools/Stepladders N 84 3 /8" 95" 43 3 /8"
Transcript of Rubbermaid Big Max Jr Assembly Instructions -...

BIG MAX 7' x 3'6" RESINSTORAGE BUILDING ASSEMBLYPre-Assembly:• Review the parts list and make sure that no parts are missing.• Level the area where the shed will be located.• Areas of “fill dirt” should be tamped/compacted to prevent
settling/sinking.• If a foundation is desired, it should be constructed before assembly.
NOTE:To simplify assembly and to ensure proper engagement of allcomponents, apply a mild detergent to dovetail and snap fitsbefore assembling.
Two Person Assembly
3713Description Assembly Letter QuantityLeft Floor A 1Left Side Panel C 1Right Side Panel D 1Left Back Panel E 1Right Door Panel F 1Right Back Panel G 1Left Front Panel H 1Right Front Panel J 1Left Door Panel K 1Gable M 2Left Roof Panel N 1Right Roof Panel P 1Wall Connector Q 4Ridge Beam R 1Right Floor U 1Lock Hasp X 1#14 x 1.0" Combo Pan Head Screw AA 241/4-20 x 0.5" Combo Round Head Bolt BB 21/4-20 Flat Washer CC 21/4-Hex Nut DD 2Roof Pin EE 4
A
EG
H
J
F
U
X
K
M
MP
C
R
D
Q
Required Tools
Safety Glasses
Phillips Screw Driver
Rubber Mallet
Liquid Soap
(2) Step Stools/Stepladders
N
843/8"
95"
433/8"

1Level construcion site before beginning assembly of shed. A foundationmay be constructed if desired.
Connect Left Floor (A) to Right Floor (U), install Screws (AA) 4 places.
2
3
AA (4)
A
U
Caution: When installing screws do not overtighten.
OPTIONAL STEP:If desired, recessed anchor locations (4 places) can be used to anchor the shed floorto a foundation.
A
C
A
C
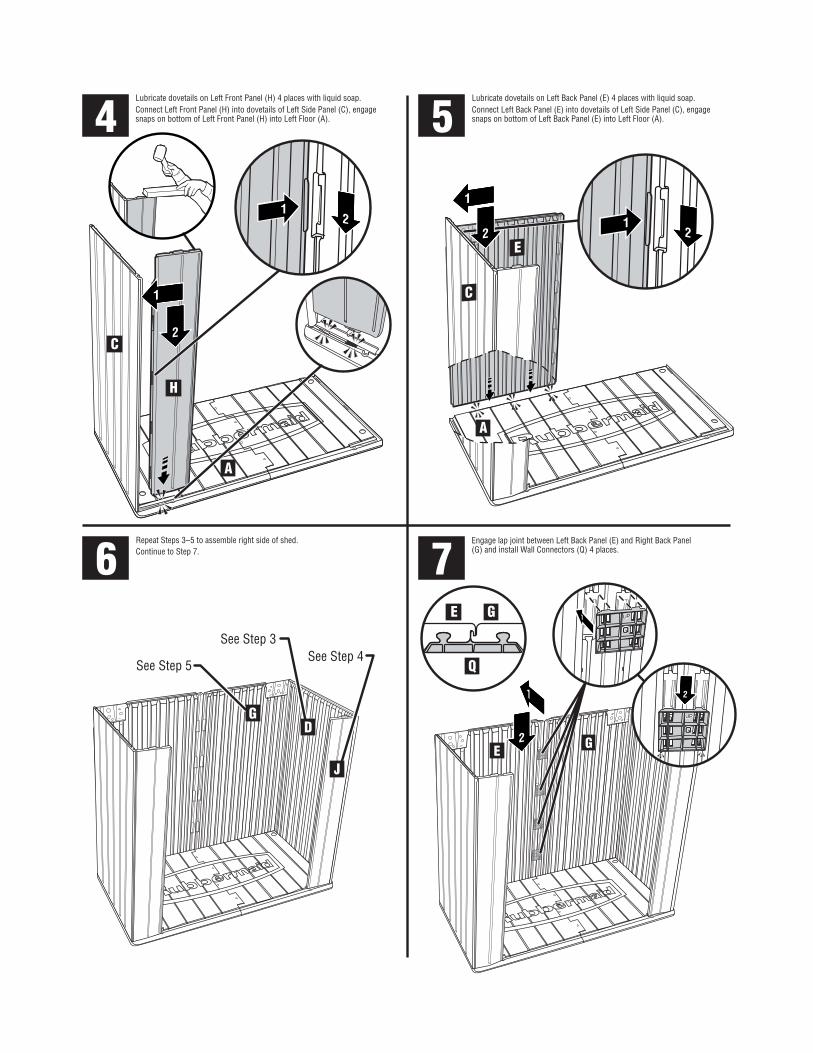
Using a srewdriver, punch out the screw holes on the top of Left Side Panel(C) 2 Places.Connect Left Side Panel (C) into Left Floor (A).
843/8"
433/8"
843/8"
76"
301/8"
71/2" 71/2"
41/8" 41/8"
41/8" 41/8"
53/4"
53/4"
433/8"
Screw Holes
E G
6Repeat Steps 3–5 to assemble right side of shed.Continue to Step 7. 7
Engage lap joint between Left Back Panel (E) and Right Back Panel(G) and install Wall Connectors (Q) 4 places.
5Lubricate dovetails on Left Back Panel (E) 4 places with liquid soap.Connect Left Back Panel (E) into dovetails of Left Side Panel (C), engagesnaps on bottom of Left Back Panel (E) into Left Floor (A).4
Lubricate dovetails on Left Front Panel (H) 4 places with liquid soap.Connect Left Front Panel (H) into dovetails of Left Side Panel (C), engagesnaps on bottom of Left Front Panel (H) into Left Floor (A).
12
A
E
C
1
2
See Step 3
See Step 5See Step 4
G
J
D
E G
Q
1
2
1
2
A
C
H
1
2
12

9
10
Install Gable (M) onto top of front wall engaging the 2 dovetails on the front paneland the dovetail on the side panel on both the left and right sides of the shed.DO NOT ENGAGE THE SNAPS.
Install Left Door Panel (K) inserting the lower hinge pin into Left Floor (A)socket, lift the left end of the Gable (M) enough to insert the top hinge pin onLeft Door Panel (K) into the Gable (M) socket. 11
Install Right Door Panel (F) inserting the lower hinge pin into Right Floor (U)socket, lift the right end of the Gable (M) enough to insert the top hinge pinon Right Door Panel (F) into the Gable (M) socket.
Install Lock Hasp (X) into back side of Right Door Panel (F).
Engage Gable (M) snaps on front wall.
8Install Gable (M) onto top of back wall engaging the 2 dovetails and snapson the back panel and the dovetail on the side panel on both the left andright sides of the shed.
M
M
F
U
3
1
2
4
X
M
K
3
1
2
4
M
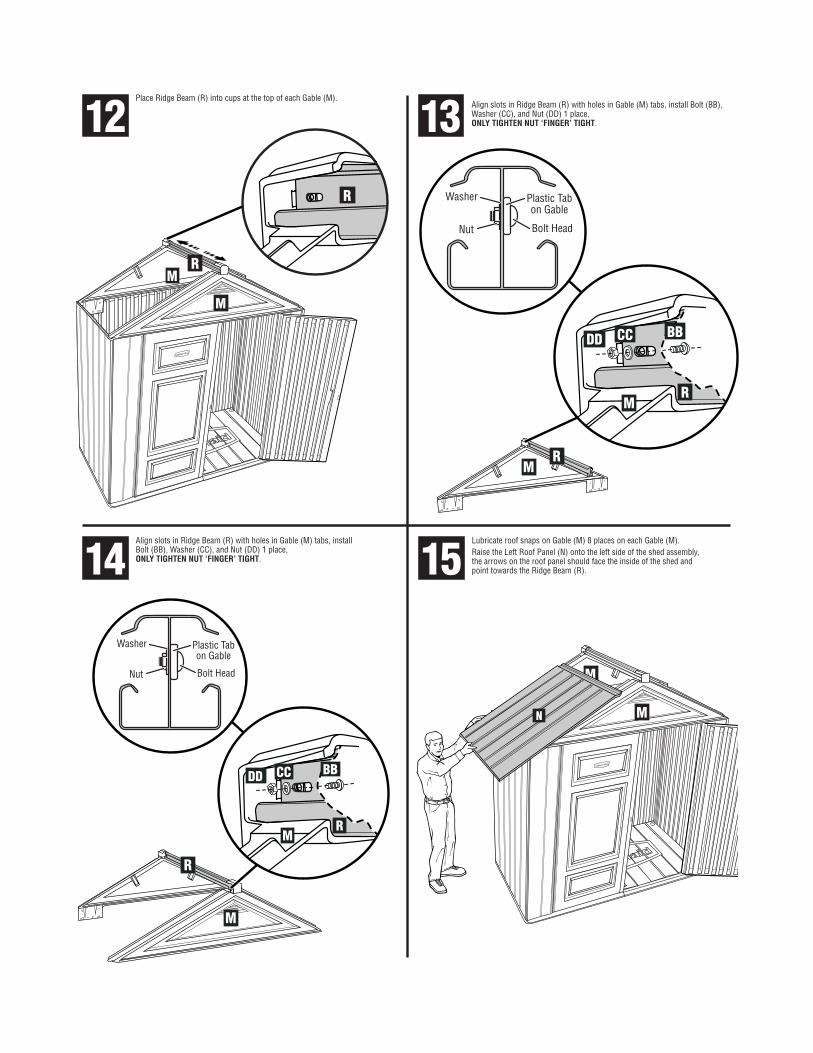
13
14
12
15Lubricate roof snaps on Gable (M) 8 places on each Gable (M).Raise the Left Roof Panel (N) onto the left side of the shed assembly,the arrows on the roof panel should face the inside of the shed andpoint towards the Ridge Beam (R).
Place Ridge Beam (R) into cups at the top of each Gable (M).
RM
Align slots in Ridge Beam (R) with holes in Gable (M) tabs, installBolt (BB), Washer (CC), and Nut (DD) 1 place,ONLY TIGHTEN NUT ‘FINGER’ TIGHT.
R
M
R
DD CC BB
M
Bolt Head
Washer
Nut
Plastic Tabon Gable
R
DD CC BB
M
Bolt Head
Washer
Nut
Plastic Tabon Gable
Align slots in Ridge Beam (R) with holes in Gable (M) tabs, install Bolt (BB),Washer (CC), and Nut (DD) 1 place,ONLY TIGHTEN NUT ‘FINGER’ TIGHT.
M
MN
R
M
M
R
16
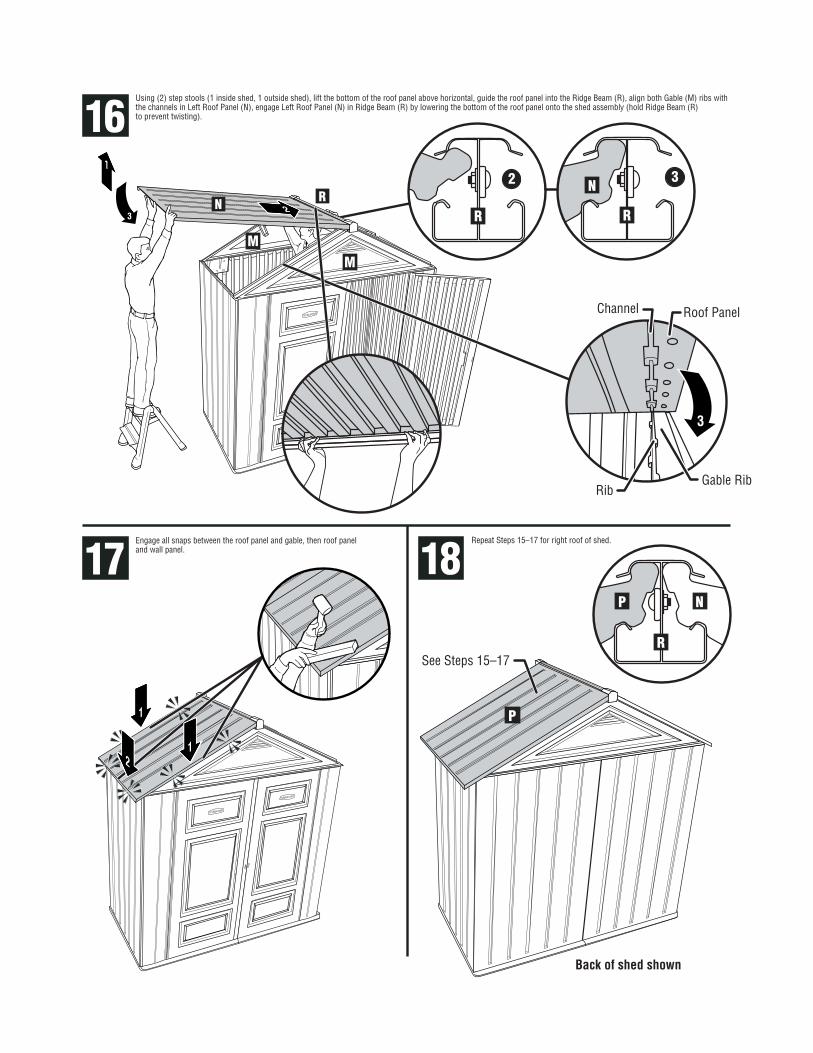
17Engage all snaps between the roof panel and gable, then roof paneland wall panel. 18
Repeat Steps 15–17 for right roof of shed.
Using (2) step stools (1 inside shed, 1 outside shed), lift the bottom of the roof panel above horizontal, guide the roof panel into the Ridge Beam (R), align both Gable (M) ribs withthe channels in Left Roof Panel (N), engage Left Roof Panel (N) in Ridge Beam (R) by lowering the bottom of the roof panel onto the shed assembly (hold Ridge Beam (R)to prevent twisting).
R
N
R
2 3
M
R
1
3
M
3
Channel Roof Panel
RibGable Rib
N 2
1
12
P
P
See Steps 15–17R
N
Back of shed shown
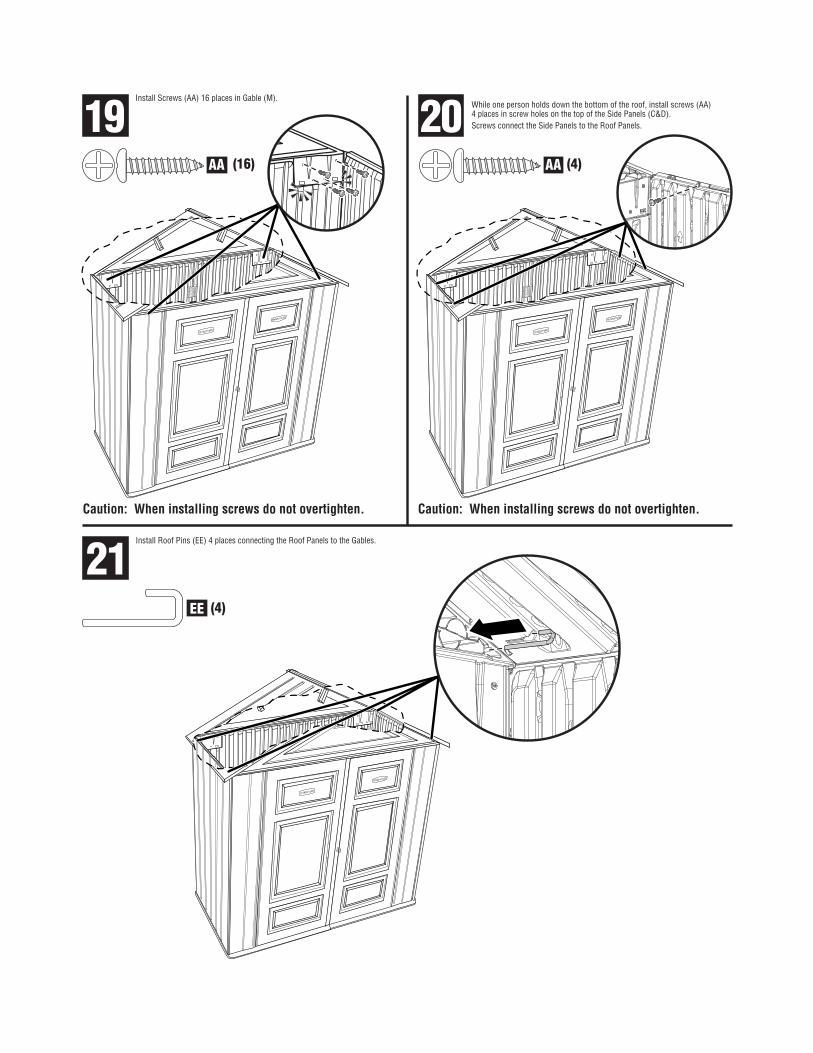
19Install Screws (AA) 16 places in Gable (M).
Caution: When installing screws do not overtighten. Caution: When installing screws do not overtighten.
20
21Install Roof Pins (EE) 4 places connecting the Roof Panels to the Gables.
While one person holds down the bottom of the roof, install screws (AA)4 places in screw holes on the top of the Side Panels (C&D).Screws connect the Side Panels to the Roof Panels.
AA (4)AA (16)
EE (4)

843/8"
95"
433/8"
Printed in U.S.A. Imprimé aux Ètats-Unis.Impreso en los EE.UU.© 2003 Rubbermaid Home Products,Wooster, OH, U.S.A. 44691-6000
02-2298-OS
Customer ServiceToll Free: 1-888-895-2110M–F 8AM to 5PM ESTor visit us atwww.rubbermaid.com
OPTIONAL STEP:If desired, add wood to create a loft (wood not included).
.75" x 24" x 37.75"
.75" x 37.25" x 37.75" .75" x 24" x 37.75"