Rockfon System VertiQ C Wall
16
Part of the ROCKWOOL Group C Wall Concealed wall system - Wall panels with sound absorption and impact resistance properties - Available in 4 standard colours - Specially developed system making installation quick and easy - Every panel is demountable System Description Rockfon ® System VertiQ ® C Wall ™
Transcript of Rockfon System VertiQ C Wall

Part of the ROCKWOOL Group
C Wall
Concealed wall system
- Wall panels with sound absorption and impact resistance properties - Available in 4 standard colours - Specially developed system making installation quick and easy - Every panel is demountable
System Description
Rockfon® System VertiQ® C Wall™

Rockfon® System VertiQ® C Wall™
2
2,5
30°
328
C Wall
Nice and neat concealed connection between the panels and anodised aluminium perimeter cover profile.
Elegant and safe rounded corner details in aluminium.
C-edge.
Description
Rockfon System VertiQ C Wall consists of 40 mm thick Rockfon®
VertiQ® C Wall panels. It is installed using specially designed fixing
brackets, anodised aluminium perimeter cover profiles and rounded
corner connectors for increased safety.
Rockfon VertiQ C Wall panels have an elegant and durable woven
surface, available in 4 colours (white, grey, light grey and black) which
are easily demountable.
RestrictionsRockfon System VertiQ C Wall has been tested for impact resistance
in accordance with DIN 18032 part 3 and fulfils the demands for
handball ball throwing (restrictedly safe against ball throwing).
The impact resistance of the panels is high, however, it is not
recommended for use in areas which are subjected to continuous
high levels of impact.
The woven surface of Rockfon VertiQ provides enhanced resistance
to perforation.

Rockfon® System VertiQ® C Wall™
3
System components and installation guide
RestrictionsRockfon System VertiQ C Wall has been tested for impact resistance
in accordance with DIN 18032 part 3 and fulfils the demands for
handball ball throwing (restrictedly safe against ball throwing).
The impact resistance of the panels is high, however, it is not
recommended for use in areas which are subjected to continuous
high levels of impact.
The woven surface of Rockfon VertiQ provides enhanced resistance
to perforation.
The quantities required of the different components depend on the size of the surface area.
Here is an example with 4 Rockfon VertiQ C Wall panels in width and 1 panel in height (2400 x 600):
Tile Cover profiles + Accessories
1 2 3 4 5 6
- Perimeter cover profileL = 2380 mm
Fixing bracket External corner connector Internal corner connector
Connection plate Locking screw
Dimension (mm) Consumption/m²
2400 x 600 4 pcs/m² 9.60 lm/m² 20 pcs 4 pcs/m² - 6 pcs 8 pcs
Cover profiles + Accessories
Panel – C-edge
Fixing bracket2Perimeter cover profile1 External corner connector3
Internal corner connector4 Connection plate5 Locking screw6
Panel

Rockfon® System VertiQ® C Wall™
4
Compatible Panels Overview
- Dimension (mm)
Panels Thickness (mm) 2400 x 600
Rockfon® VertiQ® C 40 •
Please contact Rockfon for other dimensions.
Only Rockfon VertiQ Wall panels available in dimensions mentioned below can be installed in Rockfon System VertiQ C Wall.
Corrosion resistanceClass B (EN13964)
DemountabilityPanels installed in Rockfon System VertiQ C Wall are fully demountable, using a demounting tool.
Impact resistanceRockfon System VertiQ C Wall has been tested for impact resistance in
accordance with DIN 18032 part 3 and fulfils the demands for handball ball
throwing (restrictedly safe against ball throwing). The impact resistance of
Rockfon VertiQ is high, however, it is not recommended for use in areas
which are subjected to continuous high levels of impact.
Performance

Rockfon® System VertiQ® C Wall™
5
600mm 600mm 600mm
==
600m
m60
0mm
= =
w
2420
mm
Layout
Installation
Installation requirements Ensure that the walls are smooth and even. For installation “directly
on the floor”, ensure that the floor is horizontal and flat. Carry out
any smoothing/levelling work before installation of the system. If
necessary, install a framework to compensate for uneven walls.
The walls upon which the wall panels are to be installed must be
clean and dry.
For off-floor installations, consideration should be given to using a
scuff-resistant skirting or base support between the floor and bottom
perimeter trim. This will reduce the likelihood of damage from shoes,
luggage, vaccuum cleaners or other floor-level risks.
Use mounting screws, methods and amount of fixing points
appropriate for the wall material.
Check the rectangular mounting surface, the diagonals must be
the same length:
Measure the surface of the installation. It needs to be horizontally divisible by 600 mm. Other end panel widths can be used but not cut less than 300 mm.

Rockfon® System VertiQ® C Wall™
6
10
10 20
20
2 2
2 2
3
3
1 2
10 600mm 600mm 600mm
W = 10 + (n x 600) + 10= =
20 +
238
0 +
20
1
2
2420
mm
1
2
Setting out.
Installation steps
1
PanelPanel

Rockfon® System VertiQ® C Wall™
7
= =
w
2420
mm
6
2
3
A
A
B
AB
A
Assemble and install external corner connectors and two fixing brackets in each corner.
Note! Check the rectangular mounting
surface: the diagonals must be the same
length.
Note! Use the relevant methods, mounting
screws and number of fixing points
appropriate for the wall material.
2

Rockfon® System VertiQ® C Wall™
8
3
600mm 600mm 600mm
==
600m
m60
0mm
Note! Use the relevant methods, mounting
screws and number of fixing points
appropriate for the wall material.
Check the components and install all remaining fixing brackets.
Rockfon® System VertiQ® C Wall™
9
4
2
1
1
1 32 4
1 3
43
1
2
3
4
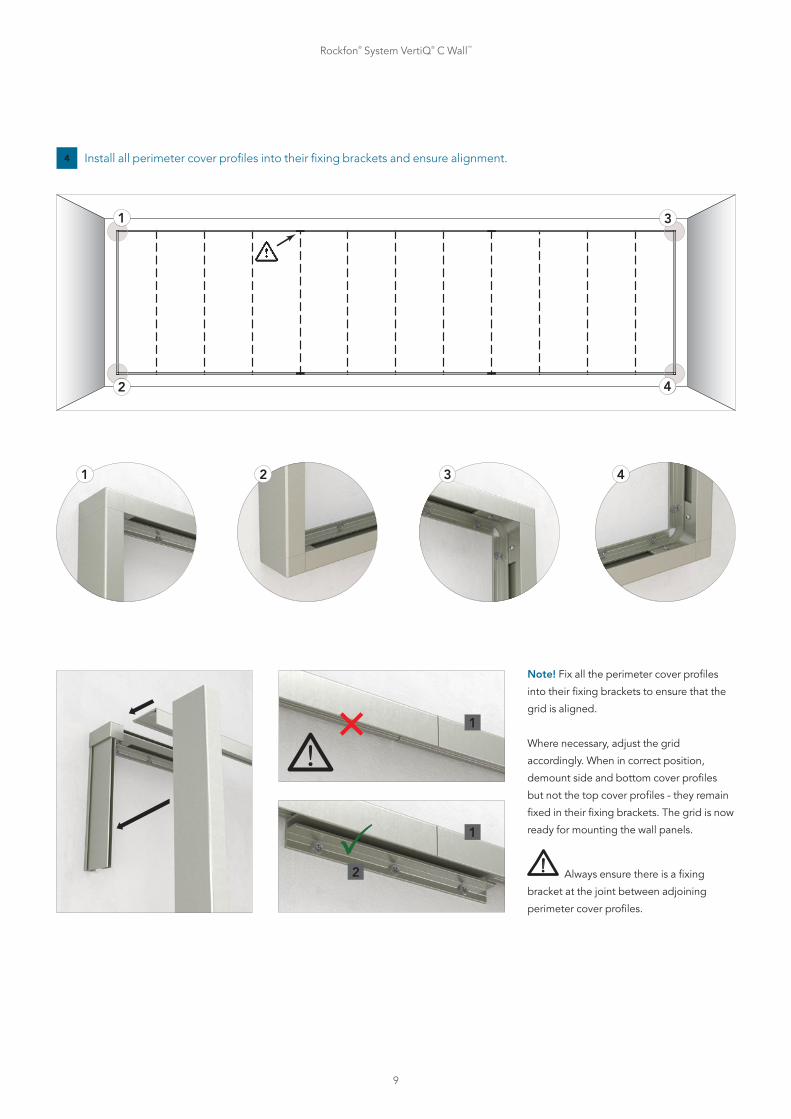
Note! Fix all the perimeter cover profiles
into their fixing brackets to ensure that the
grid is aligned.
Where necessary, adjust the grid
accordingly. When in correct position,
demount side and bottom cover profiles
but not the top cover profiles - they remain
fixed in their fixing brackets. The grid is now
ready for mounting the wall panels.
Always ensure there is a fixing
bracket at the joint between adjoining
perimeter cover profiles.
Install all perimeter cover profiles into their fixing brackets and ensure alignment.

Rockfon® System VertiQ® C Wall™
10
5
1 2
BD
C
1
2
1
2 A
A A
AA
Install the first wall panel to the left.

Rockfon® System VertiQ® C Wall™
11
6
1 32 4 5
1
4
5
1
2
2
3
1
2
2
3
4
5
A
C
B
A
C
B
Note! To achieve a level and solid panel construction across the entire wall, connection plates should be used to lock adjoining panels together.
Insert a connection plate into the groove just above the recess at the back edge of the panel. Use two connection plates per panel. This will
allow you to demount every single panel independently.
Install all the wall panels, except for the penultimate panel.

Rockfon® System VertiQ® C Wall™
12
7
D
B
CAA
Note! At every recess (4 x), use a knife to cut out 50-60 mm more space on the top side of each recess from the reverse of the panel.
Note! At the end, use a knife (plaster knife) to lift up the 4 connection plates to achieve perfect locking.
Install the final panel on the wall.

Rockfon® System VertiQ® C Wall™
13
8
1 3
43 42
31
1 32 4
B
C
A
Install all the perimeter cover profiles to the left, right and bottom.

Rockfon® System VertiQ® C Wall™
14
D
Panels mounted in Rockfon System VertiQ C Wall are fully
demountable.
The installation depth is defined as the distance from the front side
of the panel to the wall substrate. D represents the exact installation
depth that allows for easy panel installation and demounting.
The installation depth D is the minimum installation depth for easy
panel installation and demountability.
Minimum installation depth (mm)
Thickness Dimension D
mm
40 2400 x 600 43

Rockfon® System VertiQ® C Wall™
15
PanelsWe recommend the use of clean nitrile or PU coated gloves when
installing Rockfon panels in order to avoid finger prints and pollution
of the surface.
For an optimum work environment, we recommend installers always
observe common work practices and follow the installation advice as
shown on our packaging.
Cutting is made easily with a sharp knife. All offcuts and holes must
be treated according to local Building Regulations.
Note! Certain smooth matt surfaces are directional. To ensure
consistency of the finished ceiling, it is important that all panels are
installed in one direction, as indicated by the arrow printed on the
back of each panel.
General installation recommendations
Rockfon has developed specific tools that are available on www.rockfon.co.uk
Tools
Visit our online CAD Library or BIM portal to assist you in your project design.
Explore our vast library of reference projects.
Visit our video library to see our collection of Rockfon system installation videos.
Generate specification texts for our products.

Rockfon® is a registered trademark of the ROCKWOOL Group.
RockfonROCKWOOL Limited T/A Rockfon
14th Floor, Chiswick Tower, 389 Chiswick High Road,London W4 4AL
Tel: +44 (0) 208 222 7457www.rockfon.co.uk
All colour codes m
entioned are based on the NC
S - Natural C
olour System®
© property of and used on license from N
CS C
olour AB
, Stockholm 2012 or the RA
L colour standard. Subject to alterations in range and product technology w
ithout prior notice. Rockfon accepts no responsibility for printing errors.
twitter.com/RockfonUK linkedin.com/company/Rockfon-uk/ instagram.com/Rockfon_official/ youtube.com/RockfonUK
04.2019 |