Robot Builder: The Beginner's Guide to Building...
66
Transcript of Robot Builder: The Beginner's Guide to Building...


800 East 96th Street,Indianapolis, Indiana 46240 USA
ROBOT BUILDERThe Beginner’s Guide to Building Robots
John Baichtal

ii Robot Builder: The Beginner’s Guide to Building Robots
Robot Builder: The Beginner’s Guide to Building Robots
Copyright © 2015 by John BaichtalAll rights reserved. No part of this book shall be reproduced, stored in a retrieval system, or transmitted by any means, electronic, mechanical, photocopying, recording, or otherwise, without written permission from the publisher. No patent liability is assumed with respect to the use of the information contained herein. Although every precaution has been taken in the preparation of this book, the publisher and author assume no responsibility for errors or omissions. Nor is any liability assumed for damages resulting from the use of the information contained herein.
ISBN-13: 978-0-7897-5149-2ISBN-10: 0-7897-5149-6
Library of Congress Control Number: 2014944096
Printed in the United States of America
First Printing: November 2014
TrademarksAll terms mentioned in this book that are known to be trademarks or service marks have been appropriately capitalized. Que Publishing cannot attest to the accuracy of this information. Use of a term in this book should not be regarded as affecting the validity of any trademark or service mark.
LEGO and MINDSTORMS are registered trademarks of The LEGO Group.
Warning and DisclaimerEvery effort has been made to make this book as complete and as accurate as possible, but no warranty or fi tness is implied. The information provided is on an “as is” basis. The author and the publisher shall have neither liability nor responsibility to any person or entity with respect to any loss or damages arising from the information contained in this book.
Special SalesFor information about buying this title in bulk quantities, or for special sales opportunities (which may include electronic versions; custom cover designs; and content particular to your business, training goals, marketing focus, or branding interests), please contact our corporate sales department at [email protected] or (800) 382-3419.
For government sales inquiries, please contact [email protected].
For questions about sales outside the U.S., please contact [email protected].
Editor-in-Chief
Greg Wiegand
Executive Editor
Rick Kughen
Development Editor
Ginny Munroe
Managing Editor
Sandra Schroeder
Project Editor
Mandie Frank
Copy Editor
Barbara Hacha
Indexer
Erika Millen
Proofreader
Anne Goebel
Technical Editor
Pete Prodoehl
Editorial Assistant
Kristin Watterson
Designer
Mark Shirar
Compositor
Studio Galou

Contents at a Glance iii
Contents at a Glance Introduction xvii
CHAPTER 1 You, Robot Builder 1
CHAPTER 2 Robots of the World 21
CHAPTER 3 Rolling Robots 53
CHAPTER 4 Going Solar 83
CHAPTER 5 Controlling Your Robot 111
CHAPTER 6 Introduction to Programming 143
CHAPTER 7 Harnessing Infrared 161
CHAPTER 8 Building Sets 191
CHAPTER 9 Robot-Builder’s Toolbox 247
CHAPTER 10 Manipulators 283
CHAPTER 11 Water Robots 329
CHAPTER 12 Art Bots 351
Glossary 385
Index 391
ONLINE:
CHAPTER 13 Web-Interacting Robots

iv Robot Builder: The Beginner’s Guide to Building Robots
Table of ContentsINTRODUCTION xvii
What’s in This Book? xvii
Chapter 1 You, Robot Builder 1
What Are Robots? 2
Myths About Robots 4
Types of Robots 4
Anatomy of a Robot 7
Safety 9
Build a Vibrobot 10
Pizza Saver Vibrobot 11
Computer Fan Buzzbot 15
Summary 19
Chapter 2 Robots of the World 21
Watercolor Bot 22
Sparki 23
OpenROV 24
Astro Droids 25
Drink-Making Unit 26
Mars Rover Replica 27
MindCub3r 28
Ball-Balancing Robot 29
LEGO Turing Machine 30
Sir Mix-a-Bot 31
Arc-O-Matic 32
Soft-Boiled Eggbot 33
Legonardo 34
Sisyphus 35
Orbital Rendersphere 36
Clash of the Fractions 37
Lava Lamp Centrifuge 38
Quakescape 39
InMoov 40

Table of Contents v
DIWire Bender 41
Plant-Watering Robot 42
Nerf Sentry Gun 43
Yellow Drum Machine 44
Pancake Bot 45
Balloon Bot 46
Piccolo: The Tiny CNC Bot 47
Xylophone Bot 48
Flyer-Distributing Robot 49
Flowerbot 50
CoolerBot 51
Summary 52
Chapter 3 Rolling Robots 53
All About Motors 54
Choosing a Motor 55
Wheels 58
Configuration 58
Measurements 61
Tires or Treads 61
Project: DIY Wheels 65
Parts List 66
Step-by-Steps 67
The Chassis 70
Use a Pre-Made Chassis 70
Make Your Own Chassis 71
Use a Building Set 72
Powering Your Robot 72
Batteries 73
Solar Panels 74
House Current 75
Project: Building a Rolling Robot 76
Parts List 77
Step-by-Steps 78
Summary 81
vi Robot Builder: The Beginner’s Guide to Building Robots
Chapter 4 Going Solar 83
How Do Solar Panels Work? 84
BEAM Robotics 85
Three Hobbyist-Friendly Solar Cells 86
Flexible Film 86
Glass and Silicon 87
Plastic and Silicon 88
Prototyping Circuits 89
How to Breadboard 90
How to Solder 91
Using Solar Power to Charge Batteries 100
Project: DIY Solar Panel 101
Parts List 102
Step-by-Steps 103
Project: Making a Solar Spinner 106
Parts List 107
Step-by-Steps 107
Summary 109
Chapter 5 Controlling Your Robot 111
Autonomous 112
Infrared 112
Internet 113
Radio Control 114
Wireless 115
Microcontroller/Microcomputer 116
Motor Control Options 117
Adafruit Motor Shield 117
Schmalzhaus EasyDriver 118
Makeblock Me Motor Driver 118
Controlling a Robot with RC 119
Transmitter 120
Receiver 121
Electronic Speed Controller 121

Table of Contents vii
Project: Use an Arduino Uno to Control a Robot 123
Parts List 123
Step-by-Steps 125
Programming the Arduino 127
Project Remix: Swapping Motor Boards 130
Parts List 131
Step-by-Steps 132
Code 140
Summary 141
Chapter 6 Introduction to Programming 143
What Is Programming? 144
Delay 144
For 144
If/Else 144
Loops and Interrupts 145
Switch/Case 145
Variables 145
While Loops 145
The Arduino IDE 146
The Blink Sketch 148
Finding Code Examples 149
Adapting Example Code 151
Simple Debugging Using the Serial Monitor 151
Programming and Robotics Bookshelf 152
Project: Adding an Ultrasonic Sensor to Your Robot 154
Parts List 154
Step-by-Steps 155
Code 157
Summary 159
Chapter 7 Harnessing Infrared 161
Uses for Infrared Signals 162
Passive Versus Active IR 163
IR Remote Controls 165
viii Robot Builder: The Beginner’s Guide to Building Robots
Adafruit Mini Remote Control 165
Sparkfun Infrared Remote Control 166
Makeblock Infrared Receiver and Remote Controller 166
Mini Project: Discover Your Remote’s IR Codes 167
Parts List 168
Step-by-Steps 169
Code 169
Project: Controlling a Robot with IR 169
Parts List 169
Step-by-Steps 170
Code 171
Project: Dart Sentry 173
Parts List 174
Step-by-Steps 175
Code 187
Operating the Dart Sentry 189
Summary 189
Chapter 8 Building Sets 191
Uses for Building Sets 192
Enclosures 192
Gantries 193
Chassis 194
Hardware Mounts 195
Furniture 196
Examples of Building Sets 197
Vex Robotics Design System (Vexrobotics.com) 197
LEGO Mindstorms and Technic Sets (Mindstorms.com) 198
Actobotics Building System (Servocity.com) 199
Makeblock (Makeblock.cc) 200
MicroRax (Microrax.com) 200
MakerBeam (Makerbeam.eu) 202
Tamiya (Tamiyausa.com) 203
Choosing a Building Set 203
Material 204
Table of Contents ix
Beams 205
Motor Mounts 206
Connector Plates 207
Electronics 208
Gears 208
Wheels and Tank Treads 209
Customizing Building Sets 210
Combining Building Sets 210
Creating New Parts 214
Chassis Designs 216
LEGO Mindstorms EV3 Chassis 216
Step-by-Steps 217
Makeblock Chassis 226
Parts List 227
Step-by-Steps 228
Actobotics Chassis 234
Parts List 234
Step-by-Steps 236
Summary 245
Chapter 9 Robot-Builder’s Toolbox 247
Choose Your Toolbox 248
Size 248
Construction 249
Metal 249
Plastic 249
Cloth 250
Subdividers 251
Trays 251
Compartments 252
Belly 252
Handle 253
Four Toolboxes 254
Pelican 1460 Mobile Tool Chest 254
Stack-On 39-Bin Drawer Cabinet 255

x Robot Builder: The Beginner’s Guide to Building Robots
Husky 41-inch 13-Drawer Tool Cabinet 256
Craftsman 21-inch Toolbox 257
Tools 257
Drivers and Wrenches 257
Electronics 259
Soldering 262
Measurements 263
Writing and Drawing Tools 264
CNC Tools 265
Woodworking Tools 266
Attaching 267
Cutting 269
Cables 269
Introduction to CNC Tools 270
Laser Cutter 101 270
Anatomy 271
Using the Laser Cutter 274
CNC Router 101 276
Anatomy 277
Using the CNC Router 279
3D Printer 101 280
Anatomy 280
Using the 3D Printer 282
Summary 282
Chapter 10 Manipulators 283
Types of Manipulators 284
Universal Gripper 284
Scoop 285
Tentacle 286
Pneumatic 287
Pincer 288
Humanoid Hand 288
Electromagnet 289
Claw 290

Table of Contents xi
Winch 291
Pen 291
Commercial Manipulator Options 292
Makeblock Strong Robot Gripper 292
VEX Claw 293
uFactory uArm 294
Dagu Robotic Claw, MK II 294
Project: LEGO Pincer 296
Parts List 296
Step-by-Steps 298
Project: Laser-Cut Pincers 307
Parts List 307
Step-by-Steps 309
Project: Coffee Grounds Gripper 314
Parts List 315
Step-By-Steps 317
Summary 328
Chapter 11 Water Robots 329
Anatomy of a Water Robot 330
Flotation 330
Power 330
Steering 331
Propulsion 331
Control 332
Stabilization 332
Submersibles 332
Moisture 333
Waterproof Enclosures 333
Project: Floating Fanbot 334
Parts List 335
Step-by-Steps 337
Code 348
Summary 350

xii Robot Builder: The Beginner’s Guide to Building Robots
Chapter 12 Art Bots 351
Types of Art Bots 352
V-plotter 352
Vibration 352
Plotter 353
Eggbot 354
Sand Plotter 355
Car-Based 355
Paint Pendulum 356
Dot Matrix 357
Converting an Image to G-Code 358
Converting a Line Drawing into G-Code 361
Project: Rolling ‘Riter 362
Parts List 363
Step-by-Steps 365
Code 380
Summary 383
Glossary 385
Index 391
ONLINE (WWW.INFORMIT.COM/TITLE/9780789751492):CHAPTER 13 Web-Interacting Robots 1
Types of Web-Interacting Robots 2
Sniffers 2
Autotweeters 2
Telepresence 2
Interactive Robots 2
Home Automation 3
Sensor Nets 3
Hardware 4
Arduino Ethernet Shield 4
Adafruit CC3000 Breakout 4
Arduino Wi-Fi Shield 5
Roving Networks WiFly 6

xiii
Microcomputers: Non-Arduino Solutions 7
BeagleBone Black (beaglebone.org) 7
Raspberry Pi (raspberrypi.org) 7
pcDuino (pcduino.com) 7
Arduino Yún (arduino.cc/en/main/ArduinoBoardYun) 7
Dart Texter 8
Parts List 9
Step-by-Steps 9
Code 12
Summary 13

xiv
About the AuthorJohn Baichtal writes books about toys, tools, robots, and hobby electronics. He is the co-author of The Cult of LEGO (No Starch Press) and author of Hack This: 24 Incredible Hackerspace Projects from the DIY Movement; Basic Robot Building with LEGO Mindstorms NXT 2.0; and Arduino for Beginners (all from Que Publishing). Most recently he wrote Make: Lego and Arduino Projects for MAKE, collaborating with Adam Wolf and Matthew Beckler, and he is the author of the upcoming Que book, Building Your Own Drones: The Beginner’s Guide to UAVs and ROVs. He lives in Minneapolis, MN, with his wife and three children.

xv
DedicationTo my grandmother, Marion Lillie, for her continued inspiration and support.
To my wife Elise and kids Eileen Arden, Rosemary, and Jack, for putting up with and participating in a lot of nerdy stuff.
Finally, to my cousins Sean Fields and Will Fields, the next generation of robot builders. I hope this book intrigues you!
AcknowledgmentsThanks to (in no particular order) Jude Dornisch, Steven Anderson, Adam Wolf, Michael Freiert, John Wilson, Susan Solarz, Akiba, Mark Frauenfelder, Chris Berger, Michael Krumpus, Alex Dyba, Brian Jepson, Becca Steffen, Dave Bryan, Actobotics, Eric Wang, Mike Hord, Makeblock, Pat Arneson, Erin Kennedy, uFactory, Windell H. Oskay, Creative Robotics, Johngineer, Matthew Beckler, Riley Harrison, Limor & Phil @ Adafruit, Tyler Cooper, Beatty Robotics, Arcbotics, David Lang, Trammell Hudson, Pete Prodoehl, Daniele Benedettelli, Bruce Shapiro, Alex Allmont, John Edgar Park, Miguel Valenzuela, Pete McKenna, Steve Norris, and, well, obviously, Rick Kughen.
A special thanks to my mother Barbara for assembling the Glossary, and for all her support.
And to my gaming group, without whom I might not be sane: Big Ryan, Little Ryan, Drew, Gabe, Ned, Dave, Graham, and Jess.

xvi Robot Builder: The Beginner’s Guide to Building Robots
We Want to Hear from You!As the reader of this book, you are our most important critic and commentator. We value your opinion and want to know what we’re doing right, what we could do better, what areas you’d like to see us publish in, and any other words of wisdom you’re willing to pass our way.
We welcome your comments. You can email or write to let us know what you did or didn’t like about this book—as well as what we can do to make our books better.
Please note that we cannot help you with technical problems related to the topic of this book.
When you write, please be sure to include this book’s title and author as well as your name and email address. We will carefully review your comments and share them with the author and editors who worked on the book.
Email: [email protected]
Mail: Que Publishing ATTN: Reader Feedback800 East 96th StreetIndianapolis, IN 46240 USA
Reader ServicesVisit our website and register this book at quepublishing.com/register for convenient access to any updates, downloads, or errata that might be available for this book.

What’s in This Book? xvii
INTRODUCTIONRobots are incredible machines. The more complicated ones are entrusted with building cars and digging tunnels, projects that require lots of moving and lifting power but also precision. You may even have heard of experimental robots that are used for surgical proce-dures and can sew sutures or make incisions.
It’s almost a science-fiction phenomenon in a way—how could anyone actually build one of those contraptions? It’s not science fiction, of course. Robots are built by people, and you’re a person—so let’s make a robot! I call the first chapter of my book, “You, Robot Builder,” because that’s what this book is about—showing how you can build a robot from the wheels up as you learn about motors, controllers, grippers, wheels, and everything else you need to create your first bot.
Your creation may not dig a tunnel or sew up an incision, but you will have built it, and that means you can build any robot, so long as you have the knowledge and parts.
What’s in This Book?The following list describes what you’ll find in each chapter:
Chapter 1, “You, Robot Builder,” begins with the age-old question: What exactly is a robot? You’ll learn about the various categories of robot and even try out a couple of absurdly simple robots that use vibration motors to move around.
Chapter 2, “Robots of the World,” shares a bunch of cool robots that other hobbyists have built around the world, with a variety of shapes and configurations.
Chapter 3, “Rolling Robots,” shows you how to build a wheeled robot, a basic plat-form that will serve you well through this book.
Chapter 4, “Going Solar,” teaches you about solar power. Then you use what you learn to make a spinning robot.
Chapter 5, “Controlling Your Robot,” explores two cool techniques for controlling your robot: using an Arduino microcontroller and a classic radio control rig.
Chapter 6, “Introduction to Programming,” introduces you to some basic program-ming techniques that delve deeper into the Arduino phenomenon.
Chapter 7, “Harnessing Infrared,” tackles two ways to use that nifty invisible light: passively, like a remote control receiver detects a signal, and actively with infrared, which uses the light to detect movement.
Chapter 8, “Building Sets,” covers those convenient modular construction sets, with multiple plastic and metal kits discussed. You’ll even learn how to build a couple of robot chassis using building sets.
Chapter 9, “s/b Robot-Builder’s Toolbox,” explores all the tools you need to complete your project.

xviii Introduction
Chapter 10, “Manipulators,” concludes the trio of tool chapters by exploring claws, grippers, and other manipulators robots use to interact with the outside world.
Chapter 11, “Water Robots,” tackles the subject of robot boats and shows you how to build one.
Chapter 12, “Art Bots,” takes a look at robots that draw or paint. You’ll have the opportunity to build a robot that draws with chalk.
On the WebChapter 13, “Web-Controlled Robots,” explores the subject of robots connected to the Internet, and you’ll build a robot that sends text messages. Chapter 13 can be downloaded for free from the Que website, www.informit.com/title/9780789751492.
I hope you find this book helpful and inspiring as you, too, become a robot builder.

This page intentionally left blank

4Going SolarWhy worry about batteries when we orbit around the ultimate energy source? The sun radiates vast amounts of energy, and we can use this to power our robots—and other stuff—all through the cool science of solar cells (Figure 4.1), which convert light into electricity.
FIGURE 4.1 Solar cells can be a great way to power your robot.
Your initial thought might be, “Simply add solar panels for free energy!” Not so fast. As I alluded to in Chapter 3, “Rolling Robots,” it’s not that simple. Even if you have a panel big enough to power your rig the way you like it, there’s no guarantee the sun is out. Furthermore, even if the sun is out, the earth’s orbit makes it appear to move across the sky, meaning the voltage generated will f luctuate.

84 CHAPTER 4: Going Solar
All that being said, there’s a lot to like about solar-powered robots. You can store them away for a couple years and they’ll still work. You don’t have to buy new batteries periodically. Finally, you can do some intriguing things with robotics, like create autonomous crawlers that creep around your yard like a friendly robo-insect. However, even if you do use batteries in your robot, you can have a solar panel as well, to continuously charge the batteries. The best of both worlds!
In this chapter, you’ll learn about how to use these panels in your projects. Then you’ll bone up on breadboarding, which is a cool way of temporarily constructing circuits. Finally, you’ll build two sweet projects. The first is a solar-powered battery charger, and the second is a simple robot that is entirely powered by sunlight .
How Do Solar Panels Work?Solar cells are layers of semiconductive materials (shown in Figure 4.2) that create an electrical current when exposed to light. The earliest recorded observation of the photovoltaic effect took place in 1839 when Alexandre-Edmond Becquerel’s experiments with silver chloride produced voltage and current when exposed to light. By 1959, all satellites launched into space bore solar panels, and a little more than 50 years after that, we’re using them to power robots.
FIGURE 4.2 Silicon wafers consist of two layers of semi-conductive material.
You often hear different terms associated with solar technology. A solar cell is a piece of photovoltaic material, usually crystalline silicon. Solar cells are often connected into groups on a support structure, and these are called panels. A group of panels is an array.

BEAM Robotics 85
Solar cells are rated for direct current (DC) output under certain test conditions—a sunny June day in San Francisco, for instance. Measurement is in watts as well as photovoltaic efficiency. Finally, because the output is DC, you’d need an inverter to run household appliances off of it.
There are two kinds of solar cells. The most common are the crystalline silicon wafers I’ve been describing, which are covered in glass or plastic to protect the fragile cells.
The other kind of solar cell is flexible plastic. Called thin film solar cells , or TFSC, these consist of photovoltaic material deposited on a substrate. Originally used for solar-powered watches, flexible-film solar cells are more expensive than crystalline silicon and have a lower efficiency. However, they’re useful for situations where the panel needs to flex, or the weight of the panel becomes a consideration .
BEAM RoboticsOne of the earliest hobbyist uses for solar cells occurred in a phenomenon called BEAM (which stands for Biology, Electronics, Aesthetics, and Mechanics); these were analog robotics designed as if they were living things. Created in the 1990s by engineer Robert Tilden, BEAM was an attempt to make robots as simple as possible—no microchips or programs ran these bots. Instead, Tilden used discrete components, such as capacitors and resistors, to create sense-act behaviors. For example, the robot in Figure 4.3 senses light and then turns a motor.
FIGURE 4.3 This solar-powered robot spins when light strikes it. Credit: Adam Wolf

86 CHAPTER 4: Going Solar
The key to creating simple BEAM bots is tiny solar cells, which generate minute amounts of electricity; with the help of capacitors and other components, they generate enough electricity to move motors and turn on LEDs.
The biology aspect of BEAM comes into play because the robots frequently emulate insects and other living organisms. The circuits mimic the activities of biological neurons, and BEAM bots’ rudimentary control systems were intended to help the robots find food, just as a real being’s instincts might lead it to sustenance.
Tilden came up with three golden rules for BEAM robotics:
Make your robot as simple as possible. Recycle and reuse junked electronics. Use solar power.
BEAM aficionados use scientific terms to describe the various types of robots. For instance, photophobes are robots that retreat from the light, whereas a thermophile is attracted to heat. They also describe the beam bots by locomotion style: crawlers, jumpers, rollers, and so on .
Three Hobbyist-Friendly Solar CellsThere are many solar cells out there, but cataloging them is beyond the scope of this book. Instead, I’ll describe three inexpensive cells you can easily buy.
Flexible FilmThin, flexible, and durable, this type of solar cell is often used for curved surfaces, such as an radio control (RC) plane’s wings. The cell in Figure 4.4 is from Jameco.com (P/N 227985). It measures about 1½"×2½" and is paper thin. It generates 3V and costs about $4.
Jameco has other cells from the same manufacturer, ranging in size up to 10×6 inches. Adafruit also has a flexible solar cell, a 6V model (P/N 1485) that measures 4"× 8".
Three Hobbyist-Friendly Solar Cells 87
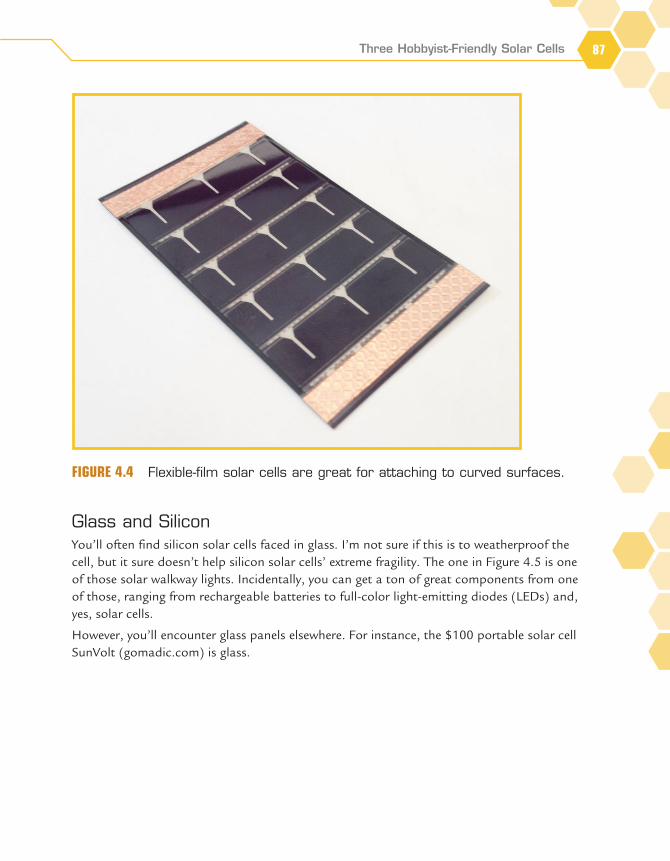
FIGURE 4.4 Flexible-film solar cells are great for attaching to curved surfaces.
Glass and SiliconYou’ll often find silicon solar cells faced in glass. I’m not sure if this is to weatherproof the cell, but it sure doesn’t help silicon solar cells’ extreme fragility. The one in Figure 4.5 is one of those solar walkway lights. Incidentally, you can get a ton of great components from one of those, ranging from rechargeable batteries to full-color light-emitting diodes (LEDs) and, yes, solar cells.
However, you’ll encounter glass panels elsewhere. For instance, the $100 portable solar cell SunVolt (gomadic.com) is glass.

88 CHAPTER 4: Going Solar
FIGURE 4.5 This solar cell came from a dismantled yard light.
Plastic and SiliconMost of the hobbyist solar panels you’ll encounter will consist of a board with one or more solar cells stuck to it and covered in clear resin. The Adafruit solar panel pictured in Figure 4.6 (P/N 417) is made up of 12 cells and delivers 6V at 3.7 watts and costs a reasonable $30. It’s pretty huge, about 7 inches on a side, but it would be great for larger projects.
I also have a smaller one, P/N YH30-18, from an unknown company. It’s roughly analogous to Jameco.com P/N 2136913. It’s about an inch long and has soldering points, and I’ve used it as a glorified light sensor in the past.

Prototyping Circuits 89
FIGURE 4.6 The most durable type of solar cells are made of plastic and silicon.
Prototyping CircuitsTo use solar cells, you need to level up your skills in laying out circuits. After a certain point, you need a way to connect and organize the wires and components. This section offers two ways; the first is using a solderless breadboard, which is a quick and easy way to prototype circuits. I’ll also show you how to solder, which uses conductive metal to stick components together. It’s fun!

90 CHAPTER 4: Going Solar
How to BreadboardAs you can see in Figure 4.7, the breadboard consists of a grid of wire holes. What you can’t see is that conductors are hidden in the plastic, so some of the rows of holes are linked together and some aren’t. So, without ado, let’s examine a breadboard’s architecture:
A. Ground bus—The ground bus is the strip of holes marked with a blue or black line. All the holes in this strip are linked together and typically are used for ground connections. Simply plug in the bus to your Arduino’s ground pin or the negative terminal of a battery pack.
B. Power bus—The power bus is configured the same as the ground bus and marked with a red line on most breadboards. Plug your power supply here and then connect components as needed to power them.
C. Terminal strips—These rows of holes are connected in groups of f ive, as marked in Figure 4.7. The various holes are given letters and numbers to help you organize your circuits.
D. Notch—The notch in the center of the breadboard separates the two sides—none of the hidden conductors cross the notch. If you want to connect the two sides, you’ll need to use wires! When breadboard projects involve integrated circuits or microchips (ICs), the chip is usually positioned to straddle the notch, and this provides limited air cooling.
FIGURE 4.7 A solderless breadboard is a convenient prototyping platform.
A C BD

Prototyping Circuits 91
Here’s an example of a simple breadboard project. Look at Figure 4.8 and follow along:
1. Plug in a resistor from the power bus to one of the terminal strips. I used a 10,000-ohm resistor (known as a 10K, Sparkfun P/N COM-11508). It doesn’t matter which wire goes where.
2. Plug in an LED. I used one of Sparkfun’s violet LEDs (P/N COM-12704) and it ended up rather dim. You might try swapping in a lower value of resistor. LEDs are polarized, meaning that one lead is positive and one is negative, and if you put it in backward, the LED won’t light up. Put the long lead of the LED (positive) in the same terminal strip as the resistor. The short end (negative) plugs into the ground bus.
3. Attach a 9V battery to a battery clip (Jameco P/N 109154), with the red lead plugged into the power bus and the black lead plugged into the ground bus. The LED should light up!
FIGURE 4.8 This simple project will show you how to use a breadboard.
How to SolderBreadboarding is well and good, but the best way to connect wires and components—assuming everything is working the way you expect—is to solder them. In this section, I’ll take you through a very quick but thorough guide to soldering.

92 CHAPTER 4: Going Solar
Soldering Toolkit
You’ll need the following supplies to solder:
Soldering iron—These come in many shapes and price points. You don’t have to spend a lot of money to get a quality iron, but the Radio Shack cheap one is not the solu-tion. The two irons I use are a Weller WES51 (just Google that P/N to find one) and an Xytronic XY-258 iron (Adafruit P/N 180) that I keep in my toolbox.Solder—Solder comes in a great number of formulations and gauges. Here’s a great sol-der and I use it for all of my projects: 0.31" gauge, rosin-core, 60/40 lead solder. You can buy it anywhere (Adafruit has it, P/N 145).Sponge or tip cleaner—It’s important to keep your iron’s tip clear of residue, such as melted jumper insulation and baked-on flux. Some irons, like the aforementioned WES51, have a sponge that comes with it, but many soldering pros swear by tip clean-ers like the Hakko 599B (Adafruit P/N 1172), which features a tangle of brass foil that cleans your iron without the need for a wet sponge.Vise—Small tabletop vises like the Panavise Jr. (Sparkfun P/N TOL-10410) help keep the printed circuit board (PCB) secure while you solder. Often they have suction cups or mounting holes for added security. You can usually hold the PCB in your hand or keep it on the table, so a vise is optional.Solder sucker—This is a tool for sucking up molten solder. Sparkfun has a cheap one (P/N TOL-00082), and Adafruit has a much nicer model that costs more (P/N 1597).Diagonal cutters—Use this for clipping off leads after you’re done soldering. Sparkfun has an inexpensive pair (P/N TOL-08794), and Adafruit has a nicer set made in Italy (P/N 152).Fume extractor—Soldering releases some toxic fumes. An ordinary desk fan or a special-ized fan called a fume extractor (Jameco P/N 2171786) will keep those noxious gases away from your respiratory tissues.
Anatomy of a PCB
Electronic projects usually include a printed circuit board, or PCB. These typically consist of a sheet of laminate embedded with traces (wires) and solder pads, which are the tiny plates onto which the components are soldered. There are also instructions screen-printed on the material. Let’s take a closer look at the typical circuit board in Figure 4.9:
A. Circuit board B. Screen-printed information C. Solder pads D. Traces

Prototyping Circuits 93
FIGURE 4.9 Screen-printed labels show you how to assemble the PCB.
Safety
Although soldering may seem dangerous—hot irons and lead poisoning!—I’m happy to say that it’s actually quite safe, as long as you follow some basic guidelines:
Beware of what your soldering iron’s tip is touching. The tip is upwards of 600 degrees and can start fires and burn skin. However, tip burns are part of the soldering experience and can be treated as you would any burn.
It’s suggested that you wear eye protection when clipping leads. These are the wires sticking out of electronic components, and they can go flying when clipped, potentially injuring you in the eyes. Better not to risk it.
A
D
B
C

94 CHAPTER 4: Going Solar
Solder is made out of lead, and that means that you shouldn’t ingest it. You should make a point to clean your hands and workspace after soldering. The latter can be cleaned up with ordinary household spray cleaner to make sure you’ve collected as much lead particulate as you can.
The fumes are also toxic. You should solder in a well-ventilated room or use a fan or fume extractor to keep those fumes away from your face .
Let’s Solder!
If you have all the stuff you need, you’re ready to solder! I’m illustrating the process by assembling a Blinky Grid kit from Wayne & Layne (wayneandlayne.com or Adafruit P/N 549), so if you’re intrigued, you know where to find one.
Follow along with the simple steps outlined in the following sections:
STEP 1 Set Up the Work Area
You usually want your soldering iron close at hand, as well as a nice work surface. If you want accessories like a fume extractor or vise, now is the time to grab them (Figure 4.10) .
FIGURE 4.10 Want to solder? Gather all your tools together.

Prototyping Circuits 95
STEP 2 Heat Up the Iron
Some irons don’t have an “on” switch; you just plug them in. If it’s got a switch, turn it on. Often an iron will have a temperature selector; if it does, set it to about 650 degrees, as you can see in Figure 4.11 .
FIGURE 4.11 Plug in your iron and heat it up!
STEP 3 Tin the Tip
The first word in soldering iron main-tenance is to “tin” the tip—basically, coating it in solder. This helps transmit heat, and if you tin your tip early and often, you will be rewarded with a hotter iron. Just touch the iron to a piece of solder and turn the iron around until the tip is coated, as you can see in Figure 4.12 .
FIGURE 4.12 Coat the tip of your iron with solder.

96 CHAPTER 4: Going Solar
STEP 4 Insert the Component
This is fairly self-evident. Components have wires sticking out of them, called leads. The circuit board normally indicates if a component is polarized. This means the leads have to be inserted in a certain way on the PCB. Also on the circuit board are little metal disks pierced with holes. These are the solder pads. Slide the component’s leads through the holes in the solder pads, just like in Figure 4.13.
FIGURE 4.13 Insert the component, making sure you got the polarity right.

Prototyping Circuits 97
STEP 5 Bend Back the Leads
Turn the PCB around so you’re looking at the back. Bend the leads of the component (as you can see in Figure 4.14) so it won’t fall out when you solder .
FIGURE 4.14 Bend the leads back to keep the component from falling out.

98 CHAPTER 4: Going Solar
STEP 6 Solder the Joint
Touch the iron’s tip to the lead and the solder pad for three seconds (Figure 4.15) and insert the end of a piece of solder. The solder should flow into the hole and rise into an even little hill .
FIGURE 4.15 Just add solder!
STEP 7 Examine the Joint
Before you move on, take a gander at the connection. It should be a neat little hill, like in Figure 4.16 .
FIGURE 4.16 A successfully soldered connection looks like a tiny hill!

Prototyping Circuits 99
STEP 8 Resolder as Necessary
Suppose your solder joint looks like the one in Figure 4.17—gooping up two solder pads. Grab your solder sucker, a spring-loaded piston that sucks away melted solder. Press down the plunger, then melt the solder with your iron while holding the solder sucker close. When the solder starts to flow, press the but-ton on the piston and it will suck the solder away.
FIGURE 4.17 Too much solder? Grab a solder sucker.
STEP 9 Clip the Lead
When the solder joint looks the way you like it, clip the lead as close to the joint as you can manage (see Figure 4.18). Ready for the next component !
FIGURE 4.18 Clip the excess lead off. You’re done!

100 CHAPTER 4: Going Solar
Using Solar Power to Charge BatteriesIf you’ve ever seen a solar yard light, you’ll know that it’s easy to charge batteries using solar power. Let me edit that: it’s easy to charge some batteries. It’s easy to charge the cheaper end of the battery spectrum. I’m talking the NiMh and NiCad batteries, found in the usual sizes and costing somewhat more.
All you need to charge one of these batteries is to connect it to an electrical source—the only caveat being you should protect the battery from the circuit reversing polarity, which can damage your batteries. To do this, you add a diode (such as 1N4001 diode, Adafruit P/N 755) between the positive lead of the solar cell and the positive lead on the battery pack, as seen in Figure 4.19.
FIGURE 4.19 Protect your solar cell from energy flowing back into the battery pack.
If you want to use one of those more compact LiPoly batteries in your project, an example is Adafruit’s Lithium Ion Polymer battery (P/N 1578) that delivers 3.7v at 500mAh, and they have a number of variants if that’s not the configuration you want.
Adafruit also sells a solar charger (P/N 390) that goes with the battery, as well as solar panels (such as P/N 417) guaranteed to work with it. You can see this arrangement in Figure 4.20. The advantage with going with a preconfigured setup like Adafruit’s is that you know it works, with no experimentation or ordering new parts when one configura-tion doesn’t work.

Project: DIY Solar Panel 101
FIGURE 4.20 A LiPoly battery getting charged with a solar panel.
Project: DIY Solar PanelOne cool thing about solar panels is that you are not limited to just one. You can take a bunch of separate panels, or even fragments of panels, and solder them together to make a larger one. You can do this one of two ways. The first is to connect them in series, which means that the negative lead of one cell connects to the positive lead of the next. When a number of cells are connected this way, the voltage is the sum of the various panels and the amps remain the same. For example, two 12V 3.5-amp cells wired in series output 24V at 3.5 amps. By contrast, if you were to wire those cells in parallel, where all the positive leads are connected together and all the negative leads are connected together, you’d get an out-put of 12V at 7 amps.
Why would you want one over the other? It all depends on what you’re using it for. Motors use a lot of amps, for instance. Go ahead and try both ways of wiring up your panels, testing each way with a multimeter. See Chapter 9, “Robot-Builder’s Tool Box,” to learn more about this great too l.

102 CHAPTER 4: Going Solar
Parts ListTo make your own multicell solar panel, you’ll need the following parts. Follow along with Figure 4.21:
Pieces of solar panel or a number of separate panels. One option is the Jameco Solar Cell Grab Bag (jameco.com, P/N 2113666), which consists of factory-extra solar cells in irregular shapes. The downside to that option is that you have to solder all the parts together. Another option is to buy individual solar panels already equipped with wires, and then manually connect them.
Stranded hookup wire like Sparkfun P/N 11375. Soldering supplies (optional). If you decide to solder and need help, I teach you how to
solder earlier this chapter. A board or other surface on which to stick the solar cells. Hot glue or some other kind of adhesive .
FIGURE 4.21 You’ll need the following parts to make your DIY solar cells.

Project: DIY Solar Panel 103
Step-by-StepsFollow along with these steps to build your DIY solar cells:
STEP 1 Decide how many volts and amps you want. Measure each panel’s output and determine whether to go with serial or parallel. If in doubt, I suggest serial because it’s easier to wire together! In Figure 4.22, I show two solar panels soldered in series, connected to a multimeter. Note that I used solid hookup wire when prototyping this project. Big mistake—the solid wire is too stiff. Stranded wire is more flexible, which is easier on fragile solder joints, and it lays flat better.
FIGURE 4.22 Connect your solar cells in series.

104 CHAPTER 4: Going Solar
STEP 2 Connect the cells together in series. This means the positive wire of one cell connects to the negative wire of the next cell. On cells without wires, you will need to solder them on. The entire metallic backing of the cell is the positive lead, and the shiny strips on the front are negative, as shown in Figure 4.23. However, if your solar cells have wire leads, you don’t have to bother with all that.
FIGURE 4.23 Solder one wire to the positive and one to the negative lead.

Project: DIY Solar Panel 105
STEP 3 Glue the cells to the board. You may want to secure the sol-der joints with a little hot glue as well, as shown in Figure 4.24.
FIGURE 4.24 A little hot glue can help keep the solder joints secure.
STEP 4 Hook up the cells as shown in Figure 4.25—each positive wire is plugged into its neighbor’s negative wire.
FIGURE 4.25 Hook up the solar cells in series.

106 CHAPTER 4: Going Solar
TIPThe entire metallic backing of the solar cell is the positive lead, and the shiny strips on the front are negative.
Project: Making a Solar SpinnerLet’s make the most basic solar-powered motor possible. It’s not just a solar panel con-nected to a motor, but it’s close. It’s called a Solar Spinner because the entire robot, except for the base, spins in the light.
What makes the robot work is a capacitor, an electronic component that stores a small amount of voltage inside an electrical field. In a way, it works like a small battery, charging up as solar power trickles in, and then releasing the electricity when the cap is full. See Figure 4.26.
FIGURE 4.26 The Solar Spinner turns when the sun’s out.

Project: Making a Solar Spinner 107
Parts ListYou’ll need the following parts to build your Solar Spinner (see Figure 4.27):
3V DC motor—Jameco P/N 2158442. A small solar panel—Harvest one from a yard light, or Jameco has a good one, P/N
2136921. Stranded wire—Jameco P/N 2187876. 1-Farad, 5.5V capacitor—Jameco P/N 142957.
FIGURE 4.27 Grab these parts to build your Spinner.
Step-by-StepsThis is a very simple build, so let’s get started!
STEP 1 Solder the negative lead of the solar panel to the negative lead of the capacitor, and then connect both to the negative port of the motor. See Figure 4.28.
FIGURE 4.28 Connect the negative leads of the three components.

108 CHAPTER 4: Going Solar
STEP 2 Connect the negative lead of the solar panel to the negative lead of the capaci-tor, and then solder both to the negative port of the motor. See Figure 4.29.
FIGURE 4.29 You guessed it—now connect the negatives.
What you basically have is a motor that turns when direct sunlight strikes the solar panel. What you do with that is up to you. Some folks have added a rubber knob to the motor, and the whole assembly rolls in circles like a one-wheeled car.

Summary 109
I decided to have the motor, cap, and solar panel rotate around the hub, with the hub fixed in place. You can see what I came up with in Figure 4.26.
SummaryIn this chapter, you found out about solar panel technology, learned how to breadboard, and even created not one but two simple solar projects: a solar panel made up of different pieces of solar cell, and a solar spinner BEAM robot. In Chapter 5, “Controlling Your Robot,” we’ll check out four ways of controlling your robot, with techniques ranging from a classic remote control rig ranging up to an Arduino and motor control shield.

This page intentionally left blank

Symbols3D-printed beams, creating, 2143D printers, 265, 280
anatomy, 280-281how to use, 282
AAbsolute Beginner’s Guide to Building Robots,
153active IR (infrared), 163-164Actobotics Building System, 199Actobotics chassis project, 234
parts list, 234-235step-by-steps, 236-245
Adafruit Industries, 150diagonal cutters, 92mini remote control, 165motor shield, 117PCB ruler, 263solar cells, 86
adapting code examples, 151Adobe Illustrator, 360Adobe Photoshop, 359-360agricultural drones, 6Allmont, Alex, 37
Altman, Mitch, 162anatomy of robots, 7-8animatronic robots, 4Apostolidis, Dimos, 50aquatic robots. See submersiblesArcBotics Sparki, 23Arc-O-Matic, 32Arduino Adventure (Kelly and Timmis), 152Arduino.cc, 150Arduino Cookbook (Margolis), 152Arduino for Beginners (Baichtal), 152Arduino IDE
Blink sketch, 148-149code examples
adapting, 151finding, 149-150
overview, 146-147Arduino Uno–controlled robot, 123
parts list, 123-124programming, 127-129step-by-steps, 125-127
arrays, 84artbots, 351
car-based artbots, 355dot matrix, 357-358Eggbot, 354
Index

392 artbots
G-codeconverting images to, 358-361converting line drawings to, 361
Paint Pendulum, 356-357plotters, 353-354Rolling ‘Riter project, 362
code, 380-383parts list, 363step-by-steps, 365-380
sand plotters, 355vibration-based drawbots, 352-353v-plotter robots, 352
Astro Droids, 25autonomous robots, 112axes, 276axles, 61
BBaichtal, John, 152Ball-Balancing Robot, 29Balloon Bot, 46ballpoint pens, 264band saws, 266Banzi, Massimo, 153basic wheeled robot project, 76
parts list, 77step-by-steps, 78-81
basic wheels, 58batteries, 73
charging with solar power, 100BattleBots, 4BEAM robotics, 85-86beams in building sets, 205
3D-printed beams, 214Beatty, Camille, 27Beatty, Genevieve, 27Beatty, Robert, 27Beckler, Matthew, 153belly construction (toolbox), 252
Benedettelli, Daniele, 34Bionicle eyes, 369Blink sketch, 148-149Blogs, Sylvia’s Super-Awesome Maker Show,
22body, 7bomb disposal robots, 6Boock, James, 39book recommendations, 152-153Branwyn, Gareth, 153breadboards, 90-91building sets, 72, 191-192
Actobotics chassis, 234parts list, 234-235step-by-steps, 236-245
choosing, 203beams, 205connector plates, 207electronics, 208gears, 208material, 204motor mounts, 206wheels and tank treads, 209
combining, 210Aluminum Beams—LEGO, 212Tamiya-LEGO, 210-211Vex-MicroRax, 213
creating new parts for, 2143D-printed beams, 214laser-cut plates, 215
examples, 197Actobotics Building System, 199LEGO Mindstorms and Technic sets,
198Makeblock, 200MakerBeam, 202MicroRax, 200-201Tamiya, 203
LEGO Mindstorms EV3 chassis project, 216
parts list, 216step-by-steps, 217-225

CNC (Computer Numerically Controlled) tools 393
Makeblock chassis, 226parts list, 227step-by-steps, 228-233
uses forchassis, 194enclosures, 192-193furniture, 196gantries, 193hardware mounts, 195
buzzbotsComputer Fan Buzzbot, 15
parts list, 16step-by-steps, 17-18
explained, 10Pizza Saver Vibrobot, 11
parts list, 12step-by-steps, 13-14
Ccables, 269-270calipers, 263CamBam, 361car-based artbots, 355Cartesian coordinates, 276case statement, 145cases, Pelican 1000-series, 333-334caster wheels, 60characteristics of robots, 3-4charging batteries with solar power, 100chassis, 7, 70
building sets, 72, 194, 216Actobotics chassis, 234-245LEGO Mindstorms EV3 chassis,
216-225Makeblock chassis, 226-233
custom chassis, 71pre-made chassis, 70
choosingbuilding sets, 203
beams, 205connector plates, 207
electronics, 208gears, 208material, 204motor mounts, 206wheels and tank treads, 209
motorsDC motors, 57servos, 56-57stepper motors, 55
toolboxes, 248belly construction, 252cloth toolboxes, 250compartments, 252handles, 253metal toolboxes, 249plastic toolboxes, 249-250size, 248trays, 251
circuits, prototyping, 89breadboards, 90-91soldering, 91-99
Clash of Fractions, 37claws
Dagu Robotic Claw, 294-295explained, 290VEX Claw, 293
cleaning bots, 4cleaning robots, 6clipping lead, 99cloth toolboxes, 250clothes for workshop safety, 9CNC (Computer Numerically Controlled)
tools, 265, 2703D printers, 280
anatomy, 280-281how to use, 282
laser cutters, 270anatomy, 271-274how to use, 274-275
routers, 276anatomy, 277-278how to use, 279

394 cocktail robots
cocktail robots, 5code examples
adapting, 151finding, 149-150
code listingsDart Sentry, 187-189Floating Fanbot project, 348-349IR-controlled robot, 171-173Rolling ‘Riter project, 380-383
codes (IR), discovering, 167-168code, 169parts list, 168step-by-steps, 169
coffee grounds gripper project, 314parts list, 315-316step-by-steps, 317-328
combat robots, 4combining building sets, 210
Aluminum Beams—LEGO, 212Tamiya-LEGO, 210-211Vex-MicroRax, 213
company websites, 150compartments (toolbox), 252compasses, 264Computer Fan Buzzbot, 15
parts list, 16step-by-steps, 17-18
Computer Numerically Controlled (CNC) tools, 265, 270
3D printers, 280anatomy, 280-281how to use, 282
laser cutters, 270anatomy, 271-274how to use, 274-275
routers, 276anatomy, 277-278how to use, 279
connector plates in building sets, 207control systems, 8controlling robots, 111
Arduino Uno–controlled robot, 123
parts list, 123-124programming, 127-129step-by-steps, 125-127
autonomous robots, 112infrared (IR), 112-113Me Motor Driver–controlled robot, 130
parts list, 131programming, 140-141step-by-steps, 132-139
microcontroller/microcomputer, 116motor controllers, 117
Adafruit motor shield, 117Adafruit’s motor shield, 117Makeblock Me Motor Driver, 118-
119, 130-141Schmalzhaus EasyDriver, 118
radio control (RC), 119electronic speed controllers (ESCs),
121-122receivers, 121transmitters, 120
web-controlled robots, 113-114wireless control, 115-116
convertingimages to G-code, 358-361line drawings to G-code, 361
CoolerBot, 51Cornfield Electronics, 162Craftsman 21-inch toolbox, 257custom chassis, 71customizing building sets, 210
combined sets, 210-213new parts, creating, 214-215
cutting tools, 269
DDagu Robotic Claw, 294-295Dart Sentry project, 173
code, 187-189operation, 189parts list, 174

395Floating Fanbot project
step-by-steps, 175-186DC motors, 57Debugging with serial monitor, 151-152Declaring variables, 145definition of robots, 2-4Delay statement, 144diagonal cutters, 92, 259diameter of axles/wheels, 61Diatom Studios, 47displacement, 330DIWire Bender, 41DIY Solar Panel project, 101
parts list, 102step-by-steps, 103-105
DIY Wheels project, 65parts list, 66step-by-steps, 67-69
DMU (Drink-Making Unit), 26dot matrix, 357-358drawbots, 351
car-based artbots, 355dot matrix, 357-358Eggbot, 354G-code
converting images to, 358-361converting line drawings to, 361
Paint Pendulum, 356-357plotters, 353-354Rolling ‘Riter project, 362
code, 380-383parts list, 363step-by-steps, 365-380
sand plotters, 355vibration-based drawbots, 352-353v-plotter robots, 352
drawing tools, 264dremels, 266drill press, 266drills, 266Drink-Making Unit (DMU), 26drivers, 257-258
drones, 5.dxf files, 361
Eear protection, 9EasyDriver (Schmalzhaus), 118Edit menu, 146Edman, Lenore, 22Eggbot, 354electrical tape, 268electromagnets, 289electronic speed controllers (ESCs),
121-122electronics in building sets, 208electronics tools, 259Else statement, 144-145EMSL (Evil Mad Scientist Laboratories)
DMU (Drink-Making Unit), 26The Original Egg-Bot, 354Watercolor Bot, 22
Enclosures, creating with building sets, 192-193
ESCs (electronic speed controllers), 121-122
Evil Mad Scientist Laboratories (EMSL)DMU (Drink-Making Unit), 26The Original Egg-Bot, 354Watercolor Bot, 22
eye safety, 9
FFeldman, Zach, 36File menu, 146files, 266
.dxf files, 361svg files, 360
finding code examples, 149-150Fletcher, Chuck, 40flexible firm solar cells, 86-87Floating Fanbot project, 334

396 Floating Fanbot project
code, 348-349parts list, 335-336step-by-steps, 337-348
flotation devices, 330Flowerbot, 50flyer-distributing robot, 49food and drink bots, 5For statement, 144Fraser, Neil, 38fume extractors, 92furniture, creating with building sets, 196
GGantries, creating with building sets, 193G-code
converting images to, 358-361converting line drawings to, 361
gears in building sets, 208Getting Started with Arduino (Banzi), 153Gilday, David, 28GIMP (GNU Image Manipulation Program),
359glass/silicon solar cells, 87-88glue
hot glue, 267super glue, 268
GNU Image Manipulation Program (GIMP), 359
goggles, 9grippers
coffee grounds gripper project, 314parts list, 315-316step-by-steps, 317-328
explained, 284Groboduino, 50ground bus, 90
Hhair, pinning up, 9hand drills, 266handles (toolbox), 253hardware, 268hardware mounts, creating with building
sets, 195heat shrink, 259heating up soldering irons, 95Help menu, 146Hex wrenches, 258HK-T6A, 114Hobby King, 61hobby knife sets, 269hot glue, 267HUB-ee
control breakout boards, 363prototyping shield, 363wheels, 363, 370
hubs, 69humanness, 4humanoid hands, 288humanoids, 5Husky 41-inch 13-drawer tool cabinet, 256
Iif/else statement, 144-145Illustrator, 360Images, converting to G-code, 358-361infrared (IR), 112-113, 161
Dart Sentry project, 173code, 187-189operation, 189parts list, 174step-by-steps, 175-186
IR codes, discovering, 167-168code, 169parts list, 168step-by-steps, 169

397Makeblock
IR-controlled robot project, 169code, 171-173parts list, 169-170step-by-steps, 170-171
IR remote controls, 165Adafruit mini remote control, 165Makeblock infrared receiver and
remote controller, 166Sparkfun infrared remote control, 166
passive versus active IR, 163-164uses for infrared signals, 162-163with water robots, 332
Inkscape, 360InMoov, 40Internet-controlled robots, 113-114interrupts, 145IR. See infrared (IR)iRobot Roomba, 6-7irons (soldering), 92, 95, 262IRrecvDemo, 168
JJameco solar cells, 86jamming transition, 284jeweler’s screwdrivers, 258jewelry and workshop safety, 9
Kkeel, 332Kelly, James F., 152Kennedy, Erin, 1-2knife sets, 269
LLang, David, 24Langevin, Gael, 40laser-cut pincers project
parts list, 307-308step-by-steps, 309-314
laser-cut plates, creating, 215laser cutters, 265, 270
anatomy, 271-274how to use, 274-275
lava lamp centrifuge, 38lead, clipping, 99LEGO
Aluminum Beams—LEGO combined building sets, 212
LEGO Mindstorms EV3 chassis project, 216
parts list, 216step-by-steps, 217-225
LEGO Pincer project, 296parts list, 296-297step-by-steps, 298-306
LEGO Mindstorms, 198-201LEGO Turing machine, 30Tamiya-LEGO combined building sets,
210-211LEGOnardo, 34libraries, 150
Adafruit IR remote library, 167Ken Shirriff’s IR library, 168
line drawings, converting to G-code, 361loops
explained, 145interrupts, 145while, 145-146
Lyneborg, Frits, 44
MMake: LEGO and Arduino Projects (Baichtal
et al), 153Makeblock, 48, 200
chassis project, 226parts list, 227step-by-steps, 228-233
infrared receiver and remote controller, 166
398 Makeblock
Me Motor Driveroverview, 118-119sample project, 130-141
plotter, 353Strong Robot Gripper, 292
MakerBeam building sets, 202manipulators, 283
clawsDagu Robotic Claw, 294-295explained, 290VEX Claw, 293
coffee grounds gripper project, 314parts list, 315-316step-by-steps, 317-328
commercial manipulator optionsDagu Robotic Claw, 294-295Makeblock Strong Robot Gripper, 292uFactory arm, 294VEX Claw, 293
electromagnets, 289humanoid hands, 288laser-cut pincers project
parts list, 307-308step-by-steps, 309-314
LEGO Pincer projectparts list, 296-297step-by-steps, 298-306
pens, 291-292pincers
explained, 288laser-cut pincers project, 307-314LEGO Pincer project, 296-306
pneumatic, 287scoops, 285tentacles, 286universal grippers, 284winchs, 291
manufacturing robots, 6Margolis, Michael, 152markers, 264Mars rover replica, 27
material for building sets, 204measurement tools, 263measurements (wheel), 61measuring tape, 263Me Motor Driver (Makeblock)
overview, 118-119sample project, 130
parts list, 131programming, 140-141step-by-steps, 132-139
menusEdit, 146File, 146Help, 146Tools, 146
metal toolboxes, 249Meyer, Adam, 33microcomputers, 116microcontrollers, 116
sensitivity to moisture, 333MicroRax building sets
overview, 200-201Vex-MicroRax combined sets, 213
MindCub3r, 28Mindstorms EV3 chassis (LEGO), 198, 216
parts list, 216step-by-steps, 217-225
mininformation about robots, 4misconceptions about robots, 4motor boards, swapping, 130
parts list, 131programming, 140-141step-by-steps, 132-139
motor controllers, 117Adafruit motor shield, 117Makeblock Me Motor Driver
overview, 118-119sample project, 130-141
Schmalzhaus EasyDriver, 118Motor Shield (Adafruit), 117

399Philips screwdrivers
motors, 8components, 54DC motors, 57motor boards, swapping, 130
parts list, 131programming, 140-141step-by-steps, 132-139
motor controllersAdafruit motor shield, 117Makeblock Me Motor Driver,
118-119, 130-141Schmalzhaus EasyDriver, 118
motor mounts in building sets, 206sensitivity to moisture, 333servos, 56-57stepper motors, 55
mounting hardware, 61multimeters, 259-261multitools, 269myths about robots, 4
NNeoPixels, 150Nerdage.net, 42Nerf sentry gun, 43Noise Induced Hearing Loss (NIHL), 9Norris, Steve, 46, 51notches (breadboard), 90notebooks, 264numerically controlled tools, 5
Oomni wheels, 59OpenROV, 24, 331Orbital Rendersphere, 36Oskay, Windell, 22Overweel, Leon, 49
PPaint Pendulum, 356-357Panavise Jr. vise, 92Pancake Bot, 45Park, John Edgar, 43parts for building sets, creating
3D-printed beams, 214laser-cut plates, 215
parts listsActobotics chassis project, 234-235Arduino Uno–controlled robot, 123-124basic wheeled robot, 77coffee groups gripper project, 315-316Computer Fan Buzzbot, 16Dart Sentry project, 174DIY Solar Panel project, 102DIY Wheels, 66Floating Fanbot project, 335-336IR codes, discovering, 168IR-controlled robot, 169-170laser-cut pincers project, 307-308LEGO Mindstorms EV3 chassis, 216LEGO Pincer project, 296-297Makeblock chassis project, 227Me Motor Driver–controlled robot, 131Pizza Saver Vibrobot, 12Rolling ‘Riter project, 363Solar Spinner project, 107ultrasonic sensor project, 154-155
passive IR (infrared), 163-164PCBs (printed circuit boards), 92PCD ruler (Adafruit), 263Pelican 1000-series cases, 333-334Pelican 1460 Mobile Tool Chest, 254pencils, 264pens, 264, 291Pensa Labs, 41permanent markers, 264Philips screwdrivers, 257

400 phone chargers
phone chargers, 270Photoshop, 359-360Piccolo, 47pincers
explained, 288laser-cut pincers project
parts list, 307-308step-by-steps, 309-314
LEGO Pincer projectparts list, 296-297step-by-steps, 298-306
PIR (passive infrared), 163-164Pizza Saver Vibrobot, 11
parts list, 12step-by-steps, 13-14
plant-watering robot, 42plastic/silicon solar cells, 88plastic toolboxes, 249-250plastic treads, 62plotterbots, 352plotters, 353-354pneumatic, 287power
batteries, 73power bus, 90power supply, 8, 269solar panels, 74wall warts, 75water robots, 330-331
power bus, 90pre-made chassis, 70preventing water damage
sensitive components, 333waterproof enclosures, 333-334
printed circuit boards (PCBs), 92printers (3D), 265
anatomy, 280-281how to use, 282
Programmable Universal Machine for Assembly (PUMA) robots, 6
programming, 143Arduino IDE
Blink sketch, 148-149overview, 146-147
Arduino Uno–controlled robot, 127-129code examples
adapting, 151finding, 149-150
debugging with serial monitor, 151-152definition of, 144Floating Fanbot project, 348-349Me Motor Driver–controlled robot,
140-141recommended books, 152-153Rolling ‘Riter project, 380-383statements
Delay, 144For, 144if/else, 144-145loops and interrupts, 145switch/case, 145while, 145-146
ultrasonic sensor projectcode, 157-159parts list, 154-155step-by-steps, 155-157
variables, 145projects
Actobotics chassis, 234parts list, 234-235step-by-steps, 236-245
Arc-O-Matic, 32Arduino Uno–controlled robot
parts list, 123-124programming, 127-129step-by-steps, 125-127
Astro Droids, 25Ball-Balancing Robot, 29Balloon Bot, 46basic wheeled robot, 76
parts list, 77step-by-steps, 78-81

401projects
Clash of Fractions, 37coffee grounds gripper, 314
parts list, 315-316step-by-steps, 317-328
Computer Fan Buzzbot, 15parts list, 16step-by-steps, 17-18
CoolerBot, 51Dart Sentry, 173
code, 187-189operation, 189parts list, 174step-by-steps, 175-186
DIWire Bender, 41DIY Solar Panel, 101
parts list, 102step-by-steps, 103-105
DIY Wheels, 65parts list, 66step-by-steps, 67-69
Drink-Making Unit (DMU), 26Floating Fanbot project, 334
code, 348-349parts list, 335-336step-by-steps, 337-348
Flowerbot, 50flyer-distributing robot, 49InMoov, 40IR codes, discovering, 167
code, 169parts list, 168step-by-steps, 169
IR-controlled robotcode, 171-173parts list, 169-170step-by-steps, 170-171
laser-cut pincersparts list, 307-308step-by-steps, 309-314
lava lamp centrifuge, 38
LEGO Mindstorms EV3 chassisparts list, 216step-by-steps, 217-225
LEGO Pincerparts list, 296-297step-by-steps, 298-306
LEGO Turing machine, 30LEGOnardo, 34Makeblock chassis, 226
parts list, 227step-by-steps, 228-233
Mars rover replica, 27MindCub3r, 28Nerf sentry gun, 43OpenROV, 24Orbital Rendersphere, 36Pancake Bot, 45Piccolo, 47Pizza Saver Vibrobot, 11
parts list, 12step-by-steps, 13-14
plant-watering robot, 42Quakescape, 39Rolling ‘Riter, 362
code, 380-383parts list, 363step-by-steps, 365-380
Sir Mix-a-Bot, 31Sisyphus, 35Soft-Boiled Eggbot, 33Solar Spinner, 106
parts list, 107step-by-steps, 107-109
Sparki, 23ultrasonic sensor project
code, 157-159parts list, 154-155step-by-steps, 155-157
Watercolor Bot, 22Xylophone Bot, 48Yellow Drum Machine, 44

402 project sites
project sites, 150propellers, 331propulsion (water robots), 331-332prototyping circuits, 89
breadboards, 90-91soldering, 91
PCBs (printed circuit boards), 92safety, 93-94soldering toolkit, 92step-by-steps, 94-99work areas, 94
protractors, 263PUMA (Programmable Universal Machine
for Assembly) robots, 6
Q-RQuakescape, 39
radio control (RC), 114-115, 119-120Arduino Uno–controlled robot
parts list, 123-124programming, 127-129step-by-steps, 125-127
electronic speed controllers (ESCs), 121-122
receivers, 121transmitters, 120
ratcheting drivers, 258RC. See radio controlreal-world robots, 6receivers (RC), 121recommended books, 152-153remote controls
IR (infrared) remote controlsAdafruit mini remote control, 165Dart Sentry project, 173-189IR codes, discovering, 167-169IR-controlled robot project, 169-173Makeblock infrared receiver and
remote controller, 166
Sparkfun infrared remote control, 166radio control (RC), 114-115, 119-120
Arduino Uno–controlled robot, 123-129
electronic speed controllers (ESCs), 121-122
receivers, 121transmitters, 120
water robots, 332Remotely Operated Vehicles (ROVs), 5Roberts, Dustyn, 153RoboBrrd, 1-2robobrrd.com, 1RobotGrrl (Erin Kennedy), 1-2Rolling ‘Riter project, 362
code, 380-383parts list, 363step-by-steps, 365-380
4-AA battery pack, 3809V battery, 379Arduino and shield, 379chassis, 365HUB-ee wheels, 370LEGO chalk holder, 372-378LEGO wheel assemblies, 370LEGO wheel mounts, 366-369
rolling robots, 53-54basic wheeled robot project, 76
parts list, 77step-by-steps, 78-81
chassis, 70building sets, 72custom chassis, 71pre-made chassis, 70
DIY Wheels project, 65parts list, 66step-by-steps, 67-69
motorscomponents, 54DC motors, 57servos, 56-57

403solar-powered robots
stepper motors, 55power
batteries, 73solar panels, 74wall warts, 75
wheelsbasic wheels, 58caster wheels, 60configuration, 58-60measurements, 61omni wheels, 59rubber wheels, 59tires versus treads, 64treads, 61-64
Roomba, 6-7Rorke, Tiago, 47rotary tools, 266routers, 265, 276
anatomy, 277-278how to use, 279
ROVs (Remotely Operated Vehicles), 5rubber treads, 63-64rubber wheels, 59rudders, 331rulers, 263
Ssafety, 9, 93-94sample code
adapting, 151finding, 149-150
sand plotters, 355Saul, Greg, 47saws, 266Schmalzhaus EasyDriver, 118scissors, 269scoops, 285screwdrivers, 257-258security bits, 258segmented plastic treads, 62
segmented rubber treads, 63sensors, 8
sensitivity to moisture, 333ultrasonic sensor project, 154
code, 157-159parts list, 154-155step-by-steps, 155-157
sentience, 4serial monitor, debugging with, 151-152servos, 56-57Shapiro, Bruce, 35, 354-355Sharpies, 264Shirriff, Ken, 168shishi odoshi, 26shoes, 9silicon solar cells
glass/silicon, 87-88plastic/silicon, 88
Sir Mix-a-Bot, 31Sisyphus, 35, 355size of toolboxes, 248sketches, 129Smith, Craig, 25socket sets, 258Soft-Boiled Eggbot, 33solar cells
flexible firm solar cells, 86-87glass/silicon solar cells, 87-88plastic/silicon solar cells, 88
solar panels, 74solar-powered robots
arrays, 84BEAM robotics, 85-86charging batteries with solar power, 100DIY Solar Panel project, 101
parts list, 102step-by-steps, 103-105
how it works, 84-85overview, 83-84
404 solar-powered robots
prototyping circuits, 89breadboards, 90-91soldering, 91-99
solar cellsflexible firm solar cells, 86-87glass/silicon solar cells, 87-88plastic/silicon solar cells, 88
Solar Spinner project, 106parts list, 107step-by-steps, 107-109
TFSC (thin film solar cells), 85Solar Spinner project, 106-109solder, 92, 262solder suckers, 92, 262soldering, 91
PCBs (printed circuit boards), 92safety, 93-94solder suckers, 92, 262soldering irons, 92, 262
heating up, 95tinning the tip, 95
soldering tools, 262soldering toolkit, 92step-by-steps, 94-99work areas, 94
soldering irons, 92, 262heating up, 95tinning the tip, 95
soldering tools, 262solid rubber treads, 64space exploration robots, 6Sparkfun, 118
diagonal cutters, 92infrared remote control, 166solder sucker, 92
Sparki, 23sponges, 92, 262stabilization (water robots), 332Stack-On 39-bin drawer cabinet, 255Stackpole, Eric, 24
statementsDelay, 144For, 144if/else, 144-145loops and interrupts, 145switch/case, 145while, 145-146
steering water robots, 331step-by-steps
Actobotics chassis project, 236-245Arduino Uno–controlled robot, 125-127basic wheeled robot, 78-81coffee groups gripper project, 317-328Computer Fan Buzzbot, 17-18Dart Sentry project, 175-186DIY Solar Panel project, 103-105DIY Wheels project, 67-69Floating Fanbot project, 337-348IR codes, discovering, 169IR-controlled robot, 170-171laser-cut pincers project, 309-314LEGO Mindstorms EV3 chassis, 217-225LEGO Pincer project, 298-306Makeblock chassis project, 228-233Me Motor Driver–controlled robot,
132-139Pizza Saver Vibrobot, 13-14Rolling ‘Riter project, 365-380
4-AA battery pack, 3809V battery, 379Arduino and shield, 379chassis, 365HUB-ee wheels, 370LEGO chalk holder, 372-378LEGO wheel assemblies, 370LEGO wheel mounts, 366-369
Solar Spinner project, 107-109ultrasonic sensor project, 155-157
stepper motors, 55subdividers (toolbox)
compartments, 252trays, 251

405tools
submersibles, 332-333Sugru, 268SunVolt, 87super glue, 268.svg files, 360swapping motor boards, 130
parts list, 131programming, 140-141step-by-steps, 132-139
switch/case statement, 145Sylvia’s Super-Awesome Maker Show (blog),
22
Ttable saws, 266tack hammers, 266Tamiya building sets
overview, 203Tamiya-LEGO combined building sets,
210-211tank treads, 61, 64
in building sets, 209segmented plastic treads, 62segmented rubber treads, 63solid rubber treads, 64
Technic sets, 198Teddy Ruxxpin, 4tentacles, 286terminal strips, 90TFSC (thin film solar cells), 85The Original Egg-Bot, 354Thickness of wheels, 61thin film solar cells (TFSC), 85Timmis, Harold, 152tinning the tip (soldering irons), 95tip cleaner (soldering), 92tires versus treads, 61-64Todd, Sylvia, 22
toolboxes, 247choosing
belly construction, 252cloth toolboxes, 250compartments, 252handles, 253metal toolboxes, 249plastic toolboxes, 249-250size, 248trays, 251
Craftsman 21-inch toolbox, 257Husky 41-inch 13-drawer tool cabinet,
256Pelican 1460 Mobile Tool Chest, 254Stack-On 39-bin drawer cabinet, 255tools
cables, 269-270CNC. See CNC toolscutting tools, 269drivers, 257-258electronics, 259measurement tools, 263soldering tools, 262tools for attaching things, 267-268woodworking tools, 266-267wrenches, 257-258writing/drawing tools, 264
toolscables, 269-270CNC (Computer Numerically Controlled)
tools, 2653D printers, 280-282laser cutters, 270-275routers, 276-279woodworking tools, 266-267
cutting tools, 269drivers, 257-258electronics, 259measurement tools, 263soldering tools, 262tools for attaching things, 267-268

406 tools
wrenches, 257-258writing/drawing tools, 264
Tools menu, 146Tower Hobbies, 61transmitters (RC), 120trays (toolbox), 251treads, 61
in building sets, 209segmented plastic treads, 62segmented rubber treads, 63solid rubber treads, 64
tunnel crawlers, 6Turing, Alan, 30TV-B-Gone, 162types of robots, 4-5
UuFactory
arm, 294Ball-Balancing Robot, 29
ultrasonic sensor projectcode, 157-159parts list, 154-155step-by-steps, 155-157
Universal Gripper, 46universal grippers, 284USB cables, 270usefulness, 4
VValenzuela, Miguel, 45variable power supply, 259variables, 145VEX Claw, 293vibration-based drawbots, 352-353vibrobots
Computer Fan Buzzbot, 15parts list, 16step-by-steps, 17-18
explained, 10Pizza Saver Vibrobot, 11
parts list, 12step-by-steps, 13-14
vinyl cutters, 265vises, 92, 262v-plotter robots, 352
Wwall warts, 75Watercolor Bot, 22water damage, preventing
sensitive components, 333waterproof enclosures, 333-334
waterproof enclosures, 333-334water robots, 329
Floating Fanbot project, 334code, 348-349parts list, 335-336step-by-steps, 337-348
flotation devices, 330power supply, 330-331propulsion, 331-332remote control, 332stabilization, 332steering, 331submersibles, 332-333water damage, preventing, 333
sensitive components, 333waterproof enclosures, 333-334
web-controlled robots, 113-114websites
Adafruit Industries, 117, 150Alex Allmont, 37ArcBotics, 23Arc-O-Matic, 32Arduino.cc, 150Arduino libraries page, 128BalloonBot, 46Chuck Fletcher, 40

407Wolf, Adam
CoolerBot, 51Dagu Robotics, 294DIWire Bender, 41EMSL (Evil Mad Scientist Laboratories),
22, 26, 354Flowerbot, 50Hobby King, 61InMoov, 40lava lamp centrifuge, 38LEGO Turing machine, 30LEGOnardo, 34Leon Overweel, 49Makeblock, 48Mars rover replica, 27MindCub3r, 28Nerdage.net, 42Nerf sentry gun, 43OpenROV, 24Orbital Rendersphere, 36Pancake Bot, 45Pensa Labs, 41Piccolo, 47Quakescape, 39robobrrd.com, 1Sir Mix-a-Bot, 31Sisyphus, 35Soft-Boiled Eggbot, 33sparkfun.com, 118Tower Hobbies, 61uFactory, 29Yellow Drum Machine, 44
Weller WES51 iron, 92wheeled robots, 53-54
basic wheeled robot project, 76parts list, 77step-by-steps, 78-81
chassisbuilding sets, 72custom chassis, 71pre-made chassis, 70
DIY Wheels project, 65parts list, 66step-by-steps, 67-69
motorscomponents, 54DC motors, 57servos, 56-57stepper motors, 55
powerbatteries, 73solar panels, 74wall warts, 75
wheelsbasic wheels, 58caster wheels, 60configuration, 58-60measurements, 61omni wheels, 59rubber wheels, 59tires versus treads, 64treads, 61-64
wheels, 8basic wheels, 58caster wheels, 60configuration, 58-60in building sets, 209measurements, 61omni wheels, 59rubber wheels, 59tires versus treads, 64treads, 61
segmented plastic treads, 62segmented rubber treads, 63solid rubber treads, 64
while loops, 145-146winchs, 291wire strippers, 259wireless control, 115-116wires, 259, 333Wolf, Adam, 153
408 woodworking tools
woodworking tools, 266-267work areas, 94workshop safety, 9Wowwee Tribot, 5wrenches, 257-258writing tools, 264
XX-axis, 276XBee modules, 115Xylophone Bot, 48Xytronic XY-258 iron, 92
Y-ZY-axis, 276Yellow Drum Machine, 44
Z-axis, 276zip ties, 267Zucker, Dave, 31