Road Star Warrior AIS Block-Off & Removal Tutorial · AIS Block-Off & Removal Tutorial WARNING!:...
23
REDHORSE Text & Photos © Copyright 2002-2009 REDHORSE http://www.freewebs.com/roadstarwarrior/ Road Star Warrior AIS Block-Off & Removal Tutorial WARNING!: The modifications described in these web pages are for INFORMATIONAL PURPOSES ONLY. I will NOT accept any responsibility if you attempt these modifications yourself. These modification can damage/ destroy/ make the bike UNSAFE/ VOID the Warranty, injure or cause death to the rider & passenger if the modification are done incorrectly! Seek a Professional motorcycle mechanic if you think your unable to do these modifications yourself or if you think your motorcycle is UNSAFE. Do the modifications at YOUR OWN RISK! Stay Alert and RIDE SAFE!
Transcript of Road Star Warrior AIS Block-Off & Removal Tutorial · AIS Block-Off & Removal Tutorial WARNING!:...

REDHORSE
Text & Photos © Copyright 2002-2009 REDHORSE
http://www.freewebs.com/roadstarwarrior/
Road Star Warrior
AIS Block-Off & Removal Tutorial
WARNING!: The modifications described in these web pages are for INFORMATIONAL PURPOSES ONLY. I will NOT accept any responsibility if you attempt these modifications yourself. These modification can damage/ destroy/ make the bike UNSAFE/ VOID the Warranty, injure or cause death to the rider &
passenger if the modification are done incorrectly! Seek a Professional motorcycle mechanic if you think your unable to do these modifications yourself or if you think your motorcycle is UNSAFE. Do the
modifications at YOUR OWN RISK!
Stay Alert and RIDE SAFE!

Baron AIS Block contents:
This is the Baron AIS kit as it comes from Baron.
Included in the packaging:
• 2 ea. Aluminum AIS blocks/flanges (approx 0.19" thick) • 1 ea. 1/2" plastic plug • 1 ea. vacuum cap • Baron sticker • Baron AIS instruction sheet • Barron Return Policy/ Contact info/ Warranty Claim sheet
• Plastic bag

Step 1:
Baron Instructions Step #1 "Remove the air scoop from the left side of the bike."
Remove the two 5mm allen head screws.

Step 2:
Baron Instructions Step #2 "Remove the fuel tank."
Remove the seat and gas tank.
Remove the two 10mm capture nuts from the rear gas tank bracket. Disconnect the two fuel quick-release connectors underneath the seat and the left scoop. Disconnect the two vapor lines from the
front left of the gas tank.

Step 3:
Baron Instructions Step #3 "Unbolt fuel connector from the bracket and move aside."
Remove the 8mm bolt from the gas tank fuel quick-release connector. Move fuel quick-release
connector aside, after you unbolt it from the bracket..

Step 4:
Baron Instructions Step #4 "Remove the steel air hose from the rear engine stay, disconnect from air box hose."
Remove the 8mm bolt from the fuel supply line bracket going to the fuel regulator. I removed this bracket to make it easier to get to the rear engine stay bolt.

Step 4 continued:
Remove the rear engine stay bolt (14mm).
If your keeping the stock air box, you can remove the steel hose from the rubber hose coming out of the air box extension. Plug the the air box hole with the supplied 1/2" plug and use the stock hose
clamp to secure the plug.

Step 5:
Baron Instructions Step #5 "Plug air box hose with supplied 1/2" plug, secure with stock wire clamp."
This is where I deviated from the instructions a little bit. As I no longer have the stock air boxes. I have installed a Do It Yourself BAK kit and coil & sensor relocation Mod on my Warrior. I didn't need the 1/2" plastic plug that Baron provided. I removed the whole unit, where it connects to the AIS
pump.

Step 5 continued:
I have indicated where the 1/2" plastic plug should go if you are keeping the stock air box. You can
also look in the previous step (picture 4C), where you can disconnect the steel hose and install the plastic plug.

Step 6:
Baron Instructions Step #6 "Find the vacuum line that runs from the rear throttle body to the air pump and disconnect from the throttle body. Cap off the throttle body nipple
with the supplied cap, secure with the stock clamp."

Step 6 continued:
Remove the vacuum hose from rear throttle body nipple. Use the supplied cap and install on nipple.
Use a stock hose clamp or a zip tie to secure cap.

Step 7:
Baron Instructions Step #7 "Remove the air pump assembly from bracket; disconnect air lines from head fittings."
Remove the four 8mm bolts. You can then slide the AIS pump away from the bracket, to get to the
air lines going to the AIS elbows.

Step 7 continued:
Disconnect both air lines from the AIS elbow fittings.

Step 8:
Baron Instructions Step #8 "Disconnect fuel line and move bracket aside." Remove the two 8mm bolts and the 6mm allen head bolt to remove the bracket.
To remove fuel connector remove plastic cap (already removed in top picture). Depress both gray buttons (top & bottom) on the connector and slide off the fuel connector.

Step 8 continued:
Disconnect the fuel supply line to the Fuel regulator. After this is completed you can set the bracket and fuel regulator aside, to get better access to the elbow fittings on each cylinder.

Step 9:
Baron Instructions Step #9 "Remove the elbow fitting from each cylinder head and replace with supplied block off plates using stock washers and screws."
Remove the 5mm allen head bolts from the AIS elbow fittings.

Step 9 continued:
Using the stock washers and bolts, block off each cylinder with the supplied block-off brackets.

Step 9 continued:
*** From this point on, you should apply some Blue Loctite to all the bolts as
you reinstall them onto the Warrior.
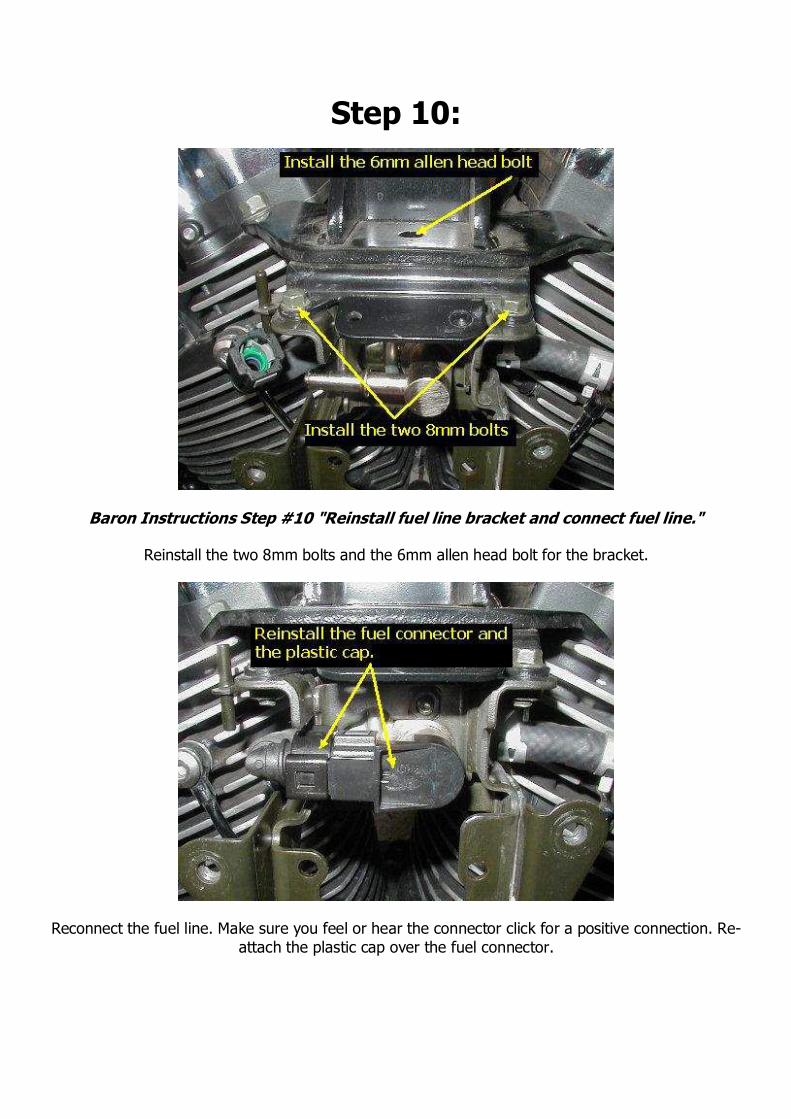
Step 10:
Baron Instructions Step #10 "Reinstall fuel line bracket and connect fuel line."
Reinstall the two 8mm bolts and the 6mm allen head bolt for the bracket.
Reconnect the fuel line. Make sure you feel or hear the connector click for a positive connection. Re-attach the plastic cap over the fuel connector.

Step 10 continued:
Reconnect the fuel supply line.

Steps 11 & 12:
Baron Instructions Step #11 "Reinstall engine stay bolt on rear cylinder."
Reinstall the 14mm engine stay bolt on the rear cylinder.
Baron Instructions Step #12 "Reinstall fuel line to the bracket."
Reinstall the gas tank quick-release connector onto the bracket with the 8mm bolt.

Step 13:
Baron Instructions Step #13 "Reinstall air scoop and tank."
Reinstall gas tank. Make sure gas tank quick-release connectors 'clicks' when you make the re-connections. You also have to reconnect the two vapor lines in the front-left of the gas tank. Reinstall
the two 10mm Acorn nuts on the rear gas tank bracket. Reinstall the seat.
Reinstall the left scoop using the two 5mm allen head bolts.

Project AIS Block-Off: COMPLETED
Here is a picture of all my 'Take-Off' parts. If you still have the stock air box, you'll still have the plastic air box extension with the 1/2 plug still attached to the main air box. The steel air
hose/bracket would still be discarded.
REDHORSE
Text & Photos © Copyright 2002-2009 REDHORSE
REDHORSE - Road Star Warrior website