RK-WI232FHSS-25-FCC-R User's Manual rev1 0 3 · PDF fileWI.232FHSS-25-FCCR/...
25
WI.232FHSS-25-FCC-R and RK-WI.232FHSS-25-FCC-R USER’S MANUAL Revision 1.0.3
Transcript of RK-WI232FHSS-25-FCC-R User's Manual rev1 0 3 · PDF fileWI.232FHSS-25-FCCR/...

WI.232FHSS-25-FCC-R and RK-WI.232FHSS-25-FCC-R
USER’S MANUAL
Revision
1.0.3

WI.232FHSS-25-FCCR/ RK-WI.232FHSS-25-FCC-R USER’S MANUAL
1
R A D I O T R O N I X , I N C .
WI.232FHSS-25-FCC-R/ RK-WI.232FHSS-25-FCC-R USER’S MANUAL
© Radiotronix 905 Messenger Lane
Moore, Oklahoma 73160 Phone 405.794.7730 • Fax 405.794.7477
www.radiotronix.com

WI.232FHSS-25-FCCR/ RK-WI.232FHSS-25-FCC-R USER’S MANUAL
2
Document Control SIGNED DATE CREATED BY TRM 3/10/2006 ENGINEERING REVIEW MARKETING REVIEW TJE 6/13/2007 APPROVED- ENG. APPROVED- MAR. TJE 6/13/2007
Revised History
REVISION SIGNED DATE DESCRIPTION
1.0.0 TRM 3/10/2006 Document created
1.0.1 TRM 3/11/2006 Corrected ANT-915-12A part number
1.0.3 TRM 3/27/2006 Updated

WI.232FHSS-25-FCCR/ RK-WI.232FHSS-25-FCC-R USER’S MANUAL
3
Table of Contents
1. DESCRIPTION ............................................................................................................................................. 5
2. DEVELOPMENT KIT SETUP....................................................................................................................... 6
3. USING THE RK-WI.232FHSS-25-FCC-R EVALUATION SOFTWARE...................................................... 7 3.1. MODULE SELECTION.................................................................................................................................. 7 3.2. COM PORT SETUP AND SELECTION........................................................................................................... 7 3.3. WIRELESS CHAT PAGE .............................................................................................................................. 8 3.4. NON-VOLATILE REGISTER PAGE ................................................................................................................ 9 3.5. VOLATILE REGISTER PAGE ...................................................................................................................... 10
4. USING THE EVALUATION SOFTWARE .................................................................................................. 11 4.1. SETTING REGISTER VALUES .................................................................................................................... 11 4.2. DIAGNOSTIC COMMAND MODES ............................................................................................................... 11
4.2.1. Transmit Diagnostic ........................................................................................................................ 12 4.2.2. Receive Diagnostic ......................................................................................................................... 12
5. NOTES........................................................................................................................................................ 13 5.1. MICROSOFT/ HILGRAEVE HYPERTERMINAL ............................................................................................... 13 5.2. LOOPBACK MODE.................................................................................................................................... 13
6. PCB LAYOUT DIAGRAMS........................................................................................................................ 14 6.1. RK-WI.232FHSS-25-FCC-R EVALUATION BOARD LAYOUT ..................................................................... 14 6.2. WI.232FHSS-25-FCC-R EVALUATION MODULE LAYOUT ......................................................................... 15 6.3. WI.232FHSS-25-FCC-R MODULE PIN OUT ............................................................................................ 16
6.3.1. Pin Descriptions .............................................................................................................................. 16 7. SCHEMATIC DIAGRAMS.......................................................................................................................... 17
7.1. WI.232FHSS-25-FCC-R SCHEMATIC DIAGRAM ...................................................................................... 17 7.2. WI.232FHSS-25-FCC-R EVALUATION BOARD SCHEMATIC DIAGRAM ....................................................... 18
8. USAGE GUIDELINES FOR FCC COMPLIANCE...................................................................................... 19 8.1. ANTENNA SELECTION .............................................................................................................................. 19 8.2. MODULE MODIFICATION........................................................................................................................... 19 8.3. END PRODUCT LABELING REQUIREMENTS ................................................................................................ 19 8.4. ADDITIONAL FCC TESTING REQUIREMENTS.............................................................................................. 20
9. FCC STATEMENTS OF COMPLIANCE.................................................................................................... 21 9.1. STATEMENTS AND CONDITIONS OF MODULAR COMPLIANCE....................................................................... 21 9.2. CUSTOMER FCC WARNING REQUIREMENTS............................................................................................. 22 9.3. NOTICES OF LIMITATION........................................................................................................................... 22
9.3.1. Product Testing ............................................................................................................................... 22 10. CUSTOM APPLICATIONS...................................................................................................................... 23
11. ORDERING INFORMATION ................................................................................................................... 24 11.1. CONTACT INFORMATION........................................................................................................................ 24
11.1.1. Technical Support ........................................................................................................................ 24 11.1.2. Sales Support............................................................................................................................... 24

WI.232FHSS-25-FCCR/ RK-WI.232FHSS-25-FCC-R USER’S MANUAL
4
Index of Tables
Table 1, Pin Descriptions ....................................................................................................................................16 Table 2, Antenna Selection .................................................................................................................................19 Table 3, FCC Statements and Conditions...........................................................................................................21 Table 4, FCC Warning Requirements .................................................................................................................22
Table of Figures
Figure 1: Module Discovery...................................................................................................................................7 Figure 2: COM Port Setup.....................................................................................................................................7 Figure 3: Wireless Chat Page ...............................................................................................................................8 Figure 4: Non-Volatile Register Page....................................................................................................................9 Figure 5: Volatile Register Page..........................................................................................................................10 Figure 6: WI.232FHSS-25-R Diagnostics............................................................................................................11 Figure 7: RS-232 Jumpers ..................................................................................................................................13 Figure 8: Evaluation Board Layout ......................................................................................................................14 Figure 9: Evaluation Module Layout....................................................................................................................15 Figure 10: WI.232FHSS-25-FCC-R Schematic Diagram....................................................................................17 Figure 11: WI.232DTS-FCC-R Evaluation Board Schematic Diagram ...............................................................18

WI.232FHSS-25-FCCR/ RK-WI.232FHSS-25-FCC-R USER’S MANUAL
5
1. Description The RK-Wi.232FHSS-25-FCC-RTM is a rapid-development/evaluation kit, which contains FCC pre-authorized Wi.232FHSS-25-FCC-ST-RTM modules. When used within the guidelines presented in this document, no FCC part 15 transmitter testing/ certification of the Wi.232FHSS-25-FCC-RTM is necessary in the end product.
Included in the kit is:
• 1 – Development Case • 1 – Development Utility and Documentation CD • 2 – Development Boards • 2 – WI.232FHSS-25-FCC-ST-RTM modules (pinned) • 2 – 900 MHz Antennas • 2 – RS-232 Cables • 2 – USB Cables • 6 – AAA Batteries • Quick Start Guide • Datasheet/ User’s Manual hard copy (optional)
* Datasheet/ User’s Manual is provided on the Documentation CD.
Chapter
1

WI.232FHSS-25-FCCR/ RK-WI.232FHSS-25-FCC-R USER’S MANUAL
6
2. Development Kit Setup
• Insert the AAA batteries into the evaluation PCB, observing the correct polarity.
• Insert a Wi.232FHSS-25-FCC-RTMmodule into one of the evaluation boards, observing the correct orientation (see later in this document). The correct orientation of the module is with the antenna connector closest to the edge of the evaluation board. Make sure it is seated fully and correctly.
• Insert the other Wi.232FHSS-25-FCC-RTM module into the other evaluation board, also observing the correct polarity.
• Connect antennas to Wi.232FHSS-25-FCC-RTM modules.
• Connect evaluation boards to computers. If using USB communications, populate USB jumpers and remove RS-232 jumpers. If using RS-232 communications, populate RS-232 jumpers and remove USB jumpers.
• Install the RK- Wi.232FHSS-25-FCC-RTM Windows software. If already installed, skip this step.
• Run the RK- Wi.232FHSS-25-FCC-RTM software, select 2400 baud operation and navigate to the “Wireless Chat” tab.
• Power-On both evaluation boards, verifying that the version/copyright information is echoed to the screen from both modules.
• Chat back and forth between evaluation boards, verifying that serial and RF communications are successful.
IMPORTANT NOTE FOR HYPERTERMINAL USERS: See section 4.1
Chapter
2

WI.232FHSS-25-FCCR/ RK-WI.232FHSS-25-FCC-R USER’S MANUAL
7
3. Using the RK-WI.232FHSS-25-FCC-RTM Evaluation Software The software supplied with the RK-Wi.232FHSS-25-FCC-RTM is used to read and set the volatile and non-volatile registers with the Wi.232FHSS-25-R module. Refer to the Wi.232FHSS-25-RTM Users Manual for more information on the register settings.
3.1. Module Selection The RK-Wi.232FHSS-25-FCC-R™ evaluation software supports both the 25mW and 250mW versions of frequency hopping modules. Select the Wi.232FHSS-25-R™ module type.
Figure 1: Module Discovery
3.2. COM Port Setup and Selection Upon starting the RK-Wi.232FHSS-25-FCC-RTM evaluation software, you will be presented with a COM port selection dialog box. If you are using the USB interface, make sure that the evaluation board is already connected to the computer via the USB cable before you start the software. This will ensure that the virtual COM port which is assigned to the USB to UART bridge controller by Windows is visible in the COM port selection list.
The first time you start the RK-Wi.232FHSS-25-FCC-RTM evaluation software, the Baud Rate should be left at 2400 baud, since this is the factory default baud rate setting for the module.
Tip: RK-Wi.232FHSS-25-FCC-RTM evaluation software does not auto-detect the baud rate of the module. If you have changed the Non-Volatile Data Rate register, you will have to select the baud rate you set this register to when you start the RK-Wi.232FHSS-25-FCC-RTM evaluation software.
Figure 2: COM Port Setup
Chapter
3

WI.232FHSS-25-FCCR/ RK-WI.232FHSS-25-FCC-R USER’S MANUAL
8
3.3. Wireless Chat Page The Wireless Chat page in the RK-Wi.232FHSS-25-FCC-RTM evaluation software demonstrates the capability of the Wi.232FHSS-25-FCC-RTM to be used as a wireless communications link. The Development kit works as a wireless chat link with no register changes required, out of the box.
To Use Wireless Chat: Type a message in the lower text field next to the “Clear Output Window” and press Enter. The text you typed will be displayed on the remote system, prefixed with a Node Identifier if the “Send Node Identifier” checkbox is checked.
Figure 3: Wireless Chat Page

WI.232FHSS-25-FCCR/ RK-WI.232FHSS-25-FCC-R USER’S MANUAL
9
3.4. Non-Volatile Register Page
The Non-Volatile Register page in the evaluation software allows you to change the default settings which will be loaded when the module is powered on or reset.
Figure 4: Non-Volatile Register Page
Tip: If you change the Non-Volatile Data Rate setting, you will have to select the baud rate you set this register to when you start the RK-Wi.232FHSS-25-FCC-RTM evaluation software.

WI.232FHSS-25-FCCR/ RK-WI.232FHSS-25-FCC-R USER’S MANUAL
10
3.5. Volatile Register Page In this page, you can change the Volatile settings of the module. Values programmed into these registers are lost of power-down, but have an immediate affect on module operation.
The page also provides a means of displaying the Diagnostic Window, a special dialog box that allows the user to place the module into a variety of diagnostic modes.
Figure 5: Volatile Register Page
WI.232FHSS-25-FCCR/ RK-WI.232FHSS-25-FCC-R USER’S MANUAL
11
4. Using the Evaluation Software
4.1. Setting Register Values On both the Volatile and Non-Volatile pages, the registers are labeled by function. To set a register value, select the value from the options available for that register and click the “Write” button. To perform a read of that register, simply click the “Read” button. Descriptions of the register functions can be found in the Wi.232FHSS-25/250-R User’s Manual.
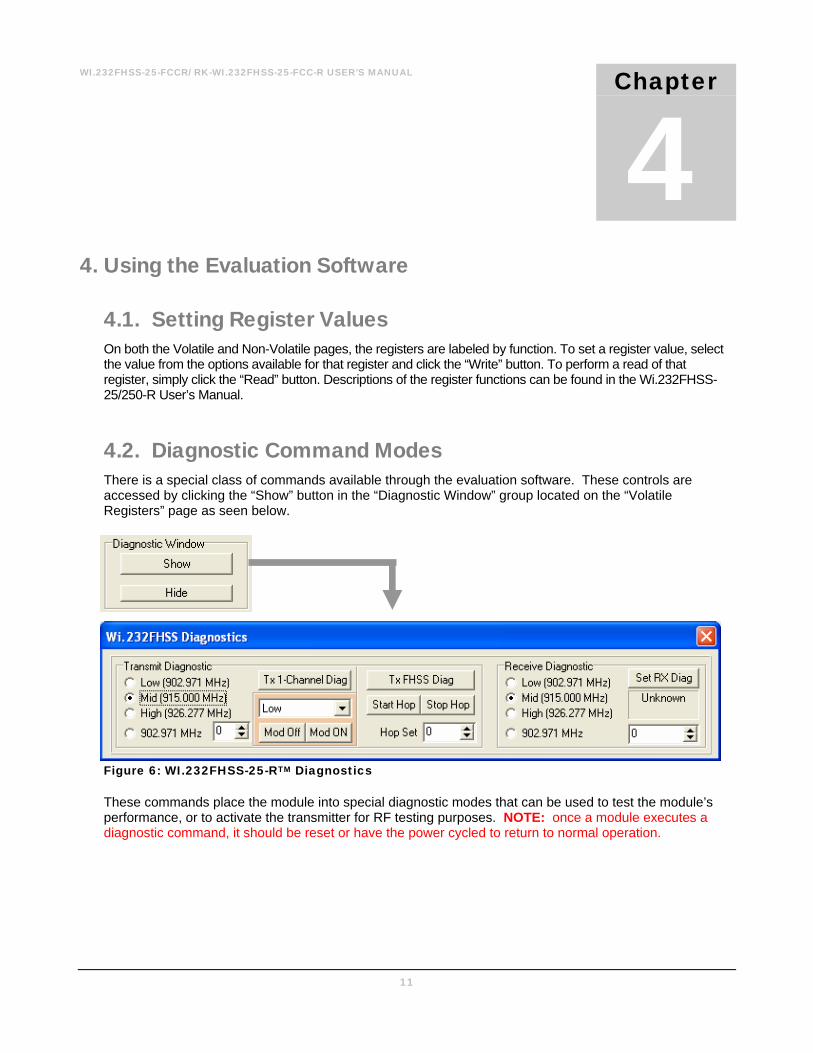
4.2. Diagnostic Command Modes There is a special class of commands available through the evaluation software. These controls are accessed by clicking the “Show” button in the “Diagnostic Window” group located on the “Volatile Registers” page as seen below.
Figure 6: WI.232FHSS-25-RTM Diagnostics
These commands place the module into special diagnostic modes that can be used to test the module’s performance, or to activate the transmitter for RF testing purposes. NOTE: once a module executes a diagnostic command, it should be reset or have the power cycled to return to normal operation.
Chapter
4

WI.232FHSS-25-FCCR/ RK-WI.232FHSS-25-FCC-R USER’S MANUAL
12
4.2.1. Transmit Diagnostic Transmit Diagnostic consists of the controls located in the “Transmit Diagnostic” group. The transmit diagnostic group is broken into two smaller sub-groups.
The left side is used to observe static transmitter characteristics- that is, when the “TX 1-Channel Diag” button is clicked, it stops the module from hopping frequencies. The radio buttons on the left allow quick selection of the transmitter’s channel/frequency. Once activated, a “…1010101010101…” bit pattern is transmitted for bit error testing or RF carrier analysis. This single-channel transmit diagnostic mode can be used with the receive diagnostic.
The right side is used to observe dynamic transmitter characteristics. Dynamic transmitter operation allows the module to hop frequencies as it transmits. The “Hop Set” radio button selects the hop sequence (analogous to a channel, values are 0-5) to be used when hopping. Dynamic transmitter mode cannot be used to provide a carrier for the Receive Diagnostic. Clicking the “Tx FHSS Diag” button sends the new hopping sequence value to the module and activates the transmitter. The “Start Hop” and “Stop Hop” buttons start and stop the diagnostic hopping, respectively.
In the middle, the light-orange colored box controls the power and modulation characteristics of the transmitter. For the Wi.232FHSS-25-FCC-RTM, there are four power settings of increasing intensity: Low, Mid-Low, Mid-High, and High. The “Mod Off” and “Mod On” buttons switch the carrier’s modulation off and on, respectively.
4.2.2. Receive Diagnostic Receive Diagnostic consists of four radio buttons which allow the selection of frequency, the “Set RX Diag” button which activates the module’s receiver and begins a bit error test, and the result box, which shows the number of bit errors recorded in the last test.
The “Set RX Diag” button switches on the receiver using the channel and mode selected in the channel selector and transceiver mode controls. The module stops hopping frequency and stays stationary. It will wait for a “10101010...” bit pattern at the RF interface. If one is not received, the module could remain in an infinite loop waiting for this start condition. If this happens, simply cycle the power to return the module to normal operation.
If a “…1010101010101…” bit pattern is received, the BER test will return the number and percent of bit errors. This information is displayed in the panel below the “Set RX Diag” button.
The Receive Diagnostic mode can be used in conjunction with another module operating in “Tx 1-Channel Diag” mode. Both transmitting and receiving modules must be on the same frequency and have the same baud rate selected for proper operation of the bit error test.

WI.232FHSS-25-FCCR/ RK-WI.232FHSS-25-FCC-R USER’S MANUAL
13
5. Notes
5.1. Microsoft/ Hilgraeve HyperTerminal The RK-Wi.232FHSS-25-FCC-RTM Evaluation Kit can be used with HyperTerminal to receive and transmit RS-232 data and send files using file transfer protocols such as ZMODEM. HyperTerminal and many other terminal programs assert RTS by default. On the evaluation board, the RTS line is tied to the CMD pin on the module. When the CMD pin is held low (RTS line is asserted), the module will be placed in command mode.
In command mode, all UART data sent to the module will be interpreted as commands and will NOT be sent to the RF engine for transmission. Additionally, if an evaluation board is switched on in the presence of an asserted RTS line, it will perform a full hardware and flash reset to the factory defaults.
To use the evaluation board with HyperTerminal or other terminal program, you must first remove the jumpers from pins 7+8 of JP2, if you are using an RS-232 connection to your PC, or JP3, if you are using a USB connection to your PC. Removing this jumper will disconnect the RTS line from the CMD pin on the module, allowing normal operation.
5.2. Loopback Mode The RK-Wi.232FHSS-25-FCC-RTM kit can be operated in a loopback mode by configuring the COM jumpers in such a way as to link together the TXD and RXD lines to and from the module in the remote evaluation board.
Using this mode, the user can send data from their local evaluation board and have it re-transmitted back to them by the remote evaluation board. The maximum baud rate allowed in loopback mode is 38400 baud for point to point (single-endpoint addressing) communications only.
It should also be noted that this method of looping back the communications bypasses the module’s flow control, which can cause loss of data. When using loopback mode, ensure that your data does not exceed 144 bytes. Data cannot be streamed to a board in loopback mode.
Loopback mode using the RS-232 jumpers:
Figure 7: RS-232 Jumpers
Chapter
5

WI.232FHSS-25-FCCR/ RK-WI.232FHSS-25-FCC-R USER’S MANUAL
14
6. PCB Layout Diagrams
6.1. RK-WI.232FHSS-25-FCC-RTM Evaluation Board Layout
Figure 8: Evaluation Board Layout
Chapter
6

WI.232FHSS-25-FCCR/ RK-WI.232FHSS-25-FCC-R USER’S MANUAL
15
6.2. WI.232FHSS-25-FCC-RTM Evaluation Module Layout
JP1 Pin 1 JP2 Pin 1
Figure 9: Evaluation Module Layout
NOTE: Pin 1 of the Wi.232FHSS-25-FCC-RTM module’s JP2 aligns with Pin 1 of JP6 on the evaluation board. The following table lists the pin numbers and their assignments.

WI.232FHSS-25-FCCR/ RK-WI.232FHSS-25-FCC-R USER’S MANUAL
16
6.3. WI.232FHSS-25-FCC-RTM Module Pin Out
6.3.1. Pin Descriptions Pin Name Pin Description JP2 Pin 1 4V to 12V Vdd JP2 Pin 2 RxD0, Wi.232FHSS-25-R RxD pin JP2 Pin 3 TxD0, Wi.232FHSS-25-R TxD pin JP2 Pin 4 CTS0, Wi.232FHSS-25-R CTS pin JP2 Pin 5 CMD (Active Low), Wi.232FHSS-25-R CMD pin JP2 Pin 6 RxD1 – Reserved for Future – No Connect JP2 Pin 7 TxD1 – Reserved for Future – No Connect JP2 Pin 8 RTS1 – Reserved for Future – No Connect JP2 Pin 9 DTR1 – Reserved for Future – No Connect JP2 Pin 10 DTR1* - Reserved for Future – No Connect JP2 Pin 11 GND JP2 Pin 12 GND JP1 Pin 1 GND JP1 Pin 2 GND JP1 Pin 3 AD1 – Buffer Empty (BE) JP1 Pin 4 AD0 – Command Response (CMD_RSP) JP1 Pin 5 RSSI JP1 Pin 6 PD5 – Exception (EX) JP1 Pin 7 PD4 – Reserved for Future – No Connect JP1 Pin 8 PD3 – Reserved for Future – No Connect JP1 Pin 9 PD2 – Reserved for Future – No Connect JP1 Pin 10 PD1 – Reserved for Future – No Connect JP1 Pin 11 GND JP1 Pin 12 GND
Table 1, Pin Descriptions

WI.232FHSS-25-FCCR/ RK-WI.232FHSS-25-FCC-R USER’S MANUAL
17
7. Schematic Diagrams
7.1. WI.232FHSS-25-FCC-RTM Schematic Diagram
Figure 10: WI.232FHSS-25-FCC-RTM Schematic Diagram
Chapter
7

WI.232FHSS-25-FCCR/ RK-WI.232FHSS-25-FCC-R USER’S MANUAL
18
7.2. WI.232FHSS-25-FCC-RTM Evaluation Board Schematic Diagram
Figure 11: WI.232DTS-FCC-RTM Evaluation Board Schematic Diagram

WI.232FHSS-25-FCCR/ RK-WI.232FHSS-25-FCC-R USER’S MANUAL
19
8. Usage Guidelines for FCC Compliance The Wi232FHSS-25-FCC-RTM modules included in this rapid development kit have been awarded a FCC and IC modular approval. That means that this module, when integrated into your end product, requires no FCC part 15 nor IC RSS-210 testing as long as the following guidelines are met. Failure to meet any of the following guidelines will prevent the inheritance of the FCC and IC modular certifications.
8.1. Antenna Selection In order to maintain compliance with FCC regulations, an antenna with no more than 4dBi gain must be used. This module has been tested with the following antennas:
Table 2, Antenna Selection
An approved antenna must be directly attached to the module’s reverse-polarity SMA connector, or through an approved shielded coaxial extension cable, in the final application to inherit the FCC and IC modular certifications. The ANT-916-12A antenna comes with an integrated extension cable.
8.2. Module Modification The module must not be physically altered in any way. If any connections are made to the modules that bypass the module pins, socket, or antenna connector, the FCC modular certification cannot be inherited.
8.3. End Product Labeling Requirements Pursuant to FCC public notice DA 00-1407, the end product must be labeled on its exterior with the following verbiage:
“Contains FCC ID: Q7V-3F090008X”
Chapter
8
RADIOTRONIX PART NO. ANTENNA TYPE ANTENNA GAIN ANT-915-02A RP ¼ Wave Whip 2 dBi ANT-915-04A RP ¼ Wave Helical 2 dBi ANT-915-06A RP ½ Wave Dipole 2 dBi ANT-916-12A RP ½ Wave Whip, Magnetic Base 4 dBi

WI.232FHSS-25-FCCR/ RK-WI.232FHSS-25-FCC-R USER’S MANUAL
20
8.4. Additional FCC Testing Requirements While the module’s FCC certification can be inherited (presuming the guidelines are met), additional testing will be required to achieve full FCC compliance for your end-product. The integrator is required to perform unintentional radiator testing on the final product per FCC sections 15.107 and 15.109. Additional, product-specific testing might be required. Please contact the FCC regarding regulatory requirements for your application.

WI.232FHSS-25-FCCR/ RK-WI.232FHSS-25-FCC-R USER’S MANUAL
21
9. FCC Statements of Compliance
9.1. Statements and Conditions of Modular Compliance
Table 3, FCC Statements and Conditions
Chapter
9 FCC / IC NOTICE (FCC ID: Q7V-3F090008X) This device complies with the rules set forth in Part 15 by the Federal Communications Commission and RSS-210/RSS-Gen by Industry Canada. Operation is subject to the following two conditions:
1) This device may not cause harmful interference 2) This device must accept any interference received, including interference that may cause
undesired operation.
Any changes or modifications not expressly approved by Radiotronix, Inc. could void the user’s authority to operate the equipment.
The Wi.232FHSS-25-FCC-RTM module is provided with an inheritable FCC Modular Certification. This certification may be inherited in an end-user product, negating the need for FCC part 15 and IC RSS-210 intentional radiator testing on this module, provided that the following guidelines are met:
1. An approved antenna must be directly coupled to the module’s RP-SMA connector or through an approved coaxial extension cable.
2. The module must not be modified in any way. Coupling of external circuitry must not bypass the provided connectors.
3. End product must be externally labeled with “Contains FCC ID: Q7V-3F090008X” 4. The end product’s user’s manual must contain an FCC statement equivalent to that listed in
section 9.2 of this manual. 5. The antenna used for this transceiver must not be co-located or operating in conjunction
with any other antenna or transmitter. 6. The integrator must not provide any information to the end-user on how to install or remove
the module from the end-product.
The integrator is required to perform unintentional radiator testing on the final product per FCC sections 15.107 and 15.109. FCC Pre-certified Wi.232FHSS-25-FCC-R FCC ID: Q7V-3F090008X

WI.232FHSS-25-FCCR/ RK-WI.232FHSS-25-FCC-R USER’S MANUAL
22
9.2. Customer FCC Warning Requirements The end-product user’s manual must contain the following or equivalent verbiage.
Table 4, FCC Warning Requirements
9.3. Notices of Limitation
9.3.1. Product Testing The integrator must still show that their product complies with FCC regulations applicable to their product. The integrator is not required to perform transmitter testing on the Wi.232FHSS-25-FCC-RTM module, provided the guidelines in this document are met.
FCC / IC NOTICE (Containing FCC ID: Q7V-3F090008X) The RF module (FCC ID: Q7V-3F090008X) contained within this device complies with the rules set forth in Part 15 by the Federal Communications Commission and RSS-210/Gen by Industry Canada. Operation is subject to the following conditions:
1. This device may not cause harmful interference 2. This device must accept any interference received, including interference that may cause
undesired operation. 3. An approved antenna must be directly coupled to the module’s RP-SMA connector or
through an approved coaxial extension cable. 4. The module must not be modified in any way. Coupling of external circuitry must not
bypass the provided connectors. 5. The antenna used for this transceiver must not be co-located or operating in conjunction
with any other antenna or transmitter.
Any changes or modifications could void the user’s authority to operate the equipment.
FCC Pre-certified Wi.232FHSS-25-FCC-R FCC ID: Q7V-3F090008X

WI.232FHSS-25-FCCR/ RK-WI.232FHSS-25-FCC-R USER’S MANUAL
23
10. Custom Applications For cost-sensitive applications, such as wireless sensors and AMR, Radiotronix can embed the application software directly into the microcontroller built into the module. For more information on this service, please contact Radiotronix.
Chapter
10

WI.232FHSS-25-FCCR/ RK-WI.232FHSS-25-FCC-R USER’S MANUAL
24
11. Ordering Information Product Part Number Description
RK-Wi.232FHSS-25-FCC-R Development Kit Wi.232FHSS-25-FCC-ST-R Straight angle connector Wi.232FHSS-25-FCC-RA-R Right angle connector
11.1. Contact Information Corporate Headquarters: 905 Messenger Lane Moore, Oklahoma 73160 405-794-7730 website: www.radiotronix.com support: [email protected]
11.1.1. Technical Support Radiotronix has built a solid technical support infrastructure so that you can get answers to your questions when you need them. Our primary technical support tools are the support forum and knowledge base found on our website. We are continuously updating these tools. To find the latest information about these technical support tools, please visit http://www.radiotronix.com/support. Our technical support engineers are available Mon-Fri between 9:00 am and 5:00 pm central standard time. The best way to reach a technical support engineer is to submit a Webcase. Webcase submissions can be made at http://www.radiotronix.com/support/webcase.asp. For customers that would prefer to talk directly to a support engineer, we do offer phone support free of charge.
11.1.2. Sales Support Our sales department can be reached via e-mail at [email protected] or by phone at 405-794-7730. Our sales department is available Mon-Fri between 8:30 am and 5:00 pm central standard time. Visit our web site at http://www.radiotronix.com/corpsales.asp for information on where to buy our products.
Chapter
11