RICOH Stereo Camera Software R-Stereo-GigE-Player...RICOH Stereo Camera R-Stereo-GigE-Player User's...
25
1/25 RICOH Stereo Camera R-Stereo-GigE-Player User's Guide Rev. 1.03 RICOH Stereo Camera Software R-Stereo-GigE-Player User's Guide RICOH Industrial Solutions Inc.
Transcript of RICOH Stereo Camera Software R-Stereo-GigE-Player...RICOH Stereo Camera R-Stereo-GigE-Player User's...

1/25
RICOH Stereo Camera R-Stereo-GigE-Player User's Guide Rev. 1.03
RICOH Stereo Camera Software
R-Stereo-GigE-Player
User's Guide
RICOH Industrial Solutions Inc.
2/25
RICOH Stereo Camera R-Stereo-GigE-Player User's Guide Rev. 1.03
Contents 1. FUNCTION OVERVIEW ............................................................................... 3
2. STARTUP PROCEDURE .............................................................................. 4
3. OPERATING PROCEDURES .......................................................................... 9
3.1 Menu Bar .......................................................................................... 9
3.1.1 File Menu ...................................................................................... 9
3.1.1.1 Opening an Image Buffer ............................................................................................................................. 10
3.1.1.2 Saving Image Buffer under a Different Name .............................................................................................. 10
3.1.1.3 Exporting the Mesh ...................................................................................................................................... 11
3.1.2 View Menu .................................................................................... 12
3.1.2.1 Image 1/Image 2........................................................................................................................................... 12
3.1.2.1.1 Operation Panel .................................................................................................................................... 13
3.1.3 Device Menu .................................................................................. 15
3.1.3.1 Camera ......................................................................................................................................................... 15
3.1.3.1.1 Mask ...................................................................................................................................................... 15
3.1.3.1.2 IP Settings in Non-volatile Memory .................................................................................................... 16
3.1.3.1.3 Trigger Settings .................................................................................................................................... 17
3.1.3.1.4 Device Information ............................................................................................................................... 17
3.1.3.2 Projector ....................................................................................................................................................... 18
3.1.3.2.1 Connection ............................................................................................................................................ 19
3.1.3.2.2 Disconnecting ....................................................................................................................................... 19
3.1.3.2.3 Brightness ............................................................................................................................................. 20
3.1.3.2.4 Reset Alarm .......................................................................................................................................... 20
3.1.4 Help Menu .................................................................................... 20
3.1.4.1 Log ................................................................................................................................................................ 20
3.1.4.2 Version Information ...................................................................................................................................... 20
3.2 Operation Panel ................................................................................... 21
3.2.1 Connection .................................................................................... 21
3.2.2 Acquisition Mode ............................................................................... 21
3.2.3 Operation ..................................................................................... 21
3.2.4 Settings ....................................................................................... 22
3.2.4.1 Manual Exposure Adjustment ....................................................................................................................... 22
3.2.4.2 Automatic Exposure Adjustment ................................................................................................................... 22
3.2.4.3 Gamma Settings ........................................................................................................................................... 22
3.2.4.4 Distance Settings ......................................................................................................................................... 22
3.2.5 Projector ...................................................................................... 22
3.3 Status Bar ........................................................................................ 22
3.3.1 Execution Result ............................................................................... 22
3.3.2 Frame Rate.................................................................................... 22
4 IP ADDRESS SETTINGS OF PC ..................................................................... 23
3/25
RICOH Stereo Camera R-Stereo-GigE-Player User's Guide Rev. 1.03
1. Function Overview
The main functions of the R-Stereo-GigE-Player software are as follows.
・ Image display:
Continuously capture and display intensity and depth images.
・ Conversion to 3D point cloud:
Convert the depth image to a 3D point cloud.
・ Exposure time adjustment:
Adjust the exposure time (shutter speed) of the camera.
・ Projector control:
Turn the projector on/off and control the brightness of the projector.
・ Trigger settings:
Configure trigger settings for IO with external hardware, e.g. use an external trigger source or output a strobe signal.
・ Imaging mode:
Choose the camera imaging mode from default mode or several High Dynamic Range (HDR) modes.
・ Gamma settings:
Adjust the gamma transformation of the camera’s brightness image.
・Measurement range settings:
Adjust the distance range for which the depth image is output.
4/25
RICOH Stereo Camera R-Stereo-GigE-Player User's Guide Rev. 1.03
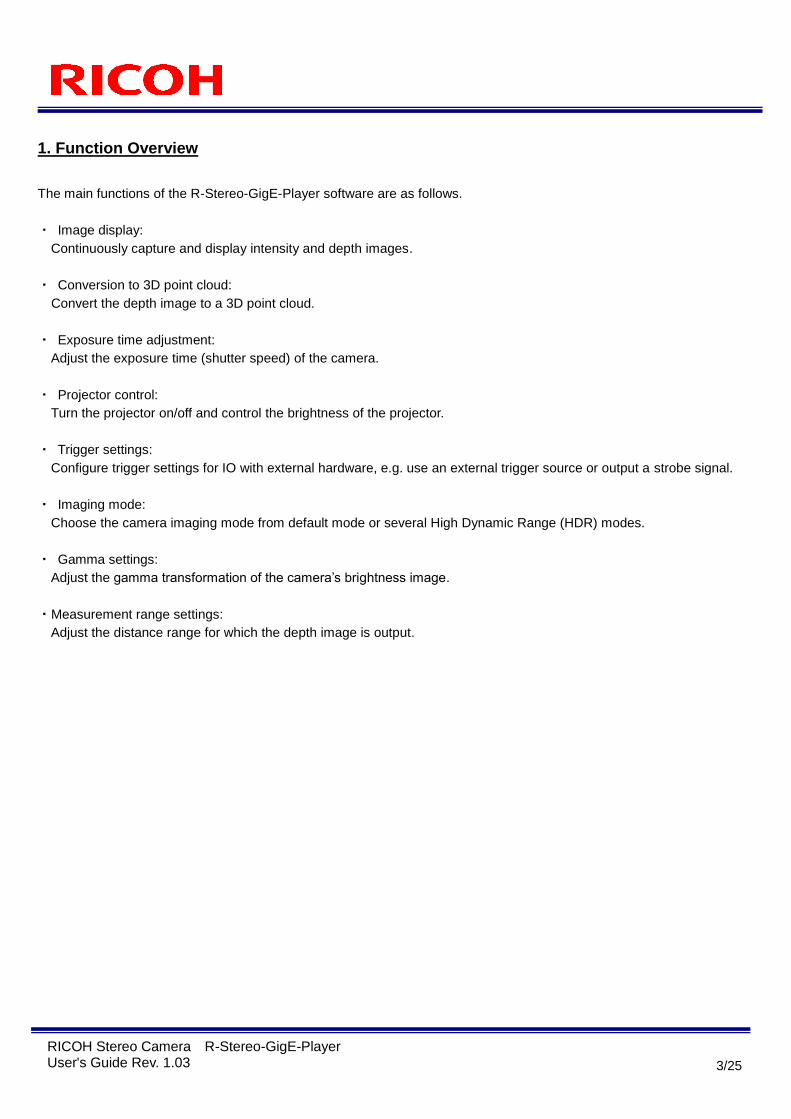
2. Startup Procedure
2.1 First, check that the power cable and LAN cable are connected to the camera.
2.2 Select "Start" - "All Programs" - "R-Stereo-GigE-Package X.X.X.XX" - "R-Stereo-GigE-Player" to launch R-Stereo-
GigE-Player.
2.3 The operation window and image display windows of R-Stereo-GigE-Player appear.
Operation window
Image display window (master camera) Image display window (slave camera)
5/25
RICOH Stereo Camera R-Stereo-GigE-Player User's Guide Rev. 1.03
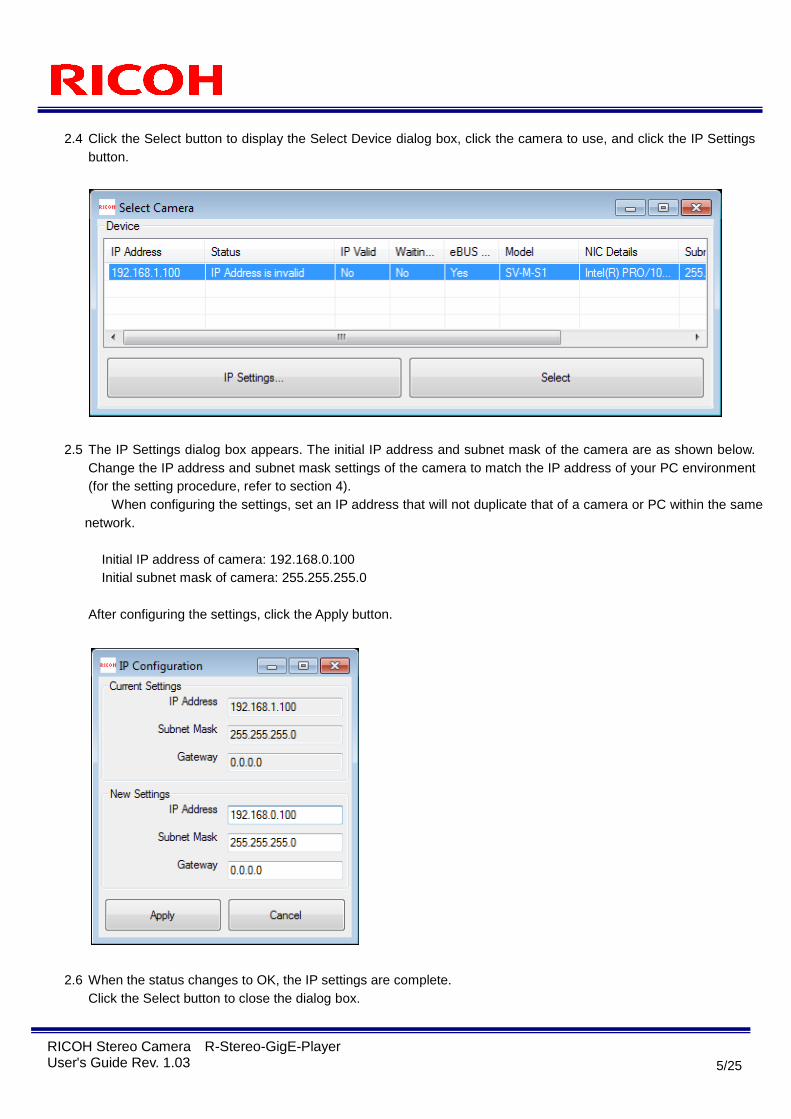
2.4 Click the Select button to display the Select Device dialog box, click the camera to use, and click the IP Settings
button.
2.5 The IP Settings dialog box appears. The initial IP address and subnet mask of the camera are as shown below.
Change the IP address and subnet mask settings of the camera to match the IP address of your PC environment
(for the setting procedure, refer to section 4).
When configuring the settings, set an IP address that will not duplicate that of a camera or PC within the same
network.
Initial IP address of camera: 192.168.0.100
Initial subnet mask of camera: 255.255.255.0
After configuring the settings, click the Apply button.
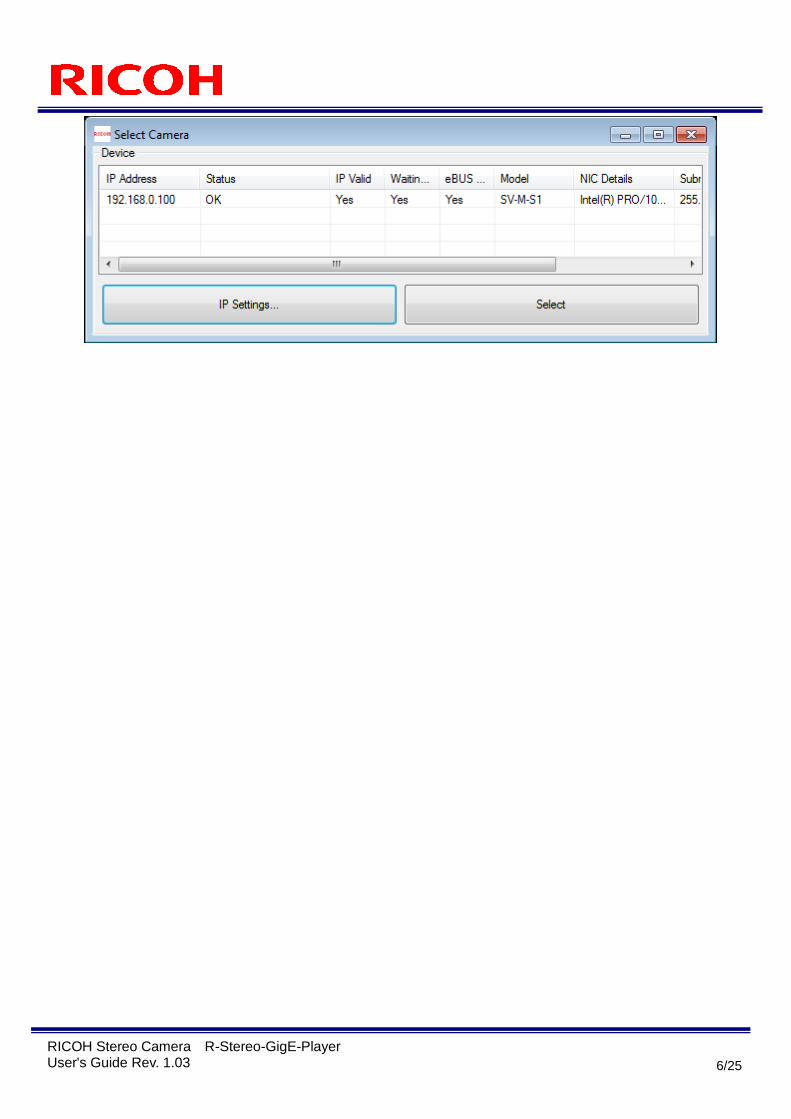
2.6 When the status changes to OK, the IP settings are complete.
Click the Select button to close the dialog box.
6/25
RICOH Stereo Camera R-Stereo-GigE-Player User's Guide Rev. 1.03
7/25
RICOH Stereo Camera R-Stereo-GigE-Player User's Guide Rev. 1.03
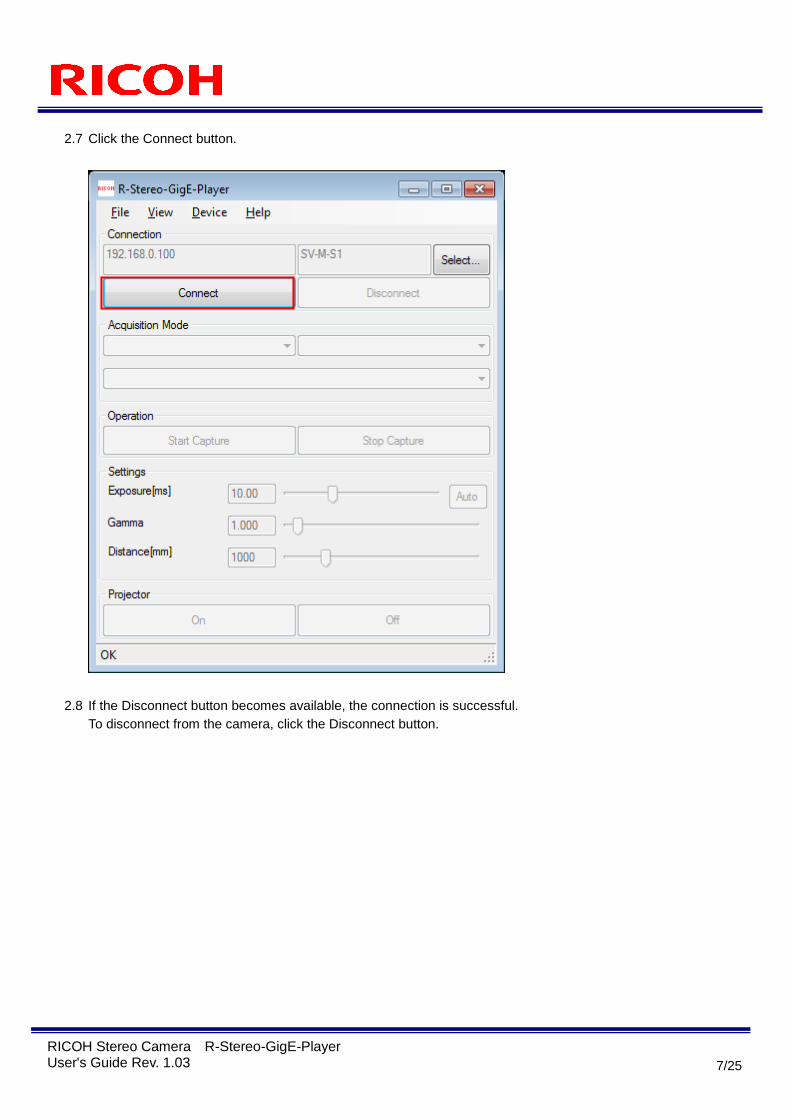
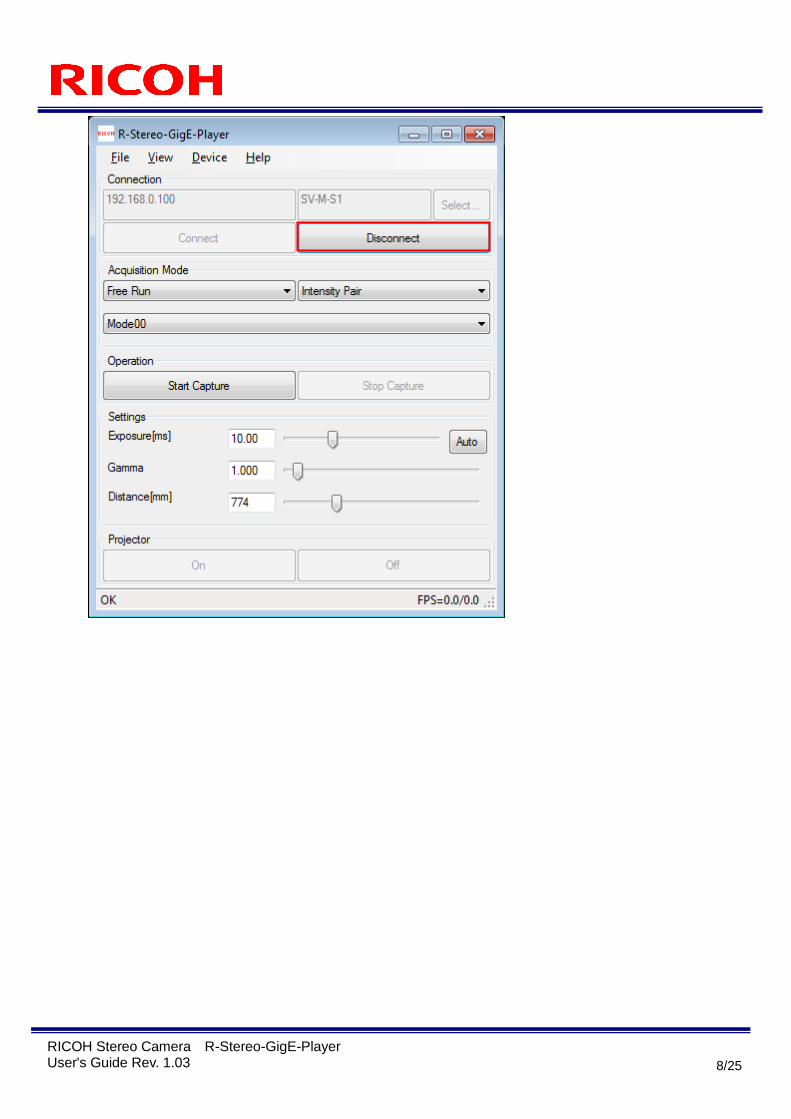
2.7 Click the Connect button.
2.8 If the Disconnect button becomes available, the connection is successful.
To disconnect from the camera, click the Disconnect button.
8/25
RICOH Stereo Camera R-Stereo-GigE-Player User's Guide Rev. 1.03
9/25
RICOH Stereo Camera R-Stereo-GigE-Player User's Guide Rev. 1.03
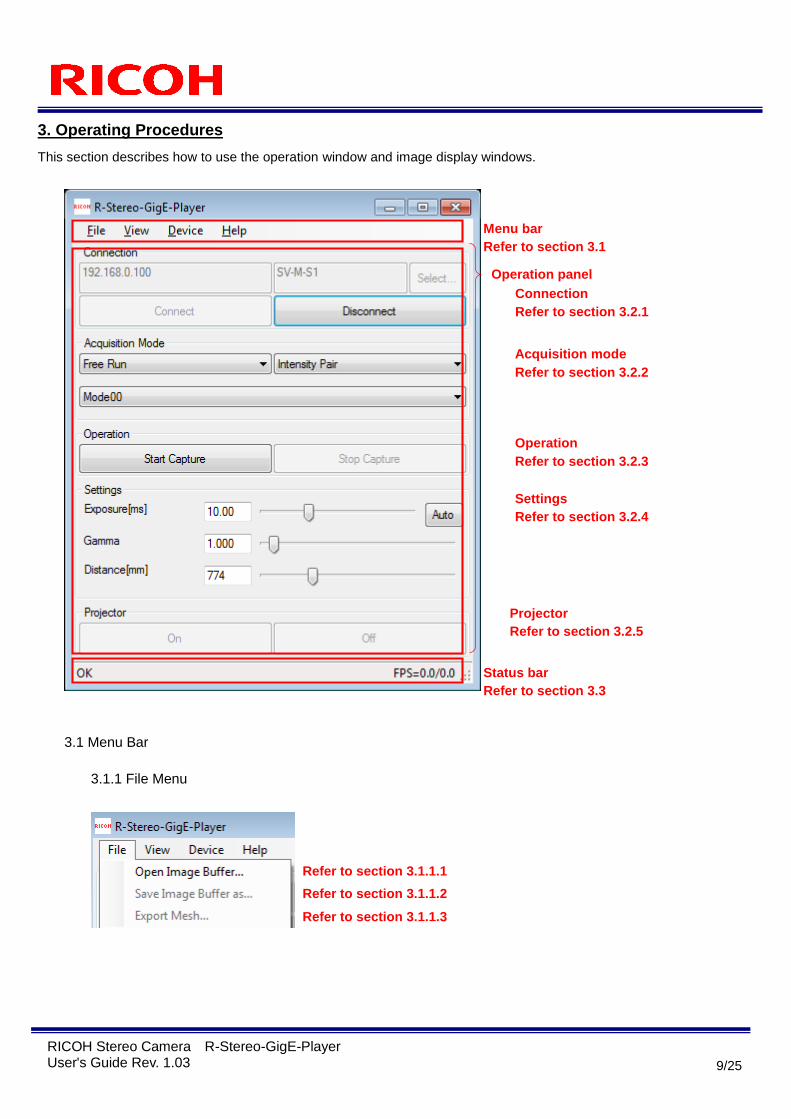
3. Operating Procedures
This section describes how to use the operation window and image display windows.
3.1 Menu Bar
3.1.1 File Menu
Refer to section 3.1.1.1
Refer to section 3.1.1.2
Refer to section 3.1.1.3
Connection
Refer to section 3.2.1
Acquisition mode
Refer to section 3.2.2
Operation
Refer to section 3.2.3
Settings
Refer to section 3.2.4
Projector
Refer to section 3.2.5
Menu bar
Refer to section 3.1
Operation panel
Status bar
Refer to section 3.3
10/25
RICOH Stereo Camera R-Stereo-GigE-Player User's Guide Rev. 1.03
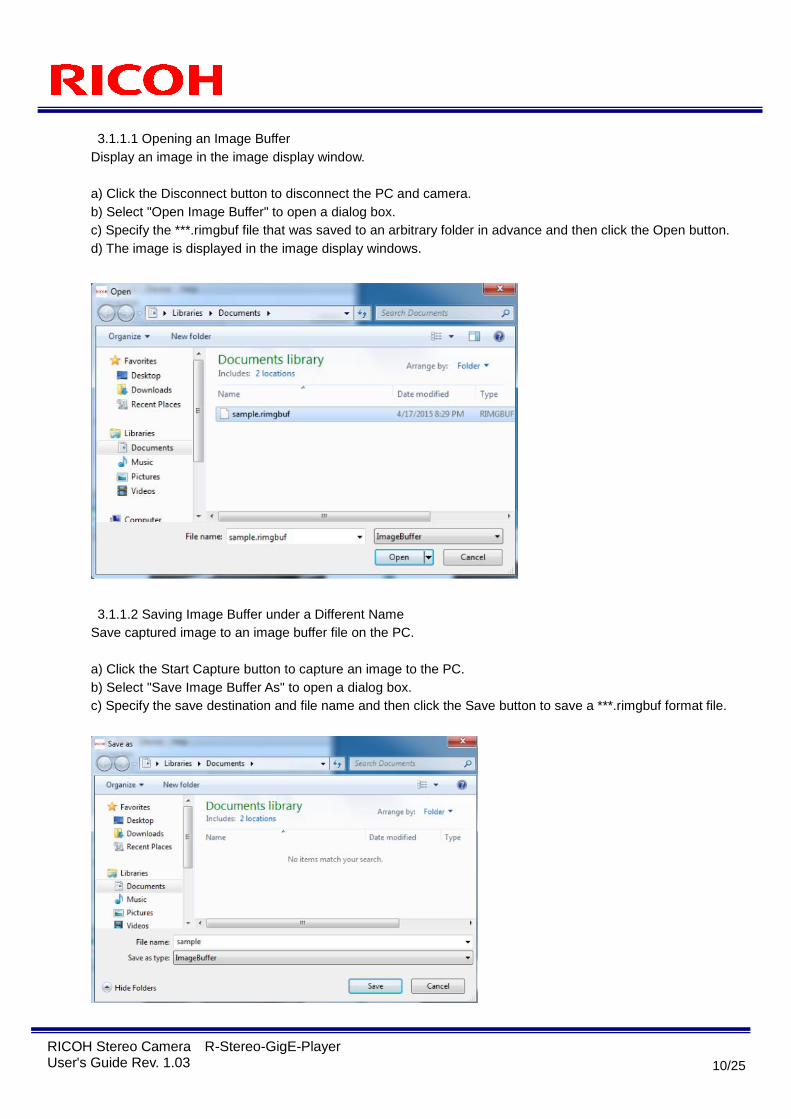
3.1.1.1 Opening an Image Buffer
Display an image in the image display window.
a) Click the Disconnect button to disconnect the PC and camera.
b) Select "Open Image Buffer" to open a dialog box.
c) Specify the ***.rimgbuf file that was saved to an arbitrary folder in advance and then click the Open button.
d) The image is displayed in the image display windows.
3.1.1.2 Saving Image Buffer under a Different Name
Save captured image to an image buffer file on the PC.
a) Click the Start Capture button to capture an image to the PC.
b) Select "Save Image Buffer As" to open a dialog box.
c) Specify the save destination and file name and then click the Save button to save a ***.rimgbuf format file.
11/25
RICOH Stereo Camera R-Stereo-GigE-Player User's Guide Rev. 1.03
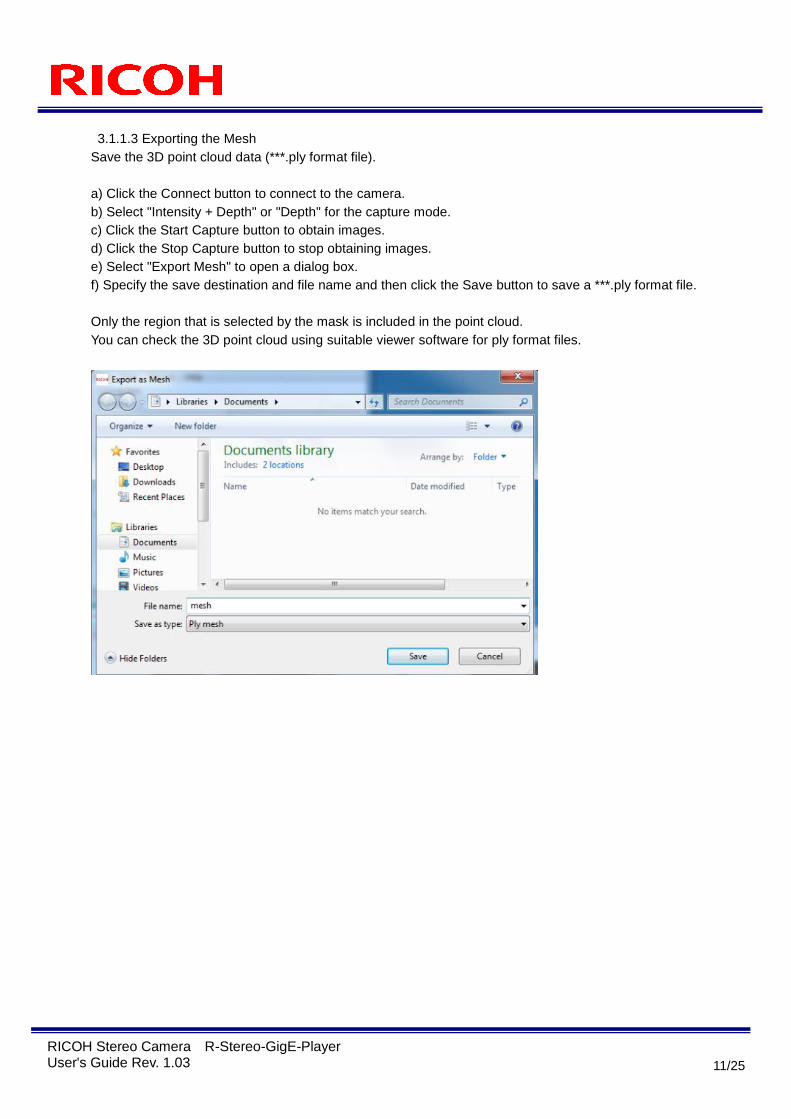
3.1.1.3 Exporting the Mesh
Save the 3D point cloud data (***.ply format file).
a) Click the Connect button to connect to the camera.
b) Select "Intensity + Depth" or "Depth" for the capture mode.
c) Click the Start Capture button to obtain images.
d) Click the Stop Capture button to stop obtaining images.
e) Select "Export Mesh" to open a dialog box.
f) Specify the save destination and file name and then click the Save button to save a ***.ply format file.
Only the region that is selected by the mask is included in the point cloud.
You can check the 3D point cloud using suitable viewer software for ply format files.

12/25
RICOH Stereo Camera R-Stereo-GigE-Player User's Guide Rev. 1.03
3.1.2 View Menu
3.1.2.1 Image 1/Image 2
The windows of image 1 and image 2 are displayed when R-Stereo-GigE-Player is started.
To display them again after they have been closed, select these menu items.
The displayed image is switched depending on the pixel type. (Refer to the following table.)
Pixel type Image 1 Image 2
Intensity Pair Base camera intensity Slave camera intensity
Intensity + Depth Base camera intensity Base camera depth
Depth Base camera depth No data
Refer to section 3.1.2.1
Operation Panel
Refer to section 3.1.2.1.1
Status bar
Refer to section 3.1.2.1.2
13/25
RICOH Stereo Camera R-Stereo-GigE-Player User's Guide Rev. 1.03
3.1.2.1.1 Operation Panel
3.1.2.1.1.1 Zoom In/Zoom Out
Adjust the magnification of the displayed image.
Adjust the magnification by entering a value in the text box or dragging the slide bar.
3.1.2.1.1.2 Image Size Adjustment
Click the Fit button to automatically adjust the image size to fit the image display window size.
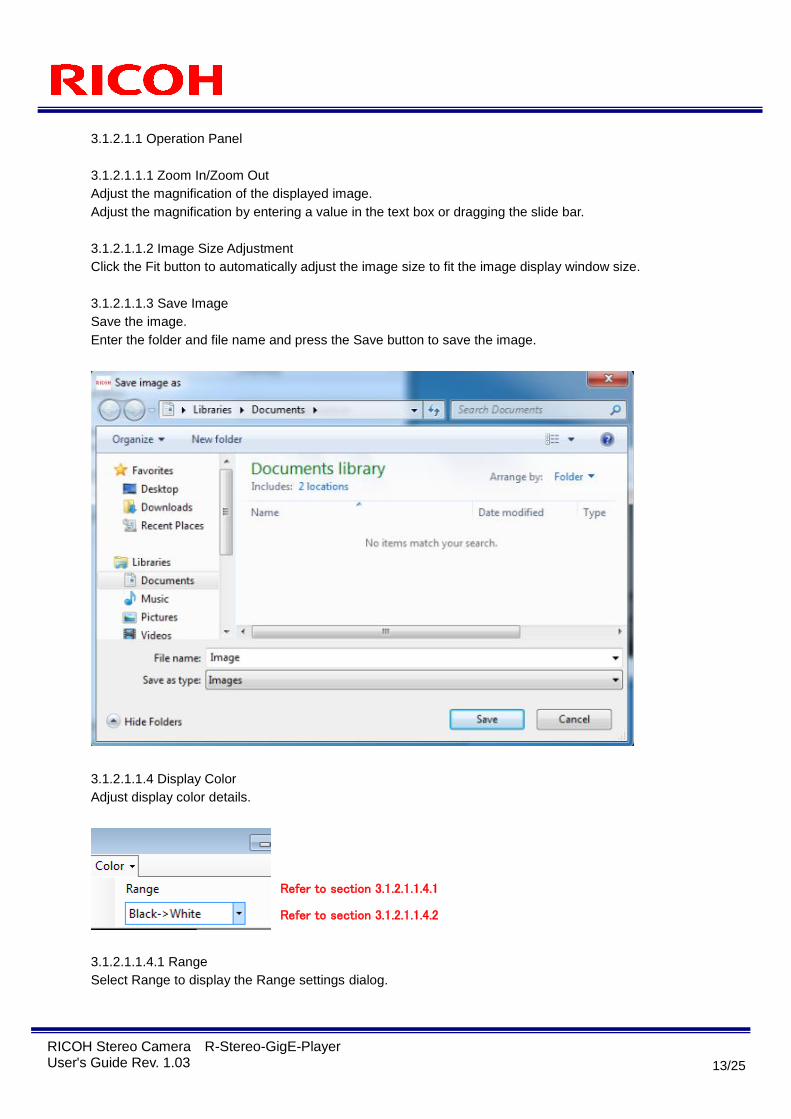
3.1.2.1.1.3 Save Image
Save the image.
Enter the folder and file name and press the Save button to save the image.
3.1.2.1.1.4 Display Color
Adjust display color details.
3.1.2.1.1.4.1 Range
Select Range to display the Range settings dialog.
Refer to section 3.1.2.1.1.4.1
Refer to section 3.1.2.1.1.4.2
14/25
RICOH Stereo Camera R-Stereo-GigE-Player User's Guide Rev. 1.03
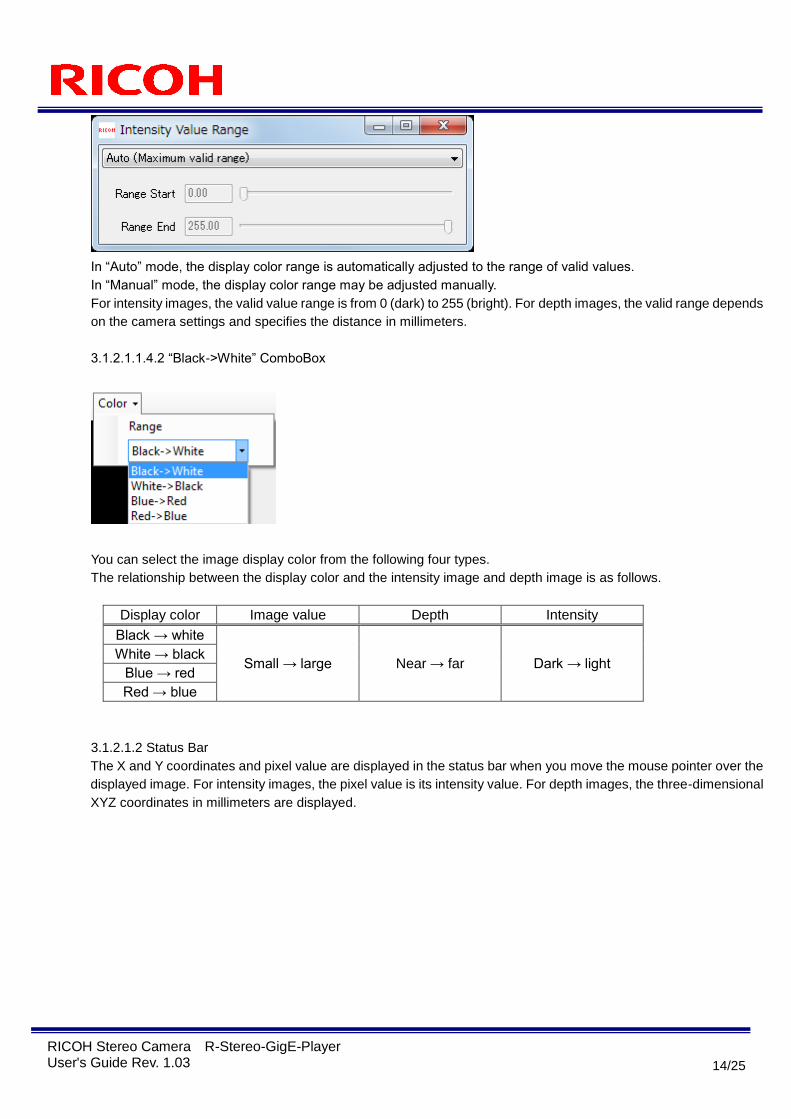
In “Auto” mode, the display color range is automatically adjusted to the range of valid values.
In “Manual” mode, the display color range may be adjusted manually.
For intensity images, the valid value range is from 0 (dark) to 255 (bright). For depth images, the valid range depends
on the camera settings and specifies the distance in millimeters.
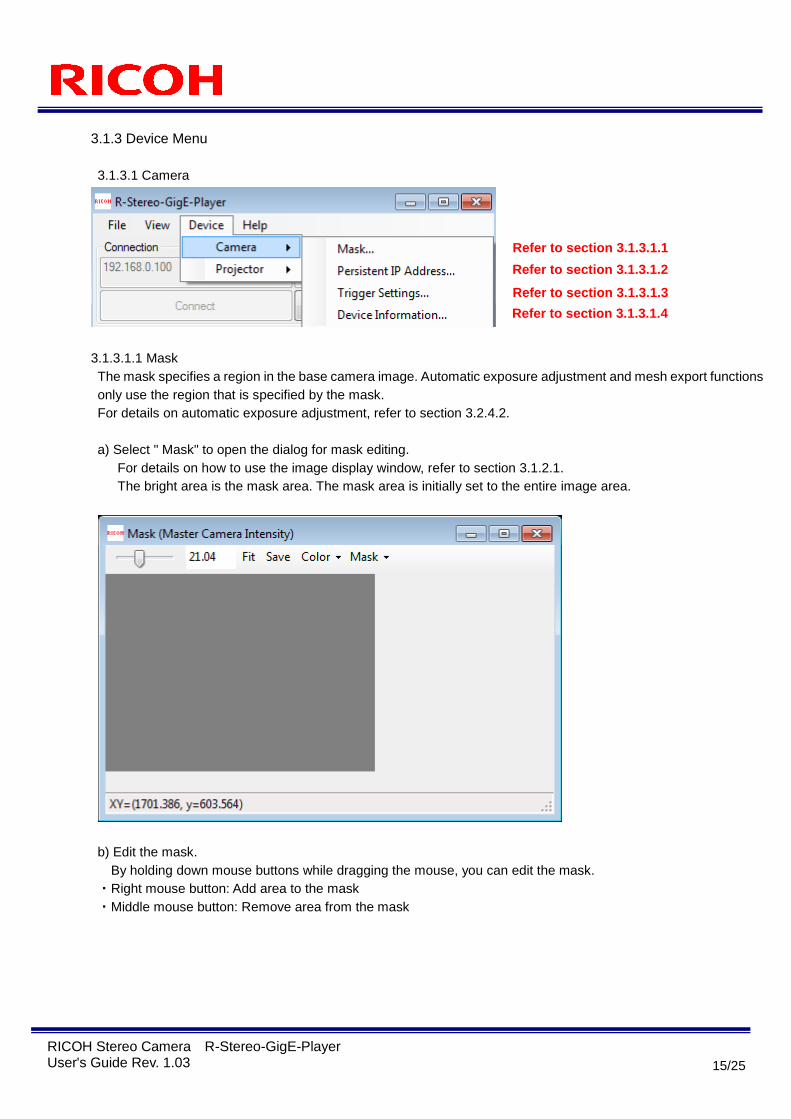
3.1.2.1.1.4.2 “Black->White” ComboBox
You can select the image display color from the following four types.
The relationship between the display color and the intensity image and depth image is as follows.
Display color Image value Depth Intensity
Black → white
Small → large Near → far Dark → light White → black
Blue → red
Red → blue
3.1.2.1.2 Status Bar
The X and Y coordinates and pixel value are displayed in the status bar when you move the mouse pointer over the
displayed image. For intensity images, the pixel value is its intensity value. For depth images, the three-dimensional
XYZ coordinates in millimeters are displayed.
15/25
RICOH Stereo Camera R-Stereo-GigE-Player User's Guide Rev. 1.03
3.1.3 Device Menu
3.1.3.1 Camera
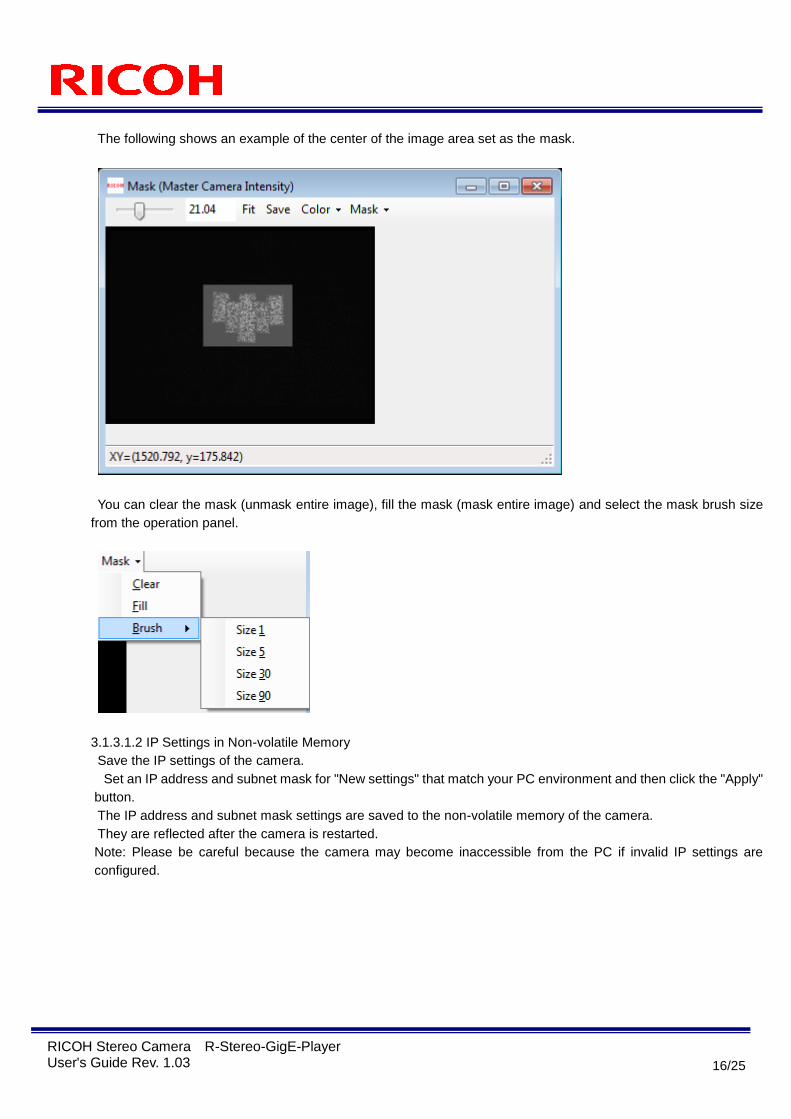
3.1.3.1.1 Mask
The mask specifies a region in the base camera image. Automatic exposure adjustment and mesh export functions
only use the region that is specified by the mask.
For details on automatic exposure adjustment, refer to section 3.2.4.2.
a) Select " Mask" to open the dialog for mask editing.
For details on how to use the image display window, refer to section 3.1.2.1.
The bright area is the mask area. The mask area is initially set to the entire image area.
b) Edit the mask.
By holding down mouse buttons while dragging the mouse, you can edit the mask.
・Right mouse button: Add area to the mask
・Middle mouse button: Remove area from the mask
Refer to section 3.1.3.1.1
Refer to section 3.1.3.1.2
Refer to section 3.1.3.1.3
Refer to section 3.1.3.1.4
16/25
RICOH Stereo Camera R-Stereo-GigE-Player User's Guide Rev. 1.03
The following shows an example of the center of the image area set as the mask.
You can clear the mask (unmask entire image), fill the mask (mask entire image) and select the mask brush size
from the operation panel.
3.1.3.1.2 IP Settings in Non-volatile Memory
Save the IP settings of the camera.
Set an IP address and subnet mask for "New settings" that match your PC environment and then click the "Apply"
button.
The IP address and subnet mask settings are saved to the non-volatile memory of the camera.
They are reflected after the camera is restarted.
Note: Please be careful because the camera may become inaccessible from the PC if invalid IP settings are
configured.
17/25
RICOH Stereo Camera R-Stereo-GigE-Player User's Guide Rev. 1.03
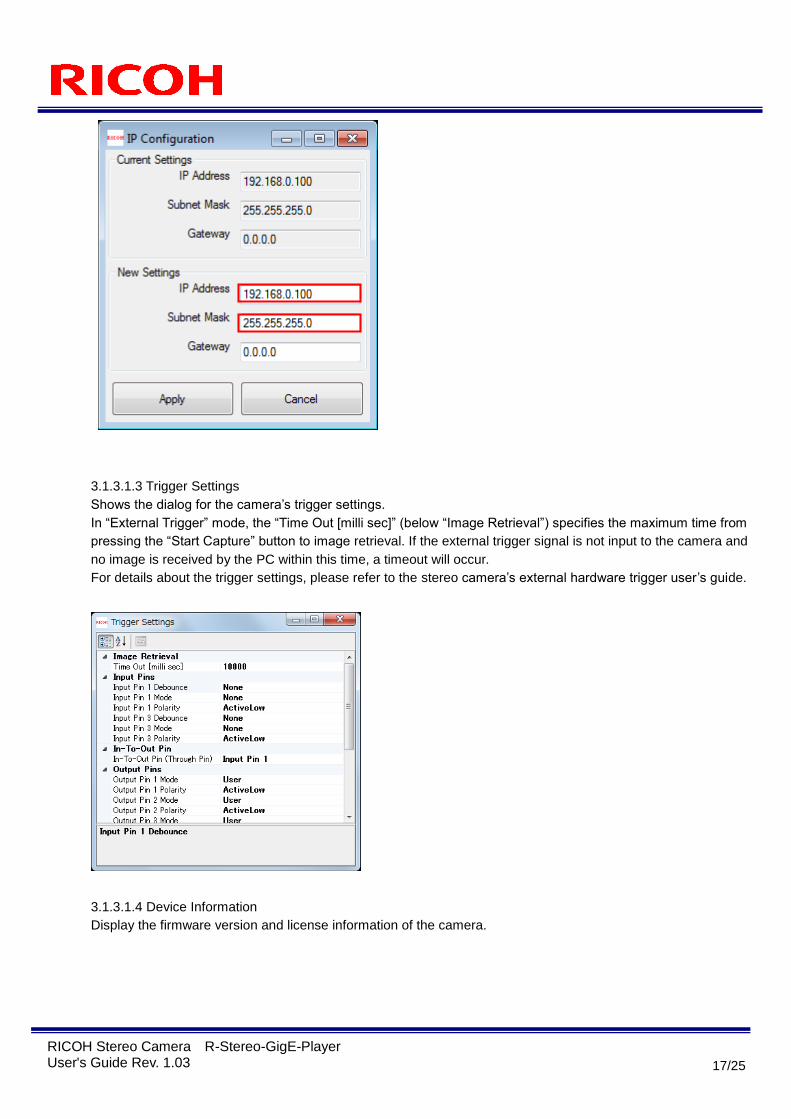
3.1.3.1.3 Trigger Settings
Shows the dialog for the camera’s trigger settings.
In “External Trigger” mode, the “Time Out [milli sec]” (below “Image Retrieval”) specifies the maximum time from
pressing the “Start Capture” button to image retrieval. If the external trigger signal is not input to the camera and
no image is received by the PC within this time, a timeout will occur.
For details about the trigger settings, please refer to the stereo camera’s external hardware trigger user’s guide.
3.1.3.1.4 Device Information
Display the firmware version and license information of the camera.
18/25
RICOH Stereo Camera R-Stereo-GigE-Player User's Guide Rev. 1.03
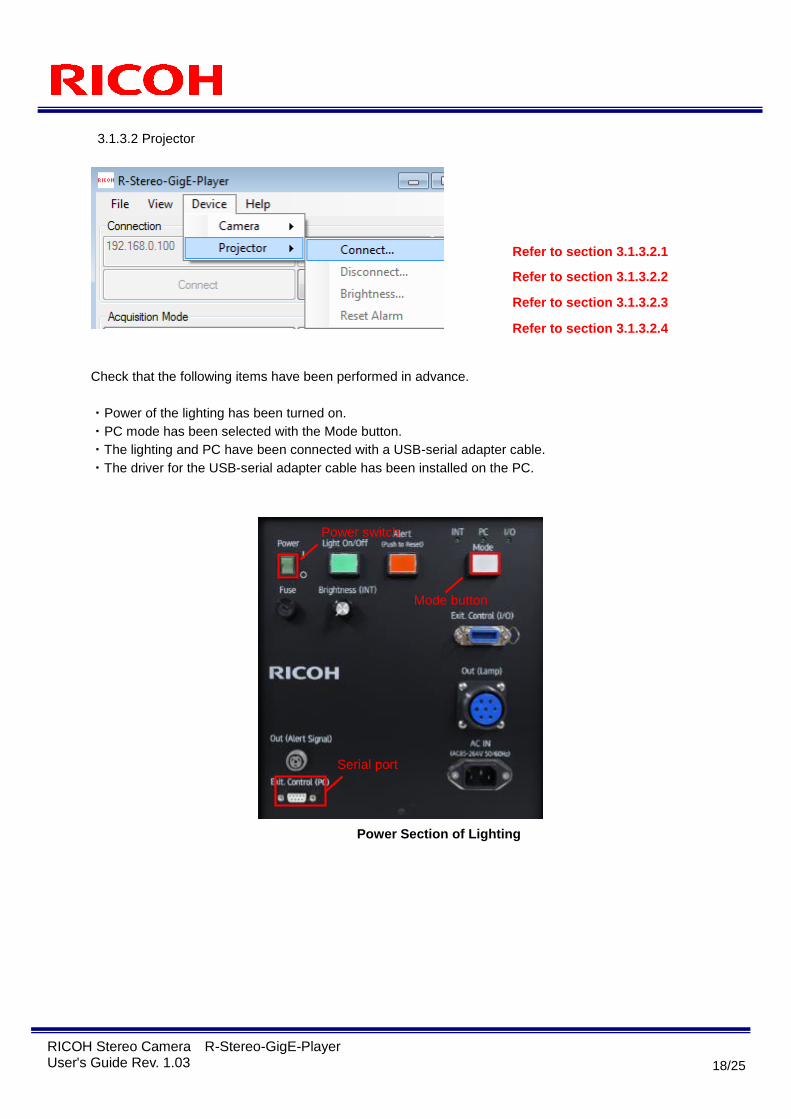
3.1.3.2 Projector
Check that the following items have been performed in advance.
・Power of the lighting has been turned on.
・PC mode has been selected with the Mode button.
・The lighting and PC have been connected with a USB-serial adapter cable.
・The driver for the USB-serial adapter cable has been installed on the PC.
Power Section of Lighting
Power switch
Mode button
Serial port
Refer to section 3.1.3.2.1
Refer to section 3.1.3.2.2
Refer to section 3.1.3.2.3
Refer to section 3.1.3.2.4
19/25
RICOH Stereo Camera R-Stereo-GigE-Player User's Guide Rev. 1.03
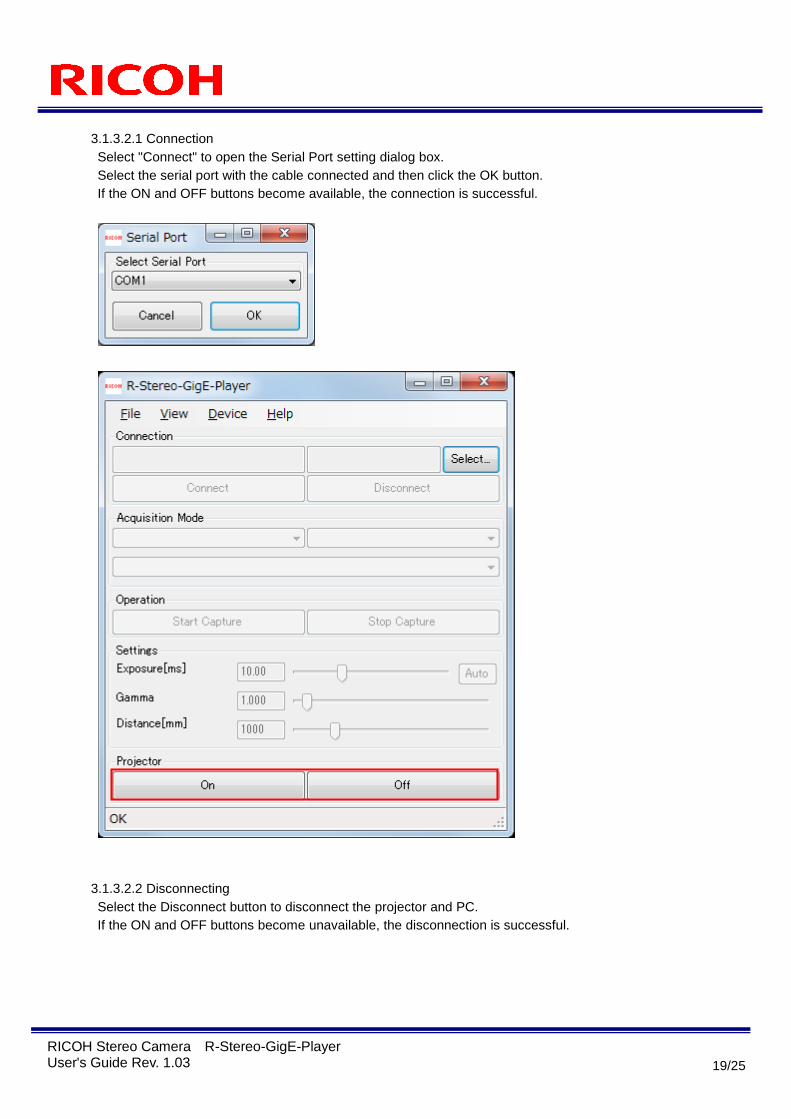
3.1.3.2.1 Connection
Select "Connect" to open the Serial Port setting dialog box.
Select the serial port with the cable connected and then click the OK button.
If the ON and OFF buttons become available, the connection is successful.
3.1.3.2.2 Disconnecting
Select the Disconnect button to disconnect the projector and PC.
If the ON and OFF buttons become unavailable, the disconnection is successful.
20/25
RICOH Stereo Camera R-Stereo-GigE-Player User's Guide Rev. 1.03
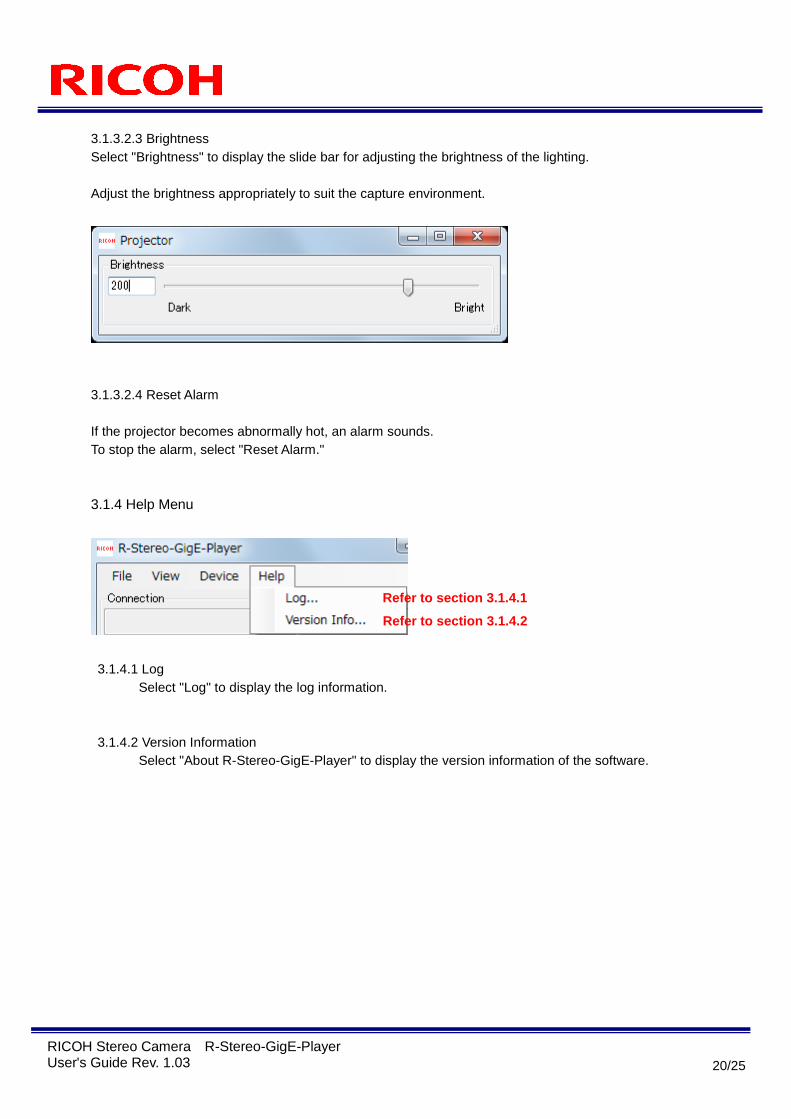
3.1.3.2.3 Brightness
Select "Brightness" to display the slide bar for adjusting the brightness of the lighting.
Adjust the brightness appropriately to suit the capture environment.
3.1.3.2.4 Reset Alarm
If the projector becomes abnormally hot, an alarm sounds.
To stop the alarm, select "Reset Alarm."
3.1.4 Help Menu
3.1.4.1 Log
Select "Log" to display the log information.
3.1.4.2 Version Information
Select "About R-Stereo-GigE-Player" to display the version information of the software.
Refer to section 3.1.4.2
Refer to section 3.1.4.1
21/25
RICOH Stereo Camera R-Stereo-GigE-Player User's Guide Rev. 1.03
3.2 Operation Panel
3.2.1 Connection
For details, refer to "2. Startup Procedure."
3.2.2 Acquisition Mode
Change the imaging mode to suit the images you wish to obtain.
Depending on the stereo camera model and its firmware, some modes may not be available.
Image Acquisition Mode Functionality
Free run This mode obtains images constantly from the camera after capturing is started.
Software trigger This mode obtains images from the camera only when the Start Capture button is clicked.
External trigger The application will start to wait for image retrieval when Start Capture button is clicked. The
image is displayed after retrieval. If no image is retrieved during the time out set in the trigger
settings, the application stops waiting for image retrieval.
Pixel Type Functionality
Intensity This mode obtains base and slave camera intensity images from the camera.
Intensity + Depth This mode obtains base camera intensity and depth images from the camera.
Depth This mode obtains only depth images from the camera.
The speed for transferring data between the camera and PC can be increased.
Imaging Mode Functionality
Mode00 Imaging Mode 00:
This is the default imaging mode.
Mode01 Imaging Mode 01:
Enhances contrast in dark areas and reduces contrast in bright areas.
Mode02 Imaging Mode 02:
High Dynamic Range (narrow) mode; covers a wider dynamic range than Mode00
Mode03 Imaging Mode 03:
High Dynamic Range (middle) mode; covers a wider dynamic range than Mode02.
Mode04 Imaging Mode 04:
High Dynamic Range (wide) mode; covers a wider dynamic range than Mode03.
3.2.3 Operation
Click the Start Capture button to start obtaining images from the camera.
Click the Stop Capture button to stop obtaining images from the camera.
The Stop Capture button is not available in the software trigger mode.
22/25
RICOH Stereo Camera R-Stereo-GigE-Player User's Guide Rev. 1.03
3.2.4 Settings
3.2.4.1 Manual Exposure Adjustment
Set the exposure time (shutter speed) of the camera manually.
The exposure time can be adjusted by entering a value in the text box or dragging the slide bar.
3.2.4.2 Automatic Exposure Adjustment
The exposure time of the camera can be set automatically so that the most stable depth of the capture target is
obtained.
The exposure time is set according to the mask.
(For details on the mask, refer to section 3.1.3.1.1.)
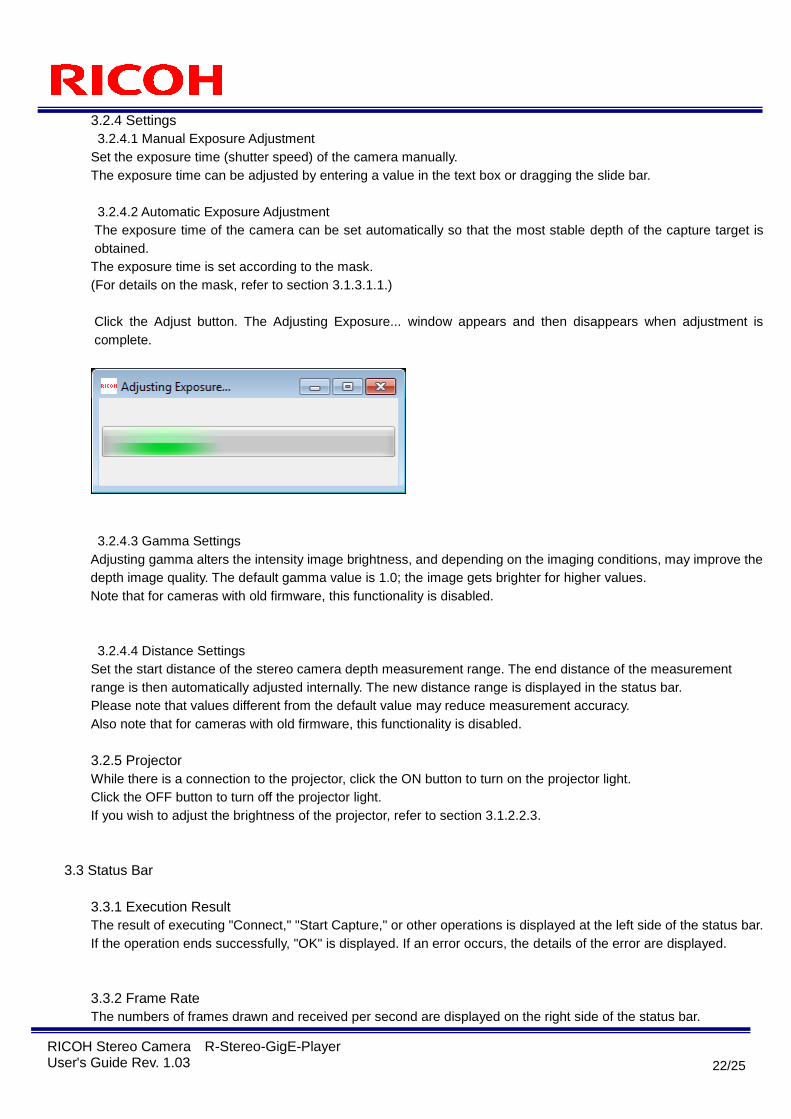
Click the Adjust button. The Adjusting Exposure... window appears and then disappears when adjustment is
complete.
3.2.4.3 Gamma Settings
Adjusting gamma alters the intensity image brightness, and depending on the imaging conditions, may improve the
depth image quality. The default gamma value is 1.0; the image gets brighter for higher values.
Note that for cameras with old firmware, this functionality is disabled.
3.2.4.4 Distance Settings
Set the start distance of the stereo camera depth measurement range. The end distance of the measurement
range is then automatically adjusted internally. The new distance range is displayed in the status bar.
Please note that values different from the default value may reduce measurement accuracy.
Also note that for cameras with old firmware, this functionality is disabled.
3.2.5 Projector
While there is a connection to the projector, click the ON button to turn on the projector light.
Click the OFF button to turn off the projector light.
If you wish to adjust the brightness of the projector, refer to section 3.1.2.2.3.
3.3 Status Bar
3.3.1 Execution Result
The result of executing "Connect," "Start Capture," or other operations is displayed at the left side of the status bar.
If the operation ends successfully, "OK" is displayed. If an error occurs, the details of the error are displayed.
3.3.2 Frame Rate
The numbers of frames drawn and received per second are displayed on the right side of the status bar.
23/25
RICOH Stereo Camera R-Stereo-GigE-Player User's Guide Rev. 1.03
4 IP Address Settings of PC
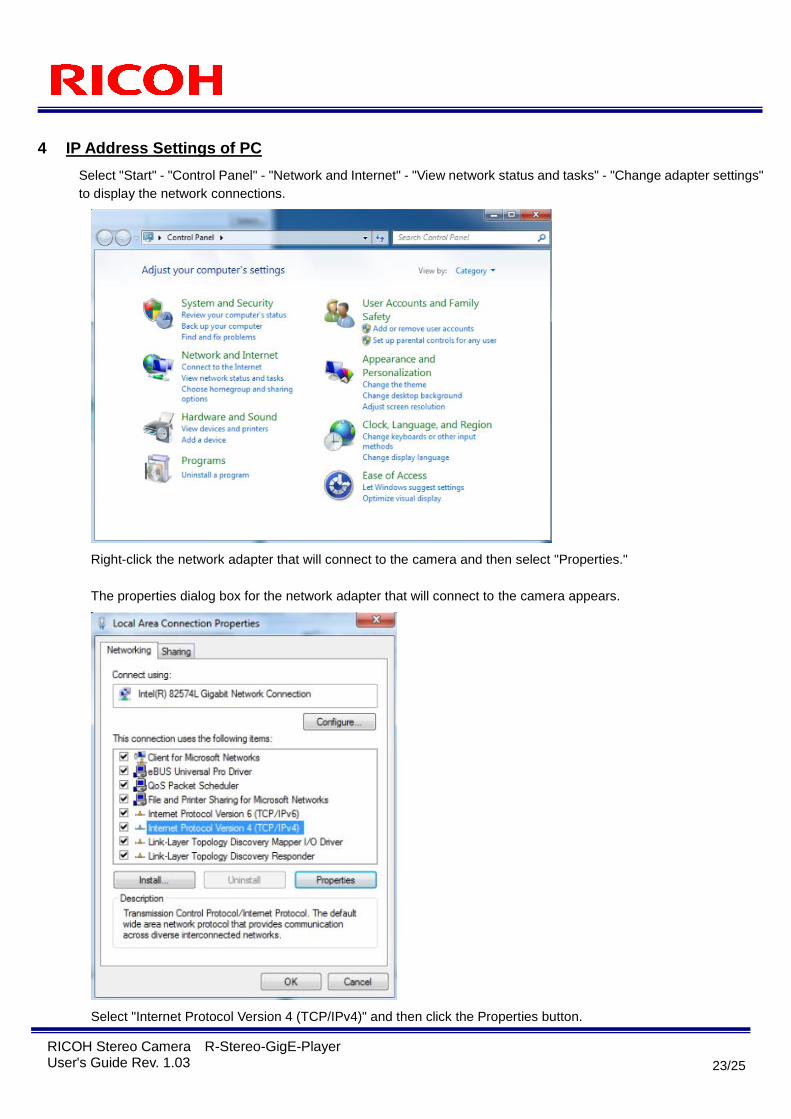
Select "Start" - "Control Panel" - "Network and Internet" - "View network status and tasks" - "Change adapter settings"
to display the network connections.
Right-click the network adapter that will connect to the camera and then select "Properties."
The properties dialog box for the network adapter that will connect to the camera appears.
Select "Internet Protocol Version 4 (TCP/IPv4)" and then click the Properties button.

24/25
RICOH Stereo Camera R-Stereo-GigE-Player User's Guide Rev. 1.03
If both TCP/IPv6 and TCP/IPv4 are displayed, select TCP/IPv4.)
Set the IP address and subnet mask in the properties dialog box for the network adapter that will connect to the
camera. Here we show an example of changing the address of the PC to 192.168.0.1.
Select "Use the following IP address" and set the IP address and subnet mask.
Set the IP address to 192.168.0.1.
Set the subnet mask to 255.255.255.0.
In this example, the first three parts of the IP address of the camera to be connected need to match the first
three parts of the IP address of the PC.
If the subnet mask is set to 255.255.0.0, the first two parts of the IP address of the camera to be connected
need to match the first two parts of the IP address of the network interface card.
Set an IP address that will not duplicate that of a camera or PC within the same network.
After setting the IP address and subnet mask of the PC, click the OK button to close the Internet protocol
properties dialog box.

25/25
RICOH Stereo Camera R-Stereo-GigE-Player User's Guide Rev. 1.03
Revision History
Rev.
Date
Changes
Note
1.00 March 24, 2015 Newly issued
1.01 March 27, 2015 Updated
Updated description on connection procedure.
1.02 June 16, 2015 Updated
Updated projector description.
1.03 December 24,
2015
Updated
Updated descriptions of acquisition mode, trigger settings, gamma, start
distance, and display color.
RICOH Industrial Solutions Inc.