RICOH PJ LX3000ST/LW3000ST Series RICOH PJ...
67
RICOH PJ LX3000ST/LW3000ST Series RICOH PJ XL4540/WXL4540
-
Upload
duonghuong -
Category
Documents
-
view
213 -
download
1
Transcript of RICOH PJ LX3000ST/LW3000ST Series RICOH PJ...

RICOH PJ LX3000ST/LW3000ST SeriesRICOH PJ XL4540/WXL4540


English1
English
Table of ContentsTable of Contents ............................1
Usage Notice ....................................2Precautions .........................................2Safety Labels of This Machine ............7Remote Control Battery ......................8Regulation & Safety Notices ...............9Other Information ..............................14
Introduction ....................................15Product Features ..............................15Package Overview ............................16Product Overview .............................17
Main Unit .............................................. 17Control Panel........................................ 18Input/Output Connections..................... 19Remote Control .................................... 20Remote Control Battery Installation...... 21Remote Control Operating Range ........ 22
Connecting the Projector ..................23Connect to Computer/Notebook ........... 23Connect to Video Sources .................... 24
Powering the Projector On / Off ........25Powering On the Projector ................... 25
Basic Operations ...........................26Powering Off the Projector ................... 26Warning Indicator ................................. 26
Adjusting the Projected Image ..........27Adjusting the Projector�s Height .......... 27Adjusting zoom-in of the projector ........ 28Adjusting Projection Image Size (Diagonal) ............................................. 29
Control Panel & Remote Control ......31Control Panel........................................ 31Remote Control .................................... 32
User Settings .................................34On-screen Display Menus ................34
How to operate .................................... 34OSD Menu Tree ................................35
Picture .................................................. 38Screen .................................................. 40Setting .................................................. 42Volume ................................................. 44Options ................................................. 45Options | LASER Settings .................... 473D ......................................................... 48
Troubleshooting ............................49
Maintaining the filter .....................54
VGA Analog .................................... 55
Appendices ....................................55
HDMI Digital ................................... 57Configurations of Terminals ..............59
Terminal : Analog RGB (Mini D-sub 15 pin) ............................... 59
PC Control ........................................60RS232 Port Setting............................... 60RS232 Signals Connection .................. 60
Specifications ....................................61Ceiling Mount Installation ..................63Trademarks .......................................64

2
English
Usage Notice
Precautions Follow all warnings, precautions and maintenance as recommended in this user�s guide to maximize the life of your unit.
■ Warning- This apparatus must be earthed.
■ Warning- Do not look into the projector’s lens when the light source is on. The bright light may hurt your eyes.
■ Warning- To reduce the risk of fire or electric shock, do not expose this projector to rain or moisture.
■ Warning- Please do not open or disassemble the projectoras this may cause electric shock.
■ Warning- When switching the projector off, please ensure the cooling cycle has been completed before disconnecting power. Allow 60 seconds for the projector to cool down.
■ Warning- Do not use lens cap when projector is powered on.
■ Warning- Turn on the projector first and then the signal sources.
■ Warning- Do not remove the cabinet cover, or you may be exposed to dangerous voltage. Refer servicing to qualified service personnel only.
■ Warning- The supplied power cord is for use with this machine only. Do not use it with other applianses. Doing so could result in fire or electric shock.

English3
English
Usage Notice■ Warning- This product should be operated only from the
type of power source which does not exceed the voltage range specified on the rating label and the power cord. If you are not sure of the type of power supply to your home, consult your sales representative or local power company.
■ Warning- Do not use the polarized plug with an exten-sion cord , receptacle, or other outlet unless the blades can be inserted completely with three wire grounding type to prevent blade exposure. Failure to follow these instructions may result in fire or electric shock.
■ Warning- Plastic bags can be dangerous, please do not leave near babies and young children. To avoid the threat of suffocation, please keep away from their nose and mouth.
■ Warning- Installing the Projector on a Wall or Ceiling:a) Do not attempt to clean or replace parts for a
machine that is installed in a high location on a wall or ceiling. Doing so may cause it to fall down, resulting in an injury.
b) Contact your sales or service representative to clean or replace parts for a machine that is installed on a wall or ceiling.
c) If a machine is incorrectly installed on a wall or ceiling, it may fall down and cause an injury. Contact your sales or service representative if you want to install a machine on a wall or ceiling.
d) Do not obstruct the machine’s vents. Doing so risks fire caused by overheated internal components.
e) For users, do not install the projector by yourself. Contact your sales or service representative if you want to install the projector on a wall or ceiling.

4
English
Usage Noticef) For sales or service representatives:
- Use brackets that are strong enough to support the projector. PJ WXL4540 Series and LW3000ST Series projectors weigh about 5.5 kg (12.2 lb.).
- The projector must be installed in a location that is sturdy enough to support the full weight of the projector and brackets.
- Use only the screws (four M4~16 screws) provided with the projector to attach the brackets to the projector.
- Use all three of the projector’s screw holes to attach the brackets. The locations of the screw holes are shown in the illustration below. Make sure that the screws are tightened firmly.
■ Caution- Never operate this unit on AC power during a thunderstorm. If you see lightning or hear thun-der, never touch the unit, cables and/or peripher-als. An electric surge caused by the storm, may result in an electrical shock or damage to the unit.
■ Caution- Never push objects of any kind into this product through openings as they may touch dangerous voltage points or short-out parts that could result in a fire or electric shock. Never spill liquid of any kind on the product.
■ Caution- Do not place or keep the projector within the reach of the children. It may fall or tip over, pos-sibly causing serious injury.
■ Caution- Do not stack other equipment on this product and do not place this product on other equip-ment. The top and bottom surface of this product increase in temperature during normal use and may damage the other unit.
■ Caution- Do not use attachments not recommended by the product manufacturer. Use of an incompat-ible attachments could cause hazards or damage to the product.

English5
English
Usage Notice■ Caution- Do not place this product on an unstable cart,
stand, tripod, bracket, or table. The product may fall, causing serious injury to a child or adult, and serious damage to the product.
■ Caution- Unplug this product from the wall outlet and take the product to qualified service personnel if you encounter any of the following conditions:a) The power supply cord or plug is damaged.b) Liquid has been spilled, or objects have fallen
into the product.c) The product has been exposed to rain or
water.d) The product does not operate normally when
following the operating instructions. Adjust only those controls that are covered by the operating instructions.
e) The product has been dropped or damaged in any way. (If the cabinet should break, please handle with care to avoid injury.)
■ Caution- Do not place anything in front of the lens while the projector is operating Things placed in front of the lens may overheat and burn or start a fire.
■ Caution- Unauthorized substitutions may result in fire, electric shock, or other hazards.
■ Caution- Upon completion of any service or repairs to this product, ask the service technician to perform safety checks to verify that the product is in proper operating condition.
■ Caution- Do not leave thermal paper documents or easily deformed items on top of the unit or near the air exhaust for long periods of time.

6
English
Usage Notice
Do:
■ After unpacking this product, read the manual carefully, and fol-low all the operating and other instructions.
■ Turn off the product before cleaning.■ Use a soft cloth moistened with mild detergent to clean the
display housing.■ Disconnect the power plug from AC outlet if the product is not
being used for a long period of time.
Do not:
■ Block the slots and openings on the unit provided for ventilation.■ Use abrasive cleaners, waxes or solvents to clean the unit.■ Use under the following conditions:
- Extremely heat, cold or humidity.- In areas susceptible to excessive dust and dirt.- Near any appliance generating a strong magnetic field.- In direct sunlight.
Important:Contents of this manual are subject to change without prior notice. In no event will the company be liable for direct, indirect, special, incidental, or consequential damages as a result of handing or operating this product.
■ Caution- The heat from the unit could erase the informa-tion on the thermal paper, or cause deformation or warping.
■ Caution- Do not use the product in a closed installation location. Do not place the product in a box or in any other closed installation location. Otherwise it may overheat, which could result in a risk of fire.

English7
English
Usage Notice
1
3
2
6 4
5
DANGER-CLASS 4 LASER RADIATION WHEN OPEN AVOID EYE OR SKIN EXPOSURE TO DIRECT OR SCATTERED RADIATION
DANGER-RAYONNEMENT LASER DE CLASSE 4-EN CASD’OUVERTURE EXPOSITION DANGEREUSE AU RAYONNEMENT DIRECT OU DIFFUS DES YEUX OU DE LA PEAU
Safety Labels of This Machine1 Do not block the air intake or exhaust. Doing so could cause a fire
due to internal overheating. Do not place your hands, face, or other objects near the air exhaust, the bottom of the unit. Doing so could result in injury and/or damage the object.
2 Do not look into the lens while the light source is on. The strong light from the light source may cause damage to your eyesight.
3 Do not place anything in front of the lens while the projector is op-erating. Things placed in front of the lens may overheat and burn or start a fire. If you want to temporarily stop the projected image, use the AV mute on the remote control or the keypad.
4 Do not remove any screws. Do not block or cover the vents.
If you wish to discard this product, please contact your local authorities, the shop where you bought this product, your local dealer or sales/ser-vice representatives.

8
English
Usage Notice
If you wish to discard this product, please contact your local authori-ties, the shop where you bought this product, your local dealer or sales/ service representatives.
Warning• Never throw batteries into a fire.
Using the batteries improperly may cause them to explode or leak and may result in serious injury. If battery-leaking fluid contacts skin, wash the fluid off immediately with clean water and consult a doctor. If the fluid spills on an instrument, avoid contact and wipe it off using tissue paper. Then dispose of the used tissue paper as flammable garbage after moistening the tissue with water.
• Do not ingest battery, Chemical Burn Hazard.The remote control supplied with this product contains a coin cell battery.If the coin cell battery is swallowed, it can cause severe internal burns in just 2 hours and can lead to death.
• Keep new and used batteries away from children.If the battery compartment does not close securely, stop using the product and keep it away from children.If you think batteries might have been swallowed or placed inside any part of the body, seek immediate medical attention.
Notes• Be sure to use CR2025 lithium 3.0V coin battery.• Dispose of batteries in a designated disposal area.• Attention should be drawn to the environmental aspects of battery disposal.• If the remote control does not operate correctly, or if the operating
range becomes reduced, replace the battery. • Avoid contact with water or liquid.• Do not expose the remote control to moisture or heat.• Do not drop the remote control.• Dispose of used battery according to the instructions.
Remote Control Battery

English9
English
Usage Notice
This appendix lists the general notices of your Projector.
Notice: Users in the United States of America
FCC notice
MODEL NAME: RICOH PJ XL4540
TRADE NAME: PROJECTORMODEL NAME: RICOH XL4540Tested To Comply
With FCC StandardsFOR HOME OR OFFICE USE
This device complies with Part 15 of the FCC Rules. Operation is subject to the following two conditions:
1. This device may not cause harmful interference and2. This device must accept any interference received,
including interference that may cause undesired operation.
This device has been tested and found to comply with the limits for a Class B digital device pursuant to Part 15 of the FCC rules. These limits are designed to provide reasonable protection against harmful interference in a residential installation. This device generates, uses and can radiate radio frequency energy and, if not installed and used in accordance with the instructions, may cause harmful interference to radio communications. However, there is no guarantee that interference will not occur in a particular installation. If this device does cause harmful interference to radio or television reception, which can be determined by turning the device off and on, the user is encouraged to try to correct the interference by one or more of the following measures:
▀■ Reorient or relocate the receiving antenna. ▀■ Increase the separation between the device and
receiver. ▀■ Connect the device into an outlet on a circuit different
from that to which the receiver is connected. ▀■ Consult the dealer or an experienced radio/television
technician for help.
Regulation & Safety Notices

10
English
Usage Notice
Notes to Users in the State of CaliforniaPerchlorate Material - special handling may apply, See www.dtsc.ca.gov/hazardouswaste/perchlorate.
WARNING: Handling the cord on this product will expose you to lead, a chemical known to the State of California to cause cancer, and birth defects or other reproductive harm. Wash hands after handling.
RESPONSIBLE PARTY: Ricoh Americas Corporation5 Dedrick Place, West Caldwell, NJ 07006Phone: 973-882-2000
Notice: Shielded cables All connections to other computing devices must be made using shielded cables to maintain compliance with FCC regulations.
Caution Changes or modifications not expressly approved by the manufacturer could void the user’s authority, which is grant-ed by the Federal Communications Commission, to operate this projector.

English11
English
Usage NoticeDeclaration of Conformity for EU countries
▀■ EMC Directive 2004/108/EC (including amendments) ▀■ Low Voltage Directive 2006/95/EC
Notice: Users in EU countries
CE Marking Traceability Information (For EU Countries Only)
Manufacturer:Ricoh Co., Ltd.3-6 Nakamagome 1-chome, Ohta-ku, Tokyo. 143-8555, Japan
Importer:Ricoh Europe PLC20 Triton Street, London. NW1 3BF, United Kingdom
User Information on Electrical and
Electronic EquipmentUsers in the countries where this symbol shown in this section has been specified in national law on collection and treatment of E-waste.
Our Products contain high quality components and are designed to facilitate recycling.Our products or product packaging are marked with the symbol be-low.
This product contains substances which are harmful to humans and the environment.

12
English
Usage NoticeNotice: Users in Turkey
All Other UsersIf you wish to discard this product, please contact your local authorities, the shop where you bought this product, your local dealer or sales/service representatives.
Laser Notice• This Product is classified as Class 2 of IEC60825-1:2007 and also complies with 21 CFR 1040.10 and 1040.11 except for deviations pursuant to Laser Notice No.50, dated June 24,2007. (For USA)
• IEC 60825-1:2014 and IEC 62471: CLASS 1 LASER PRODUCT - RISK GROUP 1. (For EU countries and Japan and China)
Light source specification3.5W laser diodes x 19Wavelength: 440-455nmPulse duration: 1.32ms
Warning• This projector has built-in laser module.Possibly hazardous optical radiation emitted from this product. Do not stare into the beam. May be harmful to the eyes.
Caution• Use of controls or adjustments or performance of procedures other than those specified herein may result in hazardous radiation exposure.
Laser emissionport

English13
English
Usage NoticeNotice: Users in the EU
Note for the Battery and/or Accumulator Symbol
In accordance with the Battery Directive 2006/66/EC Article 20 Information for end-users Annex II, the above symbol is printed on batteries and accumulators. This symbol means that in the European Union, used batteries and accumulators should be disposed of separately from your household waste. In the EU, there are separate collection systems for not only used electrical and electronic products but also batteries and accumulators. Please dispose of them correctly at your local community waste collection/recycling centre.
Notice: Users in Taiwan
請勿將電池當作一般垃圾丟棄。這個標
誌表示電池不應視為一般垃圾丟棄。僅
適用於台灣。

14
English
Usage Notice
Other Information Copyrights to ImagesWhen projecting images using the projector, be careful not to infringe the copyright of protected materials.The following are examples that may infringe the copy-right of protected materials.• Broadcasting images or movies for commercial purposes• Modifying images or movies using functions such as freeze,
magnify, or zoom to broadcast images for commercial pur-poses or public viewing
• Varying the aspect ratio of images or movies using a function that changes the screen size to broadcast images for com-mercial purposes or public viewing
Note to Users Viewing 3D Images
Pay attention to the following points when viewing images us-ing 3D glasses with projector:• How 3D images are viewed may vary according to the indi-
vidual.• Do not use 3D glasses for viewing any material other than
3D images.• Before viewing 3D images, make sure to read the manuals
provided with your 3D glasses and 3D compatible content.• Avoid viewing 3D images for a long period of time. Take a
break of 15 minutes or longer after every hour of viewing.• If you feel sick while viewing 3D images, stop viewing them.
If you continue to feel sick, consult a doctor.• When viewing 3D image in a room where on LED lighting
system or fluorescent lights are used, you may feel that the light in the room flickers. If this is the case, dim the lights until you do not notice any flickers, or turn off the lights.
• If you or any member of your family has a history of light-sen-sitive seizures, consult a doctor before viewing 3D images.

English15
English
Introduction
Product Features Outstanding features include:
■ Single chip DLP® technology
■ NTSC3.58/NTSC4.43/PAL(B/D/G/H/I/M/N)/SECAM (B/D/G/K/K1/L) and SDTV(480i/576i), EDTV(480p/576p), HDTV(720p/1080i/1080p) compatible
■ Multi-Auto functions: Auto detection, Auto image and Auto saving the adjustments
■ Full function remote control
■ User friendly multilingual on screen display
■ Advanced digital keystone correction and high quality full screen image re-scaling
■ Built-in mono 10-Watt speaker.
■ UXGA, WXGA, SXGA+, SXGA, XGA compression and VGA re-sizing
■ Macintosh compatible

16
English
Introduction
Due to different applications in each country, some regions may have different accessories.
Documentation : Read This First
User Manual (CD)
Remote Control (with Battery)
CR20253V
Power Cord
Package OverviewUnpack and inspect the box contents to ensure all parts listed below are in the box. If something is missing, please contact your nearest customer service center.
Projector VGA Cable
Use only the VGA cable, power code provided with the projector.

English17
English
IntroductionProduct Overview
Main Unit
1. Control Panel2. Focusing Ring3. Ventilation (inlet)4. IR Receiver5. Ventilation (outlet)6. Speaker
7. Power Socket8. Input / Output
Connections9. Lens
The interface is subject to model’s specifications.
6
7
8
4
2
5
3
1
9

18
English
IntroductionControl Panel
1. Power LED2. Enter3. Temp LED4. Light LED5. Menu6. Input7. Four Directional Select Keys8. Power/Standby button9. IR Receiver
85
6
9
31 42
7

English19
English
IntroductionInput/Output Connections
Monitor loop through only support in Computer-In/YPbPr.
1. Computer-In/YPbPr Connector (PC Analog Signal/Component Video Input/HDTV/YPbPr)
2. HDMI2 Input Connector 3. HDMI1 Input Connector 4. Service5. Power Socket6. Monitor-Out Connector7. PC Control (9-pin DIN Type)8. Video Input Connector9. Audio Input 2 (right) Connector 10. Audio Input 2 (left) Connector 11. Audio Output Connector (3.5mm mini jack) 12. Audio Input 1 Connector (3.5mm mini jack) 13. Microphone Input Connector 14. KensingtonTM Lock Port
The interface is subject to model’s specifications.
51 2 4
7 11
3
896
10
12
14
13

20
English
Introduction
Remote Control
15
13
14
11
12
13
10
9
3
2
1
4
5
6
7
8
1. Transmitter2. Picture3. Input4. AV Mute5. Four Directional Select
Keys6. Auto Set7. Volume +/-8. Magnify +/-
9. Eco10. Freeze11. Menu12. Enter13. Keystone / 14. Aspect15. Power

English21
English
Introduction
Remote Control Battery InstallationPress firmly and slide the battery cover off.
1 Put the cover back3Remove the old battery and install new one (CR2025). Ensure that the side with a “+” is facing up.
2
To ensure safe operation, please observe the following precautions :■ Never throw batteries into a fire.■ Do not ingest battery, Chemical Burn Hazard.■ Keep new and used batteries away from children.
For more detailed information, please see page 8.
3VOLTS
CR2025
M3VOLTS
CR2025

22
English
Introduction
Remote Control Operating Range■ When pointing the remote control directly toward the projector (Remote control signal
receiver), operating range for the remote control is within 7 m (23.0 ft). Also, operation range available for four directions (up, down, left, right to the projector) is ± 15° and the operation distance may become short.
■ If there are any obstacles between the remote control and the remote control signal receiver, the remote control may not operate correctly.
■ You can operate the projector by reflecting the remote control signal on the screen. The operating range may differ due to the loss of light caused by the properties of the screen.
■ When the remote control signal receiver is lit with a fluorescent light or other strong light source, the projector may become inoperative. Set the projector as far from the luminous source as possible.
■ You can operate all of the functions of the projector via the remote control. Make sure not to lose the remote control.
■ Before using the remote control for the first time, remove the transparent insulation sheet.
3VOLTS
CR2025
M3VOLTS
CR2025
Transparent insulation sheet
23.0’ (7m)approx. 15°
23.0’ (7m)approx. 15°

English23
English
Basic Operations
E62405SP
R
6
9
5
MOLEX
87
1
Connecting the Projector
Due to the difference in applications for each country, some regions may have different accessories.
(*) Optional accessory
Connect to Computer/Notebook
Audio Output
Microphone
External Display
1................................................................................................*RS232 Cable2.....................................................................................................VGA Cable3..................................................................................................*HDMI Cable4....................................................................................................*USB Cable5......................................................................................... *Audio Cable/RCA6....................................................................................................Power Cord7........................................................................................*VGA Output Cable8......................................................................................*Audio Output Cable9.........................................................................................*Audio Input Cable
24
English
Basic Operations
E62405SP
R
1 2 3
5
8
7
4
6
Connect to Video Sources
1................................................*15-Pin to 3 RCA Component/HDTV Adaptor2..................................................................................................*HDMI Cable3..................................................................................................*Audio Cable4......................................................................................... *Audio Cable/RCA5....................................................................................................Power Cord6................................................................................*Composite Video Cable7......................................................................................... *Audio Cable/RCA8.........................................................................................*Audio Input Cable
Due to the difference in applications for each country, some regions may have different accessories.
(*) Optional accessory
Composite Video Output
DVD Player, Set-top Box, HDTV receiver
Microphone
Audio Output

English25
English
Basic Operations
Powering the Projector On / Off
Turn on the projector first and then select the signal sources.
Powering On the Projector1. Securely connect the power cord and signal cable. When
connected, the POWER/STANDBY LED will turn Orange.
2. Turn on the light source by pressing “ ” button either on the projector or on the remote. At this moment, the POW-ER/STANDBY LED will now turn Blue.
The startup screen will display in approximately 10 sec-onds. The first time you use the projector, you will be asked to select the preferred language and power saving mode.
3. Turn on and connect the source that you want to display on the screen (computer, notebook, video player, etc). The projector will detect the source automatically. If not, push menu button and go to “OPTIONS”. Make sure that the “Source Lock” has been set to “Off”.
If you connect multiple sources at the same time, press the “INPUT” button on the control panel or direct source keys on the remote control to switch between inputs.
When the power mode is in standby mode (power con-sumption < 0.5W), the VGA output/input and audio will be deactivated when the projector is in standby.
POWER/STANDBY1
26
English
Basic Operations
Contact the nearest service center if the projector displays these symptoms.
Warning IndicatorWhen the warning indicators (see below) come on, the projector will automatically shutdown:
“Light” LED indicator is lit red and if “POWER/STANDBY” indicator flashes amber.
“TEMP” LED indicator is lit red, this indicates the projector has overheated. Under normal conditions, the projector can be switched back on.
“TEMP” LED indicator flashes red and if “POWER/STAND-BY” indicator flashes amber.
Unplug the power cord from the projector, wait for 30 seconds and try again. If the warning indicator light up again, please contact your nearest service center for assistance.
Powering Off the Projector
1. Press the “ ” button on the remote control or on the control panel to turn off the projector. The following message will be displayed on the screen.
Press the “ ” button again to confirm otherwise the message will disappear after 10 seconds. When you press the “ ” button for the second time, the fan will start cooling the system and will shut down.
2. The cooling fans continue to operate for about 4 seconds for cooling cycle and the POWER/STANDBY LED will flash Orange. When the POWER/STANDBY LED lights solid Orange, the projector has entered standby mode.
If you wish to turn the projector back on, you must wait until the projector has completed the cooling cycle and has en-tered standby mode. Once in standby mode, simply press “
” button to restart the projector.3. Disconnect the power cord from the electrical outlet and the
projector.

English27
English
Basic OperationsAdjusting the Projected Image
Adjusting the Projector�s Height
The projector is equipped with elevator feet for adjusting the image height.
1. Locate the adjustable foot you wish to modify on the underside of the projector.
2. Rotate the adjustable ring clockwise to raise the projector or counter clockwise to lower it. Repeat with the remaining feet as needed.
Tilt-Adjustment Feet
Tilt-Adjustment Ring

28
English
Basic OperationsAdjusting zoom-in of the projector
To focus on the image, slide the focus ring to the left or to the right until the image is clear.
Focusing Ring

English29
English
Basic OperationsAdjusting Projection Image Size (Diagonal)
XGA/WXGA series: focus range 1.3123 ~ 10.1706 ft. (0.4 ~ 3.1m)
113mm
43.1 mm
113.4 mm
Wide Range of Projection Distance (C)
Distance (A) (from front cap of the projector to screen)
Wide Range of Projection Distance (C)
Offset (D)
Screen Screen (H)

30
English
Basic Operations
XGA
Screen Size W x HC (Projection Distance)
Front cover to screen
(mm)
D (Offset) Bottom cover to bottom
of screen (mm)
Diagonal Length of Image Width Height
inch mm inch mm inch mm inch mm inch mm
56.4 1432.3 45.1 1146.5 33.9 859.8 27.9 710.8 597.4 6 152.2 195.3
60 1524 48 1219.2 36 914.4 29.6 752.2 638.8 6.4 161.9 205.0
75 1905 60 1524 45 1143 37.0 940.3 826.9 8.0 202.4 245.5
77 1955.8 61.6 1564.6 46.2 1173.4 38.0 965.4 852.0 8.2 207.8 250.9
80 2032 64 1625.6 48 1219.2 39.5 1003.0 889.6 8.5 215.9 259.0
100 2540 80 2032 60 1524 49.4 1253.7 1140.3 10.6 269.9 313.0
WXGA
Screen Size W x HC (Projection Distance)
Front cover to screen
(mm)
D (Offset) Bottom cover to bottom
of screen (mm)
Diagonal Length of Image Width Height
inch mm inch mm inch mm inch mm inch mm
70 1778 59.6 1513.1 37.2 945.7 30.9 786.9 673.5 5.6 141.9 184.9
75 1905 63.6 1615.4 39.7 1009.6 33.1 841.6 734.9 6.0 151.4 194.5
87 2209.8 73.8 1873.9 46.1 1171.2 38.4 976.3 862.9 6.9 175.7 218.8
92 2336.8 78.0 1981.6 48.8 1238.5 40.6 1032.4 919.0 7.3 185.8 228.9
100 2540 84.8 2153.9 53.0 1346.2 44.2 1122.2 1008.8 7.9 201.9 245.0
This table is for user’s reference only.

English31
English
User Settings
Control Panel
Control Panel & Remote Control
Using the Control Panel
POWER Refer to the “Power On/Off the Projector” section on pages 25-26.
Enter Press “Enter” to confirm your item selection.
INPUT Press “INPUT” to select an input signal.
MENUPress “MENU” to launch the on-screen display (OSD) menu. To exit OSD, press “MENU” again.
Four Directional Select Keys
Use to select items or make adjustments to your selection.
LIGHT LED Refer to the LED indicator of the projector light source status.
TEMP LED Refer to the LED indicator of the projector temperature status.
ON/STANDBY LED
Refer to the LED indicator of the projector power status.

32
English
User SettingsRemote Control
Using the Remote ControlTransmitter Send signals to the projector.
Picture Select the preset picture mode.Input Select the input source.
AV Mute Momentarily turn off/on the audio and video.
Four Directional Select Keys
Use to select items or make adjustments to your selection.
Auto Set Automatically synchronize the projector to the input source.
Volume +/- Increase/decrease speaker volume.
Magnify +/-Enlarge part of the screen image. Reduce the enlarged part of the image. (Digital Zoom)
Eco Switch LASER Power mode between Normal/ECO mode

English33
English
User Settings
Freeze Pause the screen image. Press again to resume the screen image.
MenuPress “Menu” to launch the on screen display (OSD), or go back to the pre-vious menu.
Enter Select or confirm settings
Keystone / Adjust the image to compensate for distortion caused by tilting the projector.
Aspect Use this function to choose your de-sired aspect ratio for the screen.
Power Refer to the “Power On/Off the Projec-tor” section.

34
English
User SettingsOn-screen Display MenusThe Projector has multilingual On-screen Display menus that allow you to make image adjustments and change a variety of settings.
How to operate 1. To open the OSD menu, press “Menu” on the Remote Control or
Projector Keypad.
2 When OSD is displayed, use the keys to select any item in the main menu. While making a selection on a particular page, press the or “Enter” key to enter sub menu.
3. Use the keys to select the desired item and adjust the settings using the key.
4. Select the next item to be adjusted in the sub menu and adjust as described above.
5. Press “Enter” to confirm, and the screen will return to the main menu.
6. To exit, press “Menu” again. The OSD menu will close and the projector will automatically save the new settings.
Main Menu
SettingsSub Menu

English35
English
User SettingsOSD Menu Tree
Main Menu Tree 1st level
2nd level 3rd level 4th level Default Value Range
Picture
Color Mode
Bright
depend on signal type and change Color Mode to User Mode if customer changes the settings
PC
Movie
Game
User
Wall colorWhite/ Light yellow/ Light Blue/ Pink/ Dark Green
White
Brightness depend on color mode 0 ~ 100
Contrast depend on color mode 0 ~ 100
Sharpness depend on color mode 0 ~ 31
Saturation depend on color mode 0 ~ 100
Hue depend on color mode 0 ~ 100
Gamma depend on color mode 0 ~ 3
Color Temp High / Low High
Screen
Aspect Ratio
Auto
Fill Screen
4:3
16:9
16:10
Fill Screen
Phase depend on input signal 0 ~ 31
Clock depend on input signal -5 ~ 5
H.Position depend on input signaldepend on input signal(ex:-5 ~ 5)
V.Position depend on input signaldepend on input signal(ex:-5 ~ 5)
Digtial Zoom 0 0 ~ 10
V Keystone 0 -40 ~ 40
Ceiling Mount
Front
Front CeilingFront Ceiling
Rear
Rear Ceiling

36
English
User Settings
Main Menu Tree 1st level
2nd level 3rd level 4th level Default Value Range
Setting
Language
English German French Italian Spanish Polish Swedish Dutch Portugese Japanese Traditional Chinese Simplified Chinese Thai Indonesian Arabic Norsk Turkish Danish
English
Menu LocationLeft Top, Right Top, Center, Left Bottom, Right Bottom
Center
Closed Caption Off/CC1/CC2/CC3/CC4 Off
VGA OUT (Standby)
Off/On Off
VGA 2 (Func-tion)
Input/Output Input
Test Pattern Off/On Off
Reset Yes/No No
Volume
Speaker On/Off On
Line Out On/Off On
Microphone On/Off On
Mute On/Off Off
Volume 15 0 ~ 30
Microphone Volume
15 0 ~ 30

English37
English
User Settings
Main Menu Tree 1st level
2nd level 3rd level 4th level Default Value Range
Options
Logo Default/User Default
Logo Capture
Auto Source On/Off On
InputVGA-1, VGA-2, HDMI-1, HDMI-2, Composite
Seach all source,
Auto Power Off (Min)
20 0~120
LASER Settings
LASER Hours Used (Normal)
0 infinite
LASER Hours Used (ECO) 0 infinite
LASER Power Mode Normal,ECO Normal
High Altitude On/Off Off
Filter Remind (Hour)
Filters Remind (Hour) 0 0 ~ 1000
Cleaning up reminder Yes/No No
Information
Source
Resolution
Software Version
Aspect Ration
3D
3D Off/On/Auto Auto
3D Invert On/Off Off
3D Format
Frame PackingDepend on input signal, If a HDMI source with AVINFO data existed then display 3D mode automatically.
Side-by-Side (Half)
Top amd Bottom
Frame Sequential
Field Sequential
1080p @ 24 96Hz/144Hz 144Hz

38
English
User Settings
Picture
Color ModeThere are many factory presets optimized for various types of im-ages. Use the ◄ or ► button to select the item.
Bright: For brightness optimization.
PC: For meeting presentation.
Movie: For playing video content.
Game: For game content.
User: Memorize user’s settings.
Wall ColorUse this function to obtain an optimized screen image according to the wall color. You can select from “White”, “Light Yellow”, “Light Blue”, “Pink”, and “Dark Green”.
BrightnessAdjust the brightness of the image.
Press the ◄ button to darken image.
Press the ► button to darken image.
ContrastThe Contrast controls the difference between the lightest and dark-est parts of the picture. Adjusting the contrast changes the amount of black and white in the image.
Press the ◄ button to decrease the contrast.
Press the ► button to increase the contrast.

English39
English
User Settings Sharpness
Adjust the sharpness of the image.
Press the ◄ button to decrease the sharpness.
Press the ► button to increase the sharpness.
SaturationAdjust a video image from black and white to fully saturated color.
Press the ◄ button to decrease the amount of saturation in the image.
Press the ► button to increase the amount of saturation in the image.
HueAdjust the color balance of red and green.
Press the ◄ button to increase the amount of green in the im-age.
Press the ► button to increase the amount of red in the image.
Gamma Adjust the gamma table when the dark areas or bright areas of the image are not clear.
Press the ► to emphasize details in dark areas of the image.
Press the ◄ to emphasize details in bright areas of the image.
Color Temp Select the color temperature. This function is only available when the “Color Mode” setting is set to “PC”.
Low: The screen image looks warmer.
High: The screen image looks colder.
“Sharpness”, “Sat-uration” and “Hue” functions are only supported under video mode.

40
English
User Settings
Screen
Aspect RatioAuto: Keep the image with original width-height ratio and maxi-
mize the image to fit native horizontal or vertical pixels.
4:3: The image will be scaled to fit the screen and displayed using a 4:3 ratio.
16:9: The image will be scaled to fit the width of the screen and the height adjusted to display the image using a 16:9 ratio.
16:10: The image will be scaled to fit the width of the screen and the height adjusted to display the image using a 16:10 ratio.
Fill Screen : The image will be scaled to fit full screen.
PhaseSynchronize the signal timing of the display with the graphic card. If the image appears to be unstable or flickers, use this function to correct it.
ClockAdjust to achieve an optimal image when there is a vertical flicker in the image.
H. PositionPress the ◄ button to move the image left.
Press the ► button to move the image right.
V. PositionPress the ◄ button to move the image down.
Press the ► button to move the image up.
“H. Position” and “V. Position” rang-es will depend on input source.
English41
English
User Settings
Digital ZoomPress the ◄ button to reduce the size of an image.
Press the ► button to magnify an image on the projection screen.
V KeystonePress the ◄ or ► button to adjust image distortion vertically. If the image looks trapezoidal, this option can help make the image rectangular.
Ceiling MountFront: The image is projected straight on the screen.
Front Ceiling: This is the default selection. When selected, the image will turn upside down.
Rear: When selected, the image will appear reversed.
Rear Ceiling: When selected, the image will appear reversed in upside down position.
42
English
User Settings
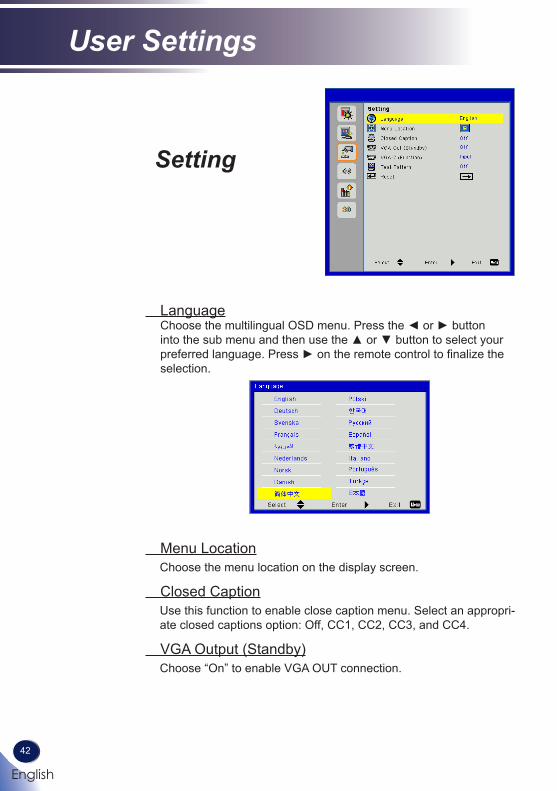
Setting
LanguageChoose the multilingual OSD menu. Press the ◄ or ► button into the sub menu and then use the ▲ or ▼ button to select your preferred language. Press ► on the remote control to finalize the selection.
Menu LocationChoose the menu location on the display screen.
Closed CaptionUse this function to enable close caption menu. Select an appropri-ate closed captions option: Off, CC1, CC2, CC3, and CC4.
VGA Output (Standby)Choose “On” to enable VGA OUT connection.

English43
English
User Settings
VGA-2 (Function)Input: Choose “Input” to let the VGA port works as a VGA input
function.
Output: Choose “Output” to enable the VGA Out function once the projector is powered on.
Test PatternDisplay a test pattern.
ResetChoose “Yes” to return the parameters on all menus to the factory default settings.

44
English
User Settings
Volume
SpeakerChoose “On” to enable the speaker.
Choose “Off” to disable the speaker.
Line OutChoose “On” to enable the line out function.
Choose “Off” to disable the line out function.
MicrophoneChoose “On” to enable the microphone.
Choose “Off” to disable the microphone.
MuteChoose “On” to turn mute on.
Choose “Off” to turn mute off.
VolumePress the ◄ button to decrease the volume.
Press the ► button to increase the volume.
Microphone VolumePress the ◄ button to decrease the microphone volume.
Press the ► button to increase the microphone volume.

English45
English
User Settings
Options
LogoUse this function to set the desired startup screen. If changes are made they will take effect the next time the projector is powered on.
Default: The default startup screen.
User: Use stored picture from “Logo Capture” function.
Logo CapturePress ► button to capture an image of the picture currently dis-played on screen.
Auto SourceOn: The projector will search for other signals if the current input
signal is lost.
Off: The projector will only search current input connection.
InputPress ► button to enable/disable input sources. The projector will not search for inputs that are not selected.
For successful logo capture, please ensure that the on-screen image does not exceed the projector’s native resolution. (WXGA:1280x800).
“Logo Capture” is not available when 3D is enabled.
Before active this function, it is recommended that “Aspect Ratio” is set to the “Auto”.

46
English
User Settings Auto Power Off (Min)
Sets the countdown timer interval. The countdown timer will start, when there is no signal being sent to the projector. The projector will automatically power off when the countdown has finished (in minutes).
LASER SettingsRefer to page 47.
High AltitudeOn: The built-in fans run at high speed. Select this option when
using the projector at altitudes above 5000 feet/1524 meters or higher.
Off: The built-in fans automatically run at a variable speed ac-cording to the internal temperature.
Filters Remind (Hour)Filters Remind (Hour): Set the filter reminder time.
Cleaning Up Remind: Select “Yes” to reset the dust filter hour counter after replacing or cleaning the dust filter.
InformationDisplay the projector information for source, resolution, software version, and aspect ratio on the screen.

English47
English
User Settings
Options | LASER Settings
LASER Hours Used (Normal)Display the projection time of normal mode.
LASER Hours Used (ECO)Display the projection time of ECO mode.
LASER Power ModeNormal: Normal mode.
ECO: Use this function to dim the projector light source which will lower power consumption and extend the light source life.

48
English
User Settings
3D
3DAuto: When a HDMI 1.4a 3D timing identification signal is de-
tected, the 3D image is selected automatically.
Choose “On” to enable 3D function.
Choose “Off” to disable 3D function.
3D InvertIf you see a discrete or overlapping image while wearing DLP 3D glasses, you may need to execute “Invert” to get best match of left/right image sequence to get the correct image.
3D FormatUse this feature to select the 3D format. Options are: “Frame Packing”, “Side-by-Side (Half)”, “Top and Bottom”, “Frame Sequen-tial”, and “Field Sequential”.
1080p@24Use this feature to select 96 or 144Hz refresh rate as using 3D glasses in the1080p @ 24 frame packing.
“Frame Packing” is supported the DLP Link 3D input signals from VGA / HDMI connector.
“Frame Se-quential” / “Field Sequential” are supported the HQFS 3D input signals from Composite/S-Video connector connector.
“Frame Pack-ing” / “Side-by-Side(Half)” / “Top and Bottom” are supported from HDMI 1.4a 3D input signals.

English49
English
Troubleshooting
Problem: No image appears on screen Ensure all the cables and power connections are correctly and
securely connected as described in the “Installation” section.
Ensure the pins of terminals are not crooked or broken.
Make sure you have removed the lens cap and the projector is switched on.
Ensure that the “AV Mute” feature is not turned on.
Problem: Partial, scrolling or incorrectly displayed image
Press “Auto Set” on the remote control.
If you are using a Notebook:
1. First, follow the steps above to adjust resolution of the computer.
2. Press the toggle output settings. example: [Fn]+[F3]
If you experience difficulty changing resolutions or your monitor freezes, restart all equipment including the projector.
Troubleshooting If you experience trouble with the projector, refer to the
following information. If the problem persists, please contact your local dealer or service center.
PANASONIC, NEC => Fn+F3 HP, SHARP, TOSHIBA => Fn+F5IBM, SONY => Fn+F7DELL, EPSON => Fn+F8FUJITSU => Fn+F10APPLE =>F7

50
English
TroubleshootingProblem: The screen of the Notebook or PowerBook com-puter is not displaying a presentation
If you are using a Notebook PC:
Some Notebook PCs may deactivate their own screens when a second display device is in use. Each has a different way to be reactivated. Refer to your computer’s documentation for detailed information.
Problem: Image is unstable or flickering Adjust the “Phase” or “Clock” to correct it. Refer to the “Screen”
section for more information.
Change the monitor setting from your computer.
Check and reconfigure the display mode of your graphic card to make it compatible with the product.
Problem: Image is out of focus Adjust the Focus Ring on the projector lens.
Make sure the projection screen is between the required distance. Please see pages 29~30.
Problem: The image is stretched when displaying 16:9 DVDChange “Aspect” by pressing the key on remote control or OSD menu to show image with proper aspect ratio.
Problem: Image is too small or too large Move the projector closer to or further from the screen.
Press “Aspect” button on the remote control or press “Menu” but-ton on the projector panel, go to “Screen --> Aspect Ratio” and try the different settings.

English51
English
TroubleshootingProblem: Image is reversed Select “Screen --> Ceiling Mount” from the OSD and adjust the
projection direction.

52
English
Troubleshooting
MessagePOWER indicator
TEMP indicator
LIGHT indicator
(Red/Blue) (Red) (Red)
Standby (Input power cord) (Red)
Normal (Power on) (Blue)
Powering up (Warming up) Flashing Red (1 sec)
Power off (Cooling Down) Flashing Red (0.5 sec)
Error (Over temp. On Event)
Error (Over temp. On Standby)
Error (Light source failed On Event)
Error (Light source failed On Standby)
Error (Fan failed On Event) Flashing 3 sec
Error (Fan failed On Standby) Flashing 3 sec
Error (Color Wheel fail / Striking Light source Fail On Event) Flashing 0.5 sec
Error (Color Wheel fail / Striking Light source Fail On Standby) Flashing 0.5 sec
Problem: Indicator lighting message
Steady light => No light =>
Note

English53
English
TroubleshootingProblem: Message Reminders
Over temperature - the projector has exceeded its recommended operating temperature and must be allowed to cool down before it may be used.
Please:1. Make sure air in and outlets are not blocked.2. Make sure the environment temprature is under 40 degrees C.
Fan failed - the system fan is not working.
The projector will switch off automatically.

54
English
Maintaining the filterInstalling and Cleaning the Optional Dust FilterWe recommend you clean the dust filter every 500 hours of operation, or more often if you are using the projector in a dusty environment.
When the warning message appears on the screen, do the following to clean the air filter:
The optional dust filter should be used in dusty environments.
If the dust filter is installed, a proper maintenance will prevent overheat-ing and projector malfunction.
The dust filter is optional.
The specific inter-faces are selected in terms of the specifications of types.
Air Filter Cleaning Procedure:1. Switch off the power to the projector by pressing the “ ” button.2. Disconnect the power cord.3. Pull out the dust filter, as shown in the illustration. 14. Carefully remove the dust filter. Then clean or change the filter. 2
To install the filter, reverse the previous steps.5. Turn on the projector and reset the filter usage counter after the dust filter is
replaced.
1
1
2
2

English55
English
Appendices
List of Compatible Signals VGA Analog
a. PC signalModes Resolution V. Frequency [Hz] H. Frequency [Hz]
VGA
640x480 60 31.5640x480 67 35.0640x480 72 37.9640x480 75 37.5640x480 85 43.3640x480 120 61.9
IBM 720x400 70 31.5
SVGA
800x600 56 35.1800x600 60 37.9800x600 72 48.1800x600 75 46.9800x600 85 53.7800x600 120 77.4
Apple, MAC II 832x624 75 49.1
XGA
1024x768 60 48.41024x768 70 56.51024x768 75 60.01024x768 85 68.71024x768 120 99.0
Apple, MAC II 1152x870 75 68.7
SXGA1280x1024 60 64.01280x1024 72 77.01280x1024 75 80.0
QuadVGA1280x960 60 60.01280x960 75 75.2
SXGA+ 1400x1050 60 65.3UXGA 1600x1200 60 75.0

56
English
Appendices
b. Extended wide timingModes Resolution V. Frequency [Hz] H. Frequency [Hz]
WXGA
1280x720 60 44.81280x800 60 49.61366x768 60 47.71440x900 60 59.9
WSXGA+ 1680x1050 60 65.3c. Component signal
Modes Resolution V. Frequency [Hz] H. Frequency [Hz]
480i 720x480 (1440x480) 59.94(29.97) 15.7
576i 720x576 (1440x576) 50(25) 15.6
480p 720x480 59.94 31.5576p 720x576 50 31.3
720p1280x720 60 45.01280x720 50 37.5
1080i1920x1080 60(30) 33.81920x1080 50(25) 28.1
1080p1920x1080 23.98/24 27.01920x1080 60 67.51920x1080 50 56.3

English57
English
Appendices
HDMI Digitala. PC signal
Modes Resolution V. Frequency [Hz] H. Frequency [Hz]
VGA
640x480 60 31.5640x480 67 35.0640x480 72 37.9640x480 75 37.5640x480 85 43.3640x480 120 61.9
IBM 720x400 70 31.5
SVGA
800x600 56 35.1800x600 60 37.9800x600 72 48.1800x600 75 46.9800x600 85 53.7800x600 120 77.4
Apple, MAC II 832x624 75 49.1
XGA
1024x768 60 48.41024x768 70 56.51024x768 75 60.01024x768 85 68.71024x768 120 99.0
Apple, MAC II 1152x870 75 68.7
SXGA1280x1024 60 64.01280x1024 72 77.01280x1024 75 80.0
QuadVGA1280x960 60 60.01280x960 75 75.2
SXGA+ 1400x1050 60 65.3UXGA 1600x1200 60 75.0

58
English
Appendicesb. Extended wide timing
Modes Resolution V. Frequency [Hz] H. Frequency [Hz]
WXGA
1280x720 60 44.81280x800 60 49.61366x768 60 47.71440x900 60 59.9
WSXGA+ 1680x1050 60 65.3c. Video signal
Modes Resolution V. Frequency [Hz] H. Frequency [Hz]480p 640x480 59.94/60 31.5
480i 720x480 (1440x480) 59.94(29.97) 15.7
576i 720x576 (1440x576) 50(25) 15.6
480p 720x480 59.94 31.5576p 720x576 50 31.3
720p1280x720 60 45.01280x720 50 37.5
1080i1920x1080 60(30) 33.81920x1080 50(25) 28.1
1080p1920x1080 23.98/24 27.01920x1080 60 67.51920x1080 50 56.3
d. HDMI 1.4a mandatory 3D timing- Video SignalModes Resolution V. Frequency [Hz] H. Frequency [Hz]
Frame Packing
720p 50 31.5720p 59.94/60 15.7
1080p 23.98/24 15.6
Side-by-Side(Half)
1080i 50 31.51080i 59.94/60 31.3
Top and Bottom
720p 50 45.0720p 59.94/60 37.5
1080p 23.98/24 33.8

English59
English
Appendices
Configurations of TerminalsTerminal : Analog RGB (Mini D-sub 15 pin)
1 Red (R/Cr) Input/R Output 9 DDC 5V / NC
2 Green (G/Y) Input/G Output 10 Ground (Ver. sync.)
3 Blue (B/Cb) Input/B Output 11 ICP download
4 ICP download / NC 12 DDC Data / NC
5 Ground (Horiz.sync.)13 Horiz. sync. Input / Output (Composite H/V
sync. Input)6 Ground (Red)
7 Ground (Green) 14 Vert. sync. Input / Output
8 Ground (Blue) 15 DDC CLK / NC
5 4 3 2 1
10 9 8 7 6
15 14 13 12 11

60
English
Appendices
RS232 Port SettingItems Method
Communication Method Asynchronous CommunicationBits per seconds 9600Data bits 8 bitsParity NoneStop bits 1Flow control None
RS232 Signals Connection
PC Control
RS232 shell is grounded. Computer COM Port
(D-Sub 9pin connector)Projector COM Port(D-Sub 9pin connector)

English61
English
Appendices
Specifications■ List of general specificationsItem SpecificationConsumption Power 210W (ECO mode) / 330W (Full mode)
Weight 5.5kg(12.2lb)
Dimensions (WxHxD) 383 x 85 x 308 mm
Environmental Consider-ations
Operational Temperatures : 41° to 104°F (5° to 40°C),20% to 80% humidity (non-condensing)Storage Temperatures : -4° to 140°F (-20° to 60°C),20% to 80% humidity (non-condensing)
Projection System DLP 0.55” chip (XGA) / DLP 0.65” chip (WXGA)
Resolution RICOH PJ XL4540/LX3000ST Series 1024 x 768pixels (XGA)RICOH PJ WXL4540/LW3000ST Series 1280 x 800pixels (WXGA)
Lens F# 2.7 , f = 7.15mm
Light Source 3.5W Laser x 19pcs
Light Source Life 10000H(Normal)/20000H(Eco)
Projection screen size 56.4 - 100 inch(XGA), 69.4 - 100 inch (WXGA)
Projection distance 71 - 125 cm (XGA), 78 - 112 cm (WXGA) (Focus range)
Speaker 10W (Mono)
Connection term
inal
Computer In terminal Mini D sub 15 pin RGB / Y/PB / PR (dual use)
Monitor Out terminal Mini D sub 15 pin
HDMI 1/2 In terminal HDMI type A connector
Video In terminal RCA Jack for Composite Video Input
Audio In terminal Two RCA audio jacks for audio input
Audio In terminal 3.5 mm diameter mini-jack for COMPUTER
Audio In (Microphone) 3.5 mm diameter mini-jack for Microphone Input
Audio Out terminal 3.5 mm diameter mini-jack
Computer compatibility IBM PC Compatible, support HDTV (1080i/p, 720p, 576i/p, 480i/p) include both PC and componet inputs
Video compatibility NTSC M(3.58MHz), 4.43MHzPAL (B, D, G, H, I, M, N), 4.43MHzSECAM (B, D, G, K, K1, L), 4.25/4.4MHzHDTV 720p (50/60Hz), 1080i/p (50/60Hz), 1080p(24/25/30/50/60Hz)SDTV 480i/p, 576i/p
Horizontal scan rate 15 KHz to 91.1 KHz
Vertiacal scan rate 24 Hz to 85 Hz
Keystone correction V: +/-10 degrees

62
English
AppendicesNote
• This model complies with the above specifications.• Designs and specifications are subject to change without notice.• This model may not be compatible with features and/or specifications that may be added in the
future.
English63
English
Appendices
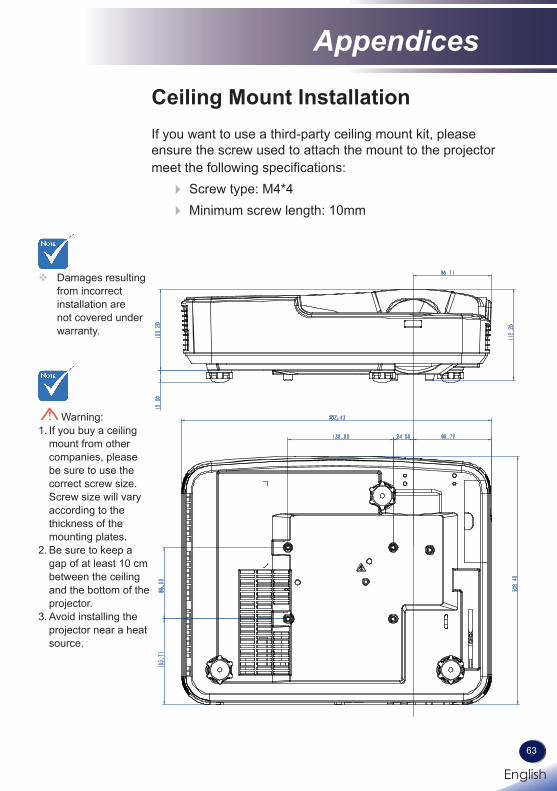
Damages resulting from incorrect installation are not covered under warranty.
Ceiling Mount InstallationIf you want to use a third-party ceiling mount kit, please ensure the screw used to attach the mount to the projector meet the following specifications: Screw type: M4*4 Minimum screw length: 10mm
Warning: 1. If you buy a ceiling
mount from other companies, please be sure to use the correct screw size. Screw size will vary according to the thickness of the mounting plates.
2. Be sure to keep a gap of at least 10 cm between the ceiling and the bottom of the projector.
3. Avoid installing the projector near a heat source.

64
English
Appendices
Trademarks
• DLP is trademarks of Texas Instruments.
• IBM is a trademark or registered trademark of International Business Machines Corporation.
• Macintosh, Mac OS X, iMac, and PowerBook are trademarks of Apple Inc., registered in the U.S. and other countries.
• Microsoft, Windows, Windows Vista, Internet Explorer and PowerPoint are either a registered trademark or trademark of Microsoft Corporation in the United States and/or other countries.
• HDMI, the HDMI Logo and High-Definition Multimedia In-terface are trademarks or registered trademarks of HDMI Licensing LLC.
• Other product and company names mentioned in this user’s manual may be the trademarks or registered trademarks of their respective holders.