Rhinoplasty Anatomy
39
Free Powerpoint Templates Page 1 Surgical anatomy of Rhinoplasty Dr Gaurav Medikeri Bangalore India
-
Upload
gaurav-medikeri -
Category
Documents
-
view
246 -
download
14
description
Surgical anatomy of rhinoplasty
Transcript of Rhinoplasty Anatomy

Free Powerpoint Templates Page 1
Surgical anatomy of Rhinoplasty
Dr Gaurav Medikeri
Bangalore
India

Free Powerpoint Templates Page 2
Sur
face
ana
tom
y
Free Powerpoint Templates Page 3

Free Powerpoint Templates Page 4

Free Powerpoint Templates Page 5
Upper Lateral Cartilages
• Triangular, base at septum/ apex at pyriform
• Cephalic attachment to nasal bones
– Nasal bones overlap ULC 1cm– Held in place with ligamentous
fibers
• Attached to septum medially, which broadens to form a platform for the cartilages
• Intranasal valve: junction of ULC with septum
– Ligaments connect with pyriform laterally to hold valve open, may be damaged during rhinoplasty and result in nasal obstruction

Free Powerpoint Templates Page 7
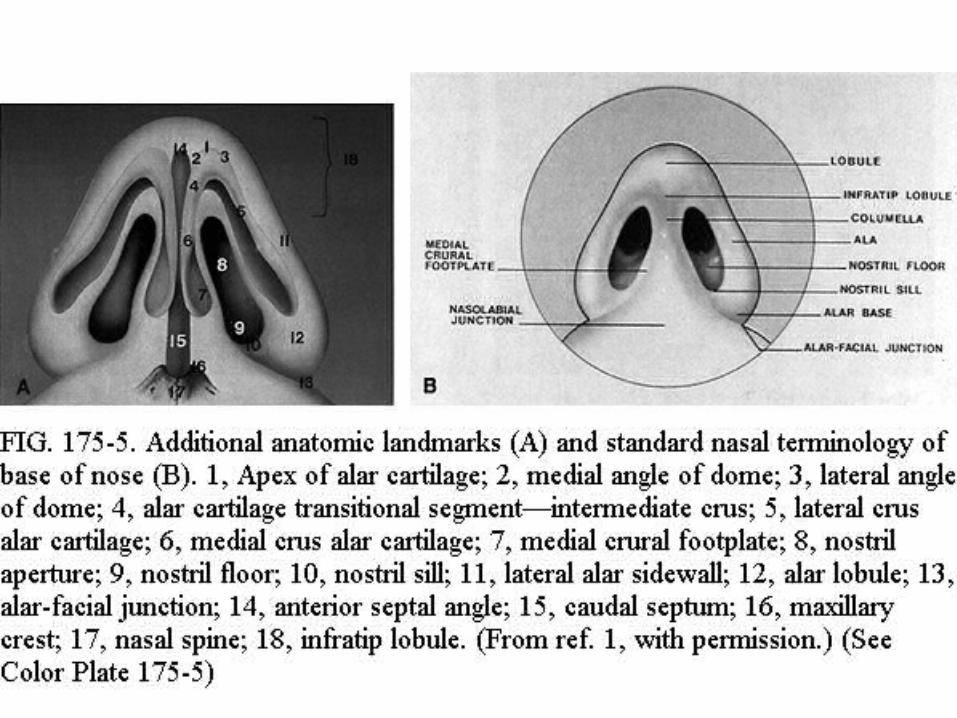
Nasal Tip – Lower Lateral Cartilage• Paired to form arch supporting
lobule/nostrils
• Divided into medial and lateral crura
• Lateral crura– Flare postero-superiorly away
from rim– Tip defining point – junction
between central and lateral crura
• Medial crura– Joined by ligamentous tissue in
columella– Sagittal orientation with caudal
flaring– columellar double break: medial
crus bends posteriorly at superior extent, marks beginning of the central crus

Free Powerpoint Templates Page 9
Nasal Tip • Dome: formed by the junction
of the medial and lateral crura– Two point tip: aesthetically
pleasing
– Tent deformity: Single point tip
• Overtight suture or poorly placed tip graft
• Sesamoid Cartilage– Accessory cartilage between
lateral crura and piriform aperture
• Cephalic border of the lower lateral cartilage forms hinge with upper lateral cartilage
Free Powerpoint Templates Page 10
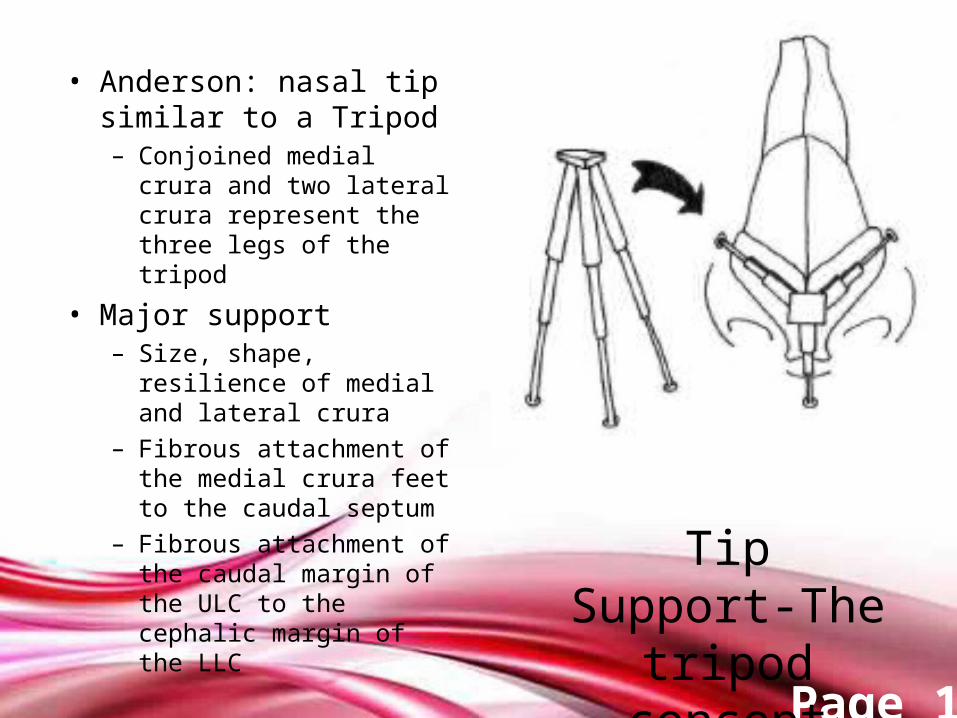
• Anderson: nasal tip similar to a Tripod– Conjoined medial crura
and two lateral crura represent the three legs of the tripod
• Major support– Size, shape, resilience of
medial and lateral crura– Fibrous attachment of the
medial crura feet to the caudal septum
– Fibrous attachment of the caudal margin of the ULC to the cephalic margin of the LLC
Tip Support-The tripod concept

Free Powerpoint Templates Page 11
Lateral crura takes
support

Free Powerpoint Templates Page 12
Tip Support
• Minor Support– Ligamentous sling between
the alar cartilages– Cartilaginous septal
dorsum– Sesamoid complex –
extending the support of the lateral crura to the piriform aperture
– Attachment of the alar cartilages to overlying skin and musculature
– Nasal spine– Membranous septum

Free Powerpoint Templates Page 13
Bony Anatomy

Free Powerpoint Templates Page 14
Which Incision ??

Free Powerpoint Templates Page 16
Caudal septum, medial crura, nasal spine
Follows medial crura to flared ends
Extend to floor for tip projection access
Hemi- is unilateral only • Avoids disruption of tip
support• Poorer access • ? Asymmetric healing
Transfixion/Hemitransfixion

Free Powerpoint Templates Page 17
Inter-cartilaginous Incision
• Access to the tip and mid-nose
• Incision intranasal, between the ULC/LLC
• Begin medially as transfixion extension
• Continue entire length of LLC
• Avoid transecting the lateral end of the LLC

Free Powerpoint Templates Page 19
Intra-cartilaginous Incision
• Access to the tip and mid-nose• Incise through vestibular mucosa +/- lower lateral
cartilage• Similar to inter-cartilaginous, but 3-5mm caudal to the
cephalic end of LLC– This is caudal to the nasal valve– Decreases risk of nasal obstruction (avoids scar contracture
of the valve)
Free Powerpoint Templates Page 20
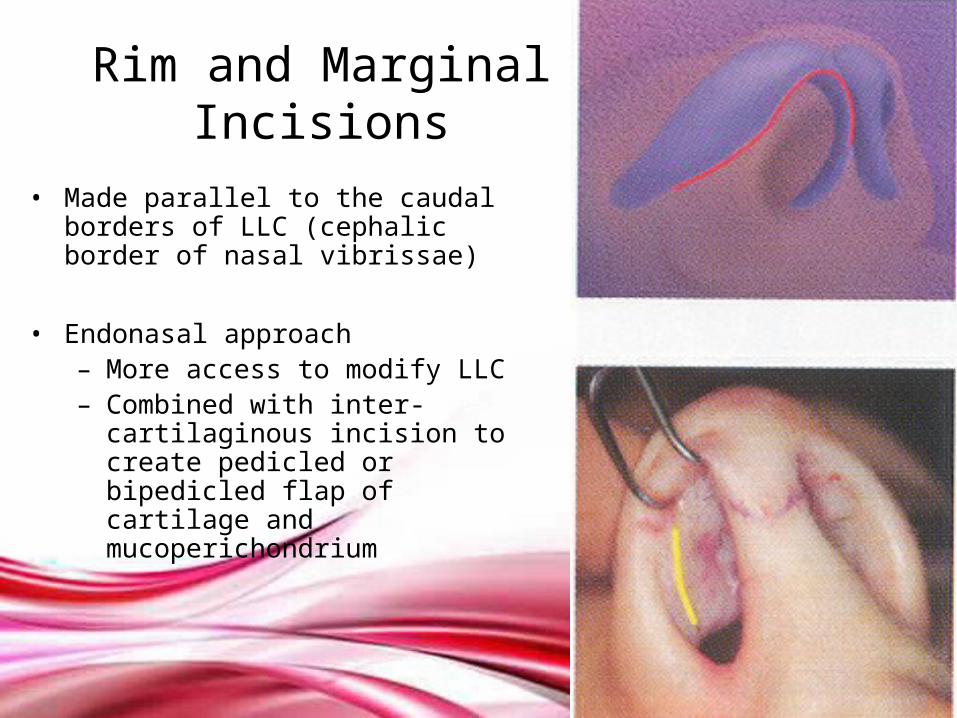
Rim and Marginal Incisions
• Made parallel to the caudal borders of LLC (cephalic border of nasal vibrissae)
• Endonasal approach– More access to modify LLC– Combined with inter-cartilaginous
incision to create pedicled or bipedicled flap of cartilage and mucoperichondrium

Free Powerpoint Templates Page 21
Rim and Marginal Incisions
• Always used in external approach – Extend to lateral end of LLC– In continuity with the
transfixion incision

Free Powerpoint Templates Page 22
Trans-columellar
• External approach
• Crosses columella just above flared ends of the medial crura
• Support your incision

Free Powerpoint Templates Page 23
• If too close to the lip, “dip” deformity – No cartilage support to
counteract tension generated by the healing skin
• Notching at the midline – “aggie mark”, Improved scar camouflage
Trans-columellar

Free Powerpoint Templates Page 24
Trans-columellar incisions
• Sercer’s• Goodman’s• Jugo’s• Padovan’s
Free Powerpoint Templates Page 25
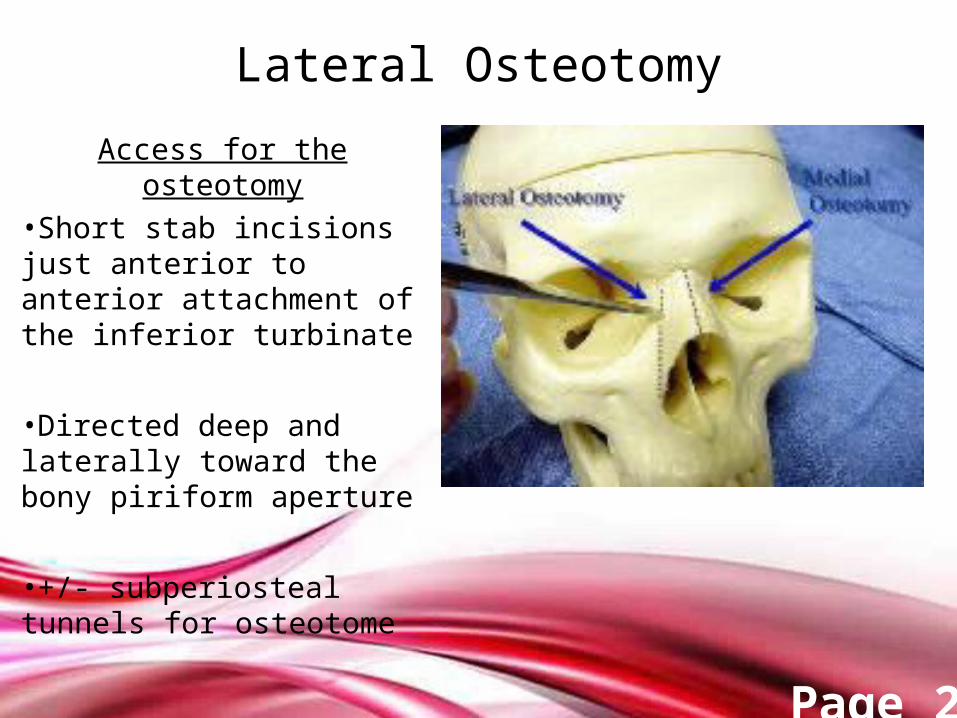
Lateral Osteotomy
Access for the osteotomy•Short stab incisions just anterior to anterior attachment of the inferior turbinate
•Directed deep and laterally toward the bony piriform aperture
•+/- subperiosteal tunnels for osteotome
Free Powerpoint Templates Page 26
Open verses Closed ???
• Open– Much better exposure of structures– More accurate placement of grafts– More accurate structural diagnosis– Teaching value
• Closed– Possibly faster than open– No external scar– Avoids tip edema– No loss of tip support

Free Powerpoint Templates Page 27

Free Powerpoint Templates Page 28
The Wide or Bulbous Tip
• Excess amount and/or convex curvature of the cephalad alar lateral crus
• Lateral alar convexities causing a trapezoid appearance from the basal view
• Increased interdomal distance
• Poor dome definition – often due to excessively obtuse angle between the medial and lateral crus

Free Powerpoint Templates Page 29
Excessive Cephalad Alar Cartilage
• Incise the cartilage
• Incise and morselize the cephalad cartilage
• Excise the cephalad cartilage

Free Powerpoint Templates Page 30
Lateral Alar Convexity

Free Powerpoint Templates Page 31
Goal: Unified Symmetric Tip
• Medial crura fixation stitch– Stabilizes crura during
strut placement
• Columellar strut– Maintains columellar
shape
• Flare Control Sutures– Narrow width of
columella by decreasing crural flare after strut

Free Powerpoint Templates Page 32
Goal: Correct Lateral Alar Convexity
• Lateral crura spanning suture
• Dome spanning suture

Free Powerpoint Templates Page 33
Tip Projection
• Posterior to anterior distance, that the tip defining point extends from the facial plane at the alar crease

Free Powerpoint Templates Page 34
Tip Rotation
• Movement of the tip along a circular arc consisting of a radius centered at the nasolabial angle that extends to the tip defining point
Nasolabial angle
Tip def. points
Free Powerpoint Templates Page 35
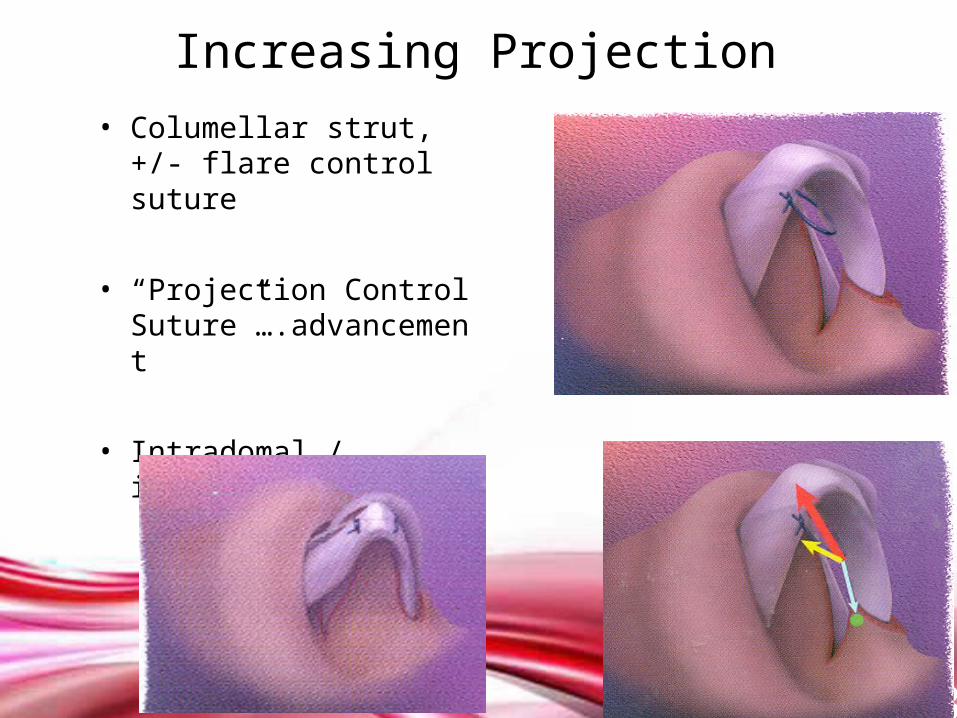
Increasing Projection
• Columellar strut, +/- flare control suture
• “Projection Control Suture”….advancement
• Intradomal / interdomal suture

Free Powerpoint Templates Page 36
Increasing Projection
• Trim protruding caudal septum, if any
• Add tip graft if the infratip lobule becomes overshortened
Under projection & Blunting of tip

Free Powerpoint Templates Page 37
Decreasing Projection
• columellar Strut, Flare sutures if needed
• Projection control sutures….recessive
• If lateral alar convexity, correct with inter-domal suture

Free Powerpoint Templates Page 38
Decreasing Projection• Intra-domal stitch, if needed
to correct widened domes
• May need to transect lateral crura.
• May need to address medial crural or alar flaring.
Free Powerpoint Templates Page 39
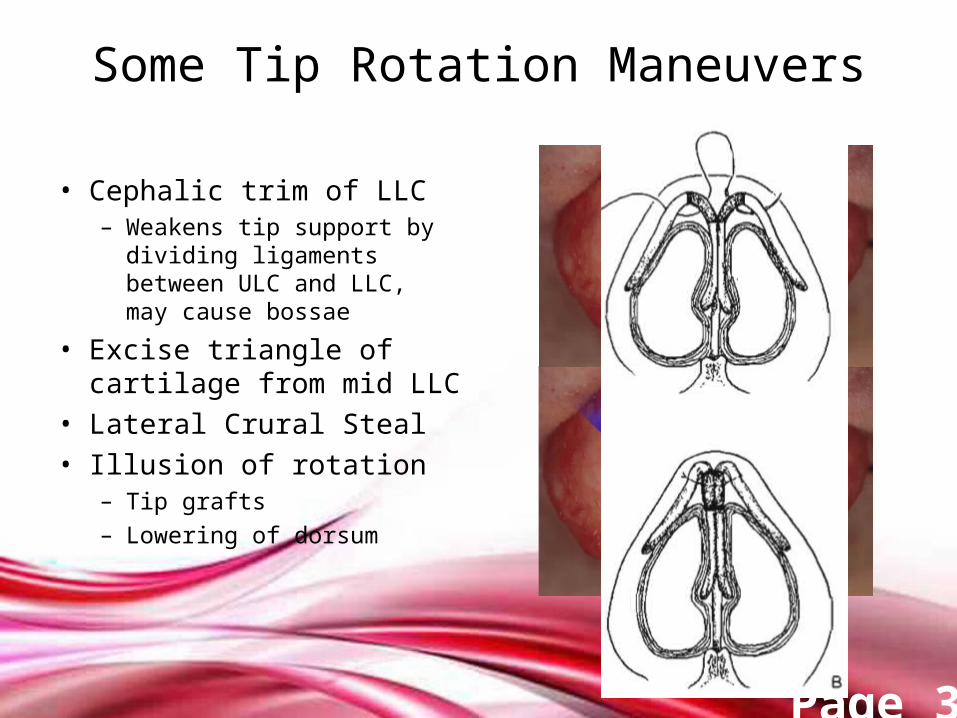
Some Tip Rotation Maneuvers
• Cephalic trim of LLC– Weakens tip support by
dividing ligaments between ULC and LLC, may cause bossae
• Excise triangle of cartilage from mid LLC
• Lateral Crural Steal• Illusion of rotation
– Tip grafts– Lowering of dorsum

Free Powerpoint Templates Page 41
Combined transdomal & interdomal sutures

Free Powerpoint Templates Page 42
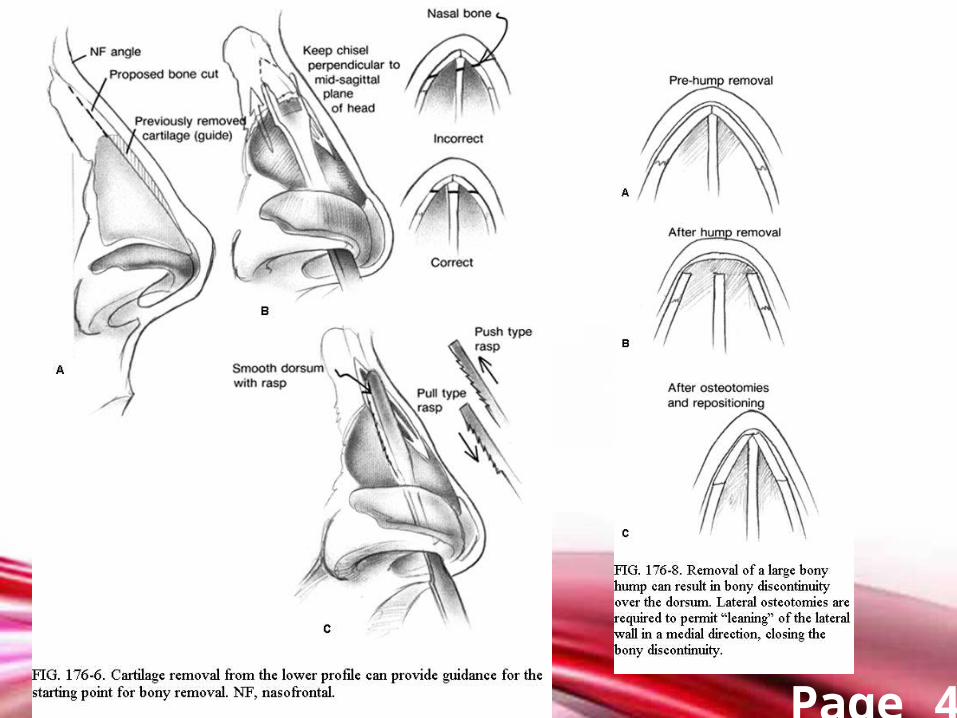
The Dorsal Hump deformity

Free Powerpoint Templates Page 43
The Dorsal Hump
Free Powerpoint Templates Page 44