RF Handbook.pdf RF Handbook / Practical Guide to RF Level Control

GEMeasurement & Control Validation
RF ValProbe®User’s Manual
M5010 Rev. FApril 2013


http://www.ge-mcs.com/en/validation-and-environmental-monitoring.html
©2013 General Electric Company. All rights reserved.Technical content subject to change without notice.
GEMeasurement & Control
RF ValProbe®Wireless Thermal Validation System
User’s Manual
M5010 Rev. FApril 2013

Contents
Chapter 1. Setting Up the RF ValProbe
1.1 Introduction . . . . . . . . . . . . . . . . . . . . . . . . . . . . . . . . . . . . . . . . . . . . . . . . . . . . . . . . . . . . . . . . 1
1.1.1 Unpacking. . . . . . . . . . . . . . . . . . . . . . . . . . . . . . . . . . . . . . . . . . . . . . . . . . . . . . . . . . . . 1
1.1.2 Safety Information . . . . . . . . . . . . . . . . . . . . . . . . . . . . . . . . . . . . . . . . . . . . . . . . . . . . . 1
1.1.3 Overview . . . . . . . . . . . . . . . . . . . . . . . . . . . . . . . . . . . . . . . . . . . . . . . . . . . . . . . . . . . . 1
1.1.4 The Kaye RF ValProbe Base Station . . . . . . . . . . . . . . . . . . . . . . . . . . . . . . . . . . . . . . . 3
1.1.5 Kaye RF ValProbe Temperature/Humidity Loggers . . . . . . . . . . . . . . . . . . . . . . . . . . . 4
1.1.6 The Logger Batteries . . . . . . . . . . . . . . . . . . . . . . . . . . . . . . . . . . . . . . . . . . . . . . . . . . . 7
1.1.6aResetting the Battery Capacity Setting . . . . . . . . . . . . . . . . . . . . . . . . . . . . . . . . . . . 8
1.2 Calibration . . . . . . . . . . . . . . . . . . . . . . . . . . . . . . . . . . . . . . . . . . . . . . . . . . . . . . . . . . . . . . . . . 9
1.2.1 Calibration Data Storage . . . . . . . . . . . . . . . . . . . . . . . . . . . . . . . . . . . . . . . . . . . . . . . . 9
1.2.2 Verifying Calibration . . . . . . . . . . . . . . . . . . . . . . . . . . . . . . . . . . . . . . . . . . . . . . . . . . . 9
1.2.3 Required Equipment . . . . . . . . . . . . . . . . . . . . . . . . . . . . . . . . . . . . . . . . . . . . . . . . . . . 10
1.2.3aTemperature Sensors. . . . . . . . . . . . . . . . . . . . . . . . . . . . . . . . . . . . . . . . . . . . . . . . 11
1.2.3bHumidity Sensors . . . . . . . . . . . . . . . . . . . . . . . . . . . . . . . . . . . . . . . . . . . . . . . . . . 11
1.3 Setting Up the RF ValProbe System . . . . . . . . . . . . . . . . . . . . . . . . . . . . . . . . . . . . . . . . . . . . 12
1.3.1 Setting Up the Base Station . . . . . . . . . . . . . . . . . . . . . . . . . . . . . . . . . . . . . . . . . . . . . 12
1.3.2 Connecting an External Sensor and Auxiliary Inputs . . . . . . . . . . . . . . . . . . . . . . . . . 14
1.3.3 Setting Up the Loggers . . . . . . . . . . . . . . . . . . . . . . . . . . . . . . . . . . . . . . . . . . . . . . . . . 15
1.3.4 Logger Installation Guidelines . . . . . . . . . . . . . . . . . . . . . . . . . . . . . . . . . . . . . . . . . . . 16
1.3.5 What’s Next? . . . . . . . . . . . . . . . . . . . . . . . . . . . . . . . . . . . . . . . . . . . . . . . . . . . . . . . . 16
Chapter 2. Installing and Using RF ValProbe Software
2.1 Introduction . . . . . . . . . . . . . . . . . . . . . . . . . . . . . . . . . . . . . . . . . . . . . . . . . . . . . . . . . . . . . . . 17
2.2 PC Requirements . . . . . . . . . . . . . . . . . . . . . . . . . . . . . . . . . . . . . . . . . . . . . . . . . . . . . . . . . . . 18
2.3 Installing RF ValProbe Software . . . . . . . . . . . . . . . . . . . . . . . . . . . . . . . . . . . . . . . . . . . . . . . 19
2.3.1 Installation for a Network Application. . . . . . . . . . . . . . . . . . . . . . . . . . . . . . . . . . . . . 20
2.3.1aSetting up Site Options . . . . . . . . . . . . . . . . . . . . . . . . . . . . . . . . . . . . . . . . . . . . . . 21
2.3.1bEstablishing Site Preferences . . . . . . . . . . . . . . . . . . . . . . . . . . . . . . . . . . . . . . . . . 23
RF ValProbe® User’s Manual iii

Contents
2.3.1cCompleting Installation. . . . . . . . . . . . . . . . . . . . . . . . . . . . . . . . . . . . . . . . . . . . . . 23
2.3.2 Installation for a Standalone Application . . . . . . . . . . . . . . . . . . . . . . . . . . . . . . . . . . . 24
2.4 Starting the RF ValProbe System. . . . . . . . . . . . . . . . . . . . . . . . . . . . . . . . . . . . . . . . . . . . . . . 25
2.5 Creating User Accounts . . . . . . . . . . . . . . . . . . . . . . . . . . . . . . . . . . . . . . . . . . . . . . . . . . . . . . 27
2.5.1 Creating a New System Administrator Account . . . . . . . . . . . . . . . . . . . . . . . . . . . . . 27
2.5.2 Creating Operator Accounts . . . . . . . . . . . . . . . . . . . . . . . . . . . . . . . . . . . . . . . . . . . . . 29
2.5.3 Printing the User List . . . . . . . . . . . . . . . . . . . . . . . . . . . . . . . . . . . . . . . . . . . . . . . . . . 33
2.5.4 Selecting Site Options . . . . . . . . . . . . . . . . . . . . . . . . . . . . . . . . . . . . . . . . . . . . . . . . . 33
2.5.5 Selecting a Communications Option and Establishing Preferences. . . . . . . . . . . . . . . 36
2.5.1 Setting Up the USB Connection. . . . . . . . . . . . . . . . . . . . . . . . . . . . . . . . . . . . . . . . . . 38
2.5.2 Setting Up the Ethernet Connection . . . . . . . . . . . . . . . . . . . . . . . . . . . . . . . . . . . . . . . 40
2.6 Viewing the RF ValProbe Hardware Inputs . . . . . . . . . . . . . . . . . . . . . . . . . . . . . . . . . . . . . . . 42
2.7 Accessing the Kaye RF ValProbe Online Help . . . . . . . . . . . . . . . . . . . . . . . . . . . . . . . . . . . . 48
2.7.1 Tabs. . . . . . . . . . . . . . . . . . . . . . . . . . . . . . . . . . . . . . . . . . . . . . . . . . . . . . . . . . . . . . . . 49
2.7.2 Buttons . . . . . . . . . . . . . . . . . . . . . . . . . . . . . . . . . . . . . . . . . . . . . . . . . . . . . . . . . . . . . 49
2.7.3 Screen-Level Help . . . . . . . . . . . . . . . . . . . . . . . . . . . . . . . . . . . . . . . . . . . . . . . . . . . . 50
Appendix A. Specifications
A.1 RF ValProbe System Specifications. . . . . . . . . . . . . . . . . . . . . . . . . . . . . . . . . . . . . . . . . . . . . 51
A.1.1 RF System Operating Frequency . . . . . . . . . . . . . . . . . . . . . . . . . . . . . . . . . . . . . . . . . 51
A.1.2 RF Certification . . . . . . . . . . . . . . . . . . . . . . . . . . . . . . . . . . . . . . . . . . . . . . . . . . . . . . 51
A.1.3 Number of Loggers. . . . . . . . . . . . . . . . . . . . . . . . . . . . . . . . . . . . . . . . . . . . . . . . . . . . 51
A.1.4 Transmission. . . . . . . . . . . . . . . . . . . . . . . . . . . . . . . . . . . . . . . . . . . . . . . . . . . . . . . . . 51
A.1.5 PC Update Rate . . . . . . . . . . . . . . . . . . . . . . . . . . . . . . . . . . . . . . . . . . . . . . . . . . . . . . 51
A.1.6 Maximum Network Form Time . . . . . . . . . . . . . . . . . . . . . . . . . . . . . . . . . . . . . . . . . . 51
A.1.7 Data Retention . . . . . . . . . . . . . . . . . . . . . . . . . . . . . . . . . . . . . . . . . . . . . . . . . . . . . . . 51
A.2 Base Station . . . . . . . . . . . . . . . . . . . . . . . . . . . . . . . . . . . . . . . . . . . . . . . . . . . . . . . . . . . . . . . 52
A.2.1 Connections . . . . . . . . . . . . . . . . . . . . . . . . . . . . . . . . . . . . . . . . . . . . . . . . . . . . . . . . . 52
A.2.2 Power . . . . . . . . . . . . . . . . . . . . . . . . . . . . . . . . . . . . . . . . . . . . . . . . . . . . . . . . . . . . . . 52
A.2.3 Indicators . . . . . . . . . . . . . . . . . . . . . . . . . . . . . . . . . . . . . . . . . . . . . . . . . . . . . . . . . . . 52
A.3 Logger . . . . . . . . . . . . . . . . . . . . . . . . . . . . . . . . . . . . . . . . . . . . . . . . . . . . . . . . . . . . . . . . . . . 53
A.3.1 Measurement Types . . . . . . . . . . . . . . . . . . . . . . . . . . . . . . . . . . . . . . . . . . . . . . . . . . . 53
A.3.1aSensor Configurations . . . . . . . . . . . . . . . . . . . . . . . . . . . . . . . . . . . . . . . . . . . . . . 53
A.3.2 Environmental . . . . . . . . . . . . . . . . . . . . . . . . . . . . . . . . . . . . . . . . . . . . . . . . . . . . . . . 54
iv RF ValProbe® User’s Manual

Contents
A.3.2aBody . . . . . . . . . . . . . . . . . . . . . . . . . . . . . . . . . . . . . . . . . . . . . . . . . . . . . . . . . . . . 54
A.3.2bExternal Probe . . . . . . . . . . . . . . . . . . . . . . . . . . . . . . . . . . . . . . . . . . . . . . . . . . . . 54
A.3.2cLogger Dimensions . . . . . . . . . . . . . . . . . . . . . . . . . . . . . . . . . . . . . . . . . . . . . . . . 54
A.3.2dBase Station Dimensions . . . . . . . . . . . . . . . . . . . . . . . . . . . . . . . . . . . . . . . . . . . . 54
A.3.2eTemperature . . . . . . . . . . . . . . . . . . . . . . . . . . . . . . . . . . . . . . . . . . . . . . . . . . . . . . 54
A.3.2fRH. . . . . . . . . . . . . . . . . . . . . . . . . . . . . . . . . . . . . . . . . . . . . . . . . . . . . . . . . . . . . . 54
A.3.2gAuxiliary Inputs . . . . . . . . . . . . . . . . . . . . . . . . . . . . . . . . . . . . . . . . . . . . . . . . . . . 55
A.3.2hBattery Life (Varies ±10%) . . . . . . . . . . . . . . . . . . . . . . . . . . . . . . . . . . . . . . . . . . 55
A.3.3 Accuracy. . . . . . . . . . . . . . . . . . . . . . . . . . . . . . . . . . . . . . . . . . . . . . . . . . . . . . . . . . . . 55
A.3.3aTemperature-Validation (External Sensor): . . . . . . . . . . . . . . . . . . . . . . . . . . . . . . 55
A.3.3bRelative Humidity . . . . . . . . . . . . . . . . . . . . . . . . . . . . . . . . . . . . . . . . . . . . . . . . . 55
A.3.3cInputs . . . . . . . . . . . . . . . . . . . . . . . . . . . . . . . . . . . . . . . . . . . . . . . . . . . . . . . . . . . 55
A.3.3dSensor Sampling Rate . . . . . . . . . . . . . . . . . . . . . . . . . . . . . . . . . . . . . . . . . . . . . . 55
A.3.4 Battery . . . . . . . . . . . . . . . . . . . . . . . . . . . . . . . . . . . . . . . . . . . . . . . . . . . . . . . . . . . . . 56
A.3.5 Logger Indicators . . . . . . . . . . . . . . . . . . . . . . . . . . . . . . . . . . . . . . . . . . . . . . . . . . . . . 56
A.3.6 Logger Timing . . . . . . . . . . . . . . . . . . . . . . . . . . . . . . . . . . . . . . . . . . . . . . . . . . . . . . . 56
A.3.7 Logger Storage . . . . . . . . . . . . . . . . . . . . . . . . . . . . . . . . . . . . . . . . . . . . . . . . . . . . . . . 56
A.4 Environmental/EMC . . . . . . . . . . . . . . . . . . . . . . . . . . . . . . . . . . . . . . . . . . . . . . . . . . . . . . . . 57
A.4.1 EMC- EN 61326. . . . . . . . . . . . . . . . . . . . . . . . . . . . . . . . . . . . . . . . . . . . . . . . . . . . . . 57
A.4.1aBase Station . . . . . . . . . . . . . . . . . . . . . . . . . . . . . . . . . . . . . . . . . . . . . . . . . . . . . . 57
A.4.1bLogger . . . . . . . . . . . . . . . . . . . . . . . . . . . . . . . . . . . . . . . . . . . . . . . . . . . . . . . . . . 57
A.5 Environmental . . . . . . . . . . . . . . . . . . . . . . . . . . . . . . . . . . . . . . . . . . . . . . . . . . . . . . . . . . . . . 57
A.5.1 Logger Storage Specifications . . . . . . . . . . . . . . . . . . . . . . . . . . . . . . . . . . . . . . . . . . . 57
A.5.2 Logger Operating Specifications . . . . . . . . . . . . . . . . . . . . . . . . . . . . . . . . . . . . . . . . . 57
A.5.3 Base Station Operating . . . . . . . . . . . . . . . . . . . . . . . . . . . . . . . . . . . . . . . . . . . . . . . . . 57
RF ValProbe® User’s Manual v

Contents
Appendix B. Using the OPC Server and Client
B.1 Introduction . . . . . . . . . . . . . . . . . . . . . . . . . . . . . . . . . . . . . . . . . . . . . . . . . . . . . . . . . . . . . . . 59
B.2 Installing the OPC Server . . . . . . . . . . . . . . . . . . . . . . . . . . . . . . . . . . . . . . . . . . . . . . . . . . . . 59
B.3 Locating Base Stations on Network. . . . . . . . . . . . . . . . . . . . . . . . . . . . . . . . . . . . . . . . . . . . . 60
B.4 Setting up a Communication Channel . . . . . . . . . . . . . . . . . . . . . . . . . . . . . . . . . . . . . . . . . . . 62
B.5 Setting up a New Device . . . . . . . . . . . . . . . . . . . . . . . . . . . . . . . . . . . . . . . . . . . . . . . . . . . . . 63
B.5.1 Viewing Sensor Data . . . . . . . . . . . . . . . . . . . . . . . . . . . . . . . . . . . . . . . . . . . . . . . . . . 65
B.5.2 Optimizing Network Performance . . . . . . . . . . . . . . . . . . . . . . . . . . . . . . . . . . . . . . . . 67
B.6 Viewing Measurement Units . . . . . . . . . . . . . . . . . . . . . . . . . . . . . . . . . . . . . . . . . . . . . . . . . . 70
B.7 Setting Up the OPC Test Client . . . . . . . . . . . . . . . . . . . . . . . . . . . . . . . . . . . . . . . . . . . . . . . . 71
Appendix C. Environmental Compliance
C.1 Waste Electrical and Electronic Equipment (WEEE) Directive . . . . . . . . . . . . . . . . . . . . . . . 75
C.2 Battery Disposal . . . . . . . . . . . . . . . . . . . . . . . . . . . . . . . . . . . . . . . . . . . . . . . . . . . . . . . . . . . . 76
C.2.1 What do the Markings Mean? . . . . . . . . . . . . . . . . . . . . . . . . . . . . . . . . . . . . . . . . . . . 76
C.2.2 The Risks and Your Role in Reducing Them . . . . . . . . . . . . . . . . . . . . . . . . . . . . . . . . 77
vi RF ValProbe® User’s Manual

Chapter 1. Setting Up the RF ValProbe
Chapter 1. Setting Up the RF ValProbe
1.1 Introduction
1.1.1 Unpacking
Unpack the Kaye RF ValProbe® Loggers and Base Station carefully and inspect them for any damage that may have occurred during shipment. If there is shipping damage, notify the carrier immediately. Verify that the following are present:
• Kaye RF ValProbe Base Station and power supply
• USB Cable
• Power cord
• Kaye RF ValProbe Loggers and calibration certificates
• Kaye RF ValProbe Software Package
1.1.2 Safety Information
Use this instrument only as specified in this User's Guide.
• The protection provided by the equipment may be impaired if the equipment is used in a manner not specified by GE.
• Do not use this equipment in environments other than those listed in the User's Guide.
1.1.3 Overview
The Kaye RF ValProbe system is a wireless thermal validation system that collects temperature and humidity data. The Kaye RF ValProbe system is designed for accurate, convenient, and reliable process validation of environmental chambers and storage areas. These applications include stability chambers, freezers, refrigerators and warehouses. A 2.4-GHz RF mesh network and multiple-redundant data storage support communications and storage of critical validation data, while safeguards guarantee data integrity, storage and compliance with regulatory requirements.
RF ValProbe® User’s Manual 1

Chapter 1. Setting Up the RF ValProbe
1.1.3 Overview (cont.)
The system consists of Kaye RF ValProbe Loggers, a Kaye RF ValProbe Base Station, and Windows-based software for programming and reading the Loggers, calibrating Loggers, verifying their calibration, and generating reports (see Figure 1 below).
Data from multiple wireless Loggers is combined in a single file from which reports are generated. These reports are designed for implementation of 21 CFR Part 11 requirements for electronic records. Users can customize the reports by defining process cycles and specifying cycle-based calculations.
Figure 1: The Kaye RF ValProbe System
2 RF ValProbe® User’s Manual

Chapter 1. Setting Up the RF ValProbe
1.1.4 The Kaye RF ValProbe Base Station
The RF ValProbe Base Station acts as the communications link between the wireless Loggers and the RF ValProbe software on the computer. When connected to the computer via a standard USB, Ethernet, or USB-Ethernet adapter, the Base Station programs, reads and collects data from up to 100 Loggers per study. Its design ensures reliable transfer of critical data. If the PC is not present or currently running, the Base Station can store data from up to a maximum of 100 Loggers or 200 sensors (100 temperature and 100 humidity).
Powered by a power supply rated from 100-240 VAC at 50/60 Hz, the Base Station (shown in Figure 2 below) includes both a USB port and an Ethernet connection. (The connections are mutually exclusive.)
Figure 2: RF ValProbe Base Station
CAUTION! Use only the GE power supply (GE #201-172) provided with your RF ValProbe. The use of non-factory power supplies may damage the equipment and will void your warranty.
RF ValProbe® User’s Manual 3

Chapter 1. Setting Up the RF ValProbe
1.1.5 Kaye RF ValProbe Temperature/Humidity Loggers
The wireless RF ValProbe Loggers use an external temperature sensor.
• The humidity sensor covers a range from 10% to 90% RH, with accuracy of ±2.0% at 25°C.
• For validation, the external temperature sensor maintains accuracy of ±0.1°C from 0°C to + 60°C; below freezing, the sensor is accurate to ±0.2°C from -22°C to 0°C, and to ±0.5°C, from -80°C to -22°C. (See Appendix A for full accuracy specifications.). The external bendable temperature sensor maintains accuracy of ±0.1°C from 0°C to 140°C. Two and five-channel temperature loggers are accurate to ±0.1°C from -80°C to +130°C.
Users can select 4/20 mA or 0-10V inputs, both with contact closure sensing. To set up an external sensor or auxiliary inputs, see page 14.
4 RF ValProbe® User’s Manual

Chapter 1. Setting Up the RF ValProbe
1.1.5 Kaye RF ValProbe Temperature/Humidity Loggers (cont.)
Figure 3: The RF ValProbe Logger with External Sensor
Each Logger can record up to 10,000 readings per sensor or input; the data is sent to the Base Station and stored simultaneously in the Logger and Base Station memories. When prompted by the RF ValProbe software, the Loggers send this data to the computer via the Base Station for reading into a study, report creation and data calculation.
RF ValProbe® User’s Manual 5

Chapter 1. Setting Up the RF ValProbe
1.1.5 Kaye RF ValProbe Temperature/Humidity Loggers (cont.)
You can attach auxiliary inputs (contact, voltage or current) into the socket on top of the probe. If you select a Logger model with an external probe, the probe is attached to the Logger through an outlet on the side. To turn the Logger on, slide the power switch (shown in Figure 4 on the next page) to the right.
Two LEDs — the green Power and the yellow Link light — indicate Logger status.
• When you press the Status button, the green Power light appears to show that the Logger is receiving sufficient power. (To use the Status button and Power signal to reset battery capacity, go to page 8.)
• The yellow Link signal passes through four stages as a user presses and holds the Status button:
1. Its initial signal is a slow blink before it attempts to connect to the network.
2. The blink becomes more rapid as the Logger scans the area for a network (Base Station or Logger) connection.
3. A double blink indicates that the Logger has linked and is transmitting, either to another Logger or to a Base Station.
4. Finally, a solid yellow light indicates that the Logger has made two separate connections (the maximum possible for a Logger) to the network.
Note: In a given network with more than one Logger, there will always be one Logger that has only one link, and consequently stays at the double blink stage.
6 RF ValProbe® User’s Manual

Chapter 1. Setting Up the RF ValProbe
1.1.6 The Logger Batteries
The Logger is powered by two 1.5 V, AA lithium batteries (GE #200-084), shipped with the Logger. To replace the batteries, first shut off the Logger by sliding the power switch (shown in Figure 4 below) to the left. Then open the sliding panel on the back of the Logger and replace the batteries in the compartment shown in Figure 4 below. Do not turn the Logger back on (sliding the power switch to the right) until you have replaced the compartment cover.
CAUTION! If it becomes necessary to replace a Logger battery, use only a GE #200-084 1.5 V lithium battery. Use of any other battery will void your Logger warranty.
Figure 4: Logger Battery Compartment, Power Switch and Network ID Wheel
Network ID Wheel
Power Switch
Battery
Compartment
+
+
RF ValProbe® User’s Manual 7

Chapter 1. Setting Up the RF ValProbe
1.1.6 The Logger Batteries (cont.)
Battery life is affected by a number of factors, including sample rate, temperature, Logger position in the network, and hours of use. In addition, individual battery characteristics and capacity vary inherently from one battery to another by up to 10%. The RF ValProbe software tracks each Logger's battery life to within 10% of a potential low-voltage occurrence to help prevent interrupted or incomplete studies. When determining the battery life remaining, the software bases its calculations on the assumption that the battery can supply a predictable amount of energy (mAh) over the temperature range.
The battery life calculation is accurate when a Logger is used exclusively for studies at or above room temperature, or exclusively for studies below room temperature. GE therefore recommends that you change the battery when switching between temperature ranges above room temperature and those below room temperature.
A low battery warning is issued when the remaining battery life is below the warning percentage specified in the RF ValProbe software. The low battery warning is issued until you replace the Logger battery and reset its battery life to 100%. If you do not specify a percentage, the low battery warning is set to 10%. GE recommends that you replace the battery when there is 10% battery life remaining.
• If the battery is used up or is removed, the study setup and data, as well as the calibration information, are maintained in non-volatile memory inside the Logger.
1.1.6a Resetting the Battery Capacity Setting
You can reset the battery capacity from the Logger itself. Once you have installed the new batteries, press and hold the Status button on the front of the logger while you turn the logger power switch on. Wait for the Power (green) light to blink five times, and then release the button. The battery capacity has been reset.
8 RF ValProbe® User’s Manual

Chapter 1. Setting Up the RF ValProbe
1.2 Calibration
1.2.1 Calibration Data Storage
Calibration data, including calibration offsets, and when the calibration was performed and by whom, are stored in the Logger in non-volatile memory. The data remains intact even if the battery is exchanged.
1.2.2 Verifying Calibration
The Kaye RF ValProbe software allows you to verify Logger calibration at one or two setpoints. For Humidity/Temperature Loggers, each sensor type must be verified independently. You may want to verify that the Loggers are within their specification before running a study; however, you do not need to recalibrate them. Since the RF ValProbe is a self-contained instrument, the sensor and instrument errors are accounted for during factory calibration.
The following section provides an overview of verifying Logger calibration. The online Help that comes with the Kaye RF ValProbe software provides step-by-step instructions on calibration procedures.
Note: In the RF ValProbe software, you can select either manual or automatic calibration verification. If you select automatic calibration verification, you will not need to enter stability or deviation criteria; however, you will still need to connect your computer to a Kaye IRTD temperature probe and to a temperature bath via the Kaye Calibration Interface (included with the IRTD). You will also need to enter setpoints, and to click the Start Calibration button.
RF ValProbe® User’s Manual 9

Chapter 1. Setting Up the RF ValProbe
1.2.3 Required Equipment
When verifying sensor calibration, you must consider the measurement uncertainty of the equipment you are using in combination with the uncertainty of the equipment used by GE to calibrate the Loggers at the factory.
For example, if you verify calibration for a Logger's humidity sensor using a calibration chamber with a measurement uncertainty of ±1.5% RH, and the GE chamber has a measurement uncertainty of ±1.0% RH, you may obtain a deviation greater than the 2.0% RH specified by the factory as the accuracy of the sensor.
The Certificate of Calibration that was shipped with each Logger provides detailed information about the equipment used by the factory to calibrate the Loggers, including the measurement uncertainty. (Auxiliary inputs are shipped with additional certification documents.) The equipment required to accurately verify calibration for each sensor type is listed on the next page.
10 RF ValProbe® User’s Manual

Chapter 1. Setting Up the RF ValProbe
1.2.3a Temperature Sensors
In order to verify that the temperature sensors in the Loggers are within the 0.1°C calibration accuracy, the total system measurement uncertainty for the calibration equipment must be better than 33mK (0.033°C) in order to achieve a 3:1 measurement uncertainty ratio. The following equipment is required to perform calibration verification:
• IRTD model 400 (25mK). The IRTD 400 (M2801) temperature measurement standard is a self-contained measurement system providing temperature data directly to the Kaye RF ValProbe software during temperature sensor calibration and calibration verification. The measurement accuracy is NIST-traceable to 0.025ºC, with a range of –196ºC to 420ºC.The IRTD provides a traceable standard that is used to calibrate Kaye RF ValProbe Loggers and to verify Logger calibration. During the calibration and calibration verification process, the Kaye RF ValProbe software automatically reads and monitors the value of the IRTD probe.
Note: During calibration, the IRTD remains connected (via an RS-232C port) to the PC running RF ValProbe software, and to the temperature chamber or bath. It does not link directly to the RF ValProbe.
• Temperature bath or chamber with the following stability and uniformity specifications:
GE recommends using the CTR-40 or CTR-80 liquid calibration baths.
1.2.3b Humidity Sensors
In order to verify the RH sensors meet the calibration accuracy specification, the RH Humidity Calibrator must have an error equal to or better than ±1%. To perform calibration verification, GE recommends a Humidity Calibrator with ±1% accuracy or better, such as the GE Humilab.
Table 1: Temperature Bath (Chamber) Specifications
Bath Stability Bath Uniformity
7mK 7mK
RF ValProbe® User’s Manual 11

Chapter 1. Setting Up the RF ValProbe
1.3 Setting Up the RF ValProbe System
Setting up an RF ValProbe system for operation involves four steps:
1. Installing the RF ValProbe software for validation, or the OPC Server for monitoring applications.
Note: To install RF ValProbe validation software, refer to page 24. You must install validation software before setting up the Base Station and Loggers.
To install an OPC Server for real-time monitoring, refer to Appendix B.
2. Setting up the Base Station
3. Connecting any External Sensors or Auxiliary Inputs
4. Setting up and positioning the Loggers
5. Starting the RF ValProbe software
1.3.1 Setting Up the Base Station
Starting the Base Station requires plugging in the power supply and establishing USB or Ethernet connections. The rear of the Base Station appears similar to Figure 5 below. The newer Base Stations do not have the USB port, but a high-speed USB-Ethernet cable, included in your RF ValProbe, will connect the Ethernet port on the Base Station to the USB port on the PC.
Figure 5: Base Station Connections (old and new)
Power USB Ethernet
12 RF ValProbe® User’s Manual

Chapter 1. Setting Up the RF ValProbe
1.3.1 Setting Up the Base Station (cont.)
• To power the Base Station, insert the round barrel connector into the power input jack of the Base Station (the input at the left shown in Figure 5 on the previous page). Attach the power supply to the power cord.Then insert the power cord into a standard 100-240 VAC outlet. A green light next to the power outlet on the Base Station indicates that the station is powered up.
IMPORTANT: The external power supply included with your RF ValProbe is fitted with an AC power cord suitable for the country of destination.
• To establish a USB connection, plug one end of the USB cable into the USB outlet in the center of the rear shown in Figure 5 on the previous page, and plug the other end into the USB port of your computer.
• To establish an Ethernet connection, plug one end of your Ethernet cable into the outlet at the right of the rear panel shown in Figure 5 on the previous page. Then plug the other end into your Ethernet connection.
• To establish a connection using the adapter, connect the crossover cable to the USB-Ethernet adapter. Plug the crossover cable to the outlet at the right of the rear panel shown in Figure 5 on the previous page. Then plug the adapter to the USB port on your PC.
Once you have attached the connection and set up the loggers (see the next page), start the RF ValProbe software and click the Preferences tab. The Preferences window opens (Figure 16 on page 37). Follow the directions from page 36 to page 48 to set up your Base Station settings.
IMPORTANT: You can only be connected via either USB or Ethernet -- not both. If you want to establish an Ethernet connection, first connect your Base Station via USB, and then switch your connection to the Ethernet, as discussed on page 40.
RF ValProbe® User’s Manual 13

Chapter 1. Setting Up the RF ValProbe
1.3.2 Connecting an External Sensor and Auxiliary Inputs
If any of your Loggers are designed for use with an external sensor, that sensor will have been shipped in the same package as your Logger.
• To connect the sensor to the Logger, simply slide the connection end of the sensor into the hole on the right side of the Logger.
• To disconnect the sensor from the Logger, pull back the connection sleeve (the grooved part visible outside the connection) and you can pull out the sensor.
CAUTION! When handling external sensors, avoid bending the sensor near either the tip or connector ends. Repeated bending will damage the sensor.
You connect auxiliary inputs (4-20 mA, 0-10V or contact closure) via the terminal at the top of the Logger shown in Figure 6 below. Figure 7 below illustrates wiring connections for the auxiliary inputs.
Figure 6: Auxiliary Input Terminal
Figure 7: Interface Connector Wiring Diagram
X X XX+
+4-20 mA _
External Switch -
XTMR+ External
_PowerSupply
Dry Contact
-
User Interface Connector
14 RF ValProbe® User’s Manual

Chapter 1. Setting Up the RF ValProbe
1.3.2 Connecting an External Sensor and Auxiliary Inputs (cont.)
Note: For a 2 or 5-channel Logger, the sensors are prewired to terminal blocks inside the Logger. To replace or reattach a sensor, you must remove the cover and retaining bar, remove the terminal block for the existing sensor, attach the terminal block of the new sensor, and replace the retaining bar and cover.
1.3.3 Setting Up the Loggers
When you are setting up the Loggers, you must first be sure that they are switched on, and that they have the same network ID (from 0 to 9 or A to F) as the Base Station. (For instance, all Loggers must have the network ID “5” if the Base Station has the ID “5”.)
IMPORTANT: If you have more than one Base Station, each one must be configured with a unique network ID.
To switch on the Logger, see the back of the Logger above the battery panel, as shown in Figure 4 on page 7. Slide the switch below the network ID wheel to the right to turn on the logger.
Note: All Base Stations and Loggers are shipped with an initial Network ID of 0. To change the Base Station Network ID, install the RF ValProbe software and refer to “Selecting a Communications Option and Establishing Preferences” on page 36.
If you need to adjust the Logger’s network ID, use a small screwdriver to turn the arrow in the middle of the network ID wheel in Figure 4 on page 7. Be sure the arrow points to the appropriate ID number. (You can choose from numbers 0 through 9, and letters A through F.)
Note: You must change the Logger network ID before you switch on the Logger. If you have already switched the Logger on, switch it off and then turn it back on so the Logger can read the correct ID.
RF ValProbe® User’s Manual 15

Chapter 1. Setting Up the RF ValProbe
1.3.4 Logger Installation Guidelines
You can now position the Loggers. Each Logger must be no more than 300 ft. distant from the Base Station and the other Loggers. GE offers several recommendations for logger placement:
• Install the Loggers at least one to two feet above the ground or floor. For better RF transmission, place them as high as possible. If possible, raise or lower the Base Station and Loggers above or below walls or any separation.
• Point the Logger antenna upwards for best results.
• Do not position the Loggers directly above or below each other. Stagger their positions for better transmission.
• If Loggers are placed at different heights, make sure that they are within antenna range (within 300 ft. from the Base Station or another logger). The RF signal is transmitted in an arc, with maximum signal strength occurring in the area 45° above and below the tip of the antenna.
• Be aware that metal surroundings can interfere with RF transmission; the Logger may transmit, but the signal will be weaker. Shorten the transmission distance accordingly.
• Do not install Loggers next to a cordless phone base or other 2.4 GHz transmission device.
• Do not install Loggers on a vibrating surface.
• Do not place Loggers where the temperature is outside their rated operating range.
IMPORTANT: If you are using Loggers with internal sensors, be sure the vents on the side remain uncovered. If the vents are covered, the sensors cannot provide correct readings.
1.3.5 What’s Next?
Once you have connected the Base Station and positioned the Loggers, proceed to Chapter 2 to use the RF ValProbe software and begin taking measurements.
16 RF ValProbe® User’s Manual

Chapter 2. Installing and Using RF ValProbe Software
Chapter 2. Installing and Using RF ValProbe Software
2.1 Introduction
Before using the Kaye RF ValProbe system, you have to install the RF ValProbe software on your PC and perform some basic system administration tasks.
The RF ValProbe software includes a Password Maintenance utility that allows a user with System Administrator permission to create and maintain user accounts and set site options.
A default System Administrator account is included with the software. You use this account to initially log in to the Password Maintenance utility and create your own System Administrator account. The default account is deleted once your own System Administrator account is created. You can then use your own account to perform all your system administration tasks.
In this chapter you:
• Install the RF ValProbe software, configured for network or local applications
• Start the program and log in to the Password Maintenance utility using the default System Administrator account
• Set site options
• Create your System Administrator account
• Create Supervisor and Operator accounts
• Print the active user list
• Select the Communications Option and other Preferences
• Check system functioning on the Hardware screen
• Access the RF ValProbe online Help
RF ValProbe® User’s Manual 17

Chapter 2. Installing and Using RF ValProbe Software
2.2 PC Requirements
To run the RF ValProbe Windows-based software, your PC should meet the following minimum requirements:
• Pentium or equivalent microprocessor with 1 GHz processor speed and at least 1 GB RAM
• At least 40 GB hard disk space available
• Microsoft Windows XP SP3 or Windows 7 Professional 32 bit or 64 bit
• Microsoft Office 2007 or 2010 (32 bit only) for reporting
• One unused USB port for communicating with the Base Station or an Ethernet connection
• Windows printer with graphical printer capability
• VGA color monitor with resolution at least 800 X 600.
If you are performing a calibration:
• One 9-pin serial port for IRTD communication, and the Kaye Calibration Interface (supplied with the IRTD), or an additional USB port with USB-serial adapter
18 RF ValProbe® User’s Manual

Chapter 2. Installing and Using RF ValProbe Software
2.3 Installing RF ValProbe Software
In addition to standalone operation, Kaye RF ValProbe offers the option of configuring the software for network capabilities. The RF ValProbe data files can thus be saved to and reported on from a central network location, rather than stored on each individual PC's hard drive. In addition, by enabling network capabilities, the RF ValProbe software will utilize one central password database for managing user names and passwords. You can then manage passwords for all your users in one place, rather than having a different password database on each PC running the Kaye RF ValProbe software.
Note: Network installations may not use the distribution set. Instead, users must create a customized network folder.
• If you are installing Kaye RF ValProbe to a network drive (from which you will install it to individual PCs), proceed to “Installation for a Network Application” on the next page.
• If you are installing Kaye RF ValProbe to an individual PC, proceed to “Installation for a Standalone Application” on page 24.
RF ValProbe® User’s Manual 19

Chapter 2. Installing and Using RF ValProbe Software
2.3.1 Installation for a Network Application
1. Be sure the network drive is mapped on your PC. On the drive, identify or create a network location (folder) to hold the RF ValProbe installation and data files. This location will also provide a central database for managing user names and passwords. The folder should be protected against data deletion.
2. Insert the RF ValProbe CD into your CD-ROM drive. If the installation does not automatically begin, complete the following steps:
• Click Start on the Windows task bar, and then click Run.
• Click Browse. From the Browse dialog box, select your CD-ROM drive, click Setup.exe, and then click Open.
3. Follow the on-screen instructions to perform the installation.
4. Click on the appropriate installation path to install Kaye RF ValProbe to the network drive.
5. Once installation has completed, the Kaye RF ValProbe Initialization program will run automatically. The Kaye RF ValProbe splash screen will appear, followed by the two System Administrator Site Options screens -- Policies and Preferences.
20 RF ValProbe® User’s Manual

Chapter 2. Installing and Using RF ValProbe Software
2.3.1a Setting up Site Options
When you start up the program for the first time, you will first set up the System Administrator Site Options, which provide more flexibility while running the RF ValProbe software. You can enable any combination that your site supports.
• Set a login timer for user identification. The login timer allows users, after initial identification, to enter only their password if user identification is within the preset time limit. When this option is enabled, the login timer can be set from 1 to 15 minutes.
Note: If you enable this option, the Time Interval readout displays to the right of that option, and the timer is initially set to 5 minutes. You can set the timer from 1 to 15 minutes using the spin buttons.
• Require minimum-length passwords for all user accounts, from 6 to 16 characters.
Note: If you select this option, use the spin buttons to set the requirement from 6 to 16 characters. The password expiration requirement can be set from 1 to 366 days with the spin buttons. Click the spin buttons once to move in 1-day increments, or click and hold to move in 10-day increments.
• Set passwords to expire after a number of days, up to 366. Users will be prompted to change their password once their current password has expired. By default, passwords are set to expire after 180 days. The software will display the password expiration date to the user at login when there are five days or less until their password expires.
RF ValProbe® User’s Manual 21
Chapter 2. Installing and Using RF ValProbe Software
2.3.1a Setting up Site Options (cont.)
• Disable user accounts after 3 unsuccessful login attempts. This option will disable a user account if there are three consecutive PC login failures for the same user ID. If a user's account is disabled, the System Administrator must enable the account and assign a new temporary password. This option does not affect logins from the RF ValProbe instrument panel.
• Display User ID during entry. By default, the user ID is shown to the user when logging in. Clearing this option will replace the user ID characters with asterisks (*****).
• Allow Operators to change Preferences. Preferences are workstation defaults that specify the temperature units (Celsius or Fahrenheit), the COM port, and when to issue low battery warnings. Any changes made to the system preferences are effective immediately, and all setups created after the preferences have been changed will reflect these new settings. If this option is not enabled, the System Administrator is responsible for changing preferences
• Disable the password system. User IDs and passwords will not be required to use the software.
Note: If you select this option, the Kaye RF ValProbe system will not enable compliance with 21CFR Part 11 requirements for electronic records.
Click the check box next to any option that you want to enable. An X appears in the check box when the option is enabled. Click the check box again if you want to disable it. The check box will be blank. Once your site options have been set, click on the Preferences tab.
22 RF ValProbe® User’s Manual

Chapter 2. Installing and Using RF ValProbe Software
2.3.1b Establishing Site Preferences
The Preferences tab has the following settings that can be initially set for all users who install Kaye RF ValProbe software from the network:
• Select temperature units (Celsius or Fahrenheit) for all temperature calculations
• Enter the Company Name.
• Specify the data directory, which will be the default location for storing and retrieving data files and storing the password database. Navigate to the location on the network you identified to store the data files. This folder should be protected against file deletion.
• Allow users to specify the lethality criteria for calculation in reports.
Select the desired options, and click OK.
2.3.1c Completing Installation
1. Click Finish to complete the initialization program.
2. Return to the Windows task bar. Click Programs, then Kaye RF ValProbe, and then RF ValProbe.
3. Follow the on-screen instructions to complete the installation to the first PC. Once you have completed installing Kaye RF ValProbe to the network PC, and setting up user accounts, you can install Kaye RF ValProbe from the network to other PCs.
RF ValProbe® User’s Manual 23
Chapter 2. Installing and Using RF ValProbe Software
2.3.2 Installation for a Standalone Application
1. Insert the RF ValProbe CD into your CD-ROM drive.
2. If the installation does not automatically begin, complete the following steps:
• Click Start on the Windows task bar, and then click Run.
• Click Browse. From the Browse dialog box, select your CD-ROM drive, click Setup.exe, and then click Open.
3. Click on the appropriate installation path to install Kaye RF ValProbe to your PC.
4. Follow the on-screen instructions to perform the installation.
5. Once installation has completed, the Kaye RF ValProbe Initialization program will run automatically. The Kaye RF ValProbe splash screen will appear, followed by the two System Administrator Site Options screens -- Policies and Preferences. Select the desired Site Options (as discussed on page 21 through page 23), and click OK.
6. Click Finish to complete the initialization program.
7. Return to the Windows task bar.
8. Click Start, then Programs, then Kaye RF ValProbe, and then Client Setup.
9. Click on the appropriate installation path to install the client to your PC.
10. Follow the on-screen instructions to finish the installation.
24 RF ValProbe® User’s Manual

Chapter 2. Installing and Using RF ValProbe Software
2.4 Starting the RF ValProbe System
To start up the RF ValProbe system for the first time:
1. Power up the Base Station, having connected it via USB to your PC.
2. Position and switch on the Loggers, with any external sensors or auxiliary inputs connected.
3. To open RF ValProbe validation software for the first time, click Start >Programs>RF ValProbe>RF ValProbe.
4. The Identification Required dialog box (shown in Figure 8 below) appears.
Figure 8: Identification Required Box
5. Enter Kaye in the User ID text box.
Kaye is the default System Administrator user ID. The User ID text box is case sensitive, so make sure you enter the default user ID exactly as it appears here.
Note: To access the Password Maintenance utility after your initial login, click Start >Programs>RF ValProbe>RF ValProbe Utilities. Then click Site Options, and enter your System Administrator user ID and password in the System Administrator Log In dialog box.
6. Enter 411 in the Current Password text box.
411 is the default System Administrator password.
RF ValProbe® User’s Manual 25

Chapter 2. Installing and Using RF ValProbe Software
2.4 Starting RF ValProbe (cont.)
7. Click OK. The Password Maintenance Add New User screen appears, as shown in Figure 9 below.
Figure 9: Password Maintenance Add New User Screen
You are now ready to create your own System Administrator account and add users to the system. The next section provides instruction on creating your new System Administrator account from this screen and adding additional users.
26 RF ValProbe® User’s Manual
Chapter 2. Installing and Using RF ValProbe Software
2.5 Creating User Accounts
The RF ValProbe software is designed for two levels of users:
System Administrator - Creates and maintains user accounts, sets site options and system preferences, backs up and restores user information, and views, prints, and maintains the audit trail. The System Administrator also performs Logger calibration.
Operator - Programs Loggers, reads Loggers, creates reports, and performs calibration verification. Operators can also change system preferences if the System Administrator has enabled the Allow Operators to change Preferences site option.
In this section you:
• Create a new System Administrator account.
• Create Operator accounts.
2.5.1 Creating a New System Administrator Account
The first task you must perform when you log in for the first time is to create a System Administrator account. Once this is accomplished, you can add users (Operators or other System Administrators) to the system and set site options.Once your System Administrator account is created, the default account you used to log on to the system (Kaye/411) will be deleted. You will then be logged in under the user name you create.
Note: It is good practice to establish more than one individual as a System Administrator. This way, the Password Maintenance utility functions can still be accessed, even if one of the System Administrators is unavailable.
The next time you log in to the Password Maintenance utility you will need to enter your own System Administrator user ID and password. The Password Maintenance utility is able to identify you by name using your unique user ID and password combination.
Note: If you want to use the Kaye RF ValProbe software to program Loggers, read Loggers and generate reports, create an Operator account for yourself using a different name and user ID than your System Administrator account.
RF ValProbe® User’s Manual 27

Chapter 2. Installing and Using RF ValProbe Software
2.5.1 Creating a New System Administrator Account (cont.)
To create a new System Administrator account:
1. The Password Maintenance Add New User screen should be displayed after you logged in to the system for the first time using the default System Administrator account. Enter your name (up to 32 characters) in the Name field.
The name you enter here displays in the active user list. User names must be unique. Once you have added your name to the active user list, you can never enter the same name again. Your name is associated with the unique user ID/password combination that you enter in steps 2 and 3. You use this user ID/password combination to log in to the Password Maintenance utility. The user ID and password are case sensitive.
2. Enter your new System Administrator identification in the User ID field. Your user ID can be any combination of numbers and characters, up to a maximum of 16. A user ID may not be used by more than one active account.
3. Enter your new System Administrator password in the Password field. Your password can be any combination of numbers and characters, up to a maximum of 16. For security reasons, it is preferable to use more than six characters or numbers.
4. Enter your password again in the Reenter Password field.
At this point you should record your user ID and password for future reference. You will need them to log in to the Password Maintenance utility. Because this is the first System Administrator account created, the system assumes that this is your account, and you will not need to change the password. However, for any additional System Administrator accounts created, the user will need to change the password when logging in for the first time.
5. The permission level is set to System Administrator by default. Click OK.
The Password Maintenance screen (shown in Figure 10 on the next page) appears. Your new System Administrator account name appears in the active user list.
28 RF ValProbe® User’s Manual

Chapter 2. Installing and Using RF ValProbe Software
2.5.1 Creating a New System Administrator Account (cont.)
Figure 10: Password Maintenance Screen
2.5.2 Creating Operator Accounts
Now that you have created your own System Administrator account, you are ready to add user accounts. All Password Maintenance activity you now perform will be recorded in the audit trail under your user name.
When you create user accounts, each user's name is added to the active user list. You assign a unique user ID for each user and a temporary password. The user will change the password when they first log in.
To create Operator accounts:
1. On the Password Maintenance screen, click the Users menu, and then click Create User. The Password Maintenance Add New User screen (shown in Figure 11 on the next page) appears.
RF ValProbe® User’s Manual 29

Chapter 2. Installing and Using RF ValProbe Software
2.5.2 Creating Operator Accounts (cont.)
Figure 11: Password Maintenance Add New User Screen
2. Enter the new user name (up to 32 characters) in the Name field.
The user name is associated with the user ID/password combination that you enter in steps 3 and 4. The user ID/password combination is used to identify the user to the RF ValProbe software. The name you enter here appears in the active user list.
Note: User names must be unique. Once a name has been used, it cannot be used again. You should keep a separate record of all user names that you assign to avoid future problems.
3. Enter the new user identification in the User ID field. The user ID can be any combination of numbers and characters, up to a maximum of 16. The user ID and password are case sensitive. A user ID may not be used by more than one active account.
4. Enter the new user password in the Password field. The password can be any combination of numbers and characters, up to a maximum of 16. The user will change this password when they first log in to the Kaye RF ValProbe software.
30 RF ValProbe® User’s Manual

Chapter 2. Installing and Using RF ValProbe Software
2.5.2 Creating Operator Accounts (cont.)
5. Enter the password again in the Reenter Password field.At this point you should record the new user ID and password. You will need to supply this information to each new user. A user ID/password combination is required any time a user:
• Programs and/or reads Loggers
• Verifies sensor calibration
• Creates reports
• Moves or copies data files
• Changes preferences (if the System Administrator has enabled the Allow Operators to change Preferences site option)
6. Click Operator to set the account’s permission level.
7. The Disable User Account option allows you to deny access to the system for this user. For example, if you are creating an account for a user who will not need access to the system for several months, you may want to select this option to deny access to the user. You can de-select this feature once the user is ready to use the system (see the Kaye RF ValProbe online Help for instructions on editing user accounts).
Select this option if you want to disable the user account.
8. Click OK.
The Password Maintenance screen (Figure 12 on the next page) appears with the newly added user name in the active user list.
RF ValProbe® User’s Manual 31

Chapter 2. Installing and Using RF ValProbe Software
2.5.2 Creating Operator Accounts (cont.)
Figure 12: Password Maintenance Screen
9. Repeat steps 1 through 8 to add more users to the system.
32 RF ValProbe® User’s Manual

Chapter 2. Installing and Using RF ValProbe Software
2.5.3 Printing the User List
All active and deleted user accounts are included in the printed list.
To print the user list:
1. On the Password Maintenance screen, click the File menu, and then click Print Users. The Windows Print dialog box appears.
2. Select a printer and click Print.
Click OK when prompted that the user list has been printed.
2.5.4 Selecting Site Options
The Password Maintenance utility provides site options that give users more flexibility while running the Kaye RF ValProbe software. To access the site options from the Password Maintenance screen, click File >Options. The System Administrator Site Options screen opens, as shown in Figure 13 below.
Figure 13: System Administrator Site Options Screen
RF ValProbe® User’s Manual 33

Chapter 2. Installing and Using RF ValProbe Software
2.5.4 Selecting Site Options (cont.)
As the System Administrator, you can select options that will:
• Disable the user identification requirement.
IMPORTANT: If you disable the user identification requirement, the Kaye RF ValProbe system does not meet FDA regulations for electronic signatures (21 CFR Part 11).GE recommends that you always require user identification.
• Set passwords to expire after a number of days, up to 366. The user will be prompted to change their password once their current password has expired. By default, passwords are set to expire after 180 days.
• Require minimum-length passwords for all user accounts, from 1 to 16 characters.
• Disable user accounts after three unsuccessful login attempts. This option will disable a user account if there are three consecutive login failures for the same user ID. If a user's account is disabled, the System Administrator must enable the account and assign a new temporary password.
• Allow Operators to change Preferences. Preferences are system defaults that specify the temperature units, the communications port, the network ID, and when to issue low battery warnings. Any changes made to the system preferences are effective immediately, and all setups created after the preferences have been changed will reflect these new settings. If this option is not enabled, the System Administrator is responsible for changing preferences.
34 RF ValProbe® User’s Manual

Chapter 2. Installing and Using RF ValProbe Software
2.5.4 Setting Site Options (cont.)
To set site options:
1. Select the check box next to any option to enable that option. To set the number of days until passwords expire, use the spin buttons to set the number of days in 30-day increments, or enter a number from 1 to 366 in the box. To specify a minimum password length, select the Require minimum password length option and use the spin buttons to set the password requirement from 1 to 16 characters, or enter the number directly into the box.To disable an option, clear the associated check box.
2. Click OK. The Password Maintenance screen appears.
3. On the File menu, click Exit to log out of the Password Maintenance utility. The RF ValProbe Main Menu appears, as shown in Figure 14 below.
Figure 14: Kaye RF ValProbe Main Menu
RF ValProbe® User’s Manual 35

Chapter 2. Installing and Using RF ValProbe Software
2.5.5 Selecting a Communications Option and Establishing Preferences
The Kaye RF ValProbe Base Station is the communications link between the Kaye RF ValProbe Loggers and your computer. After installing the Kaye RF ValProbe software and connecting the Base Station to your PC via USB, you must select or confirm a communications option in order for the Base Station to communicate with your PC. You might also need to change the Network ID of your Base Station, or select the temperature displayed (in °F or °C).
To select a communications option:
1. On the Kaye RF ValProbe Main Menu, click the Preferences tab. The Change Preferences (Figure 15 below) dialog box appears.
Figure 15: Change Preferences Dialog Box
2. Enter your System Administrator user ID and password and click OK (you can use an Operator user ID and password if you have enabled the Allow Operators to change Preferences site option).The Preferences screen (Figure 16 on the next page) appears.
Note: Three items on the Preferences screen appear for information purposes only -- the Machine ID, the Company Name and the Data Directory for backup files. These items are not user-selectable.
36 RF ValProbe® User’s Manual

Chapter 2. Installing and Using RF ValProbe Software
2.5 Selecting a Communications Option and Establishing Preferences (cont.)
Figure 16: Preferences Screen
3. To select the units in which you wish to display temperature (Celsius or Fahrenheit), click on the appropriate radio button.
Note: This selection applies to the entire RF ValProbe --both the Base Station and Loggers.
4. If you are connecting an IRTD to the PC, click on the COM port to which you will connect the IRTD from the pull-down list.
5. The Battery Life warning signals the user to change the battery if its life drops below a certain percentage (from 0 to 90%). The default setting is 10%. If you want a different percentage, use the arrow keys to scroll to the desired percentage.
6. Click on the desired communications option (USB or Ethernet) from the Base Station radio buttons. USB is the default selection. You can use USB or Ethernet, but not both simultaneously.
RF ValProbe® User’s Manual 37

Chapter 2. Installing and Using RF ValProbe Software
2.5 Selecting a Communications Option and Establishing Preference (cont.).
• To set up a USB connection, see below.
• To set up an Ethernet connection, go to page 40.
2.5.1 Setting Up the USB Connection
First, be sure you have selected the USB option for your Base Station on the Preferences screen. Also, be sure you have powered up the Base Station and connected it to your PC’s USB port before completing the following steps:
a. If you need to change the Base Station settings, click the Change Base Stations Settings button. The USB Base Station Settings window opens, as shown in Figure 17 below.
Figure 17: USB Base Station Settings
38 RF ValProbe® User’s Manual

Chapter 2. Installing and Using RF ValProbe Software
2.5.1 Setting Up the USB Connection (cont.)
b. A default network ID of 0 has been programmed into the Base Station. You can use this ID or enter a new Network ID, from 0 to 9 or A to F.
• To obtain the programmed ID, click on the Get Network ID button. The software obtains the programmed ID from the Base Station.
• To enter a different Network ID, use the arrow keys next to the text box.
c. Click OK to confirm the settings and return to the Preferences screen.
Note: Be sure that the ID number at the back of each Logger matches the network ID number programmed in this window.
By clicking the Set USB button, you set the static IP address on your PC to correspond to the static IP address of the USB-to-Ethernet converter used in the Base Station. The software performs this function on startup, but you may need to perform it here if, for example, the USB cable was plugged in after startup.
RF ValProbe® User’s Manual 39

Chapter 2. Installing and Using RF ValProbe Software
2.5.2 Setting Up the Ethernet Connection
Note: If you plan to use an Ethernet connection, please be sure the Ethernet cable is no longer than 30 m to the nearest hub/switch. If you switch the Base Station to Ethernet mode, the Base Station acquires the IP address by DHCP from your network during startup. Please make sure that there is a DHCP Server available before switching to Ethernet mode. After switching to Ethernet mode, the Base Station will no longer communicate over USB. To restore USB communication, you must establish an Ethernet connection.
If you want to switch to Ethernet operation, you must click on the Switch to Ethernet button, and follow the on-screen instructions. Be sure the Base Station remains connected to the USB port until you receive specific instructions to change the connection.
The Ethernet Base Station Settings window opens, similar to Figure 18 below.
Figure 18: Ethernet Base Stations Settings
a. To locate the Base Stations on the network, click on the Refresh Discovery button. The software scans the network and locates the Base Stations on the network.
b. To select and program a specific Base Station, highlight the desired Base Station in the Discovered Base Stations window and click on the Select Base Station button.
40 RF ValProbe® User’s Manual

Chapter 2. Installing and Using RF ValProbe Software
2.5.2 Setting Up the Ethernet Connection (cont.)
c. Users can either accept the network ID programmed into the Base Station or enter a new Network ID, from 0 to 9, or A to F. (The default ID is 0.)
• To obtain the programmed ID, click on the Get Network ID button. The software obtains the programmed ID from the Base Station.
• To enter a Network ID, use the arrow keys next to the text box.
d. Click OK to confirm the settings and return to the Preferences screen.
Note: Be sure that the ID number at the back of each Logger matches the network ID number programmed in this window.
If you want to return to USB operation, click the Switch to USB button while the Ethernet cable remains plugged into the Base Station. Then follow the on-screen instructions.
RF ValProbe® User’s Manual 41

Chapter 2. Installing and Using RF ValProbe Software
2.6 Viewing the RF ValProbe Hardware Inputs
Once you have set up your Loggers and Base Stations and established your Preferences, you can view the RF ValProbe system on the Hardware tab, to ensure that the system is functioning properly.
From the Main Menu or the Preferences tab, click on the Hardware tab. The Hardware screen initially appears blank. As the software receives data from the Base Station and Loggers, it appears similar to Figure 19 below.
Figure 19: Hardware Screen Identifying Loggers
Once the software has established data inputs from the Base Station and Loggers, the screen appears similar to Figure 20 on the next page, with the temperature and humidity displayed.
42 RF ValProbe® User’s Manual

Chapter 2. Installing and Using RF ValProbe Software
2.6 Viewing the RF ValProbe Hardware Inputs (cont.)
Figure 20: Hardware Screen with Data Inputs Established
As the RF ValProbe locates and retrieves data for Loggers via the Base Station, it displays Logger status via a variety of brief messages:
• Searching -- Logger is detected, and the system is getting more information. It may be ready to use.
• Found -- Logger is available, and ready to use.
• Starting - The software is asking each Logger to start collecting data at the specified rate and at the specified time, but the Logger has not yet acknowledged that it has begun the program.
• Logging -- The Logger is currently running in a study.
• Running -- The Logger is programmed and waiting to run in a study at a specified time.
• Waiting -- The expected readings/samples are late in arrival, due, perhaps, to poor RF communications or a stopped logger.
• Ready to Read -- The Logger has completed its study.
• Retrieving -- The system is obtaining data from the Loggers.
Note: When the system is Re-reading Loggers, even if the Logger is turned OFF, you can read the Logger data from the Base Station. GE recommends leaving the base station and loggers turned ON until the study is read, to avoid any issues retrieving data.
RF ValProbe® User’s Manual 43

Chapter 2. Installing and Using RF ValProbe Software
2.6 Viewing the RF ValProbe Hardware Inputs (cont.)
• Read -- The system is reading the Logger samples.
• Done -- The reading is complete.
• Configuring -- The system is uploading or sending calibration/verification information to the Logger.
• Stopping -- The software sends Stop Data Collection to the logger when the run is ended.
• Requesting -- The system is getting additional or needed readings/samples from the Logger.
• Failed Update -- For calibration or verification, the system failed to update Loggers. Consult GE.
The screen offers several additional display and information options:
• To view real-time data from one or more Loggers in graph format, highlight one or more Loggers in the list (use Ctrl + click to select two or more Loggers) and click on the Graph Sensors button or click File>Graph Sensors from the File menu. A blank graph screen appears, similar to Figure 21 below.
Figure 21: Real-Time Graph Screen
44 RF ValProbe® User’s Manual
Chapter 2. Installing and Using RF ValProbe Software
2.6 Viewing the RF ValProbe Hardware Inputs (cont.)
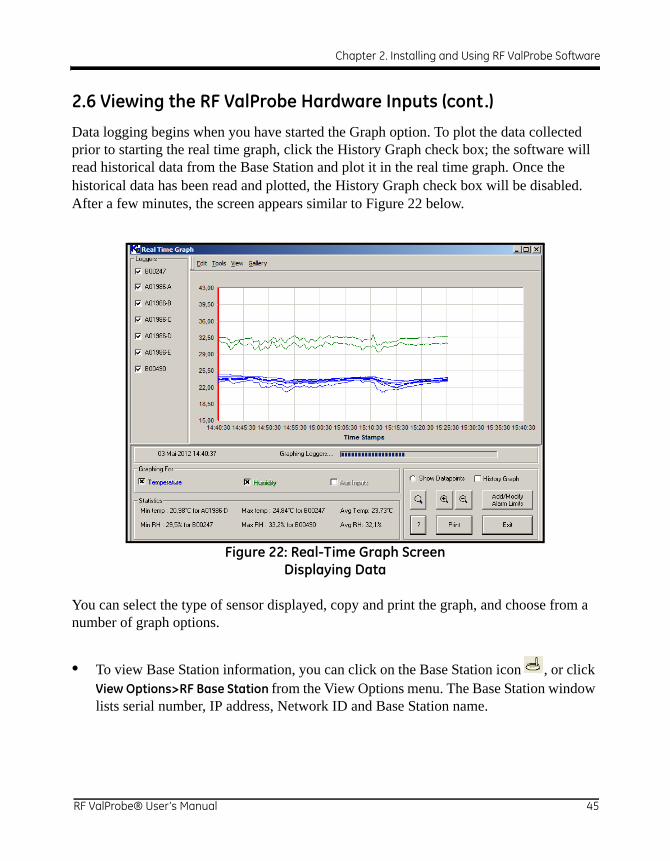
Data logging begins when you have started the Graph option. To plot the data collected prior to starting the real time graph, click the History Graph check box; the software will read historical data from the Base Station and plot it in the real time graph. Once the historical data has been read and plotted, the History Graph check box will be disabled. After a few minutes, the screen appears similar to Figure 22 below.
Figure 22: Real-Time Graph Screen Displaying Data
You can select the type of sensor displayed, copy and print the graph, and choose from a number of graph options.
• To view Base Station information, you can click on the Base Station icon , or click View Options>RF Base Station from the View Options menu. The Base Station window lists serial number, IP address, Network ID and Base Station name.
RF ValProbe® User’s Manual 45

Chapter 2. Installing and Using RF ValProbe Software
2.6 Viewing the RF ValProbe Hardware Inputs (cont.)
• To customize your view of the Hardware screen, click on the Customize Column
Layout icon , or click View Options>Customize Column Layout from the View Options menu. In addition to Status, Logger model number, and current temperature and humidity readings, you can select or deselect auxiliary inputs and contacts, percentage of battery life remaining, stability, calibration and calibration verification dates, probe ID, firmware version, RF strength, number of readings and time received.
• To refresh the view click the Refresh view button . This button reloads and redisplays information on Hardware view screens when the initial view of the Loggers or the commands sent to Loggers do not appear. Try clicking the Refresh button if a screen or a process seems to be stopped or frozen.
46 RF ValProbe® User’s Manual

Chapter 2. Installing and Using RF ValProbe Software
2.6 Viewing the RF ValProbe Hardware Inputs (cont.)
• To view and graph the RF Strength of the various RF strengths of signal paths, click Map RF Strength from the File menu. The Logger Network Strength Graph screen opens, displaying the paths and their signal strengths. You can add a background diagram or photo (as shown in Figure 23 below) on which the software will superimpose the signal path graph.
Note: Signal strength loading for the first time will take approximately 15 minutes. Mapping RF strength will function only after the signals have been loaded.
Figure 23: Logger Network Strength Screen
• To print a Logger list report from the current screen view, click on the Print button, or click File >Print Logger list report from current view from the File menu.
• To return to the Main Menu, click on the Main Menu button.
RF ValProbe® User’s Manual 47

Chapter 2. Installing and Using RF ValProbe Software
2.7 Accessing the Kaye RF ValProbe Online Help
The RF ValProbe online Help provides step-by-step instructions for using the software, including: programming Loggers, reading Loggers, creating reports, and performing calibration verification.
Note: The Kaye RF ValProbe online Help requires Internet Explorer 4.0 or later (5.0 or later is recommended).
To access online Help:
• With the Kaye RF ValProbe program running, click the Help tab.
The Kaye RF ValProbe Help window (shown in Figure 24 below) appears.
Figure 24: RF ValProbe Help Window
Click on the Contents and Index tab to access specific Help features.
48 RF ValProbe® User’s Manual

Chapter 2. Installing and Using RF ValProbe Software
2.7.1 Tabs
The following tabs and buttons are available to assist you in navigating Help:
• The Contents tab displays the Table of Contents. Click a book to display the pages in that book. Click a page to view the corresponding help topic in the right-hand window.
• The Index tab displays the Index. Enter the keyword to search for, select it from the list, and click Display to view the associated topic.
• The Search tab provides full-text search capabilities. This feature enables you to search the entire Help system for a word or phrase. Enter the word or phrase and click List Topics. Select a topic from the list and click Display. The word or phrase you searched for will be highlighted in the topic text.
• The Favorites tab enables you to store a list of your favorite or most frequently used Help topics. Whenever you open Help, you can quickly go to the topics you view most often by selecting them from this tab. When a topic you would like to store in the favorites list is displayed in the right-hand pane, click Add. You can update the list at any time by removing topics you no longer want to mark as favorites.
2.7.2 Buttons
• The Show/Hide buttons show or hide the left pane of the Help window. When you access Help for individual screens within the Kaye ValProbe software, you can use the Show button to access the Contents, Index, Search, and Favorites tabs. Use the Hide button to view a topic only and provide more room on your screen.
• The Back button returns you to the previously viewed Help topic.
• The Forward button opens the next topic in a previously viewed sequence.
• The Print button prints the current Help topic to your default printer.
• The Options button opens a menu that provides access to the Show/Hide, Back, Forward, and Print features, in addition to:
• Home - Links to the website.
• Stop - Stops loading a new topic or stops downloading information (click this option to stop a Web page from opening).
• Refresh - Updates the topic content displayed in the topic pane.
RF ValProbe® User’s Manual 49

Chapter 2. Installing and Using RF ValProbe Software
2.7.2 Buttons (cont.)
• Search Highlight On/Off - When this option is enabled (default setting), words entered using the Search feature are highlighted in the topic text
2.7.3 Screen-Level Help
You can also access online Help for individual screens in the RF ValProbe software by
clicking the button in the lower right corner of the screen, or by pressing F1.
50 RF ValProbe® User’s Manual

Appendix A. Specifications
Appendix A. Specifications
A.1 RF ValProbe System Specifications
A.1.1 RF System Operating Frequency
2.4 GHz
A.1.2 RF Certification
USA, Canada, European Union, China, India, Brazil, Argentina, Japan, Australia, Israel, Indonesia, Singapore, South Korea, South Africa. For other countries, contact factory.
A.1.3 Number of Loggers
Up to a maximum of 40 Loggers per Base Station.
A.1.4 Transmission
Maximum antenna to antenna distance in open space: 300 feet
A.1.5 PC Update Rate
10 seconds maximum
A.1.6 Maximum Network Form Time
• For 8 Loggers evenly distributed over 5 cubic ft.: typical, 2 minutes
• For 12 Loggers in a 30 ft radius single plane, typical, 4 minutes
A.1.7 Data Retention
Loggers retain up to 10,000 data samples.
RF ValProbe® User’s Manual 51

Appendix A. Specifications
A.2 Base Station
Autonomous Base Station operation configuration. The external connection (Ethernet or USB) to the Base Station can be broken and reconnected at any time with no interruption in system operation and no loss of data.
A.2.1 Connections
Ethernet and USB 2.0, full speed
Note: Connections are mutually exclusive.
A.2.2 Power
Power AdaptorInput: 100 to 240 Volts AC50-60 Hz input
A.2.3 Indicators
Power, network communications
52 RF ValProbe® User’s Manual
Appendix A. Specifications
A.3 Logger
A.3.1 Measurement Types
• Temperature
• RH
• 4-20 mA input
• 0-10 voltage input
• Contact Closure
A.3.1a Sensor Configurations
T/RH with external temperature sensor
T/RH with external temperature sensor, 4/20 mA input, contact closure
T/RH with external temperature sensor, 0-10 V input, contact closure
T with two external temperature sensors
T with five external temperature sensors
RF ValProbe® User’s Manual 53

Appendix A. Specifications
A.3.2 Environmental
A.3.2a Body
-40°C to 60°C, 0 to 95%RH non condensing
A.3.2b External Probe
-196°C to 200°C
A.3.2c Logger Dimensions
190 mm x 127 mm x 45 mm (7.5 in x 5 in x 1.75)
A.3.2d Base Station Dimensions
64 mm x 32 mm x 15 mm (2.5 in x 1.25 in x 5 in)
A.3.2e Temperature
Single Channel External Sensor
±0.1°C, range 0°C to +60°C±0.2°C, range -22°C to 0°C±0.5°C, range -80°C to -22°C±2.0°C, @ -196°C
For 2 and 5 Channel Temperature Loggers:
±0.1C range -80°C to 130°C
A.3.2f RH
2% from 10 to 90%RH5% from 0 to 10%, 90 to 100%RH3% at 40°C, 75%RH Certificate states ICH Points
54 RF ValProbe® User’s Manual

Appendix A. Specifications
A.3.2g Auxiliary Inputs
Contact: dry
Voltage and current 0.5% FS
A.3.2h Battery Life (Varies ±10%)
1 min sample rate: 8000 hours
A.3.3 Accuracy
A.3.3a Temperature-Validation (External Sensor):
±0.1°C, from 0°C to + 60° C±0.2°C, from -22°C to 0°C±0.5°C, from -80°C to -22°C2.0°C @ -196°C±0.1°C from 0°C to 140°C for external bendable probe
A.3.3b Relative Humidity
Range: 10% to 90%
Accuracy: ±2.0% at 25°C, ±5% for 75% RH at 40°C±3% for monitoring
Non-condensing environment
A.3.3c Inputs
3.8 to 22 mA Input, 16 bit A/D input, accuracy: 0.5% FS0 to 10 V input, 16 bit A/D input, accuracy: 0.5% FSContact Closure
A.3.3d Sensor Sampling Rate
5 seconds maximum, 12 hours minimum
RF ValProbe® User’s Manual 55

Appendix A. Specifications
A.3.4 Battery
Minimum Battery Life (10 second transmission rate, 25°C)
• 1 minute samples: 8000 hrs
• 15 minute samples: 1 year
Note: Additional factors impacting battery life are RF network configuration, sampling rate, and temperature.
Type: GE (p/n 200-084) 2 AA lithium batteries- 3000 mAH
CAUTION! If it becomes necessary to replace a Logger battery, use only a GE #200-084 1.5 V lithium battery. Use of any other battery will void your Logger warranty.
A.3.5 Logger Indicators
• Power
• Link
A.3.6 Logger Timing
Date and Time stamp required for each sensor reading
Time synchronization: 15 sec/day minimum
Indication of logger loss of communications interval: either 2 samples or 15 minutes (whichever is less)
A.3.7 Logger Storage
Non-volatile storage up to 10,000 data samples per sensor
56 RF ValProbe® User’s Manual
Appendix A. Specifications
A.4 Environmental/EMC
A.4.1 EMC- EN 61326
A.4.1a Base Station
Emissions classification: Class A
Immunity classification: Table A1, Annex A, for use in industrial locations
Performance Criteria: Continuous unmonitored operation
A.4.1b Logger
Emissions classification: Class A
Immunity classification: Annex C, Table C1, portable and battery operated equipment
A.5 Environmental
A.5.1 Logger Storage Specifications
-40°C to +65°C
10 to 90% RH non-condensing
Storage Vibration 2g RMS Random 10-1000 Hz
A.5.2 Logger Operating Specifications
-40°C to +65°C
10-90% RH non-condensing
Operating Vibration 1g RMS Random 10-1000 Hz
A.5.3 Base Station Operating
0°C to +50°C 10-85% RH non-condensing
RF ValProbe® User’s Manual 57

Appendix A. Specifications
58 RF ValProbe® User’s Manual

Appendix B. Using the OPC Server and Client
Appendix B. Using the OPC Server and Client
B.1 Introduction
When used with a group of RF ValProbe Base Stations and loggers, the GE OPC Server (version 4.1 and subsequent versions) enables real-time monitoring of up to 8 Base Stations and their associated Loggers over the Ethernet from remote computers. If users have RF ValProbe Base Stations connected to the Ethernet, they can read the measurements of Loggers associated with these base stations via the OPC Client. In addition, the Server can support a user-supplied OPC Historian Client, which stores all measurements over a 30-day period.
Note: Real-time monitoring via the OPC Server is only available via the Ethernet, not via USB connections.
B.2 Installing the OPC Server
The OPC Server supports four Windows® operating systems:
• Windows XP
• Windows 2003 Server
• Windows 2008 Server
• Windows 7
Note: This release does not support Windows NT 3.51 or NT 4.0.
To install the OPC Server:
1. Double-click on the GEPanaOPCServerPackage.exe file on the CD.
2. The InstallShield Wizard window opens. Click Next to continue.
3. The License Agreement window opens. Click Yes to accept the agreement and proceed. (Clicking No halts the installation.)
4. Click on Clear All to omit XML-DA. Then click Next.
RF ValProbe® User’s Manual 59

Appendix B. Using the OPC Server and Client
B.2 Installing the OPC Server (cont.)
Note: XML-DA is not available for RF ValProbe, so RF ValProbe users should uncheck this box.
5. The Wizard now asks if you wish to start copying the program files. Click Back to review or change any settings, or Next to begin copying the files.
6. When the Wizard indicates that installation is complete, click Finish to close the Wizard. You have installed GEPanaOPCServer.
B.3 Locating Base Stations on Network
When you first open the OPC Server, the screen appears similar to Figure 25 below.
Figure 25: OPC Server Initial View
To locate the RF ValProbe Base Stations connected to your local subnet, open the Tools menu and click on the Discovery option, shown in Figure 26 below.
Figure 26: The Tools Menu
60 RF ValProbe® User’s Manual

Appendix B. Using the OPC Server and Client
B.3 Locating Base Stations on Network (cont.)
The Discovery window appears similar to Figure 27 below. To find the base stations on the subnet, click the Discover button.
Figure 27: The Discovery Window
If base stations are installed on the subnet, the window should now appear similar to Figure 28 below.
Figure 28: Discovery Window Displaying Base Stations on Network
• Click on Clear to clear the screen
• Click on OK to save the database for future reference and close the screen, or
• Click on Cancel to close the window (without saving the database) and return to the main OPC Server.
RF ValProbe® User’s Manual 61

Appendix B. Using the OPC Server and Client
B.4 Setting up a Communication Channel
To set up your RF ValProbe on the network, you must first set up a communication channel. Right-click on the Address Space root, and select first New and then Communication Channel as shown in Figure 29 below.
Figure 29: New Communication Channel Option
The right pane of the main window changes to the Communication Channel view, shown in Figure 30 below.
Figure 30: The Communication Channel Window
62 RF ValProbe® User’s Manual

Appendix B. Using the OPC Server and Client
B.4 Setting up a Communication Channel (cont.)
Enter the channel name, and select the channel type from the drop-down menu. For RF ValProbe, the appropriate channel type is TCPIP.
Note: If you select a different channel type, a data entry menu appears. However, for TCP/IP, the device view provides the IP address and IP Port.
Click Add New to add another communication channel, Reset to change the settings, or Apply to apply the settings and close the window.
B.5 Setting up a New Device
Once you have set up the communication channel, you can now set up your RF ValProbe.
IMPORTANT: Be sure to install your RF ValProbe Base Station and place your Loggers in the desired locations before setting up the RF ValProbe on the OPC Server.
1. Right-click on the newly created channel. From the New option, click on the RF ValProbe Device selection. The right pane of the window appears similar to Figure 31 below.
Figure 31: New Device Option
RF ValProbe® User’s Manual 63
Appendix B. Using the OPC Server and Client
B.5 Setting up a New Device (cont.)
2. Enter the desired base station name in the text box.
3. At the IP Address text box,
• Enter the Base Station IP address. You can click on Tools > Discovery, find the IP address, and save it by clicking OK.
• Click the button to the right of the box. The Select IP Address window displays the available base stations on the network. Highlight the desired station, and click OK.
4. The correct number for the IP Port (4445) should appear in the IP Port text box. Enter the user name and password in the appropriate text boxes. (The default user name is admin, and the default password is also admin.)
5. Enter an appropriate Monitoring Interval (the interval at which the loggers send data to the base station, or transmission rate) of at least 10 seconds. The default monitoring interval is 15 seconds. If the transmission starts to lose data, GE recommends increasing the monitoring interval. Table 2 on page 68 shows the relationship between the monitoring interval, number of sensors, and frame size.
6. Enter an appropriate Timeout period. The default Timeout period is 60 seconds; however, for networks with at least 50 sensors, you may need to set a longer Timeout period. Once you have established RF ValProbe communications, the base station will flag late data if it receives no new data within this period.
Once you have entered these parameters, click Apply to save the new device in the Server database, or Reset to clear the new device and return to the communication window.
64 RF ValProbe® User’s Manual

Appendix B. Using the OPC Server and Client
B.5.1 Viewing Sensor Data
Once you have set up your RF ValProbe on the OPC Server, you will find that two buttons on the Device window are enabled: Sensors and Advanced. Sensors permits users to monitor all the Loggers that send data to the RF ValProbe, while Advanced allows users to set up parameters for the best data transmission.
Click on the Sensors button to review your loggers. The screen initially appears similar to Figure 32 below.
Figure 32: The Sensors Window
Wait for several minutes while the Server collects data. The screen first displays data in red (indicating that the sensors are present on the network) and then displays data in black. Two boxes at the bottom of the screen show the total number of Loggers on the network and the number of Loggers ready for transmitting. The screen now appears similar to Figure 33 on the next page.
Note: When you discover devices, the OPC Server retrieves all information about configuration parameters, measurement parameters, and units from the RF ValProbe. Depending upon your communication channel and its supported speed, this procedure might take a few minutes.
RF ValProbe® User’s Manual 65

Appendix B. Using the OPC Server and Client
B.5.1 Viewing Sensor Data (cont.)
Figure 33: Sensors Window with Monitored Sensors
To view real-time data from the Loggers, click on the Enable Real-Time Monitoring box at the lower right.You can now receive data on:
• Logger serial number
• Battery capacity (expressed in percentage)
• Relative Humidity
• Temperature
• Analog and Digital Inputs
• RSSI in dBm (signal strength, expressed in decibels)
You can also designate a Logger as a repeater (a sensor that takes no measurements itself, but forwards measurements from other sensors to the base station) by checking the Repeater box. To send data to the OPC Historian database of this server for storage up to a month, click on the Historize box to the right of the logger entry. (After 30 days, the oldest data will be overwritten.)
66 RF ValProbe® User’s Manual

Appendix B. Using the OPC Server and Client
B.5.2 Optimizing Network Performance
The Advanced option enables users to designate sensors that have recently had their batteries replaced, so that the server continues to accurately display battery life. Users can also establish the transmission parameters for network performance.
Click on the Advanced button to open this window, which appears similar to Figure 34 below.
Figure 34: The Advanced Option
• To change the server settings for sensors with newly replaced batteries, click on the “Selected” box next to the appropriate sensor ID number. When you have finished selecting sensors, click on the “Change Battery for Selected Sensors” button. The OPC Server resets the battery life settings.
Note: To reset the battery life setting via the Logger, refer to page 8.
RF ValProbe® User’s Manual 67
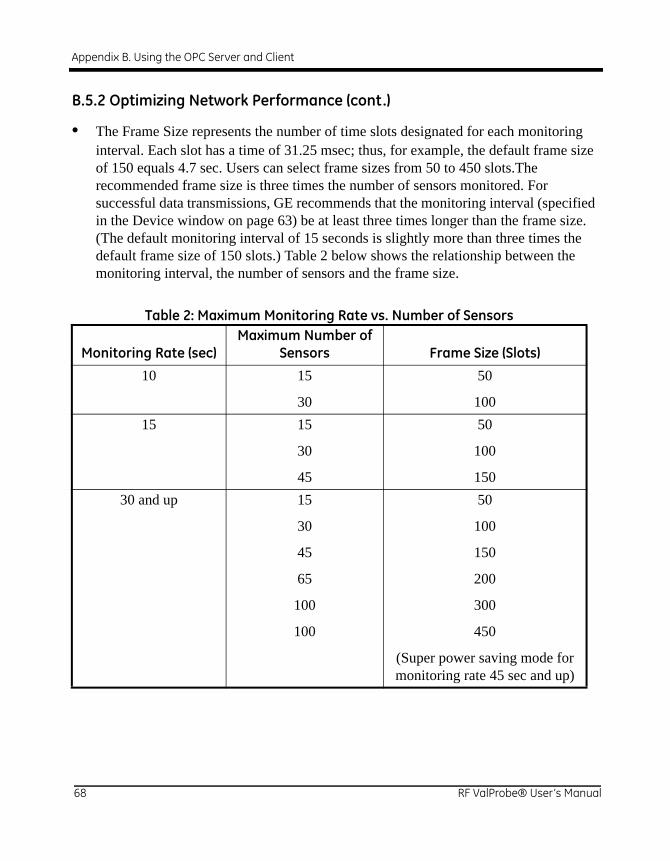
Appendix B. Using the OPC Server and Client
B.5.2 Optimizing Network Performance (cont.)
• The Frame Size represents the number of time slots designated for each monitoring interval. Each slot has a time of 31.25 msec; thus, for example, the default frame size of 150 equals 4.7 sec. Users can select frame sizes from 50 to 450 slots.The recommended frame size is three times the number of sensors monitored. For successful data transmissions, GE recommends that the monitoring interval (specified in the Device window on page 63) be at least three times longer than the frame size. (The default monitoring interval of 15 seconds is slightly more than three times the default frame size of 150 slots.) Table 2 below shows the relationship between the monitoring interval, the number of sensors and the frame size.
Table 2: Maximum Monitoring Rate vs. Number of Sensors
Monitoring Rate (sec)Maximum Number of
Sensors Frame Size (Slots)
10 15
30
50
100
15 15
30
45
50
100
150
30 and up 15
30
45
65
100
100
50
100
150
200
300
450
(Super power saving mode for monitoring rate 45 sec and up)
68 RF ValProbe® User’s Manual

Appendix B. Using the OPC Server and Client
B.5.2 Optimizing Network Performance (cont.)
a. To find the current frame size, click the Get button to the right of the Frame Size box.
b. To set a particular size as the frame size, click on the size from the drop-down list and click the Set button. A message appears, telling you that the frame size has been successfully set.
• The Network ID number for each sensor (from 0 to 9, or A to F) is set on a small rotating dial at the back of the sensor. (See page 15.)
a. To obtain the established Network ID, click the Get button to the right of the Network ID box.
b. To set another number as the ID, enter the number in the text box and click the Set button. A message appears, telling you that the Network ID has been successfully established.
Click OK to return to the Device window. You have now set up your RF ValProbe and sensors for viewing on the Sensors window and the OPC Client.
Note: Once you set or change parameters in the Advanced window, the server will issue a command to reset the system. Sensors will disconnect from and rejoin the network, creating an interval before data transmission resumes.
RF ValProbe® User’s Manual 69

Appendix B. Using the OPC Server and Client
B.6 Viewing Measurement Units
Once you have added a device to the OPC server, the Server retrieves sensor or channel information on units and attributes from the RF ValProbe firmware and stores it in the configuration database. You can then easily check which types of units and attributes are on any sensor.
To find which units or attributes are on a particular sensor:
1. Click on the specific sensor in the Address Space root directory.
2. Click on the Details button. The screen now appears similar to Figure 35 below.
Figure 35: Viewing Sensor Units in the Sensor Window
70 RF ValProbe® User’s Manual

Appendix B. Using the OPC Server and Client
B.7 Setting Up the OPC Test Client
Normally, users conduct real-time monitoring on their computer screens via the OPC Client connected to the OPC Server. GE supplies the OPC Test Client so that installers can check the operation of the OPC Server. (For real-time monitoring, users can set up their own OPC Clients, or GE can provide a custom solution.) To open the OPC Test Client, open the Windows Start Menu. From the Programs Menu, click on GE Sensing, and then on OPC Test Client. The OPC Client window appears similar to Figure 36 below.
Figure 36: OPC Client Window
To set up the OPC Client:
1. First, connect the client to the OPC Server.
a. Highlight the Server in the address tree in the left pane.
b. Click on the Connect button, or right-click on the server and click Connect. In either case, the Server is connected to the Client.
2. Next, you must establish at least one group of items to be monitored.
a. Be sure the Server is highlighted in the address tree.
RF ValProbe® User’s Manual 71

Appendix B. Using the OPC Server and Client
B.7 Setting Up the OPC Client (cont.)
b. Click on the Add Group button, or right-click on the server and click Add Group. In either case, the Add Group window appears (shown in Figure 37 below.
Figure 37: The Add Group Window
c. Type in the desired group name, adjust any necessary parameters, and click OK. The group folder appears in the address tree, below the server.
3. The last step calls for setting up tags with monitored parameters within the group.
a. Highlight the group folder in the address tree in the left pane.
b. Click on the Add Items button, or right-click on the folder and click Add Items. The Tag window opens, shown in Figure B-14 on the next page.
c. In the Tag Entry window, click on each folder in the program tree until you open a sensor folder.
d. The bottom pane displays the available tags (corresponding to the available parameters for display). Right-click on one tag, and three options appear:
• Edit Item ID enables you to change the name of the tag.
72 RF ValProbe® User’s Manual

Appendix B. Using the OPC Server and Client
B.7 Setting Up the OPC Client (cont.)
• Add to Tag List allows you to add the highlighted tag to the list of “Tags to be Added” in the right pane.
• Add All Items to Tag List enables you to add all the tags in the bottom pane to the right pane with a single click.
Figure 38: The Tag Entry Window
e. Once you have added the tags to the right window, open the File menu and click on Update Tags and Return to Explorer.
The main Client window reopens, with the tags displaying current data in the right pane, as shown in Figure 39 on the next page.
RF ValProbe® User’s Manual 73

Appendix B. Using the OPC Server and Client
B.7 Setting Up the OPC Client (cont.)
Figure 39: OPC Client, Displaying Data
74 RF ValProbe® User’s Manual

Appendix C. Environmental Compliance
Appendix C. Environmental Compliance
This appendix contains information on the following topics:
• WEEE Directive (see Section C.1 on page 75)
• Battery disposal (see Section C.2 on page 76)
C.1 Waste Electrical and Electronic Equipment (WEEE) Directive
GE Measurement & Control is an active participant in Europe’s Waste Electrical and Electronic Equipment (WEEE) take-back initiative, directive 2002/96/EC.
The equipment that you bought has required the extraction and use of natural resources for its production. It may contain hazardous substances that could impact health and the environment.
In order to avoid the dissemination of those substances in our environment and to diminish the pressure on the natural resources, we encourage you to use the appropriate take-back systems. Those systems will reuse or recycle most of the materials of your end life equipment in a sound way.
The crossed-out wheeled bin symbol invites you to use those systems.
If you need more information on the collection, reuse and recycling systems, please contact your local or regional waste administration.
Visit www.ge.com/inspectiontechnologies for take-back instructions and more information about this initiative.
RF ValProbe® User’s Manual 75

Appendix C. Environmental Compliance
C.2 Battery Disposal
This product contains a battery that cannot be disposed of as unsorted municipal waste in the European Union. See the product documentation for specific battery information. The battery is marked with this symbol, which may include lettering to indicate cadmium (Cd), lead (Pb), or mercury (Hg). For proper recycling return the battery to your supplier or to a designated collection point.
C.2.1 What do the Markings Mean?
Batteries and accumulators must be marked (either on the battery or accumulator or on its packaging, depending on size) with the separate collection symbol. In addition, the marking must include the chemical symbols of specific levels of toxic metals as follows:
• Cadmium (Cd) over 0.002%
• Lead (Pb) over 0.004%
• Mercury (Hg) over 0.0005%
76 RF ValProbe® User’s Manual

Appendix C. Environmental Compliance
C.2.2 The Risks and Your Role in Reducing Them
Your participation is an important part of the effort to minimize the impact of batteries and accumulators on the environment and on human health. For proper recycling you can return this product or the batteries or accumulators it contains to your supplier or to a designated collection point.
Some batteries or accumulators contain toxic metals that pose serious risks to human health and to the environment. When required, the product marking includes chemical symbols that indicate the presence toxic metals: Pb for lead, Hg for mercury, and Cd for cadmium.
• Cadmium poisoning can result in cancer of the lungs and prostate gland. Chronic effects include kidney damage, pulmonary emphysema, and bone diseases such as osteomalcia and osteoporosis. Cadmium may also cause anemia, discoloration of the teeth, and loss of smell (anosmia).
• Lead is poisonous in all forms. It accumulates in the body, so each exposure is significant. Ingestion and inhalation of lead can cause severe damage to human health. Risks include brain damage, convulsions, malnutrition, and sterility.
• Mercury creates hazardous vapors at room temperature. Exposure to high concentrations of mercury vapor can cause a variety of severe symptoms. Risks include chronic inflammation of mouth and gums, personality change, nervousness, fever, and rashes.
RF ValProbe® User’s Manual 77

Appendix C. Environmental Compliance
[no content intended for this page - proceed to next page]
78 RF ValProbe® User’s Manual
Index
Numerics21 CFR Part 11 Requirements. . . . . . . . . . . . . . . . . . . . . . . . . . . . . . . . . . . . . . . . . . . . . . . 2
AAccuracy . . . . . . . . . . . . . . . . . . . . . . . . . . . . . . . . . . . . . . . . . . . . . . . . . . . . . . . . . . . . . . 55Active User List, Printing . . . . . . . . . . . . . . . . . . . . . . . . . . . . . . . . . . . . . . . . . . . . . . . . . 33Add Group
OPC Test Client. . . . . . . . . . . . . . . . . . . . . . . . . . . . . . . . . . . . . . . . . . . . . . . . . . . . . . . 72Advanced Option in OPC Server . . . . . . . . . . . . . . . . . . . . . . . . . . . . . . . . . . . . . . . . . . . 67
RF ValProbe® User’s Manual 79

Index
BBack Button in Help . . . . . . . . . . . . . . . . . . . . . . . . . . . . . . . . . . . . . . . . . . . . . . . . . . . . . 49Base Station
Configurations . . . . . . . . . . . . . . . . . . . . . . . . . . . . . . . . . . . . . . . . . . . . . . . . . . . . . . . . 52Connecting to Ethernet . . . . . . . . . . . . . . . . . . . . . . . . . . . . . . . . . . . . . . . . . . . . . . . . . 13Connecting to USB . . . . . . . . . . . . . . . . . . . . . . . . . . . . . . . . . . . . . . . . . . . . . . . . . . . . 13Connections . . . . . . . . . . . . . . . . . . . . . . . . . . . . . . . . . . . . . . . . . . . . . . . . . . . . . . . . . . . 3Definition . . . . . . . . . . . . . . . . . . . . . . . . . . . . . . . . . . . . . . . . . . . . . . . . . . . . . . . . . . . . 3Getting Network ID from Ethernet . . . . . . . . . . . . . . . . . . . . . . . . . . . . . . . . . . . . . . . . 40Indicators . . . . . . . . . . . . . . . . . . . . . . . . . . . . . . . . . . . . . . . . . . . . . . . . . . . . . . . . . . . . 52Information in Software . . . . . . . . . . . . . . . . . . . . . . . . . . . . . . . . . . . . . . . . . . . . . . . . 45Locating on Ethernet . . . . . . . . . . . . . . . . . . . . . . . . . . . . . . . . . . . . . . . . . . . . . . . . . . . 40Network ID, Getting . . . . . . . . . . . . . . . . . . . . . . . . . . . . . . . . . . . . . . . . . . . . . . . . . . . 38Power. . . . . . . . . . . . . . . . . . . . . . . . . . . . . . . . . . . . . . . . . . . . . . . . . . . . . . . . . . . . . . . . 3Powering . . . . . . . . . . . . . . . . . . . . . . . . . . . . . . . . . . . . . . . . . . . . . . . . . . . . . . . . . . . . 13Selecting and Programming on Ethernet. . . . . . . . . . . . . . . . . . . . . . . . . . . . . . . . . . . . 40Setting Up . . . . . . . . . . . . . . . . . . . . . . . . . . . . . . . . . . . . . . . . . . . . . . . . . . . . . . . . . . . 12Settings, Changing . . . . . . . . . . . . . . . . . . . . . . . . . . . . . . . . . . . . . . . . . . . . . . . . . . . . 38Specifications . . . . . . . . . . . . . . . . . . . . . . . . . . . . . . . . . . . . . . . . . . . . . . . . . . . . . . . . 52
Base StationsLocating on Network via OPC Server. . . . . . . . . . . . . . . . . . . . . . . . . . . . . . . . . . . . . . 60
BatteriesDisposal . . . . . . . . . . . . . . . . . . . . . . . . . . . . . . . . . . . . . . . . . . . . . . . . . . . . . . . . . . . . . 76
BatteryInstalling . . . . . . . . . . . . . . . . . . . . . . . . . . . . . . . . . . . . . . . . . . . . . . . . . . . . . . . . . . . . . 8Life . . . . . . . . . . . . . . . . . . . . . . . . . . . . . . . . . . . . . . . . . . . . . . . . . . . . . . . . . . . . . . . . . 8Low Warning. . . . . . . . . . . . . . . . . . . . . . . . . . . . . . . . . . . . . . . . . . . . . . . . . . . . . . . . . . 8Power Setting, Resetting . . . . . . . . . . . . . . . . . . . . . . . . . . . . . . . . . . . . . . . . . . . . . . . . . 8Type . . . . . . . . . . . . . . . . . . . . . . . . . . . . . . . . . . . . . . . . . . . . . . . . . . . . . . . . . . . . . . . . . 8
Battery Life Warning Setting . . . . . . . . . . . . . . . . . . . . . . . . . . . . . . . . . . . . . . . . . . . . . . 37Buttons
Show/Hide . . . . . . . . . . . . . . . . . . . . . . . . . . . . . . . . . . . . . . . . . . . . . . . . . . . . . . . . . . . 49
80 RF ValProbe® User’s Manual

Index
CCalibration. . . . . . . . . . . . . . . . . . . . . . . . . . . . . . . . . . . . . . . . . . . . . . . . . . . . . . . . . . . . . . 9
Verification . . . . . . . . . . . . . . . . . . . . . . . . . . . . . . . . . . . . . . . . . . . . . . . . . . . . . . . . . . . 9Calibration Verification
Equipment . . . . . . . . . . . . . . . . . . . . . . . . . . . . . . . . . . . . . . . . . . . . . . . . . . . . . . . . . . . 10COM Port for IRTD . . . . . . . . . . . . . . . . . . . . . . . . . . . . . . . . . . . . . . . . . . . . . . . . . . . . . 37Communication Channel. . . . . . . . . . . . . . . . . . . . . . . . . . . . . . . . . . . . . . . . . . . . . . . . . . 62Communication, Establishing on OPC Server . . . . . . . . . . . . . . . . . . . . . . . . . . . . . . . . . 62Communications Port, Selecting . . . . . . . . . . . . . . . . . . . . . . . . . . . . . . . . . . . . . . . . . . . . 36Connections. . . . . . . . . . . . . . . . . . . . . . . . . . . . . . . . . . . . . . . . . . . . . . . . . . . . . . . . . . . . 52Contents Tab . . . . . . . . . . . . . . . . . . . . . . . . . . . . . . . . . . . . . . . . . . . . . . . . . . . . . . . . . . . 49Customize Column Layout Button . . . . . . . . . . . . . . . . . . . . . . . . . . . . . . . . . . . . . . . . . . 46
DData
Calibration . . . . . . . . . . . . . . . . . . . . . . . . . . . . . . . . . . . . . . . . . . . . . . . . . . . . . . . . . . . . 9Reports . . . . . . . . . . . . . . . . . . . . . . . . . . . . . . . . . . . . . . . . . . . . . . . . . . . . . . . . . . . . . . 2Storing . . . . . . . . . . . . . . . . . . . . . . . . . . . . . . . . . . . . . . . . . . . . . . . . . . . . . . . . . . . . . . . 9
Data Display Options . . . . . . . . . . . . . . . . . . . . . . . . . . . . . . . . . . . . . . . . . . . . . . . . . . . . 46Data Retention. . . . . . . . . . . . . . . . . . . . . . . . . . . . . . . . . . . . . . . . . . . . . . . . . . . . . . . . . . 51Discovery Option in OPC Server . . . . . . . . . . . . . . . . . . . . . . . . . . . . . . . . . . . . . . . . . . . 60Disposal
Batteries. . . . . . . . . . . . . . . . . . . . . . . . . . . . . . . . . . . . . . . . . . . . . . . . . . . . . . . . . . . . . 76Electronic Waste . . . . . . . . . . . . . . . . . . . . . . . . . . . . . . . . . . . . . . . . . . . . . . . . . . . . . . 75
EEMC Specifications. . . . . . . . . . . . . . . . . . . . . . . . . . . . . . . . . . . . . . . . . . . . . . . . . . . . . . 57Enable Real-Time Monitoring. . . . . . . . . . . . . . . . . . . . . . . . . . . . . . . . . . . . . . . . . . . . . . 66Environmental Specifications . . . . . . . . . . . . . . . . . . . . . . . . . . . . . . . . . . . . . . . . . . . . . . 57Ethernet . . . . . . . . . . . . . . . . . . . . . . . . . . . . . . . . . . . . . . . . . . . . . . . . . . . . . . . . . . . . . . . 52Ethernet Connection, Establishing . . . . . . . . . . . . . . . . . . . . . . . . . . . . . . . . . . . . . . . . . . 13Ethernet Connection,Setting Up . . . . . . . . . . . . . . . . . . . . . . . . . . . . . . . . . . . . . . . . . . . . 40Ethernet on Preferences Screen. . . . . . . . . . . . . . . . . . . . . . . . . . . . . . . . . . . . . . . . . . . . . 37
RF ValProbe® User’s Manual 81

Index
FFavorites Tab in Help . . . . . . . . . . . . . . . . . . . . . . . . . . . . . . . . . . . . . . . . . . . . . . . . . . . . 49Forward Button in Help. . . . . . . . . . . . . . . . . . . . . . . . . . . . . . . . . . . . . . . . . . . . . . . . . . . 49Frame Size for OPC Server. . . . . . . . . . . . . . . . . . . . . . . . . . . . . . . . . . . . . . . . . . . . . . . . 68
GGraphing Real-Time Data . . . . . . . . . . . . . . . . . . . . . . . . . . . . . . . . . . . . . . . . . . . . . . . . . 44
HHardware Tab (in Software) . . . . . . . . . . . . . . . . . . . . . . . . . . . . . . . . . . . . . . . . . . . . . . . 42Help
Online . . . . . . . . . . . . . . . . . . . . . . . . . . . . . . . . . . . . . . . . . . . . . . . . . . . . . . . . . . . . . . 48Screen-Level . . . . . . . . . . . . . . . . . . . . . . . . . . . . . . . . . . . . . . . . . . . . . . . . . . . . . . . . . 50
Help ButtonsBack. . . . . . . . . . . . . . . . . . . . . . . . . . . . . . . . . . . . . . . . . . . . . . . . . . . . . . . . . . . . . . . . 49Forward . . . . . . . . . . . . . . . . . . . . . . . . . . . . . . . . . . . . . . . . . . . . . . . . . . . . . . . . . . . . . 49Options . . . . . . . . . . . . . . . . . . . . . . . . . . . . . . . . . . . . . . . . . . . . . . . . . . . . . . . . . . . . . 49Print . . . . . . . . . . . . . . . . . . . . . . . . . . . . . . . . . . . . . . . . . . . . . . . . . . . . . . . . . . . . . . . . 49
Humidity SensorAccuracy . . . . . . . . . . . . . . . . . . . . . . . . . . . . . . . . . . . . . . . . . . . . . . . . . . . . . . . . . . . . . 4Range. . . . . . . . . . . . . . . . . . . . . . . . . . . . . . . . . . . . . . . . . . . . . . . . . . . . . . . . . . . . . . . . 4
Humidity Sensors . . . . . . . . . . . . . . . . . . . . . . . . . . . . . . . . . . . . . . . . . . . . . . . . . . . . . . . 11
IIdentification Required Dialog Box . . . . . . . . . . . . . . . . . . . . . . . . . . . . . . . . . . . . . . . . . 25Index Tab in Help . . . . . . . . . . . . . . . . . . . . . . . . . . . . . . . . . . . . . . . . . . . . . . . . . . . . . . . 49IP Port . . . . . . . . . . . . . . . . . . . . . . . . . . . . . . . . . . . . . . . . . . . . . . . . . . . . . . . . . . . . . . . . 64IRTD . . . . . . . . . . . . . . . . . . . . . . . . . . . . . . . . . . . . . . . . . . . . . . . . . . . . . . . . . . . . . . . . . 11
COM Port (in Preferences) . . . . . . . . . . . . . . . . . . . . . . . . . . . . . . . . . . . . . . . . . . . . . . 37
82 RF ValProbe® User’s Manual

Index
LLogger
Accuracy . . . . . . . . . . . . . . . . . . . . . . . . . . . . . . . . . . . . . . . . . . . . . . . . . . . . . . . . . . . . 55Indicators . . . . . . . . . . . . . . . . . . . . . . . . . . . . . . . . . . . . . . . . . . . . . . . . . . . . . . . . . . . . 56Number of Readings Held. . . . . . . . . . . . . . . . . . . . . . . . . . . . . . . . . . . . . . . . . . . . . . . . 5Sensor Configurations . . . . . . . . . . . . . . . . . . . . . . . . . . . . . . . . . . . . . . . . . . . . . . . . . . 53Specifications . . . . . . . . . . . . . . . . . . . . . . . . . . . . . . . . . . . . . . . . . . . . . . . . . . . . . . . . 53Timestamps . . . . . . . . . . . . . . . . . . . . . . . . . . . . . . . . . . . . . . . . . . . . . . . . . . . . . . . . . . 56Timing . . . . . . . . . . . . . . . . . . . . . . . . . . . . . . . . . . . . . . . . . . . . . . . . . . . . . . . . . . . . . . 56
Logger List Report, Printing . . . . . . . . . . . . . . . . . . . . . . . . . . . . . . . . . . . . . . . . . . . . . . . 47Loggers
Humidity Sensor . . . . . . . . . . . . . . . . . . . . . . . . . . . . . . . . . . . . . . . . . . . . . . . . . . . . . . . 4Monitoring. . . . . . . . . . . . . . . . . . . . . . . . . . . . . . . . . . . . . . . . . . . . . . . . . . . . . . . . . . . . 4Setting Network ID . . . . . . . . . . . . . . . . . . . . . . . . . . . . . . . . . . . . . . . . . . . . . . . . . . . . 15Setting Up . . . . . . . . . . . . . . . . . . . . . . . . . . . . . . . . . . . . . . . . . . . . . . . . . . . . . . . . . . . 15Switching On or Off . . . . . . . . . . . . . . . . . . . . . . . . . . . . . . . . . . . . . . . . . . . . . . . . . . . 15Temperature Sensor. . . . . . . . . . . . . . . . . . . . . . . . . . . . . . . . . . . . . . . . . . . . . . . . . . . . . 4Validation . . . . . . . . . . . . . . . . . . . . . . . . . . . . . . . . . . . . . . . . . . . . . . . . . . . . . . . . . . . . 4
Loggers, Number Supported . . . . . . . . . . . . . . . . . . . . . . . . . . . . . . . . . . . . . . . . . . . . . . . 51
MMeasurement Types. . . . . . . . . . . . . . . . . . . . . . . . . . . . . . . . . . . . . . . . . . . . . . . . . . . . . . 53Measurement Units, Viewing on OPC Server. . . . . . . . . . . . . . . . . . . . . . . . . . . . . . . . . . 70Monitoring Interval (OPC Server) . . . . . . . . . . . . . . . . . . . . . . . . . . . . . . . . . . . . . . . . . . 64
NNetwork Form Time, Maximum . . . . . . . . . . . . . . . . . . . . . . . . . . . . . . . . . . . . . . . . . . . . 51Network ID
for Ethernet . . . . . . . . . . . . . . . . . . . . . . . . . . . . . . . . . . . . . . . . . . . . . . . . . . . . . . . . . . 40for OPC Server . . . . . . . . . . . . . . . . . . . . . . . . . . . . . . . . . . . . . . . . . . . . . . . . . . . . . . . 69for USB Connection . . . . . . . . . . . . . . . . . . . . . . . . . . . . . . . . . . . . . . . . . . . . . . . . . . . 38Initial . . . . . . . . . . . . . . . . . . . . . . . . . . . . . . . . . . . . . . . . . . . . . . . . . . . . . . . . . . . . . . . 15Setting on Loggers . . . . . . . . . . . . . . . . . . . . . . . . . . . . . . . . . . . . . . . . . . . . . . . . . . . . 15
RF ValProbe® User’s Manual 83

Index
OOnline Help, Accessing. . . . . . . . . . . . . . . . . . . . . . . . . . . . . . . . . . . . . . . . . . . . . . . . . . . 48OPC Historian Database . . . . . . . . . . . . . . . . . . . . . . . . . . . . . . . . . . . . . . . . . . . . . . . . . . 66OPC Server
Advanced Option. . . . . . . . . . . . . . . . . . . . . . . . . . . . . . . . . . . . . . . . . . . . . . . . . . . . . . 67Communication Channel. . . . . . . . . . . . . . . . . . . . . . . . . . . . . . . . . . . . . . . . . . . . . . . . 62Discovery Option . . . . . . . . . . . . . . . . . . . . . . . . . . . . . . . . . . . . . . . . . . . . . . . . . . . . . 60Installing . . . . . . . . . . . . . . . . . . . . . . . . . . . . . . . . . . . . . . . . . . . . . . . . . . . . . . . . . . . . 59Locating Base Stations . . . . . . . . . . . . . . . . . . . . . . . . . . . . . . . . . . . . . . . . . . . . . . . . . 60OPC Test Client. . . . . . . . . . . . . . . . . . . . . . . . . . . . . . . . . . . . . . . . . . . . . . . . . . . . . . . 71PC Requirements. . . . . . . . . . . . . . . . . . . . . . . . . . . . . . . . . . . . . . . . . . . . . . . . . . . . . . 59Setting up RF ValProbe . . . . . . . . . . . . . . . . . . . . . . . . . . . . . . . . . . . . . . . . . . . . . . . . . 63Viewing Sensor Data . . . . . . . . . . . . . . . . . . . . . . . . . . . . . . . . . . . . . . . . . . . . . . . . . . . 65
OPC Server for RF ValProbe . . . . . . . . . . . . . . . . . . . . . . . . . . . . . . . . . . . . . . . . . . . . . . 59OPC Test Client, Setting Up . . . . . . . . . . . . . . . . . . . . . . . . . . . . . . . . . . . . . . . . . . . . . . . 71Operating Frequency . . . . . . . . . . . . . . . . . . . . . . . . . . . . . . . . . . . . . . . . . . . . . . . . . . . . . 51Operator. . . . . . . . . . . . . . . . . . . . . . . . . . . . . . . . . . . . . . . . . . . . . . . . . . . . . . . . . . . . . . . 27
Accounts, Creating . . . . . . . . . . . . . . . . . . . . . . . . . . . . . . . . . . . . . . . . . . . . . . . . . . . . 29Preferences . . . . . . . . . . . . . . . . . . . . . . . . . . . . . . . . . . . . . . . . . . . . . . . . . . . . . . . . . . 34
Options Button in Help . . . . . . . . . . . . . . . . . . . . . . . . . . . . . . . . . . . . . . . . . . . . . . . . . . . 49
PPassword
Minimum Length. . . . . . . . . . . . . . . . . . . . . . . . . . . . . . . . . . . . . . . . . . . . . . . . . . . . . . 34Requirements. . . . . . . . . . . . . . . . . . . . . . . . . . . . . . . . . . . . . . . . . . . . . . . . . . . . . . . . . 28
Password MaintenanceAdd New User . . . . . . . . . . . . . . . . . . . . . . . . . . . . . . . . . . . . . . . . . . . . . . . . . . . . . . . . 26
Password Maintenance Utility . . . . . . . . . . . . . . . . . . . . . . . . . . . . . . . . . . . . . . . . . . . . . 27Password, Default . . . . . . . . . . . . . . . . . . . . . . . . . . . . . . . . . . . . . . . . . . . . . . . . . . . . . . . 64Password, Entering in OPC Server . . . . . . . . . . . . . . . . . . . . . . . . . . . . . . . . . . . . . . . . . . 64PC Requirements. . . . . . . . . . . . . . . . . . . . . . . . . . . . . . . . . . . . . . . . . . . . . . . . . . . . . . . . 18PC Update Rate . . . . . . . . . . . . . . . . . . . . . . . . . . . . . . . . . . . . . . . . . . . . . . . . . . . . . . . . . 51Power (for Base Station) . . . . . . . . . . . . . . . . . . . . . . . . . . . . . . . . . . . . . . . . . . . . . . . . . . 52Preferences . . . . . . . . . . . . . . . . . . . . . . . . . . . . . . . . . . . . . . . . . . . . . . . . . . . . . . . . . . . . 41Print Button in Help . . . . . . . . . . . . . . . . . . . . . . . . . . . . . . . . . . . . . . . . . . . . . . . . . . . . . 49
84 RF ValProbe® User’s Manual

Index
RRefresh Discovery Button . . . . . . . . . . . . . . . . . . . . . . . . . . . . . . . . . . . . . . . . . . . . . . . . . 40Report Generation . . . . . . . . . . . . . . . . . . . . . . . . . . . . . . . . . . . . . . . . . . . . . . . . . . . . . . . . 2Return Policy. . . . . . . . . . . . . . . . . . . . . . . . . . . . . . . . . . . . . . . . . . . . . . . . . . . . . . . . . . . 90RF Certification. . . . . . . . . . . . . . . . . . . . . . . . . . . . . . . . . . . . . . . . . . . . . . . . . . . . . . . . . 51RF ValProbe
Base Station. . . . . . . . . . . . . . . . . . . . . . . . . . . . . . . . . . . . . . . . . . . . . . . . . . . . . . . . . . . 3Return Policy. . . . . . . . . . . . . . . . . . . . . . . . . . . . . . . . . . . . . . . . . . . . . . . . . . . . . . . . . 90Setting Up on OPC Server . . . . . . . . . . . . . . . . . . . . . . . . . . . . . . . . . . . . . . . . . . . . . . 63Software Installation on PC. . . . . . . . . . . . . . . . . . . . . . . . . . . . . . . . . . . . . . . . . . . . . . 24Software Requirements . . . . . . . . . . . . . . . . . . . . . . . . . . . . . . . . . . . . . . . . . . . . . . . . . 18Starting . . . . . . . . . . . . . . . . . . . . . . . . . . . . . . . . . . . . . . . . . . . . . . . . . . . . . . . . . . . . . 25System Specifications . . . . . . . . . . . . . . . . . . . . . . . . . . . . . . . . . . . . . . . . . . . . . . . . . . 51Viewing Hardware Inputs . . . . . . . . . . . . . . . . . . . . . . . . . . . . . . . . . . . . . . . . . . . . . . . 42Warranty . . . . . . . . . . . . . . . . . . . . . . . . . . . . . . . . . . . . . . . . . . . . . . . . . . . . . . . . . . . . 89
RF ValProbe® User’s Manual 85

Index
SSafety Information. . . . . . . . . . . . . . . . . . . . . . . . . . . . . . . . . . . . . . . . . . . . . . . . . . . . . . . . 1Screen-Level Help. . . . . . . . . . . . . . . . . . . . . . . . . . . . . . . . . . . . . . . . . . . . . . . . . . . . . . . 50Search Tab in Help . . . . . . . . . . . . . . . . . . . . . . . . . . . . . . . . . . . . . . . . . . . . . . . . . . . . . . 49Sensor Configurations . . . . . . . . . . . . . . . . . . . . . . . . . . . . . . . . . . . . . . . . . . . . . . . . . . . . 53Sensor Data, Available (in OPC Server) . . . . . . . . . . . . . . . . . . . . . . . . . . . . . . . . . . . . . . 66Sensor Data, Viewing in OPC Server . . . . . . . . . . . . . . . . . . . . . . . . . . . . . . . . . . . . . . . . 65Sensor Sampling Rate . . . . . . . . . . . . . . . . . . . . . . . . . . . . . . . . . . . . . . . . . . . . . . . . . . . . 55Sensors
Humidity . . . . . . . . . . . . . . . . . . . . . . . . . . . . . . . . . . . . . . . . . . . . . . . . . . . . . . . . . . . . 11Temperature. . . . . . . . . . . . . . . . . . . . . . . . . . . . . . . . . . . . . . . . . . . . . . . . . . . . . . . . . . 11
Sensors Window in OPC Server . . . . . . . . . . . . . . . . . . . . . . . . . . . . . . . . . . . . . . . . . . . . 65Show/Hide Buttons . . . . . . . . . . . . . . . . . . . . . . . . . . . . . . . . . . . . . . . . . . . . . . . . . . . . . . 49Site Options
Available . . . . . . . . . . . . . . . . . . . . . . . . . . . . . . . . . . . . . . . . . . . . . . . . . . . . . . . . . . . . 34Selecting . . . . . . . . . . . . . . . . . . . . . . . . . . . . . . . . . . . . . . . . . . . . . . . . . . . . . . . . . . . . 33Setting . . . . . . . . . . . . . . . . . . . . . . . . . . . . . . . . . . . . . . . . . . . . . . . . . . . . . . . . . . . . . . 35
SoftwareTwo User Levels . . . . . . . . . . . . . . . . . . . . . . . . . . . . . . . . . . . . . . . . . . . . . . . . . . . . . . 27
Software Installation . . . . . . . . . . . . . . . . . . . . . . . . . . . . . . . . . . . . . . . . . . . . . . . . . . . . . 24Storage Requirements . . . . . . . . . . . . . . . . . . . . . . . . . . . . . . . . . . . . . . . . . . . . . . . . . . . . 56System
Components. . . . . . . . . . . . . . . . . . . . . . . . . . . . . . . . . . . . . . . . . . . . . . . . . . . . . . . . . . . 1Description . . . . . . . . . . . . . . . . . . . . . . . . . . . . . . . . . . . . . . . . . . . . . . . . . . . . . . . . . . . 1
System Administrator . . . . . . . . . . . . . . . . . . . . . . . . . . . . . . . . . . . . . . . . . . . . . . . . . . . . 27Account, Creating . . . . . . . . . . . . . . . . . . . . . . . . . . . . . . . . . . . . . . . . . . . . . . . . . . . . . 27
86 RF ValProbe® User’s Manual

Index
TTabs
Contents. . . . . . . . . . . . . . . . . . . . . . . . . . . . . . . . . . . . . . . . . . . . . . . . . . . . . . . . . . . . . 49Tabs in Help
Favorites . . . . . . . . . . . . . . . . . . . . . . . . . . . . . . . . . . . . . . . . . . . . . . . . . . . . . . . . . . . . 49Index . . . . . . . . . . . . . . . . . . . . . . . . . . . . . . . . . . . . . . . . . . . . . . . . . . . . . . . . . . . . . . . 49Search . . . . . . . . . . . . . . . . . . . . . . . . . . . . . . . . . . . . . . . . . . . . . . . . . . . . . . . . . . . . . . 49
Tag Entry in OPC Test Client . . . . . . . . . . . . . . . . . . . . . . . . . . . . . . . . . . . . . . . . . . . . . . 72Temperature
Bath Specifications . . . . . . . . . . . . . . . . . . . . . . . . . . . . . . . . . . . . . . . . . . . . . . . . . . . . 11Sensors . . . . . . . . . . . . . . . . . . . . . . . . . . . . . . . . . . . . . . . . . . . . . . . . . . . . . . . . . . . . . 11
Temperature Units, Selecting . . . . . . . . . . . . . . . . . . . . . . . . . . . . . . . . . . . . . . . . . . . . . . 37Timeout (OPC Server). . . . . . . . . . . . . . . . . . . . . . . . . . . . . . . . . . . . . . . . . . . . . . . . . . . . 64Transmission . . . . . . . . . . . . . . . . . . . . . . . . . . . . . . . . . . . . . . . . . . . . . . . . . . . . . . . . . . . 51
UUnpacking . . . . . . . . . . . . . . . . . . . . . . . . . . . . . . . . . . . . . . . . . . . . . . . . . . . . . . . . . . . . . . 1USB . . . . . . . . . . . . . . . . . . . . . . . . . . . . . . . . . . . . . . . . . . . . . . . . . . . . . . . . . . . . . . . . . . 52USB Connection, Establishing . . . . . . . . . . . . . . . . . . . . . . . . . . . . . . . . . . . . . . . . . . . . . 13USB Connection, Setting Up . . . . . . . . . . . . . . . . . . . . . . . . . . . . . . . . . . . . . . . . . . . . . . 38USB on Preferences Screen. . . . . . . . . . . . . . . . . . . . . . . . . . . . . . . . . . . . . . . . . . . . . . . . 37User Accounts
Disabling . . . . . . . . . . . . . . . . . . . . . . . . . . . . . . . . . . . . . . . . . . . . . . . . . . . . . . . . . . . . 34User Accounts, Creating . . . . . . . . . . . . . . . . . . . . . . . . . . . . . . . . . . . . . . . . . . . . . . . . . . 27User ID
Requirements. . . . . . . . . . . . . . . . . . . . . . . . . . . . . . . . . . . . . . . . . . . . . . . . . . . . . . . . . 28User Identification, Disabling . . . . . . . . . . . . . . . . . . . . . . . . . . . . . . . . . . . . . . . . . . . . . . 34User Name, Default in OPC Server . . . . . . . . . . . . . . . . . . . . . . . . . . . . . . . . . . . . . . . . . 64User Name, Entering in OPC Server. . . . . . . . . . . . . . . . . . . . . . . . . . . . . . . . . . . . . . . . . 64
WWarranty . . . . . . . . . . . . . . . . . . . . . . . . . . . . . . . . . . . . . . . . . . . . . . . . . . . . . . . . . . . . . . 89Waste Disposal
Batteries. . . . . . . . . . . . . . . . . . . . . . . . . . . . . . . . . . . . . . . . . . . . . . . . . . . . . . . . . . . . . 76Electronic Equipment . . . . . . . . . . . . . . . . . . . . . . . . . . . . . . . . . . . . . . . . . . . . . . . . . . 75
WEEE Directive . . . . . . . . . . . . . . . . . . . . . . . . . . . . . . . . . . . . . . . . . . . . . . . . . . . . . . . . 75
RF ValProbe® User’s Manual 87

Index
88 RF ValProbe® User’s Manual

Warranty
Warranty
Each instrument manufactured by GE Sensing is warranted to be free from defects in material and workmanship. Liability under this warranty is limited to restoring the instrument to normal operation or replacing the instrument, at the sole discretion of GE Sensing. Fuses and batteries are specifically excluded from any liability. This warranty is effective from the date of delivery to the original purchaser. If GE Sensing determines that the equipment was defective, the warranty period is:
• one year for general electronic failures of the instrument
• one year for mechanical failures of the sensor
If GE Sensing determines that the equipment was damaged by misuse, improper installation, the use of unauthorized replacement parts, or operating conditions outside the guidelines specified by GE Sensing, the repairs are not covered under this warranty.
The warranties set forth herein are exclusive and are in lieu of all other warranties whether statutory, express or implied (including warranties or
merchantability and fitness for a particular purpose, and warranties arising from course of dealing or usage or trade).
RF ValProbe® User’s Manual 89

Return Policy
Return Policy
If a GE Sensing instrument malfunctions within the warranty period, the following procedure must be completed:
1. Notify GE Sensing, giving full details of the problem, and provide the model number and serial number of the instrument. If the nature of the problem indicates the need for factory service, GE Sensing will issue a RETURN AUTHORIZATION number (RA), and shipping instructions for the return of the instrument to a service center will be provided.
2. If GE Sensing instructs you to send your instrument to a service center, it must be shipped prepaid to the authorized repair station indicated in the shipping instructions.
3. Upon receipt, GE Sensing will evaluate the instrument to determine the cause of the malfunction.
Then, one of the following courses of action will then be taken:
• If the damage is covered under the terms of the warranty, the instrument will be repaired at no cost to the owner and returned.
• If GE Sensing determines that the damage is not covered under the terms of the warranty, or if the warranty has expired, an estimate for the cost of the repairs at standard rates will be provided. Upon receipt of the owner’s approval to proceed, the instrument will be repaired and returned.
90 RF ValProbe® User’s Manual

GESensing
DECLARATIONOF
CONFORMITYDOC-0008, Rev. A
Page 1 of 2
We, GE Sensing 1100 Technology Park Drive
Billerica, MA 01821 USA
declare under our sole responsibility that the
Kaye RF ValProbe®
to which this declaration relates, is in conformity with the following standards:
For US and Canada Models Only
• FCC Part 15
This Product Contains Transmitter Module FCC ID: SJC-M2135.
This equipment complies with Parts 15 of the Federal Communications Commission (FCC) rules for the United States. Operation is subject to the following two conditions: (1) this device may not cause interference, and (2) this device must accept any interference, including interference that may cause undesired operation of the device.
The equipment has been tested and found to comply with part 15 of the FCC rules. These limits are designed to provide reasonable protection against harmful interference in a residential installation. This equipment generates, uses and can radiate radio frequency energy and, if not installed and used in accordance with the instructions, may cause harmful interference to radio communications. However, there is no guarantee that interference will not occur in a particular installation. If this equipment does cause harmful interference to radio or television reception, which can be determined by turning the equipment off and on, the user is encouraged to try and correct the interference by one or more of the following measures:
• Re-orient or relocate the receiving antenna.
• Increase the separation between the equipment and receiver.
• Connect the equipment into an outlet or on a circuit different from that to which the receiver is connected.
• Consult the dealer or an experienced radio/TV technician for help.
FCC Part 15 Warning: Changes or modifications to this unit not expressly approved by the party responsible for compliance could void the user's authority to operate the equipment.

Kaye RF ValProbe Declaration of Conformity
• Industry Canada (IC)
This Product Contains Transmitter Module IC ID: 5853A-M2135.
This digital apparatus does not exceed the Class B limits for radio noise emissions from digital apparatus set out in the interference causing equipment standard entitled Digital Apparatus, ICES-003 of Industry Canada. This device complies with Canadian RSS-210 regulations.
NOTICE: The Industry Canada (IC) label identifies certified equipment. The Department does not guarantee the equipment will operate to the user’s satisfaction.
For EU Models Only
The Kaye RF ValProbe is in conformity with the following standards:
• EN 61326-1: 2006, Class A, Table 2, Industrial Locations
• EN 61326-2-3: 2006
following the provisions of the 2004/108/EC EMC and 2006/95/EC Low Voltage Directives.
• EN 300 328-3 (2000-09)
• EN 301 489-17 (2002-08)
following the provisions of the Radio Equipment and Telecommunications Terminal Equipment (R&TTE) directive and Directive 1999/5/EC.
Billerica - August 2010
Issued Mr. Gary KozinskiCertification & Standards, Lead Engineer
Page 2 of 2

For Brazil Models Only
• Anatel – Agência Nacional de Telecomunicações
This Product Contains Transmitter Module IC ID: 5853A-M2135.
This device complies with Resolução nº365/2004, certificate MT-0100/2007 issued by OCD – Master Associação de Avaliação de Conformidade Telecom.


www.ge-mcs.com©2013 General Electric Company. All rights reserved.Technical content subject to change without notice.
www.ge-mcs.com/en/about-us/quality.html
Customer Support Centers
U.S.A.For Sales and Services(Repair/Calibration):GE Measurement & ControlSt Marys Center967 Windfall RoadSt Marys, Pennsylvania 15857U.S.A.T: 814-834-9140 F: [email protected]
Europe, Asia and Middle EastSales and Service:GE Sensing & Inspection Technologies GmbHSinsheimer Strasse 6D-75179 PforzheimGermanyT: +49(0)7231-14335 0F: +49(0)7212 391 035E-mail: [email protected]
BrazilSales and Service:GE Measurement & ControlAvenida Maria Coelho Aguiar, 215
Bloco C, 6º andarJd. São Luiz - São Paulo - SP05804-900 - BrasilT +55 11 3614 1876 F +55 11 3614 1799E [email protected] www.ge-mcs.com./pt
U.S.A.For Technical Support:The Boston Center 1100 Technology Park DriveBillerica, MA 01821U.S.A.T: 800-833-9438 (toll-free)T: 978-437-1242E-mail: [email protected]
China:GE Sensing & Inspection Technologies Building 10, Jintong International Industrial ParkNo. 8 Xihu Road, Wujin High-Tech Industrial Zone Changzhou, China 213164T:+86 519 8831 8080 ext. 50087F:+86 519 8831 2601
M5010 Rev. F