Retro Plaid Quilt Pattern - Birch Fabrics · RETRO PLAID A QUILT PATTERN BY Suzy uilts in...
4
RETRO PLAID A QUILT PATTERN BY uilts Suzy in partnership with Finished size: 55” x 61” | Fabric: Mod Basics 3 @SuzyQuilts @BirchFabric #RetroPlaidQuilt #BirchFabrics 100% ORGANIC FABRIC MADE WITH LOVE, NOT PESTICIDES. birchfabrics.com + [email protected]
Transcript of Retro Plaid Quilt Pattern - Birch Fabrics · RETRO PLAID A QUILT PATTERN BY Suzy uilts in...

RETRO PLAIDA QUILT PATTERN BY
uiltsSuzy in partnership with
Finished size: 55” x 61” | Fabric: Mod Basics 3 @SuzyQuilts @BirchFabric #RetroPlaidQuilt #BirchFabrics
100% ORGANIC FABRIC MADE WITH LOVE, NOT PESTICIDES.birchfabrics.com + [email protected]
uiltsSuzy SUZYQUILTS.COM | COPYRIGHT 2016 SUZY QUILTS All rights reserved. Duplication of any kind is prohibited. 2+
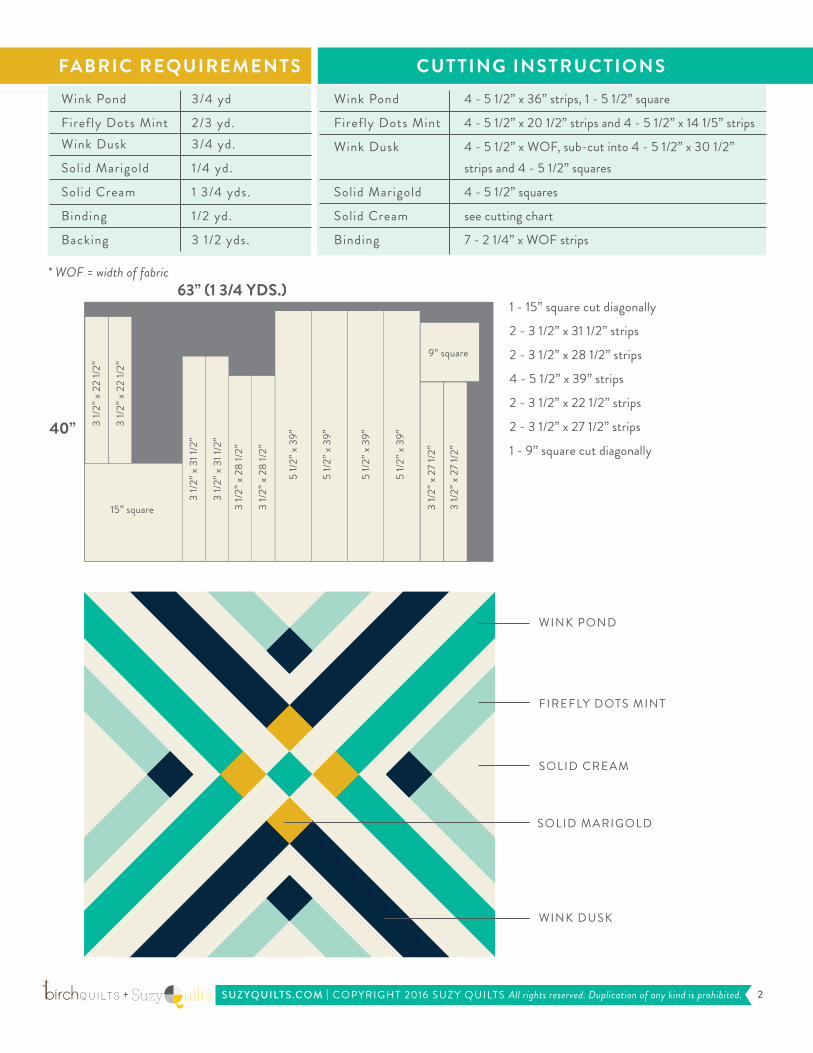
FABRIC REQUIREMENTS
Wink Pond 3/4 yd
Firefly Dots Mint 2/3 yd. Wink Dusk 3/4 yd.
Solid Marigold 1/4 yd.
Solid Cream 1 3/4 yds.
Binding 1/2 yd.
Backing 3 1/2 yds.
CUTTING INSTRUCTIONS
Wink Pond 4 - 5 1/2” x 36” strips, 1 - 5 1/2” square
Firefly Dots Mint 4 - 5 1/2” x 20 1/2” strips and 4 - 5 1/2” x 14 1/5” strips
Wink Dusk 4 - 5 1/2” x WOF, sub-cut into 4 - 5 1/2” x 30 1/2” strips and 4 - 5 1/2” squares
Solid Marigold 4 - 5 1/2” squares
Solid Cream see cutting chart
Binding 7 - 2 1/4” x WOF strips
WINK POND
FIREFLY DOTS MINT
WINK DUSK
SOLID CREAM
SOLID MARIGOLD
* WOF = width of fabric
1 - 15” square cut diagonally
2 - 3 1/2” x 31 1/2” strips
2 - 3 1/2” x 28 1/2” strips
4 - 5 1/2” x 39” strips
2 - 3 1/2” x 22 1/2” strips
2 - 3 1/2” x 27 1/2” strips
1 - 9” square cut diagonally
9” square
3 1/2
” x 2
7 1/2
”
3 1/2
” x 2
7 1/2
”
5 1/2
” x 3
9”
5 1/2
” x 3
9”
5 1/2
” x 3
9”
5 1/2
” x 3
9”
3 1/2
” x 2
8 1/2
”
3 1/2
” x 2
8 1/2
”
15” square
3 1/2
” x 2
2 1/2
”
3 1/2
” x 2
2 1/2
”
3 1/2
” x 3
1 1/2
”
3 1/2
” x 3
1 1/2
”
40”
63” (1 3/4 YDS.)

uiltsSuzy SUZYQUILTS.COM | COPYRIGHT 2016 SUZY QUILTS All rights reserved. Duplication of any kind is prohibited. 3+
1. Sew a 5 1/2” x 20 1/2” strip of Mist fabric to one side of the triangle created by cutting a 15” square of Cream fabric in half diagonally. Fig. 1
2. Sew a 5 1/2” square of Dusk fabric to the 5 1/2” side of a 5 1/2” x 20 1/2” strip of Mist fabric. Fig. 2
3. Sew Step 2 unit to Step 1 unit. Fig. 3
4. After finishing each color section, trim the excess fabric. Use a long ruler so the edge stays straight. Fig. 4
5. Continue sewing strips to the sides of the unit created in the step before. The next set of strips is Cream, followed by Pond. Fig. 5
6. Once you have finished sewing and trimming the first block, repeat Steps 1-5 to make a second, identical block. Fig. 6
7. Using the same technique as before, sew two identical blocks as seen in Fig. 7
8. Now that all 4 blocks are completed, connect them with sashing as seen in Fig. 8 DO NOT TRIM SASHING until the entire quit top is sewn together. This will ensure that when you trim the excess at the end, the corners will be square.
Fig. 1
BLOCK ASSEMBLY
This quilt is comprised of 4 large blocks joined together by sashing. Two of the blocks are unique and the other two are duplicates. Fig. 2 Fig. 3
Fig. 4
3 1/2” x
28 1/2”
3 1/2” x 31 1/2”
5 1/2” x
36”
5 1/2” x 36”
Fig. 5
Fig. 6
Fig. 7
5 1/2” x
30 1/2” 5 1/2” x 30 1/2”
3 1/2” x
22 1/2”
3 1/2” x 27 1/2”
5 1/2” x
14 1/2
” 5 1/2” x 14 1/2”

uiltsSuzy SUZYQUILTS.COM | COPYRIGHT 2016 SUZY QUILTS All rights reserved. Duplication of any kind is prohibited. 4+
1. Layer the backing wrong side up, and the batting and quilt top right side up. Baste as desired. Quilt as desired.
2. Trim the excess batting and backing and square up the quilt.
3. Join the binding strips together with a diagonal seam. Trim and press seams open.
4. Once all of the strips are sewn together, fold in half, wrong sides together, and press flat to create the binding. Sew binding to your quilt by lining up the raw edges.
5. After binding is sewn to your quilt, fold over and either machine stitch or whip stitch the binding to finish off the edges of the quilt.
6. Post your finished quilt to Instagram and use #RetroPlaidQuilt
FINISHING THE QUILT
TRIM
COLOR YOUR OWN!


![1 The Plaid Programming Languagealdrich/plaid/plaid-intro.pdf · 1 The Plaid Programming Language Plaid [PG10b, PG10a] is a new general purpose programming language developed at Carnegie](https://static.fdocuments.in/doc/165x107/5ae12e907f8b9a97518e2ff1/1-the-plaid-programming-aldrichplaidplaid-intropdf1-the-plaid-programming-language.jpg)