Restore Tab User guide
14
Restore Tab User Guide
Transcript of Restore Tab User guide
Restore Tab
User Guide
BackupAssist Restore tab © Cortex I.T. 2001-2015 User Guide: Version January 29 2015
1
Contents
1. Introduction ..................................................................................................................................... 2
Documentation .................................................................................................................................................................. 2
Licensing ............................................................................................................................................................................... 2
Overview ............................................................................................................................................................................... 2
2. Tools menu....................................................................................................................................... 3
3. Home page ....................................................................................................................................... 4
Selection screen ................................................................................................................................................................. 4
Selection results screen .................................................................................................................................................. 5
Available backups ...................................................................................................................................................... 5
Available tools ............................................................................................................................................................. 5
4. The Restore Console ....................................................................................................................... 6
Catalogues .................................................................................................................................................................... 6
Restoring without the Console ............................................................................................................................. 6
Restoring Exchange Server data ........................................................................................................................... 6
Performing a restore ........................................................................................................................................................ 7
Step 1: Loading the backup ................................................................................................................................... 7
Step 2: Locating the data – Browse tab ............................................................................................................. 8
Step 2: Locating the data – File search tab ...................................................................................................... 9
Step 3: Restoring the data ................................................................................................................................... 10
Restore Console FAQ .................................................................................................................................................... 11
5. Support and Resources ................................................................................................................ 13
Contacting Technical Support ................................................................................................................................... 13
Learn more – The Welcome Screen ........................................................................................................................ 13
BackupAssist Restore tab © Cortex I.T. 2001-2015 User Guide: Version January 29 2015
2
1. Introduction
The Restore tab provides access to a set of powerful restore tools, which are used to
restore the different types of backups that can be created using BackupAssist. The Restore
tab uses these tools to provide a guided restore of both data and applications.
Documentation
This whitepaper covers all aspects of the BackupAssist Restore tab, and can be used in conjunction
with other BackupAssist guides, which provide a comprehensive set of documentation.
For information on the BackupAssist Backup tab, see the BackupAssist Backup Tab User Guide
For information on the BackupAssist Recover tab, see the BackupAssist Recover Tab User Guide
For information on BackupAssist Remote Access, see the Settings Tab User Guide
Licensing
BackupAssist requires a license once the initial trial period has expired. Please contact your local
BackupAssist reseller or distributor for pricing information, or visit www.BackupAssist.com.
For instructions on how to activate / deactivate license keys, visit out Licensing BackupAssist page.
Overview
When the Restore tab is selected, two menus can be chosen: Home or Tools. Both of these menus are
explained in detail in this whitepaper.
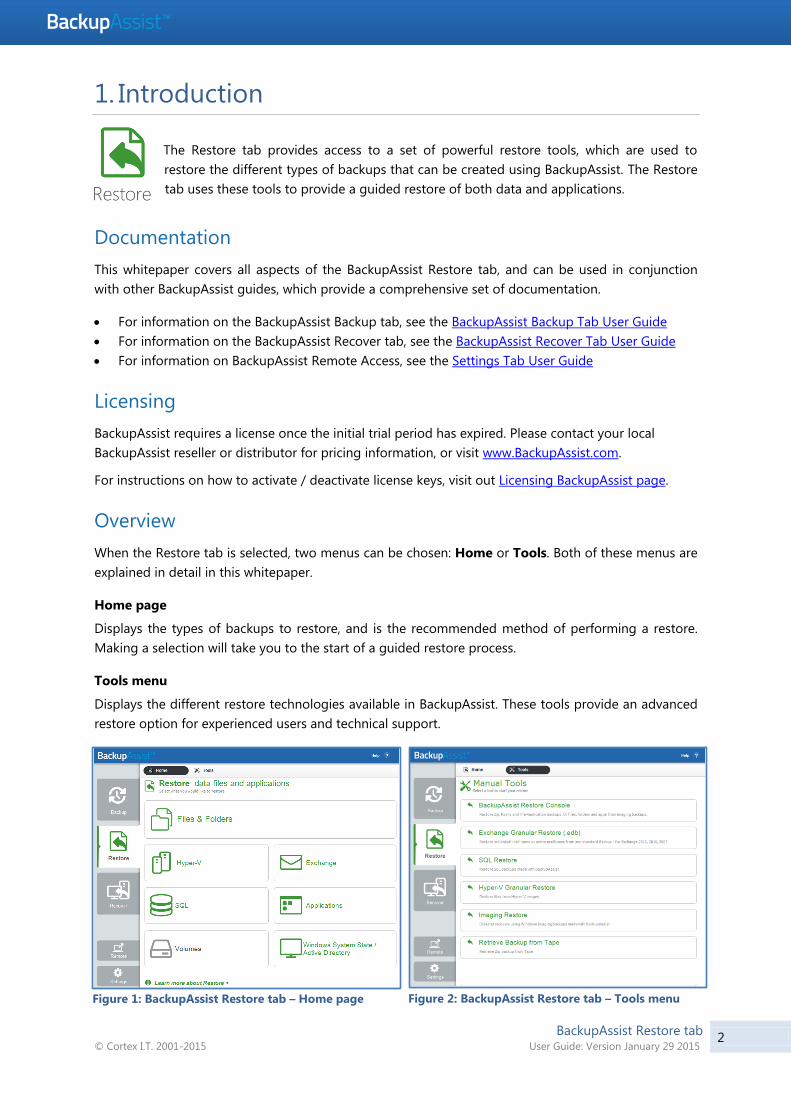
Home page
Displays the types of backups to restore, and is the recommended method of performing a restore.
Making a selection will take you to the start of a guided restore process.
Tools menu
Displays the different restore technologies available in BackupAssist. These tools provide an advanced
restore option for experienced users and technical support.
Figure 1: BackupAssist Restore tab – Home page
Figure 2: BackupAssist Restore tab – Tools menu
BackupAssist Restore tab © Cortex I.T. 2001-2015 User Guide: Version January 29 2015
3
2. Tools menu
BackupAssist Restore Console
The BackupAssist Restore Console can access System Protection, File Archiving or File Protection
backups and restore selected files or applications.
Exchange Granular Restore
The Exchange Granular Restore tool is enabled in BackupAssist with the purchase of the Exchange
Granular Add-on. This restore-based solution allows you to use System Protection, File Protection and
File Archiving backups to restore individual mailboxes and mail items.
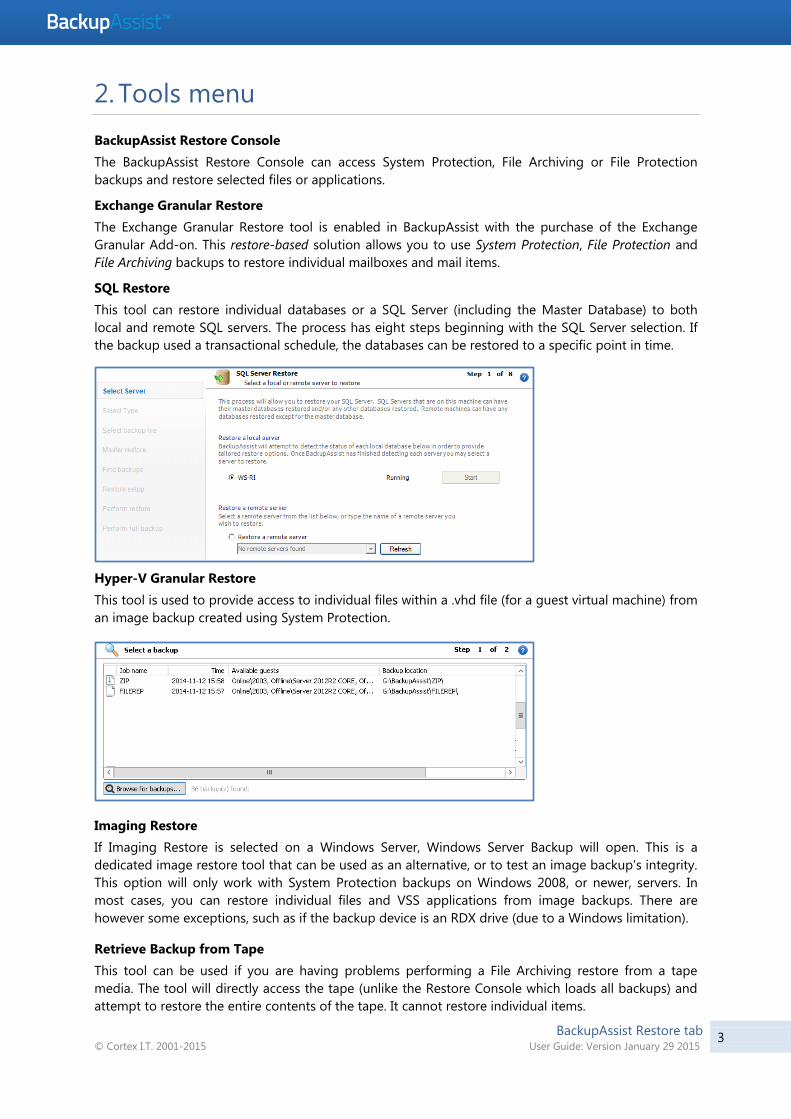
SQL Restore
This tool can restore individual databases or a SQL Server (including the Master Database) to both
local and remote SQL servers. The process has eight steps beginning with the SQL Server selection. If
the backup used a transactional schedule, the databases can be restored to a specific point in time.
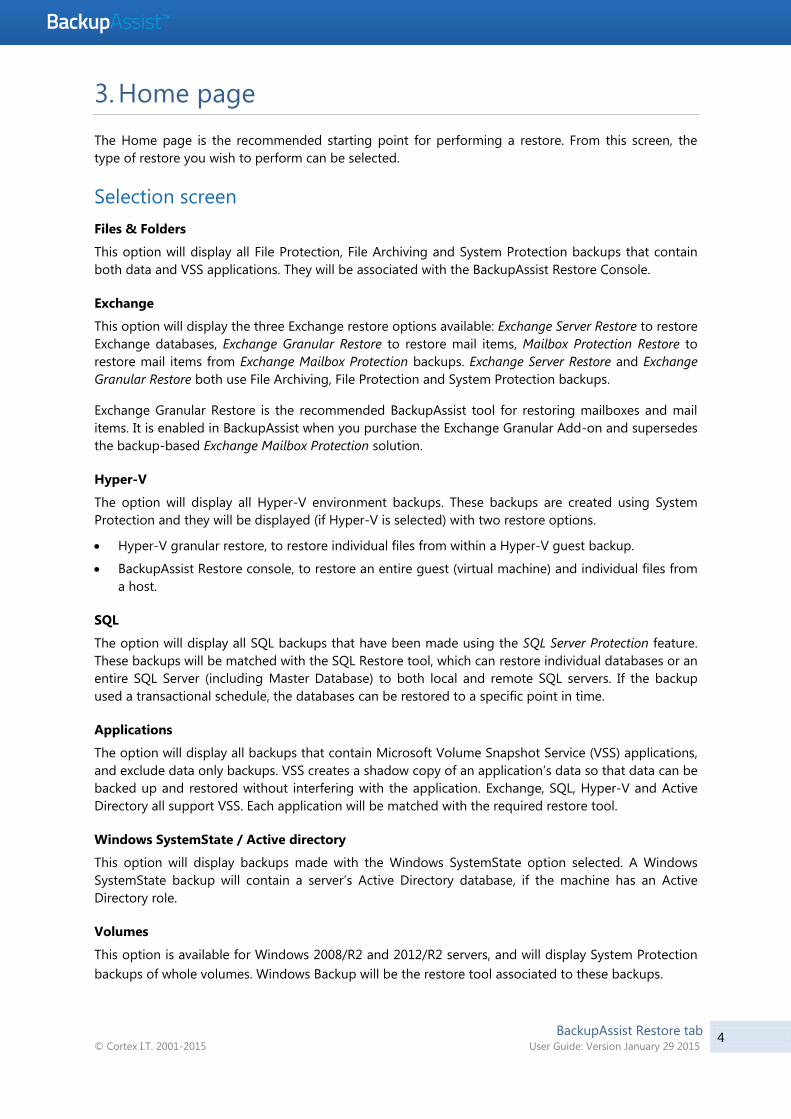
Hyper-V Granular Restore
This tool is used to provide access to individual files within a .vhd file (for a guest virtual machine) from
an image backup created using System Protection.
Imaging Restore
If Imaging Restore is selected on a Windows Server, Windows Server Backup will open. This is a
dedicated image restore tool that can be used as an alternative, or to test an image backup’s integrity.
This option will only work with System Protection backups on Windows 2008, or newer, servers. In
most cases, you can restore individual files and VSS applications from image backups. There are
however some exceptions, such as if the backup device is an RDX drive (due to a Windows limitation).
Retrieve Backup from Tape
This tool can be used if you are having problems performing a File Archiving restore from a tape
media. The tool will directly access the tape (unlike the Restore Console which loads all backups) and
attempt to restore the entire contents of the tape. It cannot restore individual items.
BackupAssist Restore tab © Cortex I.T. 2001-2015 User Guide: Version January 29 2015
4
3. Home page
The Home page is the recommended starting point for performing a restore. From this screen, the
type of restore you wish to perform can be selected.
Selection screen
Files & Folders
This option will display all File Protection, File Archiving and System Protection backups that contain
both data and VSS applications. They will be associated with the BackupAssist Restore Console.
Exchange
This option will display the three Exchange restore options available: Exchange Server Restore to restore
Exchange databases, Exchange Granular Restore to restore mail items, Mailbox Protection Restore to
restore mail items from Exchange Mailbox Protection backups. Exchange Server Restore and Exchange
Granular Restore both use File Archiving, File Protection and System Protection backups.
Exchange Granular Restore is the recommended BackupAssist tool for restoring mailboxes and mail
items. It is enabled in BackupAssist when you purchase the Exchange Granular Add-on and supersedes
the backup-based Exchange Mailbox Protection solution.
Hyper-V
The option will display all Hyper-V environment backups. These backups are created using System
Protection and they will be displayed (if Hyper-V is selected) with two restore options.
Hyper-V granular restore, to restore individual files from within a Hyper-V guest backup.
BackupAssist Restore console, to restore an entire guest (virtual machine) and individual files from
a host.
SQL
The option will display all SQL backups that have been made using the SQL Server Protection feature.
These backups will be matched with the SQL Restore tool, which can restore individual databases or an
entire SQL Server (including Master Database) to both local and remote SQL servers. If the backup
used a transactional schedule, the databases can be restored to a specific point in time.
Applications
The option will display all backups that contain Microsoft Volume Snapshot Service (VSS) applications,
and exclude data only backups. VSS creates a shadow copy of an application’s data so that data can be
backed up and restored without interfering with the application. Exchange, SQL, Hyper-V and Active
Directory all support VSS. Each application will be matched with the required restore tool.
Windows SystemState / Active directory
This option will display backups made with the Windows SystemState option selected. A Windows
SystemState backup will contain a server’s Active Directory database, if the machine has an Active
Directory role.
Volumes
This option is available for Windows 2008/R2 and 2012/R2 servers, and will display System Protection
backups of whole volumes. Windows Backup will be the restore tool associated to these backups.
BackupAssist Restore tab © Cortex I.T. 2001-2015 User Guide: Version January 29 2015
5
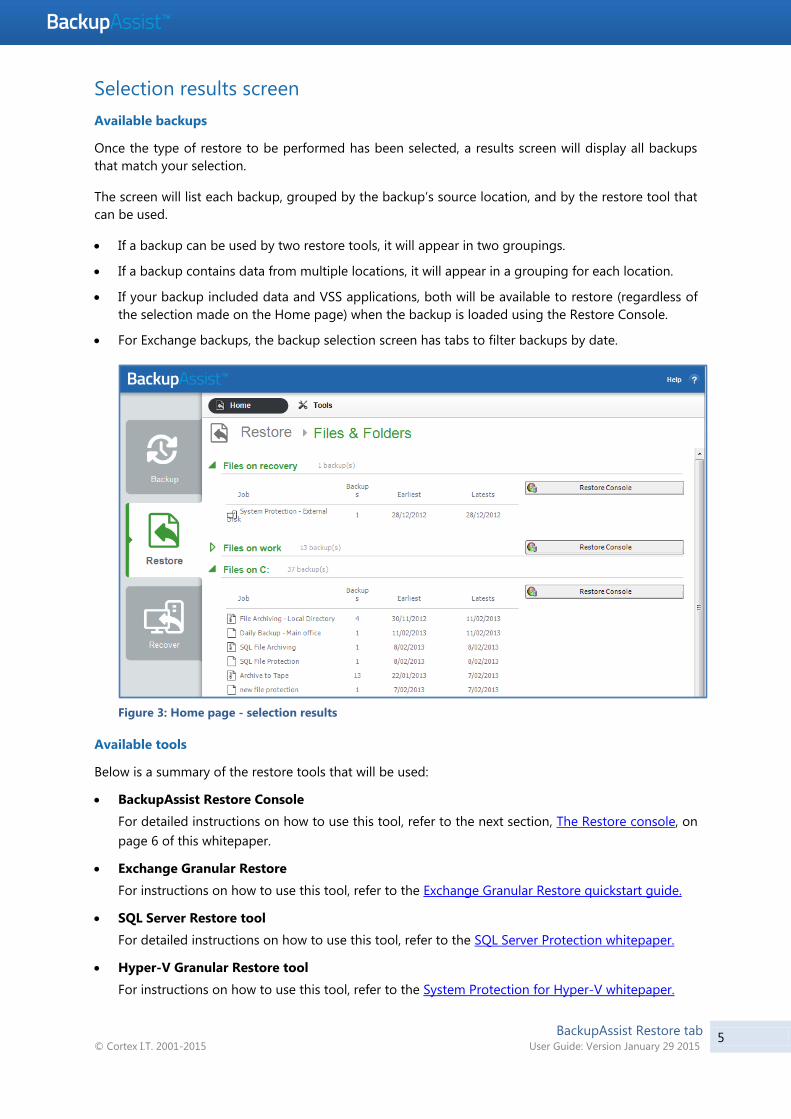
Selection results screen
Available backups
Once the type of restore to be performed has been selected, a results screen will display all backups
that match your selection.
The screen will list each backup, grouped by the backup’s source location, and by the restore tool that
can be used.
If a backup can be used by two restore tools, it will appear in two groupings.
If a backup contains data from multiple locations, it will appear in a grouping for each location.
If your backup included data and VSS applications, both will be available to restore (regardless of
the selection made on the Home page) when the backup is loaded using the Restore Console.
For Exchange backups, the backup selection screen has tabs to filter backups by date.
Figure 3: Home page - selection results
Available tools
Below is a summary of the restore tools that will be used:
BackupAssist Restore Console
For detailed instructions on how to use this tool, refer to the next section, The Restore console, on
page 6 of this whitepaper.
Exchange Granular Restore
For instructions on how to use this tool, refer to the Exchange Granular Restore quickstart guide.
SQL Server Restore tool
For detailed instructions on how to use this tool, refer to the SQL Server Protection whitepaper.
Hyper-V Granular Restore tool
For instructions on how to use this tool, refer to the System Protection for Hyper-V whitepaper.
BackupAssist Restore tab © Cortex I.T. 2001-2015 User Guide: Version January 29 2015
6
4. The Restore Console
The Restore Console makes it easy to restore data and applications and eliminates the need to
manually search for the specific backups that you want to restore from. There are three ways to access
the Restore Console:
The Start menu on your desk top
The Tools menu in BackupAssist’s restore tab
Home page on BackupAssist’s Restore tab, once a backup type has been selected.
The Restore Console will restore File Archive backups, File Protection backups (including backups using
Rsync) and System Protection backups. This functionality means it can also restore Exchange Mailbox
data, VSS applications, Hyper-V guests and data in Hyper-V hosts.
Catalogues
When a BackupAssist backup runs, a file catalogue is created for that backup. The catalogue contains a
list of files that were backed up, the location they were backed up from and the backup destination.
Once the catalogues have been loaded, you can browse the contents of your backups. Catalogues
stored locally are located in the BackupAssist settings folder: C:\Documents and Settings \ All
users\Application data\BackupAssist v8 on C:\Users\All Users\BackupAssist v8
Having catalogues stored on your local drive means you do not need to connect to all your backup
devices to find the specific backup or file that you want to restore. Simply go to the BackupAssist
Restore Tab, select the type of data you want to restore and BackupAssist will display all catalogued
backups that match your selection. The backups displayed will be for active backup jobs, and grouped
by the source data’s location and the restore tool that can be used.
If you wish to load backups for deleted backup jobs and for other backup groupings on the Home
page, select Load backups and then Load all known backups. Once you have browsed the selected
backup to find the files you want to restore, the Restore Console will ask you to attach the appropriate
backup device so the data can be retrieved.
A second copy of each backup catalogue is stored on the backup device itself. This gives you the
capacity to restore data even if the local hard drive copies of the catalogues are lost or inaccessible, or
if the backup has been moved from its original location. It also means that you can browse for and
load a backup that was made on another machine.
Restoring without the Console
If you do not have BackupAssist installed and need to restore from a backup created using File
Protection you can browse to the location of your backups and copy the required files back to their
original location or an alternate location. If your backup was created using File Archiving, you will first
need to un-zip the backup before you can copy data back to its intended location.
Restoring Exchange Server data
When you select Exchange as a restore option in the Restore tab, you will be presented with three
options: Exchange Server Restore, Exchange Granular Restore and Mailbox Protection Restore. When you
make your choice, the available backups will appear in a selection screen. If you select an Exchange
Server or Mailbox Protection backup, the Restore console will open. If you select an Exchange Granular
Restore backup, the Exchange Granular Restore tool will load the .edb file.
BackupAssist Restore tab © Cortex I.T. 2001-2015 User Guide: Version January 29 2015
7
Performing a restore
The BackupAssist Restore Console is used to locate and select the backup, select the data to be
restored and restore the data to the required destination.
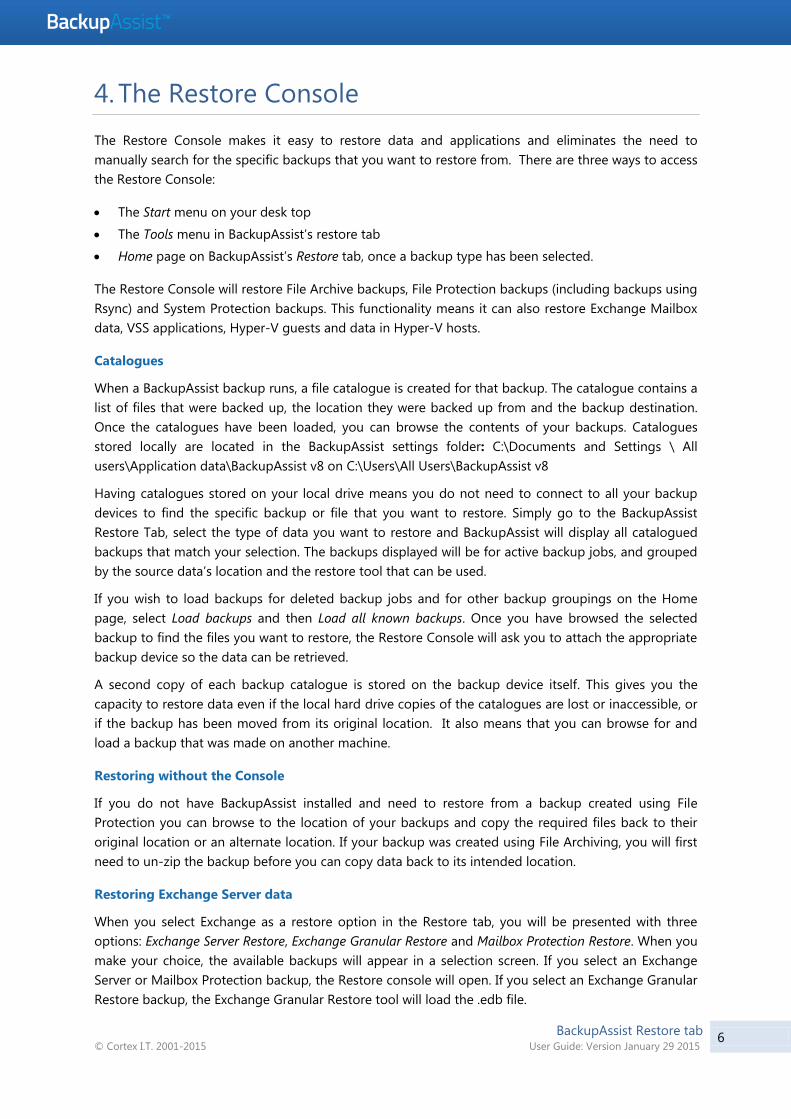
Step 1: Loading the backup
If you opened the Restore Console by navigating to it from the Restore tab’s Home page, and
selecting a restore type, the console will load all of the backups that were listed. You can use the Load
backups option if you wish to search for additional backups.
If the Restore Console was selected from the Tools menu, no backups will be present, and the Load
backups option will need to be used as documented below:
Figure 4: The BackupAssist Restore Console
a. Select Load Backups from the top left
b. Make the required selection
Load all known backups: Loads all backup catalogues located in the BackupAssist settings
folder. Each catalogue associated with each backup run on the machine will be loaded.
Load known backups - last: Loads a specific number of backup catalogues by selecting the
number of backup catalogues to load. The most recent X catalogues associated with the last X
backup runs will be loaded.
Load backups from tape: Use this option to browse your tape drive for backup catalogues.
This is useful if the catalogues are not available locally within the BackupAssist settings folder.
Note: you cannot read an NTBackup file from a tape device.
Browse for backups: If the backup catalogues are not available locally, you can browse to
where the backups are stored. This is useful if your backup destination is, for example, an
external HDD you connected to from a different machine than where the backup initially ran.
c. Once the backup catalogues are loaded, you can use the Browse or Search functions to select the
required backup and locate the data.
BackupAssist Restore tab © Cortex I.T. 2001-2015 User Guide: Version January 29 2015
8
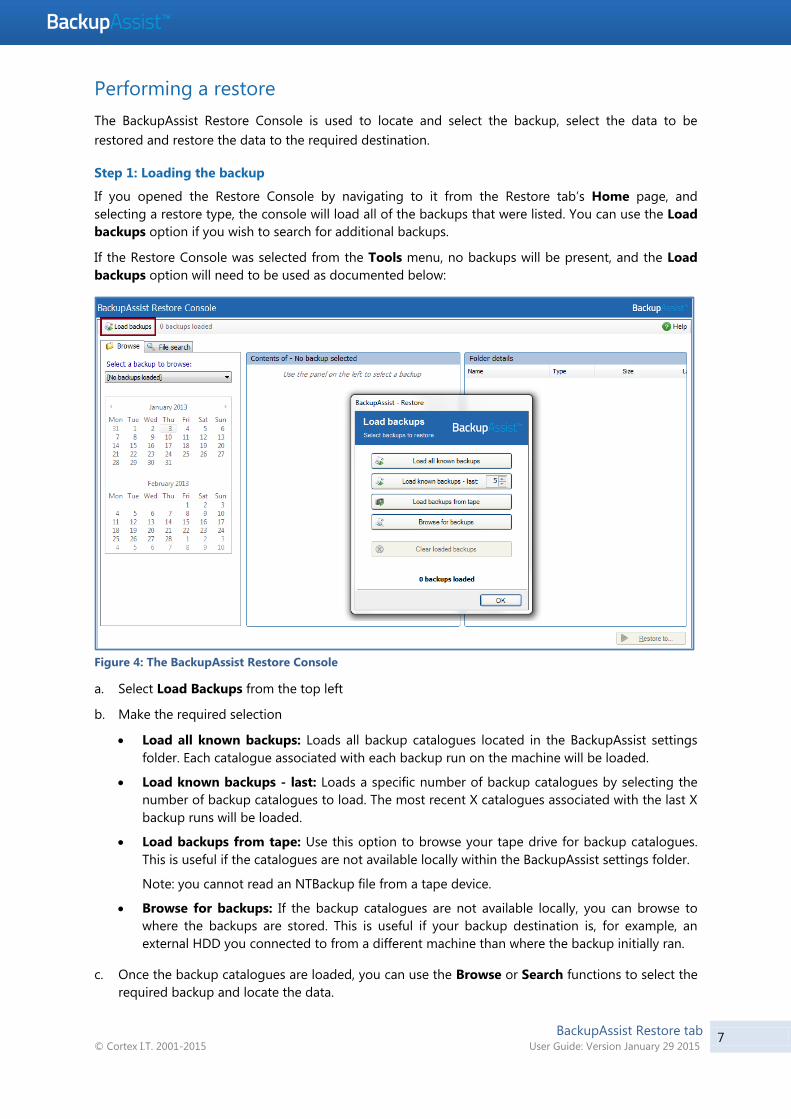
Step 2: Locating the data – Browse tab
Use the Browse tab if you know the date of the backup you wish to restore from, or if you need to
restore an entire backup set. The image below shows the Browse tab with a File Protection selection.
Figure 5: BackupAssist Restore Console – Browse tab
a. Use the drop-down menu to choose the backup that you want to restore from.
b. Use the calendar to select the date you want to restore from.
Dates for which there is a backup available, are marked in bold.
If multiple backups were created on the same day, a Time drop-down menu will appear.
c. Use the middle and right-most panes to expand the loaded backup set and select data to restore.
The following considerations apply to the selection of data:
VSS applications – use the checkbox to select any VSS application backups are included in the
loaded backup set for restoration. You can also expand each application and select individual
components (e.g. databases, storage groups, etc.) to restore.
VSS supports live application restores, which means you do not need to stop a live application
before restoring a previous version of it. If any Windows services need to be stopped and restarted
during an application restore this will happen automatically. We do recommend that you notify all
users to stop using any applications before commencing a VSS application restore, however the
restore process will not be affected if the applications are in use.
System state – BackupAssist v8 only provides the system state selection within System Protection
backups, and these backups will not have a system state restore option. Windows tools can be
used to perform these restores.
For a system state restore, it is recommended that a System Protection backup is made using the
bare-metal selection. This backup image can be used to perform a system state restore or a bare-
metal recovery and provides a comprehensive protection solution.
Mailboxes and public folders – if any mailbox or public folder backups are included within the
loaded backup set, named Exchange Server(s) will appear in the middle pane. If you select an
Exchange Server from the tree, a list of mailboxes will appear. From here you can choose which
mailboxes to restore, as well as the date range of the mail items that you want to recover.
Mailboxes must be restored independently of other data. If you need to restore other data, such as
files or applications, you will need to complete this as a separate restore task.
BackupAssist Restore tab © Cortex I.T. 2001-2015 User Guide: Version January 29 2015
9
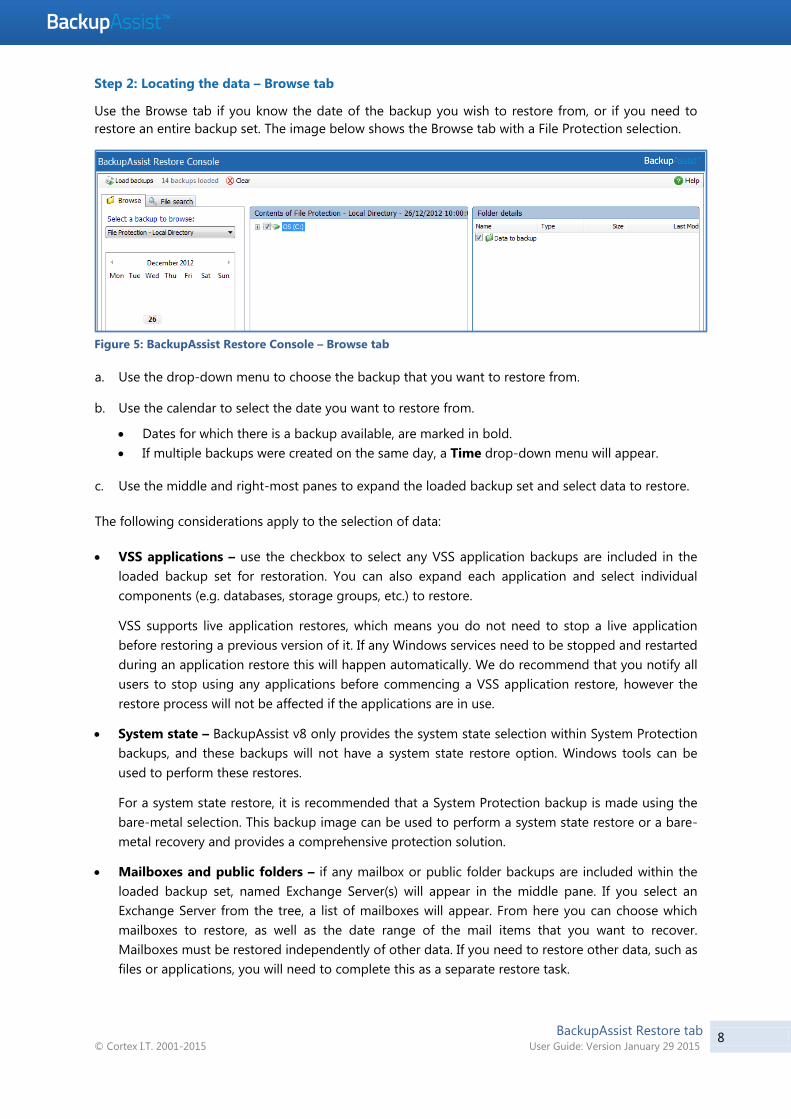
Step 2: Locating the data – File search tab
The File search option makes it easy to locate specific files or folders by performing a search using
filters. The results can be compared (e.g. the dates of two files) to identify the correct data selection.
This is ideal if you know the data required but not the backup it is in.
Figure 6: BackupAssist Restore Console – File search tab
1. Enter your search term or file name in the Search for text box. The search function supports wild
card searches so file types can be search for. E.g. *.txt or *.doc.
2. Select from the following filters if required:
Filter by job allows you to narrow the search to the backup that the files were backed up in.
Filter by date of file allows you to search for files created before or after a specific date or
within a specific time frame.
Filter by size of file allows you to search your backups for files based on their size. From the
drop-down menu, you can choose files Less than, Greater than or Between a certain size.
3. Click the Magnifying glass button or, if you have applied search filters, the New Search button.
4. The Restore Console will return a list of files based on the most recent backup sets. If the files you
are looking for are not within this initial set of search results, you can display further results by
clicking the Continue Search button, or view all results by clicking the Search All button.
If files are listed with an icon
When there are multiple backups of the same file, the Restore Console makes it easy to find the
version you need by eliminating identical copies. The Restore Console will only show multiple copies of
the same file if the file has been changed. When the Restore Console finds additional copies of a file
that has been changed within different backup sets, you will see the icon, as well as a number
indicating how many different versions of the file were found.
Click the icon next to a file to view a list of the different versions of the file, then select which
version of the file you would like to restore. If multiple versions of the same file are selected, the files
will be renamed with a numbered suffix (e.g. Deployment(0).xml).
BackupAssist Restore tab © Cortex I.T. 2001-2015 User Guide: Version January 29 2015
10
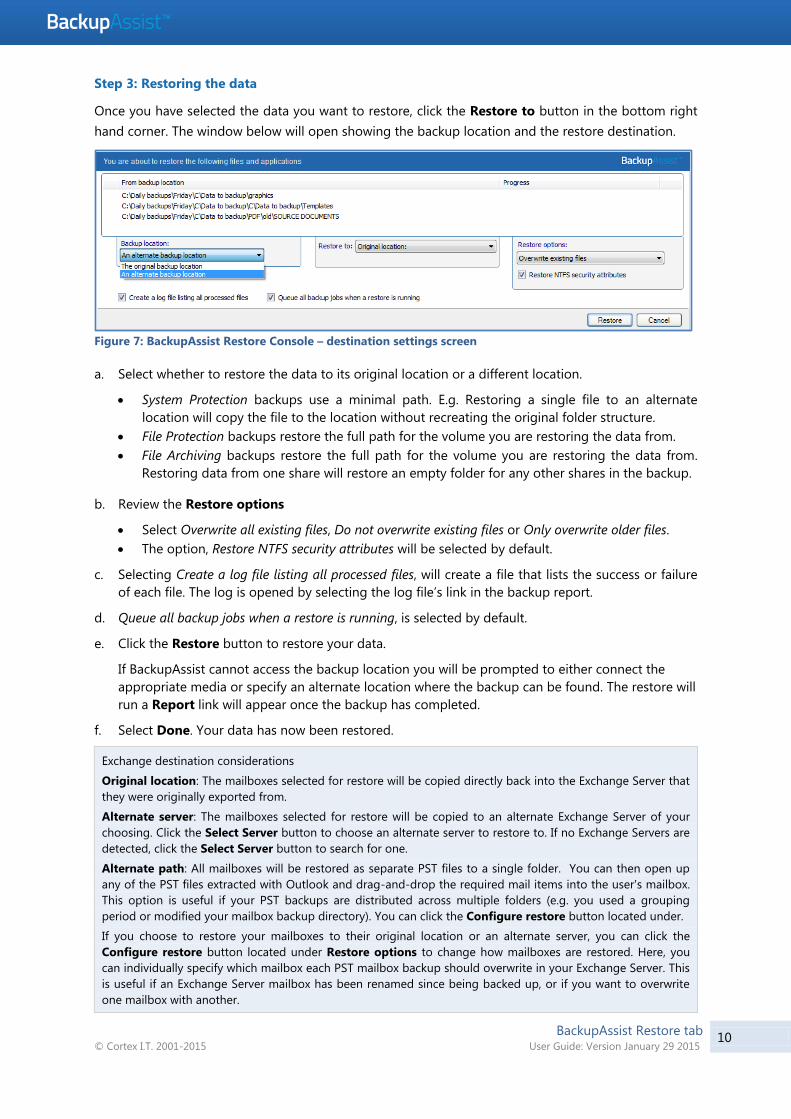
Step 3: Restoring the data
Once you have selected the data you want to restore, click the Restore to button in the bottom right
hand corner. The window below will open showing the backup location and the restore destination.
Figure 7: BackupAssist Restore Console – destination settings screen
a. Select whether to restore the data to its original location or a different location.
System Protection backups use a minimal path. E.g. Restoring a single file to an alternate
location will copy the file to the location without recreating the original folder structure.
File Protection backups restore the full path for the volume you are restoring the data from.
File Archiving backups restore the full path for the volume you are restoring the data from.
Restoring data from one share will restore an empty folder for any other shares in the backup.
b. Review the Restore options
Select Overwrite all existing files, Do not overwrite existing files or Only overwrite older files.
The option, Restore NTFS security attributes will be selected by default.
c. Selecting Create a log file listing all processed files, will create a file that lists the success or failure
of each file. The log is opened by selecting the log file’s link in the backup report.
d. Queue all backup jobs when a restore is running, is selected by default.
e. Click the Restore button to restore your data.
If BackupAssist cannot access the backup location you will be prompted to either connect the
appropriate media or specify an alternate location where the backup can be found. The restore will
run a Report link will appear once the backup has completed.
f. Select Done. Your data has now been restored.
Exchange destination considerations
Original location: The mailboxes selected for restore will be copied directly back into the Exchange Server that
they were originally exported from.
Alternate server: The mailboxes selected for restore will be copied to an alternate Exchange Server of your
choosing. Click the Select Server button to choose an alternate server to restore to. If no Exchange Servers are
detected, click the Select Server button to search for one.
Alternate path: All mailboxes will be restored as separate PST files to a single folder. You can then open up
any of the PST files extracted with Outlook and drag-and-drop the required mail items into the user's mailbox.
This option is useful if your PST backups are distributed across multiple folders (e.g. you used a grouping
period or modified your mailbox backup directory). You can click the Configure restore button located under.
If you choose to restore your mailboxes to their original location or an alternate server, you can click the
Configure restore button located under Restore options to change how mailboxes are restored. Here, you
can individually specify which mailbox each PST mailbox backup should overwrite in your Exchange Server. This
is useful if an Exchange Server mailbox has been renamed since being backed up, or if you want to overwrite
one mailbox with another.
BackupAssist Restore tab © Cortex I.T. 2001-2015 User Guide: Version January 29 2015
11
Restore Console FAQ
Can I use the Restore Console to restore any backup I have made with BackupAssist?
The Restore Console has been specifically designed to make restoring easy from File Protection
(including Rsync), File Archiving, System Protection (including Hyper–V guest restores) and Exchange
mailbox backups. It also works with the BackupAssist Zip-To-Tape add-on.
The Restore Console will not restore SQL backups created using the SQL add-on or Hyper-V granular
guest restores. For these, the SQL Server Restore and the Hyper-V Granular Restore tools should be
used.
Can I use the Restore Console to restore backups made with old versions of BackupAssist?
Only backups made with BackupAssist v5.3 or later will show up in the Restore Console. That’s because
the Restore Console keeps its records and catalogues on your local hard drive and no records of your
old backups will be stored there. The sooner you upgrade, the sooner you’ll start creating backups you
can access easily with the Restore Console.
Searching for files seems slow, what’s going on?
Using the Restore Console is a lot faster than searching through the file system manually. However,
BackupAssist still has to search through your entire file system. The time it takes will depend on the
number of backups you’ve loaded and your search criteria. If the search is too slow, try searching only
the last few backups, a specific type of backup, or filtering by job name in the search tab and selecting
only those jobs that might contain the file you’re looking for. Just filtering by date and size probably
won’t improve search speeds.
Browsing for my backup is taking a long time, why is that?
Loading backups into the Restore Console should take very little time, even for hundreds of backups.
However, once you click on a date in the calendar, the Console has to reconstruct the file system from
the backup record. That can take a few seconds, depending on the number of files and folders in the
backup.
I don’t know which version of a file to restore, how do I choose?
The Restore Console makes it easier for you to choose which version of a file to restore, because it
only shows you the changed versions – not multiple copies of files that are all the same. If you still find
it difficult to choose which file to restore, just restore them all to an alternate location and look
through them to find the version you want. BackupAssist will append numbers to the end of the files
you restore, so they’ll end up as File(1).txt, File(2).txt, etc. The file labeled (1) will be the most recent.
Can I restore my entire system using the Restore Console?
The BackupAssist v8 Restore Console can restore VSS applications like Exchange, SQL and SharePoint
using File Archiving, File Protection and System Protection backups. BackupAssist can also do a bare-
metal backup using System Protection, and use that image to recover a system using the bootable
RecoverAssist media, created using the Recovery tab.
Can I use the Restore Console to restore Rsync backups?
Yes, the Restore Console will restore Rsync backups. When you click Restore in the confirmation screen,
the Restore Console will connect to your Rsync server and use Rsync to copy the files back to your
BackupAssist Restore tab © Cortex I.T. 2001-2015 User Guide: Version January 29 2015
12
system. If this computer or user has not connected to the Rsync server before, you will see a dialog
box that asks you for the Rsync server details. This dialog box is very similar to the Rsync screen in the
main BackupAssist console. Most of the details should already be filled out, but for security reasons
you will have to register with the server and supply your password.
Will the Restore Console work with the BackupAssist Zip-To-Tape engine?
Yes, the Restore Console is fully compatible with the BackupAssist Zip-To-Tape add-on for File
Archiving backups. In fact, it will be the easiest way to restore files that have been backed up to tape,
taking much of the tedium out of searching for the backup copies you want and restoring them to any
location you choose. You can even restore from incremental, differential and copy backups made with
the Zip-To-Tape add-on.
Will the Restore Console work with encrypted backups I’ve created with BackupAssist?
Yes, the Restore Console will also be able to restore files that have been encrypted, but you’ll need to
supply the password. You can search and browse the contents or index of encrypted backups without
supplying the password, but without the password, the files cannot be restored or otherwise opened.
Note: it is important that you keep a copy of your password in a safe place, as we cannot assist you with
opening password encrypted files in the event your password is lost or forgotten.
BackupAssist Restore tab © Cortex I.T. 2001-2015 User Guide: Version January 29 2015
13
5. Support and Resources
Contacting Technical Support
Should you have any questions regarding BackupAssist or the Restore tab, please email your queries
to [email protected] and we will respond to you as soon as possible.
Similarly, if you have any suggestions for additional functionality in BackupAssist, or new products or
add-ons, please also forward such feedback to [email protected]
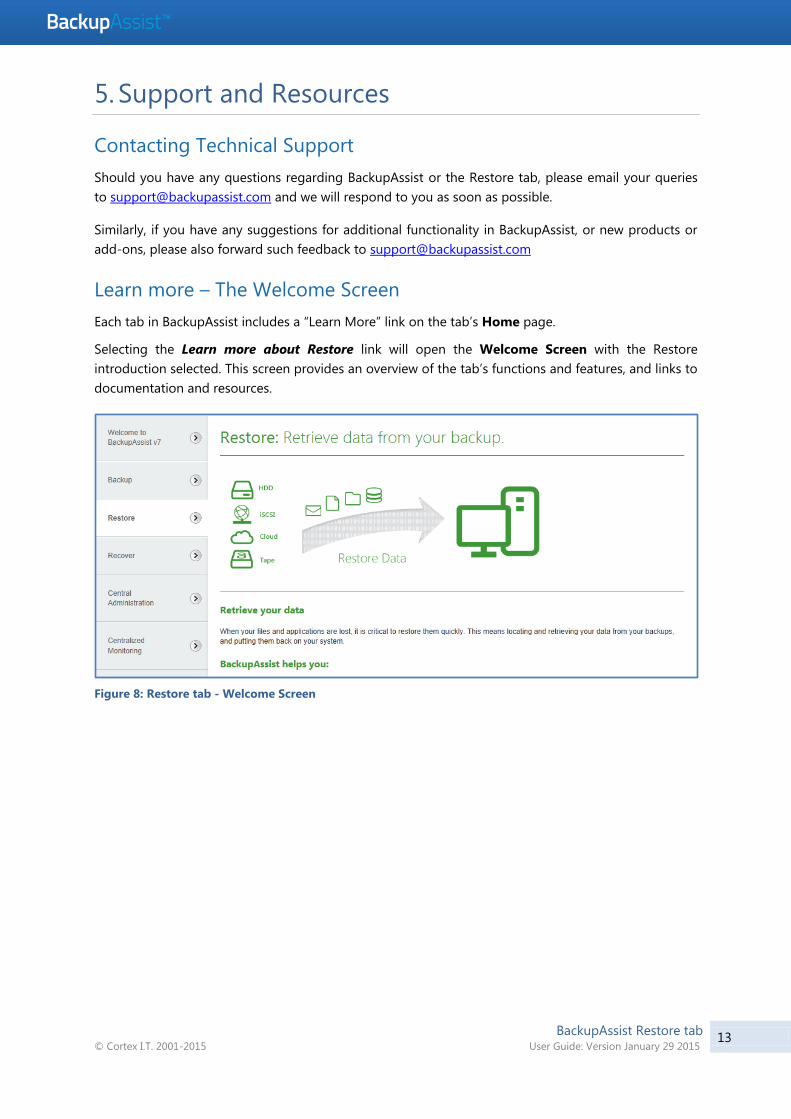
Learn more – The Welcome Screen
Each tab in BackupAssist includes a “Learn More” link on the tab’s Home page.
Selecting the Learn more about Restore link will open the Welcome Screen with the Restore
introduction selected. This screen provides an overview of the tab’s functions and features, and links to
documentation and resources.
Figure 8: Restore tab - Welcome Screen