Replication Server - SAPinfocenter-archive.sybase.com/help/topic/com.sybase.infocenter.dc... ·...
128
Configuration Guide Replication Server ® 15.2 [ UNIX ]
Transcript of Replication Server - SAPinfocenter-archive.sybase.com/help/topic/com.sybase.infocenter.dc... ·...

Configuration Guide
Replication Server®
15.2
[ UNIX ]

DOCUMENT ID: DC35817-01-1520-01
LAST REVISED: February 2009
Copyright © 2009 by Sybase, Inc. All rights reserved.
This publication pertains to Sybase software and to any subsequent release until otherwise indicated in new editions or technical notes. Information in this document is subject to change without notice. The software described herein is furnished under a license agreement, and it may be used or copied only in accordance with the terms of that agreement.
To order additional documents, U.S. and Canadian customers should call Customer Fulfillment at (800) 685-8225, fax (617) 229-9845.
Customers in other countries with a U.S. license agreement may contact Customer Fulfillment via the above fax number. All other international customers should contact their Sybase subsidiary or local distributor. Upgrades are provided only at regularly scheduled software release dates. No part of this publication may be reproduced, transmitted, or translated in any form or by any means, electronic, mechanical, manual, optical, or otherwise, without the prior written permission of Sybase, Inc.
Sybase trademarks can be viewed at the Sybase trademarks page at http://www.sybase.com/detail?id=1011207. Sybase and the marks listed are trademarks of Sybase, Inc. ® indicates registration in the United States of America.
Java and all Java-based marks are trademarks or registered trademarks of Sun Microsystems, Inc. in the U.S. and other countries.
Unicode and the Unicode Logo are registered trademarks of Unicode, Inc.
All other company and product names mentioned may be trademarks of the respective companies with which they are associated.
Use, duplication, or disclosure by the government is subject to the restrictions set forth in subparagraph (c)(1)(ii) of DFARS 52.227-7013 for the DOD and as set forth in FAR 52.227-19(a)-(d) for civilian agencies.
Sybase, Inc., One Sybase Drive, Dublin, CA 94568.

Contents
Configuration Guide for UNIX iii
About This Book .......................................................................................................................... vii
CHAPTER 1 Preparing to Install and Configure Replication Server................ 1Before you begin .............................................................................. 1Planning the replication system ....................................................... 2Using the Replication Server installation worksheet ........................ 5
Completing the worksheet ......................................................... 5Completing the database setup worksheet .................................... 19
CHAPTER 2 Configuring Replication Server and Adding Databases with rs_init 23Using rs_init ................................................................................... 23
Using rs_init interactively......................................................... 23rs_init with a resource file ........................................................ 24
Starting rs_init ................................................................................ 24Configuring a new Replication Server ............................................ 25Adding a database to the replication system ................................. 31
CHAPTER 3 Upgrading or Downgrading an Existing Replication Server..... 35Preparing to upgrade ..................................................................... 35Overview ........................................................................................ 36Upgrading to Replication Server 15.2 ............................................ 37
If an upgrade fails .................................................................... 41Upgrading a user database in a replication system ....................... 41Committing a local site to a new version level................................ 42
Setting the replication system version..................................... 42Setting the Replication Server site version.............................. 44Upgrading routes..................................................................... 46Mixed-version replication systems .......................................... 46
Upgrading Adaptive Server in replication system........................... 47Downgrading Replication Server to an earlier version ................... 51
Downgrade restrictions............................................................ 53
Contents
iv Replication Server
CHAPTER 4 Using Password Encryption ......................................................... 55Overview ........................................................................................ 55Enabling password encryption for a Replication Server................. 56Altering an encrypted password for a Replication Server .............. 57
CHAPTER 5 Secure Sockets Layer ................................................................... 59Setting up SSL services ................................................................. 59
Adding the SSL driver to the driver configuration file .............. 60Adding trusted CA certificates to the trusted roots file ............ 60Obtaining a certificate for each SSL-enabled Replication Server
61Creating an identity file............................................................ 61Adding an encrypted password to the configuration file.......... 62Creating SSL entries in the directory service .......................... 62Enabling SSL on Replication Server ....................................... 63
CHAPTER 6 Starting or Stopping a Replication Server .................................. 65Starting a Replication Server ......................................................... 65Stopping a Replication Server using isql........................................ 66
CHAPTER 7 Replication Monitoring Services .................................................. 67Introducing Replication Monitoring Services .................................. 67
Monitoring servers in the replication domain........................... 68Installation ............................................................................... 68
Configuring RMS for three-tier management support .................... 68Starting and Stopping RMS............................................................ 69Connecting to RMS ........................................................................ 70
CHAPTER 8 Installing and Implementing Non-ASE Support Features.......... 73Introduction .................................................................................... 73
Components for non-ASE support installed with Replication Server ............................................................................... 74
Overview of non-ASE support installation...................................... 75Configuring non-ASE support ........................................................ 76
Creating a replicate database connection using connection profiles 76
Creating replication definitions ................................................ 76Creating subscriptions............................................................. 76Marking primary tables ............................................................ 76
APPENDIX A Worksheets .................................................................................... 79

Contents
Configuration Guide for UNIX v
Replication Server installation worksheet ...................................... 80Database setup worksheet............................................................. 83
APPENDIX B Using rs_init with Resource Files ............................................... 85Using resource file templates......................................................... 85Using resource files for rs_init ........................................................ 86
Editing a resource file .............................................................. 87Using rs_init command line options ............................................... 88Sample Replication Server resource file ........................................ 89
APPENDIX C Sample Replication System......................................................... 99Description of the sample replication system................................. 99Setting up the example ................................................................ 100Testing and troubleshooting the replication system ..................... 105
Index ........................................................................................................................................... 107

Contents
vi Replication Server

Configuration Guide for UNIX vii
About This Book
Audience This guide is for System Administrators or other qualified installers who are familiar with their system’s environment, networks, disk resources, and media devices.
How to use this book This book explains how to:
• Set up and configure a replication system
• Start and stop a Replication Server®
• Upgrade or downgrade Replication Server software
See the Replication Server release bulletin for your platform for the operating system and platforms that Replication Server supports.
Use this book with the Replication Server Installation Guide for UNIX to install and set up Replication Server for your platform.
The information in this book is organized as follows:
• Chapter 1, “Preparing to Install and Configure Replication Server” describes what you need to know and do before you install Replication Server. Worksheets help you organize the installation information.
• Chapter 2, “Configuring Replication Server and Adding Databases with rs_init” explains how to install Replication Servers and add databases to your replication system.
• Chapter 3, “Upgrading or Downgrading an Existing Replication Server” describes how to upgrade from an earlier version of Replication Server. It also explains how to downgrade your replication system to revert to an earlier version.
• Chapter 4, “Using Password Encryption” describes how to use rs_init to enable password encryption for a Replication Server. It also explains how to alter passwords in configuration files.
• Chapter 5, “Secure Sockets Layer” describes how to enable SSL for a Replication Server.

viii Replication Server
• Chapter 6, “Starting or Stopping a Replication Server” explains how to begin using Replication Server.
• Chapter 7, “Replication Monitoring Services” explains how to configure Replication Monitoring Services (RMS).
• Chapter 8, “Installing and Implementing Non-ASE Support Features” explains how to install and configure support for non-Adaptive Server (non-ASE) data servers.
• Appendix A, “Worksheets” includes the Replication Server Installation Worksheet, which you can use to collect and record the information you need to install and configure a Replication Server, and the Database Setup Worksheet, which you can use to collect and record the information you need to add a database to your replication system.
• Appendix B, “Using rs_init with Resource Files” explains how to run rs_init in batch mode using resource files.
• Appendix C, “Sample Replication System” explains how to set up a simple replication system using the pubs2 database provided with Sybase® Adaptive Server®. This exercise is a good introduction to Replication Server.
Related documents The Sybase Replication Server documentation set consists of the following:
• The release bulletin for your platform – contains last-minute information that was too late to be included in the books.
A more recent version of the release bulletin may be available on the World Wide Web. To check for critical product or document information that was added after the release of the product CD, use the Sybase Product Manuals at http://www.sybase.com/support/manuals/.
• Installation Guide for your platform – describes installation and upgrade procedures for all Replication Server and related products.
• New Features Guide– describes the new features in Replication Server.
• Administration Guide – contains an introduction to replication systems. This manual includes information and guidelines for creating and managing a replication system, setting up security, recovering from system failures, and improving performance.
• Configuration Guide for your platform (this book) – describes configuration procedures for all Replication Server and related products, and explains how to use the rs_init configuration utility.

About This Book
Configuration Guide for UNIX ix
• Design Guide – contains information about designing a replication system and integrating heterogeneous data servers into a replication system.
• Getting Started with Replication Server – provides step-by-step instructions for installing and setting up a simple replication system.
• Heterogeneous Replication Guide and the Replication Server Options documentation set – describes how to use Replication Server to replicate data between databases supplied by different vendors.
• Reference Manual – contains the syntax and detailed descriptions of Replication Server commands in the Replication Command Language (RCL); Replication Server system functions; Sybase Adaptive Server commands, system procedures, and stored procedures used with Replication Server; Replication Server executable programs; and Replication Server system tables.
• System Tables Diagram – illustrates system tables and their entity relationships in a poster format. Available only in print version.
• Troubleshooting Guide – contains information to aid in diagnosing and correcting problems in the replication system.
• Replication Manager plug-in help, which contains information about using Sybase Central™ to manage Replication Server.
Other sources of information
Use the Sybase Getting Started CD, the SyBooks™ CD, and the Sybase Product Manuals Web site to learn more about your product:
• The Getting Started CD contains release bulletins and installation guides in PDF format, and may also contain other documents or updated information not included on the SyBooks CD. It is included with your software. To read or print documents on the Getting Started CD, you need Adobe Acrobat Reader, which you can download at no charge from the Adobe Web site using a link provided on the CD.
• The SyBooks CD contains product manuals and is included with your software. The Eclipse-based SyBooks browser allows you to access the manuals in an easy-to-use, HTML-based format.
Some documentation may be provided in PDF format, which you can access through the PDF directory on the SyBooks CD. To read or print the PDF files, you need Adobe Acrobat Reader.
Refer to the SyBooks Installation Guide on the Getting Started CD, or the README.txt file on the SyBooks CD for instructions on installing and starting SyBooks.

x Replication Server
• The Sybase Product Manuals Web site is an online version of the SyBooks CD that you can access using a standard Web browser. In addition to product manuals, you will find links to EBFs/Maintenance, Technical Documents, Case Management, Solved Cases, newsgroups, and the Sybase Developer Network.
To access the Sybase Product Manuals Web site, go to Product Manuals at http://www.sybase.com/support/manuals/.
Sybase certifications on the Web
Technical documentation at the Sybase Web site is updated frequently.
❖ Finding the latest information on product certifications
1 Point your Web browser to Technical Documents at http://www.sybase.com/support/techdocs/.
2 Click Certification Report.
3 In the Certification Report filter select a product, platform, and timeframe and then click Go.
4 Click a Certification Report title to display the report.
❖ Finding the latest information on component certifications
1 Point your Web browser to Availability and Certification Reports at http://certification.sybase.com/.
2 Either select the product family and product under Search by Base Product; or select the platform and product under Search by Platform.
3 Select Search to display the availability and certification report for the selection.
❖ Creating a personalized view of the Sybase Web site (including support pages)
Set up a MySybase profile. MySybase is a free service that allows you to create a personalized view of Sybase Web pages.
1 Point your Web browser to Technical Documents at http://www.sybase.com/support/techdocs/.
2 Click MySybase and create a MySybase profile.

About This Book
Configuration Guide for UNIX xi
Sybase EBFs and software maintenance
❖ Finding the latest information on EBFs and software maintenance
1 Point your Web browser to the Sybase Support Page at http://www.sybase.com/support.
2 Select EBFs/Maintenance. If prompted, enter your MySybase user name and password.
3 Select a product.
4 Specify a time frame and click Go. A list of EBF/Maintenance releases is displayed.
Padlock icons indicate that you do not have download authorization for certain EBF/Maintenance releases because you are not registered as a Technical Support Contact. If you have not registered, but have valid information provided by your Sybase representative or through your support contract, click Edit Roles to add the “Technical Support Contact” role to your MySybase profile.
5 Click the Info icon to display the EBF/Maintenance report, or click the product description to download the software.
Conventions This section describes the stylistic and syntactic conventions used in this book.
Style conventions Syntax statements (displaying the syntax and options for a command) are printed as follows:
alter user userset password new_passwd[verify password old_passwd]
Examples that show the use of Replication Server commands are printed as follows:
alter user louiseset password hFE5tverify password hFE5t
Command names, command option names, program names, program flags, keywords, configuration parameters, functions, and stored procedures are printed as follows:
• Use alter user to change the password for a login name.
• Variables, parameters to functions and stored procedures, and user-supplied words are in italics in syntax and in paragraph text, as follows:

xii Replication Server
The set password new_passwd clause specifies a new password.
• Names of database objects, such as databases, tables, columns, and datatypes, are in italics in paragraph text, as follows:
The base_price column in the Items table is a money datatype.
• Names of replication objects, such as function-string classes, error classes, replication definitions, and subscriptions, are in italics.
Syntax conventions Syntax formatting conventions are summarized in Table 1. Examples combining these elements follow.
Table 1: Syntax formatting conventions
Obligatory Choices:
• Curly braces and vertical bars – choose only one option.
{red | yellow | blue}
• Curly braces and commas – choose one or more options. If you choose more than one, separate your choices with commas.
{cash, check, credit}
Optional choices:
• One item in square brackets – choose it or omit it.
[anchovies]
• Square brackets and vertical bars – choose none or only one.
[beans | rice | sweet_potatoes]
Key Definition
variable Variables (words standing for values that you fill in) are in italics.
{ } Curly braces mean you must choose at least one of the enclosed options. Do not include braces in the command.
[ ] Brackets mean you may choose or omit enclosed options. Do not include brackets in the command.
| Vertical bars mean you may choose no more than one option (enclosed in braces or brackets).
, Commas mean you may choose as many options as you need (enclosed in braces or brackets). Separate your choices with commas, to be typed as part of the command.
Commas may also be required in other syntax contexts.
( ) Parentheses are to be typed as part of the command.
... An ellipsis (three dots) means you may repeat the last unit as many times as you need. Do not include ellipses in the command.

About This Book
Configuration Guide for UNIX xiii
• Square brackets and commas – choose none, one, or more options. If you choose more than one, separate your choices with commas.
[extra_cheese, avocados, sour_cream]
Repeating elements:
An ellipsis (...) means that you may repeat the last unit as many times as you need. For the alter function replication definition command, for example, you can list one or more parameters and their datatypes for either the add clause or the add searchable parameters clause:
alter function replication definition function_rep_def{deliver as 'proc_name' |add @parameter datatype[, @parameter
datatype]... |add searchable parameters @parameter
[, @parameter]... |send standby {all | replication definition}
parameters}
Accessibility features
This document is available in an HTML version that is specialized for accessibility. You can navigate the HTML with an adaptive technology such as a screen reader, or view it with a screen enlarger.
Replication Server HTML documentation has been tested for compliance with U.S. government Section 508 Accessibility requirements. Documents that comply with Section 508 generally also meet non-U.S. accessibility guidelines, such as the World Wide Web Consortium (W3C) guidelines for Web sites.
Note You might need to configure your accessibility tool for optimal use. Some screen readers pronounce text based on its case; for example, they pronounce ALL UPPERCASE TEXT as initials, and MixedCase Text as words. You might find it helpful to configure your tool to announce syntax conventions. Consult the documentation for your tool.
For information about how Sybase supports accessibility, see Sybase Accessibility at http://www.sybase.com/accessibility. The Sybase Accessibility site includes links to information on Section 508 and W3C standards.
If you need help Each Sybase installation that has purchased a support contract has one or more designated people who are authorized to contact Sybase Technical Support. If you cannot resolve a problem using the manuals or online help, please have the designated person contact Sybase Technical Support or the Sybase subsidiary in your area.

xiv Replication Server

Configuration Guide for UNIX 1
C H A P T E R 1 Preparing to Install and Configure Replication Server
This chapter helps you organize the information required to install the Replication Server software and to set up a replication system.
Before you beginSybase recommends that you first read this guide to plan your replication system before installing Replication Server. Version 15.2 of Replication Server, however, comes with a sample Replication Server that you can install during the installation process, so you can begin installing Replication Server immediately, and return to this manual to configure your Replication Server after installation.
To use the sample Replication Server, see the Replication Server Installation Guide for UNIX to begin installation.
You can use the “Worksheets” on page 79 to collect and record the information you need to install and configure a Replication Server, and to collect and record the information you need to add a database to your replication system.
Note After you have completed the worksheets, refer to the Replication Server Installation Guide for UNIX to install your Replication Server software.
Topic PageBefore you begin 1
Planning the replication system 2
Using the Replication Server installation worksheet 5
Completing the database setup worksheet 19

Planning the replication system
2 Replication Server
Planning the replication systemAnswer these questions before you begin to install and configure the software.
Where is the primary data?
Determine which Adaptive Server databases contain the data you want to replicate to other databases.
Note Although this document refers to Adaptive Server databases, you can use non-Adaptive Server databases with Replication Server. For more information, see Chapter 8, “Installing and Implementing Non-ASE Support Features”.
Where will you replicate the data?
Determine the Adaptive Server databases where Replication Server will maintain copies of the data.
What Replication Servers will you need?
When you design a replication system, you decide how many Replication Servers will be installed, which databases they will manage, and on which machine they will execute.
A Replication Server can manage one or more databases. One Replication Server is adequate for some replication systems. Other systems require a Replication Server at each geographic site to manage all of the databases at that site. Still others require multiple Replication Servers at each site to handle many databases or heavy transaction volumes.
When you upgrade Replication Servers, you can “phase in” the upgrades and install 15.2 Replication Servers initially only at certain sites. Consider the timing of such upgrades with care, and assess each site’s need for the new Replication Server features.

CHAPTER 1 Preparing to Install and Configure Replication Server
Configuration Guide for UNIX 3
Where is the RSSD for each Replication Server?
Replication system data is stored in a dedicated Adaptive Server Enterprise database called the Replication Server System Database (RSSD), or embedded in an SQL Anywhere® database (ERSSD). RSSD must be actively managed, while ERSSD is automatically created, configured, and maintained by Replication Server. If you choose to use RSSD, it is created when the Replication Server is installed.
Before you begin the installation, decide which Adaptive Server will store the RSSD for the Replication Server and the devices on which the database and its log will be stored. You can create the Adaptive Server database devices during installation, but identify their physical disk location before you install the Replication Servers.
If you choose to use ERSSD, decide the directory paths for the ERSSD database file, transaction log, and backup. For better performance and recoverability, the database file, transaction log, and backup directory should be on different disk devices.
Note Embedded Replication Server System Database (ERSSD) requires Sybase SQL Anywhere®. SQL Anywhere version 11 included with Replication Server 15.2 is only available on 32-bit and 64-bit Linux, 64-bit Sun SPARC, 64-bit Sun Solaris x86/x64, 64-bit HP Itanium, and 64-bit IBM AIX platforms.
The ERSSD, Sample Replication Server, and ASA11 folder are not available on 32-bit Sun SPARC, 32-bit Sun Solaris x86/x64, 32-bit IBM AIX, and 64-bit Linux on POWER (IBM pSeries).
Where is the initial disk partition for each Replication Server?
Replication Server stores messages, such as replicated transactions, on disk in stable queues. Disk space for the queues is allocated from disk partitions you create. A disk partition can be a raw disk partition or an operating system file.
You must allocate a disk partition of at least 20MB for each Replication Server you install. You can add more partitions later if necessary. Check each partition to make sure that it is available and that the “sybase” user can write to it. To use an operating system file for a partition, create an empty file. Verify that there is enough space on the file system for Replication Server to extend the file to full partition size.
Which Replication Server is the ID Server?
The first Replication Server you install is the ID Server. It must be running when you install new Replication Servers or add databases to the replication system.

Planning the replication system
4 Replication Server
The ID Server assigns a unique site ID to each Replication Server and a unique database ID to each database in the replication system. It also maintains replication system version information.
Which databases require Replication Agents?
A Replication Agent retrieves transactions from a database log, and passes them to the replication system via the Replication Server that manages the database.
There is one Replication Agent per database. Because the Replication Agent is configured when a database is set up for replication, you must know whether a Replication Agent is required before you add a database to the replication system. A user database requires a Replication Agent if:
• The database holds primary data that is replicated to other databases managed by the same or different Replication Servers.
• The Replication Server manages a database that is a source of replicated stored procedure execution.
You can replicate a stored procedure execution from a primary to replicate databases or from a replicate to a primary database. RepAgent retrieves the procedure call information from the database transaction log. See the Replication Server Administration Guide Volume 1.
• The database is the active or standby database in a warm standby application. RepAgent for a standby database is needed only when you switch to the standby database. See the Replication Server Administration Guide Volume 1.
An RSSD requires a Replication Agent if the Replication Server using that RSSD has a route to another Replication Server; for example:
• The Replication Server manages primary data that is replicated to databases managed by other Replication Servers.
• The Replication Server manages a database that is a source of replicated stored procedure execution.
• The Replication Server is an intermediate site in an indirect route.
An RSSD does not require a RepAgent if the replication system has only one Replication Server. RepAgent for ERSSD is managed by Replication Server. It is automatically started when a route is created. You do not need to decide the ERSSD RepAgent requirements at installation or configuration time of Replication Server.

CHAPTER 1 Preparing to Install and Configure Replication Server
Configuration Guide for UNIX 5
Which databases require warm standby?
Replication Server can maintain a warm standby database for an Adaptive Server database. If the active database fails, clients can switch to the standby database with little interruption.
To set up a warm standby application, you must perform some tasks in the Replication Server before and after you add databases to the replication system. Read Chapter 3, “Managing Warm Standby Applications” in the Replication Server Administration Guide Volume 2, before you install Replication Server.
Using the Replication Server installation worksheetMake copies of the worksheet in “Replication Server installation worksheet” on page 80 in Appendix A, “Worksheets.” Use the copies to record information as you read the rest of this section. Keep the copies so you can use them if you reconfigure your replication system.
The program used to configure Replication Server software is called rs_init. The sections on the worksheets correspond to the rs_init menus, so you can enter information from the worksheets directly into rs_init. See “Using rs_init” on page 23.
For all supported UNIX and Linux platforms, see the Replication Server Installation Guide for UNIX for information about software installation procedures and requirements.
Completing the worksheetFill out each section of the installation worksheet.
rs_init supplies default values for most of the items on the worksheets in “Replication Server installation worksheet” on page 80 and “Database setup worksheet” on page 83. Many of the defaults are constructed from values that you enter. For example, if you enter “TOKYO_RS” for the Replication Server name, rs_init names the log file TOKYO_RS.log. You can accept the displayed value or enter something else.
To use the rs_init defaults, complete the required items on the worksheet, which are marked with an asterisk (*). When you run rs_init, copy the default values from the menu to the worksheet so that you have a complete record of the configuration.
Using the Replication Server installation worksheet
6 Replication Server
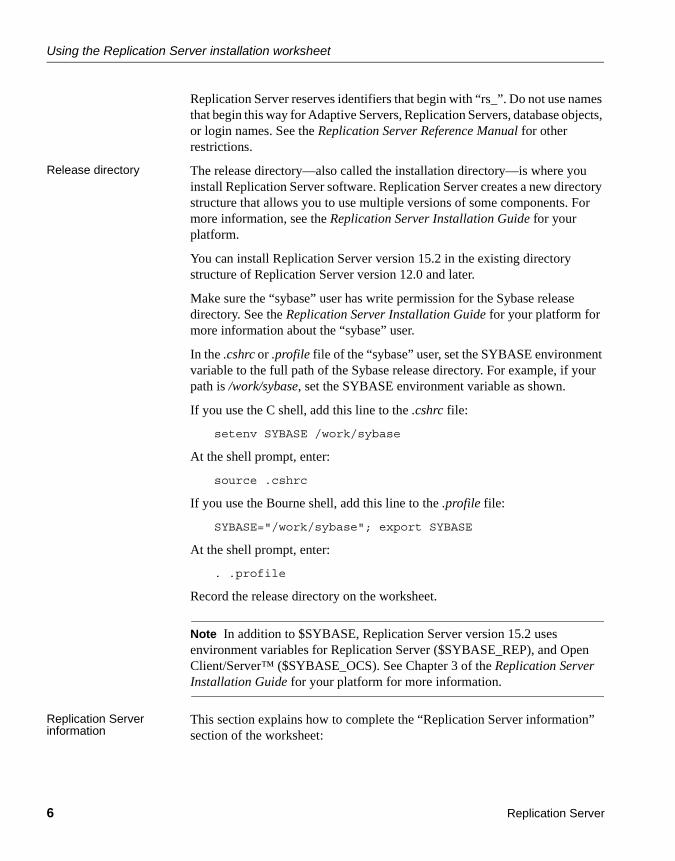
Replication Server reserves identifiers that begin with “rs_”. Do not use names that begin this way for Adaptive Servers, Replication Servers, database objects, or login names. See the Replication Server Reference Manual for other restrictions.
Release directory The release directory—also called the installation directory—is where you install Replication Server software. Replication Server creates a new directory structure that allows you to use multiple versions of some components. For more information, see the Replication Server Installation Guide for your platform.
You can install Replication Server version 15.2 in the existing directory structure of Replication Server version 12.0 and later.
Make sure the “sybase” user has write permission for the Sybase release directory. See the Replication Server Installation Guide for your platform for more information about the “sybase” user.
In the .cshrc or .profile file of the “sybase” user, set the SYBASE environment variable to the full path of the Sybase release directory. For example, if your path is /work/sybase, set the SYBASE environment variable as shown.
If you use the C shell, add this line to the .cshrc file:
setenv SYBASE /work/sybase
At the shell prompt, enter:
source .cshrc
If you use the Bourne shell, add this line to the .profile file:
SYBASE="/work/sybase"; export SYBASE
At the shell prompt, enter:
. .profile
Record the release directory on the worksheet.
Note In addition to $SYBASE, Replication Server version 15.2 uses environment variables for Replication Server ($SYBASE_REP), and Open Client/Server™ ($SYBASE_OCS). See Chapter 3 of the Replication Server Installation Guide for your platform for more information.
Replication Server information
This section explains how to complete the “Replication Server information” section of the worksheet:

CHAPTER 1 Preparing to Install and Configure Replication Server
Configuration Guide for UNIX 7
• Replication Server name Required – enter a name for the Replication Server. The name must be unique in the replication system.
• Is this Replication Server the ID Server? Required – select Yes if you are installing the ID Server or No if you are not. See “ID Server information” on page 11 for more information.
• Replication Server error log Enter the path for the Replication Server error log file. Replication Server writes informational and error messages to this text file.
• Replication Server configuration file Enter the path for the Replication Server configuration file, which contains parameters that Replication Server reads at start-up. For more information, see Chapter 4, “Managing a Replication System” in the Replication Server Administration Guide Volume 1.
• Replication Server password encryption Select Yes if you want passwords to be encrypted in the Replication Server configuration file and in the RSSD, and No if you do not want encrypted passwords.
Warning! If you do not encrypt passwords, anyone with the required permissions can look at the passwords in the configuration files and in the RSSD rs_users system table.
• Replication Server character set Enter the character set that the Replication Server will use. You can specify any Sybase-supported character set that is available for your language.
For replication to work properly, the character set used by the Replication Server should match the character set used by the data servers and RepAgents it controls. Additionally, it should be compatible with the character sets of the other Replication Servers in the system.
By default, rs_init configures Replication Server with the native character set for your platform. Additional information about character sets is available in the Adaptive Server Enterprise Configuration Guide.
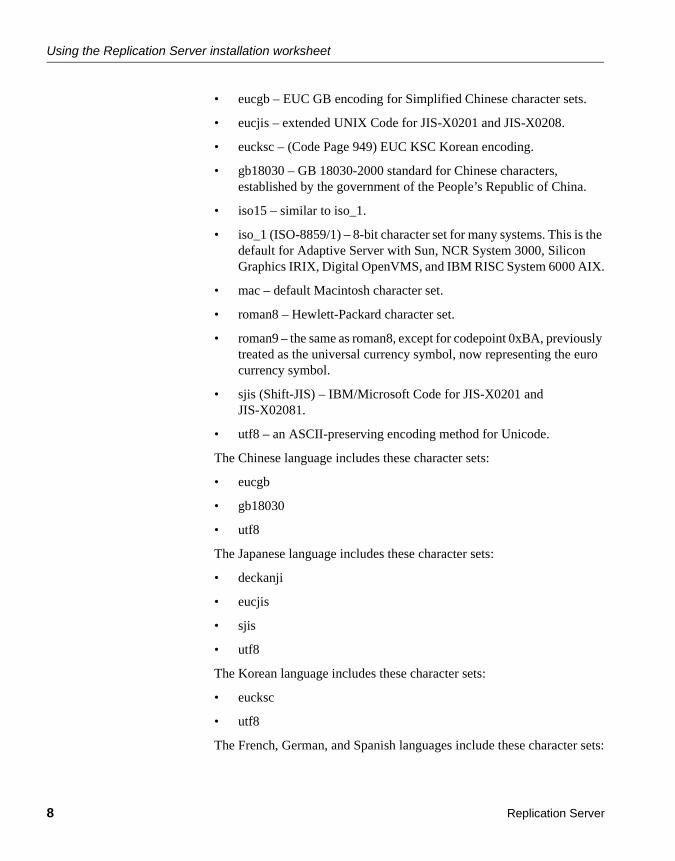
The supported character sets in the English language version of Replication Server include:
• cp437 (Code Page 437) – character set used in IBM PCs.
• cp850 (Code Page 850) – IBM/Microsoft Multilingual Character Set, used in IBM PCs.
• deckanji – DEC Kanji Code for JIS-X0208.
Using the Replication Server installation worksheet
8 Replication Server
• eucgb – EUC GB encoding for Simplified Chinese character sets.
• eucjis – extended UNIX Code for JIS-X0201 and JIS-X0208.
• eucksc – (Code Page 949) EUC KSC Korean encoding.
• gb18030 – GB 18030-2000 standard for Chinese characters, established by the government of the People’s Republic of China.
• iso15 – similar to iso_1.
• iso_1 (ISO-8859/1) – 8-bit character set for many systems. This is the default for Adaptive Server with Sun, NCR System 3000, Silicon Graphics IRIX, Digital OpenVMS, and IBM RISC System 6000 AIX.
• mac – default Macintosh character set.
• roman8 – Hewlett-Packard character set.
• roman9 – the same as roman8, except for codepoint 0xBA, previously treated as the universal currency symbol, now representing the euro currency symbol.
• sjis (Shift-JIS) – IBM/Microsoft Code for JIS-X0201 and JIS-X02081.
• utf8 – an ASCII-preserving encoding method for Unicode.
The Chinese language includes these character sets:
• eucgb
• gb18030
• utf8
The Japanese language includes these character sets:
• deckanji
• eucjis
• sjis
• utf8
The Korean language includes these character sets:
• eucksc
• utf8
The French, German, and Spanish languages include these character sets:

CHAPTER 1 Preparing to Install and Configure Replication Server
Configuration Guide for UNIX 9
• cp437
• cp850
• iso15
• iso_1
• mac
• roman8
• roman9
• utf8
When you create a subscription, Replication Server copies the requested data from the primary database to the replicate database in a process known as subscription materialization. During subscription materialization, the primary data server converts character data to the replicate Replication Server character set. Make sure that the replicate Replication Server character set, if it is different from the primary data server’s character set, is installed at the primary data server.
Similarly, when you create a route, make sure that the character set of the destination Replication Server is installed at the data server of the source Replication Server RSSD.
• Replication Server language Enter the language Replication Server should use to print messages to the error log and to clients. It can be any language that is compatible with the character set you will install.
By default, rs_init configures Replication Server to print messages in U.S.English.
Other available languages are Chinese, French, German, Japanese, Korean, and Spanish. rs_init uses the same identifiers for language names that Adaptive Server uses.
If the language for the Replication Server and the language for its connected data servers are different, the language for the Replication Server must be installed at the data servers. This lets the data servers return messages to Replication Server in the configured language and recognize and format dates for the configured language.
For example, the date format “01/02/99” is equivalent to “January 2, 1999” in us_english but “February 1, 1999” in french. Data servers can format the date correctly only if the Replication Server configured language is installed.

Using the Replication Server installation worksheet
10 Replication Server
• Replication Server sort order Enter the sort order for the Replication Server. Sort order controls which rows of a table belong in a subscription that has a where clause involving character data. It also controls how identifiers you enter are recognized with regard to case sensitivity, accents, and so forth.
You can specify any Sybase-supported sort order that is compatible with your character set. For replication to work properly, all sort orders in your replication system should be the same.
By default, rs_init configures Replication Server with the binary sort order. Available sort orders vary, depending on the character set you plan to install. Sort orders are located in the Sybase release directory in the directory charsets/charset_name, where charset_name is the name of the character set.
See the Replication Server Design Guide for guidelines on configuring languages, character sets, and sort orders in your replication system.
Replication Server security information
This section explains how to fill out the “Replication Server security information” section of the worksheet. See Chapter 8 “Managing Replication Server Security” in the Replication Server Administration Guide Volume 1, for more information on security, and Chapter 5, “Secure Sockets Layer” on page 59 in this book for information specific to configuring SSL.
Network security is available only on Solaris.
• Enable network security Required – select Yes to enable external network security, and No if you are not using network security.
• Type of security system If you are enabling network security, select DCE or Kerberos.
• Login name Enter the name of the primary user that will be making the secure connections. Sybase recommends that you use the name of the Replication Server as the principle user name.
• Keytab file name Enter the full path to the location of the keytab file.
• Use SSL security Select Yes if you are using Secure Sockets Layer (SSL) security, and No if you are not.
• SSL identity file Enter the full path to the location of the SSL identity file.
• SSL private key password Enter the private key password. The default password is password.

CHAPTER 1 Preparing to Install and Configure Replication Server
Configuration Guide for UNIX 11
Replication Server interfaces information
Use the “Replication Server interfaces information” section of the worksheet to record information that defines the network port where Replication Server listens for connections. Each entry in the interfaces file is called a listener service.
Note If you are using network-based security, available with version 11.5 or later, use the directory services of your network security mechanism to register Replication Servers, Adaptive Servers, and gateway software. See the documentation that comes with your network-security mechanism for details.
• Hostname/address Required – enter the name of the machine that is running Replication Server. If the machine has more than one host name or IP address, enter the name or address associated with the network you want to use.
• Port Required – choose a port number between 1025 and 65535 that is not in use on the machine. Look in /etc/services or use the netstat command to find out which port numbers are in use.
• Name alias Required – on networks that allow multiple protocols, you can use a name alias to distinguish listener services. An alias is a nickname for the Replication Server. You cannot use the alias for any other server on the network.
ID Server information One Replication Server in a replication system is the ID Server. In addition to the usual Replication Server tasks, the Replication Server acting as the ID Server assigns a unique ID number to every Replication Server and database in the replication system. The ID Server also maintains version information for the replication system. Otherwise, the ID Server is like any other Replication Server.
When you install a new Replication Server or add a database to your replication system, the ID Server must be running. This allows the new Replication Server, or the Replication Server that manages the new database, to log in and retrieve an ID number. The ID Server must also be running whenever you create a route.

Using the Replication Server installation worksheet
12 Replication Server
You must install the ID Server before you install any other Replication Server. If you have only one Replication Server, that server is also the ID Server. If you are installing for the first time, the Replication Server is the ID Server. If you are adding a Replication Server to an existing replication system, you must know the name of the Replication Server in the system that is the ID Server.
Warning! The ID Server is critical to your replication environment, and is difficult to move once it has been installed. Plan your installation carefully.
• ID Server name Required – if the Replication Server you are installing is the ID Server, rs_init assigns an ID Server name identical to this Replication Server name.
If you are installing a new Replication Server in an existing Replication Server domain, enter the name of the Replication Server that is acting as the ID Server.
• ID Server user If the Replication Server you are installing is the ID Server, enter the login name that other Replication Servers will use to connect with this ID Server.
If you are installing a new Replication Server to an existing Replication Server domain, copy the ID Server user name from the worksheet you completed when you created the ID Server.
• ID Server password If the Replication Server you are installing is the ID Server, enter the password for the ID Server user.
If you are adding a new Replication Server to an existing Replication Server domain, copy the ID Server password from the worksheet you completed when you created the ID Server.
Note The “Starting Replication Server ID” and “Starting Database ID” worksheet items apply only to the ID Server. If you are not installing the ID Server, skip to “Replication Server System Database information” on page 14.
• Starting Replication Server ID and starting database ID These two configuration parameters allow you to specify separate ranges of Replication Server ID numbers and database ID numbers that an ID Server will assign. You are not required to specify ranges, but makes it easier to merge replication systems later.

CHAPTER 1 Preparing to Install and Configure Replication Server
Configuration Guide for UNIX 13
Some organizations have multiple independent replication systems. Each replication system has its own ID Server, which assigns unique IDs to its Replication Servers and databases. Since the ID Server determines member Replication Servers and databases in a replication system, one replication system in an organization with multiple replication systems is also called an ID Server domain.
No special steps are required to set up multiple ID Server domains. Every Replication Server or database belongs to one replication system and has a unique ID number in that ID Server domain.
If you decide to merge ID Server domains into one replication system, the task is easier if no two Replication Servers or databases in the organization have the same ID. To establish unique IDs, allocate non-overlapping ranges of ID numbers to the ID Servers at installation.
An ID Server assigns ID numbers sequentially. Separate ranges of values are maintained for databases and Replication Servers. The default ranges are shown in Table 1-1.
Table 1-1: Database and Replication Server default ID number ranges
Minimum values for each ID Server must be within the ranges specified. For example, if your organization has three separate ID Server domains, you could set the minimum ID numbers as shown in Table 1-2.
Table 1-2: Example ID number allocation for ID Server domains
This arrangement provides the ID Server in each domain at least 100,000 ID numbers for databases and 100,000 ID numbers for Replication Servers. You need not set a maximum value, since it is unlikely that you will install more than 100,000 Replication Servers or add more than 100,000 databases to a replication system.
See Chapter 4, “Managing a Replication System” in the Replication Server Administration Guide Volume 1, for more information about adding replication system domains.
Object type Minimum ID number Maximum ID number
Database 101 16777215
Replication Server 16777216 33554431
ID Server domain Starting database IDStarting Replication Server ID
Finance division 101 16777216
Manufacturing division 100101 16877216
Sales division 200101 16977216

Using the Replication Server installation worksheet
14 Replication Server
Replication Server System Database information
Replication Server maintains its system tables in its system database. You can choose to set up a Replication Server System Database (RSSD) in an Adaptive Server Enterprise database, or an Embedded Replication Server System Database (ERSSD) in an SQL Anywhere (SA) database. Use the information in this section to complete the “Replication Server System Database” section of the worksheet.
If you want an RSSD with Adaptive Server Enterprise, see “Adaptive Server Enterprise RSSD information” on page 14. If you want an ERSSD with SQL Anywhere, see “SQL Anywhere ERSSD information.”
SQL Anywhere ERSSD information
If you want an ERSSD, enter on your worksheet the information below. See Chapter 4, “Managing a Replication System” in the Replication Server Administration Guide Volume 1, for more information on ERSSDs. All fields are required.
• ERSSD name Enter the name of the SQL Anywhere server that will hold the system database for the Replication Server.
• ERSSD database file directory Enter the directory for the SQL Anywhere server database file.
• ERSSD transaction log directory Enter the directory for the SA server transaction log.
• ERSSD backup directory Enter the directory for the SQL Anywhere server backup files.
• ERSSD error log directory Enter the directory for the SQL Anywhere server error log file.
Note rs_init automatically fills these fields with default values on the same device. However for better performance and recoverability, place the ERSSD database directory, ERSSD transaction log directory, and ERSSD backup directory on separate devices.
Adaptive Server Enterprise RSSD information
If you want an RSSD using Adaptive Server Enterprise, enter the following:
• RSSD Adaptive Server name Required – enter the name of the Adaptive Server that will hold the system database for the Replication Server.
• RSSD name Enter the name of the database where the Replication Server system tables will be stored.
CHAPTER 1 Preparing to Install and Configure Replication Server
Configuration Guide for UNIX 15
• Will RSSD be replicated? Required – select Yes if the RSSD for the Replication Server requires a RepAgent, and No if it does not. See “Which databases require Replication Agents?” on page 4 for more information.
• Allow HA failover for RSSD connections? Select Yes if the Adaptive Server managing the RSSD supports HA failover and you want RSSD connections to fail over to an alternative Adaptive Server, and No if you do not.
• Create RSSD Required – select Yes if you want rs_init to create the system database.
Select No if the system database already exists or if you want to create it manually.
If the database already exists, it should be dedicated to this Replication Server. The database must have at least 10MB for data and 10MB for log space.
• SA user Enter the login name for the “sa” user for the Adaptive Server that will hold the RSSD. The default is “sa.”
• SA password Required – enter the “sa” password for the Adaptive Server that will hold the RSSD. rs_init uses the “sa” login name to create user login names and the system tables in the RSSD.
• Primary user Enter the login name for the RSSD’s primary user. Replication Server uses this login name for system table updates. rs_init creates the primary user.
• Primary password Enter the password for the RSSD’s primary user.
• Maintenance login Enter the name of the maintenance user for the RSSD. Replication Server uses this login name to perform operations on the system tables that are replicated from other sites. rs_init creates the maintenance user for you and adds the maintenance user to the RSSD.
• Maintenance password Enter the password for the RSSD maintenance user.
Adaptive Server Enterprise RSSD device information
If you do not want rs_init to create the RSSD, skip this section. Go to “Disk partition information” on page 17.
If you selected Yes for “Create RSSD,” read this section and complete the “RSSD Device Information” section of the worksheet.

Using the Replication Server installation worksheet
16 Replication Server
The RSSD device is the Adaptive Server database device where rs_init creates the Replication Server RSSD. Therefore, choose a database device other than the default master device, that has the minimum amount of space required. Use sp_helpdevice to list the available devices.
Note rs_init by default uses a minimum of 40MB for the database size, and 16MB for the RSSD log size.
Select one of the following if the Adaptive Server does not have a device available for the RSSD:
• Add a device and record the information on your worksheet
• Have rs_init create the device when it installs Replication Server
Note If the Adaptive Server is not on the local machine, you must create the device yourself. rs_init incorrectly evaluates the local machine’s file system instead of the remote machine’s file system when it validates the path name and disk space requirements of the device.
If you want rs_init to create the device, verify that the disk file or raw partition you want to use exists and has the proper permissions. Execute sp_configure devices in Adaptive Server to verify that the value for devices is high enough to allow you to add a new device. See the Adaptive Server System Administration Guide for information about device requirements.
Use the information in this section to complete the “RSSD device information” section of the worksheet:
• Size of the RSSD database Enter the size, in megabytes, of the data portion.
• RSSD device name Required – enter the name of the Adaptive Server logical device where you want to create the RSSD. If the device already exists, it must have enough space available to create the new database.
• Create the RSSD device Required – select Yes if you want rs_init to create the RSSD data device on the Adaptive Server database device.
Select No if the RSSD data device already exists, or if you will create it before you run rs_init.
• RSSD device physical name If you want rs_init to create the RSSD device, enter the physical device name for the database device on which you want to store the RSSD.
CHAPTER 1 Preparing to Install and Configure Replication Server
Configuration Guide for UNIX 17
If you do not want rs_init to create the RSSD data device, leave this entry blank.
• RSSD device size If you want rs_init to create the RSSD device, enter the capacity, in megabytes, of the physical device. The device size must be at least the size you specified for the data portion of the RSSD database.
If you do not want rs_init to create the RSSD device, leave this entry blank.
• Size of the RSSD log Enter the size, in megabytes, for the RSSD database log.
Note Sybase recommends that you store the RSSD log on a device other than the master device, and on a different device from the RSSD database.
• RSSD log device name Required – enter the logical name for the device you want rs_init to use for the RSSD log.
• Create the RSSD log device Required – select Yes if you want rs_init to create the RSSD log device in Adaptive Server.
Select No if the device already exists or if you will create it before you run rs_init.
• RSSD log device physical name If you want rs_init to create the RSSD log device, enter the physical device name for the device.
If you do not want rs_init to create the RSSD log device, or if you are using a single device for both the RSSD and its log (this is not recommended), leave this field blank.
• RSSD log device size If you want rs_init to create the RSSD log device, enter the capacity, in megabytes, of the physical device. The device size must be at least the size you specified for the RSSD log.
If you do not want rs_init to create the RSSD log device, or if you are using a single device for both the RSSD and its log (this is not recommended), leave this field blank.
Disk partition information
Replication Server uses disk partitions for stable queues, which temporarily store the data it receives and sends.
Replication Server can use raw partitions, if they are available on your platform, or operating system files. Raw partitions provide improved recovery capability because the operating system does not buffer their I/O.
The minimum partition size is 20MB. You can add more partitions after the Replication Server is installed.

Using the Replication Server installation worksheet
18 Replication Server
Use the information in this section to complete the “Disk partition information” section of the worksheet:
• Disk partition path Required – enter the name of the physical disk device or the full path name of a file to be used for the disk partition. If you use an operating system file, there must be enough space on the file system for Replication Server to extend the file to the size you specify. You must have already created the operating system file.
See “Creating a disk partition” on page 18 for instructions.
• Logical identifier for disk partition Required – enter a logical identifier for the partition. This name is used in commands and in Replication Server messages to identify the disk partition. See the Replication Server Administration Guide for more information.
• Size of disk partition Enter the size, in megabytes, of the disk partition. The partition must be at least 20MB.
• Start value for partition This value prevents Replication Server from using the beginning of a raw disk partition. It is required if your operating system stores information, such as configuration maps, at the beginning of the disk partition. Enter the number of megabytes Replication Server should ignore. For example, if you enter 1, Replication Server will not use the first megabyte of the raw disk partition.
❖ Creating a disk partition
If you use an operating system file for a partition, the file must exist before you specify it in rs_init.
1 To create an empty file for a partition, use a text editor or the UNIX touch command. Verify that there is enough free space on the file system for the file to grow to the size you specify. Replication Server extends the file to the full partition size during installation. Grant read and write permissions on the file to the “sybase” user.
For example, log in as the “sybase” user, and create the file with this command, where path is the full path to the disk file:
touch path
2 Set the permissions on the file:
chmod 600 path
CHAPTER 1 Preparing to Install and Configure Replication Server
Configuration Guide for UNIX 19
Remote site connections information
The “Remote site connections information” section of the worksheet defines a login name for other Replication Servers to use when logging in to this Replication Server. rs_init creates this login after installing the Replication Server.
• Replication Server login name Enter the login name that other Replication Servers will use to connect to this Replication Server.
• Replication Server password Enter a password for the Replication Server login name.
Database RepAgent information
See “Planning the replication system” on page 2 for more information about when an RSSD requires a RepAgent.
Use the information in this section to complete the “Database Replication Agent information” section of the worksheet:
• RS user Enter the login name that the RSSD Replication Agent will use to connect to the Replication Server.
• RS password Enter a password for the RS user login name.
Completing the database setup worksheetMake a copy of “Database setup worksheet” on page 83 for each database you plan to add to the replication system.
Each primary or replicate database in your replication system is managed by a Replication Server. The database may also require a Replication Agent. See “Which databases require Replication Agents?” on page 4 for more information.
See the Replication Server Design Guide for guidelines on configuring character sets, languages, and sort orders in your replication system.
See the Replication Server Administration Guide for more information about login names for replication system components.
Replication Server information
Use the information in this section to complete the “Replication Server information” section of the worksheet, which identifies the Replication Server that will manage the database. The Replication Server must be installed and running before you can add the database to the replication system:
• Replication Server name Required – enter the name of the Replication Server that will manage the database.

Completing the database setup worksheet
20 Replication Server
• RS SA user Required – enter the Replication Server System Administrator (RS SA) login name (usually “sa”).
• RS SA password Required – enter the password for the RS SA user.
Replication Server interfaces information
Copy the information for the “Replication Server interfaces information” section from the Replication Server installation worksheet you completed for the Replication Server that will manage this database. Since the Replication Server is already installed, you do not have to enter this information again unless you start rs_init in a release directory that uses a different interfaces file.
• Hostname/Address Required – enter the name of the machine where the Replication Server is running.
• Port Required – enter the port number assigned to the Replication Server.
• Name alias Enter the name alias for the Replication Server.
Database information The “Database information” section of the worksheet identifies the database you are adding to the replication system:
• Adaptive Server name Required – enter the name of the Adaptive Server where the database resides.
• SA user Enter the “sa” login name for the Adaptive Server managing the database.
• SA password Enter the password for the SA user login name.
• Database name Enter the name of the database.
• Will the database be replicated? Required – select Yes if the database requires a Replication Agent, and No if it does not. See “Which databases require Replication Agents?” on page 4 for more information.
• Maintenance user Enter a login name for Replication Server to use when updating replicated data. This user must be granted all permissions necessary to maintain the replicated data. rs_init creates this login, if it does not already exist, and grants the necessary permissions.
• Maintenance password Enter the password for the maintenance user.
• Is this a physical connection for an existing logical connection?
Select Yes if you are adding an active or standby database for a warm standby application, and No if you are not.
See the instructions for setting up warm standby databases in the Replication Server Administration Guide Volume 2.
CHAPTER 1 Preparing to Install and Configure Replication Server
Configuration Guide for UNIX 21
Logical connection information
Complete the “Logical connection information” section of the worksheet only if you are adding a database that is part of a warm standby database application.
Note Setting up a warm standby application requires that you perform additional tasks in the Replication Server before and after you use rs_init to add the databases to the replication system. See Chapter 3 of “Managing Warm Standby Applications,” in the Replication Server Administration GuideVolume 2.
• Is this an active connection or standby connection? Required –select Active if you are adding the active database for the warm standby application.
Select Standby if you are adding the standby database for the warm standby application.
• Logical DS name Required – enter the name of the logical data server for the logical connection. You must have already created it using create logical connection.
• Logical DB name Required – enter the name of the logical database for the logical connection. You must have already created it using create logical connection.
Complete the rest of the items in this section only if you selected standby in response to “Is this an active connection or standby connection?”
• Active DS name Required – enter the name of the data server with the active database. Enter the actual data server name, not the logical data server name defined for the warm standby database pair.
• Active DB name Required – enter the name of the active database. Enter the actual database name, not the logical database name defined for the warm standby database pair.
• Active DB SA user Required – enter the login name of the System Administrator for the active database’s data server. Replication Server uses this login name to set up warm standby applications.
• Active DB SA password Required – enter the password for the active data server’s System Administrator login name.
• Initialize standby using dump and load? Required – select Yes if you plan to initialize the standby database with the contents of the active database with the dump and load commands.

Completing the database setup worksheet
22 Replication Server
Select No if you plan to initialize the standby database with the bcp utility, or if you do not need to initialize the standby database.
• Use dump marker to start replicating to standby? Required – select Yes if transactions will be executed in the active database while the standby database is initialized, and No if they are not.
Database RepAgent information
Complete the “Database RepAgent information” section of the worksheet if the database requires a RepAgent, and you selected Yes for “Will the database be replicated?”
• RS user Enter the Replication Server login name that the RepAgent will use to connect to the Replication Server.
The default RS user login name and password for this RepAgent is the default login name and password for the RS user for the RSSD RepAgent, which you noted in the section titled “RSSD RepAgent” on the Replication Server installation worksheet. If you want this user to use a different login name and password, you must first create the user in the Replication Server and grant it connect source permission.
• RS password Enter the password for the RS user login name.

Configuration Guide for UNIX 23
C H A P T E R 2 Configuring Replication Server and Adding Databases with rs_init
This chapter explains how to use the rs_init utility to configure Replication Server and to add databases to your replication system.
You need the worksheet in “Replication Server installation worksheet” on page 80. Each section of the worksheet corresponds to a screen or a menu in rs_init. Enter the information from the worksheet into rs_init.
Using rs_initrs_init is a utility used to configure Replication Server and add databases to a replication system. You can use rs_init interactively or with a resource file.
Using rs_init interactivelyrs_init in interactive mode is easier to use than a resource file. The interactive mode provides command keys and menu prompts to help you make selections and move between screens. rs_init rejects the invalid entries and displays warnings or error messages when you make improper selections. If you make a mistake, you can change your entry and continue with the installation session.
Topic PageUsing rs_init 23
Starting rs_init 24
Configuring a new Replication Server 25
Adding a database to the replication system 31

Starting rs_init
24 Replication Server
Table 2-1 lists the command keys you can use in interactive mode. Press Return to confirm an item you have entered.
Table 2-1: rs_init interactive command keys
rs_init with a resource fileIf you plan to install multiple Replication Servers, and many of the rs_init values are similar, using resource files to install, configure, upgrade, or downgrade may save time. See Appendix B, “Using rs_init with Resource Files” for more information.
A resource file is an ASCII-formatted file that contains configuration information for rs_init. Instead of entering configuration variables during an interactive rs_init session, you edit the resource file to contain the variables, then type that file name on the rs_init command line.
Starting rs_initThis section provides instructions on how to start rs_init. Enter the information from the Replication Server installation worksheet based on the preparation you did in Chapter 1, “Preparing to Install and Configure Replication Server.”
Keys Command Action
Ctrl+A Accept Accept the values currently listed in the menu and move to the next menu.
Ctrl+B Backward Scroll backward one page. Use this command key when a menu or list does not fit on a single screen.
Ctrl+C Quit Quit rs_init and return to the shell prompt. Your terminal may use a key mapping other than Ctrl+C. Use the key sequence that is mapped to the SIGINT signal.
Ctrl+F Forward Scroll forward one page. Use this command key when a menu or list does not fit on a single screen.
Ctrl+R Refresh Refresh the screen.
Ctrl+X or Esc
Exit Exit the current menu or prompt.
Ctrl+W Write to resource file
Generate a file containing the values specified during the current rs_init session. The default file name is $SYBASE/$SYBASE_REP/init/logs/resource.dmp. rs_init prompts you to enter an alternative file name. You can copy information from this generated file into one of the resource file templates. See Appendix B, “Using rs_init with Resource Files.”
? Help Display an online help screen.

CHAPTER 2 Configuring Replication Server and Adding Databases with rs_init
Configuration Guide for UNIX 25
❖ Starting rs_init
1 Log in to your machine as the “sybase” user.
Note You must run rs_init on the machine on which the Replication Server will run.
2 Set the SYBASE environment variable to the path of the Sybase release directory, as described in the Replication Server Installation Guide for UNIX Platforms.
3 Change to the Sybase release directory:
cd $SYBASE/$SYBASE_REP
4 Enter:
$SYBASE/$SYBASE_REP/install/rs_init
You see the RS_INIT menu.
5 Choose Configure a Server Product, then choose Replication Server. From the Configure Replication System menu you can:
• Install a new Replication Server – see “Configuring a new Replication Server” on page 25.
• Add a database to your Replication System – see “Adding a database to the replication system” on page 31.
• Upgrade or downgrade your software – see Chapter 3, “Upgrading or Downgrading an Existing Replication Server.”
• Enable password encryption for a Replication Server or alter passwords in configuration files – see Chapter 4, “Using Password Encryption.”
Configuring a new Replication ServerThis section explains how to configure a new Replication Server using rs_init. To use these instructions, you need the completed Replication Server installation worksheet. If you have not completed the worksheet, read Chapter 1, “Preparing to Install and Configure Replication Server” and complete it before you continue.

Configuring a new Replication Server
26 Replication Server
❖ Configuring a new Replication Server
1 From the rs_init menu, select Configure a Server Product. The screen you see lists the Sybase products that are installed in the release directory.
2 Select Replication Server.
3 Select Install a New Replication Server.
You see a list of tasks you must complete to install a new Replication Server.
Note The Install a New Replication Server option only lets you configure a new Replication Server; it does not allow you to install additional software.
Select each task and complete its screens until the status of each task is “Complete.”
❖ Entering Replication Server information
1 In the New Replication Server screen, select Replication Server Information. You see the Replication Server Name screen.
2 Enter the name you recorded in the “Replication Server information” section of your worksheet, and press Return. Press Ctrl+A to accept the name.
3 Select each item on the Replication Server Information screen and enter the value you recorded on your worksheet. If you use a default value, record it on your worksheet.
Note For character sets, language and sort order, enter the appropriate number for the value you want to select from the list displayed.
Note For more information on the character sets and sort orders, read Chapter 6, “Customizing Localization for Adaptive Server,” in the Adaptive Server Enterprise Configuration Guide.
In some configurations, if you set Replication Server’s language before you set its character set, you receive an error message. To avoid this, set the character set before you set the language.
4 Press Ctrl+A to accept the information and return to the New Replication Server dialog box.

CHAPTER 2 Configuring Replication Server and Adding Databases with rs_init
Configuration Guide for UNIX 27
Editing the interfaces file
The interfaces file contains network address information for each Adaptive Server and Replication Server in your replication system.
To reach the interfaces file screen, select Replication Server Interfaces Information from the Replication Server Information screen.
Select dsedit to edit the interfaces file.
See the Open Client and Open Server Configuration Guide for more information on dsedit.
Note Sybase recommends that if you are using Replication Server 15.2 with network-based security, you use the directory services of your network security mechanism to register Replication Servers, Adaptive Servers, and gateway software. See the documentation that comes with your network security mechanism for details.
❖ Entering ID Server information
The ID Server is a Replication Server that registers all Replication Servers and databases in a replication system. It assigns and maintains ID numbers for these components and maintains version information for the entire replication system.
When you:
• Configure the ID Server, you determine the login name and password (ID Server User/Password) that all Replication Servers use to log in to the ID Server.
• Install a Replication Server that is not the ID Server, copy the ID Server Name, ID Server User, and ID Server Password from the worksheet you completed for the ID Server.
To complete the ID Server Information dialog box:
1 From the New Replication Server screen, select ID Server Information.
2 If the Replication Server you are installing is not the ID Server, you see the ID Server Name screen. Select ID Server Name and type the name of the ID Server for the replication system from the worksheet you completed for the ID Server. Then press Ctrl+A to accept your changes.
Note If the Replication Server you are configuring is the ID Server, the ID Server Information dialog box appears.

Configuring a new Replication Server
28 Replication Server
The Starting Replication Server ID and Starting Database ID appear only when you configure the ID Server.
3 Complete the ID Server Information screen with the information from the “ID Server” section of your worksheet.
If you do not make entries for the Starting Replication Server ID and starting database ID, the default ranges are used, as shown in Table 1-1 on page 13.
4 Press Ctrl+A to accept your changes and return to the New Replication Server dialog box.
RSSD information Before you can enter your Replication Server System Database (RSSD) information, you must determine if you want an RSSD, or an ERSSD.
In the Replication Server System Database Choice screen, the first line asks, “Do you want Replication Server System Database embedded?” Select:
• No – if you do not want an ERSSD. This is the default value, and assumes you are creating a regular Replication Server System Database with Adaptive Server Enterprise. The second line on the screen appears as:
2. Replication Server Database on ASE INCOMPLETE
Select the Replication Server System Database on ASE option, to go to the Replication Server System Database screen, and follow the steps in “Entering Replication Server System Database information” on page 29 to complete the information about your RSSD.
• Yes – if you want an ERSSD using SQL Anywhere. The text on the second line changes to:
2. Embedded Replication Server SystemDatabase INCOMPLETE
Select the Embedded Replication Server System Database option, to go to the ERSSD Name screen, and follow the steps in “Entering ERSSD information.”
❖ Entering ERSSD information
1 In the ERSSD Name screen, enter the name of your SQL Anywhere server, and press Ctrl+A to accept the name. The Embedded Replication Server System Database screen appears.
2 You see the following options, each filled with a default value:
• ERSSD Database Directory
• ERSSD Transaction Log Directory
CHAPTER 2 Configuring Replication Server and Adding Databases with rs_init
Configuration Guide for UNIX 29
• ERSSD Backup Directory
• ERSSD Error Log Directory
• ERSSD Interface Information
Select each item to change the default value to the value you recorded on your worksheet from the Replication Server installation worksheet. See Chapter 4, “Managing a Replication System” in the Replication Server Administration Guide Volume 1, for more information on value requirements for ERSSDs.
3 Press Ctrl+A to accept the values and return to the Replication Server System Database Choice screen.
4 Press Ctrl+A to return to the New Replication Server screen.
❖ Entering Replication Server System Database information
1 In the New Replication Server screen, select Replication Server System Database.
2 Select each item on the screen and enter the value recorded on your worksheet. If you use a default value, copy it from the dialog box to your worksheet.
For “RSSD will be replicated,” select Yes if you will have more than one Replication Server in your environment. Otherwise, select No.
3 Press Ctrl+A to accept the values. You see the New Replication Server dialog box.
❖ Entering RSSD device information
If you selected Yes for Create RSSD in the Replication Server System Database screen, you see a new option, RSSD Device Information, on the New Replication Server screen.
Warning! If you selected No for Create RSSD in the Replication Server System Database screen, you must already have created the RSSD. Skip this section and go to “Entering disk partition information” on page 30.
1 From the New Replication Server dialog box, select RSSD Device Information, then choose Continue.
2 Complete the screen using information from your worksheet. If you use a default value, copy it from the screen to your worksheet.
Configuring a new Replication Server
30 Replication Server
3 Press Ctrl+A to accept your entries and return to the New Replication Server screen.
❖ Entering RSSD RepAgent information
If you selected Yes for “RSSD will be replicated” in the Replication Server System database screen, a new Database Replication Agent option will appear in the New Replication Server screen:
1 Select Database Replication Agent. Enter the RSSD Replication Server user name, and the Replication Server password from your worksheet.
Note Where necessary, rs_init uses the settings established for the Replication Server when configuring an RSSD RepAgent.
2 Press Ctrl+A to accept this information.
❖ Entering disk partition information
The Replication Server disk partition must exist before you can complete the Disk Partition Information screen. If you did not define the partition when you completed the worksheet, follow the instructions in “Creating a disk partition” on page 18 before you continue.
1 From the New Replication Server screen, select Disk Partition.
2 Complete the screen using the information you recorded on your worksheet.
You can add more partitions after Replication Server is installed. See the Replication Server Design Guide for help in determining how much space you need.
3 Press Ctrl+A to accept the values and return to the New Replication Server screen.
❖ Entering remote site connections information
rs_init completes the Remote Site Connections screen with default values based on the Replication Server name you entered.
To view or change any of these values:
1 From the New Replication Server screen, select Remote Site Connections.
2 Complete the screen using the information on your worksheet. If you use a default value, copy it to the “Remote site connections” section of the worksheet.

CHAPTER 2 Configuring Replication Server and Adding Databases with rs_init
Configuration Guide for UNIX 31
3 Press Ctrl+A to accept your changes and return to the New Replication Server screen.
❖ Completing the Replication Server configuration
When the status of each task in the New Replication Server screen is “Complete,” follow these steps to complete the configuration.
1 Press Ctrl+A to accept the information and exit the New Replication Server screen.
2 At the prompt that asks if you want to execute Replication Server tasks now:
• Enter “y” to have rs_init configure the new Replication Server.
• Enter “n” to return to the New Replication Server screen, where you can modify values in any of the screens.
Status messages display while rs_init sets up the Replication Server. If errors occur, use the error messages that display to correct the information in the configuration screens or to modify your environment.
When the configuration is complete, rs_init displays the message “Configuration completed successfully.”
3 Press Return to return to the Configure Replication System screen.
Note If you are configuring other Replication Servers on the same computer, go back to “Configuring a new Replication Server” on page 25 and repeat the procedure for each additional Replication Server.
4 Press Ctrl+X twice to return to the RS_INIT menu.
You can find out more about the progress of the installation by looking at the rs_init log files, which are stored in the init/logs subdirectory of the $SYBASE_REP directory.
Adding a database to the replication systemEach primary or replicate database in a replication system is managed by a Replication Server.
Adding a database to the replication system
32 Replication Server
Follow the steps below to add a database to the replication system. To use these instructions, you need the completed “Database Setup Worksheet.” If you have not completed the worksheet, read Chapter 1, “Preparing to Install and Configure Replication Server” and complete it before you continue.
❖ Adding a database to the replication system
1 From the RS_INIT menu, select Configure a Server Product.
2 Select Replication Server. You see the Configure Replication System screen.
3 Select Add a Database to the Replication System. rs_init indicates the status of each part of the installation with “Incomplete” or “Complete.”
4 Select Replication Server Information.
5 Select Replication Server Name. Enter the name of the Replication Server from your worksheet. Press Ctrl+A to accept your changes.
6 Complete the screen, using the information you recorded on your worksheet.
If the status of Replication Server Interfaces Information is “Incomplete,” see “Editing the interfaces file” on page 27 for help in adding an entry for the Replication Server.
7 Press Ctrl+A to accept your changes and return to the Add Database to Replication System screen.
❖ Completing database information
Follow these steps to add a database.
1 In the Add Database to Replication System screen, select Database Information.
2 Complete the screen, using the information you recorded on the worksheet. If you use a default value, copy it from the screen to your worksheet. The label refers to Adaptive Server as “SQL Server.”
Note The password you specify in this step must be valid to log in to Adaptive Server as “sa”. You cannot change the password in rs_init by specifying a different password in this screen. To change the Adaptive Server “sa” password, log in to the Adaptive Server after installation and change the password using the alter user command.
3 Choose Yes for “Will the Database Be Replicated?” if:

CHAPTER 2 Configuring Replication Server and Adding Databases with rs_init
Configuration Guide for UNIX 33
• It contains primary data.
• It is part of a warm standby application.
• Applications execute replicated stored procedures in it.
See “Planning the replication system” on page 2 for more information about when a database requires a RepAgent.
4 If you are adding the active or standby database for a warm standby application:
a Choose Yes for “Is This a Physical Connection for Existing Logical Connection?”
b Specify the additional information in the Logical DB Setup screen. See “Logical connection information” on page 33 for details.
5 Press Ctrl+A to accept your changes, then go to “Completing the configuration” on page 34.
❖ Logical connection information
This section describes entries you make in the Logical Connection Information screen when you add an active or standby database for a warm standby application.
Read Chapter 3, “Managing Warm Standby Applications” in the Replication Server Administration Guide Volume 2, before performing the steps described in this section.
Before you use rs_init to add a database for a warm standby application, you must create the logical connection in the Replication Server.
1 If you selected Yes for “Is This a Physical Connection for Existing Logical Connection?” in the Database Information screen, Logical Database Setup selections appear. You must specify logical connection parameters.
In the Database Information screen, select Logical DB Setup.
The Logical Connection Information screen appears. When you choose “active” for the first item, only these items appear:
• Logical DS Name
• Logical DB Name
2 Complete the Logical Connection Information screen, using the information you recorded on your worksheet. If you use a default value, copy it from the screen to your worksheet.

Adding a database to the replication system
34 Replication Server
3 Press Ctrl+A to accept your changes, and rs_init returns you to the Database Information screen.
❖ Completing the configuration
1 If the Database Information window indicates that there are incomplete tasks on the Add Database to Replication System screen, select each one and complete the required information.
When all tasks are “Complete,” press Ctrl+A. A message is displayed asking you if you want to execute the configuration.
2 Enter “y” to continue with the configuration.
Messages appear on the screen as the configuration progresses; these messages require no action.
Do not interrupt the configuration. Most configurations require several minutes (sometimes longer) to complete.
When the configuration is complete, rs_init displays “Configuration completed successfully.”
3 Click OK to return to the Configure Replication System dialog box.
Note To add other databases to the replication system, go to “Adding a database to the replication system” on page 31, and repeat the procedure for each database.
4 Press Ctrl+X to navigate through the screens and exit the program. rs_init displays the path to the log file for the session before you return to the command prompt.
You can find out more about the progress of the installation by looking at the current rs_init log file. rs_init log files are stored in the init/logs subdirectory of the $SYBASE_REP directory.
Configuration Guide for UNIX 35
C H A P T E R 3 Upgrading or Downgrading an Existing Replication Server
This chapter explains how to upgrade a Replication Server to version 15.2 and how to commit to that version. It details how to upgrade user databases in your replication system to Adaptive Server databases. It also tells you how to downgrade a Replication Server to an earlier software version.
Preparing to upgradeThis section provides information on what to do before you start the upgrade process.
Note For upgrading, the Replication Server version should be 12.0 or later and the Adaptive Server containing the RSSD should be 12.5 or later. Upgrading from any earlier version requires an intermediate upgrade.
❖ Before upgrading to Replication Server 15.2
1 Back up your replication system.
2 Read the release bulletin for your platform for any special installation instructions about installing or upgrading.
Topic PagePreparing to upgrade 35
Overview 36
Upgrading to Replication Server 15.2 37
Upgrading a user database in a replication system 41
Committing a local site to a new version level 42
Upgrading Adaptive Server in replication system 47
Downgrading Replication Server to an earlier version 51

Overview
36 Replication Server
3 Use rs_helpsub to check that all subscriptions are valid. If you have subscriptions that are not in a valid state before upgrading, the upgrade fails.
4 Install Replication Server, following the instructions in the Replication Server Installation Guide for UNIX Platforms.
OverviewBefore you can restart Replication Servers 15.2, you must upgrade the RSSDs so they are compatible with the new executable programs. You may also need to upgrade your user databases.
❖ Upgrading to Replication Server version 15.2
1 Upgrade the RSSDs.
2 Upgrade primary, replicate, and standby user databases.
3 Restart the Replication Servers.
4 Decide whether to set the replication site version to the new version. If you do, the new features are available, but you cannot downgrade to an earlier version.

CHAPTER 3 Upgrading or Downgrading an Existing Replication Server
Configuration Guide for UNIX 37
Upgrading to Replication Server 15.2 This section describes how to upgrade to Replication Server 15.2 by upgrading your Replication Servers.
Warning! Before upgrading to Replication Server 15.2 if your Replication Server is using an Adaptive Server RSSD with a version earlier than 12.5, you must upgrade this Adaptive Server to at least version 12.5. Otherwise, the upgrade process will fail.
If you are upgrading to Replication Server 15.2 on IBM AIX, Sun Solaris SPARC, or Sun Solaris 10 x86/x64, and using ERSSD, platforms must be 64-bit for the upgrade to function properly. For these operating systems, ERSSD can only be run on 64-bit machines.This is a restriction of the underlying SQL Anywhere database. To use Replication Server on 32-bit IBM AIX, Sun Solaris SPARC, or Sun Solaris 10 x86/x64, Sybase recommends that you use Adaptive Server for the RSSD. However, you cannot migrate data from an ERSSD to a RSSD.
❖ Upgrading to Replication Server 15.2 from an earlier version
1 Back up your current installation.
If you plan to install the Replication Server software in a directory other than an existing Sybase version directory, make sure that the interfaces file is accessible. See the Replication Server Installation Guide for instructions.
2 Install the new Replication Server software. See Replication Server Installation Guide for instructions.
3 Upgrade the RSSD for each Replication Server. See “Upgrading an RSSD” on page 38.
4 Upgrade each user database that is managed by an upgraded Replication Server. See “Upgrading a user database in a replication system” on page 41.
Warning! Do not stop the RepAgent, truncate the transaction log, increase the generation number, and so on, while upgrading an earlier version of Replication Server to version 15.2 to avoid malfunctioning of your replication system.
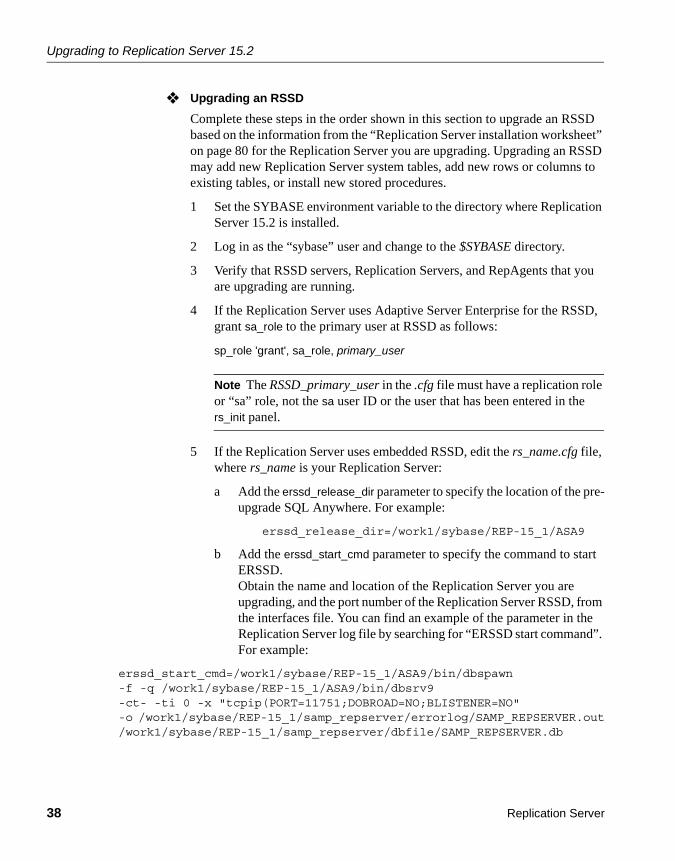
Upgrading to Replication Server 15.2
38 Replication Server
❖ Upgrading an RSSD
Complete these steps in the order shown in this section to upgrade an RSSD based on the information from the “Replication Server installation worksheet” on page 80 for the Replication Server you are upgrading. Upgrading an RSSD may add new Replication Server system tables, add new rows or columns to existing tables, or install new stored procedures.
1 Set the SYBASE environment variable to the directory where Replication Server 15.2 is installed.
2 Log in as the “sybase” user and change to the $SYBASE directory.
3 Verify that RSSD servers, Replication Servers, and RepAgents that you are upgrading are running.
4 If the Replication Server uses Adaptive Server Enterprise for the RSSD, grant sa_role to the primary user at RSSD as follows:
sp_role 'grant', sa_role, primary_user
Note The RSSD_primary_user in the .cfg file must have a replication role or “sa” role, not the sa user ID or the user that has been entered in the rs_init panel.
5 If the Replication Server uses embedded RSSD, edit the rs_name.cfg file, where rs_name is your Replication Server:
a Add the erssd_release_dir parameter to specify the location of the pre-upgrade SQL Anywhere. For example:
erssd_release_dir=/work1/sybase/REP-15_1/ASA9
b Add the erssd_start_cmd parameter to specify the command to start ERSSD. Obtain the name and location of the Replication Server you are upgrading, and the port number of the Replication Server RSSD, from the interfaces file. You can find an example of the parameter in the Replication Server log file by searching for “ERSSD start command”. For example:
erssd_start_cmd=/work1/sybase/REP-15_1/ASA9/bin/dbspawn-f -q /work1/sybase/REP-15_1/ASA9/bin/dbsrv9-ct- -ti 0 -x "tcpip(PORT=11751;DOBROAD=NO;BLISTENER=NO"-o /work1/sybase/REP-15_1/samp_repserver/errorlog/SAMP_REPSERVER.out/work1/sybase/REP-15_1/samp_repserver/dbfile/SAMP_REPSERVER.db

CHAPTER 3 Upgrading or Downgrading an Existing Replication Server
Configuration Guide for UNIX 39
6 If the Replication Server uses embedded RSSD, and it is doing routing, edit the rs_name.cfg file, where rs_name is your Replication Server:
a Add the erssd_ra_release_dir parameter to specify the location of the pre-upgrade SQL Anywhere. For example:
erssd_ra_release_dir=/work1/sybase/REP-15_1/ASA9
b Add the erssd_ra_start_cmd parameter to specify the command to start ERSSD. Obtain the name of the ERSSD Replication Agent and the location of the interfaces file from the Replication Server log file by searching for “Starting embedded RSSD Replication Agent” and using the same command format from the next line: “Executing command:”. For example:
erssd_ra_start_cmd=/work1/sybase/REP-15_1/ASA9/bin/dbltm-ud -S SAMP_RS_ERSSD_ra-C /work1/sybase/REP-15_1/samp_repserver/SAMP_RS_ERSSD_ra.cfg-ot /work1/sybase/REP-15_1/samp_repserver/SAMP_RS_ERSSD_ra.out-I /work1/sybase/interfaces
7 Start rs_init:
$SYBASE/$SYBASE_REP/install/rs_init
You see the RS_INIT menu.
8 Select Configure a Server Product. Choose Continue.
9 Select Replication Server.
10 Select Upgrade an Existing Replication Server.
11 Complete the Upgrade Existing Replication Server screen with the information from the “Replication Server installation worksheet” on page 80 for the Replication Server you are upgrading.
a Enter the name of the Replication Server with the RSSD you are upgrading.
b Enter the login name for the RS SA user. The default value is “sa.”
c Enter the password for the “sa” user on the Replication Server.
d Enter the path name of the Replication Server Configuration file.
e Press Ctrl+A to save your changes. rs_init displays the following message:
Execute the Replication Server tasks now?

Upgrading to Replication Server 15.2
40 Replication Server
12 Enter “y” to continue the RSSD upgrade.
rs_init displays informational messages as it loads the upgrade script into the RSSD. When the upgrade is complete, rs_init displays these messages:
RSSD successfully upgraded from old_rel_no tonew_rel_no. Replication Server 'rs_name' can now berestarted. Task to upgrade the RSSD succeeded.Configuration completed successfully.
where:
• old_rel_no – is the Replication Server version from which you are upgrading.
• new_rel_no – is Replication Server version 15.0.
• rs_name – is the name of the Replication Server.
13 If you installed the new Replication Server software in a different directory from the earlier version, modify the runserver files for the Replication Servers so that they use the programs in the new version directory.
14 Restart the Replication Server using the appropriate executables for the new version.
Warning! Some Replication Server configuration options with newer versions may have a wider valid range. If you increase any of these configuration options after upgrading, you must put back their old values before downgrading. Otherwise, the Replication Server may not start or may behave incorrectly. Replication Server 15.2 upgrade process prints all the current configuration option values in rs_config to rs_init log, so that you can restore their former settings before downgrading.
For instructions on downgrading an RSSD to an earlier version, see “Downgrading Replication Server to an earlier version” on page 51.

CHAPTER 3 Upgrading or Downgrading an Existing Replication Server
Configuration Guide for UNIX 41
If an upgrade failsIf a Replication Server upgrade fails because of an error, restart the old Replication Server against the RSSD and fix any problem that may have caused the error. After you fix the problem, re-run the upgrade. You can do this multiple times until the upgrade succeeds.
Note You cannot start a new Replication Server against a partially upgraded RSSD.
Upgrading a user database in a replication systemThis section describes how to upgrade a user database in the replication system. A user database can be a primary user database, a replicate database, or a standby database.
Note Upgrading a user database may add special tables used by the Replication Server.
❖ Upgrading a user database in a replication system
1 Start rs_init.
2 Select Upgrade a Database in a replication system from the Configure replication system screen, then choose Continue.
3 Complete the screen with the information from the “Database Setup Worksheet” for the upgraded Replication Server.
a Enter the name of the Adaptive Server that manages the database you are upgrading.
b Enter the name of the database you are upgrading.
c Enter the login name for the “sa” user on the Adaptive Server that manages the database that you are upgrading. The default value is “sa.”
d Enter the Adaptive Server “sa” user password.

Committing a local site to a new version level
42 Replication Server
e Enter the login name for the maintenance user on the Adaptive Server that manages the database that you are upgrading. The default is “database_maint,” where “database” is the name of the database you are upgrading.
4 If you have more Replication Servers or databases to upgrade, return to “Upgrading to Replication Server 15.2” on page 37 and repeat the procedure.
Committing a local site to a new version levelAfter you upgrade a Replication Server and its user databases, you must decide whether to commit to the new Replication Server version level.
Note You cannot create, alter, and drop replication definitions until you set the Replication Server site version to 1200 or higher.
❖ Committing to the new version level
1 Set the system version.You do not need to set the system version if it is 1102 or higher.
2 Set the site version for each upgraded Replication Server to 1520.
3 Upgrade routes for which the upgraded Replication Server is the source or destination server, and the site versions of the source and destination servers are at 1520 or higher.
4 After you upgrade routes, back up the upgraded RSSDs.
5 Committing to the new version level and upgrading routes are two separate procedures.
Setting the replication system versionAfter you upgrade and install Replication Servers and user databases in your replication system to a new version level, you can set the system version to match the earliest software version.

CHAPTER 3 Upgrading or Downgrading an Existing Replication Server
Configuration Guide for UNIX 43
The system version is the lowest version of Replication Server allowed in the system. For example, if your replication system version is 1151, you cannot use or install a Replication Server that is earlier than version 11.5.1.
When all Replication Servers in the replication system are at version 15.2 or later, follow these steps to set the system version to 15.2:
1 Log in to the ID Server.
2 Execute:
sysadmin system_version, 1520
Restrictions Note these restrictions for the system version:
• If the system version is lower than 1102, new features that were introduced in later versions, including features of version 15.2, are not available. For this reason, Sybase recommends that you set the system version to 1102 or higher.
• When you upgrade all Replication Servers to at least version 11.0.2, you can set the system version to at least 1102.
• Once the system version is set to 1102, the availability of new features is determined by the site version setting. Thus it is not necessary to set the system version higher than 1102.
System version and software version
Table 3-1 illustrates the relationship between the software version number and the system version number. Note especially the ability to use the full capabilities of version 15.2 when the system version is at 1102.
Table 3-1: Relationship between software version and system version
New features of version 15.2 are available only when the system version is at least 1102 and the site version is set to 1520.
Replication Server software version System version 1102 and higher
15.2 Full capability when site version is set to 1520
15.1 Full capability when site version is set to 1510
15.0/15.0.1 Full capability when site version is set to 1500
12.6 Full capability when site version is set to 1260
12.5 Full capability when site version is set to 1250
12.1 Full capability when site version is set to 1210
12.0 Full capability when site version is set to 1200
11.5 Full capability when site version is set to 1150
11.0.2/11.0.3 Full capability

Committing a local site to a new version level
44 Replication Server
If a software version is supported with full capability at a given system version, you can install new Replication Servers of that software version. See “Setting the Replication Server site version” on page 44 for more information.
For more information about new features, see Replication Server 15.2 New Features Guide and the release bulletin for Replication Server version 15.2.
Upgrading from version 11.0.2 or 11.0.3
As Table 3-1 shows, if you are upgrading from Replication Server version 11.0.2 or 11.0.3, and the system version is already set to 1102 or 1103, you do not need to set the system version to begin using new features in 15.2.
You must set the site version for Replication Servers that require it, and to upgrade routes. Information needed for the new features cannot be propagated to other sites until the corresponding routes are upgraded. See “Setting the Replication Server site version” on page 44 and “Upgrading routes” on page 46 for details.
Setting the Replication Server site versionAfter you upgrade Replication Server version 15.2 and its user databases, and set the system version to 1102 or higher, you must set the Replication Server site version to the new software version level before you can use the new Replication Server features.
Refer to New Features Guide Replication Server 15.2 and the Replication Server release bulletin for more information about new features.
Downgrade restriction Once you set the replication site version to a new level, you cannot downgrade any Replication Servers in the replication system below that version level or install a Replication Server below that version level.To return to an earlier software version, you must reinstall all Replication Servers and re-create your replication applications.
If you do not want to use new features that depend on the site version, do not set the Replication Server site version after the upgrade. Then you can downgrade to an earlier version if needed.
Note create, alter, and drop replication definitions are not allowed until you set the Replication Server site version to 1200 or higher.
❖ Setting the Replication Server site version to 15.2.
1 Log in to the current Replication Server.

CHAPTER 3 Upgrading or Downgrading an Existing Replication Server
Configuration Guide for UNIX 45
2 Execute this command:
sysadmin site_version, 1520
The Replication Server release bulletin may instruct you to set the site version to a more recent version level.
Note Once you have set the Replication Server site version, you cannot downgrade the Replication Server. To return to an earlier software version, you must reinstall the Replication Server and re-create any aspects of your replication applications that pertain to that Replication Server.
Backing up the RSSD After you upgrade a Replication Server, set its site version to 1520, and perform route upgrades to the relevant routes, use the Adaptive Server commands dump database or dump transaction to back up the RSSD and the Replication Server sysadmin erssd, backup command to back up the ERSSD.
You can restore the RSSD with the Adaptive Server commands load database or load transaction or restore the ERSSD using the ERSSD recovery procedure. See Chapter 4, “Managing a replication system” in the Replication Server Administration Guide Volume 1, for information on recovery procedure. If you have a current backup, you can avoid potential problems from loading an RSSD that corresponds to an earlier version level. After you load the backup, all queued messages from other Replication Servers can be recognized by this Replication Server and RSSD.
If you restore the RSSD from a backup performed before you set the site version, messages that the RSSD cannot accept might arrive at the Replication Server.
Using new features in version 15.2
You can use new Replication Server features that interact with other Replication Servers only if all these things are true:
• The system version has been set to 1102.
• The site version for both Replication Servers has been set to the current site version (1520).
• The routes between the Replication Servers have been upgraded.
See “Setting the replication system version” on page 42 and “Upgrading routes” on page 46 for more information.

Committing a local site to a new version level
46 Replication Server
For example, Replication Servers with a site version set to version 15.0 can create replication definitions for tables containing bigint datatype. Such replication definitions are distributed to other Replication Servers with site versions that are at the same version level or higher. Replication Servers of earlier versions do not receive information about these replication definitions.
Upgrading routesThe route version is the lower of the two site version numbers of the route’s source and destination Replication Servers.
Replication Server version 11.5 or later uses route version information to determine which data to propagate to other sites. Information necessary for 15.2 features is not propagated to other sites until the corresponding route versions are upgraded to 1520.
After you upgrade to Replication Server 15.2 and set the site version to 1520, you must upgrade each route for which this Replication Server is a source or destination, and the site versions of the source and destination are at 1520 or higher. How you upgrade routes depends on how you use Replication Server; in particular, if you have a mixed-version replication system.
Mixed-version replication systemsIn a replication system that includes Replication Server versions 12.0 through 15.2, and for which the site version is set to its software release level and the system version is 1102 or higher, each Replication Server can use all the features of its release. Such a system is called a mixed-version system.
In a mixed-version system, interaction between Replication Servers of different version levels is limited, and information associated with new features may not be available to Replication Servers of earlier versions. Replication Servers of the same version can exchange full information about the software features they support.
Replication Server 15.2 uses the Replication Manager (RM) plug-in to upgrade routes.The RM plug-in provides a list of all the routes that require an upgrade. You can select a single route to be updated.

CHAPTER 3 Upgrading or Downgrading an Existing Replication Server
Configuration Guide for UNIX 47
See Chapter 6, “Managing Routes” in the Replication Server Administration Guide Volume 1, for more information on routes. For a full description of the route upgrade commands, see Chapter 3, “Replication Server Commands” in the Replication Server Reference Manual.
Upgrading Adaptive Server in replication systemIf you are upgrading Adaptive Server in your replication system, use the database upgrade procedure as follows.
1 Suspend transaction processing and replication system activities.
2 Drain transaction logs for primary databases.
3 Drain the RSSD transaction log.
4 Disable the secondary truncation point.
5 Upgrade Adaptive Server.
6 Restore Replication after upgrade.
Warning! Sybase strongly recommends you perform a dump database and dump transaction before executing the steps below.
Suspending transaction activity in the databases and suspending replication
Complete the following tasks before upgrading the Adaptive Servers in your replication system.
Suspend transaction activity in the databases and suspend replication.
Note Replication includes creating and dropping both routes and subscriptions.
1 Verify that the subscriptions you are creating with the create subscription command, with primary data in the databases being upgraded, have reached a “valid” state at the primary Replication Server.
Do not upgrade while the above subscriptions are being created.
Make sure no users create subscriptions for the data in the database you are upgrading until the upgrade procedure is finished.

Upgrading Adaptive Server in replication system
48 Replication Server
2 Run rs_helproute in each Replication Server System Database (RSSD) being upgraded to determine the status of each RSSD.
The status of all routes should be “Active.” See Chapter 6, “Managing Routes” in the Replication Server Administration Guide Volume 1, to resolve route problems.
3 Shut down the applications that are using the databases you are upgrading.
4 Use the admin who command in Replication Server to identify the existing Data Server Interface (DSI) connections to the data server being upgraded.
5 Suspend all DSI connections to non-RSSD databases you are upgrading by using the following command for each database:
suspend connection to dataserver.database
6 Leave the DSI connections for the RSSDs running.
Draining transaction logs for primary databases
For each primary database you are upgrading, follow these steps to ensure that the Replication Server completely processes the pre-upgrade log.
1 Wait for all remaining transactions to be replicated.
2 Run this Replication Server command:
admin who, sqm
Find the entry that corresponds to the inbound queue for this database by looking for the Info field for the queue_number, queue_type entry. For an inbound queue, the queue type is 1. Note the last segment:block entry for the queue.
3 Open the queue dump file by executing the following Replication Server command, where file_name is the name of the dump file you will dump to:
sysadmin dump_file, "file_name"
4 Create a dummy table to check that the Replication Server has received the latest log record written in the log. You can drop this table later on.
create table dummy (c1 int, c2 char(255))gosp_setreptable dummy, truegobegin trangoinsert dummy values (1,'hello')go 10commit trango

CHAPTER 3 Upgrading or Downgrading an Existing Replication Server
Configuration Guide for UNIX 49
5 In the primary Replication Server, execute the admin who, sqm command until the last segment:block entry for the inbound queue changes.
6 Execute the following Replication Server command to dump the last block of the inbound queue to the dump file you created in step 3:
sysadmin dump_queue, queue_number, queue_type, last_seg, block, 1
Use the queue_number, queue_type, last_seg, and block values found in the output of the admin who, sqm command in step 5.
7 Examine the dump file to make sure it contains the transaction corresponding to the inserts you performed in step 4 (you can use an editor to examine the file).
8 Repeat steps 5 through 7 until the transaction corresponding to the update is in the dump file. After draining the transaction logs, do not allow any other activity in the databases. If activity does occur, you need to redrain the transaction logs.
Manually draining the RSSD transaction log
Manually drain the transaction log of each primary RSSD in the data server you are upgrading.
If Replication Server has routes to other Replication Servers, make sure that Replication Server processes all transactions in the RSSD transaction log before you upgrade the databases.
You can make sure the transaction log is completely processed by creating a replication definition in the primary Replication Server and then watching for it to appear in the replicate Replication Server RSSD. When the replication definition is in the replicate RSSD, the log is fully processed.
❖ Creating a replication definition for ensuring that the RSSD log is processed
1 Log in to the primary Replication Server.
2 Create a temporary replication definition:
create replication definition rep_def_name with primary at dataserver.database (column_a int) primary key (column_a)
3 Log in to the replicate RSSD.
4 Execute the following query to see whether the replication definition has arrived from the primary RSSD:
select * from rs_objects

Upgrading Adaptive Server in replication system
50 Replication Server
where objname = "rep_def_name"
When the replication definition has arrived in the replicate RSSD, the RSSD transaction log has been drained.
Disabling the secondary truncation point
When you upgrade a primary database, the Replication Agent must not be running and the secondary truncation point should be turned off for the duration of the upgrade.
1 Shut down the Replication Agents or make sure that dbcc logtransfer is not running for the databases that is being upgraded.
2 Shut down Replication Servers for the RSSDs you are upgrading.
3 In each primary database including RSSDs, execute the following commands to turn off the secondary truncation point:
1> use database 2> go 1> dbcc settrunc ("ltm", "ignore") 2> go
Repeat step 3 for each primary database and each primary RSSD.
Upgrading Adaptive Server
For information on upgrading Adaptive Server, see the Adaptive Server Enterprise Installation Guide for your platform.
Restoring replication after upgrade
1 Zero out the locator in the RSSD for each replicated primary.
Using isql, connect to the RSSD and execute the following commands:
1> use RSSD 2> go 1> rs_zeroltm dataserver, RSSD 2> go
2 Set the secondary truncation point to “valid” in each primary database. Using isql, connect to the replicated primary database, and execute the following commands:
1> use database2> go1> dump tran database with truncate_only2> go1> dbcc settrunc("ltm","valid")2> go
CHAPTER 3 Upgrading or Downgrading an Existing Replication Server
Configuration Guide for UNIX 51
Downgrading Replication Server to an earlier versionDowngrading is reversing to an earlier version of the software. You cannot downgrade an RSSD to a version below the site version.
To revert to an earlier software version after:
• The site version for a Replication Server has been set to the new version, you must reinstall the Replication Server.
• The system version has been set to the new version, you must reinstall all of the Replication Servers in the replication system.
❖ Downgrading to an earlier software version
1 Read the Replication Server release bulletin for information about downgrading your software. In particular, find out if an RSSD downgrade is required to return to the earlier version.
Note If an RSSD downgrade is not required, you do not have to perform these steps. Reinstall the earlier software version following the instructions in Replication Server Installation Guide for UNIX Platforms.
2 Back up your system.
If you are downgrading to a directory other than the existing Sybase version directory, make sure the appropriate interfaces file is accessible.
3 Back up the RSSD for the Replication Server you plan to downgrade.
4 Log in as the “sybase” user, and change to the $SYBASE_REP directory.
5 Verify that the RSSDs and the Replication Servers you plan to downgrade are running.
6 Start rs_init:
$SYBASE/$SYBASE_REP/install/rs_init
The RS_INIT menu appears.
7 Select Configure a Server Product.
8 Select Replication Server.
9 Select Downgrade RSSD for an Existing Replication Server.
10 Complete the Downgrade RSSD for Replication Server screen with the information from the “Replication Server installation worksheet” on page 80 for the Replication Server you are downgrading.

Downgrading Replication Server to an earlier version
52 Replication Server
a Enter the name of the Replication Server whose RSSD you are downgrading.
b Enter the login name for the Replication Server “sa” user. The default value is “sa.”
c Enter the password for the Replication Server “sa” user.
d Enter the path name of the Replication Server Configuration file.
11 Press Ctrl+A to save your changes. rs_init displays the message:
Execute the Replication Server tasks now?
12 Enter “y” to continue.
Informational messages display as rs_init loads the downgrade script into the RSSD. When the downgrade is complete, you see these messages:
RSSD successfully downgraded to rel_no.Replication Server 'rs_name' can now be restarted.Task to downgrade the RSSD succeeded.Configuration completed successfully.
where:
• rel_no – is the Replication Server version from which you are downgrading.
• rs_name – is the name of your Replication Server.
Press Return after each message. You see the Configure Replication System screen.
13 Press Ctrl+C and enter “y” to exit rs_init.
14 Log in to each user database managed by the Replication Server and execute this command:
dbcc settrunc("ltm", "begin")
15 Shut down all Replication Servers and RepAgents on this machine.
16 When you downgrade to an earlier software version, you must install the earlier software. Read the release bulletin for the earlier version of Replication Server. Then refer to the installation or configuration guide for that version for installation instructions.
17 Restart the RepAgents that are connected to the Replication Server.

CHAPTER 3 Upgrading or Downgrading an Existing Replication Server
Configuration Guide for UNIX 53
Downgrade restrictions• To revert to an earlier software version after the site version or system
version for a Replication Server has been set to the new version, you must reinstall the Replication Server.
• If you plan to downgrade in a directory other than the existing Sybase version directory, make sure that the interfaces file is accessible.
If necessary, downgrade the RSSD for each Replication Server you are downgrading. You must downgrade the RSSD using the pre-downgrade—that is, the most recent—version of rs_init.

Downgrading Replication Server to an earlier version
54 Replication Server

Configuration Guide for UNIX 55
C H A P T E R 4 Using Password Encryption
This chapter explains how to use rs_init to enable password encryption for a Replication Server and change passwords in configuration files.
OverviewWhen you enable password encryption for a Replication Server, passwords are stored and transmitted in encrypted format. The passwords specified with create user or alter user are encrypted in the rs_users and rs_maintusers system tables in the RSSD.
When you use rs_init to administer passwords in your replication system, you can:
• Specify during installation that a Replication Server should use encryption.
• Enable encryption for a Replication Server. See “Enabling password encryption for a Replication Server” on page 56 for instructions.
• Change an encrypted password in a Replication Server configuration file. See “Altering an encrypted password for a Replication Server” on page 57 for instructions.
Note Once you have encrypted passwords using rs_init, they cannot be decrypted.
Topic PageOverview 55
Enabling password encryption for a Replication Server 56
Altering an encrypted password for a Replication Server 57

Enabling password encryption for a Replication Server
56 Replication Server
Enabling password encryption for a Replication ServerIn this procedure, rs_init creates a new configuration file that contains encrypted passwords for the Replication Server. rs_init encrypts the passwords in the rs_users and rs_maintusers system tables.
❖ Enabling password encryption
1 Log in as the “sybase” user and change to the Sybase installation directory.
2 Start rs_init. Enter:
$SYBASE/$SYBASE_REP/install/rs_init
You see the RS_INIT menu.
3 Select Configure a Server Product.
4 Select Replication Server.
5 Select Enable Password Encryption for a Replication Server.
6 Complete the screen as follows.
a Enter the name of the Replication Server for which you want to enable password encryption.
b Enter the login name for the Replication Server with “sa” user.
c Enter the password for the Replication Server “sa” user.
d Enter the full path for the Replication Server configuration file.
7 Press Ctrl+A to save your changes. rs_init displays:
Execute the Replication Server tasks now?
8 Enter “y” to enable encryption.
rs_init shuts down the Replication Server and encrypts the passwords in the Replication Server configuration file and in the rs_users and rs_maintusers system tables.
When encryption is complete, rs_init displays:
Replication Server 'rs_name' can now be restarted.
9 Press Return. rs_init displays:
Configuration tasks completed successfully.
10 Press Return. You see the Configure Replication System screen.
11 Press Ctrl+C and enter “y” to exit rs_init.

CHAPTER 4 Using Password Encryption
Configuration Guide for UNIX 57
12 Restart the Replication Server and any connected RepAgents.
13 Delete the backup of the Replication Server configuration file.
Note The backup file contains unencrypted passwords, so you should remove that file to protect your replication system security. However, you may first want to make a hard copy or offline backup of the file and store it in a safe place.
The backup file has the same name as the Replication Server configuration file, but the extension is changed to a three-digit number such as “001.” The file with the highest extension number is the most recent backup file.
Altering an encrypted password for a Replication Server
Follow the steps in this section to change an encrypted password in a Replication Server configuration file.
If password encryption is not enabled, you can use a text editor to change passwords in the configuration file.
Note The steps in this procedure do not apply to the passwords stored in the RSSD. To change the Replication Server password, use the alter user command. To change the maintenance user password, use the alter connection or alter route command.
❖ Altering an encrypted password
1 Log in as the “sybase” user and change to the Sybase installation directory.
2 Start rs_init. Enter:
$SYBASE/$SYBASE_REP/install/rs_init
You see the RS_INIT menu.
3 Select Configure a Server Product.
4 Select Replication Server.
5 Select Alter a Replication Server Configuration File Password.

Altering an encrypted password for a Replication Server
58 Replication Server
6 Complete the screen as follows.
a Enter the name of the Replication Server whose configuration file you want to update.
b Enter the login name for the Replication Server “sa” user.
c Enter the password for the Replication Server “sa” account.
d Enter the full path name for the Replication Server configuration file.
e Enter the parameter for the password you want to alter. The parameters for the password that you can be used are:
• RSSD_primary_pw_enc – for the RSSD primary user.
• RSSD_maint_pw_enc – for the RSSD maintenance user.
• ID_pw_enc – for the ID Server user name.
f Enter the new password you want to use.
7 Press Ctrl+A to save your changes. rs_init displays:
Execute the Replication Server tasks now?
8 Enter “y”.
rs_init shuts down the Replication Server, then records the new password in the Replication Server configuration file. When that process is complete, rs_init displays this message:
Configuration completed successfully.
Press Return to continue.
9 Press Return. You see the Configure Replication System screen.
10 Press Ctrl+C and type “y” to exit rs_init.
11 Restart the Replication Server.

Configuration Guide for UNIX 59
C H A P T E R 5 Secure Sockets Layer
This chapter discusses how to set up the Secure Sockets Layer (SSL) advanced security option for Replication Server.
SSL is an industry standard for sending wire- or socket-level encrypted data over secure network connections. See Chapter 8, “Managing Replication Server Security” in the Replication Server Administration Guide Volume 1, for detailed information on the SSL security option.
Setting up SSL servicesBefore setting up SSL services on Replication Server, review the SSL Plus user documentation and documentation for any third-party SSL security software you are using.
❖ Setting up SSL services on Replication Server
The following steps are described in detail in the rest of this chapter.
1 Add the SSL driver to the Open Client/Server™ driver configuration file.
2 Modify the Open Client/Server trusted roots file to include trusted CA certificates.
3 Obtain a certificate from a trusted Certificate Authority (CA) for each Replication Server accepting SSL connections.
4 Create the identity file that concatenates a certificate and its private key.
Topic PageSetting up SSL services 59

Setting up SSL services
60 Replication Server
5 Use rs_init to enable SSL on Replication Server and to add an encrypted SSL password to the Replication Server configuration file.
Note You can enable and disable SSL on Replication Server using configure replication server and the use_ssl option.
6 Create an SSL entry in the Replication Server interfaces file, Windows Registry, or directory service.
7 Restart Replication Server.
Adding the SSL driver to the driver configuration fileReplication Server uses the libtcl.cfg file to map security mechanism names to security driver file names. The default location is $SYBASE/$SYBASE_OCS/config/libtcl.cfg.
SSL driver names are listed in the [FILTERS] section of libtcl.cfg. They have this form:
[FILTERS]filter = driver
where:
• filter – specifies the local name for the security mechanism.
• driver – is the file name for the driver. A sample entry for SSL is:
[FILTERS]ssl = libsybfssl.so
For more information about configuring libtcl.cfg for security drivers, see “Configuring libtcl.cfg” in Chapter 8, “Managing Replication Server Security” in the Replication Server Administration Guide Volume 1.
Adding trusted CA certificates to the trusted roots fileThe list of known and trusted CAs is maintained in the trusted roots file:
$SYBASE/config/trusted.txt
The System Administrator adds and deletes CAs using a standard ASCII-text editor. The trusted roots file is similar in format to a certificate file.
By default, Replication Server recognizes these third-party CAs:

CHAPTER 5 Secure Sockets Layer
Configuration Guide for UNIX 61
• Thawte
• Entrust
• Baltimore
• VeriSign
• RSA
Obtaining a certificate for each SSL-enabled Replication ServerThe System Administrator installs server certificates and private keys for the Replication Server installation. The System Administrator can get a server certificate using third-party tools provided with an existing public-key infrastructure (PKI) already in use in the customer environment. Each Replication Server acting as a server in an SSL-enabled connection must have a certificate issued by a trusted CA.
Most third-party PKI vendors have utilities to generate certificates and private keys.
If you request a certificate from a third-party vendor, and that certificate is in PKCS#12 format, use the certpk12 utility to convert the certificate into a format understood by Replication Server.
Adaptive Server Enterprise provides the certreq and certauth utilities to test the certificate request tool and to verify that the authentication methods are working on your server. See Chapter 9, “Security Administration” in Adaptive Server Enterprise System Administration Guide for more information.
Creating an identity fileThe System Administrator must create an identity file that is understood by the SSL Plus software. The identity file contains the concatenation of a certificate and its corresponding encrypted private key.
The name and default location of the identity file is the following, where servername is the name of the server as specified at start-up:
$SYBASE/$SYBASE_REP/certificates/servername.crt
To place the identity file in a different location, you must specify the alternate location in the RS_ssl_identity entry in the configuration file.

Setting up SSL services
62 Replication Server
To make a successful connection, the common name in the certificate must match the Replication Server name in the directory service.
Client certificates are not supported.
Adding an encrypted password to the configuration fileSpecify an SSL password that decodes the identity file private keys. This password is stored as the RS_ssl_pw entry in the Replication Server configuration file where it will not be sent over the network.
Use rs_init to add or change an encrypted SSL password, which is stored as RS_ssl_pw_enc in the Replication Server configuration file.
Creating SSL entries in the directory serviceThe Replication Server directory service—such as the interfaces file, the Windows Registry, or an LDAP server—defines the server address and port numbers, and determines security protocols that are enforced for client connections. Replication Server implements the SSL protocol as a filter that is appended to master and query lines in the directory service.
All attempts to connect to a master or query entry in a directory service with an SSL filter must support the SSL protocol. For example, suppose a primary Replication Server (SYBSRV1) and a replicate Replication Server (SYBSRV2) use the Transmission Control Protocol (TCP) and the SSL protocol for communication.
Entries in the interfaces file might look like this:
SYBSRV1query tcp sun-ether sybasehost1 5001 sslmaster tcp sun-ether sybasehost1 5001 ssl
SYBSRV2query tcp sun-ether sybasehost2 4001 sslmaster tcp sun-ether sybasehost2 4001 ssl
You can also configure Replication Server to accept SSL connections and, at the same time, have other connections that accept clear text or use security mechanisms such as DCE and Kerberos. To support both SSL and other connection protocols, you must use multiple interfaces files.

CHAPTER 5 Secure Sockets Layer
Configuration Guide for UNIX 63
For example, a typical interfaces file entry that supports the Transmission Control Protocol (TCP) and both SSL and clear text connections looks like this:
SYBSRV1query tcp sun-ether sybasehost1 5001 sslmaster tcp sun-ether sybasehost1 5001 sslmaster tcp sun-ether sybasehost1 5001
The interfaces file master line entries allow SYBSRV1 to listen for both SSL and clear text connections. To make sure that SYBSRV1 sends queries to SYBSRV2 using SSL, there must be a single query entry in the interfaces file for SYBSRV1. To allow SYBSRV1 to send queries to other servers using a different protocol, you must use a separate interfaces file.
Enabling SSL on Replication Server
Note Replication Server 15.2 does not require the REP_SSL license, as SSL comes as a part of the basic REP_SERVER license.
You can enable SSL using rs_init; you can enable or disable SSL using configure replication server with the use_ssl option.
To use configure replication server, enter:
configure replication server set use_ssl to 'on'
Set use_ssl to off to disable SSL. By default, SSL is not enabled on Replication Server. When use_ssl is off, Replication Server does not accept SSL connections.
use_ssl is a static option. You must restart Replication Server after you change its value.

Setting up SSL services
64 Replication Server
Configuration Guide for UNIX 65
C H A P T E R 6 Starting or Stopping a Replication Server
This chapter explains how to start and shut down a Replication Server.
Starting a Replication ServerWhen you install a new Replication Server to your replication system, rs_init creates a runserver file in the Sybase installation directory. The runserver file is an executable script that contains the complete command line required to start a Replication Server.
The runserver file name is constructed based on the name of the server. For example, for a Replication Server named ROME_RS, the runserver file is named RUN_ROME_RS.
Start-up sequence for servers
Start servers in this order:
1 If the Replication Server uses RSSD in Adaptive Server Enterprise, start the Adaptive Server first.
2 Replication Servers.
Starting servers at system boot
In a production system, you must start Adaptive Servers and Replication Servers, whenever your machine reboots. To do this, see your System Administrator.
❖ Starting a Replication Server using the runserver file
1 Log in to your system as the “sybase” user. Replication Server must execute as “sybase” so that it has the permissions required to access its configuration file, log file, and disk partitions.
Topic PageStarting a Replication Server 65
Stopping a Replication Server using isql 66

Stopping a Replication Server using isql
66 Replication Server
2 Set the $SYBASE_REP and $SYBASE_OCS environment variables to the path of the Sybase installation directory, as described in the Replication Server Installation Guide.
3 From the shell prompt, execute the runserver file as a background process.
For example, enter this command to start the TOKYO_RS Replication Server:
$SYBASE/$SYBASE_REP/RUN_TOKYO_RS &
Diagnostic messages display as the servers start up. The messages are also recorded in the servers’ log files.
Stopping a Replication Server using isqlTo stop a Replication Server using isql:
1 Use isql to log in to the Replication Server as the System Administrator:
isql -Usa -Psa_password -Sservername
2 Enter:
1> shutdown2> go
Configuration Guide for UNIX 67
C H A P T E R 7 Replication Monitoring Services
This chapter provides an overview of Replication Monitoring Services (RMS), a middle management monitoring layer, designed to provide complete monitoring and troubleshooting services for large and complex replication environments. It also describes the steps required for configuring the RMS.
Introducing Replication Monitoring ServicesThe Replication Manager (RM) plug-in for Sybase Central can manage small and simple replication environments with fewer than ten servers. However, to manage large and complex replication environments, the RM can use a management server layer called the Replication Monitoring Services (RMS). RMS monitors the servers and components in a replication environment, provides the ability to control the flow of data in the replication environment, and sets the configuration parameters.
RMS functionality is available through the RM or a command line API. RM provides commands to create, modify, or delete replication objects; RMS provides an API to monitor and troubleshoot the replication environment.
RMS is applicable only for a three-tier management support.
Three-tier management support
In a three-tier management support, the RM connects to the servers in the environment through the RMS. RMS provides the monitoring capabilities for the replication environment.
Topic PageIntroducing Replication Monitoring Services 67
Configuring RMS for three-tier management support 68
Starting and Stopping RMS 69
Connecting to RMS 70

Configuring RMS for three-tier management support
68 Replication Server
RMS monitors the status of the servers and other components in the replication environment, and the RM provides the client interface that displays the information provided by the RMS.
Monitoring servers in the replication domainUsing RMS, you can monitor the following servers in your replication domain:
• Adaptive Server Enterprise
• SQL Anywhere and Sybase IQ
• Replication Agent
• Mirror Replication Agent
• DirectConnect™
• Open Server™
• Replication Server
• Other RMS Servers
InstallationYou can use InstallShield to install the RMS component at the same time you install Replication Server.
If you choose Typical or Full installation when you install Replication Server 15.2, InstallShield automatically installs the RMS component.
Configuring RMS for three-tier management supportFollow these steps to configure RMS:
1 Navigate to the $SYBASE directory and source SYBASE.csh.
2 Go to the $SYBASE/$SYBASE_OCS/bin directory and select dsedit to add the following entry to the interfaces files.
• Server Name – RMServices.

CHAPTER 7 Replication Monitoring Services
Configuration Guide for UNIX 69
• Port – 32008.
• Hostname – host name of the machine on which RMS will run.
3 To start RMS, go to the $SYBASE_UA/bin directory and run agent.
4 To configure the RMS server, start an isql session by entering:
isql -Usa -Psa_pwd -SRMServices
5 To change the RMS password, enter:
configure password=newPassword
go
6 Set the parameter sybasehome to the directory where the interfaces file resides by running the following command, where /software/Sybase is the directory in which the Sybase interfaces file resides:
configure sybasehome=/software/Sybase
The interfaces file contains the connection specifications for the servers added to an RMS domain.
7 You can now start using the RMS API commands to monitor a replication environment. For example:
add replication server SAMPLE_RS set username to sa
See Chapter 9, “Replication Monitoring Services API” of the Replication Server Reference Manual for API definitions.
Starting and Stopping RMSRMS is a Java application built using the Sybase Unified Agent Framework (UAF). To start or stop RMS, you must also start or stop UAF.
❖ Starting RMS
1 Navigate to the Replication Server installation directory, $SYBASE.
2 Set the environment variables by sourcing SYBASE.csh.
3 Change to the $SYBASE_UA/bin directory.
4 Execute agent or add this command to run Unified Agent (UA) in the background.

Connecting to RMS
70 Replication Server
❖ Stopping RMS
1 Navigate to the Replication Server installation directory, $SYBASE.
2 Set the environment variables by sourcing SYBASE.csh.
3 Stop RMS:
• If an Adaptive Server UA is running, enter one of the following commands:
shutdown [-port rmi-port] [-U username] [-P password]
Or
shutdown [-port rmi-port] [-user username] [-password password]
where:
• rmi-port value is 9999
• username and password are the values configured for the Adaptive Server UA.
• If RMS is the only Unified Agent running, enter shutdown.
Connecting to RMSOnce the RMS has been started, you can connect to it using the RM plug-in. You can use RM plug-in to add the servers that need to be monitored by the RMS.
1 Click the Connect icon from the RM toolbar. The Connect to a Replication Domain window opens.
2 Select the RMS Server radio button.
3 Enter the user name and password needed to connect to RMS.
4 Select RMS from the list of servers in the drop-down list, or click the options button to provide the connection information for the RMS.
5 Enter a server name, host, and port number.
CHAPTER 7 Replication Monitoring Services
Configuration Guide for UNIX 71
6 Click OK. The RMS server is added in your object tree.
Note For information on RMS API, see Chapter 9, “Replication Monitoring Services API” in the Replication Server Reference Manual.

Connecting to RMS
72 Replication Server

Configuration Guide for UNIX 73
C H A P T E R 8 Installing and Implementing Non-ASE Support Features
This chapter describes how to install and implement non-ASE support in Replication Server version 15.2.
IntroductionReplication Server version 15.2 support for replication into a non-ASE replicate database requires:
• Replication Server system tables—rs_lastcommit and rs_info—created in the non-Sybase database, and Replication Server support functions such as rs_get_lastcommit and rs_get_charset.
• Function strings that:
a Replace certain language command and stored procedure invocations from the replicate Replication Server, then
b Produce operations in the replicate database that emulate the behavior of the commands and stored procedures that would exist in a Sybase Adaptive Server Enterprise replicate database.
• Heterogeneous datatype support for non-ASE datatypes that do not map directly to Replication Server datatypes (or Sybase ASE datatypes), which must be translated to the appropriate datatypes for replication into the replicate database.
Topic PageIntroduction 73
Overview of non-ASE support installation 75
Configuring non-ASE support 76

Introduction
74 Replication Server
Components for non-ASE support installed with Replication ServerThe default installation of Replication Server version 15.2 includes the following components:
• Connection profiles that contain function-string classes and error classes for each actively supported database
• Datatype classes
• Replication Server native datatype literal descriptor rows in the RSSD rs_datatype table
• The Replication Server datatype translation engine
See the Replication Server Administration Guide Volume 1 for a list of function-string classes and datatype classes.
Connection profiles
Replication Server 15.2 includes connection profiles that you use to connect to non-ASE data servers. Connection profiles contain or install these components:
• Datatype definitions
• Replication Server support objects in the replicate database
• Replication Server function strings
• Class-level translations for non-ASE datatypes
Datatype definitions Datatype definitions assign a unique datatype ID to each datatype, and describe the attributes of each non-ASE datatype, such as delimiters, length, scale, precision, minimum and maximum values, how it is represented using native Replication Server datatypes. Replication Server uses datatype definitions to:
• Identify datatypes
• Convert datatypes into native datatypes for internal handling (if necessary)
• Translate datatypes
Replication Server support objects
Replication Server relies on a replicate database to maintain some of the operational data that Replication Server needs to replicate to that database.
Non-ASE support accommodates the Replication Server replicate database requirements by creating two tables in the replicate database:

CHAPTER 8 Installing and Implementing Non-ASE Support Features
Configuration Guide for UNIX 75
• rs_info – stores the character set and sort order used by the database. The Replication Server maintenance user ID must have select permission on this table.
• rs_lastcommit – is used by the replicate Replication Server to record information about the most recent replicated operations committed in the replicate database. Because this table is both read and updated by the replicate Replication Server, the Replication Server maintenance user ID must have both insert and update permission on this table.
Replication Server function strings
Function strings allow users to customize the database operations sent by the replicate Replication Server to the replicate database. Non-ASE support uses function strings to replace invocations of stored procedures and certain database commands that the replicate Replication Server sends to the replicate database.
The function strings required to support connections to non-ASE data servers are installed in the RSSD of the replicate Replication Server.
Class-level translations for non-ASE datatypes
Connection profiles provide default datatype-to-datatype mappings, called class-level translations.
Connection profiles provide a function-string class for each supported database server. The class-level translations are specific to each function-string class that supports a non-Sybase replicate database.
Overview of non-ASE support installationSet up and configure non-ASE support in Replication Server version 15.2 following these steps:
1 “Creating a replicate database connection using connection profiles” on page 76
2 “Creating replication definitions” on page 76
3 “Creating subscriptions” on page 76
4 “Marking primary tables” on page 76
Once you complete all these steps, you can begin replicating transactions to a non-ASE replicate database.

Configuring non-ASE support
76 Replication Server
Configuring non-ASE supportThe following sections provide detailed step-by-step procedures for installing and setting up non-ASE support in Replication Server version 15.2.
Creating a replicate database connection using connection profilesUse the using profile clause with the create connection command to create a connection to a non-ASE replicate database. See “create connection with using profile clause,” in Chapter 3, “Replication Server Commands” in the Replication Server Reference Manual.
Creating replication definitionsNo special procedure is required to create replication definitions for the primary tables in Replication Server version 15.2 to replicate transactions to a non-ASE replicate database.
See Chapter 9, “Managing Replicated Tables” in the Replication Server Administration Guide Volume 1, for instructions.
Creating subscriptionsNo special procedure is required to create subscriptions in Replication Server version 15.2 to replicate transactions to a non-ASE replicate database.
See Chapter 9, “Managing Replicated Tables” in the Replication Server Administration Guide Volume 1, for instructions.
Marking primary tablesNo special procedure is required to mark the primary tables for replication in Replication Server version 15.2 to replicate transactions to a non-ASE replicate database.
See Chapter 9, “Managing Replicated Tables” in the Replication Server Administration Guide Volume 1, for instructions.

CHAPTER 8 Installing and Implementing Non-ASE Support Features
Configuration Guide for UNIX 77
For more information about creating a subscription, see the Adaptive Server Enterprise System Administration Guide or the appropriate Replication Agent Administration Guide.

Configuring non-ASE support
78 Replication Server

Configuration Guide for UNIX 79
A P P E N D I X A Worksheets
This appendix contains the Replication Server Installation Worksheet, and the Database Setup Worksheet.
Topic PageReplication Server installation worksheet 80
Database setup worksheet 83
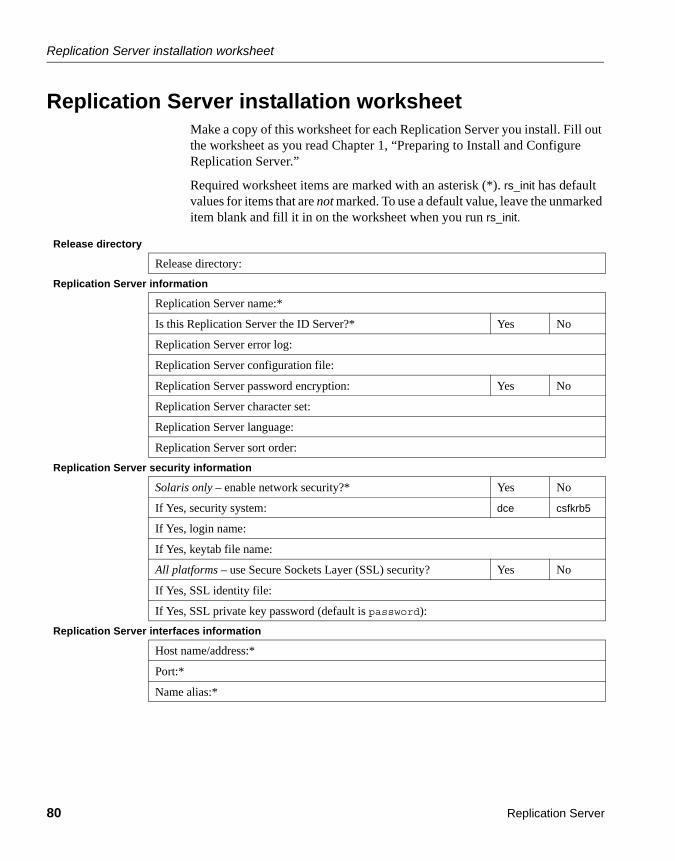
Replication Server installation worksheet
80 Replication Server
Replication Server installation worksheetMake a copy of this worksheet for each Replication Server you install. Fill out the worksheet as you read Chapter 1, “Preparing to Install and Configure Replication Server.”
Required worksheet items are marked with an asterisk (*). rs_init has default values for items that are not marked. To use a default value, leave the unmarked item blank and fill it in on the worksheet when you run rs_init.
Release directory
Release directory:
Replication Server information
Replication Server name:*
Is this Replication Server the ID Server?* Yes No
Replication Server error log:
Replication Server configuration file:
Replication Server password encryption: Yes No
Replication Server character set:
Replication Server language:
Replication Server sort order:
Replication Server security information
Solaris only – enable network security?* Yes No
If Yes, security system: dce csfkrb5
If Yes, login name:
If Yes, keytab file name:
All platforms – use Secure Sockets Layer (SSL) security? Yes No
If Yes, SSL identity file:
If Yes, SSL private key password (default is password):
Replication Server interfaces information
Host name/address:*
Port:*
Name alias:*

APPENDIX A Worksheets
Configuration Guide for UNIX 81
ID Server information
ID Server name:*
ID Server user:
ID Server password:
Starting Replication Server ID:
Starting database ID:
Replication Server System Database choice
Will RSSD be embedded? (default is no) Yes No
SQL Anywhere Embedded Replication Server System Database information
Complete if you selected Yes for “Will RSSD be embedded?”
ERSSD name:*
ERSSD database file directory:*
ERSSD transaction log directory:*
ERSSD backup directory:*
ERSSD error log directory:*
Adaptive Server Enterprise Replication Server System Database information
Complete if you selected No for “Will RSSD be embedded?”
RSSD Adaptive Server name:*
RSSD name:
Will RSSD be replicated?* Yes No
Allow HA failover for RSSD connections? Yes No
Create RSSD:* Yes No
SA user:
SA password:*
Primary user:
Primary password:
Maintenance login:
Maintenance password:
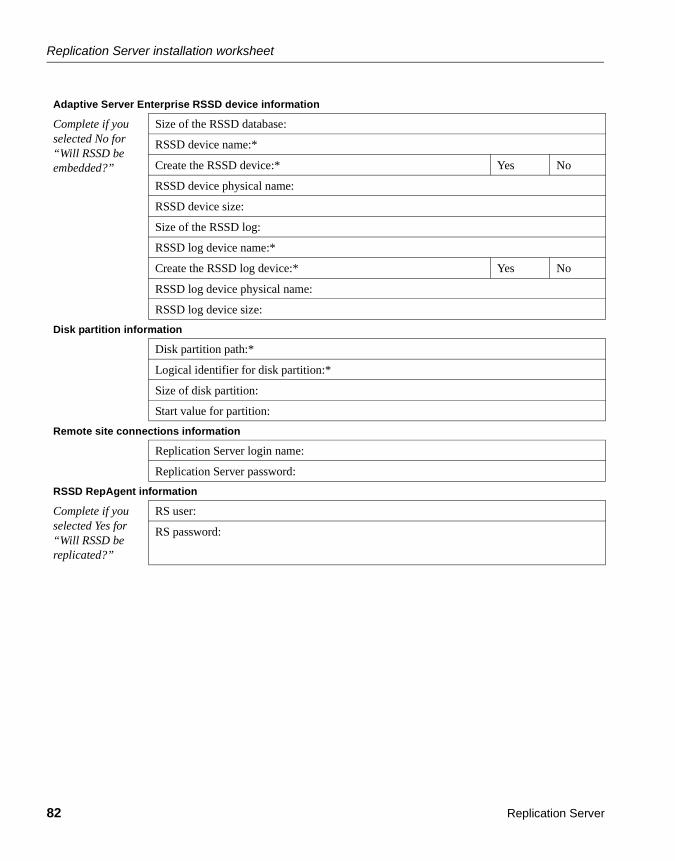
Replication Server installation worksheet
82 Replication Server
Adaptive Server Enterprise RSSD device information
Complete if you selected No for “Will RSSD be embedded?”
Size of the RSSD database:
RSSD device name:*
Create the RSSD device:* Yes No
RSSD device physical name:
RSSD device size:
Size of the RSSD log:
RSSD log device name:*
Create the RSSD log device:* Yes No
RSSD log device physical name:
RSSD log device size:
Disk partition information
Disk partition path:*
Logical identifier for disk partition:*
Size of disk partition:
Start value for partition:
Remote site connections information
Replication Server login name:
Replication Server password:
RSSD RepAgent information
Complete if you selected Yes for “Will RSSD be replicated?”
RS user:
RS password:

APPENDIX A Worksheets
Configuration Guide for UNIX 83
Database setup worksheetMake a copy of this worksheet for each database you add to the replication system. Fill out the worksheet as you read Chapter 1, “Preparing to Install and Configure Replication Server.” Refer to the information on the worksheet when you use rs_init to add the database to your replication system.
Required worksheet items are marked with an asterisk (*). rs_init has default values for items that are not marked. To use the default values, leave the unmarked items blank and fill them in on the worksheet when you run rs_init.
Replication Server information
Replication Server name:*
RS SA user:*
RS SA password:*
Replication Server interfaces information
Host name/address:*
Port:*
Name alias:
Database information
Adaptive Server name:*
SA user:
SA password:
Database name:
Will the database be replicated?* Yes No
Maintenance user:
Maintenance password:
Is this a physical connection for an existing logical connection? Yes No
Logical connection information
Complete if you selected Yes for “Is this a physical connection for an existing logical connection?”
Is this an active connection or a standby connection?* Active Standby
Logical DS name:*
Logical DB name:*

Database setup worksheet
84 Replication Server
Complete the rest of the items in this section only if you selected “Standby” in response to “Is this an active connection or standby connection?”
Active DS name:*
Active DB name:*
Active DB SA user:*
Active DB SA password:*
Initialize standby using dump and load?* Yes No
Use dump marker to start replicating to standby?* Yes No
Complete the following three sections if you selected Yes for “Will the database be replicated?”
Database RepAgent information
RS user:
RS password:

Configuration Guide for UNIX 85
A P P E N D I X B Using rs_init with Resource Files
This appendix explains how to use rs_init resource files. It also lists the rs_init command line options.
Using resource file templatesInstead of using rs_init interactively, you can use a resource file to install, configure, upgrade, or downgrade a Replication Server. Resource files are text files that you can modify using any text editor that can save ASCII format files. To create a resource file, copy and edit a template file, which is supplied with the Replication Server software. Then execute rs_init with the -r command line option, specifying the resource file that rs_init is to use for input.
Sybase supplies several resource file templates for Replication Server. Each template contains the attributes that are valid for a certain rs_init operation.
Table B-1 lists the Replication Server resource file templates. The templates are located in subdirectories under the init subdirectory of the Sybase installation directory.
Table B-1: Resource file templates for Replication Server
Topic PageUsing resource file templates 85
Using resource files for rs_init 86
Using rs_init command line options 88
Sample Replication Server resource file 89
Template name Description
install.rs Configures a new Replication Server.
setupdb.rs Adds a database to the replication system.

Using resource files for rs_init
86 Replication Server
Using resource files for rs_initThis section explains how to prepare a resource file for rs_init.
❖ Using resource files for rs_init
1 From Table B-1, find the resource file template you want to use.
2 Make a copy of the template and rename it to distinguish it from the original. For example:
cp install.rs install.rsx
Note You must have read and write permissions on the copy of the resource file template that you want to edit. You may need to grant write permission to yourself as the file owner.
3 Use a text editor to edit the new resource file.
To use the vi editor, for example, enter:
vi install.rsx
See “Editing a resource file” on page 87 for instructions.
4 When you have finished editing the resource file, start rs_init from the operating system prompt, using the -r flag (see Table B-2 on page 88) to specify your resource file. For example:
upgr.rs Upgrades an RSSD for a Replication Server. Use this template after installing new Replication Server software.
upgrdb.rs Upgrades a user database that is already part of a replication system.
downgr.rs Downgrades an RSSD for a Replication Server. Use this template before reinstalling the previous Replication Server software release.
eers.rs Enables password encryption for a Replication Server.
updrscf.rs Alters a password in a Replication Server configuration file.
Template name Description
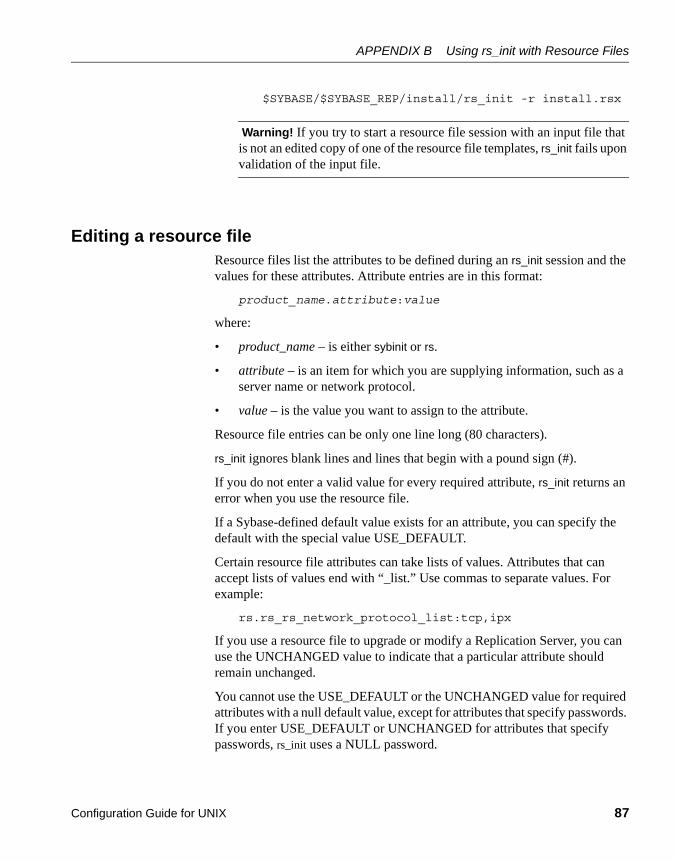
APPENDIX B Using rs_init with Resource Files
Configuration Guide for UNIX 87
$SYBASE/$SYBASE_REP/install/rs_init -r install.rsx
Warning! If you try to start a resource file session with an input file that is not an edited copy of one of the resource file templates, rs_init fails upon validation of the input file.
Editing a resource fileResource files list the attributes to be defined during an rs_init session and the values for these attributes. Attribute entries are in this format:
product_name.attribute:value
where:
• product_name – is either sybinit or rs.
• attribute – is an item for which you are supplying information, such as a server name or network protocol.
• value – is the value you want to assign to the attribute.
Resource file entries can be only one line long (80 characters).
rs_init ignores blank lines and lines that begin with a pound sign (#).
If you do not enter a valid value for every required attribute, rs_init returns an error when you use the resource file.
If a Sybase-defined default value exists for an attribute, you can specify the default with the special value USE_DEFAULT.
Certain resource file attributes can take lists of values. Attributes that can accept lists of values end with “_list.” Use commas to separate values. For example:
rs.rs_rs_network_protocol_list:tcp,ipx
If you use a resource file to upgrade or modify a Replication Server, you can use the UNCHANGED value to indicate that a particular attribute should remain unchanged.
You cannot use the USE_DEFAULT or the UNCHANGED value for required attributes with a null default value, except for attributes that specify passwords. If you enter USE_DEFAULT or UNCHANGED for attributes that specify passwords, rs_init uses a NULL password.

Using rs_init command line options
88 Replication Server
Using rs_init command line optionsAfter you have edited your resource file, start rs_init from the operating system prompt:
rs_init resource_file_name [-option] [parameter]
where:
• option – is the letter specifying a command line option.
• parameter – is any valid parameter for that option.
You can specify more than one command line option. For a resource file session, you must specify the -r option and the resource file name. Table B-2 lists the available options for a resource file. You can also use some of these options in an interactive rs_init session.
Table B-2: rs_init command line options
Flags Parameters Explanation
-a none Validates the resource file and exits without performing the configuration task. Without the -a flag, rs_init validates the resource file and continues the product configuration. You must use the -r flag with the -a flag.
-c See “Replication Server information” on page 6 for a list of character sets.
Specifies the character set used for all messages and prompts. The -c flag forces rs_init to use a particular character set. Otherwise, rs_init uses your system’s default character set.
-e none Records information about the user’s environment and exits. Information is written to the log file. Without the -e flag, rs_init records user environment information and continues the product configuration.
-h none Prints out usage message (help) and exits.
-l French, German, Japanese, Spanish, Chinese, Korean
Specifies the language used for all messages and prompts. The -l flag forces rs_init to use a particular language. Without this option, rs_init uses U.S. English.
-log Path and file name of log file
Lets the user specify location of the session log file. Without the -log flag, rs_init uses the default log location ($SYBASE/init/log).
-r Path and file name of resource file
Specifies that rs_init is to take input from the listed resource file. Use this flag in noninteractive sessions to configure new server products, upgrade existing server products, or modify existing server products.

APPENDIX B Using rs_init with Resource Files
Configuration Guide for UNIX 89
Sample Replication Server resource fileThis section contains a sample resource file for configuring a new Replication Server. Your resource file will have different values for many of the attributes, but will be similar to the sample.
####################################################### RESOURCE TEMPLATE## This file contains a list of configuration attributes
# for Sybase Replication Server. This is the template# for configuring a new Replication Server. DO NOT EDIT# THIS FILE.
# Copy the template to another file and edit that.## Syntax of the resource file is:## product_name.attribute:value## Attributes with a value of USE_DEFAULT will use the#Sybase defaults for this platform.##NOTES:# Generic attributes are prefaced by "sybinit." The# only generic attributes are "release_directory" and# "product."#
-s Path of Sybase release directory
Specifies the Sybase release directory. If you do not use the -s flag, rs_init assumes that the Sybase release directory is the current directory.
-T IGNORE_WARNINGS none Entering certain values for some attributes causes rs_init to exit with a warning. (rs_init exits, for instance, if you specify an operating system file for the location of the master device.) Invoking an rs_init resource file session with the -T IGNORE_WARNINGS flag allows the rs_init session to continue.
-v none Prints the rs_init version string and exits.
Flags Parameters Explanation
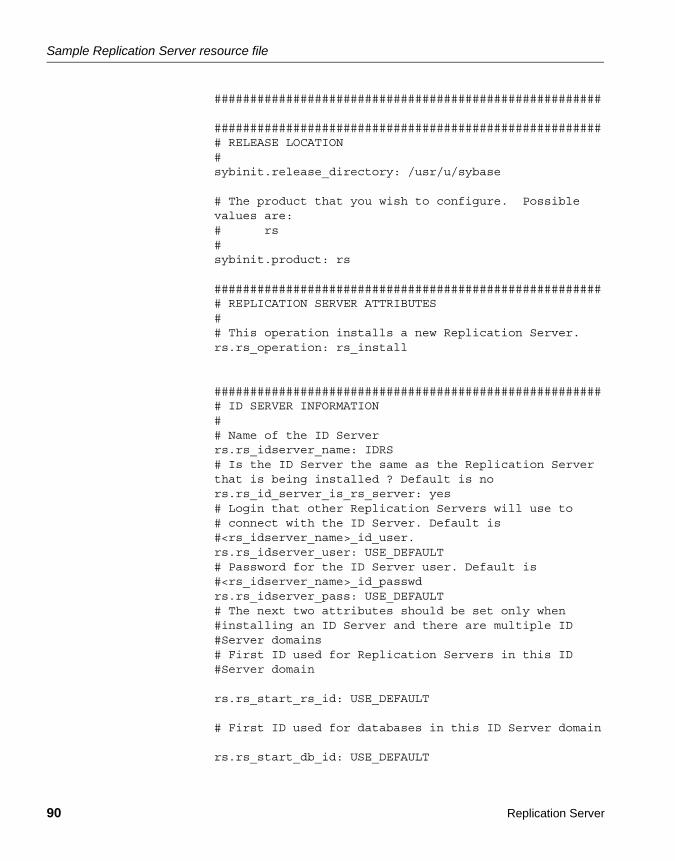
Sample Replication Server resource file
90 Replication Server
######################################################
####################################################### RELEASE LOCATION#sybinit.release_directory: /usr/u/sybase
# The product that you wish to configure. Possiblevalues are:# rs#sybinit.product: rs
####################################################### REPLICATION SERVER ATTRIBUTES## This operation installs a new Replication Server.rs.rs_operation: rs_install
####################################################### ID SERVER INFORMATION## Name of the ID Serverrs.rs_idserver_name: IDRS# Is the ID Server the same as the Replication Serverthat is being installed ? Default is nors.rs_id_server_is_rs_server: yes# Login that other Replication Servers will use to# connect with the ID Server. Default is #<rs_idserver_name>_id_user.rs.rs_idserver_user: USE_DEFAULT# Password for the ID Server user. Default is#<rs_idserver_name>_id_passwdrs.rs_idserver_pass: USE_DEFAULT# The next two attributes should be set only when#installing an ID Server and there are multiple ID#Server domains# First ID used for Replication Servers in this ID#Server domain
rs.rs_start_rs_id: USE_DEFAULT
# First ID used for databases in this ID Server domain
rs.rs_start_db_id: USE_DEFAULT

APPENDIX B Using rs_init with Resource Files
Configuration Guide for UNIX 91
####################################################### REPLICATION SERVER INFORMATION## Replication Server namers.rs_name: NYRS# Will the Replication Server manage databases with# primary data, submit asynchronous transactions, or#serve as an intermediate site in an indirect route ?#Default is nors.rs_requires_ltm: no
# Will the Replication Server(11.0 or higher) manage#databases with primary data, submit asynchronous#transactions, or serve as an intermediate site in an#indirect route ? Default is yesrs.rs_needs_repagent: yes
# Locations of the errorlog and config file for the# Replication Server.# The default names of these files are <rs_name>.log and#<rs_name>.cfg respectively.# The default directory in which these files are located#is the current working directory on Unix platforms, and#in %SYBASE%\install on PC platforms.
rs.rs_rs_errorlog: USE_DEFAULTrs.rs_rs_cfg_file: USE_DEFAULT
# Character set to be used by this Replication Server#(and the RSSD LTM if needed)rs.rs_charset: USE_DEFAULT# Language to be used by this Replication Server (and#the RSSD LTM if needed)rs.rs_language: USE_DEFAULT
# Sort order to be used by this Replication Server (and#the RSSD LTM if needed)rs.rs_sortorder: USE_DEFAULT
######################################################
# REPLICATION SERVER SYSTEM DATABASE CHOICE## Is this an embedded rssdrs.rs_rssd_embedded: no

Sample Replication Server resource file
92 Replication Server
####################################################### EMBEDDED REPLICATION SERVER SYSTEM DATABASE#INFORMATION# The following only applies if embedded RSSD is chosen## erssd namers.rs_erssd_name: rep_erssd# embedded rssd database directoryrs.rs_erssd_database_dir: /work/database# embedded rssd transaction log directoryrs.rs_erssd_translog_dir: /work/translog# embedded rssd backup directoryrs.rs_erssd_backup_dir: /work/backup# embedded rssd error log directoryrs.rs_erssd_errorlog_dir: /work/errorlog######################################################
# REPLICATION SERVER SYSTEM DATABASE INFORMATION# The following only applies if embedded RSSD is not#chosen# Name of the Adaptive Server that will manage the# Replication Server's system database.rs.rs_rssd_sqlsrvr: NYDS# Name of the database where the Replication Server#system tables will be stored. Default is <rs_name>_RSSDrs.rs_rssd_db: USE_DEFAULT# Do you want the RSSD connections to allow HA failover?#Default is nors.rs_rssd_ha_failover: no# Do you want rs_init to create the system database ?#Default is nors.rs_create_rssd: no# sa login for the system Adaptive Server - default is sars.rs_rssd_sa_login: USE_DEFAULT# sa password for the system Adaptive Server - default#is NULLrs.rs_rssd_sa_pass: # Name of the RSSD primary user. Default is#<rs_rssd_db>_primrs.rs_rssd_prim_user: USE_DEFAULT
# Password for the RSSD primary user. Default is#<rs_rssd_db>_prim_psrs.rs_rssd_prim_pass: USE_DEFAULT# Name of the RSSD maintenance user. Default is#<rs_rssd_db>_maint
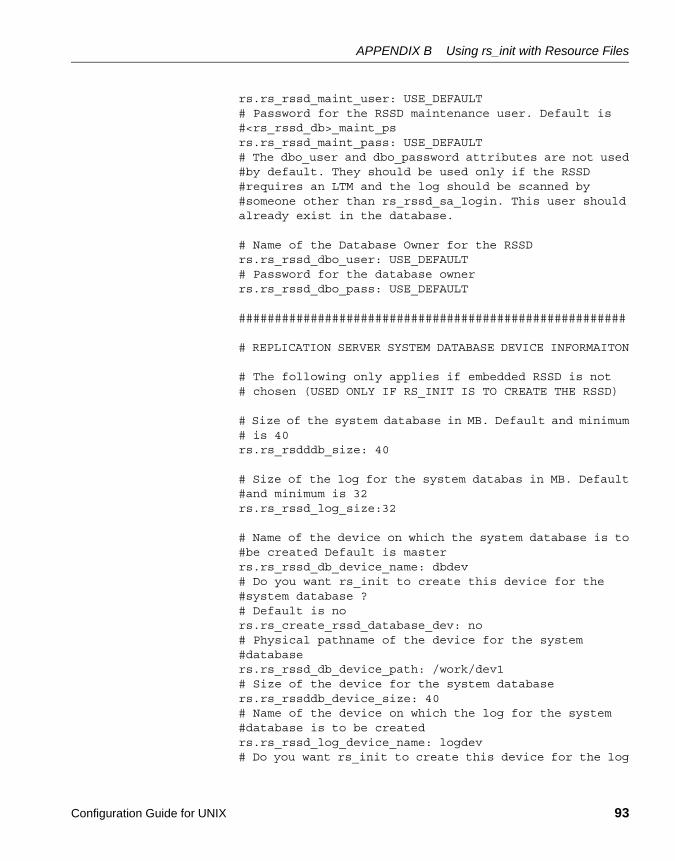
APPENDIX B Using rs_init with Resource Files
Configuration Guide for UNIX 93
rs.rs_rssd_maint_user: USE_DEFAULT# Password for the RSSD maintenance user. Default is#<rs_rssd_db>_maint_psrs.rs_rssd_maint_pass: USE_DEFAULT# The dbo_user and dbo_password attributes are not used#by default. They should be used only if the RSSD#requires an LTM and the log should be scanned by#someone other than rs_rssd_sa_login. This user shouldalready exist in the database.
# Name of the Database Owner for the RSSDrs.rs_rssd_dbo_user: USE_DEFAULT# Password for the database ownerrs.rs_rssd_dbo_pass: USE_DEFAULT
######################################################
# REPLICATION SERVER SYSTEM DATABASE DEVICE INFORMAITON
# The following only applies if embedded RSSD is not# chosen (USED ONLY IF RS_INIT IS TO CREATE THE RSSD)
# Size of the system database in MB. Default and minimum# is 40 rs.rs_rsdddb_size: 40
# Size of the log for the system databas in MB. Default#and minimum is 32rs.rs_rssd_log_size:32
# Name of the device on which the system database is to#be created Default is masterrs.rs_rssd_db_device_name: dbdev# Do you want rs_init to create this device for the#system database ?# Default is nors.rs_create_rssd_database_dev: no# Physical pathname of the device for the system#databasers.rs_rssd_db_device_path: /work/dev1# Size of the device for the system databasers.rs_rssddb_device_size: 40# Name of the device on which the log for the system#database is to be createdrs.rs_rssd_log_device_name: logdev# Do you want rs_init to create this device for the log

Sample Replication Server resource file
94 Replication Server
# for the system database ? Default is no
rs.rs_create_rssd_log_dev: no# Physical pathname of the device for the log for the# system databasers.rs_rssd_log_device_path: /work/dev2# Size of the device for the log for the system databasers.rs_rssd_log_device_size:32####################################################### DISK PARTITION INFORMATION## Full path name of a raw disk partition for the# Replication Serverrs.rs_diskp_name: /work/dev3# Logical identifier name for the raw disk partition for# the Replication Serverrs.rs_diskp_lname: part1# Size, in megabytes, of the raw disk partition.Default# is 20.rs.rs_diskp_size: 20# The offset, in megabytes, at which the Replication#Server should begin writing in the raw disk partition.#Default is 0rs.rs_diskp_vstart: 0####################################################### REMOTE SITE CONNECTION INFORMATION## Replication Server login name that other Replication# Servers will use to connect with this Replication# Server Default is <rs_name>_rsirs.rs_rs_user: USE_DEFAULT# Password for the Replication Server login name# Default is <rs_name>_rsi_psrs.rs_rs_pass: USE_DEFAULT####################################################### SYSTEM DATABASE LOG TRANSFER MANAGER INFORMATION ## (IF RSSD NEEDS LTM)# Name of the RSSD LTM. Default is# <rs_rssd_sqlsrvr>_<rs_name>_RSSD_ltm.rs.ltm_name: NY_LTM# Replication Server login name that the log transfer# manager will use when connecting to the Replication# Server# Default is <rs_name>_ltmrs.rs_ltm_rs_user: USE_DEFAULT

APPENDIX B Using rs_init with Resource Files
Configuration Guide for UNIX 95
# Password for the login name for the log transfer# manager# Default is <rs_name>_ltm_psrs.rs_ltm_rs_pass: USE_DEFAULT# Login name for the user who will start and shutdown#the log# transfer manager for the Replication Server system# database# Default is sars.rs_ltm_admin_user: USE_DEFAULT# Password for the admin user - default is NULLrs.rs_ltm_admin_pass: USE_DEFAULT######################################################
# ID SERVER INTERFACES INFORMATION
# These attributes are valid only for Unix platforms.# On PC platforms, adding interface file entries through# resource files is not supported.# rs.do_add_id_server must be no on these platforms.## Add ID Server to interfaces file? Default is nors.do_add_id_server: USE_DEFAULT# Connect retry count; number of times client tries to# connect to ID Server before giving uprs.rs_id_server_connect_retry_count: USE_DEFAULT# Connect retry delay time (in seconds); amount of time# client waits between each connection attemptrs.rs_id_server_connect_retry_delay_time: USE_DEFAULT# Notes associated with ID Server interfaces file entryrs.rs_id_server_notes: Default Sybase Configuration# Protocol for ID Server network listenerrs.rs_id_server_network_protocol_list: tcp# Name of host for ID Serverrs.rs_idserver_hostname: herbie# Port numbers for network listenerrs.rs_idserver_port: 5002
####################################################### REPLICATION SERVER INTERFACES INFORMATION
# These attributes are valid only for Unix platforms.# On PC platforms,adding interface file entries through# resource files is not supported.# rs.do_add_replication_server must be no on these# platforms.

Sample Replication Server resource file
96 Replication Server
## Add Replication Server to interfaces file?rs.do_add_replication_server: no# Connect retry count; number of times client tries to# connect# to Replication Server before giving uprs.rs_rs_connect_retry_count: USE_DEFAULT# Connect retry delay time (in seconds); amount of time# client waits between each connection attemptrs.rs_rs_connect_retry_delay_time: USE_DEFAULT# Notes associated with Replication Server interfaces# file entryrs.rs_rs_notes: Default Sybase Configuration# Protocol for Replication Server network listenerrs.rs_rs_network_protocol_list: tcp# Name of host for Replication Serverrs.rs_rs_hostname: herbie# Port numbers for network listenerrs.rs_rs_port: 5005
###################################################### LOG TRANSFER MANAGER INTERFACES INFORMATION - IF RSSD# HAS LTM
# These attributes are valid only for Unix platforms.# On PC platforms,adding interface file entries through# resource files is not supported.# rs.do_add_ltm must be no on these platforms.
# Add Log Transfer Manager to interfaces file?rs.do_add_ltm: no
# Connect retry count; number of times client tries to# connect to Log Transfer Manager before giving uprs.rs_ltm_connect_retry_count: USE_DEFAULT# Connect retry delay time (in seconds); amount of time#client waits between each connection attemptrs.rs_ltm_connect_retry_delay_time: USE_DEFAULT# Notes associated with Log Transfer Manager interfaces# file entryrs.rs_ltm_notes: Default Sybase Configuration# Protocol for Log Transfer Manager network listenerrs.rs_ltm_network_protocol_list: tcp# Name of host for Log Transfer Managerrs.rs_ltm_hostname: herbie# Port numbers for network listener
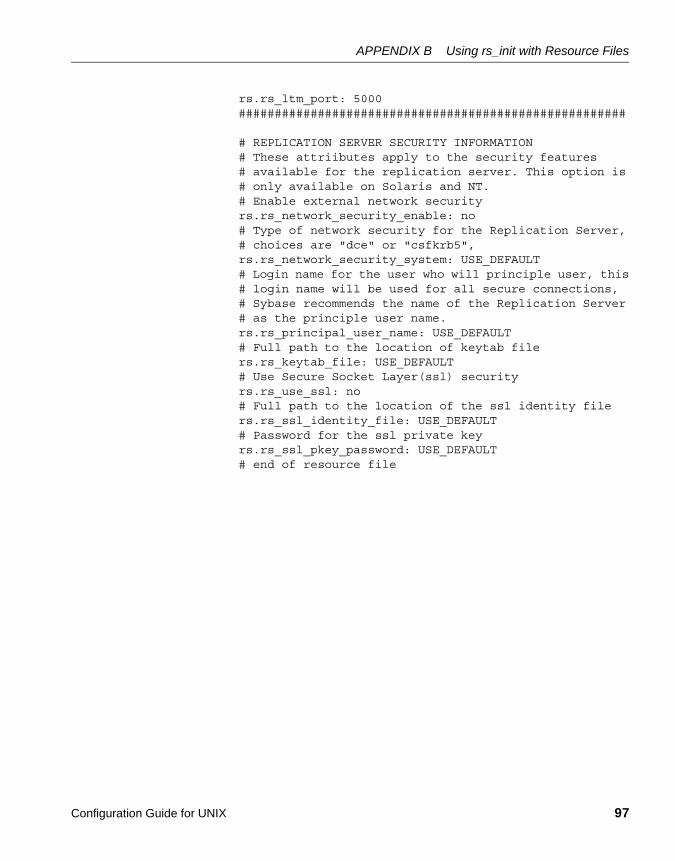
APPENDIX B Using rs_init with Resource Files
Configuration Guide for UNIX 97
rs.rs_ltm_port: 5000######################################################
# REPLICATION SERVER SECURITY INFORMATION# These attriibutes apply to the security features# available for the replication server. This option is# only available on Solaris and NT.# Enable external network securityrs.rs_network_security_enable: no# Type of network security for the Replication Server,# choices are "dce" or "csfkrb5", rs.rs_network_security_system: USE_DEFAULT# Login name for the user who will principle user, this# login name will be used for all secure connections,# Sybase recommends the name of the Replication Server# as the principle user name.rs.rs_principal_user_name: USE_DEFAULT# Full path to the location of keytab file rs.rs_keytab_file: USE_DEFAULT# Use Secure Socket Layer(ssl) security rs.rs_use_ssl: no# Full path to the location of the ssl identity filers.rs_ssl_identity_file: USE_DEFAULT# Password for the ssl private keyrs.rs_ssl_pkey_password: USE_DEFAULT# end of resource file

Sample Replication Server resource file
98 Replication Server
Configuration Guide for UNIX 99
A P P E N D I X C Sample Replication System
This appendix describes a sample replication system and the steps needed to set it up.
The sample replication system replicates the changes made to two tables in the pubs2 database from one Adaptive Server to another Adaptive Server.
You can set up this example as an introduction to using Replication Server or to test your replication system installation.
Note The application architecture for this example is similar to the decision-support model described in the Replication Server Design Guide.
Description of the sample replication systemThe goal of this replication system is to replicate all changes made to the authors and titles tables in the pubs2 database in one Adaptive Server to the same tables in the pubs2 database in another Adaptive Server.
The replication system has two Adaptive Servers:
• A primary Adaptive Server, named TOKYO_DS, holds the RSSD for the primary Replication Server and the primary pubs2 database.
• The replicate Adaptive Server, named SYDNEY_DS, holds the RSSD for the replicate Replication Server and the replicate pubs2 database.
The replication system has two Replication Servers:
Topic PageDescription of the sample replication system 99
Setting up the example 100
Testing and troubleshooting the replication system 105

Setting up the example
100 Replication Server
• A primary Replication Server named TOKYO_RS manages the primary pubs2 database.
• A replicate Replication Server named SYDNEY_RS manages the replicate pubs2 database.
The replication system has two RepAgents:
• A RepAgent for the primary RSSD runs in the ASE TOKYO_RSSD and transfers the RSSD log to the primary Replication Server.
• A RepAgent for the primary pubs2 database runs in the ASE TOKYO_PUBS2 and transfers the pubs2 log to the primary Replication Server.
Setting up the exampleThis section outlines the tasks for setting up the replication system.
• “General setup tasks” on page 100 explains how to install the servers and databases used in the example. These instructions may refer you to other chapters in this guide, or to other books.
• “Establishing replication” on page 102 explains how to set up replication between the pubs2 databases in the two Adaptive Servers.
❖ General setup tasks
If you already have Adaptive Servers or Replication Servers installed, you can use them for the example. Substitute the names of your servers throughout the instructions.
You must choose the machines where each server will execute. You must also locate disk space for Adaptive Server database devices and Replication Server partitions.
1 Install the primary Adaptive Server, TOKYO_DS.
• The Adaptive Server must have room on its database devices for a 2MB pubs2 database, a 10MB RSSD, and at least 10MB for logs.
2 Install the replicate Adaptive Server, SYDNEY_DS.
• The Adaptive Server must have room on its database devices for a 2MB pubs2 database, a 10MB RSSD, and at least 10MB for logs.

APPENDIX C Sample Replication System
Configuration Guide for UNIX 101
3 Install the pubs2 database in the primary Adaptive Server:
isql -Usa -Psa_passwd -STOKYO_DS < \$SYBASE/$SYBASE_ASE/scripts/installpubs2
4 Install the pubs2 database in the replicate Adaptive Server:
isql -Usa -Psa_passwd -SSYDNEY_DS < \$SYBASE/$SYBASE_ASE/scripts/installpubs2
5 Complete Appendix A, “Worksheets” for the primary Replication Server (TOKYO_RS).
• Create the RSSD for TOKYO_RS in the TOKYO_DS Adaptive Server.
• The RSSD requires a RepAgent.
6 Complete Appendix A, “Worksheets” for the replicate Replication Server (SYDNEY_RS).
• Create the RSSD for SYDNEY_RS in the SYDNEY_DS Adaptive Server.
• The RSSD does not require a RepAgent.
7 Complete “Database setup worksheet” on page 83 for the primary pubs2 database.
• The database is in Adaptive Server TOKYO_DS.
• The database is managed by the TOKYO_RS Replication Server.
• The database requires a RepAgent.
8 Complete “Database setup worksheet” on page 83 for the replicate pubs2 database.
• The database is in Adaptive Server SYDNEY_DS.
• The database is managed by the SYDNEY_RS Replication Server.
• The database does not require a RepAgent.
9 Log in to the machine where the primary Replication Server will execute. Run rs_init and install Replication Server TOKYO_RS using the worksheet you completed in step 5.
10 Log in to the machine where you installed the primary Replication Server. Run rs_init and add the primary pubs2 database to the replication system using the worksheet you completed in step 7.

Setting up the example
102 Replication Server
11 Log in to the machine where the replicate Replication Server will execute. Run rs_init and install Replication Server SYDNEY_RS using the worksheet you completed in step 6.
12 Log in to the machine where you installed the replicate Replication Server. Run rs_init and add the replicate pubs2 database to the replication system using the worksheet you completed in step 8.
❖ Establishing replication
Create a route from the primary Replication Server to the replicate Replication Server.
1 Log in to the primary Replication Server as “sa”:
isql -Usa -STOKYO_RS
2 Enter the create route command:
create route to SYDNEY_RS set username SYDNEY_RS_rsi set password SYDNEY_RS_rsi_ps
go
Note Find the user name and password for the create route command in the “Remote site connections” section of the Replication Server Installation Worksheet for the replicate Replication Server.
3 Create a login account in the primary Adaptive Server for the user who will create the replication definitions and subscriptions. In this example, the login name is “repsys.” Add the user to the pubs2 databases and grant the user select permissions for the tables to replicate.
isql -Usa -STOKYO_DSsp_addlogin repsys, repsys_psgo
use pubs2go
sp_adduser repsysgo
grant select on authors to repsysgrant select on titles to repsysgoquit

APPENDIX C Sample Replication System
Configuration Guide for UNIX 103
4 Add the “repsys” user to the two Replication Servers and grant create object permission to the user. The “repsys” user must have the same login name and password in the two Replication Servers and the primary Adaptive Server:
isql -Usa -STOKYO_RScreate user repsysset password repsys_psgo
grant create object to repsysgoquit
isql -Usa -SSYDNEY_RScreate user repsysset password repsys_psgo
grant create object to repsysgoquit
5 Create replication definitions for the authors and titles tables:
isql -Urepsys -Prepsys_ps -STOKYO_RScreate replication definition authorswith primary at TOKYO_DS.pubs2with all tables named 'authors' (
au_id varchar(11),au_lname varchar(40),au_fname varchar(20),phone char(12),address varchar(40),city varchar(20),state char(2),country varchar(12),postalcode char(10)
)primary key (au_id)searchable columns (state, postalcode)go
create replication definition titleswith primary at TOKYO_DS.pubs2with all tables named 'titles'
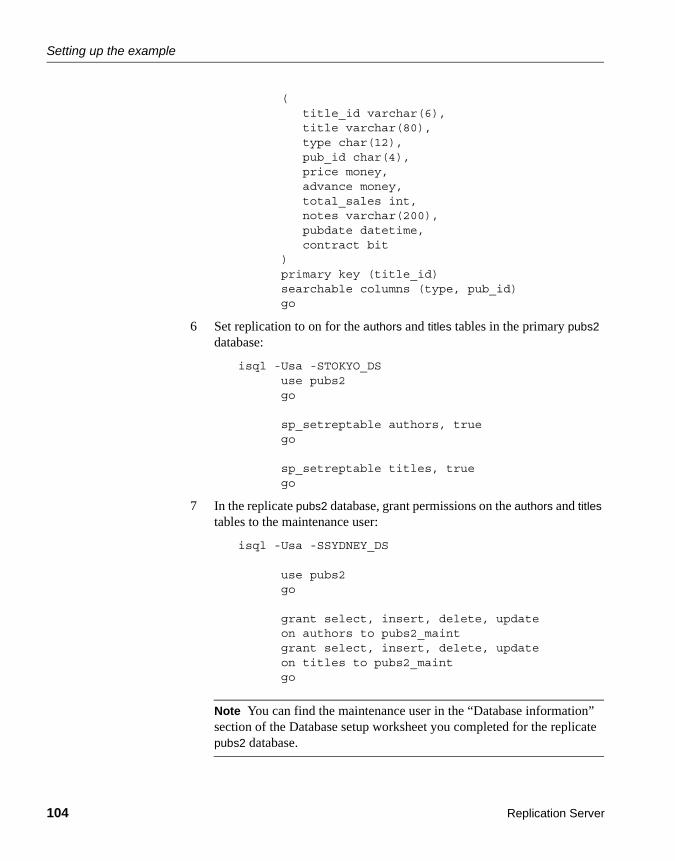
Setting up the example
104 Replication Server
(title_id varchar(6),title varchar(80),type char(12),pub_id char(4),price money,advance money,total_sales int,notes varchar(200),pubdate datetime,contract bit
)primary key (title_id)searchable columns (type, pub_id)go
6 Set replication to on for the authors and titles tables in the primary pubs2 database:
isql -Usa -STOKYO_DSuse pubs2go
sp_setreptable authors, truego
sp_setreptable titles, truego
7 In the replicate pubs2 database, grant permissions on the authors and titles tables to the maintenance user:
isql -Usa -SSYDNEY_DS
use pubs2go
grant select, insert, delete, updateon authors to pubs2_maintgrant select, insert, delete, updateon titles to pubs2_maintgo
Note You can find the maintenance user in the “Database information” section of the Database setup worksheet you completed for the replicate pubs2 database.

APPENDIX C Sample Replication System
Configuration Guide for UNIX 105
8 In the replicate Replication Server, create subscriptions for the authors and titles tables:
isql -Urepsys -Prepsys_ps -SSYDNEY_RS
create subscription authors_subfor authors with replicate at SYDNEY_DS.pubs2 without materializationgo
create subscription titles_subfor titles with replicate at SYDNEY_DS.pubs2 without materializationgo
Note Since there is already data at the replicate database, this example uses the create subscription without materialization option. For other methods, see Chapter 3, “Replication Server Commands,” in the Replication Server Reference Manual.
Testing and troubleshooting the replication systemReplication should now be established for the authors and titles tables. To test and troubleshoot the replication system:
• Log in to the replicate pubs2 database and select the data from the titles and authors tables. If the rows exist in the tables, it indicates that the subscriptions were created and materialized successfully.
• If rows are not appearing in the replicate tables, execute the check subscription command in each of the Replication Servers:
check subscription authors_subfor authorswith replicate at SYDNEY_DS.pubs2
The check subscription command reports the status of the subscription. If the status is not “valid” in both the primary and replicate Replication Servers, then either the subscription has not finished materializing or an error has occurred.
Testing and troubleshooting the replication system
106 Replication Server
The authors and titles tables are very small. If there are no configuration problems, they should not take more than a few seconds to materialize. If you do not see the results quickly, you can assume that an error has occurred.
• Log in to the primary pubs2 database and execute some insert, update, and delete SQL commands against the authors and titles tables. Then log in to the replicate pubs2 database and verify that your modifications appear in the replicate tables. If rows do not appear in the replicate tables, execute the check subscription command in each of the Replication Servers.
• Check the error logs for the primary and replicate Replication Servers for error messages. The most common problems are:
• Failure to log in to the primary Adaptive Server. The user who creates the subscription in the replicate Replication Server must have the same login name and password in the primary Adaptive Server and the primary Replication Server.
• Missing permissions in the primary database. The user who creates the subscription must be a user in the primary database and must have select permission in the primary table.
• Missing permissions in the replicate database. The maintenance user must have select, insert, update, and delete permissions on the tables in the replicate database.
• A Replication Server or Adaptive Server has stopped running. Try logging in to each of the servers. Restart any servers that are not running.

Configuration Guide for UNIX 107
Aactive databases, warm standby applications 21Adaptive Server Enterprise
for RSSD 14RSSD device information 15
advanced security feature. See SSLalter user command, specifying passwords with 55altering passwords 57asynchronous transactions 4attribute format for resource files 87audience for this book vii
Bbackup configuration file 57
Ccertauth utility 61certificate authority 60certpk12 utility 61certreq utility 61changing encrypted password 57chapter listings in this book viicharacter sets
Chinese 8cp437 7cp850 7deckanji 7eucgb 8eucjis 8eucksc 8French 8gb18030 8German 8iso_1 8iso15 8
Japanese 8Korean 8mac 8Replication Server 9roman8 8roman9 8sjis 8Spanish 8utf8 8
Chinese character sets 8command line options in rs_init 88commands
alter user 55create replication definition 103create route 102create subscription 105create user 103sysadmin site_version 45sysadmin system_version 43
communication protocolTCP, Transmission Control Protocol 62
configuration filesbackup 57Replication Server 7
configuringnon-ASE support 76–77Replication Server 25RMS for three-tier support 68
connection profiles 74, 76create connection command, using 76creating database connections 76using profile clause 76
connectionsphysical 20remote site 18, 30
conventionsdocument style xiexamples xisyntax statements xii
copying resource file templates 86
Index

Index
108 Replication Server
create replication definition command example 103create route command example 102create subscription command example 105create user command
example 103specifying passwords with 55
creatingpartitions 18routes 102
.cshrc file 6
Ddatabase ID, starting 12Database Setup Worksheet 83
completing 19template 83
databasesadding to replication system 31log, for RSSD 15
dates, formatting 9deckanji character set 7definitions
rs_init 23runserver 65
descriptionsID Server 3, 11rs_init resource file 24RSSD 3
device information, Adaptive Server Enterprise for RSSD 15
directory services 27disabling secondary truncation point 50disk partitions 3, 17downgr.rs resource file template 86downgrading an RSSD 40, 52dsedit, editing interfaces files with 27
Eediting
interface files with dsedit 27interfaces files 27resource files 86
eers.rs resource file template 86Embedded Replication Server System Database. See
ERSSDenabling password encryption for Replication Server
56, 57encrypted password
changing 57ERSSD 57
encryption, password 7entering RSSD or ERSSD information 28environment variables
release directory 6SYBASE 6
error log in Replication Server 7ERSSD
described 3encrypted password 57enter information for RSSD 28platform support 37platforms supported by SQL Anywhere 37SQL Anywhere database 14system database 14worksheet 79
eucgb character set 8eucjis character set 8eucksc character set 8examples
create replication definition command 103create user command 103pubs2 replication system 99replication systems 99, 106style conventions xi
executing rs_init with resource files 86
Ffiles
.profile 6
.cshrc 6identity for SSL 61installation logs 31, 34libtcl.cfg 60Replication Server configuration file 7Replication Server error log 7resource file templates 85
Index
Configuration Guide for UNIX 109
runserver 65foreign data servers. See non-ASE supportFrench character sets 8
Ggb18030 character set 8German character sets 8
Hheterogeneous data servers. See non-ASE supporthost name 11how to use this book vii
IID Server
described 3, 11information screen 27installing 7, 11, 27name 12password 12user 12
identify file for SSL 61install.rs resource file template 85installing
ID Server 27non-ASE support 75
intended audience for this book viiinteractive mode in rs_init 23interfaces file 37
editing 27release directory 20
interfaces information for Replication Server 10iso_1 character set 8iso15 character set 8isql program 66
JJapanese character sets 8
KKorean character sets 8
Llanguages for Replication Server 9libtcl.cfg file 60lists of values, resource file
attributes 87log files and rs_init 88logical connections 20
warm standby applications, for 21logical DB setup 33login name
Replication Server 19
Mmac character set 8maintenance password 20maintenance user
permissions 20RSSD, for 15
menus in rs_init 5multiple replication systems 12
Nname alias 11network-based security 27non-ASE support 73–77
components 74configuring 76–77configuring, database connections 76connection profiles 74, 76create connection command, for connection
profiles 76datatype definitions 74installation 75Replication Server class-level translations for non-
ASE datatypes 75Replication Server function strings 75Replication Server support objects 74

Index
110 Replication Server
using profile clause, to create connections 76NULL default values, resource file 87
Oonline help for rs_init utility 24operating systems in this book viiorganization of this book vii
Ppartitions
creating 18Replication Server 3, 17, 30
password administration in rs_init 55password encryption 7
enabling for a Replication Server 56, 57passwords
Adaptive Server “sa” user 15altering 57changing encrypted 57encryption 7ERSSD 57maintenance user 20primary user 15specifying with alter user command 55specifying with create user command 55
permissions for maintenance user 20physical connections 20planning replication systems 2platform support
ERSSD and SQL Anywhere 37in this book vii
port, interfaces 11preparing to start rs_init 25primary data and RepAgent 4primary user for RSSD 15.profile file 6pubs2 example replication system 99
Qqueues, stable 3
quitting rs_init 24
Rraw disk partitions, protecting start sectors 18release directory
environment variables and 6interfaces file 20
remote site connections 18, 30for Replication Server 19
RepAgentprimary data and 4replicated stored procedure execution and 4RSSD and 4, 19warm standby applications and 4
replicated databasesrestoring 50
replicated stored procedure executionRepAgent and 4
Replication Monitoring Servicesdescription 67installing 68starting and stopping 69using Unified Agent Framework 69
Replication Servercharacter sets 9configuration file 7configuring 25error log 7install worksheet 80interfaces information 10language 9login name 19name 6partitions 17password encryption, enabling 56, 57remote site connections 19site version, setting 44sort order 9starting 65stopping 66version number 44
Replication Server Administration Guide 7, 13, 18, 19Replication Server ID, starting 12Replication Server Installation Guide vii

Index
Configuration Guide for UNIX 111
Replication Server Installation Worksheet 5, 79Replication Server Reference Manual 6Replication Server site version See site versionReplication Server System Database. See RSSDReplication system version. See system versionreplication systems
adding a database 31example 99, 106multiple 12planning 2
requirements for warm standby applications 33reserved words 5resource file mode in rs_init 85resource file of rs_init described 24resource file templates 85
copying 86downgr.rs 86eers.rs 86install.rs 85setupdb.rs 85upgr.rs 86upgrdb.rs 86uprscf.rs 86
resource filesattribute format 87editing 86preparing for rs_init 86rs_init 23sample 89starting a session 86templates 85using 85
restoring replicated databases 50restoring replication after upgrade 50RMS 69
connecting to 70roman8 character set 8roman9 character set 8routes, creating 102rs_init
command line options 88commands, list of 24defined 23executing with resource files 86interactive command keys 24interactive mode 23
log file 31, 34, 88menus 5online help 24password administration 55preparing for, with resource files 86preparing to start 25quitting 24resource file 23resource file mode 85resource file, description of 24starting 24, 56version number 89writing to a resource file 24
RSSDAdaptive Server Enterprise device information 15described 3device 15, 17, 29downgrading 40, 52draining transaction log manually 49enter information 28log device 17maintenance user 15primary user 15RepAgent and 4, 19RepAgent requirement 7screen 29upgrading 37, 40using Adaptive Server Enterprise 14worksheet section 14
runserver filesdefined 65
Ssample replication systems 99, 106
troubleshooting 105sample resource files 89Secure Sockets Layer. See SSLservers
start-up sequence 66setting basic configurations for Replication Server 25setupdb.rs resource file template 85site connections, remote 18, 30site ID 4site version, setting for Replication Server 44

Index
112 Replication Server
sjisi character set 8sort order for Replication Server 9sp_setreptable system procedure example 104Spanish character sets 8SQL Anywhere
platform support 37used for ERSSD 3
SQL Anywhere and ERSSD 14SSL
certificate authority 60enabling on Replication Server 63identify file 61identity file, creating 61master and query entries 62setting up 59
stable queues 3starting
database ID 12Replication Server ID 12rs_init 24, 56sessions with resource files 86
start-up sequence for servers 66stopping
rs_init 24suspending
replication 47transaction activity 47
Sybaseinstallation directory 57release directory 6
SYBASE environment variable 6, 38“sybase” user 6syntax statements
conventions xiisysadmin site_version command 45sysadmin system_version command 43System database. See RSSD, ERSSD
Ttemplates
downgr.rs resource file 86eers.rs resource file 86resource files, copying 86
transactions, asynchronous 4
troubleshootingexample replication system 105
UUNCHANGED value, resource file attributes 87upgr.rs resource file template 86upgrading
Adaptive Server 47Replication Server software 37RSSD 37, 40
upgrdb.rs resource file template 86uprscf.rs resource file template 86USE_DEFAULT value, resource file attributes 87using
resource files 85rs_init 23
using profile clause, for connection profiles 76utf8 character set 8utilities
certauth 61certpk12 61certreq 61rs_init 23
Vversion number
Replication Server 44rs_init 89
Wwarm standby applications
active database 21adding active or standby database 33dump marker for initializing standby database 22logical connection information 21RepAgent and 4requirements 33standby database 21
who should read this book viiworksheets

Index
Configuration Guide for UNIX 113
database setup 19, 83Replication Server Installation 5, 79

Index
114 Replication Server