Repackaging Applications with InstallShield Developer...
35
Repackaging Applications with InstallShield Developer 7 By Bryan A. Thompson Last Updated 2/13/2002
Transcript of Repackaging Applications with InstallShield Developer...
Repackaging Applications with InstallShield Developer 7
By Bryan A. Thompson Last Updated 2/13/2002
2
System Configuration Notes Before starting the repackaging process, it is necessary to configure a PC with a clean install of whichever OS will be used on the system where the repackaged application will be stored. This means no applications other than ones absolutely necessary for the repackaging process.
Note 1: CIS has determined that it is not possible to repackage an application on a machine running the CIS Unattended Install of Windows XP due to shell folder redirection. However, repackaged applications can still be installed on Unattended Installs of Windows XP. Note 2: The machine used by CIS for the production of this MSI file is a Gateway E3600, 1.5GHz, 20GB HDD, and 768MB of RAM. CIS will gladly supply a copy of the Ghost Image used to install this machine upon request.
Next, install the Installshield Developer 7 application and the Update to v7.01.
Note: CIS has experienced problems with the v7.02 update available from Installshield and recommends against upgrading to this version.
Next, start the Installshield Developer 7 application. Choose “Tools/Options” from the menu and click the “File Locations” tab. Change the “Project Location” entry to read “C:\Temp\MySetups”. Change the first entry in “Merge Module Locations” to read “C:\Temp\MySetups\MergeModules”. Create the folder C:\Temp\MySetups. Place shortcuts on the desktop to the C:\Temp\MySetups folder and the All Users profile. Store the application to be installed on the C: drive in the “C:\Temp\<whatever>” folder and install the app from the C:\Temp\<whatever> folder. This will reduce dependencies on remote drive mappings and CD drive letters, necessary when the application is to install on different types of machines or where network independence is required.
3
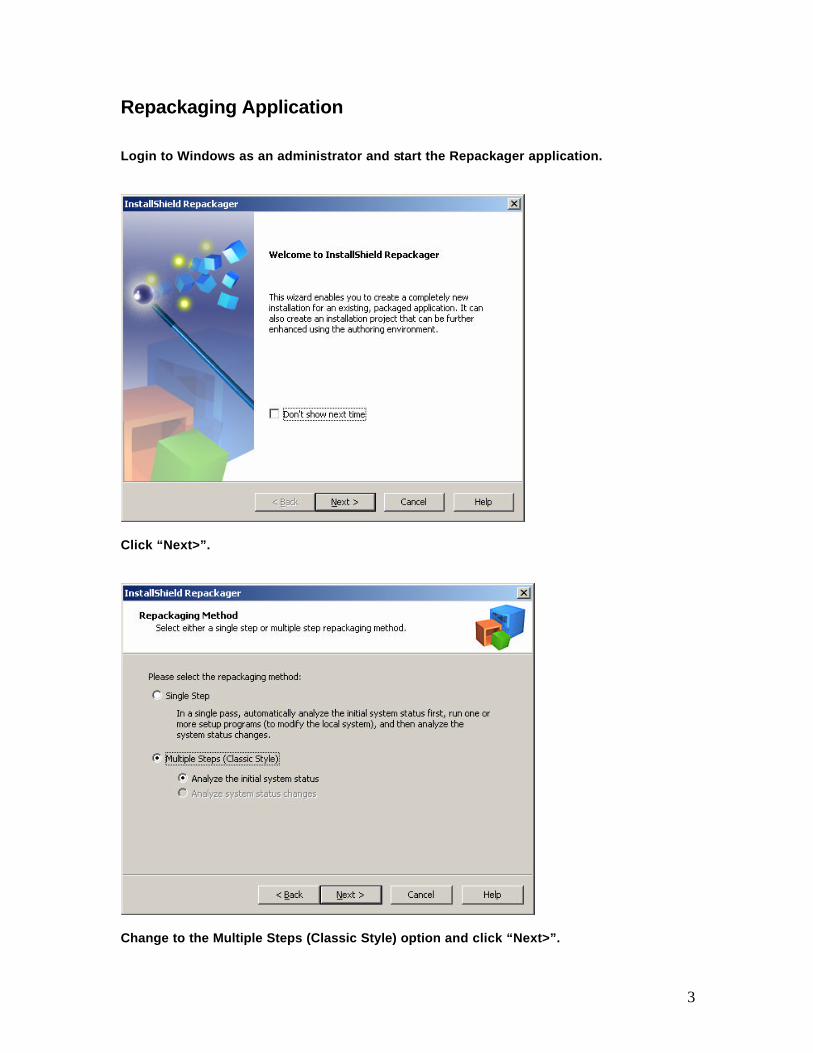
Repackaging Application Login to Windows as an administrator and start the Repackager application.
Click “Next>”.
Change to the Multiple Steps (Classic Style) option and click “Next>”.
4
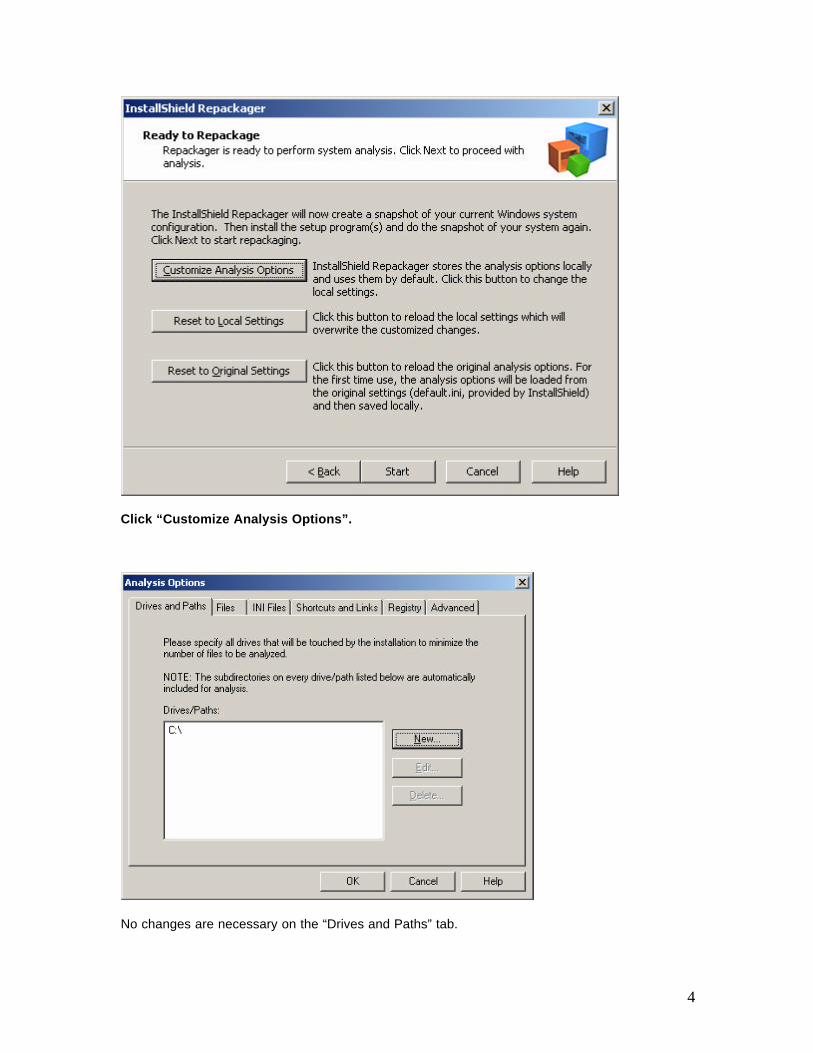
Click “Customize Analysis Options”.
No changes are necessary on the “Drives and Paths” tab.
5
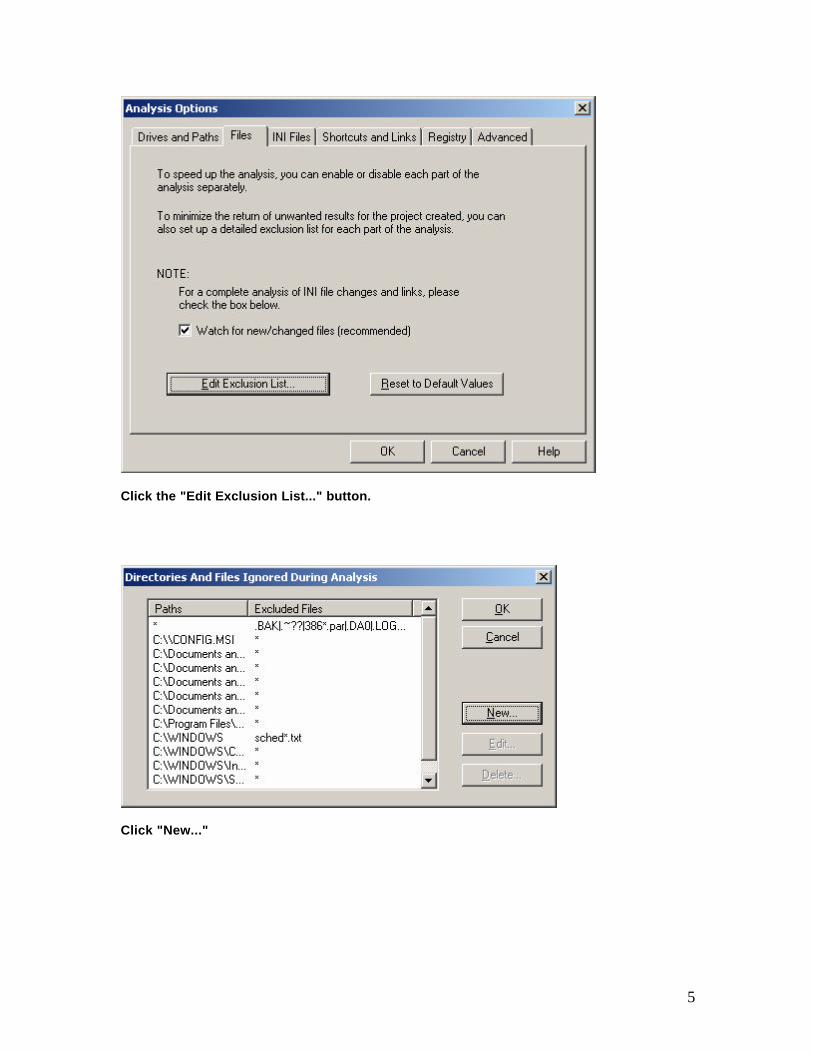
Click the "Edit Exclusion List..." button.
Click "New..."
6
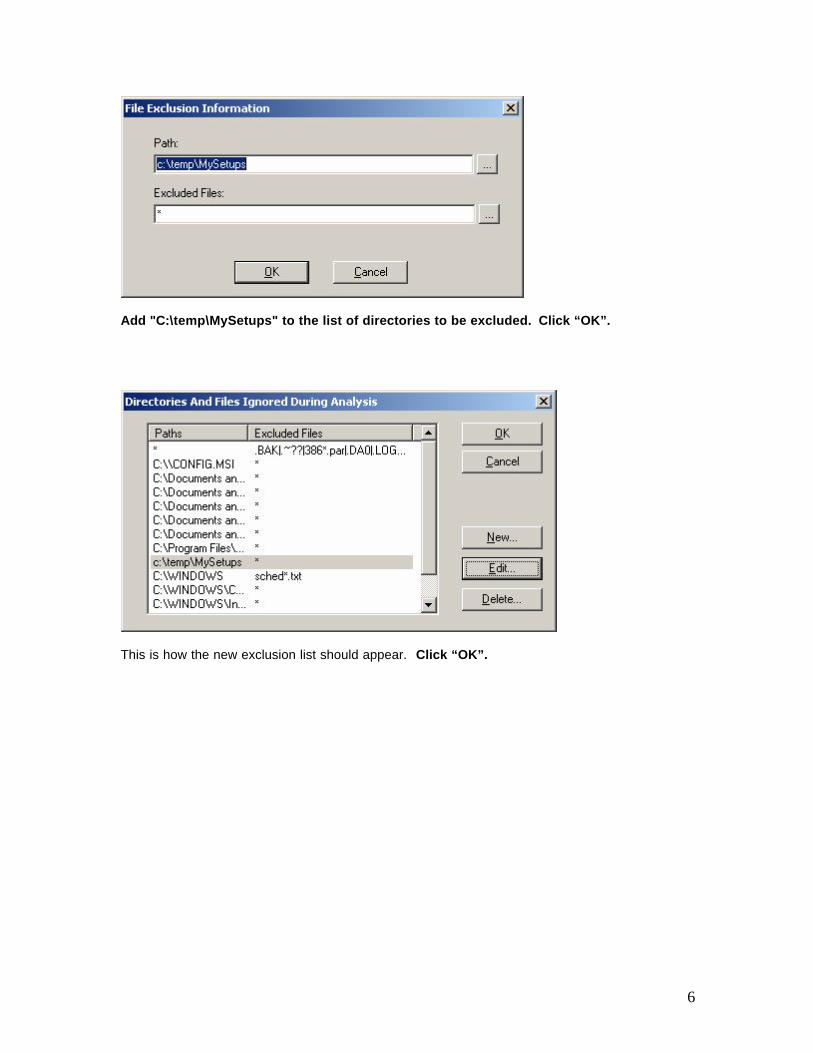
Add "C:\temp\MySetups" to the list of directories to be excluded. Click “OK”.
This is how the new exclusion list should appear. Click “OK”.

7
No changes are necessary on the INI Files tab.
No changes are necessary on the Shortcuts and Links tab.
8
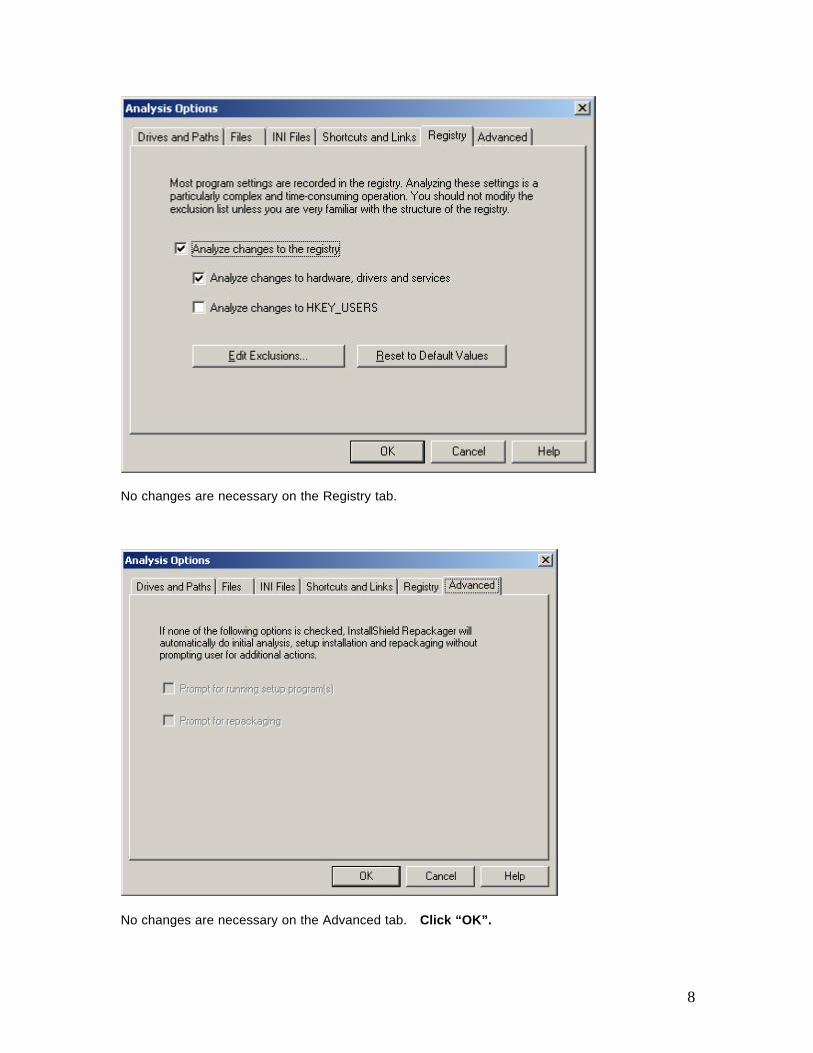
No changes are necessary on the Registry tab.
No changes are necessary on the Advanced tab. Click “OK”.
9
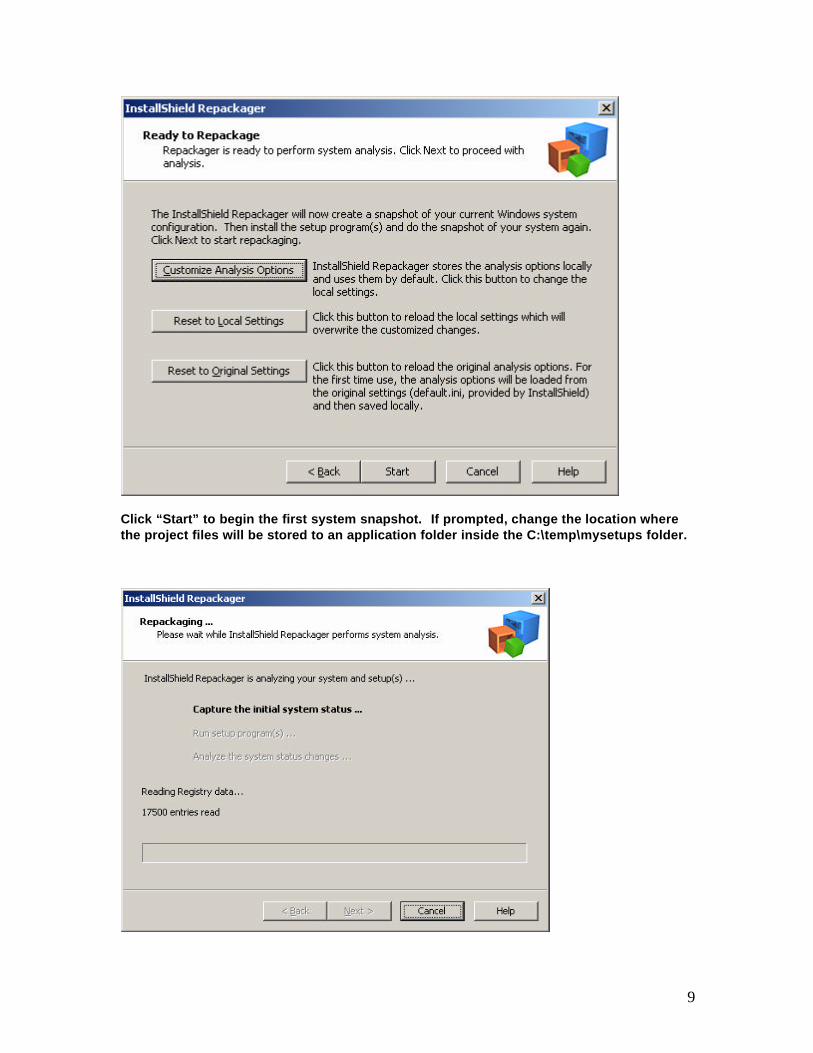
Click “Start” to begin the first system snapshot. If prompted, change the location where the project files will be stored to an application folder inside the C:\temp\mysetups folder.
10
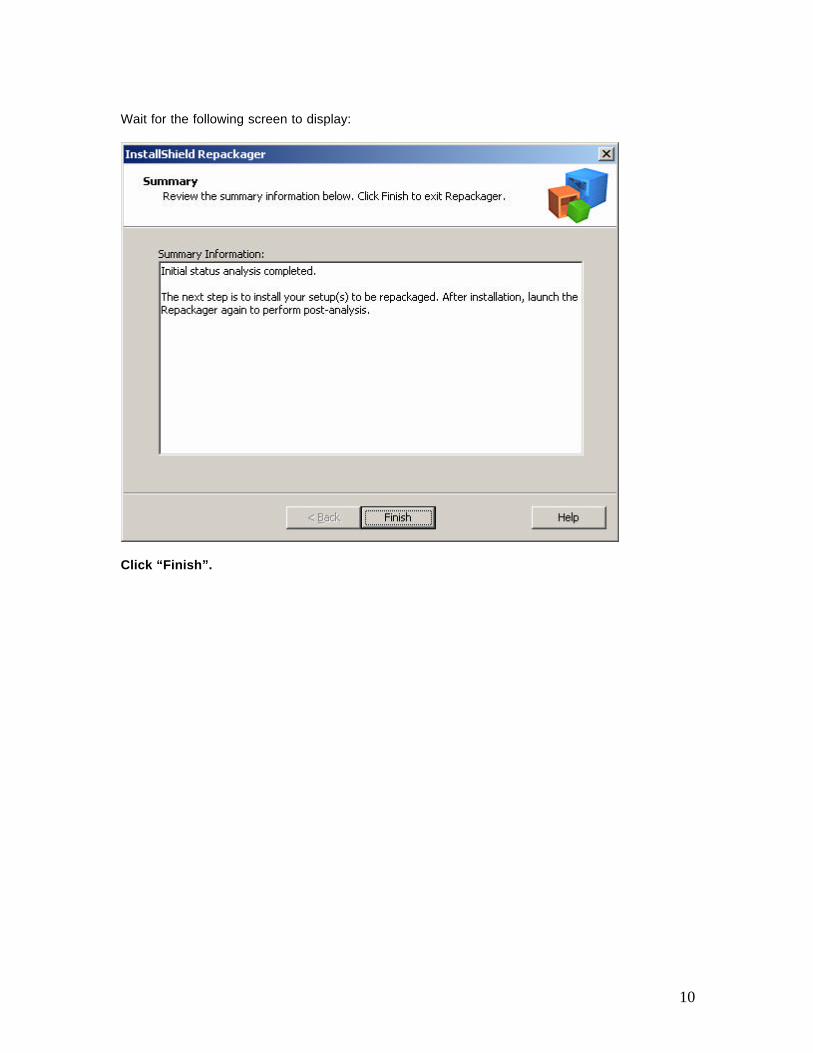
Wait for the following screen to display:
Click “Finish”.
11
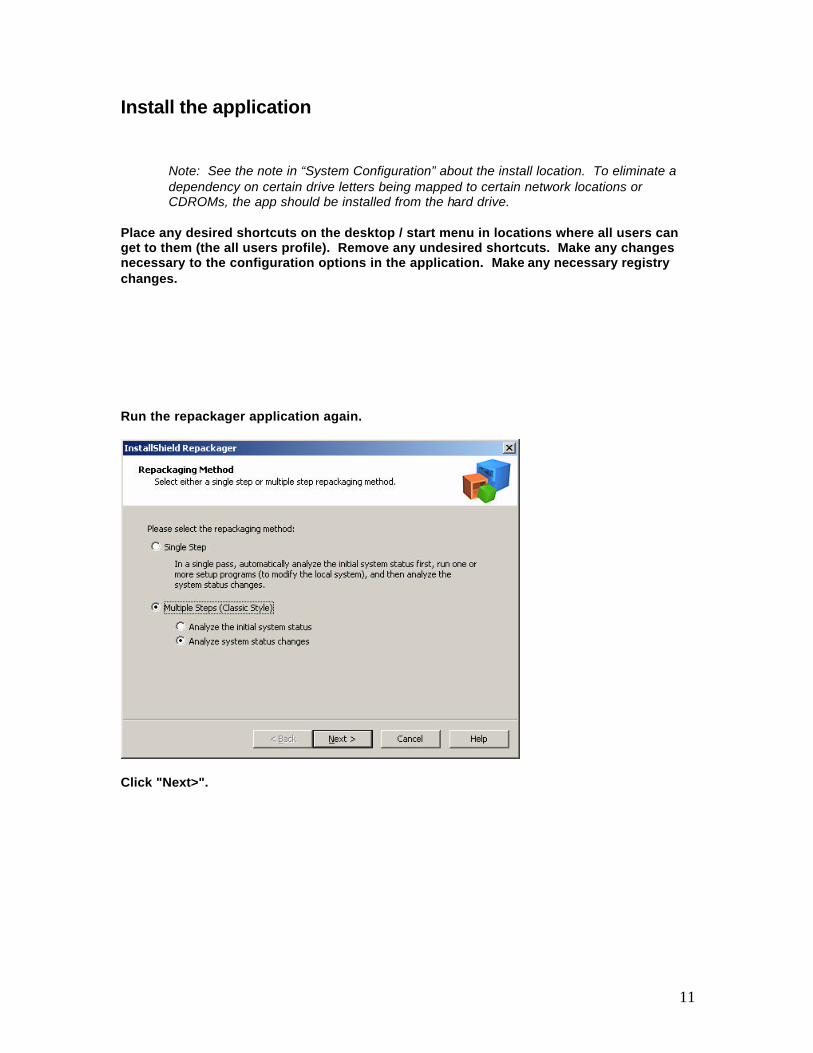
Install the application Note: See the note in “System Configuration” about the install location. To eliminate a dependency on certain drive letters being mapped to certain network locations or CDROMs, the app should be installed from the hard drive.
Place any desired shortcuts on the desktop / start menu in locations where all users can get to them (the all users profile). Remove any undesired shortcuts. Make any changes necessary to the configuration options in the application. Make any necessary registry changes. Run the repackager application again.
Click "Next>".

12
Change the necessary items on the “Collect Product Information” form. Leave the company name blank and choose an appropriate product name to avoid setting the install directory to anything other than the location where the application installed most of its files. Unlike the image shown above, URLs need to be in the form http://help.umr.edu to create hyperlinks in Control Panel/Add Remove Programs.
Change the path to the location (should be on the C: drive) where the setup files are to be stored for this project. Click "Next>".
13
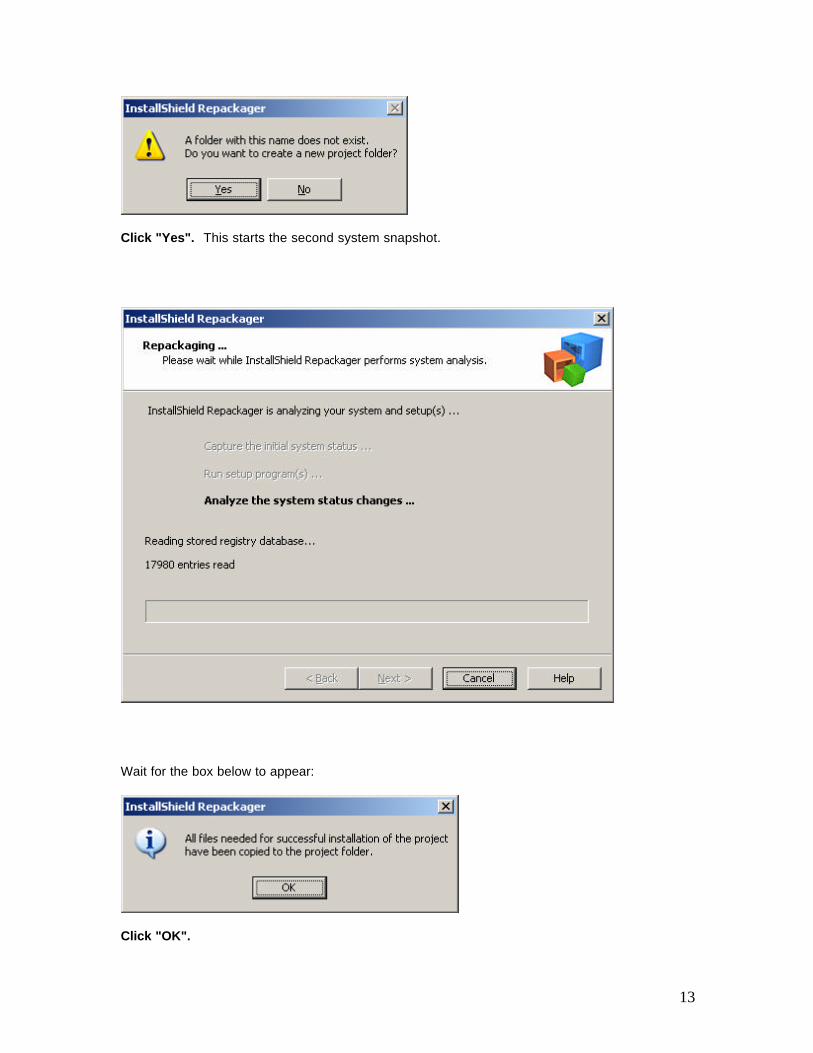
Click "Yes". This starts the second system snapshot.
Wait for the box below to appear:
Click "OK".
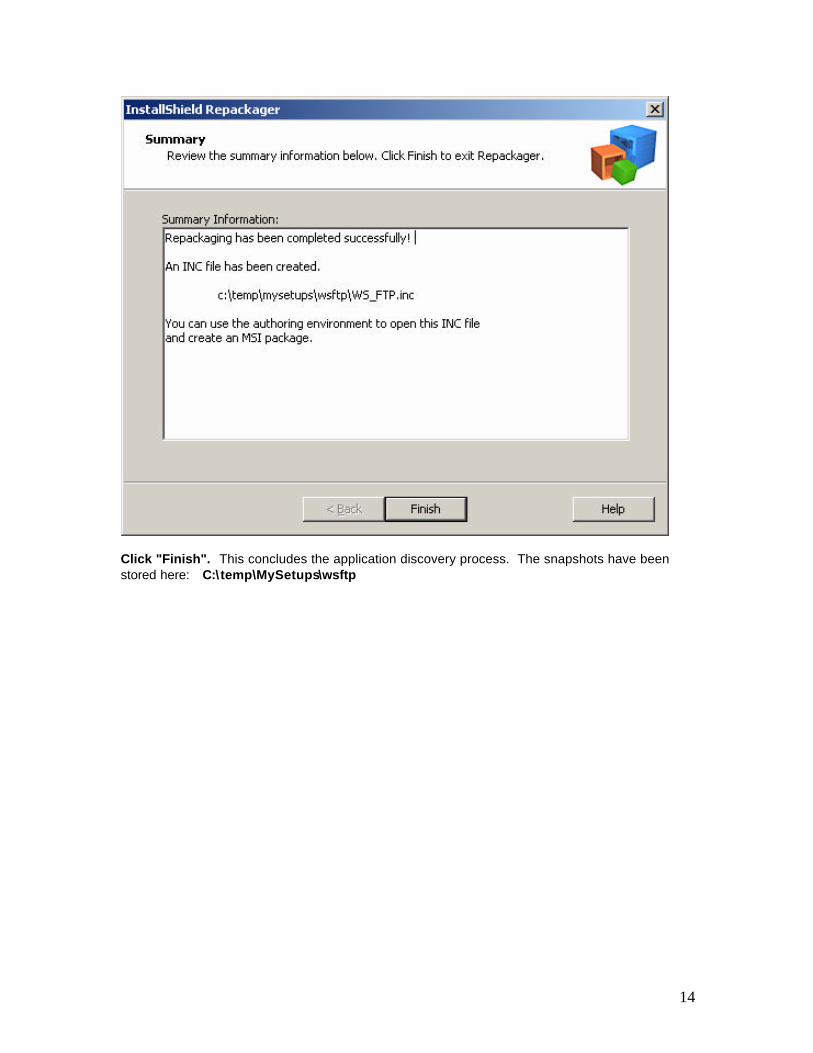
14
Click "Finish". This concludes the application discovery process. The snapshots have been stored here: C:\temp\MySetups\wsftp
15
The InstallShield Developer 7 application
Note: If a prompt appears asking to upgrade at this point, don't upgrade until after all applications captured under the old version of Repackager have been packaged as msi's. Note: Be sure that the changes listed in the “System Configuration” have been made before continuing with this step.
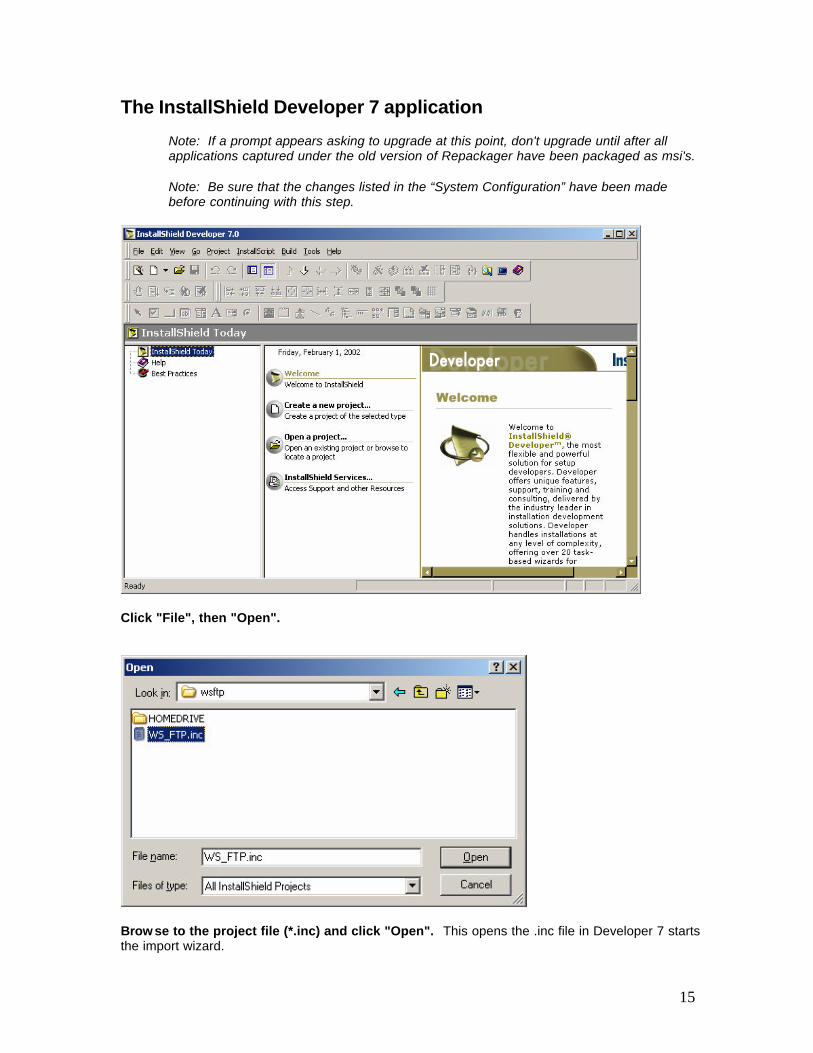
Click "File", then "Open".
Brow se to the project file (*.inc) and click "Open". This opens the .inc file in Developer 7 starts the import wizard.
16
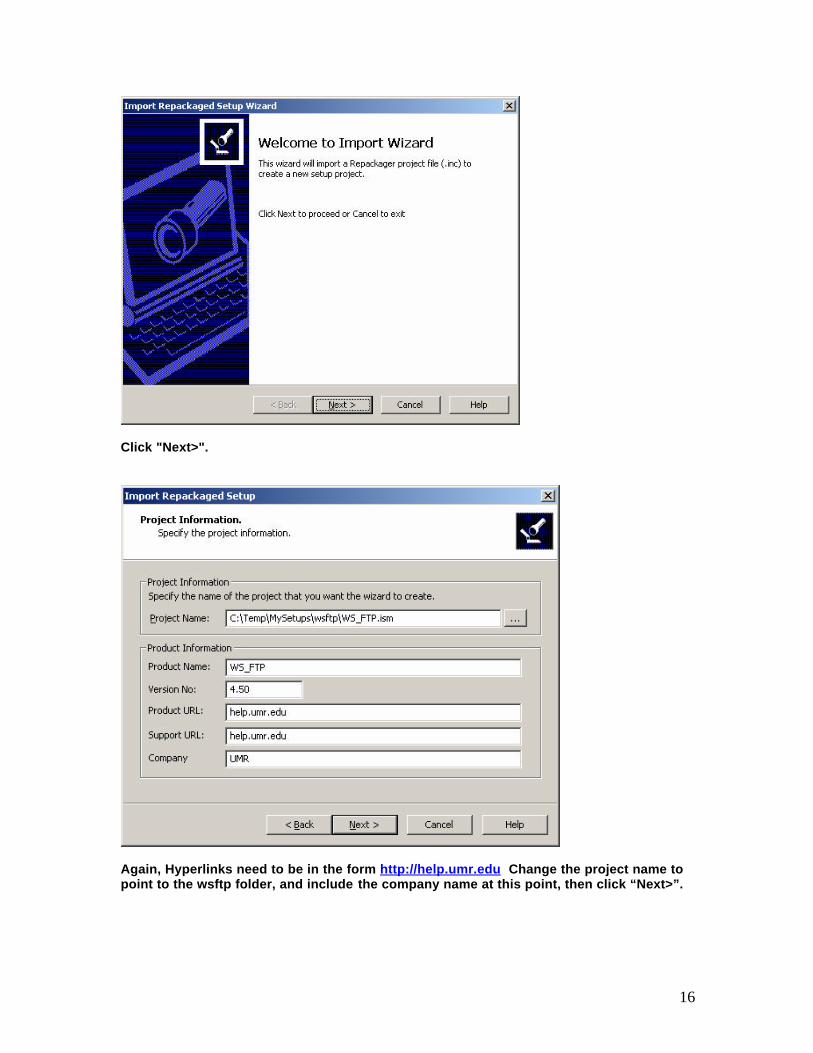
Click "Next>".
Again, Hyperlinks need to be in the form http://help.umr.edu Change the project name to point to the wsftp folder, and include the company name at this point, then click “Next>”.
17
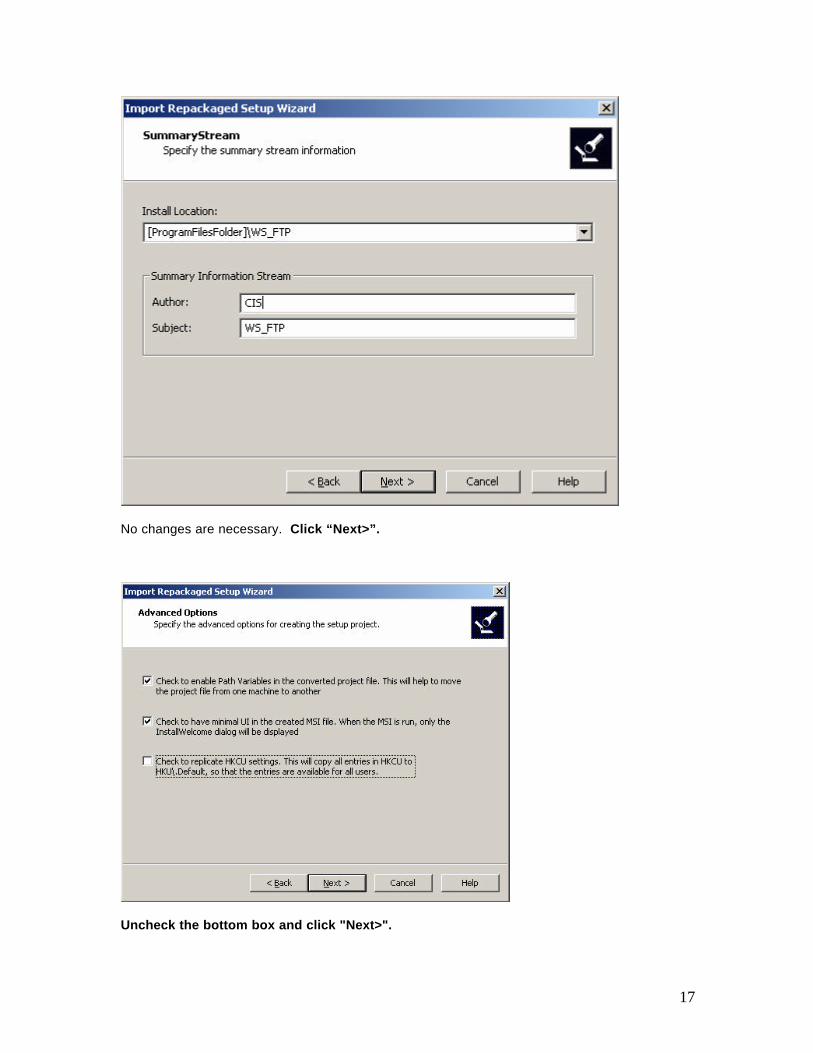
No changes are necessary. Click “Next>”.
Uncheck the bottom box and click "Next>".
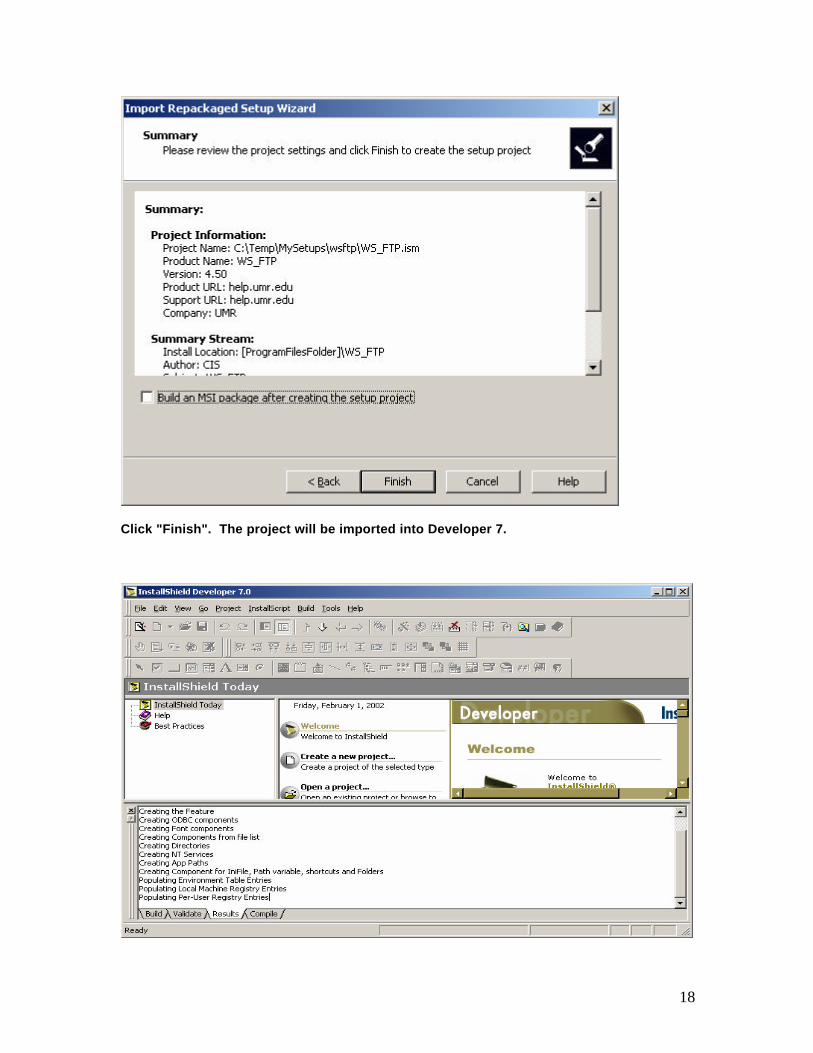
18
Click "Finish". The project will be imported into Developer 7.
19
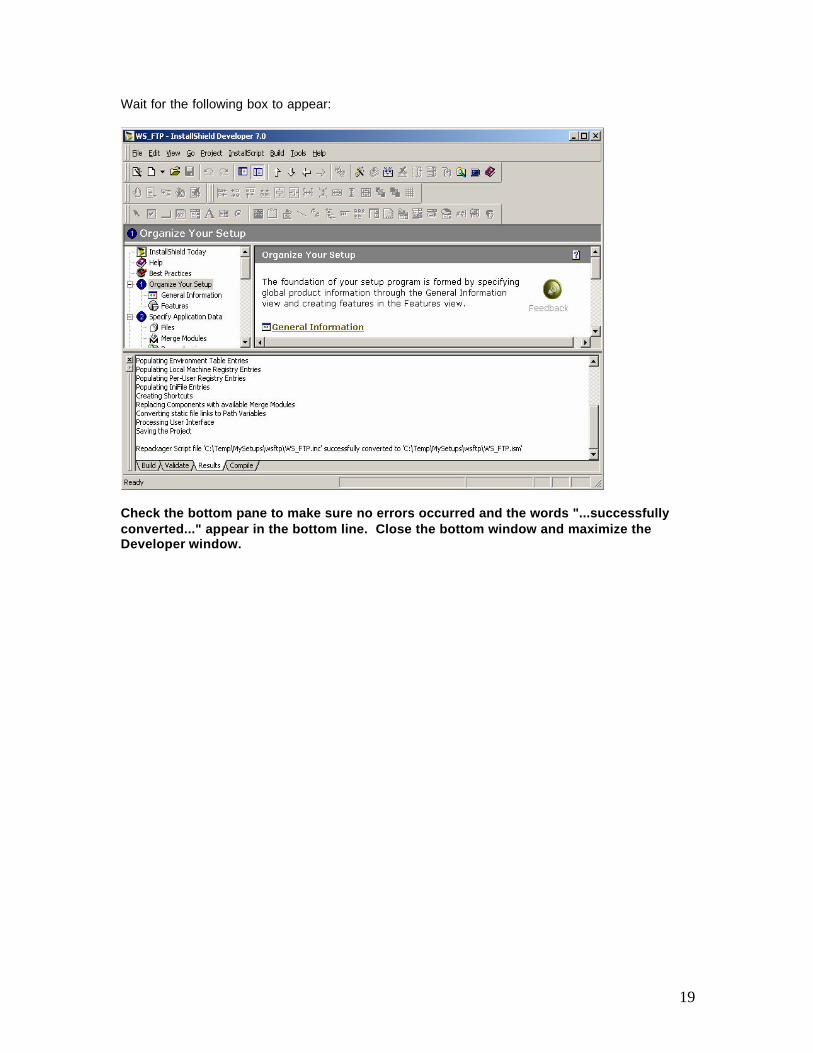
Wait for the following box to appear:
Check the bottom pane to make sure no errors occurred and the words "...successfully converted..." appear in the bottom line. Close the bottom window and maximize the Developer window.
20
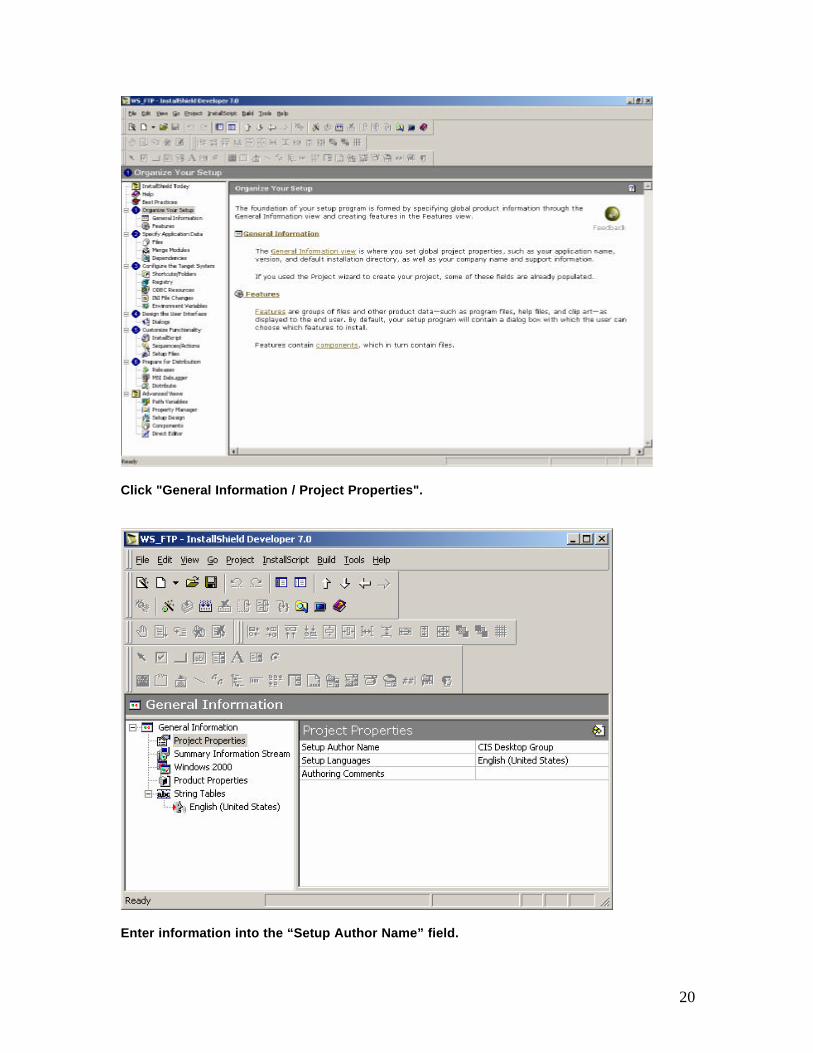
Click "General Information / Project Properties".
Enter information into the “Setup Author Name” field.
21
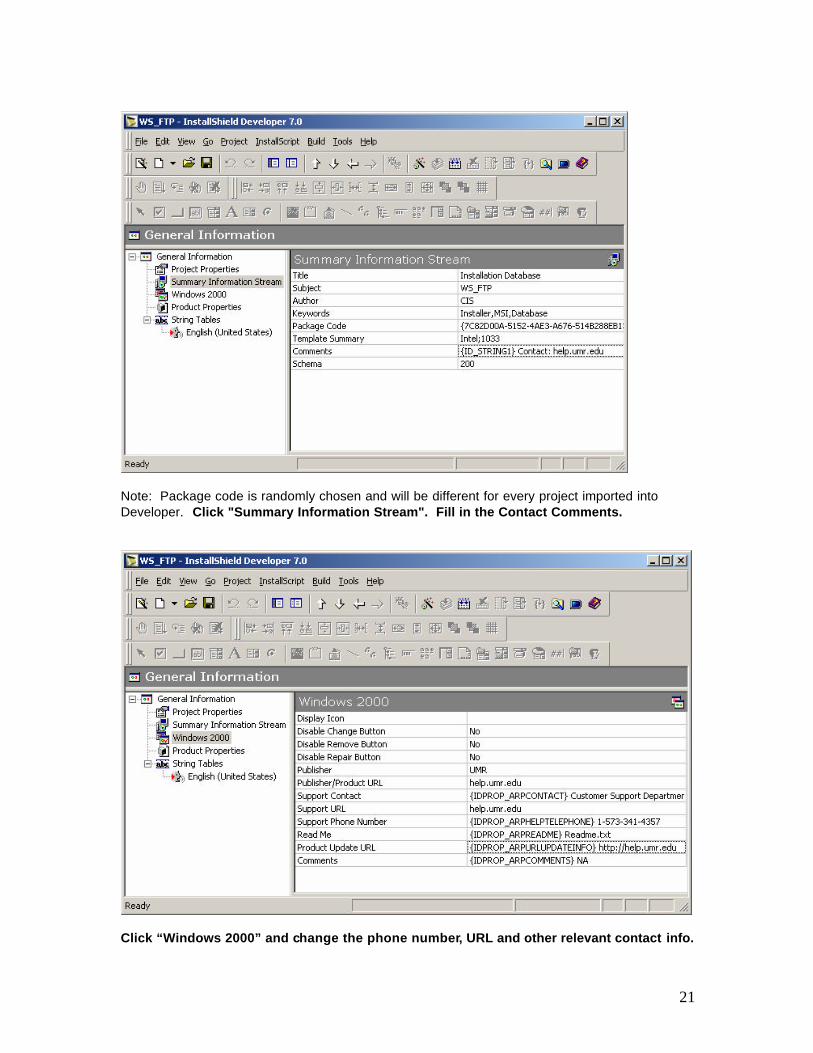
Note: Package code is randomly chosen and will be different for every project imported into Developer. Click "Summary Information Stream". Fill in the Contact Comments.
Click “Windows 2000” and change the phone number, URL and other relevant contact info.
22
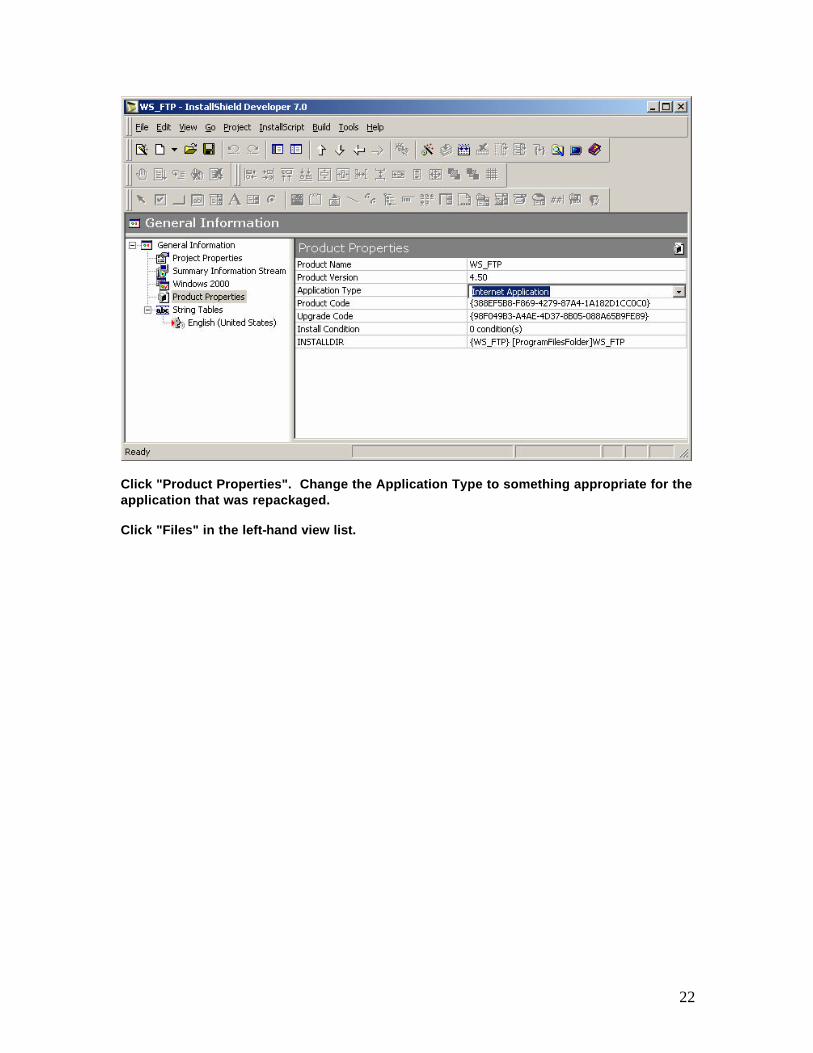
Click "Product Properties". Change the Application Type to something appropriate for the application that was repackaged. Click "Files" in the left-hand view list.
23
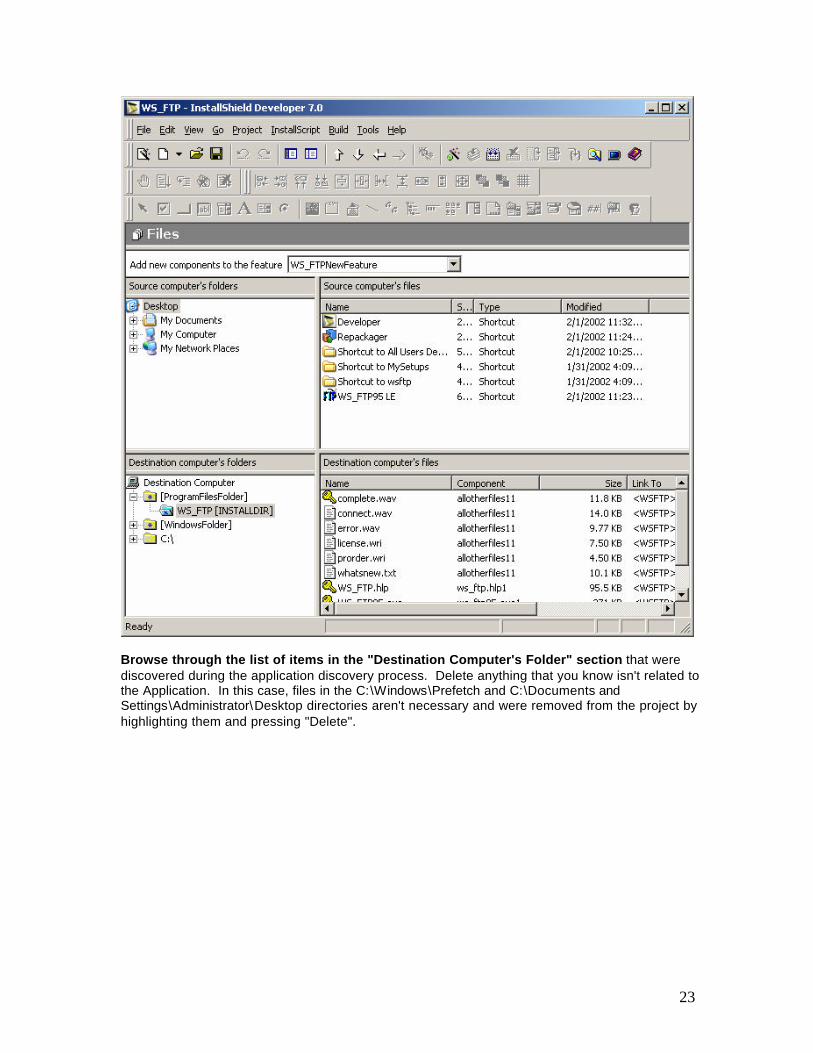
Browse through the list of items in the "Destination Computer's Folder" section that were discovered during the application discovery process. Delete anything that you know isn't related to the Application. In this case, files in the C:\Windows\Prefetch and C:\Documents and Settings\Administrator\Desktop directories aren't necessary and were removed from the project by highlighting them and pressing "Delete".
24
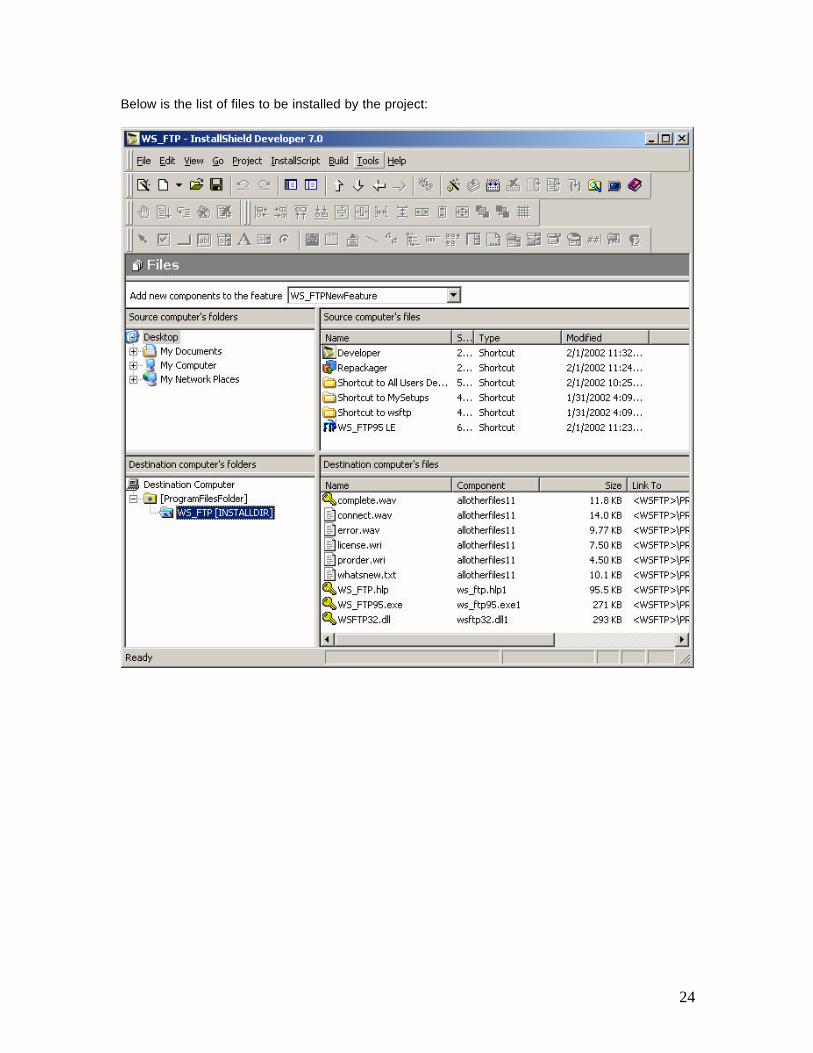
Below is the list of files to be installed by the project:
25
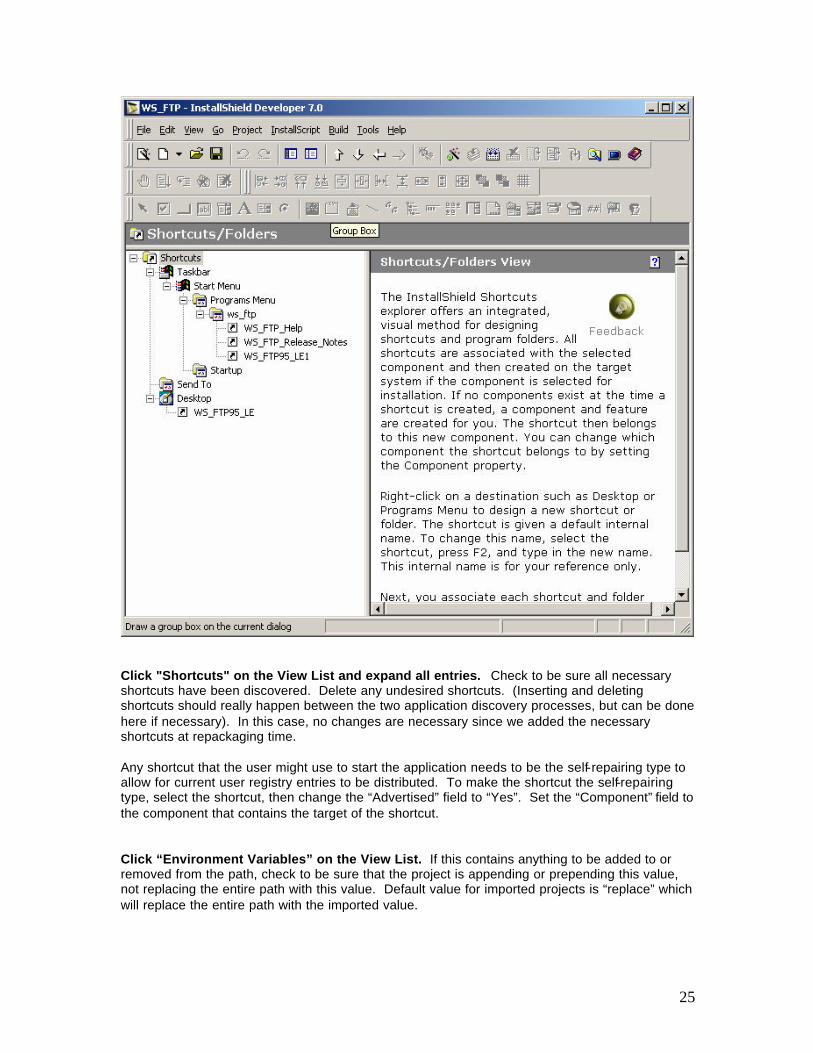
Click "Shortcuts" on the View List and expand all entries. Check to be sure all necessary shortcuts have been discovered. Delete any undesired shortcuts. (Inserting and deleting shortcuts should really happen between the two application discovery processes, but can be done here if necessary). In this case, no changes are necessary since we added the necessary shortcuts at repackaging time. Any shortcut that the user might use to start the application needs to be the self-repairing type to allow for current user registry entries to be distributed. To make the shortcut the self-repairing type, select the shortcut, then change the “Advertised” field to “Yes”. Set the “Component” field to the component that contains the target of the shortcut. Click “Environment Variables” on the View List. If this contains anything to be added to or removed from the path, check to be sure that the project is appending or prepending this value, not replacing the entire path with this value. Default value for imported projects is “replace” which will replace the entire path with the imported value.
26
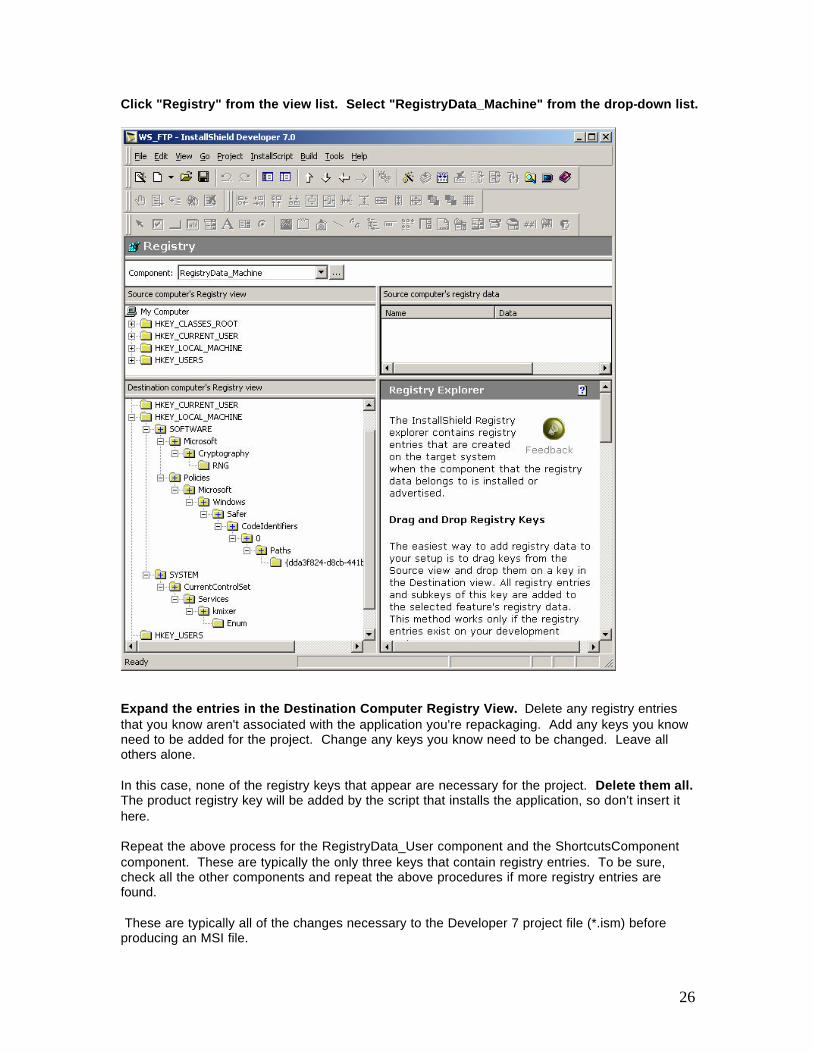
Click "Registry" from the view list. Select "RegistryData_Machine" from the drop-down list.
Expand the entries in the Destination Computer Registry View. Delete any registry entries that you know aren't associated with the application you're repackaging. Add any keys you know need to be added for the project. Change any keys you know need to be changed. Leave all others alone. In this case, none of the registry keys that appear are necessary for the project. Delete them all. The product registry key will be added by the script that installs the application, so don't insert it here. Repeat the above process for the RegistryData_User component and the ShortcutsComponent component. These are typically the only three keys that contain registry entries. To be sure, check all the other components and repeat the above procedures if more registry entries are found. These are typically all of the changes necessary to the Developer 7 project file (*.ism) before producing an MSI file.
27
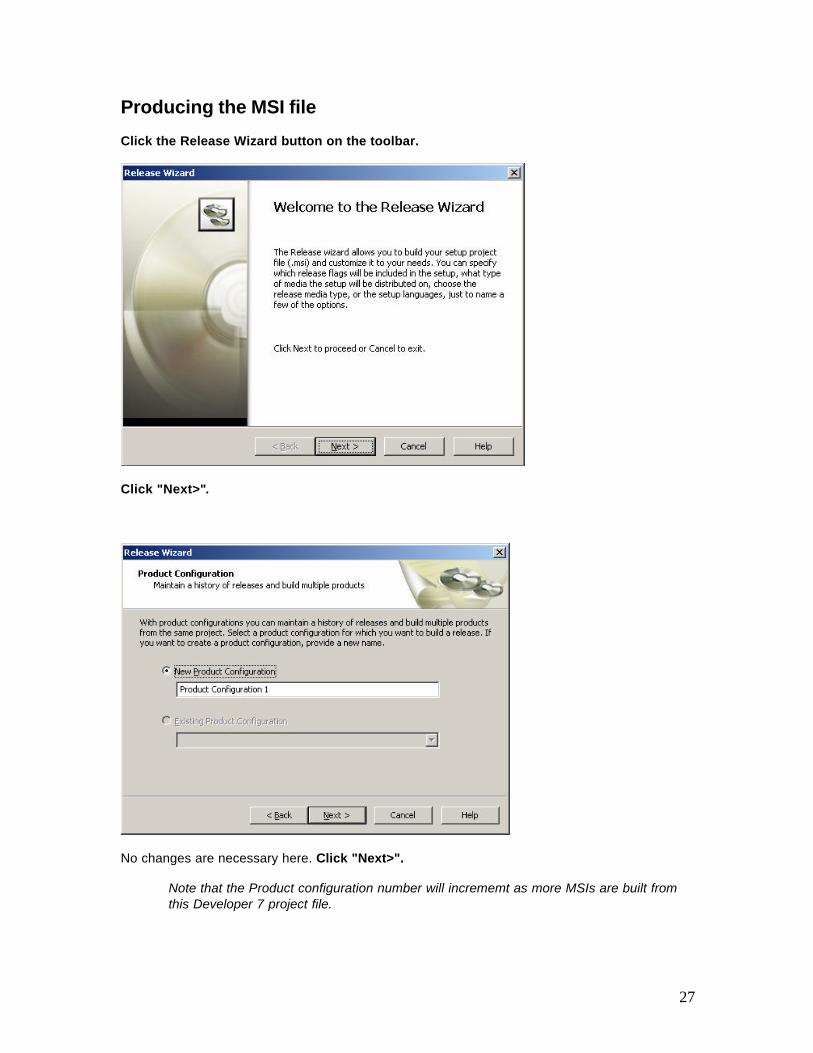
Producing the MSI file Click the Release Wizard button on the toolbar.
Click "Next>".
No changes are necessary here. Click "Next>".
Note that the Product configuration number will incrememt as more MSIs are built from this Developer 7 project file.
28
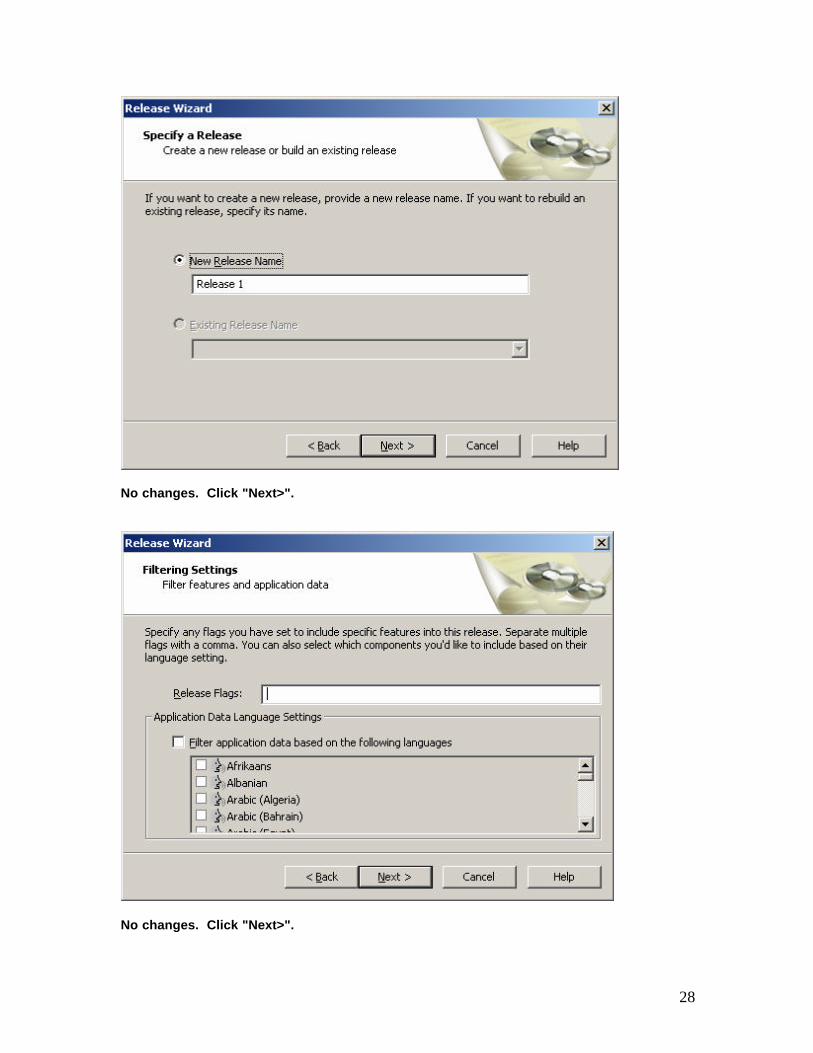
No changes. Click "Next>".
No changes. Click "Next>".
29
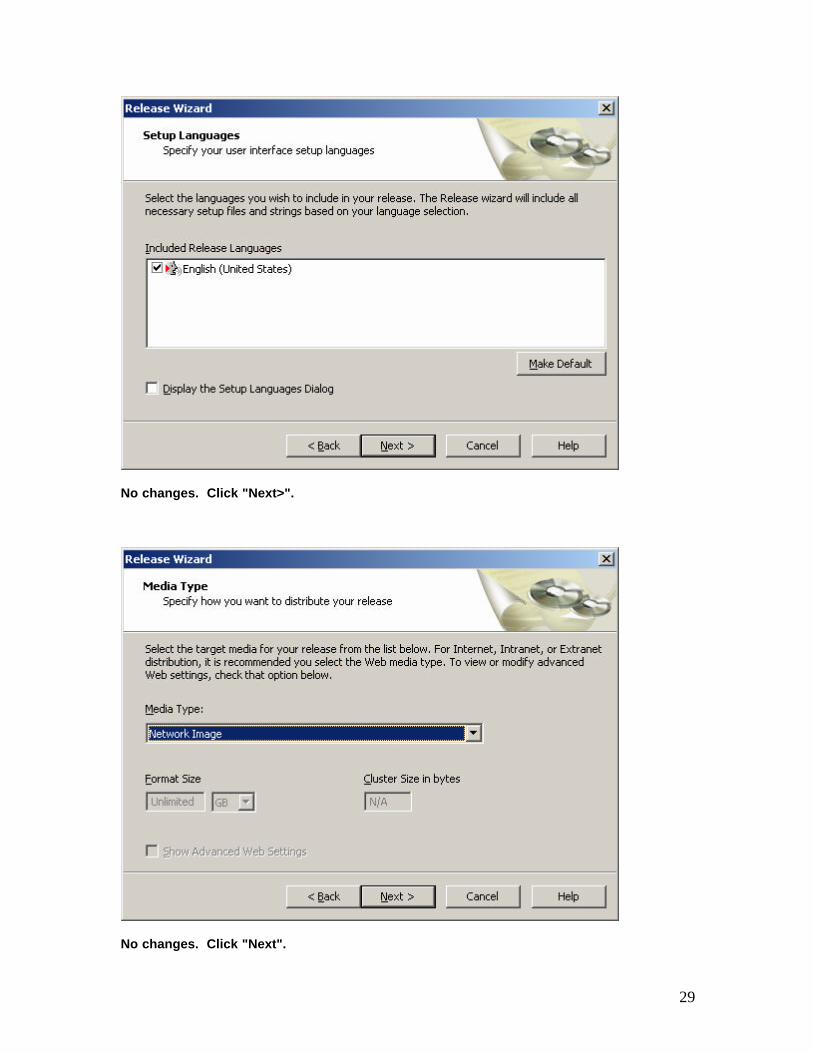
No changes. Click "Next>".
No changes. Click "Next".
30
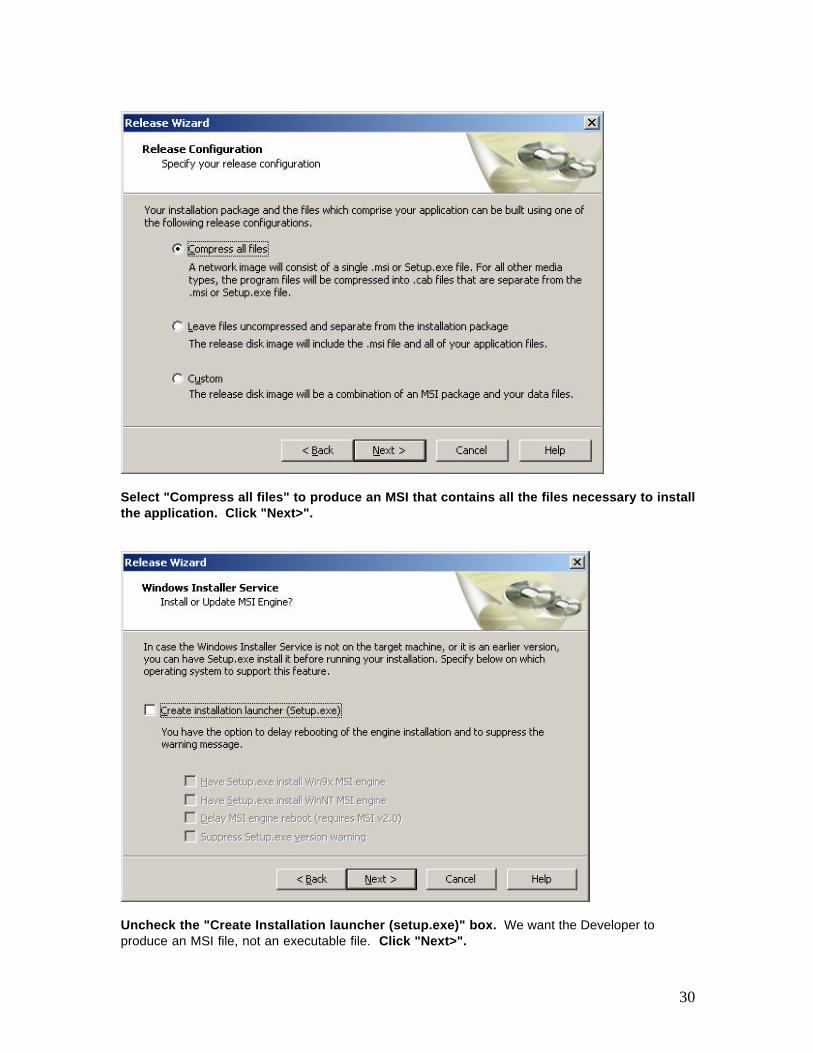
Select "Compress all files" to produce an MSI that contains all the files necessary to install the application. Click "Next>".
Uncheck the "Create Installation launcher (setup.exe)" box. We want the Developer to produce an MSI file, not an executable file. Click "Next>".
31
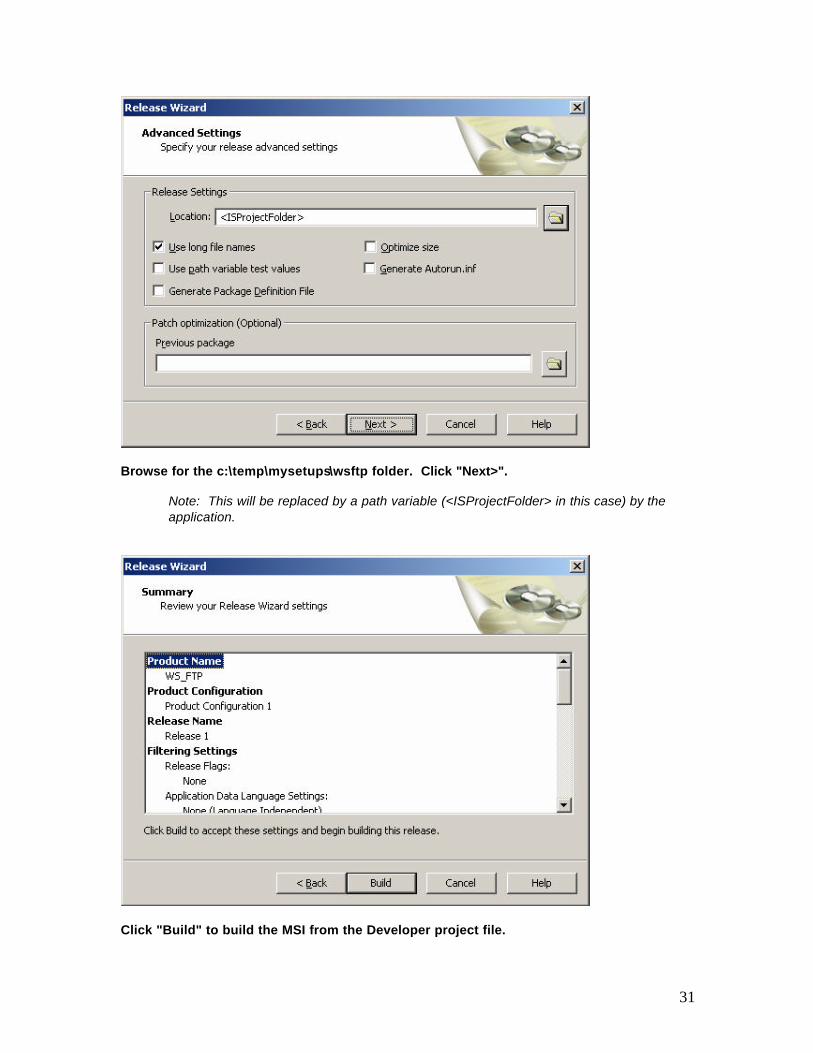
Browse for the c:\temp\mysetups\wsftp folder. Click "Next>".
Note: This will be replaced by a path variable (<ISProjectFolder> in this case) by the application.
Click "Build" to build the MSI from the Developer project file.
32
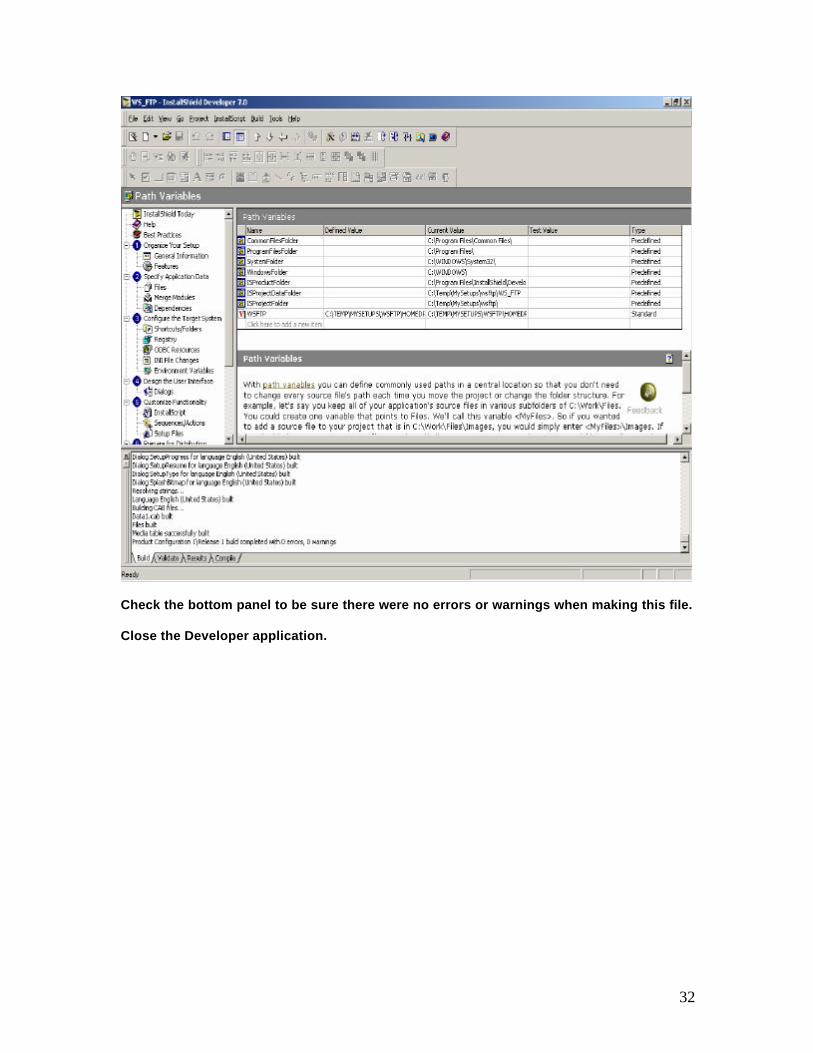
Check the bottom panel to be sure there were no errors or warnings when making this file. Close the Developer application.
33
Testing the MSI Application To test the application, login to Windows as an administrator, then copy the WS_FTP.MSI file stored in the following directory to the new machine: C:\Temp\MySetups\WS_FTP\Product Configuration 1\Release 1\DiskImages\DISK1
Note: To test the MSI for dependencies on network drives, unmap all network drives before installing the application.
Install the product. Look for errors during installation. Further confirmation that the application installed properly can be found by examining the contents of the log file that was created during the MSI install. These files are stored in the following directory: C:\WINNT\SYSTEM32\UMRINST\APPLOGS Next check all shortcuts the product is supposed to install to verify that they exist and that they work. Then run the product to make sure it is working as it should, and that all custom configurations are in place.
34
Known Issues with InstallShield Developer 7
1) Don’t try to upgrade the Developer 7 application via the Web Update or any other means without first making MSIs for all applications that have already been captured using the Repackager tool.
2) To maintain independence from network drives (desirable at MSI install time), don’t store
the application to be installed or any Repackager or Developer 7 files on any drive that won’t be present on all machines that you wish to distribute the MSI to. These include networked drives, CDROMs, ZIP drives, etc.
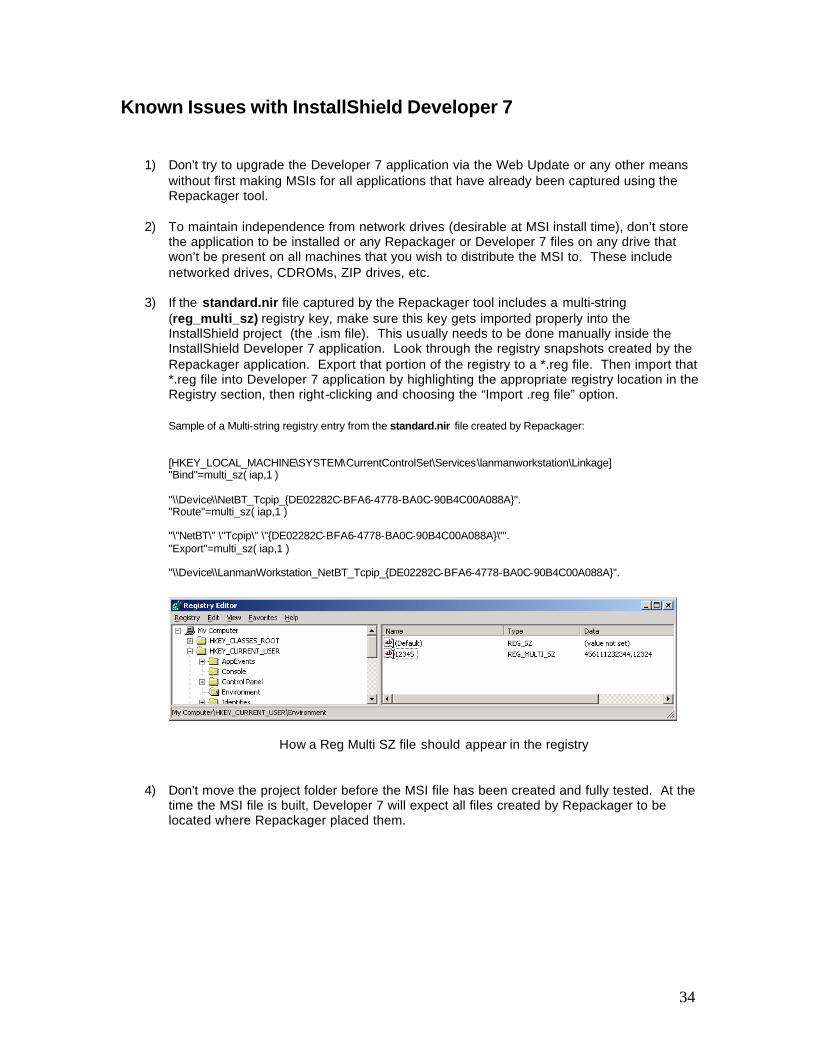
3) If the standard.nir file captured by the Repackager tool includes a multi-string
(reg_multi_sz) registry key, make sure this key gets imported properly into the InstallShield project (the .ism file). This usually needs to be done manually inside the InstallShield Developer 7 application. Look through the registry snapshots created by the Repackager application. Export that portion of the registry to a *.reg file. Then import that *.reg file into Developer 7 application by highlighting the appropriate registry location in the Registry section, then right-clicking and choosing the “Import .reg file” option.
Sample of a Multi-string registry entry from the standard.nir file created by Repackager: [HKEY_LOCAL_MACHINE\SYSTEM\CurrentControlSet\Services\lanmanworkstation\Linkage] "Bind"=multi_sz( iap,1 ) "\\Device\\NetBT_Tcpip_{DE02282C-BFA6-4778-BA0C-90B4C00A088A}". "Route"=multi_sz( iap,1 )
"\"NetBT\" \"Tcpip\" \"{DE02282C-BFA6-4778-BA0C-90B4C00A088A}\"". "Export"=multi_sz( iap,1 ) "\\Device\\LanmanWorkstation_NetBT_Tcpip_{DE02282C-BFA6-4778-BA0C-90B4C00A088A}".
How a Reg Multi SZ file should appear in the registry
4) Don’t move the project folder before the MSI file has been created and fully tested. At the
time the MSI file is built, Developer 7 will expect all files created by Repackager to be located where Repackager placed them.

35
5) If the project changes the PATH environment variable, check to be sure that the change is set to append or prepend to the path, not replace it. By default, Repackager sets this value to “Replace”, which will replace the entire path with the value in the PATH variable in the project.
6) Shortcuts that are used to start the program should be self-repairing shortcuts. This is
necessary when the application self-repair feature is expected to run before the first time the application runs. This is also desirable for repairing broken applications when the user starts the app. By default, Repackager sets these shortcuts to be the normal type, not the self-repairing type. To make a shortcut the self-repairing type, in the “Shortcuts” View List, highlight the shortcut and change the “Advertised” value to “Yes”. Then change the “Component” to be the component that contains the target of the shortcut. Remember to do this for ALL shortcuts that the user might use to start the application.