Renpy Cookbook
131
Renpy Cookbook 1 THE RENPY COOKBOOK “USERS PROGRAMMING TIPS”
description
Renpy Cookbook (A Hint Codes, Snippets, and many other source code tricks in Renpy Programming Environment, includes some Python codes)
Transcript of Renpy Cookbook

Renpy Cookbook
1
THE RENPY COOKBOOK
“USERS PROGRAMMING TIPS”

Renpy Cookbook
2
Contenido Springy movement ............................................................................................................ 5
General information ...................................................................................................... 5
Avoiding singularities .............................................................................................. 5
What ρ does .............................................................................................................. 6
What μ does .............................................................................................................. 6
Simple form .................................................................................................................. 6
Optimizing ................................................................................................................ 7
Complex form ............................................................................................................... 7
Showing and Hiding the Window .................................................................................... 9
Fullscreen game run Setting ........................................................................................... 10
Preloader Image .............................................................................................................. 11
Splashscreen Effect......................................................................................................... 12
Simple Flash Effect ........................................................................................................ 14
Double Vision Effect ...................................................................................................... 16
Examples .................................................................................................................... 18
Lip Flap .......................................................................................................................... 19
Example ...................................................................................................................... 19
Blink And Lip Flap ..................................................................................................... 20
Showing layered sprites with different emotions ....................................................... 22
Particle Burst .................................................................................................................. 23
Realistic Snowfall Effect ................................................................................................ 27
Example ...................................................................................................................... 30
Adding a simple and somewhat functioning Analog Clock ....................................... 31
Menu Buttons ................................................................................................................. 35
Examples .................................................................................................................... 35
Creating Your Own Buttons ....................................................................................... 36
Centered Window ........................................................................................................... 38
Censoring for wider-audience ........................................................................................ 39
Name Above the Text Window ...................................................................................... 40
Menu Positions ............................................................................................................... 42
RPG frame ...................................................................................................................... 43
In the init section ........................................................................................................ 43
In the game script ....................................................................................................... 43
Auto-read Setting ............................................................................................................ 45
Default text speed Setting ............................................................................................... 46
The tile engine and unit engine....................................................................................... 47

Renpy Cookbook
3
Where can I get them? ............................................................................................ 47
What are they? ........................................................................................................ 47
Restrictions: ............................................................................................................ 48
In-game Messages .......................................................................................................... 51
Example Usage ........................................................................................................... 53
Chinese and Japanese ..................................................................................................... 56
Multiple Language Support ............................................................................................ 57
Selecting a Default Language ..................................................................................... 57
Language Chooser ...................................................................................................... 57
Language-Dependent Initialization ............................................................................ 58
Translating the Script ................................................................................................. 59
Multi-Path Translation ............................................................................................ 59
In-line translation .................................................................................................... 60
IME Language Support on Renpy .................................................................................. 61
Hangul (Korean Alphabet) Inputter ................................................................................ 73
How To Use ................................................................................................................ 73
Styles .......................................................................................................................... 73
Example ...................................................................................................................... 74
JCC - JPEG Compression of Character Art.................................................................... 75
Requirements .............................................................................................................. 75
Running JCC .............................................................................................................. 76
Building a Windows Installer using NSIS ...................................................................... 77
Music Room ................................................................................................................... 78
New CG Gallery ............................................................................................................. 80
Example ...................................................................................................................... 80
Documentation ........................................................................................................... 82
Conditions ............................................................................................................... 83
Convenience ........................................................................................................... 84
Customization ......................................................................................................... 84
Styles ...................................................................................................................... 85
Good Looking Italics ...................................................................................................... 86
Money and Inventory Systems in Action ....................................................................... 87
Example 1 source code ................................................................................................... 87
Walkthrough of Example 1 (beginner) ........................................................................... 88
Example 2 source code ................................................................................................... 90
Walkthrough of Example 2 (advanced) .......................................................................... 92
Tips menu ....................................................................................................................... 98

Renpy Cookbook
4
Example ...................................................................................................................... 98
Unarchiving files from rpa ........................................................................................... 100
Example .................................................................................................................... 100
Who's that? Changing character names during the game ......................................... 101
Conditional Hyperlinks ................................................................................................ 102
Timed menus ................................................................................................................ 103
UI Widgets .................................................................................................................... 105
Summary ................................................................................................................... 105
Warning ................................................................................................................ 105
The parser ................................................................................................................. 105
Defining tags ............................................................................................................ 107
Usage example .......................................................................................................... 108
Compatibility considerations .................................................................................... 109
Interpolation ......................................................................................................... 109
Escape sequences .................................................................................................. 109
Space compacting ................................................................................................. 109
Multiple argument tags ......................................................................................... 110
How to add an "about" item to the main menu ............................................................. 111
Additional basic move profiles ..................................................................................... 112
How to use these functions ....................................................................................... 112
Quadratic motion ...................................................................................................... 113
Exponential decay..................................................................................................... 114
Handling the extra parameter ............................................................................... 116
Optimizing ............................................................................................................ 116
Power functions ........................................................................................................ 117
Animation “bop” ...................................................................................................... 118
Konami Code ................................................................................................................ 120
In-game Splashscreen ................................................................................................... 122
Runtime init blocks ................................................................................................... 123
Importing scripts from Celtx ........................................................................................ 128
Letting images appear after a while .......................................................................... 130
How to add ambient noises to your game for greater immersion ................................. 131

Renpy Cookbook
5
Springy movement If you want to add some spring to your moves, the following code might be what you’re looking for. It’s based on the under-damped response to a step input, which is gradually decaying oscillations. I’m going to offer two different ways of doing it – one simple and one more complex that offers more options.
General information
The equation used is basically x(t) = 1 - ℯ-ρt
cos(μt) (which is then divided by a scaling factor). It takes two parameters that you can use to tweak the motion: ρ and μ.
Avoiding singularities
You can set these two parameters to any values that you like, as long as the following equation isn’t true:
ℯρ = cos(μ)
This is because of the scaling factor used, and it means that you have selected values of ρ and μ that leave you back where you started when the springing is done. You’ll know if you’ve picked this combination if you get a divide by zero error, but the only way you can manage that is if ρ is less than

Renpy Cookbook
6
or equal to zero. So as long as you keep ρ greater than zero, you won’t have to worry about that.
What ρ does
ρ controls the decay rate, or how fast the bounces dissipate. The higher you set ρ, the faster the bounciness vanishes as it settles. If you set ρ too low, it will still be bouncing at the end of the Move, and it will seem to come to an abrupt halt.
You can set ρ to a negative number, which means increasing oscillations, as if it is in resonance. I don’t know why you’d want to do this – but if you want to, that’s how.
If you make ρ large: The motion will start more abruptly and the bouncing will end more quickly.
If you make ρ small, but greater than zero: The motion will start more smoothly and the bouncing will take longer to end (and might not end before the time’s up, which will mean an abrupt finish).
If you make ρ zero or negative: The motion will start smoothly but the bouncing will get bigger or stay the same size instead of getting smaller. You also run the risk of a singularity.
What μ does
μ controls the bounce frequency, or how many bounces happen during the move.
If you make μ large (positive or negative): The motion will start more abruptly and you will get more bounces.
If you make μ small (positive or negative) or zero: The motion will start more smoothly, and you will get less bounces (or none at all).
Simple form
The simplest way to use the bounce formula is as a time warp function to Move.
import math def springy_time_warp_real(x, rho, mu): return (1.0 - math.exp(-rho * x) * math.cos(mu * x)) / (1.0 - math.exp(-rho) * math.cos(mu)) springy_time_warp = renpy.curry(springy_time_warp_real)

Renpy Cookbook
7
And to use it:
show eileen happy at Move(offscreenleft, center, 1.0, time_warp = springy_time_warp(rho = 5.0, mu = 15.0))
Optimizing
If you have selected a ρ and μ that you like, and you don’t intend to change them, you can simplify the equation a bit to get a speed increase. The best way to do that is to start out with the following code:
import math rho = 5.0 mu = 15.0 scale_factor = 1.0 - math.exp(-rho) * math.cos(mu) def springy_time_warp(x): return (1.0 - math.exp(-rho * x) * math.cos(mu * x)) / scale_factor ... show eileen happy at Move(offscreenleft, center, 1.0, time_warp = springy_time_warp)
Use that code during development, so you can tweak ρ and μ until you’re ready to release. Then replace ρ and μ with your chosen values, and scale_factor
with 1 – ℯ–ρcos(μ).
Complex form
Now the simple form does the job most of the time, but it has some limitations. The nature of the motion means that it can be pretty abrupt when it starts for certain values. You can use time warp functions to smooth this out, but not with the simple form. Another benefit of the complex form is that it is already optimized, and doesn’t require editing before release.
class UnderdampedOscillationInterpolater(object): anchors = { 'top' : 0.0, 'center' : 0.5, 'bottom' : 1.0, 'left' : 0.0, 'right' : 1.0, } def __init__(self, start, end, rho, mu): import math

Renpy Cookbook
8
if len(start) != len(end): raise Exception("The start and end must have the same number of arguments.") self.start = [ self.anchors.get(i, i) for i in start ] self.end = [ self.anchors.get(i, i) for i in end ] self.rho = rho self.mu = mu self.c = 1.0 - math.exp(-rho) * math.cos(mu) def __call__(self, t, sizes=(None, None, None, None)): import math t = (1.0 - math.exp(-self.rho * t) * math.cos(self.mu * t)) / self.c def interp(a, b, c): if c is not None and isinstance(a, float): a = int(a * c) if c is not None and isinstance(b, float): b = int(b * c) rv = (b - a) * t + a if isinstance(a, int) and isinstance(b, int): return int(rv) else: return rv return [ interp(a, b, c) for a, b, c in zip(self.start, self.end, sizes) ] def Springy(startpos, endpos, time, rho, mu, child=None, repeat=False, bounce=False, anim_timebase=False, style='default', time_warp=None, **properties): return Motion(UnderdampedOscillationInterpolater(startpos, endpos, rho, mu), time, child, repeat=repeat, bounce=bounce, anim_timebase=anim_timebase, style=style, time_warp=time_warp, add_sizes=True, **properties)
And you use it with:
show eileen happy at Springy(offscreenleft, center, 1.0, 5.0, 15.0)

Renpy Cookbook
9
Showing and Hiding the Window This recipe lets you show and hide the window. When the window is show, it will always be shown, even during transitions. When it is hidden, transitions will occur without the window on the screen. (But note that if dialogue is shown with the window hidden, it will be shown during the dialogue.)
init python: show_window_trans = MoveTransition(0.25, enter_factory=MoveIn((None, 1.0, None, 0.0))) hide_window_trans = MoveTransition(0.25, leave_factory=MoveOut((None, 1.0, None, 0.0))) def hide_window(): store._window_during_transitions = False narrator("", interact=False) renpy.with_statement(None) renpy.with_statement(hide_window_trans) def show_window(): narrator("", interact=False) renpy.with_statement(show_window_trans) store._window_during_transitions = True
Use it like:
e "Let's go somewhere else!" $ hide_window() scene bg somewhere else with dissolve $ show_window() e "We're here!"
You can change show_window_trans and hide_window_trans to change the effects that are used to show and hide the window.

Renpy Cookbook
10
Fullscreen game run Setting To make the game start up fullscreen initially, open options.rpy, and change the line that reads:
config.default_fullscreen = False
to
config.default_fullscreen = True
To make this setting take effect, close Ren'Py, delete game/saves/persistent, and then re-launch your game.

Renpy Cookbook
11
Preloader Image To create a Preloader Image (placeholder image show while Ren'py is reading the scripts and launching the game), make an image named presplash.png, and put that image into the game directory.
Note: Ren'Py takes longer to load the first time after the script changes then it does later on. Game should be run twice in a row to see how long it takes the second time.

Renpy Cookbook
12
Splashscreen Effect An example of a splashscreen effect can be found at the end of the "script.rpy" file in the demo/game directory of Ren'py :
# The splashscreen is called, if it exists, before the main menu is # shown the first time. It is not called if the game has restarted. # We'll comment it out for now. # # label splashscreen: # $ renpy.pause(0) # scene black # show text "American Bishoujo Presents..." with dissolve # $ renpy.pause(1.0) # hide text with dissolve # # return
To add a text splashscreen to your game, insert code like this into anywhere in your script file (as long as it is not itself in a block):
label splashscreen: $ renpy.pause(0) scene black show text "American Bishoujo Presents..." with dissolve with Pause(1.0) hide text with dissolve return
Here's another example of a splashscreen, this time using an image:
init: image splash = "splash.png" label splashscreen: $ renpy.pause(0) scene black with Pause(0.5) show splash with dissolve with Pause(2.0) scene black with dissolve

Renpy Cookbook
13
with Pause(1.0) return
You need to declare the image in an init block (which can be anywhere in your script file, either before or after the splashscreen code). You must also declare another interaction before the scene transition, which is why $ renpy.pause(0) must exist as the first thing in the splashscreen label.

Renpy Cookbook
14
Simple Flash Effect This is the version of the effect that was used in Ori, Ochi, Onoe. It's designed to work with Ren'Py 5.6.1 and later.
This effect can be used for transitions such as flashbacks, light saturation effects and much more.
init: image bg road = "road.jpg" $ flash = Fade(.25, 0, .75, color="#fff") label start: scene black # Or whatever image you're transitioning from. "We're about to change the background in a flash." scene bg road with flash "Wowsers!"
I first saw this effect done in a game called Moe: Moegi Iro No Machi, as a transition between character images. I found it to be pretty cool, so I tried to emulate it in Ren'Py. It didn't take long; it's pretty simple. This code was tested and confirmed to work on Ren'Py versions 5.6.1 through 5.6.4, but it should work on any version 5.0 or higher release.
I have provided an image to use for this effect:
This image should be placed in your game or data folder, whichever you use for your game data.
This code will work for the demo script included with Ren'Py. It can very easily be modified to fit your game.
init: $ noisedissolve = ImageDissolve(im.Tile("noisetile.png"), 1.0, 1) label start: scene bg washington with fade show eileen vhappy with noisedissolve "Eileen" "Just popping in!"

Renpy Cookbook
15
hide eileen with noisedissolve
That's all there is to it. It's very simple to implement, and looks cool too. Please note that this effect is not limited to character images; you can show and hide any image or scene with it.

Renpy Cookbook
16
Double Vision Effect The following code produces a blurred "double vision" effect. This was used in the games Gakuen Redux and Secretary of Death.
The basic idea is that you create a half-opaque version of the background, and then show it at a random location after showing the background. That means that unlike many effects, invoking this effect during your story requires two statements, not just one.
init: image cs2 = Image("b_city_scape_02.gif") image cs2alpha = im.Alpha("b_city_scape_02.gif", 0.5) python hide: def gen_randmotion(count, dist, delay): import random args = [ ] for i in range(0, count): args.append(anim.State(i, None, Position(xpos=random.randrange(-dist, dist), ypos=random.randrange(-dist, dist), xanchor='left', yanchor='top', ))) for i in range(0, count): for j in range(0, count): if i == j: continue args.append(anim.Edge(i, delay, j, MoveTransition(delay))) return anim.SMAnimation(0, *args) store.randmotion = gen_randmotion(5, 5, 1.0) label start: scene cs2 show cs2alpha at randmotion "Presented in DOUBLE-VISION (where drunk)."
Renpy Cookbook
17
In this code, the statements which actually produce the effect during the story are:
scene cs2 show cs2alpha at randmotion
As you may have noticed, for every image that you want to show in double vision, you'll have to create two images for it as well. In the code above, these are the lines which create the images (note that like all image statements, they must be placed in an init block):
image cs2 = Image("b_city_scape_02.gif") image cs2alpha = im.Alpha("b_city_scape_02.gif", 0.5)
You can already use the default vpunch and hpunch transitions to shake the screen. But what about a shake that goes in every directions randomly, Phoenix Wright style?
init: python: import math class Shaker(object): anchors = { 'top' : 0.0, 'center' : 0.5, 'bottom' : 1.0, 'left' : 0.0, 'right' : 1.0, } def __init__(self, start, child, dist): if start is None: start = child.get_placement() # self.start = [ self.anchors.get(i, i) for i in start ] # central position self.dist = dist # maximum distance, in pixels, from the starting point self.child = child def __call__(self, t, sizes): # Float to integer... turns floating point numbers to # integers. def fti(x, r): if x is None: x = 0 if isinstance(x, float): return int(x * r) else: return x

Renpy Cookbook
18
xpos, ypos, xanchor, yanchor = [ fti(a, b) for a, b in zip(self.start, sizes) ] xpos = xpos - xanchor ypos = ypos - yanchor nx = xpos + (1.0-t) * self.dist * (renpy.random.random()*2-1) ny = ypos + (1.0-t) * self.dist * (renpy.random.random()*2-1) return (int(nx), int(ny), 0, 0) def _Shake(start, time, child=None, dist=100.0, **properties): move = Shaker(start, child, dist=dist) return renpy.display.layout.Motion(move, time, child, add_sizes=True, **properties) Shake = renpy.curry(_Shake) # #
You can now use it inline or create a few transitions :
init: $ sshake = Shake((0, 0, 0, 0), 1.0, dist=15)
Syntax : Shake(position, duration, maximum distance) with 'position' being a tuple of 4 values : x-position, y-position, xanchor, yanchor.
Examples
show phoenix think with dissolve ph "I think this game lacks a little something... Right! Some..." ph "Objection!" with sshake # shaking the whole screen with the previously defined 'sshake' ph "Eheh... Uh? What the?! It's reverberating!" show phoenix at Shake((0.5, 1.0, 0.5, 1.0), 1.0, dist=5) with None # shaking the sprite by placing it at the center (where it already was) ph "Ng!..." show phoenix at center, Shake(None, 1.0, dist=5) with None # exactly the same thing but it shows how you can first give a predefined position and, # giving None as a position for Shake, let it take 'center' as the shaking position. ph "AAgh! Stop it already!" ph "...... Is it over?" with Shake((0, 0, 0, 0), 3.0, dist=30) # some serious shaking of the screen for 3 seconds # try not to abuse high values of 'dist' since it can make things hard on the eyes

Renpy Cookbook
19
Lip Flap Sometimes, you want to synchronize a character's lip movements to her dialogue. That's what Lip Flap is for.
First, download lip_flap.rpy, and add it to your game directory. This file contains the definition of the LipFlap function. This function returns an object that can be used in a show statement to produce lip flap.
Function: LipFlap (prefix, default="", suffix=".png", combine=...):
prefix - The prefix of filenames that are used to produce lip flap.
default - The default lip that is used when no parameters is given.
suffix - A suffix that is used.
combine - A function that combines its three arguments (prefix, lip, and suffix) into a displayable. The default combine function is Image(prefix + lip + suffix). This could be changed if you want to, say LiveComposite the lips onto a larger character image.
To use lip flap, first declare an image using LipFlap. Then show that image with a parameter string consisting of alternating lips and delays. It will show the first lip, wait the first delay, show the second lip, wait the second delay, and so on. If the string ends with a lip, it will display that lip forever. If it ends in a delay, it will repeat after that delay has elapsed.
See Blink And Lip Flap for an example of combining this with character blinking.
Example
# Note that Ayaki_ShyA.png, Ayaki_ShyB.png, and Ayaki_ShyC.png all exist in the # game directory. init: image ayaki shy = LipFlap("Ayaki_Shy", "A", ".png") label ayaki: scene bg whitehouse # Show Ayaki with her default lip, A. show ayaki shy

Renpy Cookbook
20
"..." # Show Ayaki with varying lips. show ayaki shy "A .15 B .20 C .15 A .15 C .15 A" "Ayaki" "Whatsoever, things are true." return
Blink And Lip Flap
What do you do if you've got a character and you want her eyes to occasionally blink, and you also want her mouth to move when she's speaking?
This.
init python: # This is set to the name of the character that is speaking, or # None if no character is currently speaking. speaking = None # This returns speaking if the character is speaking, and done if the # character is not. def while_speaking(name, speak_d, done_d, st, at): if speaking == name: return speak_d, .1 else: return done_d, None # Curried form of the above. curried_while_speaking = renpy.curry(while_speaking) # Displays speaking when the named character is speaking, and done otherwise. def WhileSpeaking(name, speaking_d, done_d=Null()): return DynamicDisplayable(curried_while_speaking(name, speaking_d, done_d)) # This callback maintains the speaking variable. def speaker_callback(name, event, **kwargs): global speaking if event == "show": speaking = name elif event == "slow_done": speaking = None elif event == "end": speaking = None # Curried form of the same. speaker = renpy.curry(speaker_callback)

Renpy Cookbook
21
init: # Create such a character. $ girl = Character("Girl", callback=speaker("girl")) # Composite things together to make a character with blinking eyes and # lip-flap. image girl = LiveComposite( (359, 927), (0, 0), "base.png", (101, 50), Animation("eye_open.png", 4.5, "eye_closed.png", .25) , (170, 144), WhileSpeaking("girl", Animation("mouth_speak1.png", .2, "mouth_speak2.png", .2), "mouth_closed.png"), ) # The game starts here. label start: scene black show girl "Not speaking." girl "Now I'm speaking. Blah blah blah blah blah blah blah." "Not speaking any more." girl "Now I'm speaking once again. Blah blah blah blah blah blah blah."

Renpy Cookbook
22
Showing layered sprites with different emotions
Have you ever wanted to make a layered image but you didn't want to declare separate statements for each one? Are you tired of using "show eileen happy at center with dissolve"?
Then this is for you! Welcome to the world of LiveComposite and dynamic displayables using ConditionSwitch! You'll only need to declare something like "$ Janetmood = mad" to change the emotion on her face or the pose and any number of fun things.
#Put this in your init section! init: #This declares a conditional image with a LiveComposite inside of it image eileen = ConditionSwitch( "e_face == 'happy", LiveComposite( #If she's happy, call the LiveComposite (375, 480), (0, 0), "e.png", #This is the size of the sprite in widthxheight of pixels #I'm telling it not to move e.png but use the base dimensions and #the path to e.png. If I had it in a folder, it would be #"/foldername/imagename.format" #This is probably the "base" image or body. (94, 66), "e_happy.png", #This is 94 pixels to the right and 66 pixels down, if I remember correctly #This is the alternate face layer, which is put on top of the stack. #So the order goes bottom to top when you're listing images. ), "e_face == 'sad", LiveComposite( (375, 480), (0, 0), "e.png", (94, 66), "e_sad.png", #Don't forget your commas at the end here ), "e_face == None", "e.png") #If it's not set to anything, the neutral base "e.png" displays #Be sure to close your parentheses carefully label start: #This is how you call it during the game itself show eileen #This shows the LiveComposite "e.png" when e_face == None. We haven't changed it yet. e "I'm neutral." #Now we change the variable to happy. $ e_face = "happy" e "Now sprite is happy!" #You can also declare ConditionSwitches in Character statements to #change the side image.

Renpy Cookbook
23
Particle Burst While SnowBlossom is useful for the common falling particles, you may want to have an explosion of particles. Useful for when things are blowing up or simulating sparks from a steel on steel impact.
This is the factory class that creates the particle burst
init: python: class ExplodeFactory: # the factory that makes the particles def __init__(self, theDisplayable, explodeTime=0, numParticles=20): self.displayable = theDisplayable self.time = explodeTime self.particleMax = numParticles
theDisplayable The displayable or image name you want to use for your particles
explodeTime The time for the burst to keep emitting particles. A value of zero is no time limit.
numParticles The limit for the number of particle on screen.
Here is an example of how to use it.
Put the following into your init block.
image boom = Particles(ExplodeFactory("star.png", numParticles=80, explodeTime = 1.0))
Then you can just "show boom" to show the particle burst.
Here is the rest of the code
def create(self, partList, timePassed): newParticles = None if partList == None or len(partList) < self.particleMax: if timePassed < self.time or self.time == 0: newParticles = self.createParticles() return newParticles def createParticles(self): timeDelay = renpy.random.random() * 0.6 return [ExplodeParticle(self.displayable, timeDelay)]

Renpy Cookbook
24
def predict(self): return [self.displayable] init: python: class ExplodeParticle: def __init__(self, theDisplayable, timeDelay): self.displayable = theDisplayable self.delay = timeDelay self.xSpeed = (renpy.random.random() - 0.5) * 0.02 self.ySpeed = (renpy.random.random() - 0.5) * 0.02 self.xPos = 0.5 self.yPos = 0.5 def update(self, theTime): if (theTime > self.delay): self.xPos += self.xSpeed self.yPos += self.ySpeed if self.xPos > 1.05 or self.xPos < -1.05 or self.yPos > 1.05 or self.yPos < -1.05: return None return (self.xPos, self.yPos, theTime, self.displayable)
This is a nifty effect that I saw in Fate/stay night, so I wanted to replicate it in Ren'py. While I may have not replicated it exactly, it will surely add some flavor to your VNs if you use it when the situation demands it. Basically, here's what you do.
Open your favourite image editor of choice (mine is Photoshop), and make a new canvas with the size of the screen you're using for your game (let's say 800x600 is today's default). Use paint bucket to paint the canvas white, in case you created a transparent canvas. Now, we need a function called "Add Noise", so find it in your filter toolbar. Use monochromatic noise, and for these images I used uniform distribution with values around 50% (changed +/- .01 for each of the images). I got five images.
Now, as you see, each of them is a bit different than the other. Perfect! What we need to do next, is put all these in an anim.SMAnimation function to do us good. So let's define all five states and all the edges to make this animation fluid and non-stop. Like so...
image static = anim.SMAnimation("a", anim.State("a", "noise1.png"), anim.State("b", "noise2.png"), anim.State("c", "noise3.png"), anim.State("d", "noise4.png"), anim.State("e", "noise5.png"),

Renpy Cookbook
25
anim.Edge("a", .2, "b", trans=Dissolve(.2, alpha=True)), anim.Edge("b", .2, "a", trans=Dissolve(.2, alpha=True)), anim.Edge("a", .2, "c", trans=Dissolve(.2, alpha=True)), anim.Edge("c", .2, "a", trans=Dissolve(.2, alpha=True)), anim.Edge("a", .2, "d", trans=Dissolve(.2, alpha=True)), anim.Edge("d", .2, "a", trans=Dissolve(.2, alpha=True)), anim.Edge("a", .2, "e", trans=Dissolve(.2, alpha=True)), anim.Edge("e", .2, "a", trans=Dissolve(.2, alpha=True)), anim.Edge("b", .2, "c", trans=Dissolve(.2, alpha=True)), anim.Edge("c", .2, "b", trans=Dissolve(.2, alpha=True)), anim.Edge("b", .2, "d", trans=Dissolve(.2, alpha=True)), anim.Edge("d", .2, "b", trans=Dissolve(.2, alpha=True)), anim.Edge("b", .2, "e", trans=Dissolve(.2, alpha=True)), anim.Edge("e", .2, "b", trans=Dissolve(.2, alpha=True)), anim.Edge("c", .2, "d", trans=Dissolve(.2, alpha=True)), anim.Edge("d", .2, "c", trans=Dissolve(.2, alpha=True)), anim.Edge("c", .2, "e", trans=Dissolve(.2, alpha=True)), anim.Edge("e", .2, "c", trans=Dissolve(.2, alpha=True)), anim.Edge("d", .2, "e", trans=Dissolve(.2, alpha=True)), anim.Edge("e", .2, "d", trans=Dissolve(.2, alpha=True)), )
Now that's some typing right there! :D I wanted to do dissolves rather than just showing images, that would look too coarse. This looks perfect, even though it might be a tad memory consumptive. If the static changes too slow for your taste, change the delay of the edge (the first number before "trans") to a lower value, like .15 or .1
To use this, you just call it like this whenever you wish to show static in-game.
show static
One last thing - remember that these images (if you followed my instructions blindly) are opaque, so nothing below the static will be visible! To change that, you can:
change layer transparency in your image editor (less flexible) - to something around 50% - before you save your noise images
use im.Alpha for every noise state before you load the images in SMAnimation (more flexible, as you can define static with various degrees of alpha for different situations in the game, but probably less memory-efficient)

Renpy Cookbook
26
So this was my first cookbook recipe, hope you like it! Thanks goes to FIA and PyTom for correcting the script, now everything will work if you use opacity changes with im.Alpha (or use transparent .pngs, but as I said, that's less flexible).

Renpy Cookbook
27
Realistic Snowfall Effect This recipe lets you implement a more realistic snowfall effect than the one you can get using SnowBlossom. Code is pretty much commented, and should work with Ren'Py 6.9.0+ (it'll work in early versions of Ren'Py if you change line #116 to use im.FactorZoom instead of im.FactorScale)
init python: ################################################################# # Here we use random module for some random stuffs (since we don't # want Ren'Py saving the random number's we'll generate. import random # initialize random numbers random.seed() ################################################################# # Snow particles # ---------------- def Snow(image, max_particles=50, speed=150, wind=100, xborder=(0,100), yborder=(50,400), **kwargs): """ This creates the snow effect. You should use this function instead of instancing the SnowFactory directly (we'll, doesn't matter actually, but it saves typing if you're using the default values =D) @parm {image} image: The image used as the snowflakes. This should always be a image file or an im object, since we'll apply im transformations in it. @parm {int} max_particles: The maximum number of particles at once in the screen. @parm {float} speed: The base vertical speed of the particles. The higher the value, the faster particles will fall. Values below 1 will be changed to 1 @parm {float} wind: The max wind force that'll be applyed to the particles. @parm {Tuple ({int} min, {int} max)} xborder: The horizontal border range. A random value between those two will be applyed when creating particles. @parm {Tuple ({int} min, {int} max)} yborder: The vertical border range. A random value between those two will be applyed when creating particles. The higher the values, the fartest from the screen they will be created. """ return Particles(SnowFactory(image, max_particles, speed, wind, xborder, yborder, **kwargs)) # ---------------------------------------------------------------

Renpy Cookbook
28
class SnowFactory(object): """ The factory that creates the particles we use in the snow effect. """ def __init__(self, image, max_particles, speed, wind, xborder, yborder, **kwargs): """ Initialize the factory. Parameters are the same as the Snow function. """ # the maximum number of particles we can have on screen at once self.max_particles = max_particles # the particle's speed self.speed = speed # the wind's speed self.wind = wind # the horizontal/vertical range to create particles self.xborder = xborder self.yborder = yborder # the maximum depth of the screen. Higher values lead to more varying particles size, # but it also uses more memory. Default value is 10 and it should be okay for most # games, since particles sizes are calculated as percentage of this value. self.depth = kwargs.get("depth", 10) # initialize the images self.image = self.image_init(image) def create(self, particles, st): """ This is internally called every frame by the Particles object to create new particles. We'll just create new particles if the number of particles on the screen is lower than the max number of particles we can have. """ # if we can create a new particle... if particles is None or len(particles) < self.max_particles: # generate a random depth for the particle depth = random.randint(1, self.depth) # We expect that particles falling far from the screen will move slowly than those # that are falling near the screen. So we change the speed of particles based on # its depth =D depth_speed = 1.5-depth/(self.depth+0.0) return [ SnowParticle(self.image[depth-1], # the image used by the particle random.uniform(-self.wind, self.wind)*depth_speed, # wind's force self.speed*depth_speed, # the vertical speed of the particle random.randint(self.xborder[0], self.xborder[1]), # horizontal border random.randint(self.yborder[0], self.yborder[1]), # vertical border ) ] def image_init(self, image): """

Renpy Cookbook
29
This is called internally to initialize the images. will create a list of images with different sizes, so we can predict them all and use the cached versions to make it more memory efficient. """ rv = [ ] # generate the array of images for each possible depth value. for depth in range(self.depth): # Resize and adjust the alpha value based on the depth of the image p = 1.1 - depth/(self.depth+0.0) if p > 1: p = 1.0 rv.append( im.FactorScale( im.Alpha(image, p), p ) ) return rv def predict(self): """ This is called internally by the Particles object to predict the images the particles are using. It's expected to return a list of images to predict. """ return self.image # --------------------------------------------------------------- class SnowParticle(object): """ Represents every particle in the screen. """ def __init__(self, image, wind, speed, xborder, yborder): """ Initializes the snow particle. This is called automatically when the object is created. """ # The image used by this particle self.image = image # For safety (and since we don't have snow going from the floor to the sky o.o) # if the vertical speed of the particle is lower than 1, we use 1. # This prevents the particles of being stuck in the screen forever and not falling at all. if speed <= 0: speed = 1 # wind's speed self.wind = wind # particle's speed self.speed = speed # The last time when this particle was updated (used to calculate the unexpected delay # between updates, aka lag) self.oldst = None # the horizontal/vertical positions of this particle self.xpos = random.uniform(0-xborder, renpy.config.screen_width+xborder) self.ypos = -yborder

Renpy Cookbook
30
def update(self, st): """ Called internally in every frame to update the particle. """ # calculate lag if self.oldst is None: self.oldst = st lag = st - self.oldst self.oldst = st # update the position self.xpos += lag * self.wind self.ypos += lag * self.speed # verify if the particle went out of the screen so we can destroy it. if self.ypos > renpy.config.screen_height or\ (self.wind< 0 and self.xpos < 0) or (self.wind > 0 and self.xpos > renpy.config.screen_width): ## print "Dead" return None # returns the particle as a Tuple (xpos, ypos, time, image) # since it expects horizontal and vertical positions to be integers, we have to convert # it (internal positions use float for smooth movements =D) return int(self.xpos), int(self.ypos), st, self.image
Example
init: image snow = Snow("snowflake.png") label start: show snow "Hey, look! It's snowing."

Renpy Cookbook
31
Adding a simple and somewhat functioning Analog Clock
This cookbook recipe will add a sort of functioning analog clock on your screen.
But first, copy these images below to your game directory (or wherever you save your images)
Clock
Clock_1
Clock_2
Now copy the code below inside your script.
init python: renpy.image("clock.png") # Short Clockhand renpy.image("clock_1.png") # Long Clockhand renpy.image("clock_2.png") # Clockface def Clocks(): if clock: # if False - clock is hide ui.at(Position(xpos=150, ypos=140, xanchor="center", yanchor="center")) ui.add("clock_2") # xalign and yalign can be replaced by xpos and ypos - position where the center of the clock should be # this segment is the one responsible for the clockface ui.at(Position(xpos=150, ypos=140, xanchor="center", yanchor="center")) ui.at(RotoZoom((minutes*6), (minutes*6), 5.0, 1, 1, 1, rot_bounce= False, rot_anim_timebase=False, opaque=False), ) ui.add("clock") # this segment is the one responsible for the short clock hand. ui.at(Position(xpos=150, ypos=140, xanchor="center", yanchor="center")) ui.at(RotoZoom ((minutes*0.5), (minutes*0.5), 5.0, 1, 1, 1, rot_bounce= False, rot_anim_timebase=False, opaque=False)) ui.add("clock_1") # this segment is the one responsible for the long clock hand. config.overlay_functions.append(Clocks)
OK, so it's not like your standard Analog Clock. It will behave like an Analog Clock, it will rotate like an Analog Clock but you have to dictate the actual time to be displayed...

Renpy Cookbook
32
HOW TO USE:
After putting the previous code inside your game script. You will now have to write something like this (see below code)
init: $ clock = False
The code above declares the clock so Ren'py can use it. The "False" tells Ren'py "not" to show the Analog Clock by default. Why is that?
Well, you don't want the Analog Clock to show in your screen instantly do you? Like you have a very dramatic scene and there is this Analog Clock dangling on the top left side of the screen. What you and me want is to "dictate" when will the clock show.
OK, so the time comes when we needed the clock to be shown.
You show it like this...
label start: "What time is it?" "Let's look at the clock." $ clock = True with dissolve "Ah!... Nice clock!"
So the line [ $ clock = True ] tells Ren'py to "show" the clock.
The line [ with dissolve ] tells Ren'py to "show" the clock with a "Dissolve" transition. Pretty cool eh?... You could also replace "Dissolve" with other transitions for maximum joy.
To hide the clock again just use [ $ clock = False ] and to hide it with transition add the line [ with dissolve ] below it.
HOW TO DICTATE STARTING TIME ON CLOCK:
Of course, for this Analog Clock to be useful you have to be able to set the time and dictate the time. But before that, please copy the code below in your game script.

Renpy Cookbook
33
init: $ minutes = 0
So what is this? You see, this is the code where you dictate the starting time of the clock... in this case 0 minutes or 12:00 Midnight. If you wanted to change the starting time to 9:00AM you will have to calculate how many minutes have passed from 12:00 Midnight till 9:00AM... in this case it's 540 minutes so you will have to write the above code like this (see below)
init: $ minutes = 540
HOW TO ADD/CHANGE TIME ON CLOCK:
Let's say you are in the middle of the game and your current time is set at 540 (9:00AM) and you wanted to add 2 minutes to the clock. You will have to write something like this (see below)
$ minutes += 2
The code above adds additional two minutes to the current time count and the analog clock will now display the time 9:02AM.
Here is an good example of how to use Analog Clock in actual. In this code we assume you set your clock to 9:00AM or [$ minutes = 540]
label start: $ clock = True with dissolve "It is already 9:00AM." "He is very late." "But he is my friend so I will wait." $ minutes += 2 "Two minutes has passed." $ minutes += 2 "Four minutes has passed." $ minutes += 2 "Six minutes has passed." "HE IS LATE! I KILL HIM!" $ clock = False with dissolve

Renpy Cookbook
34
So the above code will show the analog clock with dissolve at 9:00AM then it will move by two minutes, and another two minutes, and another tow minutes.
For your convenience, I also add a sort of guide to make adding minutes a lot easier.
# 12:00 MN - 0 # 1:00 AM - 60 # 2:00 AM - 120 # 3:00 AM - 180 # 4:00 AM - 240 # 5:00 AM - 300 # 6:00 AM - 360 # 7:00 AM - 420 # 8:00 AM - 480 # 9:00 AM - 540 # 10:00 AM - 600 # 11:00 AM - 660 # 12:00 NN - 720 # 1:00 PM - 780 # 2:00 PM - 840 # 3:00 PM - 900 # 4:00 PM - 960 # 5:00 PM - 1020 # 6:00 PM - 1080 # 7:00 PM - 1140 # 8:00 PM - 1200 # 9:00 PM - 1260 # 10:00 PM - 1320 # 11:00 PM - 1380

Renpy Cookbook
35
Menu Buttons This is a recipe that you can use to make buttons appear on the main screen. These buttons can act as shortcuts to the game menu, toggles for skipping or other user preferences, or in order to bring up an inventory menu.
# This file adds a number of buttons to the lower-right hand corner of # the screen. Three of these buttons jump to the game menu, which # giving quick access to Load, Save, and Prefs. The fourth button # toggles skipping, to make that more convenient. init python: # Give us some space on the right side of the screen. style.window.right_padding = 100 def toggle_skipping(): config.skipping = not config.skipping show_button_game_menu = True def button_game_menu(): if show_button_game_menu: # to save typing ccinc = renpy.curried_call_in_new_context ui.vbox(xpos=0.99, ypos=0.98, xanchor='right', yanchor='bottom') ui.textbutton("Skip", clicked=toggle_skipping, xminimum=80) ui.textbutton("Save", clicked=ccinc("_game_menu_save"), xminimum=80) ui.textbutton("Load", clicked=ccinc("_game_menu_load"), xminimum=80) ui.textbutton("Prefs", clicked=ccinc("_game_menu_preferences"), xminimum=80) ui.close() config.overlay_functions.append(button_game_menu)
Examples
If you want the buttons to be shown on the screen all the time, you can simply copy the above code into a .rpy file.
If you want to disable the buttons, such as during a minigame, you can write, for example,
label minigame: e "Let's play Poker!"

Renpy Cookbook
36
# I want to disable the buttons, so I use: $ show_button_game_menu = False # Now the button is no longer shown. # ... poker code ... # Now I want to re-activate the buttons, so I use: $ show_button_game_menu = True e "That was fun." jump ending
When "$ show_button_game_menu = False" is run, that tells the computer that you do not want to show the button until you change show_button_game_menu to True again.
Creating Your Own Buttons
If you want to create your own on-screen button, you need to first create a variable that can be used to change whether or not the button is shown on the screen, then create a overlay function, and then finally attach the function to the overlay function list.
All of this needs to go inside a "init python:" block, which you create by typing "init python:" into one of you script files.
init python: # Give us some space on the right side of the screen. style.window.right_padding = 100
To create a variable that determines whether or not the button is shown, you need to first decide on an appropriate name. A good name would be one that describes what the button does; for example, in the example code, the variable was named "show_button_game_menu" because the buttons formed shortcuts to the game menu and the variable determines whether or not the menu should be shown. If you wanted a button that shows an inventory when clicked, a good variable name would be "show_inventory_button."
After you decide on the name, you have to decide whether or not you want the button to be shown at the beginning of the game, or if you want the button to be unlocked later. For the game menu example, it is a good idea to show the buttons starting from the beginning of the game. However, if you want to create a button that goes to a list of spells in the player's spellbook, and you don't let the player learn spells until halfway through the game, it would be a good idea to unlock the button later.

Renpy Cookbook
37
If you want to show the button from the beginning of the game, you would write "your_variable_name = True," and if you would write "your_variable_name = False"
init python: # Give us some space on the right side of the screen. style.window.right_padding = 100 your_variable_name = True or False #depending on your decision
Next, you have to write the actual function itself.
init python: # Give us some space on the right side of the screen. style.window.right_padding = 100 your_variable_name = True or False #depending on your decision def my_button_function(): if your_variable_name: ui.vbox(xpos=0.99, ypos=0.98, xanchor='right', yanchor='bottom') ui.textbutton("Button Name", clicked=do_something, xminimum=80) ui.close()
And then finally, append the function to the config.overlay.
init python: # Give us some space on the right side of the screen. style.window.right_padding = 100 your_variable_name = True or False #depending on your decision def my_button_function(): if your_variable_name: ui.vbox(xpos=0.99, ypos=0.98, xanchor='right', yanchor='bottom') ui.textbutton("Button Name", clicked=do_something, xminimum=80) ui.close() config.overlay_functions.append(my_button_function)

Renpy Cookbook
38
Centered Window The following code should be put in one of your RPY files, preferably options.rpy. If you are not sure where to put it, place it at the very end of your file.
init python hide: import os os.environ['SDL_VIDEO_CENTERED'] = '1'
This forces the main program window to be centered. Without this code, the placement of the window is left up to the OS.

Renpy Cookbook
39
Censoring for wider-audience When you wish to distribute your game to a wider audience than just hentai fans, why not make hentai optional? Using the following code, a "Hentai" option is added to the preferences. It defaults to False, so that your game would be teen-safe from the start.
init python: # Set the default value. if persistent.hentai is None: persistent.hentai = False # Add the pref. config.preferences['prefs_left'].append( _Preference( "Hentai", "hentai", [ ("Enabled", True, "True"), ("Disabled", False, "True") ], base=persistent))
Then when it comes time for a hentai scene:
if persistent.hentai: # Let's get it on. else: # Holding hands is more than enough.

Renpy Cookbook
40
Name Above the Text Window The show_two_window argument in the Character class allows the developer to place the location of a speaker's name into its own ui.window above the text window. The picture shown on Wiki article on Ren'Py is a perfect example of this.
The following code is PyTom's code, pulled from the Lemmasoft forum.
init: $ e = Character("Eileen", show_two_window=True)
# This file implements quick save and load functionality. The # quicksave functionality adds a button to the overlay that is # displayed over the game. When the button is clicked, the game is # saved in a special quicksave slot. It also adds a quick load button # to the main menu. When that button is clicked, the quicksave game is # loaded. # This is called when the quick save button is clicked. label _quick_save: # Saves the game. $ renpy.save('quicksave', _('Quick Save')) # Tell the user that we saved the game. $ ui.add(Solid((0, 0, 0, 128))) $ ui.text(_('The game has been saved using quick save.'), xpos=0.5, xanchor='center', ypos=0.5, yanchor='center') $ ui.saybehavior() $ ui.interact(suppress_overlay=True, suppress_underlay=True) return # This is called when the quick load button is clicked, to load the # game. label _quick_load: $ renpy.load('quicksave') return init -1: python hide: # Add the quick save button in as an overlay function. def quick_save_button(): ui.textbutton(_("Quick Save"), xpos=0.98, ypos=0.02, xanchor='right', yanchor='top', clicked=renpy.curried_call_in_new_context('_quick_save'))

Renpy Cookbook
41
config.overlay_functions.append(quick_save_button) # Add the quick load function to the main menu. library.main_menu.insert(1, ('Quick Load', ui.jumps("_quick_load"), 'renpy.can_load("quicksave")'))

Renpy Cookbook
42
Menu Positions This shows how to reposition the elements of the main menu. Elements of the game menu can be repositioned in a similar way. Use the style inspector (shift+I with your mouse over a displayable) to figure out which styles to use.
Layouts may be easier to use for more complicated designs.
init python hide: # Expand the main menu frame to be transparent, and taking up the # screen. Set the box inside it to one that absolutely positions # its children. style.mm_menu_frame.clear() style.mm_menu_frame.set_parent(style.default) style.mm_menu_frame_box.box_layout = "fixed" style.mm_button["Start Game"].xpos = 400 style.mm_button["Start Game"].ypos = 400 style.mm_button["Continue Game"].xpos = 450 style.mm_button["Continue Game"].ypos = 450 style.mm_button["Preferences"].xpos = 500 style.mm_button["Preferences"].ypos = 500 style.mm_button["Quit"].xpos = 550 style.mm_button["Quit"].ypos = 550

Renpy Cookbook
43
RPG frame This is a frame you can use for your RPG project if you intend to create a hybrid project (renpy+minigames).
It might be a good introduction to style editing and game loops notions.
In the init section
init python: def stats_frame(name, level, hp, maxhp, **properties): ui.frame(xfill=False, yminimum=None, **properties) ui.hbox() # (name, "HP", bar) from (level, hp, maxhp) ui.vbox() # name from ("HP", bar) ui.text(name, size=20) ui.hbox() # "HP" from bar ui.text("HP", size=20) ui.bar(maxhp, hp, xmaximum=150, left_bar=Frame("rrslider_full.png", 12, 0), right_bar=Frame("rrslider_empty.png", 12, 0), thumb=None, thumb_shadow=None) ui.close() ui.close() ui.vbox() # Level from (hp/maxhp) ui.text("Lv. %d" % level, xalign=0.5, size=20) ui.text("%d/%d" % (hp, maxhp), xalign=0.5, size=20) ui.close() ui.close()
In the game script
label start: with None jump fight label fight: python: charmax_HP = 1000 char_HP = 1000 tigermax_HP = 2000

Renpy Cookbook
44
tiger_HP = 2000 while True: while tiger_HP >= 1000: tiger_HP = tiger_HP - 10 stats_frame("Tiger", 4, tiger_HP, tigermax_HP, xalign=0.75, yalign=0.0) stats_frame("Hero", 1, 86, 86, xalign=0.0, yalign=0.0) renpy.pause(0.05) break "Tiger" "Gao gao! You're strong!"
Renpy Cookbook
45
Auto-read Setting To enable and set the delay of the auto-read mode at the first run of your game (instead of going in the preferences menu), add to your script :
init: if not persistent.set_afm_time: $ persistent.set_afm_time = True $ _preferences.afm_time = 10
This will change the setting to 10 the first time the player runs the game. It will then store the fact that it has done so into game/saves/persistent, so if the user changes the setting, it won't be reset.
Maximum setting is 41 for the default Menu Preference User Interface, but it can be set higher in your script file. Minimum setting is 1 and will make your game show all lines of text with no interruption.

Renpy Cookbook
46
Default text speed Setting To set the default speed of text, open options.rpy, and change the line that reads:
config.default_text_cps = 0
Replace 0 with the number of characters that should be shown per second. Valid numbers are in the range 1-100, with 0 being special-cased as infinite speed. (Note that this is somewhat odd... 0 is infinitely fast, 1 is very slow, and 100 is very fast.)
To make this setting take effect, close Ren'Py, delete game/saves/persistent, and then re-launch your game.

Renpy Cookbook
47
The tile engine and unit engine The Tile Engine and Unit Engine are extensions, written by Chronoluminaire, for adding isometric or square-grid tile-based maps into Ren'Py.
Where can I get them?
This includes v1.0 of the Tile Engine and Unit Engine, as well as four extensive demos that show what's possible and how to do it, as well as providing a number of sample isometric and square tiles. (Note that the performance will be very bad if you try to use the game directory in versions of Ren'Py earlier than 6.6.1.)
What are they?
The TileEngine is a Ren'Py object you can use to represent and display a map that's built out of tiles. It'll do the following:
Display your map from either an isometric view or a square-grid view Let the user scroll around the map with keyboard or mouse, optionally
displaying a cursor sprite Display sprites on top of the map, given their grid co-ordinates. Provide functions for converting screen co-ordinates to or from grid
co-ordinates, respective to your chosen view (isometric or square-grid).
The UnitEngine is a Ren'Py object that builds on top of the TileEngine, providing a lot more infrastructure for games that want to move units around the map, especially in a turn-based way. It lets you do the following:
Define Unit objects, which are Sprites with a bunch of extra properties. Let the player move Units around the map by clicking or by keyboard
control. Calculate which squares the unit can reach within its allocated
Movement or Action Points, with capability for different units having different costs to move through different types of terrain.
Calculate the route and do the movement step by step when you or the player move a unit to a given square. If you supply animations for the unit moving in each of the eight directions, it'll use them.
Let the player select Actions that units can take, from a list you supply - for example, attacking or healing other units, or perhaps transforming the map square they're on.

Renpy Cookbook
48
The UnitEngine works either with "Movement Points" or "Action Points", and you specify which one you want to use when you create it. In the Movement Points (MP) system, each unit gets to move a certain number of spaces per turn, and also gets a specified number of actions per turn (usually 1). In the Action Points (AP) system, movement and action both come from the same allocation of Action Points each turn.
It has a Callback system so that your own Ren'Py code can be executed whenever the user selects a unit, moves a unit, or takes an action.
Restrictions:
Known bugs
AP mode doesn't yet work properly. Only MP mode is fully implemented.
Scrolling is currently jerky. If you return to the main menu from the UnitEngine, any overlays will
still be displayed once you start a new game.
Features for a possible later version
In Version 1 of the TileEngine, there's no 3D, either layers or heightmaps. You can give each square a "Height" property if you want, and have your custom code do special things to it, but the engine won't do anything to it unless you override some methods. Version 2 may have layer-style 3D.
There's no way to rotate the view. That's possible for Version 2. The performance isn't great. I plan to write a custom displayable to
handle the tiles, which will fix both this and the jerky scrolling mentioned above.
Animating units is fiddly, and animating tiles currently isn't possible. I plan to fix this for Version 2.
General
I'm afraid that to use the TileEngine or UnitEngine, you're going to have to do a little programming. Not much, but your game's script will have to be more complicated than a simple Ren'Py game. We've tried to explain things gently here, and Chronoluminaire will be happy to answer questions in the Ren'Py forum. But this is just a warning that the TileEngine and UnitEngine won't completely do every line of

Renpy Cookbook
49
programming for your tile-based map: you'll have to do a little bit yourself.
I've been using this for testing purposes and it meets my needs. It may be a useful recipe to start from for anyone doing a similar task. This is written to follow the conventions of my project's "real" engine (KeyLimePie), so you may want to tweak it to suit your needs. My project expects to present options along the 8 cardinal directions ("n", "s", "nw", ...) and one "center" direction, for a simple 3x3 grid of choices. The code below replaces the built-in menu with a 3x3 grid menu. It expects menu choices to be prefixed by the direction in lowercase and a colon (ex: "se: Some Choice"). It expects all choices have a direction prefix, and it "stacks" direction choices so the direction always shows just the first applicable option in the list of choices.
The menu styling is fairly basic and not always great, but as I said I mostly use this just for testing. I'm also not sure the checkpoint code is correct (for save/load) as I haven't actually needed it.
I placed this code directly in the top init block of script.rpy, but it should work just fine in its own file (may need an "early" keyword, though).
python: ## KeyLimePie Menu Powers Activate! ## style.create('keylimepie_menu_choice', 'default', 'KeyLimePie menu choice') style.create('keylimepie_menu_choice_button', 'default', 'KeyLimePie menu button') style.keylimepie_menu_choice.layout = "subtitle" style.keylimepie_menu_choice.xmaximum = 0.3 style.keylimepie_menu_choice.size_group = None style.keylimepie_menu_choice_button.xmaximum = 0.3 style.keylimepie_menu_choice_button.size_group = None # NOTE: It would be nice to intercept this at the renpy.export # level instead, because we want the "disabled" items as well def keylimepie_menu(items): renpy.choice_for_skipping() # Roll forward roll_forward = renpy.roll_forward_info() choices = {} for label, value in items: pieces = label.split(':', 1) dir, label = pieces[0], pieces[1].strip() if dir not in choices: choices[dir] = (label, value) renpy.ui.window(style=style.menu_window) renpy.ui.grid(3, 3) for dir in ('nw', 'n', 'ne', 'w', 'center', 'e', 'sw', 's', 'se'):

Renpy Cookbook
50
if dir in choices: renpy.ui.textbutton(choices[dir][0], # style=style.menu_choice_button, text_style=style.keylimepie_menu_choice, clicked=renpy.ui.returns(choices[dir][1]), focus=None, default=None, ) else: renpy.ui.text() # TODO: Disabled choices? renpy.ui.close() renpy.shown_window() rv = renpy.ui.interact(mouse='menu', type='menu', roll_forward=roll_forward) renpy.checkpoint(rv) return rv menu = keylimepie_menu
Renpy Cookbook
51
In-game Messages If you want to have an in-game messages system - perhaps email, or a collection of letters, or something like that - then the following code provides a base to work from, or can be used as-is.
To use the system, copy and paste the following into a new .rpy file in your game directory:
init python: # Message Styles style.messageWindow = Style(style.window) style.messageColumns = Style(style.hbox) style.messageListBox = Style(style.vbox) style.messageListViewport = Style(style.viewport) style.messageButton = Style(style.button) style.messageButtonText = Style(style.button_text) style.messageScrollBar = Style(style.vscrollbar) style.messageBodyScrollBar = Style(style.vscrollbar) style.messageBodyBox = Style(style.vbox) style.messageBodyViewport = Style(style.viewport) style.messageText = Style(style.say_dialogue) style.messageControls = Style(style.hbox) # Default style values... style.messageWindow.ymaximum = 600 style.messageColumns.spacing = 10 style.messageListViewport.xminimum = 280 style.messageListViewport.xmaximum = 280 style.messageListBox.yalign = 0.0 style.messageButton["Message"].xfill = True style.messageButton["CurrentMessage"].xfill = True style.messageButtonText["Message"].color="#99A" style.messageButtonText["CurrentMessage"].color="#FFF" style.messageBodyViewport.xminimum = 460 style.messageBodyViewport.xmaximum = 460 style.messageBodyViewport.ymaximum = 550 style.messageBodyScrollBar.ymaximum=550 style.messageControls.spacing = 10 def init_messages():

Renpy Cookbook
52
if hasattr(store, "messages") == False: store.messages = [] def add_message(subject, sender, message, condition=None): init_messages() store.messages.append( (subject, sender, message, condition) ) def show_messages(): message = None while message != -1: message = show_message_ui(message) def show_message_ui(currentMessage): init_messages() messageCount = count_messages() ui.window(style=style.messageWindow) ui.hbox(style=style.messageColumns) # For the three columns of controls vp = ui.viewport(style=style.messageListViewport) ui.window(style=style.messageListBox) ui.vbox() # For the mail list index = 0 for message in store.messages: if (message[3] == None or eval(message[3]) == True): styleIndex = "Message" if (index == currentMessage): styleIndex = "CurrentMessage" ui.button(clicked=ui.returns(index), style=style.messageButton[styleIndex]) ui.text(message[0] + " - " + message[1], style=style.messageButtonText[styleIndex]) index = index + 1 ui.close() # mail list vbox ui.bar(adjustment=vp.yadjustment, style=style.messageScrollBar) ui.window(style=style.messageBodyBox) ui.vbox() # For the right-hand stuff; message and buttons ui.hbox() vp2 = ui.viewport(style=style.messageBodyViewport) if (currentMessage >= 0) and (currentMessage < messageCount): hasMessage = True ui.text(store.messages[currentMessage][2], style=style.messageText) else: hasMessage = False ui.null() ui.bar(adjustment=vp2.yadjustment, style=style.messageBodyScrollBar) ui.close()

Renpy Cookbook
53
ui.hbox(style=style.messageControls) # For the buttons ui.button(clicked=ui.returns(-1), style=style.messageButton["Close Messages"]) ui.text("Close Messages", style = style.messageButtonText["Close Messages"]) if hasMessage: ui.button(clicked=ui.returns(-2), style=style.messageButton["Delete Message"]) t = ui.text("Delete Message", style = style.messageButtonText["Delete Message"]) ui.close() # buttons hbox ui.close() # right-hand column vbox ui.close() # columns hbox result = ui.interact() if result == -2: #(delete current message) del store.messages[currentMessage] return None else: return result def count_messages(): init_messages() return len(store.messages) def count_visible_messages(): init_messages() count = 0 for message in store.messages: if (message[3] == None or eval(message[3]) == True): count = count + 1 return count
Example Usage
init: $ e = Character('Eileen', color="#c8ffc8") # The game starts here. label start: e "Welcome to messages! Right now you don't have any messages." $ show_messages() e "See?" $ add_message("Welcome to messages", "Message System", "Now you have your first message!")

Renpy Cookbook
54
e "Now we've added a message for you." $ show_messages() e "Next, we'll add a few more..." $ add_message("My Holiday Photos", "Bob", "Drone drone drone drone drone drone drone " + "drone drone drone drone drone drone drone drone drone drone drone drone drone drone " + "drone drone drone drone drone drone drone drone drone drone drone drone drone drone " + "drone drone drone drone drone drone drone drone drone drone drone drone drone drone " + "drone drone drone drone drone drone drone drone drone drone drone drone drone drone " + "drone drone drone drone drone drone drone drone drone drone drone drone drone drone " + "drone drone drone drone drone drone drone drone drone drone drone drone drone drone " + "drone drone drone drone drone drone drone drone drone drone drone drone drone drone " + "drone drone drone drone drone drone drone drone drone drone drone drone drone drone " + "drone drone drone drone drone drone drone drone drone drone drone drone drone drone " + "drone drone drone drone drone drone drone drone drone drone drone drone drone drone...") $ add_message("Where are you?", "Simon", "You've not been on FaceSpace for years! I mean," " like, {i}ten minutes{/i}, dude! Where are you?!") $ add_message("Buy Stuff", "Mississippi", "Did you know that people who bought books in the"+ " past also bought books? How about you buy some books?\n"+ "Here are some books you might like:\n- {i}To Murder A Coot{/i}\n"+ "- {i}The Girl with the Pirate Tattoo{/i}\n- {i}9Tail Cat{/i}") $ add_message("Tuesday", "Mum", "Did you remember you were coming to visit on Tuesday?" + " I hope you didn't forget.") $ add_message("Re: Tuesday", "Mum", "You haven't called. Are you still coming?"+ " I'm making pie.") $ add_message("Re: Re: Tuesday", "Mum", "Why don't you let us know whether you're coming?" + " Have you checked your mail? Are you OK? I hope you haven't got into a car crash or" + " something. You see them on the news all the time. Are you really OK?" + " Please, let us know!") $ show_messages() e "Now we'll add some spam..." python: spam_filter = False #spam... for x in range(20): add_message("Billions of dollars!", "Prince Terence of Nigeria", "I am the" + " custodian of the Nigerian Central Bank, and I need a foreign account to" + " place billions of dollars in for a period of two (2) months for no apparent" + " reason. You could earn millions in interest, just mail me your credit card" + " and PIN today!", condition="spam_filter == False") $ show_messages() e "Eep! OK, let's turn the spam filter on..." $ spam_filter = True $ show_messages()

Renpy Cookbook
55
$ message_count = count_messages() $ visible_count = count_visible_messages() e "And after all that, you now have %(message_count)s messages, of which you can see %(visible_count)s."

Renpy Cookbook
56
Chinese and Japanese The procedure for supporting Chinese and Japanese changed in Ren'Py 6.3.2, please ensure you use this version.
There are two steps you need to perform to get Ren'Py to support Chinese or Japanese language text:
1) You need to save as UTF-8 unicode. SciTE should do this by default when you save a script, but you need to be aware of this.
2) You need to download a free Chinese or Japanese font, place it in the game directory, and then tell Ren'Py to use it. You'll also want to set the language to "eastasian". For example, if your font is mikachan.ttf, then you would write:
Code:
init: $ style.default.font = "mikachan.ttf" $ style.default.language = "eastasian"
You'll want a font you can distribute with the game.
If you do all both of these steps, then Ren'Py should support Chinese and Japanese text.
Oh, since Ren'Py handles all text rendering itself, it shouldn't matter if your Windows isn't Chinese or Japanese. (The one issue being that renpy.input() is not supported for non-English languages, and especially not for ones that require input method support.)

Renpy Cookbook
57
Multiple Language Support This recipe will explain how to add multiple language support to a Ren'Py game. This support allows fonts and menu translations to be changed to support the language the user selects. We will also give two strategies for translating the text of the game.
Selecting a Default Language
The following code will specify a default language for the game. A default language is necessary so that Ren'Py can start up, and begin displaying the language chooser.
init -3 python: if persistent.lang is None: persistent.lang = "english" lang = persistent.lang
This code will set the default language to "english". It also stores the current language, whatever it's set to, into the lang variable, so that it can be accessed by init code.
Language Chooser
The language chooser allows the user to select a message. It's simply a Ren'Py menu, where each menu option sets persistent.lang to the appropriate value. The code following the menu then causes Ren'Py to restart, re-running init code.
label language_chooser: scene black menu: "{font=DejaVuSans.ttf}English{/font}": $ persistent.lang = "english"
"{font=mikachan.ttf}日本語{/font}": $ persistent.lang = "japanese" $ renpy.utter_restart()
Note that this is just normal Ren'Py code, and so it's possible to change the scene command to display a different image.

Renpy Cookbook
58
As we'll want the user to be able to change the language from the main menu, we add a menu option to config.main_menu.
init python: config.main_menu.insert(3, (u'Language', "language_chooser", "True"))
Finally, we may want to automatically display the language chooser the first time the game starts up. This can be done by conditionally jumping to language_chooser from the splashscreen, using the following code:
label splashscreen: if not persistent.chose_lang: $ persistent.chose_lang = True jump language_chooser return
Language-Dependent Initialization
The lang variable can be used during initialization to change styles, images, configuration variables, and other properties in accordance with the chosen language.
It can be used inside init python blocks:
init python: if lang == "english": style.default.font = "DejaVuSans.ttf" e = Character("Eileen") # ... elif lang == "japanese": style.default.font = "mikachan.ttf" style.default.language = "eastasian" config.translations["Language"] = u"言語を選択" e = Character(u"光") # ...

Renpy Cookbook
59
It can also be used inside init blocks, to redefine images:
init: if lang == "english": image bg city = "city_en.jpg" elif lang == "japanese": image bg city = "city_jp.jpg"
Translating the Script
There are two approaches to translating the script: multi-path translation, and in-line translation. In the former, each language has its own blocks of script, while in the latter, the languages are intermixed.
Multi-Path Translation
The key to multi-path translation is branching based on the language, to a separate set of labels for each language. This branching is best done at the start statement, which might look like:
label start: $ game_lang = lang if lang == "english": jump start_en else: jump start_jp label start_en: "It was a dark and stormy night..." e "But we're inside, so it's okay." # ... label start_jp:
"それは暗い嵐の夜だった..."
e "しかし、我々の中なので、大丈夫だ。" # ...
Note that the multi-path translation lets you use the same characters (in this case, the narrator) in both languages.
A limitation of the multi-path approach is that it cannot load a game saved in a different language. To work around this, we store lang in game_lang when

Renpy Cookbook
60
starting a new game. We then use an after_load hook to check that the languages match, and report an error if they do not.
label after_load: if lang == game_lang: return if lang == "english": "The language of the save file is not the current selected language." elif lang == "japanese":
"ファイルを保存した言語は、現在の選択された言語ではありません。" $ renpy.full_restart()
In-line translation
In-line translation works by defining characters that display text only if a given language is selected.
init python: en = Character(None, condition='lang == "english"') jp = Character(None, condition='lang == "japanese"') en_e = Character("Eileen", condition='lang == "english"')
jp_e = Character(u"光", condition='lang == "japanese"')
The script can then give lines in each language.
label start: en "It was a dark and stormy night..."
jp "それは暗い嵐の夜だった..." en_e "But we're inside, so it's okay." jp_e "しかし、我々の中なので、大丈夫だ。" # ...
The in-line approach supports switching between languages. The downside to this approach is that each line of dialogue must specify both the language and the character.

Renpy Cookbook
61
IME Language Support on Renpy As of Renpy 6.1.0, not only is it impossible to use renpy.input() to enter text that requires an IME (Chinese, Japanese, etc.), it is also impossible to enter characters that appear in Latin-alphabet-based languages like Spanish and French.
Is it still true? I've successfully inputted unicode strings via renpy.input() and then displayed it with simple "%(string)s", no unicode was lost. The only case I can imagine would be on unicode-impaired systems, but even there it should store escape strings like \u017c and so on, for example - that's the case with writing unicode directly to renpy.say() without prefixing the string with u (eg. u"zażółć"). If it does that, displaying it is just a simple matter of .decode('unicode_escape'), no writing to file is ever needed
This procedure works around that limitation by reading a text file editable by users.
First, make a small text file containing the name of your character and nothing else. Make sure that the name is the only line, then save the file as UTF-8 in the game directory (where the script would be.) Mark it clearly so that prospective players can easily find it.
Next, insert this code into the init statement of your script:
$ nameVar = file(config.gamedir + "/Your name.txt").read().decode("utf-8")
Declare the named character like so, placing the name as the variable nameVar:
$ a = Character(nameVar, color="#c8ffc8")
If you need to insert the name into someone's dialogue, use %(nameVar)s to do it.
Also, include simple instructions telling the player how to alter the text file.
Of course, this procedure is not only limited to character names. It can be used to put in any kind of text.

Renpy Cookbook
62
This is a kana converter for Ren'py. There are three files: one for hiragana, one for katakana without dashes, and another for katakana with dashes. The code is open-source, and should be improved wherever possible.
Hiragana Version:
# Ren'Py Kana Converter v1.0 (Hiragana) # Originally programmed by Ivlivs from the Lemmasoft Forums. # # For a long time, renpy.input() was limited to not only Roman # letters, but those used in the English language. Officially, it still is, # but the following code offers a powerful workaround. # # Allowing the input of kanji into Ren'Py through the input is possible # but horrendously impractical as of now, so I did the next best # thing: I made a kana converter, since kana proper nouns are # perfectly legitimate in the Japanese language. # # This code is open-source. Feel free to modify it, so long as you # credit me. # # NOTE: Converters can be made for other left-to-right non-ligature # alphabets, like those used in the Romance, Germanic (excluding English), # Scandinavian, or Slavic languages. init: pass label hiragana: $ brew = renpy.input(u"ローマ字で名前を入力してください。\nEnter your name in romaji.") python: # -*- coding: utf-8 -*- # This is a program that would be able to change a string typed # in Roman letters into a string of kana. # It will later be appended to Ren'Py in order to further internationalize it.
# Double vowels are converted thusly: "aa" ---> "ああ" # Weed out non-alphanumeric characters. l = list(brew) # The same string, converted into a list. n = "" # An empty string to put the newly-converted name. # A list of acceptable characters. accept = ["a", "b", "c", "d", "e", "f", "g", "h", "i", "j", "k", "l", "m", "n", "o", "p", "q", "r", "s", "t", "u", "v", "w", "x", "y", "z", "1", "2", "3", "4", "5", "6", "7", "8", "9", "0", "\'"] for letter in l: # On the first run, letter will be the first character in l. It will equal subsequent characters as the for-loop continues.

Renpy Cookbook
63
if letter.lower() in accept: # The lowercase version of the variable letter is now checked against the list of acceptable characters. n += letter # Put a letter in variable n. brew = n # Replace the contents of s with the contents of n. n = "" # n is erased in case it is needed again. # Here are dictionaries for letters and their corresponding kana. # In the oneLetterHiragana dictionary, numerals are mapped to themselves. # This is so that the parsing code will include it and still convert letters to kana.
oneLetterHiragana = {"a": u"あ", "i": u"い", "u": u"う", "e": u"え", "o": u"お", "1": "1", "2": "2", "3": "3", "4": "4", "5": "5", "6": "6", "7": "7", "8": "8", "9": "9", "0": "0"}
twoLetterHiragana = {"ka": u"か", "ki": u"き", "ku": u"く", "ke": u"け", "ko": u"こ",
"sa": u"さ", "si": u"し", "su": u"す", "se": u"せ", "so": u"そ",
"ta": u"た", "ti": u"ち", "tu": u"つ", "te": u"て", "to": u"と",
"na": u"な", "ni": u"に", "nu": u"ぬ", "ne": u"ね", "no": u"の",
"ha": u"は", "hi": u"ひ", "hu": u"ふ", "he": u"へ", "ho": u"ほ",
"ma": u"ま", "mi": u"み", "mu": u"む", "me": u"め", "mo": u"も",
"ya": u"や", "yi": u"い", "yu": u"ゆ", "ye": u"いぇ", "yo": u"よ",
"ra": u"ら", "ri": u"り", "ru": u"る", "re": u"れ", "ro": u"ろ",
"wa": u"わ", "wi": u"うぃ", "wu": u"う", "we": u"うぇ", "wo": u"うぉ",
"la": u"ら", "li": u"り", "lu": u"る", "le": u"れ", "lo": u"ろ",
"fu": u"ふ",
"ga": u"が", "gi": u"ぎ", "gu": u"ぐ", "ge": u"げ", "go": u"ご",
"za": u"ざ", "zi": u"じ", "zu": u"ず", "ze": u"ぜ", "zo": u"ぞ",
"da": u"だ", "di": u"ぢ", "du": u"づ", "de": u"で", "do": u"ど",
"ba": u"ば", "bi": u"び", "bu": u"ぶ", "be": u"べ", "bo": u"ぼ",
"pa": u"ぱ", "pi": u"ぴ", "pu": u"ぷ", "pe": u"ぺ", "po": u"ぽ",
"ji": u"じ", "ju": u"じゅ", "n\'": u"ん"}
threeLetterHiragana = {"shi": u"し", "chi": u"ち", "dzu": u"づ", "tsu": u"つ",
"kya": u"きゃ", "kyi": u"きぃ", "kyu": u"きゅ", "kye": u"きぇ", "kyo": u"きょ",
"sya": u"しゃ", "syi": u"しぃ", "syu": u"しゅ", "sye": u"しぇ", "syo": u"しょ",
"tya": u"ちゃ", "tyi": u"ちぃ", "tyu": u"ちゅ", "tye": u"ちぇ", "tyo": u"ちょ",
"nya": u"にゃ", "nyi": u"にぃ", "nyu": u"にゅ", "nye": u"にぇ", "nyo": u"にょ",
"hya": u"ひゃ", "hyi": u"ひぃ", "hyu": u"ひゅ", "hye": u"ひぇ", "hyo": u"ひょ",
"mya": u"みゃ", "myi": u"みぃ", "myu": u"みゅ", "mye": u"みぇ", "myo": u"みょ",
"rya": u"りゃ", "ryi": u"りぃ", "ryu": u"りゅ", "rye": u"りぇ", "ryo": u"りょ",
"gya": u"ぎゃ", "gyi": u"ぎぃ", "gyu": u"ぎゅ", "gye": u"ぎぇ", "gyo": u"ぎょ",
"zya": u"じゃ", "zyi": u"じぃ", "zyu": u"じゅ", "zye": u"じぇ", "zyo": u"じょ",
"dya": u"ぢゃ", "dyi": u"ぢぃ", "dyu": u"ぢゅ", "dye": u"ぢぇ", "dyo": u"ぢょ",
"bya": u"びゃ", "byi": u"びぃ", "byu": u"びゅ", "bye": u"びぇ", "byo": u"びょ",
"pya": u"ぴゃ", "pyi": u"ぴぃ", "pyu": u"ぴゅ", "pye": u"ぴぇ", "pyo": u"ぴょ",
"sha": u"しゃ", "shu": u"しゅ", "she": u"しぇ", "sho": u"しょ",
"cha": u"ちゃ", "chu": u"ちゅ", "che": u"ちぇ", "cho": u"ちょ",
"nka": u"んか", "nki": u"んき", "nku": u"んく", "nke": u"んけ", "nko": u"んこ",
"nsa": u"んさ", "nsi": u"んし", "nsu": u"んす", "nse": u"んせ", "nso": u"んそ",
"nta": u"んた", "nti": u"んち", "ntu": u"んつ", "nte": u"んて", "nto": u"んと",
"nna": u"んな", "nni": u"んに", "nnu": u"んぬ", "nne": u"んね", "nno": u"んの",
"nha": u"んは", "nhi": u"んひ", "nhu": u"んふ", "nhe": u"んへ", "nho": u"んほ",
"nma": u"んま", "nmi": u"んみ", "nmu": u"んむ", "nme": u"んめ", "nmo": u"んも",
"nra": u"んら", "nri": u"んり", "nru": u"んる", "nre": u"んれ", "nro": u"んろ",

Renpy Cookbook
64
"nwa": u"んわ", "nwi": u"んうぃ", "nwu": u"んう", "nwe": u"んうぇ", "nwo": u"んうぉ",
"nga": u"んが", "ngi": u"んぎ", "ngu": u"んぐ", "nge": u"んげ", "ngo": u"んご",
"nza": u"んざ", "nzi": u"んじ", "nzu": u"んず", "nze": u"んぜ", "nzo": u"んぞ",
"nda": u"んだ", "ndi": u"んぢ", "ndu": u"んづ", "nde": u"んで", "ndo": u"んど",
"nba": u"んば", "nbi": u"んび", "nbu": u"んぶ", "nbe": u"んべ", "nbo": u"んぼ",
"mba": u"んば", "mbi": u"んび", "mbu": u"んぶ", "mbe": u"んべ", "mbo": u"んぼ",
"npa": u"んぱ", "npi": u"んぴ", "npu": u"んぷ", "npe": u"んぺ", "npo": u"んぽ",
"mpa": u"んぱ", "mpi": u"んぴ", "mpu": u"んぷ", "mpe": u"んぺ", "mpo": u"んぽ",
"kka": u"っか", "kki": u"っき", "kku": u"っく", "kke": u"っけ", "kko": u"っこ",
"ssa": u"っさ", "ssi": u"っし", "ssu": u"っす", "sse": u"っせ", "sso": u"っそ",
"tta": u"った", "tti": u"っち", "ttu": u"っつ", "tte": u"って", "tto": u"っと",
"hha": u"っは", "hhi": u"っひ", "hhu": u"っふ", "hhe": u"っへ", "hho": u"っほ",
"mma": u"んま", "mmi": u"んみ", "mmu": u"んむ", "mme": u"んめ", "mmo": u"んも",
"rra": u"っら", "rri": u"っり", "rru": u"っる", "rre": u"っれ", "rro": u"っろ",
"wwa": u"っわ", "wwi": u"っうぃ", "wwu": u"っう", "wwe": u"っうぇ", "wwo": u"っうぉ",
"nja": u"んじゃ", "nji": u"んじ", "nju": u"んじゅ", "nje": u"んじぇ", "njo": u"んじょ",
"jja": u"っじゃ", "jji": u"っじ", "jju": u"っじゅ", "jje": u"っじぇ", "jjo": u"っじょ"} fourLetterHiragana = {"nshi": u"んし", "nchi": u"んち", "ndzu": u"んづ",
"nkya": u"んきゃ", "nkyi": u"んきぃ", "nkyu": u"んきゅ", "nkye": u"んきぇ", "nkyo": u"んきょ",
"nsya": u"んしゃ", "nsyi": u"んしぃ", "nsyu": u"んしゅ", "nsye": u"んしぇ", "nsyo": u"んしょ",
"ntya": u"んちゃ", "ntyi": u"んちぃ", "ntyu": u"んちゅ", "ntye": u"んちぇ", "ntyo": u"んちょ",
"nnya": u"んにゃ", "nnyi": u"んにぃ", "nnyu": u"んにゅ", "nnye": u"んにぇ", "nnyo": u"んにょ",
"nhya": u"んひゃ", "nhyi": u"んひぃ", "nhyu": u"んひゅ", "nhye": u"んひぇ", "nhyo": u"んひょ",
"nmya": u"んみゃ", "nmyi": u"んみぃ", "nmyu": u"んみゅ", "nmye": u"んみぇ", "nmyo": u"んみょ",
"nrya": u"んりゃ", "nryi": u"んりぃ", "nryu": u"んりゅ", "nrye": u"んりぇ", "nryo": u"んりょ",
"ngya": u"んぎゃ", "ngyi": u"んぎぃ", "ngyu": u"んぎゅ", "ngye": u"んぎぇ", "ngyo": u"んぎょ",
"nzya": u"んじゃ", "nzyi": u"んじぃ", "nzyu": u"んじゅ", "nzye": u"んじぇ", "nzyo": u"んじょ",
"ndya": u"んぢゃ", "ndyi": u"んぢぃ", "ndyu": u"んぢゅ", "ndye": u"んぢぇ", "ndyo": u"んぢょ",
"nbya": u"んびゃ", "nbyi": u"んびぃ", "nbyu": u"んびゅ", "nbye": u"んびぇ", "nbyo": u"んびょ",
"npya": u"んぴゃ", "npyi": u"んぴぃ", "npyu": u"んぴゅ", "npye": u"んぴぇ", "npyo": u"んぴょ",
"nsha": u"んしゃ", "nshu": u"んしゅ", "nshe": u"んしぇ", "nsho": u"んしょ",
"ncha": u"んちゃ", "nchu": u"んちゅ", "nche": u"んちぇ", "ncho": u"んちょ",
"sshi": u"っし", "cchi": u"っち", "ddzu": u"っづ",
"kkya": u"っきゃ", "kkyi": u"っきぃ", "kkyu": u"っきゅ", "kkye": u"っきぇ", "kkyo": u"っきょ",
"ssya": u"っしゃ", "ssyi": u"っしぃ", "ssyu": u"っしゅ", "ssye": u"っしぇ", "ssyo": u"っしょ",
"ttya": u"っちゃ", "ttyi": u"っちぃ", "ttyu": u"っちゅ", "ttye": u"っちぇ", "ttyo": u"っちょ",
"hhya": u"っひゃ", "hhyi": u"っひぃ", "hhyu": u"っひゅ", "hhye": u"っひぇ", "hhyo": u"っひょ",
"mmya": u"んみゃ", "mmyi": u"んみぃ", "mmyu": u"んみゅ", "mmye": u"んみぇ", "mmyo": u"んみょ",
"rrya": u"っりゃ", "rryi": u"っりぃ", "rryu": u"っりゅ", "rrye": u"っりぇ", "rryo": u"っりょ",
"ggya": u"っぎゃ", "ggyi": u"っぎぃ", "ggyu": u"っぎゅ", "ggye": u"っぎぇ", "ggyo": u"っぎょ",
"zzya": u"っじゃ", "zzyi": u"っじぃ", "zzyu": u"っじゅ", "zzye": u"っじぇ", "zzyo": u"っじょ",
"ddya": u"っぢゃ", "ddyi": u"っぢぃ", "ddyu": u"っぢゅ", "ddye": u"っぢぇ", "ddyo": u"っぢょ",
"bbya": u"っびゃ", "bbyi": u"っびぃ", "bbyu": u"っびゅ", "bbye": u"っびぇ", "bbyo": u"っびょ",
"ppya": u"っぴゃ", "ppyi": u"っぴぃ", "ppyu": u"っぴゅ", "ppye": u"っぴぇ", "ppyo": u"っぴょ",
"ssha": u"っしゃ", "sshu": u"っしゅ", "sshe": u"っしぇ", "ssho": u"っしょ",
"ccha": u"っちゃ", "cchu": u"っちゅ", "cche": u"っちぇ", "ccho": u"っちょ"} while brew != "": # The parsing will continue until the string is empty. if brew[:1].lower() in oneLetterHiragana: # Check the letter against the one-letter dictionary. n += oneLetterHiragana[brew[:1].lower()] # Add the corresponding kana to n. brew = brew[1:] # Remove the letters from s. elif brew.lower() == "n": # This parses "n" when it is by itself.

Renpy Cookbook
65
n += u"ん" brew = brew[1:] elif brew[:2].lower() in twoLetterHiragana: # Check the letters against the two-letter dictionary. n += twoLetterHiragana[brew[:2].lower()] # Add the corresponding kana to n. brew = brew[2:] # Remove the letters from brew. elif brew[:3].lower() in threeLetterHiragana: # Check the letters against the three-letter dictionary. n += threeLetterHiragana[brew[:3].lower()] # Add the corresponding kana to n. brew = brew[3:] # Remove the letters from brew. elif brew[:4].lower() in fourLetterHiragana: # Check the letters against the four-letter dictionary. n += fourLetterHiragana[brew[:4].lower()] # Add the corresponding kana to n. brew = brew[4:] # Remove the letters from brew. else: # Simply use the unconvertable string as-is. n += brew[:4].lower() brew = brew[4:] brew = n # Kick the Python variable back out to Ren'Py so it could be displayed properly. $ whatt = brew return
Katakana Version, no dashes:
# Ren'Py Kana Converter v1.0 (Katakana, no dashes) # Originally programmed by Ivlivs from the Lemmasoft Forums. # # For a long time, renpy.input() was limited to not only Roman # letters, but those used in the English language. Officially, it still is, # but the following code offers a powerful workaround. # # Allowing the input of kanji into Ren'Py through the input is possible # but horrendously impractical as of now, so I did the next best # thing: I made a kana converter, since kana proper nouns are # perfectly legitimate in the Japanese language. # # This code is open-source. Feel free to modify it, so long as you # credit me. # # NOTE: Converters can be made for other left-to-right non-ligature # alphabets, like those used in the Romance, Germanic (excluding English), # Scandinavian, or Slavic languages. init: pass label katakana:

Renpy Cookbook
66
$ brew = renpy.input(u"ローマ字で名前を入力してください。\nEnter your name in romaji.") python: # -*- coding: utf-8 -*- # This is a program that would be able to change a string typed # in Roman letters into a string of kana. # It will later be appended to Ren'Py in order to further internationalize it. # Double vowels are converted thusly: "aa" ---> "アア" # Weed out non-alphanumeric characters. l = list(brew) # The same string, converted into a list. n = "" # An empty string to put the newly-converted name. # A list of acceptable characters. accept = ["a", "b", "c", "d", "e", "f", "g", "h", "i", "j", "k", "l", "m", "n", "o", "p", "q", "r", "s", "t", "u", "v", "w", "x", "y", "z", "1", "2", "3", "4", "5", "6", "7", "8", "9", "0", "\'"] for letter in l: # On the first run, letter will be the first character in l. It will equal subsequent characters as the for-loop continues. if letter.lower() in accept: # The lowercase version of the variable letter is now checked against the list of acceptable characters. n += letter # Put a letter in variable n. brew = n # Replace the contents of s with the contents of n. n = "" # n is erased in case it is needed again. # Here are dictionaries for letters and their corresponding kana. # In the oneLetterHiragana dictionary, numerals are mapped to themselves. # This is so that the parsing code will include it and still convert letters to kana. oneLetterKatakana = {"a": u"ア", "i": u"イ", "u": u"ウ", "e": u"エ", "o": u"オ", "1": "1", "2": "2", "3": "3", "4": "4", "5": "5", "6": "6", "7": "7", "8": "8", "9": "9", "0": "0"}
twoLetterKatakana = {"ka": u"カ", "ki": u"キ", "ku": u"ク", "ke": u"ケ", "ko": u"コ",
"sa": u"サ", "si": u"シ", "su": u"ス", "se": u"セ", "so": u"ソ",
"ta": u"タ", "ti": u"チ", "tu": u"ツ", "te": u"テ", "to": u"ト",
"na": u"ナ", "ni": u"ニ", "nu": u"ヌ", "ne": u"ネ", "no": u"ノ",
"ha": u"ハ", "hi": u"ヒ", "hu": u"フ", "he": u"ヘ", "ho": u"ホ",
"ma": u"マ", "mi": u"ミ", "mu": u"ム", "me": u"メ", "mo": u"モ",
"ya": u"や", "yi": u"イー", "yu": u"ユ", "ye": u"イェ", "yo": u"ヨ",
"ra": u"ラ", "ri": u"リ", "ru": u"ル", "re": u"レ", "ro": u"ロ",
"wa": u"わ", "wi": u"ウィ", "wu": u"ウ", "we": u"ウェ", "wo": u"ウォ",
"la": u"ラ", "li": u"リ", "lu": u"ル", "le": u"レ", "lo": u"ロ",
"fu": u"フ",
"ga": u"ガ", "gi": u"ギ", "gu": u"グ", "ge": u"ゲ", "go": u"ゴ",
"za": u"ザ", "zi": u"ジ", "zu": u"ズ", "ze": u"ゼ", "zo": u"ゾ",
"da": u"ダ", "di": u"ヂ", "du": u"ヅ", "de": u"デ", "do": u"ド",

Renpy Cookbook
67
"ba": u"バ", "bi": u"ビ", "bu": u"ブ", "be": u"ベ", "bo": u"ボ",
"pa": u"パ", "pi": u"ピ", "pu": u"プ", "pe": u"ペ", "po": u"ポ",
"ji": u"ジ", "ju": u"ジュ", "n\'": u"ン"}
threeLetterKatakana = {"shi": u"シ", "chi": u"チ", "dzu": u"ヅ", "tsu": "ツ",
"kya": u"キャ", "kyi": u"キィ", "kyu": u"キュ", "kye": u"キェ", "kyo": u"キョ",
"sya": u"シャ", "syi": u"シィ", "syu": u"シュ", "sye": u"シェ", "syo": u"ショ",
"tya": u"チャ", "tyi": u"チィ", "tyu": u"チュ", "tye": u"チェ", "tyo": u"チョ",
"nya": u"ニャ", "nyi": u"ニィ", "nyu": u"ニュ", "nye": u"ニェ", "nyo": u"ニョ",
"hya": u"ヒャ", "hyi": u"ヒィ", "hyu": u"ヒュ", "hye": u"ヒェ", "hyo": u"ヒョ",
"mya": u"ミャ", "myi": u"ミィ", "myu": u"ミュ", "mye": u"ミェ", "myo": u"ミョ",
"rya": u"リャ", "ryi": u"リィ", "ryu": u"リュ", "rye": u"リェ", "ryo": u"リョ",
"gya": u"ギャ", "gyi": u"ギィ", "gyu": u"ギュ", "gye": u"ギェ", "gyo": u"ギョ",
"zya": u"ジャ", "zyi": u"ジィ", "zyu": u"ジュ", "zye": u"ジェ", "zyo": u"ジョ",
"dya": u"ヂャ", "dyi": u"ヂィ", "dyu": u"ヂュ", "dye": u"ヂェ", "dyo": u"ヂョ",
"bya": u"ビャ", "byi": u"ビィ", "byu": u"ビュ", "bye": u"ビェ", "byo": u"ビョ",
"pya": u"ピャ", "pyi": u"ピィ", "pyu": u"ピュ", "pye": u"ピェ", "pyo": u"ピョ",
"sha": u"シャ", "shu": u"シュ", "she": u"シェ", "sho": u"ショ",
"cha": u"チャ", "chu": u"チュ", "che": u"チェ", "cho": u"チョ",
"nka": u"ンカ", "nki": u"ンキ", "nku": u"ンク", "nke": u"ンケ", "nko": u"ンコ",
"nsa": u"ンサ", "nsi": u"ンシ", "nsu": u"ンす", "nse": u"ンセ", "nso": u"ンソ",
"nta": u"ンタ", "nti": u"ンチ", "ntu": u"ンつ", "nte": u"ンて", "nto": u"ンと",
"nna": u"ンナ", "nni": u"ンニ", "nnu": u"ンヌ", "nne": u"ンネ", "nno": u"ンノ",
"nha": u"ンハ", "nhi": u"ンヒ", "nhu": u"ンフ", "nhe": u"ンヘ", "nho": u"ンホ",
"nma": u"ンマ", "nmi": u"ンミ", "nmu": u"ンム", "nme": u"ンメ", "nmo": u"ンモ",
"nra": u"ンラ", "nri": u"ンリ", "nru": u"ンル", "nre": u"ンレ", "nro": u"ンロ",
"nwa": u"ンわ", "nwi": u"ンウィ", "nwu": u"ンウ", "nwe": u"ンウェ", "nwo": u"ンウォ",
"nga": u"ンガ", "ngi": u"ンギ", "ngu": u"ング", "nge": u"ンゲ", "ngo": u"ンゴ",
"nza": u"ンザ", "nzi": u"ンジ", "nzu": u"ンズ", "nze": u"ンゼ", "nzo": u"ンゾ",
"nda": u"ンダ", "ndi": u"ンヂ", "ndu": u"ンヅ", "nde": u"ンデ", "ndo": u"ンド",
"nba": u"ンバ", "nbi": u"ンビ", "nbu": u"ンブ", "nbe": u"ンベ", "nbo": u"ンボ",
"mba": u"ンバ", "mbi": u"ンビ", "mbu": u"ンブ", "mbe": u"ンベ", "mbo": u"ンボ",
"npa": u"ンパ", "npi": u"ンピ", "npu": u"ンプ", "npe": u"ンペ", "npo": u"ンポ",
"mpa": u"ンパ", "mpi": u"ンピ", "mpu": u"ンプ", "mpe": u"ンペ", "mpo": u"ンポ",
"kka": u"ッカ", "kki": u"ッキ", "kku": u"ック", "kke": u"ッケ", "kko": u"ッコ",
"ssa": u"ッサ", "ssi": u"ッシ", "ssu": u"ッす", "sse": u"ッセ", "sso": u"ッソ",
"tta": u"ッタ", "tti": u"ッチ", "ttu": u"ッつ", "tte": u"ッて", "tto": u"ット",
"hha": u"ッハ", "hhi": u"ッヒ", "hhu": u"ッフ", "hhe": u"ッヘ", "hho": u"ッホ",
"mma": u"ンマ", "mmi": u"ンミ", "mmu": u"ンム", "mme": u"ンメ", "mmo": u"ンモ",
"rra": u"ッラ", "rri": u"ッリ", "rru": u"ッル", "rre": u"ッレ", "rro": u"ッロ",
"wwa": u"ッわ", "wwi": u"ッウィ", "wwu": u"ッウ", "wwe": u"ッウェ", "wwo": u"ッウォ",
"nja": u"ンジャ", "nji": u"ンジ", "nju": u"ンジュ", "nje": u"ンジェ", "njo": u"ンジョ",
"jja": u"ッジャ", "jji": u"ッジ", "jju": u"ッジュ", "jje": u"ッジェ", "jjo": u"ッジョ"} fourLetterKatakana = {"nshi": u"ンシ", "nchi": u"ンチ", "ndzu": u"ンヅ",
"nkya": u"ンキャ", "nkyi": u"ンキィ", "nkyu": u"ンキュ", "nkye": u"ンキェ", "nkyo": u"ンキョ",
"nsya": u"ンシャ", "nsyi": u"ンシィ", "nsyu": u"ンシュ", "nsye": u"ンシェ", "nsyo": u"ンショ",
"ntya": u"ンチャ", "ntyi": u"ンチィ", "ntyu": u"ンチュ", "ntye": u"ンチェ", "ntyo": u"ンチョ",
"nnya": u"ンニャ", "nnyi": u"ンニィ", "nnyu": u"ンニュ", "nnye": u"ンニェ", "nnyo": u"ンニョ",
"nhya": u"ンヒャ", "nhyi": u"ンヒィ", "nhyu": u"ンヒュ", "nhye": u"ンヒェ", "nhyo": u"ンヒョ",
"nmya": u"ンミャ", "nmyi": u"ンミィ", "nmyu": u"ンミュ", "nmye": u"ンミェ", "nmyo": u"ンミョ",
"nrya": u"ンリャ", "nryi": u"ンリィ", "nryu": u"ンリュ", "nrye": u"ンリェ", "nryo": u"ンリョ",
"ngya": u"ンギャ", "ngyi": u"ンギィ", "ngyu": u"ンギュ", "ngye": u"ンギェ", "ngyo": u"ンギョ",
"nzya": u"ンジャ", "nzyi": u"ンジィ", "nzyu": u"ンジュ", "nzye": u"ンジェ", "nzyo": u"ンジョ",
"ndya": u"ンヂャ", "ndyi": u"ンヂィ", "ndyu": u"ンヂュ", "ndye": u"ンヂェ", "ndyo": u"ンヂョ",

Renpy Cookbook
68
"nbya": u"ンビャ", "nbyi": u"ンビィ", "nbyu": u"ンビュ", "nbye": u"ンビェ", "nbyo": u"ンビョ",
"npya": u"ンピャ", "npyi": u"ンピィ", "npyu": u"ンピュ", "npye": u"ンピェ", "npyo": u"ンピョ",
"nsha": u"ンシャ", "nshu": u"ンシュ", "nshe": u"ンシェ", "nsho": u"ンショ",
"ncha": u"ンチャ", "nchu": u"ンチュ", "nche": u"ンチェ", "ncho": u"ンチョ",
"sshi": u"ッシ", "cchi": u"ッチ", "ddzu": u"ッヅ",
"kkya": u"ッキャ", "kkyi": u"ッキィ", "kkyu": u"ッキュ", "kkye": u"ッキェ", "kkyo": u"ッキョ",
"ssya": u"ッシャ", "ssyi": u"ッシィ", "ssyu": u"ッシュ", "ssye": u"ッシェ", "ssyo": u"ッショ",
"ttya": u"ッチャ", "ttyi": u"ッチィ", "ttyu": u"ッチュ", "ttye": u"ッチェ", "ttyo": u"ッチョ",
"hhya": u"ッヒャ", "hhyi": u"ッヒィ", "hhyu": u"ッヒュ", "hhye": u"ッヒェ", "hhyo": u"ッヒョ",
"mmya": u"ンミャ", "mmyi": u"ンミィ", "mmyu": u"ンミュ", "mmye": u"ンミェ", "mmyo": u"ンミョ",
"rrya": u"ッリャ", "rryi": u"ッリィ", "rryu": u"ッリュ", "rrye": u"ッリェ", "rryo": u"ッリョ",
"ggya": u"ッギャ", "ggyi": u"ッギィ", "ggyu": u"ッギュ", "ggye": u"ッギェ", "ggyo": u"ッギョ",
"zzya": u"ッジャ", "zzyi": u"ッジィ", "zzyu": u"ッジュ", "zzye": u"ッジェ", "zzyo": u"ッジョ",
"ddya": u"ッヂャ", "ddyi": u"ッヂィ", "ddyu": u"ッヂュ", "ddye": u"ッヂェ", "ddyo": u"ッヂョ",
"bbya": u"ッビャ", "bbyi": u"ッビィ", "bbyu": u"ッビュ", "bbye": u"ッビェ", "bbyo": u"ッビョ",
"ppya": u"ッピャ", "ppyi": u"ッピィ", "ppyu": u"ッピュ", "ppye": u"ッピェ", "ppyo": u"ッピョ",
"ssha": u"ッシャ", "sshu": u"ッシュ", "sshe": u"ッシェ", "ssho": u"ッショ",
"ccha": u"ッチャ", "cchu": u"ッチュ", "cche": u"ッチェ", "ccho": u"ッチョ"} while brew != "": # The parsing will continue until the string is empty. if brew[:1].lower() in oneLetterKatakana: # Check the letter against the one-letter dictionary. n += oneLetterKatakana[brew[:1].lower()] # Add the corresponding kana to n. brew = brew[1:] # Remove the letters from s. elif brew.lower() == "n": # This parses "n" when it is by itself.
n += u"ン" brew = brew[1:] elif brew[:2].lower() in twoLetterKatakana: # Check the letters against the two-letter dictionary. n += twoLetterKatakana[brew[:2].lower()] # Add the corresponding kana to n. brew = brew[2:] # Remove the letters from brew. elif brew[:3].lower() in threeLetterKatakana: # Check the letters against the three-letter dictionary. n += threeLetterKatakana[brew[:3].lower()] # Add the corresponding kana to n. brew = brew[3:] # Remove the letters from brew. elif brew[:4].lower() in fourLetterKatakana: # Check the letters against the four-letter dictionary. n += fourLetterKatakana[brew[:4].lower()] # Add the corresponding kana to n. brew = brew[4:] # Remove the letters from brew. else: # Simply use the unconvertable string as-is. n += brew[:4].lower() brew = brew[4:] brew = n # Kick the Python variable back out to Ren'Py so it could be displayed properly. $ whatt = brew return

Renpy Cookbook
69
Katakana Version (dashes):
# Ren'Py Kana Converter v1.0 (Katakana, dashes) # Originally programmed by Ivlivs from the Lemmasoft Forums. # # For a long time, renpy.input() was limited to not only Roman # letters, but those used in the English language. Officially, it still is, # but the following code offers a powerful workaround. # # Allowing the input of kanji into Ren'Py through the input is possible # but horrendously impractical as of now, so I did the next best # thing: I made a kana converter, since kana proper nouns are # perfectly legitimate in the Japanese language. # # This code is open-source. Feel free to modify it, so long as you # credit me. # # NOTE: Converters can be made for other left-to-right non-ligature # alphabets, like those used in the Romance, Germanic (excluding English), # Scandinavian, or Slavic languages. init: pass label dashkata:
$ brew = renpy.input(u"ローマ字で名前を入力してください。\nEnter your name in romaji.") python: # -*- coding: utf-8 -*- # This is a program that would be able to change a string typed # in Roman letters into a string of kana. # It will later be appended to Ren'Py in order to further internationalize it.
# Double vowels are converted thusly: "aa" ---> "アー" # Weed out non-alphanumeric characters. l = list(brew) # The same string, converted into a list. n = "" # An empty string to put the newly-converted name. # A list of acceptable characters. accept = ["a", "b", "c", "d", "e", "f", "g", "h", "i", "j", "k", "l", "m", "n", "o", "p", "q", "r", "s", "t", "u", "v", "w", "x", "y", "z", "1", "2", "3", "4", "5", "6", "7", "8", "9", "0", "\'"] for letter in l: # On the first run, letter will be the first character in l. It will equal subsequent characters as the for-loop continues. if letter.lower() in accept: # The lowercase version of the variable letter is now checked against the list of acceptable characters. n += letter # Put a letter in variable n. brew = n # Replace the contents of s with the contents of n.

Renpy Cookbook
70
n = "" # n is erased in case it is needed again. # Here are dictionaries for letters and their corresponding kana. # In the oneLetterHiragana dictionary, numerals are mapped to themselves. # This is so that the parsing code will include it and still convert letters to kana. oneLetterKatakana = {"a": u"ア", "i": u"イ", "u": u"ウ", "e": u"エ", "o": u"オ", "1": "1", "2": "2", "3": "3", "4": "4", "5": "5", "6": "6", "7": "7", "8": "8", "9": "9", "0": "0"}
twoLetterKatakana = {"ka": u"カ", "ki": u"キ", "ku": u"ク", "ke": u"ケ", "ko": u"コ",
"sa": u"サ", "si": u"シ", "su": u"ス", "se": u"セ", "so": u"ソ",
"ta": u"タ", "ti": u"チ", "tu": u"ツ", "te": u"テ", "to": u"ト",
"na": u"ナ", "ni": u"ニ", "nu": u"ヌ", "ne": u"ネ", "no": u"ノ",
"ha": u"ハ", "hi": u"ヒ", "hu": u"フ", "he": u"ヘ", "ho": u"ホ",
"ma": u"マ", "mi": u"ミ", "mu": u"ム", "me": u"メ", "mo": u"モ",
"ya": u"や", "yi": u"イー", "yu": u"ユ", "ye": u"イェ", "yo": u"ヨ",
"ra": u"ラ", "ri": u"リ", "ru": u"ル", "re": u"レ", "ro": u"ロ",
"wa": u"わ", "wi": u"ウィ", "wu": u"ウ", "we": u"ウェ", "wo": u"ウォ",
"la": u"ラ", "li": u"リ", "lu": u"ル", "le": u"レ", "lo": u"ロ",
"fu": u"フ",
"ga": u"ガ", "gi": u"ギ", "gu": u"グ", "ge": u"ゲ", "go": u"ゴ",
"za": u"ザ", "zi": u"ジ", "zu": u"ズ", "ze": u"ゼ", "zo": u"ゾ",
"da": u"ダ", "di": u"ヂ", "du": u"ヅ", "de": u"デ", "do": u"ド",
"ba": u"バ", "bi": u"ビ", "bu": u"ブ", "be": u"ベ", "bo": u"ボ",
"pa": u"パ", "pi": u"ピ", "pu": u"プ", "pe": u"ペ", "po": u"ポ",
"ji": u"ジ", "ju": u"ジュ", "n\'": u"ン"}
threeLetterKatakana = {"shi": u"シ", "chi": u"チ", "dzu": u"ヅ", "tsu": "ツ",
"kya": u"キャ", "kyi": u"キィ", "kyu": u"キュ", "kye": u"キェ", "kyo": u"キョ",
"sya": u"シャ", "syi": u"シィ", "syu": u"シュ", "sye": u"シェ", "syo": u"ショ",
"tya": u"チャ", "tyi": u"チィ", "tyu": u"チュ", "tye": u"チェ", "tyo": u"チョ",
"nya": u"ニャ", "nyi": u"ニィ", "nyu": u"ニュ", "nye": u"ニェ", "nyo": u"ニョ",
"hya": u"ヒャ", "hyi": u"ヒィ", "hyu": u"ヒュ", "hye": u"ヒェ", "hyo": u"ヒョ",
"mya": u"ミャ", "myi": u"ミィ", "myu": u"ミュ", "mye": u"ミェ", "myo": u"ミョ",
"rya": u"リャ", "ryi": u"リィ", "ryu": u"リュ", "rye": u"リェ", "ryo": u"リョ",
"gya": u"ギャ", "gyi": u"ギィ", "gyu": u"ギュ", "gye": u"ギェ", "gyo": u"ギョ",
"zya": u"ジャ", "zyi": u"ジィ", "zyu": u"ジュ", "zye": u"ジェ", "zyo": u"ジョ",
"dya": u"ヂャ", "dyi": u"ヂィ", "dyu": u"ヂュ", "dye": u"ヂェ", "dyo": u"ヂョ",
"bya": u"ビャ", "byi": u"ビィ", "byu": u"ビュ", "bye": u"ビェ", "byo": u"ビョ",
"pya": u"ピャ", "pyi": u"ピィ", "pyu": u"ピュ", "pye": u"ピェ", "pyo": u"ピョ",
"sha": u"シャ", "shu": u"シュ", "she": u"シェ", "sho": u"ショ",
"cha": u"チャ", "chu": u"チュ", "che": u"チェ", "cho": u"チョ",
"nka": u"ンカ", "nki": u"ンキ", "nku": u"ンク", "nke": u"ンケ", "nko": u"ンコ",
"nsa": u"ンサ", "nsi": u"ンシ", "nsu": u"ンす", "nse": u"ンセ", "nso": u"ンソ",
"nta": u"ンタ", "nti": u"ンチ", "ntu": u"ンつ", "nte": u"ンて", "nto": u"ンと",
"nna": u"ンナ", "nni": u"ンニ", "nnu": u"ンヌ", "nne": u"ンネ", "nno": u"ンノ",
"nha": u"ンハ", "nhi": u"ンヒ", "nhu": u"ンフ", "nhe": u"ンヘ", "nho": u"ンホ",
"nma": u"ンマ", "nmi": u"ンミ", "nmu": u"ンム", "nme": u"ンメ", "nmo": u"ンモ",
"nra": u"ンラ", "nri": u"ンリ", "nru": u"ンル", "nre": u"ンレ", "nro": u"ンロ",
"nwa": u"ンわ", "nwi": u"ンウィ", "nwu": u"ンウ", "nwe": u"ンウェ", "nwo": u"ンウォ",
"nga": u"ンガ", "ngi": u"ンギ", "ngu": u"ング", "nge": u"ンゲ", "ngo": u"ンゴ",
"nza": u"ンザ", "nzi": u"ンジ", "nzu": u"ンズ", "nze": u"ンゼ", "nzo": u"ンゾ",
"nda": u"ンダ", "ndi": u"ンヂ", "ndu": u"ンヅ", "nde": u"ンデ", "ndo": u"ンド",

Renpy Cookbook
71
"nba": u"ンバ", "nbi": u"ンビ", "nbu": u"ンブ", "nbe": u"ンベ", "nbo": u"ンボ",
"mba": u"ンバ", "mbi": u"ンビ", "mbu": u"ンブ", "mbe": u"ンベ", "mbo": u"ンボ",
"npa": u"ンパ", "npi": u"ンピ", "npu": u"ンプ", "npe": u"ンペ", "npo": u"ンポ",
"mpa": u"ンパ", "mpi": u"ンピ", "mpu": u"ンプ", "mpe": u"ンペ", "mpo": u"ンポ",
"kka": u"ッカ", "kki": u"ッキ", "kku": u"ック", "kke": u"ッケ", "kko": u"ッコ",
"ssa": u"ッサ", "ssi": u"ッシ", "ssu": u"ッす", "sse": u"ッセ", "sso": u"ッソ",
"tta": u"ッタ", "tti": u"ッチ", "ttu": u"ッつ", "tte": u"ッて", "tto": u"ット",
"hha": u"ッハ", "hhi": u"ッヒ", "hhu": u"ッフ", "hhe": u"ッヘ", "hho": u"ッホ",
"mma": u"ンマ", "mmi": u"ンミ", "mmu": u"ンム", "mme": u"ンメ", "mmo": u"ンモ",
"rra": u"ッラ", "rri": u"ッリ", "rru": u"ッル", "rre": u"ッレ", "rro": u"ッロ",
"wwa": u"ッわ", "wwi": u"ッウィ", "wwu": u"ッウ", "wwe": u"ッウェ", "wwo": u"ッウォ",
"nja": u"ンジャ", "nji": u"ンジ", "nju": u"ンジュ", "nje": u"ンジェ", "njo": u"ンジョ",
"jja": u"ッジャ", "jji": u"ッジ", "jju": u"ッジュ", "jje": u"ッジェ", "jjo": u"ッジョ"}
fourLetterKatakana = {"nshi": u"ンシ", "nchi": u"ンチ", "ndzu": u"ンヅ",
"nkya": u"ンキャ", "nkyi": u"ンキィ", "nkyu": u"ンキュ", "nkye": u"ンキェ", "nkyo": u"ンキョ",
"nsya": u"ンシャ", "nsyi": u"ンシィ", "nsyu": u"ンシュ", "nsye": u"ンシェ", "nsyo": u"ンショ",
"ntya": u"ンチャ", "ntyi": u"ンチィ", "ntyu": u"ンチュ", "ntye": u"ンチェ", "ntyo": u"ンチョ",
"nnya": u"ンニャ", "nnyi": u"ンニィ", "nnyu": u"ンニュ", "nnye": u"ンニェ", "nnyo": u"ンニョ",
"nhya": u"ンヒャ", "nhyi": u"ンヒィ", "nhyu": u"ンヒュ", "nhye": u"ンヒェ", "nhyo": u"ンヒョ",
"nmya": u"ンミャ", "nmyi": u"ンミィ", "nmyu": u"ンミュ", "nmye": u"ンミェ", "nmyo": u"ンミョ",
"nrya": u"ンリャ", "nryi": u"ンリィ", "nryu": u"ンリュ", "nrye": u"ンリェ", "nryo": u"ンリョ",
"ngya": u"ンギャ", "ngyi": u"ンギィ", "ngyu": u"ンギュ", "ngye": u"ンギェ", "ngyo": u"ンギョ",
"nzya": u"ンジャ", "nzyi": u"ンジィ", "nzyu": u"ンジュ", "nzye": u"ンジェ", "nzyo": u"ンジョ",
"ndya": u"ンヂャ", "ndyi": u"ンヂィ", "ndyu": u"ンヂュ", "ndye": u"ンヂェ", "ndyo": u"ンヂョ",
"nbya": u"ンビャ", "nbyi": u"ンビィ", "nbyu": u"ンビュ", "nbye": u"ンビェ", "nbyo": u"ンビョ",
"npya": u"ンピャ", "npyi": u"ンピィ", "npyu": u"ンピュ", "npye": u"ンピェ", "npyo": u"ンピョ",
"nsha": u"ンシャ", "nshu": u"ンシュ", "nshe": u"ンシェ", "nsho": u"ンショ",
"ncha": u"ンチャ", "nchu": u"ンチュ", "nche": u"ンチェ", "ncho": u"ンチョ",
"sshi": u"ッシ", "cchi": u"ッチ", "ddzu": u"ッヅ",
"kkya": u"ッキャ", "kkyi": u"ッキィ", "kkyu": u"ッキュ", "kkye": u"ッキェ", "kkyo": u"ッキョ",
"ssya": u"ッシャ", "ssyi": u"ッシィ", "ssyu": u"ッシュ", "ssye": u"ッシェ", "ssyo": u"ッショ",
"ttya": u"ッチャ", "ttyi": u"ッチィ", "ttyu": u"ッチュ", "ttye": u"ッチェ", "ttyo": u"ッチョ",
"hhya": u"ッヒャ", "hhyi": u"ッヒィ", "hhyu": u"ッヒュ", "hhye": u"ッヒェ", "hhyo": u"ッヒョ",
"mmya": u"ンミャ", "mmyi": u"ンミィ", "mmyu": u"ンミュ", "mmye": u"ンミェ", "mmyo": u"ンミョ",
"rrya": u"ッリャ", "rryi": u"ッリィ", "rryu": u"ッリュ", "rrye": u"ッリェ", "rryo": u"ッリョ",
"ggya": u"ッギャ", "ggyi": u"ッギィ", "ggyu": u"ッギュ", "ggye": u"ッギェ", "ggyo": u"ッギョ",
"zzya": u"ッジャ", "zzyi": u"ッジィ", "zzyu": u"ッジュ", "zzye": u"ッジェ", "zzyo": u"ッジョ",
"ddya": u"ッヂャ", "ddyi": u"ッヂィ", "ddyu": u"ッヂュ", "ddye": u"ッヂェ", "ddyo": u"ッヂョ",
"bbya": u"ッビャ", "bbyi": u"ッビィ", "bbyu": u"ッビュ", "bbye": u"ッビェ", "bbyo": u"ッビョ",
"ppya": u"ッピャ", "ppyi": u"ッピィ", "ppyu": u"ッピュ", "ppye": u"ッピェ", "ppyo": u"ッピョ",
"ssha": u"ッシャ", "sshu": u"ッシュ", "sshe": u"ッシェ", "ssho": u"ッショ",
"ccha": u"ッチャ", "cchu": u"ッチュ", "cche": u"ッチェ", "ccho": u"ッチョ"} while brew != "": # The parsing will continue until the string is empty. if brew[:1].lower() in oneLetterKatakana: # Check the letter against the one-letter dictionary. n += oneLetterKatakana[brew[:1].lower()] # Add the corresponding kana to n. brew = brew[1:] # Remove the letters from s. elif brew.lower() == "n": # This parses "n" when it is by itself. n += u"ン" brew = brew[1:] elif brew[:2].lower() in twoLetterKatakana: # Check the letters against the two-letter dictionary.

Renpy Cookbook
72
if brew[2:3].lower() == brew[1:2].lower(): # This uses the dash to demarcate double vowels. brew = brew[:2] + brew[3:]
n += twoLetterKatakana[brew[:2].lower()] + u"ー" brew = brew[2:] # Remove the letters from s. else: n += twoLetterKatakana[brew[:2].lower()] # Add the corresponding kana to n. brew = brew[2:] # Remove the letters from s. elif brew[:3].lower() in threeLetterKatakana: # Check the letters against the three-letter dictionary. if brew[3:4].lower() == brew[2:3].lower(): # This uses the dash to demarcate double vowels. brew = brew[:3] + brew[4:]
n += threeLetterKatakana[brew[:3].lower()] + u"ー" brew = brew[3:] # Remove the letters from s. else: n += threeLetterKatakana[brew[:3].lower()] # Add the corresponding kana to n. brew = brew[3:] # Remove the letters from s. elif brew[:4].lower() in fourLetterKatakana: # Check the letters against the four-letter dictionary. if brew[4:5].lower() == brew[3:4].lower(): # This uses the dash to demarcate double vowels. brew = brew[:4] + brew[5:]
n += fourLetterKatakana[brew[:4].lower()] + u"ー" brew = brew[4:] # Remove the letters from s. else: n += fourLetterKatakana[brew[:4].lower()] # Add the corresponding kana to n. brew = brew[4:] # Remove the letters from s. else: # Simply use the unconvertable string as-is. n += brew[:4].lower() brew = brew[4:] brew = n # Kick the Python variable back out to Ren'Py so it could be displayed properly. $ whatt = brew return

Renpy Cookbook
73
Hangul (Korean Alphabet) Inputter This code is for Korean Ren'Py users.
renpy.input doesn't support 'Hangul' inputting(6.11.0), so if you want to put and use 'Hangul' in Ren'py, you probably should use this code.
Before using it in your script, Notice that
a) It implements Dubeolsik keyboard, b) and it can't get any number or sign or even alphabet characters. c) For inputting convenience, I removed some shortcut keys : 's' (screenshot), 'f' (fullscreen toggle), 'm' (music toggle), 'h' (hide window), so you might have to append different keys to use these functions.
How To Use
1. Download this Hangul_inputter.rpy file and put it in your project\game directory.
2. And then you will be able to use this function.
Function: hangulInput (prompt = 'What's your name?', default = , limit = 5):
Return two values. First one is the word inputted by user, and the other is 1 or 0, indicating if the last word has final consonant or not.
prompt - A prompt that is used to ask the user for the text.
default - A default for the text that this input can return.
limit - A limit to amount of text that this function will return.
Styles
The following styles are to customize hangul inputter's appearence.
style.hi_frame (inherits from style.frame)
The style of frame that is applied to inputter's frame.

Renpy Cookbook
74
style.hi_label (inherits from style.label)
The style of label(the text placed at topmost in inputter).
style.hi_text (inherits from style.text)
The style applied to inputted text.
Example
init python: style.hi_frame.background = '#114faa70' style.hi_frame.xalign = .5 style.hi_frame.yalign = .5 style.hi_frame.xminimum = 250 label start:
$ name, final = hangulInput('이름을 입력해주세요', '코왈스키', limit = 5) if final:
'%(name)s아 %(final)s' else:
'%(name)s야 %(final)s'
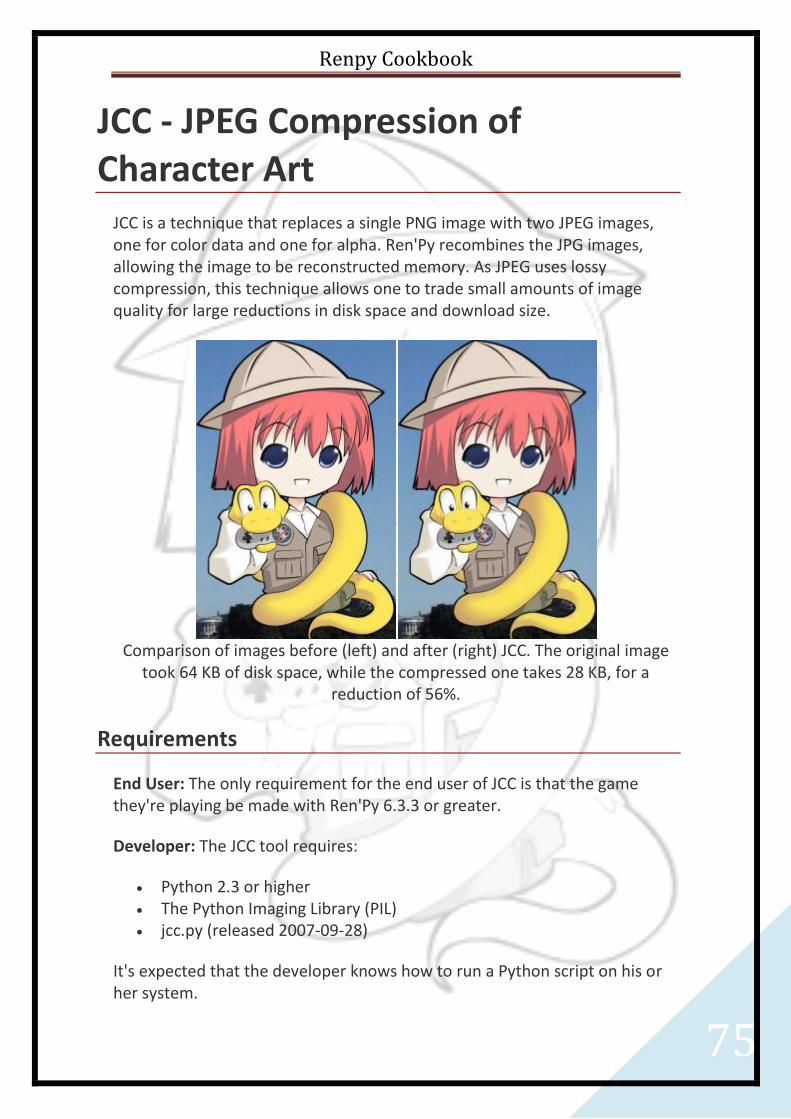
Renpy Cookbook
75
JCC - JPEG Compression of Character Art
JCC is a technique that replaces a single PNG image with two JPEG images, one for color data and one for alpha. Ren'Py recombines the JPG images, allowing the image to be reconstructed memory. As JPEG uses lossy compression, this technique allows one to trade small amounts of image quality for large reductions in disk space and download size.
Comparison of images before (left) and after (right) JCC. The original image
took 64 KB of disk space, while the compressed one takes 28 KB, for a reduction of 56%.
Requirements
End User: The only requirement for the end user of JCC is that the game they're playing be made with Ren'Py 6.3.3 or greater.
Developer: The JCC tool requires:
Python 2.3 or higher The Python Imaging Library (PIL) jcc.py (released 2007-09-28)
It's expected that the developer knows how to run a Python script on his or her system.

Renpy Cookbook
76
Running JCC
To convert the images used in your game to use JCC, place the jcc.py script in the game directory of your project, and run it. This will do two things:
All PNG files with filenames like filename.png underneath the game directory will be moved to filename.png.bak, and will have filename.png.base.jpg and filename.png.mask.jpg created to store the JPEG-compressed data.
A script file, jcc.rpy, is added to the game directory. This file contains code that causes Ren'Py to use the compressed files.
Note that this will compress all PNG files in the game directory, losing some quality in the process. There are some files that you may not want compressed, such as the frame of the text window, or SFonts. You should restore these png files from the backups, and delete the corresponding jpg files.

Renpy Cookbook
77
Building a Windows Installer using NSIS
To build a Windows installer using NSIS, please perform the following steps:
1. Download the latest version of NSIS from its web site, and install it. 2. Create README.txt and LICENSE.txt files for your game, and place
them in your game's base directory. (The directory containing the game/ directory.)
3. Build the distributions using the Ren'Py Launcher, and then unzip the windows distribution.
4. Download installer.nsi, and place it in the unzipped windows directory. (The directory containing yourgame.exe.
5. Edit installer.nsi, changing values as appropriate. You'll certainly want to change the EXE, INSTALLER_EXE, PRODUCT_NAME, PRODUCT_VERSION, PRODUCT_WEBSITE, and PRODUCT_PUBLISHER lines.
6. Right-click on installer.nsi, and pick "Compile NSIS Script". 7. NSIS will run, and assuming there are no errors, produce the installer.
Be sure to test it before releasing.

Renpy Cookbook
78
Music Room This is the code for a sample music room. It displays a list of buttons corresponding to music tracks. If a given track has been heard by the user before, a button is displayed with the tracks name. When the button is clicked, the track is played. Otherwise, a disabled button with "???" as the label is shown.
The important things to customize here are the scene statement (which controls the background used) and the various music_button calls.
init python: def set_playing_(track): store.playing = track return True set_playing = renpy.curry(set_playing_) # Call this with a button name and a track to define a music # button. def music_button(name, track): if store.playing == track: role = "selected_" else: role = "" if not renpy.seen_audio(track): name = "???" clicked = None else: clicked = set_playing(track) ui.textbutton( name, clicked=clicked, role=role, size_group="music") # Add to the main menu. config.main_menu.insert(3, ("Music Room", "music_room", "True")) label music_room: scene black python: _game_menu_screen = None

Renpy Cookbook
79
# The default track of music. playing = "11-Yesterday.ogg" label music_room_loop: # Play the playing music, if it changed. python: renpy.music.play(playing, if_changed=True, fadeout=1) # Display the various music buttons. ui.vbox(xalign=0.5, ypos=100) music_button("Yesterday", "11-Yesterday.ogg") music_button("Yellow Submarine", "15-Yellow_Submarine.ogg") music_button("Hey Jude", "21-Hey_Jude.ogg") ui.close() # This is how we return to the main menu. ui.textbutton( "Return", clicked=ui.returns(False), xalign=0.5, ypos=450, size_group="music") if ui.interact(): jump music_room_loop else: return

Renpy Cookbook
80
New CG Gallery This is a rewritten CG gallery, supporting more sophisticated forms of unlocking. To use it, download new_gallery.rpy, and add it to your game directory. You'll then need to create a Gallery object, and call the show() method on it, after configuring the gallery and adding buttons. This is often done inside a single label, which can be added to config.main_menu.
This requires 6.6.0 or later (not in compat-mode) to run.
Example
init: # Position the navigation on the right side of the screen. $ style.gallery_nav_frame.xpos = 800 - 10 $ style.gallery_nav_frame.xanchor = 1.0 $ style.gallery_nav_frame.ypos = 12 # Add the gallery to the main menu. $ config.main_menu.insert(2, ('Gallery', "gallery", "True")) # The entry point to the gallery code. label gallery: python hide: # Construct a new gallery object. g = Gallery() # The image used for locked buttons. g.locked_button = "gallery_locked.png" # The background of a locked image. g.locked_background = "gallery_lockedbg.jpg" # Frames added over unlocked buttons, in hover and idle states. g.hover_border = "gallery_hover.png" g.idle_border = "gallery_idle.png" # An images used as the background of the various gallery pages. g.background = "gallery_background.jpg" # Lay out the gallery images on the screen. # These settings lay images out 3 across and 4 down. # The upper left corner of the gird is at xpos 10, ypos 20. # They expect button images to be 155x112 in size. g.grid_layout((3, 4), (10, 12), (160, 124)) # Show the background page. g.page("Backgrounds") # Our first button is a picture of the beach.

Renpy Cookbook
81
g.button("thumb_beach.jpg") # # These show images, if they have been unlocked. The image name must # have been defined using an image statement. g.unlock_image("bg beach daytime") g.unlock_image("bg beach nighttime") # # This shows a displayable... g.display("beach_sketch.jpg") # ... if all prior images have been show. g.allprior() # A second set of images. g.button("thumb_lighthouse.jpg") g.unlock_image("bg lighthouse day") g.unlock_image("bg lighthouse night") g.display("lighthouse_sketch.jpg") g.allprior() # We can use g.page to introduce a second page. g.page("Characters") g.button("thumb_eileen.jpg") # # Note that we can give image and unlock image more than one image # at a time. g.unlock_image("bg lighthouse day", "eileen day happy") g.unlock_image("bg lighthouse day", "eileen day mad") # Another page, this one for concept art. g.page("Concept Art") g.button("thumb_concepts.jpg") # # We can apply conditions to buttons as well as to images. # The "condition" condition checks an arbitrary expression. g.condition("persistent.beat_game") # g.display("concept1.jpg") g.display("concept2.jpg") g.display("concept3.jpg") # Now, show the gallery. g.show() return

Renpy Cookbook
82
Documentation
Function: Gallery ():
Creates a new gallery object.
Method: Gallery.page (name, background=None):
Creates a new page, and adds it to the gallery. Buttons will be added to this page.
name - The name of the page.
background - If not None, a displayable giving the background of this page. If None, the background is taken from the background field of the gallery object.
Method: Gallery.button (idle, hover=None, locked=None, **properties):
Creates a button, adding it to the current page. Images and conditions will be added to this button. The button is unlocked if all conditions added to it are true, and at least one image associated with it is unlocked.
idle - A displayable that is used when this button is not focused.
hover - A displayable that is used when this button is focused.
If hover is specified, it is used. Otherwise, the idle picture is displayed, and the idle_border and hover_border are used to create a button on top of that image.
locked - A displayable which is displayed when this button is locked. If not specified, the displayable given by the locked_button field of the gallery object is used.
Additional keyword arguments are expected to be properties that are used to position the button. These take precedence over properties produced by the layout function of the gallery object.
Method: Gallery.image (*images):
This adds an image to be displayed by the gallery. It takes as an arguments one or more strings, giving image names to be displayed. (These image names should have been defined using the Ren'Py image statement.)

Renpy Cookbook
83
Conditions are added to this image. The image is unlocked if all all conditions are satisfied.
Method: Gallery.display (displayable):
This adds an image to be displayed by the gallery. It takes as an argument a displayable, which will be shown to the user.
Conditions are added to this image. The image is unlocked if all all conditions are satisfied.
Method: Gallery.show (page=0):
Shows the gallery to the user.
page the 0-based page number to show to the user. (So 0 is the first page, 1 is the second, and so on.)
Conditions
Conditions can be assigned to buttons or images in the gallery. Conditions are added to the last button or image defined. A button is unlocked if all of its conditions are satisfied and at least one of its images is unlocked. An image is unlocked if all of its conditions are satisfied.
Method: Gallery.unlock (*images):
This takes as its arguments one or more image names. It is satisfied if all named images have been shown to the user.
Method: Gallery.condition (expr):
This takes as an argument a python expression, as a string. The condition is satisfied if that expression evaluates to true.
Method: Gallery.allprior ():
Satisified if all prior images associated with the current button have been unlocked. This should only be used with images, not buttons.

Renpy Cookbook
84
Convenience
Method: Gallery.unlock_image (*images):
Equivalent to calling image and unlock with the same arguments. This defines an image that is shown only if all of the named images given as argumenst have been seen by the user.
Customization
Customization can be performed by setting fields on the gallery object.
layout - A function that takes two arguments, a 0-based button number and the number of buttons on the current page. It's expected to return a dictionary giving the placement properties for the numbered button.
The default layout function returns an empty dictionary, requiring buttons to be placed by hand.
Method: Gallery.grid_layout (gridsize, upperleft, offsets):
When called, replaces layout with a function that arranges buttons in a grid.
gridsize - A (columns, rows) pair, giving the number of columns and rows in the grid.
upperleft - A (x, y) pair, where x and y are the positions of the upper-left corder of the grid.
offsets - A (xoffset, yoffset) pair, where xoffset is the distance between (the upper-left corner of) buttons in the same row, and yoffset is the distance between buttons in the same column.
navigation - A function that is called with three arguments: The name of the current page, the 0-based number of the current page, and the total number of pages. This function should add ui elements to the screen that cause ui.interact to return either ("page", page_num), where page_num is the page that the user should next see, or ("return", 0), to cause Gallery.show to return.
The default navigation shows a frame containing buttons for each page, and one "Return" button.
locked_button - A displayable that is shown when a button is locked.

Renpy Cookbook
85
locked_image - A function that is called with two arguments: A 0-based image number, and the number of images in the current button. It is responsible for indicating to the user that the current image is locked. It should not cause an interaction to occur.
The default locked_image shows locked_background to the user, along with the words "Image number of number in page is locked.", where number is the 1-based number of the image.
locked_background - Used by the default locked_image, a background image that is displayed by a locked image.
idle_border - A displayable that is shown by an unfocused button when no hover parameter is given for that button.
hover_border - A displayable that is shown by a focused button when no hover parameter is given for that button.
transition - A transition that is used when showing gallery pages and gallery images.
Styles
The following styles are used by the default navigation function.
style.gallery_nav_frame (inherits from style.frame) The style of the frame holding the gallery navigation. Use this to customize the look of the frame, and also to move the frame around on the screen.
style.gallery_nav_vbox (inherits from style.vbox) The style of the vbox holding the gallery navigation functions.
style.gallery_nav_button (inherits from style.button) The style of a gallery navigation button.
style.gallery_nav_button_text (inherits from style.button_text) The style of the text of a gallery navigation button.

Renpy Cookbook
86
Good Looking Italics If you plan to do a lot of work in italics, such as having the narrator's voice be in italics by default, you'll want to use an oblique font.
First, you'll want to download DejaVuSans-Oblique.ttf and put it in your project's game directory. (On most platforms, you can get to this directory by clicking the "Game Directory" button in the Ren'Py Launcher.)
Then, you need to add the following line to an init block:
$ config.font_replacement_map["DejaVuSans.ttf", False, True] = ("DejaVuSans-Oblique.ttf", False, False)
For example:
init: $ config.font_replacement_map["DejaVuSans.ttf", False, True] = ("DejaVuSans-Oblique.ttf", False, False)
This modified the config.font_replacement_map to use the uploaded font in place of the regular font when doing (non-bold) italics.
The supplied font is of course not the only font you can use. Any true type font which you can legally distribute, you can use in a Ren'Py game.

Renpy Cookbook
87
Money and Inventory Systems in Action
So, you want to add a system that keeps track of money in the game so that the character can shop or earn coins, do you? This kind of thing would probably be pretty useful in a game using the DSE (Dating Sim Engine offered in Frameworks.
Here are two possible solutions for you.
You can just copy and paste the code if you want and modify it to your purposes, but I encourage going through it to gain a deeper understanding of object-oriented programming.
This is a beginner example and is probably the kind of thing you're going to want to use if you're only doing this once or twice. It also introduces some of the concepts that we're going to expand upon.
Example 1 source code $ coins = 0 $ items = [] "Today you made 10 coins! Good job!" $ coins += 10 "You have %(coins)d coins remaining. What would you like to buy?" menu: "Spaghetti": $ coins -= 3 $ items.append("spaghetti") "Olives": $ coins -= 4 $ items.append("olives") "Chocolate": $ coins -= 11 $ items.append("chocolate") if "chocolate" in items: "You have a bar of chocolate! Yummy!"

Renpy Cookbook
88
Walkthrough of Example 1 (beginner)
init: pass label start: $ coins = 0
You can keep track of money... let's call it coins... with a variable. The $ (cash sign) means that we're using a python statement outside on an "init python:" block.
We're going to initially set this value to 0. The "label start:" tells Ren'Py where to begin at.
I'm leaving init blank for now.
$ items = []
Here's something new. We're declaring the variable "items" as an empty set, usually defined by brackets such as "[" and "]". Since it's empty, there's nothing-inbetween yet.
"Today you made 10 coins! Good job!" $ coins += 10
We've added a string that lets the player know what's happening. By using the += operator, we can add coins. We're adding 10 coins to zero.
"You have %(coins)d coins remaining. What would you like to buy?"
%(coins)d is what we say if we want to put the number of coins into a string or dialogue of printed text. "%(coins)d" is a dynamic string that will insert the value of that variable, whether it's text or a number.
If my money was instead measured in "pennies", then I would use "%(pennies)d". The variable name goes inside the parentheses.
menu:
This kind of label lets Ren'Py know to offer the user a set of choices, which we will then define. Indentation is important. For menu labels, it is four spaces over.

Renpy Cookbook
89
"Spaghetti": $ coins -= 3
By using the -= operator, you can subtract coins, just like before when we gave the player 10 coins by adding it to zero.
$ items.append("spaghetti")
If you have a list named "items", you can add things to the list by saying items.append("thing"). It's a python statement so we also use a $ sign.
"Olives": $ coins -= 4 $ items.append("olives") "Chocolate": $ coins -= 11 $ items.append("chocolate")
Then we just put the rest of what we know into practice by making the rest of the menu options.
if "chocolate" in items: "You have a bar of chocolate! Yummy!"
The question statement if "object" in "list" tells you whether or not the list contains that object. When we append "chocolate" to "items" then the brackets look like this to Ren'Py: ["chocolate"]
If the player buys everything, it would look like this:
["chocolate", "olives", "spaghetti"]
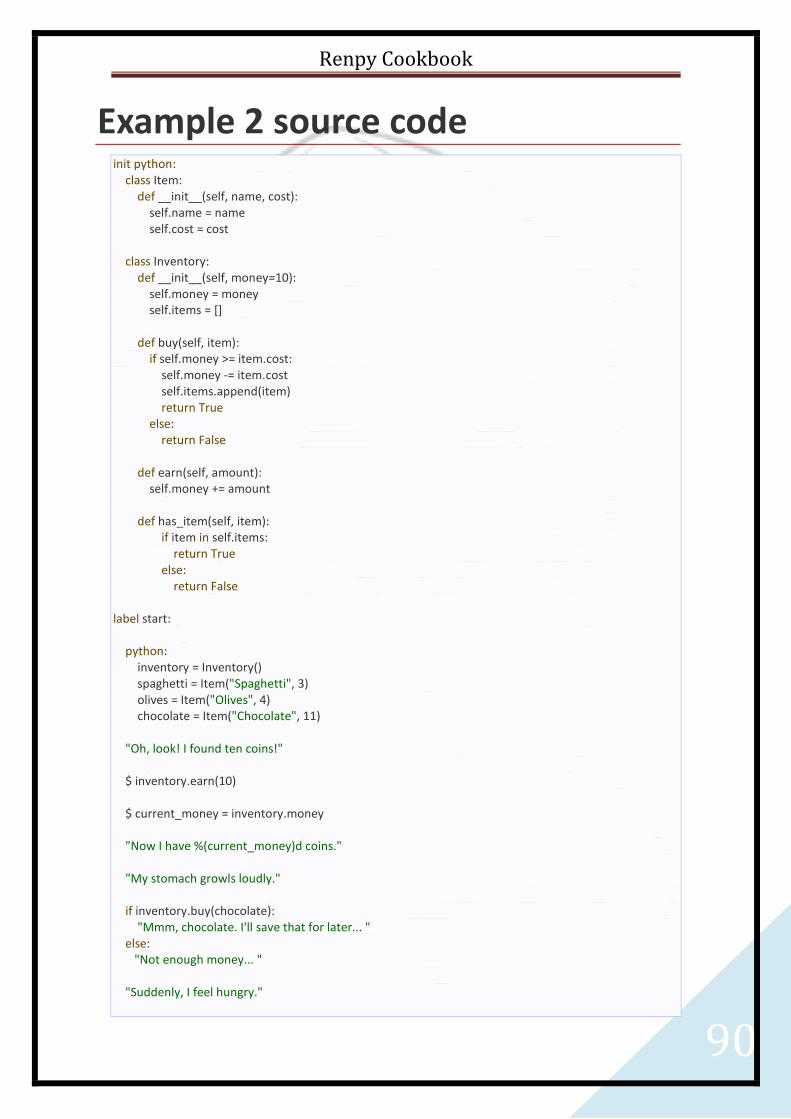
Renpy Cookbook
90
Example 2 source code init python: class Item: def __init__(self, name, cost): self.name = name self.cost = cost class Inventory: def __init__(self, money=10): self.money = money self.items = [] def buy(self, item): if self.money >= item.cost: self.money -= item.cost self.items.append(item) return True else: return False def earn(self, amount): self.money += amount def has_item(self, item): if item in self.items: return True else: return False label start: python: inventory = Inventory() spaghetti = Item("Spaghetti", 3) olives = Item("Olives", 4) chocolate = Item("Chocolate", 11) "Oh, look! I found ten coins!" $ inventory.earn(10) $ current_money = inventory.money "Now I have %(current_money)d coins." "My stomach growls loudly." if inventory.buy(chocolate): "Mmm, chocolate. I'll save that for later... " else: "Not enough money... " "Suddenly, I feel hungry."

Renpy Cookbook
91
jump preshop jump shop2 if inventory.has_item(chocolate): "Good thing I bought that chocolate earlier." else: "If only I had some chocolate..." label preshop: $ spaghetticost = spaghetti.cost $ olivescost = olives.cost $ chocolatecost = chocolate.cost label shop2: menu shop: "I go into the store." "Buy spaghetti for %(spaghetticost)d coins.": if inventory.buy(spaghetti): "Hey, those are uncooked. I can't eat those yet!" jump game_continues "Buy olives for %(olivescost)d coins.": if inventory.buy(olives): "I hate olives." "And they cost more than the spaghetti." "But at least I don't have to cook them... " jump game_continues "Buy chocolate for %(chocolatecost)d coins.": if inventory.buy(chocolate): "Mmmm, dark semi-sweet chocolate! My favorite!" jump game_continues "Buy nothing.": jump game_continues label fallthrough: "Not enough money..." jump shop2 label game_continues: "And so I left the store."

Renpy Cookbook
92
Walkthrough of Example 2 (advanced)
Here's an advanced solution using the long-term goal of classes of objects to reduce the amount of work needed over the entire project. I hope you're ready to put it all into practice.
You can actually read more about classes here: [in Python]
init python:
This statement lets Ren'Py know to run this at the start ("init") and that it's python code ("python:") so none of these statements need a cash sign $ to prefix them.
It's a little different from the above method.
class Item:
Here, we declare a class of objects, which is like a group.
def __init__(self, name, cost):
We define some properties for it at initialization: name and cost.
self.name = name self.cost = cost
"self" refers back to the original class ("Item") and the period is a break in the hierarchy. "name" comes directly after that, so name is a property of "Item". The same thing is true of "cost".
class Inventory:
We declare another class called "Inventory".
def __init__(self, money=10):
The "Inventory" (self) is defined as having "10" money at initialization again. In other words, the variable container "money" is set as equal to the number "10."

Renpy Cookbook
93
This can be freely changed, of course. Just remember where it is, maybe leave a comment for yourself.
self.money = money
As before, we're declaring that the property "money" of the "self" (class Inventory) is contained within a global variable called "money".
self.items = []
This is an empty set called "items" which can be filled, just like before—but now it's contained with the class called Inventory as an embedded property of that group.
def buy(self, item): if self.money >= item.cost:
We define another function: "buy" with the property of "item."
If the money contained with the "Inventory" is less than the "cost" variable contained within the "Item" class then we...
You may also notice the period between self and money. That tells Ren'Py the location of money in the hierarchy.
The >= syntax is identical to the += and -= we were using before, except that this time we're using it only to evaluate the container within the variable and not change it.
self.money -= item.cost
We subtract the amount of the cost away from the "Inventory" money. In effect, the player has lost money.
self.items.append(item)
We put the "Item" into the "Inventory".
Just like in the beginner's code, we're adding the "item" into the empty set.
return True
The player bought the item.
else: return False

Renpy Cookbook
94
The player didn't buy the item.
def earn(self, amount):
We're making another definition now, for the earning of money.
The variable in operation here is the "amount" in question.
self.money += amount
Again, "self" still refers to class "Inventory". So what is earned is added from "amount" into "money."
def has_item(self, item):
This is a definition that checks to see if the item is in the inventory or not.
if item in self.items: return True else: return False
This one is pretty self-explanatory and works like checking about adding an item into the "items" container.
Was that a little confusing?
Let's see it in action.
label start:
This tells Ren'Py where to begin, just like last time.
python:
You can declare a python block even from a "start" label.
inventory = Inventory()
The variable "inventory" is declared to be the same as the "Inventory" class, which is followed by (). Again, no $ sign is necessary.
spaghetti = Item("Spaghetti", 3)

Renpy Cookbook
95
Spaghetti is declared to be of class "Item."
Notice that it's taking the arguments "name" and "cost" just like we declared before?
It costs 3 "money".
olives = Item("Olives", 4) chocolate = Item("Chocolate", 11)
We then apply that same kind of code to two other objects. Olives cost more than spaghetti and chocolate is obviously a luxury few can afford...
"Oh, look! I found ten coins!" $ inventory.earn(10)
We state that 10 "money" is earned and sent to the inventory, after it goes to amount.
$ current_money = inventory.money
This is a hack to make the field a global so we can use it as a dynamic string below.
"Now I have %(current_money)d coins." "My stomach growls loudly."
Like in Example 1, this string changes depending on the amount declared for the variable "current_money".
if inventory.buy(chocolate):
If you give the player 11 instead of 10 coins under the class Inventory, he can buy it.
"Mmm, chocolate. I'll save that for later... " else: "Not enough money... " "Suddenly, I feel hungry."
The "else" function just handles what happens if it's not possible to buy it. By the default option, the player can't afford it.
jump preshop jump shop2

Renpy Cookbook
96
A "jump" will go to the label and not return.
See below for these sections.
if inventory.has_item(chocolate):
If the "Item" "chocolate" is contained within the "Inventory" item set... then the statement below is printed:
"Good thing I bought that chocolate earlier." else: "If only I had some chocolate..."
Well, we only had 10 coins, huh?
Let's take a look at those shop labels.
label preshop: $ spaghetticost = spaghetti.cost $ olivescost = olives.cost $ chocolatecost = chocolate.cost
We redefine some of the properties of the items into global variables.
label shop2: menu shop: "I go into the store."
By not including a colon, Ren'Py will display this dialogue at the same time as the menu.
"Buy spaghetti for %(spaghetticost)d coins.": if inventory.buy(spaghetti): "Hey, those are uncooked. I can't eat those yet!" jump game_continues
This is just like we've done before, and here we're using a dynamic string for the cost of the spaghetti: that means you can change it in the future or maybe even lower it.
Then we jump down to the label game_continues which is covered further on below.
"Buy olives for %(olivescost)d coins.": if inventory.buy(olives): "I hate olives." "And they cost more than the spaghetti." "But at least I don't have to cook them... "

Renpy Cookbook
97
jump game_continues "Buy chocolate for %(chocolatecost)d coins.": if inventory.buy(chocolate): "Mmmm, dark semi-sweet chocolate! My favorite!" jump game_continues
More of the same.
"Buy nothing.": jump game_continues
Always remember to give the player a neutral option when shopping. With a user interface, this would probably be a cancel imagebutton.
label fallthrough: "Not enough money..." jump shop2
This is what happens when you can't afford an item.
label game_continues: "And so I left the store."
The player's shopping trip ends here.

Renpy Cookbook
98
Tips menu With this script you are able to create new menu with buttons to jump in different part of game script.
Example
init: # Add the TIPS menu to the main menu. $ config.main_menu.insert(2, ("TIPS", "tips", "True")) python: def tip(text, target, condition): if eval(condition): clicked = ui.jumps(target) else: clicked = None # This shows a textbutton. You can customize it... for example, # the xminimum parameter sets how wide the button will be. ui.textbutton(text, clicked=clicked, xminimum=400) label tips: # Show the tips background. scene bg tips_background # Show the tips menu in the middle of the screen. $ ui.vbox(xalign=0.5, yalign=0.5) # Show each tip, using the tip function. The three arguments are: # - The text of a tip. # - The label that we jump to if the tip is picked. # - A string containing an expression, that determines if the tip is # unlocked. $ tip("Tip #1", "tip1", "persistent.unlock_tip_1") $ tip("Tip #2", "tip2", "persistent.unlock_tip_2") # etc. for as many tips as you want. $ tip("Stop viewing TIPS.", "end_tips", "True") $ ui.close() $ ui.interact() label end_tips: return label tip_1: "Perhaps you should have checked to see if that was a carton of oatmeal, or a carton of rat poison." jump tips label tip_2:

Renpy Cookbook
99
"She's a TRAP!" jump tips
To unlock the first tip in this example, you would write the following in your game script at the point you want the tip to be unlocked:
$ persistent.unlock_tip_1 = True

Renpy Cookbook
100
Unarchiving files from rpa With this script you are able to unarchive files from your rpa (as to give them to players as bonus presents etc...)
Example
init python: def unarchive(original_filename, new_filename): # original_filename is the name the file has when stored in the archive, including any # leading paths. # new_filename is the name the file will have when extracted, relative to the base directory. import os import os.path new_filename = config.basedir + "/" + new_filename dirname = os.path.dirname(new_filename) if not os.path.exists(dirname): os.makedirs(dirname) orig = renpy.file(original_filename) new = file(new_filename, "wb") from shutil import copyfileobj copyfileobj(orig, new) new.close() orig.close() label start: # We have Track01.mp3 in archive and images/photo.png in archive too # This will unarchive Track01.mp3 from archive basedir/extracted path $ unarchive("Track01.mp3", "extracted/Track01.mp3") # This will unarchive photo.png as xxx.png from archive to basedir/extracted path $ unarchive("images/photo.png", "extracted/xxx.png")

Renpy Cookbook
101
Who's that? Changing character names during the game
Quite often the first time a character appears in the game, the player won't know the name of the character, just that they're the "Maid" perhaps, or the "Stranger". Yet later, when the player has learned more about them, we want the game to refer to them differently.
Fortunately it's easy to do, using DynamicCharacter. We just use a placeholder (which Ren Py calls a "variable") and then change the meaning of this placeholder term when we want to.
init: $ millie = DynamicCharacter("maid_name") # we've chosen to call the variable "maid_name", but it doesn't exist yet. label start: # Set "maid_name" to mean something early on in the game. # You don't have to use it right away. $ maid_name = "Maid" # ''now'' the variable "maid_name" exists - it's only created when you set it. millie "I hope you'll be comfortable here." millie "We always do our best to make our guests comfortable." millie "If you need anything, just ask for \"Millie\" - that's me." $ maid_name = "Millie" millie "The bell boy's just bringing your suitcases now."
The first three times that Millie speaks, she'll be identified as the "Maid", but after she's told the player her name, she'll be shown as "Millie".
For this simple example it would be just as easy to use two different Characters and switch between them after Millie has given her name. But imagine in a more complex game where Millie only gives her name if the player decides to tip her. By using DynamicCharacter, you don't have to think about whether the player chose to tip or not, the game will show "Millie" or "Maid" as appropriate.

Renpy Cookbook
102
Conditional Hyperlinks Maybe you want to be able to turn hyperlinks on or off for some reason. Putting this code into a Python init block will show hyperlinks only when persistent.hyperlinks_on is True:
import re expr = re.compile(r'{a=.*?}|{/a}') def remove_hyperlinks(input): global expr if persistent.hyperlinks_on: return input else: return re.sub(expr, "", input) config.say_menu_text_filter = remove_hyperlinks
Of course, by tweaking the regular expression and using naming conventions for hyperlink labels, it's possible to filter only certain hyperlinks while leaving others in. This, for example, will only suppress hyperlinks beginning with "opt_":
expr = re.compile(r'{a=opt_.*?}|{/a}')
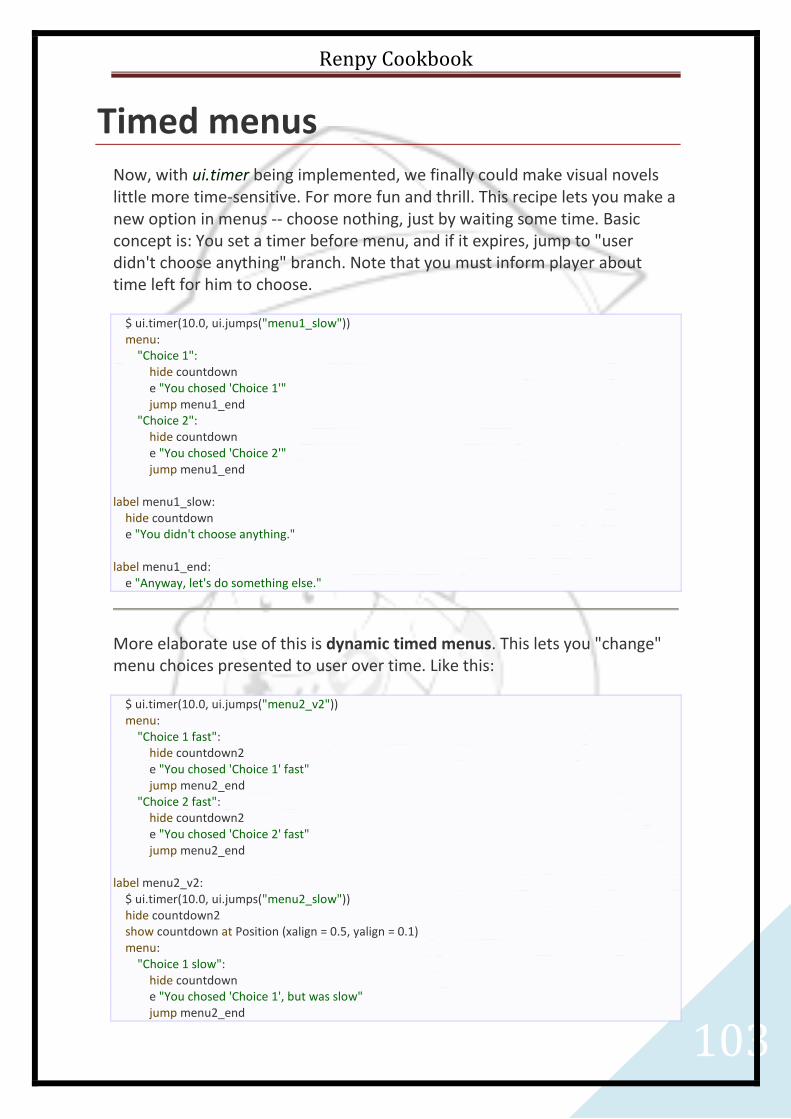
Renpy Cookbook
103
Timed menus Now, with ui.timer being implemented, we finally could make visual novels little more time-sensitive. For more fun and thrill. This recipe lets you make a new option in menus -- choose nothing, just by waiting some time. Basic concept is: You set a timer before menu, and if it expires, jump to "user didn't choose anything" branch. Note that you must inform player about time left for him to choose.
$ ui.timer(10.0, ui.jumps("menu1_slow")) menu: "Choice 1": hide countdown e "You chosed 'Choice 1'" jump menu1_end "Choice 2": hide countdown e "You chosed 'Choice 2'" jump menu1_end label menu1_slow: hide countdown e "You didn't choose anything." label menu1_end: e "Anyway, let's do something else."
More elaborate use of this is dynamic timed menus. This lets you "change" menu choices presented to user over time. Like this:
$ ui.timer(10.0, ui.jumps("menu2_v2")) menu: "Choice 1 fast": hide countdown2 e "You chosed 'Choice 1' fast" jump menu2_end "Choice 2 fast": hide countdown2 e "You chosed 'Choice 2' fast" jump menu2_end label menu2_v2: $ ui.timer(10.0, ui.jumps("menu2_slow")) hide countdown2 show countdown at Position (xalign = 0.5, yalign = 0.1) menu: "Choice 1 slow": hide countdown e "You chosed 'Choice 1', but was slow" jump menu2_end

Renpy Cookbook
104
"Choice 2": hide countdown e "You chosed 'Choice 2', but was slow" jump menu2_end label menu2_slow: hide countdown e "You was really slow and didn't choose anything." label menu2_end: e "Anyway, let's do something else."
And lastly, I admit that whole concept was shamelessly ripped off from the great VN/TRPG series "Sakura Taisen"

Renpy Cookbook
105
UI Widgets
Summary
This code allows using any arbitrary text tag within say and menu statements and, with some extra coding, UI widgets. Due to its nature, you'll need some programming skills to make use of it, since you have to define the behavior for the tags you want to create. Basic knowledge of python should be enough (you don't need to understand the parser's code, but you should be able to understand the examples before trying to define you own tags).
Warning
The code relies on some undocumented parts of Ren'py (the renpy.display.text.text_tags dictionary and the renpy.display.text.text_tokenizer function), which seem to be made with mostly internal usage in mind. This means that these elements might change without warning in later versions of Ren'py, causing this code to stop working. The code was tested on Ren'py 6.6.
The parser
You should include this code as is within your game, either pasting it on an existing script file or creating a new file for it. It defines the function that parses the tags and the variable to hold all the needed information for the custom tags; and tells Ren'py to call this parser function for each menu and say statement.
init python: # This dictionary holds all the custom text tags to be processed. Each element is a tuple in the form # tag_name => (reqs_close, function) where: # tag_name (the dictionary key) is the name for the tag, exactly as it should appear when used (string). # reqs_close is a boolean defining whether the tag requires a matching closing tag or not. # function is the actual function to be called. It will always be called with two positional arguments: # The first argument 'arg' is the argument provided in the form {tag=arg} within the tag, or None if there was no argument. # The second argument 'text' is the text enclosed in the form {tag}text{/tag} by the tag, or None for empty tags. # Note that for non-empty tags that enclose no text (like in "{b}{/b}"), an empty string ("") is passed, rather than None. custom_text_tags = {} # This function is the heart of the module: it takes a string argument and returns that string with all the custom tags
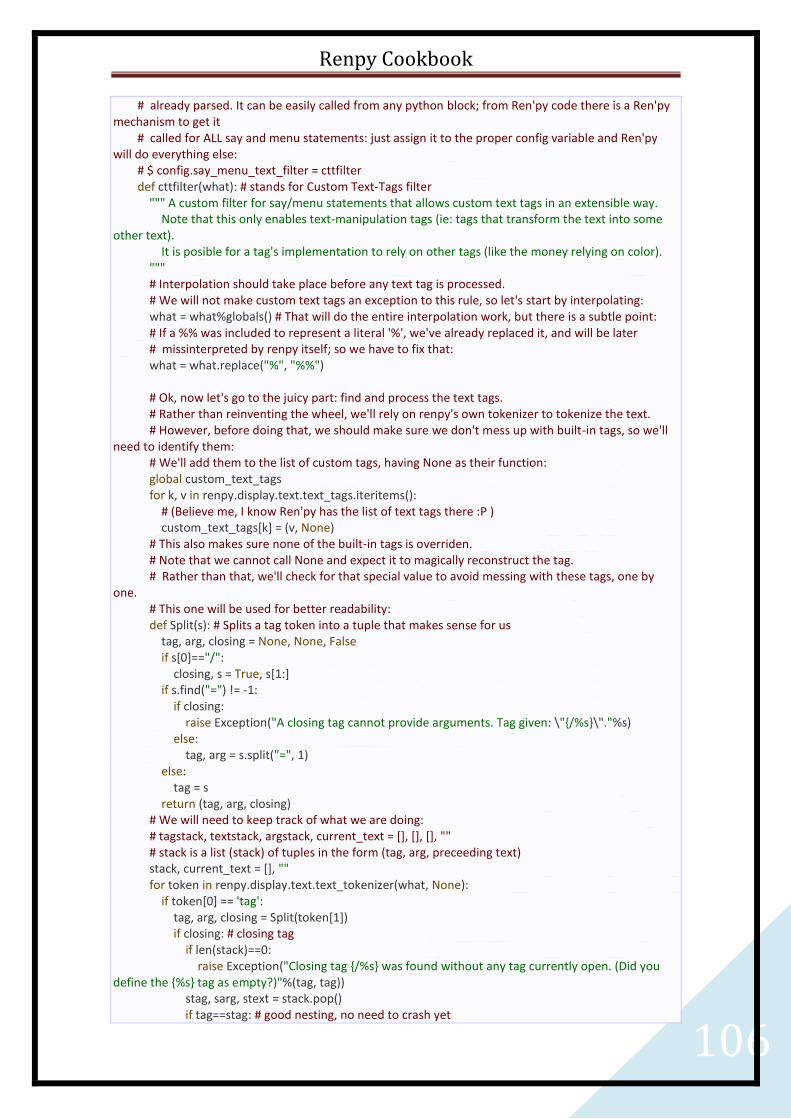
Renpy Cookbook
106
# already parsed. It can be easily called from any python block; from Ren'py code there is a Ren'py mechanism to get it # called for ALL say and menu statements: just assign it to the proper config variable and Ren'py will do everything else: # $ config.say_menu_text_filter = cttfilter def cttfilter(what): # stands for Custom Text-Tags filter """ A custom filter for say/menu statements that allows custom text tags in an extensible way. Note that this only enables text-manipulation tags (ie: tags that transform the text into some other text). It is posible for a tag's implementation to rely on other tags (like the money relying on color). """ # Interpolation should take place before any text tag is processed. # We will not make custom text tags an exception to this rule, so let's start by interpolating: what = what%globals() # That will do the entire interpolation work, but there is a subtle point: # If a %% was included to represent a literal '%', we've already replaced it, and will be later # missinterpreted by renpy itself; so we have to fix that: what = what.replace("%", "%%") # Ok, now let's go to the juicy part: find and process the text tags. # Rather than reinventing the wheel, we'll rely on renpy's own tokenizer to tokenize the text. # However, before doing that, we should make sure we don't mess up with built-in tags, so we'll need to identify them: # We'll add them to the list of custom tags, having None as their function: global custom_text_tags for k, v in renpy.display.text.text_tags.iteritems(): # (Believe me, I know Ren'py has the list of text tags there :P ) custom_text_tags[k] = (v, None) # This also makes sure none of the built-in tags is overriden. # Note that we cannot call None and expect it to magically reconstruct the tag. # Rather than that, we'll check for that special value to avoid messing with these tags, one by one. # This one will be used for better readability: def Split(s): # Splits a tag token into a tuple that makes sense for us tag, arg, closing = None, None, False if s[0]=="/": closing, s = True, s[1:] if s.find("=") != -1: if closing: raise Exception("A closing tag cannot provide arguments. Tag given: \"{/%s}\"."%s) else: tag, arg = s.split("=", 1) else: tag = s return (tag, arg, closing) # We will need to keep track of what we are doing: # tagstack, textstack, argstack, current_text = [], [], [], "" # stack is a list (stack) of tuples in the form (tag, arg, preceeding text) stack, current_text = [], "" for token in renpy.display.text.text_tokenizer(what, None): if token[0] == 'tag': tag, arg, closing = Split(token[1]) if closing: # closing tag if len(stack)==0: raise Exception("Closing tag {/%s} was found without any tag currently open. (Did you define the {%s} tag as empty?)"%(tag, tag)) stag, sarg, stext = stack.pop() if tag==stag: # good nesting, no need to crash yet

Renpy Cookbook
107
if custom_text_tags[tag][1] is None: # built-in tag if sarg is None: # The tag didn't take any argument current_text = "%s{%s}%s{/%s}"%(stext, tag, current_text, tag) # restore and go on else: # the tag had an argument which must be restored as well current_text = "%s{%s=%s}%s{/%s}"%(stext, tag, sarg, current_text, tag) # restore and go on else: # custom tag current_text = "%s%s"%(stext, custom_text_tags[tag][1](sarg, current_text)) # process the tag and go on else: # bad nesting, crash for good raise Exception("Closing tag %s doesn't match currently open tag %s."%(tagdata[0], tagstack[-1])) else: # not closing if tag in custom_text_tags: # the tag exists, good news if custom_text_tags[tag][0]: # the tag requires closing: just stack and it will be handled once closed stack.append((tag, arg, current_text)) current_text = "" else: # empty tag: parse without stacking if custom_text_tags[tag][1] is None: # built-in tag if arg is None: # no argument current_text = "%s{%s}"%(current_text, tag) else: # there is an argument that also must be kept current_text = "%s{%s=%s}"%(current_text, tag, arg) else: # custom tag current_text = "%s%s"%(current_text, custom_text_tags[tag][1](arg, None)) else: # the tag doesn't exist: crash accordingly raise Exception("Unknown text tag \"{%s}\"."%tag) else: # no tag: just accumulate the text current_text+=token[1] return current_text # This line tells Ren'py to replace the text ('what') of each say and menu by the result of calling cttfilter(what) config.say_menu_text_filter = cttfilter
That's all about the parser itself. You don't need to understand how it works to use it.
Defining tags
Custom tags are expected to produce text, optionally relying on argument and/or content values. They cannot just produce arbitrary displayables, but they can rely on built-in tags to achieve formating. Each tag is defined by a function that must:
Accept two positional arguments: the first argument will be the argument given in the tag (like in {tag=argument}), or None if there is no argument; the second argument is the content of the tag, or None for empty tags (non-empty tags used with no content, like in "{b}{/b}" will produce an empty string rather than a None.

Renpy Cookbook
108
Apply any relevant conversions to the arguments, knowing that they will always be pased as strings. For example, if a tag expects a numeric value for the argument, the function should call int() or float() before attempting any arithmetic operation.
Return an output value, which will replace the tag usage in the original text. The return value can include built-in text tags, but not custom ones: they are processed only once, so Ren'py would try to handle them and crash.
Once the function for a tag is defined, the parser must be made aware of it. This is done by including an entry in the custom_text_tags dictionary. The key used must be the text that identifies the tag (for example, for a tag "{myTag}", the key would be "myTag"). The value is a tuple with two fields: the first one is a boolean indicating whether the tag requires a closing tag (like {/myTag}) (True) or not (False); the second field is the name of the function that should be used to process this tag.
Usage example
The following code defines two tags, feeds them to the parser's dictionary, and makes some use of them in a say statement to allow testing them. To test this example, put this code in a .rpy script file and the parser code above into another file, or just paste the parser code followed by the example's code in a single file.
init: image bg black = Solid("#000") # Declare characters used by this game. $ test = Character('The Tester', color="#ffc") python: def tab(arg, text): # This function will handle the custom {tab=something} tag return " " * int(arg) def money(arg, text): total = int(arg) c = total % 100 s = int(total/100) % 100 g = int(total/10000) if g>0: return "%d{color=#fc0}g{/color}%d{color=#999}s{/color}%d{color=#f93}c{/color}"%(g, s, c) elif s>0: return "%d{color=#999}s{/color}%d{color=#f93}c{/color}"%(s, c) else: return "%d{color=#f93}c{/color}"%(c) custom_text_tags["tab"] = (False, tab) # "Registers" the function, pairing it with the "{tab}" tag custom_text_tags["money"] = (False, money) # idem, for the {money} tag

Renpy Cookbook
109
label start: scene bg black $ indent, cash = renpy.random.randint(0, 8), renpy.random.randint(0, 100000000) test "{tab=%(indent)d}(%(indent)d space indentation)\n{tab=4}{b}%(cash)d{color=#f93}c{/color}{/b}={money=%(cash)d}" jump start
The example combines the two custom tags with some built-in tags, and makes heavy use of interpolation, to demonstrate that the parser behaves as should be expected. So much markup and interpolation in a single statement doesn't reflect normal usage.
Compatibility considerations
As mentioned above, forward compatibility with future versions of Ren'py shouldn't be asumed, because the code relies on elements that might change without any warning. In addition, there are some points worth mentioning.
Interpolation
To makes sure that interpolation is handled before (custom) text tag parsing, the parser function simply takes care of the interpolation task itself, before starting the actual parsing task.
There is a catch, however: if the function implementing a tag includes %'s in its return value, these would be treated by Python as introducing interpolation. This might be useful on some cases, but literal %'s should be doubled "%%" if no interpolation is intended.
Escape sequences
Python escape sequences in strings, such as \n or \", are handled by python, so they will be appropriatelly interpreted. Ren'py escape sequences such as escaped spaces (\ ) are replaced before the parser is called; so those sequences introduced by the tag functions will not be replaced.
Space compacting

Renpy Cookbook
110
Ren'py space compacting is done before the parser is called, so space introduced by the tag functions will be kept. This is the reason why the {tab} tag in the example works.
Multiple argument tags
While multiple argument tags are not explicitly supported, they can be easily emulated using python's split() function to break the argument into chunks of separate data.

Renpy Cookbook
111
How to add an "about" item to the main menu
Quite simple, really. Make a new text file, name it about.rpy and put the following text in it. Modify as necessary.
init: # Adding about button to main menu $ config.main_menu.insert(3, ('About', _intra_jumps("about", "main_game_transition"), "True")) # About box label about: python hide: renpy.transition(config.intra_transition) ui.window(style=style.gm_root) ui.frame(ymargin=10, xmargin=10, style=style.menu_frame) ui.side(['t', 'c', 'r', 'b'], spacing=2) # Here you put the title of your VN layout.label("My visual novel", None) vp = ui.viewport(mousewheel=True) # This is where the text will go. You can use all the usual tags. ui.text("This is my first visual novel, be gentle, thank you.. :)") ui.bar(adjustment=vp.yadjustment, style='vscrollbar') layout.button(u"Return to menu", None, clicked=ui.jumps("main_menu_screen")) ui.close() ui.interact() return
In case you don't want a label remove layout.label( ) and change ui.side( ): The 't' (top) part must be removed, or else Ren'Py will throw an "error: Invalid resolution for Surface".
ui.side(['c', 'r', 'b'], spacing=2)

Renpy Cookbook
112
Additional basic move profiles Ren'Py comes with a few basic pre-defined move profiles. The “move” family (“move”, “moveinright”, “moveoutbottom”, etc.) is a simple linear interpolation between the start and end points. The “ease” family (“ease”, “easeinright”, “easeoutbottom”, etc.) uses a cosine curve to create a smooth acceleration/deceleration. The graph below shows what these profiles look like.
Here are a few additional basic movement profiles that you can use to add some variation to your game.
How to use these functions
The most straightforward way to use these functions is to use them as the time_warp parameter in a call to Move.
init: python hide: def bop_time_warp(x): return -23.0 * x**5 + 57.5 * x**4 - 55 * x**3 + 25 * x**2 - 3.5 * x start: # Move the ball from the left side of the screen to the right with a “bop” profile show ball at Move((0.25, 0.5), (0.75, 0,5), 1.0, time_warp=bop_time_warp, xanchor="center", yanchor="center")

Renpy Cookbook
113
You can also use define.move_transitions to create a whole new family of transitions using these profiles.
init: python hide: def quad_time_warp(x): return -2.0 * x**3 + 3.0 * x**2 def quad_in_time_warp(x): return 1.0 - (1.0 - x)**2 def quad_out_time_warp(x): return x**2 define.move_transitions("quad", 1.0, quad_time_warp, quad_in_time_warp, quad_out_time_warp) start: show eileen happy with quadinleft
Quadratic motion
Quadratic motion serves pretty much the same purpose as the standard, cosine-based “ease” motions, but they’re a little more efficient. They’re also a better model for natural accelerations and decelerations, because most natural accelerations (and decelerations) are pretty well modelled as constant acceleration motion, which is quadratic. You can see from the picture that they’re also a little “gentler” - with a less aggressive acceleration/deceleration profile (except the double-ended version, which is a best fit polynomial to a quadratic acceleration followed by deceleration). It may look a bit more organic than the built-in “ease” motion.

Renpy Cookbook
114
def quad_time_warp(x): return -2.0 * x**3 + 3.0 * x**2 def quad_in_time_warp(x): return 1.0 - (1.0 - x)**2 def quad_out_time_warp(x): return x**2
Exponential decay
Besides quadratic (constant acceleration) motion, the other most common (non-oscillatory) motion you see naturally is exponentially decaying motion. This is the kind of motion you see when something is being slowed down by friction. They’re much less efficient than the quadratic or standard ease functions, but they also allow you much more control because you can adjust the decay constant k. Larger k values mean the decay is faster (which means a more aggressive acceleration/deceleration profile).

Renpy Cookbook
115
import math def decay_time_warp_real(x, k): return (1.0 / (1.0 + math.exp(-k * (x - 0.5))) - 1.0 / (1.0 + math.exp(k / 2.0))) / (1.0 / (1.0 + math.exp(-k / 2.0)) - 1.0 / (1.0 + math.exp(k / 2.0))) def decay_in_time_warp_real(x, k): return (math.exp(1.0) - math.exp(1.0 - k * x)) / (math.exp(1.0) - math.exp(1.0 - k)) def decay_out_time_warp_real(x, k): return (math.exp(k * x) - 1.0) / (math.exp(k) - 1.0) decay_time_warp = renpy.curry(decay_time_warp_real) decay_in_time_warp = renpy.curry(decay_in_time_warp_real) decay_out_time_warp = renpy.curry(decay_out_time_warp_real)

Renpy Cookbook
116
Handling the extra parameter
Because of the extra k parameter, you have to use these functions a little differently:
show ball at Move((0.25, 0.5), (0.75, 0,5), 1.0, time_warp=decay_time_warp(k=10.0), xanchor="center", yanchor="center") # Or... $ define.move_transitions("decay10", 1.0, decay_time_warp(k=10.0), decay_in_time_warp(k=10.0), decay_out_time_warp(k=10.0)) show eileen happy with decay10inleft
Optimizing
Now, if you pick a k-value and like it, it’s kind of a waste to do all of these calculations every time. You can simplify the equations like this:
import math def decay_fixed_time_warp(x): return AAA / (1.0 + math.exp(-k * (x - 0.5))) - BBB def decay_fixed_in_time_warp(x): return CCC - DDD * math.exp(1.0 - k * x) def decay_fixed_out_time_warp_real(x): return EEE * math.exp(k * x) - EEE
Where:
AAA:
BBB:
CCC:
DDD:
EEE:
And don’t forget to set k!
To automate all of this, check out the handy helper script.
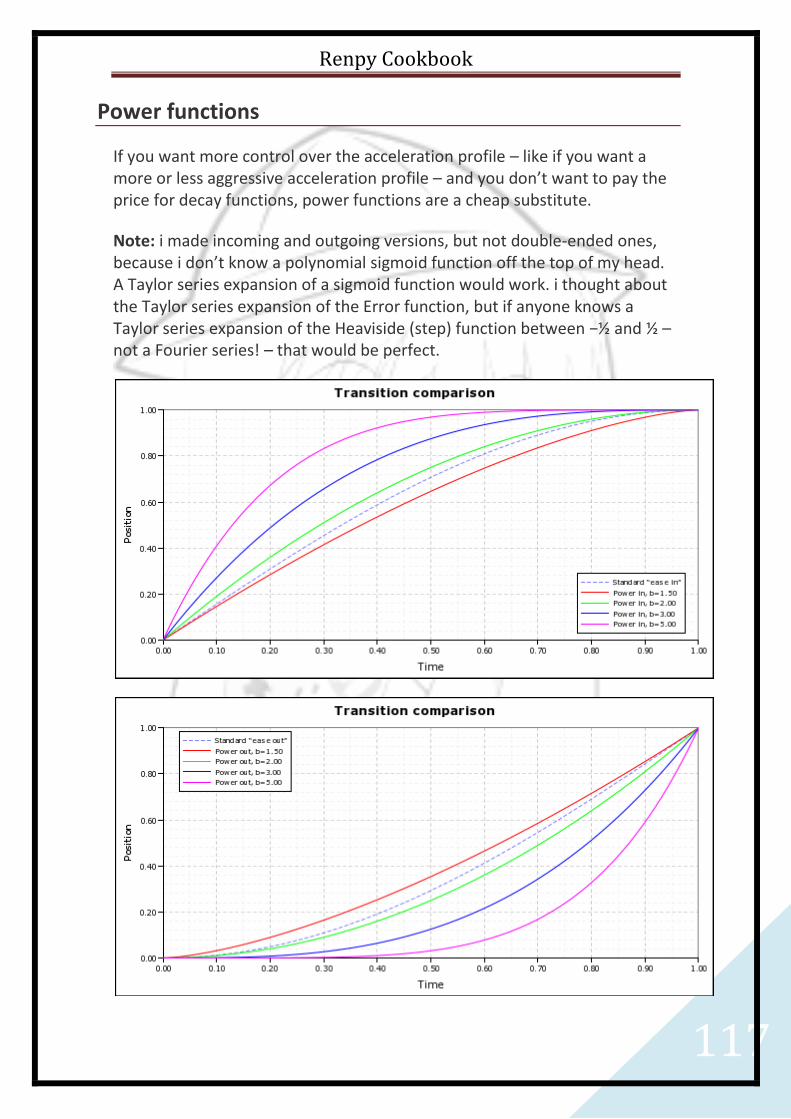
Renpy Cookbook
117
Power functions
If you want more control over the acceleration profile – like if you want a more or less aggressive acceleration profile – and you don’t want to pay the price for decay functions, power functions are a cheap substitute.
Note: i made incoming and outgoing versions, but not double-ended ones, because i don’t know a polynomial sigmoid function off the top of my head. A Taylor series expansion of a sigmoid function would work. i thought about the Taylor series expansion of the Error function, but if anyone knows a Taylor series expansion of the Heaviside (step) function between −½ and ½ – not a Fourier series! – that would be perfect.

Renpy Cookbook
118
def power_in_time_warp_real(x, b): return 1.0 - (1.0 - x)**b def power_out_time_warp_real(x, b): return x**b power_in_time_warp = renpy.curry(power_in_time_warp_real) power_out_time_warp = renpy.curry(power_out_time_warp_real)
Tip: If you want a really cheap deceleration profile, a quick and dirty hack is to pass a value greater than zero but less than one to power_out_time_warp. It won’t give you a very pretty profile, but it will give you a very efficient one.
Animation “bop”
This next profile is not so much about modelling reality as it is fun. Next time you watch a kid’s cartoon – Disney stuff is a good example – watch carefully how characters move. If a character is looking down, and then someone calls her, she doesn’t just lift her head. What she does is kind of pull down, then look up. They do this for pretty much every motion they make – they kinda pull back, as if they’re storing up energy to spring, then make the motion. Just watch here, and you’ll see – for example, at about 1:00, Goofy is lying down floating in mid-air, and twice he kinda squeezes in before doing something; at 1:07, it’s a big squeeze, before that is a little one. It’s a silly little thing, but it adds some life to animations.
Each of these “bop” motions overshoots by around 15%. They make your objects either go a bit in the wrong direction before moving in the right direction, or go past where they were supposed to stop then pull back, or both. There are five different profiles. Three match the standard in (“bop in”), out (“bop out”) and normal (“bop move”) motions. And then there are two extra motions that either accelerate at the beginning (“to bop”) or decelerate at the end smoothly (“bop to”). You could use this to, for example, have a character at left move from left to centre to get close to a character at right... they accelerate naturally, but then skid to a stop, realize they’re too close and pull back very quickly.

Renpy Cookbook
119
def bop_time_warp(x): return -23.0 * x**5 + 57.5 * x**4 - 55 * x**3 + 25 * x**2 - 3.5 * x def bop_in_time_warp(x): return -2.15 * x**2 + 3.15 * x def bop_out_time_warp(x): return 2.15 * x**2 - 1.15 * x def bop_to_time_warp(x): return -5 * x**5 + 5 * x**4 + x**2 def to_bop_time_warp(x): return -5 * x**5 + 20 * x**4 - 30 * x**3 + 19 * x**2 - 3 * x
You can use bop_time_warp, bop_in_time_warp and bop_out_time_warp in define.move_transitions. bop_to_time_warp and to_bop_time_warp are handy by themselves when you want the motion to start with a bop but end smoothly, or start smoothly but end with a bop.

Renpy Cookbook
120
Konami Code This executes the konami_code label when the Konami Code is entered on the keyboard. The code consists of the following keys in sequence:
up up down down left right left right b a
It should be fairly easy to change the code and the label branched to.
# This lets you easily add the Konami code to your Ren'Py game. When # the Konami code (up up down down left right left right a b) has been # entered, this calls the konami_code label (in a new context, so that # the current game state isn't lost. init python hide: class KonamiListener(renpy.Displayable): def __init__(self, target): renpy.Displayable.__init__(self) import pygame # The label we jump to when the code is entered. self.target = target # This is the index (in self.code) of the key we're # expecting. self.state = 0 # The code itself. self.code = [ pygame.K_UP, pygame.K_UP, pygame.K_DOWN, pygame.K_DOWN, pygame.K_LEFT, pygame.K_RIGHT, pygame.K_LEFT,

Renpy Cookbook
121
pygame.K_RIGHT, pygame.K_b, pygame.K_a, ] # This function listens for events. def event(self, ev, x, y, st): import pygame # We only care about keydown events. if ev.type != pygame.KEYDOWN: return # If it's not the key we want, go back to the start of the statem # machine. if ev.key != self.code[self.state]: self.state = 0 return # Otherwise, go to the next state. self.state += 1 # If we are at the end of the code, then call the target label in # the new context. (After we reset the state machine.) if self.state == len(self.code): self.state = 0 renpy.call_in_new_context(self.target) return # Return a small empty render, so we get events. def render(self, width, height, st, at): return renpy.Render(1, 1) # Create a KonamiListener to actually listen for the code. store.konami_listener = KonamiListener('konami_code') # This adds konami_listener to each interaction. def konami_overlay(): ui.add(store.konami_listener) config.overlay_functions.append(konami_overlay) # This is called in a new context when the konami code is entered. label konami_code: "You just earned an additional 30 lives!" "While they might not be of much use in a dating sim, good for you!" return

Renpy Cookbook
122
In-game Splashscreen This special feature allows you to create a skippable set of image transitions, like an in-game movie. This may save you from creating a MPEG flux if you don't feel like it or if you find it too hard.
# In the usual init section, place all the images # you will need for transitions and alpha transitions. init: image hello = "myimage0.png" #change here the desired image name image world = "myimage1.png" #change here the desired image name image black = Solid((0, 0, 0, 255)) ## This here is the flash effect transition $ flash = Fade(.25, 0, .75, color="#fff") # I won't lecture you about how to create good "video" scenes. # This depends entirely on your inspiration. # It is best you kept one file for your in-game splashcreen (IGS) # This will be better for future editing. #The idea here is to create a 2 image IGS #with some short music and a little flash effect. # Let's create our IGS. label OP: $ mouse_visible = False #Turns off the mouse cursor #Pause for 2 seconds, not necessary, but it's good for narration transitions $ renpy.pause(2.0) #Play a tune $ renpy.music.play('theme.ogg') #This here is tricky: it applies the transition effect, #plus the renpy.pause #Your first image will appear with a flash effect #and pause for 1.5 seconds scene hello with flash with Pause(1.5) #You can also use the pre-defined alpha #transitions already defined in the Ren'py build. scene world with fade with Pause(1.5) #You can also use animation effects such as Pan, particles... #You might eventually create an entire #animation studio if you're patient enough.

Renpy Cookbook
123
scene hello with Pan((0, 0), (800, 300), 1.5) with fade with Pause(2.0) #Don't forget to stop the music or it will loop endlessly. $ renpy.music.stop(fadeout=1.0) #And return the mouse or you'll feel lost :) $ mouse_visible = True #outta the OP! jump next_scene # You will end here if you click or press space label next_scene: #This little script here is necessary because of skipping, #the previous code might not have been read. python: if renpy.sound.is_playing(channel=7): renpy.music.stop() mouse_visible = True scene black "Hello world ('_')/~"
Runtime init blocks
The biggest advantage of init: and init python: blocks is the fact that they are run automatically each time the game is run - and they can be spread around different files. The biggest disadvantage of them is the fact that variables created in init blocks are not saved (and don't participate in rollback) until you assign them a new value outside of an init block - in the runtime. After assigning them a new value, they work correctly and all changes will be tracked (even state inside objects, like state.love_love_points = a + 1). The following should be placed inside (for example) a 00initvars.rpy file:
# this file adds a function that sequentially calls # all __init_variables labels defined in your *.rpy # files init python: def init_variables(): initvarlabels = [label for label in renpy.get_all_labels() if label.endswith('__init_variables') ] for l in initvarlabels: renpy.call_in_new_context(l)

Renpy Cookbook
124
To use this file, simply add a call to the init_variables function to the start and after_load labels of your game:
label start: $ init_variables() # your normal code here label after_load: $ init_variables() # your normal code here return
To define an init block, simply create an __init_variables label in your files (don't worry about it being called the same in each file, RenPy automatically replaces the double underscore with a unique prefix based on the file name). Important: Don't forget the hasattr condition for each of your variables. Otherwise, all your saved variables will be overwritten every time the game starts!
label __init_variables: python: if not hasattr(renpy.store,'a_list'): #important! a_list = [] if not hasattr(renpy.store,'stats_dict'): # important! stats_dict = { 'v':{ 'lvl':1, 'maxhp':4, 'hp':3, }, 'l':{ 'lvl':3, 'maxhp':6, 'hp':5, }, } return
This script defines all SVG color names as per http://www.w3.org/TR/css3-color/#svg-color as named Ren'Py Solid displayables:
init -500: image aliceblue = Solid("#f0f8ff") image antiquewhite = Solid("#faebd7") image aqua = Solid("#00ffff") image aquamarine = Solid("#7fffd4") image azure = Solid("#f0ffff") image beige = Solid("#f5f5dc") image bisque = Solid("#ffe4c4") image black = Solid("#000000") image blanchedalmond = Solid("#ffebcd") image blue = Solid("#0000ff")

Renpy Cookbook
125
image blueviolet = Solid("#8a2be2") image brown = Solid("#a52a2a") image burlywood = Solid("#deb887") image cadetblue = Solid("#5f9ea0") image chartreuse = Solid("#7fff00") image chocolate = Solid("#d2691e") image coral = Solid("#ff7f50") image cornflowerblue = Solid("#6495ed") image cornsilk = Solid("#fff8dc") image crimson = Solid("#dc143c") image cyan = Solid("#00ffff") image darkblue = Solid("#00008b") image darkcyan = Solid("#008b8b") image darkgoldenrod = Solid("#b8860b") image darkgray = Solid("#a9a9a9") image darkgreen = Solid("#006400") image darkgrey = Solid("#a9a9a9") image darkkhaki = Solid("#bdb76b") image darkmagenta = Solid("#8b008b") image darkolivegreen = Solid("#556b2f") image darkorange = Solid("#ff8c00") image darkorchid = Solid("#9932cc") image darkred = Solid("#8b0000") image darksalmon = Solid("#e9967a") image darkseagreen = Solid("#8fbc8f") image darkslateblue = Solid("#483d8b") image darkslategray = Solid("#2f4f4f") image darkslategrey = Solid("#2f4f4f") image darkturquoise = Solid("#00ced1") image darkviolet = Solid("#9400d3") image deeppink = Solid("#ff1493") image deepskyblue = Solid("#00bfff") image dimgray = Solid("#696969") image dimgrey = Solid("#696969") image dodgerblue = Solid("#1e90ff") image firebrick = Solid("#b22222") image floralwhite = Solid("#fffaf0") image forestgreen = Solid("#228b22") image fuchsia = Solid("#ff00ff") image gainsboro = Solid("#dcdcdc") image ghostwhite = Solid("#f8f8ff") image gold = Solid("#ffd700") image goldenrod = Solid("#daa520") image gray = Solid("#808080") image green = Solid("#008000") image greenyellow = Solid("#adff2f") image grey = Solid("#808080") image honeydew = Solid("#f0fff0") image hotpink = Solid("#ff69b4") image indianred = Solid("#cd5c5c") image indigo = Solid("#4b0082") image ivory = Solid("#fffff0") image khaki = Solid("#f0e68c") image lavender = Solid("#e6e6fa") image lavenderblush = Solid("#fff0f5") image lawngreen = Solid("#7cfc00") image lemonchiffon = Solid("#fffacd")

Renpy Cookbook
126
image lightblue = Solid("#add8e6") image lightcoral = Solid("#f08080") image lightcyan = Solid("#e0ffff") image lightgoldenrodyellow = Solid("#fafad2") image lightgray = Solid("#d3d3d3") image lightgreen = Solid("#90ee90") image lightgrey = Solid("#d3d3d3") image lightpink = Solid("#ffb6c1") image lightsalmon = Solid("#ffa07a") image lightseagreen = Solid("#20b2aa") image lightskyblue = Solid("#87cefa") image lightslategray = Solid("#778899") image lightslategrey = Solid("#778899") image lightsteelblue = Solid("#b0c4de") image lightyellow = Solid("#ffffe0") image lime = Solid("#00ff00") image limegreen = Solid("#32cd32") image linen = Solid("#faf0e6") image magenta = Solid("#ff00ff") image maroon = Solid("#800000") image mediumaquamarine = Solid("#66cdaa") image mediumblue = Solid("#0000cd") image mediumorchid = Solid("#ba55d3") image mediumpurple = Solid("#9370db") image mediumseagreen = Solid("#3cb371") image mediumslateblue = Solid("#7b68ee") image mediumspringgreen = Solid("#00fa9a") image mediumturquoise = Solid("#48d1cc") image mediumvioletred = Solid("#c71585") image midnightblue = Solid("#191970") image mintcream = Solid("#f5fffa") image mistyrose = Solid("#ffe4e1") image moccasin = Solid("#ffe4b5") image navajowhite = Solid("#ffdead") image navy = Solid("#000080") image oldlace = Solid("#fdf5e6") image olive = Solid("#808000") image olivedrab = Solid("#6b8e23") image orange = Solid("#ffa500") image orangered = Solid("#ff4500") image orchid = Solid("#da70d6") image palegoldenrod = Solid("#eee8aa") image palegreen = Solid("#98fb98") image paleturquoise = Solid("#afeeee") image palevioletred = Solid("#db7093") image papayawhip = Solid("#ffefd5") image peachpuff = Solid("#ffdab9") image peru = Solid("#cd853f") image pink = Solid("#ffc0cb") image plum = Solid("#dda0dd") image powderblue = Solid("#b0e0e6") image purple = Solid("#800080") image red = Solid("#ff0000") image rosybrown = Solid("#bc8f8f") image royalblue = Solid("#4169e1") image saddlebrown = Solid("#8b4513") image salmon = Solid("#fa8072")

Renpy Cookbook
127
image sandybrown = Solid("#f4a460") image seagreen = Solid("#2e8b57") image seashell = Solid("#fff5ee") image sienna = Solid("#a0522d") image silver = Solid("#c0c0c0") image skyblue = Solid("#87ceeb") image slateblue = Solid("#6a5acd") image slategray = Solid("#708090") image slategrey = Solid("#708090") image snow = Solid("#fffafa") image springgreen = Solid("#00ff7f") image steelblue = Solid("#4682b4") image tan = Solid("#d2b48c") image teal = Solid("#008080") image thistle = Solid("#d8bfd8") image tomato = Solid("#ff6347") image turquoise = Solid("#40e0d0") image violet = Solid("#ee82ee") image wheat = Solid("#f5deb3") image white = Solid("#ffffff") image whitesmoke = Solid("#f5f5f5") image yellow = Solid("#ffff00") image yellowgreen = Solid("#9acd32")
Either place this init block into an existing script or in its own rpy file. Now you can show lightgoldenrodyellow or scene mediumspringgreen etc. if you are so inclined.

Renpy Cookbook
128
Importing scripts from Celtx Copy and paste this into your script.rpy at the top.
init: #gfx initializer python: import os for fname in os.listdir(config.gamedir + '/gfx'): if fname.endswith(('.jpg', '.png')): tag = fname[:-4] fname = 'gfx/' + fname renpy.image(tag, fname)
Celtx is a nice, standard, and free screenplay editor. It provides traditional screenplay formatting and many useful screenplay editing and organization tools and reports.
celtx2renpy.py is a command line Python script to convert a Celtx screenplay (following a few simple conventions) into a Ren'Py script.
You'll need argparse and beautifulsoup, both of which you can install with easy_install or pip install. Then from a command line you can run the celtx2renpy.py converter with your screenplay script.
The input file that it expects is not the .celtx file, but the .html screenplay script file embedded in the .celtx file, which is a normal .zip archive and you should be able to open in any archive program. (If you are working with version control, an automation tool called musdex) for version-controlling such zip archives as bundles of files, which can handle the extraction for you.)
The converter follows a few simple script conventions, that are meant look meaningfully well in Celtx and are relatively close to their screenplay intentions/counterparts:
Scene Heading Starts a new "label" named from the lower-cased text up to the first double dash. Ex: "OPENING -- THE BEGINNING" starts a new label called "opening".
Action Actions become character-less (narrator) dialog.

Renpy Cookbook
129
Character and Dialog Should be as expected, character saying dialog. Character names are lower-cased. Only special behavior is that the character named "NARRATOR" gets output as character-less, which is used for parentheticals.
Parenthetical A parenthetical surrounded in square brackets is a "condition" and becomes an "if" for the current "shot" or current character's dialog, depending on which one it follows. A parenthetical surrounded in curly brackets becomes a "python:" block.
Transition A transition is lower-cased and assumed to be a Ren'Py command, for example "JUMP OPENING" or even "SHOW BG AWESOME".
Shot A shot title is title-cased, and any final colons are removed, and used as a menu option. All of the following scripting is the reaction to that menu choice, up until the next shot/scene.
Obviously you can't do really deep nesting or similarly complicated script structures, but hopefully you should get about 95% of the way to the script that you want with this tool.

Renpy Cookbook
130
Letting images appear after a while
You can let an image appear 3 seconds after the text appeared using ATL:
show eileen happy: alpha 0.0 time 3.0 alpha 1.0 e "this is the text which appears 3 seconds before the image 'eileen happy' appears"
You can let the image fade in over the course of 3 seconds, starting 2 seconds after the text appeared:
show eileen happy: alpha 0.0 time 2.0 linear 3.0 alpha 1.0 e "this is the text which appears 2 seconds before the image 'eileen happy' fades in"
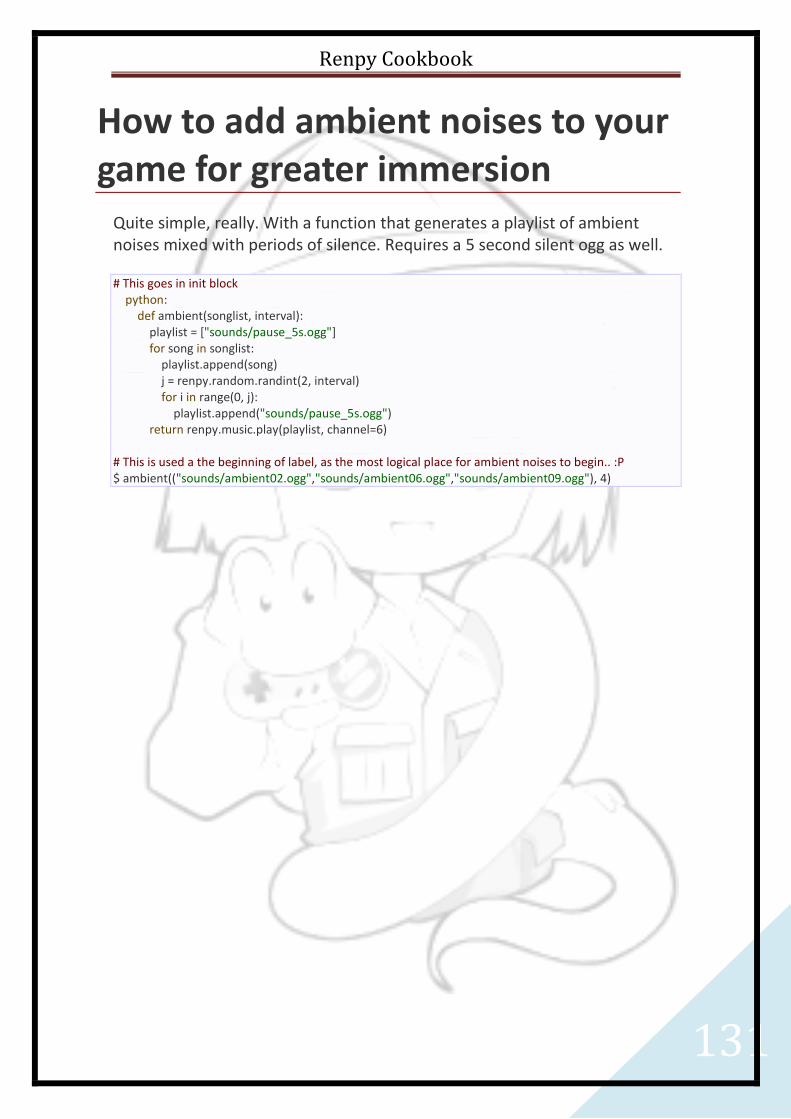
Renpy Cookbook
131
How to add ambient noises to your game for greater immersion
Quite simple, really. With a function that generates a playlist of ambient noises mixed with periods of silence. Requires a 5 second silent ogg as well.
# This goes in init block python: def ambient(songlist, interval): playlist = ["sounds/pause_5s.ogg"] for song in songlist: playlist.append(song) j = renpy.random.randint(2, interval) for i in range(0, j): playlist.append("sounds/pause_5s.ogg") return renpy.music.play(playlist, channel=6) # This is used a the beginning of label, as the most logical place for ambient noises to begin.. :P $ ambient(("sounds/ambient02.ogg","sounds/ambient06.ogg","sounds/ambient09.ogg"), 4)