Remote Deposit Scan Guide - cbtks.com
51
Enterprise Payment Solutions™ JHA EPS SmartPay Business September 2016 Remote Deposit Scan Handbook SM
Transcript of Remote Deposit Scan Guide - cbtks.com

Enterprise Payment Solutions™ JHA EPS SmartPay Business September 2016
Remote Deposit Scan Handbook
SM


Other Trademarks Various other trademarks and service marks used or referenced in this document are the property of their respective companies/owners: Microsoft, Windows, Windows NT, Windows Vista, and Internet Explorer are either registered trademarks or trademarks of Microsoft Corporation in the United States and/or other countries. Adobe and Acrobat Reader are either registered trademarks or trademarks of Adobe Systems Incorporated in the United States and/or other countries. Canon USA trademarks, logos, and service marks and those trademarks, logos, and service marks licensed to Canon USA by Canon Inc. including but not limited to the Canon logo, are registered and unregistered marks of Canon USA or Canon Inc. Digital Check trademarks, logos, and service marks are registered marks of Digital Check and Digital Check Corp. Chrome is a registered trademark of Google., Inc. RDM, the RDM logo, EC6000i, EC7000i, and ITMS are trademarks of RDM Corporation. Panini is a registered trademark of Panini S.p.A. Unisys trademarks, logos, and service marks are registered marks of the Unisys Corporation. Portions of this software: The MIT License (MIT) Permission is hereby granted, free of charge, to any person obtaining a copy of this software and associated documentation files (the "Software"), to deal in the Software without restriction, including without limitation the rights to use, copy, modify, merge, publish, distribute, sublicense, and/or sell copies of the Software, and to permit persons to whom the Software is furnished to do so, subject to the following conditions: The above copyright notice and this permission notice shall be included in all copies or substantial portions of the Software. THE SOFTWARE IS PROVIDED "AS IS", WITHOUT WARRANTY OF ANY KIND, EXPRESS OR IMPLIED, INCLUDING BUT NOT LIMITED TO THE WARRANTIES OF MERCHANTABILITY, FITNESS FOR A PARTICULAR PURPOSE AND NONINFRINGEMENT. IN NO EVENT SHALL THE AUTHORS OR COPYRIGHT HOLDERS BE LIABLE FOR ANY CLAIM, DAMAGES OR OTHER LIABILITY, WHETHER IN AN ACTION OF CONTRACT, TORT OR OTHERWISE, ARISING FROM, OUT OF OR IN CONNECTION WITH THE SOFTWARE OR THE USE OR OTHER DEALINGS IN THE SOFTWARE. AlaSQL ------ Copyright (c) 2014-2015 Andrey Gershun ([email protected]) & Mathias Rangel Wulff ([email protected]) Angular UI-Router ----------------- Copyright (c) 2013-2015 The AngularUI Team, Karsten Sperling AngularJS --------- Copyright (c) 2010-2015 Google, Inc. http://angularjs.org AngularJS UI Bootstrap ---------------------- Copyright (c) 2012-2015 the AngularUI Team angular-deferred-bootstrap -------------------------- Copyright (c) 2014 philippd angular-file-upload ------------------- Copyright (c) 2013 danialfarid angular-growl ------------- Copyright (c) 2013 Marco Rinck angular-idle ------------ Copyright (c) 2013 Mike Grabski angular-mask ------------ Copyright (c) 2014 Igor Rafael angular-translate ----------------- Copyright (c) <2014> <[email protected]> angular-zeroclipboard --------------------- Copyright (C) 2014 lisposter(Leigh Zhu) angularUtils ------------ Copyright (c) 2014 Michael Bromley Bootstrap --------- Copyright (c) 2011-2015 Twitter, Inc jasmine.js

---------- Copyright (c) 2008-2014 Pivotal Labs jQuery ------ jQuery Foundation, Inc. and other contributors Json.NET -------- Copyright (c) 2007 James Newton-King Mordernizr ---------- Generic MIT License Moment.js --------- Copyright (c) 2011-2015 Tim Wood, Iskren Chernev, Moment.js contributors Unity.MVC5 ---------- Copyright (c) 2013 FeedbackHound ui-grid ------- Copyright (c) 2012-2015 the AngularUI Team ZeroClipboard ------------- Copyright (c) 2009-2014 Jon Rohan, James M. Greene Apache License Licensed under the Apache License, Version 2.0 (the "License"); you may not use this file except in compliance with the License. You may obtain a copy of the License at http://www.apache.org/licenses/LICENSE-2.0 Unless required by applicable law or agreed to in writing, software distributed under the License is distributed on an "AS IS" BASIS, WITHOUT WARRANTIES OR CONDITIONS OF ANY KIND, either express or implied. See the License for the specific language governing permissions and limitations under the License. dotless ------- Copyright (c) 2009-2010 dotless project, http://www.dotlesscss.com unity ----- Generic Apache License, Version 2.0 Microsoft EULA -------------- Microsoft ASP.NET Identity Core Microsoft ASP.NET MVC Microsoft ASP.NET Razor Microsoft ASP.NET Web Optimization Framework Microsoft ASP.NET Web Pages Microsoft Token Validation Extension for Microsoft .Net Framework 4.5 Microsoft.Web.Infrastructure WebGrease NUnit License ------------- Copyright © 2002-2015 Charlie Poole Copyright © 2002-2004 James W. Newkirk, Michael C. Two, Alexei A. Vorontsov Copyright © 2000-2002 Philip A. Craig

© 1999-2016 Jack Henry & Associates, Inc.®
i September 2016
Remote Deposit Scan Handbook
Contents Introduction ................................................................................................................................ 1
System Requirements .................................................................................................... 2
Compatibility View Settings ................................................................................. 3
Temporary Internet Files and History Settings .................................................... 4
Trusted Sites in Internet Explorer ........................................................................ 6
Trusted Sites in Google Chrome ......................................................................... 8
Privileges and Roles ..........................................................................................10
Available Resources ......................................................................................................10
Process Workflow ..........................................................................................................10
Session Timeouts ..........................................................................................................11
Logging In .................................................................................................................................12
Creating a Secret Question ...........................................................................................12
Choosing an Identification Phrase .................................................................................13
Installing Device Control ...........................................................................................................14
Working with Remote Deposit Scan ..........................................................................................19
Editing an Approved Transaction ...................................................................................29
Voiding a Transaction ........................................................................................33
Resolving Transactions ......................................................................................33
Bulk Check Operations ..................................................................................................34
Bulk Approve .....................................................................................................34
Bulk Capture ......................................................................................................36
Bulk Void ...........................................................................................................36
Bulk Resolve ......................................................................................................36
Scanner Device Control ............................................................................................................37
Device Control Indicators...............................................................................................37
Status Messages and Alerts ..............................................................................39
Changing a Scanner ......................................................................................................40
Uninstalling a Scanner ...................................................................................................43

© 1999-2016 Jack Henry & Associates, Inc.®
1 September 2016
Remote Deposit Scan Handbook
Introduction The Remote Deposit Scan Handbook is a guide for all persons who process transactions through Remote Deposit Scan (RDS). Prior to working with the application, you should have received a login letter from your financial institution that contains the following information.
• The application URL where you will use the provided administrator login credentials (see figure): https://smartpay.profitstars.com/business/login
FIGURE 1 - SAMPLE INFORMATION FROM LOGIN LETTER
Upon logging in to the system, you will be prompted to change your temporary password. A password must be between 8-15 characters and contain at least one upper case letter, one lower case letter, and one number.
• Your Merchant ID and scanner model/scanner number
• Instructions for any EPS Education training you wish to schedule, in order to better learn the application
NOTE: EPS Support is not available for training in the use of the application.
In addition to the login letter, your financial institution should have provided you with the Scanner Installation Quick Start: Remote Deposit Scan, a guide that assists with the installation of a scanner and Device Control, an EPS application used to manage scanners with RDS. Remote Deposit Scan provides the ability to process your customer checks through a single-check scanner and convert them to an electronic image transaction, later deposited into a bank account. Checks can be scanned throughout the day, and their amount will be added into the deposit total. A deposit will consist of all transactions created that day, unless otherwise noted. For example, a transaction given a future effective date will not be deposited until such time. The system can detect duplicate transactions within 75 days of the original transaction being created. ACH items will be deposited separately from Check 21 items.
NOTE: Your tabs and menu options may differ slightly from those pictured throughout this document.

© 1999-2016 Jack Henry & Associates, Inc.®
2 September 2016
Remote Deposit Scan Handbook
System Requirements In addition to a high-speed Internet connection, the following components are required for working with the EPS application(s). The following components are required for working with the application(s). For the PC:
• Local administrative rights
• USB port 2.0 or higher
For Microsoft® Windows®:
• Windows 8.1: Microsoft Internet Explorer® 11 or Google Chrome™
• Windows 10: Microsoft Internet Explorer 11 or Google Chrome
• .NET® Framework 4.6 or higher
NOTE: The current version of Chrome and its two previous versions are supported.
The application does not support Apple® Boot Camp® or any virtualization software. The following scanners support this application’s features.
Scanner Model Supported
Panini® I:Deal®
WI: Deal
My Vision X
Vision X
Digital Check® CX30
TS230
TS240
RDM® EC7000i
EC7500i
Epson® Capture One TMS 1000

© 1999-2016 Jack Henry & Associates, Inc.®
3 September 2016
Remote Deposit Scan Handbook
Scanner Model Supported
Unisys Burroughs® Micro EX
Micro Elite
SmartSource Professional®
SmartSource Professional Elite
SmartSource Merchant Elite
SmartSource Value
Compatibility View Settings Adding the EPS URL to the Compatibility View Settings feature of Internet Explorer may help with viewing certain features in the application.
1. Open Internet Explorer. From the top navigational menu, select Tools | Compatibility View Settings.
FIGURE 2 - COMPATIBILITY VIEW SETTINGS
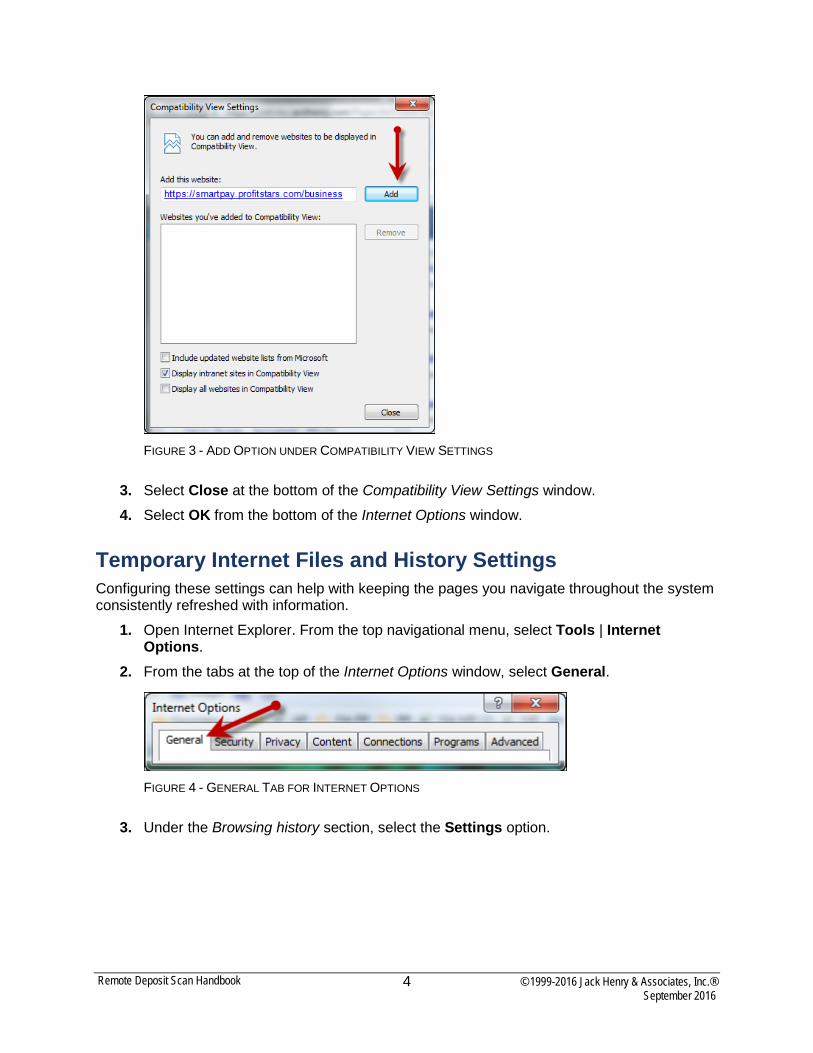
2. The Compatibility View Settings window appears. Within the Add this website field provided, enter https://smartpay.profitstars.com/business and select Add.
© 1999-2016 Jack Henry & Associates, Inc.®
4 September 2016
Remote Deposit Scan Handbook
FIGURE 3 - ADD OPTION UNDER COMPATIBILITY VIEW SETTINGS
3. Select Close at the bottom of the Compatibility View Settings window. 4. Select OK from the bottom of the Internet Options window.
Temporary Internet Files and History Settings Configuring these settings can help with keeping the pages you navigate throughout the system consistently refreshed with information.
1. Open Internet Explorer. From the top navigational menu, select Tools | Internet Options.
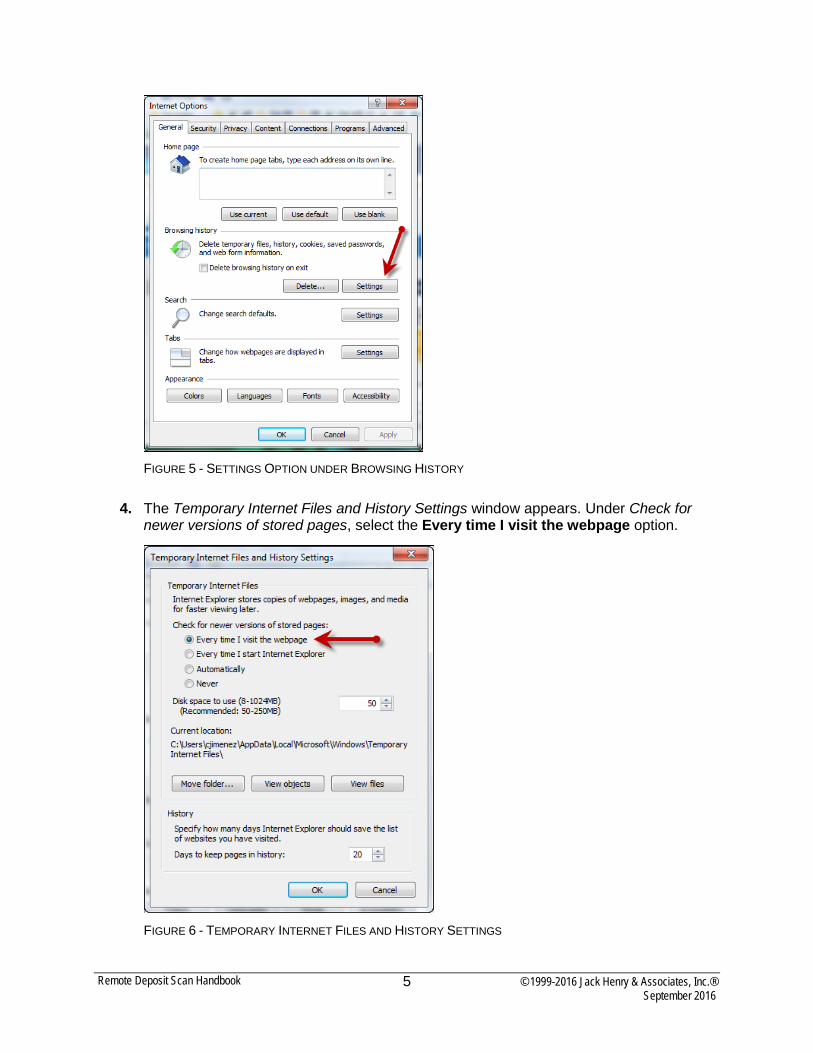
2. From the tabs at the top of the Internet Options window, select General.
FIGURE 4 - GENERAL TAB FOR INTERNET OPTIONS
3. Under the Browsing history section, select the Settings option.
© 1999-2016 Jack Henry & Associates, Inc.®
5 September 2016
Remote Deposit Scan Handbook
FIGURE 5 - SETTINGS OPTION UNDER BROWSING HISTORY
4. The Temporary Internet Files and History Settings window appears. Under Check for newer versions of stored pages, select the Every time I visit the webpage option.
FIGURE 6 - TEMPORARY INTERNET FILES AND HISTORY SETTINGS

© 1999-2016 Jack Henry & Associates, Inc.®
6 September 2016
Remote Deposit Scan Handbook
5. Select OK at the bottom of the Temporary Internet Files and History Settings window. 6. Select OK from the bottom of the Internet Options window.
Trusted Sites in Internet Explorer A user will need to ensure that the application URL is added to the Trusted Sites option in Internet Settings. Use the following steps to add the website to your Trusted Sites.
1. Open Internet Explorer. From the top navigational menu, select Tools | Internet Options.
FIGURE 7 - INTERNET OPTIONS
2. From the tabs at the top of the Internet Options window, select Security.
FIGURE 8 - SECURITY TAB UNDER INTERNET OPTIONS
3. Select the Trusted Sites icon to activate the Sites option. Select Sites.

© 1999-2016 Jack Henry & Associates, Inc.®
7 September 2016
Remote Deposit Scan Handbook
FIGURE 9 - SITES OPTION UNDER TRUSTED SITES CATEGORY
4. The Trusted Sites window appears. In the Add this website to the zone field, enter the URL: https://smartpay.profitstars.com/business and select Add.
FIGURE 10 - ADDING A TRUSTED SITE
5. Select Close at the bottom of the Trusted sites window. 6. From the bottom of the Internet Options window, select OK.

© 1999-2016 Jack Henry & Associates, Inc.®
8 September 2016
Remote Deposit Scan Handbook
Trusted Sites in Google Chrome You may need to add a URL address to your list of trusted sites in order for application to run optimally with Google Chrome.
1. Open Chrome. On the far right of the address bar, select the menu icon and choose Settings.
FIGURE 11 - SETTINGS
2. Scroll to the bottom of the page and select Show Advanced Settings.
FIGURE 12 - SHOW ADVANCED SETTINGS
3. Under the Network heading, select Change proxy settings.

© 1999-2016 Jack Henry & Associates, Inc.®
9 September 2016
Remote Deposit Scan Handbook
FIGURE 13 - CHANGE PROXY SETTINGS OPTION
4. From the Internet Properties window, under the Security tab, select the Trusted Sites icon to highlight it, then select the Sites option.
FIGURE 14 - TRUSTED SITES, SITES OPTIONS
5. In the Trusted Sites window, enter https://smartpay.profitstars.com/business in the Add this website to the zone field. Select Add.

© 1999-2016 Jack Henry & Associates, Inc.®
10 September 2016
Remote Deposit Scan Handbook
FIGURE 15 - TRUSTED SITES URLS
6. Select Close. From the Internet Properties window, select OK.
Privileges and Roles The Admin user will need to assign the RDS User role in order for you to access this application. This role is located within the Customer Services privilege. For a complete walkthrough about assigning privileges and roles, please see the User Administrator Handbook for more information and complete instructions.
Available Resources If you have questions about using the Remote Deposit Scan application, please contact your first line of support for more information. For a complete guide on how to run reports using the information processed with the application, please see the User Reports Handbook for instructions.
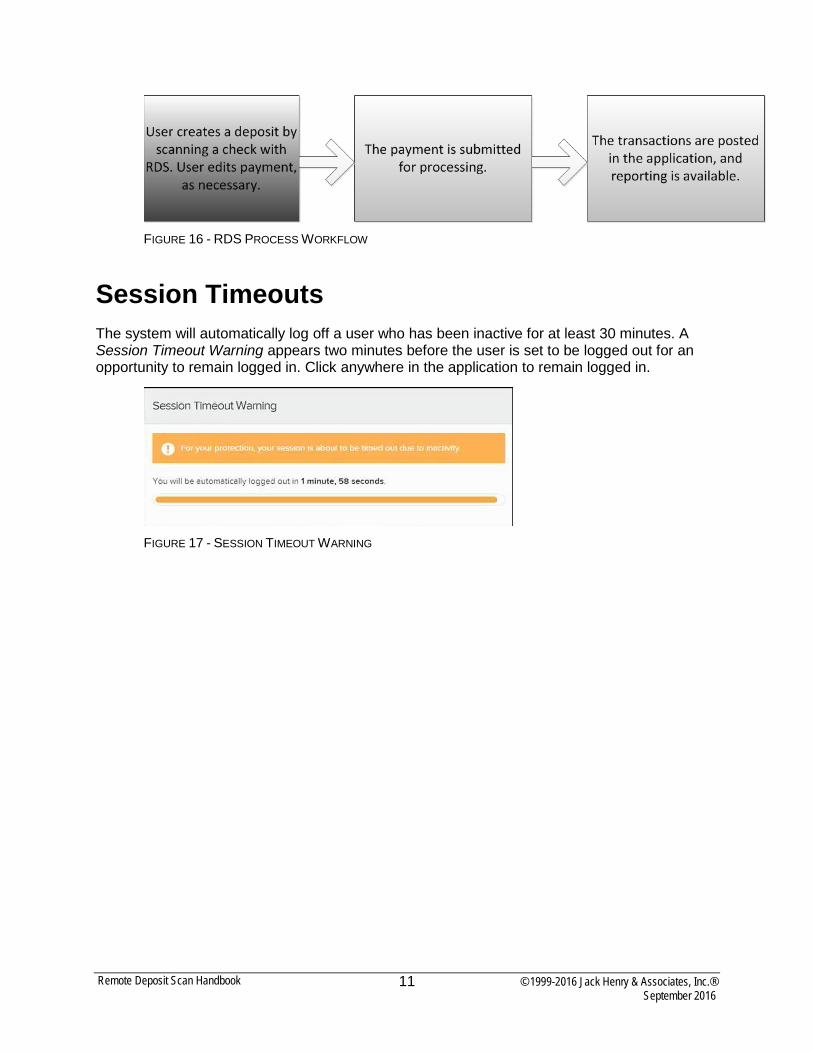
Process Workflow The below figure describes the process for making a deposit using the Remote Deposit Scan application.
© 1999-2016 Jack Henry & Associates, Inc.®
11 September 2016
Remote Deposit Scan Handbook
FIGURE 16 - RDS PROCESS WORKFLOW
Session Timeouts The system will automatically log off a user who has been inactive for at least 30 minutes. A Session Timeout Warning appears two minutes before the user is set to be logged out for an opportunity to remain logged in. Click anywhere in the application to remain logged in.
FIGURE 17 - SESSION TIMEOUT WARNING

© 1999-2016 Jack Henry & Associates, Inc.®
12 September 2016
Remote Deposit Scan Handbook
Logging In Your admin user will provide you with a URL address. Save this URL to your favorites, as it is a route of access into the system. A user name, temporary password, and company name will also be provided so that you may log in to the system. Only the passwords are case-sensitive.
1. Once at the provided URL address, complete the User Name, Password, and Company fields. Click Login.
2. The system will prompt you to change your password. Passwords expire every 90 days and are case-sensitive. Use the following guidelines when creating a new password:
• At least 1 uppercase letter
• At least 1 lowercase letter
• At least 1 number
• 8-15 characters in length 3. Click Update Password.
Creating a Secret Question A secret question is a tool used when you forget your password and can have another temporary password generated and sent to an email address. Without an email address in a user’s profile, that user will not be able to answer a secret question for a new password for access into the system. The Merchant Admin will need to manually edit/enter an email address for each merchant user, so that merchant user has the option to request a new password by answering a secret question in the application. Secret questions do not need to be a complete question or contain a question mark. Secret questions and answer are not case-sensitive fields. Once an admin has entered an email address for the merchant user profile, use the following steps to configure the secret question that will be asked of the user, before a new password can be generated and sent to the applicable email address. If the secret question is answered correctly, you will receive an email with a new temporary password.
NOTE: Single sign-on users do not need to set up a secret question.
1. Log in to the application, and select the user menu | My Settings.
FIGURE 18 - MY SETTINGS OPTION

© 1999-2016 Jack Henry & Associates, Inc.®
13 September 2016
Remote Deposit Scan Handbook
2. The system will prompt you for your current login password in order to reach the My Settings page. Once there, make changes to the Change Password, Secret Question, and/or Authorized Caller sections, as needed. Select Update when finished.
FIGURE 19 - MY SETTINGS PAGE
Choosing an Identification Phrase The EPS Support team answers questions about EPS products in the event you need additional help with an application. EPS takes support-related calls from users who have been designated as an authorized caller by the Admin user. If you have been designated as an authorized caller, you will need to set up an identification phrase and answer to verify your status when calling EPS Support for assistance. Authorized callers: For specific questions about an application, please contact our support team at 877-542-2244 or at [email protected]
NOTE: Non-authorized callers who contact EPS Support will be referred back to their first line of support.
1. Log in to the application, and select the user menu | My Settings. 2. The system will prompt you for your current login password in order to reach the My
Settings page. Make changes to the Identification Phrase sections, as needed. 3. Type the answer to the question in the Enter New Identification Response field, and
again in the Confirm New Identification Response field. EPS Support will verify this answer when you call. From this page, you can also make changes to your password or secret question and answer if needed.
4. Select Update when finished.
© 1999-2016 Jack Henry & Associates, Inc.®
14 September 2016
Remote Deposit Scan Handbook
Installing Device Control If you are accessing the application for the first time, you will need to install Device Control, a feature used to manage your scanner(s). Device Control will need to be installed before you can begin making deposits.
NOTE: If you have already installed Device Control via instructions from your financial institution or from the Scanner Interface Conversion: Remote Deposit Scan document, you may skip the following steps and proceed to the next section of this document.
1. Navigate to your financial institution’s application URL, and complete the User Name, Password, and Company fields. Select Login.
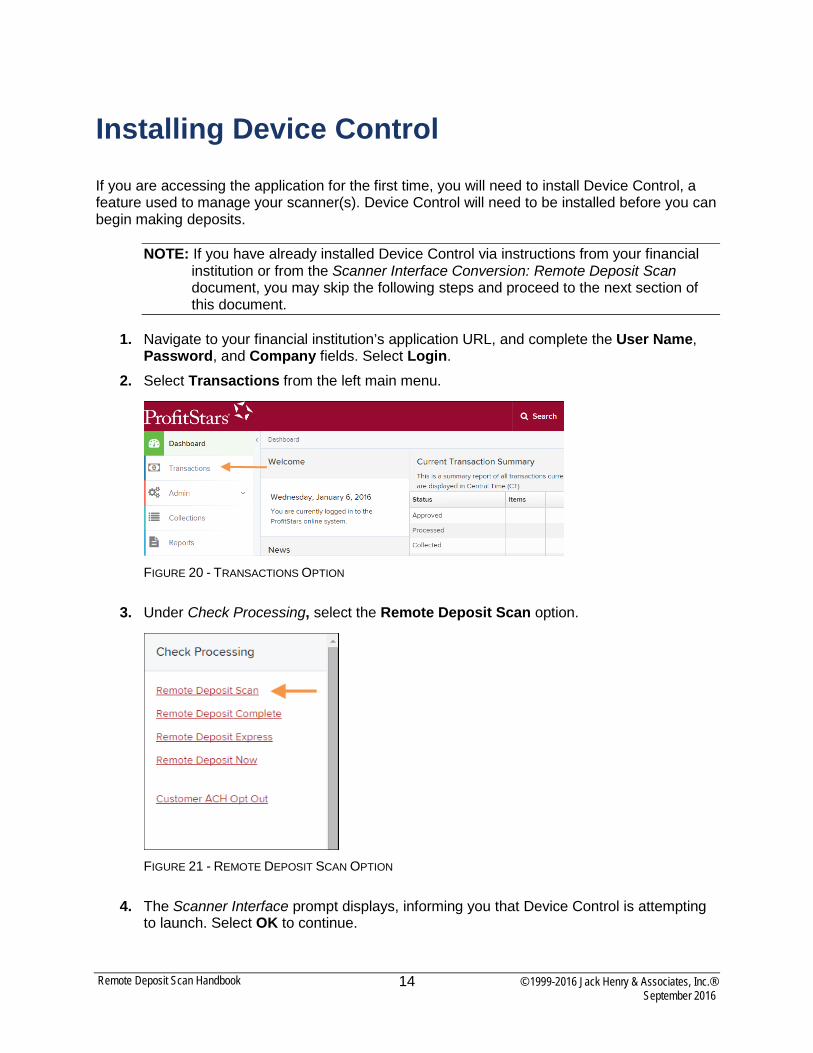
2. Select Transactions from the left main menu.
FIGURE 20 - TRANSACTIONS OPTION
3. Under Check Processing, select the Remote Deposit Scan option.
FIGURE 21 - REMOTE DEPOSIT SCAN OPTION
4. The Scanner Interface prompt displays, informing you that Device Control is attempting to launch. Select OK to continue.

© 1999-2016 Jack Henry & Associates, Inc.®
15 September 2016
Remote Deposit Scan Handbook
FIGURE 22 - CONFIRMATION TO LAUNCH DEVICE CONTROL
5. The system will prompt you to begin installing Device Control. Select Install to continue.
FIGURE 23 - PROMPT TO INSTALL DEVICE CONTROL
6. The Device Control will check for any browser updates that may be necessary. If you do not have a group policy conflict, please proceed to the next step. If you have a group policy that may conflict with any browser setting updates, a message will appear (see below). Paste the error details (now placed on your computer clipboard) into an email and/or document for your technical support staff to view. Once this issue has been resolved, retry the upgrade.
FIGURE 24 - BROWSER SETTING GROUP POLICY ERROR
7. The Internet Browser Settings Update window will display. Read the agreement, and select Accept to acknowledge and agree to the terms described.

© 1999-2016 Jack Henry & Associates, Inc.®
16 September 2016
Remote Deposit Scan Handbook
FIGURE 25 - INTERNET BROWSER SETTINGS UPDATE WINDOW
8. The system will ask you to log out of the application. After logging out of the portal, close all windows for Internet Explorer or Google Chrome. Select OK to continue.
FIGURE 26 - PROMPT TO LOG OUT OF THE APPLICATION AND CLOSE ALL BROWSER WINDOWS
FIGURE 27 - PROMPT TO LOG OUT OF THE APPLICATION AND CLOSE CHROME INSTANCES
9. Restart your computer. After you have restarted your computer, you may log in to the application and select Transactions.
10. Under Check Processing, select Remote Deposit Scan. Device Control will initialize. Select which scanner and model you wish to install for use, and click Install.

© 1999-2016 Jack Henry & Associates, Inc.®
17 September 2016
Remote Deposit Scan Handbook
FIGURE 28 - SELECTING A DEVICE AND MODEL
11. The Add/Remove Devices window displays. Select the scanner you wish to add and select Install.
FIGURE 29 - ADD/REMOVE DEVICES
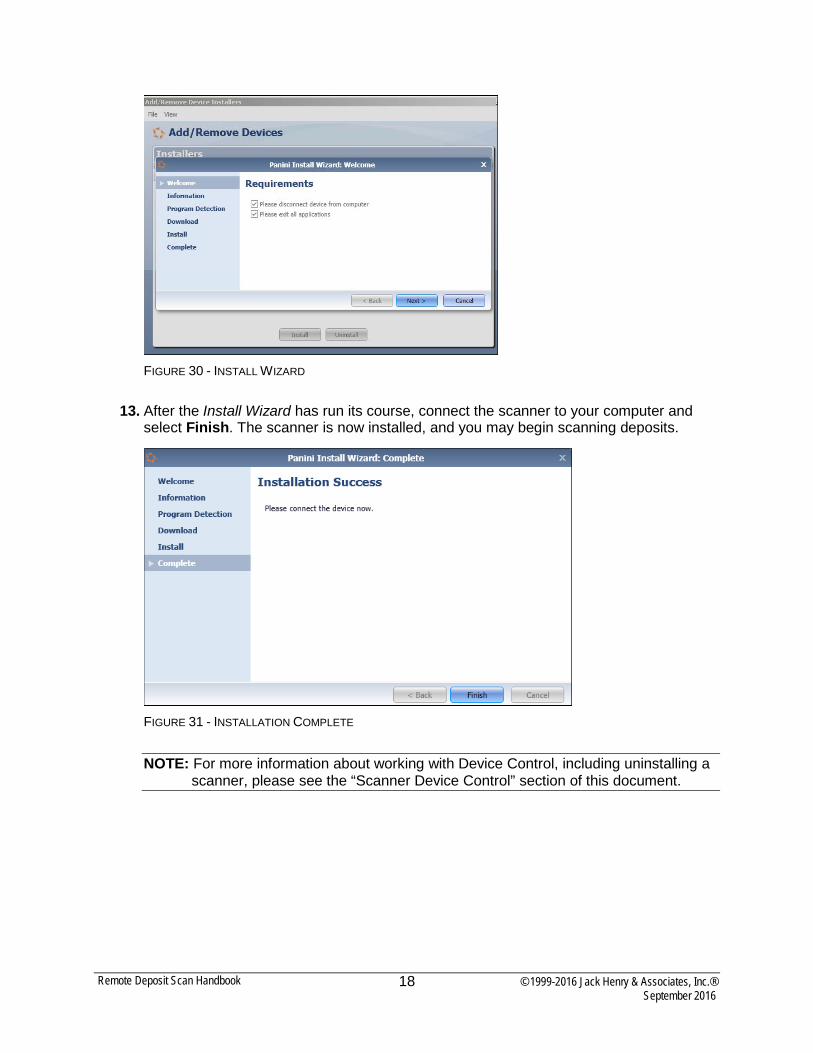
12. The Install Wizard tool appears. Disconnect the scanner’s USB or power cable from your computer, and exit all other applications. Select Next in the Install Wizard tool to continue.
© 1999-2016 Jack Henry & Associates, Inc.®
18 September 2016
Remote Deposit Scan Handbook
FIGURE 30 - INSTALL WIZARD
13. After the Install Wizard has run its course, connect the scanner to your computer and select Finish. The scanner is now installed, and you may begin scanning deposits.
FIGURE 31 - INSTALLATION COMPLETE
NOTE: For more information about working with Device Control, including uninstalling a scanner, please see the “Scanner Device Control” section of this document.

© 1999-2016 Jack Henry & Associates, Inc.®
19 September 2016
Remote Deposit Scan Handbook
Working with Remote Deposit Scan The Remote Deposit Scan application allows you to scan one check at a time. The scanner will read the MICR line of the check and scan the front and back sides of the check. In the system application, you will have the opportunity to specify an account location, name on account, payment origin, and amount of the item (discussed in this section) for deposit. The more information you enter around a transaction, the easier it will be to locate that item at a later time. Depending on the settings with your financial institution, the scanner may frank the front of the check with the words, Electronically Presented. You can opt to scan a second document (e.g., check stub or invoice) and/or key additional information to associate with the check and/or the customer who wrote the check. A deposit can be in any number of statuses when it enters the system. The table below lists the potential status of any one transaction within the system.
Status Definition
Approved The transaction has been verified and will be processed at the designated cut-off time.
Processed The transaction has been transmitted to the appropriate network (ACH or Check 21). Changes can no longer be made, and the transaction can no longer be voided.
Collected (ACH Only) The transaction, originally returned NSF, has been re-presented to the Fed by ProfitStars, and funds were recovered.
Awaiting Capture Status for credit card transactions only.
Awaiting Approval The transaction has been verified, but the amount of the transaction exceeded the Dual Authorization limit of the user who created it. An authorized approver must review and either approve or void the transaction.
Declined The transaction has been declined by the EPS system and will not be processed. The transaction exceeded either Dual Authorization or Velocity limits.
Voided The transaction has been voided and will not be processed. A transaction may not be voided once the item is in the Processed status.
Error An internal error has occurred within the EPS system. Contact your first line of support.
In Collection (ACH Only) The transaction, returned NSF, is in the process of being re-presented to the Fed by ProfitStars.
In Research May be used by your support group.

© 1999-2016 Jack Henry & Associates, Inc.®
20 September 2016
Remote Deposit Scan Handbook
Status Definition
Uncollected NSF (ACH Only) The transaction was returned to ProfitStars NSF by the Fed, and funds could not be recovered.
Suspended The transaction has been verified but has exceeded Velocity limits.
Disputed (ACH Only) The transaction was returned to ProfitStars by the Fed because the account holder at the receiving financial institution has disputed its validity. The transaction will be charged back (reversed).
Invalid/Closed Account (ACH Only) The transaction was returned to ProfitStars by the Fed because the account number at the receiving financial institution was invalid or because the account was closed.
Resolved The transaction has been moved into a Resolved status by a user to indicate that no further action related to the transaction is required. Transactions can be moved into a Resolved status from a status of Declined, Voided, Invalid/Closed Account, Disputed, Uncollected NSF, Error, or In Research.
1. Log in to the system and select Transactions from the left main menu. 2. Under Check Processing, select Remote Deposit Scan. 3. If Device Control has not already launched, the system will ask you to confirm launching
Device Control. Select OK to continue.
FIGURE 32 - PROMPT TO LAUNCH DEVICE CONTROL
4. The Check Processing: Remote Deposit Scan page appears, and Device Control, the feature used to help manage your scanning device, also appears at the bottom of your page. Complete the required fields designated by an asterisk:
• Location: Select the account location where the check will be processed. Once you select a location, the Device Control will update to a ready status.
• Payment Origin: Select the type of payment.
• Name on Account (Grayed-out): A field for the name of the check writer. The information for this field will auto-populate for a previously created customer profile in the system once the check is scanned.
• Amount: Enter the amount for the check.

© 1999-2016 Jack Henry & Associates, Inc.®
21 September 2016
Remote Deposit Scan Handbook
FIGURE 33 - RDS FIELDS
NOTE: Customer data fields will remain unavailable until a check has been scanned.
5. Place the check in the scanner, and scan the check item. 6. If the check could not be read properly, a MICR Repair prompt will appear. Select the
expand icon next to Repair Instructions for more help on how to repair a MICR.
FIGURE 34 - MICR REPAIR WINDOW
a. Use the window provided to repair the MICR line. A key is provided to enter up to 85 characters from the MICR into the repair field. When finished, select Repair Complete OR
b. You may select to close the prompt and rescan the check by selecting Repair Complete, placing the check back into the scanner, and selecting Rescan on the Check Processing page.

© 1999-2016 Jack Henry & Associates, Inc.®
22 September 2016
Remote Deposit Scan Handbook
FIGURE 35 - RESCAN OPTION
NOTE: At any time, you may attempt to repair the MICR line by selecting Repair to the right of the MICR field.
FIGURE 36 - REPAIR OPTION FOR MICR LINE
7. If there is more than one customer record available for an account, use the drop-menu in the Customer panel to select the appropriate customer record.

© 1999-2016 Jack Henry & Associates, Inc.®
23 September 2016
Remote Deposit Scan Handbook
FIGURE 37 - SELECTING A CUSTOMER FOR AN ACCOUNT
8. At the bottom of the Customer panel, you have the option to Edit a customer, Add a new customer to be associated with the account information, or Search for a currently existing customer to associate with the account information on the deposit item. The following fields are typically used to generate a customer record when filling out customer data. The more data you fill out for a customer record, the easier it will be to locate that customer in the system at a later time.
• Name on Account
• Customer Number
• First Name
• Last Name
• Address
• Daytime Phone
• Evening Phone

© 1999-2016 Jack Henry & Associates, Inc.®
24 September 2016
Remote Deposit Scan Handbook
FIGURE 38 - CUSTOMER PANEL
NOTE: You may request up to three additional information fields for the customer to complete. These fields can be required or optional and can be requested by sending an inquiry to your financial institution.
The following table describes the optional fields available to complete for a customer when scanning a check, listed in alphabetical order.
Status Definition
Address This field contains the mailing address of the customer. This field will repopulate the next time a check from the same customer is scanned.
Amount The amount of the transaction as a two-decimal-place number (for example, XX.XX).
Back of Check When clicked, the back image of the check displays.
Check Number This field contains the check serial number captured when a check has been scanned.
City Contains the city where the customer resides. This field will repopulate the next time a check or credit card from the same customer is scanned.

© 1999-2016 Jack Henry & Associates, Inc.®
25 September 2016
Remote Deposit Scan Handbook
Status Definition
Company Name This field replaces the Last Name field when the Customer Type is set to Business. This field will repopulate the next time a check or credit card from the same customer is scanned, and users can search by this field.
Country This field contains the country where the customer resides and will repopulate the next time a check or credit card from the same customer is scanned. This field does not appear on reports.
Customer Number This field must be unique for each customer. It will repopulate the next time a check or credit card from the same customer is scanned. This field is available to appear on reports, and users can search by this field to populate personal information when this customer makes a deposit in the future.
Customer Type This is a required field that defaults to Individual. This field can be changed to Business depending on the type of customer.
Daytime Phone This field contains the customer’s daytime phone number. It will repopulate the next time a check or credit card from the same customer is scanned. This field does not appear on reports.
Description This field is informational and does not appear on reports, but will appear on the Transaction Details page.
Driver’s License This field contains the driver’s license number of the customer. This field will repopulate the next time a check or credit card from the same customer is scanned. This field does not appear on reports.
Effective Date This field contains the date the transaction is to be processed.
Email Address This field contains the email address of the customer. It will repopulate the next time a check or credit card from the same customer is scanned. This field will not appear on reports.
Evening Phone This field contains the customer’s evening phone number. It will repopulate the next time a check or credit card from the same customer is scanned. This field does not print on reports.
Fax Number This field contains the customer’s fax number. This field will repopulate the next time a check or credit card from the same customer is scanned. This field does not appear on reports.
Federal Tax ID No. This field replaces the Social Security No. field when the Customer Type field is set to Business. It will repopulate the next time a check or credit card from the same customer is scanned. This field does not appear on reports.
First Name This field contains the customer’s first name and will repopulate the next time a check or credit card from the same customer is scanned. This field does not appear on reports.

© 1999-2016 Jack Henry & Associates, Inc.®
26 September 2016
Remote Deposit Scan Handbook
Status Definition
Front of Check When clicked, the image of the front of the check displays.
Supporting Image When clicked, the system will prompt you to scan a second document, such as a check stub or invoice, to associate with the check, granted the document fits through the scanner.
Last Name This field contains the customer’s last name and will repopulate the next time a check or credit card from the same customer is scanned. Users can search by this field. This field does not appear on reports.
Location This field contains the account to be debited/credited with the payment. This is a required field.
Name on Account This field contains the name of the person from whom the item was received or the actual name used on the credit card or bank account. This field will repopulate the next time a check or credit card with the same account information is scanned and will appear on reports.
Payment Origin This field is required if displayed and shows a value based on input from the Payment Type field from the New Deposit page. It will contain one of the following:
• Mailed-In • Drop Box • Retail/Point of Purchase Sale • Back office
Postal Code Contains the zip code of the merchant residence or business.
Process Payment When clicked, a response message will appear as to whether the transaction has been approved to be processed.
Rescan When clicked, the system will prompt for the check to be scanned again.
Repair When clicked, a repair page displays, and the MICR Repair Entry field allows users to fix the MICR line of a check.
Social Security No. This field contains the Social Security Number of the customer. This field will repopulate the next time a check or credit card from the same customer is scanned. This field does not appear on reports.
State This field contains the state from which the customer’s driver’s license was issued. This field will repopulate the next time a check or credit card from the same customer is scanned. This field does not appear on reports.
Suite/Apt. # This field contains the suite or apartment number of the customer. This field will repopulate the next time a check or credit card from the same customer is scanned. This field does not appear on reports.

© 1999-2016 Jack Henry & Associates, Inc.®
27 September 2016
Remote Deposit Scan Handbook
Status Definition
Transaction Number This field must be unique for each transaction processed. It will be automatically populated if left blank and will appear on reports.
Zip/Postal This optional key entry field contains the zip code or postal code of your customer and will repopulate the next time a check from the same customer is scanned. This field is not available to appear on reports.
9. Select Front of Check to view the front image of the item. Select Back of Check to
view the back image of the item. 10. Notice whether your settings have determined if franking the check is automatic,
disabled, or whether you have the option to frank an item. In the below example, franking is set to automatic for each item.
FIGURE 39 - FRANKING SETTING FOR SCANNED CHECKS
11. If an additional image needs to accompany the item, select Supporting Image, and scan the document through the scanner.
FIGURE 40 - IMAGE 2 OPTION

© 1999-2016 Jack Henry & Associates, Inc.®
28 September 2016
Remote Deposit Scan Handbook
12. When ready to complete the payment, select Process Payment. The system will have a prompt confirming the submission. Select OK to continue.
FIGURE 41 - PAYMENT PROCESSING CONFIRMATION
The following list describes all the potential prompts the system may provide when attempting to submit a check.
• Internal Error – This message indicates an internal error has occurred in the system. Please contact your first line of support.
• Invalid MICR – This message indicates that the MICR line is invalid, specifically the routing & transit number of the financial institution. Acknowledged account numbers are between 4-17 numerical characters.
• Transaction Approved – This response indicates that the transaction payment information has been verified; the transaction will be added to the Approved status to be processed later.
• Transaction Not Approved – This response appears for one of the following reasons.
• A Velocity (transaction) limit has been met or exceeded. This item will be placed in the Suspended transaction status.
• A transaction has been declined due to a Dual Authorization setting on the processor. This item will appear in the Declined transaction status.
• A transaction has been declined due to a transaction limit set by your financial institution.

© 1999-2016 Jack Henry & Associates, Inc.®
29 September 2016
Remote Deposit Scan Handbook
Editing an Approved Transaction A transaction that has been approved but not yet processed or voided can be edited by the dollar amount and/or deposit date (Effective Date). Once processed at the designated cut-off time, transactions will be deposited as entered. Any edits performed after processing will not be reflected. Upon logging in to the application, the Dashboard displays with the Current Transaction Summary showing the status of all transactions within the past 60 days. A transaction can be in any one status during processing.
FIGURE 42 -DASHBOARD WITH TRANSACTION STATUS SUMMARY
Below is a table listing all the potential statuses for a transaction.
Status Definition
Approved The transaction has been verified and will be processed at the designated cut-off time.
Processed The transaction has been transmitted to the appropriate network (ACH or Check 21). Changes can no longer be made, and the transaction can no longer be voided.
Collected (ACH Only) The transaction, originally returned NSF, has been re-presented to the Fed by ProfitStars, and funds were recovered.
Awaiting Capture Status for credit card transactions only.

© 1999-2016 Jack Henry & Associates, Inc.®
30 September 2016
Remote Deposit Scan Handbook
Status Definition
Awaiting Approval The transaction has been verified, but the amount of the transaction exceeded the Dual Authorization limit of the user who created it. An authorized approver must review and then either approve or void the transaction.
Declined The transaction has been declined by the EPS system and will not be processed. The transaction exceeded either Dual Authorization limits or Velocity limits.
Voided The transaction has been voided and will not be processed. Transactions may not be voided once they are in the Processed status.
Error An internal error has occurred within the EPS system. Contact your first line of support.
In Collection (ACH Only) The transaction, returned NSF, is in the process of being re-presented to the Fed by ProfitStars.
In Research May be used by your support group.
Uncollected NSF (ACH Only) The transaction was returned to ProfitStars NSF by the Fed, and funds could not be recovered.
Suspended The transaction has been verified, but it has exceeded Velocity limits.
Disputed (ACH Only) The transaction was returned to ProfitStars by the Fed because the account holder at the receiving financial institution has disputed its validity. The transaction will be charged back (reversed).
Invalid/Closed Account (ACH Only) The transaction was returned to ProfitStars by the Fed because the account number at the receiving financial institution was invalid or because the account was closed.
Resolved The transaction has been moved into a Resolved status by a user to indicate that no further action related to the transaction is required. Transactions can be moved into a Resolved status from a status of Declined, Voided, Invalid/Closed Account, Disputed, Uncollected NSF, Error, or In Research.
NOTE: Selecting any one status from the Current Transaction Summary page will automatically generate a report for all transactions within that status for the current day. For more on reports, please see the User Reports Manual.
1. To edit a transaction, log in to the application, and select the Approved link from the Current Transaction Summary.
2. Select the View link next to the transaction you would like to edit.

© 1999-2016 Jack Henry & Associates, Inc.®
31 September 2016
Remote Deposit Scan Handbook
FIGURE 43 - VIEW COLUMN FOR APPROVED STATUS TRANSACTIONS
3. The Transaction Details page appears. To edit the transaction amount, select the Edit (or pencil icon) to the left of the Sale field (as shown below).
FIGURE 44 - TRANSACTION DETAILS PAGE WITH EDIT OPTION

© 1999-2016 Jack Henry & Associates, Inc.®
32 September 2016
Remote Deposit Scan Handbook
4. The Sale amount will become an editable field where you can enter a new amount. Enter a new amount and a Reason for changing the amount. Select the save link when finished. Selecting the red X will cancel the change.
FIGURE 45 - EDITING A TRANSACTION AMOUNT
5. To change the date the transaction will be processed, select Edit next to the Effective Date field.
FIGURE 46 - EDITING AN EFFECTIVE DATE
6. The Effective Date field will become a workable field where you can enter a new date. A calendar option appears for date selection, or you may type in a date in MM/DD/YYYY format. Enter a new date and the Reason for changing the effective date. Select the check mark to save changes.
FIGURE 47 - SAVING A NEW EFFECTIVE DATE

© 1999-2016 Jack Henry & Associates, Inc.®
33 September 2016
Remote Deposit Scan Handbook
Voiding a Transaction A transaction can be voided as long as it is still in a status of Approved, Awaiting Approval, or Suspended. Recall that an approved transaction will moved to the Processed status at the end of the closing day for your financial institution.
1. Log in to the application, and select a status from the Current Transaction Summary page that has not yet been processed. For example, click the Approved status link.
2. A report of approved transactions displays. Select the View link next to the transaction you would like to void.
3. From the Transaction Details page, select Actions | Void.
FIGURE 48 - VOIDING A TRANSACTION
4. The system will ask you to confirm voiding the transaction. Select Void. The transaction will be voided and appear as a Voided status on the Current Transaction Summary page until it is resolved.
FIGURE 49 - CONFIRMING VOIDING A TRANSACTION
Resolving Transactions Resolving a transaction means indicating a reason why the transaction was voided for communication and auditing purposes. Once a transaction has been voided, it will appear in the Voided status, where you can opt to resolve the transaction.
1. Log in to the application and select the Voided status from the Current Transaction Summary on the Dashboard page of the application.
2. Select the View icon for the transaction you wish to resolve. 3. From the Transaction Details page, select Actions. Enter a reason for resolving the
transaction. For example, the transaction was deposited in the wrong account. Select Resolve. The transaction will now appear under the Resolved status in the Current Transaction Summary.

© 1999-2016 Jack Henry & Associates, Inc.®
34 September 2016
Remote Deposit Scan Handbook
FIGURE 50 - MARK TRANSACTION RESOLVED OPTION
Bulk Check Operations The system will allow you to take action on multiple check items, at once. Bulk check operations are available depending on a transaction’s status. You will need the Accounting privilege and Bulk Operations role to perform the following tasks.
Bulk Approve You may bulk approve transactions that are in the Awaiting Approval status.
1. Log in to the system, and select Transactions. 2. Under the Bulk Check Operations heading, select Approve.
FIGURE 51 - BULK APPROVE OPTION
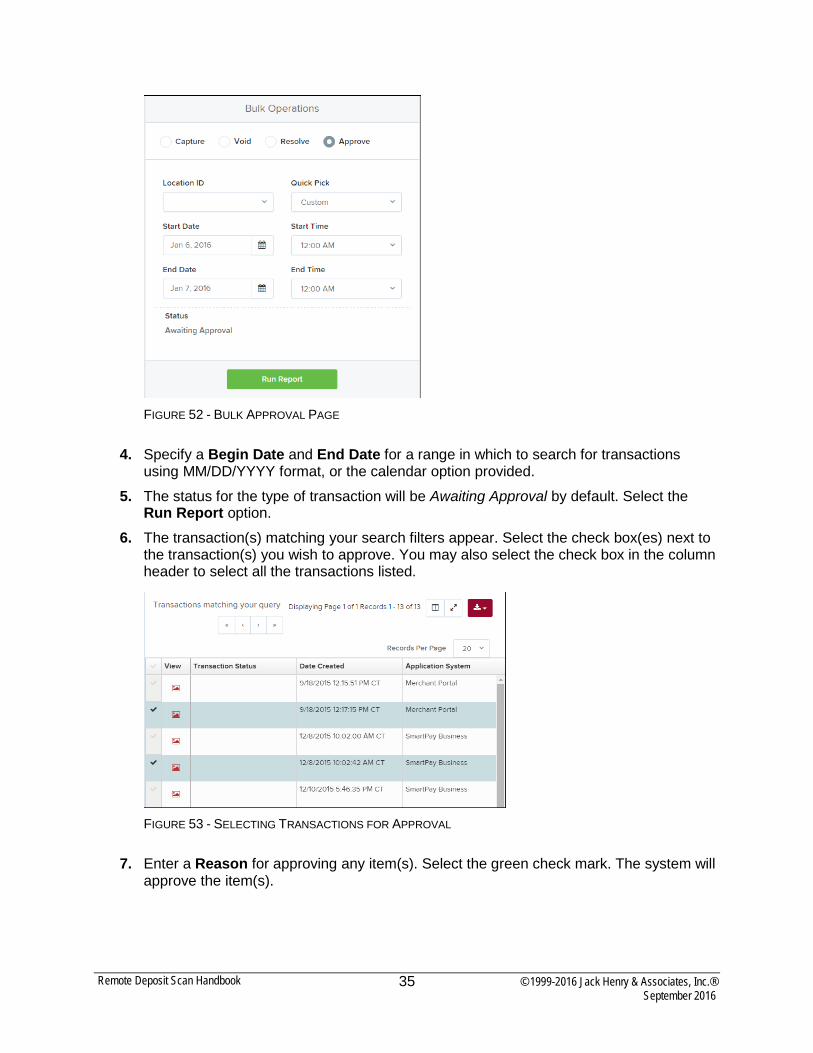
3. The Bulk Operations page appears. Specify a Location from which to search for transactions. Specify a Begin Date and End Date for a range in which to search for transactions using MM/DD/YYYY format, or the calendar option provided.
© 1999-2016 Jack Henry & Associates, Inc.®
35 September 2016
Remote Deposit Scan Handbook
FIGURE 52 - BULK APPROVAL PAGE
4. Specify a Begin Date and End Date for a range in which to search for transactions using MM/DD/YYYY format, or the calendar option provided.
5. The status for the type of transaction will be Awaiting Approval by default. Select the Run Report option.
6. The transaction(s) matching your search filters appear. Select the check box(es) next to the transaction(s) you wish to approve. You may also select the check box in the column header to select all the transactions listed.
FIGURE 53 - SELECTING TRANSACTIONS FOR APPROVAL
7. Enter a Reason for approving any item(s). Select the green check mark. The system will approve the item(s).

© 1999-2016 Jack Henry & Associates, Inc.®
36 September 2016
Remote Deposit Scan Handbook
Bulk Capture You may search for and capture transactions in the Awaiting Capture status.
1. Log in to the system, and select Transactions. 2. Under the Bulk Check Operations heading, select Capture. 3. The Bulk Capture page appears. Select a Location from which to search for
transactions. Specify a Begin Date and End Date for a range in which to search for transactions using a MM/DD/YYYY format, or the calendar option provided.
4. Select Run Report. The transaction(s) matching your search filters appear. Select the check box(es) next to the transactions you wish to capture. You may also select the check box in the column header to select all the transactions listed.
5. Enter a Reason for capturing any item(s). Select the Capture option.
Bulk Void The Bulk Void option can be used for transactions in the Approved, Awaiting Capture, Awaiting Approval, or Suspended status.
1. Log in to the system, and select Transactions. 2. Under Bulk Check Operations, select Void. 3. The Bulk Void page appears. Select a Location from which to search for transactions.
Specify a Begin Date and End Date for a range in which to search for transactions using a MM/DD/YYYY format, or the calendar option provided.
4. Select Run Report. The transaction(s) matching your search filters appear. Select the check box(es) next to the transactions you wish to void. You may also select the check box in the column header to select all the transactions listed
5. Enter a Reason for voiding any items. Select the Void option.
Bulk Resolve You may resolve multiple transactions with a status of Declined, Voided, Invalid/Closed Account, Uncollected NSF, Disputed, Error, or In Research.
1. Log in to the system, and select Transactions. 2. Under the Bulk Check Operations heading, select Resolve. 3. The Bulk Resolve page appears. Specify a Location from which to search for
transactions. Specify a Begin Date and End Date for a range in which to search for transactions using a MM/DD/YYYY format, or the calendar option provided.
5. Select Run Report. The transaction(s) matching your search filters appear. Select the check box(es) next to the transactions you wish to void. You may also select the check box in the column header to select all the transactions listed.
4. Enter a Reason for resolving these transactions, and select Resolve.

© 1999-2016 Jack Henry & Associates, Inc.®
37 September 2016
Remote Deposit Scan Handbook
Scanner Device Control
Device Control Indicators The Device Control can be in any one of several statuses. Look to your hidden icons on the bottom navigational bar to view the status of the Device Control. In the following figure, the Device Control icon is yellow, indicating that it is in use.
FIGURE 54 - DEVICE CONTROL ICON
• A green icon indicates the Device Control services are available.
• A black icon indicates that the Device Control services are offline.
• A red icon indicates that an error has occurred with the Device Control.
1. Select the Device Control icon to bring up the Device Control Information window.
FIGURE 55 - DEVICE CONTROL MENU

© 1999-2016 Jack Henry & Associates, Inc.®
38 September 2016
Remote Deposit Scan Handbook
2. To stop the Device Control, select Service | Stop. The Device Control icon and window will appear black.
FIGURE 56 - STOP DEVICE CONTROL SERVICE
FIGURE 57 - DEVICE CONTROL, BLACK
© 1999-2016 Jack Henry & Associates, Inc.®
39 September 2016
Remote Deposit Scan Handbook
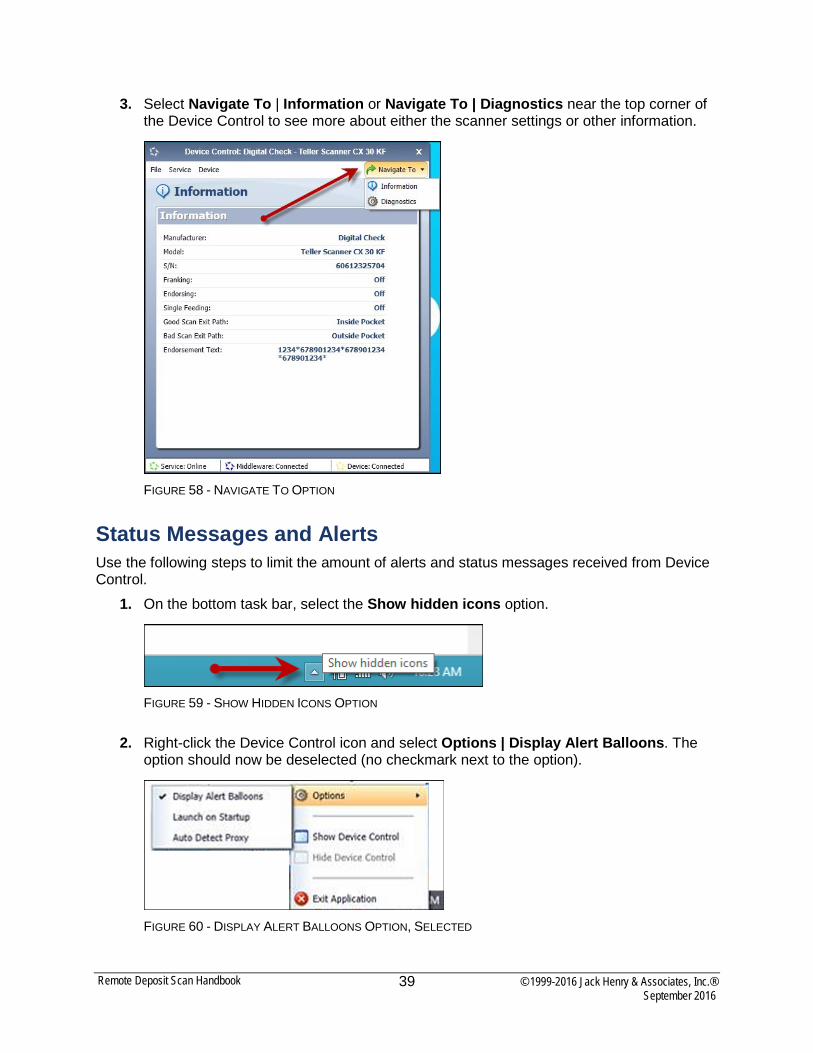
3. Select Navigate To | Information or Navigate To | Diagnostics near the top corner of the Device Control to see more about either the scanner settings or other information.
FIGURE 58 - NAVIGATE TO OPTION
Status Messages and Alerts Use the following steps to limit the amount of alerts and status messages received from Device Control.
1. On the bottom task bar, select the Show hidden icons option.
FIGURE 59 - SHOW HIDDEN ICONS OPTION
2. Right-click the Device Control icon and select Options | Display Alert Balloons. The option should now be deselected (no checkmark next to the option).
FIGURE 60 - DISPLAY ALERT BALLOONS OPTION, SELECTED

© 1999-2016 Jack Henry & Associates, Inc.®
40 September 2016
Remote Deposit Scan Handbook
FIGURE 61 - DISPLAY ALERT BALLOONS, DESELECTED
Changing a Scanner To select a different scanner with the Device Control, follow the steps below.
1. From the Device Control Information window, select Service | Stop.
FIGURE 62 - STOP DEVICE CONTROL SERVICE
2. Select Device | Chooser.

© 1999-2016 Jack Henry & Associates, Inc.®
41 September 2016
Remote Deposit Scan Handbook
FIGURE 63 – DEVICE | CHOOSER OPTION
3. The Choose a Device Manufacturer window appears. Select a manufacturer for the scanner you wish to utilize. You may also opt to select a particular model.
FIGURE 64 - SELECTING A NEW SCANNER AND MODEL
4. If the scanner and model you selected has not yet been installed, the system will display an indicator, Not Installed! You have the option of installing this scanner if applicable.
© 1999-2016 Jack Henry & Associates, Inc.®
42 September 2016
Remote Deposit Scan Handbook
FIGURE 65 - SELECTED DEVICE NOT INSTALLED
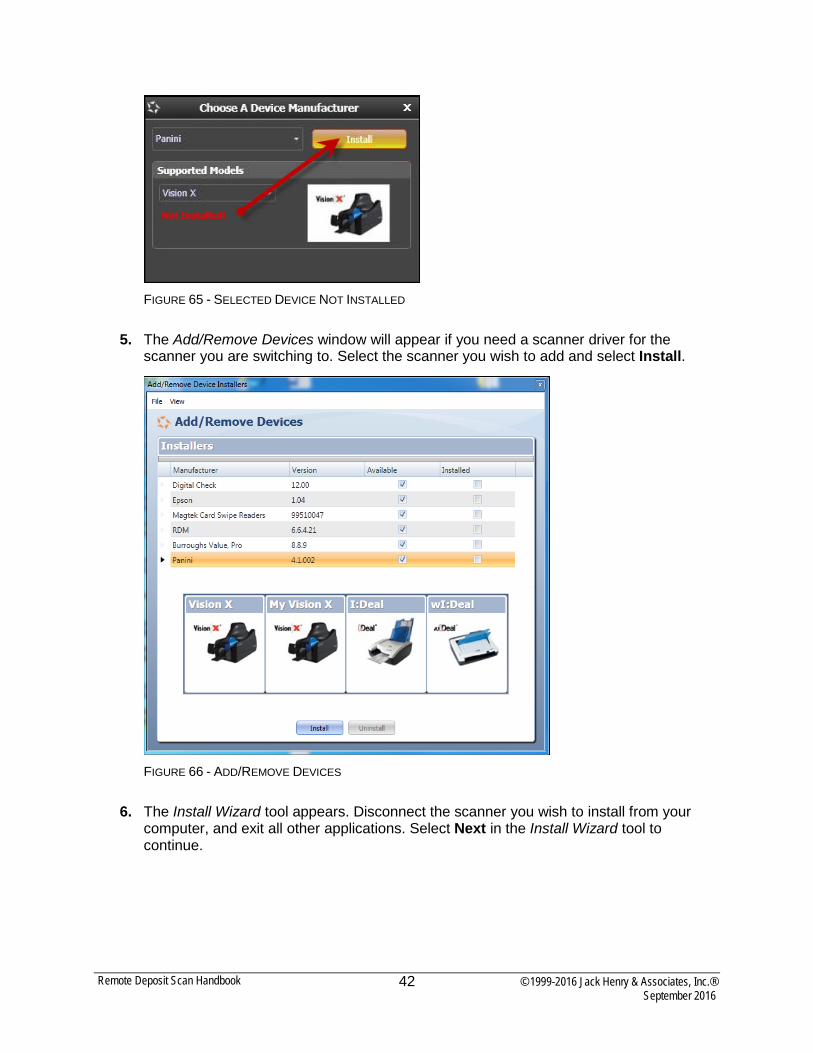
5. The Add/Remove Devices window will appear if you need a scanner driver for the scanner you are switching to. Select the scanner you wish to add and select Install.
FIGURE 66 - ADD/REMOVE DEVICES
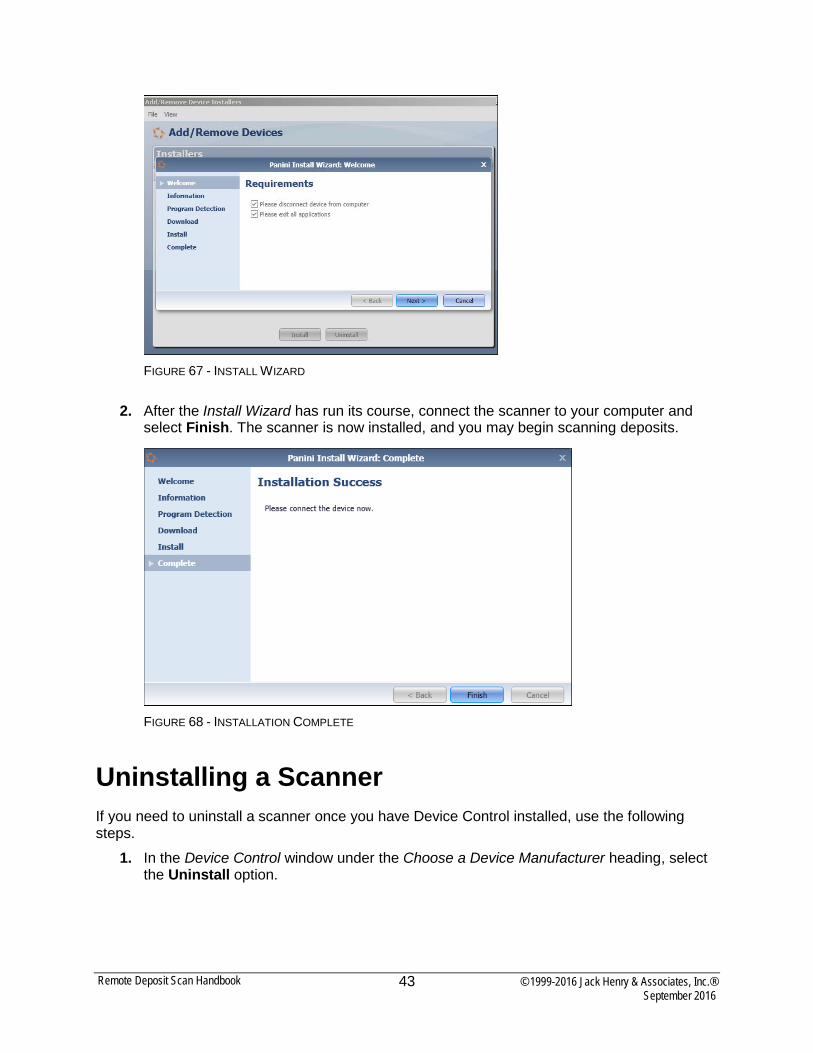
6. The Install Wizard tool appears. Disconnect the scanner you wish to install from your computer, and exit all other applications. Select Next in the Install Wizard tool to continue.
© 1999-2016 Jack Henry & Associates, Inc.®
43 September 2016
Remote Deposit Scan Handbook
FIGURE 67 - INSTALL WIZARD
2. After the Install Wizard has run its course, connect the scanner to your computer and select Finish. The scanner is now installed, and you may begin scanning deposits.
FIGURE 68 - INSTALLATION COMPLETE
Uninstalling a Scanner If you need to uninstall a scanner once you have Device Control installed, use the following steps.
1. In the Device Control window under the Choose a Device Manufacturer heading, select the Uninstall option.

© 1999-2016 Jack Henry & Associates, Inc.®
44 September 2016
Remote Deposit Scan Handbook
FIGURE 69 - UNINSTALL OPTION
7. The Add/Remove Devices page appears. Choose the scanner to uninstall, and select Uninstall.
FIGURE 70 - SELECTING A SCANNER WITH UNINSTALL OPTION
8. The Uninstall Wizard initiates. Complete the instructions, and select Next to continue.

© 1999-2016 Jack Henry & Associates, Inc.®
45 September 2016
Remote Deposit Scan Handbook
FIGURE 71 - UNINSTALL WIZARD WITH NEXT OPTION
9. The installer information for the scanner appears. Select Next to continue.
FIGURE 72 - UNINSTALL WIZARD WITH INSTALLER INFORMATION
10. The uninstallation process will complete. Select Next to continue.

© 1999-2016 Jack Henry & Associates, Inc.®
46 September 2016
Remote Deposit Scan Handbook
FIGURE 73 - UNINSTALL COMPLETE PROMPT
11. Once the process is complete, select Finish. The scanner you selected will now be uninstalled.
FIGURE 74 - UNINSTALL FINISH