Remote Access VPN Administration Guide R80 -...
164
18 September 2017 Administration Guide REMOTE ACCESS VPN R80.10 Classification: [Protected]
Transcript of Remote Access VPN Administration Guide R80 -...

18 September 2017
Administration Guide
REMOTE ACCESS VPN
R80.10
Clas
sific
atio
n: [P
rote
cted
]

© 2017 Check Point Software Technologies Ltd.
All rights reserved. This product and related documentation are protected by copyright and distributed under licensing restricting their use, copying, distribution, and decompilation. No part of this product or related documentation may be reproduced in any form or by any means without prior written authorization of Check Point. While every precaution has been taken in the preparation of this book, Check Point assumes no responsibility for errors or omissions. This publication and features described herein are subject to change without notice.
RESTRICTED RIGHTS LEGEND:
Use, duplication, or disclosure by the government is subject to restrictions as set forth in subparagraph (c)(1)(ii) of the Rights in Technical Data and Computer Software clause at DFARS 252.227-7013 and FAR 52.227-19.
TRADEMARKS:
Refer to the Copyright page http://www.checkpoint.com/copyright.html for a list of our trademarks.
Refer to the Third Party copyright notices http://www.checkpoint.com/3rd_party_copyright.html for a list of relevant copyrights and third-party licenses.

Important Information
Latest Software
We recommend that you install the most recent software release to stay up-to-date with the latest functional improvements, stability fixes, security enhancements and protection against new and evolving attacks.
Check Point R80.10
For more about this release, see the R80.10 home page http://supportcontent.checkpoint.com/solutions?id=sk111841.
Latest Version of this Document
Download the latest version of this document http://supportcontent.checkpoint.com/documentation_download?ID=53105.
To learn more, visit the Check Point Support Center http://supportcenter.checkpoint.com.
Feedback
Check Point is engaged in a continuous effort to improve its documentation.
Please help us by sending your comments mailto:[email protected]?subject=Feedback on Remote Access VPN R80.10 Administration Guide.
Searching in Multiple PDFs
To search for text in all the R80.10 PDF documents, download and extract the complete R80.10 documentation package http://downloads.checkpoint.com/dc/download.htm?ID=54846. Use Shift-Control-F in Adobe Reader or Foxit reader.
Revision History
Date Description
18 September 2017 Addition of CLI commands ("VPN CLI Commands" on page 163).
16 May 2017 First release of this document

Important Information
Remote Access VPN Administration Guide R80.10 | 4
SmartConsole Toolbars For a guided tour of SmartConsole, click What's New in the left bottom corner of SmartConsole.
Global Toolbar (top left of SmartConsole) Description and Keyboard Shortcut
The main SmartConsole Menu
The Objects menu.
Also leads to the Object Explorer Ctrl+E
Install policy on managed gateways
Ctrl+Shift+Enter
Navigation Toolbar (left side of SmartConsole) Description and Keyboard Shortcut
Gateways & Servers configuration view
Ctrl+1
Security Policies Access Control view
Security Policies Threat Prevention view
Ctrl+2
Logs & Monitor view
Ctrl+3
Manage & Settings view - review and configure the Security Management Server settings
Ctrl+4
Command Line Interface Button (left bottom corner of SmartConsole) Description and Keyboard Shortcut
Open a command line interface for management scripting and API
F9
What's New Button (left bottom corner of SmartConsole) Description and Keyboard Shortcut
Open a tour of the SmartConsole

Important Information
Remote Access VPN Administration Guide R80.10 | 5
Objects and Validations Tabs (right side of SmartConsole) Description
Objects Manage security and network objects
Validations Validation warnings and errors
System Information Area (bottom of SmartConsole) Description
Task List Management activities, such as policy installation tasks
Server Details The IP address of the Security Management Server
Connected Users
The administrators that are connected to the Security Management Server

Contents Important Information ................................................................................................... 3
SmartConsole Toolbars ............................................................................................ 4 Check Point VPN.......................................................................................................... 12
IPsec VPN ................................................................................................................ 12 Remote Access VPN ................................................................................................ 12
VPN Connectivity Modes ................................................................................................ 12 Sample Remote Access VPN Workflow .......................................................................... 13
VPN Components .................................................................................................... 14 Understanding the Terminology ............................................................................. 15 Establishing a Connection between a Remote User and a Security Gateway .......... 15
Getting Started with Remote Access ........................................................................... 17 Overview of the Remote Access Workflow .............................................................. 17 Basic Gateway Configuration .................................................................................. 17 Including Users in the Remote Access Community ................................................. 18 Configuring User Authentication ............................................................................. 19 Configuring VPN Access Rules for Remote Access ................................................. 19 Deploying Remote Access Clients ........................................................................... 20
Check Point Remote Access Solutions ........................................................................ 21 Secure Remote Access ............................................................................................ 21 Types of Solutions ................................................................................................... 21
Client-Based vs. Clientless ............................................................................................ 21 Secure Connectivity and Endpoint Security.................................................................... 22
Remote Access Solution Comparison ..................................................................... 23 Summary of Remote Access Options ...................................................................... 25
Mobile Access Web Portal ............................................................................................. 25 SSL Network Extender .................................................................................................. 25 Capsule Workspace for iOS ........................................................................................... 26 Capsule Workspace for Android .................................................................................... 26 Capsule Connect for iOS ................................................................................................ 26 Capsule VPN for Android ............................................................................................... 26 Check Point VPN Plugin for Windows 8.1 ....................................................................... 27 Check Point Capsule VPN for Windows 10 ..................................................................... 27 Check Point Mobile for Windows ................................................................................... 27 Endpoint Security VPN ................................................................................................... 27 Endpoint Security VPN for Mac ...................................................................................... 28 Endpoint Security Suite ................................................................................................. 28 SecuRemote .................................................................................................................. 28
Configuring Policy for Remote Access VPN ................................................................ 29 Configuring Remote Access Policy .......................................................................... 29 Creating and Configuring the Security Gateway...................................................... 29 Defining a Remote Access Community .................................................................... 29 Defining Access Control Rules ................................................................................ 30 Access Roles for Remote Access ............................................................................ 30
Creating Access Roles for Remote Access and VPN Clients .......................................... 30 Policy Definition for Remote Access ....................................................................... 31 Modifying Encryption Properties for Remote Access VPN ...................................... 31

Installing the Policy ................................................................................................. 32 IPsec and IKE for Remote Access ........................................................................... 32
User and Client Authentication for Remote Access .................................................... 33 Client-Security Gateway Authentication Schemes .................................................. 33
Digital User Certificates ................................................................................................ 33 Pre-Shared Secret ......................................................................................................... 34 Other Authentication Methods ....................................................................................... 34
Multiple Login Options for R80.x Gateways ............................................................. 34 Compatibility with Older Clients .................................................................................... 35 Configuring Multiple Log-in Options .............................................................................. 36 Multi-Factor Authentication with DynamicID ................................................................. 37
Internal User Database vs. External User Database ............................................... 39 Defining User and Authentication Methods in LDAP ............................................... 40 User Certificate Management ................................................................................. 40
Tracing the Status of User's Certificate ......................................................................... 40 Automatically Renewing a Users' Certificate ................................................................. 40 Revoking Certificates..................................................................................................... 41 For Internally Managed Users ....................................................................................... 41 For Users Managed in LDAP .......................................................................................... 41 Multiple Certificates per User ....................................................................................... 41 User Certificate Creation Methods when Using the ICA ................................................. 41 Creating Remote Access VPN Certificates for Users ..................................................... 42 Using Certificates Using Third Party PKI ....................................................................... 44
Using a Pre-Shared Secret ..................................................................................... 45 NT Group/RADIUS Class Authentication Feature .................................................... 45
Granting User Access Using RADIUS Server Groups ..................................................... 46 Configuring Authentication for NT groups and RADIUS Classes .................................... 46
Configuring RADIUS Objects ................................................................................... 47 Configuring RADIUS Settings for Users ......................................................................... 47 Completing RADIUS Authentication Configuration ........................................................ 49
Working with RSA Hard and Soft Tokens ................................................................ 49 SecurID Authentication Devices ..................................................................................... 49
Enabling Hybrid Mode and Methods of Authentication ............................................ 50 Defining User Authentication Methods in Hybrid Mode .................................................. 50
Office Mode ................................................................................................................. 51 The Need for Remote Clients to be Part of the LAN ................................................ 51 Office Mode ............................................................................................................. 52 How Office Mode Works .......................................................................................... 52
A Closer Look ................................................................................................................ 52 Assigning IP Addresses ........................................................................................... 54
IP Pool ........................................................................................................................... 54 IP Assignment Based on Source IP Address .................................................................. 54 DHCP Server .................................................................................................................. 54 RADIUS Server .............................................................................................................. 54 Office Mode and Static Routes in a Non-flat Network .................................................... 55
IP Address Lease duration ...................................................................................... 55 Using Name Resolution - WINS and DNS ................................................................ 55 Anti-Spoofing .......................................................................................................... 55 Using Office Mode with Multiple External Interfaces .............................................. 56 Office Mode Per Site ................................................................................................ 56 Enabling IP Address per User ................................................................................. 57

DHCP Server .................................................................................................................. 57 ipassignment.conf File .................................................................................................. 58 Sample ipassignment.conf File ..................................................................................... 58
Office Mode Considerations .................................................................................... 59 IP Pool versus DHCP...................................................................................................... 59 Routing Table Modifications .......................................................................................... 59 Using the Multiple External Interfaces Feature ............................................................. 59
Configuring Office Mode .......................................................................................... 60 IP Pool Configuration ..................................................................................................... 60 Configuring IP Assignment Based on Source IP Address ............................................... 61 Office Mode through the ipassignment.conf File............................................................ 62 Subnet masks and Office Mode Addresses .................................................................... 62 Checking the Syntax ...................................................................................................... 63 DHCP Configuration ....................................................................................................... 63 Office Mode - Using a RADIUS Server ............................................................................ 64 Use First Office Mode IP ................................................................................................ 65
Desktop Security ......................................................................................................... 66 The Need for Desktop Security ............................................................................... 66 Desktop Security Solution ....................................................................................... 66
The Desktop Security Policy .......................................................................................... 67 Configuring Desktop Security ........................................................................................ 68 Policy Server ................................................................................................................. 70 Location-Based Policies ................................................................................................ 70 Logs and Alerts ............................................................................................................. 71 Blocking or Allowing IPv6 Traffic ................................................................................... 72 Wireless Hotspots ......................................................................................................... 72
Desktop Security Considerations ............................................................................ 72 Letting Users Disable the Firewall.......................................................................... 73 Avoiding Double Authentication for Policy Server .................................................. 73
Secure Configuration Verification ............................................................................... 74 The Need to Verify Remote Client's Security Status ............................................... 74 The Secure Configuration Verification Solution ...................................................... 74 Overview of the SCV Workflow ................................................................................ 75
Installing SCV Plugins on the Client............................................................................... 75 Configuring an SCV Policy on the Security Management Server ................................. 75 Downloading the SCV Policy to the Client ...................................................................... 75 Verifying the SCV Policy ................................................................................................. 75 Runtime SCV Checks ..................................................................................................... 75 Making the Organizational Security Policy SCV-Aware .................................................. 76
SCV Checks ............................................................................................................. 76 Check Point SCV Checks ................................................................................................ 76 Third Party SCV Checks ................................................................................................. 77 Additional Script Elements ............................................................................................ 77
Considerations regarding SCV ................................................................................ 77 Planning the SCV Policy ................................................................................................. 77 User Privileges .............................................................................................................. 78
Configuring SCV ...................................................................................................... 78 Configuring SCV - Server Side ....................................................................................... 78 Client Side Configuration ............................................................................................... 79 SCV Policy Syntax .......................................................................................................... 79 The local.scv Sets .......................................................................................................... 82 An Example of a local.scv File ....................................................................................... 84

Common Attributes ....................................................................................................... 87 Layer Two Tunneling Protocol (L2TP) Clients ............................................................. 99
Introduction to L2TP Clients ................................................................................... 99 Establishing a VPN between a IPsec / L2TP Client and a Gateway .......................... 99 Behavior of an L2TP Connection ........................................................................... 100 Security Gateway Requirements for IPsec / L2TP ................................................. 101 L2TP Global Configuration .................................................................................... 101 Authentication of Users ......................................................................................... 101
Authentication Methods ............................................................................................... 101 Certificates .................................................................................................................. 101
User Certificate Purposes ..................................................................................... 102 Configuring Remote Access for Microsoft IPsec / L2TP Clients ............................ 102
Configuring a Remote Access Environment ................................................................. 103 Defining the Client Machines and their Certificates ..................................................... 103 Configuring User Certificate Purposes ........................................................................ 105 Making the L2TP Connection ....................................................................................... 106 For More Information .................................................................................................. 106
VPN Routing - Remote Access .................................................................................. 107 The Need for VPN Routing..................................................................................... 107 Check Point Solution for Greater Connectivity and Security ................................. 108
Hub Mode (VPN Routing for Remote Clients) ............................................................... 109 Configuring VPN Routing for Remote Access VPN ................................................ 112
Hub Mode for Remote Access Clients .......................................................................... 112 Adding the Office Mode Range to the VPN Domain ....................................................... 113 Client to Client via Multiple Hubs Using Hub Mode ...................................................... 114
Link Selection for Remote Clients ......................................................................... 115 Configuring Link Selection for Remote Access Only .................................................... 115
Directional VPN in Remote Access Communities.................................................. 116 User Groups as the Destination in RA communities..................................................... 116 Configuring Directional VPN with Remote Access Communities ................................. 117
Remote Access Advanced Configuration ................................................................... 118 Domain Controller Name Resolution .................................................................... 118
LMHOSTS..................................................................................................................... 118 Authentication Timeout and Password Caching .................................................... 118
The Problem ................................................................................................................ 118 The Solution ................................................................................................................ 119 Re-Authentication Interval .......................................................................................... 119 Password Caching ....................................................................................................... 119
Secure Domain Logon (SDL) ................................................................................. 119 The Problem ................................................................................................................ 119 The Solution ................................................................................................................ 120 Cached Information ..................................................................................................... 120 Configuring Secure Domain Logon .............................................................................. 120 Using Secure Domain Logon ........................................................................................ 120
How to Work with non-Check Point Firewalls ....................................................... 121 Resolving Internal Names with an Internal DNS Server ....................................... 121 Split DNS ............................................................................................................... 121
Configuring Split DNS .................................................................................................. 121 Enabling or Disabling Split DNS .................................................................................. 122
Multiple Entry Point for Remote Access VPNs .......................................................... 123 The Need for Multiple Entry Point Security Gateways .......................................... 123

The Check Point Solution for Multiple Entry Points .............................................. 123 MEP Methods ............................................................................................................... 123 Preferred Backup Security Gateway ............................................................................ 124 Visitor Mode and MEP .................................................................................................. 124 Routing Return Packets ............................................................................................... 125
Configuring MEP ................................................................................................... 125 First to Respond .......................................................................................................... 125 Primary-Backup .......................................................................................................... 126 Load Distribution ......................................................................................................... 127 Configuring Return Packets ........................................................................................ 127
Disabling MEP ....................................................................................................... 128 Secondary Connect.................................................................................................... 129
Secondary Connect ............................................................................................... 129 Configuring Secondary Connect ............................................................................ 129 Secondary Connect for Users ................................................................................ 130
SSL Network Extender .............................................................................................. 131 Introduction to the SSL Network Extender ........................................................... 131 How the SSL Network Extender Works ................................................................. 132 Commonly Used Concepts .................................................................................... 132
Remote Access VPN .................................................................................................... 132 Remote Access Community ......................................................................................... 132 Office Mode .................................................................................................................. 132 Visitor Mode................................................................................................................. 132 Endpoint Security on Demand ...................................................................................... 133
Special Considerations for the SSL Network Extender ......................................... 134 Pre-Requisites ............................................................................................................ 134 Features ...................................................................................................................... 134
Configuring SSL Network Extender ...................................................................... 135 Configuring the Server ................................................................................................ 135 Configuring ESOD Policies ........................................................................................... 139 Load Sharing Cluster Support ..................................................................................... 140 Customizing the SSL Network Extender Portal ........................................................... 140 Installation for Users without Administrator Privileges .............................................. 143
SSL Network Extender User Experience .............................................................. 143 Configuring Microsoft Internet Explorer ...................................................................... 143 About ActiveX Controls ................................................................................................ 143 Downloading and Connecting the Client ...................................................................... 144 Uninstall on Disconnect ............................................................................................... 148 Using SSL Network Extender on Linux / Mac Operating Systems ................................ 148 Removing an Imported Certificate ............................................................................... 151
Troubleshooting SSL Network Extender ............................................................... 151 SSL Network Extender Issues ..................................................................................... 151 ESOD Issues ................................................................................................................ 152
Resolving Connectivity Issues ................................................................................... 153 The Need for Connectivity Resolution Features .................................................... 153 Check Point Solution for Connectivity Issues ........................................................ 153
Other Connectivity Issues ............................................................................................ 153 Overcoming NAT Related Issues ........................................................................... 154
During IKE phase I ....................................................................................................... 155 During IKE phase II ...................................................................................................... 155 During IPsec ................................................................................................................ 156 NAT and Load Sharing Clusters ................................................................................... 158

Overcoming Restricted Internet Access ................................................................ 158 Visitor Mode................................................................................................................. 159
Configuring Remote Access Connectivity .............................................................. 161 Configuring Small IKE phase II Proposals ................................................................... 161 Configuring Visitor Mode ............................................................................................. 161 Configuring Remote Clients to Work with Proxy Servers ............................................. 162
VPN CLI Commands .................................................................................................. 164

Remote Access VPN Administration Guide R80.10 | 12
CHAPTE R 1
Check Point VPN In This Section:
IPsec VPN ...................................................................................................................... 12
Remote Access VPN ..................................................................................................... 12
VPN Components .......................................................................................................... 14
Understanding the Terminology .................................................................................. 15
Establishing a Connection between a Remote User and a Security Gateway ........... 15
IPsec VPN The IPsec VPN solution lets the Security Gateway encrypt and decrypt traffic to and from other gateways and clients. Use SmartConsole to easily configure VPN connections between Security Gateways and remote devices.
For Site to Site Communities, you can configure Star and Mesh topologies for VPN networks, and include third-party gateways.
The VPN tunnel guarantees:
• Authenticity - Uses standard authentication methods
• Privacy - All VPN data is encrypted
• Integrity - Uses industry-standard integrity assurance methods
IKE and IPsec
The Check Point VPN solution uses these secure VPN protocols to manage encryption keys, and send encrypted packets. IKE (Internet Key Exchange) is a standard key management protocol that is used to create the VPN tunnels. IPsec is protocol that supports secure IP communications that are authenticated and encrypted on private or public networks.
Remote Access VPN If employees remotely access sensitive information from different locations and devices, system administrators must make sure that this access does not become a security vulnerability. Check Point's Remote Access VPN solutions let you create a VPN tunnel between a remote user and the internal network. The Mobile Access Software Blade extends the functionality of Remote Access solutions to include many clients and deployments.
VPN Connectivity Modes When securely connecting remote clients with the internal resources, organizations face connectivity challenges, such as these:
• The IP addresses of a remote access client might be unknown
• The remote access client can be connected to a LAN with internal IP addresses (like at hotels)
• It is necessary for the remote client to use protocols that are not supported

Check Point VPN
Remote Access VPN Administration Guide R80.10 | 13
The Check Point IPsec VPN Software Blade provides these VPN connectivity modes to help organizations resolve those challenges:
• Office Mode
Remote users can be assigned the same or non-routable IP addresses from the local ISP. Office Mode solves these routing problems and encapsulates the IP packets with an available IP address from the internal network. Remote users can send traffic as if they are in the office and avoid VPN routing problems.
• Visitor Mode
Remote users can be restricted to using only HTTP and HTTPS protocols. Visitor Mode lets these users tunnel all protocols through regular TCP connections on port 443.
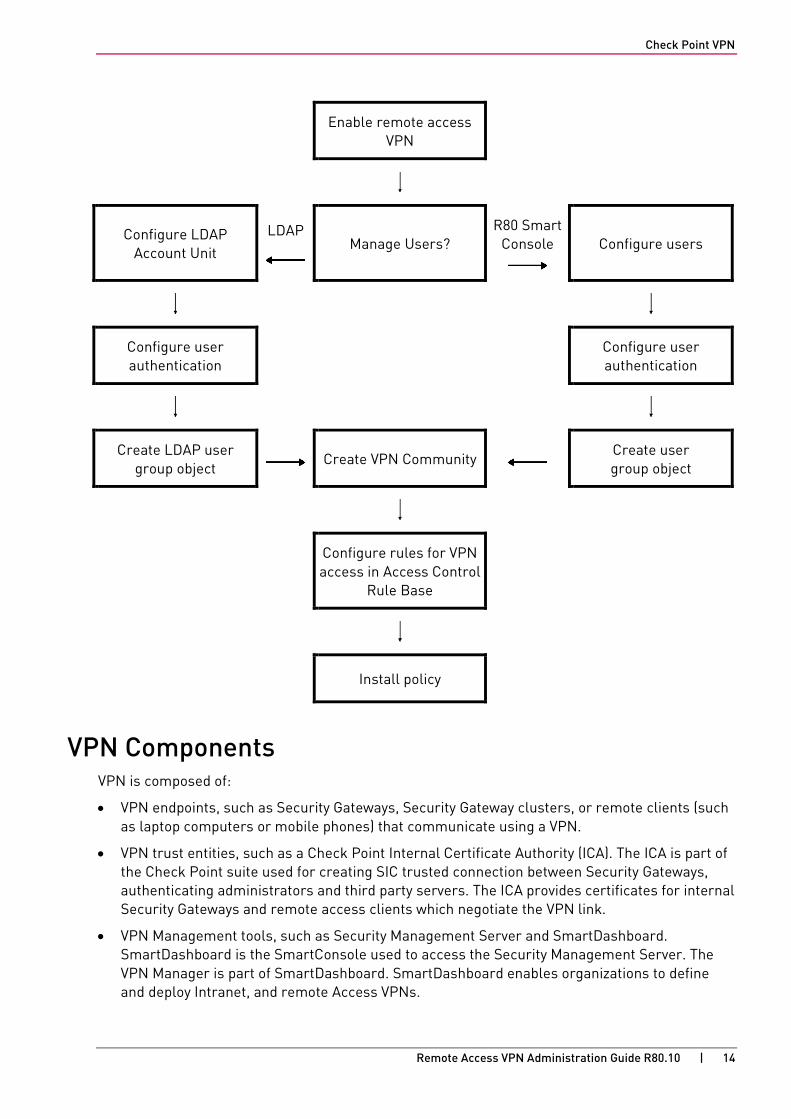
Sample Remote Access VPN Workflow Here is an example of a remote access VPN workflow:
1. Use SmartConsole to enable remote access VPN on the Security Gateway.
2. Add the remote user information to the Security Management Server:
• Create and configure an LDAP Account Unit
• Enter the information in the SmartConsole user database
3. Configure the gateway for remote user authentication (optional).
4. Define the gateway Access Control and encryption rules.
5. Create the group objects to use in the gateway rules:
• LDAP Group object - for an LDAP Account Unit
• User Group object - for users configured in the SmartConsole user database
6. Create and configure the encryption settings for the VPN community object in Global Properties > Remote Access > VPN - Authentication and Encryption.
7. Add Access Control rules to the Access Control Rule Base to allow VPN traffic to the internal networks.
Check Point VPN
Remote Access VPN Administration Guide R80.10 | 14
Enable remote access
VPN
Configure LDAP Account Unit
LDAP
Manage Users?
R80 Smart Console
Configure users
Configure user authentication
Configure user authentication
Create LDAP user group object Create VPN Community
Create user group object
Configure rules for VPN access in Access Control
Rule Base
Install policy
VPN Components VPN is composed of:
• VPN endpoints, such as Security Gateways, Security Gateway clusters, or remote clients (such as laptop computers or mobile phones) that communicate using a VPN.
• VPN trust entities, such as a Check Point Internal Certificate Authority (ICA). The ICA is part of the Check Point suite used for creating SIC trusted connection between Security Gateways, authenticating administrators and third party servers. The ICA provides certificates for internal Security Gateways and remote access clients which negotiate the VPN link.
• VPN Management tools, such as Security Management Server and SmartDashboard. SmartDashboard is the SmartConsole used to access the Security Management Server. The VPN Manager is part of SmartDashboard. SmartDashboard enables organizations to define and deploy Intranet, and remote Access VPNs.

Check Point VPN
Remote Access VPN Administration Guide R80.10 | 15
Understanding the Terminology • VPN - Virtual Private Network. A secure, encrypted connection between networks and remote
clients on a public infrastructure, to give authenticated remote users and sites secured access to an organization's network and resources.
• VPN Domain - A group of computers and networks connected to a VPN tunnel by one VPN gateway that handles encryption and protects the VPN Domain members.
• VPN Community - A named collection of VPN domains, each protected by a VPN gateway.
• VPN Security Gateway - The gateway that manages encryption and decryption of traffic between members of a VPN Domain, typically located at one (Remote Access VPN) or both (Site to Site VPN) ends of a VPN tunnel.
• Site to Site VPN - An encrypted tunnel between two gateways, typically of different geographical sites.
• Remote Access VPN - An encryption tunnel between a Security Gateway and remote access clients, such as Endpoint Security VPN, and communities.
• Remote Access Community - A group of computers, appliances, and devices that access, with authentication and encryption, the internal protected network from physically remote sites.
• IKE (Internet Key Exchange) - An Encryption key management protocol that enhances IPSec by providing additional features, flexibility, and ease of configuration.
• IPSec - A set of secure VPN protocols that manage encryption keys and encrypted packet traffic, to create a standard for authentication and encryption services.
Establishing a Connection between a Remote User and a Security Gateway
To allow the user to access a network resource protected by a Security Gateway, a VPN tunnel establishment process is initiated. An IKE (Internet Key Exchange) negotiation takes place between the peers.
During IKE negotiation, the peers' identities are authenticated. The Security Gateway verifies the user's identity and the client verifies that of the Security Gateway. The authentication can be performed using several methods, including digital certificates issued by the Internal Certificate Authority (ICA). It is also possible to authenticate using third-party PKI solutions and pre-shared secrets.
After the IKE negotiation ends successfully, a secure connection (a VPN tunnel) is established between the client and the Security Gateway. All connections between the client and the Security Gateway VPN domain (the LAN behind the Security Gateway) are encrypted inside this VPN tunnel, using the IPsec standard. Except for when the user is asked to authenticate in some manner, the VPN establishment process is transparent.

Check Point VPN
Remote Access VPN Administration Guide R80.10 | 16
Item Description
1 Host1. Part of VPN Site 1.
2 Gateway 1. Part of VPN Site 1.
3 Internet
4 Remote Client
5 Gateway 2. Part of VPN Site 2.
6 LDAP Server. Part of VPN Site 2.
In the figure, the remote user initiates a connection to Security Gateway 1. User management is not performed via the VPN database, but by LDAP server belonging to VPN Site 2. Authentication takes place during the IKE negotiation. Security Gateway 1 verifies that the user exists by querying the LDAP server behind Security Gateway 2. After the user's existence is verified, the Security Gateway authenticates the user, for example by validating the user's certificate. After IKE is successfully completed, a tunnel is created and the remote client connects to Host 1.
If the client is behind the Security Gateway (for example, if the user accesses the corporate LAN from a company office), connections from the client to destinations that are also behind the LAN Security Gateway are not encrypted.

Remote Access VPN Administration Guide R80.10 | 17
CHAPTE R 2
Getting Started with Remote Access In This Section:
Overview of the Remote Access Workflow .................................................................. 17
Basic Gateway Configuration ....................................................................................... 17
Including Users in the Remote Access Community ................................................... 18
Configuring User Authentication ................................................................................. 19
PROC// Configuring VPN Access Rules for Remote Access ...................................... 19
Deploying Remote Access Clients ............................................................................... 20
Overview of the Remote Access Workflow This is an overview of the workflow to give your employees remote access to your VPN gateway.
1. Enable the IPsec VPN blade on the gateway and do basic gateway configuration (on page 17).
2. Add the gateway to the Remote Access VPN Community ("Basic Gateway Configuration" on page 17).
3. Include users in the Remote Access VPN Community ("Including Users in the Remote Access Community" on page 18).
4. Configure user authentication ("Configuring User Authentication" on page 19).
5. Configure VPN access rules in the security policy ("PROC// Configuring VPN Access Rules for Remote Access" on page 19).
6. If necessary, define the Desktop Policy (see "Desktop Security" on page 66).
7. Install policy on the gateway.
8. Deploy the remote access client to users ("Deploying Remote Access Clients" on page 20).
Basic Gateway Configuration As a best practice, use these gateway settings for most remote access clients. See the documentation for your client for more details.
These instructions use the default Remote Access VPN Community, RemoteAccess. You can also create a new Remote Access VPN Community with a different name.
To configure a gateway for remote access:
1. In SmartConsole, right click the gateway and select Edit. The Check Point Gateway window opens.
2. In the Network Security tab, select IPsec VPN to enable the blade.
Note that some clients also require the Mobile Access blade. See the Required Licenses for your client in Check Point Remote Access Solutions (on page 21).
3. Add the gateway to the Remote Access VPN Community:
a) From the Check Point Gateway tree, click IPsec VPN.
b) In This Security Gateway participates in the following VPN Communities, make sure the gateway shows or click Add to add the gateway.

Getting Started with Remote Access
Remote Access VPN Administration Guide R80.10 | 18
c) Click the RemoteAccess community.
d) Click OK.
The ICA automatically creates a certificate for the Security Gateway.
4. Set the VPN domain for the Remote Access community.
The default is All IP Addresses behind Gateway are based on Topology information. You can change this if necessary for your environment.
Optional: To change the VPN domain:
a) From the Check Point Gateway tree, click Network Management.
b) In VPN Domain, click Set domain for Remote Access Community.
5. Configure Visitor Mode.
a) Select IPSec VPN > Remote Access.
b) Select Support Visitor Mode and keep All Interfaces selected.
c) Optional: Select the Visitor Mode Service, which defines the protocol and port of client connections to the gateway.
6. Configure Office Mode.
a) From the Check Point Gateway tree, select VPN Clients > Office Mode.
The default is Allow Office Mode to all users.
b) Optional: Select Offer Office Mode to group and select a group.
c) Select an Office Mode method. See Office Mode (on page 51) for details.
7. Click OK.
Including Users in the Remote Access Community By default, the Remote Access VPN Community includes a user group, All Users, that includes all defined users. You can use this group or add different user groups to the Remote Access VPN Community. The community can contain users defined in LDAP, which includes Active Directory, or users defined on the Security Management Server.
For more information about user groups and LDAP, see the Security Management Server Administration Guide http://downloads.checkpoint.com/dc/download.htm?ID=54842.
To add user groups to a Remote Access VPN Community:
1. In SmartConsole >Access Tools, select VPN Communities.
2. Right-click the Remote Access Community object and click Edit. 3. Click Participant User Groups.
4. Add or remove groups.
5. Click OK.

Getting Started with Remote Access
Remote Access VPN Administration Guide R80.10 | 19
Configuring User Authentication Users must authenticate to the VPN gateway with a supported authentication method. You can configure authentication methods for the remote access gateway in:
• Gateway Properties > VPN Clients > Authentication
• SmartDashboard > Mobile Access tab > Authentication
• Gateway Properties > Mobile Access > Authentication
If no authentication methods are defined for the gateway, users select an authentication method from the client.
On newer remote access clients that connect to R80.x gateways, users can see multiple login options and select one that applies to them. On older clients or clients that work with pre- R80.10 gateways, users see one configured authentication method.
See User and Client Authentication for Remote Access (on page 33) for details.
Configuring VPN Access Rules for Remote Access You must configure rules to allow users in the Remote Access VPN Community to access the LAN. You can limit the access to specified services or specified clients. Configure rules in SmartConsole > Security Policies > Access Control.
To make a rule apply to a VPN Community, the VPN column of the Rule Base must contain one of these:
• Any - The rules applies to all VPN Communities. If you configure a new VPN Community after the rule was created, the rule also applies to the new VPN Community.
• One or more specified VPN communities - For example, RemoteAccess. Right-click in the VPN column of a rule and select Specific VPN Communities. The rule applies to the communities shown in the VPN column.
Examples:
• This rule allows traffic from all VPN Communities to the internal network on all services: Name Source Destination VPN Services &
Applications
Allow all remote access
* Any Internal_Network * Any * Any
• This rule allows traffic from RemoteAcccess VPN Community to the internal network on HTTP and HTTPS. Name Source Destination VPN Services &
Applications
Allow RemoteAccess community
* Any Internal_Network RemoteAccess HTTP HTTPS
• This rule allows traffic from RemoteAcccess VPN Community to the internal network on all services when the traffic starts from the Endpoint Security VPN client.

Getting Started with Remote Access
Remote Access VPN Administration Guide R80.10 | 20
Name Source Destination VPN Services & Applications
Allow all from Endpoint Security VPN
Endpoint Security VPN Access Role
Internal_Network RemoteAccess * Any
See Access Roles for Remote Access (on page 30) for details of how to create Access Roles for Remote Access and VPN Clients to include them in rules in the Access Control Rule Base.
Deploying Remote Access Clients See the documentation for your remote access client for deployment instructions.
Make sure that users have:
• The site name or URL.
• The credentials or hardware required to authenticate.

Remote Access VPN Administration Guide R80.10 | 21
CHAPTE R 3
Check Point Remote Access Solutions In This Section:
Secure Remote Access ................................................................................................. 21
Types of Solutions ......................................................................................................... 21
Remote Access Solution Comparison ......................................................................... 22
Summary of Remote Access Options .......................................................................... 25
Secure Remote Access In today's business environment, it is clear that workers require remote access to sensitive information from a variety of locations and a variety of devices. Organizations must also make sure that their corporate network remains safe and that remote access does not become a weak point in their IT security.
Types of Solutions All of Check Point's Remote Access solutions provide:
• Enterprise-grade, secure connectivity to corporate resources.
• Strong user authentication.
• Granular access control.
Factors to consider when choosing remote access solutions for your organization:
• Client-Based vs. Clientless - Does the solution require a Check Point client to be installed on the endpoint computer or is it clientless, for which only a web browser is required. You might need multiple solutions within your organization to meet different needs.
• Secure Connectivity and Endpoint Security - Which capabilities does the solution include?
• Secure Connectivity - Traffic is encrypted between the client and VPN gateway. After users authenticate, they can access the corporate resources that are permitted to them in the access policy. All Check Point solutions supply this.
• Endpoint Security - Endpoint computers are protected at all times, even when there is no connectivity to the corporate network. Some Check Point solutions supply this.
Client-Based vs. Clientless Check Point remote access solutions use IPsec and SSL encryption protocols to create secure connections. All Check Point clients can work through NAT devices, hotspots, and proxies in situations with complex topologies, such as airports or hotels. These are the types of installations for remote access solutions:
• Client-based - Client application installed on endpoint computers and devices. The client supplies access to most types of corporate resources according to the access privileges of the user.

Check Point Remote Access Solutions
Remote Access VPN Administration Guide R80.10 | 22
• Clientless - Users connect through a web browser and use HTTPS connections. Clientless solutions usually supply access to web-based corporate resources.
• On demand client - Users connect through a web browser and a client is installed when necessary. The client supplies access to most types of corporate resources according to the access privileges of the user.
Secure Connectivity and Endpoint Security You can combine secure connectivity with additional features to protect the network or endpoint computers.
• Secure Connectivity - Traffic is encrypted between the client and VPN gateway and strong user authentication is supported. All Check Point solutions supply this.
These solutions require licenses based on the number of users connected at the same time.
• Security Verification for Endpoint computers - Makes sure that devices connecting to the gateway meet security requirements. Endpoint machines that are not compliant with the security policy have limited or no connectivity to corporate resources. Some Check Point solutions supply this.
• Endpoint Security:
• Desktop Firewall - Protects endpoint computers at all times with a centrally managed security policy. This is important because remote clients are not in the protected network and traffic to clients is only inspected if you have a Desktop Firewall. Some Check Point solutions supply this
• More Endpoint Security Capabilities - Check Point solutions can include more Endpoint Security capabilities, such as anti-malware, disk encryption and more.
These solutions require licenses based on the number of clients installed.
Check Point Remote Access Solutions
Remote Access VPN Administration Guide R80.10 | 23
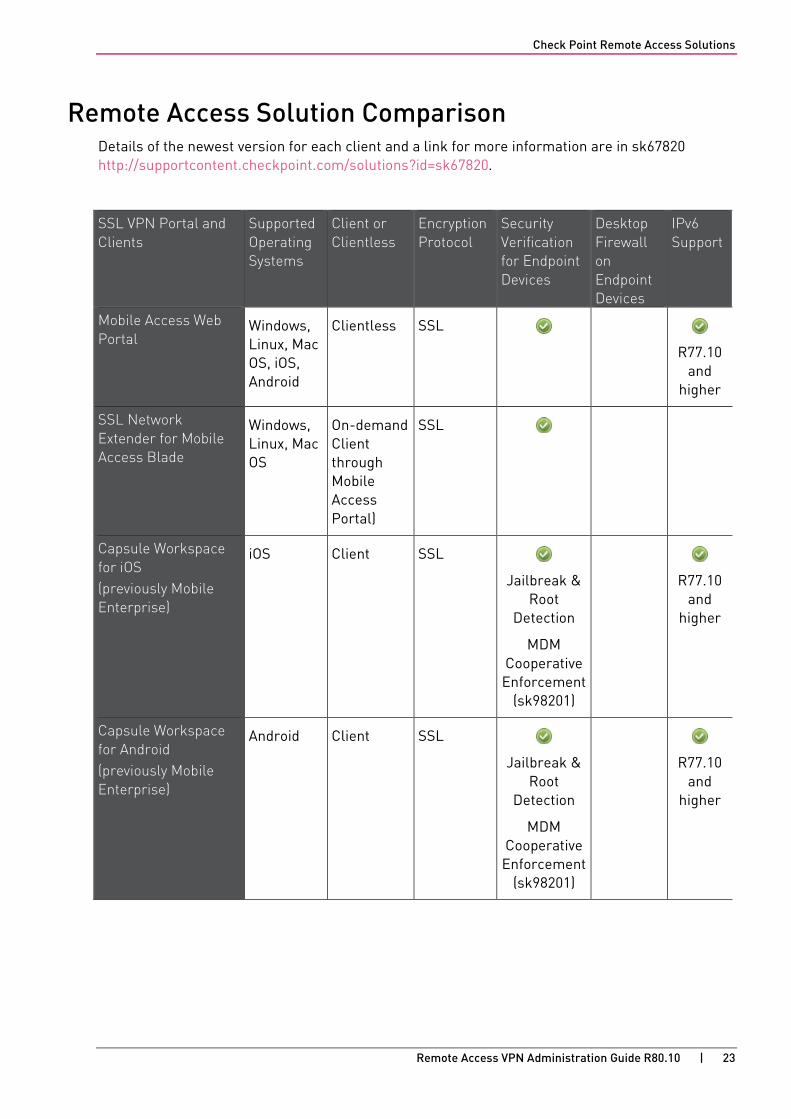
Remote Access Solution Comparison Details of the newest version for each client and a link for more information are in sk67820 http://supportcontent.checkpoint.com/solutions?id=sk67820.
SSL VPN Portal and Clients
Supported Operating Systems
Client or Clientless
Encryption Protocol
Security Verification for Endpoint Devices
Desktop Firewall on Endpoint Devices
IPv6 Support
Mobile Access Web Portal
Windows, Linux, Mac OS, iOS, Android
Clientless SSL
R77.10 and
higher
SSL Network Extender for Mobile Access Blade
Windows, Linux, Mac OS
On-demand Client through Mobile Access Portal)
SSL
Capsule Workspace for iOS (previously Mobile Enterprise)
iOS Client SSL
Jailbreak & Root
Detection
MDM Cooperative Enforcement
(sk98201)
R77.10 and
higher
Capsule Workspace for Android (previously Mobile Enterprise)
Android Client SSL
Jailbreak & Root
Detection
MDM Cooperative Enforcement
(sk98201)
R77.10 and
higher

Check Point Remote Access Solutions
Remote Access VPN Administration Guide R80.10 | 24
Layer-3 VPN Tunnel Clients
Supported Operating Systems
Client or Clientless
Encryption Protocol
Security Verification for Endpoint Devices
Desktop Firewall on Endpoint Devices
IPv6 Support
Capsule Connect for iOS (previously Mobile VPN)
iOS Client IPsec / SSL MDM Cooperative Enforcement
(sk98201)
Capsule VPN for Android (previously Mobile VPN)
Android Client IPsec/SSL MDM Cooperative Enforcement
(sk98201)
Check Point VPN Plugin for Windows 8.1
Windows 8.1
Pre- installed client
SSL
Check Point Capsule VPN for Windows 10
Windows 10
Client SSL
Check Point Mobile for Windows
Windows Client IPsec
Layer-3 VPN Tunnel Clients Integrated with Endpoint Security
Supported Operating Systems
Client or Clientless
Encryption Protocol
Security Verification for Endpoint Devices
Desktop Firewall on Endpoint Devices
IPv6 Support
Endpoint Security VPN for Windows
Windows Client IPsec
Endpoint Security VPN for Mac
Mac OS Client IPsec
Endpoint Security Suite Remote Access VPN Blade
Windows, Mac OS
Client IPsec
Additional Remote Access Solutions
Supported Operating Systems
Client or Clientless
Encryption Protocol
Security Verification for Endpoint Devices
Desktop Firewall on Endpoint Devices
IPv6 Support
SecuRemote Windows Client IPsec

Check Point Remote Access Solutions
Remote Access VPN Administration Guide R80.10 | 25
Summary of Remote Access Options Below is a summary of each Remote Access option that Check Point offers. All supply secure remote access to corporate resources, but each has different features and meets different organizational requirements.
Details of the newest version for each client and a link for more information are in sk67820 http://supportcontent.checkpoint.com/solutions?id=sk67820.
Mobile Access Web Portal The Mobile Access Portal is a clientless SSL VPN solution. It is recommended for users who require access to corporate resources from home, an internet kiosk, or another unmanaged computer. The Mobile Access Portal can also be used with managed devices.
It provides:
• Secure Connectivity
• Security Verification
The Mobile Access Portal supplies access to web-based corporate resources. You can use the on-demand client, SSL Network Extender, through the Portal to access all types of corporate resources.
Required Licenses - Mobile Access Software Blade on the gateway.
Supported Platforms - Windows, Mac OS X, Linux, iOS, Android
Where to Get the Client - Included with the Security Gateway. See sk67820 http://supportcontent.checkpoint.com/solutions?id=sk67820.
SSL Network Extender SSL Network Extender is a thin SSL VPN on-demand client installed automatically on the user's machine through a web browser. It supplies access to all types of corporate resources.
SSL Network Extender has two modes:
• Network Mode - Users can access all application types (Native-IP-based and Web-based) in the internal network. To install the Network Mode client, users must have administrator privileges on the client computer.
Supported Platforms: Windows, Mac OS X, Linux
• Application Mode - Users can access most application types (Native-IP-based and Web-based) in the internal network, including most TCP applications. The user does not require administrator privileges on the endpoint machine.
Supported Platforms - Windows
Required Licenses - Mobile Access Software Blade on the gateway
Where to Get the Client - Included with the Security Gateway. See sk67820 http://supportcontent.checkpoint.com/solutions?id=sk67820.

Check Point Remote Access Solutions
Remote Access VPN Administration Guide R80.10 | 26
Capsule Workspace for iOS Capsule Workspace for iOS is an SSL VPN client. It supplies secure connectivity and access to web-based corporate resources and Microsoft Exchange services. It also gives secure access to Capsule Docs protected documents. It was previously called Mobile Enterprise.
Capsule Workspace is ideal for mobile workers who have privately-owned smart phones or tablets. It protects only the business data inside the App and does not require device-level security measures, such as device-lock or device-wipe.
Required Licenses - Mobile Access Software Blade on the gateway and a mail license on the Security Management Server
Supported Platforms - iOS
Where to Get the Client - Apple App Store
Capsule Workspace for Android Capsule Workspace for Android is an SSL VPN client. It supplies secure connectivity and access to web-based corporate resources and Microsoft Exchange services. It also gives secure access to Capsule Docs protected documents. It was previously called Mobile Enterprise.
Capsule Workspace for Android is ideal for mobile workers who have privately-owned smart phones or tablets. It protects only the business data inside the App and does not require device-level security measures, such as device-lock or device-wipe.
Required Licenses - Mobile Access Software Blade on the gateway
Supported Platforms - Android
Where to Get the Client - Google Play Store
Capsule Connect for iOS Capsule Connect is a full L3 tunnel app that gives users network access to all mobile applications. It supplies secure connectivity and access to all types of corporate resources. It was previously called Mobile VPN.
Required Licenses - Mobile Access Software Blade on the gateway and a mail license on the Security Management Server
Supported Platforms - iOS 6.0 +
Where to Get the Client - Apple App Store
Capsule VPN for Android Capsule VPN for Android devices is an L3 VPN client. It supplies secure connectivity and access to corporate resources using L3 IPSec/SSL VPN Tunnel. It was previously called Mobile VPN.
Required Licenses - Mobile Access Software Blade on the gateway
Supported Platforms - Android 4 + (ICS+)
Where to Get the Client - Google Play Store

Check Point Remote Access Solutions
Remote Access VPN Administration Guide R80.10 | 27
Check Point VPN Plugin for Windows 8.1 Check Point VPN Plugin for Windows 8.1 is an L3 VPN client. It supplies secure connectivity and access to corporate resources using L3 SSL VPN Tunnel.
Required Licenses - Mobile Access Software Blade on the gateway
Supported Platforms - Windows 8.1
Where to Get the Client - Pre-installed with Windows.
Check Point Capsule VPN for Windows 10 Check Point Capsule VPN for Windows 10 is an L3 VPN client. It supplies secure connectivity and access to corporate resources using L3 SSL VPN Tunnel.
Required Licenses - Mobile Access Software Blade on the gateway
Supported Platforms - Windows 10
Where to Get the Client - Microsoft Software & Apps store.
Check Point Mobile for Windows Check Point Mobile for Windows is an IPsec VPN client. It is best for medium to large enterprises that do not require an Endpoint Security policy.
The client gives computers:
• Secure Connectivity
• Security Verification
Required Licenses - IPsec VPN and Mobile Access Software Blades on the gateway.
Supported Platforms - Windows
Where to Get the Client - Check Point Support Center - sk67820 http://supportcontent.checkpoint.com/solutions?id=sk67820.
Endpoint Security VPN Endpoint Security VPN is an IPsec VPN client that replaces SecureClient. It is best for medium to large enterprises.
The client gives computers:
• Secure Connectivity
• Security Verification
• Endpoint Security that includes an integrated Desktop Firewall, centrally managed from the Security Management Server.

Check Point Remote Access Solutions
Remote Access VPN Administration Guide R80.10 | 28
Required Licenses - The IPsec VPN Software Blade on the gateway, an Endpoint Container license, and an Endpoint VPN Software Blade license on the Security Management Server.
Supported Platforms - Windows
Where to Get the Client - Check Point Support Center - sk67820 http://supportcontent.checkpoint.com/solutions?id=sk67820.
Note - Endpoint Security VPN on Mac OS X includes a Desktop Firewall but not Security Verification.
Endpoint Security VPN for Mac Endpoint Security VPN combines Remote Access VPN with Endpoint Security in a client that is installed on endpoint computers. It is recommended for managed endpoints that require a simple and transparent remote access experience together with Desktop Firewall rules. It includes:
• Enterprise Grade Remote Access Client that replaces SecureClient for Mac.
• Integrated Desktop Firewall, centrally managed from the Security Management Server.
Required Licenses - The IPsec VPN Software Blade on the gateway, an Endpoint Container license, and an Endpoint VPN Software Blade license on the Security Management Server.
Supported Platforms for Users - Mac OS X
Where to Get the Client - Check Point Support Center - sk67820 http://supportcontent.checkpoint.com/solutions?id=sk67820.
Endpoint Security Suite The Endpoint Security Suite simplifies endpoint security management by unifying all endpoint security capabilities in a single console. Optional Endpoint Security Software Blades include: Firewall, Compliance Full Disk Encryption, Media Encryption & Port Protection, and Anti- Malware & Program Control. As part of this solution, the Remote Access VPN Software Blade provides full, secure IPsec VPN connectivity.
The Endpoint Security suite is best for medium to large enterprises that want to manage the endpoint security of all of their endpoint computers in one unified console.
Required Licenses - Endpoint Security Container and Management licenses and an Endpoint VPN Software Blade on the Security Management Server.
Supported Platforms - Windows, Mac OS X
Where to Get the Client - Check Point Support Center - sk67820 http://supportcontent.checkpoint.com/solutions?id=sk67820.
SecuRemote SecuRemote is a secure, but limited-function IPsec VPN client. It provides secure connectivity.
Required Licenses - IPsec VPN Software Blade on the gateway. It is a free client and does not require additional licenses.
Supported Platforms - Windows
Where to Get the Client - Check Point Support Center - sk67820 http://supportcontent.checkpoint.com/solutions?id=sk67820.
Remote Access VPN Administration Guide R80.10 | 29
CHAPTE R 4
Configuring Policy for Remote Access VPN
In This Section:
Configuring Remote Access Policy .............................................................................. 29
Creating and Configuring the Security Gateway ......................................................... 29
Defining a Remote Access Community ....................................................................... 29
Defining Access Control Rules .................................................................................... 30
Access Roles for Remote Access ................................................................................ 30
Policy Definition for Remote Access ............................................................................ 31
Modifying Encryption Properties for Remote Access VPN ......................................... 31
Installing the Policy ...................................................................................................... 32
IPsec and IKE for Remote Access ................................................................................ 32
Configuring Remote Access Policy Configure Remote Access VPN policy in the Unified Access Control Policy Rule Base.
Make sure that:
• All Remote Access Gateways are part of a Remote Access VPN Community.
• The Remote Access Community is included in the VPN column of the rule.
For R80.x gateways, you can include Remote Access and VPN clients in rules as the Source of the rule. To do this you create an Access Role for each client.
Creating and Configuring the Security Gateway 1. Create a Security Gateway network object.
2. On the General Properties page, select VPN.
3. Initialize a secure communication channel between the VPN module and the Security Management Server by clicking Communication
4. On the Topology page, define the interfaces and the VPN domain.
The ICA automatically creates a certificate for the Security Gateway.
Defining a Remote Access Community To define the VPN Remote Access community and its participants:
1. From the Objects Bar, click VPN Communities.
2. Double-click RemoteAccess.
The Remote Access window opens.
Configuring Policy for Remote Access VPN
Remote Access VPN Administration Guide R80.10 | 30
3. On the Participating Gateways page, click the Add button and select the Security Gateways that are in the Remote Access Community.
4. On the Participating User Groups page, click the Add button and select the group that contains the Remote Access users.
5. Click OK.
6. Publish the changes.
Defining Access Control Rules Access control is a layer of security not connected with VPN. The existence of a remote access community does not mean that members of that community have free automatic access to the network. Appropriate rules need to be created in the Access Control Policy Rule Base blocking or allowing specific services.
1. Create a rule in the Security Access Control Rule Base that deals with remote access connections.
2. Right-click the cell in the VPN column, and select Specific VPN Communities.
3. Click the add button for each community that you are adding to the rule.
4. Close the VPN community window.
5. Define Services & Applications and Actions.
6. Publish the changes and install the policy.
For example, to allow remote access users to access the organization's SMTP server, called SMTP_SRV, create the following rule:
Source Destination VPN Service Action Track
Any SMTP_SRV Remote_Access_ Community
SMTP Accept Log
Access Roles for Remote Access For R80.x gateways, create Access Roles for Remote Access and VPN Clients to include them in rules in the Access Control Rule Base. This applies to Mobile Access and IPsec clients. When an Access Role for a client is in the Source column of a rule, the rule applies to traffic that originates from that client.
You can also use an Access Role in the Destination column.
You must enable Identity Awareness on each gateway that is an installation target for rules with Access Roles.
Creating Access Roles for Remote Access and VPN Clients
To create an Access Role for a new Remote Access or VPN client:
1. Open a New Access Role window in one of these ways:
• In the object tree, click New> More > User > Access Role.
• From the Source column of the Access Control policy Rule Base: Click > click > select Access Role.
2. Enter a Name for the access role.
Configuring Policy for Remote Access VPN
Remote Access VPN Administration Guide R80.10 | 31
3. Optional: Enter a Comment or click the down arrow to select a Color for the object.
4. From the left pane, select Remote Access Clients.
5. Expand the Specific Client list and click New > Allowed client. 6. Click to select a client and enter an object name.
7. Click OK.
8. Optional: To make the Access Role include only specified users, select Users from the left pane and define the allowed users.
9. Click OK.
Policy Definition for Remote Access There must be a rule in the Security Policy Rule Base that grants remote users access to the LAN. Consider which services are allowed. Restrict those services that need to be restricted with an explicit rule in the Security Policy Rule Base.
Modifying Encryption Properties for Remote Access VPN
The encryption properties of the users participating in a Remote Access community are set by default. If you must modify the encryption algorithm, the data integrity method and/or the Diffie-Hellman group, you can either do this globally for all users or configure the properties per user.
To modify the user encryption properties globally:
1. From Menu, click Global Properties.
2. From the navigation tree, click Remote Access > VPN- Authentication and Encryption.
3. From the Encryption algorithms section, click Edit. The Encryption Properties window opens.
4. In the IKE Security Association (Phase 1) tab, configure the applicable settings:
• Support encryption algorithms - Select the encryption algorithms that will be supported with remote hosts.
• Use encryption algorithms - Choose the encryption algorithm that will have the highest priority of the selected algorithms. If given a choice of more than one encryption algorithm to use, the algorithm selected in this field will be used.
• Support Data Integrity - Select the hash algorithms that will be supported with remote hosts to ensure data integrity.
• Use Data Integrity - The hash algorithm chosen here will be given the highest priority if more than one choice is offered.
• Support Diffie-Hellman groups - Select the Diffie-Hellman groups that will be supported with remote hosts.
• Use Diffie-Hellman group - Client users utilize the Diffie-Hellman group selected in this field.
5. Click OK.
6. Install policy.

Configuring Policy for Remote Access VPN
Remote Access VPN Administration Guide R80.10 | 32
To configure encryption policies for specified users:
1. Open Global Properties, and click Remote Access > Authentication and Encryption.
2. From the Encryption algorithms section, click Edit. 3. In the Encryption Properties window, click the IPSEC Security Association (Phase 2) tab.
4. Clear Enforce Encryption Algorithm and Data Integrity on all users.
5. Click OK and close the Global Properties window.
6. For each user:
a) From the Objects Bar, double-click the user.
b) From the navigation tree, click Encryption.
c) Click Edit.
The IKE Phase 2 Properties window is displayed.
d) Click the Encryption tab.
e) Click Defined below.
f) Configure the Encryption Algorithm and Data Integrity.
g) Click OK and close the User Properties window.
7. Install policy.
Installing the Policy Install the policy and instruct the users to create or update the site topology.
IPsec and IKE for Remote Access For Remote users, the IKE settings are configured in Global Properties > Remote Access > VPN Authentication and Encryption.
IKEv2 is not supported for Remote Access.
For more information about IPsec and IKE, see the VPN Site to Site Administration Guide http://supportcontent.checkpoint.com/documentation_download?ID=53104.
Remote Access VPN Administration Guide R80.10 | 33
CHAPTE R 5
User and Client Authentication for Remote Access
In This Section:
Client-Security Gateway Authentication Schemes ..................................................... 33
Multiple Login Options for R80.x Gateways ................................................................. 34
Internal User Database vs. External User Database .................................................. 39
Defining User and Authentication Methods in LDAP .................................................. 40
User Certificate Management ...................................................................................... 40
Using a Pre-Shared Secret .......................................................................................... 45
NT Group/RADIUS Class Authentication Feature ....................................................... 45
Configuring RADIUS Objects ........................................................................................ 47
Working with RSA Hard and Soft Tokens .................................................................... 49
Enabling Hybrid Mode and Methods of Authentication .............................................. 50
Client-Security Gateway Authentication Schemes Authentication is a key factor in establishing a secure communication channel among Security Gateways and remote clients. Various authentication methods are available, for example:
• Digital certificates
• Pre-shared secrets
• Other authentication methods
On R80.10 and higher Mobile Access and IPsec VPN gateways, you can configure multiple login options. The options can be different for each gateway and each Software Blade. Users select one of the available options to log in with a supported client.
See the documentation for each client to learn which authentication methods are supported.
Digital User Certificates Digital Certificates are the most recommended and manageable method for authentication. Both parties present certificates as a means of proving their identity. Both parties verify that the peer's certificate is valid (i.e. that it was signed by a known and trusted CA, and that the certificate has not expired or been revoked).
Digital certificates are issued either by Check Point's Internal Certificate Authority or third-party PKI solutions. Check Point's ICA is tightly integrated with VPN and is the easiest way to configure a Remote Access VPN. The ICA can issue certificates both to Security Gateways (automatically) and to remote users (generated or initiated).
Generate digital certificates easily in SmartConsole > Security Policies > Access Tools > Client Certificates.

User and Client Authentication for Remote Access
Remote Access VPN Administration Guide R80.10 | 34
The administrator can also initiate a certificate generation on the ICA management tool. It is also possible to use third-party Certificate Authorities to create certificates for authentication between Security Gateways and remote users. The supported certificate formats are PKCS#12, CAPI, and Entrust.
Users can also be given a hardware token for storing certificates. This option offers the advantage of higher level of security, since the private key resides only on the hardware token.
As part of the certificate validation process during the IKE negotiation, both the client and the Security Gateway check the peer's certificate against the Certificate Revocation List (CRL) published by the CA which issued the certificate. If the client is unable to retrieve a CRL, the Security Gateway retrieves the CRL on the client's behalf and transfers the CRL to the client during the IKE negotiation (the CRL is digitally signed by the CA for security).
Pre-Shared Secret This authentication method has the advantage of simplicity, but it is less secure than certificates. Both parties agree upon a password before establishing the VPN. The password is exchanged "out-of-band", and reused multiple times. During the authentication process, both the client and Security Gateway verify that the other party knows the agreed-upon password.
Other Authentication Methods These user authentication methods are supported for remote access.
• Security Gateway Password - Users enter their password held on the Security Gateway.
• DynamicID One Time Password - Users enter the number shown in an SMS message to a specified cellphone number or by email.
• OS Password - Users enter their Operating System password.
• SecurID One Time Password - Users enter the number shown on a Security Dynamics SecurID card.
SoftID (a software version of RSA's SecurID) and various other One Time Password cards and USB tokens are also supported.
• RADIUS - Users enter the correct response, as defined by the RADIUS server.
• TACACS - Users enter the correct response, as defined by the TACACS or TACACS+ server.
• SAA - SAA is an OPSEC API extension to Remote Access Clients that enables third party authentication methods, such as biometrics, to be used with Endpoint Security VPN, Check Point Mobile for Windows, and SecuRemote.
Multiple Login Options for R80.x Gateways On R80.10 and higher Mobile Access and IPsec VPN gateways, you can configure multiple login options. The options can be different for each gateway and each supported Software Blade, and for some client types. Users select one of the available options to log in with a supported client.
By default, all clients connect with the pre-R80.x method. When you create new login options, newer clients can see them in addition to the pre-R80.x option, but older clients cannot.
To see which clients support the new multiple login options, see sk111583 http://supportcontent.checkpoint.com/solutions?id=sk111583.

User and Client Authentication for Remote Access
Remote Access VPN Administration Guide R80.10 | 35
Each configured login option is a global object that can be used with multiple gateways and the Mobile Access and IPsec VPNSoftware Blades.
Compatibility with Older Clients By default, older clients connect with a single authentication method, based on settings available on pre-R80 gateways.
You can block older clients from connecting. After you do this, only clients that support multiple login options can connect to the gateway.
By default, Allow old clients to connect is selected in VPN Clients > Authentication. If you clear the option, older clients are blocked.
You can choose if newer clients that support multiple login options can connect with the authentication settings defined for older clients.
Configuring the Authentication Method for Newer Clients
To block newer clients from using the authentication method defined for older clients:
1. In the Gateway Properties, select VPN Clients > Authentication.
2. In the Compatibility with Older Clients section, click Settings.
The Single Authentication Clients Settings window opens.
3. Clear Allow newer client that support Multiple Login Options to use this authentication method.
4. Click OK.
5. Install policy.
To let newer clients connect to the gateway with the authentication settings defined for older clients:
Select Allow newer client that support Multiple Login options to use this authentication method.
Configuring Authentication Settings for Older Clients
To let older clients connect to the R80.10 gateway:
1. In the Gateway Properties, select VPN Clients > Authentication.
2. Select Allow older clients to connect to this gateway.
If this is not selected, older clients cannot connect to the gateway.
To change the authentication method for older clients:
1. In the Gateway Properties, select VPN Clients > Authentication.
2. In the Compatibility with Older Clients section, click Settings.
The Single Authentication Clients Settings window opens.
3. Change the Display Name to change the way the authentication method is shown in SmartConsole.
4. Select an Authentication method.

User and Client Authentication for Remote Access
Remote Access VPN Administration Guide R80.10 | 36
5. Click Customize to change the description of fields that are shown to users in the Connect window. See Customize Display Settings (on page 37).
6. Click OK.
7. Click OK.
8. Install policy on the gateway.
You can configure DynamicID for older clients manually in GuiDBedit. See sk86240 http://supportcontent.checkpoint.com/solutions?id=sk86240.
Configuring Multiple Log-in Options Configure login options from: Gateway Properties > VPN Clients > Authentication
If Mobile Access is enabled, you can also configure login options from:
• Gateway Properties > Mobile Access > Authentication
• SmartDashboard > Mobile Access tab > Authentication
The login options selected for IPsec VPN clients, such as Endpoint Security VPN, Check Point Mobile for Windows, and SecuRemote, show in the VPN Clients > Authentication page in the Multiple Authentication Client Settings table.
The login options selected for Mobile Access clients, such as the Mobile Access portal and Capsule Workspace, show in the Mobile Access > Authentication page in the Multiple Authentication Client Settings table.
To configure multiple login options for IPsec VPN Clients:
1. From the Gateway Properties tree of a gateway select VPN Clients > Authentication.
2. In the Multiple Authentication Clients Settings table, see a list of configured login options.
The default login options are:
• Personal_Certificate - Require a user certificate.
• Username_Password - Require a username and password.
• Cert_Username_Password - Require a username and password and a user certificate.
3. Click Add to create a new option or Edit to change an option. Each configured login option is a global object that can be used with multiple gateways and Software Blades.
4. For each login option select one or more Authentication Factors and relevant Authentication Settings.
For example, if you select SecurID, select the SecurID Server and Token Card Type. If you select Personal Certificate, select which certificate field the gateway uses to fetch the username. See Certificate Parsing (on page 37).
5. Select Customize Display to configure what users see when they log in with this option. See Customize Display Settings (on page 37).
6. Click OK.
7. Use the Up and Down arrows to set the order of the login options.
• If you include Personal Certificates, it must be first.
• If you include DynamicID, it cannot be first.
8. Click OK.

User and Client Authentication for Remote Access
Remote Access VPN Administration Guide R80.10 | 37
Customize Display Settings Enter descriptive values to make sure that users understand what information to input. These fields must all be the same language but they do not need to be in English.
• Headline - The title of the login option, for example, Log in with a Certificate or Log in with your SecurID Pinpad.
• Username label - A description of the username that users must enter, for example, Email address or AD username.
• Password label - A description of the password that users must enter, for example, AD password.
Certificate Parsing When you select Personal Certificate as a Login option, you can also configure what information the gateway sends to the LDAP server to parse the certificate. The default is the DN. You can configure the settings to use the user's email address or a serial number instead.
To change the certificate parsing:
1. In the Multiple Authentication Clients Settings table on the Authentication page, select a Personal_Certificate entry and click Edit. The Authentication Factor window opens.
2. In the Authentication Settings area in the Fetch Username from field, select the information that the gateway uses to parse the certificate.
3. Click OK.
4. Install policy.
Deleting Login Options
To permanently delete a Login Option:
1. In SmartConsole, select Security Policies > Shared Policies > Mobile Access and click Open Mobile Access Policy in SmartDashboard.
2. In SmartDashboard go to the Mobile Access tab > Authentication page.
3. From the list of login options, select an option and click Delete.
Multi-Factor Authentication with DynamicID Multi-factor authentication is a system where two or more different methods are used to authenticate users. Using more than one factor delivers a higher level of authentication assurance. DynamicID is one option for multi-factor authentication.
Users who successfully complete the first-phase authentication can be challenged to provide an additional credential: a DynamicID One Time Password (OTP). The OTP is sent to their mobile communications device (such as a mobile phone) via SMS or directly to their email account.
On R80.x and higher gateways, DynamicID is supported for all Mobile Access and IPsec VPN clients.
User and Client Authentication for Remote Access
Remote Access VPN Administration Guide R80.10 | 38
Configuring DynamicID Basic DynamicID configuration is shown here. For Advanced configuration options, see the Mobile Access Administration Guide http://downloads.checkpoint.com/dc/download.htm?ID=53103.
To configure global DynamicID settings that all gateways use:
1. In SmartConsole, select Security Policies > Shared Policies > Mobile Access and click Open Mobile Access Policy in SmartDashboard.
SmartDashboard opens and shows the Mobile Access tab.
2. From the navigation tree, click Authentication.
3. From the Dynamic ID Settings section, click Edit. 4. Enter the DynamicID Settings (on page 38).
5. Click OK.
6. Click Save and then close SmartDashboard.
7. From SmartConsole, install policy.
To configure DynamicID settings for a specified gateway:
1. In SmartConsole, in the Gateways & Servers view, open the Security Gateway.
2. From the navigation tree, select VPN Clients > Authentication.
3. From the Dynamic ID Settings section, clear the Use Global Settings option.
4. Click Edit. 5. Enter the DynamicID Settings (on page 38).
6. Click OK.
7. Install the policy.
DynamicID Settings This table explains parameters used in the SMS Provider and Email Settings field. The value of these parameters is automatically used when sending the SMS or email.
Parameter Meaning
$APIID The value of this parameter is the API ID.
$USERNAME The value of this parameter is the username for the SMS provider.
$PASSWORD The value of this parameter is the password for the SMS provider.
$PHONE User phone number, as found in Active Directory or in the local file on the gateway, including digits only and without a + sign.
$EMAIL The email address of the user as found in Active Directory or in the local SmsPhones.lst file on the gateway. If the email address should be different than the listed one, it can be written explicitly.
$MESSAGE The value of this parameter is the message configured in the Advanced Two-Factor Authentication Configuration Options in SmartDashboard.
$RAWMESSAGE The text from $Message but without HTTP encoding.

User and Client Authentication for Remote Access
Remote Access VPN Administration Guide R80.10 | 39
Enter this information in the DynamicID Setting window:
1. Fill in the Provider and Email Settings field using one of these formats:
a) To let the DynamicID code to be delivered by SMS only, use the following syntax:
https://api.example.com/http/sendmsg?api_id=$APIID&user= $USERNAME&password=$PASSWORD&to=$PHONE&text=$MESSAGE
b) To let the DynamicID code to be delivered by email only, without an SMS service provider, use the following syntax:
mail:TO=$EMAIL;SMTPSERVER=smtp.example.com;[email protected]; BODY=$RAWMESSAGE
c) To let the DynamicID code to be delivered by SMS or email, use the following syntax:
sms:https://api.example.com/sendsms.php?username=$USERNAME&password= $PASSWORD&phone=$PHONE&smstext=$MESSAGE mail:TO=$EMAIL; SMTPSERVER=smtp.example.com;[email protected]; BODY=$RAWMESSAGE
2. In the SMS Provider Account Credentials section, enter the credentials received from the SMS provider:
• Username
• Password
• API ID (optional)
Internal User Database vs. External User Database Remote Access functionality includes a flexible user management scheme. Users are managed in a number of ways:
• INTERNAL - A Security Gateway can store a static password in its local user database for each user configured in Security Management Server. No additional software is needed.
• LDAP - LDAP is an open industry standard that is used by multiple vendors. Check Point products integrate LDAP with Check Point User Directory. Manage the users externally on the LDAP server, and changes are reflected on the SmartDashboard. Security Gateways query the User Directory data for authentication.
• RADIUS - Remote Authentication Dial-In User Service (RADIUS) is an external authentication scheme that provides security and scalability by separating the authentication function from the access server.
When employing RADIUS as an authentication scheme, the Security Gateway forwards authentication requests by remote users to the RADIUS server. The RADIUS server, which stores user account information, authenticates the users. The RADIUS protocol uses UDP for communications with the Security Gateway. RADIUS Servers and RADIUS Server Group objects are defined in SmartDashboard.
• SecurID Token Management ACE/Server - Developed by RSA Security, SecurID requires users to both possess a token authenticator and to supply a PIN or password. Token authenticators generate one-time passwords that are synchronized to an RSA ACE/Server, and may come in the form of hardware or software. Hardware tokens are key-ring or credit card-sized devices, while software tokens reside on the PC or device from which the user wants to authenticate. All tokens generate a random, one-time-use access code that changes every minute or so.

User and Client Authentication for Remote Access
Remote Access VPN Administration Guide R80.10 | 40
When a user attempts to authenticate to a protected resource, that one-time-use code must be validated by the ACE/Server.
When employing SecurID as an authentication scheme, the Security Gateway forwards authentication requests by remote users to the ACE/Server. ACE manages the database of RSA users and their assigned hard or soft tokens. The VPN module acts as an ACE/Agent 5.0, which means that it directs all access requests to the RSA ACE/Server for authentication. For agent configuration see ACE/Server documentation.
The differences between user management on the internal database, and User Directory:
• User Directory is done externally and not locally.
• If you change User Directory templates the change is applied to users dynamically, immediately.
Defining User and Authentication Methods in LDAP 1. Obtain and install a license that enables the VPN module to retrieve information from an LDAP
server.
2. Create an LDAP account unit.
3. Define users as LDAP users. A new network object for LDAP users is created on the Users tree. (The LDAP users also appear in the objects list window to the right.)
For more information see: LDAP and User Management in the R80.10 Security Management Server Administration Guide http://downloads.checkpoint.com/dc/download.htm?ID=54842.
User Certificate Management Managing user certificates involves:
• Tracing the status of the user's certificate
• Automatically renewing a certificate
• Revoking certificates
Tracing the Status of User's Certificate The status of a user's certificate can be traced at any time in the Certificates tab of the user's Properties window. The status is shown in the Certificate state field. If the certificate has not been generated by the user by the date specified in the Pending until field, the registration key is deleted.
If the user is defined in LDAP, then tracing is performed by the ICA management tool.
Automatically Renewing a Users' Certificate ICA certificates for users can be automatically renewed a number of days before they expire. The client initiates a certificate renewal operation with the CA before the expiration date is reached. If successful, the client receives an updated certificate.

User and Client Authentication for Remote Access
Remote Access VPN Administration Guide R80.10 | 41
To configure automatic certificate renewal:
1. From Menu, click Global Properties.
2. From the navigation tree, click Remote Access > Certificates.
3. Click Renew users internal CA certificates
4. Enter the number of days to Start the renewal process.
This is the number of days before the certificate for the user expires and the client renews the certificate.
5. Click OK and publish the changes.
6. Install the Access Control Policy.
7. Tell the users to update the topology of the site.
Revoking Certificates The way in which certificates are revoked depends on whether they are managed internally or externally, using LDAP.
For Internally Managed Users When a user is deleted, their certificate is automatically revoked. Certificates can be disabled or revoked at any time.
If the certificate is already active or was not completed by the user, you can revoke it by clicking Revoke in the Certificates tab of the User Properties window.
For Users Managed in LDAP If users are managed in LDAP, certificates are revoked using the ICA management tool.
Multiple Certificates per User Check Point VPN lets you define many certificates for each user. This lets users connect from different devices without the necessity to copy or move certificates from one device to another. Users can also connect from different devices at the same time.
User Certificate Creation Methods when Using the ICA Check Point's Internal Certificate Authority (ICA) offers two ways to create and transfer certificates to remote users:
1. The administrator generates a certificate in Security Management Server for the remote user, saves it to removable media and transfers it to the client "out-of-band."
2. The administrator initiates the certificate process on the Security Management Server (or ICA management tool), and is given a registration key. The administrator transfers the registration key to the user "out-of-band." The client establishes an SSL connection to the ICA (using the CMC protocol) and completes the certificate generation process using the registration key. In this way:
• Private keys are generated on the client.
• The created certificate can be stored as a file on the machines hard-drive, on a CAPI storage device, or on a hardware token.
This method is especially suitable for geographically spaced-remote users.

User and Client Authentication for Remote Access
Remote Access VPN Administration Guide R80.10 | 42
Creating Remote Access VPN Certificates for Users This section contains procedures for creating Remote VPN user certificates and sending them to end users.
There are two basic procedures for supplying remote access VPN certificates to users.
• Sending a P12 File:
• The administrator creates a p12 certificate file and sends it to users.
• The user saves the p12 file on the device and specifies the certificate using a remote VPN Client.
• Users authenticate by entering a certificate password when starting a remote access VPN connection.
• Using a Registration key: • The administrator creates a registration key and sends it to the user.
• The user enrolls the certificate by entering the registration key in a Remote Access VPN client. The user can optionally save the p12 file to the device. The user must do this in an administrator-defined period of time.
• End users authenticate using this certificate. A password can also be required according to the security policy settings. If the user saves the p12 file to the device, a password is always necessary.
Enabling a User Certificate
To enable a user certificate:
1. In SmartConsole, from the Objects Bar click Users > Users.
2. Create a new user or double-click an existing user.
The User Properties window opens.
3. From the navigation tree, click Encryption.
4. Click Edit. The IKE Phase 2 Properties window opens.
5. Click the Authentication tab and make sure that Public key is selected.
6. Click OK.
7. Publish the changes.
Creating a P12 Certificate File After creating a user certificate, you must then make this certificate available to remote access users. Use this procedure to create a p12 certificate.
To create a p12 certificate file for remote access VPN users:
1. Create the user certificate ("Enabling a User Certificate" on page 42).
2. In the User Properties window, from the navigation tree click Certificates.
3. In the Certificates page, click New.
4. Select Certificate file (.p12). 5. In the Certificate File (.P12) window, enter and confirm the certificate password.
6. Optional: Enter descriptive text in the Comment field.

User and Client Authentication for Remote Access
Remote Access VPN Administration Guide R80.10 | 43
7. Click OK and enter a path to save the p12 file.
The new certificate shows in the Certificate. The status is set to Valid.
8. Click OK.
9. Send the .p12 file to the end user by secure email or other secure means.
Creating Certificate Registration Key After creating a user certificate, you must then make this certificate available to remote access users. Use this procedure to create a certificate registration key that lets the user enroll the certificate for use with a device.
To create a certificate registration key:
1. Create the user certificate ("Enabling a User Certificate" on page 42).
2. In the User Properties window, from the navigation tree click Certificates.
3. In the Certificates pane, click New.
4. Select Registration key for certificate enrollment. 5. In the Registration Key for Certificate Enrollment window, select the number of days before
the certificate expires.
6. Click the email button to send the registration key to the user.
7. Optional: Enter descriptive text in the Comment field.
8. Click OK.
Instructions for End Users Remote Access VPN users can use many different clients to connect to network resources. It is the administrator's responsibility to give appropriate instructions to end users to make sure that they successfully enroll the certificate.
The Creating Certificates ("Creating Remote Access VPN Certificates for Users" on page 42) section gives some general procedural guidelines that apply to many VPN clients. For detailed instructions, refer to the VPN client documentation.
Enrolling User Certificates - ICA Management Tool
To use the ICA Management to enroll a user certificate:
1. In SmartConsole, from the Objects Bar click Users > Users.
2. Create a new user or double-click an existing user.
The User Properties window opens.
3. From the navigation tree click Encryption.
4. Click Edit.
The IKE Phase 2 Properties window opens.
5. Click the Authentication tab, and select Public Key.
6. Click OK.
7. Publish the changes.
8. Enroll the user certificate using the ICA management tool.

User and Client Authentication for Remote Access
Remote Access VPN Administration Guide R80.10 | 44
Using Certificates Using Third Party PKI Using third party PKI involves creating a certificate for the user and can also include a certificate for the Security Gateway.
You can use a third-party OPSEC PKI certificate authority that supports the PKCS#12, CAPI or Entrust standards to issue certificates for Security Gateways and users. The Security Gateway must trust the CA and have a certificate issued by the CA.
See Certificate Parsing (on page 37) to configure which information the gateway sends to the LDAP server to parse the certificate.
By default, for users managed on an LDAP server, the full distinguished name (DN) which appears on the certificate is the same as the user's name. But if the user is managed on the internal database, the user name and DN on the certificate will not match. For this reason, the user name in the internal database must be either the full DN which appears on the certificate or just the name which appears in the CN portion of the certificate. For example, if the DN which appears on the certificate is:
CN=John, OU=Finance, O=Widget Enterprises, C=US
The name of the user on the internal database must be either:
• John, or:
• CN=John, OU=Finance, O=Widget Enterprises, C=US
Note - The DN on the certificate must include the user's LDAP branch. Some PKI solutions do not include (by default) the whole branch information in the subject DN, for example the DN only includes the common name. This can be rectified in the CA configuration.
Configuring Third-Party PKI Certificates
To use a third-party PKI solution:
1. In SmartConsole, from the Objects Bar click Users > Users.
2. Create a new user or double-click an existing user.
The User Properties window opens.
3. From the navigation tree, click Encryption.
4. Click Edit. The IKE Phase 2 Properties window opens.
5. Click the Authentication tab and select Public key.
6. Define the third party Certificate Authority as an object in SmartDashboard.
7. Optional - Generate a certificate for your Security Gateway from the third party CA.
8. Generate a certificate for the remote user from the third party CA. (Refer to relevant third party documentation for details.)
9. Transfer the certificate to the user.

User and Client Authentication for Remote Access
Remote Access VPN Administration Guide R80.10 | 45
10. In Global Properties > Authentication window, add or disable suffix matching.
For users with certificates, it is possible to specify that only certificates with a specified suffix in their DN are accepted. This feature is enabled by default, and is required only if:
• Users are defined in the internal database, and
• The user names are not the full DN.
All certificates DN's are checked against this suffix.
Note - If an hierarchy of Certificate Authorities is used, the chain certificate of the user must reach the same root CA that the Security Gateway trusts.
Using a Pre-Shared Secret When using pre-shared secrets, the remote user and Security Gateway authenticate each other by verifying that the other party knows the shared secret: the user's password.
To enable authentication with pre-shared secrets:
1. From Menu, click Global Properties.
2. From the navigation tree, click Remote Access >VPN Authentication.
3. In the Support authentication methods section, select Pre-Shared Secret (For SecuRemote client / SecureClient users).
4. Click OK.
5. Configure the Authentication settings for each applicable user:
a) From the Objects Bar, double-click the user.
The User Properties window opens.
b) From the navigation tree, click Encryption.
c) Select IKE and click Edit.
The IKE Phase 2 Properties window opens.
d) From the Authentication tab, click Password (Pre-Shared Secret).
e) Enter and Confirm the Password (Pre-shared secret).
f) Click OK.
6. Publish the changes.
7. Give the password to the user.
NT Group/RADIUS Class Authentication Feature Authentication can take place according to NT groups or RADIUS classes. In this way, remote access users are authenticated according to the remote access community group they belong to.
Note - Only NT groups are supported, not Active Directory.

User and Client Authentication for Remote Access
Remote Access VPN Administration Guide R80.10 | 46
Granting User Access Using RADIUS Server Groups The Security Gateway lets you control access privileges for authenticated RADIUS users, based on the administrator's assignment of users to RADIUS groups. These groups are used in the Security Rule Base to restrict or give users access to specified resources. Users are unaware of the groups to which they belong.
To use RADIUS groups, you must define a return attribute in the RADIUS user profile of the RADIUS server. This attribute is returned to the Security Gateway and contains the group name (for example, RAD_<group to which the RADIUS users belong>) to which the users belong.
Use these RADIUS attributes (refer to RFC 2865):
• For SecurePlatform - attribute "Class" (25)
• For other operating systems, including Gaia, Windows, and IPSO- attribute "Vendor-Specific" (26)
Sample workflow for RADIUS authentication configuration:
1. Create a RADIUS host object.
2. Configure the RADIUS server object settings.
3. Configure gateways to use RADIUS authentication.
4. Define user groups.
5. Configure RADIUS authentication settings for user.
6. Complete the RADIUS authentication configuration.
Configuring Authentication for NT groups and RADIUS Classes
To enable this group authentication feature:
1. Set the add_radius_groups property in objects.C to true.
2. Define a generic* profile, with RADIUS as the authentication method.
3. Create a rule in the Policy Rule Base whose "source" is this group of remote users that authenticate using NT Server or RADIUS.
Office Mode IP assignment file This method also works for Office Mode. The group listed in the ipassignment.conf file points to the group that authenticates using NT group authentication or RADIUS classes (see "Office Mode through the ipassignment.conf File" on page 62).
Associating a RADIUS Server with Security Gateway You can associate users with the RADIUS authentication server in the User Properties > Authentication tab. You can override that association and associate a gateway with a RADIUS server.
To associate one or more Radius servers to a gateway, run this dbedit command: modify network_objects <gateway obj> radius_server servers:<radius obj>
To turn off the RADIUS-gateway association: modify users <user obj> use_fw_radius_if_exist false

User and Client Authentication for Remote Access
Remote Access VPN Administration Guide R80.10 | 47
Configuring RADIUS Objects To create a new RADIUS host object:
1. In SmartConsole, the Objects tab, click New > Host. The New Host window opens.
2. Enter the Object Name and the IP Address of the new RADIUS host object, and click OK.
3. Install policy.
To configure the RADIUS server object settings:
1. In SmartConsole, the Objects tab, click New > More > Server > More > RADIUS.
The RADIUS Server Properties window opens.
2. Configure new server properties:
• Enter the Name of the RADIUS server object.
• Select the RADIUS Host object.
• Select the Service - RADIUS (on port 1645) or NEW-RADIUS (on port 1812 service).
Note - The default setting is RADIUS, but the RADIUS standards group recommends using NEW-RADIUS, because port 1645 can conflict with the datametrics service running on the same port.
• Enter the Shared Secret that you configured on the RADIUS server
• Select the version - RADIUS Ver. 1.0 Compatible (RFC 2138 compliant) or RADIUS Ver. 2.0 Compatible (RFC 2865 compliant)
• Select the peer authentication Protocol - PAP or MS-CHAP v2
• If you use more than one RADIUS authentication server, select the Priority
3. Click OK.
To configure a Security Gateway to use RADIUS authentication:
1. In SmartConsole, go to the Gateways & Servers view, right-click a Security Gateway object and select Edit.
2. In the gateway property window that opens, select Other > Legacy Authentication.
3. In the Enabled Authentication Schemes section, select RADIUS.
4. Click OK.
Configuring RADIUS Settings for Users
To define a RADIUS user group:
1. In SmartConsole, the Objects tab, click New > More > Users > User Group.
The New User Group window opens.
2. Enter the name of the group in this format: RAD_<group_name>.
Make sure the group is empty.
3. Click OK.
4. Install policy.

User and Client Authentication for Remote Access
Remote Access VPN Administration Guide R80.10 | 48
To configure RADIUS authentication settings for users with Security Gateway user accounts:
1. Create new internal user profile for each user. In SmartConsole, click Objects > New > More > User > User.
The User Properties window opens.
2. In the General Properties tab, configure these settings:
• Enter a User Name for the RADIUS server.
• Set the Expiration Date.
3. In the Authentication tab, configure these settings:
• Select RADIUS from the Authentication method list
• From the RADIUS Server list, select the RADIUS object that you configured earlier
4. Click OK.
To configure RADIUS authentication settings for users without Security Gateway user accounts:
Create a new external user profile for each user in SmartDashboard, which opens from SmartConsole.
1. Open SmartDashboard:
a) In SmartConsole, go to the Manage & Settings tab.
b) Click Blades .
c) Click one of the links for Configure in >SmartDashboard.
2. From the Network object tree, click the Users icon. 3. Right-click External User Profiles and select New External User Profile > Match all users (or
Match by domain).
If you support more than one external authentication scheme, set up External User Profiles with the Match By Domain setting.
The External User Profile Properties window opens.
4. In the General Properties tab, configure these settings:
• Enter a User Name for the RADIUS server. (When configuring Match all users as an External User Profile, the name "generic*" is automatically assigned)
• Set the Expiration Date.
5. In the Authentication tab, configure these settings:
• Select RADIUS from the Authentication Scheme list.
• From the Select a RADIUS Server or Group of Servers list, select the RADIUS object that you configured earlier
6. Click OK.
7. Close SmartDashboard.
8. Install policy in SmartConsole.

User and Client Authentication for Remote Access
Remote Access VPN Administration Guide R80.10 | 49
Completing RADIUS Authentication Configuration
To complete the RADIUS authentication configuration:
1. In SmartConsole, create the required Access Control rules to allow access to users authenticated through the RADIUS server.
2. Make sure that communication between the firewall and the server is not NATed in the Address Translation Rule Base.
3. Save the changes.
4. Close all SmartConsole windows.
5. On the Security Management Server, use GuiDBedit to change the value of the add_radius_groups attribute from false to true.
6. Save and then close GuiDBedit.
7. Open SmartConsole.
8. Install the policy.
9. On the RADIUS server, edit the RADIUS users to include a class RADIUS attribute on the users Return list that corresponds to the user group that they access.
To use a different attribute instead of the class attribute:
1. Close all SmartConsole windows and clients.
2. On the Security Gateway, use GuiDBedit to modify the value of the firewall_properties attribute radius_groups_attr to the new RADIUS attribute.
3. Save.
4. Close GuiDBedit.
5. Open SmartConsole.
6. Install the policy.
7. On the RADIUS server, make sure that you use the same RADIUS attribute on users' Return lists that corresponds to the Firewall user group that they access.
Working with RSA Hard and Soft Tokens If you use SecurID for authentication, you must manage the users on RSA's ACE management server. ACE manages the database of RSA users and their assigned hard or soft tokens. The client contacts the site's Security Gateway. The Security Gateway contacts the ACE Server for user authentication information. This means:
• The remote users must be defined as RSA users on the ACE Server.
• On the Security Gateway, the SecurID users must be placed into a group with an external user profile account that specifies SecurID as the authentication method.
SecurID Authentication Devices Several versions of SecurID devices are available. The older format is a small device that displays a numeric code, called a tokencode, and time bars. The token code changes every sixty seconds, and provides the basis for authentication. To authenticate, the user must add to the beginning of the tokencode a special password called a PIN number. The time bar indicates how much time is left before the next tokencode is generated. The remote user is requested to enter both the PIN number and tokencode into the client connection window.
User and Client Authentication for Remote Access
Remote Access VPN Administration Guide R80.10 | 50
The newer format resembles a credit card, and displays the tokencode, time bars and a numeric pad for typing in the PIN number. This type of device mixes the tokencode with the entered PIN number to create a Passcode. The client requests only the passcode.
SoftID operates the same as the passcode device but consists only of software that sits on the desktop.
The Advanced view displays the tokencode and passcode with COPY buttons, allowing the user to cut and paste between softID and the client:
Enabling Hybrid Mode and Methods of Authentication Hybrid mode allows the Security Gateway and remote access client to use different methods of authentication.
To enable Hybrid Mode:
1. From Menu, click Global Properties.
2. From the navigation tree, click Remote Access > VPN Authentication.
3. In the Support authentication methods section, click Support Legacy Authentication for SC (hybrid mode), L2TP (PAP), and Nokia clients (CRACK).
4. Click OK.
5. Publish the changes.
Defining User Authentication Methods in Hybrid Mode
To define the Hybrid Mode authentication for a user:
1. From the Objects Bar, double-click the user.
The User Properties window opens.
2. From the navigation tree, click Authentication.
3. Select the Authentication Scheme.
4. Configure the necessary settings.
5. Click OK.
6. Publish the changes.
7. Give these credentials to the user.

Remote Access VPN Administration Guide R80.10 | 51
CHAPTE R 6
Office Mode In This Section:
The Need for Remote Clients to be Part of the LAN ................................................... 51
Office Mode ................................................................................................................... 52
How Office Mode Works ............................................................................................... 52
Assigning IP Addresses ................................................................................................ 54
IP Address Lease duration ........................................................................................... 55
Using Name Resolution - WINS and DNS ................................................................... 55
Anti-Spoofing ................................................................................................................ 55
Using Office Mode with Multiple External Interfaces ................................................. 56
Office Mode Per Site ..................................................................................................... 56
Enabling IP Address per User ...................................................................................... 57
Office Mode Considerations ......................................................................................... 59
Configuring Office Mode ............................................................................................... 60
The Need for Remote Clients to be Part of the LAN As remote access to internal networks of organizations becomes widespread, it is essential that remote users are able to access as many of the internal resources of the organization as possible. Typically, when remote access is implemented, the client connects using an IP address locally assigned by, for example, an ISP. The client may even receive a non-routable IP which is then hidden behind a NATing device. Because of this, several problems may arise:
• Some networking protocols or resources may require the client’s IP address to be an internal one. Router ACLs (access lists), for example, might be configured to allow only specific or internal IP addresses to access network resources. This is difficult to adjust without knowing the remote client’s IP address in advance.
• When assigned with a non-routable IP address a conflict may occur, either with similar non-routable addresses used on the corporate LAN, or with other clients which may receive the same IP address while positioned behind some other hiding NAT device.
For example, if a client user receives an IP of 10.0.0.1 which is entered into the headers of the IPSec packet. The packet is NATed. The packet’s new source IP is 192.168.17.5. The Security Gateway decapsulates the NATed IP and decrypts the packet. The IP address is reverted to its original source IP of 10.0.0.1. If there is an internal host with the same IP, the packet will probably be dropped (if Anti-Spoofing is turned on). If there is no duplicate IP, and the packet is forwarded to some internal server, the server will then attempt to reply to a non-existent address.
• Two remote users are assigned the same IP address by an ISP (for example, two users are accessing the organization from hotels which provide internal addresses and NAT them on the outbound). Both users try to access the internal network with the same IP address. The resources on the internal network of the organization may have difficulty distinguishing between the users.

Office Mode
Remote Access VPN Administration Guide R80.10 | 52
Office Mode Office Mode enables a Security Gateway to assign a remote client an IP address. The assignment takes place once the user connects and authenticates. The assignment lease is renewed as long as the user is connected. The address may be taken either from a general IP address pool, or from an IP address pool specified per user group. The address can be specified per user, or via a DHCP server, enabling the use of a name resolution service. With DNS name resolution, it is easier to access the client from within the corporate network.
It is possible to allow all your users to use Office Mode, or to enable the feature for a specific group of users. This can be used, for example, to allow privileged access to a certain group of users (e.g., administrators accessing the LAN from remote stations). It is also useful in early integration stages of Office Mode, allowing you time to "pilot" this feature on a specific group of users, while the rest of the users continue to work in the traditional way.
Office Mode is supported with the following:
• Endpoint Security VPN
• SSL Network Extender
• Crypto
• L2TP
How Office Mode Works When you connect to the organization, an IKE negotiation is initiated automatically to the Security Gateway. When using Office Mode, a special IKE mode called config mode is inserted between phase 1 and phase 2 of IKE. During config mode, the client requests an IP from the Security Gateway. Several other parameters are also configurable this way, such as a DNS server IP address, and a WINS server IP address.
After the Security Gateway allocates the IP address, the client assigns the IP to a Virtual Adapter on the Operating system. The routing of packets to the corporate LAN is modified to go through this adapter. Packets routed in this way bear the IP address assigned by the Security Gateway as their source IP address. Before exiting through the real adapter, the packets will be IPsec encapsulated using the external IP address (assigned to the real adapter) as the source address. In this way, non-routable IP addresses can be used with Office Mode; the Office Mode non-routable address is concealed within the IPsec packet.
For Office Mode to work, the IP address assigned by the Security Gateway needs to be routable to that Security Gateway from within the corporate LAN. This lets packets on the LAN being sent to the client to be routed back through the Security Gateway (see "Office Mode and Static Routes in a Non-flat Network" on page 55).
Note - A remote user with SecuRemote client only is not supported in Office Mode.
A Closer Look The following steps illustrate the process taking place when a remote user connected through Office Mode wishes to exchange some information with resources inside the organization:
• The user is trying to connect to some resource on the LAN, thus a packet destined for the internal network is to be sent. This packet is routed through the virtual interface that Office Mode had set up, and bears the source IP address allocated for the remote user.

Office Mode
Remote Access VPN Administration Guide R80.10 | 53
• The packet is encrypted and builds a new encapsulating IP header for it. The source IP of the encapsulating packet is the remote client's original IP address, and its destination is the IP address of the Security Gateway. The encapsulated packet is then sent to the organization through the Internet.
• The Security Gateway of the organization receives the packet, decapsulates and decrypts it, revealing the original packet, which bears the source IP allocated for the remote user. The Security Gateway then forwards the decapsulated packet to its destination.
• The internal resource gets a packet seemingly coming from an internal address. It processes the packet and sends response packets back to the remote user. These packets are routed back to the (internal) IP address assigned to the remote user.
• The Security Gateway gets the packet, encrypts and encapsulates it with the remote users' original (routable) IP address and returns the packet back to the remote user:
Item Description
1 Host IP Address 10.0.01
2 Server
3 Gateway
4 Internet
5 ISP Router
6 User's machine
• The remote host uses the Office mode address in the encapsulated packet and 10.0.0.1 in the encapsulating header.
• The packet is NATed to the new source address: 192.168.17.5
• The Security Gateway decapsulates the NATed IP address and decrypts the packet. The source IP address is the Office Mode address.
• The packet is forwarded to the internal server, which replies correctly.

Office Mode
Remote Access VPN Administration Guide R80.10 | 54
Assigning IP Addresses The internal IP addresses assigned by the Security Gateway to the remote user can be allocated using one of the following methods:
• IP Pool
• DHCP Server
IP Pool The System Administrator designates a range of IP addresses to be utilized for remote client machines. Each client requesting to connect in Office Mode is provided with a unique IP address from the pool.
IP Assignment Based on Source IP Address IP addresses from the IP pool may be reserved and assigned to remote users based on their source IP address. When a remote host connects to the Security Gateway, its IP address is compared to a predefined range of source IP addresses. If the IP address is found to be in that range, then it is assigned an Office Mode IP address from a range dedicated for that purpose.
The IP addresses from this reserved pool can be configured to offer a separate set of access permissions given to these remote users.
DHCP Server A Dynamic Host Configuration Protocol (DHCP) server can be used to allocate IP addresses for Office Mode clients. When a remote user connects to the Security Gateway using Office Mode, the Security Gateway requests the DHCP server to assign the user an IP address from a range of IP addresses designated for Office Mode users.
Security Gateway DHCP requests can contain various client attributes that allow DHCP clients to differentiate themselves. The attributes are pre-configured on the client side operating system, and can be used by different DHCP servers in the process of distributing IP addresses. Security Gateways DHCP request can contain the following attributes:
• Host Name
• Fully Qualified Domain Name (FQDN)
• Vendor Class
• User Class
RADIUS Server A RADIUS server can be used for authenticating remote users. When a remote user connects to a Security Gateway, the username and password are passed on to the RADIUS server, which checks that the information is correct, and authenticates the user. The RADIUS server can also be configured to allocate IP addresses.
Note - Authentication and IP assignment must be performed by the same RADIUS server.
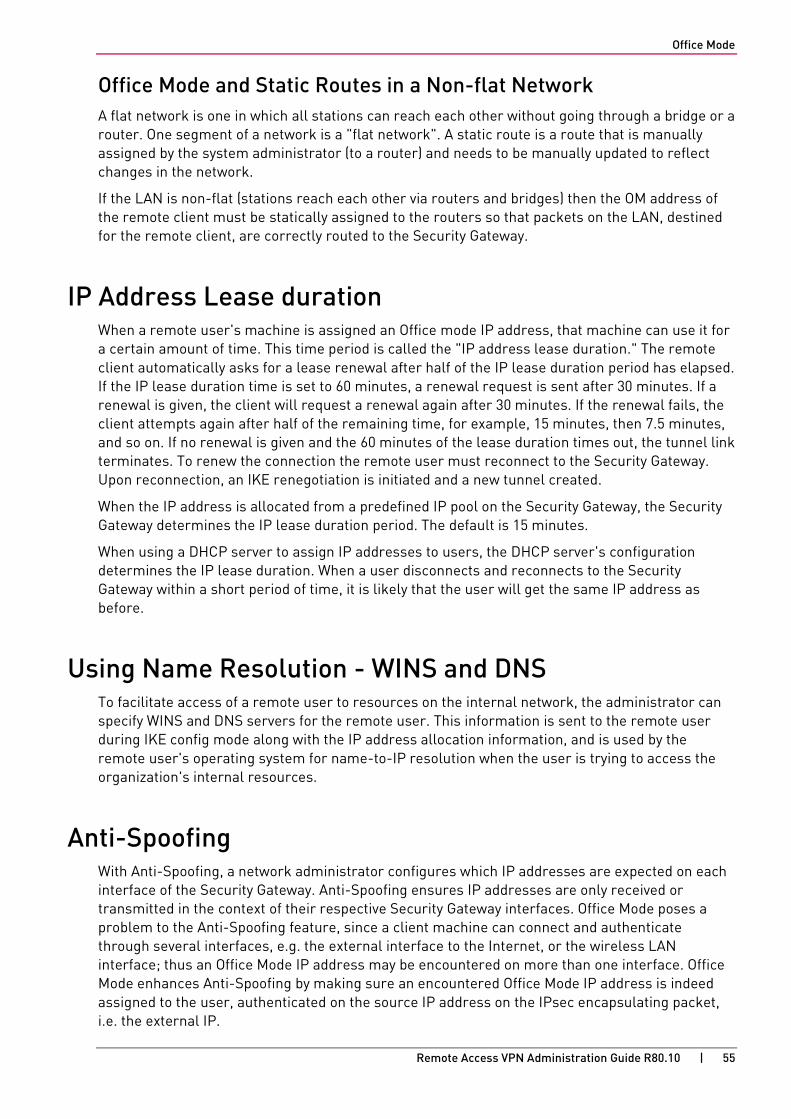
Office Mode
Remote Access VPN Administration Guide R80.10 | 55
Office Mode and Static Routes in a Non-flat Network A flat network is one in which all stations can reach each other without going through a bridge or a router. One segment of a network is a "flat network". A static route is a route that is manually assigned by the system administrator (to a router) and needs to be manually updated to reflect changes in the network.
If the LAN is non-flat (stations reach each other via routers and bridges) then the OM address of the remote client must be statically assigned to the routers so that packets on the LAN, destined for the remote client, are correctly routed to the Security Gateway.
IP Address Lease duration When a remote user's machine is assigned an Office mode IP address, that machine can use it for a certain amount of time. This time period is called the "IP address lease duration." The remote client automatically asks for a lease renewal after half of the IP lease duration period has elapsed. If the IP lease duration time is set to 60 minutes, a renewal request is sent after 30 minutes. If a renewal is given, the client will request a renewal again after 30 minutes. If the renewal fails, the client attempts again after half of the remaining time, for example, 15 minutes, then 7.5 minutes, and so on. If no renewal is given and the 60 minutes of the lease duration times out, the tunnel link terminates. To renew the connection the remote user must reconnect to the Security Gateway. Upon reconnection, an IKE renegotiation is initiated and a new tunnel created.
When the IP address is allocated from a predefined IP pool on the Security Gateway, the Security Gateway determines the IP lease duration period. The default is 15 minutes.
When using a DHCP server to assign IP addresses to users, the DHCP server's configuration determines the IP lease duration. When a user disconnects and reconnects to the Security Gateway within a short period of time, it is likely that the user will get the same IP address as before.
Using Name Resolution - WINS and DNS To facilitate access of a remote user to resources on the internal network, the administrator can specify WINS and DNS servers for the remote user. This information is sent to the remote user during IKE config mode along with the IP address allocation information, and is used by the remote user's operating system for name-to-IP resolution when the user is trying to access the organization's internal resources.
Anti-Spoofing With Anti-Spoofing, a network administrator configures which IP addresses are expected on each interface of the Security Gateway. Anti-Spoofing ensures IP addresses are only received or transmitted in the context of their respective Security Gateway interfaces. Office Mode poses a problem to the Anti-Spoofing feature, since a client machine can connect and authenticate through several interfaces, e.g. the external interface to the Internet, or the wireless LAN interface; thus an Office Mode IP address may be encountered on more than one interface. Office Mode enhances Anti-Spoofing by making sure an encountered Office Mode IP address is indeed assigned to the user, authenticated on the source IP address on the IPsec encapsulating packet, i.e. the external IP.

Office Mode
Remote Access VPN Administration Guide R80.10 | 56
Using Office Mode with Multiple External Interfaces Typically, routing is performed before encryption in VPN. In some complex scenarios of Office Mode, where the Security Gateway may have several external interfaces, this might cause a problem. In these scenarios, packets destined at a remote user's virtual IP address will be marked as packets that are supposed to be routed through one external interface of the Security Gateway. Only after the initial routing decision is made do the packets undergo IPsec encapsulation. After the encapsulation, the destination IP address of these packets is changed to the original IP address of the client. The routing path that should have been selected for the encapsulated packet might be through a different external interface than that of the original packet (since the destination IP address changed), in which case a routing error occurs. Office Mode has the ability to make sure that all Office Mode packets undergo routing after they are encapsulated.
Office Mode Per Site After a remote user connects and receives an Office Mode IP address from a Security Gateway, every connection to that Security Gateways encryption domain will go out with the Office Mode IP as the internal source IP. The Office Mode IP is what hosts in the encryption domain will recognize as the remote user's IP address.
The Office Mode IP address assigned by a specific Security Gateway can be used in its own encryption domain and in neighboring encryption domains as well. The neighboring encryption domains should reside behind Security Gateways that are members of the same VPN community as the assigning Security Gateway. Since the remote hosts' connections are dependent on the Office Mode IP address it received, if the Security Gateway that issued the IP becomes unavailable, all he connections to the site will terminate.
In order for all Security Gateways on the site to recognize the remote users Office Mode IP addresses, the Office Mode IP range must be known by all of the Security Gateways and the IP ranges must be routable in all the networks. However, when the Office Mode per Site feature is in use, the IP-per-user feature cannot be implemented.
Note - When Office Mode per Site is activated, Office Mode Anti-Spoofing is not enforced.
Office Mode
Remote Access VPN Administration Guide R80.10 | 57
In this scenario:
Item Description
1 Security Gateway 1
2 VPN Domain A
3 Internet
4 Remote Host
5 Security Gateway 2
6 VPN Domain B
• The remote user makes a connection to Security Gateway 1.
• Security Gateway 1 assigns an Office Mode IP address to the remote user.
• While still connected to Security Gateway 1, the remote user can make a connection to hosts behind Security Gateway 2 using the Office Mode IP address issued by Security Gateway 1.
Enabling IP Address per User In some configurations, a router or other device restricts access to portions of the network to specified IP addresses. A remote user connecting in Office Mode can get a specified IP address, or an IP address from a specified range, which will allow the connection to pass through the router.
Note - If this feature is implemented, you must enable Anti-Spoofing for Office Mode (see "Anti-Spoofing" on page 55).
You can use a DHCP server or IP Pool to allocate IP addresses.
DHCP Server
To configure Office Mode addresses that are allocated by a DHCP server:
1. In SmartConsole, click Gateways & Servers and double-click the Security Gateway.
The gateway window opens and shows the General Properties page.
2. From the navigation tree, click VPN Clients > Office Mode.
3. Enable Office Mode for a group or all users.

Office Mode
Remote Access VPN Administration Guide R80.10 | 58
4. In the Office Mode Method section select these options:
• Click Using one of the following methods
• Click Automatic (using DHCP)
5. Click MAC address for DHCP allocation, select calculated per user name
6. Click OK and publish the changes.
7. Install the Policy on the Security Gateway.
8. Log in to the Security Gateway CLI, run this command to obtain the MAC address assigned to the user. vpn macutil <username>
9. On the DHCP Server make a new reservation, specifying the IP address and MAC address, assigning the IP address for the exclusive use of the given user.
ipassignment.conf File The $FWDIR/conf/ipassignment.conf file on the Security Gateway, is used to implement the IP-per-user feature. It lets the administrator to assign specific addresses to specific users or specific ranges to specific groups when they connect using Office Mode or L2TP clients.
Note - This file must be manually added to all Security Gateways.
Sample ipassignment.conf File
# This file is used to implement the IP-per-user feature. It allows the # administrator to assign specific addresses to specific users or specific # ranges to specific groups when they connect using Office Mode or L2TP. # # The format of this file is simple: Each line specifies the target # gateway, the IP address (or addresses) we wish to assign and the user # (or group) name as in the following examples: # # Gateway Type IP Address User Name # ============= ===== ======================================== ========================================= # Paris-GW, 10.5.5.8, Jean # Brasilia, addr 10.6.5.8, wins=(192.168.3.2,192.168.3.3) Joao # comments are allowed # Miami, addr 10.7.5.8, dns=(192.168.3.7,192.168.3.8) CN=John,OU=users,O=cpmgmt.acme.com.gibeuu # 10.1.1.2 range 100.107.105.110-100.107.105.119/24 Finance # * net 10.7.5.32/28 suffix=(acct.acme.com) Accounting # # Note that real records do not begin with a pound-sign (#), and the commas # are optional. Invalid lines are treated as comments. Also, the # user name may be followed by a pound-sign and a comment. # # The first item is the gateway name or address. On lines that assign # multiple IP addresses to a group of users or a network (range or net # in the second item) this should be the physical address of the gateway, # or an asterisk (*) to signify all gateways. # On lines that assign one IP for one user this could be the gateway # name as well. A gateway will only honor lines that refer to it. # # The second item is a descriptor. It can be 'addr', 'range' or 'net'. # 'addr' specifies one IP for one user. This prefix is optional. # 'range' and 'net' specify a range of addresses. These prefixes are # required.

Office Mode
Remote Access VPN Administration Guide R80.10 | 59
# # The third item is the IP address or addresses. In the case of a single # address, it is specified in standard dotted decimal format. # ranges can be specified either by the first and last IP address, or using # a net specification. In either case you need to also specify the subnet # mask length ('/24' means 255.255.255.0). With a range, this is the subnet # mask. With a net it is both the subnet mask and it also determines the # addresses in the range. # # After the third item come any of three keyword parameters. These are # specifications for WINS (or NBNS) servers, for DNS servers and a DNS # suffix. The parameters themselves are on the format 'keyword=(params)' # where the params can be one address (such as "192.168.3.2"), several # IP addresses (such as "192.168.3.2,192.168.3.3") or a string (only # for the DNS suffix. The relevant keywords are "dns", "wins" and # "suffix" and they are not case-sensitive. # Inside the keyword parameters there must be no spaces or any other # extra characters. These will cause the entire line to be ignored. # # The last item is the user name. This can be a common name if the # user authenticates with some username/password method (like hybrid # or MD5-Challenge) or a DN if the user authenticates with a # certificate. #
Office Mode Considerations
IP Pool versus DHCP The question of whether IP addresses should be assigned by the Firewall (using IP pools) or by a DHCP server is a network administration and financial issue. Some network administrators may prefer to manage all of their dynamic IP addresses from the same location. For them, a central DHCP server might be preferable. Moreover, DHCP allows a cluster to assign all the addresses from a single pool, rather than have a different pool per cluster member as you have to with Firewall IP pools. On the other hand, purchasing a DHCP server can be viewed by some as an unnecessary financial burden, in which case the IP pool option might be preferred.
Routing Table Modifications IP addresses, assigned by Office Mode need to be routed by the internal LAN routers to the Security Gateway (or Security Gateway cluster) that assigned the address. This is to make sure packets, destined to remote access Office Mode users, reach the Security Gateway in order to be encapsulated and returned to the client machine. This may require changes to the organization's routing tables.
Using the Multiple External Interfaces Feature Enabling this feature instructs Office Mode to perform routing decisions after the packets are encapsulated using IPsec, and prevents possible routing problems (see "Using Office Mode with Multiple External Interfaces" on page 56). This feature adds new checks and changes to the routing of packets through the Security Gateway, and has an impact on performance. As a result, we recommend that you use this feature only when these conditions are met:
• The Security Gateway has multiple external interfaces
• Office Mode packets are routed to the wrong external interface
Office Mode
Remote Access VPN Administration Guide R80.10 | 60
Configuring Office Mode Before configuring Office Mode the assumption is that standard VPN Remote Access has already been configured.
Before starting the Office Mode configuration, you must select an internal address space designated for remote users using Office Mode. This can be any IP address space, as long as the addresses in this space do not conflict with addresses used within the enterprise domain. It is possible to choose address spaces which are not routable on the Internet, such as 10.x.x.x.
The basic configuration of Office Mode is using IP pools. You can also configure Office Mode using DHCP for address allocation (see "DHCP Configuration" on page 63).
IP Pool Configuration Make sure that all the internal routers are configured to route all the traffic destined to the internal address space you had reserved to Office Mode users through the Security Gateway.
To deploy the basic Office Mode using IP pools:
1. From the Objects Bar click New > Network.
The New Network window opens.
2. In the General tab, set the IP address pool range:
a) Enter a Name for the network.
b) In Network Address enter the first IP address.
c) In Net Mask enter the subnet mask according to the required amount of IP addresses (entering 255.255.255.0, for example, will designate all 254 IP addresses from 10.130.56.1 to 10.130.56.254 for Office Mode addresses.)
d) Click OK and publish the changes.
3. Click Gateways & Servers and double-click the Security Gateway.
The gateway window opens and shows the General Properties page.
4. From the navigation tree, click VPN Clients > Office Mode.
5. Configure these settings:
• In the Office Mode Method section, from Allocate IP from network select the IP Pool network object
• Optional Parameters > IP lease duration - Enter the number of minutes that the IP address is used by the remote host
• To allow routing to be done after the encapsulation of Office Mode packets, click Support connectivity enhancement for gateways with multiple external interfaces
• To check that Office Mode packets are not spoofed, click Perform Anti-Spoofing on Office Mode addresses
6. Click OK and publish the changes.
7. If you completed configuring the settings for Office Mode, install the policy.
To specify which WINS and DNS servers Office Mode users can use:
Note - WINS and DNS servers should be set on the Security Management Server only when IP pool is the selected method.

Office Mode
Remote Access VPN Administration Guide R80.10 | 61
1. Create a DNS server object.
a) From the Objects Bar click New > Host.
b) In the General page, enter the Object Name and IP address settings.
c) In the Servers page, click DNS Server.
d) Click OK.
2. Create a WINS server object.
a) From the Objects Bar click New > Host.
b) In the General page, enter the Object Name and IP address settings.
c) Click OK.
3. Publish the changes.
4. Click Gateways & Servers and double-click the Security Gateway.
The gateway window opens and shows the General Properties page.
5. From the navigation tree, click VPN Clients > Office Mode.
6. Click Optional Parameters.
7. For the DNS and WINS Servers, click Primary and select the server.
8. Click OK.
9. Install the Policy.
Configuring IP Assignment Based on Source IP Address Configure the settings of the IP Assignment Based on Source IP Address feature in $FWDIR\conf\user.def. This file is on the Security Management Server which manages the gateways used for remote access.
You must define a range of source IP addresses and a range of Office Mode addresses. The $FWDIR\conf\user.def file can contain multiple definitions for multiple gateways.
The first range defined in each line is the source IP address range. The second range in the line is the Office Mode IP address range.
For example:
all@module1 om_per_src_range={<10.10.5.0, 10.10.5.129; 1.1.1.5, 1.1.1.87>, <10.10.9.0, 10.10.9.255; 1.1.1.88, 1.1.1.95>}; all@module2 om_per_src_range={<70.70.70.4, 70.70.70.90; 8.8.8.6,8.8.8.86>};
In this scenario:
• (10.10.5.0, 10.10.5.129), (10.10.9.0, 10.10.9.255), and (70.70.70.4, 70.70.70.90) are the VPN remote clients source IP address ranges
• (1.1.1.5, 1.1.1.87), (1.1.1.88, 1.1.1.95), and (8.8.8.6, 8.8.8.68) are the Office Mode IP addresses that will be assigned to the remote users whose source IP falls in the range defined on the same line.
For example: A user with a source IP address between 10.10.10.5.0 and 10.10.5.129, will receive an Office Mode address between 1.1.1.5 and 1.1.1.87.

Office Mode
Remote Access VPN Administration Guide R80.10 | 62
To enable IP Assignment Based on Source IP Address:
In $FWDIR\conf\user.def add: om_use_ip_per_src_range (<value>)
Where valid values are:
• [Exclusively] - If the remote host IP is not found in the source range, the remote user does not get an Office Mode IP address.
• [True] - If the remote host IP is not found in the source IP range, the user will get an Office Mode IP address using another method.
• [False] (default)- The parameter is not used.
Office Mode through the ipassignment.conf File You can over-ride the Office Mode settings created on Security Management server. Edit the plain text file called ipassignment.conf in $FWDIR\conf on the Check Point Security Gateway. The gateway uses these Office Mode settings and not those defined for the object in Security Management server.
ipassignment.conf can specify:
• An IP per user/group, so that a particular user or user group always receives the same Office Mode address. This allows the administrator to assign specific addresses to users, or particular IP ranges/networks to groups when they connect using Office Mode.
• A different WINS server for a particular user or group.
• A different DNS server.
• Different DNS domain suffixes for each entry in the file.
Subnet masks and Office Mode Addresses You cannot use the ipassignment.conf file to assign a subnet mask to a single user. If using IP pools, the mask is taken from the network object, or defaults to 255.255.255.0 if using DHCP.

Office Mode
Remote Access VPN Administration Guide R80.10 | 63
Checking the Syntax The syntax of the ipassignment file can be checked using the command ipafile_check.
From a shell prompt run: vpn ipafile_check ipassignment.conf
The two parameters are:
• warn. Display errors
• detail. Show all details
For example:
DHCP Configuration
To configure Office Mode with a DHCP server:
1. On your DHCP server's configuration, make sure that you have designated an IP address space for Office Mode users (e.g., 10.130.56.0).
2. From the Objects Bar click New > Host. 3. Configure the settings for the name, IP address, and subnet mask.
4. Click OK and publish the changes.

Office Mode
Remote Access VPN Administration Guide R80.10 | 64
5. Double-click the Remote Access gateway.
The gateway window opens and shows the General Properties page.
6. From the navigation tree, click VPN Clients > Office Mode.
7. Configure these settings:
• Click Automatic (use DHCP)
• From Use specific DHCP server, select the DHCP server
• In Virtual IP address for DHCP server replies, enter an IP address from the sub network of the IP addresses which are designated for Office Mode usage.
Office Mode supports DHCP Relay method for IP assignment, so you can direct the DHCP server as to where to send its replies. The routing on the DHCP server and that of internal routers must be adjusted so that packets from the DHCP server to this address are routed through the Security Gateway.
• Optional: In the Additional IP addresses for Anti-Spoofing, select the network object you have created with the IP address range you have set aside for Office Mode on the DHCP server.
8. Click OK and publish the changes.
To create a new network object for Office Mode on the DHCP server:
1. From the Objects Bar click New > Network.
The New Network window opens.
2. In Network Address enter the first address that is used (e.g. 10.130.56.0).
3. In Net Mask enter the subnet mask according to the amount of addresses that is used.
For example, the IP address 255.255.255.0 designates that all 254 IP addresses from 10.130.56.1 until 10.130.56.254 are set aside for remote host Office Mode addresses on the DHCP server.
4. Click OK and publish the changes.
5. Install the Access Control policy.
6. Make sure that all the internal routers are configured to route all the traffic destined to the internal address space you had reserved to Office Mode users through the Security Gateway.
For example, in the example above it is required to add routes to the class C sub network of 10.130.56.0 through the Security Gateway's IP address.
7. Make sure that the remote access clients are also configured to use Office Mode.
Office Mode - Using a RADIUS Server
To configure the RADIUS server to allocate IP addresses:
1. From the Objects Bar, click Servers > RADIUS.
2. Right-click the RADIUS server and select Edit. The RADIUS Server Properties window opens.
3. Click the Accounting tab.
4. Select Enable IP Pool Management. 5. Select the service the RADIUS server uses to communicate with remote users.
6. Click OK and publish the changes.

Office Mode
Remote Access VPN Administration Guide R80.10 | 65
To configure the RADIUS server to perform authentication for remote users:
1. In SmartConsole, click Gateways & Servers and double-click the Security Gateway.
The gateway window opens and shows the General Properties page.
2. From the navigation tree, click VPN Clients > Office Mode. 3. In the Office Mode Method section, click From the RADIUS server used to authenticate the
user.
4. Click OK and publish the changes.
Use First Office Mode IP
To configure all gateways to work in Office Mode:
1. From Menu, click Global Properties.
2. From the navigation tree, click Remote Access > VPN - Advanced.
3. In the Office Mode section, click Use first allocated Office Mode IP address for all connections to the Security Gateways of the site.
4. Click OK and publish the changes.
Remote Access VPN Administration Guide R80.10 | 66
CHAPTE R 7
Desktop Security In This Section:
The Need for Desktop Security .................................................................................... 66
Desktop Security Solution ............................................................................................ 66
Desktop Security Considerations ................................................................................ 72
Letting Users Disable the Firewall .............................................................................. 72
Avoiding Double Authentication for Policy Server ...................................................... 73
The Need for Desktop Security Security Gateways enforce Security Policies on traffic that passes through the Security Gateways in the network. Remote clients are located outside of the protected network and traffic to the remote clients does not pass through the Security Gateways. Therefore remote clients are vulnerable to attack.
Attackers can also use unprotected remote access clients to access the protected network, through the VPN tunnel.
Desktop Security Solution Check Point clients that include Desktop Security, such as Endpoint Security VPN, enforce a Desktop Security Policy on the client to give it Firewall protection. The administrator defines the Desktop Security Policy in the Desktop Rule Base in SmartDashboard. You can assign rules to specified user groups or to all users.
The Security Management Server downloads the Desktop Security Policy to a Policy Server, which is a feature that you enable on the Remote Access Security Gateway. Remote Access Client computers download their Desktop Security Policies from the Policy Server when they connect to the Security Gateway.
Clients enforce the Desktop Policy to accept, encrypt, or drop connections based on the Source, Destination, and Service.
Note - If you use Endpoint Security VPN as part of the Check Point Endpoint Security Suite, you can configure if your client Firewall comes from Desktop Security in SmartDashboard or SmartEndpoint.

Desktop Security
Remote Access VPN Administration Guide R80.10 | 67
Item Description
1 Security Management Server
2 Firewall
3 Internet
4 Gateway and policy server
5 Security Gateway
6 Remote Access Client
The Desktop Security Policy The Desktop Security Policy has Inbound and Outbound rules.
• Inbound rules - Enforced on connections going to the client computer.
• Outbound rules - Enforced on connections that originate from the client computer.
Each rule defines traffic by source, destination, and service. The rule defines what action to enforce on traffic that matches.
• Source - The network object that initiates the communication.
• Destination - The user group and location for Inbound communications, or the IP address of Outbound communications.
• Service - The service or protocol of the communication.
• Action - Accept, Encrypt, or Block.
Connections to computers inside of the organization, for example, all of the machines in the VPN domain of the Security Gateway, are automatically encrypted, even if the rule that lets them pass is an Accept rule.

Desktop Security
Remote Access VPN Administration Guide R80.10 | 68
Implied Rules In addition to the rules that you define, the Desktop Security Policy has implicit rules added to the end of the inbound and outbound policies.
• The implicit outbound rule allows all connections that originate from the client to go out, if they do not match previous blocking rules: Any Destination, Any Service = Accept.
• The implicit inbound rule blocks all connections coming to the client that do not match previous rules. Any Source, Any Service = Block.
User Granularity You can define different rules for remote users based on locations and user groups.
• Locations - Set rules to be implemented by physical location. For example, a user with a laptop in the office building will have a less restrictive policy than when the same user on the same laptop connects from a public wireless access point.
• User Groups - Set rules to be implemented for some users and not others. For example, define restrictive rules for most users, but give system administrators more access privileges. In addition, you can define rules to be enforced for all remote users, by not specifying a specific user group, but rather all users.
Rules apply to user groups, not individual users. The client does not identify user groups, so it must get group definitions from the gateway when it connects. The gateway resolves the user groups of the authenticated user and sends this information to the client. The client enforces the rules that apply to the user, based on the user groups.
Rules can also be applied to radius groups on the RADIUS server.
Default Policy When a client is started, and before it connects to the Policy Server, it enforces a "default policy," which consists of the rules defined for all users in the last policy downloaded from the Policy Server. This is because at this point, the client does not know to which groups the user belongs. The default policy is enforced until the user downloads an updated policy (and the current user's group information) from a Policy server.
If a client loses its connection to the Policy Server, it enforces the default policy until the connection is restored and a Policy is downloaded.
Configuring Desktop Security
To enable the gateway to be a Policy Server for Desktop Security:
1. Click Gateways & Servers and double-click the Security Gateway.
The gateway window opens and shows the General Properties page.
2. On the Network Security tab, select IPsec VPN and Policy Server.
3. Click OK. 4. Publish the changes.

Desktop Security
Remote Access VPN Administration Guide R80.10 | 69
To activate the Desktop Security policy:
1. Click Security Policies and open the Manage Policies window (CTRL + T).
2. Click the All icon.
3. Select the policy to edit and click Edit. The policy window opens.
4. Select Desktop Security.
5. Click OK. 6. Install policy.
To configure the Desktop Policy rules:
1. Click Security Policies, and from the navigation tree, click Access Control > Desktop.
2. Click Open Desktop Policy in SmartDashboard.
SmartDashboard opens and shows the Desktop tab.
3. Configure the inbound rules: Click Rules>Add Rule to add rules to the policy.
In inbound rules, the client computer (the desktop) is the destination. Select user groups to which the rule applies.
4. Configure the outbound rules. Click Rules>Add Rule to add rules to the policy.
In outbound rules, the client computer (the desktop) is the source. Select user groups to which the rule applies.
5. Click Save and close SmartDashboard.
6. Install the policy.
Make sure that you install the Advanced Security policy on the Security Gateways and the Desktop Security policy on your Policy Servers.
Operations on the Rule Base Define the Desktop Security Policy. Rules are managed in order: what is blocked by a previous rule cannot be allowed later.
The right-click menus of the Rule Base include these options:
• Add Rule - Add a rule above or below the selected rule.
• Delete - Delete rules which are no longer necessary.
• Hide - Hide rules that are irrelevant to your current view, to enhance readability of your Rule Base. Hidden rules are still applied.
• Disable Rule - Rules that are currently not implemented, but might be in the future, can be disabled.
• Where Used - See where the selected network object is included in other rules.
• Copy as Image – Copy a picture of the rule to your clipboard.
• Copy Rule UID – Copy the unique UID for the rule.
• View Rule Logs - See logs for traffic that matched this rule.
• Negate Cell - If a cell is negated, the rule will then be an "all-except" the object or service. For example, if http is negated in the Service column, all services except http are included in the rule.

Desktop Security
Remote Access VPN Administration Guide R80.10 | 70
Making a Rule for FTP If clients use active FTP, you must add a rule to the Desktop Security Policy to specifically allow the service that you need. Select be one of the active FTP services that is not ftp-pasv.
To add the Active FTP Rule:
1. In SmartDashboard, open the Desktop tab.
2. Right-click the Outbound rules and select Add.
3. In the rule, select one of the FTP services as the service and Accept as the action.
Policy Server A Policy Server is installed on a Security Gateway, when you enable it in the Gateway General Properties > Network Security tab. It serves as a repository for the Desktop Security Policy. Client machines download their Desktop Security Policies from the Policy Server.
When the client computer connects or re-authenticates to the site, it automatically checks the Policy Server for updates and downloads them.
Location-Based Policies Location-based policies add location awareness support for the Desktop Firewall using these policies:
• Connected Policy - Enforced when:
• VPN is connected.
• VPN is disconnected and Location Awareness determines that the endpoint computer is on an internal network. The Connected Policy is not enforced "as is" but modified according to the feature's mode (the disconnected_in_house_fw_policy_mode property).
• Disconnected Policy - Enforced when the VPN is not connected and Location Awareness sees that the endpoint computer is not on an internal network.
Location-Based Polices for Desktop Firewall are disabled by default.
Configuring Location Awareness The Location Awareness configuration is based on these properties in the client configuration file:
• disconnected_in_house_fw_policy_enabled - Defines if the feature is enabled or disabled.
Possible values are:
• true - enabled
• false - disabled (default)
• disconnected_in_house_fw_policy_mode - Defines which policy will be enforced after Location Awareness detection.
Possible values are:
• encrypt_to_allow - Connected policy will be enforced, based on last connected user. Encrypt rules will be transformed to Allow rules (default).
• any_any_allow - "Any – Any – Allow" will be enforced.

Desktop Security
Remote Access VPN Administration Guide R80.10 | 71
To enable Location Awareness for desktop firewall:
1. On a gateway, open $FWDIR/conf/trac_client_1.ttm.
2. Add the disconnected_in_house_fw_policy_enabled entry to the file: :disconnected_in_house_fw_policy_enabled ( :gateway (disconnected_in_house_fw_policy_enabled :default (true) ) )
3. Save the file and install the policy.
To configure the location based policy:
1. On a gateway, open $FWDIR/conf/trac_client_1.ttm.
2. Add the disconnected_in_house_fw_policy_mode entry to the file: :disconnected_in_house_fw_policy_mode ( :gateway (disconnected_in_house_fw_policy_mode :default (encrypt_to_allow) ) )
3. Save the file and install the policy.
Note - It is highly recommended to configure default values for these properties in trac_client_1.ttm for all gateways.
Logs and Alerts Desktop Security logs are saved locally on the client computer in:
• 32-bit systems - C:\Program Files\CheckPoint\Endpoint Connect\trac_fwpktlog.log
• 64-bit systems - C:\Program Files(x86)\CheckPoint\Endpoint Connect\trac_fwpktlog.log
Alerts are saved and uploaded to the Security Management Server when the client connects. You can see alerts in the Logs tab in the SmartConsole Logs & Monitor view.

Desktop Security
Remote Access VPN Administration Guide R80.10 | 72
Blocking or Allowing IPv6 Traffic By default, the desktop firewall allows IPv6 traffic to the client.
To block IPv6 traffic to the client:
1. On the Security Gateway, open this file for editing:
$FWDIR/conf/trac_client_1.ttm
2. Add these lines: :allow_ipv6 ( :gateway (allow_ipv6 :default (false) ) )
3. Save and close the file.
4. Install policy.
Wireless Hotspots Desktop Policy can support wireless hotspots.
A proxy might be required.
Desktop Security Considerations Plan your Desktop Security policy to balance considerations of security and convenience. You want to let users work as freely as possible, but at the same time, make it hard to attack the remote user's computer. Important points:
• Do not explicitly allow a service in the inbound policy unless the user has a server running on that port. If you do allow a service on inbound connections to the client, define who is allowed to open the connection, and from where.
• The best way to implement the outbound policy is to use rules only to block specified problematic services (such as Netbus) and allow the rest. A restrictive policy (for example, allow only POP3, IMAP and HTTP and block all the rest) will make it more difficult for your users to work. If you allow only specified services in the outbound policy and block all others, you will have to update the policy often when you learn that users need a different service.
• Outbound connections to the encryption domain of the organization are always encrypted automatically , even if the outbound rule for the service specifies Accept.
• Keep in mind that the implied rules (see Implied Rules (on page 68)) might allow or block services which were not explicitly handled in previous rules. For example, if a server runs on a client computer, you must create an explicit rule that allows the connection to the client computer. If you do not, the connection will be blocked by the inbound implicit block rule.

Desktop Security
Remote Access VPN Administration Guide R80.10 | 73
Letting Users Disable the Firewall You can configure if Endpoint Security VPN users can choose to disable the firewall policy on their local machines.
If this option is enabled, when users right-click the client icon, they can select Disable Security Policy.
To change the Allow disable firewall setting:
1. On the gateway, open the $FWDIR/conf/trac_client_1.ttm file with a text editor.
2. Find the line :allow_disable_firewall and set the value:
• true - Users can disable their firewall policy.
• false - Users do not have the option to disable their firewall policy.
• client_decide - Takes the value from a file on the client machine
3. Save the file and install the policy.
Avoiding Double Authentication for Policy Server When using Policy Server High Availability, it is possible that users will connect to the organization through one Security Gateway and to a Policy Server which is installed on a different module. In this case they will be prompted twice for authentication — once for the Security Gateway module and the other for the Policy Server. If a user usually connects to the organization through a specific Security Gateway, and this Security Gateway has a Policy Server module installed on it, this double authentication can be avoided by configuring the user's profile to use the High Availability among all Policy Servers, trying selected first option, and selecting the primary Policy Server as that one the Security Gateway through which the user usually connects to the organization. This way, after the user authenticates to the Security Gateway, he will automatically be authorized to download the security policy from the Policy Server installed on that Security Gateway.
Remote Access VPN Administration Guide R80.10 | 74
CHAPTE R 8
Secure Configuration Verification In This Section:
The Need to Verify Remote Client's Security Status .................................................. 74
The Secure Configuration Verification Solution .......................................................... 74
Overview of the SCV Workflow ..................................................................................... 75
SCV Checks ................................................................................................................... 76
Considerations regarding SCV ..................................................................................... 77
Configuring SCV ............................................................................................................ 78
The information and procedures in this section are relevant for Endpoint Security VPN and Check Point Mobile for Windows remote access clients.
The Need to Verify Remote Client's Security Status Network and Firewall administrators can use different tools to control computers inside their organization. For example, to disable dangerous components such as Java and ActiveX controls in browsers, install Anti-Virus, and make sure they are run correctly.
For remote users who access the organization from outside of the LAN, the administrator cannot enforce control of the computer with the same tools. For example, suppose the remote user has ActiveX enabled, and connects to a website containing a malicious ActiveX control which infects his or her computer. When the remote user connects to the organization's LAN, the LAN becomes vulnerable as well.
A properly configured Desktop Security Policy, cannot protect against this type of attack, because the attack does not target a vulnerability in the access control to the user's machine. Instead it takes advantage of the vulnerable configuration of applications on the client.
The Secure Configuration Verification Solution Secure Configuration Verification (SCV) ,makes sure that remote access client computers are configured in accordance with the enterprise Security Policy. Use SCV to:
• Get reports on the configuration of remote clients.
• Make sure that clients comply with the organization's security policy.
• Block connectivity from clients that do not comply.
SCV does not replace the Desktop Security Policy, but works with it.
SCV uses SCV checks, which are DLLs (plug-ins) on the client, that are invoked and enforced according to the policy that you configure on the Security Management Server. SCV checks include sets of conditions that define a securely configured client system. Checks can include, for example, the user's browser configuration, the version of the Anti-Virus software installed on the desktop computer, and the operation of the personal firewall policy. These security checks are performed at pre-defined intervals by the remote access client. Based on the results of the SCV checks, the Security Gateway decides whether to allow or block connections from the client to the LAN.
Secure Configuration Verification
Remote Access VPN Administration Guide R80.10 | 75
• If the client passes all the SCV checks, the client is compliant.
• If the client fails one of the checks, it is not compliant.
Check Point's SCV solution comes with many predefined SCV checks for the operating system and user's browser, and also allows OPSEC partners, such as Anti-Virus software manufacturers, to add SCV checks for their own products.
Overview of the SCV Workflow
Installing SCV Plugins on the Client SCV checks are performed through special DLLs which check elements of the client's configuration and return the results of these checks. An SCV application registers its SCV DLLs in the system registry.
The first step in configuring SCV is for the administrator to install the applications that provide the SCV checks on the client. During installation, these applications register themselves as SCV plug-ins and write a hash value of their SCV DLLs to prevent tampering.
Configuring an SCV Policy on the Security Management Server An SCV Policy is a set of rules or conditions based on the checks that the SCV plug-ins provide. These conditions define the requested result for each SCV check, and on the basis of the results, the client is classified as securely configured or non-securely configured. For example, an administrator who wishes to disallow a file-sharing application would define a rule in the SCV Policy verifying that the file-sharing application process is not running.
Note - The SCV check described in this example is among the pre-defined SCV checks included with Security Management Server. This check must be configured to test for the specific process.
Downloading the SCV Policy to the Client When the client downloads its Desktop Policy from the Policy Server, it downloads its SCV Policy at the same time.
Verifying the SCV Policy After downloading the SCV Policy, the client confirms that the SCV DLL's specified in the SCV Policy have not been tampered with by calculating their hash values and comparing the results with the hash values specified for the DLLs when they were installed (see "Installing SCV Plugins on the Client" on page 75).
Runtime SCV Checks At regular intervals (default is every 15 seconds), the client performs the SCV checks specified in the SCV Policy by invoking the SCV DLLs, and compares the results to the SCV Policy. The SCV Policy can be configured to display a popup notification on non-securely configured clients and/or send a log to the Security Management Server.

Secure Configuration Verification
Remote Access VPN Administration Guide R80.10 | 76
Making the Organizational Security Policy SCV-Aware The client can determine whether the client is securely configured. Once all the organization's clients have been configured according to the previous steps, the administrator specifies the actions to be taken on the Security Gateway based on the client's SCV status. For example, the administrator can specify that non-securely configured clients cannot access some or all of the resources on the corporate LAN, protecting the organization from the dangers associated with the client's poor security configuration.
The administrator can choose whether to enforce SCV for remote clients. If SCV is enforced, only securely configured clients are allowed access under the rule. If SCV is not enforced, all clients are allowed access under the rule.
In simplified mode, this is configured globally. In traditional mode, this is configured individually for each rule.
When the client connects to a Security Gateway, an IKE negotiation takes place between the client and the Security Gateway. If the Security Gateway Security Policy requires an SCV check to be made, the Security Gateway holds the connection while it checks if the client is securely configured (checked by SCV). If the Security Gateway already knows the client's SCV status (i.e., the SCV status was checked in the last 5 minutes), then:
• If the client is securely configured, the Security Gateway allows the connection.
• If the client is not securely configured, the Security Gateway either drops the connection, or accepts and logs it (this behavior is configurable).
If the Security Gateway does not know the client's SCV status, it initiates an SCV check by sending an ICMP unreachable error message containing an SCV query to the client. When a client gets this SCV query, it tries to determine its SCV status. In Connect mode, the client also connects to a Policy Server to download an updated SCV Policy. In parallel, when the client gets the SCV query, it starts sending SCV status replies to the Security Gateway via UDP port 18233 every 20 seconds for 5 minutes. These replies are used as a keep-alive mechanism, in order to keep the user's connection alive in the Security Gateway state tables while the client is trying to determine its SCV status. The keep alive packets also allow the user to open subsequent connections in the 5 minute period in which they are sent without a need for further SCV queries. When the client determines its SCV status, it sends an SCV reply containing the status back to the Security Gateway via UDP port 18233. When the Security Gateway receives the SCV status of the user, it decides how to handle the user's connection.
SCV Checks
Check Point SCV Checks The default SCV checks (plug-ins) are part of the Endpoint Security VPN and Check Point Mobile for Windows installation:
• OS Monitor - Verifies Operating System version, Service Pack, and Screen Saver configuration (activation time, password protection, etc.).
• HotFix Monitor - Verifies that operating system security patches are installed, or not installed.
• Group Monitor - Verifies that the user logged into the operating system and is a member of specified Domain User Groups.

Secure Configuration Verification
Remote Access VPN Administration Guide R80.10 | 77
• Process Monitor - Verifies that a process is running, or not running, on the client machine (for example, that a file sharing application is not running, or that Anti-Virus is running).
• Browser Monitor - Verifies Internet Explorer version and configuration settings, such as Java and ActiveX options.
• Registry Monitor - Verifies System Registry keys, values, and their contents.
• Anti-Virus Monitor - Verifies that an Anti-Virus is running and checks its version. Supported: Norton, Trend Office Scan, and McAfee.
• SCVMonitor - Verifies the version of the SCV product, specifically the versions of the SCV DLLs installed on the client's machine.
• HWMonitor - Verifies CPU type, family, and model.
• ScriptRun - Runs a specified executable on the client machine and checks the return code of the executable. For example, a script can check if a certain file is present on the client machine. It can perform additional configuration checks that you choose.
• Windows Security Monitor - Verifies that components monitored by Window Security Center are installed and enforced (for example, check if there is Anti-Virus installed and running). You can define which components you want to check.
Third Party SCV Checks SCV checks can be written by third party vendors using Check Point's OPSEC SCV SDK. For details, see the Remote Access Clients for Windows Administration Guide.
Additional Script Elements • SCVpolicy — SSCV checks out of the ones defined in SCVNames (on page 82) that run on the
user's desktop.
• SCVGlobalParams — Defines general SCV parameters.
A network administrator can easily enable a set of specific SCV checks (e.g. only check that the user's client is enforcing a security policy) or as many SCV checks as required (e.g. all of the above SCV checks). The SCV checks are performed independently by the SCV Dynamic Link Libraries, and the client checks their status through the SCV plugins every 15 seconds, and determines whether the user is securely configured or not. If one or more of the tests fails, the client is considered to be non-securely configured.
Note - To enforce a specific SCV check, set the parameters of the check in the SCVNames section, and include the name of the check in SCVPolicy.
Considerations regarding SCV The following sections describe things that are important to know before configuring SCV.
Planning the SCV Policy The file $FWDIR/conf/local.scv on the Security Management Server contains a sample of a basic SCV policy for checks that are supplied with any SCV installation. You can review this file to help you decide which SCV tests to perform. If you need additional SCV checks for OPSEC products, such as Anti-Virus and Endpoint Security SCV checks, visit: http://www.opsec.com.

Secure Configuration Verification
Remote Access VPN Administration Guide R80.10 | 78
User Privileges To implement SCV effectively, it is suggested that you consider not to allow your remote users to have administrative privileges on their desktops. Giving the users administrative privileges can allow them to change system settings and cause SCV tests to fail. A desktop which fails an SCV check is a potential security threat to the organization.
For example, as an administrator you may want to configure the user's browser not to allow him to download Java applets from websites. A normal user will not be able to download these applets, but a user with administrative privileges can override the browser's configuration. A properly defined SCV policy can indicate that the browser's configuration had changed and trigger a proper action on the Security Gateway side. However, if the user is allowed by the Security Gateway to pass to the LAN - either by a wrong configuration of the SCV policy or lack of enforcement of the user's SCV status on the Security Gateway side - then the user's desktop will become a potential security risk to the LAN.
The SCV policy itself is protected. Users can not change the SCV policy definition files they receive, even if they have administrative rights. The SCV policy files supplied to the client are signed before arriving to the client and checked against their signature by the client. If the signatures do not match, the SCV check fails.
Configuring SCV Configuring SCV involves setting it up on the server, setting it up on the client, and configuring SCV policy.
Configuring SCV - Server Side
To configure SCV settings in Global Properties:
1. From Menu, click Global Properties.
2. From the navigation tree, click Remote Access > Secure Configuration Verification (SCV). 3. Configure the settings:
• Apply Secure Configurations on Simplified Mode - Specifies if SCV is applied to all remote access rules in the simplified policy mode.
• Upon Verification failure - Specifies the action that is performed when the client fails one or more SCV checks. The options are to Block the client's connection or to Accept it and send a log about the event.
• Basic configuration verification on client's machine - Specifies whether the Remote Access Client performs SCV checks to determine if the policy is installed on all network interfaces cards on the client's desktop, and if only TCP/IP protocols are installed on these interfaces.
• Configurations Violation Notification on client's machine - Specifies if a log record is saved on the Security Management Server machine indicating that a remote user is not verified by SCV (this is a general indication, without a specification of a certain SCV check the user's desktop had failed).
4. Click OK and publish the changes.

Secure Configuration Verification
Remote Access VPN Administration Guide R80.10 | 79
Client Side Configuration 1. If you intend to use an OPSEC SCV application, install the application on the client and enable
the application's integration with SCV (see the application's documentation for information on how to do this).
2. Start the client and connect to the Security Gateway to receive the SCV Policy.
SCV Policy Syntax The SCV Policy is configured by the administrator in the text file $FWDIR/conf/local.scv. This file can be edited either manually by the administrator using a text editor or using a tool called SCVEditor, available at: http://www.opsec.com. The local.scv file is a policy file, containing sets, subsets and expressions.
Note - In general, you can use the pre-defined checks (in the SCVNames section of the local.scv file) as templates and list the modified checks in the SCV Policy section, without writing new SCV subsets.
Sets and Sub-sets Each set has a certain purpose which was predefined for it. For example, one set can be used to define certain parameters, another could specify certain actions that should take place in a certain event etc. Sets are differentiated by their names and hierarchy in a recursive manner. Each set can have a sub-set, and each sub-set can have a sub-set of its own and so on. Subsets can also contain logical expressions. Sets and sub-sets with more than one sub-sets/conditions are delimited by left and right parentheses (), and start with the set/sub-set name. Differentiation between sub-sets/expressions with the same hierarchy is done using the colon :. For example:
(SetName :SubSetName1 ( :ExpressionName1_1 (5) :ExpressionName1_2 (false) ) :SubSetName2 ( :ExpressionName2_1 (true) :SubSetName2_1 ( :ExpressionName2_1_1 (10) ) ) )
In the example above the set named SetName has two subsets: SubSetName1 and SubSetName2. SubSetName1 has two conditions in it (ExpressionName1_1 and ExpressionName1_2). SubSetName2 has one condition (ExpressionName2_1) and one subset (SubSetName2_1) in it. SubSetName2_1 has one condition as well (ExpressionName2_1_1).
Expressions Expressions are evaluated by checking the value of the expression (which corresponds to an SCV check) and comparing it with the value defined for the expression (the value in the parentheses). For example, in the browser monitor SCV check provided with the client, you can specify the following expression:
:browser_major_version (5)

Secure Configuration Verification
Remote Access VPN Administration Guide R80.10 | 80
This expression checks whether the version of the Internet Explorer browser installed on the client is 5.x. If the (major) version is 5, this expression is evaluated as true, otherwise it is evaluated as false. The name of the expression (e.g. "browser_major_version") is determined by the SCV application and is supplied by manufacturer.
If several expressions appear one after the other, they are logically ANDed, meaning that only if all expressions are evaluated as true, then the value of all of them taken together is true. Otherwise (if even one of the expressions is false), the value of all of them is false. For example:
:browser_major_version (5) :browser_minor_version (0)
These expressions are ANDed. If the version of Internet Explorer is 5 AND the minor version is 0 (i.e. version 5.0), then the result is true, otherwise it is false. If the version of Internet Explorer is, for example, 4.0, then the first expression is false and the second one is true, and the result of both of them is false.
Sometimes, some expressions can influence the way in which others are evaluated. For example:
:browser_major_version (5) :browser_minor_version (0) :browser_version_operand (">=")
These expressions are ANDed, but the third expression influences the way that the first and second ones are evaluated. In the example above, if the version of Internet Explorer is greater than or equal to (">=") 5.0, then the result is true, otherwise it is false. If the version of Internet Explorer is, for example, 4.5, then the result is false, if the version is 5.1 or higher than the result is true.
Logical Sections As mentioned earlier, subsequent expressions are automatically ANDed. However, sometimes it is necessary to perform a logical OR between expressions, instead of logical AND. This is done by using labels:
The begin_or (orX) label - this label starts a section containing several expressions. The end of this section is marked by the end (orX) label (X should be replaced with a number which differentiates between different sections OR sections). All of expressions inside this section are logically ORed, producing a single value for the section. For example:
:begin_or(or1) :browser_major_version (5) :browser_major_version (6) :end(or1)
This section checks whether the version of Internet Explorer is 5 OR 6 - if it is then the result is true, otherwise it is false.

Secure Configuration Verification
Remote Access VPN Administration Guide R80.10 | 81
The begin_and (andX) label - this label is similar to the begin_or (orX) label, but the expressions inside are evaluated and logically ANDed. The end of this section is marked by the end (andX) or the end (orX) label. As mentioned earlier, simple subsequent expressions are automatically ANDed. The reason that this label exists is to allow nested ANDed sections inside ORed sections. For example, if an administrator considers old browsers as secure since they do not have a lot of potentially unsafe components, and new browsers as secure, since they contain all the latest security patches, he can define the following SCV rules:
:begin_or (or1) :begin_and (and1) :browser_major_version (5) :browser_minor_version (0) :browser_version_operand (">=") :end (and1) :begin_and (and2) :browser_major_version (3) :browser_minor_version (0) :browser_version_operand ("<=") :end (and2) :end (or1)
In the example above, the first AND section checks whether the version of IE >= 5.0, the second AND section checks whether the version of IE is <=3.0 and they are ORed. The entire example is evaluated as true only if the version of IE is larger than (or equal to) 5.0 OR lower than (or equal to) 3.0.
Expressions and Labels with Special Meanings There are several expressions and labels which have special meaning:
• begin_admin (admin) - this label starts a section defining several actions which are performed only if the client is considered as non-SCVed by previous expressions in the subset (i.e. if previous expressions in the subset have returned a value of false). The end of this section is marked by the end (admin) label.
• send_log (type) - This expression is used as part of the begin_admin (admin) - end (admin) section, and determines whether to send a log to the Security Management Server (and the client's diagnostic tool) specifying that the client is not SCVed.
The word type should be replace by the type of log to send, such as log/alert. Alert means sending a log to the Security Management Server, while log means sending the log to the remote client's diagnostic tool.
• mismatchmessage ("Message") - This expression is used as part of the begin_admin (admin) - end (admin) section, and specifies that a popup message should be shown on the remote user's desktop, indicating the problem. The text in the inverted commas (Message) should be replaced by a meaningful text which should instruct the client about the possible sources of the problem and the action he should perform.

Secure Configuration Verification
Remote Access VPN Administration Guide R80.10 | 82
For example:
:browser_major_version (5) :browser_minor_version (0) :browser_version_operand (">=") :begin_admin (admin) :send_log (alert) :mismatchmessage ("The version of your Internet Explorer browser is old. For security reasons, users with old browsers are not allowed to access the local area network of the organization. Please upgrade your Internet Explorer to version 5.0 or higher. If you require assistance in upgrading or additional information on the subject, please contact your network administrator.") :end (admin)
In this example, if the user's IE browser's version is lower than 5.0, an alert is sent to the Security Management Server machine and a popup message is shown to the user with indication of the problem.
The local.scv Sets The local.scv policy files contains one set called SCVObject. This set must always be present and contains all the subsets which deal with the SCV checks and parameters. Currently SCVObject has 3 subsets:
• SCVNames - This section is the main SCV policy definition section, in which all of the SCV checks and actions are defined. This is the definition part of the SCV policy, and doesn't actually determine the SCV checks that will be performed. In this section sets of tests are defined. Later on, the administrator will choose from these sets those he wants to run on the user's desktop.
• SCVPolicy - This section specifies the names of the SCV checks that should actually be performed on the client's machine, from the SCV checks defined in SCVNames.
• SCVGlobalParams - This section contains some global SCV parameters.
SCVNames In this section the administrator specifies the names and different checks for the SCV products. Here is a general definition of an SCV check subset of SCVNames:
: (SCVCheckName1 :type (plugin) :parameters ( :Expression1 (value) :Expression2 (value) :begin_admin (admin) :send_log (alert) :mismatchmessage ("Failure Message") :end (admin) ) )
The test section begins with the name of the SCV check (SCVCheckName1). SCVCheckName1 defines the name of the set of tests. It is defined in the SCV application and should be provided by the SCV manufacturer. The type (plugin) expression specifies that the test is performed by an SCV DLL plugin. The parameters subset is where the SCV rules and actions are defined. The type (plugin) expression and the parameters subset should always be specified when defining a subset of SCV checks (such as SCVCheckName1).

Secure Configuration Verification
Remote Access VPN Administration Guide R80.10 | 83
SCVPolicy This section defines the names of the SCV checks that should be enforced (the names are part of the SCV check names specified in SCVNames). This section's general structure is:
:SCVPolicy ( :(SCVCheckName1) :(SCVCheckName2) )
Note - there is a space between the colon (:) and the opening brace.
The Difference between SCVNames and SCVPolicy • The SCVNames section defines the different parameters for the checks.
• The SCVPolicy section states which checks are enforced.
To enforce a specific SCV check:
• Set the check's parameters in SCVNames.
• Include the name of the check in SCVPolicy.
SCVGlobalParams This section includes global parameters for SCV.
:SCVGlobalParams ( :enable_status_notifications (true) :status_notifications_timeout (10) :disconnect_when_not_verified (false) :block_connections_on_unverified (false) :scv_policy_timeout_hours (24) :enforce_ip_forwarding (true) :not_verified_script ("myscript.bat") :not_verified_script_run_show (true) :not_verified_script_run_admin (false) :not_verified_script_run_always (false) :allow_non_scv_clients (false) :block_scv_client_connections (false) )

Secure Configuration Verification
Remote Access VPN Administration Guide R80.10 | 84
An Example of a local.scv File (SCVObject :SCVNames ( : (user_policy_scv :type (plugin) :parameters ( ) ) : (BrowserMonitor :type (plugin) :parameters ( :browser_major_version (5) :browser_minor_version (0) :browser_version_operand (">=") :browser_version_mismatchmassage ("Please upgrade your Internet browser.") :intranet_download_signed_activex (disable) :intranet_run_activex (disable) :intranet_download_files (disable) :intranet_java_permissions (disable) :trusted_download_signed_activex (disable) :trusted_run_activex (disable) :trusted_download_files (disable) :trusted_java_permissions (disable) :internet_download_signed_activex (disable) :internet_run_activex (disable) :internet_download_files (disable) :internet_java_permissions (disable) :restricted_download_signed_activex (disable) :restricted_run_activex (disable) :restricted_download_files (disable) :restricted_java_permissions (disable) :send_log (alert) :internet_options_mismatch_message ("Your Internet browser settings do not meet policy requirements\nPlease check the following settings:\n1. In your browser, go to Tools -> Internet Options -> Security.\n2. For each Web content zone, select custom level and disable the following items: DownLoad signed ActiveX, Run ActiveX Controls, Download Files and Java Permissions.") ) ) : (OsMonitor :type (plugin) :parameters ( :os_version_mismatchmessage ("Please upgrade your operating system.") :enforce_screen_saver_minutes_to_activate (3) :screen_saver_mismatchmessage ("Your screen saver settings do not meet policy requirements\nPlease check the following settings:\n1. Right click on your desktop and select properties.\n2. Select the Screen Saver tab.\n3. Under Wait choose 3 minutes and check the Password Protection box.") :send_log (log) :major_os_version_number_9x (4) :minor_os_version_number_9x (10) :os_version_operand_9x (">=") :service_pack_major_version_number_9x (0) :service_pack_minor_version_number_9x (0) :service_pack_version_operand_9x (">=") :major_os_version_number_nt (4) :minor_os_version_number_nt (0)
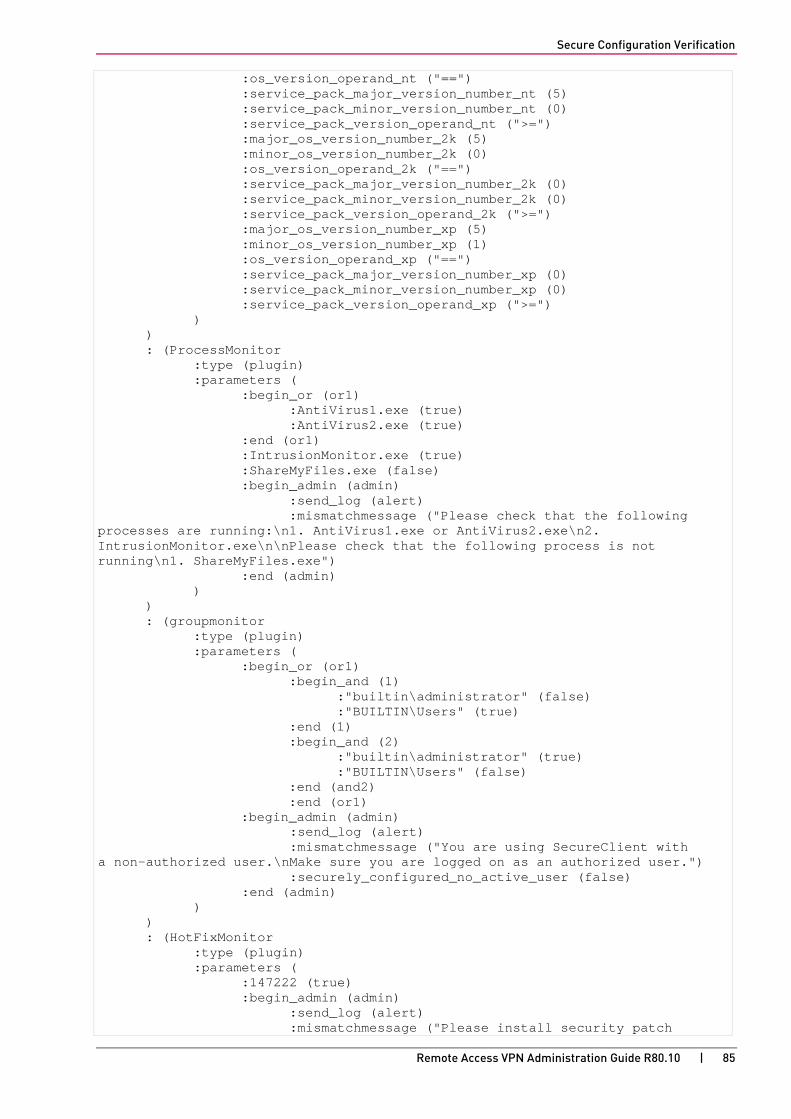
Secure Configuration Verification
Remote Access VPN Administration Guide R80.10 | 85
:os_version_operand_nt ("==") :service_pack_major_version_number_nt (5) :service_pack_minor_version_number_nt (0) :service_pack_version_operand_nt (">=") :major_os_version_number_2k (5) :minor_os_version_number_2k (0) :os_version_operand_2k ("==") :service_pack_major_version_number_2k (0) :service_pack_minor_version_number_2k (0) :service_pack_version_operand_2k (">=") :major_os_version_number_xp (5) :minor_os_version_number_xp (1) :os_version_operand_xp ("==") :service_pack_major_version_number_xp (0) :service_pack_minor_version_number_xp (0) :service_pack_version_operand_xp (">=") ) ) : (ProcessMonitor :type (plugin) :parameters ( :begin_or (or1) :AntiVirus1.exe (true) :AntiVirus2.exe (true) :end (or1) :IntrusionMonitor.exe (true) :ShareMyFiles.exe (false) :begin_admin (admin) :send_log (alert) :mismatchmessage ("Please check that the following processes are running:\n1. AntiVirus1.exe or AntiVirus2.exe\n2. IntrusionMonitor.exe\n\nPlease check that the following process is not running\n1. ShareMyFiles.exe") :end (admin) ) ) : (groupmonitor :type (plugin) :parameters ( :begin_or (or1) :begin_and (1) :"builtin\administrator" (false) :"BUILTIN\Users" (true) :end (1) :begin_and (2) :"builtin\administrator" (true) :"BUILTIN\Users" (false) :end (and2) :end (or1) :begin_admin (admin) :send_log (alert) :mismatchmessage ("You are using SecureClient with a non-authorized user.\nMake sure you are logged on as an authorized user.") :securely_configured_no_active_user (false) :end (admin) ) ) : (HotFixMonitor :type (plugin) :parameters ( :147222 (true) :begin_admin (admin) :send_log (alert) :mismatchmessage ("Please install security patch

Secure Configuration Verification
Remote Access VPN Administration Guide R80.10 | 86
Q147222.") :end (admin) ) ) : (AntiVirusMonitor :type (plugin) :parameters ( :type ("Norton") :Signature (">=20020819") :begin_admin (admin) :send_log (alert) :mismatchmessage ("Please update your AntiVirus (use the LiveUpdate option).") :end (admin) ) ) : (HWMonitor :type (plugin) :parameters ( :cputype ("GenuineIntel") :cpumodel ("9") :cpufamily ("6") :begin_admin (admin) :send_log (alert) :mismatchmessage ("Your machine must have an\nIntel(R) Centrino(TM) processor installed.") :end (admin) ) ) : (ScriptRun :type (plugin) :parameters ( :exe ("VerifyScript.bat") :begin_admin (admin) :send_log (alert) :mismatchmessage ("Verification script has determined that your configuration does not meet policy requirements.") :end (admin) ) ) : (RegMonitor :type (plugin) :parameters ( :value ("Software\TrendMicro\PC-cillinNTCorp\CurrentVersion\Misc.\PatternVer>=414") :begin_admin (admin) :send_log (alert) :mismatchmessage ("Please update your AntiVirus (use the LiveUpdate option).") :end (admin) ) ) : (SCVMonitor :type (plugin) :parameters ( :scv_version ("54014") :begin_admin (admin) :send_log (alert) :mismatchmessage ("Please upgrade your Secure Configuration Verification products package.") :end (admin) ) ) : (sc_ver_scv

Secure Configuration Verification
Remote Access VPN Administration Guide R80.10 | 87
:type (plugin) :parameters ( :Default_SecureClientBuildNumber (52032) :Default_EnforceBuildOperand ("==") :MismatchMessage ("Please upgrade your SecureClient.") :EnforceBuild_9X_Operand (">=") :SecureClient_9X_BuildNumber (52030) :EnforceBuild_NT_Operand ("==") :SecureClient_NT_BuildNumber (52032) :EnforceBuild_2K_Operand (">=") :SecureClient_2K_BuildNumber (52032) :EnforceBuild_XP_Operand (">=") :SecureClient_XP_BuildNumber (52032) ) ) ) :SCVPolicy ( : (BrowserMonitor) : (HWMonitor) : (AntiVirusMonitor) ) :SCVGlobalParams ( :enable_status_notifications (false) :status_notifications_timeout (10) :disconnect_when_not_verified (false) :block_connections_on_unverified (false) :scv_policy_timeout_hours (24) :enforce_ip_forwarding (true) :not_verified_script ("") :not_verified_script_run_show (false) :not_verified_script_run_admin (false) :not_verified_script_run_always (false) :not_verified_script_run_always (false) :allow_non_scv_clients (false) )
When using this file, it is important to maintain the same indentation/nesting format.
Common Attributes Typically, an administrator might need to change only a few of the common parameters (SCV checks) contained in the SCV policy file.
SCV Checks
Anti-Virus monitor Parameters:
• Type (“av_type”)
Type of Anti-Virus. For example, “Norton”, “VirusScan”, “OfficeScan”, or “ZoneLabs”.
• Signature(x)
Required Virus definition file signature. The signature’s format depends on the Anti-Virus type. For example, on Norton Anti-Virus the signature maybe be “>=20031020”. (The format for Norton’s AV signature is “yyyymmdd”).
For TrendMicro Officescan, the signature may be “<650”
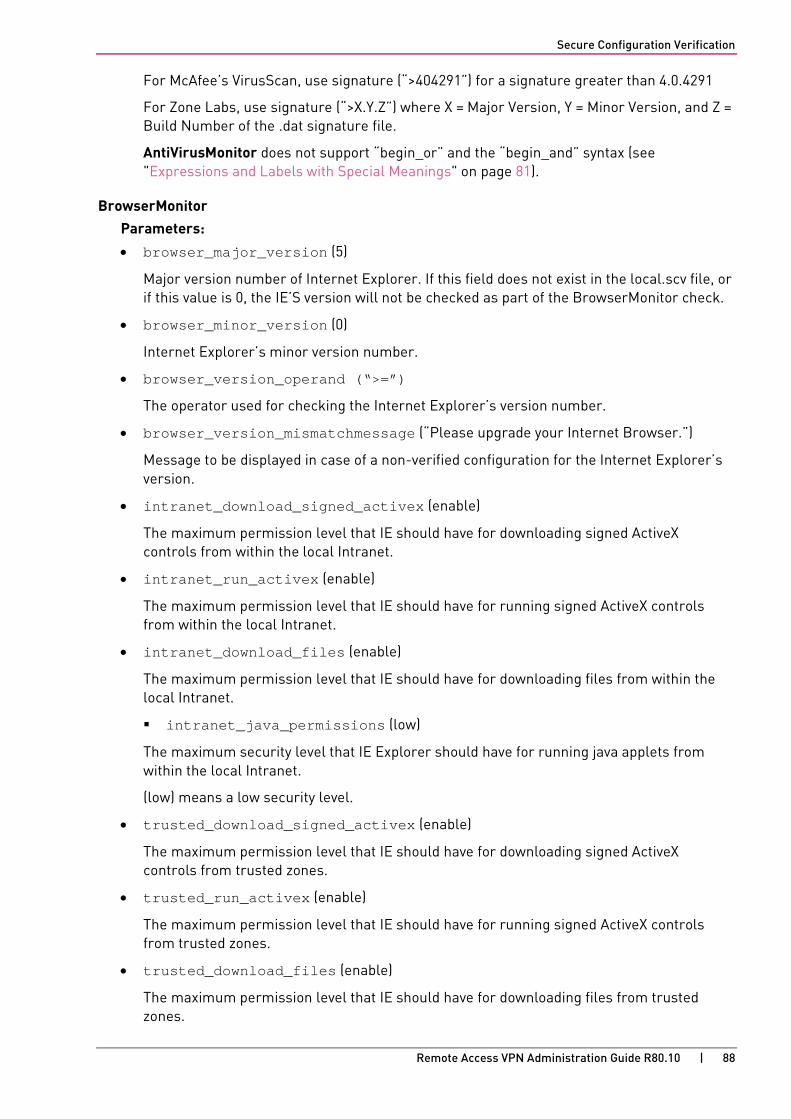
Secure Configuration Verification
Remote Access VPN Administration Guide R80.10 | 88
For McAfee’s VirusScan, use signature (“>404291”) for a signature greater than 4.0.4291
For Zone Labs, use signature (“>X.Y.Z”) where X = Major Version, Y = Minor Version, and Z = Build Number of the .dat signature file.
AntiVirusMonitor does not support “begin_or” and the “begin_and” syntax (see "Expressions and Labels with Special Meanings" on page 81).
BrowserMonitor Parameters:
• browser_major_version (5)
Major version number of Internet Explorer. If this field does not exist in the local.scv file, or if this value is 0, the IE’S version will not be checked as part of the BrowserMonitor check.
• browser_minor_version (0)
Internet Explorer’s minor version number.
• browser_version_operand (“>=”)
The operator used for checking the Internet Explorer’s version number.
• browser_version_mismatchmessage (“Please upgrade your Internet Browser.”)
Message to be displayed in case of a non-verified configuration for the Internet Explorer’s version.
• intranet_download_signed_activex (enable)
The maximum permission level that IE should have for downloading signed ActiveX controls from within the local Intranet.
• intranet_run_activex (enable)
The maximum permission level that IE should have for running signed ActiveX controls from within the local Intranet.
• intranet_download_files (enable)
The maximum permission level that IE should have for downloading files from within the local Intranet.
intranet_java_permissions (low)
The maximum security level that IE Explorer should have for running java applets from within the local Intranet.
(low) means a low security level.
• trusted_download_signed_activex (enable)
The maximum permission level that IE should have for downloading signed ActiveX controls from trusted zones.
• trusted_run_activex (enable)
The maximum permission level that IE should have for running signed ActiveX controls from trusted zones.
• trusted_download_files (enable)
The maximum permission level that IE should have for downloading files from trusted zones.

Secure Configuration Verification
Remote Access VPN Administration Guide R80.10 | 89
• trusted_java_permissions (medium)
The maximum security level that IE should have for running java applets from trusted zones.
• internet_download_signed_activex (disable)
The maximum permission level that IE should have for downloading signed ActiveX controls from the Internet.
• Internet_run_activex (disable)
The maximum permission level that IE should have for running signed ActiveX controls from the Internet.
• internet_download_files (disable)
The maximum permission level that IE should have for downloading files from the Internet.
• internet_java_permissions (disable)
The maximum security level that IE should have for running java applets from the Internet.
• restricted_download_signed_activex (disable)
The maximum permission level that IE should have for downloading signed ActiveX controls from restricted zones.
• restricted_run_activex (disable)
The maximum permission level that IE should have for running signed ActiveX controls from restricted zones.
• restricted_download_files (disable)
The maximum permission level that IE should have for downloading files from restricted zones.
• restricted_java_permissions (disable)
The maximum security level that IE should have for running java applets from restricted zones.
• send_log (type)
Determines whether to send a log to Security Management Server for specifying that the client is not “SCVed.”
This SCV check does not support the “begin admin/end admin” parameter section.
The (type) section should be replaced by (log) or (alert)
• internet_options_mismach_message (“Your Internet browser settings do not meet policy requirements”)
Mismatch message for the Internet Explorer settings.

Secure Configuration Verification
Remote Access VPN Administration Guide R80.10 | 90
BrowserMonitor can be configured to check only Internet Explorer’s version, or only the browser’s settings for a certain zone. For example, if none of the following parameters appear: restricted_download_signed_activex restricted_run_activex restricted_download_files restricted_java_permissions
then BrowserMonitor will not check the restricted zones’ security settings. In similar fashion, if the parameter “browser_major_version” does not appear or is equal to zero, then IE’s version number is not checked.
BrowserMonitor does not support the “begin_or” and the “begin_and” syntax, and does not support the admin parameters (see "Expressions and Labels with Special Meanings" on page 81).
For the script for checking Internet Explorer Service Pack, see Script for Internet Explorer Service Pack below.
Groupmonitor Parameters
• “builtin\administrator” (false)
A name of a user group. The user has to belong to this group in order for the machine configuration to be verified.
• securely_configured_no_active_user (true)
Specifies whether the machine’s configuration may be considered verified when no user is logged on. The default value is false.
HotFixMonitor Parameters
• HotFix_Number (true)
A number of a system Hotfix to be checked. In order for the machine to be verified, the Hotfix should be installed, for example: “823980(true)” verifies that Microsoft’s RPC patch is installed on the operating system.
• HotFix_Name (true)
The full name of a system HotFix to be checked. In order for the machine to be verified, the HotFix should be installed, for example: “KB823980(true)” verifies that Microsoft’s RPC patch is installed on the operating system.
Not all the mentioned fields for HotFixMonitor need to appear in the local.scv file. Some of them may not appear at all, or may appear more than once. These fields may also be ORed and ANDed. In this way, multiple Hotfixes can be checked, and the results ORed or ANDed for extra flexibility.
HWMonitor Parameters
• cputype (“GenuineIntel”)
The CPU type as described in the vendor ID string. The string has to be exactly 12 characters long. For example: “GenuineIntel”, or “AuthenticAMD”, or “aaa bbb ccc ” where spaces count as a character.
Secure Configuration Verification
Remote Access VPN Administration Guide R80.10 | 91
• cpufamily(6)
The CPU family.
• cpumodel(9)
The CPU model.
HWMonitor does not support the “begin_or” and the “begin_and” syntax (see "Expressions and Labels with Special Meanings" on page 81).
OsMonitor Parameters
• enforce_screen_saver_minutes_to_activate (3)
Time in minutes for the screen saver to activate. If the screen saver does not activate within this time period, then the client is not considered verified. In addition, the screen saver must be password protected.
• screen_saver_mismatchmessage (“Your screen saver settings do not meet policy requirements”)
Mismatch message for the screen saver check. The screen saver will not be checked if the property “enforce_screen_saver_minutes_to_activate” does not appear, or if the time is set to zero.
• send_log (type)
Determines whether to send a log to Security Management Server for specifying that the client is not “SCVed.”
This SCV check does not support the “begin admin/end admin” parameter section.
The (type) section should be replaced by (log) or (alert)
• major_os_version_number_9x (4)
Specifies the major version required for 9x operating systems to be verified.
• minor_os_version_number_9x (10)
Specifies the minor version required for 9x operating systems to be verified.
• os_version_operand_9x (“>=”)
Operator for checking the operating system’s version on 9x.
• service_pack_major_version_number_9x (0)
Specifies the major service pack’s version required for 9x operating system’s to be verified.
• service_pack_minor_version_number_9x (0)
Specifies the minor service pack’s version required for 9x operating systems to be verified.
• service_pack_version_operand_9x (“>=”)
Operator for checking the operating system’s service pack on 9x.
• major_os_version_number_nt (4)
Specifies the major version required for Windows NT operating systems to be verified.
• minor_os_version_number_nt (10)
Specifies the minor version required for Windows NT operating systems to be verified.

Secure Configuration Verification
Remote Access VPN Administration Guide R80.10 | 92
• os_version_operand_nt (“>=”)
Operator for checking the operating system’s version on Windows NT.
• service_pack_major_version_number_nt (0)
Major service pack version required for Windows NT operating systems to be verified
• service_pack_minor_version_number_nt (0)
Minor service pack version required for Windows NT operating systems to be verified
• service_pack_version_operand_nt (“>=”)
Operator for checking the operating system’s service pack on Windows NT
• major_os_version_number_2k (4)
Specifies the major version required for Windows 2000 operating systems to be verified.
• minor_os_version_number_2k (10)
Specifies the minor version required for Windows 2000 operating systems to be verified.
• os_version_operand_2k (“>=”)
Operator for checking the operating system’s version on Windows 2000
• service_pack_major_version_number_2k (0)
Specifies major service pack version required for Windows 2000 operating systems to be verified.
• service_pack_minor_version_number_2k (0)
Specifies minor service pack version required for Windows 2000 operating systems to be verified.
• service_pack_version_operand_2k (“>=”)
Operator for checking the operating system’s service pack on Windows 2000
• major_os_version_number_xp (4)
Specifies the major version required for Windows XP operating systems to be verified.
• minor_os_version_number_xp (10)
Specifies the minor version required for Windows XP operating systems to be verified.
• os_version_operand_xp (“>=”)
Operator for checking the operating system’s service pack on Windows XP
• service_pack_major_version_number_xp (0)
Specifies the major service pack version required for Windows XP operating systems to be verified.
• service_pack_minor_version_number_xp (0)
Specifies the minor service pack version required for Windows XP operating systems to be verified.
• service_pack_version_operand_xp (“>=”)
Operator for checking the operating system’s service pack on Windows XP.

Secure Configuration Verification
Remote Access VPN Administration Guide R80.10 | 93
• os_version_mismatches (“Please upgrade your operating system”)
Message to be displayed in case of a non-verified configuration for the operating system’s version/service pack. The operating system’s version and service pack will not be checked if none of the parameters appear in the scv file.
• :major_os_version_number_2003 (5)
Specifies the major version required for Windows 2003 operating systems to be verified.
• :minor_os_version_number_2003 (2)
Specifies the minor version required for Windows 2003 operating systems to be verified.
• :os_version_operand_2003 ("==")
Operator for checking the operating system’s service pack on Windows 2003
• :service_pack_major_version_number_2003 (0)
Specifies the major service pack version required for Windows 2003 operating systems to be verified.
• :service_pack_minor_version_number_2003 (0)
Specifies the minor service pack version required for Windows 2003 operating systems to be verified.
• :service_pack_version_operand_2003 (">=")
Operator for checking the operating system’s service pack on Windows 2003
OsMonitor can be configured to check only the screen saver’s configuration, or only the operating system’s version and service pack. For example, if none of the following parameters appear:
• major_os_version_number_xp
• minor_os_version_number_xp
• os_version_operand_xp
• service_pack_major_version_number_xp
• service_pack_minor_version_number_xp
• service_pack_version_operand_xp
then OsMonitor will not check the system’s version and service pack on Windows XP platforms.
Similarly, if the parameter “enforce_screen_saver_minutes_to_activate” does not appear, then the screen saver’s configuration is not checked.
OSMonitor does not support the “begin_or” and the “begin_and” syntax (see "Expressions and Labels with Special Meanings" on page 81).
ProcessMonitor Parameters
• ProcessName.exe (true)
A process the administrator would like to check. If the value is true, the process needs to be running for the machine to be verified. If the value is false, the process should not be running for the machine to be verified.
ProcessMonitor can also be used to check for the existence/exclusion of more than one process. The fields may be ANDed or ORed for flexibility.

Secure Configuration Verification
Remote Access VPN Administration Guide R80.10 | 94
RegMonitor Parameters
• PredefinedKeys (HIVE)
Specify the registry hive from one of the following choices:
HKEY_CURRENT_USER HKEY_LOCAL_MACHINE HKEY_USERS
If one of the hives is not specified, then HKEY_LOCAL_MACHINE is used.
To configure a check for HKEY_CLASSES_ROOT, use HKEY_LOCAL_MACHINE\Software\Classes and HKEY_CURRENT_USER\Software\Classes.
• value (registry_value_path)
The path of a registry DWORD, under the hive specified by the predefined keys will be checked. The value should be an operator followed by a number, e.g. “Software\TrendMicro\PC-cillinNTCorp\CurrentVersion\Misc.\PatternVer>=414”
The syntax for the value parameter is:
:value (“pathOPval”)
For example:
:value (“Software\...\PaternVer>=414”)
• string (registry_string_path)
The path of a registry string, under the hive specified by the predefined keys will be checked. The string’s value is compared to the given value, in the way that DWORDs are compared.
• keyexist (registry_key_path)
The path of a registry key to check if the key exists, under the hive specified by the predefined keys will be checked. The key must exist if the machine is to be verified.
• keynexist (registry_key_path)
The path of a registry key to be checked for exclusion, under the hive specified by the predefined keys will be checked. For the machine to be verified, the key should not exist.
• allow_no_user (default: true)
This parameter is valid only when a user is logged in to the machine.
Since SC services and SCV checks run also when no user is logged on, a decision should be taken if the check passed or failed.
If no user is logged on to the machine, and a running RegMonitor check is configured to monitor HKEY_CURRENT_USER, the behavior is according to the flag allow_no_user.
If allow_no_user is true, the check will PASS.
If allow_no_user is false, the check will FAIL.
This attribute is not, by default, included in the local.scv file. If the attribute does not exist in the file, then the default setting used is also true.
Configuring this attribute is done via local.scv. For example:

Secure Configuration Verification
Remote Access VPN Administration Guide R80.10 | 95
: (RegMonitor :type (plugin) :parameters ( :keyexist ("HKEY_CURRENT_USER\Software\CheckPoint") :allow_no_user (true) :begin_admin (admin) :send_log (alert) :mismatchmessage ("mismatch message ") :end (admin) ) )
Not all the mentioned fields for RegMonitor need to appear in the local.scv file. Some of them may not appear at all, or may appear more than once. These fields may also be ORed and ANDed. In this way, multiple registry entries can be checked, and the results ORed or ANDed for extra flexibility.
Script for Internet Explorer Service Pack
RegMonitor can be configured to check the version and service pack of Internet Explorer. The script looks as follows:
: (RegMonitor :type (plugin) :parameters ( :begin_or (or1) :keynexist ("Software\Microsoft\Internet Explorer") :string ("Software\Microsoft\Internet Explorer\Version>=6") :begin_and (and1) :string ("Software\Microsoft\Internet Explorer\Version>=5.5") :string ("Software\Microsoft\Windows\CurrentVersion\Internet Settings\MinorVersion>=SP2") :string ("Software\Microsoft\Windows\CurrentVersion\Internet Settings\MinorVersion<=SP9") :end_and (and1) :begin_and (and2) :string ("Software\Microsoft\Internet Explorer\Version>=5.5") :string ("Software\Microsoft\Windows\CurrentVersion\Internet Settings\MinorVersion>=;SP2") :string ("Software\Microsoft\Windows\CurrentVersion\Internet Settings\MinorVersion<=;SP9") :end_and (and2) :end_or (or1) :begin_admin (admin) :send_log (alert) :mismatchmessage ("Your IE must be at least version 5.5 with SP2.") :end (admin) ) )

Secure Configuration Verification
Remote Access VPN Administration Guide R80.10 | 96
SCVMonitor Parameters
• scv_version(“>=541000076”)
Represents the SCV product’s build number. This is the version of the DLLs in charge of the SCV checks. This number differs from the build number of the client. SCV products can be upgraded, and maybe updated without updating the client.
The string is an operator followed by the DLL’s version number in the format “vvshhhbbb”. For example, if you want the DLL version to be at least 54.1.0.220, the syntax should be: scv_version (“>=541000220”)
SCVMonitor does not support the “begin_or” and the “begin_and” syntax (see "Expressions and Labels with Special Meanings" on page 81).
ScriptRun Parameters
• exe (“VerifyScript.bat”)
Runs an executable. Supply the name of the executable, and the full path to the executable.
• run_as_admin (“no”)
Determines whether the verification script is run with administrator privileges. The default is “no”. The only other value is “yes”.
• run_timeout (10)
Time (in seconds) to wait for the executable to finish. If the executable does not finish within the set time, the process is considered as a failure, and the machine categorized as “not verified”. The default value is zero, which is the same as “no timeout”.
ScriptRun does not support the “begin_or” and the “begin_and” syntax.
user_policy_scv Parameters
• logged_on_to_policy_server (true/false)
Specifies whether the user has to be logged on to a Policy Server to be considered SCVed.
• policy_refresh_rate (“168”)
Time, in hours, for which the desktop policy remains valid. After 168 hours the desktop policy is not considered valid, and the user is no longer SCVed. If this parameter is not specified, the policy is not checked for freshness.
• mismatchmessage (“Place a message here”)
The message displayed when the user_policy_scv check fails.
• dont_enforce_while_connecting
If this parameter is present, the user is considered SCVed while connecting to the Security Gateway. The user is considered SCVed only for the duration of the connect process.

Secure Configuration Verification
Remote Access VPN Administration Guide R80.10 | 97
SCVGlobalParams Parameters
For all boolean parameters (true or false), the values should not be enclosed in quotation marks.
• enable_status_notifications (true/false)
If “true”, the client displays a balloon window when the Desktop is not SCVed. On windows 9x and NT, where balloons are not supported, popups appear.
• status_notifications_timeout ()
The number of seconds the balloon window (see previous parameter) will be displayed.
• disconnect_when_not_verified (true/false)
If “true”, the Remote Access client will disconnect from the site when the Desktop is not SCVed.
• block_connections_on_unverified (true/false)
If “true”, the Remote Access client will drop all open connections when the Desktop is not SCVed.
Note - This parameter, if true, blocks all connections to the machine, not just those connections to and from the VPN site.
• scv_policy_timeout_hours ()
The period (in hours) during which the SCV policy is considered valid since the last logon to the Policy Server. When this timeout is about to expire the Remote Access client will attempt to logon to the Policy Server to get a new SCV policy.
Possible values are between 1 and 504 hours(21 days). The default value is 168 hours (one week). If you set the value to 0, the SCV policy never expires (no time-out).
• enforce_ip_forwarding (true/false)
If “true” the IP Forwarding between network interface cards on the user’s desktop must be disabled for the user to be considered SCVed.
• ip_forwarding_mismatchmessage (“Message string placed here”)
The value is a string displayed when ip forwarding is enabled. For example: ip_forwarding_mismatchmessage (“Please....etc”)
This is relevant only if ip forwarding is part of the SCV checks, that is, if the parameter is defined as True.
• not_verified_script (“script_name.bat”)
The name of executable that will be run when the Desktop is not SCVed. The next three parameters provide more options related to the running of the executable.
• not_verified_script_run_show (true/false)
If “true”, the executable’s progress will be displayed in an onscreen window.
• not_verified_script_run_admin (true/false)
If “true”, the executable will run with administrator privileges.

Secure Configuration Verification
Remote Access VPN Administration Guide R80.10 | 98
• not_verified_script_run_always (true/false)
If “true”, the executable will run every time the Desktop is not SCVed. If “false”, it will run once per the Remote Access client session.
• :allow_non_scv_clients (true/false)
If “true”, the client will send a verified state to the enforcing Security Gateway even if the OS does not support SCV.

Remote Access VPN Administration Guide R80.10 | 99
CHAPTE R 9
Layer Two Tunneling Protocol (L2TP) Clients
In This Section:
Introduction to L2TP Clients ........................................................................................ 99
Establishing a VPN between a IPsec / L2TP Client and a Gateway ........................... 99
Behavior of an L2TP Connection ................................................................................ 100
Security Gateway Requirements for IPsec / L2TP .................................................... 101
L2TP Global Configuration ......................................................................................... 101
Authentication of Users .............................................................................................. 101
User Certificate Purposes .......................................................................................... 102
Configuring Remote Access for Microsoft IPsec / L2TP Clients.............................. 102
Introduction to L2TP Clients Some organizations prefer to use L2TP clients for remote access to internal networks, rather than the more feature-rich and secure Check Point clients. There are L2TP clients built into many operating systems.
Check Point Security Gateways can create VPNs with L2TP IPsec clients. This explanation focuses on the Microsoft IPsec / L2TP client.
You can access a private network through the Internet by using a virtual private network (VPN) connection with the Layer Two Tunneling Protocol (L2TP). L2TP is an industry-standard Internet tunneling protocol.
Creating a Remote Access environment for users with Microsoft IPsec / L2TP clients is based on the same principles as those used for setting up Check Point Remote Access Clients. Make sure that you understand how to configure Remote Access VPN before you begin to configure Remote Access for Microsoft IPsec / L2TP clients.
Establishing a VPN between a IPsec / L2TP Client and a Gateway
To allow the user at the Microsoft IPsec / L2TP client to access a network resource protected by a Security Gateway, a VPN tunnel is established between the Microsoft IPsec / L2TP client and the Security Gateway, as shown below.
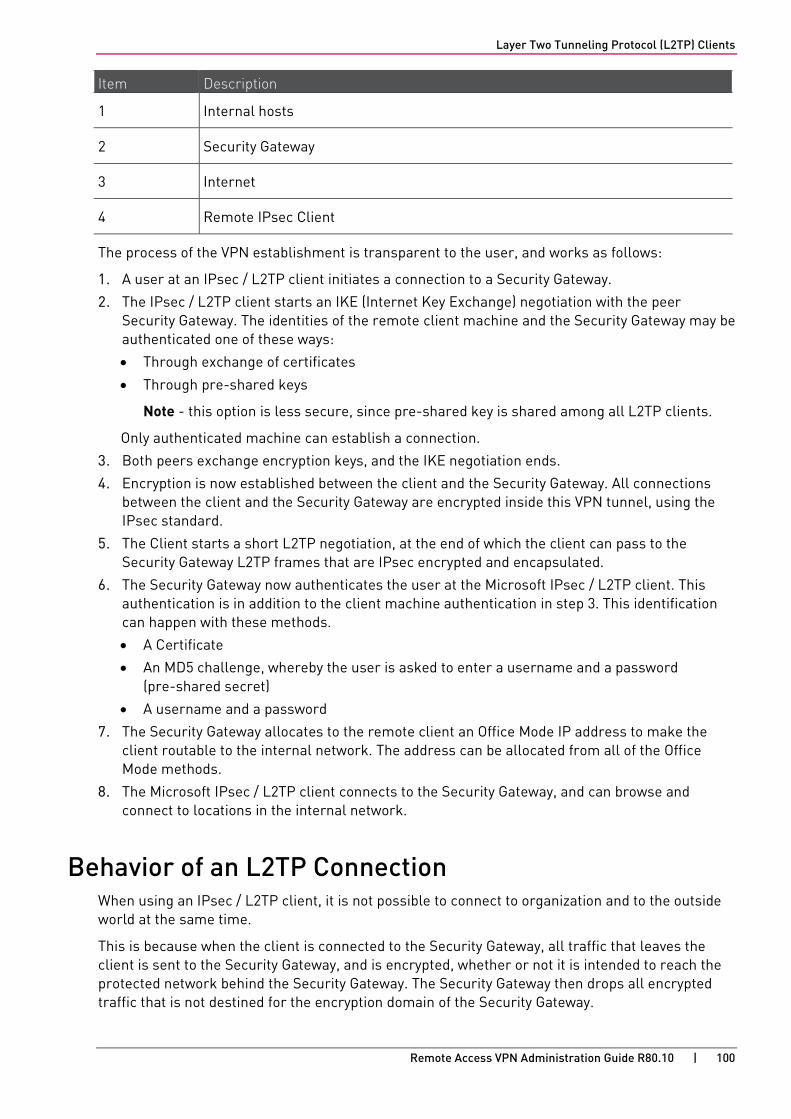
Layer Two Tunneling Protocol (L2TP) Clients
Remote Access VPN Administration Guide R80.10 | 100
Item Description
1 Internal hosts
2 Security Gateway
3 Internet
4 Remote IPsec Client
The process of the VPN establishment is transparent to the user, and works as follows:
1. A user at an IPsec / L2TP client initiates a connection to a Security Gateway.
2. The IPsec / L2TP client starts an IKE (Internet Key Exchange) negotiation with the peer Security Gateway. The identities of the remote client machine and the Security Gateway may be authenticated one of these ways:
• Through exchange of certificates
• Through pre-shared keys
Note - this option is less secure, since pre-shared key is shared among all L2TP clients.
Only authenticated machine can establish a connection.
3. Both peers exchange encryption keys, and the IKE negotiation ends.
4. Encryption is now established between the client and the Security Gateway. All connections between the client and the Security Gateway are encrypted inside this VPN tunnel, using the IPsec standard.
5. The Client starts a short L2TP negotiation, at the end of which the client can pass to the Security Gateway L2TP frames that are IPsec encrypted and encapsulated.
6. The Security Gateway now authenticates the user at the Microsoft IPsec / L2TP client. This authentication is in addition to the client machine authentication in step 3. This identification can happen with these methods.
• A Certificate
• An MD5 challenge, whereby the user is asked to enter a username and a password (pre-shared secret)
• A username and a password
7. The Security Gateway allocates to the remote client an Office Mode IP address to make the client routable to the internal network. The address can be allocated from all of the Office Mode methods.
8. The Microsoft IPsec / L2TP client connects to the Security Gateway, and can browse and connect to locations in the internal network.
Behavior of an L2TP Connection When using an IPsec / L2TP client, it is not possible to connect to organization and to the outside world at the same time.
This is because when the client is connected to the Security Gateway, all traffic that leaves the client is sent to the Security Gateway, and is encrypted, whether or not it is intended to reach the protected network behind the Security Gateway. The Security Gateway then drops all encrypted traffic that is not destined for the encryption domain of the Security Gateway.

Layer Two Tunneling Protocol (L2TP) Clients
Remote Access VPN Administration Guide R80.10 | 101
Security Gateway Requirements for IPsec / L2TP In order to use Microsoft IPsec / L2TP clients, the Security Gateway must be set up for remote access. The setup is very similar to that required for remote access using Check Point Remote Access Clients, and involves creating a Remote Access community that includes the Security Gateways and the user groups.
An additional requirement is to configure the Security Gateway to supply addresses to the clients by means of the Office Mode feature.
L2TP Global Configuration Certain settings related to L2TP authentication can be configured globally for Security Gateways of version R71 and higher. These setting are configured in the global properties configuration section of the SmartConsole.
All L2TP clients can be configured to use a Pre-shared key for IKE in addition to the standard user authentication.
To use a Pre-shared key for IKE, go to Global Properties > Remote Access > VPN - Authentication and Encryption and select Support L2TP with Pre-Shared Key.
Note - IKE Security Association created for L2TP cannot be used for regular IPsec traffic.
Authentication of Users There are two methods used to authenticate an L2TP connection:
• Using Legacy Authentication
• Using certificates
Authentication Methods L2TP clients can use any of the following Authentication schemes to establish a connection:
• Check Point password
• OS password
• RADIUS
• LDAP
• TACACS
Using a username and password verifies that a user is who they claim to be. All users must be part of the Remote Access community and be configured for Office Mode.
Certificates During the process of establishing the L2TP connection, two sets of authentication are performed. First, the client machine and the Security Gateway authenticate each other's identity using certificates. Then, the user at the client machine and the Security Gateway authenticate each other using either certificates or a pre-shared secret.

Layer Two Tunneling Protocol (L2TP) Clients
Remote Access VPN Administration Guide R80.10 | 102
The Microsoft IPsec / L2TP client keeps separate certificates for IKE authentication of the client machine, and for user authentication.
On the Security Gateway, if certificates are used for user authentication, then the Security Gateway can use the same certificate or different certificates for user authentication and for the IKE authentication.
Certificates for both clients and users can be issued by the same CA or a different CA. The users and the client machines are defined separately as users in SmartConsole.
Certificates can be issued by:
• The Internal Certificate Authority (ICA) on the Security Management Server
• OPSEC certified Certificate Authority
User Certificate Purposes It is possible to make sure that PKI certificates are used only for a defined purpose. A certificate can have one or more purposes, such as "client authentication", "server authentication", "IPsec" and "email signing". Purposes appear in the Extended Key Usage extension in the certificate.
The certificates used for IKE authentication do not need any purposes. For the user authentication, the Microsoft IPsec / L2TP client requires that
• The user certificate must have the "client authentication" purpose
• The Security Gateway certificate must have the "server authentication" purpose
Most CAs (including the ICA) do not specify such purposes by default. This means that the CA that issues certificates for IPsec / L2TP clients must be configured to issue certificates with the appropriate purposes (in the Extended Key Usage extension).
It is possible to configure the ICA on the Security Management Server so that the certificates it issues will have these purposes. For OPSEC certified CAs, it is possible to configure the Security Management Server to create a certificate request that includes purposes (in the Extended Key Usage extension).
It is also possible to configure the Microsoft IPsec / L2TP clients so that they do not validate the Security Gateway certificate during the L2TP negotiation. This is not a security problem because the client has already verified the Security Gateway certificate during IKE negotiation.
Configuring Remote Access for Microsoft IPsec / L2TP Clients
Establishing a Remote Access VPN for Microsoft IPsec / L2TP clients requires configuration to be performed both on the Security Gateway and on the client machine. The configuration is the same as setting up Check Point Remote Access Clients, with a few additional steps.
High-level workflow to create a Remote Access deployment:
1. Configure a Remote Access environment, including objects and authentication credentials (normally certificates) for the users.
2. Configure support for Office Mode and L2TP on the Security Gateway.

Layer Two Tunneling Protocol (L2TP) Clients
Remote Access VPN Administration Guide R80.10 | 103
3. On the client machine, place the user certificate in the User Certificate Store, and the client machine certificate in the Machine Certificate Store.
4. On the client machine, set up the Microsoft IPsec / L2TP client connection profile.
Configuring a Remote Access Environment Configure the network to use VPN connections for Remote Access.
Defining the Client Machines and their Certificates 1. Define a user that corresponds to each client machine, or one user for all machines, and
generate a certificate for each client machine user. The steps are the same as those required to define users and their certificate.
2. Add users that correspond to the client machines to a user group, and add the user group to the Remote Access VPN community.
Configuring Office Mode and L2TP Support
To configure L2TP support:
1. Configure Office Mode (on page 51).
2. Click Gateways & Servers and double-click the Security Gateway.
The gateway window opens and shows the General Properties page.
3. From the navigation tree, click VPN Clients > Remote Access.
4. Click Support L2TP.
5. Select the Authentication Method for the users:
• To use certificates, choose Smart Card or other Certificates (encryption enabled). • To use a username and a shared secret (password), choose MD5-challenge.
6. For Use this certificate, select the certificate that the Security Gateway presents in order to authenticate itself to users.
7. Click OK and publish the changes.
Preparing the Client Machines 1. In the Windows Services window of the client machine, make sure that the IPsec Policy Agent
is running. It should preferably be set to Automatic.
2. Make sure that no other IPsec Client is installed on the machine.
Placing the Client Certificate in the Machine Certificate Store 1. Log in to the client machine with administrator permissions.
2. Run the Microsoft Management Console. Click Start > Run
3. Type: MMC, and press Enter.
4. Select Console > Add/Remove Snap-In.
5. In the Standalone tab, click Add.
6. In the Add Standalone Snap-in window, select Certificates.
7. In the Certificates snap-in window, select Computer account.

Layer Two Tunneling Protocol (L2TP) Clients
Remote Access VPN Administration Guide R80.10 | 104
8. In the Select Computer window select the computer (whether local or not) where the new certificates have been saved.
9. Click Finish to complete the process and click Close to close the Add/Remove Snap- in window.
10. The MMC Console window is displayed, where a new certificates branch has been added to the Console root.
11. Right-click on the Personal entry of the Certificates branch and select All Tasks > Import. A Certificate Import Wizard is displayed.
12. In the Certificate Import Wizard, browse to the location of the certificate.
13. Enter the certificate file password.
14. In the Certificate Store window make sure that the certificate store is selected automatically based on the certificate type.
15. Select Finish to complete the Import operation.
16. Go to the Certificate subdirectory (under Personal). There is one certificate with the user name and a second certificate with the management name.
17. Select the management certificate and drag it to the Certificates list under the Trusted Root Certificate subdirectory.
18. Exit from the MMC console. You do not have to save it. You can see the changes in Internet Explorer Properties.
Using the MMC, the certificate can be seen in the certificate store for the "Local Computer".
Placing the User Certificate in the User Certificate Store 1. On the client machine, double-click on the user's certificate icon (the .p12 file) in the location
where it is saved. A Certificate Import Wizard is displayed
2. Enter the password.
3. In the Certificate Store window make sure that the certificate store is selected automatically based on the certificate type.
4. Select Finish to complete the Import operation.
Using the MMC, the certificate can be seen in the certificate store for the "current user".
Setting up the Microsoft IPsec/L2TP Client Connection Profile Once the Client machine's certificate and the user's certificate have been properly distributed, set up the L2TP connection profile. The instruction might be slightly different on different versions of Windows.
To configure the L2TP profile:
1. On the client machine, go to the Network and Sharing Center.
2. Select Set up a new connection or network > Connect to a workplace > Use my Internet connection (VPN).
3. In Internet address, enter the IP address or the resolvable host name of the Security Gateway.
4. In Destination name, enter a name for the new connection, for example, L2TP_connection.
5. On Windows 7: Select Don't connect now; just set it up so I can connect later.
6. Click Next.

Layer Two Tunneling Protocol (L2TP) Clients
Remote Access VPN Administration Guide R80.10 | 105
7. Click Create.
8. Click Close.
To complete the L2TP connection configuration:
1. In the Network and Sharing Center, click Change adapter settings. 2. Right-click on the connection you created and select Properties.
3. In the Security tab, under Type of VPN, select Layer 2 Tunneling Protocol with IPSEC (L2TP/IPSEC).
4. Click Advanced settings, and in the L2TP tab:
• If you configured the gateway to use MD5-Challenge select, Use preshared key for authentication and enter the preshared key, .
• If you configured the gateway to use Smart Card or another certificate, select Use certificate for authentication.
5. Click OK.
6. Under Authentication select Use Extensible Authentication protocols or Allow these protocols.
• If you select Use extensible Authentication protocols: Select MD5-challenge, or Smart Card or other Certificates. Choose the authentication method chosen on the gateway.
• If you select Allow these protocols: Select Unencrypted password (PAP). 7. Click OK.
Configuring User Certificate Purposes A CA that issues certificates for IPsec/L2TP clients must be configured to issue certificates with the appropriate purposes.
Alternatively, the Microsoft IPsec/L2TP Client can be set to not require the "Server Authentication" purpose on the Security Gateway certificate.
Configuring the CA to Issue Certificates (L2TP)
To configure the CA with the ICA Management Tool:
1. Run the ICA Management tool:
2. Change the property IKE Certificate Extended Key Usage property to the value 1, to issue Security Gateway certificates with the "server authentication" purpose.
3. Change the property IKE Certificate Extended Key Usage to the value 2 to issue user certificates with the "client authentication" purpose.
If you are using an OPSEC certified CA to issue certificates, use GuiDBedit, the graphical Database Tool to change the value of the global property cert_req_ext_key_usage to 1. This causes the Security Management Server to request a certificate that has purposes (Extended Key Usage extension) in the certificate.
To configure the CA with SmartConsole:
1. Click Gateways & Servers and double-click the Security Gateway.
The gateway window opens and shows the General Properties page.
2. From the navigation tree, click IPsec VPN.
3. In the Repository of Certificates Available to the Gateway section, click Add.

Layer Two Tunneling Protocol (L2TP) Clients
Remote Access VPN Administration Guide R80.10 | 106
4. The Certificate Properties window opens.
5. Configure the settings for the certificate and click OK.
6. Select the certificate and click View.
7. Make sure that the Extended Key Usage Extension appears in the certificate.
8. From the navigation tree, click VPN Clients > Remote Access.
9. In the L2TP Support section, select the new certificate.
10. Click OK and publish the changes.
To Configure the Microsoft IPsec/L2TP Clients so they do not Check for the "Server Authentication" Purpose The following procedure tells the Microsoft IPsec/L2TP Client not to require the "Server Authentication" purpose on the Security Gateway certificate.
1. In the client machine, right-click on the My Network Places icon on the desktop and select Properties.
2. In the Network and Dial-up Connections window, double click the L2TP connection profile.
3. Click Properties, and select the Security tab.
4. Select Advanced (custom settings), and click Settings.
5. In the Advanced Security Settings window, under Logon security, select Use Extensible Authentication Protocol (EAP), and click Properties.
6. In the Smart Card or other Certificate Properties window, uncheck Validate server certificate, and click OK.
Note - The client validates all aspects of the Security Gateway certificate, during IKE authentication, other than the "Server Authentication" purpose.
Making the L2TP Connection 1. Click on Connect to make the L2TP connection.
2. To view the IP address assigned to the connection, either view the Details tab in the connection Status window, or use the ipconfig /all command.
For More Information The L2TP protocol is defined in RFC 2661. Encryption of L2TP using IPsec is described in RFC 3193. For information about the L2TP protocol and the Microsoft IPsec/L2TP client, see the Network and Dial Up Connections Help in Windows for your version.

Remote Access VPN Administration Guide R80.10 | 107
CHAPTE R 10
VPN Routing - Remote Access In This Section:
The Need for VPN Routing ......................................................................................... 107
Check Point Solution for Greater Connectivity and Security .................................... 108
Configuring VPN Routing for Remote Access VPN ................................................... 112
Link Selection for Remote Clients ............................................................................. 114
Directional VPN in Remote Access Communities .................................................... 116
The Need for VPN Routing There are a number of scenarios in which a Security Gateway or remote access clients cannot connect directly to another Security Gateway (or clients). Sometimes, a given Security Gateway or client is incapable of supplying the required level of security. For example:
• Two Security Gateways with dynamically assigned IP addresses (DAIP Security Gateways). Hosts behind either Security Gateway need to communicate; however, the changing nature of the IP addresses means the two DAIP Security Gateways cannot open VPN tunnels. At the moment of tunnel creation, the exact IP address of the other is unknown.
• Remote access client users wish to have a private conversation using Voice-over-IP (VoIP) software or utilize other client-to-client communication software such as Microsoft NetMeeting. Remote access clients cannot open connections directly with each other, only with configured Security Gateways.
In all cases, a method is needed to enhance connectivity and security.

VPN Routing - Remote Access
Remote Access VPN Administration Guide R80.10 | 108
Check Point Solution for Greater Connectivity and Security
VPN routing provides a way of controlling how VPN traffic is directed. VPN routing can be implemented with Security Gateway modules and remote access clients. Configuration for VPN routing is performed either directly through SmartConsole (in simple cases) or by editing the VPN routing configuration files on the Security Gateways (in more complex scenarios).
Item Description
1 Host machines
2 Security Gateway A
3 Internet
4 Security Gateway B
5 Host machines
6 Security Management Server
7 Security Gateway C
8 Host machines
In the figure above, one of the host machines behind Security Gateway A needs to connect with a host machine behind Security Gateway B. For either technical or policy reasons, Security Gateway A cannot open a VPN tunnel with Security Gateway B. However, both Security Gateways A and B can open VPN tunnels with Security Gateway C, so the connection is routed through Security Gateway C.
As well as providing enhanced connectivity and security, VPN routing can ease network management by hiding a complex network of Security Gateways behind a single Hub.

VPN Routing - Remote Access
Remote Access VPN Administration Guide R80.10 | 109
Hub Mode (VPN Routing for Remote Clients) VPN routing for remote access clients is enabled via Hub Mode. In Hub mode, all traffic is directed through a central Hub. The central Hub acts as a kind of router for the remote client. Once traffic from remote access clients is directed through a Hub, connectivity with other clients is possible as well as the ability to inspect the subsequent traffic for content.
When using Hub mode, enable Office mode. If the remote client is using an IP address supplied by an ISP, this address might not be fully routable. When Office mode is used, rules can be created that relate directly to Office mode connections.
Note - Office mode is not supported in SecuRemote.
Allowing Clients to Route all Traffic Through a Security Gateway In the following figure, the remote client needs to connect with a server behind Security Gateway 2. Company policy states that all connections to this server must be inspected for content. For whatever reason, Security Gateway 2 cannot perform the required content inspection. When all the traffic is routed through Security Gateway 1, connections between the remote client and the server can be inspected.
Item Description
1 Security Gateway 1
2 Internet
3 Remote client
4 Security Gateway 2
5 Server
6 Hosts

VPN Routing - Remote Access
Remote Access VPN Administration Guide R80.10 | 110
Suppose the same remote client needs to access an HTTP server on the Internet. The same company policy regarding security still applies.
Item Description
1 HTTP Server
2 Internet
3 Remote client
4 Security Gateway
5 OSPEC Certified UFP server
6 Hosts
The remote client's traffic is directed to the Security Gateway where it is directed to the UFP (URL Filtering Protocol) server to check the validity of the URL and packet content, since the Security Gateway does not possess URL-checking functionality. The packets are then forwarded to the HTTP server on the Internet.
NATing the address of the remote client behind the Security Gateway prevents the HTTP server on the Internet from replying directly to the client. If the remote client's address is not NATed, the remote client will not accept the clear reply from the HTTP server.
Remote Client to Client Communication Remote client to client connectivity is achieved in two ways:
• By routing all the traffic through the Security Gateway
• Including the Office Mode range of addresses in the VPN domain of the Security Gateway

VPN Routing - Remote Access
Remote Access VPN Administration Guide R80.10 | 111
Routing all Traffic through the Security Gateway Two remote users use VoIP software to hold a secure conversation. The traffic between them is directed through a central Hub, as shown in the following figure.
Item Description
1 Security Gateway
2 Internet
3 Remote Client VoIP
4 Remote Client VoIP
For this to work:
• Allow VPN clients to route traffic through this gateway must be enabled on the Security Gateway.
• The remote client must be configured with a profile that enables all traffic to be routed through the Security Gateway.
• Remote clients are working in connect mode.
If the two remote clients are configured for Hub mode with different Security Gateways, the routing takes place in three stages - each remote client to its designated Security Gateway, then between the Security Gateways:

VPN Routing - Remote Access
Remote Access VPN Administration Guide R80.10 | 112
Item Description
1 Remote Client 1
2 Remote Client 2
3 Internet
4 Security Gateway A
5 Security Gateway B
In the figure above, remote client 1 is configured for Hub mode with Security Gateway B. Remote client 2 is configured for Hub mode with Security Gateway A. For the connection to be routed correctly:
• Office mode must be enabled.
• VPN configuration files on both Security Gateways must include the Office Mode address range used by the other. The VPN configuration file on Security Gateway A directs all traffic aimed at an Office Mode IP address of Security Gateway B towards Security Gateway B. A connection leaves Remote Client1 and is sent to Security Gateway B. From gateway B the connection is passed to Security Gateway A. Security Gateway A once more redirects the traffic towards Remote Client 2. The reply from Remote Client2 follows the same path but in reverse.
• Office mode addresses used by both Security Gateways must be non-overlapping.
Configuring VPN Routing for Remote Access VPN Common VPN routing scenarios can be configured through a VPN star community, but not all VPN routing configuration is handled through SmartConsole. VPN routing between Security Gateways (star or mesh) can be also be configured by editing the configuration file $FWDIR/conf/vpn_route.conf
VPN routing cannot be configured between Security Gateways that do not belong to a VPN community.
Hub Mode for Remote Access Clients
To enable Hub Mode for Remote Access clients:
1. Click Gateways & Servers and double-click the Security Gateway.
The gateway window opens and shows the General Properties page.
2. From the navigation tree, click VPN Clients > Remote Access.
3. In the Hub Mode configuration section, click Allow VPN clients to route all traffic through this gateway.
4. Click OK.
5. From the Objects Bar, click VPN Communities.
6. Double-click the Remote Access community object.
7. From the Participating Gateways page, make sure that the Hub Security Gateway is in the window.
8. On the Participant User Groups page, select the remote access users or user groups.

VPN Routing - Remote Access
Remote Access VPN Administration Guide R80.10 | 113
9. Click OK.
10. Create the access control rule in the Access Control Policy.
VPN routing traffic is handled in the Security Policy Rule Base as a single connection, matched to one rule only.
11. Click OK and publish the changes.
12. Configure the profile on the remote client to route all communication through the designated Security Gateway.
Adding the Office Mode Range to the VPN Domain SmartConsole includes a default object for Office Mode IP addresses, CP_default_Office_Mode_addresses_pool. You can use the default object, or create a new one for your network.
To create a new Office Mode IP address object:
1. In SmartConsole, click Objects > Object Explorer (Ctrl+E).
2. Click New > Network.
3. Enter the Name, IP address and Net mask.
4. Click OK and publish the changes.
To configure VPN routing for remote access clients with the VPN domain:
1. Create a network group, click New > Network Group.
2. Add these network groups:
• VPN domain
• Office Mode
3. Click OK and publish the changes.
4. Click Gateways & Servers and double-click the Security Gateway.
The gateway window opens and shows the General Properties page.
5. From the navigation tree, click Network Management > VPN Domain.
6. Click Manually defined.
7. Select the new network group.
8. Click OK and publish the changes.
The remote clients must connect to the site and perform a site update before they can communicate with each other.

VPN Routing - Remote Access
Remote Access VPN Administration Guide R80.10 | 114
Client to Client via Multiple Hubs Using Hub Mode The figure below shows two remote clients each configured to work in Hub mode with a different Security Gateway:
Item Description
1 Hub 1
2 Internet
3 Remote Client 1
4 Remote Client 2
5 Hub 2
Remote Client 1 works in Hub mode with Hub 1. Remote Client 2 works in Hub mode with the Hub 2. In order for VPN routing to be performed correctly:
• Remote clients must be working in Office mode
• Office mode address range of each Security Gateway must be included in the vpn_route.conf file installed on the other Security Gateway.
Destination Next hop router interface Install On
Hub1_OfficeMode_range Hub1 Hub2
Hub2_OfficeMode_range Hub2 Hub1
When Remote Client 1 communicates with Remote Client 2:
• The traffic first goes to the Hub 1, since Remote Client 1 is working in Hub mode with Hub 1.
• Hub 1 identifies Remote Client 2's IP address as belonging to the Office mode range of Hub 2.
• The vpn_route.conf file on Hub 1 identifies the next hop for this traffic as Hub 2.
• The traffic reaches the Hub 2; Hub 2 redirects the communication to Remote Client 2.

VPN Routing - Remote Access
Remote Access VPN Administration Guide R80.10 | 115
Link Selection for Remote Clients Link Selection is a method used to determine which interface to use for incoming and outgoing VPN traffic and the best possible path for the traffic. Using Link Selection, you choose which IP addresses are used for VPN traffic on each Security Gateway.
Load Sharing and Service Based Link Selection are not supported when the peer is a Remote Access Client. If the Probing Redundancy mode configuration is Load Sharing and the peer is a remote access client, High Availability will be enforced for the client's tunnel.
Link selection is configured on each Security Gateway in the Security Gateway Properties > IPSec VPN > Link Selection window. The settings apply to both:
• Security Gateway to Security Gateway connections
• Remote access client to Security Gateway connections
You can configure Link Selection for remote users separately. These settings override the settings configured on the Link Selection page.
Configuring Link Selection for Remote Access Only
To configure separate Link Selection settings for remote access VPN:
1. Using GuiDBedit, the Check Point Database Tool, select the Security Gateway object.
2. Under Network Objects, change the value of apply_resolving_mechanism_to_SR to false on the Security Gateway object.
3. Edit the ip_resolution_mechanism attribute to determine how remote access clients resolve the IP address of the local Security Gateway. Select one of the following:
• mainIpVpn - Always use the main IP address specified in the IP Address field on the General Properties page of the Security Gateway
• singleIpVpn - The VPN tunnel is created with the Security Gateway using an IP address set in single_VPN_IP_RA
• singleNATIpVPN - The VPN tunnel is created using a NATed IP address set in single_VPN_IP_RA
• topologyCalc - Calculate the IP address used for the VPN tunnel by network topology based on the location of the remote peer
• oneTimeProb - Use one time probing to determine which link will be used.
• ongoingProb - Use ongoing probing to determine which link will be used.
4. If you are using ongoing or one time probing, also edit these parameters:
• interface_resolving_ha_primary_if – The primary IP address used for one-time / ongoing probing.
• use_interface_IP – Set to true if all IP addresses defined in topology tab should be probed. Set to false if the manual list of IP addresses should be probed.
• available_VPN_IP_list - A List of IP addresses that should be probed. (This list is used only if the value of use_interface_IP is false).
5. Save changes.

VPN Routing - Remote Access
Remote Access VPN Administration Guide R80.10 | 116
To use multiple external links with remote access clients:
1. Open SmartConsole.
2. Click Gateways & Servers and double-click the Security Gateway.
The gateway window opens and shows the General Properties page.
3. From the navigation tree, click VPN Clients > Office Mode.
4. In the Multiple Interfaces section, select Support connectivity enhancement for gateways with multiple external interfaces.
5. Click OK.
6. Install policy on the gateway.
Directional VPN in Remote Access Communities Directional VPN for Remote Access Communities lets you reject connections to or from a specified network object.
Source Destination VPN Service Action
Any Any Remote_Access_Community => MyIntranet
Any drop
Any Any Remote_Access_Community => Any Traffic
Any accept
Connections are not allowed between remote users and hosts within the "MyIntranet" VPN community. All other connections that start from the Remote Access Community, from inside or outside of the VPN communities, are allowed.
User Groups as the Destination in RA communities User groups can be placed in the destination column of a rule. This makes:
• Configuring client to client connections easier
• Configuring "back connections" between a remote client and a Security Gateway possible. Source Destination VPN Service Action
Any Remote_Users@Any Any Traffic => Remote_Access_Community
Any accept
To include user groups in the destination column of a rule:
• The rule must be directional
• In the VPN column, the Remote Access community must be configured as the endpoint destination

VPN Routing - Remote Access
Remote Access VPN Administration Guide R80.10 | 117
Configuring Directional VPN with Remote Access Communities
To configure Directional VPN with Remote Access communities:
1. From Menu, click Global Properties.
2. From the navigation tree, click VPN > Advanced.
3. Click Enable VPN Directional Match in VPN Column.
4. Click OK and publish the changes.
5. Go to Security Policies > Access Control Policy. 6. Right-click the VPN cell for the rule, and select Directional Match Condition.
The New Directional Match Condition window opens.
7. Configure the directional VPN:
• From Traffic reaching from, select the source of the connection
• From Traffic leaving to, select the connection's destination
8. Click OK.
9. Install policy.

Remote Access VPN Administration Guide R80.10 | 118
CHAPTE R 11
Remote Access Advanced Configuration In This Section:
Domain Controller Name Resolution ........................................................................ 118
Authentication Timeout and Password Caching ....................................................... 118
Secure Domain Logon (SDL) ...................................................................................... 119
How to Work with non-Check Point Firewalls .......................................................... 121
Resolving Internal Names with an Internal DNS Server .......................................... 121
Split DNS ..................................................................................................................... 121
Domain Controller Name Resolution If clients are configured in Connect Mode and Office Mode, clients automatically resolve the NT domain name using dynamic WINS.
Otherwise, clients resolve the NT domain name using either LMHOSTS or WINS.
LMHOSTS Enter the relevant information (see below) the $FWDIR/conf/dnsinfo.C file on the Security Gateway, and install the policy.
( :LMdata( :( :ipaddr (<IP address>) :name (<host name>) :domain (<domain name>) ) :( :ipaddr (<IP address>) :name (<host name>) :domain (<domain name>) ) ) )
When the topology is updated, the name resolution data will be automatically transferred to the dnsinfo entry of the userc.C file and then to its LMHOSTS file.
Authentication Timeout and Password Caching
The Problem Users consider multiple authentications during the course of a single session to be a nuisance. At the same time, these multiple authentications are an effective means of ensuring that the session has not been hijacked (for example, if the user steps away from the client for a period of time). The problem is finding the correct balance between convenience and security.
Remote Access Advanced Configuration
Remote Access VPN Administration Guide R80.10 | 119
The Solution Multiple authentication can be reduced by:
• Increasing the re-authentication interval
• Caching the user's password
Re-Authentication Interval For Connect Mode, the countdown to the timeout begins from the time that the Client is connected.
To set the length of time between re-authentications:
1. From Menu, select Global Properties.
2. From the navigation tree, click Remote Access > Endpoint Security VPN.
3. In Re-authenticate user every, select a number of minutes between re-authentications.
4. Click OK. 5. Install Policy.
Password Caching When the timeout expires, the user will be asked to authenticate again. If password-caching is enabled, clients will supply the cached password automatically and the authentication will take place transparently to the user. In other words, the user will not be aware that re-authentication has taken place.
Password caching is possible only for multiple-use passwords. If the user's authentication scheme implement one-time passwords (for example, SecurID), then passwords cannot be cached, and the user will be asked to re-authenticate when the authentication time-out expires. For these schemes, this feature should not be implemented.
To configure password caching:
1. From Menu, select Global Properties.
2. From the navigation tree, click Remote Access > Endpoint Security VPN.
3. In Enable password caching, select an option.
4. If Password caching is enabled, in Cache password for, select the amount of minutes it is cached for.
Secure Domain Logon (SDL)
The Problem When a Remote Access client user logs on to a domain controller, the user has not yet entered credentials and so the connection to the domain controller is not encrypted.

Remote Access Advanced Configuration
Remote Access VPN Administration Guide R80.10 | 120
The Solution When the Secure Domain Logon (SDL) feature is enabled, then after the user enters the OS user name and password (but before the connection to the domain controller is started), the User Authentication window is displayed. When the user enters the client credentials, the connection to the domain controller takes place over an encrypted tunnel.
Cached Information When the Remote Access client computer successfully logs on to a domain controller, the user's profile is saved in cache. This cached information will be used if subsequent logons to the domain controller fail, for whatever reason.
To configure this option in the client registry, proceed as follows:
1. Go to HKLM\Software\Microsoft\Windows NT\Current Version\Winlogon.
2. Create a new key CachedLogonCount with the valid range of values from 0 to 50. The value of the key is the number of previous logon attempts that a server will cache.
A value of 0 disables logon caching and any value above 50 will only cache 50 logon attempts.
Configuring Secure Domain Logon 1. Configure the SecuRemote client to use LMHOSTS (all platforms) or WINS (all platforms
except Win 9x).
2. For Win NT and Win 2000, configure the SDL timeout.
3. Define the site where the domain controller resides and download/update the topology.
4. If the client is not already a domain member, configure the machine as a domain member.
5. For Win NT and 2000:
• Enable Auto Local Logon (optional)
• Enable Secure Domain Logon
6. Reboot the computer and logon.
Using Secure Domain Logon
After you have rebooted the computer:
1. When the Windows Logon window is displayed, enter the operating system credentials.
2. Click OK.
The Logon window is displayed.
3. Enter the client credentials in the defined time (see Configuring SDL Timeout).
If you fail to logon and no cached information is used, wait one minute and try again.
If SDL is already configured on the client, the administrator can customize the client installation packages with SDL enabled by default.
Create a self-extracting client package using the VPN Configuration Utility and select Enable Secure Domain Logon. See the Remote Access Clients for Windows Administration Guide for details.

Remote Access Advanced Configuration
Remote Access VPN Administration Guide R80.10 | 121
How to Work with non-Check Point Firewalls If a remote access client is located behind a non-Check Point firewall, the following ports must be opened on the firewall to allow VPN traffic to pass:
Port Description
UDP port 500 Always, even if using IKE over TCP
TCP port 500 Only if using IKE over TCP
IP protocol 50 ESP Unless always using UDP encapsulation
UDP port 2746 Only if using MEP, interface resolving or interface High Availability
UDP port 259 Only if using MEP, interface resolving or interface High Availability
Resolving Internal Names with an Internal DNS Server Problem:
Remote Access Clients use an internal DNS server to resolve the names of internal hosts (behind the Security Gateway) with non-unique IP addresses.
Solution:
Best practice is:
• For Endpoint Security VPN and Check Point Mobile for Windows, use Office mode.
• For SecuRemote, use the Split DNS (on page 121) feature.
Split DNS Split DNS uses a SecuRemote DNS Server, an object that represents an internal DNS server that you can configure to resolve internal names with unregistered, (RFC 1981-style) IP addresses. It is best to encrypt the DNS resolution of these internal names.
After you configure a SecuRemote DNS server to resolve traffic from a specified domain and install policy, it takes effect. If users try to access that domain while connected to the VPN, the request is resolved by the SecuRemote DNS server. The internal DNS server can only work when users are connected to the VPN.
You can configure multiple SecuRemote DNS servers for different domains.
Configuring Split DNS
To configure a SecuRemote DNS server for Split DNS:
1. In SmartConsole, in the Objects tree, select New > More > Server > More > SecuRemote DNS.
The New SecuRemote DNS window opens.
2. In the General tab, enter a name for the server and select the host on which it runs.
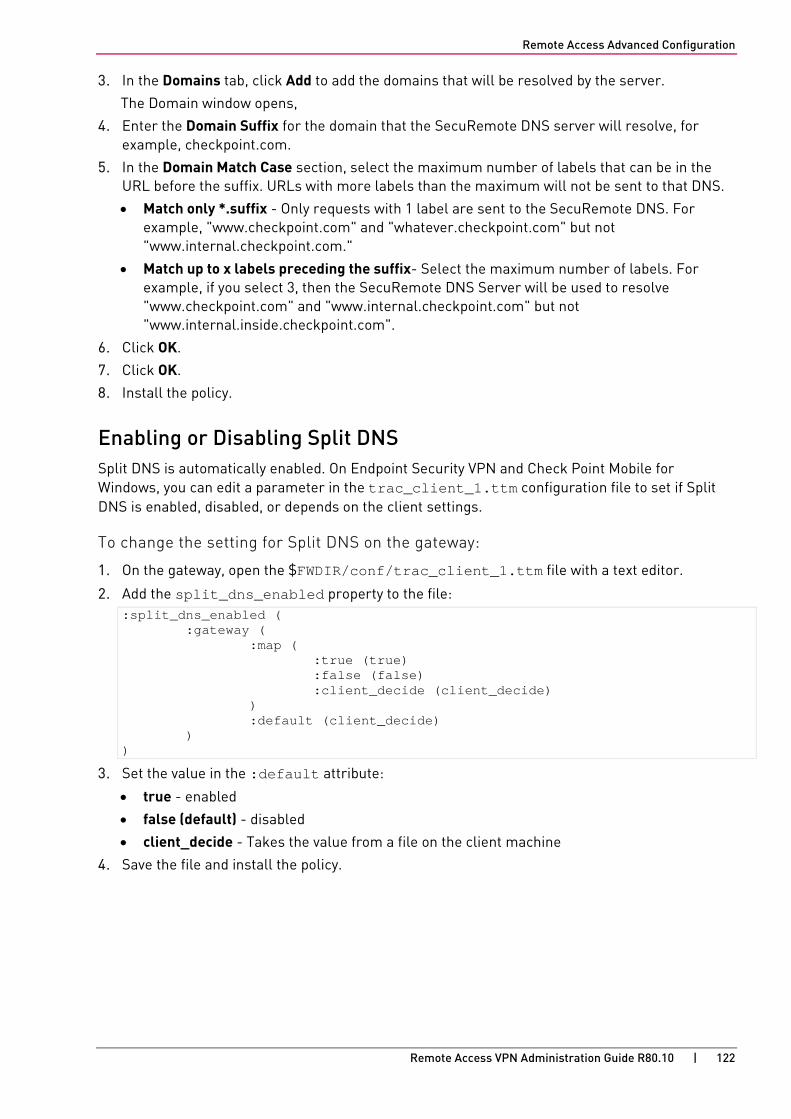
Remote Access Advanced Configuration
Remote Access VPN Administration Guide R80.10 | 122
3. In the Domains tab, click Add to add the domains that will be resolved by the server.
The Domain window opens,
4. Enter the Domain Suffix for the domain that the SecuRemote DNS server will resolve, for example, checkpoint.com.
5. In the Domain Match Case section, select the maximum number of labels that can be in the URL before the suffix. URLs with more labels than the maximum will not be sent to that DNS.
• Match only *.suffix - Only requests with 1 label are sent to the SecuRemote DNS. For example, "www.checkpoint.com" and "whatever.checkpoint.com" but not "www.internal.checkpoint.com."
• Match up to x labels preceding the suffix- Select the maximum number of labels. For example, if you select 3, then the SecuRemote DNS Server will be used to resolve "www.checkpoint.com" and "www.internal.checkpoint.com" but not "www.internal.inside.checkpoint.com".
6. Click OK.
7. Click OK.
8. Install the policy.
Enabling or Disabling Split DNS Split DNS is automatically enabled. On Endpoint Security VPN and Check Point Mobile for Windows, you can edit a parameter in the trac_client_1.ttm configuration file to set if Split DNS is enabled, disabled, or depends on the client settings.
To change the setting for Split DNS on the gateway:
1. On the gateway, open the $FWDIR/conf/trac_client_1.ttm file with a text editor.
2. Add the split_dns_enabled property to the file: :split_dns_enabled ( :gateway ( :map ( :true (true) :false (false) :client_decide (client_decide) ) :default (client_decide) ) )
3. Set the value in the :default attribute:
• true - enabled
• false (default) - disabled
• client_decide - Takes the value from a file on the client machine
4. Save the file and install the policy.

Remote Access VPN Administration Guide R80.10 | 123
CHAPTE R 12
Multiple Entry Point for Remote Access VPNs
In This Section:
The Need for Multiple Entry Point Security Gateways.............................................. 123
The Check Point Solution for Multiple Entry Points ................................................. 123
Configuring MEP ......................................................................................................... 125
Disabling MEP ............................................................................................................. 128
The Need for Multiple Entry Point Security Gateways The Security Gateway provides a single point of entry to the internal network. It is the Security Gateway that makes the internal network "available" to remote machines. If the Security Gateway fails, the internal network is no longer available. It therefore makes good sense to have Multiple Entry Points (MEP) to the same network.
The Check Point Solution for Multiple Entry Points In a MEP environment, more than one Security Gateway is both protecting and giving access to the same VPN domain. How a remote user selects a Security Gateway in order to reach a destination IP address depends on how the MEP Security Gateways have been configured, which in turn depends on the requirements of the organization.
The Check Point solution for multiple entry points is based on a proprietary Probing Protocol (PP) that tests Security Gateway availability. The MEP Security Gateways do not have to be in the same location and can be widely-spaced, geographically.
Note - In a MEP Security Gateway environment, the remote clients supported are the Check Point Remote Access Clients.
MEP Methods There are three methods used to choose which Security Gateway is used as the entry point for a connection:
• First to Respond - The first Security Gateway to reply to the probing mechanism is chosen.
• Primary/Backup - The client attempts to connect to the Primary Security Gateway first. If the Primary Security Gateway does not reply, the client attempts to connect to the Backup Security Gateway. If the Backup Security Gateway does not reply, there are no further attempts to connect.
• Random Selection - In a Load Sharing MEP environment, the client randomly selects a Security Gateway and assigns the Security Gateway priority. The remote peer stays with this chosen Security Gateway for all subsequent connections to host machines within the VPN domain. Load distribution takes place on the level of "different clients", rather than the level of "endpoints in a connection".

Multiple Entry Point for Remote Access VPNs
Remote Access VPN Administration Guide R80.10 | 124
Preferred Backup Security Gateway Preferred Backup Security Gateway allows remote hosts to choose which Security Gateway in the MEP configuration will be the backup Security Gateway. All other Security Gateways in the MEP configuration will be ignored should the first two Security Gateways become unavailable.
Item Description
1 Remote Access Client
2 Internet
3 Security Gateway A (Primary Gateway)
4 Security Gateway B (Backup Gateway)
5 Security Gateway C
6 VPN Domain
In this scenario:
• The VPN Domain is behind three Security Gateways: A, B and C.
• Security Gateway A is the Primary Security Gateway.
• Security Gateway B is the Backup Security Gateway when Security Gateway A is not available.
• If Security Gateway A and Security Gateway B becomes unavailable, the remote host will not attempt to connect to Security Gateway C.
Visitor Mode and MEP Since the RDP Security Gateway discovery mechanism used in a MEP environment runs over UDP, this creates a special challenge for Remote Access clients in Visitor Mode, since all traffic is tunneled over a regular TCP connection.
In a MEP environment:
• The RDP probing protocol is not used; instead, a special Visitor Mode handshake is employed.
• When a MEP failover occurs, the Remote Access client disconnects and the user needs to reconnect to the site in the usual way.

Multiple Entry Point for Remote Access VPNs
Remote Access VPN Administration Guide R80.10 | 125
• In a Primary-Backup configuration, the connection will failover to the backup Security Gateway should the primary Security Gateway become unavailable. Even if the Primary Security Gateway is restored, the connection does not return to the primary Security Gateway.
• All the gateways in the MEP:
Must support visitor mode.
The user must be working with a Visitor Mode enabled profile.
Routing Return Packets To make sure return packets are routed correctly, the MEP Security Gateway makes use of IP pool NAT.
IP Pool NAT IP pool NAT is a type of NAT in which source IP addresses from remote VPN domains are mapped to an IP address drawing from a pool of registered IP addresses. In order to maintain symmetric sessions using MEP Security Gateways, the MEP Security Gateway performs NAT using a range of IP addresses dedicated to that specific Security Gateway and should be routed within the internal network to the originating Security Gateway. When the returning packets reach the Security Gateway, the Security Gateway restores the original source IP address and forwards the packets to the source.
Note - When Office Mode is enabled, there is no need to configure IP Pool NAT since Office Mode dynamically assigns IP's to remote hosts.
Configuring MEP To configure MEP, decide on the MEP selection method:
• First to Respond
• Primary/Backup
• Load Distribution
First to Respond When more than one Security Gateway leads to the same (overlapping) VPN domain, they are considered MEP by the remote peer, and the first Security Gateway to respond to the probing protocol is chosen. To configure first to respond, define that part of the network that is shared by all the Security Gateways into a single group and assign that group as the VPN domain.
To configure the VPN domain for each Security Gateway:
1. In SmartConsole, click Gateways & Servers and double-click the Security Gateway.
The gateway window opens and shows the General Properties page.
2. From the navigation tree, click Network Management > VPN Domain.
3. Click Manually defined.
4. Click the field and select the VPN domain.
5. Repeat these steps for each Security Gateway.
Note - Make sure to use the same VPN domain for the Security Gateways.

Multiple Entry Point for Remote Access VPNs
Remote Access VPN Administration Guide R80.10 | 126
To configure First to Respond in the configuration file:
1. On the Security Management Server, open $FWDIR/conf/trac_client_1.ttm.
2. Make these changes:
• Under mep_mode, change default (client_decide) to default(first_to_respond).
• Under ips_of_gws_in_mep, change default (client_decide) to default(<PrimaryIP&#SecondaryIP&#TertiaryIP&#>).
For example, default(192.168.20.250À.168.20.240&#).
3. Save the changes.
4. Install Policy.
5. Connect with a client for the configuration to be applied.
Primary-Backup
To configure the Primary-Backup selection method:
1. From Menu, click Global Properties.
2. From the navigation tree, click VPN > Advanced.
3. Click Enable Backup Gateway.
4. Click OK. 5. Publish the changes.
To configure the backup gateway settings:
1. Click Gateways & Servers and double-click the primary Security Gateway.
The gateway window opens and shows the General Properties page.
2. From the navigation tree, click IPsec VPN.
3. Click Use Backup Gateways.
4. From the drop-down menu, select the backup gateway.
5. Determine if the backup gateway uses its own VPN domain.
6. To configure the backup gateway without a VPN domain of its own:
a) Double-click the Security Gateway and from the navigation tree click Network Management > VPN Domain.
b) Click Manually defined.
c) Click the field and select the group or network that contains only the backup gateway
d) Click OK and publish the changes.
7. To configure the backup gateway that DOES have a VPN domain of its own:
a) Make sure that the IP address of the backup gateway is not included in the VPN domain of the primary gateway.
b) For each backup gateway, define a VPN domain that does not overlap with the VPN domain of the other backup gateways.
Note - The VPN domain of the primary gateway and the VPN domain of the backup gateways cannot overlap. Make sure that the IP address does not belong both domains.

Multiple Entry Point for Remote Access VPNs
Remote Access VPN Administration Guide R80.10 | 127
8. Configure IP pool NAT to handle return packets (see "Configuring Return Packets" on page 127).
To configure Primary/Backup in the configuration file:
1. On the Security Management Server, open $FWDIR/conf/trac_client_1.ttm.
2. Make these changes:
• Under mep_mode, change default (client_decide) to default(primary_backup).
• Under ips_of_gws_in_mep, change default (client_decide) to default(<PrimaryIP&#SecondaryIP&#TertiaryIP&#>).
For example, default(192.168.20.250À.168.20.240&#)
3. Save the changes.
4. Install Policy.
5. Connect with a client for the configuration to be applied.
Load Distribution When you enable this option, the load distribution is dynamic and the remote client randomly selects a Security Gateway.
To configure load distribution for remote access clients:
1. From Menu, click Global Properties.
2. From the navigation tree, click Remote Access > VPN Advanced.
3. In the Load distribution section, click Enable load distribution for Multiple Entry Point configurations (Remote Access connections).
4. Click OK and publish the changes.
5. Configure the same VPN domain for all Security Gateways.
To configure Load Distribution in the configuration file:
1. On the Security Management Server, open $FWDIR/conf/trac_client_1.ttm.
2. Make these changes:
• Under mep_mode, change default (client_decide) to default(load_shiaring).
• Under ips_of_gws_in_mep, change default (client_decide) to default(<PrimaryIP&#SecondaryIP&#TertiaryIP&#>).
For example, default(192.168.20.250À.168.20.240&#)
3. Save the changes.
4. Install Policy.
5. Connect with a client for the configuration to be applied.
Configuring Return Packets For clients that do not use Office Mode, return packets are handled with IP pool NAT addresses belonging to the Security Gateway.
Multiple Entry Point for Remote Access VPNs
Remote Access VPN Administration Guide R80.10 | 128
Configuring IP Pool NAT For each Security Gateway, create a network object that represents the IP pool NAT addresses for that Security Gateway.
To configure NAT for an IP pool for Remote Access VPN:
1. From Menu, click Global Properties.
2. From the navigation tree, click NAT.
3. Click Enable IP Pool NAT.
4. Click OK and publish the changes.
5. For each Security Gateway create a network object that represents the IP pool NAT addresses for that Security Gateway. The IP pool can be a network, group, or address range.
6. Click Open Object Explorer (Ctrl+E).
a) Create the new object.
b) Configure the IP addresses.
c) Click OK and publish the changes.
7. Double-click the Security Gateway object where IP pool NAT translation is performed.
8. From the navigation tree, click NAT > IP Pool NAT.
9. Click Allocate IP Addresses from, and select the IP pool object.
10. Click Use IP Pool NAT for VPN client connections.
11. Optional: Click Use IP Pool NAT for Security Gateway to Security Gateway connections.
12. Click OK and publish the changes.
13. Edit the routing table of each internal router, so that packets with an IP address assigned from the NAT pool are routed to the appropriate Security Gateway.
Disabling MEP Disabling MEP is configured by setting the following command to true in DBedit, the Check Point database tool:
• desktop_disable_mep
• When MEP is disabled, MEP RDP probing and fail over will not be performed. As a result, remote hosts will connect to the Security Gateway defined without considering the MEP configuration.

Remote Access VPN Administration Guide R80.10 | 129
CHAPTE R 13
Secondary Connect In This Section:
Secondary Connect ..................................................................................................... 129
Configuring Secondary Connect ................................................................................ 129
Secondary Connect for Users .................................................................................... 130
Secondary Connect Secondary Connect gives access to multiple VPN gateways at the same time, to transparently connect users to distributed resources. Users log in once to a selected site and get transparent access to resources on different gateways. Tunnels are created dynamically as needed, based on the destination of the traffic.
For example: Your organization has Remote Access gateways in New York and Japan. You log in to a VPN site that connects you to the New York gateway. When you try to access a resource that is behind the Japan gateway, a VPN tunnel is created and you can access the resource behind the Japan gateway.
Traffic flows directly from the user to the gateway, without site-to-site communication. VPN tunnels and routing parameters are automatically taken from the network topology and destination server IP address.
In an environment with Secondary Connect, the gateway that the client first authenticates to is the Primary gateway. A gateway that the client connects to through a secondary VPN, is a Secondary gateway.
Secondary Connect is compatible with legacy SecureClient settings.
For gateway requirements for Secondary Connect, see sk65312 http://supportcontent.checkpoint.com/solutions?id=sk65312.
Configuring Secondary Connect Users can access all gateways that are in the Remote Access Community on the same Management server.
Make sure to do the configuration procedure on each Primary and Secondary gateway.
All gateways that participate in Secondary Connect must have a server certificate that is signed by the internal Certificate Authority.
If you use Office Mode IP addresses, make sure that the IP addresses are different on each gateway so there are no conflicts. The Office Mode IP address that is issued by the first gateway is used to access the secondary gateways.
If user authentication credentials are not cached, users must enter their credentials again when they try to access resources on a different gateway.
Note - If your gateway is a VSX gateway, the path for the trac_client_1.ttm is: /var/opt/CPsuite-R80/fw1/CTX/CTX00001/conf/trac_client_1.ttm

Secondary Connect
Remote Access VPN Administration Guide R80.10 | 130
Where CTX00001 represents the VS number: CTX00001 for VS1, CTX00002 for VS2, and so on.
To configure Secondary Connect on each gateway:
1. Make sure the gateway has a server certificate that is signed by the internal Certificate Authority.
2. On each gateway, open the $FWDIR/conf/trac_client_1.ttm configuration file.
3. Set the :default value of automatic_mep_topology to true.
4. Find enable_secondary_connect. If you do not see this parameter, add it manually as shown here:
:enable_secondary_connect ( :gateway ( :map ( :true (true) :false (false) :client_decide (client_decide) ) :default (true) ) )
5. Make sure the :default value of enable_secondary_connect is true.
6. Save the file.
7. Install the policy.
Secondary Connect for Users When users log in to the VPN, they can select a site and gateway.
If their credentials are not cached, they might be prompted to authenticate again for a secondary connection.

Remote Access VPN Administration Guide R80.10 | 131
CHAPTE R 14
SSL Network Extender In This Section:
Introduction to the SSL Network Extender ............................................................... 131
How the SSL Network Extender Works ..................................................................... 132
Commonly Used Concepts ......................................................................................... 132
Special Considerations for the SSL Network Extender ............................................ 134
Configuring SSL Network Extender........................................................................... 135
SSL Network Extender User Experience .................................................................. 143
Troubleshooting SSL Network Extender ................................................................... 151
Introduction to the SSL Network Extender Whenever users access the organization from remote locations, it is essential that not only the usual requirements of secure connectivity be met but also the special demands of remote clients. These requirements include:
• Connectivity: The remote client must be able to access the organization from various locations, even if behind a NATing device, Proxy or Firewall. The range of applications available must include web applications, mail, file shares, and other more specialized applications required to meet corporate needs.
• Secure connectivity: Guaranteed by the combination of authentication, confidentiality and data integrity for every connection.
• Usability: Installation must be easy. No configuration should be required as a result of network modification. The given solution should be seamless for the connecting user.
To resolve these issues, a secure connectivity framework is needed to ensure that remote access to the corporate network is securely enabled.
The SSL (Secure Socket Layer) Network Extender is a simple-to-implement remote access solution. A thin client is installed on the user's machine. (The SSL Network Extender client has a much smaller size than other clients.) It is connected to an SSL enabled web server that is part of the Enforcement Module. By default, the SSL enabled web server is disabled. It is activated by using the SmartDashboard, thus enabling full secure IP connectivity over SSL. The SSL Network Extender requires a server side configuration only, unlike other remote access clients. Once the end user has connected to a server, the thin client is downloaded as an ActiveX component, installed, and then used to connect to the corporate network using the SSL protocol.
It is much easier to deploy a new version of the SSL Network Extender client than it is to deploy a new version of other conventional clients.
Note - If the Mobile Access blade is active on a Security Gateway, SSL Network Extender works through Mobile Access and not IPsec VPN. In this case, SSL Network Extender must be configured through the Mobile Access blade. If you already had SSL Network Extender configured on an IPsec VPN Security Gateway and then you enable the Mobile Access blade, you must reconfigure SSL Network Extender for the Mobile Access blade.

SSL Network Extender
Remote Access VPN Administration Guide R80.10 | 132
How the SSL Network Extender Works The SSL Network Extender is a thin client installed on the user's computer and an SSL enabled web server component, integrated into the Security Gateway.
To enable connectivity for clients using the SSL Network Extender, a Security Gateway must be configured to support Remote Access Clients, in addition to a minor configuration specific to SSL Network Extender.
Users download SSL Network Extender from a Security Gateway portal.
Commonly Used Concepts This section briefly describes commonly used concepts that you will encounter when dealing with the SSL Network Extender. It is strongly recommended that you review the "Remote Access VPN" section of this book before reading this guide.
Remote Access VPN Refers to remote users accessing the network with client software such as Endpoint VPN clients, SSL clients, or third party IPsec clients. The Security Gateway provides a Remote Access Service to the remote clients.
Remote Access Community A Remote Access Community, a Check Point concept, is a type of VPN community created specifically for users that usually work from remote locations, outside of the corporate LAN.
Office Mode Office Mode is a Check Point remote access VPN solution feature. It enables a Security Gateway to assign a remote client an IP address. This IP address is used only internally for secure encapsulated communication with the home network, and therefore is not visible in the public network. The assignment takes place once the user connects and authenticates. The assignment lease is renewed as long as the user is connected. The address may be taken either from a general IP address pool, or from an IP address pool specified per user group, using a configuration file.
Visitor Mode Visitor Mode is a Check Point remote access VPN solution feature. It enables tunneling of all client-to-Security Gateway communication through a regular TCP connection on port 443. Visitor mode is designed as a solution for firewalls and Proxy servers that are configured to block IPsec connectivity.

SSL Network Extender
Remote Access VPN Administration Guide R80.10 | 133
Endpoint Security on Demand Endpoint Security on Demand (ESOD) may be used to scan endpoint computers for potentially harmful software before allowing them to access the internal application. When end users access the SSL Network Extender for the first time, they are prompted to download an ActiveX component that scans the end user machine for Malware. The scan results are presented both to the Security Gateway and to the end user. SSL Network Extender access is granted/denied to the end user based on the compliance options set by the administrator.
ESOD Policy per User Group Since there are many different kinds of threats to your network's security, different users may require different configurations in order to guard against the increasing number and variety of threats. The ability to configure a variety of ESOD policies enables the administrator to customize the software screening process between different user groups.
Screened Software Types ESOD can screen for the Malware software types listed in the following table:
Software Type Description
Worms Programs that replicate over a computer network for the purpose of disrupting network communications or damaging software or data.
Trojan horses Malicious programs that masquerade as harmless applications.
Hacker tools Tools that facilitate a hacker's access to a computer and/or the extraction of data from that computer.
Keystroke loggers Programs that record user input activity (that is, mouse or keyboard use) with or without the user's consent. Some keystroke loggers transmit the recorded information to third parties.
Adware Programs that display advertisements, or records information about Web use habits and store it or forward it to marketers or advertisers without the user's authorization or knowledge.
Browser plug-ins Programs that change settings in the user's browser or adds functionality to the browser. Some browser plug-ins change the default search page to a pay-per-search site, change the user's home page, or transmit the browser history to a third party.
Dialers Programs that change the user's dialup connection settings so that instead of connecting to a local Internet Service Provider, the user connects to a different network, usually a toll number or international phone number.
3rd party cookies Cookies that are used to deliver information about the user's Internet activity to marketers.

SSL Network Extender
Remote Access VPN Administration Guide R80.10 | 134
Software Type Description
Other undesirable software Any unsolicited software that secretly performs undesirable actions on a user's computer and does not fit any of the above descriptions.
Special Considerations for the SSL Network Extender This section lists SSL Network Extender special considerations, such as pre-requisites, features and limitations:
Pre-Requisites The SSL Network Extender pre-requisites are listed below:
Client-side Pre-Requisites The SSL Network Extender client-side pre-requisites for remote clients are:
• A supported Windows or Mac operating system.
• Allow ActiveX or Java Applet.
• A supported browser
• First time client installation, uninstallation, and upgrade require administrator privileges on the client computer.
Server-Side Pre-Requisites The SSL Network Extender server-side pre-requisites are listed below:
• The SSL Network Extender is a server side component, which is part of a specific Enforcement Module, with which the SSL Network Extender is associated.
• The specific Security Gateway must be configured as a member of the Remote Access Community, and configured to work with Visitor Mode. This will not interfere with Remote Access client functionality, but will allow Remote Access client users to utilize Visitor Mode.
• The same access rules are configured for both Remote Access client and SSL Network Extender users.
Features The SSL Network Extender features are listed below:
• Easy installation and deployment.
• Intuitive and easy interface for configuration and use.
• The SSL Network Extender mechanism is based on Visitor Mode and Office Mode.
• Automatic proxy detection is implemented.
• Small size client: Download size of SSL Network Extender < 400K; after installation, size of SSL Network Extender on disk is approximately 650K.

SSL Network Extender
Remote Access VPN Administration Guide R80.10 | 135
• All Security Gateway authentication schemes are supported: Authentication can be performed using a certificate, Check Point password or external user databases, such as SecurID, LDAP, RADIUS and so forth.
• At the end of the session, no information about the user or Security Gateway remains on the client machine.
• Extensive logging capability, on the Security Gateway.
• High Availability Clusters and Failover are supported.
• SSL Network Extender Upgrade is supported.
• The SSL Network Extender supports the RC4 encryption method.
• Users can authenticate using certificates issued by any trusted CA that is defined as such by the system administrator in SmartDashboard.
• SSL Network Extender is now supported on IPSO.
• Endpoint Security on Demand prevents threats posed by Malware types, such as Worms, Trojan horses, Hacker's tools, Key loggers, Browser plug-ins, Adware, Third party cookies, and so forth.
• SSL Network Extender can be configured to work in Hub Mode. VPN routing for remote access clients is enabled via Hub Mode. In Hub mode, all traffic is directed through a central Hub.
Configuring SSL Network Extender The following sections describe how to configure the server. Load Sharing Cluster Support, customizing the Web GUI, upgrading the SSL Network Extender client and Installation for Users without Administrator privileges are also discussed.
Configuring the Server Before configuring the server, verify that you have a valid license for the SSL Network Extender.
Use cpconfig to verify that you have a valid license for the SSL Network Extender. Check Point software is activated with a License Key. You can obtain this License Key by registering the Certificate Key that appears on the back of the software media pack, in the Check Point Support Center http://supportcenter.checkpoint.com.
Server-Side Configuration The SSL Network Extender requires only server side configuration
Configuring the Security Gateway for a Remote Access Community Make sure that the VPN Software Blade is enabled before you configure the Remote Access community.
To configure the Security Gateway for Remote Access:
1. In SmartConsole, click Gateways & Servers and double-click the Security Gateway.
The gateway window opens and shows the General Properties page.

SSL Network Extender
Remote Access VPN Administration Guide R80.10 | 136
2. From the navigation tree, click IPsec VPN.
The page shows the VPN communities that the Security Gateway is participating.
3. To add the Security Gateway to a Remote Access community:
a) Click Add.
b) Select the community.
c) Click OK.
4. From the navigation tree, click Network Management > VPN Domain.
5. Configure the VPN Domain.
6. Configure the settings for Visitor Mode ("Proxy Replacement for the Security Gateway" on page 163).
7. From the navigation tree, click VPN Clients > Office Mode.
8. Configure the settings for Office Mode ("IP Pool Configuration" on page 60).
Note - Office Mode support is mandatory on the Security Gateway side.
9. Click OK and publish the changes.
Configuring the Gateway to Support the SSL Network Extender
Note - If the Mobile Access blade is active on a Security Gateway, SSL Network Extender works through Mobile Access and not IPsec VPN. In this case, SSL Network Extender must be configured through the Mobile Access blade. If you already had SSL Network Extender configured on an IPsec VPN Security Gateway and then you enable the Mobile Access blade, you must reconfigure SSL Network Extender for the Mobile Access blade.
Configure each Security Gateway that uses SSL Network Extender. When the Mobile Access Software Blade is enabled, SSL Network Extender is enabled as a Web client.
To configure the SSL Network Extender settings for a Security Gateway:
1. In SmartConsole, click Gateways & Servers and double-click the Security Gateway.
The gateway window opens and shows the General Properties page.
2. If Mobile Access is enabled:
a) From the navigation tree, click Mobile Access.
b) When Web is selected, SSL Network Extender is enabled.
3. From the navigation tree, click VPN Clients.
4. Click SSL Network Extender.
5. From The gateway authenticates with this certificate, select the certificate that is used to authenticate to all SSL clients.
6. Click OK and publish the changes.
Configuring SSL Network Extender
To configure the settings for SSL Network Extender connections:
1. From Menu, click Global Properties.
2. Select Remote Access > SSL Network Extender.

SSL Network Extender
Remote Access VPN Administration Guide R80.10 | 137
3. Select the user authentication method, employed by the SSL Network Extender, from the drop-down list. The options are:
• Certificate - The system authenticates the user only with a certificate.
• Certificate with enrollment - The system authenticates the user only with a certificate. Enrollment is allowed.
If the users do not have a certificate, they can enroll using a registration key that they previously received from the administrator.
• Legacy - (Default setting) The system authenticates the user with the Username and Password.
• Mixed - The system tries to authenticate the user with the certificate. If the user does not have a valid certificate, the system tries to authenticate the user with the Username and Password.
Management of Internal CA Certificates If the administrator has configured Certificate with Enrollment as the user authentication scheme, users can create a certificate for their use, by using a registration key, provided by the system administrator.
To create a user certificate for enrollment:
1. Follow the procedure described in "The Internal Certificate Authority (ICA) and the ICA Management Tool" in the R80.10 Security Management Server Administration Guide http://downloads.checkpoint.com/dc/download.htm?ID=54842. Note - In this version, enrollment to an External CA is not supported.
2. Browse to the ICA Management Tool site, https://<mngmt IP>:18265, and select Create Certificates.
3. Enter the user's name, and click Initiate to receive a Registration Key, and send it to the user.
When the user attempts to connect to the SSL Network Extender, without having a certificate, the Enrollment window is displayed, and he/she can create a certificate for his/her use by entering the Registration Key, received from the system administrator.
For a description of the user login experience, refer to Downloading and Connecting the Client (on page 144).
Note - The system administrator can direct the user to the URL, http://<IP>/registration.html, to allow the user to receive a Registration Key and create a certificate, even if they do not wish to use the SSL Network Extender, at this time.
4. You can determine whether the SSL Network Extender will be upgraded automatically, or not. Select the client upgrade mode from the drop-down list. The options are:
• Do not upgrade: Users of older versions will not be prompted to upgrade.
• Ask user: (Default) Ask user whether or not to upgrade, when the user connects.
• Force upgrade: Every user, whether users of older versions or new users will download and install the newest SSL Network Extender version.
Note - The Force Upgrade option should only be used in cases where the system administrator is sure that all the users have administrator privileges. Otherwise, the user will not be able to connect to and use the SSL Network Extender.
For a description of the user upgrade experience, refer to Downloading and Connecting the Client (on page 144).

SSL Network Extender
Remote Access VPN Administration Guide R80.10 | 138
5. Select the supported encryption method from the drop-down list. The options are:
• 3DES only: (Default) The SSL Network Extender client supports 3DES, only.
• 3DES or RC4: The SSL Network Extender client supports the RC4 encryption method, as well as 3DES.
6. You can determine whether the SSL Network Extender will be uninstalled automatically, when the user disconnects. Select the desired option from the drop-down list. The options are:
• Keep installed: (Default) Do not uninstall. If the user wishes to uninstall the SSL Network Extender, he/she can do so manually.
• Ask user whether to uninstall: Ask user whether or not to uninstall, when the user disconnects.
• Force uninstall: Always uninstall automatically, when the user disconnects.
For a description of the user disconnect experience, refer to Uninstall on Disconnect (on page 148).
Note - The Uninstall on Disconnect feature will not ask the user whether or not to uninstall, and will not uninstall the SSL Network Extender, if a user has entered a suspend/hibernate state, while he/she was connected.
7. You can determine whether Endpoint Security on Demand will be activated, or not. When ESOD is activated, users attempting to connect to the SSL Network Extender will be required to successfully undergo an ESOD scan before being allowed to access the SSL Network Extender. Select the desired option from the drop-down list. The options are:
• None
• Endpoint Security on Demand
Fetching the XML Configuration File
After installing the ESOD server and configuring it, fetch the XML config file from the ESOD server:
1. Open a browser on any computer or server.
2. Browse to http://<site ip>/<site name or virtual directory>/sre/ report.asp and save the displayed XML file to disk, using Save As.
3. Copy the XML file to $FWDIR/conf/extender/request.xml on the Security Gateway.
Upgrading ESOD
Note - At present, the Dynamic ESOD Update feature is not supported.
You can manually upgrade ESOD as follows:
1. Replace the ICSScanner.cab file, under $FWDIR/conf/extender, with the new package.
2. Edit the file ics.html, under $FWDIR/conf/extender, as follows:
3. Search for #Version= and replace the current value with the new version.
4. Save.

SSL Network Extender
Remote Access VPN Administration Guide R80.10 | 139
Configuring ESOD Policies On the Security Management Server:
Note - Make sure that Endpoint Security on Demand is enabled in the Global Properties > Remote Access > SSL Network Extender page.
1. Navigate to the $FWDIR/lib directory.
2. Backup the vpn_table.def file.
3. Change the file name vpn_table_HFA.def to vpn_table.def.
On the Security Gateway:
1. Using the ESOD server, or ESOD configuration Tool (which can be downloaded from the Check Point download center), create xml policy files for each group and place them in $FWDIR/conf/extender.
2. You can create a default policy file, named request.xml. This is only optional, and will be used when no group is given.
3. In the $FWDIR/conf folder, create a file called ics.group. This should be a text file, in which, each row lists a group name and its policy xml file.
Example of ics.group file:
Group1 group1.xml
Group2 group2.xml
Group3 defGroup.xml
Group4 defGroup.xml
Important notes about the ics.group file:
• The group name must be the same as its name in SmartDashboard.
• Several groups can register to the same xml file.
• Each group must appear only once in the ics.group file.
• Only groups that are listed in the ics.group file will use their specific xml files. Groups that are not listed in the ics.group file will try to use the default policy, located in the request.xml file. If the request.xml file does not exist, an error will be returned.
• The default xml file, request.xml, cannot appear in the ics.group file.
4. After creating the ics.group file (or after any change has been made), install policy.
5. Run cpstop and then cpstart on the Security Gateway.
6. Each user should be assigned the specific URL that matches his group. The URL should be in the format: https://hostIP/<groupName>_ics.html
For example, all users belonging to "group1" will surf to the assigned URL: https://10.10.10.10/group1_ics.html.
For troubleshooting tips, see Troubleshooting (see "Troubleshooting SSL Network Extender" on page 151).
SSL Network Extender
Remote Access VPN Administration Guide R80.10 | 140
Load Sharing Cluster Support The SSL Network Extender provides Load Sharing Cluster Support. When the client connects to the cluster, all its traffic will pass through a single Security Gateway. If that member Security Gateway fails, the client reconnects transparently to another cluster member and resumes the session.
To provide Load Sharing Cluster Support:
1. In SmartConsole, click Gateways & Servers and double-click the cluster object.
The cluster window opens and shows the General Properties page.
Note - A Load Sharing Cluster must have been created before you can configure use of sticky decision function.
2. From the navigation tree, click ClusterXL and VRRP.
3. Make sure that Load Sharing is selected.
4. In the Advanced Settings section, click Use Sticky Decision Function.
5. If you are using Office Mode, configure these settings:
a) From the navigation tree, click VPN Clients > Office Mode.
b) In the Office Mode Method section, make sure that Automatic (using DHCP) is NOT selected.
Only the Manual (using IP pool) method is supported.
6. Click OK and publish the changes.
Customizing the SSL Network Extender Portal You can modify the SSL Network Extender Portal by changing skins and languages.
Configuring the Skins Option To configure the Skins Option:
The skin directory is located under $FWDIR/conf/extender on the SSL Network Extender Security Gateways.
There are two subdirectories. They are:
• chkp: contains skins that Check Point provides by default. At upgrade, this subdirectory may be overwritten.
• custom: contains skins defined by the customer. If custom does not exist yet, create it. At upgrade, this subdirectory is not overwritten. New skins are added in this subdirectory.
Disabling a Skin 1. Enter the specific skin subdirectory, under custom, that is to be disabled and create a file
named disable. This file may be empty.
2. If the specific skin does not exist under custom, create it and then create a file within it named disable.
3. Install Policy. The next time that the user connects to the SSL Network Extender portal, this skin will not be available to him/her.

SSL Network Extender
Remote Access VPN Administration Guide R80.10 | 141
Example cd $FWDIR/conf/extender/skin/custom mkdir skin1 touch disable
Creating a Skin 1. Enter the custom subdirectory.
2. Create a folder with the desired skin name.
Note - Verify that this name is not already used in chkp. If it is, the new skin definition will override the existing skin definition (as long as the new skin definition exists). Once you have deleted the new skin definition, the chkp skin definition will once again be used.
Each skin folder must contain the following five style sheets:
• help_data.css: The main OLH page uses this style sheet.
• help.css: The inner frame on the OLH page uses this style sheet.
• index.css: The ESOD pages, and the main SSL Network Extender portal page use this style sheet.
• style.css: All login pages use this style sheet.
• style_main.css: The main SSL Network Extender Connection page, Proxy Authentication page and Certificate Registration page use this style sheet.
Note - It is recommended that you copy the aforementioned files from another chkp skin, and then modify them as desired.
3. Install Policy after creating the new skin.
Example
Add your company logo to the main SSL Network Extender portal page.
cd $FWDIR/conf/extender/skin/custom mkdir <skin_name> cd <skin_name>
copy ../../chkp/skin2/* .
Place logo image file in this directory
Edit index.css.
Goto .company_logo and replace the existing URL reference with a reference to the new logo image file.
Save.
Install Policy.
Note - No spaces are allowed in the <skin_name>
Configuring the Languages Option To configure the Languages Option:
The languages directory is located under $FWDIR/conf/extender on the SSL Network Extender Security Gateways.
There may be two subdirectories. They are:
• chkp: contains languages that Check Point provides by default. At upgrade, this subdirectory may be overwritten.

SSL Network Extender
Remote Access VPN Administration Guide R80.10 | 142
• custom: contains languages defined by the customer. If custom does not exist yet, create it. At upgrade, this subdirectory is not overwritten. New languages are added in this subdirectory.
Disabling a Language 1. Enter the specific language subdirectory, under custom, that is to be disabled (if it exists) and
create a file named disable. This file may be empty.
2. If the specific language does not exist under custom, create it and then create a file within it named disable.
3. Install Policy. The next time that the user connects to the SSL Network Extender portal, this language will not be available to him/her.
Adding a Language 1. Enter the custom subdirectory.
2. Create a folder with the desired language name.
Note - Verify that this name is not already used in chkp. If it is, the new language definition will override the existing language definition (as long as the new language definition exists). Once you have deleted the new language definition, the chkp language definition will once again be used.
3. Copy the messages.js file of an existing chkp language to this folder.
4. Edit the messages.js file and translate the text bracketed by quotation marks.
5. Save.
6. Install Policy after adding the new language.
Example cd $FWDIR/conf/extender/language mkdir custom cd custom mkdir <language_name> cd <language_name> copy ../../chkp/english/messages.js
Edit the messages.js file and translate the text bracketed by quotation marks.
Save.
In custom/english/messages.js, add a line as follows:
<language_name>="translation of language_name";
Install Policy.
Note - No spaces are allowed in the <language_name>
Modifying a Language 1. Enter the custom subdirectory.
2. Create a folder with a language name that matches the chkp language folder to be modified.
3. Create an empty messages.js file, and insert only those messages that you want to modify, in the following format: <variable_name>="<desired text>";
Note - For reference, refer to the messages.js file, located in chkp/<language>.

SSL Network Extender
Remote Access VPN Administration Guide R80.10 | 143
Installation for Users without Administrator Privileges The SSL Network Extender usually requires Administrator privileges to install the ActiveX component. To allow users that do not have Administrator privileges to use the SSL Network Extender, the Administrator can use his/her remote corporate installation tools (such as, Microsoft SMS) to publish the installation of the SSL Network Extender, as an MSI package, in configuring the SSL Network Extender.
To prepare the SSL Network Extender MSI package:
1. Move the extender.cab file, located in $FWDIR/conf/extender, to a Windows machine and open the file using WinZip.
2. Extract the cpextender.msi, and use as an MSI package, for remote installation.
On Windows , Mac and Linux, it is possible to install SSL Network Extender for users that are not administrators, if the user knows the admin password. In this case, perform a regular SSL Network Extender installation and supply the administrator password when asked.
SSL Network Extender User Experience This section describes the user experience, including downloading and connecting the SSL Network Extender client, importing a client certificate, and uninstalling on disconnect.
Configuring Microsoft Internet Explorer Check Point SSL Network Extender uses ActiveX controls and cookies to connect to applications via the Internet. These enabling technologies require specific browser configuration to ensure that the applications are installed and work properly on your computer. The Trusted Sites Configuration approach includes the SSL Network Extender Portal as one of your Trusted Sites. This approach is highly recommended, as it does not lessen your security. Please follow the directions below to configure your browser.
Trusted Sites Configuration 1. In Internet Explorer, select Tools > Internet Options > Security.
2. Select Trusted sites.
3. Click Sites.
4. Enter the URL of the SSL Network Extender Portal and click Add.
5. Click OK twice.
About ActiveX Controls ActiveX controls are software modules, based on Microsoft's Component Object Model (COM) architecture. They add functionality to software applications by seamlessly incorporating pre-made modules with the basic software package.
On the Internet, ActiveX controls can be linked to Web pages and downloaded by an ActiveX-compliant browser. ActiveX controls turn Web pages into software pages that perform like any other program.

SSL Network Extender
Remote Access VPN Administration Guide R80.10 | 144
The SSL Network Extender can use ActiveX control in its applications. To use ActiveX you must download the specific ActiveX components required for each application. Once these components are loaded, you do not need to download them again unless upgrades or updates become available. If you do not want to use an ActiveX component you may work with a Java Applet.
Note - You must have Administrator rights to install or uninstall software on Windows XP Professional, as well as on the Windows 2000 operating systems.
Downloading and Connecting the Client The following section discusses how to download and connect the SSL Network Extender.
To download the Client:
1. Using Internet Explorer, browse to the SSL Network Extender portal of the Security Gateway at https://<GW name or IP>. The following Security Alert message may be displayed
The site's security certificate has been issued by an authority that you have not designated as a trusted CA. Before you connect to this server, you must trust the CA that signed the server certificate. (The system administrator can define which CAs may be trusted by the user.) You can view in the certificate in order to decide if you wish to proceed.
Note - The administrator can direct the user to the URL, http://< mngmt IP>:18264, to install this CA certificate, thereby establishing trust, and avoiding future displays of this message.
2. Click Yes.
If Endpoint Security on Demand is enabled, the ESOD web page is displayed.
If this is the first time that the user is scanned with ESOD, the user should install the ESOD ActiveX object.
If this is the first time that ESOD is used, the following Server Confirmation window appears. The user is asked to confirm that the listed ESOD server is identical to the organization's site for remote access.
3. Click one of the following:
• No: an error message is displayed and the user is denied access.
• Yes: the ESOD client continues the software scan. Moreover, if the Save this confirmation for future use check box is selected, the Server Confirmation window will not appear the next time the user attempts to login.

SSL Network Extender
Remote Access VPN Administration Guide R80.10 | 145
Once the user has confirmed the ESOD server, an automatic software scan takes place on the client's machine. Upon completion, the scan results and directions on how to proceed are displayed as shown below.
ESOD not only prevents users with potentially harmful software from accessing your network, but also requires that they conform to the corporate Anti-Virus and firewall policies, as well. A user is defined as having successfully passed the ESOD scan only if he/she successfully undergoes scans for Malware, Anti-Virus, and Firewall. Each malware is displayed as a link, which, if selected, redirects you to a data sheet describing the detected malware. The data sheet includes the name and a short description of the detected malware, what it does, and the recommended removal method/s.
The options available to the user are configured by the administrator on the ESOD server. The options are listed in the following table:
Scan Option Description
Scan Again Allows a user to rescan for malware. This option is used in order to get refreshed scan results, after manually removing an undesired software item.
Cancel Prevents the user from proceeding with the portal login, and closes the current browser window.
Continue Causes the ESOD for Mobile Access client to disregard the scan results and proceed with the log on process.

SSL Network Extender
Remote Access VPN Administration Guide R80.10 | 146
To continue with the download:
1. From the Scan Results, select a different language from the list. If you change languages, while connected to the SSL Network Extender portal, you will be informed that if you continue the process you will be disconnected, and must reconnect.
2. From the Scan Results, you can select a different skin from the Skin drop-down list . You can change skins, while connected to the SSL Network Extender portal.
3. Click Continue.
• If the configured authentication scheme is User Password Only, an SSL Network Extender Login window is displayed. Enter the User Name and Password and click OK.
Note - If user authentication has been configured to be performed via a 3rd party authentication mechanism, such as SecurID or LDAP, the Administrator may require the user to change his/her PIN, or Password. In such a case, an additional Change Credentials window is displayed, before the user is allowed to access the SSL Network Extender.
• If the configured authentication scheme is Certificate without Enrollment, and the user already has a certificate. If the user does not already have a certificate, access is denied.
• If the configured authentication scheme is Certificate with Enrollment, and the user does not already have a certificate, the Enrollment window is displayed:
4. Enter the Registration Key and select PKCS#12 Password.
5. Click Ok. The PKCS#12 file is downloaded.
At this point the user should open the file and utilize the Microsoft Certificate Import wizard as follows.
Note - It is strongly recommended that the user set the property Do not save encrypted pages to disk on the Advanced tab of the Internet Properties of Internet Explorer. This will prevent the certificate from being cached on disk.

SSL Network Extender
Remote Access VPN Administration Guide R80.10 | 147
Importing a Client Certificate with the Microsoft Certificate Import Wizard to Internet Explorer
Importing a client certificate to Internet Explorer is acceptable for allowing access to either a home PC with broadband access, or a corporate laptop with a dial-up connection. The client certificate will be automatically used by the browser, when connecting to an SSL Network Extender Security Gateway.
To import a client certificate:
1. Open the downloaded PKCS#12 file. The following Certificate Import Wizard opens.
2. Click Next. The File to Import window appears:
The P12 file name is displayed.
3. Click Next. The Password window appears:
It is strongly recommended that the user enable Strong Private Key Protection. The user will then be prompted for consent/credentials, as configured, each time authentication is required. Otherwise, authentication will be fully transparent for the user.
4. Enter your password, click Next twice. If the user enabled Strong Private Key Protection, the following Importing a New Private Exchange Key window appears:
• If you click OK, the Security Level is assigned the default value Medium, and the user will be asked to consent each time the certificate is required for authentication.
• If you click Set Security Level, the Set Security Level window appears. Select either High or Medium and click Next.
5. Click Finish. The Import Successful window appears.
6. Click OK.
7. Close and reopen your browser. You can now use the certificate that has now been imported for logging in.
8. If you are connecting to the SSL Security Gateway for the first time, a VeriSign certificate message appears, requesting the user's consent to continue installation.
• If you connect using Java Applet, a Java security message will appear. Click Yes.
• If the system administrator configured the upgrade option, the following Upgrade Confirmation window is displayed:
If you click OK, you must re-authenticate and a new SSL Network Extender version is installed.
• If you click Cancel, the client connects normally. (The Upgrade Confirmation window will not be displayed again for a week.) The SSL Network Extender window appears. A Click here to upgrade link is displayed in this window, enabling the user to upgrade even at this point. If you click on the Click here to upgrade link, you must reauthenticate before the upgrade can proceed.
9. At first connection, the user is notified that the client will be associated with a specific Security Gateway. Click Yes.
The server certificate of the Security Gateway is authenticated. If the system Administrator has sent the user a fingerprint, it is strongly recommended that the user verify that the root CA fingerprint is identical to the fingerprint, sent to him/her.
The system Administrator can view and send the fingerprint of all the trusted root CAs, via the Certificate Authority Properties window in SmartDashboard.
10. If the user is using a proxy server that requires authentication, the Proxy Authentication pop-up is displayed. The user must enter his/her proxy username and password, and click OK.

SSL Network Extender
Remote Access VPN Administration Guide R80.10 | 148
11. If you are connected with Windows Vista, a Windows Firewall message will appear. Click Unblock.
You may work with the client as long as the SSL Network Extender Connection window, shown below, remains open, or minimized (to the System tray).
Once the SSL Network Extender is initially installed, a new Windows service named Check Point SSL Network Extender and a new virtual network adapter are added. This new network adapter can be seen by typing ipconfig /all from the Command line.
Note - The settings of the adapter and the service must not be changed. IP assignment, renewal and release will be done automatically.
Note - The Check Point SSL Network Extender service is dependent on both the virtual network adapter and the DHCP client service. Therefore, the DHCP client service must not be disabled on the user's computer.
Both the virtual network adapter and the Check Point SSL Network Extender service are removed during the product uninstall.
There is no need to reboot the client machine after the installation, upgrade, or uninstall of the product.
12. When you finish working, click Disconnect to terminate the session, or when the window is minimized, right-click the icon and click Disconnect. The window closes.
Uninstall on Disconnect If the administrator has configured Uninstall on Disconnect to ask the user whether or not to uninstall, the user can configure Uninstall on Disconnect as follows.
To set Uninstall on Disconnect:
1. Click Disconnect. The Uninstall on Disconnect window is displayed, as shown in the following figure.
2. Click Yes to Uninstall.
If you select Cancel, the SSL Network Extender will not be uninstalled.
If you click Yes, the Uninstall on Disconnect window will be displayed the next time the user connects to the SSL Network Extender.
Using SSL Network Extender on Linux / Mac Operating Systems There are two methods to access Network Applications using Linux:
• Java
• Command Line

SSL Network Extender
Remote Access VPN Administration Guide R80.10 | 149
Java 1. When connecting for the first time, the SSL Network Extender installation archive package is
downloaded.
This process is similar to the Windows Java installation.
2. If the user does not have root permissions, the user is prompted to enter a root password in order to install the package. Enter the password and press Enter.
After the installation is finished, the applet will try to connect.
If it is the first time, the following window is displayed:
If the system Administrator has sent the user a fingerprint, it is strongly recommended that the user verify that the server certificate fingerprint is identical to the Root CA Fingerprint seen in the window.
3. Click Yes to confirm.
Command Line
To download the SSL Network Extender installation archive package:
1. In the Network Applications Settings window, click on click here in the sentence For Linux command line SSL Network Extender installation click here. The Shell archive package is downloaded to the users home directory.
Before running the installation script, make sure execute permissions are available on the file. Use the command chmod + x snx_install.sh to add execution permissions.
2. Download and select the SSL Network Extender manual installation.
• Download MSI installation package for Windows
• Download command line SSL Network Extender for Linux
• Download command line SSL Network Extender for Macintosh
3. Select the operating system.
The Shell archive package is downloaded to the user's home directory.
4. Run snx_install.sh.
If the user does not have root permissions, the user is prompted to enter a root password in order to install the package. Enter the password and press Enter.
To disconnect after installation, run Server_1:/ snx -d.
SSL Network Extender Command Attributes Attributes Description
snx -f <configuration file> Run SSL Network Extender using parameters defined in a configuration file other than the default name or location.
snx -d Disconnect from Mobile Access
snx -s <server> Specify server IP or hostname
snx -u <username> Specify a valid user

SSL Network Extender
Remote Access VPN Administration Guide R80.10 | 150
Attributes Description
snx -c <certificate file> Specify which certificate is used to authenticate.
snx -l <CA directory> Define the directory where CA's certificates are stored.
snx -p <port> Change the HTTPS port. (default port is TCP 443).
snx -g Enable debugging. snx.elg log file is created.
snx -e <cipher> Force a specific encryption algorithm. Valid values - RC4 and 3DES.
Configuration File Attributes It is possible to predefine SSL Network Extender attributes by using a configuration file (.snxrc) located in the users home directory. When the SSL Network Extender command SSL Network Extender is executed, the attributed stored in the file are used by the SSL Network Extender command. To run a file with a different name execute the command snx -f <filename>.
Attributes Description
server Change the HTTPS port. (default port is TCP 443).
sslport Change the HTTPS port. (default port is TCP 443).
username Specify a valid user
certificate Specify which certificate is used to authenticate
calist Define the directory where CA's certificates are stored.
reauth Enable reauthentication. Valid values -{yes, no}
debug Enable debugging. snx.elg log file is created. Valid values {yes, no}. To activate debugging when running java, create a .snxrc file with the line debug yes in the home directory.
cipher Force a specific encryption algorithm. Valid values: RC4 and 3DES
proxy_name Define a Proxy hostname
proxy_port Define a proxy port
proxy_user Define a proxy user
proxy_pass Define a password for proxy authentication
Note - Proxy information can only be configured in the configuration file and not directly from the command line.

SSL Network Extender
Remote Access VPN Administration Guide R80.10 | 151
Removing an Imported Certificate If you imported a certificate to the browser, it will remain in storage until you manually remove it. It is strongly recommended that you remove the certificate from a browser that is not yours.
To remove the imported certificate:
1. In the Internet Options window of your browser, access the Content tab.
2. Click Certificates.
The Certificates window is displayed:
3. Select the certificate to be removed, and click Remove.
Troubleshooting SSL Network Extender The following sections contain tips on how to resolve issues that you may encounter when using SSL Network Extender.
SSL Network Extender Issues All user's packets destined directly to the external SSL Network Extender Security Gateway will not be encrypted by the SSL Network Extender.
If there is a need to explicitly connect to the gateway through the SSL tunnel, connect to the internal interface, which is part of the encryption domain.
1. The SSL Network Extender gateway allows users to authenticate themselves via certificates. Therefore, when connecting to the SSL Network Extender gateway, the following message may appear: "The Web site you want to view requests identification. Select the certificate to use when connecting."
In order not to display this message to the users, two solutions are proposed:
On the client computer, access the Internet Explorer. Under Tools > Options > Security tab, select Local intranet > Sites. You can now add the SSL Network Extender gateway to the Local intranet zone, where the Client Authentication pop-up will not appear. Click Advanced, and add the gateway external IP or DNS name to the existing list.
On the client computer, access the Internet Explorer. Under Tools > Options > Security tab, select Internet Zone > Custom Level. In the Miscellaneous section, select Enable for the item Don't prompt for client certificate selection when no certificates or only one certificate exists. Click OK. Click Yes on the Confirmation window. Click OK again.
Note - This solution will change the behavior of the Internet Explorer for all Internet sites, so if better granularity is required, refer to the previous solution.
2. If the client computer has Endpoint Security VPN software installed, and is configured to work in 'transparent mode', and its encryption domain contains SSL Network Extender gateway, or otherwise overlaps with the SSL Network Extender encryption domain, the SSL Network Extender will not function properly. To resolve this, disable the overlapping site in Endpoint Security VPN.
3. If the client computer has Endpoint Security VPN software installed, and is configured to work in 'connect mode', and its encryption domain contains SSL Network Extender gateway, or otherwise overlaps with the SSL Network Extender encryption domain, the SSL Network Extender will not function properly. To resolve this, verify that the flag allow_clear_traffic_while_disconnected is True (which is the default value).

SSL Network Extender
Remote Access VPN Administration Guide R80.10 | 152
ESOD Issues 1. User did not pass the scan (a 'Continue' button is not displayed).
The user probably did not match the policy requirements.
• If using "ESOD per User Group" feature – Verify that the user is using the correct policy.
• According to the policy, Explain the user how to remove the elements that are blocking him.
2. User cannot access the given URL for his specific group. • Make sure that the group listed in the URL is listed in the ics.group file, with the correct
xml file.
• Make sure that the xml file that is assigned to the group exists in $FWDIR/conf/extender.
• Make sure Install Policy has been made since the ics.group file has changes.
3. User has passed the ESOD scan, but gets a "Wrong ESOD Scan" error when trying to connect. This means that the user has passed the scan intended for a group that he does not belong to.
• Verify that the user is using the correct URL.
• Look at the Logs tab in the SmartConsole Logs & Monitor view. The log should state which xml file the user used for the scan.
• Make sure that this file is the same as the user's group file. If not, direct the user to the correct URL.

Remote Access VPN Administration Guide R80.10 | 153
CHAPTE R 15
Resolving Connectivity Issues In This Section:
The Need for Connectivity Resolution Features ....................................................... 153
Check Point Solution for Connectivity Issues ........................................................... 153
Overcoming NAT Related Issues ............................................................................... 153
Overcoming Restricted Internet Access .................................................................... 158
Configuring Remote Access Connectivity ................................................................. 161
The Need for Connectivity Resolution Features While there are a few connectivity issues regarding VPN between Security Gateways, remote access clients present a special challenge. Remote clients are, by their nature, mobile. During the morning they may be located within the network of a partner company, the following evening connected to a hotel LAN or behind some type of enforcement or NATing device. Under these conditions, a number of connectivity issues can arise:
• Issues involving NAT devices that do not support fragmentation.
• Issues involving service/port filtering on the enforcement device
Check Point Solution for Connectivity Issues Check Point resolves NAT related connectivity issues with a number of features:
• IKE over TCP
• Small IKE phase II proposals
• UDP encapsulation
• IPsec Path Maximum Transmission Unit (IPsec PMTU)
Check Point resolves port filtering issues with Visitor Mode (formally: TCP Tunneling).
Other Connectivity Issues Other connectivity issues can arise, for example when a remote client receives an IP address that matches an IP on the internal network. Routing issues of this type are resolved using Office Mode (on page 51).
Other issues, such as Domain Name Resolution involving DNS servers found on an internal network protected by a Security Gateway, are resolved with Split DNS (on page 121).

Resolving Connectivity Issues
Remote Access VPN Administration Guide R80.10 | 154
Overcoming NAT Related Issues NAT related issues arise with hide NAT devices that do not support packet fragmentation.
When a remote access client attempts to create a VPN tunnel with its peer Security Gateway, the IKE or IPsec packets may be larger than the Maximum Transmission Unit (MTU) value. If the resulting packets are greater than the MTU, the packets are fragmented at the Data Link layer of the Operating System's TCP/IP stack.
Problems arise when the remote access client is behind a hide NAT device that does not support this kind of packet fragmentation:
Item Description
1 Server
2 Security Gateway
3 Internet
4 Router
5 Remote Client
Hide NAT not only changes the IP header but also the port information contained in the UDP header. For example, if the UDP packet is too long, the remote client fragments the packet. The first fragment consists of the IP header plus the UDP header and some portion of the data. The second fragment consists of only the IP header and the second data fragment. The NATing device does not know how to wait for all the fragments, reassemble and NAT them.
When the first fragment arrives, the NAT device successfully translates the address information in the IP header, and port information in the UDP header and forwards the packet. When the second fragment arrives, the NATing device cannot translate the port information because the second packet does not contain a UDP header; the packet is dropped. The IKE negotiation fails.

Resolving Connectivity Issues
Remote Access VPN Administration Guide R80.10 | 155
During IKE phase I To understand why large UDP packets arise, we need to take a closer look at the first phase of IKE. During IKE phase I, the remote access client and Security Gateway attempt to authenticate each other. One way of authenticating is through the use of certificates. If the certificate or Certificate Revocation List (CRL) is long, large UDP packets result, which are then fragmented by the operating system of the remote client.
Note - If the VPN peers authenticate each other using pre-shared secrets, large UDP packets are not created; however, certificates are more secure, and thus recommended.
IKE Over TCP IKE over TCP solves the problem of large UDP packets created during IKE phase I. The IKE negotiation is performed using TCP packets. TCP packets are not fragmented; in the IP header of a TCP packet, the DF flag ("do not fragment") is turned on. A full TCP session is opened between the peers for the IKE negotiation during phase I.
During IKE phase II A remote access client does not have a policy regarding methods of encryption and integrity. Remote access clients negotiate methods for encryption and integrity via a series of proposals, and need to negotiate all possible combinations with the Security Gateway. This can lead to large UDP packets which are once again fragmented by the remote client's OS before sending. The NAT device in front of the remote client drops the packet that has no UDP header (containing port information). Again, the IKE negotiation fails.
Why not use IKE over TCP again, as in phase I?
IKE over TCP solves the fragmentation problem of long packets, but in phase II there are times when the Security Gateway needs to initiate the connection to the remote client. (Only the remote client initiates phase I, but either side can identify the need for a phase II renewal of keys; if the Security Gateway identifies the need, the Security Gateway initiates the connection.)
If the Security Gateway initiates the connection, the Security Gateway knows the IP address of the NATing device, but cannot supply a port number that translates to the remote client behind the NATing device. (The port number used during previous connections is only temporary, and can quickly change.) The NATing device cannot forward the connection correctly for the remote client; the connection initiated by the Security Gateway fails.
It is possible to use IKE over TCP, but this demands a TCP connection to be always open; the open session reserves the socket on the Security Gateway, taking up valuable system resources. The more reasonable solution is to keep open the port on the NATing device by sending UDP "keep alive" packets to the Security Gateway, and then performing IKE phase II in the usual way. However, there is still a need to shorten the UDP packets to prevent possible fragmentation.

Resolving Connectivity Issues
Remote Access VPN Administration Guide R80.10 | 156
Small IKE Phase II Proposals Both Security Gateway and remote peer start the IKE negotiation by proposing a small number of methods for encryption and integrity. The more common methods are included in the small proposals.
If proposals match between the remote client and the Security Gateway, the proposed methods are used; if no match is found, a greater number of proposals are made. Usually a match is found with the small proposals, and fragmentation is no longer an issue. However, there are cases where a match is not found, and a larger number of proposals need to be made. (This will most likely happen in instances where the remote Security Gateway uses AES-128 for encryption, and AES-128 is not included in the small proposals.)
A greater number of proposals can result in larger UDP packets. These larger packets are once again fragmented at the Data Link Layer of the TCP/IP stack on the client, and then discarded by the hide NAT device that does not support fragmentation. In the case of AES-128, this method of encryption can be included in the small proposals by defining AES-128 as the preferred method.
During IPsec
NAT Traversal (UDP Encapsulation for Firewalls and Proxies) Having successfully negotiated IKE phases I and II, we move into the IPsec stage. Data payloads encrypted with AES and SHA, for example, are placed within an IPsec packet. However, this IPsec packet no longer contains a TCP or UDP header. A hide NAT device needs to translate the port information inside the header. The TCP/UDP header has been encrypted along with the data payload and can no longer be read by the NATing device.
A port number needs to be added. UDP Encapsulation is a process that adds a special UDP header that contains readable port information to the IPsec packet.
IPsec Path Maximum Transmission Units IPsec Path MTU is a way of dealing with IPsec packet fragmentation. The Data Link layer imposes an upper limit on the size of the packets that can be sent across the physical network, the Maximum Transmission Unit, or MTU. Before sending a packet, the TCP/IP stack of the operating system queries the local interface to obtain its MTU. The IP layer of the TCP/IP stack compares the MTU of the local interface with the size of the packet and fragments the packet if necessary.
When a remote client is communicating across multiple routers with a Security Gateway, it is the smallest MTU of all the routers that is important; this is the path MTU (PMTU), and for remote access clients there is a special IPsec PMTU discovery mechanism to prevent the OS of the client from fragmenting the IPsec packet if the IPsec packet is too large.
However, the PMTU between the remote client and the Security Gateway will not remain constant, since routing across the Internet is dynamic. The route from Security Gateway to client may not be the same in both directions, hence each direction may have its own PMTU. VPN handles this in two ways:
• Active IPsec PMTU
• Passive IPsec PMTU

Resolving Connectivity Issues
Remote Access VPN Administration Guide R80.10 | 157
Active IPsec PMTU After IKE phase II but before the IPsec stage, the remote access client sends special discovery IPsec packets of various sizes to the Security Gateway. The DF (do not fragment) bit on the packet is set. If a packet is longer than any router's MTU, the router drops the packet and sends an ICMP error message to the remote client. From the largest packet not fragmented, the remote client resolves an appropriate PMTU. This PMTU is not conveyed directly to the OS. Unknown to the operating system, during the TCP three-way handshake, the Maximum Segment Size (MSS) on the SYN and SYN-ACK packets are changed to reflect the PMTU. This is known as Active IPsec PMTU.
Passive IPsec PMTU Passive IPsec PMTU solves the problem of dynamic Internet routing. Passive IPsec PTMU is a process that occurs when either side receives an ICMP error message resulting from a change in the routing path. Since routes change dynamically on the Internet, if a different router needs to fragment the packet that has the DF bit set, the router discards the packet and generates an ICMP "cannot fragment" error message. The error message is sent to the VPN peer that sent the packet. When the peer receives this error message, the peer decreases the PMTU and retransmits.
Note - From the system administrator perspective, there is nothing to configure for PMTU; the IPsec PMTU discovery mechanism, both active and passive, runs automatically.
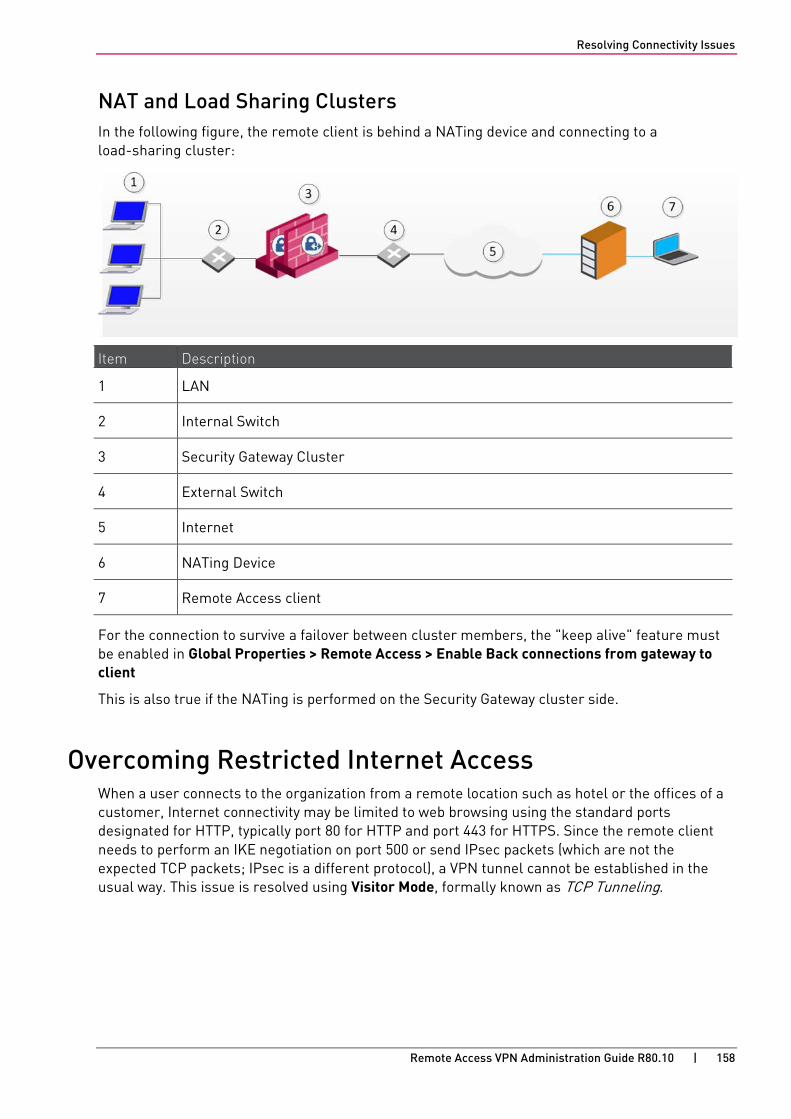
Resolving Connectivity Issues
Remote Access VPN Administration Guide R80.10 | 158
NAT and Load Sharing Clusters In the following figure, the remote client is behind a NATing device and connecting to a load-sharing cluster:
Item Description
1 LAN
2 Internal Switch
3 Security Gateway Cluster
4 External Switch
5 Internet
6 NATing Device
7 Remote Access client
For the connection to survive a failover between cluster members, the "keep alive" feature must be enabled in Global Properties > Remote Access > Enable Back connections from gateway to client
This is also true if the NATing is performed on the Security Gateway cluster side.
Overcoming Restricted Internet Access When a user connects to the organization from a remote location such as hotel or the offices of a customer, Internet connectivity may be limited to web browsing using the standard ports designated for HTTP, typically port 80 for HTTP and port 443 for HTTPS. Since the remote client needs to perform an IKE negotiation on port 500 or send IPsec packets (which are not the expected TCP packets; IPsec is a different protocol), a VPN tunnel cannot be established in the usual way. This issue is resolved using Visitor Mode, formally known as TCP Tunneling.

Resolving Connectivity Issues
Remote Access VPN Administration Guide R80.10 | 159
Visitor Mode Visitor Mode tunnels all client-to-gateway communication through a regular TCP connection on port 443.
Item Description
1 Host Server
2 Check Point gateway
3 Internet
4 Non-Check Point peer gateway that works with Visitor Mode to allow traffic to the client
5 Remote Access Client
All required VPN connectivity between the Client and the Server is tunneled inside this TCP connection. This means that the peer Security Gateway needs to run a Visitor Mode (TCP) server on port 443.
Number of Users
To obtain optimal performance of the Visitor Mode server:
• Minimize the number of users allowed Visitor Mode if performance degrades
• Increase the number of sockets available on the OS by editing the appropriate values, for example the socket descriptor on Linux systems
Allocating Customized Ports The organization decides that it would like to use a customized port for the Visitor Mode Server other than the typically designated port 443. In this scenario, another port that is mutually agreed upon by all the remote locations and the home organization, can be used for Visitor Mode. This solution works well with business partners; the partner simply agrees to open a port for the visitor Mode connections. If the chosen port is not represented by a pre-defined service in SmartDashboard, this service must be created in order for the port to be used. If a port has been mutually agreed upon, and there is a proxy, configure the proxy to allow traffic destined to this port.
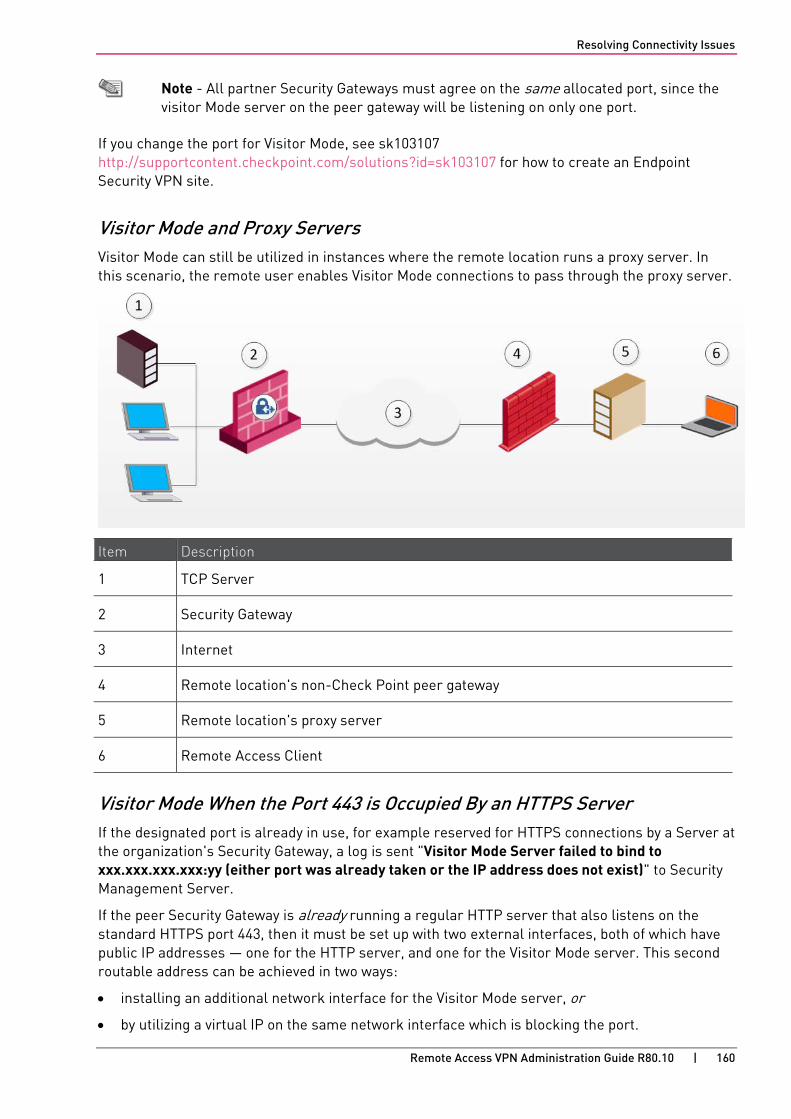
Resolving Connectivity Issues
Remote Access VPN Administration Guide R80.10 | 160
Note - All partner Security Gateways must agree on the same allocated port, since the visitor Mode server on the peer gateway will be listening on only one port.
If you change the port for Visitor Mode, see sk103107 http://supportcontent.checkpoint.com/solutions?id=sk103107 for how to create an Endpoint Security VPN site.
Visitor Mode and Proxy Servers Visitor Mode can still be utilized in instances where the remote location runs a proxy server. In this scenario, the remote user enables Visitor Mode connections to pass through the proxy server.
Item Description
1 TCP Server
2 Security Gateway
3 Internet
4 Remote location's non-Check Point peer gateway
5 Remote location's proxy server
6 Remote Access Client
Visitor Mode When the Port 443 is Occupied By an HTTPS Server If the designated port is already in use, for example reserved for HTTPS connections by a Server at the organization's Security Gateway, a log is sent "Visitor Mode Server failed to bind to xxx.xxx.xxx.xxx:yy (either port was already taken or the IP address does not exist)" to Security Management Server.
If the peer Security Gateway is already running a regular HTTP server that also listens on the standard HTTPS port 443, then it must be set up with two external interfaces, both of which have public IP addresses — one for the HTTP server, and one for the Visitor Mode server. This second routable address can be achieved in two ways:
• installing an additional network interface for the Visitor Mode server, or
• by utilizing a virtual IP on the same network interface which is blocking the port.

Resolving Connectivity Issues
Remote Access VPN Administration Guide R80.10 | 161
On the Security Gateway object running the Visitor Mode server, General Properties > Remote Access page > there is a setting for Allocated IP address. All the available IP addresses can be configured to listen on port 443 for Visitor Mode connections.
Visitor Mode in a MEP Environment Visitor Mode also works in a MEP environment. For more information, see: Visitor Mode and MEP (on page 124).
Interface Resolution For interface resolution in a Visitor Mode environment, it is recommended to use static IP resolution or dedicate a single interface for Visitor Mode.
Configuring Remote Access Connectivity This section describes how to configure Remote Access connectivity in SmartDashboard and DBedit.
Configuring Small IKE phase II Proposals Small phase II IKE proposals always include AES-256, but not AES-128. Suppose you want to include AES-128 in the small proposals:
1. Open the command line database editing tool DBedit. There are two properties that control whether small proposals are used or not, one for pre-NG with Application Intelligence, the other for NG with Application Intelligence.
• phase2_proposal - determines whether an old client (pre-NG with Application Intelligence) will try small proposals - default "false".
• phase2_proposal_size - determines whether a new client (for NG with Application Intelligence) will try small proposals - default "true".
2. In Global Properties > Remote Access page > VPN -Advanced subpage > User Encryption Properties section, select AES-128. This configures remote users to offer AES-128 as a small proposal.
Configuring Visitor Mode Visitor Mode requires the configuration of both the Server and the Client. See also: Visitor Mode and MEP (on page 124).
Visitor Mode and Gateway Clusters Cluster support is limited. The High Availability and Load Sharing solutions must provide "stickiness". That is, the visitor mode connection must always go through the same cluster member.
Failover from cluster member to cluster member in a High Availability scenario is not supported.

Resolving Connectivity Issues
Remote Access VPN Administration Guide R80.10 | 162
Configuring Remote Clients to Work with Proxy Servers 1. In the Remote Access client, select Detect Proxy from Internet Explorer Settings.
2. Enter a username and password for proxy authentication. This information is later transferred with the "connect" command to the proxy server.
Remote Access clients can read any of the Visitor Mode settings, but only if:
• The client is connected to a LAN or WLAN
• Secure Domain Logon (SDL) is not enabled.
Note - Visitor mode attempts to connect to the proxy server without authenticating. If a user name and password is required by the proxy, the error message "proxy requires authentication appears".
Windows Proxy Replacement If a Remote Access client is on a LAN\WLAN and a proxy server is configured on the LAN, the client replaces the proxy settings so that new connections are not sent to the VPN domain via the proxy but go directly to the LAN\WLAN's Security Gateway. This feature works with and without Visitor Mode.
When a Remote Access client replaces the proxy file, it generates a similar plain script PAC file containing the entire VPN domain IP ranges and DNS names (to be returned as "DIRECT"). This file is stored locally, since the Windows OS must receive this information as a plain script PAC file. This file replaces the automatic configuration script as defined in Internet Explorer:

Resolving Connectivity Issues
Remote Access VPN Administration Guide R80.10 | 163
Configuring Windows Proxy Replacement Windows proxy replacement is configured either on the Security Gateway or on the Remote Access client.
Proxy Replacement for the Security Gateway
To configure the Security Gateway to support Visitor Mode:
1. From Menu, click Global Properties.
2. From the navigation tree, click Advanced.
3. In the Advanced Configuration page, click Configure.
The Advanced Configuration window opens:
4. From the navigation tree, click VPN Advanced Properties > Remote Access VPN.
5. Select one of these options:
• ie_proxy_replacement - When selected, Windows proxy replacement is always performed, even if Visitor Mode is not enabled
• ie_proxy_replacement_limit_to_tcpt - When selected, the proxy replacement is only when Visitor Mode is enabled
VPN CLI Commands
Remote Access VPN Administration Guide R80.10 | 164
VPN CLI Commands For more about the CLI commands, see the R80.10 VPN Site to Site Administration Guide.