Remote access, motion detection alert & two-way audio user manual.pdf · Select your home WiFi SSID...
18
User Manual Model No. IPC-135 Remote access, motion detection alert & two-way audio Z MI • IP-Camera Red Shield SENSOR SERIES
Transcript of Remote access, motion detection alert & two-way audio user manual.pdf · Select your home WiFi SSID...

User ManualModel No. IPC-135
Remote access, motion detection alert & two-way audio
Z MI • IP-Camera
Red ShieldSENSOR SERIES
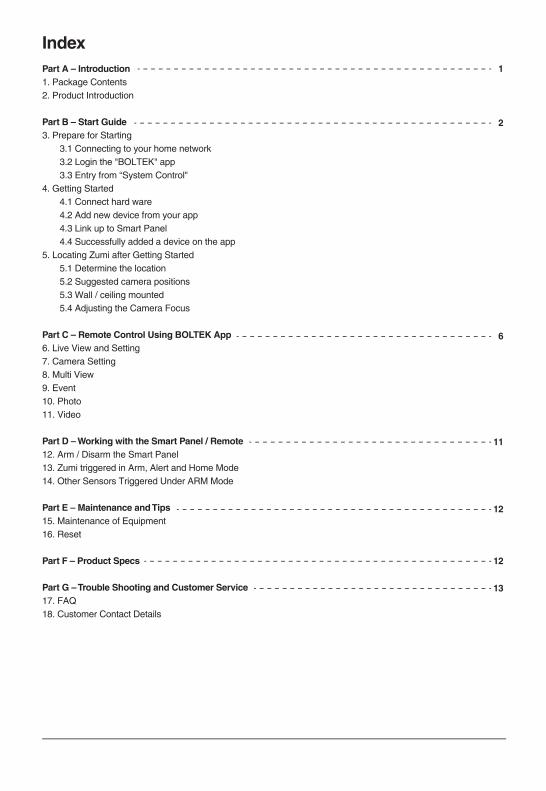
Part A – Introduction1. Package Contents2. Product Introduction
Part B – Start Guide3. Prepare for Starting 3.1 Connecting to your home network 3.2 Login the "BOLTEK" app 3.3 Entry from “System Control"4. Getting Started 4.1 Connect hard ware 4.2 Add new device from your app 4.3 Link up to Smart Panel 4.4 Successfully added a device on the app5. Locating Zumi after Getting Started 5.1 Determine the location 5.2 Suggested camera positions 5.3 Wall / ceiling mounted 5.4 Adjusting the Camera Focus
Part C – Remote Control Using BOLTEK App6. Live View and Setting7. Camera Setting8. Multi View9. Event10. Photo11. Video
Part D – Working with the Smart Panel / Remote12. Arm / Disarm the Smart Panel13. Zumi triggered in Arm, Alert and Home Mode14. Other Sensors Triggered Under ARM Mode
Part E – Maintenance and Tips15. Maintenance of Equipment16. Reset
Part F – Product Specs
Part G – Trouble Shooting and Customer Service17. FAQ18. Customer Contact Details
Index1
2
6
11
12
12
13
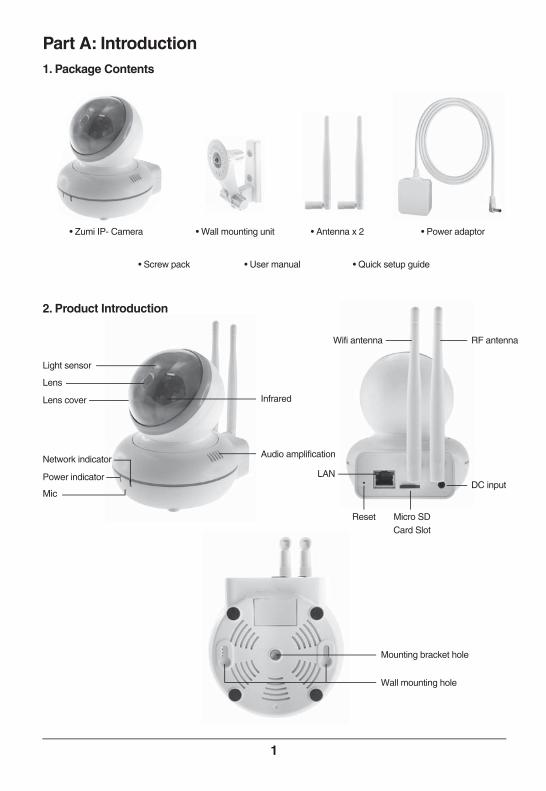
Part A: Introduction1. Package Contents
2. Product Introduction
• Zumi IP- Camera
Light sensor
Micro SDCard Slot
Infrared
Audio amplification
LAN
Wifi antenna
DC input
Reset
Lens
Lens cover
Network indicator
Power indicator
Mic
• Wall mounting unit
• User manual • Quick setup guide• Screw pack
• Antenna x 2 • Power adaptor
1
Mounting bracket hole
Wall mounting hole
RF antenna
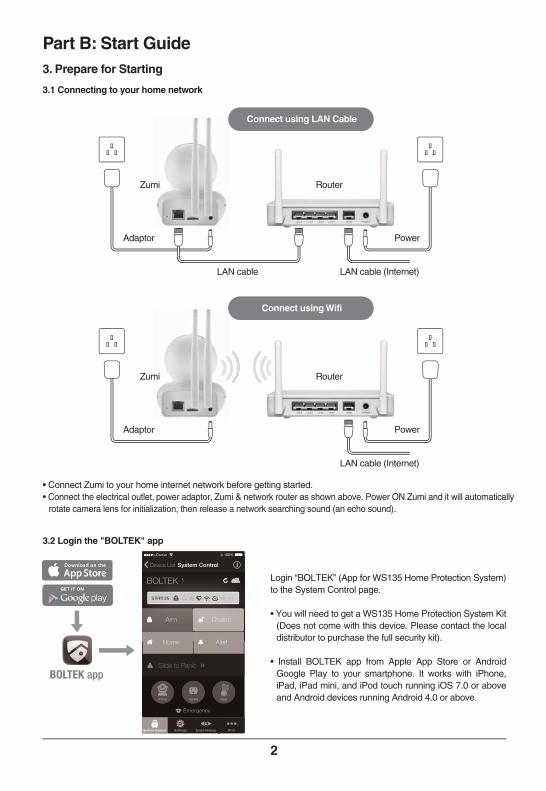
Part B: Start Guide3. Prepare for Starting
3.1 Connecting to your home network
• Connect Zumi to your home internet network before getting started.• Connect the electrical outlet, power adaptor, Zumi & network router as shown above. Power ON Zumi and it will automatically
rotate camera lens for initialization, then release a network searching sound (an echo sound).
3.2 Login the "BOLTEK" app
Login “BOLTEK” (App for WS135 Home Protection System) to the System Control page.
• You will need to get a WS135 Home Protection System Kit (Does not come with this device. Please contact the local distributor to purchase the full security kit).
• Install BOLTEK app from Apple App Store or Android Google Play to your smartphone. It works with iPhone, iPad, iPad mini, and iPod touch running iOS 7.0 or above and Android devices running Android 4.0 or above.
2
BOLTEK 1
System ControlDevice List
Carrier 100%
Arm
Home
Disarm
Alert
System Control Settings Event History More
Emergency
Slide to Panic
SocketIP Cam Temp.
Loto
•
STATUS
Home Alert
System Control Settings Event History More
Emergency
Slide to Panic
SocketIP Cam
Carrier 100%
Temp.
BOBOLTEK 1
System ControlDevice List
Carrier 100%
Arm
H
Disarm
Al t
STATUS
BOLTEK app
Adaptor
LAN cable LAN cable (Internet)
Power
Zumi Router
Adaptor
LAN cable (Internet)
Power
Zumi Router
Connect using LAN Cable
Connect using Wifi
3
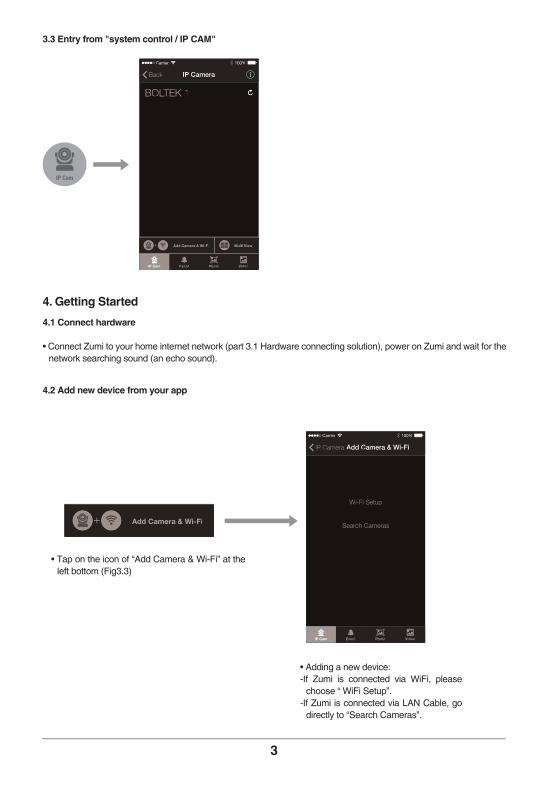
3.3 Entry from "system control / IP CAM"
4. Getting Started
4.1 Connect hardware
• Connect Zumi to your home internet network (part 3.1 Hardware connecting solution), power on Zumi and wait for the network searching sound (an echo sound).
4.2 Add new device from your app
• Tap on the icon of “Add Camera & Wi-Fi” at the left bottom (Fig3.3)
• Adding a new device:-If Zumi is connected via WiFi, please
choose “ WiFi Setup”.-If Zumi is connected via LAN Cable, go
directly to “Search Cameras”.
IP Cam
BOLTEK 1
IP CameraBack
Carrier 100%
Multi ViewAdd Camera & Wi-Fi
VideoEvent PhotoIP Cam
BOLTEK 1
IP CameraBack
Carrier 100%
Multi ViewAdd Camera & Wi-Fi
VideoEvent PhotoIP Cam
Add Camera & Wi-FiAdd Camera & Wi-Fi
Add Camera & Wi-FiIP Camera
Carrier 100%
VideoEvent PhotoIP Cam
Wi-Fi Setup
Search Cameras
Add Camera & Wi-FiIP Camera
Carrier 100%
VideoEvent PhotoIP Cam
Wi-Fi Setup
Search Cameras

Select your home WiFi SSID and input WiFi password, Tap on “Config” when you hear the network searching sound from the hardware.
A WiFi connected sound will indicate that Zumi has linked to home WiFi. Select “Finish” to go back to the first page.
Click “Search Camera” and Choose your device ID from the device list pop-up. Follow the instruction to link up Zumi to the main panel (refer to part 4.3). Press “Check” that it is successfully connected on the app.
Go to the Add Sensor mode of the BOLTEK smart panel – “Settings” > ”Add / Delete Sensor” > ”Add Mode”. Refer to BOLTEK Manual for detailed information.
Trigger Zumi by producing motions such as a hand-wave before the camera lens. A beep indicates that Zumi has successfully enrolled to the Smart Panel. Press DONE to go back.
4
4.3 Link up to the Smart Panel
4.4 Successfully added a device to the app
WiFi Setup Search Camera
DELETEADD MODE
BACK
ADD/DELETE SENSORS010203
MAGNET1PIR1REMOTE1
DELETEADD MODE
BACK
ADD/DELETE SENSORS01020304
MAGNET1PIR1ZUMI1REMOTE1
DONE ADD MORE
ADD SENSORS
YOU HAVE JUST ADDED03 ZUMI1
Add Camera & Wi-FiIP Camera
Carrier 100%
VideoEvent PhotoIP Cam
Wi-Fi Setup
Search Cameras
CancelRefresh
Search Result
ZumiXXXX-000000-XXXXX
Add Camera & Wi-FiIP Camera
Carrier 100%
VideoEvent PhotoIP Cam
CancelRefresh
Search Result
ZumiXXXX-000000-XXXXX
Add Camera & Wi-FiIP Camera
Carrier 100%
VideoEvent PhotoIP Cam
Wi-Fi Setup
Search Cameras
Add Camera & Wi-FiIP Camera
Carrier 100%
VideoEvent PhotoIP Cam
Wi-Fi Setup
Search Cameras
VideoEvent PhotoIP Cam
Onekey ConfigBack
Carrier 100%
Home-WiFI
SSID
Config
Finish
••••
Password
WPA2-PSK
Safe Mode
VideoEvent PhotoIP Cam
Onekey ConfigBack
Carrier 100%
Home-WiFI
SSID
Config
Finish
••••
Password
WPA2-PSK
Safe Mode
5
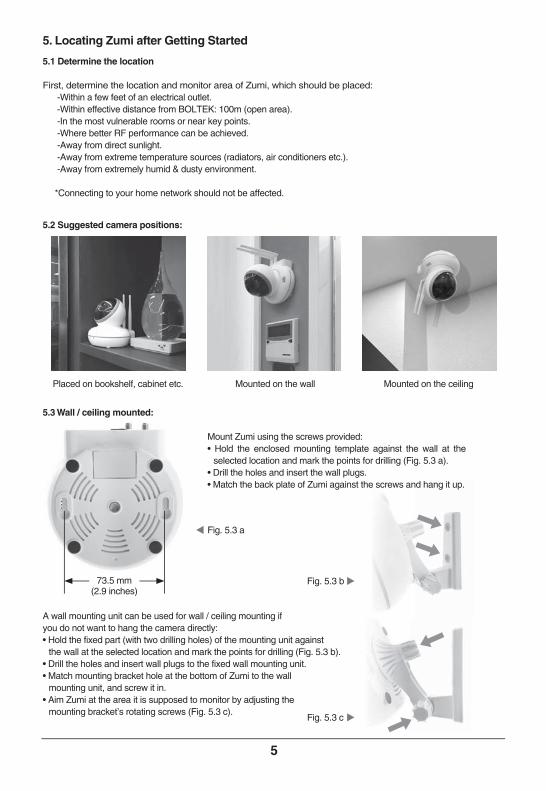
Placed on bookshelf, cabinet etc.
73.5 mm(2.9 inches)
Mounted on the wall Mounted on the ceiling
5. Locating Zumi after Getting Started
5.1 Determine the location
First, determine the location and monitor area of Zumi, which should be placed: -Within a few feet of an electrical outlet. -Within effective distance from BOLTEK: 100m (open area). -In the most vulnerable rooms or near key points. -Where better RF performance can be achieved. -Away from direct sunlight. -Away from extreme temperature sources (radiators, air conditioners etc.). -Away from extremely humid & dusty environment.
*Connecting to your home network should not be affected.
5.2 Suggested camera positions:
5.3 Wall / ceiling mounted:
A wall mounting unit can be used for wall / ceiling mounting ifyou do not want to hang the camera directly:• Hold the fixed part (with two drilling holes) of the mounting unit against
the wall at the selected location and mark the points for drilling (Fig. 5.3 b).• Drill the holes and insert wall plugs to the fixed wall mounting unit.• Match mounting bracket hole at the bottom of Zumi to the wall
mounting unit, and screw it in.• Aim Zumi at the area it is supposed to monitor by adjusting the
mounting bracket’s rotating screws (Fig. 5.3 c).
Mount Zumi using the screws provided:• Hold the enclosed mounting template against the wall at the
selected location and mark the points for drilling (Fig. 5.3 a).• Drill the holes and insert the wall plugs.• Match the back plate of Zumi against the screws and hang it up.
Fig. 5.3 b
Fig. 5.3 c
Fig. 5.3 a
6
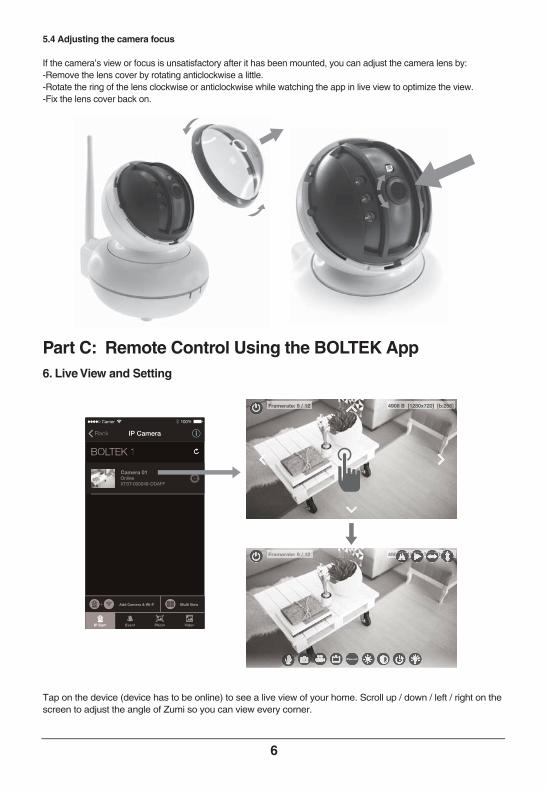
5.4 Adjusting the camera focus
If the camera’s view or focus is unsatisfactory after it has been mounted, you can adjust the camera lens by:-Remove the lens cover by rotating anticlockwise a little.-Rotate the ring of the lens clockwise or anticlockwise while watching the app in live view to optimize the view.-Fix the lens cover back on.
Part C: Remote Control Using the BOLTEK App6. Live View and Setting
Tap on the device (device has to be online) to see a live view of your home. Scroll up / down / left / right on the screen to adjust the angle of Zumi so you can view every corner.
Framerate: 9 / 12 4908 B [1280x720] [b:256]FFramerFramerFramerFramerFramer t 9ate: 9ate: 9ate: 9ate: 9ate: 9 // 12/ 12/ 12/ 12/ 12/ 12 49084908490490490490 [[12[1[1[1[1[1[ 72x72x72x7x7x7 [[b[b:[b[b[b[b[ ]]]]20]20]720] [[[0]20] [ :2:2b:256]56]56]222565656281281280x0x0x28282800x08 B08 B08 B [BBBBBB
Preset
4908 B [1280x720] [b:256]Framerate: 9 / 12
BOLTEK 1
IP CameraBack
Carrier 100%
Camera 01OnlineXTST-000048-DDAFF
Multi ViewAdd Camera & Wi-Fi
VideoEvent PhotoIP Cam
BOLTEK 1
IP CameraBack
Carrier 100%
Camera 01OnlineXTST-000048-DDAFF
Multi ViewAdd Camera & Wi-Fi
VideoEvent PhotoIP Cam
7
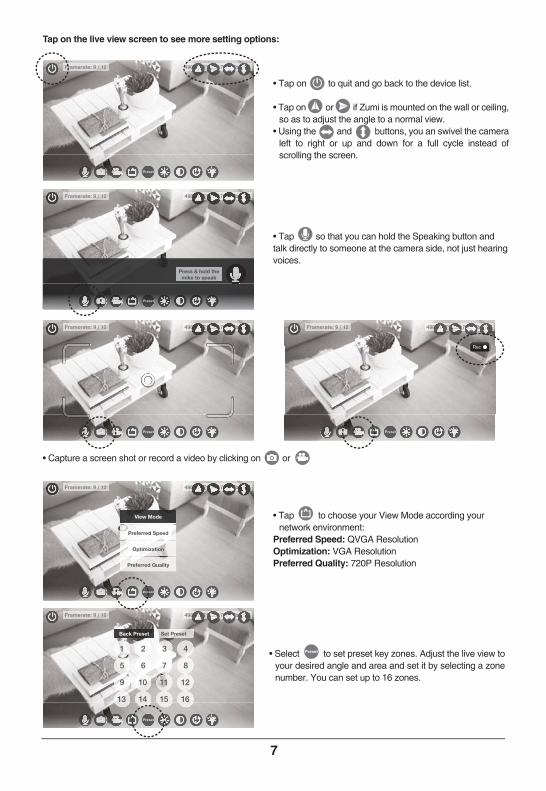
• Tap on to quit and go back to the device list.
• Tap on or if Zumi is mounted on the wall or ceiling, so as to adjust the angle to a normal view.
• Using the and buttons, you an swivel the camera left to right or up and down for a full cycle instead of scrolling the screen.
• Tap to choose your View Mode according your network environment:
Preferred Speed: QVGA ResolutionOptimization: VGA Resolution Preferred Quality: 720P Resolution
Framerate: 9 / 12 4908 B [1280x720] [b:256]FFFramerFramerFramerFramerFramer 9t 9ate: 9ate: 9ate: 9ate: 9ate: 9 / 2/ 12/ 12/ 12/ 12/ 12/ 12 90849084908490490490490 [ 2[12[1[1[1[1[1[ 272x72x72x7x7x7 [b[b[b:[b[b[b[b[ ]]]]]20]20]720] [[[0]20] [ :2:2b:256]56]56]222565656281281280x0x0x28282800x08 B08 B08 B [BBBBB8 B
Preset
Preset
Framerate: 9 / 12 4908 B [1280x720] [b:256]FFFramerFramerFramerFramer 9t 9ate: 9ate: 9ate: 9ate: 9 / 2/ 12/ 12/ 12/ 12/ 12 90849084908490490490 [ 2[12[1[1[1[1[[ 272x72x7x7x7 [b[b[b:[b[b[b[[ ]]]]]720]72 [[[0]20]] [b:2b:256]56]]2256561281280x0x28280x08 B08 B [[[BBBB
View Mode
Preferred Speed
Optimization
Preferred Quality
Framerate: 9 / 12 4908 B [1280x720] [b:256]
Rec
FFFramerFramerFramerFramerFramer 9t 9ate: 9ate: 9ate: 9ate: 9ate: 9 / 2/ 12/ 12/ 12/ 12/ 12/ 12 90849084908490490490490 [ 2[12[1[1[1[1[1[ 272x72x72x7x7x7 [b[b[b:[b[b[b[b[ ]]]]
Rec
20]20]720] [[[0]20] [ :2b:2b:256]56]56]222565656281281280x0x0x28282800x08 B08 B08 B [BBBBBB
PresetPreset
Framerate: 9 / 12 4908 B [1280x720] [b:256]FFFramerFramerFramerFramer 9t 9ate: 9ate: 9ate: 9ate: 9 / 2/ 12/ 12/ 12/ 12/ 12 90849084908490490490 [ 2[12[1[1[1[1[[[ 272x72x7x7x7 [b[b[b:[b[b[b[[[ ]]]]720]72 [[[0]20]]] [b:2b:256]56]]2256561281280x0x28280x08 B08 B [[[BBBB
• Select to set preset key zones. Adjust the live view to your desired angle and area and set it by selecting a zone number. You can set up to 16 zones.
Preset
Framerate: 9 / 12 4908 B [1280x720] [b:256]FFFramerFramerFramerFramerFramer 9t 9ate: 9ate: 9ate: 9ate: 9ate: 9 / 12/ 12/ 12/ 12/ 12/ 12/ 12 490849084908490490490490 [12[12[1[1[1[1[1[ 7272x72x7x7x7x7 [b[b[b:[b[b[b[b[ ]]]]20]20]720] [[[0]20] [ :2:2b:256]56]56]222565656281281280x0x0x28282800x08 B08 B08 B [BBBBB8 B
Preset
Set PresetBack Preset
1 1 1 1
1 1 1 1
1 0 1 2
3 4 5 6
1 2 3 4
5 6 7 8
9 0 0 0
Tap on the live view screen to see more setting options:
• Capture a screen shot or record a video by clicking on or
• Tap so that you can hold the Speaking button and talk directly to someone at the camera side, not just hearing voices.
Framerate: 9 / 12 4908 B [1280x720] [b:256]FFFramerFramerFramerFramera e 9t 9ate: 9ate: 9ate: 9ate: 9a e 9 / 12/ 12/ 12/ 12/ 12/ 12/ 49084908490849049049090 [12[12[1[1[1[1[[[ 7272x72x7x7x7 [b[b[b:[b[b[b[b[[ ]]]]]720] [[[0]20]]] [b:2b 56]56]]22565612880x028280x08 B08 [[[BBBB
PresetPreset
Press & hold themike to speak
8
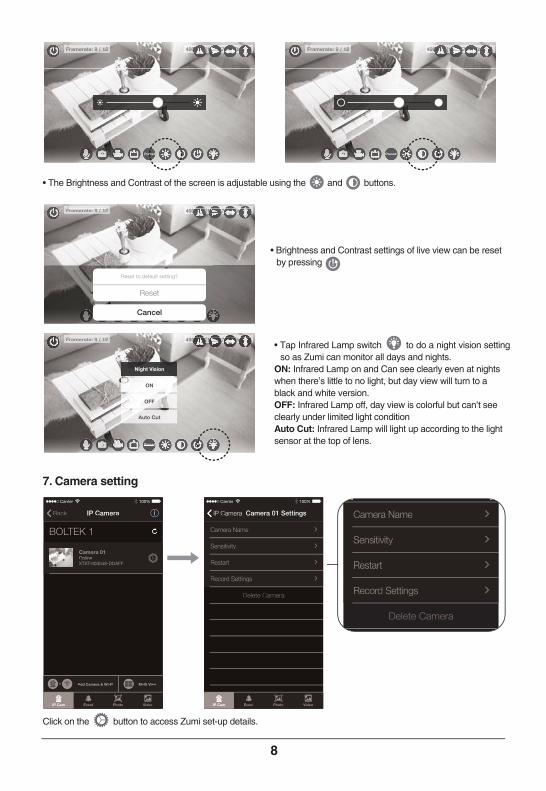
• The Brightness and Contrast of the screen is adjustable using the and buttons.
7. Camera setting
Click on the button to access Zumi set-up details.
Camera 01 SettingsIP Camera
Carrier 100%
Record Settings
Delete Camera
Restart
Sensitivity
Camera Name
VideoEvent PhotoIP Cam
Camera 01 SettingsIP Camera
Carrier 100%
Record Settings
Delete Camera
Restart
Sensitivity
Camera Name
VideoEvent PhotoIP Cam
BOLTEK 1
IP CameraBack
Carrier 100%
Camera 01OnlineXTST-000048-DDAFF
Multi ViewAdd Camera & Wi-Fi
VideoEvent PhotoIP Cam
BOLTEK 1
IP CameraBack
Carrier 100%
Camera 01OnlineXTST-000048-DDAFF
Multi ViewAdd Camera & Wi-Fi
VideoEvent PhotoIP Cam
• Tap Infrared Lamp switch to do a night vision setting so as Zumi can monitor all days and nights.
ON: Infrared Lamp on and Can see clearly even at nights when there’s little to no light, but day view will turn to a black and white version.OFF: Infrared Lamp off, day view is colorful but can’t see clearly under limited light conditionAuto Cut: Infrared Lamp will light up according to the light sensor at the top of lens.Preset
Framerate: 9 / 12 4908 B [1280x720] [b:256]FFFramerFramerFramerFramer 9t 9ate: 9ate: 9ate: 9ate: 9 / 12/ 12/ 12/ 12/ 12/ 12 490849084908490490490 [12[12[1[1[1[1[ 7272x72x7x7x7 [b[b[b:[b[b[b[ ]]]]720]72 [[[020]]] [b:2b:256]56]]2256561281280x0x28280x08 B08 B [[[BBBB
Night Vision
ON
OFF
Auto Cut
Framerate: 9 / 12 4908 B [1280x720] [b:256]FFramerFramerFramerFramerFramer t 9ate: 9ate: 9ate: 9ate: 9ate: 9 / 12/ 12/ 12/ 12/ 12/ 12 49084908490490490490 [12[12[1[1[1[1[ 72x72x72x7x7x7 [b[b:[b[b[b[b[ ]]]]20]20]720] [[[0]20] [ :2:2b:256]6]56]222565656281281280x0x0x2828280x08 B08 B08 B [BBBBBB
Preset
Framerate: 9 / 12 4908 B [1280x720] [b:256]FFramerFramerFramerFramerFramer t 9ate: 9ate: 9ate: 9ate: 9ate: 9 / 12/ 12/ 12/ 12/ 12/ 12 49084908490490490490 [12[12[1[1[1[1[ 72x72x72x7x7x7 [b[b:[b[b[b[b[ ]]]]20]20]720] [[[0]20] [ :2:2b:256]56]56]222565656281281280x0x0x2828280x08 B08 B08 B [BBBBBB
Preset
• Brightness and Contrast settings of live view can be resetby pressing
Framerate: 9 / 12 4908 B [1280x720] [b:256]FFramerFramerFramerFramerFramerFramer 9ate: 9ate: 9ate: 9ate: 9ate: 9ate: 9 / 12/ 12/ 12/ 12/ 12/ 12/ 12 49084908490490490490490 [12[12[1[1[1[1[1[ 72x72x72x7x7x7x7 [b[b:[b[b[b[b[b[ ]]]]]20]20]720] [[[0]20] [ :2b:2b:256]56]56]22256565281281280x0x0x2828280x08 B08 B08 B [BBBBB8 B
PresetCancel
Reset
Reset to default setting?
Record Settings
Delete Camera
Restart
Sensitivity
Camera Name
Record Settings
Delete Camera
Restart
Sensitivity
Camera Name
9
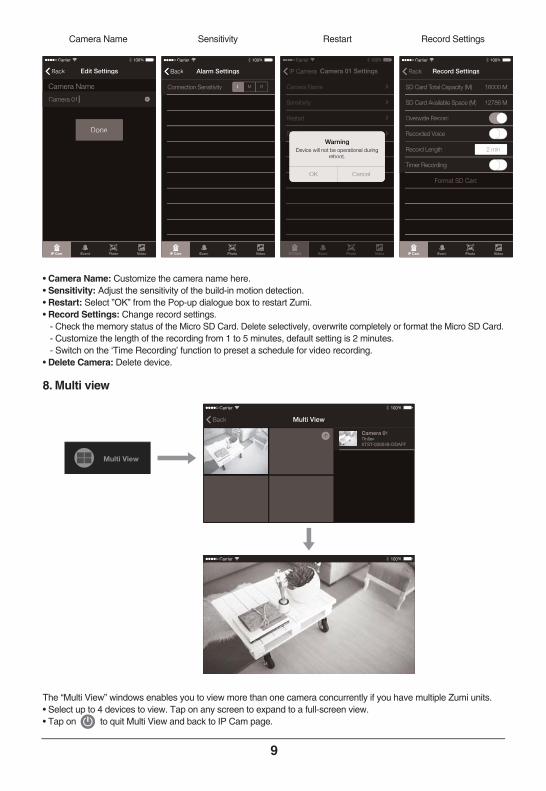
• Camera Name: Customize the camera name here.• Sensitivity: Adjust the sensitivity of the build-in motion detection.• Restart: Select ”OK” from the Pop-up dialogue box to restart Zumi.• Record Settings: Change record settings. - Check the memory status of the Micro SD Card. Delete selectively, overwrite completely or format the Micro SD Card. - Customize the length of the recording from 1 to 5 minutes, default setting is 2 minutes. - Switch on the ‘Time Recording’ function to preset a schedule for video recording.• Delete Camera: Delete device.
8. Multi view
The “Multi View” windows enables you to view more than one camera concurrently if you have multiple Zumi units. • Select up to 4 devices to view. Tap on any screen to expand to a full-screen view.• Tap on to quit Multi View and back to IP Cam page.
Camera Name Sensitivity Restart Record Settings
ML SConnection Sensitivity
Alarm SettingsBack
Carrier 100%
VideoEvent PhotoIP Cam VideoEvent PhotoIP Cam
ML SConnection Sensitivity
Alarm SettingsBack
Carrier 100%
Camera 01
Camera Name
Edit SettingsBack
Carrier 100%
Done
VideoEvent PhotoIP Cam Video
Camera 01
Camera Name
Edit SettingsBack
Carrier 100%
Done
Event PhotoIP Cam
Recorded Voice
Timer Recording
Format SD Card
Overwrite Record
SD Card Available Space (M) 12786 M
SD Card Total Capacity (M) 16000 M
Record SettingsBack
Carrier 100%
Record Length 2 min
VideoEvent PhotoIP Cam
Recorded Voice
Timer Recording
Format SD Card
Overwrite Record
SD Card Available Space (M) 12786 M
SD Card Total Capacity (M) 16000 M
Record SettingsBack
Carrier 100%
Record Length 2 min
VideoEvent PhotoIP Cam
Camera 01 SettingsIP Camera
Carrier 100%
Record Settings
Delete Camera
Restart
Sensitivity
Camera Name
VideoEvent PhotoIP Cam
CancelOK
Device will not be operational duringreboot.
Warning
Camera 01 SettingsIP Camera
Carrier 100%
Re S
Restart
Sensitivity
Camera Name
VideoEvent PhotoIP Cam
CancelOK
Device will not be operational duringreboot.
Warning
Multi View
Camera 01OnlineXTST-000048-DDAFF
Multi ViewBack
Carrier 100%
Camera 01OnlineXTST-000048-DDAFF
Multi ViewBack
Carrier 100%
Carrier 100%Carrier 100%
10
9. Event
10. Photo
11. Video
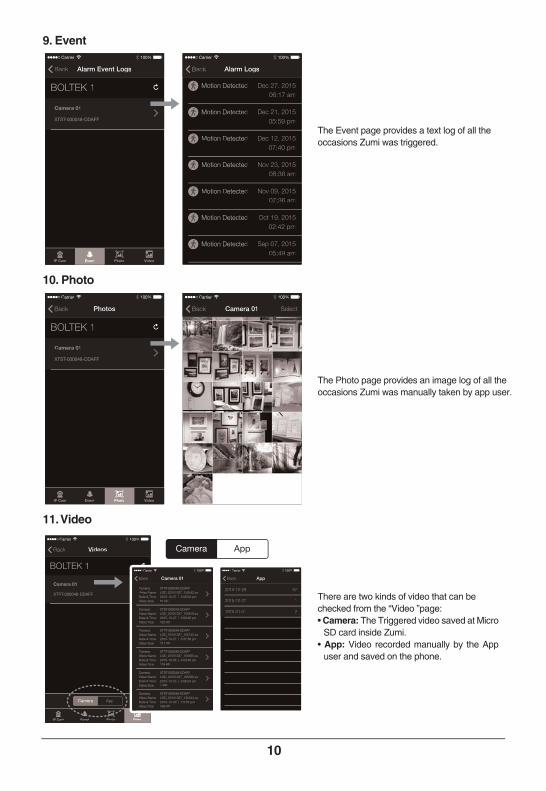
The Event page provides a text log of all the occasions Zumi was triggered.
The Photo page provides an image log of all the occasions Zumi was manually taken by app user.
There are two kinds of video that can be checked from the “Video ”page:• Camera: The Triggered video saved at Micro
SD card inside Zumi. • App: Video recorded manually by the App
user and saved on the phone.
Camera App
Alarm LogsBack
Carrier 100%
Motion Detected Dec 27, 2015
06:17 am
Motion Detected Dec 21, 2015
05:59 pm
Motion Detected Dec 12, 2015
07:40 pm
Motion Detected Nov 23, 2015
08:36 am
Motion Detected Nov 09, 2015
07:36 am
Motion Detected Oct 19, 2015
02:42 pm
Motion Detected Sep 07, 2015
05:49 am
Alarm LogsBack
Carrier 100%
Motion Detected Dec 27, 2015
06:17 am
Motion Detected Dec 21, 2015
05:59 pm
Motion Detected Dec 12, 2015
07:40 pm
Motion Detected Nov 23, 2015
08:36 am
Motion Detected Nov 09, 2015
07:36 am
Motion Detected Oct 19, 2015
02:42 pm
Motion Detected Sep 07, 2015
05:49 am
BOLTEK 1
Alarm Event LogsBack
Carrier 100%
Camera 01
XTST-000048-DDAFF
VideoEvent PhotoIP Cam
BOLTEK 1
Alarm Event LogsBack
Carrier 100%
Camera 01
XTST-000048-DDAFF
VideoEvent PhotoIP Cam
No Photos
Camera 01 SelectBack
Carrier 100%
Camera 01 SelectBack
Carrier 100%
BOLTEK 1
PhotosBack
Carrier 100%
Camera 01
XTST-000048-DDAFF
VideoEvent PhotoIP Cam
BOLTEK 1
PhotosBack
Carrier 100%
Camera 01
XTST-000048-DDAFF
VideoEvent PhotoIP Cam
1970-01-01 2
2015-10-27 1
2015-10-29 57
AppBack
Carrier 100%
1970-01-01 2
2015-10-27 1
2015-10-29 57
AppBack
Carrier 100%
Camera App
VideoEvent PhotoIP Cam
BOLTEK 1
VideosBack
Carrier 100%
Camera 01
XTST-000048-DDAFF
Camera App
VideoEvent PhotoIP Cam
BOLTEK 1
VideosBack
Carrier 100%
Camera 01
XTST-000048-DDAFF
Camera:Video Name:Date & Time:Video Size:
XTST-000048-DDAFFLOD_20151027_135544.avi2015-10-30 | 1:5:53 pm509 KB
Camera:Video Name:Date & Time:Video Size:
XTST-000048-DDAFFLOD_20151027_160330.avi2015-10-25 | 3:06:04 am1 MB
Camera:Video Name:Date & Time:Video Size:
XTST-000048-DDAFFLOD_20151027_155955.avi2015-10-26 | 4:03:40 am134 KB
Camera:Video Name:Date & Time:Video Size:
XTST-000048-DDAFFLOD_20151027_155742.avi2015-10-27 | 3:37:56 pm317 KB
Camera:Video Name:Date & Time:Video Size:
XTST-000048-DDAFFLOD_20151027_155618.avi2015-10-27 | 3:56:36 pm323 KB
Camera:Video Name:Date & Time:Video Size:
XTST-000048-DDAFFLOD_20151027_150542.avi2015-10-27 | 3:06:04 pm51 KB
Camera 01Back
Carrier 100%
Camera:Video Name:Date & Time:Video Size:
XTST-000048-DDAFFLOD_20151027_135544.avi2015-10-30 | 1:5:53 pm509 KB
Camera:Video Name:Date & Time:Video Size:
XTST-000048-DDAFFLOD_20151027_160330.avi2015-10-25 | 3:06:04 am1 MB
Camera:Video Name:Date & Time:Video Size:
XTST-000048-DDAFFLOD_20151027_155955.avi2015-10-26 | 4:03:40 am134 KB
Camera:Video Name:Date & Time:Video Size:
XTST-000048-DDAFFLOD_20151027_155742.avi2015-10-27 | 3:37:56 pm317 KB
Camera:Video Name:Date & Time:Video Size:
XTST-000048-DDAFFLOD_20151027_155618.avi2015-10-27 | 3:56:36 pm323 KB
Camera:Video Name:Date & Time:Video Size:
XTST-000048-DDAFFLOD_20151027_150542.avi2015-10-27 | 3:06:04 pm51 KB
Camera 01Back
Carrier 100%
11
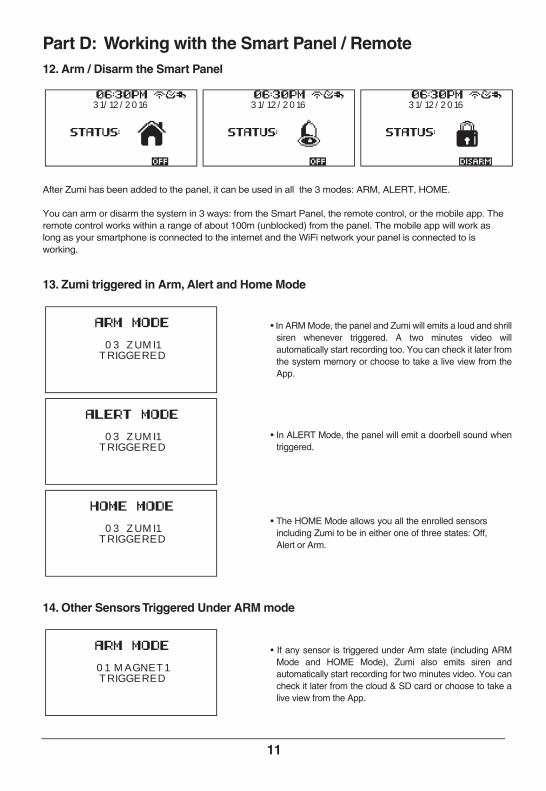
• In ARM Mode, the panel and Zumi will emits a loud and shrill siren whenever triggered. A two minutes video will automatically start recording too. You can check it later from the system memory or choose to take a live view from the App.
• If any sensor is triggered under Arm state (including ARM Mode and HOME Mode), Zumi also emits siren and automatically start recording for two minutes video. You can check it later from the cloud & SD card or choose to take a live view from the App.
• In ALERT Mode, the panel will emit a doorbell sound when triggered.
• The HOME Mode allows you all the enrolled sensors including Zumi to be in either one of three states: Off, Alert or Arm.
Part D: Working with the Smart Panel / Remote12. Arm / Disarm the Smart Panel
After Zumi has been added to the panel, it can be used in all the 3 modes: ARM, ALERT, HOME.
You can arm or disarm the system in 3 ways: from the Smart Panel, the remote control, or the mobile app. The remote control works within a range of about 100m (unblocked) from the panel. The mobile app will work as long as your smartphone is connected to the internet and the WiFi network your panel is connected to is working.
13. Zumi triggered in Arm, Alert and Home Mode
14. Other Sensors Triggered Under ARM mode
OFF
06:30PM31/12/2016
STATUS:
OFF
06:30PM31/12/2016
STATUS:
disarm
06:30PM31/12/2016
STATUS:
ALERT MODE
03 ZUMI1TRIGGERED
ARM MODE
01 MAGNET1TRIGGERED
ARM MODE
03 ZUMI1TRIGGERED
HOME MODE
03 ZUMI1TRIGGERED
12
Part E: Maintenance and Tips15. Maintenance of equipment
• The product can be cleaned with a soft dry cloth. Do not use abrasive, solvent based or aerosol cleaners as this may damage and / or discolor the product.
• Do not allow water to enter or attempt to clean the inside of the unit. If the camera is affected with damp, please use a soft dry cloth as soon as possible.
• Do not touch the camera lens with your fingers.• Protect the camera from oil, water, steam, moisture and dust.• Do not aim the camera lens at the sun.• Do not attempt to disassemble or repair cameras. If there are any technical problems, please consult the local
distributor.
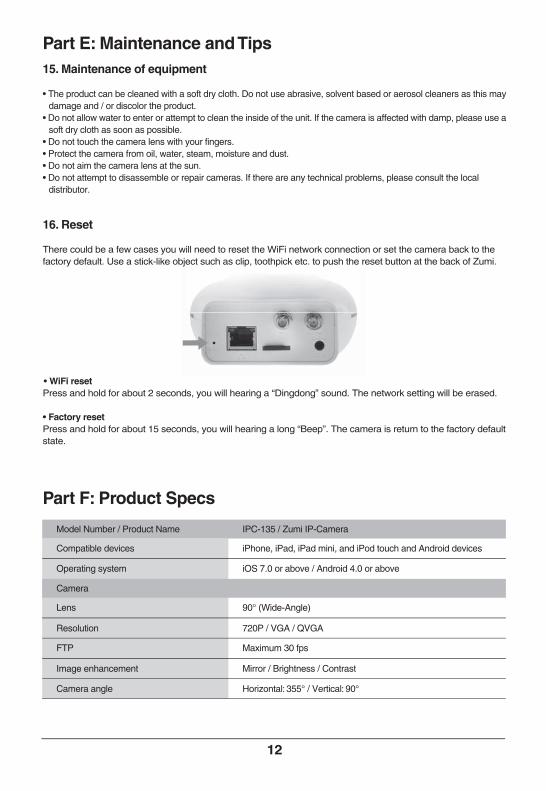
16. Reset
There could be a few cases you will need to reset the WiFi network connection or set the camera back to the factory default. Use a stick-like object such as clip, toothpick etc. to push the reset button at the back of Zumi.
• WiFi resetPress and hold for about 2 seconds, you will hearing a “Dingdong” sound. The network setting will be erased.
• Factory resetPress and hold for about 15 seconds, you will hearing a long “Beep”. The camera is return to the factory default state.
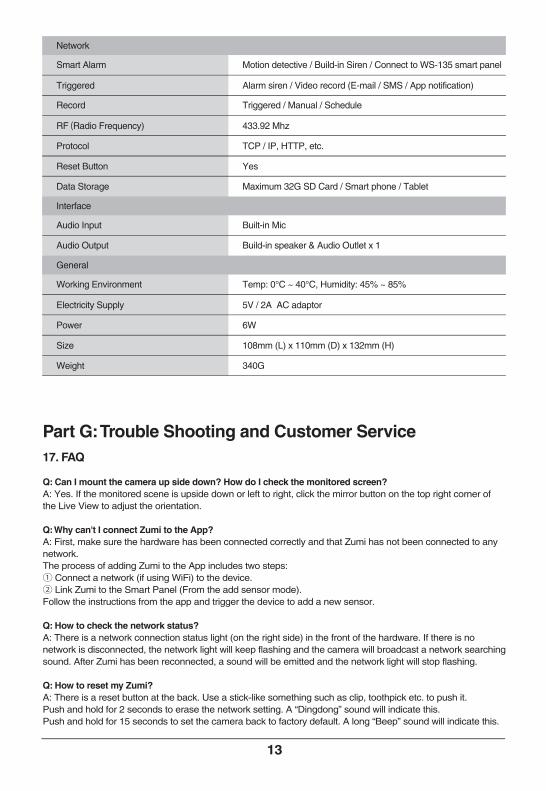
Part F: Product Specs
Model Number / Product Name
Compatible devices
IPC-135 / Zumi IP-Camera
Camera
iPhone, iPad, iPad mini, and iPod touch and Android devices
Camera angle Horizontal: 355° / Vertical: 90°
Lens 90° (Wide-Angle)
Resolution 720P / VGA / QVGA
FTP Maximum 30 fps
Operating system iOS 7.0 or above / Android 4.0 or above
Image enhancement Mirror / Brightness / Contrast
13
Part G: Trouble Shooting and Customer Service17. FAQ
Q: Can I mount the camera up side down? How do I check the monitored screen?A: Yes. If the monitored scene is upside down or left to right, click the mirror button on the top right corner of the Live View to adjust the orientation.
Q: Why can't I connect Zumi to the App?A: First, make sure the hardware has been connected correctly and that Zumi has not been connected to any network.The process of adding Zumi to the App includes two steps:① Connect a network (if using WiFi) to the device. ② Link Zumi to the Smart Panel (From the add sensor mode).Follow the instructions from the app and trigger the device to add a new sensor.
Q: How to check the network status?A: There is a network connection status light (on the right side) in the front of the hardware. If there is no network is disconnected, the network light will keep flashing and the camera will broadcast a network searching sound. After Zumi has been reconnected, a sound will be emitted and the network light will stop flashing.
Q: How to reset my Zumi?A: There is a reset button at the back. Use a stick-like something such as clip, toothpick etc. to push it.Push and hold for 2 seconds to erase the network setting. A “Dingdong” sound will indicate this. Push and hold for 15 seconds to set the camera back to factory default. A long “Beep” sound will indicate this.
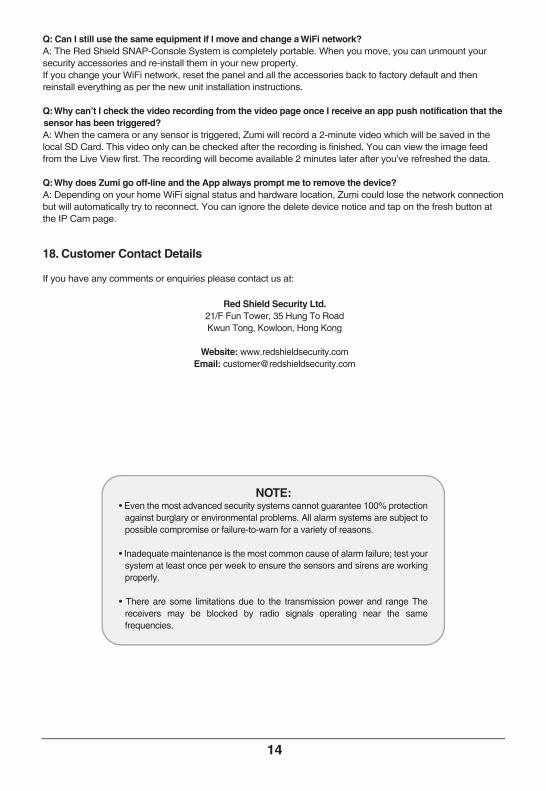
Network
Protocol TCP / IP, HTTP, etc.
Smart Alarm Motion detective / Build-in Siren / Connect to WS-135 smart panel
Triggered Alarm siren / Video record (E-mail / SMS / App notification)
Record Triggered / Manual / Schedule
Interface
Audio Input
General
Audio Output
Built-in Mic
Build-in speaker & Audio Outlet x 1
RF (Radio Frequency) 433.92 Mhz
Data Storage Maximum 32G SD Card / Smart phone / Tablet
Reset Button Yes
Power 6W
Working Environment Temp: 0°C ~ 40°C, Humidity: 45% ~ 85%
Electricity Supply 5V / 2A AC adaptor
Weight 340G
Size 108mm (L) x 110mm (D) x 132mm (H)
14
Q: Can I still use the same equipment if I move and change a WiFi network?A: The Red Shield SNAP-Console System is completely portable. When you move, you can unmount your security accessories and re-install them in your new property.If you change your WiFi network, reset the panel and all the accessories back to factory default and then reinstall everything as per the new unit installation instructions.
Q: Why can’t I check the video recording from the video page once I receive an app push notification that the sensor has been triggered?A: When the camera or any sensor is triggered, Zumi will record a 2-minute video which will be saved in the local SD Card. This video only can be checked after the recording is finished. You can view the image feed from the Live View first. The recording will become available 2 minutes later after you’ve refreshed the data.
Q: Why does Zumi go off-line and the App always prompt me to remove the device?A: Depending on your home WiFi signal status and hardware location, Zumi could lose the network connection but will automatically try to reconnect. You can ignore the delete device notice and tap on the fresh button at the IP Cam page.
18. Customer Contact Details
If you have any comments or enquiries please contact us at:
Red Shield Security Ltd.21/F Fun Tower, 35 Hung To RoadKwun Tong, Kowloon, Hong Kong
Website: www.redshieldsecurity.comEmail: [email protected]
NOTE:• Even the most advanced security systems cannot guarantee 100% protection
against burglary or environmental problems. All alarm systems are subject to possible compromise or failure-to-warn for a variety of reasons.
• Inadequate maintenance is the most common cause of alarm failure; test your system at least once per week to ensure the sensors and sirens are working properly.
• There are some limitations due to the transmission power and range The receivers may be blocked by radio signals operating near the same frequencies.
*Support Micro SD Card up to 32GB (not included)
Remote access, motion detection alert & two-way audio
Z MI • IP-Camera
NOMONTHLYFEES
ection
Model No. IPC-135
Control and Monitorwith free ‘BOLTEK’ App!Control and Monitorwith free ‘BOLTEK’ App!
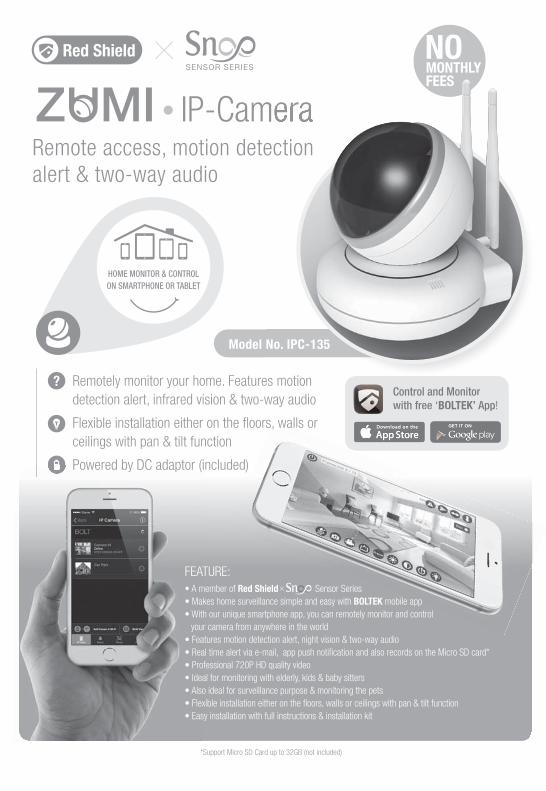
Remotely monitor your home. Features motiondetection alert, infrared vision & two-way audio
Flexible installation either on the floors, walls orceilings with pan & tilt function
Powered by DC adaptor (included)
HOME MONITOR & CONTROLON SMARTPHONE OR TABLET
Powered by DC adaptorPowered by DC adaptor (i (i
s, wall
• A member of Red Shield Sensor Series• Makes home surveillance simple and easy with BOLTEK mobile app• With our unique smartphone app, you can remotely monitor and control
your camera from anywhere in the world• Features motion detection alert, night vision & two-way audio• Real time alert via e-mail, app push notification and also records on the Micro SD card*• Professional 720P HD quality video• Ideal for monitoring with elderly, kids & baby sitters• Also ideal for surveillance purpose & monitoring the pets• Flexible installation either on the floors, walls or ceilings with pan & tilt function• Easy installation with full instructions & installation kit
FEATURE:Sn
Red Shield SnSENSOR SERIES
Made in China
*Support Micro SD Card up to 32GB (not included)
© 2016 Red Shield Security Limited. All rights reserved. Red Shield logo is the trademark owned by Red Shield Security Limited.iPhone, iPad and iPod touch are registered trademarks of Apple Inc. iPad mini is a trademark of Apple Inc. App Store is a service
mark of Apple Inc. Apple and the Apple logo are trademarks of Apple Inc., registered in the U.S. and other countries.Android and Google Play are trademarks of Google Inc.
A product from
www.redshieldsecurity.com
Red Shield
Pan & TiltFunction
Live View24 x 7
LIVE
Record to Micro SD Card*
A True DIYCamera
Ideal for MonitoringElderly, Kids & Pet
Motion TriggerAlert
SmartphoneApp Controlled
Two WayCommunication
Wi-FiConnected
HD VideoRecording
720P
InfraredNight Vision
Push Notification,Text Messages & Email