Remixlive for iOS FAQ - Mixvibesresources.mixvibes.com/livepad/faq/faq_remixlive_ios.pdf ·...
22
Remixlive for iOS FAQ This is a short list of the most frequently asked questions. For more information about Remixlive for iOS or Mixvibes, or if you need support, please email [email protected] . Last updated: June 27th, 2017 Table of contents Table of contents General What is the difference between Loop, One Shot and Gate? How do I change the BPM? How can I move, duplicate or delete a pad? How can I rename a Pad? How can I access the Sample Library? How can I mix and match samples from different packs? How do I rename or delete a recording? How do I share a recording? Can I connect an external sound system to my device? Can I use a MIDI controller with Remixlive? Which iOS versions is Remixlive for iOS compatible with? Which devices are compatible with Remixlive for iOS?? Can I sell songs I make using Remixlive? Finger-drumming specifics How can I access the finger-drumming grid? What is quantization and how does it work? How can I access the sample editor for the finger-drumming grid? What is the difference between One-Shot, Retrigger and Gate? What is the ‘Link’ feature for? How do you create a link group? What is the ‘Link Launch’ button for? What is the ‘Shock’ feature for? How do you create a shock group? How can I route a finger-drumming pad to another channel?
Transcript of Remixlive for iOS FAQ - Mixvibesresources.mixvibes.com/livepad/faq/faq_remixlive_ios.pdf ·...
Remixlive for iOS FAQ This is a short list of the most frequently asked questions. For more information about Remixlive for iOS or Mixvibes, or if you need support, please email [email protected]. Last updated: June 27th, 2017
Table of contents Table of contents
General What is the difference between Loop, One Shot and Gate? How do I change the BPM? How can I move, duplicate or delete a pad? How can I rename a Pad? How can I access the Sample Library? How can I mix and match samples from different packs? How do I rename or delete a recording? How do I share a recording? Can I connect an external sound system to my device? Can I use a MIDI controller with Remixlive? Which iOS versions is Remixlive for iOS compatible with? Which devices are compatible with Remixlive for iOS?? Can I sell songs I make using Remixlive?
Finger-drumming specifics How can I access the finger-drumming grid? What is quantization and how does it work? How can I access the sample editor for the finger-drumming grid? What is the difference between One-Shot, Retrigger and Gate? What is the ‘Link’ feature for? How do you create a link group? What is the ‘Link Launch’ button for? What is the ‘Shock’ feature for? How do you create a shock group? How can I route a finger-drumming pad to another channel?

Pattern Recording How do I select a pad to record a pattern on it? Is pattern recording on a pad destructive? How do I record a pattern? How do I change the length of the pattern? Is pattern recording continuous or does it stop at the end of the bar? How can I undo events (notes/beats) in my patterns? What is “overdub” and how does it work? How can I access the sample editor for recorded patterns? What is ‘Replay Quantize’ and how does it work? Are my patterns saved and where? How can I place one of my patterns onto the grid?
Sample packs How can I create a new sample pack? How can I rename, duplicate, reset or delete a sample pack?
Features What does channel filter mean? What does ‘Transpose’ mean? How do I change the pitch of a sample? What is the use of the ‘Quantize’ feature? How do I modify the quantization of a sample? How can I change the quantization of an entire sample pack? What is ‘Advanced Sample Editing’?
Record samples How can I record samples? What does ‘Rec Length’ mean? What does ‘Overdub’ mean? How do I rename, reset or delete a recorded sample?
Import/Export How can I add my own samples to Remixlive? What kind of file formats can I import in Remixlive for iOS? Can I add songs to Remixlive? What is the use of the button ‘Import Packs’ in the Sample Packs page? How can I import/export packs ?
Tips Can I trigger an entire line of samples at once?

How can I change the color of the pads? Can I record my performance in high quality ? How can I easily reset the value of a slider or a knob? How can I make a roll effect? Can I pause the track while it's playing? How can I retrieve In-App Purchases I previously bought? What should I do when I experience performance issues?
Changes to this FAQ

General What is the difference between Loop, One Shot and Gate? There are 3 play modes for each pad: - Loop: tap to make the sample play in an endless loop. To stop the sample, tap again. - One Shot: tap to play the sample once. Tap the pad again to stop the sample, or the sample will stop by itself after being played once. - Gate: the sample will play for as long as your finger touches the pad.
How do I change the BPM? If you want to change the BPM, either: - Tap on the ‘ + ’ or ‘ - ’ on either side of the BPM's value to increase or decrease it. - Swipe the BPM's value up or right to increase it. - Swipe the BPM's value down or left to decrease it - Double tap on the BPM to reset it

How can I move, duplicate or delete a pad? To move, duplicate or delete a pad, go to the Sample Editor (notebook icon, the fourth icon from the top, on the right hand side of the main screen) and select the pad you want to move or delete. Then: - If you want to copy-paste the pad, press the lower part of the pad and drag it onto
another pad. The sample of this second pad will be replaced by the sample of the first one. - If you want to swap pads' samples, press the higher part of the pad and drag it onto another pad. The two samples will be swapped. - If you want to delete a sample from the grid, press the lower or the higher part of the pad and drag it onto the sample info zone (highlighted in red).
How can I rename a Pad? To rename a pad :
1. Go to the Sample Editor (notebook icon, the fourth icon from the top on the right-hand side of on the main screen)
2. Select the pad you want to rename on the mini-grid. 3. Open the context menu (arrow button) located next to the pad’s name on the Sample
Editor Menu. 4. Tap the ‘Rename’ button 5. Your device’s keyboard will show up. Rename the pad to your liking and tap ‘OK’.

How can I access the Sample Library? To access the Sample Library, go to the Sample Library view (folder icon at the bottom right-hand corner of the main screen).
How can I mix and match samples from different packs? To fill a pad with a sample from an existing Sample Pack : 1. Go to the Sample Library (folder icon at the bottom right-hand corner of the main screen) 2. You can browse or search samples by Packs, Loops, Sounds or User. 3. Select a pad and tap the sample you want to fill the pad with.
How do I rename or delete a recording? To rename or delete a recording, go to the ‘Recordings’ section and tap ‘Edit’. Then: - If you want to rename a recording, tap on the name of the recording to change it. - If you want to delete one or more recordings, select the recording(s) and tap on ‘Delete’.

How do I share a recording? You can share your recordings with AirDrop, SoundCloud or e-mail.To do so, open the main menu (hamburger icon on the top left-hand corner of the main screen). Then, go to the ‘Recordings’ section and tap on the track you want to share. - If you want to share it with AirDrop, tap on the ‘Upload’ icon and choose the AirDrop profile you want to send it to. - If you want to share it with SoundCloud, tap on the SoundCloud icon, and log to your SoundCloud account. - If you want to share it by e-mail, tap on the e-mail icon and choose the email address to send it to. Then, tap on ‘Send’.
Can I connect an external sound system to my device? Yes, with a compatible external sound card plugged into your iOS device. Can I use a MIDI controller with Remixlive? Remixlive does not offer a MIDI feature so far, so you cannot use a MIDI controller with the app. Which iOS versions is Remixlive for iOS compatible with? Remixlive is compatible with iOS 7.1 and above. Which devices are compatible with Remixlive for iOS?? Here is the list of devices that support Remixlive: - iPhone 5, 5C, 5S, 6, 6+, 6S, 6S+, SE, 7. - iPad 2, 3, 4, Mini, Mini 2, Mini 3, Mini 4, Air, Air 2, Pro. - iPod Touch 5G, 6G. Can I sell songs I make using Remixlive? The samples contained in Remixlive are royalty-free so you can use them in your tracks without any risk of copyright infringement. However, selling or distributing samples separately is not permitted. For instance, you can't upload a track that is just one bass loop on its own. But as long as you add a drum loop or another sample on top of it, you become the owner of the track. Most of the samples are provided by Loopmasters, so you can check the Loopmasters license agreement at this address for reference: http://support.loopmasters.com/knowledgebase/articles/388556-loopmasters-license And a guide on how to use Loopmasters' samples: http://support.loopmasters.com/knowledgebase/articles/242283-how-can-i-use-the-samples Note : If you are using samples other than the ones natively provided in Remixlive, Mixvibes declines any responsibility in cases of copyright infringement.

Finger-drumming specifics How can I access the finger-drumming grid? To access the finger-drumming grid, tap on the “DRUMS” button located on the right-hand side of the master clock. Click on the “LOOP” button right above it to go back to the loop grid.
What is quantization and how does it work?
Quantize (snap to beat) feature is tailored to compensate for device latency. Select a quantize value when playing in finger drumming mode to always play on the beat as it snaps your hits to the closest beat depending on which quantize value you select. For instance, choose 1 as quantize value and each hit will be played on the next beat, even the ones that are played to early. Choose ¼ and and each hit will be played on the next ¼ of beat. How can I access the sample editor for the finger-drumming grid? To access the finger-drumming grid’s sample editor :
1. Open the finger-drumming grid (tap on the “DRUMS” button located on the right-hand side of the master clock)
2. Open the sample-editor (notebook icon) Also works the other way around.

What is the difference between One-Shot, Retrigger and Gate? - One Shot: Tap to play the sample once. Tap the pad again to stop the sample, or the sample will stop by itself after being played once. - Retrigger: Tap to play the sample once. Unlike the One-Shot playmode, you can retrigger the pad whenever you want, even if the sample is not finished by tapping on it again. - Gate: the sample will play for as long as your finger touches the pad. What is the ‘Link’ feature for? The ‘Link’ feature enables you to create play groups inside the finger-drumming grid, linking two or more pads together so that they play at the same time. How do you create a link group? To create a link group :
1. Open the finger-drumming grid (tap on the “DRUMS” button located on the right-hand side of the master clock)
2. Open the sample-editor (notebook icon) 3. Select a pad on the finger-drumming grid 4. Tap on the arrow above ‘Link’ to assign the pad to a link group (group 1 for example) 5. Activate ‘Link Launch’ 6. Select another pad on the finger-drumming grid 7. Tap on the arrow above ‘Link’ to assign the pad to the chosen link group (group 1) 8. Activate ‘Link Launch’
What is the ‘Link Launch’ button for? The ‘Link launch’ button activates the link triggering inside a group from one or multiple pads. Example : you create a link group of two pads (pad 1 & pad 2).
1. If you want both pads to be played when tapping on either one of them, activate Link launch for both pads (tap on pad 1 and it will simultaneously play pads 1 & 2 ; tap on pad 2 and it will also play pads 1 & 2).
2. If you want both pads to play but only when tapping on one of them (pad 1 for example), activate Link launch only for pad 1. (tap on pad 1 and it will simultaneously play pads 1 & 2 ; tap on pad 2 and it will only play pad 2)
What is the ‘Shock’ feature for? The ‘shock’ feature allows exclusive triggering in between pads belonging to the same shock group. Route two pads to a same shock group and they will never play at the same time. How do you create a shock group? To create a shock group :
1. Open the finger-drumming grid (tap on the “DRUMS” button located on the right-hand side of the master clock)
2. Open the sample-editor (notebook icon) 3. Select a pad on the finger-drumming grid 4. Tap on the arrow above ‘Shock’ to assign the pad to a shock group (group 1 for
example) 5. Select another pad on the finger-drumming grid 6. Tap on the arrow above ‘Shock’ to assign the pad to the chosen shock group (group 1)
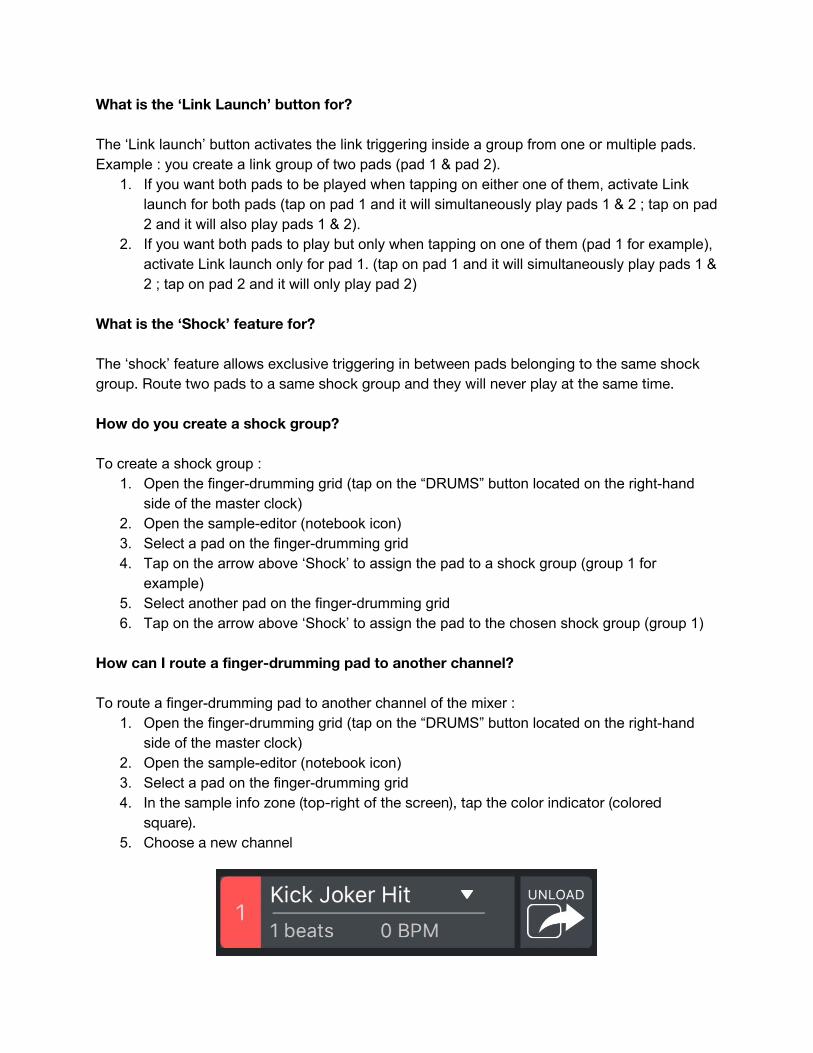
How can I route a finger-drumming pad to another channel? To route a finger-drumming pad to another channel of the mixer :
1. Open the finger-drumming grid (tap on the “DRUMS” button located on the right-hand side of the master clock)
2. Open the sample-editor (notebook icon) 3. Select a pad on the finger-drumming grid 4. In the sample info zone (top-right of the screen), tap the color indicator (colored
square). 5. Choose a new channel

Pattern Recording How do I select a pad to record a pattern on it? To record a pattern, you must first choose onto which you will record it. For that :
1. Open the context menu of the record selector (arrow button in between the grid selector and the track recorder, REC button) and choose ‘Finger Drumming to a loop pad’. If this option is the last one you have used, you don’t need to open this menu, just tap on the pad selector icon (checkboard icon) next to the arrow button.
2. Choose a pad on the loop grid on which you want to record your pattern. The last played pad will always be selected by default. Tap on another one or tap on this one if you’re satisfied with this one. Selecting a pad will automatically send you to the finger-drumming grid.
Is pattern recording on a pad destructive? Recording a pattern on a pad automatically replaces the original loop of the pad by the pattern you have recorded. However, the loop is not deleted, you can still retrieve it in the sample collection (folder icon).

How do I record a pattern? To record a pattern :
1. Select a pad (see section ‘How do I select a pad to record a pattern on it?’ above)
2. Tap on the REC button of the pattern recording sidebar 3. Play your pattern 4. Tap again on the REC button of the pattern recording sidebar to end
the pattern recording 5. Once you’re done recording your samples, tap on the ‘Exit’ button
next to the record selector. 6. However, if you’re not entirely satisfied with your pattern, you can
clear it by tapping on the trash button (Clear).
How do I change the length of the pattern? To change the length of the pattern recording :
1. Open the pattern recording sidebar menu by tapping on the arrow located at the center of the sidebar.
2. Tap on the pattern length box (right under the pattern recording button in the pattern recording sidebar)
3. Choose a pattern length (1 beat, 2 beats, 4, 8, etc…). Once recorded, you cannot change a pattern’s length.
Is pattern recording continuous or does it stop at the end of the bar? Pattern recording is continuous meaning that unless you tap again on the pattern recording button in the pattern recording sidebar to end the recording, the app keeps recording any events produced (any note/beat) played on the finger-drumming grid. How can I undo events (notes/beats) in my patterns? To undo events (notes/beats) in a pattern, tap on the undo button (backward arrow). Please note that you can only undo events during the pattern recording and that you can only undo the events of the last bar.

What is “overdub” and how does it work? Overdub means that you can resume recording over a pattern you have previously recorded without deleting it. How can I access the sample editor for recorded patterns? To access the sample editor for recorded patterns :
1. Select your pattern on the loop grid 2. Open the Sample Editor (notebook icon, the fourth icon from the top at
the right-hand on the main screen) What is ‘Replay Quantize’ and how does it work? The ‘Replay Quantize’ feature helps you adjust automatically your patterns by snapping all your notes to the closest beat mark depending on which value you set the replay quantize. Choose 1 as replay quantize value and all the events (notes/beats) that are not placed on a beat (played too early or too late) will be moved to the closest beat. Are my patterns saved and where? All your patterns are automatically saved in the ‘USER’ section of the Sample Library (folder icon at the bottom on the right-hand side of the main screen). How can I place one of my patterns onto the grid? To place a pattern you have recorded and saved onto the grid :
1. Open the loop grid (‘LOOP’ button located on the right-hand side of the master clock)
2. Open the Sample Library (folder icon at the bottom on the right-hand side of the main screen)
3. Go to the user section of the sample library 4. Select a pad on the loop grid 5. Tap on the pattern in the sample library that you want to load on the grid

Sample packs How can I create a new sample pack? To create a new sample pack: 1. Open the main menu (hamburger icon on the top left-hand corner of the main screen) 2. Go to the ‘Sample Packs’ page. 3. Tap the ‘+ New pack’ button above the packs list. A new empty pack is created and added to the bottom of the packs list.
How can I rename, duplicate, reset or delete a sample pack? To rename, duplicate, reset or delete a sample pack, go to the ‘Sample Packs’ page and swipe the name of the pack to the left to access the buttons. Otherwise, if you need to batch-edit several sample packs at once, you can tap the ‘Edit’ button. Then: - If you want to rename a sample pack, tap on its name and edit it with your keyboard. - If you want to duplicate, reset or delete one or more sample packs, select the sample pack(s) and tap on ‘Duplicate’, ‘Reset’ or ‘Delete’. Be careful, a deleted sample pack cannot be restored.

If you wish to do one of these operations for a single specific pack, swipe the name of the pack to the left to let the options appear as shown in the figure below :

Features What does channel filter mean? A filter is a cut-off for everything above (low) or below (high) the frequency setting of the filter knob. Move the filter knob to the left to attenuate high frequencies and to the right to cut-off low frequencies. How do I change the volume of the corresponding column ? Tap on the Mixer view (fader icon on the left-hand side of the main screen) and adjust the fader to the desired volume on the corresponding column. How do I adjust the equalizer? Tap on the Mixer View (fader icon on the left-hand side of the main screen) and adjust the HI, MID, LO knobs. Note: The EQ feature is only available for iPad. What does ‘Transpose’ mean? ‘Transpose’ raises or lowers the pitch (tone) of the sample without changing its length or its tempo. The higher it is, the more high-pitched it will sound (like a chipmunk voice). Similarly, the lower it is, the more low-pitched it will sound. Note : This feature is only available after buying this In-App Purchase. How do I change the pitch of a sample? To change the pitch of a sample, use the ‘Transpose’ feature.
1. Go to the Sample Editor (the notebook icon, the fourth icon from the top on the right-hand side of the main screen). 2. Then, on the mini-grid, tap on the sample you want to edit. 3. Tap on the tab with the tuning fork icon. You can then increase or decrease the
pitch of the selected sample by tapping on ‘ + ’ or ‘ - ’ on either side of the word ‘Transpose’. Note : This feature is only available after buying this In-App Purchase. What is the PAN feature for ? The PAN setting controls the distribution of sound across the right and left channels of stereo output devices (speakers/headphones). For instance, moving the PAN cursor to the left will raise the volume of the left channel and reduce the volume of the right channel. What is ‘Reverse’ and ‘Repeat Frequency’? Press “Reverse” to reverse the playback of the sample and press this button again to resume normal playback. Select a value for Repeat frequency and the playback will loop the corresponding X-beat period of the sample.

Note: When both are activated the Repeat frequency will automatically turn off. What is the use of the ‘Quantize’ feature? Quantize your samples to be sure they start and end on the beat (in sync). For instance, choosing a quantize value of 8 will have the sample start at the beginning of the next 8-beat period. How do I modify the quantization of a sample? To modify the quantization value of a sample:
1. Go to the Sample Editor (the notebook icon, the fourth icon from the top on the right-hand side of the main screen). 2. Then, on the mini-grid, tap on the sample you want to edit. 3. Tap on the tab with the play icon, then on the circled value next to the ‘Quantize’
option. Then, choose the number of beats corresponding to the quantization you want. ‘Global’ means that the quantization of the selected sample is the same as the overall quantization value of the sample pack.

How can I change the quantization of an entire sample pack? To replace the default quantization value by a different one: 1. Open the main menu (hamburger icon on the top left corner of the main screen) 2. Go to the ‘Sample Packs’ section and tap ‘Edit’. 3. Tap the Q of a sample pack (default value is Q4) and choose a new quantization value. What is ‘Advanced Sample Editing’? ‘Advanced Sample Editing’ allows you to change your samples' length and ADSR parameters. - ‘Pos’ (Position) and ‘Length’ determine the played interval of the sample. Default values are respectively 0 and 1, which corresponds to the original start and end points. - Attack time (A): duration from zero to maximum amplitude 1. - Decay time (D): duration from the initial maximum amplitude to a stable state amplitude 1. - Sustain time (S): duration and level of the steady state amplitude. - Release time (R): duration from the steady state to its final zero amplitude. To modify the ADSR parameters:
1. Go to the Sample Editor (the notebook icon, the fourth icon from the top on the right-hand side of the main screen) 2. Go to the Advanced Sample Parameters tab (sine wave icon) 3. Select the envelope parameter that you want to change.
4. Below the parameters’ buttons, tap ‘ + ’ or ‘ – ’ on either side of the value to change it. You can also change these values by swiping your finger between the two ‘ + ’ and ‘ – ’ buttons or directly on the waveform. Note : This feature is only available after buying this In-App Purchase. How can I open the ‘Zoom Waveform’ view? To open the ‘Zoom Waveform’ view :
1. Go to the Sample Editor (the notebook icon, the fourth icon from the top on the right-hand side of the main screen)
2. Go to the Advanced Sample Parameters tab (sine wave icon) 3. Tap on the magnifier icon
What’s the ‘Beatgrid edit’ for? This view is a part of the ‘Zoom Waveform’ view. You can open it by tapping on the BPM button once in the ‘Zoom Waveform’ view. Once on it you can :
1. Divide the tempo of the sample by 2 2. Double the sample’s tempo 3. Or edit it by hand with the Start & End buttons and the + and - buttons
Please note that this function is only available for loop and FX pads.

Record samples How can I record samples? To record samples: 1. Open the context menu of the record selector (arrow button in between the grid selector and the track recorder, REC button) and choose ‘Mic input to a loop pad’. If this option is the last one you have used, you don’t need to open this menu, just tap on the pad selector icon (checkboard icon) next to the arrow button. 2. Tap on the microphone icon next to the arrow to open the sample recording menu. 3. Tap the ‘Start’ button to start recording your sample. (The microphone needs to be enabled in your device’s settings too, in order to record on pad. If the microphone is off, the app will open your iOS settings to let you turn it on). 4. Once you’re done recording your samples, tap on the ‘Exit’ button next to the record selector. The last played pad will be selected by default, tap on another pad if you want to record over another one. What does ‘Rec Length’ mean? ‘Rec Length’ allows you to choose the number of beats your record will last. By choosing ‘Sound’, you can start and stop the recording of your sample manually (maximum of 16 seconds). What does ‘Overdub’ mean? ‘Overdub’ mode allows you to overlap several recordings on one pad. When ‘Overdub’ is turned on, your new recording will overlap over the existing one. How do I rename, reset or delete a recorded sample? To rename, reset or delete a recorded sample:
1. Go to the Sample Editor (notebook icon, the fourth icon from the top on the right-hand side of the main screen). 2. On the mini-grid, select the pad that you want to edit and tap on its name in the sample info zone (top-right of the screen).
3. Choose ‘Rename’ or ‘Unload’. You cannot rename or delete a non-user’s sample. How do I sync with other apps through Wifi? Ableton Link allows syncing several apps installed on different devices over a local network, so that everyone plays on the same beat. Make sure your computer and the other device(s) you want to pair are connected to the same WiFi network. Then tap on the settings and click on Ableton Link button to enable it. The BPM and phase of both apps will be synced. Note: This is available only with iOS 2.1.2 version and MAC 1.3 version

Import/Export How can I add my own samples to Remixlive? If you want to import your own samples, you first need to buy the ‘Import iTunes’ In-App Purchase. Once this feature is activated, you can import your own samples from iTunes. To do so: 1. Open the main menu (hamburger icon on the top left-hand corner of the main screen) 2. Tap on ‘Import iTunes’. 3. Select the samples you want to import (they must be in WAV, MP3, AAC, M4A or AIFF format). 4. Then, you can find your samples in the ‘User’ tab of the Sample Library (to find the Sample Library, please refer to the above section). Here’s the tutorial on how to import samples from iTunes : https://www.youtube.com/watch?v=GTcE7dPvynE What kind of file formats can I import in Remixlive for iOS? Remixlive supports WAV, AAC, M4A and AIFF formats, 16/24 bits and all sampling rates. The maximum file length allowed is 20 seconds. Can I add songs to Remixlive? The length of Remixlive's samples is limited to a maximum of 20 seconds. However, you can create a sample from a song and then import it into Remixlive. Please keep in mind that using songs in Remixlive requires you to comply with the copyright regulations related to this song. Mixvibes declines all responsibility in case of copyright infringement. What is the use of the button ‘Import Packs’ in the Sample Packs page? The ‘Import packs’ button allows you to transfer your own packs from your computer to your iOS device. If you want to import your own packs from Remixlive for Mac into Remixlive on your iOS device, you will need to buy Remixlive for Mac (on Apple’s Mac App Store). How can I import/export packs ? 1. Once the pack is exported, open iTunes. Connect your iOS device to your computer using a Lightning cable. 3. In iTunes, click on your device’s button in the top bar. 4. Select the App tab, then select Remixlive in the apps list. 5. Locate the folder where your pack is, drag and drop the sample pack file in the Documents area of Remixlive (in the iTunes window). 6. Open Remixlive on your iOS device, tap ‘Sample packs’. 7. Tap the ‘Import packs’ option. Remixlive for iOS will now import and automatically open the file. Note: you can also export a pack from Remixlive for iOS to your computer in order to transfer it to another iOS device.To do so, please select “edit” in the sample pack view and then export.

Tips Can I trigger an entire line of samples at once? To trigger an entire line of samples at once, swipe right or left on any pad. All pads of the line with their play mode set to ‘Loop’ will play. How can I change the color of the pads? To change the color of an entire channel : 1. Open the mixer view 2. Tap on a mixer channel’s number (above the filter knobs) 3. Choose a colour
Note : This feature is only available after buying this In-App Purchase. Can I record my performance in high quality ? To record in High Quality: 1. Open the main menu (hamburger icon in the top left-hand corner of the main screen) 2. Go to the Settings View (tap ‘Settings’) 3. Activate HQ Track Recording (you will need to buy this In-app) 4. Tap the ‘Done’ button 5. You can now record in high quality (AIFF), have fun! Please note that recording files weigh 10 MB per minute on average. Note : This feature is only available after buying this In-App Purchase. Note bis : To record, tap the REC button in the Top Bar

How can I easily reset the value of a slider or a knob? To reset the value of a slider or a knob, just double-tap it. How can I make a roll effect? To make a roll effect: 1. Go to the FX tab and press one of the ‘Beat repeat’ pads. 2. Swipe to the others ‘Beat repeat’ pads to decrease or increase the number of beats to be repeated. Can I pause the track while it's playing? Tap the Master Clock to play or pause the track. While recording, it will also pause the recording. This feature allows you to take your time to set up transitions. How can I retrieve In-App Purchases I previously bought? If you lost your In-App Purchases or if you are asked to pay for In-App Purchases that you already paid for: 1. Make sure you are connected to the Internet, and that you are logged-in with the App Store account that you used to buy the In-App Purchases. 2. Open the main menu (hamburger icon in the top left-hand corner of the main screen) 3. In ‘Store’, tap on the category you want (Sample Packs, FX or Features) 4. Tap the ‘Restore’ button (at the top right-hand corner of the pop-up window). 5. If this doesn't work, you would likely need to "buy" these IAPs again, but as long as you are connected with the same account, you won't be charged again for them. What should I do when I experience performance issues? If you are experiencing performance issues, try to: - Close any other app or apps that may be running in the background. - Turn the Wi-Fi / Bluetooth off in order to save battery. - Turn off the multiple mode switch - Make sure your phone is not running too low on battery - Close and reopen the app - Restart your phone - Download the latest update If none of these solutions work, please feel free to contact our support team via e-mail at the following address : [email protected]
Changes to this FAQ We will occasionally update this FAQ. When we post changes to this FAQ, we will revise the ‘last updated’ date at the top. We recommend that you check from time to time to inform yourself of any changes in this FAQ or any of our other policies.